Cute air clay projects are my favorite kind of studio therapy—quick, low-stress, and ridiculously satisfying when they turn out extra chubby and sweet. Here are my go-to cute air clay ideas that keep things beginner-friendly while still giving you that “I made this!” glow.
Chubby Animal Figurines With Dot Eyes
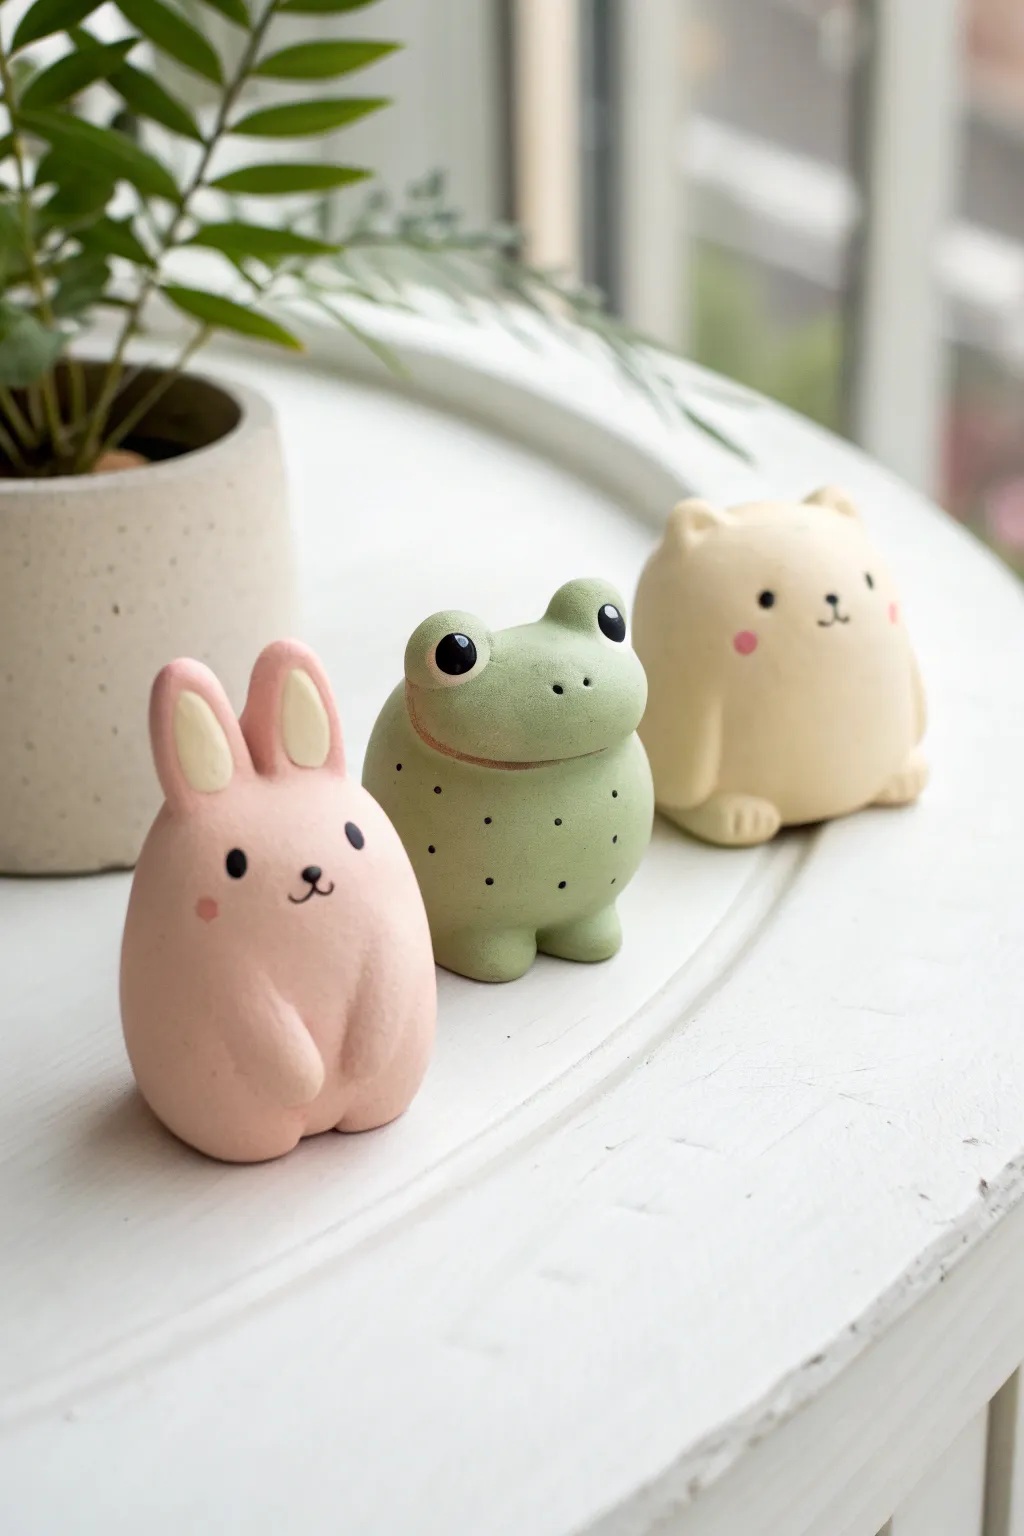
These delightfully chubby animal figurines—a bunny, frog, and bear—bring instant charm to any desk or shelf. Their simple, rounded shapes and sweet expressions make them an approachable project for beginners working with air-dry clay.
How-To Guide
Materials
- Air-dry clay (white)
- Acrylic paints (pastel pink, sage green, cream/beige, black)
- Matte sealant spray or varnish
- Ball stylus tool or toothpick
- Small paintbrush
- Water cup (for smoothing)
- Fine-grit sandpaper (optional)
Step 1: Shaping the Bases
-
Prepare the Clay:
Start by conditioning three equal portions of air-dry clay. Knead them warm in your hands until they are soft, pliable, and free of cracks. -
Form the Bodies:
Roll each portion into a smooth egg shape. Gently tap the wider bottom against your work surface so each figure stands upright stably. These should look like little gumdrops. -
Add Tiny Feet:
For each animal, roll two very small balls of clay. Press them gently to the bottom front of the body shapes to create stubby little feet, blending the seams upward with a drop of water.
Smooth Operator
Before the clay dries, vigorously smooth any fingerprints with a slightly wet finger. Water acts like magic erasable sandpaper for air-dry clay.
Step 2: Sculpting the Bunny (Pink)
-
Shape the Ears:
Roll two medium teardrop shapes for the ears. Flatten them slightly, creating a shallow indentation in the center of each with your thumb or a modeling tool. -
Attach and Blend:
Attach the ears to the top of one body shape. Use a sculpting tool to drag the clay from the base of the ears down onto the head, creating a seamless connection. Smooth with a damp finger. -
Create Arms:
Roll two small sausage shapes for arms. Press them vertically onto the bunny’s belly so they curve inward as if it’s holding its tummy.
Step 3: Sculpting the Frog (Green)
-
Make the Eyes:
Roll two small spheres for the frog’s protruding eyes. Attach them to the top of the second body base, spacing them slightly apart. -
Separate the Head:
Use a needle tool or toothpick to gently score a horizontal line across the body, just below the eyes. This creates the illusion of a wide, froggy mouth and separates the head area. -
Add Texture Details:
Using a very small dotting tool, press tiny indentations into the frog’s body where you plan to paint spots later.
Make ‘Em Wobble
Embed a heavy coin or washer inside the bottom of the raw clay body. This lowers the center of gravity, making them feel premium and less tip-prone.
Step 4: Sculpting the Bear (Cream)
-
Bear Ears:
Create two small, rounded semi-circles. Attach these to the top sides of the third body shape, blending the seams carefully. -
Bear Arms:
Like the bunny, roll two sausage shapes. Attach these to the sides of the bear, letting them hang straight down rather than curving inward. -
Drying Time:
Set all three figures aside in a dry, room-temperature spot. Let them harden completely for at least 24 to 48 hours. I find flipping them occasionally helps the bottoms dry evenly.
Step 5: Painting and Finishing
-
Base Coats:
Paint the bunny a soft pastel pink, the frog a muted sage green, and the bear a warm cream color. You may need two thin coats for opaque coverage. -
Detailed Painting:
Once the base is dry, paint the inner ears of the bunny with a lighter cream or yellow. Add lighter green or brown spots to the frog’s belly. -
The Dotted Eyes:
Using the back of a paintbrush or a ball stylus dipped in black paint, dot the eyes onto each character. Keep the spacing wide for a cuter look. -
Sweet Expressions:
Use a fine liner brush or toothpick to paint tiny noses and mouths. For the cheeks, dap a tiny bit of watered-down pink paint or use real cosmetic blush on a Q-tip. -
Sealing:
Wait for all paint to cure fully. Finish by spraying the trio with a matte fixative or varnish to protect the surface and unify the sheen.
Now you have an adorable set of desk buddies ready to keep you company


Tiny Food Charms With Smiley Faces
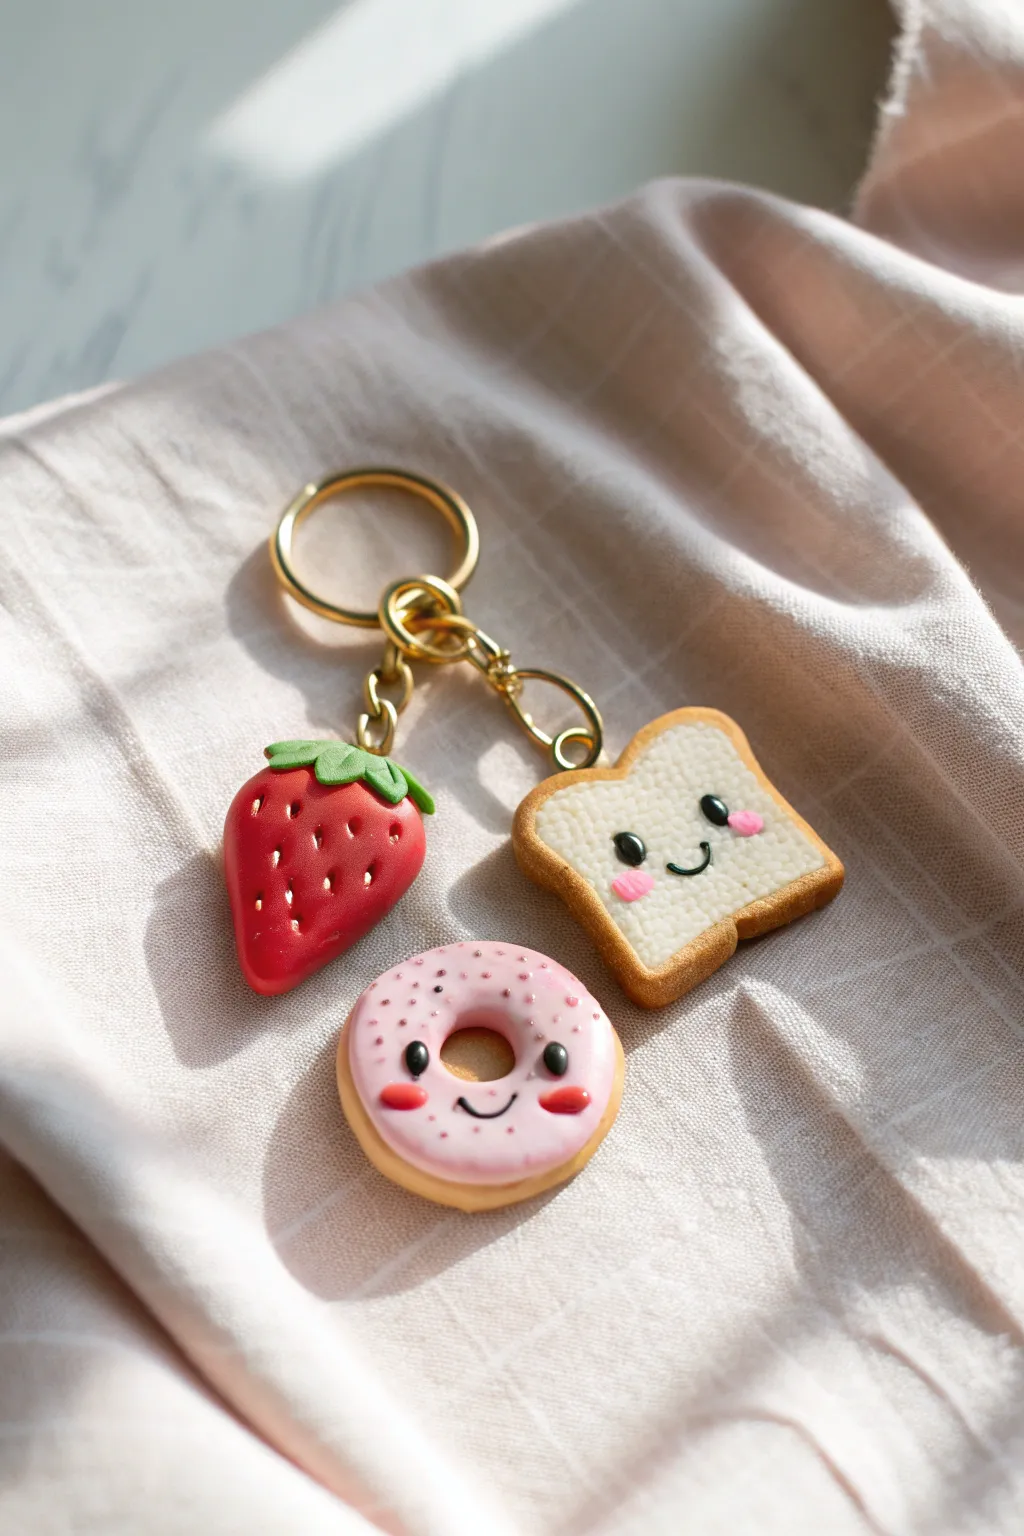
Brighten up your keys with this adorable set of breakfast-themed charms featuring a strawberry, a happy toast slice, and a sprinkled donut. These tiny food friends are crafted with simple shapes and expressive little faces that make them irresistible to look at.
Step-by-Step
Materials
- Air dry clay (white)
- Acrylic paints (red, green, light brown, pink, black)
- Clay sculpting tools (needle tool, ball tool)
- Small rolling pin
- Gold keychain ring with chain and jump rings
- Eye screws (small, gold)
- Glossy varnish or UV resin
- Fine detail paintbrush
- Superglue (optional)
Step 1: The Strawberry
-
Shape the base:
Start by mixing a vibrant red into a small ball of clay. Roll it into a smooth sphere, then gently pinch and elongate the bottom half to create a rounded, tapered strawberry shape. -
Texture the surface:
Using a needle tool, carefully poke small, evenly spaced indentations all over the surface of the strawberry to mimic seeds. -
Create the leaves:
Mix a small amount of green clay. Flatten it slightly and cut out a small star or flower shape. Attach this to the top of the strawberry, gently curving the tips of the leaves downward. -
Add hardware:
Dip the end of a small gold eye screw into a tiny dot of glue and twist it securely into the center of the green leaves before the clay dries.
Loose Screws?
If an eye screw feels loose after the clay dries, unscrew it gently, add a drop of superglue to the hole, and screw it back in for a permanent hold.
Step 2: The Happy Toast
-
Form the bread:
Mix a very pale beige or off-white clay. Roll it out to about 1/4 inch thickness and cut a square shape. Use your fingers to gently indent the top edge to create the classic dip of a bread loaf, and round the bottom corners slightly. -
Add the crust:
Roll a thin snake of light brown clay. Wrap this around the outer edge of your bread shape, smoothing the seam where the clay colors meet so it looks like a baked crust. -
Sculpt the face:
Using a very small ball tool, press two indentations for eyes. Roll two tiny balls of black clay and press them into the sockets. Add a tiny snake of black clay for a smile and two small pink ovals for blushing cheeks. -
Insert hardware:
Just like with the strawberry, screw an eye pin into the top right or left corner of the crust.
Softer Edges
Use a tiny bit of water on your finger to smooth out fingerprints or harsh lines on the raw clay before drying for a seamless finish.
Step 3: The Frosted Donut
-
Shape the dough:
Mix a golden-brown or biscuit color. Roll a ball and flatten it into a thick disc. Use a tool or the back of a paintbrush to punch a hole cleanly through the center. -
Frost it:
Roll out a thin piece of light pink clay. Cut a wavy circle shape slightly smaller than your donut base. Lay this over the donut and smooth the edges down so it looks like dripping icing. -
Add the face:
Create the face similar to the toast: use tiny black clay balls for eyes and a curved black thread of clay for the smile. Add flattened red or dark pink ovals for rosy cheeks. -
Sprinkle time:
You can either use tiny bits of colored clay for sprinkles or wait until the end to paint them on. For this look, I prefer painting tiny dots of darker pink or red acrylic paint onto the frosting after the clay has hardened slightly. -
Attach hardware:
Insert your final eye screw into the top of the donut.
Step 4: Assembly & Finish
-
Dry completely:
Allow all three charms to dry for at least 24-48 hours. Air dry clay shrinks slightly, which helps secure the eye screws. -
Paint details:
If you didn’t use colored clay, paint the charms now. You can also add tiny white highlights to the eyes with a toothpick and white paint to make them look shiny and alive. -
Seal:
Coat each charm with a glossy varnish or UV resin. This protects the paint and gives them a professionally finished, ceramic-like shine. -
Connect to keychain:
Using jump rings and pliers, attach each charm to the chain links of your gold keychain ring. Arrange them so they hang at slightly different lengths.
Now you have a sweet set of breakfast friends to keep your keys company


Kawaii Mushrooms and Toadstools
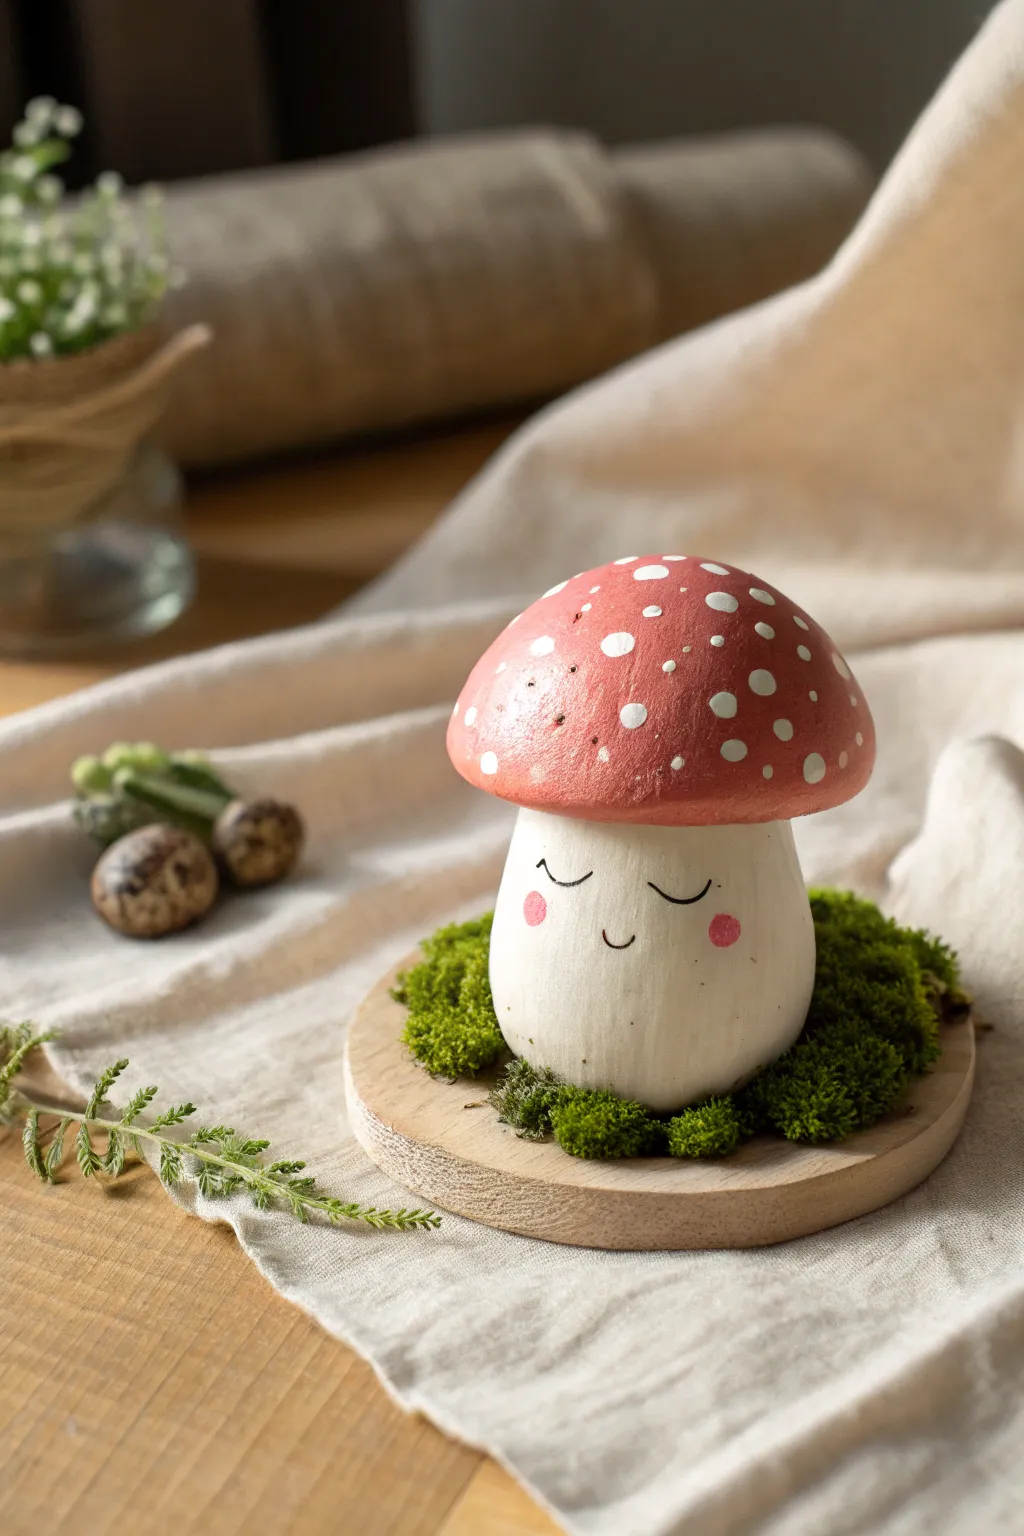
Bring a touch of enchanted forest charm to your desk with this adorable little mushroom friend. Featuring a sweet sleepy face and a classic red-and-white toadstool cap, it rests peacefully on a bed of faux moss for the coziest cottagecore vibe.
Step-by-Step Tutorial
Materials
- White air dry clay (approx. 100-150g)
- Acrylic paints (red, white, pink, black)
- Small wooden coaster or wood slice base
- Preserved moss or faux moss
- Strong craft glue or hot glue gun
- Fine detail paintbrush
- Medium flat paintbrush
- Sculpting tools or a toothpick
- Water cup for smoothing
- Sandpaper (fine grit)
Step 1: Sculpting the Mushroom
-
Form the base:
Start with a ball of clay about the size of a tangerine for the stalk. Roll it between your palms until smooth, then gently shape it into a thick, rounded cylinder that is slightly wider at the bottom for stability. -
Refine the stalk shape:
Tap the bottom of your cylinder on your work surface to flatten it so it stands upright. Use a wet finger to smooth out any cracks or fingerprints on the sides. -
Create the cap:
Take a second portion of clay, slightly larger than the first, and roll it into a ball. Flatten this ball into a thick disc, then gently press your thumbs into the center while rotating to dome the shape upwards like a bowl. -
Test the fit:
Place the cap onto the stalk to check proportions. The cap should overhang the stalk slightly, like an umbrella. If it feels too heavy, hollow out the underside of the cap a bit more to remove excess weight. -
Attach the pieces:
Score the top of the stalk and the underside of the cap with a toothpick (hatching marks). Apply a little water or slip (clay mixed with water) to these rough areas and press the cap firmly onto the stalk. -
Smoothing the join:
While I typically just press them together, for extra security you can use a sculpting tool to drag a small amount of clay from the underside of the cap down onto the stalk, smoothing the seam with a wet finger. -
Dry completely:
Set your mushroom aside to dry in a cool, dry place. Depending on humidity and thickness, this may take 24-48 hours. Turn it occasionally so the bottom dries evenly.
Pro Tip: Texture Trick
For a more organic, earthy look, gently tap the red paint with a dry sponge before it dries to remove brush strokes.
Step 2: Painting and Assembly
-
Smooth the surface:
Once bone dry, lightly sand any rough patches or fingerprints with fine-grit sandpaper. Wipe away the dust with a barely damp cloth. -
Base coat the stalk:
Paint the stalk entirely white. You may need two coats to get a solid, opaque finish. Let this dry completely before moving on. -
Paint the cap:
Using your medium brush, paint the entire top cap a vibrant rusty red. Be careful around the rim where it meets the white underside. Apply two coats for richness. -
Add the dots:
Dip the handle end of a paintbrush into white paint to create perfect polka dots. Stamp them randomly all over the red cap, varying the pressure slightly for different sizes. -
Paint the face:
Using a very fine detail brush and black paint, carefully paint two downwards curving arcs for sleepy eyes and a tiny ‘u’ shape for a smile in the center of the stalk. -
Add rosy cheeks:
Mix a tiny bit of red with white to make soft pink. Use a small round brush or a Q-tip to dab two pink circles on either side of the smile for blush. -
Seal the piece:
Once all paint is dry, apply a coat of matte varnish or sealant to protect your work and give it a finished look. -
Prepare the base:
Take your wooden coaster or slice. Apply a generous amount of craft glue or hot glue around the center where the mushroom will sit. -
Create the moss bed:
Press clumps of preserved moss into the glue on the wooden base, creating a lush green ring. -
Final assembly:
Apply glue to the bottom of your painted mushroom and press it firmly into the center of the moss ring, nesting it snugly so it looks like it grew there.
Troubleshooting: Cracking?
If small cracks appear while drying, mix a tiny bit of fresh clay with water to make a paste and fill them in.
Now your peaceful little mushroom is ready to bring a moment of calm to your bookshelf or garden collection


Mini Rainbow Trinket Dish
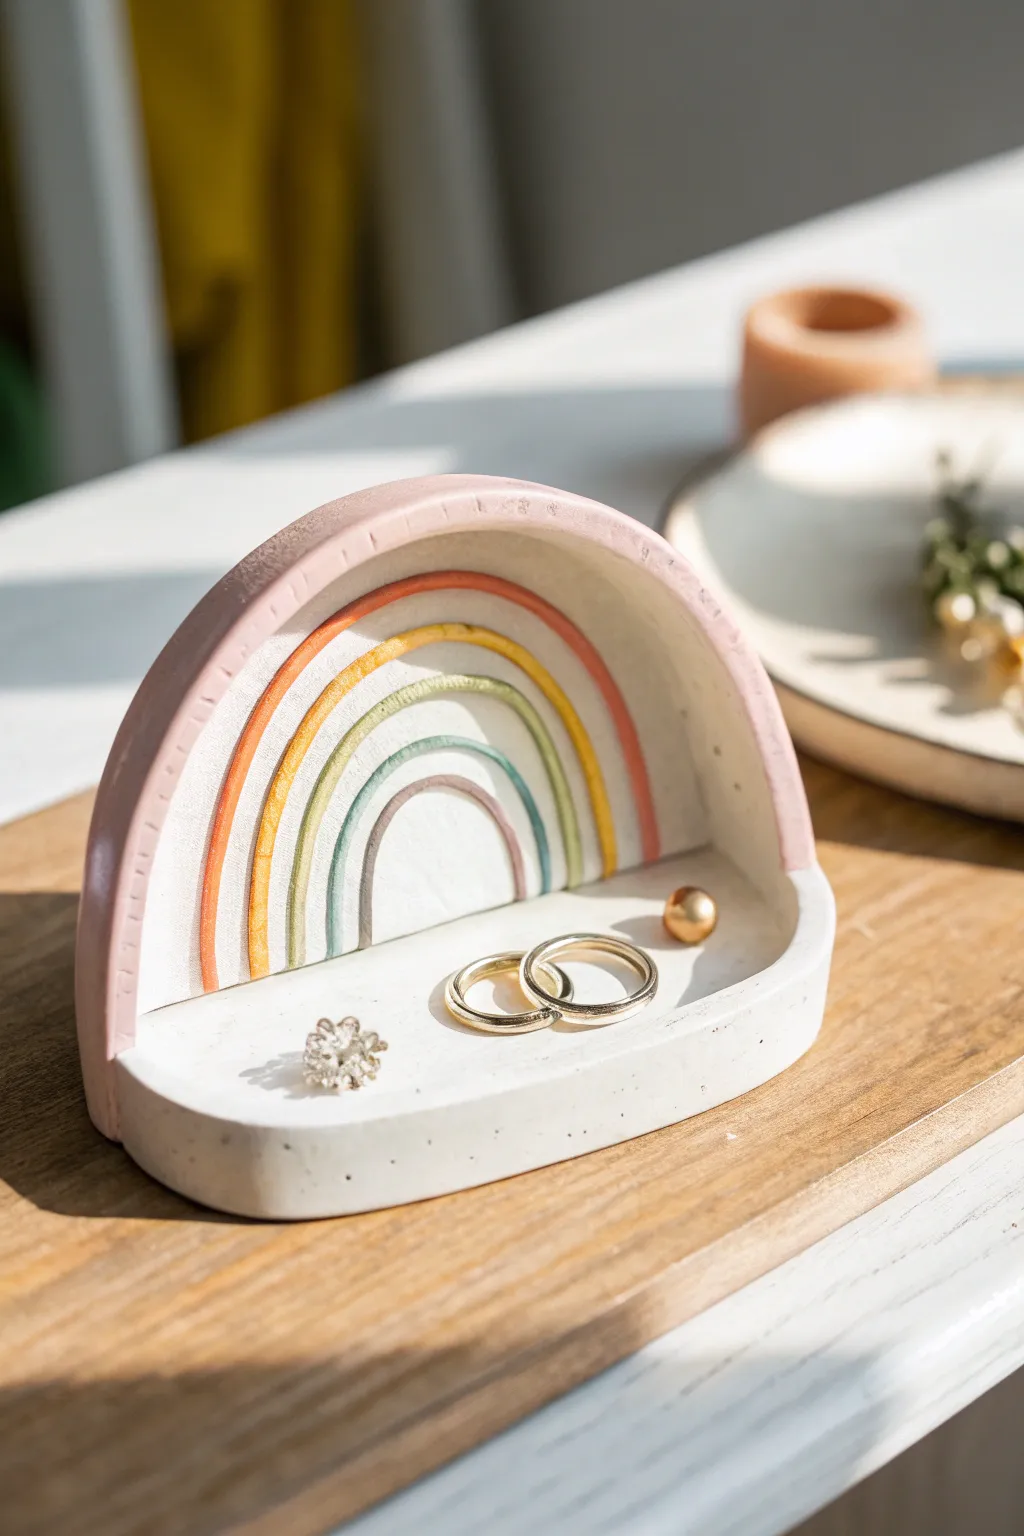
Brighten up your vanity with this charming upright trinket dish, featuring a sweet pastel rainbow design. Its unique vertical shape acts as a perfect backdrop for your favorite rings and small treasures while adding a pop of color.
Step-by-Step Guide
Materials
- White sculpting air-dry clay (smooth finish)
- Pastel acrylic paints (pink, orange, yellow, green, blue)
- Rolling pin
- Circle cutter (cookie cutter or small lid, approx. 4 inches)
- Craft knife or scalpel
- Fine-grit sandpaper
- Small flat paintbrush
- Very fine detail paintbrush
- Superglue or strong craft adhesive
- Water in a small cup
- Gloss or matte varnish (optional)
Step 1: Shaping the Clay Pieces
-
Roll out the base:
Begin by conditioning your air-dry clay until it’s smooth and pliable. Roll out a slab to an even thickness of about 1/4 inch (6mm). This thickness ensures the dish is sturdy enough to stand upright. -
Cut the circles:
Use your 4-inch circle cutter to punch out two identical circles from the slab. Remove the excess clay and set it aside, keeping the edges of your circles clean. -
Create the half-moons:
Take your craft knife and cut one of the circles exactly in half to create two semi-circles. One will be the upright back panel, and the other can simply be reshaped back into your clay supply. -
Create the base platform:
Take the second full circle and cut a straight line across it, removing about one-third of the shape. This creates a circle with a flat edge, which will serve as the floor of the dish. -
Smooth the edges:
Dip your finger in a little bit of water and run it along all cut edges of both clay pieces. Smoothing them now saves significant sanding time later. -
Dry the components:
Place both clay pieces on a flat surface to dry for 24-48 hours. Flip them occasionally to prevent warping and ensure even drying on both sides.
Step 2: Sanding and Assembly
-
Refine the surface:
Once fully dry, use fine-grit sandpaper to gently smooth out any bumps or sharp edges. Pay special attention to the flat edge of the base and the bottom edge of the upright semi-circle. -
Dust off before gluing:
Wipe both pieces with a slightly damp cloth or dry brush to remove all sanding dust, as dust will prevent the glue from bonding securely. -
Glue the structure:
Apply a thin line of strong superglue along the bottom straight edge of the upright semi-circle. Press this firmly onto the straight back edge of the base piece. -
Secure the bond:
Hold the pieces together firmly for about 60 seconds (or per your glue’s instructions) to ensure a tight, 90-degree angle bond. Let the glue cure completely before handling.
Keep it Straight
To ensure your back piece stands 90 degrees perfectly, lean it against a small box or block while the glue dries so it doesn’t tilt backward.
Step 3: Painting the Rainbow
-
Base coat (optional):
If your clay dried slightly grey or uneven, paint the entire piece with a solid coat of white acrylic paint first for a fresh, clean canvas. -
Sketch the arches:
Using a very light pencil touch, sketch five concentric arches on the upright panel. I find it helpful to start with the smallest inner arch and work my way out to keep spacing even. -
Paint the outer border:
Mix a soft dusty rose color and paint the outermost curved edge of the upright panel, extending slightly onto the face of the dish to form the first, largest arch. -
Fill the warm tones:
Moving inward, paint the next arch with a muted terracotta orange followed by a soft, buttery yellow. Use a fine detail brush to keep the lines crisp. -
Paint the cool tones:
Continue with a sage green arch and finish with a dusty blue for the smallest, innermost arch. Leave narrow strips of white space between each color band for that modern, illustrative look shown in the photo. -
Add texture detail:
For the grooved look on the outer pink rim, use a non-inked pen or dull pencil to gently press small tick marks into the paint while it’s still slightly tacky, or paint them on with a darker pink shade. -
Seal the piece:
Once all paint is perfectly dry, apply a coat of matte varnish over the entire dish to protect it from scratches and give it a professional finish.
Warping Woes?
If your flat clay pieces curl up while drying, dampen the concave side slightly and place them under a heavy book overnight to flatten them out again.
Now you have a sweet, handmade spot to keep your everyday jewelry safe and display-ready

The Complete Guide to Pottery Troubleshooting
Uncover the most common ceramic mistakes—from cracking clay to failed glazes—and learn how to fix them fast.
Heart Cheek Magnets With Happy Faces
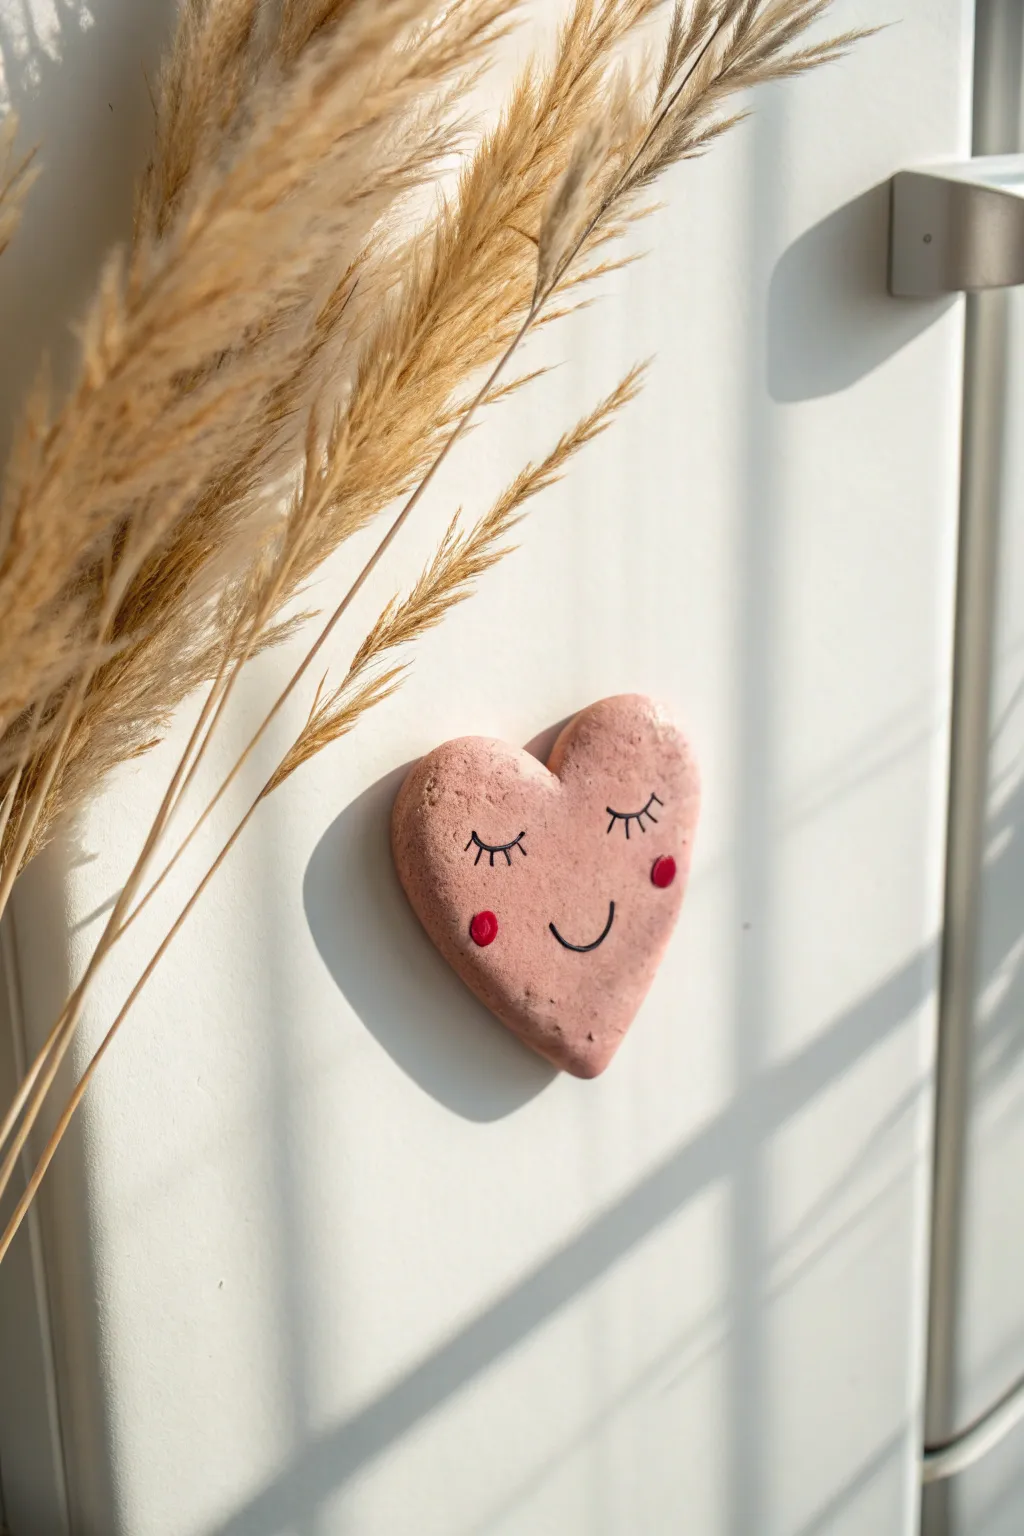
Brighten up your fridge or magnetic board with these irresistibly sweet heart magnets. Made from simple air-dry clay and finished with a soft pink hue, these sleeping happy faces add a touch of whimsy to any space.
Detailed Instructions
Materials
- Air-dry clay (white)
- Acrylic paint (pastel pink, black, bright red/pink)
- Small rolling pin
- Heart-shaped cookie cutter (medium size)
- Sandpaper (fine grit)
- Fine-point paintbrush or black paint pen
- Round disk magnets
- Strong craft glue (E6000 or hot glue)
- Matte sealant or varnish (optional)
- Small bowl of water
- Parchment paper
Step 1: Shaping the Clay
-
Condition the Clay:
Take a small handful of white air-dry clay and knead it in your hands until it becomes warm, soft, and pliable. This prevents cracking later on. -
Roll it Out:
Place the clay on a sheet of parchment paper. Use your rolling pin to flatten it into an even slab, aiming for a thickness of about 1/4 inch (6mm) to ensure durability. -
Cut the Shape:
Press your heart-shaped cookie cutter firmly into the clay. Give it a tiny wiggle to ensure a clean cut, then lift the cutter away. -
Soften the Edges:
Dip your finger into a little water and gently run it along the cut edges of the heart. This smooths out any sharp ridges left by the cutter, giving it that soft, pillowy look. -
Let it Cure:
Leave your heart on the parchment paper to dry completely. Depending on your brand of clay and humidity, this usually takes 24 to 48 hours. Flip it over halfway through to ensure the back dries evenly.
Step 2: Painting the Base
-
Smooth the Surface:
Once fully dry, check for any rough spots. I gently rub fine-grit sandpaper over the surface and edges to make it perfectly smooth. -
Mix the Pink:
Create a soft, dusty pink shade by mixing a small amount of red acrylic paint into white, or use a pre-mixed pastel pink tube. -
Apply the Base Coat:
Paint the entire front and sides of the heart. Use long, even strokes to minimize brush marks. Let this coat dry for about 15 minutes. -
Second Coat:
Apply a second layer of pink if the white clay is still showing through slightly. Allow this to dry completely before moving to the details.
Smooth Finish Tip
Keep a tiny spray bottle of water nearby. Lightly misting the clay as you smooth with your finger helps eliminate fingerprints specifically.
Step 3: Adding the Face
-
Draft the Face:
Lightly sketch the position of the eyes and mouth with a pencil if you’re nervous about freehanding. Center the smile low on the heart. -
Draw the Eyes:
Using a very fine liner brush dipped in black paint (or a black paint pen for better control), draw two small U-shapes for closed eyelids. Add three tiny lashes to the outer corner of each eye. -
Paint the Smile:
Carefully paint a simple, small curve between the eyes for the smile. Keep the line thin and delicate. -
Add Rosy Cheeks:
Dip the handle end of a paintbrush into bright red or dark pink paint. Dot it gently onto the clay below the outer edge of each eye to create perfect circular cheeks. -
Seal (Optional):
If you want extra protection, brush on a layer of matte varnish once the facial features represent fully dry.
Glitter Upgrade
Mix a pinch of superfine iridescent glitter into your sealant topcoat. It adds a subtle shimmer that catches the light beautifully.
Step 4: Assembly
-
Prepare the Back:
Flip the heart over. If the clay surface is very smooth, scratch the center slightly with sandpaper to give the glue something to grip. -
Attach the Magnet:
Apply a generous dab of strong craft glue to the back of the magnet. -
Secure and Dry:
Press the magnet firmly onto the center of the heart’s back. Let the glue cure according to the package instructions (usually overnight for maximum hold).
Pop this charming little face onto your fridge and enjoy the happy vibes every time you reach for a snack
Sweet Little Ring Cones
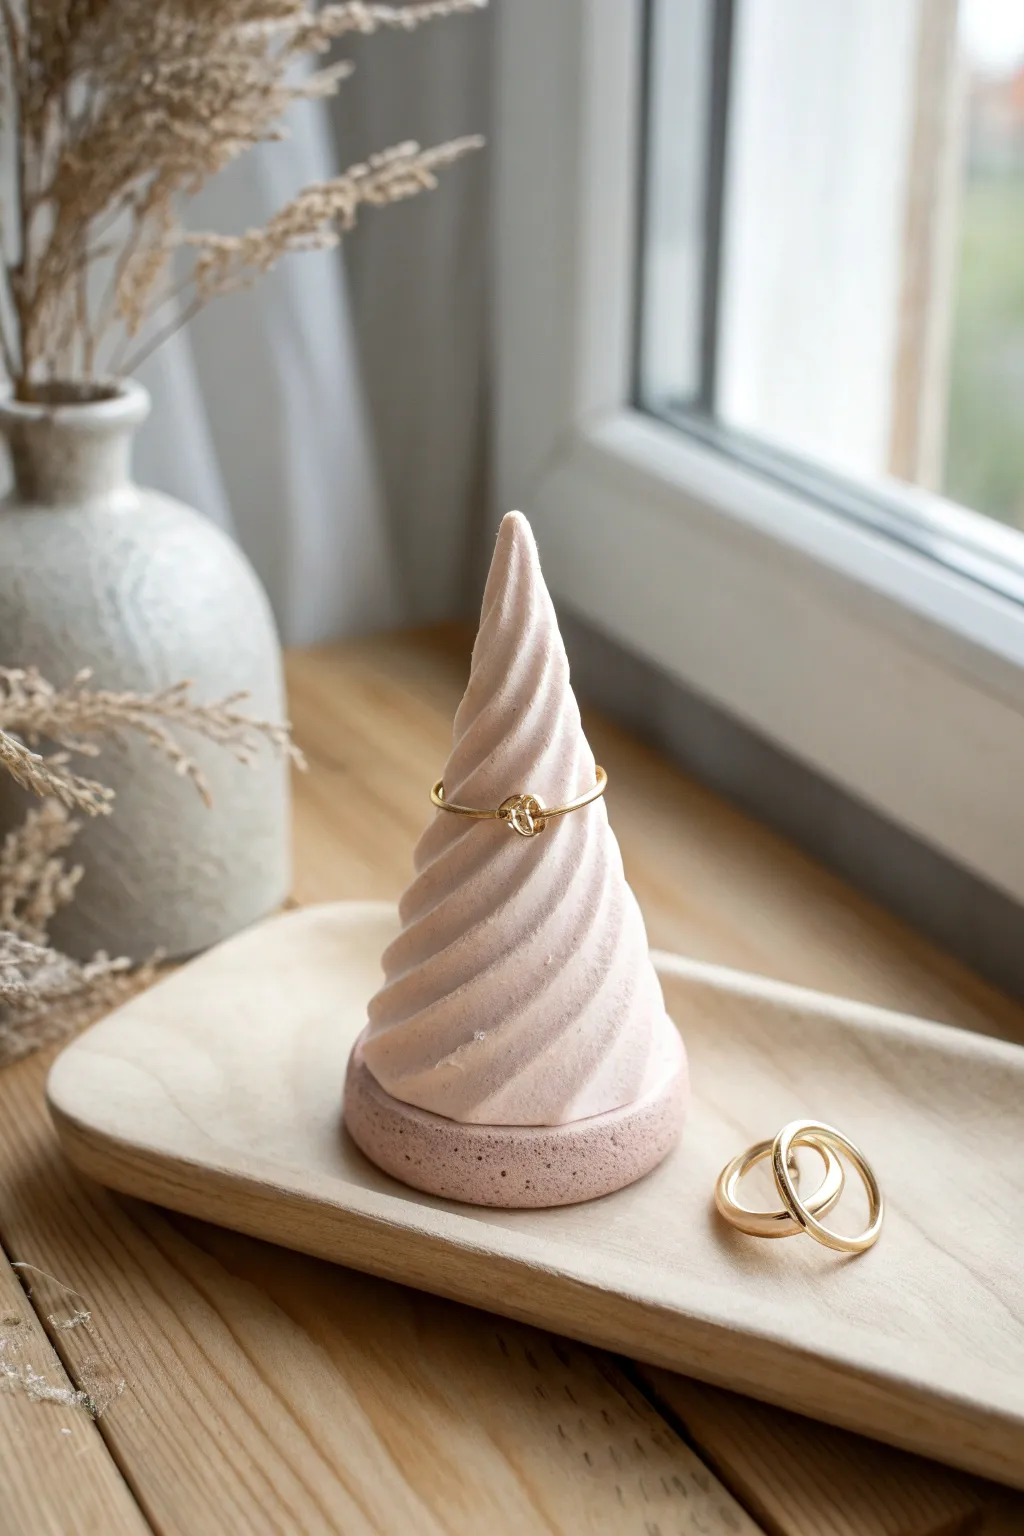
These delightful ring holders mimic the soft twists of meringue or ice cream, adding a touch of sweetness to your vanity. With their distinct spiral texture and matte finish, they are perfectly shaped to keep your favorite bands safe and displayed beautifully.
How-To Guide
Materials
- Air dry clay (white or pale pink)
- Small rolling pin
- Clean, smooth work surface or silicone mat
- Small cup of water
- Clay sculpting tool or dull butter knife
- Fine-grit sandpaper (400-600 grit)
- Acrylic paint (optional: pale blush or cream)
- Matte sealant or varnish
- Sponge dabber or soft paintbrush
Step 1: Forming the Base
-
Prepare the clay:
Start by taking a handful of air dry clay, roughly the size of a golf ball. Knead it in your hands until it feels warm and pliable to remove any air bubbles. -
Roll the coil:
On your flat surface, roll the clay back and forth to create a long, thick snake or coil. You want it to be tapered, with one end thicker (about 1 inch wide) and the other end coming to a thinner point. -
Create the base:
Take a separate small piece of clay and flatten it into a perfect circle, about 2 inches in diameter. This circular disc will serve as the sturdy foundation for your cone. -
Create the twisted effect:
Instead of rolling a smooth cone, we need that twisted look. Hold the thick end of your tapered coil at the center of your base disc and begin winding the clay upwards. -
Spiral upwards:
Wind the clay in a tight spiral moving upward, making each layer slightly smaller than the one below it to create the conical shape. -
Refine the shape:
Once you reach the top point, gently press the coils together so they adhere to one another. I find that lightly wetting my finger helps stick the layers without losing the definition.
Keep it clean
Keep a pack of wet wipes nearby while sculpting. Air dry clay leaves a dusty residue on hands that can transfer back onto the clay as you smooth it, dulling the finish.
Step 2: Smoothing and Texturing
-
Blend the seams:
Using a sculpting tool or your finger, very gently smooth the internal seams where the coils touch, but be careful not to flatten the ridges; the deep grooves are essential for the ‘twisted’ look. -
Enhance the twist:
If the spiral definition faded during stacking, run a rounded sculpting tool or the back of a dull knife along the grooves to deepen the spiral pattern from base to tip. -
Shape the peak:
Pinch the very top of the cone gently to create a soft, slightly rounded point rather than a needle-sharp tip, which will be less fragile when dry. -
Smooth the exterior surface:
Dip your finger in water and run it along the ridges of the spiral. This removes fingerprints and creates that soft, meringue-like surface texture. -
Texture the base (optional):
For the bottom disc, you can gently tap it with a stiff brush or a textured sponge to create a porous, stone-like contrast to the smooth cone above. -
Begin drying:
Place your cone in a cool, dry spot away from direct sunlight. Let it air dry undisturbed for 24 to 48 hours. -
Sand imperfections:
Once fully cured and hard, use very fine-grit sandpaper to buff away any rough patches or sharp edges, particularly around the bottom rim.
Step 3: Finishing Touches
-
Painting (optional):
If your clay dried a plain grey or white and you want the pink hue shown, mix a very small amount of blush acrylic paint with white. Apply a thin wash to keep it looking natural. -
Create depth:
To emphasize the spiral, you can brush a slightly darker shade of diluted paint deep into the crevices and wipe the raised areas clean with a damp cloth. -
Seal the piece:
Apply a coat of matte varnish or sealant over the entire piece. A matte finish is key here to maintain the velvety, organic look of the clay. -
Final cure:
Allow the sealant to dry completely according to the bottle instructions before placing any jewelry on the cone to prevent sticking.
Speckled Stone Effect
Mix tiny amounts of dried coffee grounds or black pepper into your wet clay before rolling it. This creates a trendy, speckled terrazzo look without needing paint.
Your new ring cone is ready to organize your jewelry with a lovely handmade touch


What Really Happens Inside the Kiln
Learn how time and temperature work together inside the kiln to transform clay into durable ceramic.
Mini Planters With Sleepy Animal Faces
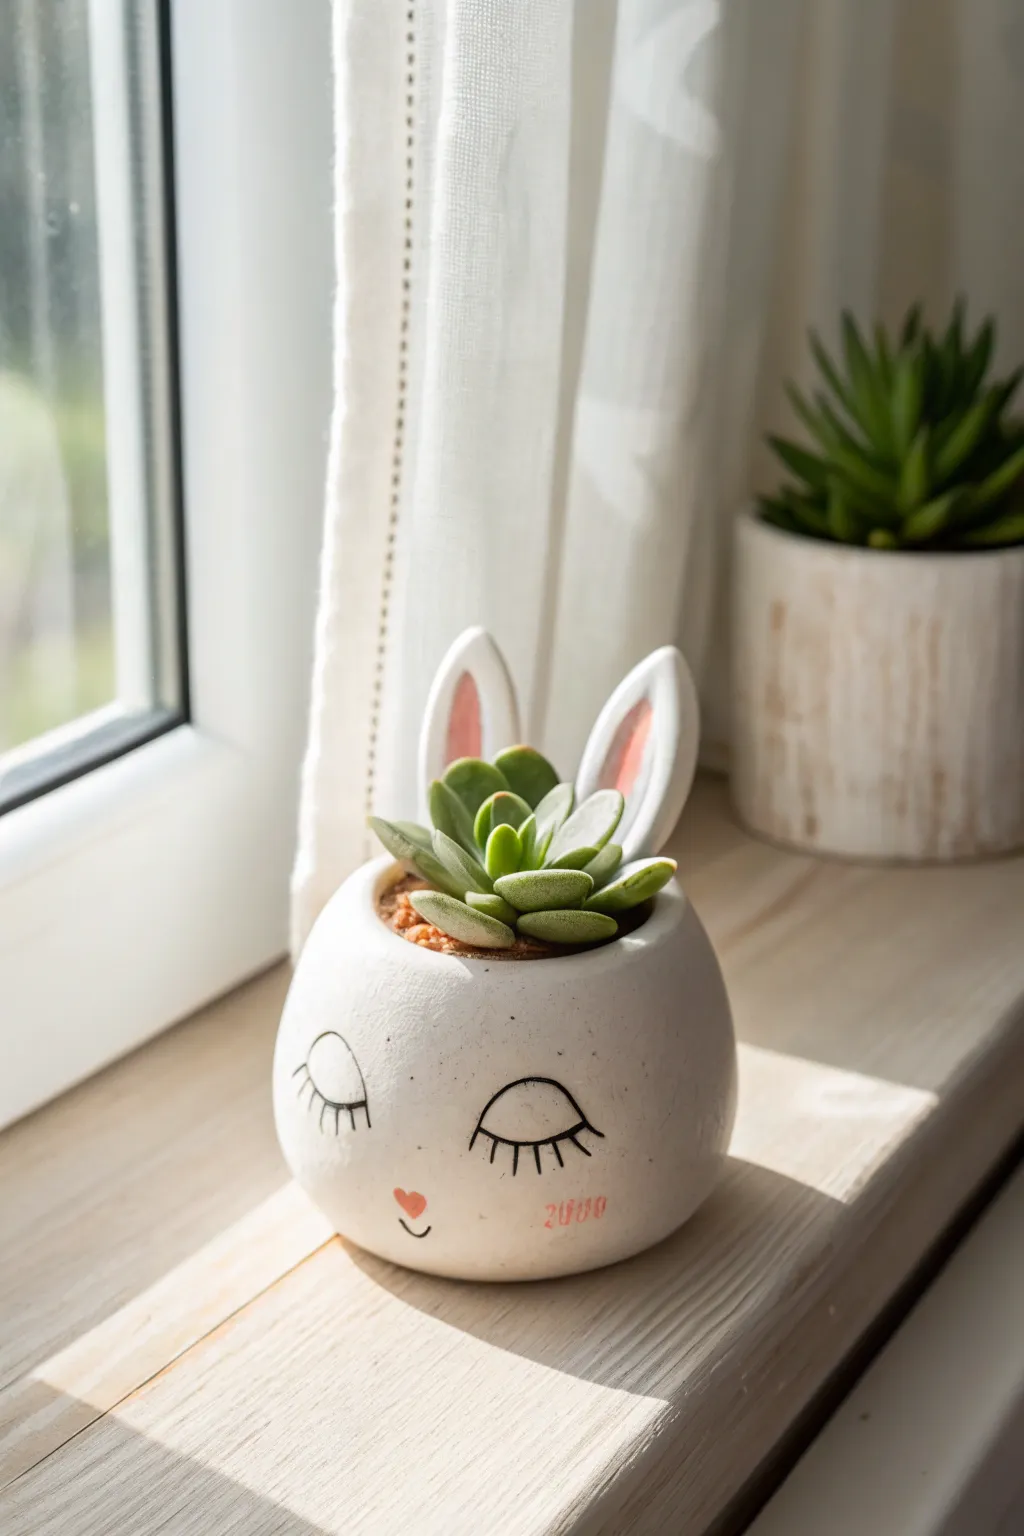
This adorable air-dry clay project transforms a simple vessel into a peaceful, sleeping bunny character complete with perky ears and sweet facial details. The smooth, matte white finish gives it a modern ceramic look that brightens up any windowsill.
Step-by-Step Guide
Materials
- White organic air-dry clay (approx. 300g)
- Small rolling pin
- Small bowl of water
- Clay carving tools or a toothpick
- Fine grit sandpaper
- Black fine-point permanent marker or acrylic paint
- Soft pink acrylic paint
- Fine detail paintbrush
- Acrylic matte varnish or sealant
- Small succulent plant and potting soil
Step 1: Shaping the Base
-
Condition the clay:
Start by kneading your white air-dry clay in your hands until it becomes warm, soft, and pliable. Getting rid of air bubbles now prevents cracking later. -
Form the pinch pot:
Roll the clay into a smooth ball about the size of a large orange. Push your thumb into the center, stopping about a half-inch from the bottom. -
Thin the walls:
Gently pinch and turn the ball, working the clay upwards to thin out the walls. Aim for an even thickness of about 1/4 inch all around to ensure the pot is sturdy but not too heavy. -
Smooth the surface:
Dip your finger in a little water and run it over the exterior and interior to smooth out any fingerprints or cracks. You want a nice, rounded, organic shape. -
Flatten the bottom:
Tap the pot gently against your table to create a flat stable base so your bunny won’t tip over.
Cracks happen!
If small cracks appear as the clay dries, don’t panic. Mix a tiny bit of fresh clay with water to make a paste and fill the cracks, then sand smooth once dry.
Step 2: Creating the Bunny Ears
-
Shape the ears:
Take two smaller balls of clay and roll them into thick sausage shapes, tapering them slightly at the top to form the bunny ears. -
Indent the ears:
Use your thumb or a modeling tool to press a shallow indentation into the center of each ear, creating the inner ear cavity. -
Score and slip:
Use a needle tool or toothpick to scratch grid lines (scoring) on the bottom of the ears and the top rim of the pot where you want them to sit. Apply a dab of water (slip) to attach them securely. -
Blend the seams:
I like to use a small clay tool to drag clay from the base of the ear down onto the pot, smoothing the join line completely so the ears look seamless and integrated.
Step 3: Drying and Refining
-
Let it dry completely:
Place your bunny in a cool, dry spot away from direct sunlight. Let it dry for 24-48 hours. Turn it occasionally to ensure even drying. -
Sand for smoothness:
Once bone dry, use fine-grit sandpaper to gently buff the surface. This removes any final bumps and gives that professional ceramic appearance. -
Dust off:
Wipe the pot down with a slightly damp cloth or a dry brush to remove all the sanding dust before painting.
Level Up: Tail Detail
Add a small ball of clay to the back of the pot before drying to create a fluffy bunny tail. Paint it white or give it a little texture with a toothbrush.
Step 4: Painting the Details
-
Paint the inner ears:
Mix a soft, rosy pink acrylic paint. Using your fine detail brush, carefully paint the inside indentation of the bunny ears. -
Add the face:
Using a steady hand and a fine-point black marker (or a very thin liner brush with black paint), draw two downward-curved semi-circles for the sleeping eyes. -
Draw the lashes:
Add three small vertical lines extending downward from the center of each closed eye to create the eyelashes. -
Create the nose and mouth:
Paint a tiny pink heart shape between the eyes for the nose. Below that, use the black marker to draw a small, simple curved mouth. -
Add faint blush (optional):
For a subtle touch, you can dry-brush an extremely small amount of pink on the cheeks, or add a tiny detail like the ‘2000’ visible in the inspiration image. -
Seal the project:
Apply a coat of matte spray varnish or brush-on sealant to protect the clay from moisture, especially important since this is a planter.
Once sealed and dry, pop in your favorite succulent for a cozy new home
Boba Cup Desk Buddy
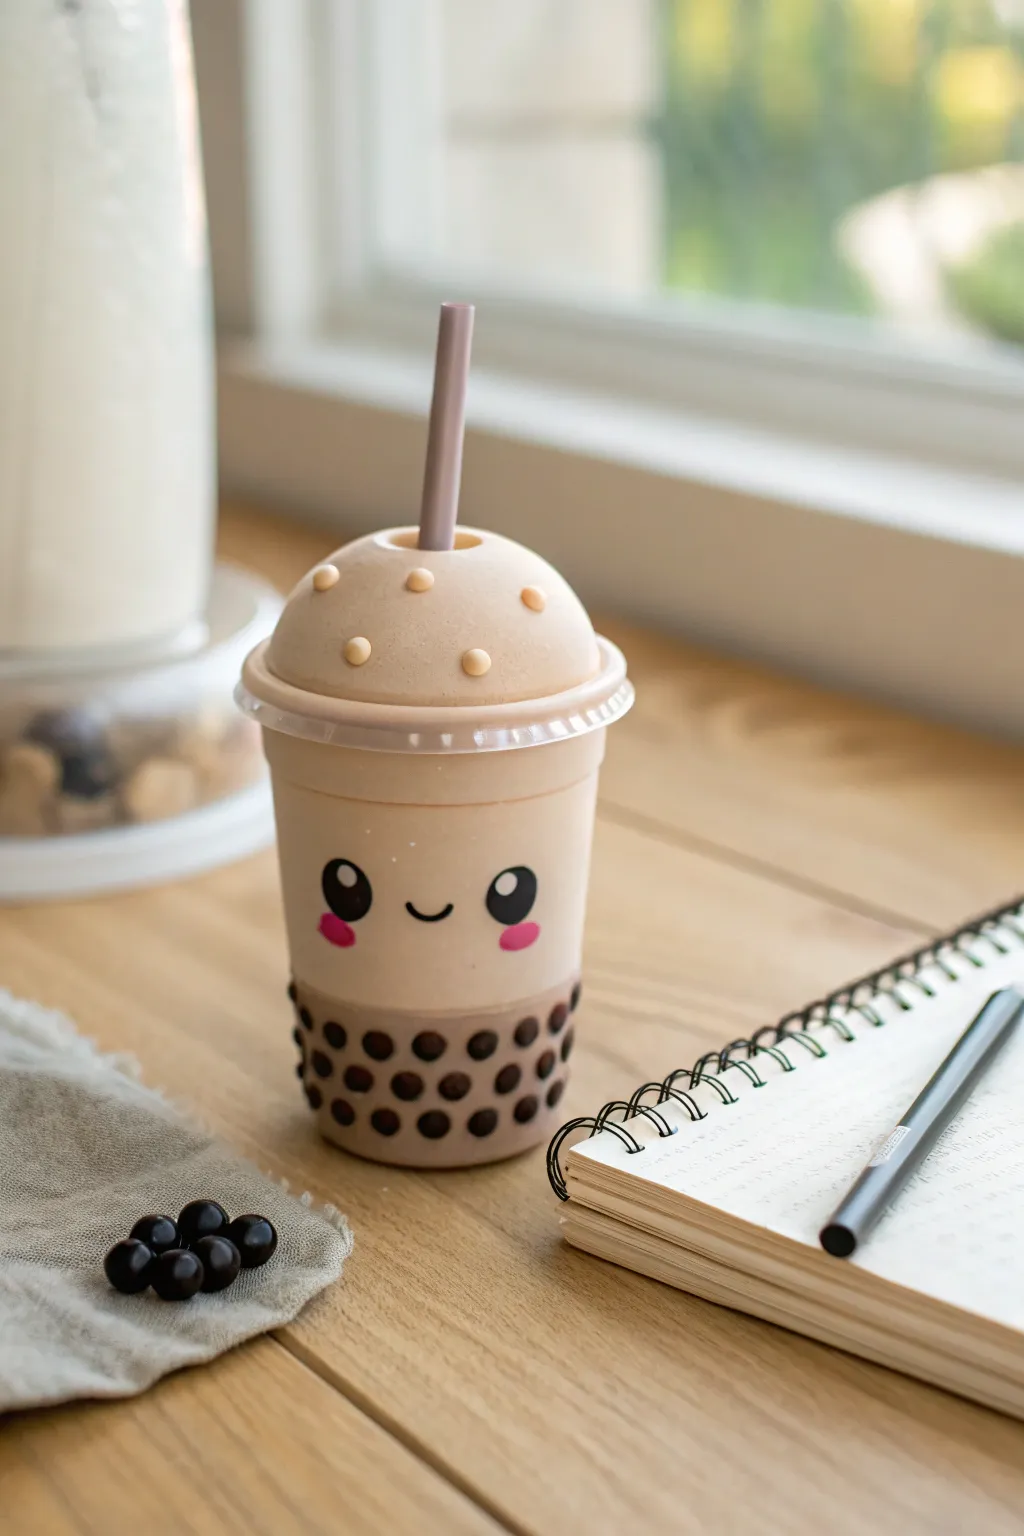
Transform your desk into a happier place with this adorable boba tea figurine. This project captures the classic milk tea look with a kawaii smiley face and realistic-looking tapioca pearls at the bottom.
How-To Guide
Materials
- Light brown air-dry clay (or white clay mixed with brown acrylic paint)
- Dark brown air-dry clay (for boba pearls)
- Purple or pink clay (for straw)
- Small amount of light cream/yellow clay (for toppings)
- Black acrylic paint or Posca marker
- Pink acrylic paint or Posca marker
- Clear plastic cup lid (domed style) – small size to fit your sculpture
- Rolling pin
- Clay knife or sculpting tool
- Water used for smoothing
- Clear varnish or gloss glaze
Step 1: Shaping the Cup Base
-
Mix the perfect tea color:
Start by conditioning your light brown clay. I like to knead in a tiny bit of white clay to get that soft, milky tea shade seen in the photo. It should be uniform and smooth. -
Form the cylinder:
Roll a large ball of the light brown clay, then gently roll it back and forth on your work surface to create a thick cylinder. Flatten the top and bottom by tapping them against the table. -
Taper the shape:
Gently roll the bottom half of the cylinder with slightly more pressure so it tapers down just a little bit, mimicking the shape of a real disposable plastic cup. -
Create the rim:
Using a separate small piece of the same light brown clay, roll out a thin snake. Wrap this around the top edge of your cylinder to create the cup’s distinct rim. Blend the bottom edge of this rim downward into the cup body using a sculpting tool and a drop of water.
Smooth Operator
Use a wet fingertip to gently rub away fingerprints as you work. The smoother the ‘plastic’ cup looks, the more convincing the final illusion will be.
Step 2: Creating the Boba Pearls
-
Roll the pearls:
Take your dark brown clay and pinch off many tiny pieces. Roll them into small, uniform spheres about the size of peas. -
Attached bottom pearls:
Begin pressing these dark spheres into the bottom third of your light brown cup gently. You want them to look like they are embedded inside the liquid, so flatten them slightly so they aren’t protruding too much. -
Layering effect:
Place the pearls randomly but densely near the bottom edge, spacing them out more as you go up. Stop adding them about one-third of the way up the cup. -
Add loose pearls:
Create a few loose pearls to scatter next to your finished piece for extra decoration, exactly like the reference photo shows.
Step 3: The Dome and Straw
-
Sculpt the dome lid:
Form a semi-circle or dome shape using the light brown clay. Ensure the diameter matches the top of your cup perfectly. -
Make the straw hole:
Before attaching the dome, use a tool or the back of a paintbrush to poke a hole in the very center of the dome for the straw. -
Assemble cup and lid:
Attach the dome to the top of your cup base. You can use a little water to bond the clay together. Smooth the seam carefully. -
Create the straw:
Roll a smooth, straight snake out of purple or pink clay. Cut it to length and let it stiffen for 10 minutes so it doesn’t droop. -
Insert the straw:
Place the straw into the hole you created earlier. Secure it with a tiny dab of glue or water if the clay is still wet. -
Add tiny toppings:
Using very light cream or yellow clay, roll tiny micro-balls and press them gently onto the dome lid to represent sprinkles or foam bubbles.
Level Up: Realism
Instead of clay pearls, paint the bottom third dark brown, let dry, then paint lighter brown circles over it to simulate pearls seeing through milky tea!
Step 4: Face and Finishing Details
-
Dry the sculpture:
Allow the entire piece to dry for at least 24 hours. The surface must be hard before painting. -
Draw the eyes:
Using black paint or a marker, draw two large circles in the middle of the cup. Leave a small white dot (or paint one in later) in the upper corner of each eye for a shiny reflection. -
Add the smile:
Draw a small, curved ‘u’ shape directly between the eyes for the mouth. -
Paint the blush:
Dab two pink oval spots directly under the eyes for rosy cheeks. -
Install the plastic rim:
Cut the rim off a real plastic dome lid (or from a clear water bottle). Carefully place this plastic ring around the seam where your dome meets that cup base. This adds that crucial realistic ‘plastic cup’ shine. -
Varnish:
Finish by coating the boba pearls and eyes with a high-gloss varnish to make them look wet and shiny.
Now you have a sweet, permanent tea treat to keep you company while you work or study

TRACK YOUR CERAMIC JOURNEY
Capture glaze tests, firing details, and creative progress—all in one simple printable. Make your projects easier to repeat and improve.
Puffy Cloud and Star Keychain Tags
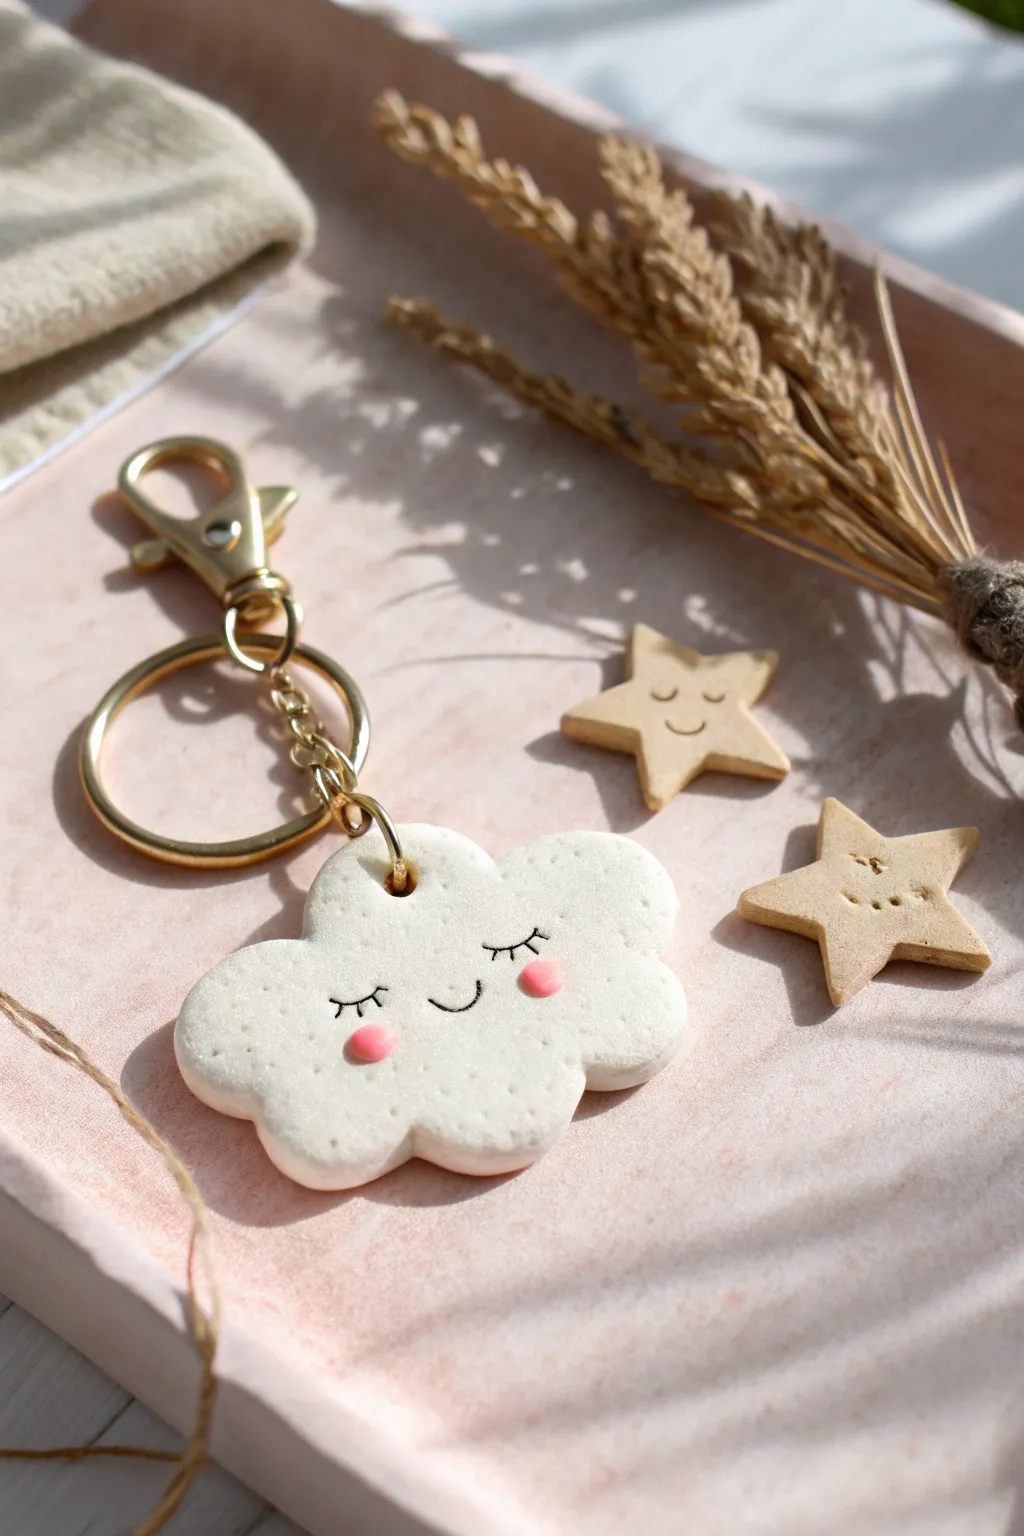
Bring a little piece of the sky with you wherever you go with this adorable cloud and star keychain set. These puffy, smiling charms feature sweet celestial faces and rosy cheeks, making them perfect for personalizing bags or gifting to a daydreamer.
Detailed Instructions
Materials
- White polymer clay or air dry clay
- Beige or light yellow clay (for stars)
- Pink clay (tiny amount for cheeks)
- Acrylic rolling pin
- Cloud cookie cutter (or X-Acto knife)
- Small star cookie cutter
- Black fine-point marker or acrylic paint
- Needle tool or toothpick
- Headpins or eye pins (gold)
- Jump rings (gold)
- Keychain clasp hardware (gold)
- Round nose pliers
- Gloss glaze (optional)
Step 1: Shaping the Sky
-
Condition the white clay:
Start by taking a chunk of white clay and kneading it in your hands until it becomes soft, pliable, and warm. This prevents cracks later on. -
Roll it out:
Using your acrylic rolling pin, flatten the white clay into a sheet. Aim for a thickness of about 1/4 inch (6mm) so the keychain feels substantial and puffy. -
Cut the cloud:
Press your cloud-shaped cookie cutter firmly into the clay. If the clay sticks, you can dip the cutter in a little cornstarch first. Gently push the cloud out. -
Soften the edges:
I like to take a moment here to gently tap the edges of the cloud with my fingertip. This rounds off the sharp cuts and gives it that soft playful look. -
Make the stars:
Repeat the rolling process with your beige or light yellow clay. Use the small star cutter to create two little star companions. -
Add hardware holes:
Carefully insert a gold eye pin into the top center of the cloud and the top point of one star. Alternatively, use a needle tool to poke a hole near the edge if you plan to use jump rings directly.
Step 2: Adding Personality
-
Create rosy cheeks:
Take two minuscule balls of pink clay. Flatten them slightly and press them onto the cloud shape where the cheeks should be. -
Texture the surface:
To mimic the look in the photo, gently tap the surface of the cloud and stars with a clean toothbrush or a crumpled ball of foil. This creates a soft, organic texture. -
Bake or dry:
Follow the specific instructions for your clay type. If using polymer clay, bake on a parchment-lined tray. If using air dry clay, let them sit in a dry spot for 24-48 hours. -
Draw the faces:
Once the pieces are fully cured and cool, use a fine-point black permanent marker to draw sleepy eyelashes and a smile on the cloud. -
Detail the stars:
Draw simple smiling faces on the stars as well so they match the happy theme. -
Seal the design:
Protect your painted faces by brushing a thin layer of gloss or matte glaze over the charms. This is crucial for air dry clay to prevent moisture damage.
Smooth Operator
Before baking or drying, lightly brush the clay with a tiny bit of baby oil or water to smooth out any fingerprints.
Step 3: Assembly
-
Prepare the chain:
Take your gold keychain hardware. If it has a long chain, you might want to shorten it by opening and removing a few links with your pliers. -
Attach the cloud:
Open a jump ring with your pliers—twist it sideways, don’t pull it apart. Loop it through the eye pin on your cloud and attach it to the bottom link of the chain. -
Attach the star:
Connect the star charm to the main ring or a higher point on the chain using another jump ring, allowing it to dangle freely next to the cloud. -
Final check:
Ensure all jump rings are closed tightly so your charms stay secure.
Night Sky Edition
Make a dark blue cloud and speckle it with white paint stars instead, keeping the pink cheeks for contrast.
Your charming new accessories are now ready to brighten up your keys or backpack
Mini Cupcakes With Sprinkle Texture
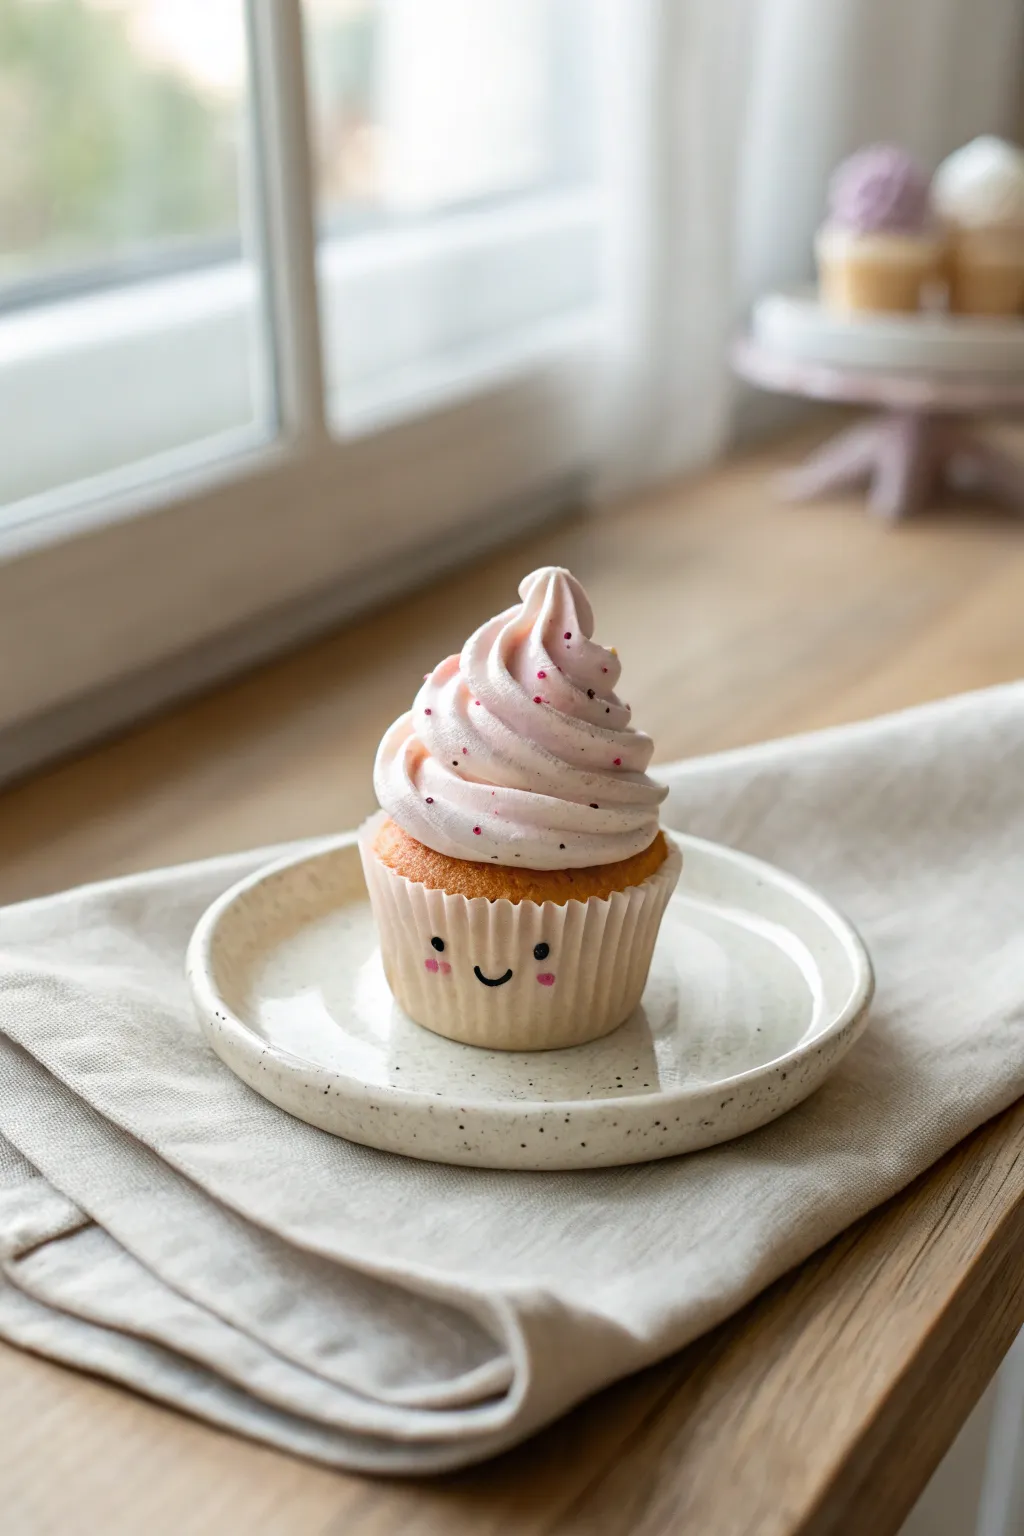
This adorable miniature cupcake features a whimsical smiley face on its liner and a perfectly swirled dollop of frosting. Using simple texturing techniques and air-dry clay, you’ll sculpt a sweet treat that looks almost good enough to eat.
Step-by-Step Tutorial
Materials
- White air-dry clay (or light beige)
- Acrylic paints (ochre, golden brown, pale pink, black, hot pink)
- Silicone cupcake liner mold (small/mini)
- Old toothbrush or stiff bristle brush
- Piping bag or clay extruder (star tip)
- Pre-made fake sprinkles (or cured clay bits)
- Fine detail paintbrush
- Gloss varnish (optional)
Step 1: Forming the Base
-
Color the clay:
Start by tinting a ball of white air-dry clay with a very small amount of yellow ochre or beige paint until you achieve a light, doughy color. -
Shape the base:
Roll the clay into a smooth ball that fits snugly into your chosen mini silicone cupcake liner mold. -
Mold the liner ridges:
Press the ball firmly into the mold to capture the ribbed texture of the cupcake liner. If you don’t have a mold, shape it into a slight cone and use a dull knife to press vertical lines all around the sides. -
Create the muffin top:
Gently gently gently flatten the top of the clay while it’s still in the mold (or hand-shaped), letting the clay slightly overflow the rim to create that classic ‘baked muffin’ dome shape. -
Add cake texture:
Using an old toothbrush or a stiff brush, stipple the exposed top of the clay dome to create a spongy, cake-like texture. -
Remove and dry:
Carefully pop the base out of the mold. Set it aside to dry until the surface is firm to the touch, usually just an hour or two depending on humidity.
Creamy Texture Tip
To make ‘frosting’ clay easier to pipe, mix it with a generous amount of liquid clay or white glue until it reaches a whipped consistency.
Step 2: Frosting and Decoration
-
Mix frosting clay:
Take a fresh batch of white clay. Mix in a tiny drop of water to make it softer and more pliable, almost like a thick paste or stiff buttercream. -
Tint the frosting:
Add the smallest dot of pale pink paint to tint your frosting mixture. You want a very pastel, strawberry-cream look. -
Prepare the specks:
Take tiny, dried crumbs of dark pink clay or pre-made fake sprinkles and fold them gently into your soft frosting clay. -
Load the tool:
Place your softened, speckled pink clay into a clay extruder fitted with a large star tip. If the clay is soft enough, you can even use a real piping bag with a durable tip. -
Pipe the swirl:
Starting from the outer edge of your dried cupcake base, pipe a spiral moving inward and upward, finishing with a peaked tip in the center. -
Refine the shape:
If the piping breaks, just smooth it back together with a slightly damp finger. The joy of clay is that you can try the swirl as many times as you need. -
Let it cure:
Allow the entire piece to dry completely. This usually takes 24 to 48 hours for air-dry clay to become fully hard.
Step 3: Bringing it to Life
-
Paint the cake:
Once fully dry, use a golden brown paint to lightly brush the textured ‘cake’ area just below the frosting line, enhancing the baked effect. -
Draft the face:
Lightly mark the position of the eyes and mouth on the ribbed liner section using a pencil. -
Draw the features:
Using a very fine detail brush and black acrylic paint, dab two small dots for eyes and a tiny ‘U’ shape for the smile. -
Add cheeks:
Dip the end of a paintbrush handle or dotting tool into hot pink paint and stamp two rosy cheeks just below the eyes. -
Seal (optional):
Finish by brushing a coat of matte varnish over the base and a satin or gloss varnish on the frosting to make it look creamy and fresh.
Turn It Into Jewelry
Before the frosting dries, insert an eyepin into the top swirl. Once cured and sealed, attach it to a chain for a sweet necklace charm.
Your cheerful little cupcake is now ready to brighten up your desk or shelf, perfectly preserved and calorie-free
Chonky Dino Minis in Pastel Colors
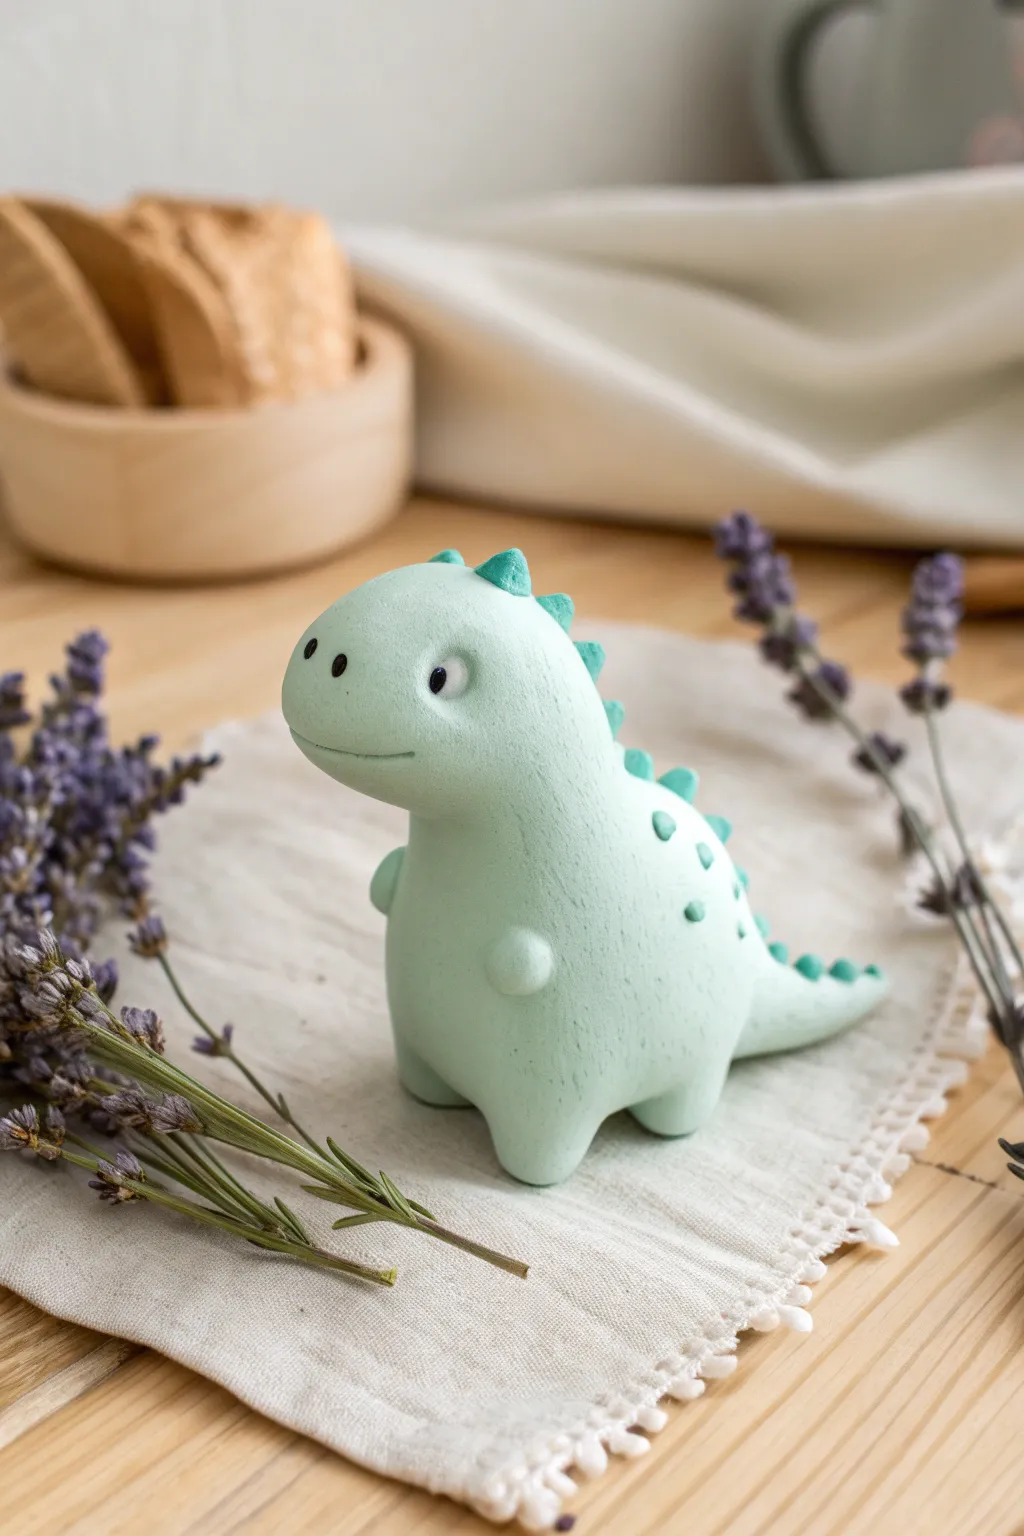
Sculpt a prehistoric pal that’s more sweet than scary with this adorable air clay project. This tutorial guides you through creating a chunky, pastel green dinosaur with a delightful matte texture and tiny spike details.
How-To Guide
Materials
- White air dry clay
- Acrylic paint (Mint Green, Teal, Black, White)
- Clay sculpting tools (ball tool, needle tool)
- Small cup of water
- Rolling pin
- Fine grit sandpaper (optional)
- Matte sealant or varnish
Step 1: Prepping the Clay
-
Mix your main color:
Start by taking a generous amount of white air dry clay. Mix in a small drop of mint green acrylic paint, kneading thoroughly until the color is uniform and pastel. If it’s too pale, add a tiny dot of teal. -
Create the body base:
Roll the mint clay into a smooth ball about the size of a tangerine. Then, gently roll it between your palms to elongate it slightly into a fat egg shape. This will be the main body. -
Shape the head:
Using your fingers, gently pinch and pull the narrower top part of your egg shape to define a head. You want a seamless transition, so keep the neck thick and sturdy, bending the head slightly forward.
Step 2: Adding Limbs and Features
-
Form the legs:
Roll four small balls of the same mint clay. They should be roughly marble-sized. Press them gently onto the bottom of the body to form stubby legs. -
Blend the seams:
Use a silicone tool or your finger dipped in a little water to smooth the clay where the legs meet the body. The goal is to make it look like one solid piece. -
Add the tail:
Roll a cone shape of clay and attach it to the lower back of the body. Curve it slightly to one side for a dynamic pose and blend the seams thoroughly. -
Create tiny arms:
Roll two very small tic-tac shapes. Press these onto the front of the chest area. They should look tiny and uselessly cute. Blend just the back edge so they stick out slightly.
Cracks Appearing?
If small cracks form while drying, mix a tiny bit of fresh clay with water to make a paste. Fill the cracks, smooth it out with a finger, and let dry again.
Step 3: Defining the Face
-
Sculpt the snout:
Gentle press and round the front of the face to create a distinct snout area. It should look soft and rounded, not pointy. -
Add eye sockets:
Use a small ball tool to make two shallow indentations where the eyes will go. Placing them slightly wide apart increases the cute factor. -
Carve the mouth:
Use a needle tool or a thin blade to carefully press a curved line into the snout for a smile. I usually curve the ends up slightly for a happy expression. -
Add nostrils:
Press two tiny holes above the mouth using a small needle tool to create the nostrils.
Make it a Planter
Before drying, carve a deep hole in the back instead of adding spikes. Once sealed, you can place a tiny air plant inside for a prehistoric plant pot.
Step 4: Spikes and Details
-
Prepare the spike color:
Take a small amount of white clay and mix it with a bit more teal paint than before to create a darker, contrasting shade for the spikes. -
The main head spikes:
Form several tiny triangles or cones from the teal clay. Place the largest ones on top of the head. -
Run down the spine:
Continue placing the teal cones down the back of the dinosaur’s neck and spine. Make them progressively smaller as you move towards the tail tip. -
Add back spots:
Roll tiny balls of the teal clay and flatten them gently onto the dinosaur’s back, scattered near the spikes for extra texture. -
Secure the pieces:
Use a tiny dab of water or liquid clay (slip) to attach each spike and spot securely.
Step 5: Finishing Touches
-
Let it dry:
Allow your dinosaur to dry completely. This usually takes 24-48 hours depending on the brand of clay and humidity. Flip it occasionally so the bottom dries too. -
Sand imperfections:
Once fully dry, you can lightly sand any fingerprints or rough seams with fine-grit sandpaper for a professional finish. -
Paint the eyes:
Using a fine detail brush, paint the insides of the eye sockets white. Once dry, add a black pupil. Add a tiny white highlight dot for life. -
Seal the work:
Apply a coat of matte varnish or sealant. This protects the clay and gives it that smooth, finished look seen in the photo.
Place your new dino friend on your desk or shelf for a daily dose of prehistoric cheer
Mini Berry Bears and Fruit Animals
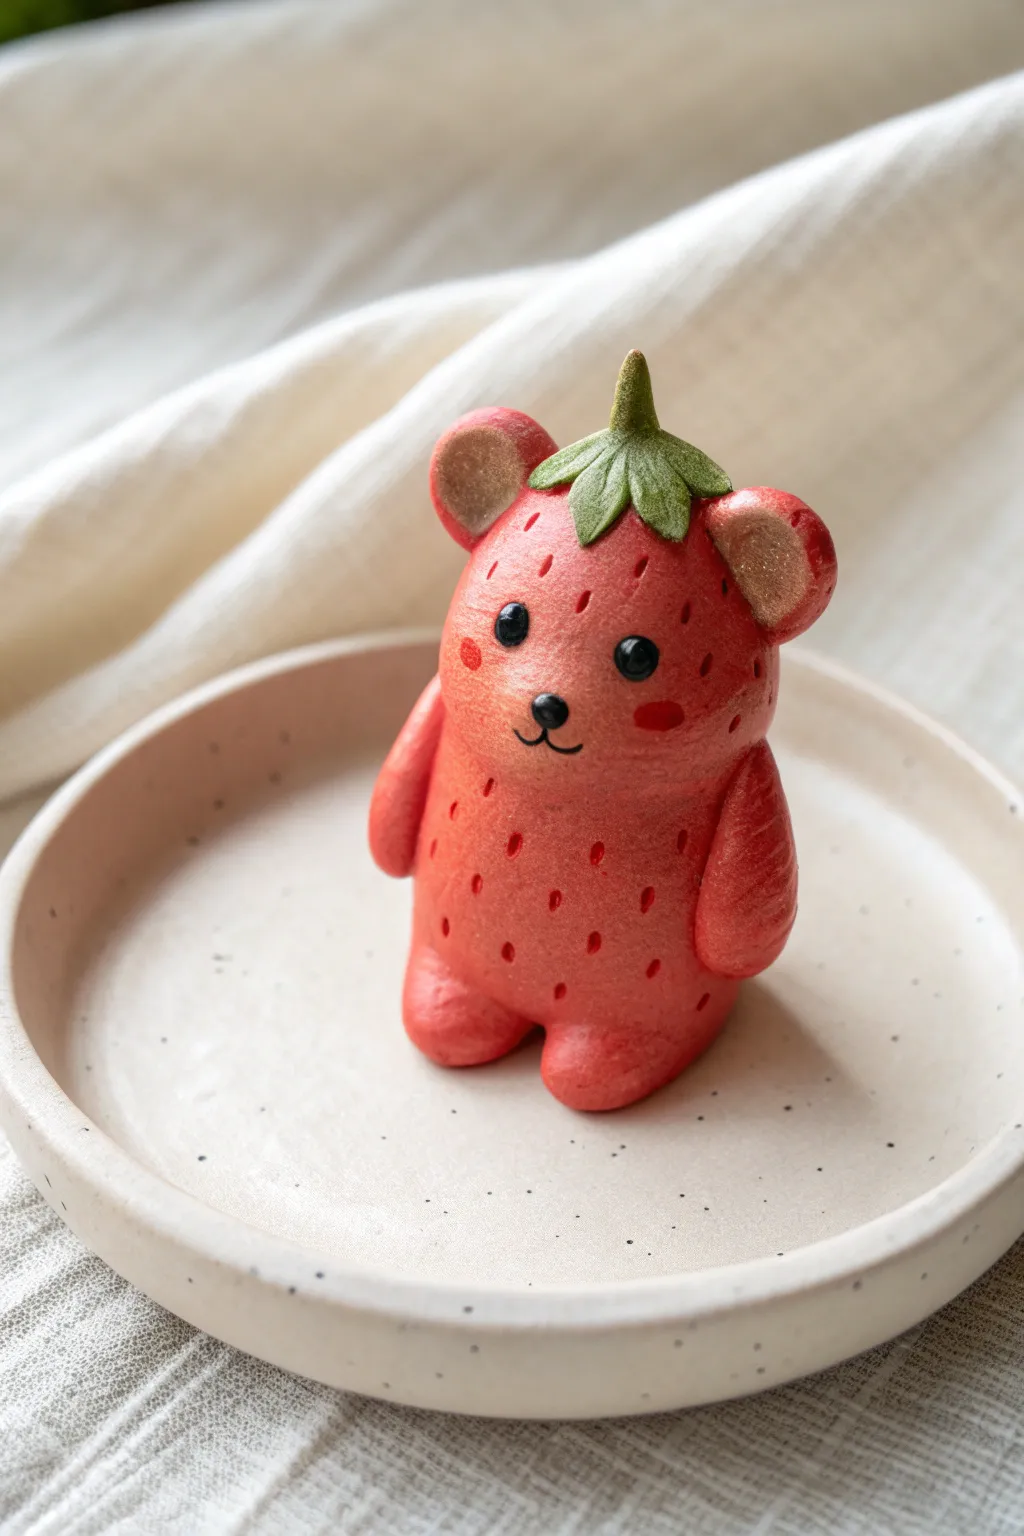
This adorable hybrid creature combines the roundness of a teddy bear with the fresh textures of a ripe strawberry. With its leafy hat and seeded red body, this figurine makes a perfect desk companion or a sweet handmade gift.
Detailed Instructions
Materials
- Red air dry clay (lightweight or porcelain style preference)
- Green air dry clay
- Beige or light pink air dry clay (for inner ears)
- Black acrylic paint or clay (for eyes/nose)
- Fine-point needle tool or toothpick
- Ball tool (small)
- Glossy varnish or clear nail polish
- Small paintbrush
- Water for smoothing
Step 1: Shaping the Base
-
Roll the body:
Start with a golf-ball-sized amount of red clay. Roll it into a smooth sphere, then gently elongate it into a chubby oval shape. This will serve as both the head and body in one piece. -
Flatten the base:
Tap the bottom of your oval gently on your work surface to create a flat base so the bear stands upright without wobbling. -
Form the legs:
Pinch the bottom corners of the oval slightly to suggest two stubby legs. You can also attach two tiny, flattened balls of red clay to the bottom front for feet, blending the seams with a little water. -
Attach the arms:
Roll two small sausages of red clay for arms. Attach them to the sides of the body, pressing the top of each arm firmly so it blends into the shoulder area while leaving the rounded hand ends hanging naturally.
Step 2: Adding Bear Features
-
Create the ears:
Roll two small red balls for ears. Press a smaller ball of beige or light pink clay into the center of each to create the inner ear. Flatten them slightly. -
Attach the ears:
Press the ears onto the top left and right sides of the head. Use a blending tool or your finger to smooth the join at the back of the ears so they don’t fall off. -
Indent the face:
Use a ball tool to make slight indentations where the eyes will go. This adds a bit of dimension to the face before painting.
Cracks appeared?
If small cracks form while drying, utilize a ‘clay slip.’ Mix a tiny bit of raw clay with water to make a paste, fill the crack, and smooth it over with a finger.
Step 3: Strawberry Texture Details
-
Create the seeds:
Using a needle tool or toothpick, gently press small, teardrop-shaped indents all over the red body and head to mimic strawberry seeds. Keep the face area relatively clear of seeds. -
Painting the seeds (Optional):
If you want extra contrast, you can dip the tip of a toothpick in dark red or brown paint and dab it into the seed indents, but the simple texture often looks great on its own. -
Make the calyx (leafy top):
Take a small amount of green clay and flatten it into a star shape. I like to pinch the tips to make them pointy like realistic leaves. -
Add the stem:
Roll a tiny stem from green clay and attach it to the center of your star shape. -
Crown the bear:
Place the leafy green cap on top of the bear’s head, right between the ears. Curve the individual leaves down so they hug the curvature of the head.
Make it a Charm
Before the clay dries, insert a long eye-pin through the leafy top. Once dry and varnished, you can attach jump rings to turn your bear into a keychain or necklace pendant.
Step 4: Face and Finishing
-
Paint the eyes:
Using a fine detail brush and black acrylic paint (or two tiny balls of black clay), create two round eyes in the indentations you made earlier. Add a tiny white dot for a highlight if you used paint. -
Add nose and mouth:
Paint a small black oval nose in the center of the face. Draw a thin ‘w’ shape underneath connecting to the nose to create the mouth. -
Add blush:
Dab two small spots of darker red paint or use a tiny bit of red chalk pastel on the cheeks for a cute blush effect. -
Dry completely:
Let the figurine air dry for 24-48 hours depending on the brand of clay used. -
Seal the piece:
Once fully dry, coat the entire bear with a glossy varnish. This makes it look like a juicy, fresh strawberry and protects the paint.
Your fruity little friend is now ready to sweeten up your shelf
Pocket-Size Fairy Garden Pebbles

Transform ordinary smooth stones into charming little beetles that bring a pop of color to any miniature garden. With their glossy red wings and bright button eyes, these cheerful ladybugs look as if they’ve just landed for a rest.
Step-by-Step Tutorial
Materials
- Small to medium smooth river rocks (oval or round)
- Air dry clay (white or terracotta)
- Acrylic paint (bright red, black, white)
- Fine-grit sandpaper
- Paintbrushes (medium flat and fine detail)
- Dotting tool or toothpick
- Clear gloss varnish or sealant
- Water cup and paper towels
Step 1: Prepping the Pebble Base
-
Select your stones:
If you have smooth, rounded river rocks, wash and dry them thoroughly to remove any dust or oils. -
Create clay forms (alternative):
If you don’t have suitable rocks, roll a lump of air dry clay into a smooth ball, then flatten the bottom slightly against your work surface to create a domed beetle shape. -
Refine the shape:
Smooth out any fingerprints or cracks with a drop of water on your finger. Let the clay dry completely, which can take 24-48 hours depending on thickness. -
Sand for smoothness:
Once fully dry, lightly sand the surface of your clay ‘stone’ with fine-grit sandpaper to ensure a perfect canvas for painting. Wipe away the dust.
Pro Tip: Better Dots
If your paint is too thick, dots will have pointy peaks. Thin the black paint slightly with water before dotting so the spots settle flat and smooth.
Step 2: Painting the Base Coat
-
Prime the surface:
Apply a coat of white acrylic paint to the top of the stone or clay. This acts as a primer and helps the red color pop much more vibrantly than painting directly on a dark surface. -
Apply the red:
Paint the entire top surface with a bright, tomato-red acrylic paint. You may need two thin coats for full opacity, letting the first dry before adding the second. -
Define the head:
Using a smaller brush, paint a curved semi-circle of black at one end of the oval to create the ladybug’s head. -
Draw the wing divide:
With a fine liner brush and black paint, draw a straight line down the center of the red back, starting from the black head section and going to the tail.
Level Up: Flying Bugs
Before drying the clay, press a small wire loop into the bottom. After painting, you can use this loop to stake them into taller plants so they ‘hover’.
Step 3: Adding Personality
-
Dot the spots:
Using the handle end of a paintbrush or a dotting tool, dip into black paint and press gently onto the red wings to create symmetrical spots. I find odd numbers of spots often look more natural. -
Paint the eyes:
Dip a clean dotting tool or the handle of a larger brush into white paint. Place two large white dots onto the black head section for the eyes. -
Add pupils:
Once the white eye dots are dry, use a toothpick or very fine tool to add a tiny black dot in the center of each white circle. -
Highlight the eyes:
For that extra spark of life, add the tiniest speck of white inside the black pupil. This ‘catchlight’ makes them look instantly cuter.
Step 4: Sealing and Display
-
Apply varnish:
Once all paint is thoroughly dry, brush on a coat of high-gloss varnish or sealant. This protects the paint from moisture and gives the bug a shiny, shell-like finish. -
Dry properly:
Let the varnish cure completely according to the manufacturer’s instructions before handling. -
Prepare the habitat:
Fill a small shallow bowl or saucer with potting soil or sand. -
Add greenery:
Plant small succulents or place snippets of artificial greenery around the edges of your container. -
Place your bugs:
Nestle your finished ladybugs into the soil, perhaps tilting one slightly on a larger plain rock to make it look like it’s climbing.
Now you have a colony of low-maintenance pets ready to brighten up your desk or windowsill garden
Tiny Cottagecore House Charms
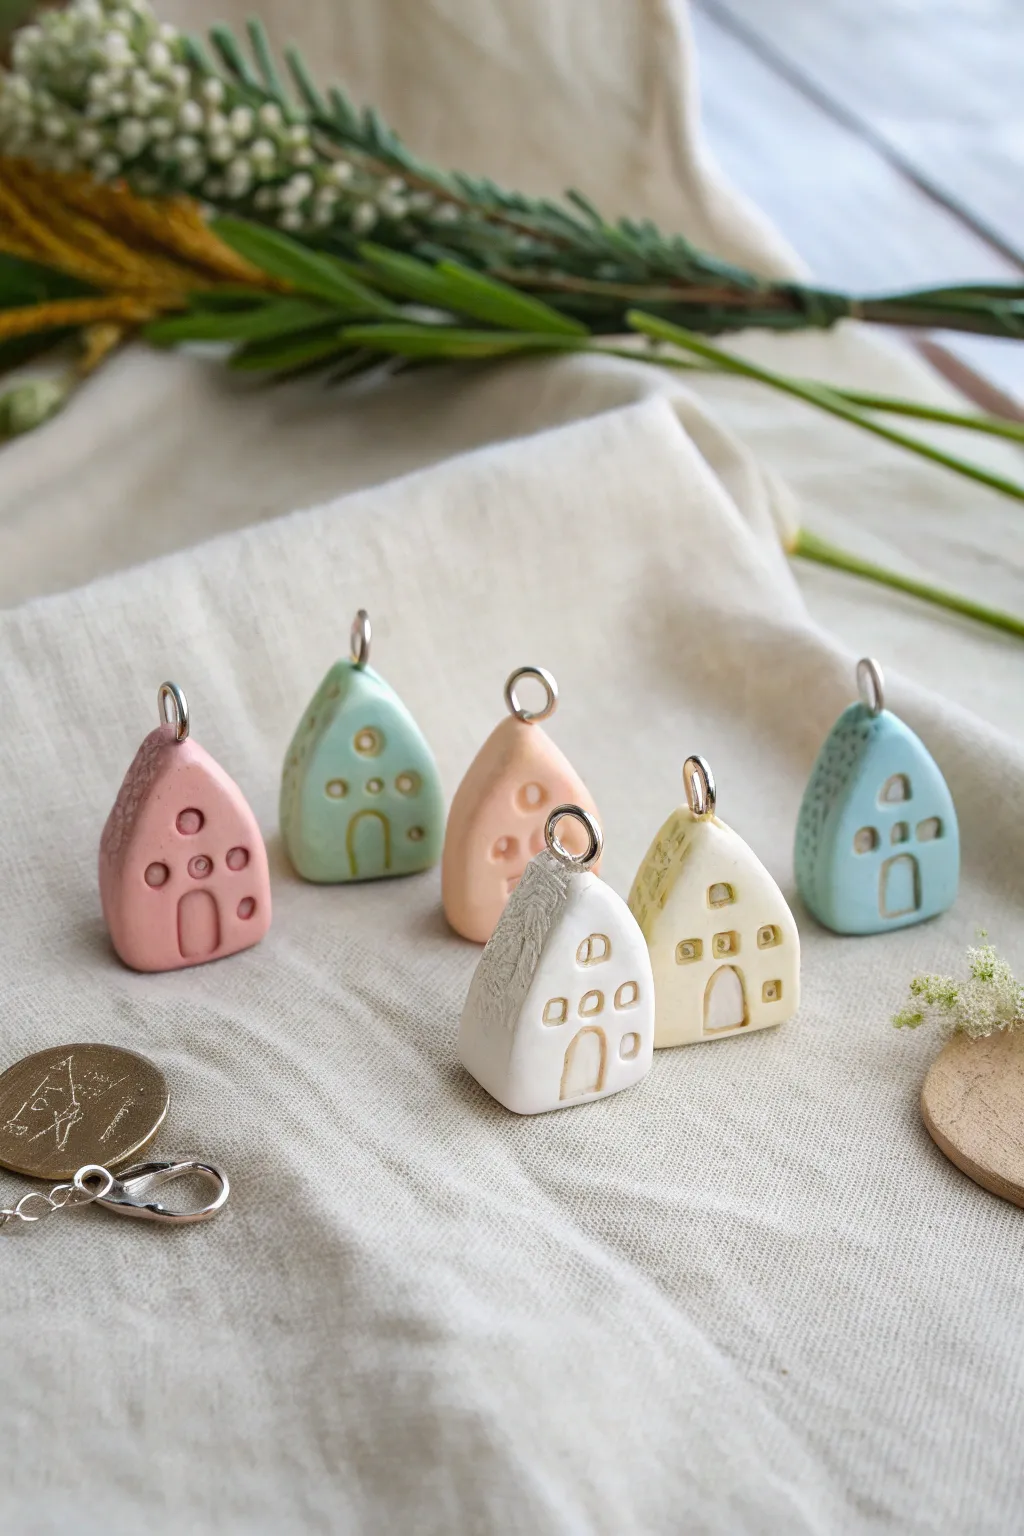
Capture the cozy essence of cottagecore with these adorable miniature house charms. Fashioned from air dry clay in soft pastels, each tiny home features textured roofs and dainty windows, perfect for hanging on a necklace or bracelet.
Detailed Instructions
Materials
- Air dry clay (white)
- Acrylic paints (pastel pink, mint green, peach, cream, soft blue)
- Small metal jump rings (approx. 5-7mm)
- Sculpting tools or a needle tool
- Rolling pin
- Sharp blade or X-Acto knife
- Sanding paper (fine grit)
- Matte varnish or sealant
Step 1: Shaping the Base
-
Prepare the Clay:
Before starting, verify your clay is soft and conditioned. Knead a small ball of white air dry clay until it is smooth and pliable, eliminating any cracks. -
Tinting (Optional):
You can paint the houses later or mix color directly into the clay now. For the soft pastel look shown, knead a very small drop of acrylic paint into separate balls of clay—one for pink, one mint, one peach, etc. -
Form the Basic Block:
Pinch off a small piece of clay, roughly the size of a grape. Roll it into a smooth ball first, then flatten the bottom against your work surface so it stands upright. -
Create the House Shape:
Using your fingers, gently squeeze the top portion of the ball to taper it into a rounded point, creating a peaked roof shape. The bottom should remain somewhat rectangular or square. -
Refine the Edges:
Tap the sides of the house gently against your work surface to flatten the walls slightly, giving the structure more definition. It shouldn’t be a perfect cube; a soft, organic shape adds to the charm.
Step 2: Adding Details
-
Define the Roof:
Use a sculpting tool to lightly press an indentation where the roof meets the walls, separating the two areas visually. On the side of the roof, use a needle tool to scratch in texture. -
Create Roof Texture:
For the specific texture in the photo, create tiny, random stippling dots or small scratch marks on just one slope of the roof to mimic moss or shingles. -
Carve the Door:
Use the tip of your needle tool to outline a small arched door at the center base of the house. Press gently to indent the outline without cutting all the way through. -
Add Windows:
Above the door, press the tool into the clay to create simple recessed squares or circles for windows. You can arrange them symmetrically or in a quirky pattern. -
Insert the Jump Ring:
Take a metal jump ring and carefully push it into the very peak of the roof. Ensure at least half the ring is buried so it stays secure once dry. Smooth the clay around the entry point.
Smooth Surface Secret
Keep a small bowl of water nearby. If your clay starts to crack while shaping, dip your finger in water and gently smooth the fissure immediately.
Step 3: Finishing Touches
-
Drying Time:
Place your tiny village on a clean surface or parchment paper to dry. This usually takes 24-48 hours depending on humidity. Flip them occasionally so the bottom dries evenly. -
Sanding:
Once completely hard, use fine-grit sandpaper to gently smooth out any fingerprints or rough edges on the bottom and sides, taking care not to sand away your carved details. -
Applying a Wash:
To make the details pop, mix a tiny bit of darker paint (like brown or dark grey) with plenty of water. Brush this wash over the door and windows. -
Wipe Back:
I like to immediately wipe the surface with a damp cloth or tissue. The dark paint will stay in the recessed crevices of the windows and doors, highlighting the carvings. -
Sealing:
Protect your charms by applying a coat of matte varnish. This seals the clay against moisture and prevents the paint from chipping over time. -
Add Hardware:
Once the varnish is dry, attach a lobster clasp or threading cord to your jump ring to turn your little house into a wearable pendant or a zipper pull.
Make it a Neighborhood
Vary the heights and widths of your houses. Make some tall and skinny, others squat and wide, to create a diverse and interesting village collection.
Your miniature neighborhood constitutes a delightful handmade accessory collection
Sleepy Moon Wall Mini Hanging
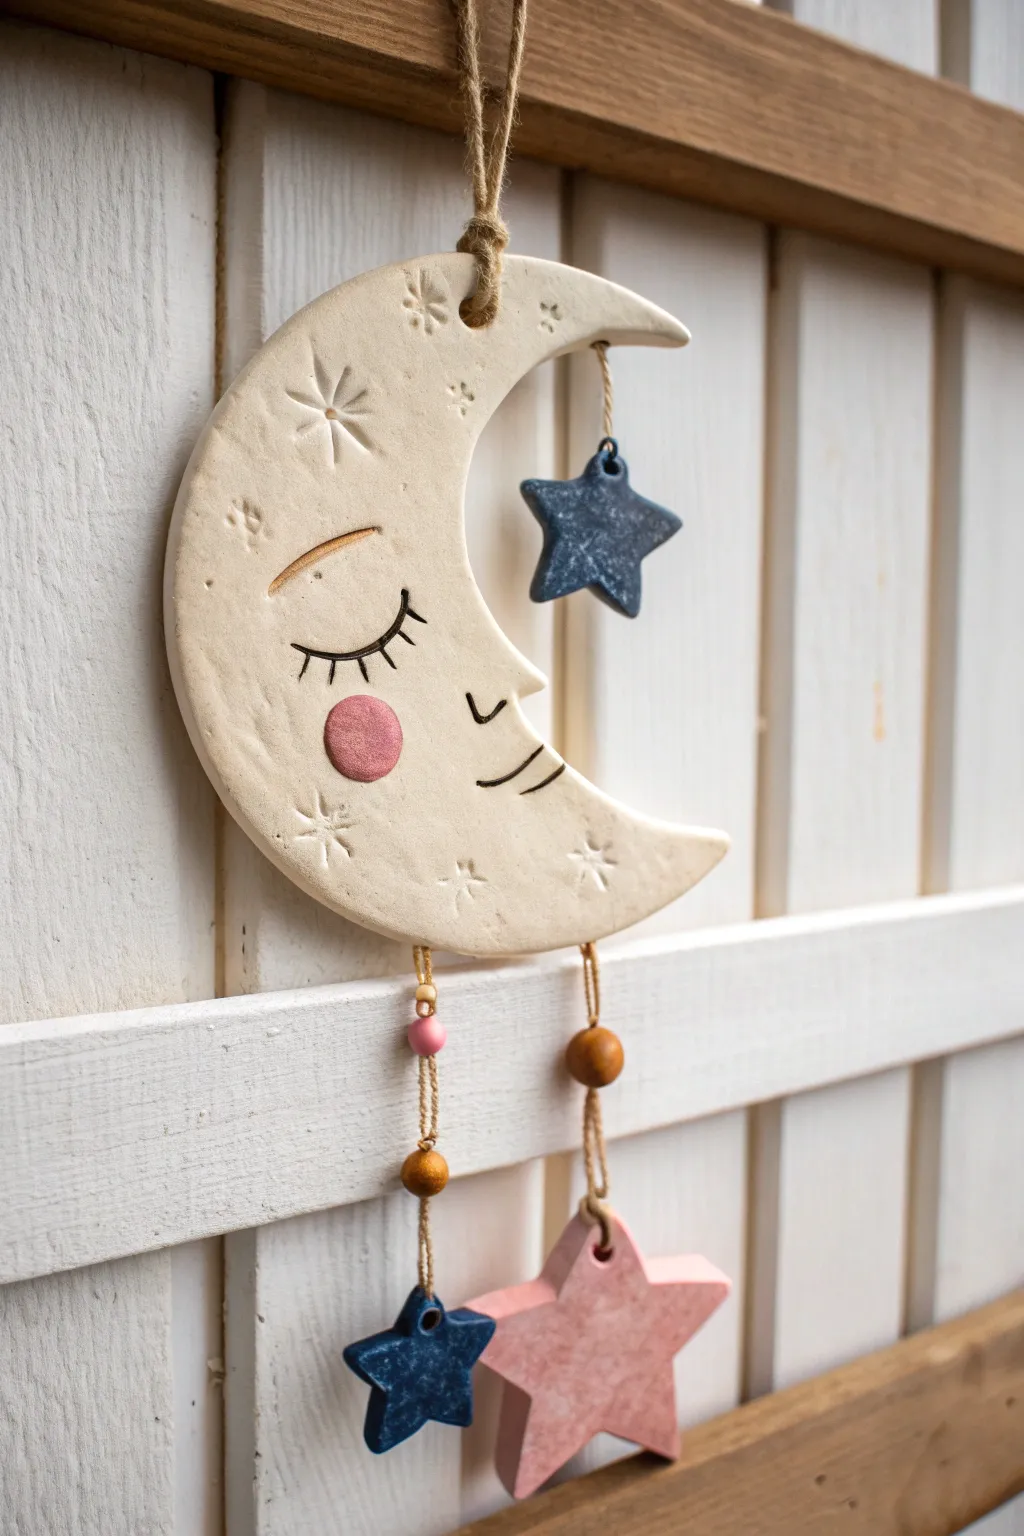
Bring sweet dreams to any room with this charming air dry clay wall hanging featuring the classic “man in the moon.” The creamy white moon, adorned with a peaceful sleeping face and celestial textures, dangle alongside colorful stars for a rustic, handmade touch.
Step-by-Step
Materials
- White smooth air dry clay
- Rolling pin
- Craft knife or clay tool set
- Circle cutter (approx. 4-5 inches)
- Small star cookie cutter
- Larger star cookie cutter (optional, or hand-cut)
- Small letter stamps or textures tools (for star indents)
- Textured fabric or sandpaper (optional for surface texture)
- Wooden skewer or toothpick
- Acrylic paints: Cream/Off-white, Navy Blue, Dusty Pink, Gold
- Fine detail paintbrush
- Jute twine
- Wooden beads (natural and gold painted)
- Mod Podge or satin varnish
- Bowl of water (for smoothing)
- Sandpaper (fine grit)
Step 1: Shaping the Celestial Bodies
-
Roll the clay base:
Begin by conditioning your air dry clay until it is soft and pliable. Roll it out on a non-stick surface to an even thickness of about 1/4 inch (6mm). If you want an earthy texture like the reference, you can lightly press a piece of canvas or rough paper onto the clay surface before cutting. -
Cut the crescent moon:
Use a large round cutter or trace a bowl to cut a perfect circle. Reposition the cutter slightly off-center over the circle creating a crescent shape, and cut again. This creates the classic moon arc. Smooth the sharp edges with a little water on your finger. -
Create the nose profile:
Instead of a simple curve on the inner edge, use your craft knife to carefully carve out a small nose silhouette. It should look like a subtle bump jutting out about halfway down the inner curve. -
Stamp the texture:
Using a small snowflake stamp, a star-shaped tool, or even the tip of a Phillips head screwdriver, press random star patterns all over the moon’s surface. Vary the pressure so some are deep and some are faint. -
Face details:
With a needle tool or clay scribe, gently carve the sleepy eye curve with long eyelashes. Carve a small smile line near the bottom and a little definition for the eyebrow area. -
Pierce holes:
You need holes for hanging. Use a skewer to make a hole at the very top center for the main hanger. Make one hole at the top tip for the dangling star, and two holes along the bottom edge for the lower dangles. Make these holes slightly larger than your twine, as clay shrinks when drying. -
Cut the stars:
Roll out more clay. Cut two small stars (about 1 inch) and one larger star (about 2 inches). If you don’t have cutters, you can sketch the shape with a needle tool and cut with a knife. Smooth all edges with water. -
Prepare stars for hanging:
Pierce a hole through the top point of every star so they can be strung later. -
Dry completely:
Place all pieces on a wire rack or clean paper towel. Let them dry for 24-48 hours, flipping them occasionally to prevent warping.
Clay Cracking?
If small cracks appear while drying, mix a tiny bit of fresh clay with water to make a paste (slip) and fill the cracks. Smooth over with a damp finger and let dry again.
Step 2: Painting and Assembly
-
Base coat:
Once fully dry, lightly sand any rough spots. Paint the moon with a creamy off-white color to give it a ceramic look. I find that leaving some brush strokes visible adds to the rustic charm. -
Add color to the stats:
Paint the two small stars a deep navy blue and the large star a soft dusty pink. For a textured look, dab the paint on with a sponge rather than brushing it smooth. -
Face painting:
Using a very fine liner brush and black or dark brown paint, carefully trace inside the carved lines for the eye, lashes, and mouth. Paint a perfect pink circle for the cheek. -
Earthy accents:
Paint a few wooden beads gold and leave others natural. If you carved an eyebrow line, you can accentuate it with a faint wash of brown paint. -
Top tip dangle:
Cut a short piece of jute twine. Thread one end through the hole in the moon’s top tip and knot it securely. Thread the other end through one of the navy blue stars, tying it so the star hangs just below the tip. -
Bottom strands:
Cut two longer pieces of jute twine (about 6-8 inches). Tightly knot one end of each string to the bottom holes of the moon. -
Adding beads:
Thread a pink bead and a gold bead onto one string, and a single wooden bead onto the other. Tie tiny knots under the beads if they slip, or just let them rest on the star below. -
Attach the bottom stars:
Tie the second navy star to the bottom of one string, and the large pink star to the other. Vary the lengths slightly so they hang at different heights. -
Create the main hanger:
Loop a thick piece of jute twine through the top center hole of the moon. Tie a strong knot to create a loop for hanging on the wall. -
Seal (Optional):
Finish with a coat of matte or satin varnish to protect the paint and give the clay a finished, fired-ceramic sheen.
Pro Tip: Rustic Texture
To get the speckled, stone-like look on the blue stars shown in the photo, dip an old toothbrush in white paint and gently flick it (splatter technique) over the dry blue paint.
Hang your sleepy moon near a bed or window to catch the light and add peaceful vibes to your space.
Surprise “Hidden Face” Sculptures
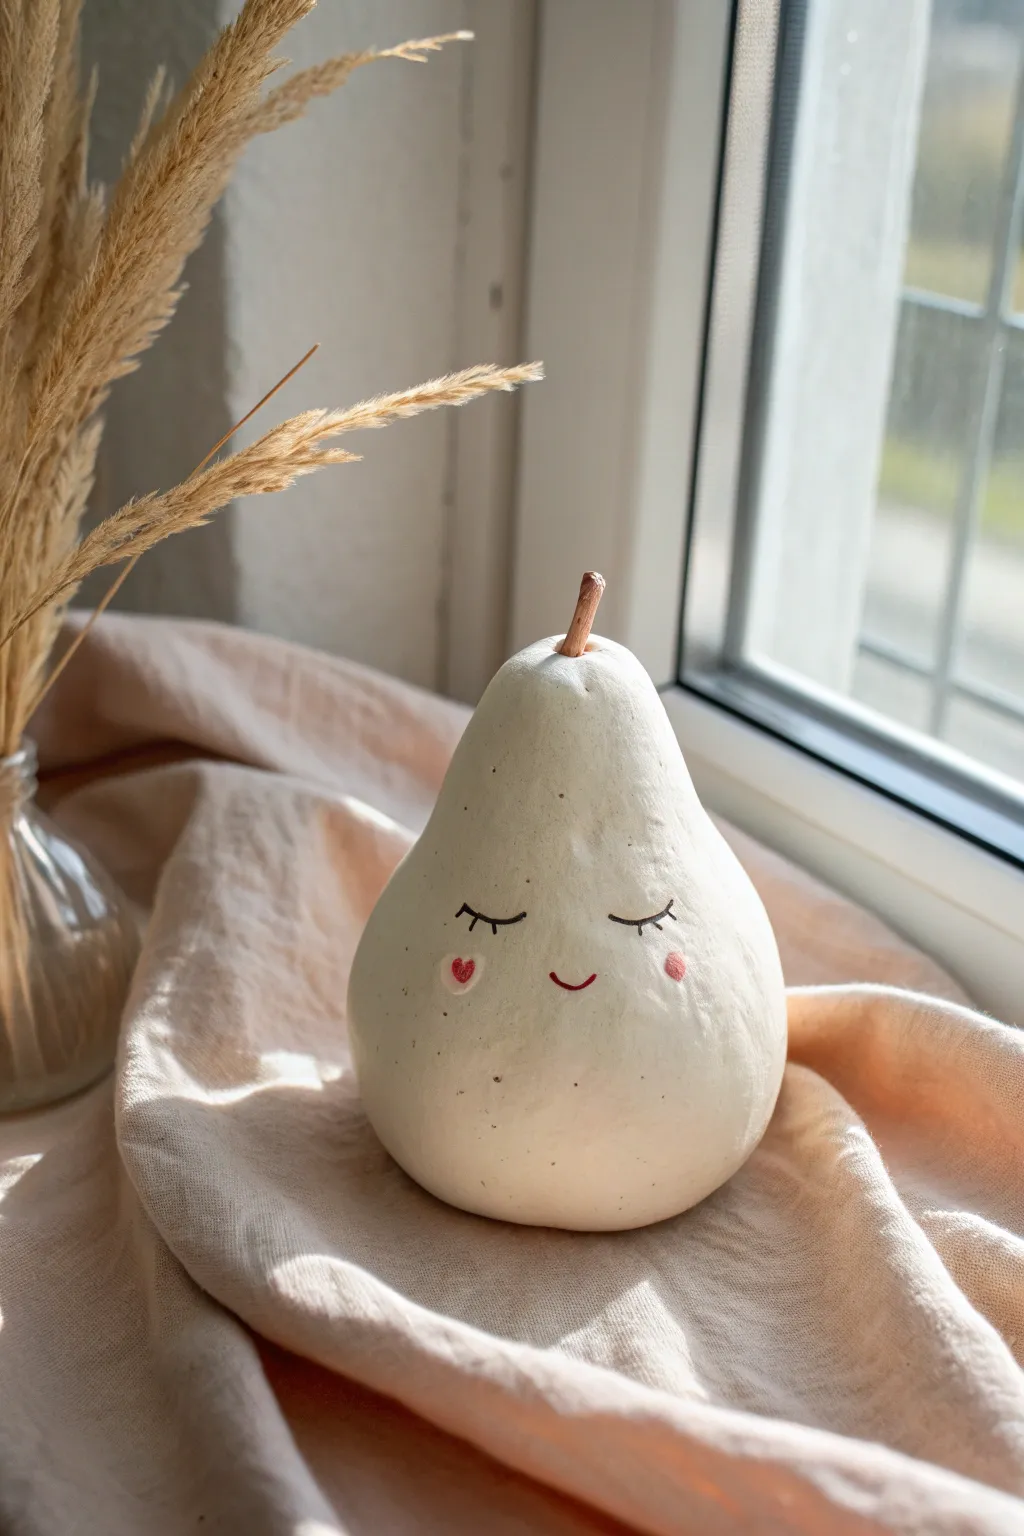
This charming little pear brings a sense of calm to any shelf with its serene, sleeping expression and soft pastel cheeks. The smooth, organic shape is perfect for beginners, while the delicate painted details add a heartwarming touch of personality.
Step-by-Step Tutorial
Materials
- White air-dry clay
- Aluminum foil
- Acrylic rolling pin
- Small piece of driftwood or a real twig
- Bowl of water
- Sponge or fine-grit sandpaper
- Acrylic paint (white, black, soft pink, red)
- Fine detail paintbrush (0 or 00 size)
- Matte varnish (optional)
Step 1: Shaping the Core
-
Create a foil armature:
Crumple a piece of aluminum foil into a tight ball, then shape the top part to taper upwards, mimicking the core shape of a pear. This saves clay and makes the sculpture lighter. -
Roll out the clay:
Take a generous handful of air-dry clay and roll it out into a slab about 1/4 inch thick. Make sure it’s large enough to wrap around your foil core. -
Cover the armature:
Wrap the clay sheet around the foil core, carefully pressing the seams together. I find it helpful to pinch off excess clay at the top and bottom to avoid bulky spots. -
Smooth the seams:
Dip your finger in a little water and rub over the joined areas until the clay merges seamlessly.
Smooth Operator
Keep a small bowl of water nearby while sculpting. Dip your finger often to smooth cracks instantly, but don’t soak the clay or it will get mushy.
Step 2: Sculpting the Form
-
Refine the shape:
Roll the sculpture gently between your palms to smooth out bumps. Gently press the bottom against your work surface to create a flat base so the pear stands upright. -
Taper the top:
Using your thumb and forefinger, gently stroke the clay upwards at the top to create the classic pear neck. It shouldn’t be perfectly symmetrical; organic shapes look more natural. -
Insert the stem:
Take your small twig or driftwood piece. Push it into the very top tip of the clay pear while the clay is still wet to create a hole, then remove it. We will glue it in later to keep it clean. -
Surface smoothing:
Use a barely damp sponge to wipe over the entire surface. This removes fingerprints and creates a lovely matte texture.
Golden Hour Glow
Mix a tiny amount of gold mica powder into your varnish or paint the stem gold for a chic, modern variation on this rustic design.
Step 3: Drying and Refining
-
Let it dry completely:
Place the pear in a cool, dry spot for 24-48 hours. Turn it occasionally so the bottom dries evenly. -
Sand imperfections:
Once fully dry and hard, use fine-grit sandpaper to buff away any remaining rough patches or sharp edges. -
Secure the stem:
Add a drop of strong craft glue into the hole at the top and re-insert your twig stem.
Step 4: Painting the Details
-
Base coat (optional):
If your clay dried a bit grey or uneven, paint the entire pear with a coat of matte white acrylic paint for a fresh, clean look. -
Draft the face:
Lightly sketch the position of the eyes and mouth with a pencil. Place them lower on the ‘belly’ of the pear to up the cute factor. -
Paint the eyes:
Using your finest brush and black paint, carefully trace the sleeping eye curves. Add three tiny lashes to the outer corner of each eye. -
Add the smile:
Paint a small, simple ‘U’ shape for the mouth in red or reddish-brown paint right between the eyes. -
Blush the cheeks:
Mix a very watery pink paint or use a dry-brush technique to add soft, round rosy cheeks. -
Heart detail:
On the left cheek, paint a tiny solid red heart for a touch of love. -
Seal (optional):
Finish with a matte varnish to protect your paint and give the pear a finished, professional sheen.
Now you have an adorable desk companion to keep you company while you work or read