Whenever you’re stuck staring at a lump of clay, a good set of clay examples is like having a friend in the studio nudging you toward your next project. Here are my go-to clay ideas—starting with the classics and drifting into the fun, quirky stuff once you’re warmed up.
Pinch Pot Trinket Dish
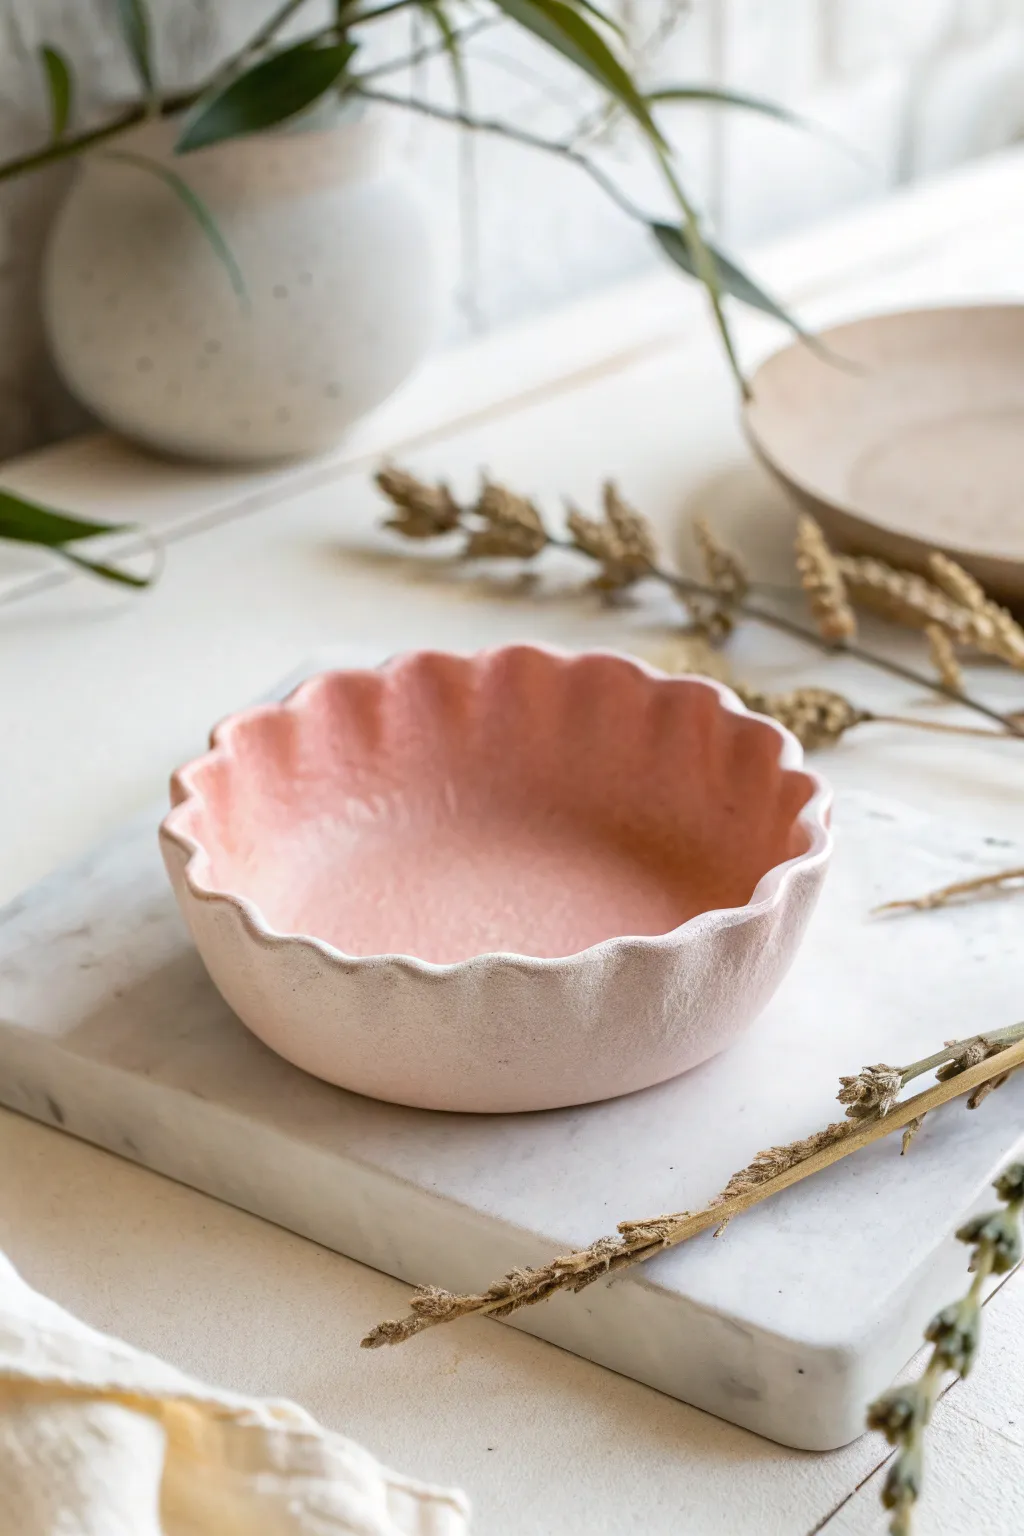
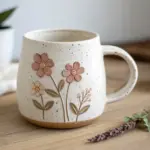
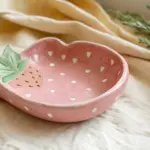
This charming trinket dish combines the organic feel of hand-built pottery with a delicate, flower-like scalloped edge. It features a soft matte pink interior and a textured, limestone-like exterior that brings an elegant touch to any vanity or side table.
Step-by-Step Guide
Materials
- Air-dry clay (white or terracotta)
- Rolling pin
- Small bowl (to use as a slump mold)
- Fettling knife or clay tool
- Sponge
- Water cup
- Pink acrylic paint (matte finish)
- Stone-textured paint or fine sand
- Matte spray varnish
- Sandpaper (fine grit)
Step 1: Forming the Base
-
Prepare the clay:
Start by conditioning a ball of air-dry clay roughly the size of a tennis ball. Knead it in your hands until it feels warm and pliable, removing any air bubbles that might be trapped inside. -
Start the pinch pot:
Push your thumb into the center of the ball, stopping about half an inch from the bottom. This initial indentation establishes the depth of your dish. -
Pinch the walls:
Using your thumb on the inside and fingers on the outside, gently pinch and rotate the clay. Work your way from the bottom up, aiming for an even wall thickness of about a quarter-inch throughout. -
Widen the form:
As you pinch, gradually flare the walls outward to create a wider, shallow bowl shape rather than a tall cup. Use a flat surface to tap the bottom occasionally to ensure it sits flat. -
Smooth surfaces:
Dip your finger or a sponge slightly in water and smooth out any deep cracks or fingerprints on the interior and exterior walls. Don’t use too much water, or the clay will become mud.
Step 2: Creating the Scallops
-
Mark the rim:
Use a needle tool or toothpick to lightly mark even intervals around the top rim of your bowl where you want the scallops to be. -
Pinch the waves:
Place your index finger on the inside of the rim at one of your marks, and your thumb and middle finger on the outside. Gently press the rim inward with your index finger while supporting the outsides to create a curve. -
Refine the shape:
Move around the bowl, repeating this motion to create a continuous wave pattern. I find it helpful to go around twice—once to get the rough shape, and a second time to smooth and even out the curves. -
Check symmetry:
Look at the bowl from above to ensure the scallops are relatively distinct and the bowl is still circular. Gently nudge any wayward sections back into place. -
Final smooth:
Run a damp sponge along the very top edge of the rim to soften any sharp angles created during the sculpting process. -
Drying:
Allow the clay to dry fully. This usually takes 24-48 hours depending on humidity. Rotate the piece occasionally so the bottom dries evenly. -
Sanding:
Once bone dry, lightly sand the exterior and rim with fine-grit sandpaper to remove any rough burrs, but leave some texture for that rustic look.
Keep it Clean
Wipe your hands frequently when shaping the rim. Sticky clay residue on your fingers can drag against the rim, ruining the smooth curve of your delicate scallops.
Step 3: Decorating and Finishing
-
Mix exterior texture:
To recreate the limestone texture seen in the photo, mix a small amount of fine sand or baking soda into a white or cream acrylic paint. -
Paint the exterior:
Dab this textured mixture onto the outside of the bowl using a stiff brush. Use a stippling motion rather than long strokes to build up a stone-like surface. -
Paint the interior:
Select a soft, matte pink acrylic paint. Apply two thin coats to the inside of the bowl, carefully painting up to the rim but keeping a clean line where it meets the textured exterior. -
Add depth:
If the pink looks too flat, mix a tiny drop of white into your pink and dry-brush the raised center parts of the interior to mimic light hitting the curve. -
Seal the piece:
Finish vertically by spraying the entire dish with a matte varnish. This protects the paint and seals the clay without adding a high-gloss shine that would ruin the natural aesthetic.
Gold Rim Upgrade
For a luxe touch, paint just the very top ridge of the scallops with metallic gold leaf liquid or a gold paint pen after the base colors maintain dryness.
Place your new dish on a bedside table to catch jewelry or display it as a standalone piece of handmade art


Mini Coil Bowl Set
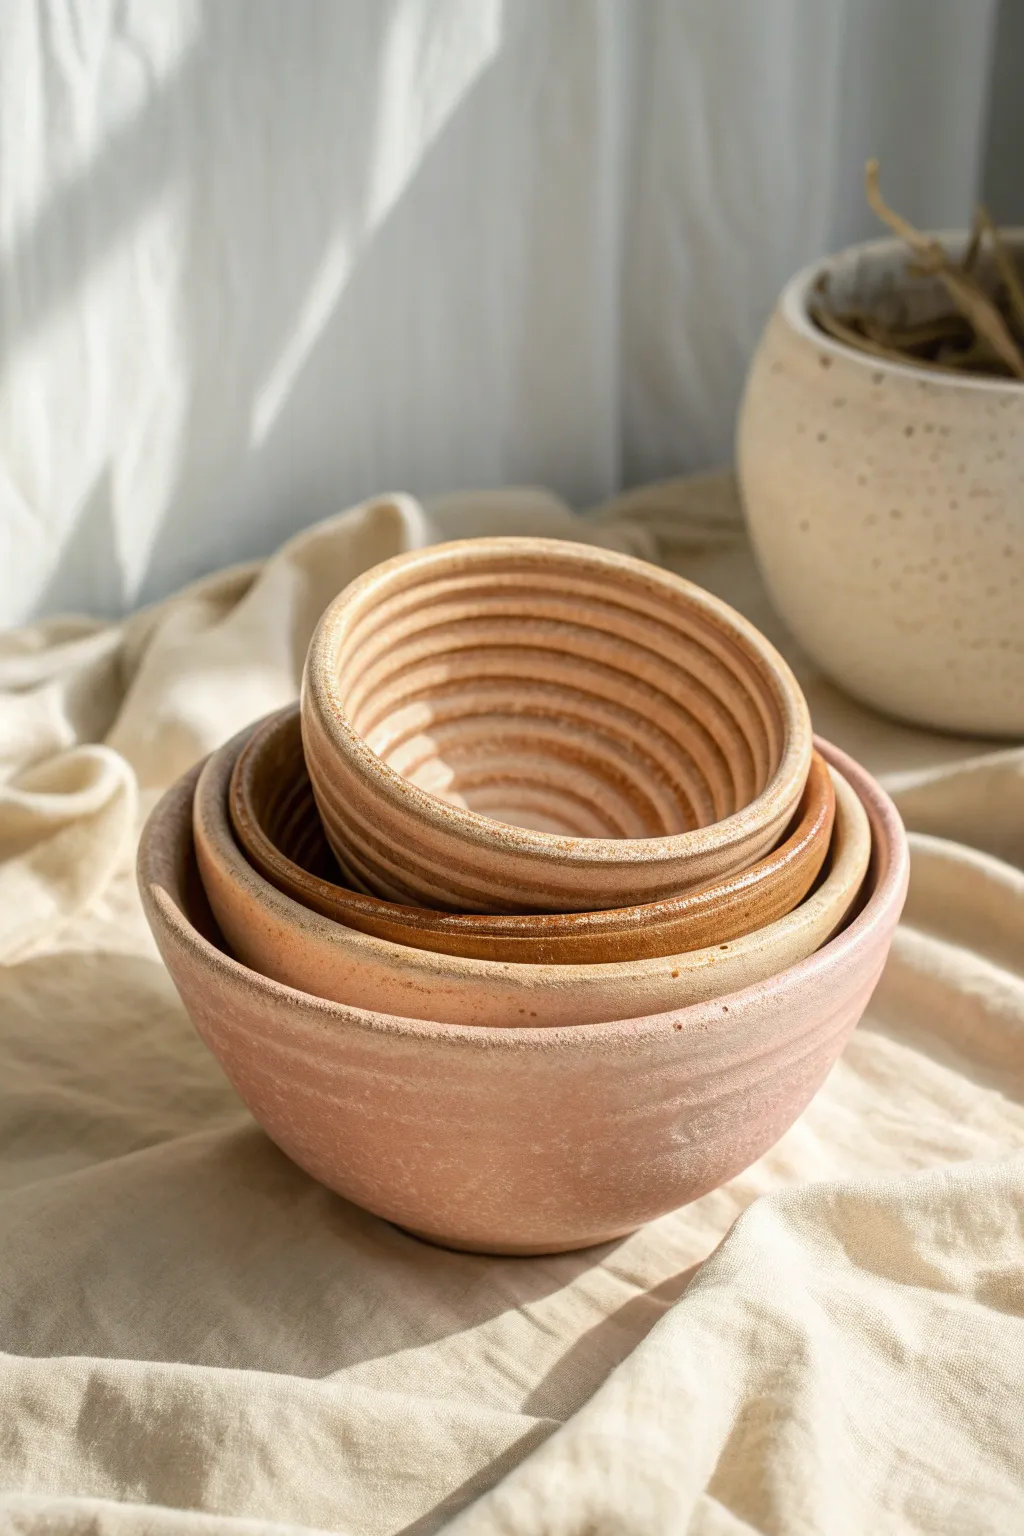
Embrace the tactile beauty of hand-built pottery with this set of four nesting bowls, ranging from raw terracotta to soft blush. The distinct interior ridges highlight the coil technique, while the smooth exteriors offer a modern, clean finish.
How-To Guide
Materials
- Stoneware clay (terracotta or buff)
- Potter’s wheel (optional, but hand-building is the focus)
- Clay rib (wood or rubber)
- Needle tool
- Sponge
- Rolling pin
- Canvas mat
- Slip (clay mixed with water)
- Scoring tool or serrated rib
- Matte glazes (terra cotta, warm beige, pale pink)
Step 1: Preparation & Base Construction
-
Prepare your clay:
Begin by wedging your clay thoroughly to remove any air bubbles. You will need enough clay for four bowls of graduating sizes, so separating it into four balls now—small, medium, large, and extra-large—helps visualize the set. -
Roll the bases:
For the largest bowl, take the largest ball of clay and flatten it onto your canvas. Use a rolling pin to create a slab about 1/4 inch thick. Cut out a perfect circle using a round cutter or by tracing a template with your needle tool. -
Create the first coil:
Take a fresh chunk of clay and roll it between your palms or on the table to create a long, snake-like coil. Aim for a thickness similar to a sturdy pencil. -
Attach the coil:
Score the outer edge of your circular base and brush on a little slip. Place your first coil directly on top of this scored edge, pressing gently to adhere it without flattening the coil’s round shape.
Clean Coils
To keep interior coils defined but easy to clean, brush a very thin layer of clear glaze or slip into the crevices before bisque firing to seal tiny cracks.
Step 2: Building the Walls
-
Continue coiling:
Roll more coils and stack them one by one. For an open bowl shape, place each new coil slightly outward from the center relative to the one below it. Continue until you reach the desired height. -
Blend the exterior:
To give the bowl strength and a cleaner look, use your thumb or a wooden tool to smudge the coils downward on the *outside* only. This blends the clay into a smooth surface. -
Refine the shape:
Support the inside wall with one hand while holding a rib tool against the outside. Gently compress and shape the wall while rotating the bowl (or turning your banding wheel) to smooth the exterior. -
Preserve the interior:
Leave the coils visible on the inside. You can gently run a damp sponge or a rounded tool along the grooves to neaten them up, but don’t smooth them out completely—this texture is key to the design. -
Finish the rim:
Run a damp chamois cloth or a wet sponge along the top rim to compress the clay particles and ensure it is smooth and pleasant to touch.
Step 3: Creating the Set
-
Build the remaining bowls:
Repeat the previous steps for the remaining three bowls. Each subsequent base should be slightly smaller than the previous one so they can nest inside each other. -
Check the fit:
While the clay is still leather hard, carefully test the nesting ability. Don’t stack them if they are too soft, but visually compare the diameters to ensure graduation. -
Slow drying:
Cover the bowls loosely with plastic to let them dry slowly. Uneven drying can cause warping, which ruins the nesting effect.
Gradient Effect
Mix varying amounts of Mason stain into a white base glaze to creating a perfect matching ombré gradient across your four bowls.
Step 4: Glazing & Finishing
-
Bisque fire:
Once bone dry, fire the pieces in a kiln to bisque temperature (usually cone 04 or 06) to prepare them for glazing. -
Select your palette:
Choose earthy, matte glazes. For the smallest bowl, use a raw terracotta or clear glaze over red clay. Use graduated warm tones for the others—a deep tan, a sandy beige, and a soft blush pink for the largest. -
Wipe back technique:
When glazing the interiors, apply the glaze thinly. I like to wipe a damp sponge over the high points of the coils immediately after dipping; this exposes the clay body on the ridges and accentuates the spiral pattern. -
Glaze fire:
Fire the bowls a second time to the temperature required by your specific clay and glaze combination. -
Sand the bottoms:
After the final firing, use a sanding block or diamond pad to smooth the unglazed foot of each bowl so they don’t scratch each other when stacked.
Stack your finished set on a linen cloth to highlight the beautiful transitions of color and texture you have achieved


Slab-Built Soap Dish
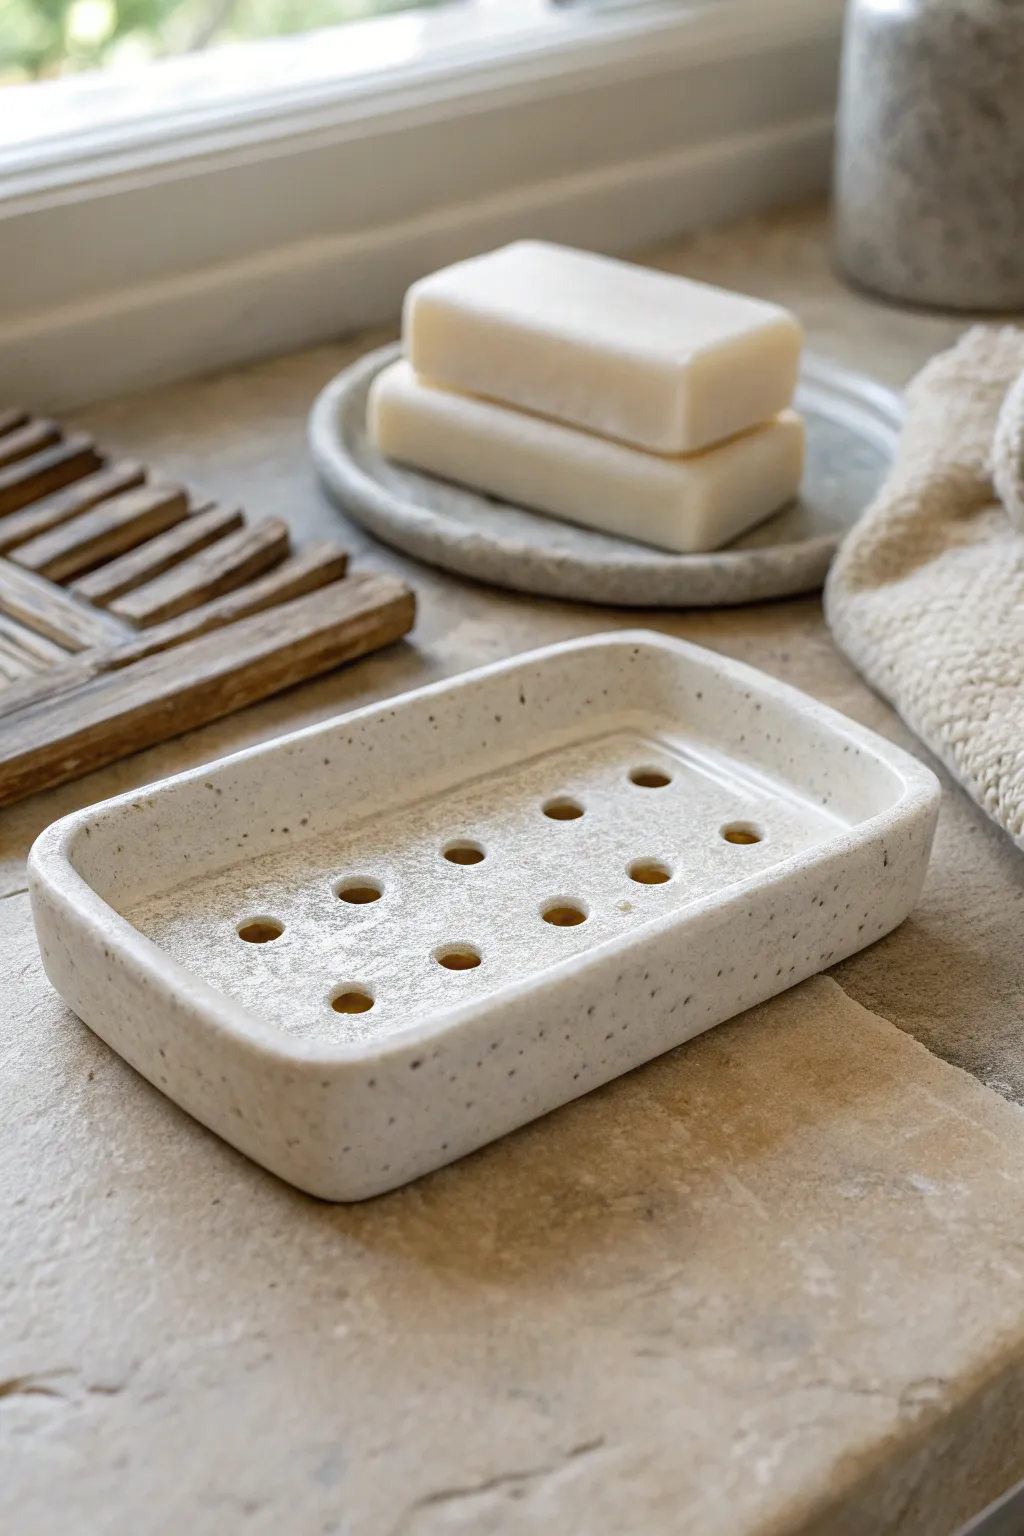
This minimalist soap dish features a clean, rectangular design with drainage holes to keep your soap dry and lasting longer. Utilizing a speckled clay body gives it a modern, organic look that fits beautifully in any bathroom.
Detailed Instructions
Materials
- Speckled Stoneware Clay
- Rolling Pin or Slab Roller
- Two wooden guide slats (approx. 1/4 inch thick)
- Fettling knife or needle tool
- Rectangular template (card stock or paper)
- Small circular cutter or straw
- Rib tool (flexible metal or rubber)
- Sponge
- Scoring tool or serrated rib
- Slip
- Clear or White glaze (optional)
Step 1: Preparing the Slabs
-
Roll out the slab:
Begin by wedging your speckled clay to remove air bubbles. Place the clay between two wooden guide slats on a canvas board. Use your rolling pin to roll the clay out into a smooth, even slab about 1/4 inch thick. -
Compress the clay:
Take a rubber or metal rib and gently drag it across the surface of the slab in multiple directions. This aligns the clay particles, reducing the chance of warping later, and smooths out the canvas texture. -
Cut the base:
Place your rectangular template onto the slab. Using a fettling knife or needle tool, cut cleanly around the template to create the base of your dish. -
Cut the walls:
From the remaining slab, cut long strips for the walls. These should be approximately 3/4 to 1 inch tall. Ensure you have enough length to go around the entire perimeter of the base.
Step 2: Assembling the Form
-
Score the edges:
Using a serrated rib or needle tool, rough up the outer edges of the top surface of your base slab. Do the same to the bottom edge of your wall strips where they will connect. -
Apply slip:
Brush a generous amount of slip onto the scored areas of the base. This acts as the glue for your join. -
Attach the walls:
Place the wall strip onto the base. If using multiple strips, join them by cutting them at a 45-degree angle where they meet for a cleaner seam. Press down firmly to ensure a solid bond. -
Reinforce the seam:
Use a small modeling tool or your finger to smooth the clay from the wall down onto the base on the inside, and from the base up onto the wall on the outside. This prevents cracking. -
Refine the shape:
Once the walls are attached, use your fingers and a damp sponge to smooth the connections. Gently round the corners of the rectangle so they aren’t sharp, mimicking the soft edges seen in the photo.
Clean Hole Tip
Twist your cutter or straw slightly as you pull it out of the clay. This helps detach the little clay plug cleanly without dragging and deforming the surrounding area.
Step 3: Adding Details and Drying
-
Create drainage holes:
Use a small circular cutter, or even a sturdy drinking straw, to punch holes in the bottom slab. Arrange them in a neat grid pattern—this allows water to drain away from the soap. -
Clean up the holes:
After punching the holes, little burrs of clay often remain. Wait until the clay is leather hard, then gently smooth these edges with a damp sponge or finger. -
Smooth the rim:
Run a damp sponge or a piece of chamois leather over the top rim of the dish to make it soft and comfortable to the touch. I find this step crucial for a professional finish. -
Slow drying:
Loosely cover the soap dish with plastic to let it dry slowly. Uneven drying can cause the flat bottom to warp or curl up. -
Bisque fire:
Once bone dry, fire the piece in a kiln to bisque temperature (usually cone 04 or 06). -
Glaze and final fire:
Apply a clear or white glaze if you want to highlight the speckles, or leave the exterior raw if the clay is fully vitrified. Fire again to the clay’s maturity temperature.
Level Up: Matching Set
Create a slightly larger tray without drainage holes to sit underneath this one. It will catch the dripping water and protect your countertop surfaces.
Place your favorite bar of soap on your new creation and enjoy the clean, handmade touch it adds to your sink


Marbled Clay Coasters
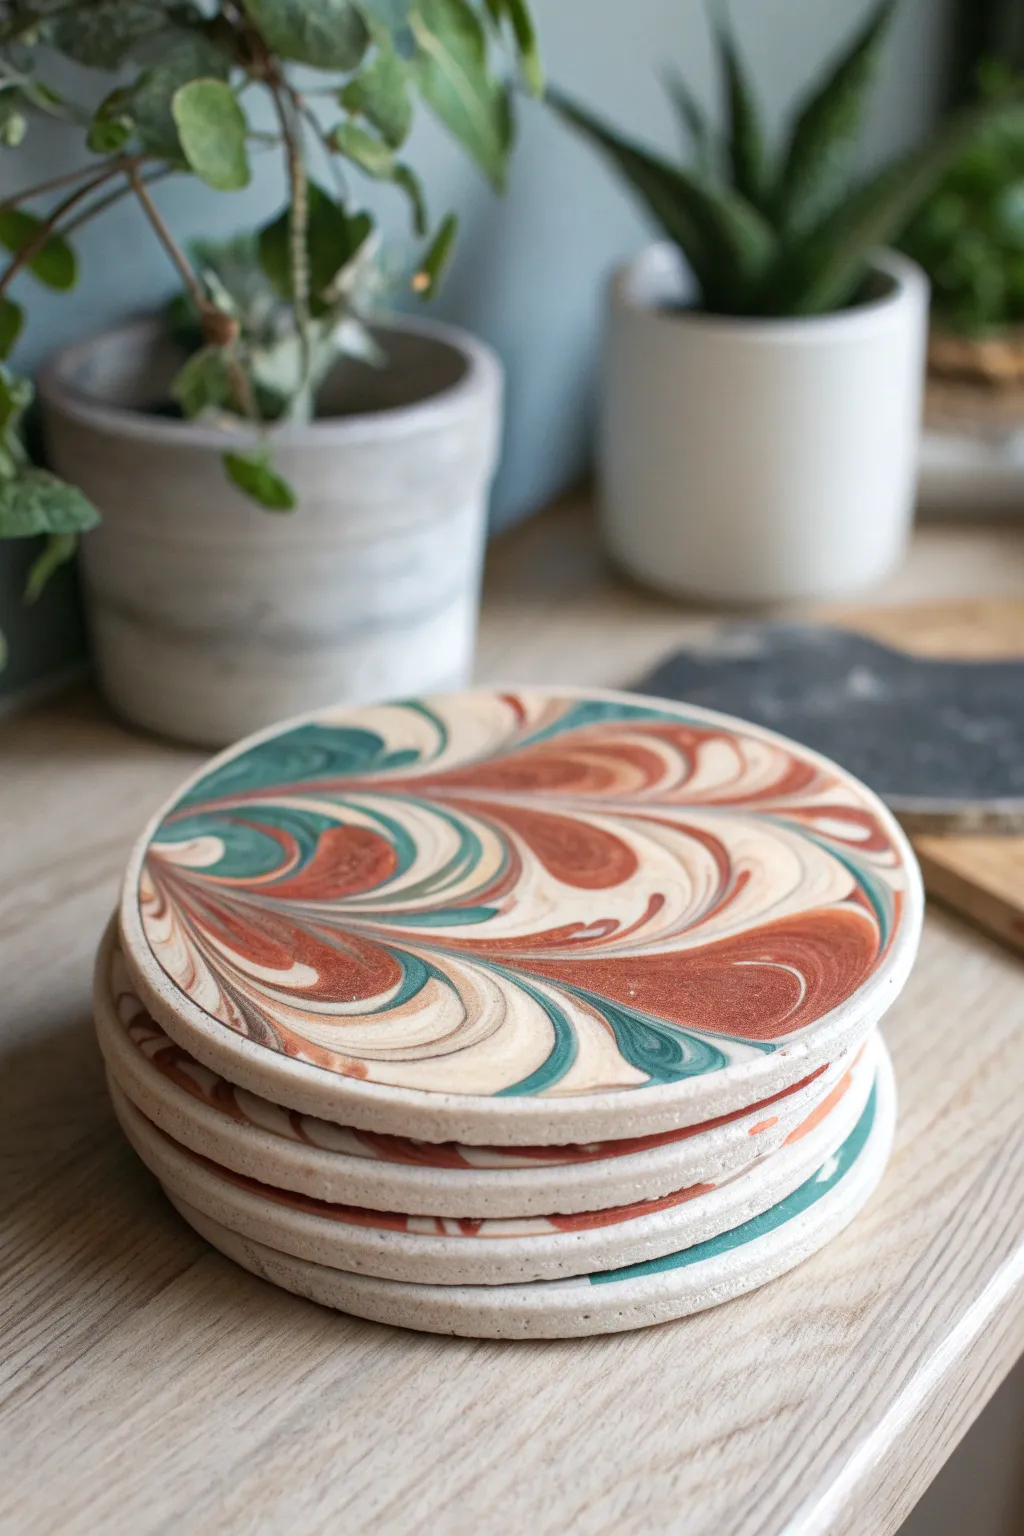
These sophisticated coasters feature a mesmerizing feather pattern created by marbling teal, terracotta, and cream clay together. The result provides a modern, organic look that adds a touch of artisan charm to any coffee table while protecting your surfaces.
Step-by-Step
Materials
- Polymer clay (white or cream, teal/emerald green, terracotta/rust)
- Acrylic roller
- Rolling pin guide rings or playing cards (for even thickness)
- Round cookie cutter (approx. 4 inches)
- Craft knife or tissue blade
- Needle tool or toothpick
- Parchment paper or ceramic tile
- Fine-grit sandpaper (400 to 1000 grit)
- Oven (for baking)
- Matte varnish or sealant (optional)
Step 1: Preparing the Clay
-
Condition the clay:
Begin by thoroughly kneading each block of polymer clay—cream, teal, and terracotta—individually until they are soft, pliable, and warm to the touch. -
Create base logs:
Roll each color into a long, thin snake or log. You will want significantly more of the cream/white clay than the colored clays, as it acts as the primary background. -
Combine the logs:
Twist the colored snakes together gently with the larger white log. Don’t over-twist yet; just get them generally combined into one thick rope. -
Fold and twist:
Fold the combined rope in half and twist it again. Repeat this process of folding, rolling, and twisting about 3-4 times to begin integrating the colors without muddying them.
Clean Cuts Every Time
Place a piece of plastic cling wrap over the clay before using your cutter. This creates a beautifully rounded, ‘beveled’ edge instantly without sanding.
Step 2: Creating the Feather Pattern
-
Roll out the slab:
Using your acrylic roller, flatten your twisted clay log into a thick slab. You want to see streaks of color running horizontally across the clay. -
Drag the design:
Take your needle tool or a toothpick and drag lines vertically through the clay. Drag one line down, then the next line up, alternating across the entire surface to create the feathered chevron effect seen in the photo. -
Compress the pattern:
Gently roll over the surface with the acrylic roller one more time. This heals the grooves left by the needle tool and embeds the pattern into a smooth, flat surface. -
Check thickness:
Ensure the slab is an even thickness, roughly 1/4 inch thick. I find that using guide rings on my roller helps keep everything perfectly level.
Fixing Bubbles
If you see air bubbles trapped in the clay after rolling, pierce them gently with a sharp needle and smooth the air out with your finger before baking.
Step 3: Cutting and Baking
-
Cut the shapes:
Position your round cutter over the most visually interesting parts of the marbled slab. Press down firmly to cut out your coaster shapes. -
Release the suction:
If the clay sticks to the surface, slide a long tissue blade underneath to gently release the rounds without distorting their circular shape. -
Smooth edges:
Before baking, run your finger lightly around the rim of each coaster to soften the sharp cut edge. -
Bake:
Place the coasters on a ceramic tile or parchment-lined baking sheet. Bake according to your clay package instructions (usually 275°F/135°C for 15-30 minutes per 1/4 inch of thickness). -
Cool under weight:
As soon as you remove them from the oven, place a heavy book or flat object on top of the coasters while they cool. This ensures they cure perfectly flat.
Step 4: Finishing Touches
-
Sand the edges:
Once fully cool, use wet/dry sandpaper under a trickle of water to smooth the edges and the top surface. Start with 400 grit and work up to 1000 grit for a professional feel. -
Clean up:
Wash off any sanding residue with plain water and dry the coasters thoroughly with a lint-free towel. -
Seal (Optional):
For extra durability against moisture, apply a thin coat of matte water-based polyurethane or polymer clay varnish. Let it dry completely. -
Add backing:
Glue a circle of cork or felt to the bottom of each coaster to prevent them from scratching your furniture.
Now you have a stunning set of custom coasters ready to gift or keep for your own living space

The Complete Guide to Pottery Troubleshooting
Uncover the most common ceramic mistakes—from cracking clay to failed glazes—and learn how to fix them fast.
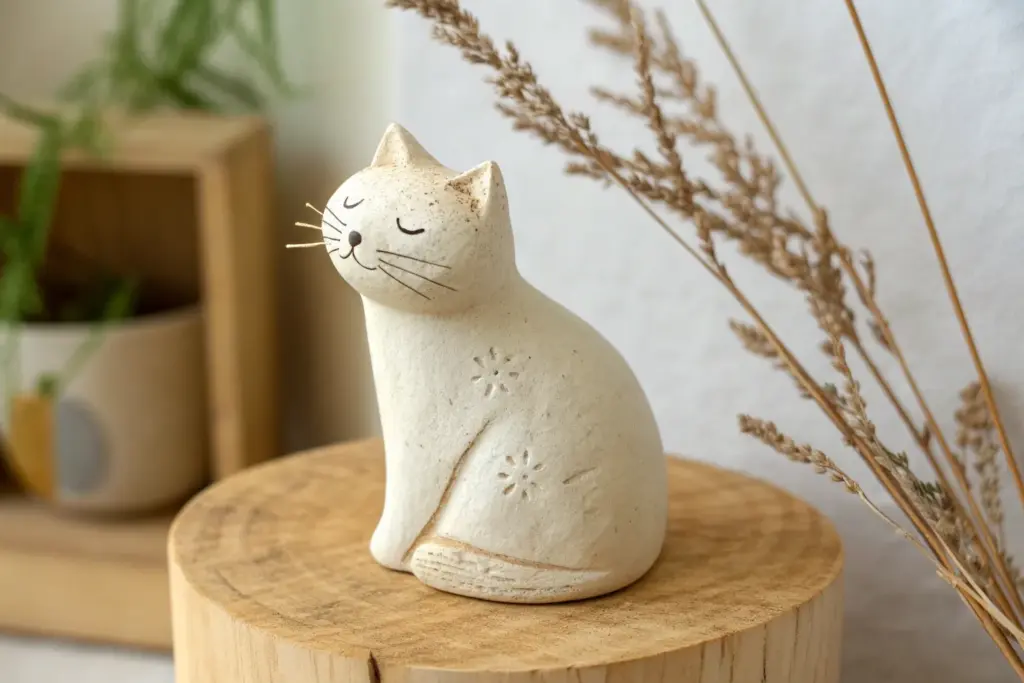
Cute Face Magnets
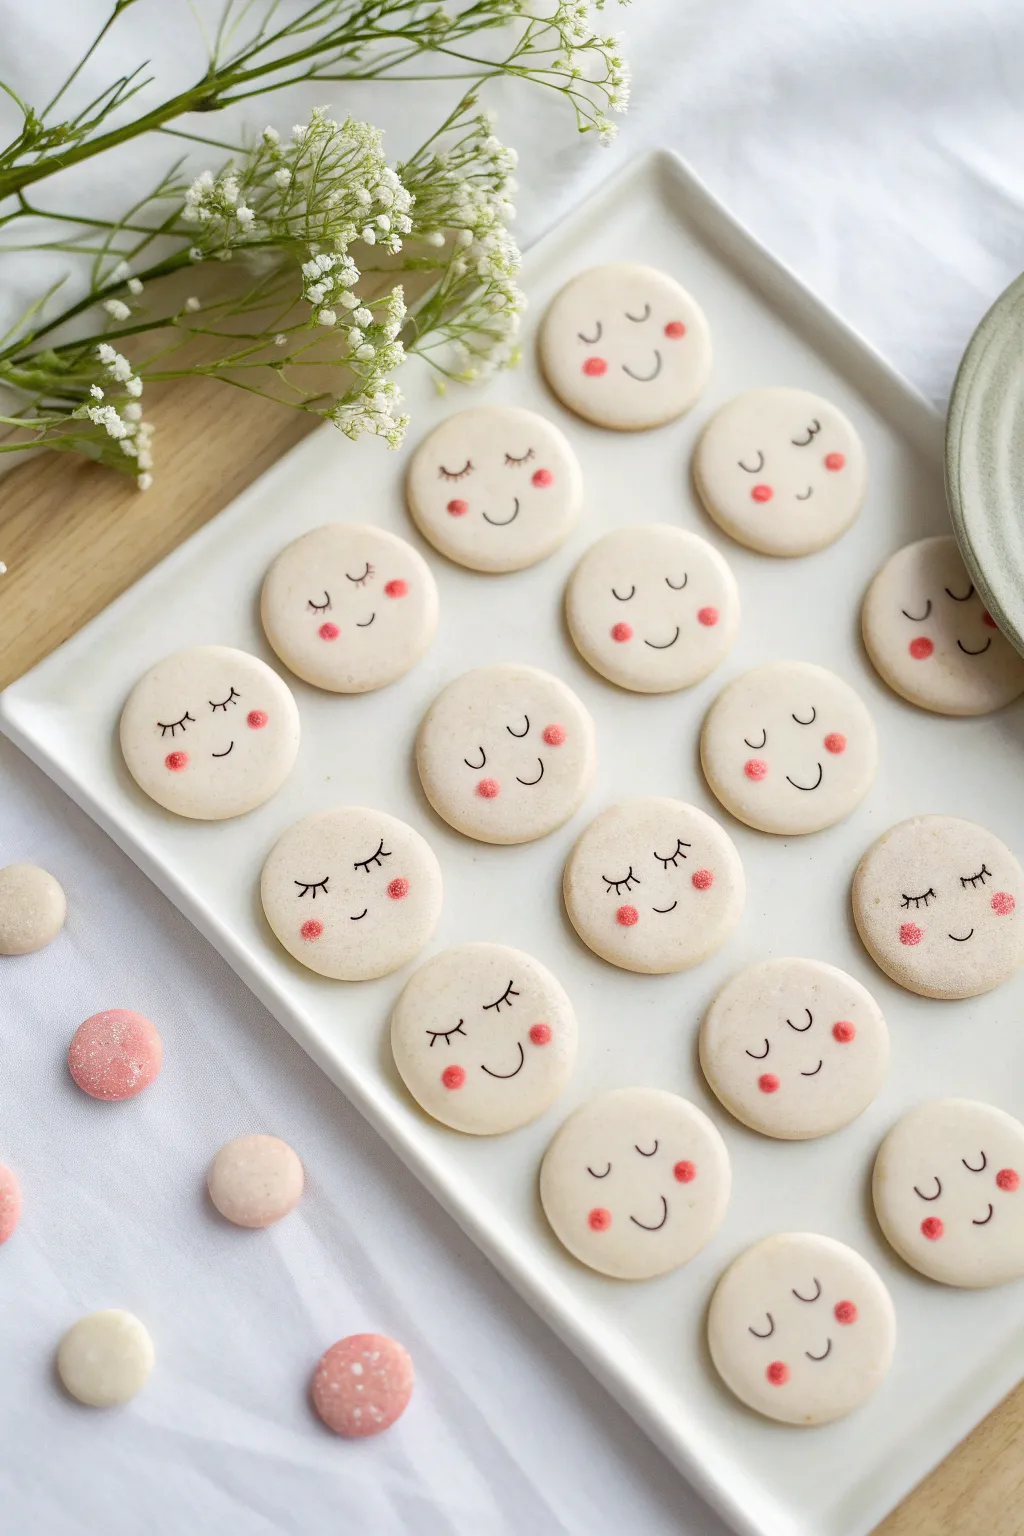
These charming little magnets feature serene, sleeping faces that bring a sense of calm to any surface. Their smooth, matte finish and delicate painted details make them perfect for organization or as sweet handmade gifts.
Step-by-Step Guide
Materials
- White air-dry clay or polymer clay
- Rolling pin
- Small round cookie cutter (approx. 1.5 inch)
- Fine-grit sandpaper
- Black fine-point permanent marker or acrylic paint pen
- Pink soft pastel chalk or pink blush powder
- Small cotton swab or soft detail brush
- Small disk magnets
- Strong craft glue (E6000 or superglue)
- Matte spray sealant (optional)
- Parchment paper or baking mat
Step 1: Shaping the Base
-
Prepare your workspace:
Lay down a sheet of parchment paper or a silicone baking mat to prevent the clay from sticking to your table. -
Condition the clay:
Take a handful of white clay and knead it in your hands until it becomes soft, pliable, and free of cracks. -
Roll it out:
Using your rolling pin, roll the clay out to an even thickness of about 1/4 inch (6mm). You want them thick enough to be durable but light enough for a magnet. -
Cut the shapes:
Press your round cookie cutter firmly into the clay to create your circles. Cut as many as you need, trying to minimize waste between shapes. -
Smooth the edges:
Gently lift the circles. Dip your finger in a tiny bit of water and run it around the circumference to smooth out any sharp edges or stray bits of clay. -
Dry or bake:
If using air-dry clay, let the circles sit for 24-48 hours, flipping them halfway through to ensure even drying. If using polymer clay, bake according to the package instructions. -
Sand for perfection:
Once fully cured and hard, check the surfaces. I like to use fine-grit sandpaper to buff away any fingerprints or bumps for a flawlessly smooth canvas.
Clean Lines Hack
Work steadily when drawing the faces. If using a paint pen, test the flow on paper first to prevent sudden blobs of ink from ruining your smooth white clay surface.
Step 2: Adding the Details
-
Practice your expressions:
Before drawing on the clay, sketch a few simple face designs on paper. The image shows two main styles: simple U-shaped sleeping eyes and eyes with tiny lashes. -
Draw the eyes:
Using the black fine-point marker, carefully draw two closed eyes on the upper half of the circle. Keep your lines thin and confident. -
Add the lashes (optional):
For the ‘lashed’ look, add three tiny, short ticks to the outer corner of each eye curve. -
Draw the smile:
Place a small, simple U-shaped curve centered below the eyes to create a gentle smile. -
Prepare the blush:
Scrape a small amount of pink pastel chalk into a powder. If you don’t have pastels, real cosmetic powder blush works surprisingly well here. -
Apply rosy cheeks:
Dip a cotton swab or a dry soft brush into the pink powder. Tap off the excess, then gently dab or swirl it onto the clay cheeks just outside the smile line. -
Build the color:
Start with a light application of pink and layer it gradually until you achieve that soft, airbrushed look shown in the photo. -
Seal the face:
To protect the marker and powder from smudging, apply a light coat of matte spray sealant. Do this in a well-ventilated area and let it dry completely.
Make Them Sparkle
Before sealing, dab a tiny dot of metallic gold paint on the cheeks as ‘freckles’, or use glittery nail polish over the pink blush for a magical, starry-night effect.
Step 3: Finishing Up
-
Attach the magnet:
Flip the clay face over. Apply a dab of strong craft glue to the center of the back. -
Press and set:
Press the magnet firmly into the glue. Let the adhesive cure fully according to the glue manufacturer’s timeline before using them on your fridge.
Now you have a collection of serene faces ready to hold up your most important notes and photos
Mini Cactus In Tiny Pots
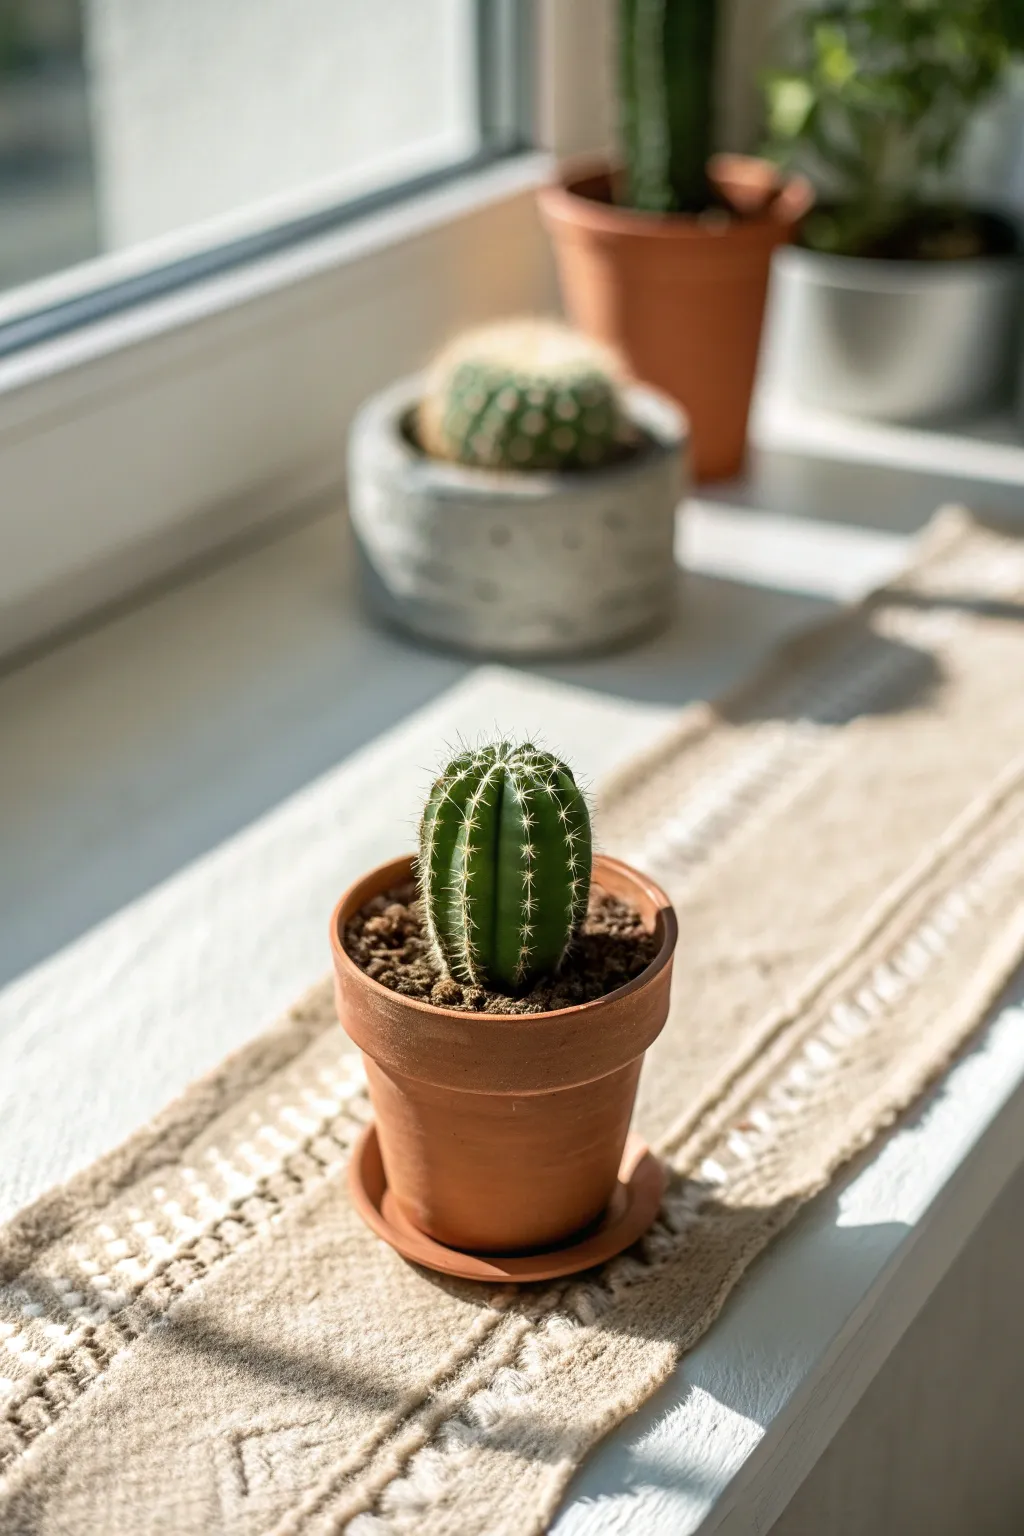
Recreate the charm of a sun-drenched windowsill with this hyper-realistic polymer clay project. You’ll sculpt a convincing miniature barrel cactus nestled in its own hand-crafted tiny terracotta pot, perfect for adding greenery without the watering schedule.
How-To Guide
Materials
- Terracotta colored polymer clay
- Green polymer clay (forest green shade)
- Black and brown polymer clay (for dirt)
- Translucent liquid clay or bake and bond
- Fine white sand or white acrylic paint
- Needle tool or toothpick
- Small circle cutter (approx. 1 inch)
- Acrylic roller
- Texture sponge or stiff brush
- Fine detail paintbrush
- Gloss varnish (optional)
Step 1: Sculpting the Pot
-
Prepare the base clay:
Start by conditioning your terracotta-colored polymer clay until it is soft and pliable. Roll it into a smooth ball free of cracks. -
Form the pot shape:
Flatten the ball slightly and use your thumb to press an indentation into the top, pinching and rotating to form a cup shape with tapered walls. Aim for a classic conical cylinder shape. -
Refine the rim:
Roll a thin snake of the same terracotta clay. Wrap this around the top edge of your pot to create the signature rim. -
Blend the rim seams:
Use a modeling tool or your finger to smooth the join where the rim meets the pot body, ensuring it looks like one cohesive piece. -
Create the saucer:
Roll out a small sheet of terracotta clay and cut a circle slightly larger than the pot’s base. Press a smaller circle indentation in the center to seat the pot. -
Add texture:
Lightly tap the exterior with a texture sponge to mimic the slightly porous, matte surface of real earthenware.
Step 2: Creating the Soil
-
Mix the soil color:
Combine scraps of brown and black clay. Don’t mix them thoroughly; a marbled effect adds depth and realism to the dirt. -
Texture the soil:
Crumble the mixed clay into tiny, irregular granules. Pack these granules into the pot, filing it to just below the rim. -
Secure the dirt:
Add a drop of liquid clay to the bottom of the pot before filling to ensure the ‘soil’ adheres during baking.
Needle Tool Secret
For sharper ribs on the cactus, roll the needle tool vertically rather than just dragging it. This compresses the clay creating a smoother valley.
Step 3: Sculpting the Cactus
-
Form the cactus body:
Roll a ball of forest green clay into a short, fat cylinder with a rounded top, sized to fit comfortably inside your pot. -
Mark the ribs:
Using a needle tool, press vertical lines evenly spaced around the cylinder, running from the very top center down to the base. -
Deepen the ridges:
Between your marked lines, gently press inward to make the sections bulge out slightly, creating the defined ribs of a barrel cactus. -
Create spine areoles:
Along the peak of each rib, poke tiny, evenly spaced holes using your needle tool. These will be the anchor points for the spines. -
Pre-shade the grooves:
I like to brush a tiny amount of dark green or brown pastel powder into the deep crevices between ribs to fake shadow depth. -
Plant the cactus:
Press the cactus firmly into the center of your textured soil. Use a tool to nudge the loose soil granules up against the base of the plant.
Clay Too Soft?
If your cactus slumps while sculpting, leach the clay by pressing it between sheets of printer paper for an hour to remove excess oil before shaping.
Step 4: Adding Spines & Finishing
-
Bake the project:
Bake the entire piece—pot, soil, and cactus—according to your clay package instructions. Let it cool completely. -
Paint the spines:
With a very fine brush and white acrylic paint, carefully paint tiny starburst shapes or simple dots over the holes you poked earlier. -
Add physical spikes (optional):
For extra realism, glue tiny snippets of white fishing line or brush bristles into the holes instead of painting them. -
Dust the pot:
Dry brush a little white paint onto the terracotta pot’s exterior to simulate mineral deposits and water stains found on aged pots.
Place your tiny creation on a sunny ledge and enjoy the look of nature that lasts forever


What Really Happens Inside the Kiln
Learn how time and temperature work together inside the kiln to transform clay into durable ceramic.
Polymer Clay Earrings From Slabs
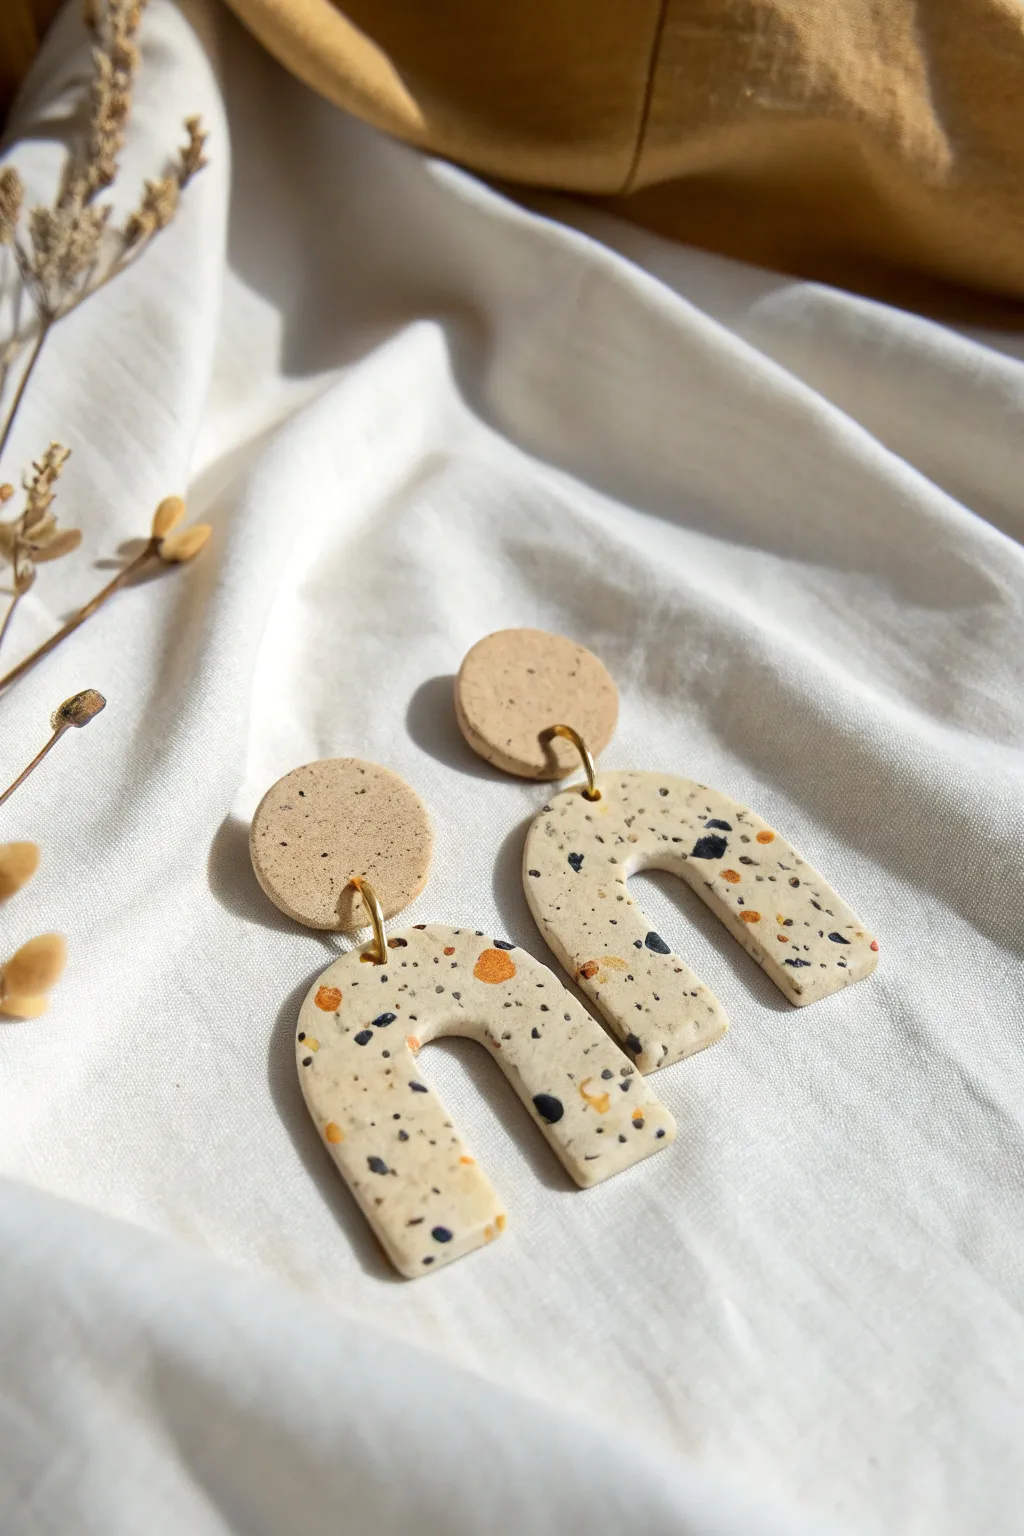
These understated earrings balance warm earthy tones with a modern arch silhouette, perfect for everyday wear. The project combines a simple speckled stud with a more complex terrazzo slab technique to create a harmonious, organic look.
Step-by-Step Tutorial
Materials
- Polymer clay (beige/tan, black, terracotta/rust orange)
- Acrylic roller or pasta machine
- Coarse salt, black pepper, or faux granite glitter (for the stud effect)
- Fimo liquid clay or translucent liquid sculpey (optional)
- Circle cutter (small, approx 10-12mm)
- Arch cutter (approx 30-40mm)
- Needle tool or toothpick
- Jump rings (gold, 6-8mm)
- Earring posts and backs
- Jewelry pliers (flat nose and round nose)
- Baking tile or oven-safe surface
- Sandpaper (wet/dry, varying grits) or Dremel tool
- Super glue or UV resin
- Cardstock or paper for baking
Step 1: Preparing the Speckled Stud Base
-
Condition the base clay:
Start by conditioning your beige or tan clay until it is soft and pliable. Roll it out into a medium-thick sheet, roughly 3mm thick. -
Add texture:
To achieve the subtle ‘sand’ look seen in the top circle, sprinkle a tiny amount of ground black pepper or specialized granite-effect embossing powder over the clay sheet. -
Embed the speckles:
Gently roll over the sheet once more with your acrylic roller to press the texture into the clay without thinning it too much. You want the surface to look organic, not perfectly smooth. -
Cut the studs:
Using your small circle cutter, punch out two circles. These will be the top studs that sit on the earlobe.
Smudged Terrazzo?
If your colored chips look smeared after rolling, your clay might be too soft or warm. Let the chopped pieces set in the fridge for 10 minutes before applying them to the base slab.
Step 2: Creating the Terrazzo Slab
-
Prepare terrazzo colors:
Take small amounts of black and terracotta/rust-colored clay. Roll them into very thin snakes or flat sheets. -
Chop the fragments:
Using a tissue blade or craft knife, chop these colored clays into tiny, irregular angular pieces. Aim for a mix of sizes, but keep them generally small like confetti. -
Prepare the slab base:
Roll out a fresh sheet of the beige clay, slightly thicker than your final desired thickness. -
Apply the fragments:
Scatter the chopped black and terracotta pieces randomly over the beige sheet. I like to drop them from a slight height to ensure a random distribution. -
Flatten the slab:
Place a piece of parchment paper over the slab and use your roller to press the colored chips flat into the base clay. Roll until the surface is uniform and smooth. -
Cut the arches:
Position your U-shaped arch cutter over an area of the slab with a pleasing distribution of colors. Press down firmly to cut two matching arch shapes.
Step 3: Assembly and Baking
-
Pierce holes:
Use a needle tool to create holes for the jump rings. Make one hole at the bottom center of each circle stud and one at the top center of each arch. -
Check alignment:
Ensure the holes are not too close to the edge to prevent tearing, but close enough that the jump ring can connect them easily. -
Bake:
Place the clay pieces on a baking tile. Bake according to your polymer clay brand’s manufacturer instructions (usually 275°F/130°C for 15-30 minutes). -
Cool down:
Allow the pieces to cool completely before handling them. They remain slightly flexible while warm and harden fully as they cool.
Matte Finish Pro-Tip
To get that raw, stone-like matte finish seen in the photo, dip your finger in cornstarch and lightly rub the unbaked clay surface. It removes stickiness and prevents fingerprints.
Step 4: Finishing Touches
-
Sanding:
Use wet/dry sandpaper to smooth the edges and buff the surface of the terrazzo pieces. This helps reveal the crisp edges of the colored clay chips. -
Attach posts:
Glue flat-pad earring posts to the back of the circle studs using super glue or a dab of UV resin cured under a UV lamp. -
Connect pieces:
Twist open a gold jump ring using two pairs of pliers. Thread it through the hole in the arch and the hole in the stud. -
Close rings:
Twist the jump ring closed securely, ensuring there is no gap where the clay could slip out.
Once assembled, your new architectural earrings are ready to add an artistic touch to any outfit
Simple Charm Keychains

Brighten up your keys or bag with this adorable handmade charm set, featuring a sweet strawberry, a layered heart, and a happy little gradient star. It’s a perfect beginner-friendly project that combines simple shaping techniques with playful painting details.
Step-by-Step
Materials
- Polymer clay in red, green, pink, teal, white, and yellow
- Gold keychain hardware (lobster clasp, large jump ring, smaller jump rings)
- Eye pins (gold)
- Clay roller or pasta machine
- Small shape cutters (heart, star, teardrop) or an X-Acto knife
- Needle tool or toothpick
- Black acrylic paint
- Fine detail paintbrush
- Pink chalk pastel (optional, for cheeks)
- Jewelry pliers (round nose and flat nose)
- Oven for baking clay
- Glaze or polyurethane varnish (optional)
Step 1: Sculpting the Strawberry
-
Shape the base:
Start by conditioning a small ball of red polymer clay until it’s soft and pliable. Roll it into a smooth ball and then gently pinch one side to form a rounded teardrop shape. -
Flatten it slightly:
Place your teardrop on your work surface and press down gently to flatten it into a 2D charm shape, keeping the edges soft and rounded. -
Create the leaves:
Take a small pinch of green clay and flatten it into a tiny disk. Use a needle tool or knife to cut out a rough star shape, or simply mold tiny teardrops and arrange them on top of the red berry to look like leaves. -
Add the seeds:
Use a needle tool or a small dotting tool to press small indentations all over the red surface for the seed texture. -
Insert hardware:
Trim an eye pin to an appropriate length and carefully insert it into the top center of the strawberry, right through the green leaves.
Sticky Situation?
Work on a ceramic tile or piece of glass. You can bake the clay directly on it, preventing fingerprints or distortion from moving the raw clay.
Step 2: Making the Layered Heart
-
Prepare the colors:
Roll out thin sheets of pink, teal, yellow, and a darker pink clay. Aim for a consistent thickness, roughly 2-3mm for the base. -
Cut the base:
Use a medium-sized heart cutter to punch out your base shape from the main pink color. -
Layer the details:
Cut progressively smaller hearts from the teal, yellow, and dark pink clays. If you don’t have nested cutters, you can hand-cut these shapes with a craft knife for a charming, organic look. -
Assemble the stack:
Stack the hearts from largest to smallest directly on top of the base. Gently press them together so they adhere without smashing the layers. -
Add the eye pin:
Like the strawberry, insert a trimmed eye pin into the top center of the heart.
Step 3: Creating the Stars
-
Form the gradient star:
To make the large star, take a pinch of yellow clay and a pinch of pink clay. Mash them together slightly at the border to create a rough blend, then flatten the piece. -
Cut the shape:
Use a star cutter to punch out the shape, positioning it so the yellow is at the top point and the pink flows into the bottom points. -
Soften the edges:
Use your finger to gently tap the edges of the star to remove any sharp cut marks and give it a bubbly, friendly appearance. -
Insert the hardware:
Insert an eye pin into the top point of the gradient star. -
Make the mini star:
Roll out a small piece of teal clay and cut a tiny star shape using a small cutter. Insert a small eye pin or poke a hole directly through one point if you plan to use a jump ring directly.
Make it Sparkle
Mix a tiny pinch of fine glitter or mica powder into the translucent or light-colored clay before rolling for a subtle, magical shimmer.
Step 4: Baking and Assembly
-
Bake the charms:
Arrange all your clay pieces on a tile or baking sheet lined with parchment paper. Bake according to your clay manufacturer’s instructions (usually 275°F/135°C for 15-30 minutes). -
Paint the strawberry seeds:
Once cool, dip a fine brush or needle tip into black acrylic paint and carefully fill in the seed indentations on the strawberry. -
Paint the star face:
Use the same fine tool to paint two small curved eyes and a smile on the gradient star. If you want rosy cheeks, brush a tiny amount of pink chalk pastel dust near the smile. -
Seal the pieces:
I recommend coating the charms with a thin layer of polyurethane varnish or UV resin to protect the paint and give them a professional shine. -
Assemble the keychain:
Open your jump rings using two pairs of pliers (twist sideways, don’t pull apart). Attach the strawberry, heart, and stars to the large central ring of the keychain hardware. -
Final adjustment:
Vary the lengths of the chains or jump rings so the charms hang at slightly different heights for a clustered effect.
Now your keys have a handmade, colorful companion that is sure to make you smile every time you head out the door

TRACK YOUR CERAMIC JOURNEY
Capture glaze tests, firing details, and creative progress—all in one simple printable. Make your projects easier to repeat and improve.
Ring Cone And Catch Dish
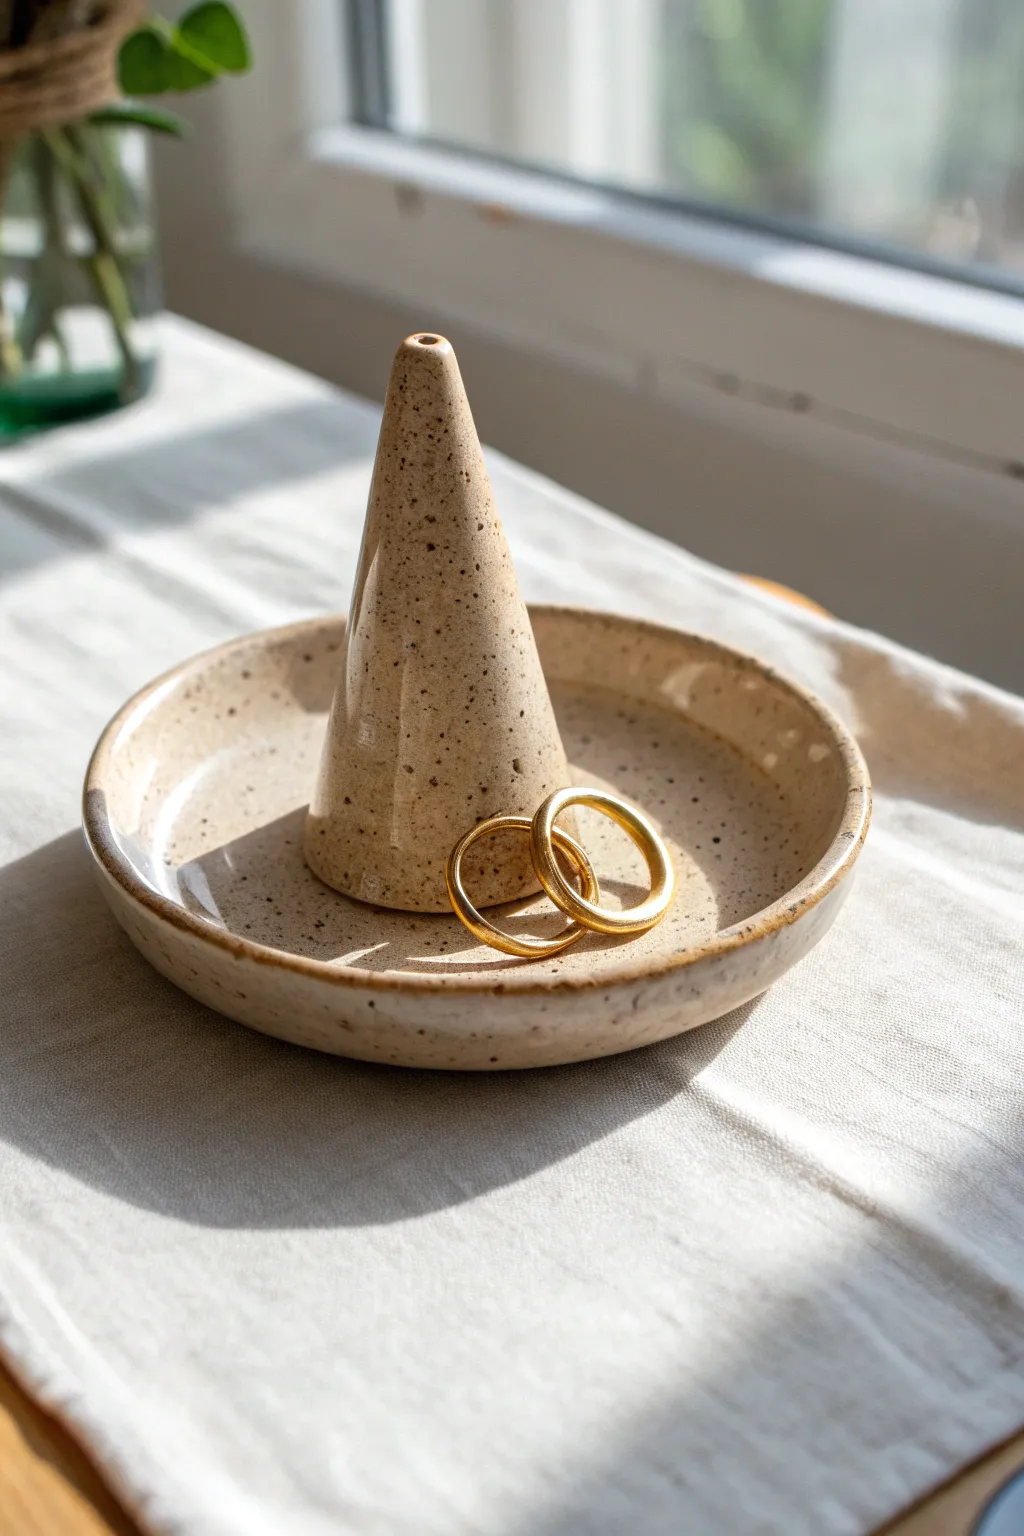
This elegant two-piece set combines a functional ring cone with a catch-all dish, crafted from a beautiful speckled clay body that mimics natural stone. The minimalist design allows the texture of the clay to shine, creating a timeless organizer for your daily jewelry.
Step-by-Step Tutorial
Materials
- Speckled Stoneware or Polymer Clay (beige/sand color with flecks)
- Rolling pin with guide rings (approx. 1/4 inch thickness)
- Circle cutter (approx. 4-5 inches diameter)
- Needle tool or fettling knife
- Small sponge
- Stylus tool or small straw (for the hole)
- Loop tool (for trimming)
- Scoring tool (or an old toothbrush)
- Slip (liquid clay)
- Pottery wheel (optional, can be hand-built)
- Transparent glossy glaze
- Kiln (if using stoneware)
Step 1: Shaping the Catch Dish
-
Prepare the clay slab:
Start by wedging a baseball-sized amount of speckled clay to remove air bubbles. Roll it out into an even slab about 1/4 inch thick, turning the clay frequently to ensure it doesn’t stick to your work surface. -
Cut the base:
Using your circle cutter or a bowl as a template, cut a perfect circle from the slab. This will be the foundation of your catch dish. -
Lift the edges:
Gently lift the edges of the circle with your fingertips. I like to pinch upwards slightly while rotating the piece on a banding wheel to create a shallow, curved wall. -
Smooth the form:
Take a slightly damp sponge and run it along the rim of the dish to compress the clay particles and smooth out any sharp edges or fingernail marks. It should look soft and rounded. -
Initial drying:
Set the dish aside on a ware board until it reaches a leather-hard state. It needs to be firm enough to support the cone later without sagging.
Cone Leaning?
If your cone starts to lean while attaching, the clay is too wet. Let the cone stiffen up to a firm leather-hard stage before trying to attach it to the base dish.
Step 2: Forming the Cone
-
Create a coil:
Roll a thick coil of clay, roughly the thickness of a large carrot. Tap one end on the table to create a flat bottom. -
Shape the taper:
Place the coil upright and use your palms to gently roll and taper the clay upwards, thinning it out as you reach the top to form a cone shape. -
Refine the surface:
Use a rib tool or an old credit card to smooth the sides of the cone, removing fingerprints and creating a sleek, straight profile. -
Add the top detail:
Near the very peak of the cone, use a small tool or straw to create a tiny indentation or hole. This mimics the look of the reference image and adds a finished feel. -
Check fit:
Place the cone gently into the center of your leather-hard dish to ensure the proportions look balanced. The cone should sit comfortably without dominating the bowl space.
Clean Seams
Wrap a damp paintbrush handle with a tiny bit of plastic wrap to smooth the tight inner angle where the cone meets the dish without scratching the surface.
Step 3: Assembly and Finishing
-
Score the connection points:
Use your needle tool or scoring rib to scratch up the bottom of the cone and the center of the dish where they will meet. Roughing the surface is crucial for a strong bond. -
Apply slip and attach:
Dab a generous amount of slip onto the scored areas. Press the cone firmly into the center of the dish with a slight twisting motion to lock the clay together. -
Clean the seam:
A tiny bit of slip might ooze out from under the cone. Use a small, damp brush to wipe this away, creating a seamless transition between the vertical cone and horizontal dish. -
Dry slowly:
Cover the assembled piece loosely with plastic. Uneven thickness can cause cracking, so let it dry very slowly over several days until bone dry. -
Bisque fire:
Fire the piece in the kiln to cone 04 (or according to your clay body’s instructions) to prepare it for glazing. -
Glaze application:
Dip the entire piece into a transparent glossy glaze. This will seal the clay and make those beautiful speckles pop, giving it a wet, polished stone look. -
Glaze wiping:
Wipe the very bottom foot of the dish clean with a sponge so it doesn’t stick to the kiln shelf during the final firing. -
Final firing:
Fire the piece again to the final temperature required for your specific clay and glaze, usually around cone 5 or 6 for stoneware.
Once cooled, your speckled ring holder is ready to organize your treasures with modern style
Wavy Incense Holder Tray
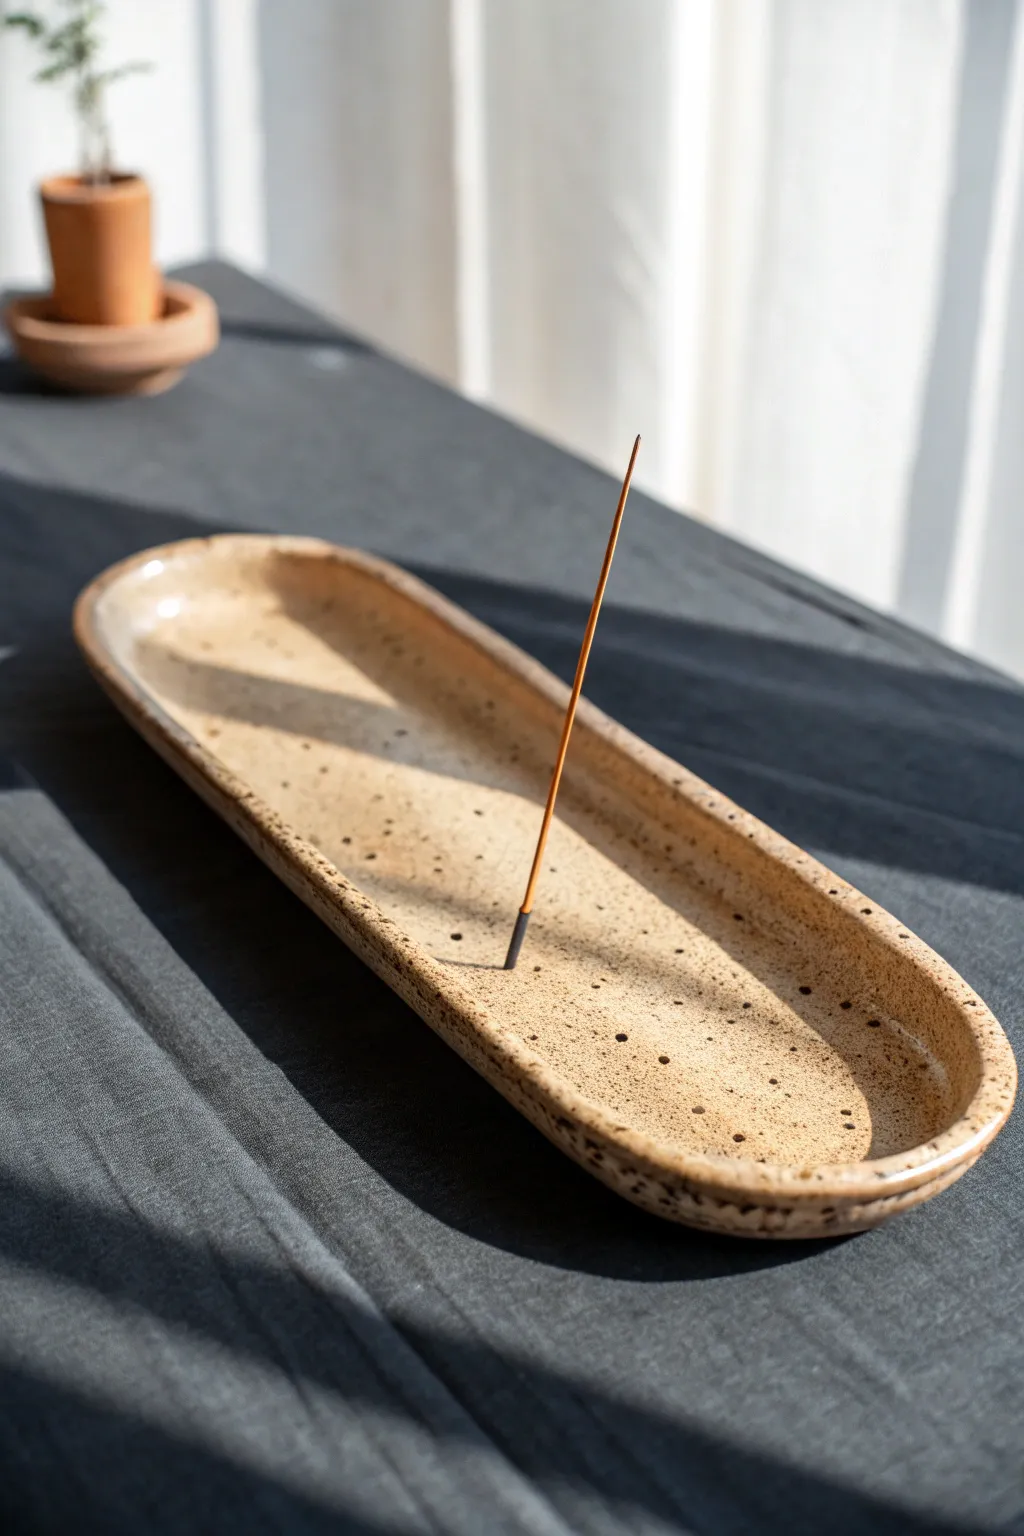
This elegant incense holder combines functionality with a minimalist, organic aesthetic. Its elongated oval shape and speckled stoneware finish capture the light beautifully, creating a serene landing spot for falling ash.
Step-by-Step
Materials
- Speckled stoneware clay (buff or light brown)
- Rolling pin
- Two 1/4 inch wooden guide strips
- Oval paper template (approx. 10″ x 3″)
- Needle tool
- Fettling knife
- Modeling tool or smooth rib
- Small sponge
- Incense stick (for sizing the hole)
- Clear glossy glaze
- Kiln
Step 1: Prepping and Shaping the Base
-
Prepare your clay:
Begin by wedging your speckled stoneware clay thoroughly to remove any air bubbles. You want a consistent texture throughout to prevent cracking later. -
Roll out the slab:
Place your clay between two 1/4 inch wooden guide strips on a canvas-covered surface. Roll the clay out into a long, even slab, ensuring it’s slightly larger than your intended final shape. -
Compress the slab:
Using a smooth rib tool, gently compress the surface of the clay in both directions. This aligns the clay particles, which helps prevent warping during drying and firing—a crucial step for flat pieces. -
Cut the shape:
Lay your oval paper template lightly onto the slab. Using a needle tool, trace around the template held vertically to cut out your base shape. -
Smooth the edges:
Once the excess clay is removed, run a damp finger or a small, slightly wet sponge along the sharp cut edges to round them off gently.
Warping Woes?
If your tray curls up at the ends while drying, try weighing down the center with a small sandbag during the leather-hard stage to keep it flat.
Step 2: Forming the Rim and Detail
-
Create a coil:
Roll a separate piece of clay into a long, thin coil, roughly the thickness of a pencil. This will become the raised rim of your tray. -
Score and slip:
Score the outer edge of your oval base and one side of your coil. Apply a small amount of slip (liquid clay) to the scored areas on the base. -
Attach the rim:
Gently press the coil onto the edge of the base, working your way around the oval. Be careful not to trap air pockets between the coil and the slab. -
Blend the coil:
Use a modeling tool to blend the inside seam of the coil down into the base so it disappears completely. Then, blend the outside seam downwards as well. -
Refine the lip:
With a damp sponge, smooth the attached rim to create a seamless, raised lip. I find pinching the rim gently between thumb and forefinger helps establish a slight, organic wave. -
Check the profile:
Look at the tray from the side to ensure the rim height is relatively even, adjusting any low or high spots by gently pressing or molding the clay.
Step 3: Finishing Touches and Firing
-
Determine the holder spot:
Decide where you want your incense stick to stand. The center often works best for catching ash, but off-center can look striking. -
Create the mound:
Take a tiny ball of clay and attach it firmly to your chosen spot using the score and slip method. Flatten it slightly into a small mound. -
Pierce the hole:
Using an actual incense stick (or a tool of similar diameter), press a hole into the center of the mound at a slight angle. Wiggle it just a bit to ensure the hole won’t shrink too tight. -
Slow drying:
Place the tray on a board and cover it loosely with plastic. Let it dry slowly over several days to prevent the long shape from curling up at the ends. -
Bisque fire:
Once bone dry, fire the piece to bisque temperature (usually cone 04) to prepare it for glazing. -
Glazing:
Wipe the bisque ware with a damp sponge to remove dust. Dip or brush on a clear glossy glaze. The clear coat will melt over the clay body, allowing those natural speckles to pop through. -
Final fire:
Fire the piece again to the maturation temperature of your specific clay and glaze (often cone 5 or 6 for stoneware).
Double Duty
Make a second hole with a wider diameter on the opposite end. This allows the holder to accommodate thicker Tibetan-style incense sticks as well.
Now you have a serene, custom-made vessel ready to catch the ash from your favorite scents
Leaf Imprint Trinket Plates
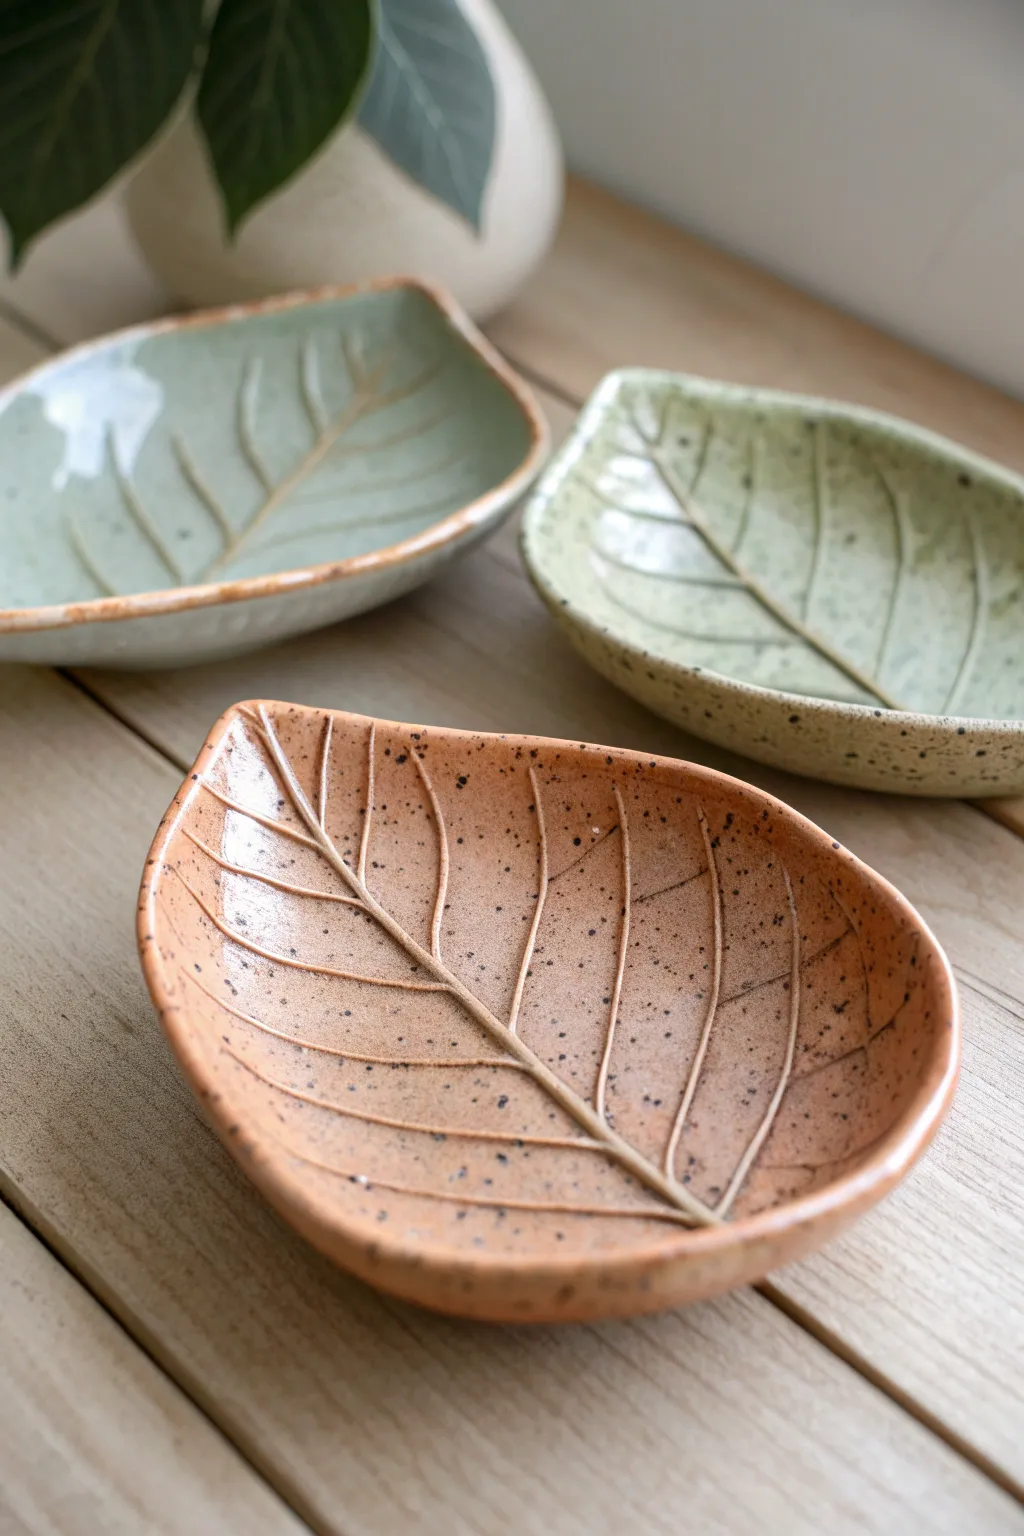
Create these organic, nature-inspired trinket plates that beautifully capture the delicate vein patterns of real leaves. With their softly curved edges and speckled glaze finish, they make perfect holders for jewelry or simply serve as charming seasonal decor.
Step-by-Step Tutorial
Materials
- White or light-colored air-dry clay or kiln-fire clay
- Fresh leaves with prominent veins (like hydrangea or hosta)
- Rolling pin
- Rolling guides or wooden slats (approx. 1/4 inch thick)
- Fettling knife or craft knife
- Small sponge
- Small bowl of water
- Speckled glaze (if firing) or acrylic glossy paints (if air drying)
- Clear sealant (for air dry clay only)
- Soft paintbrush
- Sandpaper (fine grit)
- Canvas mat or cloth for rolling
Step 1: Preparation & Impression
-
Select your leaf:
Choose fresh, sturdy leaves with thick, raised veins on the back side. The deeper the veins, the clearer your impression will be, so look for leaves that aren’t too dry or brittle. -
Prepare the workspace:
Lay down a canvas mat or cloth to prevent sticking. Place your rolling guides on either side of your workspace to ensure an even thickness. -
Roll the slab:
Take a ball of clay and roll it out between your guides until it is smooth and uniform, roughly 1/4 inch thick. Make sure the slab is large enough to accommodate your chosen leaf with some border space. -
Position the leaf:
Place your leaf vein-side down onto the clay slab. Press it gently with your fingers first to help it adhere slightly so it doesn’t shift during rolling. -
Create the imprint:
Use your rolling pin to firmly roll over the leaf once or twice. Apply even pressure to embed the veins into the clay without making the slab too thin. -
Cut the shape:
Using a craft knife or fettling knife, carefully cut around the perimeter of the leaf. I find it easiest to hold the knife vertical to get a clean edge, following the natural outline of the botanical form. -
Remove the leaf:
Locate the stem of the leaf and gently peel it upwards and away from the clay to reveal the imprinted texture underneath.
Vein Definition Tip
If the impression looks faint, gently re-trace the major vein lines with a modeling tool or a dull pencil while the clay is still damp to deepen them.
Step 2: Shaping & Drying
-
Smooth the edges:
Dip your finger or a small sponge into water and gently run it along the cut edges of the clay to soften any sharpness or burrs left by the knife. -
Create the curve:
To transform the flat leaf into a dish, carefully lift the clay and prop up the edges. You can nestle the clay leaf into a shallow bowl lined with paper towel or use crumpled pieces of paper underneath the rim to support a gentle upward curve. -
Refine the form:
Check that the tip of the leaf isn’t curling strangely and that the stem area looks natural. Make small adjustments now while the clay is still pliable. -
Let it dray:
Allow the clay to dry completely. If using air-dry clay, this may take 24-48 hours; turn it occasionally for even drying. If using kiln clay, dry until bone dry. -
Sand imperfections:
Once fully dry, use fine-grit sandpaper to gently smooth the rim or any rough spots on the bottom. Wipe away dust with a slightly damp sponge.
Fixing Warped Leaves
If the edges curl too much while drying, place a small, lightweight bag of sand or rice in the center to gently weigh it down without flattening the texture.
Step 3: Finishing
-
Base coat application:
For the speckled look shown, select earthy tones like sage green or terracotta. Apply your base glaze or paint evenly, ensuring you get into the deep crevices of the vein impression. -
Adding speckles:
If your glaze doesn’t have speckles built-in, create them manually. Load a stiff brush with dark brown or black paint/glaze and flick the bristles to splatter tiny dots across the surface. -
Highlight the veins:
To make the texture pop, you can gently wipe back some glaze from the raised areas with a damp sponge before firing, or dry-brush a lighter color over the veins if painting. -
Final cure or fire:
Fire the piece in a kiln according to your clay’s instructions. If using air-dry clay, apply two coats of a glossy varnish to mimic the ceramic shine and protect the surface.
Place your finished leaf dishes on a bedside table to hold rings or group them together as a natural centerpiece
Animal Planter Buddy
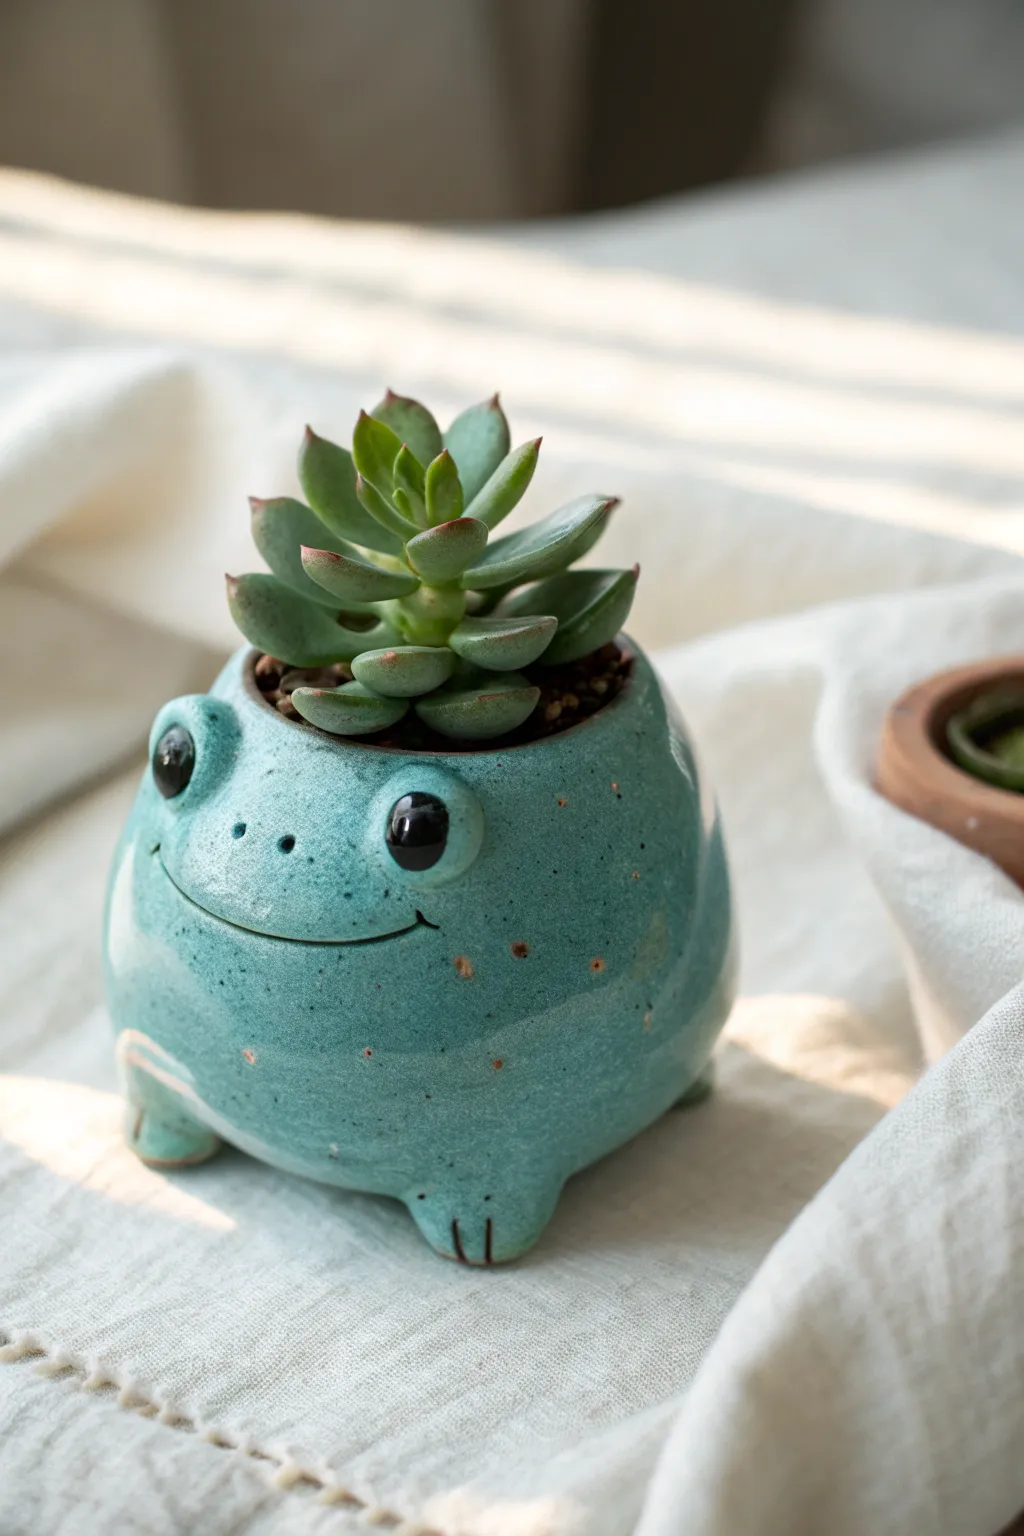
Bring a little joy to your windowsill with this adorable, round-bodied frog planter glazed in a speckled turquoise. This wheel-thrown or hand-built ceramic buddy features big, glossy eyes and a cheerful smile, making it the perfect home for your favorite succulent.
How-To Guide
Materials
- Stoneware clay (smooth or lightly grogged)
- Pottery wheel (optional, can be pinch-potted)
- Pin tool
- Wooden modeling tools
- Score and slip tool
- Small sponge
- Speckled turquoise glaze
- Glossy black underglaze or glaze (for eyes)
- Kiln for bisque and glaze firing
Step 1: Foming the Body
-
Throw or pinch the base:
Start by creating a rounded, enclosed form. If throwing on the wheel, pull a small cylinder and belly it out significantly to create a spherical shape, narrowing the rim inward. -
Refine the opening:
Ensure the top opening is wide enough for a small plant, approximately 2-3 inches in diameter. Smooth the rim with a chamois or sponge so it’s pleasant to the touch. -
Trimming (if wheel-thrown):
Once leather hard, trim the bottom to create a curved, continuous line for the belly, removing excess weight. -
Add drainage:
Don’t forget to punch a drainage hole in the absolute center of the bottom using a hole cutter or drill tool.
Step 2: Sculpting the Features
-
Shape the legs:
Roll four small, stubby coils of clay. Shape them into little feet by slightly flattening one end and using a knife tool to mark three little toe indentations. -
Attach the legs:
Score and slip the feet onto the bottom curve of the pot. I like to space them wide apart so the frog looks stable and plump. -
Create the eye sockets:
Roll two small balls of clay and press your thumb into them to create hollow domes. These will be the protruding eyelids. -
Attach the eyes:
Score and slip these domes high up on the ‘face’ of the pot. Smooth the seams completely so they look like they grow naturally out of the body. -
Carve the smile:
Using a sharp pin tool or a wire loop tool, carve a long, sweeping smile line that connects comfortably below the eyes. Vary the depth slightly—deeper at the corners makes the expression friendlier. -
Add nostril details:
Poke two small, symmetrical holes between the eyes for nostrils.
Wobbly Frog?
If the legs are uneven, gently tap the leather-hard pot onto a flat surface to level the feet before they dry completely.
Step 3: Glazing and Finishing
-
Bisque fire:
Once the piece is bone dry, fire it to the appropriate bisque temperature for your specific clay body (usually Cone 06/04). -
Wax resist:
Apply wax resist to the bottom of the feet to prevent them from sticking to the kiln shelf. -
Apply the main glaze:
Dip or brush the entire piece in a speckled turquoise or robin’s egg blue glaze. Ensure an even coat so the speckles distribute nicely. -
Detail the eyes:
Carefully wipe the glaze off the round pupil area inside the eyelids. Paint this area with a glossy black glaze or underglaze to make the eyes pop. -
Highlight the texture:
If you want the smile to stand out, make sure the glaze isn’t too thick in the recessed line, or let it pool slightly for a darker effect depending on the glaze type. -
High fire:
Fire the piece to glaze temperature (e.g., Cone 5/6). The heat will melt the glaze, revealing the beautiful speckles seen in the sample.
Crown Jewel
Add a tiny clay crown painted with gold luster for a ‘Frog Prince’ variation after the glaze firing.
Once the kiln cools, plant your favorite succulent inside to complete this charming little character
Textured Photo Or Note Holder
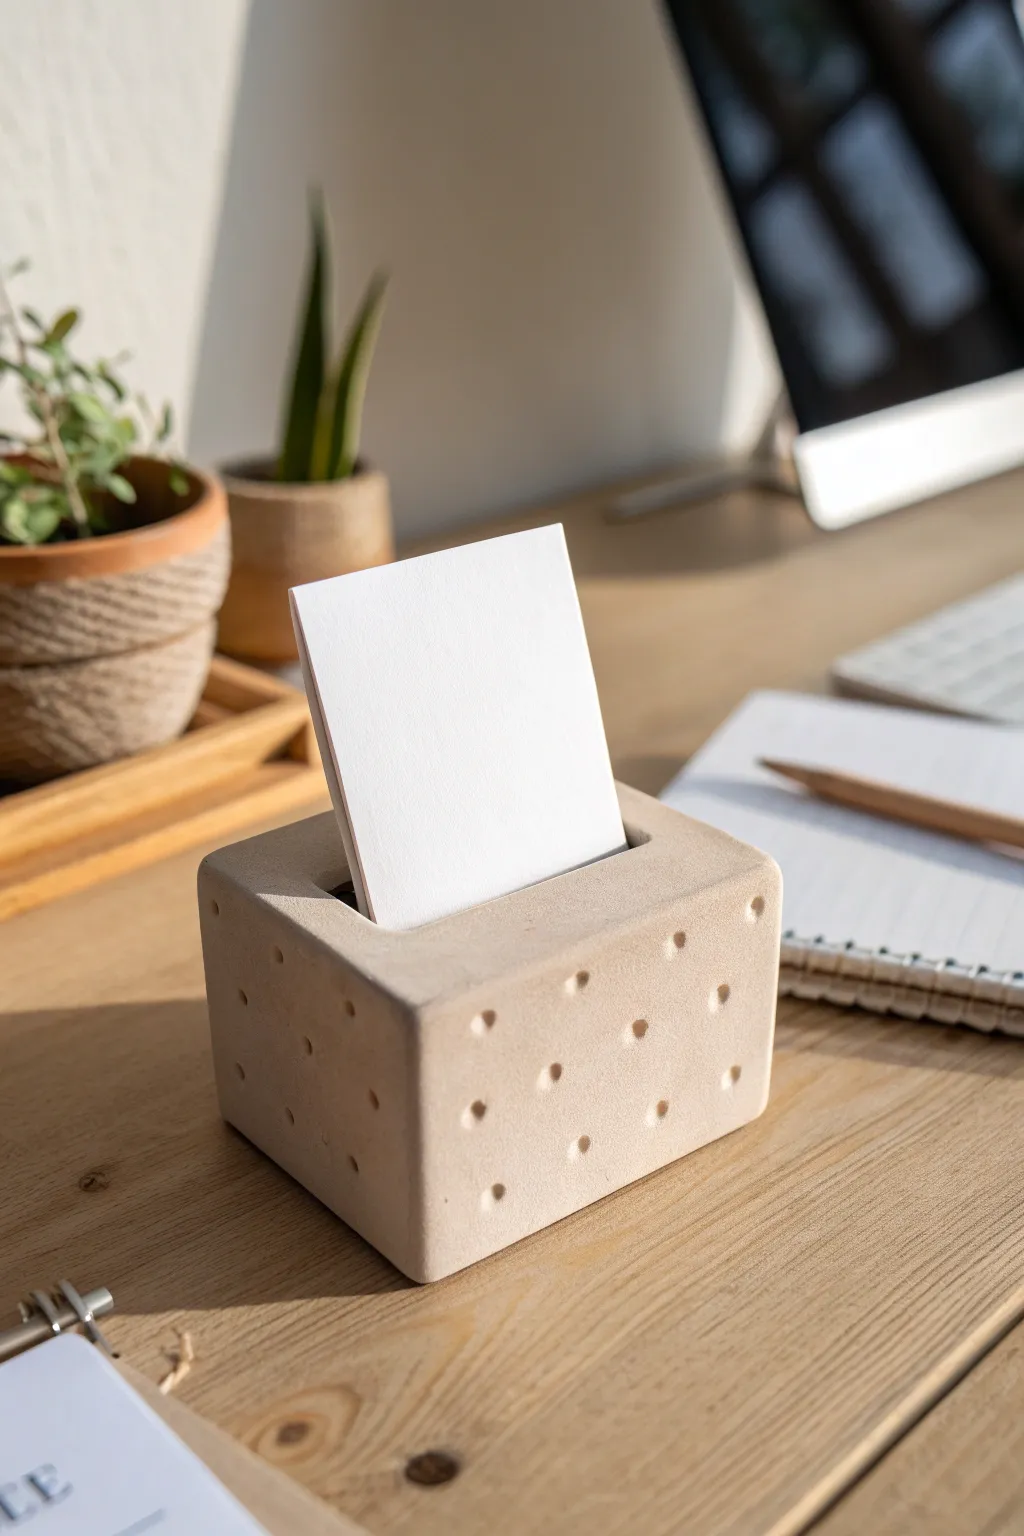
This minimalist desktop accessory combines simple geometry with tactile texture, perfect for holding important notes or favorite photos. The natural beige finish and uniform dimpled pattern give it a modern, architectural feel that elevates any workspace.
Detailed Instructions
Materials
- Air-dry clay (stone, concrete, or beige color)
- Clay roller or rolling pin
- Sharp crafting knife or clay blade
- Ruler
- Small round tool for texture (e.g., end of a paintbrush, knitting needle, or dotting tool)
- Wide popsicle stick or sturdy cardstock (for slot creation)
- Fine-grit sandpaper
- Small bowl of water
- Clear matte varnish (optional)
Step 1: Shaping the Base
-
Condition the clay:
Begin by taking a substantial chunk of your air-dry clay and kneading it thoroughly in your hands. You want it to be pliable and free of air bubbles, warm enough to work without cracking. -
Form a rough block:
Shape the clay into a rough cube using your palms. Don’t worry about sharp corners just yet; focus on getting the volume correct for the size you want. -
Square the sides:
Place the clay on a flat work surface. Gently tap each of the six sides against the table to flatten them. Use your ruler to ensure the height, width, and depth are equal, aiming for a cube about 2.5 to 3 inches in size. -
Refine the edges:
Use your clay blade or a ruler to gently press against the sides to sharpen the corners. The goal is a clean, modern cube shape, though a slightly soft edge adds to the organic pottery look. -
Smoothing:
If you notice any fingerprints or cracks, dip your finger closer to water and gently smooth them out. I find that smoothing now saves a lot of sanding time later.
Step 2: Creating the Mechanism
-
Mark the center:
Using your ruler, lightly find the center line on the top face of your cube. This is where your note or photo will sit. -
Create the slot:
Carefully press your wide popsicle stick or a doubled-up piece of thick cardstock directly down into the center line. Push it about halfway down into the block to ensure stability for taller papers. -
Widen gently:
Wiggle the stick creating the slot ever so slightly back and forth to ensure the opening is wide enough to actually hold a thick card without damaging it. -
Clean the opening:
Remove the stick. If the clay bulged up around the opening, slice the excess off with your craft knife to make the top surface perfectly flat again.
Clean Impressions
To keep the dimples clean and prevent the tool from sticking, dip the tip of your dotting tool into cornstarch or a tiny bit of water before pressing it into the clay.
Step 3: Adding Texture and Finishing
-
Plan the grid:
Visualize a grid pattern on the four vertical sides of the cube. You can lightly mark guide points with a pin if you don’t trust your eye, but freehanding often looks more natural. -
Imprint the dimples:
Using the back of a paintbrush or a dotting tool, press firmly into the clay to create small, round indentations. Try to keep the depth consistent for every dot. -
Continue the pattern:
Rotate the block and repeat the dimpling process on all visible vertical sides. Be careful not to squash the overall cube shape while you are applying pressure. -
Initial drying:
Set the block aside to dry. To prevent the bottom from warping or staying wet, place it on a wire rack if possible. -
Reshape slot (mid-dry):
After about an hour, when the clay has stiffened slightly but isn’t hard, re-insert your popsicle stick into the slot once more to ensure it hasn’t shrunk too tight. -
Final drying:
Let the piece cure completely. Depending on the thickness of your block and humidity, this could take 24 to 48 hours. -
Sanding:
Once bone dry, take fine-grit sandpaper and lightly buff the flat surfaces. This removes any tiny burrs around the dimples and sharpens the cube’s profile. -
Dusting off:
Wipe the piece down with a slightly damp cloth or a dry soft brush to remove all sanding dust from the indentations. -
Sealing:
For durability, apply a thin coat of clear matte varnish. This will protect the clay from stains while maintaining that natural, stony aesthetic shown in the photo.
Cracking Issues?
If you see hairline cracks appearing as the thick block dries, patch them immediately with a ‘slip’ made of clay dissolved in a little water, then smooth over.
Place your favorite photo or a daily reminder in the slot and enjoy your handmade desk accessory
Wall Hanging Relief Tile
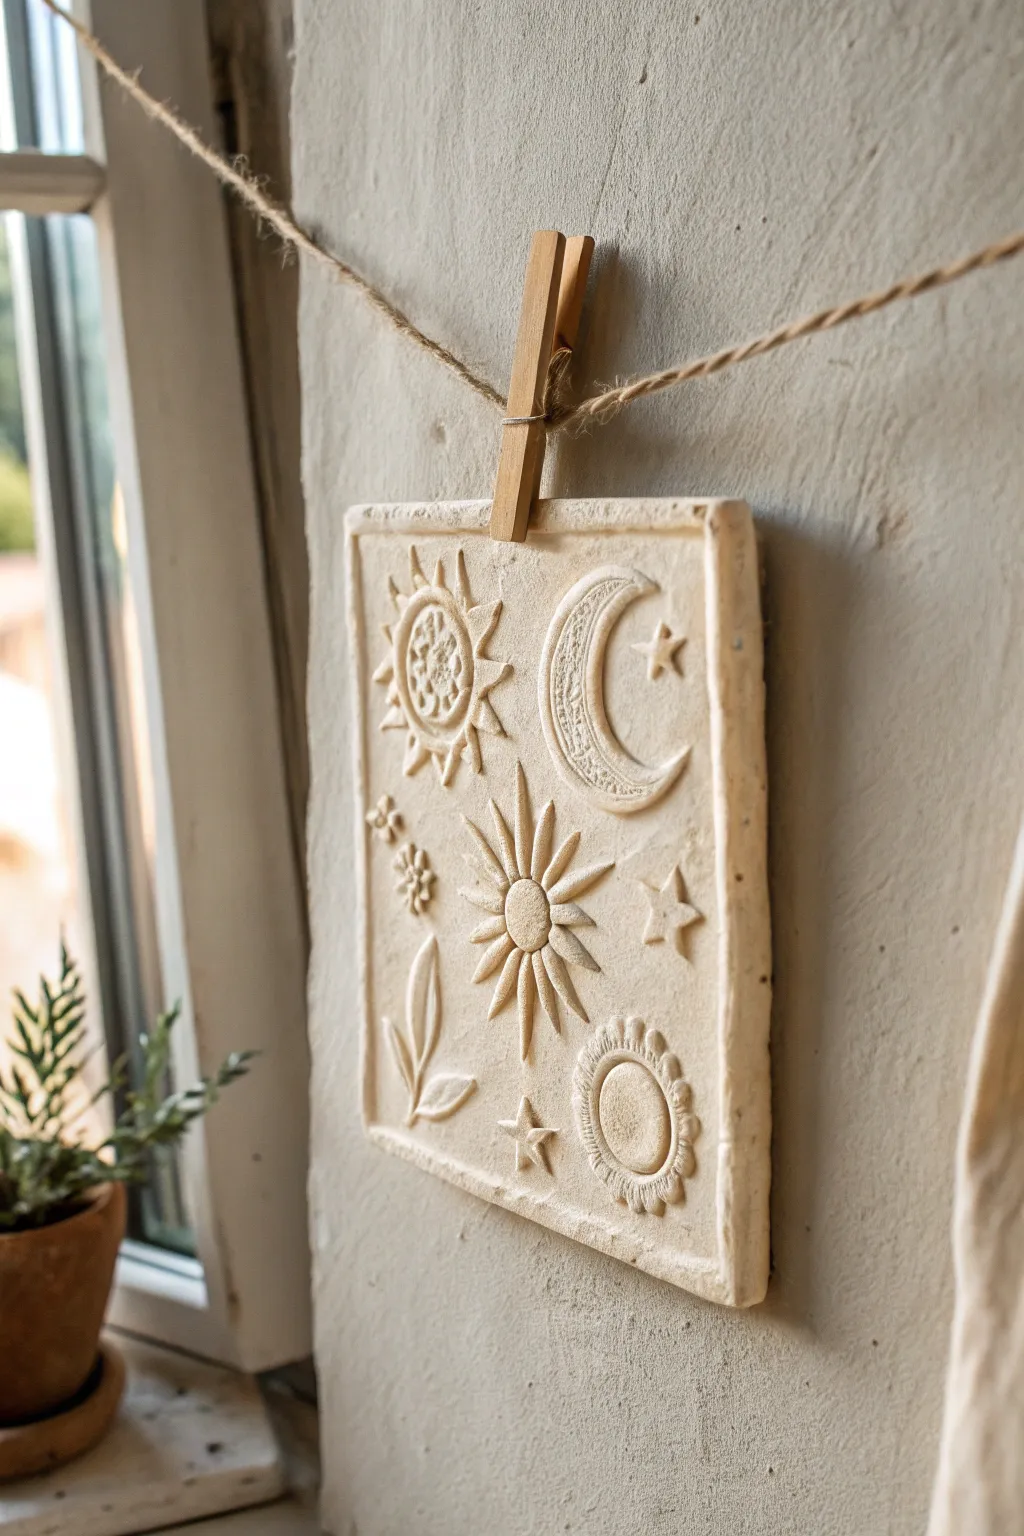
Capture the magic of the cosmos with this charming square wall plaque, featuring raised sun, moon, and star motifs. The natural, unglazed finish gives it a warm, rustic appeal perfect for hanging by a sunny window.
Step-by-Step
Materials
- White or light beige air-dry clay (or polymer clay)
- Rolling pin
- Square cookie cutter (approx. 4×4 inches) or knife and ruler
- Clay sculpting tools (needle tool, ball stylus)
- Small star-shaped cutters (optional)
- Texture stamps or found objects (for patterns)
- Jute twine
- Wooden clothespin
- Small bowl of water
- Fine-grit sandpaper
Step 1: Base Preparation
-
Condition the Clay:
Begin by taking a handful of your air-dry clay and kneading it thoroughly until it is soft, pliable, and free of cracks. -
Roll the Slab:
Roll the clay out onto a smooth surface or canvas mat to an even thickness of about 1/4 inch. Ensure it’s not too thin, or it may warp while drying. -
Cut the Square:
Use a square cookie cutter or a ruler and sharp knife to cut a clean, perfect square from the slab. Smooth the cut edges gently with a damp fingertip to remove any burrs.
Step 2: Creating the Celestial Motifs
-
Sculpt the Crescent Moon:
Roll a small coil of clay and taper the ends. Curve it into a ‘C’ shape and flatten it slightly. Score the back of the moon and the spot on the tile where it will go, dab with a little water, and press it firmly near the top right corner. -
Add Moon Texture:
Use a needle tool or a texture stamp to gently press intricate patterns or lines into the surface of the moon for visual interest. -
Form the Top Sun:
Roll a small ball for the sun’s center and flatten it onto the top left area using the score-and-slip method. For the rays, shape tiny triangles or coils and radiate them outward from the center. -
Detail the Sun:
Press a patterned stamp or a bottle cap into the center of the sun to create a textured core. -
Create the Central Starburst:
Place a small dome of clay in the center of the tile. Create longer, teardrop-shaped rays and arrange them around this center point, pressing them down so they adhere well. -
Add Texture to Rays:
Run a needle tool down the center of each sun ray to give them a leaf-like, dimensional look. -
Sculpt the Bottom Sun:
In the bottom right corner, add another circle. Instead of sharp rays, create a scalloped edge using small balls of clay flattened around the perimeter, or use a tool to indent the edges. -
Add Floral and Star Accents:
Fill the empty spaces with smaller details. I like to hand-sculpt tiny stars or use a small fondant cutter for precision. Add a simple stem with leaves in the bottom left corner for balance. -
Refine Edges:
Go over every added element with a small sculpting tool to ensure the edges are sealed to the base slab, preventing them from popping off later.
Warping Woes?
If the corners start to curl up while drying, place a light book on top of the tile (sandwich it between paper towels first) to weigh it down gently as it cures.
Step 3: Finishing Touches
-
Dry the Piece:
Place the tile on a wire cooling rack or a piece of cardboard. Let it dry completely for 24-48 hours, flipping it occasionally to prevent curling. -
Sand and Smooth:
Once fully dry, use fine-grit sandpaper to gently buff away any fingerprints or rough edges on the sides of the square. -
Hang the Artwork:
Cut a length of jute twine and tie knots at the ends or loop it. Use a wooden clothespin to clip the top of the tile to the twine, creating that rustic floating look shown in the image.
Level Up: Antique It
Mix a tiny amount of brown acrylic paint with water. Brush it over the relief and wipe it back immediately with a cloth. The dark color stays in the crevices for depth.
Now you have a serene piece of celestial art ready to add a touch of whimsy to your wall
Tiny Room Diorama Tray
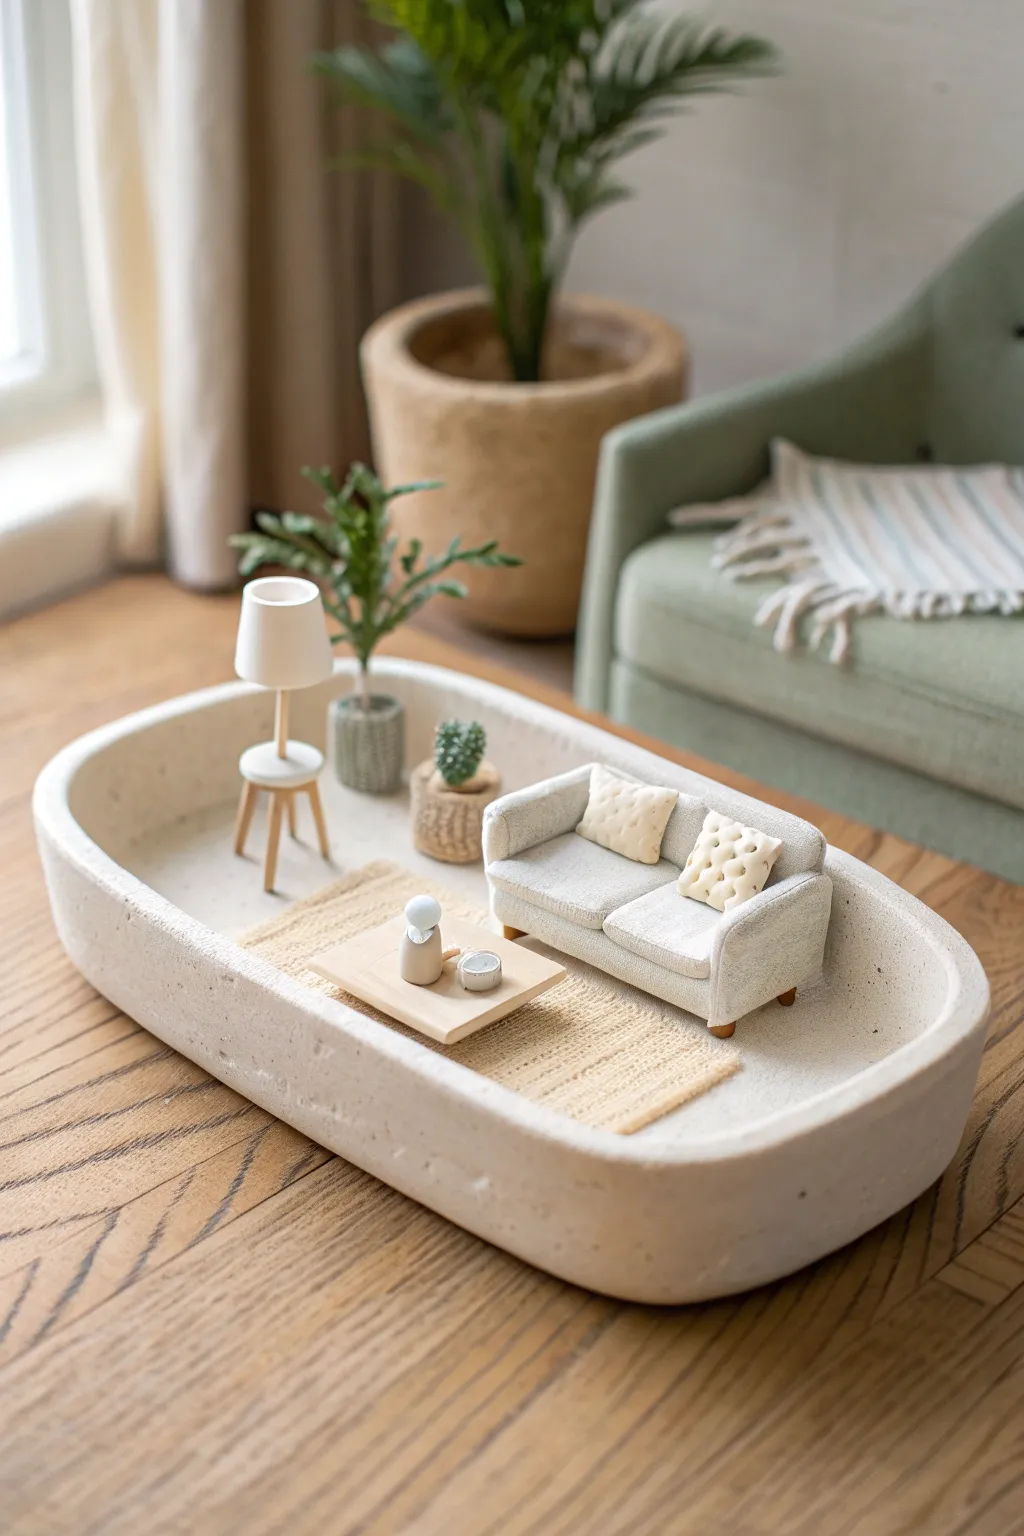
Create a charming, pocket-sized living space nestled inside a sleek, oval basin. This project combines polymer clay sculpting with simple diorama techniques to build a serene, modern micro-environment perfect for a desk or shelf display.
Step-by-Step Tutorial
Materials
- Air-dry clay (stone or white color)
- Polymer clay (white, beige, green, brown)
- Fine grit sandpaper
- Acrylic rolling pin
- Sculpting tools (needle tool, ball stylus)
- Hessian styling fabric or burlap scrap
- Thin wooden sheet or balsa wood
- Toothpicks or thin wooden skewers
- Craft glue or strong super glue
- White acrylic paint (optional for texture)
- Matte varnish
Step 1: Sculpting the Tray Base
-
Form the base shape:
Begin with a large lump of air-dry clay. Roll it out into a thick oval slab, approximately 1/4 inch thick. This will be the floor of your miniature room. -
Build the walls:
Roll a long, thick snake of clay. Attach this coil around the perimeter of your oval base, scoring and slipping the clay where the pieces join to ensure a strong bond. -
Smooth and shape:
Use your fingers and a little water to smooth the coil upwards, blending it seamlessly into the base to create a continuous wall. Aim for a height of about 1.5 inches with a rounded, organic top edge. -
Dry and sand:
Allow the clay tray to dry completely (24-48 hours). Once hard, sand the entire surface with fine-grit sandpaper to mimic the look of smooth, cast stone.
Cracking Clay?
If your air-dry tray develops hairline cracks while drying, mix a small amount of fresh clay with water to make a paste (slip) and fill in the gaps, then sand smooth once dry.
Step 2: Creating the Furniture
-
Sculpt the sofa base:
Using light grey or white polymer clay, form a rectangular block for the seat and a thinner rectangle for the backrest. Join them together securely. -
Add arms and details:
Add two curved pieces for the armrests. Use a needle tool to gently scribe lines separating the seat cushions, giving them a plush, upholstered look. -
Make the legs:
Cut four very short pieces of toothpick or shape tiny cones of brown clay. Bake or glue these to the bottom of the sofa after the main body is firm. -
Craft tiny pillows:
Shape two small squares of cream-colored clay. Press a textured tool or clean toothbrush against them to create a fabric-like weave pattern, then press dimples into the center for a ‘tufted’ button effect. -
Assemble the lamp:
Mold a small white cone for the lampshade and a flat white circle for the base. Connect them using a small snippet of a wooden skewer as the lamp stand. -
Prepare the coffee table:
Cut two small squares from your balsa wood or roll out beige clay into flat squares. Stack one slightly smaller square on top of the other at an angle for a modern design.
Step 3: Adding Greenery and Decor
-
Make the planters:
Form two small cylinders from clay. For texture, I like to roll one over a comb or textured fabric to create a woven basket look. -
Sculpt the cactus:
Roll a tiny ball of green clay and place it in the smaller pot. Use a needle tool to poke tiny holes all over it to simulate spines. -
Create the leafy plant:
For the taller plant, wrap green clay around thin wire stems to create leaves. Stick these wires into the larger pot, arranging them to fan out naturally. -
Accessorize the table:
Create minute shapes like a tiny vase or a bowl from scrap clay to place on the coffee table. -
Bake the polymer pieces:
Place all your polymer clay furniture and plants on a tile and bake according to the package instructions. Let them cool completely.
Textured Upholstery
Before baking the sofa, gently press a piece of real fabric (like denim or linen) onto the clay surface to imprint a realistic woven texture onto the ‘furniture’.
Step 4: Assembly
-
Lay the rug:
Cut a small rectangle from your hessian or burlap fabric. Fray the edges slightly by pulling out a few threads to create a fringed rug look. -
Arrange the scene:
Glue the rug into the center of the tray. Position the sofa on top of the rug, followed by the coffee table. -
Final placement:
Glue the lamp and plants into their designated spots around the furniture, ensuring the composition feels balanced and inviting.
Now you have a peaceful miniature sanctuary that brings a touch of calm to any room
Whistle Or Bell Creature
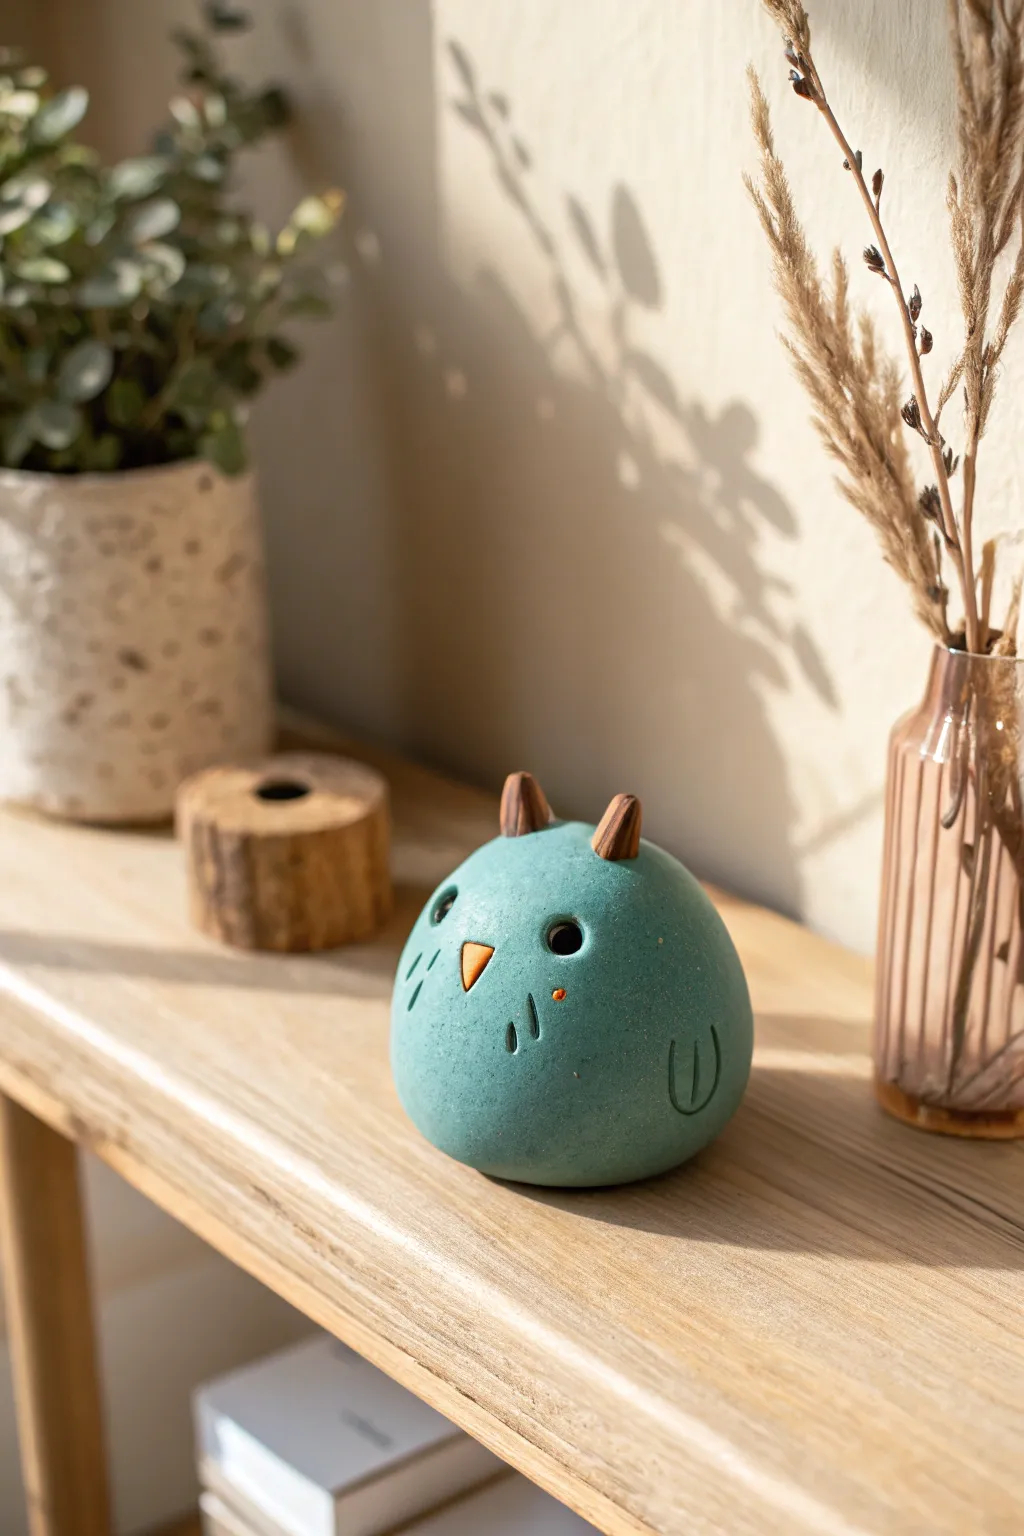
This charming, rotund little creature combines the rustic appeal of matte turquoise clay with simple, expressive details to create a delightful desk companion. Whether functioning as a whistle or a hollow shaker, its rounded form and minimalist features make it an approachable sculpting project.
Step-by-Step Guide
Materials
- Turquoise polymer clay or air-dry clay
- Brown polymer clay (for ears)
- Small amount of orange clay (for nose)
- Clay sculpting tools (needle tool, small loop tool)
- Small rolling pin
- Aluminum foil (optional, for core)
- Hollow bead or whistle mechanism (if making functional)
- Matte sealant or varnish
Step 1: Forming the Base Body
-
Condition the main clay:
Begin by thoroughly kneading your turquoise clay until it is soft and pliable. If you are using a large amount of clay, you might want to create a tightly packed ball of aluminum foil first to serve as a lightweight core. -
Shape the sphere:
Roll the clay into a smooth, even ball. If using a foil core, wrap the clay sheet around it, smoothing the seams completely so they vanish. The final shape should be slightly flattened on the bottom so it sits stably without rolling away. -
Refine the surface:
Gently rub the surface with your thumb or a smooth tool to remove any fingerprints. A bit of cornstarch or water (depending on your clay type) can help achieve that stone-like smoothness.
Sticky Situation?
If your clay gets too soft and sticky, put it in the fridge for 10 minutes. This firms it up, making it easier to carve details without distorting the round shape.
Step 2: Adding Facial Features
-
Create the eye sockets:
Using a small ball tool or the rounded end of a paintbrush, press two indentations into the upper front of the sphere. These should be deep enough to create shadow but not pierce through the wall. -
Add the beak:
Take a tiny piece of orange clay and shape it into a small, flat triangle. Press this firmly into the center of the face, just below the eye line. You can score the back slightly for better adhesion. -
Sculpt the ears:
Roll two small cones of brown clay. Flatten the bottoms slightly and attach them to the top of the head. I like to curve the tips just a tiny bit to give the creature more character. -
Blend the ear seams:
Use a modeling tool to gently blend the base of the brown ears into the turquoise scalp, ensuring a strong bond so they don’t pop off later.
Step 3: Details and Texturing
-
Incise the wing details:
On the lower sides of the body, use a U-shaped gouge or a needle tool to carve simple outlines representing wings. A ‘U’ shape with a vertical line through it works perfectly for this stylized look. -
Add facial markings:
Using a needle tool, gently impress three small vertical dashes under each eye area to suggest feathers or whiskers. -
Create the blush spots:
If you have tiny bits of orange clay left, press minute dots onto the cheeks, or use a tool to create small divots that you can paint later. -
Refine the surface again:
Check your work for any accidental fingernail marks or dust. Lightly brush with a soft brush specifically for clay to smooth out the final texture.
Make it Sing via Sound hole
To make a real whistle, build the creature hallow. Cut a bevel into a rectangular opening and direct the mouthpiece air exactly at the sharp edge of the bevel.
Step 4: Finishing Touches
-
Bake or Dry:
Follow the specific instructions for your clay type. If using polymer clay, bake at the recommended temperature (usually around 275°F/135°C). For air-dry clay, allow it to sit undisturbed for 24-48 hours. -
Cool down:
Let the piece cool completely before handling. It is weakest when it is still warm from the oven. -
Highlight the eyes:
If the eye sockets aren’t dark enough from shadow alone, use a tiny drop of diluted black acrylic paint inside the recesses to add depth. -
Seal the piece:
Apply a coat of matte varnish or sealant. Avoid glossy finishes if you want to maintain the natural, stone-like aesthetic shown in the example.
Place your little clay friend on a shelf near a window to catch the afternoon light