Every March I end up reaching for green clay heishi beads and a little sparkle, because nothing says St. Patrick’s Day like a bracelet stack that looks lucky on sight. Here are my favorite clay bead bracelet ideas—classic crowd-pleasers first, then a few playful twists when you’re ready to experiment.
Classic Green-and-Gold Lucky Stack
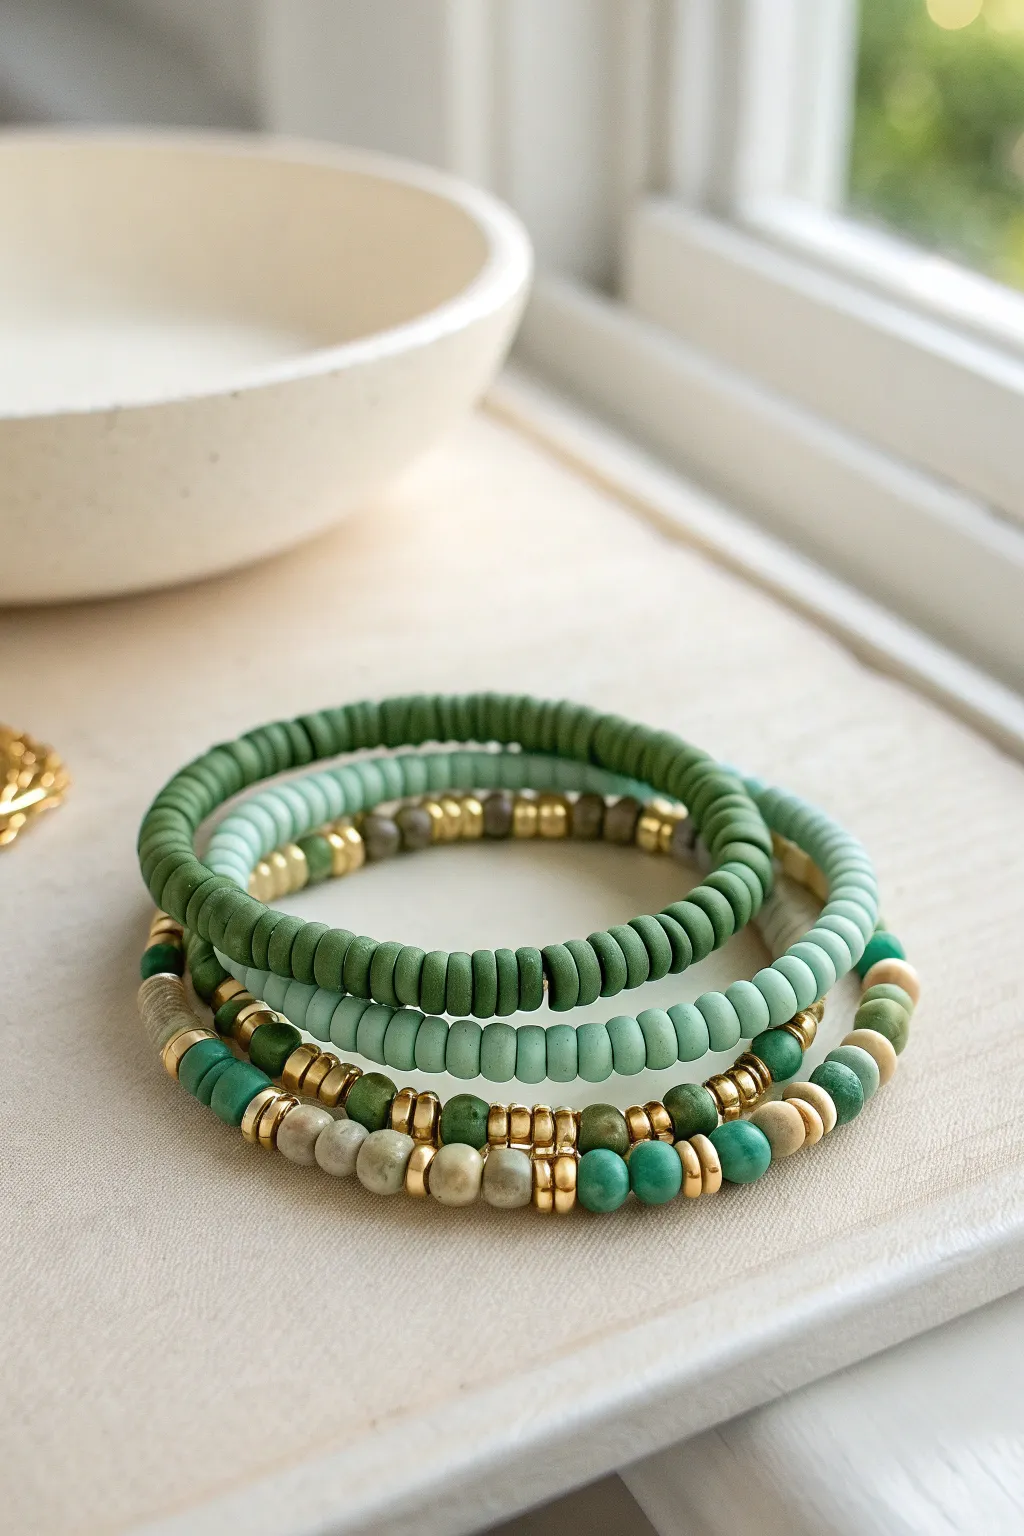
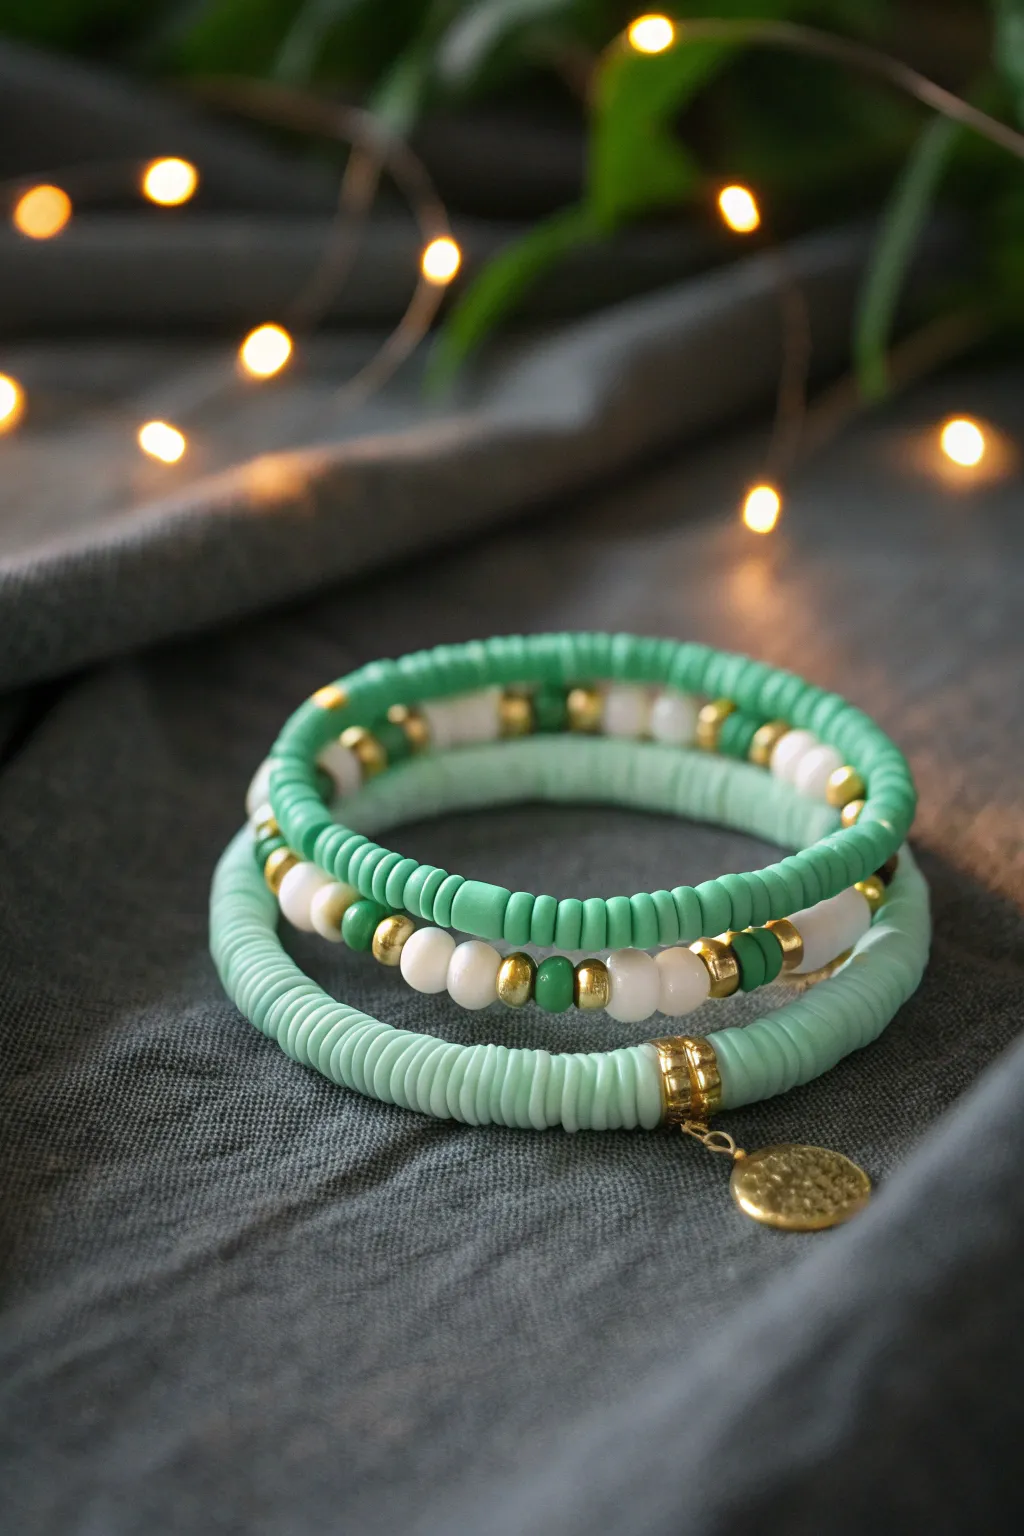
Embrace the spirit of St. Patrick’s Day with this sophisticated trio of stretch bracelets featuring varying shades of green and elegant gold accents. The combination of matte clay discs, natural stone beads, and metallic spacers creates a textured, luxurious stack that feels lucky without being loud.
Step-by-Step Tutorial
Materials
- Matte dark forest green Heishi clay beads (6mm)
- Matte sage green Heishi clay beads (6mm)
- Natural stone beads in mixed greens (jade or aventurine, 6mm and 8mm)
- Small gold spacer beads (disc or rondelle shape)
- Gold tube beads (curved or straight)
- Cream or beige stone beads (for accents)
- High-quality elastic cord (0.8mm)
- Super glue or jewelry cement
- Scissors
- Bead stopper or tape
Step 1: The Dark Forest Strand
-
Measure and cut:
Cut a piece of elastic cord about 10-12 inches long. This generous length makes tying the knot much easier later on. Secure one end with a bead stopper or a piece of tape to prevent beads from sliding off. -
Begin stringing:
This first bracelet is the simplest of the stack, focusing on uniform texture. Start threading the dark forest green Heishi clay beads onto the elastic. -
Check the fit:
Continue adding beads until the strand measures about 6.5 to 7 inches, or your desired wrist size. Wrap it around your wrist to check the fit; it should be snug but not tight. Remove or add a few discs as needed. -
Tie it off:
Pre-stretch the elastic slightly to prevent sagging later, then tie a secure surgeon’s knot (right over left, left over right). Add a tiny drop of jewelry glue to the knot. -
Finish the strand:
Once the glue is tacky but dry, trim the excess cord close to the knot. If possible, gently slide a bead over the knot to hide it.
Knot Slipping?
If your elastic knots feel insecure, try a ‘surgeon’s knot’ where you loop the cord through twice on the first pass before pulling tight. It adds extra friction.
Step 2: The Sage & Gold Mix
-
Prepare the cord:
Cut another 12-inch length of elastic and secure the end just like the first bracelet. -
Create the pattern base:
Thread on a section of the sage green Heishi beads. Use about 20-30 beads to create a solid block of color that will sit on the top of the wrist. -
Add metallic accents:
Transition into a mixed section. Slide on a gold spacer bead, followed by a few sage beads, and repeat. I like to vary the number of green beads between the gold spacers to keep the look organic. -
Incorporate stone accents:
Towards the back of the bracelet (the side opposite your main sage block), thread on 3-4 darker natural stone beads separated by gold spacers to tie the color palette together with the first bracelet. -
Close the loop:
Check the length against the first bracelet to ensure they match perfectly. Tie your surgeon’s knot, glue, dry, and trim the excess cord.
Make it Lucky
Add a small gold four-leaf clover charm or a shamrock pendant to the eclectic stone strand. Attach it using a gold jump ring between two of the metal spacer beads.
Step 3: The Eclectic Stone Strand
-
Select your beads:
This final strand is the most detailed. Lay out a pattern on a bead board or towel before stringing. You want a mix of the dark green stones, cream stones, and plenty of gold spacers. -
Start the sequence:
Begin threading with a repeating pattern: one stone bead followed by two flat gold spacer beads stacked together. This double-gold technique adds a richer look. -
Vary the textures:
Alternate between the dark green stones and the cream/beige stones. For visual interest, swap a standard round stone for a gold tube bead or a cluster of 3-4 small gold spacers every inch or so. -
Add Heishi accents:
To connect this bracelet visually to the others, add two or three small sections of the dark green Heishi beads (about 5 beads long) amidst the stones. -
Final adjustments:
Wrap the strand around your wrist. Because round stone beads are bulkier than flat clay discs, you might need a slightly longer length of cord to get the same comfortable fit. -
Secure the stack:
Pre-stretch the cord one last time. Tie your knot firmly, apply your adhesive, and let it cure completely before trimming the ends. Slide the knot inside one of the larger stone beads if the hole size permits.
Slip on all three bracelets together for a chic, textured look that brings a touch of Irish elegance to your outfit


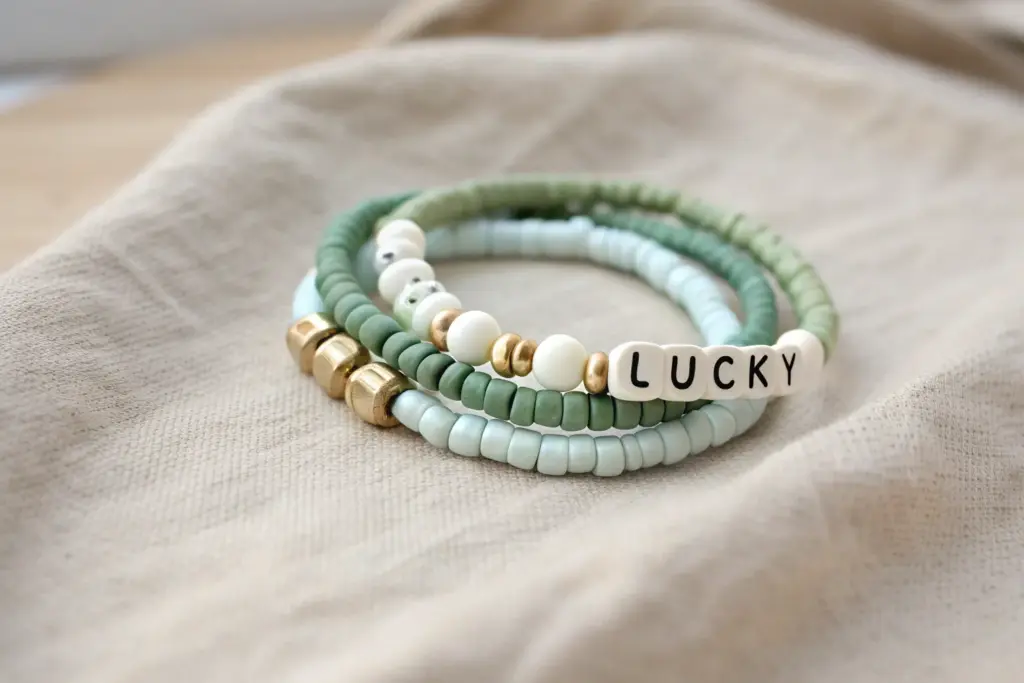
“LUCKY” Letter Bead Centerpiece

Embrace the spirit of St. Patrick’s Day or simply invite good fortune with this elegant beaded bracelet. Combining earthy green stone beads with crisp letter cubes creates a sophisticated accessory that’s miles beyond your typical plastic pony bead craft.
How-To Guide
Materials
- Green semi-precious round beads (6mm or 8mm, likely Aventurine or Jade)
- White square letter beads spelling ‘LUCKY’
- Two gold round spacer beads (4mm or 5mm)
- Beading wire (flexible, 49-strand recommended)
- Two gold crimp beads
- Two gold wire guards
- Gold lobster clasp and jump ring
- Crimp tool or flat nose pliers
- Wire cutters
- Bead design board (optional but helpful)
Step 1: Setting the Stage
-
Measure and Cut:
Begin by measuring your wrist to determine the desired length of your bracelet. Add about 1.5 inches to this measurement and cut a length of beading wire. It is always better to have a bit of excess wire to work with than to come up short. -
Layout Design:
Arrange your beads on a layout board or a soft towel. Place the ‘LUCKY’ letter beads in the center. Position a gold spacer bead on immediate left and right of the word to frame it. -
Distribute the Green:
Count your green stone beads and divide them into two equal piles. Place one set on the left of your centerpiece and the other on the right to ensure the bracelet remains symmetrical.
Step 2: Stringing the Beads
-
Start the Strand:
Secure one end of your wire temporarily with a piece of tape or a bead stopper so beads don’t slide off as you work. -
First Green Section:
Thread the first half of your green round beads onto the wire. Enjoy the variation in color tones if you are using natural stones; the slight differences add beautiful depth. -
Add the Accent:
Slide on the first gold spacer bead. This metallic pop acts as a visual transition between the stone texture and the smooth letter beads. -
Spell it Out:
Thread the letter beads in order: L, U, C, K, Y. Double-check that they are facing the correct direction and aren’t upside down before proceeding. -
Second Green Section:
Add the second gold spacer bead followed by the remaining stack of green round beads to complete the pattern.
Stone Selection
For the specific look in the photo, search for ‘Green Aventurine’ or ‘Moss Agate.’ These stones have that darker, varied, semi-translucent green quality.
Step 3: Adding the Hardware
-
Prep the Crimp:
On one end of the wire, slide on a crimp bead followed by a wire guard. Loop the wire through the guard and back down through the crimp bead. -
Secure the Clasp:
Before tightening, hook your lobster clasp onto the wire guard. I find using a wire guard gives the project a much more professional finish than just looping the wire. -
Crimp It:
Pull the wire snug so the loop is tight but flexible. Use your crimping tool to flatten the crimp bead securely, locking the wire in place. -
Finish the Second End:
Repeat the crimping process on the other end, this time attaching a jump ring instead of a clasp. Be sure to pull the wire tight enough to remove gaps between beads, but leave just enough wiggle room so the bracelet drapes naturally. -
Trim and Tuck:
Use your flush cutters to trim the excess wire tail close to the crimp bead. If possible, tuck a tiny bit of the tail into the first adjacent green bead for a seamless look.
Level Up: Hidden Knot
Use elastic cord instead of wire for a clasp-free version. Pre-stretch the elastic and hide the final knot inside one of the gold spacer beads for a clean finish.
Slip on your new lucky charm and enjoy the elegant touch of green it brings to your outfit


Shamrock Charm Focal Bracelet
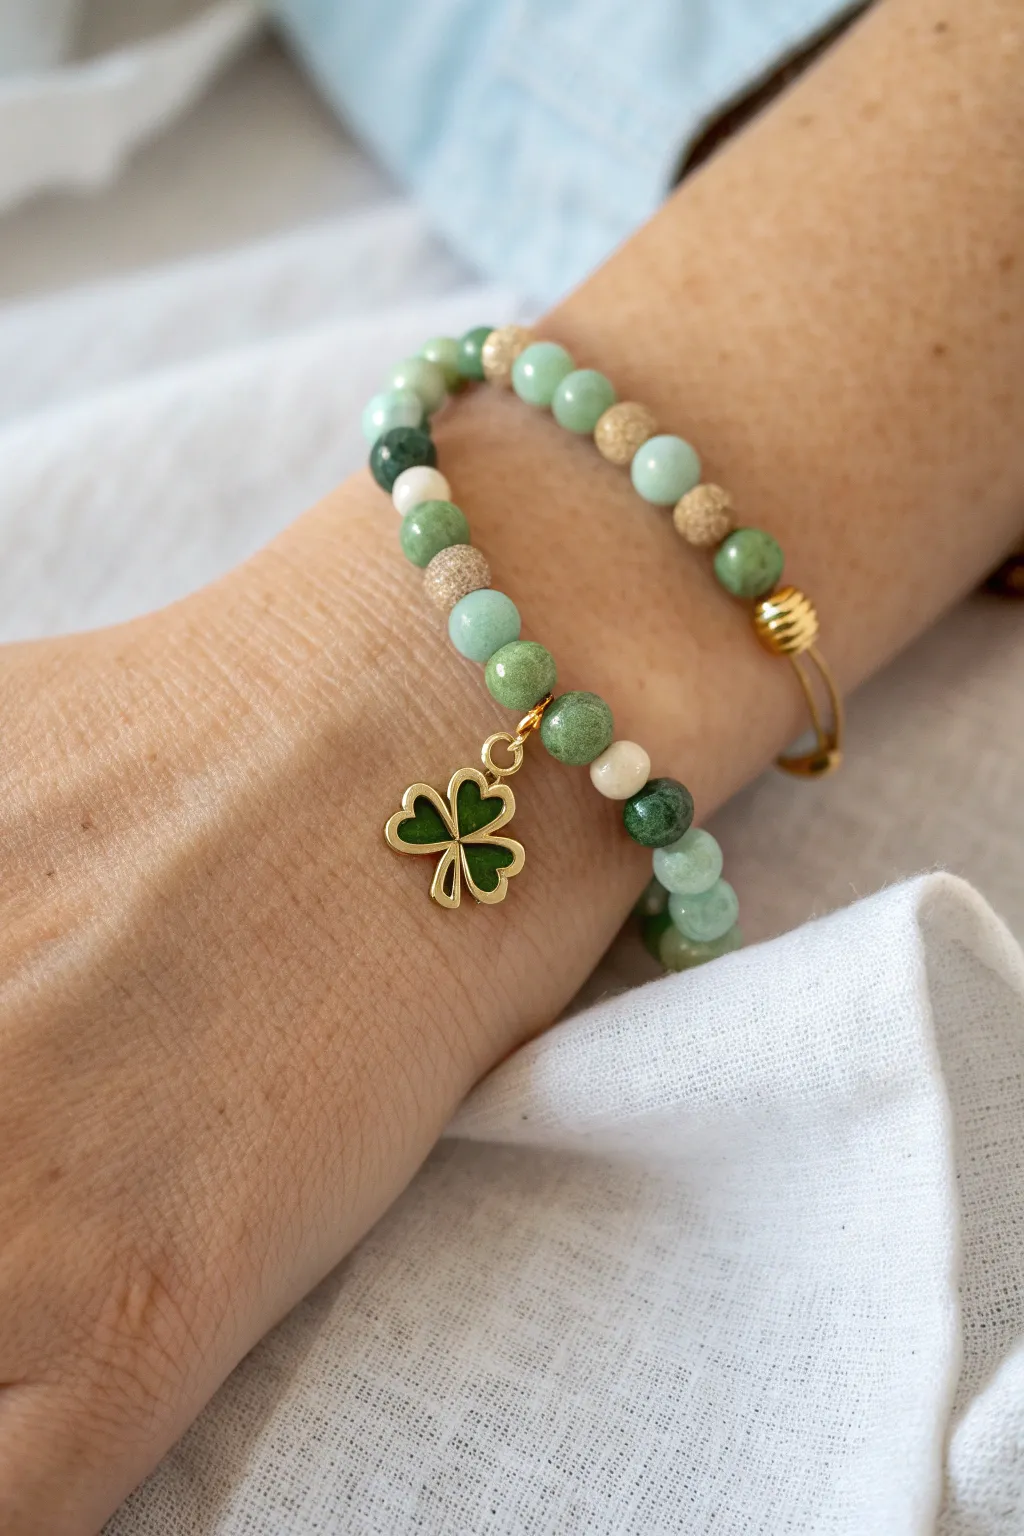
This elegant bracelet balances earthy gemstone tones with a delicate gold accent for a sophisticated take on St. Patrick’s Day style. The mix of sage, forest green, and cream beads creates a natural palette that really lets the enamel shamrock charm shine.
Step-by-Step
Materials
- Elastic beading cord (0.7mm or 0.8mm)
- Gold enamel four-leaf clover/shamrock charm
- 6mm or 8mm round gemstone beads (Green Aventure, Jade, or Moss Agate mix)
- Small cream/white accent beads (Riverstone or White Tridacna)
- Textured gold-tone metal spacer beads (round)
- Gold jump ring (4mm or 5mm, open)
- Jewelry glue (GS Hypo Cement recommended)
- Scissors or bead nippers
- Two pairs of jewelry pliers (flat nose or chain nose)
Step 1: Planning Your Design
-
Measure your wrist:
Wrap a flexible measuring tape comfortably around your wrist to determine your size. Add about 0.5 to 1 inch to this measurement to ensure the bracelet fits comfortably without pinching. -
Lay out the bead board:
If you have a bead design board, lay your beads in the circular channe so you can visualize the pattern. If not, a soft cloth or towel works perfectly to keep beads from rolling away. -
Create the color mixture:
This bracelet relies on a random but balanced mix. Alternate darker forest greens with lighter sage greens. Intersperse the cream beads and textured gold spacers every 3-4 colored beads to break up the pattern. -
Identify the center point:
Choose the exact spot where you want your charm to hang. This should generally be opposite the knot closure, though with a continuous pattern, it’s less critical.
Knot Slipping?
If your surgeon’s knot feels slippery, try rubbing the ends of the elastic with a little beeswax or roughing them slightly with sandpaper before tying for extra grip.
Step 2: Attaching the Charm
-
Open the jump ring:
Using your two pairs of pliers, grip the gold jump ring on either side of the split. Twist one hand forward and one hand back to open the ring sideways—never pull it apart outward, as this weakens the metal. -
Connect the charm:
Slide the loop of your shamrock charm onto the open jump ring. While it’s open, if you want the charm to hang directly on the cord, you can close it now. Alternatively, attach it to a specific bead or distinct carrier bead. -
Close the ring:
Use the same twisting motion with your pliers to bring the ends of the jump ring back together until they are flush and tight.
Step 3: Stringing the Beads
-
Pre-stretch the cord:
Cut a piece of elastic cord about 10-12 inches long. Before stringing, give it a few firm tugs to pre-stretch the elastic; this prevents the bracelet from loosening up immediately after you wear it. -
Secure the end:
Place a piece of tape or a bead stopper clip on one end of your cord so your beads don’t slide right off while you work. -
Start stringing:
Begin threading your beads onto the elastic. I like to start with a bead that has a slightly larger hole if possible, which will help hide the knot later. -
Add the focal section:
When you reach the planned center of your strand, string on the jump ring holding your shamrock charm. It should sit freely between two beads. -
Finish the pattern:
Continue adding beads, mirroring your random pattern until the strand reaches your desired length. -
Test the fit:
carefully wrap the un-knotted strand around your wrist to check the size. Remove or add beads as necessary to get that perfect fit.
Make It Luxe
Swap the textured metal spacers for genuine gold-filled stardust beads. They catch the light beautifully and won’t tarnish as quickly, elevating the look instantly.
Step 4: Finishing Touches
-
Prepare the knot:
Remove the tape or bead stopper. Bring the two ends of the elastic together, ensuring there is no slack in the bead line. -
Tie a surgeon’s knot:
Cross the right end over the left, loop it through twice, and pull tight. Then cross the left end over the right, loop it through once, and pull securely. This extra loop creates friction that holds the elastic better. -
Secure with glue:
Apply a tiny dab of GS Hypo Cement or strong jewelry glue directly onto the knot. You don’t need much; just enough to saturate the knot threads. -
Hide the knot:
While the glue is still slightly tacky, pull the elastic gently so the knot slides inside the hole of the adjacent bead. Let it dry completely in this position. -
Trim the excess:
Once the glue is fully cured (usually 24 hours for full strength), use sharp scissors or nippers to trim the excess elastic tails as close to the bead hole as possible without cutting the knot.
Wear your new charm bracelet stacked with gold bangles for a chic, layered look


Irish Flag Tricolor Color Blocks
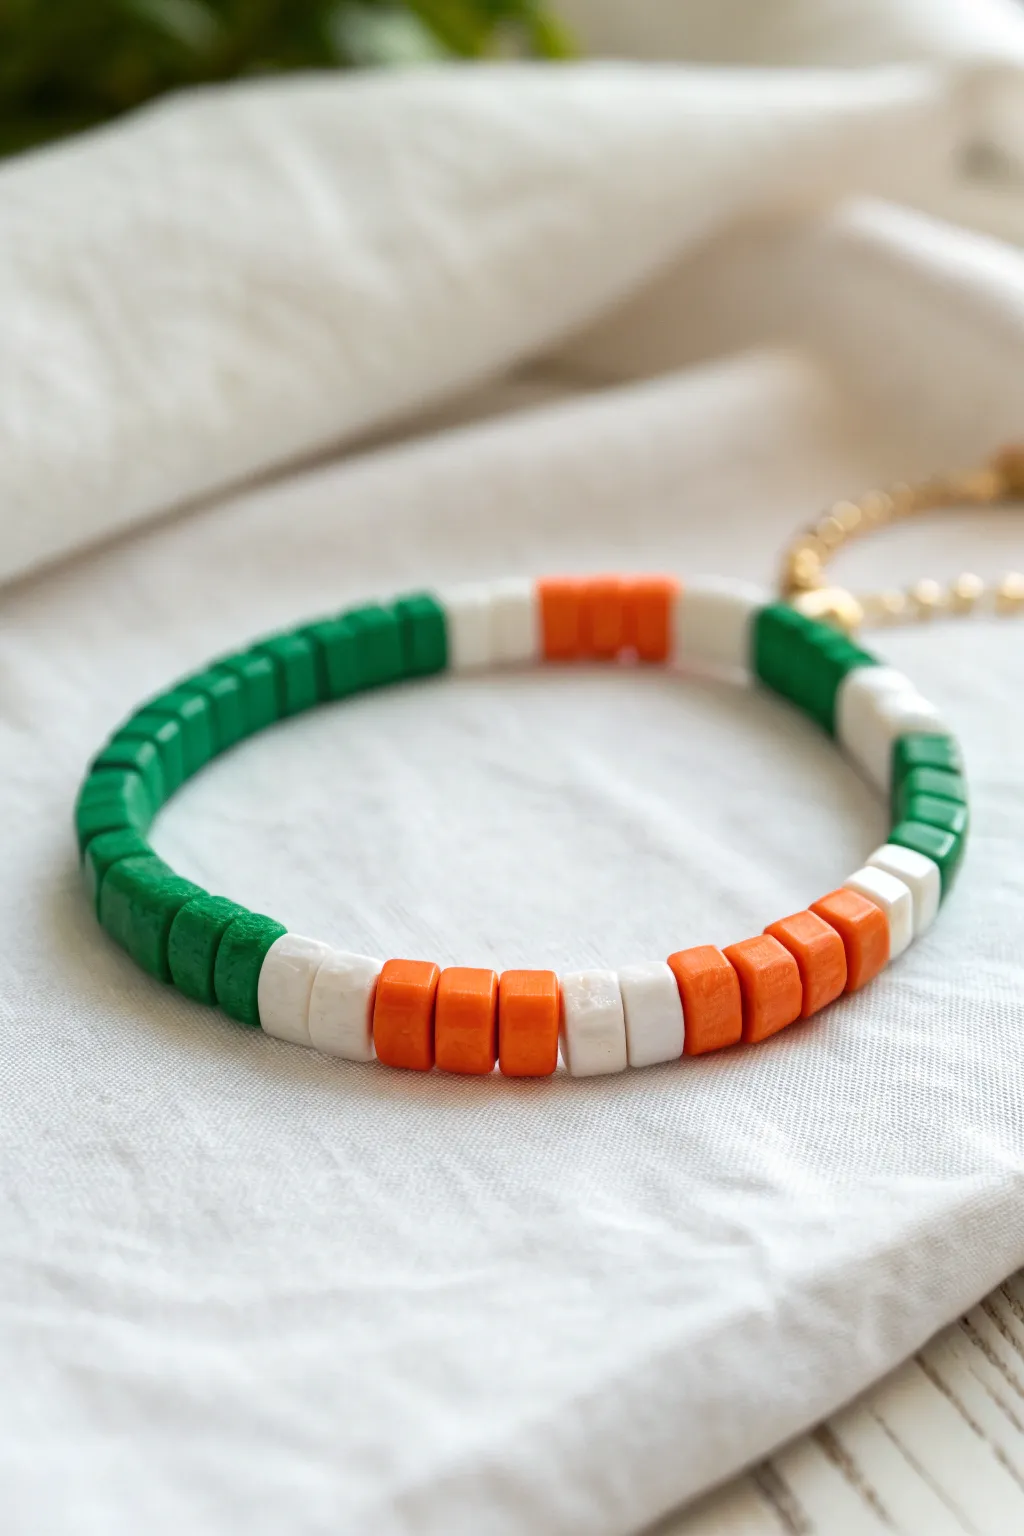
Celebrate St. Patrick’s Day with a sophisticated take on the Irish flag’s colors using this sleek color-blocked design. The matte texture of square clay beads gives the traditional green, white, and orange palette a modern, wearable update.
Step-by-Step Guide
Materials
- Square polymer clay heishi beads (approx 4-6mm) in Kelly Green
- Square polymer clay heishi beads in Bright White
- Square polymer clay heishi beads in Orange
- Strong elastic cord (0.8mm or 1mm)
- Small gold crimp beads or knot covers (optional)
- Gold extension chain and clasp (optional for adjustable fit)
- Super glue or jewelry adhesive
- Scissors or jewelry snips
Step 1: Planning the Pattern
-
Measure your wrist:
Before you cut any string, wrap the elastic cord loosely around your wrist to gauge the size. Add about 3-4 inches of extra length to give yourself plenty of room for tying the knots later. -
Pre-layout the design:
Lay your beads out on a flat surface or bead board to establish the pattern. This design relies on asymmetry, so planning it visually first is crucial. -
Establish the main block:
Create the primary visual anchor by setting aside a large group of green beads. For this specific look, aim for a section about 1.5 to 2 inches long.
Square Bead Alignment
Unlike round beads, square beads can rotate and look messy. String them tightly enough so they maintain a flat ‘brick’ alignment.
Step 2: Stringing the Beads
-
Secure the end:
Create a temporary knot at one end of your elastic cord or use a piece of tape to prevent beads from sliding off while you work. -
Start with the green section:
Thread the main block of green square beads onto the elastic. Keep the tension slightly loose so the beads can sit flat against each other without buckling. -
Add a white transition:
Add a small block of white beads. In the reference, this looks like about 3-4 beads. -
Add an orange transition:
Follow the white with a small block of orange beads, keeping the count roughly equal to the white section for balance. -
Create a white spacer:
Thread on another small set of white beads (approx. 3-4) to separate the orange sections. -
Build the orange block:
Add a slightly longer section of orange beads now. This varies the visual rhythm; try using 5-6 beads here. -
Repeat the spacer pattern:
Add another small group of white beads (2-3), followed by a small group of orange beads (3-4). -
Finish the color run:
Complete the patterned section with 2-3 final white beads. -
Close the loop with green:
Fill the rest of the bracelet length with green beads until it reaches your desired size. The goal is for the green to meet the initial green block, making the colored stripes feel like an insert.
Gold Accent Upgrade
Replace one of the white spacer sections with gold square beads or a single gold disc for a metallic pop that matches the clasp.
Step 3: Finishing Touches
-
Check the fit:
Wrap the unfinished strand around your wrist one last time. It should sit comfortably without pinching or leaving deeper indentations on your skin. -
Tie the knot:
Remove the temporary tape or knot. Tie the two ends of the elastic together using a surgeon’s knot (right over left, left over right) for maximum security. -
Secure with glue:
Place a tiny drop of jewelry adhesive or super glue right onto the knot. I find using a toothpick to apply the glue helps avoid getting it on the visible beads. -
Hide the knot:
While the glue is still slightly tacky but not wet, gently pull the knot inside the hole of the nearest bead to conceal it. -
Trim excess cord:
Once the glue is completely dry, snip off the excess elastic tail close to the bead. -
Optional: Add hardware:
If you prefer a clasp over a stretch fit, attach crimp beads to the ends instead of knotting, and connect jump rings and a gold extension chain as shown in the background of the image.
Now you have a stylish piece of jewelry ready for the parade or just a subtle nod to Irish heritage

The Complete Guide to Pottery Troubleshooting
Uncover the most common ceramic mistakes—from cracking clay to failed glazes—and learn how to fix them fast.
Green Ombre From Forest to Mint
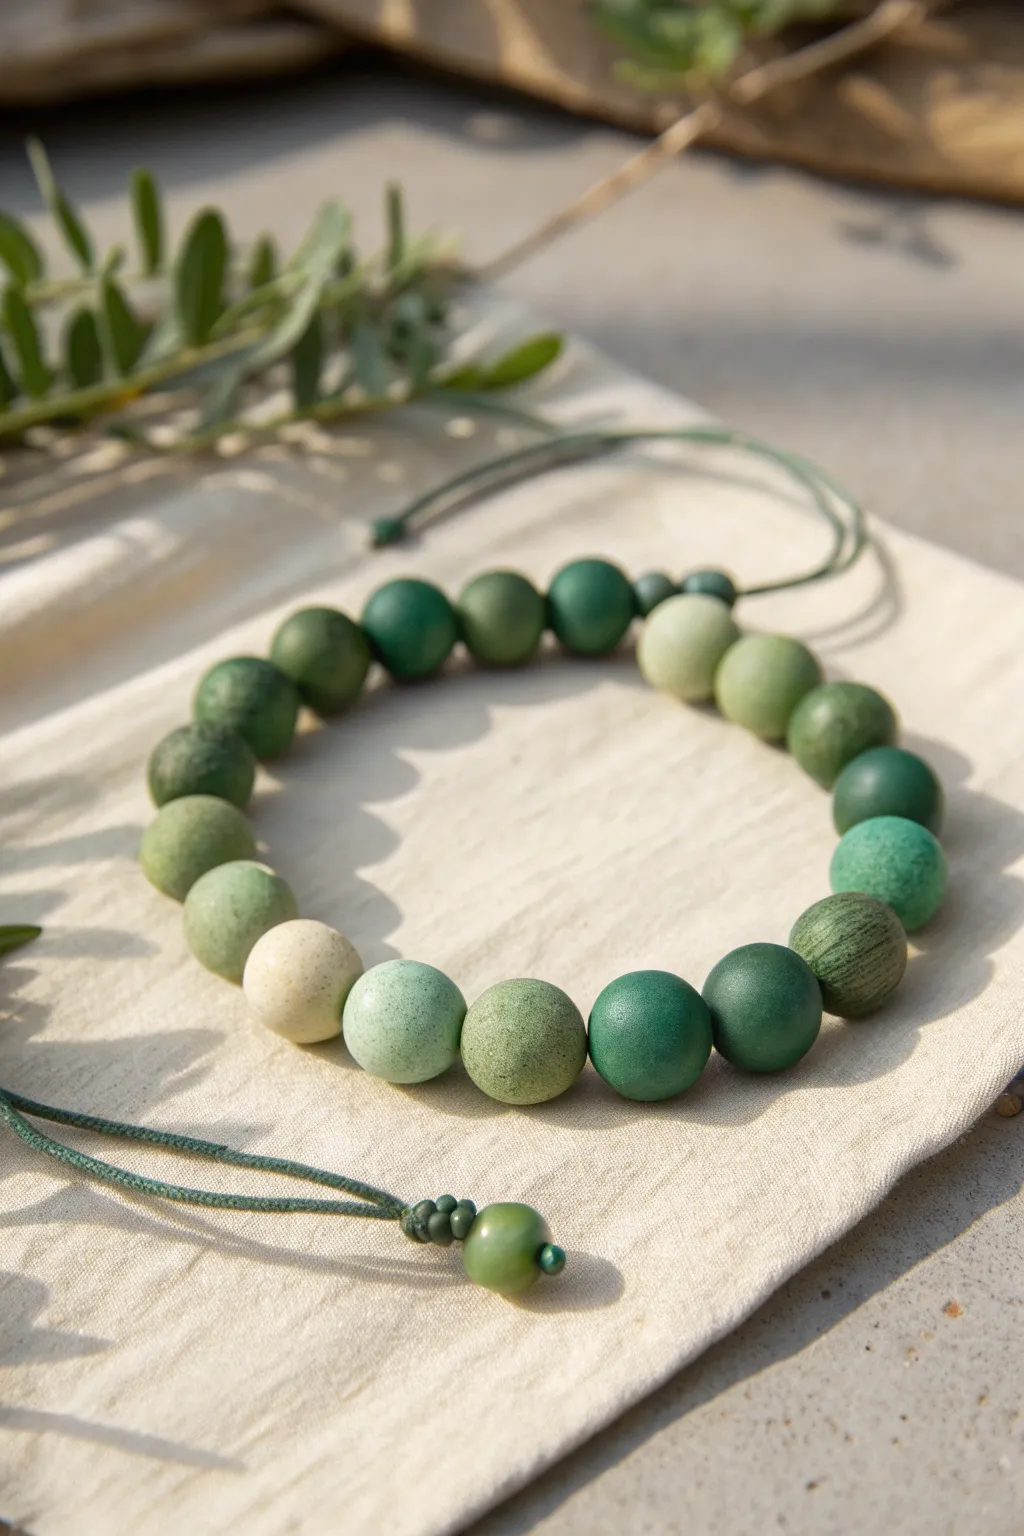
Capture the lush spectrum of a mossy forest floor with this sophisticated St. Patrick’s Day accessory. This project focuses on subtle color transitions using matte clay beads to create a wearable gradient that feels organic and modern.
Step-by-Step Tutorial
Materials
- Polymer clay (forest green, kelly green, white, pale yellow)
- Clay roller or pasta machine
- Round bead rolling tool (or palms)
- Bead piercing pin or toothpick
- Green 1mm waxed cotton cord or nylon cord
- Baking sheet and parchment paper
- Sandpaper (fine grit, 400-600)
- Scissors
Step 1: Creating the Ombre Palette
-
Condition the base colors:
Begin by thoroughly kneading your dark forest green and white polymer clay separately until they are soft and pliable. This prevents cracking later. -
Mix the darkest shade:
For your deepest tone, you can use the forest green straight from the package, or mix in a tiny pinch of black to deepen it further. Set aside a ball of this pure color. -
Create the mid-tones:
Take a portion of forest green and mix it with a small amount of kelly green and white. Knead until the color is uniform. This will be your second darkest shade. -
Lighten the mixture:
Continue creating lighter shades by progressively adding more white to your green mixtures. Aim for about 5-6 distinct shades ranging from deep emerald to a soft sage. -
Form the lightest beads:
For the palest beads (the ‘mint’ end of the spectrum), use mostly white clay with just a speck of green and a tiny dot of yellow to warm it up. Additionally, keep one or two beads almost entirely cream or pale beige for high contrast. -
Portion the clay:
Pinch off equal amounts of clay from each color mix. You’ll want roughly 18-20 beads total for a standard adult bracelet, so ensure you have enough clay for 2-3 beads of each shade.
Clean Hole Pro Tip
To prevent the exit hole from puckering, pierce the bead halfway from one side, then flip it and pierce specifically to meet the hole from the other side.
Step 2: Shaping and Baking
-
Roll the spheres:
Roll each pinch of clay between your palms or use a bead roller to create smooth, uniform spheres. I find that using a circular motion with light pressure creates the roundest shape. -
Texture the surface (optional):
To mimic the matte, stone-like look in the photo, gently roll the unbaked beads over a piece of coarse sandpaper or dab them lightly with a toothbrush bristles to remove the shiny synthetic look. -
Pierce the holes:
Carefully insert your bead piercing pin through the center of each sphere. Gently rotate the pin as you push through to avoid distorting the round shape. -
Bake the beads:
Arrange the beads on a parchment-lined baking sheet. Bake according to your clay manufacturer’s instructions (usually 275°F/135°C for 15-30 minutes). Let them cool completely before handling. -
Refine the finish:
Once cool, inspect the beads. If there are any fingerprints, lightly sand them away with fine-grit sandpaper for that perfect matte finish.
Level Up: Speckled Effect
Mix tiny shavings of black pepper or dried tea leaves into your lighter clay colors before rolling. This creates a realistic, natural stone ‘terrazzo’ texture.
Step 3: Assembly & Knotting
-
Cut the cord:
Cut a length of green waxed cord approximately 25 inches long. This gives you plenty of slack for the knots. -
String the gradient:
Thread your beads onto the cord, arranging them carefully from your darkest forest green to the lightest mint/cream, and then back to dark again if you want a mirrored look, or keep it as a linear gradient around the wrist. -
Check the sizing:
Wrap the strung beads around your wrist to verify the length. Add or remove beads as needed to ensure the beaded section covers the top and sides of your wrist comfortably. -
Secure the ends:
Tie a simple overhand knot tightly against the first and last bead of the strand to keep them separated from the adjustable closure section. -
Create the sliding closure:
Overlap the two cord ends. Using a spare piece of cord or the ends themselves, tie a square knot or a macramé sliding knot over the overlapped section to allow adjustability. -
Finish the tails:
Thread one smaller bead onto each tail end of the cord. Tie a knot at the very end to secure it and trim any excess cord. This added weight helps the dangling ties hang nicely.
Slip on your new gradient bracelet and enjoy the subtle nod to nature’s greenery
Green-and-White Stripe Pattern
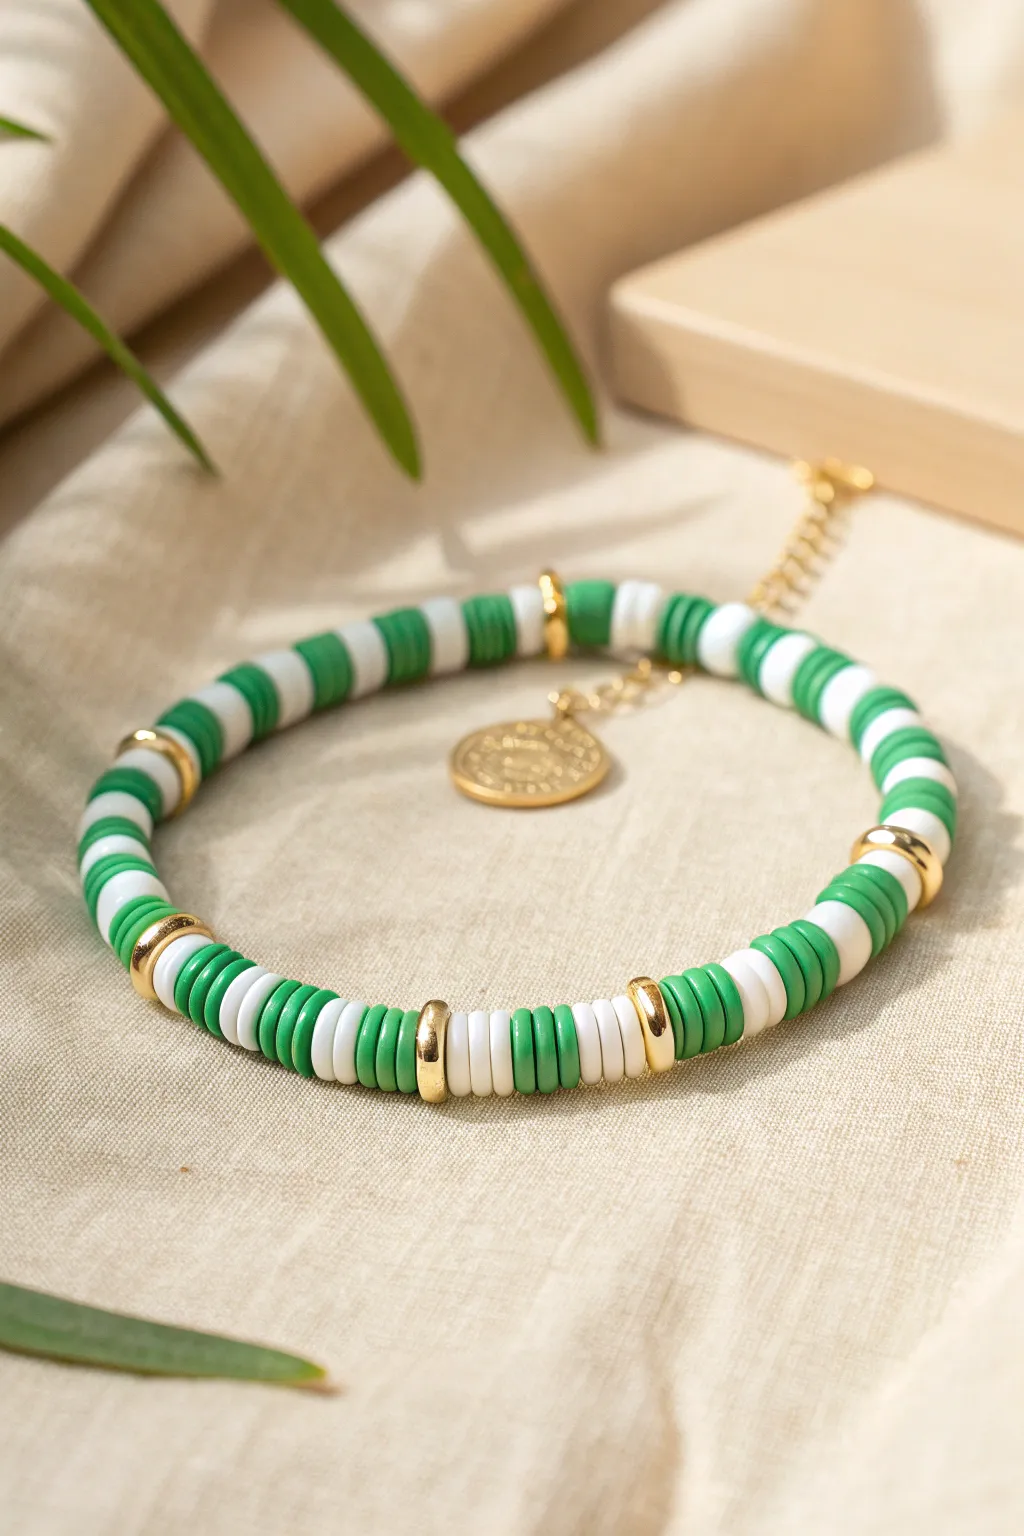
This elegant bracelet balances festive spirit with everyday wearability, featuring a crisp green-and-white striped pattern accented by gleams of gold. The classic gold coin charm adds a subtle touch of luck, making it a perfect subdued accessory for St. Patrick’s Day.
Step-by-Step Guide
Materials
- Green polymer clay heishi beads (6mm)
- White polymer clay heishi beads (6mm)
- Small gold rondelle spacer beads (approx 4-5mm)
- Small gold coin charm or pendant
- Gold jump ring (4-6mm)
- Elastic beading cord (0.8mm clear)
- Jewelry glue or clear nail polish
- Scissors
Step 1: Setting Up
-
Measure and Cut:
Begin by measuring your wrist with a flexible tape measure. Add about 3-4 inches to this measurement to ensure you have plenty of slack for tying the final knot. Cut your elastic cord to this length. -
Pre-stretch:
Gently pull tightly on the elastic cord several times. Pre-stretching prevents the bracelet from drooping or loosening after the first few wears, keeping that striped pattern crisp. -
Secure one end:
Attach a piece of tape or a binder clip to one end of your cord. This simple safety measure stops your beads from sliding off while you work on your pattern.
Step 2: Creating the Pattern
-
Start with green:
Thread on three green heishi beads to begin the sequence. This creates the first boldly colored segment of your stripe. -
Add the gold accent:
Slide on one gold rondelle spacer bead. This gold break defines the sections and adds that necessary metallic shine. -
Create a white stripe:
Add three white heishi beads. This high-contrast section brightens the design and really makes the green pop. -
Finish the segment:
Slide on another three green heishi beads to complete one full pattern unit before the next gold spacer appears. -
Repeat the sequence:
Continue the pattern: one gold spacer, followed by three white beads, and then three green beads. However, pay attention to the specific rhythm in the photo—it often alternates longer green sections with white and gold interruptions. -
Refining the rhythm:
For the exact look shown, try this updated cadence: 5 green beads, 3 white beads, 1 gold spacer. Or simply alternate blocks of 4-5 green and 3 white, placing a gold spacer roughly every inch or so between a white and green transition.
Knot Slipping?
If your elastic knot feels insecure, try a surgeon’s knot. Loop the elastic through twice on the first pass instead of once before tightening.
Step 3: Adding the Charm
-
Identify the center:
Once you have beaded roughly half the length of the bracelet, pause your pattern. -
Prepare the jump ring:
Using two pairs of pliers (or your fingers if the metal is soft enough), twist the gold jump ring open laterally—don’t pull it apart. -
Attach the coin:
Slip the gold coin charm onto the open jump ring, then slide the jump ring onto your elastic cord. Alternatively, you can slide a specific gold bail bead onto the cord now and attach the charm later. -
Resume beading:
Continue your green, white, and gold pattern until the bracelet reaches your desired length. Wrap it around your wrist to check the fit; it should sit comfortably without digging in.
Go for Gold
Replace the single gold spacer with three very thin gold heishi beads for a textured, stacked metallic look instead of a solid bead.
Step 4: Finishing Touches
-
Tie the knot:
Remove the tape or clip. Bring the two ends of the elastic together and tie a standard square knot (right over left, left over right). -
Tighten securely:
Pull the cords firmly to tighten the knot. I usually stretch the bracelet slightly while pulling the knot ends to seat it deeply. -
Glue the knot:
Apply a tiny drop of jewelry glue or clear nail polish directly onto the knot. This seals it and prevents it from slipping over time. -
Hide the knot:
If possible, gently tug the cord so the knot slides inside one of the larger gold spacer beads or a green bead to conceal it. -
Trim excess:
Once the glue is dry, trim the excess cord ends close to the knot, being careful not to snip the main knot itself.
Now you have a stylish lucky charm to wear on your wrist


What Really Happens Inside the Kiln
Learn how time and temperature work together inside the kiln to transform clay into durable ceramic.
Lucky Clover Pop Bead Placement
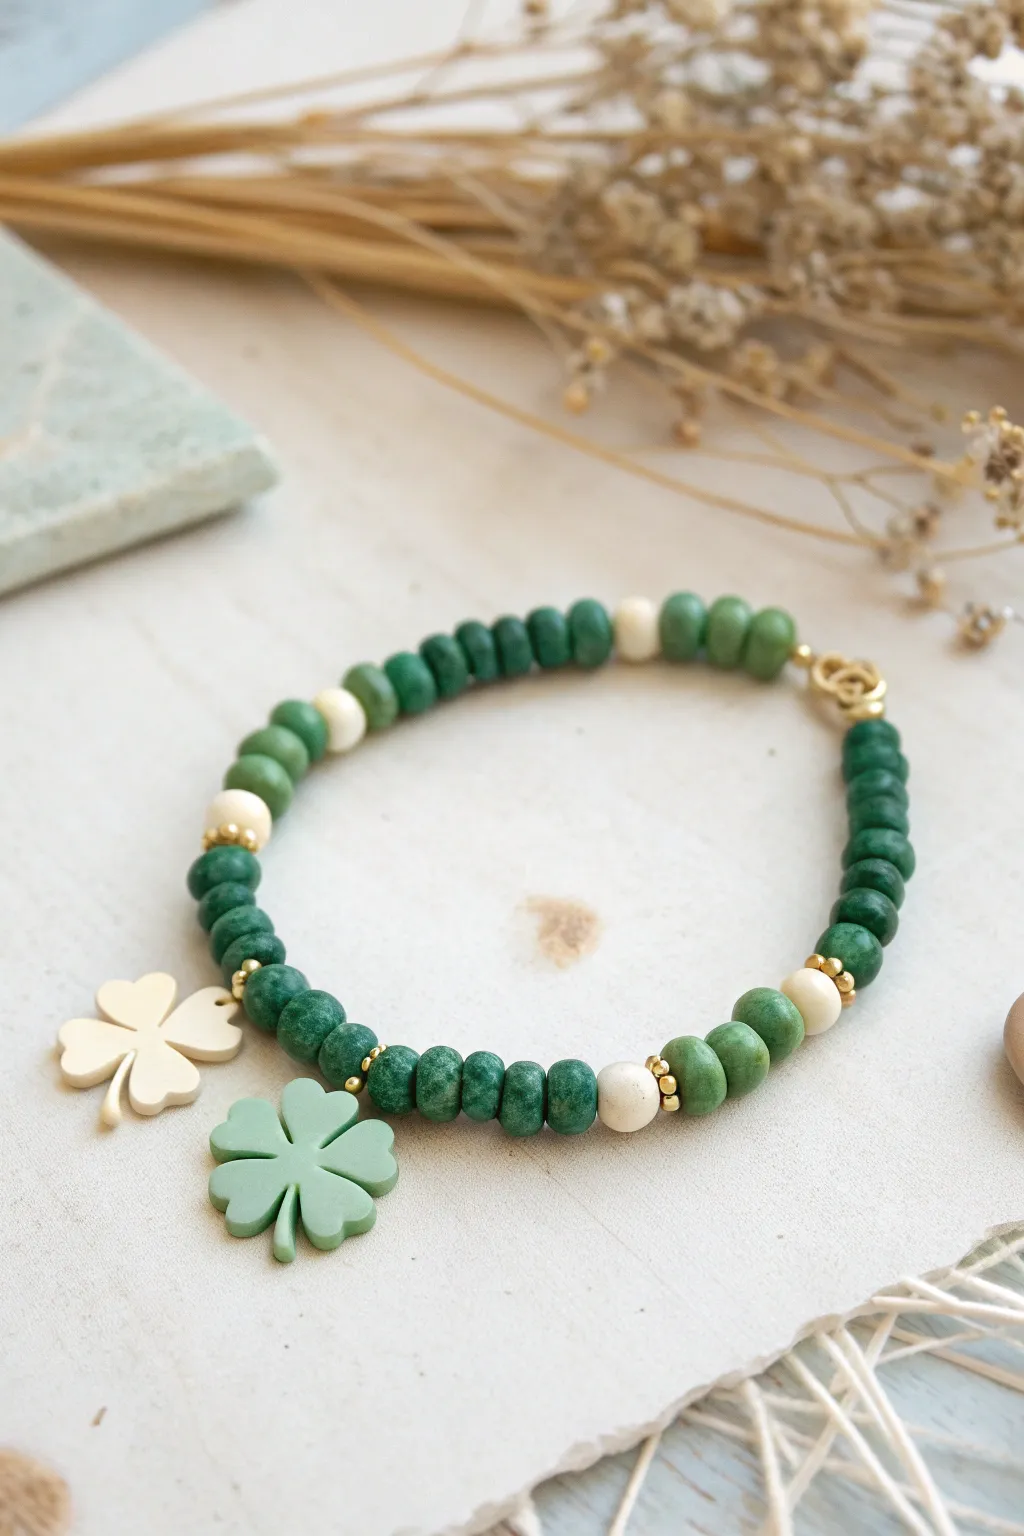
This elegant St. Patrick’s Day accessory combines earthy matte textures with lucky symbols for a piece that’s festive yet subtle enough for everyday wear. The design features a pleasing rhythm of deep green disc beads interrupted by creamy accents, highlighted by a charming pair of clover pendants.
How-To Guide
Materials
- Green polymer clay disc beads (approx. 6-8mm, matte finish)
- Cream/Off-white polymer clay disc beads (same size as green)
- Small gold spacer beads (2-3mm, metal or plated)
- Strong elastic beading cord (0.7mm or 0.8mm)
- One cream four-leaf clover charm
- One green four-leaf clover charm
- Gold jump rings (4-6mm)
- Gold lobster clasp and extender chain (optional) or crimp beads
- Jewelry pliers
- Scissors or jewelry cutters
- Super glue or jewelry cement
Step 1: Planning the Pattern
-
Measure your wrist:
Before cutting any cord, wrap a measuring tape around your wrist to find your size. Add about 0.5 inches for a comfortable fit, or more if you prefer a looser bangle style. -
Cut the cord:
Cut a piece of elastic cord about 10-12 inches long. Having this extra length makes tying the final knot significantly easier than struggling with short ends. -
Secure one end:
Place a piece of tape or a bead stopper clip on one end of your cord to prevent your beads from sliding off while you work. -
Establish the main rhythm:
This design relies on blocks of green. Start by stringing approximately 8 to 10 green disc beads. The exact number can vary depending on the thickness of your specific beads. -
Add the first accent:
Slide on one gold spacer bead, followed by one cream disc bead, and then another gold spacer bead. This creates a bright ‘pop’ to break up the green.
Step 2: Stringing and Beading
-
Continue the pattern:
Repeat the previous sequence: string a block of 8-10 green beads, followed by the gold-cream-gold accent trio. Continue this until you have reached sufficiently around the wrist, leaving a gap for the focal point. -
Prepare the focal section:
For the center where the charms hang, you want a slightly shorter block of green beads to keep the attention centered. String about 4-6 green beads here. -
Attach the charms:
Using your pliers, carefully open two jump rings. Attach one to the cream clover and one to the green clover. Thread these jump rings directly onto the elastic cord, placing a single gold spacer bead between them for separation. -
Complete the symmetry:
Finish the beadwork by mirroring your center section; add another 4-6 green beads after the charms to balance the design. -
Check the fit:
carefully wrap the strung beads around your wrist. The ends should meet comfortably without stretching the elastic visibly. Add or remove green beads from the ends if necessary.
Knot Slipping?
If your elastic knot feels insecure, try clamping a crimp bead over the knot itself after tying, then apply glue. The metal crimp acts as a permanent lock.
Step 3: Finishing Touches
-
Adding hardware (Option A):
If using a clasp like the image: thread a crimp bead and the lobster clasp onto one end. Thread the cord back through the crimp bead and flatten it with pliers. Repeat on the other side with a jump ring or extender chain. -
Tying the knot (Option B):
For a simpler stretchy bracelet without metal clasps, remove the tape/clip and bring both ends together. Tie a surgeon’s knot (right over left twice, then left over right). -
Tighten securely:
Pull all four strands (the two tails and the two bracelet sides) firmly to tighten the knot. I always give it a good tug to pre-stretch the elastic slightly. -
Secure with glue:
Apply a tiny dot of super glue or jewelry cement directly onto the knot. Let it dry completely before handling. -
Hide the knot:
Once the glue is dry, trim the excess cord ends close to the knot. If possible, gently tug the bracelet to slide the knot inside one of the larger green beads to hide it.
Go for Gold
Swap the matte cream beads for genuine gold-filled or brass heishi beads. The extra metallic shine elevates the bracelet from fun craft to boutique jewelry.
Now you have a charming accessory ready to bring a touch of luck to your outfit
Mint, Lime, and Emerald Confetti Mix
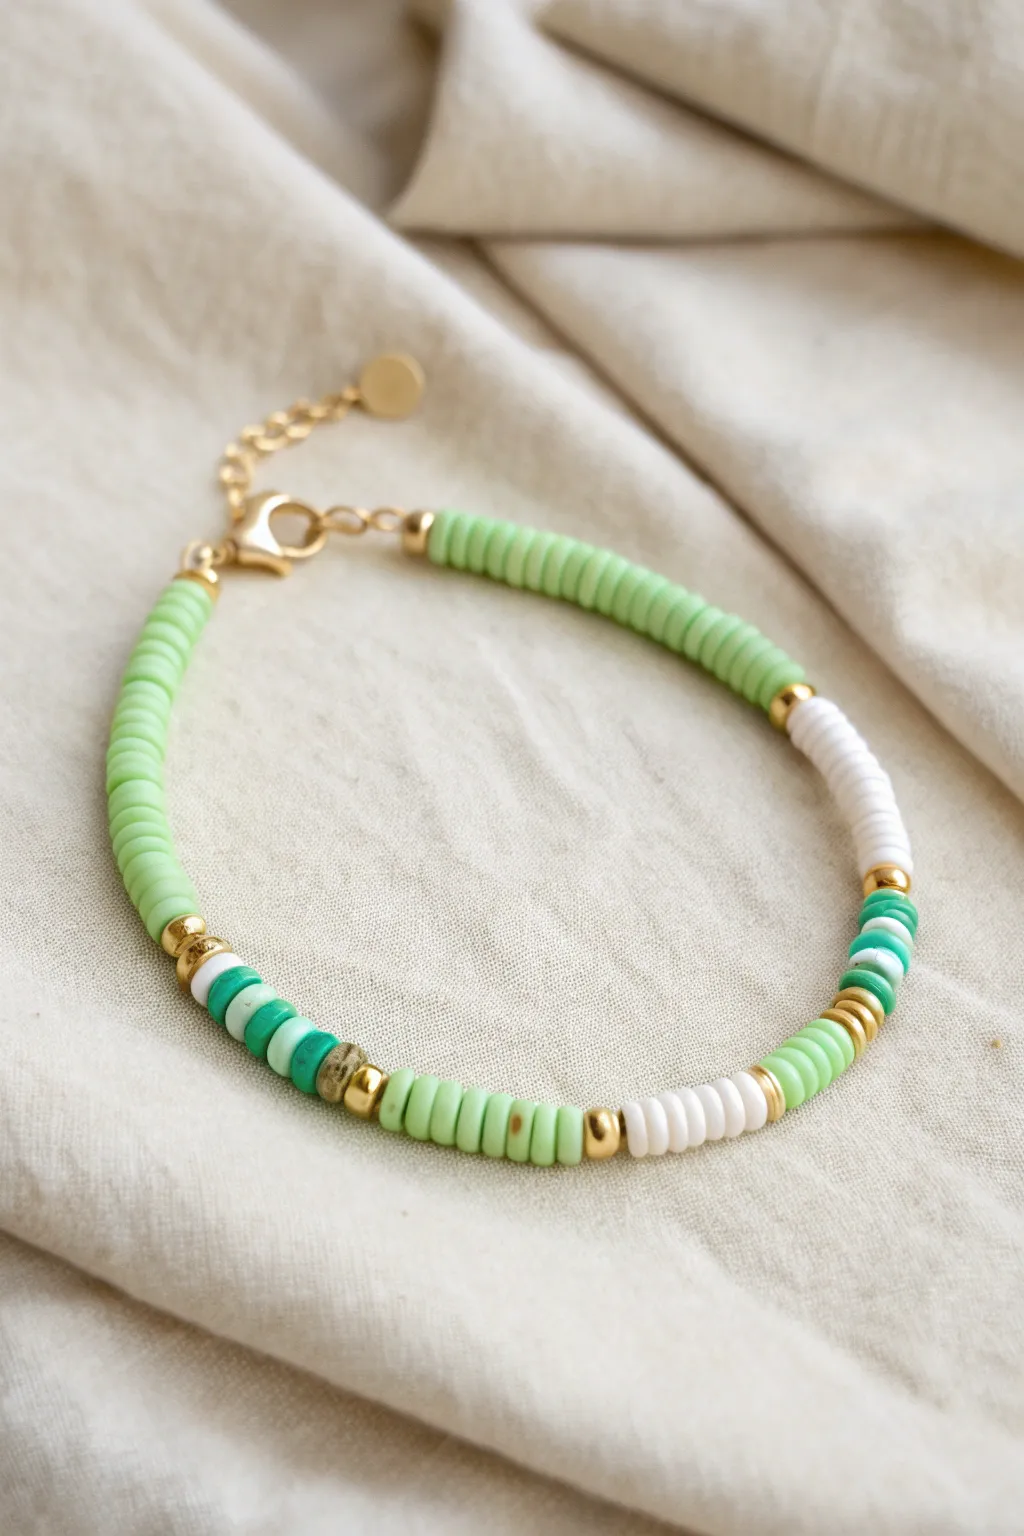
Embrace the multiple shades of green associated with St. Patrick’s Day with this fresh, confetti-style bracelet. Using a polymer clay heishi bead base in soft mint, it features playful interruptions of white, emerald, and gold for a sophisticated festive look.
Detailed Instructions
Materials
- 4mm polymer clay heishi beads (Light Mint Green)
- 4mm polymer clay heishi beads (White)
- 4mm polymer clay heishi beads (Emerald/Teal Green)
- 3mm gold spacer beads (round or faceted)
- Small gold disc spacers
- Gold tone lobster clasp
- Gold tone jump rings and extension chain
- Elastic cord (0.8mm) or beading wire
- Crimp beads and crimp covers (if using wire)
- Wire cutters
- Flat nose pliers
Step 1: Preparation and First Section
-
Measure your materials:
Cut a piece of beading wire or elastic cord approximately 9-10 inches long. This gives you plenty of room to work without beads sliding off the ends while you design. -
Secure the start:
If using beading wire, thread on a crimp bead and your jump ring attached to the extension chain. Loop the wire back through the crimp bead and flatten it securely with pliers to create your starting anchor. -
Begin the mint base:
Review the design: the bracelet consists of long sections of mint green interrupted by ‘confetti’ patterns. Start by threading on approximately 1.5 inches of the light mint green heishi beads. -
Add first accent:
Slide on a single small gold disc spacer to cap off the mint section.
Weird Gaps?
If your heishi beads are curving or showing gaps, your tension is too tight. The wire needs a tiny bit of slack so the flat beads can rotate comfortably around your wrist without buckling.
Step 2: Creating the Confetti Patterns
-
Build the white segment:
Thread on about 8 to 10 white heishi beads. This creates a crisp, bright block that contrasts beautifully with the green. -
Gold transition:
Add a gold round spacer bead followed quickly by a few thin gold disc spacers mixed with emerald green beads. The key here is irregularity—don’t make it too perfect. -
The emerald mix:
Create the ‘dark’ section. Thread on 4-5 beads in varying shades of darker teal or emerald green. I like to alternate these with a single gold disc spacer in the middle to break up the color. -
Return to mint:
Cap this busy confetti section with another gold round spacer bead, then return to your main color. -
Middle mint section:
String another long segment of the light mint green beads. This section should be slightly shorter than your first one, perhaps just over an inch, to keep the pattern asymmetrical.
Step 3: Second Pattern & Finishing
-
Second confetti group:
Create a second focal point. Start with a gold round bead, then add a short stack of white beads (about 5). -
Add metallic detail:
Place a gold spacer, then a unique patterned bead or a textured bronze bead if you have one, followed by another gold spacer. -
Final green transition:
Finish this pattern block with a mix of light mint and emerald beads, separated by thin gold discs. -
Complete the length:
Fill the rest of the strand with the light mint green beads until you reach your desired total wrist length (usually around 6.5 to 7 inches). -
Check the symmetry:
Hold the bracelet up in a circle. Ensure the two ‘confetti’ sections sit somewhat opposite each other, or at least balanced along the curve. -
Clasp preparation:
Thread on a crimp bead, followed by the jump ring attached to your lobster clasp. -
Secure the end:
Loop the wire back through the crimp bead and pull tight, leaving just a tiny bit of slack so the beads can move. Use your pliers to smash the crimp bead flat. -
Hide the hardware:
If you are using crimp bead covers, gently close one over each flattened crimp bead to make it look like a gold finish bead. -
Trim excess:
Snip off the excess wire tail as close to the bead as possible using your flush cutters.
Go for Gold
Swap the plain gold spacers for gold-filled or brass textured beads. Adding a bead with a ‘stardust’ or hammered finish catches the light better and elevates the plastic clay to look like posh jewelry.
Now you have a chic, verdant accessory perfect for avoiding pinches on St. Patrick’s Day

TRACK YOUR CERAMIC JOURNEY
Capture glaze tests, firing details, and creative progress—all in one simple printable. Make your projects easier to repeat and improve.
“Blessed” Soft Neutral-and-Green Stack
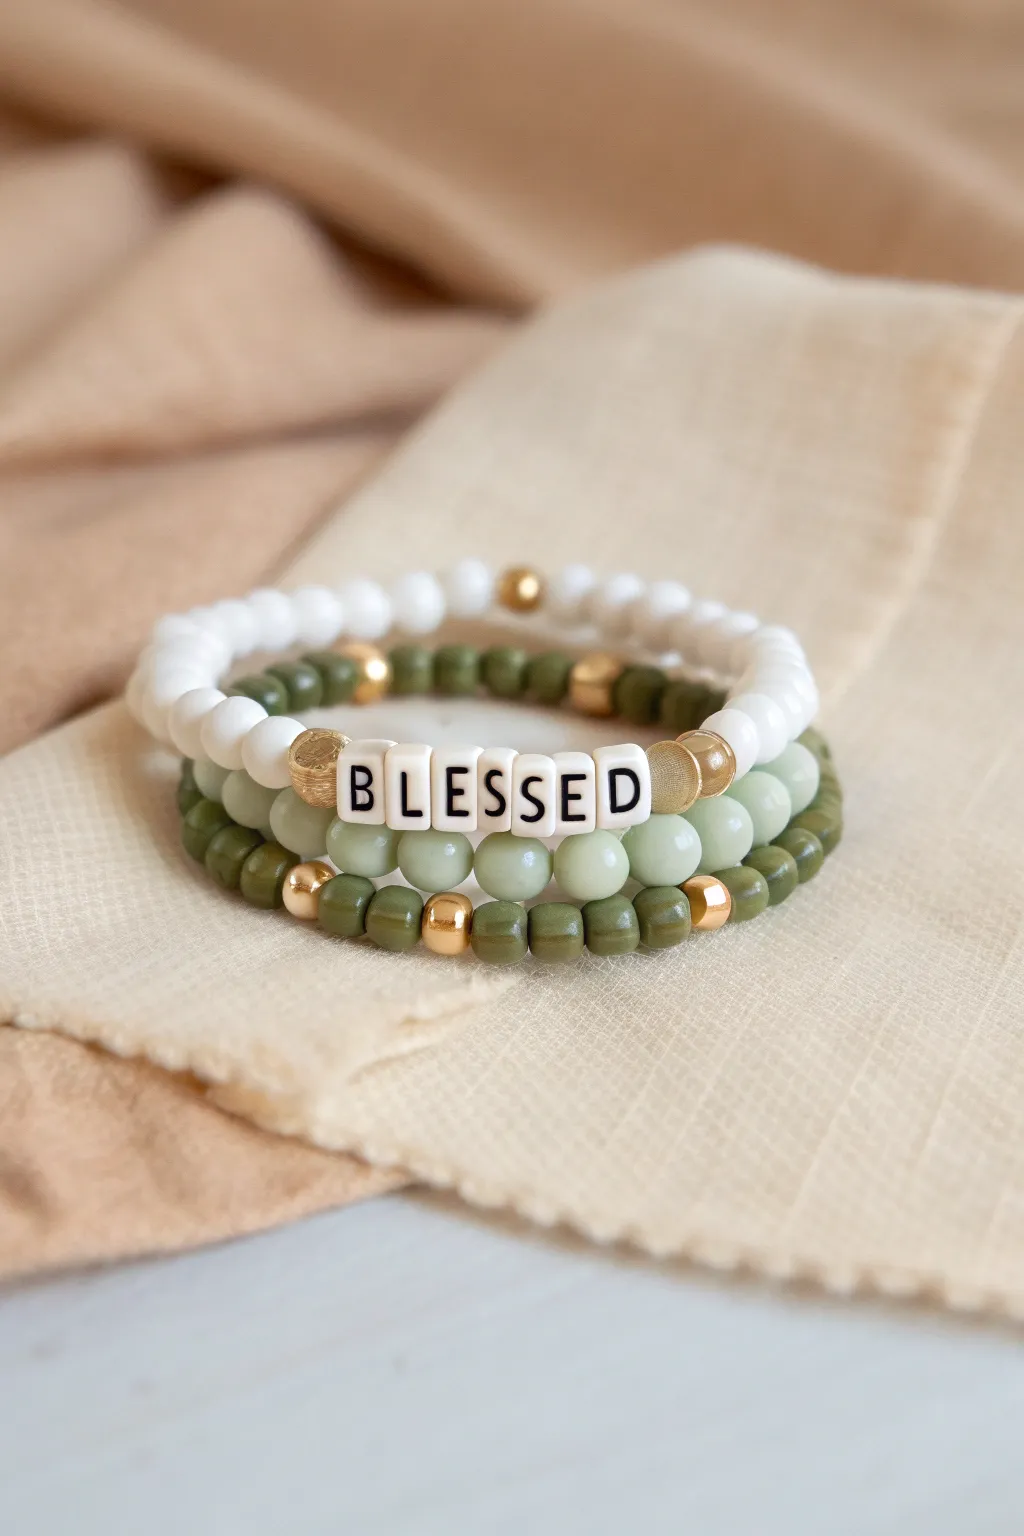
This elegant three-piece bracelet set combines earthy olive tones with crisp white and gold accents for a subtle nod to St. Patrick’s Day that works year-round. The centerpiece features letter beads spelling ‘BLESSED’, nestled between rows of varying green and cream textures.
Step-by-Step Guide
Materials
- Elastic stretch cord (0.8mm or 1mm thickness)
- White or cream square letter beads (B, L, E, S, S, E, D)
- 6mm-8mm white jade or polished glass beads
- 6mm matte sage green or pale jade round beads
- 6mm dark olive wood or stained wood beads
- Small gold spacer beads (smooth round metal)
- Small gold hematite or metal cube beads
- Jewelry glue (e.g., G-S Hypo Cement)
- Scissors
Step 1: The White Accent Bracelet
-
Measure the cord:
Cut a piece of elastic cord about 10-12 inches long. This extra length makes tying the finishing knots much easier without fumbling. -
Pre-stretch:
Gently pull the elastic cord between your hands a few times. Pre-stretching prevents the bracelet from loosening up after the first few wears. -
Start the pattern:
Thread on approximately 10 of your glossy white round beads to begin the base of the bracelet. -
Add gold accents:
Slide on one small round gold spacer bead, followed by three more white beads, and then another gold spacer. This creates a subtle hint of shine. -
Finish the strand:
Continue adding white beads until the strand measures about 6.5 to 7 inches, or whatever length fits your wrist comfortably. -
Knot and secure:
Tie a secure surgeon’s knot (right over left, left over right). Add a tiny dot of jewelry glue to the knot, let it dry for a moment, and trim the excess cord.
Hiding the Knot
If using beads with larger holes, gently tug the finished knot inside a bead before the glue fully hardens. It makes the finish invisible.
Step 2: The ‘Blessed’ Focal Bracelet
-
Prepare the center:
Cut another length of elastic. Locate your ‘BLESSED’ letter beads and two distinct gold accent beads—I like using textured or slightly larger gold discs here to frame the word. -
String the word:
Thread a gold accent bead, then the letters B-L-E-S-S-E-D, and finish with the second gold accent bead. Center this arrangement on your cord. -
Add flanking beads:
On either side of your word centerpiece, add pale sage green matte beads. You want about 8-10 beads on each side to complete the circle. -
Check the fit:
Wrap the unfinished strand around your wrist to check sizing against the first bracelet. Adjust the number of green beads if necessary so they sit comfortably together. -
Tie it off:
Secure this bracelet with a surgeon’s knot and a dab of glue, just like the first one. Tuck the knot inside one of the larger bead holes if possible.
Step 3: The Olive Wood Contrast Bracelet
-
Select your beads:
For the bottom layer, use the dark olive wood beads. These have a visible texture that contrasts beautifully with the smooth stone and plastic above. -
Create the pattern:
String four dark olive beads, then add one small gold cube or round spacer. Repeat this 4-beads-1-gold pattern for the entire length of the strand. -
Final sizing:
Ensure this third bracelet matches the length of the previous two. Consistency is key for a neat stack. -
The final knot:
Tie your final surgeon’s knot tightly. Apply your adhesive and let it cure fully before trimming the tails close to the beads. -
Stack them up:
Once the glue is completely dry on all three bracelets, arrange them on your wrist with the ‘Blessed’ bracelet in the middle for the perfect layered look.
Change the Charm
Swap ‘BLESSED’ for ‘LUCKY’ or ‘IRISH’ to lean harder into the holiday theme, or use gold letter beads for a warmer look.
Enjoy wearing your custom stack that brings a sophisticated touch of luck to your outfit
Pot of Gold Spacer Clusters
Eschewing neon brights for a more sophisticated look, this design pairs matte sage green Heishi beads with brilliant gold accents that mimic hidden treasures. It’s a subtle nod to St. Patrick’s Day that remains wearable all year round.
Step-by-Step
Materials
- Matte sage green Heishi clay disc beads (approx. 6mm)
- Textured gold rondelle or barrel spacer beads (6-8mm)
- Smooth gold spherical spacer beads (4mm)
- Stretch cord (0.8mm clear elastic)
- Gold tone crimp covers (optional)
- Gold tone findings: jump rings, lobster clasp, extender chain
- Scissors
- Jewelry pliers (chain nose)
- Bead stopper or tape
- Super glue or jewelry cement
Step 1: Planning and Prep
-
Measure your wrist:
Cut a piece of stretch cord about 10-12 inches long. This gives you plenty of extra room for tying knots later without struggling. -
Secure the end:
Place a bead stopper or a piece of tape on one end of your cord so your beads don’t slide off while you work. -
Pre-stretch the cord:
Give the elastic a few gentle tugs. This helps prevent the bracelet from stretching out permanently after the first time you wear it.
Step 2: Creating the Pattern
-
Start the base:
Begin by threading about 1.5 to 2 inches of the green Heishi clay beads. Ensure they lay flat against each other for that seamless tube look. -
Add the first gold accent:
Slide on one of the textured gold barrel beads. These represent your ‘pot of gold’ nuggets. -
Create a spacer:
Add a very short section of green Heishi beads—just about 3 or 4 discs—to create a small gap. -
Add the second gold accent:
Slide on another textured gold barrel bead. This creates a clustered gold look separated slightly by the green. -
Resume the green:
String another long section of green Heishi beads. I usually aim for about 2 inches here to balance the design. -
Repeat the gold cluster:
Add another textured gold bead, followed by 3-4 green discs, and one more textured gold bead. -
Continue the pattern:
Fill the rest of the bracelet length with green beads until you are about 0.5 inches from your desired finished size.
Double the Gold
To make the gold sections really pop, try stacking two textured gold beads directly next to each other without the clay spacer in between.
Step 3: Finishing the Ends
-
Transition beads:
At both ends of your beaded strand, add two smooth gold spherical beads. These act as a tapering finish before the clasp. -
Preparing the closure:
If you are making a standard stretch bracelet, you can tie a surgeon’s knot here. However, to match the photo, we will add a clasp. -
Attach the crimp:
Thread the cord end through a crimp bead (and a wire guardian if you have one), then back through the crimp bead to create a loop. -
Secure the loop:
Flatten the crimp bead with your pliers to secure the loop. Repeat this process on the other end of the bracelet. -
Connect hardware:
Use your pliers to open a jump ring. Attach your lobster clasp to one end loop and close the ring securely. -
Add the extender:
On the opposite end loop, attach a jump ring and the gold extender chain. This allows the bracelet size to be adjustable. -
Final check:
Trim any excess elastic cord close to the crimps. If desired, cover your crimp beads with gold crimp covers for a polished, professional look.
Make It a Set
Create a matching stacker bracelet using only the gold spherical beads and a single green clay bead in the center for a minimalist companion piece.
Now you have a chic, modern accessory that brings a touch of luck to your wrist
Rainbow-to-Green Lucky Gradient
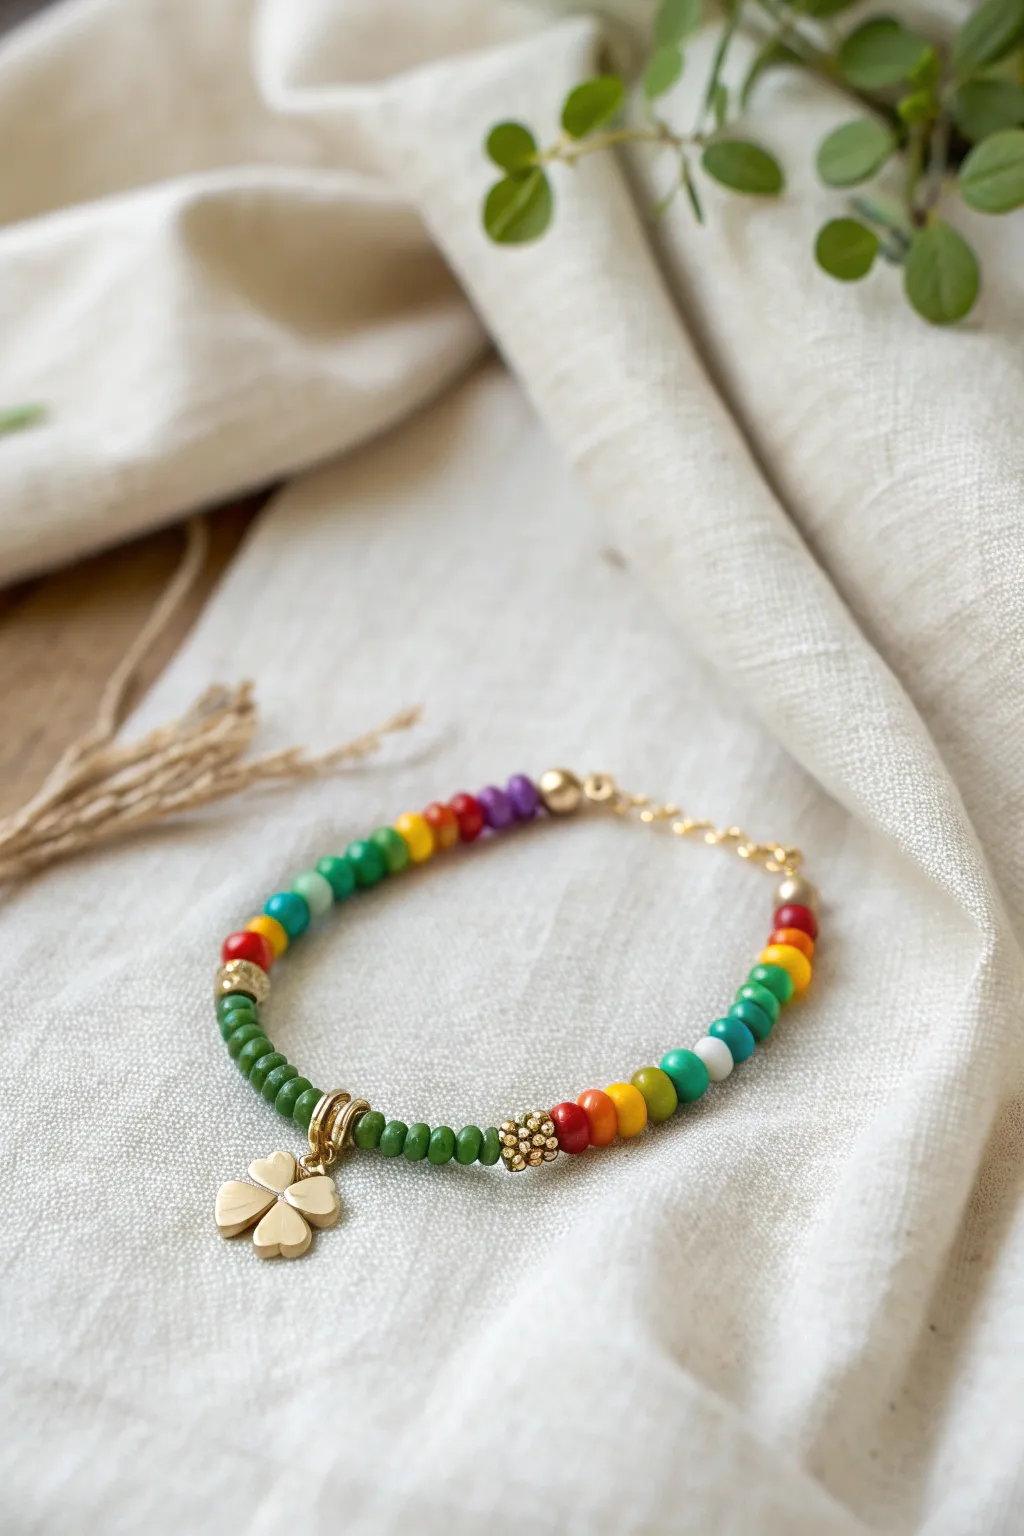
Embrace the spirit of St. Patrick’s Day with this delicate charm bracelet that combines vibrant rainbow hues with earthy greens. The gold clover charm serves as a lucky focal point, balancing the playful transition of colors for a sophisticated yet festive accessory.
Step-by-Step Tutorial
Materials
- Small round heishi or seed beads (approx. 4mm) in green, red, orange, yellow, blue, purple, and white
- Gold finish four-leaf clover charm
- Gold finish spacer beads (textured globes and simple rings)
- Gold finish crimp beads and bead tips (calottes)
- Gold finish jump rings (4mm and 6mm)
- Small lobster claw clasp and extender chain
- Strong beading wire (e.g., Tiger Tail or flexible nylon-coated wire)
- Wire cutters
- Flat nose pliers
- Crimp pliers
Step 1: Setting the Foundation
-
Measure and cut:
Begin by measuring your wrist and adding about 2 inches to determine the length of your beading wire. Cut the wire using your wire cutters. -
Secure the first end:
Thread a crimp bead onto one end of the wire, followed by a bead tip (calotte) facing outwards. Create a small loop with the wire and thread it back through the crimp bead. -
Close the crimp:
Use your crimp pliers to flatten the crimp bead securely. Trim the excess short tail of wire, then gently close the clamshell of the bead tip over the crimp using flat nose pliers. -
Attach the clasp:
Open a small jump ring with pliers, attach your lobster clasp to the bead tip loop, and close the ring securely.
Step 2: Beading the Rainbow Section
-
Start the sequence:
Begin stringing beads from the clasp end. Start with a small gold spacer bead to give the strand a finished look. -
First rainbow segment:
Thread on a sequence of approximately 5-6 beads in a rainbow order: purple, blue, green, yellow, orange, and red. This creates the first burst of color. -
Transition to green:
String a mixed transition section. Add a light green bead, a dark green bead, and a teal or blue bead to create a gradient effect moving away from the rainbow. -
Add gold accent:
Slide on a textured gold globe bead. This acts as a visual break between the rainbow segment and the main green section. -
Central green run:
Thread on about 10-12 dark green beads. This creates a solid block of color that will support the charm. Stop halfway through your total bracelet length.
Pro Tip: Dangle Factor
Use a slightly larger jump ring for the clover charm than you think you need. This ensures the charm has plenty of swing and doesn’t get stuck rigidly against the adjacent beads.
Step 3: Installing the Lucky Charm
-
Prepare the charm hanger:
Slide two thin gold ring spacers onto the wire. These will frame the charm and allow it to dangle freely without getting stiff. -
Attach the charm:
Attach the gold clover charm to a jump ring, and then thread the wire directly through that jump ring so it sits between the two gold ring spacers. -
Secure the charm position:
Ensure the charm segment is centered. The gold ring spacers should keep it moving fluidly against the green beads.
Level Up: Personalized luck
Before the second rainbow section, add small gold letter beads to spell out ‘LUCK’ or ‘IRISH’ amidst the green beads for a personalized message hidden in the gradient.
Step 4: Completing the Symmetry
-
Mirror the green section:
Continue stringing the second half of the bracelet. Add another set of 10-12 dark green beads to match the section before the charm. -
Second gold accent:
Place another textured gold globe bead onto the wire to mirror the one on the opposite side. -
Reverse gradient:
I like to reverse the pattern here for balance. String a red bead, followed by orange, yellow, light green, dark green, tear/blue, and finally white. -
Final rainbow touch:
Finish the beading pattern with a small segment of red, orange, and yellow beads leading up to the end of the wire. -
Ending spacer:
Add one final small gold spacer bead to cap off the design before securing the end.
Step 5: Finishing Touches
-
Prepare final closure:
Thread the remaining wire end through a bead tip and then a crimp bead. -
Crimp and trim:
Pull the wire taut so there are no gaps between beads (but not so tight it won’t bend), flatten the crimp bead, and trim the excess wire close. -
Close the bead tip:
Close the bead tip clamshell over the crimp using your flat nose pliers. -
Add the extender:
Open a final jump ring, attach your chain extender to the loop of the bead tip, and close the jump ring.
Now you have a charming, lucky accessory ready to wear for the festivities
Marbled “Lucky Green” Swirl Beads
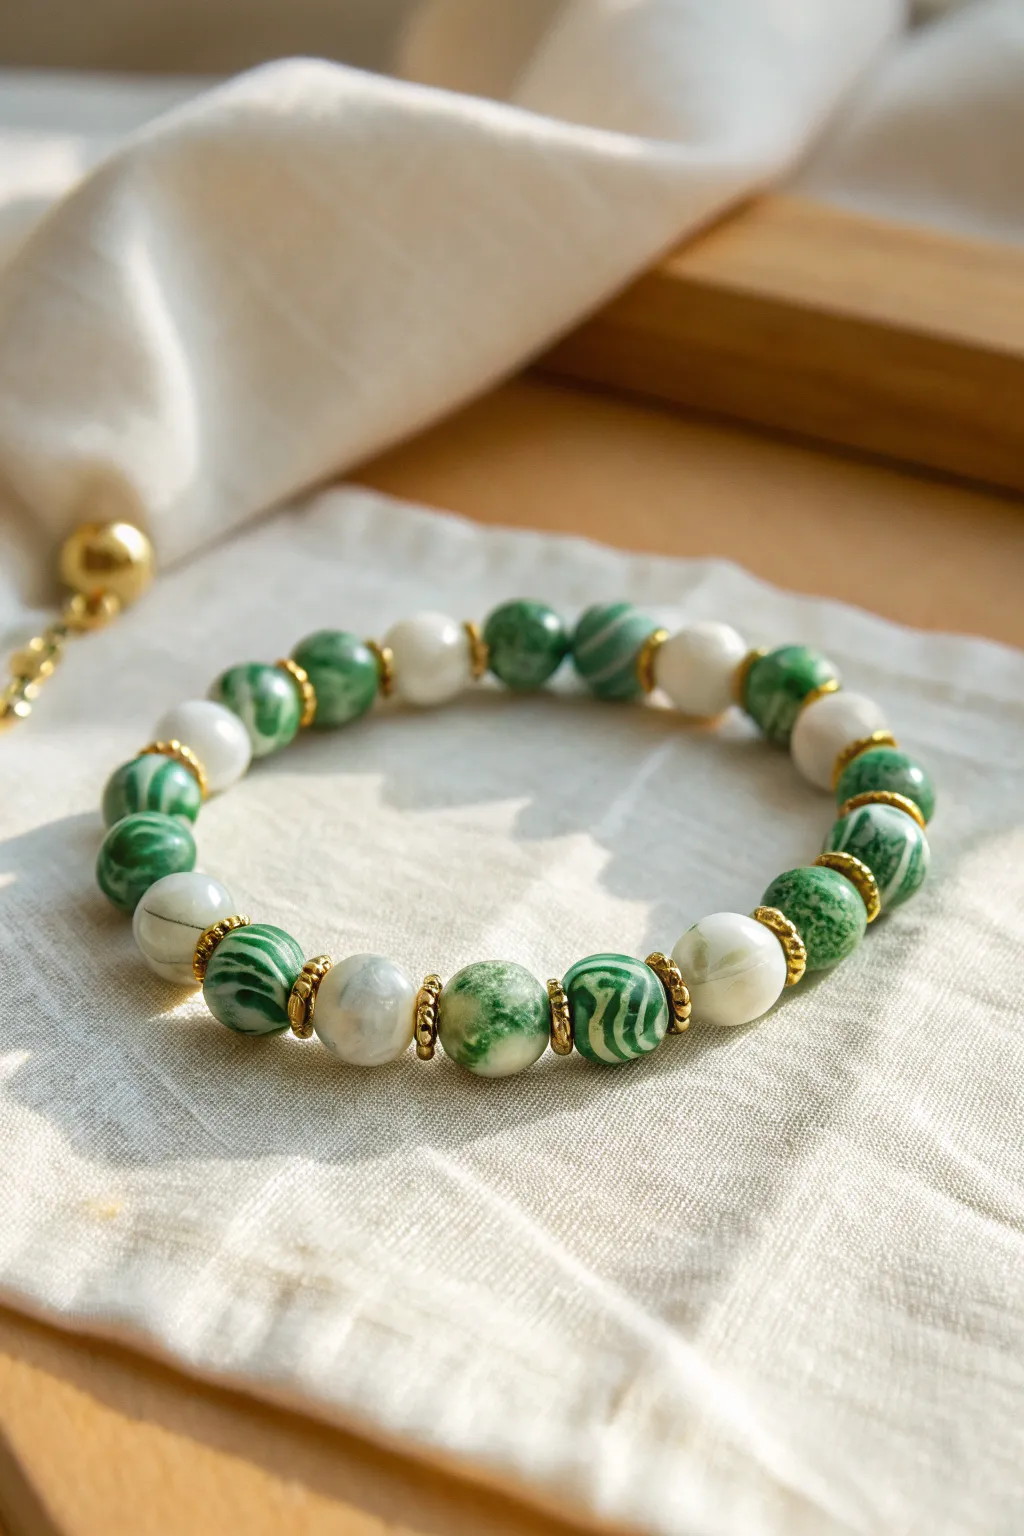
Capture the organic beauty of malachite and agate with this sophisticated polymer clay bracelet. The mix of swirling green patterns, creamy white spacers, and gold accents creates a luxurious yet understated St. Patrick’s Day accessory.
Detailed Instructions
Materials
- Polymer clay (emerald green, translucent white, and opaque white)
- Small gold tone metal spacer beads (daisy or textured ring shape)
- Beading elastic cord (0.7mm or 0.8mm)
- Clay bead roller or piercing tool
- Tissue blade or craft knife
- Ceramic tile or glass work surface
- Oven for baking
- Gloss glaze or resin (optional for shine)
- Superglue or jewelry glue
Step 1: Creating the Clay Canes
-
Condition the Clay:
Begin by conditioning your green, opaque white, and translucent white polymer clay separately until they are soft and pliable. -
Color Mixing:
Create a few variations of green. Mix a little white into your emerald green to make a mid-tone, and keep some dark emerald pure. This tonal variety adds depth to marble. -
Make Logs:
Roll each color into several thin snakes or logs about 4 inches long. -
Twist Together:
Bundle a random assortment of green, white, and translucent logs together. Twist the entire bundle tightly like a candy cane to begin blending the colors. -
Fold and Roll:
Fold the twisted log in half and roll it smooth again. Repeat this twisting, folding, and rolling process 3-4 times. Stop before the colors turn into a solid muddy green; you want distinct streaks.
Fixing Muddy Colors
If you over-mix and lose the defined swirls, don’t scrap it! Chop the ‘muddy’ log into chunks and mix in fresh white clay chunks, then re-roll for a terrazzo effect.
Step 2: Forming the Beads
-
Portioning:
Cut your long marbled log into equal-sized segments using your tissue blade. Aim for pieces that will roll into roughly 8mm or 10mm balls. -
Plain White Beads:
Roll out pure white clay and cut equal segments for the white spacer beads shown in the pattern. I like to make these slightly smaller than the green ones for visual rhythm. -
Rolling Rounds:
Roll each segment between your palms to create a smooth, perfect sphere. Check for fingerprints and gently smooth them out. -
Adding Texture (Optional):
For the more speckled beads seen in the photo, you can take a small bit of green clay, chop it finely, roll the white bead in the ‘crumbs’, and then roll smooth again.
Add Subtle Shimmer
Mix a pinch of gold leaf flakes or gold mica powder into the translucent clay before marbling. It adds a deep, hidden sparkle that catches the light.
Step 3: Piercing and Baking
-
Create Holes:
Use a bead piercing tool or a thick needle to poke holes through the center of each bead. Twist the tool gently as you push through to avoid deforming the sphere. -
Refine the Shape:
The piercing often squishes the bead slightly, so give it a gentle roll between your fingers again with the pin still inside to re-round it. -
Baking:
arrange your beads on a ceramic tile or baking sheet. Bake according to the manufacturer’s instructions for your specific brand of clay (usually 275°F for 15-30 minutes). -
Cooling:
Allow the beads to cool completely in the oven before handling them to prevent cracking. -
Glazing:
If you want the high-gloss finish shown in the photo, apply a coat of gloss glaze or UV resin to each bead and let it cure/dry.
Step 4: Assembly
-
Layout Design:
Lay out your design on a bead board or towel. The pattern shown generally alternates: one marbled green bead, one gold spacer, one white bead, one gold spacer. -
Stringing:
Cut a piece of elastic cord about 10 inches long. Pre-stretch the cord by pulling on it a few times to prevent it from stretching out later. -
Thread the Beads:
String your beads following your layout. Ensure the gold spacers sit snugly between the clay beads. -
Tying the Kno:
Once all beads are added and fit your wrist, tie a strong surgeon’s knot (right over left, left over right, seemingly looping through twice on the first pass). -
Secure and Hide:
Add a tiny drop of superglue to the knot. Once dry, trim the excess cord and gently tug the knot inside one of the larger clay beads to hide it.
Now you have a stunning piece of wearable art that looks like genuine polished stone
Leprechaun Hat Accent Bead
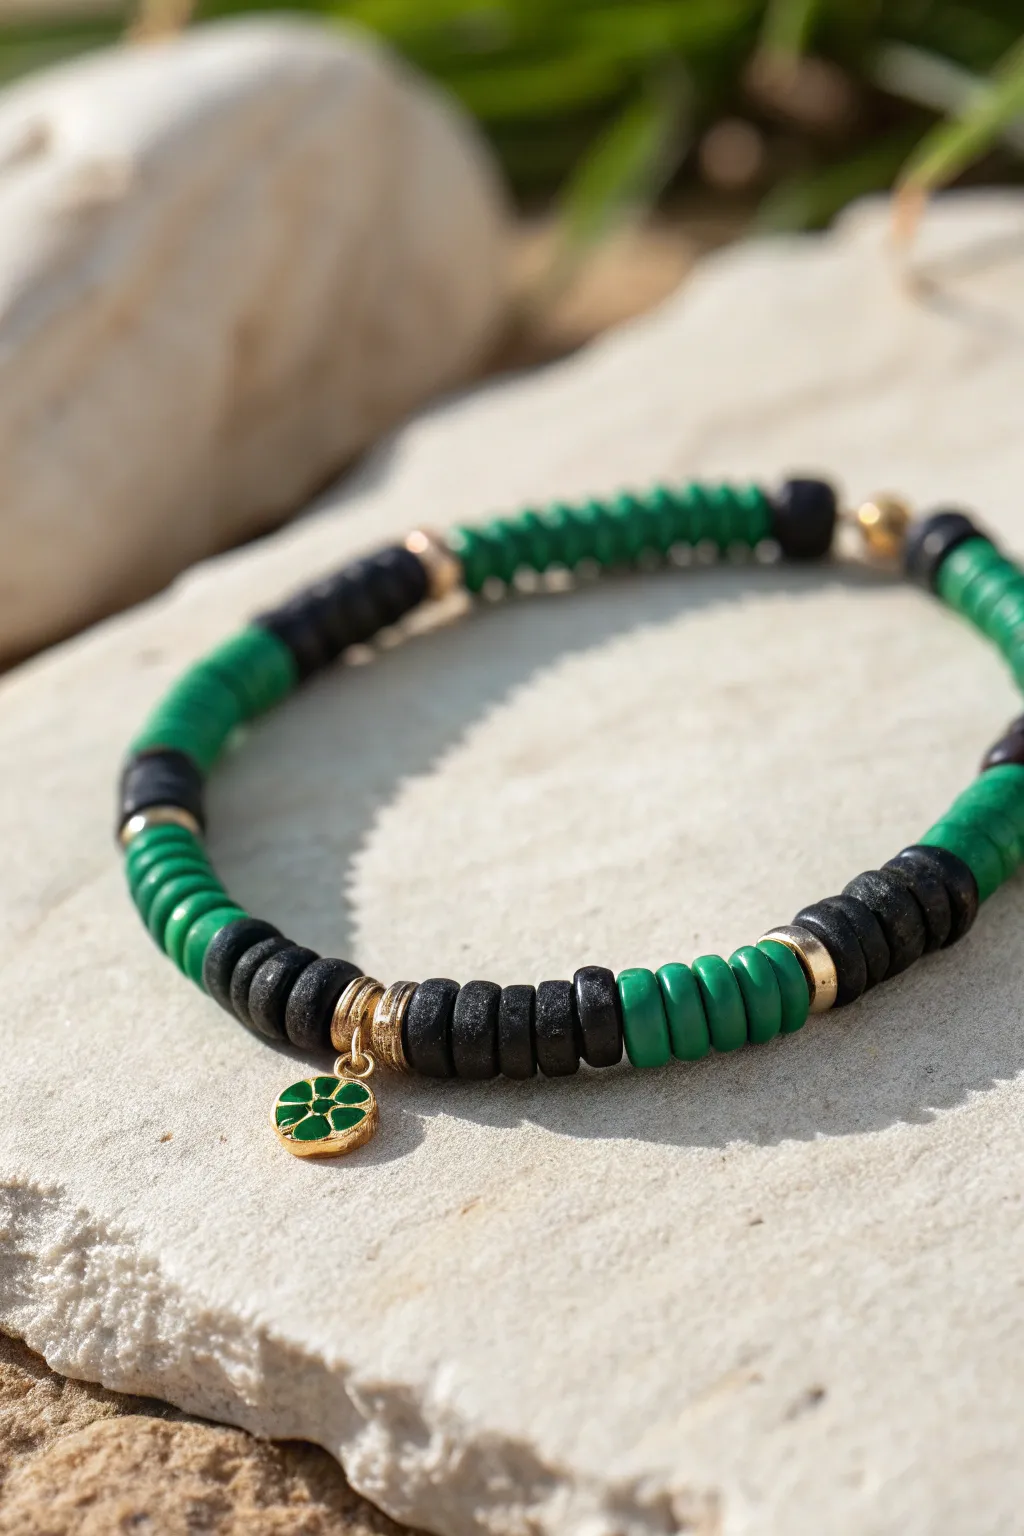
This sophisticated yet playful bracelet combines the earthy tones of matte black and vibrant green polymer clay beads with a charming four-leaf clover charm. The alternating block pattern creates a striking visual rhythm perfect for St. Patrick’s Day or everyday luck.
Step-by-Step Guide
Materials
- Green polymer clay heishi beads (flat disc beads, approx. 6mm)
- Black polymer clay heishi beads (flat disc beads, approx. 6mm)
- Gold tone spacer beads (flat disc or small rondelle style)
- Gold tone round bead (optional, for knot cover)
- Small gold tone four-leaf clover charm with green enamel
- Gold tone jump ring (4-6mm)
- Elastic stretch cord (0.8mm or 1mm depending on hole size)
- Jewelry adhesive (e.g., G-S Hypo Cement)
- Scissors or jewelry snips
- Bead stopper or tape
- Flat-nose pliers
Step 1: Preparation and Planning
-
Measure and Cut:
Begin by measuring your wrist to determine the desired length of your bracelet. Cut a piece of elastic cord about 10-12 inches long—this gives you plenty of extra room for tying knots comfortably. -
Secure the End:
Attach a bead stopper or a simple piece of masking tape to one end of your elastic cord. This prevents your beads from sliding off while you work on your pattern. -
Plan the Charm Section:
Locate your gold jump ring and the clover charm. Using flat-nose pliers, gently twist the jump ring open laterally, slide on the charm, and twist it closed securely. Set this aside for the focal point.
Knot Security
Don’t trim your elastic too close right away! Leave a tiny tail (1-2mm) after glueing. If the knot slips slightly as it settles, the tail prevents it from undoing completely.
Step 2: Creating the Pattern
-
Start the Charm Section:
Thread one gold spacer bead onto the elastic cord. This will act as a frame for your charm. -
Add the Charm:
Slide the jump ring with your prepared green clover charm onto the cord next to the spacer bead. -
Complete the Frame:
Add a second gold spacer bead immediately after the charm. You now have a gleaming gold section that highlights the dangling clover. -
First Black Segment:
String approximately 8 to 10 black heishi beads. The exact number depends on how long you want your color blocks to be, but aim for about 3/4 of an inch. -
First Green Segment:
Next, string about 5 or 6 green heishi beads. This creates a slightly shorter pop of color to contrast with the longer black section. -
Add a Gold Accent:
Slide on a single gold spacer bead to separate the green section from the next block. I find this little shimmer really elevates the design. -
Second Black Segment:
Add another block of black beads, matching the length of your first green segment (about 5-6 beads). -
Alternating Pattern:
Continue this pattern around the bracelet: a long section of green beads (approx 10-12), followed by a gold spacer. -
Midpoint Check:
Follow with a short section of black beads (5-6), another gold spacer, and then a short section of green beads. -
Checking the Fit:
Periodically wrap the strand around your wrist. The goal is to end with a pattern that looks balanced when the ends meet.
Step 3: Finishing Touches
-
Final Bead Adjustments:
Ensure your pattern ends in a way that flows seamlessly into the start. If you started with gold spacers near the charm, try to end with a bead color that contrasts or complements that starting point. -
Pre-stretch the Cord:
Gently pull on both ends of the elastic cord to pre-stretch it. This crucial step prevents the bracelet from sagging or loosening after the first time you wear it. -
Tying the Knot:
Remove the bead stopper. Bring both ends together and tie a surgeon’s knot (loop the cord through twice before pulling tight) or a secure square knot. -
Hiding the Knot:
If one of your beads has a larger hole, or if you included a hollow gold round bead at the end, gently tug the knot inside it to conceal the join. -
Secure with Glue:
Apply a tiny dab of jewelry adhesive to the knot. Let it dry for a few minutes before trimming the excess cord close to the knot.
Texture Twist
Swap the standard smooth black clay beads for black lava stone beads. This adds a matte, organic texture and allows you to diffuse essential oils on your wrist.
Now you have a striking accessory ready to bring a touch of luck to your outfit
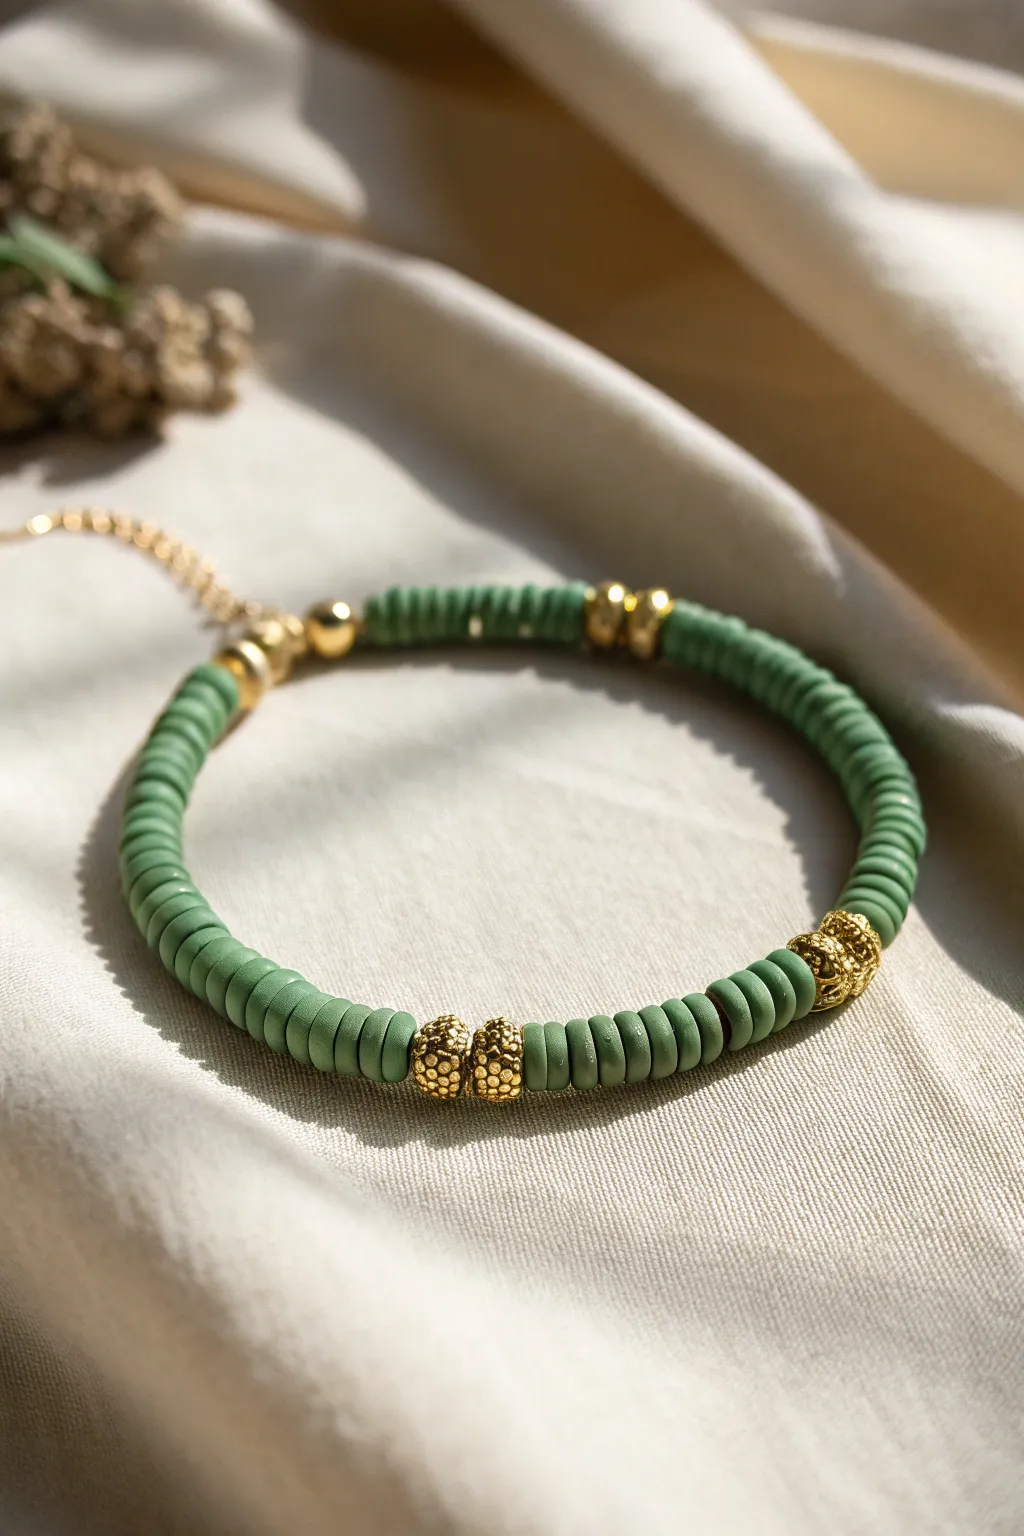
Celtic Knot-Inspired Pattern Breaks
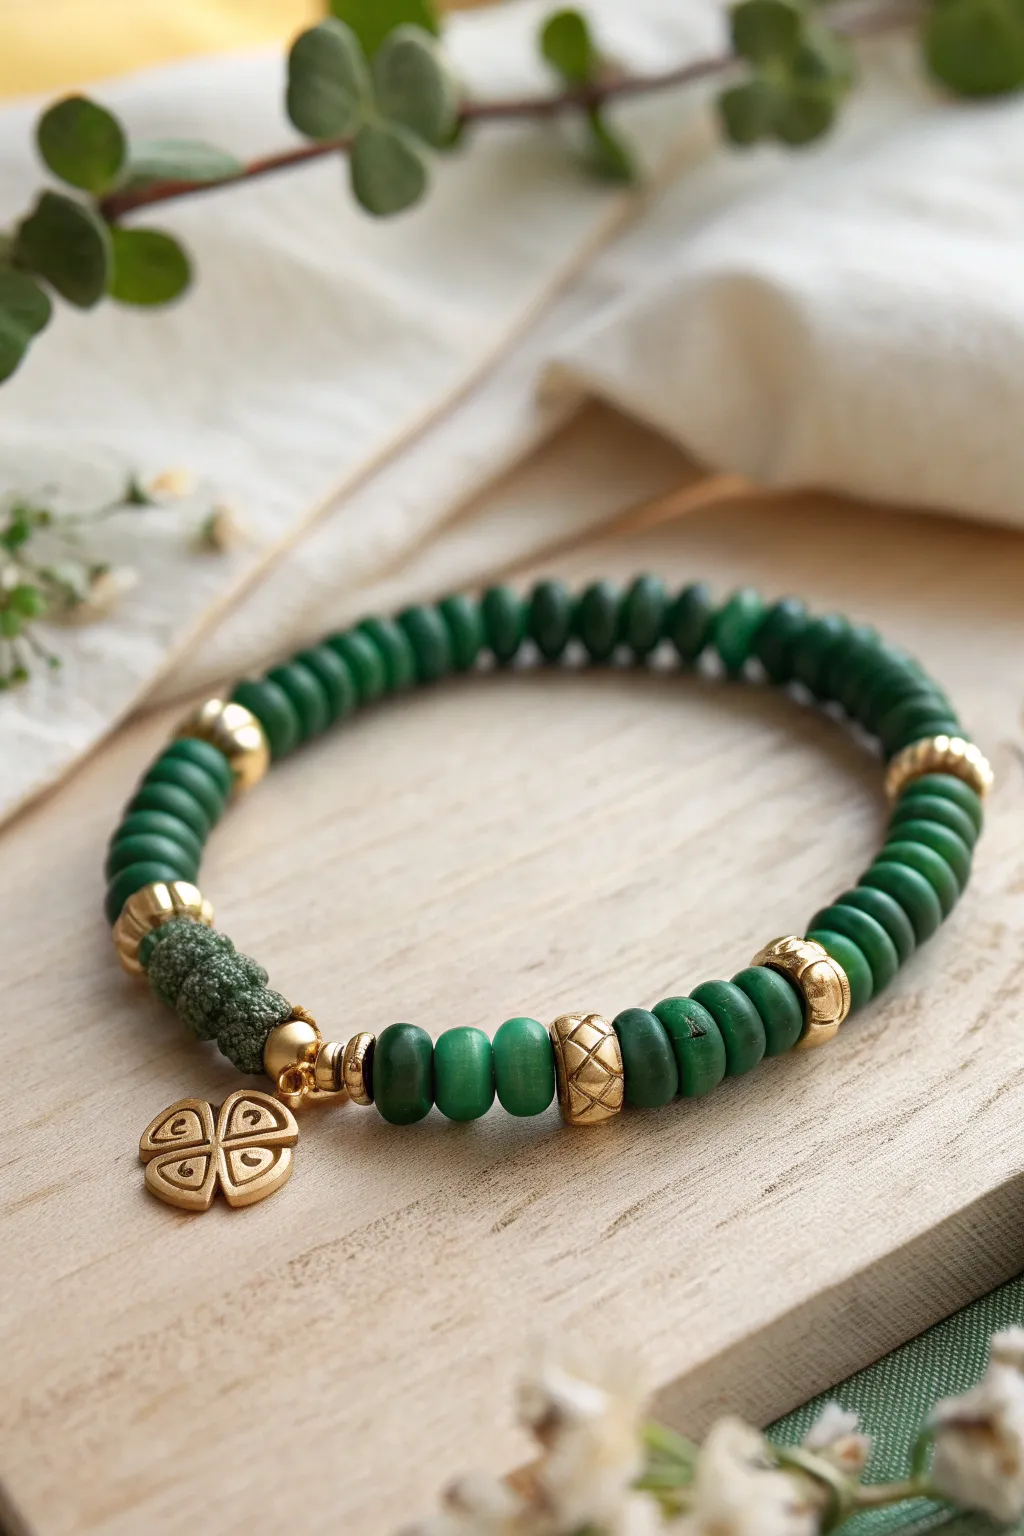
This elegant St. Patrick’s Day accessory combines the earthy texture of green wood or clay disc beads with the luxe shine of gold accents. The design features rhythmic pattern breaks created by textured gold spacers and a lucky four-leaf clover charm.
How-To Guide
Materials
- Dark green wooden or polymer clay Heishi beads (approx. 6mm)
- Gold tone patterned spacer beads (barrel shape)
- Smooth gold disc spacer beads
- Gold tone four-leaf clover charm with jump ring
- Textured green focal bead or DIY knotted bead element
- Strong elastic bead cord (0.8mm)
- Jewelry adhesive or clear nail polish
- Scissors
Step 1: Preparation
-
Measure your cord:
Cut a length of elastic cord about 10-12 inches long. This gives you plenty of slack for tying the final knot without struggling to hold onto tiny ends. -
Pre-stretch the elastic:
Gently pull tightly on the cord a few times before you start beading. I always do this to prevent the bracelet from sagging or stretching out permanently after the first wear.
Step 2: Creating the Pattern
-
Start the sequence:
Begin by threading the textured green focal bead (or creating a macramé knot bead) onto the center of your cord. This will anchor your design. -
Add first gold accents:
On the right side of the focal bead, slide on a smooth gold disc spacer, followed immediately by a patterned gold barrel bead. -
Begin the green run:
Thread on approximately 8 to 10 of the dark green disc beads. These serve as the main body of the bracelet, providing that rich forest hue. -
Insert a pattern break:
Interrupt the green sequence by adding one textured gold barrel bead. This creates the ‘Celtic Knot’ inspired rhythm mentioned in the section theme. -
Continue the pattern:
Add another set of 10-12 green disc beads. Keep an eye on the length; you want the gold spacers to be somewhat evenly distributed around the wrist. -
Repeat on the other side:
Go back to the left side of your central focal bead. Mirror the pattern exactly: one smooth gold spacer, one patterned barrel bead, then your run of green discs. -
Check the fit:
Wrap the unfinished strand around your wrist. Add or subtract green beads from the ends until the two ends meet comfortably without gaps.
Knot Slipping?
If your elastic knot feels insecure, try a drop of clear nail polish instead of glue. It seals the fibers without making them brittle.
Step 3: Finishing Touches
-
Attach the charm:
Open the jump ring on your four-leaf clover charm. Slide it onto the cord right next to the central focal bead or hanging from the gold spacer nearby. -
Tie the knot:
Bring the two ends of the elastic cord together. Tie a surgeon’s knot (right over left, left over right twice) and pull it very tight. -
Secure the knot:
Apply a tiny dot of jewelry adhesive to the knot. Let it dry for a few minutes to ensure it won’t slip undone. -
Hide the mechanics:
Ideally, pull the knot inside the hole of one of the larger gold barrel beads if the hole size permits. This gives a professional finish. -
Trim excess:
Snip off the extra elastic cord close to the knot, being careful not to cut the main strand.
Use Wood Beads
For the exact look in the photo, dye unfinished wood beads with dark green ink; the natural grain adds depth unlike plastic.
Wear your lucky charm with pride or stack it with other gold bangles for a sophisticated holiday look
Pearl-and-Green Lucky Luxe Mix
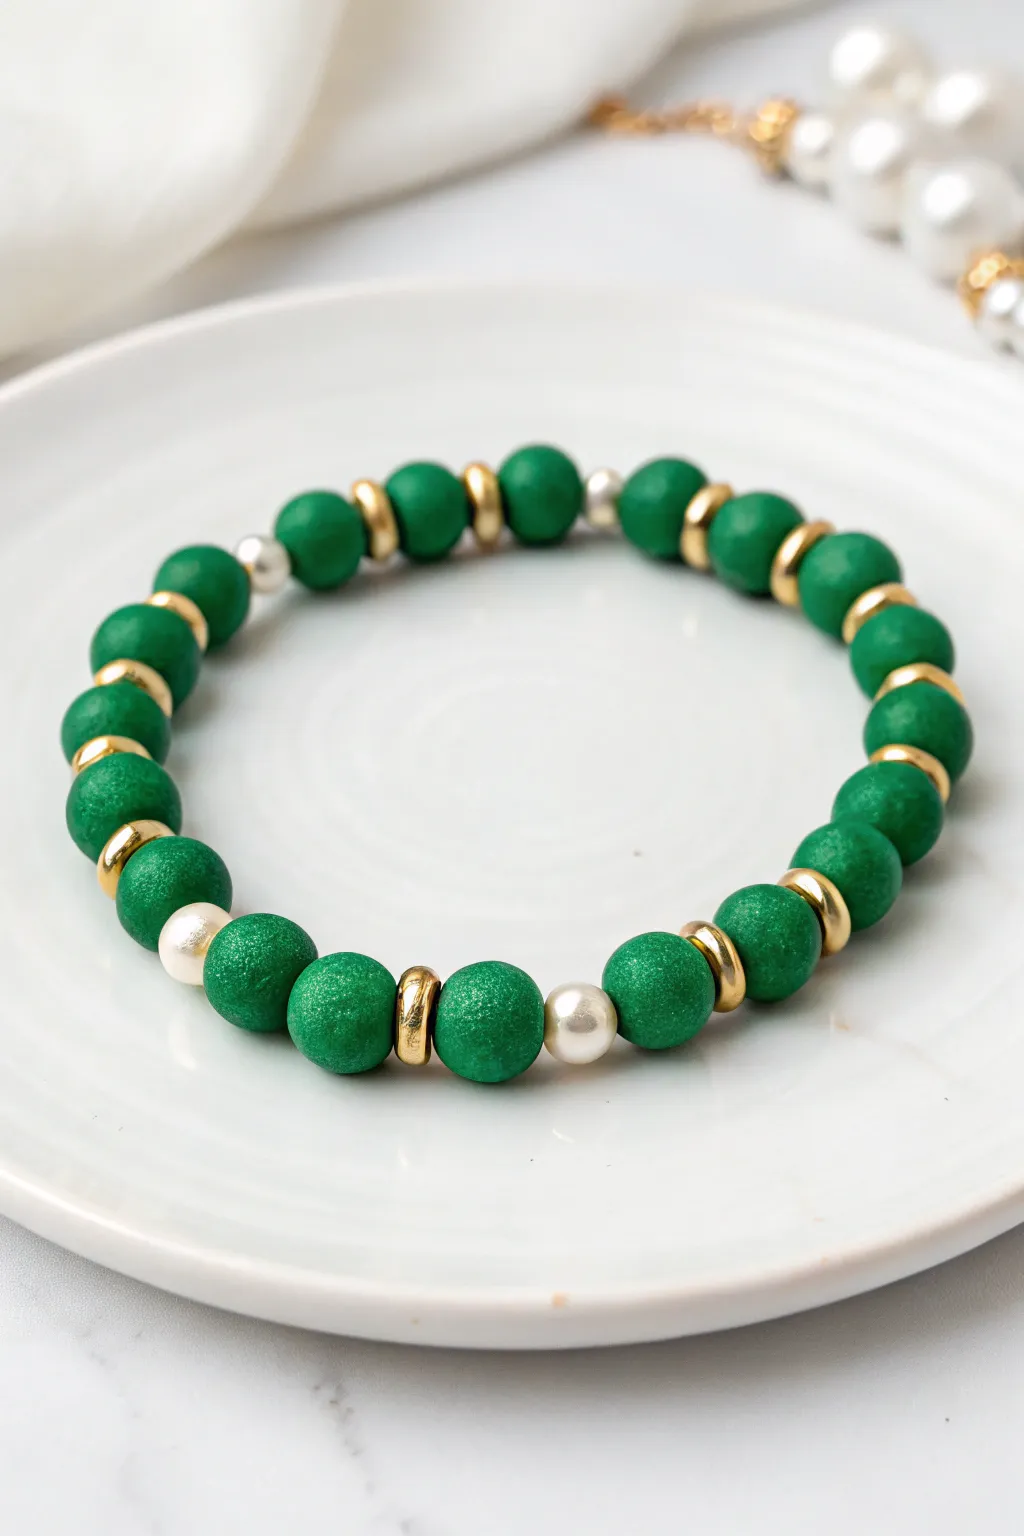
Elevate your St. Patrick’s Day accessory game with this sophisticated mix of textures and shines. Combining matte emerald clay beads with gleaming gold spacers and classic pearls creates a lucky charm that feels more like high-end jewelry than a simple craft.
Step-by-Step
Materials
- Emerald green polymer clay beads (round, approx. 8mm, matte or textured finish)
- Gold tone disk spacer beads (approx. 4-6mm)
- Small white faux pearls (approx. 4-6mm)
- Small silver or clear spacer beads (optional, for spacing)
- Strong elastic display cord (0.7mm or 0.8mm)
- Jewelry glue or clear nail polish
- Scissors
- Bead layout board (optional)
- Small piece of tape
Step 1: Planning the Pattern
-
Establish the rhythm:
Before stringing anything, lay out your beads on a soft surface or bead board to visualize the sophisticated pattern. The key to this look is an alternating rhythm rather than a random mix. -
Define the core sequence:
Observe the primary repeating unit: generally, it involves a green clay bead followed immediately by a flat gold spacer disk. -
Identify the accents:
Notice that the pearls aren’t placed after every single green bead. Plan to insert a pearl roughly every 4th or 5th green bead to break up the color block without overwhelming the green. -
Measure your wrist:
Wrap a piece of string around your wrist to find your size, then add about half an inch for a comfortable fit that doesn’t pinch.
Knot Slipping?
If the elastic feels slippery, dust the knot area with a tiny bit of cornstarch or baby powder before tying. The friction helps the knot grip itself tighter.
Step 2: Stringing the Design
-
Prepare the elastic:
Cut a length of elastic cord about 10-12 inches long. This extra length makes tying the knot at the end significantly easier than struggling with short ends. -
Secure the end:
Pre-stretch your elastic cord by pulling it firmly a few times to prevent it from sagging later. Tape one end of the cord to your table so beads don’t slip off while you work. -
Start with green:
Begin threading by sliding on one emerald green clay bead. -
Add the gold touch:
Follow the green bead immediately with a gold disk spacer. The flat surface of the spacer should sit flush against the round bead. -
Repeat the core sequence:
Repeat the green bead and gold spacer combination three or four times. -
Insert a pearl:
Instead of a gold spacer, thread on a small white pearl after a green bead. This creates a soft, classy interruption in the pattern. -
Resume the pattern:
Immediately follow the pearl with another emerald green bead to sandwich it, then continue with your green-and-gold sequence. -
Check the spacing:
Periodically hold the strand up to ensure your pearls are spaced somewhat evenly, though they don’t need to be mathematically perfect. -
Add subtle variation:
If you look closely at the design, you might see a tiny silver spacer occasionally next to a pearl. Feel free to add one if you want a mixed-metal look, or stick strictly to gold for warmth. -
Verify the length:
Wrap the unfinished beaded strand around your wrist to check the fit. Add or remove the final ‘green-gold’ unit as needed until the ends meet comfortably.
Make it Boutique
Add a singular rhinestone or crystal bead in place of one pearl to catch the light. Just one is enough to add sparkle without ruining the matte aesthetic.
Step 3: Finishing Touches
-
Pre-knot tension check:
Bring the two ends of the elastic together and verify there are no gaps between the beads. The strand should be taut but not buckling. -
Tie the knot:
Tie a secure surgeon’s knot. This is done by crossing right over left and looping through twice, then pulling tight. -
Double check security:
I always give the elastic a firm tug after the first knot to ensure it settles, then tie a standard overhand knot on top for extra security. -
Apply adhesive:
Dab a tiny drop of jewelry glue or clear nail polish directly onto the knot. This prevents it from slipping over time. -
Hide the mechanics:
While the glue is still slightly tacky but not wet, gently pull the knot inside the hole of the nearest green clay bead to conceal it. -
Trim the excess:
Once the glue is fully dry, carefully trim the excess elastic tail close to the bead, being extremely careful not to cut the main cord.
Slip on your new Luxe bracelet and enjoy the subtle shimmer of gold against that rich emerald green.
Glow-in-the-Dark Green Parade Stack
Soft mint greens meet crisp white and metallic gold in this elegant three-strand stack, perfect for a sophisticated St. Patrick’s Day look. The combination of flat Heishi clay beads and glowing white elements creates a subtle shimmer that transitions beautifully from day to evening festivities.
Detailed Instructions
Materials
- Polymer clay Heishi disk beads (mint green)
- Polymer clay Heishi disk beads (darker seafoam green)
- Round opaque white beads (4mm or 6mm)
- Gold tone spacer beads (various flat rounds and tiny donuts)
- Gold tone crimp covers or large metallic rings
- Gold hammered coin charm
- Small gold jump ring
- High-quality elastic beading cord (0.7mm recommended)
- Jewelry adhesive (e.g., G-S Hypo Cement)
- Scissors or jewelry nippers
- Tape or bead stopper
Step 1: Preparation & First Strand (Solid Mint)
-
Measure and cut:
Cut three lengths of elastic cord, each about 10-12 inches long to give yourself plenty of room for tying knots later. -
Secure the ends:
Pre-stretch the elastic gently to prevent sagging later, then place a bead stopper or a piece of tape on one end of your first cord. -
Focus on the bottom strand:
We’ll start with the bottom bracelet in the stack, which is primarily solid mint green. Begin threading your mint Heishi disk beads onto the cord. -
Add the focal section:
Continue threading until the strand is nearly complete. Instead of a continuous pattern, thread two larger gold geometric spacers or crimp covers side-by-side to act as your charm holder. -
Finish the base loop:
Fill the rest of the strand with mint beads until it fits comfortably around your wrist (usually 6.5 to 7 inches).
Keep it Rolling
To put these bracelets on, roll them over your hand rather than stretching and pulling them wide. This preserves the elastic’s memory and prevents snapping.
Step 2: Second Strand (Patterned Mix)
-
Start the middle strand:
Secure the end of your second cord. This design relies on a repeating pattern of white, gold, and green. -
Create the repeating unit:
Thread on a small gold spacer, followed by a round white bead, another gold spacer, a darker seafoam green Heishi bead, and finally a mint Heishi bead. -
Vary the rhythm:
I like to occasionally swap the single Heishi beads for a small stack of 3-4 mint disks to break up the pattern slightly, just like the center bracelet in the photo. -
Check the symmetry:
Continue this alternating pattern until the length matches your first bracelet. Ensure the beads sit flush but aren’t too tight, which can cause the bracelet to buckle.
Stiff Strand Fix
If your bracelet feels stiff and stick-like after tying, you strung the beads too tightly. Leave a tiny gap (about 1mm) of bare cord before knotting to allow flexibility.
Step 3: Third Strand (Textured Green)
-
Begin the top strand:
Prepare your final cord. This bracelet uses a darker seafoam or jade green Heishi bead as naturally interspersed accents. -
Build the pattern:
Thread primarily mint green disks, but every inch or so, insert a segment containing: gold spacer, white round bead, gold spacer, and a few dark green disks. -
Maintain consistency:
Keep the white round beads spaced out as highlights rather than the main feature for this specific layer.
Step 4: Assembly & Finishing Touches
-
Attach the charm:
For the first (bottom) bracelet, use jewelry pliers to open a small gold jump ring. Slide on your gold coin charm. -
Secure the charm:
Hook the jump ring onto the section between the two large gold spacers you placed earlier and pinch the ring closed securely. -
Tie the knots:
For each bracelet, remove the tape/stopper. Tie a standard surgeon’s knot (right over left, left over right) followed by an extra overhand knot for security. -
Apply adhesive:
Place a tiny dot of jewelry glue on each knot to prevent them from slipping over time. -
Hide the knots:
Once the glue is tacky but not fully hard, pull the knot gently inside the hole of the nearest large bead if possible, or trim the excess cord close to the knot after it fully dries.
You now have a chic, coordinated set of bracelets ready to add a splash of luck to your outfit
Lucky Charm Cluster With Mixed Dangles

Embrace the luck of the Irish with this vibrant green Heishi bead bracelet featuring elegant gold accents and a classic four-leaf clover charm. The matte finish of the clay discs pairs beautifully with the metallic shine, creating a sophisticated accessory perfect for St. Patrick’s Day and beyond.
Step-by-Step Guide
Materials
- Green polymer clay Heishi beads (approx 4-6mm)
- Small gold spacer beads (round or saucer-shaped)
- Gold textured bead caps or ring spacers (braided/rope look)
- Gold round charm with green four-leaf clover inlay
- Gold lobster clasp
- Gold jump rings (open)
- Gold extension chain with small leaf tag (optional)
- Elastic beading cord (0.8mm or 1mm)
- Jewelry adhesive (e.g., E6000 or GS Hypo Cement)
- Scissors or bead nippers
- Chain nose pliers
- Flat nose pliers
Step 1: Preparation and Centerpiece
-
Measure the Cord:
Cut a piece of elastic cord about 10-12 inches long. This extra length makes tying the knot much easier at the end. -
Pre-stretch the Elastic:
Hold the cord firmly at both ends and give it several gentle tugs. Pre-stretching helps prevent the bracelet from sagging or expanding after you wear it a few times. -
Secure Your End:
Place a piece of tape or a bead stopper on one end of the cord so your beads don’t slide off while you work. -
Prepare the Charm:
Using your pliers, gently twist open a small gold jump ring. Attach your green clover charm to the ring, then close it securely. This ensures the charm hangs correctly.
Step 2: Beading the Pattern
-
Start the Main Strand:
Begin stringing your green Heishi beads onto the cord. You will need enough to cover approximately one-third of your wrist circumference. -
Add the First Spacer:
Slide on one of the textured gold ring spacers. These specific spacers have a bumpy, rope-like texture that adds visual interest against the smooth clay. -
Create the Focal Section:
Add three to four green Heishi beads after the gold spacer. This creates a small segment of color leading into the center. -
Add the Second Spacer:
Thread on a second textured gold ring spacer. -
Attach the Charm:
Slide the jump ring holding your clover charm onto the cord right next to the second gold spacer. The charm should sit freely. -
Mirror the Pattern:
Add a third textured gold ring spacer on the other side of the charm. -
Finish the Focal Point:
Add another short segment of three to four green Heishi beads, followed by the fourth and final textured gold spacer. -
Complete the Strand:
String the remaining green Heishi beads until the bracelet reaches your desired length (usually around 6.5 to 7 inches total). Check the fit by wrapping it around your wrist.
Pro Tip: Spacer Stability
Buy spacers with a hole size close to your cord thickness. If the holes are too big, the spacer might swallow the knot or sit crookedly on the cord.
Step 3: Finishing Touches
-
Add Clasp End:
Thread the cord through the loop of your gold lobster clasp. -
Gold Accent:
Add a single small gold round bead next to the clasp to give it a polished finish. -
Tie the Knot:
Remove the tape or bead stopper. Bring both ends of the cord together and tie a strong surgeon’s knot (right over left, left over right and loop through twice). Pull the knot tight. -
Secure with Glue:
Dab a tiny amount of jewelry adhesive onto the knot. Let it dry according to the glue instructions—I usually give it at least 15 minutes before moving it. -
Hide the Knot:
Carefully slide one of the adjacent clay beads over the knot to conceal it inside the bead hole. -
Attach Extension Chain:
On the opposite side from the lobster clasp (where you started), use a jump ring to attach the gold extension chain. This adds adjustability and a decorative dangle. -
Trim Excess:
Once the glue is fully cured, use your scissors to trim the excess cord ends as close to the knot as possible.
Troubleshooting: Uneven Look
Clay beads can vary in thickness. If your ‘mirrored’ sections look uneven, count the total width in millimeters rather than just counting the number of beads.
Wear your lucky charm bracelet solo or stack it with gold bangles for a festive look.