
When the air turns crisp, I love pulling out air dry clay and making easy little pieces that instantly feel like fall decor. These ideas are all about cozy textures, autumn colors, and simple shapes you can actually finish in an afternoon.
Pumpkin Tealight Holders
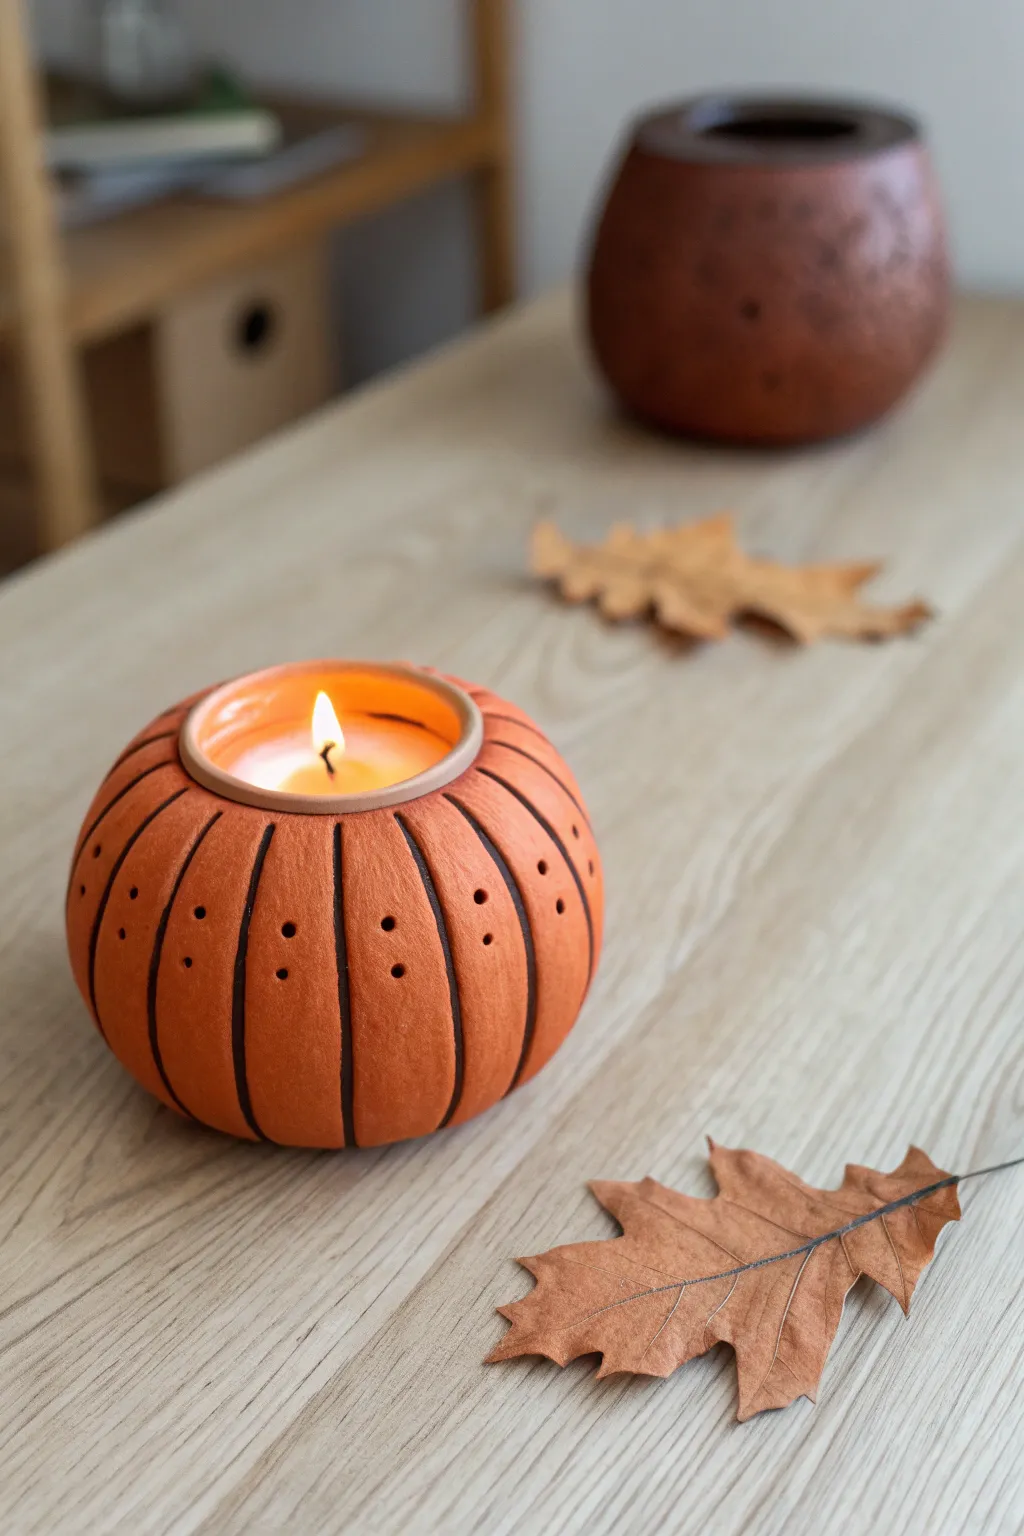
Embrace the warmth of autumn with this charming pumpkin tealight holder, crafted to mimic the rustic texture of terracotta. Its ribbed sides and delicate pinholes create a cozy, flickering display perfect for chilly evenings.
Detailed Instructions
Materials
- Terracotta-colored air dry clay
- Rolling pin
- Tealight candle (for sizing)
- Small bowl or sphere (for molding)
- Clay knife or fettling tool
- Modeling tool or knitting needle (for holes)
- Sponge and water
- Fine-grit sandpaper
- Acrylic matte varnish (optional)
Step 1: Shaping the Base
-
Prepare the Clay:
Start by kneading a generous handful of terracotta-colored air-dry clay until it is warm and pliable. Smooth out any major cracks before you begin shaping. -
Roll a Sphere:
Roll the clay into a smooth ball between your palms. Aim for a size slightly larger than a baseball to ensure it can accommodate a tealight. -
Create the Opening:
Using your thumbs, gently press into the center of the sphere to create a hollow. Widen this opening gradually until it fits your tealight candle with a little wiggle room. -
Check the Fit:
Place your actual tealight candle inside carefully to test the size. The rim of the clay should sit slightly higher than the top of the candle tin. -
Refine the Walls:
Pinch the walls of your pumpkin to even out the thickness. You want the clay to be sturdy but not overly chunky, roughly 1/4 inch thick throughout. -
Smooth the Rim:
Use a little water on your fingertip to smooth the top rim of the opening. It should be flat and level so the finished piece looks polished.
Step 2: Adding Texture and Details
-
Mark vertical Sections:
Using a clay knife or the edge of a ruler, gently mark vertical lines from the bottom center up to the rim. These will guide your sculpting. -
Carve the Ribs:
Deepen these vertical lines to create the pumpkin’s distinct ribs. I prefer to press a smooth modeling tool into the lines rather than cutting, as this creates a softer, rounded groove. -
Round the Segments:
Gently press on the clay sections between the grooves to puff them out slightly, enhancing the rounded, pumpkin-like appearance. -
Refine the Grooves:
Go back over your grooves with a slightly damp sponge or brush to smooth out any sharp edges or clay crumbs. -
Add Decorative Holes:
Take a small, round tool—like the end of a paintbrush or a knitting needle—and poke three small holes vertically down the center of each pumpkin rib. -
Clean the Holes:
Ensure the tool goes all the way through the wall of the clay. If the clay pushes inward, support the wall from the inside with your finger while you poke.
Keep it Clean
Work with clean hands and a damp cloth nearby. Terracotta clay can stain, and keeping your fingers clean prevents dried crumbs from marring the smooth surface.
Step 3: Finishing Touches
-
Final Smoothing:
Give the entire piece a final check. Use a damp sponge to wipe away fingerprints and soften any harsh tool marks on the surface. -
Let it Dry:
Allow the clay to dry completely. Since the walls are thick, this might take 24-48 hours. Keep it away from direct heat to prevent cracking. -
Sand for Perfection:
Once fully dry and hard, use fine-grit sandpaper to gently buff the surface. This removes any lingering imperfections and gives the “terracotta” a professional matte finish. -
Seal (Optional):
If you want to protect the finish, apply a thin coat of matte acrylic varnish. This preserves the natural clay look while making it easier to dust later.
Metallic Magic
Paint the inside of the pumpkin with gold or copper acrylic paint. When the candle is lit, the inner glow will reflect warmly through the pinholes.
Place a tea light inside and enjoy the soft, patterned shadows casting across your table


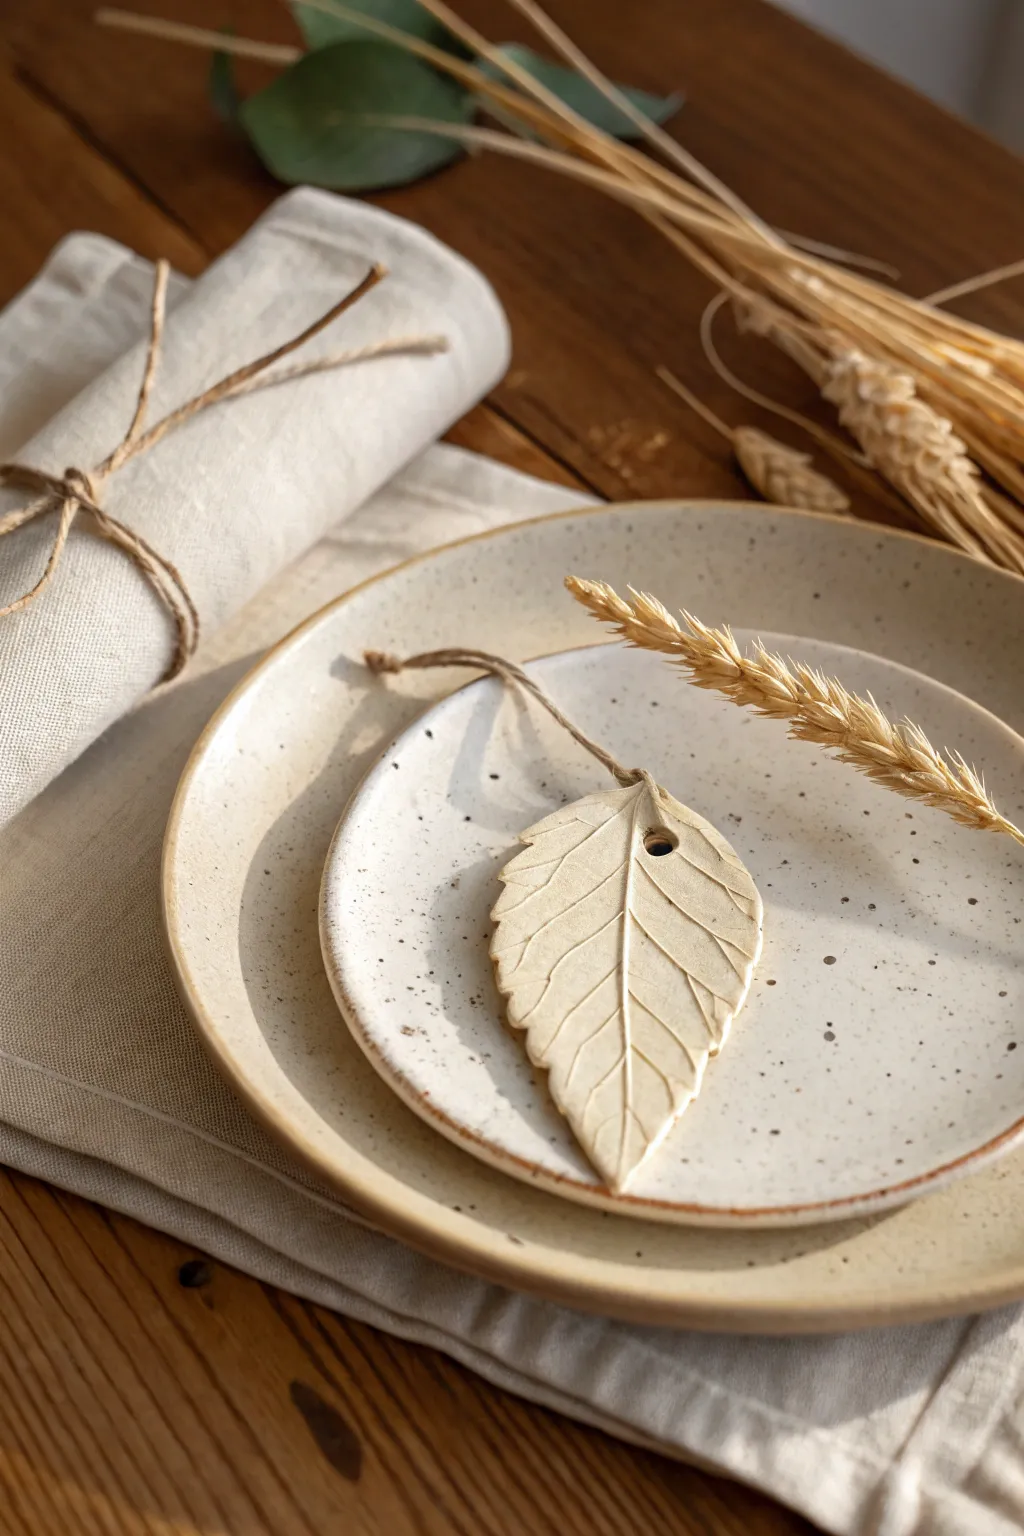
Leaf-Imprint Trinket Dishes
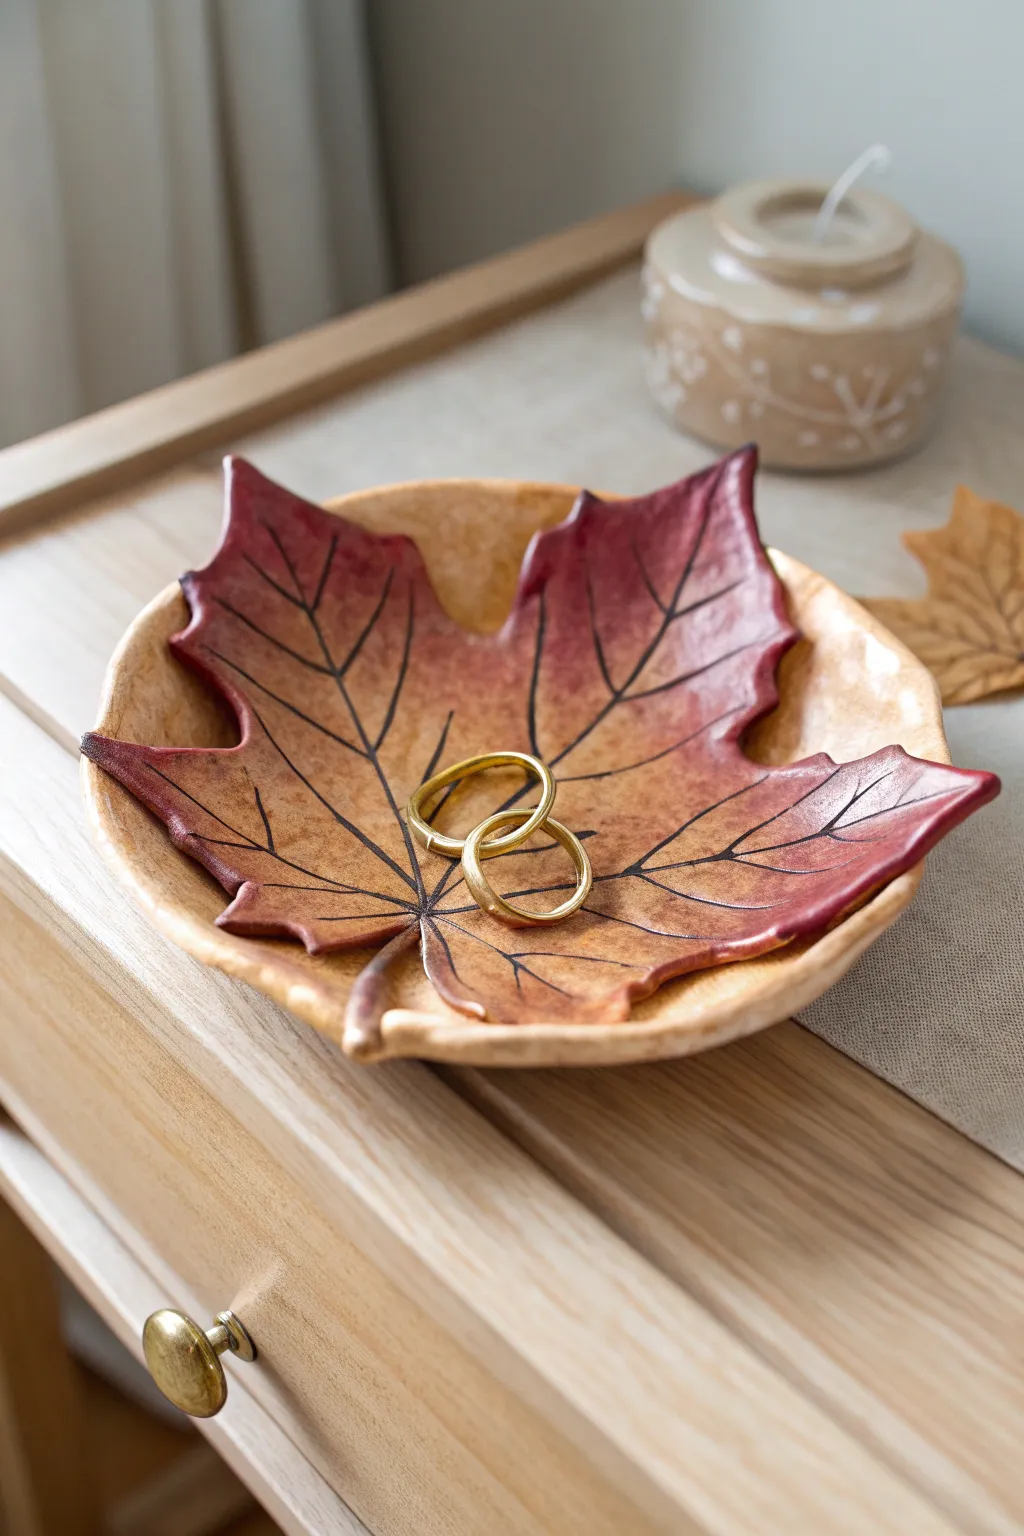
Capture the essence of autumn with this stunning, two-part trinket dish featuring a detailed maple leaf nesting inside a simple clay bowl. The intricate vein detailing and the beautiful ombré gradient from deep burgundy to warm ochre make this functional piece look like a professional ceramic artwork.
Step-by-Step
Materials
- Air dry clay (white or terracotta)
- Fresh maple leaf (sturdy, with prominent veins)
- Rolling pin
- Precision craft knife or clay needle tool
- Small bowl (for use as a mold)
- Acrylic paints (Burgundy/Deep Red, Ochre/Mustard Yellow, Dark Brown)
- Fine-tipped paintbrush
- Medium soft paintbrush
- Sponge or paper towel
- Water cup
- Fine-grit sandpaper
- Gloss varnish or sealant
Step 1: Shaping the Clay Base
-
Roll the clay:
Begin by taking a handful of air dry clay and conditioning it in your warm hands until pliable. Roll it out on a smooth surface to an even thickness of about 1/4 inch. -
Form the outer bowl:
Cut a circle from your rolled clay that is slightly larger than your maple leaf. You can use a circular cookie cutter or trace around a small plate for accuracy. -
Shape the mold:
Gently lift the clay circle and drape it into your small bowl mold. Press it lightly against the sides to create a gentle curve, smoothing the edges with a wet finger to remove any cracks or roughness. -
First drying phase:
Set this base bowl aside to firm up slightly while you work on the leaf layer. It doesn’t need to be bone dry, just sturdy enough to hold its shape.
Leaf Sticking?
If the real leaf sticks to the clay and tears during removal, try lightly dusting the underside of the leaf with cornstarch before pressing it into the wet clay.
Step 2: Creating the Leaf
-
Prep the leaf:
Roll out a second slab of clay, slightly thinner than the first (around 1/8 inch or 3-4mm). Select your fresh maple leaf and place it vein-side down onto the clay. -
Impress the texture:
Use your rolling pin to firmly roll over the leaf. Apply even pressure to ensure the veins and stem make a deep, clean impression without distorting the leaf shape too much. -
Cut the outline:
With the leaf still pressed into the clay, use your precision craft knife or needle tool to trace the exact perimeter of the leaf. Remove the excess clay carefully. -
Reveal the details:
Find the stem of the real leaf and gently peel it away from the clay to reveal the intricate texture underneath. If any edges look sharp, smooth them very gently with a damp fingertip. -
Combine the layers:
Score the back of your clay leaf and the center of your base bowl with a needle tool. Apply a tiny amount of water or slip to the scored areas. -
Final shaping:
Press the leaf firmly into the center of the base bowl. Ensure the leaf tips curl up slightly along with the curve of the bowl to create that natural, ‘fallen leaf’ appearance. -
Dry completely:
Allow the entire piece to dry in the mold for at least 24-48 hours. I find flipping it carefully halfway through helps the bottom dry thoroughly.
Pro Tip: Curved Edges
Don’t let the leaf lie flat! Prop up the tips of the clay leaf with small rolled balls of foil while drying. This creates a natural, curled shape typical of dried fall foliage.
Step 3: Painting and Finishing
-
Sand imperfections:
Once fully dry and hard, use fine-grit sandpaper to gently smooth the rim of the outer bowl or any rough spots on the underside. Wipe away the dust. -
Base wash:
Mix your ochre or mustard yellow paint with a little water to create a wash. Paint the entire surface of the leaf, letting it seep into the textures, then wipe away the excess with a paper towel for a stained effect. -
Adding the ombré:
While the base is still slightly tacky, apply the burgundy paint to the tips of the leaf lobes. Use a damp brush to blend the red inward toward the yellow center, creating a soft gradient. -
Enhancing the veins:
Mix a very thin, watery dark brown paint. Using your finest brush, carefully run this dark wash into the main vein lines. The liquid will naturally settle into the deep impressions. -
Detailing the rim:
For added dimension, lightly brush the very edge of the leaf tips with a concentrated bit of the burgundy or dark brown to mimic the crisp edges of a dried leaf. -
Outer bowl color:
Paint the bottom bowl (the part underneath the leaf) in a solid, warm neutral tone like beige or light terra cotta to contrast with the vibrant leaf. -
Seal the piece:
Finish by applying two coats of gloss varnish. This not only protects the paint but gives the dish a ceramic-like shine and makes it durable for holding rings or keys.
Place your finished dish on a entryway table or nightstand for a perfect seasonal accent that holds your treasures


Acorn and Pinecone Ornaments
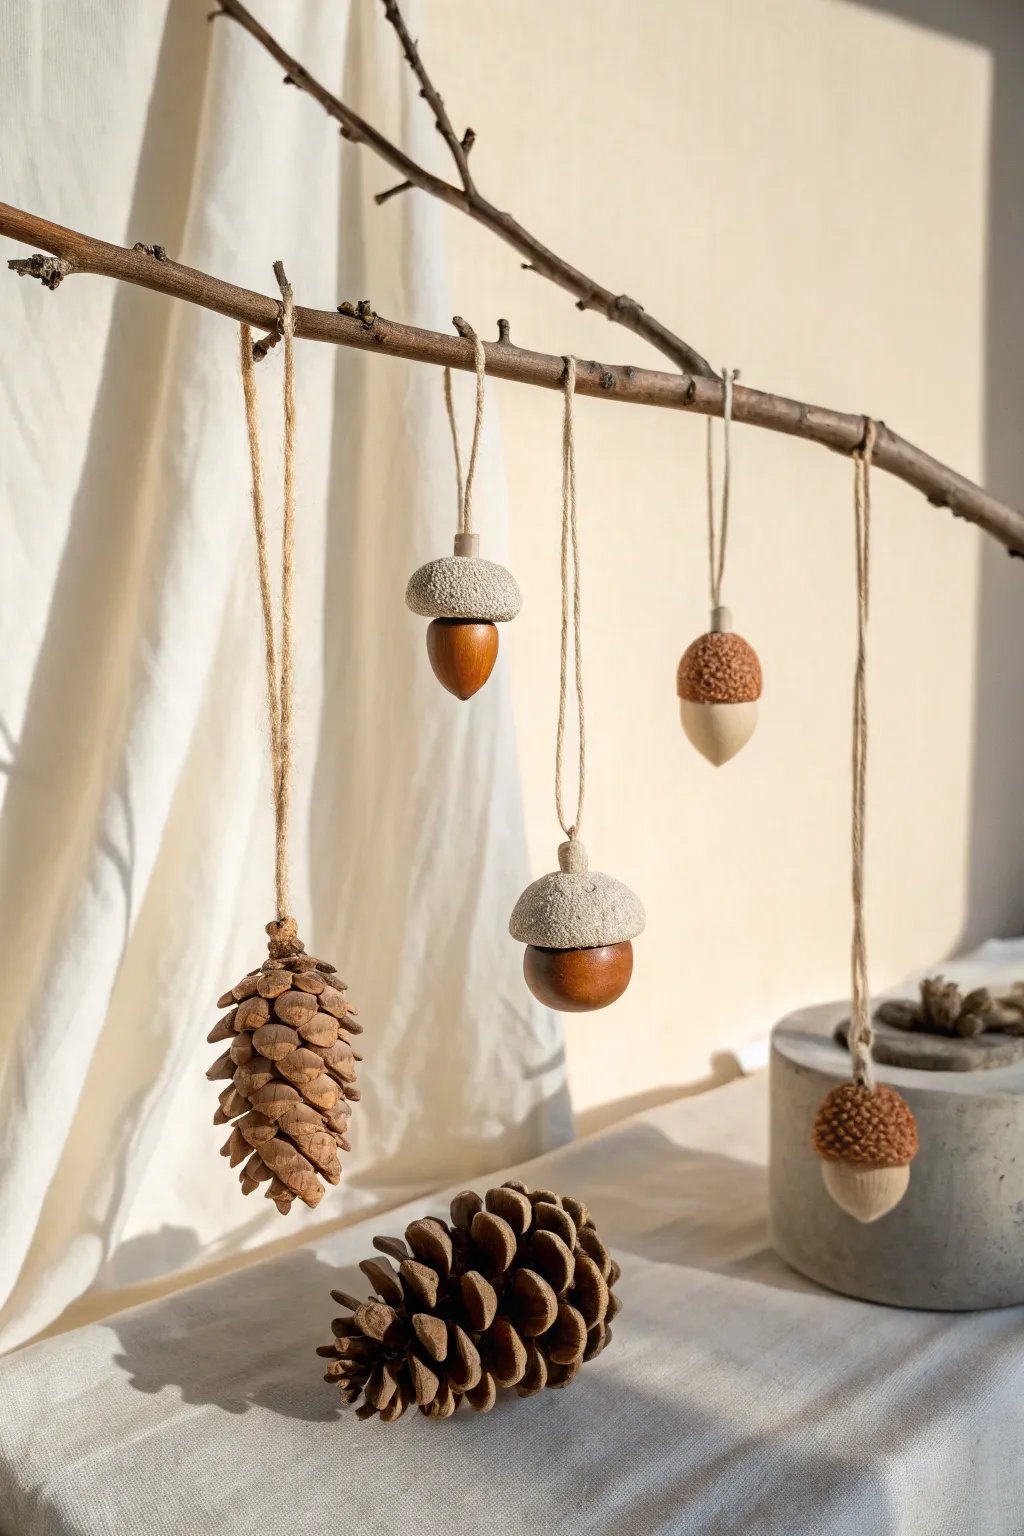
Bring the quiet beauty of the autumn forest indoors with this charming mobile project. Combining real pinecones with handcrafted clay and wood acorns creates a minimalist, earthy decoration perfect for the season.
Step-by-Step Guide
Materials
- Air dry clay (white or light beige)
- Wooden beads (large, round or oval)
- Wooden balls or pre-made wood acorn shapes
- Real pinecones (small to medium size)
- Jute twine or natural hemp cord
- Sturdy tree branch (for hanging)
- Texturing tools (old toothbrush, sponge, or sandpaper)
- Wood stain (warm walnut or oak)
- Acrylic paint (burnt sienna/copper and light beige)
- Paintbrushes
- Hot glue gun and glue sticks
- Eye screws (tiny size) or small drill bit
Step 1: Prepping the Wood Elements
-
Stain the wooden bases:
If you are using raw wooden beads or wooden acorn bottoms, apply a warm walnut or oak wood stain first. Wipe off excess stain with a rag to let the natural grain show through, and allow them to dry completely according to the manufacturer’s instructions. -
Alternative paint method:
For a richer look like the darker acorn in the photo, you can paint the wooden base with a copper or burnt sienna acrylic paint mixed with a tiny drop of water to act as a wash. -
Prepare the pinecones:
Clean your pinecones gently with a dry brush to remove any debris or bugs. If they are tightly closed, you can bake them on a foil-lined sheet at 200°F (90°C) for about 30 minutes to help them open up nicely.
Natural Texture
Press the wet clay cap into a piece of real tree bark or a rough stone to imprint authentic, organic patterns instantly.
Step 2: Creating the Clay Caps
-
Form the initial cap:
Pinch off a small ball of air dry clay, roughly the size of a marble. Flatten it slightly into a disk shape. -
Mold onto the wood:
Press the clay disk onto the top of your stained wooden bead or ball. Gently work the edges down to cup the top of the wood, mimicking the natural shape of an acorn cap. -
Add a stem loop:
Before texturing, create a small hole in the very center top of the clay cap using a toothpick or skewer. This will be essential for threading your hanging twine later. Make sure the hole goes all the way through to the wood. -
Texture the surface:
For that realistic, bumpy texture seen in the photo, take an old toothbrush or a piece of coarse sandpaper and firmly dab the outside of the wet clay. I prefer stippling with a stiff bristle brush to get deep, organic pitting. -
Create variation:
For the alternative acorn style shown, keep the clay cap smoother or shape the clay into a deeper, cup-like form around a smaller wooden bead. You can paint this one a solid earthy brown after it dries. -
Dry thoroughly:
Set your clay-capped acorns aside in a safe spot to dry. Depending on humidity, this usually takes 24 to 48 hours.
Level Up: Scented Clay
Knead a drop of cinnamon or clove essential oil into the clay before sculpting. Your ornaments will smell like autumn as they dry.
Step 3: Assembly and Hanging
-
Drill the pinecones:
Carefully screw a tiny eye hook into the flat top of your pinecone. If the center is too hard, use a very small drill bit to make a pilot hole first. -
Cut the twine:
Cut varied lengths of jute twine. You want the ornaments to hang at different heights for visual interest, so cut some short (6 inches) and some much longer (10-12 inches). -
Thread the acorns:
Take a length of twine, fold it in half, and thread the looped end through the hole in your dried clay cap. Secure it with a knot inside the cap or glue the twine ends into the hole directly. -
Tie the pinecones:
Thread twine through the eye hook on your pinecones and secure with a sturdy knot. You can wrap the twine around the stem stump if you prefer a more rustic look without hardware. -
Attach to the branch:
Lay your branch on a table and arrange the ornaments below it to test the composition. Once satisfied, tie each piece of twine securely to the branch. -
Secure the knots:
Dab a tiny dot of hot glue heavily on the back of the knots on the branch to prevent them from sliding around or unraveling. -
Final touches:
Trim any excess twine tails near the knots for a clean finish. Hang your beautiful new mobile on a wall hook or suspend it from the ceiling.
Now you have a stunning piece of nature-inspired decor ready to warm up your home


Fall Garland Cutouts
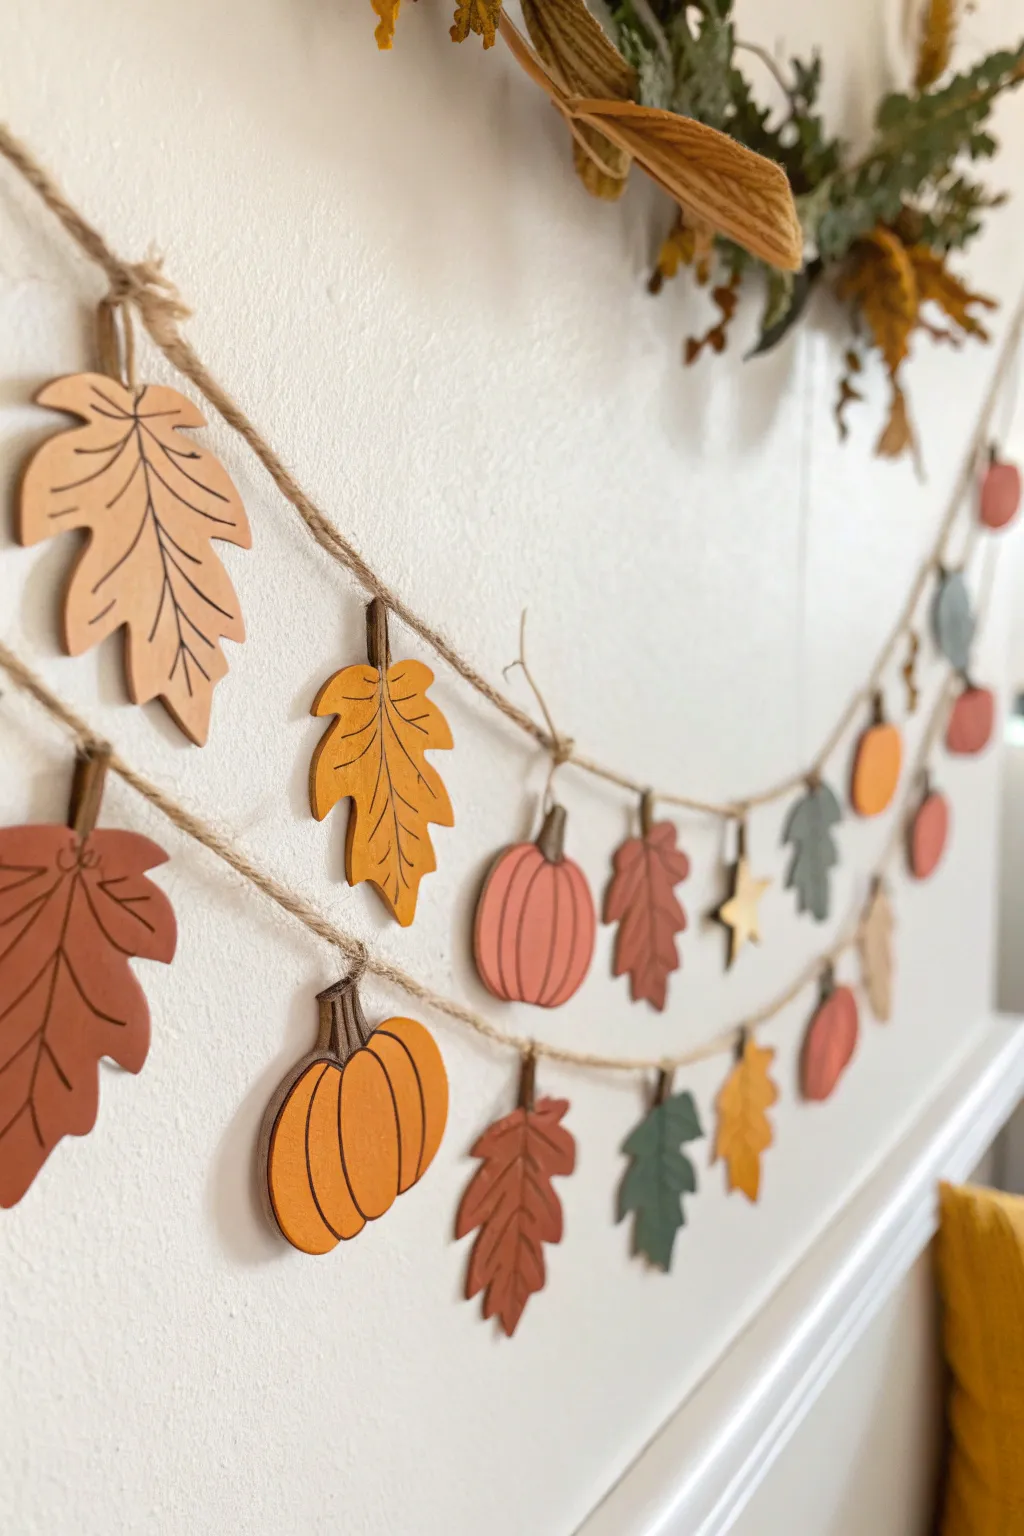
Bring the rich, warm hues of autumn indoors with this charming handcrafted garland. Using air dry clay, you’ll create gentle leaf and pumpkin shapes that add a cozy, rustic touch to any mantel or wall.
Step-by-Step Tutorial
Materials
- Air dry clay (white or terracotta)
- Leaf and pumpkin cookie cutters
- Rolling pin
- Parchment paper
- Sandpaper (fine grit)
- Acrylic paints (terracotta, mustard yellow, sage green, burnt orange, brown)
- Fine detail paintbrush
- Medium flat paintbrush
- Jute twine
- Toothpick or straw
- Matte sealant spray (optional)
Step 1: Shaping the Foliage
-
Prepare your workspace:
Lay down a sheet of parchment paper to prevent sticking. Grab a generous handful of air dry clay and knead it until it’s soft and pliable, working out any air bubbles. -
Roll out the clay:
Use your rolling pin to flatten the clay to an even thickness, aiming for about 1/4 inch. If it’s too thin, the ornaments might crack; too thick, and they’ll be heavy. -
Cut the shapes:
Press your leaf and pumpkin cookie cutters firmly into the clay. I find that wiggling the cutter slightly before lifting helps release the shape cleanly. -
Create hanging holes:
Before the clay starts to dry, use a straw or a toothpick to poke a hole near the stem of each shape. Make sure the hole is wide enough for your jute twine to pass through later. -
Smooth the edges:
Dip your finger in a little water and run it along the cut edges of each shape to smooth down any roughness or jagged bits left by the cutter. -
Let them dry:
Arrange the cutouts on a flat surface lined with fresh parchment paper. Let them air dry for 24-48 hours, flipping them halfway through to ensure even drying and prevent curling.
Step 2: Adding Color and Detail
-
Sand for perfection:
Once fully cured, gently run fine-grit sandpaper over the edges and surface if there are any uneven spots. Wipe away the dust with a dry cloth. -
Mix your palette:
Squeeze out your acrylic paints. You want a cohesive fall palette, so mix a little brown into your oranges and yellows to mute them slightly for that earthy look. -
Base coat application:
Paint each shape a solid color using the medium flat brush. Alternate colors for variety—make some leaves mustard, some pumpkins terracotta, and others sage green. -
Paint the edges:
Don’t forget the sides! carefully paint the thickness of the clay to match the front, giving the piece a finished, professional look. -
Dry the base:
Allow the base coats to dry completely. This usually takes about 20-30 minutes depending on how thick you applied the paint. -
Detail the veins:
Using your fine detail brush and dark brown paint, carefully draw the stems and veins on the leaves. Use light pressure for thin, delicate lines. -
Detail the pumpkins:
For the pumpkins, draw curved vertical lines to mimic the ribs of a pumpkin skin, and paint the stem stumps a dark brown. -
Seal the deal:
If you want extra durability, mist the pieces with a matte sealant spray and let it dry outdoors or in a well-ventilated area.
Clay cracked while drying?
Mix a tiny bit of fresh wet clay with water to make a paste (slip). Fill the crack, smooth it over with your finger, and let it dry again.
Step 3: Stringing the Garland
-
Measure the twine:
Cut a length of jute twine as long as you want your garland intended for, plus an extra 12 inches on each end for hanging loops. -
Create the ties:
Cut smaller pieces of jute twine, about 4 inches long each. These will attach the ornaments to the main line. -
Thread the ornaments:
Thread a small piece of twine through the hole of a clay shape and double knot it around the main long strand of twine. Trim the excess ends of the knot for a tidy look. -
Space them out:
Continue tying on your leaves and pumpkins, spacing them about 3-4 inches apart. Be mindful to alternate colors and shapes as you go for a balanced composition.
Add some sparkle
Mix a small amount of gold metallic paint into your brown detail color. It adds a subtle shimmer to the veins and stems that catches the light.
Now hang your beautiful handmade garland and enjoy the cozy autumn vibes it brings to your space

The Complete Guide to Pottery Troubleshooting
Uncover the most common ceramic mistakes—from cracking clay to failed glazes—and learn how to fix them fast.
Maple Leaf Coasters
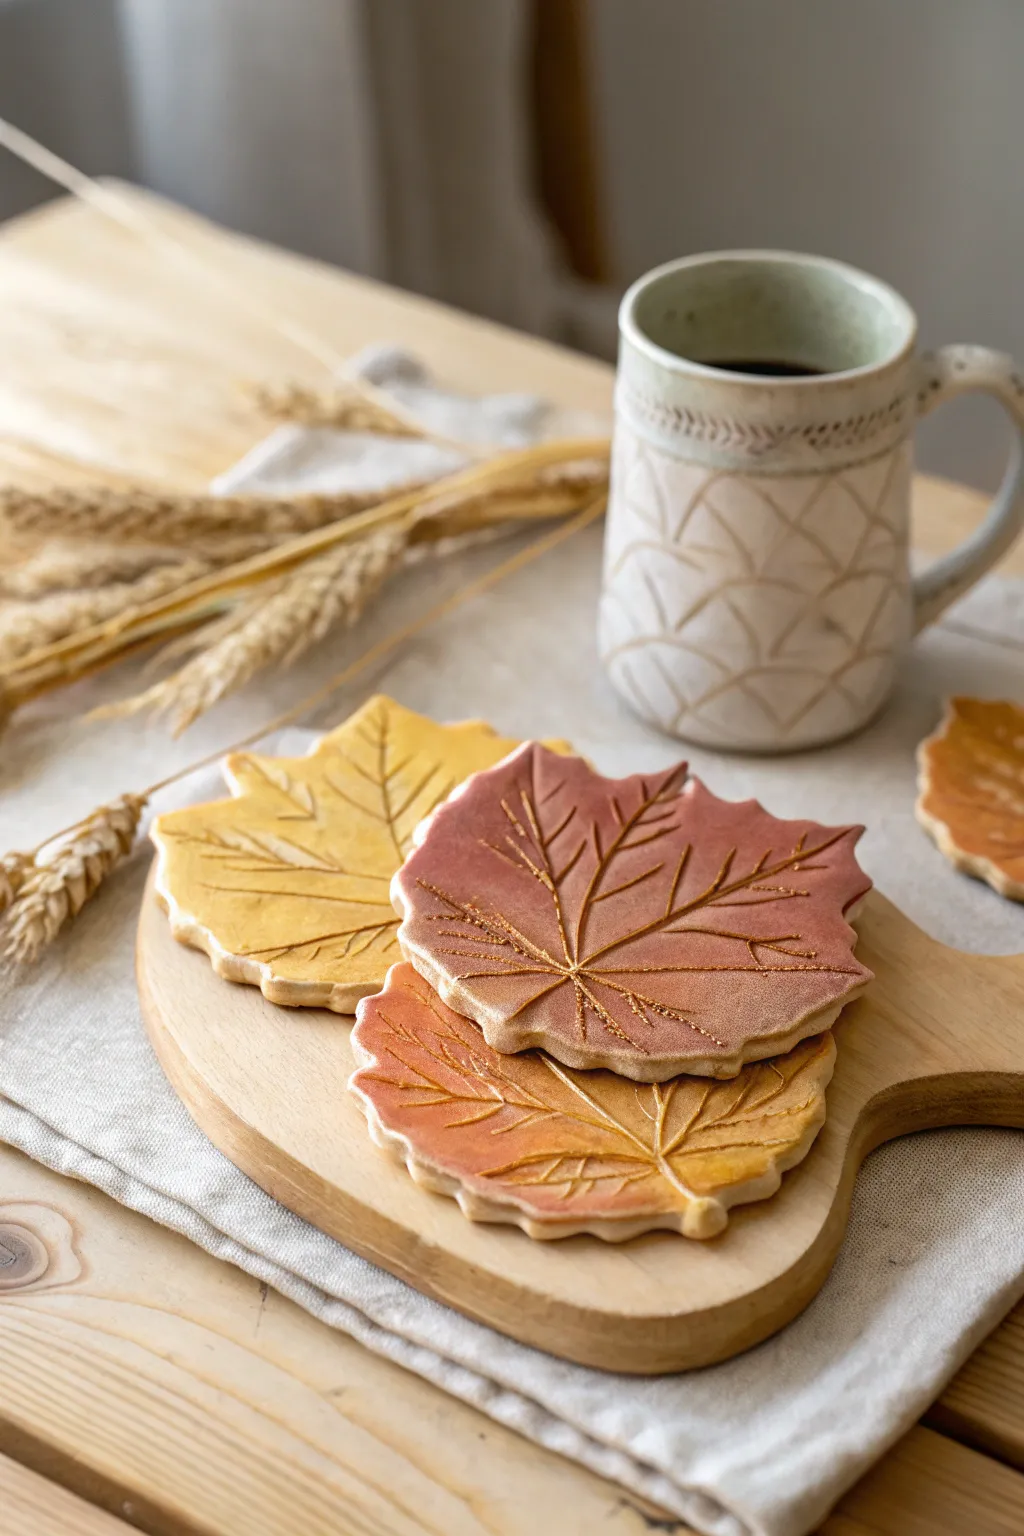
Capture the fleeting beauty of autumn with these elegant air dry clay coasters. Featuring a stunning gradient of warm fall hues and delicate, gold-filled veins, they bring a sophisticated seasonal touch to your coffee table.
Step-by-Step
Materials
- White or terracotta air dry clay
- Maple leaf cookie cutter (large) or printed template
- Rolling pin
- Parchment paper or non-stick mat
- Craft knife or needle tool
- Sandpaper (fine grit)
- Acrylic paints (Yellow ochre, burnt sienna, deep red, brown)
- Sponge dabbers or soft makeup sponges
- Fine detail paintbrush
- Gold metallic paint or gold leaf pen
- Matte or satin waterproof varnish
Step 1: Shaping the Clay
-
Prepare the workspace:
Lay down your parchment paper or non-stick mat on a flat surface to prevent the clay from sticking as you work. -
Condition the clay:
Take a handful of air dry clay and knead it warm in your hands until it becomes pliable and smooth, removing any air bubbles. -
Roll it out:
Roll the clay into an even slab, aiming for a thickness of about 1/4 inch (6mm). This thickness ensures the coaster is sturdy enough to hold a mug without cracking. -
Cut the shapes:
Press your large maple leaf cookie cutter firmly into the clay. If using a paper template, place it on the clay and carefully trace around it with a craft knife. -
Smooth the edges:
Dip your finger in a little water and gently run it along the cut edges of the leaf to smooth out any jagged bits or roughness.
Step 2: Adding Texture & Drying
-
Carve the main veins:
Using a needle tool or a dull knife, gently carve the primary veins radiating from the stem area to the leaf points. Press deep enough to create a groove, but don’t cut all the way through. -
Add secondary veins:
Branching off from your main lines, carve smaller, delicate veins that angle outward. Varying the pressure slightly makes them look more natural. -
Dry flat:
Place the clay leaves on a flat surface to dry. I find it helpful to place a light book on top (with parchment paper in between) after a few hours to prevent curling. -
Allow full cure:
Let the coasters dry completely for 24-48 hours. They should feel light and hard to the touch when ready. -
Sand imperfections:
Once fully dry, use fine-grit sandpaper to buff away any remaining rough edges or bumps on the surface.
Natural Texture Hack
Before cutting the shape, gently press a real leaf into the clay slab and roll over it once. This transfers realistic veins instantly.
Step 3: Painting & Finishing
-
Base coat:
Apply a thin wash of yellow ochre acrylic paint over the entire surface. Wiping it back slightly with a damp paper towel creates a nice, stained look. -
Create the gradient:
Sponge burnt sienna and deep red paint onto the edges and tips of the leaves, blending inward toward the yellow center to mimic a turning leaf. -
Highlight the veins:
Using a very fine brush or a gold pen, carefully fill the carved vein indentations with metallic gold paint. This adds that luxurious shimmer. -
Enhance the tips:
Lightly brush a tiny amount of gold paint on the very edges of the leaf points to define the shape further. -
Seal the coaster:
Once the paint is totally dry, apply 2-3 coats of waterproof varnish. This is crucial to protect the clay from moisture when used as a coaster.
Preventing Curling
If the edges start lifting while drying, flip the leaves over carefully every few hours to ensure airflow hits both sides evenly.
Stack these beautiful leaves on your coffee table for an instant burst of autumn warmth
Mini Harvest Bud Vases
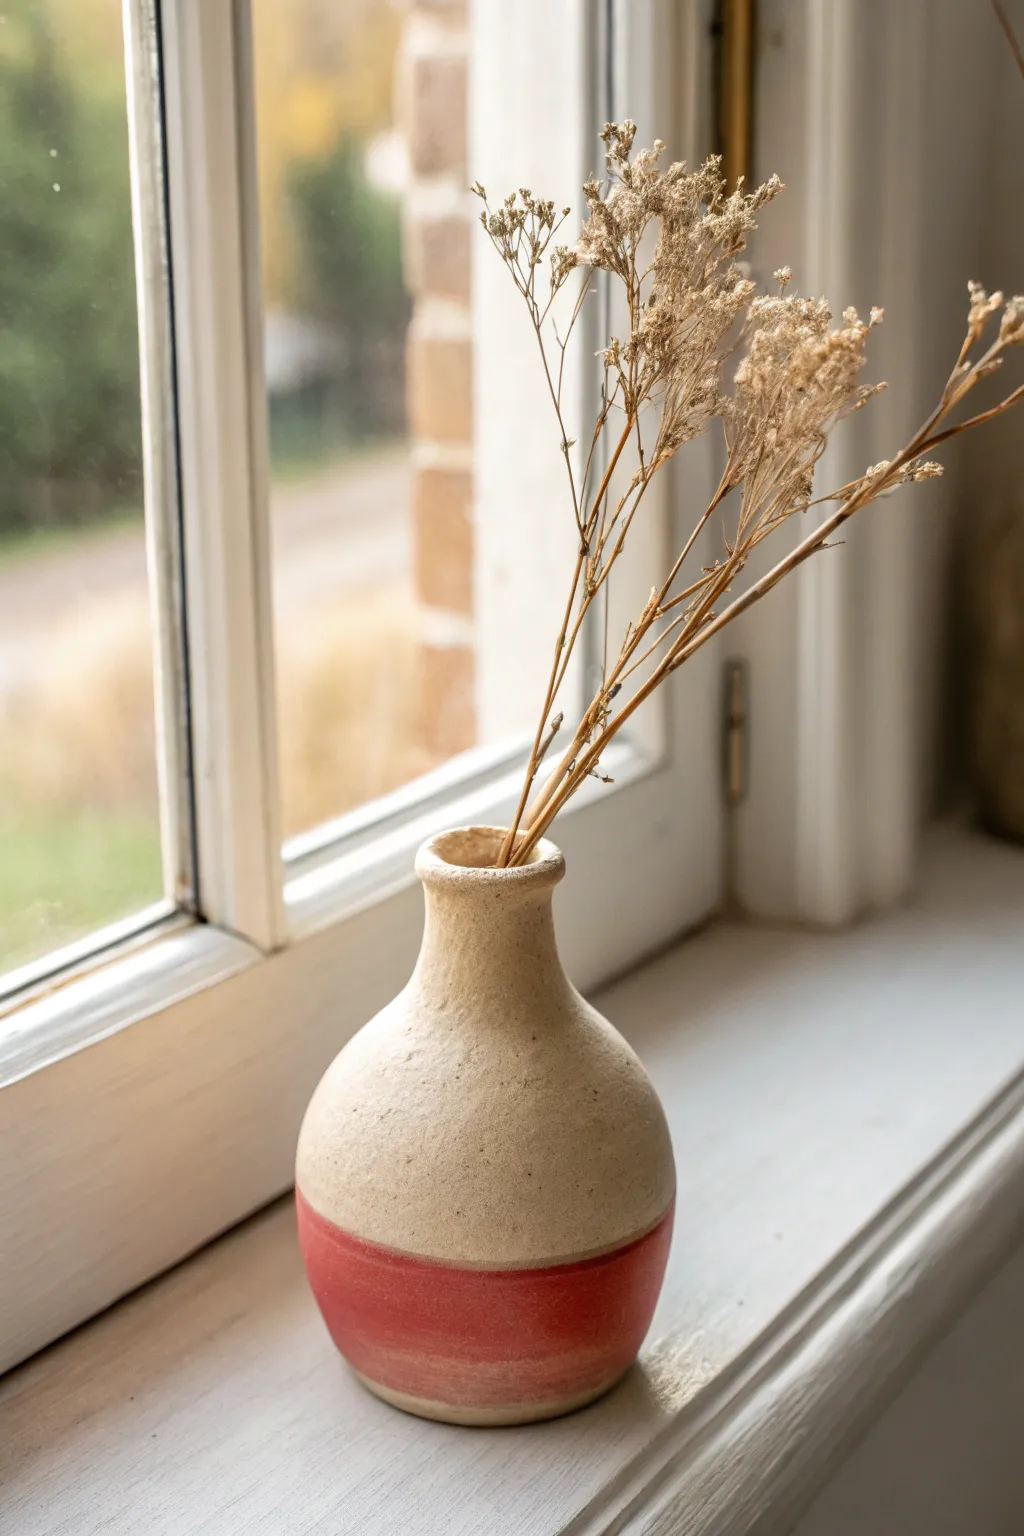
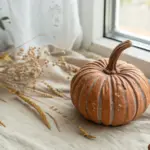
Bring a touch of minimalist autumn charm to your windowsill with this lovely two-toned bud vase. The textured sandy upper balances perfectly with the warm terracotta base, creating a cozy home for your favorite dried stems.
Step-by-Step Tutorial
Materials
- Air dry clay (white or natural stone color)
- Acrylic paint (warm terracotta/brick red)
- Small rolling pin
- Modeling tools or a dull butter knife
- Paintbrush (flat, medium size)
- Water cup and sponge
- Sandpaper (fine grit)
- Clear matte varnish (optional)
- Small bowl relative to desired vase size (for pinch pot method)
Step 1: Shaping the Base
-
Prepare your clay:
Start with a ball of air dry clay about the size of a tennis ball. Knead it well in your hands to awaken the clay fibers and remove any air bubbles, ensuring the material is pliable and smooth. -
Form the pinch pot:
Hold the clay ball in one hand and push your thumb into the center, stopping about a half-inch from the bottom. Gently pinch and rotate the clay between your thumb and fingers to open up the bowl shape. -
Refine the walls:
Continue pinching upward, aiming for an even wall thickness of about 1/4 inch. Keep the bottom rounded and full, as this will be the widest part of your vase. -
Close the form:
As you move closer to the top, start angling your pinches inward to narrow the opening. You want to create a gentle slope from the wide belly of the vase up toward where the neck will begin.
Step 2: Creating the Neck
-
Add a coil:
Roll a small sausage-shaped coil of clay. Score (scratch) the top rim of your base and the bottom of the coil, apply a dab of water, and attach the coil to the opening to begin building the neck height. -
Smooth the join:
Using your thumb or a modeling tool, blend the clay coil downwards onto the body on the outside, and upwards on the inside. I find it helpful to support the wall from the inside with a finger while smoothing the outside to prevent collapsing. -
Shape the neck:
Gently squeeze the neck to narrow it further. It should be tall and elegant but sturdy enough to hold dried flowers. Smooth out any bumps with a slightly damp sponge. -
Flare the rim:
At the very top of the neck, gently press your thumb outward while rotating the vase to create a subtle, organic flare or lip.
Cracks Appearing?
Mix a tiny bit of clay with water to make a paste (slip). Fill the cracks with this paste and smooth over with your finger. Let it dry again before painting.
Step 3: Texturing and Drying
-
Wait for leather-hard stage:
Let the vase sit for about an hour or two until it is leather hard—stiff but still cool to the touch. -
Add superficial texture:
Take a rough sponge or a crumpled ball of aluminum foil and gently dab it all over the surface. This mimics the sandy, stone-like texture seen in the photo. -
Dry completely:
Allow the vase to dry fully for 24-48 hours. Turn it occasionally so the bottom dries evenly. The clay will turn a lighter color when completely dry. -
Sand imperfections:
Once bone dry, use fine-grit sandpaper to smooth out any sharp jagged bits on the rim or uneven lumps on the body, but leave the overall stippled texture intact.
Speckled Stone Effect
For a granite look, flick tiny droplets of watered-down black or brown paint onto the unpainted upper section using an old toothbrush tailored for texture.
Step 4: Painting and Finishing
-
Tape off the line:
Decide where you want your color block to be—aim for the bottom quarter of the vase. Because the surface is textured, masking tape might not seal perfectly, so you can also sketch a light pencil line as a guide instead. -
Mix your color:
Create a warm terracotta hue by mixing red acrylic with a touch of brown and a tiny drop of yellow oxide. You want a matte, earthy tone rather than a bright primary red. -
Paint the base:
Carefully paint the bottom section up to your guide line. Use a flat brush to get a crisp edge. Apply two coats if necessary for full opacity. -
Leave the top natural:
Leave the upper portion unpainted to show off the natural clay texture. If your clay dried too grey, you can dry-brush a little distinct cream or beige paint over the texture. -
Seal (Optional):
Since air dry clay isn’t waterproof, apply a coat of matte varnish if you want extra durability. Note that this vase is strictly for dried florals and should not hold water.
Place your finished vase near natural light and fill it with dried wheat or baby’s breath for an instant autumn upgrade


What Really Happens Inside the Kiln
Learn how time and temperature work together inside the kiln to transform clay into durable ceramic.
Thanksgiving Leaf Place Cards
Bring a touch of organic elegance to your Thanksgiving table with these textured, cream-colored leaf place cards. Their subtle speckling and natural linen twine ties perfectly complement a rustic fall aesthetic.
Step-by-Step
Materials
- White or cream air dry clay
- Rolling pin
- Real leaves (with prominent veins) or leaf stamps
- Leaf-shaped cookie cutter (or craft knife)
- Sandpaper (fine grit)
- Brown acrylic paint
- Old toothbrush
- Matte sealant or varnish
- Natural jute twine
- Drinking straw or skewer
- Parchment paper
Step 1: Shaping the Clay
-
Prepare your workspace:
Lay down a sheet of parchment paper to protect your surface and prevent the clay from sticking. Tape the corners down so it doesn’t slide around while you work. -
Condition the clay:
Take a handful of air dry clay and knead it gently in your hands until it feels pliable and warm. If it feels too dry, dip your finger in water and work it in. -
Roll it out:
Use your rolling pin to flatten the clay to a uniform thickness, aiming for about 1/4 inch. Avoid making it too thin, as the edges might curl or crack as they dry. -
Imprint the texture:
Place a real leaf vein-side down onto the clay, or position your leaf stamp carefully. Press firmly with your fingers or roll over it gently with the rolling pin to transfer the pattern deeply into the clay. -
Cut the shape:
Position your leaf-shaped cookie cutter over the texture you just created and press down firmly. If you are cutting freehand with a craft knife, trace around the real leaf carefully. -
Refine the edges:
Peel away the excess clay from around your shape. Dip your finger in a little water and gently smooth any rough edges or uneven cuts to ensure a professional finish. -
Create the hanging hole:
Use a drinking straw to punch a clean hole near the top of the leaf stem. Twist the straw slightly as you push through to get a neat circle.
Warping Woes?
If leaves curl while drying, place a lightweight book on top of them after the first few hours of drying to keep them perfectly flat.
Step 2: Finishing Touches
-
Allow to dry:
Move the parchment paper with your leaves to a safe, dry spot. Let them sit for at least 24-48 hours, flipping them occasionally to ensure even drying and prevent warping. -
Sand for smoothness:
Once fully cured and hard, check the edges again. Briefly rub fine-grit sandpaper over any sharp points or rough spots on the rim of the leaf. -
Prepare the speckle mixture:
Squeeze a tiny dot of brown acrylic paint onto a palette and dilute it with water until it’s very runny and ink-like. -
Apply the speckles:
I find this part most fun: dip an old toothbrush into the watery paint. Hold it over your clay leaves and run your thumb across the bristles to flick tiny droplets onto the surface. -
Let the paint set:
Wait about 10 minutes for the speckles to dry completely. They should look like natural pottery flecks rather than painted dots. -
Seal the piece:
Apply a coat of matte varnish or sealant over the entire leaf. This protects the clay from moisture and gives it that finished ceramic look. -
Add the twine:
Cut a length of natural jute twine, about 6 inches long. Thread it through the hole you punched earlier. -
Secure the loop:
Tie the two ends of the twine together in a simple knot, creating a rustic loop for hanging or attaching to a napkin.
Natural Tint
Knead a tiny drop of yellow or ochre paint directly into the raw white clay before rolling to achieve that warm, creamy stone color.
Now you have a set of timeless, custom décor pieces ready to grace your holiday table setting
Jack-o’-Lantern Luminary Jars
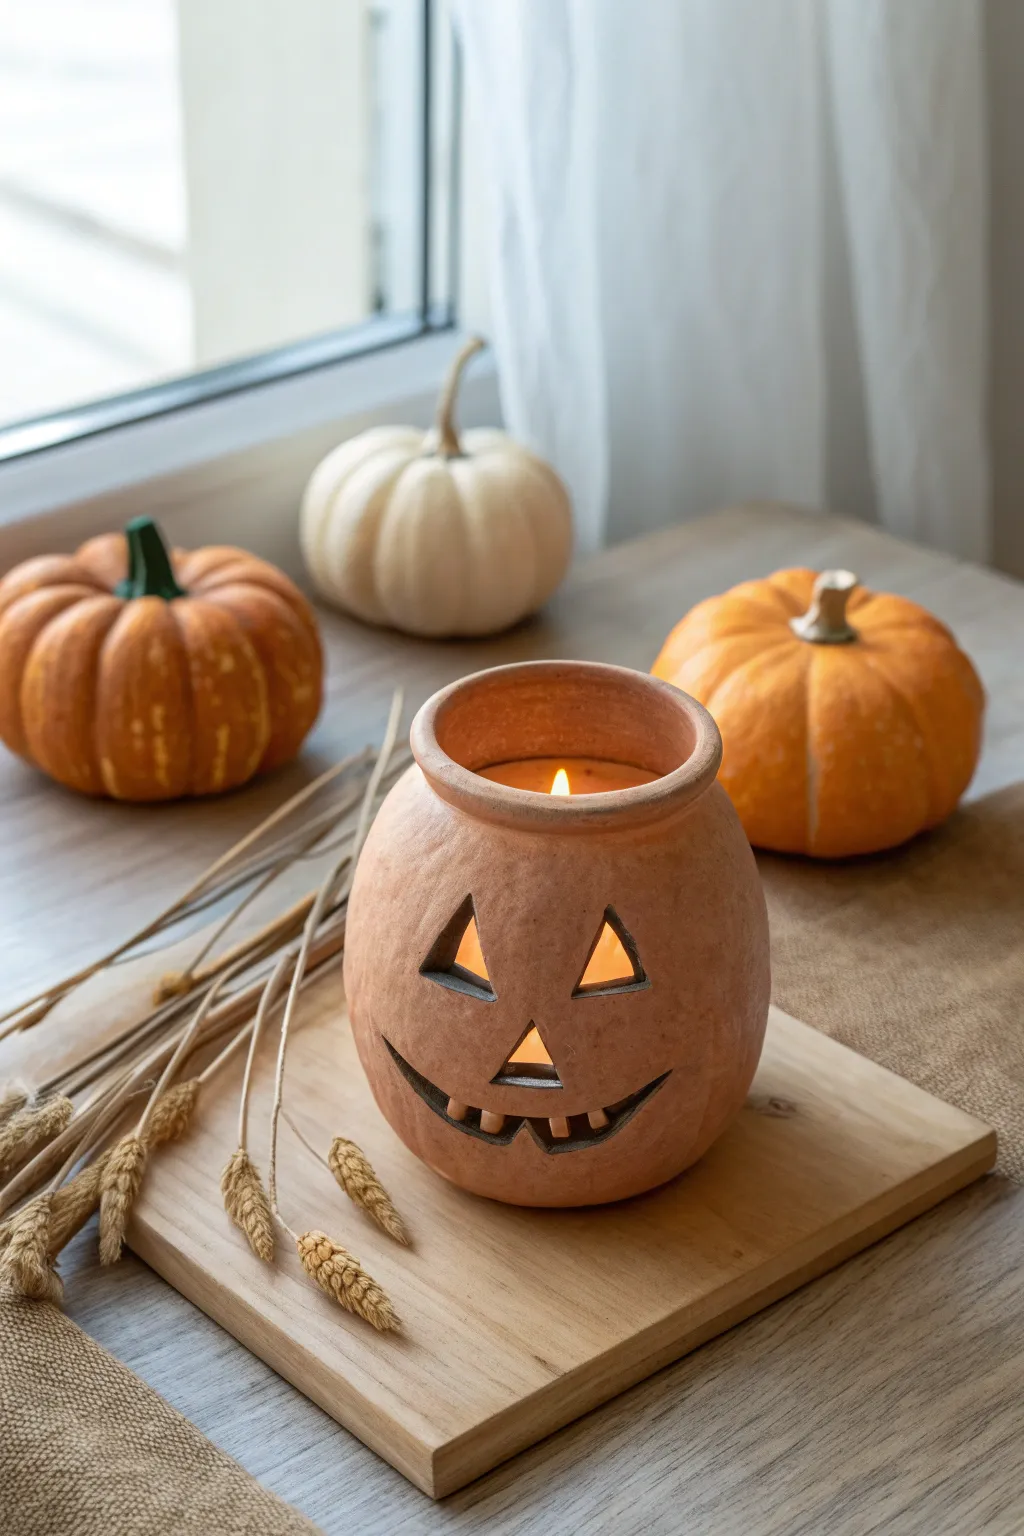
Embrace the cozy warmth of autumn with this charming Jack-o’-Lantern luminary, crafted to mimic the rustic look of terracotta. Its open top and cutout features allow candlelight to dance through, creating perfect ambient lighting for chilly evenings.
Detailed Instructions
Materials
- Air dry clay (terracotta color preferred, or white)
- Glass jar (medium-sized, wide mouth, label removed)
- Rolling pin
- Parchment paper or craft mat
- Craft knife or scalpel tool
- Small bowl of water
- Sponge or smoothing tool
- Sandpaper (fine grit)
- Acrylic paint (if using white clay: burnt orange, brown)
- Matte varnish or sealant
- Tea light candle
Step 1: Preparing the Base
-
Prep the jar:
Ensure your glass jar is completely clean and dry. This jar will act as the permanent internal structure, so you don’t need to worry about the clay collapsing. -
Roll the clay slab:
Roll out a large slab of air dry clay on parchment paper to an even thickness of about 1/4 inch. It needs to be long enough to wrap entirely around the circumference of your chosen jar. -
Wrap the jar:
Carefully lift the clay slab and wrap it around the glass jar. Press it gently against the glass to adhere, ensuring no air bubbles are trapped underneath. -
Seal the seam:
Where the two ends of the clay meet, use your fingers dipped in a little water to smooth the seam together until it disappears completely. This is crucial for a seamless finish. -
Trim the excess:
Use your craft knife to slice off any excess clay hanging below the bottom of the jar. Gently tap the jar on the table to flatten the clay base.
Fixing Cracks
Using a glass core can sometimes cause shrinkage cracks as the clay dries. If hairline cracks appear, fill them with a ‘slip’ made of clay mixed with water, let dry, and sand smooth.
Step 2: Shaping the Pumpkin
-
Form the rim:
At the top of the jar, fold the excess clay slightly inward over the rim. Roll a small snake of clay and attach it to create a thick, rounded collar, blending it smoothly into the body using water and your smoothing tool. -
Bulking the shape:
To give it that classic pumpkin plumpness, add extra clay to the sides if your jar is too straight. Apply small patches of clay to the mid-section and smooth them out to create a rounder silhouette. -
Add vertical grooves:
Using a modeling tool or the handle of a spoon, gently press vertical indentations from the rim to the base. This mimics the natural ribs of a pumpkin. -
Smooth the surface:
Dip a sponge in water ensuring it isn’t dripping wet, and wipe down the entire surface to remove fingerprints and harsh tool marks. The texture should look like unglazed pottery.
Spooky Shadows
Experiment with different cutout shapes on the opposite side of the jar. Try bat silhouettes or crescent moons to cast unique shadows against the wall when lit.
Step 3: Carving the Face
-
Sketch the face:
Lightly trace your Jack-o’-Lantern face onto the damp clay with a needle tool or toothpick. I prefer a classic look with triangle eyes and a jagged grin. -
Cut the eyes:
Using a sharp craft knife, carefully cut out the triangular eye shapes. Lift the cut pieces out cleanly. -
Carve the mouth:
Proceed to cut out the mouth and nose. When carving the teeth, take your time to keep the corners sharp. Remember, you are cutting through the clay to reveal the glass jar underneath. -
Clean the edges:
Dip a small brush or your finger in water and smooth perfectly around the cut edges of the eyes and mouth so they look finished, not ragged.
Step 4: Finishing Touches
-
Dry thoroughly:
Let the project dry for at least 24-48 hours. Keep it away from direct heat to prevent cracking. -
Sand for smoothness:
Once fully dry and hard, use fine-grit sandpaper to gently buff away any remaining rough spots or bumps on the surface. -
Paint (optional):
If you used terracotta clay, you can skip this. If you used white clay, mix burnt orange with a touch of brown acrylic paint and sponge it on for a textured, earthen look. -
Seal carefully:
Apply a coat of matte varnish to protect the clay. Avoid using gloss, as the matte finish is essential for that rustic terracotta vibe. -
Clean the glass:
Use a damp cloth or cotton swab to wipe any clay smear or paint off the exposed glass inside the eyes and mouth so the candlelight can shine through clearly.
Place a tea light inside and watch your handcrafted pumpkin bring a warm, spooky glow to your window ledge

TRACK YOUR CERAMIC JOURNEY
Capture glaze tests, firing details, and creative progress—all in one simple printable. Make your projects easier to repeat and improve.
Ghost and Bat Hanging Tags
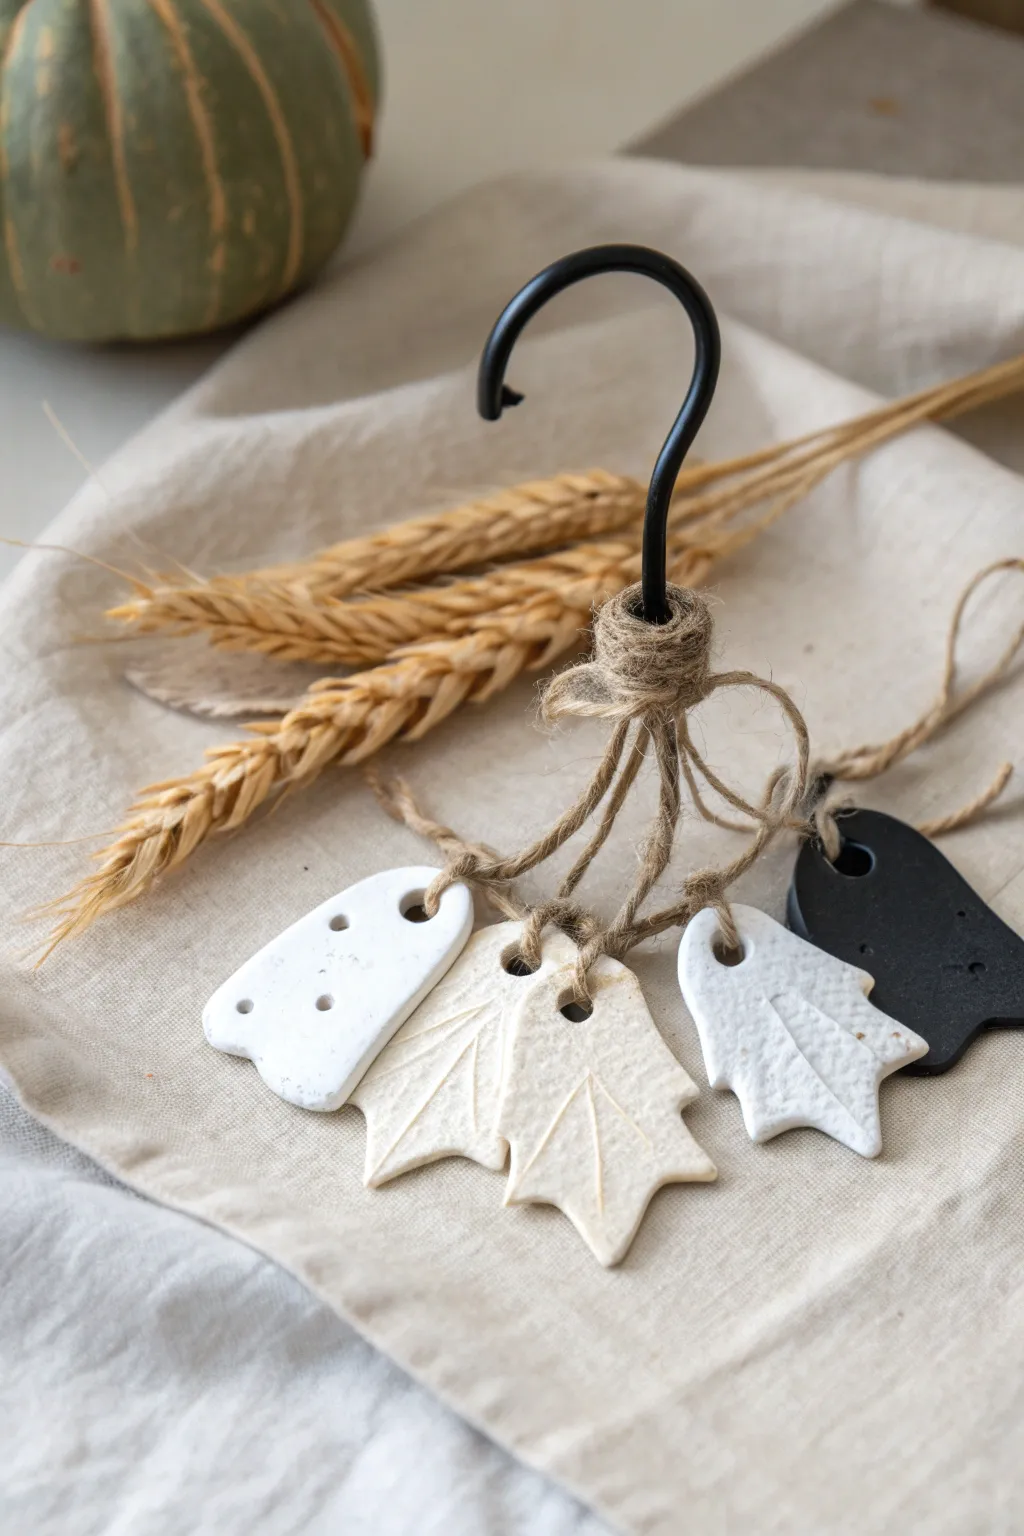
These charming hanging tags combine the rustic texture of air-dry clay with spooky Halloween motifs like ghosts and autumn leaves. Suspended from a sturdy hook with natural jute, they make for perfect seasonal decor on a doorknob or mantelpiece.
How-To Guide
Materials
- White air-dry clay
- Rolling pin
- Small cookie cutters (ghost and leaf shapes)
- Black acrylic paint
- Paintbrush
- Jute twine
- Large black metal S-hook (or similar hook)
- Straw or skewer (for poking holes)
- Sandpaper (fine grit)
- Modeling tool or toothpick (for veins)
Step 1: Shaping the Clay
-
Prepare your workspace:
Lay down a clean mat or piece of parchment paper to prevent the clay from sticking to your table. -
Roll the clay:
Take a handful of air-dry clay and condition it by kneading it slightly until pliable. Roll it out to an even thickness of about 1/4 inch. -
Cut the shapes:
Use your cookie cutters to punch out several shapes. Aim for a mix of ghosts and leaves. Alternatively, you can freehand cut these simple organic shapes using a craft knife. -
Add texture:
For the leaf shapes, use a modeling tool or a simple toothpick to gently press veins into the surface. Leave the ghosts relatively smooth, or give them a slightly dimpled texture for a rustic look. -
Create hanging holes:
Using a straw or a skewer, poke a hole near the top of each shape. Make sure the hole is large enough for your jute twine to pass through easily. -
Add ghost features:
For the ghost tags, use the skewer end to press two small eyes and a mouth into the wet clay. Don’t go all the way through; just create indentations.
Step 2: Drying and Refining
-
Let them dry:
Place your clay pieces on a flat surface to dry. I like to flip them over after a few hours to ensure the backs dry evenly. Allow 24-48 hours depending on humidity. -
Sand edges:
Once fully cured and hard, take a piece of fine-grit sandpaper and gently smooth any rough edges left by the cutter.
Prevent Curling
If your clay shapes start curling at the edges while drying, place a light book or board on top of them once they are partially dry to keep them flat.
Step 3: Decoration and Assembly
-
Paint the accent tag:
Select one tag (like a leaf or a rounded shape) to be the dark contrast piece. Paint it entirely black with acrylic paint and let it dry. -
Prepare the twine:
Cut several lengths of jute twine, each about 10-12 inches long. You will need one strand for each clay tag. -
Attach twine to tags:
Thread a piece of twine through the hole of a clay tag. Secure it with a simple knot or a loop hitch near the tag itself. -
Create the main knot:
Gather all the twine strands together, hold them against the bottom of the black metal hook, and wrap a separate, longer piece of twine around the bundle and the hook base. -
Secure the bundle:
Tie this wrapping strand tightly to create a gathered ‘neck’ just below the hook, similar to a tassel. The tags should hang at slightly different lengths for visual interest. -
Add a bow:
To finish the look, tie a small bow with the excess wrapping twine at the front of the bundle. -
Trim the ends:
Snip any overly long tail ends of the jute so the assembly looks neat but still retains its rustic charm.
Texture Tip
For a stone-like effect on the white tags, gently press a piece of crumpled aluminum foil or a coarse sponge against the wet clay before cutting your shapes.
Hang your new spooky creation in a spot where the shadows can play across the textured clay ghosts and leaves
Mushroom Ring Cones
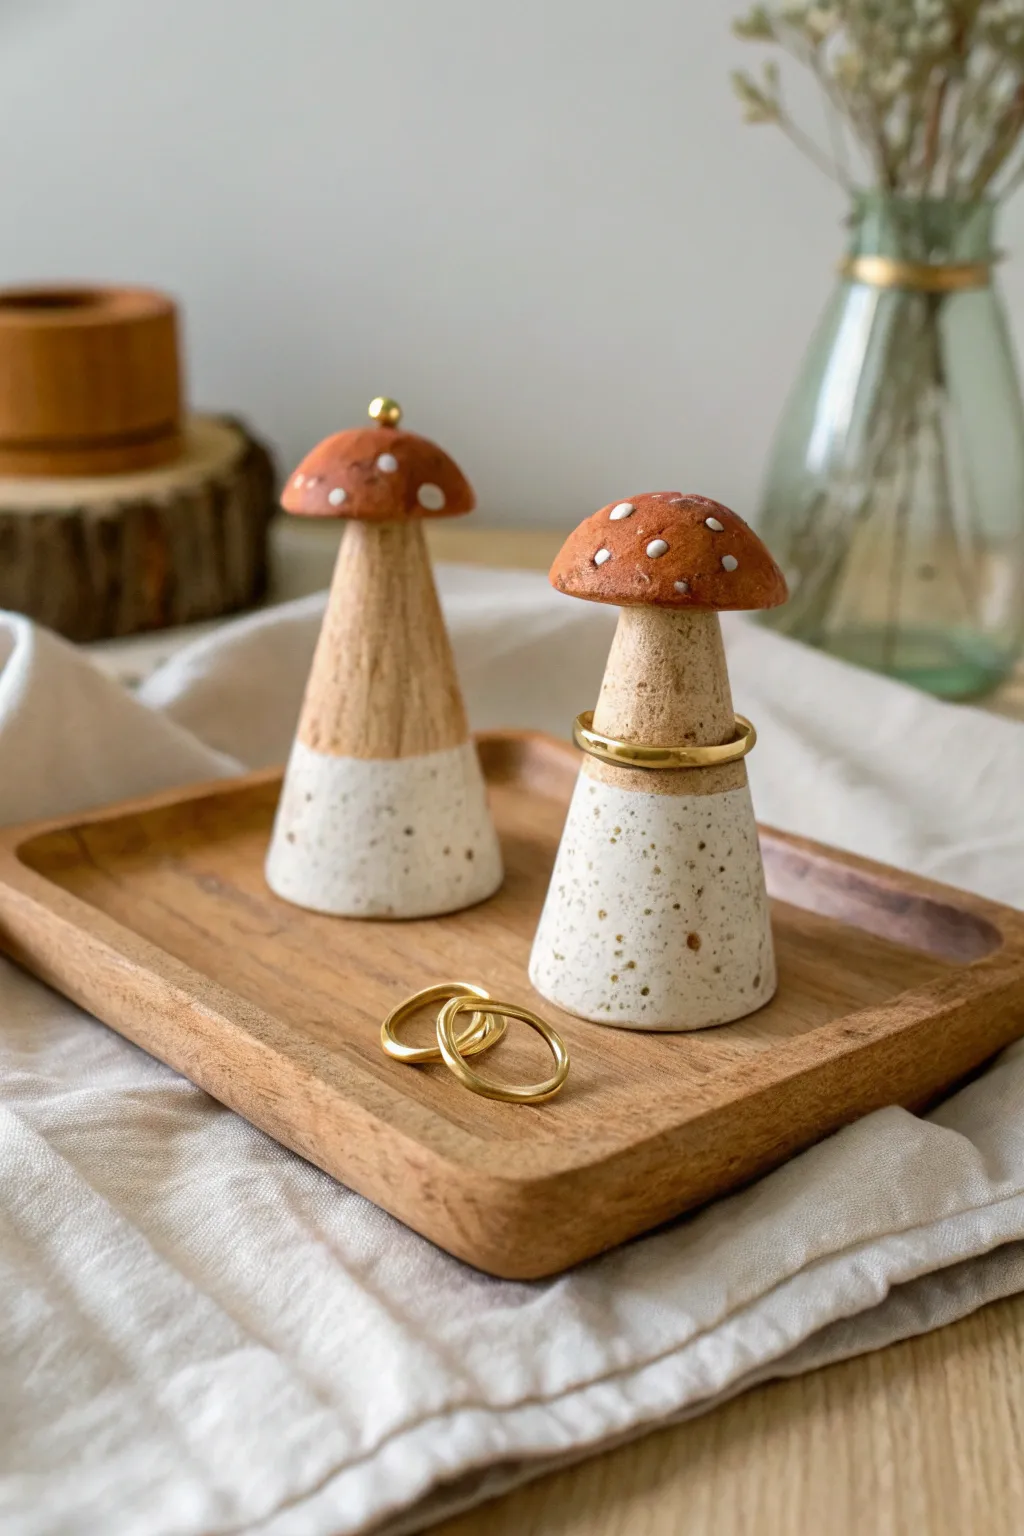
These enchanting ring holders combine rustic charm with functional decor, featuring speckled stoneware-style bases and classic red mushroom caps. They are the perfect way to display your favorite jewelry while adding a touch of fairy-tale magic to your dresser.
Detailed Instructions
Materials
- Air dry clay (white or natural stone color)
- Acrylic paints (burnt sienna, cream/beige, white, gold)
- Pottery speckled paint or an old toothbrush with brown paint
- Small brass bead (optional)
- Rolling pin
- Craft knife
- Water and sponge
- Fine grit sandpaper
- Clear varnish (matte or satin)
- Strong craft glue (e.g., E6000)
Step 1: Shaping the Form
-
Form the base cone:
Start with a luscious lump of clay, about the size of a golf ball. Roll it into a smooth ball first to remove air pockets, then gently roll it against your work surface to tap it into a cone shape. Flatten the bottom so it stands perfectly upright. -
Refine the cone shape:
For that distinctive two-tone look seen in the photo, your cone needs a slight transition. About halfway up the cone, gently pinch and roll the clay to make the top half slightly narrower than the bottom half, mimicking a mushroom stem rising from a base. -
Create the mushroom cap:
Take a separate, smaller piece of clay and roll it into a ball, then flatten it slightly into a dome shape. Curl the edges downward just a bit to create that classic toadstool umbrella look. -
Test the fit:
Before adhering, place the cap onto the tip of your cone stem. If it feels wobbly, flatten the tip of the stem slightly to create a better platform. Once satisfied, score both joining surfaces with a craft knife. -
Attach the cap:
Apply a dab of water (slip) to the scored areas and press the cap firmly onto the stem. Smooth out the clay underneath the cap where it meets the stem using a modeling tool or your finger to ensure a seamless bond.
Uneven Dots?
If your white dots look messy or smear, let the red base coat dry completely first. Use the flat back of a drill bit or a toothpick for precise, uniform circles.
Step 2: Refining and Drying
-
Add top detail:
If you want the version with the brass detail, press a small indentation into the very top center of the mushroom cap now, sized to fit your bead later. -
Smooth the surface:
Dip your finger or a damp sponge into water and gently rub the entire surface of the mushroom. This removes fingerprints and creates a professional, smooth finish. I find this step crucial for getting clarity in the paint later. -
Dry thoroughly:
Let your mushrooms dry completely. This usually takes 24-48 hours depending on humidity. Rotate them occasionally so the bottom dries evenly. -
Sand imperfections:
Once fully dry and hard, use fine-grit sandpaper to buff away any remaining uneven spots or rough textures on the base or cap.
Wood Texture Trick
To make the ‘stem’ look like real wood, scratch subtle vertical lines into the wet clay with a needle tool before drying. The paint will settle into these grooves.
Step 3: Painting and Finishing
-
Paint the cap:
Paint the mushroom cap with a warm burnt sienna or reddish-brown acrylic paint. You may need two coats for opaque coverage. -
Paint the stem:
Mix a cream or light beige color. Paint the upper narrow part of the stem with this wood-tone shade. To achieve the textured look in the photo, you can dry-brush a tiny amount of darker brown vertically over the beige. -
Create the speckled base:
Leave the base white (or paint it cream), then create the speckled stoneware effect. Dip an old toothbrush into watered-down brown paint and flick the bristles with your thumb to mist tiny specks onto the bottom half of the cone. -
Add white dots:
Using the handle end of a small paintbrush or a dotting tool, dip into white paint and carefully place small, raised dots onto the dry red cap. -
Attach hardware:
If adding the decorative top, use a drop of strong craft glue to secure the small brass bead into the indentation you made earlier. -
Seal the piece:
Finish by applying a coat of matte or satin varnish over the entire piece. This protects the paint from scratching and gives it that finished ceramic look.
Place your new woodland creation on your vanity and enjoy the organic warmth it brings to your space
Wheat Sheaf Napkin Rings
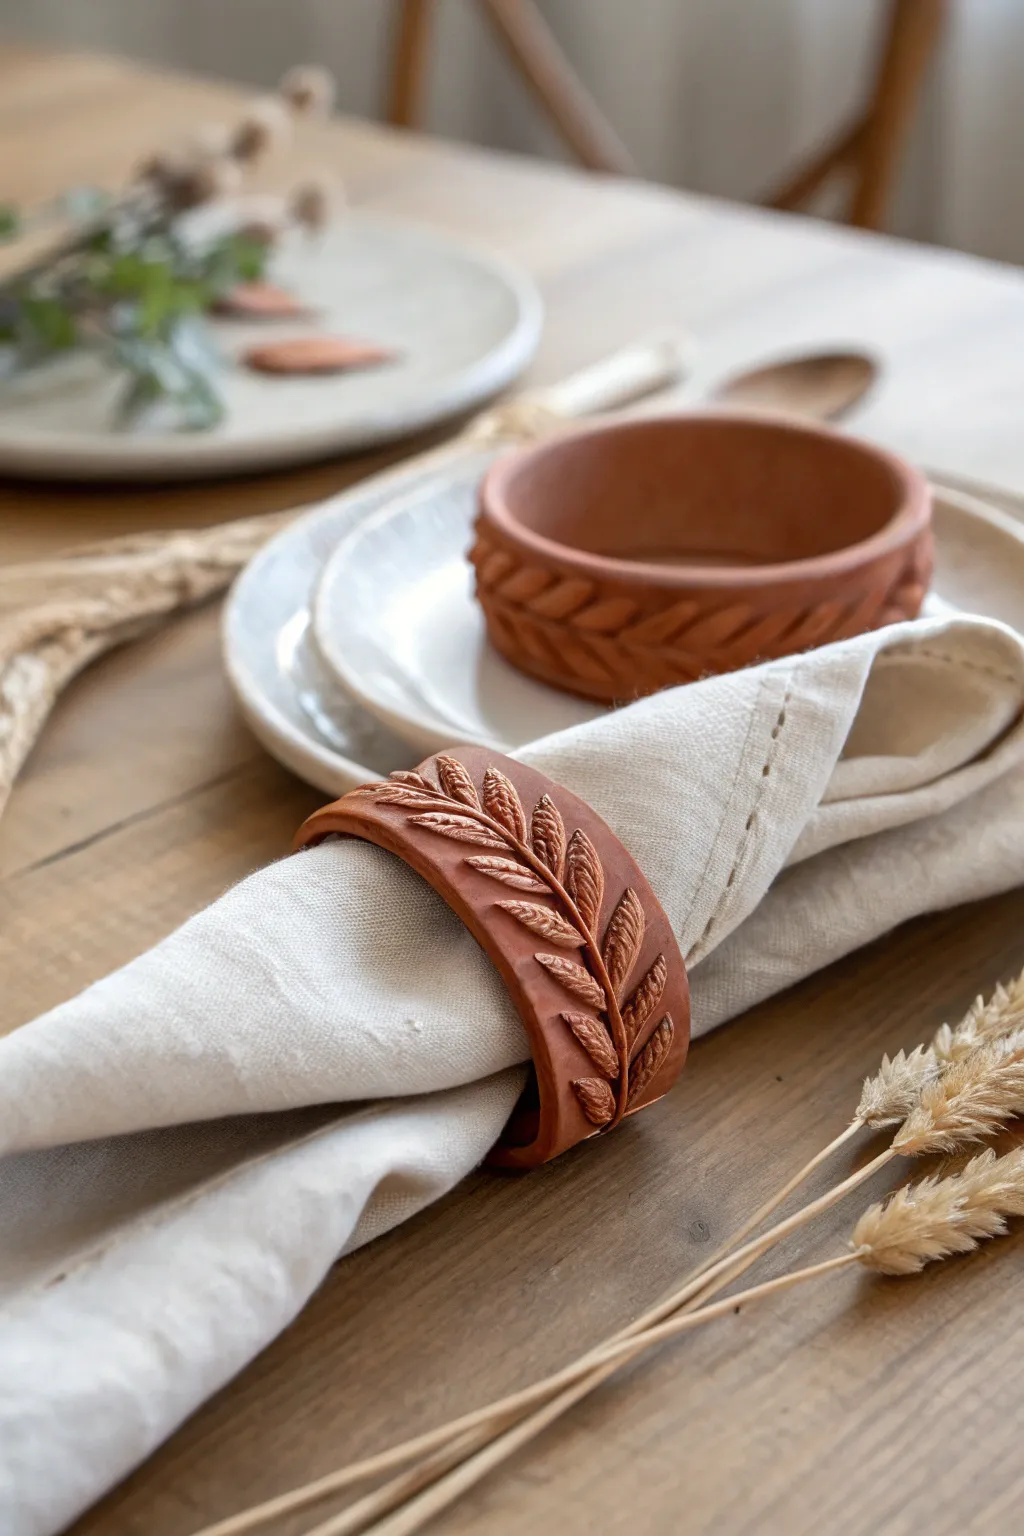
Embrace the warmth of autumn with these elegant, rustic napkin rings that feature a beautifully detailed wheat motif. Crafted to look like traditional terracotta pottery, they add a grounded, artisanal touch to any Thanksgiving or fall tablescape.
Step-by-Step
Materials
- Terracotta-colored air dry clay
- Rolling pin
- Cardboard tube (from paper towels or toilet paper)
- Parchment paper
- Craft knife or clay needle tool
- Small sculpting spatula or clean toothpick
- Slip (clay mixed with a little water)
- Fine grit sandpaper
- Ruler
- Clear matte acrylic sealer (optional)
Step 1: Forming the Base Band
-
Prepare your workspace:
Begin by covering your work surface with a sheet of parchment paper to prevent sticking. Cut your cardboard tube into sections approximately 1.5 to 2 inches wide to use as drying forms for your rings. -
Condition the clay:
Take a handful of terracotta air dry clay and knead it gently until it is warm, pliable, and free of cracks. If it feels too dry, dip your fingertips in water and work it in. -
Roll out a slab:
Use your rolling pin to flatten the clay into an even slab, aiming for a consistent thickness of about 1/4 inch. I find it helpful to place two wooden craft sticks on either side of the clay as guide rails to ensure even thickness. -
Cut the strip:
Using a ruler and your craft knife, cut long rectangular strips measuring roughly 1.5 inches wide and 6 inches long. These will become the napkin rings. -
Shape the ring:
Wrap a small piece of parchment paper around your cardboard tube section. Then, wrap the clay strip over the parchment-covered tube. Overlap the ends slightly. -
Join the seam:
Score the overlapping ends with scratch marks and apply a dab of slip. Press them firmly together, blending the clay with your finger or a tool until the seam disappears. This creates a solid hoop.
Cracking Up?
If small cracks appear during drying, make a paste of clay and water (slip) and fill them in with a finger. Let dry again and sand smooth.
Step 2: Sculpting the Wheat Detail
-
Create the stem:
Roll a very thin ‘snake’ or coil of fresh clay. Lay it diagonally or centrally across the front face of your ring, pressing gently to adhere it as the central wheat stem. -
Form the grains:
Roll several tiny, tear-drop shapes of clay, each about the size of a grain of rice. You will need about 10-14 of these per ring. -
Attach the grains:
Starting at the top of the stem, attach the teardrop shapes on either side in a V-formation. Use a tiny bit of slip on the back of each grain to ensure it sticks permanently. -
Detail the texture:
Once the grains are placed, use your needle tool or knife to press a central line down the middle of each grain. Then, add tiny angled notches along the edges of the grains to mimic the feathery texture of wheat. -
Smooth the edges:
Check the edges of your main ring band. If sharp or uneven, run a slightly damp finger along the rim to soften the look. -
Let it dry:
Allow the rings to dry completely on their cardboard forms. This usually takes 24-48 hours depending on humidity. Don’t rush this, or they may crack.
Double Harvest
Try pressing a real leaf or dried flower into the wet clay band for an imprinted botanical texture instead of sculpting relief details.
Step 3: Refining and Finishing
-
Sand imperfections:
Once fully dry and hard, remove the cardboard tube carefully. Use fine grit sandpaper to gently smooth out any rough spots on the rim or the inside of the ring. -
Dust off:
Wipe the ring down with a dry cloth or soft brush to remove sanding dust from the crevices of the wheat sculpture. -
Optional sealing:
To protect against food stains and moisture, you can brush on a coat of matte acrylic varnish. This usually deepens the terracotta color slightly, giving it a rich, finished look.
Slide your finished rings onto crisp linen napkins to bring a timeless touch of the harvest season to your table
Cinnamon Texture Trinket Plates
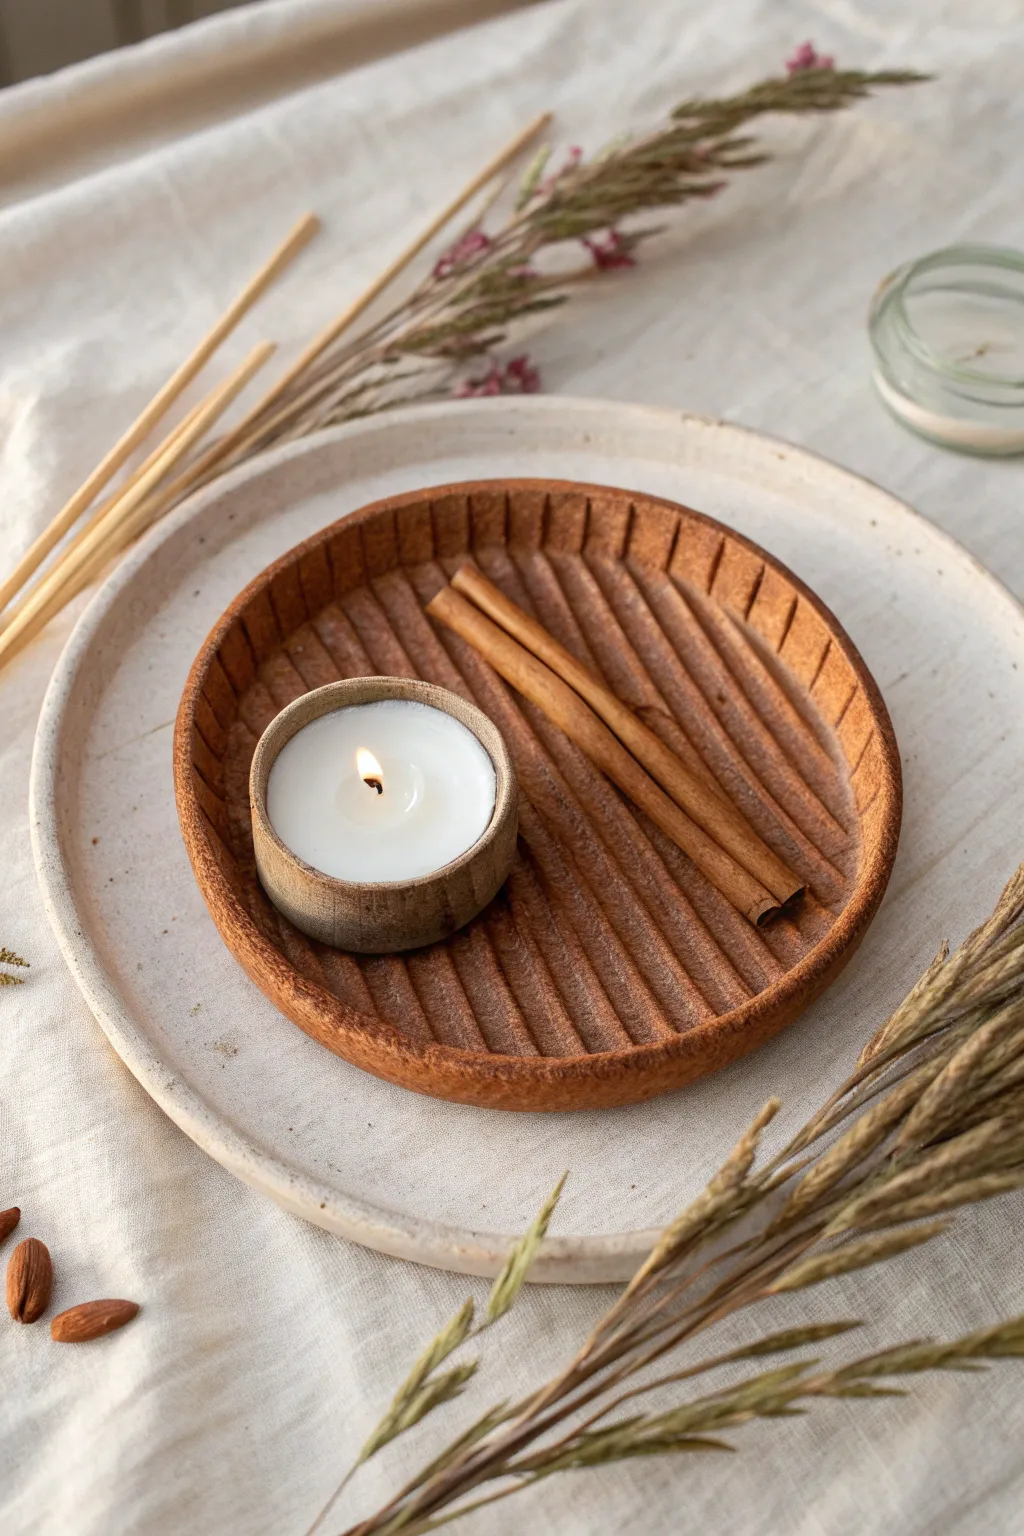
Bring the warmth of autumn into your home with this textured trinket dish that mimics the ridges of cinnamon sticks. The earthy terracotta tones and ribbed surface make it perfect for holding seasonal potpourri or a cozy tealight.
Step-by-Step Guide
Materials
- Air dry clay (terracotta or white)
- Rolling pin
- Circle template (bowl or plate approx. 6-7 inches)
- Craft knife or clay tool
- Wooden dowel, chopstick, or cinnamon stick (for texturing)
- Small bowl or jar (for molding)
- Acrylic paints (burnt sienna, raw umber, cream)
- Paintbrushes
- Fine-grit sandpaper
- Matte varnish or sealant
- Water and sponge
Step 1: Shaping the Base
-
Prepare your clay:
Start by taking a substantial chunk of air dry clay. Knead it in your hands until it’s warm, pliable, and free of air bubbles. -
Roll it out:
On a clean, flat surface or a silicone mat, roll the clay out to an even thickness of about 1/4 inch. Try to keep the pressure consistent so you don’t have lumpy areas. -
Cut the circle:
Place your circle template (like a breakfast bowl) onto the clay and trace around it with a craft knife to get a clean, round shape. -
Smooth the edges:
Dip your finger in a little water and run it along the cut edge to smooth out any roughness or sharp corners.
Step 2: Adding the Texture
-
Create the ridges:
Using a thin wooden dowel, a chopstick, or even a real cinnamon stick for authenticity, press firmly into the clay to create parallel indentations across the entire surface. -
Refine the lines:
Go back over the lines to ensure they are distinct and deep enough to show up after painting, but be careful not to cut all the way through the clay. -
Form the rim:
Gently lift the edges of your clay circle. You can lean them against the inside of a shallow bowl to help them hold an upward curve while drying, or simply pinch them up slightly for a flatter tray. -
Make the candle cup:
Roll a smaller ball of clay and flatten it slightly. Press your thumb into the center and pinch the sides up to create a small cup just big enough for a tealight. -
Texture the cup:
Roll the outside of your small cup against a textured surface or lightly press your dowel against it to match the main tray’s aesthetic.
Scent Selection
Knead a generous sprinkle of real ground cinnamon or nutmeg directly into the clay before rolling. It adds a subtle speckle and faint scent while you work.
Step 3: Drying and Finishing
-
Let it dry completely:
Place your pieces in a safe spot away from direct heat. Let them air dry for 24-48 hours until they are hard and lighter in color. I find flipping them halfway through helps the bottom dry evenly. -
Sand imperfections:
Once fully dry, take fine-grit sandpaper and gently smooth any rough edges on the rim or the bottom of the tray. -
Base coat painting:
Mix burnt sienna with a touch of raw umber to get that rich, baked cinnamon color. Paint the entire surface of the tray and the outside of the candle cup. -
Highlighting:
Dip a dry brush into a tiny amount of lighter cream or tan paint. Wipe most of it off on a paper towel, then lightly brush across the raised ridges to accentuate the texture. -
Paint the cup interior:
Paint the inside of the small candle cup with a creamy off-white color to simulate melted wax or simply to provide contrast. -
Seal the project:
Finish by applying a coat of matte varnish to protect the paint and give the piece a finished, professional look.
Gilded Edges
For a luxe upgrade, paint just the very top rim of the tray and candle holder with liquid gold leaf or metallic bronze paint after the sealant dries.
Now you have a charming piece of autumn decor ready to display on your coffee table or nightstand
Sweater-Texture Pencil Cups

Bring the warmth of your favorite fall sweater to your desk with this clever trompe-l’œil pencil holder. Using air dry clay, you’ll sculpt delicate cables and ribs to mimic knitted yarn, creating a sturdy vessel that looks incredibly soft to the touch.
Detailed Instructions
Materials
- White or cream air dry clay (approx. 500g)
- Clean, empty tin can or smooth glass jar (for the base form)
- Parchment paper or non-stick craft mat
- Rolling pin
- Clay extruder (optional but helpful for yarn strands)
- Needle sculpting tool or toothpick
- Water and a small slip brush
- Craft knife
- Ruler
- Smooth sandpaper (finely grit)
- Matte white acrylic paint (optional)
Step 1: Preparing the Base
-
Prepare your form:
Clean your chosen tin can or glass jar thoroughly and dry it completely. This will act as the permanent structure inside your clay sweater, so choose a size that fits your pens comfortably. -
Roll out the base layer:
Roll out a slab of clay to about 3mm thickness. Cut a rectangle that is the exact height of your can and just long enough to wrap around it once. -
Wrap the form:
Apply a very thin layer of water or watered-down PVA glue to the outside of the can. Wrap your clay sheet around it, pressing firmly to adhere. Smooth the seam where the edges meet with a wet finger so it disappears.
Cracking Cables?
If small cracks appear between the ‘yarn’ strands as it dries, mix a tiny amount of clay with water to make a thick paste (slip) and paint it into the cracks with a fine brush.
Step 2: Creating the Ribbed Brim
-
Roll thin coils:
Roll out long, thin snakes of clay, roughly 2-3mm in diameter. If you have a clay extruder, use a small circle disc to get perfectly uniform ‘yarn’ strands quickly. -
Twist the rim:
Take two clay strands and twist them together tightly to form a rope. Apply a little water to the top rim of your clay-covered can and press this twisted rope around the circumference to create the ‘cast-on’ edge. -
Add vertical ribbing:
Just below the twisted rim, place short, vertical segments of clay strands side-by-side for about 1 inch down. Alternate between slightly flattened strands and round strands to mimic the knit-purl pattern of a sweater cuff.
Step 3: Weaving the Cable Pattern
-
Form the main cables:
Roll two slightly thicker strands of clay (about 4mm). Twist them together loosely to create a classic cable look. Make enough length to run from the bottom of the ribbing to the base of the cup. -
Attach the cables:
Score the surface of the base clay lightly where you want your cables to sit. Brush on a little water slip, then press your twisted cable vertically onto the cup. I like to space these about an inch apart. -
Create the V-stitch background:
For the spaces between cables, you need a stockinette stitch look. Take two very thin strands of clay and twist them tightly. Press this twisted strand vertically between the cables. -
Refine the V-stitches:
To make the twisted strand look like knit stitches, use your needle tool to gently press into the center of each ‘twist’, flattening it slightly into a V shape. Repeat this to fill the empty panels. -
Add bordering details:
Place single, straight vertical strands of clay on either side of your large cables to frame them and clean up the edges where the textures meet.
Simulate Fuzzy Wool
For an ultra-realistic texture, gently tap the damp clay surface with a stiff toothbrush or stippling sponge. This creates a subtle pitted surface that mimics fuzzy wool fibers.
Step 4: Finishing Details
-
Refine the texture:
Go over your ‘yarn’ strands with a damp brush to smooth out any fingerprints or sharp clay burrs, softening the edges to look like fabric. -
Check the seamlessness:
Ensure the pattern repeats seamlessly around the back. You may need to stretch or compress your final cable slightly to close the gap invisibly. -
Finish the bottom edge:
Add a final twisted rope of clay around the very bottom edge of the can to finish the ‘hem’ of the sweater cleanly. -
Dry properly:
Let the cup dry slowly away from direct heat or sunlight to prevent cracking. This usually takes 24-48 hours depending on humidity. -
Sand and paint:
Once fully cured, use fine sandpaper to gently remove any sharp bits. If the natural clay color is uneven, give it a coat of matte white or cream acrylic paint for that pristine wool look.
Now you have a charming piece of desk decor that adds texture and warmth to your workspace all year round
Apple-Shaped Catch-All Bowls
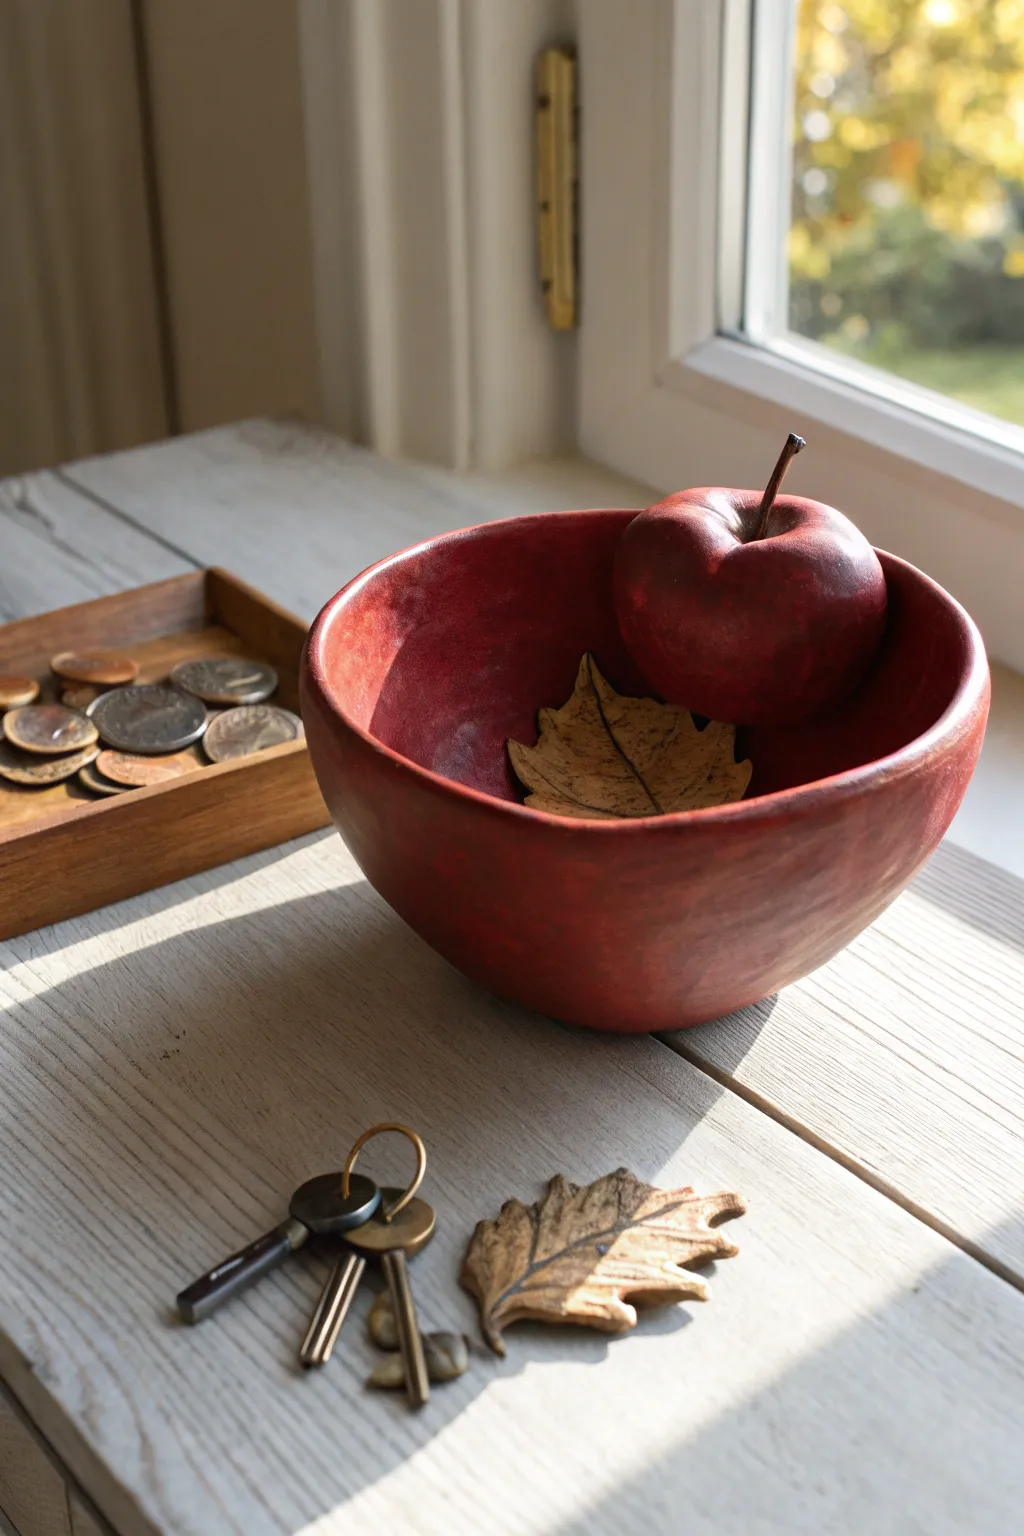
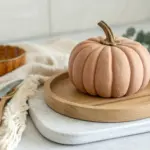
Embrace the cozy warmth of autumn with this stunningly simple air-dry clay bowl, finished in a deep, mottled red that mimics the skin of a heritage apple. Its organic shape and textured finish make it the perfect seasonal catch-all for your entryway table or windowsill.
Step-by-Step Tutorial
Materials
- Air-dry clay (white or terracotta)
- Rolling pin
- Bowl for mold (medium size)
- Plastic wrap
- Sponge or fine-grit sandpaper
- Acrylic paints (dark red, maroon, brown, black)
- Paintbrushes (medium flat and small round)
- Matte or satin sealant/varnish
- Small cup of water
- Mod Podge (optional for sealing)
- Paper towel or rag
Step 1: Shaping the Clay
-
Prepare your clay:
Start by kneading a large handful of air-dry clay to warm it up and make it pliable. Ensure there are no air bubbles trapped inside. -
Roll it out:
Roll the clay out on a smooth surface to an even thickness of about 1/4 inch. If you want a more rustic feel, don’t worry about making it perfectly smooth. -
Prepare the mold:
Take a kitchen bowl that has the shape/size you want for your finished piece. Wrap the outside of this bowl tightly with plastic wrap to prevent the clay from sticking. -
Drape the form:
Gently lift your rolled clay slab and drape it over the outside of the upside-down bowl. Use your hands to smooth the clay down the sides, ensuring it conforms to the bowl’s shape. -
Trim the edges:
Using a craft knife or a clay tool, trim the excess clay around the rim to create a clean-ish edge. For an organic look like the photo, you can use your fingers to soften and slightly wave the rim rather than cutting a perfect circle. -
Initial structural drying:
Let the clay sit on the mold for about 24 hours until it is firm enough to hold its shape but not fully dry. -
Remove from mold:
Carefully pop the clay off the bowl and peel away the plastic wrap. Set the bowl right-side up to allow the inside to dry completely. This may take another 24-48 hours depending on humidity.
Step 2: Refining and Painting
-
Sand and smooth:
Once fully bone dry, use fine-grit sandpaper to smooth out any sharp ridges on the rim or major bumps. Alternatively, a slightly damp sponge can smooth the clay without creating dust. -
Base coat mixing:
Mix a dark red acrylic paint with a tiny drop of brown to deepen the tone. Applying a base coat effectively primes the porous clay. -
Apply the first layer:
Paint the entire bowl, inside and out. Don’t worry about perfect coverage; a little streakiness adds texture. -
Create the mottled texture:
To achieve that realistic apple-skin look, mix a slightly darker maroon or brownish-black shade. Using a fairly dry brush or a scrunched-up paper towel, dab this darker color randomly over the red base. -
Building depth:
Focus the darker dabbing slightly more around the base and the rim to create a shadowed effect. I like to keep the center of the bowl slightly brighter red to mimic the way light hits fruit. -
Dry brushing details:
If you want extra dimension, lightly dry brush a tiny bit of lighter red or even orange on the raised areas of the clay to highlight the texture. -
Drying the paint:
Allow the paint layers to dry completely. Acrylics dry fast, so 30 minutes is usually sufficient. -
Seal the piece:
Apply a coat of matte or satin varnish to protect the paint and give it a finished look. Avoid high-gloss varnish if you want that natural, earthy aesthetic.
Cracking Up?
If small cracks appear while drying, mix a tiny bit of fresh clay with water to make a paste (slip) and fill them in. Smooth with a finger and let dry again before painting.
Natural Texture
Before the clay dries, gently press a piece of rough fabric or a crumpled paper bag against the surface to give it a subtle, organic grain rather than a perfectly smooth finish.
Place your beautiful new bowl near a window to catch the autumn light and enjoy the cozy vibe it brings to your space
Autumn Moon Phase Wall Tiles
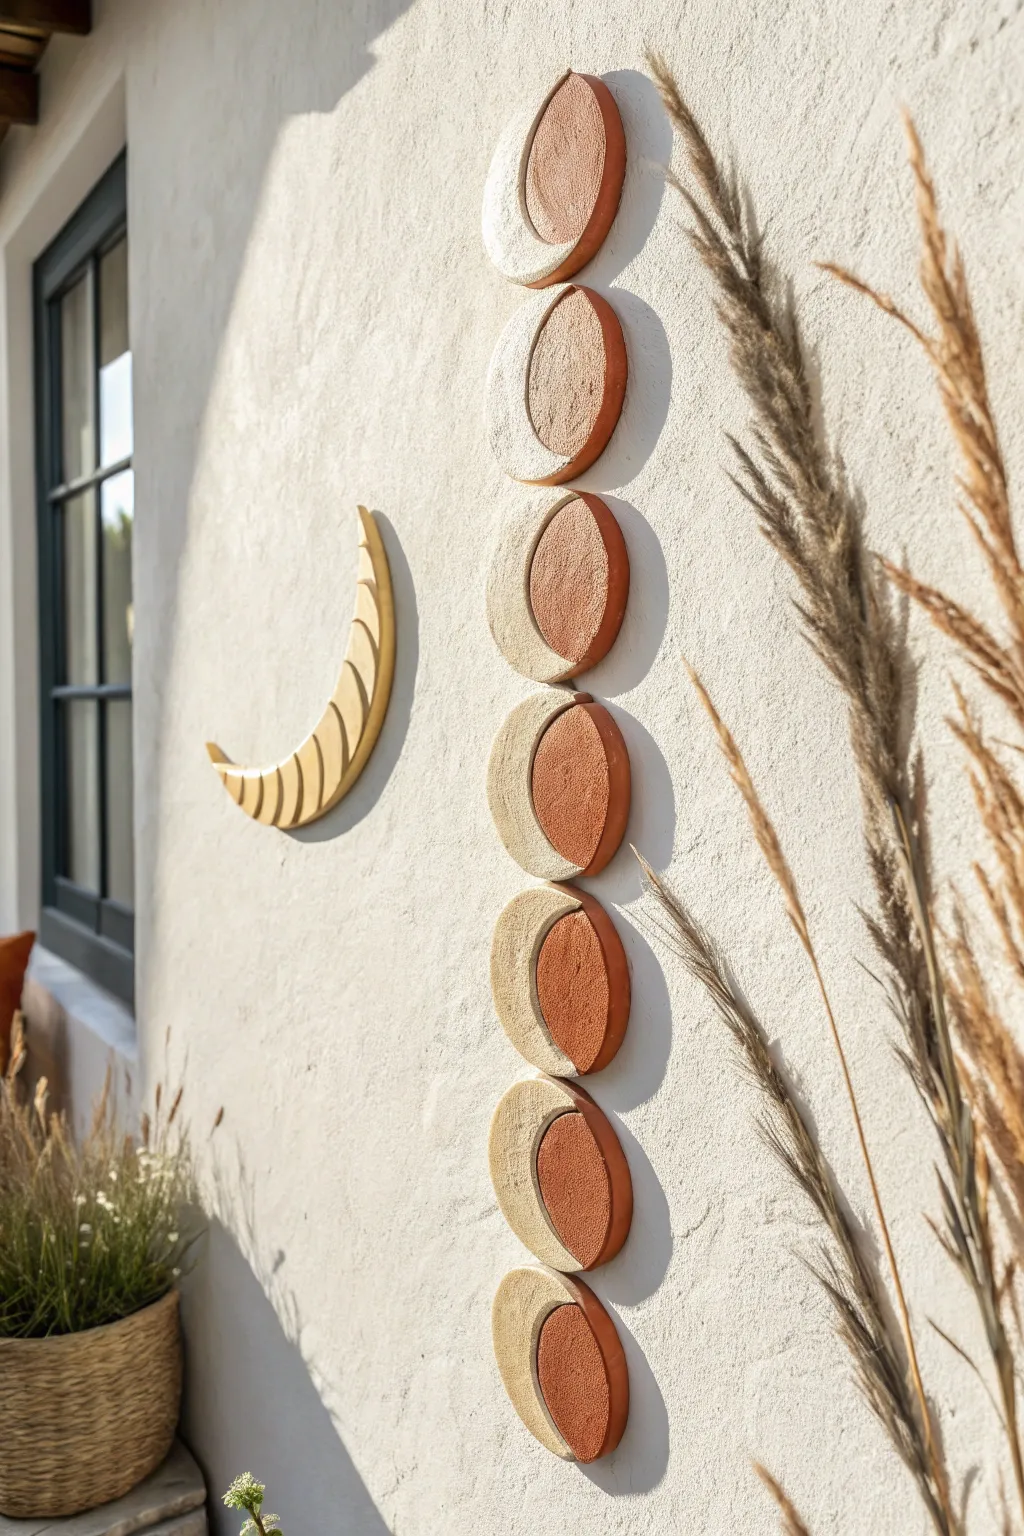
Embrace the cozy autumn vibes with this striking vertical wall hanging featuring textured moon phases in warm earthy tones. This project combines the rustic charm of terra cotta color with the modern simplicity of textured air-dry clay for a statement piece that mimics the changing seasons.
Step-by-Step
Materials
- Air-dry clay (white)
- Terra cotta colored acrylic paint
- Cream or off-white acrylic paint
- Rolling pin
- Circle cookie cutters (two sizes: one large for the base, one slightly smaller for the crescent curve)
- Texture tool (sandpaper, stiff bristle brush, or clay texture sponge)
- Craft knife
- Sandpaper (fine grit)
- Strong craft glue (E6000 or similar)
- Matte varnish or sealant
- Command strips or mounting tape for hanging
Step 1: Shaping the Clay Pieces
-
Condition the clay:
Start by kneading your air-dry clay until it is soft, pliable, and free of cracks. This ensures a smooth surface for your work. -
Roll out the slab:
Roll your clay out onto a non-stick surface or canvas cloth to an even thickness of about 1/4 inch (6mm). Try to keep the thickness consistent for all pieces. -
Cut the primary circles:
Using your larger circle cutter, punch out 14 full circles. You will need pairs for each completed ‘moon’ phase shown in the image—one for the colored back piece and one to become the textured crescent. -
Create the crescents:
Take 7 of your circles. Use the same large cutter (or a slightly smaller one depending on the curve you want) to cut an off-center curve out of the circle, leaving behind a crescent moon shape. Set the excess scrap aside. -
Texture the crescents:
While the clay is still wet, take your stiff brush, sandpaper, or sponge and gently press it into the surface of the 7 crescent shapes. Repeat this dabbing motion to create a rough, stone-like texture. -
smooth the base circles:
Take the remaining 7 full circles. Dip your finger in a little water and smooth out the edges and surface perfectly. These will remain smooth to contrast with the textured top piece. -
Create the solitary crescent:
If you wish to make the separate large crescent shown in the photo, roll out a larger piece of clay. Cut a large crescent shape freehand or with a template. Use a modeling tool to carve vertical, curved lines along the length for a segmented look.
Uneven Texture Tip
For a truly organic, rugged look on the crescents, scrunch up a ball of aluminum foil and roll it firmly over the damp clay before cutting your shapes.
Step 2: Drying and Refining
-
Rest and dry:
Place all your formed pieces on a flat board or wire rack. Let them dry completely, which usually takes 24-48 hours depending on humidity. Turning them over halfway through helps prevent warping. -
Check for rough edges:
Once fully dry, inspect your pieces. Use fine-grit sandpaper to gently smooth any jagged edges on the back circles or the sides of the crescents.
Step 3: Painting and Assembly
-
Paint the base circles:
Apply the terra cotta acrylic paint to the 7 smooth full circles. You may need two coats for full, opaque coverage. Let the paint dry fully between coats. -
Paint the crescents:
Paint the textured crescent shapes with your cream or off-white paint. Use a dabbing motion with your brush to get the paint into all the texture crevices without smoothing them out. -
Paint the segmented moon:
Paint the large separate crescent moon in a muted yellow or gold tone to make it stand out from the stack. -
Dry fit the placement:
Lay a terra cotta circle down and place a textured cream crescent on top of it, aligning the outer curves so they match up on one side. -
Glue the layers:
Apply a strong craft glue to the back of the textured crescent and press it firmly onto the terra cotta circle. I find weighting these down with a heavy book while the glue sets ensures a tight bond. -
Seal the artwork:
Once assembled and dry, spray or brush a matte varnish over everything to protect the paint and clay from moisture. -
Mount to the wall:
Attach mounting tape or adhesive strips to the back of each completed tile. Arrange them vertically on your wall with equal spacing between each piece.
Pieces Curling Up?
If your flat circles start curling while drying, gently weigh them down with a heavy book or board. Place a plain sheet of paper between the clay and the weight.
Step back and enjoy the rhythmic, calming pattern your new clay art brings to the space