I love how slab relief lets you turn a simple flat piece of clay into something you can practically feel with your eyes. Whether you’re into low relief carving or chunky high relief add-ons, these ideas will get your fingers itching to build up, carve back, and play with texture.
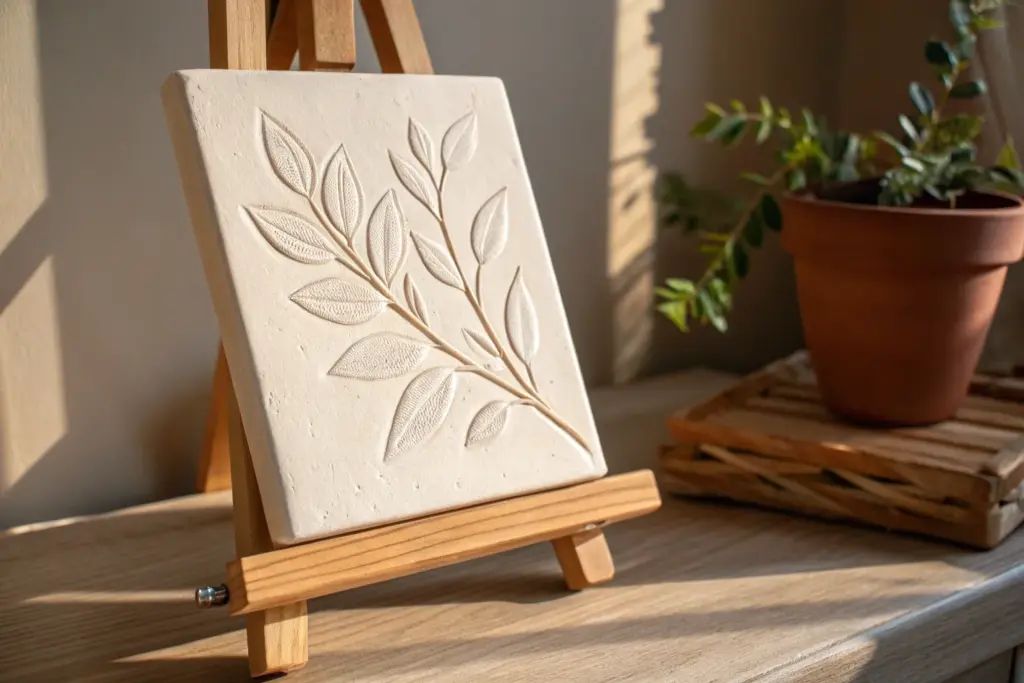
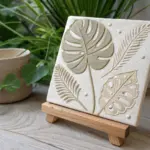
Botanical Leaf Vein Tile
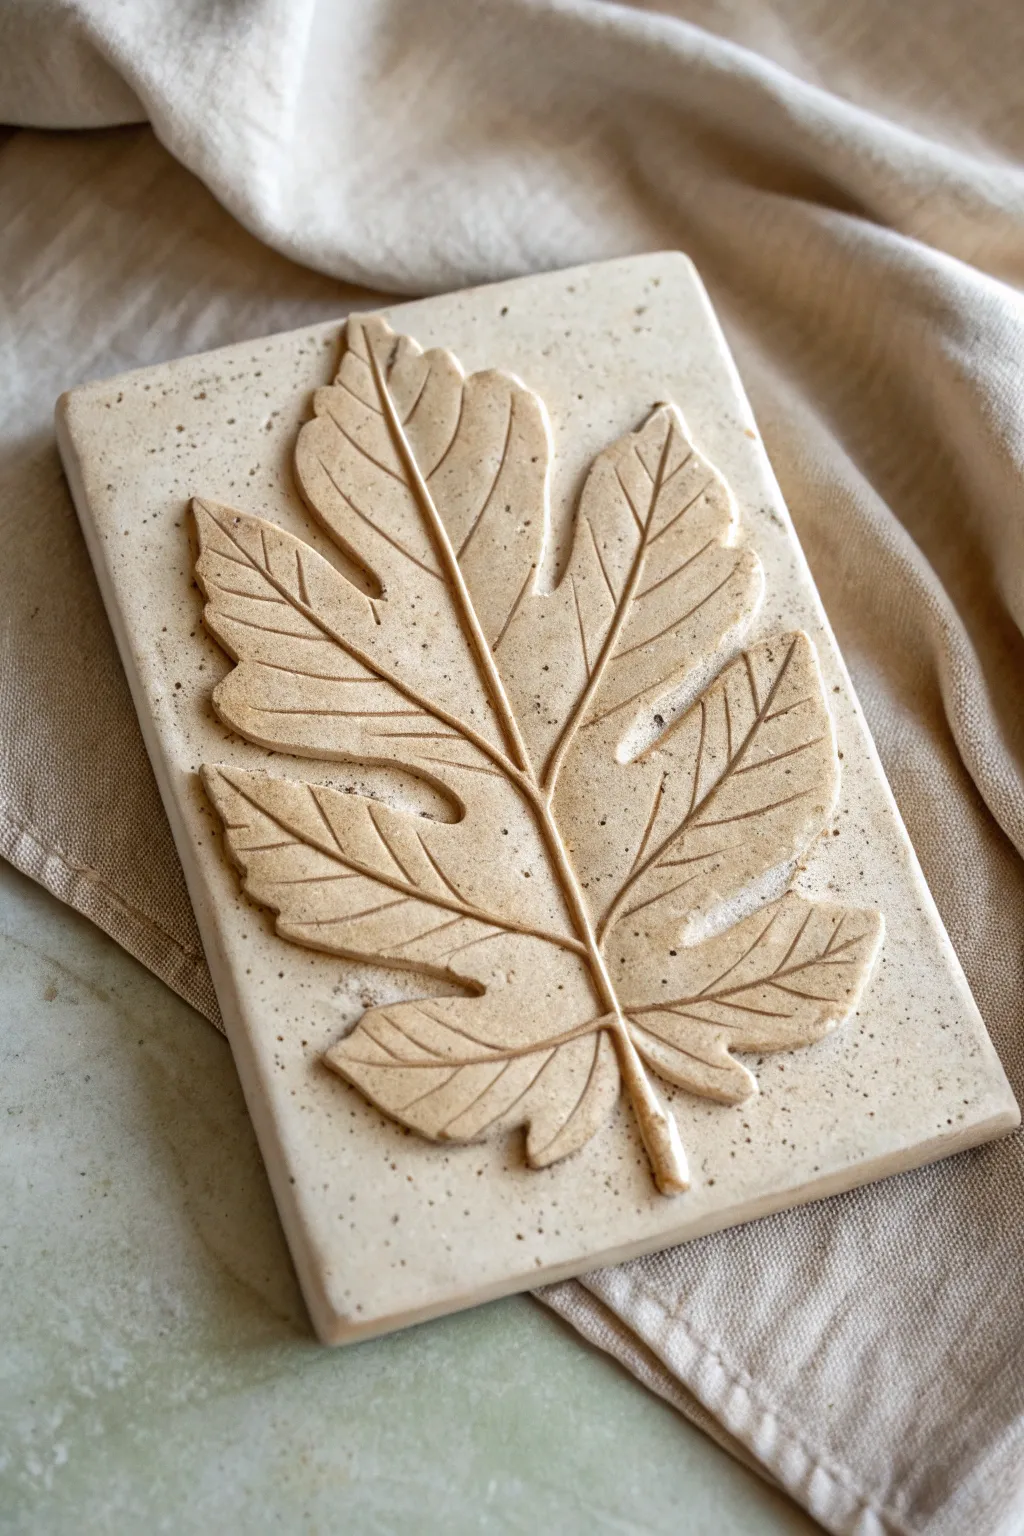
Capture the intricate beauty of botanical forms with this sophisticated slab relief project. Using specked stoneware clay, you will sculpt a raised leaf motif that feels organic and timeless, perfect for adding a touch of nature to your home decor.
How-To Guide
Materials
- Speckled stoneware clay (approx. 1 lb)
- Canvas or slab mat for rolling
- Rolling pin
- Two wooden guide strips (1/4 inch thick)
- Needle tool or X-Acto knife
- Slip (clay and water mixture)
- Scoring tool (or an old toothbrush)
- Small rubber rib
- Modeling tool (spoon-shaped or rounded end)
- Large fig leaf (fresh or a printed template)
- Sponge
Step 1: Preparing the Base
-
Roll the Slab:
Begin by wedging your speckled stoneware clay to remove air bubbles. Place it on your canvas and use the wooden guide strips on either side to roll out an even slab, approximately 1/4 inch thick. -
Cut the Tile Shape:
Using a needle tool and a straight edge or ruler, cut distinct rectangle from your slab. Aim for dimensions around 5×7 inches, but feel free to adjust based on your leaf size. -
Refine the Edges:
Smooth the cut edges of your rectangular tile with a damp sponge or your finger to remove any sharp burrs or crumbs. -
Prepare the Surface:
Lightly compress the surface of the tile with a rubber rib to align the clay particles, which helps prevent warping during drying.
Warping Woes?
If corners lift while drying, flip the tile daily and weight the corners gently with small sandbags. Slow, even drying is the best defense against warping.
Step 2: Creating the Leaf Appliqué
-
Roll a Thinner Slab:
Roll out a second, smaller piece of clay. This one should be slightly thinner than your base tile, perhaps 3/16 of an inch. -
Trace the Leaf:
Place your fresh leaf or paper template onto this second slab. Gently trace around the outline with a needle tool, cutting all the way through the clay. -
Refine the Cutout:
Lift the leaf shape carefully. Use your fingertips to gently round off the sharp cut edges so the leaf looks organic rather than like a cookie-cutter shape. -
Score the Attachment Areas:
Place the clay leaf onto the base tile to determine positioning. Lightly mark the outline on the base, then remove the leaf. Thoroughly score (scratch) the area inside the marks on the base and the entire back of the leaf. -
Apply Slip and Attach:
Brush a generous amount of slip onto the scored area of the base tile. Place the clay leaf on top, pressing down firmly but gently from the center outwards to eliminate trapped air pockets.
Highlight the speckle
Use a transparent glaze or a light wash of iron oxide before firing. This will settle into the vein grooves and make the natural clay speckles pop beautifully.
Step 3: Sculpting Details
-
Bevel the Edges:
Use a modeling tool to blend the very bottom edges of the leaf slightly onto the tile where they meet, or undercut them slightly if you want a sharper relief look. I find smoothing the transition just a little helps durability. -
Carve the Primary Veins:
Using a dull pencil or a rounded modeling tool, press firmly to create the deep central vein and the main branching veins. Don’t just draw a line; compress the clay to create a groove. -
Add Secondary Veins:
Branching off from the main lines, press in smaller, more delicate vein patterns. Vary your pressure to make these lines lighter than the main arteries. -
Sculpt Surface Texture:
Between the veins, use your thumb or a spoon-like tool to gently press the clay, creating subtle undulations that mimic the pillowy surface of a real leaf. -
Define the Stem:
Add a tiny coil of clay at the bottom for the stem if your cutout didn’t include one, blending it seamlessy into the main leaf vein and the base tile. -
Final Cleanup:
Check the entire piece for stray clay crumbs. Use a soft, barely damp brush to smooth out any rough tool marks without washing away your texture. -
Dry Slowly:
Place the tile on a piece of drywall or between sheets of drywall to dry very slowly. This is crucial for slabs to remain flat.
Once fired, you will have a permanent botanical sculpture that captures the simple elegance of nature


Layered Wildflower Bouquet Panel
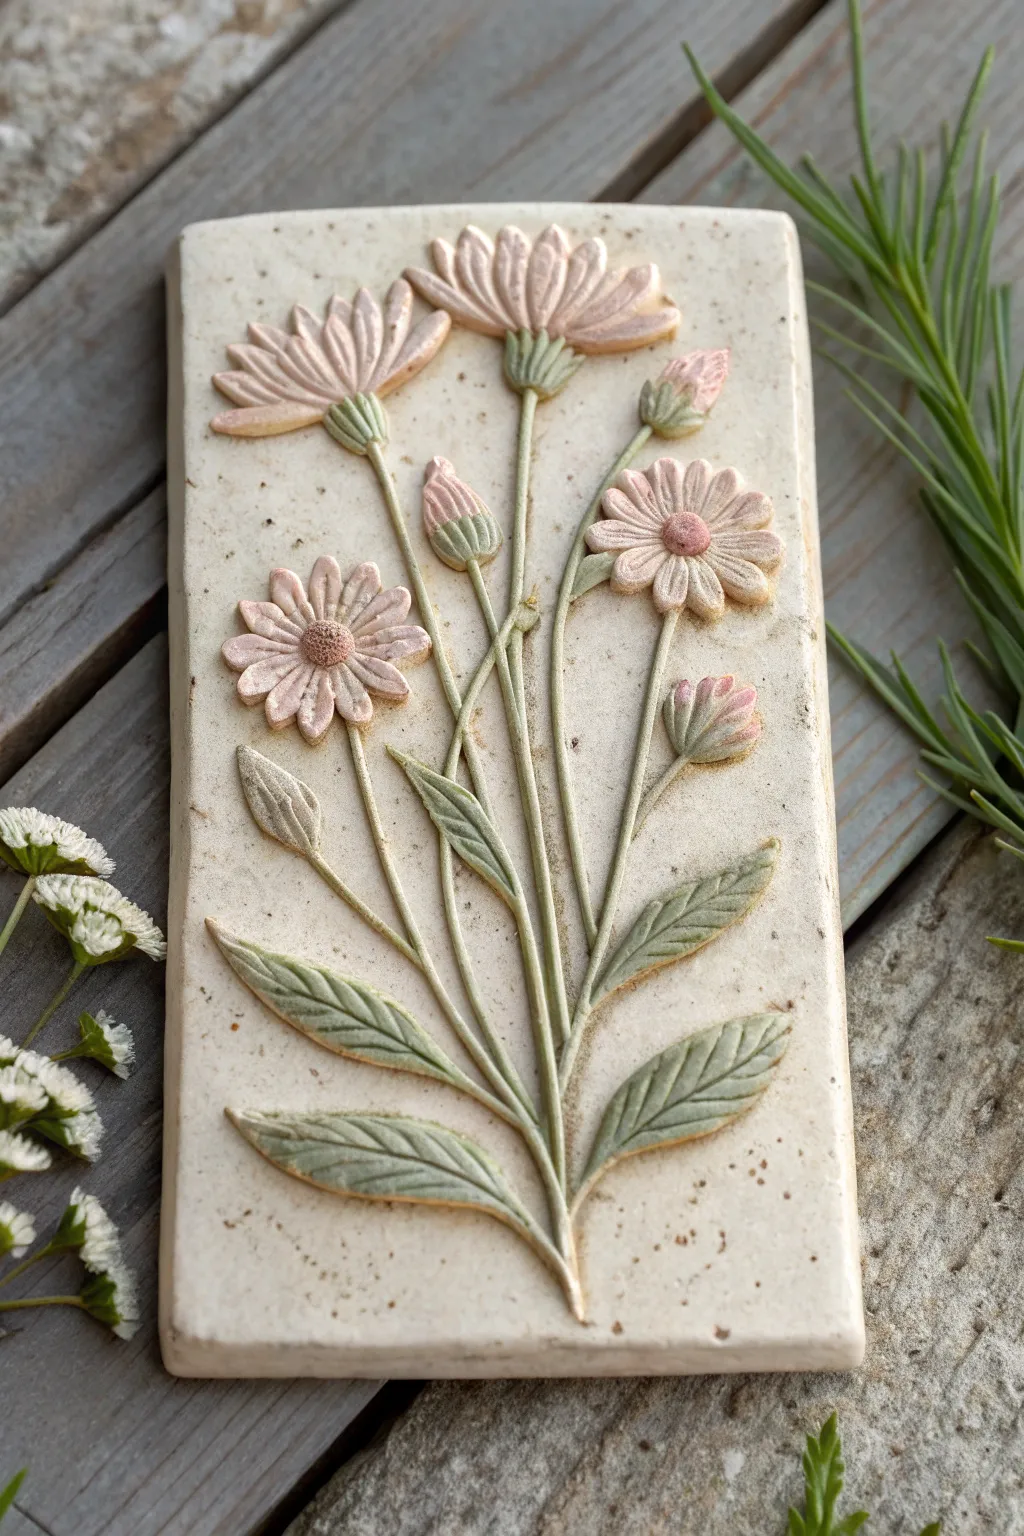
Capture the fleeting beauty of a summer meadow on a creamy ceramic slab using simple relief techniques. This project features raised textural details with soft, muted glazes that highlight the natural stems and blossoms against a speckled clay body.
Detailed Instructions
Materials
- Speckled cream stoneware clay (mid-fire)
- Canvas rolling surface
- Rolling pin and guide strips (1/2 inch)
- Needle tool
- Scoring tool or serrated rib
- Slip (clay slurry)
- Modeling tools (wooden and metal)
- Small sponge
- Underglazes: Pale Sage Green, Muted Dusty Pink
- Fine detail brushes
- Clear matte glaze (optional)
Step 1: Slab Preparation
-
Roll the base:
Start by wedging your speckled stoneware clay to remove air bubbles. Roll it out on canvas using 1/2-inch guide strips to ensure an even thickness. Cut a flawless rectangle, approximately 4×8 inches, using a needle tool and a straight edge. -
Smooth the canvas texture:
Using a slightly damp sponge or a soft rib, gently compress the surface of the slab to remove the canvas texture imprinted during rolling. This creates the smooth, creamy backdrop essential for the flowers. -
Sketch the layout:
Lightly trace your floral design onto the leather-hard slab with a needle tool. Don’t dig deep; just mark where the main stems and flower heads will sit to guide your buildup.
Step 2: Building the Relief
-
Form the stems:
Roll very thin coils of clay for the stems. I find it helpful to vary the thickness slightly for a natural look. Score the traced lines on the slab, apply a touch of slip, and gently press the coils into place. -
Refine the stems:
Use a small wooden modeling tool to blend the underside of the coils onto the slab, leaving the top rounded and raised. This integrates the stem so it doesn’t look pasted on. -
Shape the leaves:
Hand-shape small flattened teardrops of clay for the leaves. Create distinct veins by pressing a dull knife edge or tool into the leaf surface before attaching. -
Attach foliage:
Score and slip the areas where leaves connect to stems. Attach them firmly, curling the tips slightly upwards to add dynamic movement and three-dimensionality. -
Create flower buds:
For the closed buds, shape small ovals of clay. Score the bottoms and attach them to the ends of the upper stems. Use a needle tool to draw vertical lines, mimicking the sepals wrapping the bud. -
Sculpt open blooms:
Form small balls of clay and flatten them into discs. Cut petal shapes into the disc or attach individual petals for the larger top flower. Press a textured center into the middle daisy-like blooms using a texture tool or the head of a small screw.
Seamless Connections
When attaching tiny stems, use a paintbrush dipped in vinegar instead of slip. The acid breaks down the clay surface slightly, creating a strong bond without the mess of excess slurry.
Step 3: Refining and Glazing
-
Clean up details:
Once the added clay has stiffened slightly, go back with a clean, damp brush to smooth any rough connection points or stray slip marks. This ‘cleanup’ phase makes the relief look professional. -
Texture the background:
If desired, sprinkle a tiny amount of grog or sand onto the background and press it in lightly to enhance the speckled effect, avoiding the flower elements themselves. -
Bisque fire:
Allow the piece to dry slowly under plastic to prevent warping. Once bone dry, bisque fire it to the temperature appropriate for your specific clay body (usually Cone 04). -
Apply green underglaze:
Dilute your Pale Sage Green underglaze slightly with water. Paint it carefully onto the stems, leaves, and the base of the flower buds. Wipe back high points with a sponge if you want the clay speckles to show through. -
Apply pink details:
Use the Muted Dusty Pink underglaze for the flower petals and the tips of the buds. Apply two coats for opacity, or a single wash for a watercolor effect. -
Highlight the centers:
Dab a slightly darker brownish-pink in the very center of the open flowers to create depth and focus. -
Final firing:
Glaze fire the piece to maturity (Cone 5 or 6). You can leave the clay bare for a matte finish or apply a thin coat of clear matte glaze over everything to seal the surface.
Cracking Relief?
If leaves pop off as they dry, your slab was likely too dry when you attached them. Wrap the whole piece in wet paper towels and plastic for 24 hours to re-hydrate and equalize moisture.
Now you have a permanent botanical imprint that perfectly captures the quiet elegance of wildflowers


Tree of Life Relief Tile
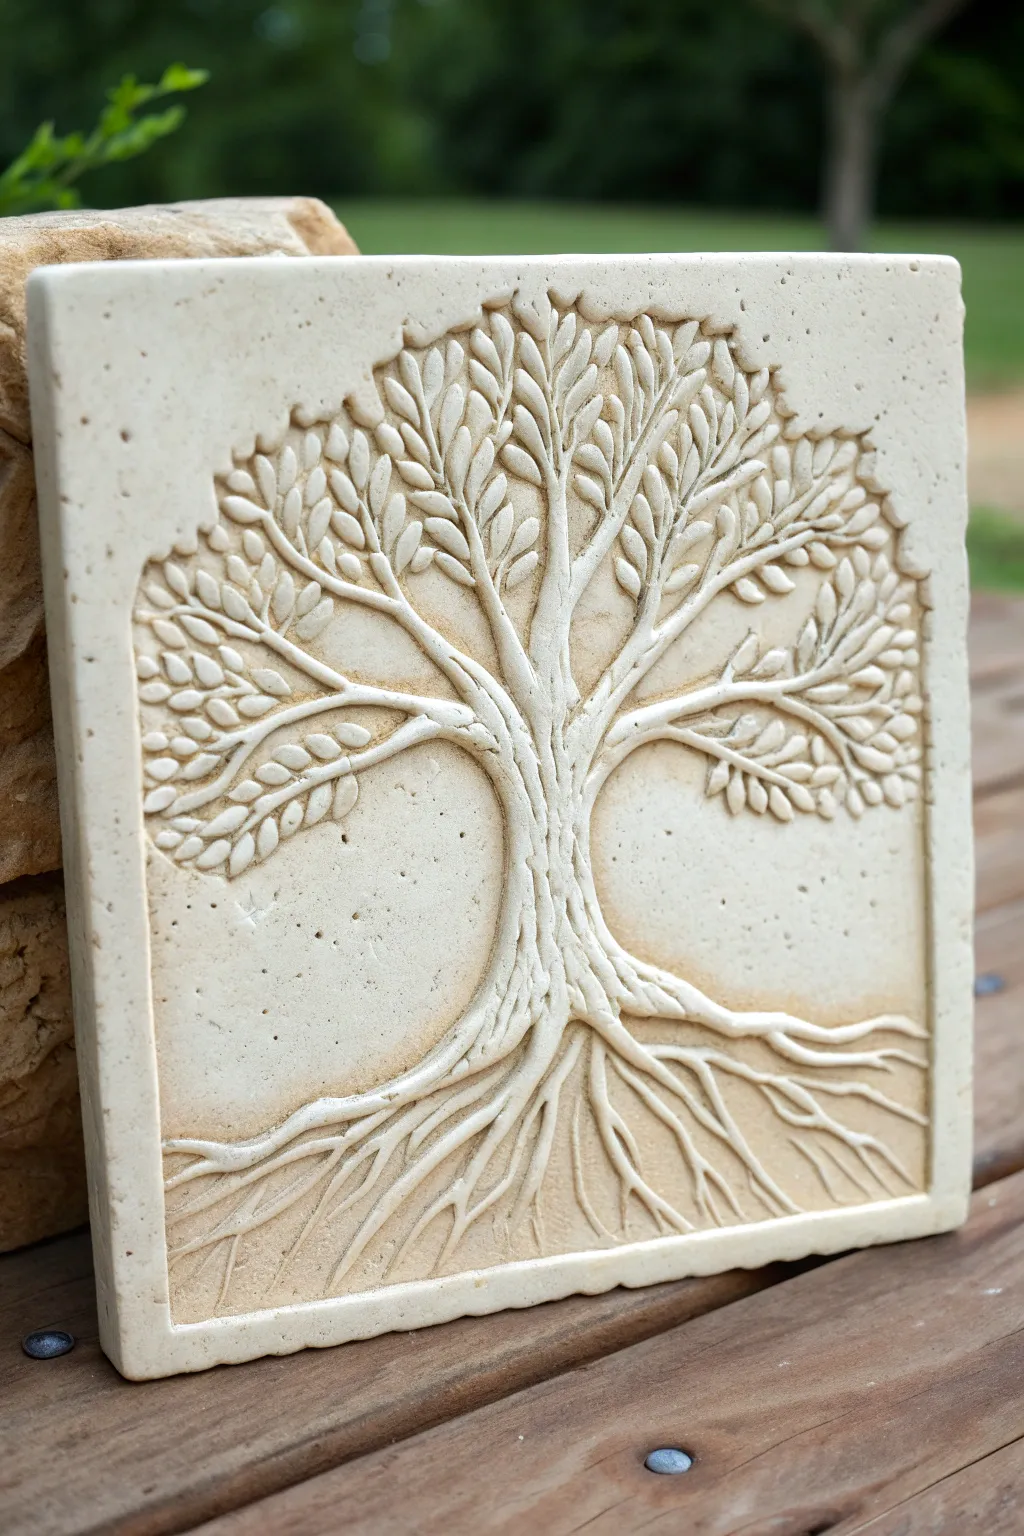
Capture the enduring beauty of nature with this elegant ceramic relief tile featuring a stylized tree of life. The project combines distinct, flowing roots with a lush canopy of leaves, all carved and modeled onto a simple square slab for a classic architectural look.
Step-by-Step Tutorial
Materials
- Stoneware clay body (smooth, light-colored or white for glazing)
- Clay slab roller or rolling pin with thickness strips
- Wooden modeling tools (various tips)
- Needle tool
- Loop tool (small)
- Rib tool (metal or rubber)
- Ware board or canvas-covered board
- Slip (liquid clay)
- Scoring tool (or serrated rib)
- Sponge
- Ruler or square template
- Clear or light translucent glaze (optional)
Step 1: Preparing the Foundation
-
Roll the slab:
Begin by rolling out a distinct slab of clay to an even thickness of about 1/2 to 3/4 inch. Wedging the clay thoroughly beforehand ensures there are no air bubbles. -
Cut the square:
Using a ruler and a needle tool, cut a precise square from your slab. A size of 8×8 or 10×10 inches works well for this level of detail. Smooth the outer edges with a damp sponge to remove sharpness. -
Create the border:
Lightly incise a border about 1/2 inch in from the edge using your ruler. Do not cut all the way through; just mark the framing line where the background will be recessed.
Step 2: Sculpting the Trunk and Roots
-
Sketch the outline:
With the needle tool, lightly sketch the central trunk, the sweeping main branches, and the intricate root system directly onto the clay surface. -
Recess the background:
Using a small loop tool, carefully carve away the clay in the negative spaces—the areas between the roots, branches, and the border. Dig down about 1/4 inch, leaving the tree form raised. -
Refine the trunk shape:
Smooth the edges of the raised trunk using a wooden modeling tool. Round the form slightly so it doesn’t look like a flat cutout. -
Model the roots:
Define the individual roots. They should flow organically from the base of the trunk, tapering as they reach the bottom border. Use a tool with a rounded tip to create the valleys between roots. -
Add texture to the bark:
Gently scratch vertical lines along the trunk and main branches to simulate bark texture. Vary the pressure so lines aren’t uniform.
Clean Lines
Keep a soft watercolor brush handy while you carve. Use it to gently sweep away clay crumbs from the deep recessed areas without marring the smooth surface underneath.
Step 3: Detailing the Canopy
-
Add pellets for leaves:
For the leaves, you have two options: carve them out of the existing raised slab, or add small bits of clay. I find adding small, flattened coils or pellets gives better dimension. Score and slip the area first if adding clay. -
Shape individual leaves:
Using a small spatula tool or your fingers, shape each leaf into an oval or teardrop form. Arrange them in clusters along the branches. -
Vein the leaves:
Press a central vein into each leaf using the edge of a modeling tool. This small detail catches the glaze later and defines the form. -
Under-cutting:
Create slight shadows by under-cutting. Gently push the clay under the edges of the leaves and branches to make them appear separated from the background.
Root Variation
Make the roots overlap one another slightly rather than laying them all side-by-side. This simple layering trick adds instant 3D depth and realism.
Step 4: Finishing Touches
-
Smooth the background:
Go back to the recessed background areas. Use a small, damp sponge or a smooth tool to burnish or smooth out any tool marks, making the relief pop. -
Clean the border:
Ensure the raised border frame is crisp and square. Run a finger lightly over the sharp corners to prevent chipping after firing. -
Dry slowly:
Place plastic loosely over the tile to let it dry very slowly. Uneven drying in relief tiles often causes warping. -
Bisque fire:
Once bone dry, fire the piece to bisque temperature according to your clay body’s specifications. -
Apply wash or glaze:
To mimic the stone look in the photo, apply an iron oxide wash and wipe it back so it stays in the crevices of the texture, or use a matte, cream-colored glaze that breaks over edges.
Once fired, this durable relief tile makes a stunning garden accent or a centerpiece for a tiled wall


Koi Fish and Ripple Scene
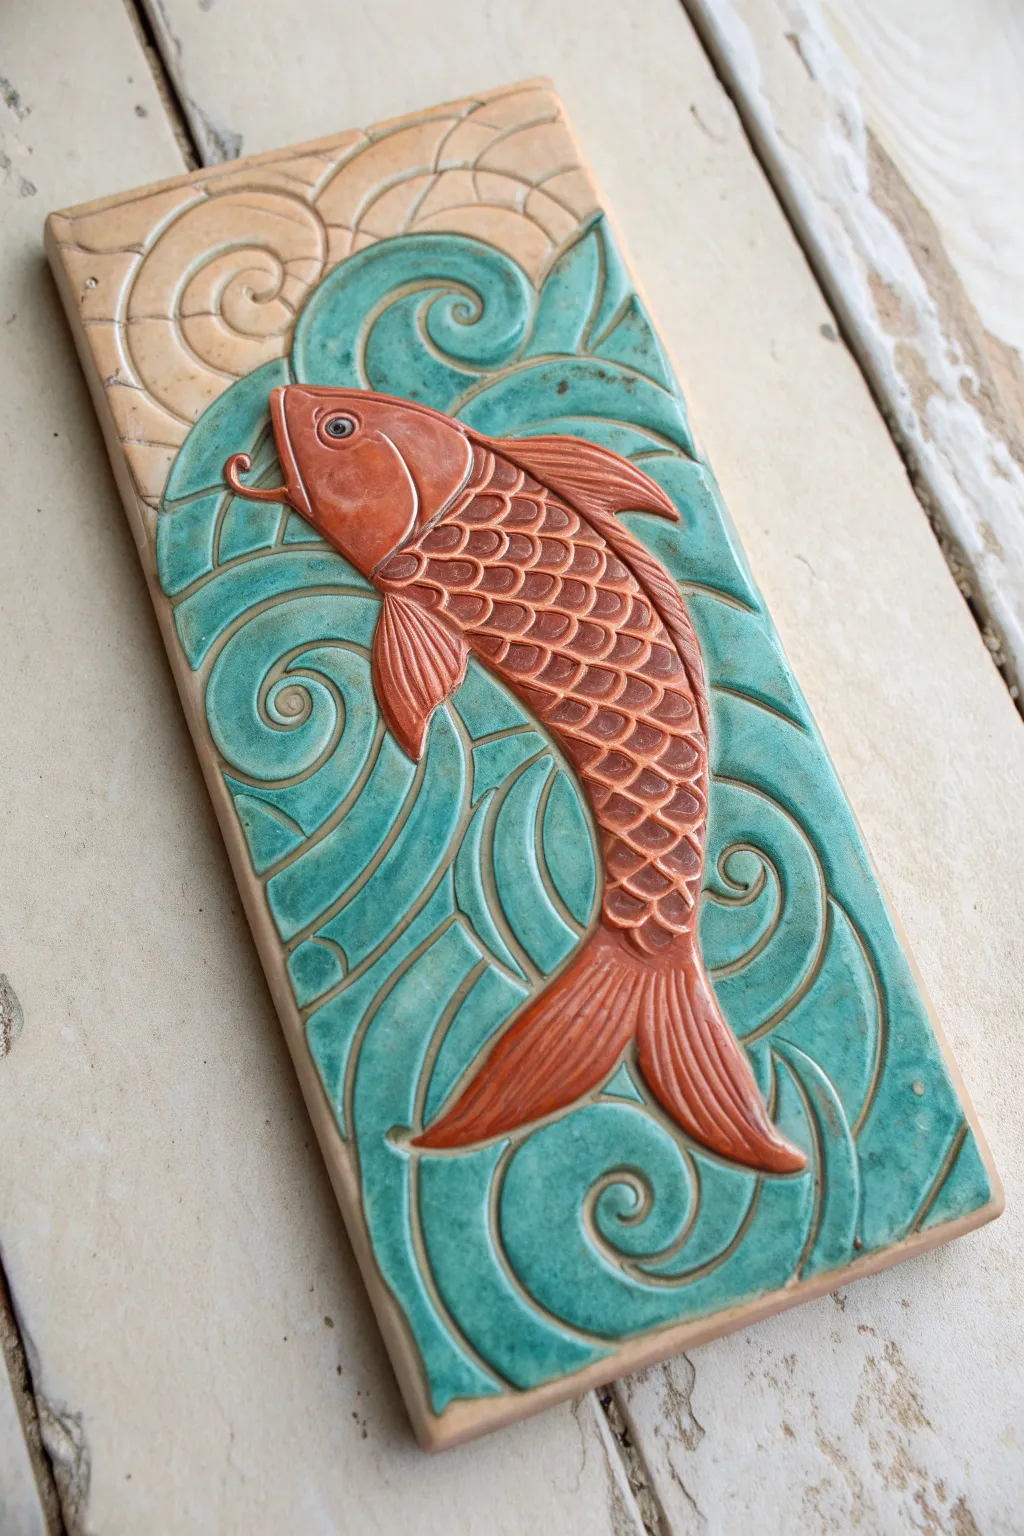
Capture the fluid motion of a koi fish in clay with this dynamic slab relief project. The contrast between the matte, earthen fish and the glossy turquoise waves creates a stunning tactile piece perfect for wall mounting.
Step-by-Step Guide
Materials
- Earthenware or stoneware clay slab (approx. 1/2 inch thick)
- Fettling knife
- Loop tools (various sizes)
- Needle tool
- Modeling tool
- Rolling pin and guide strips
- Underglazes (Reddish-brown, Teal/Turquoise)
- Clear glaze (optional for extra shine)
- Small sponge
- Kiln for firing
Step 1: Slab Preparation and Transfer
-
Roll the foundation:
Begin by rolling out an even slab of clay, roughly 1/2 inch thick. Use guide strips to ensure the thickness is consistent, as this prevents warping later. -
Cut the shape:
Trim your slab into a tall rectangle using a fettling knife. The example here is a long, vertical orientation, which suits the upward movement of the fish perfectly. -
Sketch the design:
Lightly trace your design onto the leather-hard clay using a needle tool. Draw the fish leaping diagonally across the center and sketch large, swirling wave patterns in the background. Don’t press too deep; these are just guide lines.
Step 2: Carving the Relief
-
Define the fish:
Using a loop tool, begin carving away the clay around the fish’s body. You want the fish to sit at the highest level of the relief, so remove material from the water areas to make the fish appear raised. -
Sculpt the body shape:
Round out the edges of the fish using a modeling tool or your fingers to give it a 3D, organic form. Pay attention to the curve of the back and the taper of the tail. -
Add the barbel:
Carefully model the signature whisker (barbel) near the mouth. This is a delicate detail, so I often reinforce it with a tiny coil of added clay if the carving gets too think. -
Detail the head:
Carve the gill cover (operculum) as a curved line behind the head. Press a small ring or use a hollow tool to create the eye socket, placing a tiny clay ball inside for the pupil. -
Carve the scales:
For the scales, use a small U-shaped loop tool or a modeling tool to press overlapping semi-circles into the body. Start from the tail and move toward the head to mimic natural scale layering. -
Texture the fins:
Use a needle tool or knife to draw fine, linear striations on the dorsal, pectoral, and tail fins. This texture distinguishes the fins from the smooth head and scaled body.
Depth Perception
Carve the water closest to the fish deeper than the water at the edges. This exaggerated depth makes the fish visually ‘pop’ forward more aggressively.
Step 3: Creating the Environment
-
Carve the waves:
Switch to a medium loop tool to carve the water. Follow your sketched swirls, carving deep channels to distinguish the waves. The areas between the swirls should remain slightly raised. -
Detail the swirls:
Refine the spiral centers of the waves. Deep, clean cuts here will hold more glaze later, enhancing the visual depth of the water. -
Carve the sky:
At the very top left corner, carve simplified cloud or sun ray motifs. Keep these shallower than the water to suggest they are further in the distance. -
Smooth surfaces:
Use a damp sponge or finger to smooth out any sharp burrs or rough crumbs of clay left from carving. A smooth surface ensures a cleaner glaze application.
A Touch of Gold
After the final firing, apply gold luster to the eye or the edges of the scales and re-fire at a low temperature for a luxurious Kintsugi-inspired effect.
Step 4: Glazing and Finishing
-
Bisque fire:
Allow the tile to dry slowly to the bone-dry stage, then bisque fire it according to your clay body’s specifications. -
Glaze the fish:
Apply a reddish-brown underglaze or glaze to the fish. Be careful to stay within the lines, wiping away any drips that land on the background. -
Glaze the water:
Apply a turquoise or teal glaze to the wave sections. Allow the glaze to pool naturally in the carved recesses of the swirls to create variation in color intensity. -
Leave the sky bare:
To mimic the example, leave the top ‘sky’ section unglazed (or use a clear matte glaze) to show the natural raw clay color. This provides a beautiful contrast to the glossy water. -
Final wipe:
Use a clean, damp sponge to wipe the high points of the water slightly if you want to accentuate the relief texture, then fire the piece for the final glaze cycle.
Once fired, mount your tile in a shadow box or use high-strength epoxy to attach a hanger for display

The Complete Guide to Pottery Troubleshooting
Uncover the most common ceramic mistakes—from cracking clay to failed glazes—and learn how to fix them fast.
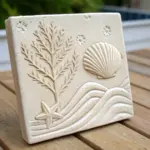
Sea Turtle Shell Texture Tile

Capture the graceful movement of a sea turtle gliding over ocean waves with this elegant monochrome relief tile. Using a subtractive carving method on a simple clay slab, you’ll create depth and texture that brings this underwater scene to life.
Detailed Instructions
Materials
- Light-colored stoneware clay (smooth or fine grog)
- Square tile cutter or ruler and knife
- Rolling pin and guide slats (approx. 1/4 inch thick)
- Needle tool
- Loop tools (small and medium)
- Modeling tool with a small spoon end
- Rubber kidney rib
- Soft sponge
- Slip (liquid clay)
- Canvas mat or wooden board
Step 1: Preparing the Slab Canvas
-
Roll the foundation:
Begin by rolling out your clay on a canvas mat or between wooden slats to ensure an even thickness. Aim for a slab that is roughly 1/4 to 3/8 of an inch thick to allow enough depth for carving without making the tile too fragile. -
Smooth the surface:
Before cutting, compress the clay surface with a rubber kidney rib. Swipe it gently in multiple directions to align the clay particles, which helps prevent warping later and provides a silky canvas for your carving. -
Cut the tile shape:
Measure and cut a perfect square from your slab. A 6×6 inch square is a manageable size for this level of detail. Clean up the edges with a damp sponge to remove any sharp burrs. -
Draft the design:
Lightly sketch the outline of the turtle and the wave patterns directly onto the leather-hard clay using a needle tool. Keep your touch very light—you just want a faint guide, not deep incisions yet.
Clean Lines
When carving the shell lines, lay a piece of thin plastic wrap over the clay. Draw through the plastic to create soft, rounded edges instead of sharp, jagged cuts.
Step 2: Sculpting the Turtle
-
Define the outline:
Once you are happy with the placement, retrace the perimeter of the turtle’s shell, head, and flippers with a deeper cut. Hold your needle tool perpendicular to the slab for a crisp edge. -
Excavate the background:
Using a small loop tool, begin carving away the negative space around the upper part of the turtle. Removing a thin layer of clay here makes the turtle appear to float above the background. -
Shape the carapace:
Gently round the top of the shell with a modeling tool or your thumb to give it a domed, three-dimensional look. I find that smoothing the edges down toward the background helps integrate the form naturally. -
Detail the scutes:
Draw the geometric plate pattern (scutes) onto the shell. Use a small carving tool to deepen the lines between the plates, creating distinct separations. -
Texture the skin:
For the head and flippers, use the point of your needle tool to stipple tiny, irregular scales. Press gently to create a pebbled texture that contrasts beautifully with the smooth shell. -
Add facial features:
Carve a small, almond-shaped eye and a distinct beak line on the turtle’s head. Keep these details sharp to give the creature character.
Ocean Glaze
Use a translucent celadon glaze solely on the waves and background, leaving the turtle unglazed (raw) to highlight the matte texture of the clay body.
Step 3: Carving the Environment
-
Outline the waves:
At the bottom of the tile, define the rolling wave shapes. These should be stylized, overlapping curves that suggest movement without being overly realistic. -
Bevel the wave edges:
To create the layered look seen in the example, bevel the top edge of each wave simply by slicing away a small angle of clay or pressing it down with a modeling tool. This creates a shadow line that separates the waves. -
Smooth the water:
Run a slightly damp finger or a very soft brush over the wave humps to make them look smooth and fluid, contrasting with the textured turtle skin. -
Add decorative elements:
In the empty space around the turtle, press in small star shapes or circles using stamps or the end of a paintbrush handle to represent bubbles or starfish. -
Final clean-up:
Once the carving is complete, check for any little crumbs of clay (burrs) left from your tools. Brush them away with a soft, dry brush rather than smearing them with unwanted water. -
Drying process:
Place your finished tile between two pieces of drywall or wooden boards to dry slowly. This sandwiching technique is crucial for flat tiles to prevent the corners from curling up.
Once fired, this piece serves as a tranquil coaster or a stunning focal point for a larger mosaic wall
Bird on a Branch Relief

Capture the delicate beauty of nature with this elegant bird on a branch relief sculpture. The finished piece features a creamy, matte stone finish with clean lines and soft shadows, making it a perfect addition to a garden wall or indoor sanctuary.
How-To Guide
Materials
- High-quality white stoneware or porcelain clay body
- Rolling pin
- Two 1/2-inch thick wooden guide strips
- Needle tool
- Loop tools (small and medium sizes)
- Small carving knife or scalpel
- Rubber kidney rib
- Soft paintbrush
- Sponge
- Bowl of water
- Template of the bird and branch design (paper)
Step 1: Slab Preparation
-
Rolling the Foundation:
Begin by wedging your white stoneware clay thoroughly to remove any air bubbles. Place your wooden guide strips on either side of clay and roll it into a smooth, even slab. For this project, a thickness of about half an inch provides sturdy support without being too heavy. -
Cutting the Tile:
Measure and mark a perfect square, roughly 8×8 inches, or your desired finished size. Use a needle tool against a straight edge to cut the square cleanly. Don’t discard the excess clay; keep it moist under plastic as you will need it for the appliqué elements. -
Smoothing the Surface:
Before adding any design, use a rubber kidney rib to compress the clay slab. Work in multiple directions to align the clay particles, which helps prevent warping later. The surface should be impeccably smooth.
Uneven Drying?
If the corners of your tile start lifting as it dries, place weighted bags of sand or rice gently on the corners to hold them down flat.
Step 2: Building the Relief
-
Transferring the Design:
Lightly place your paper template onto the slab. Using a dull pencil or stylus, gently trace the main lines of the branch and the bird outline just enough to leave a faint impression on the clay surface. -
Adding the Branch:
Roll small coils from your spare clay to match the thickness of the branch segments. Score the slab along the branch lines and apply a small amount of slip. Press the coils onto the scored lines firmly to ensure a strong bond. -
Refining the Branch Connection:
Use a small modeling tool to blend the edges of the added coil onto the slab so it looks like it’s emerging from the clay rather than just sitting on top. Leave the top of the coil rounded to create dimension. -
Forming the Bird:
Shape a flat, roughly bird-shaped piece of clay about 1/4 inch thick. Score and slip the area where the bird sits on the branch, then attach this clay pad. Use your thumb to gently round the belly and head, building up volume in the center. -
Creating Leaves:
For the leaves, flatten small balls of clay into teardrop shapes. Attach them to the branch ends using the score and slip method. Ensure the leaves curve slightly upwards or downwards to mimic natural growth, rather than lying completely flat.
Level Up: Antique Look
After bisque firing, apply a dark oxide wash (like iron oxide) and wipe most of it away with a sponge. This leaves dark color in the recesses.
Step 3: Refining and Detailing
-
Carving the Veins:
Once the added clay has stiffened slightly (leather hard is best here), use a sharp needle tool or small knife to carve the center vein and angled side veins into each leaf. Keep these cuts crisp and deliberate. -
Defining the Bird’s Wing:
Use a small loop tool to carve a shallow indentation separating the wing from the body. Then, use a knife to incise delicate lines representing the flight feathers near the tail. -
Sculpting the Beak and Eye:
Carefully shape the beak to a dull point. For the eye, press a small round tool or the back of a drill bit gently into the head. I find adding a tiny, carved ring around this indentation gives the eye more life and realism. -
Refining the Edges:
Go around the entire perimeter of the bird and leaves with a small modeling tool. Undercut the edges very slightly; this creates a sharper shadow line and makes the image pop against the background. -
Adding Texture:
Keep the bird’s body relatively smooth to contrast with the background, or add extremely faint texture marks for feathers if desired. The background slab should remain smooth.
Step 4: Finishing and Firing
-
Final Smoothing:
Dip a soft paintbrush in water and gently brush over the relief areas to remove any sharp burrs or clay crumbs created during carving. Be careful not to wash away your crisp details. -
Drying:
Place the tile on a drywall board or wooden ware board. Cover it loosely with plastic for the first two days to slow down drying, which prevents the corners from curling up. Once the colour lightens evenly, it is bone dry. -
Bisque Firing:
Fire the piece to bisque temperature (usually Cone 04). Since this piece relies on shadow and form rather than color, you may choose to leave it unglazed for a matte stone look, or apply a clear matte glaze.
Display your finished relief on a small easel or mount it into a garden wall to enjoy the tranquil scene


What Really Happens Inside the Kiln
Learn how time and temperature work together inside the kiln to transform clay into durable ceramic.
Desert Cactus Landscape Layers

Capture the serene beauty of the Southwest with this monochromatic clay relief tile. By layering carved lines and added clay elements on a smooth slab, you’ll build a dimensional scene featuring a towering saguaro, rolling dunes, and a textured sun.
Step-by-Step Guide
Materials
- Light-colored stoneware clay (smooth body)
- Rolling pin and guide sticks (about 3/8 inch thick)
- Needle tool
- Fettling knife
- Loop tools (small and medium)
- Scoring tool or serrated rib
- Slip (clay mixed with water)
- Small wooden modeling tool
- Small round piping tip or straw (for texture)
- Rubber kidney rib
- Canvas or slab mat
Step 1: Preparing the Base
-
Roll the slab:
Start by rolling out a smooth, even slab of clay approximately 3/8-inch thick. Use guide sticks to ensure uniform thickness, as this prevents warping later. -
Cut the canvas:
Using a ruler and your fettling knife, cut a clean rectangle from the slab. A size like 8×10 inches works wonderfully for this level of detail. Smooth the edges with a slightly damp sponge or your finger. -
Transfer outline:
Lightly sketch your design directly onto the clay using a needle tool. Don’t dig deep; just map out the placement of the large cactus on the left, the rolling hills in the background, and the sun in the upper right.
Pro Tip: Warping
To prevent warping as the clay shrinks, dry your tile on a piece of drywall or intricate wire rack that allows air to reach the bottom center.
Step 2: Sculpting the Landscape
-
Define the hills:
Use a medium loop tool or a modeling tool to gently carve along the lines of the distant mountains and hills. Create separation by depressing the clay slightly behind the foreground hills. -
Smooth the transitions:
After carving, use a rubber rib or your finger to smooth the recessed areas, creating soft, rolling transitions between the layers of the landscape rather than sharp cliffs. -
Create the sun:
Roll a small ball of clay and flatten it into a disc. Score and slip the area in the upper right sky, then press the disc firmly into place to form the sun. -
Texture the sun:
Using a needle tool, poke a ring of decorative dots around the sun’s perimeter. For the sun’s surface, gently dab it with a coarse sponge or a crumpled piece of plastic wrap to give it a pitted, crater-like texture.
Level Up: Oxide Wash
After bisque firing, apply an iron oxide wash and wipe it back with a sponge. The dark color will remain in the carved grooves, making the details pop.
Step 3: Building the Cactus
-
Form the main trunk:
Roll a coil of clay that tapers slightly at the top. Flatten it gently so it isn’t round, but rather a raised relief shape. Score and slip the vertical area where the cactus will stand. -
Attach the arms:
Roll two smaller coils for the arms. Bend them into the classic ‘L’ shape. Score and slip them onto the main trunk, blending the connection points seamlessly with a wooden tool so they look like one continuous growth. -
Add ribs:
Take a small loop tool or a wooden styling tool and carefully carve vertical grooves running the length of the cactus trunk and arms. This mimics the pleats of a real saguaro. -
Refine the edges:
Clean up any clay crumbs from the grooving process with a soft brush.
Step 4: Foreground Details
-
Add scrub vegetation:
Form small teardrop shapes of clay. Cluster three or four together at the base of the cactus and in the lower right corner to create agave-like plants. -
Detail the plants:
Use a knife or modeling tool to press a central indentation into each leaf, giving them dimension and shadow. -
Create the pathway:
Carve a winding line starting from the bottom right leading into the distance. To emphasize this path, use a small hollow tool (like a straw or piping tip) to stamp a repetitive border of tiny circles along one side of the line. -
Add ground texture:
Beneath the cactus and foreground plants, add texture to represent gravel or sand. I like to use the rounded end of a paintbrush handle to create varying divots in the clay. -
Sky details:
Finish by adding a few scattered poke-marks in the sky area to suggest stars or atmospheric texture, balancing the negative space.
Step 5: Finishing
-
Slow drying:
Place a piece of plastic loosely over the tile. Let it dry slowly for several days to prevent the corners from curling up. -
Sanding and firing:
Once bone dry, gently sand any sharp burrs. Bisque fire the piece. You can leave it as bare clay for a natural look or apply a clear matte glaze.
Display your finished tile on a stand or frame it to bring a touch of the arid wilderness into your home
Mountain Meadow Depth Tile
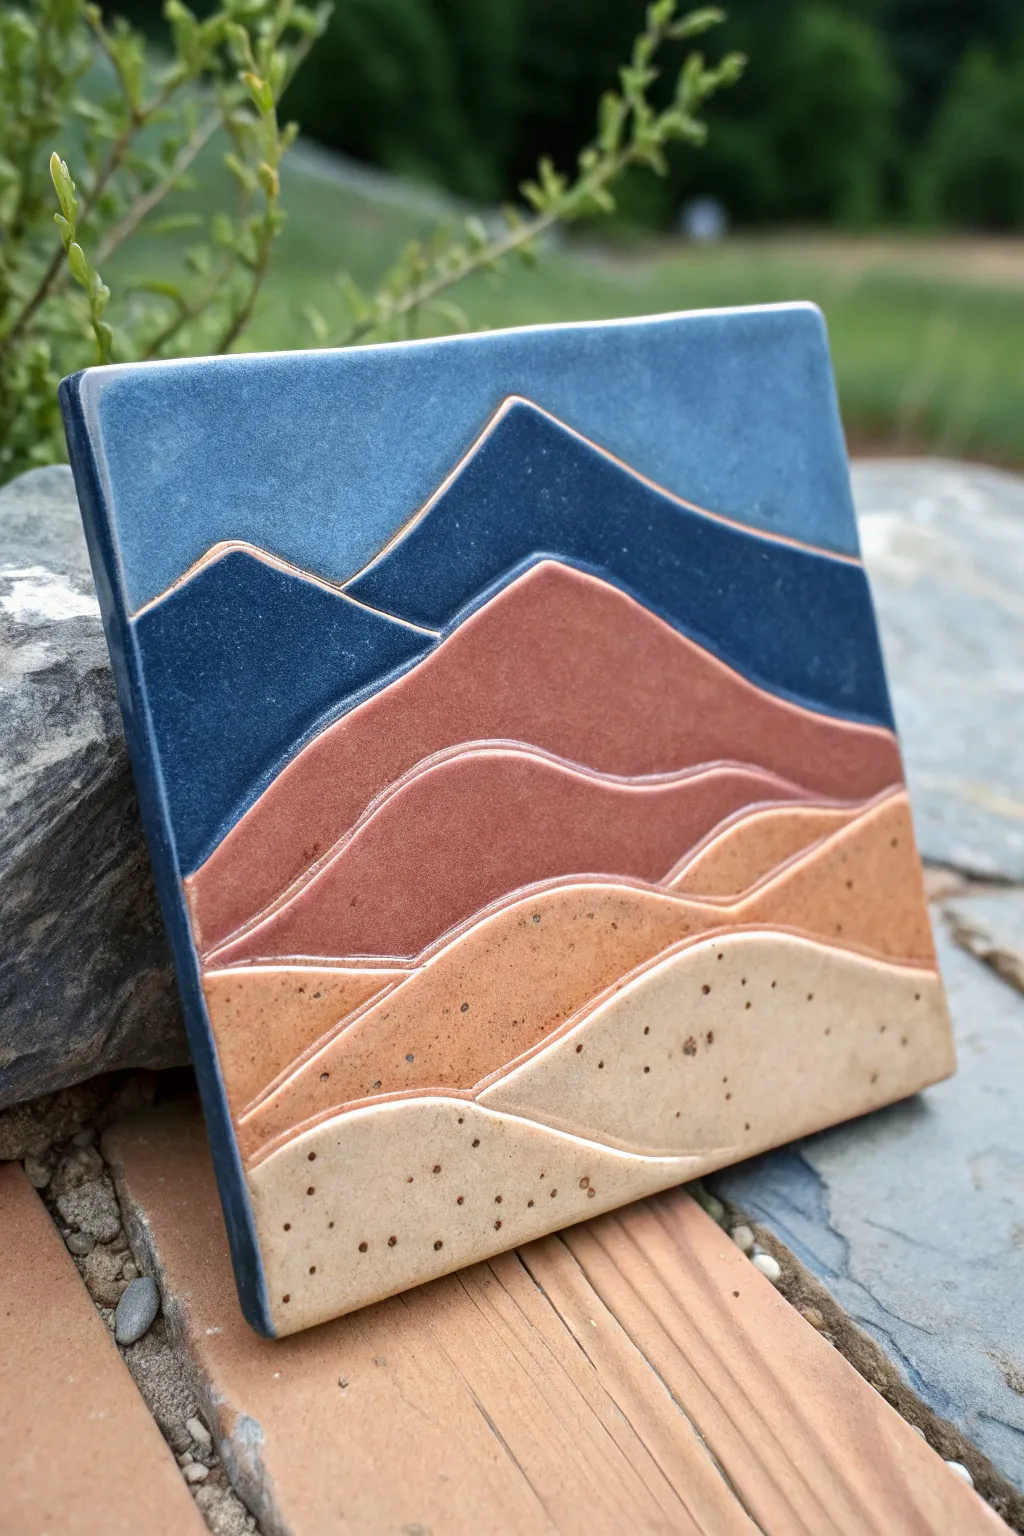
Capture the serene beauty of rolling hills and distant peaks with this layered slab relief project. Using simple carving and glazing techniques, you’ll create a dimensional landscape that shifts from speckled sandy foregrounds to deep, cool mountain blues.
Step-by-Step
Materials
- Cone 5-6 stoneware clay body (white or light buff)
- Slab roller or rolling pin with thickness strips
- Rolling canvas
- Needle tool
- Fettling knife
- Loop tool or carving tool (small)
- Rubber kidney rib
- Sponge
- Glazes: Speckled Sand/Tan (matte), Terracotta/Rust (satin/matte), Deep Navy Blue (gloss/satin), Medium Denim Blue (satin)
- Wax resist
- Small glaze brushes (rounds and flats)
- Sighillata (optional, for extra smooth surface)
Step 1: Slab Preparation & Design
-
Roll the foundation:
Begin by rolling out a smooth, even slab of clay approximately 3/8-inch thick. If you are using a rolling pin, use thickness strips to ensure the slab is perfectly uniform. -
Compress surfaces:
Using a rubber kidney rib, compress the clay on both sides. This aligns the clay particles to prevent warping and creates a pristine canvas for your carving. -
Cut the tile shape:
Measure and cut a perfect square, likely around 6×6 inches or 8×8 inches depending on your preference. Use a fettling knife held vertically to ensure straight, crisp edges. -
Sketch the landscape:
With a needle tool, very lightly sketch your mountain design onto the clay surface. Draw about five distinctive layers: two foreground dunes, two mid-ground hills, and a sharp mountain range in the background.
Step 2: Carving & Relief
-
Define the lines:
Once you are happy with the composition, go over your sketched lines with a V-tip carving tool or a small loop tool to create deep, definitive channels between each section. -
Carve the relief:
To create the illusion of depth, gently carve away a small amount of clay from the top edge of each ‘lower’ section where it meets the section above it. This makes the upper mountain layers physically recede. -
Create the sun contour:
For the very top sky section, gently slope the clay downwards toward the mountain peaks, creating a slight bevel that catches the glaze later. -
Smooth the channels:
Dip a small brush in water or use your finger to run along the carved grooves. This removes the sharp burrs and ‘crumbs’ left by the carving tool, ensuring a clean partition between colors. -
Dry slowly:
Sandwich the tile between two pieces of drywall board or weighted plastic to dry slowly. This is crucial for preventing the corners from curling up during the drying process. -
Bisque fire:
Once bone dry, fire the tile to Cone 04 (or your clay’s specific bisque temperature).
Warping Woes?
If corners lift while drying, flip the tile onto a fresh board and weigh down the corners gently with small sandbags or extra clay chunks wrapped in plastic.
Step 3: Glazing the Landscape
-
Clean the bisque:
Wipe the bisqueware down with a damp sponge to remove dust, which can prevent glaze adhesion. -
Wax the channels:
Using a very fine liner brush and wax resist, carefully paint inside the carved lines separating each hill section. This will keep the clay body revealed as a natural outline. -
Glaze the foreground:
Start at the bottom. Apply 2-3 coats of the speckled sand glaze to the lowest dune. I like to let this dry briefly before moving to the next section to avoid smudging. -
Apply the mid-tones:
Move up to the next two sections. Apply the terracotta or rust-colored glaze. Ensure the glaze pools slightly against the waxed line for good coverage, but doesn’t spill over. -
Paint the mountains:
For the sharp peaks, use the deep navy blue glaze. This dark color adds visual weight and pushes the mountains into the distance. -
Glaze the sky:
Finish with the medium denim blue glaze for the sky. If you want an atmospheric effect, apply it slightly thinner near the mountain tops and thicker near the top edge. -
Clean the edges:
Use a damp sponge to wipe any glaze drips off the sides and back of the tile to protect your kiln shelves. -
Glaze fire:
Fire the tile to Cone 5 or 6 according to your glaze specifications.
Glaze Line Precision
If you don’t have steady hands for waxing lines, use masking tape or an automotive pinstriping tape to mask the grooves before glazing.
Hang your finished tile on a wall or use it as a stunning trivet to bring a piece of the mountains into your home

TRACK YOUR CERAMIC JOURNEY
Capture glaze tests, firing details, and creative progress—all in one simple printable. Make your projects easier to repeat and improve.
Mushroom Forest Mini Scene

Step into a world of tactile nature with this charming ceramic tile featuring raised, semi-realistic mushrooms. The piece combines flat carving techniques for the background grasses with three-dimensional modeling for the fungi, creating a lovely sense of depth and texture perfect for a wall hanging.
Step-by-Step Tutorial
Materials
- White or speckled stoneware clay slab (approx. 1/2 inch thick)
- Square template (card cut to size)
- Needle tool
- Loop carving tools (set)
- Small rolling pin
- Serrated rib or scoring tool
- Slip (clay and water slurry)
- Modeling tools (wooden or rubber tipped)
- Underglazes (Warm Brown, Terra Cotta, Cream/White, Forest Green)
- Small paintbrushes (fine tip and flat)
- Canvas work surface
Step 1: Preparing the Base
-
Roll the slab:
Start by rolling out your clay slab on canvas to an even thickness of about 1/2 inch. Keep it sturdy, as this needs to support added weight. -
Cut the square:
Place your square paper or card template onto the clay and trace around it with a needle tool held vertically. Remove the excess clay. -
Smooth the surface:
Use a slightly damp sponge or a soft rib to gently compress and smooth the surface of the tile, removing any canvas texture.
Step 2: Carving the Background
-
Sketch the layout:
Lightly trace the positions of your three mushrooms and the background grasses using a dull pencil or very light touch with a needle tool. -
Carve the wheat/grass:
Using a small loop tool or V-tip carving tool, gently carve the stylized grass stalks and leaves in the background. These are shallow, negative spaces that sit ‘behind’ the future mushrooms. -
Add texture:
Make small notches along the carved stalks to mimic seed heads or wheat textures. Keep these incisions clean and sharp.
Pro Tip: Gravity Defying Caps
If your large mushroom cap is sagging before it adheres, tuck a small ball of paper towel underneath the rim for support. It will burn out harmlessly in the kiln.
Step 3: Sculpting the Mushrooms
-
Form the caps:
Roll three balls of fresh clay. Flatten them slightly into domes—one large for the center, two smaller ones for the sides. -
Score and slip:
Generously score the area on the tile where the caps will go and the back of your clay domes. Apply slip and press them firmly onto the tile. -
Shape the stems:
I like to roll small coils for the stems, tapering them slightly at the top. Flatten the back side of each coil. -
Attach the stems:
Score, slip, and attach the stems directly beneath the caps. Use a modeling tool to blend the clay of the stem onto the background slab just slightly at the very bottom for distinct grounding. -
Detail the gills:
Underneath each cap, use a needle tool or knife to draw fine, radiating lines representing the mushroom gills. These should fan out from the top of the stem to the edge of the cap. -
Texture the stems:
Drag a serrated tool or stiff brush vertically down the stems to create a fibrous, organic texture.
Troubleshooting: Cracking Joints
If cracks appear where stems meet the background during drying, your clay was too dry. Compress the seam with a rubber tool and add a tiny coil of soft clay to bridge the gap.
Step 4: Refining and Painting
-
Add foreground details:
Roll tiny snakes of clay for the grass blades at the base. Attach them over the bottom of the stems to make the mushrooms look nestled in vegetation. -
Create mossy texture:
Dab a stiff-bristled brush or a rough sponge with thick slip along the very bottom edge to simulate mossy earth. -
Dry to leather hard:
Allow the piece to dry slowly under loose plastic until it is leather hard. This makes painting easier and prevents smudging. -
Paint the caps:
Apply a Terra Cotta or Warm Brown underglaze to the tops of the caps. For depth, dab a darker brown near the center top and blend outward. -
Highlight the stems:
Wash the stems with a diluted Cream or very light brown underglaze. Wipe back slightly with a sponge to let the carving texture hold the darker clay color. -
Final touches:
Use a fine detail brush to apply Forest Green underglaze specifically to the added foreground grass blades and moss texture. -
Fire:
Bisque fire the piece according to your clay’s instructions, apply a clear matte glaze if desired (or leave raw for a rustic look), and glaze fire to finish.
Once fired, you will have a durable, nature-inspired relief that captures the quiet beauty of the forest floor
Abstract Ripple Carved Relief
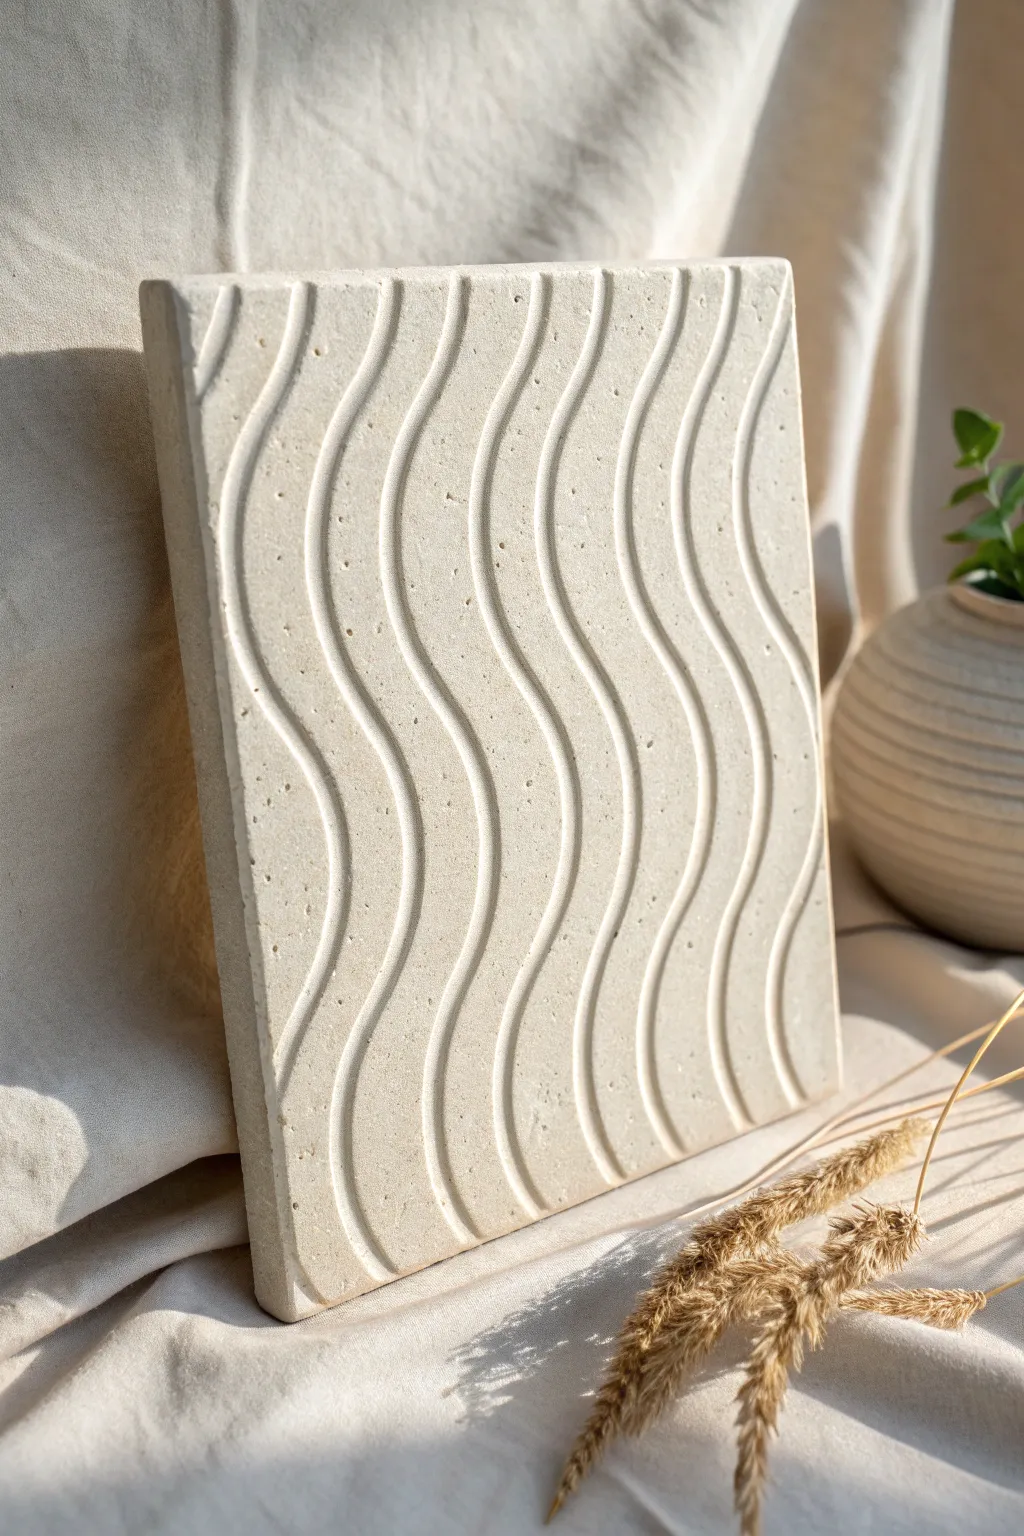
This minimalist relief project captures the soothing rhythm of water ripples on a textured, sandy surface. By carving simple, flowing lines into a slab of plaster or air-dry clay, you create a piece of modern, tactile wall art that plays beautifully with light and shadow.
Step-by-Step Guide
Materials
- High-density crafting plaster or white concrete mix
- Square mold (silicone or wood, approx. 8×8 inches)
- Mixing bucket and stir stick
- U-shaped loop tool or carving gouge
- Fine-grit sandpaper (220 grit)
- Spray bottle with water
- Sand-colored acrylic paint (optional for tinting)
- Clear matte sealant spray
- Ruler and pencil (optional)
Step 1: Preparation and Casting
-
Prepare the workspace:
Lay down a drop cloth or old newspaper to protect your surface from plaster dust and drips. Ensure your mold is clean and dry before you begin. -
Mix the casting medium:
Follow the manufacturer’s instructions to mix your plaster or concrete. Aim for a consistency similar to pancake batter—smooth and pourable but not watery. -
Add a subtle tint (optional):
If you want that warm, sandy beige tone seen in the example, mix a very small amount of sand-colored acrylic paint or pigment powder directly into the wet mix. -
Pour the slab:
Pour the mixture into your square mold until it reaches a thickness of about 0.75 to 1 inch. This provides enough depth for carving without making the piece too heavy. -
Release air bubbles:
Gently tap the sides of the mold and lift it slightly to drop it on the table a few times. This forces trapped air bubbles to the surface. -
Initial set:
Let the plaster sit undisturbed until it is ‘leather hard.’ This means it has solidified enough to hold its shape but is still cool and damp to the touch—usually about 30-45 minutes depending on your specific mix.
Step 2: Carving the Ripples
-
Unmold carefully:
Once leather hard, very gently remove the slab from the mold. Place it on a flat, sturdy surface. If it feels too soft, wait another 10 minutes. -
Plan the flow:
Visualize the vertical waves. You can lightly sketch the wavy lines with a pencil if you’re nervous, or I prefer to just freehand it for a more organic feel. -
Carve the first groove:
Using a U-shaped loop tool, start at the top edge and carve a continuous, gentle S-curve down to the bottom. Apply consistent pressure to keep the depth uniform. -
Maintain spacing:
Carve the second line parallel to the first, leaving a raised ridge between them about half an inch wide. The beauty lies in the imperfect, hand-carved look, so don’t stress about total precision. -
Clear debris:
Periodically blow away the carving crumbs or use a soft, dry brush to sweep them out of the grooves so you can see your progress clearly. -
Complete the pattern:
Continue carving parallel wavy lines across the entire face of the slab until the pattern is complete. -
Texturize the surface:
To achieve that porous, stone-like texture, lightly tap the raised surfaces with a stiff-bristled brush or a balled-up piece of foil while the material is still slightly damp.
Clean Lines Tip
Keep a small bowl of water nearby. Dipping your loop tool into water before carving helps the metal glide through the plaster smoothly, reducing chipping.
Step 3: Finishing Touches
-
Full cure:
Allow the carved slab to dry completely. This usually takes 24 to 48 hours. The color will lighten significantly as the moisture evaporates. -
Sand edges:
Once fully dry, use fine-grit sandpaper to smooth any sharp edges on the perimeter of the slab for a professional finish. -
Soften the grooves:
Fold a small piece of sandpaper and gently run it through the carved grooves to remove any jagged bits of plaster left from the carving process. -
Seal the artwork:
Take the slab to a well-ventilated area and apply two light coats of clear matte sealant. This protects the porous surface from dust and fingerprints without making it shiny. -
Display:
For a standing display like the image, lean the heavy slab securely against a wall or use a sturdy plate stand.
Level Up: Framing
Mount your finished relief slab inside a deep shadow box frame with an oak or light wood finish to elevate it into a high-end gallery piece.
Enjoy the calm atmosphere this textured relief brings to your space
Geometric Sunburst Texture Tile
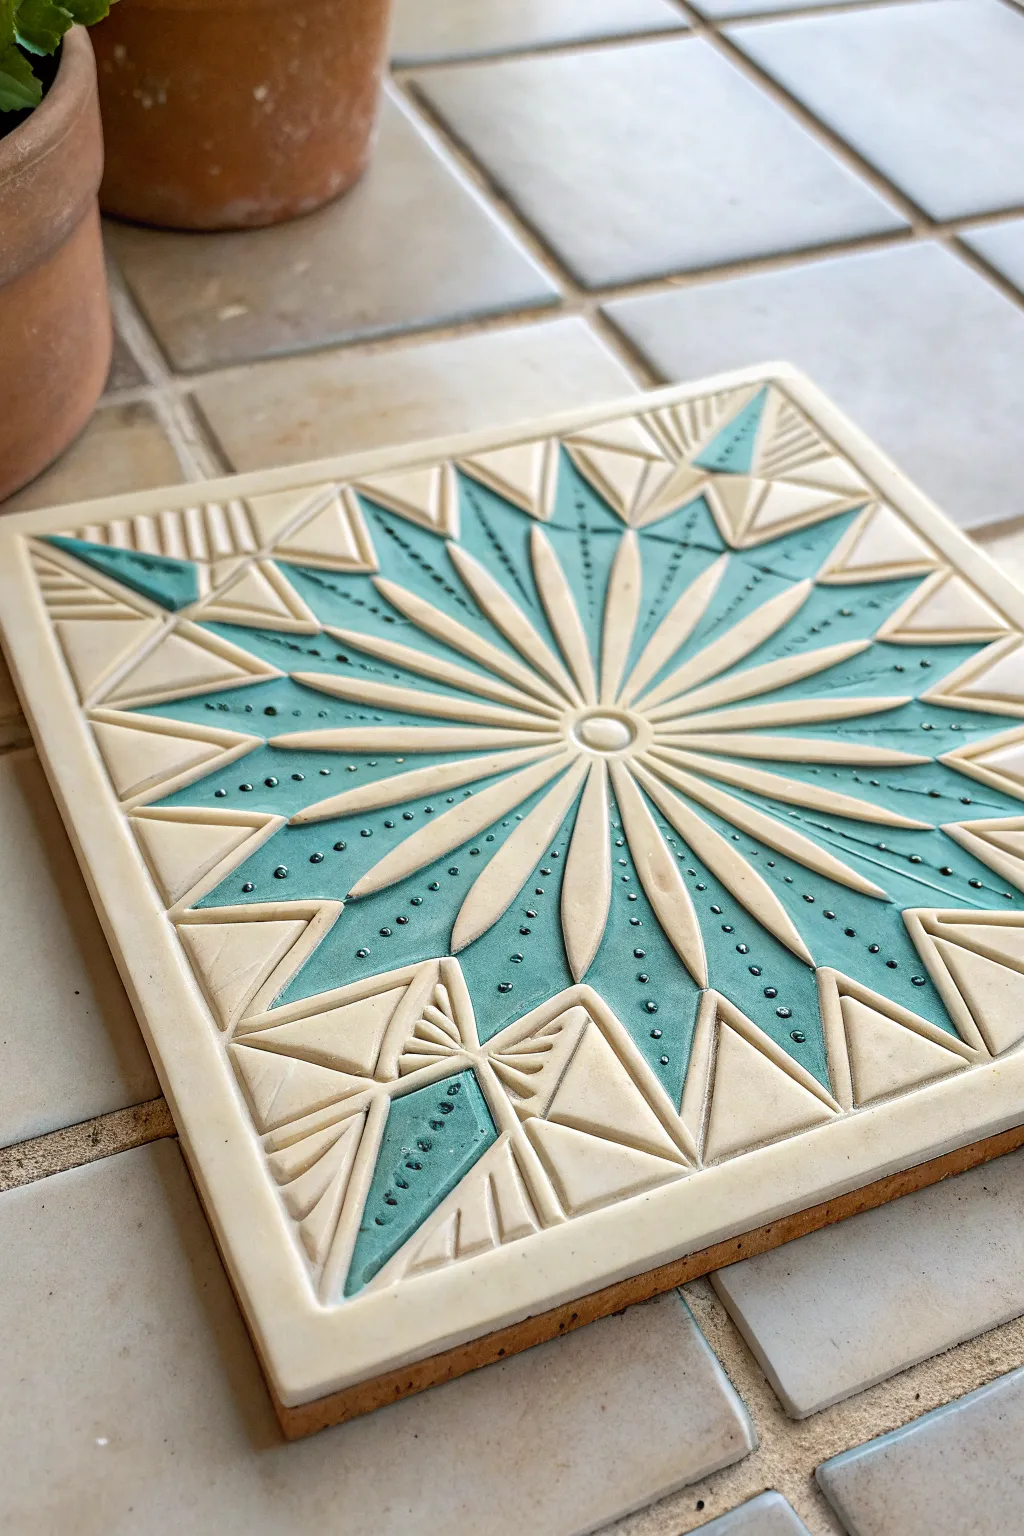
This project explores the satisfying world of slab relief carving to create a striking geometric sunburst design. By combining incising techniques with targeted underglaze application, you will produce a stunning two-tone tile that feels both modern and classically artisanal.
How-To Guide
Materials
- Stoneware clay slab (rolled to 1/2 inch thick)
- Square template (6×6 inch)
- Needle tool or X-Acto knife
- Loop tool (small, square-headed)
- Carving tool (V-gouge)
- Small circular cutter (approx. 1/2 inch)
- Ruler or straight edge
- Teal or turquoise underglaze
- Small paintbrush
- Damp sponge
- Clear transparent glaze
Step 1: Slab Preparation & Layout
-
Cut the base:
Begin by rolling out your clay slab to a uniform half-inch thickness. Place your 6×6 inch square template on the clay and cut around it cleanly using a needle tool or fettling knife. -
Smooth the surface:
Before marking any designs, compress the clay surface with a rubber rib to remove canvas texture and align the clay particles, which helps prevent warping later. -
Mark the center:
Use a ruler to lightly score diagonals from corner to corner to find the exact center of your tile. Mark this spot gently. -
Add the focal point:
Take your small circular cutter and make an impression directly in the center point. Don’t cut all the way through; just press deep enough to define the sun’s core. -
Map the primary rays:
Using your ruler, lightly incise 16 straight lines radiating from the center circle to the outer edges, creating even sections like a pizza.
Step 2: Carving the Relief
-
Define the petals:
Within every other radiating segment, sketch a teardrop or petal shape that starts narrow at the center and widens before tapering back to a point near the edge. -
Carve the background:
Using a small square-headed loop tool or a carving gouge, carefully remove the clay between your petal shapes. You want to lower the background level by about 1/8 to 1/4 inch, leaving the petals raised. -
Create the border triangles:
In the corners and along the edges where the sunburst doesn’t reach, carve out triangular negative spaces. Leave thin ridges of raised clay to separate these triangles, forming a geometric frame. -
Refine the edges:
Go back over your raised petals and geometric borders with a damp sponge or finger to smooth any sharp burrs created during carving. I find this step crucial for a professional finish. -
Detail the rays:
Use a V-gouge or a needle tool to incise a single straight line down the center of each raised petal shape to add dimension. -
Add texture dots:
In the recessed background areas between the rays, use a dull pencil point or a small ball stylus to press a row of small dots. These should follow the centerline of the negative space. -
Texture the corners:
In the recessed triangles at the corners, add linear texture by pressing the side of a needle tool or a small comb tool into the clay create parallel hatch marks.
Clean Lines Tip
When carving the negative space, keep the tool perpendicular to the tile. Angling it can undercut the raised shapes, making them fragile and prone to chipping.
Step 3: Glazing & Finishing
-
Bisque fire:
Allow the tile to dry slowly under plastic to prevent warping, then bisque fire it according to your clay body’s specifications (usually cone 04). -
Apply underglaze:
Once fired, brush a generous coat of teal or turquoise underglaze over the entire surface of the tile, ensuring it gets into all the carved recesses and texture dots. -
Wipe back:
Let the underglaze dry slightly, then take a clean, damp sponge and wipe the surface. You want to remove the color from the high points (the petals and raised borders) while leaving it trapped in the background carving and dots. -
Dry and inspect:
Check your work. If you wiped away too much color, you can re-apply to specific spots. The raised clay should be clean and white/cream, providing strong contrast. -
Final glaze:
Apply a coat of clear transparent glaze over the entire tile. -
Final firing:
Glaze fire the tile to the temperature required for your specific clay and glaze combination.
Frame It Up
Instead of a single tile, make four! Arrange them in a larger square so the corner triangles meet to form new diamond patterns in the center.
Once cooled from the kiln, this vibrant geometric tile makes a perfect trivet or a stunning piece of wall art
Mandala in Low Relief Layers
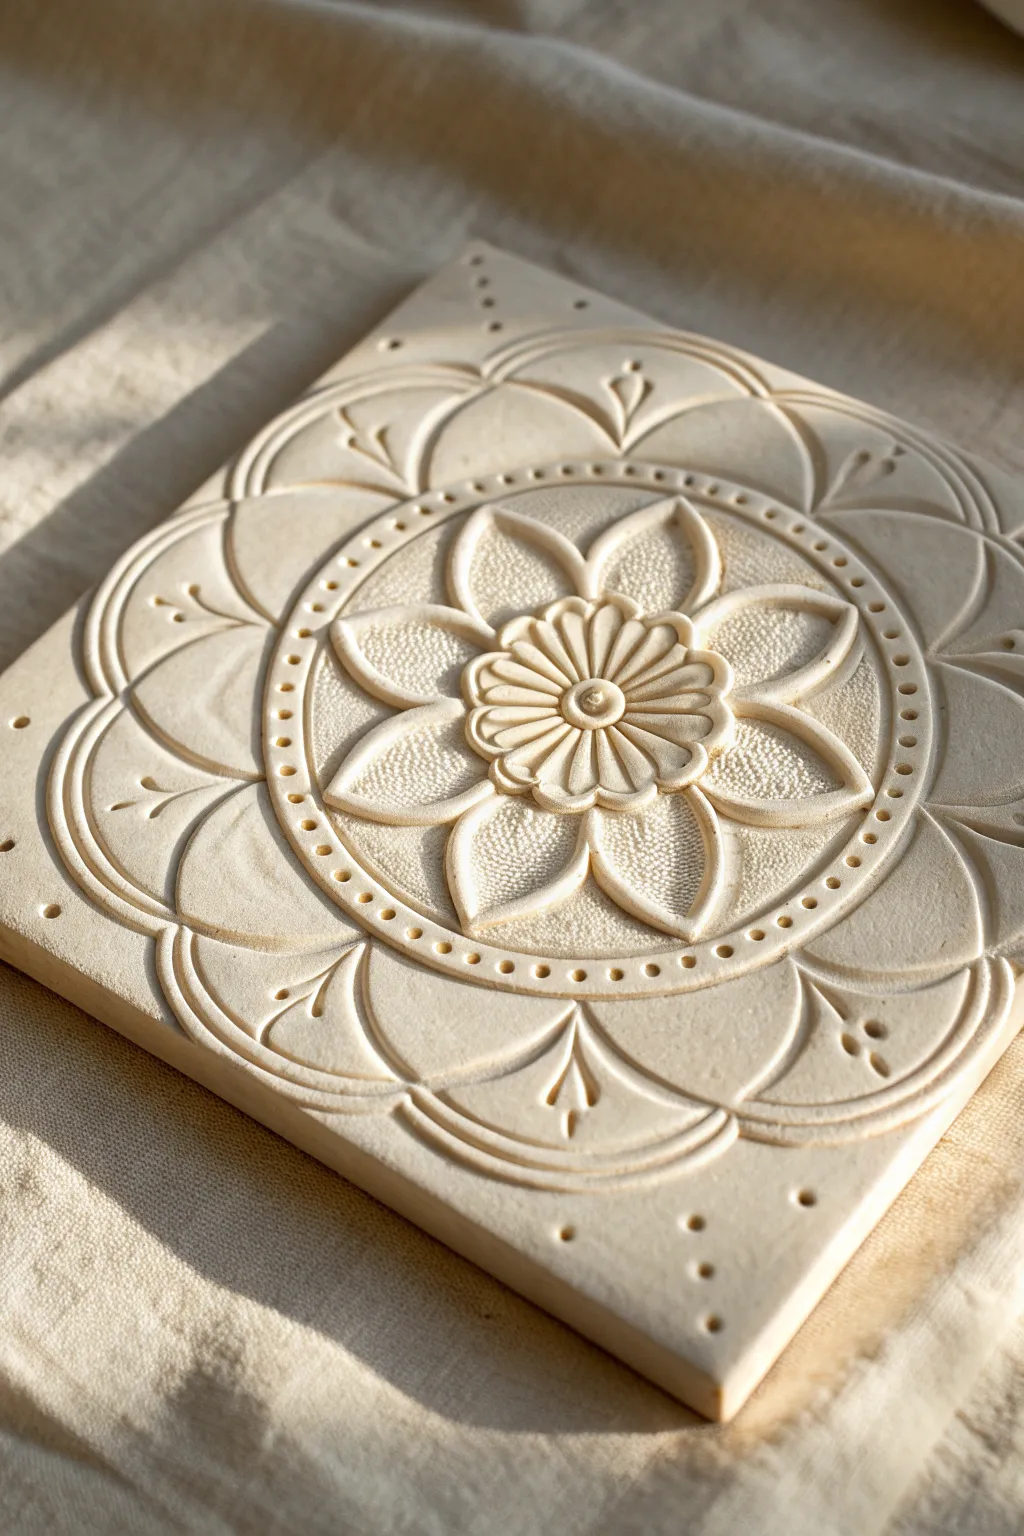
This elegant low-relief project transforms a simple clay slab into a textured mandala masterpiece. By layering carved lines, punched dots, and slightly raised floral elements, you’ll create a monochromatic design that plays beautifully with light and shadow.
Detailed Instructions
Materials
- White or cream stoneware clay (smooth body)
- Rolling pin
- Two 1/4-inch guide sticks (or slab roller)
- Needle tool
- Loop tool (small, wire end)
- Wooden modeling tool (rounded tip)
- Small hole punch tool or drill bit shank
- Ruler
- Rib tool (metal or rubber)
- Compass or circular templates
- Sponge
Step 1: Preparation and Layout
-
Roll the slab:
Begin by wedging your clay to remove air bubbles, then roll it out into an even slab using your guide sticks. You want a consistent thickness of about 1/4 to 3/8 inch to allow for carving depth without piercing through. -
Compress the surface:
Using a rib tool, firmly smooth and compress the clay surface on both sides. This aligns the clay particles, preventing warping later, and creates a pristine canvas for your detailed carving. -
Cut the square:
Measure and cut a precise square from your slab. A 6×6 or 8×8 inch square works well for this level of detail. Smooth the cut edges with a damp sponge or your finger. -
Mark the center:
Use a ruler to lightly mark an ‘X’ from corner to corner to find the exact center of your tile. This point will be the anchor for all your concentric circles. -
Scribe guide circles:
Using a compass or circular templates, lightly scribe three main concentric circles: a small inner circle for the flower center, a medium one for the main petals, and a large outer ring for the scalloped border.
Sticky Clay Problems?
If your carving tool drags or pulls up crumbs, the clay is too wet. Let the slab sit for 20-30 minutes to firm up before continuing the detail work.
Step 2: Carving the Central Motif
-
Outline the central flower:
In the innermost circle, lightly sketch a multi-petaled rosette. Around that, sketch larger, pointed lotus-style petals that extend to the second guide circle. -
Carve the petal outlines:
Take your needle tool or a fine stylus and firmly trace your sketched lines. I find creating a ‘V’ shaped channel by angling the tool slightly gives the best definition for the glaze later. -
Excavate the background:
Using a small wire loop tool, gently shave away a thin layer of clay from the negative space between the petals. You don’t need to go deep—just enough to make the petals appear raised. -
Texture the petals:
For the larger petals, use a texturing tool or just the point of a needle to stipple the inner surface. This bumpy texture contrasts beautifully with the smooth raised edges. -
Sculpt the center:
Refine the tiny central rosette. Use a small wooden tool to round the edges of each mini-petal, giving them a soft, pillowy look rather than sharp, flat cuts.
Step 3: Border Details and Refining
-
Define the outer ring:
Carve a double line for the large outer circle, creating a distinct band or channel that separates the central flower from the corner designs. -
Add the dot border:
Inside this circular channel, use a small hole punch tool (or the non-drilling end of a drill bit) to press a series of evenly spaced divots. Press straight down and pull straight up for clean holes. -
Sketch the scallops:
On the remaining outer corners of the square, sketch large scalloped arcs that radiate from the center. These should look like fan blades or larger petals framing the circle. -
Carve corner flourishes:
Carve these arched lines deeply. Inside each arch, add a simple teardrop or leaf motif using the loop tool to remove a small scoop of clay. -
Detail the corners:
Add small accent dots or faint lines within the corner scallops to echo the texture of the center. -
Clean up burrs:
Let the clay dry to leather-hard. Once firm, take a dry, soft brush or a slightly damp sponge and gently wipe away any clay crumbs or sharp ‘burrs’ created during carving. -
Final smoothing:
Run a clean finger over the highest points of the relief to burnish them slightly smooth, ensuring the tactile experience of the tile is pleasant.
Pro Tip: Depth Illusion
Make the cut deepest right next to the raised element (like a petal edge) and taper it up as you move away. This undercut creates a stronger shadow line.
Allow your tile to dry slowly under plastic to prevent warping, and enjoy the meditative process of seeing your mandala emerge
Moon Phases Over Cloud Layers
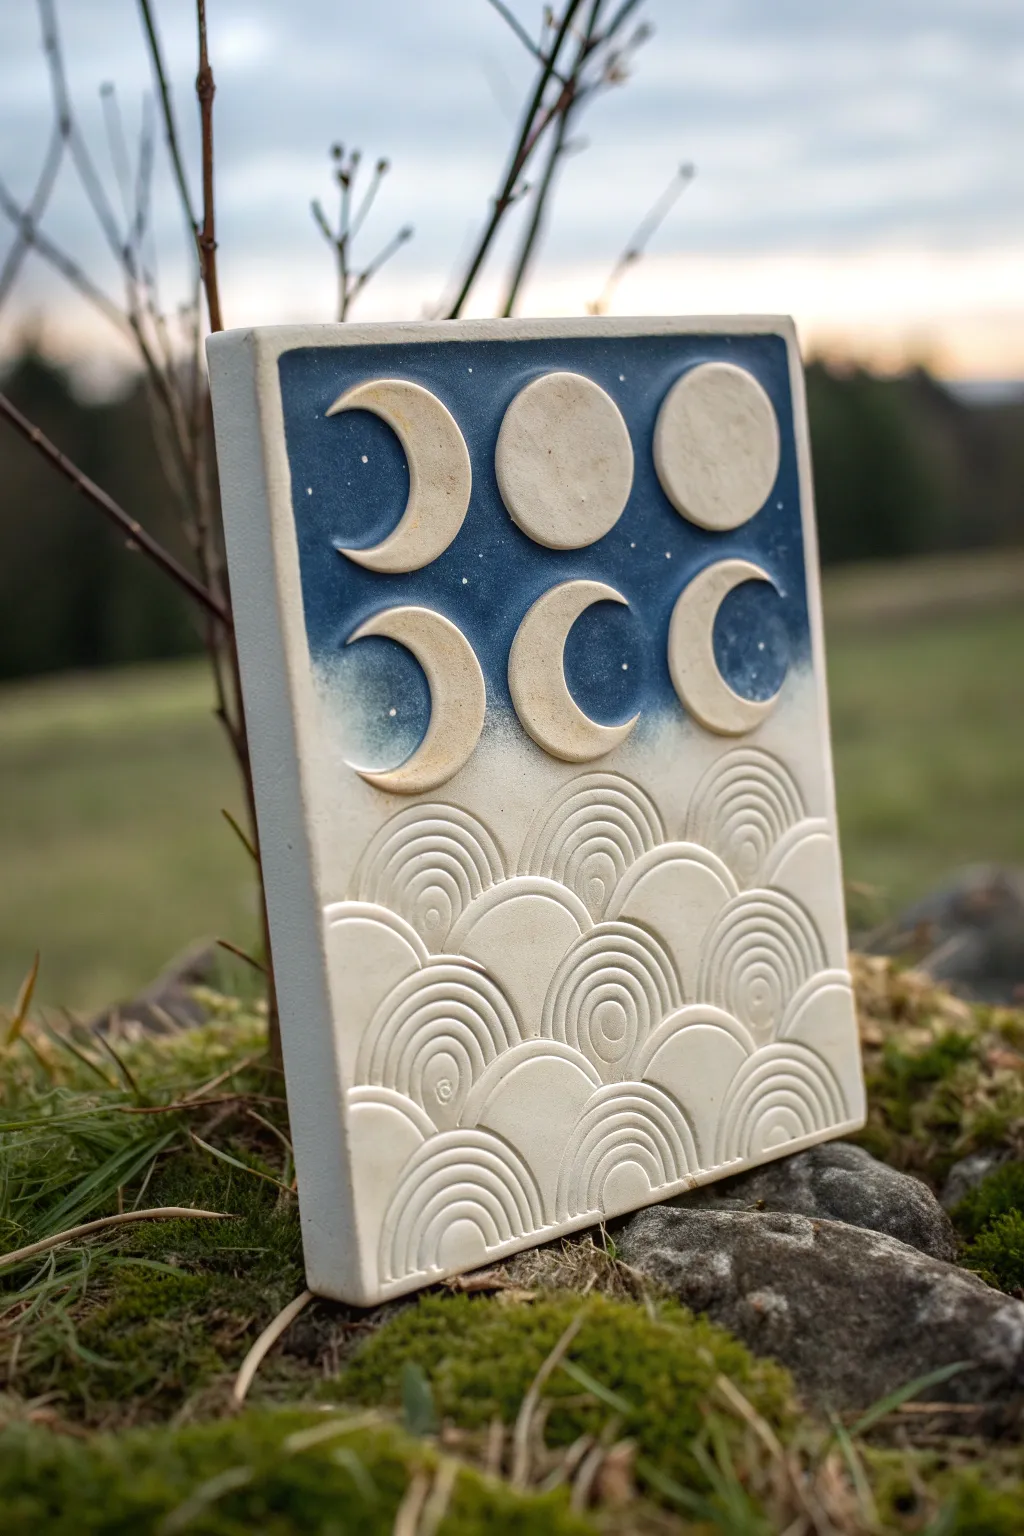
This elegant ceramic slab relief combines celestial imagery with stylized textures for a serene, finished piece. The contrast between the deep, starry blue sky and the raw, rhythmic clay waves creates a captivating depth that is perfect for hanging or display.
Detailed Instructions
Materials
- White stoneware or porcelain clay
- Rolling pin and canvas or slab roller
- Fettling knife
- Needle tool
- Circle cutters (various sizes)
- Small carving loop tool (or U-shaped gouge)
- Deep blue underglaze
- White underglaze (optional for stars)
- Soft fan brush
- Sponge
- Spray bottle (fine mist)
Step 1: Preparing the Slab
-
Roll out the base:
Begin by rolling out an even slab of white stoneware clay to a thickness of approximately 3/8-inch. Compress the clay on both sides with a rib to prevent warping later. -
Cut the rectangle:
Using a ruler and fettling knife, cut a clean rectangle for your tile base. Smooth the edges with a slightly damp sponge to remove any sharpness. -
Plan the composition:
Lightly sketch a horizon line just below the halfway point of the tile using a needle tool. This will separate your sky section from the cloud waves.
Clean Lines Pro-Tip
When carving the concentric arches, wait until the clay is stiff leather-hard. If it’s too wet, the lines will be mushy; too dry, and the clay will chip.
Step 2: Sculpting the Sky
-
Cut the moon shapes:
Roll a thinner piece of clay (about 1/4-inch) for the appliqués. Use circle cutters to punch out five circles. Keep two full circles for the top row. -
Refine the crescents:
For the crescent moons, use the same circle cutter to take a ‘bite’ out of the remaining three circles, creating crescent shapes. Smooth the cut edges with your finger. -
Attach the moons:
Score and slip the back of each moon shape and the corresponding spot on the sky section. Arrange them in two rows as shown—alternating phases for visual interest—and press them firmly into place. -
Bevel the edges:
I like to gently press around the edges of each attached moon with a modeling tool to ensure a seamless connection, making them look like they are emerging from the slab rather than just sitting on top.
Make It Functional
Before drying, punch two small holes in the top corners. After firing, thread invisible fishing line or rustic twine through them for instant wall mounting.
Step 3: Carving the Clouds
-
Outline the scallops:
Starting from the bottom edge, lightly draw overlapping semi-circles (scallops) to create the cloud bank. Continue layering these up until you reach the horizon line. -
Carve the concentric lines:
Using a small U-shaped loop tool or a fine carving tool, carve repetitive, concentric arches inside every other scallop shape. Keep your hand steady and pressure even. -
Leave negative space:
Leave the alternating scallops smooth and uncarved. This contrast between texture and smooth clay is crucial for the visual rhythm of the piece. -
Clean up burrs:
Once the clay is leather hard, use a dry, stiff brush or a soft rib to knock off any little clay crumbs or burrs created during carving.
Step 4: Surface Decoration
-
Apply the background color:
Carefully paint deep blue underglaze onto the sky background, working around the raised moon shapes. Following the contours meticulously here makes a big difference. -
Create the ombre effect:
While the blue is damp, use a slightly wet sponge to gently fade the bottom edge of the blue section where it meets the white clouds, creating a misty transition. -
Clean the moons:
If any blue underglaze got onto the moons, gently scrape it off with a clean knife or wipe with a damp brush to keep them bright white. -
Add the stars:
Dip a stiff toothbrush or bristle brush into watered-down white underglaze (or slip). Run your thumb over the bristles to splatter tiny white stars across the blue sky. -
Final drying:
Allow the tile to dry slowly under plastic to prevent corner warping before bisque firing. -
Firing:
Fire to cone 6 (or your clay’s specific temperature). This piece looks beautiful left unglazed for a matte finish, or you can apply a clear matte glaze over the front.
Hang your finished celestial tile where it can catch the light and reveal those lovely carved textures
Topographic Contour Map Relief
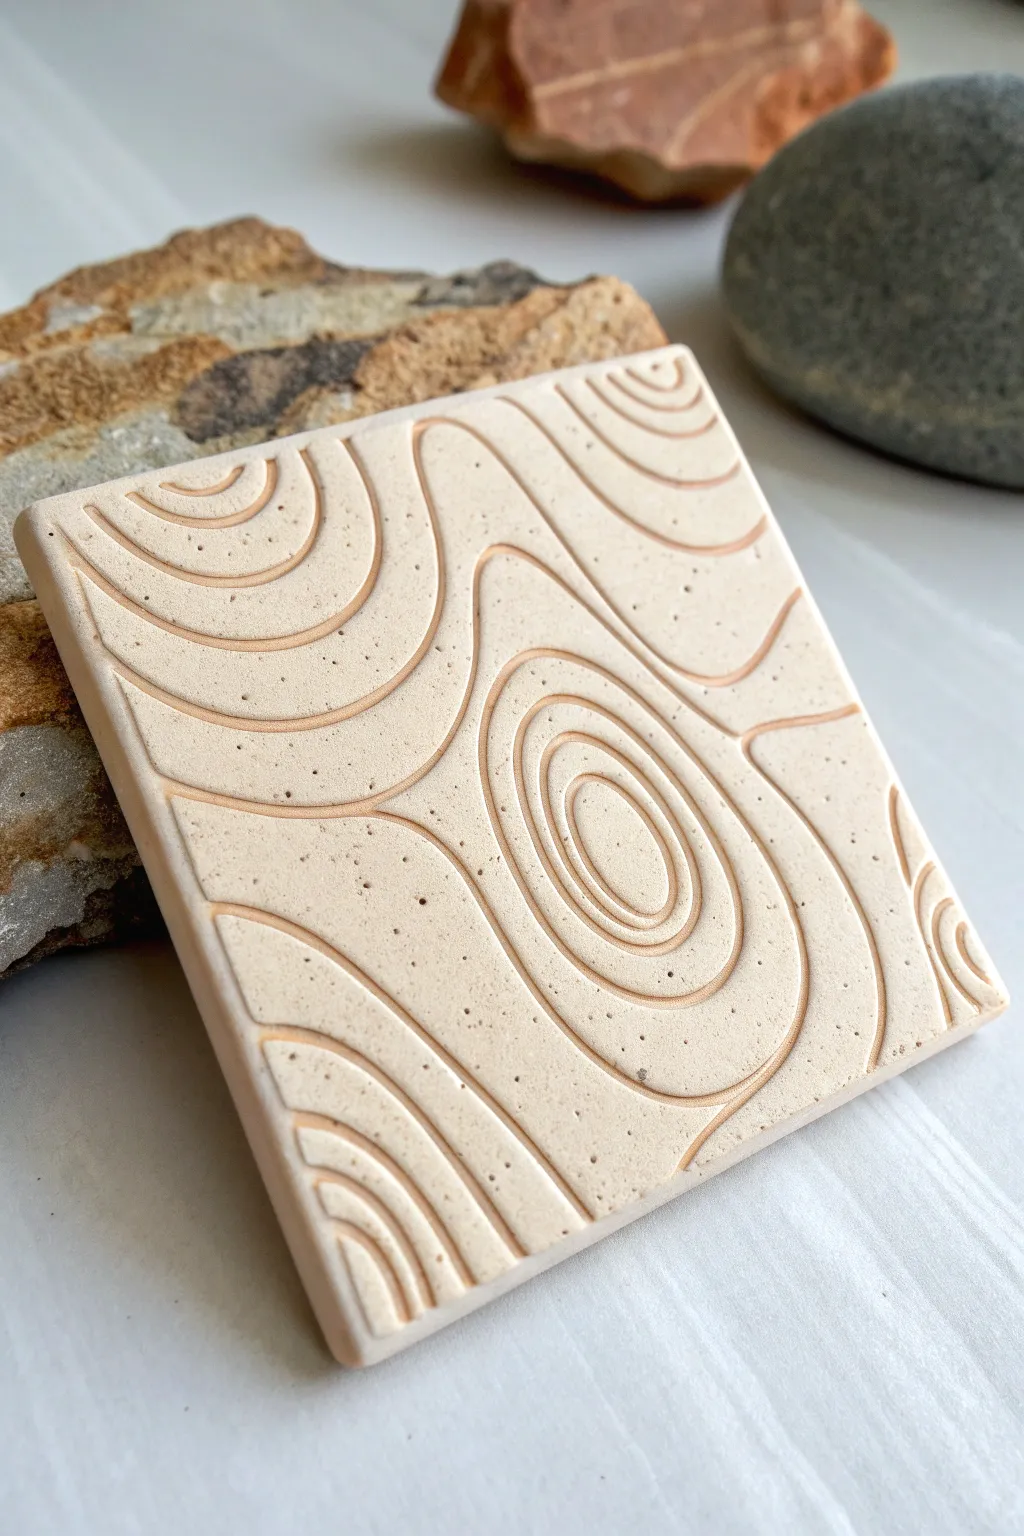
This project captures the organic beauty of topographic maps in a tactile, minimal format. By carving sweeping, rhythmic lines into a smooth clay slab, you’ll create a sophisticated relief piece that mimics the natural flow of landscapes.
How-To Guide
Materials
- Light-colored stoneware clay or polymer clay (white/beige)
- Rolling pin
- Two wood slat guides (approx. 1/4 inch thick)
- Needle tool or small loop tool
- Sponge
- Canvas or cloth work surface
- Paper template (optional)
- Wire clay cutter
- Ruler or square cutter
Step 1: Preparation & Rolling
-
Prepare your workspace:
Lay down a piece of canvas or a heavy cloth on your table. This prevents the clay from sticking and adds a nice texture to the back of your piece. -
Wedge the clay:
Take a handful of your chosen clay. If using ceramic clay, wedge it thoroughly to remove air bubbles. This ensures a consistent surface for carving later. -
Set up guides:
Place your two wooden slat guides parallel to each other on the canvas. The distance between them should be slightly wider than your intended final tile size. -
Roll the slab:
Place the ball of clay between the guides. Using the rolling pin, roll the clay out until the pin rests flat on the guides, creating a perfectly even thickness. -
Smooth the surface:
Before cutting, take a rectangular rib or a slightly damp sponge and compress the surface of the clay. You want it perfectly smooth, erasing any canvas texture on the top side.
Step 2: Shaping & Design
-
Cut the square:
Using a ruler and a needle tool (or a square cookie cutter if you have one large enough), cut a precise square from your prepared slab. -
Refine the edges:
Gently rub your finger or a damp sponge along the cut edges to soften the sharp 90-degree angles just slightly. This prevents chipping later. -
Plan your topography:
Lightly sketch your design on a piece of paper first. Look for “islands” of concentric circles and flowing lines that weave around them, simulating elevation changes. -
Transfer or freehand sketch:
You can now lightly scratch the design onto the clay surface using a needle tool. Don’t go deep yet; just make faint guide marks. -
Begin the main carving:
Using a small loop tool or a specialized sgraffito tool, begin carving along your guide lines. Apply steady, even pressure to remove a consistent ribbon of clay. -
Focus on the focal point:
Start with the central concentric ovals (the ‘hilltop’) and work outward. This helps anchor your spacing. -
Vary spacing intentionally:
Notice how topographic lines get closer together on ‘steep’ slopes and further apart on flat areas. Mimic this by varying the distance between your carved lines for a dynamic look. -
Clean up the crumbs:
As you carve, little balls of clay debris (burrs) will form. I like to wait until they are slightly dry to brush them off with a soft brush rather than smearing them while wet.
Clean Line Strategy
For the crispest lines, carve when the clay is “leather hard” (stiff but cool/damp). Carving wet clay creates messy, jagged edges that are hard to fix.
Step 3: Finishing Touches
-
Smooth the grooves:
Once the main carving is done, inspect the channels. If the edges are jagged, run a damp paintbrush through the carved lines to polish them. -
Add texture (optional):
The example image shows subtle speckling. To achieve this, you can gently flick a stiff toothbrush with diluted brown underglaze or oxide wash across the surface. -
Dry slowly:
Place a loose sheet of plastic over the tile to let it dry slowly over a day or two. This prevents the corners from curling up. -
Final wipe:
Once bone dry (if ceramic) or before baking (if polymer), give the surface one last check. A very light sanding with a scouring pad can remove any final rough spots. -
Fire or bake:
Follow the manufacturer’s instructions for your specific material. For stoneware, bisque fire it, and simply leave it unglazed or apply a clear matte glaze to protect the surface.
Level It Up
After carving, rub a dark oxide wash (like iron oxide) into the grooves and wipe the surface clean with a sponge. This highlights the depth of your lines dramatically.
Once fired or cured, this geometric relief makes a stunning coaster or a standalone sculptural accent for your shelf