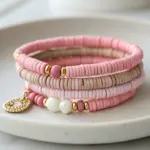
When I’m making clay bracelets for boys, I always aim for that sweet spot: tough-looking, comfy to wear, and still fun to customize. These ideas lean into masculine or gender-neutral vibes with bold color choices, clean patterns, and just enough personality to make each one feel like his own.
Classic Color-Block Heishi Bracelet
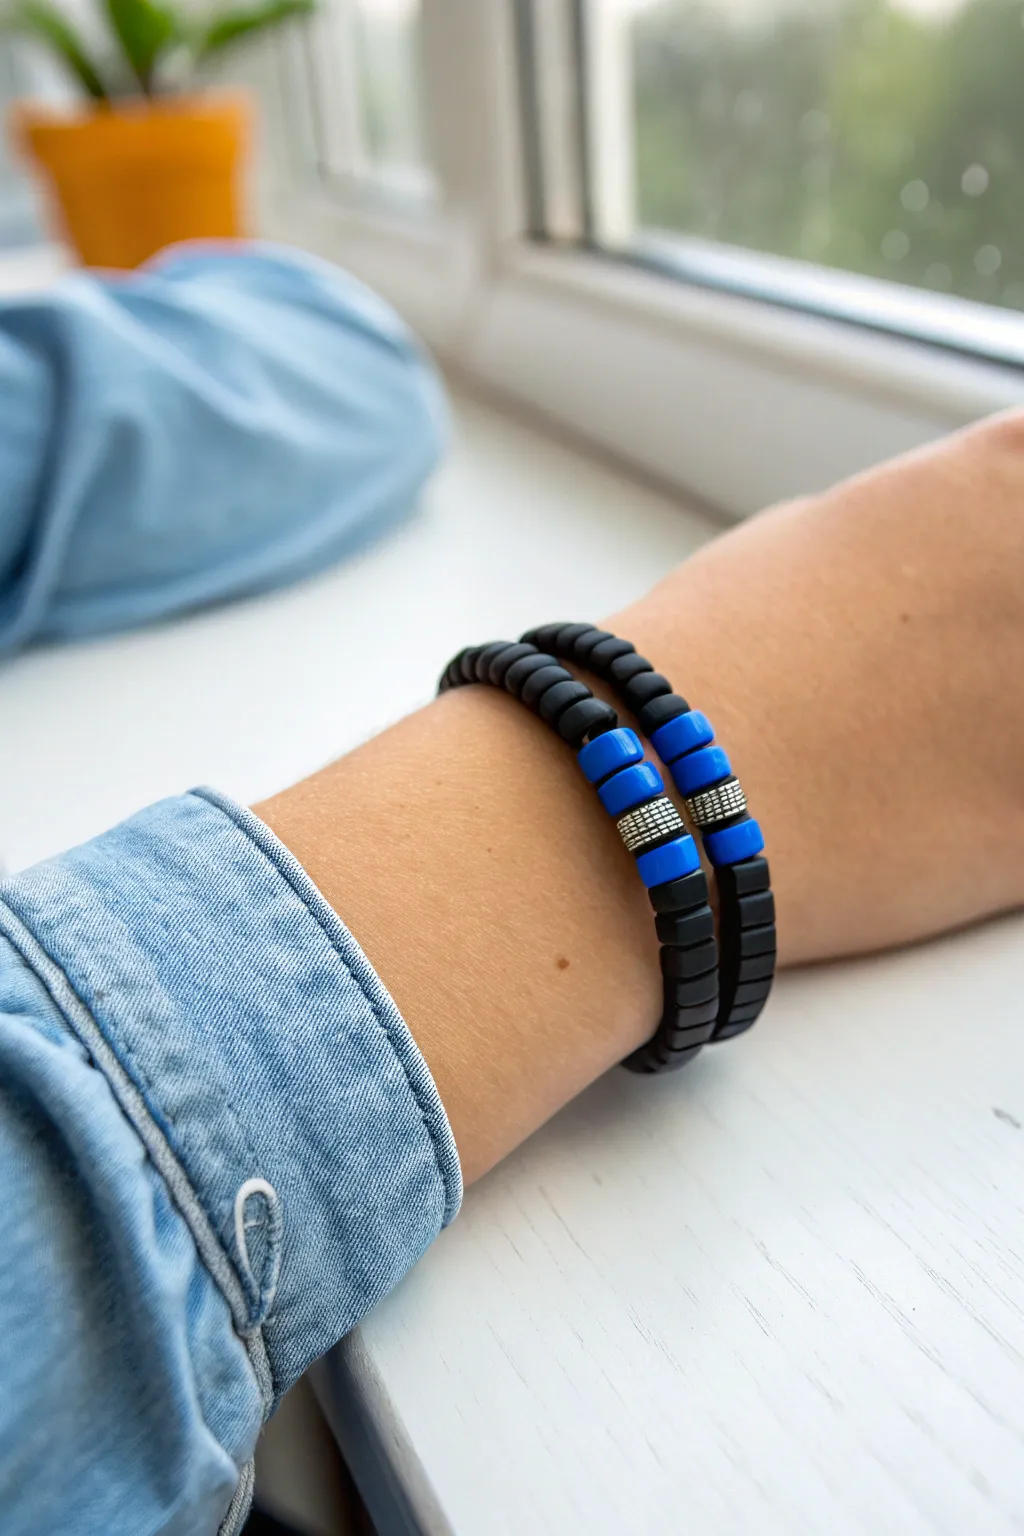
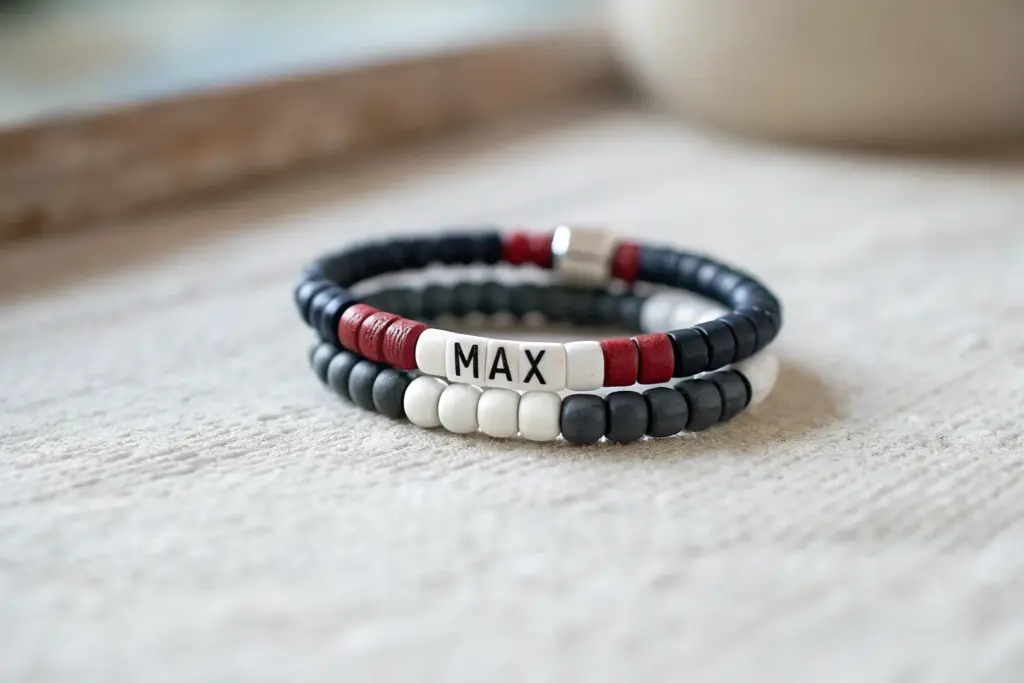
This modern, masculine design pairs matte black clay beads with striking royal blue accents for a sophisticated look that works perfectly when stacked. The defining feature is the central focal point, where metallic spacers add a touch of industrial edge to the smooth clay texture.
Step-by-Step
Materials
- Matte black polymer clay heishi beads (6mm)
- Royal blue polymer clay heishi beads (6mm)
- Silver metallic spacer beads (barrel or cylinder shape with textured/grid pattern)
- Strong elastic stretch cord (0.8mm or 1mm)
- Jewelry glue or clear nail polish
- Scissors
Step 1: Planning and Setup
-
Measure the wrist:
Before you begin stringing, measure the wrist where the bracelet will sit. Add about half an inch to this measurement to ensure a comfortable fit that isn’t too tight. -
Prepare your cord:
Cut a piece of elastic cord about 10-12 inches long. Having this extra length makes the final knotting process much easier and less frustrating than working with short ends. -
Pre-stretch the elastic:
Give your cut piece of elastic a few firm tugs. This is a crucial step I always do to prevent the bracelet from loosening up immediately after you wear it for the first time. -
Secure the end:
Attach a piece of tape to one end of the cord or use a bead stopper clip. This simple precaution saves you from the disaster of beads sliding right off as you string them.
Sticky Situation?
If you get glue on the matte beads, don’t wipe it! Let it dry completely, then gently flake it off with a fingernail or use a tiny bit of acetone on a Q-tip.
Step 2: Creating the Pattern
-
Start with black:
Begin stringing your matte black heishi beads. You want these to form the main body of the bracelet. String enough to cover about half of your total desired length. -
Begin the blue accent:
Once you have your base of black beads, slide on two royal blue heishi beads. Ensure they sit flush against the black stack. -
Add the first metallic spacer:
Thread on one silver metallic spacer bead. The specific bead in the example has a textured, grid-like pattern, which adds great visual interest. -
Complete the center focal point:
Add two more royal blue beads immediately after the silver spacer. This creates a balanced ‘sandwich’ of color with the metal in the middle. -
Finish the black section:
Resume stringing with the matte black beads. Continue adding them until the bracelet reaches your measured length. -
Check the fit:
Wrap the unfinished strand around the wrist to check the sizing. The ends should touch comfortably without stretching the cord.
Stacking Pro Tip
Make the second bracelet roughly 2-3 beads larger or smaller than the first. This slight variance helps them sit comfortably next to each other on the arm without tangling.
Step 3: Finishing Touches
-
Prepare to knot:
Remove the tape or stop-clip carefully. Bring both ends of the elastic together, ensuring there are no gaps between your beads. -
Tie the surgeon’s knot:
Make a standard overhand knot, but loop the end through the circle a second time before pulling tight. This extra loop adds significant security. -
Tighten properly:
Pull the cords tight, but do it slowly to avoid snapping the elastic. You should feel the knot cinch down firmly. -
Secure with adhesive:
Place a teeny-tiny drop of jewelry glue or clear nail polish directly onto the knot. Let it dry for a minute so it doesn’t smear on the beads. -
Hide the evidence:
Trim the excess cord ends close to the knot, but leave about 1-2mm just in case. Gently tug the bracelet so the knot slides inside the hole of the nearest heishi bead to hide it. -
Repeat for the second bracelet:
To achieve the stacked look in the photo, repeat the entire process to create an identical second bracelet. Wearing them together amplifies the bold blue accent.
Slip on your new stack of bracelets and enjoy the refined pop of color they add to your daily outfit


All-Black Matte Disc Bead Bracelet
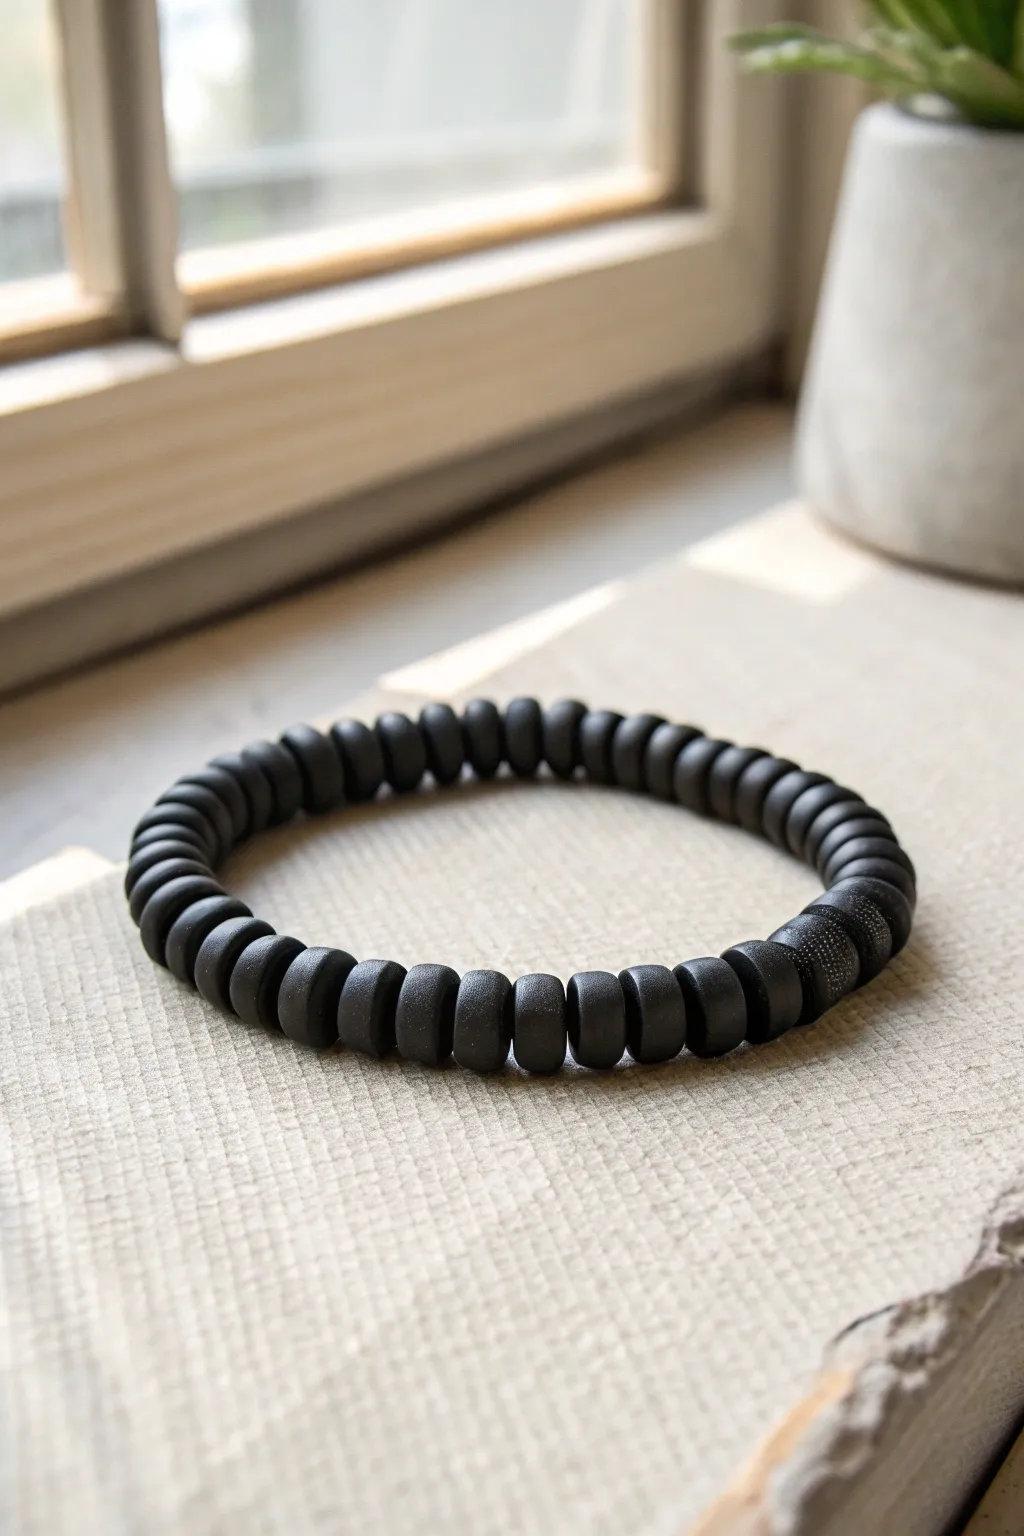
Achieve a sleek, modern aesthetic with this monochrome all-black bracelet. Featuring a continuous strand of matte disc beads broken only by a subtle textural shift at the closure, it’s a perfect understated accessory for boys.
Step-by-Step Guide
Materials
- Matte black polymer clay disc (Heishi) beads (6mm or 8mm diameter)
- One textured black focal bead (same diameter) or polymer clay to make one
- Strong elastic beading cord (0.7mm or 0.8mm)
- Superglue or jewelry adhesive
- Scissors
Step 1: Planning and Sizing
-
Measure the Wrist:
Begin by measuring the wrist where the bracelet will sit. Use a measuring tape or a strip of paper, adding about half an inch to the total length for a comfortable, non-restrictive fit. -
Pre-string Layout:
Lay out your black disc beads on a bead board or a soft towel. This prevents them from rolling away and helps you visualize the total length before you start stringing. -
Prepare the Cord:
Cut a piece of elastic cord about 10-12 inches long. Having extra length on both ends makes the final knotting process significantly easier than fighting with short tails. -
Stretch the Elastic:
Firmly tug on the elastic cord a few times before adding any beads. Pre-stretching the cord ensures the bracelet won’t sag or become loose immediately after creating it.
Hiding the Knot
If the knot won’t fit inside the bead hole, gently widen the hole of the focal bead with a small drill bit or reamer before stringing.
Step 2: Creating the Focal Bead
-
Texture Option:
If you don’t have a pre-purchased textured bead like the one shown, you can make one. Take a small ball of black polymer clay and roll it into a thick disc shape matching your other bead sizes. -
Apply Detail:
Using a needle tool or a coarse piece of sandpaper, gently press a pitted pattern into the surface of the raw clay bead to mimic the stippled texture seen in the photo. -
Poke a Hole:
Use a toothpick or bead pin to create a central hole large enough for your elastic cord. Bake this single bead according to your clay package instructions and let it cool completely.
Step 3: Assembly
-
Secure the End:
Attach a piece of tape or a binder clip to one end of your cut elastic cord. This acts as a stopper to keep your beads from sliding off while you work. -
Begin Stringing:
Start threading the matte black disc beads onto the cord. I find it easiest to pick them up directly with the cord tip rather than using fingers for these thin shapes. -
Check Length:
Continue stringing beads until you have covered nearly the entire length required for the wrist measurement you took earlier. -
Insert Focal Bead:
Once most of the strand is complete, thread on your textured focal bead. This bead will act as a visual anchor and can also hide the knot later. -
Fill Remaining Space:
Add just a few more standard disc beads if necessary to reach the final desired circumference, ensuring the pattern looks balanced. -
Test Fit:
Wrap the unfinished strand around your wrist to verify the fit. It should sit flush against the skin without digging in or drooping excessively.
Uneven Tiling
If disc beads twist or don’t lay flat, string them tighter. Gaps allow rotation; a snug fit keeps the ‘column’ shape uniform and sleek.
Step 4: Finishing Touches
-
Prepare the Knot:
Remove the tape or clip from the end. distinctively cross the two ends of the elastic cord over each other to prepare for tying. -
Tie a Surgeon’s Knot:
Tie a standard overhand knot, but loop the end through twice instead of once before pulling tight. This friction helps hold the elastic in place securely. -
Tighten Evenly:
Pull all four strands (the two tails and the two bracelet sides) firmly to cinch the knot down tight. Do this slowly to avoid snapping the cord. -
Secure with Glue:
Place a tiny drop of superglue or jewelry adhesive directly onto the knot. Allow it to dry for a few moments to fuse the threads. -
Hide the Evidence:
Trim the excess cord tails close to the knot, leaving about 1mm. Gently pull the elastic so the knot slides inside the hole of the larger textured focal bead.
Wear this sleek dark accessory solo for a minimalist look or stack it with leather bands for added texture


Two-Color Sport Stripe Pattern
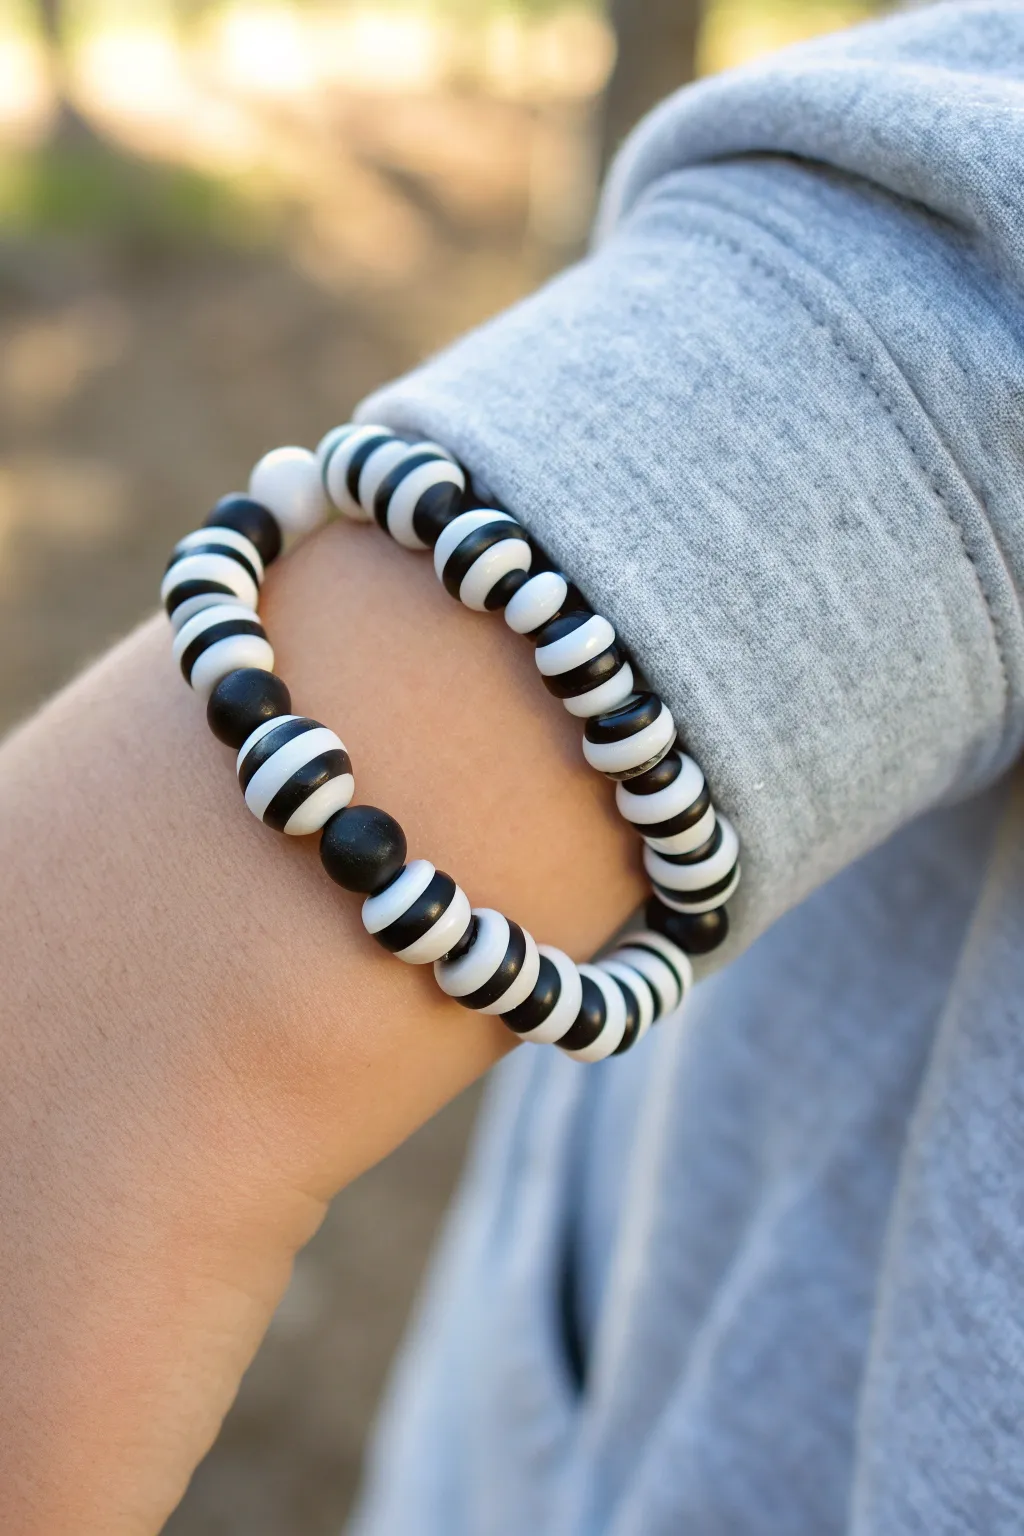
Create a bold, high-contrast accessory perfect for showing team spirit or just adding a sporty vibe to an everyday outfit. This project uses polymer clay to hand-roll custom striped beads that mimic the look of classic athletic jerseys.
Detailed Instructions
Materials
- Black polymer clay
- White polymer clay
- Acrylic roller or pasta machine
- Needle tool or toothpick
- Elastic cord (0.8mm or 1mm)
- Clay slicer blade
- Oven for baking
- Baking sheet and parchment paper
- Super glue (optional, for knots)
Step 1: Creating the Striped Cane
-
Condition the clay:
Start by warming up your black and white polymer clay in your hands until it is soft and malleable. This prevents cracking later on. -
Roll flat sheets:
Using your acrylic roller or pasta machine, roll out a sheet of white clay and a sheet of black clay to roughly the same thickness, about 3mm thick. -
Cut discs:
Use a small circle cutter (about the size of a dime or smaller) to punch out an equal number of circles from both the black and white sheets. -
Stack the layers:
Create a ‘stack’ by alternating the circles: one black, one white, one black, one white. Make this stack about 2 inches tall. -
Consolidate the stack:
Gently squeeze the stack from top to bottom to adhere the layers, then gently roll the sides on your work surface to smooth out the ridges, forming a solid cylinder.
Smudged Stripes?
If your white clay is picking up black smudges, wash your hands and wipe down your tools and work surface with a baby wipe before handling the white clay again.
Step 2: Forming the Beads
-
Slice the cane:
Take your clay blade and slice the cylinder into sections. Because the layers are horizontal, you want to cut perpendicular to the stripes to create chunks. -
Roll into spheres:
Take each sliced chunk and gently roll it between your palms. The goal is to create a round bead where the stripes wrap around the circumference. -
Refine the shape:
If the stripes get distorted, I gently press the bead back into a round shape rather than over-rolling. Aim for a slightly flattened sphere shape, almost like a chunky disc. -
Make solid spacer beads:
Roll a few small spheres of just solid black clay and a few of just solid white clay. These will serve as accents to break up the pattern. -
Pierce the holes:
Using your needle tool, carefully poke a hole through the center of each bead. To avoid squishing the bead, twist the tool as you push through.
Step 3: Baking and Assembly
-
Prepare for baking:
Arrange all your beads on a baking sheet lined with parchment paper. Ensure they aren’t touching each other. -
Bake the beads:
Bake according to your clay package instructions (usually around 275°F or 135°C for 15-30 minutes). Let them cool completely before handling. -
Measure the cord:
Cut a piece of elastic cord about 10-12 inches long. This gives you plenty of extra room for tying knots. -
String the pattern:
Thread your beads onto the elastic. Looking at the finished photo, try a pattern like: 3 striped beads, 1 solid black, 3 striped beads, 1 solid white. -
Check the fit:
Wrap the strand around the intended wrist to check the size. Add or remove striped beads as needed to get a comfortable fit. -
Tie the knot:
Tie a strong surgeon’s knot (right over left, left over right) and pull it tight. The elastic should stretch slightly as you secure it. -
Secure and trim:
Add a tiny drop of super glue to the knot for extra security, let it dry, and then trim the excess cord ends close to the beads.
Try Matte Finish
After baking, lightly sand the beads with fine-grit sandpaper to give them a matte, weathered stone look that feels very masculine and sporty.
Slip on your custom striped bracelet and enjoy the durable, waterproof accessory you made yourself


Varsity Team-Color Stack Set
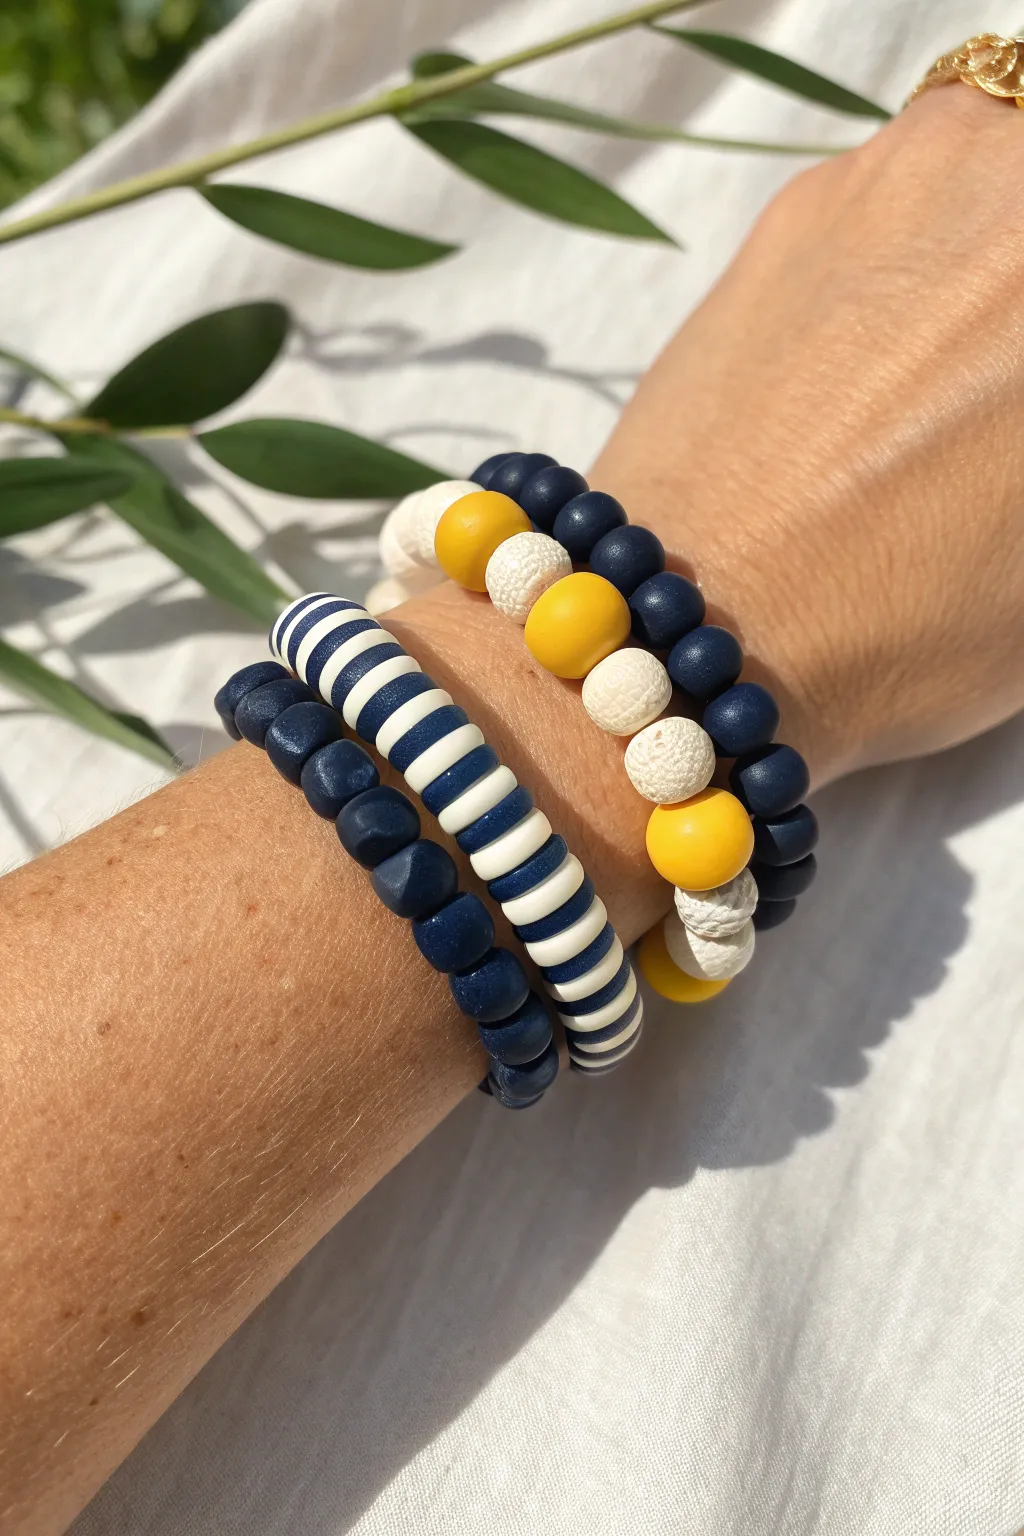
Embrace a classic collegiate vibe with this triple-stack bracelet set featuring bold navy, crisp white, and sunny yellow-gold accents. This combination uses varied bead textures—flat clay discs, rounded matte beads, and textured spacers—to create a sporty yet sophisticated accessory perfect for game day or everyday wear.
Step-by-Step Guide
Materials
- Navy blue polymer clay heishi beads (flat discs)
- White polymer clay heishi beads
- Navy blue round matte acrylic or wood beads (approx. 8mm)
- Mustard yellow or gold round wood beads (approx. 10mm)
- Navy blue round wood beads (approx. 10mm)
- White textured lava stones or ‘sugar’ beads (approx. 10mm)
- Strong elastic cord (0.8mm or 1mm thickness)
- Beading needle (optional but helpful)
- Scissors
- Jewelry glue or clear nail polish
- Crimp beads (optional for extra security)
Step 1: Preparation
-
Measure and Cut:
Begin by measuring the wrist where the bracelets will sit. Add about 3-4 inches to this measurement to allow plenty of room for knotting. Cut three separate lengths of your elastic cord based on this total length. -
Pre-stretch the Cord:
Before you start stringing, give each piece of elastic a gentle tug a few times. This pre-stretching prevents the bracelets from sagging or loosening up immediately after you wear them.
Knot Security Pro-Tip
After tying your square knot, pull the elastic tight and let it relax, then pull tight again. Do this twice before glowing to ‘set’ the knot deeply against itself.
Step 2: Bracelet 1: The Navy & White Striped Disc
-
Start the Pattern:
Thread your elastic through a needle if using one. Begin your pattern by stringing approximately 5-6 navy blue flat clay heishi beads. -
Create the Stripe:
Follow the navy section with an equal number of white flat clay heishi beads. The goal is to create distinct, bold blocks of color rather than a mixed look. -
Continue the Rhythm:
Repeat this alternating pattern—5 navy, 5 white—until you reach the desired length for the wrist. I find it helps to periodically wrap it around my wrist to check the fit. -
Tie it Off:
Once the length is correct, tie a square knot (right over left, left over right). Pull it tight. Add a drop of jewelry glue on the knot, let it dry, and snip the excess cord closely.
Step 3: Bracelet 2: The Solid Navy Round
-
Select Your Beads:
For the middle bracelet shown in the stack, gather your smaller navy blue round beads. These have a smooth, matte finish that contrasts nicely with the other textures. -
String the Solids:
Simple stringing is key here. Thread the navy round beads onto your second piece of elastic cord one by one. -
Check Consistency:
Ensure all beads are uniform in size. If you find a bead with a chipped hole or uneven shape, discard it to keep the professional look. -
Secure the Strand:
When the strand wraps comfortably around the wrist, tie your sturdy square knot. Apply a dab of glue to the knot and, if possible, slide the knot inside one of the bead holes to hide it before trimming.
Level Up: Personalized Charm
Add a single metallic letter bead or a small silver charm to the solid navy bracelet. It personalizes the stack without disrupting the sporty team-color theme.
Step 4: Bracelet 3: The Mixed Varsity Statement
-
Plan the Pattern:
This final bracelet uses larger beads. Layout your pattern on a flat surface first: a sequence of navy, white textured, and mustard yellow beads works best. -
Start Stringing:
For the specific look in the photo, try a pattern like: two navy beads, one yellow, one white textured, one yellow. Repeat this, or create uneven blocks of color for a more organic feel. -
Texture Balance:
Pay attention to where the white textured ‘lava’ style beads land. You want them spaced out evenly so the rough texture pops against the smooth wood beads. -
Final Adjustments:
Wrap the strand around the wrist. Since these beads are bulkier, you might need slightly fewer beads than the flat disc bracelet to get the same inner circumference. -
Final Knot:
Tie your closing square knot firmly. Because these beads have larger holes, it’s fairly easy to pull the knot inside a neighboring bead for a clean finish. Glue and trim as usual.
Now you have a durable, custom-fit stack that captures that spirited varsity energy perfectly

The Complete Guide to Pottery Troubleshooting
Uncover the most common ceramic mistakes—from cracking clay to failed glazes—and learn how to fix them fast.
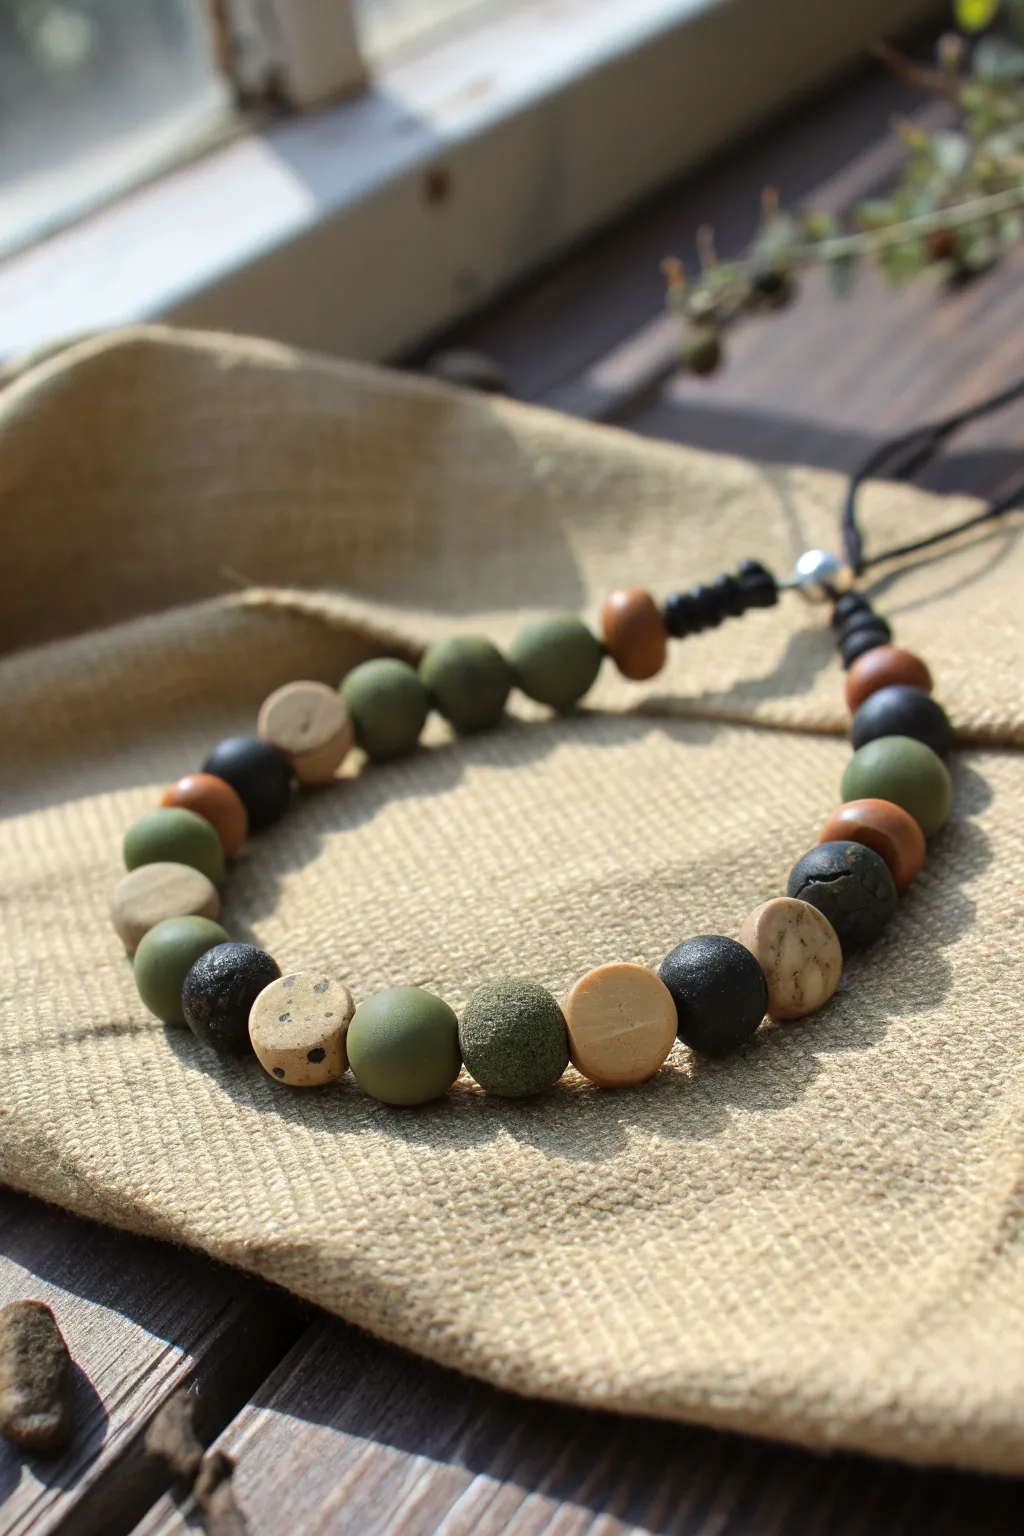
Minimal Initial Bead Centerpiece
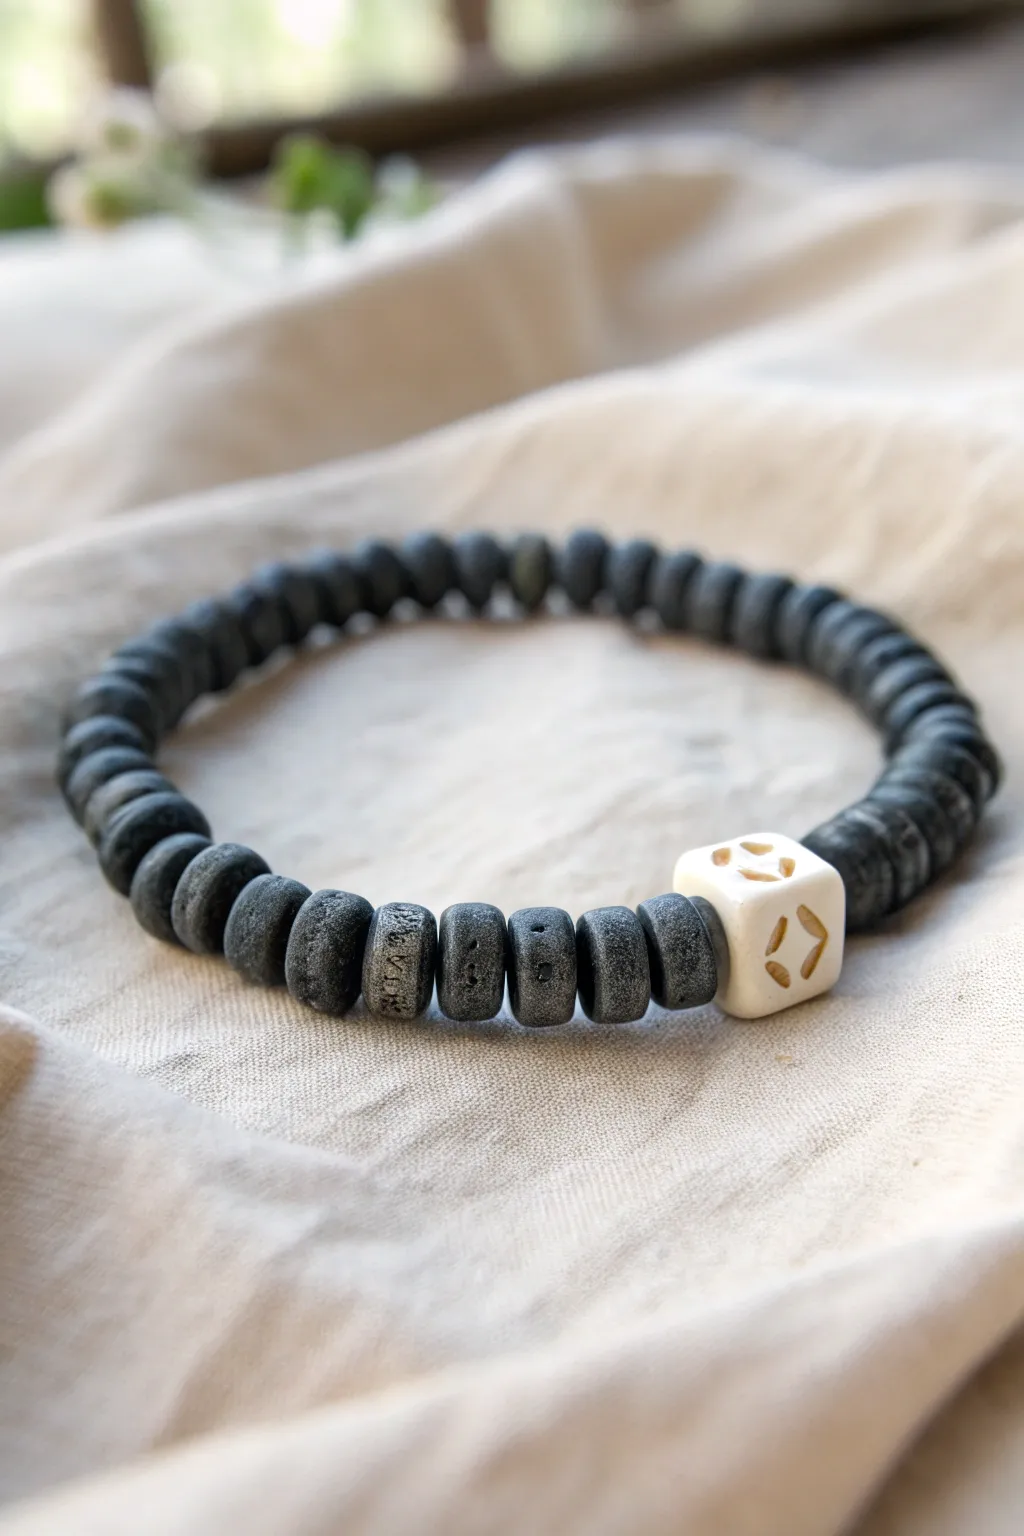
This masculine design combines the earthy texture of dark heishi-style clay beads with a striking geometric focal point. The matte finish and carved details give it an ancient, artifact-like quality perfect for everyday wear.
How-To Guide
Materials
- Black polymer clay
- White or cream polymer clay
- Metallic gold acrylic paint
- Small square clay cutter or craft knife
- Rolling pin or pasta machine
- Texture sponge or coarse sandpaper
- Fine detail carving tool or needle tool
- Elastic stretch cord (0.7mm or 0.8mm)
- Super glue or jewelry cement
- Toothpicks or bead pins
- Oven and baking tray
Step 1: Crafting the Dark Heishi Beads
-
Condition the Clay:
Begin by thoroughly kneading your black polymer clay until it is soft and pliable. This prevents cracking during the subtle texturing process later. -
Create a Snake:
Roll the black clay into a long, even snake. Aim for a diameter of about 6-8mm, depending on how chunky you want the final beads to be. -
Apply Texture:
Before slicing, roll the clay snake gently over coarse sandpaper or a texture sponge. This imitates the stony, pitted surface seen in the reference image, rather than a perfectly smooth plastic look. -
Slice the Discs:
Use a sharp tissue blade to slice the snake into even discs. Aim for slices that are roughly 2-3mm thick. Don’t worry if they aren’t perfectly uniform; subtle variation adds to the rugged aesthetic. -
Make the Holes:
Use a toothpick or a bead pin to pierce a hole through the center of each disc. I like to twist the tool as I push through to avoid squashing the bead’s shape. -
Refine the Edges:
Gently tap the sides of each bead to round off any sharp cutting edges, maintaining that worn, tumbling-stone appearance.
Paint Smudges?
If gold paint dries on the white surface, dampen a Q-tip with a tiny bit of rubbing alcohol to gently scrub the surface clean without removing paint from the etched grooves.
Step 2: Creating the Focal Cube
-
Shape the Cube:
Condition a small amount of white or cream clay. Form it into a cube shape, approximately 10mm on all sides, ensuring the edges are soft and slightly rounded. -
Pierce the Center:
Create a hole through the center of the cube that matches the orientation of your bracelet stringing. Make sure the hole is large enough to hide the stringing knot later. -
Carve the Design:
Using a needle tool or a very fine carving tool, etch deep geometric symbols or initials into the faces of the cube. Press firmly to create defined grooves that will hold paint. -
Bake the Components:
Arrange all beads and the cube on a baking tray lined with parchment paper. Bake according to your specific clay brand’s temperature and time instructions.
Stone Effect
Mix a tiny pinch of translucent or granite-colored clay into your black clay before rolling. This creates marbling that looks incredibly realistic like real volcanic stone.
Step 3: Finishing and Assembly
-
Cool and Paint:
Allow the beads to cool completely. Take the white focal bead and brush metallic gold acrylic paint over the carved areas. -
Wipe the Excess:
Before the paint fully dries, quickly wipe the surface of the cube with a damp paper towel. This leaves the gold paint only inside the deep carvings for a sharp contrast. -
String the Design:
Cut a piece of elastic cord about 10 inches long. String the dark heishi beads onto the cord until you reach the desired length, inserting the white focal cube in the center. -
Check the Fit:
Wrap the strand around the wrist to test the fit. Add or remove dark discs as needed to ensure it isn’t too tight. -
Secure the Knot:
Tie a strong surgeon’s knot (right over left, left over right) with the elastic cord. Pull it tight. -
Hide the Knot:
Apply a tiny drop of super glue to the knot for extra security. Once dry, trim the excess cord and gently tuck the knot inside the large hole of the focal bead.
Enjoy the cool, custom look of your new handmade wristwear
Jersey Number Clay Bracelet
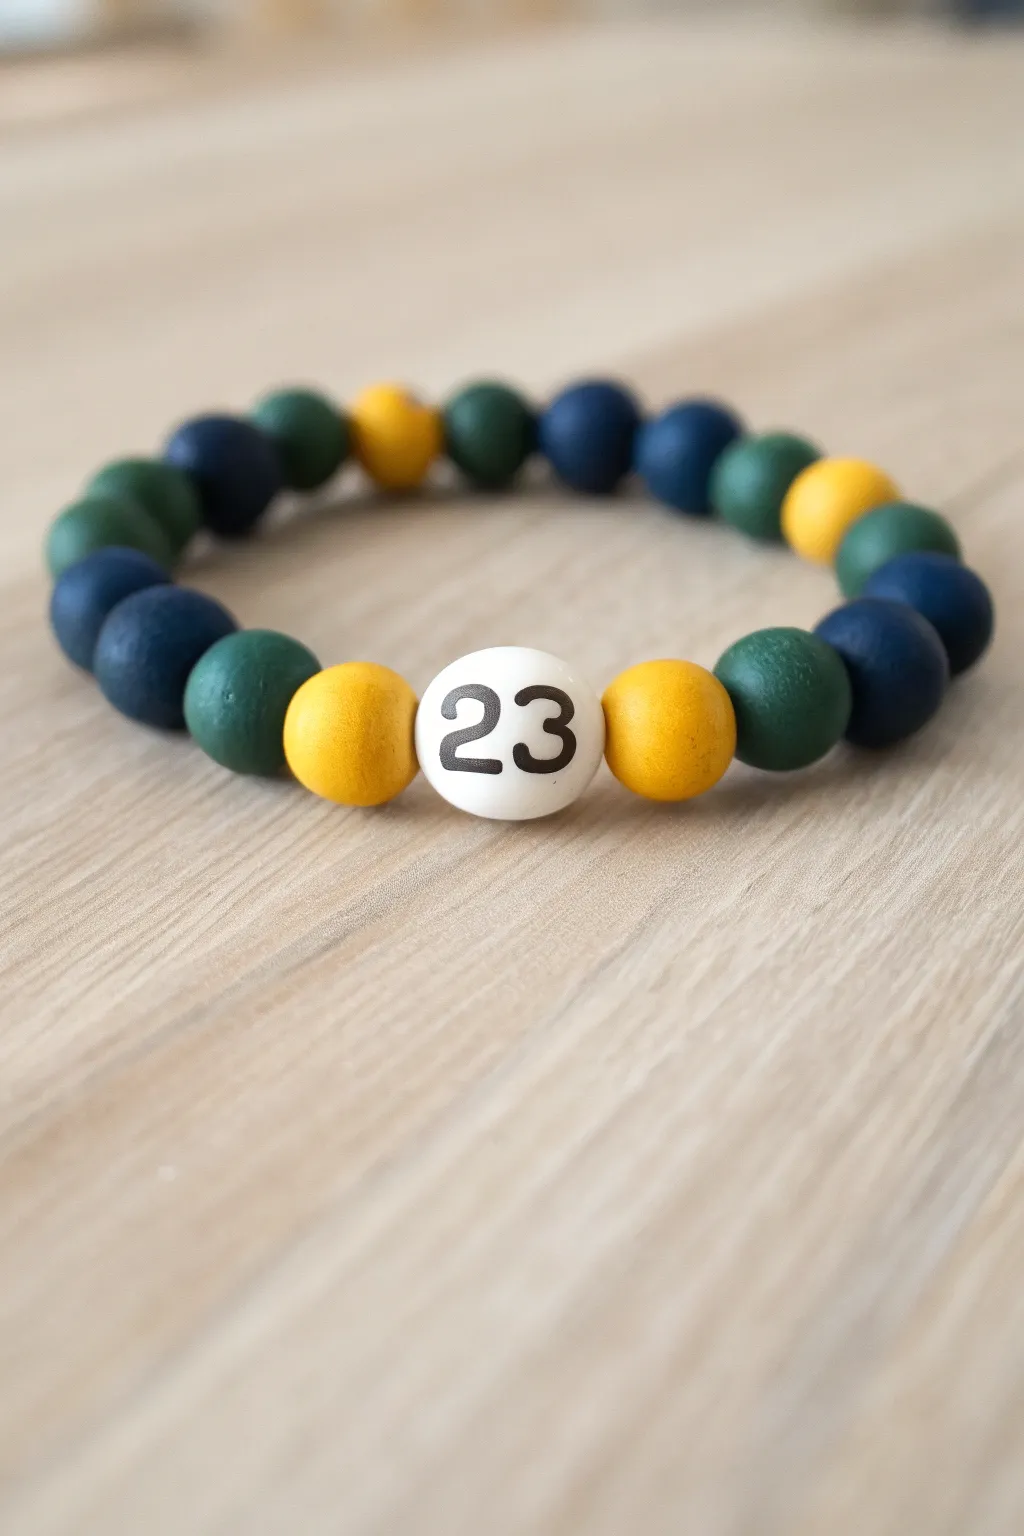
Show off team pride with a personalized beaded bracelet featuring a crisp jersey number centerpiece. The classic mix of matte blue, green, and yellow clay beads creates a sporty look that’s perfect for any young athlete or fan.
Step-by-Step Guide
Materials
- Polymer clay (matte finish): navy blue, hunter green, mustard yellow, white
- Elastic stretch cord (0.7mm or 0.8mm)
- Black acrylic paint or fine-tip permanent marker
- Bead rolling tool (optional, for uniform size)
- Toothpick or bead reamer
- Super glue or jewelry cement
- Oven and baking tray
- Small paintbrush (if using paint)
- Scissors
Step 1: Creating the Jersey Number Bead
-
Prepare white clay:
Condition a small amount of white polymer clay until it is soft and pliable. -
Shape the focal bead:
Roll the white clay into a smooth ball. It should be slightly larger than the other beads, about 10-12mm in diameter. -
Flatten slightly:
Gently press the ball between your thumb and forefinger to create a slightly flattened lens shape so the number sits nicely on the wrist. -
Pierce the bead:
Use a toothpick or bead reamer to create a hole through the center. Rotate the tool as you push through to prevent distortion. -
Bake the focal bead:
Place the white bead on your baking tray and bake according to the package instructions. Let it cool completely. -
Add the number:
Once cool, carefully paint or draw the jersey number ’23’ (or your chosen number) onto the center using black acrylic paint or a fine permanent marker. -
Seal the number:
Allow the paint/ink to dry fully, then consider adding a tiny dab of matte varnish over the number to protect it from wear.
Smooth Operator
To remove fingerprints from your raw clay beads before baking, lightly brush them with a tiny amount of cornstarch or baby powder.
Step 2: Crafting the Colored Clay Beads
-
Condition colored clay:
separately condition your navy blue, hunter green, and mustard yellow clays. -
Portion the clay:
Pinch off small, equal-sized pieces of each color. Aim for chunks that will roll into 8mm beads. -
Roll spheres:
Roll each piece between your palms to create perfectly round spheres. I utilize a bead roller here to ensure every bead is the exact same size. -
Create the holes:
Pierce each colored sphere with your toothpick, ensuring the hole is wide enough for your elastic cord. -
Bake colored beads:
Arrange all your colored beads on the baking tray and bake as directed. Allow them to cool before handling.
Team Texture
Before baking, roll the colored beads over a piece of sandpaper or a clean toothbrush to give them a cool, stone-like texture.
Step 3: Assembly
-
Cut the cord:
Cut a length of elastic cord about 10 inches long. This gives you plenty of room to tie the knot. -
Pre-stretch elastic:
Give the cord a few firm tugs. This pre-stretching prevents the bracelet from loosening up immediately after wearing. -
Start the pattern:
Begin threading your beads. Start with a yellow bead, followed by a green, and then a blue to establish your pattern. -
Flank the centerpiece:
When you reach the middle, thread a yellow bead, then your white jersey number bead, and another yellow bead to frame it perfectly. -
Finish the strand:
Continue the pattern on the other side until the bracelet reaches the desired length for the wrist. -
Check fit:
Wrap the strand around your wrist to double-check the sizing before tying. -
Tie the knot:
Tie a strong surgeon’s knot (right over left, left over right) and pull tight. -
Secure and trim:
Add a tiny drop of super glue to the knot. Once dry, trim the excess cord and gently tuck the knot inside the hole of a neighboring bead.
Slip on this custom jersey bracelet and cheer on your favorite player in style


What Really Happens Inside the Kiln
Learn how time and temperature work together inside the kiln to transform clay into durable ceramic.
Sport Ball Accent Bead Bracelet
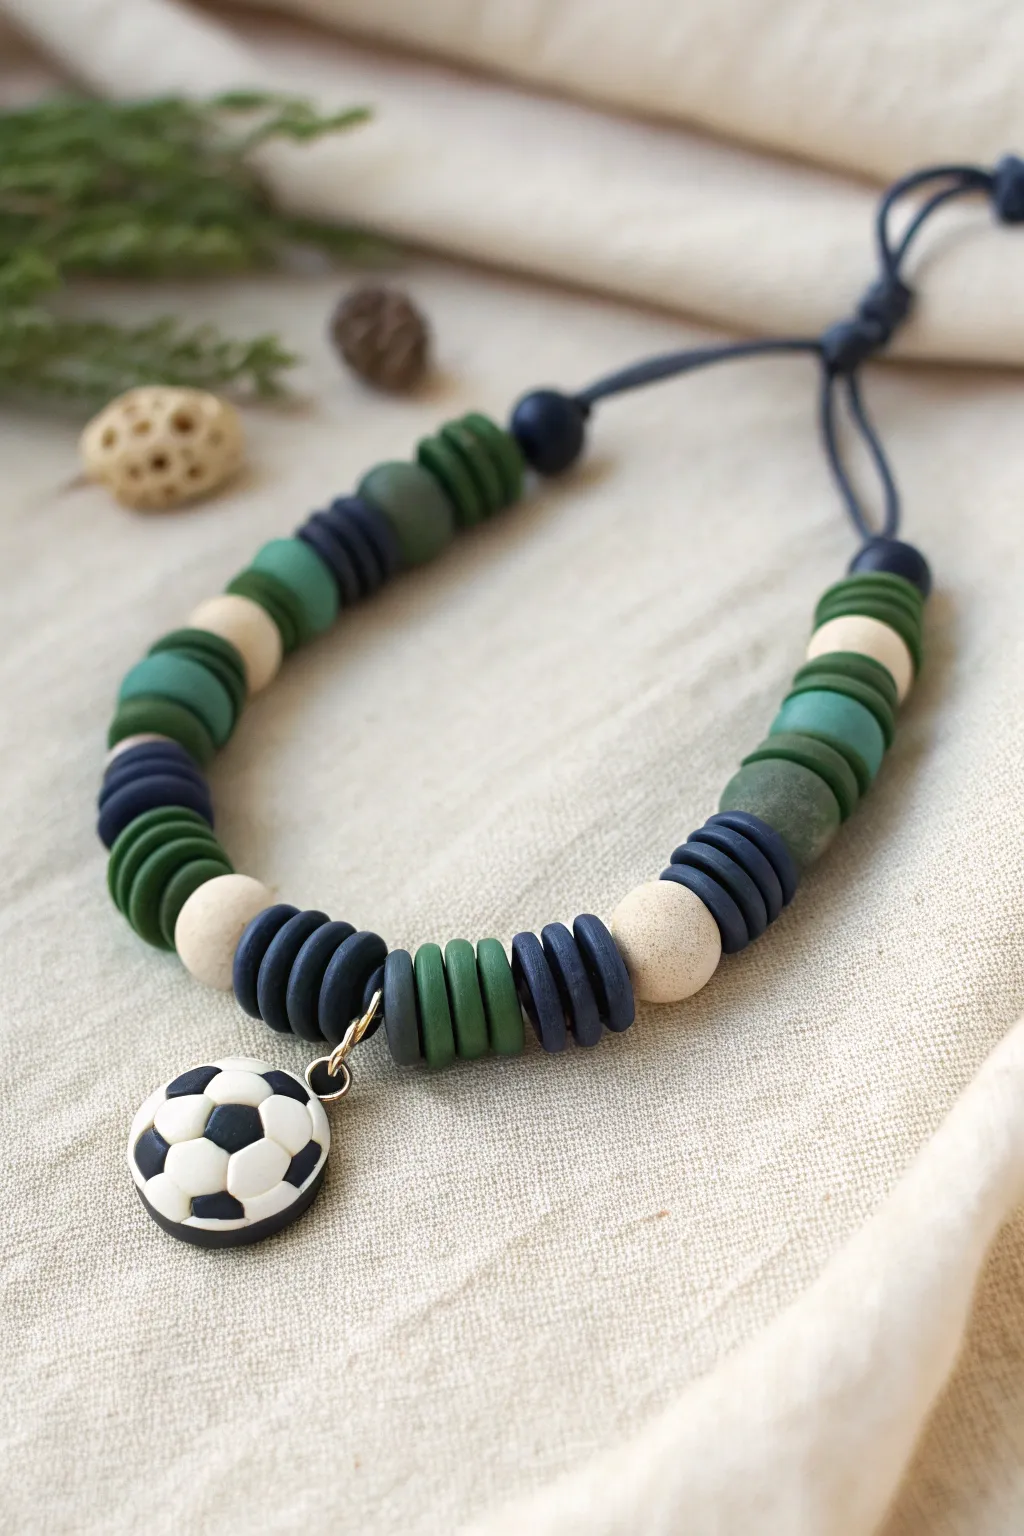
This rugged, sporty bracelet features a handmade polymer clay soccer ball charm and an array of disc and round beads in earthy team colors. It is stranded on a durable cord with adjustable sliding knots, making it perfect for active kids who want to show off their favorite sport.
Step-by-Step
Materials
- Polymer clay (black, white, dark blue, forest green, olive green, beige)
- Small circle cutter (approx. 1 inch)
- Small eye pin or jump ring
- Strong beading cord (navy or black, approx. 1mm)
- Needle tool or toothpick
- Rolling pin or pasta machine
- Clay blade
- Oven for baking
- Round nose pliers
- Super glue (cyanoacrylate)
Step 1: Making the Beads
-
Mix your colors:
Prepare your clay palette. You will need a dark navy blue, a deep forest green, an olive green, and a speckled beige (you can mix a tiny bit of brown or pepper into white for this effect). -
Roll out sheets:
Roll the navy, forest green, and olive green clay into slabs of equal thickness, roughly 3-4mm distinct. -
Cut disc shapes:
Use a small circle cutter or a straw to punch out numerous small discs from each color sheet. You’ll need about 10-12 of each color. -
Shape round beads:
Take the beige clay and the olive green clay. Roll medium-sized balls (about 1cm diameter) to serve as spacer beads. Make about 4-6 beige ones and 3-4 olive ones. -
Create the soccer ball base:
Roll a larger ball of white clay, flattening it slightly into a thick disc or keeping it rounded depending on your preference. This will be the charm base. -
Add the patches:
Roll out a very thin sheet of black clay. Cut tiny pentagons (5-sided shapes) using a small cutter or your blade. Carefully press these onto the white ball in a traditional soccer pattern. -
Smooth the surface:
Gently roll the soccer ball between your palms to smooth the black patches into the white clay so they lie flush. -
Insert the hardware:
Trim a gold eye pin to size and insert it into the top of the soccer ball charm. I like to add a dab of liquid clay or translucent bakeable adhesive to the pin shaft for extra security. -
Pierce the beads:
Use your needle tool to poke holes through the center of every disc and round bead. Ensure the hole is wide enough for your cord to pass through twice if needed. -
Bake the batch:
Arrange all your pieces on a baking sheet or tile. Bake according to the manufacturer’s instructions for your specific brand of clay (usually 275°F/135°C for 15-30 minutes).
Uneven Patches?
If cutting tiny pentagons is too hard, you can use tiny balls of black clay. Press them onto the white ball and roll smooth; they will naturally flatten into organic patch shapes.
Step 2: Assembly
-
Prepare the cord:
Cut a length of beading cord about 18 inches long. Fold it in half to find the center, then attach the soccer charm using a jump ring right at that midpoint. -
Start the pattern:
Begin threading beads on either side of the charm. Start with the disc beads, grouping them in sets of three or four of the same color (e.g., 4 navy, 3 green, 3 olive). -
Add accent spacers:
Interperse the groups of flat disc beads with the larger round beige or olive beads to create visual breaks in the texture. -
Mirror the design:
Continue adding beads until you have about 2-3 inches of beading on each side of the central charm, keeping the pattern symmetrical. -
Secure the ends:
Once the beads are placed, tie a simple overhand knot tightly against the last bead on both sides to prevent them from sliding around. -
Form the closure:
Cross the two tail ends of the cord over each other to form a circle. You will now create a sliding knot mechanism. -
Tie sliding knots:
Tie a barrel knot or a simple adjustable knot using one tail end around the opposing cord strand. Repeat with the other tail end. -
Finish the tails:
Tie a small knot at the very tip of each cord tail to stop the sliding knot from slipping off. Add a tiny drop of super glue to these end knots for durability.
Pro Tip: Smooth Edges
Before baking, run a finger dipped in cornstarch or baby oil over your disc beads. This smooths out fingerprints and removes any rough edges left by the cutter.
Enjoy gifting this sporty accessory to your favorite team player
Skatepark Neutrals and Asphalt Gray
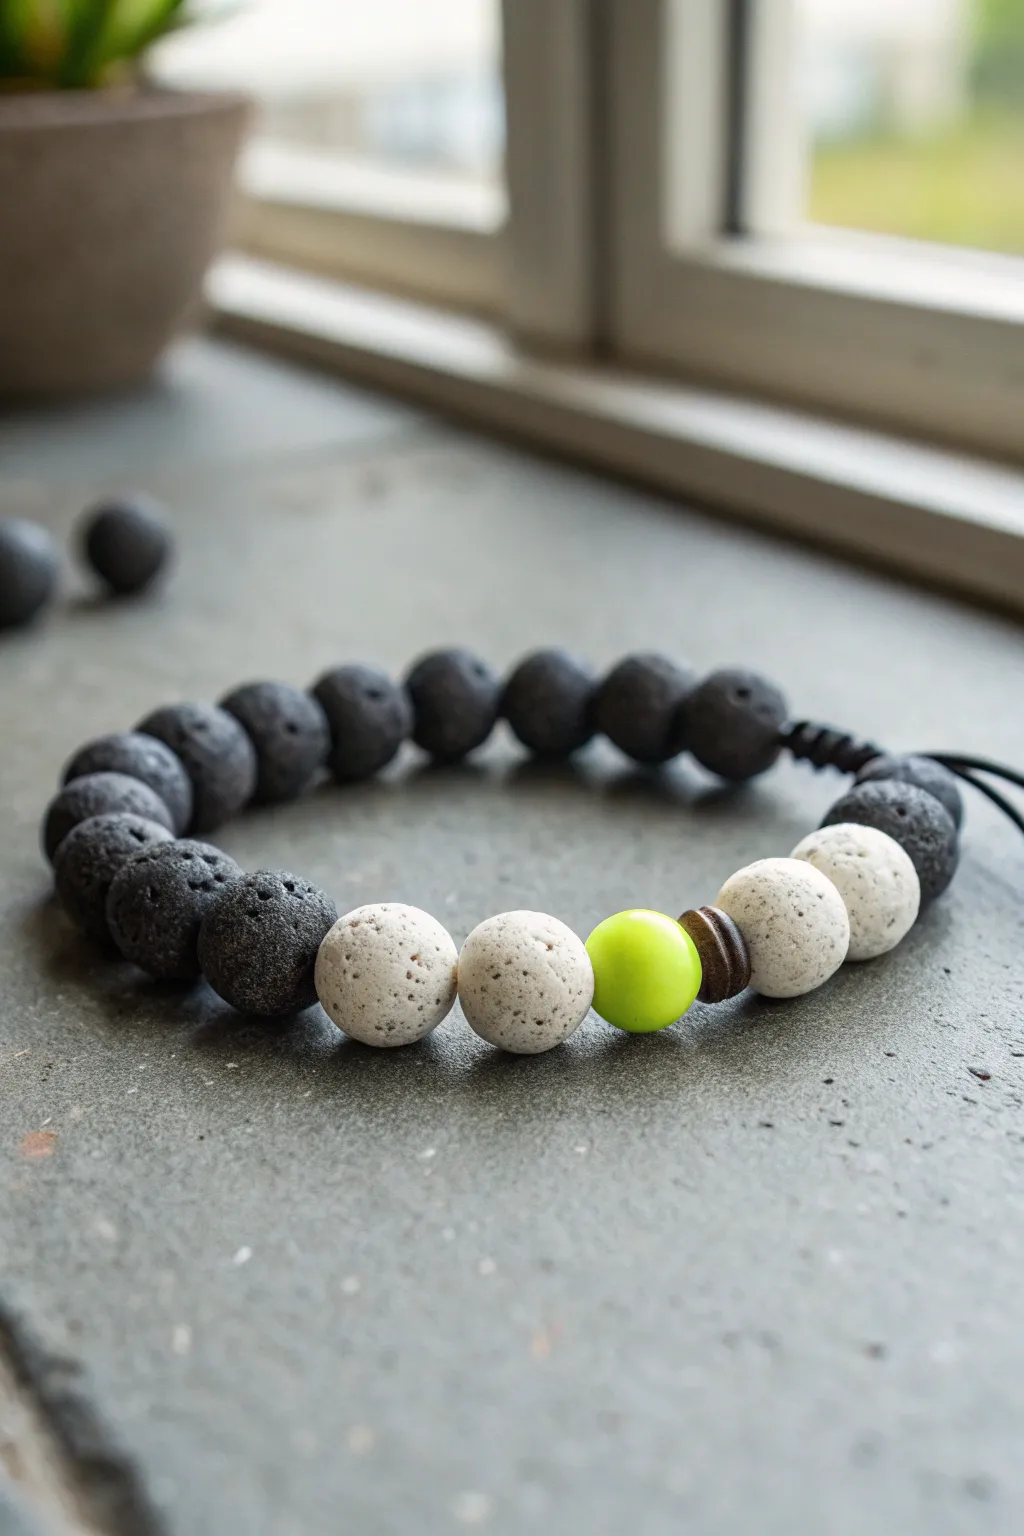
Merging the textures of city streets with a punch of lime green energy, this bracelet captures the essence of skatepark style. The porous black beads mimic asphalt, while the smooth polymer accents provide a sleek, modern contrast.
Step-by-Step Guide
Materials
- Black polymer clay
- White or granite-effect polymer clay
- Lime green polymer clay
- Salt or coarse sandpaper (for texturing)
- Toothpicks or a bead piercing pin
- Elastic jewelry cord (0.8mm or 1mm)
- Leather cord or waxed cotton (optional for knot closure)
- Super glue or jewelry cement
- Thin wooden disc bead or wood-effect clay
Step 1: Forging the Asphalt Beads
-
Condition the dark clay:
Start by warming up your black polymer clay in your hands until it is pliable. You want it soft enough to take texture easily but firm enough to hold a round shape. -
Roll spheres:
Pinch off small portions of the black clay and roll them between your palms to create smooth, even spheres. You will need roughly 10-14 of these, aiming for about 8-10mm in diameter. -
Create porosity:
To mimic the look of lava rock or asphalt, roll the raw clay beads gently over coarse sandpaper or press coarse salt crystals into the surface. -
Refine the texture:
If using salt, be sure to press deeply enough to leave pits. You can also use a stiff toothbrush or a needle tool to poke irregular holes for that authentic airy rock look. -
Pierce the beads:
Carefully insert a toothpick or bead pin through the center of each textured black bead. Rotate the pin as you push to avoid squashing the sphere.
Step 2: Crafting the Concrete & Neon Accents
-
Mix the grey blend:
Take your white polymer clay and mix in a tiny speck of black to create a very pale grey. If you have granite-effect clay, that works beautifully here too. -
Form the light beads:
Roll four spheres of this lighter clay, matching the size of your black asphalt beads exactly. These will represent the concrete elements. -
Texture lightly:
Give these white/grey beads a slightly smoother texture than the black ones. A gentle roll on fine-grit sandpaper or a quick dab with a toothbrush is enough. -
The pop of color:
Condition the lime green clay and roll a single, perfect sphere. Keep this one entirely smooth and glossy to stand out against the rougher textures. -
Make the spacer:
Create a small, thin disc shape out of brown clay to act as a wooden spacer, or select a pre-made small wooden bead. Pierce all these accent beads just like the black ones. -
Bake the batch:
Arrange all your beads on a baking sheet. Follow the temperature instructions on your clay package (usually around 275°F/135°C) and bake for roughly 30 minutes. -
Cool and wash:
Let the beads cool completely. If you used the salt method for texture, soak the black beads in warm water now to dissolve the crystals, leaving behind natural-looking craters.
Salty Texture Tip
Use large-grain sea salt rather than table salt. The larger crystals create deeper, more distinct pits that look exactly like real volcanic pumice stone once washed away.
Step 3: Assembly & Finishing
-
Measure the cord:
Cut a length of elastic or non-stretchy cord depending on your preferred closure. For a simple slip-on fit, elastic is easiest; make it about 10 inches long to give yourself tying room. -
Arrangement strategy:
Thread the lime green bead on first, followed by the wood spacer. Then, add two white ‘concrete’ beads on either side of that central focal point. -
Complete the circle:
Fill the rest of the strand with your black ‘asphalt’ beads until the bracelet reaches the desired wrist size. -
Tie the knot:
Bring the ends of the cord together. If using elastic, tie a surgeon’s knot (right over left twice, then left over right) and pull tight. -
Secure the bind:
Place a tiny drop of super glue on the knot for security. I usually hide the knot by sliding it inside the hole of the nearest black bead before the glue fully sets. -
Adjustable alternative:
If you prefer the look in the photo with the braided tail, use non-stretch cord and finish with a sliding macramé square knot closure instead of a simple tie.
Glow Up
Swap the standard lime green clay for glow-in-the-dark polymer clay. It keeps the same daylight look but adds a hidden surprise when the lights go out.
Now you have a rugged, street-style accessory ready for daily wear

TRACK YOUR CERAMIC JOURNEY
Capture glaze tests, firing details, and creative progress—all in one simple printable. Make your projects easier to repeat and improve.
Camouflage-Inspired Clay Disc Mix
Embrace the outdoors with this rugged, camouflage-inspired bracelet featuring handmade clay beads in earthy tones. The mix of matte greens, browns, and textured discs creates a cool, tactical look perfect for everyday wear.
Detailed Instructions
Materials
- Polymer clay (olive green, forest green, dark brown, tan, black)
- Black waxed cotton cord (1mm or 1.5mm)
- Needle tool or toothpick
- Acrylic roller
- Optional: Texture sponge or sandpaper
- Silver metal bead (large hole for clasp)
- Baking sheet and parchment paper
- Wet/dry sandpaper (400-800 grit)
- Oven
Step 1: Prepping the Clay Colors
-
Conditioning:
Begin by conditioning each block of polymer clay in your hands until it’s soft and pliable. You want the clay to be warm enough that it won’t crack when rolled. -
Mixing custom shades:
To achieve that natural, uneven camouflage look, don’t just use straight colors. Mix a little black into your green to darken it, or swirl some tan into the brown for a marbled effect. Aim for 3-4 distinct earthy shades: olive, deep hunter green, matte black, and a sandy tan. -
Creating the speckled bead:
For the specific speckled bead seen in the design, take a small ball of tan clay and grate or chop tiny bits of black clay into it. Roll it together gently so the black specs are embedded but not fully blended.
Natural Stone Texture
Before baking, roll your raw clay beads in a small pile of course salt or sugar. After baking, wash the beads; the granules dissolve, leaving realistic pits.
Step 2: Shaping the Beads
-
Partioning the clay:
Pinch off equal-sized amounts of clay for your round beads. A bead roller adds precision, but hand-rolling works perfectly for this organic style. Aim for beads about 8-10mm in diameter. -
Rolling spheres:
Roll the chunks between your palms to create smooth, round spheres. Make approximately 12-15 round beads in varying colors, focusing heavily on olive and forest green. -
Creating disc beads:
For the flat disc beads, roll a small snake of clay and slice it into thick coins, or roll a sphere and gently flatten it between your fingers. These act as spacers and add visual variety. -
Adding texture:
To mimic the rugged texture seen on the dark green bead, gently press a piece of sandpaper or a textured sponge against the raw clay surface. This creates a stone-like finish. -
Piercing the holes:
Using your needle tool or a toothpick, carefully pierce a hole through the center of each bead. Rotate the bead as you push through to prevent it from squishing out of shape. Ensure the holes are wide enough for your cord to pass through twice if needed for the knots.
Step 3: Baking and Finishing
-
Baking:
Arrage your beads on a parchment-lined baking sheet. Bake according to your polymer clay manufacturer’s instructions (usually around 275°F/135°C for 15-30 minutes). -
Cooling:
Allow the beads to cool completely in the oven with the door slightly ajar to prevent them from becoming brittle from thermal shock. -
Sanding for matte finish:
Once cool, use wet/dry sandpaper under running water to lightly buff the beads. This removes fingerprints and gives them that perfect matte, stone-like quality seen in the photo.
Glow-in-the-Dark Ops
Mix a tiny amount of glow-in-the-dark polymer clay into the white or tan beads. It adds a subtle ‘night vision’ vibe that reveals itself in darkness.
Step 4: Assembly
-
Stringing the core:
Cut a length of black waxed cord (about 12 inches) plus a second piece (about 8 inches) for the adjustable closure if you are doing a sliding knot. -
The pattern:
String your beads onto the main cord. Alternate between the round spheres and the flat discs. There is no strict pattern, but try to separate similar colors. Place the textured green bead and the speckled tan bead centrally as focal points. -
Adding the metal accent:
Thread the silver metal bead at one end of your bead sequence. This acts as a stopper for the adjustable loop. -
Knotting the ends:
At each end of the beaded section, tie a simple overhand knot with the cord to keep the beads tight and centered. -
Creating the adjustable closure:
Overlap the two tail ends of the cord. Using your shorter piece of cord, tie a series of square knots (macrame style) over the overlapped tails to create a sliding clasp mechanism. -
Final trim:
Tie knots at the very ends of the pull cords, trim any excess, and carefully melt the tips with a lighter (if using synthetic cord) or use a drop of glue to secure them.
This rugged accessory is now ready to handle any backyard adventure or add a subtle earth-tone accent to a daily outfit
Earth-Tone Adventure Bracelet
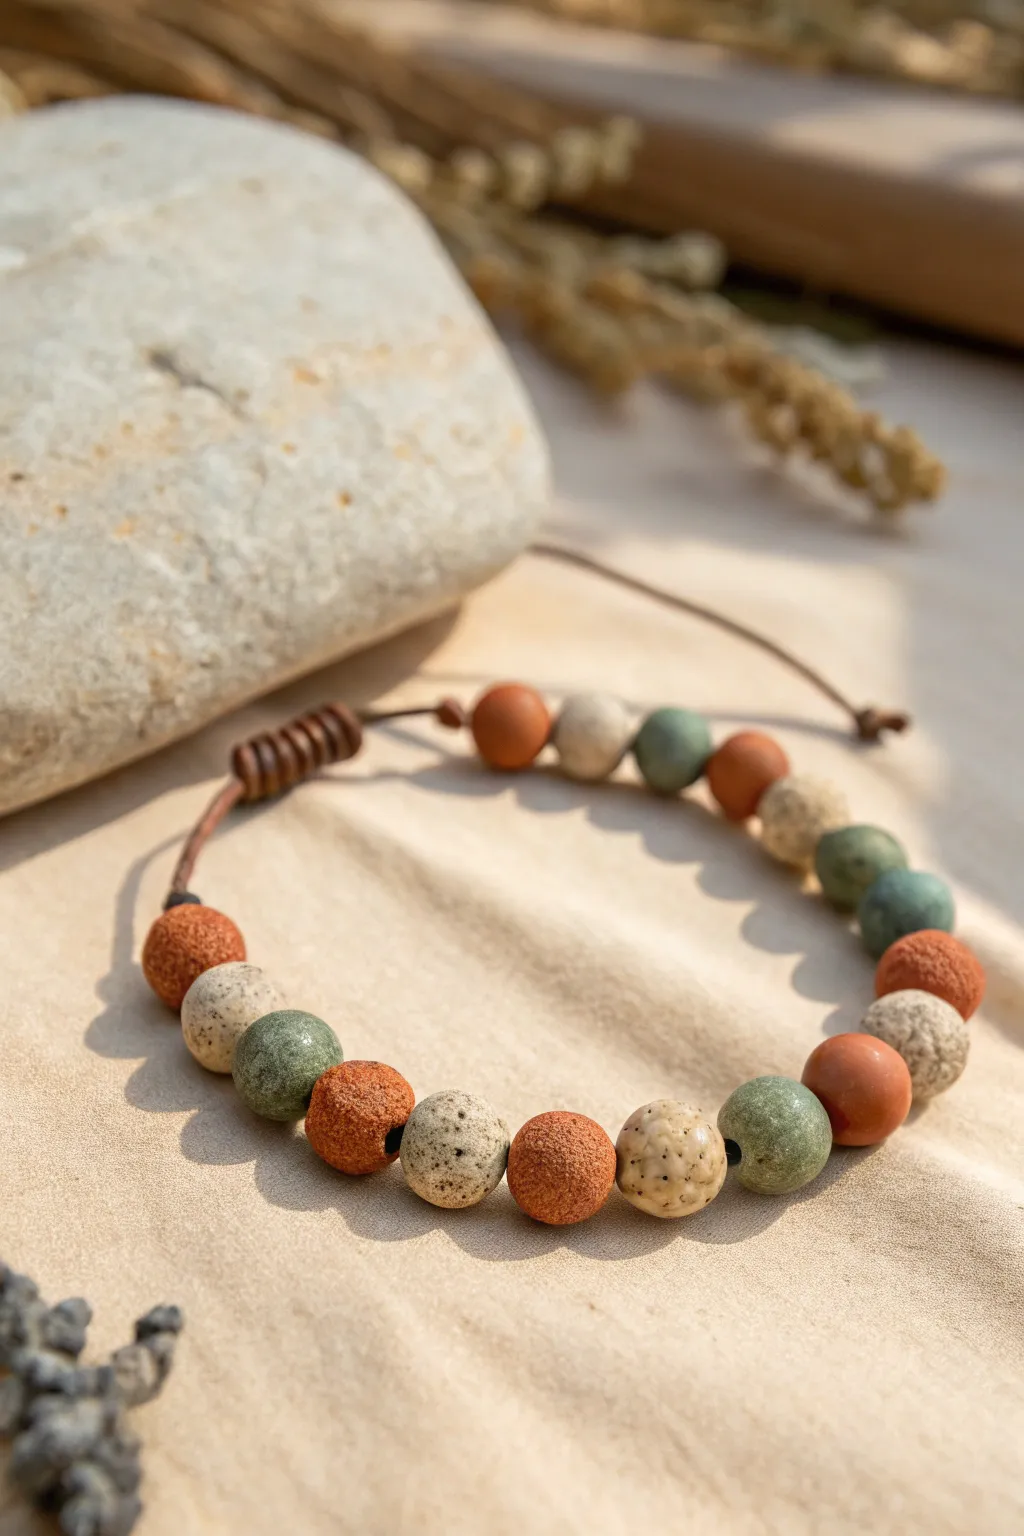
Capture the spirit of the outdoors with this rustic, durable bracelet featuring handmade clay beads in shades of terracotta, sage, and sand. The textured finish and adjustable sliding knot make it a comfortable and stylish accessory for any young explorer.
Step-by-Step Guide
Materials
- Polymer clay (terracotta orange, sage green, beige/cream)
- Black pepper or dried coffee grounds (for speckling)
- Course sandpaper or a toothbrush (for texturing)
- Heavy-duty brown jewelry cord (1mm or 1.5mm thick)
- Bamboo skewer or large needle tool
- Ruler
- Scissors
- Baking sheet and oven
Step 1: Crafting the Clay Beads
-
Prepare the clay:
Begin by conditioning your three colors of polymer clay until they are soft and pliable. If the colors are too bright, mix in a tiny pinch of brown or black clay to mute them into earthy tones. -
Add texture specs:
Take the beige clay and flatten it slightly. Sprinkle a pinch of ground black pepper or dried coffee grounds onto it, then fold and knead the clay repeatedly until the specks are evenly distributed throughout. -
Portion the clay:
Roll each color into a long, even log or snake shape, roughly the thickness of a thick marker. Slice equal-sized segments from each log to ensure your beads will be uniform in size. -
Roll the spheres:
Take each segment and roll it between your palms to create a smooth, round sphere. You will need about 5-6 beads of each color, depending on the desired length. -
Create surface texture:
To get that rugged, stone-like surface seen in the image, gently roll each bead over a piece of coarse sandpaper. Alternatively, you can tap the surface lightly with the bristles of a toothbrush. -
Pierce the holes:
Using a bamboo skewer or a needle tool, carefully pierce a hole through the center of each bead. Rotate the skewer as you push through to prevent squashing the bead’s shape, ensuring the hole is large enough for your cord. -
Bake the beads:
Arrange your beads on a baking sheet or a tile. Bake them in the oven according to your polymer clay manufacturer’s instructions (usually around 275°F or 135°C for 15-30 minutes). I like to cover mine with a foil tent to prevent scorching. -
Cool down:
Once baked, remove the beads from the oven and let them cool completely before handling. They will harden fully as they cool.
Hole Distortion?
If piercing the beads squashes them into ovals, let the clay rest for 10 minutes to cool/harden slightly before piercing, or re-roll gently while the skewer is still inside.
Step 2: Assembly & Macramé Closure
-
Cut the cord:
Cut a piece of brown jewelry cord approximately 12-14 inches long. This will be the main strand for the beads. -
String the pattern:
Thread your cooled beads onto the cord. Follow the pattern shown: alternate between the rust, sage, and speckled beige beads. Aim for a beaded section of about 6-7 inches. -
Secure the ends:
Tie a simple overhand knot on either side of the bead group to keep them centered and prevent sliding. Leave long tails of cord on both ends. -
Prepare for closure:
Cross the two tail ends of the cord over each other to form a circle. You might want to tape these down temporarily to a table to keep them taut while you work. -
Start the sliding knot:
Cut a separate piece of cord about 10 inches long. Place this under the two crossed tail cords. -
Tie the square knots:
Create a series of square macramé knots around the central crossed cords. Tie ‘left over right’, then ‘right over left’. Repeat this 5-6 times to create the decorative barrel shown in the image. -
Trim closure cords:
Once the sliding knot is long enough, pull it tight. Trim the excess ends of the *knotting* cord (not the bracelet tails) very close to the knot. -
Seal the knot:
Carefully melt the tips of the trimmed knotting cord with a lighter or dab with super glue to prevent unraveling. -
Finish the tails:
Check the fit of the bracelet. Tie a small knot at the very end of each bracelet tail cord to stop them from slipping through the slider. Trim any remaining excess cord.
Pro Texture Tip
Roll your raw beads over a real rock or piece of concrete from your driveway to imprint authentic, organic stone textures directly onto the clay surface.
Now you have a rugged, custom-made accessory ready for the next outdoor expedition
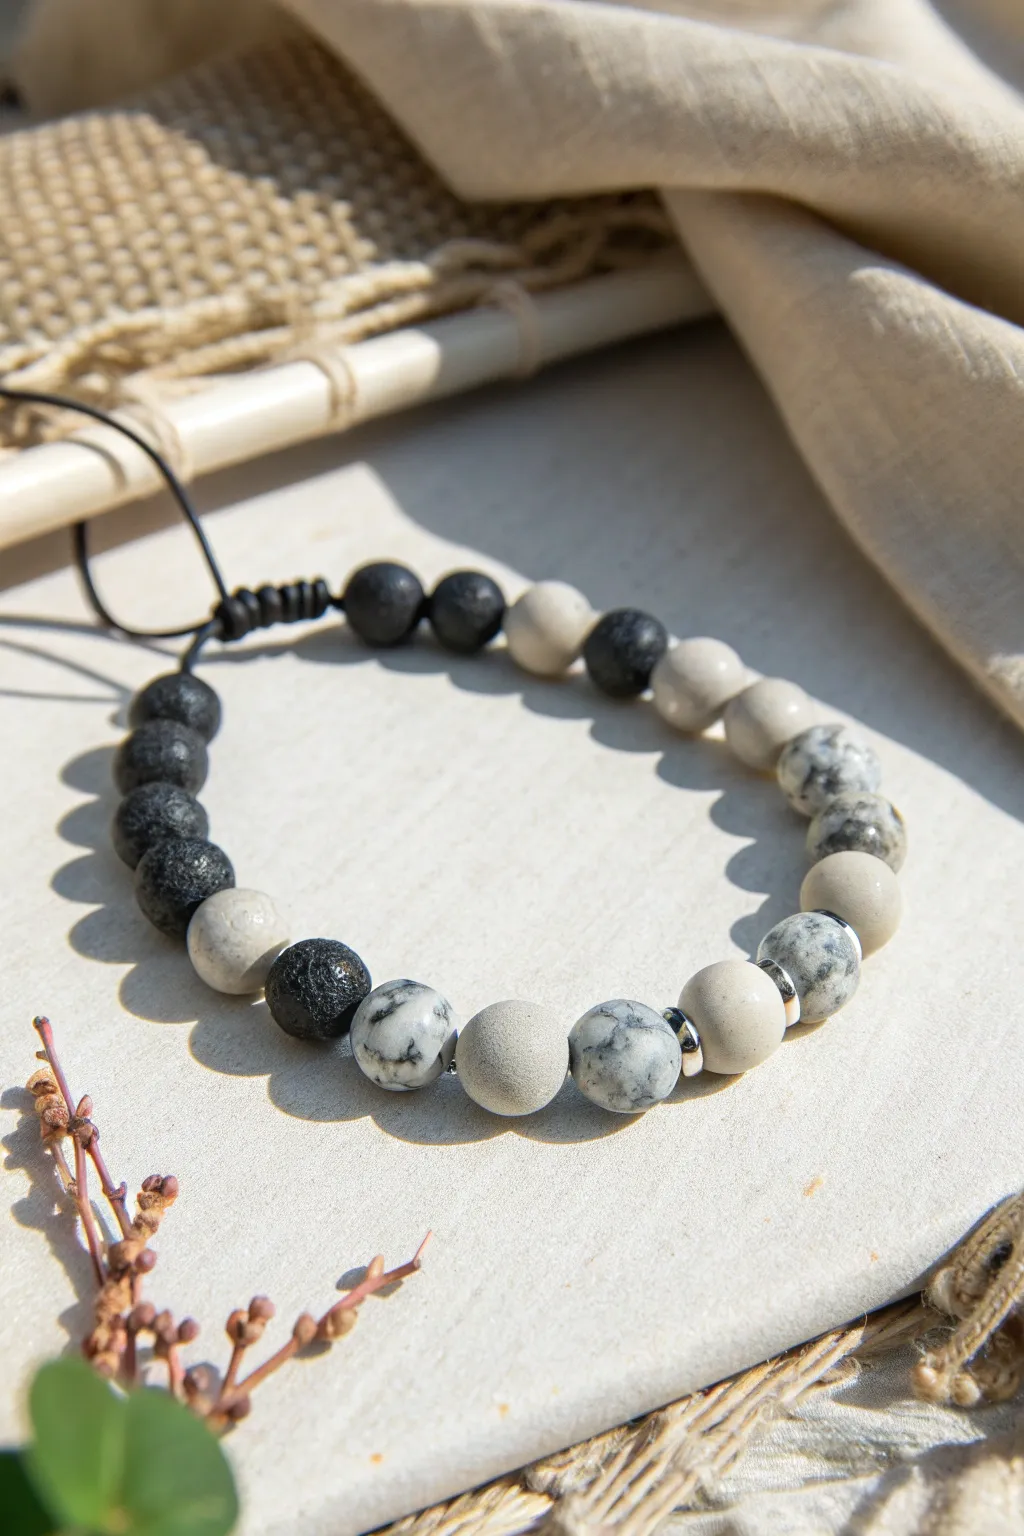
Industrial Look With Metallic Spacers
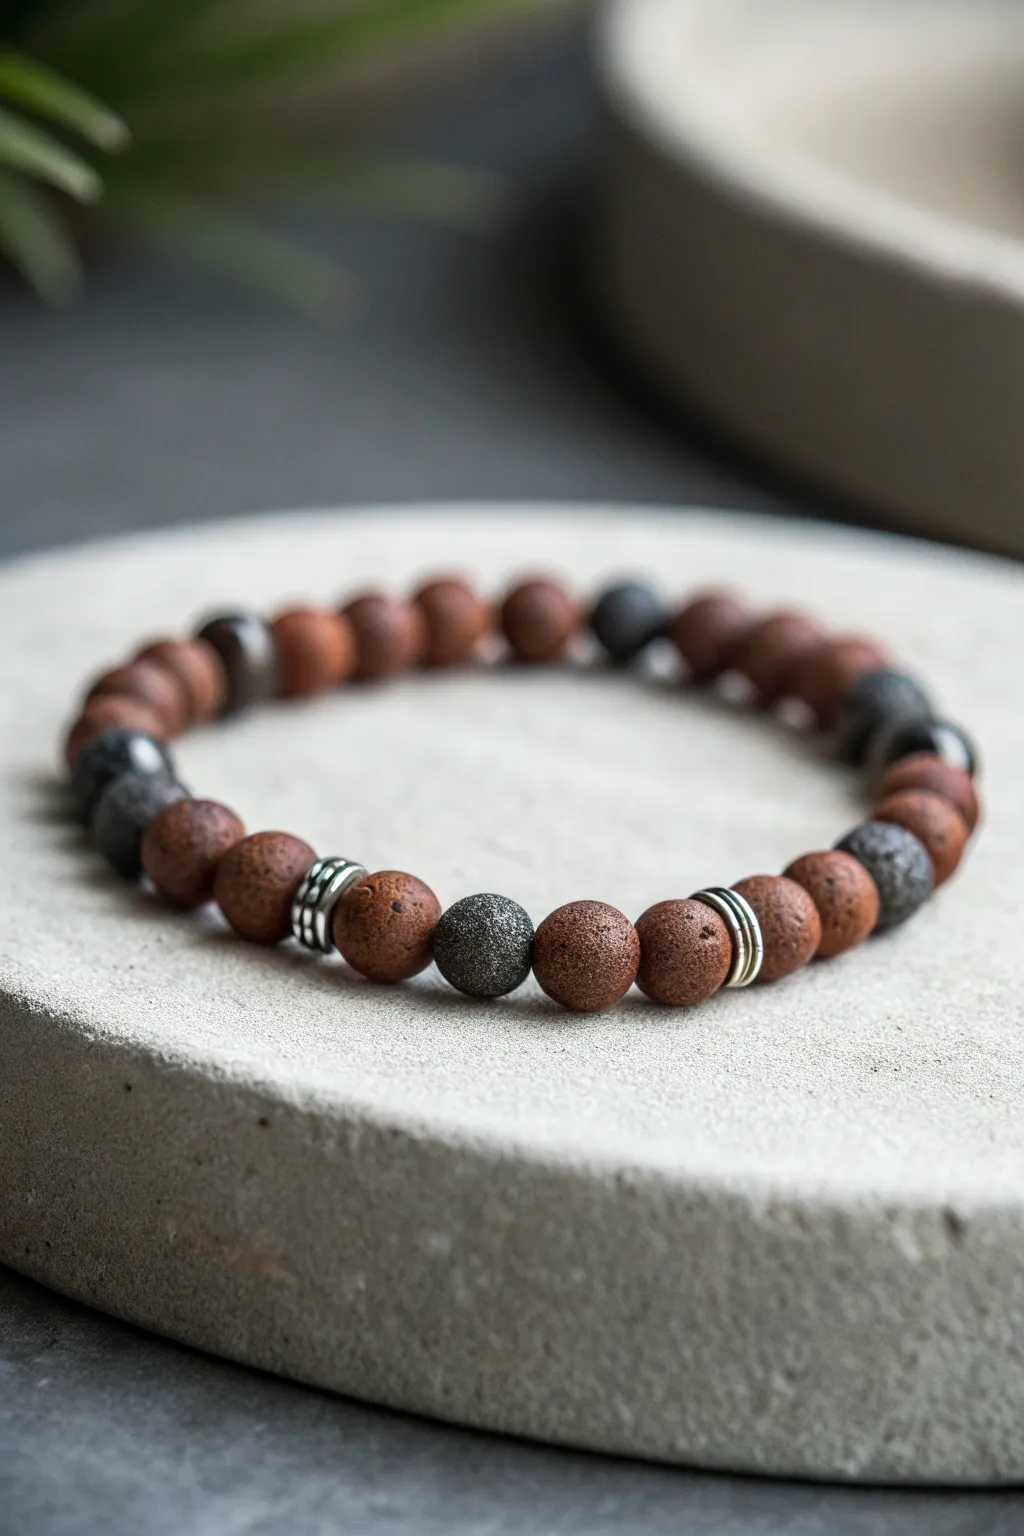
This rugged, earthy bracelet combines the warmth of terracotta-colored clay with the cool, industrial edge of metallic spacers and lava stone textures. It’s a perfect accessory for effortless style, balancing natural elements with a modern finish.
Step-by-Step
Materials
- Red-brown polymer clay (terracotta color)
- Black polymer clay (or charcoal color)
- Coarse sea salt or sugar (for texturing)
- Silver-tone metal spacer beads (ring shape)
- Elastic beading cord (0.8mm or 1mm)
- Super glue or jewelry adhesive
- Medium grit sandpaper
- Bead piercing tool or toothpick
- Oven for baking clay
- Baking sheet/tile
Step 1: Creating the Clay Beads
-
Condition the Clay:
Start by warming up your red-brown terracotta clay in your hands until it is soft and pliable. -
Analyze Your Bead Count:
Look at the pattern: the majority are terracotta. You will need roughly 18-20 red-brown beads and about 6-8 black beads, depending on wrist size. -
Form the Base Spheres:
Roll the terracotta clay into a uniform log and slice it into equal segments. Roll each segment between your palms to create smooth, round spheres about 8mm to 10mm in diameter. -
Repeat for Black Beads:
Do the same process with your black clay, making sure these spheres match the size of your terracotta ones. -
Apply Texture:
To get that pitted, stone-like surface seen in the image, roll your raw clay beads gently in coarse sea salt or sugar. Press the granules in slightly so they stick. -
Pierce the Beads:
Use your piercing tool or a toothpick to carefully poke a hole through the center of each bead. I find twisting the tool as you push through helps prevent the bead from squishing out of shape. -
Bake the Beads:
Arrange your beads on a baking tile. Bake according to your polymer clay package instructions (typically around 275°F/135°C for 15-30 minutes). -
Cool and Rinse:
Once baked and fully cooled, soak the beads in warm water to dissolve the salt or sugar granules. This reveals the realistic, porous ‘lava stone’ texture.
Step 2: Assembly
-
Prepare the Cord:
Cut a length of elastic cord about 10-12 inches long. Pre-stretch it by pulling on it firmly a few times to prevent the bracelet from loosening later. -
Establish the Pattern:
Refer to the image for the specific sequence. Notice the focal point involves a pattern of: Terracotta | Silver Spacer | Terracotta | Black | Terracotta | Terracotta | Silver Spacer. -
Start Threading:
Begin threading your beads onto the elastic. Start with the main run of terracotta beads to keep the complex focal section for the end. -
Incorporate the Dark Accents:
Add the black beads intermittently as shown. The design features a cluster of dark beads on one side and single dark accents separated by red beads on the other. -
Add Metallic Spacers:
Insert the silver ring spacers. These fit snugly between two terracotta beads to create that industrial separation. Ensure the hole of the spacer is large enough to hide the knot later if possible. -
Check the Size:
Wrap the unfinished strand around your wrist. It should fit comfortably without gaps, but not be tight enough to leave marks. -
Tie the Knot:
Tie a strong surgeon’s knot (right over left, left over right). Pull the elastic tight so the beads press firmly against each other. -
Secure the Knot:
Place a tiny drop of super glue or jewelry adhesive directly onto the knot. Let it dry completely before touching it. -
Hide the Knot:
Trim the excess clear cord carefully. If your spacer bead or one of the clay beads has a large enough opening, gently tug the cord to pull the knot inside for a seamless finish.
Uneven Texture?
If the salt leaves holes that are too sharp, lightly sand the surface of the baked bead with medium-grit sandpaper to soften the edges for a smoother feel.
Aromatic Upgrade
Since you created a porous texture, these beads act like real lava stone. Add a drop of essential oil to the finished beads to turn this into a diffuser bracelet.
Now you have a rugged, custom-made accessory that pairs perfectly with denim or casual wear
Geometric Triangle Bead Statement
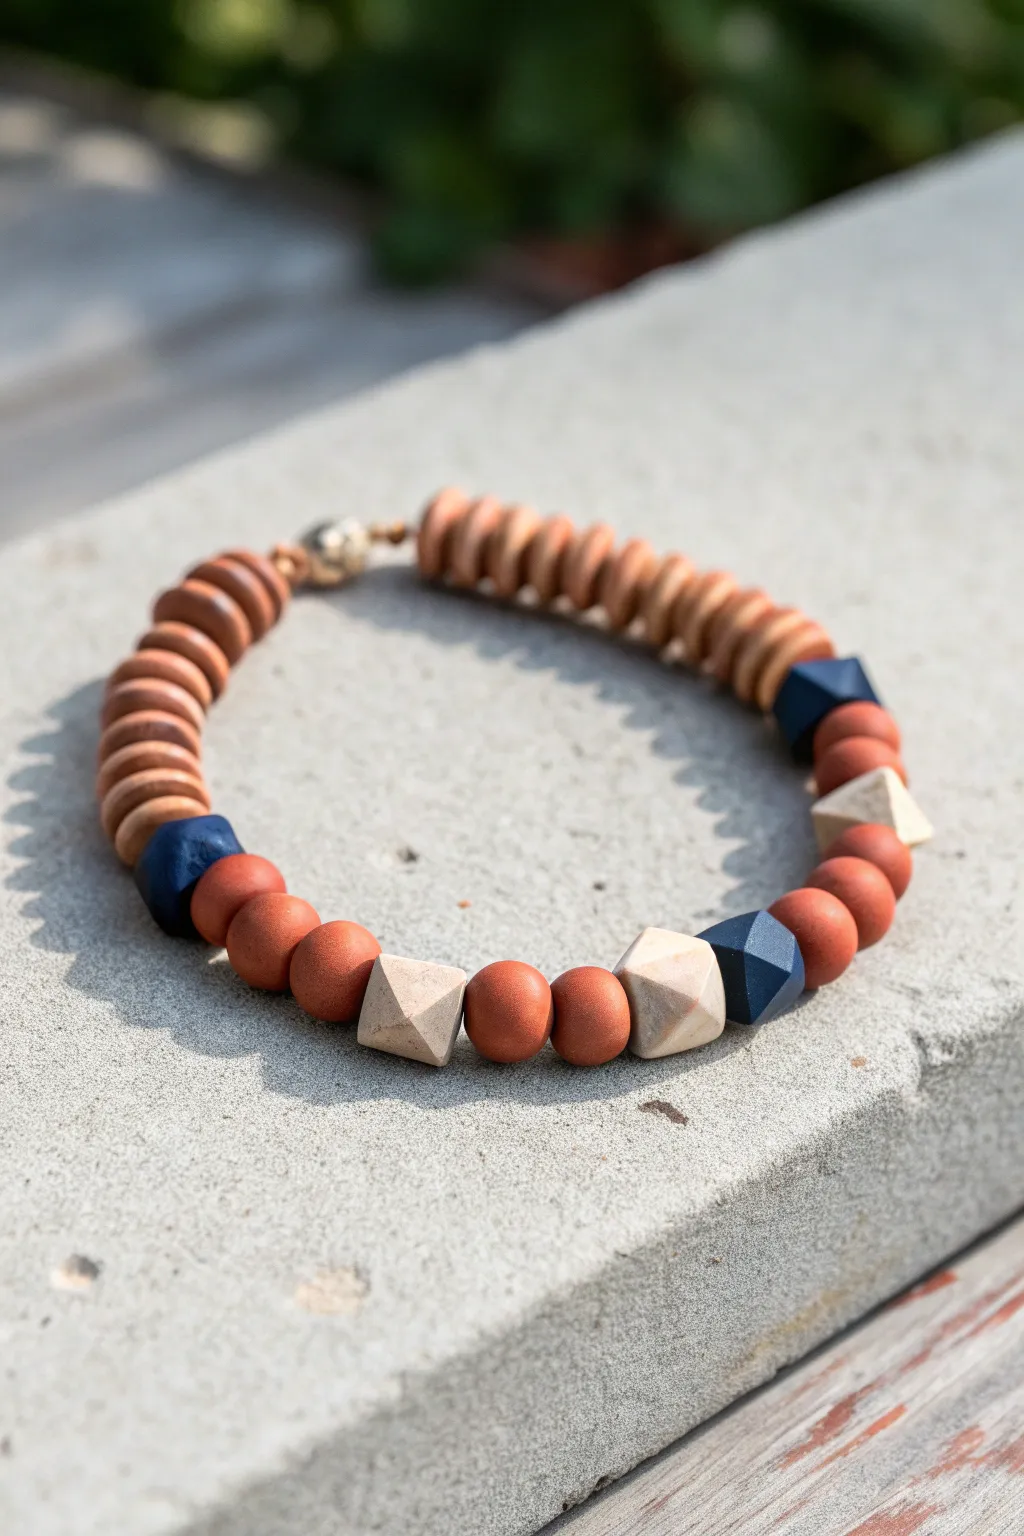
This stylish bracelet combines warm terracotta tones with cool geometric accents for a thoroughly modern look. The mix of simple disc beads, smooth round spheres, and sharp faceted statement beads creates a masculine piece that’s perfect for stacking or wearing solo.
Detailed Instructions
Materials
- Polymer clay (terracotta/rust color)
- Polymer clay (navy blue)
- Polymer clay (stone beige/granite effect)
- Sharp tissue blade or clay slicer
- Bead rolling tool (optional, but helpful)
- Thick beading needle or toothpick
- Strong elastic beading cord (0.8mm or 1mm)
- Sandpaper (fine grit)
- Oven for baking
- Baking sheet with parchment paper
- Jewelry glue or super glue
- Small metal clasp (optional, visible in image) or just knot the elastic
Step 1: Creating the Base Beads
-
Prepare the terracotta clay:
Begin by conditioning your rust-colored clay until it is soft and pliable. Roll it into a long, even snake that is approximately 1/2 inch in diameter. -
Cut consistent slices:
Using your tissue blade, slice the clay log into uniform discs. You will need about 20-25 of these for the back section of the bracelet. Aim for a thickness of about 3mm per disc. -
Smooth the edges:
Lightly tap the edges of each disc to round them off slightly so they aren’t sharp, but keep their flat, cylindrical shape. Pierce the center of each with your needle. -
Form the round spacers:
From the remaining terracotta clay, roll about 6-8 small spheres. I prefer to use a bead roller here to get them perfectly round, but hand-rolling works just fine if you are patient. -
Pierce the spheres:
Carefully poke a hole through the center of each sphere bead, rotating the bead as you push the needle through to avoid distorting the shape.
Clean Cuts Matter
Chill your clay in the fridge for 10 minutes before carving the geometric beads. Firmer clay slices cleaner and deforms less under the blade pressure.
Step 2: Sculpting the Geometric Accents
-
Prepare accent colors:
Condition your navy blue and beige/stone effect clays. Roll them into thick balls, slightly larger than your terracotta spheres. -
Cut the multifaceted shapes:
This is the signature step. Take a clay ball and use your sharp blade to slice off small sections of the surface at random angles. Don’t aim for symmetry; you want sharp, geometric facets. -
Refine the facets:
Continue slicing until the entire round surface is gone and you are left with a jagged, gem-like shape. Create three blue accents and two beige accents. -
Create the pyramid beads:
For the specific beige beads seen in the center, form a cube first, then slice away the corners to create a double-pyramid or bicone shape that tapers at the ends. -
Drill the holes:
Gently pierce these geometric beads. Be extra careful not to squash the sharp edges you just carved. For clean holes, twist the needle as you insert it. -
Bake the beads:
Place all your discs, spheres, and geometric beads on a baking sheet lined with parchment paper. Bake according to your clay manufacturer’s instructions (usually 275°F for 15-30 minutes). -
Cool and finish:
Let the beads cool completely. If any fingerprints are visible, lightly buff them away with fine-grit sandpaper, or wash them quickly in soapy water to remove any residue.
Add Metallic Flair
Before baking, brush a tiny amount of gold mica powder onto just the edges of the blue geometric beads for an antique, distressed metallic look.
Step 3: Assembly
-
Lay out the design:
Arrange your beads on a layout board or towel. The pattern shown uses a central sequence of: beige prism, rust sphere, blue facet, rust sphere, rust sphere, beige prism, rust sphere, rust shere, blue facet. -
Prepare the back section:
For the rest of the bracelet loop, stack your flat terracotta discs tightly together. This creates that solid, ribbed look distinctive to heishi-style bracelets. -
String the beads:
Cut a piece of elastic cord about 10 inches long. String your beads following your layout. Pre-stretching the elastic cord a few times before stringing helps prevent it from sagging later. -
Check the fit:
Wrap the strand around the wrist to check sizing. Add or remove terracotta disc beads from the back section as needed to get the perfect fit. -
Secure the knot:
Tie a strong surgeon’s knot with the elastic ends. Pull it tight, dab a tiny drop of jewelry glue on the knot, and let it dry before snipping the excess cord. -
Hide the knot:
Ideally, pull the knot carefully inside the hole of one of the larger geometric beads to hide it from view.
You now have a striking, architectural accessory that looks professionally designed and handmade
Textured Stamp-Pattern Clay Beads

This rugged, nature-inspired bracelet combines the raw look of lava stone with custom-textured clay beads in deep, earthy tones. It features an adjustable cord closure, making it a versatile accessory that captures the essence of a walk through the woods.
Step-by-Step
Materials
- Polymer clay (olive green)
- Black lava stone beads (6mm or 8mm)
- Dark green polished gemstone beads (like jade or agate, 6mm or 8mm)
- Black nylon cord or waxed cotton cord (0.8mm or 1mm)
- Rolling pin or pasta machine
- Fine-tooth comb or ribbed sculpting tool
- Drinking straw or piercing tool
- Scissors and lighter
- Baking sheet and oven
Step 1: Crafting the textured clay beads
-
Condition the clay:
Start by warming a small block of olive green polymer clay in your hands until it becomes soft and pliable. Roll it into a smooth snake about half an inch thick. -
Cut equal segments:
Use a tissue blade or knife to slice the snake into equal-sized chunks. Aim for pieces that will roll into balls roughly the same size as your lava beads. -
Roll into spheres:
Roll each chunk between your palms to create smooth, round spheres. Don’t worry if they aren’t perfectly geometric; a little organic variation adds character. -
Apply the texture:
Take a fine-tooth comb or a ribbed tool and gently roll the side of the bead across the teeth. Apply enough pressure to leave parallel grooves around the circumference of the bead without squashing its round shape. -
Pierce the beads:
Using a bead piercing pin or a toothpick, carefully poke a hole through the center of each textured bead. I like to rotate the pin while pushing to keep the hole clean and prevent distortion. -
Bake the clay:
Arrange your textured beads on a baking sheet lined with parchment paper or cardstock. Bake according to the manufacturer’s instructions for your specific brand of clay, then let them cool completely.
Fixing squashed beads
If your bead flattens while texturing, pop it in the fridge for 10 minutes to harden slightly before trying again with lighter pressure.
Step 2: Assembling the bracelet
-
Prepare the center cord:
Cut a piece of cord approximately 12 inches long. Melt one end slightly with a lighter and tap it (carefully!) to form a needle-like point for easier threading. -
Plan your pattern:
Lay out your bead design on a mat. The image uses a pattern alternating between black lava beads, your new textured green clay beads, and smooth dark green stone beads. Try grouping two similar beads together for visual rhythm. -
Thread the beads:
String your beads onto the center of the cord following your planned pattern. Ensure the textured lines of your clay beads are oriented perpendicular to the cord for the best look. -
Secure the ends:
Once all beads are strung, verify the length fits the wrist. Tie a simple overhand knot tightly against the beads on both ends to keep them centered and secure.
Step 3: Creating the sliding closure
-
Form the loop shape:
Bring the two excess tail ends of the cord together so they overlap and run parallel to each other, forming a circle with the bracelet. -
Start the macramé knot:
Cut a separate piece of cord about 10 inches long. Place it under the two parallel tail cords. Tie a simple knot firmly around both tail cords to anchor it. -
Knot the closure:
Create a series of square knots (macramé) over the tail cords. Take the right strand over the center, left strand over the right, under the center, and up through the loop on the right. Pull tight. Repeat starting with the left strand. -
Finish the sliding knot:
Continue knotting for about half an inch. Trim the excess ends of the knotting cord (not the bracelet tails!) and carefully melt the tips with a lighter to fuse them into the knot body. -
Add stopper beads:
Thread a small bead onto the very end of each bracelet tail cord. This prevents the cord from slipping out of the sliding knot mechanism. -
Final trim:
Tie a knot below each stopper bead, trim the remaining excess cord, and heat-seal the very tips to prevent fraying.
Scent diffuser upgrade
Add a drop of essential oil like cedarwood or pine to the black lava beads. They act as natural diffusers, carrying a forest scent all day.
Enjoy wearing your handcrafted piece that perfectly balances rugged texture with refined style
Faux Stone and Marble Clay Beads
This masculine bracelet mimics the rugged look of lava rock and the sophisticated veins of marble, all achieved with polymer clay. It’s a stylish, adjustable accessory that balances rough textures with smooth finishes.
Detailed Instructions
Materials
- Black polymer clay
- White polymer clay
- Translucent polymer clay (optional, for depth)
- Beige or sand-colored polymer clay
- Coarse sea salt or sandpaper (for texture)
- Needle tool or toothpick
- Black nylon cord (0.8mm or 1mm)
- Small silver spacer beads or washers (approx. 4mm)
- Acrylic roller or pasta machine
- Tissue blade
- Oven/toaster oven
- Baking sheet/tile
- Scissors
Step 1: Creating the Faux Lava Beads
-
Condition the clay:
Start by conditioning a block of black polymer clay until it is soft and pliable in your hands. -
Roll spheres:
Pinch off equal-sized pieces of clay, roughly the size of a pea, and roll them into smooth balls between your palms. Aim for about 8-10 mm in diameter. -
Add texture:
To create the pitted ‘lava’ effect, roll your black clay spheres in coarse sea salt. Press the salt gentle into the surface so it leaves deep indentations. -
Refine the surface:
Alternatively, you can poke the surface repeatedly with a stiff toothbrush or a needle tool to create random, rough holes without using salt. -
Pierce the holes:
Carefully insert a needle tool or toothpick through the center of each bead to create the stringing hole, twisting as you push to avoid squashing the shape.
Step 2: Creating the Marble and Solid Beads
-
Prep marble colors:
Condition a chunk of white clay and a very small amount of black clay. You want a ratio of roughly 20 parts white to 1 part black. -
Create the veins:
Roll the black clay into thin, snake-like threads. Chop the white clay into irregular chunks. -
Combine and twist:
Wrap the thin black threads around the white chunks, then squash them all together into a log. Twist the log like a candy cane. -
Fold and roll:
Fold the twisted log in half and roll it out again. Repeat this twisting process just once or twice—stop before the colors blend into grey. You want distinct streaks. -
Form marble beads:
Cut segments from your marbled log and roll them into spheres matching the size of your black lava beads. -
Make solid accent beads:
Take your sand or beige-colored clay and roll several smooth, solid-colored spheres. Keep these matte and untextured for contrast. -
Finish bead prep:
Pierce holes through the marble and beige beads just as you did with the lava ones.
Sticky Situation?
If your white clay is picking up lint or dirt, clean your hands and work surface with a baby wipe or rubbing alcohol before handling the lighter colors.
Step 3: Baking and Assembly
-
Bake the beads:
Arrange all beads on a baking tile or sheet. Bake according to your clay manufacturer’s instructions (usually 275°F/135°C for 30 minutes). -
Remove salt (if used):
Once the black beads have cooled completely, soak them in a bowl of warm water to dissolve the salt crystals, revealing the pitted texture. -
Cut the cord:
Cut a piece of black nylon cord roughly 12 inches long. This gives you plenty of room for knotting. -
Plan the pattern:
Lay out your beads on a table. A great pattern matches the photo: a section of black lava beads, followed by a beige bead, a marble bead, and so on. -
String the beads:
Thread the beads onto the cord. Insert the small silver spacer beads specifically between the marble and beige beads to add a touch of metallic shine. -
Create the sliding knot:
Bring the two tail ends of the cord together, overlapping them. Cut a separate 4-inch piece of cord to create a square knot macramé closure over the overlapped tails. -
Secure the closure:
Tie about 4-5 square knots to create the sliding mechanism. Trim the excess from the knotting cord and carefully melt the tips with a lighter or use a dab of glue. -
Final knots:
Tie a simple overhand knot at the very end of each cord tail to prevent them from slipping through the closure.
Pro Tip: Better Holes
Make your bead holes slightly larger than you think you need. Clay shrinks slightly when baked, and trying to force a thick cord through a tiny hole is frustrating.
Now you have a rugged, stackable bracelet that looks like real stone but carries the personal touch of handmade craftsmanship
Glow-in-the-Dark Accent Strip Bracelet
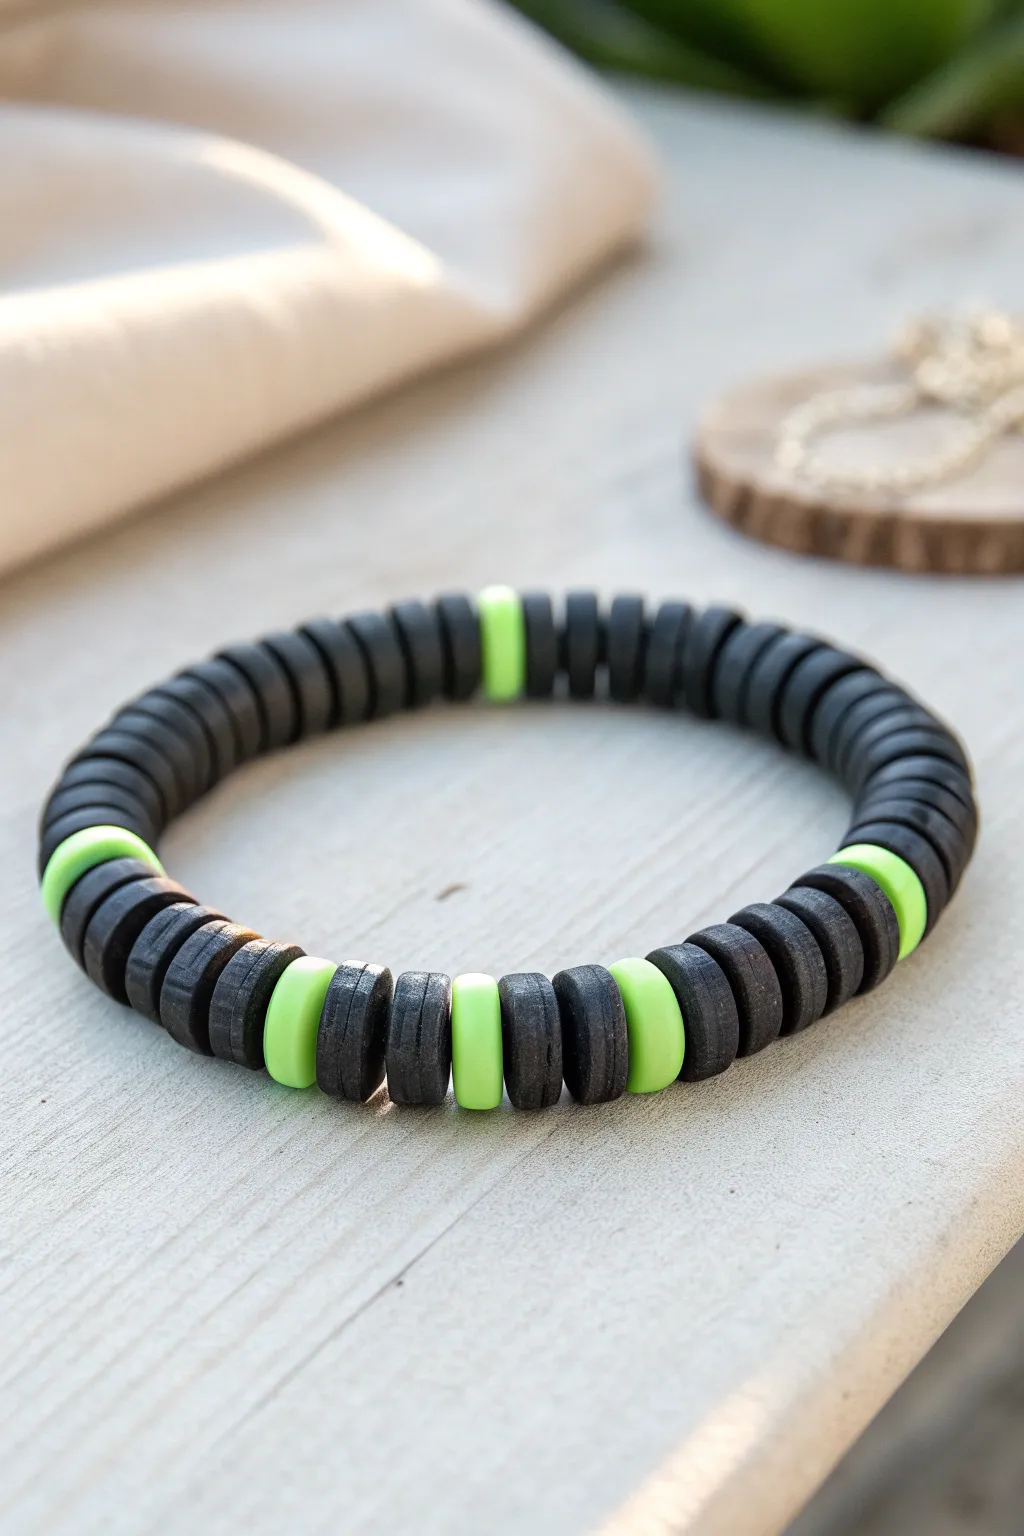
This trendy stacker combines rugged charcoal black discs with electric lime accents that really pop against the dark tones. The flat heishi-style beads give it a modern, surfer-cool vibe that’s perfect for everyday wear.
How-To Guide
Materials
- Black polymer clay heishi beads (6mm or 8mm)
- Lime green (or glow-in-the-dark) polymer clay heishi beads
- Strong elastic stretch cord (0.8mm)
- Jewelry glue or clear nail polish
- Scissors
Step 1: Planning and Setup
-
Measure your wrist:
Before you start stringing, wrap a piece of string around the wrist that will wear the bracelet. Mark the spot where it overlaps comfortably, then measure that length against a ruler. Add about half an inch to this measurement to account for the bulk of the beads. -
Prepare the elastic:
Cut a length of your stretch cord about 3-4 inches longer than your final measurement. This extra length is crucial for tying a secure knot later without struggling against tension. -
Pre-stretch the cord:
Give your cut piece of elastic a few gentle tugs. Pre-stretching helps prevent the bracelet from sagging or becoming loose after the first few times you wear it. -
Secure the end:
Place a piece of tape over one end of the cord or attach a binder clip. This acts as a stopper so your beads don’t slide right off while you work.
Sticky Situation?
If the bead holes are too small for the knot to hide inside, don’t force it. Just trim the elastic ends to about 2mm; the dark cord will blend in with the black beads.
Step 2: Creating the Layout
-
Establish the main pattern:
This design relies on an irregular, organic rhythm rather than a perfect mathematical sequence. Start by threading on a large section of the black beads, roughly 1.5 to 2 inches long. -
Add first accent:
Slide on a single lime green bead. This creates a sharp, high-contrast break in the dark column. -
Continue the dark section:
Add another segment of black beads. Vary the length slightly from the first section; maybe make this one about an inch long for visual interest. -
Create a cluster:
Now, thread on a pattern of alternating beads to create the focal point shown in the image. Thread: 1 Green, 2 Black, 1 Green, 2 Black, 1 Green. -
Resume main color:
Follow that cluster with another solid run of black beads. I usually like to make this section roughly the same length as the very first section needed to complete the circle. -
Add final details:
If you need more length to fit the wrist measurement, add one more single green bead followed by enough black beads to reach your target size.
Step 3: Finishing Touches
-
Check the fit:
Carefully bring the two ends of the elastic together (don’t let go!) and wrap it around the wrist to ensure it sits comfortably. Add or remove a few black beads if necessary. -
The surgeon’s knot:
To tie it off, cross the ends like a normal knot, but loop the top string through twice instead of once. Pull tight. -
Secure the knot:
Tie a second standard overhand knot on top of the first one. Pull all four strands (the two loose ends and the two bracelet sides) firmly to lock everything in place. -
Glue for durability:
Dab a tiny drop of jewelry glue or clear nail polish directly onto the knot. This prevents it from slipping over time. -
Hide the work:
Once the glue is tacky but not fully dry, slide a bead over the knot if the hole is large enough. If not, trim the excess string close to the knot after the glue creates a permanent bond.
Glow Up
Swap the standard lime green beads for glow-in-the-dark polymer clay discs. Charge them under a lamp for a hidden surprise when the lights go out.
Now you have a sleek, modern accessory that looks professionally made and adds a bold edge to any outfit
High-Visibility Neon Pop Bracelet
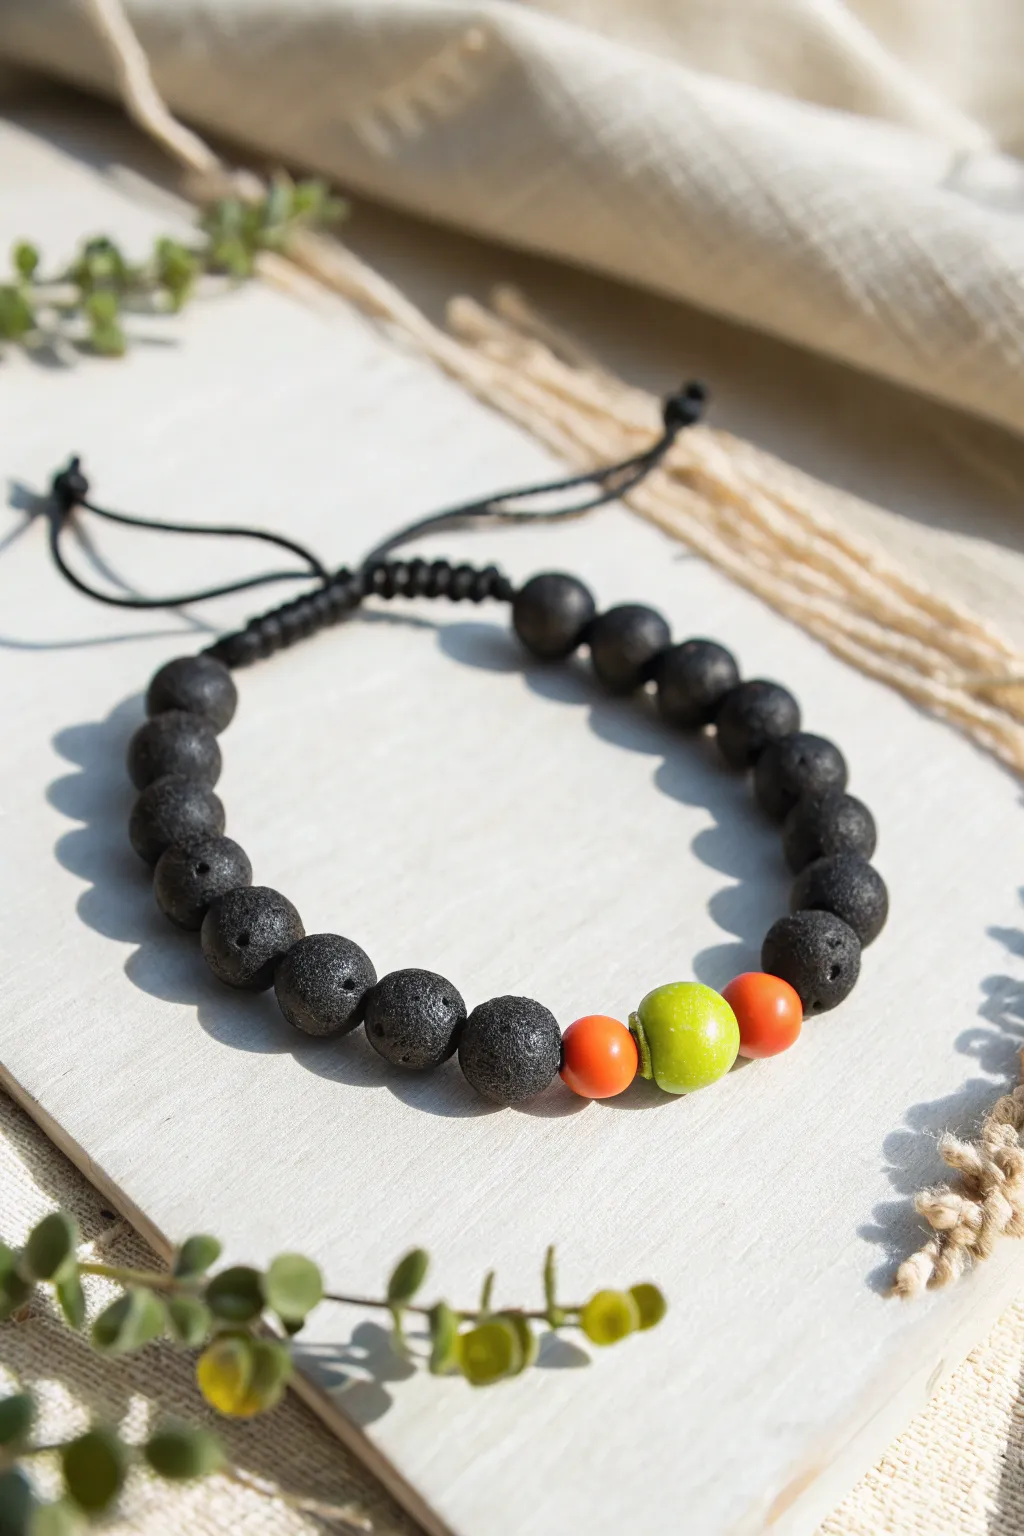
This rugged yet vibrant bracelet combines charred texture with a surprising burst of color, perfect for adding a sporty edge to any outfit. The contrast between the matte black lava stones and the glossy neon clay beads makes for a striking accessory that’s as fun to make as it is to wear.
Step-by-Step Guide
Materials
- Black polymer clay (or black lava stone beads)
- Bright lime green polymer clay
- Bright reddish-orange polymer clay
- Glossy polymer clay glaze
- Black nylon cord (0.8mm or 1mm thickness)
- Toothpick or bead piercing tool
- Baking sheet and parchment paper
- Scissors
Step 1: Creating the Lava Beads
-
Condition the black clay:
Start by warming up a chunk of black polymer clay in your hands until it is soft and pliable. -
Portion the beads:
Roll the clay into a long snake about 1/2 inch thick, then cut it into approximately 18-20 equal segments to ensure your beads are uniform in size. -
Shape the spheres:
Roll each small segment between your palms to create smooth, round spheres. -
Texture the surface:
To mimic the look of real lava stone, take a toothpick or a rough piece of sandpaper and gently poke or press into the surface of each black bead. Don’t smooth it out; you want that pitted, organic texture. -
Pierce the holes:
Carefully insert a toothpick or piercing tool through the center of each bead. I like to twist the tool as I push to prevent the bead from squishing out of shape.
Hole distortion?
If your beads squish when piercing, let the plain clay balls sit in the fridge for 15 minutes to firm up before making holes.
Step 2: Making the Neon Accents
-
Form the center bead:
Take a piece of lime green clay, slightly larger than your black segments, and roll it into a smooth ball. This will be the focal point. -
Create the side accents:
Roll two smaller balls using the reddish-orange clay. These should be roughly the same size as your black lava beads. -
Pierce the accent beads:
Just like with the black beads, carefully pierce holes through the center of these three colored beads. Ensure the holes are wide enough for your cord. -
Bake the beads:
Arrange all your beads on a baking sheet lined with parchment paper. Bake according to your clay package instructions (usually around 275°F for 15-30 minutes). -
Glaze the neon:
Once cool, apply a coat of glossy glaze only to the green and orange beads to make them shine and stand out against the matte black.
Scent Infusion
Since the black beads are textured like lava stone, place a drop of essential oil on them after baking to turn the bracelet into a diffuser.
Step 3: Assembly & Knotting
-
Prepare the cord:
Cut a piece of black nylon cord about 24 inches long. Stiffening the ends with a dab of glue or clear nail polish makes threading much easier. -
String the pattern:
Thread approximately 9 black beads, followed by one orange, the large green center bead, the second orange bead, and finally the remaining 9 black beads. -
Check the fit:
Wrap the strung beads around your wrist to check the size. Add or remove black beads if necessary so the ends almost meet. -
Prepare for closure:
Bring the two ends of the cord together so they overlap parallel to each other. You will tie a sliding knot over these two overlapped strands. -
Tie the sliding knot:
Cut a separate 10-inch piece of cord. Lay it under the overlapped main cords and tie a series of square macramé knots (or a ‘cobra stitch’) around them for about half an inch. -
Secure the closure:
Pull the knot tight, trim the excess tails of the knotting cord (not the main bracelet production cords), and carefully melt the tips with a lighter or seal with glue. -
Finish the tails:
Tie a simple overhand knot at the very end of each main drawcord tail to prevent them from slipping through the closure.
Now you have a durable, stylish accessory ready for everyday wear
Interchangeable Mix-and-Match Bead Set
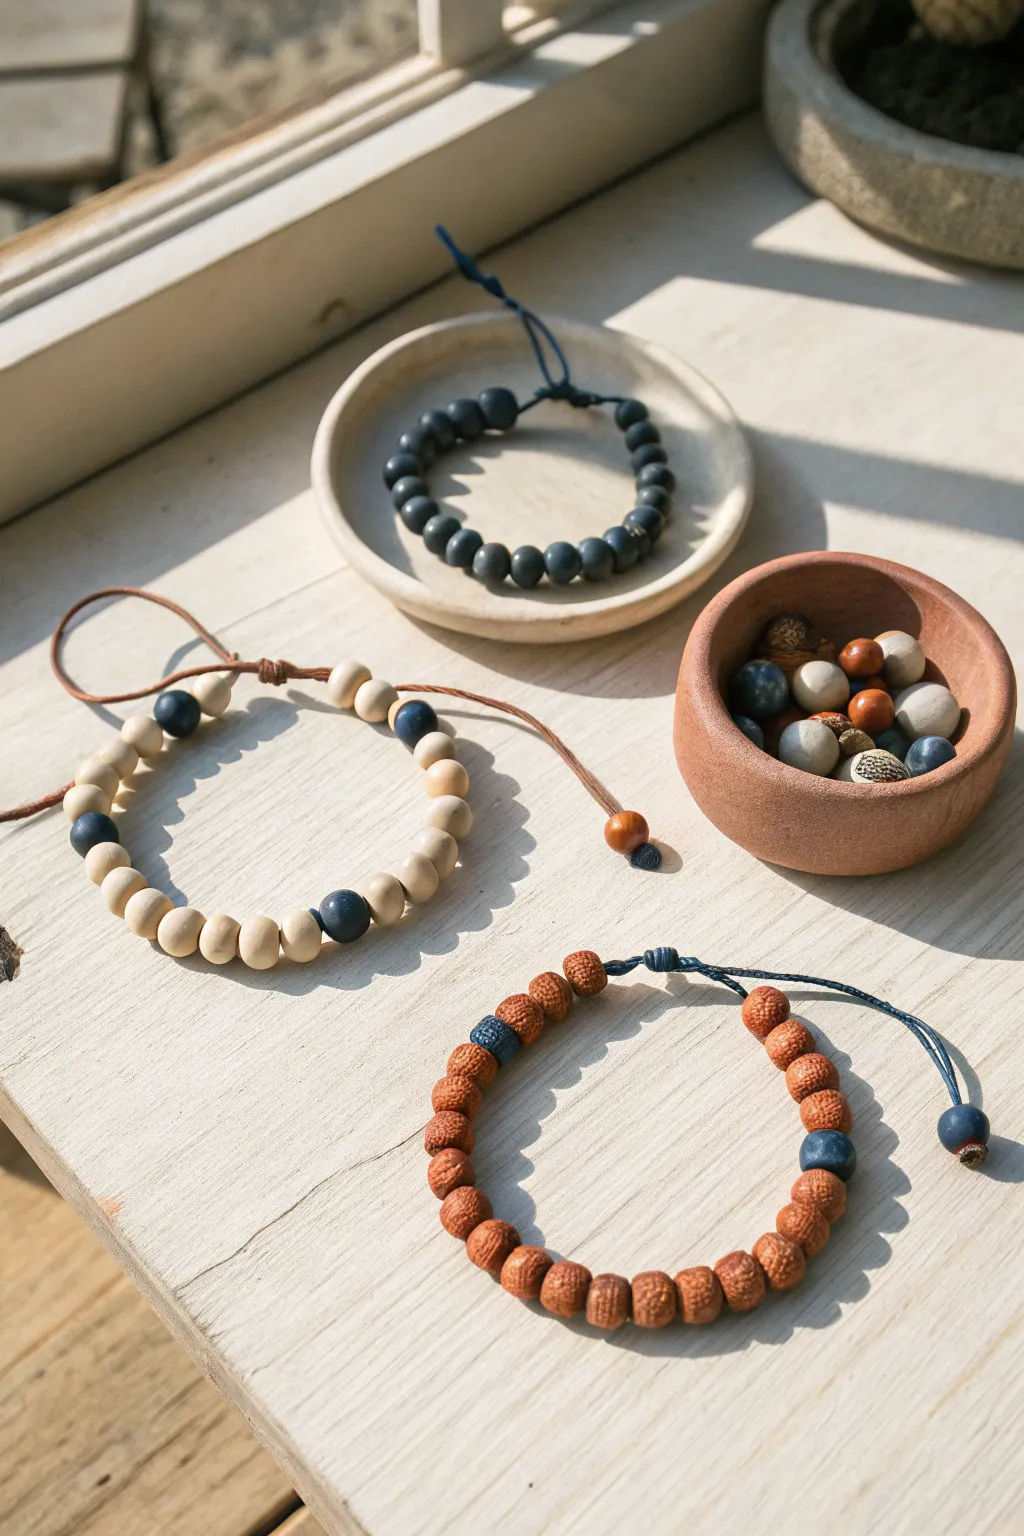
These simple, handsome bracelets combine earthy tones with adjustable sliding knots for a rugged look that appeals to boys of all ages. By creating a mix of textured clay beads in dark grey, natural cream, and terracotta hues, you can design a versatile collection perfect for mixing and matching.
How-To Guide
Materials
- Polymer clay (colors: dark charcoal/slate, creamy beige, terracotta/rust brown, navy blue)
- Hemp cord or waxed cotton cord (1mm thickness, in brown and navy blue)
- Toothpicks or a bead piercing tool
- Baking sheet with parchment paper
- Oven (for baking clay)
- Texturing tool (rough sandpaper, toothbrush, or a dried orange peel)
- Scissors
Step 1: Prepping and Shaping Beads
-
Condition the Clay:
Begin by working your polymer clay in your hands until it becomes soft and pliable. Start with the creamy beige color to avoid transferring darker pigments to it. -
Roll Uniform Spheres:
Pinch off small amounts of clay and roll them into smooth balls between your palms. You are aiming for a size slightly larger than a pea, roughly 8-10mm in diameter. -
Create the Color Palette:
Repeat the rolling process for the dark charcoal clay and the terracotta clay. For the project shown, you will need about 20 beige beads, 20 dark grey beads, and 20 terracotta beads. -
Make Accent Beads:
Create a few smaller accent beads in navy blue. For the terracotta bracelet, roll a slightly flattened cylindrical bead in blue to act as a focal point. -
Texture the Beads:
This is crucial for that organic, non-plastic look. Gently roll your beads over a rough surface like coarse sandpaper or lightly press a toothbrush against them to create a pitted, stone-like texture. I like to keep the texture subtle but visible.
Step 2: Piercing and Baking
-
Pierce the Holes:
Using a toothpick or piercing tool, carefully bore a hole through the center of each bead. Rotate the bead as you push the tool through to prevent it from flattening. -
Check Hole Size:
Verify that your cord fits through the designated holes. The hole needs to be wide enough for the cord to pass through easily, especially for the sliding knot mechanism later. -
Bake the Clay:
Arrange the beads on a parchment-lined baking sheet. Bake according to your clay manufacturer’s specific instructions (usually around 275°F or 135°C for 15-30 minutes). -
Cool Down:
Allow the beads to cool completely before handling. The clay hardens fully as it cools.
Sticky Situation?
If fingerprints are visible on your clay beads before baking, lightly brush them with a tiny amount of baby oil or cornstarch to smooth them out perfectly.
Step 3: Assembly and Knots
-
Cut the Cord:
Cut a length of cord about 12-14 inches long. Use brown cord for the cream bracelet and navy blue cord for the terracotta and dark grey ones. -
Design the Cream Bracelet:
Thread the cream beads onto the brown cord, interspersing a navy blue accent bead every five or six cream beads. Create a symmetrical pattern. -
Design the Dark Grey Bracelet:
String the dark charcoal beads onto a navy blue cord. Keep this one simple and monochromatic for a sleek, modern look. -
Design the Terracotta Bracelet:
Thread the textured terracotta beads onto a navy blue cord. Place the special blue cylindrical accent bead in the center or slightly offset. -
Tie End Knots:
Once beads are centered, tie a simple overhand knot on each side of the bead group to keep them in place on the central part of the cord. -
Create the Sliding Closure:
Bring the two tail ends of the cord together so they overlap. Cut a separate piece of cord (about 4 inches). -
Knot the Slider:
Tie a series of square knots (macrame style) around the overlapping tails using the separate piece of cord. Typically, 3 or 4 square knots are sufficient. -
Finish the Ends:
Trim the excess cord from your square knots and secure with a tiny dab of glue if needed. Tie small stopper knots at the very ends of the main cord tails, perhaps adding a small spare bead before the knot for decoration.
Level Up: Essential Oils
Make these functional diffuser jewelry! Use porous lava beads for the black accents, or leave the terracotta unsealed so it can absorb drops of essential oil.
Now you have a rugged, stylish set of bracelets ready to be worn together or swapped out depending on the day’s outfit
Mini Robot or Monster Clay Bead Feature
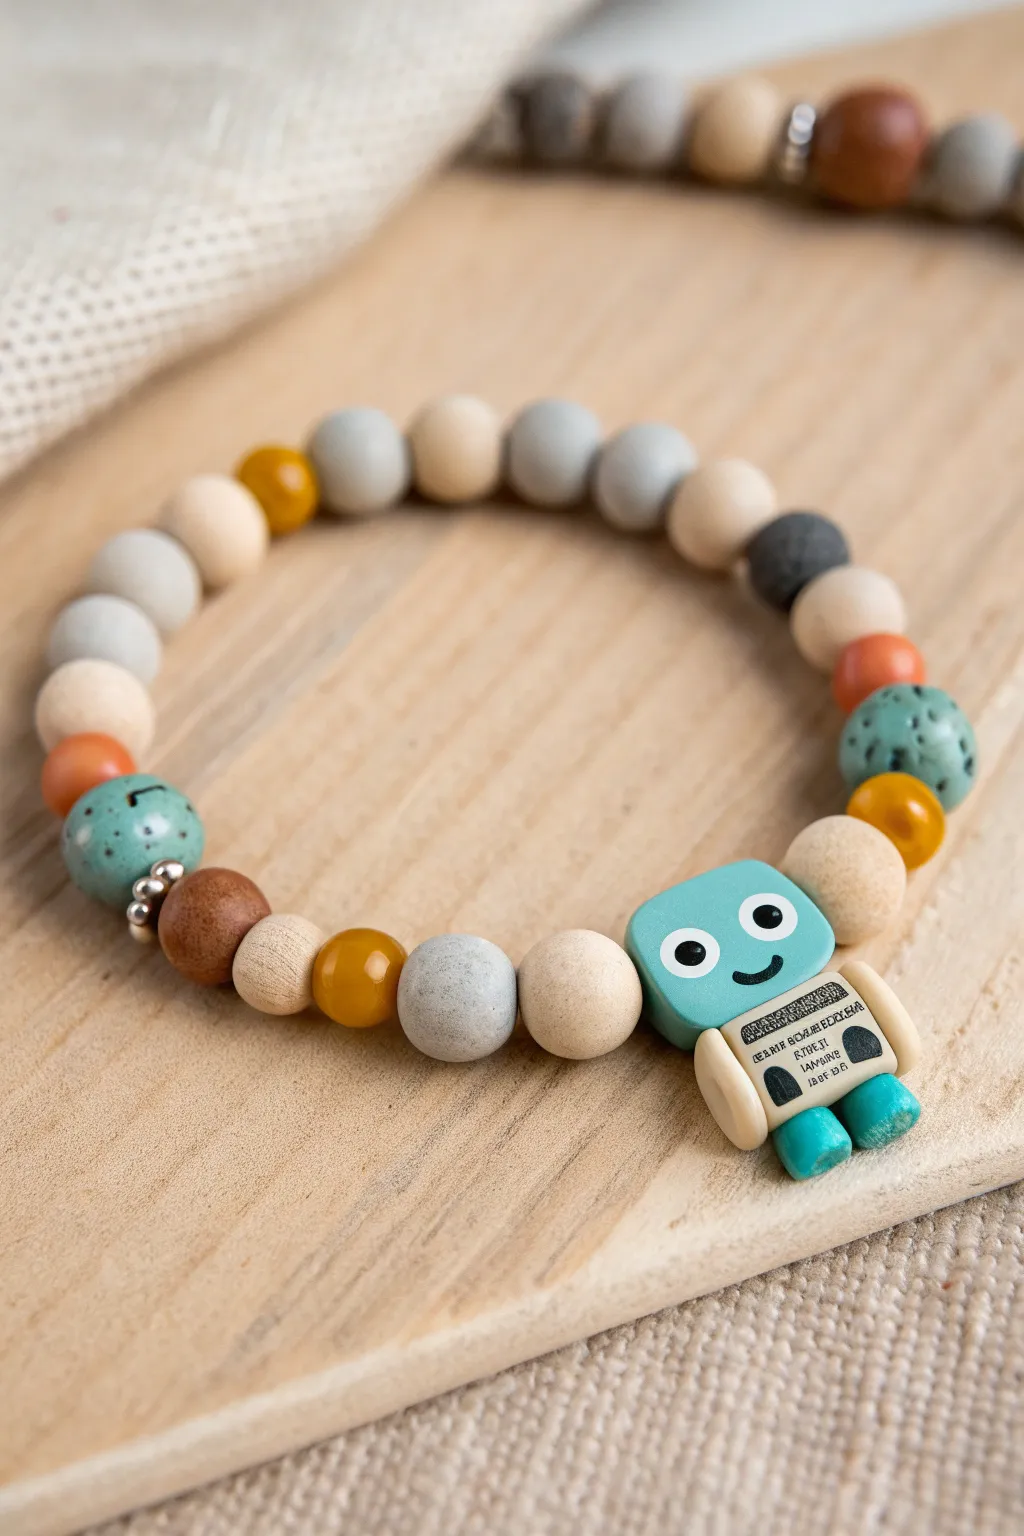
This charming bracelet combines natural earthy tones with a playful, retro-tech vibe thanks to its custom polymer clay robot centerpiece. It’s a tactile accessory that mixes smooth wooden textures with the matte finish of handmade clay components, perfect for tech-loving kids.
Step-by-Step Tutorial
Materials
- Polymer clay (teal/turquoise, cream/beige, white, black)
- Wooden beads (assorted sizes: 8mm-12mm, round and natural finish)
- Ceramic or speckled stone beads (teal and grey)
- Spacer beads (small silver metal)
- Elastic beading cord (0.8mm or 1mm)
- Clay sculpting tools (needle tool, small blade)
- Black acrylic paint or fine-point permanent marker
- High-gloss varnish (optional for robot eyes)
- Super glue (cyanoacrylate)
- Toothpick or beading needle
Step 1: Sculpting the Robot Centerpiece
-
Form the head base:
Start by conditioning a small block of teal polymer clay. Shape it into a soft square or ‘squircle’ (rounded square) about 1.5cm wide. Flatten it slightly so it isn’t too bulky on the wrist. -
Create the face details:
Using a tiny ball tool or the end of a paintbrush, make two indentations for eyes. Press small flat circles of white clay into these spots, then top them with even smaller black clay dots for pupils. -
Add the smile:
Roll a microscopically thin snake of black clay. Use a needle tool to gently curve it into a smile and press it onto the face below the eyes. -
Build the body block:
Form a slightly smaller rectangle from cream or beige clay for the robot’s torso. This should be roughly the same width as the head but shorter. Flatten the bottom edge so it sits flush. -
Add tech detailing:
On the cream torso, add a small black rectangle of clay for a ‘screen’. You can gently etch horizontal lines into it with a needle tool for a vented look, or use a tiny stamp if you have one. -
Form the limbs:
Roll two small cylinders of the same cream clay for arms and attach them to the sides of the body. For feet, create two small teal cylinders (matching the head color) and attach them to the bottom of the torso. -
Create the heavy joining holes:
This is crucial: The robot acts as a large bead. Carefully pierce a hole horizontally through the entire robot structure (through the side of the head or upper torso depending on balance). Ensure the hole is wide enough for your elastic cord. -
Bake the robot:
Place your assembled robot on a tile or parchment paper. Bake according to your polymer clay package instructions (usually 275°F/135°C for 15-30 minutes). Let it cool completely before handling. -
Add text details (optional):
Once cool, use a super-fine permanent marker or a thin brush with black paint to add tiny ‘code’ or text details on the cream body panel for that authentic mechanical look.
Structural Integrity
Insert a short piece of wire into the robot’s neck and legs before baking. This internal armature keeps the head and feet from snapping off during active wear.
Step 2: Assembling the Bracelet
-
Prepare the cord:
Cut a length of elastic cord about 10-12 inches long. I always like to prestretch the elastic by pulling it firmly a few times; this prevents the bracelet from sagging later. -
Secure one end:
Place a piece of tape or a bead stopper on one end of the cord so your beads don’t slide off while you work. -
Start the pattern:
Begin threading your beads. Start with the two large pale wooden beads that will flank the robot. Thread them on first, leaving space in the middle for the main event. -
Add the robot:
Thread your cooled robot bead onto the cord. Since the robot is the focal point, ensure it is facing outward correctly. -
Alternate textures:
Continue beading on either side of the robot. Create a random but balanced pattern. Mix the natural wood beads with grey stone beads and the speckled teal ceramic beads to echo the robot’s colors. -
Insert accent colors:
Intersperse a few mustard yellow and burnt orange beads to add warmth. These pop beautifully against the cool grey and teal tones. -
Use spacers:
Place the small silver metal spacer beads next to the darker wood or teal beads. This adds a tiny industrial touch that matches the robot theme. -
Check the sizing:
Wrap the strand around your wrist (or a sizing cone) to check the fit. Add or remove wooden filler beads at the back of the design until fit is perfect. -
Tie the knot:
Remove the tape/stopper. Tie the ends together using a surgeon’s knot (loop it through twice before pulling tight). Pull the knot very tight. -
Secure and hide:
Add a tiny drop of super glue to the knot. Once dry, trim the excess cord and gently tug the cord so the knot slides inside one of the larger wooden beads to hide it.
Glow Up
Use glow-in-the-dark polymer clay for the robot’s eyes or the ‘screen’ on its chest. Detailed painting over the glow clay creates a fun surprise in the dark.
Now you have a charming, rustic-meets-tech accessory that is ready for everyday adventures