
Whenever I need a mood-boosting clay session, I head straight under the sea—it’s basically an excuse to use all the color, texture, and tiny details. These ideas are beginner-friendly, displayable, and perfect for building that vibrant ocean floor look without overthinking it.
Classic Ocean Relief on a Blue Background
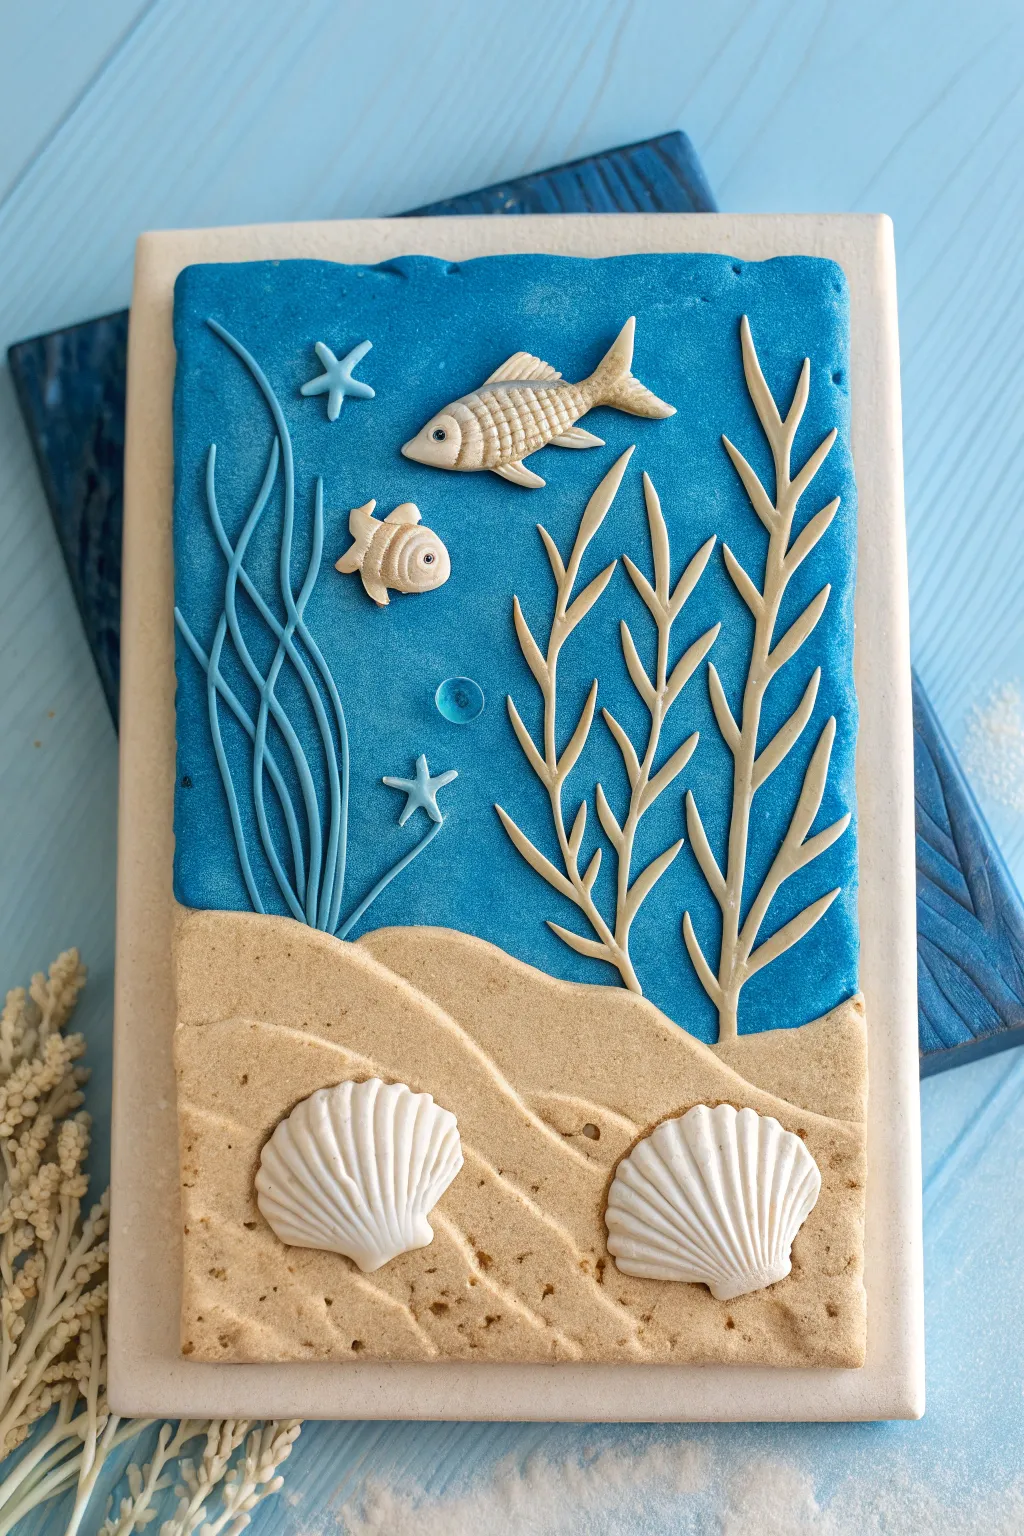
This charming polymer clay relief project captures specific textures of the deep sea using simple tools. By layering textured sandy dunes against a vibrant blue backdrop, you’ll create a framed underwater window perfect for coastal decor.
Detailed Instructions
Materials
- White or cream polymer clay (base slab)
- Blue polymer clay (ocean water)
- Beige or sand-colored polymer clay (seabed)
- White polymer clay (shells and fish)
- Clay roller or pasta machine
- Texture tools (needle tool, ball stylus, toothbrush or sandpaper)
- Scalpel or craft knife
- Liquid polymer clay or bake-and-bond
- Oven and baking sheet
- Optional: Small blue glass marble or bead (bubble detail)
Step 1: Setting the Stage
-
Prepare the base:
Roll out a thick slab of white or cream clay to approximately 5×7 inches to serve as your canvas. Ensure it is smooth and even, about a quarter-inch thick. -
Create the ocean background:
Roll a sheet of blue clay slightly thinner than your base. Place it over the top two-thirds of the white slab. Trim the sides to match the base perfectly. -
Texture the water:
Using a piece of sandpaper or a stiff toothbrush, gently press texture into the entire blue surface to give it a matte, watery grain rather than a shiny finish. -
Form the seabed:
Roll out beige clay and cut a wavy, organic line across the top. Layer this over the bottom third of the slab, overlapping the blue clay slightly to create the ocean floor. -
Add sand dunes:
To create depth, add a second, smaller wavy strip of beige clay on top of the first layer. Smooth the bottom edges down but leave the top wavy edge raised for a dune effect. -
Texture the sand:
Stipple the beige clay vigorously with a stiff brush or crumpled foil to mimic the coarse texture of sand.
Uneven Dunes?
If your sand layers aren’t blending well, apply a tiny smear of liquid polymer clay or baby oil between the layers before texturing to help them fuse without seams.
Step 2: Sculpting the Residents
-
Sculpt the large fish body:
Model a flat, teardrop shape from white clay for the main fish. Pinch the tail end to define the fin shape and place it near the top center. -
Detail the large fish:
Use a needle tool to impress a cross-hatch pattern on the body for scales. Add a small clay ball for the eye, poking the center for a pupil. Score lines into the dorsal and tail fins. -
Create the small fish:
Form a smaller, rounder fish shape from beige or white clay. Place it below and to the left of the larger fish. Add vertical stripe indentations for texture. -
Make the starfish:
Cut or mold two small five-pointed stars from light blue clay—one near the surface and one deeper down. Gently press the center of each arm with a needle tool. -
Add the bubble:
Press a small transparent blue glass bead or a tiny ball of translucent blue clay into the background near the center to act as a rising air bubble.
Step 3: Flora and Shells
-
Roll seaweed coils:
Roll very thin, long snakes of blue clay. Arrange them on the left side of the panel, curving them upwards to look like swaying seagrass. -
Cut branched seaweed:
Roll a thin sheet of cream-colored clay. Use a scalpel to freehand cut detailed, branching coral or seaweed shapes. I find lifting these delicate pieces with the knife blade helps prevent distortion. -
Place the seaweed:
Arrange the branched cream seaweed on the right side, pressing them gently onto the blue background so they adhere without smashing the texture. -
Mold the scallop shells:
Create two fan shapes from white clay. Use a modeling tool handle or a knife to press deep, radiating grooves from the bottom center to the wide outer edge. -
Position the shells:
Place the two large shells on the sandy bottom, angled slightly outward. Ensure the ridges are distinct and deep to catch shadows.
Level Up: Glossy Water
After baking, apply a layer of UV resin or glossy water-based varnish only to the blue background and the bubble for a realistic wet look.
Step 4: Final Touches
-
Inspect the edges:
Run your finger or a smooth tool around the outer perimeter of the rectangular block to tidy up any overlapping layers. -
Bake the project:
Bake according to your clay manufacturer’s instructions (usually 275°F/130°C for 15-30 minutes). Let it cool completely before handling.
Display your finished ocean relief on a small easel or mount it in a shadow box to bring a permanent piece of the beach into your home
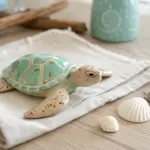


Coil-and-Curl Octopus Focal Piece
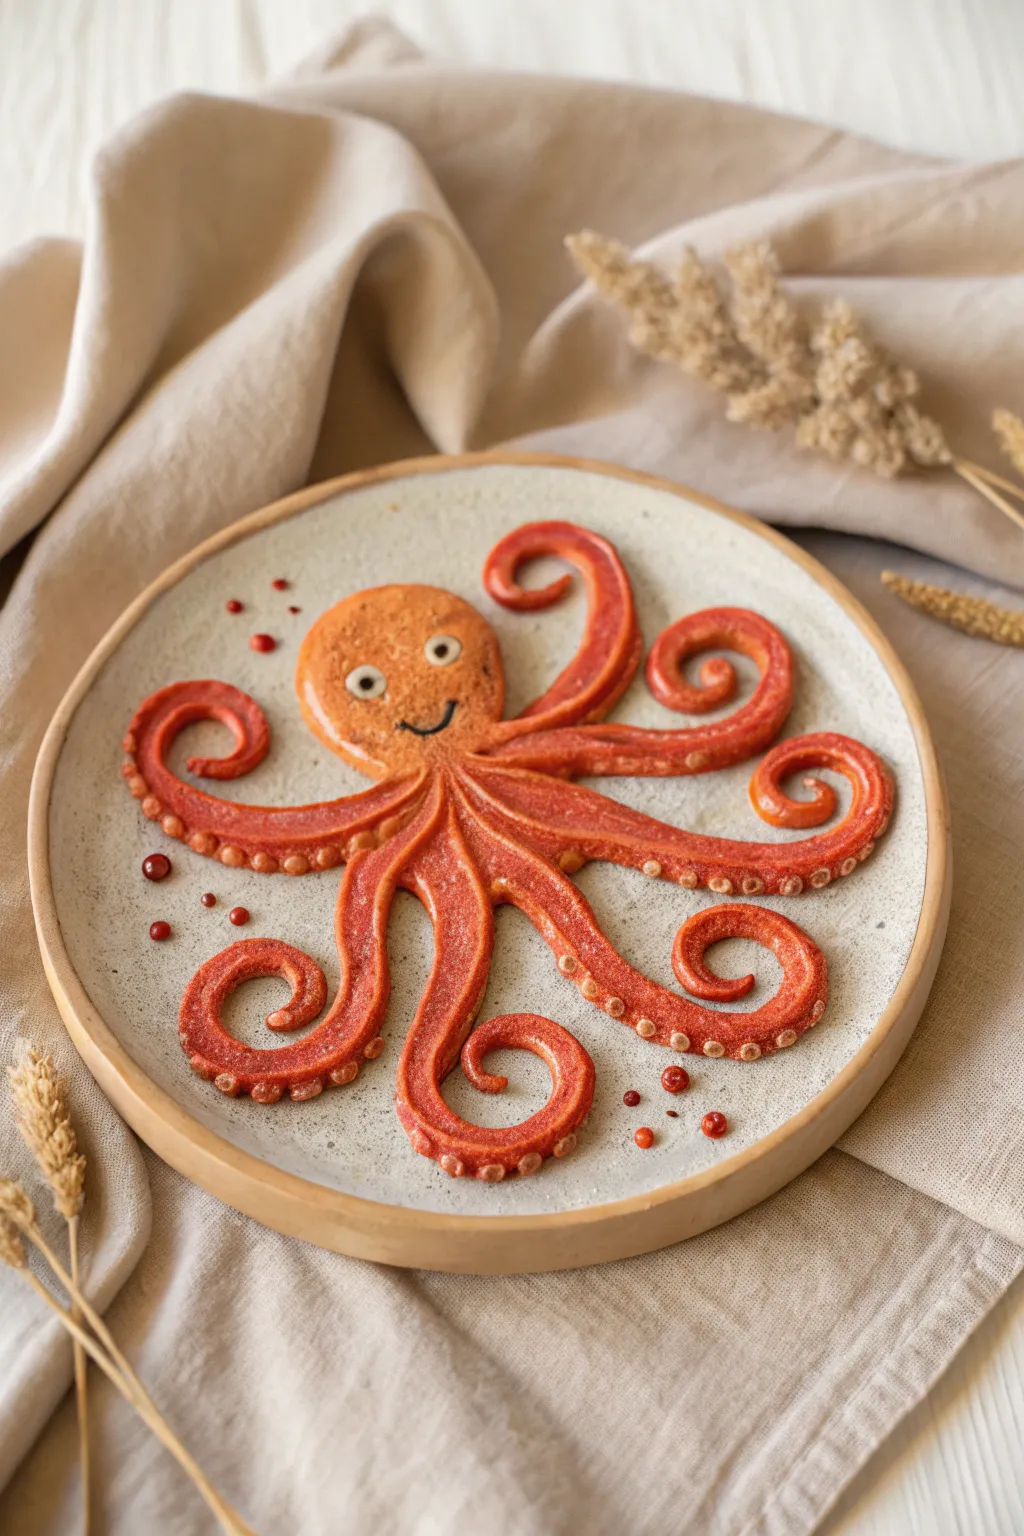
Bring the ocean floor to your crafting table with this delightful relief sculpture featuring a cheerful octopus with spiraling tentacles. Using simple coiling techniques and textural details, you’ll create a lively character that seems to dance right off its ceramic backing.
How-To Guide
Materials
- Orange polymer clay (or air-dry clay)
- Small amount of white clay
- Tiny amount of black clay
- Red clay or reddish-orange soft pastel chalk (for shading)
- Round ceramic plate or wooden disc (approx. 6-8 inches)
- Clay carving tools (needle tool, small ball stylus)
- Acrylic rolling pin
- Liquid clay adhesive (optional)
- Gloss varnish
Step 1: Preparation and Base Shape
-
Prepare your surface:
Clean your ceramic plate or wooden disc thoroughly to ensure the clay adheres well. If using wood, you might want to seal it first. -
Condition the clay:
Knead your orange clay until it is soft, pliable, and free of cracks. Warm clay is much easier to coil without breaking. -
Create the head:
Roll a medium-sized ball of orange clay and flatten it slightly into an oval shape. Press this onto the upper center of your plate to form the octopus’s head, smoothing the edges down.
Step 2: Forming the Tentacles
-
Roll the coils:
Roll out eight long, tapered snakes of orange clay. Make them thicker at the base (where they attach to the head) and thinner at the tips. -
Attach the first arms:
Starting from the bottom of the head, press the thick ends of the first two tentacles into place. Shape them to flow outward and curl dramatically at the ends. -
Create movement:
Continue attaching the remaining arms, arranging them in a radial pattern. Twist and curl each one differently—some spiraling tightly like a snail shell, others waving gently. -
Seamless blending:
Use a clay modeling tool or your finger to smooth the seams where the tentacles meet the head, creating a unified body shape.
Loose Tentacles?
If tentacles won’t stick to the plate, apply a thin layer of liquid clay or white glue under them before positioning.
Step 3: Adding Texture and Detail
-
Make the suction cups:
Roll tiny balls of orange clay. Press these onto the underside or side of each tentacle, flattening them slightly with a small ball stylus to create the cup center. -
Texturize the skin:
I find that gently dabbing the main surface with a coarse sponge or crumpled foil gives the skin a lovely, organic, slightly bumpy texture. -
Add shading:
If using polymer clay, brush a little shaved reddish pastel chalk along the edges of the tentacles and heavily textured areas to deepen the color. -
Create bubbles:
Roll several tiny balls of reddish or orange clay and scatter them around the octopus on the plate to look like rising bubbles. Press them flat.
Go Glittery
Mix a pinch of iridescent mica powder into your orange clay before rolling for a shimmering, magical sea creature effect.
Step 4: The Face and Finishing
-
Form the eyes:
Press two small, flattened circles of white clay onto the head. Add tiny black pupils to the center of each white circle. -
Add the smile:
Roll a very thin thread of black clay and curve it into a smile shape. Press this gently onto the face below the eyes. -
Bake or Dry:
If using polymer clay, bake the plate according to the clay manufacturer’s instructions (usually 275°F/130°C). If using air-dry clay, allow it to dry for 24-48 hours. -
Apply varnish:
Once cool or dry, brush a coat of gloss varnish over the octopus and bubbles to give them a wet, underwater shine.
Now you have a charming sea creature ready to brighten up any room with its happy smile


Friendly Shark or Whale Wall Tile
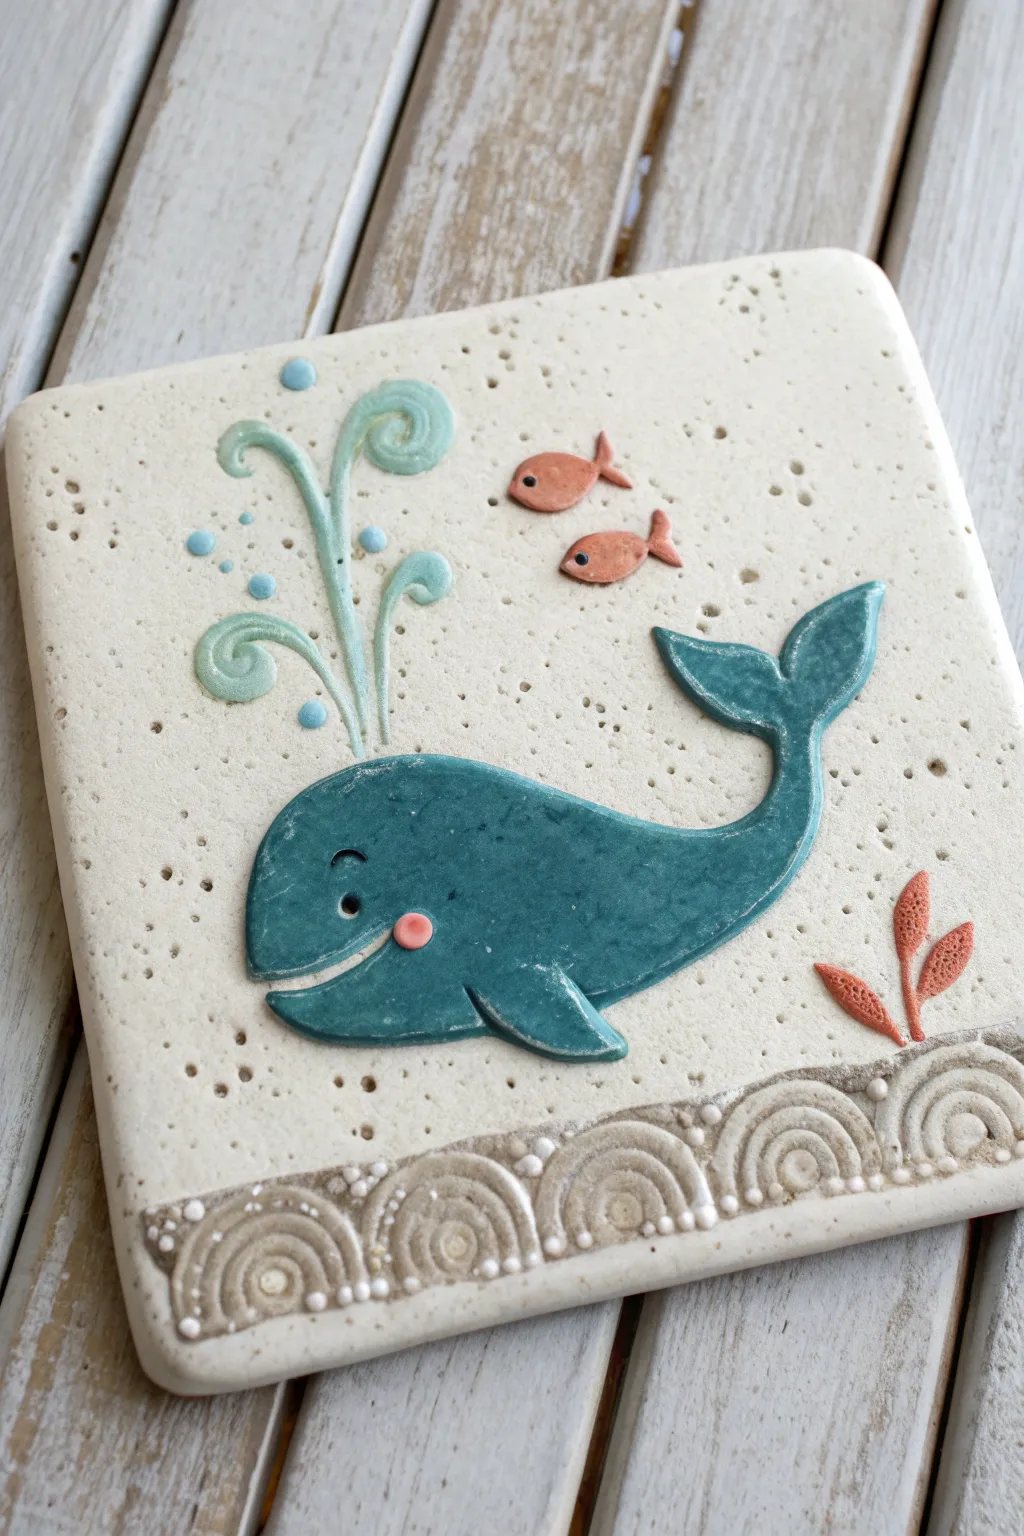
Dive into creativity with this charming ceramic tile featuring a smiling blue whale and his fishy friends. The design uses layered relief techniques and speckled clay for a wonderfully tactile, sandy finish that captures the spirit of the ocean floor.
Step-by-Step Guide
Materials
- White or speckled stoneware clay
- Rolling pin and guide sticks (approx. 1/4 inch thickness)
- Needle tool
- Fettling knife
- Small circular cutters (straws or clay hole punches)
- Slip (clay and water mixture)
- Scoring tool (or serrated kidney)
- Underglazes: Teal/Turquoise, soft pink, coral/orange, pale blue/mint
- Clear matte or satin glaze
- Sponge
- Small paintbrushes
- Texture tools (or household items for impressing)
Step 1: Base Preparation
-
Roll the Slab:
Begin by rolling out a smooth slab of speckled stoneware clay to an even thickness of about 1/4 to 3/8 inch. Cut out a square shape, approximately 6×6 inches, using your fettling knife and a ruler to ensure straight edges. -
Smooth the Canvas:
Gently compress the clay surface with a damp sponge or a soft rib tool. This removes canvas textures and aligns the clay particles which helps prevent warping during drying. -
Round the Corners:
Use your finger or a slightly damp sponge to soften and round off the four sharp corners of the square. This gives the tile a friendlier, softer appearance matching the scene.
Step 2: Sculpting the Scene
-
Create the Waves:
Roll a long, thin coil of clay. Flatten it slightly and attach it across the bottom edge of the tile using the score and slip method. Use a tool or your fingers to press a repeating arch pattern into this strip to mimic rolling waves. -
Add Wave Texture:
Using a small loop tool or a textured stamp, press concentric semi-circles inside each wave arch to add depth. Dot small balls of clay along the top ridge of the waves to look like sea foam. -
Shape the Whale Body:
On a separate piece of thin clay, sketch the outline of the whale’s body, including the tail curved upward. Cut this shape out with a needle tool. -
Attach the Whale:
Score the back of the whale cutout and the center area of the tile where it will sit. Apply slip and firmly press the whale onto the tile, smoothing down the edges slightly to integrate it. -
Form the Flipper:
Cut a small, elongated teardrop shape for the side fin. Attach this near the bottom center of the whale’s body, angling it backward as if swimming. -
Add Facial Details:
Use a needle tool to carve a simple curved smile. Press a small hole for the eye, and attach a tiny flattened ball of clay for a rosy cheek at the corner of the mouth. -
Create the Spout:
Roll three very thin coils of clay. Curl the ends into spirals and arrange them erupting from the top of the whale’s head. Flatten them gently onto the background tile to secure them. -
Fish and Flora:
Cut out two tiny fish shapes and attach them swimming above the whale. Add a small organic shape near the tail for coral or seaweed, pressing texture into the leaves. -
Bubble Accents:
Roll tiny spheres of clay in varying sizes. Press these flat onto the background around the water spout to represent bubbles rising to the surface.
Warping Woes?
Tiles love to warp. Dry very slowly. Place a piece of drywall or a wooden board on top of the tile while it dries to keep it perfectly flat.
Step 3: Decoration & Glazing
-
Bisque Fire:
Allow the tile to dry slowly between two boards or under plastic to prevent corner curling. Once bone dry, bisque fire the piece according to your clay’s specifications. -
Paint the Whale:
Apply 2-3 coats of a teal or deep turquoise underglaze to the whale’s body. Be careful to stay within the raised edges of the relief. -
Detail the Background Elements:
Use a pale mint or light blue underglaze for the water spout swirls. Paint the small fish and the seaweed in coral or soft orange tones. Use a dot of pink for the whale’s cheek. -
Enhance the Waves:
Apply a wash of diluted brown or beige underglaze into the recessed lines of the wave pattern at the bottom, then wipe back the surface with a sponge. This creates an antique, sandy look that highlights the texture. -
Final Glaze:
Once the underglaze is dry, coat the entire tile with a clear matte or satin glaze. I prefer satin as it feels soft to the touch without being too shiny. -
Final Firing:
Fire the tile a second time to the temperature required by your glaze and clay body.
Make it Organic
Don’t over-smooth the background tile. Leave some of the natural clay texture or even press sandpaper into it to mimic a sandy seabed.
Display your finished tile on a plate stand or frame it in a shadow box to bring a splash of ocean joy to your room


Tropical Fish Trio With Bold Stripes
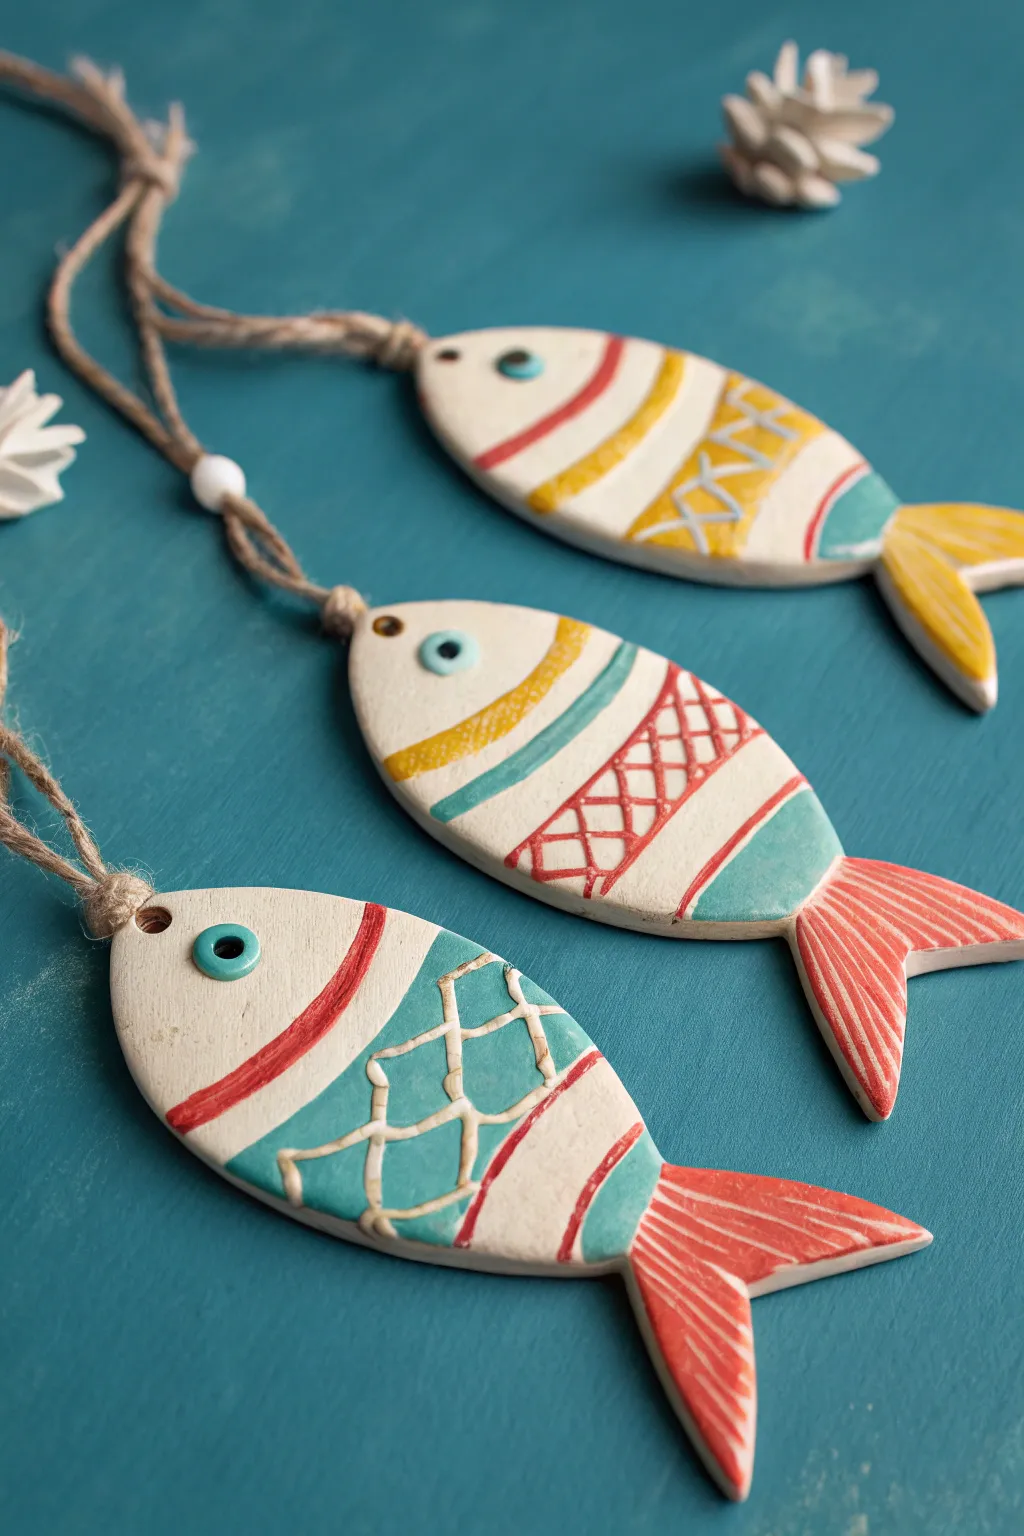
Bring a coastal breeze indoors with this trio of bold, patterned clay fish. With simple shapes and vibrant stripes, these ornaments capture the playful spirit of tropical waters in a rustic, handmade style.
Step-by-Step Tutorial
Materials
- Air-dry clay or white polymer clay
- Rolling pin
- Carving tool or clay knife
- Toothpick or needle tool
- Acrylic paints (red, teal, yellow, white)
- Fine detail paintbrush
- Flat shader paintbrush
- Jute twine or hemp cord
- Matte or satin varnish
- Small white beads (optional)
- Sandpaper (fine grit)
Step 1: Shaping the Catch
-
Roll the clay:
Begin by conditioning a handful of white clay until it is soft and pliable. Roll it out on a smooth surface to an even thickness of about 1/4 inch. -
Cut the silhouette:
Using a clay knife, cut out a simple, elongated almond shape for the fish body. You can freehand this or use a paper template for consistency across all three fish. -
Add the tail:
Cut a separate triangle or forked shape for the tail fin. Score the connection points on both the body and tail, add a dab of water or liquid clay, and press them firmly together to join. -
Smooth the edges:
Dip your finger in a little water and run it along the cut edges of the clay to smooth out any roughness or sharp corners. -
Create the eye:
Use the end of a paintbrush handle or a small straw to press a circular indentation near the front for the eye. Use a smaller tool to make a tiny hole in the center for the pupil. -
Pierce the hanging hole:
Use a toothpick or straw to punch a clean hole through the top edge of the fish’s mouth area. Ensure it is wide enough for your jute twine to pass through later. -
Carve texture details:
Using a needle tool, gently carve texture lines into the tail fin to mimic rays. For the body, lightly sketch where your pattern zones will be, but keep the surface mostly smooth for painting.
Clean Lines
For super crisp stripes, apply thin masking tape or washi tape to the dried clay before painting. Peel it off while the paint is still slightly wet to avoid chipping.
Step 2: Painting the Patterns
-
Dry and sand:
Allow the clay to dry completely according to package instructions (usually 24-48 hours for air-dry clay). Once hard, lightly sand any rough spots. -
Base coat the eye:
Paint the inside of the eye indentation with a specific color—teal for one, red for another—leaving the surrounding clay white. -
Paint the first stripes:
Using a flat brush, paint bold, curved stripes on the body. For the bottom fish, create a wide teal band in the center. For the others, alternate thin red and yellow lines. -
Add geometric details:
Once the base stripes offer a guide, use a fine brush to add geometric patterns. I like to paint a crisscross lattice pattern over the teal band using white or cream paint to look like a net. -
Detail the tails:
Paint the tail fins in solid colors like yellow or red to contrast with the body. Use a very fine brush to highlight the carved texture lines with white paint. -
Refine the lines:
Go back with a steady hand and clean up any painted edges. Enhance the separation between stripes by painting thin accent lines in contrasting colors, like a red line bordering a teal section. -
Seal the work:
Protect your painting with a coat of matte or satin varnish. This also enriches the colors and gives the piece a finished, professional look.
Driftwood Mobile
Instead of individual ornaments, tie all three fish at varying heights to a piece of driftwood found on the beach for a stunning coastal mobile.
Step 3: Stringing Up
-
Cut the twine:
Cut a length of jute twine, approximately 10-12 inches long for each fish. -
Attach the hanger:
Fold the twine in half and thread the loop end through the hole in the fish’s mouth. Pass the loose ends through the loop and pull tight to create a lark’s head knot. -
Add a bead:
Thread a small wooden or white bead onto the twine, sliding it down to rest just above the knot for a decorative touch. -
Tie it off:
Tie the loose ends of the twine together in a simple overhand knot to close the loop, ready for hanging.
Hang your colorful school of fish on a wall or branch to enjoy a permanent splash of summer

The Complete Guide to Pottery Troubleshooting
Uncover the most common ceramic mistakes—from cracking clay to failed glazes—and learn how to fix them fast.
Seahorse With Stamped Texture and Coral
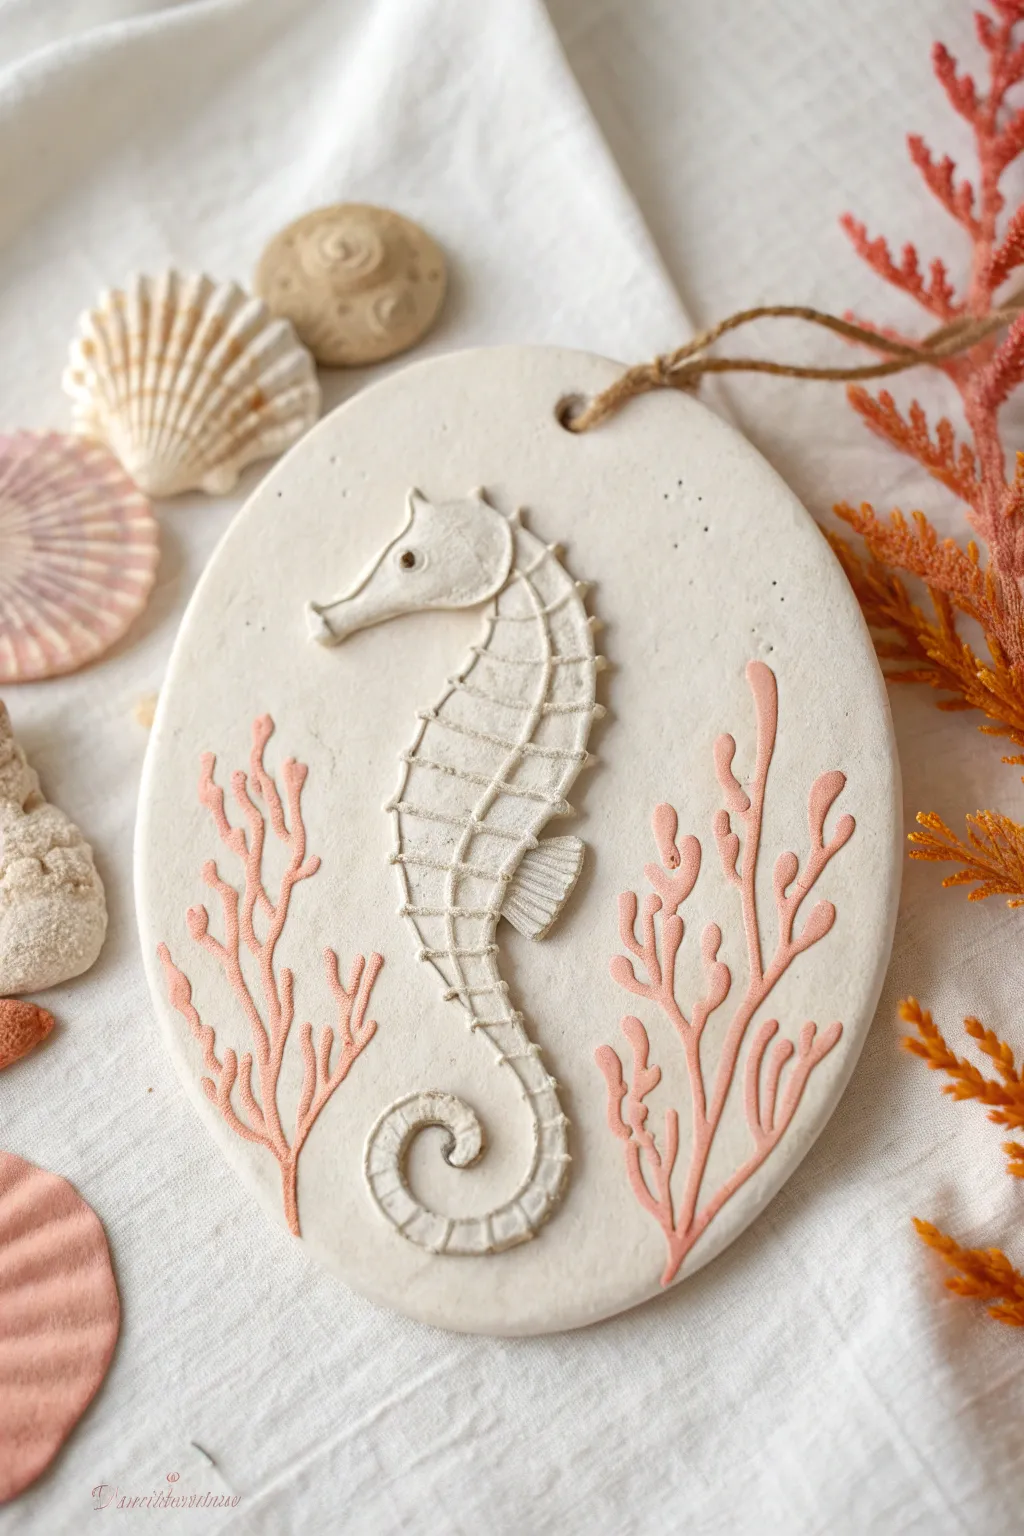
This elegant oval ornament captures the delicate beauty of marine life with a raised seahorse design and soft pink coral motifs. Using simple clay layering and texture techniques, you can create a sophisticated piece that looks like it washed ashore on a sandy beach.
Step-by-Step
Materials
- White air-dry clay or polymer clay
- Rolling pin
- Oval cookie cutter (large)
- Clay sculpting tools (needle tool, small spatula)
- Textured fabric or mesh (for seahorse body)
- Soft pink acrylic paint or clay paint
- Small round paintbrush
- Jute twine or rustic string
- Water (for smoothing)
- Sandpaper (fine grit)
- Straw or round tool (for hole punching)
Step 1: Base Preparation
-
Condition the Clay:
Start by kneading a large ball of white clay until it is warm, pliable, and free of cracks. -
Roll the Slab:
Roll the clay out evenly to a thickness of about 1/4 inch. You want it sturdy enough to hold the relief elements without warping. -
Cut the Shape:
Use a large oval cookie cutter to stamp out the main background shape. If you don’t have a cutter, trace an oval template lightly with a needle tool and cut it out manually. -
Create the Hanging Hole:
While the clay is soft, use a straw or a small round tool to punch a hole near the top center for the hanging cord.
Step 2: Sculpting the Seahorse
-
Form the Body:
Roll a separate snake of clay and taper one end for the tail. Curl the tapered end into a spiral and curve the upper portion into an ‘S’ shape to form the seahorse’s torso and neck. -
Attach the Body:
Score the back of your seahorse shape and the center of the oval base. Apply a tiny dab of water or slip, then press the body gently onto the base. -
Head Sculpting:
Shape a small, elongated triangle for the head. Smooth it onto the neck, using a tool to refine the snout and create a tiny coronet (crown) on top. -
Adding Texture:
Here I prefer to use a small piece of mesh or a textured tool to gently press horizontal grid lines across the seahorse’s body, mimicking its bony plates. -
Refining Details:
Add a tiny ball of clay for the eye and attach a small, fan-shaped piece of clay to the back for the dorsal fin. Use a needle tool to scratch vertical lines into the fin. -
Clean Up:
Dip a brush or finger in water and gently smooth around the edges where the seahorse meets the base to make it look cohesive.
Crack Control
If you see hairline cracks forming as the clay dries, mix a tiny bit of fresh clay with water to make a paste and smooth it into the cracks immediately.
Step 3: Coral and Finishing
-
Sketch the Coral:
Once the seahorse is secure, use a needle tool to very lightly sketch branching coral shapes on either side of the seahorse directly into the wet clay. -
Wait for Drying:
Allow the clay to dry completely according to the package instructions. This usually takes 24-48 hours for air-dry clay. -
Sand Edges:
Once fully dry, use fine-grit sandpaper to gently smooth the outer rim of the oval and any rough spots on the surface. -
Paint the Coral:
Using a fine-tip brush and soft pink paint, carefully paint over your sketched coral lines. Thicken the lines slightly to give them a coral-like weight. -
Add Speckles:
Dip an old toothbrush or stiff brush into diluted grey or beige paint and lightly flick it over the background to create subtle sand-like speckles. -
Final Assembly:
Thread a piece of rustic jute twine through the top hole and tie a secure knot to complete the ornament.
Raise the Coral
Instead of just painting flat coral, roll very thin snakes of clay and attach them over your sketch lines for a 3D effect before drying.
Hang your new coastal creation in a sunny spot to evoke memories of the ocean
Spaghetti-Style Seaweed and Kelp Forest
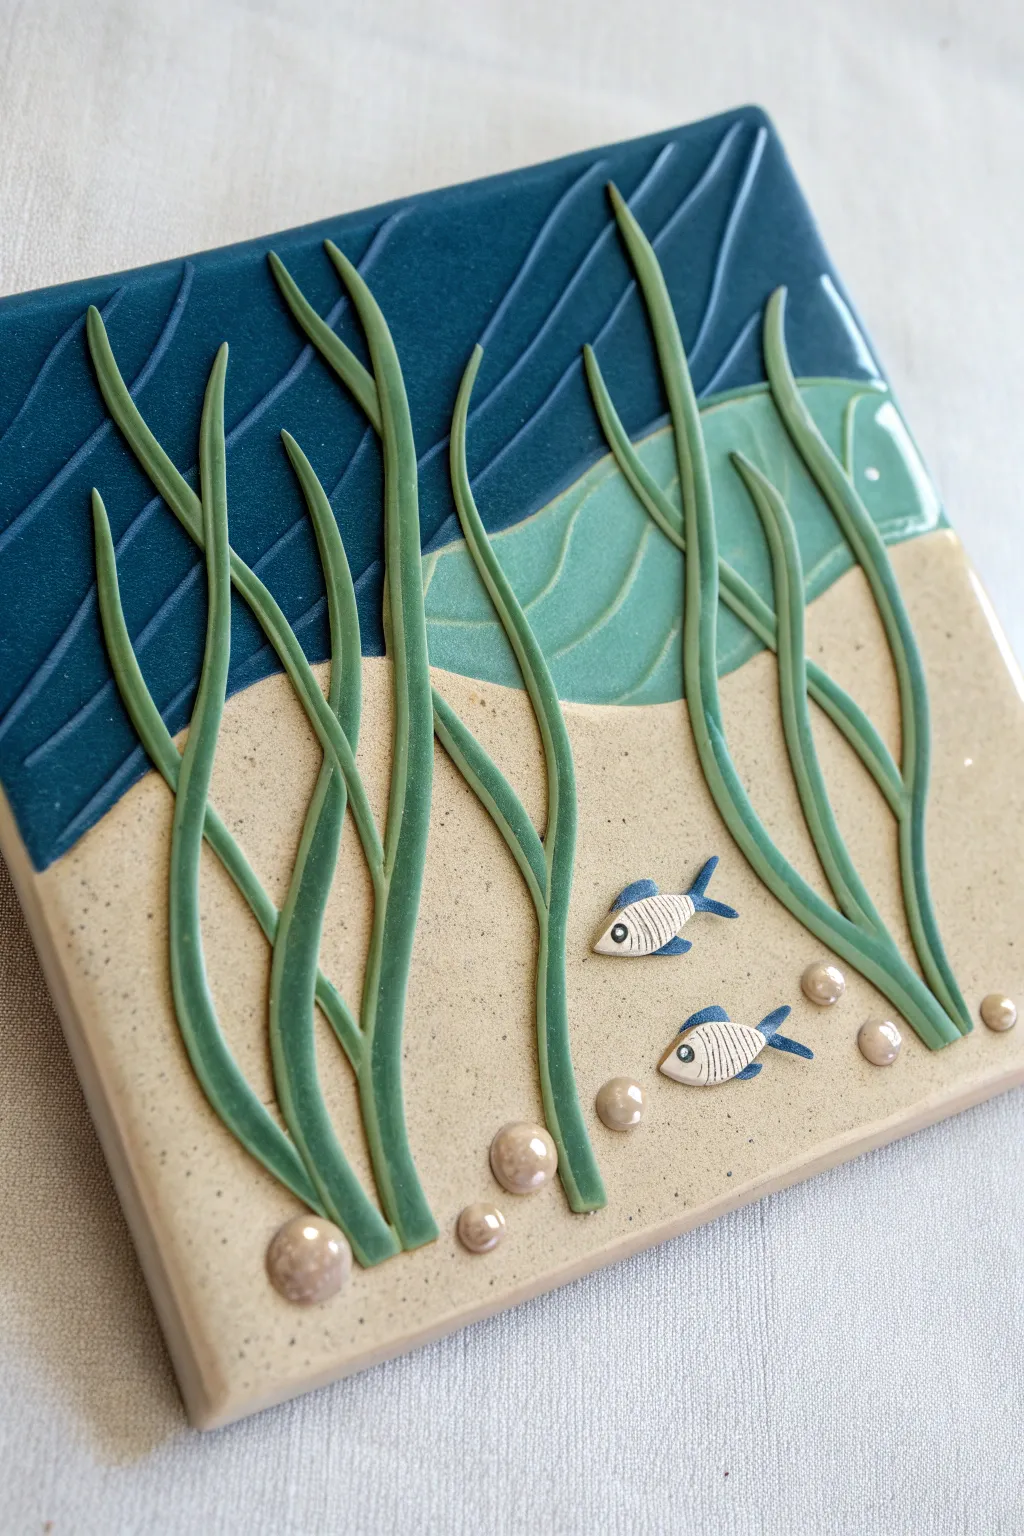
Create a serene underwater scene using simple layering techniques and clever clay extruding. This relief tile features waving kelp strands, curious little fish, and a multi-toned ocean background that adds depth and dimension.
Step-by-Step Guide
Materials
- Stoneware clay (speckled or sandy color)
- Rolling pin and guide strips (approx. 1/4 inch)
- Clay extruder with small round die (or just your hands)
- Fettling knife or X-Acto blade
- Underglazes: Dark Blue, Teal/Aqua, White, Black
- Clear transparent glaze
- Score and slip tool (or a needle tool and water)
- Small paintbrush
- Sponge
Step 1: Base Preparation
-
Roll the slab:
Begin by rolling out a smooth slab of speckled stoneware clay to an even thickness of about 1/4 inch using guide strips. -
Cut the tile shape:
Measure and cut a square or rectangle for your background. Smooth the edges with a damp sponge to remove any sharp burrs. -
Map out the design:
Lightly trace a wavy horizon line across the upper third of the tile using a needle tool. This will separate the deep water from the sandy bottom.
Uneven Drying?
If the seaweed dries faster than the tile, the thin strands might crack off. Tent the whole tile loosely with plastic for the first 24 hours to equate moisture levels.
Step 2: Creating the Background
-
Texture the water:
For the upper water section, carve gentle, diagonal flowing lines into the clay surface to represent currents. I like to vary the pressure here so some lines are deeper than others. -
Apply the sand texture:
Leave the bottom section mostly smooth, letting the natural speckles of the clay represent the sand, or tap it gently with a stiff brush for extra grit. -
Initial underglaze application:
Paint the top section with dark blue underglaze. Paint the middle wavy section (if you created a transitional zone) with a teal or aqua underglaze. Leave the bottom section bare clay.
Step 3: Sculpting the Seaweed
-
Extrude the strands:
Using a clay extruder with a small round die, push out long strings of clay. If you don’t have an extruder, simply roll even, thin snakes of clay by hand. -
Flatten the kelp:
Gently press down on your clay snakes to flatten them slightly, transforming them from round tubes into linguine-like ribbons. -
Arrange the flow:
Place the seaweed strands onto the tile created earlier. Start from the bottom ‘sand’ area and wave them upwards towards the surface. -
Overlap for depth:
Layer some strands over others. Ensure the strands cross over both the sandy bottom and the painted water sections to tie the composition together. -
Secure the strands:
Once you are happy with the arrangement, score and slip the back of each strand and press them firmly onto the background tile. -
Coloring the greens:
Paint the seaweed strands with a leafy green underglaze. Wipe away any stray marks that get on the background.
Level Up: Glossy Bubbles
For extra shine, add a drop of melted clear glass or a heavy dab of gloss glaze specifically on the ‘bubbles’ before the final firing to make them look wet.
Step 4: Fish and Details
-
Shape the fish:
Cut out two tiny, flat almond shapes from a scrap piece of clay for the fish bodies. Add tiny triangles for tails. -
Add fish patterns:
Paint the fish bodies white. Once dry, use a very fine brush or underglaze pencil to draw vertical stripes and a small eye in dark blue or black. -
Attach the swimmers:
Score and slip the fish into the open space between the seaweed strands. -
Create bubbles:
Roll tiny balls of clay varying in size. Flatten them slightly and attach them near the bottom as pebbles or rising bubbles.
Step 5: Firing and Finishing
-
Bisque fire:
Allow the piece to dry slowly to prevent warping, then bisque fire according to your clay body’s instructions. -
Glaze application:
Apply a clear, transparent glaze over the entire piece. This will make the underglaze colors pop and give the water a wet, shiny look. -
Final firing:
Fire the piece a second time to the maturation temperature of your glaze and clay.
Hang your finished tile on the wall or use it as a coaster to bring a splash of ocean calm to your home


What Really Happens Inside the Kiln
Learn how time and temperature work together inside the kiln to transform clay into durable ceramic.
Mini Ocean Magnet Set: Fish, Shells, and Starfish
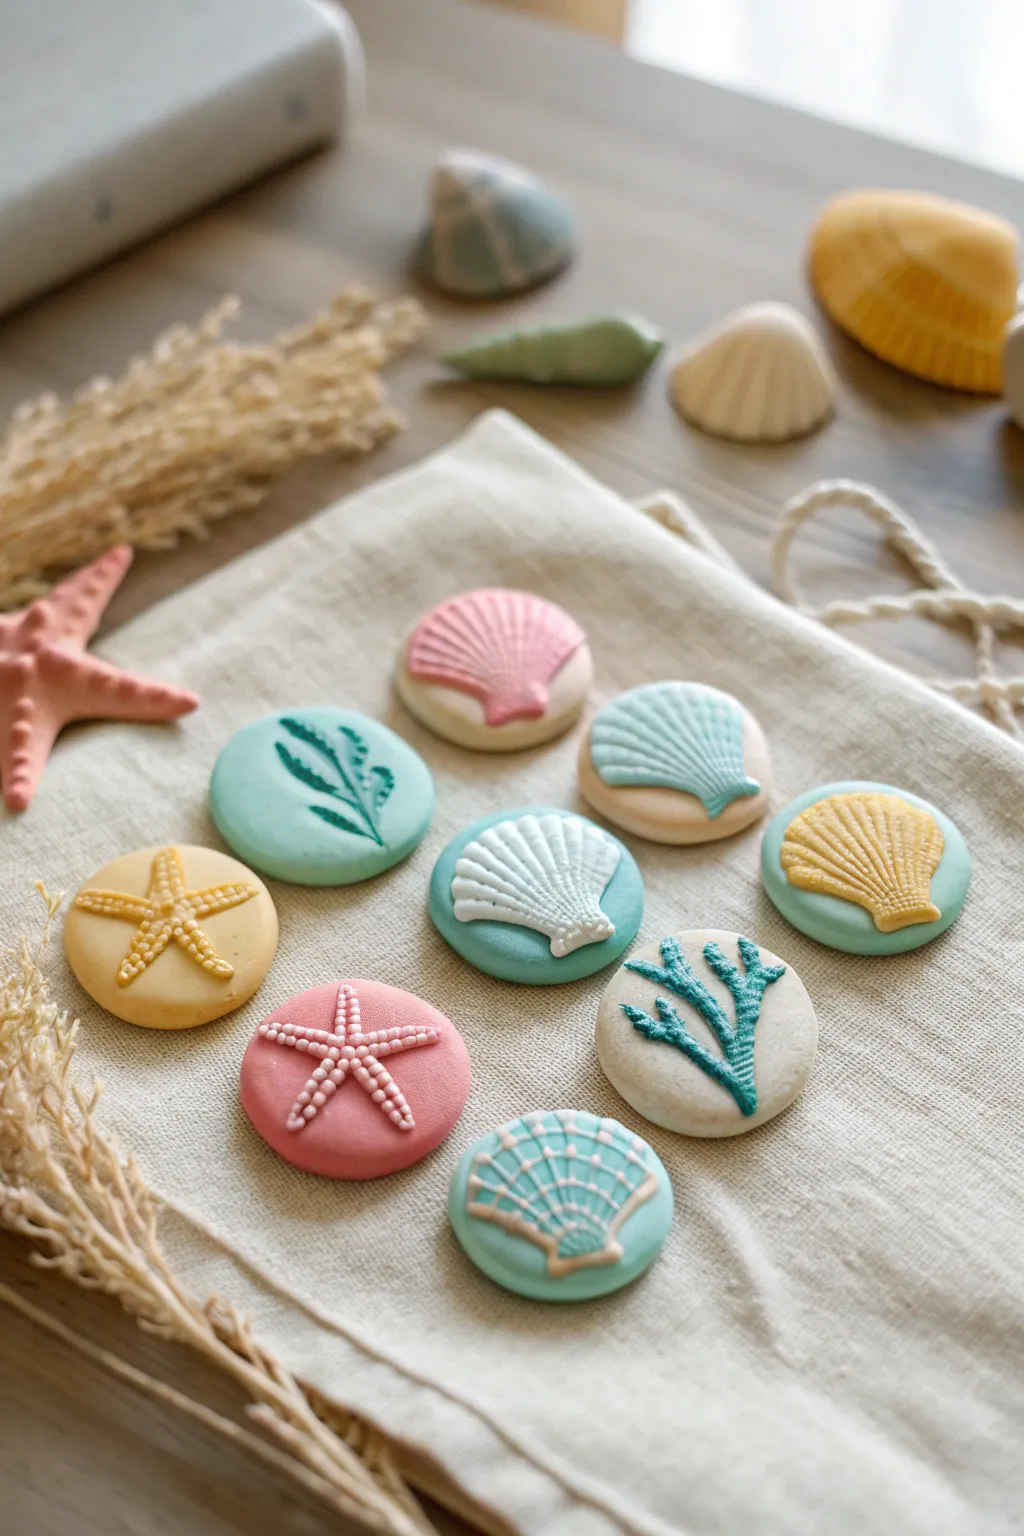
These charming clay discs feature raised marine motifs in a soft, dreamy pastel palette. Perfect for decorating your fridge or a magnetic board, they capture the delicate textures of starfish, scallops, and coral in miniature relief.
Detailed Instructions
Materials
- Air-dry clay (white)
- Acrylic paints (pastel pink, mint green, teal, yellow, cream)
- Small rolling pin
- Round cookie cutter (approx. 1.5 – 2 inches)
- Silicone molds (seashell, starfish, seaweed themes) or sculpting tools
- Strong craft glue or E6000
- Small round magnets
- Fine grit sandpaper
- Matte varnish (optional)
- Small detailing brushes
- Parchment paper
Step 1: Preparing the Bases
-
Condition the clay:
Begin by kneading your white air-dry clay until it is smooth, pliable, and free of cracks. If it feels too dry, you can wet your hands slightly. -
Roll out the slab:
On a sheet of parchment paper, roll out the clay to an even thickness of about 1/4 inch. Try to keep the surface as smooth as possible. -
Cut the discs:
Using your round cookie cutter, punch out several circles. These will serve as the canvas for your ocean designs. Gently smooth the cut edges with your fingertip and a little water to remove any sharpness. -
Coloring the base (Optional):
If you want the base discs to be colored clay rather than painted later, knead a tiny drop of acrylic paint directly into the clay ball before rolling. This gives a delightful, solid color throughout.
Step 2: Creating the Sea Life
-
Mold the motifs:
Take small pinches of fresh clay and press them firmly into your silicone seashell or starfish molds. Ensure the clay fills every crevice for maximum detail. If you don’t have molds, you can hand-sculpt simple starfish by pulling five points from a small ball. -
Release the shapes:
Gently pop the clay shapes out of the molds. If they stick, a light dusting of cornstarch in the mold beforehand can be a lifesaver. -
Refine the details:
Use a needle tool or a toothpick to re-define lines on scallop shells or poke tiny texture holes into the starfish legs if the molding process smoothed them out. -
Attach to the base:
Score the back of your sea creature and the center of a clay disc with a needle tool. Apply a tiny dab of water or liquid clay (slip) to the scored areas and press the creature gently onto the disc. Do not squash the details. -
Add seaweed:
For the seaweed designs, roll very thin snakes of clay. Arrange them on a disc in branching patterns, flattening them slightly to adhere.
Clean Edges Pro-Tip
Dip your finger in water and smooth the edges of your clay discs immediately after cutting. This eliminates sanding later and gives a polished porcelain look.
Step 3: Finishing Touches
-
Drying time:
Place all your assembled discs on a clean sheet of parchment paper. Let them dry completely for 24-48 hours, flipping them halfway through to ensure the backs dry evenly. -
Sand imperfections:
Once fully hard, inspect the edges. I like to use specific fine-grit sandpaper here to gently buff away any rough spots on the rim of the circles. -
Painting the details:
If you used white clay, now is the time to paint. Use soft pastel acrylics. You can paint the background disc one color (like mint or cream) and the raised shell a contrasting color (like pink or yellow). -
Adding dimension:
For a professional look, apply a very subtle white dry-brush over the raised textures of the shells to highlight the ridges. -
Seal:
protect your work with distinct coat of matte varnish. This keeps the ‘natural’ clay look while protecting the paint from chipping. -
Magnetize:
Flip the dried pieces over. Apply a strong dab of E6000 or heavy-duty craft glue to the center of the back and press a round magnet into it. Let the glue cure fully according to the package instructions.
Shimmery Level-Up
Dust the raised parts of the shells with pearl mica powder before the varnish dries. It mimics real nacre and adds a magical underwater sparkle.
Now you have a serene set of ocean treasures to organize your notes
Mixed-Media Sea Plants for Fuzzy Texture
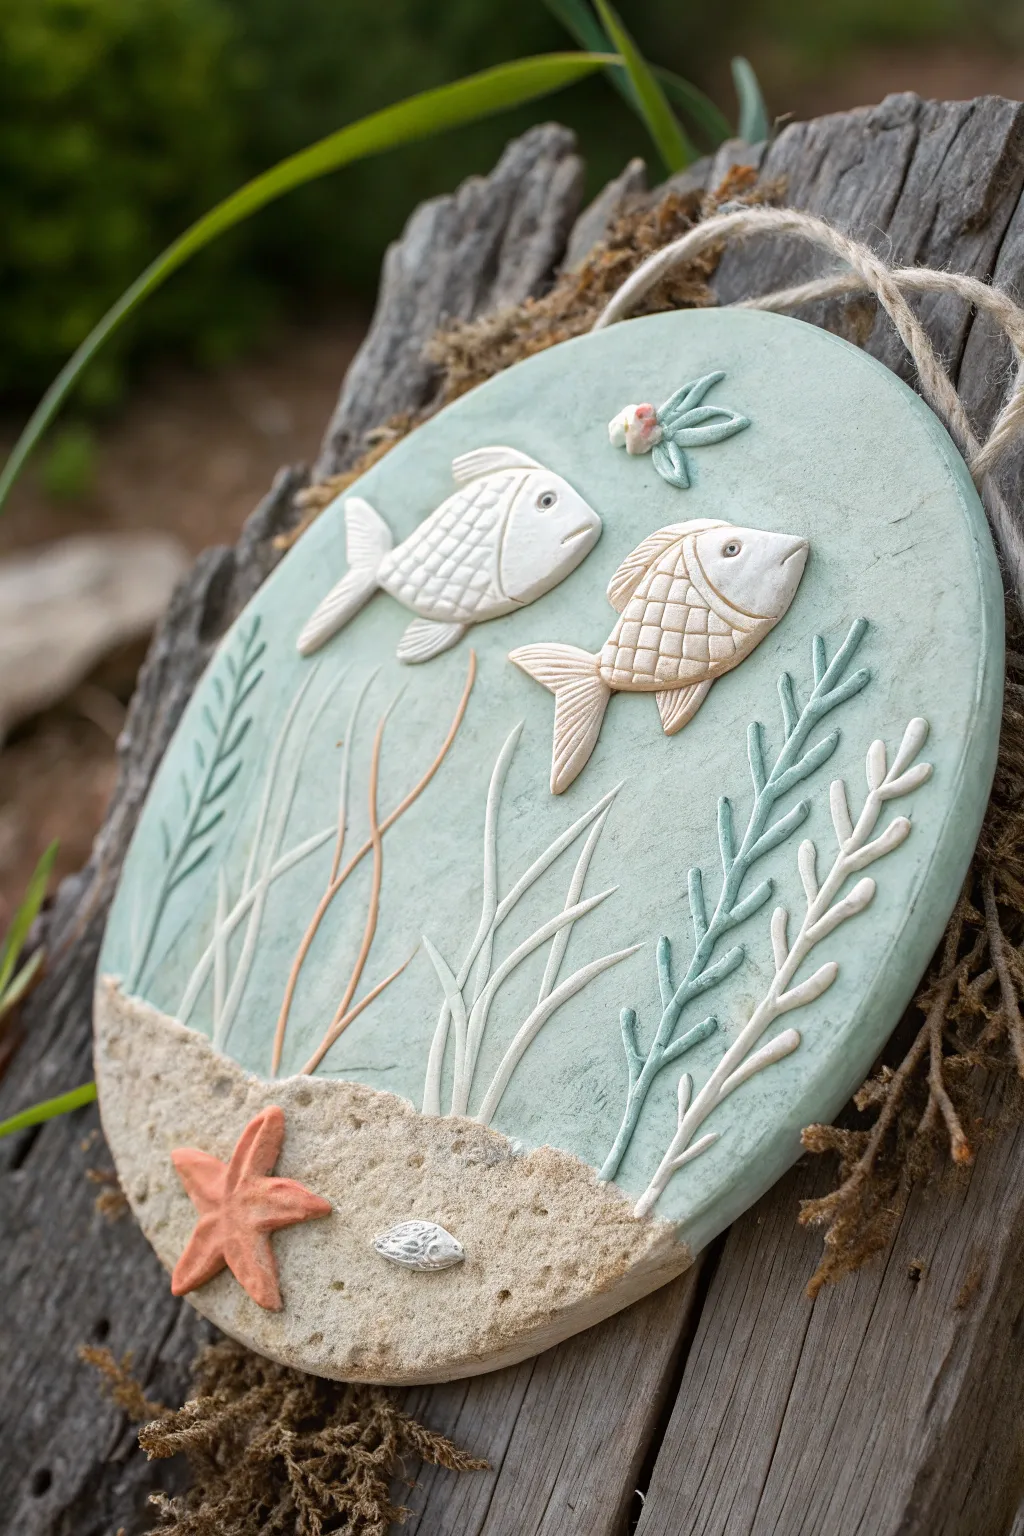
Capture the serenity of the ocean floor with this delightful mixed-media clay plaque. Featuring raised relief fish and gentle swaying seaweed on a textured sandy bed, this piece brings a calming splash of coastal charm to any wall.
Detailed Instructions
Materials
- Air-dry clay or polymer clay (white)
- Circular rolling guide or a round plate
- Rolling pin
- Modeling tools (or toothpicks/skewers)
- Acrylic paints (pale teal, sand/beige, white, coral orange, metallic silver, sage green)
- Real sand or fine grit texture medium
- White craft glue (PVA)
- Jute twine for hanging
- Fine grit sandpaper
- Matte spray varnish
Step 1: Shaping the Base
-
Roll the foundation:
Begin by rolling out a generous slab of white clay to an even thickness of about 1/4 inch. Use guides to keep the surface flat and smooth. -
Cut the circle:
Place a round plate or circular template over the clay and carefully cut around the edge with a craft knife to create your plaque base. -
Create hanging holes:
Before the clay touches air too long, use a straw or a skewer to poke two holes near the top edge, spaced about 2 inches apart, for the jute hanger later. -
Smooth the edges:
Dip your finger in a little water and run it along the cut edge of the circle to round it off and remove any sharp cutting marks.
Natural Texture Hack
For the most realistic sandy bottom, apply a layer of PVA glue to the dried clay and sprinkle actual beach sand over it before painting.
Step 2: Sculpting the Elements
-
Form the fish bodies:
Roll out two small ovals of clay. Flatten them slightly and gently press them onto the upper right section of the plaque. I like to position them swimming in the same direction for better flow. -
Detail the fish:
Add small triangles for tails and fins. Use a needle tool or knife to press a cross-hatch or scale pattern onto the bodies, and poke a small hole for the eyes. -
Roll clay snakes:
Create several very thin snakes or coils of clay for the seaweed. Vary the thickness slightly to mimic natural growth. -
Arrange the flora:
Lay the clay snakes vertically, starting from the bottom ‘ocean floor’ area up towards the fish. Gently curve them to suggest water movement. -
Add texture to plants:
Use a modeling tool to press small indentations along the sides of the thicker clay snakes, creating a leafy or feathery seaweed look. -
Sculpt the starfish:
Shape a small five-pointed star from a pea-sized ball of clay. Press it securely into the bottom left corner of the composition. -
Embed the shell:
Mold a tiny clam shape or press a real miniature shell into the clay near the starfish for added realism. -
Create the sandy bottom:
Apply a thin layer of extra clay paste or slip to the bottom third of the circle to define the sea floor. While wet, press a rough sponge or stiff brush into it to create heavy texture.
Step 3: Painting and Finishing
-
Dry completely:
Allow the entire piece to dry according to your clay manufacturer’s instructions. This usually takes 24-48 hours depending on thickness. -
Base coat the water:
Paint the background sky/water area with a pale teal or seafoam green acrylic paint, carefully working around your raised elements. -
Highlight the fish:
Paint the fish a creamy white or very light beige. Once dry, you can dry-brush a tiny bit of brown over the scales to make the texture pop. -
Paint the seaweed:
Use sage green for the leafy seaweed and a soft coral or beige tone for the thinner branches. -
Create the sand texture:
Mix a beige paint with real sand or texture medium. Apply this thickly to the bottom textured area, covering the base of the seaweed strands. -
Detail the accents:
Paint the starfish a muted orange and the small shell with metallic silver to make it catch the light. -
Seal the artwork:
Once all paint is fully dry, spray the entire plaque with a matte varnish to protect the surface and unify the sheen. -
Add the hanger:
Thread a length of rustic jute twine through the top holes and knot it securely to finish your hanging display.
Level Up: Driftwood Frame
Glue the finished round plaque onto a square backing of reclaimed wood or driftwood planks to create a stunning rustic frame contrast.
Hang your new seascape in a sunny spot to let the textures cast gentle shadows

TRACK YOUR CERAMIC JOURNEY
Capture glaze tests, firing details, and creative progress—all in one simple printable. Make your projects easier to repeat and improve.
Deep-Sea Glow Look With Dark Water and Bright Creatures
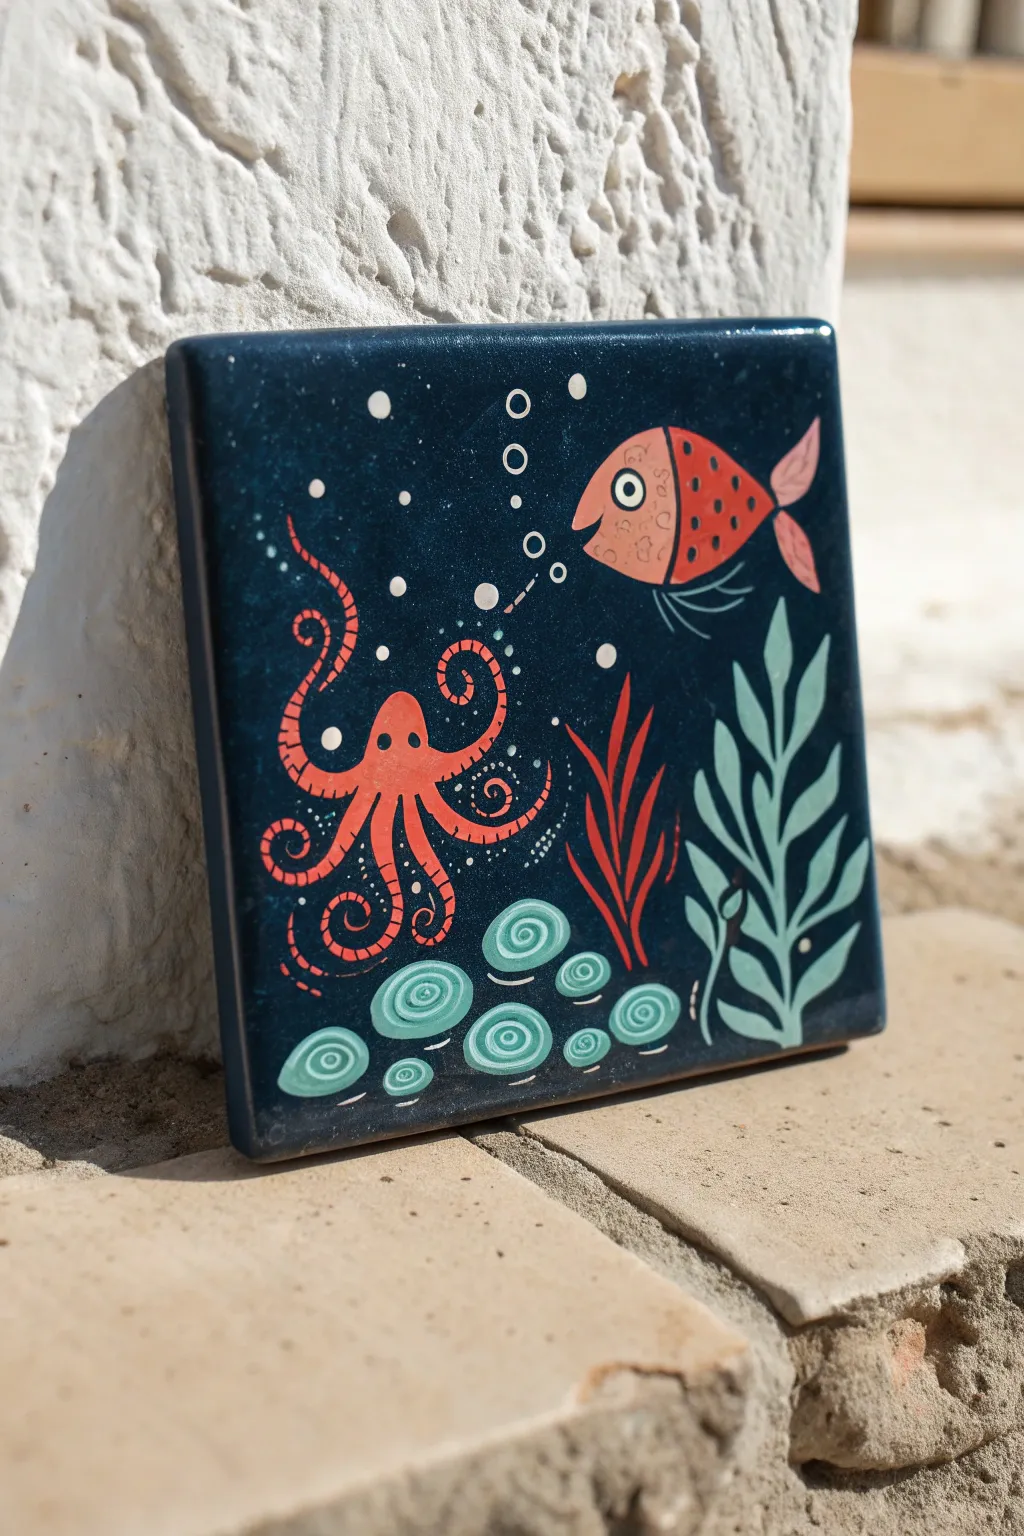
Create a captivating underwater vignette that pops against a midnight blue background, giving the illusion of deep ocean waters. This ceramic painting project uses vibrant oranges and teals to bring a friendly octopus and fish to life on a simple square tile.
Step-by-Step Tutorial
Materials
- Square ceramic bisqueware tile (approx 6×6 inches)
- Deep midnight blue underglaze
- Bright orange underglaze
- Coral red underglaze
- Teal/Aqua green underglaze
- White underglaze
- Black underglaze (for pupils)
- Wide flat brush
- Fine liner brush (0 or 00 size)
- Small round brush
- Clear dipping glaze or brush-on clear glaze
- Sponge
- Pencil (for sketching)
Step 1: Setting the Scene
-
Prepare the surface:
Wipe down your bisqueware tile with a damp sponge to remove any kiln dust or oils from your hands, ensuring a smooth surface for painting. -
Lightly sketch:
Using a pencil, lightly outline your composition directly on the bisque. Draw the octopus on the bottom left, the seaweed on the right, and the fish near the top right. Don’t worry about erasing; pencil marks will burn off in the kiln. -
Apply the background:
With a wide flat brush, carefully paint around your sketched creatures with the deep midnight blue underglaze. I find it easier to outline the shapes first and then fill in the open dark water areas. -
Layer the night sea:
Apply a second and third coat of the midnight blue to ensure solid, opaque coverage without brushstrokes showing through. Let each coat dry until matte before adding the next.
Step 2: Painting the Sea Life
-
Base coat the octopus:
Use a small round brush to fill in the octopus body with bright orange underglaze. Paint the tentacles carefully, allowing them to curl naturally. -
Add the fish and seaweed:
Paint the fish body with coral red underglaze, making the tail lighter (a mix of red and white) if desired. Fill in the leafy seaweed on the right with teal underglaze and the spiky seaweed with red. -
Create the sea floor:
At the bottom, paint several rounded shapes using the teal underglaze to represent stones or coral mounds on the ocean floor. -
Solidify colors:
Just like the background, apple 2-3 coats of underglaze to all your main subjects (octopus, fish, plants) to ensure the colors come out bright and bold after firing.
Smudged the blue?
If dark blue gets on your orange octopus, don’t try to wipe it while wet. Let it dry completely, then gently scrape the mistake off with a crafting knife or needle tool.
Step 3: Deep Sea Details
-
Octopus texture:
Once the orange base is dry, use your fine liner brush and coral red underglaze to add small dashed lines along the tentacles to suggest suckers. -
Fish details:
Add small red dots or scales to the fish’s body and use a very fine line of black underglaze to define the fins and mouth. -
Sea floor spirals:
Using white underglaze and the fine liner brush, paint concentric spiral patterns on top of the teal sea floor stones. -
Bring them to life:
Paint small white circles for the eyes on both creatures. Once dry, add a tiny dot of black for the pupils to give them expression.
Make colors pop
For the brightest result on a dark background, paint a layer of white underglaze under your light colors (like the orange octopus) before applying the actual color.
Step 4: Finishing Touches
-
Add the bubbles:
Dip the handle end of a paintbrush into white underglaze and stamp dots of varying sizes rising from the octopus and fish to create bubbles. -
Create the spray:
For the background texture, dilute a small amount of white underglaze with water. Loading a stiff brush or old toothbrush, gently flick or spatter tiny white specks across the dark blue areas to mimic plankton or distant stars. -
Clean the edges:
Use a damp sponge to wipe any stray underglaze off the sides or back of the tile for a professional finish. -
Glaze application:
Once the underglaze is bonedry, dip the entire tile into clear glaze (or brush on 2-3 even coats) to seal the design and make the colors distinct. -
Fire:
Fire the tile in a kiln according to the clay and glaze manufacturer’s instructions (typically Cone 06 or 05 for low fire earthenware).
Once fired, display your glowing deep-sea tile on a stand or mount it as part of a wall mosaic