Whenever I want a quick creative win, I reach for polymer clay or air-dry clay and start playing with wearable shapes. Here are my favorite clay jewellery making ideas—from the classics everyone loves to a few studio-style twists that feel extra special.
Classic Geometric Dangle Earrings
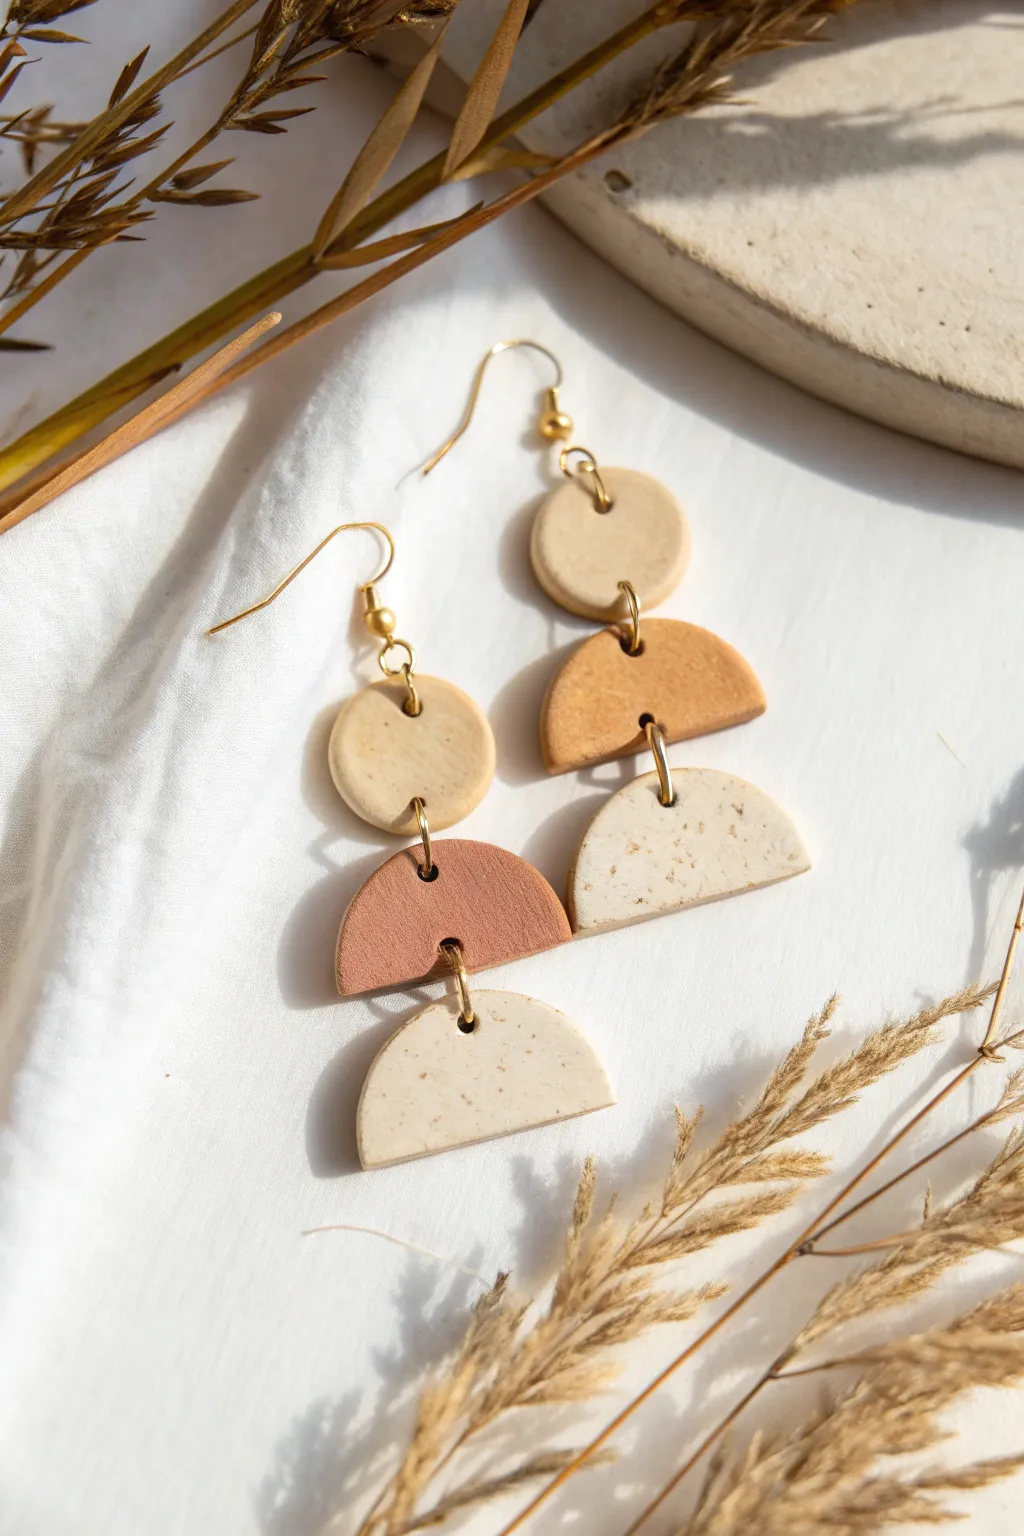
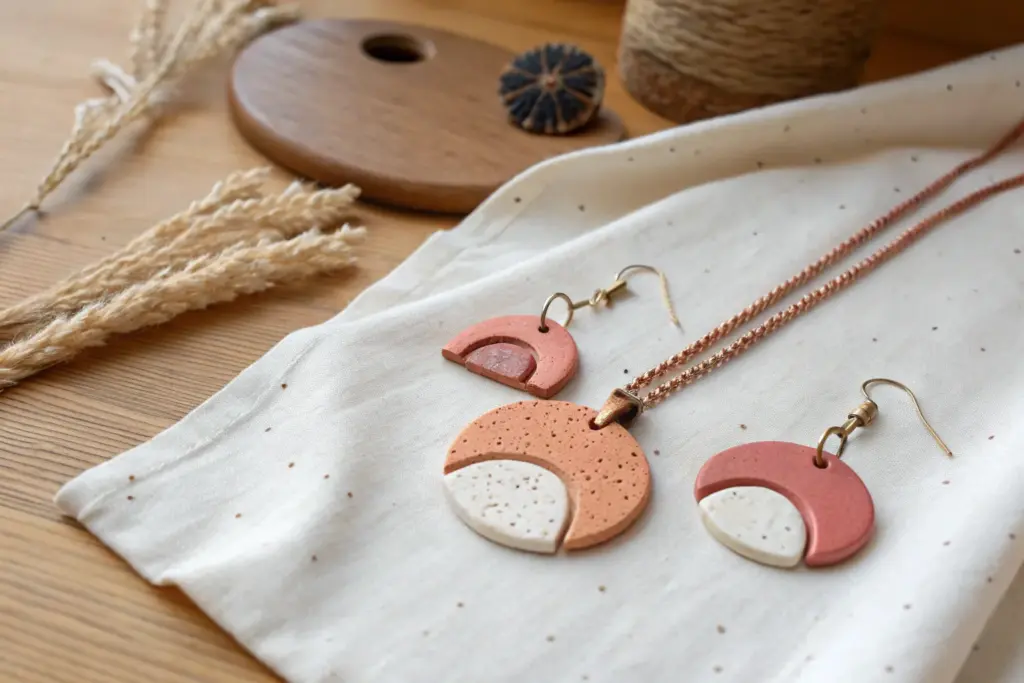
Embrace a minimalist aesthetic with these textural, multi-tiered polymer clay earrings. Featuring a soothing palette of sandy beige, warm terracotta, and speckled granite, their articulated geometric shapes create beautiful movement with every turn.
Step-by-Step Guide
Materials
- Polymer clay (beige, terracotta/ochre mix, granite/speckled white)
- Acrylic rolling pin or pasta machine
- Circle cutters (approx. 15mm and 25mm diameter)
- Tissue blade or craft knife
- Gold-plated jump rings (6mm or 7mm)
- Gold-plated earring hooks (French hook style)
- Needle tool or small drill bit
- Jewelry pliers (flat nose and chain nose)
- Baking sheet and parchment paper
- Fine grit sandpaper (400-600 grit)
Step 1: Preparing the Clay
-
Color Mixing:
Begin by conditioning your clay. Aim for three distinct tones: a plain creamy beige, a warm terracotta (you might mix orange and brown for this), and a store-bought ‘granite’ or ‘speckled’ clay. If you don’t have speckled clay, mix coarse black pepper or dried coffee grounds into white clay for a natural faux-stone effect. -
Rolling:
Roll out each color of clay to an even thickness, ideally around 2-3mm. A pasta machine set to a medium setting works best for consistency, but an acrylic roller with depth guides works perfectly too.
Uneven Surfaces?
If your clay creates ‘moon craters’ or bumps while baking, bake on top of a standard piece of printer paper instead of parchment, and cover with paper too.
Step 2: Cutting Shapes
-
Top Circles:
Use your smallest circle cutter (approx. 15mm) to cut two discs from the creamy beige clay. These will form the top tier where the earring hook attaches. -
Middle Tier:
Using the medium cutter (approx. 25mm), cut two circles from the terracotta clay. Then, take your tissue blade and slice these circles directly in half to create semi-circles. -
Bottom Tier:
Repeat the previous step with the speckled granite clay: cut two medium circles and slice them in half to create the bottom semi-circles. -
Smoothing Edges:
Gently rub your finger along the cut edges of all shapes to soften any harsh lines or clay burrs before baking. This saves sanding time later.
Step 3: Creating Connections
-
Piercing Holes:
Use a needle tool to pierce holes for the jump rings. For the top circles, you need one hole at the very top (for the hook) and one at the bottom. For the middle semi-circles, piece a hole at the top center of the straight edge and the bottom center of the curved edge. -
Bottom Holes:
For the bottom granite semi-circles, only pierce one hole at the top center of the straight edge. Ensure all holes are large enough to fit your jump rings comfortably. -
Baking:
Arrange pieces on a parchment-lined baking sheet. Bake according to your brand’s specific instructions—usually around 275°F (135°C) for 30-45 minutes. I like to tent foil over them to prevent any scorching. -
Finishing:
Once cooled, lightly sand the edges with fine-grit sandpaper if needed to ensure a professional, smooth finish.
Textural Twist
Before baking, gently press a piece of coarse linen or sandpaper onto the clay surface to give the ‘stone’ pieces an authentic, gritty texture.
Step 4: Assembly
-
Opening Rings:
Use your two pairs of pliers to twist open a jump ring. Remember to twist the ends away from each other (front to back) rather than pulling them apart, which weakens the metal. -
Connecting Tiers:
Thread an open jump ring through the bottom hole of a top circle and the top hole of a middle semi-circle. Close the ring securely. -
Attaching the Bottom:
Use another jump ring to connect the bottom of the middle semi-circle to the top of the granite semi-circle. -
Adding Hooks:
Finally, open the loop on your earring hook (or use a small jump ring if preferred) and attach it to the top hole of the beige circle. Repeat the entire assembly for the second earring.
Wear these lightweight, earthy dangles to add a touch of modern bohemian style to your everyday outfit


Modern Arch Statement Earrings
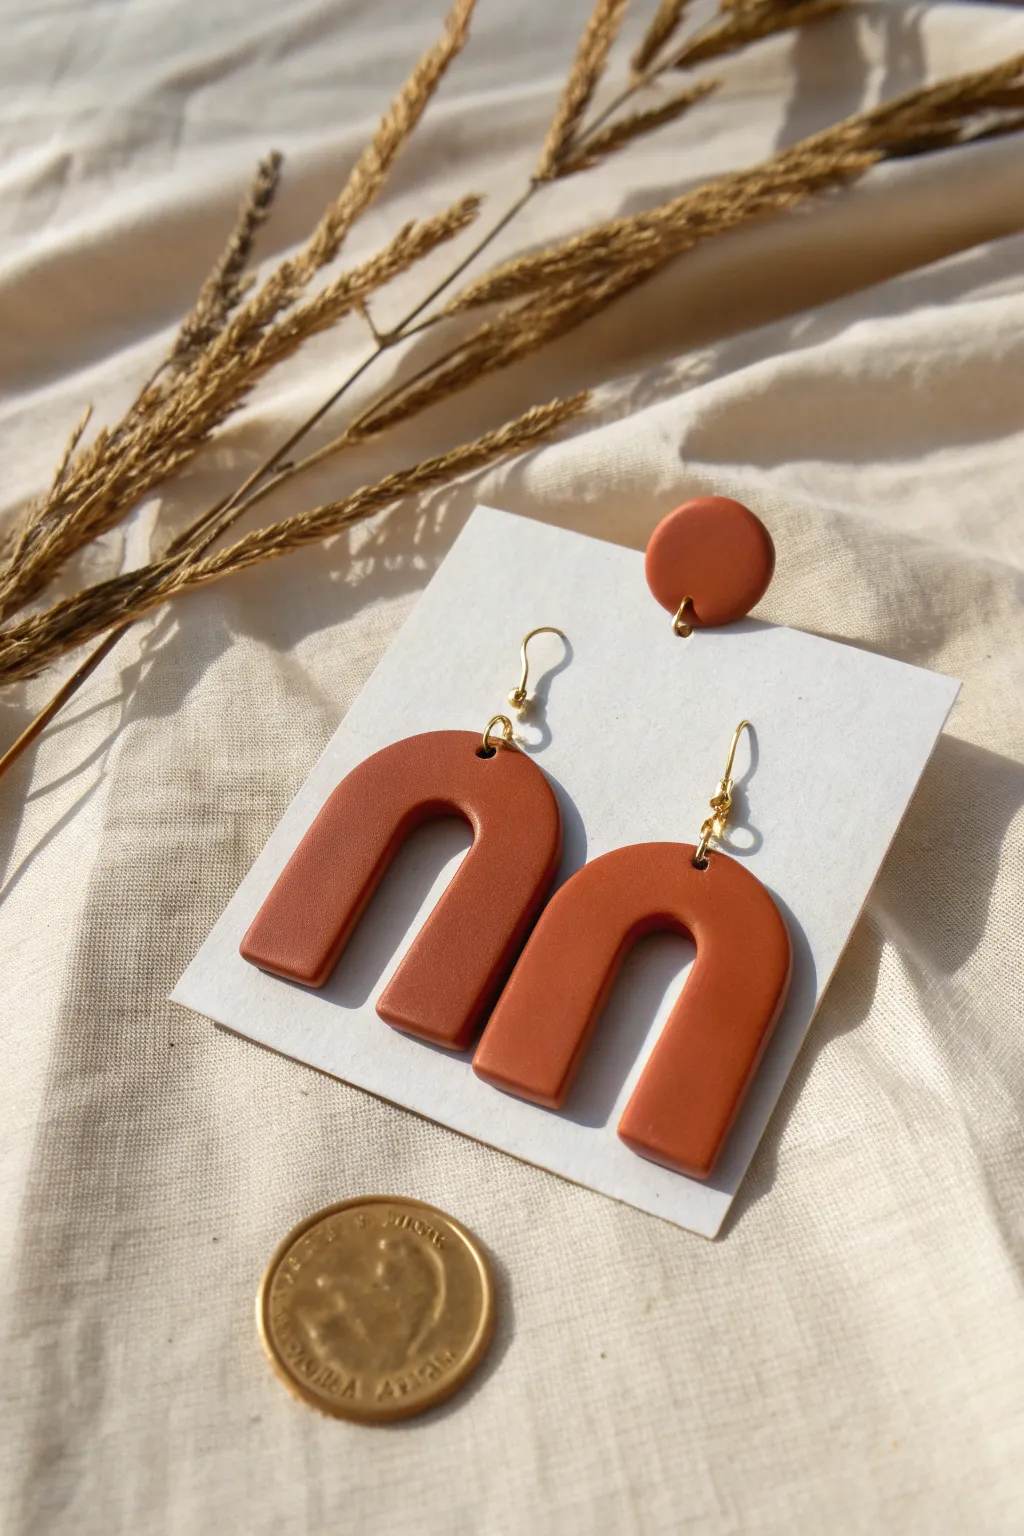
Capture the warmth of earthy tones with these modern, minimalist arch earrings. The rich terracotta colour and simple geometric shape make them a versatile accessory for everyday wear or special occasions.
Step-by-Step Tutorial
Materials
- Terracotta or burnt orange polymer clay
- Acrylic rolling pin or pasta machine
- Arch-shaped clay cutter (approx. 3-4 cm tall)
- Small circular cutter (approx. 1 cm)
- Clean ceramic tile or glass work surface
- Needle tool or toothpick
- Sandpaper (400, 600, and 1000 grit)
- Gold earring hooks
- Gold jump rings (6-7mm)
- Jewellery pliers (flat nose and round nose)
- Hand drill or pin vice with a small bit
- Baby wipes
Step 1: Conditioning and Cutting
-
Prepare your workspace:
Begin by cleaning your work surface and rolling pin with a baby wipe to ensure no dust or lint gets trapped in your clay. -
Condition the clay:
Take a block of terracotta polymer clay and knead it in your hands until it becomes soft and pliable. This step prevents cracks during baking. -
Roll out a slab:
Using an acrylic roller or a pasta machine on a medium setting (approx. 3-4mm thickness), roll the clay into an even slab. Ensure the thickness is uniform for professional results. -
Cut the arches:
Press your arch-shaped cutter firmly into the clay slab. Wiggle it slightly to ensure a clean cut, then lift straight up. Repeat to create a matching pair. -
Create the studs (optional):
If you wish to make the matching stud shown in the image, use a small circular cutter to punch out a circle from the remaining clay slab. -
Smooth the edges:
Before baking, gently run your finger along the cut edges of the clay pieces to soften any sharpness or potential drag lines from the cutter. -
Make the holes:
Use a needle tool to poke a hole at the top center of each arch. Ensure the hole is large enough for your jump rings but not too close to the edge to avoid breakage.
Step 2: Baking and Finishing
-
Bake the pieces:
Transfer your tile with the clay pieces directly into the oven. Follow the temperature instructions on your specific brand of clay, usually baking for 30-45 minutes to ensure durability. -
Cool down:
Once baked, turn off the oven and let the pieces cool completely inside, or carefully remove the tile and let them cool on a heat-safe surface. -
Check hardness:
Properly cured polymer clay should be slightly flexible when cooled, not brittle. If it snaps easily, it may need a longer baking time next time. -
Sand the edges:
Dip your sandpaper in water and gently sand the edges of the earrings, starting with the coarsest grit and working up to the finest. This creates a beautifully smooth, professional finish. -
Buff the surface:
Quickly buff the surface of the clay with a soft piece of denim or cotton fabric to bring back a subtle sheen after sanding.
Fixing Fingerprints
Before baking, lightly brush the raw clay surface with a tiny amount of baby oil or cornstarch to smooth out accidental fingerprints.
Step 3: Assembly
-
Open the jump rings:
Using two pairs of pliers, twist a gold jump ring open sideways (never pull it apart outwards) to maintain its circular shape. -
Attach the hook:
Slide the open jump ring through the hole in the top of the clay arch, then thread the loop of the gold earring hook onto the jump ring. -
Close the ring:
Use your pliers to twist the jump ring back into a closed position, ensuring the ends meet perfectly so the hook doesn’t slip out. -
Final check:
Inspect the connection points to make sure everything is secure. Repeat the assembly process for the second earring. -
Clean up:
Give the earrings a final wipe with a soft cloth to remove any fingerprints from handling the metal components.
Add a Texture Twist
Before cutting the shapes, press a piece of coarse sandpaper or a texture mat into the raw slab to give the terracotta a stone-like finish.
Now you have a stunning pair of handmade statement earrings ready to wear or gift.


Marbled Clay Earrings
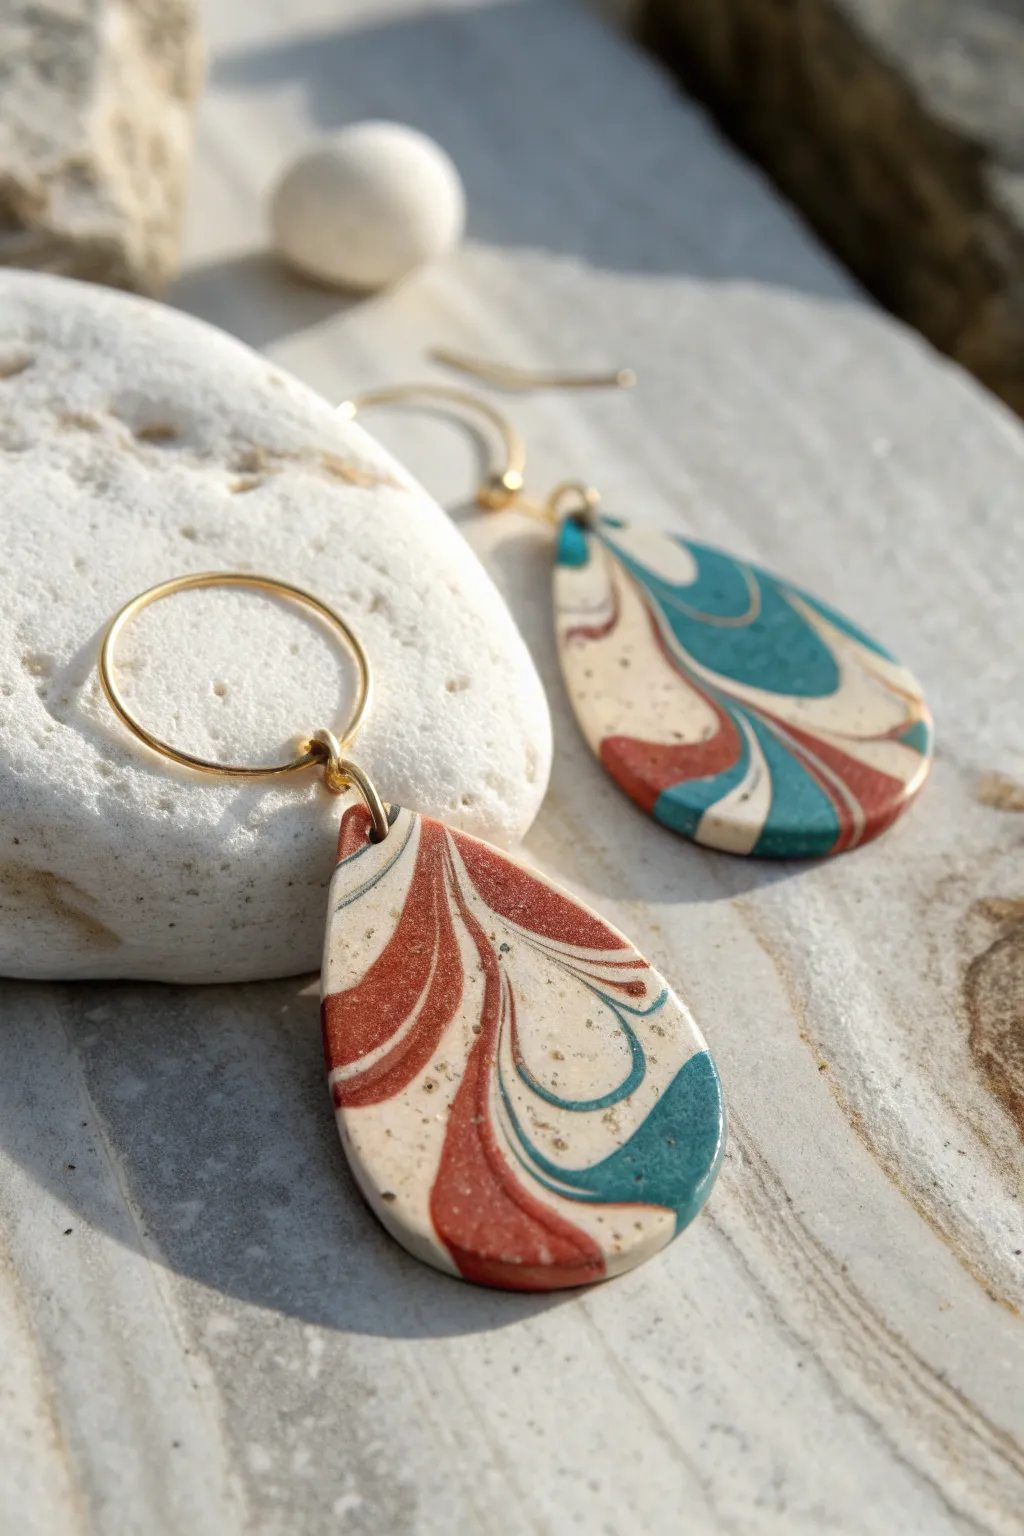
These elegant teardrop earrings feature a stunning marbled pattern reminiscent of warm earth meeting cool ocean waves. The organic swirl of terra cotta, speckled granite, and teal creates a sophisticated yet earthy look perfect for everyday wear.
Step-by-Step Guide
Materials
- Polymer clay in speckled granite (or white with pepper)
- Polymer clay in terra cotta/rust red
- Polymer clay in muted teal/turquoise
- Acrylic roller or pasta machine
- Teardrop shape cutter (approx. 1.5 inch)
- Flexible tissue blade
- Small circle cutter or needle tool (for holes)
- Gold tone jump rings (large hoop style)
- Gold tone earring hooks
- Jewelry pliers (flat nose and round nose)
- Oven and baking sheet
- Fine grit sandpaper (800-1000 grit)
- UV resin or gloss glaze (optional)
Step 1: Preparing the Clay
-
Conditioning:
Start by thoroughly conditioning each color of clay separately. Roll and knead them until they are soft, pliable, and warm to the touch to prevent cracking later. -
Creating simple snakes:
Roll each color into a long, thin cylinder or ‘snake’. You will need slightly more of the speckled granite color than the teal or rust to achieve the background dominance shown in the photo. -
Combining the colors:
Twist the three colored snakes together into one larger rope. Fold this rope in half and twist it again. Repeat this twist-and-fold process about 3-4 times, but be careful not to over-blend or the colors will turn muddy. -
Forming the block:
Squish your twisted rope into a solid rectangular block or ball. This compresses the air bubbles out and prepares the clay for the final marbling reveal.
Muddy Colors?
If your colors are blending into brown instead of distinct swirls, you are twisting too much. Stop mixing sooner. You want distinct streaks, not a homogenous blend.
Step 2: Marbling and Cutting
-
Rolling the slab:
Using your acrylic roller or pasta machine, roll the block out into a flat slab about 3mm thick. As you roll, the marble pattern will elongate and reveal itself. -
Finding the best composition:
Use your teardrop cutter to hover over the slab without cutting. Look for areas where the rust and teal create sweeping, fluid lines against the speckled background. -
Cutting the shapes:
Once you’ve found your favorite section, press the cutter firmly into the clay. I like to wiggle the cutter very slightly before lifting to ensure clean edges. -
Adding connection points:
Use a small circle cutter or a needle tool to punch a hole at the very top point of each teardrop. Make sure the hole is close to the edge but leaves at least 2mm of clay for strength. -
Smoothing edges:
Before baking, gently run your finger along the cut edges of the clay to smooth out any harsh lines or fingerprints. -
Baking:
Place your pieces on a baking sheet lined with parchment paper. Bake according to your specific clay brand’s instructions (usually 275°F for 30-45 minutes).
Step 3: Finishing and Assembly
-
Cooling and sanding:
Allow the clay to cool completely. Once hard, use fine-grit sandpaper under running water to gently sand the edges until they are perfectly smooth and rounded. -
Buffing:
Rub the surface briskly with a piece of denim or a soft cloth to give the clay a natural, matte sheen. Alternatively, apply a thin layer of glaze if you prefer a high-gloss finish. -
Attaching the hoop:
Using two pairs of pliers, twist open the large gold jump . Thread it through the hole in the clay teardrop and close it securely. -
Adding the ear wire:
Open the small loop at the bottom of your earring hook. Slide this onto the large jump ring so the teardrop hangs freely. -
Final check:
Ensure all jump rings are closed tightly with no gaps where the clay could slip out.
Go for texture
Before baking, gently press coarse sea salt or sand onto the surface for a literal gritty texture, then rinse it off after baking for a cool pitted stone effect.
Enjoy wearing your unique, geological-inspired art pieces


Color-Blocked Drop Shapes
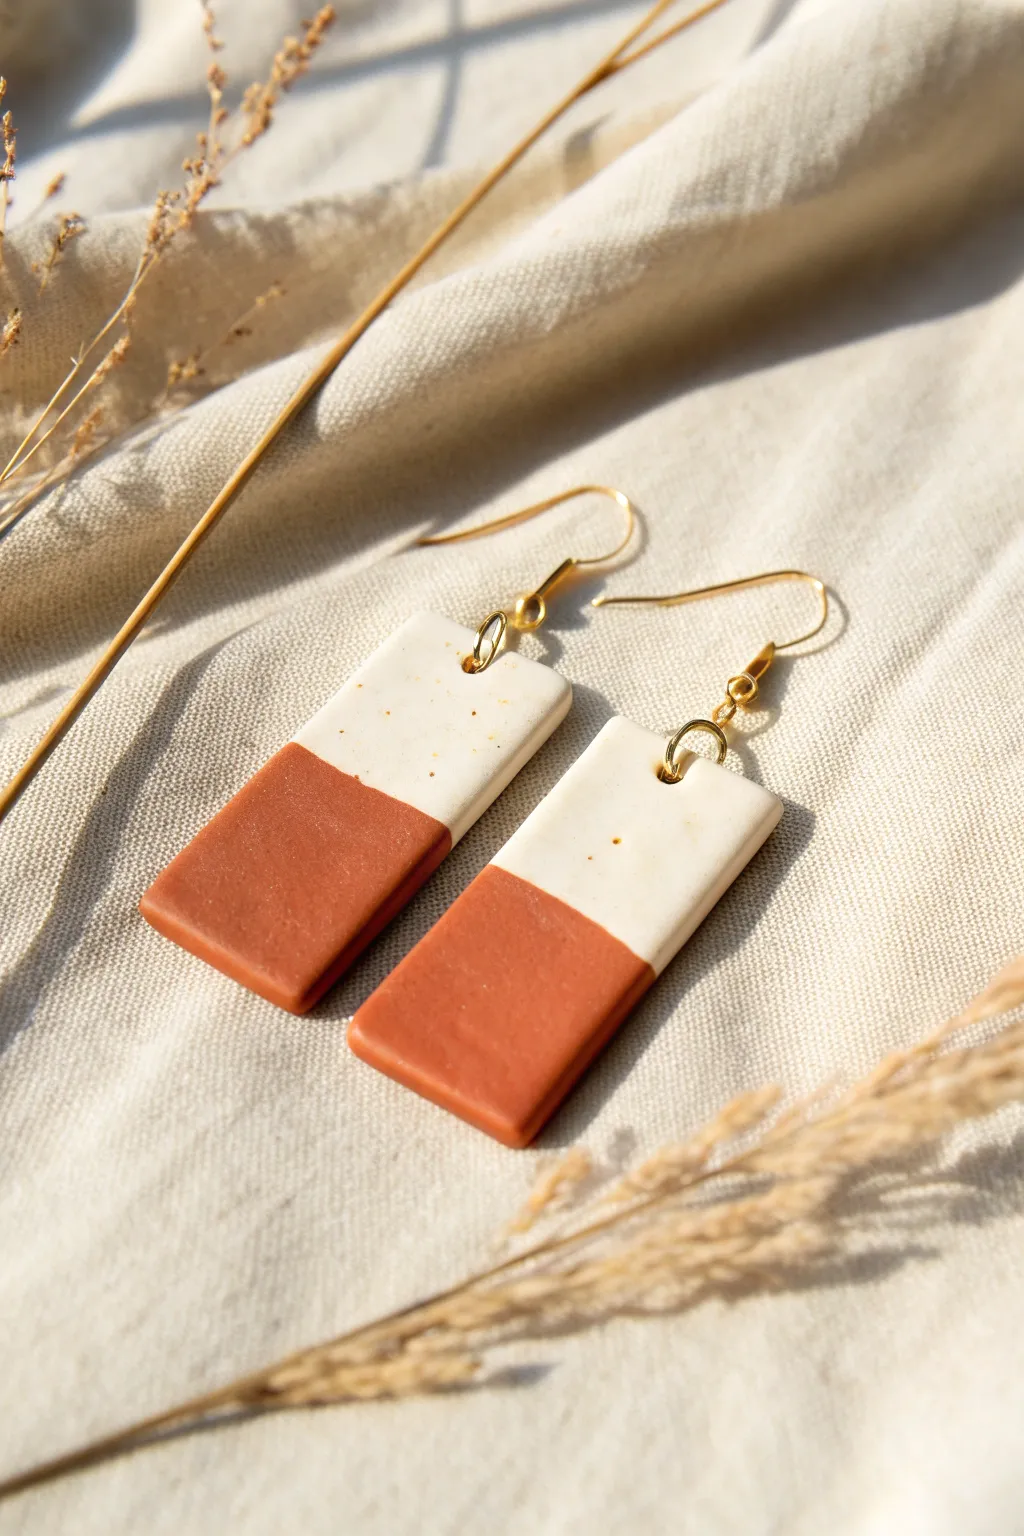
Embrace earthy simplicity with these modern, two-toned rectangular drop earrings. The warm rust tones paired with a speckled cream create a sophisticated color-blocked design that works beautifully for everyday wear.
Step-by-Step Tutorial
Materials
- Polymer clay (terracotta/rust color)
- Polymer clay (cream or white)
- Black pepper or ground vanilla bean (for speckles)
- Clay roller or pasta machine
- Tissue blade or sharp craft knife
- Rectangular clay cutter (approx. 1 inch x 2 inches) or a ruler
- Small circle cutter or pin drill (for jump ring holes)
- Gold jump rings (6mm or 7mm)
- Gold fishhook ear wires
- Fine-grit sandpaper (optional)
- Parchment paper or ceramic tile
Step 1: Preparing the Clay
-
Condition the base:
Begin by thoroughly conditioning your cream-colored polymer clay until it is soft and pliable. If the clay feels too stiff, warm it between your palms for a few minutes. -
Create the speckled effect:
Flatten the cream clay slightly and sprinkle a tiny pinch of black pepper or ground vanilla bean onto the surface. -
Mix the speckles:
Fold the clay over the spices and roll it out, then fold again. Repeat this folding and rolling process until the specks are evenly distributed throughout the white clay. -
Condition the accent color:
Clean your hands or wear gloves to avoid color transfer, then condition the terracotta/rust-colored clay until smooth. -
Roll the sheets:
Using your acrylic roller or pasta machine on a medium-thick setting (approx. 3mm), roll both clay colors into separate flat sheets of equal thickness.
Clean Cuts Pro-Tip
Before cutting your shapes, dip your cutter or blade into cornstarch or water. This acts as a release agent and prevents the clay from sticking to the tool.
Step 2: Creating the Color Block
-
Cut straight edges:
Using your tissue blade, cut a long, perfectly straight edge on one side of both the cream and terracotta clay sheets. -
Join the seams:
Place the two straight edges against each other on your work surface. Push them gently together so they touch without overlapping. -
Smooth the connection:
Place a piece of parchment paper over the seam and gently run your roller over the join to bond the two colors into a single sheet. Be careful not to thin the clay too much. -
Cut the rectangles:
Position your rectangular cutter so the seam runs horizontally across the middle (or slightly off-center for an asymmetrical look). Press down firmly to cut your shapes. -
Make the second earring:
Repeat the cut for the second earring, ensuring the color ratio matches the first one. -
Add pierced holes:
Using a small tool or pin drill, create a hole at the top center of the cream section, leaving about 2-3mm of space from the top edge.
Step 3: Baking and Assembly
-
Bake carefully:
Place your clay pieces on a ceramic tile or baking sheet lined with parchment. Bake according to your specific brand’s package instructions (usually around 275°F/135°C for 30 minutes). -
Cool down:
Allow the pieces to cool completely inside the oven or on a cooling rack before handling them to prevent warping. -
Sand the edges:
Once cool, inspect the edges. I like to use a fine-grit sandpaper wet-sanding technique to smooth out any tiny burrs or fingerprints for a truly professional finish. -
Clean up:
Wipe the earrings with a damp cloth or baby wipe to remove any sanding dust. -
Open the jump ring:
Using two pairs of pliers, twist a gold jump ring open laterally (twist ends away from each other, don’t pull apart). -
Attach hardware:
Thread the jump ring through the hole in the clay piece, then slide the loop of the fishhook ear wire onto the jump ring. -
Close and finish:
Twist the jump ring closed securely. Repeat the assembly steps for the second earring.
Level Up: Texture
Before baking, gently press a piece of sandpaper or a textured fabric onto the clay surface to replace the smooth finish with a stone-like matte texture.
Wear your new geometric creations with pride, knowing you’ve mastered the art of clean, modern color-blocking

The Complete Guide to Pottery Troubleshooting
Uncover the most common ceramic mistakes—from cracking clay to failed glazes—and learn how to fix them fast.
Botanical Leaf-Print Pendants
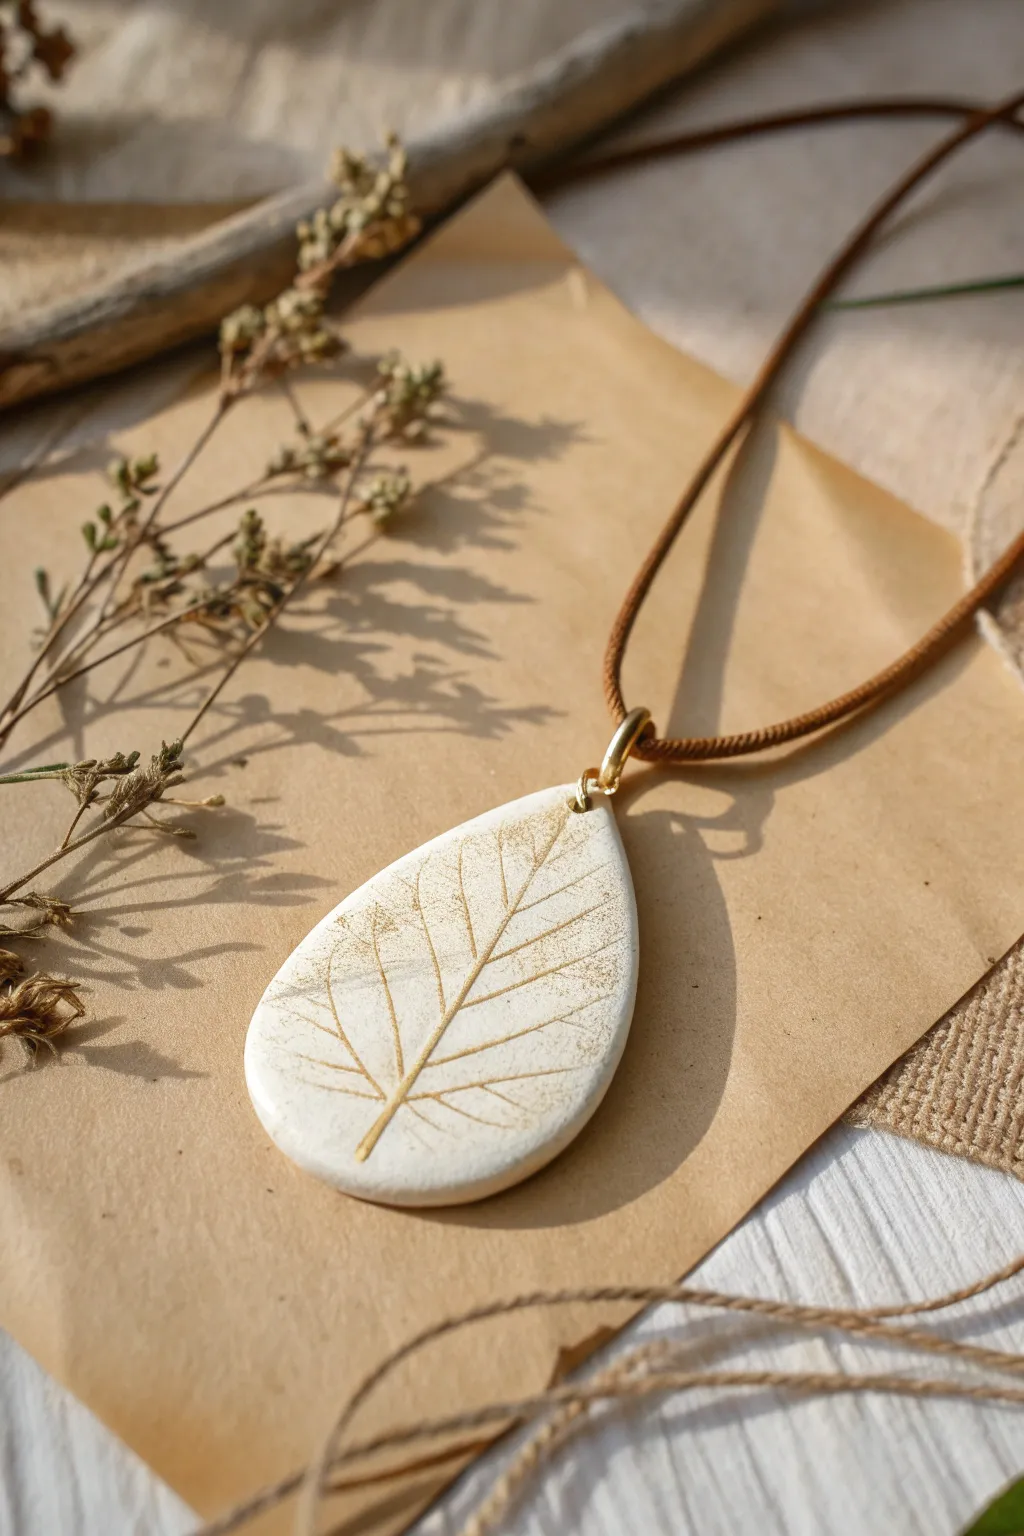
This elegant pendant captures the delicate veins of a real leaf, immortalized in white clay and highlighted with shimmering gold. The organic teardrop shape and rustic leather cord create a beautiful balance between modern minimalism and nature-inspired charm.
Step-by-Step Tutorial
Materials
- White polymer clay (or air-dry clay)
- Fresh leaf with prominent veins (e.g., hydrangea or sage)
- Acrylic rolling pin
- Teardrop-shaped clay cutter (or craft knife and paper template)
- Gold mica powder or gold acrylic paint
- Small soft paintbrush
- Gold jump ring (6mm or larger)
- Jewelry pliers
- Brown suede or leather cord
- Sandpaper (fine grit)
- Gloss varnish or resin (optional)
Step 1: Preparation and Impression
-
Condition the Clay:
Begin by warming a small block of white polymer clay in your hands. Knead it thoroughly until it is soft, pliable, and free of any cracks or air bubbles. -
Roll out a Slab:
Use your acrylic rolling pin to flatten the clay into an even slab. Aim for a thickness of about 4-5mm to ensure the pendant feels substantial but not too heavy. -
Select and Position:
Choose a fresh leaf with a clear vein structure. Place it vein-side down onto the clay surface, ensuring the central stem runs vertically where you want the design to flow. -
Imprint the Texture:
Gently but firmly roll over the leaf with the rolling pin once. Don’t press so hard that the leaf tears, but apply enough pressure to transfer the finest details. -
Reveal the Design:
Carefully lift the leaf stem and peel it away from the clay. I love this moment—seeing the perfect negative impression left behind is always satisfying.
Sticky Leaf Syndrome?
If the leaf sticks to the clay and won’t peel off cleanly, try lightly dusting the leaf with cornstarch before pressing it down. This acts as a release agent.
Step 2: Cutting and Finishing
-
Cut the Shape:
Position your teardrop cutter over the imprinted design so the leaf pattern is centered nicely. Press down firmly to cut the shape. -
Smooth the Edges:
Remove the excess clay from around the cutter. Before lifting the pendant, gently run your finger along the cut edges to soften any sharp corners. -
Create the Suspension Hole:
Use a toothpick or a small straw to pierce a hole at the very top of the teardrop. Make sure it’s large enough to fit your jump ring later. -
Apply the Gold:
Dip a soft, dry brush into gold mica powder. Gently dust it over the imprinted leaf veins. The powder will cling to the raw clay, highlighting the texture. -
Clean Up:
If excess gold powder lands on the smooth surface where you don’t want it, use a tiny piece of scotch tape or a clean brush to lift it away, leaving the gold only in the recesses. -
Bake or Cure:
Place the pendant on a baking sheet lined with parchment paper. Bake according to your polymer clay package instructions (usually 275°F/130°C for 15-30 minutes).
Step 3: Assembly
-
Cool and Buff:
Let the clay cool completely. If there are any rough spots on the back or sides, lightly sand them with fine-grit sandpaper for a professional finish. -
Enhance Contrast (Optional):
If you are using acrylic paint instead of mica powder, this is when you would dry-brush a tiny amount of gold paint over the veins. -
Seal (Optional):
To protect the gold finish, you can apply a thin layer of matte or gloss varnish, though leaving the clay raw provides the lovely matte texture seen in the photo. -
Add Hardware:
Open a gold jump ring using your pliers. Thread it through the hole at the top of the pendant and close it securely. -
String the Cord:
Thread your brown suede or leather cord through the jump ring. Tie the ends at your desired length using a simple knot or add cord ends and a clasp for a cleaner look.
Gold Preservation
To prevent mica powder from rubbing off over time without making the piece shiny, use a spray fixative designed for pastels rather than a brush-on varnish.
Now you have a stunning piece of wearable nature that captures the season effectively
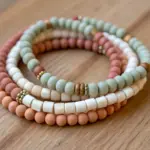
Minimal Pendant Necklaces on Cord
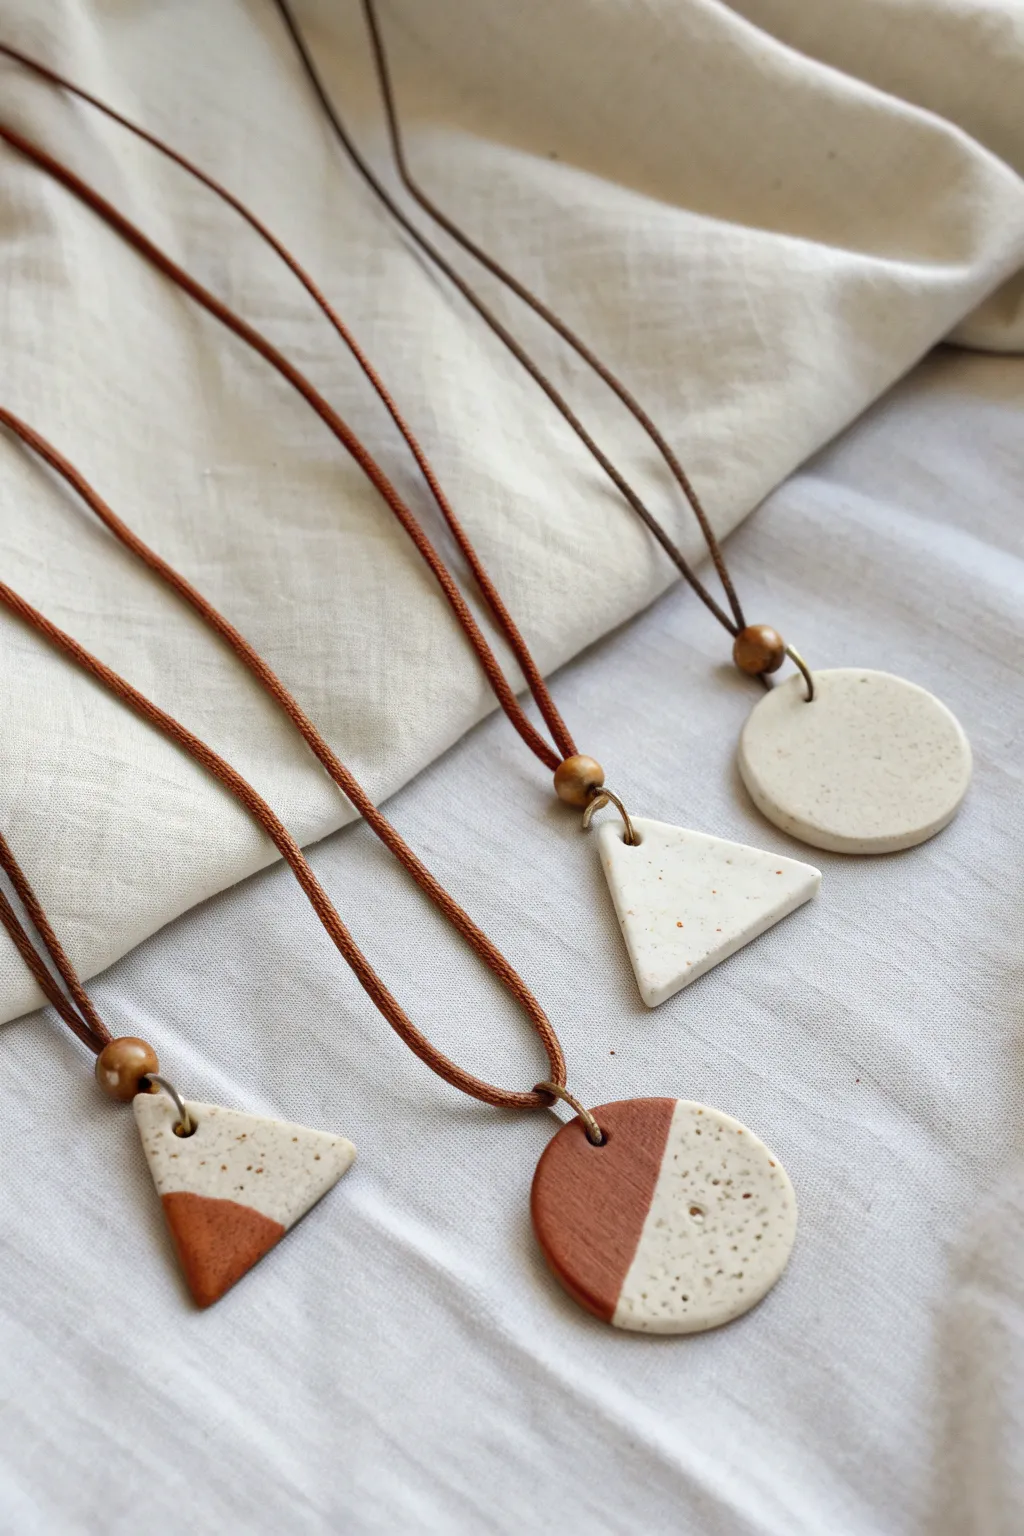
These understated necklaces champion the beauty of minimalist shapes and organic textures. By combining speckled white clay with warm terracotta tones on simple cord, you achieve an effortless, earthy style perfect for everyday wear.
Step-by-Step
Materials
- Polymer clay (Speckled White/Granite)
- Polymer clay (Terracotta or warm brown)
- Waxed cotton cord (1mm – 1.5mm, brown)
- Wooden beads (6mm – 8mm with large holes)
- Jump rings (6mm – 8mm, antique brass or gold)
- Clay roller or pasta machine
- Shape cutters (Circle and Triangle)
- Needle tool or toothpick
- Tissue blade or craft knife
- Fine-grit sandpaper (400 to 1000 grit)
- Jewelry pliers
- Baking tile or parchment paper
- Oven
Step 1: Preparing the Clay
-
Condition the clay:
Start by warming up your speckled white and terracotta clays in your hands separately. Knead them until they are soft, pliable, and free of cracks. -
Roll out sheets:
Using your acrylic roller or pasta machine on a medium-thick setting (about 3mm to 4mm), roll out sheets of both clay colors. You want them thick enough to be sturdy pendants. -
Create the two-tone effect:
For the dual-color pendants, use your tissue blade to cut a straight line through both the white and terracotta sheets. I like to cut at a slight diagonal for interest. -
Join the seams:
Place the cut edge of a terracotta piece against the cut edge of a white piece. Push them gently together on your work surface so they adhere. -
Smoothing the join:
Cover the clay with a piece of parchment paper and gently roll over the seam with your roller to bond them completely and level the surface.
Clean Cuts Every Time
Before pressing your cutter into the clay, dip it into cornstarch or spray with a mist of water. This prevents the clay from sticking inside the cutter and damaging the shape.
Step 2: Cutting and Refining
-
Cut the shapes:
Press your circle and triangle cutters firmly into the clay. For the two-tone pieces, position the cutter so the seam runs through the shape where you want the color split to be. -
Lift and smooth:
Gently remove the excess clay and lift your cut shapes. Use your finger to softly smooth the edges, removing any sharp ridges left by the cutter. -
Pierce the holes:
Use a needle tool or toothpick to create a hole at the top of each pendant. Ensure the hole is large enough for your jump ring but not too close to the edge to prevent tearing. -
Bake the pieces:
Place your pendants on a ceramic tile or baking sheet lined with parchment. Bake according to your customized clay package instructions, usually around 275°F (135°C) for 30-45 minutes. -
Cool and sand:
Let the pieces cool completely inside the oven to prevent cracking. Once cool, lightly wet-sand the edges under running water for a perfectly smooth, professional finish.
Step 3: Assembly
-
Attach the jump ring:
Using two pairs of pliers, twist a jump ring open (don’t pull it apart) and thread it through the hole in your clay pendant. Close the ring securely. -
Prepare the cord:
Cut a length of waxed cotton cord to your desired necklace length, adding a few extra inches for knotting. -
Thread the components:
Thread one end of the cord through the jump ring you just attached to the pendant. -
Add the wooden bead:
Hold both ends of the cord together above the pendant. Slide a wooden bead down over *both* strands of cord until it rests just above the jump ring. -
Secure the bead (optional):
If the bead slides too freely, you may tie a simple overhand knot with both cords just above the bead to keep it in place, though gravity often does the work for this style. -
Finish the closure:
Tie the two loose ends of the cord together using sliding knots so the necklace is adjustable, or a simple overhand knot if it fits over your head easily.
Fixing Fingerprints
If you notice fingerprints before baking, lightly brush the surface with a tiny amount of baby oil or rubbing alcohol to smooth them away instantly.
Enjoy wearing your handcrafted art pieces or gift them to a friend who appreciates modern simplicity


What Really Happens Inside the Kiln
Learn how time and temperature work together inside the kiln to transform clay into durable ceramic.
Mixed Bead and Clay Necklaces
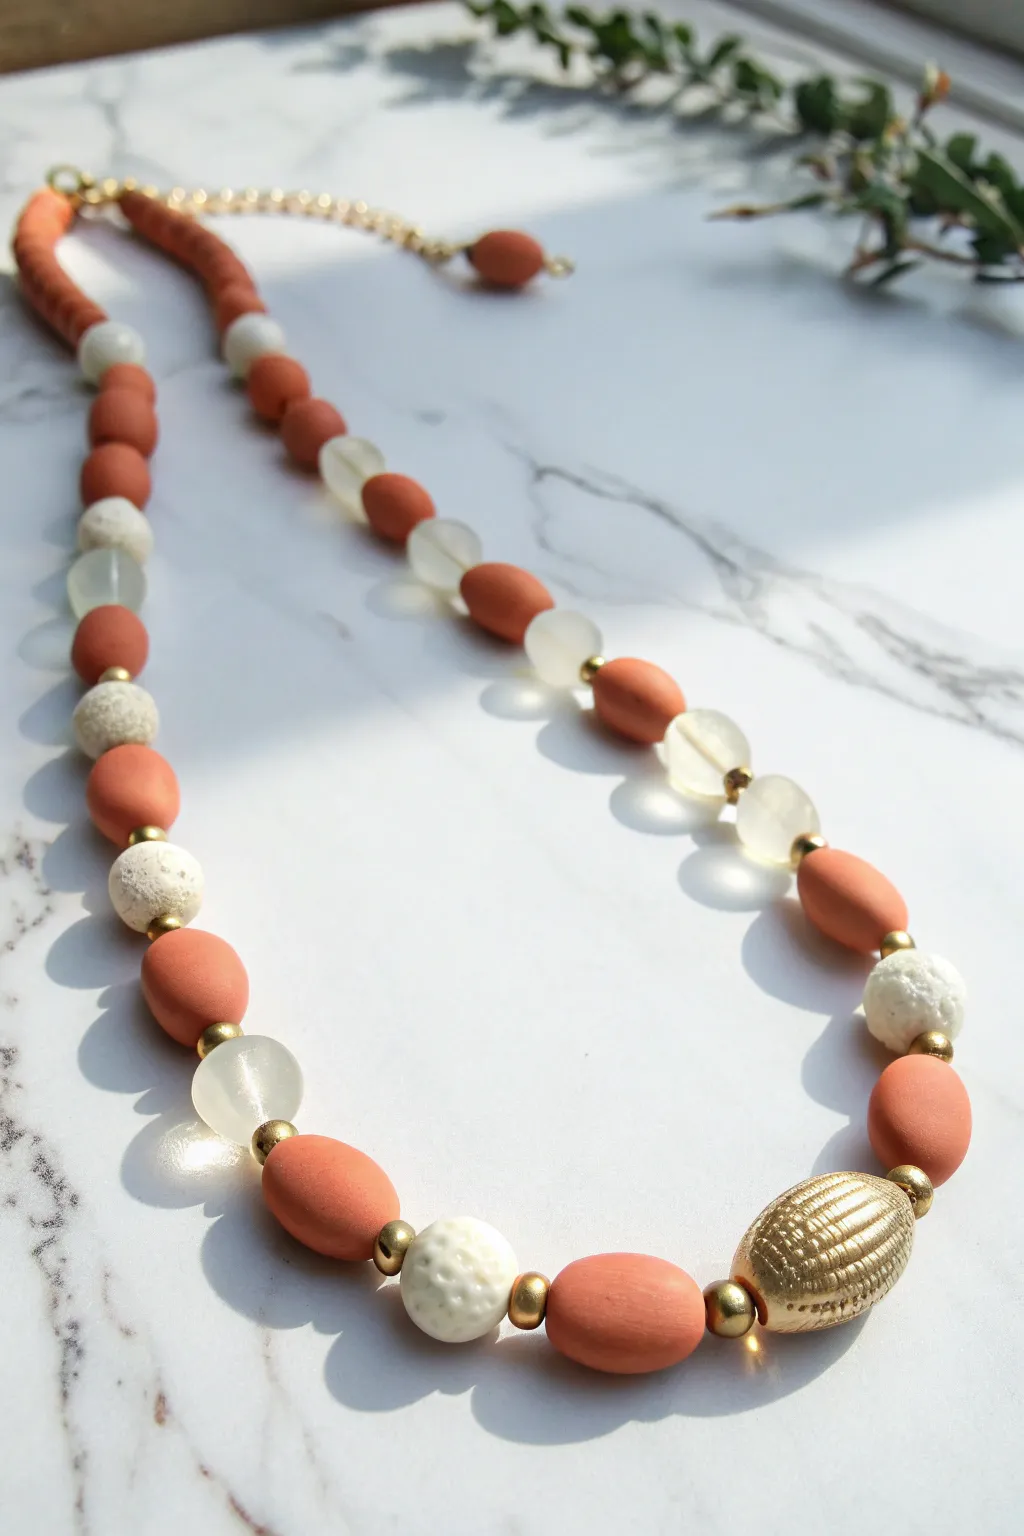
This elegant necklace balances the earthy warmth of terracotta-colored clay with the refined shimmer of gold and frosted glass. It’s a perfect introductory project for mixing handmade polymer clay components with store-bought accents for a high-end boutique look.
Step-by-Step
Materials
- Terracotta or burnt orange polymer clay
- White polymer clay (or white lava stone beads)
- Textured sponge or sandpaper (for white beads)
- Large gold textured oval focal bead
- Small gold spacer beads (brass or plated)
- Translucent frosted glass beads (round)
- Beading wire (tigertail)
- 2 Crimp beads
- 2 Crimp covers (gold)
- Gold chain extender and lobster clasp
- Needle tool or toothpick
- Clay roller or pasta machine
- Oven for baking
Step 1: Crafting the Clay Beads
-
Condition the Clay:
Begin by thoroughly conditioning your terracotta-colored polymer clay until it is soft and pliable. Do the same for the white clay if you are hand-making the textured white beads. -
Shape the Terracotta Ovals:
Roll the terracotta clay into a smooth log. Cut uniform sections and roll them into balls, then gently elongate them between your palms to create smooth oval shapes. You’ll need about 20-25 of these depending on your desired length. -
Shape the Terracotta Rounds:
Create smaller round beads from the same terracotta clay to use near the clasp ends of the necklace, tapering the size down slightly. -
Create Textured White Beads:
Roll your white clay into round balls. To replicate the ‘lava stone’ or coral look, gently roll the unbaked beads over a coarse piece of sandpaper or press a textured sponge into the surface to create pits and craters. -
Pierce the Beads:
Using a needle tool or toothpick, carefully pierce a hole through the center of each bead. I find twisting the tool while pushing prevents the bead from squishing out of shape. -
Bake the Clay:
Arrange your beads on a baking sheet lined with parchment paper. Bake according to your polymer clay package instructions (typically 275°F/135°C for 15-30 minutes). Let them cool completely before handling.
Step 2: Assembling the Design
-
Prepare the Wire:
Cut a length of beading wire approximately 24 inches long. Secure one end with a piece of tape to prevent beads from sliding off while you work. -
Start from the Center:
Thread your large gold textured focal bead onto the center of the wire. This anchors your design and ensures symmetry. -
Build the Central Pattern:
On both sides of the gold focal bead, add a gold spacer bead, followed by a terracotta oval. -
Add the First Transition:
Next, on each side, add another spacer, a white textured bead, and another spacer. The gold spacers act as essential separators that make the colors pop. -
Establish the Rhythm:
Continue the pattern outward: spacer, terracotta oval, spacer, frosted glass bead. This alternating rhythm creates the visual interest seen in the photo. -
Vary the Sequence:
As you move further up the strand, you can alternate between the white textured beads and the frosted glass beads, always separating them with terracotta ovals and gold spacers. -
Taper the Ends:
When you reach the last few inches of the necklace, switch to smaller terracotta beads (ovals or rounds) without the large glass or white beads to make the necklace sit comfortably on the neck.
Uneven Bead Holes?
If bead holes shrink during baking, gently re-drill them with a small hand drill or bead reamer rather than forcing the wire through.
Step 3: Finishing Touches
-
Attach the First Crimp:
Slide a crimp bead onto one end of the wire, followed by the loop of your lobster clasp. Thread the wire back through the crimp bead and pull tight. -
Secure the Clasp:
Use flat-nose pliers to flatten the crimp bead securely. Cover it with a gold crimp cover for a professional finish. -
Finish the Second End:
Repeat the crimping process on the other end, attaching the chain extender instead of the clasp. Make sure the beads are snug but not so tight that the necklace creates stiff angles. -
Trim Excess Wire:
Trim any remaining tail of the beading wire close to the crimp beads so it doesn’t poke the wearer.
Smooth Finishes
Buff your baked terracotta beads with a piece of denim or soft cotton cloth to give them a subtle, professional sheen without using varnish.
Now you have a stunning, bespoke necklace ready to wear or gift.
Mini Charm Earrings and Necklaces
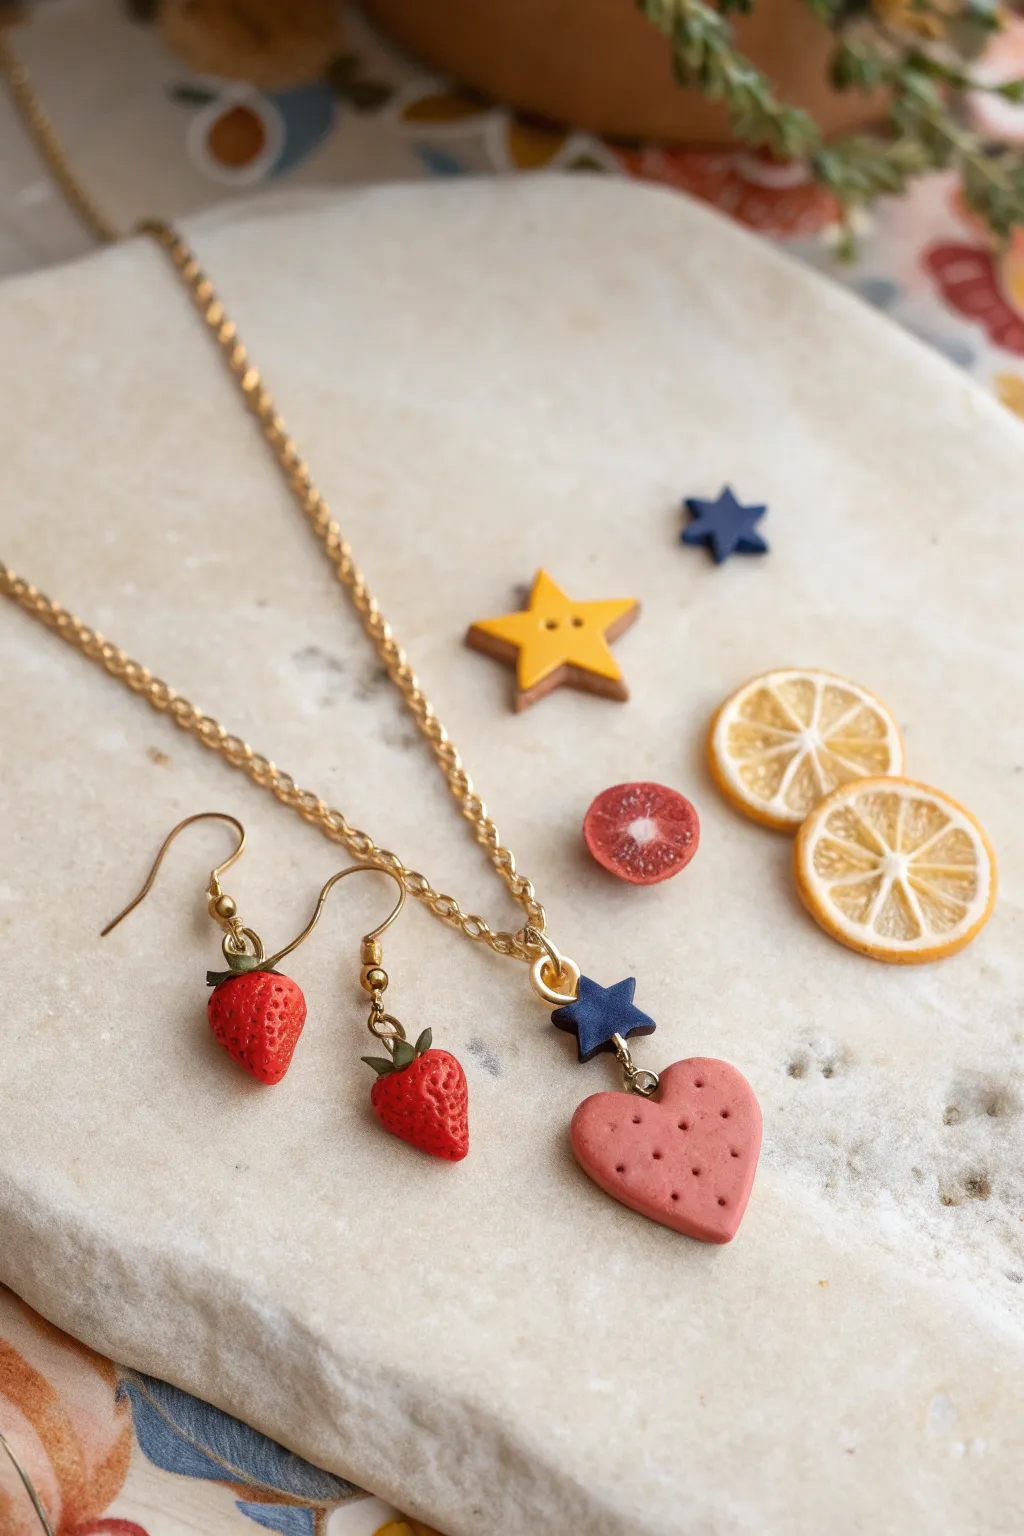
Embrace a playful aesthetic with this delightful jewelry set featuring realistic miniature food charms made from polymer clay. This project combines techniques for texturing and shading to create lifelike strawberries, citrus slices, and cute cookie pendants.
Step-by-Step Tutorial
Materials
- Polymer clay (colors: red, green, pink, translucent white, yellow, orange, dark blue)
- Liquid polymer clay (translucent)
- Gold finish jewelry chain
- Gold finish earring hooks (fishhook style)
- Gold jump rings and eye pins
- Ball stylus tool
- Needle tool or toothpick
- Soft pastel chalks (reds and browns for shading)
- Small paintbrush
- X-acto knife or clay blade
- Small star cookie cutter (optional)
- Gloss glaze (for fruit interiors)
- Matte varnish (optional for cookie)
- Needle nose pliers
Step 1: Sculpting the Strawberries
-
Shape the base:
Start by conditioning a small amount of red clay. Roll two pea-sized balls and gently pinch one end of each to form a teardrop strawberry shape. -
Texture the surface:
Use a needle tool or the finest point of a ball stylus to press tiny indentations all over the surface of the berries to mimic seeds. Don’t press too deep, just enough to catch the light. -
Add leaves:
Roll a very tiny snake of green clay and cut it into minuscule segments. Press 4-5 of these onto the wider end of each strawberry, flattening them slightly with a tool to look like leafy sepals. -
Insert hardware:
Carefully insert a gold eye pin through the center of the leaves and into the strawberry body. I find trimming the pin slightly helps it sit flush.
Step 2: Creating the Citrus & Cookie Charms
-
Make a citrus cane:
Wrapped a log of translucent yellow (or orange) clay in a thin sheet of white clay. Cut this log into 8 wedges. -
Reassemble the fruit:
re-form the wedges into a circle with thin snakes of white clay between them to create the pith lines. Wrap the whole cylinder in a final layer of colored rind clay. -
Slice and texture:
Slice thin disks from your cane. Use a needle tool to gently rough up the translucent sections to give them a juicy, pulpy texture. -
Form the heart cookie:
Roll out pink clay to about 4mm thickness. Use a small cutter or blade to shape a heart. Use a needle tool to poke ‘air holes’ across the surface, resembling a sugar cookie. -
Make the star accent:
Cut a small star shape from dark blue clay. This will act as the connector charm for the necklace.
Fixing Fingerprints
Work fingerprint-free by lightly buffing raw clay with a drop of baby oil or using cornstarch on your fingers before the final texturing step.
Step 3: Baking & Assembly
-
Add eye pins:
Insert eye pins into the top of the heart cookie, the blue star, and any citrus slices you want to turn into charms. -
Bake:
Place all clay pieces on a tile or parchment-lined baking sheet. Bake according to your brand’s package instructions (usually 275°F/135°C for 15-30 minutes). -
Cool and glaze:
Once fully cooled, apply a coat of gloss glaze to the cut surface of the citrus slices to make them look wet and fresh. Leave the cookie and star matte. -
Assemble the earrings:
Using pliers, open the loop on your earring hooks and slide on the strawberry charms. Close the loop securely. -
Link the necklace pendant:
Use a jump ring to connect the pink heart to the bottom of the blue star. Attach the top of the blue star to the center of your gold chain with another jump ring.
Pro Shading Tip
Before baking, brush a tiny amount of brown pastel dust onto the edges of the pink heart cookie. It creates a perfect ‘baked’ golden-brown effect.
Now you have a charming, handmade set perfect for adding a pop of whimsy to any outfit

TRACK YOUR CERAMIC JOURNEY
Capture glaze tests, firing details, and creative progress—all in one simple printable. Make your projects easier to repeat and improve.
Faux Stone Slab Jewelry

Achieve the organic elegance of natural agate or layered sandstone without the weight of real rock. This polymer clay project captures delicate striations of terracotta, cream, and beige in a classic pendant and earring set.
Step-by-Step Guide
Materials
- Polymer clay (Terracotta/Rust, Beige/Tan, White, Translucent)
- Acrylic roller
- Tissue blade or sharp craft knife
- Oval cutters (Large for pendant, small for earrings)
- Fine grit sandpaper (400-1000 grit)
- Buffing cloth or denim scrap
- Pendant bail (Silver tone)
- Earring wires/hooks (Silver tone)
- Jewelry jump rings
- Beige faux suede cord or leather cord
- Jewelry pliers
- Needle tool or hand drill
Step 1: Creating the Faux Stone Block
-
Condition the Clay:
Begin by thoroughly conditioning each block of clay until soft and pliable. You’ll need roughly equal parts of white, beige, and the rust color, plus a slightly smaller amount of translucent clay to add depth. -
Roll Sheets:
Roll each color into flat sheets of varying thickness. Don’t worry about being precise; having some sheets thick and others paper-thin creates a more natural, geological look. -
Stack and Layer:
Stack the sheets on top of one another in a random order. I like to tear some sheets in half and overlap them to create uneven, organic lines rather than perfect stripes. -
Compress the Stack:
Once stacked into a block about 1-2 inches high, press down firmly to adhere the layers and eliminate air bubbles. Use your acrylic roller to flatten the block slightly. -
Create Distortion:
To mimic the swirls seen in the photo, gently twist the entire block of clay just once or twice. You can also push the ends towards the center to ripple the layers. -
Slice the Slab:
Use your tissue blade to slice thin cross-sections off your block. You are looking for the “grain” where the layers are most interesting. Lay these slices side-by-side on a flat surface to create a veneers slab. -
Smooth the Veneer:
Roll over your assembled slices with the acrylic roller to fuse them into a single, cohesive sheet. Aim for a thickness of about 3-4mm for the final jewelry pieces.
Natural Pepper
Mix a tiny pinch of black pepper or used ground coffee into your translucent clay before stacking. These specks look like mineral impurities found in real stone.
Step 2: Cutting and Baking
-
Cut the Pendant:
Position your large oval cutter over the most attractive section of the slab—look for nice contrast between the rust and white swirls—and press down firmly to cut the pendant shape. -
Cut the Earrings:
Use the smaller oval cutters to punch out two matching shapes for the earrings. Try to find spots on the slab that coordinate with the pendant but aren’t identical. -
Refine Edges:
Gently smooth the cut edges with your fingertip to remove any harsh lines or clay burrs left by the cutters. -
Add Holes:
Use a needle tool to pierce a hole at the top center of each shape. Ensure the hole is large enough for your jump rings. -
Bake:
Place the pieces on a ceramic tile or baking sheet. Bake according to your polymer clay manufacturer’s instructions (usually 275°F/135°C for 30-45 minutes).
Matte vs. Gloss
For a ‘wet stone’ look, coat the baked pieces in UV resin. For the dry sandstone look shown here, stick to buffing only.
Step 3: Finishing Assembly
-
Sand for Finish:
Once cool, wet sand the pieces starting with 400 grit and working up to 1000 grit. This creates that smooth, river-stone texture. -
Buffing:
Vigorously rub the pieces with a piece of denim or a buffing cloth to achieve a subtle, natural sheen (not a high gloss). -
Attach Pendant Bail:
Open the pinch bail (or use a jump ring) and attach it through the hole in the large pendant. Thread the beige suede cord through the bail. -
Assemble Earrings:
Use pliers to open jump rings, threading them through the earring holes and attaching the ear wires. Close the rings securely.
Wear your earthy new set with a simple linen top to let the intricate faux-stone patterns take center stage
Painted Folk-Style Medallion Pendants
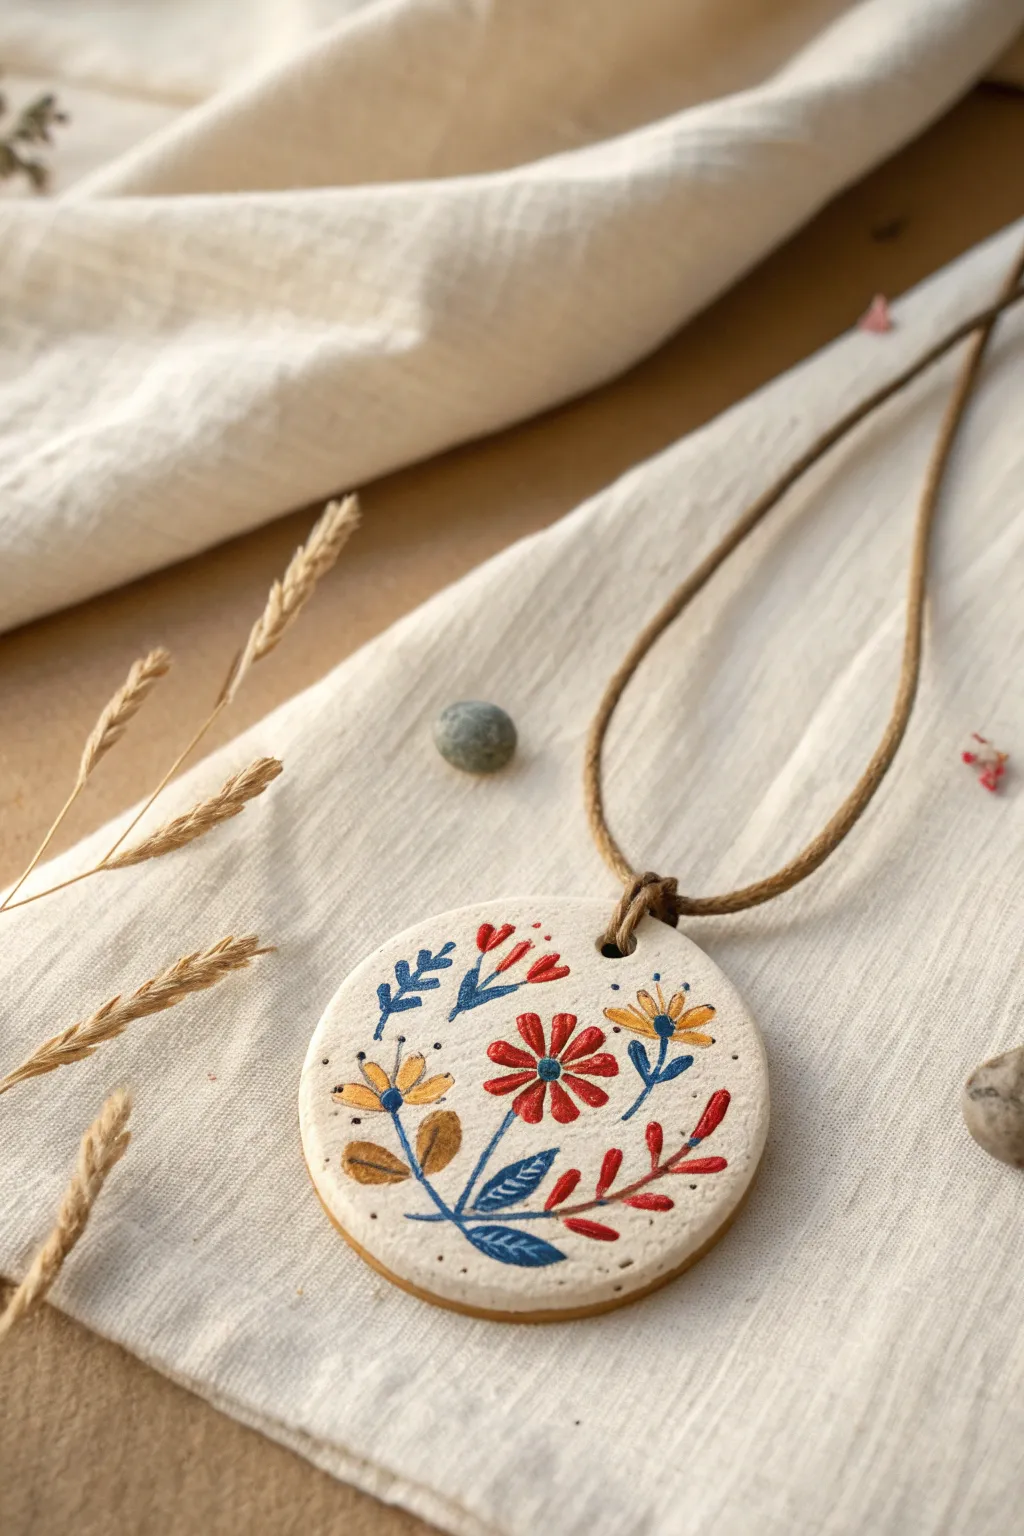
Capture the charm of traditional embroidery with this hand-painted clay medallion. The design features a delicate arrangement of red, yellow, and blue wildflowers on a matte white base, strung on a simple cord for a rustic, bohemian look.
How-To Guide
Materials
- White polymer clay or air-dry clay
- Rolling pin
- Circular cookie cutter (approx. 2-inch diameter)
- Straw or cocktail stick
- Fine-grit sandpaper
- Acrylic paints (red, navy blue, yellow ochre, gold)
- Fine detail brushes (sizes 0 and 00)
- Small dotting tool or toothpick
- Matte varnish or sealant
- Waxed cotton cord or leather thonging
Step 1: Shaping the Base
-
Condition the clay:
Start by kneading a small ball of white clay in your hands until it becomes soft, pliable, and warm. This prevents cracking later on. -
Roll it out:
Place the clay on a smooth surface and use your rolling pin to flatten it to an even thickness of about 4-5mm. If you want that stone-like texture, you can gently press a piece of canvas fabric onto the surface before cutting. -
Cut the shape:
Press your circular cutter firmly into the clay to create a clean disk. Remove the excess clay from around the edges before lifting the cutter. -
Create the hole:
Using a straw or a cocktail stick, carefully pierce a hole near the top edge for the cord. Rotate the tool slightly as you pull it out to ensure clean edges. -
Smooth the edges:
Dip your finger in a little water (for air-dry clay) or baby oil (for polymer clay) and gently run it along the cut edge to soften any sharp ridges. -
Dry or Bake:
Follow your specific clay’s instructions to cure the piece. For air-dry clay, leave it for 24-48 hours; for polymer clay, bake it in the oven at the recommended temperature.
Brush Control Secret
Thin your acrylic paint with a tiny drop of water until it has an ink-like consistency. This helps the paint flow smoothly for fine lines without creating lumps or ridges.
Step 2: Painting the Design
-
Prep the surface:
Once fully cured and cool, lightly sand the surface if needed. Wipe away any dust with a damp cloth to ensure a clean painting canvas. -
Paint the main flower:
Using your smallest brush and red acrylic paint, create the central flower. Paint eight small teardrop shapes radiating from a center point, leaving a tiny gap in the middle. -
Add the blue stems:
Switch to navy blue paint. Draw thin, sweeping lines for stems—one curving up from the bottom left, one for the central flower, and smaller branches extending outward. -
Create yellow blooms:
Mix yellow ochre with a tiny touch of gold for a classic look. Paint simple three-petal or five-petal flowers at the ends of the blue stems on the left and right sides. -
Leaf details:
Paint small, pointed leaf shapes along the blue stems. Use navy blue for the lower leaves and red specific branches on the right side to balance the color palette. -
Add highlights:
Once the base colors are dry, use navy blue to add tiny veins onto the yellow petals and a center dot to the main red flower. -
Dotted details:
Use a dotting tool or the tip of a toothpick to add tiny black or dark blue dots around the flowers and scattered in empty spaces for a whimsical, pollery-like effect. -
Final touches:
Add small strokes of gold or bronze to the lower leaves on the left side to give the piece a subtle shimmer.
Vintage Patina
Before sealing, rub a tiny amount of brown shoe polish or diluted burnt umber paint over the surface and wipe it off immediately. It stays in the crevices for an aged look.
Step 3: Assembly
-
Seal the artwork:
Allow the paint to dry completely. Apply a thin coat of matte varnish over the front and sides to protect your design from scratches and moisture. -
String it up:
Cut a length of brown waxed cord. Fold it in half and thread the loop through the pendant hole. -
Secure the cord:
Pull the loose ends of the cord through the loop (creating a lark’s head knot) and tighten it gently against the top of the clay disk.
Wear your handcrafted pendant with pride or wrap it up as a thoughtful handmade gift
Hollow Beads and Donut Shapes
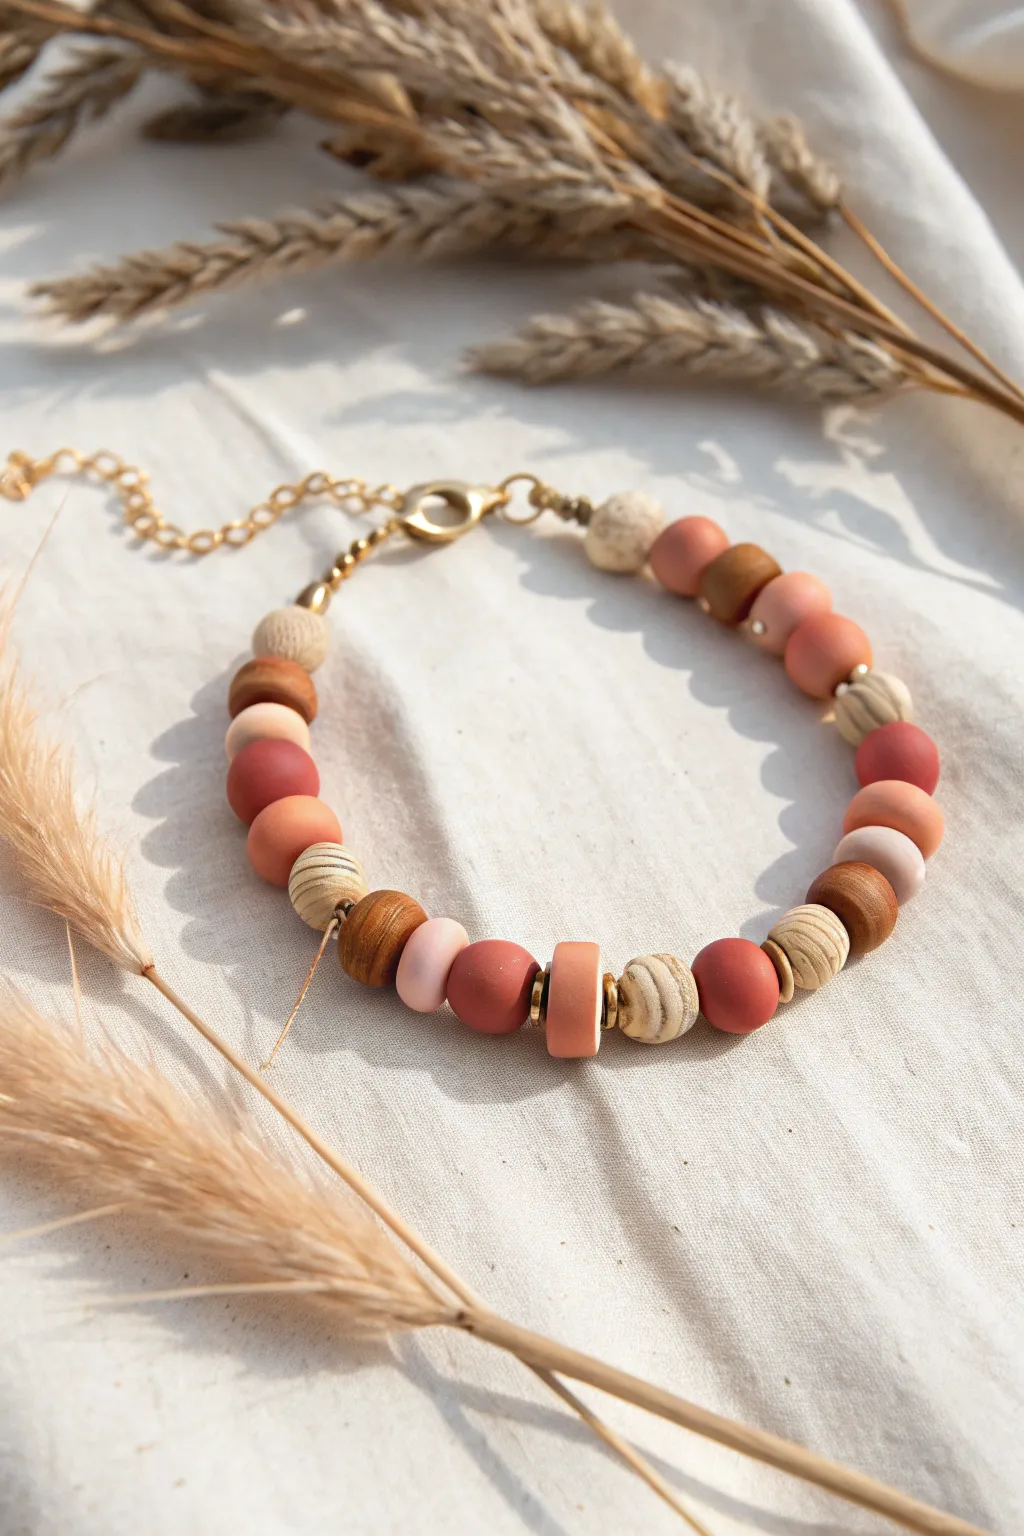
Learn to craft this effortlessly chic bracelet featuring a mix of handmade polymer clay beads in warm, earthy tones. By combining smooth rounds, textured donuts, and spacer beads, you’ll create a piece that feels both organic and elegantly finished.
How-To Guide
Materials
- Polymer clay in a palette of terracotta, rust, peach, beige, and chocolate
- Rolling pin or pasta machine
- Small round cutters (for donut shapes)
- Bead piercing pins or toothpicks
- Texturing tool (wood grain or sandstone texture sponge)
- Sandpaper (various grits)
- Beading wire or strong stretch cord
- Gold tone crimp beads
- Gold tone spacer discs (heishi beads)
- Lobster clasp and extension chain
- Jewelry pliers (flat nose and cutting)
- Oven for baking
Step 1: Creating the Clay Palette
-
Condition the Clay:
Begin by thoroughly conditioning each color of your polymer clay until it is soft and pliable. Warm clay is essential for avoiding cracks later on. -
Color Mixing:
To achieve that natural, mismatched aesthetic, mix a few custom shades. Blend a pinch of white into your rust color for a softer terracotta, or mix beige with chocolate for a latte tone.
Step 2: Forming the Beads
-
Rolling Round Beads:
Pinch off small, equal-sized pieces of clay (about the size of a pea or blueberry) and roll them between your palms to create perfect spheres. Make about 10-15 of these in various colors. -
Creating Donut Shapes:
Flatten a few spheres slightly into thick discs. Use a small tool to press a hole through the center, then widen it gently to create a ‘donut’ or rondelle shape rather than a simple bead. -
Adding Texture:
Set aside a few of your beige or light brown beads. Before piercing them, roll them gently over coarse sandpaper or a texturing sponge to mimic the look of natural stone or wood. -
Piercing the Holes:
Using your bead piercing pin, carefully bore a hole through the center of every bead. I find twisting the pin as it goes in prevents the bead from becoming misshapen. -
Baking:
Arrange your beads on a ceramic tile or baking sheet lined with paper. Bake according to your specific clay brand’s instructions (usually 275°F/130°C for 15-30 minutes). -
Cooling and Buffing:
Allow the beads to cool completely. Once hard, you can lightly sand any rough edges or fingerprints near the holes for a professional finish.
Baking Pro-Tip
To prevent flat spots on your round beads, bake them on a bed of cornstarch or bunched-up polyester batting. This cradles the curve while they harden in the oven.
Step 3: Assembly
-
Planning the Pattern:
Lay out your beads on a bead board or soft cloth. Experiment with the arrangement, placing round clay beads next to textured ones, and interspersing them with the faux-wood looks. -
Adding Gold Accents:
Insert small gold spacer discs between select beads. This breaks up the clay textures and adds that crucial touch of elegance seen in the reference photo. -
Starting the Strand:
Cut a length of beading wire. Crimp one end to a jump ring attached to your lobster clasp using pliers to secure the start. -
Stringing:
Thread your pattern onto the wire. Keep the tension consistent but not too tight, so the bracelet remains flexible. -
Finishing the Ends:
Once all beads are strung, add a crimp bead and the loop of your extension chain to the end. -
Securing the Clasp:
Thread the wire back through the crimp bead and the last couple of clay beads. Flatten the crimp bead firmly with pliers and trim the excess wire.
Level Up: Texture
Mix black pepper or dried used coffee grounds into beige clay before baking. It creates incredible ‘granite’ speckles that look just like real stone.
Enjoy styling your new bracelet stacked with other gold chains or worn solo for a minimalistic statement
Metallic Accents and Edge Details
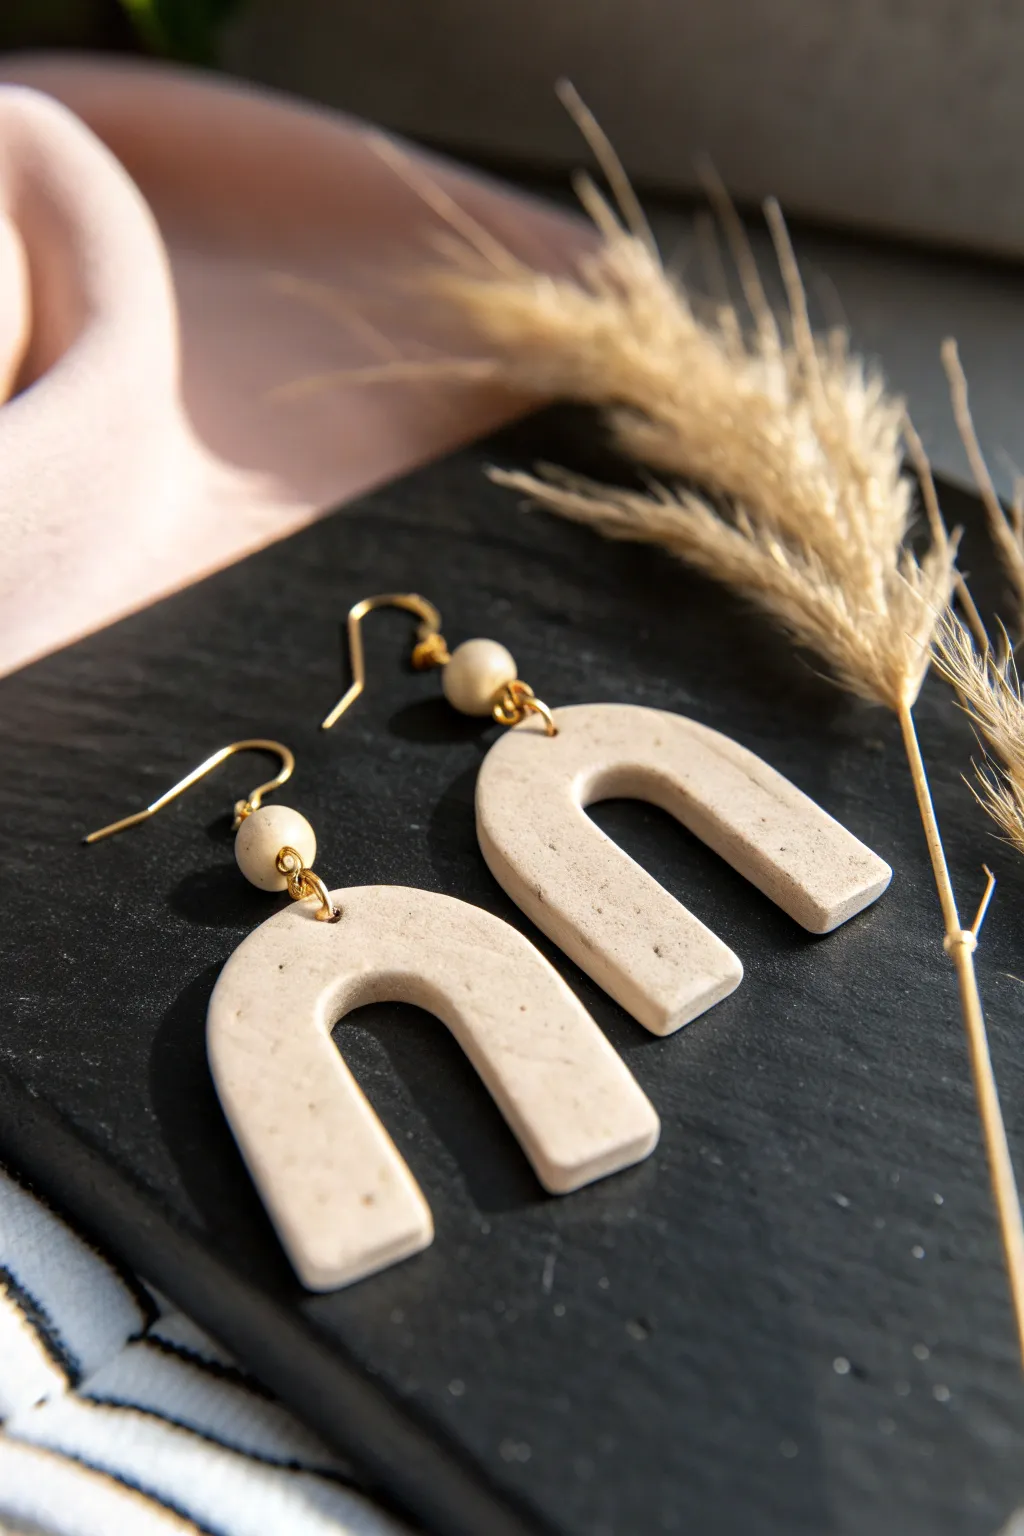
Embrace a natural, minimalist aesthetic with these granite-effect polymer clay earrings. The speckled beige texture combines beautifully with warm wooden beads and gold findings for a sophisticated, earthy accessory.
Step-by-Step
Materials
- Polymer clay (beige or granite/stone effect)
- Small wooden beads
- Gold tone earring hooks
- Gold tone jump rings (6-8mm)
- Gold tone eye pins
- U-shape clay cutter
- Rolling pin or pasta machine
- Texture tool (toothbrush or stiff brush – optional)
- Round nose pliers
- Flat nose pliers
- Wire cutters
- Baking sheet and parchment paper
- Hand drill or pin vibe
- Sandpaper (fine grit)
Step 1: Clay Preparation and Cutting
-
Condition the Clay:
Begin by warming the polymer clay in your hands, kneading it until it becomes soft and pliable. If you don’t have pre-speckled granite clay, mix a small amount of black pepper or black glitter into beige clay to achieve the stone look. -
Roll to Thickness:
Using a pasta machine on a medium setting or a rolling pin with depth guides, roll the clay out into an even slab approximately 3-4mm thick. -
Cut the Shapes:
Take your U-shape cutter and press it firmly into the clay slab. Ensure you cut straight down without rocking the cutter to keep the edges clean. -
Smooth the Edges:
Gently lift the cut shapes. Use your finger or a soft rubber tool to lightly smooth the raw edges, removing any potential sharp bits before baking. -
Drill Holes (Pre-Bake):
Using a needle tool or toothpick, create a hole at the very top center of the arch shape. Ensure the hole is large enough for your jump rings but not too close to the edge to prevent cracking.
Stone Texture Tip
To enhance the organic stone look, lightly tap the raw clay surface with a toothbrush before cutting. This adds tiny pores that mimic real granite.
Step 2: Baking and Finishing
-
Bake the Clay:
Place your clay arches on a parchment-lined baking sheet. Bake according to the manufacturer’s instructions for your specific brand of clay—usually between 265°F and 275°F (130°C) for 30 minutes. -
Cool Down:
Allow the pieces to cool completely inside the oven or on a cooling rack. Do not manipulate them while warm, as polymer clay is fragile until fully cool and cured. -
Sanding:
Once cool, use fine-grit sandpaper wet with a little water to gently buff the edges and surface for a professional, matte stone finish. -
Wash and Dry:
Rinse off any sanding dust with water and dry the pieces thoroughly with a clean cloth.
Level Up: Gold Leaf
Before baking, randomly press small flakes of gold leaf onto the surface. The metallic shine against the matte stone texture creates a stunning contrast.
Step 3: Assembly
-
Prepare the Bead Link:
Slide a wooden bead onto a gold eye pin. If the eye pin is too long, trim the excess wire with wire cutters, leaving about 1cm above the bead. -
Create a Loop:
Using round nose pliers, bend the remaining wire tail at a 90-degree angle, then roll it back towards the bead to create a neat loop. Repeat this for the second earring. -
Open Jump Rings:
Hold a jump ring with two pairs of pliers. Twist laterally (one hand forward, one back) to open it without distorting the circle shape. -
Connect the Arch:
Thread the open jump ring through the hole in your clay arch and through the bottom loop of your wooden bead component. Close the jump ring securely by twisting it back. -
Attach the Hook:
Use your pliers to gently open the small loop at the base of the ear wire hook. Slide this through the top loop of the wooden bead component. -
Final Secure:
Close the ear wire loop securely. Give the earring a gentle shake to ensure all connections move freely and nothing is stiff.
Enjoy wearing these elegant, nature-inspired pieces that go with just about any outfit
Mosaic and Inlay Earrings
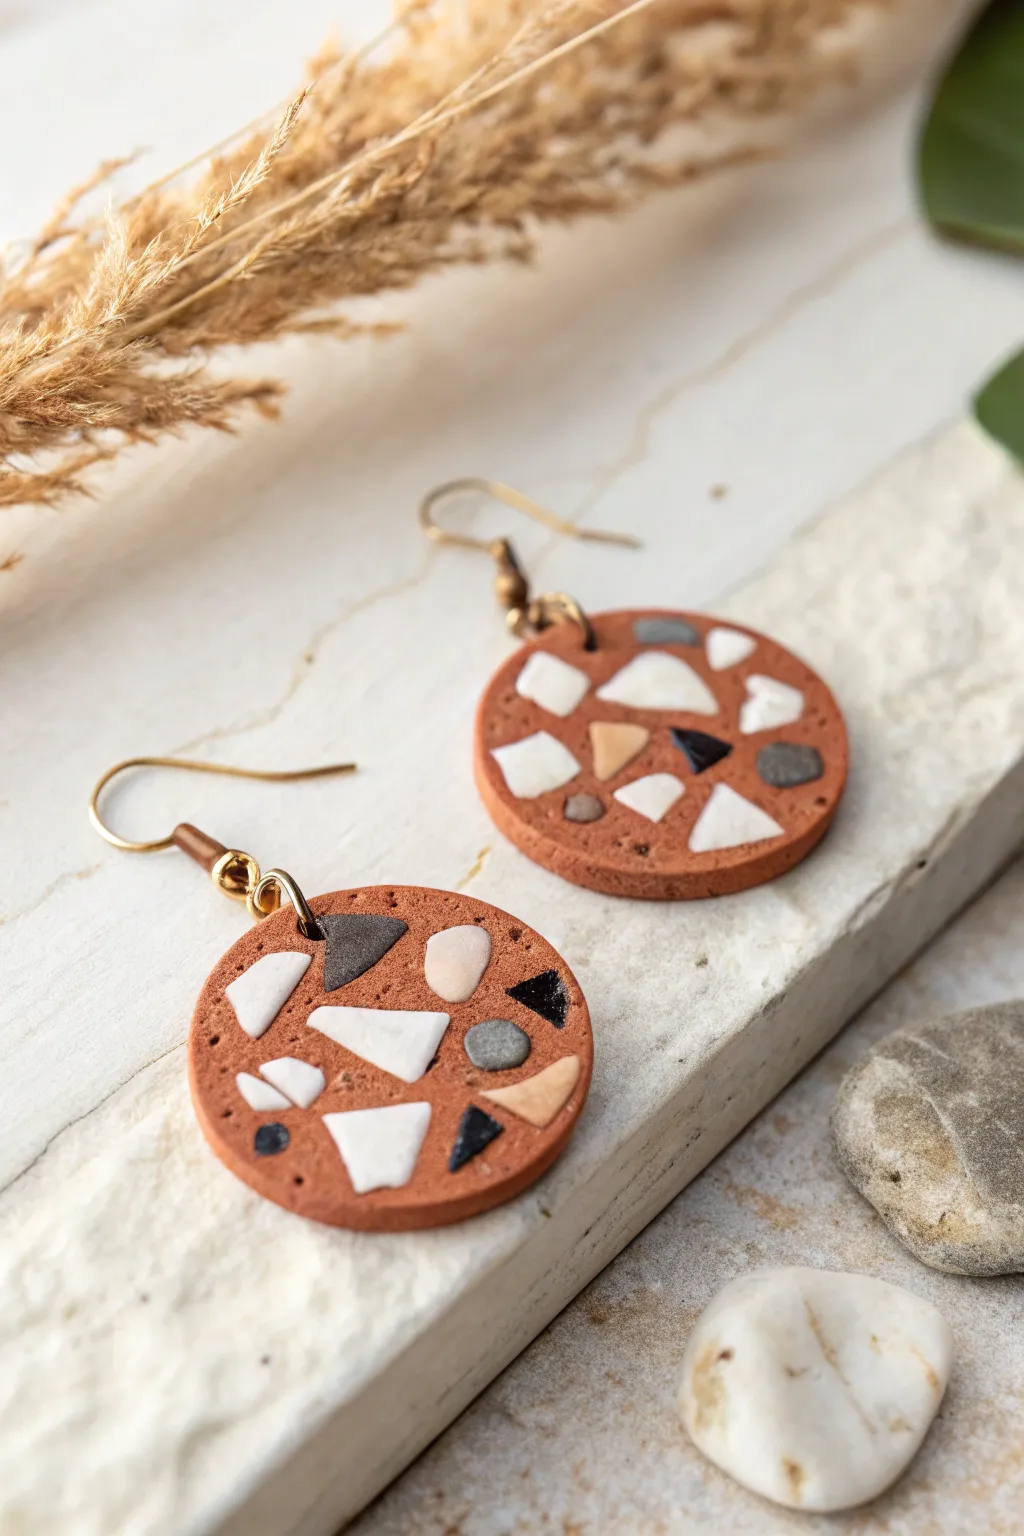
Embrace earthy warmth with these stunning circular earrings that mimic the look of classic terrazzo flooring. Using a terracotta-colored base embedded with fragments of white, beige, black, and granite-gray clay, you’ll create a sophisticated inlay pattern that feels both modern and timeless.
Step-by-Step Tutorial
Materials
- Polymer clay in terracotta (rust orange), white, beige, black, and stone gray effect
- Circle clay cutter (approx. 3-4 cm diameter)
- Acrylic rolling pin or pasta machine
- Craft knife or tissue blade
- Ceramic tile or baking surface
- Sandpaper (various grits from 400 to 1000)
- Hand drill or dremel tool with fine bit
- Jump rings (gold tone)
- French hook ear wires (gold tone)
- Jewelry pliers (flat nose and round nose)
- Matte varnish or sealant (optional)
Step 1: Creating the Mosaic Chips
-
Condition the accent colors:
Start by thoroughly conditioning your white, beige, black, and gray polymer clays separately until they are soft and pliable. -
Flatten the clay:
Roll each color out into a thin sheet, approximately 2mm thick. You can use a rolling pin or the thickest setting on a pasta machine. -
Cut the fragments:
Using your craft knife, cut random, jagged shapes from each color sheet. Aim for a mix of irregular triangles, trapezoids, and shard-like pieces ranging from tiny specks to 5mm chunks. -
Bake the chips (Part 1):
Place these loose fragments on a baking sheet and bake them for about 10-15 minutes at the temperature recommended by your clay manufacturer. Note: You are technically baking them to harden them *before* embedding, often called ‘pre-baking’, to keep sharp edges.
Step 2: Forming the Base
-
Prepare the terracotta base:
Condition a large block of terracotta-colored clay. Roll it into a sheet that is slightly thicker than your final desired earring thickness, perhaps around 4mm. -
Arrange the pattern:
Take your pre-baked chips and press them firmly into the soft terracotta sheet. I like to arrange them intentionally to ensure a balanced distribution of colors, leaving some gaps of negative space. -
Embed the chips:
Once the chips are placed, gently run your acrylic roller over the entire slab. The goal is to push the hard chips down until they are flush with the soft clay surface. -
Smooth the surface:
Continue rolling in different directions to close any gaps around the chips. If the clay distorts, gently push the edges back in with your fingers to maintain a consistent thickness. -
Cut the shapes:
Place your circle cutter on the slab, looking for the most pleasing arrangement of chips. Press down firmly to cut out your two earring circles. -
Drill holes:
Using a small tool or a toothpick, pierce a hole near the top edge of each circle for the jump ring. Make sure the hole is big enough for your hardware.
Clean Cuts Only
Before cutting your circles, place a piece of cling film (plastic wrap) over the clay slab. This creates a beautifully rounded, domed edge on your cut pieces instead of a sharp, flat one.
Step 3: Finishing and Assembly
-
Bake the earrings:
Place your cut circles on a ceramic tile or baking sheet. Bake according to the manufacturer’s instructions for the full duration (usually 30 minutes per 6mm of thickness). -
Cool down:
Allow the pieces to cool completely before handling. They are fragile while warm. -
Sand for exposure:
Place your sandpaper on a flat surface and add a little water. Place the earring face down and sand in a circular motion. This removes the top thin layer of terracotta to reveal the crisp, sharp shapes of the embedded chips underneath. -
Refine the finish:
Work your way through higher grits of sandpaper to buff the surface until it is inextricably smooth and matte. Don’t forget to sand the edges for a professional look. -
Add hardware:
Use your pliers to twist open a jump ring. Loop it through the hole in the clay piece and the loop on the earring hook. -
Secure the closure:
Twist the jump ring closed carefully, ensuring the ends meet perfectly flush so the hook doesn’t slip out.
Add Some Texture
Before baking, gently roll the surface over a piece of coarse sandpaper or use a toothbrush to stipple the terracotta areas. This gives the background a realistic, stone-like texture.
Enjoy styling these versatile accessories with your favorite neutral outfits for a touch of artisan charm
Tiny Ceramic Tile Pendants With Glaze Look
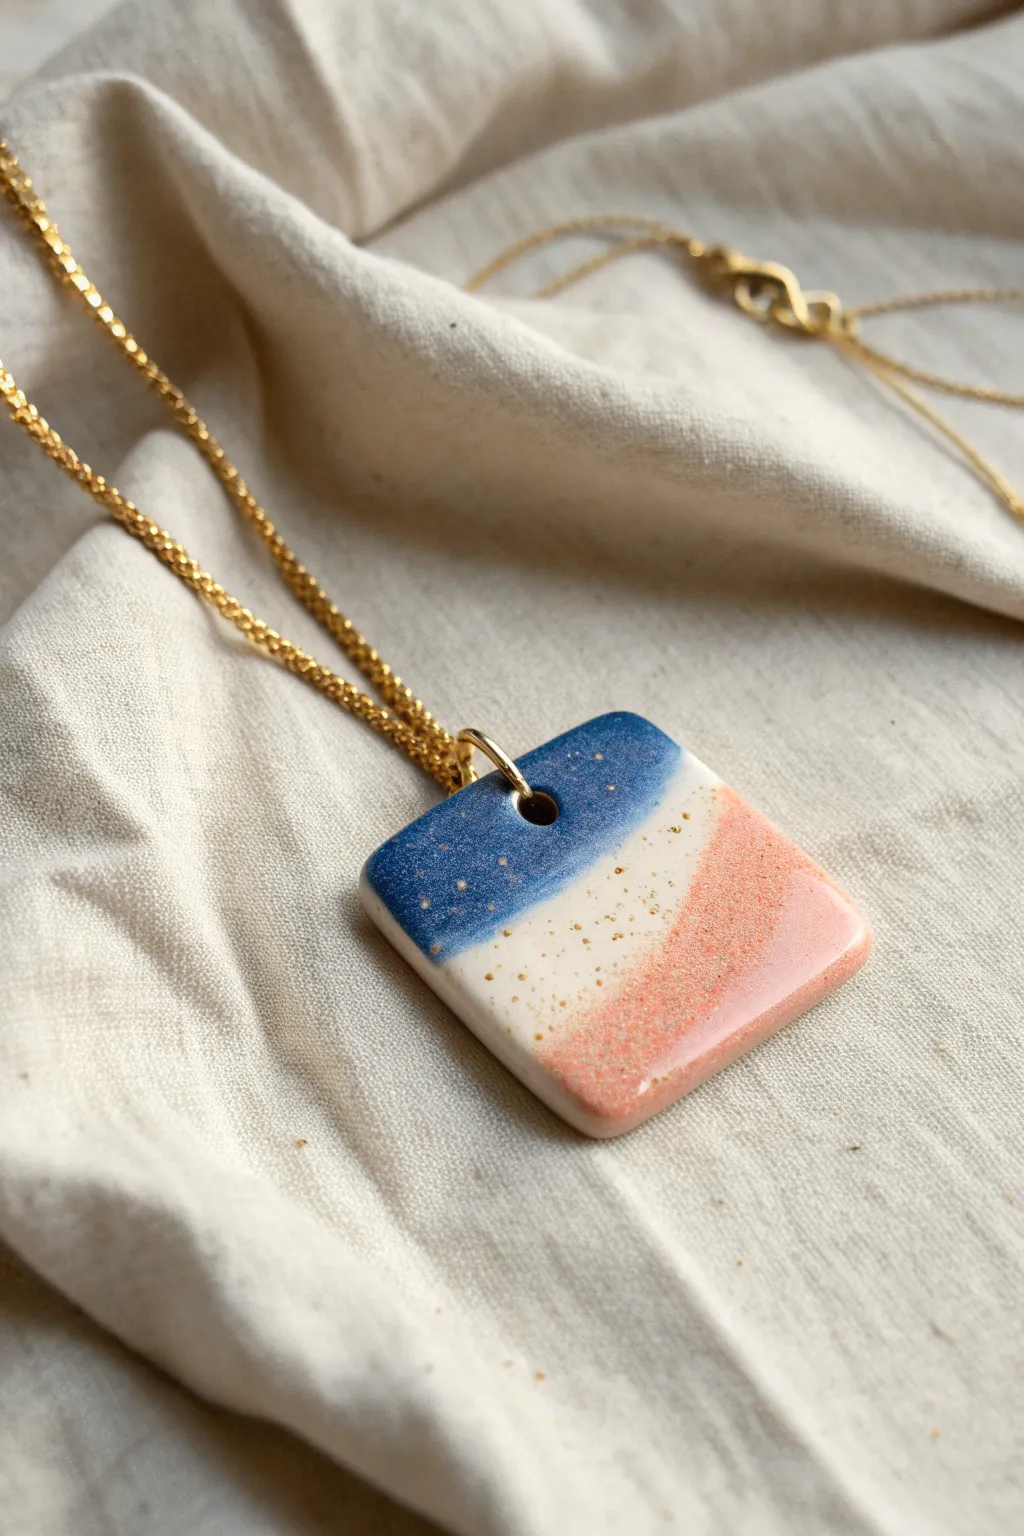
Achieve the sophisticated look of fired ceramic glazes without needing a kiln using polymer clay and resin. This square pendant features a chic color-blocked design in navy, cream, and coral, finished with a dusting of gold and a high-gloss shine.
Step-by-Step Guide
Materials
- White polymer clay
- Deep blue acrylic paint or alcohol ink
- Coral/salmon acrylic paint or alcohol ink
- Gold glitter (very fine) or gold leaf flakes
- UV resin or two-part epoxy resin
- UV lamp (if using UV resin)
- Square clay cutter (approx. 1 inch)
- Small round cutter or straw (for the hole)
- Sandpaper (various grits)
- Ceramic tile or glass work surface
- Small paintbrush
- Gold necklace chain and jump ring
Step 1: Shaping the Base
-
Condition the clay:
Start by thoroughly conditioning your white polymer clay until it is soft and pliable. Roll it out into a sheet about 1/4 inch thick; you want this to have some heft to mimic a real ceramic tile. -
Cut the square:
Place your square clutter onto the clay sheet and press down firmly to create a clean shape. If the clay sticks to the cutter, dip the cutter in a little cornstarch first. -
Create the hole:
Using a small round cutter or a simple drinking straw, punch a hole near one corner of the square. Position it far enough from the edge so the clay won’t crack later, but close enough for a jump ring to fit. -
Smooth the edges:
Gently rub your finger along the cut edges to soften them slightly. Ceramic tiles often have a slightly rounded, ‘soft’ edge rather than a razor-sharp one. -
Bake the clay:
Place your clay square on a ceramic tile or baking sheet. Bake according to the manufacturer’s instructions for your specific brand of clay (usually 275°F for 15-30 minutes). -
Cool and sand:
Once baked and fully cooled, use fine-grit sandpaper to buff away any fingerprints or rough edges. Wipe clean with a damp cloth or alcohol wipe.
Domed Edge Pro-Tip
For that perfect ‘domed’ resin look, let the resin sit for 2 minutes after spreading but before curing. It naturally self-levels and pulls slightly from sharp edges creates a smoother curve.
Step 2: Creating the Glaze Effect
-
Mix your colors:
Prepare your ‘glaze’ colors. I like to mix a tiny drop of acrylic paint into a small amounts of resin for a translucent look, or paint directly on the clay for opacity. For this project, we will paint directly on the white clay. -
Paint the blue section:
Using a small brush, paint a diagonal section of deep blue across the top corner (where the hole is). It doesn’t need to be a perfectly straight line; an organic wave looks more like dipped pottery. -
Paint the coral section:
Paint the opposite bottom corner with your coral or salmon pink paint. Leave a white stripe running diagonally through the center of the square. -
Add gold speckles:
While the paint is still slightly tacky (or over dry paint), sprinkle a very small pinch of fine gold glitter over the pendant. Focus on the transition areas between colors for a magical effect. -
Prepare the resin:
Once the paint is completely dry, pour a small amount of clear resin onto the center of the pendant. If using UV resin, work away from direct sunlight. -
Spread the resin:
Use a toothpick or tool to gently guide the resin to the very edges of the square. Be careful not to let it drip over the sides. The surface tension should hold it in a nice dome. -
Clear the hole:
Double-check that resin hasn’t flowed into your jump ring hole. If it has, use a clean toothpick to scoop it out before curing. -
Cure the finish:
Cure the pendant under a UV lamp for 2-3 minutes or let your epoxy cure for 24 hours. The result should look wet, glossy, and hard like glass. -
Assembly:
Open a gold jump ring using two pliers (twist, don’t pull). Thread it through the hole in your pendant and loop it onto your gold chain before closing the ring securely.
Fixing Resin Stickiness
If your UV resin feels tacky after curing, wipe it with an alcohol swab and cure it again submerged in a small bowl of water. This cuts off oxygen inhibition for a hard finish.
Enjoy wearing your sophisticated, faux-ceramic art piece that looks like it came straight from the kiln