Clay carving is my favorite way to make a simple form look instantly special, even if you’re brand-new to decorating. Here are easy, beginner-friendly carving ideas that lean on repeating patterns, cozy texture, and that satisfying carved-line contrast.
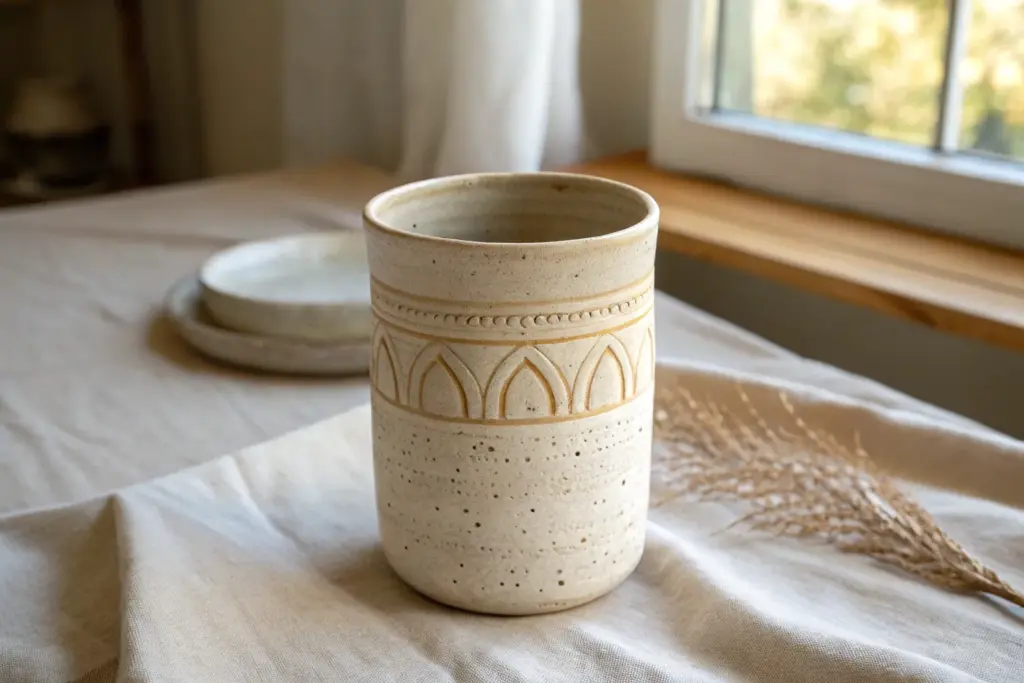
Simple Leaf Garland Around the Rim
Embrace the natural beauty of clay with this simple yet elegant carving project that circles your vessel in trailing foliage. The combination of gritty speckled clay and a smooth, creamy glaze creates a timeless piece perfect for holding trinkets or serving snacks.
Step-by-Step Guide
Materials
- Speckled buff stoneware clay
- Pottery wheel (or rolling pin/slump mold for handbuilding)
- Needle tool
- Metal decorating rib
- Small loop carving tool or sgraffito tool
- Sponge
- Wire cutter
- Clear or semi-transparent creamy white glaze
Step 1: Forming the Vessel
-
Wedge the clay:
Start by thoroughly wedging about 1-1.5 lbs of speckled buff clay to remove air bubbles and align the particles. -
Center and open:
If throwing on the wheel, center your clay block and open it up, aiming for a rounded, open bowl shape rather than a tall cylinder. -
Pull the walls:
Pull the walls up and out, maintaining a thickness of about 1/4 inch. The walls need to be slightly substantial to support the carving later without piercing through. -
Shape the curve:
Use a rib tool on the inside to create a smooth, continuous curve from the floor to the rim. -
Smooth the exterior:
Run a metal rib gently over the exterior to remove throwing lines. A smooth canvas is essential for the carving pattern to stand out cleanly. -
Dry to leather hard:
Allow the bowl to dry slowly until it reaches a leather-hard state. It should be firm enough to hold its shape when handled, but soft enough to carve into easily. -
Trim the foot:
Flip the bowl over and trim a neat foot ring, ensuring the bottom curve mirrors the inside.
Jagged Lines?
If your carving tool drags or creates jagged edges, the clay is too dry. Mist it lightly with water and wrap it in plastic for an hour to rehydrate the surface before trying again.
Step 2: Carving the Garland
-
Mark the center line:
Using a needle tool, very lightly scratch a horizontal guide line around the circumference of the bowl, positioned slightly below the midpoint of the wall. -
Carve the stem:
Take your carving tool and deepen this guide line into a confident groove. This continuous line will serve as the central stem for your leaf garland. -
Outline the top leaves:
Starting at any point on the stem, carve simple, small almond-shapes angling upward and to the right. Space them evenly, leaving a small gap between each leaf. -
Outline the bottom leaves:
Mirror the top leaves by carving corresponding almond shapes on the underside of the stem, angling downward and to the right to create a flowing, directional pattern. -
Add vein details:
Switch to a finer point tool if you have one. Inside each leaf outline, carve a single straight line down the center to represent the central vein. -
Clean up burrs:
Wait until the clay is bone dry, then use a stiff brush or a slightly damp sponge to gently knock off any clay crumbs or sharp burrs left from carving. Don’t rub too hard or you’ll lose the crisp edges.
Depth Control
Keep your non-dominant hand on the inside of the bowl directly behind where you are carving. This helps you feel the wall thickness and assume control, preventing accidental punctures.
Step 3: Finishing
-
Bisque fire:
Fire the piece in the kiln to bisque temperature (usually Cone 04 or 06) to prepare it for glazing. -
Wax the decoration (Optional):
If you want the raw clay texture to remain exposed in the carved lines, you can carefully brush wax resist into the grooves. -
Glaze application:
Dip the bowl into a semi-transparent creamy white glaze. The key here is a glaze that breaks over texture—pooling slightly in the carved lines to highlight them while letting the clay speckles show through. -
Wipe the foot:
Clean off any glaze from the bottom foot ring with a damp sponge. -
Final firing:
Glaze fire the piece to the maturity temperature of your clay body (usually Cone 5 or 6 for stoneware).
Once cooled, your bowl is ready to bring a touch of earthy elegance to your table


Triangle Band for Instant Geometry
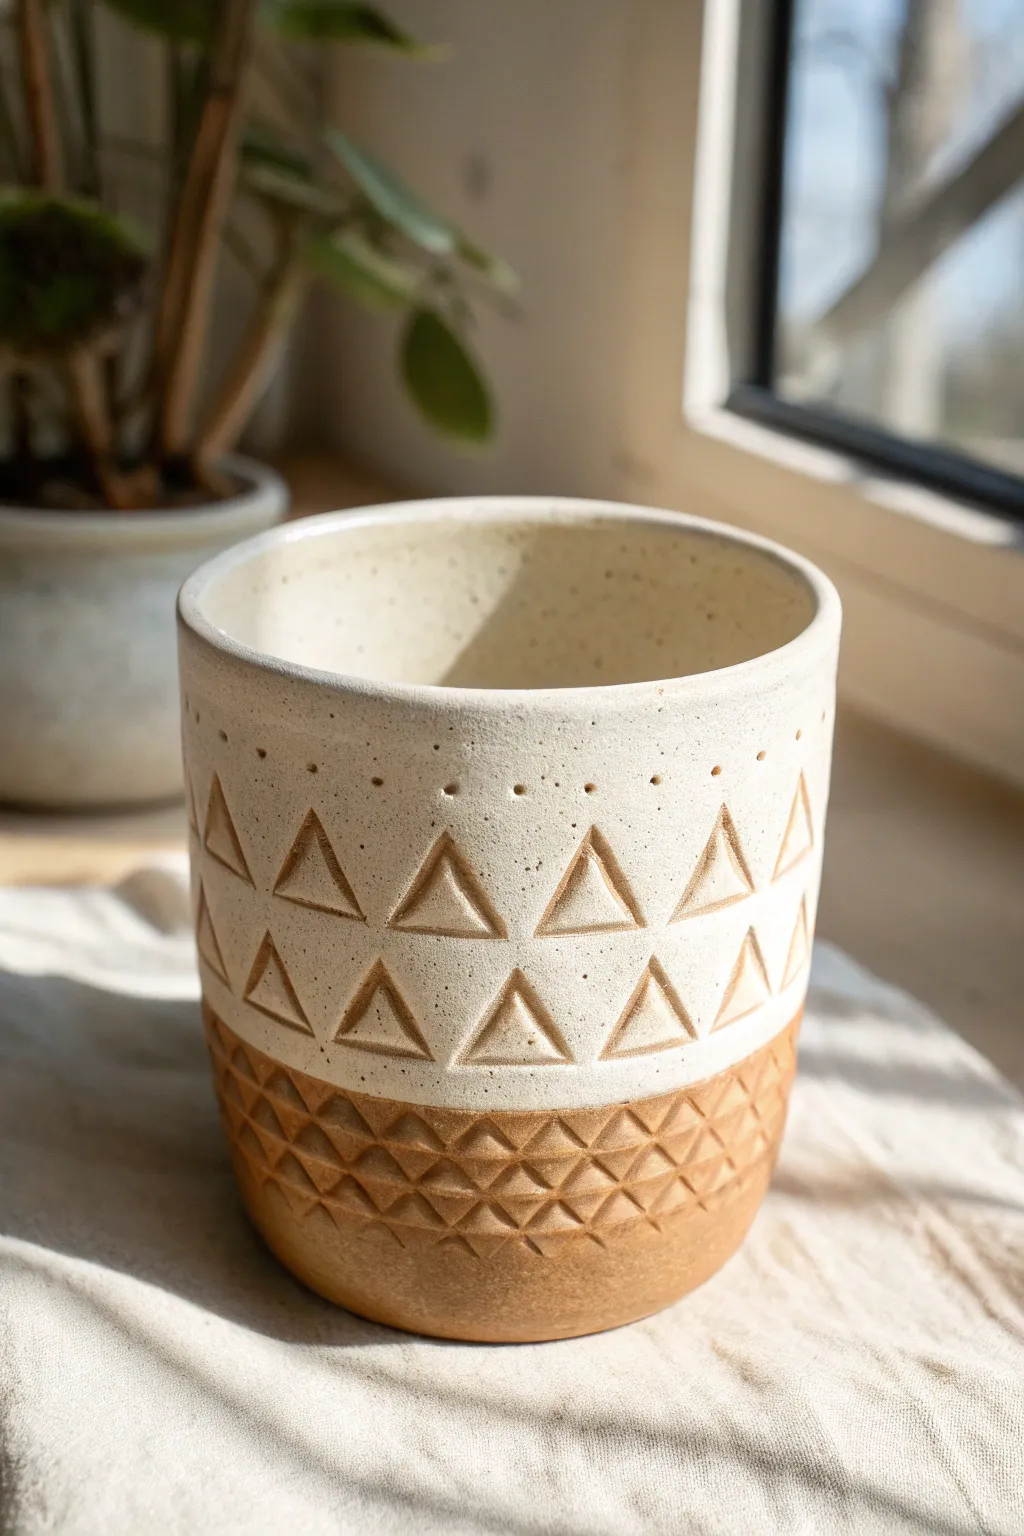
This project combines the rustic charm of exposed clay with the crisp neatness of geometric carving. You’ll create a sturdy vessel featuring bands of carved triangles that contrast beautifully against a smooth, creamy glaze.
Step-by-Step
Materials
- Speckled stoneware clay
- Pottery wheel (or slab roller for hand-building)
- Small loop tool or carving tool
- Pin tool
- Sponge
- Creamy white matte glaze
- Measuring tape or ruler
- Wax resist (optional)
Step 1: Forming the Vessel
-
Prepare the Clay:
Start by wedging about 1.5 to 2 pounds of speckled stoneware clay to remove any air bubbles. This ensures a smooth throwing or building process and helps speckles distribute evenly. -
Throw the Cylinder:
If using a wheel, throw a straight-sided cylinder with a flat bottom. Aim for walls that are slightly thicker than usual—about 1/4 inch—to accommodate the depth of the carving without piercing through. -
Refine the Rim:
While the wheel is spinning slowly, use a chamois or a wet sponge to round off the rim for a soft, finished look. A smooth rim is crucial since this area will be prominent. -
Leather Hard Stage:
Allow the piece to dry slowly until it reaches a leather-hard state. It should be firm enough to handle without deforming but soft enough to carve into easily. -
Trim the Base:
Turn the pot over and trim the bottom. Create a slight foot or just a clean, flat base, ensuring the transition from the wall to the floor is crisp.
Smooth Moves
Use a soft rib tool to compress the clay surface before carving. A compressed surface reduces grog dragging and results in much cleaner lines.
Step 2: Carving the Geometry
-
Mark the Grid:
Using a pin tool and a ruler (or a steady hand while the wheel turns slowly), lightly score horizontal guide lines around the pot. You need two main bands: a wide middle band for the large triangles and a bottom band for the textured base. -
Plot Triangle Points:
For the middle section, make small tick marks at even intervals along your guide lines to determine the width of your triangles. This little bit of math upfront saves a headache later. -
Outline the Triangles:
Connect your tick marks to sketch the triangular shapes lightly into the clay surface. Create two rows: one pointing up and one pointing down, interlocking them slightly. -
Carve the Outlines:
Using a small loop tool or V-tip carving tool, carve deeply along the outlines of the triangles. Keep your pressure consistent to ensure uniform line width. -
Create the Texture Band:
For the bottom section, carve a dense grid of intersecting diagonal lines to create a diamond or small triangle texture. This area will remain unglazed, so make the texture deep and tactile. -
Add Dots:
Use a small drill bit tool or the rounded end of a paintbrush to press a row of small, evenly spaced dots just above the top row of triangles. -
Clean Up Burrs:
Once the carving is done, let the piece dry a bit more. Then, gently rub the surface with a barely damp sponge or a scouring pad to remove any sharp clay burrs or crumbs.
Color Pop
Before the final glaze, brush a dark underglaze (like black or navy) into the carved lines and wipe away the excess to make the geometry stand out.
Step 3: Glazing and Finishing
-
Bisque Fire:
Fire the piece to cone 04 (or your clay body’s bisque temperature). This prepares the clay to accept glaze. -
Wax the Base:
Apply wax resist to the bottom textured band and the very bottom of the pot. We want the raw, toasted clay color to show here, contrasting with the white glaze above. -
Glaze the Interior:
Pour a creamy white matte glaze into the inside of the vessel, swirl it around to coat completely, and pour out the excess. -
Dip the Top:
Holding the base, dip the top 2/3 of the exterior into the glaze. The wax resist should stop the glaze neatly, but I usually double-check and sponge off any drips on the textured area immediately. -
Final Fire:
Fire the piece to cone 5 or 6 (depending on your stoneware). The heat will bring out the iron speckles through the white glaze and darken the raw clay base.
Once cooled, fill your new speckled pot with a lush green plant to complete the earthy look


Scallop Rows Like Fish Scales
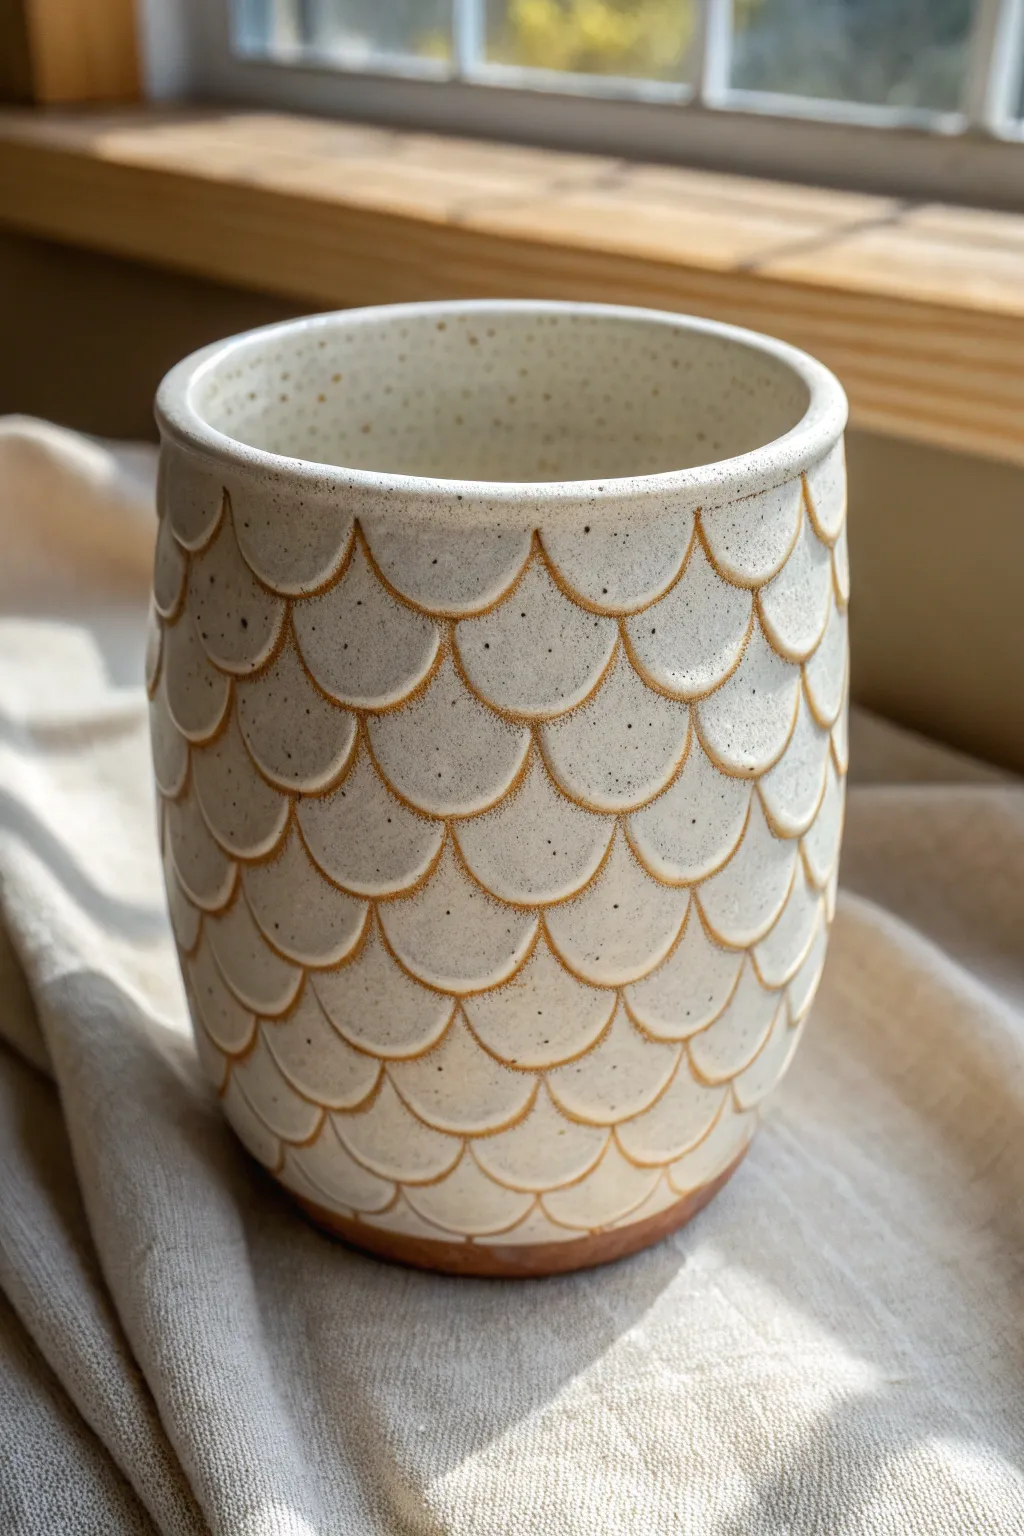
This charming handmade tumbler features rhythmic, overlapping arches reminiscent of fish scales or mermaid tails. The speckled clay body peeking through the white glaze adds a beautiful depth and rustic warmth to the repetition.
How-To Guide
Materials
- Speckled stoneware clay (buff or white)
- Pottery wheel (or slab roller/rolling pin for hand-building)
- Wire texturing tool or loop tool (small, U-shaped)
- Flexible metal rib
- Sponge
- Water
- White or cream breaking glaze (glaze that thins over edges)
- Kiln
Step 1: Forming the Base
-
Wedge and Center:
Begin by thoroughly wedging about 1-1.5 lbs of speckled stoneware clay to remove air bubbles. Secure it to your wheel head and center it perfectly. -
Throw the Cylinder:
Open the clay and pull up the walls to create a tall, straight-sided cylinder. Aim for walls slightly thicker than your usual final preference, as you will be carving material away later. -
Refine the Shape:
Using a flexible metal rib, smooth the exterior to remove throwing lines and create a gentle curve at the bottom if desired. The surface needs to be pristine before carving. -
Compress the Rim:
Pay special attention to the rim, smoothing it with a chamois or sponge. A rounded, slightly thickened rim feels better on the lips and resists chipping. -
Leather Hard Stage:
Allow the piece to dry slowly to a leather-hard state. It should be firm enough to handle without warping but soft enough to carve easily.
Uneven Scales?
Don’t stress over perfection. If a row gets wonky, gently smooth it with a rib and re-carve, or embrace it—hand-carved variations show the maker’s hand.
Step 2: Carving the Scales
-
Mark Guidelines:
Use a needle tool to very lightly scratch horizontal rings around the vessel. These will help keep your rows of scallops level as you work up the pot. -
Start at the Top:
I usually prefer starting just below the rim. Press your U-shaped loop tool into the clay and drag it downward in a short, curved motion to create the first scallop. -
Complete the First Row:
Continue making these U-shaped carvings side-by-side around the entire circumference. Try to keep the pressure consistent so the depth is uniform. -
Offset the Second Row:
For the next row down, position your tool tip in the middle of the scallop above (like bricklaying). This offset pattern creates the classic fish scale look. -
Work Downward:
Continue carving row by row, moving toward the base. As you reach the bottom curve, you may need to make the scales slightly smaller to accommodate the narrowing form. -
Clean Up Burrs:
Once the carving is complete, let the pot dry a bit more until bone dry. Gently brush away any clay crumbs or sharp burrs with a soft paintbrush or a slightly damp sponge, being careful not to wash away the texture.
Gradient Effect
Dip the top half in a second, different colored glaze that is transparent (like celadon). It will pool beautifully in the scales for a two-tone look.
Step 3: Finishing
-
Bisque Fire:
Load your bone-dry tumbler into the kiln and bisque fire it according to your clay body’s specifications (usually Cone 04 or 06). -
Wax the Foot:
Apply wax resist to the bottom foot and up the side about 1/4 inch to leave a clean, unglazed line at the base. -
Glaze Application:
Dip the tumbler into a white or cream glaze. A breaking glaze is best here—it will settle in the deep recesses but pull away from the sharp carved ridges, highlighting the pattern. -
Check the Rim:
Wipe the rim slightly if you want the raw clay to show through there as well, matching the breaking effect of the scales. -
Glaze Fire:
Fire the piece again to the final temperature required for your glaze and clay (typically Cone 5, 6, or 10).
Enjoy your morning coffee in a mug that feels as delightful to hold as it is to look at


Wavy Ripple Lines for a Calm Surface
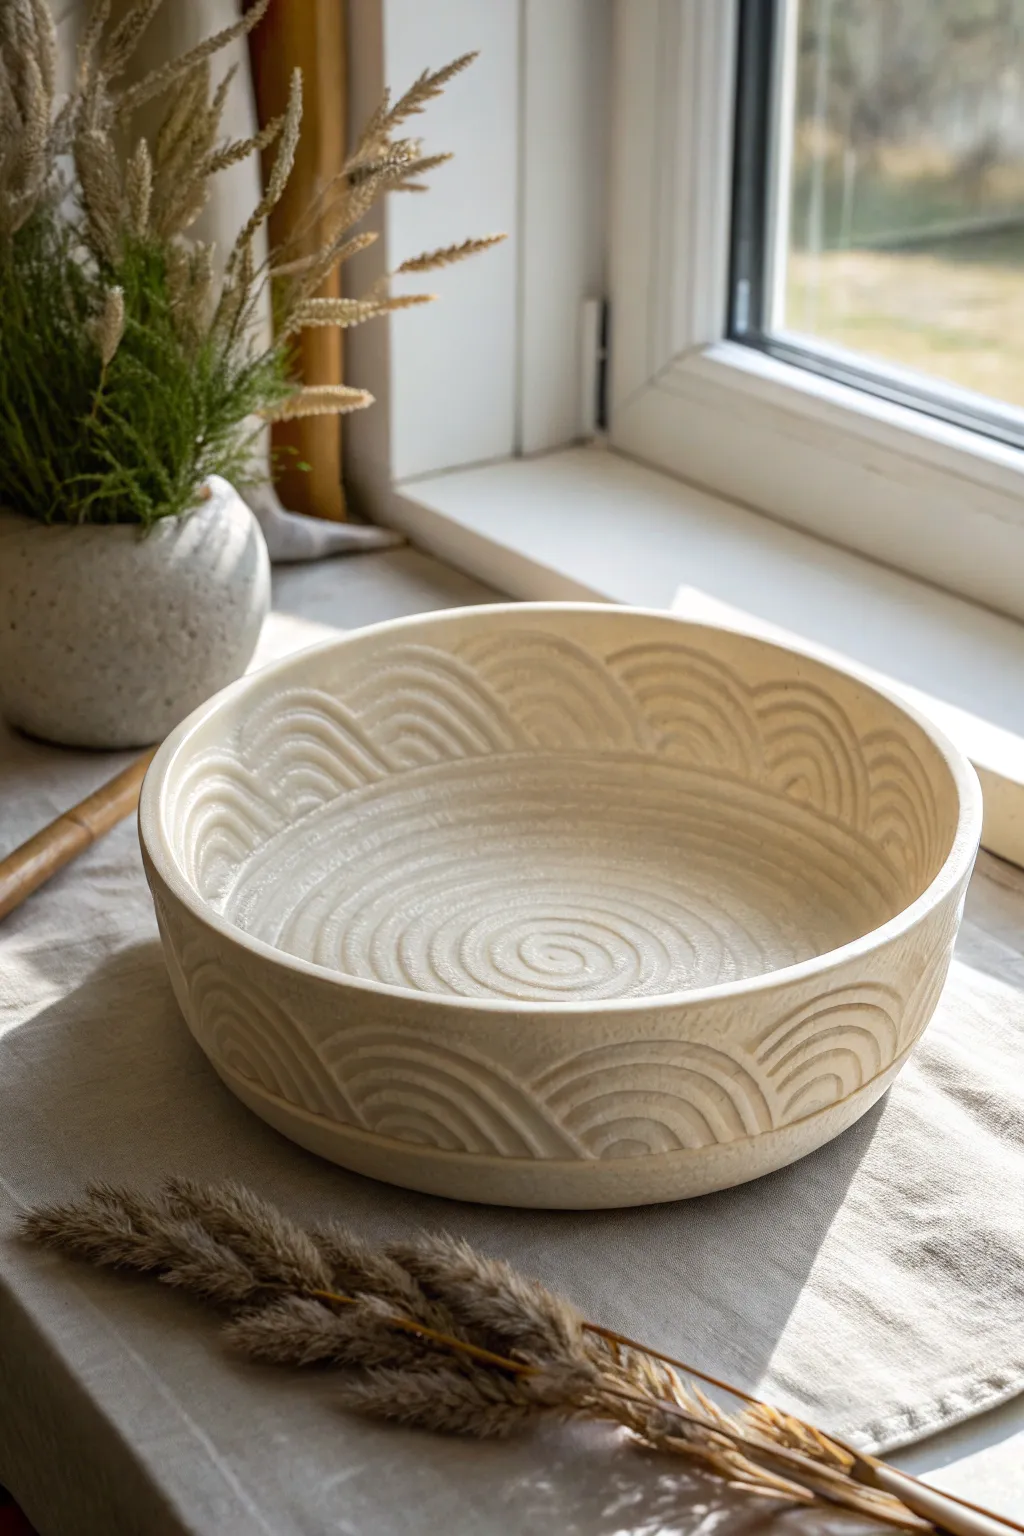
Capture the soothing rhythm of ocean tides with this elegant ceramic bowl project. Featuring a hypnotic spiral center and repeating arched waves along the walls, this piece uses simple carving techniques to create magnificent texture and depth.
Step-by-Step Tutorial
Materials
- Stoneware clay body (white or light colored)
- Potter’s wheel (or slab roller/molds for hand-building)
- Wire cutter
- Metal kidney rib
- Wooden modeling tool
- Loop tool (small, U-shaped)
- Carving tool (needle tool or specific sgraffito tool)
- Sponge
- Cream or off-white glaze (semi-opaque)
Step 1: Forming the Base
-
Prepare the Clay:
Begin by thoroughly wedging about 3-4 pounds of clay to remove air bubbles and ensure consistency. -
Center and Open:
Throw the clay on the wheel, centering it into a low puck shape before opening it up wide to establish the floor of your bowl. -
Pull the Walls:
Pull the walls up vertically, aiming for a straight-sided, drum-like cylinder rather than a flared bowl to better showcase the exterior carving. -
Refine the Rim:
Compress the rim with a chamois or sponge to prevent cracking, keeping it slightly thick to support the carving later. -
Smooth the Surface:
Use a metal kidney rib to remove throwing lines from both the interior and exterior surfaces, creating a blank canvas for your texture. -
Leather Hard Stage:
Set the bowl aside to dry until leather hard; the clay should be firm enough to hold its shape but soft enough to carve without chipping.
Step 2: Carving the Design
-
Mapping the Interior:
Start at the very center of the bowl’s floor. Using a needle tool, lightly sketch a spiral guide that expands outward towards the walls. -
Carving the Spiral:
With a small U-shaped loop tool, follow your guide to carve a continuous, grooved spiral starting from the center and working outward. -
Transition to Walls:
Stop the spiral once you reach the interior wall junction. Smooth any burrs with a soft finger or damp sponge. -
Marking the Arches:
Lightly scratch a horizontal guide line around the interior wall where you want the arches to peak. Divide the circumference into equal sections for uniform waves. -
Carving Inner Arches:
Use the loop tool to carve nested semi-circles (rainbow shapes). Start with the smallest inner arch and carve parallel lines over it until the motif fills the space. -
Exterior Setup:
If you threw the bowl on a bat, you may need to trim the foot now. Otherwise, stabilize the bowl upside down or on its side on a foam cushion. -
Mirroring the Exterior:
Repeat the arch motif on the outside walls. I find it helpful to look at the interior spacing to keep the rhythm consistent, though exact alignment isn’t necessary. -
Cleanup:
Once all carving is complete, gently brush away clay crumbs with a soft brush. Don’t use water yet, as it can soften the sharp edges.
Depth Control
Keep your tool at a consistent angle while carving. If you struggle with depth, wrap tape around the loop tool’s handle as a depth gauge.
Step 3: Finishing
-
Bisque Fire:
Allow the bowl to dry completely (bone dry) before firing it to bisque temperature (usually Cone 04). -
Glazing Strategy:
Select a glaze that breaks over texture. A translucent cream or celadon is ideal because it pools in the grooves and thins on the ridges, highlighting the carving. -
Application:
Dip or brush the glaze onto the piece. Ensure the glaze gets into the deep spiral and arch grooves. -
Final Fire:
Clean the foot of the bowl and fire to the final temperature required by your clay and glaze combination.
Level Up: Color Inlay
Before glazing, brush a dark underglaze into the grooves and wipe the surface back with a sponge to make the pattern pop intensely.
Fill your new bowl with fruit or simply display it by a window to let the light play across the carved textures

The Complete Guide to Pottery Troubleshooting
Uncover the most common ceramic mistakes—from cracking clay to failed glazes—and learn how to fix them fast.
Carved Bands on a Classic Planter
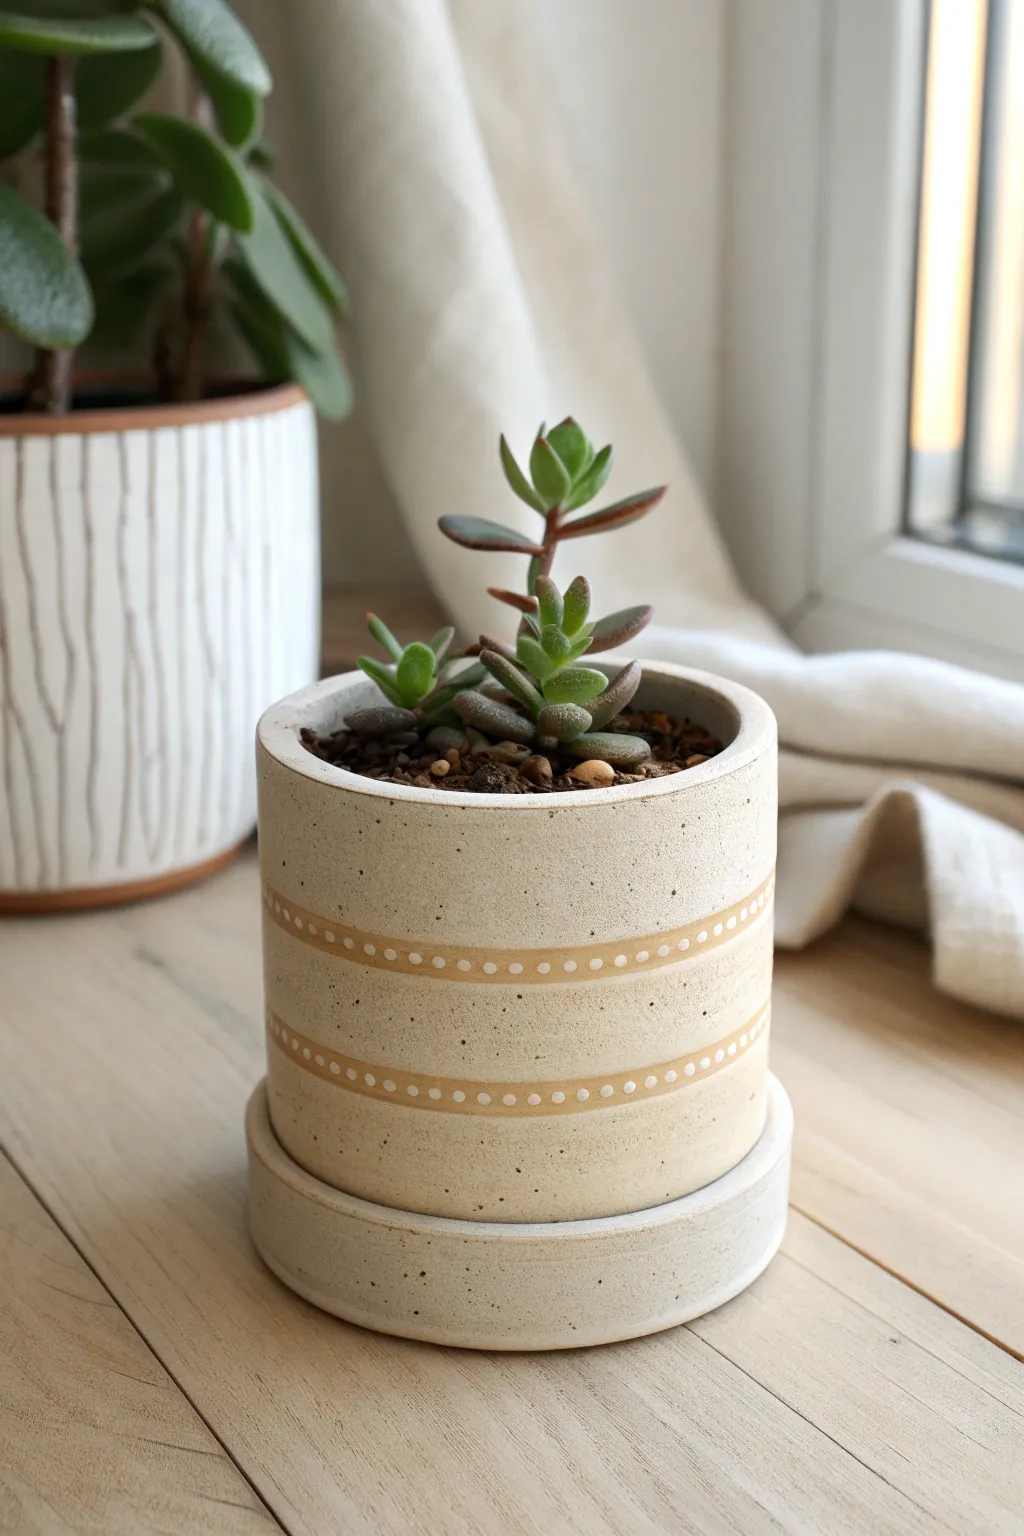
This project transforms a simple cylinder into a charming home for your succulents using subtle texture and contrast. The design features a creamy, speckled finish interrupted by two parallel bands of raw clay, accented with delicate white slip dots for a rhythmic, folk-art feel.
How-To Guide
Materials
- Stoneware clay (speckled or buff)
- Slab roller or rolling pin with guide sticks
- Circle cutter or template (approx. 4-inch diameter)
- Canvas or ware board
- Needle tool
- Scoring rib or fork
- Slip (clay slurry)
- Rib tool (metal or rubber)
- Wire clay cutter
- White underglaze or white decorative slip
- Fine-point applicator bottle or slip trailer
- Loop tool or small carving tool
- Masking tape (optional)
- Small paintbrush
- Matte white glaze (optional, or use raw clay aesthetic)
Step 1: Forming the Cylinder
-
Roll the Slabs:
Begin by rolling out a slab of speckled stoneware clay to a uniform thickness, about 1/4 inch. You will need enough length to form the circumference of your pot plus a little overlap, and enough width for the height (approx 3-4 inches). -
Cut the Components:
Using a needle tool and a straight edge, cut a clean rectangle for the pot’s walls. Cut two circles using your template: one for the base of the pot and a slightly larger one for the saucer. -
Prepare the Saucer Rim:
Cut a narrow strip of clay, roughly 1/2 inch tall, to serve as the rim for the saucer. This creates the matching catch-tray seen in the final piece. -
Score and Slip:
Score the edges of your rectangle and the circumference of the smaller base circle. Apply slip generously to the scored areas. -
Assemble the Cylinder:
Wrap the rectangle around the base circle. Join the vertical seam where the walls meet by pressing firmly, then smooth the seam inside and out using a rib tool until invisible. -
Assemble the Saucer:
Attach the narrow strip to the larger circle base using the same score, slip, and smooth method. Ensure the join is watertight. -
Refine the Form:
Use a damp sponge or a soft rib to smooth the rim of both the pot and the saucer. The edges should be slightly rounded, not sharp. -
Leather Hard Stage:
Allow the pieces to dry slowly to a leather-hard state. This is crucial for clean carving; if the clay is too wet, it will drag.
Steady Hands
Don’t have a banding wheel? Stack a few heavy books and place your arm on them to stabilize your hand at the right height, then rotate the pot manually against your tool.
Step 2: Carving and Decoration
-
Mark the Bands:
Place your pot on a banding wheel if you have one. Holding a needle tool steady, spin the wheel to lightly scribe two sets of parallel lines where your decorative bands will go. I usually place the lower band an inch from the bottom. -
Carving the Channels:
Using a loop tool or a small carving gouge, carefully remove the surface clay between your scribed lines. You want a shallow, flat channel that reveals the raw texture underneath. -
Smooth the Channels:
Use a slightly damp finger or a small brush to smooth the raw clay inside the carved channels, removing any burrs or crumbs left by the tool. -
Apply White Slip Dots:
Fill a fine-point applicator bottle with white slip or white underglaze. Carefully squeeze small, uniform dots in a straight line centered within each carved channel. -
Drying:
Let the applied dots dry until they lose their sheen. Then cover the pot loosely with plastic to dry slowly to the bone-dry stage to prevent cracking. -
Bisque Fire:
Fire the piece to cone 04 (or your clay body’s bisque temperature) in a kiln.
Step 3: Glazing and Finishing
-
Wax Resist:
Apply wax resist over the carved bands and the white dots. This will protect your decoration and the raw clay texture from the glaze. -
Glazing:
Dip or brush the main body of the pot and the saucer in a matte cream or off-white glaze. The glaze should cover the smooth parts but bead off the waxed carved areas. -
Clean Up:
Wipe away any stray glaze droplets that are sitting on the wax with a damp sponge to ensure sharp, clean lines around your bands. -
Final Fire:
Fire the pot again to the maturity temperature of your clay and glaze (typically cone 5 or 6 for stoneware).
Slip Consistency
If your slip dots form sharp peaks like meringue, tap the pot gently on the table immediately after piping. This vibration settles the dots into nice, smooth domes.
Pair your new textured planter with a drainage-loving succulent and enjoy the natural contrast.
Easy Crosshatch for Cozy Grip
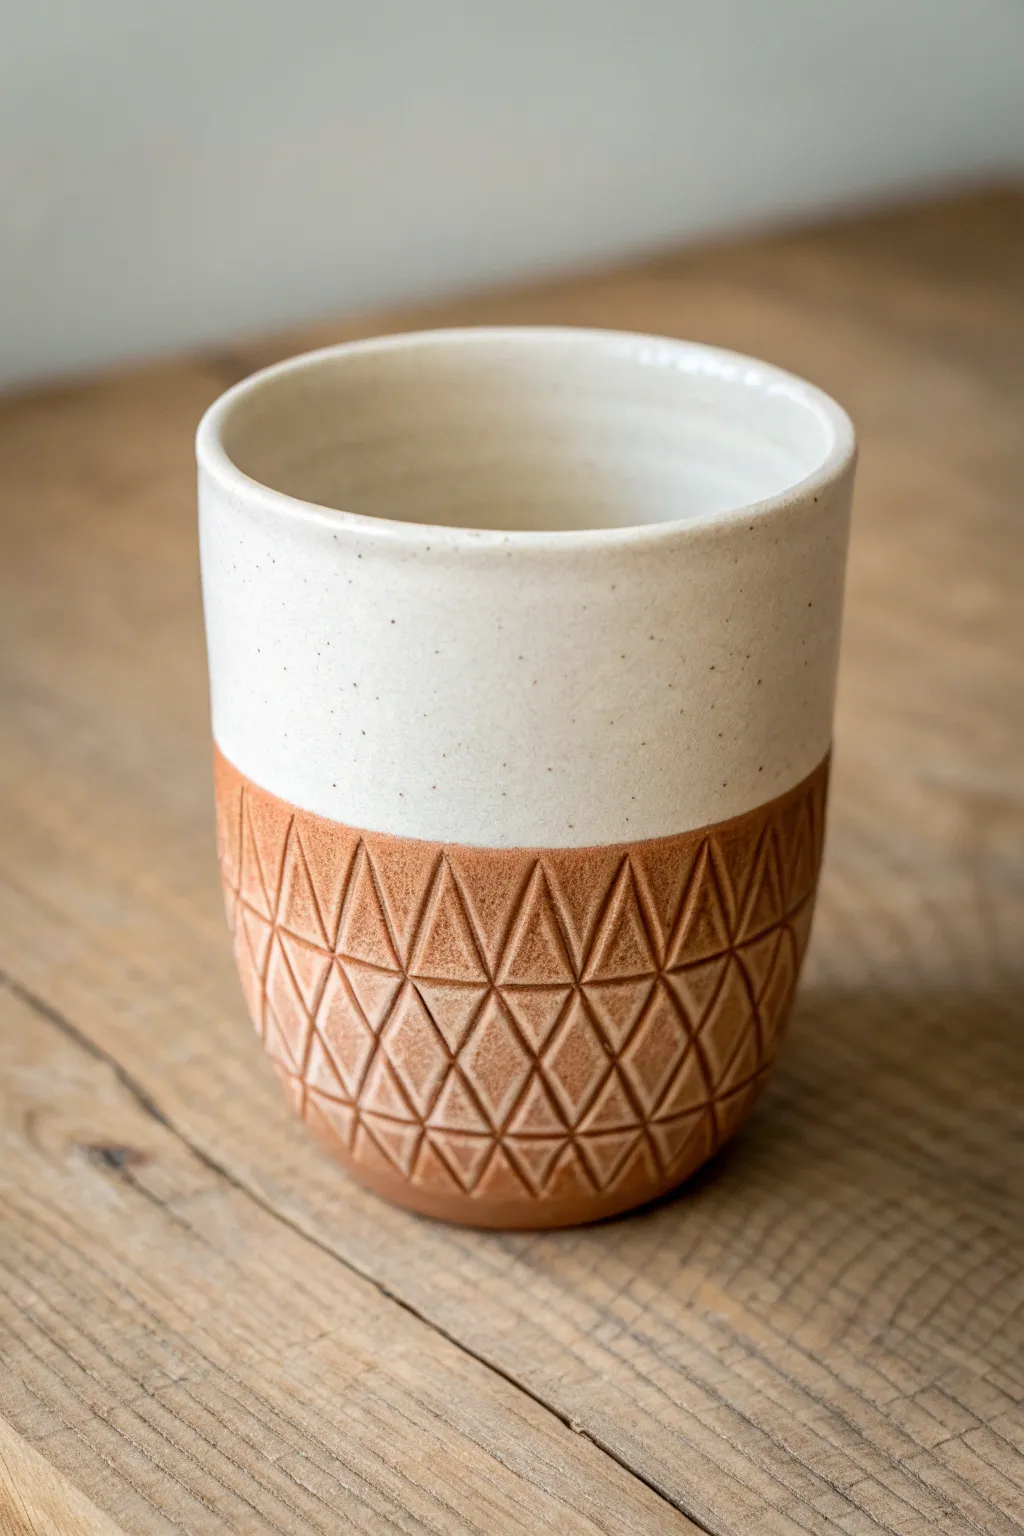
This project combines the rustic warmth of raw terracotta with the clean elegance of a speckled cream glaze. The carved diamond pattern on the lower half not only adds striking texture but provides a comfortable, tactile grip for your morning coffee.
Step-by-Step Tutorial
Materials
- Red stoneware or terracotta clay
- Pottery wheel (or slab roller for handbuilding)
- Needle tool
- Carving tool (triangle loop tool or v-tip tool)
- Sponge
- Flexible rib
- Speckled cream or white matte glaze
- Wax resist
- Paintbrush
Step 1: Throwing and Shaping
-
Center and throw:
Begin by centering your ball of red stoneware clay on the wheel. Throw a simple cylinder, aiming for a height of about 4-5 inches. -
Shape the curve:
Gently belly out the bottom quarter of the form slightly to create a rounded base, keeping the top three-quarters vertical and straight. -
Refine the surface:
Use a flexible rib to compress the walls and smooth out any throwing lines. A smooth canvas is essential for clean carving later. -
Define the rim:
Chamois or sponge the rim to ensure it is rounded and comfortable for drinking. Cut the pot from the bat but leave it until it reaches leather-hard consistency.
Uneven Spacing?
If your triangles don’t meet up perfectly at the end of the row, don’t panic. Gently fudge the width of the last two shapes to blend the seam. No one will notice!
Step 2: Trimming and Marking
-
Trim the foot:
Once leather hard, flip the cup and trim the bottom. Create a distinct transition line where the foot ends and the wall begins. -
Establish the carving zone:
Decide where your glaze line will be. Lightly score a horizontal line around the circumference of the cup, roughly halfway up or slightly lower. -
Create vertical guides:
To keep the pattern regular, visually divide the cup into even sections. You can lightly mark vertical lines with a needle tool every inch around the base. -
Mark the grid:
Sketch a light grid of diamonds or triangles using your needle tool within the carving zone. Don’t press deep; these are just guides.
Step 3: Carving the Pattern
-
Begin the first cuts:
Using a sharp v-tip or small loop tool, begin carving the diagonal lines. Start from the bottom and carve upward to the left to form the first side of your triangles. -
Complete the triangles:
Carve the opposing diagonal lines, moving upward to the right. Intersect your first set of lines to form a row of standing triangles. -
Second row:
Move up to the next tier of the grid. Carve inverted triangles that fit snugly between the points of the first row, creating a diamond effect. -
Verify depth:
Keep your carving depth consistent. You want to remove enough clay to create shadow and texture, but not so much that you weaken the wall. -
Clean up burrs:
Once the carving is done, let the piece dry slightly more. Then, gently rub the surface with a scrubby pad or stiff brush to remove any clay burrs or crumbs. -
Bisque fire:
Allow the cup to dry completely to the bone-dry stage. Load it into the kiln for a bisque firing.
Sharp Tool Tip
Carving moves smoothest when clay is ‘firm leather hard.’ If the tool drags or tears the clay, it’s too wet. If it chatters and chips, it’s too dry.
Step 4: Glazing and Finishing
-
Apply wax resist:
Brush a coat of wax resist over the entire carved area and the bottom foot. Be very precise at the top edge of the carving to create a crisp line. -
Prepare the glaze:
Stir your speckled cream glaze thoroughly to ensure the speckles are evenly distributed. -
Dip the cup:
Holding the cup by the foot, dip the top half into the glaze. Submerge it just past the wax line—the wax will repel the glaze from the carved section. -
Clean the line:
Immediately use a damp sponge to wipe away any stubborn glaze droplets that might be sitting on top of the wax resist. -
Glaze fire:
Load the piece into the kiln for the final glaze firing according to your clay and glaze temperature specifications. -
Final sand:
After firing, check the unglazed clay area. If it feels too rough, give it a quick polish with high-grit wet sandpaper for a velvety finish.
Enjoy the satisfying feel of the texture as you sip your favorite warm drink


What Really Happens Inside the Kiln
Learn how time and temperature work together inside the kiln to transform clay into durable ceramic.
Minimal Mountain Horizon Line Carving
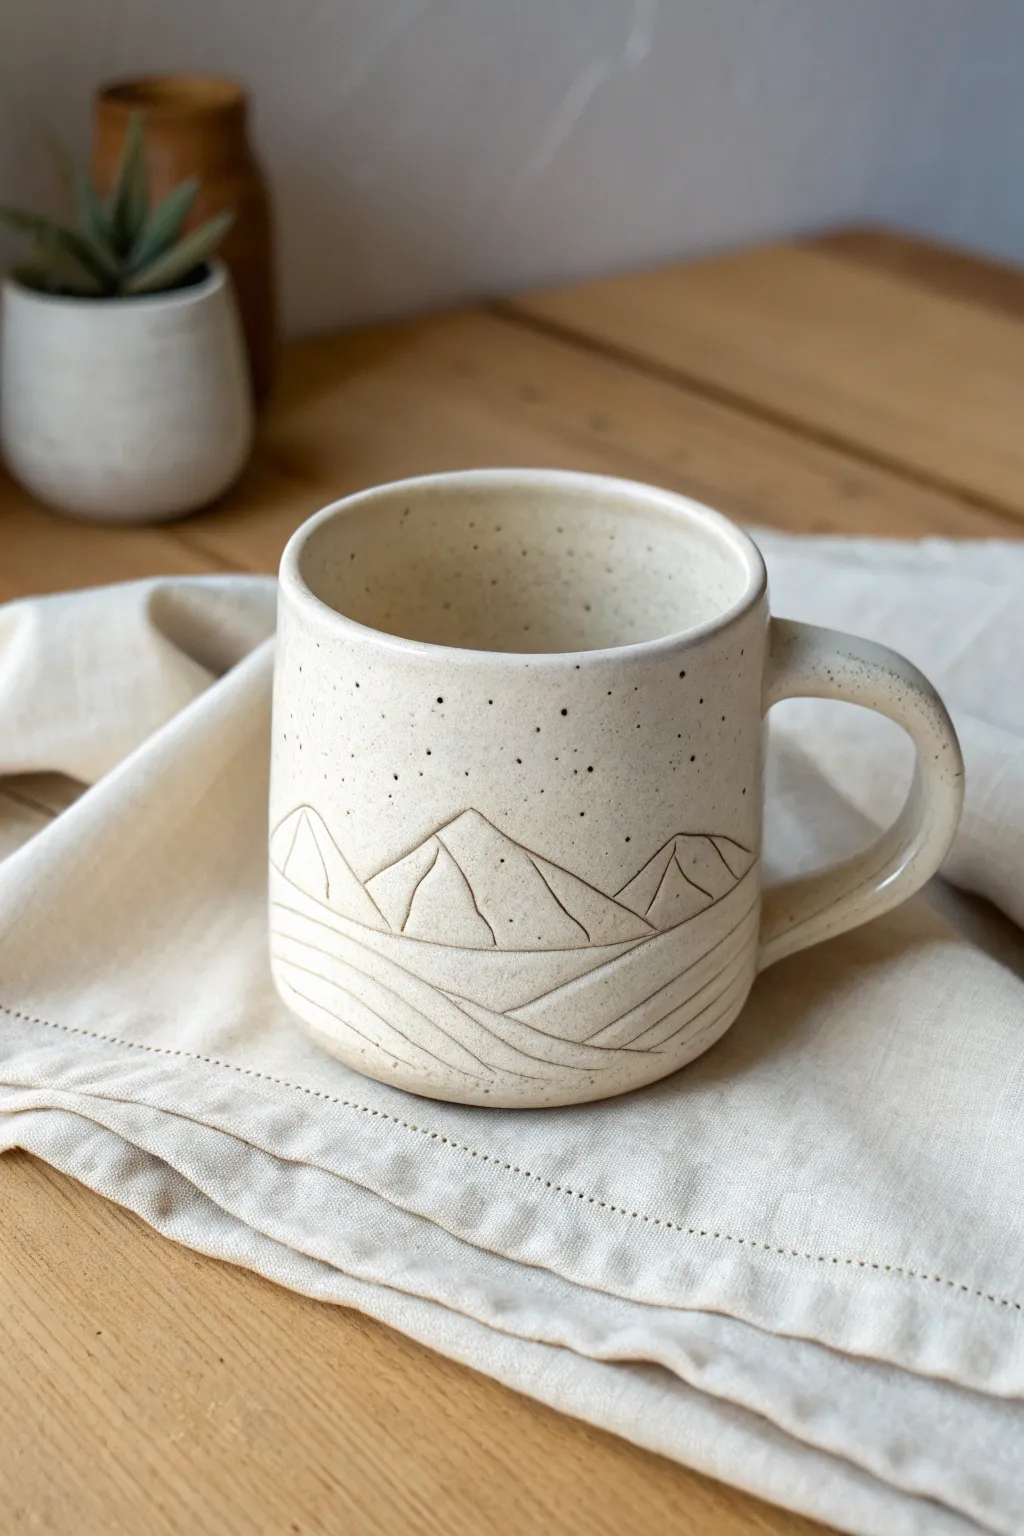
Capture the serenity of a quiet morning range with this elegantly simple clay carving project. Using a smooth, speckled clay body, you will carve a continuous horizon line of mountains that wraps around the mug, creating a tactile and visual landscape.
Detailed Instructions
Materials
- Speckled stoneware clay (mid-fire recommended)
- Pottery wheel or slab roller (for mug construction)
- Needle tool
- Loop tool or carving gouge (small tip)
- Sponge
- Rib tool (metal or rubber)
- Water bowl
- Transparent matte or satin glaze
- Kiln
Step 1: Planning and Forming the Vessel
-
Prep your clay:
Begin by wedging your speckled stoneware clay thoroughly to remove air bubbles and ensure an even consistency, which is crucial for clean carving later. -
Construct the mug body:
Whether throwing on the wheel or hand-building with slabs, create a straight-sided cylinder mug form. Aim for a wall thickness of about 1/4 inch to allow depth for carving without puncturing. -
Refine the surface:
Use a rib tool to compress and smooth the exterior walls. This step is vital because the carving needs a uniform canvas; any bumps will disrupt your clean lines. -
Dry to leather hard:
Allow the mug to dry slowly until it reaches a sturdy ‘leather hard’ state. The clay should be firm enough to handle without warping but soft enough to carve into easily. -
Add the handle:
Once leather hard, attach your handle. Score and slip the connection points securely, then blend the seams for a smooth transition.
Sticky Carving Tools
If clay keeps sticking to your loop tool, the mug is likely too wet. Let it dry for another hour until carving produces shavings rather than mush.
Step 2: Carving the Horizon
-
Sketch the peaks:
Lightly trace your mountain range onto the clay surface using a needle tool. I find it easiest to start with the highest peaks and fill in the valleys afterwards to ensure balance. -
Vary sizes and shapes:
Create visual interest by varying the height and width of your mountains. Draw some slightly overlapping to suggest depth. -
Outline the landscape:
Using your small loop tool or gouge, carefully carve along your traced lines. Maintain a steady, shallow depth to create a nice relief. -
Carve inner details:
Add a few angled lines inside the mountain triangles to differentiate the slopes from the flat sky. Keep these minimalistic. -
Add foreground lines:
Below the mountains, carve long, flowing horizontal waves to represent rolling hills or fields. These should be less angular than the mountains. -
Smooth the burrs:
Wait for the carved areas to dry slightly, then gently rub over them with a finger or damp sponge to soften any sharp clay crumbs or burrs.
Step 3: Final Touches and Firing
-
Bisque fire:
Once the mug is bone dry, load it into the kiln for the bisque firing (usually Cone 04) to permanently set the form. -
Wax the foot:
Apply wax resist to the bottom of the mug (the foot ring) to prevent glaze from sticking to the kiln shelf. -
Apply clear glaze:
Dip the mug into a transparent matte or satin glaze. This will seal the clay while letting the lovely natural speckles show through. -
Wipe the relief:
If the glaze pools too thickly in your carved lines, gently dab them with a sponge. You want the glaze to break slightly over the edges to highlight the texture. -
Glaze fire:
Fire the mug a second time to the maturation temperature of your specific clay and glaze (often Cone 5 or 6 for stoneware). -
Sand the bottom:
After the final firing is complete and cool, use fine-grit sandpaper to smooth the unglazed foot ring so it won’t scratch your table.
Enhance the Contrast
For bolder lines, wipe a dark underglaze or oxide wash into the carved grooves before applying the clear glaze to really pop the design.
Enjoy your morning coffee with a view of your own personal mountain range
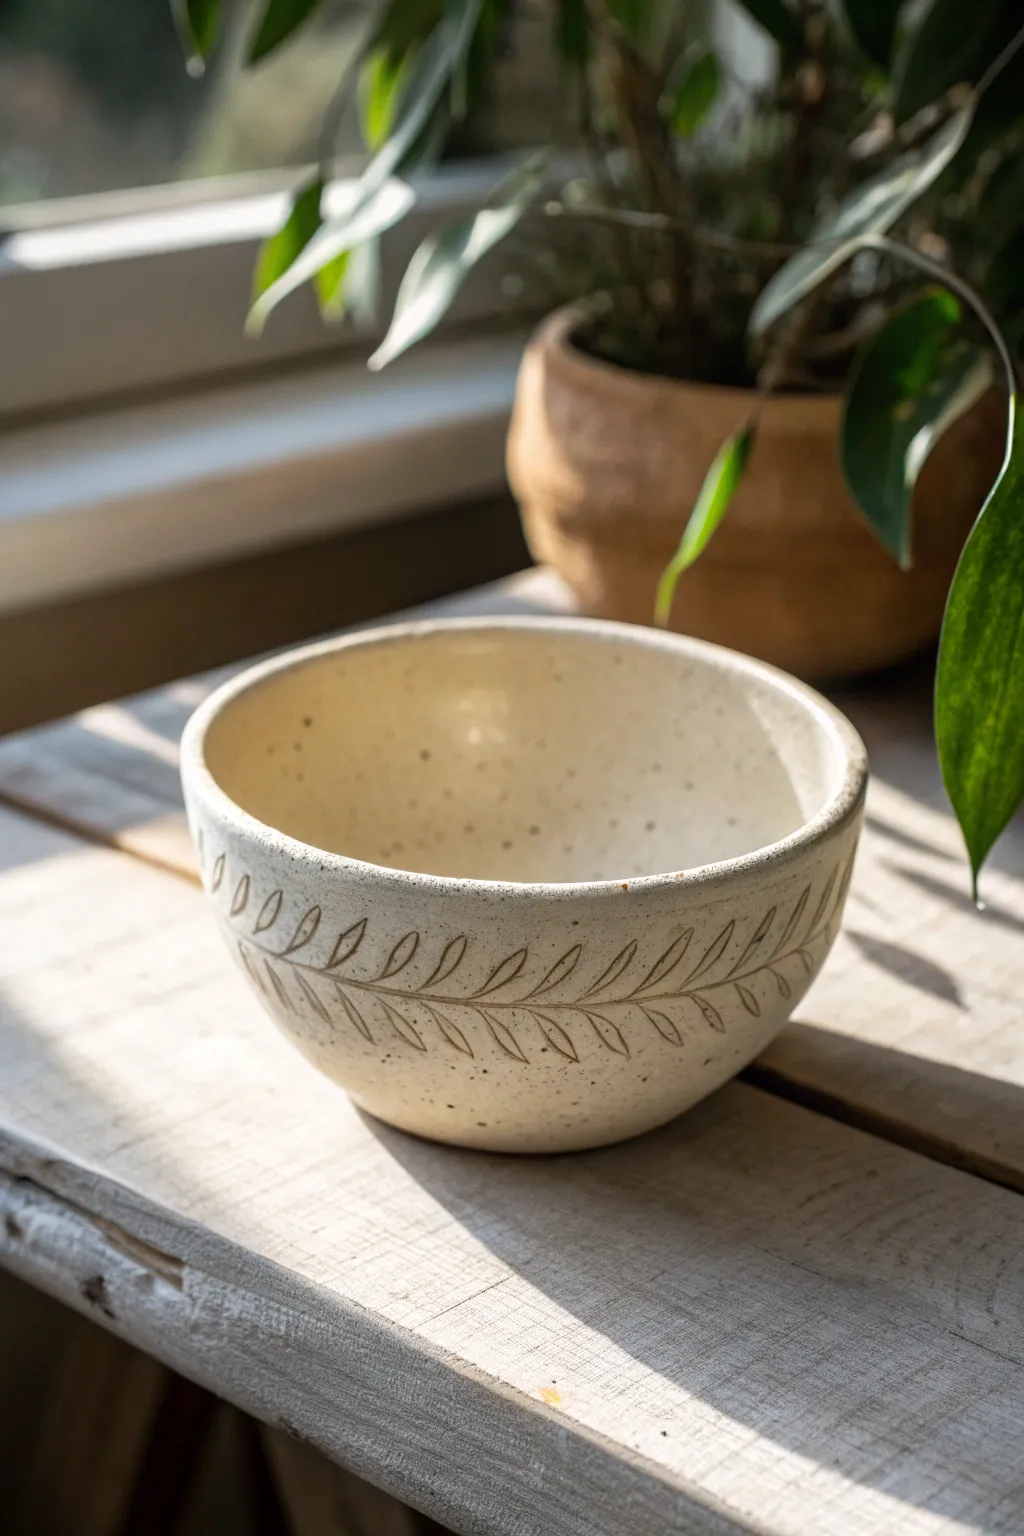
Two-Depth Carving for Extra Pop
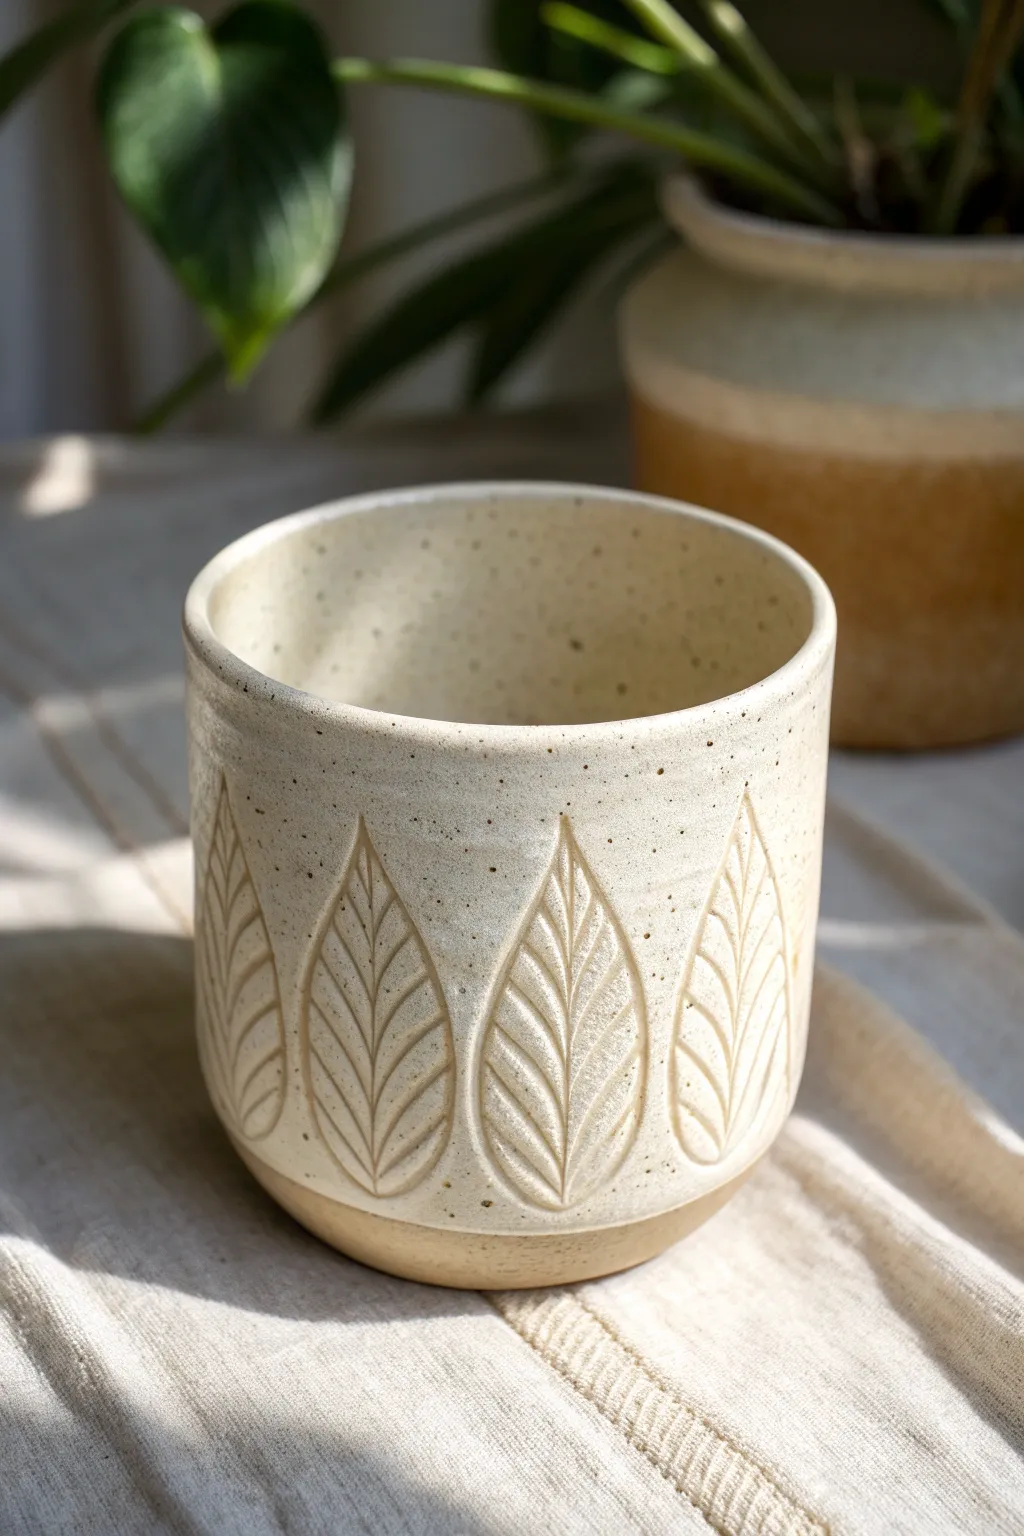
Embrace the natural texture of speckled clay with this lovely planter featuring a repeating carved leaf motif. By carving away the negative space around the leaves and adding incised veins, you create a beautiful tactile surface that catches the glaze just right.
How-To Guide
Materials
- Speckled buff stoneware clay
- Pottery wheel (or slab roller for handbuilding)
- Cylindrical rib tool
- Wire clay cutter
- Needle tool
- Small loop tool or carving tool
- V-tip carving tool or sgraffito tool
- Sponge
- White or clear matte glaze
- Wax resist (optional)
Step 1: Forming the Cylinder
-
Wedge and center:
Begin by thoroughly wedging about 2-3 pounds of speckled stoneware clay to remove air bubbles. Center the clay on your wheel head until it runs smooth and steady. -
Open the clay:
Open up the centered mound, creating a flat floor. Since this is a planter, leaving the floor slightly thicker is a good idea to prevent cracking, but aim for even walls. -
Pull the walls:
Pull the walls up into a straight cylinder. Aim for a height of about 5-6 inches. Keep the walls vertical, avoiding too much flare at the top. -
Refine the shape:
Use a cylindrical rib on the inside and outside to compress the walls and ensure they are perfectly straight. Smooth the rim with a chamois or sponge. -
Dry to leather hard:
Wire the pot off the bat and let it dry slowly until it reaches a solid leather-hard stage. The clay should be firm enough to handle without deforming but soft enough to carve easily.
Uneven Carving Depths?
If your carving looks messy, try using a slightly duller loop tool for the background removal. Sharp tools can dig in too fast; a duller edge gives more control during smoothing.
Step 2: Carving the Leaves
-
Plan the spacing:
Lightly mark the circumference of the pot into equal sections. Visualizing five or six large leaves usually works well for this size. -
Outline the leaf shapes:
With a needle tool, very lightly sketch the outline of a large, pointed leaf in each section. The bottom of the leaf should sit near the foot of the pot, pointing upward. -
Carve the negative space:
Using a small loop tool, carve away the clay *outside* the leaf shape. Dig slightly deeper near the outline to make the leaf appear raised. -
Refine the edges:
Smooth the transition between the carved background and the raised leaf surface. The goal is to have the leaf standing proud against the recessed background. -
Carve the central vein:
Switch to a V-tip tool or sharp carving tool. Carve a straight, deep line down the center of each leaf, starting from the tip and ending at the base. -
Add the side veins:
Carve angled lines radiating from the central vein out to the leaf edges. Press firmly to create clean, crisp channels that will break the glaze later. -
Clean up burrs:
Once the clay is bone dry, use a stiff brush or a slightly damp sponge to knock off any sharp little clay crumbs or burrs left from carving. Don’t over-wet the dry clay.
Level Up: Oxide Wash
Before glazing, brush an iron oxide wash into the carved leaf veins and wipe it back with a sponge. This will make the leaf details pop dramatically beneath a translucent glaze.
Step 3: Glazing and Finishing
-
Bisque fire:
Fire the piece in a bisque kiln to cone 04 (or your clay body’s specifications). This prepares the pot for glazing. -
Wax the foot:
Apply wax resist to the bottom inch of the pot, covering the uncarved foot area. This creates that beautiful raw clay contrast seen in the photo. -
Apply the glaze:
Dip the pot into a white or clear matte glaze. A glaze that breaks over texture is ideal here, as it will pool darker in your carved veins and highlight the speckles. -
Clean the foot:
Even with wax, wipe the bottom edge with a damp sponge to meaningful ensure a razor-sharp glaze line where the carving ends. -
Glaze fire:
Fire the planter to its final temperature (typically Cone 5/6 for stoneware). Allow the kiln to cool completely before unloading.
Now you have a stunning, tactile planter ready to house your favorite greenery

TRACK YOUR CERAMIC JOURNEY
Capture glaze tests, firing details, and creative progress—all in one simple printable. Make your projects easier to repeat and improve.
Little Floral Medallions in a Grid
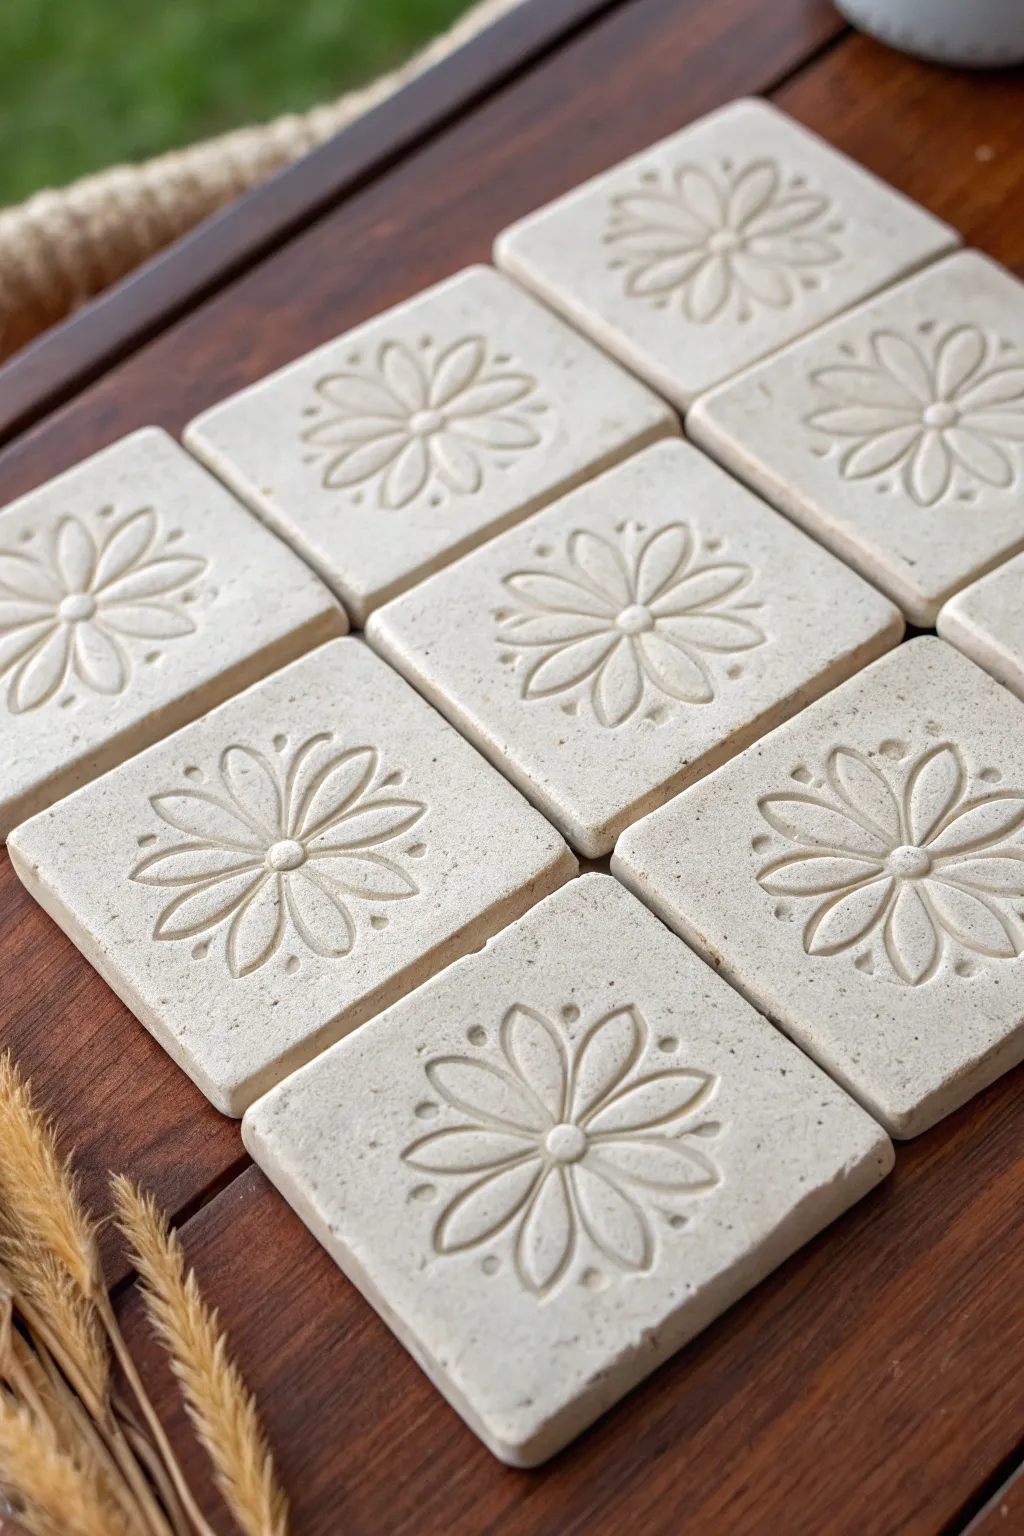
Create a stunning grid of uniform tiles that mimic the look of carved sandstone with delicate floral motifs. These charming medallions feature a relief-carved daisy design perfect for drink coasters or a decorative wall mosaic.
Step-by-Step Tutorial
Materials
- Air-dry clay (stone or white color) or polymer clay
- Square cookie cutter (approx. 3.5 – 4 inches)
- Rolling pin
- Depth guides (wooden slats or stacks of playing cards)
- Needle tool or sharp pin
- Loop carving tool (small, U-shaped)
- Small ball stylus or dotting tool
- Smooth work surface or clay mat
- Ruler
- Fine-grit sandpaper (optional)
- Clear matte varnish (waterproof if used as coasters)
Step 1: Preparing the Base
-
Condition the Clay:
Begin by kneading your chosen clay until it is soft, pliable, and free of air bubbles. If using air-dry clay, keep your hands slightly moist to prevent cracking. -
Roll the Slab:
Place your depth guides on either side of the clay ball. Roll the clay out into a smooth, even slab about 1/4 to 1/3 inch thick. I find that using guides is crucial here to ensure every tile has the exact same thickness. -
Cut the Squares:
Using your square cookie cutter, cut out nine identical squares. If you don’t have a cutter, measure carefully with a ruler and cut cleanly with a sharp knife. -
Smooth the Edges:
Gently tap the cut edges with your finger or a flat tool to round them off slightly. This prevents sharp, brittle corners and gives the tile a more finished, stone-like appearance.
Step 2: Drafting the Design
-
Find the Center:
Lightly mark the exact center of each square tile using your ruler and the needle tool. Don’t press too hard; you just need a faint guide point. -
Stamp the Center Circle:
Press a small circular object (like a marker cap or large ball stylus) gently into the center point to create the flower’s central disk. -
Mark Guide Lines:
Use the needle tool to lightly sketch eight radial lines extending from the center circle to form the axes for your petals. Think of a compass: North, South, East, West, and then the diagonals between them.
Keep it Slick
Periodically wipe your needle and loop tools with a damp sponge while working. Clay buildup on the tool tip creates drag and results in messy, jagged carving lines.
Step 3: Carving the Motif
-
Outline the Petals:
Using the needle tool, lightly sketch the teardrop shape of each petal along your guide lines. Aim for eight petals total, ensuring they are evenly spaced. -
Carve the Petal Interior:
Switch to your small U-shaped loop tool. Carefully scoop out a shallow layer of clay from inside each petal outline. The goal is to make the petal slightly concave, catching the light. -
Define the Petal Vein:
With the needle tool, draw a single, confident line down the center of each carved petal, starting from the center disk and extending almost to the tip. -
Deepen the Outlines:
Go back over the outer edges of each petal with the needle tool, pressing slightly deeper to create a crisp separation between the flower and the background. -
Add Decorative Dots:
Take your small dotting tool. Press a small indentation into the clay in the negative space between the tips of each petal. This adds a lovely border detail. -
Add Texture (Optional):
If you want that weathered stone look, gently tap a toothbrush or a piece of coarse sandpaper over the uncarved surfaces of the tile to add subtle texture.
Make it a Mosaic
Rather than keeping them separate, glue the finished tiles onto a piece of plywood with a small gap between them. Grout the gaps for a permanent wall hanging.
Step 4: Finishing Up
-
Initial Drying:
Place the tiles on a wire rack or between two sheets of drywall to dry. Flip them occasionally to ensure they dry flat and don’t warp. -
Sand and Refine:
Once bone dry (or cured if using polymer), lightly sand any rough burrs or sharp ridges created during carving using fine-grit sandpaper. -
Clean the Surface:
Wipe away all clay dust with a slightly damp cloth or a soft brush to prepare the surface for sealing. -
Seal the Tiles:
Apply two coats of a matte varnish. This protects the carving and is essential if you plan to use these as coasters to prevent moisture damage.
Arranging these tiles in a grid creates a wonderfully calm, symmetrical visual anchor for your coffee table
Peekaboo Pierced Carving for Light and Shadow
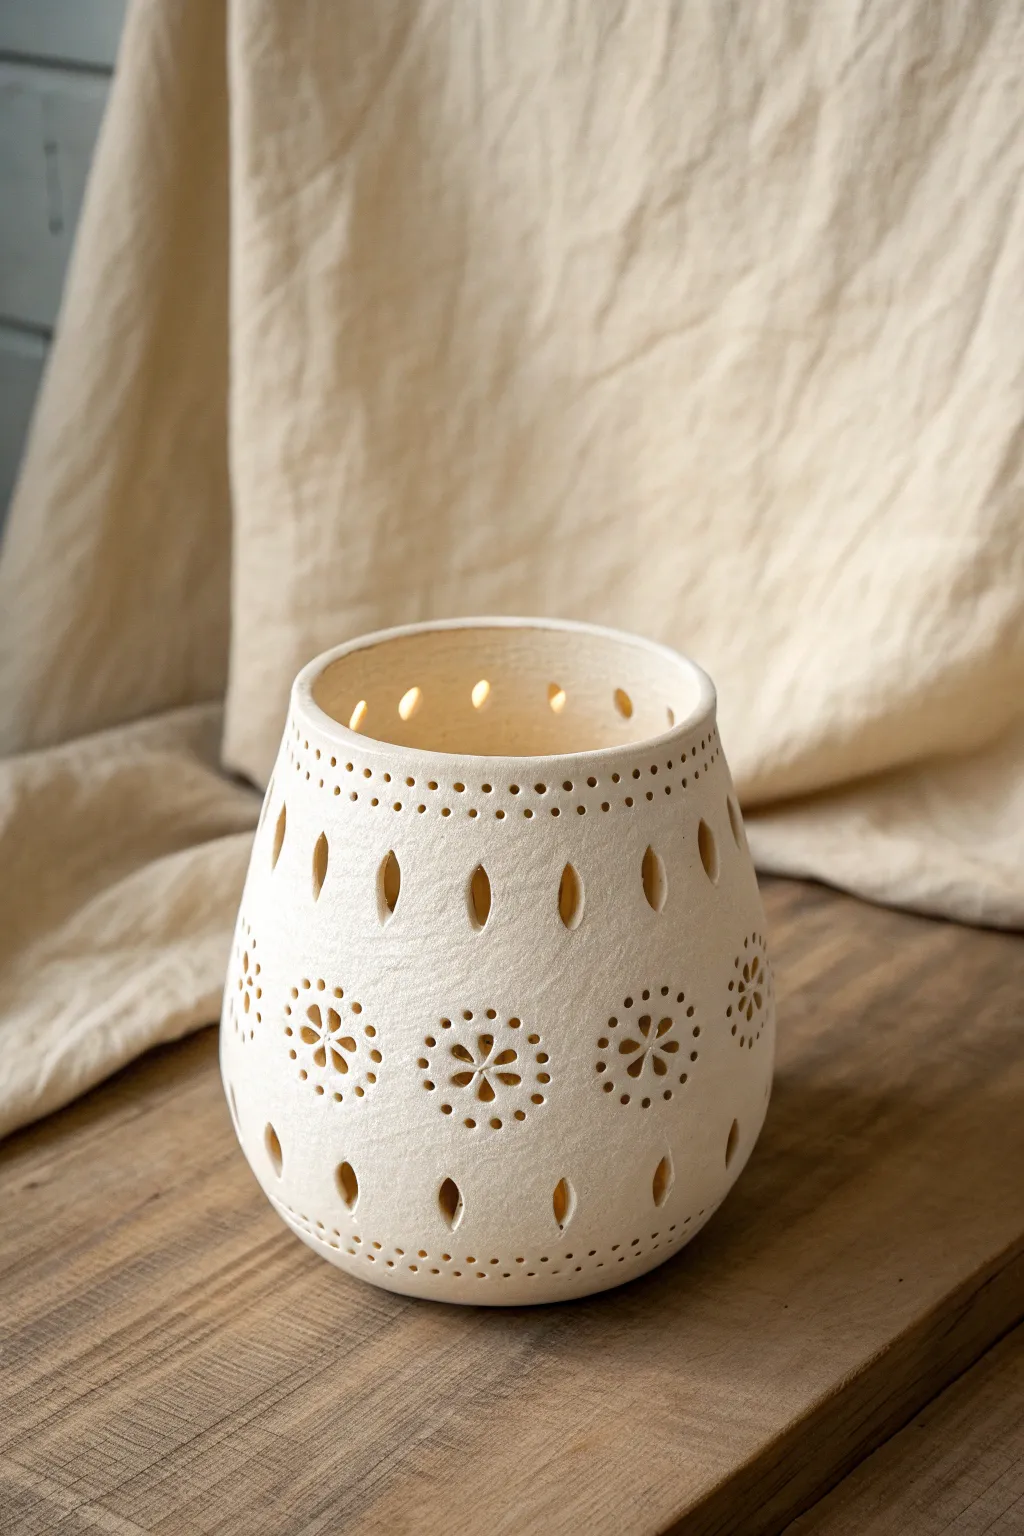
Create a cozy atmosphere with this handcrafted clay luminary that features delicate cutouts for light to dance through. The unglazed finish gives it a rustic, natural charm while the precise floral and teardrop piercings create beautiful shadow patterns when lit.
Detailed Instructions
Materials
- White stoneware or earthenware clay
- Rolling pin
- Canvas mat or cloth
- Cylindrical mold (like a large can or PVC pipe)
- Small circle cutter (straw or hole punch tool)
- Needle tool
- Fettling knife
- Small carving tool (teardrop shape)
- Sponge
- Rib tool
- Slip and scoring tool
Step 1: Forming the Cylinder
-
Roll the slab:
Begin by wedging your white clay to remove air bubbles. Roll it out on a canvas mat to an even thickness of about 1/4 inch. I find using guide sticks helps keep the thickness consistent. -
Cut to size:
Measure the circumference of your chosen cylindrical mold. Cut a rectangular slab that is slightly longer than this measurement to allow for an overlap, and as tall as you want your luminary to be. -
Wrap and join:
Wrap the slab around your mold. Score the overlapping edges with a needle tool, apply a bit of slip, and press them firmly together to create a seam. -
Smooth the seam:
Use a rib tool to blend the seam on the outside until it is invisible. Gently do the same for the inside if you can reach it, or simply smooth it with your finger. -
Shape the rim:
While the clay is still on the mold or just after removing it, slightly taper the top rim inward by gently compressing it with your hands to give it a soft, rounded opening.
Cracked Clay Fix
If you see tiny hairline cracks while carving, your clay is getting too dry. Mist it lightly with water and wrap it in plastic for an hour to rehydrate before continuing.
Step 2: Adding the Base and Refining
-
Cut the base:
Roll a small piece of clay for the base. Place your cylinder on top of it and trace around the bottom edge with a needle tool. -
Attach the bottom:
Score the bottom edge of the cylinder and the outer edge of the base circle. Apply slip and press the cylinder onto the base. Blend the clay upwards from the base to the wall to seal it completely. -
Dry to leather hard:
Let the piece dry slowly until it reaches a leather-hard state. It should be firm enough to handle without warping but soft enough to carve easily.
Clean Cuts Secret
Wait until the clay is a bit stiffer than usual leather-hard. The drier the clay, the cleaner the cut will be, resulting in less cleanup and sharper edges for your light holes.
Step 3: Carving the Design
-
Plan the spacing:
Lightly scratch horizontal guidelines around the vessel to mark where your rows of patterns will go. You need a top row of dots, a row of teardrops, a middle row of flowers, and bottom rows of teardrops and dots. -
Pierce the top rim:
Using a small hole punch tool or a drinking straw, punch a row of small holes just below the rim. Rotate the pot as you go to keep them evenly spaced. -
Carve upper teardrops:
Below the dots, carve a row of vertical teardrop shapes. Use a small loop tool or a specialized teardrop cutter. Remove the clay cleanly. -
Create the floral centers:
For the main floral band, start by punching the center holes of your flowers first. Space these evenly around the middle circumference of the pot. -
Carve the petals:
Around each center hole, carve six teardrop-shaped petals radiating outward. Take your time here to ensure symmetry. -
Add floral details:
Punch small dots between the petals or around the outer edge of the flower to enhance the intricate look. -
Repeat bottom patterns:
Mirror the top design by carving a row of vertical teardrops near the base, followed by a final row of small punched holes at the very bottom.
Step 4: Finishing Touches
-
Clean the cuts:
Once the clay is fully dry (bone dry), use a dry stiff brush or a slightly damp sponge to gently smooth away any sharp crumbs or burrs left from carving. -
Bisque fire:
Fire the piece in a kiln to bisque temperature (usually cone 04 or 06). -
Final look:
For this natural look, you can leave the clay unglazed on the outside or apply a clear matte glaze. Use a sponge to wipe any glaze out of the holes so they remain open.
Place a tea light inside and watch your beautiful patterns illuminate the room with a warm glow
Low Relief Carving With Layered Slabs
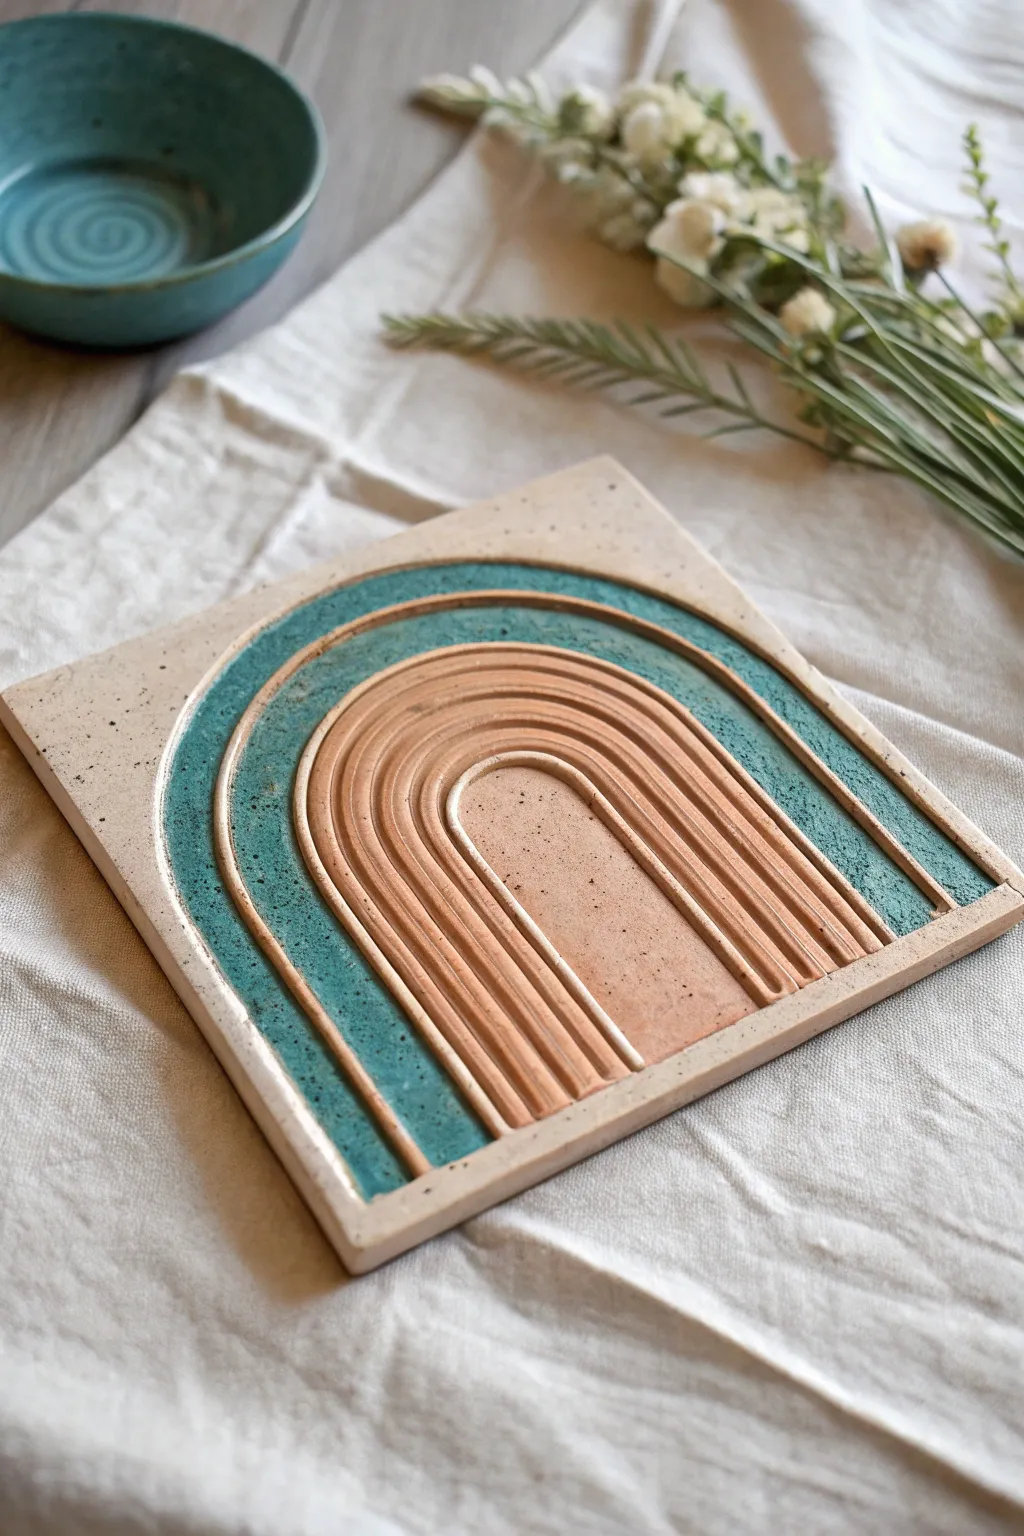
This project combines sleek, modern lines with earthy textures to create a stunning low-relief ceramic tile. The interplay between the smooth terracotta-colored arches and the speckled teal glaze makes it a beautiful decorative trivet or wall hanging.
Step-by-Step
Materials
- Speckled Stoneware Clay
- Rolling Pin
- Underglaze (Teal/Turquoise)
- Clear Glaze (Matte or Glossy)
- Needle Tool
- Wire Loop Tool or Ribbon Tool (Flat head)
- Guide Sticks or Slat Boards (approx. 1/2 inch thick)
- Ruler
- Compass or Circular Objects to trace
- Sponge
- Kiln
Step 1: Slab Preparation
-
Roll the foundation:
Begin by rolling out a substantial slab of speckled stoneware clay. Use guide sticks on either side of your clay to ensure an even thickness, aiming for about 1/2 inch to allow depth for carving. -
Compress the slab:
Using a rib tool or a damp sponge, compress both sides of the slab firmly. This aligns the clay particles, reducing the chance of warping during the firing process. -
Cut the square:
Measure and cut a perfect square using your ruler and needle tool. A 6×6 inch or 8×8 inch square works well for this design. Smooth the cut edges with a finger to remove sharp burrs.
Uneven Floor Texture?
If the bottom of your carved areas looks too messy, use the back of a spoon or a modeling tool to burnish and compress the recessed clay while it is leather hard.
Step 2: Design & Carving
-
Map the arches:
Determine the center point at the bottom edge of your square. Using a compass or by lightly tracing circular objects, lightly sketch a series of concentric arches radiating from that center point. -
Create the channels:
Select which bands will be recessed. In the reference image, the wide teal band and the central ‘tunnel’ are deeply carved. Use a flat-headed wire loop tool to carefully remove clay from these specific areas. -
Refine the depth:
Go back over your carved channels to ensure the floor of the carving is relatively flat and even. It doesn’t need to be perfect; a little texture adds character. -
Outline the raised ridges:
For the inner terracotta arches, use a smaller loop tool or a U-shaped gouge to crave narrow, deep grooves between the bands. This separates them visually and creates distinct raised ridges. -
Cleanup:
Wait until the clay is leather-hard. Use a slightly damp sponge or a soft brush to sweep away any clay crumbs or sharp bits created during the carving process.
Level Up: Wall Mounting
Before the clay dries, create a small angled hole in the back of the tile. This allows you to hang the finished piece on a nail without needing extra hardware.
Step 3: Glazing & Finishing
-
Bisque fire:
Once the tile is completely bone dry, load it into the kiln for a bisque firing. -
Wax resist application:
Apply wax resist carefully to the raised arches and the outer border of the tile. This will prevent glaze from sticking to the areas you want to remain raw clay. -
Apply underglaze:
Paint a teal or deep turquoise underglaze into the wide recessed channel you carved earlier. Depending on the opacity, you may need 2-3 coats. -
Wipe back:
If any underglaze got onto the raised ridges, wipe it away immediately with a clean, damp sponge before it dries. -
Final glaze:
Apply a thin coat of clear matte or satin glaze over the entire piece to seal it, or just over the colored sections if you prefer the raw clay texture on the ridges. -
Glaze fire:
Fire the piece again to the maturation temperature of your specific clay and glaze combination.
Display your finished tile on a table as a coaster or mount it on the wall to add a pop of modern texture to your room