If you love making things that feel both artsy and practical, clay plaques are the sweet spot—part mini sculpture, part home décor. I like them because you can keep the shapes simple and still get a ton of personality through texture, lettering, and finish.
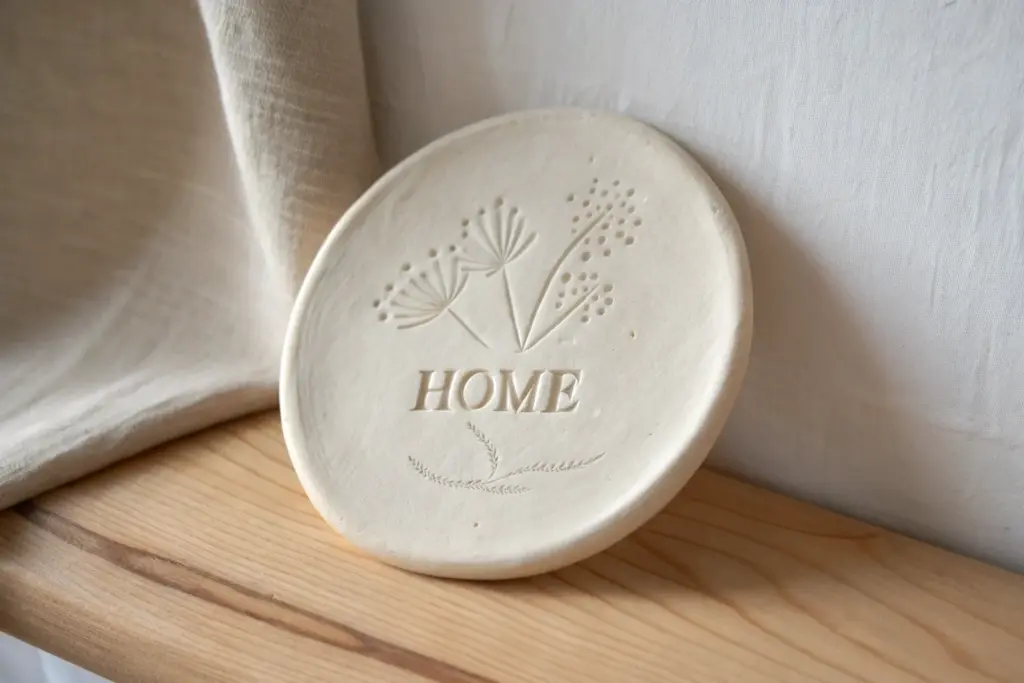
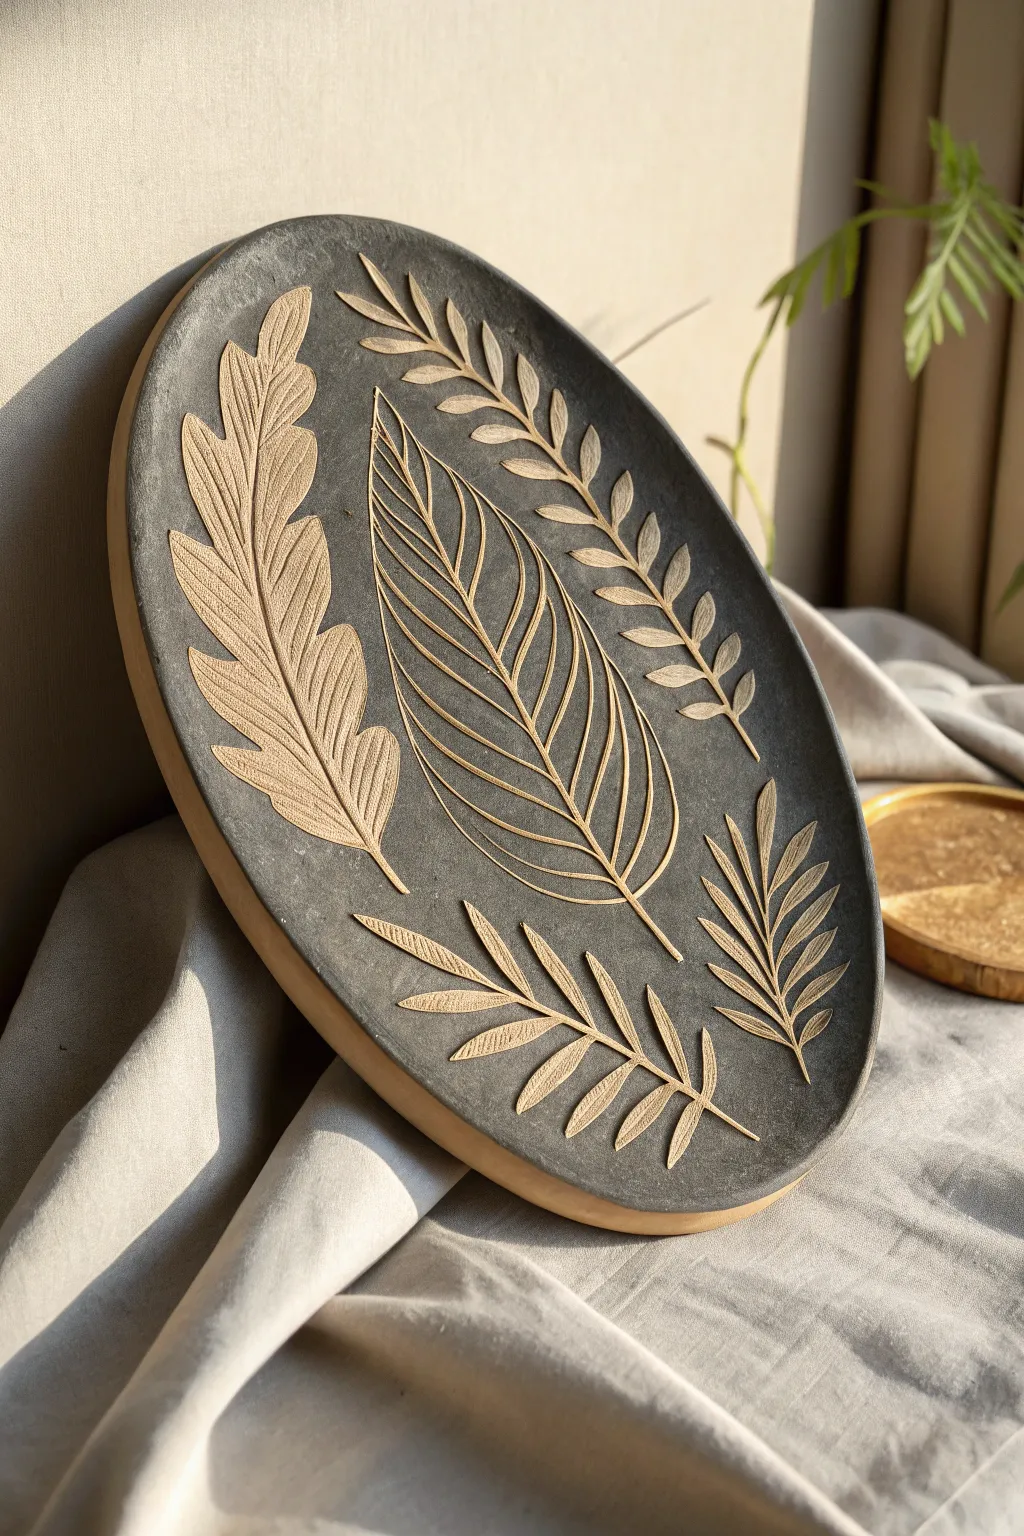
Pressed Botanical Imprint Plaque
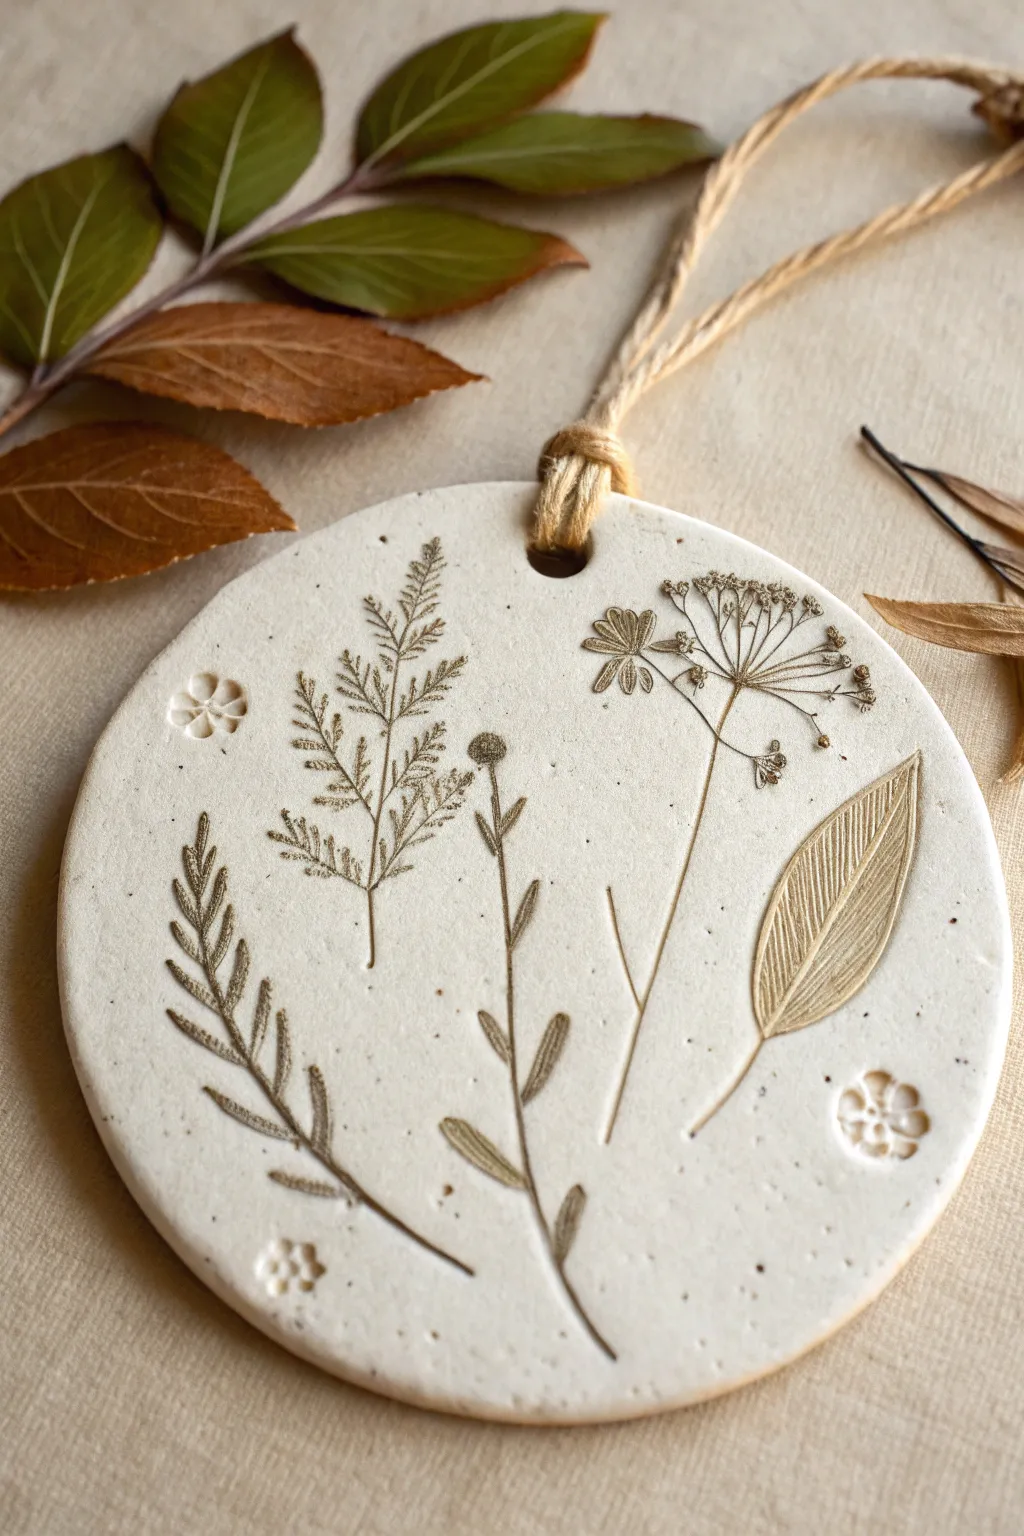
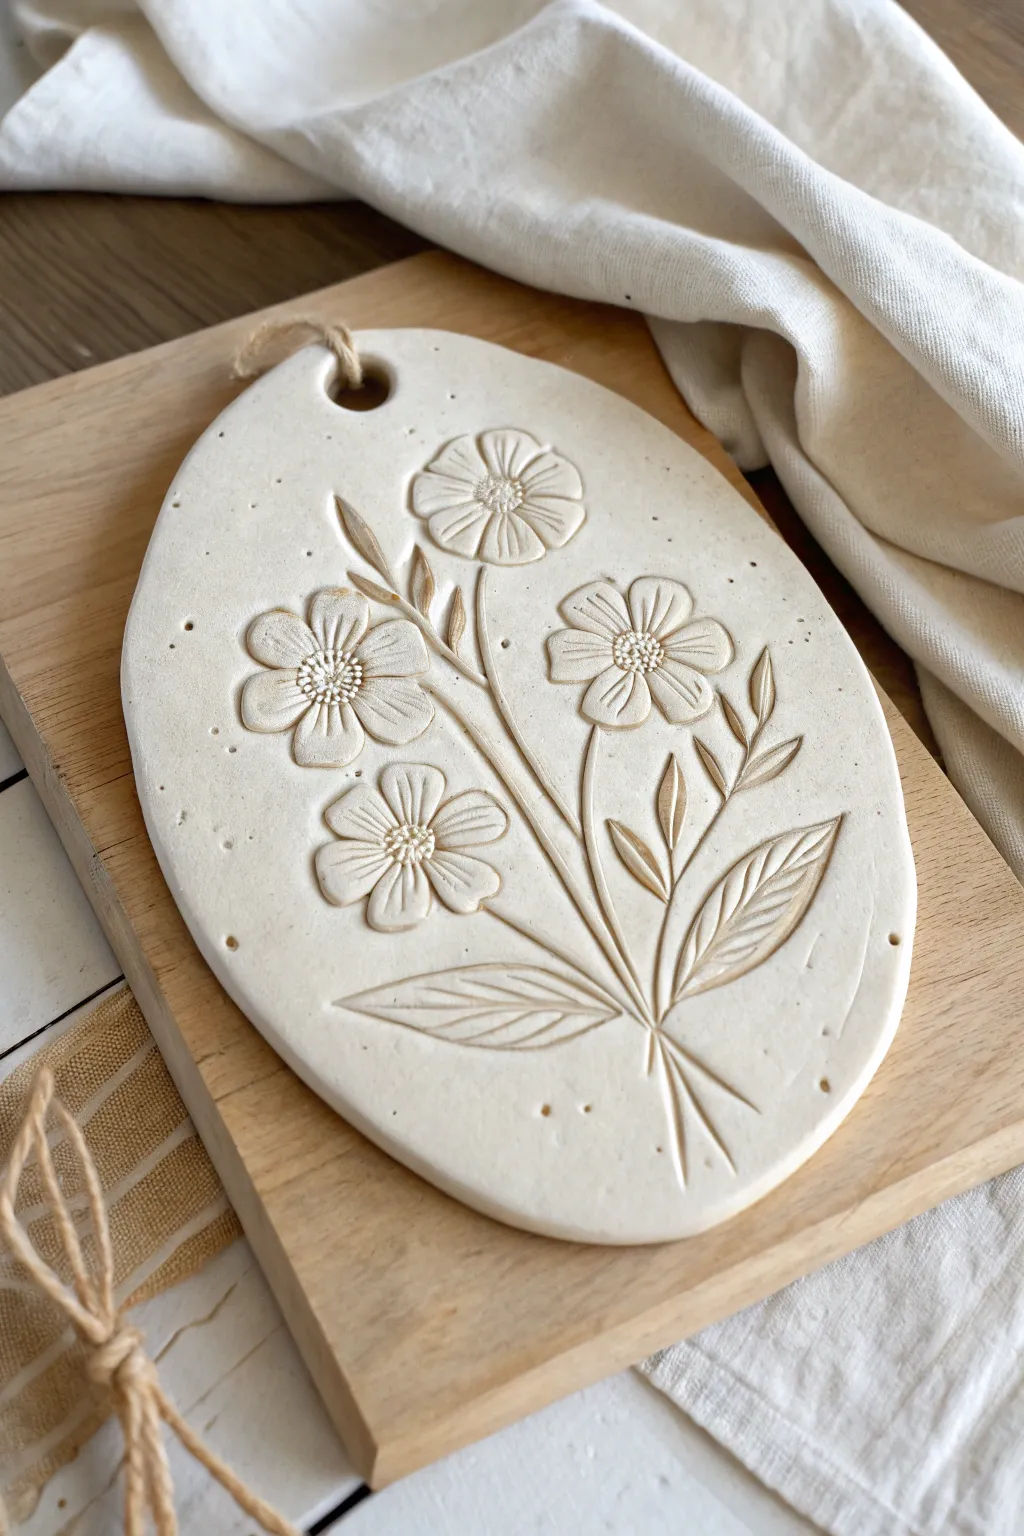
Capture the delicate details of nature with this elegant clay plaque featuring sepia-toned botanical impressions. This project combines simple rolling techniques with careful placement to create a sophisticated, fossil-like wall hanging perfect for minimalist decor.
Detailed Instructions
Materials
- White air-dry clay (or white polymer clay)
- Fresh or pressed botanical sprigs (fern, dill, thin leaves with strong veins)
- Rolling pin
- Circle cutter (cookie cutter or small bowl rim, approx. 4-5 inches)
- Vegetable oil or clay release agent
- Brown acrylic paint or antiquing wax
- Small paintbrush
- Paper towels or soft cloth
- Straw or chopstick (for creating hole)
- Fine-grit sandpaper (optional)
- Jute twine or decorative ribbon
- Wax paper or parchment paper
Step 1: Preparation & Rolling
-
Prepare your workspace:
Lay down a sheet of wax paper or parchment paper to prevent sticking. This also allows you to move the clay easily without warping it later. -
Condition the clay:
Take a handful of white air-dry clay and knead it in your hands until it becomes soft, pliable, and free of cracks. Warmth from your hands helps this process significantly. -
Roll the slab:
Place the clay ball in the center of your paper and use the rolling pin to flatten it into an even slab. Aim for a consistent thickness of about 1/4 inch (6-7mm) to ensure durability. -
Smooth the surface:
Dip your finger in a tiny bit of water and gently smooth out any surface imperfections or cracks on the top of the slab.
Mastering the Imprint
For the crispest lines, use plants with stiff veins (like fern or sage) rather than soft, fleshy leaves. Lightly misting the clay with water first can help capture finer textures.
Step 2: Impressing the Botanicals
-
Arrange your composition:
Before pressing, gently lay your chosen botanical sprigs onto the clay surface to test the layout. Try varying heights and leaf types, just like the mixture of ferns and seed heads seen in the example. -
Clean the stems:
Ensure there is no dirt or excess bulk on the stems. If a stem is too thick, slice it in half lengthwise so it lays flat against the clay. -
Roll over the plants:
Once you are happy with the placement, take your rolling pin and roll firmly over the plants one time. Do not roll back and forth; a single, firm pass embeds them cleanest. -
Remove the greenery:
Use tweezers or the tip of a craft knife to carefully lift the plant material out of the clay. Pull straight up to avoid damaging the crisp edges of the impression. -
Add decorative stamps:
If you have small flower stamps or want to use the top of a seed pod, press these into the negative spaces now to create the small floral icons seen near the edges.
Step 3: Cutting & Refining
-
Cut the shape:
Center your circle cutter or bowl over the design. Press straight down firmly to cut the circle shape. Twist slightly to separate the circle from the excess clay. -
Create the hanging hole:
While the clay is still wet, use a straw or a chopstick to poke a hole near the top edge. Make distinct circular motions to ensure the hole is large enough for your twine. -
Smooth the edges:
Dip your finger in water again and run it along the cut edge of the circle to round it off and remove any sharp ridges from the cutter. -
Dry the piece:
Allow the clay to dry completely according to the package instructions. This usually takes 24-48 hours. Turn the piece over halfway through to ensure even drying and prevent curling. -
Sand imperfections:
Once fully hard, lightly sand the edges with fine-grit sandpaper if there are any rough spots.
Add Subtle Texture
Before adding plants, press a piece of linen or canvas gently onto the clay slab to give the background a fabric-like texture, making the smooth botanical imprints pop even more.
Step 4: Antiquing & Finishing
-
Prepare the wash:
Mix a small amount of brown acrylic paint with water to create a thin, watery wash. Alternatively, use a brown antiquing wax. -
Apply the color:
Paint the wash over the impressed areas, making sure the pigment gets deep into the crevices of the leaves and stems. -
Wipe back the excess:
Immediately use a damp paper towel or soft cloth to wipe the surface of the clay. I personally like to use a fairly dry cloth here so I don’t remove the paint from the deep grooves, leaving the background white and the imprint dark. -
Attach the hanger:
Cut a length of jute twine. Fold it in half to create a loop, thread the loop through the hole, and pull the tails through the loop to create a lark’s head knot as shown in the photo.
Hang your finished plaque near a window where natural light can highlight the textures of your botanical fossil


Letter-Stamped Quote Plaque
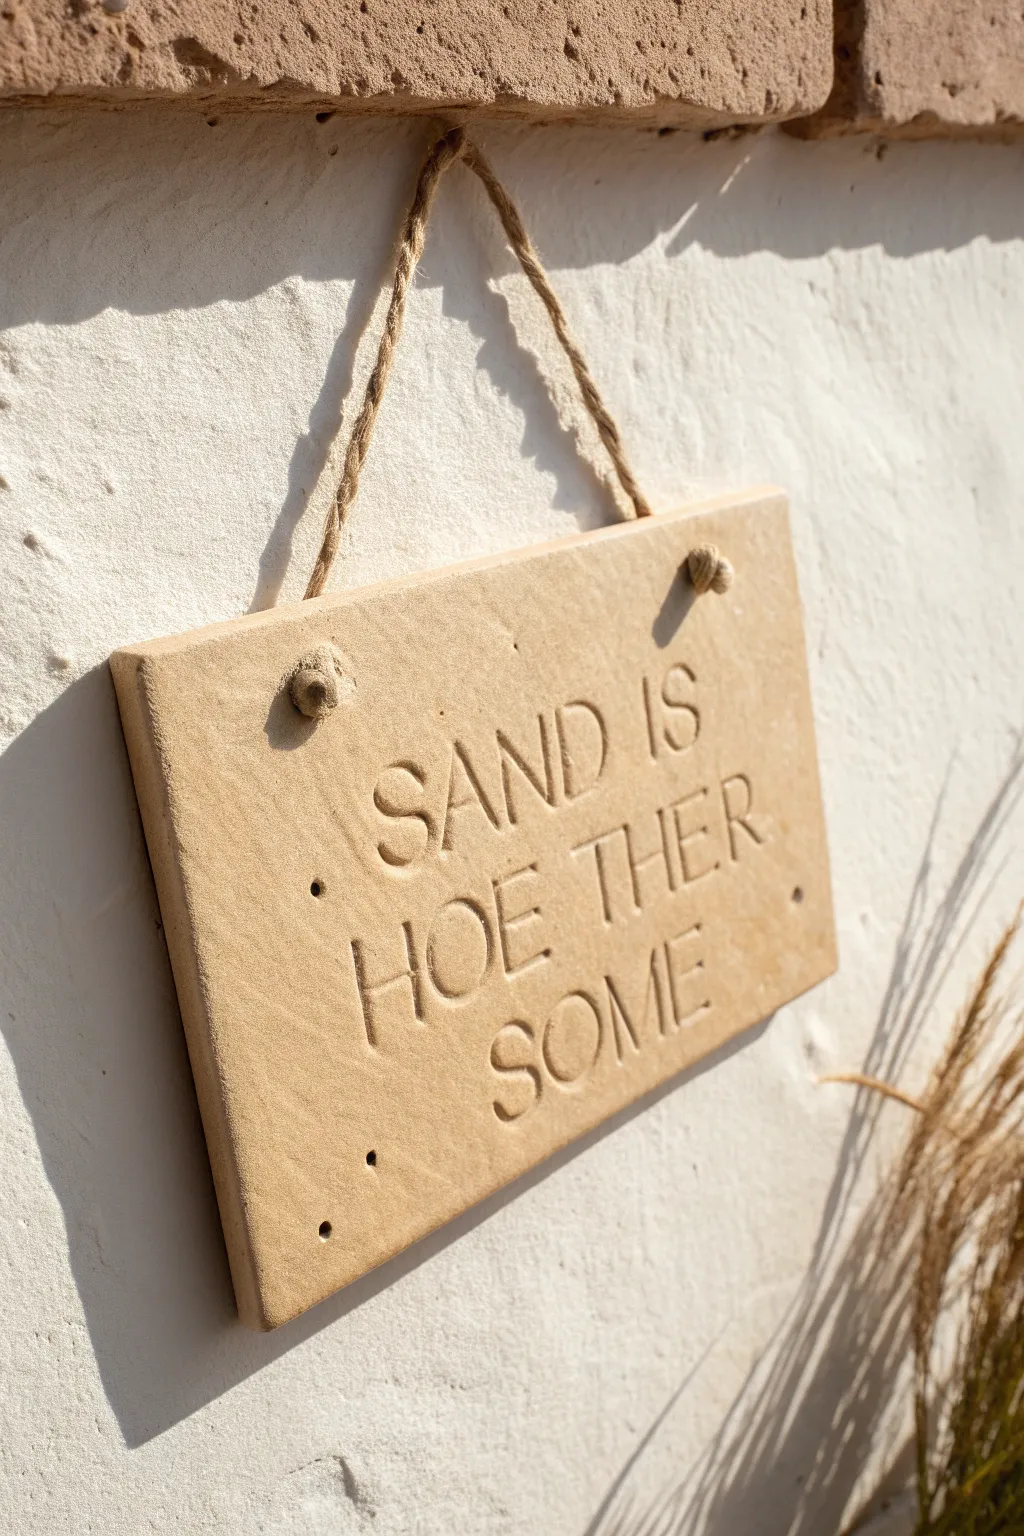
Create the look of carved sandstone without the heavy lifting using air-dry clay and simple letter stamps. This project results in a charming, textured wall hanging perfect for adding a touch of rustic whimsy to your home decor.
How-To Guide
Materials
- Air-dry clay (stone or terracotta color preferred)
- Rolling pin
- Parchment paper or canvas work surface
- Alphabet stamp set (serif font)
- Sharp knife or clay cutting tool
- Straw or skewer (for holes)
- Jute twine or rustic rope
- Fine-grit sandpaper (optional)
- Ruler
- Small bowl of water
- Matte sealant spray
Step 1: Preparing the Slab
-
Condition the Clay:
Begin by taking a substantial chunk of air-dry clay and kneading it in your hands to warm it up. You want it pliable and free of air bubbles, but not sticky. -
Roll it Out:
Place the clay onto parchment paper or a canvas cloth to prevent sticking. Use a rolling pin to flatten the clay to an even thickness of about 1/4 to 1/2 inch. I find that keeping it slightly thicker adds to the stone-like durability. -
Cut the Shape:
Using a ruler and a sharp knife, measure and cut a clean rectangle. For the plaque in the image, aim for approximately 6 inches by 8 inches, but adjust size according to your quote length. -
Soften the Edges:
Dip your finger in a little water and run it along the cut edges of the rectangle. You want to smooth out any sharp corners to give it a weathered, tumbled stone appearance rather than a freshly cut look.
Clean Stamp Impressions
If clay sticks to your stamps, dust them lightly with cornstarch or baby powder before pressing them down. This ensures a crisp release every time.
Step 2: Stamping and Texturing
-
Mock Up the Text:
Before stamping the clay, arrange your letter stamps on the table to check the spacing. This ensures your words will fit comfortably on the plaque. -
Create Guidelines:
Very lightly press the edge of your ruler into the clay to create faint horizontal guidelines for your text. -
Stamp the Letters:
Press the stamps firmly into the clay. Don’t worry if they aren’t perfectly aligned or if the depth varies slightly; this unevenness mimics hand-carved stone. Wiggle the stamp slightly before pulling it out to ensure a deep impression. -
Add Texture:
To mimic the sandstone texture in the image, take a crumpled ball of aluminum foil or a stiff-bristled brush and gently tap it over the surface of the clay, avoiding the stamped letters. -
Create Hanging Holes:
Use a straw or a thick skewer to punch two holes near the top corners. Make sure the holes are large enough to accommodate your jute rope, and place them at least half an inch from the edge to prevent tearing. -
Add Decorative Holes:
For extra detail, you can poke random small pinholes or imperfections around the text using a needle tool, just like the subtle pitting seen on real stone.
Faux Stone Effect
Mix a small amount of sand or coffee grounds into the clay before rolling it out. This adds genuine grit and speckling for an ultra-realistic stone look.
Step 3: Finishing and Assembly
-
Let it Dry:
Allow the plaque to dry completely. This usually takes 24-48 hours depending on humidity. Flip it over halfway through the drying process to ensure the back dries evenly and to prevent warping. -
Refine Edges:
Once bone dry, use fine-grit sandpaper to gently smooth any jagged bits on the edges, but keep the overall rough texture intact. -
Seal the Project:
Spray the entire plaque with a matte sealant. This protects the clay from moisture and deepens the color slightly, making it look more like natural rock. -
Prepare the Rope:
Cut a length of jute twine or rustic rope, roughly 18 inches long. -
Thread the Holes:
Feed the ends of the rope through the holes from the front to the back. -
Secure the Knots:
Tie a chunky knot on the front side of the plaque at each hole. The knot should sit on the face of the clay, not hidden behind it, to match the reference style. -
Final Adjustments:
Trim any excess fraying from the rope knots and adjust the loop so the plaque hangs straight.
Hang your new faux-stone plaque in a sunny spot to let the shadows highlight the stamped lettering.


Personalized Name and Date Plaque

Create a timeless keepsake with this elegant, minimalist clay plaque featuring stamped lettering and a delicate dotted border. Its creamy, matte finish and simple wooden stand make it a perfect addition to a nursery shelf or a thoughtful personalized gift.
Step-by-Step
Materials
- White creative paper clay or air-dry clay
- Rolling pin
- Circle cutter or a small bowl (approx. 4-5 inches diameter)
- Letter stamp set (uppercase serif font)
- Wooden skewer or toothpick
- Fine-grit sandpaper (220-400 grit)
- Small geometric wooden stand
- Clear matte varnish (optional)
- Small cup of water
- Parchment paper or non-stick rolling mat
Step 1: Shaping the Base
-
Prepare the Clay:
Begin by kneading a fist-sized ball of white air-dry clay until it becomes pliable and warm. If the clay feels too dry, dip your fingers in water and work it in, but avoid making it slushy. -
Roll it Out:
Place the clay on a sheet of parchment paper. Use your rolling pin to flatten the clay into an even slab. Aim for a thickness of about 1/4 inch (approx. 6mm). Consistency is key here to prevent warping later. -
Cut the Circle:
Position your circle cutter or inverted bowl over the smoothest section of the clay. Press down firmly to cut your shape. Lift the cutter and peel away the excess clay from the outside. -
Refine the Edges:
Dip your finger in a little water and gently run it along the cut edge of the circle. This smooths out any harsh lines or burrs left by the cutter, giving it that soft, finished pottery look.
Clean Stamp Impressions
If clay gets stuck in your letter stamps, lightly dust the stamp face with cornstarch or brush with a tiny bit of baby oil before pressing into the clay.
Step 2: Adding the Details
-
Mark the Border:
Take your wooden skewer or toothpick. Starting at the top center, gently press the blunt end into the clay near the edge to create a small indentation. Don’t push all the way through. -
Complete the Pattern:
Continue pressing dots around the entire circumference, spacing them roughly 1/4 inch apart. I find it helpful to do the north, south, east, and west points first to keep the spacing even. -
Plan Your Text:
Before stamping, lightly lay your letter stamps on top of the clay without pressing down to ensure ‘NAME’ and ‘DATE’ are centered. You can lighty mark the center point with a needle if it helps. -
Stamp the Name:
Press the stamps into the clay firmly and evenly for the name. Rock the stamp extremely slightly to ensure the corners of the letters register, then lift straight up. -
Add the Date:
Repeat the stamping process for the date, positioning it centered directly beneath the name. Leave a pleasing amount of negative space between the two lines. -
Add Decorative Dots:
Using a slightly larger round tool or the back of a paintbrush, press a single larger dot centered above the name and another one centered below the date for a vertical accent.
Preventing Curling
During the first few hours of drying, flip the plaque over gently every 30 minutes. This ensures both sides dry at the same rate, preventing the edges from curling upward.
Step 3: Drying and Finishing
-
Initial Drying:
Leave the plaque on the parchment paper to air dry. To keep it perfectly flat, place a light book on top of it once the surface is dry to the touch (usually after 2-3 hours). -
Full Cure:
Allow the clay to dry completely for 24 to 48 hours. The clay will turn from a cool gray-white to a bright, bone-white color when fully dry. -
Sand for Perfection:
Once fully cured, use fine-grit sandpaper to gently buff the edges and surface. Focus on smoothing any fingerprints or slight irregularities on the rim. -
Clean Up:
Wipe the plaque down with a dry, soft cloth or a very slightly damp paper towel to remove all the sanding dust. -
Optional Sealing:
If you want to protect the piece from humidity, apply a thin coat of clear matte varnish. This will keep the natural look but make it easier to dust later. -
Display:
Place the finished plaque on a small wooden easel or stand. Ensure the stand is stable and doesn’t obscure the text.
Once displayed on a shelf or windowsill, the natural light will catch the subtle texture of your handmade creation


Baby Handprint or Footprint Keepsake Plaque
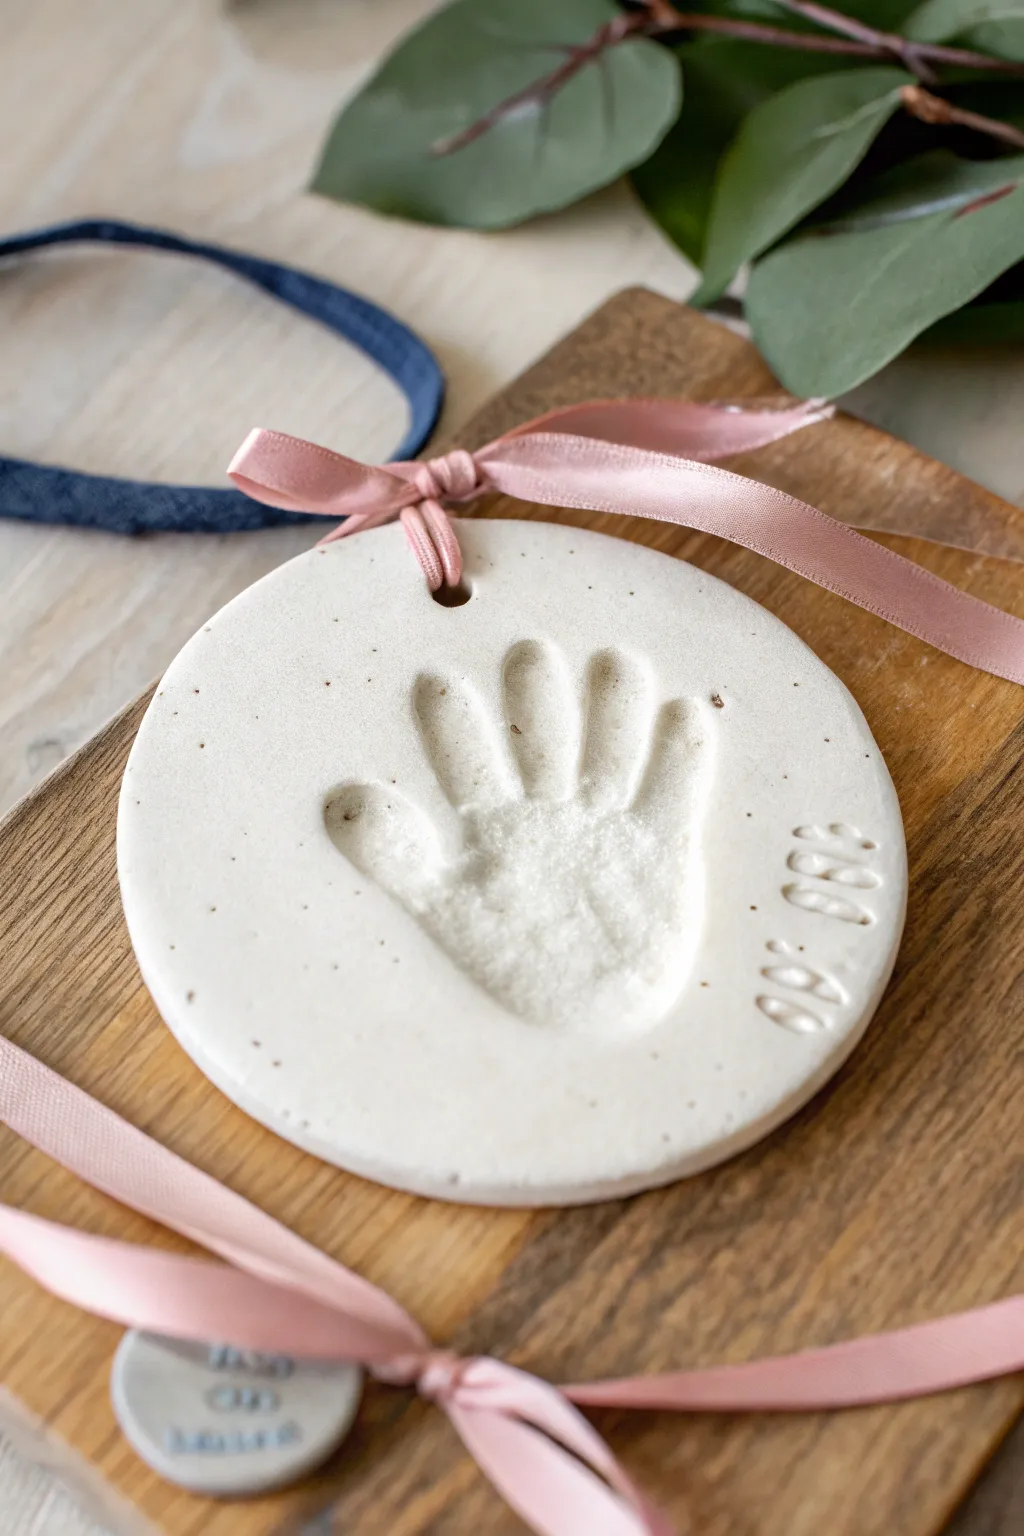
Capture a fleeting moment in time with this simple yet elegant clay keepsake plaque. The soft, natural white clay highlights the delicate details of a little hand, while the imprinted date ensures you’ll never forget just how tiny they once were.
How-To Guide
Materials
- White classic air-dry clay or salt dough
- Rolling pin
- Round cookie cutter or bowl (approx. 4-5 inches diameter)
- Small straw or wooden skewer
- Number stamp set
- Fine-grit sandpaper (optional)
- Pink satin ribbon (1/4 inch width)
- Parchment paper or non-stick craft mat
- Baby wipes
Step 1: Preparing the Clay Base
-
Condition the clay:
Begin by taking a handful of white air-dry clay. Knead it in your hands for a few minutes until it is warm, pliable, and free of any large cracks. -
Roll it out:
Place your clay on a sheet of parchment paper. Use a rolling pin to flatten the clay into a smooth sheet. -
Check the thickness:
Aim for a thickness of about 1/4 to 1/2 inch. You want it thick enough to take a deep impression without cracking, but not so thick that it takes weeks to dry. -
Cut the shape:
Press your round cookie cutter or an upside-down bowl firmly into the clay to cut a perfect circle. Peel away the excess clay from the edges. -
Smooth the edges:
Dip your finger in a tiny bit of water and run it gently around the cut edge of the circle to smooth out any roughness or sharp corners.
Cracking Clay?
If you see hairline cracks while drying, mix a tiny bit of fresh clay with water to make a paste and smooth it into the cracks with your finger.
Step 2: Creating the Impressions
-
Position the hand:
Bring your little one over. Gently guide their hand to the center of the clay circle. I find it helpful to hold their wrist steady while spreading their fingers slightly. -
Press firmly:
Press the palm down firmly, then gently press each individual finger and the thumb into the clay to ensure a clear imprint. -
Lift straight up:
Carefully lift the hand straight up and away from the clay to avoid dragging or smudging the print. Keep baby wipes nearby for quick cleanup. -
Add the date:
Using your number stamp set, press the date into the clay on the right side of the handprint, following the curve of the circle. -
Create a hanging hole:
Use a straw to punch a clean hole near the top center of the plaque. Give it a little twist before pulling it out to ensure the hole is clear.
Add Subtle Shimmer
After the clay dries completely, brush a very light coat of pearl acrylic paint over the handprint area to make the impression pop.
Step 3: Finishing Touches
-
Dry the plaque:
Let the plaque dry flat on parchment paper in a cool, dry place. Flip it over gently after 24 hours to help the bottom dry evenly. Total drying usually takes 2-3 days. -
Sand imperfections:
Once fully cured and hard, you can use fine-grit sandpaper to very lightly buff away any rough spots on the rim or surface. -
Prepare the ribbon:
Cut a length of pink satin ribbon, approximately 12 inches long. -
Thread the ribbon:
Fold the ribbon in half and push the looped end through the hole from front to back. -
Secure the loop:
Pull the loose ends of the ribbon through the loop you just pushed through the hole and tighten it to create a lark’s head knot. -
Tie a bow:
Tie the loose ends into a neat bow at the top of the loop, trimming the ends at an angle for a polished look.
Hang this precious memento on a wall or tree to cherish those tiny fingers forever

The Complete Guide to Pottery Troubleshooting
Uncover the most common ceramic mistakes—from cracking clay to failed glazes—and learn how to fix them fast.
Pet Pawprint Memory Plaque
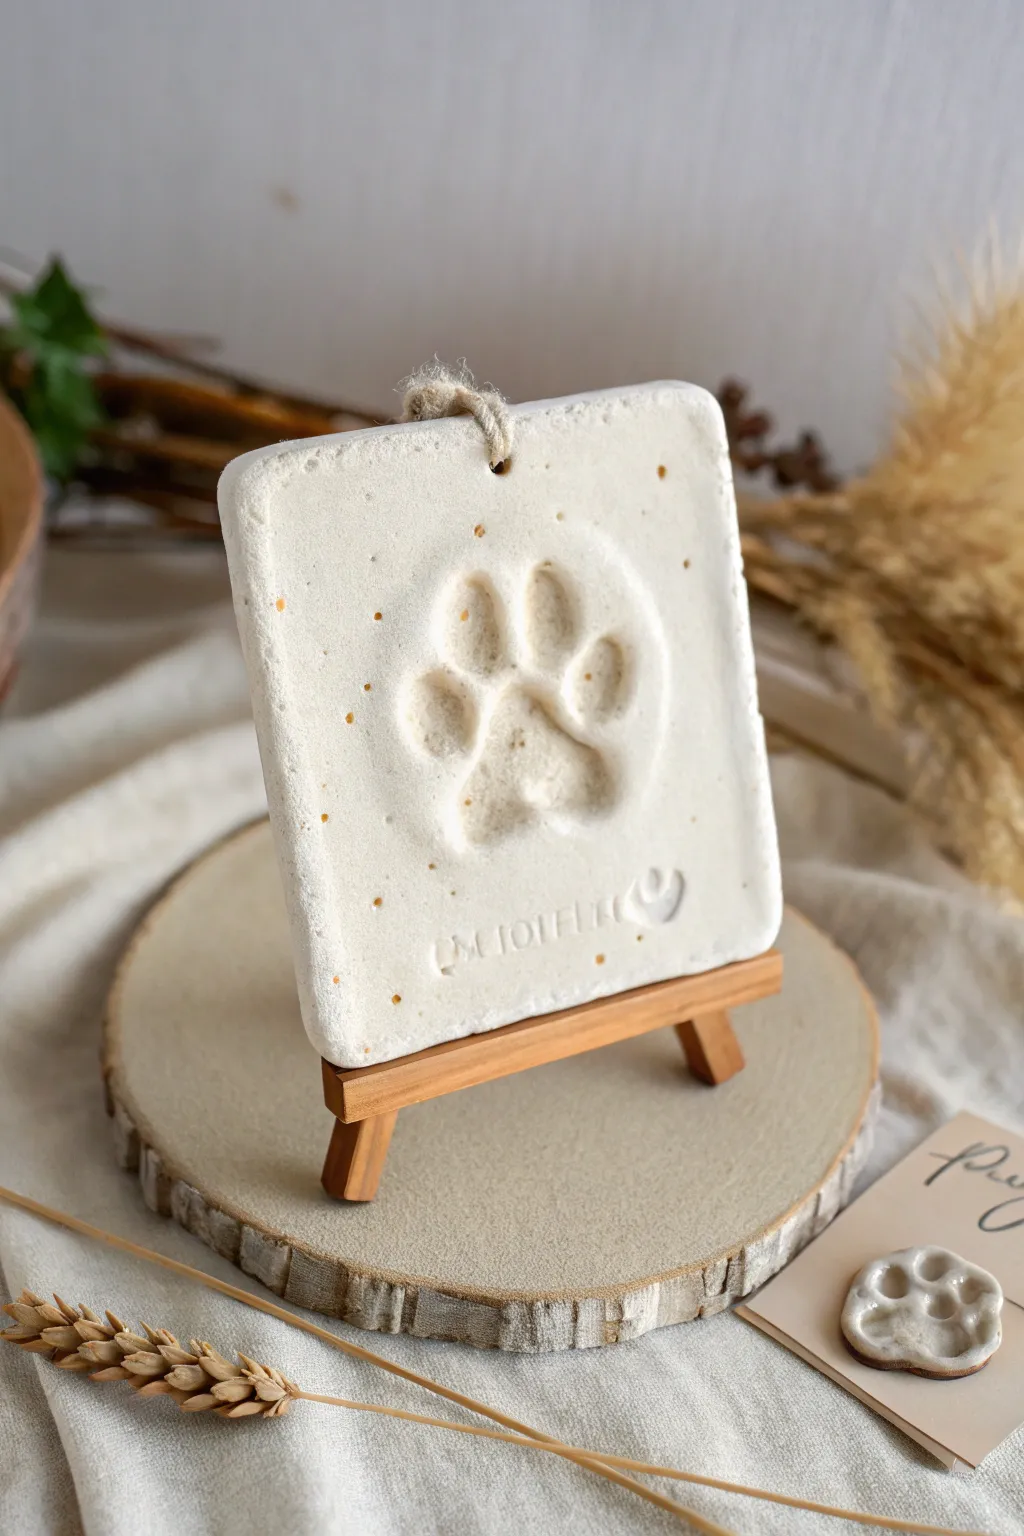
Capture your furry friend’s memory with this rustic, elegant clay plaque featuring a deep-relief paw impression. The finished piece has a soft, stone-like texture with subtle speckles and personalized stamping, perfect for displaying on a miniature easel.
Step-by-Step Guide
Materials
- White or cream air-dry clay (or polymer clay)
- Rolling pin
- Square cookie cutter (approx. 4-5 inches) or knife
- Parchment paper or silicone mat
- Straw or skewer (for hole)
- Letter stamp set
- Small heart stamp tool
- Twine or jute cord
- Fine-grit sandpaper
- Optional: Gold flakes or speckled clay additives
- Miniature wooden easel for display
Step 1: Preparing the Clay Base
-
Condition the clay:
Start by taking a generous handful of white air-dry clay. Knead it thoroughly in your hands until it becomes warm, soft, and pliable. This prevents cracks later on. -
Add texture (optional):
If you want the speckled look shown in the photo but only have plain white clay, knead in a tiny pinch of dried tea leaves, sand, or gold flakes now to create a faux-stone effect. -
Roll it out:
Place the clay on a sheet of parchment paper. Use a rolling pin to flatten it into an even slab. You want it relatively thick, about 1/4 to 1/2 inch, to accommodate the deep paw impression. -
Cut the shape:
Press a square cookie cutter firmly into the clay slab. If you don’t have a cutter large enough, use a ruler and a craft knife to cut a perfect square. Peel away the excess clay. -
Smooth the edges:
Dip your finger in a little water and run it along the cut edges of the square to soften any sharp corners or roughness.
Clean Prints Only
If your pet has furry paws, trim the hair between their pads slightly or press their paw through a sheet of plastic wrap to keep fur out of the clay.
Step 2: Creating Impressions
-
Make the paw print:
Guide your pet’s clean paw onto the center of the clay square. Press down firmly on each toe pad and the main pad to get a deep, clear impression. Lift the paw straight up to avoid smearing. -
Clean up the potential mess:
If the clay stuck to the paw slightly, you might see rough edges. Gently smooth these inside the impression with a damp cotton swab or a clay tool. -
Add the name:
Using your letter stamp set, press your pet’s name into the clay below the paw print. Apply even pressure so all letters are the same depth. -
Stamp the heart:
Add a small heart symbol next to the name for a sweet, decorative touch similar to the inspiration image. -
Create hanging hole:
Use a straw or a skewer to poke a hole through the top center of the plaque. I like to give the straw a little twist as I pull it out to ensure a clean cutout.
Step 3: Finishing Touches
-
Initial drying:
Let the clay air dry flat on the parchment paper. To keep it from curling at the corners, you can lightly place a piece of paper and a book on top after the surface is dry to the touch. -
Turn and dry:
After about 24 hours, carefully flip the plaque over to let the back side dry completely. Total drying time will depend on humidity but usually takes 48-72 hours. -
Sand the surface:
Once fully hardened, use fine-grit sandpaper to gently buff the edges and surface. This removes any fingerprints and makes the plaque look like polished stone. -
Add twine accent:
Cut a short length of jute twine. Thread it through the top hole and tie a simple knot or loop, leaving short frayed ends as a decorative rustic element. -
Seal (optional):
To protect the piece from dust, apply a thin coat of matte varnish or sealant. This is especially helpful if you added organic speckles like tea leaves. -
Display:
Place your finished plaque on a miniature wooden easel to complete the gallery-style presentation shown in the photo.
Gilded Details
After the clay is dry, paint only the inside of the paw impression with liquid gold leaf or metallic paint to make the print really pop.
This simple yet beautiful plaque creates a lasting tribute that looks wonderful on any shelf or mantel
House Number and Street Name Plaque
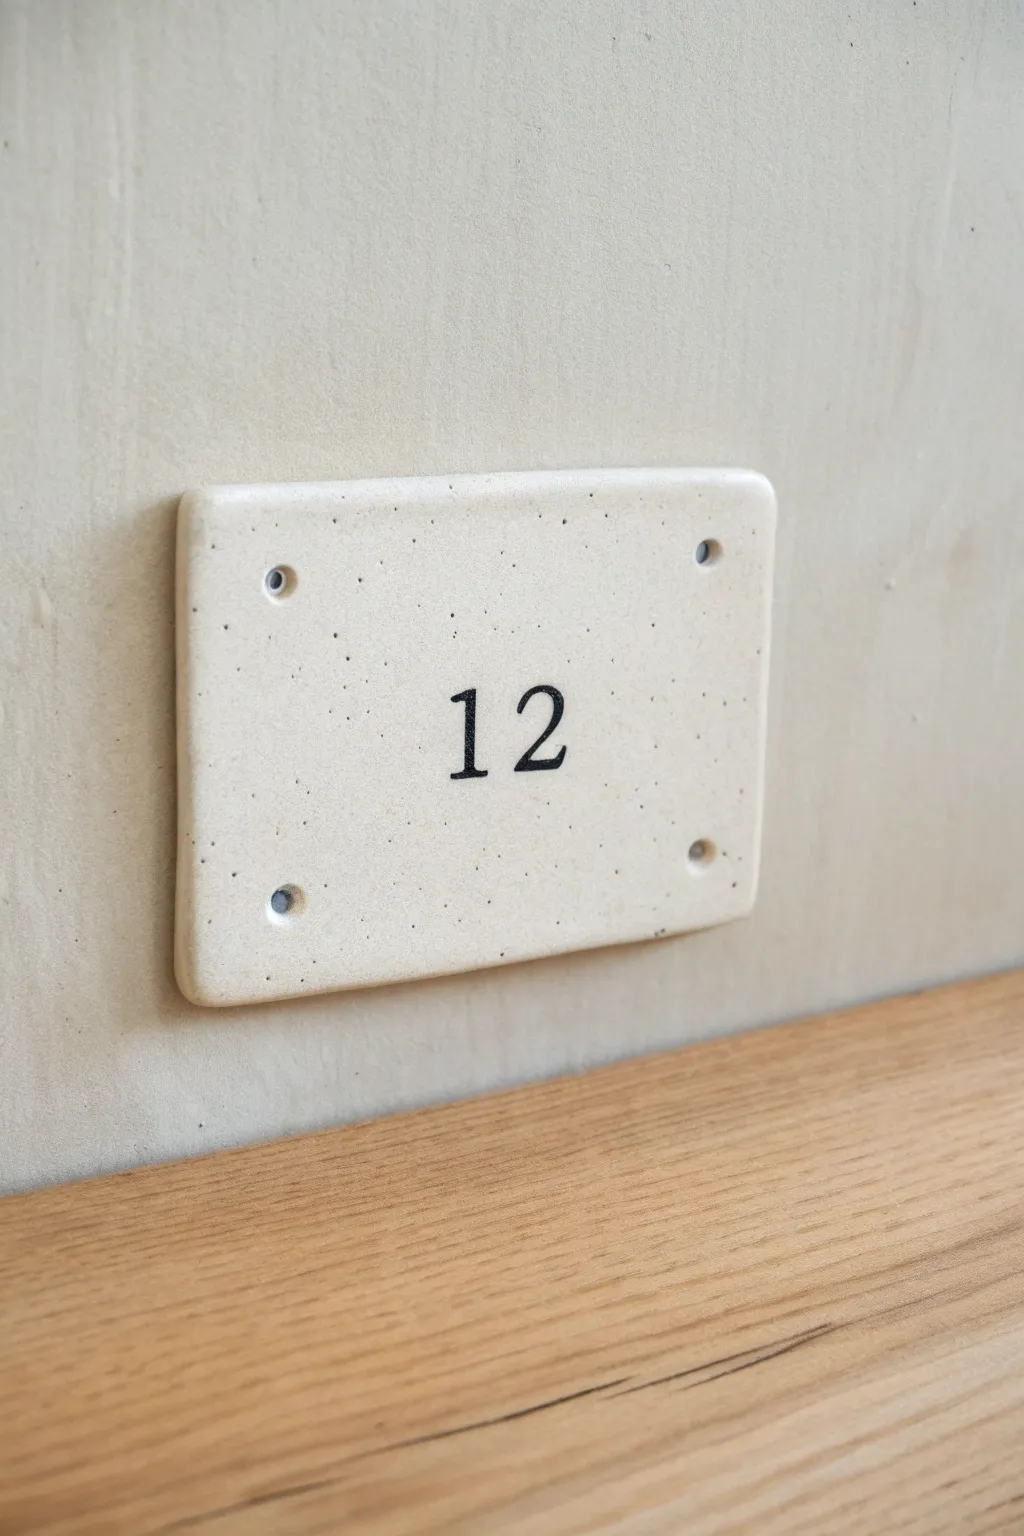
This elegant house number plaque relies on the natural beauty of speckled clay to create a modern, understated welcome to your home. The soft, creamy glaze contrasts beautifully with crisp black numerals, offering a timeless look that works well with both contemporary and rustic entryways.
Step-by-Step
Materials
- Speckled stoneware clay (white or buff)
- Black underglaze
- Clear glossy or satin glaze
- Rolling pin
- Canvas, slab mat, or wooden work board
- Thickness guide strips (approx. 1/4 inch or 6mm)
- Needle tool or sharp craft knife
- Rectangular template or ruler
- Small circle cutter or straw (for screw holes)
- Soft sponge
- Fine-grit sandpaper
- Small angled shader brush or liner brush
- Kiln access
Step 1: Shaping the Slab
-
Prep your surface:
Set up your workspace by laying down a piece of canvas or a slab mat to prevent sticking. Place your thickness guide strips on either side of where you will roll the clay. -
Roll the clay:
Take a manageable chunk of speckled stoneware clay and begin rolling it out. Ensure the rolling pin rests on the guide strips as you work to guarantee a perfectly even thickness across the entire slab. -
Smooth the texture:
Before cutting, run a flexible rib tool or a very slightly damp sponge over the surface. This compresses the clay particles and removes the canvas texture, giving you a smooth starting point. -
Cut the rectangle:
Place your rectangular template (cardstock works well) onto the clay. Using a needle tool held perpendicular to the table, cut around the shape cleanly. Alternatively, use a ruler to measure and cut a precise rectangle. -
Refine the edges:
Once the rectangle is cut, use a damp sponge or your finger to gently soften the sharp cut edges. You want a slightly rounded, finished look rather than a sharp 90-degree angle. -
Add holes:
Using a small circular cutter or a sturdy straw, punch four holes—one in each corner. Be mindful not to place them too close to the edge to prevent cracking during firing. Measure their placement so they are symmetrical.
Step 2: Bisque and Glazing
-
Dry slowly:
Place the plaque on a drywall board or wooden ware board to dry. Cover it loosely with plastic for the first day to ensure the corners don’t dry faster than the center, which helps prevent warping. -
Sand for perfection:
Once bone dry, take the piece outside or wear a mask and very gently sand any rough spots on the edges or inside the screw holes. Wipe away all dust with a damp sponge. -
Bisque fire:
Load the plaque into the kiln for a bisque firing (typically Cone 04). This hardens the clay and prepares it for glazing. -
Apply clear glaze:
After the bisque firing, dip or brush your clear glaze onto the entire piece. Using a clear glaze allows natural specks of the clay body to shine through as a design element. Wipe the back clean if you are firing directly on a kiln shelf.
Pro Tip: Stencil Success
Not confident in your freehand lettering? Print your number in a serif font, cut it out to make a paper stencil, and gently trace through it onto the bisque ware.
Step 3: Adding the Numbers
-
Transfer the design:
Once the clear glaze is dry to the touch (but before the final firing), use a pencil to lightly sketch your numbers onto the surface. Don’t worry about marks; graphite will burn off in the kiln. -
Paint the first layer:
Using a liner brush loaded with black underglaze (or a black overglaze if preferred), carefully paint the outline of your numbers. I find that steadying my hand on a bridge or stack of books helps with these straight serif lines. -
Fill in the numbers:
Fill in the body of the numbers with the black pigment. You want solid, opaque coverage, so apply a second coat if the first looks streaky or thin. -
Clean up edges:
If you smudge the black line, use a clean, damp brush or a precision Q-tip to gently wipe away the mistake before the glaze sets completely. -
Final fire:
Fire the piece again to the maturation temperature of your clay and glaze (often Cone 5 or 6 for stoneware). This will melt the clear glaze into a smooth, glassy finish and fused the black numbers permanent.
Troubleshooting: Warping
If your plaque curls up at the edges while drying, flip it over daily and weigh down the corners gently with small sandbags to keep it perfectly flat.
Now you have a custom, durable piece of art that adds instant curb appeal to your home.


What Really Happens Inside the Kiln
Learn how time and temperature work together inside the kiln to transform clay into durable ceramic.
Minimal Line-Art Face Plaque
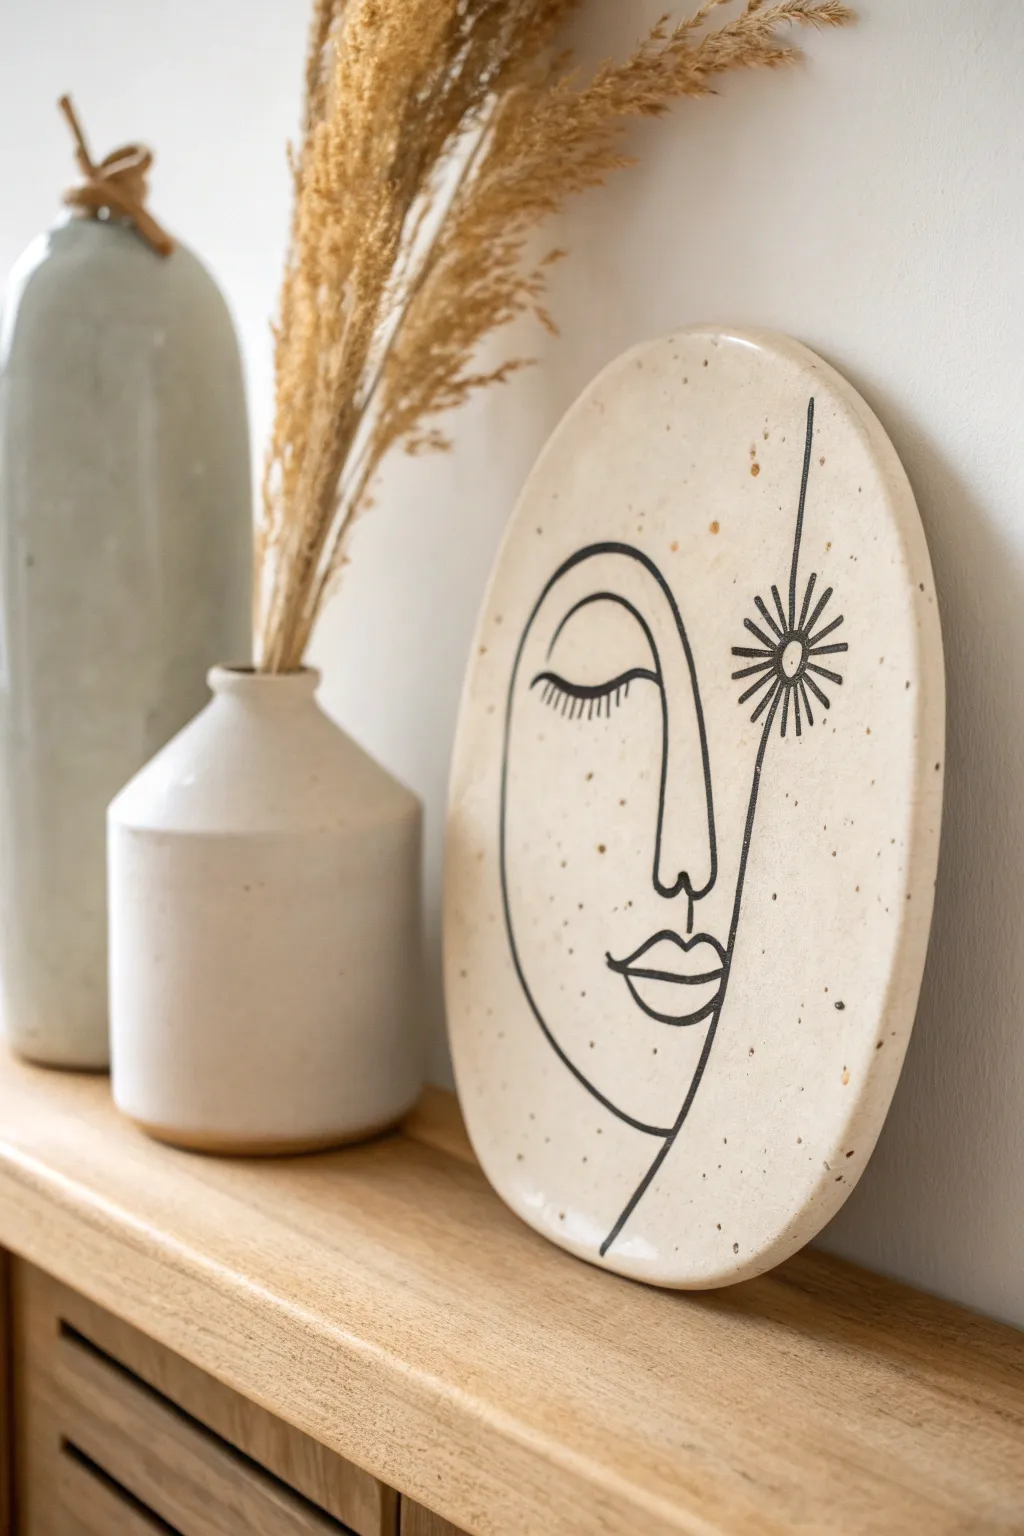
Capture the essence of modern boho decor with this striking line-art plaque. Using speckled clay and fluid black illustration, you create a piece that feels both ancient and perfectly contemporary.
Detailed Instructions
Materials
- Speckled stoneware clay (or white air-dry clay)
- Black underglaze (for kiln firing) or black acrylic paint
- Rolling pin
- Two wooden guide strips (approx. 1/4 inch thick)
- Needle tool or toothpick
- Fine-point detail brush (size 0 or 1)
- Sponge
- Clear matte glaze (optional, for kiln firing)
- Cardboard or paper for template
- Scissors
Step 1: Shaping the Canvas
-
Prepare your workspace:
Begin by laying down a canvas cloth or non-stick mat on a sturdy table to prevent the clay from sticking. -
Roll out the slab:
Place your ball of speckled clay between the two wooden guide strips. Roll the clay out until the rolling pin rests on the guides, ensuring a perfectly even thickness across the entire slab. -
Draft your shape:
Sketch a tall, elongated oval shape onto a piece of cardstock or paper to serve as your template. It doesn’t need to be a perfect geometric oval; a slightly organic, egg-like shape adds character. -
Cut the clay:
Place your paper template onto the rolled slab. Holding your needle tool vertically, trace around the template to cut out the plaque shape. -
Smooth the edges:
Dip a small sponge in water and run it gently along the cut rim of the clay. Round off any sharp corners or jagged bits left by the cutting tool for a professional finish. -
Dry slightly:
Let the slab sit for about 30 minutes to an hour until it reaches a ‘leather-hard’ state. It should be firm enough to handle without warping but still cool to the touch.
Wobbly Lines?
If your hand shakes while painting, rest your pinky finger on a dry part of the clay to anchor your hand. This simple bridge creates stability for fine details.
Step 2: Designing the Face
-
Plan the composition:
Before committing to the clay, sketch your line art on paper. The design features a continuous-line style profile on the left and a stylized sunburst eye on the right. -
Lightly trace the design:
Using a needle tool with extremely light pressure, scratch the design onto the leather-hard clay surface. You want these lines to be barely visible guides, not deep grooves. -
Outline the profile:
Start with the strong curve of the nose and forehead. Notice how the line loops down to form the nose, then curves back up to separate the face from the hair area. -
Add the closed eye:
Draw the sleeping eyelid on the left side with a simple downward curve, adding small vertical dashes for eyelashes. -
Detail the lips and jaw:
Create the lips with two joined shapes below the nose, then extend a long, sweeping line downward to define the jawline and neck. -
Create the sun feature:
On the right side, draw a vertical line that intersects a small circle. Add radiating lines around the circle to create the starburst or sun effect.
Speckled Effect
Using plain air-dry clay? Mimic the stoneware look by flicking a toothbrush loaded with diluted brown paint over the wet clay before painting the face.
Step 3: Applying Color & Finishing
-
Prepare your paint or underglaze:
Pour a small amount of black underglaze (or acrylic paint if using air-dry clay) onto a palette. Add a drop of water if needed to achieve an ink-like consistency. -
Paint the main lines:
Load your fine-point brush and carefully trace over your scratched guidelines. Keep your hand steady and try to maintain a consistent line width. -
Refine the details:
Go back in to crisp up the eyelashes and the rays of the sunburst. I find that holding your breath slightly while painting these tiny lines helps keep the hand steady. -
Final drying:
Allow the piece to dry completely. If you are using ceramic clay, this step takes several days until bone dry; for air-dry clay, usually 24-48 hours. -
Kiln fire or seal:
If using ceramic clay, bisque fire the piece, apply a clear matte glaze if desired, and glaze fire. If using air-dry clay, coat the front with a water-based matte varnish to protect your artwork.
Display your finished plaque on a shelf or mount it on the wall for an instant artistic statement.
Lace or Crochet Texture Plaque
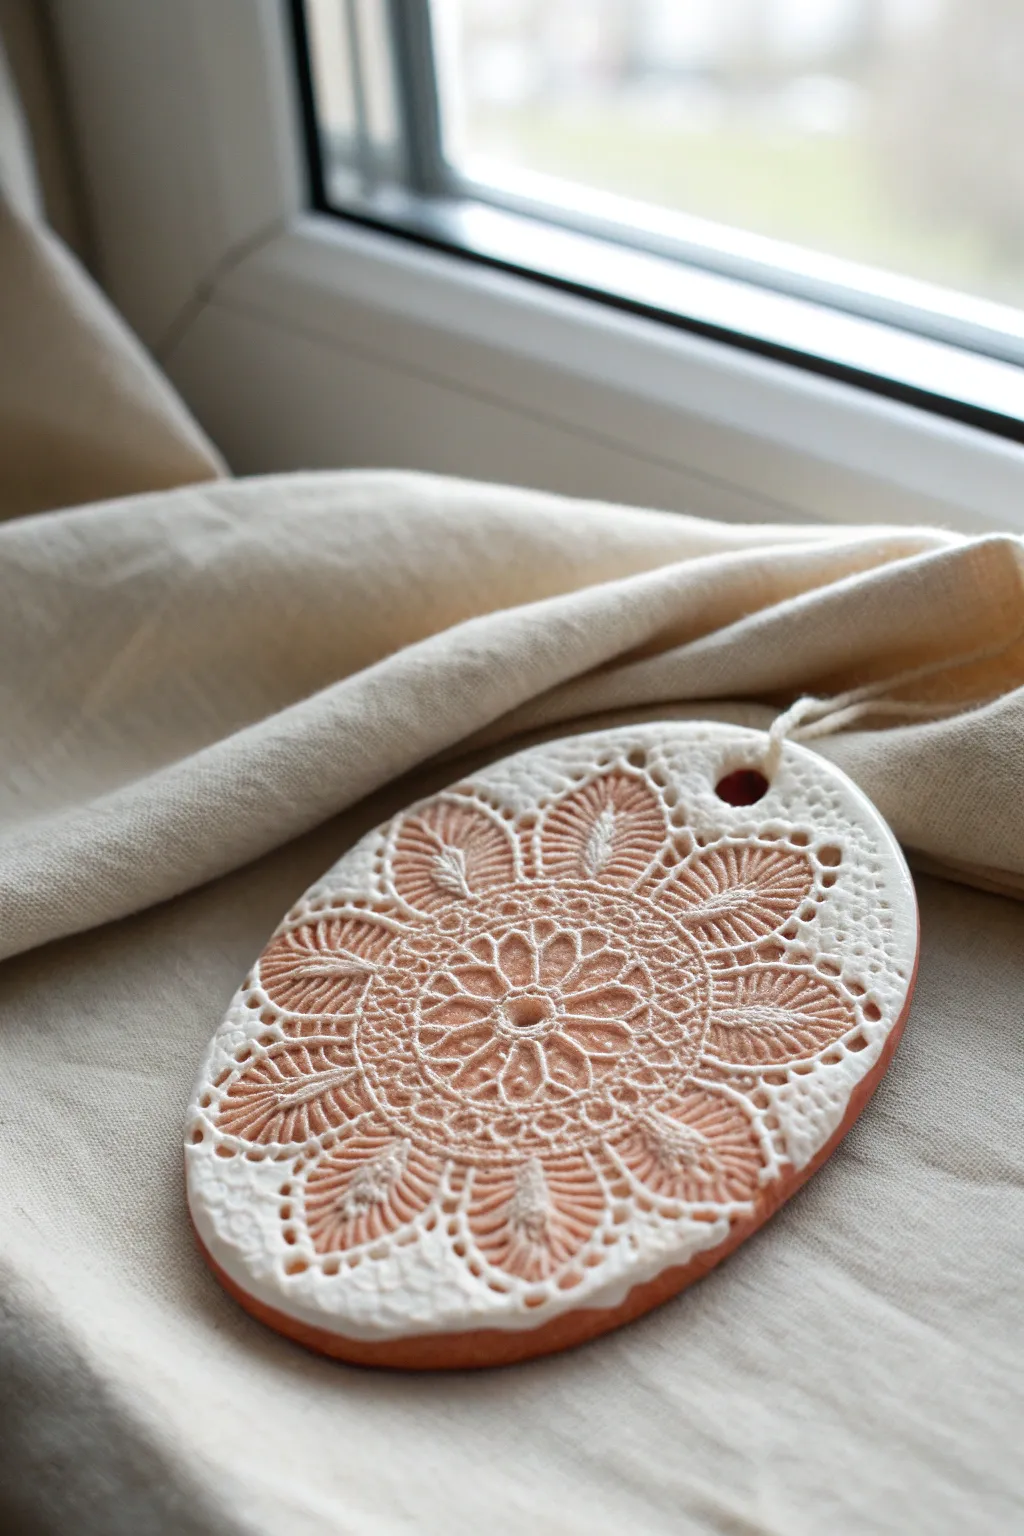
This elegant wall ornament combines the rustic warmth of terracotta-colored clay with the delicate intricacy of white lace. By pressing real doilies or crochet work into two layers of contrasting clay, you create a sophisticated relief pattern that feels both vintage and modern.
How-To Guide
Materials
- Terracotta-colored air-dry clay (or polymer clay)
- White or cream air-dry clay
- Rolling pin
- Vintage lace doily or crochet coaster (with deep texture)
- Oval cookie cutter or craft knife
- Straw or small circle cutter (for hanging hole)
- Parchment paper or non-stick work mat
- Small sponge
- Cotton twine or jute
- Fine-grit sandpaper (optional)
- Matte spray varnish (optional)
Step 1: Preparing the Base
-
Condition the base clay:
Start by taking a handful of the terracotta-colored clay. Knead it thoroughly in your hands until it becomes warm, pliable, and free of cracks. If it feels too dry, add a tiny drop of water. -
Roll the primary slab:
Place the terracotta clay on a piece of parchment paper to prevent sticking. Roll it out into an even slab, approximately 5-6mm thick. Smooth the surface with a slightly damp finger if you see any imperfections. -
Prepare the contrast layer:
Take a smaller amount of the white clay—about half the volume of the terracotta piece. Knead this until soft and ready to use. -
Create the white overlay:
Roll the white clay out very thinly on a separate sheet of paper. Aim for a thickness of about 1-2mm; it needs to be almost translucent in spots to allow the base color to peek through later. -
Layer the clays:
Carefully lift the thin white sheet and place it directly on top of the terracotta slab. Gently run the rolling pin over them once—just enough to bond the two layers together without distorting them too much.
Sticky Lace?
If the lace sticks to the clay, lightly dust the clay surface with cornstarch or baby powder before laying down your fabric. Brush off excess powder after peeling.
Step 2: Creating the Impression
-
Position the texture tool:
Lay your lace doily or crochet piece flat on top of the white clay layer. Make sure the most textured side of the fabric is facing down into the clay. -
Embed the lace:
Using firm, even pressure, roll over the lace with your rolling pin. I like to do one pass firmly rather than rolling back and forth, to avoid ghost images. You want the lace to push through the white layer and bite slightly into the terracotta below. -
Reveal the pattern:
Slowly peel back the lace from one corner to the other. The white clay should have stretched and separated in the deep grooves, revealing the lovely terracotta color underneath the raised lace pattern. -
Refine the surface:
If the texture created any jagged peaks of clay that look too sharp, gently tap them down with a finger, but preserve the overall relief.
Step 3: Shaping and Finishing
-
Cut the shape:
Position your oval cutter over the best part of the pattern. Press down firmly to cut the shape. If you don’t have a cutter, trace an oval paper template with a craft knife. -
Add the suspension hole:
Use a straw or a small circular tool to punch a clean hole near the top edge for hanging. Make sure it isn’t too close to the rim to prevent cracking. -
Smooth the edges:
Dip your finger in a little water and run it along the cut edges of the oval to smooth away any roughness or separation between the clay layers. -
Cleaning the back:
If the back of the plaque has picked up texture from your work surface, flip it gently and smooth it out with a damp sponge. -
Drying process:
Place the finished piece on a flat surface to dry. To prevent warping, I recommend flipping the piece over every few hours during the first day of drying. -
Sanding edges:
Once fully dry (usually 24-48 hours), use fine-grit sandpaper to gently buff the outer rim of the oval for a professional finish. -
Sealing:
Apply a light coat of matte spray varnish if you want to protect the piece from dust and moisture without adding unwanted shine. -
Stringing:
Thread a piece of natural cotton twine or jute through the hole and tie a secure knot to create your hanging loop.
Vintage Patina
After drying, rub a little brown shoe polish or diluted acrylic paint into the cracks and wipe the surface clean to antique it.
Hang your beautiful textured plaque in a sunlit window or on a gallery wall to enjoy those intricate details.

TRACK YOUR CERAMIC JOURNEY
Capture glaze tests, firing details, and creative progress—all in one simple printable. Make your projects easier to repeat and improve.
Leaf Vein Sgraffito Plaque
This striking oval tray combines the sleek look of slate-colored clay with the organic warmth of natural botanical illustrations. Using the sgraffito technique, you’ll carve delicate leaf veins through a dark underglaze to reveal the contrasting clay body beneath.
Step-by-Step Guide
Materials
- Light-colored stoneware or porcelain clay
- Rolling pin and guide strips (approx. 1/4 inch thick)
- Black or charcoal underglaze
- Oval template (paper or craft foam)
- GR Pottery form or a slump mold (optional)
- Sponge
- Soft fan brush
- Needle tool
- Loop carving tool (small/fine)
- Leaf sketches or stencils
- Banding wheel (optional)
- Clear matte glaze
Step 1: Forming the Plaque
-
Roll the slab:
Begin by wedging your light-colored clay to remove air bubbles. Roll it out into a smooth, even slab about 1/4 inch thick using guide strips to ensure consistency. -
Compress the surface:
Run a rubber rib over the clay surface in multiple directions. This compression is crucial for preventing warping later and creates a smooth canvas for your carving. -
Cut the shape:
Place your oval template onto the slab and cut around it cleanly with a needle tool. Smooth the rough cut edges with a damp sponge or your finger. -
Shape the rim:
If you want a flat plaque, simply let it dry on a board. To create the shallow tray lip seen in the photo, gently lift the edges of the oval or press the slab onto a slump mold or pottery form.
Step 2: Applying the Surface
-
Leather hard stage:
Allow the clay to dry slowly to a ‘leather hard’ state. The clay should be firm enough to hold its shape perfectly but still cool to the touch and able to be carved without chipping. -
Apply underglaze:
Using a soft fan brush, apply 2-3 even coats of black or charcoal underglaze to the top surface. Let each coat lose its sheen before applying the next to avoid pulling up the previous layer. -
Clean the rim:
Use a damp sponge to carefully wipe any stray underglaze off the rim’s edge. This creates that clean, contrasting light border that frames the dark interior beautifully.
Clean Lines
If your carving tool is dragging lumps of clay across the surface, your clay is too wet. If the clay is chipping or flaking off jaggedly, it is too dry. Wait or re-hydrate accordingly.
Step 3: Carving the Design
-
Plan the layout:
Lightly sketch your leaf arrangement onto the dried underglaze with a soft pencil. Don’t worry about mistakes; the pencil lines will burn off in the kiln. -
Outline the major leaves:
Using a fine-point sgraffito tool or needle tool, gently scratch the outline of the large central leaf and the fern-like fronds. You only need to scratch deep enough to remove the black color and reveal the light clay. -
Carve the large leaf veins:
For the central striated leaf, use a slightly wider loop tool to carve parallel curved lines running from the center vein to the outer edge. Vary your pressure slightly to give the lines a natural taper. -
Detail the fern fronds:
Work on the surrounding fronds. Carve the center stems first, then add the leaflets. I like to start at the stem and flick the tool outward to get a sharp tip on each leaflet. -
Add texture to the oak-style leaf:
For the lobed leaf on the left, outline the shape first. Then, instead of just veins, fill the interior with fine, hair-thin directional scratches to create a texture distinct from the other leaves. -
Refine the small foliage:
If you have empty visual space, add smaller sprigs or filler leaves near the bottom or sides to balance the composition. -
Clean up burrs:
Use a soft, dry brush to gently sweep away the clay crumbs (burrs). Avoid rubbing them into the black background, as they can smudge the crisp dark surface.
Sharper Contrast
Use a porcelain slip or white underglaze in the carved grooves after scratching if your clay body isn’t light enough to provide high contrast against the black background.
Step 4: Finishing
-
Bisque fire:
Once the piece is bone dry, fire it to bisque temperature (usually vertically cone 04) to set the shape and the underglaze. -
Glaze application:
Apply a coat of clear matte glaze over the entire design. A glossy glaze can reflect too much light and obscure the carving, while matte finishes honor the stone-like aesthetic. -
Final firing:
Fire the piece to the maturity temperature of your clay body (likely cone 5 or 6 for stoneware). Allow it to cool completely in the kiln.
This sophisticated tray serves as a perfect catch-all for jewelry or simply as a standalone piece of art for your table
Geometric Relief Pattern Plaque
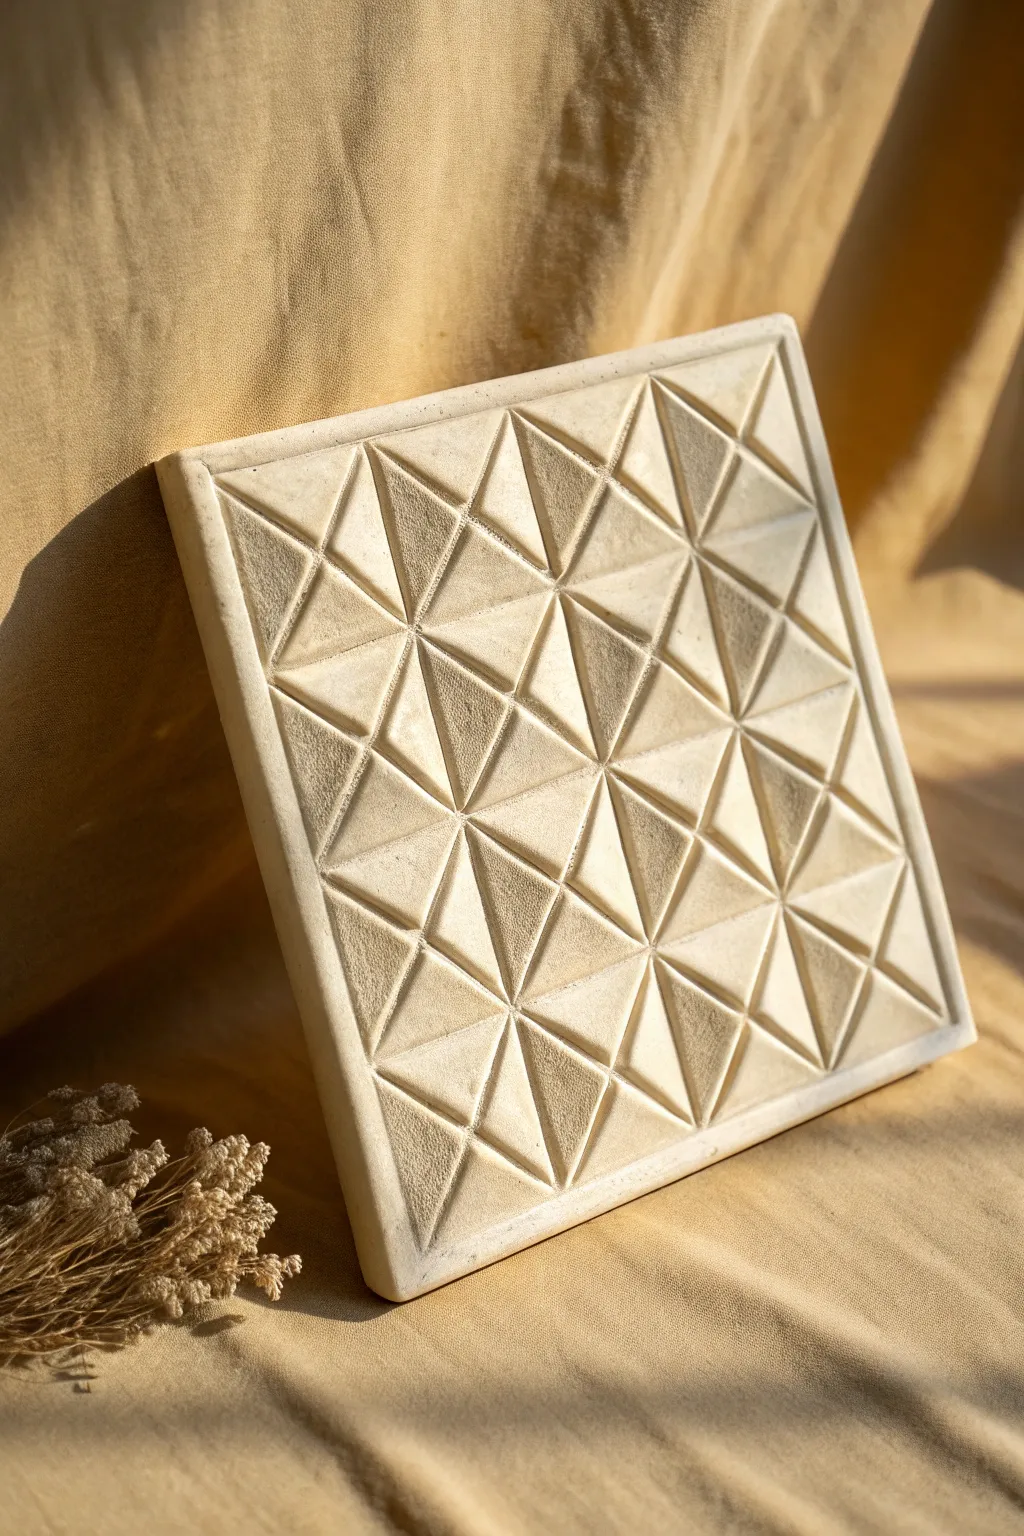
This sophisticated wall hanging utilizes the beauty of light and shadow through its precise, angled facets. The repetitive triangular prism pattern creates a modern, architectural relief that looks deceptively complex but is built on a simple grid system.
Step-by-Step Tutorial
Materials
- White tonal air-dry clay or polymer clay (approx. 2 lbs)
- Square rolling guides (approx. 1/2 inch thick)
- Rolling pin
- Ruler
- Sharp precision knife or scalpel
- Ribbon loop tool (triangular or flat edged)
- Small sponge
- Fine grit sandpaper
- Board or tile for working surface
Step 1: Preparation and Grid Layout
-
Condition the Clay:
Begin by kneading your chosen clay until it is smooth, pliable, and free of air bubbles. If using air-dry clay, keep a damp cloth nearby to prevent premature drying. -
Roll the Slab:
Place your rolling guides on either side of the clay ball on your work board. Roll the clay out into a smooth, even square slab, ensuring it’s approximately 1/2 inch to 3/4 inch thick to allow depth for carving. -
Trim to Size:
Using your ruler and precision knife, trim the rough edges to create a perfect square. A 6×6 or 8×8 inch square works well for this level of detail. -
Mark the Grid:
Lightly press your ruler into the surface to create a grid of smaller squares. For this pattern, aim for a 4×4 grid (16 squares total). Do not cut all the way through; these are just guide lines. -
Draw the Diagonals:
Inside each small grid square, lightly score an ‘X’ from corner to corner. This subdivides every square into four triangles facing a central point. -
Define the Frame:
Score a border line about 1/4 inch from the outer edge of the entire slab to create the frame that encloses the design.
Uneven Slopes?
Work under a directional lamp. Moving a single light source to the side casts strong shadows, immediately revealing which slopes are too high or uneven.
Step 2: Carving the Relief
-
Establish the High Points:
Identify the center point of each ‘X’ you drew. In this design, the center points where the lines cross will remain the ‘high’ points of the pyramids. -
Identify Low Points:
The grid lines separating the squares will become the ‘valleys’ or low points. Visualizing this before cutting is crucial. -
Begin Angled Cuts:
Using a ribbon tool or a sharp sculpting knife held at an angle, gently shave away clay from the center of a triangle slope down toward the grid line. -
Refine the Planes:
Work systematically. Carve the four facets of one pyramid unit first. I find it easier to carve all the left-facing slopes in a row, then switch to the right-facing slopes to maintain a consistent hand angle. -
Check the Depth:
Ensure you are carving deeply enough to catch shadows, but be careful not to puncture the back of the plaque. The valleys should be V-shaped grooves. -
Sharpen the Ridges:
Go back over the high ridges (the ‘X’ lines) and the deep valleys (tge grid lines) to ensure they are crisp and straight. Use the flat side of a knife to burnish and smooth the sloping faces.
Step 3: Finishing Touches
-
Texture:
If you want the subtle stone-like texture seen in the reference, gently dab the carved surfaces with a dry sponge or stipple with a stiff brush. -
Dry Slowly:
Let the piece dry very slowly away from direct heat or sunlight. To prevent warping, place a light weight (like a small board) on the corners if they start to curl up. -
Sand and Refine:
Once bone dry (or cured if using polymer), take fine grit sandpaper and gently sand the high ridges to make them perfectly sharp. Dust off the residue. -
Seal (Optional):
Apply a matte varnish if desired to protect the surface while maintaining the raw stone aesthetic.
Level Up: Color Wash
After drying, apply a very diluted wash of burnt umber acrylic paint and wipe it off immediately. The dark pigment stays in the deep crevices, enhancing the geometric 3D effect.
Hang your finished relief on a wall where natural light hits it from the side to reveal the full drama of the geometric patterns
Soft Ombre Wash Plaque
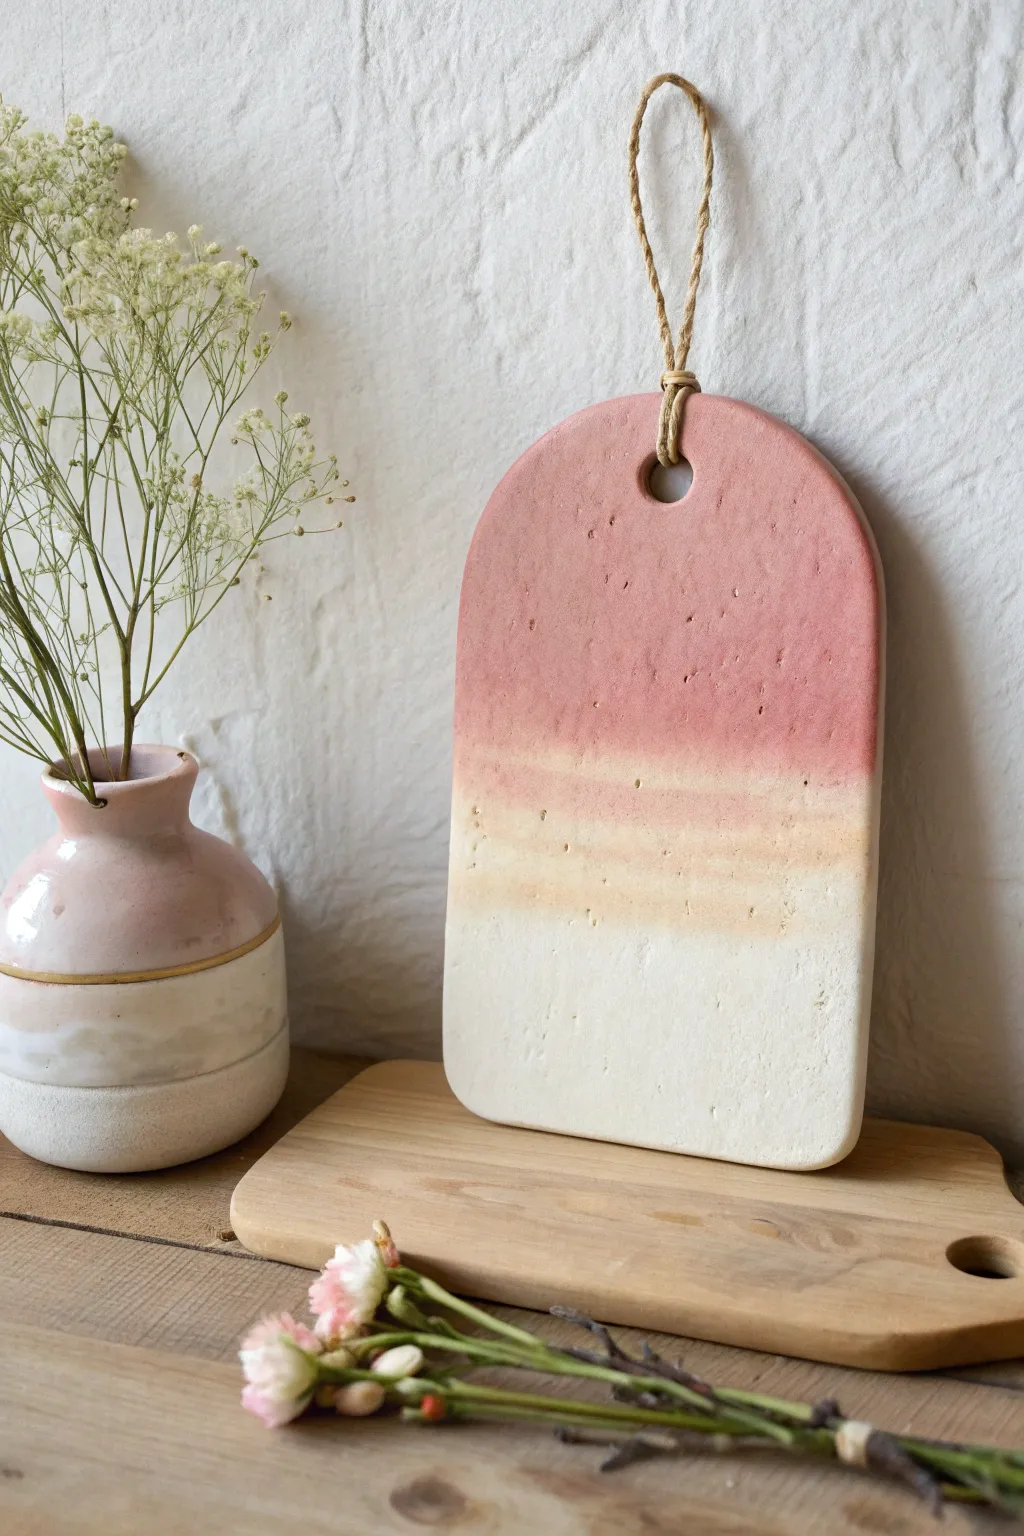
Capture the warmth of a sunrise with this beautifully simple arched plaque, featuring a gentle ombre wash that fades from earthy terra cotta to natural cream. Its textured, matte surface and rugged twine hanger make it a perfect minimalist accent for any wall.
Step-by-Step
Materials
- Air-dry clay (white or light cream)
- Rolling pin
- Sharp clay knife or X-Acto blade
- Paper template (arched shape)
- Sandpaper (medium and fine grit)
- Acrylic paint (Terra cotta/Rust, Cream, and White)
- Small sponge or foam pouncer
- Cup of water
- Wooden skewer or straw
- Jute twine
- Matte sealant spray (optional)
Step 1: Shaping the Clay
-
Prepare the Clay:
Begin by kneading a large handful of air-dry clay to warm it up and remove air bubbles. This conditioning step prevents cracking later on. -
Roll it Out:
Roll the clay onto a smooth surface to a thickness of about 1/4 to 1/2 inch. For this rustic look, don’t worry if the surface isn’t perfectly glass-smooth; a little texture adds character. -
Cut the Arch:
Place your paper arch template onto the rolled slab. Use your knife to trace around the edge, cutting cleanly through the clay. Remove the excess scraps. -
Create the Hanger Hole:
Using a straw or a tool, punch a clean hole near the top center of the arch. Make sure it’s large enough to thread your jute twine through later. -
Smooth the Edges:
Dip your finger in a little water and run it along the cut edges of the arch to soften any sharp corners or jagged bits left by the knife. -
Initial Texture:
Verify the surface texture. If it looks too manufactured, you can lightly press a crumpled paper towel or coarse fabric onto the clay to impart subtle divots. -
Dry Time:
Set the plaque aside on a wire rack or piece of parchment paper to dry completely. This usually takes 24-48 hours depending on humidity; turn it over halfway through for even drying.
Step 2: Adding the Color Wash
-
Create a Wash:
Mix a small amount of terra cotta or rust-colored acrylic paint with water. You want a watery consistency—more like a watercolor stain than thick paint. -
Apply Top Color:
Using a sponge, dab the watery rust mixture onto the top third of the dried plaque. Let the liquid settle into the tiny pores of the clay. -
Start the Gradient:
While the top is still wet, dilute your paint further with more water or a touch of cream paint. Apply this lighter mix to the middle section. -
Blend the Transition:
Use a clean, damp sponge to gently blur the line where the darkest color meets the middle tone. I like to use a stippling motion here to avoid harsh brush strokes. -
Fade to White:
Leave the bottom third of the plaque largely unpainted, exposing the raw clay color. If your clay isn’t white enough, lightly wash the bottom area with watered-down white acrylic. -
Create Texture Specs:
For that speckled stone look, load a stiff toothbrush with a tiny bit of dark brown paint and flick the bristles to spatter very subtle dots across the colored sections. -
Distress (Optional):
Once the paint is fully dry, take a piece of fine-grit sandpaper and lightly scuff the painted surface. This reveals bits of the white clay underneath and enhances the weathered aesthetic.
Warping Woes?
If the edges curl up while drying, gently weigh the plaque down with a heavy book (place parchment paper in between) once the clay is semi-dry but still leathery.
Step 3: Finishing Touches
-
Seal the Surface:
Spray the entire piece with a matte sealant if you want to protect the finish without adding shine. This is helpful if the plaque will hang in a humid area like a bathroom. -
Prepare the Twine:
Cut a length of jute twine approx 12-15 inches long. Fold it in half to create a loop. -
Attach the Hanger:
Push the folded end of the loop through the hole from front to back. Then, thread the loose ends through the loop and pull tight to secure it with a lark’s head knot. -
Knot the Top:
Tie the two loose ends of the twine together in a simple overhand knot at the very top to complete the hanger.
Texture Trick
Mix a pinch of baking soda into your acrylic paint wash. It adds a gritty, limestone-like texture that mimics real pottery glaze instantly.
Hang your new clay art near a window to let the natural light highlight that beautiful, soft color transition
Tiny Tile Mosaic Plaque
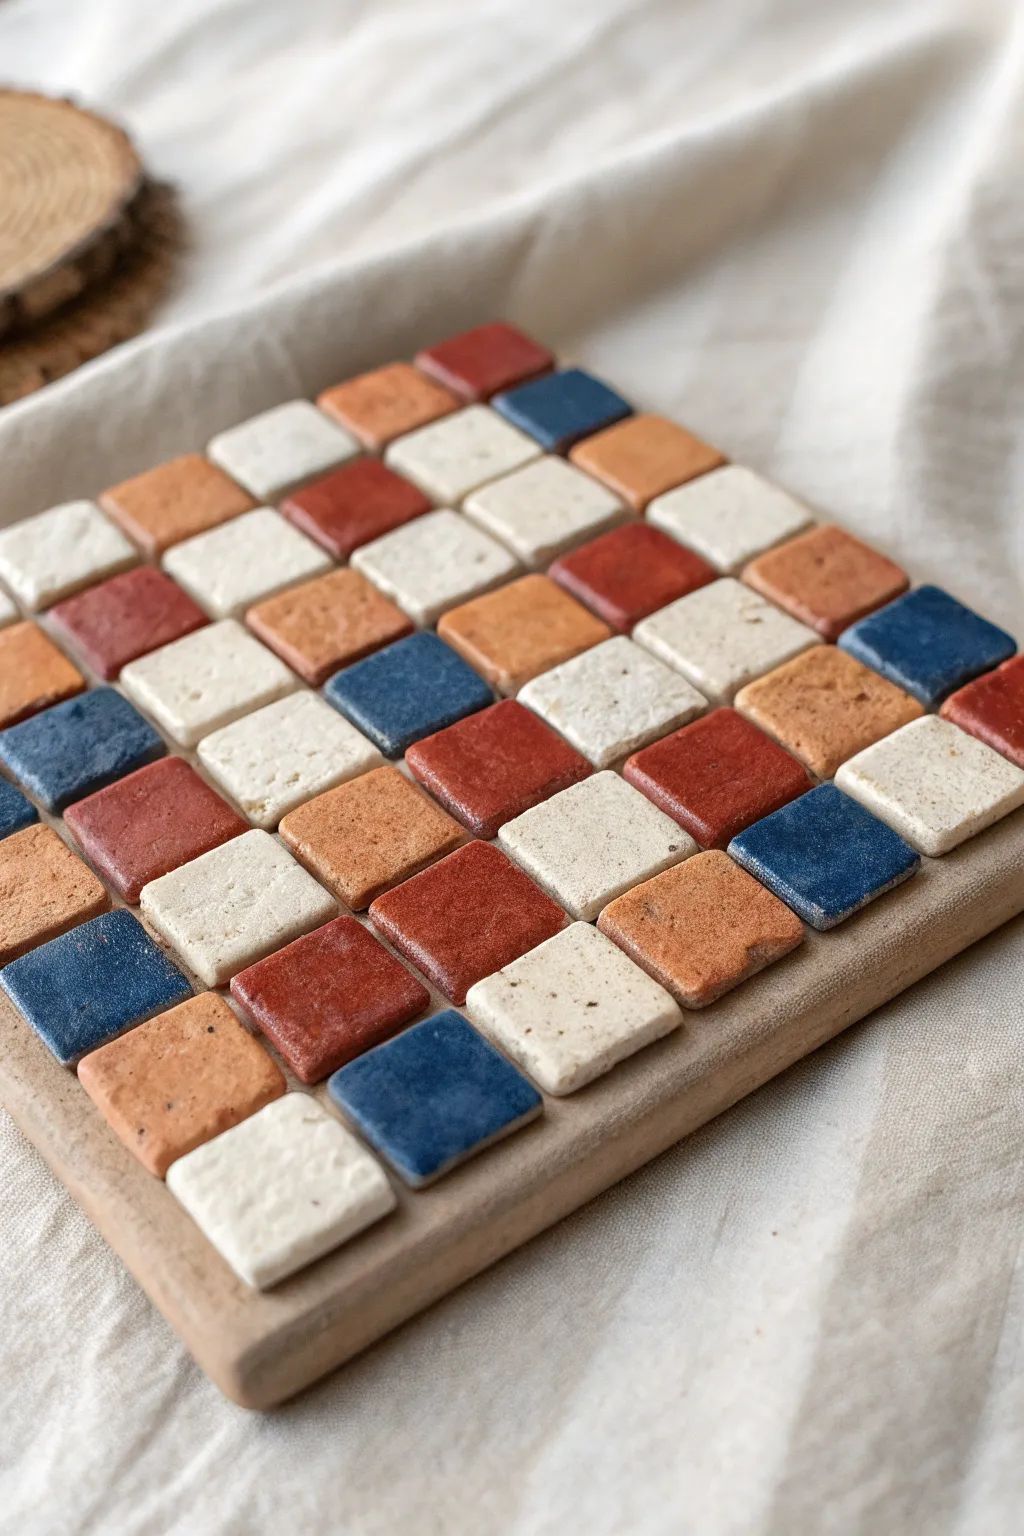
Create a charming, rustic piece of home decor with this tiny tile mosaic plaque. Featuring an array of hand-cut clay squares in earthy reds, muted blues, and creamy whites, this project proves that small details can make a big impact.
Step-by-Step Tutorial
Materials
- Polymer clay or air-dry clay (terracotta, white, dark red, navy blue)
- Square clay or wood base (approx. 4×4 inches)
- Craft knife or clay blade
- Rolling pin
- Ruler
- Ceramic tile adhesive or strong craft glue
- Sandpaper based on clay type involved
- Matte sealant or varnish
- Parchment paper
Step 1: Preparing the Tiles
-
Condition the clay:
Begin by conditioning each color of clay separately until it is soft and pliable. If you are mixing custom colors to achieve the muted earthy tones shown, do this now. -
Roll out slabs:
Roll each color out onto parchment paper to a uniform thickness, ideally about 1/8th of an inch. Using guides or playing cards stacked on either side of your roller ensures every tile is the same height. -
Measure the grid:
Before cutting, lightly score a grid on your rolled clay to guide your cuts. Aim for squares that are roughly 1cm by 1cm for that tiny mosaic look. -
Cut the tiles:
Use a sharp clay blade or craft knife to cut the squares. Don’t worry if they aren’t mathematically perfect; slightly irregular edges add to the rustic, handmade charm. -
Texture the surface (optional):
For a stone-like appearance, gently tap the surface of the unbaked tiles with a toothbrush or a piece of crumbled foil to add subtle pitting. -
Bake or dry tiles:
Follow the manufacturer’s instructions to bake (for polymer) or dry (for air-dry) your cut tiles. They need to be fully hardened before assembly.
Grid Master Tip
To get perfectly even tile height without specialized tools, place two rulers on either side of your clay while rolling. The rolling pin will rest on the rulers, creating a slab of exact thickness.
Step 2: Preparing the Base
-
Create the base:
If making your own base from clay, roll out a thick slab (approx. 1/4 inch) into a square slightly larger than your intended grid of tiles. Smooth the edges with a wet finger or water. -
Level the surface:
Ensure the top surface of your base is perfectly flat so the tiles will sit evenly. -
Harden the base:
Bake or dry the base completely. If necessary, sand the top lightly after drying to create a better surface for adhesion.
Level Up: Antiquing
Mix a tiny drop of dark brown acrylic paint with water and brush it over the finished mosaic, then wipe it off immediately. The dark pigment will settle in the cracks for an ancient stone look.
Step 3: Assembly
-
Plan your pattern:
Lay your hardened tiles out on a table first to finalize your color arrangement. I like to scatter the blue and dark red accents randomly to keep the eye moving across the piece. -
Apply adhesive:
Apply a thin layer of strong craft glue or tile adhesive to the top of your base plaque. Work in small rows so the glue doesn’t dry out before you place the tiles. -
Place the first row:
Start consistently from one corner. Place your first tile, pressing it firmly into the adhesive. -
Continue the grid:
Place subsequent tiles next to each other, leaving a very small, hairline gap between them—no need for grout here, we want a tight fit. -
Check alignment:
After every couple of rows, use the side of your ruler to gently push the tiles into a straight line before the glue sets. -
Finish the layout:
Continue until the entire surface is covered. If you have excess base sticking out, you can sand it down later, but careful planning usually avoids this.
Step 4: Finishing Touches
-
Clean imperfections:
Once the glue is dry, inspect the surface. Use a soft brush to sweep away any dust or clay crumbs stuck in the crevices. -
Seal the piece:
Apply a coat of matte varnish or sealant over the entire top surface. This protects the clay colors and gives the piece a unified, professional finish. -
Add protective backing:
If using this as a coaster or trivet, glue a square of cork or felt to the bottom of the base to protect your furniture.
Now you have a beautifully textured mosaic plaque ready to display or gift to a friend
Terrazzo Chip Inlay Plaque
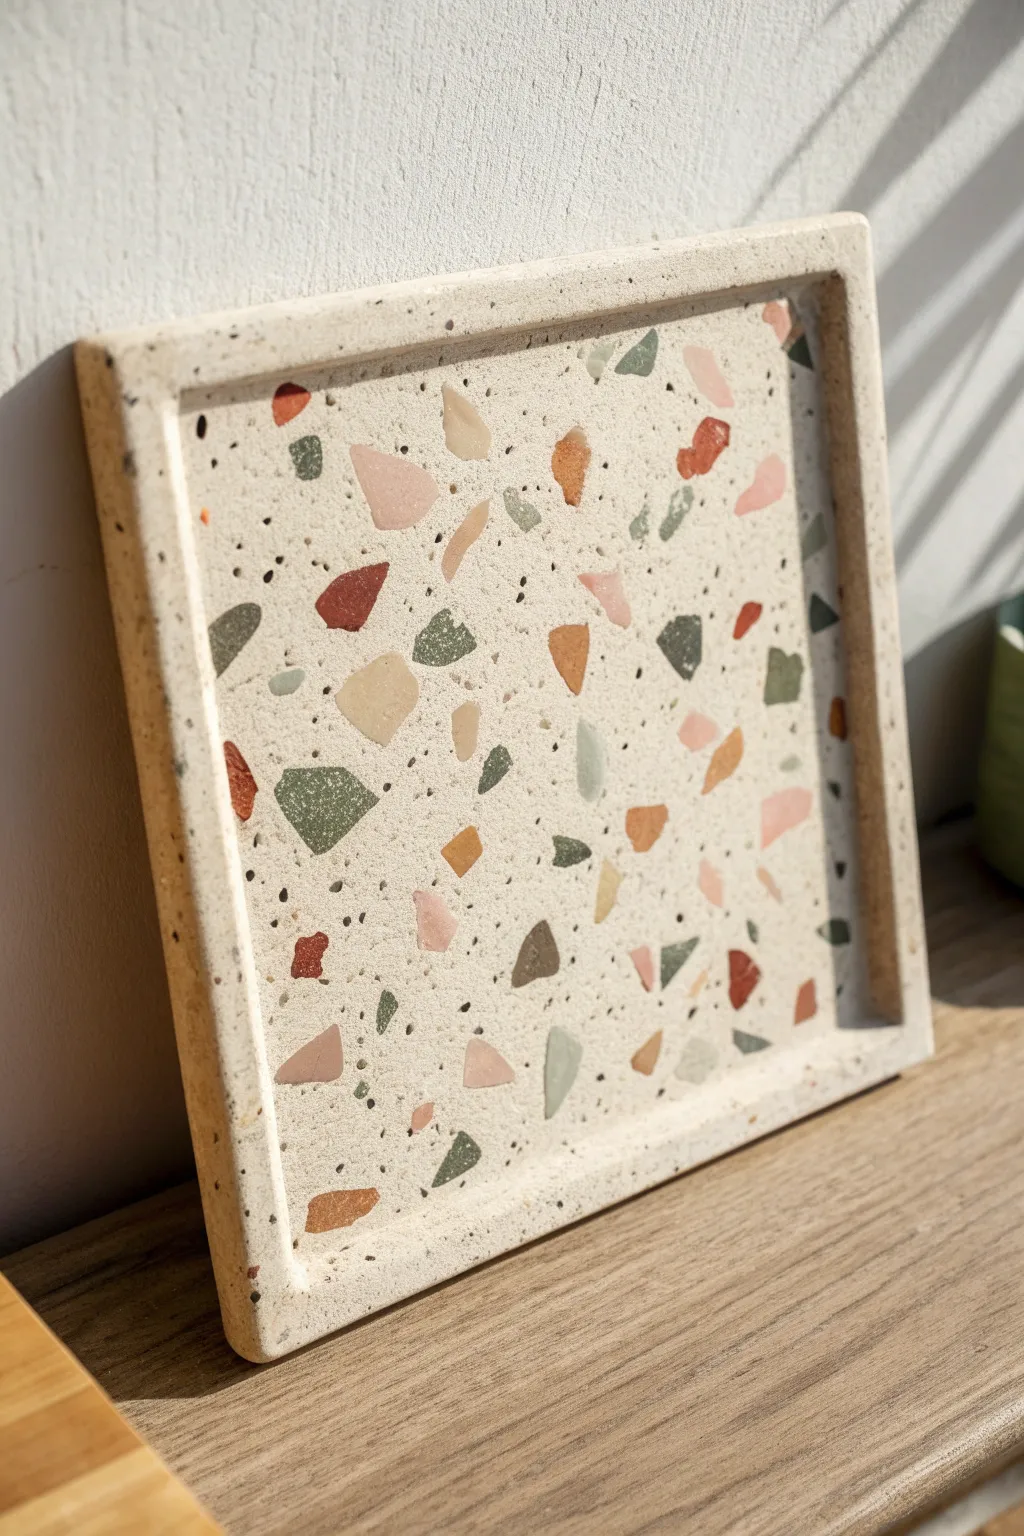
Mimic the sophisticated look of real terrazzo stone with this surprisingly lightweight polymer clay project. By embedding colorful clay fragments into a speckled granite base, you create a modern, durable tray perfect for holding jewelry or keys.
Step-by-Step Guide
Materials
- Polymer clay (white or granite effect)
- Small amounts of colored polymer clay (terracotta, sage green, blush pink, mustard yellow)
- Black pepper or black sand (optional, for speckling)
- Acrylic rolling pin or pasta machine
- Square cookie cutter or craft knife
- Ruler
- Baking sheet and parchment paper
- Sandpaper (various grits: 200, 400, 600)
- UV resin or polyurethane varnish (for sealing)
- Small brush
Step 1: Preparing the Chips
-
Mix your palette:
Begin by conditioning small amounts of your colored clays. For this project, aim for earthy tones like muted rust, sage green, and soft pink. I like to custom mix colors to get that perfect organic stone look rather than using them straight from the package. -
Roll thin sheets:
Roll each colored clay piece out very thinly, roughly 1-2mm thick. The thinner they are, the more they will look like stone chips rather than chunky blobs. -
Bake the sheets:
Place your thin colored sheets on parchment paper and bake them for about 10-15 minutes at the temperature recommended by the manufacturer. They don’t need a full cure, just enough to be brittle. -
Create the chips:
Once cooled, break or chop the baked clay sheets into random, jagged shards. Vary the sizes from tiny specks to larger triangles to mimic the natural irregularity of terrazzo aggregate.
Step 2: Creating the Base
-
Condition the base clay:
Take a large block of white or granite-effect polymer clay. Condition it thoroughly until it is soft and pliable. -
Add speckling (optional):
If you are using plain white clay, knead in a pinch of coarse black pepper or black craft sand to simulate the tiny dark minerals found in natural stone. -
Incorporate the chips:
Gently press a generous amount of your pre-baked colored chips into the raw base clay. Don’t worry about placement perfection; randomness is key. -
Roll the slab:
Use your acrylic roller to flatten the clay into a thick slab, about 5-6mm thick. As you roll, the chips will become flush with the surface.
Uneven Chips?
If chips aren’t showing after rolling, your base layer might be too soft. Pop the raw slab in the fridge for 10 min, then slice a thin layer off the top with a flexible blade.
Step 3: Shaping the Tray
-
Cut the square base:
Using a ruler and craft knife (or a large square cutter), cut a clean square shape from your prepared speckled slab. This acts as the bottom of your tray. -
Prepare the rim strips:
Roll out any remaining mixture into long strips, roughly 5-6mm thick and about 1cm tall. Trim the edges to be sharp and straight. -
Attach the rim:
Place the strips along the outer edge of your square base top. Cut the corners at a 45-degree angle (miter joint) for a seamless, professional finish where the sides meet. -
Blend the seams:
Use a modeling tool or your finger to gently blend the clay on the inside and outside seams where the rim meets the base, ensuring a strong bond.
Level Up: Gold Leaf
Add flecks of gold leaf into the raw base clay along with your colored chips. After sanding, the metallic elements will catch the light beautifully alongside the colors.
Step 4: Finishing Touches
-
Smooth the surface:
Before baking, lightly run your finger or a baby wipe over the entire piece to remove fingerprints and smooth out harsh corners. -
Final bake:
Bake the assembled tray for the full recommended time (usually 30-45 minutes) at the manufacturer’s suggested temperature. Let it cool completely. -
Sanding for reveal:
This is the crucial step. Wet sand the surface starting with 200 grit sandpaper and working up to 600 grit. This abrasion will remove the thin layer of base clay covering your colored chips, revealing the crisp terrazzo pattern underneath. -
Seal:
Wipe away all sanding dust with a damp cloth. Apply a thin coat of matte polyurethane varnish or UV resin to protect the surface and give it a subtle stone-like sheen.
Enjoy styling your modern stone-effect tray on a coffee table or vanity.
Faux Woodgrain Sign Plaque
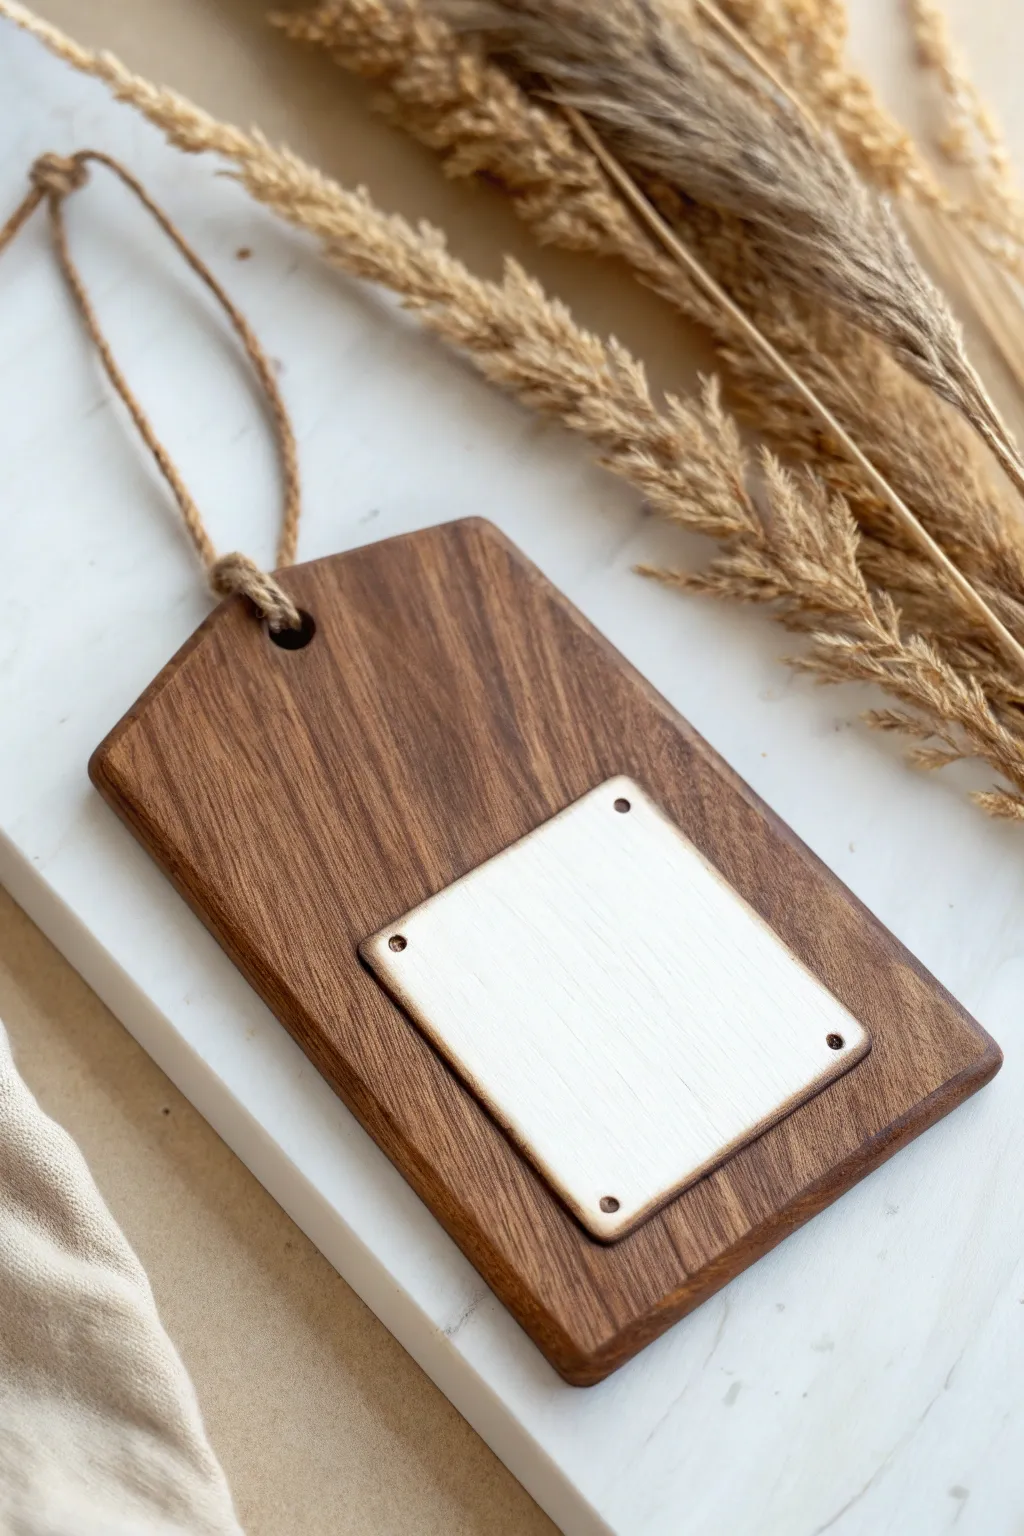
Create the warm, organic look of dark walnut wood using polymer clay in this deceptively simple project. This chunky tag features a convincing wood grain texture and a raised “inset” panel perfect for personalization or labeling.
Step-by-Step
Materials
- Polymer clay (dark brown or black)
- Polymer clay (white or cream)
- Rolling pin or pasta machine
- Coarse sandpaper (60-80 grit)
- Craft knife or blade
- Ruler
- Needle tool or toothpick
- Brown acrylic paint (burnt umber)
- Paintbrush
- Paper towel or baby wipes
- Matte varnish (optional)
- Jute twine
- Straw or small round cutter (for the hole)
Step 1: Base Construction
-
Condition the Clay:
Begin by thoroughly conditioning a block of dark brown polymer clay until it is soft and pliable. If you want a deeper color, mix in a tiny amount of black clay. -
Roll the Slab:
Roll the clay out into a thick slab, approximately 1/4 inch thick. A thicker slab gives the final piece a more substantial, real-wood feel. -
Create Texture:
Take a sheet of coarse sandpaper (60-80 grit) and press it firmly into the surface of the clay. Lift and rotate the sandpaper slightly, then press again to create random, deep pitting. -
Add Grain Lines:
Use a needle tool to drag long, slightly wavering lines vertically down the slab to mimic wood grain. Vary the pressure so some lines are deep grooves and others are faint scratches. -
Cut the Shape:
Using a ruler and craft knife, cut a large rectangle (about 3 inches by 5 inches). Trim the top two corners at a 45-degree angle to create the classic tag shape. -
Make the Hanger Hole:
Use a sturdy straw or a small round cutter to punch a hole centered near the top edge of the tag. Make sure the hole is wide enough to accommodate your jute twine later. -
Smooth the Edges:
Gently tap the cut edges with your finger to soften the sharpness slightly, as real wood tags would be sanded down.
Paint sticking too much?
If acrylic paint dries too fast while antiquing, keep a slightly damp sponge handy. You can re-wet the surface to remove more paint and reveal the base color.
Step 2: The Inset Panel
-
Prepare Light Clay:
Condition a smaller amount of white or cream clay. Roll this out much thinner than your base, about 1/16 inch thick. -
Cut the Square:
Cut a square or slightly rectangular piece from the light clay. It should be sized to fit comfortably in the lower half of your dark tag with plenty of border space. -
Texture the Insert:
Lightly press the sandpaper onto this white square as well, but use much less pressure than before. You want a subtle surface texture, not deep gouges. -
Attach the Panel:
Place the white square onto the dark tag base. Press it down gently to bond the clays; I like to use a small roller to ensure it’s flat without squishing the texture. -
Add Rivet Details:
Using a small ball tool or the blunt end of a paintbrush, press a small indentation into each of the four corners of the white panel to simulate screw holes or rivets.
Pro Tip: Direction Matters
Always drag your texturing tools in one primary vertical direction. Real wood grain flows one way; cross-hatching will ruin the illusion of timber.
Step 3: Finishing
-
Bake:
Bake the piece according to your clay manufacturer’s instructions (usually 275°F for 15-30 minutes). Let it cool completely before proceeding. -
Apply the Wash:
Mix a small amount of burnt umber acrylic paint with water to create a thin wash. Brush this over the entire piece, getting into all the textured grooves. -
Wipe Back:
Immediately use a paper towel or baby wipe to wipe away the excess paint from the surface. The dark paint will remain in the deep scratches and the ‘rivet’ holes, highlighting the texture. -
Detail the Edges:
For extra realism, lightly sponge a little dark brown paint around the very edges of the light panel to make it look scorched or aged. -
Seal (Optional):
Once the paint is dry, apply a coat of matte varnish if you want to protect the finish, though leaving it raw mimics unfinished wood better. -
String It Up:
Cut a length of jute twine, fold it in half, and pass the loop through the top hole. Pull the loose ends through the loop to secure it with a lark’s head knot.
Hang your new faux-wood tag on a gift basket or use it as rustic wall decor to bring a touch of nature indoors
Coastal Shell Texture Plaque
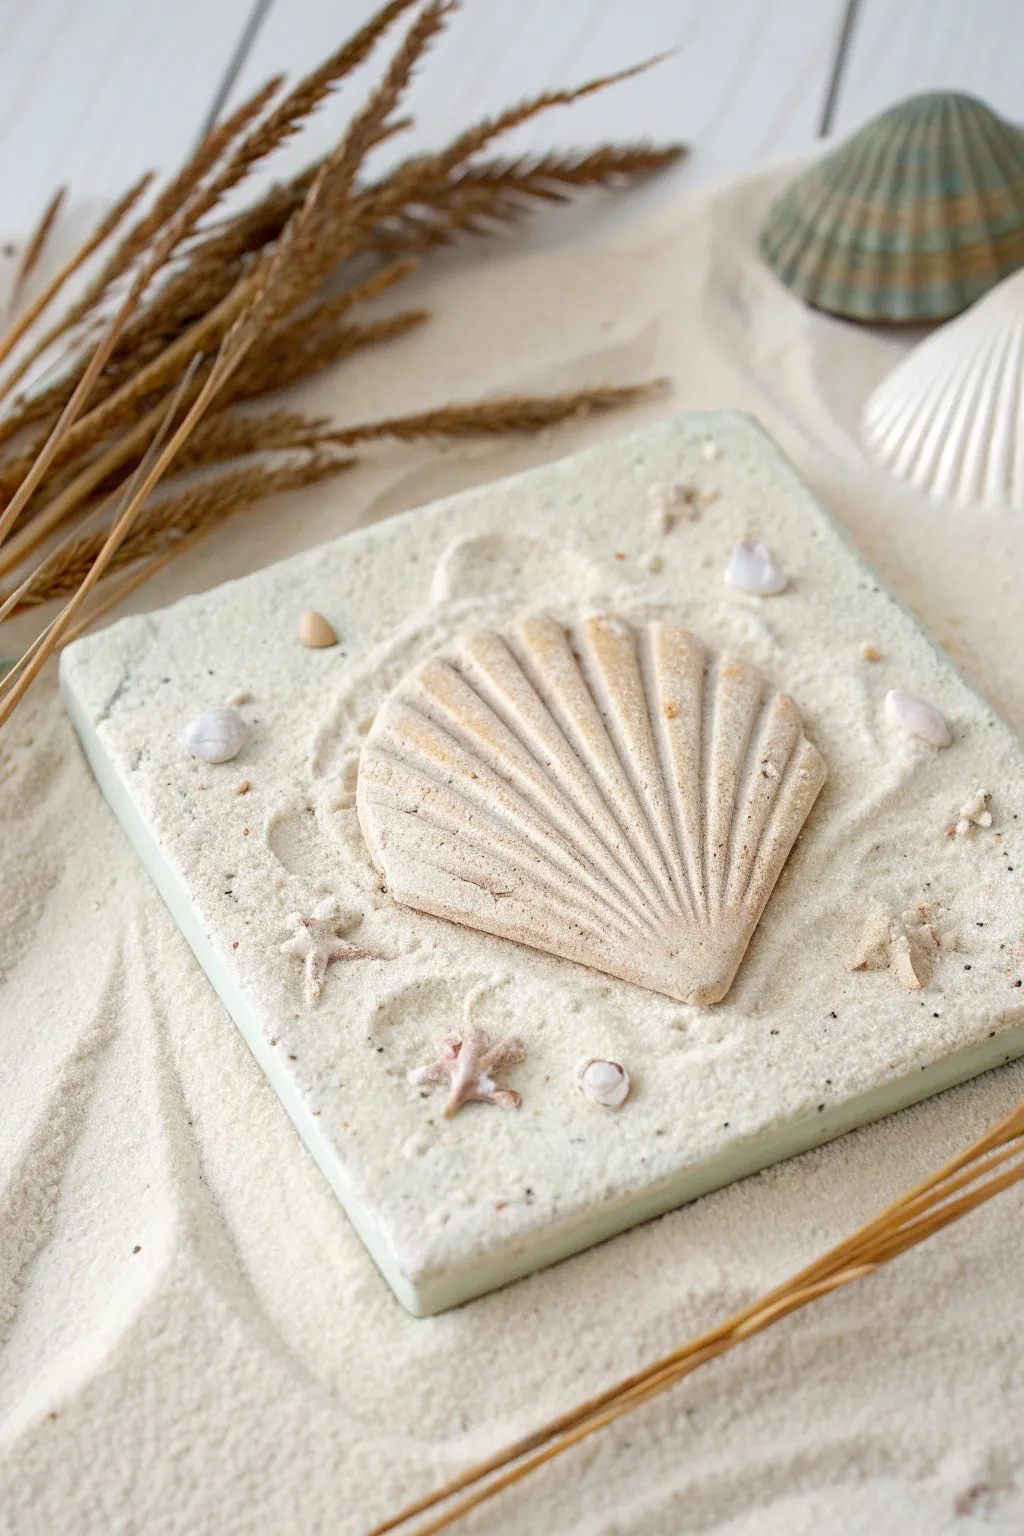
Capture the serene beauty of the shoreline with this textured clay plaque that mimics the look of fossilized sand. By combining air-dry clay with real sand and relief techniques, create a permanent piece of beach decor that feels as organic as the coast itself.
Step-by-Step Tutorial
Materials
- White or light gray air-dry clay (approx. 500g)
- Fine grain beach sand (clean and dry)
- Square rolling guide or cookie cutter (approx. 6×6 inches)
- Large scallop shell (for making a mold or direct impression)
- Small decorative items: tiny starfish, small seashells
- Rolling pin
- Sculpting tools or a craft knife
- Cornstarch or baby powder (release agent)
- Matte sealant spray
- Water in a mist bottle
- Fine grit sandpaper
Step 1: Preparing the Sandy Base
-
Condition the Clay:
Start by kneading your air-dry clay until it is warm and pliable. This prevents cracks later on. -
Incorporate Sand:
Create a well in the center of your clay ball and pour in about 2-3 tablespoons of fine sand. Knead this thoroughly into the clay body. This integration gives the final piece that authentic, gritty stone texture shown in the photo. -
Roll the Slab:
On a flat surface dusted with cornstarch, roll out the clay to a uniform thickness of about 3/4 inch. It needs to be thick enough to act as a sturdy base. -
Cut the Shape:
Using a square cutter or a knife and ruler, trim the clay into a perfect square. Smooth the cut clay edges with a damp finger to soften any sharp angles. -
Surface Texturing:
Sprinkle a generous layer of loose sand over the top of the wet clay slab. Take your rolling pin and gently roll over it once to embed the surface sand grains into the clay without flattening the slab too much.
Step 2: Sculpting the Shell Relief
-
Create the Shell Mound:
Take a separate ball of clay and shape it into a rough semi-circle dome. Place this in the center of your square slab and blend the edges downward into the base using a sculpting tool or your thumb so it looks like it’s rising from the sand. -
Impress the Shape:
Here I prefer to use a real large scallop shell as a stamp. Dust the real shell heavily with cornstarch, then press it firmly onto the clay dome to transfer the ridges and shape. Rock it gently to ensure deep grooves. -
Refine the Ridges:
Carefully peel back the real shell. Use a sculpting tool to deepen the radiating lines of the fan shape if the impression is too shallow. The ridges should look sharp and defined. -
Add Decorative Elements:
Take your tiny starfish and small shells. Press them randomly into the vacant spaces around the main shell. Push them deep enough that they leave a distinct void, or leave them embedded if you want them permanently attached. -
Simulate Sand Drifts:
Using a dry, stiff-bristled brush, stipple the clay around the base of the shell and tiny elements. This creates the illusion of wind-swept sand piling up against the objects.
Fixing Cracks
If small fissure cracks appear while drying, mix a paste of clay and water (slip) and fill them in with a small brush, then smooth over.
Step 3: Finishing Touches
-
Final Sand Dusting:
While the clay is still wet, sprinkle a pinch of slightly coarser sand or tiny stone flecks into the crevices of the shell and corners of the plaque. -
Drying:
Allow the plaque to dry completely on a wire rack. This is crucial—air dry clay of this thickness may take 48 to 72 hours. Flip it gently halfway through the drying process to ensure the bottom dries evenly. -
Sanding Edges:
Once fully cured and hard, use fine-grit sandpaper to smooth only the outer vertical edges of the square, keeping the top surface rough and textured. -
Wash and Seal:
Mix a very watery wash of beige or light ochre acrylic paint. Brush it over the entire piece and immediately wipe it back with a rag; the color will stay in the deep recesses of the shell, adding dimension. -
Protective Coat:
Finish with two light coats of matte spray sealant. This keeps the loose surface sand in place and protects the clay from moisture.
Level Up: Fossil Look
Mix crushed seashells into the initial clay body instead of just sand to create a jagged, authentic coquina stone appearance.
Display your finished plaque on a small easel or lay it flat on a coffee table to bring a permanent touch of summer to your home
Moon and Stars Carved Plaque
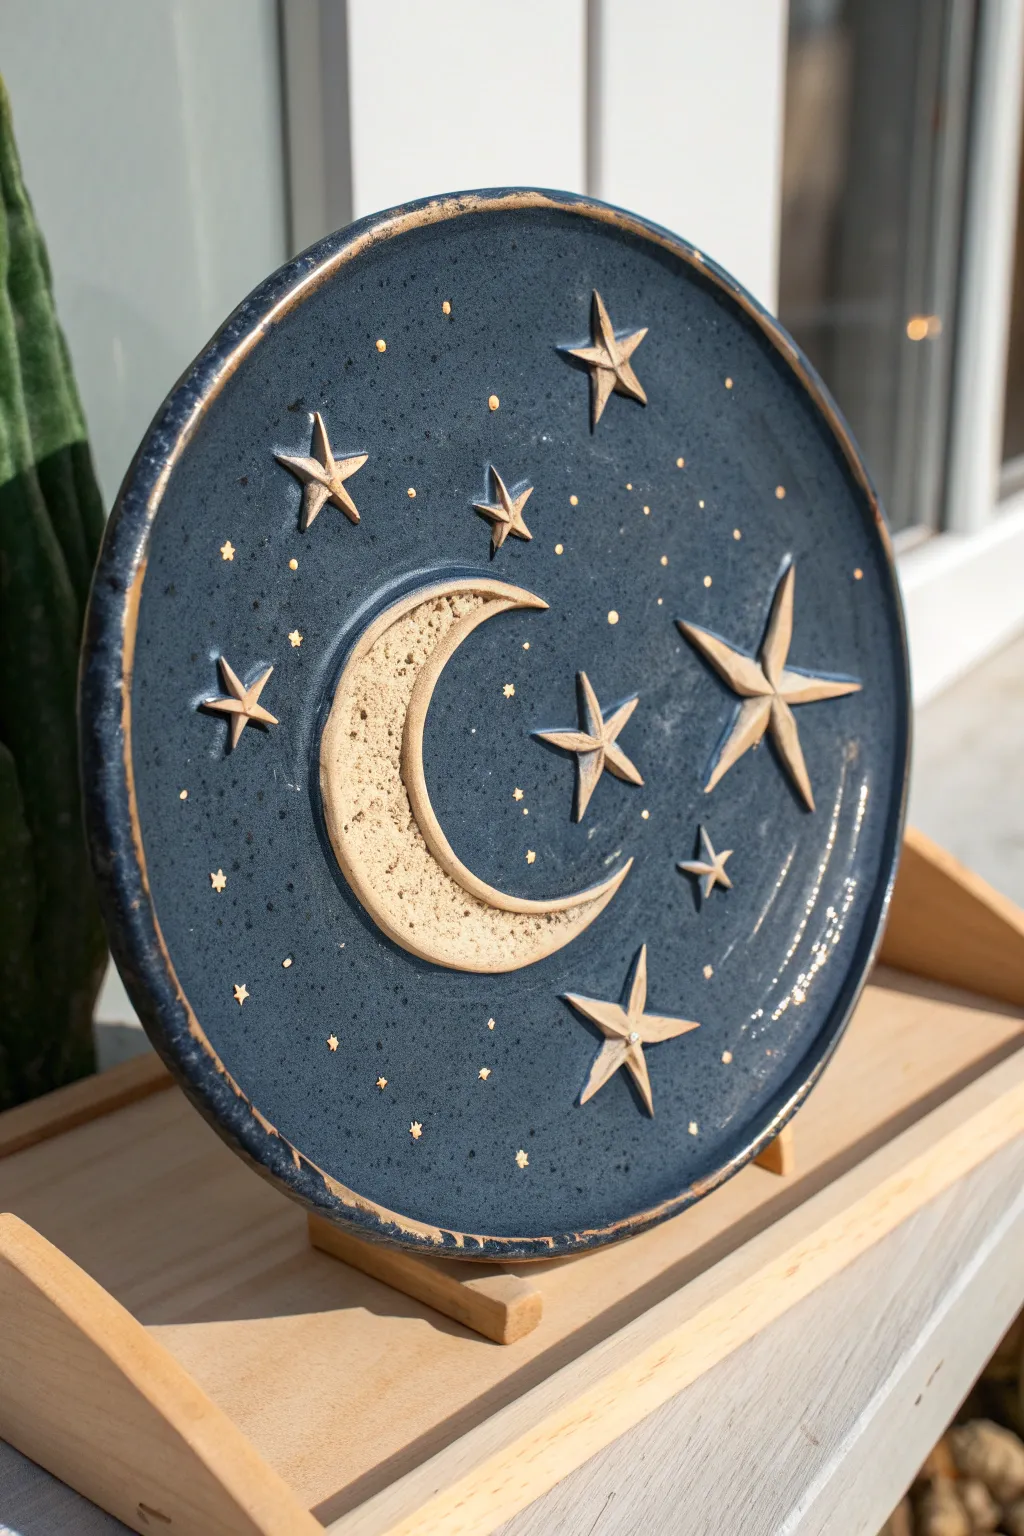
Capture the magic of a starry midnight sky with this striking ceramic plaque featuring a textured moon and raised stars against a deep indigo backdrop. The contrast between the raw, sandy clay body and the glossy dark glaze gives this piece a timeless, mystical feel perfect for wall decor or a display stand.
Step-by-Step Guide
Materials
- Stoneware clay (buff or speckled)
- Rolling pin and canvas mat
- Circular template or rim of a bowl (approx. 8-10 inches)
- Needle tool or fettling knife
- Loop tool (for carving)
- Sponge
- Dark blue speckled glaze (midnight blue/cobalt)
- Wax resist emulsion
- Small liner brush
- Gold luster or gold overglaze (optional for accents)
- Kiln access
Step 1: Shaping the Base
-
Roll the slab:
Begin by wedging your stoneware clay thoroughly to remove air bubbles. Roll it out on a canvas mat to an even thickness of about 1/4 to 3/8 inch. I find using wooden guide strips helps keep the thickness perfectly uniform. -
Cut the circle:
Place your circular template or an inverted bowl onto the slab. Using your needle tool, cut straight down around the edge to create your plaque shape. If you want a slight rim like the example, gently press the edges upward with your thumbs while rotating the piece on a banding wheel. -
Smooth the edges:
Dip a small sponge in water and wring it out well. Run it along the cut rim to soften the sharp angle into a rounded, finished edge. This prevents the glaze from crawling away from sharp corners later.
Step 2: Designing the Cosmos
-
Sketch the layout:
Once the clay has stiffened slightly to leather-hard, lightly sketch your design into the surface using a needle tool. Draw a large crescent moon on the left side and scatter various sizes of 5-pointed stars around the remaining space. -
Carve the moon:
For the crescent moon, you aren’t removing clay but rather defining it. If you want the textured look shown, use a tool to gently roughen the surface inside the moon outline, creating a crate-like, porous texture. -
Sculpt the stars:
This step requires patience. Using a small ribbon tool or a knife, carve away a tiny layer of the background clay *around* your pencil stars, effectively making them raised relief. Alternatively, if carving the background down is too difficult, you can cut stars from a separate thin slab and score-and-slip them onto the surface to build them up. -
Refine the shapes:
Use a modeling tool to bevel the edges of your stars, giving them a faceted, 3-D appearance. The center of each star should be the highest point, sloping down to the tips. -
Dry and bisque fire:
Allow the plaque to dry slowly under plastic for a day, then uncovered until bone dry. Fire it to bisque temperature (usually cone 04) according to your clay body’s instructions.
Wax Resist Trick
Add a drop of food coloring to your wax resist so you can clearly see exactly where you’ve painted it on the pale bisque ware.
Step 3: Glazing and Finishing
-
Prepare for glazing:
Wipe the bisque-fired plaque with a damp sponge to remove dust. Now, carefully apply wax resist to the moon, the raised stars, and the very outer rim of the plate. This wax will prevent the glaze from adhering to these specific areas, leaving the raw clay exposed. -
Apply the background color:
Dip the entire plaque into a bucket of dark blue speckled glaze, or brush on 3 coats if using commercial bottled glazes. The wax will repel the glaze, but you may need to wipe any stray beads of glaze off the waxed areas with a damp sponge. -
Clean the details:
Double-check your moon and stars. If glaze has settled into the textured crevices of the moon where you didn’t want it, scrape it away gently with a needle tool. -
Glaze fire:
Fire the piece again to the maturation temperature of your glaze and clay (typically cone 5 or 6 for stoneware). -
Add golden accents:
Once the piece is cool, use a very fine liner brush to paint tiny dots of gold luster or overglaze in the empty blue spaces between the larger stars. This creates the ‘distant stars’ effect. -
Final firing:
If you added gold luster, the piece requires a third, very low-temperature firing (often cone 018) to set the metallic finish permanently.
Uneven Glaze?
If brushstrokes are visible in your blue background, try alternating the direction of your brush with each coat (horizontal, then vertical) for smoother coverage.
Display your celestial plaque on a stand or hang it on the wall to enjoy a piece of the night sky even during the day
Bas-Relief Floral Bouquet Plaque
Capture the delicate beauty of a spring meadow with this sophisticated oval clay plaque. Featuring a stunning bas-relief floral bouquet, this project combines simple shaping techniques with detailed carving for a timeless, artisanal look that fits perfectly in any home.
Step-by-Step
Materials
- Air-dry clay or polymer clay (white or light beige)
- Rolling pin
- Oval cookie cutter or oval template with knife
- Needle tool or toothpick
- Ball stylus tools (various sizes)
- Rubber shaping tool or clay shaper
- Small carving tool or X-Acto knife
- Jute twine or leather cord
- Sandpaper (fine grit)
- Water (for smoothing)
Step 1: Preparation and Base
-
Condition the Clay:
Begin by taking a generous handful of white or light beige clay. Knead it thoroughly in your hands until it becomes warm, pliable, and free of any cracks or air bubbles. -
Roll the Slab:
Place the clay on a clean, flat surface. Use your rolling pin to flatten it into an even slab, aiming for a thickness of about 1/4 inch (6mm) to ensure durability. -
Cut the Shape:
Using an oval cutter or a paper template, cut out a large oval shape. Smooth the raw edges gently with a damp finger to remove any jagged bits. -
Create the Hanger Hole:
While the clay is still soft, use a straw or a large punch tool to create a clean hole at the very top center of the oval. This will fit your twine later.
Step 2: Sculpting the Design
-
Outline the Stems:
Lightly trace the general lines of your bouquet onto the clay surface using a needle tool. Draw a central gathering point near the bottom and fan out lines for four main flower stems. -
Add Dimension to Stems:
Roll very thin, tiny coils of fresh clay. Lay these over your traced stem lines, gently pressing them down so they adhere but remain raised above the surface. -
Form the Flower Heads:
For the four main blooms, roll small balls of clay and flatten them into discs. Press these onto the ends of your stems. Use a carving tool or knife to cut petal divisions into these discs, radiating from the center. -
Refine the Petals:
Use a small ball stylus to press into the center of each petal, creating a concave shape that catches the light. This gives the flowers their ‘bas-relief’ 3D effect. -
Detail the Centers:
Create the flower centers by adding a tiny flattened ball to the middle of each bloom. Using a needle tool, stipple (poke repeatedly) the center to create a textured, pollen-like appearance. -
Add Leaves:
Roll small teardrop shapes of clay for the leaves. Place them along the stems and at the base of the bouquet. Flatten them slightly onto the plaque. -
Carve Veins:
With an X-Acto knife or needle tool, carefully score a central vein line down each leaf, followed by smaller angled veins for realistic detail. -
Add Background Texture:
To mimic the speckled look in the photo, I like to gently prick the empty background space randomly with a needle tool. Keep the texture sparse for an elegant finish. -
Incise the Tie:
At the point where the stems bundle together, carve a few quick lines to suggest a tie or ribbon holding the bouquet.
Smooth Seams
dip your finger or a rubber tool in a tiny bit of water (or oil for polymer) to smooth the seams where you attach new clay pieces.
Step 3: Finishing Touches
-
Dry the Clay:
Allow the plaque to dry completely according to your clay manufacturer’s instructions. For air-dry clay, flip it occasionally to prevent warping. -
Sand Edges:
Once fully cured, use fine-grit sandpaper to gently smooth the outer rim of the oval and any rough spots on the back. -
Apply a Wash (Optional):
For an antique look, brush a diluted brown acrylic paint over the relief and immediately wipe it off with a damp cloth, leaving darker color in the crevices. -
Attach the Hanger:
Cut a length of jute twine. Thread it through the top hole and tie a secure knot to create a loop for hanging.
Add Color
Before sealing, use soft pastels or watercolor paints to add a very faint blush of pink or yellow to the center of the flowers for a subtle tint.
Hang your beautiful relief sculpture in a spot where natural sunlight can highlight the delicate textures you created
Topographic Map Relief Plaque
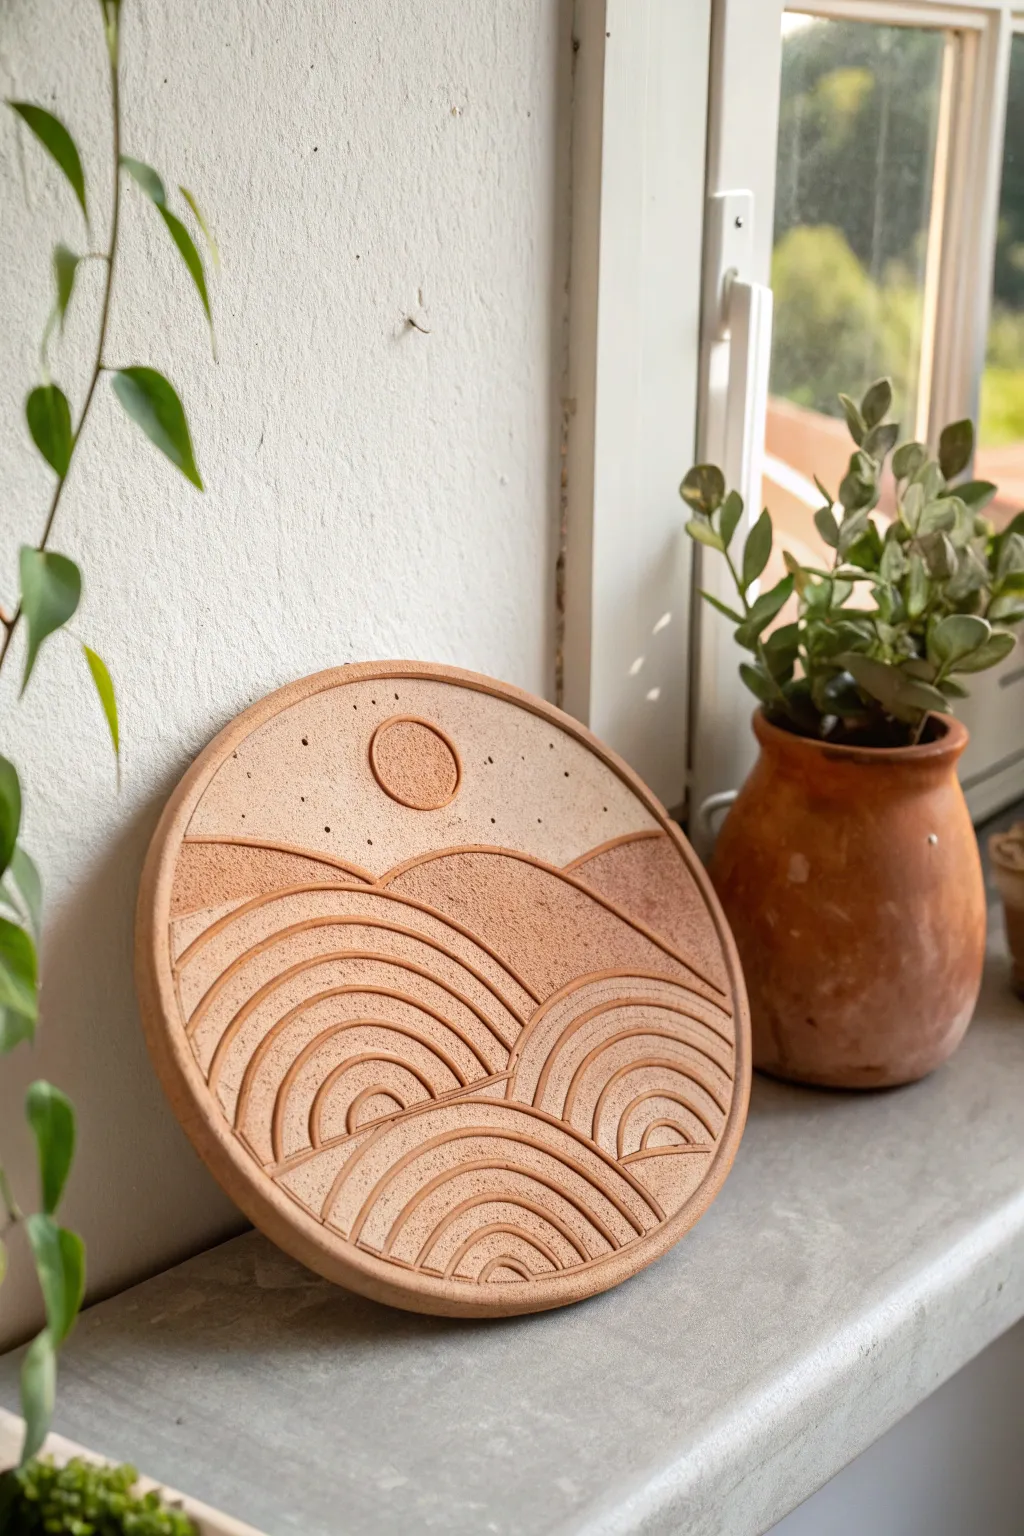
This warm, earthy relief plaque captures the serene beauty of rolling hills under a soft sun. Using simple geometric lines and the natural texture of terra cotta clay, you’ll create a minimalist landscape that brings a calming, organic touch to any windowsill.
How-To Guide
Materials
- Terracotta air-dry clay or kiln-fire clay
- Rolling pin
- Two 1/4 inch wooden guide strips (slats)
- Circle cutter or a bowl approx. 8 inches diameter
- Needle tool or fettling knife
- Carving loop tool (small U-shape)
- Small round sponge
- Small circular cookie cutter or bottle cap (approx. 1 inch)
- Scoring tool or old toothbrush
- Slip (clay mixed with water)
- Smooth work surface or canvas board
Step 1: Base Preparation
-
Prepare the Clay:
Wedge your terracotta clay thoroughly to remove air bubbles, ensuring a smooth consistency for carving. -
Roll the Slab:
Set up your wooden guide strips on your canvas board. Place the clay ball between them and roll it out until the rolling pin rests on the strips, guaranteeing an even thickness. -
Cut the Circle:
Place your circle cutter or bowl onto the slab. Press down firmly or trace around the bowl with a needle tool to cut out your perfect circle base. -
Smooth the Edges:
Dip your finger or a small sponge in a little water and gently run it along the cut edge of the circle to remove any sharp burrs or roughness. -
Create the Rim:
From the leftover clay, roll a long, thin coil (snake). Score the outer edge of your circle base and apply a little slip. -
Attach the Rim:
Lay the coil onto the scored edge to create a raised border. Blend the inside seam of the coil down onto the base slab, but leave the outside somewhat distinct for a framed look.
Clean Lines Pro Tip
When carving the concentric arches, wait until the clay is ‘leather hard’ (stiff but cool). The loop tool will cut cleaner ribbons without dragging the clay.
Step 2: Sculpting the Landscape
-
Draft the Horizon:
Using your needle tool, very lightly sketch three large, overlapping hill shapes across the bottom two-thirds of the plaque. Don’t cut deep yet; just plan your composition. -
Carve the Arches:
With the small U-shaped loop tool, carve concentric arches inside each hill shape. Start from the bottom center of each hill and work outward, keeping the spacing consistent. -
Deepen the Outlines:
Go back over the main outline of each hill with the loop tool or needle tool to separate them visually from the background. -
Add Texture:
Instead of smoothing the carved grooves perfectly, I like to leave some of the ‘crumbs’ or slight roughness from the carving tool to enhance the earthy, sandy aesthetic.
Warping Woes?
If the edges of your plaque start lifting as it dries, place a small weighted board or book on top of the rim (cushioned by foam) to gently press it flat.
Step 3: Sky and Sun Details
-
Place the Sun:
In the upper third (the sky area), position your small circular cutter or bottle cap centrally above the hills. -
Indent the Sun:
Press the cutter gently into the clay to create an outlined circle. Do not cut all the way through; imply the sun through relief. -
Texture the Sun:
Using the back of a paintbrush or a small modeling tool, gently stipple the inside of the sun circle to give it a dappled texture different from the smooth sky. -
Add Stardust:
Take your needle tool and randomly poke small, shallow holes in the sky area around the sun to mimic distant stars or atmospheric dust.
Step 4: Finishing Touches
-
Final Smoothing:
Check the rim and the uncarved sky areas. If you see fingerprints, gently sponge them away without disturbing your carved lines. -
Initial Drying:
Place a piece of plastic wrap loosely over the plaque. This slows down drying and prevents the edges from curling up. -
Complete the Process:
Once leather hard, remove the plastic. If using air-dry clay, let it cure fully for 24-48 hours. If using kiln clay, proceed to your bisque firing schedule once bone dry.
Display your finished relief on a plate stand near natural light to let the shadows accentuate the carved textures