If you’ve ever wanted your phone to sound louder without cords or gadgets, a clay phone amplifier is such a satisfying little build. I love how a simple sound chamber and a flared acoustic horn can turn into a playful sculpture that actually earns its spot on your desk.
Classic Flared Horn Dock
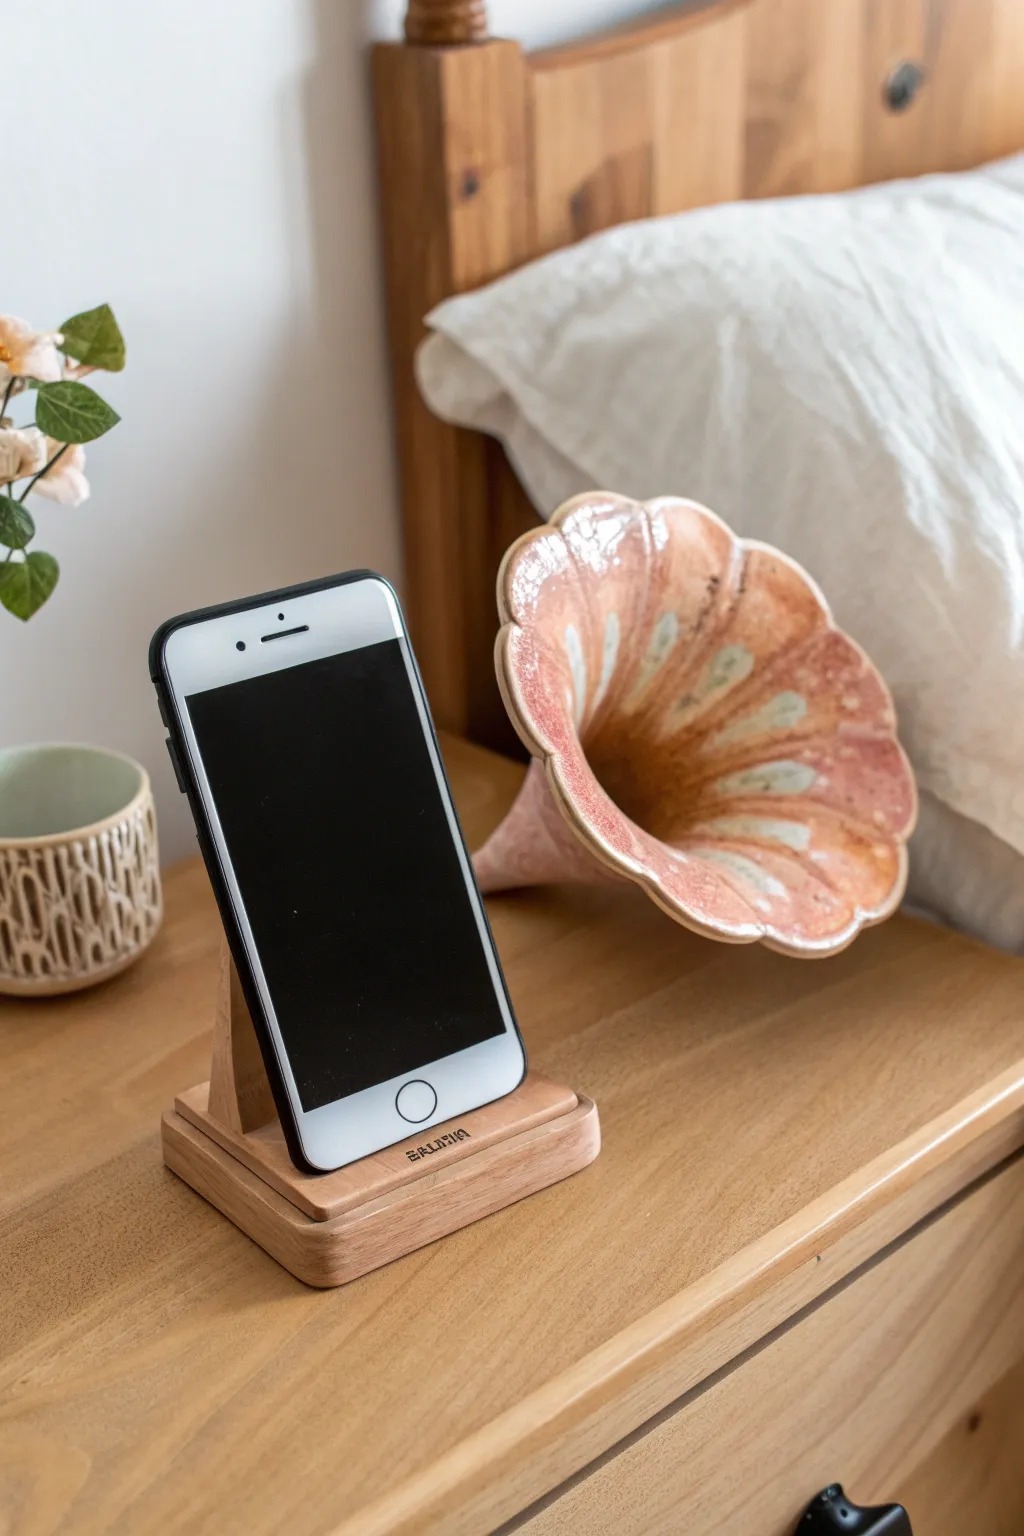
Marrying vintage phonograph aesthetics with modern utility, this ceramic amplifier naturally boosts your phone’s volume without a single wire. The speckled stoneware finish and graceful, organic flare make it a functional sculpture perfect for a bedside table or desk.
How-To Guide
Materials
- Speckled stoneware clay (approx. 3-4 lbs)
- Pottery wheel
- Throwing tools (sponge, needle tool, rib, wire cutter)
- Trimming tools
- Circular hole cutter or fettling knife
- Scoring tool and slip
- Clear glaze (suitable for your clay body)
- Smartphone (for sizing purposes)
Step 1: Throwing the Base Cylinder
-
Center the clay:
Begin by wedging about 1.5 lbs of clay and securing it firmly to the center of your wheel head. Center the clay using medium speed and steady hand pressure. -
Open the form:
Open the center, but instead of creating a flat bottom, keep the floor slightly rounded to help bounce sound waves later. Pull the walls up to create a cylinder about 6-7 inches long. -
Create the taper:
As you pull the clay, collar the neck slightly so the cylinder is wider at the base and narrower at the top. Aim for a diameter at the top that can accommodate a phone slot, roughly 2.5 inches. -
Smooth the interior:
Use a sponge on a stick or a long rib to smooth the interior walls while the wheel is spinning slowly, ensuring there are no ridges that could distort the sound. -
Cut off and set aside:
Use your wire cutter to separate the cylinder from the wheel. Slide it onto a ware board and let it stiffen to a leather-hard state.
Pro Tip: Slot Angle
Cut the phone slot at a slight backward angle, not straight down. This lets the phone lean back securely, directing the speaker output directly into the amplification chamber.
Step 2: Throwing the Horn
-
Center the second piece:
Take the remaining clay (approx 2 lbs) and center it. This part requires a wider base, so flatten your mound slightly more than usual. -
Open wide:
Open the clay aggressively outward rather than downward. You are essentially throwing a funnel or a bowl with no bottom. -
Pull and flair:
Pull the walls outward and upward. Use a rib on the inside to create a smooth, continuous curve that flares dramatically at the rim. -
Match the connection point:
Measure the narrow end of your funnel. It needs to match the diameter of the ‘top’ of your base cylinder. Use calipers to check the size, allowing a little extra for trimming later. -
Refine the rim:
Compress the rim well with a chamois or sponge to prevent cracking, as this wide edge is vulnerable. Cut it off the wheel and let it dry to leather-hard.
Step 3: Assembly and Finishing
-
Trim the components:
Once leather-hard, trim the excess clay from the bottom of the base cylinder so it sits flat. Trim the narrow end of the horn so it has a clean, flat surface for attachment. -
Cut the phone slot:
On the cylinder (the base), carefully mark a rectangle that fits your phone. It should be located toward the back, leaving room for the sound to travel forward. Cut this out with a fettling knife and smooth the raw edges. -
Check the fit:
I like to gently test the phone slot with a ruler or template to ensure it’s wide enough, remembering that clay shrinks during firing. -
Join the pieces:
Score and slip both the rim of the cylinder and the narrow end of the horn. Press them firmly together. You might need to prop up the horn with foam or newspaper while the joint sets. -
Blend the seam:
Use a coil of soft clay to reinforce the seam where the two pieces meet. Smooth it out completely with a rib so the transition looks seamless on the outside. -
Refine the surface:
Wipe down the entire piece with a damp sponge to remove any joining marks or fingerprints. This is also the time to accentuate the speckles by wiping away fine clay particles. -
Dry slowly:
Cover the piece loosely with plastic. Because the rim is thin and the base is thick, slow drying is crucial to prevent warping or cracking. -
Bisque fire:
Once bone dry, fire the piece in the kiln to bisque temperature (usually cone 04). -
Glaze application:
Dip or brush a transparent glaze over the entire piece. A clear glaze highlights the natural beauty and speckles of the stoneware clay. -
Final firing:
Fire the piece to the maturity temperature of your clay body (likely cone 5 or 6 for stoneware) and allow the kiln to cool naturally.
Troubleshooting: Sagging Horn
If the heavy horn starts drooping during assembly, support it with a sculpted block of foam or a bag of rice until the joint is bone dry and strong enough to hold itself.
Place your phone in the finished dock and enjoy the surprisingly rich acoustic boost provided by your handmade craft


Retro Gramophone-Style Cone
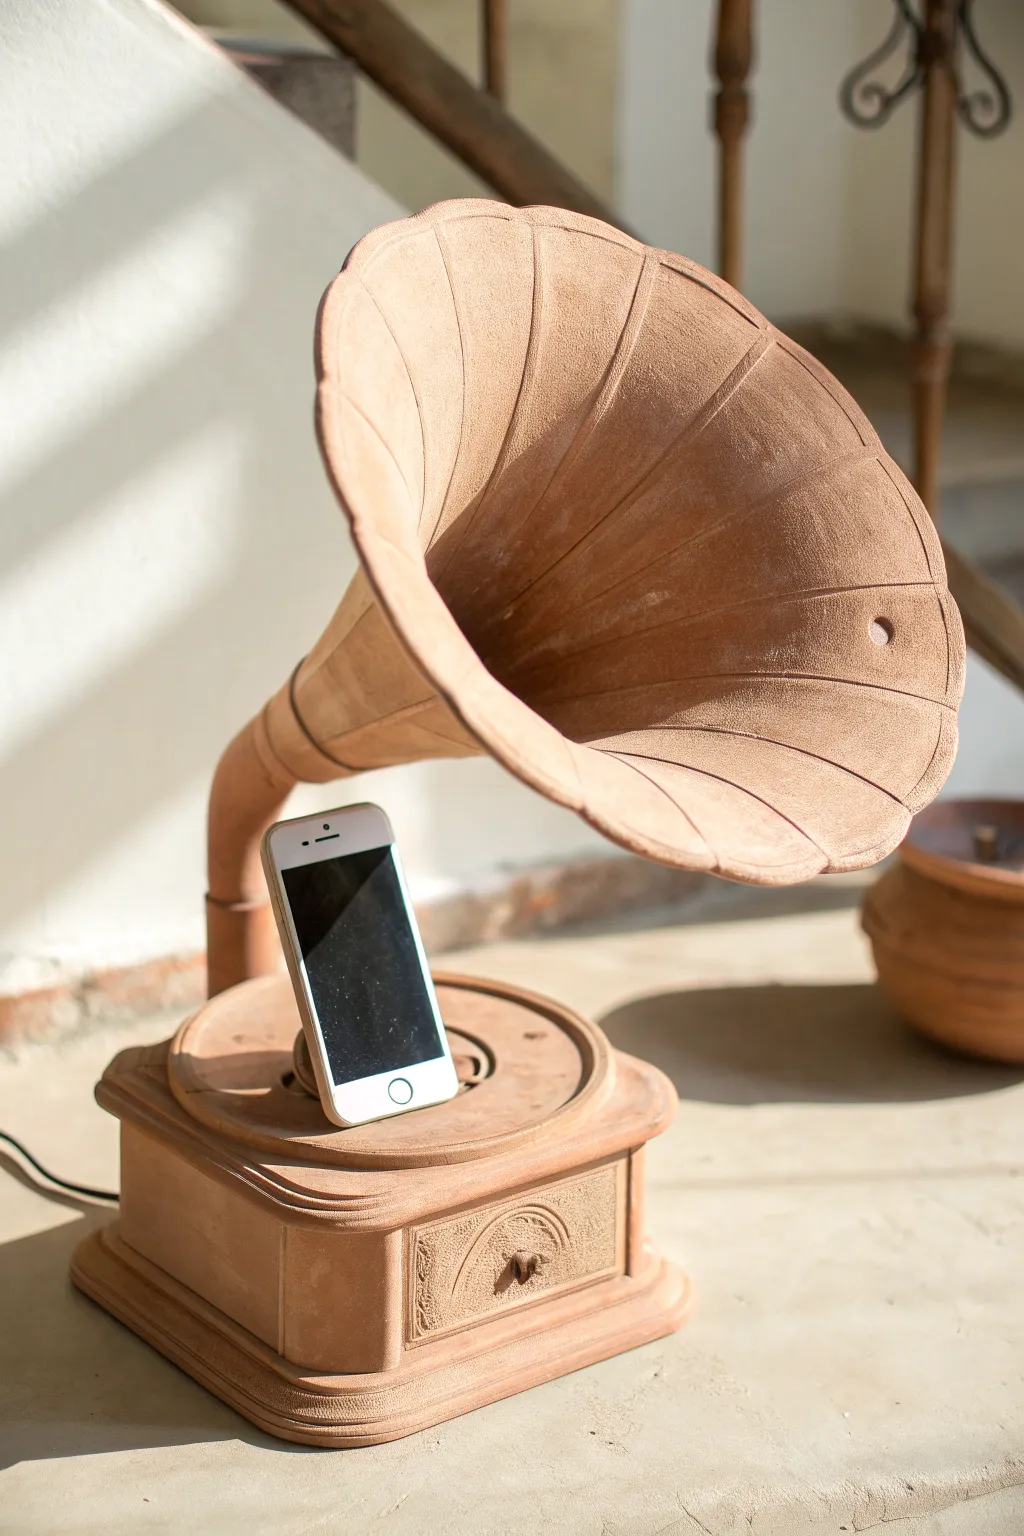
Merging vintage aesthetics with modern utility, this terracotta amplifier uses natural acoustics to boost your phone’s volume without a single wire. Its warm, unglazed finish and gramophone silhouette make it a stunning conversation piece for any shelf.
Detailed Instructions
Materials
- Stoneware clay (terracotta or buff)
- Pottery wheel (optional but helpful for base)
- Slab roller or rolling pin
- Canvas mat
- Cardboard or stiff paper for templates
- Slip and score tool (needle tool or serrated rib)
- Clay knife or fettling knife
- Curved rib tool (wood or rubber)
- Sponge
- Internal support materials (newspaper or balloons)
- Smartphone (for sizing)
Step 1: Forming the Base Box
-
Roll the Slabs:
Begin by rolling out an even slab of clay, roughly 1/4 inch thick. You will need enough material to construct a square box roughly 6-7 inches wide and 4 inches tall. -
Cut the Panels:
Using a ruler and fettling knife, cut four rectangular side panels, a square base, and a slightly larger square top piece. Beveled edges at 45 degrees create cleaner corner joints. -
Assemble the Box:
Score the edges thoroughly and apply clay slip. Press the walls together onto the base platform to form the box structure. Reinforce the interior seams with thin coils of clay, smoothing them down to ensure strength. -
Add Decorative Trim:
Roll thin coils or strips of clay and attach them around the bottom edge and near the top rim to mimic the wooden molding found on antique phonographs. -
Create the Drawer Detail:
On the front panel, carve a rectangular outline to suggest a faux drawer. I like to add a small sculpted handle and some incised arch patterns to give it that authentic furniture look.
Step 2: Sculpting the Turntable & Phone Dock
-
Form the Turntable:
Roll a circular slab slightly smaller than the box top. Attach this to the center of the box lid, creating a raised platform. -
Carve the Slot:
Using your phone as a size reference (but adding about 15% extra width to account for clay shrinkage), cut a rectangular slot into the center of the turntable. This slot needs to go all the way through the lid into the hollow box below. -
Smooth the Edges:
Use a damp sponge to round over the sharp edges of the phone slot so it won’t scratch your device later.
Acoustic Pro Tip
For better sound amplification, smooth the inside of the elbow joint and horn with a damp sponge on a stick. Rough interiors can damper the sound waves.
Step 3: Constructing the Horn
-
Template the Cone:
To make the large horn, create a cone template from stiff paper first. It should be a wide fan shape. Trace this onto a fresh slab of clay and cut it out. -
Roll and Join:
Carefully curl the clay fan into a cone shape. Score and slip the overlapping seam, pressing it firmly together. Use a rubber rib to smooth the seam inside and out until it’s invisible. -
Flare the Bell:
Gently stretch the wider opening of the cone outward with your fingers to create the bell shape. You can scallop the edges slightly for a floral look. -
Create the Elbow:
Form a curved tube or ‘elbow’ piece using the coil or slab method. This connects the horn to the base. Ensure the airway remains open and smooth inside for better sound travel. -
Attach the Horn:
Score the connection points heavily. Attach the elbow to the back of the box (connecting to the interior chamber) and the horn to the elbow. I prefer to use propped-up newspapers or foam under the horn to support its weight while the clay stiffens. -
Score Lines:
Use a needle tool to draw vertical lines radiating from the center of the horn to the rim, mimicking the segmented metal panels of real antique gramophones.
Level Up: Audio Port
Cut a small hole in the back of the base box to allow a charging cable to pass through, letting you charge your phone while listening.
Step 4: Finishing touches
-
Refine the Surface:
Once the piece is leather-hard, use a slightly damp sponge to wipe away any grog or roughness. The goal is a velvety, matte texture. -
Drying:
This piece has varying thicknesses, so accurate drying is crucial. Cover loosely with plastic for several days to let the moisture even out before removing the plastic for final drying. -
Firing:
Bisque fire the piece. For the look in the image, you can stop there or fire to maturity without glaze to keep that raw, earthy terracotta tone.
Place your creation in a sunny spot and enjoy music through your handmade amplifier


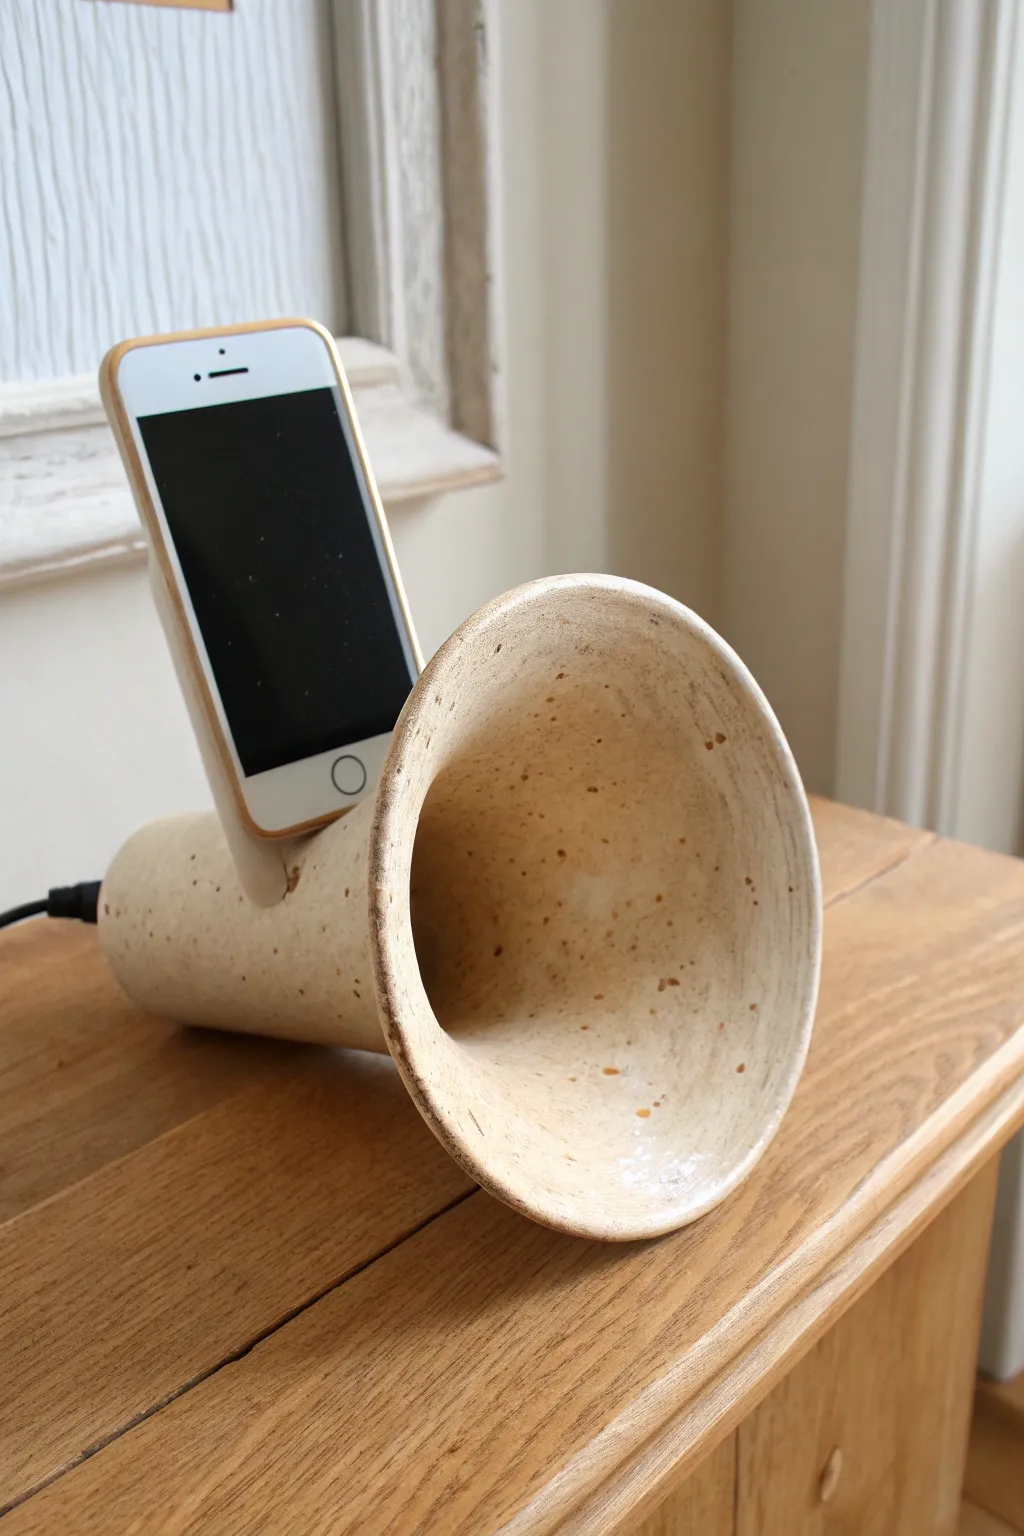
Minimal Cylinder With Side Horn
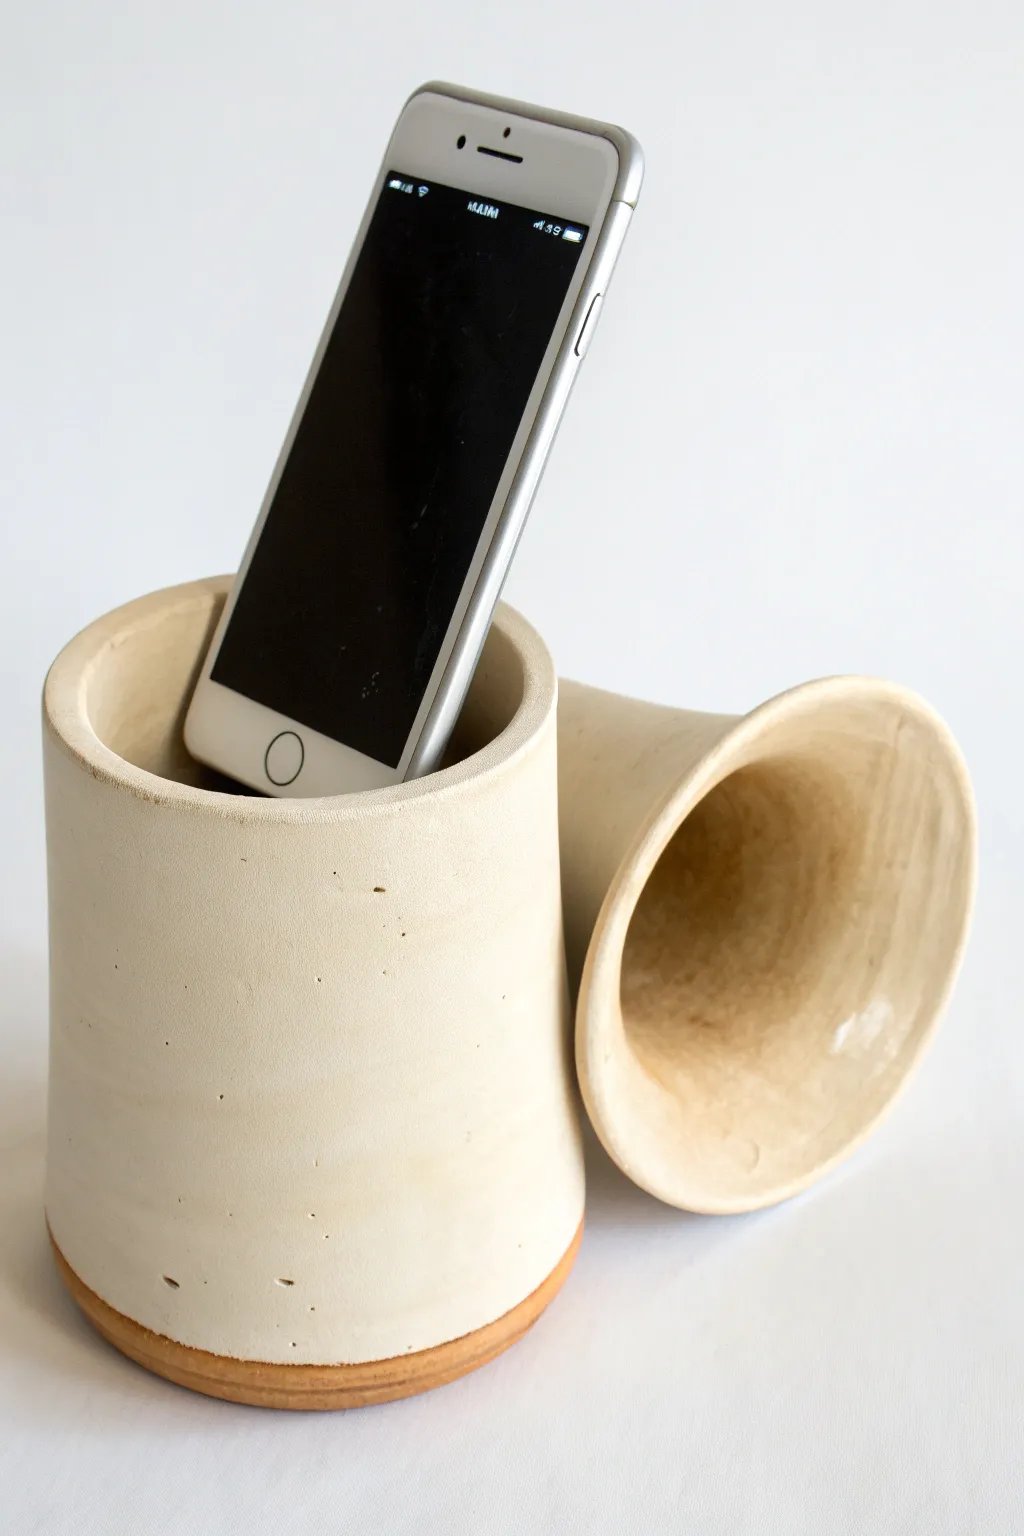
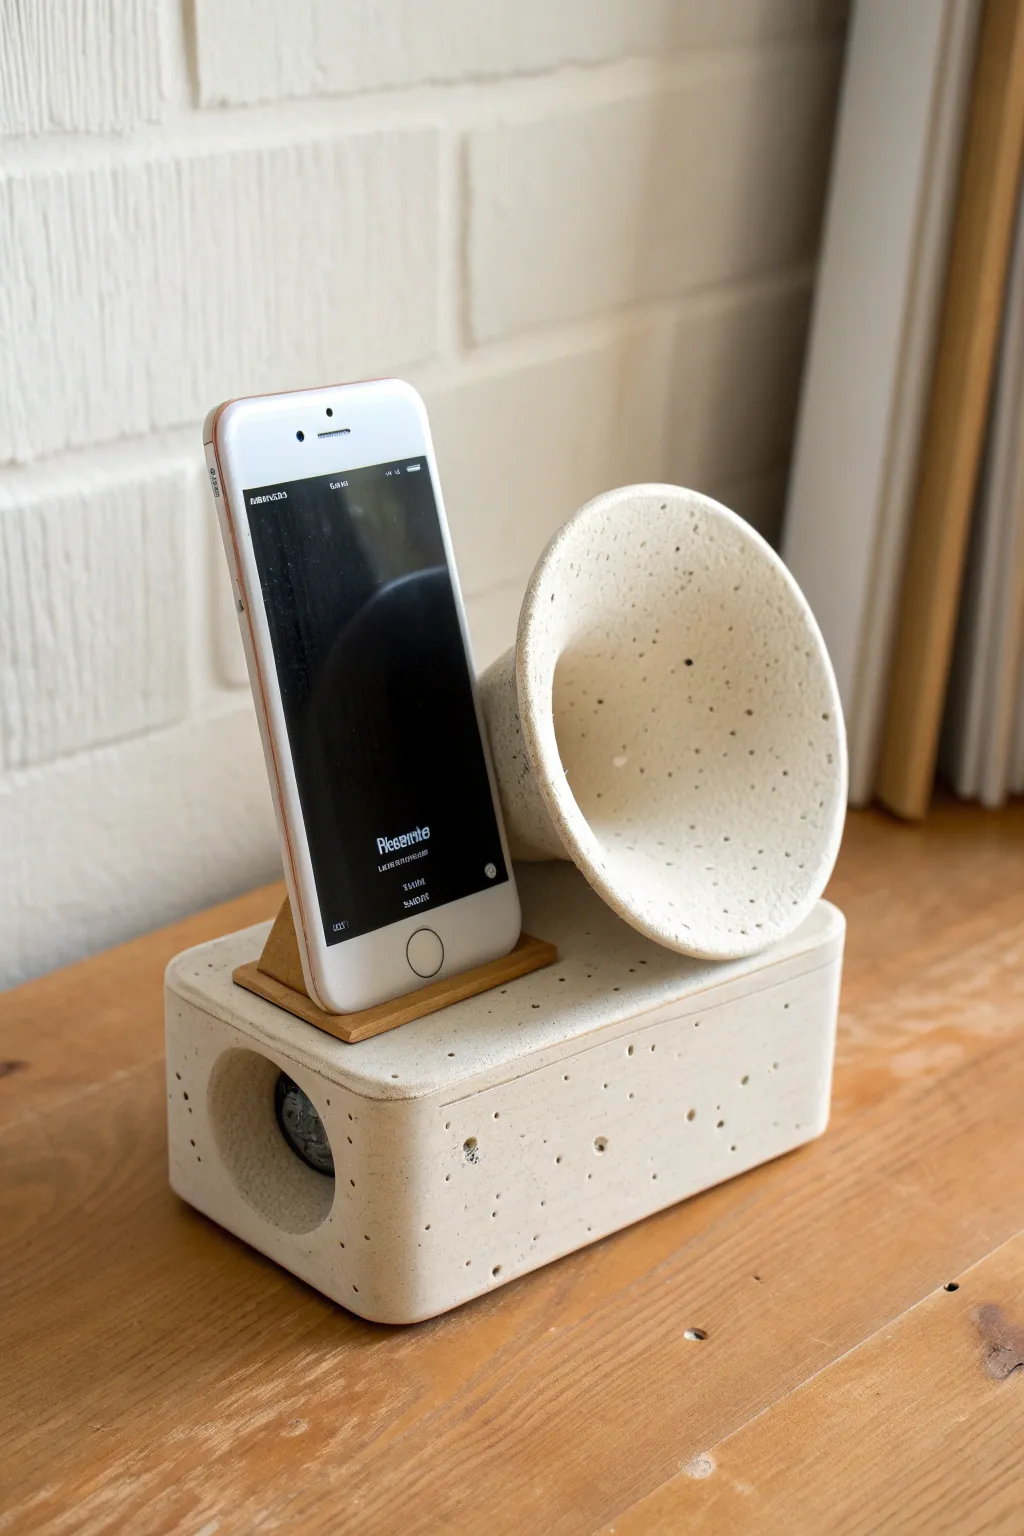
This elegant passive speaker combines a simple cylinder dock with a distinctive side-mounted horn, amplifying your phone’s sound naturally through acoustic design. The unglazed finish highlights natural clay textures, while the wide bell shape projects audio clearly into the room.
Step-by-Step
Materials
- Light-colored stoneware clay
- Pottery wheel (or slab roller if hand-building)
- Needle tool
- Wire cutter
- Rib tool
- Sponge
- Slip (clay slurry)
- Scoring tool
- Calipers or ruler
- Clear matte glaze (optional)
- Smartphone (for sizing)
Step 1: Throwing the Components
-
Prepare the Clay:
Start by wedging two balls of white stoneware clay. One should be slightly larger for the main cylinder body, and a smaller one for the horn attachment. -
Center the Main Body:
Secure the larger ball of clay onto your wheel and center it. Open the form to create a flat floor, aiming for a base width of about 3 to 3.5 inches. -
Pull the Cylinder:
Pull up the walls to form a straight, vertical cylinder about 5-6 inches tall. Keep the walls even, but leave the rim slightly thicker to support the phone. -
Refine the Shape:
Use a rib tool to smooth the outside and inside walls, removing throwing lines if you prefer that clean, minimalist look shown in the photo. -
Throw the Horn:
With the second ball of clay, throw a small, hollow cone shape. Start narrow at the base (where it connects to the cylinder) and pull it outward into a flared bell shape. -
Check Proportions:
Before cutting the horn off the wheel, hold your calipers near the cylinder to ensure the narrow end of the horn will fit nicely against the cylinder wall. -
Dry to Leather Hard:
Cut both pieces off the wheel using a wire cutter. Let them dry slowly until they reach a leather-hard state so they can be handled without warping.
Step 2: Assembly and Finishing
-
Trim the Cylinder Base:
Place the cylinder back on the wheel (or a banding wheel). Trim away excess clay at the bottom, creating a neat foot ring or a flat bottom depending on your preference. -
Mark the Connection Point:
Hold the horn piece against the side of the cylinder to determine the best placement. I like to mark the outline gently with a needle tool. -
Cut the Sound Hole:
carefully cut a circular hole in the cylinder wall inside your marked outline. This allows sound to travel from the cylinder chamber into the horn. -
Prepare the Horn Edge:
Trim the narrow end of the horn at a slight curve if necessary, so it sits flush against the rounded wall of the cylinder. -
Score and Slip:
Thoroughly score the edges of the hole on the cylinder and the connecting edge of the horn. Apply a generous amount of slip to both scored areas. -
Attach the Horn:
Press the horn firmly onto the cylinder. Wiggle it slightly to lock the clay particles together and ensure a strong bond. -
Reinforce the Seam:
Roll a very thin coil of clay and press it into the seam where the horn meets the cylinder. Smooth this out with a tool or your finger to make the transition seamless. -
Create the Phone Slot:
Measure the width and thickness of your smartphone. On the top rim of the cylinder, mark and cut a rectangular slot sized to fit your device comfortably. -
Smooth the Edges:
Use a damp sponge to round over the cut edges of the phone slot and the rim of the horn. Sharp edges can chip easily after firing. -
Final Cleanup:
Scan the piece for any burrs or rough spots. Sponge the entire surface lightly to create that consistent texture. -
Dry and Bisque Fire:
Allow the assembled piece to dry completely under plastic to prevent cracking at the seam. Once bone dry, bisque fire it in your kiln. -
Glaze and Fire:
For the look in the photo, leave the exterior raw or apply a clear matte glaze. You might glaze the interior for easier cleaning before the final firing.
Acoustic Boost
Make the connection hole between the cylinder and horn as large as possible without weakening the wall. A larger opening allows more sound waves to travel through.
Dual-Tone Design
Try dipping just the rim of the horn in a glossy colored glaze while keeping the body raw clay. This creates a brilliant contrast.
Once fired, slide your phone in and enjoy the surprisingly rich volume boost from your handmade creation


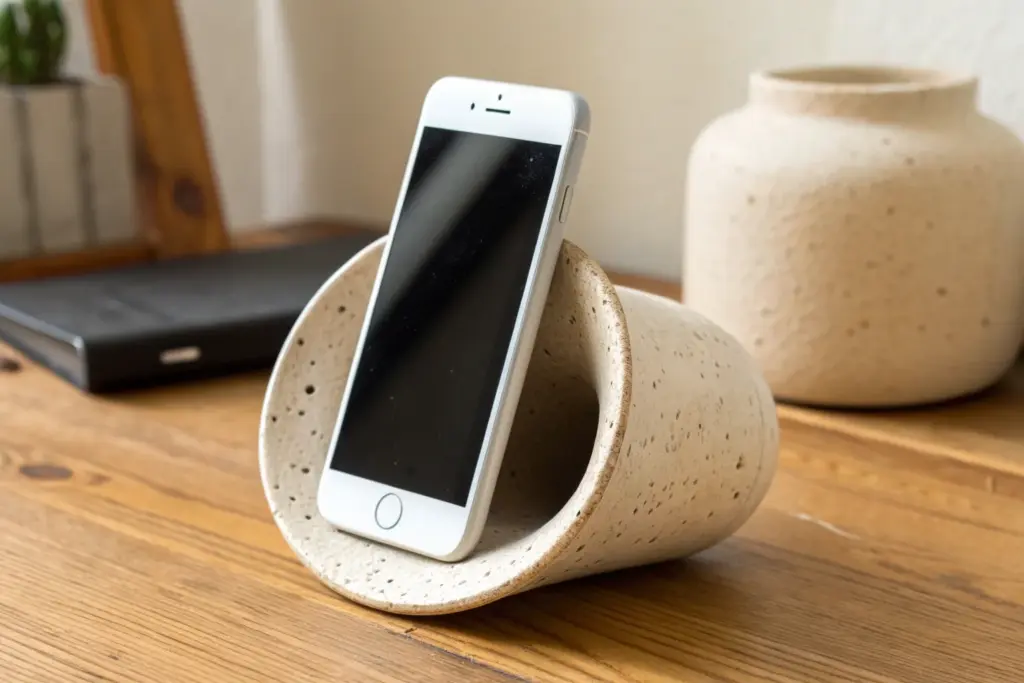
Arch Bridge Amplifier
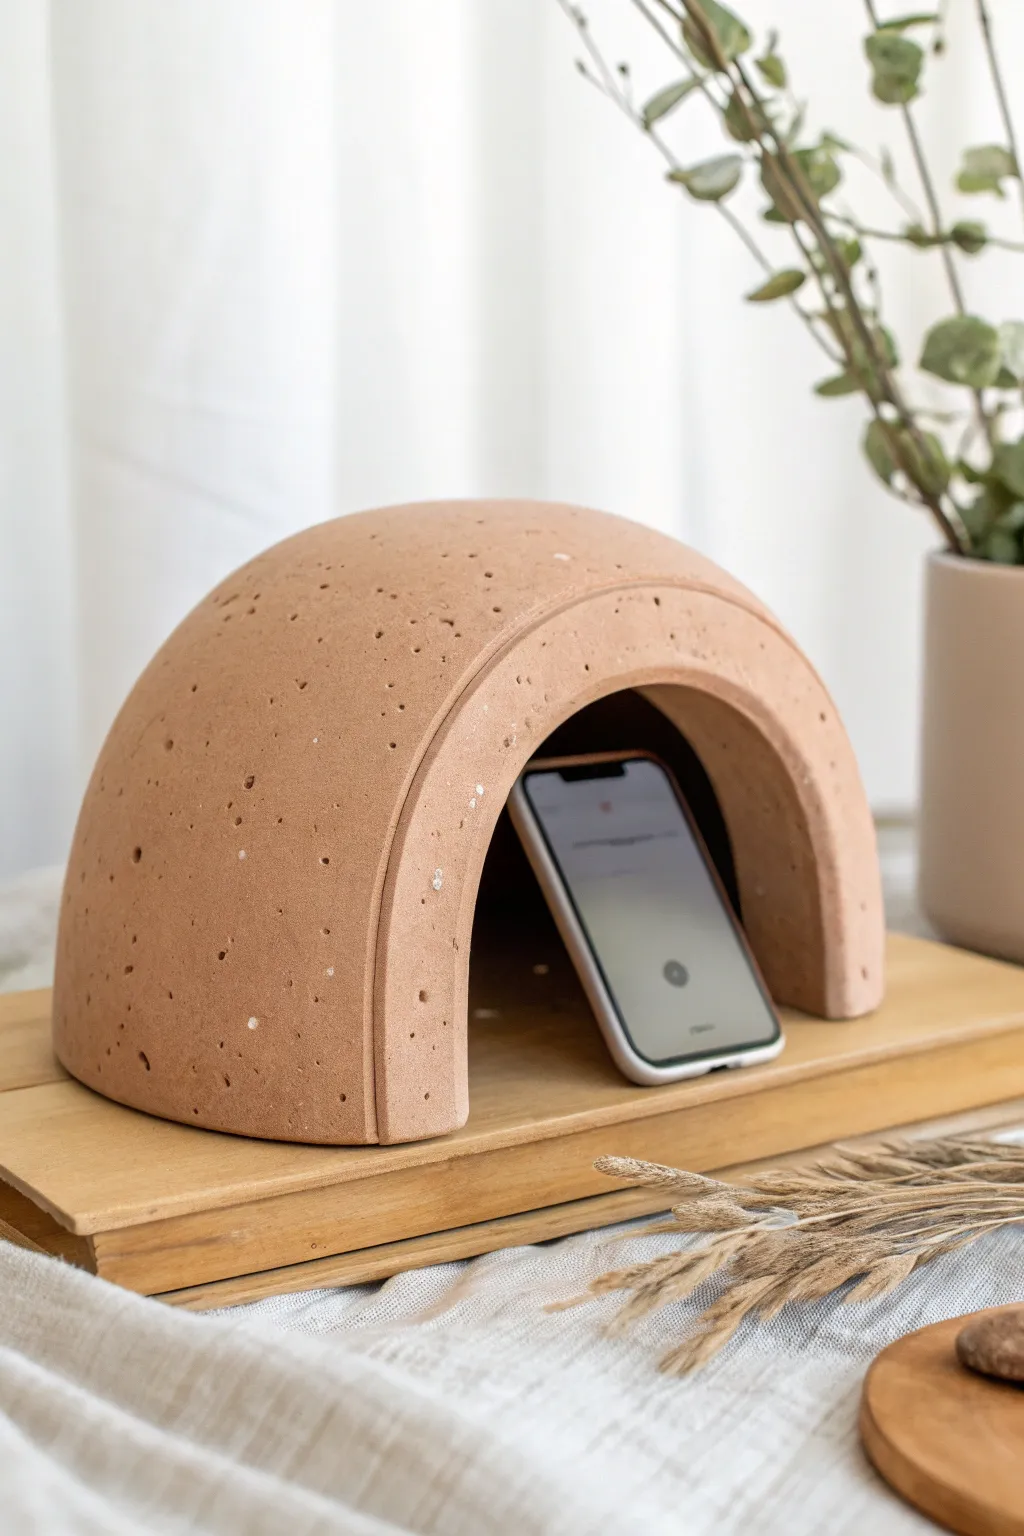
Enhance your phone’s sound with this beautifully minimal acoustic amplifier, featuring a speckled terracotta finish and a sturdy arched design that channels sound outward. Its rustic, pitted texture adds an organic touch, making it a functional piece of sculpture for your desk or bedside table.
Step-by-Step
Materials
- Air-dry clay or pottery clay (terracotta color)
- Small balloon or 5-inch PVC pipe segment (for the form)
- Parchment paper
- Rolling pin
- Clay knife or fettling knife
- Coarse sponge or stiff bristle brush
- Toothbrush (for texturing)
- Small bowl of water
- Sandpaper (medium and fine grit)
- Matte sealant (optional)
Step 1: Creating the Base Form
-
Prepare your mold:
If using a PVC pipe, clean the exterior and wrap it lightly in parchment paper to prevent sticking. If using a balloon, inflate it until it creates a dome shape roughly 6-7 inches wide, then tape it securely to your work surface. -
Roll the main slab:
Roll out a large slab of terracotta clay to a consistent thickness of about 1/2 inch. This needs to be thick enough to support its own weight. -
Drape the arch:
Carefully lift your clay slab and drape it over your chosen form. Smooth it downwards with your hands, ensuring it hugs the curve without stretching too thin. -
Trim the edges:
Once draped, use your clay knife to trim the bottom edges flush with the table surface so the arch sits flat. -
Create the front opening:
This step defines the amplifier’s mouth. Cut a semi-circle from the front face of the dome, leaving a substantial overhang to capture the sound.
Acoustic Boost
Make the back wall slightly curved inward (concave) rather than flat. This parabola shape helps reflect sound waves out of the front more effectively.
Step 2: Refining and Texturing
-
Add the arch detail:
Roll a flat strip of clay, about 1 inch wide and 1/4 inch thick. Attach this strip to the front edge of your arch using the score-and-slip method to create a raised rim or ‘lip’ around the opening. -
Build the back soundstop:
Cut a semi-circular piece of clay slab to fit the back of the arch. Attach this to the rear vertical opening to close off the back of the tunnel, forcing sound out the front. -
Blend the seams:
Use a modeling tool or your fingers to smooth the seams where you attached the rim and the back wall. The connections should look seamless and sturdy. -
Create the pitted texture:
Here is where the magic happens. Take a stiff toothbrush or a coarse sponge and press it firmly into the damp clay surface repeatedly. Don’t be afraid to be random; you want organic irregularity. -
Add larger craters:
Use the back end of a small paintbrush or a toothpick to poke slightly larger, deeper holes scattered across the surface to mimic the porous look of stone or concrete. -
Smooth the phone slot:
Double-check the interior floor of the arch. Ensure it is perfectly flat so your phone will stand securely without rocking.
Step 3: Drying and Finishing
-
Slow drying process:
Cover the piece loosely with plastic wrap to let it dry very slowly over 2-3 days. This prevents cracking, especially given the thickness of the walls. -
Remove the form:
Once the clay is leather-hard (firm but not dry), carefully slide out the PVC pipe or deflate the balloon. -
Final dry:
Allow the clay to dry completely exposed to the air until it is uniform in color and room temperature to the touch. -
Sand the base:
Using medium-grit sandpaper, sanding the bottom edges flat against a hard surface ensures the amplifier won’t wobble. -
Surface refinement:
Lightly sand the exterior to remove any sharp burrs from the texturing process, but keep that lovely rustic feel intact. -
Seal (Optional):
For longevity, apply a matte sealant spray. This protects the porous surface from oils on your hands or dust without making it look glossy or plastic.
Stone Effect
Mix dried coffee grounds or coarse sand into your wet clay before rolling the slab. When fired or dried, this creates incredible natural speckling.
Place your phone inside and enjoy music with a richer, warmer tone without using any electricity

What Really Happens Inside the Kiln
Learn how time and temperature work together inside the kiln to transform clay into durable ceramic.
Wide-Mouth Monster Speaker
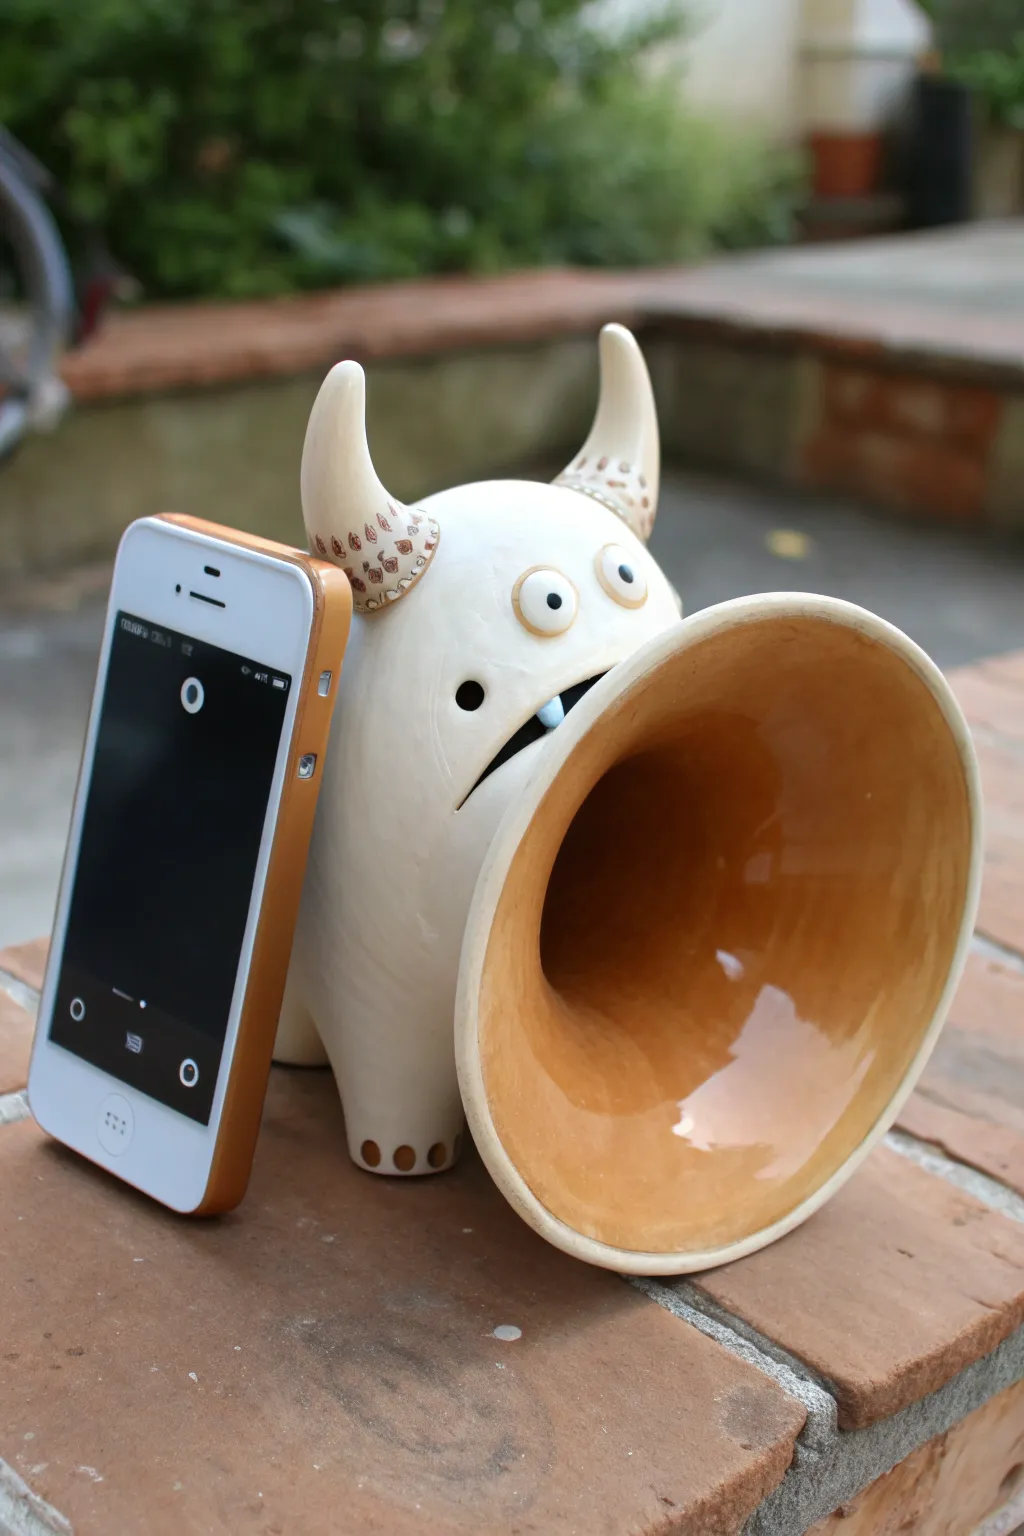
This whimsical ceramic creature serves a double purpose: it’s an adorable desk companion and an acoustic amplifier for your smartphone without needing any wires or batteries. With its wide-open yelling mouth and chunky horns, the cream and caramel-glazed stoneware design projects sound naturally while looking like a friendly little beast.
Step-by-Step Guide
Materials
- White stoneware or earthenware clay
- Rolling pin and guide sticks (approx. 1/4 inch)
- Pottery knife or needle tool
- Slip and scoring tool
- Wooden modeling tools
- Bisque firing kiln access
- Cream/White matte glaze
- Caramel/Honey gloss glaze
- Brown underglaze or oxide wash
- Small paintbrush
Step 1: Forming the Body and Amplifier Bell
-
Roll the main slab:
Begin by rolling out a medium-sized slab of clay to an even 1/4 inch thickness. This needs to be sturdy enough to support the horn structure but not too heavy. -
Create the sound horn:
Cut a large circle from your slab and removing a wedge to create a cone shape. Form a wide, trumpet-like cone—this will be the ‘mouth’ or amplifier bell. Smooth the seam thoroughly. -
Shape the body pinch pots:
Create two large pinch pots and join them together to form a hollow, egg-shaped body. Alternatively, shape a larger block of clay into a rounded mound, but hollowing it out is essential for firing safety. -
Attach the bell:
Cut a large hole in the front of the body where the amplifier bell will sit. Score and slip both the hole’s edge and the narrow end of your trumpet cone, then join them securely. Blend the clay so the transition is seamless. -
Carve the phone slot:
On the back or top-side of the body (depending on where the sound channel meets the horn), carefully cut a slot sized for a smartphone. I stick my own phone in a plastic bag to test the fit during this stage—just make sure the slot connects openly to the interior chamber so sound can travel. -
Check the acoustics:
Ensure the passage from the phone slot to the wide mouth is clear of clay debris. A smooth interior helps bounce the sound waves better.
Slumping Horn?
If the large mouth droops while wet, ball up newspaper or plastic bags and stuff them inside the bell for support. Leave this stuffing in until the clay is leather-hard and can hold its own weight.
Step 2: Sculpting the Monster Features
-
Add sturdy legs:
Roll four short, thick coils for legs. Attach them to the base of the body, blending the clay upwards. Use a small tool to impress three little toe marks on the front of each foot. -
Form the curving horns:
Roll two tapered cones of clay for horns. Bend them slightly to give them character and attach them to the top of the head. Position them so they curve inward or upward, framing the face. -
Create the eyes:
Roll two small balls of clay and flatten them slightly into discs. Score and attach them above the amplifier mouth. Add tiny pupils by pressing a small indentation or adding a tiny speck of clay to the center. -
Add facial details:
Using a needle tool, carve a simple line for a mouth or nose feature if desired, though the giant horn acts as the main ‘mouth.’ In the photo, a simple carved line and a small nostril dot provide extra expression. -
Texture the horns:
Using a small loop tool or pencil, lightly carve patterns onto the horns. The example uses small U-shapes or scales near the base of the horns.
Acoustic Boost
Burnish (smooth with a spoon) the inside of the horn before firing. A smoother surface reflects sound waves better than a rough one, making your passive amplifier louder and clearer.
Step 3: Glazing and Finishing
-
Bisque fire:
Allow the piece to dry slowly under plastic to prevent cracking, especially where the heavy horn joins the body. Once bone dry, bisque fire it to cone 04 (or your clay’s specification). -
Apply the interior glaze:
Pour a caramel or honey-colored gloss glaze into the interior of the horn and the phone slot. Swirl it around to coat the inside completely, then pour out the excess. This glossy surface inside is crucial for reflecting sound. -
Glaze the exterior:
Brush or dip the exterior of the monster in a creamy, matte white glaze. Be careful not to get this glaze inside the horn where the caramel color is. -
Highlight the details:
Use a brown oxide wash or underglaze on the horn textures and the toe indentations. Wipe away the excess with a sponge so the dark color remains only in the recesses. -
Final firing:
Fire the piece again to the maturation temperature of your glaze (typically cone 5 or 6 for stoneware). Ensure the foot is wiped clean of glaze so it doesn’t stick to the kiln shelf.
Once cooled, slide your phone into the slot and enjoy the surprisingly robust sound coming from your new clay friend
Frog Croak Mouth Amplifier
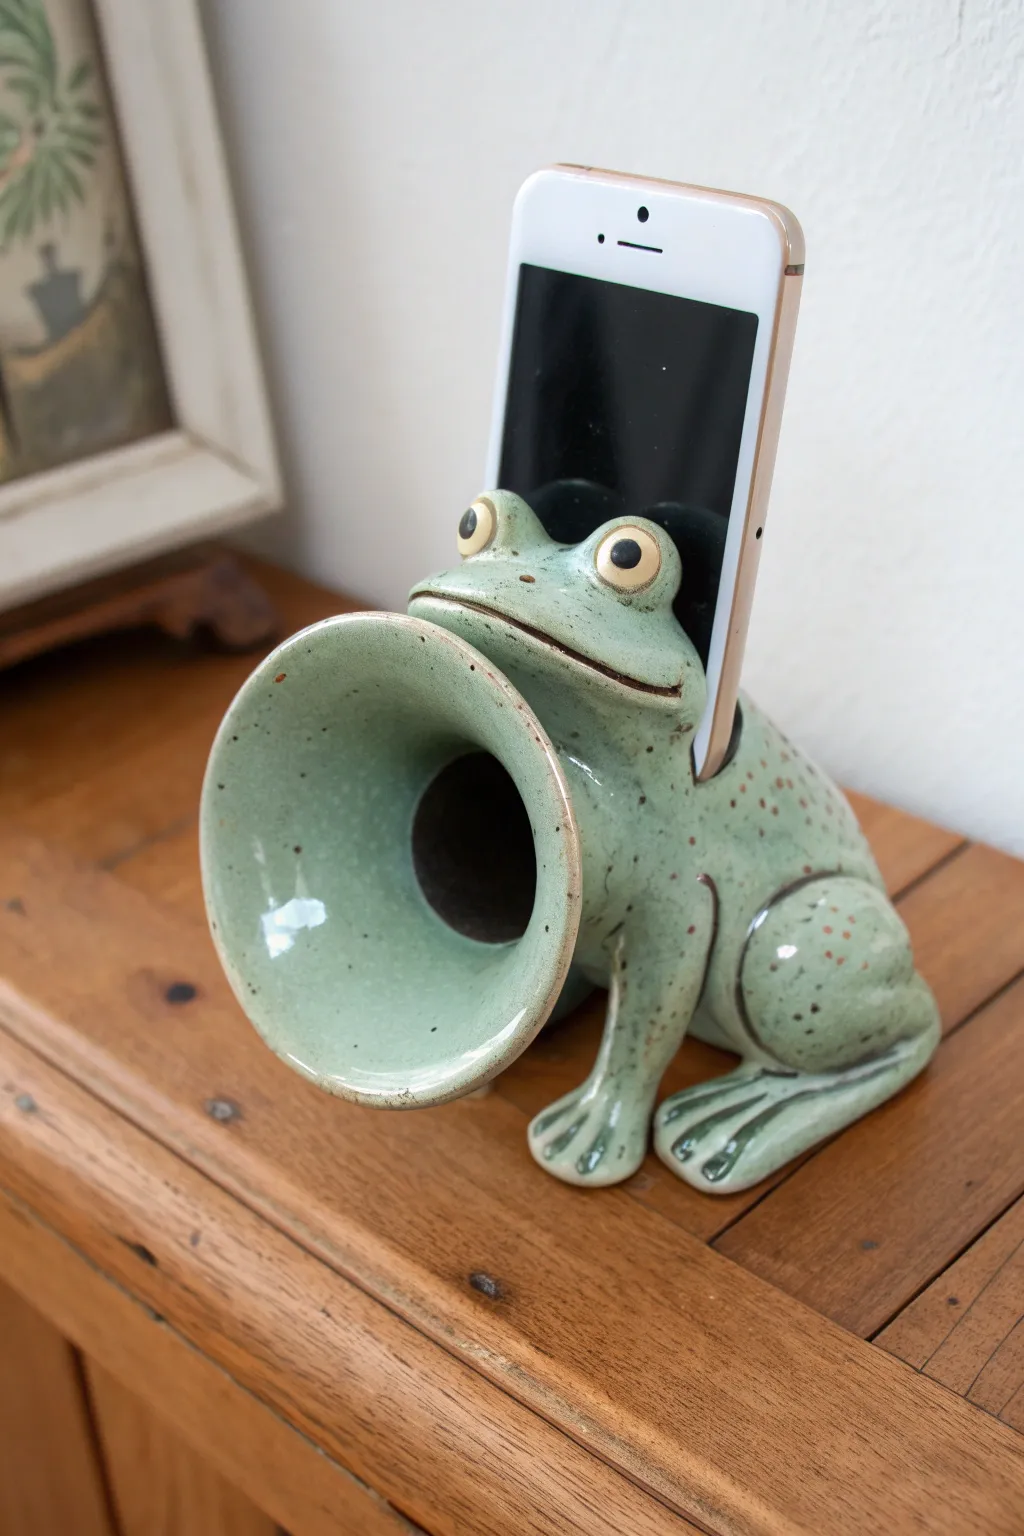
This whimsical ceramic amplifier turns your smartphone into a singing frog, using the natural acoustics of clay to boost volume without electricity. With its wide-open mouth acting as a horn and a speckled green glaze, it’s both a functional speaker and a charming desk companion.
Step-by-Step
Materials
- Stoneware clay (smooth body recommended)
- Pottery wheel (optional, for the horn)
- Basic clay tools (needle tool, rib, sponge, wire cutter)
- Slip and scoring tool
- Fettling knife
- Rolling pin
- Underglazes: Light green, dark green, black, white
- Clear glaze
- Kiln
- Smartphone (for sizing)
Step 1: Forming the Body and Horn
-
Throw or pinch the horn:
Begin by creating the amplifier’s ‘speaker.’ If you are using a wheel, throw a small, flared trumpet shape about 3-4 inches wide at the rim. Alternatively, pinch a cone shape by hand and smooth it carefully. -
Shape the body pinch pot:
Create a medium-sized pinch pot for the frog’s main body. This needs to be hollow and voluminous to help resonate the sound. -
Close the body form:
Close up the pinch pot to make a hollow sphere or egg shape, trapping the air inside to keep the walls firm while you work. -
Prepare the connection point:
Hold your horn piece against the front of the body to determine placement. Trace the circle where they meet, then cut a hole in the body slightly smaller than the horn’s base. -
Attach the mouth:
Score and slip both the base of the horn and the opening on the body. Press them firmly together, blending the clay from the horn onto the body so the seam disappears completely. This creates the open mouth.
Step 2: Sculpting Frog Features
-
Add the legs:
Roll two thick coils for the legs. Bend them into a ‘Z’ shape and attach them to the sides of the body with slip. Flatten the ends to act as feet and carve simple toes for stability. -
Create the front legs:
Add two smaller, straighter coils to the front chest area for the forelegs, blending them smoothly into the body so the frog looks like it is sitting up. -
Form the eyes:
Roll two small balls of clay. Score the top of the head area and attach the balls. Press a smaller tool into the center of each to create an indentation for the pupil later. -
Sculpt the mouth ridge:
Roll a very thin coil and attach it around the outer edge of the horn where it meets the face, creating a distinct ‘lip’ line that gives the frog its wide grin.
Acoustic Check
Before the clay is too dry, shine a light through the phone slot. You should clearly see the light coming through the mouth. If not, the sound path is blocked and needs clearing
Step 3: Fitting the Phone Slot
-
Measure the slot:
I prefer to use a ruler rather than the actual phone at this stage to avoid getting clay on the device. Measure the width and depth of your intended smartphone. -
Cut the opening:
On the back of the frog’s head/neck area, cut a rectangular slot. It needs to be wide enough for the phone to slide in, but snug enough to hold it upright. -
Check the interior:
Reach through the mouth opening or use a tool to smooth the inside of the slot. Ensure there is a clear path for sound to travel from the slot area through to the mouth horn. -
Dry slowly:
Cover the piece loosely with plastic to let it dry very slowly. This prevents the phone slot from warping or shrinking unevenly.
Toad Texture
Instead of a smooth green finish, use a carving tool to gouge small bumps before bisque firing, then glaze with watery browns and rusts for a bumpy ‘toad’ look
Step 4: Glazing and Finishing
-
Bisque fire:
Once bone dry, fire the piece in the kiln to bisque temperature (usually cone 04 or 06). -
Apply base color:
Sponge or brush on a light celadon or sage green glaze over the entire body and inside the horn. -
Add speckled texture:
Take a stiff bristle brush with iron oxide or a darker brown glaze/underglaze. Flick the bristles to spatter small spots across the back and sides for a natural froggy texture. -
Detail the eyes:
Paint the eyeballs white and the pupils black using underglaze and a fine detail brush. Leave a tiny white dot in the black pupil for a ‘hightlight’ to bring life to the face. -
Final glaze fire:
Fire the piece again to your clay’s maturity temperature (e.g., cone 5/6) to vitrify the clay and melt the glaze.
Place your new green friend on a shelf and enjoy the amplified tunes


The Complete Guide to Pottery Troubleshooting
Uncover the most common ceramic mistakes—from cracking clay to failed glazes—and learn how to fix them fast.
Howling Dog Head Horn
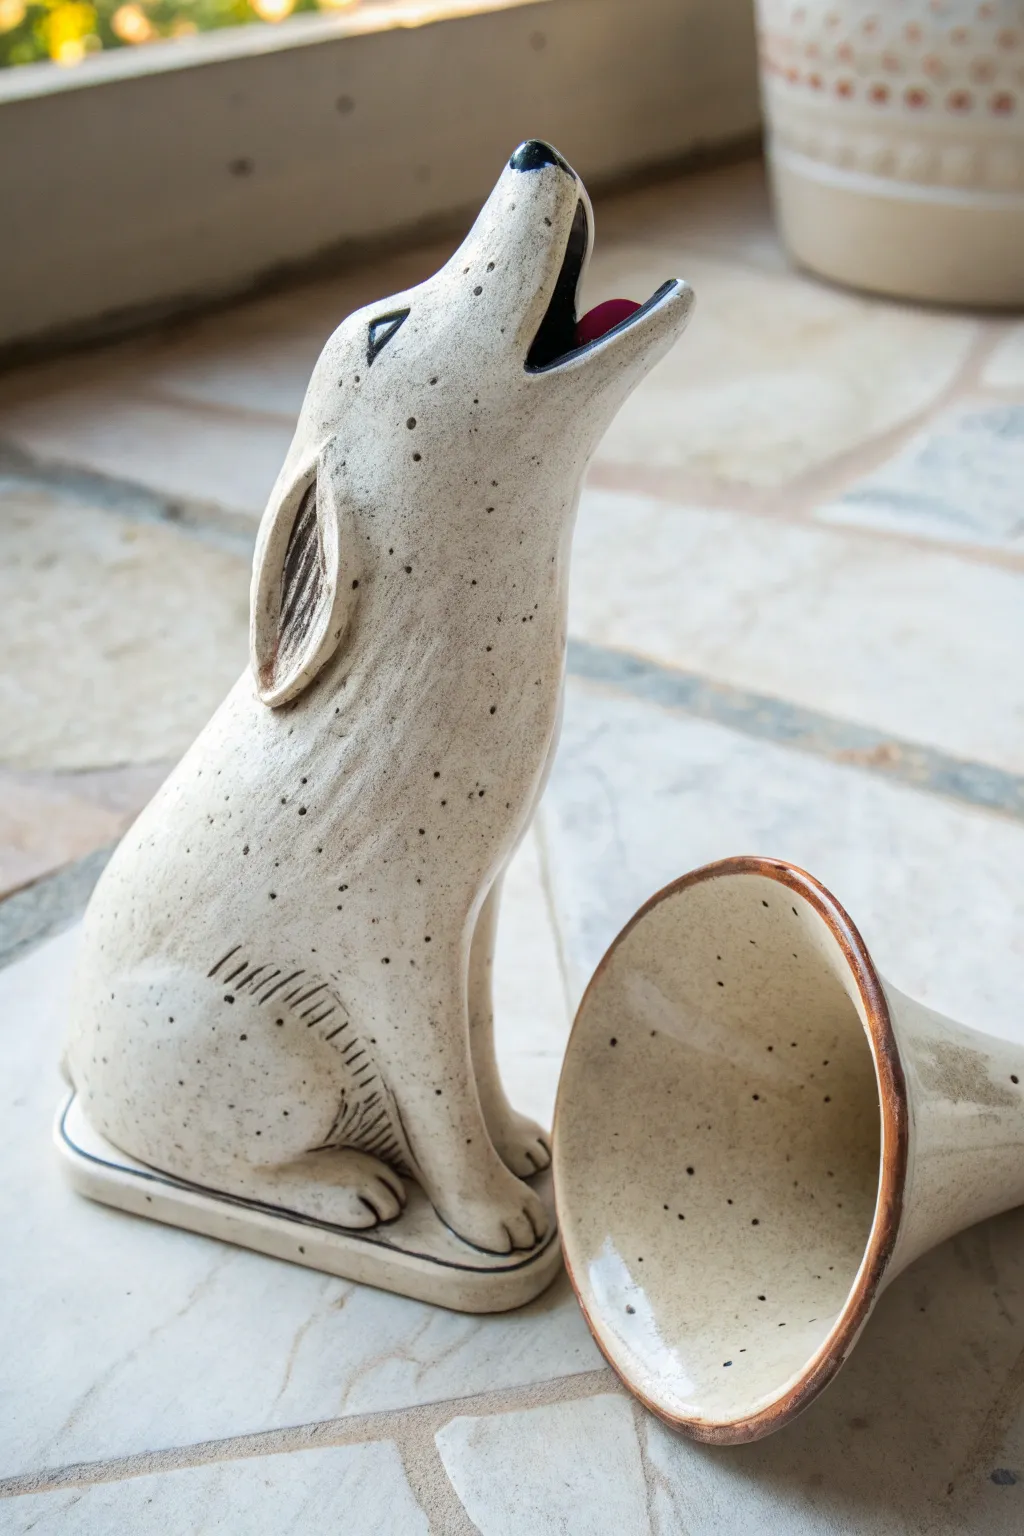
Embrace the call of the wild with this charming ceramic amplifier shaped like a howling coyote or wolf. The whimsical design features a hollow body and a detachable conical horn that projects sound, all finished in a creamy speckled glaze with rustic brown accents.
Detailed Instructions
Materials
- Speckled stoneware clay (mid-fire)
- Clay carving tools (needle tool, loop tool)
- Rib tool (kidney)
- Slip and score tool
- Underglaze (black and dark brown)
- Clear or transparent milky white glaze
- Rolling pin
- Sponge
- Kiln
Step 1: Sculpting the Body
-
Form the base:
Begin with a solid lump of clay, roughly the size of a grapefruit. Use your palms to shape it into a tall, tapered cone that leans slightly backward, mimicking the posture of a sitting dog. -
Shape the head:
Pinch and pull the top of the cone upwards and slightly forwards to create the neck and head. Elongate the snout significantly to capture the ‘howling’ silhouette. -
Define the legs:
Using a modeling tool or your fingers, delineate the front legs from the main body mass. They should be fused to the chest but have defined paws at the bottom. -
Hollow the form:
Once the basic shape is leather hard, flip the piece over and carefully hollow out the interior using a loop tool. The walls should be even, roughly a quarter-inch thick. -
Close the base:
Roll out a slab of clay for the base. Score and slip the bottom of your hollow sculpture and attach it to the slab. Trim away excess clay and smooth the seam. -
Open the mouth:
This is crucial for the amplifier function. Carve a round opening where the mouth is. Ensure this connects all the way to the hollow interior chamber. -
Add the ears:
Shape two teardrop pieces of clay. Score and slip them onto the sides of the head, pressing the centers in to create depth. -
Refine the surface:
Smooth the entire dog with a damp sponge to remove fingerprints. Use a needle tool to scratch in texture for the fur around the legs and chest.
Slumping Snout?
If the long snout droops while sculpting, prop it up with a small piece of sponge or a wad of paper towel until the clay stiffens.
Step 2: Creating the Horn
-
Form the cone:
I prefer to throw this part on the wheel for symmetry, but you can also hand-build it. Create a wide funnel shape that tapers down to a neck. -
Check the fit:
The narrow end of your horn needs to fit reasonably well into or against the dog’s open mouth. Measure twice before finishing the rim. -
Smooth the interior:
Use a rib to compress and smooth the inside of the cone. A smooth surface helps reflect sound better than a rough one.
Phone Dock Mod
Cut a slot in the dog’s back before hollow-ing that leads into the chamber. Size it to fit your phone so it acts as a passive speaker.
Step 3: Decoration and Glazing
-
Bisque fire:
Let both pieces dry completely (bone dry) and fire them in the kiln to bisque temperature. -
Apply underglaze details:
Paint the tip of the nose black. Use a dark brown underglaze to accent the rim of the horn, the inside of the ears, and the base of the sculpture. -
Accentuate the fur:
Wash a thinned dark brown underglaze over the textured fur areas, then wipe it back with a sponge so the color sits only in the grooves. -
Add the tongue:
Paint a small splash of red or deep pink inside the mouth area for a pop of color. -
Glaze application:
Dip or brush a clear or semi-transparent milky glaze over the entire dog and the horn. This will allow the clay’s natural speckles to show through. -
Final wipe:
Wipe the bottom of the base and the rim of the horn (if you plan to fire it standing up) completely clean of glaze. -
Final firing:
Fire the pieces to the maturity temperature of your clay and glaze.
Place the horn near the mouth and enjoy the acoustic charm of your new artwork
Elephant Trunk Sound Funnel
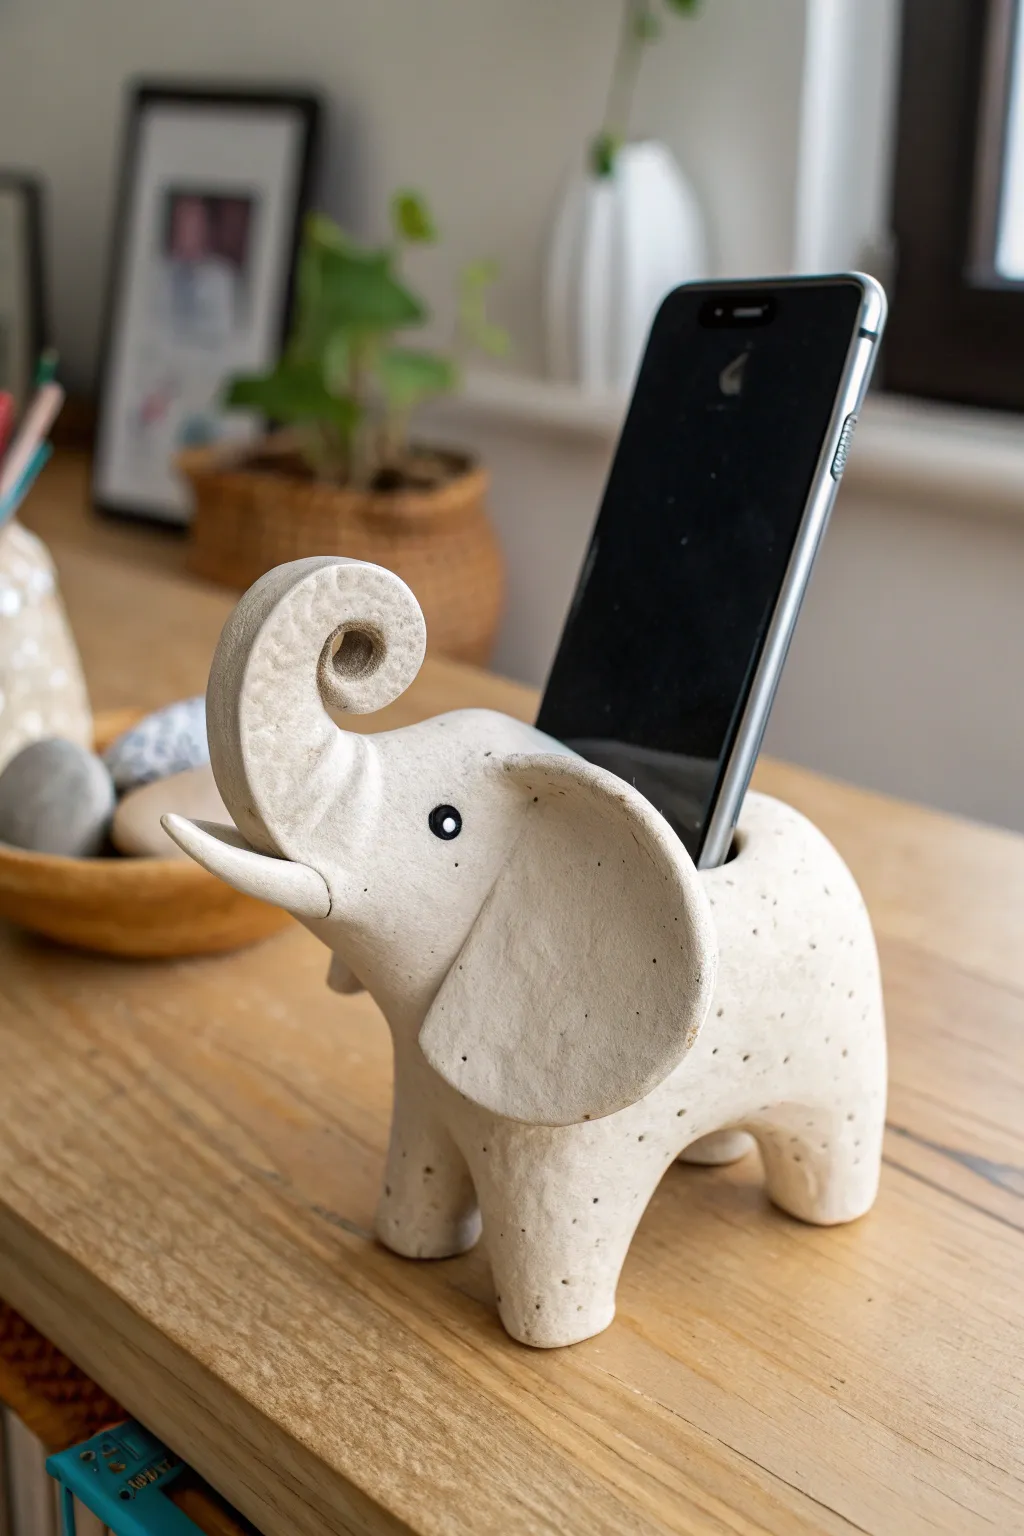
Transform a lump of clay into this charming little elephant that works double duty as a phone stand and acoustic amplifier. Its speckled white finish and whimsical curled trunk add a touch of handcrafted personality to your desk while naturally boosting your music volume.
Step-by-Step Tutorial
Materials
- White stoneware clay with speckles (or plain white air-dry clay)
- Small rolling pin
- Assorted clay sculpting tools (needle tool, modeling tool)
- Slip and scoring tool (if using kiln clay) or water (if using air-dry)
- Cell phone (for sizing reference)
- Black underglaze or acrylic paint (for the eye)
- Clear matte glaze or sealant
- Sponge and water bowl
- Canvas or cloth work surface
Step 1: Forming the Body Base
-
Prepare the main mass:
Begin by taking a substantial fist-sized ball of clay and wedging it thoroughly to remove air bubbles. Shape it into a smooth, thick oblong oval, slightly flattened on the bottom so it sits stably. -
Create the sound cavity:
Using your thumb or a large loop tool, hollow out the rear portion of the elephant’s body. The opening should be positioned on the back top, wide enough to hold a phone vertically, but deep enough to act as a resonance chamber. -
Shape the legs:
Instead of attaching separate legs, try pulling them directly from the main body mass. Gently pinch and pull four stout, short legs from the bottom corners, tapping the feet on the table to flatten them for good stability.
Slumping Trunk?
If the heavy clay trunk droops while wet, prop it up with a small customized wedge of sponge or a crumpled ball of paper towel until the clay stiffens enough to hold its own weight.
Step 2: Sculpting the Head and Trunk
-
Form the head shape:
Define the head area at the front of your oval body. If the neck area feels too thick, gently smooth clay away to create a slight indentation separating the head from the body. -
Attach the trunk coil:
Roll a thick coil of clay that tapers towards one end. Score and slip the thicker end to the center of the face. This will become the most crucial part of the sculpture. -
Position the curl:
Curve the trunk upwards and backwards in a tight ‘C’ shape. The tip should curl inward significantly, creating that classic trumpet look. Ensure the base of the trunk is thick and sturdy. -
Hollow the trunk end:
Use a round modeling tool to create a deep indentation at the very tip of the trunk. While this doesn’t connect to the main chamber, it visually suggests the sound funnel concept. -
Add tusks:
Roll two very small, pointed cones of white clay. Attach these just below the trunk on either side, curving slightly upward. Smooth the seams completely so they don’t break off later.
Step 3: Ears and Assembly
-
Flatten the ears:
Roll out a slab of clay about 1/4 inch thick. Cut out two large, rounded shapes—somewhat like guitar picks or flattened kidney beans—for the ears. -
Attach the ears:
Score and slip the flat side of the ears to the side of the head. I like to press the upper curve of the ear slightly forward to give the elephant an attentive, listening expression. -
Blend the seams:
With a modeling tool, firmly blend the clay from the back of the ear onto the neck and body. The connection needs to be strong, as protruding parts are fragile. -
Refine the slot:
Test the fit with your phone (wrap the phone in plastic wrap first to keep it clean). Ensure the phone sits at a comfortable viewing angle and isn’t too tight.
Acoustic Boost
For better sound amplification, make the hollow chamber inside the body as large and smooth as possible. Rough interiors absorb sound waves rather than reflecting them out.
Step 4: Details and Finishing
-
Smooth the surface:
Use a slightly damp sponge to wipe down the entire piece. This smooths out fingerprints and reveals the natural grit or ‘tooth’ of the clay, which adds texture. -
Paint the eye:
using a fine-point brush and black underglaze (or acrylic if air-drying), paint a small solid black circle for the eye. Add a tiny white dot in the center for a sparkle of life, then outline the circle with a thin black line. -
Let it dry slowly:
Place a loose plastic bag over the elephant for the first 24 hours to ensure even drying, especially for the thinner ears and trunk. Then remove the bag and let it bone dry. -
Fire or seal:
If using ceramic clay, bisque fire to cone 04, apply a clear matte glaze, and glaze fire to cone 6. If using air-dry clay, allow it to cure fully for 48-72 hours, then coat with a matte acrylic sealant.
Place your phone in the slot and enjoy your favorite playlist with your new acoustic companion

TRACK YOUR CERAMIC JOURNEY
Capture glaze tests, firing details, and creative progress—all in one simple printable. Make your projects easier to repeat and improve.
Whale Spout Front Horn
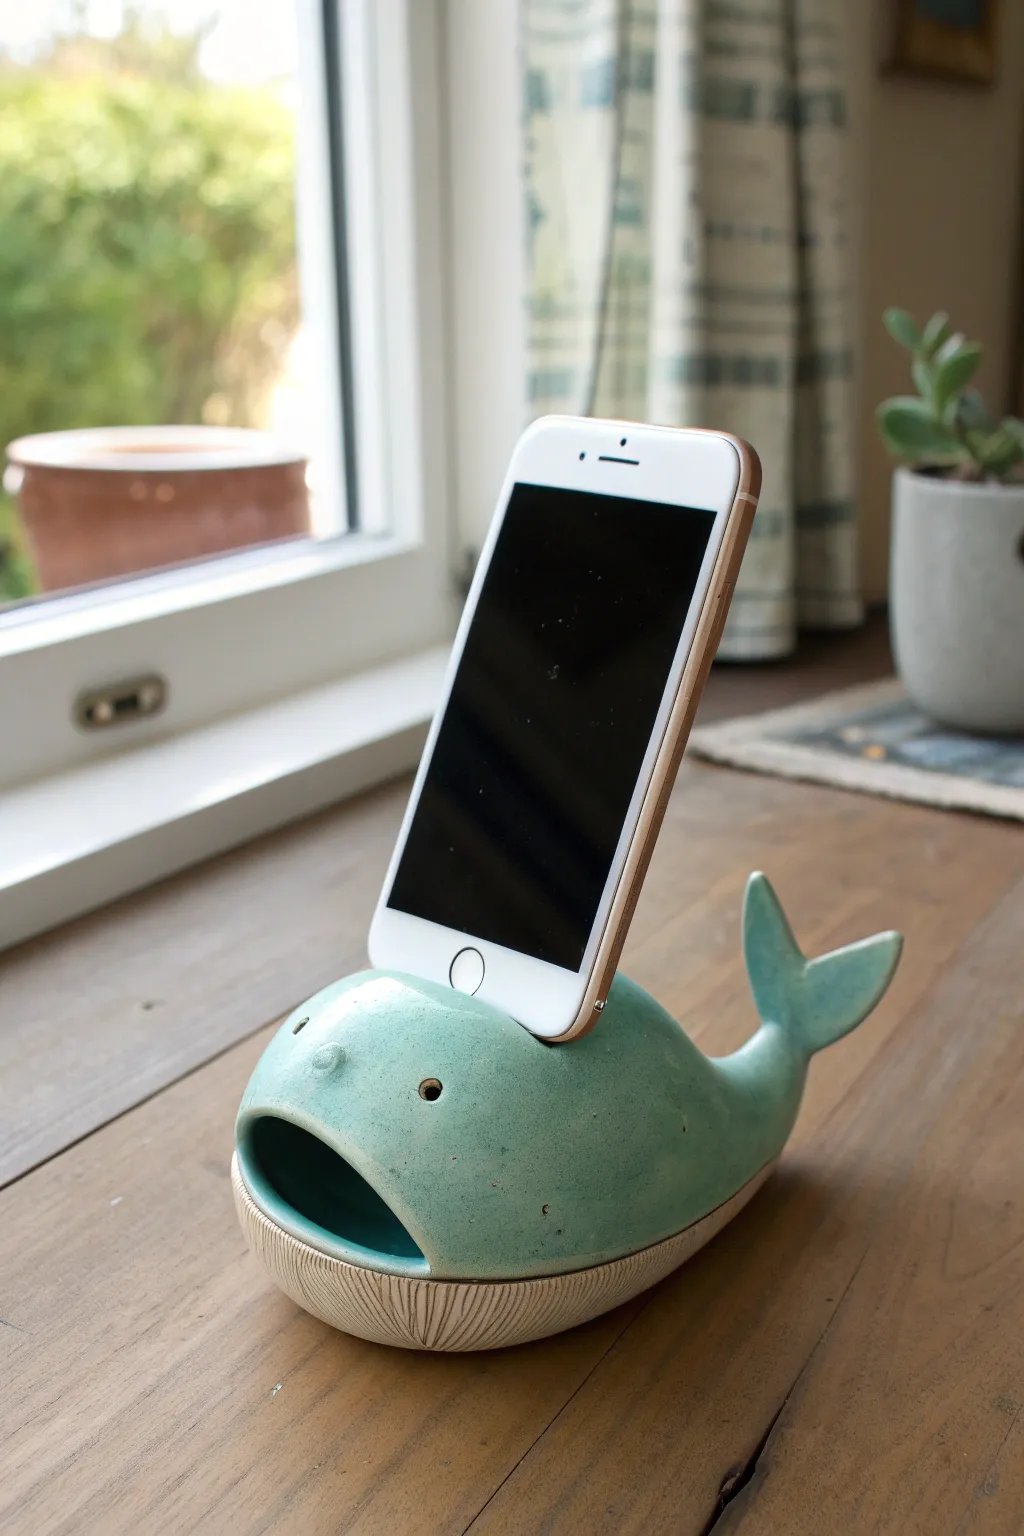
This charming ceramic whale turns your smartphone’s speaker into a room-filling sound system using natural acoustics. With its glossy teal body and textured stoneware belly, it acts as both a functional passive amplifier and a whimsical desk sculpture.
Step-by-Step Guide
Materials
- Stoneware clay (smooth or lightly grogged)
- Pottery tools (needle tool, rib tool, loop tool)
- Slip and scoring tool
- Rolling pin
- Canvas work surface
- Underglaze (teal/seafoam green)
- Clear glaze
- Sponge
- Kiln access
Step 1: Forming the Body
-
Prepare the Clay:
Begin by wedging your stoneware clay thoroughly to remove air pockets. You will need a ball of clay roughly the size of a large grapefruit. -
Pinch Pot Base:
Form a large, elongated pinch pot. Instead of making it perfectly round, gently squeeze it into an oval shape to mimic a whale’s body. -
Close the Form:
If you started with two pinch pots, score and slip the edges to join them into a hollow egg shape. If you used one large piece, shape it into a solid form and hollow it out later, or close up the single pinch pot into a sealed oval. -
Smooth the Exterior:
Use a metal or rubber rib to smooth the exterior surface. You want to maintain a distinct separation between a rounded upper back and a slightly flatter belly area. -
Create the Mouth:
Using a sharp knife or needle tool, cut a wide, horizontal slit at the front for the mouth. Gently pry it open and use your fingers to shape a ‘smiling’ open cavity. This is where the sound will exit. -
Hollow the Interior:
If you are working solid, use a loop tool to hollow out the body through the mouth hole. The walls should be even, about 1/4 inch thick. I find it helpful to smooth the inside with a damp sponge for better acoustics.
Step 2: Details & Texture
-
Sculpt the Tail:
Roll a small coil of clay and flatten one end into a fluke shape. Score and slip the other end, then attach it to the rear of the body, curving it upward playfully. -
Blend the Seams:
Thoroughly blend the clay where the tail meets the body so it looks like one continuous piece. Smooth away any tool marks. -
Carve the Phone Slot:
Carefully measure your phone’s width. Cut a rectangular slot on the top of the whale’s back. It needs to be wide enough for your phone, plus a little wiggle room for shrinkage during firing. -
Connect the Chambers:
Ensure the hole you just cut leads directly into the main hollow cavity. The path from the phone speaker down into the body and out the mouth must be unobstructed. -
Texturing the Belly:
Using a needle tool or a fine loop tool, carve vertical lines along the bottom thrid of the whale. These striations mimic the ventral pleats of a baleen whale and add great tactile contrast. -
Add Eyes and Spouts:
Poke two small holes for eyes and create a tiny blowhole bump if desired. Keep these details simple to match the stylized aesthetic.
Unwanted Muffling?
If the sound is muffled, check the interior smoothness. Rough clay inside absorbs sound waves; a burnished or glazed interior reflects sound better.
Step 3: Glazing & Firing
-
Bisque Fire:
Let the piece dry slowly under plastic to prevent the tail from cracking. Once bone dry, bisque fire it in the kiln. -
Wax Resist:
Apply wax resist to the textured belly area. We want the raw clay texture to remain unglazed to contrast with the shiny body. -
Apply Glaze:
Dip or brush a glossy teal or seafoam green glaze over the top portion of the whale. The wax will prevent glaze from sticking to the belly. -
Clean Up:
Use a damp sponge to wipe any stray glaze droplets off the textured belly lines to ensure they show up crisp and clean. -
Final Fire:
Fire the piece again specifically for the glaze temperature you are using.
Upgrade the Splash
Add a small splash of white slip or glaze on the tip of the tail or near the ‘waterline’ to give the effect of the whale breaking the surface.
Place your phone in the slot and enjoy your favorite tunes with a little extra volume and a lot of extra style
Nautilus Shell Spiral Chamber
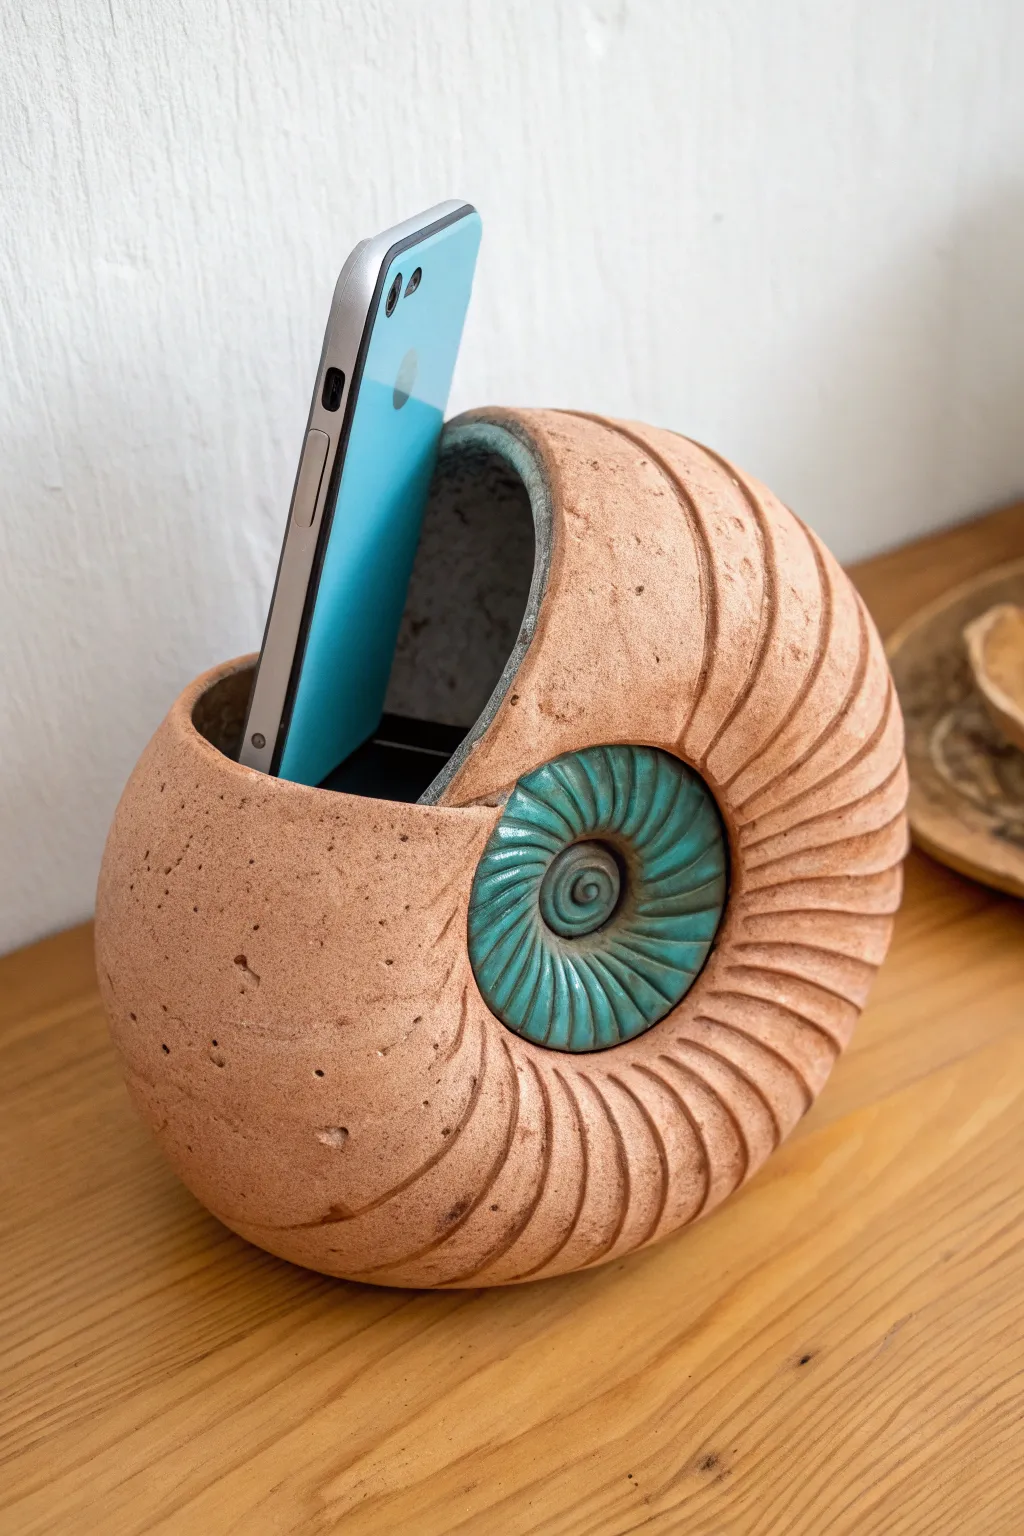
Harness the natural amplification power of the spiral with this stunning ceramic phone dock. Combining rustic terracotta textures with a vibrant pop of teal glaze, this piece serves as both a sculptural object and a functional sound booster.
Detailed Instructions
Materials
- Stoneware clay (terracotta or groggy clay recommended)
- Pottery wheel (optional, can be hand-built)
- Ribs (metal and rubber)
- Needle tool
- Carving tools (loop tool and wire end tool)
- Sponge
- Small circle cutter or stamp
- Teal/Turquoise glossy glaze
- Clear matte glaze (optional for exterior)
- Kiln access
Step 1: Forming the Body
-
Base Construction:
Start with a substantial ball of clay (approx. 2-3 lbs). Whether throwing on the wheel or pinching by hand, your goal is a closed, hollow form. If throwing, create a donut shape and close the walls inward until sealed. -
Shape Refinement:
Once the hollow form is leather hard, gently paddle it into an oval, slightly flattened shape to mimic the profile of a seashell rather than a perfect sphere. -
Creating the Sound Flat:
Identify the bottom of your shell. Tap this area gently against your work surface to create a flat spot so the amplifier stands stable and won’t wobble when a phone is inserted.
Cracking Issues?
If cracks appear near the deep carvings during drying, you carved too deeply while the clay was too wet. Wait until firm leather hard next time, and compress the clay with a rib before cutting.
Step 2: Sculpting the Spiral
-
Mapping the Design:
Use a needle tool to lightly sketch the nautilus spiral on one side. Start from the center point and spiral outward, ensuring the lines flow naturally around the curve of the pot. -
Carving the Center:
Press a small circle stamp or use a carving tool to define the ‘eye’ of the spiral at the very center. This recessed area will later hold the pooled glaze. -
Adding Texture:
Following your sketched lines, use a carving tool to gouge deep, rhythmic grooves radiating from the center spiral outward to the back of the shell. These ridges give the piece its fossil-like character. -
Refining the Ridges:
Take a damp sponge and smooth the sharp edges of your carved grooves. You want the texture to look weathered and organic, not sharp and mechanical. -
Detailing the Surface:
For extra realism, I like to create small pockmarks on the smooth outer areas using a stiff brush or a needle tool to mimic natural wear found on sea-tumbled shells.
Boost the Bass
Make the hollow chamber larger and the walls slightly thinner. A larger acoustic volume inside the shell creates deeper resonance and louder amplification for your music.
Step 3: Chamber & Drying
-
Cutting the Insert:
Measure the width and depth of your phone. Cut a rectangular slot into the top front of the shell. This opening connects to the hollow interior, allowing sound to travel. -
Interior Cleanup:
Use a finger or tool to smooth the inside edges of the cut. Ensure no sharp burrs remain that could scratch your device. -
Slow Drying:
Cover the piece loosely with plastic to let it dry very slowly. Because the walls vary in thickness due to carving, slow drying prevents cracking. -
Bisque Fire:
Once bone dry, fire the piece to bisque temperature (usually cone 04 or 06) to prepare it for glazing.
Step 4: Glazing & Finishing
-
Waxing:
Apply wax resist to the main body of the shell if you plan to keep the raw clay look. Crucially, wax the outer rim of the spiral center to keep the glaze contained. -
Applying Color:
Carefully brush or bulb-syringe a thick layer of teal or turquoise glaze into the center spiral recess only. Let it pool slightly in the deep grooves of the spiral. -
Interior Glaze:
Pour a small amount of glaze into the phone slot, swirl it to coat the interior chamber, and pour it out. This smooth surface helps reflect sound waves better than raw clay. -
Outer Protection:
If you want to protect the raw clay without adding shine, sponge a very thin layer of matte clear glaze over the textured exterior, or simply leave it bare for a tactile finish. -
Final Fire:
Fire the piece to the maturity temperature of your clay and glaze (e.g., cone 5/6). The center glaze should melt into a glassy pool against the matte shell.
Place your phone in the slot and enjoy the surprisingly rich audio warmth of your handmade acoustic vessel
Flower Trumpet Bloom Horn
Blend vintage gramophone aesthetics with organic floral shapes in this unique ceramic project. This passive amplifier uses the natural resonance of fired clay and a carefully shaped trumpet to boost your phone’s volume without any cords or batteries.
How-To Guide
Materials
- Stoneware clay (smooth body recommended)
- Hardwood block (oak or beech)
- Pottery wheel (optional, can be hand-built)
- Modeling tools (ribs, needle tool, sponge)
- Wire clay cutter
- Rolling pin
- Slip and score tool
- Peach/Pink underglaze
- White or cream underglaze
- Clear variation glaze
- Wood glue
- Chisel or router
- Sandpaper (various grits)
- Wood oil or varnish
Step 1: Forming the Trumpet
-
Wedging the clay:
Start by thoroughly wedging about 2-3 lbs of stoneware clay to remove air bubbles. This is crucial for a shape that needs to support its own weight while flaring out. -
Throwing the initial cone:
Center the clay on the wheel and open it up right down to the wheel head (create a bottomless cylinder). Pull the walls up into a tall, narrow cone shape, keeping the base slightly wider for stability. -
Flaring the rim:
Slow the wheel down. Gently apply pressure from the inside of the rim outward, gradually stretching the clay into a wide trumpet shape. Support the underside with your other hand to prevent collapse. -
Scalloping the edges:
Once you have a wide flare, stop the wheel. Use your fingers or a moist sponge to gently press indentations into the rim at regular intervals, creating a soft, waved flower petal effect. -
Bending the neck:
While the clay is still plastic but firm enough to hold shape, carefully bend the narrow end of the cone about 90 degrees. This creates the ‘elbow’ that will eventually connect to the wooden base. -
Refining the shape:
Use a smooth rib tool to compress the exterior walls and define the transition from the narrow neck to the wide flower mouth. Let this dry slowly under plastic to preventing cracking.
Step 2: Glazing and Firing
-
Bisque firing:
Once bone dry, fire the piece to bisque temperature (usually cone 04 or 06). Sand away any sharp burrs lightly after firing. -
Applying base color:
Brush a coat of peach or soft pink underglaze on the entire exterior and interior of the trumpet. I like to sponge it slightly to give it a textured, organic look rather than a flat color. -
Adding petal details:
Paint elongated teardrop shapes in white or cream running from the center of the horn out toward the petal tips. This mimics the natural variegation found in morning glories or lilies. -
Clear glazing:
Dip or brush a clear glaze over the entire piece. A glaze with a slight crackle effect adds a lovely vintage character to the final look. -
Final firing:
Fire the piece to the maturity temperature of your clay body (likely cone 5/6 for stoneware). Ensure the kiln is well-ventilated for bright colors.
Slumping Issues?
If the flower rim droops while throwing, use a heat gun or torch to stiffen the clay slightly as you work. This adds immediate strength to the flare.
Step 3: Crafting the Base
-
Cutting the wood block:
Cut a solid piece of hardwood into a rectangular block, approximately 4×5 inches and 1.5 inches thick. This creates a heavy, stable foundation. -
Routing the phone slot:
Measure the thickness of your specific phone (with its case). Use a router or chisel to carve a deep slot across the front of the block where the phone will stand upright. -
Drilling the sound channel:
Drill a hole through the wood that connects the bottom of the phone slot to the back of the block. This channel is critical as it carries the sound from the speaker into the ceramic horn. -
Fitting the horn:
check the diameter of your ceramic horn’s small end. Carve a matching recess in the back of the wooden block so the ceramic neck fits snugly into the sound channel. -
Sanding and sealing:
Sand the wood progressively from 120 to 400 grit until it feels silky smooth. Apply a natural oil or clear matte varnish to protect the wood and bring out the grain. -
Assembly:
Using a strong epoxy or construction adhesive, glue the ceramic horn into the recessed hole in the wood base. Hold it in place until the bond sets.
Acoustic Boost
Make the interior surface of the horn as smooth as possible with a rib tool. A smoother, glossier interior reflects sound waves better than a rough texture.
Place your phone in the slot and enjoy the surprisingly rich volume boost of your handmade creation
Mushroom Cap Megaphone
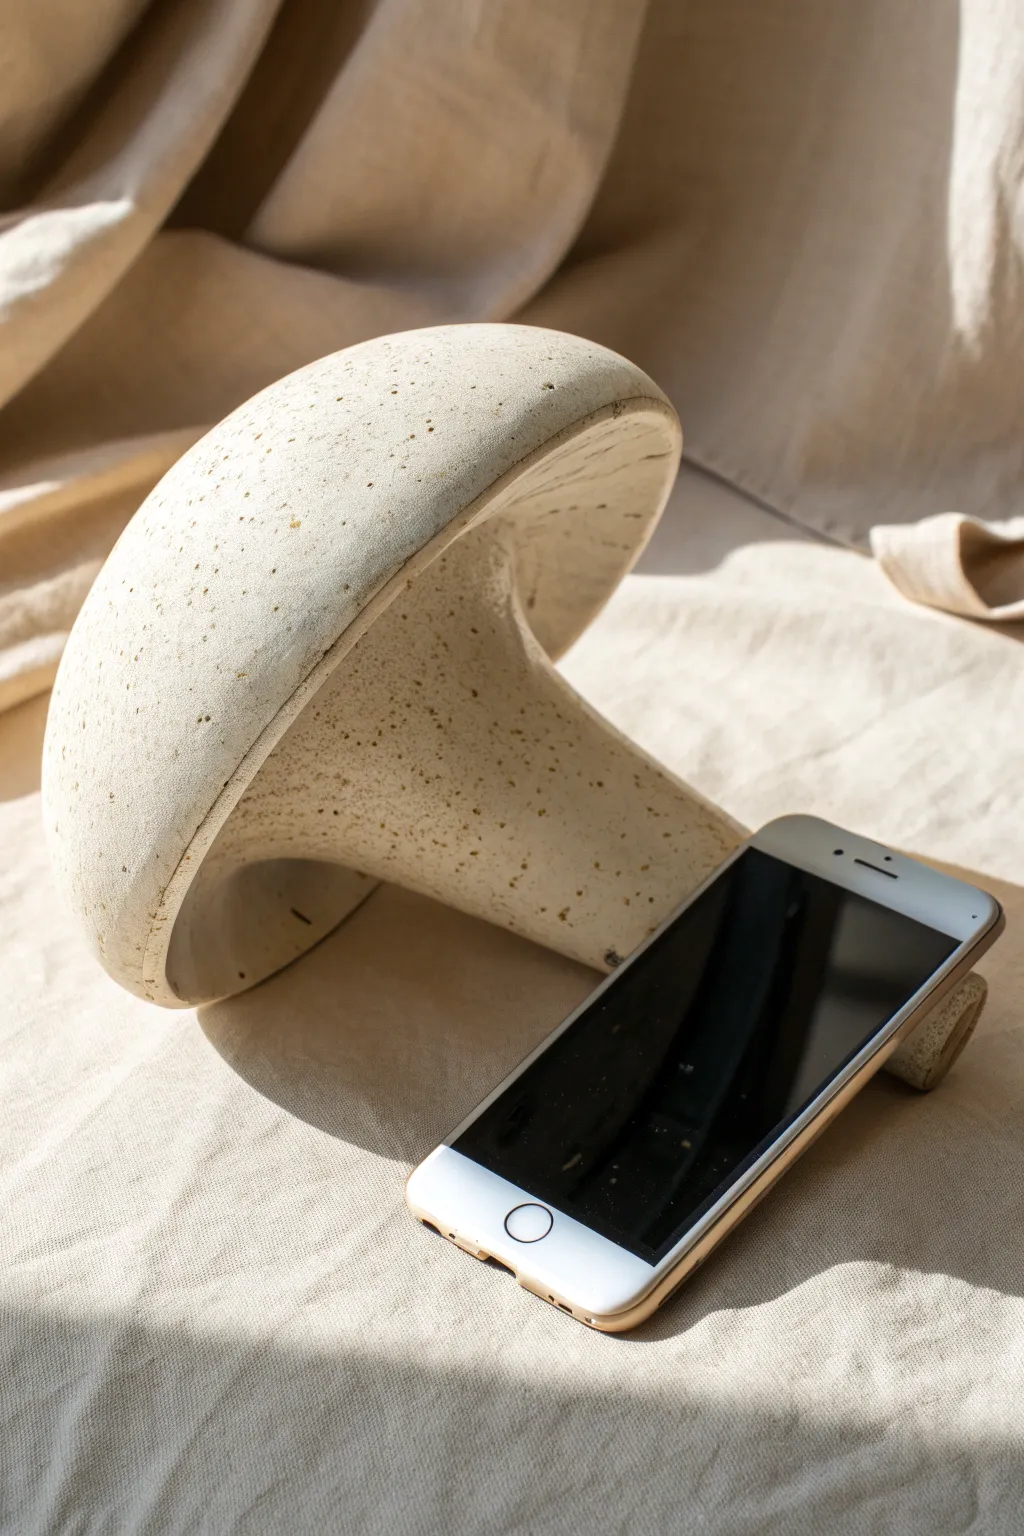
Transform a wedge of clay into a functional piece of art with this mushroom-shaped passive amplifier. Its organic curve naturally boosts your phone’s volume while the speckled, matte finish adds an earthy, modern touch to any nightstand.
Step-by-Step Guide
Materials
- Speckled stoneware clay (approx. 3-4 lbs)
- Pottery wheel
- Throwing bats
- Wooden rib tool
- Metal kidney scraper
- Pin tool
- Sponge
- Wire cutter
- Trimming tools (large loop and small ribbon)
- Calipers (optional)
- Matte clear glaze
- Kiln access
Step 1: Throwing the Form
-
Center the clay:
Start with a generous amount of wedged speckled clay properly centered on your wheel head. You will need enough mass to support a wide, heavy top. -
Open wide:
Since this form is essentially a sideways funnel, open your clay much wider than you would for a standard cylinder. Leave a thick floor, as you will be trimming a foot later. -
Establish the stem:
Pull the walls up, keeping the base narrow to form the ‘stem’ of the mushroom. This section needs to remain thick enough to support the weight of the cap above. -
Flare the cap:
As you move past the stem area, aggressively flare the clay outward. Use a wooden rib on the outside to support the wall as you stretch the clay into a wide, open bowl shape. -
Curve the rim:
Gently curve the very edge of the wide rim back inward slightly. This creates that classic mushroom cap profile and adds structural integrity to the thin edge. -
Smooth the interior:
Using a sponge or a flexible rib, compress and smooth the entire interior curve. A seamless curve is crucial for good sound direction. -
Cut from wheel:
Wire the piece off the bat but leave it in place to dry until it reaches a solid leather-hard state. It needs to be firm enough to be handled sideways.
Sound Check
Make the interior curve of the mushroom cap as smooth and continuous as possible. A consistent, bell-like curve amplifies sound waves better than a shape with sharp angles.
Step 2: Trimming and Sculpting
-
Invert and chuck:
Because the shape is top-heavy and irregular, use a tall chuck or foam bat to secure the mushroom cap-down on the wheel for trimming. -
Refine the stem:
Trim excess weight off the stem area. Sculpt a gentle curve where the stem transitions into the underside of the cap. -
Open the base:
Unlike a normal pot, you need to trim all the way through the bottom floor to open the tube. This creates the hole where the sound enters. -
Create the phone slot:
Once off the wheel, stand the mushroom on its side (its final resting position). Carefully carve a notch or flatten a section of the stem rim so a phone can sit flush against the opening. -
Add a stabilizer:
If the mushroom tends to roll, attach a small coil or wedge of clay to the underside of the stem (opposite the phone slot) to act as a discreet kickstand. -
Smooth the surface:
Use a damp sponge to remove any trimming marks and bring the grog (speckles) to the surface. I find this creates the best texture for unglazed areas.
Step 3: Firing and Glazing
-
Bisque fire:
Fire the piece to cone 04 (or your clay’s specific bisque temperature). -
Apply glaze:
Dip or brush a thin coat of matte clear glaze over the piece. This seals the clay but preserves the raw, speckled look shown in the image. -
Wipe the footing:
Ensure the side that touches the table is completely free of glaze. -
Glaze fire:
Fire to the maturity temperature of your clay body (likely Cone 5 or 6 for stoneware).
Slumping Hazard
If the wide cap starts flopping while throwing, use a heat gun or blowtorch to stiffen the clay during the process. Don’t rush the flare—do it in multiple passes.
Place your phone in the cradle and enjoy the naturally amplified acoustics of your new sculpture
Stacked Totem With Hidden Dock

This clever passive amplifier combines the aesthetic of mid-century pottery with modern utility, amplifying your phone’s speaker naturally through a hollow chamber. The design features a pleasing stack of terracotta and blue-glazed rings that form a sculptural acoustic tower.
Detailed Instructions
Materials
- Terracotta or earthenware clay (approx. 3-4 lbs)
- Pottery wheel (or coil building tools if hand-building)
- Needle tool
- Rib tool (wooden and metal)
- Sponge
- Wire cutter
- Blue ceramic glaze (cone 04 or suitable for your clay body)
- Paintbrush for glazing
- Drill bit or hole punch tool (small)
- Calipers (optional but helpful)
Step 1: Forming the Base Chamber
-
Center the clay:
Start with a larger lump of clay (about 1.5 lbs) on the wheel to create the substantial base. Center it low and wide to ensure stability for the final tall structure. -
Open and widen:
Open the clay and pull it outward into a low, wide bowl shape. This bottom section needs to be the widest part of the totem, functioning as the main resonance chamber. -
Close the form:
Collar the walls inward significantly to create a closed, rounded donut shape. Leave the top opening just wide enough to attach the next section, rather than closing it completely. -
Create speaker holes:
Once the base is relatively firm (leather hard), use a small drill bit or hole punch to create a grid of small holes on the front face. This is where the sound will escape. -
Trim the foot:
Flip the base over and trim a clean foot ring. I like to make the foot wide and heavy to prevent the tower from tipping over when a phone is inserted.
Acoustic Tuning
Make sure the connection holes between levels are as wide as possible. A continuous, wide inner channel moves air better, resulting in louder, clearer audio amplification.
Step 2: Throwing the Middle Rings
-
Measure the base:
Use calipers to measure the opening of your base section. You need the next ring to sit perfectly on top of this diameter. -
Throw ring #2:
Throw a second, slightly smaller closed donut form. The bottom opening of this piece must match the top opening of your base. The top opening should get progressively smaller. -
Throw ring #3:
Repeat the process for the third ring (the middle terracotta one). This should be smaller in overall diameter than the blue ring below it. -
Throw ring #4:
Throw the fourth ring (the upper blue one). Keep curving the walls inward to maintain that consistent rounded, organic look. -
Refine the surface:
Smooth all the rings with a rib tool while they are still on the wheel to get that polished, stone-like texture visible in the photo.
Make It Modular
Instead of scoring and slipping the stack permanently, try firing the rings separately! If they fit snugly, you can unstack them to clean the inside or rearrange the color pattern.
Step 3: Creating the Dock and Assembly
-
Throw the top cup:
Create the final, smallest top section. Unlike the others, this shouldn’t be fully closed; it needs to be a cup shape to hold the phone. -
Cut the slot:
While the top piece is leather hard, carefully cut a rectangular slot into the bottom of the cup component. This allows the phone’s speaker to communicate with the hollow chamber below. -
Score and slip:
Score the connection points (rims) of all five leather-hard pieces aggressively and apply slip. -
Stack and seal:
Stack the pieces in order: base, large terracotta ring, middle blue ring, small terracotta ring, and top cup. Press them firmly together. -
Smooth the seams:
Blend the seams on the *inside* if you can reach, but for the outside, you want them to look like distinct stacked stones. Clean up any oozing slip with a sponge. -
Slow drying:
Cover the entire tower loosely with plastic to let it dry very slowly. Because the walls vary in thickness, fast drying will cause cracking. Bisque fire once bone dry.
Step 4: Glazing and Finishing
-
Wax resist:
Apply wax resist to the sections you want to remain raw terracotta—specifically the very bottom trim, the second ring from the bottom, and the top cup. -
Apply blue glaze:
Dip or brush a rich denim-blue glaze onto the base section (avoiding the speaker holes if glaze is thick) and the fourth ring up. -
Clean speaker holes:
Use a needle tool to ensure no glaze has clogged the tiny speaker grid holes on the base. Clear holes are essential for sound. -
Final wipe:
Wipe away any stray glaze specks from the unglazed terracotta areas with a damp sponge to keep the clay body looking pristine. -
Glaze fire:
Fire the piece to the maturity temperature of your glaze and clay body.
Place your phone in the cradle and enjoy the surprisingly rich volume boost from your handcrafted ceramic tower.
Double-Exit Horn For Wider Sound
Enhance your phone’s audio naturally with this minimalist passive amplifier featuring a speckled cream clay finish. This functional sculpture combines a sleek, rectangular acoustic chamber with a dramatic flared horn to direct and deepen sound without electricity.
Step-by-Step Guide
Materials
- Light-colored stoneware clay with speckles (or plain clay + grog)
- Rolling pin
- Wooden slats (for thickness guides)
- Fettling knife
- Needle tool
- Slip and scoring tool
- Balloon (small round shape)
- Cornstarch
- Sponge
- Small wooden craft piece (for phone stand insert)
- Smartphone (for sizing)
Step 1: Planning and Slab Rolling
-
Measure your device:
Before touching clay, measure the width and thickness of your smartphone. You will need these dimensions to create the perfect slot for it to rest in. -
Prepare the clay:
Wedge your speckled stoneware clay thoroughly to remove air pockets. If you want a more random texture, wedge in some coarse sand or grog at this stage. -
Roll main slab:
Roll out a large slab of clay approximately 1/4 inch thick. Use wooden slats on either side of your clay as guides for your rolling pin to ensure even thickness throughout. -
Cut chamber panels:
Cut five rectangles for the main box base: a bottom, a top, two long sides, and two short ends. The exact size depends on your phone, but a standard size is roughly 6 inches long by 3 inches deep.
Step 2: Forming the Acoustic Chamber
-
Cut the phone slot:
On the rectangle destined to be the top face, cut a rectangular slot slightly wider than your phone. Position it off-center to the left, leaving room for the horn on the right. -
Create the horn opening:
On the same top panel, cut a circular hole on the right side. This is where your flared horn will attach later. -
Cut the side port:
On one of the shorter end panels (the left side), cut a circular hole about 1.5 inches in diameter to serve as the secondary sound exit/bass port. -
Assemble the box:
Score the edges of your base and side panels firmly. Apply slip (liquid clay) to the scored areas and assemble the four walls onto the base. -
Reinforce joints:
Roll thin coils of clay and press them into the interior corners of the box to strengthen the seams. Smooth these out with a modeling tool or your finger. -
Attach the top:
Score and slip the top edges of the walls and attach the top panel (the one with the slot and hole). Gently paddle the outside to ensure a tight seal and crisp 90-degree angles.
Slumping Horns?
If the horn sags while attaching, support it with crumpled newspaper or a sponge underneath until the clay stiffens enough to hold its own weight.
Step 3: Sculpting the Horn
-
Inflate the balloon:
Blow up a small round balloon until it matches the diameter you want for the horn’s curve. Dust it lightly with cornstarch so the clay doesn’t stick. -
Drape the horn:
Roll a smaller slab of clay and drape it over the balloon, smoothing it down to form a curved, organic bowl shape. Trim the edges to create an even rim. -
Cut the throat:
Once the clay over the balloon has stiffened slightly (leather hard), pop the balloon and cut a hole in the bottom of the bowl shape that matches the hole on your box. -
Attach horn to box:
Score and slip the bottom edge of your horn and the area around the hole on the box top. Press them together firmly. -
Blend the seam:
Use a small modeling tool to blend the clay where the horn meets the box, ensuring the transition is smooth and airtight for better sound projection.
Pro Tip: Better Sound
Use a smooth, glossy glaze on the INSIDE of the horn and box. A smoother interior surface reflects sound waves better than a rough one, resulting in louder audio.
Step 4: Finishing Touches
-
Smooth the exterior:
I like to take a damp sponge and wipe down the entire piece, softening any sharp edges on the box corners and the rim of the horn to expose the clay’s speckles. -
Add detail holes:
Using a needle tool, poke random small divots or ‘wormholes’ into the surface for extra texture, mimicking the organic look of weathered stone. -
Dry slowly:
Cover the piece loosely with plastic and let it dry very slowly over several days to prevent the box seams from cracking. -
Bisque fire:
Fire the piece in a kiln to bisque temperature (usually Cone 04). -
Glaze and final fire:
Apply a matte cream or clear glaze if your clay body is already the right color. Fire to the final temperature for your clay (typically Cone 5 or 6) to vitrify the amplifier. -
Add phone rest:
Once finished and cooled, glue a small piece of wood or cork inside the slot or construct a small wooden angled rest (as seen in the photo) to hold the phone upright.
Place your phone in the cradle and enjoy the richer sound filling your room