When I’m staring at a plain terracotta pot, I treat it like a tiny blank canvas that can become anything from garden decor to a cute tabletop accent. Here are my favorite clay pot art ideas—starting with the classic go-to designs and moving into the fun, unexpected transformations.
Classic Solid Color With a Clean Rim
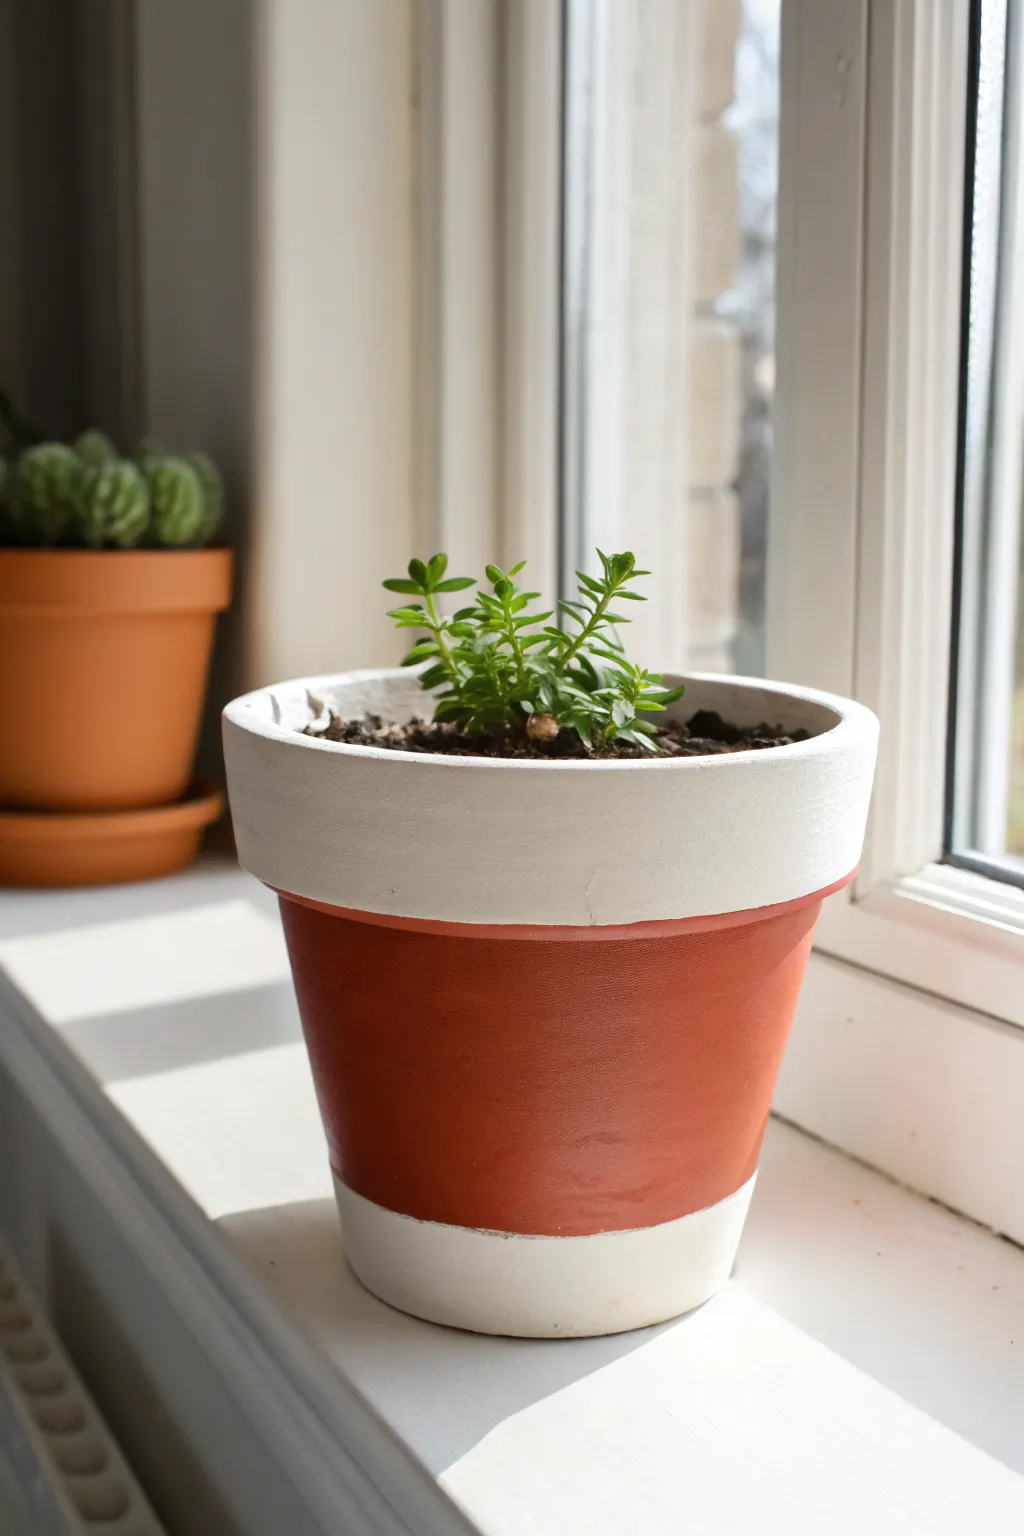
Achieve a modern, high-contrast look by pairing the natural warmth of terracotta with crisp white borders. This clean design highlights the classic shape of the pot while giving it a fresh, updated feel perfect for any windowsill.
Step-by-Step Tutorial
Materials
- Terracotta pot (4-6 inch diameter)
- White or cream acrylic paint (outdoor rated if for exterior use)
- Medium flat paintbrush
- Small angled paintbrush
- Painter’s tape or masking tape
- Clear acrylic sealer (matte or satin finish)
- Water cup and paper towels
- Newspaper or drop cloth
Step 1: Preparation
-
Clean the pot:
Start by thoroughly wiping down your terracotta pot with a damp cloth to remove any dust or debris. If the pot is old, scrub it well and let it dry completely, as trapped moisture can cause paint to bubble later. -
Smooth the surface:
If you notice any rough patches or sharp bits of clay, gently sand them down with fine-grit sandpaper for a smoother painting surface.
Step 2: Painting the Rim
-
Establish boundaries:
For the upper rim, you can choose to tape off the line where the rim meets the body of the pot, or if you have a steady hand, you can paint freehand. I personally find painting freehand here works well since the pot’s natural groove acts as a guide. -
First rim coat:
Load your medium flat brush with white paint. Apply paint horizontally around the rim, ensuring you cover the very top edge and about an inch into the inner rim so the soil line won’t show the bare clay. -
Dry and repeat:
Let this first coat dry for about 15-20 minutes. Terracotta is porous and will soak up the first layer quickly. -
Second rim coat:
Apply a second coat of white paint to the rim to achieve a solid, opaque finish. If brushstrokes are visible, try using a slightly softer brush or thinning the paint with a tiny drop of water.
Uneven Lines?
If paint bleeds under your tape, wait for it to dry fully. Then, gently scrape the excess paint away with a craft knife or use fine-grit sandpaper to buff the terracotta back to its original color.
Step 3: Painting the Bottom Band
-
Mark the bottom line:
Decide how thick you want your bottom white band to be. Use painter’s tape to mark a straight line around the lower circumference of the pot. Press the tape edge down firmly to prevent paint bleeding. -
Paint the base:
Flip the pot upside down to make this easier. Paint the area below the tape, including the bottom edge of the pot, with your white acrylic paint. -
Build opacity:
Allow the first coat on the bottom to dry, then apply a second or third coat until you match the solid whiteness of the rim. -
Remove tape:
Carefully peel off the painter’s tape while the final coat is still slightly tacky. This helps ensure a crisp, clean edge without chipping the dry paint. -
Touch up:
Inspect your lines. If any paint bled under the tape or your freehand rim line is wobbly, use a damp Q-tip to wipe away mistakes or a small angled brush with the appropriate color (white or a terracotta-colored paint mix) to correct it.
Add Texture
Mix a teaspoon of baking soda into your white acrylic paint for the final coat. This creates a trendy, textured ceramic look that mimics high-end pottery.
Step 4: Finishing Touches
-
Enhancing the center:
For this project, the goal is to leave the center section raw terracotta to contrast with the white. If your pot has water stains or uneven coloring in the middle, you can mix burnt sienna, orange, and a touch of brown paint to create a ‘faux terracotta’ color and paint this middle section for a uniform look. -
Dry completely:
Let the entire pot dry for at least 6-12 hours to ensure all layers are fully cured. -
Seal the pot:
Apply a coat of clear acrylic sealer over the entire exterior of the pot. This protects the white paint from yellowing and prevents water from seeping through the clay and bubbling the paint. -
Wait for cure:
Allow the sealer to cure according to the manufacturer’s instructions, usually 24 hours, before potting your plant.
Now you have a beautifully crisp, geometric planter ready to showcase your favorite greenery.


Easy Geometric Color Blocks
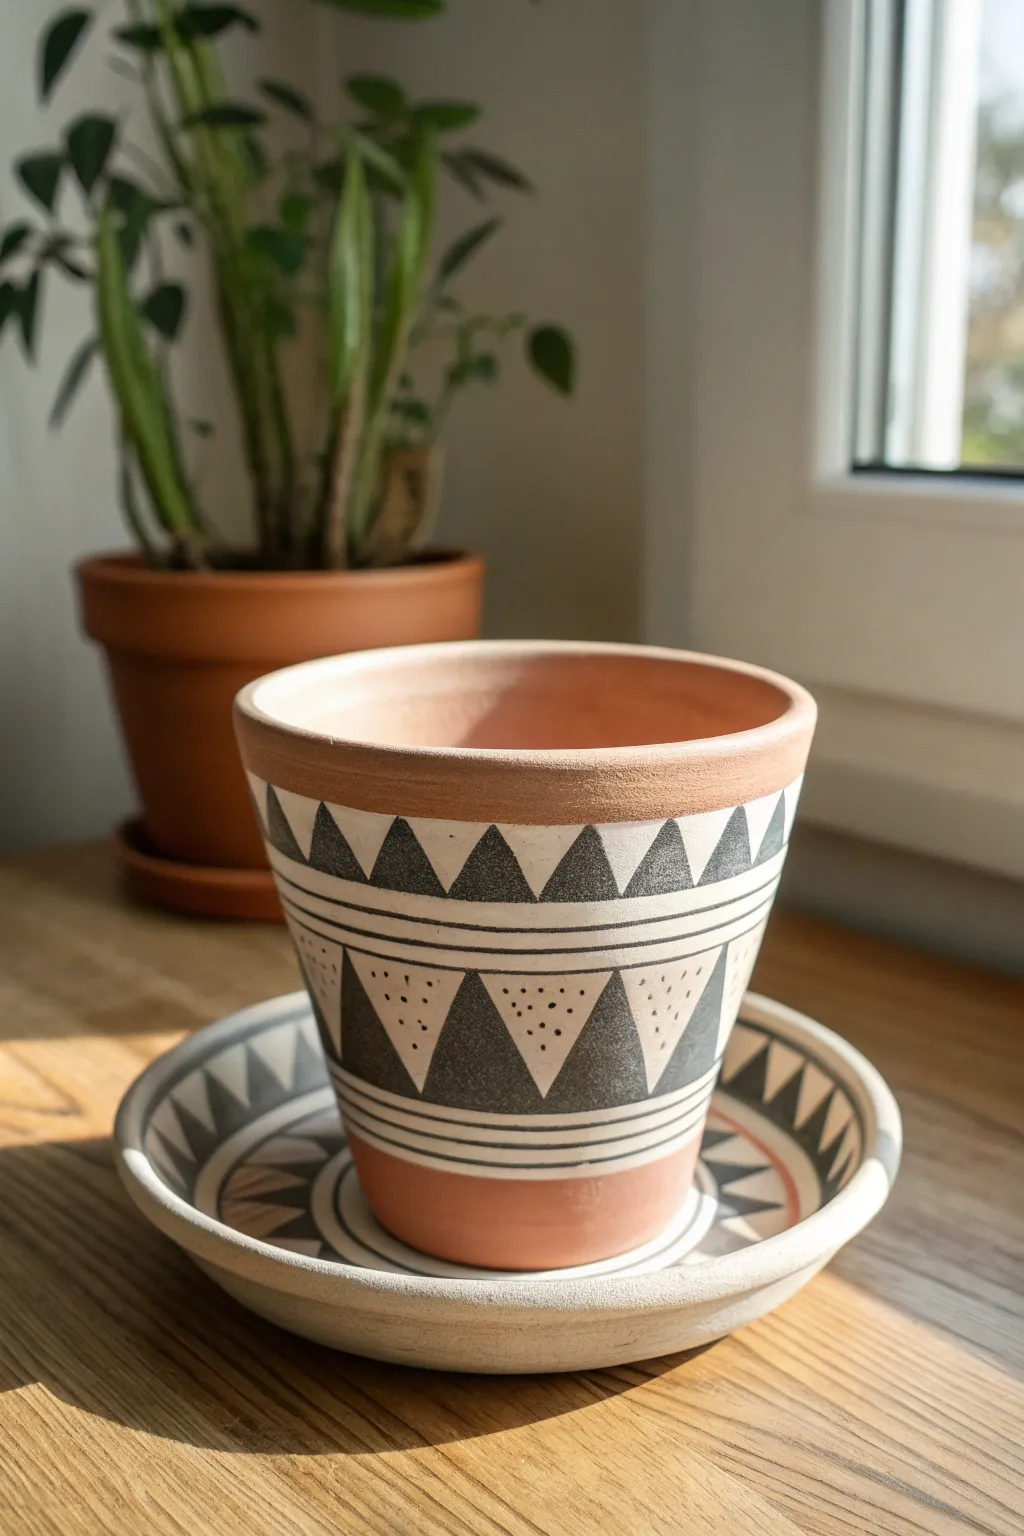
Transform a plain terracotta vessel into a modern statement piece with this striking black and white geometric design. The high-contrast triangles and crisp lines give it a sophisticated mud-cloth vibe that looks far more expensive than it is.
How-To Guide
Materials
- Terracotta pot and matching saucer
- Matte white acrylic paint
- Matte black acrylic paint
- Flat paintbrush (medium width)
- Small round detail brush (size 1 or 2)
- Fine-grit sandpaper
- Washi tape or painter’s tape
- Pencil
- Ruler or soft tape measure
- Clear matte sealer spray
Step 1: Prep and Base
-
Prepare the surface:
Start by giving your terracotta pot a quick sanding with fine-grit sandpaper to remove any rough burrs or bumps. Wipe it down with a damp cloth to remove all dust and let it dry completely. -
Define the raw zones:
Decide how much natural clay you want to leave exposed at the top rim and the very bottom base. Apply a level strip of painter’s tape around the top rim (about 1.5 inches down) and another strip near the bottom to protect the raw terracotta areas. -
Paint the white band:
Using your flat brush, apply a coat of matte white acrylic paint between your two tape lines. This will serve as the background for your geometric work. -
Apply second coat:
Allow the first coat to dry for about 20 minutes. Apply a second coat of white to ensure full, opaque coverage where the terracotta doesn’t show through. Remove the tape while the paint is still slightly tacky to get a crisp edge.
Uneven Lines?
If your hand shakes while painting thin horizontal bands, stabilize your hand by resting your pinky finger on the pot’s surface or use rubber bands as painting guides.
Step 2: Drafting the Design
-
Mark the bands:
Once the white base is fully dry (give it an hour), use a pencil and a flexible ruler to lightly mark horizontal rings around the pot. You’ll need an upper band for small triangles, a middle section for lines, and a lower band for large triangles. -
Sketch the upper triangles:
In the top section of the white band, lightly sketch a row of small, connected triangles pointing upward. Try to keep them relatively uniform in width. -
Sketch the lower triangles:
In the bottom section of the white band, sketch larger, taller triangles. I like to alternate these: one pointing up, one pointing down, creating a zigzag negative space. -
Plan the saucer:
Don’t forget the saucer. Lightly sketch a similar ring of medium-sized triangles around the inner rim of the saucer plate.
Step 3: Painting the Patterns
-
Fill the top triangles:
Using your small round detail brush and black paint, carefully fill in every other triangle in your top row. This creates a high-contrast pattern against the white background. -
Paint the divider lines:
Switch to your steady hand. Paint two thin, parallel black horizontal lines separating the top triangle row from the main bottom section. -
Fill the large triangles:
Move to the large bottom triangles. Paint the upward-pointing triangles solidly black. Leave the downward-pointing triangles white. -
Add the dot details:
For the downward-pointing triangles that you left white, use the very tip of your brush or a toothpick to add three vertical rows of tiny black dots. This adds that intricate, tribal texture. -
Clean up the bottom edge:
Paint two more thin horizontal black lines at the very bottom of your white section to frame the design. -
Detail the saucer:
Paint the triangles on the saucer rim black. I often add a thin circular line around the center of the saucer to tie it all together visually.
Make it Pop
For a subtle pop of color, paint a very thin ring of terracotta-colored or coral paint inside the saucer design or between the black lines to echo the clay’s natural hue.
Step 4: Finishing Touches
-
Check your edges:
Look over your work for any smudges. If you went outside the lines, you can carefully touch up with a bit of white paint once the black is dry. -
Erase pencil marks:
Gently erase any visible pencil lines that weren’t covered by paint. Be sure the paint is 100% dry before rubbing an eraser on it. -
Seal the pot:
Take the pot and saucer outside and spray them with a clear matte sealer. This protects your artwork from water damage when you water your plants.
Now you have a custom planter that perfectly blends rustic warmth with modern design


Soft Ombre Fade
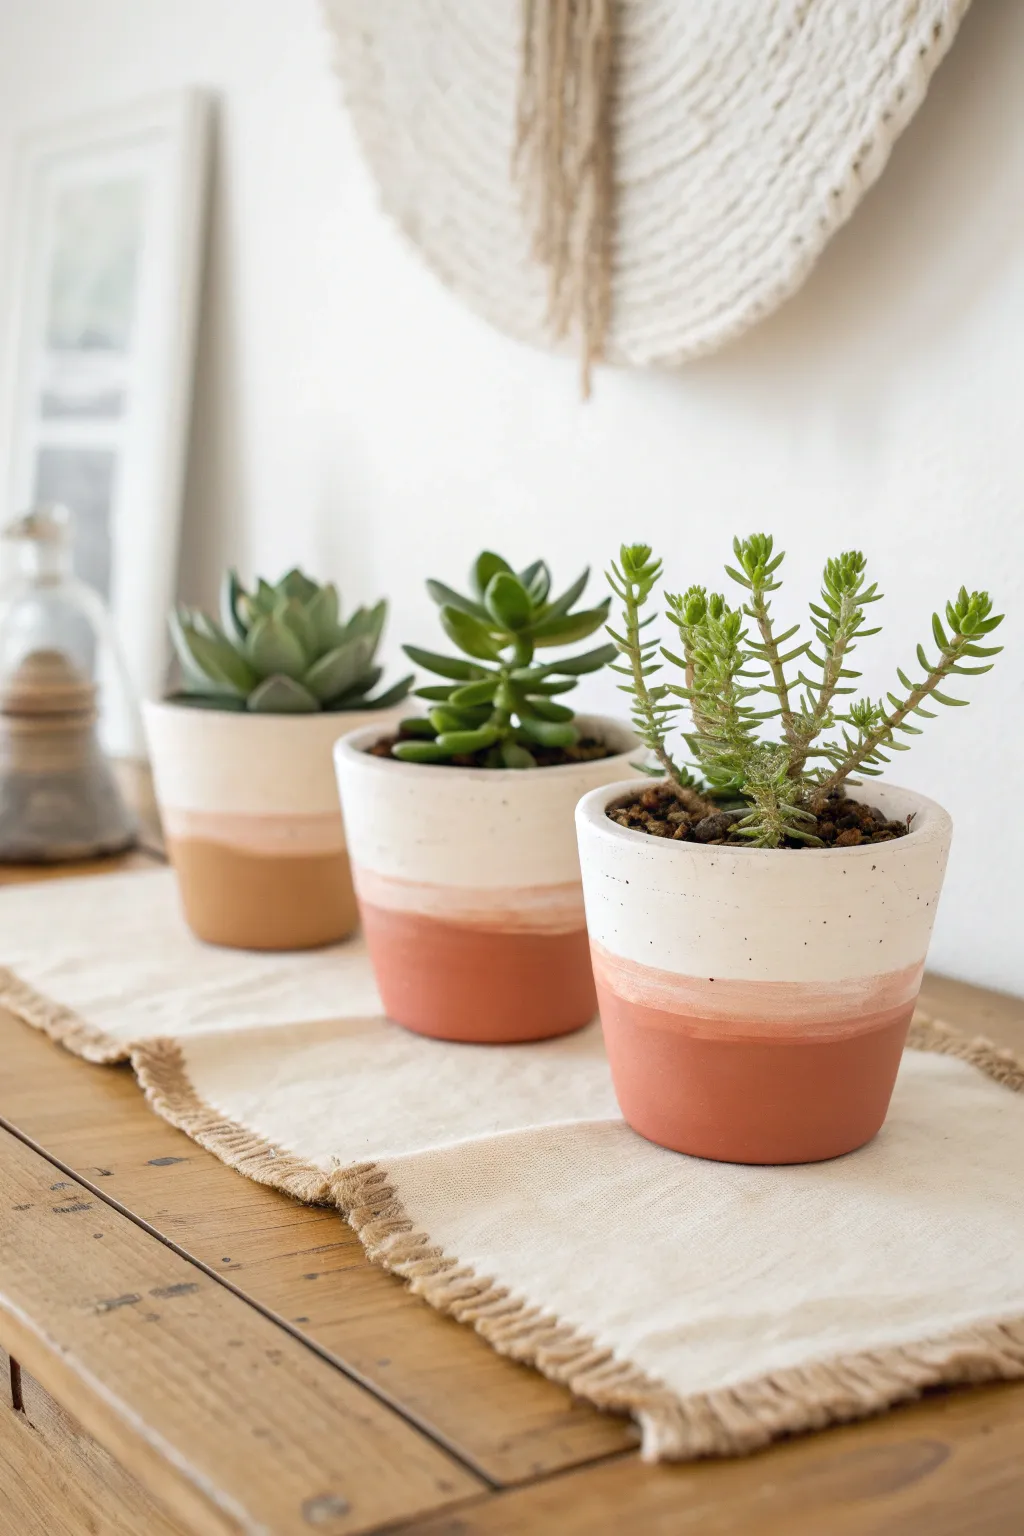
Achieve a soft, dreamy look for your succulents with this simple yet striking clay pot makeover. By blending creamy white into a gentle blush tone, you create a modern, earthy gradient that perfectly complements the natural terracotta base.
Step-by-Step
Materials
- Standard terracotta pots
- White acrylic paint (matte finish)
- Blush or pale peach acrylic paint
- Flat paintbrush (1-inch width)
- Small foam sponge or blending brush
- Paper plate or palette
- Painter’s tape (optional)
- Clear matte sealer spray
Step 1: Preparation & Base Coat
-
Clean surface:
Begin by wiping down your terracotta pots with a damp cloth to remove any dust or sticker residue. Let them dry completely, as moisture will trap underneath the paint. -
Pour paints:
Squeeze a generous amount of white acrylic paint onto your palette. Add a smaller dollop of your blush or peach color nearby, leaving space in between for mixing. -
Paint top section:
Load your flat brush with pure white paint. Apply a solid coat to the upper third of the pot, including the rim. -
Extend the white:
Bring the white paint down just past the halfway mark of the pot. Don’t worry about a perfect bottom edge here; a little unevenness helps the blending process later. -
Dry and repeat:
Allow the first coat of white to dry for about 10-15 minutes. Terracotta absorbs paint quickly, so apply a second coat of white to the top section to ensure it looks opaque and crisp.
Uneven Blending?
If your paint dries too fast to blend, keep a misting bottle handy. A tiny spritz of water on the paint keeps it workable longer, allowing for a much smoother, seamless fade.
Step 2: Creating the Ombré
-
Mix the transition shade:
On your palette, mix a small amount of the blush paint into a larger amount of white to create a very pale, creamy peach tone. -
Apply the middle band:
Apply this mixed shade directly below the solid white section, creating a band that is roughly an inch wide depending on your pot size. -
Wet blending:
While both the white above and the new peach mix are still slightly wet, use your brush or a damp sponge to lightly stroke usually the seam where they meet. This softens the hard line. -
Add the blush layer:
Dip your brush into the original blush color without mixing it with much white. Apply this below your middle band, stopping before you reach the bottom of the pot. -
Defining the raw edge:
Decide where you want the paint to end and the raw clay to begin. I prefer to leave the bottom third unpainted for that earthy contrast. -
Feather the bottom edge:
Instead of a harsh straight line at the bottom, use a drier brush to feather the blush paint downward slightly. This creates a softer fade into the raw terracotta. -
Check the gradient:
Step back and look at the pot. If the transition from white to blush looks too stripes-like, dab a little wet paint on the transition lines and gently stipple with a sponge to blur them.
Add Metallic Flair
For a chic twist, paint a thin gold leaf line right where the paint meets the raw terracotta. It adds a touch of glamour without overpowering the soft, natural vibe.
Step 3: Finishing Touches
-
Clean the interior:
If any paint splattered inside the rim, wipe it away with a damp paper towel for a professional finish. -
Allow to cure:
Let the pots sit for at least an hour until the paint is completely dry to the touch. -
Seal the work:
Take the pots to a well-ventilated area and spray them with a clear matte sealer. This protects the gradient from water damage when you water your plants. -
Prepare for planting:
Once the sealer allows, you can pot your succulents directly. If you plan to change plants often, you might keep them in their nursery pots inside your new creation.
Enjoy styling these pots together or separately to bring a calm, artistic touch to your space


Mandala-Style Marker Patterns
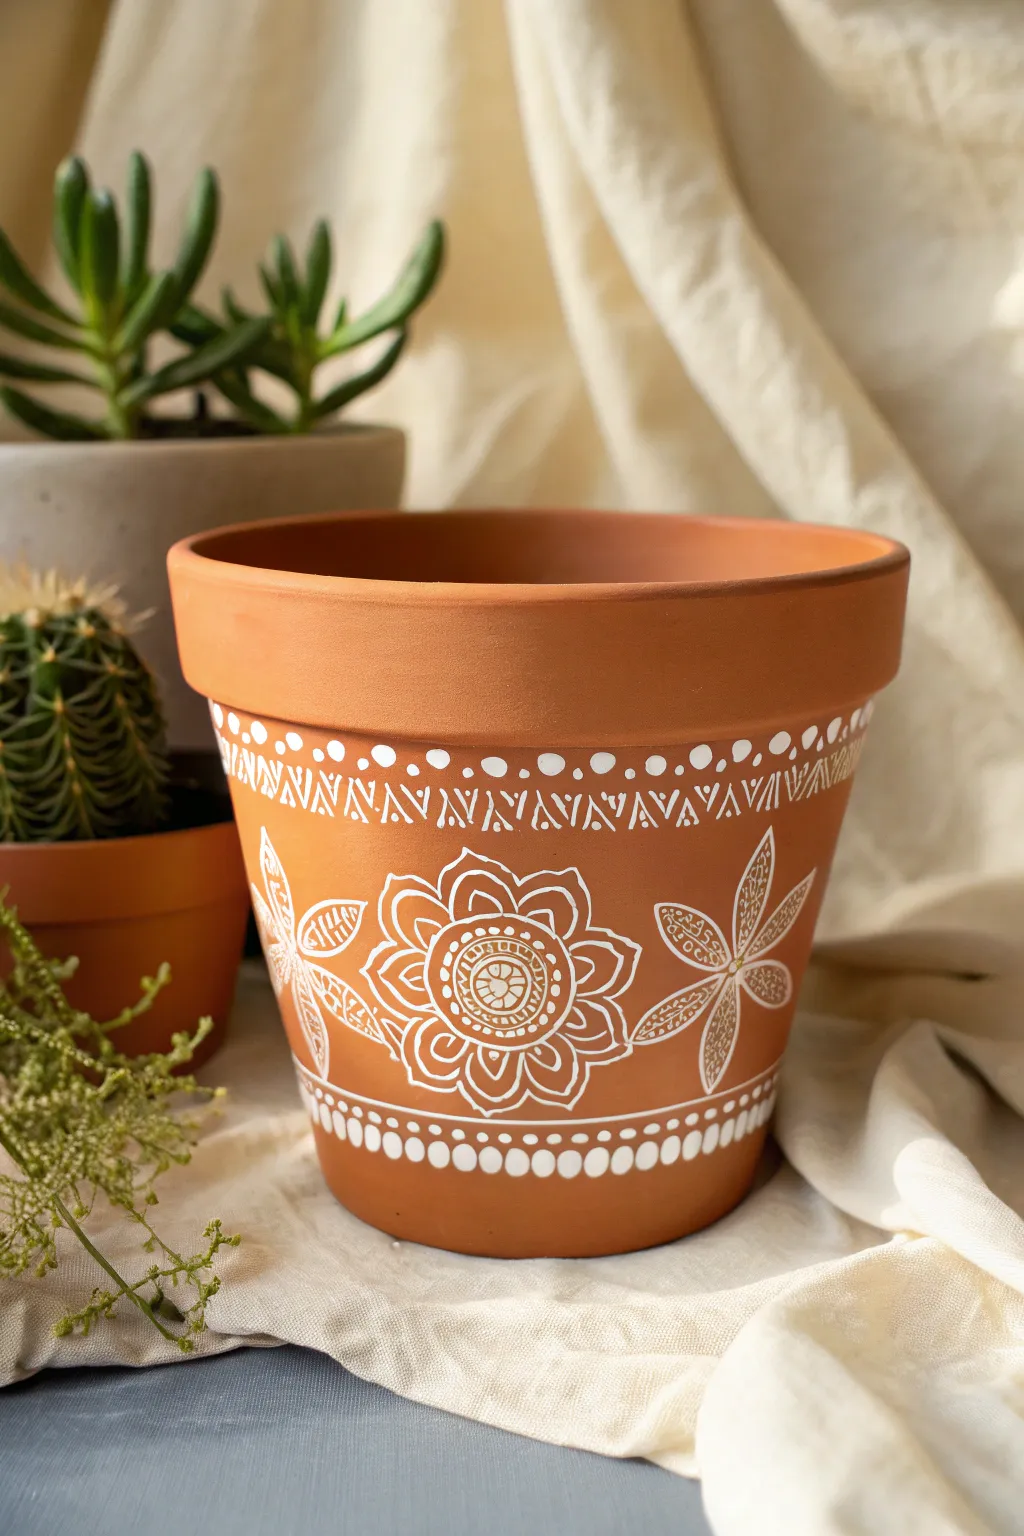
Transform a plain terracotta pot into a boho-chic masterpiece using simple white ink designs reminiscent of henna art. This project features a large central mandala flower flanked by delicate leaves, framed by geometric borders on the rim and base.
How-To Guide
Materials
- Terracotta pot (standard 6-inch or larger)
- White paint marker (oil-based works best, fine tip)
- White paint marker (extra-fine tip for details)
- Damp cloth or sponge
- Pencil (optional)
- Eraser or cotton swab with rubbing alcohol
- Clear spray sealant (matte or satin finish)
Step 1: Preparation
-
Clean the surface:
Before starting, wipe down your terracotta pot with a damp cloth to remove any dust or loose clay particles. A clean surface is crucial for the marker ink to adhere smoothly. -
Dry completely:
Allow the pot to dry fully. Moisture trapped in the clay can cause the paint markers to bleed or run unexpectedly. -
Sketch placement (optional):
If you are nervous about freehanding, lightly sketch the four main compass points of your central flower with a pencil to ensure it is centered on the face of the pot.
Oops, Smudged Ink?
If you make a mistake, don’t panic! While the ink is wet, wipe it with a damp Q-tip. If it’s dry, scrape it gently with a craft knife or use fine sandpaper.
Step 2: Drawing the Central Mandala
-
Center circle:
Using your fine-tip white marker, draw a small circle in the middle of the pot’s side. Draw a grid-like cross hatch pattern inside it. -
Inner petals:
Around the gridded center, draw a second circle. Create a ring of small, tight ‘U’ shapes or scallops around this second circle to act as the first layer of petals. -
Middle layer:
Draw larger, rounded petal shapes radiating outward from the scalloped ring. Inside each of these petals, add a smaller, concentric petal outline for detail. -
Outer bloom:
Create the largest layer of petals now. These should be broad and pointy, like a lotus flower. I find it helps to draw the top point of the petal first, then connect the sides down to the center. -
Mandala details:
Fill the space between the middle and outer petals with tiny dots or small lines to add texture and depth to the floral design.
Level Up: Gold Accents
Add a touch of luxury by tracing inside a few key petals with a metallic gold paint pen. The mix of white and gold looks incredible on terracotta.
Step 3: Adding Floral Accents
-
Side flowers:
To the right and left of your main mandala, draw simple, four-petaled flowers. Space them so the petals almost touch the main design. -
Leaf details:
Elongate the petals of these side flowers into leaf shapes. Draw a central vein line down the middle of each leaf. -
Stippling texture:
On one side of the leaf vein, fill the space with tiny stippled dots. Leave the other half of the leaf empty for a nice contrast.
Step 4: Border Designs
-
Top rim border:
Just below the heavy rim of the pot, draw a continuous horizontal line. About half an inch below that, draw a second parallel line. -
Zig-zag fill:
Connect these two lines with a continuous zig-zag pattern all the way around the circumference of the pot. -
Upper dots:
Above the top line of your zig-zag border, place a medium-sized white dot at every upward point of the zig-zag. -
Double lines:
Inside every other triangle created by the zig-zag, draw two small parallel lines to create a striped fill effect. -
Bottom border layout:
Near the base of the pot, replicate the two horizontal parallel lines used at the top. -
Bottom border fill:
Instead of zig-zags, fill this bottom channel with small, vertical oval shapes spaced closely together, creating a ‘beaded’ look. -
Final dots:
Add a row of tiny dots just above the top line of this bottom border to mirror the top design.
Step 5: Finishing Touches
-
Clean up:
Check for any smudges or lines you want to sharpen. You can use a cotton swab dipped in rubbing alcohol to carefully erase and correct small mistakes. -
Let it cure:
Allow the marker ink to dry for at least 24 hours before sealing. -
Seal:
Spray the entire pot with a clear matte sealant. This protects your artwork from water damage when you water your plants.
Now your custom planter is ready to give your favorite succulent a stylish new home.

The Complete Guide to Pottery Troubleshooting
Uncover the most common ceramic mistakes—from cracking clay to failed glazes—and learn how to fix them fast.
Bold Botanical Stencils
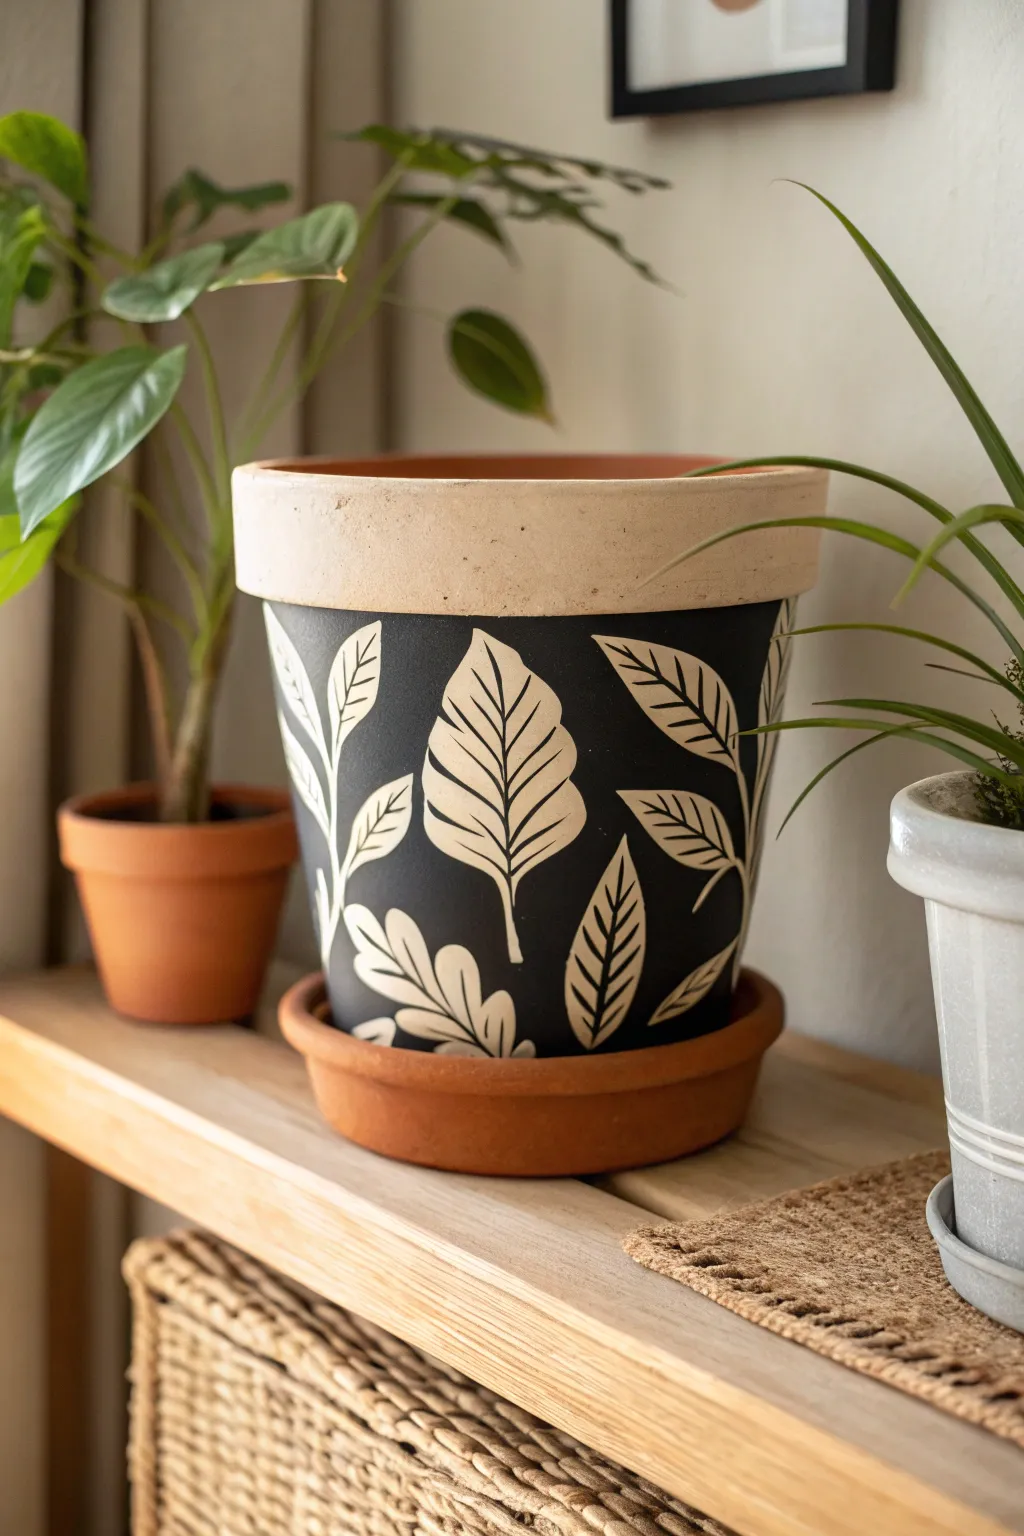
Transform a standard terracotta planter into a sophisticated statement piece with this high-contrast design. By combining matte black paint with crisp, cream-colored leaf silhouettes, you achieve a modern botanical look that still honors the natural clay texture.
Detailed Instructions
Materials
- Terracotta pot (standard size)
- Matching terracotta saucer
- Matte black acrylic craft paint
- Cream or off-white acrylic paint
- Painter’s tape (blue or green)
- Botanical leaf stencils (adhesive works best)
- Stencil brushes or small foam pouncers
- Fine detail brush (liner brush)
- Medium flat paintbrush
- Matte spray sealer (water-based)
- Pencil (optional)
Step 1: Preparation and Base Coat
-
Clean surface:
Begin by thoroughly wiping down your terracotta pot with a damp cloth to remove any dust or store shelf grime. Let it dry completely so the moisture doesn’t trap bubbles under your paint. -
Tape the rim:
To preserve that lovely natural clay band at the top, apply a strip of painter’s tape just below the rim’s lip. Press the edges down firmly with your fingernail to ensure a sharp, clean line later. -
First black coat:
Using your medium flat brush, apply the first layer of matte black acrylic paint to the main body of the pot, painting from the tape line down to the bottom edge. Don’t worry about the bottom saucer yet. -
Dry and repeat:
Let the first coat set for about 15-20 minutes. Terracotta absorbs paint quickly, so you’ll likely need a second or even third coat to achieve that solid, opaque matte finish without streaks. -
Remove tape:
Carefully peel away the painter’s tape while the final coat is still slightly tacky. This helps prevent the dried film of paint from chipping off with the tape.
Step 2: Stenciling the Leaves
-
Plan placement:
Before painting, hold your stencils against the black background to gauge spacing. A random, scattered arrangement often looks more organic and pleasing than a rigid grid. -
Secure stencil:
Adhere your first leaf stencil to the pot. If your stencil isn’t adhesive, use small loops of painter’s tape on the back to hold it tight against the curved surface. -
Load the brush:
Dip your stencil brush or foam pouncer into the cream paint, then offload most of it onto a paper towel. You want the brush to be almost dry—this prevents paint from bleeding under the stencil edges. -
Apply cream paint:
Using a straight up-and-down dabbing motion (never swiping), apply the cream paint through the stencil. Build the color up slowly with thin layers rather than one gloopy one. -
Lift and clean:
Gently lift the stencil straight up. Wipe the back of the stencil clean before moving to the next spot to avoid transferring wet cream paint onto your black background. -
Repeat pattern:
Continue adding leaves around the pot. Feel free to rotate the stencil or use only partial sections of the leaf to create the illusion that the pattern wraps naturally around the curve.
Clean Lines Pro Tip
Dealing with stencil bleed? Use a tiny angled brush dipped in the background color (matte black) to ‘erase’ any fuzzy edges and sharpen your leaf shapes.
Step 3: Refining and Sealing
-
Handwork details:
Stencils on curved surfaces can sometimes be tricky. I find it helpful to go back in with a fine detail liner brush to sharpen any leaf tips or stems that didn’t transfer perfectly crisp. -
Add veins:
If your stencil is just a solid silhouette, use the fine brush and the black background color to carefully paint thin veins inside the cream leaves for that block-print style seen in the example. -
Dry completely:
Allow the design to cure for at least a few hours. Since terracotta is porous, ensuring deep dryness is key to long-lasting designs. -
Apply sealer:
Take the pot outside or to a well-ventilated area and apply a light coat of matte spray sealer. This protects the finish from water damage when you water your plants.
Level Up: Texture
Mix a teaspoon of baking soda into your cream paint before stenciling. This creates a gritty, chalk-like texture that makes the leaves feel like embossed ceramic.
Place your favorite green plant inside and enjoy the beautiful contrast of your new custom planter
Black-and-White Doodle Pot
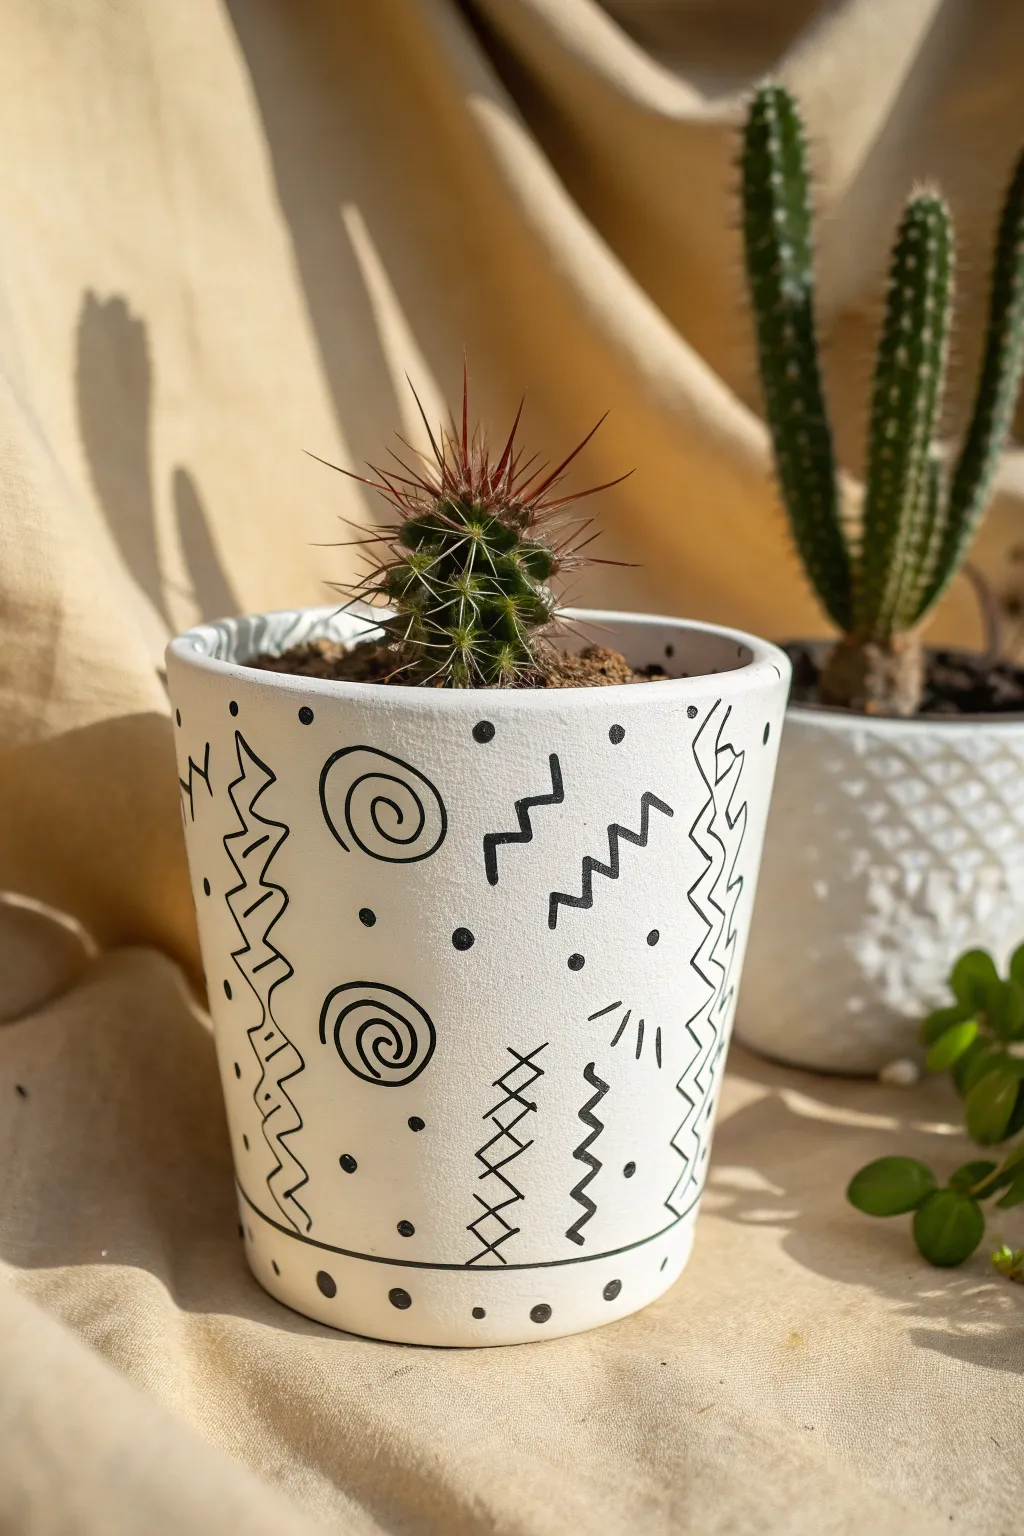
Transform a plain terracotta vessel into a chic, modern planter using nothing more than high-contrast paint and playful mark-making. This black-and-white doodle design relies on simple geometric shapes like spirals and zigzags to create a rhythmic, textural look that feels perfectly imperfect.
How-To Guide
Materials
- Terracotta pot (4-6 inch diameter)
- White acrylic paint (matte finish)
- Black acrylic paint or black oil-based paint marker
- Wide flat paintbrush
- Small round paintbrush (size 0 or 1)
- Pencil
- Clear matte sealer (spray or brush-on)
- Newsprint or drop cloth
- Water cup and paper towels
Step 1: Base Coat Preparation
-
Clean the surface:
Wipe down your terracotta pot with a damp cloth to remove any dust or manufacturing residue. Any loose grit will create a bumpy painted surface. -
Apply the first layer:
Using your wide flat brush, apply a generous coat of white acrylic paint. It will likely look streaky at first as the clay absorbs the moisture. -
Dry and repeat:
Allow the first coat to dry completely for about 20 minutes. Apply a second coats of white paint, brushing in the opposite direction (horizontally vs vertically) to minimize brush strokes. -
Checking opacity:
If I can still see the orange clay peeking through, I add a third thin coat. You want a solid, bright white canvas for this high-contrast look. -
Rim and interior:
Paint the top rim of the pot and extend the white paint about one inch down into the interior, so the soil line looks neat once planted.
Steady Hand Pro-Tip
Rest your painting hand’s pinky finger against the pot while drawing lines. This creates a pivot point and stabilizes your hand for much cleaner doodles.
Step 2: Drafting the Design
-
Plan vertical sections:
Using a pencil very lightly, sketch faint vertical guidelines to divide the pot into roughly four to six equal sections. These will help you keep your patterns straight. -
Sketch the zigzags:
Draw vertical zigzag lines (mountains and valleys) down a few of the invisible columns you created. Vary them—make some open and jagged, others tighter like teeth. -
Place the spirals:
In the open spaces between zigzags, sketch loose spiral shapes. Keep them different sizes to add visual interest. -
Add filler motifs:
Lightly mark spots for smaller details like crisscross ladders, wavy lines, or small sunburst dashes.
Step 3: Inking the Doodles
-
Choose your tool:
For the sharpest lines, use a black oil-based paint marker. If you prefer a more hand-painted organic feel, use thin black acrylic paint and a size 0 round brush. -
Trace major lines:
Start by tracing over your main zigzag columns. Don’t worry about being perfectly straight; a little wobble adds to the hand-drawn charm. -
Define the spirals:
Go over your spiral pencil marks. Press down firmly at the start of the line and lift slightly toward the center to vary the line weight. -
Create the ladders:
Paint the ‘ladder’ motif shown near the bottom: a vertical zigzag line with horizontal dashes crossing through the peaks and valleys. -
Add floating zigzags:
Paint free-floating, shorter zigzag segments (resembling lightning bolts) in the larger empty white spaces.
Level Up: Texture
Mix baking soda into your white base paint (1:1 ratio) before applying. This creates a grainy, ceramic-like texture that makes the matte finish look high-end.
Step 4: Details & Finishing
-
Populate with dots:
Fill the negative space with scattered black dots. Vary the placement—some near the spirals, some isolating in open areas. -
Draw the bottom border:
Paint a thin, solid black line encircling the pot roughly half an inch from the bottom edge. -
Decorate the base:
below that bottom line, add evenly spaced dots all around the base rim to anchor the design. -
Refine and erase:
Once the black paint is bone dry, gently erase any visible pencil marks. Touch up any white areas if you accidentally smudged black ink. -
Seal the work:
Apply a coat of clear matte sealer over the entire exterior. This protects your artwork from water damage when you water the plant inside.
Now you have a striking geometric planter ready to highlight your favorite cactus or succulent


What Really Happens Inside the Kiln
Learn how time and temperature work together inside the kiln to transform clay into durable ceramic.
Floral Decoupage Wrap
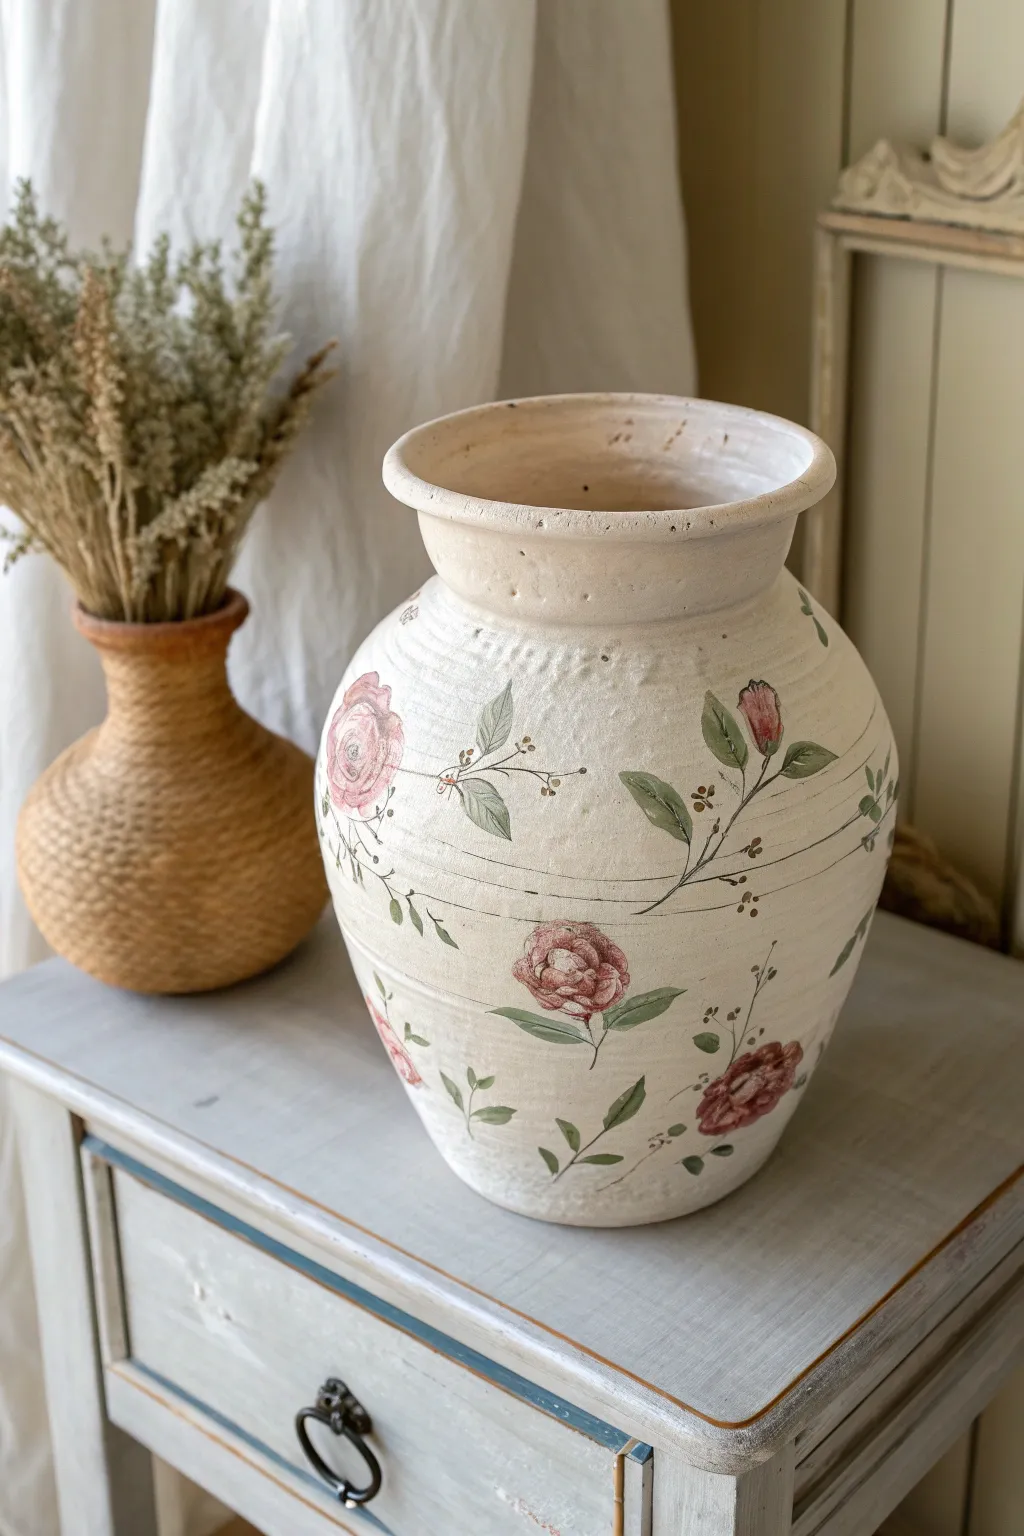
Transform a plain terra cotta or ceramic vessel into a piece of timeless decor using a delicate floral decoupage technique. This project achieves an authentic aged look with distressed finishes and soft botanical motifs that seem to fade right into the clay surface.
Step-by-Step Guide
Materials
- Large terra cotta or ceramic urn/vase
- Chalk paint (cream or off-white)
- Medium grit sandpaper
- Fine grit sandpaper
- Floral decoupage paper or napkins (vintage rose/botanical theme)
- Decoupage medium (e.g., Mod Podge Matte)
- Small detail scissors
- Flat synthetic paintbrush
- Detail liner brush
- Acrylic paint (olive green, muted brown)
- Clear matte sealer spray
- Damp lint-free cloth
- Pencil (optional)
Step 1: Base Preparation
-
Clean the Surface:
Begin by thoroughly wiping down your clay urn with a damp cloth to remove any dust or oils. Let it dry completely before starting. -
Apply Base Coat:
Using a flat brush, apply a generous coat of cream-colored chalk paint over the entire exterior of the pot. Chalk paint is ideal here because its matte, porous finish mimics old pottery. -
Second Coat Layering:
Once the first layer is dry to the touch (usually 30-45 minutes), apply a second coat if needed for full opacity. Avoid making it too perfect; visible brushstrokes add to the rustic charm. -
Initial Distressing:
After the paint is fully cured, take medium grit sandpaper and gently sand areas that would naturally wear, like the rim, ridges, and widest part of the belly. You want hints of the underlying clay to peek through.
Wrinkle Rescue
If your thin napkin paper wrinkles while drying, don’t peel it off. Wait for it to dry completely, then lightly sand the wrinkle down. It actually adds to the aged texture.
Step 2: Applying the Decoupage
-
Prepare the Graphics:
Carefully cut out your floral motifs. Specifically, look for individual vintage rose blooms and buds. I prefer to cut as close to the design edge as possible to minimize the halo effect. -
Separate the Layers:
If you are using paper napkins, peel away the two white backing plies so you are left with only the single, whisper-thin printed sheet. -
Plan placement:
Lay your cutouts against the dry pot to visualize the arrangement. Aim for a scattered, organic pattern rather than perfect symmetry. -
Adhere the Main Blooms:
Brush a thin layer of decoupage medium onto the pot where a flower will go. Gently place the paper cutout on top. -
Smooth the Paper:
Dip your finger in a tiny bit of water or medium and smooth the paper from the center outward to push out air bubbles. Be extremely gentle to avoid tearing damp paper. -
Seal the Motifs:
Brush a light coat of decoupage medium over the top of the adhered flower to seal it. Repeat this process for all your main floral elements.
Step 3: Hand-Painted Details
-
Extend the Stems:
This step is crucial for realism. Mix a little olive green and brown acrylic paint. Using a detail liner brush, paint thin stems extending from your decoupage flowers. -
Add Painted Leaves:
Paint simple, elongated leaves along your hand-painted stems. Keep the paint thin and somewhat translucent so it matches the printed texture of the decoupage. -
Create Connecting Vines:
Draw very fine, trailing vines that connect the different floral clusters. I like to keep my hand loose here to create natural, flowing curves. -
Add Tiny Buds:
Dip the tip of a small brush into muted pink or brown and dot tiny buds or berries along the hand-painted vines to fill empty spaces.
Water Cutting Trick
Instead of scissors, use a wet paintbrush to outline your motif on the napkin, then gently tear along the wet line. This creates a soft, feathered edge that blends invisibly.
Step 4: Aging and Sealing
-
Create Texture Lines:
To mimic the wheel-thrown lines seen in the image, lightly score horizontal lines around the belly of the pot using a fine-grit sandpaper block or even a dull pencil. -
Weather the Artwork:
Very lightly sand over your dried decoupage and painted vines. This scratches the image slightly, making it look like it was painted on the clay years ago rather than just glued on. -
Final Wash (Optional):
Mix a large amount of water with a drop of brown paint. Brush this dirty water wash over the entire pot and immediately wipe it back with a rag to deposit ‘age’ into the crevices. -
Protective Coat:
Finish the project by spraying the entire vessel with a clear matte sealer. This protects your artwork from dust and moisture without adding unwanted shine.
Now you have a beautifully weathered vessel ready to hold dried stems or stand alone as art
Mosaic and Beaded Embellishments
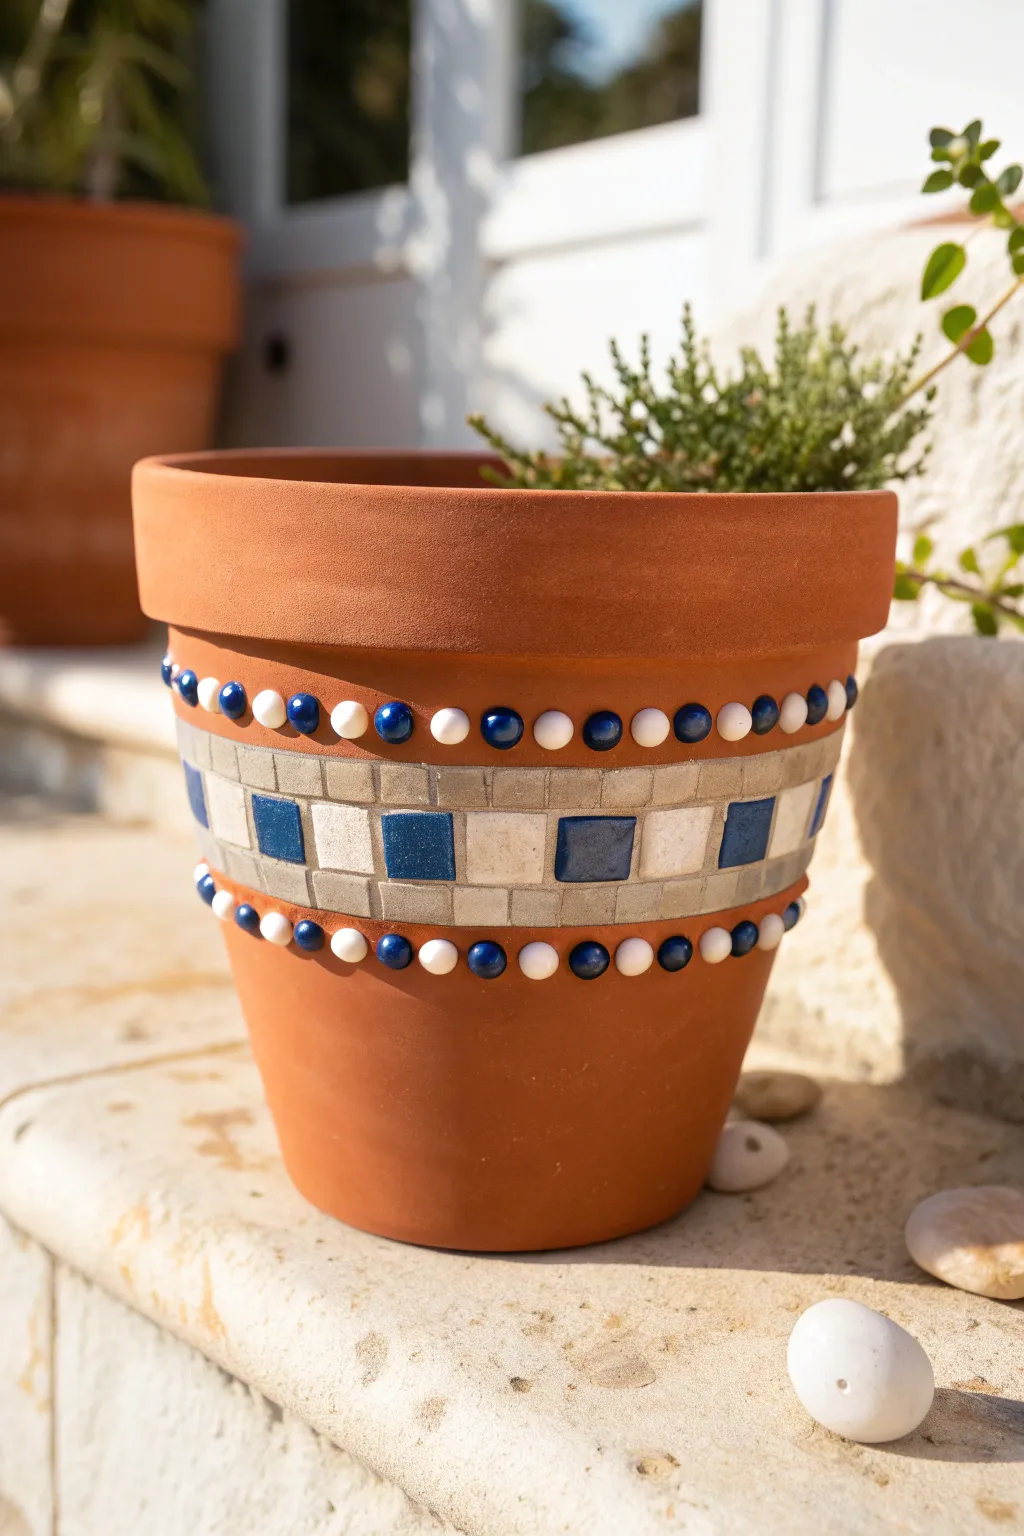
Transform a standard terracotta planter into a coastal-inspired centerpiece using simple mosaic techniques and beadwork. The classic combination of deep ocean blue and crisp white stones against the earthy clay creates a timeless look perfect for sunny patios.
Step-by-Step
Materials
- Terracotta pot (medium size, approx. 6-8 inches diameter)
- Small square mosaic tiles/tesserae (blue glass and white stone/ceramic)
- Flat-backed crafting beads or half-pearls (dark blue and white)
- Strong craft adhesive (e.g., E6000 or waterproof silicone glue)
- Pre-mixed grout (light grey or sand color)
- Sponge and water bowl
- Soft cloth for polishing
- Pencil or chalk
- Ruler or measuring tape
- Protective sealer spray (optional)
Step 1: Planning and Layout
-
Clean the surface:
Before beginning, wipe down your terracotta pot with a damp cloth to remove any fine dust or store residue. Let it dry completely so the adhesive bonds properly. -
Establish the center band:
Using a ruler, measure about 1.5 to 2 inches down from the bottom lip of the pot’s rim. Mark this spot with a pencil. -
Draw guide lines:
Create a band around the circumference of the pot. Draw two parallel lines approximately 1.5 inches apart (or slightly wider than your square tiles). This will be the home for your mosaic sections.
Step 2: Creating the Mosaic Band
-
Dry fit the tiles:
Lay out your square tiles on a table first to plan your pattern. The design shown features alternating larger blue and white squares, bordered by smaller rectangular grey or off-white buffer tiles. -
Start gluing the center squares:
Apply a dab of strong adhesive to the back of a blue square tile. Place it in the center of your marked band. Press firmly for a few seconds. -
Continue the pattern:
Leave a small gap (about 1/8th inch) for grout, then glue a white square tile next to the blue one. Continue alternating colors around the entire pot until the central row is complete. -
Add the border tiles:
Now, fill the remaining space above and below your colored squares with smaller, neutral-colored rectangular tiles. These create a finished ‘frame’ for the colorful center line. -
Let the adhesive cure:
Allow the glue to dry completely according to the manufacturer’s instructions. I usually leave it overnight to ensure nothing shifts during grouting.
Sliding Tiles?
If heavy tiles slide down while the glue is wet, use strips of painter’s tape to hold them in place horizontally until the adhesive grabs hold.
Step 3: Grouting
-
Apply the grout:
Scoop a small amount of pre-mixed sandy grout onto the mosaic band. Use your gloved fingers or a small spatula to press the grout firmly into all the crevices between the tiles. -
Wipe away excess:
Wait about 10-15 minutes until the grout looks hazy. Take a damp (not dripping) sponge and gently wipe across the surface of the tiles to remove the excess grout without digging it out of the seams. -
Final polish:
Once dry, buff the tiles with a soft, dry cloth to remove the final haze and make the colors shine.
Make it Sparkle
Swap the matte white beads for mirrored disco-ball beads or distinct metallic silver charms to catch the sunlight on a bright patio.
Step 4: Beaded Embellishments
-
Plan the bead borders:
You will be placing beading directly above and below the mosaic band. Select flat-backed beads in colors that match your tiles. -
Glue the top row:
Apply a small dot of glue just above the grout line of your mosaic band. Press a blue bead into place, followed by a white bead, creating an alternating pattern tailored to your taste. -
Align the bottom row:
Repeat the process for the bottom border. Try to align the beads with those on the top row to keep the design symmetrical and tidy. -
Clean up drips:
Watch carefully for any glue that might slide down the terracotta surface and wipe it away immediately before it hardens. -
Final cure time:
Let the beaded sections dry undisturbed for at least 24 hours before moving the pot. -
Seal the pot (optional):
If this pot will live outdoors, giving the entire exterior a coat of matte spray sealer will help protect the embellishments from the elements.
Place your favorite succulent inside and enjoy the handmade charm on your patio

TRACK YOUR CERAMIC JOURNEY
Capture glaze tests, firing details, and creative progress—all in one simple printable. Make your projects easier to repeat and improve.
Distressed Vintage Wash
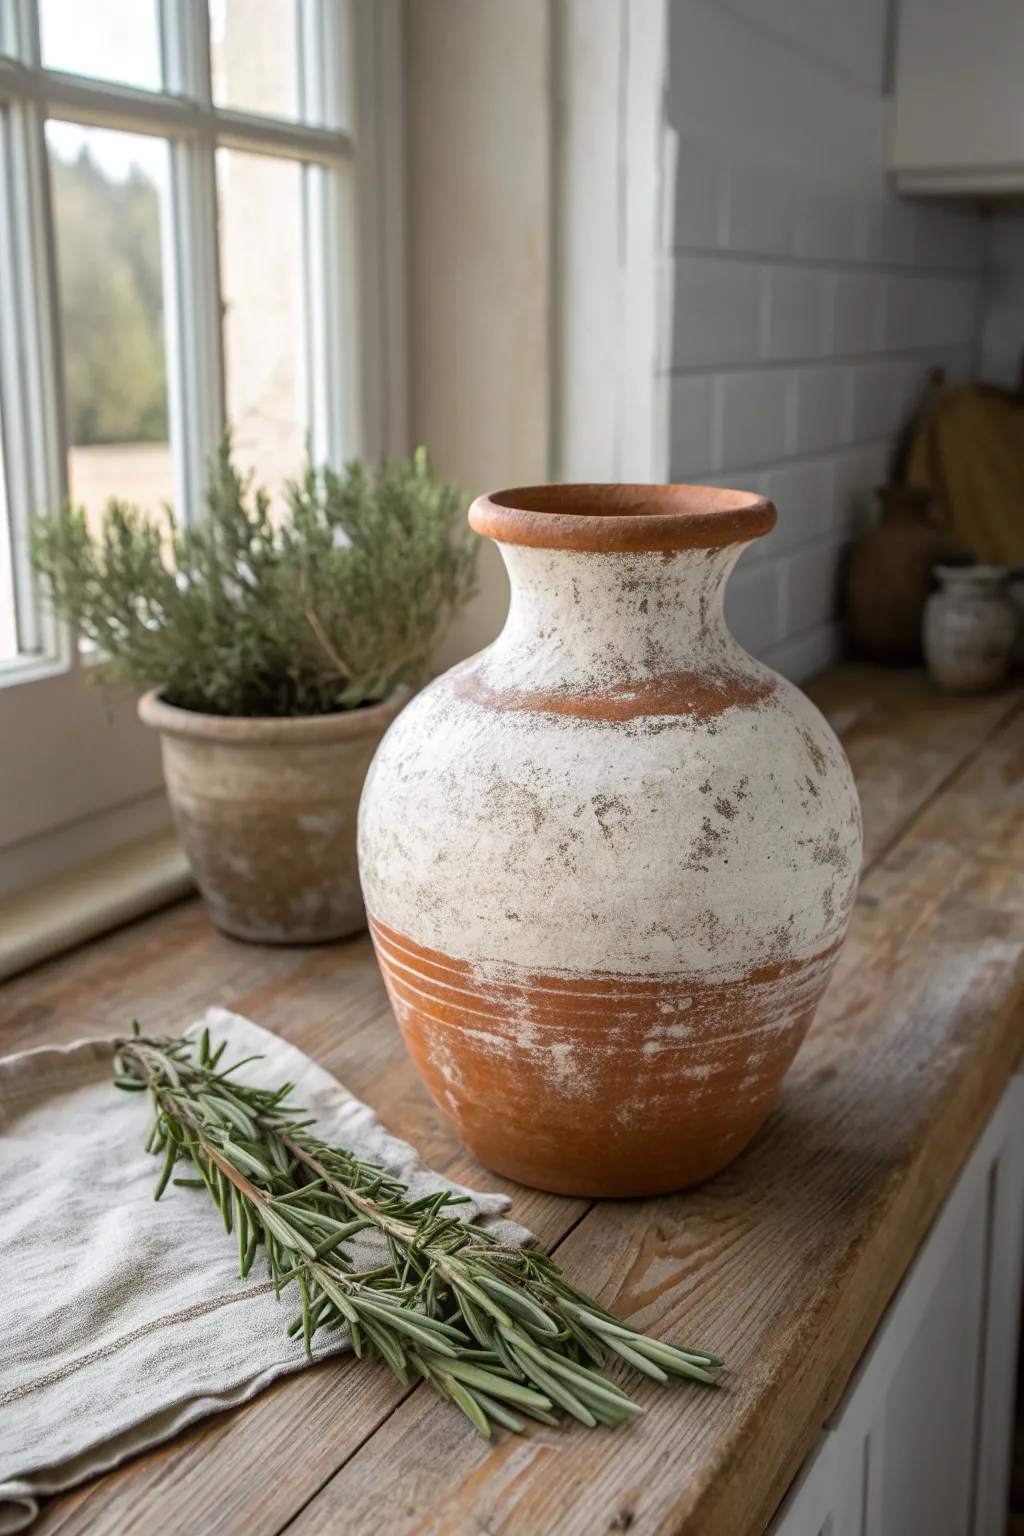
Transform a plain terracotta vessel into a weathered antique treasure with this layered distressing technique. By combining whitewashing with strategic sanding, you’ll create a finish that mimics decades of sun exposure and gentle aging.
Step-by-Step Guide
Materials
- Unsealed terracotta pot or vase
- Chalk-style paint (warm white or cream)
- Baking powder
- Medium-grit sandpaper (120-150 grit)
- Coarse-grit sandpaper (60-80 grit)
- Clean cotton rags
- Chip brush or old bristle brush
- Small bowl for mixing
- Water
- Clear matte sealer (optional)
Step 1: Preparation and Mixing
-
Clean surface:
Begin by wiping down your terracotta vessel with a damp cloth to remove any dust or oils. If the pot is old, scrub it clean and let it dry completely before starting. -
Create texture paste:
In your mixing bowl, combine about half a cup of chalk paint with a tablespoon of baking powder. This is a trick I love because the baking powder creates a subtle, gritty texture that looks authentically aged. -
Adjust consistency:
Stir the mixture well. It should foam slightly and thicken. If it feels too paste-like to spread easily, add water a teaspoon at a time until it resembles thick heavy cream.
Garden Dirt Trick
For ultimate realism, rub actual dry garden soil into the crevices of the textured paint while it’s still slightly tacky, then brush off excess when dry.
Step 2: Application Layering
-
Initial dry brushing:
Dip just the tips of your chip brush into the paint mixture. Offload most of the paint onto a paper towel or scrap cardboard until the brush is almost dry. -
Focus the center:
Start applying the paint around the widest, central bulb of the pot. Use horizontal, sweeping strokes. Apply the paint heavily in the middle, creating a solid band of white. -
Feather the edges:
As you move upward toward the neck and downward toward the base, lighten your hand pressure. You want the paint to become sparse and scratchy, allowing more of the orange clay to peek through. -
Leave zones bare:
Intentionally leave the very top rim and the bottom few inches of the base completely unpainted. This grounding of raw clay is essential for the vintage aesthetic. -
Partial drying:
Let the paint sit for about 10 to 15 minutes. It should be tacky to the touch but not fully cured or hard.
Mossy Accents
Dab bits of watered-down sage green paint near the base or rim with a sea sponge to mimic natural moss growth on the clay.
Step 3: Distressing and Aging
-
Wet rag distressing:
Take a damp (not soaking) cotton rag. Gently rub over the painted areas, especially where the white transitions to bare clay. This smears and softens the paint edges for a natural fade. -
Full dry time:
Allow the pot to dry completely. This usually takes about an hour, depending on humidity. The paint must be bone dry before sanding. -
Heavy sanding:
Use the coarse-grit sandpaper to aggressively attack specific areas. Focus on raised ridges or bumps in the clay, scrubbing the paint away to expose the terracotta underneath. -
Create chipping effects:
Scuff random patches in the solid white center section. Don’t be afraid to scratch deep enough to create texture; real vintage pots have divots and imperfections. -
Soft sanding:
Switch to the medium-grit sandpaper. Lightly go over the entire painted surface to smooth out the baking powder grit just enough so it feels weathered, not rough. -
Removing dust:
Wipe the entire piece down with a dry cloth to remove the sanding dust. You’ll see the white paint brighten up against the clay.
Step 4: Finishing Touches
-
Evaluate the fade:
Step back and look at your pot. If the transition from white to clay looks too abrupt, use a very dry brush with a tiny amount of paint to feather those lines again. -
Optional dirt wash:
If the white looks too bright and new, mix a tiny drop of brown or gray paint with lots of water. Brush this dirty water over the white areas and immediately wipe it off for a stained look. -
Seal (optional):
Since terracotta is porous, seal the inside if you plan to use fresh water. For the outside, you can leave it unsealed for a matte look or apply a flat matte spray sealer to protect the finish.
Place your newly aged vessel near a window where the light can catch the texture of the weathered finish
Marbled Swirl Paint Effect
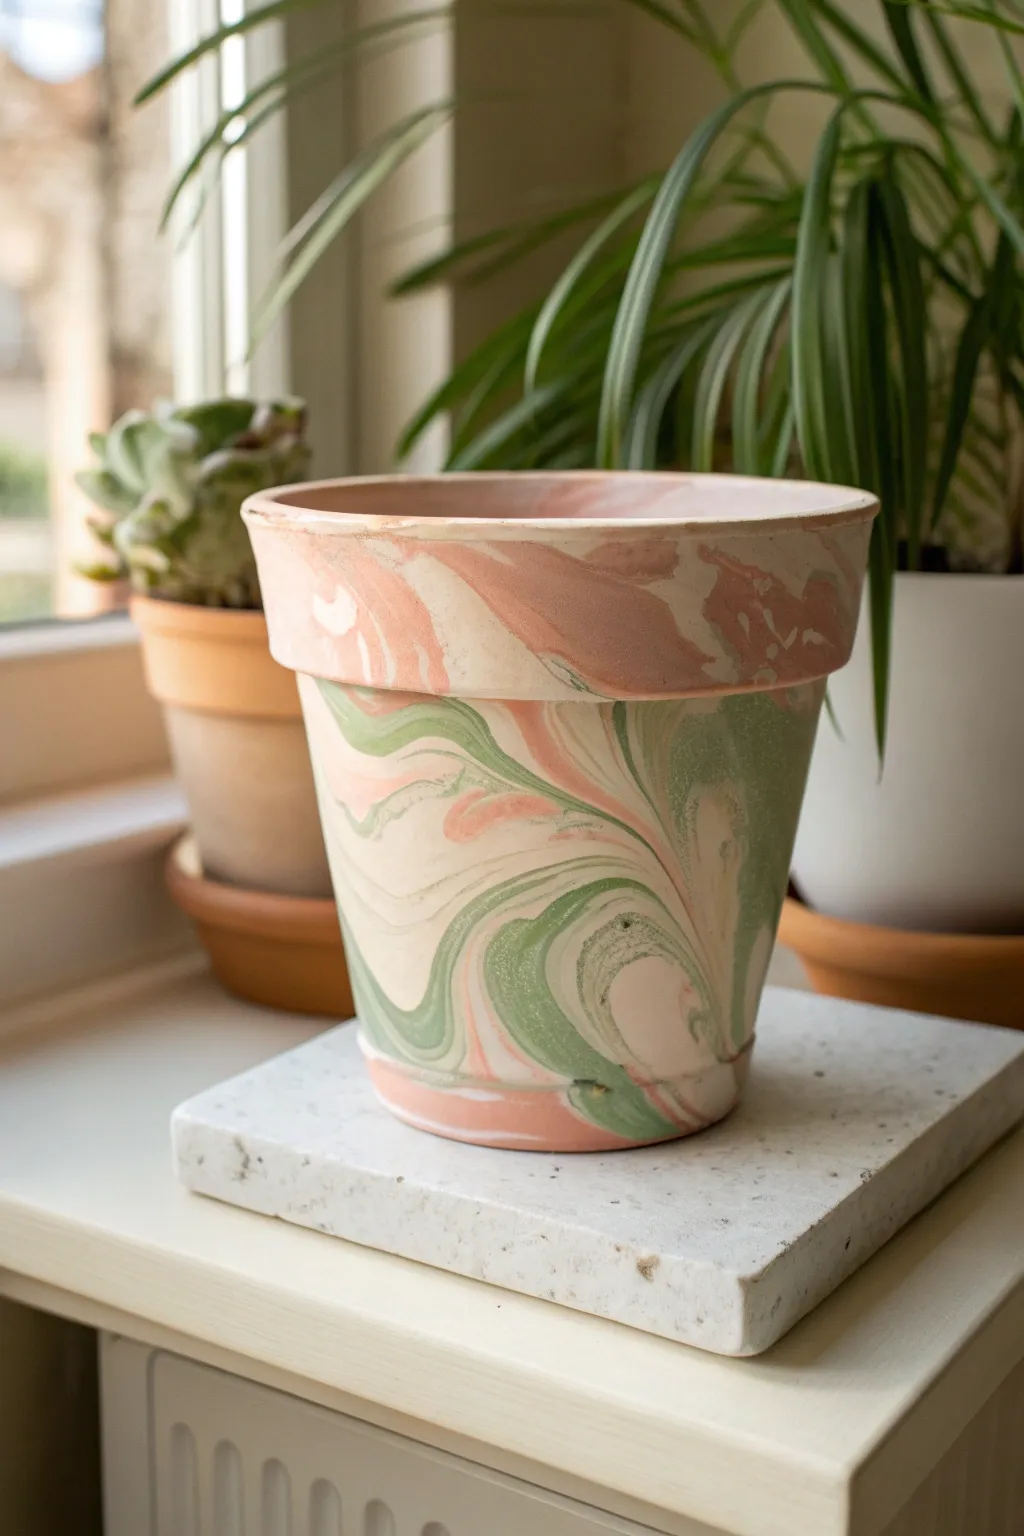
Transform a plain terracotta vessel into a soft, dreamy piece of decor using a simple hydro-dipping technique. This method creates organic swirls of salmon pink, sage green, and creamy white that look like genuine polished stone.
Step-by-Step Tutorial
Materials
- Terracotta pot (clean and dry)
- White acrylic primer or white spray paint
- Large plastic bucket or container (deep enough to submerge the pot)
- Acrylic paints (Salmon Pink, Sage Green, and Cream/White)
- Floetrol or pouring medium (optional but recommended)
- Wooden stir sticks or toothpicks
- Water
- Clear matte or satin sealant spray
- Masking tape (for inside the rim)
- Disposable gloves
- Newspaper or drop cloth
Step 1: Preparation and Base Coat
-
Clean the surface:
Begin by wiping down your terracotta pot with a damp cloth to remove any dust or oils. Let it dry completely. -
Protect the interior:
Apply masking tape around the inside of the rim if you want to keep the interior natural terracotta color. This creates a neat, professional finish line. -
Prime the pot:
Apply a coat of white acrylic primer or white spray paint to the entire exterior. This base layer ensures the pastel colors pop rather than sinking into the dark clay. -
Let it cure:
Allow the white base coat to dry fully according to the manufacturer’s instructions, usually about 1-2 hours.
Water Temp Matters
Use room temperature water. Cold water causes paint to skin over too fast, while hot water disperses pigment too thinly.
Step 2: Creating the Marble Mix
-
Prepare the water bath:
Fill your plastic container with room temperature water. Make sure there is enough depth to dip the pot up to its rim. -
Thin your paints (Optional):
If your acrylics are very thick, mix them with a small amount of water or pouring medium in separate cups until they have the consistency of heavy cream. -
Drop the first color:
Gently pour or drop a small amount of the cream/white paint onto the center of the water surface. It should spread out into a thin film. -
Add secondary colors:
Drop the salmon pink paint into the center of the white circle, followed by the sage green. I find that alternating the colors creates the most interesting layers. -
Swirl the pattern:
Take a toothpick or skewer and very gently drag it through the floating paint. Create s-curves or figure-eights to marble the colors without over-mixing them into a single muddy hue.
Step 3: The Dip and Finish
-
Position the pot:
Put on your disposable gloves. Hold the pot securely by the inner rim or place your hand inside it like a puppet to keep your grip hidden. -
Execute the dip:
Slowly lower the pot into the water at a slight angle. Rotate the pot slowly as you submerge it to wrap the floating paint around the curved surface. -
Clear surface tension:
Once the pot is fully submerged up to the rim, quickly blow on the water’s surface or use your free hand to sweep away the remaining paint film before pulling the pot back up. -
Remove carefully:
Lift the pot out of the water. Inspect the design immediately; if there are big water droplets, gently tap the pot base on a table to encourage them to run off. -
Dry properly:
Set the pot upside down on a supported stick or a raised platform (like an old bottle) so the rim doesn’t touch the table. Let it dry for at least 24 hours. -
Seal the deal:
Once fully dry, spray the exterior with a clear matte sealant. This protects the paint from water damage when you water your plants.
Gold Veining
Add a drop of metallic gold paint to your swirl mix for a luxurious, high-end stone look that catches the sunlight.
Now you have a unique, custom planter ready to showcase your favorite succulent or fern with style
Hand-Lettered Herb Labels
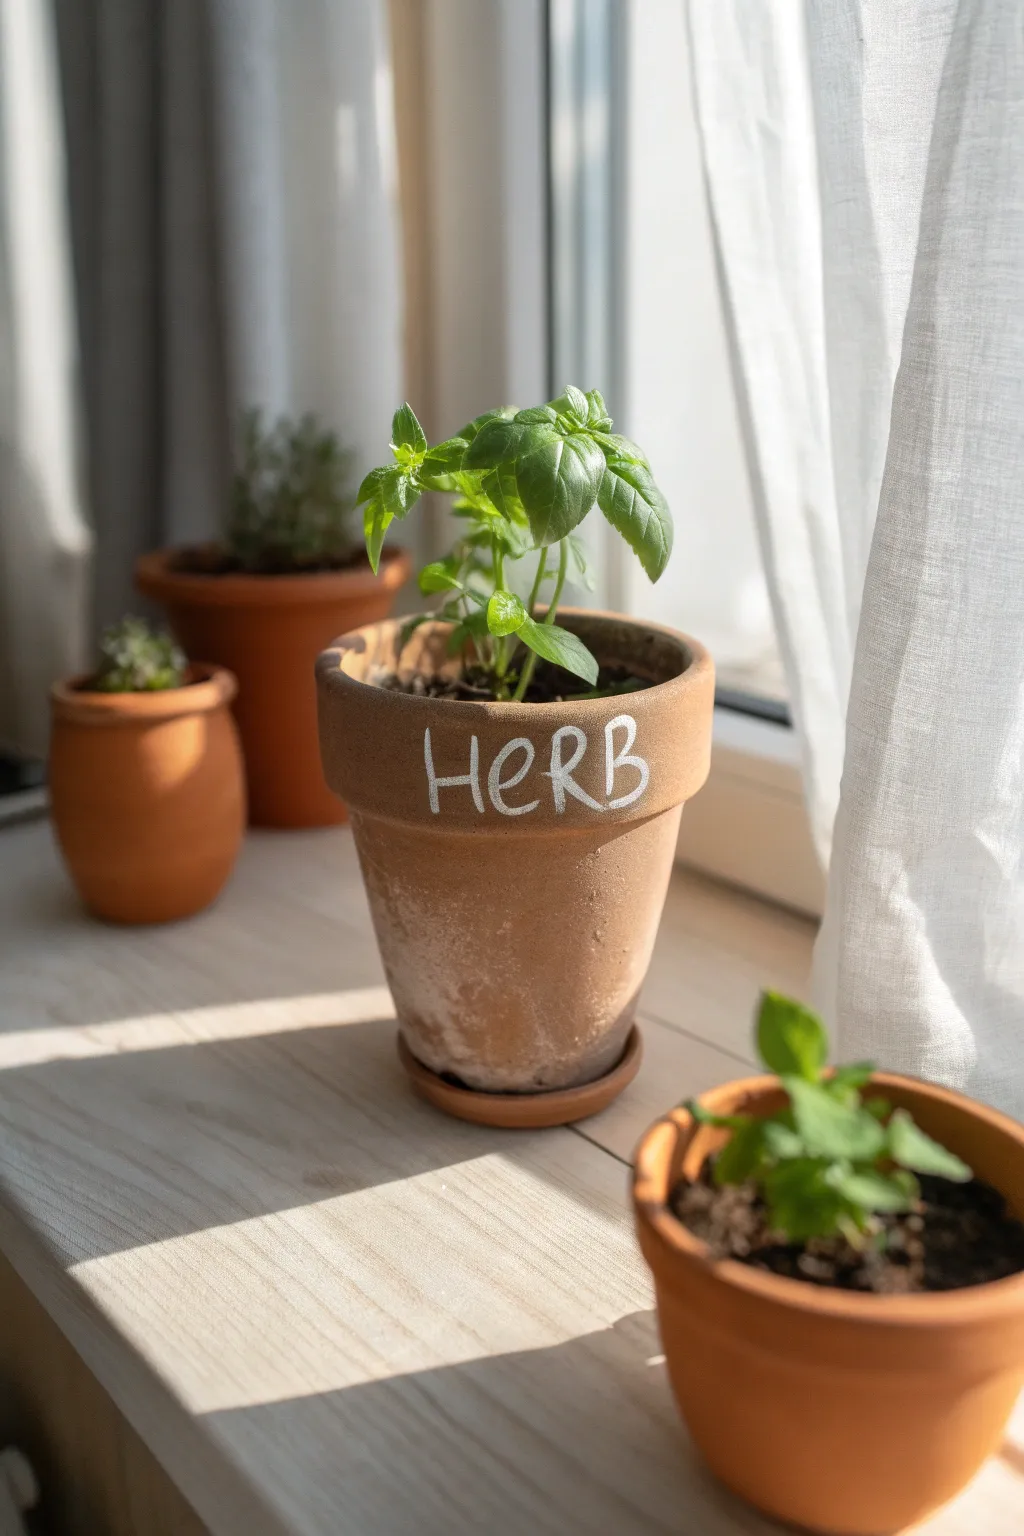
Bring a touch of organized charm to your windowsill garden with this minimalist labeling project. The beauty lies in the contrast between the rough, aged terracotta texture and the clean, handwritten white lettering.
Step-by-Step
Materials
- Standard terracotta pot (4-inch to 6-inch size)
- White paint pen (medium tip)
- Pencil
- Eraser
- Small piece of 220-grit sandpaper
- Paper towel or rag
- White acrylic paint (optional, for aging effect)
- Water
- Matte spray sealer (optional)
Step 1: Preparing the Pot
-
Surface Prep:
Begin by wiping down your terracotta pot with a damp cloth to remove any loose dust or debris. Let it dry completely. -
Light Sanding:
Gently rub the sandpaper over the area where you plan to write. You don’t want to remove the texture entirely, just knock down the roughest grit to make writing smoother. -
Creating the Aged Look (Optional):
To mimic the mineral deposits seen in the photo, dilute a tiny drop of white acrylic paint with a lot of water. -
Applying the Wash:
Dip a rag into your watery paint mixture and dab it randomly around the lower half of the pot. Blot it immediately with a dry towel so it looks like a natural stain rather than paint. -
Drying Time:
Allow the pot to sit for about 20 minutes until the moisture has fully evaporated from the clay.
Step 2: Drafting the Design
-
Planning Position:
Identify the center of the pot’s rim or the upper body where the curve is most consistent. -
Pencil Sketching:
Using a pencil, very lightly sketch out your word—’HERB’, ‘BASIL’, or ‘MINT’. Keep the letters tall and narrow for that specific casual handwritten style. -
Checking Alignment:
Step back and look at the pot from a distance. Because terracotta pots are tapered, straight text can sometimes look curved. Adjust your pencil lines slightly upward at the ends if needed. -
Refining the Font:
Thicken your pencil strokes slightly to visualize the final weight. The style in the image uses simple, all-caps sans-serif letters with a slightly loose, organic feel.
Pen Primer
If your paint pen tip gets clogged with clay dust while writing, wipe it frequently on a damp paper towel to keep the ink flowing cleanly.
Step 3: Inking the Lettering
-
Priming the Pen:
Shake your white paint pen vigorously and press the tip onto a scrap piece of paper until the ink flows smoothly and opaquely. -
First Pass:
Trace over your pencil lines with steady, even pressure. I find it helpful to pull the pen toward me rather than pushing it away to prevent splatters. -
Managing Texture:
The clay might absorb the first layer of ink quickly. Don’t worry if it looks translucent or slightly streaky at first. -
Drying Break:
Let the first coat of ink dry for at least 5 to 10 minutes. Touching it too soon can smudge the lines or clog the pen tip with damp clay dust. -
Second Coat:
Go over the letters a second time. This layer will sit on top of the first and providing that bright, solid white pop against the orange clay. -
Touch Ups:
Look for any jagged edges caused by the pot’s texture and smooth them out with the very tip of the pen.
Creative Twist
Instead of general labels, use the scientific Latin names for your plants (like ‘Ocimum basilicum’) for a sophisticated botanical garden vibe.
Step 4: Final Touches
-
Cleanup:
Once the ink is absolutely bone dry (give it an hour), gently erase any visible pencil marks that weren’t covered by the paint. -
Sealing:
Since terracotta is porous and ‘breathes’ water, apply a light coat of matte spray sealer over the lettering. This prevents the paint from bubbling off when you water the plant later. -
Potting:
Fill your newly labeled masterpiece with soil and your favorite herb.
Now your windowsill looks curated and charming, ready to help your indoor garden grow
Desk Caddy Pot for Pens and Brushes

Transform a plain terracotta pot into a chic organizational tool with this geometric pattern design. Featuring a distinct three-tiered layout with triangles and abstract shapes, the muted color palette brings a warm, bohemian vibe to any workspace.
Step-by-Step Tutorial
Materials
- Terracotta pot (4-6 inch diameter)
- Acrylic paints (terracotta orange, teal green, cream/off-white, mustard yellow, dark rust red)
- Flat paintbrushes (medium and small)
- Fine detail paintbrush or paint pen (white)
- Pencil
- Ruler or measuring tape
- Painters tape (optional)
- Matte spray sealer
Step 1: Base Preparation
-
Clean the surface:
Ensure your terracotta pot is completely clean and dry. Wipe away any dust with a damp cloth and let it air dry for at least 15 minutes before starting. -
Divide the canvas:
Using a pencil and a ruler, lightly mark three distinct horizontal sections around the pot. You want a top band just under the rim, a wide middle section, and a bottom band near the base. -
Paint the top band:
Load a medium flat brush with the terracotta orange paint. Carefully paint the top section you marked, blending it right up to the underside of the rim. Use two coats for solid coverage. -
Paint the bottom band:
Switch to your teal green paint. Fill in the bottommarked section completely. I find painting horizontal strokes helps maintain a smooth finish around the curve of the pot. -
Create the middle ground:
Fill the large middle section with a creamy off-white paint. This lighter color might require three thin coats to ensure the clay doesn’t show through. -
Let it cure:
Allow the base blocks of color to dry completely for about 30 minutes. The surface must be dry to the touch before adding detailed shapes.
Step 2: Geometric Details
-
Sketch the shapes:
Lightly sketch your geometric elements with a pencil. Draw a row of small triangles in the top orange band, large rectangles in the middle cream band, and inverted triangles in the bottom teal band. -
Paint top triangles:
Using a small flat brush, fill in the sketched triangles on the top band. Alternate colors in a random pattern—use cream, teal, and mustard yellow. Leave some space between each shape. -
Add middle rectangles:
In the cream center band, paint the rectangular blocks. Use the mustard yellow for the primary rectangles and a rust red for narrower vertical strips next to them. -
Paint bottom triangles:
Fill in the inverted triangles on the bottom teal band using mustard yellow. Keep these shapes distinct and sharp. -
Line work details:
Once the color blocks are dry, take a very fine detail brush or a white paint pen. Add vertical lines inside the yellow rectangles on the middle band. -
Dot accents:
Using the end of a paintbrush handle or your detail tool, add small black or dark brown dots to the cream sections in the middle band for a speckled texture. -
Geometric outlines:
Draw delicate white outlines or internal patterns on the bottom teal triangles. A simple inverted triangle outline within the teal space adds nice depth. -
Clean up edges:
If any paint bled over the lines between the bands, use a small brush with the background color to touch up the edges for a crisp look. -
Seal the deal:
Once all paint is fully dry (wait at least an hour), take the pot to a well-ventilated area and apply a clear matte spray sealer to protect your work from scratches.
Steady Hand Trick
Rest your pinky finger against the dry part of the pot while painting details. This acts as an anchor and stops your hand from shaking for crisp lines.
Mix It Up
Try swapping the teal for a navy blue or sage green to match different room aesthetics while keeping the same geometric layout.
Now fill your stylish new caddy with your favorite art supplies and enjoy the upgrade to your desk
Stacked Tiered Planter Sculpture
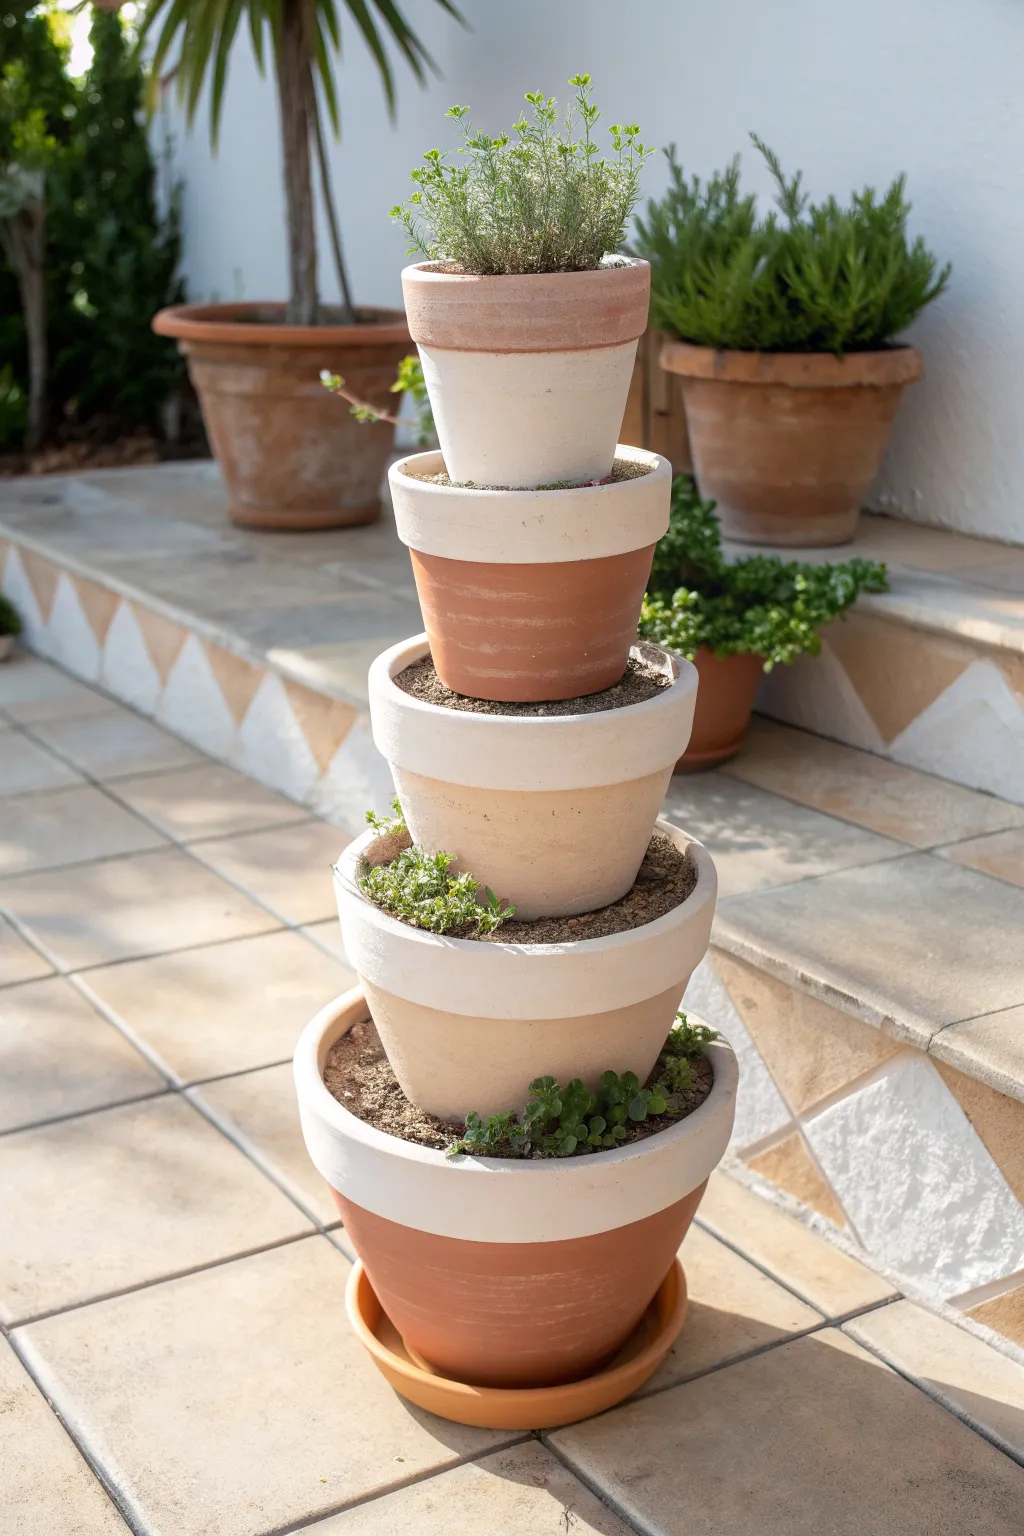
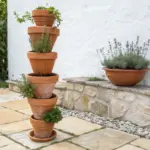
Transform ordinary clay pots into a striking architectural element for your patio with this sleek tiered planter tower. The alternating bands of raw terracotta and white-washed surfaces create a clean, modern aesthetic while providing a perfect vertical home for small herbs and succulents.
Detailed Instructions
Materials
- 5 terracotta pots in graduated sizes (e.g., 14″, 12″, 10″, 8″, 6″)
- 1 large terracotta saucer (sized for the largest pot)
- White acrylic paint or outdoor craft paint
- Painter’s tape (1-inch width)
- Wide foam brush or flat paintbrush
- Potting soil designed for container gardening
- Small gravel or pottery shards for drainage
- Sturdy metal rebar stake (slightly taller than stacked pots) or a long wooden dowel
- Assorted small plants (thyme, sedum, rosemary)
- Rubber mallet (optional, for driving the stake)
Step 1: Painting the Design
-
Clean and prep:
Begin by thoroughly wiping down all your terracotta pots with a damp cloth to remove any dust or manufacturing residue. Let them dry completely, as moisture will prevent the paint from adhering properly. -
Map out the bands:
Study the reference image to plan your color blocking. Notice how some pots have a white rim and raw base, while others are reversed or fully painted. Use painter’s tape to mark off crisp lines where you want the color transitions to happen. -
Masking technique:
Press the edges of the painter’s tape down firmly with your thumbnail to ensure no paint seeps underneath. For the top pot, tape off the bottom section to keep it raw; for the second pot down, you might tape just below the rim. -
Apply the white paint:
Using a foam brush, apply the white paint to the designated areas. I like to use long, horizontal strokes that follow the curvature of the pot for a smooth finish. -
Layer for opacity:
Terracotta is very porous and will soak up the first coat. Apply a second—and possibly a third—coat of white paint, allowing about 20-30 minutes of drying time between layers until the white looks solid and bright. -
Remove the tape:
Carefully peel away the painter’s tape while the final coat is still slightly tacky. This helps prevent the dried paint from chipping along the edge, leaving you with a sharp, clean line.
Step 2: Assembling the Tower
-
Position the base:
Place your large terracotta saucer on the ground where you want the tower to stand permanently, as it will be heavy to move later. Set the largest pot into the saucer. -
Secure the center rod:
Insert your metal rebar or wooden dowel through the drainage hole of the bottom pot directly into the ground beneath. If you are on a hard patio surface, just ensure the rod passes through all pots to keep them aligned, or use a washer-and-nut system if stability is a concern. -
Fill the base:
Add a layer of gravel to the bottom of the largest pot for drainage, then fill it with potting soil until it is roughly 2 inches from the rim. Pack the soil down lightly to create a firm base for the next tier. -
Stack the second tier:
Thread the second-largest pot onto the central rod through its drainage hole. Settle it directly onto the soil of the base pot. Wiggle it slightly to ensure it sits level and stable. -
Repeat the stacking:
Continue this process, filling each pot with soil before threading the next smaller pot onto the rod. Ensure each pot is centered so the tower rises straight up without leaning. -
Top tier placement:
Place the smallest, topmost pot onto the stack. This one will hold your focal plant, like the rosemary shown in the image, so ensure it has enough soil depth.
Seal the Deal
Before planting, spray the inside of each pot with a clear waterproof sealer. This stops moisture from seeping through and bubbling your exterior paint job.
Step 3: Planting and Finishing
-
Select your plants:
Choose small, trailing, or ground-cover plants for the lower tiers where space is tight. Thyme, creeping jenny, or small succulents work beautifully in the narrow soil rings exposed on the lower pots. -
Plant the gaps:
Gently tuck your plants into the exposed soil visible around the rim of each pot. Use a spoon or a small dibber to help get the roots deep into the crevices without disturbing the stack. -
Crown the tower:
Plant your tallest or most bushy herb, such as rosemary or lavender, in the very top pot to give the sculpture height and a soft, green crown. -
Clean up:
Brush away any loose soil that may have fallen onto the white painted rims during planting. A soft, dry paintbrush works perfectly for dusting off the textured terracotta. -
Water carefully:
Water the tower gently starting from the top. Let the water trickle down through the tiers. This helps settle the soil and locks the pots into place.
Herb Garden Theme
Make it a culinary tower by planting a different herb in each tier: basil on top, followed by oregano, thyme, parsley, and mint at the wide base.
Your elegant vertical garden is now ready to serve as a stunning focal point while saving precious floor space
Whimsical Mushroom Garden Pots
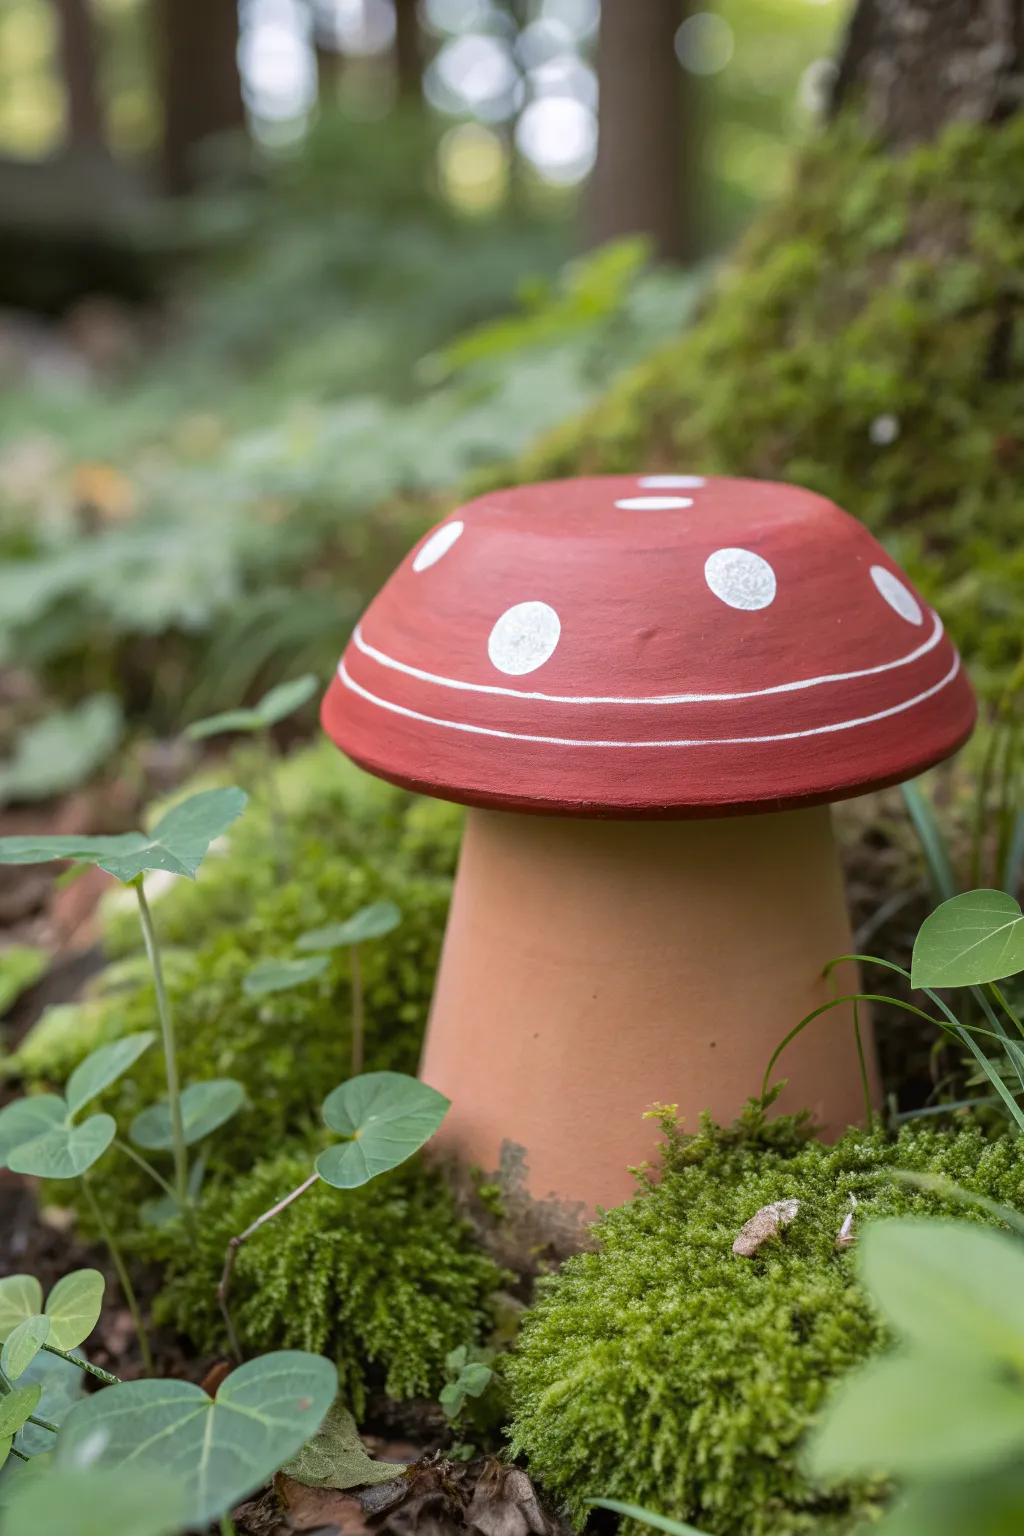
Transform ordinary clay pots into enchanting forest floor dwellers with this simple yet striking garden project. By combining a classic terracotta pot with a painted saucer, you can create a durable mushroom statue that looks right at home nestled among moss and ferns.
How-To Guide
Materials
- Small to medium terracotta pot (standard shape)
- Terracotta saucer (slightly wider than the pot’s base)
- Outdoor acrylic craft paint (Red)
- Outdoor acrylic craft paint (White)
- Outdoor clear sealer (matte or satin finish)
- Strong outdoor adhesive (e.g., E6000 or construction adhesive)
- Foam sponge brush or medium flat brush
- Small round detail brush
- Fine-grit sandpaper
- Damp cloth
- Pencil
Step 1: Preparation & Base Painting
-
Clean the terracotta:
Begin by thoroughly wiping down your pot and saucer with a damp cloth to remove any dust or sticker residue. If the pots are old, scrub them well and let them dry completely, as moisture can trap paint bubbles. -
Prepare the surface:
Lightly sand any rough edges on the saucer or the pot using fine-grit sandpaper. This ensures a smoother surface for painting and helps the adhesive bond better later on. -
Flip the saucer:
Turn the terracotta saucer upside down. This will become your mushroom cap. Place it on a protected work surface. -
Apply the red base coat:
Using your foam brush or flat brush, apply a generous coat of red outdoor acrylic paint to the entire top surface and rim of the upturned saucer. Don’t worry about the underside. -
Let it dry:
Allow the first coat to dry to the touch, usually about 15-20 minutes depending on humidity. -
Add a second coat:
Apply a second layer of red paint to ensure opaque, solid coverage. Terracotta is porous and tends to soak up the first layer, so this second pass makes the color pop.
Step 2: Adding Details
-
Sketch the rings:
Once the red paint is fully dry, take a pencil and very lightly sketch two concentric rings around the lower edge of the saucer rim. These will guide your white line work. -
Paint the rings:
Using a small round detail brush loaded with white paint, carefully trace over your pencil lines to create two thin white stripes circling the cap. -
Plan the polka dots:
Visualize where you want your classic mushroom spots. I like to keep them random rather than perfectly symmetrical for a more natural look. -
Paint large dots:
Paint several large white circles on the top and sides of the red cap. You don’t need a stencil; a slightly imperfect hand-painted circle adds rustic charm. -
Touch up edges:
Check the edges of your white lines and dots. If the red background shows through too much, dab a little extra white paint for solid brightness. -
Dry completely:
Let all the paint work dry completely for at least an hour.
Clean Lines
For steadier hands when painting the white ring stripes, rest your pinky finger on the dry part of the saucer as an anchor while you rotate the saucer with your other hand.
Step 3: Assembly & Finishing
-
Seal the cap:
Apply a coat of outdoor clear sealer to the painted saucer. A matte finish looks more natural in a garden setting, while satin adds a bit of whimsy. Let this cure according to the spray can instructions. -
Position the pot:
Take your unpainted terracotta pot and flip it upside down so the wider opening is on the ground. This creates the sturdy stem. -
Test the fit:
Place the painted saucer on top of the inverted pot’s base to check balance. The saucer should sit centered on the pot’s bottom (which is now the top). -
Apply adhesive:
Lift the saucer off and apply a strong bead of outdoor adhesive like E6000 to the rim of the pot’s base. -
Secure the cap:
Press the saucer firmly onto the glue. Give it a slight twist to spread the adhesive for a better grip. -
Cure time:
Leave the mushroom undisturbed for 24 hours to ensure the bond is completely set and weatherproof. -
Installation:
Place your finished mushroom in a shady spot of the garden, perhaps tucking some soft moss around the base to integrate it into the landscape.
Weathered Look
Before gluing, lightly sponge some diluted white or gray paint onto the unpainted ‘stem’ pot to simulate age or lichen growth, making it look like it’s been in the forest for years.
Now you have a charming pop of color ready to brighten up the shady corners of your garden
Cute Creature Face Planters
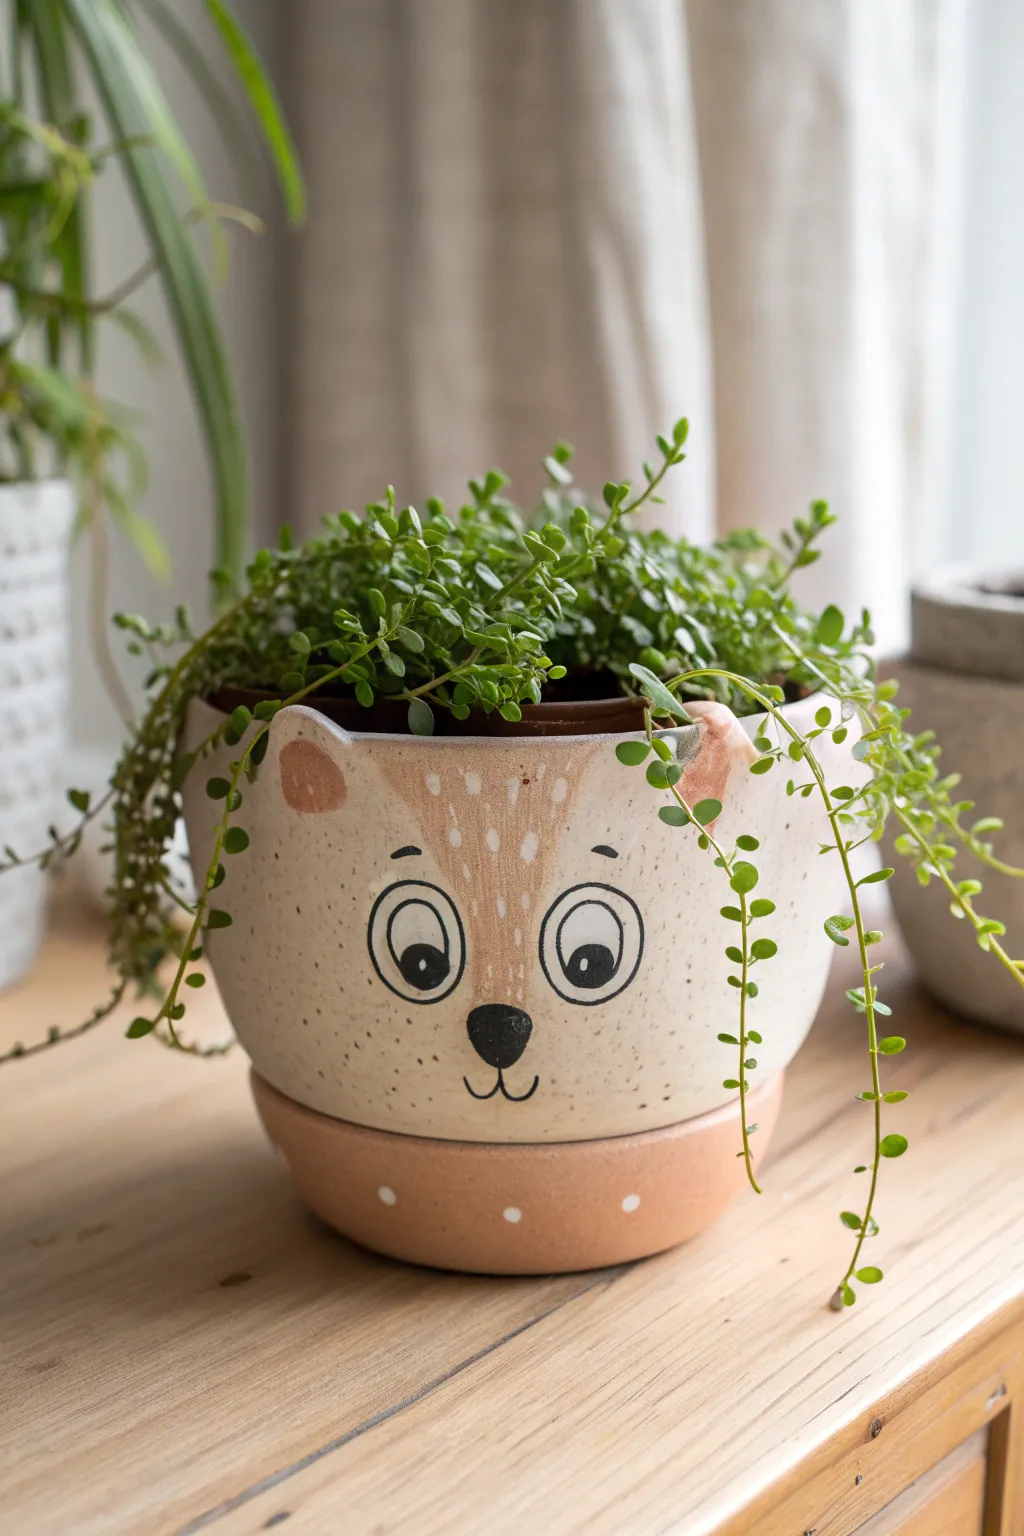
Bring a touch of forest charm to your indoor garden with this adorable deer face planter. Featuring soft earthy tones and a sweet expression, this project transforms a standard terracotta pot into a whimsical character perfect for trailing plants.
Step-by-Step
Materials
- Standard terracotta pot and matching saucer
- White or cream acrylic paint (matte base)
- Tan/light brown acrylic paint
- Dark brown/black acrylic paint
- Pink or peach acrylic paint
- Sponge brush or large flat brush
- Assorted detail brushes (round and liner)
- Old toothbrush (for speckling)
- Water cup and palette
- Matte clear sealant spray
Step 1: Base Preparation
-
Clean the surface:
Before starting, ensure your terracotta pot and saucer are completely clean and dry to help the paint adhere properly. -
Prime the pot:
Using a sponge brush, apply a base coat of cream or white acrylic paint to the entire exterior of the pot. Don’t worry about the saucer yet. -
Build opacity:
Let the first coat dry completely, then add a second or third coat until you have a solid, opaque finish where no orange clay shows through. -
Paint the saucer:
While the main pot dries, paint the exterior of the saucer with a soft peach or pinkish-tan color to create a contrasting base.
Clean Lines Hack
If you struggle painting perfect circles for the eyes, trace a bottle cap or a large coin lightly with a pencil before reaching for your paintbrush.
Step 2: Creating the Face
-
Outline the forehead:
Mix a light tan or fawn brown color. Using a round brush, paint a wide ‘V’ shape starting from the top rim, extending down between where the eyes will go, to create the deer’s forehead marking. -
Fill in the ears:
Paint two small semi-circles or soft triangles on the left and right sides of the rim using the same tan color to suggest the ears folded back. -
Add inner ear details:
Once the tan ear shapes are dry, take a little bit of pink paint and add a smaller shape inside the left ear to give it depth. -
Create the signature spots:
Using a small detail brush and white paint, dab tiny vertical dashes or dots onto the tan forehead area to mimic a fawn’s spots. -
Draft the eyes:
Lightly sketch two large circles for eyes with a pencil first if you are nervous, then trace them carefully with black paint and a fine liner brush. -
Fill the pupils:
Paint a smaller black circle inside each eye outline, leaving a generous amount of white space around it for a surprised, cute expression. -
Add the eye sparkle:
This is crucial for cuteness: place a tiny white dot in the upper right corner of both black pupils to bring the character to life. -
Paint the nose:
Paint a soft, rounded triangle or oval in black right between and slightly below the eyes. -
Draw the mouth:
Use your finest liner brush to draw a simple ‘w’ shape or two curved lines extending down from the nose to form the mouth. -
Add eyebrows:
Paint two small, floating curved lines above the eyes to give the deer a gentle expression.
Make it 3D
Glue small pieces of felt or leather to the rim for actual tactile ears, or tie a small jute twine bow around the top of the pot for a rustic collar.
Step 3: Finishing Touches
-
Speckle the pot:
Dip an old toothbrush into thinned black or dark brown paint. Run your thumb over the bristles to flick tiny speckles across the cream part of the face for a ceramic pottery look. -
Decorate the saucer:
Using a small round brush or the end of a paintbrush handle, add evenly spaced white polka dots around the peach saucer. -
Seal the work:
Once all paint is thoroughly dry (I usually wait overnight to be safe), spray the entire pot and saucer with a matte clear sealant to protect your artwork from water damage.
Pop in a trailing plant like trailing jade or string of turtles to give your new deer friend a lush green hairstyle
Broken Pot Fairy-Tale Mini Scene
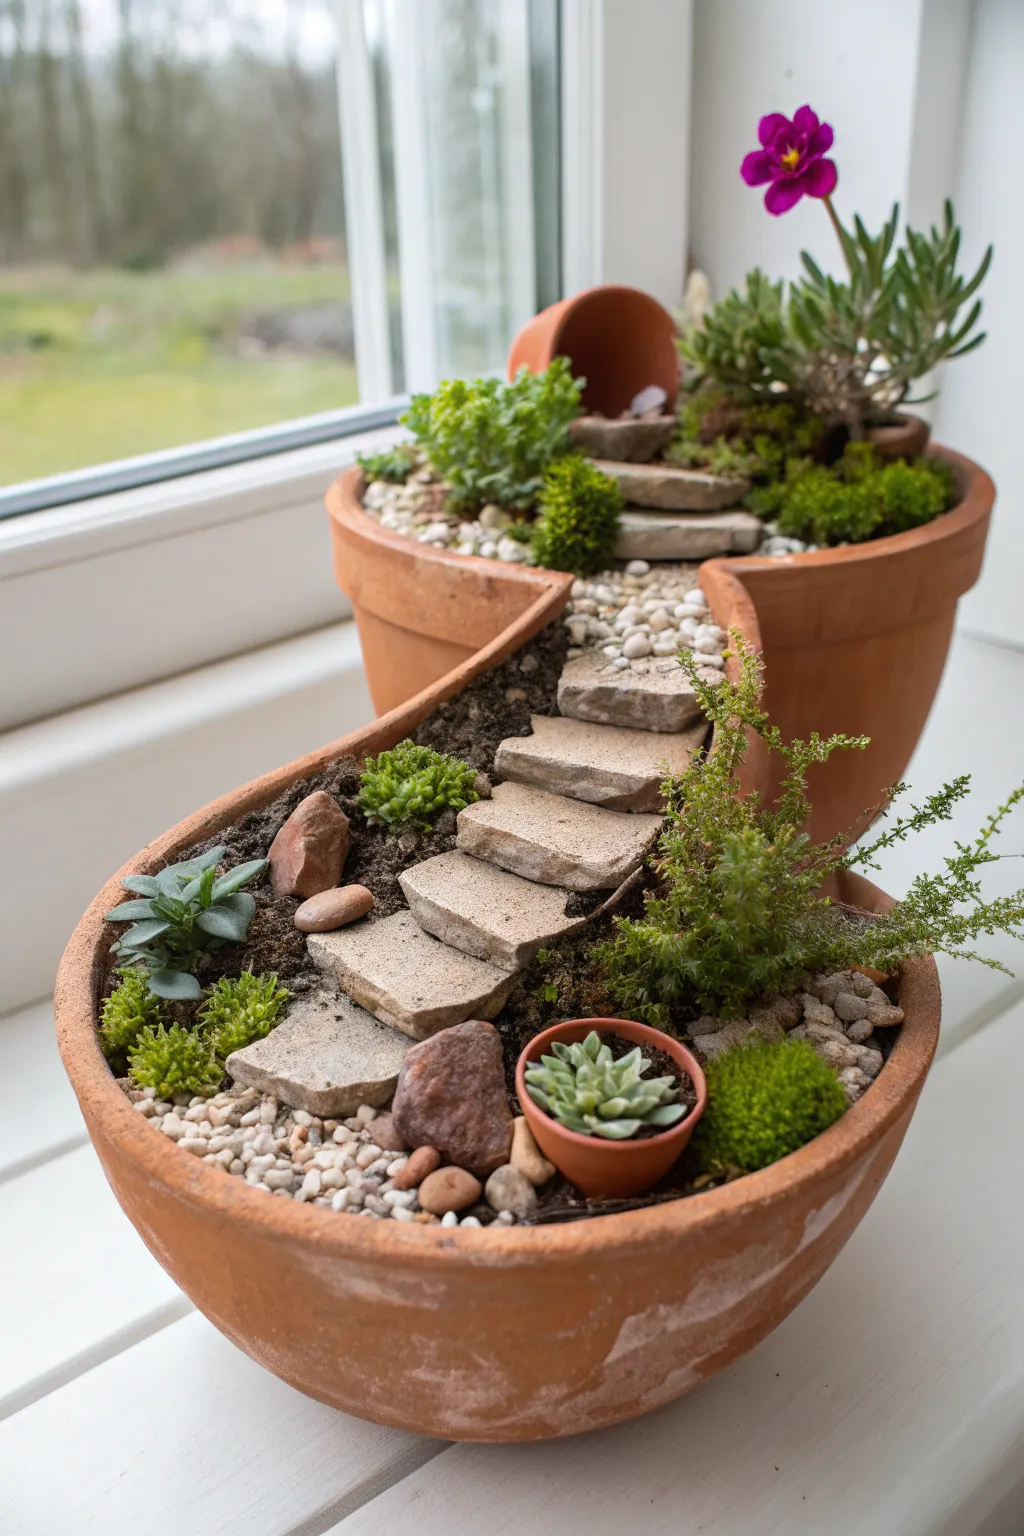
Transform broken terracotta pots into a whimsical, multi-level landscape with this creative gardening project. This tiered design uses a clever arrangement of shards to create a miniature stone staircase that seems to invite fairies right up to a hidden hilltop.
How-To Guide
Materials
- One large terracotta pot (approx 8-10 inches)
- One medium terracotta bowl or shallow pot
- Large terracotta shard (curved, to bridge the gap)
- Small terracotta pot (2-inch)
- Potting soil mix (succulent/cactus blend recommended)
- Flat stones or slate pieces (for stairs)
- Small pebbles or gravel (white and natural tones)
- Assorted succulents (Sedum, Echeveria, Crassula)
- Moss (sheet moss or cushion moss)
- Small flowering plant (e.g., Viola or Kalanchoe)
- Hammer and safety glasses (for customizing shards)
- Trowel or old spoon
Step 1: Structural Setup
-
Prepare the Break:
If your large pot isn’t already broken, put on safety glasses and gently tap the rim with a hammer to create a dip or opening on one side. Save the large curved shard; this is crucial for the bridge. -
Position the Pots:
Place the large pot behind the shallow bowl. Nestle them together so the broken opening of the tall pot aligns with the back of the shallow bowl, creating a continuous slope. -
Fill with Soil:
Fill both containers with succulent potting mix. Pack the soil firmly, especially where the two pots meet, to create a stable foundation for your bridge. -
Install the Bridge:
Take the long, curved terracotta shard you saved. Invert it (concave side down) and press it into the soil, connecting the lower bowl to the upper pot’s rim. This forms the ramp for your staircase.
Step 2: Hardscaping
-
Build the Staircase:
Starting from the bottom of the shard ramp, press flat stones into the soil one by one. Overlap them slightly as you climb upward to create a stable, realistic set of steps. -
Secure the Steps:
Pack a little damp soil under each stone as you go to prevent wobbling. I find using a small spoon helps tuck soil into these tight crevices. -
Add the Upper Path:
Once the stairs reach the top soil level of the large pot, continue the path using smaller flat stones leading toward the back. -
Create Pebble Borders:
Pour small white pebbles along the right side of the staircase ramp. This defines the walkway and adds a nice color contrast against the terracotta. -
Add Decorative Rocks:
Place a few larger, rougher rocks at the base of the stairs in the lower bowl to anchor the scene visually.
Soil Stability Check
If the soil ramp keeps sliding, mix a bit of clay or mud into it for stickiness, or mist it with water before placing the stone steps to help them grip.
Step 3: Planting & Details
-
Plant the ‘Trees’:
In the upper pot, towards the back right, plant a taller succulent like a Crassula or a flowering plant to act as a miniature tree canopy. -
Add Cushion Moss:
Tuck round clumps of bright green moss into the gaps around the stairs and near the base rocks. This softens the hard edges. -
Plant Ground Cover:
Plant low-growing sedum or creeping thyme along the sides of the staircase ramp to simulate shrubbery clinging to a hillside. -
Feature the Mini Pot:
Plant a tiny Echeveria rosette inside the 2-inch mini pot. Nestle this entire small pot into the soil at the bottom right of the lower bowl. -
Install the ‘Cave’:
Bury another small terracotta pot on its side in the upper level, partially covering it with soil and moss to look like a secret cave entrance. -
Final Dressing:
Sprinkle loose gravel over any remaining exposed soil patches to give the project a finished, clean look. -
Watering:
Use a spray bottle or a syringe to water the plants gently right at their roots, avoiding washing away your carefully placed soil and stones.
Magical Lighting
Hide a tiny battery-operated LED fairy light inside the upper ‘cave’ pot to create a warm, inviting glow in the evening.
Now you have a charming miniature world that looks like a slice of a fairy tale garden right on your windowsill