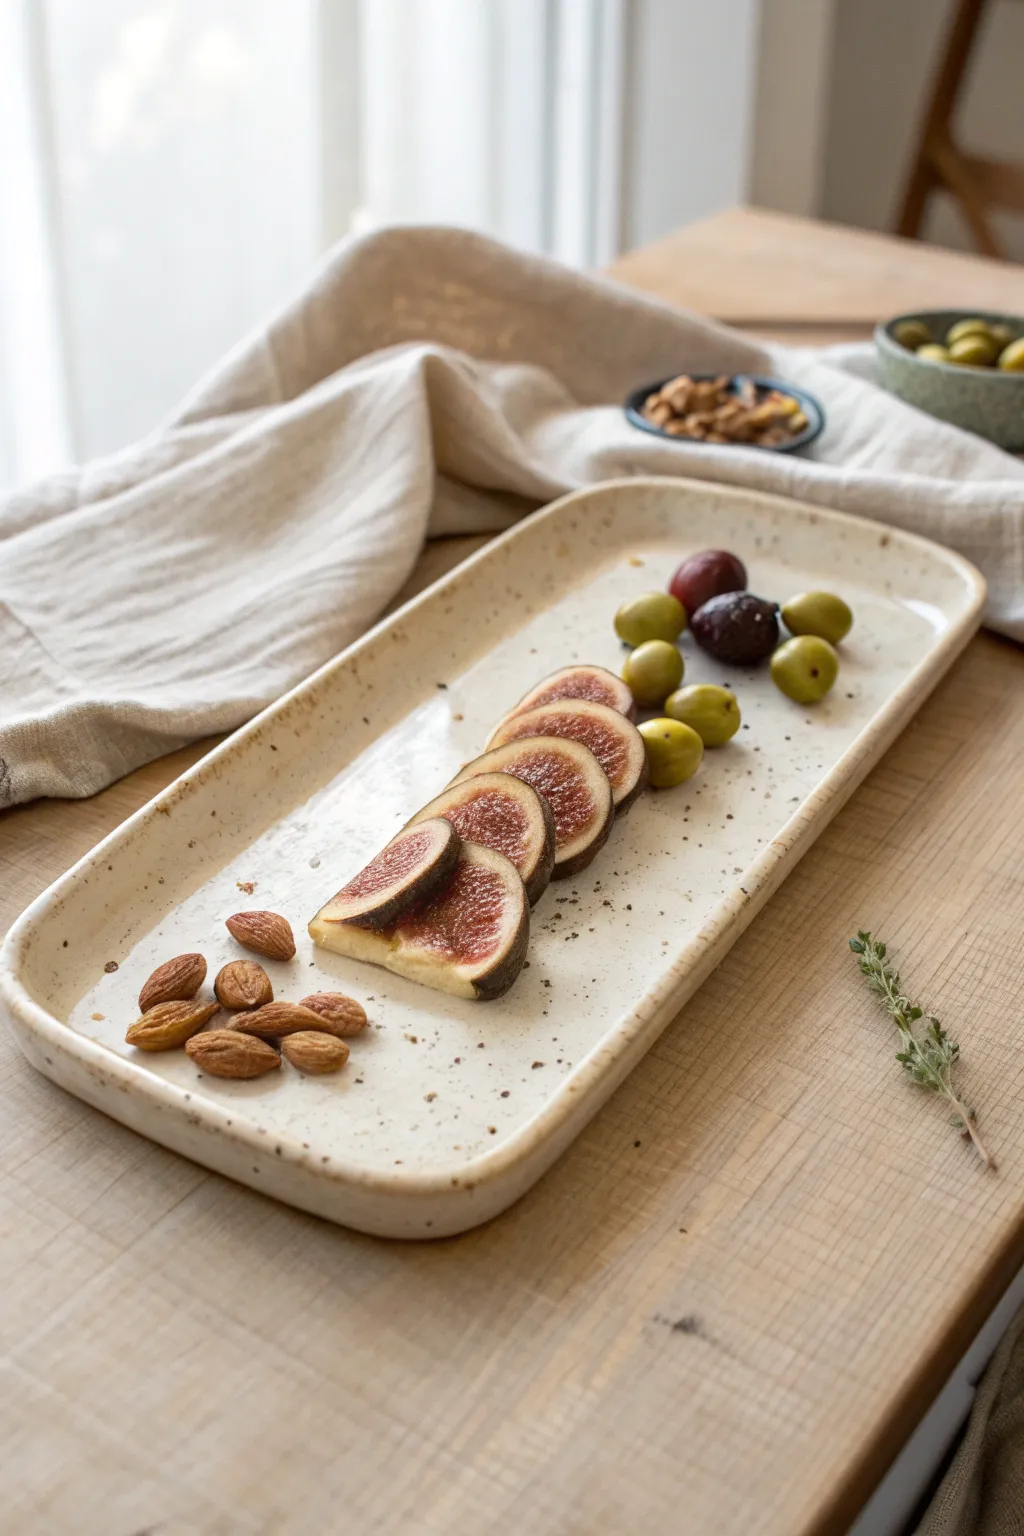
Whenever I’m in the studio and I need a project that feels both artsy and actually useful, I reach for clay platters. These clay platter ideas are the kind you can keep simple for your first try—or level up with texture, carving, and playful shapes once you’re feeling brave.
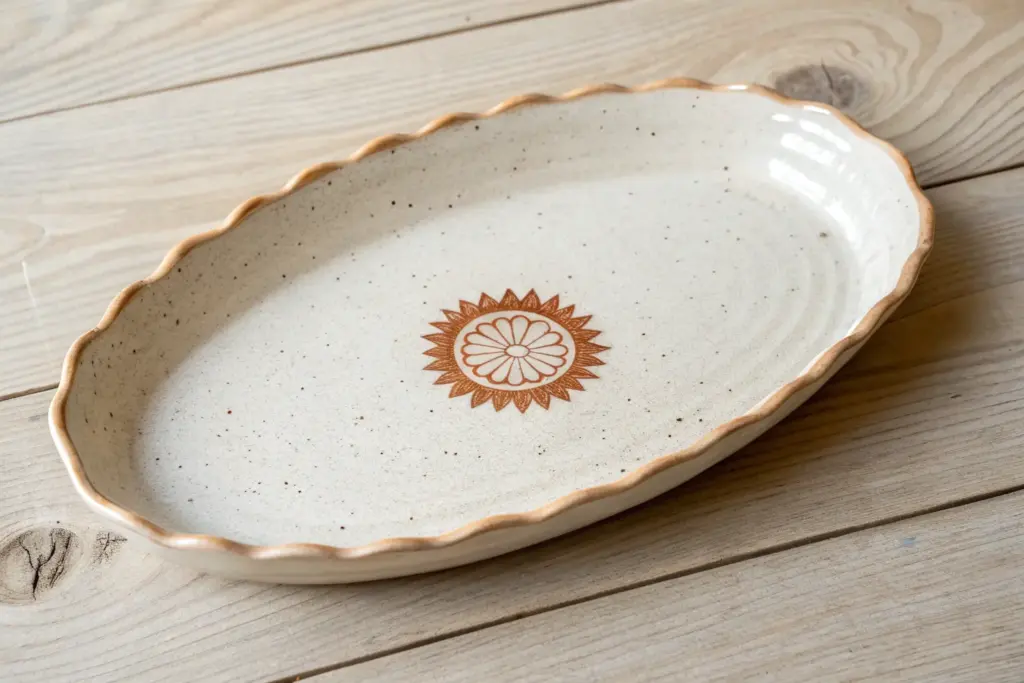
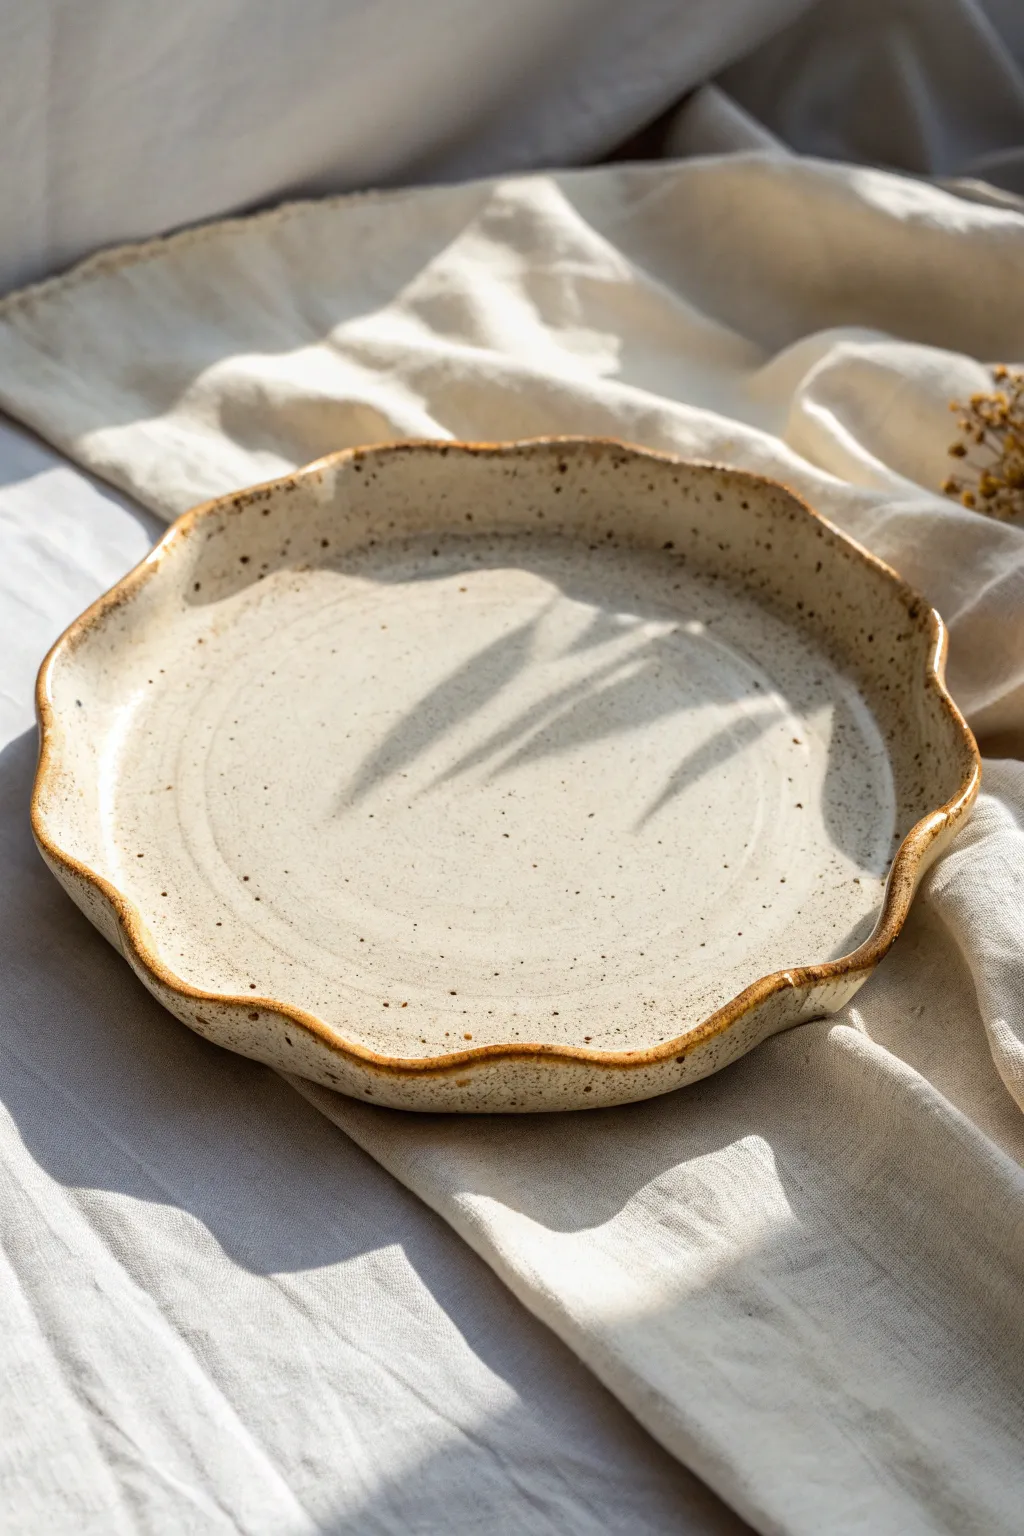
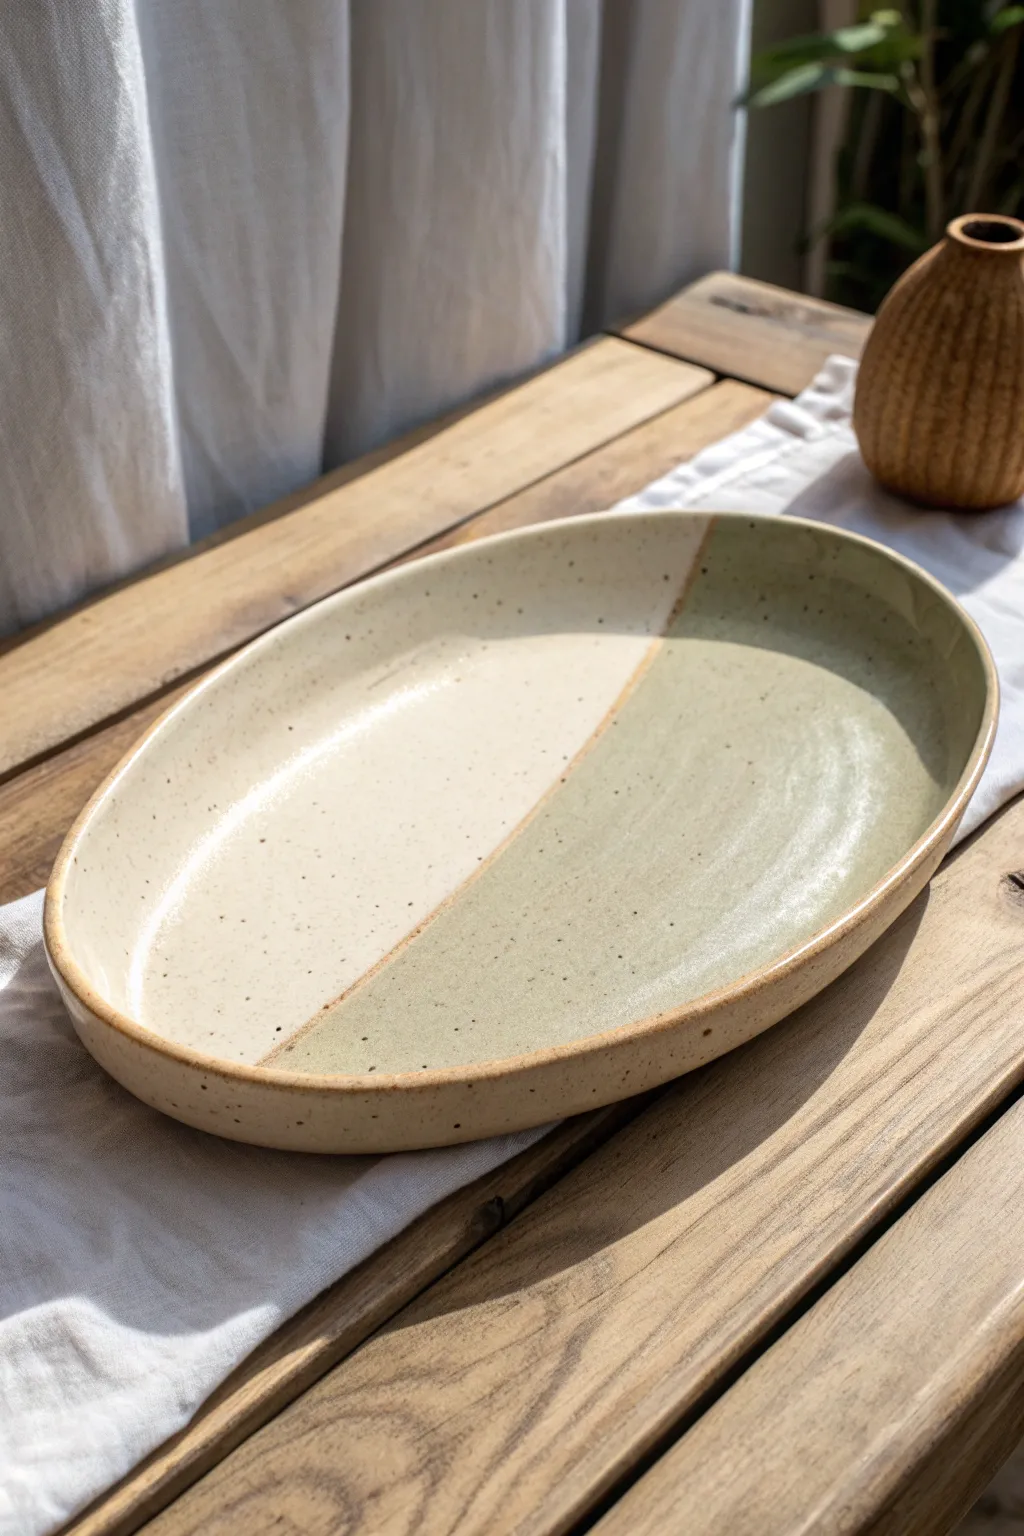
Classic Oval Slab Platter
This project embraces the charming imperfection of hand-built pottery with a simple, elegant oval form. Finished with a creamy, speckled glaze and a raised rim, it’s perfect for serving fresh fruit in the summer sun.
Step-by-Step
Materials
- Stoneware clay (buff or speckled)
- Rolling pin
- Guide strips or slab roller (approx. 1/4 inch thickness)
- Oval paper template
- Fettling knife or needle tool
- Smooth red rib tool
- Sponge
- Scoring tool or serrated rib
- Slip
- Speckled cream or ‘oatmeal’ glaze
- Kiln
Step 1: Preparing the Slab
-
Wedge the clay:
Start by thoroughly wedging your clay to remove air bubbles and ensure particle alignment, which prevents warping later. -
Roll out the slab:
Using a rolling pin and guide strips (or a slab roller), flatten your clay into a consistent slab about 1/4 inch thick. Make sure the slab is wider than your intended oval shape. -
Compress the clay:
Run a smooth rib tool over the surface of the slab on both sides. This compression step is crucial for preventing cracks during drying and firing. -
Cut the base:
Place your paper oval template onto the slab. Using your fettling knife held vertically, trace around the template to cut out the base shape. -
Cut the wall strips:
From the remaining clay, cut long strips approximately 1 inch to 1.5 inches wide. These will form the raised rim of your platter.
Clean Edges
After cutting your initial oval, let the slab stiffen to ‘leather hard’ before attaching the walls. It makes the tall sides much less floppy and easier to handle.
Step 2: Building the Form
-
Score the connection points:
Take a serrated rib or scoring tool and rough up the outer edge of the oval base where the wall will sit. Do the same to one long edge of your clay strips. -
Apply slip:
Brush a generous amount of slip onto the scored areas of the base to act as your glue. -
Attach the wall:
Place the clay strip onto the base, matching the scored edges. If you need multiple strips to go all the way around, cut the ends at a 45-degree angle where they meet for a stronger join. -
Blend the seams:
Using a modeling tool or your thumb, firmly blend the clay from the strip down onto the base on the inside. Then, do the same on the outside, pulling clay from the base up onto the wall. -
Smooth the transition:
Run a wet sponge or chamois cloth along the join to erase the tool marks, creating a seamless curve from the floor of the platter to the wall.
Step 3: Refining and Glazing
-
Shape the rim:
Gently pinch and smooth the top lip of the wall. I like to slightly flare the wall outward here to give the platter a more open, welcoming feel. -
Dry slowly:
Cover the platter loosely with plastic sheets to let it dry slowly. This helps prevent the rim from drying faster than the base, which causes warping. -
Bisque fire:
Once bone dry, fire the piece to bisque temperature (usually cone 04 or 06, depending on your clay body). -
Clean the bisque:
Wipe down the fired piece with a damp sponge to remove any kiln dust before glazing. -
Apply the glaze:
Pour a speckled cream or oatmeal glaze into the platter, swill it around to coat the interior, and pour out the excess. Use a brush or spray gun to coat the exterior evenly. -
Create the rim detail:
While glazing, the glaze naturally breaks thinner over the sharp edge of the rim, creating that darker outline seen in the image. Ensure you don’t apply glaze too thickly right on that edge. -
Glaze fire:
Loading the platter into the kiln carefully, fire to the maturity temperature of your clay and glaze (often cone 5 or 6 for stoneware).
Rustic Texture
Add fine iron filings or use a clay body with heavy grog to enhance the speckled effect if your glaze is too uniform. The specks will bleed through the cream glaze.
Once cooled, your platter is ready to be the centerpiece of your next garden table setting


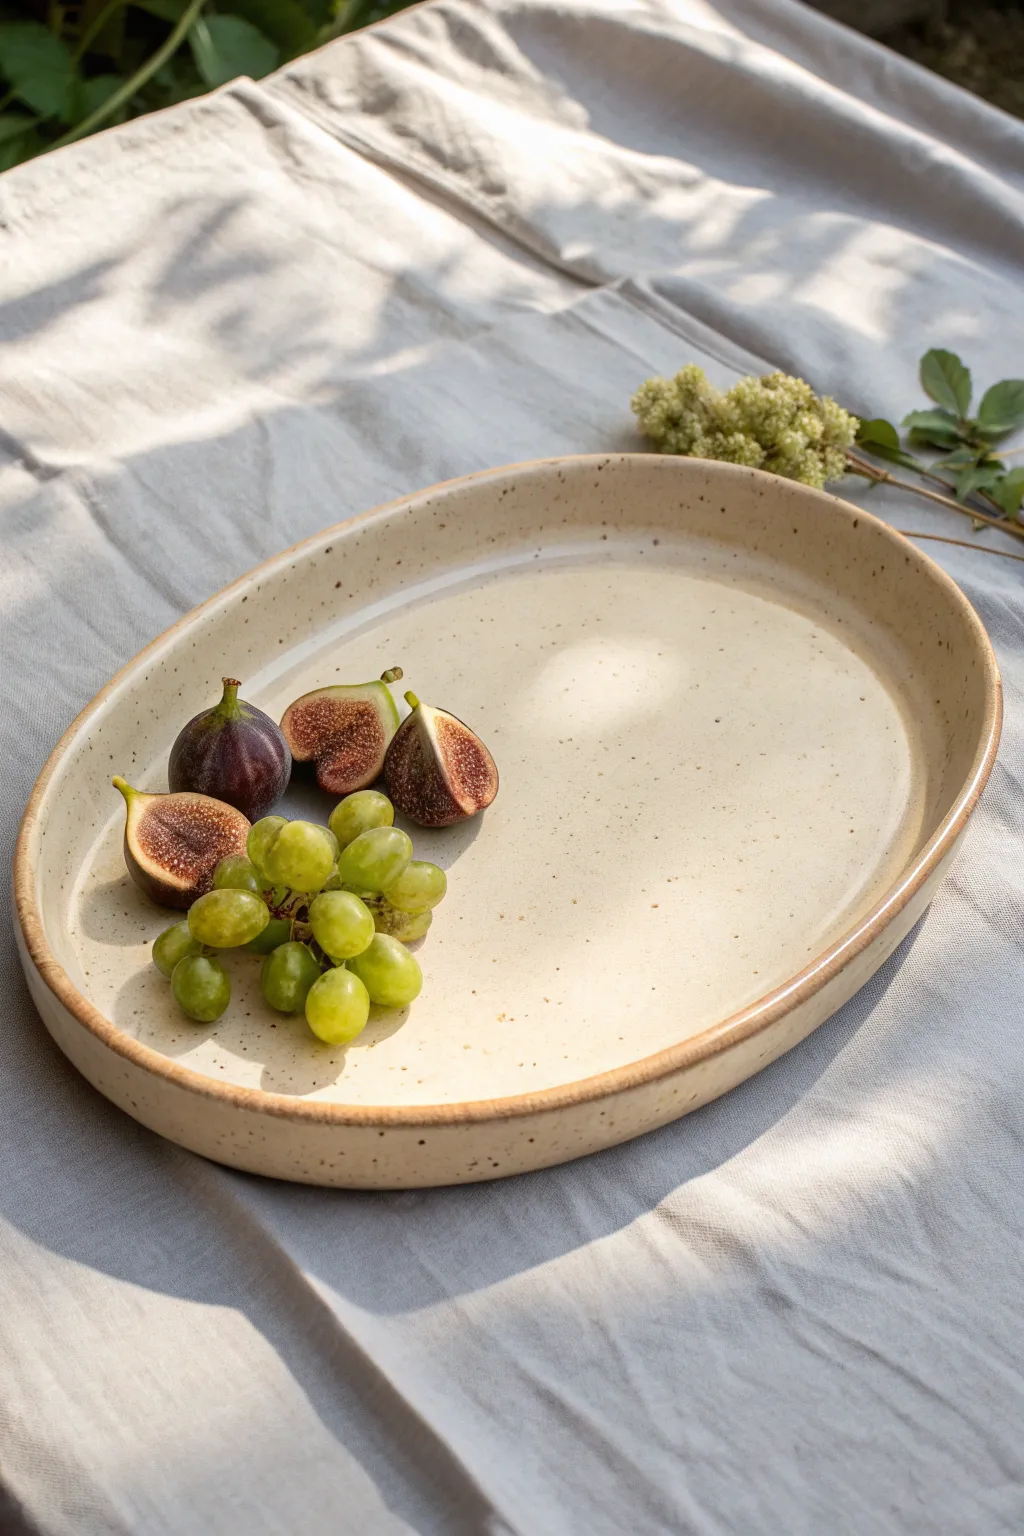
Round Platter With a Raised Rim
This project focuses on creating a classic, versatile serving platter with a warm, artisanal feel. The creamy, speckled glaze finish combined with the natural warmth of the exposed clay rim gives it a timeless, rustic elegance perfect for any gathering.
How-To Guide
Materials
- Speckled Buff Stoneware Clay (approx. 3-4 lbs)
- Rolling pin & thickness strips (or slab roller)
- Round plaster mold or hump mold (approx. 10-12 inches)
- Pottery sponge
- Metal kidney rib
- Soft rubber rib
- Needle tool
- Fettling knife
- Wire clay cutter
- Creamy white speckle glaze (cone 5/6)
- Kiln
Step 1: Forming the Slab
-
Prepare the Clay:
Begin by wedging your speckled buff clay thoroughly to remove any air bubbles. Pat it into a circular pancake shape with your hands to prepare it for rolling. -
Roll the Slab:
Using your rolling pin and guide strips (set to about 1/4 or 3/8 inch thickness), roll out a large, even slab. Flip the clay and roll from different directions to ensure the clay particles are compressed, which helps prevent warping later. -
Compress the Surface:
Take your soft rubber rib and firmly compress the surface of the slab. I find that doing this on both sides creates a much smoother canvas for the glaze later.
Rim Stability Tip
To prevent the raised rim from flopping during drying, place a coil of foam or rolled-up newspaper under the lip for support until the clay stiffens.
Step 2: Shaping the Platter
-
Cut the Circle:
Place your hump mold or a paper template onto the slab to gauge the size. Use your needle tool to cut a circle that is about 1.5 inches wider than you want the final flat surface to be, allowing room for the rim. -
Drape the Clay:
Carefully lift your clay slab and center it over your plaster hump mold. Gently press the center down first, working your way outward to ensure there is no trapped air between the clay and the mold. -
Define the Rim:
The key feature of this platter is the raised rim. Rather than pressing the edges flat against the mold, allow the excess clay at the perimeter to flare slightly away from the mold’s curve, or gently tease it upward with your fingers to create that distinct vertical lip. -
Bevel the Edge:
Take your sponge or a chamois cloth and smooth the very edge of the rim. You want it rounded and soft to the touch, not sharp. -
Dry Slowly:
Cover the piece loosely with plastic. Let it dry on the mold until it is leather hard—firm enough to hold its shape but not bone dry. Removing it too early can cause the rim to slump.
Step 3: Refining and Bisque Firing
-
Clean the Foot:
Once leather hard, remove the platter from the mold. Flip it over onto a foam bat. Use a trimming tool to tidy up the bottom or carve distinct foot rings if you prefer a lifted look. -
Smooth the Surface:
Go over the entire piece with a slightly damp sponge to remove any harsh tool marks or fingerprints. -
Bisque Fire:
Let the platter dry completely to the bone-dry stage. Load it into the kiln for a bisque fire (usually Cone 04 or 06, depending on your clay).
Texture Twist
Before draping the slab, press a linen cloth or lace into the clay surface. The glaze will break beautifully over the subtle texture, adding visual depth.
Step 4: Glazing and Final Fire
-
Wax the Bottom:
Apply wax resist to the entire bottom of the platter and slightly up the side of the foot to prevent glaze from running onto your kiln shelf. -
Apply Glaze:
Pour or dip your creamy white speckle glaze onto the platter. For a platter this size, pouring the glaze into the center and tilting the plate to coat the surface often works best for an even layer. -
Clean the Rim:
To achieve the look in the photo, take a damp sponge and carefully wipe the glaze off the very top edge of the rim. This exposes the toasted clay body and highlights the form. -
Pop Air Bubbles:
Check the surface for any pinholes or bubbles in the wet glaze and smooth them over with your finger. -
Final Fire:
Fire the piece to the maturity temperature of your clay and glaze (typically Cone 5 or 6 for stoneware). Allow the kiln to cool naturally.
Now you have a stunning, food-safe platter ready to showcase your favorite appetizers or cheeses


Rectangular Serving Platter
This elegant rectangular serving platter features a minimalist aesthetic with a warm, creamy glaze and natural speckling. Its slightly raised, rounded rim offers a modern touch, making it perfect for presenting everything from charcuterie to fresh fruit.
Step-by-Step Guide
Materials
- Speckled stoneware clay (mid-range cone 5/6)
- Canvas work surface or slab mat
- Rolling pin
- Two wooden guide slats (approx. 1/4 inch thick)
- Rectangular paper template (approx. 6×14 inches)
- Needle tool or fettling knife
- Potter’s sponge
- Rib tool (rubber or silicone)
- Sureform rasp or shredder tool
- Satin cream or white matte glaze
- Kiln
Step 1: Slab Preparation
-
Prepare the Clay:
Begin by wedging your speckled stoneware clay thoroughly to remove air pockets and ensure an even consistency. -
Set Up Guides:
Place your wooden guide slats on either side of your canvas work surface. These will ensure your slab is a uniform thickness. -
Roll the Slab:
Toss the clay securely onto the canvas and begin rolling. Roll from the center outward, rotating the clay frequently to prevent sticking, until the rolling pin rests flat on the guide slats. -
Compress the Clay:
Using a rubber rib, firmly compress the surface of the slab. This aligns the clay particles which helps prevent warping during drying and firing.
Warp Watch
To prevent warping, dry the platter on a piece of drywall or intricate wooden slats. Flip it daily while drying carefully so both sides lose moisture evenly.
Step 2: Shaping the Platter
-
Cut to Size:
Place your rectangular paper template onto the slab. Using a needle tool or fettling knife, cut cleanly around the perimeter, holding the tool vertical. -
Soften the Edges:
Run a damp finger or a small piece of sponge along the freshly cut edges to remove any sharp burrs or crumbs of clay. -
Create the Rim:
Gently lift the outer 1/2 inch of the slab’s edge upward. You can use your thumb to support the underside while your fingers gently curve the clay upwards. -
Refine the Curve:
Smooth the transition from the flat base to the raised rim using a damp sponge. The goal is a soft, organic curve rather than a sharp 90-degree angle. -
Level the Corners:
Ensure the rounded corners are lifted to the same height as the straight sides. I like to visually check this at eye level to ensure symmetry.
Texture Twist
Before cutting your shape, roll a textured fabric (like lace or burlap) into the slab to leave an imprint that the glaze will break over beautifully.
Step 3: Finishing and Firing
-
Slow Drying:
Cover the platter loosely with plastic sheeting. Allow it to dry slowly to the leather-hard stage to prevent the corners from curling up. -
Refine the Bottom:
Once leather hard, flip the platter over gently. Use a damp sponge to smooth the bottom surface. -
Bisque Fire:
Once bone dry, fire the piece to a bisque temperature (usually Cone 04) suitable for your clay body. -
Glaze Application:
Wipe the bisque ware with a clean, damp sponge to remove dust. Determine if you want a fully glazed look or a raw bottom; for this look, dip or brush a satin cream glaze over the entire top surface and rim. -
Final Fire:
Load the kiln and fire to the maturity temperature of your clay and glaze (typically Cone 5 or 6 for stoneware). -
Sand the Foot:
After firing, use wet-dry sandpaper to smooth any rough patches on the unglazed bottom so it sits perfectly flat on your table.
Your finished platter will be a versatile centerpiece ready to showcase your favorite appetizers with handmade charm


Scalloped Edge Platter
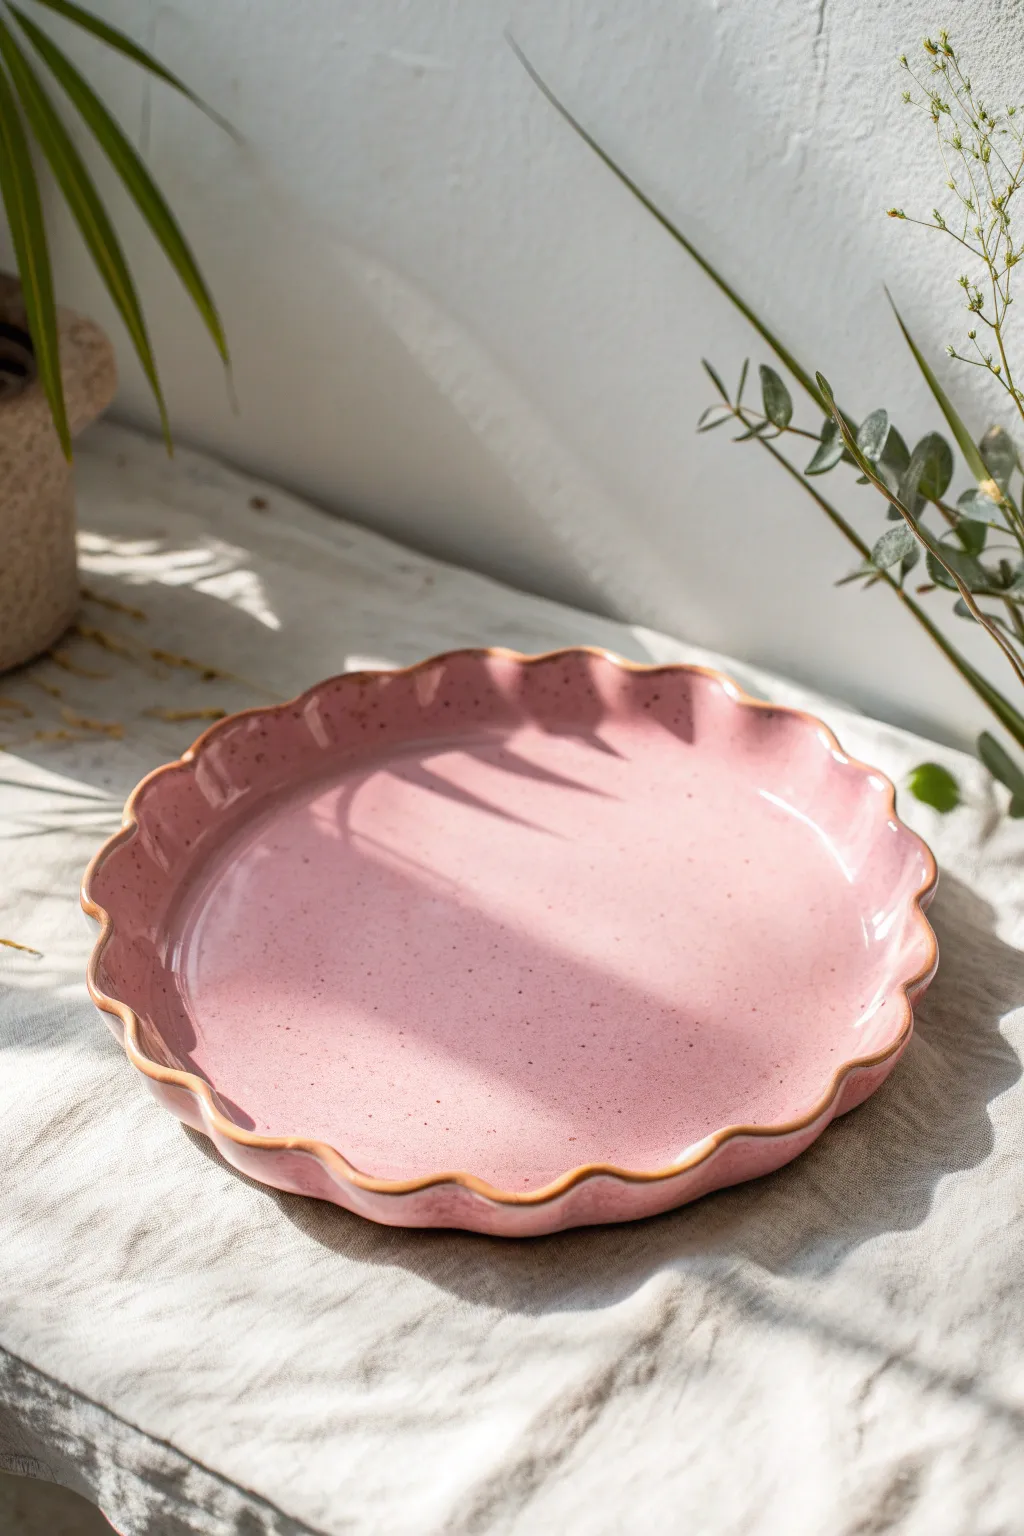
Embrace the charm of soft curves with this delicate pink platter, featuring a playful scalloped rim and a subtle speckled finish. The gentle undulation of the edges creates a flower-like silhouette that turns any meal into a special occasion.
Step-by-Step Guide
Materials
- White or light stoneware clay (speckled variety ideal)
- Rolling pin
- Two wooden guide strips (1/4 inch thick)
- Wide canvas cloth or slab mat
- Rib tool (rubber or silicone)
- Needle tool
- Fettling knife
- Large circular template or plate (approx. 10-12 inches)
- Sponge
- Modeling tool with a rounded handle
- Slump mold or large curved bowl
- Pink translucent glaze (speckled if clay is plain)
- Kiln
Step 1: Preparing the Slab
-
Wedge the clay:
Begin by thoroughly wedging your clay to remove any air bubbles. This is crucial for a flat platter to prevent cracking or warping later. -
Set up the workspace:
Lay down your canvas cloth on a sturdy table. Place the two wooden guide strips on either side of your workspace, spaced slightly wider than your desired platter size. -
Roll out the slab:
Place your clay ball in the center and begin rolling it out. Keep the rolling pin resting on the guide strips to ensure a perfectly even 1/4 inch thickness across the entire slab. -
Compress the surface:
Take your rubber rib tool and drag it smoothly across the surface of the clay in multiple directions. This compresses the clay particles, strengthening the slab and erasing the texture of the canvas.
Even Scallops
Use a coin or a small jar lid to press into the edge of the clay as a guide. This helps keep every scallop identical in depth and width before you smooth them out.
Step 2: Shaping the Form
-
Cut the circle:
Place your circular template or an existing dinner plate gently onto the slab. Using your needle tool or fettling knife, trace around it to cut a perfect circle, holding the tool vertical for a clean edge. -
Remove excess clay:
Peel away the scrap clay from around your circle. Save these scraps immediately in a bag to keep them moist for other projects. -
Smooth the rim:
Use a slightly damp sponge to round over the sharp cut edge of your circle. Smooth rims are essential for glazes to break beautifully over the edge later. -
Mark the scallops:
Lightly visualize or gently mark where your scallops will go. Divide the circle into equal sections—usually 8 or 12 works best for a balanced look. -
Form the scallops:
Use your thumb or the handle of a modeling tool to gently push the rim inward at regular intervals. I find alternating between pushing in and gently pulling the adjacent sections out creates the most organic wave. -
Refine the curves:
Go back around the rim with a damp finger, smoothing the transitions of the waves so they look like soft petals rather than sharp indents.
Rim Accent
After glazing the pink base, gently wipe a sponge with a darker oxide or transparent glaze just along the very tip of the rim to highlight the beautiful wavy edge.
Step 3: Drying and Firing
-
Transfer to mold:
Carefully lift your slab and place it into a slump mold or a large, shallow, paper-lined bowl. This will give the platter its slight concave shape and lifted rim. -
Let it stiffen:
Allow the clay to dry to a leather-hard state while inside the mold. This ensures it retains that gentle curve without flopping flat. -
Final smoothing:
Once leather hard, remove it from the mold. Use a sponge to do one final pass over the rim and the foot, ensuring no sharp burrs remain. -
Bisque fire:
Let the piece dry completely (bone dry) before loading it into the kiln for a bisque firing (usually Cone 04). -
Glazing:
Wipe the bisque-ware with a damp sponge to remove dust. Dip or brush on your pink glaze. If your clay body wasn’t speckled, choose a glaze with suspended speckles to mimic the look in the photo. -
Wipe the foot:
Ensure the bottom of the platter that sits on the shelf is completely free of glaze to prevent it sticking to the kiln shelf. -
Glaze fire:
Fire the piece again to the maturity temperature of your specific clay and glaze combination (often Cone 5 or 6 for stoneware).
Once cooled, your platter is ready to add a soft touch of elegance to your table setting

The Complete Guide to Pottery Troubleshooting
Uncover the most common ceramic mistakes—from cracking clay to failed glazes—and learn how to fix them fast.
Pinched Rim Organic Platter
Embrace the beauty of imperfection with this lovely organic platter, featuring a soft, undulating rim and a warm, speckled finish. The subtle brown edge highlights its handmade nature, making it a perfect centerpiece for rustic table settings.
Step-by-Step Tutorial
Materials
- Speckled buff stoneware clay (or white clay with added grog/speckles)
- Rolling pin
- Canvas mat or slab roller
- Large round template (paper or flexible plastic)
- Needle tool
- Rib tool (yellow soft rubber)
- Small sponge
- Pottery wheel (optional, for centering/smoothing base) or banding wheel
- Clear or transparent glossy glaze
- Iron oxide wash or dark brown underglaze
- Paintbrush (small detail brush)
Step 1: Forming the Base
-
Prepare the Clay:
Begin with a well-wedged ball of speckled buff stoneware. This clay body naturally provides the lovely spots seen in the final piece, so you won’t need to add textures manually later. -
Roll the Slab:
Roll out a slab of clay on your canvas mat to an even thickness of about 1/4 to 3/8 inch. Ensure you roll in multiple directions to compress the clay particles, which helps prevent warping. -
Smooth the Surface:
Take your soft rubber rib and gently compress the entire surface of the slab on both sides. This step is crucial for removing canvas texture and creates that silky smooth interior finish. -
Cut the Shape:
Place your large round template onto the slab. Using a needle tool, cut vertically around the template to create a perfect circle.
Step 2: Shaping the Rim
-
Lift the Edges:
Ideally, place your clay circle onto a foam slump mold to give it a gentle curve. Alternatively, place it on a banding wheel and gently lift the outer 1-2 inches of the rim upward with your fingers. -
Create the Waves:
To form the signature wavy edge, use your thumb and forefinger. Support the clay from underneath with two fingers and gently press down in between them with your thumb. -
Refine the Undulations:
Work your way around the entire circumference. I like to keep the waves irregular and organic rather than perfectly symmetrical, as this enhances the rustic aesthetic. -
Smooth the Lip:
Dampen your small sponge slightly (squeeze it out well!) and run it over the very edge of the rim. This softens any sharp cuts from the needle tool and rounds off the waves. -
Dry Slowly:
Cover the piece loosely with plastic to let it dry very slowly to the leather-hard stage. This prevents the rim from warping or cracking as the clay shrinks.
Warping Woes?
If your platter lifts in the center while drying, weight it down with a small sandbag during the leather-hard stage to keep the bottom flat.
Step 3: Glazing and Finishing
-
Bisque Fire:
Once bone dry, fire the platter to bisque temperature (usually cone 04 or 06, depending on your clay). -
Clean the Bisqueware:
Wipe the fired piece down with a damp sponge to remove any kiln dust ensuring the glaze adheres properly. -
Apply the Main Glaze:
Dip the entire platter into a clear or transparent glossy glaze. A transparent glaze is essential here to let the natural speckles of the clay body show through. -
Clean the Foot:
Wipe the bottom foot ring completely clean of glaze so it doesn’t fuse to your kiln shelf. -
Highlight the Rim:
Using a small detail brush, carefully apply a thin line of iron oxide wash or a dark brown underglaze just along the very edge of the wavy rim. This creates that defined, toasted outline. -
Final Fire:
Load the kiln for your final glaze firing (follow the temperature guide for your specific clay body, likely cone 5 or 6 for stoneware).
Rim Definition
Don’t have iron oxide? You can wipe the glaze off just the very edge of the rim exposing the bare clay, which often toasts a darker brown naturally.
Once cooled, your platter is ready to bring a touch of earthy elegance to your dining table
Leaf-Imprint Platter
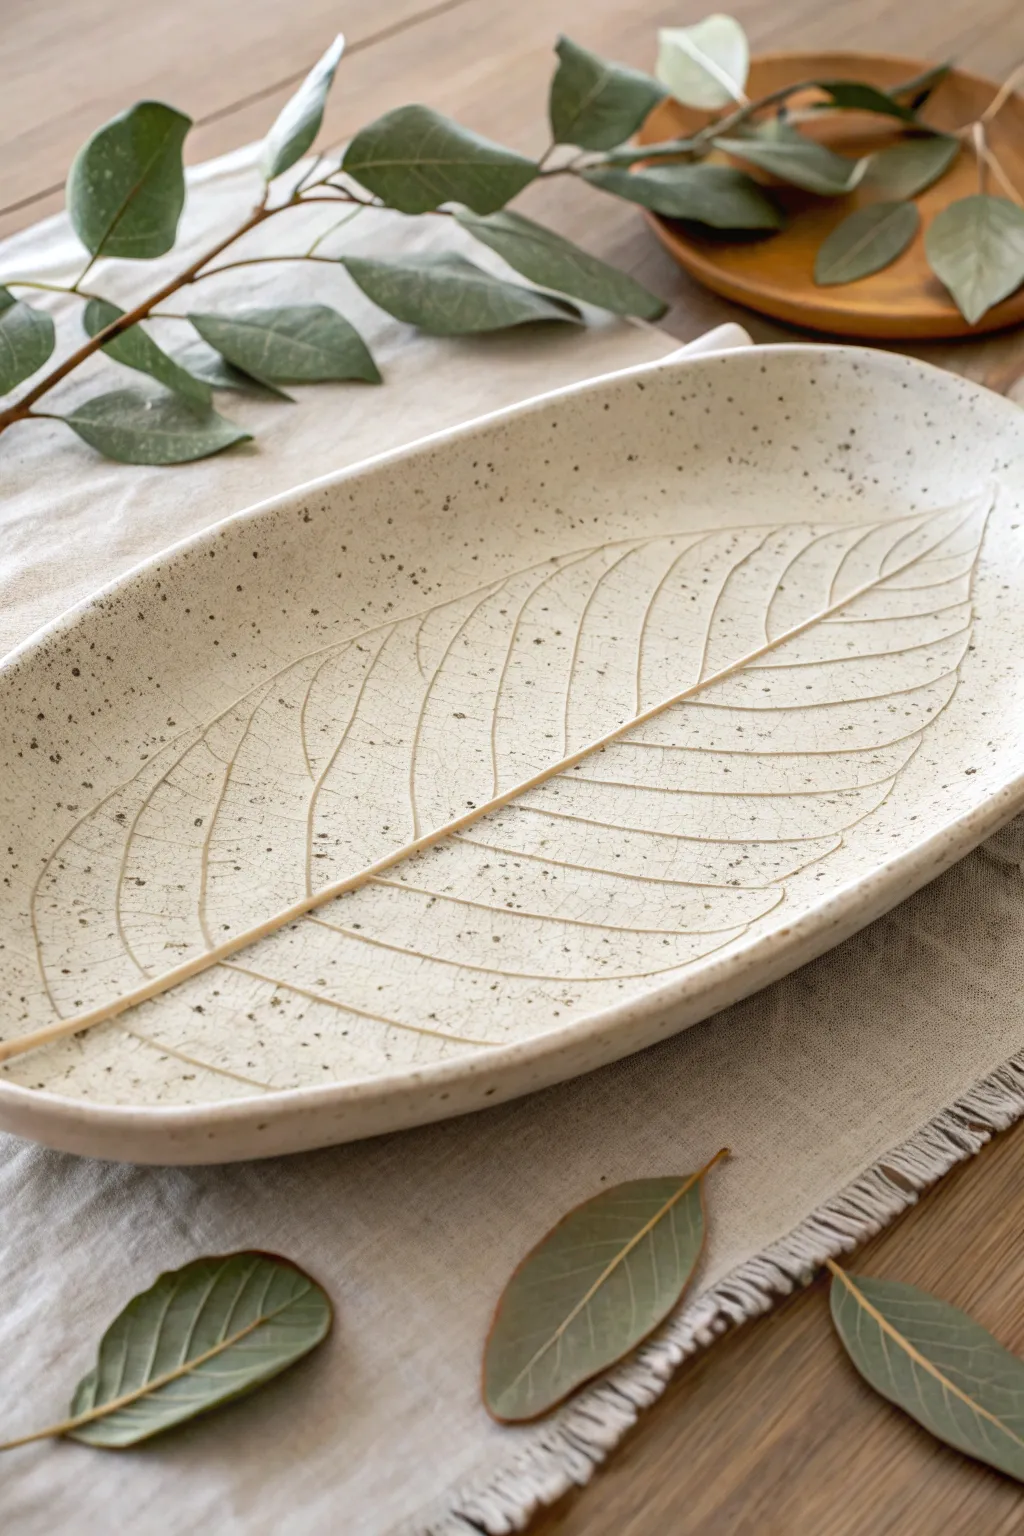
Bring the outdoors in with this elegant, nature-inspired ceramic platter that captures the intricate beauty of leaf veins. The finished piece features a creamy, speckled surface with a subtle, organic embossment perfect for serving or display.
Step-by-Step Guide
Materials
- White stoneware clay with grog or speckles
- Large, fresh leaf with prominent veins (e.g., walnut, hickory, or ficus)
- Rolling pin
- Canvas work surface or slab roller
- Needle tool or fettling knife
- Smooth rib tool (rubber or metal)
- Shallow oval slump mold (or a makeshift form)
- Sponge
- Small rolling tool or brayer (optional)
- Clear or translucent white glaze
- Kiln
Step 1: Preparing the Slab
-
Wedge the clay:
Begin by thoroughly wedging your clay to remove air bubbles and ensure an even consistency. For a platter of this size, you’ll want a generous amount of clay, roughly 3-4 pounds. -
Roll the slab:
Roll out a slab of clay on your canvas surface. Aim for a thickness of about 1/4 to 3/8 of an inch. Keep the thickness consistent across the entire piece to prevent warping later. -
Compress the clay:
Using a rib tool, gently compress the surface of the slab on both sides. This aligns the clay particles, smooths the texture, and strengthens the slab against cracking.
Selecting the Right Leaf
Use leaves with thick, woody stems and veins, like Hosta, Rhubarb, or Kale. Thin, delicate leaves won’t leave a deep enough impression to catch the glaze.
Step 2: Creating the Impression
-
Select and place the leaf:
Choose a fresh leaf that isn’t dry or brittle. Place it vein-side down onto the center of your slab. The vein structure is usually more pronounced on the underside, which gives a deeper impression. -
Roll the impression:
Use a rolling pin or a small brayer to firmly press the leaf into the clay. Roll from the center stem outward to the edges to avoid trapping air bubbles under the leaf. -
Check the depth:
Carefully lift one edge of the leaf to peek at the impression. It should be distinct and visibly deep. If it’s too faint, lay the leaf back down and roll again with slightly more pressure. -
Remove the leaf:
Once satisfied, peel the leaf away slowly. Use a needle tool to gently lift the stem if it’s stuck. You should now have a crisp, negative relief of the botanical structure.
Highlight with Oxide
Before glazing, rub a small amount of iron oxide or dark underglaze into the impressed veins and wipe away the excess. This adds contrast and depth.
Step 3: Shaping and Refining
-
Cut the shape:
Using a needle tool, cut a large oval shape around the leaf impression. Leave a generous border of negative space around the leaf design, as seen in the photo. -
Smooth the edges:
Run a damp sponge or your finger along the cut rim to soften the sharp square edge left by the knife. I like to round it off completely so it feels nice to hold later. -
Form the curve:
Carefully lift the slab and transfer it into your shallow oval slump mold. Gently press the clay down so it conforms to the curve of the mold. -
Refine the rim:
While in the mold, double-check the rim again. If the transfer caused any distortion or fingerprints, smooth them out now with a rib or slightly damp sponge.
Step 4: Firing and Glazing
-
Slow drying:
Loosely cover the platter with plastic to let it dry slowing. Uneven drying leads to warping, especially with large flat platters. Once bone dry, bisque fire the piece according to your clay body’s specifications. -
Clean the bisque:
After the first firing, wipe the bisque ware with a clean, damp sponge to remove any dust that might resist the glaze. -
Apply the glaze:
Dip or brush on a semi-opaque white or clear glaze. The goal is a milky finish that pools slightly in the veins to highlight the texture but doesn’t obscure the clay’s natural speckles. -
Wipe the foot:
Ensure the bottom of the platter is completely free of glaze to prevent it from fusing to the kiln shelf. -
Glaze fire:
Fire the piece a second time to the maturation temperature of your glaze and clay body.
Now you have a stunning, food-safe platter that permanently preserves a moment of nature’s design


What Really Happens Inside the Kiln
Learn how time and temperature work together inside the kiln to transform clay into durable ceramic.
Botanical Relief Platter
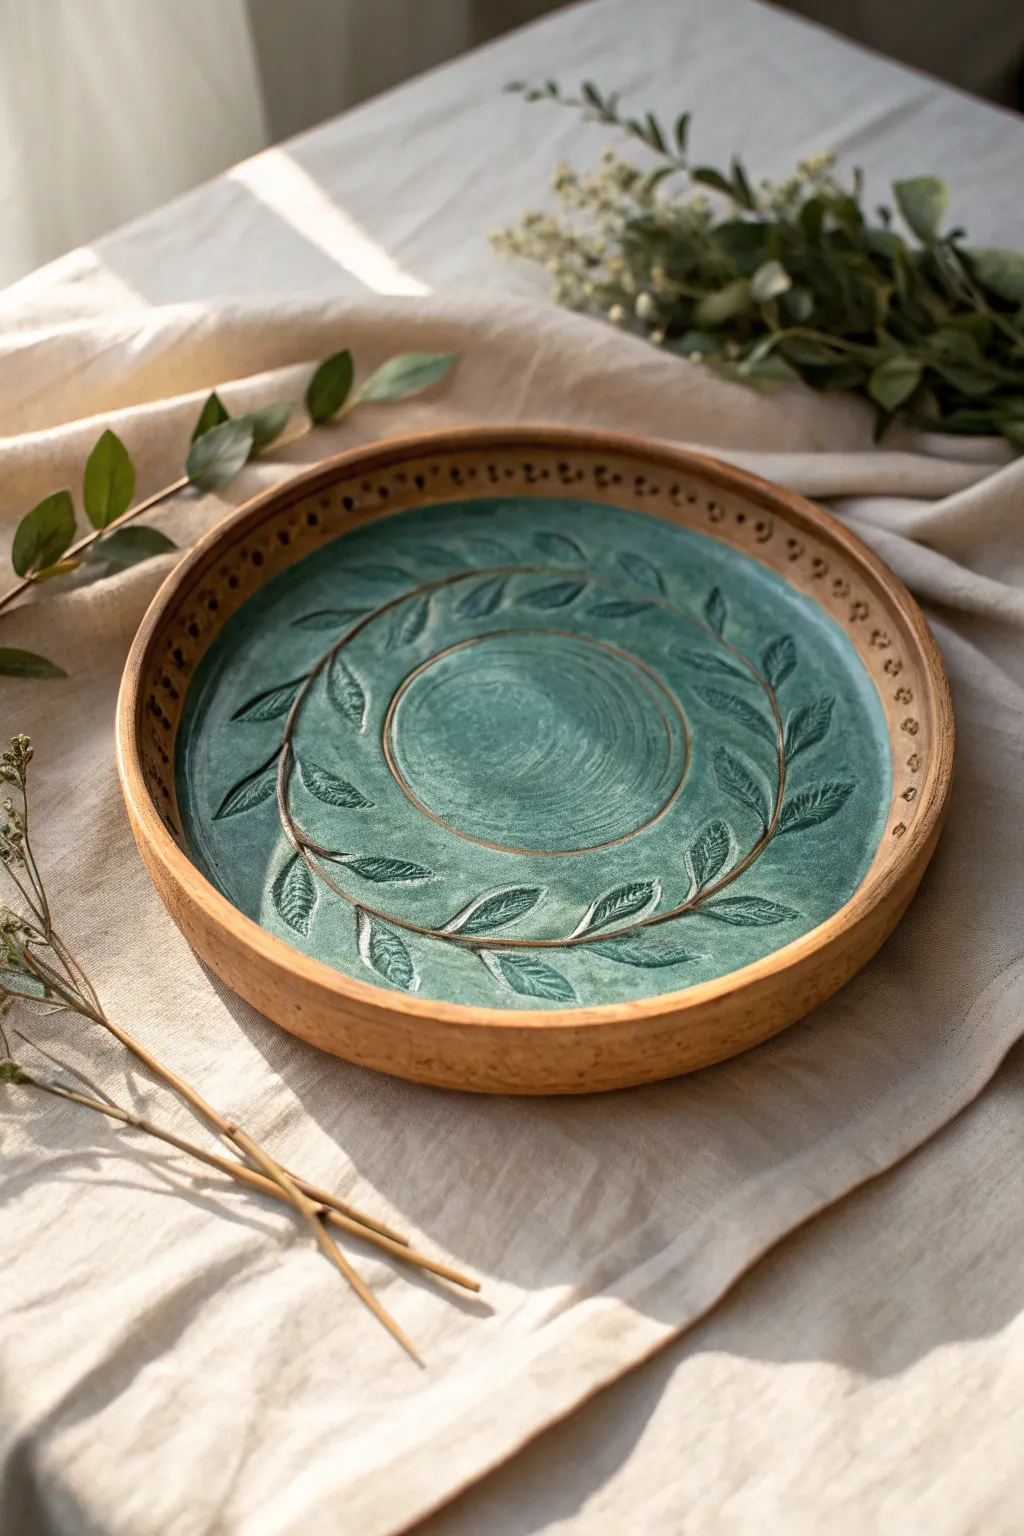
This rustic yet elegant platter features a deep forest green glaze that highlights a beautiful raised leaf motif. The contrast between the glossy, vibrant interior and the raw, earthy outer rim gives it a timeless, hand-crafted appeal perfect for serving or display.
Step-by-Step
Materials
- Speckled stoneware clay (mid-fire)
- Circular bat or banding wheel
- Rolling pin and guide sticks (approx. 1/4 inch)
- Large circular template or plate cutter
- Needle tool
- Carving tools (loop tool and ribbon tool)
- Sponge
- Rib tool (wooden or silicone)
- Forest green celadon or translucent glaze
- Clear matte glaze (optional)
- Kiln
- Small round piping tip or hole punch (for rim detail)
Step 1: Forming the Base
-
Prepare the slab:
Begin by wedging your speckled stoneware clay thoroughly to remove air bubbles. Roll it out into a large, even slab using guide sticks to ensure a consistent thickness of about 1/4 inch. -
Cut the circle:
Place your circular template onto the slab. Using a needle tool, cut cleanly around the template to create the base of your platter. Smooth the cut edge with a damp sponge. -
Create the rim:
Roll a long coil of clay, approximately 3/4 inch thick. Wait for the slab base to firm up slightly to leather-hard so it can support the weight. -
Attach the rim:
Score the outer edge of your circular base and the bottom of the coil. Apply slip to both scored areas. Press the coil firmly onto the base edge, blending the clay together on the inside and outside seams to ensure a strong bond. -
Shape the profile:
Using a rib tool, smooth the attached rim to create a vertical wall. It should stand up straight, creating a shallow basin.
Clean Lines Pro-Tip
When carving negative space, work when the clay is leather-hard. If it’s too wet, the clay will drag; too dry, and it will chip. The perfect consistency feels like cold cheddar cheese.
Step 2: Carving the Design
-
Mark the center:
Lightly find the center of your platter. Using a needle tool with very light pressure, trace a circle in the middle—this will be the ’empty’ center zone of the design. -
Outline the vines:
Lightly sketch a swirling vine pattern around the central circle. The vine should encircle the center, with leaves branching off in a flowing, organic direction. -
Carve the relief:
Using a small loop tool, carefully carve away the negative space around the leaves. You want the leaves and the vine stem to remain raised while the background recedes slightly. -
Add leaf details:
With a sharp needle tool or a fine carving tool, incite veins into each leaf. I find that varying the pressure here makes the leaves look more natural and less stamped. -
Refine the center:
Use a ribbon tool to add circular texture to the center circle you marked earlier, giving it a brushed, swirling appearance. -
Decorate the rim:
For the rim detail, take a small circular tool (like the end of a piping tip) and gently press a repeating pattern of small dots or circles along the top edge of the rim.
Level Up: Oxide Wash
Before glazing, apply a black iron oxide wash to the carved areas and wipe it back. This will settle into the deepest crevices, adding dramatic shadow and depth beneath the green glaze.
Step 3: Glazing and Finishing
-
Bisque fire:
Allow the platter to dry slowly to prevent warping. Once bone dry, bisque fire it according to your clay body’s specifications (usually Cone 04). -
Wax the rim:
Apply liquid wax resist to the top edge and outer wall of the rim. This ensures the raw speckled clay remains visible after firing. -
Apply the glaze:
Pour a forest green celadon glaze into the interior of the platter. Swirl it around to coat the bottom and the inner walls evenly, then pour out the excess. -
Wipe back highlights:
While the glaze is still powdery, take a strictly damp sponge and very gently wipe the tops of the raised leaves. This removes a tiny bit of glaze thickness, helping the relief pop. -
Glaze fire:
Load the kiln and fire to the maturity temperature of your clay and glaze (typically Cone 5 or 6 for stoneware).
The finished piece balances texture and color beautifully, making it a standout addition to any table setting
Lace-Textured Platter
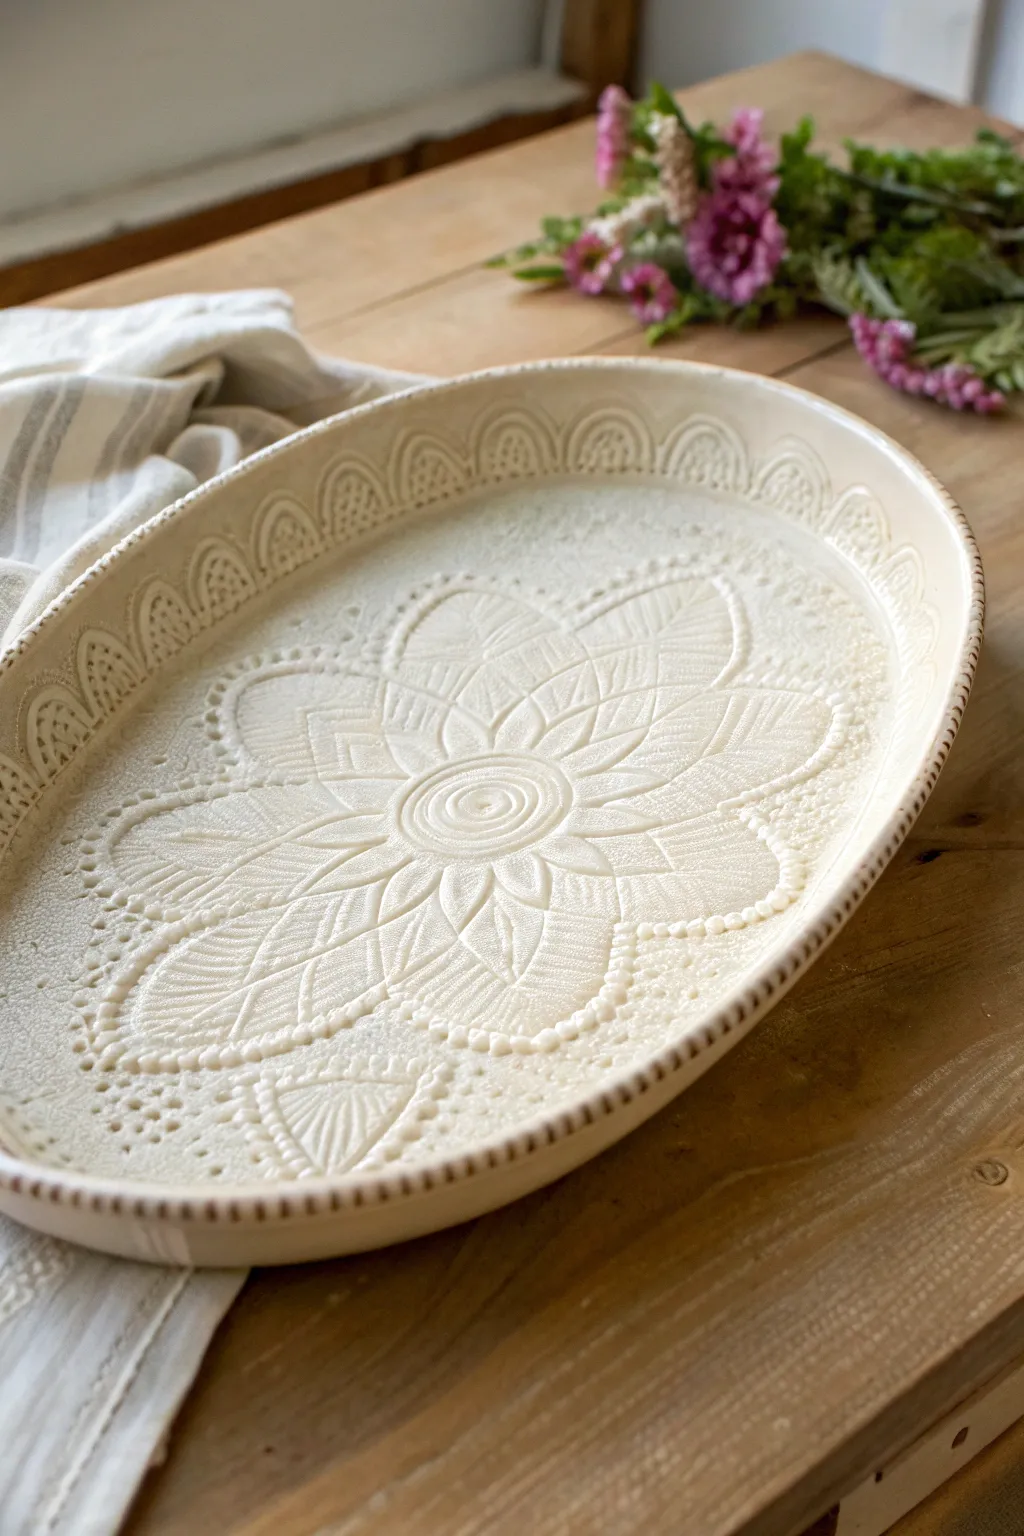
This elegant oval platter captures the timeless beauty of vintage textiles, preserving intricate lace details forever in ceramic form. The raised floral motif and scalloped edging create a tactile surface that is perfect for serving or display, combining rustic charm with sophisticated craftsmanship.
Step-by-Step Tutorial
Materials
- Stoneware or earthenware clay body (white/cream)
- Rolling pin
- Canvas or heavy cloth for rolling
- Two wooden guide slats (approx. 1/4 inch thick)
- Large oval platter mold or a hump mold
- Vintage lace doily or lace fabric (prominent floral pattern)
- Rib tool (rubber or silicone)
- Needle tool or fettling knife
- Sponge
- Cornstarch (optional release agent)
- Clear or light translucent glaze
Step 1: Preparing the Slab
-
Wedge the Clay:
Begin by thoroughly wedging your clay to remove any air bubbles and ensure an even consistency. This is crucial for slabs to prevent cracking during firing. -
Set Up Guides:
Place your canvas on a sturdy work table. Set your wooden guide slats on either side of the clay ball to ensure your slab ends up completely uniform in thickness. -
Roll the Slab:
Using your rolling pin, roll the clay out until the pin rests flat on both wooden guides. I like to flip the slab over once during this process to smooth out the canvas texture on the bottom. -
Smooth the Surface:
Take a rubber rib tool and gently compress the clay surface. Stroke in multiple directions to align the clay particles, creating a pristine, smooth canvas for your texture.
Step 2: Creating the Texture
-
Position the Doily:
Ideally, choose a lace doily with a strong central flower pattern. Lay it carefully onto the smooth clay slab, ensuring it is centered and wrinkle-free. -
First Pass:
Gently roll over the lace once with the rolling pin to tack it down. Don’t press too hard yet; just ensure it won’t shift. -
Deep Impression:
Roll firmly over the lace again. You want to push the fabric deep enough that the thread details transfer, but not so deep that the slab becomes paper-thin. -
Check the Rim:
If your doily has a scalloped edge, ensure that pattern is fully impressed. If your fabric is rectangular, you might need to use separate lace trims to create a border design. -
Remove the Lace:
Slowly peel back the lace from one corner to reveal the pattern. Do this gently to avoid distorting the fresh clay surface.
Sticky Situation?
If the lace sticks to the clay, lightly dust the clay surface with cornstarch before laying down the fabric. It acts as a resist and burns off in the kiln without a trace.
Step 3: Shaping the Platter
-
Cut the Shape:
Using a needle tool or fettling knife, cut an oval shape around your design. Leave a small margin of plain clay around the lace impression to act as a rim. -
Smooth the Cut Edge:
With a slightly damp sponge, run your finger along the cut edge to round it off and remove any sharp crumbs of clay. -
Add Decorative Tooling:
To mimic the stitched effect on the rim in the image, use a tracing wheel or the tip of a dull pencil to create small, evenly spaced vertical dashes along the very edge of the rim. -
Prepare the Mold:
Dust your hump mold lightly with cornstarch. This acts as a release agent preventing stickiness. -
Form the Curve:
Carefully lift your textured slab and drape it over the mold. Gravity will help it settle, but you can gently pat the bottom (non-textured side) to ensure it conforms to the curve. -
Refine the Rim Lift:
Ensure the edges of the platter are lifted slightly to give it that bowl-like depth shown in the photo. You may need to prop up the edges with small bits of foam or bunched newspaper while it dries to leather hard.
Color Wash
Apply an iron oxide wash into the texture and wipe it back with a sponge before glazing. This darkens the deep grooves and makes the ’embroidery’ pop visually.
Step 4: Finishing and Firing
-
Slow Drying:
Cover the piece loosely with plastic to let it dry slowly. Uneven drying causes warping, especially with flat platters. -
Bisque Fire:
Once bone dry, fire the piece to bisque temperature (usually Cone 06 or 04) according to your clay’s specifications. -
Glazing:
Apply a clear or very light translucent glaze. A celadon or a transparent cream glaze works beautifully here because it pools slightly in the depressions, highlighting the lace texture without hiding it. -
Final Fire:
Fire the glazed piece to maturity. The result will be a durable, glossy surface that feels amazing to touch.
Your finished platter will be a lovely homage to textile arts, ready to grace any table

TRACK YOUR CERAMIC JOURNEY
Capture glaze tests, firing details, and creative progress—all in one simple printable. Make your projects easier to repeat and improve.
Geometric Stamped Pattern Platter
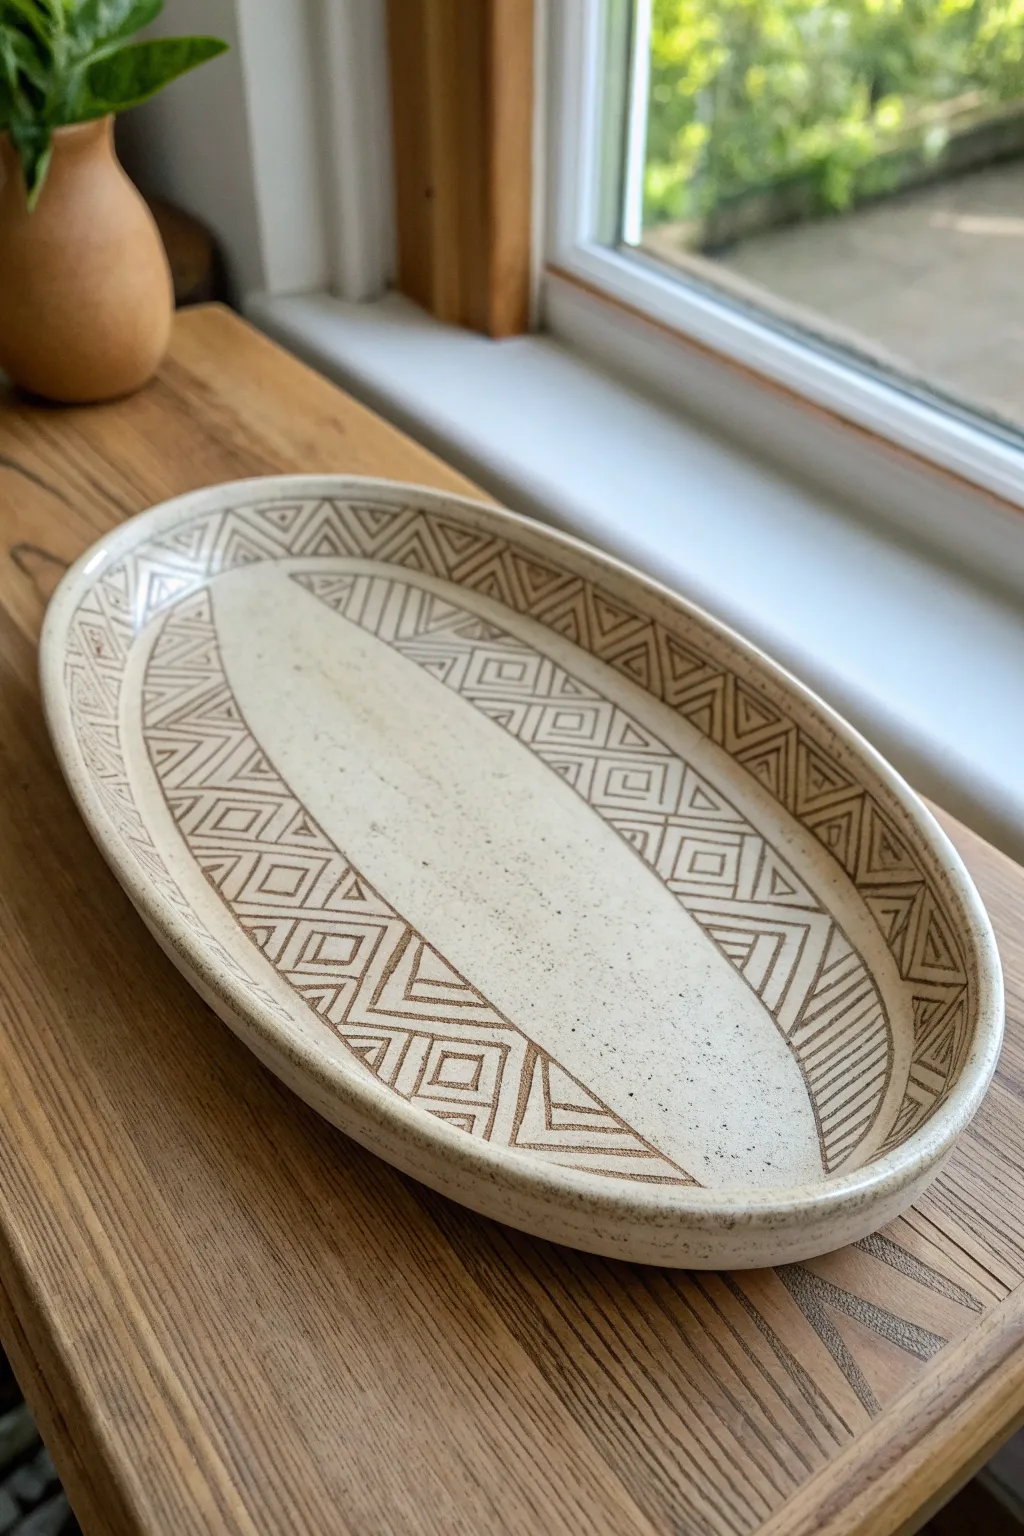
This elegant oval platter features a striking balance of creamy, speckled stoneware and precise geometric carvings inlaid with a rich oxides or underglaze. The design uses repeated triangles and diamonds to frame a smooth, open center, creating a stunning serving piece that feels both ancient and modern.
Step-by-Step
Materials
- Speckled cream stoneware clay (cone 5/6)
- Oval slump mold or paper template
- Rolling pin and guide sticks (approx. 1/4 inch)
- Ribs (soft rubber and metal)
- Needle tool
- Carving tool (small loop or sgraffito tool)
- Dark brown underglaze or iron oxide wash
- Sponge and bucket of water
- Clear matte or satin glaze
- Paintbrush for applying wash
Step 1: Forming the Base
-
Roll the slab:
Begin by rolling out your speckled clay to an even thickness of about 1/4 inch. Using guide sticks helps maintain consistency, which is crucial for preventing warping later. -
Compress the clay:
Take a soft rubber rib and compress the clay slab on both sides. This aligns the clay particles, smooths the surface texture, and ultimately strengthens your platter. -
Cut the oval shape:
Place your oval template or mold lightly on top of the clay. Use a needle tool to trace and cut out the oval shape. If you’re using a slump mold, cut the slab slightly larger to account for the depth of the curve. -
Shape the platter:
Gently transfer your slab into the oval slump mold. Press it softly into the curve using a sponge or a soft rib, starting from the center and working outward to avoid trapping air bubbles. -
Refine the rim:
While the clay is still in the mold, use a chamois or a damp sponge to smooth the rim. It should be rounded and comfortable to the touch, not sharp. -
Leather hard drying:
Allow the platter to dry slowly to a leather-hard state. It needs to be firm enough to hold its shape when removed from the mold and stiff enough to carve cleanly without burrs.
Step 2: Designing the Geometry
-
Mark the design boundaries:
Using a very light touch with a needle tool, sketch the large internal oval that defines the central negative space. This central island should echo the outer rim shape. -
Create the border:
Lightly mark a second line about an inch or so inward from the rim. The space between this line and your central oval is where the complex pattern will live. -
Map the pattern segments:
Divide the patterned area into sections. I find it helpful to mark the four cardinal points (top, bottom, left, right) first to ensure the pattern stays symmetrical as you work around the curves. -
Carve the main lines:
Using your carving tool, firmly incise the zig-zag lines that form the triangular sections. Use confident, steady strokes to keep the lines clean. -
Add detailed motifs:
Within the triangular spaces you’ve created, carve the smaller details—nested diamonds, parallel hatching lines, and smaller triangles. Varying the density of lines adds visual interest. -
Cleaning up crumbs:
Once carving is complete, gently brush away any clay crumbs with a soft, dry brush. Avoid using water here, as it can soften the crisp edges you just carved.
Smudged Lines?
If your oxide is smearing too much during wipe-back, let the wash dry a bit longer before sponging, and ensure your sponge is barely damp, not soaking wet.
Step 3: Inlay and Finishing
-
Bisque fire:
Let the platter dry completely to bone dry, then bisque fire it to the appropriate cone (usually Cone 06 or 04). -
Apply the inlay wash:
Mix your dark brown underglaze or iron oxide wash. Paint it generously over the entire carved area, ensuring it gets deep into every incised line. -
Wipe back the surface:
Take a clean, damp sponge and wipe away the excess oxide from the surface. Rinse your sponge frequently. You want the dark color to remain only in the recessed carved lines, revealing the cream clay body on the surface. -
Glazing:
Once the inlay is dry, dip or brush a clear matte or satin glaze over the entire piece. A glossy glaze can work too, but a matte finish often complements the earthy, tribal feel of the geometric patterns better. -
Final firing:
Fire the platter to its final maturity temperature (Cone 5 or 6 typically). This will vitrify the clay and seal the dark inlay permanently beneath the glaze.
Clean Carving
Carving when the clay is too soft creates messy, ragged edges. Wait until ‘stiff leather hard’—like a block of cheddar cheese—for the crispest lines.
Now you have a stunning, food-safe platter ready for serving or display.
Carved Sgraffito Linework Platter
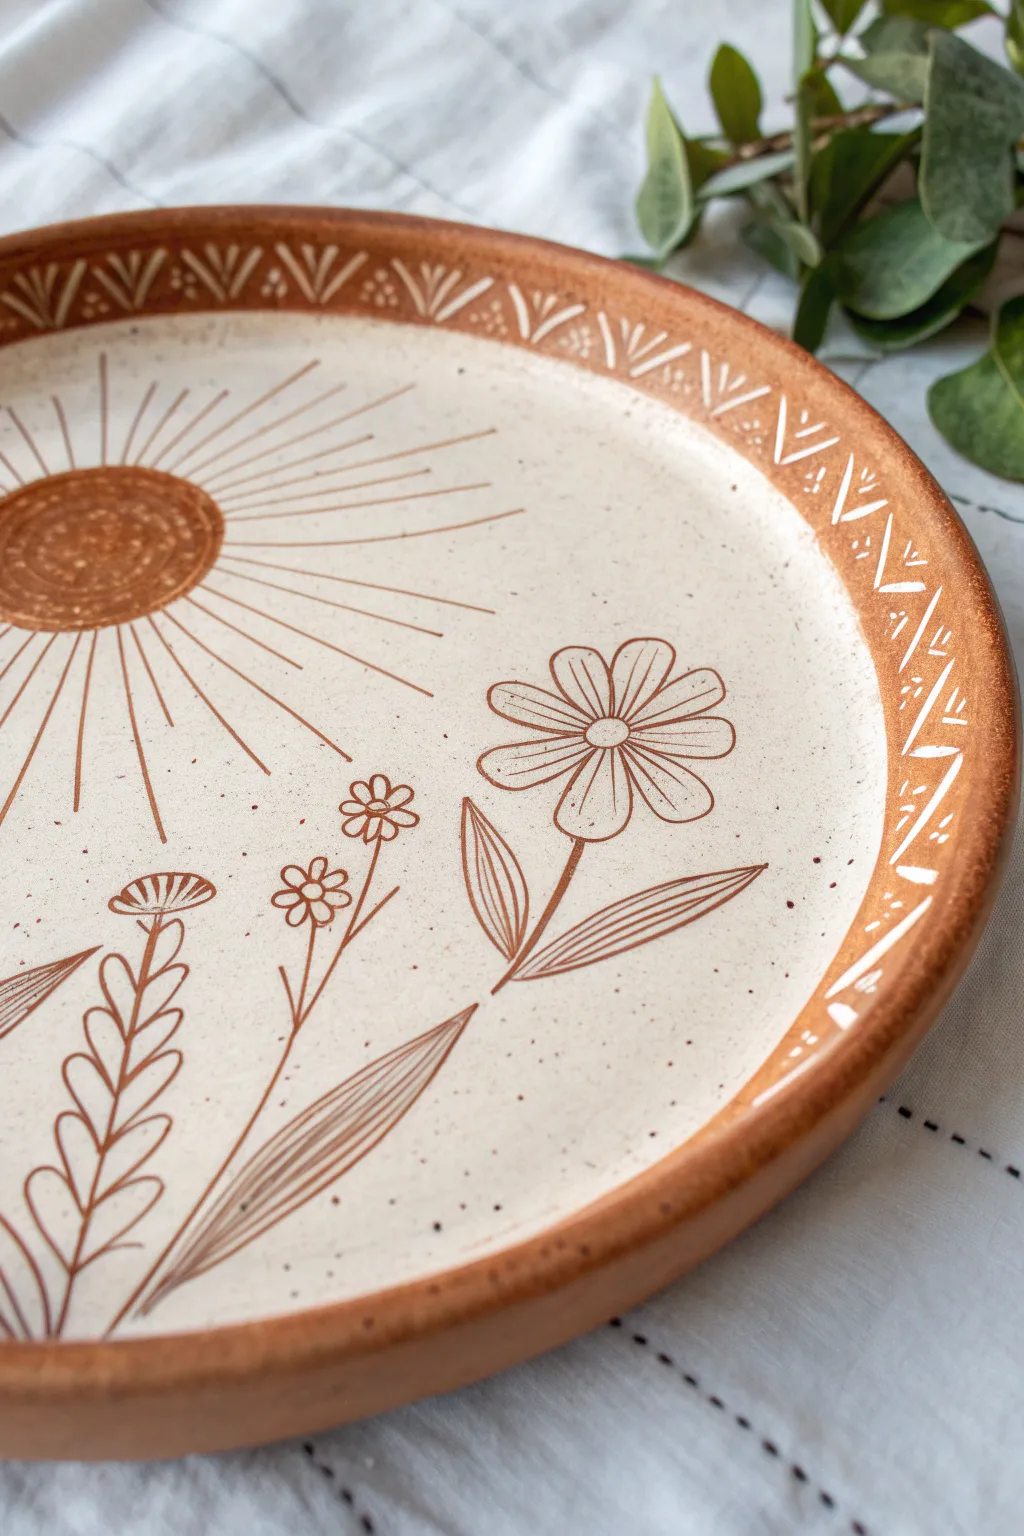
Capture the warmth of a desert sunrise with this lovely terracotta platter featuring crisp sgraffito linework. The contrast between the rich red clay body and the creamy white slip creates a rustic yet refined aesthetic perfect for modern boho table settings.
Step-by-Step Tutorial
Materials
- Red stoneware or terracotta clay (approx. 3-4 lbs)
- White underglaze or slip
- Rolling pin and guide sticks (1/4 inch)
- Round platter mold or large dinner plate
- Circular trimming tool (optional)
- Sgraffito tool or needle tool
- Small loop carving tool
- Soft fan brush
- Sponge
- Clear transparent glaze (cone 04-06 or cone 5-6 depending on your clay)
Step 1: Forming the Platter
-
Prepare the slab:
Begin by wedging your red clay thoroughly to remove air bubbles. Roll it out into a smooth, even slab about 1/4 inch thick, using guide sticks to ensure uniform thickness. -
Cut and shape:
Place your mold or template onto the clay slab and cut out a large circle. Gently lift the clay and drape it over your plaster mold or into a shallow bowl to give it a curved rim. -
Refine the rim:
Use a damp sponge to smooth the edges of the rim, compressing the clay particles to prevent future cracking. Ensure the lip is rounded and comfortable to the touch. -
Leather hard stage:
Allow the platter to dry slowly until it reaches a sturdy leather-hard state. It should be firm enough to hold its shape perfectly but still retain moisture.
Clean Lines Tip
Wait until the slip is leather hard before carving. If it’s too wet, the lines will be mushy; too dry, and the slip might chip off in chunks.
Step 2: Applying Slip and Design
-
Apply the background:
Using a soft fan brush, apply 2-3 even coats of white underglaze or slip to the interior surface of the plate only. Let the sheen disappear between coats to avoid dragging the previous layer. -
Clean the rim:
If any white slip strayed onto the very edge of the rim where you want the raw clay exposed, wipe it back carefully with a clean, damp sponge. -
Plan the sun:
Visualize the placement of your sun element to the left side of the plate. You can lightly sketch the circle and rays with a pencil; the graphite will burn off later in the kiln. -
Carve the sun body:
Using a small loop tool, carve away the white slip inside the sun’s circle to reveal the red clay beneath. I like to leave small dots of white slip in the center for texture. -
Etch the rays:
Switch to a sharp sgraffito or needle tool. Draw straight lines radiating from the sun, varying their lengths to create a dynamic, glowing effect.
Step 3: Detailing the Flora
-
Outline the flowers:
On the right side of the plate, lightly sketch or freehand three main floral elements: a large daisy-like bloom, a stalk with small leaves, and smaller posies. -
Carve the petals:
Carefully trace your flower outlines with the sgraffito tool. Press firmly enough to cut through the white layer cleanly, exposing the red clay lines without gouging too deep. -
Add leaf details:
For the leaves, draw the outer shape and then add interior veins with delicate, swift strokes to mimic natural textures. -
Clean up burrs:
As you carve, small clay crumbs (burrs) will accumulate. Do not brush them away with your hand, as they might smear the white slip. Use a oversized fluffy soft brush to gently flick them off.
Smudge Rescue
If you accidentally smudge red clay onto the white area, wait for it to dry completely, then gently scrape the smudge off with an X-Acto knife.
Step 4: Rim Decoration and Finishing
-
Carve the border pattern:
On the terracotta rim (outside the white slip area), use a small carving tool to create a repeating geometric pattern. Try alternating V-shapes and vertical ticks for a tribal look. -
Inlay option (optional):
If you want the rim carving to stand out more, you can brush white slip into these grooves and wipe the surface clean, leaving white only in the recesses. -
Bisque fire:
Once the plate is completely bone dry, fire it to cone 04 (or your clay’s bisque temperature) to harden the ware. -
Glaze application:
Dip or brush a clear, transparent glaze over the entire piece. This will seal the clay and make the red and white contrast pop. -
Final firing:
Fire the piece a second time to the maturation temperature of your specific clay and glaze combination.
Enjoy using your radiate platter as a centerpiece or hanging it on the wall to brighten up a room
Painted Botanical Platter

This charming ceramic project brings nature to your table with its hand-painted fern fronds, broad leaves, and delicate wildflowers on a creamy, speckled background. The organic, uneven rim and warm floral motifs give it a cozy, artisanal feel that is perfect for serving or display.
Step-by-Step
Materials
- Raw stoneware clay (speckled buff recommended)
- Slab roller or rolling pin with guide sticks
- Large platter mold or form (or a large bowl)
- Pottery sponge and rib tool
- Underglaze set (dark green, sage green, mustard yellow, burnt orange, rust red)
- Fine detail brushes (liners and small rounds)
- Clear transparent food-safe glaze
- Kiln (or access to a firing service)
Step 1: Forming the Platter
-
Roll the Slab:
Begin by wedging your speckled clay to remove air bubbles. Roll it out into a generous slab about 1/4 to 3/8 inch thick, ensuring even thickness throughout. -
Cut the Shape:
Cut a large oval shape from your slab. To verify the size, hold your mold or form over the clay before cutting, leaving about an inch of excess around the edge. -
Shape on Form:
Drape the clay slab over your hump mold (or into a slump mold). Gently press the clay against the form using a damp sponge, smoothing it from the center outward to compress the particles. -
Refine the Rim:
For that organic look shown in the image, use your fingers or a sponge to slightly curl the rim upward. Don’t worry about making it perfectly symmetrical; the undulating edge adds character. -
Dry to Leather Hard:
Allow the platter to dry slowly until it reaches the leather-hard stage. It should be stiff enough to hold its shape but cool to the touch and receptive to painting.
Smudged Lines?
If you smear underglaze while painting, don’t wipe it wet! Let it dry completely, then gently scratch the mistake off with a needle tool or stiff brush.
Step 2: Painting the Botanicals
-
Plan the Composition:
Lightly sketch your design directly onto the leather-hard clay using a dull pencil. The pencil lines will burn off in the kiln, so sketch freely. -
Paint the Stems:
Using a thin liner brush and dark green underglaze, paint the main central stems first. Keep your hand loose to create natural, flowing curves rather than stiff straight lines. -
Add Fern Fronds:
For the fern-like leaves on the bottom left and right, use short, rhythmic strokes pulling away from the stem. Vary the pressure to taper the ends of each leaf. -
Paint Broad Leaves:
Switch to a small round brush for the broader, eucalyptus-style leaves. Paint the outline first, then fill in the center with a slightly lighter wash of green if you want tonal variation. -
Detail the Leaves:
Once the green leaves are touch-dry, go back in with a very fine brush and a darker green to add center veins to the larger leaves for added depth. -
Add the Flowers:
Using mustard yellow and burnt orange underglazes, paint the simple five-petal flowers scattered throughout the design. I like to double-load the brush slightly for a natural blend. -
Paint Berry Clusters:
Use the tip of a small brush or a dotting tool to add clusters of tiny berries in rust red and orange at the ends of thin stems. -
Add Final Accents:
Sprinkle in a few floating dots of yellow and orange around the flowers to fill empty space and add whimsy.
Step 3: Glazing and Firing
-
Bisque Fire:
Once the underglaze is completely dry, fire the piece to cone 04 (or your clay’s specific bisque temperature). -
Apply Clear Glaze:
After the bisque firing, wipe the piece with a damp sponge to remove dust. Dip or brush on a clear, food-safe glaze over the entire painted surface. -
Glaze Fire:
Load the kiln again and fire to the maturity temperature of your clay and glaze (typically cone 5 or 6 for stoneware).
Keep it Vibrant
Underglazes can look pastel before firing. Apply 2-3 coats for solid, opaque coverage, or 1 coat for a watercolor wash effect.
Once cooled, your custom botanical platter is ready to serve appetizers or simply brighten up your kitchen shelf
Two-Tone Dipped Glaze Platter
Embrace the beauty of simplicity with this elegant oval platter, featuring a striking diagonal dipping technique that merges creamy oat tones with soft sage. The speckled stoneware clay body peeks through the glaze, adding rustic warmth and texture to this modern serving piece.
How-To Guide
Materials
- Speckled stoneware clay (approx. 3-4 lbs)
- Potter’s wheel or slab roller (depending on construction method)
- Rib tool (wooden or silicone)
- Wire cutter
- Sponge
- Trimming tools
- Cream/Oatmeal colored dipping glaze
- Sage green dipping glaze
- Wax resist (liquid)
- Paintbrush (for wax)
- Clean bucket of water
- Kiln
Step 1: Forming the Platter
-
Prepare the Clay:
Begin by thoroughly wedging about 3 to 4 pounds of speckled stoneware clay to remove any air bubbles and align the particles. -
Roll or Throw:
You can either throw a thick bottomless ring on the wheel and attach a slab bottom, or more simply, roll out a large, even slab about 1/4 inch thick. For an oval shape, rolling a slab is often easier for beginners. -
Shape the Base:
If using a slab, drape it over a hump mold to create a gentle curve, or cut an oval shape and gently pull up the edges to form a shallow rim. -
Refine the Rim:
Use a damp sponge or chamois to smooth the rim completely. You want a rounded, comfortable edge, as this will be exposed raw clay in the final piece. -
Dry to Leather Hard:
Allow the platter to dry slowly until it reaches the leather-hard stage. This is crucial so the form holds its shape during trimming. -
Trim the Foot:
Flip the platter over and trim a defined foot ring. This lifts the piece off the table and gives it a professional shadow line.
Rim Reveal Tip
When wiping the rim, rotate the sponge frequently to a clean spot. This prevents smearing the glaze back onto the clay and keeps that raw edge crisp and sharp.
Step 2: Bisque & Prep
-
Bisque Fire:
Once bone dry, fire the piece in the kiln to a bisque temperature (usually cone 04 or 06) to prepare it for glazing. -
Clean the Surface:
Wipe the bisque-fired platter with a clean, damp sponge to remove any kiln dust, which can prevent the glaze from adhering properly. -
Wax the Foot:
Apply liquid wax resist to the foot ring and signed bottom of the platter to prevent glaze from sticking to the kiln shelf.
Warping Woes?
Flat platters love to warp. Dry your piece very slowly and evenly, away from drafts. Weighted drying (sandbags) on rims can also help keep them flat.
Step 3: Glazing Technique
-
Mix Glazes:
Ensure your dipping glazes are mixed well. I like stir them vigorously right before dipping to ensure the speckles and colorants are suspended evenly. -
First Dip (Cream):
Hold the platter by the foot and rim. Dip about 60% of the platter into the cream/oatmeal glaze at a diagonal angle. Hold for 3 seconds, then lift and shake gently to remove drips. -
Clean the Line:
While the glaze is still powdery but not wet, you can gently tidy up the diagonal line with a sponge if it’s uneven, though a natural dip line looks best. -
Dry Briefly:
Let the first glaze layer dry until it is touch-dry. If you dip too soon, the glazes might run or the first layer may flake off. -
Second Dip (Sage):
Rotate the platter 180 degrees. Dip the unglazed side into the sage green glaze, overlapping the cream glaze slightly in the middle to create a third, blended tone, or keeping them separate for a crisp line. -
Wipe the Rim:
This is a key stylistic step: Take a damp sponge and carefully wipe the glaze off the very top edge of the rim. This reveals the beautiful toasted color of the raw stoneware clay, framing the glazes. -
Check the Foot:
Double-check the bottom and foot ring. Any stray droplets of glaze must be sponged off cleanly.
Step 4: Final Firing
-
Load the Kiln:
Place the platter on the kiln shelf. Because it is wide and flat, ensure it is well-supported to prevent warping. -
Glaze Fire:
Fire to the maturity temperature of your clay and glaze (typically cone 5 or 6 for stoneware). Allow the kiln to cool completely before opening.
Serve your favorite appetizers or simply display this stunning two-tone piece to add an artisanal touch to your home
Speckled Clay Platter
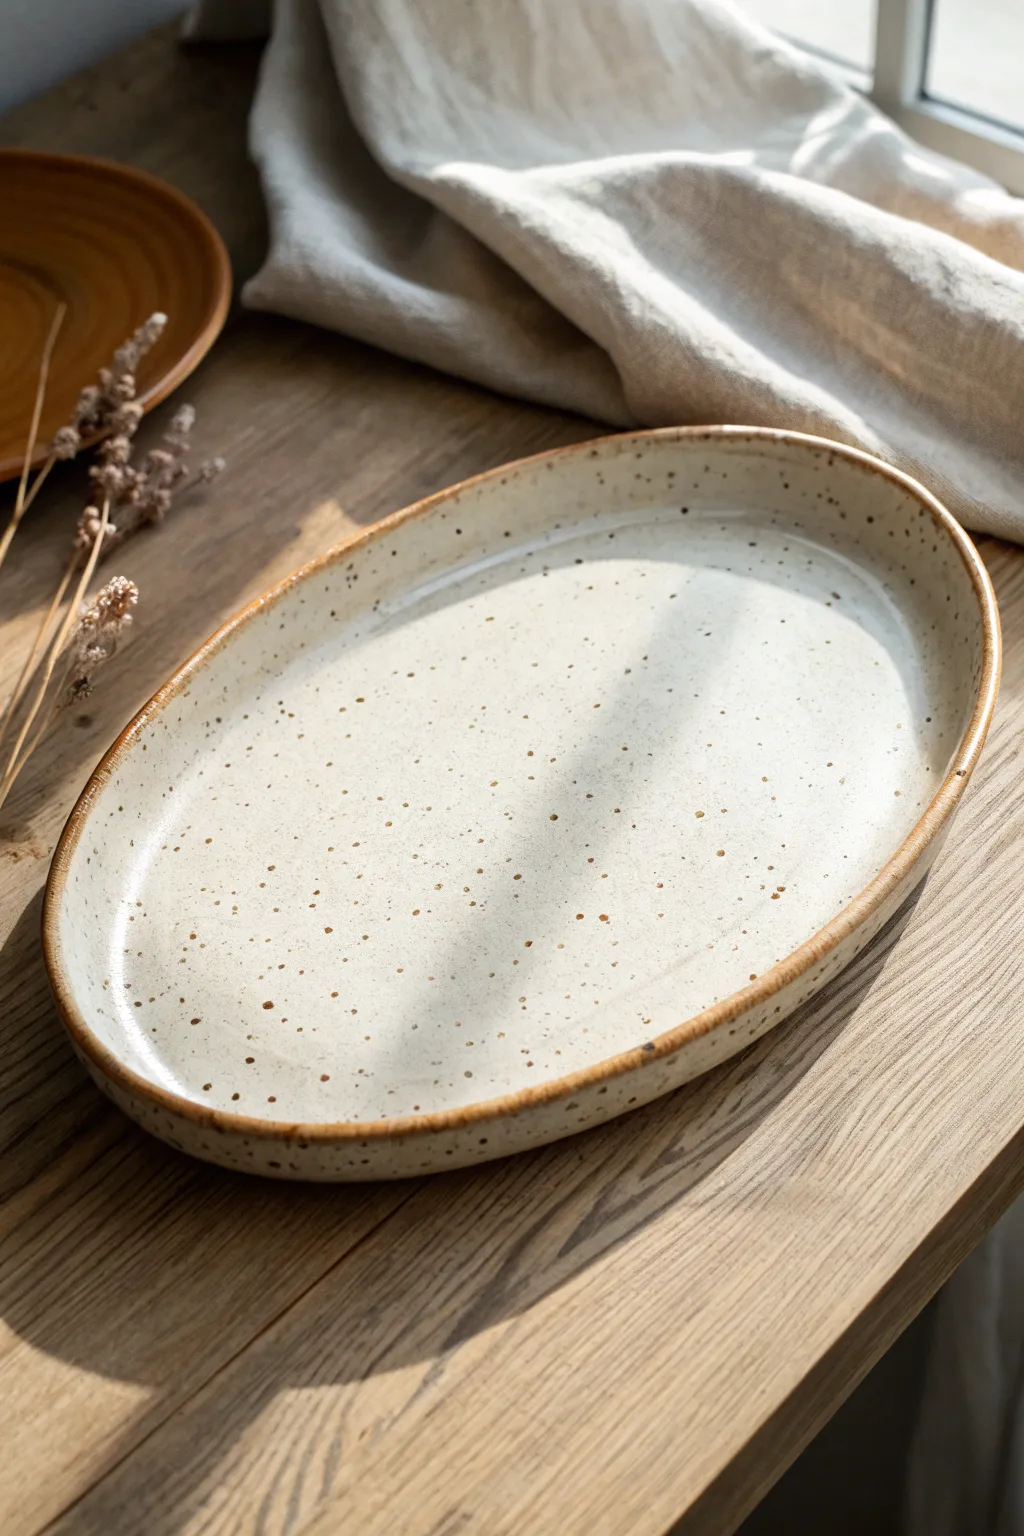
This project features a stunningly simple oval platter that highlights the natural beauty of speckled stoneware clay. The glossy white glaze interacts beautifully with the clay iron spots, creating a rustic yet modern serving piece perfect for any table setting.
Step-by-Step Guide
Materials
- Speckled stoneware clay (mid-fire)
- Rolling pin
- Canvas working board
- Oval paper template or large oval mold
- Rib tool (flexible rubber)
- Fettling knife or needle tool
- Sponge
- Surform tool (cheese grater style)
- Glossy white glaze (translucent)
- Iron oxide wash (optional, for rim)
- Kiln
Step 1: Shaping the Form
-
Prepare the clay:
Begin by wedging about 2-3 pounds of speckled stoneware clay thoroughly to remove air bubbles. Form it into a rough elongated loaf shape rather than a ball to make rolling an oval easier. -
Roll the slab:
On your canvas board, roll the clay out into a large, consistent slab. Aim for a thickness of about 1/4 to 3/8 inch. Roll from the center outward in multiple directions to maintain an even surface. -
Smooth the surface:
Take a flexible rubber rib and compress the clay surface on both sides. This step is crucial not just for smoothness, but to align the clay particles which prevents cracking during drying. I like to sweep the rib in long, confident strokes. -
Cut the shape:
Place your oval template onto the slab. Using a fettling knife held vertically, cut around the guideline. If you are using a slump mold, cut the shape slightly larger than the mold to account for the depth. -
Form the rim:
Transfer the slab onto a large foam hump mold or into a slump mold to give it a gentle curve. If you don’t have a mold, you can place the slab on a piece of foam and gently press the center down while pulling the edges up to create a shallow dish shape. -
Refine the edge:
With a damp sponge, round over the sharp cut edge of the rim. You want a soft, rounded lip that feels good to touch. Compressing the rim with your fingers also helps prevent future chipping. -
Slow drying:
Cover the piece loosely with plastic to dry slowly to a leather-hard state. Uneven drying is the enemy of flat platters, so take your time here.
Warping Woes?
Platters love to warp. To prevent this, dry your piece very slowly under plastic, and place a small weighted bag of sand in the center while it dries to leather hard.
Step 2: Refining and Bisque
-
Clean up the foot:
Once leather hard, flip the platter over. Use a surform tool or rib to smooth out any canvas texture from the bottom. This ensures the plate sits perfectly flat on a table. -
Sponge cleaning:
Wipe the entire piece down with a barely damp sponge to remove any dust or crumbs from the refining process. Let it dry completely to bone dry. -
Bisque fire:
Load the bone-dry platter into the kiln for a bisque firing (typically Cone 04). Ensure it is supported evenly to prevent warping during the firing.
Go Matte
Try a satin matte white glaze instead of gloss. It creates a softer, more contemporary feel and feels silky to the touch, though the speckles may look slightly more muted.
Step 3: Glazing and Finishing
-
Clean the bisque:
Wipe the bisqued platter with a wet sponge to remove kiln dust. This helps the glaze adhere properly without crawling. -
Apply rim accent:
For that warm, toasted edge look, dip a small sponge in a watered-down iron oxide wash and very lightly wipe it along the rim. Wipe most of it back so it just stains the clay. -
Glaze application:
Pour a translucent white glossy glaze into the center of the platter, swirl it to coat the interior, and pour out the excess. Alternatively, you can dip the piece if you have a large enough container. -
Checking the speckles:
Ensure the glaze layer isn’t too thick. The beauty of this piece relies on the dark clay speckles burning through the white glaze. A thinner application favors this interaction. -
Wipe the foot:
Carefully wipe the bottom of the platter completely clean of glaze. Leave a clean line about 1/4 inch up the side if you glazed the exterior. -
Final wipe:
Check the rim again. If the white glaze is too heavy on the edge, sponge it back slightly to reveal that iron oxide detail we added earlier. -
Glaze fire:
Fire the piece to the maturity temperature of your clay body (likely Cone 5 or 6). Allow the kiln to cool naturally.
Your finished platter will be a versatile and durable addition to your kitchen collection
Marbled Clay Swirl Platter
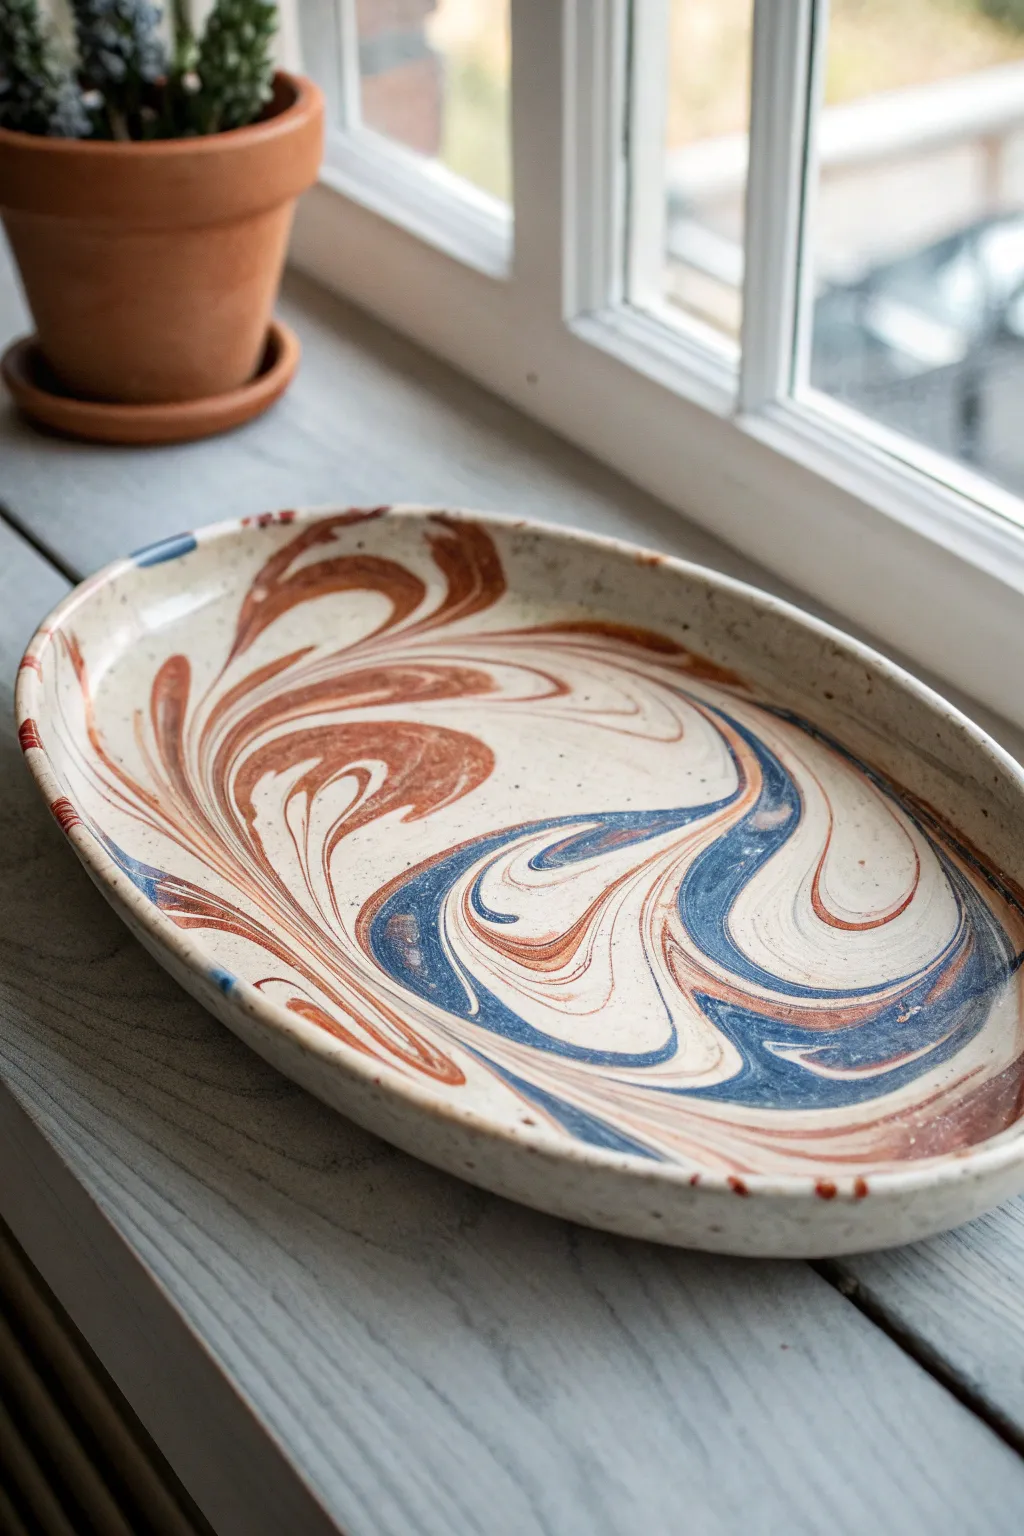
This elegant oval platter captures the movement of tides with mesmerizing swirls of terra cotta and cobalt blue against a creamy, speckled white background. The intricate marbling technique ensures that every single piece you create is a completely unique work of art.
Detailed Instructions
Materials
- White speckled stoneware clay (about 2-3 lbs)
- Terra cotta or red stoneware clay (small amount)
- Blue mason stain or cobalt oxide
- Rolling pin
- Slab roller (optional)
- Canvas work surface
- Oval paper template or slump mold
- Rib tool (rubber or metal)
- Fettling knife or needle tool
- Sponge
- Clear transparent glaze
- Kiln
Step 1: Preparing the Clay Colors
-
Prepare the base:
Begin by wedging your main body of white speckled clay thoroughly to remove air bubbles. This will be the canvas for your marble effect. -
Create the colored clay:
If you don’t use pre-colored blue clay, take a golf-ball-sized piece of white clay and knead in your blue mason stain or cobalt oxide until the color is uniform. Wear gloves for this step to avoid staining your hands. -
Prepare the red accents:
Wedge a similar small amount of terra cotta or red stoneware clay. Ensure this clay body has a similar shrinkage rate to your white body to prevent cracking during firing. -
Form coils:
Roll your white base clay into a thick log. Then, roll the blue and red clays into several long, thin snakes or coils of varying thicknesses.
Muddy Colors?
If your swirls look grey or brown instead of distinct red and blue, you likely twisted the clay too many times. Limit your mixing to just 2-3 folds max for bold lines.
Step 2: Marbling the Slab
-
Attach the colors:
Lay the colored snakes lengthwise along the white clay log. You can twist them slightly or layer them to create depth. -
Twist the log:
Pick up the entire log and twist it like a towel you’re wringing out. This action starts to swirl the colors internally. -
Fold and roll:
Fold the twisted log in half on itself and roll it back into a thick cylinder. Repeat the twisting and folding process once more—but be careful not to over-blend, or the colors will turn muddy. -
Slam the clay:
Throw the clay block down onto your canvas surface to flatten it slightly and compress the layers together. -
Roll out the slab:
Using your rolling pin, roll the clay out into a slab about 1/4 inch thick. As you roll, the stunning marble pattern hidden inside will stretch and reveal itself. -
Compress the surface:
Run a rubber rib tool firmly over the surface. This compresses the clay particles for strength and smooths out any texture from the canvas.
Step 3: Shaping and Finishing
-
Cut the shape:
Place your oval template onto the most attractive section of the marbled pattern. Using a fettling knife held vertically, cut around the template. -
Create the lift:
To give the platter its shallow bowl shape, transfer the slab onto a large foam hump mold or drape it into a shallow plaster slump mold. -
Refine the rim:
Once the clay is leather hard, take a damp sponge and smooth the rim. I like to pay extra attention here, ensuring the colored marbling wraps cleanly around the edge. -
Dry slowly:
Cover the platter loosely with plastic to let it dry slowly. Uneven drying can warp large flat pieces. -
Bisque fire:
Once bone dry, fire the piece to bisque temperature (usually cone 04, depending on your clay). -
Glaze application:
Dip or brush a clear, glossy transparent glaze over the entire piece. This will make the colors pop and ensure the pottery is food safe. -
Final firing:
Fire the piece to the maturity temperature of your clay body (likely Cone 5 or 6 for stoneware).
Add Gold Luster
For an elevated look, apply a thin rim of gold luster to the edge of the finished glazed piece and fire it a third time at a very low temperature (around cone 018).
Now you have a stunning centerpiece that looks like a slice of agate stone ready for your table
Terrazzo-Inspired Inlay Platter
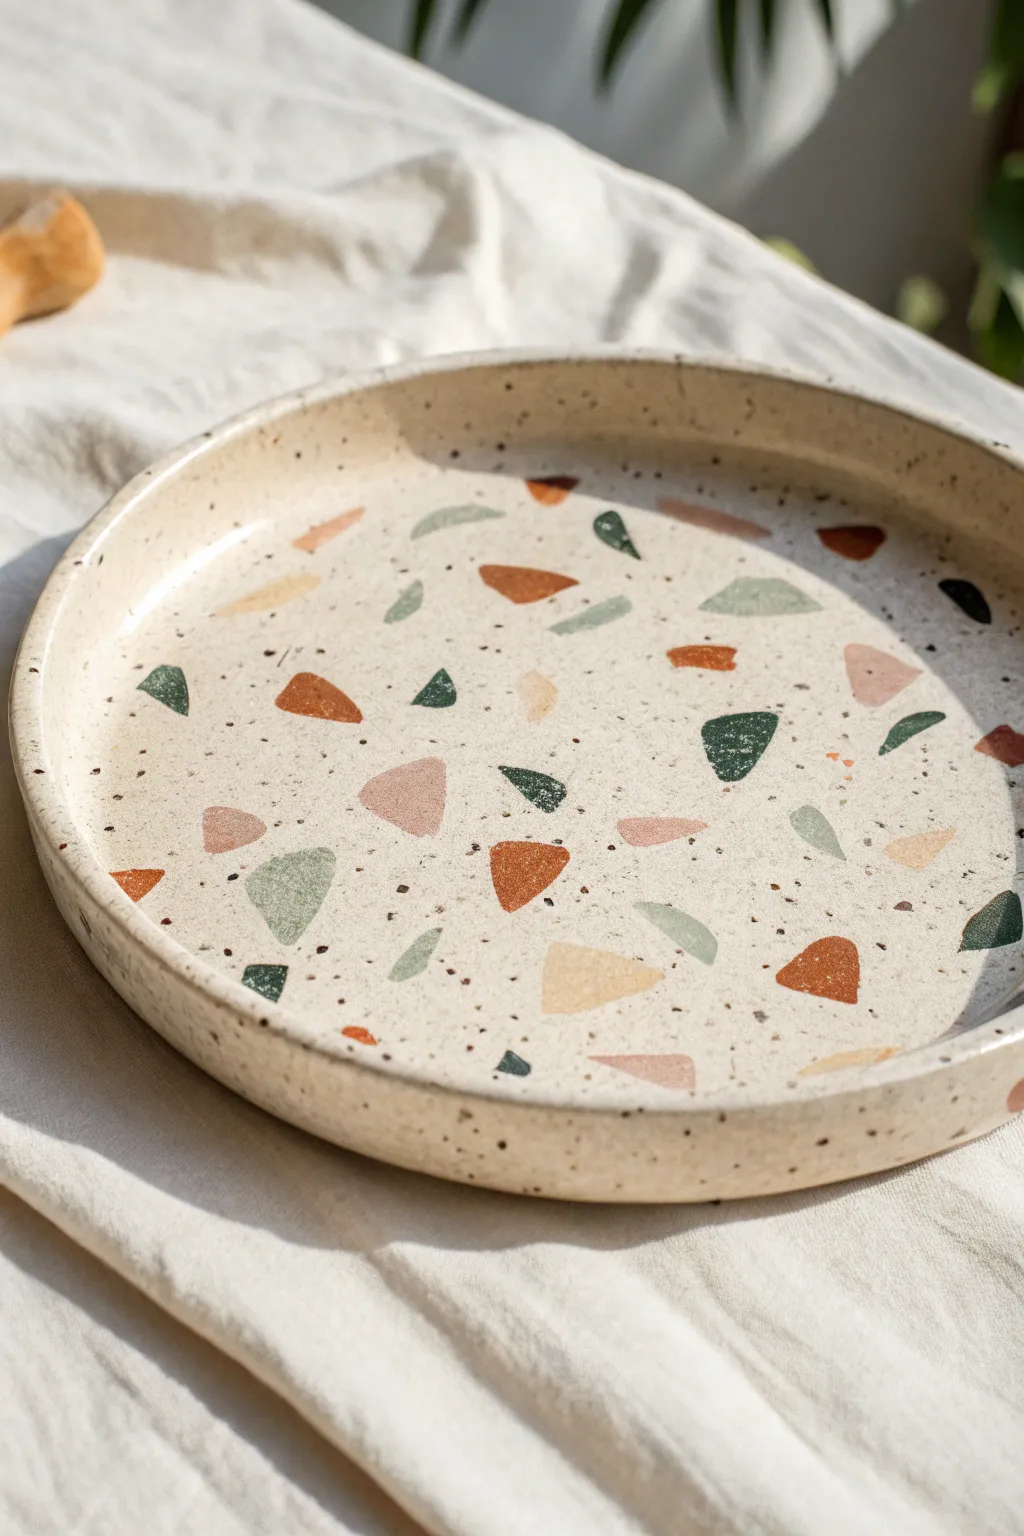
Achieve a high-end ceramic look using polymer or air-dry clay without needing a kiln. This project creates a stunning speckled serving platter featuring inlaid geometric fragments in warm earth tones like terracotta, sage, and forest green.
Step-by-Step Tutorial
Materials
- Polymer clay (base color: granite or beige with speckles)
- Polymer clay (chip colors: burnt orange, sage green, forest green, pale peach)
- Acrylic rolling pin
- Circle cutter or a round plate template
- Craft knife or scalpel
- Fine-grit sandpaper (400-800 grit)
- Large oven-safe bowl (for forming shape)
- Matte or satin varnish
- Release agent (cornstarch or parchment paper)
Step 1: Prepping the Chips
-
Roll Colored Sheets:
Condition your colored clay blocks (orange, sage, forest green, peach) individually until soft. Roll each one out into a thin sheet, about 1-2mm thick. These need to be much thinner than your eventual base. -
Cut Geometric Shapes:
Using a craft knife, freehand cut small triangular shards, wonky squares, and irregular polygons from each colored sheet. Vary the sizes, keeping most between 0.5cm and 1.5cm wide. -
Set Aside:
Carefully lift your cut shapes and set them aside on a piece of parchment paper so they stay clean while you prepare the main body of the platter.
Clean Cuts Only
Wipe your craft knife with baby wipes or rubbing alcohol between distinct colors. This prevents muddy smears on your crisp geometric shapes.
Step 2: Forming the Base
-
Condition Base Clay:
Take a large amount of your speckled beige or granite-effect clay. Knead it thoroughly until it is completely pliable and free of cracks. -
Roll the Slab:
Roll the base clay out on a non-stick surface to a consistent thickness of roughly 5mm (1/4 inch). I find using depth guides or wooden stain sticks on either side of the roller ensures an even surface. -
Cut the Circle:
Place your large circle template or plate onto the clay slab. Cut around it with a sharp blade to create a clean, perfect disc, removing the excess clay.
Step 3: Creating the Inlay
-
Arrange the Chips:
Gently place your colored geometric chips onto the raw clay slab. Scatter them randomly but aim for a balanced distribution of color and size across the surface. -
Initial Press:
Lightly press each chip down with your finger just enough so they stick to the base and won’t slide around during rolling. -
Embed the Pattern:
Cover the clay slab with a sheet of parchment paper. Use your acrylic roller to roll over the entire surface firmly. This pushes the chips flush with the base clay, creating a smooth, unified layer. -
Inspect the Surface:
Peel back the paper. If the chips are still slightly raised, replace the paper and roll again until the surface is completely level.
Air bubbles?
If you see a bubble under the clay after rolling, pierce it gently with a needle. Smooth the air out with your finger and re-roll the area gently.
Step 4: Shaping and Finishing
-
Form the Lip:
To create the shallow dish shape, gently lift the clay circle. You can drape it inside a large, shallow oven-safe bowl to give it form. -
Smooth Edges:
Run a wet finger along the rim of the platter to smooth out any harsh cutting lines or uneven areas while the clay is still pliable. -
Bake:
Bake the platter according to your specific clay brand’s instructions (usually around 275°F/130°C for 30 minutes per 1/4 inch of thickness). Let it cool completely inside the oven to prevent thermal shock. -
Sand for Smoothness:
Once fully cooled, use wet/dry sandpaper under running water to gently sand the surface. This reveals the crisp edges of your terrazzo chips and removes any fingerprints. -
Rinse and Dry:
Wash off any sanding residue and dry the platter thoroughly with a lint-free cloth. -
Seal:
Apply a thin coat of matte or satin varnish to seal the surface and protect the design. Let it cure fully before use.
Now you have a chic, modern catch-all dish that looks exactly like expensive artisan stonewear.
Chip-and-Dip Platter With a Built-In Bowl
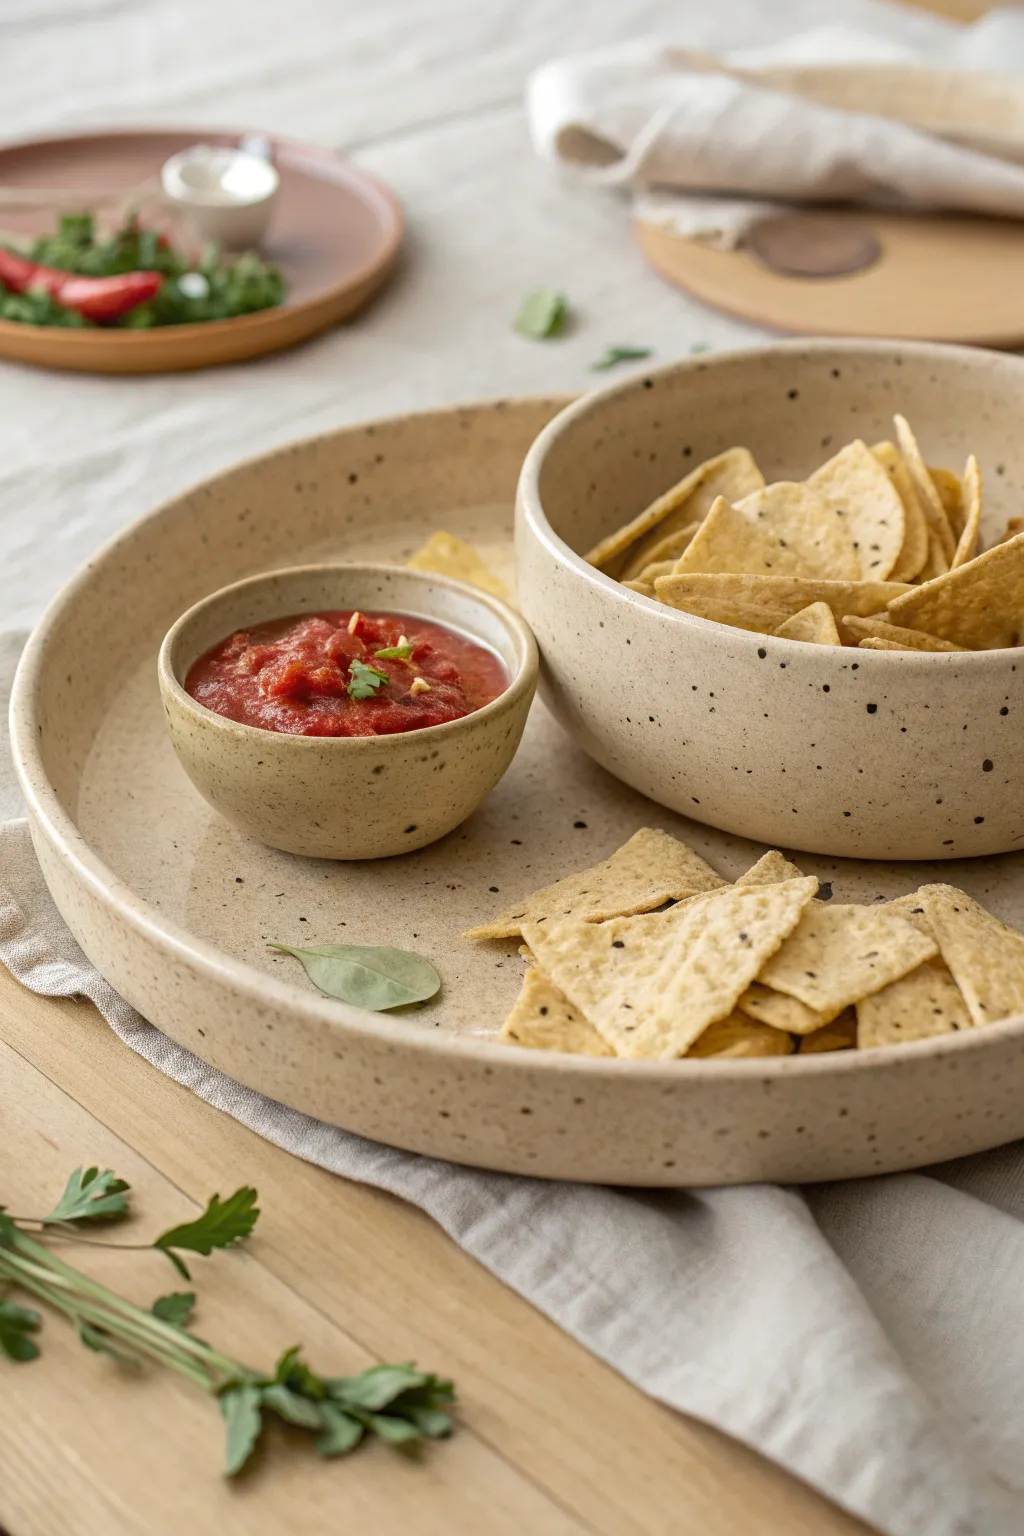
Bring rustic charm to your snack table with this modern, minimalist chip-and-dip set featuring a large serving tray and two matching bowls. The speckled stoneware clay and soft matte glaze create an earthy, handmade aesthetic perfect for hosting.
Step-by-Step Tutorial
Materials
- Speckled Stoneware Clay (2-3 lbs)
- Pottery Wheel (or slab roller/rolling pin for hand-building)
- Rib tool (metal and rubber)
- Needle tool
- Wire cutter
- Sponge
- Trimming tools
- Matte cream/beige glaze
- Kiln
Step 1: Creating the Main Platter
-
Wedging clay:
Begin by thoroughly wedging about 1.5 to 2 pounds of your speckled clay to remove air bubbles and ensure consistency. -
Centering:
Throw the clay forcefully onto the center of the wheel head and center it using steady pressure and water for lubrication. -
Opening the form:
Open the clay into a wide, low disk shape, compressing the floor multiple times with a rib to prevent S-cracks later. -
Pulling the walls:
Pull a short, vertical wall about 1.5 inches high. Keep the wall thick enough to support the wide rim. -
Shaping the profile:
Use a rubber rib to gently flare the wall outward and smooth the interior curve, creating a shallow basin with a distinct vertical rim. -
Finishing the rim:
Compress the rim with a chamois or sponge to ensure it is smooth and rounded, then cut the platter off the wheel with a wire tool.
Rim Compression Tip
Use a piece of soft plastic or chamois leather held over the rim while spinning to get that perfectly rounded, professional edge without finger marks.
Step 2: Forming the Dip Bowls
-
Preparing small bats:
For the bowls, prepare two smaller balls of clay—one about 0.75 lb for the chip bowl and one smaller 0.25 lb ball for the salsa cup. -
Throwing the chip bowl:
Center the larger ball and pull it into a classic bowl shape with slightly steep sides. Aim for a diameter that fits comfortably inside your platter with room to spare. -
Throwing the salsa cup:
Throw the smallest ball into a tiny, shallow dipping bowl. Keep the walls proportional to the other pieces. -
Drying to leather hard:
Cover all three pieces loosely with plastic and let them dry slowly until they reach a leather-hard state.
Attached Bowl Variation
Instead of separate bowls, score and slip the small salsa cup directly onto the platter’s interior floor before firing for a permanent, one-piece server.
Step 3: Trimming and Finishing
-
Trimming the platter:
Invert the platter on the wheel (using a foam bat or lugs) and trim the base flat. I find a flat, un-footed bottom works best for stability on a table. -
Trimming the bowls:
Trim a small foot ring onto both bowls to give them a bit of lift and refinement. -
Smoothing surfaces:
Sponge down any sharp edges or trimming marks on all three pieces to ensure the speckles in the clay body aren’t dragged or smeared. -
Bisque firing:
Once fully bone dry, load the pieces into the kiln for a bisque fire (typically Cone 04 or 06). -
Glazing:
Dip or pour a matte cream glaze over the pieces. If you want the raw speckled clay texture heavily visible, you can leave the exterior unglazed or wipe the glaze back slightly. -
Glaze firing:
Fire the kiln to the maturity temperature of your clay (likely Cone 5 or 6). Ensure the pieces don’t touch in the kiln. -
Sanding:
After cooling, sand the bottom of the platter and bowl feet with high-grit sandpaper to protect your tabletops from scratches.
Now you have a stunning, cohesive serving set ready for your next gathering