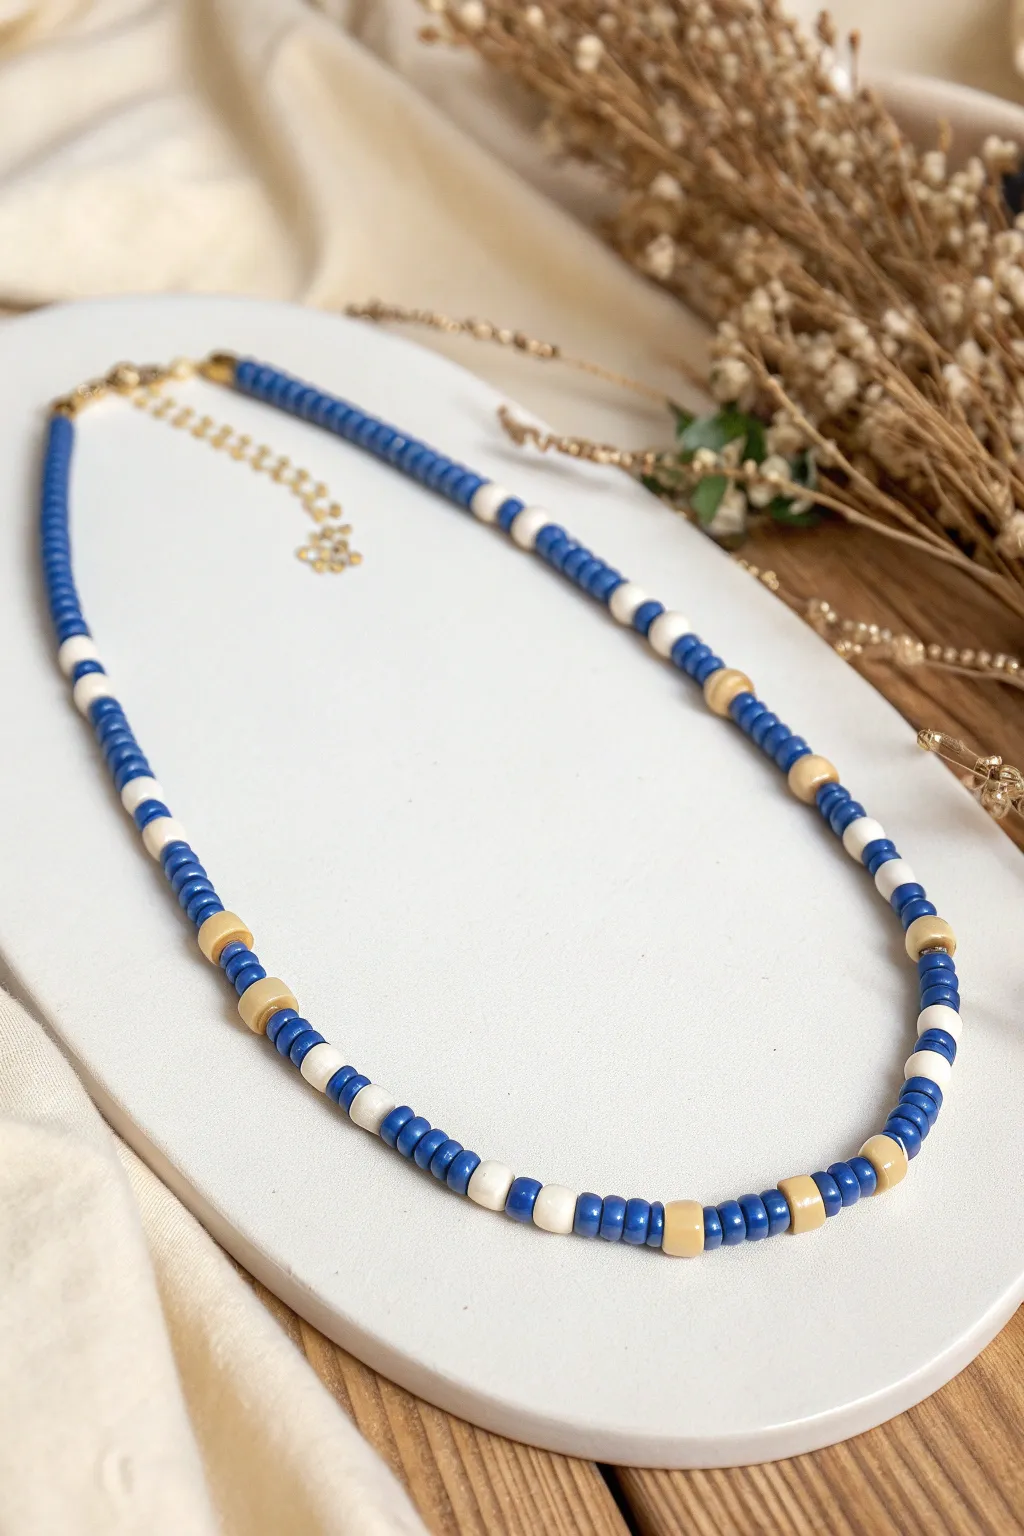
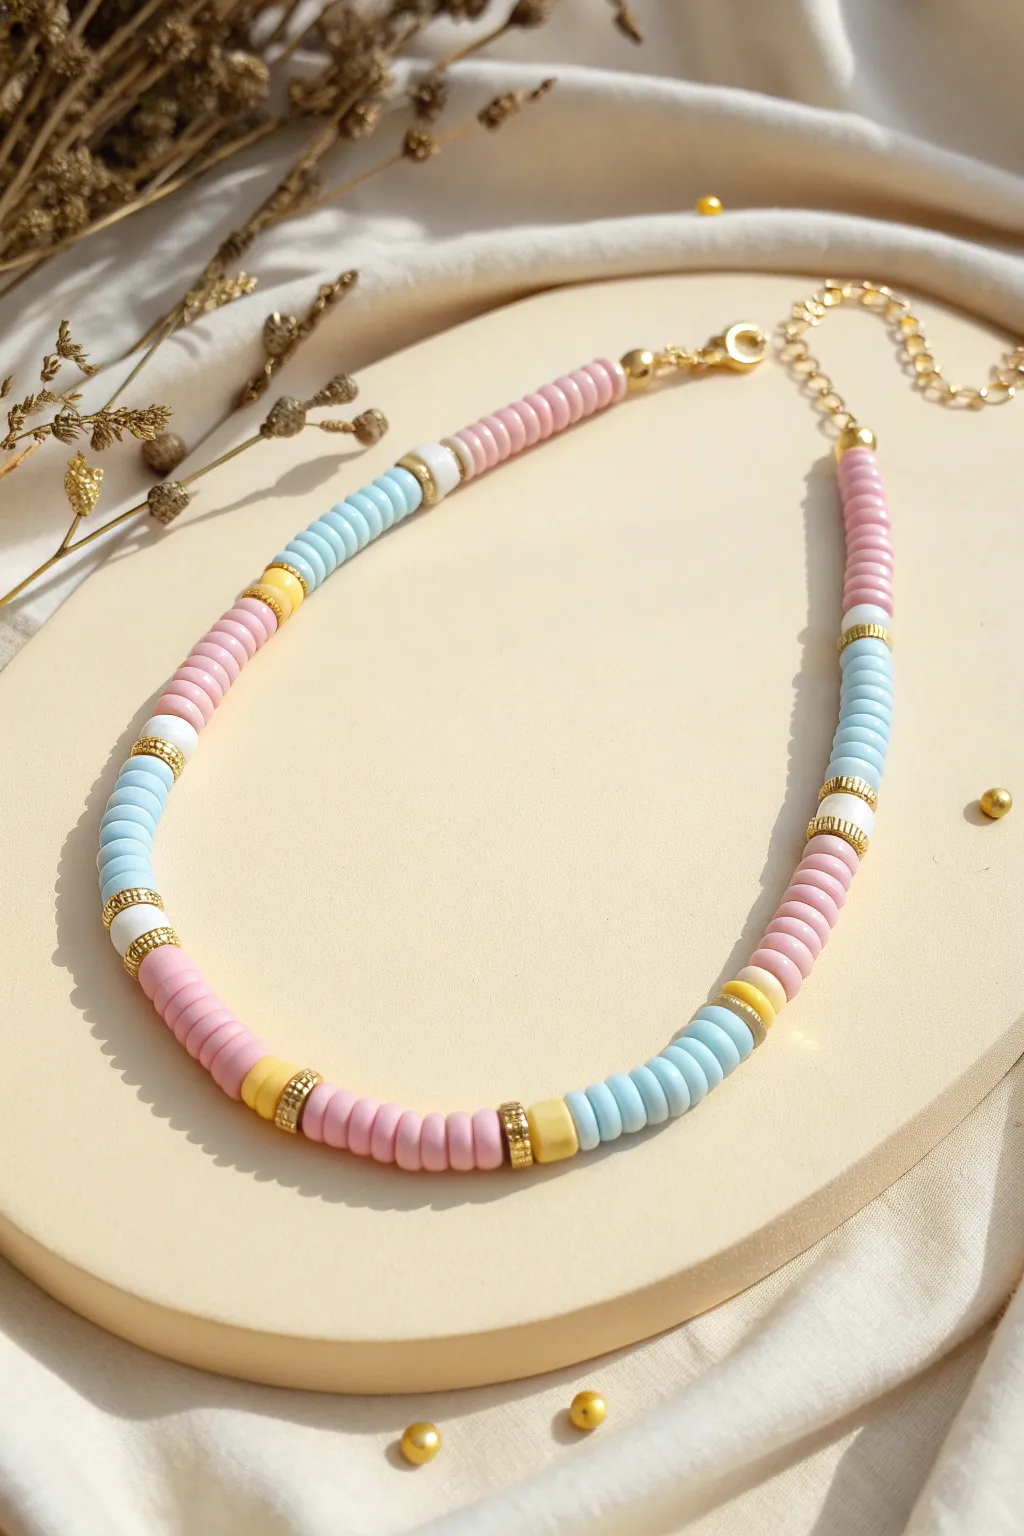
If you’re chasing that sunny, put-together beach vibe, preppy clay bead necklaces are my favorite quick win to string up at the studio table. Here are 16 polymer clay heishi bead necklace ideas that start with the classics and then get a little more playful once you’ve found your color groove.
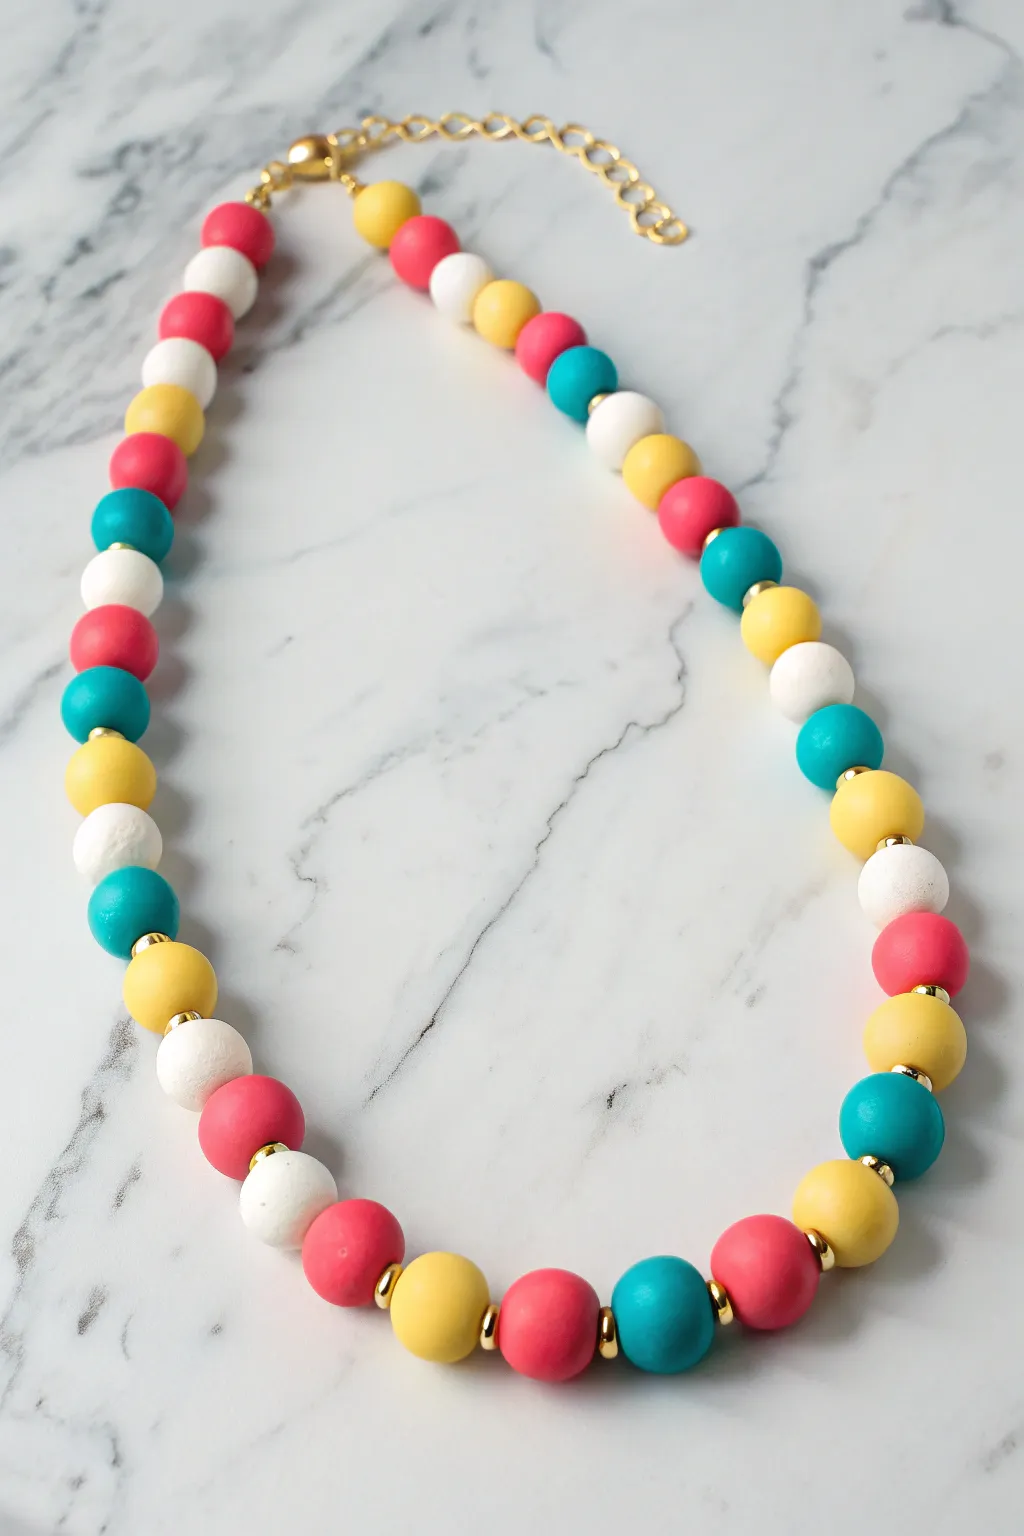
Rainbow Heishi Choker
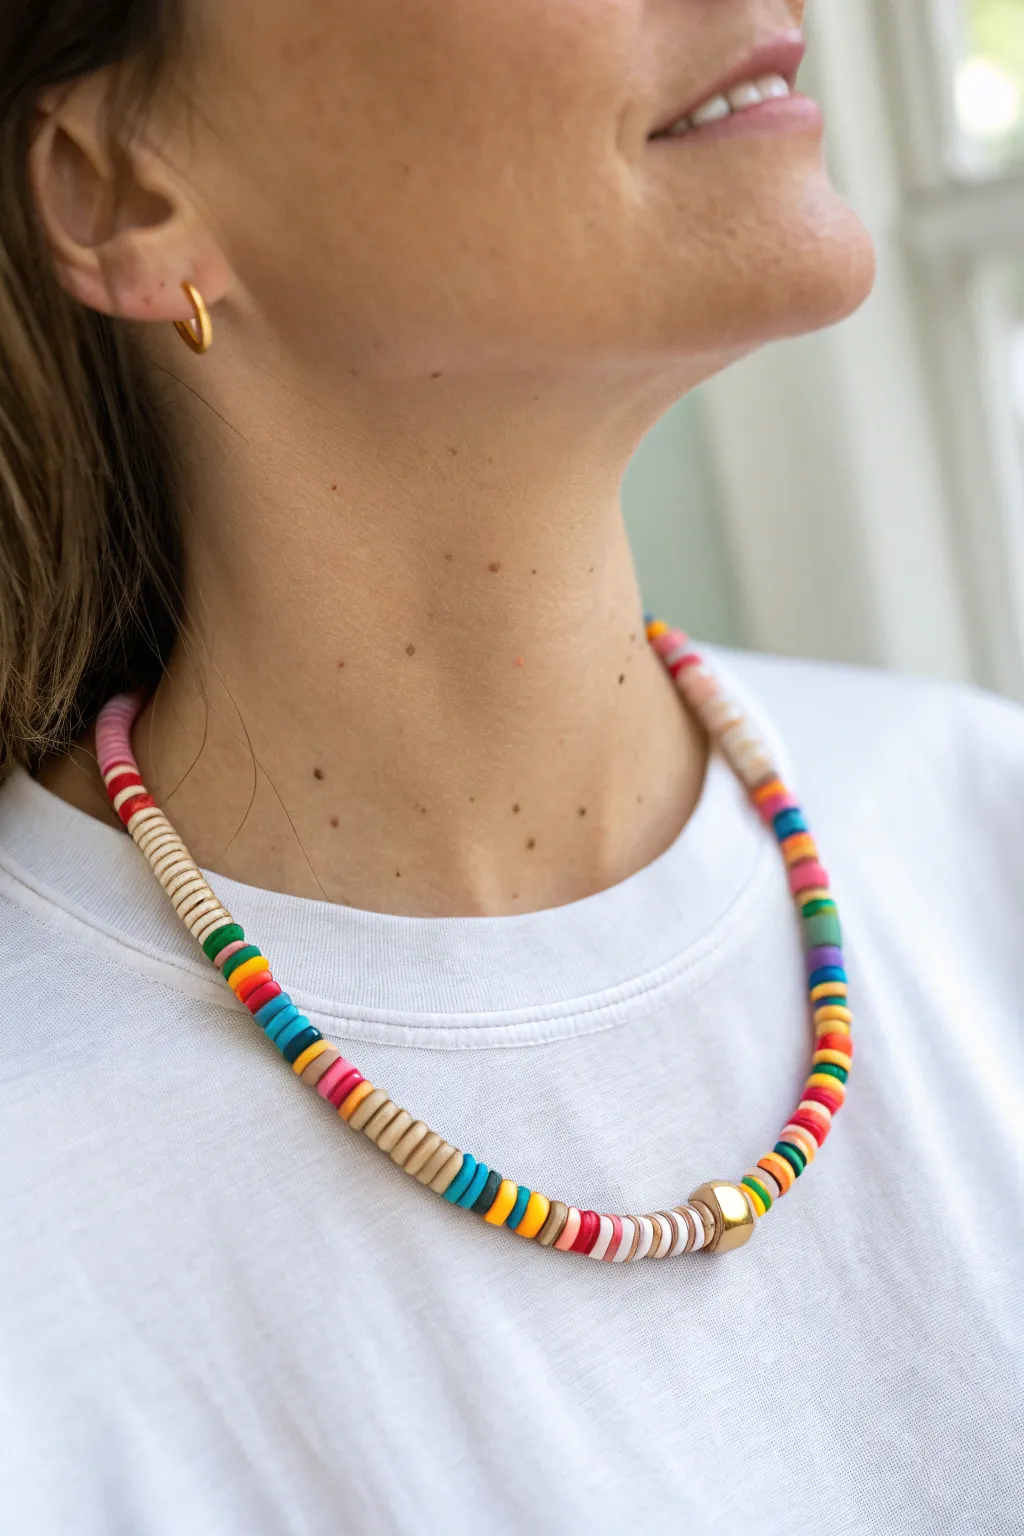
Capture the essence of endless summer with this vibrant choker that mixes classic rainbow brightness with organic neutrals. This design features a playful, segmented pattern of polymer clay heishi beads anchored by a chic gold accent, perfect for layering or wearing solo as a statement piece.
Step-by-Step Tutorial
Materials
- Polymer clay heishi beads (6mm or 8mm) in: bright pink, red, orange, yellow, green, teal/blue, purple, white, beige/tan
- One large playful gold accent bead (hexagonal or round)
- Strong beading wire or elastic cord (0.8mm)
- Two crimp beads
- Two crimp bead covers (gold)
- Two wire guardians (optional, for durability)
- Gold lobster clasp
- Gold jump ring
- Jewelry pliers (flat nose and cutting pliers)
- Bead stopper or tape
- Ruler
Step 1: Planning and Preparation
-
Measure your fit:
Since this is a choker style, standard necklace lengths might droop too much. Wrap a piece of string around your neck where you want the necklace to sit—usually right at the base of the neck—and measure that length against a ruler. Add one inch for the clasp and ease. -
Prepare the cord:
Cut a length of your beading wire or elastic that is about 4-5 inches longer than your final measurement. This extra length creates a ‘tail’ that makes tying knots or attaching clasps much easier later on. -
Secure the end:
Clip a bead stopper onto one end of your cut cord. If you don’t have a stopper, a piece of masking tape folded over the end works perfectly to keep your hard work from sliding off. -
Sort your palette:
Organize your heishi beads by color. This design relies on alternating blocks of color, so having piles of red, orange, yellow, green, blue, purple, pink, white, and tan ready to go will speed up the process.
Gold Bead Placement
Don’t center the gold bead exactly! Off-centering it slightly creates a casual, effortless ‘surfer’ vibe rather than a perfectly symmetrical, formal look.
Step 2: Stringing the Pattern
-
Start with the focal point:
Unlike standard stringing, it helps to visualize the center first. Locate your large gold accent bead. We will build the pattern outwards from the center to ensure symmetry, but you will physically string it from one end to the other. -
Create the first neutral block:
Begin stringing with a section of simple white heishi beads. Aim for a block about 0.5 to 0.75 inches long. This neutral start sits near the clasp and keeps the focus on the front color. -
Begin the rainbow sequence:
After the white block, add a small section of red beads (about 4-5 beads), followed immediately by a tan/beige block of the same size. This alternating pattern of ‘bright color’ then ‘neutral tan’ is the key to this specific look. -
Continue the pattern:
Follow the red/tan section with orange beads, then another tan block. Continue this rhythm: yellow, tan, green, tan, blue, tan. Keep checking your length against your neck as you go. -
The center accent:
Once you have completed about half of your desired length (or reached the point where the necklace sits at your throat’s hollow), slide on your large gold accent bead. I like to frame this bead with a specific color block, like the rainbow grouping shown in the image, to make it pop. -
Mirror the pattern:
Continue stringing on the other side of the gold bead. You can either mirror the exact color sequence backwards (blue, green, yellow…) or just continue the rainbow progression forward (purple, pink, red…). The example shows a continuous mix, so feel free to keep the pattern moving forward. -
Add larger neutral sections:
Notice how the example has larger sections of tan beads mixed in occasionally. Don’t be afraid to break the 5-bead rule and add a 1-inch block of tan or white beads to break up the rainbow intensity. -
Check the final length:
hold the strand up to your neck again. The ends should almost touch behind your neck. If it’s too short, add a few more white or tan warm-tone beads to the ends.
Mix It Up
Add pearls or small cowrie shells between the color blocks instead of just tan heishi beads for an even beachier, textured aesthetic.
Step 3: Finishing Touches
-
Thread the first crimp:
Remove the bead stopper. Slide a crimp bead onto the wire, followed by a wire guardian (if using) and one half of the clasp mechanism (the jump ring or the lobster claw). -
Loop and secure:
Thread the wire back through the crimp bead to create a loop. Pull it tight, but leave a tiny bit of wiggle room so the clasp can move freely. -
Crimp it down:
Use your flat nose pliers to smash the crimp bead flat, locking the wire in place. For a professional finish, you can place a crimp cover over the smashed bead and gently close it to look like a gold ball. -
Repeat on the other side:
Repeat the crimping process on the other end of the necklace with the lobster clasp. Make sure the beads are pushed together snugly before crimping so there are no gaps in the wire. -
Trim excess wire:
Use your cutting pliers to snip off the excess tail of wire as close to the crimp bead as possible without cutting the main strand.
Now you have a stunning, beach-ready accessory that adds a pop of happy color to any outfit


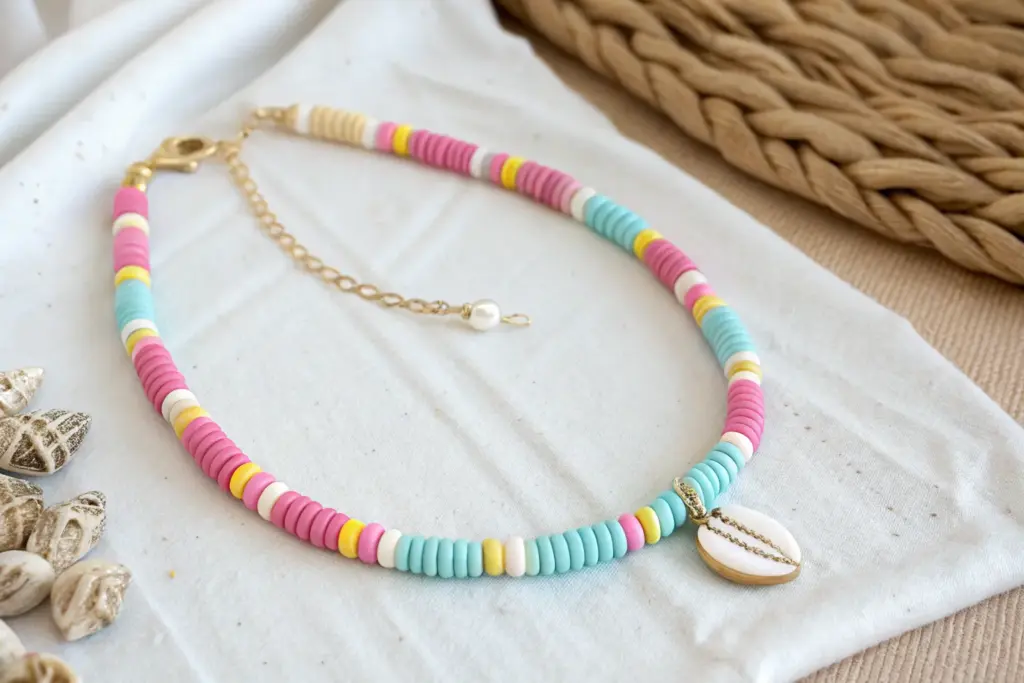
Pearls With Bright Heishi Pops
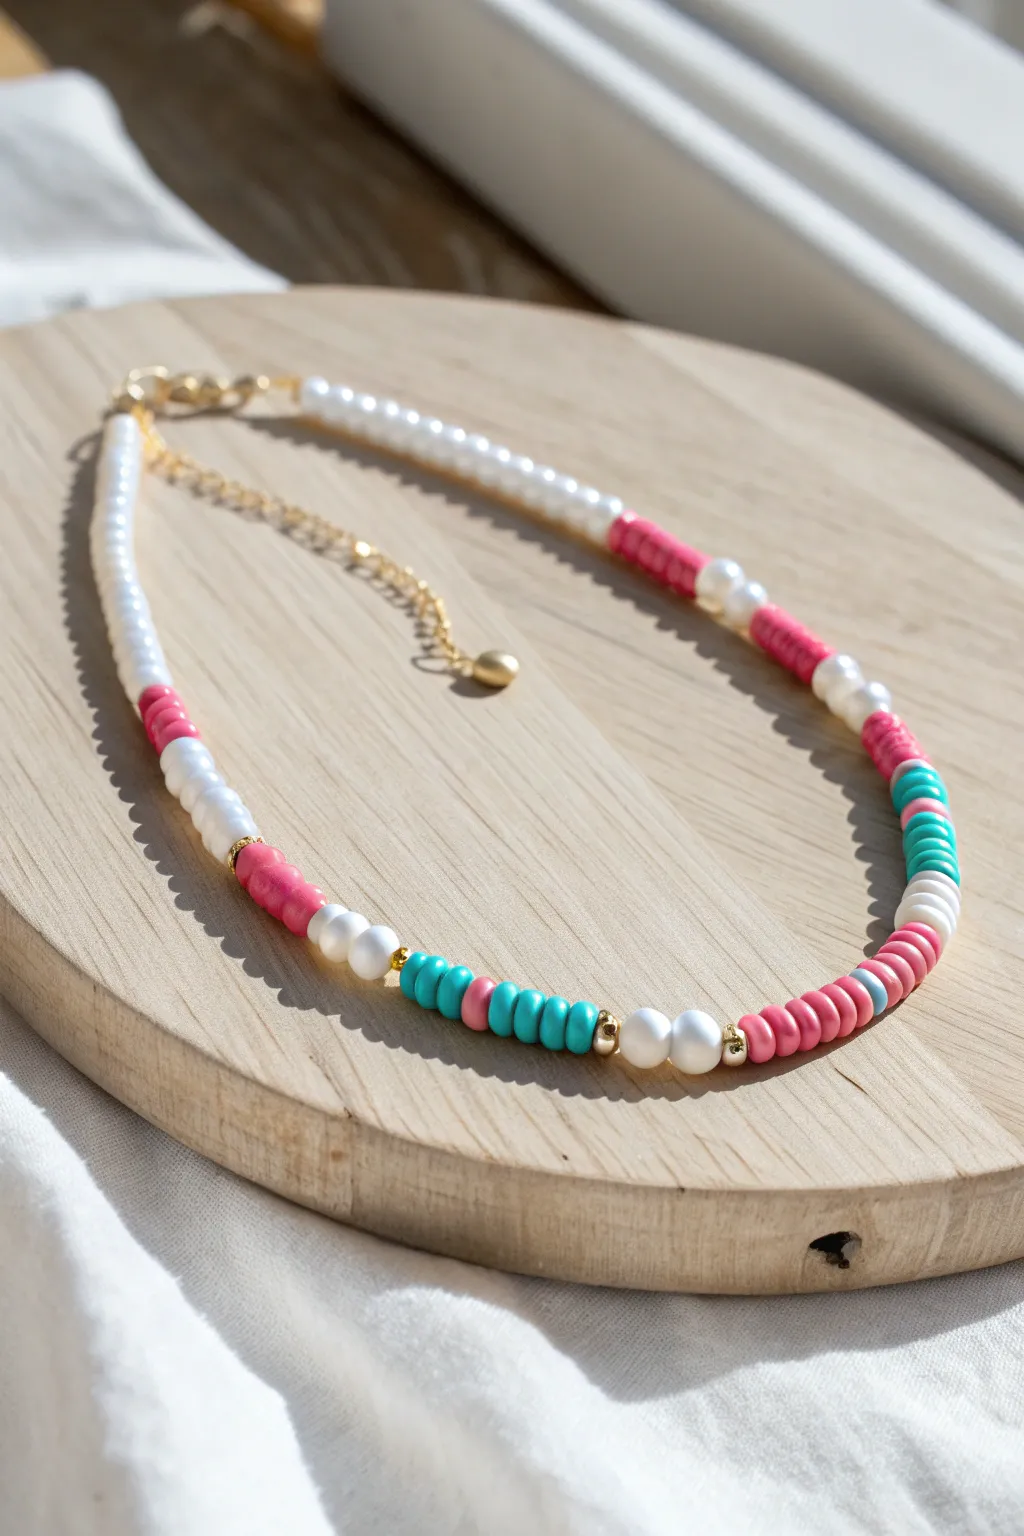
This trendy necklace design combines the classic elegance of freshwater-style pearls with playful bursts of bright heishi clay beads. It creates a stunning high-low mix perfect for layering or wearing as a standalone statement piece.
Step-by-Step Guide
Materials
- White faux pearl beads (approx. 4mm)
- Pink heishi polymer clay beads (6mm)
- Turquoise/Teal heishi polymer clay beads (6mm)
- Small gold spacer beads
- Gold lobster clasp
- Gold jump rings
- Gold extender chain
- Beading wire (gold or clear)
- Crimp beads
- Crimp bead covers (optional)
- Jewelry pliers (flat nose and cutting)
Step 1: Starting the Strand
-
Measure and cut:
Cut a length of beading wire approximately 18-20 inches long. This gives you plenty of room for the design plus extra space for finishing the ends comfortably. -
Attach the first clasp:
Thread a crimp bead onto one end of the wire, followed by a jump ring attached to your lobster clasp. -
Secure the wire:
Loop the wire back through the crimp bead, creating a small loop. Use your flat nose pliers to squash the crimp bead firmly so it holds the wire in place. -
The pearl foundation:
Begin stringing your white pearl beads. Add enough pearls to cover about 2 to 2.5 inches of the wire. This creates the classic white section that sits near the collarbone.
Gold accents matter
Use gold-filled or stainless steel spacer beads instead of plastic ones. The weight and shine drastically upgrade the final look.
Step 2: Creating the Pattern
-
First color pop:
Slide on a small section of pink heishi beads. Aim for a stack of about 5 or 6 beads to create a distinct block of color. -
Pearl spacing:
Follow the pink section with two white pearls to act as a neutral breaker. -
Second color block:
Thread on another stack of 5 or 6 pink heishi beads. -
Add a gold accent:
Slide on one gold spacer bead, followed by two white pearls, and then another gold spacer bead. These metallic hints add a polished look. -
Third color block:
Add a slightly longer block of pink heishi beads, perhaps 8 to 10 beads this time. -
Pearl transition:
String two more white pearls, followed by a gold spacer bead. -
Introduce teal:
Now, switch colors by adding a small block of 4 or 5 turquoise heishi beads. -
Alternating segments:
Create an alternating pattern: add two pink heishi beads, then 4 turquoise heishi beads. -
Center focus:
Create the focal point of the strand. Add a gold spacer, two white pearls, and another gold spacer. -
Mirror the pattern:
Continue stringing in reverse order if you want symmetry, or keep mixing small groupings of pink and teal heishi beads separated by pairs of pearls and gold spacers until you have about 2.5 inches of wire left. -
Final pearl section:
Finish the beading by adding a final section of white pearls to match the starting length (about 2.5 inches).
Step 3: Finishing Touches
-
Prepare the end:
Thread a crimp bead onto the remaining wire tail. -
Add the extender:
Loop the wire through the last link of your gold extender chain (or a jump ring) and thread it back through the crimp bead. -
Tighten and crimp:
Pull the wire taut so there are no large gaps between beads, but leave a tiny bit of wiggle room so the necklace drapes naturally. Flatten the crimp bead with your pliers. -
Clean up:
Trim any excess wire sticking out from the crimp bead using your cutting pliers. Use a crimp cover if desired for a professional finish.
Mix it up
Try asymmetrical color blocking instead of a mirrored pattern for a more modern, eclectic ‘surfer chic’ aesthetic.
Your vibrant new accessory is ready to add a splash of preppy charm to any outfit


Gold Spacer Glam Upgrade
Elevate simple round clay beads into a chic statement piece by interspersing them with gleaming touches of gold involved in this easy-to-master stringing project. The pattern features a vibrant, repeating color palette that feels both preppy and sophisticated, perfect for layering or wearing solo.
Step-by-Step
Materials
- Round polymer clay beads (10mm or 12mm) in: Hot Pink, Sunshine Yellow, White, Turquoise
- Small gold spacer beads (3mm or 4mm, metallic saucer or round shape)
- Beading wire (gold or clear, thin enough to fit twice through the crimp beads)
- 2 Gold crimp beads
- 2 Gold crimp covers (optional but recommended)
- 2 Gold wire guards (optional)
- Gold lobster clasp
- Gold extension chain
- Crimping pliers
- Wire cutters
- Bead design board or ruler
Step 1: Preparation and Planning
-
Measure and Cut Wire:
Cut a length of beading wire approximately 20-22 inches long. This gives you plenty of slack for an standard 16-18 inch necklace plus room to secure the ends comfortably. -
Layout Your Pattern:
Arrange your beads on a design board or a piece of felt to visualize the sequence before stringing. The pattern shown here follows a distinct cycle: Pink, White, Yellow, Pink, Turquoise, White, Yellow, Pink, Turquoise, Yellow, White. -
Establish the Rhythm:
Notice that the sequence isn’t perfectly uniform, which adds charm, but generally rotates through the four main colors. Place a single gold spacer bead between every single clay bead in your layout. -
Secure the First End:
Thread a crimp bead onto one end of the beading wire. Loop the wire through a wire guard (if using) and attach the extension chain. -
Crimp to Lock:
Pass the tail of the wire back through the crimp bead. Use your crimping pliers to flatten the crimp bead securely, then trim the excess short tail wire. -
Add a Crimp Cover:
If you want a polished look, place a gold crimp cover over the flattened crimp bead and gently close it with pliers so it looks like a round gold bead.
Clean Bead Holes
Polymer clay beads often have clogged holes. keep a T-pin or a straightened paperclip nearby to poke through any blockages before trying to thread them onto your wire.
Step 2: Stringing the Necklace
-
Start Stringing:
Begin threading your beads onto the wire, starting with a few smaller gold spacers if you wish, or jump straight into the pattern sequence you laid out. -
Alternating Technqiue:
Thread one large clay bead, followed immediately by one small gold spacer bead. Repeat this process methodically. -
Check the Pattern:
After every 5-6 beads, pause and hold the strand up to ensure you haven’t accidentally skipped a gold spacer. The ‘glam’ look relies on that consistent metallic flash between the matte colors. -
Maintain Tension:
Keep the beads pushed together relatively snugly as you work, but not so tight that the wire becomes stiff. The necklace needs to drape naturally. -
Complete the Strand:
Continue stringing until you reach your desired length (usually around 16-18 inches of beaded area). End the strand with a final clay bead or a few gold spacers to match the start.
Bumpy Necklace?
If the necklace feels stiff or kinks when coiled, you strung it too tightly. Leave a tiny gap (hair’s width) near the clasp before crimping to allow the beads to rotate slightly.
Step 3: Finishing Touches
-
Prepare the Clasp End:
Thread a crimp bead onto the open wire end, followed by a wire guard and the lobster clasp. -
Loop Back:
Feed the wire back through the wire guard and down through the crimp bead. I also like to push the wire through the first adjacent clay bead for extra security. -
Tighten the Slack:
Pull the wire tail until the loop is small and the clasp sits close to the beads. Ensure there is just a tiny bit of wiggle room (about 1-2mm) so the necklace remains flexible. -
Final Crimp:
Use your crimping pliers to crush the crimp bead firmly into place. -
Trim and Cover:
Cut the remaining tail of the wire flush against the bead. Apply the second crimp cover over the crimp bead and gently close it to finish the piece professionally.
Your vibrant new accessory is ready to add a pop of color to any outfit you choose


Initial or Name Bead Center
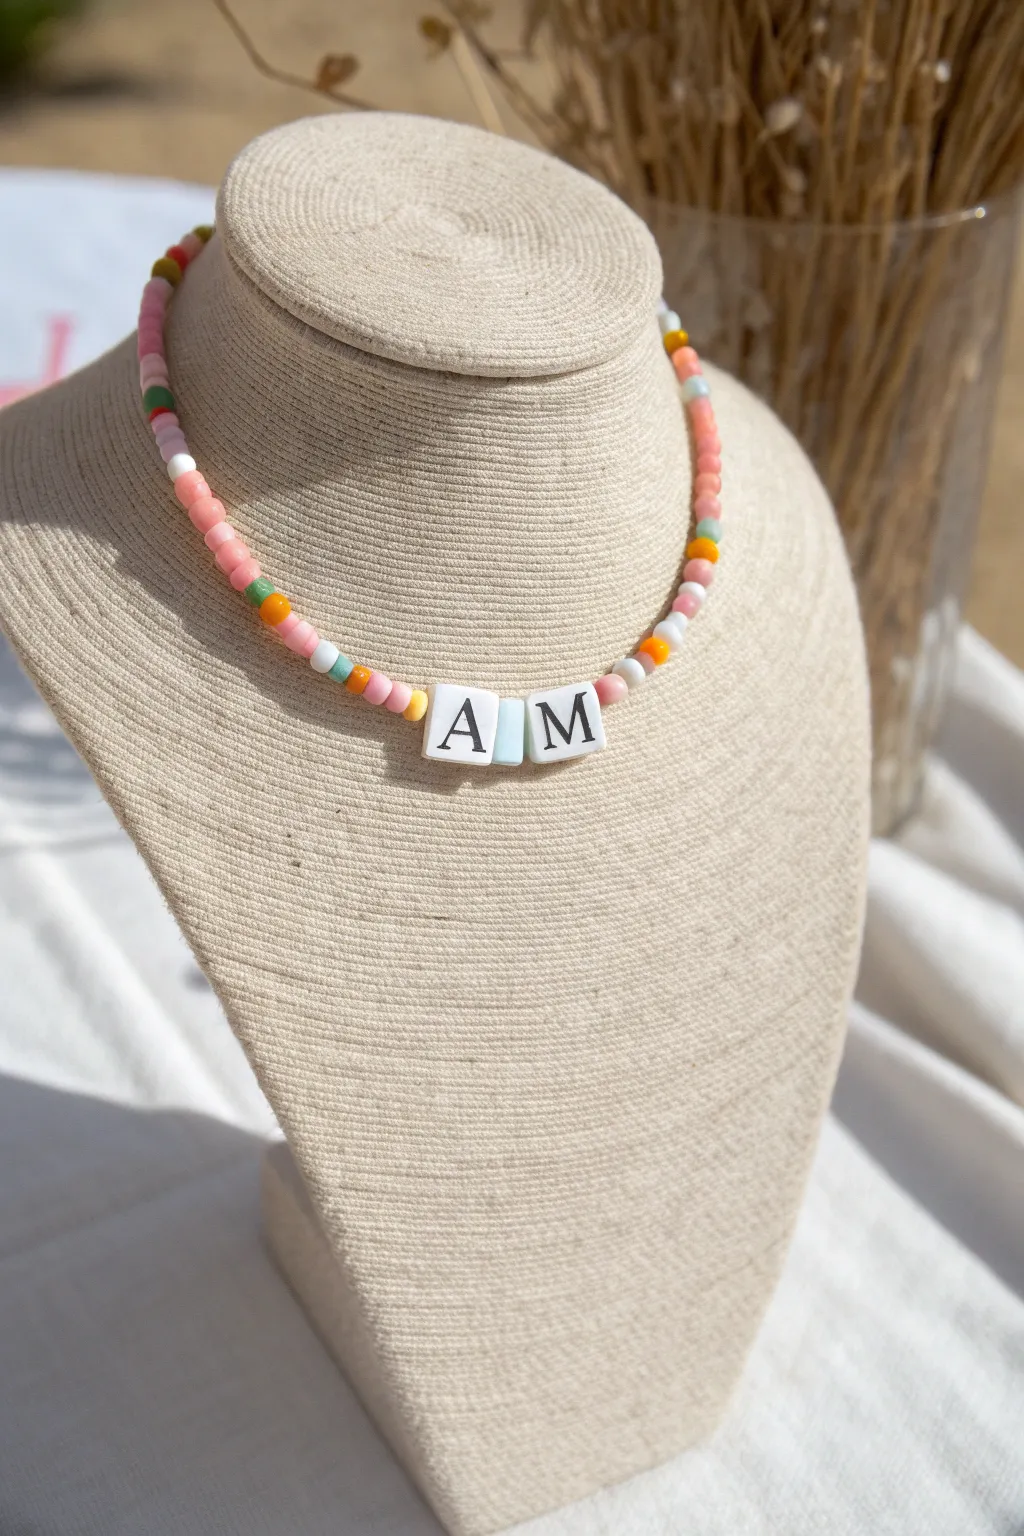
This cheerful necklace combines the classic preppy aesthetic with a personalized touch, featuring vibrant seed beads surrounding a bold initial centerpiece. It’s a quick, beginner-friendly project that results in a custom accessory perfect for layering or wearing solo.
How-To Guide
Materials
- Elastic beading cord (0.5mm – 0.8mm clear)
- White square letter beads (‘A’ and ‘M’ or your choice)
- Size 6/0 or 8/0 glass seed beads (opaque pink, light pink, orange, white, green, teal)
- Small cylindrical spacer bead (light blue)
- Beading needle (collapsible eye recommended)
- Scissors
- Super glue or clear detailed jewelry glue
- Bead stopper or decorative washi tape
Step 1: Planning and Preparation
-
Measure your cord:
Cut a length of elastic cord about 22-24 inches long. This gives you plenty of extra room for tying knots without struggling against tension. -
Secure the end:
Attach a bead stopper or simply tape down one end of the cord to your work surface. This prevents your colorful pattern from sliding off while you work. -
Sort your palette:
Pour small piles of your seed beads onto a bead mat or tray. For this look, you’ll primarily need medium pink, light pink, and orange, with accents of white, green, and teal.
Knot Slipping?
If your elastic knot feels loose, tie a second knot on top of the first. Pull tight on all four strands (the two tails and the necklace loop) to lock it.
Step 2: Creating the Centerpiece
-
Thread the needle:
If you are using a collapsible eye needle, thread your elastic cord through it now. This makes picking up seed beads significantly faster. -
String the first letter:
Slide on your first letter bead (in this example, the ‘A’). Ensure the letter is facing the correct direction relative to how the necklace will hang. -
Add the spacer:
Place the small light blue cylindrical spacer bead next. This little detail breaks up the text and adds a subtle pop of cool color between the stark white cubes. -
String the second letter:
Add the second letter bead (the ‘M’). Slide the entire three-bead assembly to the center of your cord length.
Level Up: Heart Spacers
Replace the central cylindrical spacer with a small gold or colorful heart bead. It adds a sweeter vibe and separates initials perfectly for couples or BFFs.
Step 3: Building the Pattern
-
Start the right side pattern:
Working outward from the letter ‘M’, begin the beaded pattern. Start with three pink beads followed by a darker orange bead to establish the warm tone foundation. -
Add color variation:
Continue threading beads, introducing random pops of white, teal, and green every 6-8 beads. The pattern here is intentionally organic, not strictly repeating. -
Maintain the pink dominance:
Keep the light pink and medium pink beads as your main fillers. I find that alternating between two shades of pink creates a nice depth compared to using a single flat color. -
Mirror the left side:
Remove your needle (if necessary) and switch to the other side of the cord, working outward from the letter ‘A’. Replicate the same ‘random but balanced’ color distribution. -
Check the symmetry:
Hold the two ends of the cord together and let the centerpiece drop. Ensure you have roughly the same amount of beading on both sides so the clasp (or knot) stays at the back of the neck. -
Test the fit:
Wrap the strand around your neck to check the length. Add or remove beads from the ends until it sits right at the collarbone, typically around 14-16 inches for a choker style.
Step 4: Finishing Touches
-
Pre-stretch the cord:
Gently pull on both ends of the necklace before tying. This pre-stretching prevents the necklace from sagging later after you’ve worn it a few times. -
Tie the surgeon’s knot:
Tie a standard overhand knot, but loop the tail through the loop an extra time before pulling tight. This is a surgeon’s knot and is very secure for elastic. -
Add security:
Apply a tiny dab of super glue or jewelry cement directly onto the knot. Be careful not to glue the beads next to it. -
Hide the knot:
Once the glue is tacky but pliable, try to slide a nearby bead with a larger hole over the knot to conceal it. -
Trim excess:
After the glue has fully dried, use your scissors to snip the excess cord tails close to the knot.
Now you have a personalized beaded necklace ready to add a pop of color to your outfit

The Complete Guide to Pottery Troubleshooting
Uncover the most common ceramic mistakes—from cracking clay to failed glazes—and learn how to fix them fast.
Smiley Face Centerpiece
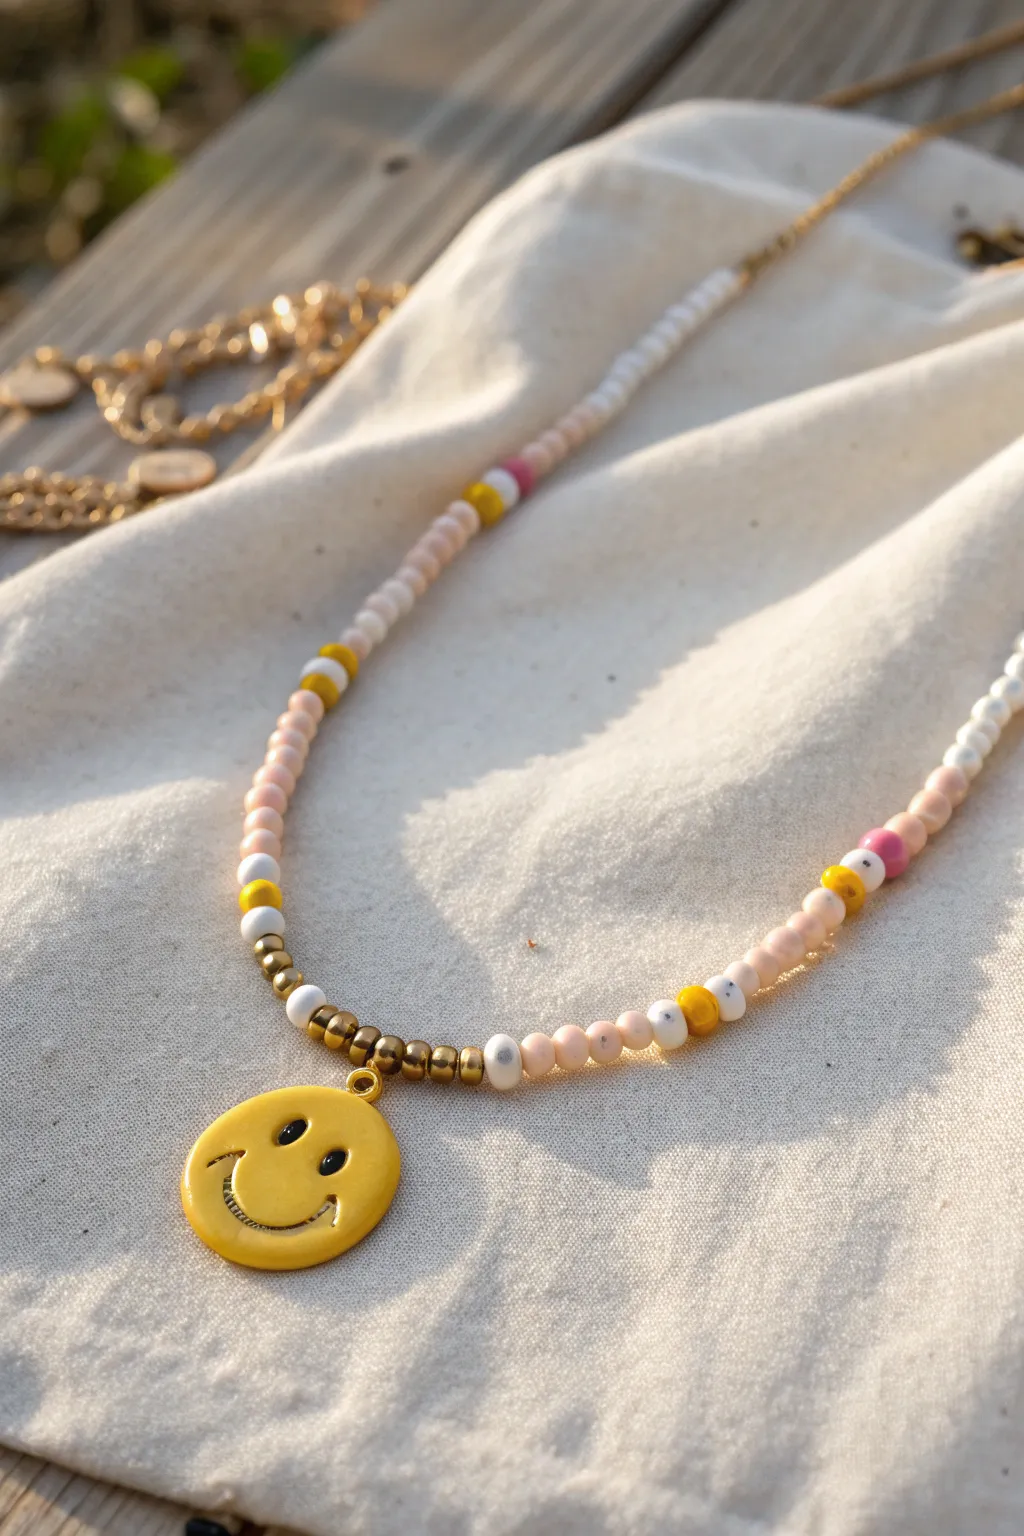
Brighten up your day with this cheerful necklace that puts a charming yellow smiley face front and center. Featuring a mix of matte pastel beads, pops of magenta, and elegant gold accents, this accessory perfectly balances playful vibes with a polished finish.
Step-by-Step Tutorial
Materials
- Yellow smiley face charm (enamel or acrylic) with gold loop
- Gold seed beads (approx. size 8/0 or 3mm)
- Pale pink/peach matte round beads (3-4mm)
- White matte or pearl seed beads
- Yellow matte seed beads
- Magenta/Hot pink seed beads
- Beading wire (e.g., Tiger Tail) or strong nylon cord
- 2 Crimp beads
- 2 Crimp covers (gold)
- Clasp (lobster claw or spring ring)
- Jump rings
- Wire cutters
- Flat nose pliers
Step 1: Setting the Center Stage
-
Prepare your wire:
Cut a length of beading wire or cord approximately 18-20 inches long. This gives you plenty of extra room to work with, even if you want a choker style. -
Secure the charm:
Slip your yellow smiley face charm onto the exact center of the wire. -
Add gold accents:
Thread three gold seed beads onto the wire on the left side of the charm, and three gold seed beads onto the right side. These will neatly frame the pendant. -
Begin the bead pattern:
On both sides of the gold beads, add one white bead, followed by one pale pink bead.
Uneven Hanging?
If the smiley charm twists or won’t lay flat, add a small jump ring between the charm loop and the wire to give it more movement.
Step 2: Building the Pattern
-
Create the first segment:
Working outward on both sides simultaneously or one at a time, thread on about 5 to 7 pale pink matte beads. -
Insert a color pop:
Add a specific color sequence to break up the pink: one white bead, one yellow bead, one white bead. -
Continue the pink base:
Add another segment of approximately 6 pale pink matte beads. -
Add a magenta accent:
Create the next playful color block: one white bead, one magenta (hot pink) bead, one white bead, and then one yellow bead. -
Resume the main color:
Return to your base color by threading on another long section of the pale pink/peach beads. I find creating piles of each color beforehand speeds this up significantly. -
Repeat the pattern:
Continue this alternating pattern—long pink sections separated by small blocks of white, yellow, and magenta accents—until you reach your desired necklace length.
Bead Tray Magic
Use a flocked bead board to lay out your design before stringing. It keeps round beads from rolling away and helps you visualize the pattern.
Step 3: Finishing Touches
-
Check for symmetry:
Lay the necklace flat in a U-shape. Ensure the patterns on the left and right mirror each other reasonably well, though a little variation adds to the handmade charm. -
Prepare the crimp:
Slide a crimp bead onto one end of the wire, followed by a jump ring or one half of your clasp. -
Secure the end:
Thread the wire back through the crimp bead to create a loop around the clasp hardware. Use your flat nose pliers to squash the crimp bead flat and tight. -
Hide the hardware:
Place a gold crimp cover over the flattened crimp bead and gently close it with pliers so it looks like a round gold bead. -
Finish the second side:
Repeat the crimping process on the other end of the necklace with the other half of your clasp. Make sure the beads are snug but not too stiff before crimping. -
Trim excess wire:
Snip off any tail ends of the wire close to the beads using your wire cutters.
Now you have a happy, trendy accessory ready to wear with your favorite casual outfit
Cowrie Shell Statement Center
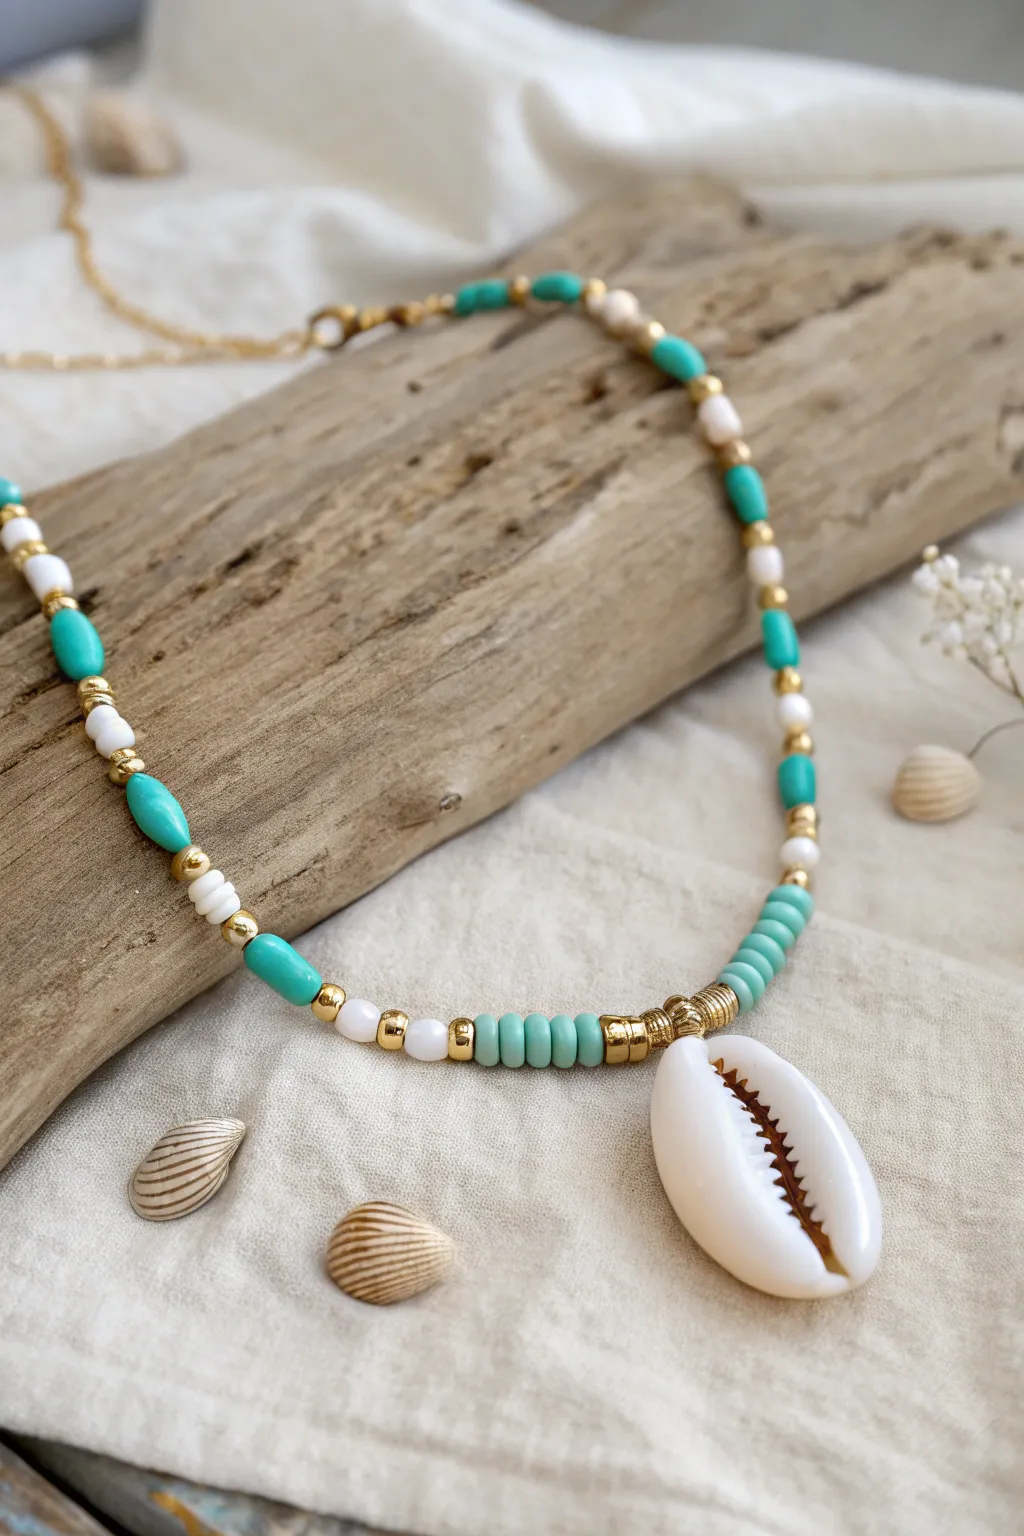
Capture the essence of a sun-drenched beach day with this elegant beaded necklace featuring a striking white cowrie shell centerpiece. The blend of turquoise tube beads, pristine white accents, and gleaming gold spacers creates a sophisticated yet summery accessory perfect for layering.
Step-by-Step
Materials
- Large white natural cowrie shell (approx. 20-25mm) with open back
- Turquoise tube beads or seed beads (approx. 4mm long)
- White round seed beads (size 6/0 or 8/0)
- Gold round spacer beads (3mm)
- Gold flat heishi spacer beads (4mm)
- Beading wire (gold color preferred, 0.38mm or 0.45mm)
- 2 Gold crimp beads
- 2 Gold wire guardians (optional but recommended)
- 2 Gold crimp covers (3mm)
- Gold lobster clasp and jump ring
- Chain extension (optional)
- Jewelry pliers (flat nose and wire cutters)
- Beading mat or tray
Step 1: Preparing the Centerpiece
-
Measure your wire:
Cut a length of beading wire approximately 20 inches long. This gives you plenty of room for a standard 16-18 inch necklace plus extra for finishing the ends. -
Secure one end:
To prevent beads from sliding off while you work, place a piece of tape or a bead stopper on one end of your wire. -
Prepare the shell:
If your cowrie shell doesn’t have holes drilled on the sides, you will thread the wire through the natural opening. Ensure the back of the shell is sliced open to allow the wire to pass through easily. -
String the center section:
We will build the necklace from the center outwards. Thread the wire through the cowrie shell so the shell sits right in the middle of your wire length.
Shell Orientation
If the cowrie shell keeps flipping backward, try adding a small drop of jewelry glue where the wire touches the inside top of the shell to fix it in place.
Step 2: Creating the Bead Pattern based on Symmetry
-
The immediate center accents:
On the right side of the shell, thread on three gold flat heishi spacers. Repeat this on the left side of the shell. These gold stacks frame the shell beautifully. -
Adding the turquoise blocks:
On the right side, add four turquoise tube beads. Do the same on the left side. Symmetry is key for this polished look. -
First transition point:
On the right side, add one gold spacer bead, one white round bead, and another gold spacer bead. Repeat this exact sequence on the left side. -
Second turquoise section:
Add a single turquoise tube bead to the right side, followed by a gold spacer. Repeat on the left. -
Establishing the repeating pattern:
Now, begin the main pattern on both sides: string one white round bead, one gold spacer, one turquoise tube bead, and one gold spacer. -
Repeat the sequence:
Continue this alternating pattern (White Bead > Gold Spacer > Turquoise Tube > Gold Spacer) up both lengths of the wire. -
Check the length:
Periodically hold the necklace up to your neck to check the fit. Stop beading when you have about 1 inch left of your desired finished length.
Step 3: Finishing the Ends
-
Prepare the first crimp:
Remove the tape from one end. Slide on a crimp bead followed by a wire guardian. -
Attach the clasp:
Loop the wire through the guardian and catch the loop of your lobster clasp. Thread the wire back down through the crimp bead and pull tight, leaving a tiny bit of wiggle room. -
Secure the crimp:
Use your flat nose pliers to flatten the crimp bead securely. I like to give it a gentle tug to ensure it holds firm. -
Hide the crimp:
Place a gold crimp cover over the flattened crimp bead and gently close it with pliers so it looks like a round gold bead. -
Finish the other side:
Repeat the crimping process on the other end of the necklace, attaching a jump ring or chain extension instead of a clasp. -
Trim excess wire:
Tuck any small tails of wire into the first few adjacent beads, then trim any remaining excess with your wire cutters close to the beads.
Mix It Up
Swap the turquoise tube beads for navy blue or coral red heishi beads for a totally different color palette while keeping the same beachy vibe.
Now you are ready to wear your sophisticated seaside creation with your favorite summer outfit


What Really Happens Inside the Kiln
Learn how time and temperature work together inside the kiln to transform clay into durable ceramic.
Layered Preppy Necklace Stack
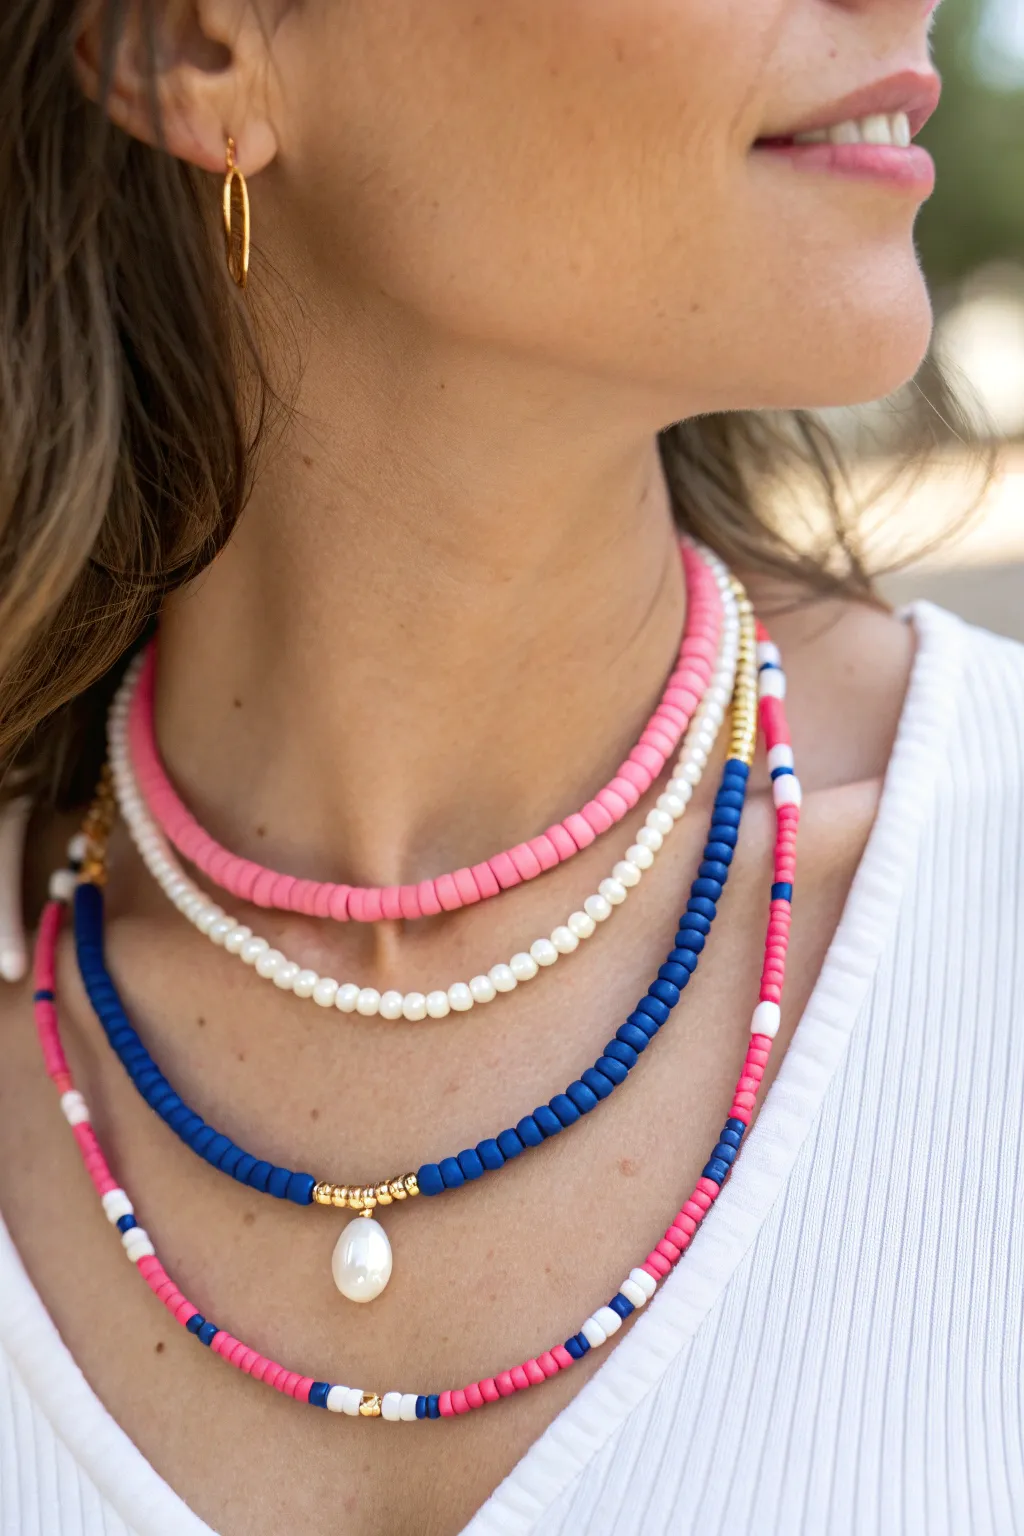
This trendy four-layer necklace stack combines vibrant pink heishi beads, delicate pearls, and cool blue tones for a polished yet beachy aesthetic. The varied textures and lengths create an effortless layered look that pairs perfectly with casual summer outfits or dresses up a simple white tee.
Step-by-Step Tutorial
Materials
- Pink flat vinyl heishi beads (approx. 4-6mm)
- Small white faux pearl beads (3-4mm)
- Matte royal blue tube or cylinder beads
- Hot pink cylinder beads
- White cylinder beads
- Gold tone spacer beads (small rounds and flat discs)
- One teardrop pearl charm
- Gold tone headpin or jump ring for charm
- Beading wire or strong illusion cord
- 8 Crimp beads
- 4 Clasps (lobster claw or spring ring)
- 8 Jump rings
- Crimping pliers
- Wire cutters
- Ruler or measuring tape
Step 1: Planning the Lengths
-
Determine strand lengths:
Before stringing, decide on the lengths for your gradient effect. A good standard is 14 inches for the choker, 16 inches for the pearls, 18 inches for the pendant strand, and 20-22 inches for the long mixed strand. -
Cut the wire:
Cut four pieces of beading wire, adding about 3 extra inches to each measurement to allow room for crimping and handling the ends comfortably.
Step 2: Layer 1: The Pink Heishi Choker
-
Secure the start:
take your shortest wire segment. Thread on a crimp bead and one half of a clasp. Loop the wire back through the crimp bead and use your crimping pliers to flatten it securely. -
String the beads:
String the pink flat heishi beads continuously until you reach your desired choker length (approx. 14 inches). These sit flat against the skin, forming a solid band of color. -
Finish the strand:
Add a crimp bead and a jump ring to the end. Loop the wire back through the crimp bead, pull tight (leaving a tiny bit of wiggle room so the necklace drapes naturally), and crimp it shut. Trim excess wire.
Pro Tip: Lay It Flat
Before crimping the ends, lay all four strands on a table inside each other to check how they nest. Adjust lengths now to prevent overlapping.
Step 3: Layer 2: The Pearl Strand
-
Start the second strand:
Repeat the starting crimp process on your second shortest wire. This will sit just below the pink choker. -
Add pearls:
String the small 3-4mm white round pearls for the entire length. I find that using varied ‘imperfect’ freshwater-style pearls adds a nice organic texture compared to perfectly round ones. -
Close the strand:
Finish this strand with a crimp bead and jump ring, ensuring it is slightly longer than the pink layer so they nestle rather than bunch.
Troubleshooting: Stiff Wire
If the necklace hangs stiffly rather than draping, you’ve crimped it too tight. Leave 1-2mm of slack in the wire before flattening the final crimp.
Step 4: Layer 3: Blue Strand with Pendant
-
Prepare the pendant:
If your teardrop pearl doesn’t have a loop, slide it onto a headpin. Create a wrapped loop at the top using round nose pliers, or simply attach a jump ring if it’s pre-drilled. -
Begin the blue pattern:
Start your third wire length. String the matte royal blue tube beads. Stop when you reach the exact center point of the strand. -
Create the focal point:
At the center, add three small gold spacer beads, then slip on your pearl pendant, followed by three more gold spacer beads. -
Finish the blue layering:
Continue stringing the blue tube beads up the other side to match the length of the first half. Finish the ends with crimps and hardware.
Step 5: Layer 4: The Mixed Pattern Strand
-
Plan the random mix:
For the longest strand, you’ll create a color-blocked pattern. The pattern seen here uses segments of hot pink, white, royal blue, and occasional gold accents. -
Create color blocks:
String about 1 inch of hot pink cylinder beads, followed by a gold spacer, then a single white bead, another gold spacer, and 1 inch of blue cylinder beads. -
Vary the segments:
Continue this approximate pattern, occasionally switching the order or length of the color blocks to keep it feeling playful and not too rigid. -
Add gold highlights:
Intersperse small gold beads randomly between sections, specifically using a few larger gold beads in the very center to weight the necklace slightly. -
Final assembly:
Once the longest strand reaches your desired length, crimp and attach the final clasp components. Trim all remaining wire tails flush with the beads.
Now you have a vibrant, custom-fitted stack ready to brighten up your daily wardrobe
Varsity Stripe Color Blocks
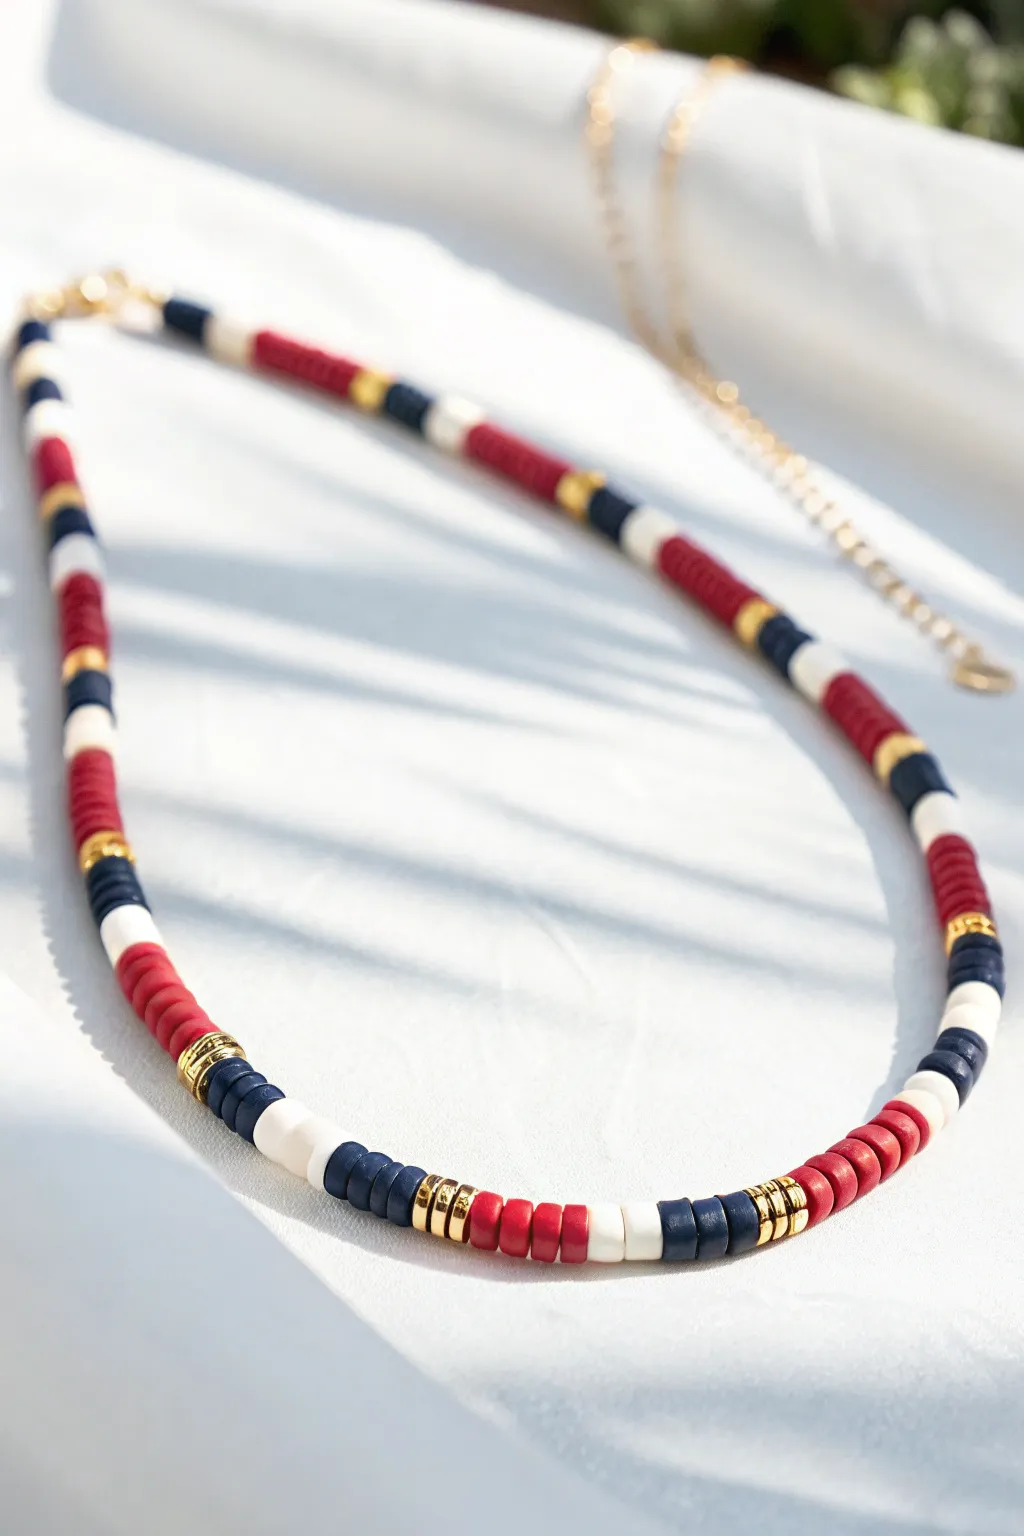
Capture the classic, sporty vibe of collegiate style with this striking heishi bead necklace. The bold navy, red, and white color blocks separated by gleaming gold spacers create a crisp look perfect for layering or wearing solo.
Step-by-Step Guide
Materials
- 6mm polymer clay disc beads (Heishi beads) in navy blue
- 6mm polymer clay disc beads in bright red
- 6mm polymer clay disc beads in white
- 6mm gold spacer beads (flat disc or slightly rounded)
- Beading wire or strong elastic cord (0.8mm)
- 2 gold crimp beads (if using wire)
- 2 gold crimp bead covers (optional)
- Gold lobster clasp and jump ring
- Gold extension chain (optional)
- Jewelry pliers (flat nose and cutting pliers)
- Bead design board or masking tape
Step 1: Planning the Pattern
-
Measure and cut:
Decide on your desired necklace length, typically around 16 to 18 inches for this choker style. Cut a piece of beading wire or elastic cord about 4 inches longer than your target length to allow ample room for tying knots or attaching clasps. -
Secure the end:
If you are using beading wire, thread a crimp bead onto one end, loop the wire through a jump ring or the loop of your extension chain, and thread it back through the crimp bead. Flatten the crimp bead with pliers to secure it. If using elastic, simply tape one end down to your table so beads don’t slide off. -
Analyze the pattern:
Take a close look at the ‘varsity’ pattern. It relies on distinct blocks of color separated by gold. The sequence generally follows: a long block of red, a gold spacer, a short block of navy, a short block of white, a short bloc of navy, a gold spacer, and repeat.
Step 2: Stringing the Beads
-
Start with red:
Begin your first sequence by stringing approximately 10 to 12 red polymer clay discs. This creates the dominant color block in the pattern. -
Add the first accent:
Slide on one gold spacer bead. This metallic pop is crucial for defining the ‘varsity’ athletic stripe look. -
Create the navy stripe:
Thread on about 4 to 5 navy blue beads. You want this section to be significantly shorter than the red section to act as a stripe rather than a main block. -
Add the contrast center:
Add 4 to 5 white beads next. This white section sits in the middle of the navy stripes, creating that classic tri-color appeal. -
Finish the stripe sequence:
Close the stripe section by adding another 4 to 5 navy blue beads. Ensure the count matches the first navy group for symmetry. -
Cap it with gold:
Add a second gold spacer bead to finish this specific pattern segment. -
Repeat the main block:
Return to the red beads. String another 10 to 12 red discs exactly as you did in the first step. Consistency in counting constitutes the neatness of the final piece. -
Alternate the pattern:
To add visual interest, you can alternate the long block color. After the next stripe section, try using white as the long block (10-12 beads) instead of red, sandwiched by navy stripes. Or, stick to the single repeating pattern shown in the image for a uniform look.
Uneven Stripes?
Clay beads vary slightly in thickness. Instead of counting beads, measure your color blocks in millimeters (e.g., 5mm of blue) to ensure perfectly matching stripe widths every time.
Step 3: Finishing Touches
-
Check the length:
Continue repeating the pattern until the beaded section reaches your desired length. Wrap it around your neck (carefully!) to check the fit before finishing. -
Prepare the clasp:
Thread a crimp bead onto the open end of the wire, followed by the lobster clasp. -
Loop back:
Feed the wire tail back through the crimp bead and pull it taut so the clasp sits close to the beads, but not so tight that the necklace becomes stiff. -
Secure the crimp:
Use your flat nose pliers to crush the crimp bead firmly. I like to give it a gentle tug to ensure it won’t slip. -
Trim excess wire:
Snip off the excess beading wire with your cutting pliers. If you have crimp covers, place one over the crimped bead and gently close it with pliers to make it look like a gold bead. -
Hide final tails:
If you have a customized fit and a little extra wire tail, try tucking it back into the first few beads of your pattern before trimming for an extra clean finish.
Add a Charm
Personalize the varsity look by attaching a gold initial letter charm or a tiny pearl to the center of the necklace using a jump ring for a custom monogram effect.
Enjoy styling your new necklace with a simple white tee or a cozy sweater for that polished academic aesthetic

TRACK YOUR CERAMIC JOURNEY
Capture glaze tests, firing details, and creative progress—all in one simple printable. Make your projects easier to repeat and improve.
Coastal Blues and Clean Whites
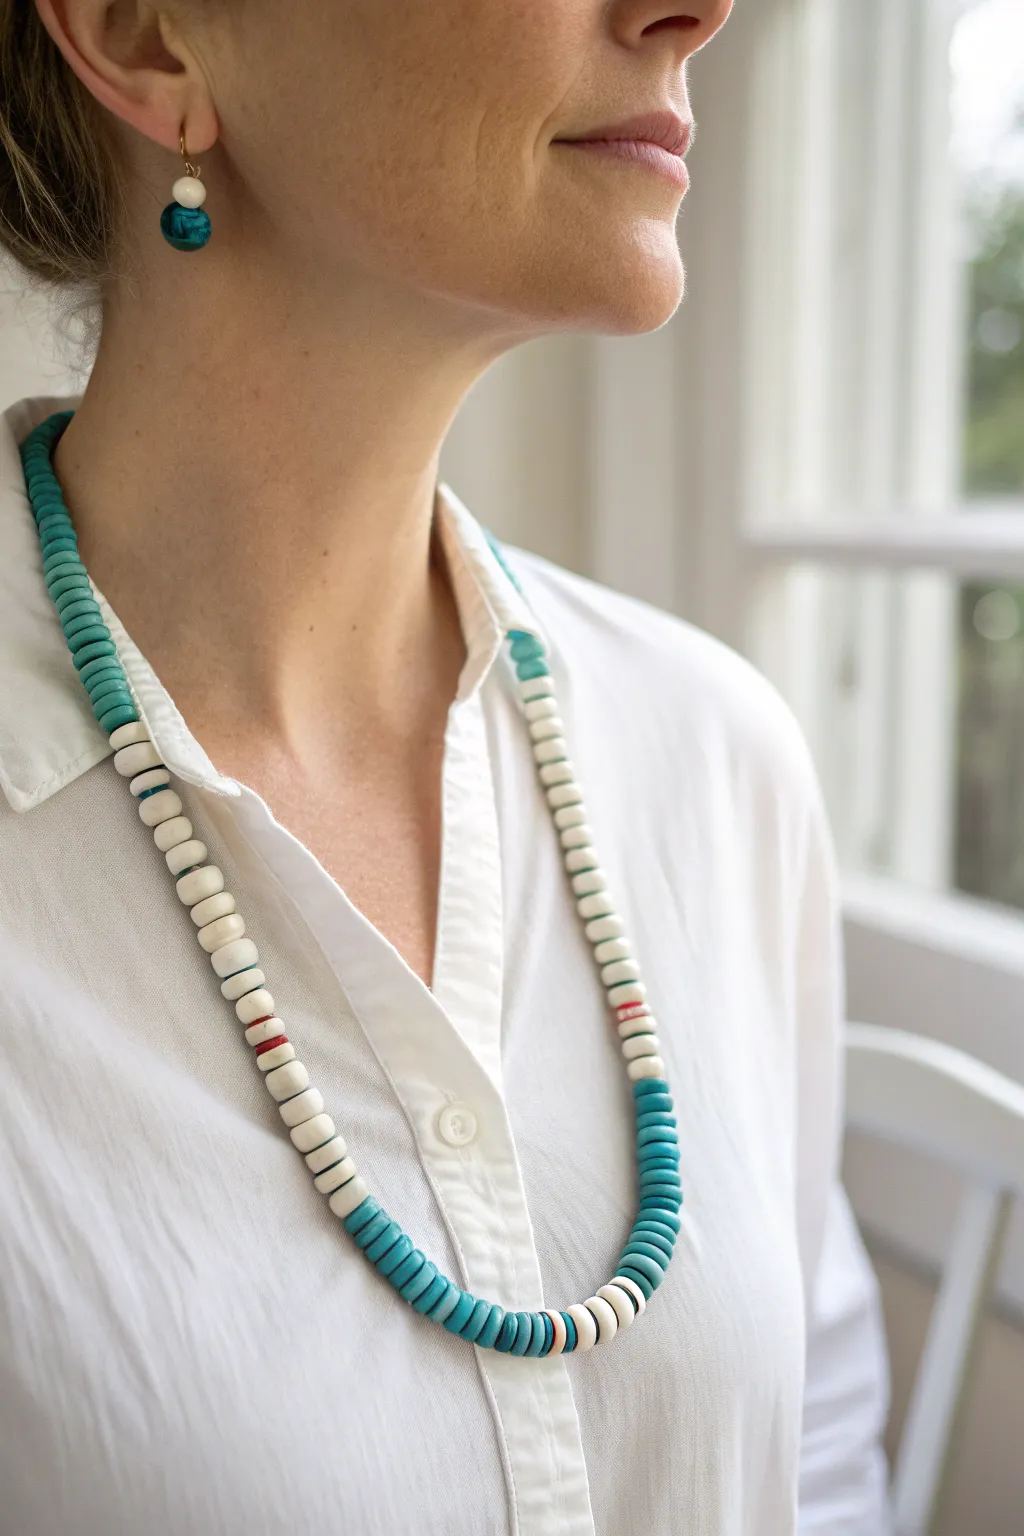
Capture the calm of a seaside morning with this elegant, longline clay bead necklace. Combining creamy whites with striking turquoise heishi beads creates a sophisticated color block design that elevates any casual white shirt.
Step-by-Step Tutorial
Materials
- White or cream polymer clay heishi beads (approx. 6-8mm)
- Turquoise/Teal polymer clay heishi beads (approx. 6-8mm)
- Small red spacer beads or seed beads (2-4 pieces)
- Gold tone crimp beads (2mm)
- Gold tone crimp bead covers (3mm)
- Flexible beading wire (e.g., Tigertail or nylon-coated steel, 0.018 inch)
- Gold tone jump rings (4-6mm)
- Gold tone lobster clasp
- Wire cutters
- Chain nose pliers
- Flat nose pliers
- Bead stopper or masking tape
Step 1: Planning the Strand
-
Measure your length:
Decide on your desired necklace drop. The necklace in the photo is a longer opera-style length, so aim for approximately 28 to 32 inches of visual length, plus an extra 4 inches of wire for finishing. -
Cut the wire:
Use your wire cutters to snip a generous length of beading wire. It’s always better to have too much than too little when working on a longer strand. -
Secure the end:
Attach a bead stopper or a piece of masking tape to one end of the wire. This prevents your beads from sliding off while you work on the pattern.
Smooth Transitions
When adding the single accent beads (the red ones), ensure the hole size matches your wire thickness so they don’t look wonky or sit at an angle against the flat heishi beads.
Step 2: Creating the Color Blocks
-
Start the left side:
Begin stringing with your turquoise beads. Thread on approximately 3-4 inches of just the blue/teal beads to create the solid neck section seen on the wearer’s left. -
Transition to white:
Switch to your cream or white heishi beads. Thread on about 10-12 beads. This starts the long white section. -
Add a hidden detail:
Thread one single turquoise bead, followed by one tiny red spacer bead, and then resume with white beads. This mimics the subtle pop of color seen near the collarbone. -
Continue the white section:
String a long segment of white beads, approximately 5-6 inches. Pause periodically to hold the strand up against yourself to check the visual balance. -
Insert the second accent:
Add a small accent cluster: one red spacer bead, followed by 3-4 white beads, then another red spacer bead. -
Resume white beading:
Continue threading white beads for another 2-3 inches as you approach the bottom curve of the necklace.
Add Matching Earrings
Use leftover beads to make the matching earrings shown! Thread a single turquoise bead and a white bead onto a headpin, loop the top, and attach to a gold ear wire.
Step 3: Forming the Center Curve
-
Begin the turquoise dip:
Switch back to your turquoise beads. Thread about 2 inches of blue beads. -
Create the focal transition:
Add 4 white beads to break up the color. -
Complete the bottom center:
Add a prominent section of turquoise beads, roughly 3 inches long. This will sit at the very bottom center of the necklace loop. -
Mirror the transition:
Add another small group of 4 white beads to mirror the previous white transition. -
Finish the right side teal:
Resume threading turquoise beads for about 2-3 inches, creating an asymmetrical balance with the other side.
Step 4: Finishing the Right Side
-
Add the final white section:
Switch back to white beads for a long stretch, roughly 6-7 inches, matching the position of the white section on the first side. -
Add the stripe detail:
Near the top of this white section, add a single red bead, followed by two white beads, then a red bead, just like the detail we added earlier. -
Complete the strand:
Finish the strand with turquoise beads until you reach your desired total length.
Step 5: Securing the Clasp
-
Prepare the crimp:
Remove the bead stopper. Thread a crimp bead onto the wire, followed by a jump ring or the loop of your lobster clasp. -
Loop back:
Pass the wire back through the crimp bead and through the first 2-3 heishi beads on the strand. Pull tight so there is only a tiny loop of wire holding the clasp. -
Crimp firmly:
Use the flat portion of your crimping pliers (or chain nose pliers) to flatten the crimp bead securely. I like to give it a gentle tug to ensure it holds. -
Cover the crimp:
Place a crimp cover over the flattened bead. Gently squeeze it closed with pliers until it looks like round gold bead. -
Trim excess wire:
Snip off the excess wire tail as close to the beads as possible so it doesn’t scratch your neck. -
Repeat on the other end:
Repeat the crimping process on the other end of the necklace with the other half of your clasp set.
Slip on your new creation and enjoy the fresh, coastal vibe it brings to your outfit
Sunset Sorbet Palette
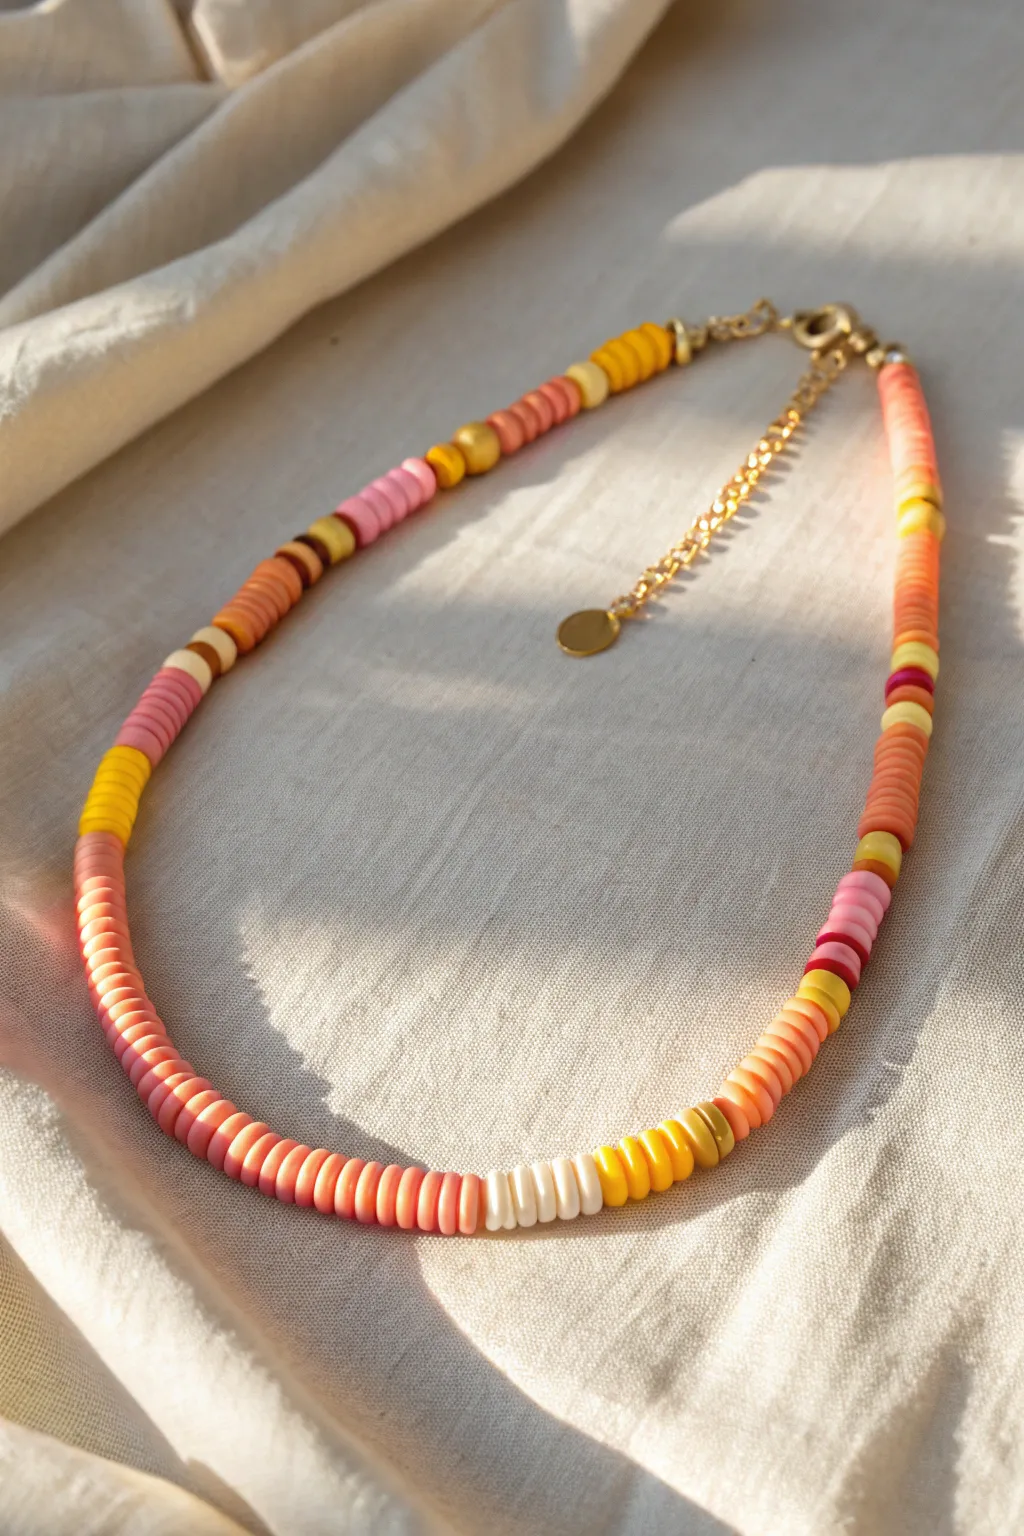
Capture the golden hour with this vibrant beaded necklace featuring a stunning gradient of citrus yellows, warm peaches, and soft pinks. The playful mix of polymer clay heishi discs creates a textural, beach-ready accessory perfect for layering or wearing solo.
How-To Guide
Materials
- Polymer clay heishi beads (6mm flat discs) in: bright yellow, mustard yellow, pale yellow, bright orange, coral, pale pink, hot pink, maroon, white and dark brown
- Gold tone metallic spacer beads (round or faceted, approx 3-4mm)
- Gold tone crimp beads and bead covers
- Gold tone lobster clasp
- Gold tone extender chain with flat round charm
- Beading wire (flexible, coated)
- Crimping pliers
- Wire cutters
- Ruler or measuring tape
Step 1: Planning and Preparation
-
Measure your wire:
Cut a piece of beading wire approximately 20-22 inches long. This gives you plenty of slack to work with for a standard 16-18 inch choker style necklace. -
Define the color palette:
Organize your beads into color families before you start stringing. The ‘Sunset Sorbet’ look relies on blocking warm tones together—think segments of yellow transitioning into orange, then pinks, interspersed with neutrals. -
Secure the start:
Thread a crimp bead onto one end of the wire, followed by the jump ring attached to your extender chain. -
Loop and crimp:
Pass the tail of the wire back through the crimp bead to create a small loop. Use your crimping pliers to flatten the crimp bead securely, locking the wire in place. -
Cover the mechanics:
Place a crimp bead cover over the flattened crimp bead and gently close it with pliers so it looks like a round gold bead.
Randomize It
For a true ‘surfer chic’ vibe, avoid counting beads exactly. Grab pinch-fulls of similar shades and string them without separating them perfectly.
Step 2: Stringing the Pattern
-
Start with a warm anchor:
Begin stringing with a segment of approximately 10-12 bright yellow heishi beads to establish the first block of color. -
Add a metallic accent:
Slide on one gold spacer bead. These gold accents are crucial for breaking up the matte texture of the clay and adding a touch of elegance. -
Transition to peaches:
Add a short segment of pale peach or coral beads, varying the length slightly for a more organic feel. I usually aim for about half an inch here. -
Create contrast:
Thread on a small pattern block: one dark brown bead, one pale yellow bead, and one maroon bead to create a striking visual break in the pastel tones. -
Build the pink section:
String a long section of mixed pink beads—alternating between pale pink and hot pink discs for depth. -
Insert the white highlight:
About halfway through your necklace, create a focal point by adding a distinct block of 6-8 plain white beads. This acts like a ‘palate cleanser’ in the design. -
Mirror the warmth:
Follow the white section with a gradient shift back to warmth: a few yellow beads, followed by a longer stretch of burnt orange or terracotta discs. -
Repeat accents:
Continue adding gold spacer beads randomly between your color blocks. Don’t worry about perfect symmetry; asymmetry gives this style its charm. -
Finish the strand:
Continue the pattern until you reach your desired length (usually around 16 inches for the beaded portion), ending with a color block that complements your starting yellow section.
Stiff Necklace?
If the necklace feels stiff or kinks, you’ve strung it too tightly. Leave a tiny 1-2mm gap of exposed wire at the end before crimping to allow movement.
Step 3: Finishing Touches
-
Add final hardware:
Slide a crimp bead onto the remaining wire end, followed by the lobster clasp. -
Secure the end:
Loop the wire back through the crimp bead and pull it tight, ensuring there is no large gap between the beads and the clasp, but leaving just enough wiggle room so the necklace drapes naturally. -
Crimp and trim:
Flatten the crimp bead firmly with your pliers. Trim the excess wire tail close to the bead using your wire cutters. -
Final cover:
Apply the last crimp bead cover over the crushed crimp bead to give the end a polished, professional finish.
Now you have a radiantly warm accessory that brings a bit of summer sunshine to any outfit you wear
Gingham-Inspired Alternating Micro-Blocks
This charming necklace captures the essence of a classic gingham pattern using alternating blocks of deep blue and crisp white, accented by earthy beige tones for a warm, preppy finish. It’s a versatile accessory that pairs perfectly with casual denim or summery linens.
Step-by-Step Tutorial
Materials
- Blue glass seed beads (size 6/0 or 8/0)
- White glass seed beads (size 6/0 or 8/0)
- Beige/tan Heishi beads or cylindrical spacer beads (approx. 4mm)
- Beading wire (approx. 18-20 inches)
- 2 Crimp beads
- 2 Crimp bead covers (optional)
- Lobster clasp
- Jump ring
- Extension chain (optional)
- Crimping pliers
- Wire cutters
Step 1: Preparation
-
Measure the Wire:
Cut a length of beading wire approximately 20 inches long. This gives you plenty of extra room for crimping and adjusting the length for a choke-style or collarbone fit. -
Start the Clasp:
Thread one crimp bead onto the wire, followed by the jump ring or the end of your extension chain. Loop the wire back through the crimp bead. -
Secure the End:
Slide the crimp bead close to the loop, but leave it loose enough for free movement. Use your crimping pliers to flatten the bead securely, then trim the excess tail wire.
Tension Check
Before crimping the final end, coil the necklace into a circle. If beads buckle, it’s too tight. Leave 1-2mm of slack on the wire.
Step 2: Creating the Pattern
-
Begin with Blue:
To start the strand, thread on a long section of just the blue seed beads. Aim for about 2–3 inches of solid blue. I like to do this so the clasp area remains simple and comfortable against the neck. -
First Accent:
After the solid blue section, string on one white seed bead, followed by one blue seed bead, and then one more white seed bead. -
Add a Solid Block:
thread on a block of 6 to 8 blue seed beads. This creates the ‘micro-block’ look mentioned in the section title. -
Introduce the Beige:
Slide on one beige cylindrical bead. This distinctive shape breaks up the round seed beads and adds texture. -
Build the Central Pattern:
Now, create a pattern block: String 3 blue beads, followed by one beige cylinder, and then another 3 blue beads. -
Switch to White:
Add a segment of white by stringing 1 white, 1 blue, 1 white, followed by a beige cylinder. -
Alternate Colors:
Continue stringing, but now vary the lengths slightly. String a block of 5 blue beads, then a beige cylinder. -
The Gingham Motif:
Create the signature alternating look by stringing: 1 white, 1 blue, 1 white. Follow this immediately with a beige cylinder. -
Heavy Blue Section:
Thread on a longer segment of blue beads—about 8 to 10 beads—followed by a beige cylinder. -
Repeat Towards Center:
Repeat the previous step: another beige cylinder, a small group of 3 blue beads, and another beige cylinder. -
Mirror the Design:
Once you reach the center, start mirroring your pattern specifically or continue alternating blue blocks (3-8 beads) with beige spacers and small white/blue/white motif sections until you reach the last 3 inches of wire. -
Finish with Blue:
End the beading just like you started, with a solid 2–3 inch section of only blue seed beads.
Mix Up The Material
Swap the beige cylinder beads for genuine freshwater pearls or tiny gold spacer beads to elevate this from casual preppy to beach chic.
Step 3: Finishing Touches
-
Thread the Final Crimp:
Double check the length on your neck. If satisfied, thread a crimp bead onto the end of the wire, followed by the lobster clasp. -
Create the Loop:
Feed the wire back through the crimp bead and pull tight, ensuring there’s no slack in the beads but the necklace remains flexible. -
Seal the Strand:
Use the crimping pliers to crush the crimp bead flat. If you are using crimp covers, gently close one over each flattened crimp bead now for a polished look.
Now you have a stylish, custom-made necklace ready to layer or wear solo.
Linked Heishi Segments
Embrace a playful, soft aesthetic with this segmented heishi bead necklace. By combining matte polymer clay discs in sweet pastels with bright gold spacers, you create a polished piece that feels structural yet delicately feminine.
Step-by-Step Guide
Materials
- Polymer clay heishi beads (pastel pink, light blue, matte white, light yellow)
- Gold tone metallic spacer beads (round and slightly textured/faceted)
- Beading wire (0.38mm or 0.45mm)
- Gold tone crimp beads
- Gold tone lobster clasp
- Gold tone extender chain
- Wire cutters
- Flat nose pliers
- Crimping pliers
Step 1: Preparation & First Segment
-
Cut the Wire:
Start by cutting a length of beading wire about 18-20 inches long. This gives you plenty of slack to work with, even if you want a shorter choker length. -
Secure the Start:
Thread a crimp bead onto one end of the wire, followed by the gold extension chain. Loop the wire back through the crimp bead. -
Crimp it Closed:
Use your crimping pliers to flatten the crimp bead securely, locking the chain in place. I always give a tiny tug here just to make sure it’s solid before moving on. -
First Pink Section:
String on approximately 20-22 pastel pink heishi beads to create your first color block. This section sits near the back of the neck. -
Add a Spacer:
Slide on one gold metallic spacer bead to finish this first monochromatic segment.
Step 2: Creating the Pattern
-
Blue Block:
Thread roughly 15 light blue heishi beads onto the wire. This segment should be slightly shorter than the first pink one. -
The White Accent:
Add a single gold spacer, followed by about 4 white heishi beads, and another gold spacer. This creates a crisp, bright visual break. -
Short Pink Segment:
Add a small cluster of pink beads—about 10—followed by another gold spacer bead. -
Yellow Pop:
Introduce the yellow by stringing on 4-5 yellow heishi beads. Capping this small yellow section creates a nice rhythm. -
Center Blue Section:
String a longer section of blue beads (around 20) to mirror the weight of the beginning pink section. Add a gold spacer. -
Repeating the White Detail:
Repeat the white accent pattern: one gold spacer, 4 white beads, and another gold spacer.
Pro Tip: Tightness Check
Before the final crimp, hold the necklace in a circle shape. If you pull the wire too tight while it’s straight, the necklace will become stiff and won’t drape naturally on your neck.
Step 3: Finishing the Length
-
Pink to Center Transition:
Add a medium-length segment of pink beads (about 15) and cap it with a gold spacer. -
Central Yellow Detail:
String 4 yellow beads, followed by a gold spacer, then a small group of pink beads (about 6-8). Create a distinct separation here with another gold spacer. -
Final Blue Stretch:
Add a section of blue beads, keeping the count symmetrical to the blue section on the opposite side if possible, or randomize for a more organic feel. -
Ending Symmetry:
Finish the beading with a long pink segment (20-22 beads) to match the very beginning of the necklace. -
Attach the Clasp:
Thread a crimp bead and your lobster clasp onto the end of the wire. Loop the wire back through the crimp bead and a few of the heishi beads. -
Final Crimp:
Use the crimping pliers to secure the clasp. Trim away any excess wire tail close to the beads for a neat finish.
Level Up: Pearl Accents
Swap out the small white heishi segments for freshwater pearls. The contrast between the matte clay and the organic luster of pearls adds an instant high-end, beachy vibe.
Enjoy wearing your custom color-blocked creation with your favorite casual outfits
Tiny Heishi Pendant Drop
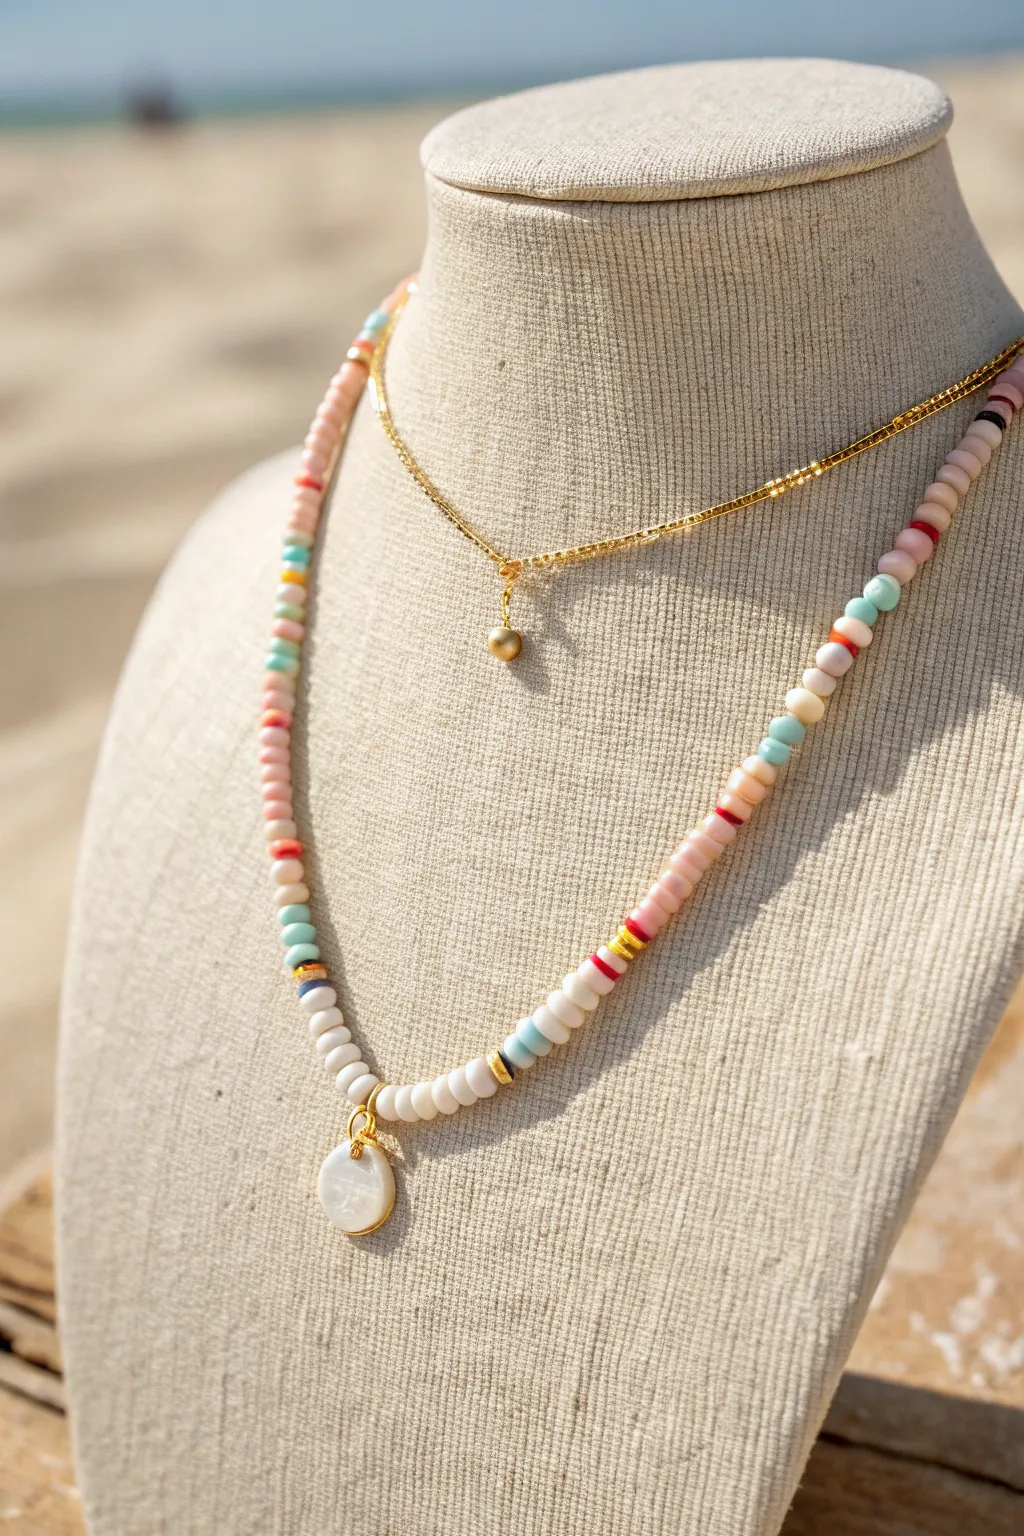
Capture the laid-back elegance of a beach day with this delicate beaded necklace, featuring a mix of soft pastels and vibrant accent beads. The centerpiece is a simple, luminous shell pendant that adds just the right amount of shine to your summer stack.
Step-by-Step Tutorial
Materials
- 4mm polymer clay heishi beads (white, soft pink, peach, teal, bright red)
- Gold tone disk spacer beads (3mm or 4mm)
- Small gold round spacer beads
- Flat round mother-of-pearl or shell pendant (approx. 10-12mm) with gold bail
- Beading wire (0.38mm or 0.45mm)
- 2 gold crimp beads
- 2 gold crimp bead covers (optional)
- 2 gold wire guardians (optional but recommended)
- Gold lobster clasp and jump ring
- Wire cutters
- Crimping pliers
- Bead design board or masking tape
Step 1: Planning and Preparation
-
Measure your length:
Decide on the finished length of your necklace. For the choker style shown, 15 to 16 inches is standard, but you can go longer if you prefer a looser fit. -
Cut the wire:
Cut a piece of beading wire about 4 to 5 inches longer than your desired finished length. This extra slack is crucial for tying off the ends comfortably. -
Secure one end:
To prevent beads from sliding off while you work, place a piece of masking tape or a bead stopper on one end of your wire. -
Organize your palette:
Pour small amounts of your heishi beads onto your workspace. Separating colors helps you visualize the pattern before you start stringing.
Step 2: Creating the Pattern
-
Start strong:
Begin by threading about 1.5 inches of solid white or cream heishi beads. This creates a neutral back section near the clasp. -
Introduce block patterns:
Start your color pattern. Thread a small block of color, such as 6-8 beads of soft pink. -
Add gold accents:
Slide on a gold disk spacer. I like to use these spacers to break up the matte clay texture and add a little glimmer between color transitions. -
Mix in vibrant pops:
Add a contrasting section. Try threading 3 teal beads, followed by a gold spacer, and then perhaps 2 bright red beads for a tiny pop of intensity. -
Continuing the rhythm:
Continue this seemingly random yet balanced rhythm—alternating between blocks of pastel pinks, peaches, and small interruptions of teal, red, and gold. -
Check the halfway point:
Periodically hold the wire up to your neck or measure it to see where the center falls. You want the pattern to look cohesive leading up to the pendant.
Gaps in the Line?
If the necklace is stiff, you crimped too tight against the beads. Leave a tiny 1-2mm gap of bare wire at the end before crimping; the necklace will drape fluidly.
Step 3: Adding the Centerpiece
-
Frame the pendant:
When you reach the exact center of your necklace, thread on a slightly larger gold spacer or a specific gold accent bead to act as a visual anchor. -
Attach the drop:
Slide the bail of your mother-of-pearl pendant onto the wire. Make sure the shiny side is facing forward. -
Complete the frame:
Add a matching gold spacer on the other side of the pendant so it sits symmetrically.
Layered Luxe
Make a second, shorter necklace using only a delicate gold chain and a single tiny gold bead (as seen in the photo) to create a trendy, pre-curated stack.
Step 4: Finishing the Strand
-
Mirror the pattern:
Continue beading the second half of the necklace. You don’t have to mirror the first side perfectly bead-for-bead, but keep the color ratios and block sizes similar for balance. -
End with neutrals:
Finish the strand with a section of white beads to match the beginning of your necklace. -
Add crimp and clasp:
Remove the tape. Slide a crimp bead and then a wire guardian onto the wire. Loop the wire through the lobster clasp, back through the guardian, and back down into the crimp bead. -
Secure the crimp:
Use your crimping pliers to flatten or fold the crimp bead securely. Give it a gentle tug to ensure it holds. -
Cover the mechanics:
Place a crimp cover over the flattened crimp bead and gently close it with pliers to make it look like a seamless gold bead. -
Finish the other side:
Repeat the crimping process on the other end, attaching a jump ring instead of a clasp. Trim any excess wire close to the beads.
Now you have a breezy, custom accessory ready to pair with your favorite summer outfits
Swap-Out Centerpiece With a Big Loop
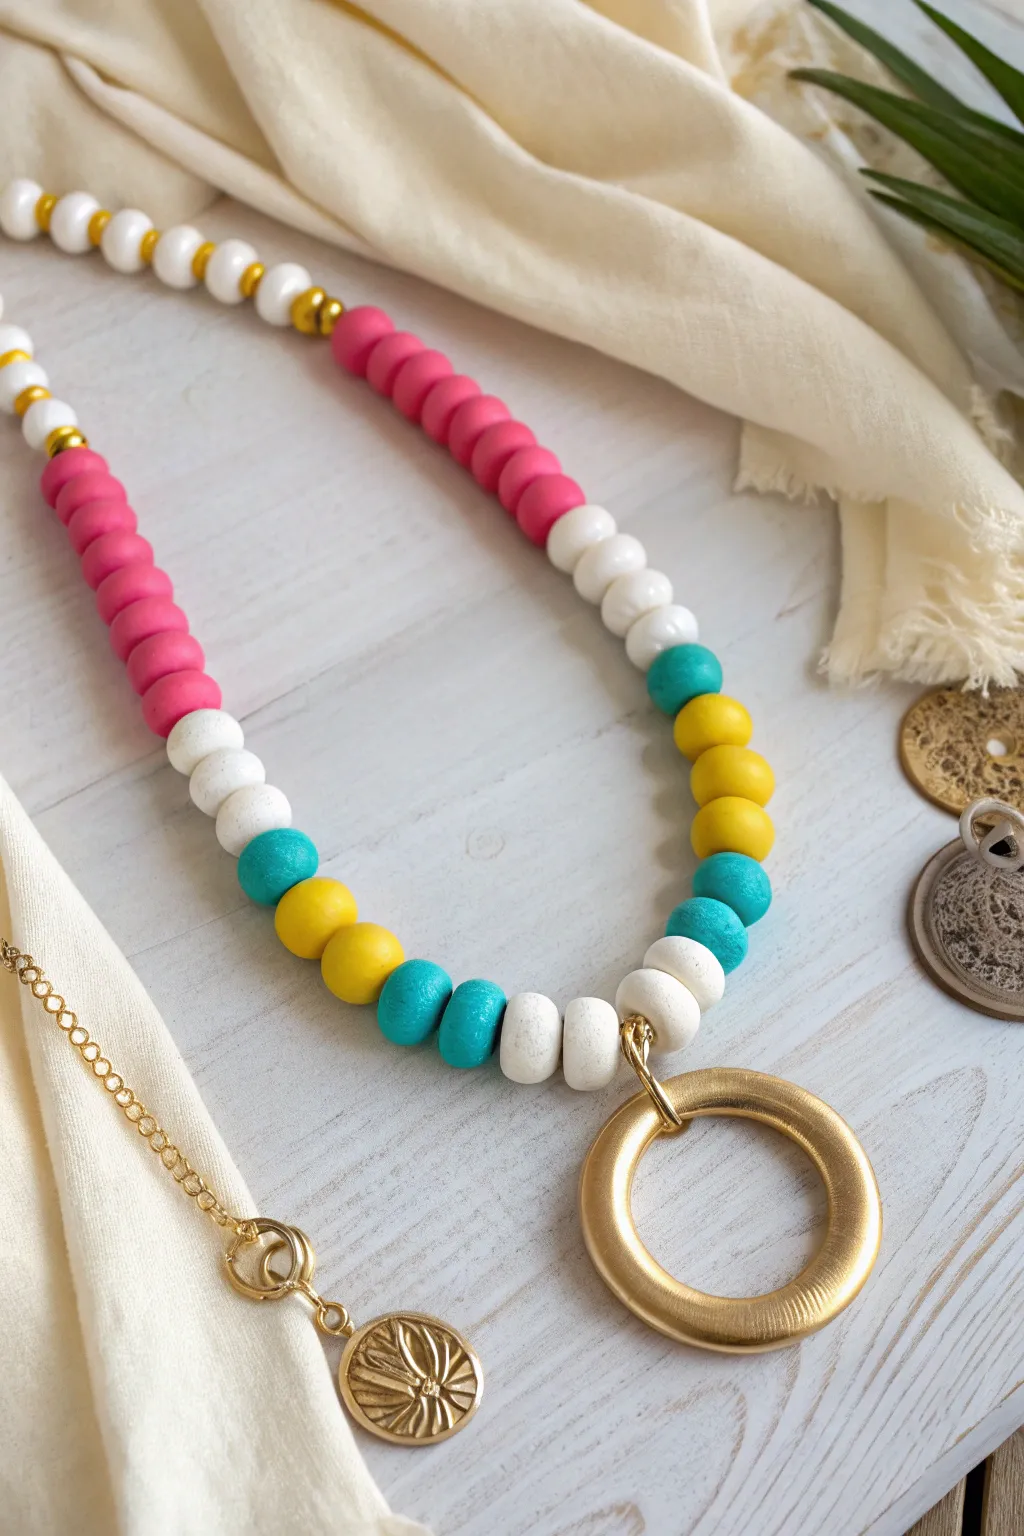
Embrace a bold, preppy aesthetic with this chunky clay bead necklace featuring a striking gold loop centerpiece. The design combines color-blocked segments of pink, turquoise, yellow, and white for a cheerful accessory that stands out against any outfit.
Step-by-Step
Materials
- Polymer clay heishi beads (hot pink)
- Polymer clay heishi beads (turquoise/teal)
- Polymer clay heishi beads (bright yellow)
- Polymer clay heishi beads (white)
- Small gold spacer beads (round or faceted)
- Large gold circular pendant (approx. 2 inches diameter) with bail
- Beading wire (nylon-coated steel wire recommended)
- 2 Crimp beads
- 2 Wire guards (optional but recommended for durability)
- Clasp (lobster claw or toggle)
- 2 Jump rings
- Crimping tool or flat nose pliers
- Wire cutters
- Bead stopper or tape
Step 1: Preparing the Centerpiece
-
Measure your wire:
Cut a length of beading wire approximately 24-26 inches long. This style looks best as a longer necklace, but you can adjust based on your preference. -
Start the center connection:
Since this necklace highlights a central pendant, we will start from the middle and work outwards. Thread the wire through the built-in loop or bail of your large gold circle pendant. -
Center the pendant:
Slide the pendant to the exact middle of your wire length. You should now have two equal lengths of wire extending from either side of the gold loop.
Loose Beads?
If your beads look uneven or have gaps that expose the wire, ensure you are pulling the wire taut (but not rigid) before that final crimp. Clay beads compress slightly.
Step 2: Designing the First Side
-
Begin the pattern:
On the right-hand side wire, thread on two white clay beads immediately next to the gold pendant loop to create a clean transition. -
Add the first color block:
Slide on three white beads followed by two turquoise beads. Clay beads can vary slightly in thickness, so eyeball the stack to ensure consistent segment lengths. -
Build the yellow segment:
Thread on four bright yellow beads. Push them down snugly against the turquoise ones. -
Create the turquoise block:
Add four turquoise beads. Notice how this creates a bold, alternating pattern between cool and warm tones. -
Transition to white:
Add a longer section of white beads. I usually string about eight to ten white beads here to create visual breathing room before the pink section starts. -
Start the main color block:
Begin the large pink section. Thread approximately 15-20 hot pink clay heishi beads onto the wire. -
Insert gold accents:
Slide a small gold spacer bead onto the wire, then continue with another 5-8 pink clay beads. Add another gold spacer, then finish with 5-8 white clay beads. -
Finish the side:
Continue adding white beads alternating with occasional gold spacers until you reach your desired length for this side. Secure the end temporarily with a bead stopper or a piece of tape.
Level Up
Make the pendant interchangeable! Instead of stringing directly through the loop, attach a large spring-gate ring to the center so you can swap out charms anytime.
Step 3: Mirroring the Pattern
-
Start the left side:
Moving to the left-hand wire, recreate the initial pattern exactly to maintain symmetry. Start with the two white beads against the pendant. -
Add turquoise and yellow:
Thread on the three white, two turquoise, four yellow, and four turquoise beads just like the first side. -
Complete the white transition:
Add the matching segment of eight to ten white beads. -
Build the pink section:
Thread on the long section of 15-20 hot pink beads to balance the necklace’s visual weight. -
Finalize the pattern:
Finish stringing the left side with the gold spacers and remaining white beads, ensuring this side matches the length of the right side perfectly.
Step 4: Securing the Necklace
-
Prepare the crimp:
Remove the bead stopper from one side. Slide a crimp bead onto the wire, followed by a wire guard (if using) and one half of your clasp. -
Create the loop:
Thread the wire back through the crimp bead, pulling it tight so the clasp sits close to the last bead but still has room to wiggle. -
Crimp it shut:
Use your crimping tool to flatten or fold the crimp bead securely. Give it a gentle tug to ensure it holds. -
Trim excess wire:
Cut the tail of the wire close to the crimp bead, or tuck it into the first few adjacent beads for a cleaner look. -
Finish the second side:
Repeat the crimping process on the other side with the jump ring or the other half of the clasp. Make sure the beads are pushed together but not so tight that the necklace becomes stiff.
Enjoy wearing your vibrant new necklace that perfectly balances chunky textures with sleek metal accents