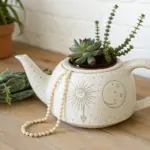
Halloween is basically pinch-pot season in my studio—simple bowls turn into little characters fast, and it’s wildly satisfying. If you’ve got a lump of clay and a spooky mood, these halloween pinch pot ideas will keep your hands busy and your shelf extra festive.
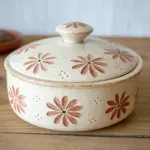
Pumpkin Candy Bowl Pinch Pot
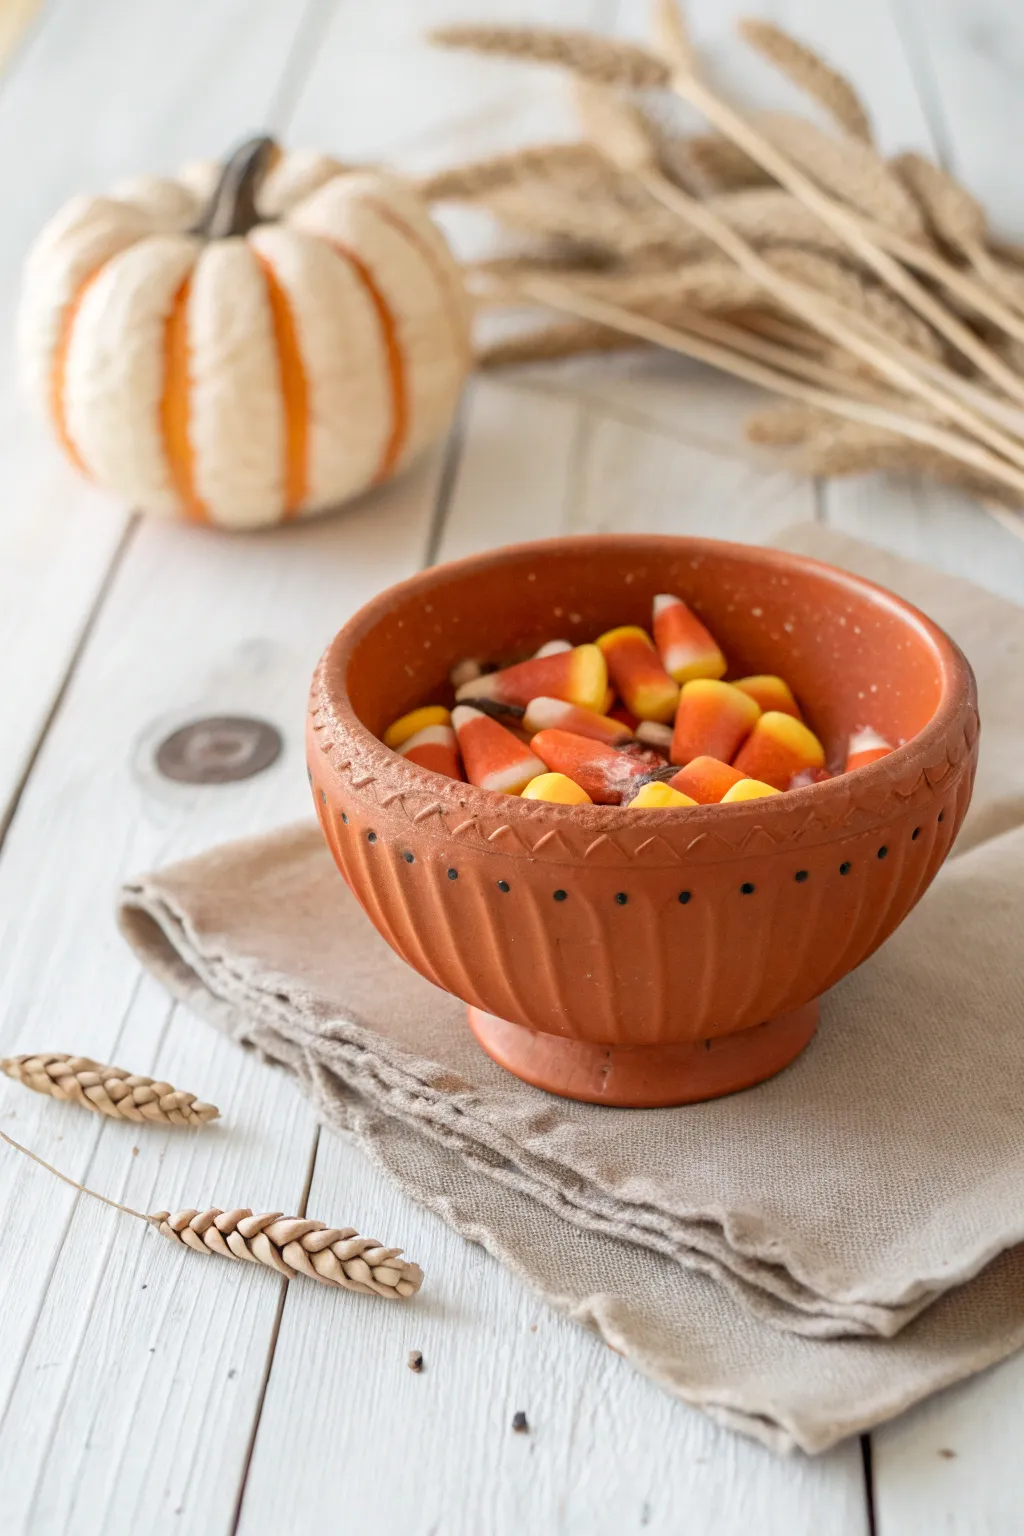
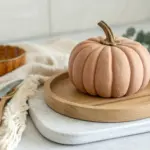
This charming, footed candy dish brings a rustic autumn warmth to any table setting with its rich terracotta hue and hand-carved details. Using basic pinch pot techniques, you’ll create a fluted vessel perfect for holding seasonal treats like candy corn.
Detailed Instructions
Materials
- Air-dry clay or kiln-fire clay (terracotta color recommended)
- Small bowl or cup (for water)
- Sponge
- Loop tool or carving tool
- Needle tool or toothpick
- Stylus tool or small drill bit (for dot details)
- Rib tool (optional, for smoothing)
- Rolling pin (small)
- Clear acrylic sealer (if using air-dry clay)
Step 1: Forming the Base Structure
-
Prepare the Clay:
Start with a ball of clay roughly the size of a large orange. Condition it by kneading briefly until it is smooth and pliable, ensuring there are no air bubbles trapped inside. -
Create the Primary Pinch Pot:
Hold the clay ball in one hand and press your thumb into the center, stopping about half an inch from the bottom. Gently pinch and rotate the clay between your thumb and fingers to open up the bowl shape. -
Shape the Walls:
Continue thinning the walls evenly as you work upwards. Aim for a slightly flared, open rim rather than a straight vertical wall. The walls should be about 1/4 inch thick for stability. -
Form the Foot Ring:
Take a smaller piece of clay, roll it into a thick coil, and form a ring. Score and slip the bottom of your bowl and the top of the ring, then press them firmly together to create a raised foot. -
Smooth the Connections:
Use your thumb or a modeling tool to blend the clay from the foot ring into the main bowl body so the seam disappears. This ensures the foot won’t detach later.
Step 2: Adding Texture and Detail
-
Mark the Fluting Lines:
Using a needle tool, lightly sketch vertical lines around the exterior of the bowl. Space them evenly to act as guides for your carving. -
Carve the Vertical Flutes:
With a loop tool, carve out vertical channels following your guide lines. Start from just above the foot and stop about half an inch below the rim. I find shallow, repeated strokes work better than one deep gouge. -
Refine the Ridges:
Use a damp sponge or finger to gently soften the sharp edges of your carved flutes. You want distinct ridges, but not sharp corners that feel rough to the touch. -
Create the Rim Border:
Leave the top band smooth. Using a small carving tool, carve a continuous zigzag pattern or small alternating slanted notches right at the transition point where the rim meets the fluted body. -
Add Dotted Accents:
Take a stylus tool or the back of a drill bit and press small circular indentations into the smooth band between the flutes. Place one dot centered above each vertical ridge for a rhythmic look. -
Detail the Lower Rim:
Add a second row of tiny dots or small carved dashes along the very top edge of the rim itself to frame the opening.
Uneven Drying?
If the rim dries faster than the thick base, it might crack. Drape a damp paper towel over the rim during the first few hours of drying to keep moisture levels even.
Step 3: Finishing Touches
-
Clean Up the Surface:
Once the major carving is done, look over the piece for any clay crumbs or burrs. Brush them away with a soft brush or smooth them down with a slightly damp sponge. -
Check the Foot:
Set the bowl on a flat surface to ensure it sits level. If it wobbles, gently tap the bowl down or sand the bottom of the foot slightly once it’s leather-hard. -
Slow Drying:
If using air-dry clay, let the piece dry slowly away from direct heat to prevent cracking. Cover it loosely with plastic for the first day if the environment is very dry. -
Sealing or Polishing:
Once fully dry, buff the surface with a soft cloth to bring out a natural sheen. If you used air-dry clay, apply a matte or satin sealer to protect the finish and deepen the terracotta color.
Sharper Carvings
Wait until the clay is ‘leather hard’ (stiff but still cool to the touch) before doing the detailed carving. The clay will hold crisp lines much better than when wet.
Fill your new handmade bowl with colorful candies and admire the artisanal touch it adds to your decor


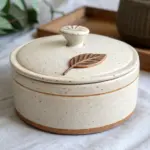
Lidded Pumpkin Pinch Pot Jar
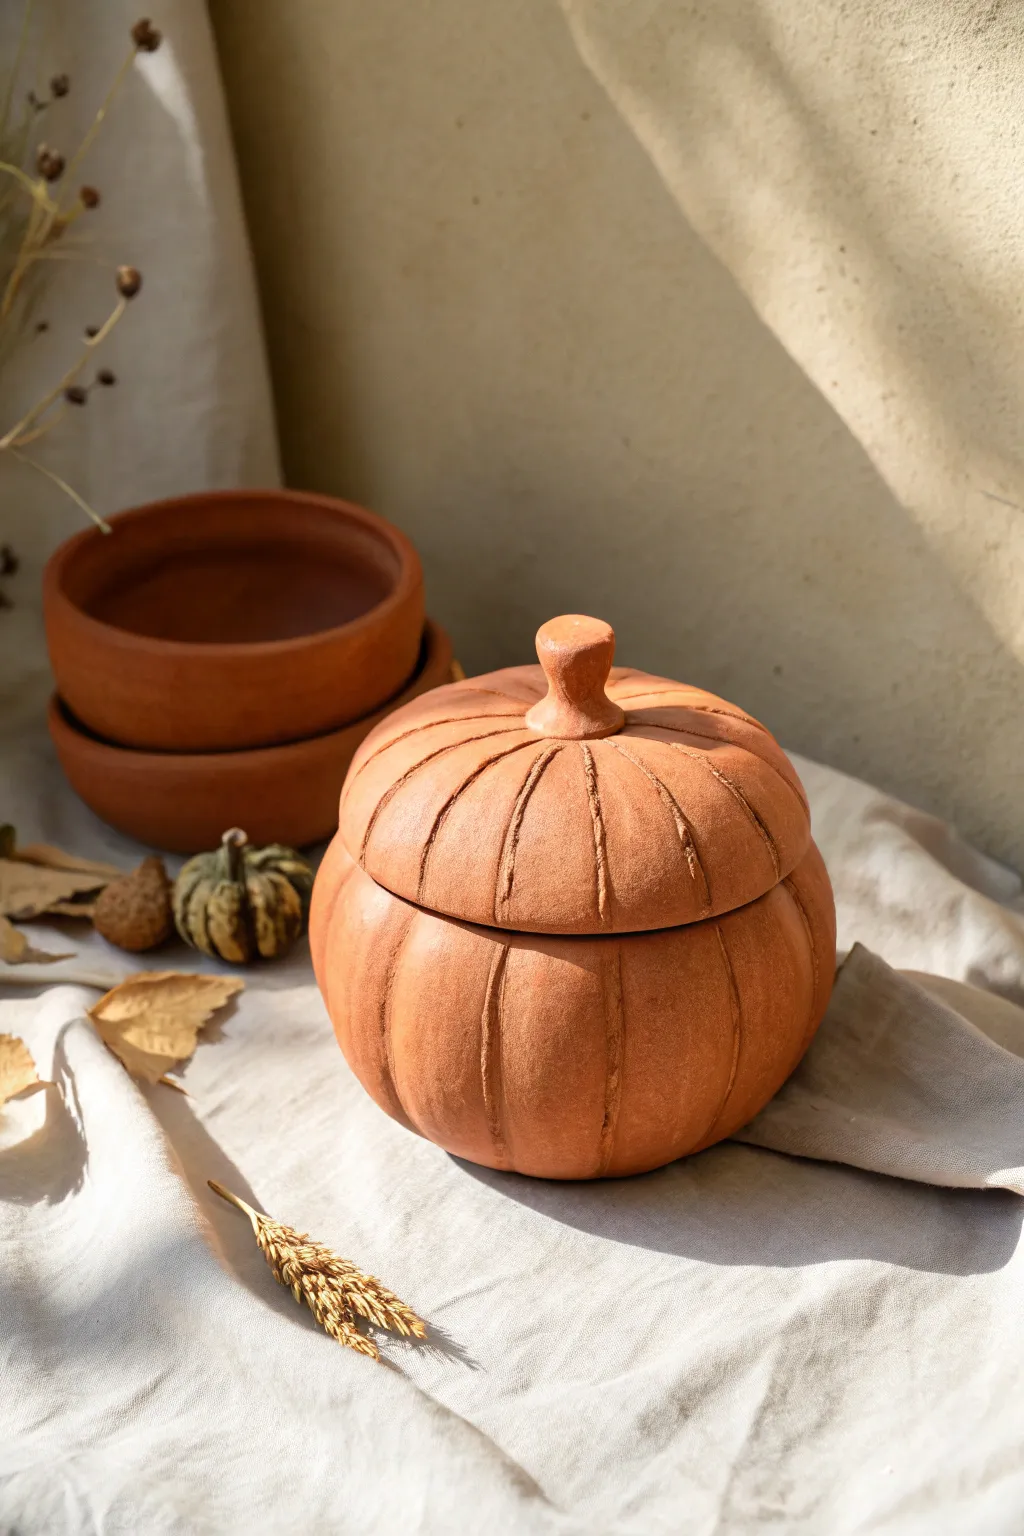
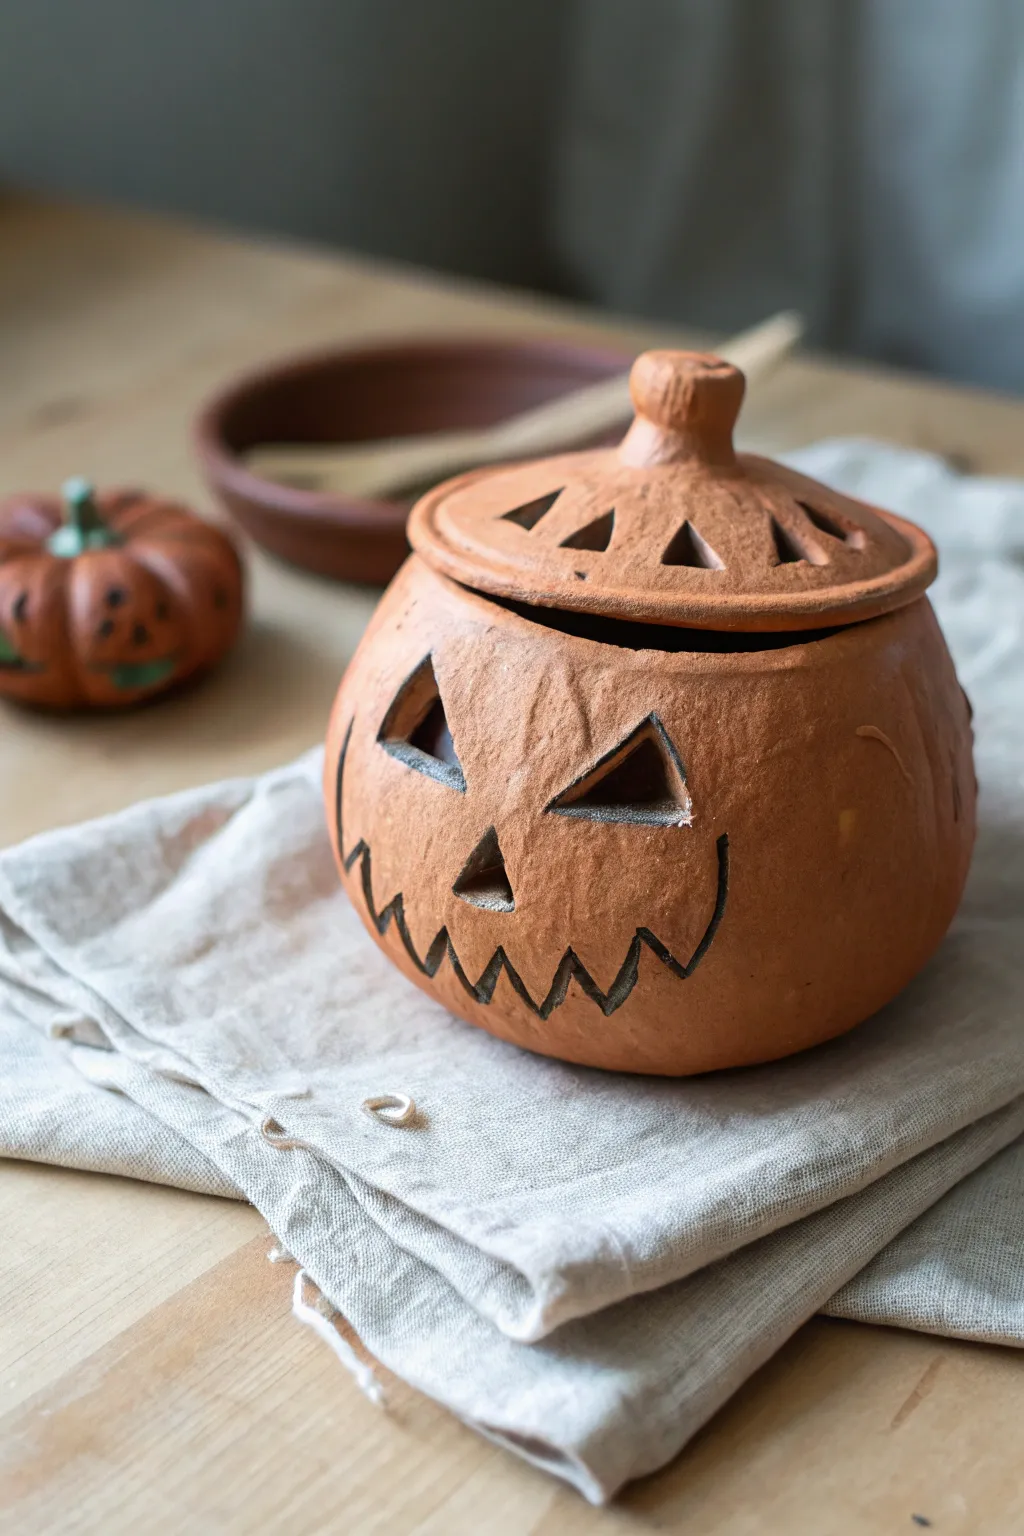
Bring an earthy, handmade touch to your Halloween decor with this charming pumpkin-shaped pinch pot jar. The natural terracotta finish and rustic grooves make it perfect for storing little treats or displaying as a standalone autumn accent.
Step-by-Step Tutorial
Materials
- Terracotta air-dry clay or kiln-fire clay
- Modeling tool or butter knife
- Sponge
- Small bowl of water
- Needle tool or toothpick
- Rubber kidney rib (optional)
Step 1: Forming the Base Pots
-
Prepare your clay:
Start by wedging a baseball-sized amount of clay to remove any air bubbles. Divide the clay into two equal portions. -
Create the first pinch pot:
Take one ball of clay and press your thumb into the center, stopping about a half-inch from the bottom. Gently pinch and rotate the clay between your thumb and fingers to open up a bowl shape. -
Shape the second pinch pot:
Repeat the process with the second ball of clay. Aim to make the rim diameter of this second pot match the first one as closely as possible. -
Check the fit:
Place one pot upside down on top of the other to ensure the rims align. If they don’t match perfectly, gently manipulate the clay walls until they sit flush against each other.
Uneven Lid Issues
If the lid rocks or doesn’t sit flat, wrap a piece of sandpaper around a flat block and gently sand the rim of the pot and under the lid until they are flush.
Step 2: Assembling the Pumpkin Body
-
Score the rims:
Using a needle tool or an old toothbrush, scratch up the rim surfaces of both pinch pots to create a rough texture. -
Apply slip:
Dab a little water or clay slip onto the scored areas to act as glue. -
Join the pots:
Press the two pots together firmly at the rims to create a sealed hollow sphere. This sphere will become the body of your pumpkin. -
Smooth the seam:
Use your thumb or a modeling tool to smudge the clay across the seam line, blending the top and bottom halves until the join is invisible. -
Establish the pumpkin shape:
Gently tap the sphere on your work surface to flatten the bottom slightly for stability. I find it helpful to press down gently on the top as well to create a squatter, more realistic pumpkin silhouette.
Rustic Wash
For an aged look, dilute brown acrylic paint with water. Brush it all over the dried pumpkin, then immediately wipe it off with a rag, leaving paint only in the grooves.
Step 3: Adding Texture and Detail
-
Carve the segments:
Use a modeling tool or the back of a butter knife to press deep vertical vertical lines into the clay. Start at the top center and draw down to the bottom center, dividing the pumpkin into uniform segments. -
Accentuate the curves:
Use your fingers to gently push the clay outward from the inside of each segment line, making the sections look plump and round. -
Refine the surface:
Smooth out any unwanted fingerprints with a slightly damp sponge, but keep the texture somewhat rustic to match the organic feel of a real pumpkin.
Step 4: Creating the Lid
-
Cut the lid opening:
Using a sharp needle tool or knife, cut a circle or hexagon shape around the top of the pumpkin. Angle your knife inward (about 45 degrees) while cutting; this creates a gallery that prevents the lid from falling inside. -
Remove the lid:
Carefully lift the cut piece off. If the clay has slumped, reshape the opening gently to ensure it’s circular again. -
Form the stem:
Roll a small coil of spare clay and attach it to the center of your lid piece. Score and slip the connection point securely. -
Sculpt the handle:
Shape the added coil into a stem that flares slightly at the top for a comfortable grip. You can twist it slightly for character. -
Refine the grooves on the lid:
Realize that cutting the lid might have interrupted your vertical lines. Re-carve the grooves on the lid so they line up perfectly with the grooves on the body.
Step 5: Drying and Finishing
-
Final smooth:
Give the entire piece one last wipe with a damp sponge to soften sharp edges, paying attention to the rim of the jar and the lid edge. -
Dry properly:
Place the lid on the pot while it dries to ensure they warp together and stay fitting perfectly. Let the clay dry completely according to package directions.
Once fully dry, your lidded pumpkin jar is ready to hide spooky sweets or stand proud on your mantel


Twisted Stem and Vine Pumpkin Pot
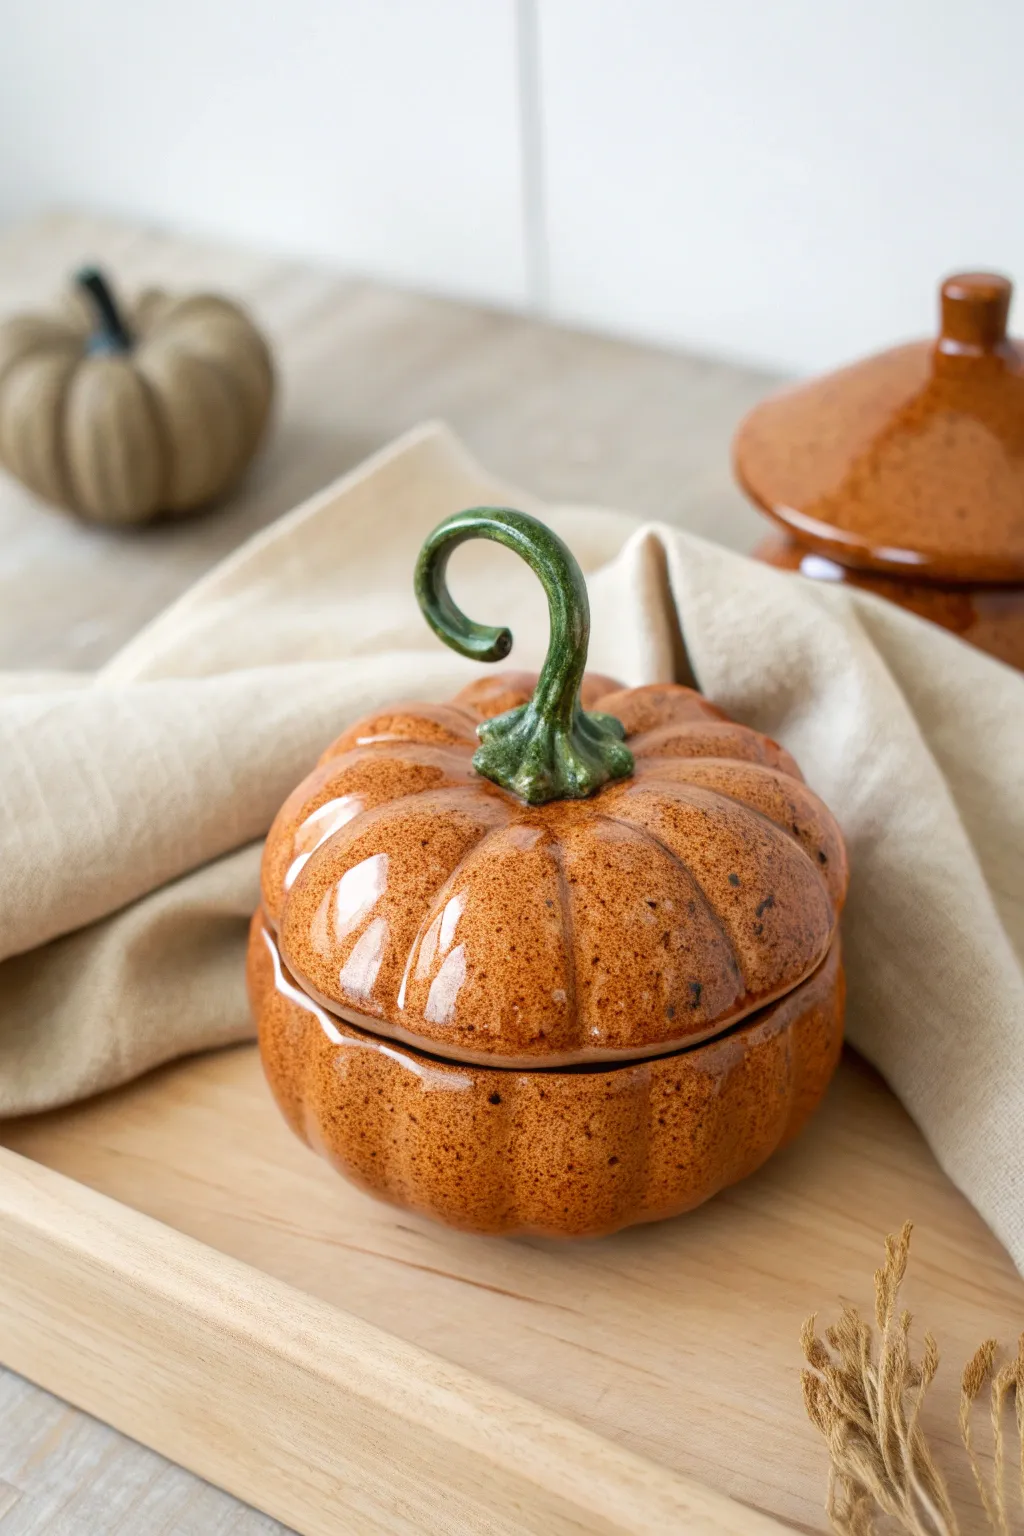
This charming ceramic pumpkin features a functional lid with a whimsical, twisted green stem that doubles as a handle. The warm, speckled glaze gives it a cozy, autumnal feel perfect for storing seasonal treats or trinkets.
How-To Guide
Materials
- Cone 5/6 speckled stoneware clay (such as Speckled Buff)
- Pottery wheel (or hand-building tools if preferred)
- Needle tool
- Loop trimming tool
- Rib tool (wooden or silicone)
- Sponge
- Scoring tool or serrated rib
- Slip
- Transparent orange glaze (e.g., Mayco’s Speckled Pumpkin)
- Deep green glaze for the stem
- Small paintbrush
- Fan brush for glazing
Step 1: Throwing the Form
-
Center the Clay:
Begin with about 1.5 to 2 lbs of speckled clay. Wedge it thoroughly to remove air bubbles, then slam it onto your wheel head. Using plenty of water, center the clay until it runs smooth without any wobble. -
Open the Form:
Open the centered clay, leaving a floor thickness of about a quarter-inch. Compress the floor with your fingers or a flat tool to prevent future S-cracks. -
Pull the Walls:
Pull the walls upward, aiming for a rounded, bulbous belly shape. Constrict the rim slightly inward as you go higher to create that classic pumpkin curve. -
Shape the Belly:
Use a rounded wooden rib on the inside of the pot while supporting the outside with your sponge. Ideally, push the belly outward to create a full, round volume. -
Form the Gallery:
At the rim, use the side of your finger or a specialized tool to press a small ledge (gallery) into the inside of the lip. This is where your lid will eventually sit.
Clean Lines
Wipe back the glaze slightly on the raised ridges of the pumpkin ribs with a damp sponge before firing. This highlights the form and adds visual depth.
Step 2: Creating the Lid
-
Measure the Opening:
Before throwing the lid, use calipers to measure the diameter of the gallery you just created on the pot body. -
Throw the Lid:
Center a smaller ball of clay (about 0.5-0.75 lb). Throw a low, shallow bowl shape upside down. Ensure the rim width matches your caliper measurement exactly so it fits the pot. -
Sculpt the Dome:
While the lid is still attached to the hump or bat, refine the curve so it mimics the top section of a pumpkin.
Step 3: Assembly & Detail
-
Trimming:
Once both pieces are leather hard, trim away excess clay from the bottom of the pot to create a clean foot ring. Trim the top of the lid to ensure it has a smooth, rounded surface for the stem. -
Carving the Ribs:
Place the lid on the pot. Using a sculpting tool or the back of a paintbrush, press vertical indentations deeply into the clay from top to bottom. I like to smooth these indentations with a damp sponge to soften the edges. -
Pulling the Stem:
Roll a coil of clay and taper one end. Pull it slightly like a handle to create a natural, organic texture. Twist the top into a dramatic curl. -
Attach the Stem:
Score the center of the lid and the base of your stem. Apply slip and press the stem firmly onto the lid. Use a tiny coil to reinforce the connection point, blending it to look like the base of a vine. -
Add Texture:
Use a needle tool to scratch fine lines into the base of the green stem area, mimicking the rough texture where a pumpkin stem meets the fruit.
Vine Accents
Roll tiny, thread-thin coils of clay and attach them curling away from the stem base across the lid to look like delicate creeping pumpkin vines.
Step 4: Glazing
-
Bisque Fire:
Fire the assembled (and thoroughly dried) piece to cone 04. -
Wax Resist:
Apply wax resist to the foot of the pot and the rim where the lid touches the gallery to prevent them from fusing together in the kiln. -
Apply Orange Glaze:
Brush 3 coats of a semi-transparent orange glaze over the body and lid. The transparency is key to letting the natural speckles of the clay body show through. -
Glaze the Stem:
Carefully paint the stem and the immediate area surrounding it with a deep, earthy green glaze. Let the green overlap slightly onto the orange for a natural transition. -
Final Fire:
Glaze fire to cone 5 or 6 (depending on your clay and glaze specifications).
Now you have a durable, seasonal container ready to hold candy corn or sit beautifully on your autumn table

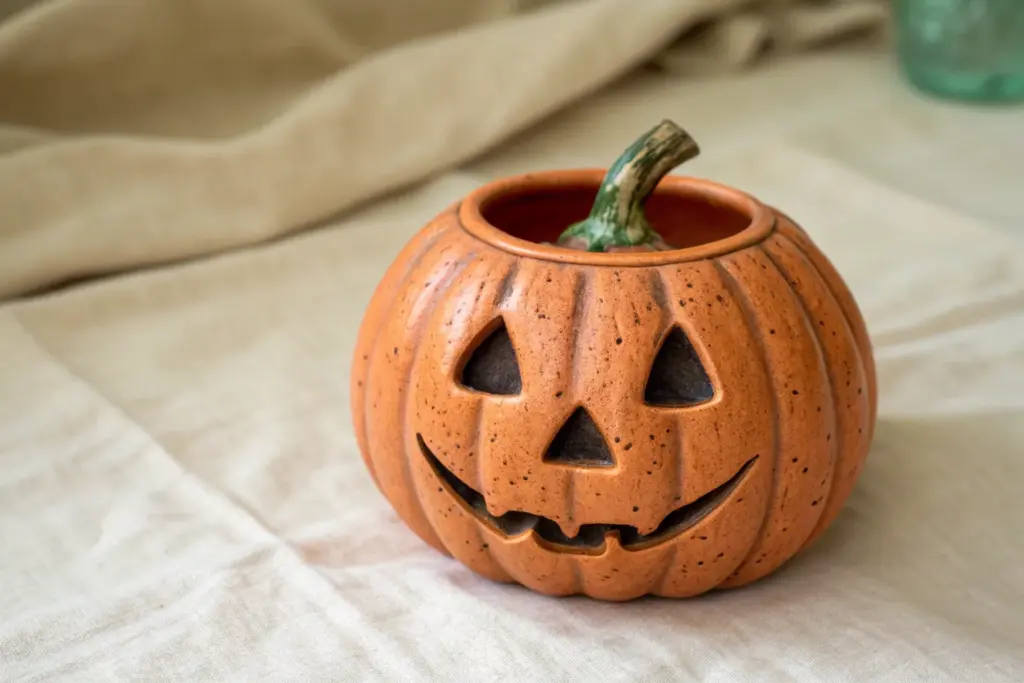
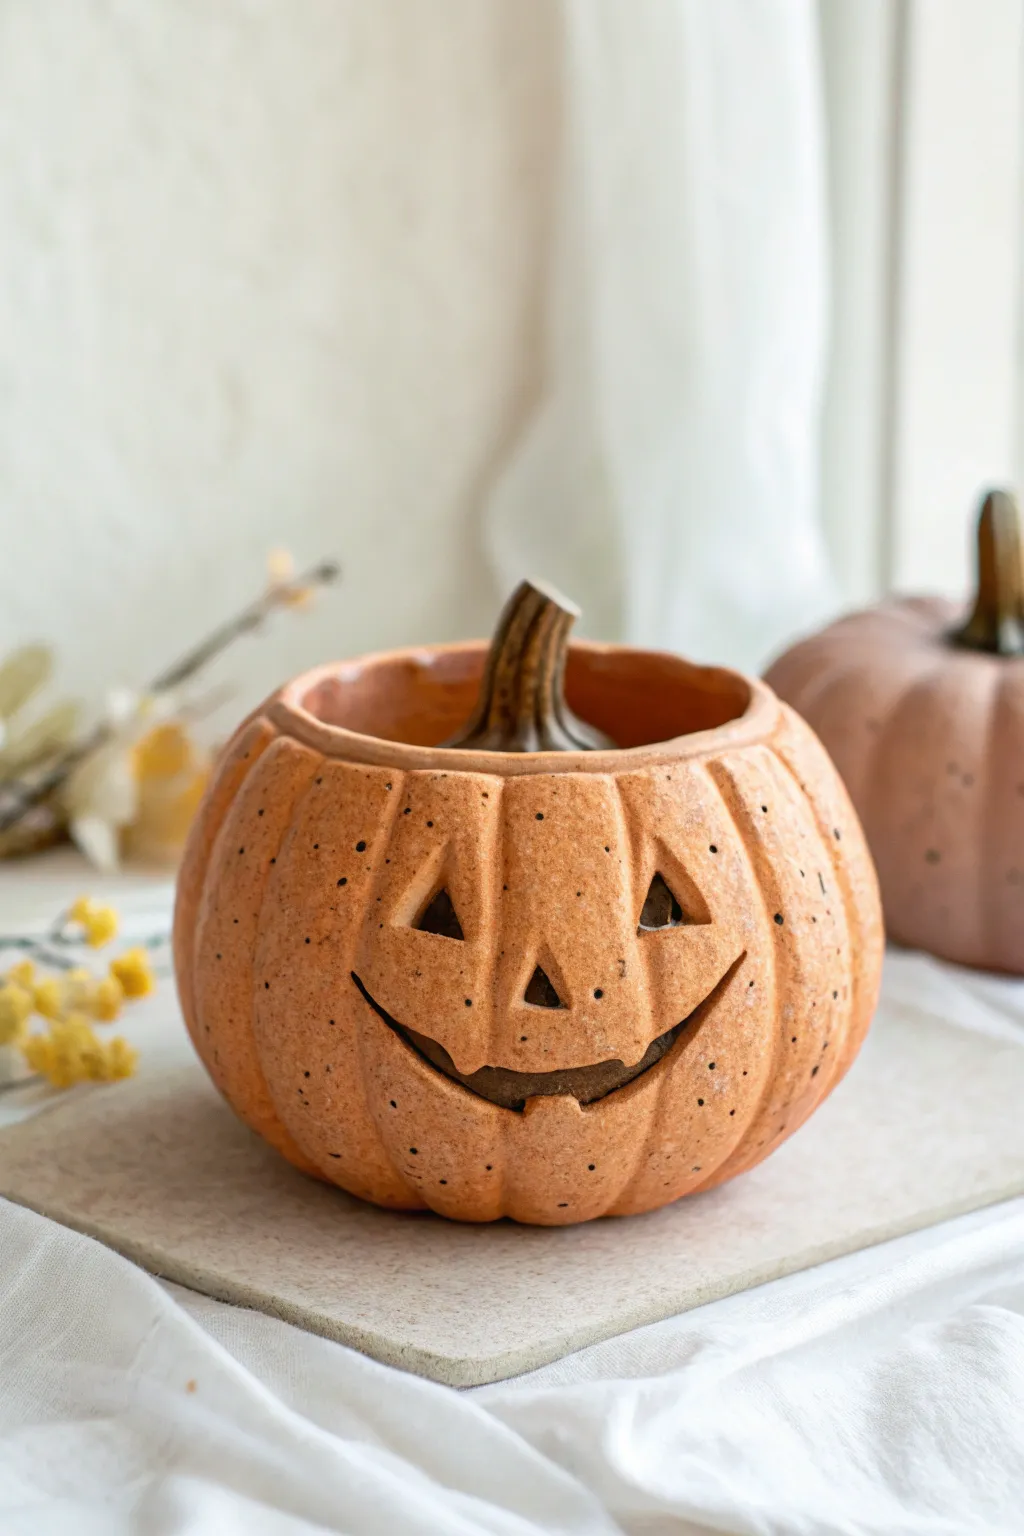
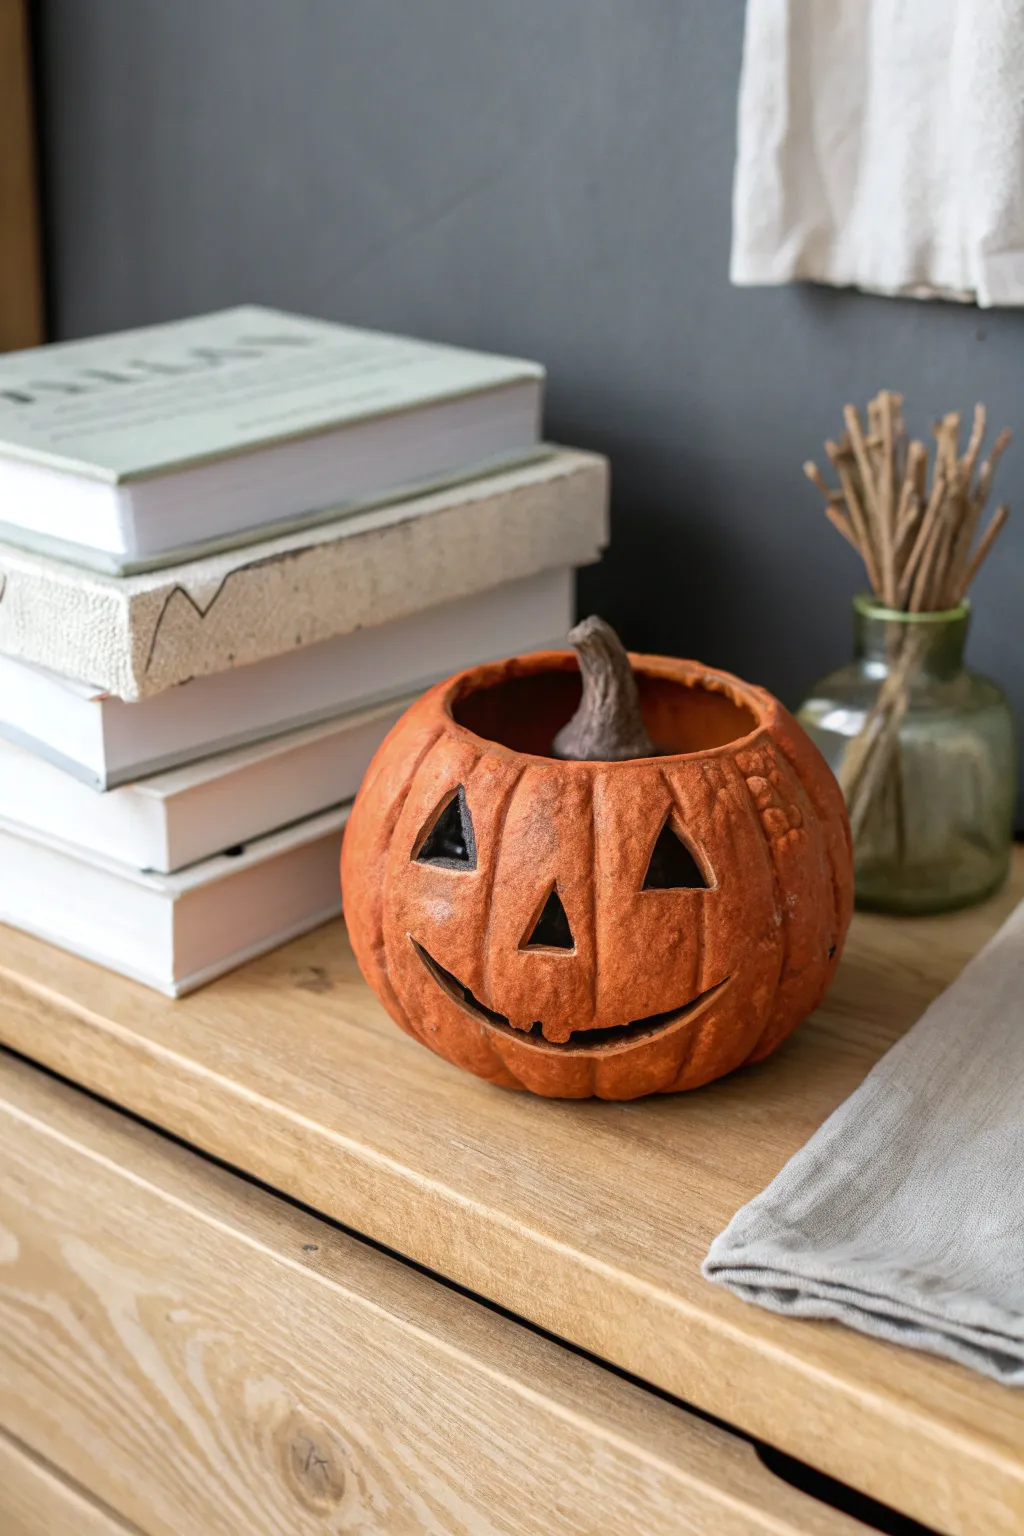
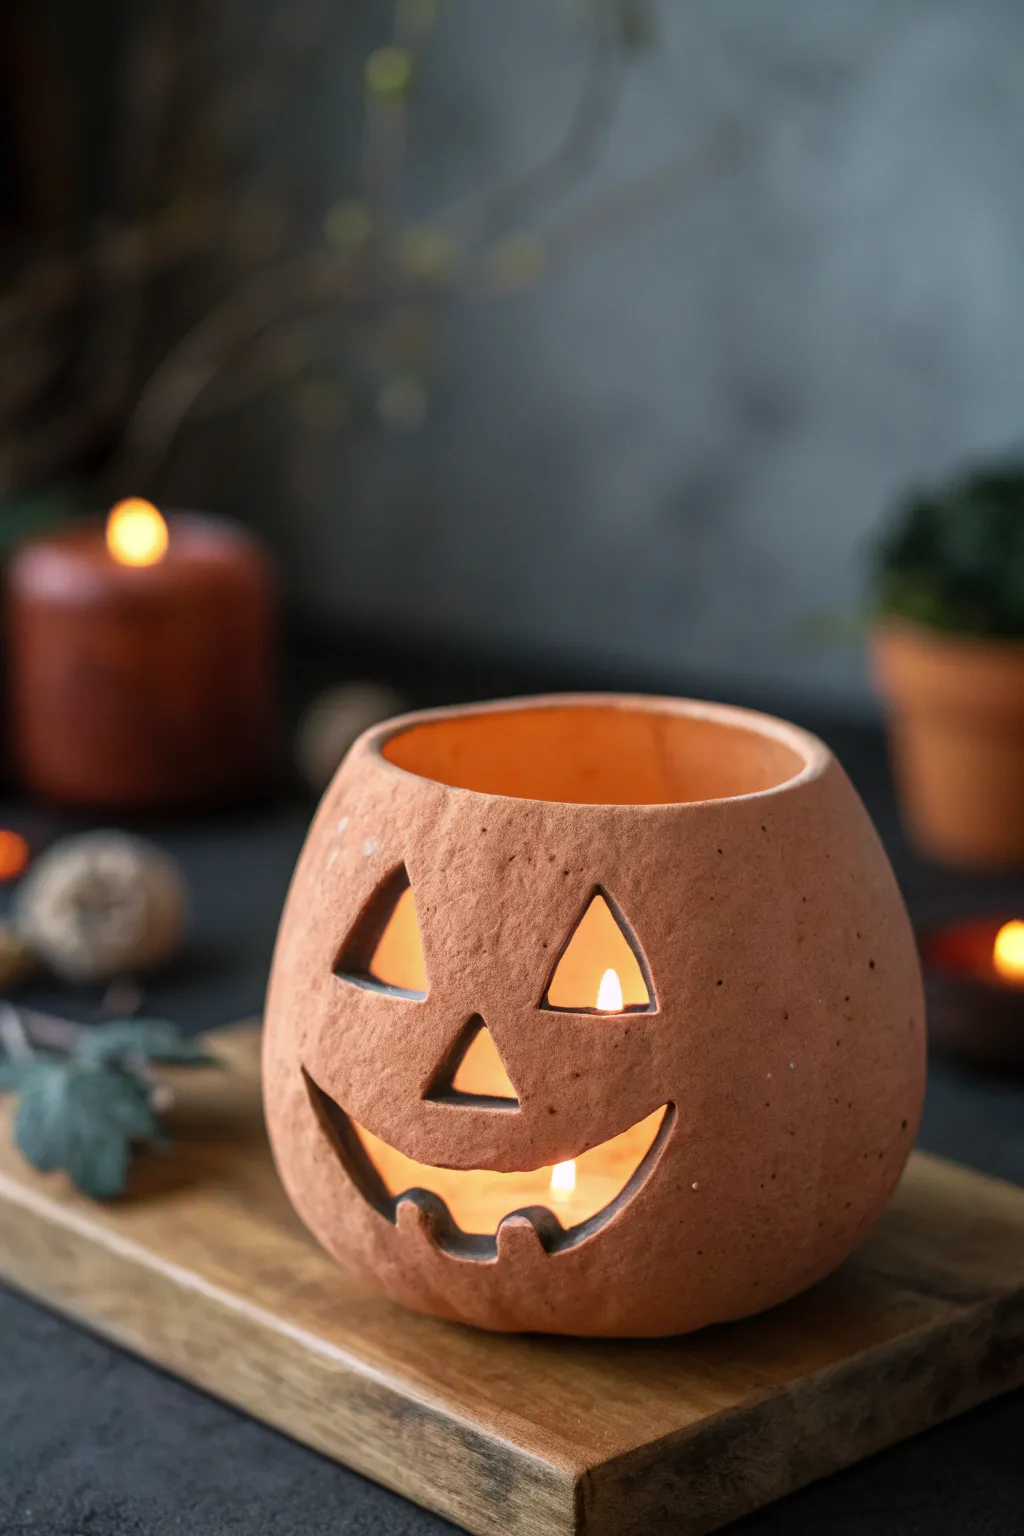
Spooky Face Pumpkin Pinch Pot
This rustic, unglazed ceramic pumpkin pot brings earthy warmth to your Halloween decor. Using simple pinch techniques and classic carving, you’ll sculpt a functional vessel featuring a mischievous jack-o’-lantern face and a vented lid.
Step-by-Step Guide
Materials
- Terracotta air-dry clay or kiln-fire earthenware clay
- Clay carving tools (needle tool, small loop tool)
- Fettling knife
- Wooden sculpting tool
- Sponge
- Water cup
- Canvas mat or work board
- Scoring tool or old fork
Step 1: Forming the Base
-
Prepare the Clay:
Start with a ball of terracotta clay roughly the size of a grapefruit. Knead it thoroughly to remove any air bubbles, which helps prevent cracks later. -
Open the Pot:
Press your thumb deep into the center of the ball, stopping about half an inch from the bottom. This initial depth sets the thickness for your entire pot. -
Pinch the Walls:
Begin pinching the clay between your thumb and fingers, rotating the ball as you work. Aim for an even thickness of about a quarter inch, pulling the walls upward. -
Shape the Pumpkin:
Gently push the walls outward from the inside to create a bulbous, round shape. Curve the top rim slightly inward to mimic the natural slope of a pumpkin. -
Refine the Surface:
Use a damp sponge or a wooden rib tool to smooth the exterior walls, removing deep fingerprints while leaving a slight texture for that rustic look.
Cracking Lid?
If the lid cracks while drying, it likely dried faster than the thick stem. Wrap the stem in plastic while the rest dries to even out the process.
Step 2: Creating the Lid
-
Measure the Opening:
Before making the lid, ensure the rim of your pot is level. You can use a needle tool to trim any uneven edges. -
Form the Lid Slab:
Flatten a smaller piece of clay into a thick disk wider than your pot’s opening. Gently curve it upward to create a slight dome shape. -
Make the Flange:
Roll a small coil of clay. Score and slip the underside of the lid, then attach the coil in a circle that will fit *inside* the pot’s rim. This keeps the lid secure. -
Add the Stem:
Roll a knobby, thick piece of clay for the stem. Score the center of the lid heavily and attach the stem, blending the clay downward for a seamless connection. -
Carve Lid Vents:
Using a sharp knife, cut small triangular vents around the lid. This adds a decorative touch and is crucial if you plan to put a candle inside.
Step 3: Carving the Face
-
Let it Leather Hard:
I usually let the pot sit for an hour or two until it reaches a ‘leather hard’ state. It should be firm to the touch but not dry. -
Outline the Features:
Lightly sketch the triangular eyes, small nose, and jagged mouth directly onto the clay surface with a needle tool. -
Cut the Eyes:
Use a fettling knife or scalpel to carefully cut out the eye triangles through the wall thickness. Remove the cut pieces gently. -
Carve the Grin:
For the mouth, cut a continuous jagged line. You can choose to cut all the way through or just carve deeply into the surface for a relief effect. -
Clean Up Edges:
Once the cuts are made, use a damp brush or sponge to smooth the sharp cut edges so they look finished rather than ragged. -
Texture:
Add subtle vertical lines down the sides of the pumpkin with a wooden tool to suggest the pumpkin’s ribs.
Pro Tip: Rustic Look
After carving, rub the exterior with a dry scouring pad or rough burlap before it fully hardens to enhance that stony, ancient texture.
Step 4: Finishing
-
Final Smoothing:
Give the entire piece one last pass with a damp sponge to remove any crumbs of clay created during carving. -
Drying:
Allow the pot to dry slowly under a loose plastic sheet for the first day, then uncover to finish drying completely. -
Firing or Sealing:
If using kiln clay, fire to cone 04. If using air-dry clay, allow it to cure fully for 24-48 hours before display.
Place a battery-operated tea light inside to see your spooky creation glow warmly

The Complete Guide to Pottery Troubleshooting
Uncover the most common ceramic mistakes—from cracking clay to failed glazes—and learn how to fix them fast.
Goofy Grin Pumpkin Pinch Pot
This charming ceramic pumpkin pot features a classic, goofy grin and a unique speckled orange finish that brings warmth to your autumn decor. It’s a perfect beginner-friendly project that combines simple pinch pot construction with expressive carving techniques.
How-To Guide
Materials
- Terracotta or stoneware clay (low-fire)
- Pottery needle tool
- Fettling knife
- Loop tool (small)
- Serrated rib tool
- Sponge
- Orange underglaze (matte finish)
- Brown underglaze
- Black speckle glaze (or ‘speckled egg’ style glaze)
- Clear matte glaze (optional, depending on clay body)
- Kiln access
Step 1: Forming the Base
-
Prepare the Clay:
Start by wedging a baseball-sized ball of clay to remove air bubbles, then pat it into a smooth, round sphere in your hands. -
Open the Pot:
Push your thumb into the center of the sphere, stopping about a half-inch from the bottom. Gently pinch and turn the clay between your thumb and fingers to open up the walls evenly. -
Shape the Pumpkin:
As you pinch, encourage the clay to bulge outwards slightly to create a plump pumpkin shape. Aim for even walls about 1/4 inch thick. -
Define the Rim:
Smooth the rim with a damp chamois or sponge. I like to gently push the rim inward just a bit so the opening is slightly narrower than the body, emphasizing the roundness.
Slumping Walls?
If the pumpkin shape starts to collapse while carving, stuff the inside gently with crumpled newspaper to support the walls until the clay stiffens up to leather hard.
Step 2: Adding Texture and Features
-
Create Ribs:
Using the side of a wooden modeling tool or your finger, press vertical indentations from the rim to the base to create the pumpkin’s segments or ribs. -
Refine the Segments:
Soften the edges of these indentations with a damp sponge so the pumpkin looks organic and puffy rather than sharp. -
Map the Face:
Lightly trace your goofy face design onto the clay surface using a needle tool. Draw large triangular eyes, a small nose, and a wide, upturned mouth. -
Carve the Features:
Use a fettling knife or small loop tool to carefully cut out the eyes, nose, and mouth. Work slowly to avoid distorting the pot’s shape. -
Bevel the Edges:
After cutting, gently smooth the cut edges with a damp brush or finger to remove sharp burrs and make the openings look finished.
Pro Tip: Clean Cuts
Wait until the clay is ‘leather hard’ (firm like cheddar cheese) before carving the face. The knife will cut cleanly without dragging or warping the soft clay.
Step 3: Lid and Stem
-
Form the Lid:
Make a flat disk of clay slightly larger than the pot’s opening. check the fit often as you trim it to rest just inside the rim. -
Sculpt the Stem:
Roll a coil of clay and attach it to the center of the lid. Twist it slightly and curve the top to mimic a natural pumpkin stem. -
Texture the Stem:
Use a needle tool to draw deep linear grooves up the length of the stem for realistic bark texture.
Step 4: Glazing and Firing
-
Bisque Fire:
Allow the clay to dry completely to the bone-dry stage, then bisque fire it according to your clay’s specifications (usually Cone 04). -
Apply Orange Underglaze:
Apply three even coats of matte orange underglaze to the exterior of the pumpkin body. Let each coat dry before applying the next. -
Add Speckles:
You can use a specific speckled glaze, or simply load a toothbrush with watered-down brown or iron oxide underglaze and flick it over the orange surface for that spotted effect. -
Glaze the Stem:
Paint the stem with a dark brown underglaze, letting it settle into the textured grooves to highlight the details. -
Final Firing:
If you want a waterproof finish, apply a clear matte glaze over everything. Fire the piece again to the appropriate temperature for your glazes.
Place a battery-operated tealight inside to watch your goofy grin glow warmly on a chilly evening
Winking Jack-O’-Lantern Pinch Pot
Create a charmingly rustic pumpkin pot that doubles as a festive candy dish or candle holder. This project uses basic pinch pot techniques to form a hollow, textured pumpkin with a classic carved face and a distinctively textured stem.
Step-by-Step
Materials
- Air-dry clay (terracotta color preferred) or polymer clay
- Acrylic paints (burnt orange, dark brown, black, dark green)
- Clay carving tools or a small knife
- Sponge or textured fabric
- Small bowl of water
- Paintbrushes (various sizes)
- Matte sealant or varnish
Step 1: Forming the Pumpkin Base
-
Create the sphere:
Start with a softball-sized lump of clay. Roll it firmly between your palms to create a smooth, tight ball, ensuring there are no trapped air bubbles inside. -
Start the pinch pot:
Push your thumb into the center of the ball, stopping about half an inch from the bottom. Begin pinching the clay walls between your thumb and fingers while rotating the ball. -
Shape the walls:
Continue pinching and turning until you have a bowl shape with walls of even thickness, curving them slightly inward at the top to mimic a pumpkin’s roundness rather than a straight-sided bowl. -
Define the ribs:
Use the side of a pencil or a modeling tool to press vertical indentations from the top rim down to the base. Space these evenly around the pot to create the pumpkin’s segments. -
Add surface texture:
Gently press a coarse sponge or a piece of crumpled fabric against the exterior clay. This removes the fingerprints and gives the surface that organic, squash-like skin texture shown in the photo.
Make It Glow
Make the pumpkin face flicker safely by placing a battery-operated tea light inside. The light will cast spooky shadows through the triangular eyes.
Step 2: Carving and Details
-
Smooth the rim:
Run your wet finger along the top opening to smooth any cracks. I like to keep this edge slightly uneven to maintain the rustic, hand-carved look. -
Carve the eyes:
Use a sharp knife tool to cut out two triangular eyes. Make one slightly smaller or angled differently to suggest a playful squint or ‘wink’ effect. -
Cut the nose:
Center a small triangular cutout below the eyes for the nose. -
Sculpt the mouth:
Carve a wide, crescent-shaped smile. Instead of cutting all the way through, you can deeply incise the clay to create shadow, or cut completely through for a luminary effect. The reference image features a deeply recessed mouth line. -
Create the stem:
Roll a separate coil of clay into a thick, tapered stump. Twist it slightly to give it character. -
Attach the stem:
Wait! This pumpkin is an open pot. Instead of attaching the stem to a lid, create a faux stem ‘handle’ inside or attach it to the interior back wall so it peeks out the top, or simply skip it if you want an open bowl. Alternatively, fashion a separate stem piece that rests inside.
Cracking Clay?
If small cracks appear while the clay dries, mix a tiny bit of fresh clay with water to make a paste (slip) and fill them in with a small brush.
Step 3: Painting and Finishing
-
Dry the clay:
Allow your pumpkin to dry completely according to package instructions (usually 24-48 hours for air-dry clay). -
Base coat:
Paint the entire exterior with a burnt orange acrylic paint. If your clay was already terracotta colored, you can skip this full coverage step. -
Apply an antiquing wash:
Mix a small amount of dark brown paint with water. Brush this over the pumpkin, getting into the ribs and texture, then immediately wipe off the high points with a paper towel. -
Highlighting:
Dry brush a lighter, yellowish-orange on the raised sections of the pumpkin ribs to accentuate the roundness. -
Darken the features:
Paint the inside of the carved eyes, nose, and mouth with matte black paint to create depth. -
Paint the stem:
If you made a stem, paint it a dark, muddy green-brown, adding lighter highlights on the ridges of the twist. -
Seal the work:
Once all paint is dry, apply a matte sealant to protect your finish without making it look glossy or plastic.
Now you have a timeless autumn decoration ready to hold treats or simply smile from your shelf


What Really Happens Inside the Kiln
Learn how time and temperature work together inside the kiln to transform clay into durable ceramic.
Luminary Jack-O’-Lantern Pinch Pot
Create a charmingly rustic autumn centerpiece with this terracotta-style pinch pot pumpkin. Its warm, unglazed finish and distinctive facial features make it a perfect vessel for holding tea lights on cozy evenings.
Step-by-Step Tutorial
Materials
- Air-dry clay (terracotta color) or earthenware clay
- Basic clay tool set (needle tool, ribbon tool, clean-up tool)
- Small bowl of water
- Sponge
- Rolling pin (optional)
- Small kitchen knife or hobby knife
- Fine-grit sandpaper (optional)
- Tea light candle
Step 1: Forming the Base
-
Prepare the Clay:
Start with a ball of clay roughly the size of a large orange or grapefruit. Knead it thoroughly to remove air bubbles and ensure an even, pliable consistency. -
Begin the Pinch Pot:
Hold the clay ball in one hand and push your thumb deep into the center, stopping about a half-inch from the bottom. -
Open the Walls:
Gently pinch the clay between your thumb and fingers, rotating the ball as you work. I like to keep my pressure consistent to ensure the walls are an even thickness all around. -
Shape the Pumpkin Body:
Instead of opening the pot into a wide bowl, gently curve the walls inward as you reach the top to create a rounded, enclosed pumpkin shape with a smaller opening. -
Refine the Rim:
Smooth the opening at the top with a damp sponge. It doesn’t need to be perfectly circular; a slight organic wave adds to the rustic charm. -
Flat Bottom:
Tap the pot gently on your work surface to create a flat, stable base so the luminary won’t wobble when a candle is inside.
Cracks Appearing?
If small cracks appear while the clay dries, create a ‘slip’ (a paste of clay and water) and fill the cracks, then smooth over with a damp sponge.
Step 2: Carving the Features
-
Clean the Surface:
Use a metal rib or a slightly damp sponge to smooth the exterior walls, removing any deep fingerprints or cracks. -
Let it Firm Up:
Allow the clay to dry to a ‘leather-hard’ state. This is crucial—if it’s too soft, the walls will collapse when you cut; too dry, and it will chip. -
Sketch the Face:
Lightly trace your Jack-O’-Lantern face onto the surface using a needle tool. Draw two triangles for eyes, a smaller triangle nose, and a wide, grinning mouth. -
Cut the Eyes:
Using a thin hobby knife or clay fettling knife, carefully cut out the triangular eyes. Support the wall from the inside with your other hand to prevent warping. -
Carve the Nose:
Remove the nose piece next. Keep your cuts straight and perpendicular to the clay surface for a clean look. -
Detail the Mouth:
Carve the mouth in sections if needed. Notice the specific design here: a bottom lip with two square ‘teeth’ protruding upward. Cut carefully around these shapes. -
Clean the Edges:
Once the pieces are removed, use a wet finger or a small brush to smooth the raw edges of the cutouts so they look finished rather than jagged.
Add a Stem
Don’t throw away the clay cutouts! Mush them together and sculpt a small, twisted stem. Attach it to the back rim or make a separate lid.
Step 3: Finishing Touches
-
Texture the Surface:
For that realistic stone-like texture, gently dab the surface with a stiff-bristled brush or a scouring pad. Don’t overdo it; just add subtle pitting. -
Final Smoothing:
Check the interior floor of the pot and smooth it out so a candle can sit perfectly flat. -
Slow Drying:
Place a plastic bag loosely over the pot to let it dry slowly over 24-48 hours. This prevents the rim from drying faster than the base, which causes cracks. -
Sanding:
Once fully dry (bone dry), use fine-grit sandpaper to soften any sharp edges on the rim or around the facial features. -
Baking or Sealing:
If using polymer or fired clay, follow manufacturer instructions for baking/firing. For air-dry clay, apply a matte sealant to protect the finish. -
Light it Up:
Place a tea light or LED candle inside to see your spooky face glow.
Enjoy the warm glow of your handmade pumpkin luminary as the autumn evenings get darker
Black Cat Pinch Pot With Pointy Ears
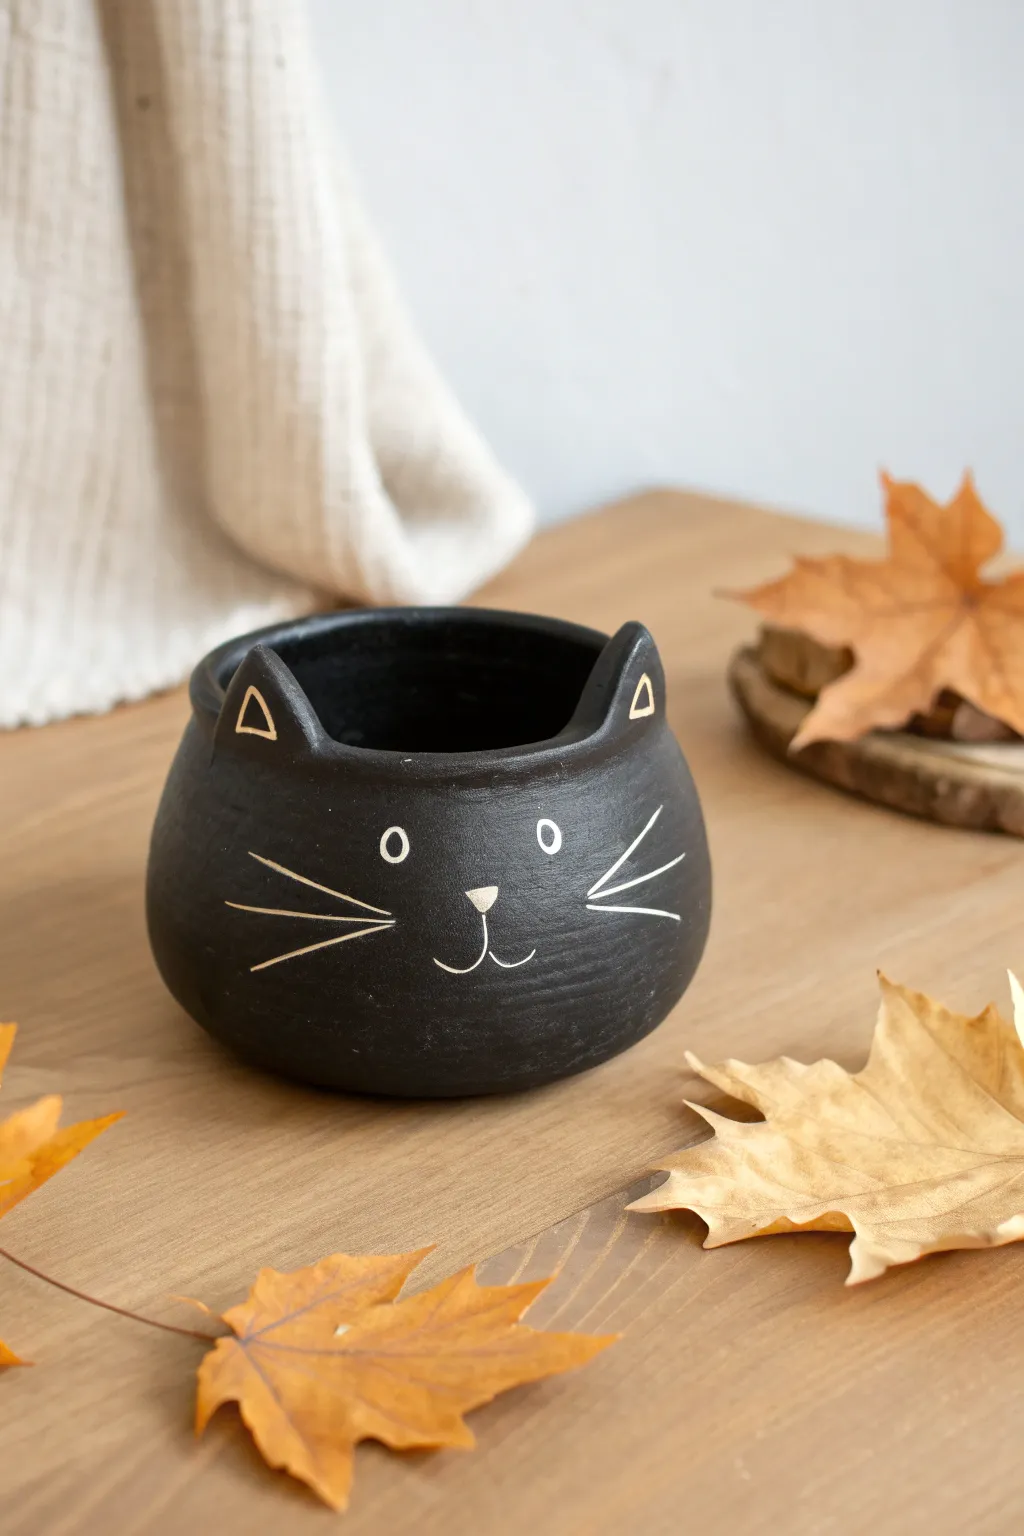
This adorable black cat pinch pot adds the perfect touch of Halloween whimsy to your decor or serves as a charming candy dish. Its matte black finish contrasts beautifully with simple carved details for the face, creating a minimalist yet festive look.
Step-by-Step
Materials
- Air-dry clay (white or terracotta)
- Acrylic paint (matte black)
- Acrylic paint (white or metallic gold)
- Fine detail paintbrush
- Carving tool or toothpick
- Small bowl of water
- Sponge
- Matte sealant or varnish
Step 1: Shaping the Base
-
Prepare the Clay:
Start with a ball of air-dry clay about the size of a large orange. Knead it thoroughly in your hands to warm it up and remove air bubbles, ensuring it’s pliable and smooth. -
Form the Initial Pinch Pot:
Push your thumb into the center of the ball, stopping about half an inch from the bottom. Begin pinching the clay walls between your thumb and fingers, rotating the ball as you go to thin the walls evenly. -
Smooth the Shape:
Continue pinching until you have a bowl shape. Gently tap the bottom on a flat surface to create a stable base so the pot won’t wobble. -
Close the Opening Slightly:
To get that rounded cat head shape, curve the upper rim slightly inward. You want the opening to be a bit narrower than the widest part of the bowl. -
Refine the Surface:
Dip your finger or a slightly damp sponge into water and smooth out any cracks or fingerprints on both the inside and outside surfaces.
Cracked Clay Fix
If small cracks appear while drying, mix a tiny bit of clay with water to make a paste (slip) and fill the crack. Let it dry again, sand it smooth, and paint over it.
Step 2: Adding Features
-
Create the Ears:
Pinch two small, triangular sections of clay from the upper rim to form the ears. Alternatively, shape two small triangles separately and attach them by scoring (scratching) both surfaces, adding a dab of water (slip), and pressing them firmly onto the rim. -
Seamless Blending:
If you attached separate pieces, use your thumb or a modeling tool to smooth the clay at the seams until the ears look like they are a natural part of the pot. -
Shape the Ear Tips:
Gently pinch the tips of the ears to make them slightly rounded rather than dangerously sharp, matching the soft aesthetic of the pot in the photo. -
Dry to Leather Hard:
Let the pot sit for a few hours until it is ‘leather hard’—firm enough to carve without deforming, but not completely dry. -
Carve the Face Details:
Using a needle tool or toothpick, lightly carve the outline of the eyes, nose, mouth, and whiskers into the clay. I find it helpful to sketch lightly first before committing to deeper lines. -
Full Drying:
Allow the pot to dry completely. This usually takes 24-48 hours depending on the thickness of your clay and humidity.
Pro Tip: Scratch Test
Don’t know if it’s fully dry? The clay should feel room temperature, not cool to the touch. If it feels cold, there is still moisture trapped inside.
Step 3: Painting and Finishing
-
Base Coat Application:
Apply a coat of matte black acrylic paint to the entire pot, inside and out. Ensure you get coverage into the carved grooves. -
Second Coat:
Once the first layer is dry, add a second coat of black paint for a solid, opaque finish. Let this dry completely. -
Highlighting the Details:
Using a very fine detail brush and white or light cream paint, carefully fill in the carved lines for the whiskers, eyes, and mouth. The grooves help guide your brush. -
Painting the Ears:
Paint small triangles inside the ear shapes using the same light color to define them. -
Cleanup Touches:
If any white paint strays outside the lines, wait for it to dry and touch it up with a bit of black paint. -
Sealing the Pot:
Finish by applying a matte varnish or sealant to protect the paint and give the pot a finished, professional look.
Now your charming feline friend is ready to hold sweet treats or small trinkets for the season

TRACK YOUR CERAMIC JOURNEY
Capture glaze tests, firing details, and creative progress—all in one simple printable. Make your projects easier to repeat and improve.
Ghost Pinch Pot With Wavy Rim
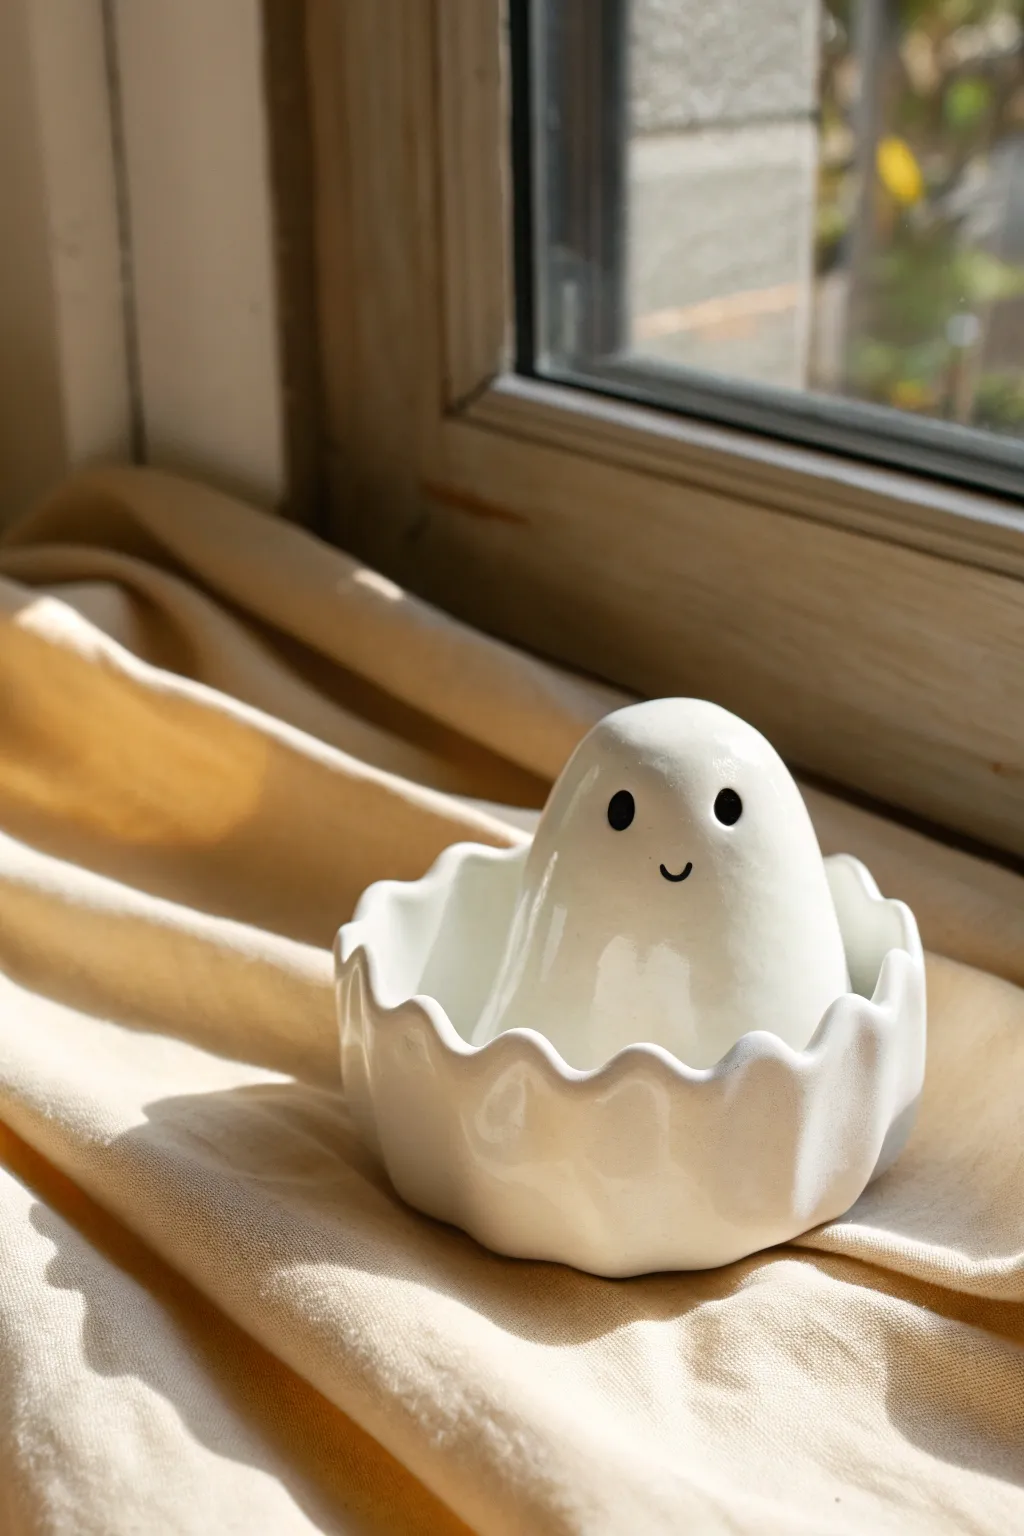
This adorable set features a smooth, rounded ghost figurine nesting perfectly inside a decorative pinch pot with a scalloped edge. The glossy white glaze gives it a clean, modern ceramic look that turns spooky decor into something sweet and sophisticated.
Step-by-Step Tutorial
Materials
- White polymer clay or air-dry clay (for a ceramic look)
- Clay carving tools or a wooden skewer
- Rolling pin
- Small bowl of water (for smoothing)
- Glossy white acrylic paint (if using air-dry clay)
- Black acrylic paint
- Fine detail paintbrush
- High-gloss varnish or sealant
- Fine-grit sandpaper
- Sponge
Step 1: Shaping the Ghost
-
Prepare the Clay:
Start with a ball of white clay about the size of a plum. Knead it thoroughly until it is soft and pliable to prevent cracks later on. -
Form the Base Shape:
Roll the clay into a smooth sphere, then gently elongate it upward to create a gumdrop or rounded cone shape. This will be your ghost’s body. -
Round the Head:
Use your palms to smooth the top into a perfect dome. Avoid making it too pointy; you want a friendly, approachable silhouette. -
Flatten the Base:
Tap the bottom of your ghost figure on your work surface to create a flat, stable base so it stands upright on its own.
Fixing Cracks
If using air-dry clay, small cracks may appear as it dries. Make a paste (slip) with a bit of clay and water, fill the cracks, and smooth over while damp.
Step 2: Creating the Wavy Pot
-
Start the Pinch Pot:
Take a second lump of clay, slightly larger than the first. Roll it into a ball and push your thumb into the center, stopping before you break through the bottom. -
Pinch the Walls:
Gently pinch and rotate the clay between your thumb and fingers to thin out the walls. Aim for an even thickness of about 1/4 inch all around. -
Test the Fit:
Place your ghost inside the pot to check the size. I prefer the pot to cover the bottom third of the ghost, so adjust the width accordingly. -
Create Key Scallops:
Using your thumb or the handle of a tool, gently press down on the rim at four equidistant points to create the valleys of your wave. -
Refine the Waves:
Pinch the raised sections between your pressed points to define the peaks. Smooth the edges with a little water on your finger to make the rim soft and flowing. -
Dry or Cure:
Follow the instructions for your specific clay type. If baking polymer clay, bake both pieces now. If using air-dry clay, let them dry completely for 24-48 hours.
Step 3: Finishing Touches
-
Sand Smooth:
Once hardened, inspect your pieces. Use fine-grit sandpaper to buff away any fingerprints or rough textures, especially along the wavy rim. -
Base Coat:
I usually apply two to three thin coats of glossy white paint to both the ghost and the bowl to get that ceramic effect, letting each layer dry fully. -
Paint the Eyes:
Using the tip of a fine brush or a dotting tool, dab two solid black circles onto the ghost’s face for eyes. -
Add the Smile:
Carefully paint a tiny, thin ‘u’ shape between the eyes for the mouth. Keep it small and centered for maximum cuteness. -
Seal for Shine:
Finish by applying a thick coat of high-gloss varnish over both pieces. This mimics the look of fired glaze seen in the photo.
Make it Functional
Before drying, use the ghost to press a deeper indentation into the pot’s center. This ensures the ghost sits securely, or the pot can double as a ring dish.
Place your shiny little ghost inside its custom bowl to haunt your windowsill with style
Franken-Critter Pinch Pot With Stitches
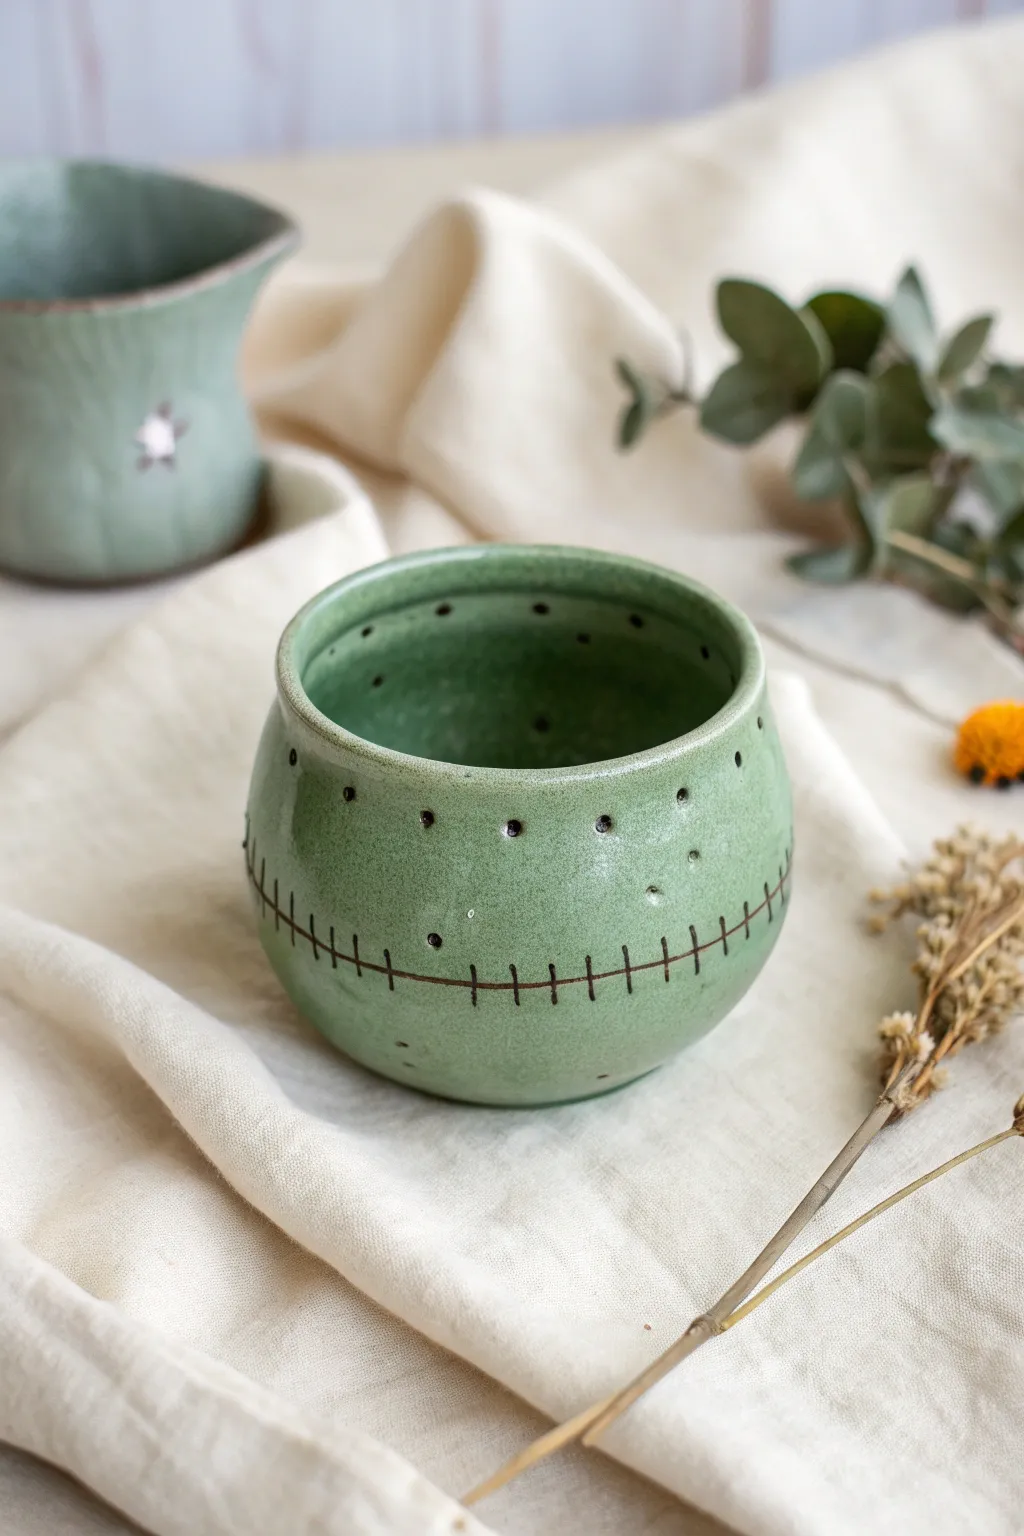
Embrace the spooky spirit with this subtle yet charming nod to Frankenstein’s monster. This rounded pinch pot features a beautiful dusty green glaze accented with whimsical carved stitches and dots, perfect for holding Halloween candy or small succulents.
How-To Guide
Materials
- Stoneware clay or air-dry clay (if not firing)
- Needle tool or toothpick
- Loop tool (small)
- Sponge
- Water cup
- Rib tool or old credit card
- Dusty green ceramic glaze (or acrylic paint if using air-dry clay)
- Dark brown or black underglaze (or dark acrylic paint)
- Fine liner brush
- Clear sealant (if using air-dry clay)
Step 1: Forming the Base
-
Prepare your clay ball:
Start with a ball of clay roughly the size of a tennis ball. Pat it firmly between your palms to ensure it’s a tight, solid sphere without cracks. -
Open the pot:
Hold the clay in one hand and press your thumb into the center, stopping about a half-inch from the bottom. This is the classic start to any pinch pot. -
Pinch the walls:
Rotate the ball slowly while rhythmically pinching the clay between your thumb (inside) and fingers (outside). Work from the base upwards to thin the walls evenly. -
Create a bulbous shape:
As you pinch, encourage the middle section to curve outward slightly by applying gentle pressure from the inside. Then, gently collar (squeeze inward) the rim to create that nice, enclosed curve shown in the photo. -
Smooth the surfaces:
Run a damp sponge or a flexible rib tool over the exterior to remove fingerprints and create a smooth canvas for your carving. I find this steps helps the final glaze look much cleaner.
Uneven Drying?
If your pot rim dries faster than the base and cracks, loosely drape a piece of plastic wrap over the rim while you work, or slow down drying by keeping it in a loosely closed bag overnight.
Step 2: Adding the Stitch Detail
-
Mark the horizon line:
Use your needle tool to very lightly scratch a horizontal line around the ‘waist’ of your pot. This will serve as the guide for your main scar. -
Carve the main scar:
Once you are happy with the placement, go over your guide line again, pressing slightly deeper to create a distinct groove. It doesn’t need to be perfectly straight; a little wobble adds character. -
Add the vertical stitches:
Perpendicular to your main horizontal line, carve short, vertical has marks every half-inch or so. Make sure they cross over the main line clearly to look like sutures. -
Poke the decorative holes:
Using the blunt end of a small paintbrush or a detail tool, gently press small circular indentations into the clay. Create a row near the rim and scatter a few random ones on the upper half for texture.
Step 3: Finishing and Glazing
-
Dry the piece:
Allow your clay to dry completely to the leather-hard or bone-dry stage, depending on your clay instructions. If using kiln clay, bisque fire it now. -
Apply the dark wash:
Dilute a small amount of black or dark brown underglaze (or acrylic paint) with water. Brush this wash into all your carved lines and dot indentations. -
Wipe back the excess:
immediately take a clean, damp sponge and wipe the surface of the pot. The dark color will stay trapped in the carved lines, making the stitches pop, while the surface returns to clean clay. -
Glaze the interior:
Pour your green glaze inside the pot, swirl it around to coat the bottom and walls completely, and pour out the excess. Clean any drips off the rim. -
Glaze the exterior:
Carefully brush or dip the exterior with a semi-translucent green glaze. A glaze that breaks nicely over texture is ideal here, as it will pool slightly darker in your stitches without obscuring them. -
Clear coat (Air-Dry Only):
If you used air-dry clay and acrylics, once your green paint is dry, seal the entire piece with a glossy varnish to mimic the ceramic shine seen in the image. -
Final Fire or Dry:
Fire your pot in the kiln according to your glaze’s temperature guidelines, or let your varnish cure completely if using the no-fire method.
Level Up: Scar Texture
Before glazing, gently dab the stitched area with a coarse sponge to create a slightly raised, rough texture, making the ‘scar’ feel more like healed skin.
Now you have a delightfully creepy little vessel ready to haunt your shelf.
Skull Face Pinch Pot Dish
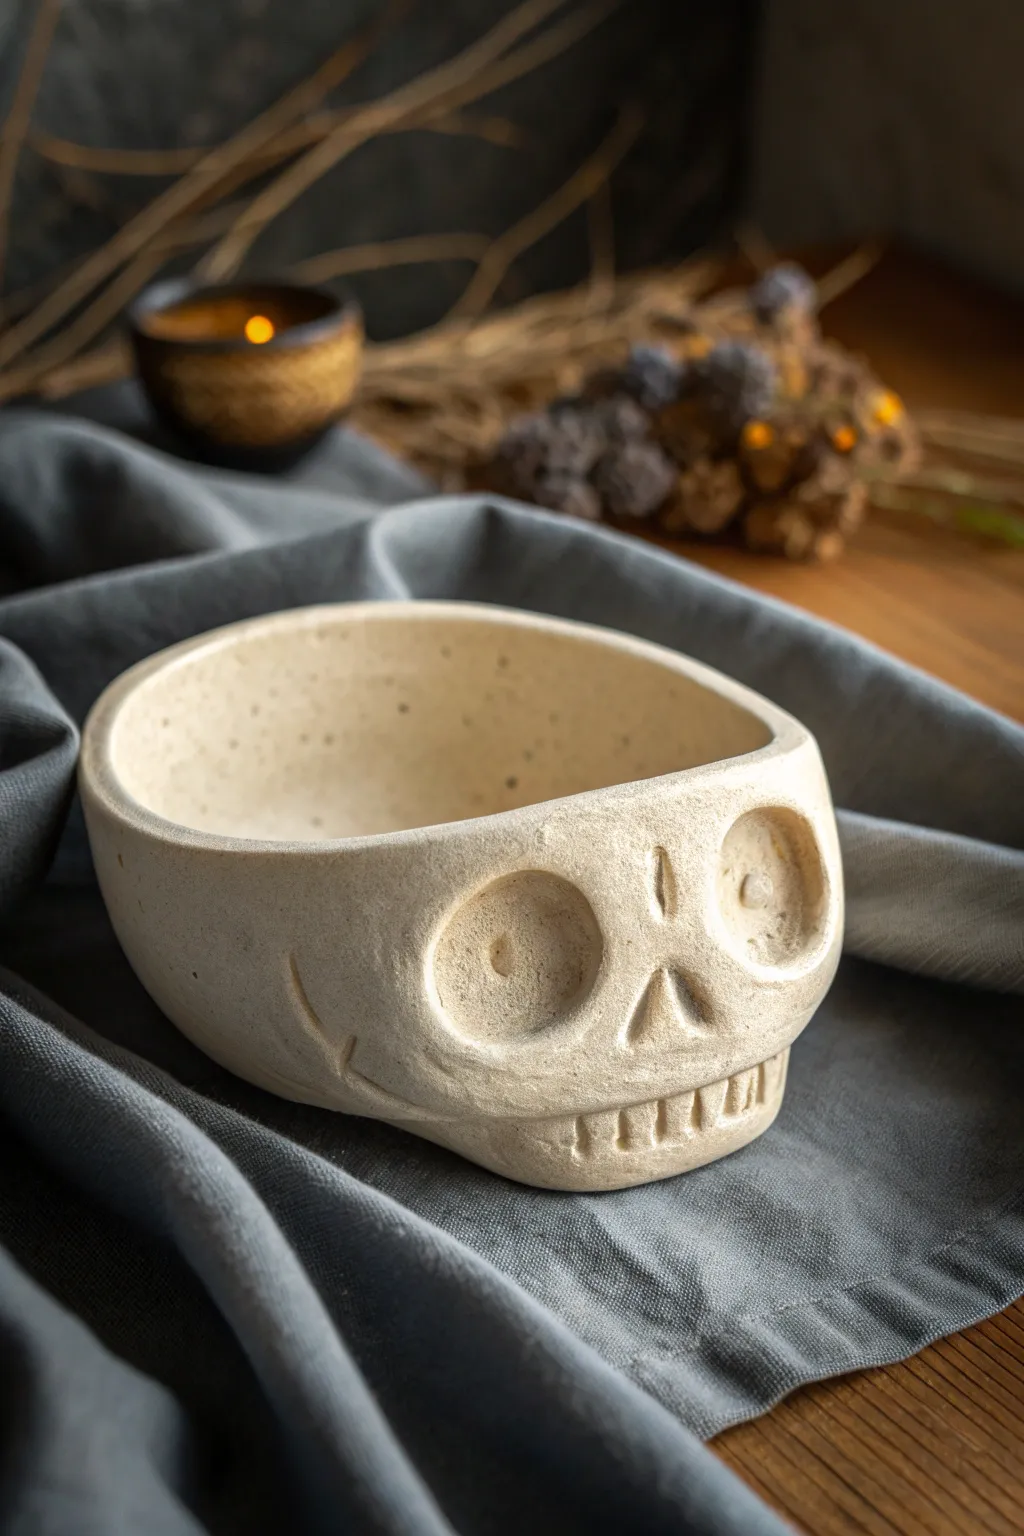
Embrace the eerie season with this charmingly spooky skull dish, crafted from speckled stoneware clay for a natural, bone-like finish. Its wide, open top makes it perfect for holding candies or trinkets, while the deeply recessed features give it distinct personality.
Step-by-Step Guide
Materials
- Speckled stoneware clay (approx. 1 lb)
- Small bowl of water
- Loop tool or carving tool
- Needle tool
- Wooden modeling tool (rounded tip)
- Sponge
- Rubber kidney rib (optional)
Step 1: Forming the Base
-
Create a sphere:
Begin by wedging your clay to remove air bubbles, then roll it into a smooth, tight ball about the size of a large orange. -
Open the pot:
Push your thumb gently into the center of the sphere, stopping about a half-inch from the bottom to ensure a sturdy base. -
Pinch the walls:
Using your thumb on the inside and fingers on the outside, pinch and rotate the clay to thin the walls evenly. Aim for a thickness of about 1/4 inch throughout. -
Shape the jaw:
While the clay is malleable, gently squeeze the bottom half of the circle to elongate it slightly into an oval shape, creating a subtle jawline area at the front. -
Smooth the exterior:
Run a damp sponge or a rubber kidney rib over the exterior to remove fingerprints and create that smooth, bone-like surface seen in the image. -
Flatten the rim:
Tap the rim gently against your work surface or use a paddle to level it out, giving the bowl a clean, finished edge.
Smooth as Bone
Burnish the leather-hard clay with the back of a spoon before firing. This compresses the particles, creating a satiny, polished sheen without needing glaze.
Step 2: Sculpting the Face
-
Mark feature placement:
Use a needle tool or wooden skewer to lightly sketch where the large eyes and small nose will go. The eyes should sit fairly low on the bowl’s vertical face. -
Impress the eye sockets:
Using your thumb or the rounded end of a large wooden tool, press firmly into the marked eye areas to create deep, concave sockets without punching through to the inside. -
Define the nose cavity:
Carve a small, upside-down heart or triangle shape between the eyes for the nasal cavity. I like to soften the edges of this cut with a damp fingertip immediately. -
Add pupils:
Roll two tiny balls of clay and press them deep into the center of the eye sockets to create pupils, giving the skull a focused gaze. -
Outline the mouth:
Use a needle tool to draw a long, sweeping horizontal line near the bottom edge of the pot for the mouth, curving it up slightly at the ends for a grin. -
Carve the teeth:
With a small loop tool or knife, carve vertical lines across the mouth slit to define the individual teeth, removing small wedges of clay between them for dimension. -
Add the cheek line:
On the left side of the face, carve a curved line extending from the corner of the mouth upward, suggesting a cheekbone or jaw structure.
Step 3: Refining and Drying
-
Smooth the interior:
Check the inside of the bowl for any distortions caused by pressing the face features. Smooth these out with a damp sponge so the bowl remains functional. -
Clean up edges:
Go over the carved areas—especially around the teeth and eyes—with a slightly damp brush to remove any sharp clay crumbs or burrs. -
Slow drying:
Cover the piece loosely with plastic for the first day to let the moisture equalize, then uncover it to dry completely to the bone-dry stage. -
Fire the piece:
Bisque fire the piece. For the finish shown, leave the exterior unglazed to show off the raw clay texture, and apply a clear glaze only to the interior if desired for food safety.
Aged Patina
After bisque firing, wipe a black iron oxide wash or diluted dark underglaze over the carved features and wipe it back. It will stay in the recesses, making the details pop.
Your spooky stoneware creation is now ready to haunt your coffee table or serve up treats
Eyeball Pinch Pot Candy Cup
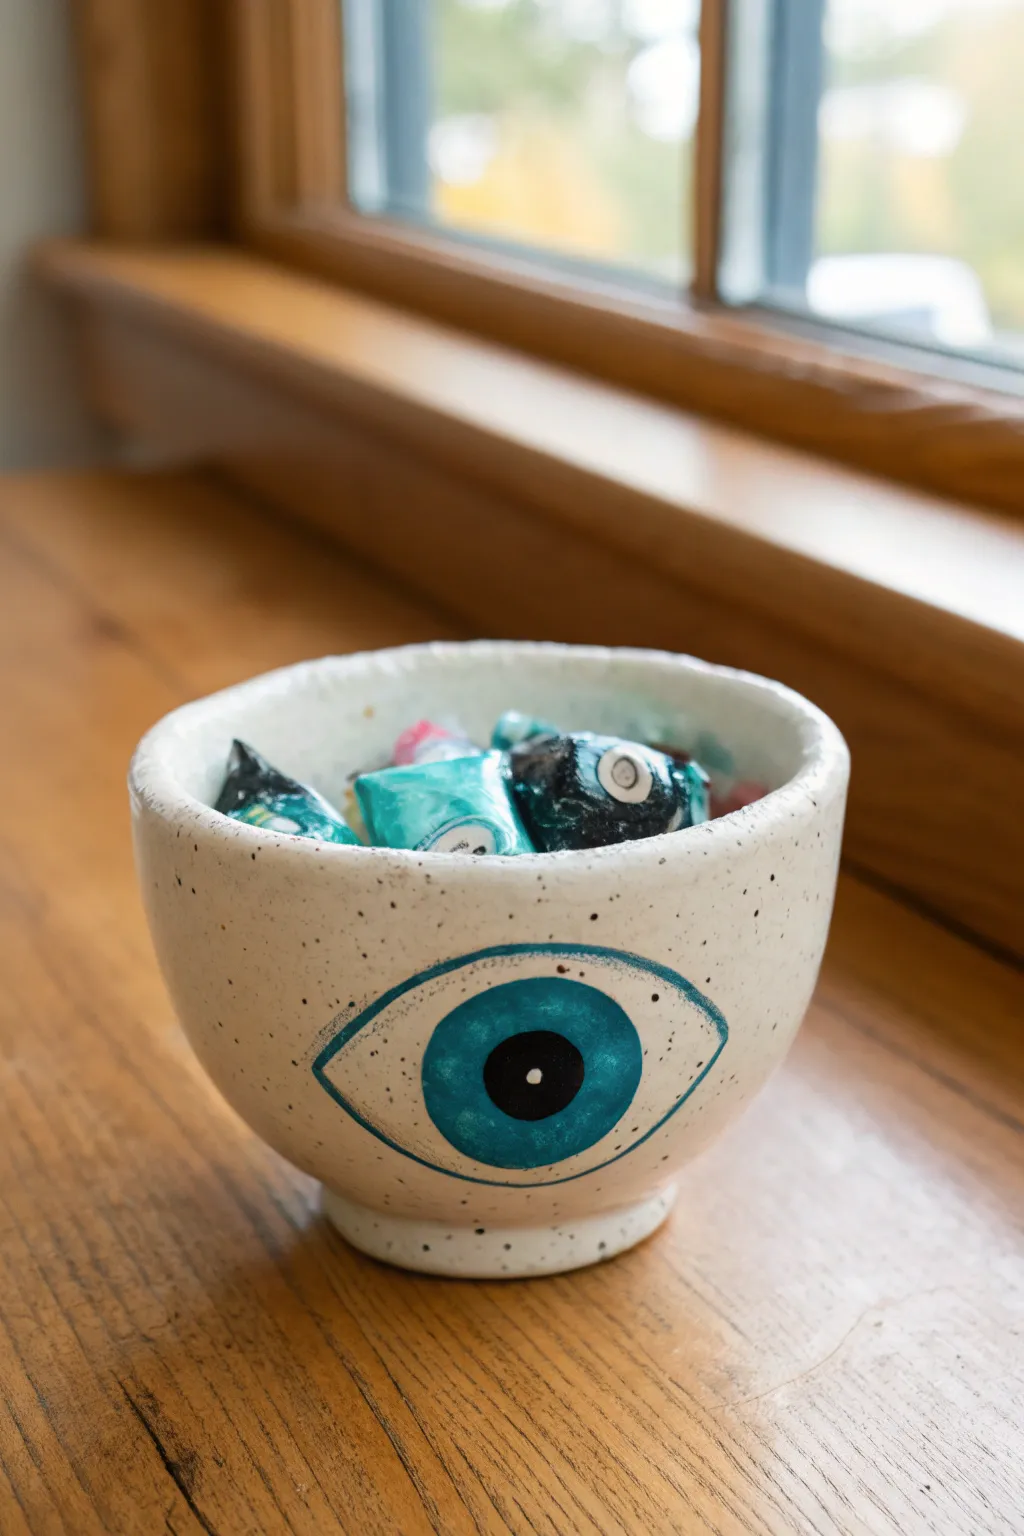
Keep a watchful eye on your Halloween treats with this delightful ceramic pinch pot. The design features a smooth, speckled white surface adorned with a striking, hand-painted blue eye, making it the perfect spooky yet stylish container for seasonal candies.
Detailed Instructions
Materials
- White clay (polymer clay, air-dry clay, or kiln-fire clay)
- Speckled clay additives (if using plain clay)
- Pottery sponge
- Pin tool or needle tool
- Wooden modeling tool
- Slip (clay and water mixture)
- Blue underglaze or acrylic paint
- Black underglaze or acrylic paint
- Clear glaze (or gloss varnish for non-fired clay)
- Fine detail paintbrush
- Small bowl or sandpaper
Step 1: Forming the Pinch Pot Base
-
Prepare your clay:
Start with a ball of white clay about the size of a tennis ball. If you want that beautiful speckled look show in the photo but only have plain clay, knead in some purpose-made speckles or ground peppercorns (for air-dry clay only) before shaping. -
Begin the pinch:
Hold the clay ball in one hand and firmly press your thumb into the center, stopping about a half-inch from the bottom to ensure the base remains sturdy. -
Pinch the walls:
Gently pinch the clay between your thumb and fingers, rotating the ball as you go. Work your way from the bottom up to the rim, aiming to keep the wall thickness even. -
Shape the bowl:
Continue thinning the walls until they are about a quarter-inch thick. Flare the opening slightly so it’s wide enough to hold a good handful of wrapped candies. -
Create a foot ring:
Using a small coil of spare clay, create a ring about the diameter of the bowl’s bottom. Score and slip the bottom of your pot and the ring, then attach the ring firmly. -
Blend the foot:
Using a wooden tool or your thumb, smooth the coil onto the pot so it becomes a seamless part of the base. This gives the bowl that professional, lifted look. -
Smooth the surfaces:
Take a slightly damp sponge and run it over the entire surface to remove fingerprints and smooth out any small cracks.
Step 2: Designing the Eye
-
Outline the eye shape:
Once the clay is leather-hard (firm but cool to the touch), usually after drying for a few hours, use a pin tool to very lightly sketch the almond shape of the eye on the side of the bowl. -
Sketch the iris and pupil:
Lightly etch a large circle in the center of the almond shape for the iris, and a smaller circle in the absolute middle for the pupil. -
Clean up the lines:
If your sketching created any burrs or rough crumbs of clay, gently brush them away with a soft dry brush.
Cracking Up?
If you see tiny cracks forming on the rim as you pinch, your clay might be too dry. Dip your fingers in water (sparingly) and smooth the rim immediately to heal the splits.
Step 3: Painting and Finishing
-
Paint the iris base:
Using a fine detail brush, fill in the iris circle with a bright teal or cyan blue paint. I prefer to do two thin coats rather than one thick one to avoid streaks. -
Add the outline:
Carefully trace the outer almond shape of the eye with the same blue paint using the very tip of your brush. -
Paint the pupil:
Fill in the center pupil circle with solid black paint. Make sure the blue is completely dry first so the colors don’t bleed into each other. -
Add the highlight:
This is crucial for bringing the eye to life: add a tiny dot of white paint near the edge of the black pupil to create a reflection. -
Final drying or firing:
If using kiln-fire clay, let the piece bone dry before bisque firing. If using air-dry clay, allow it to dry for at least 24-48 hours until completely hard. -
Apply the finish:
Dip into a clear glaze and fire again (for ceramics) or brush on a high-gloss varnish (for air-dry clay) to give the entire bowl, especially the eye, a wet, shiny appearance.
Make it Pop
Paint the entire inside of the bowl a solid red or deep blue for a surprising pop of color that reveals itself as the candy disappears.
Now fill your creepy creation with chocolates and enjoy the staring contest with your new decor
Mummy Wrap Texture Pinch Pot
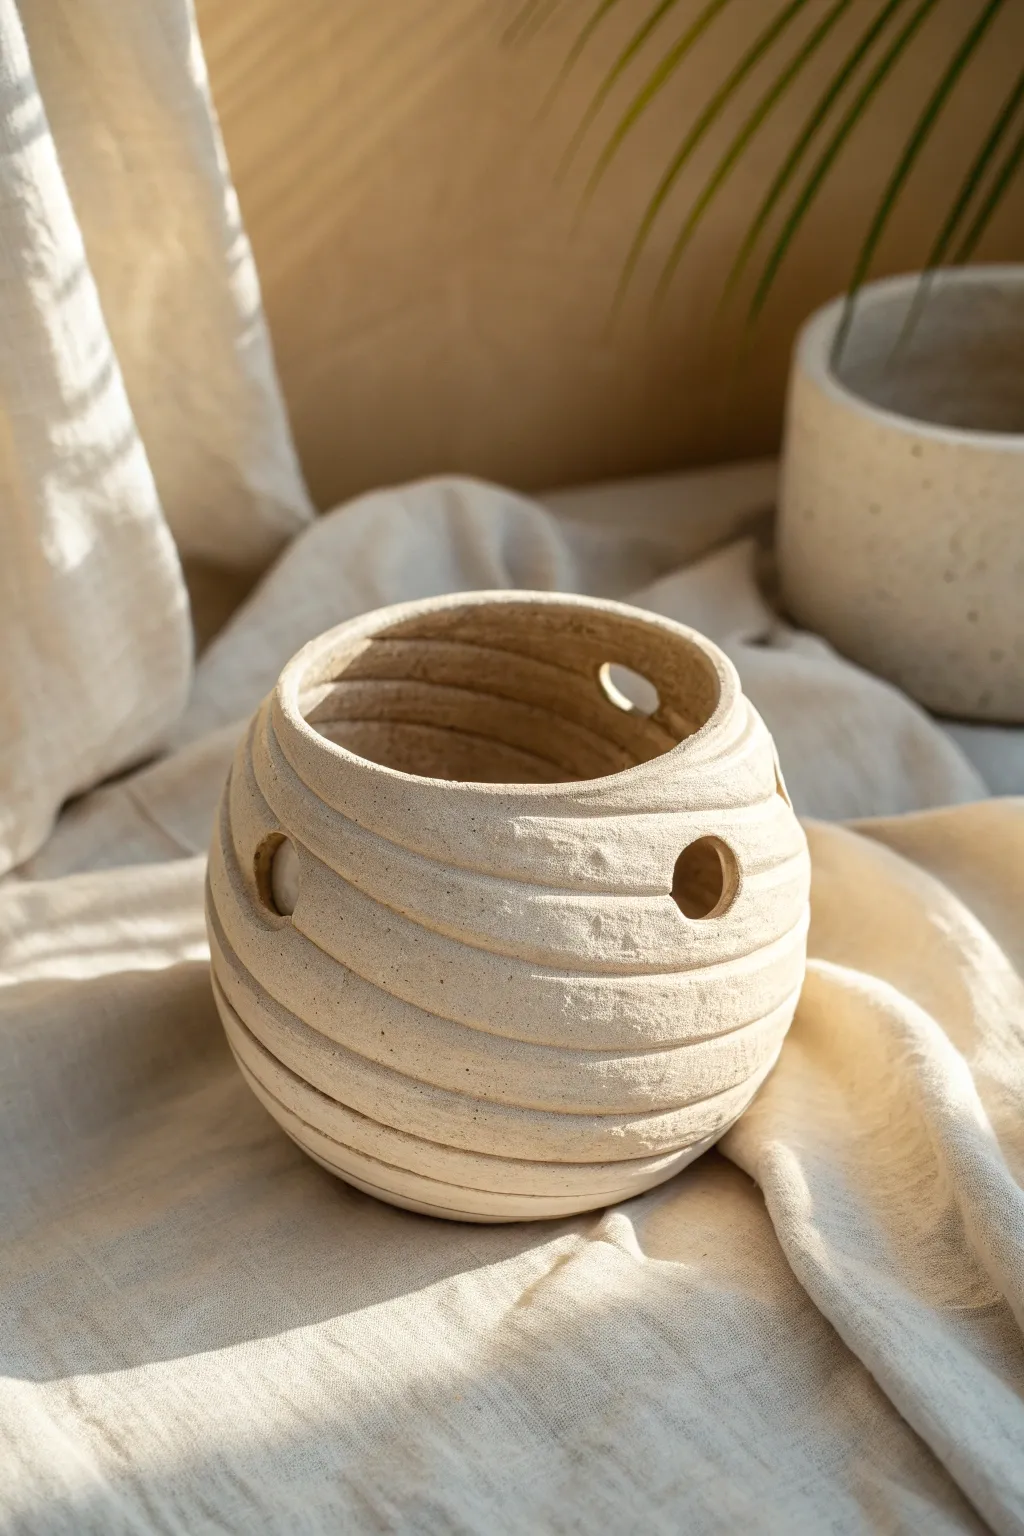
This rustic, textured vessel combines the classic pinch pot technique with distinct, wrap-like ridges that evoke an ancient or mummified appearance. The result is a sculptural, organic luminary perfect for holding LED tea lights to cast spooky shadows.
Step-by-Step Guide
Materials
- White or speckled stoneware clay (with fine grog)
- Small bowl of water
- Sponge
- Fettling knife
- Needle tool
- Wooden sculpting tool (flat edge)
- Hole cutter or small round cookie cutter (approx. 1/2 inch)
- Canvas or cloth-covered work surface
- Rib tool (kidney shaped)
Step 1: Forming the Base
-
Prepare your clay:
Start with a ball of clay roughly the size of a grapefruit. Wedging it well beforehand ensures there are no air bubbles, which is crucial for firing later. -
Begin the pinch pot:
Hold the ball in one hand and firmly press your thumb into the center, stopping about a half-inch from the bottom. This establishes your interior depth without punching through. -
Shape the walls:
Gently pinch the clay between your thumb and fingers, rotating the ball as you work. Use even pressure to thin the walls while pulling the clay upwards to create height. -
Create a spherical form:
Unlike a bowl, you want the rim to curve slightly inward at the top. encourage this closed form by gently collaring the rim in with both hands as you rotate the pot. -
Smooth the interior:
Use your thumb or a slightly damp sponge to smooth out any distinct finger marks inside the pot. The inside doesn’t need to be perfect, but a clean surface helps maintain structural integrity.
Collapsing Walls?
If your spherical shape starts slumping, stuff the inside with crumpled newspaper or paper towels. This internal support holds the shape while the clay stiffens.
Step 2: Creating the Mummy Texture
-
Mark your guidelines:
Using a needle tool, lightly scratch a continuous spiral line around the exterior of the pot, starting from the bottom and winding up to the rim. This doesn’t have to be perfect; it just guides your texture. -
Carve the initial grooves:
Take a wooden sculpting tool or the loop end of a trimming tool and carve into the guidelines. You want to remove small strips of clay to create defined channels between the ‘wraps.’ -
Refine the ridges:
Use a damp sponge or your finger to soften the sharp edges of your carved lines. I generally press the upper edge of each ridge slightly inward to create an overlapping effect, mimicking fabric wrapping. -
Add surface texture:
To get that aged, limestone look seen in the photo, gently pat the exterior with a rough sponge or a stiff bristle brush. This removes the ‘plastic’ shine of the clay and adds graininess. -
Finish the rim:
Ensure the top rim follows the spiral pattern, ending naturally rather than being cut completely flat. Smooth the lip with a piece of plastic wrap or chamois so it isn’t sharp to the touch.
Step 3: Adding Details and Drying
-
Plan your cutouts:
Identify 3 to 5 spots around the upper half of the vessel where you want light to escape. Staggering them at slightly different heights adds visual interest. -
Cut the holes:
Using a circular hole cutter or a small round cookie cutter, punch clean holes through the wall. If the clay is very soft, support the wall from the inside with your other hand to prevent collapsing. -
Clean the openings:
Once the holes are cut, use a slightly damp brush to smooth the raw edges of the circles. Sharp or ragged edges can crack during drying. -
Check the bottom:
Tap the pot gently on your work surface to flatten the bottom slightly so it sits stable without wobble. -
Slow drying:
Loosely cover the pot with plastic for the first 24 hours to let the moisture even out. Then, uncover it and allow it to dry completely to bone dry state before bisquing. -
Firing:
Fire according to your clay body’s instructions. For the look in the image, leave unglazed or use a very matte, dry white glaze to preserve the stony texture.
Natural Texture
Mix a teaspoon of sand or coffee grounds into your clay before starting. When fired, these burn out or melt, leaving a pitted, ancient texture automatically.
Once fired, place a battery-operated candle inside to see your mummy wrap pot glow with eerie charm
Spiderweb Textured Pinch Pot Bowl
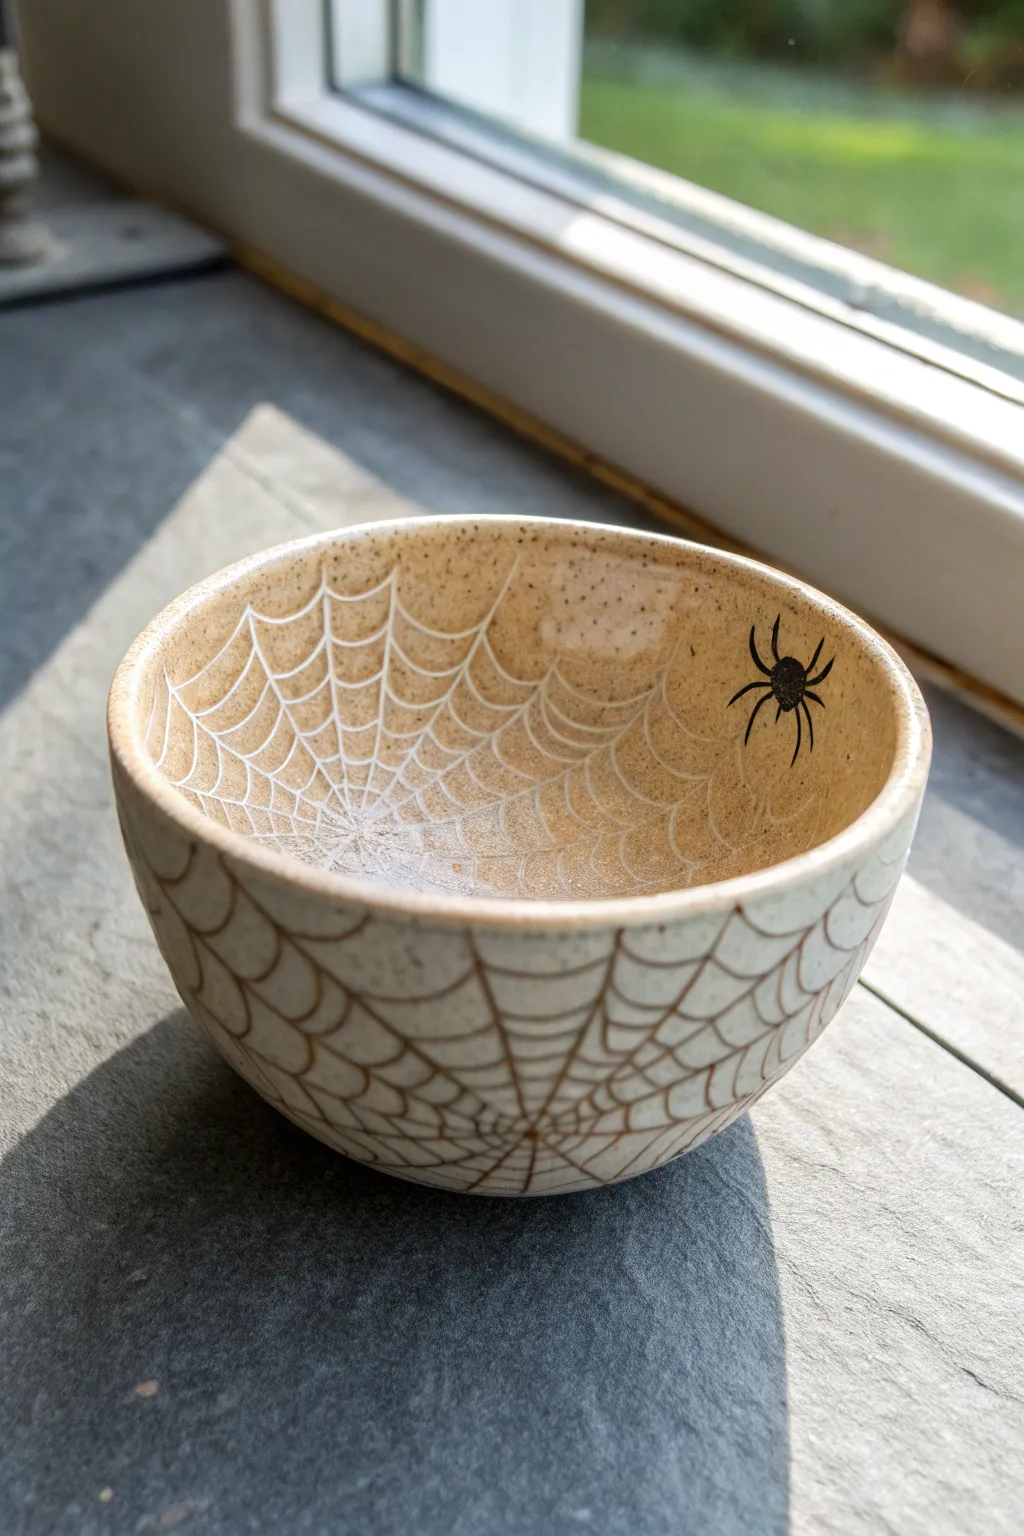
This elegant little ceramic piece combines the rustic charm of a handmade pinch pot with intricate Halloween details. Using distinct carving and glazing techniques, you’ll create a striking web pattern that wraps from the outside in, complete with a tiny resident spider.
Detailed Instructions
Materials
- White or speckled stoneware clay
- Sponge
- Loop tool or carving tool
- Needle tool
- White underglaze
- Black underglaze
- Small fine-tipped paintbrush
- Clear transparent glaze
- Kiln (or access to a firing service)
Step 1: Forming the Bowl
-
Form the pinch pot:
Start with a ball of clay roughly the size of a tennis ball. Push your thumb into the center, leaving about a half-inch of clay at the bottom. Gently pinch the walls while rotating the ball in your hand to thin them out and raise the height. -
Shape and smooth:
Continue pinching until the walls are an even thickness, aiming for about 1/4 inch. Gently flare the rim outward slightly if you prefer a wider opening. Smooth the interior and exterior with your fingers or a rubber rib to remove deep fingerprints. -
Refine the rim:
Use a damp sponge to compress the rim, making it smooth and rounded. I find it helpful to turn the pot upside down on a flat surface and gently tap it to level the rim perfectly. -
Dry to leather hard:
Let the bowl sit until it reaches the leather-hard stage. It should be firm enough to handle without warping but still cool to the touch and able to be carved.
Smudged Lines?
If you wipe away too much white inlay from the grooves, let it dry completely, re-apply the underglaze, and try wiping again with a sponge that is squeezed almost entirely dry.
Step 2: Carving the Outer Web
-
Incise the skeleton lines:
Using a needle tool or a very fine carving tool, lightly sketch vertical lines radiating from the bottom center of the bowl up to the rim on the exterior. These are the main structural threads of your web. -
Carve the connecting threads:
Connect the vertical lines with scalloped, U-shaped horizontal lines. Start near the bottom and work your way up to the rim, creating concentric rings of webbing. -
Deepen the lines:
Once you are happy with the placement, go over your lines with a slightly wider carving tool to create shallow grooves. Brush away any clay crumbs with a soft, dry brush.
Step 3: Creating the Interior Inlay
-
Carve the interior web:
Repeat the web pattern on the inside of the bowl. Draw lines radiating from the very center of the floor up to the rim, then connect them with scalloped lines. -
Apply white underglaze:
Generously paint white underglaze into the carved grooves on the *interior* of the bowl only. It’s okay if you get glaze outside the lines; you want the grooves completely filled. -
Let underglaze stiffen:
Allow the white underglaze to dry until it is no longer shiny and feels chalky. -
Wipe back:
Using a barely damp sponge, gently wipe the surface of the interior. The goal is to remove the white underglaze from the high points of the clay while leaving it trapped in the carved recesses (a technique called mishima).
Level Up: Creepy Crawlies
Instead of painting the spider, sculpt a tiny 3D spider out of a clay scrap and score-and-slip it onto the rim before the first firing for a tactile, creepy surprise.
Step 4: Painting the Exterior & Spider
-
Paint the exterior lines:
For the outside, we are doing the reverse. Use a fine liner brush and brown or dilute black underglaze to carefully paint *inside* the carved grooves on the exterior. -
Draw the spider body:
Choose a spot near the upper rim on the interior. Using black underglaze and your smallest brush, paint two small connected circles for the body. -
Add the legs:
Carefully paint eight legs radiating from the body. Make the front two and back two slightly longer for a realistic silhouette. -
Bisque fire:
Once completely bone dry, fire the piece to bisque temperature (usually Cone 04).
Step 5: Finishing
-
Apply clear glaze:
Dip the entire bisque-fired bowl into a clear, transparent glaze. Shake off any excess drips. -
Final fire:
Fire the bowl again to the maturation temperature of your clay body (likely Cone 5 or 6). This will make the clay vitrified and the web design pop under the glossy surface.
Now you have a perfect vessel for passing out candy or holding your favorite spooky trinkets