When I’m in the studio and want a quick win, I always reach for polymer clay or air-dry clay and make something tiny with a sweet little face. These cute clay ideas are all about simple shapes, happy colors, and that instant “I can’t believe I made this” joy.
Mini Food Charms
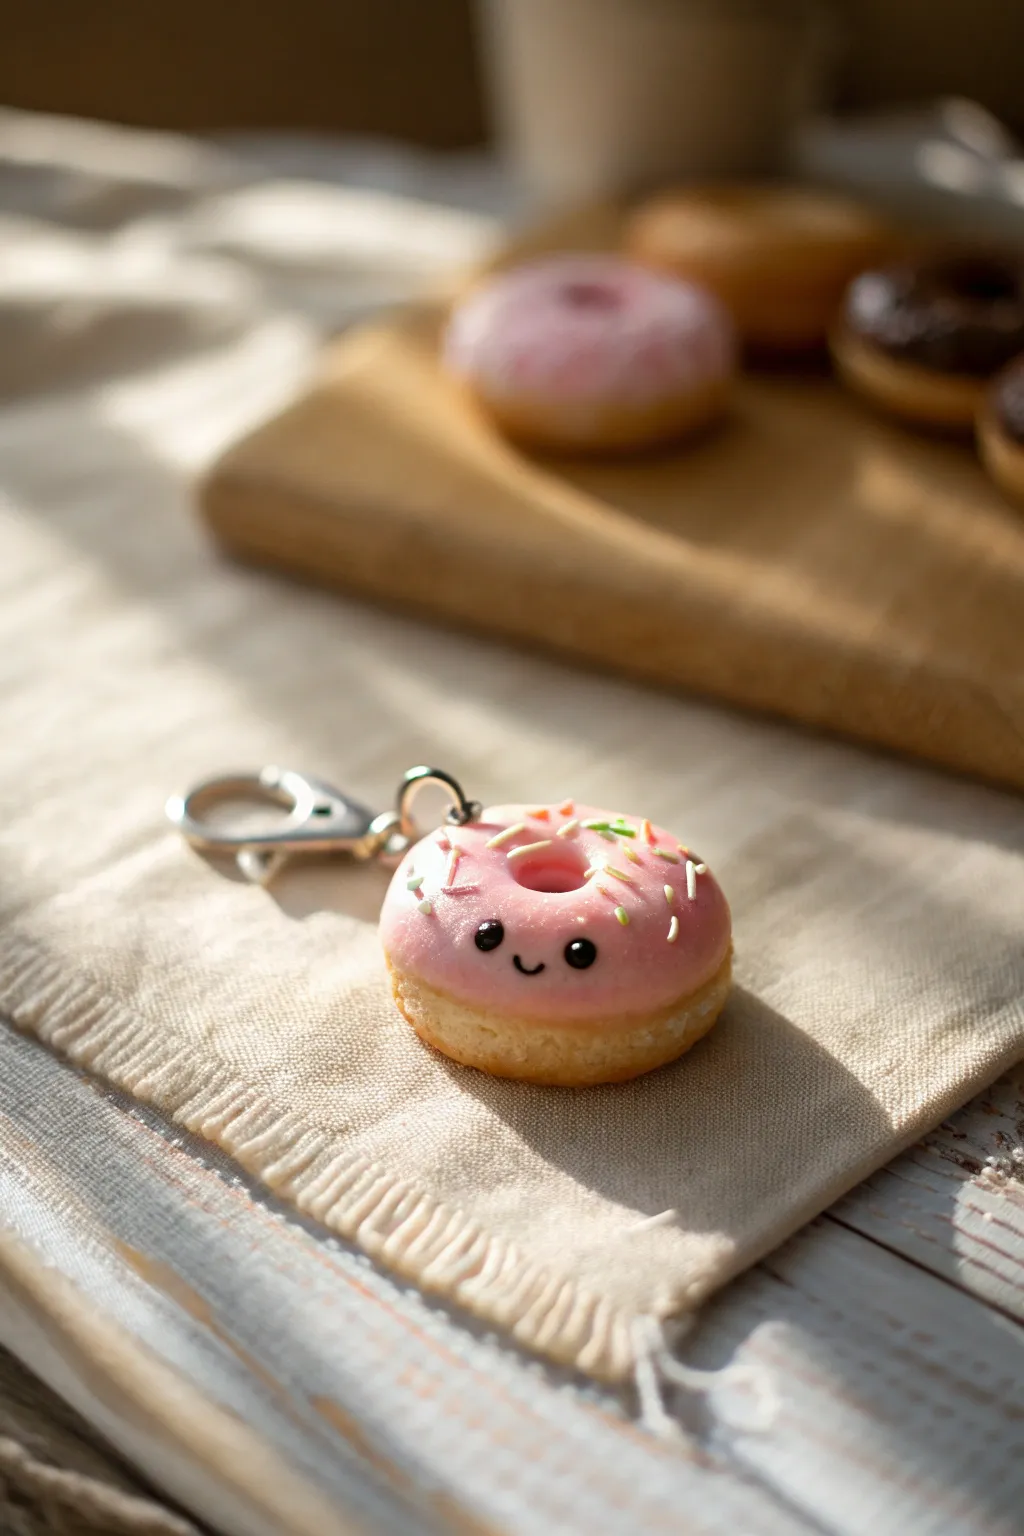
This adorable mini donut charm combines realistic textures with a sweet, cartoonish personality. With its glossy pink frosting and tiny smile, it’s the perfect accessory to brighten up your keychain or backpack.
Step-by-Step Guide
Materials
- Polymer clay (beige/tan, pink, black)
- Liquid polymer clay (translucent or white)
- Soft pastels (yellow ochre, orange, brown)
- Paintbrush (soft bristle)
- Toothbrush or crumpled foil (for texturing)
- Dotting tool or toothpick
- Eye pin or screw eye
- Gloss varnish or UV resin
- Craft knife or scalpel blade
- Rolling pin or pasta machine
Step 1: Shaping the Dough Base
-
Condition the Clay:
Begin by conditioning your beige or tan polymer clay until it is soft and pliable. Roll a small amount into a smooth ball, roughly the size of a large marble or slightly larger depending on your desired charm size. -
Form the Donut Shape:
Gently flatten the ball between your palms or on your work surface to create a thick disc. Don’t make it too thin; you want that fluffy donut look. -
Create the Center Hole:
Use the handle of a paintbrush or a large dotting tool to push a hole directly through the center of the disc. Widen the hole slightly by rotating the tool, smoothing the edges with your finger. -
Texture the Dough:
Take an old toothbrush or a ball of crumpled aluminum foil and gently tap it all over the surface of the beige clay. This creates a realistic baked texture. -
Add Baked Shading:
Scrape some chalk pastel dust (yellow ochre, orange, and a tiny bit of brown) into a pile. Use a soft, dry brush to dust the edges and bottom of the donut to simulate a golden-brown baked effect.
Step 2: Applying the Frosting
-
Prepare the Frosting Clay:
Condition a piece of pink clay. I recommend mixing in a few drops of liquid polymer clay to soften it significantly until it has the consistency of sticky taffy or thick frosting. -
Shape the Frosting Layer:
Roll the pink clay into a thin sheet or flatten a small ball manually. Use a cutter or your blade to cut a rough wavy circle shape that represents dripping icing. -
Attach the Frosting:
Drape the pink clay over the top of your textured donut base. Gentle press it down, allowing the wavy edges to hang naturally over the sides. -
Refine the Hole:
Using your dotting tool again, re-pierce the hole in the center so the frosting matches the donut’s shape, smoothing the pink clay down into the hole for a neat finish. -
Create Sprinkles:
Roll extremely thin snakes of clay in various pastel colors (green, yellow, white). Bake these snakes separately for 5 minutes just to harden them, then chop them into tiny bits with a blade. -
Add the Sprinkles:
Press the tiny chopped sprinkle bits into the soft pink frosting. Ensure they are embedded slightly so they don’t fall off later.
Texturing Secret
Avoid texturing the area where the face will go. A smoother surface helps the tiny clay eyes and mouth stick better and look cleaner.
Step 3: Adding the Kawaii Face
-
Mark Eye Placement:
Decide where the face will go on the frosting. Use a needle tool to make two tiny indents for placement. -
Insert the Eyes:
Roll two minuscule balls of black clay. Pick them up with a needle tool or toothpick and press them gently into the indents you made on the pink frosting. -
Create the Smile:
Roll an incredibly thin thread of black clay. Cut a tiny segment and shape it into a U-shape on your fingertip or work surface. -
Attach the Smile:
Carefully transfer the smile to the space between the eyes using a needle tool. Press it gently to secure it to the pink clay. -
Add Eye Highlights:
For that extra spark of life, use white acrylic paint or a speck of white clay to add a tiny white dot to the upper corner of each black eye.
Fixing Fingerprints
If you smudge the smooth frosting while working, lightly brush it with a tiny amount of baby oil or clay softener on your finger to smooth it out.
Step 4: Finishing Touches
-
Insert Hardware:
Insert a screw eye or eye pin into the top of the donut. It helps to add a tiny dab of liquid clay or bake-and-bond to the pin before inserting for a stronger hold. -
Bake the Charm:
Bake the donut according to your polymer clay package instructions (usually around 275°F/130°C for 15-30 minutes). Let it cool completely. -
Glaze:
Once cool, apply a coat of gloss varnish or UV resin specifically to the frosting and eyes to make them shine. Leave the dough part matte for realism.
Now attach your jump rings and lobster clasp, and enjoy your sweet new accessory


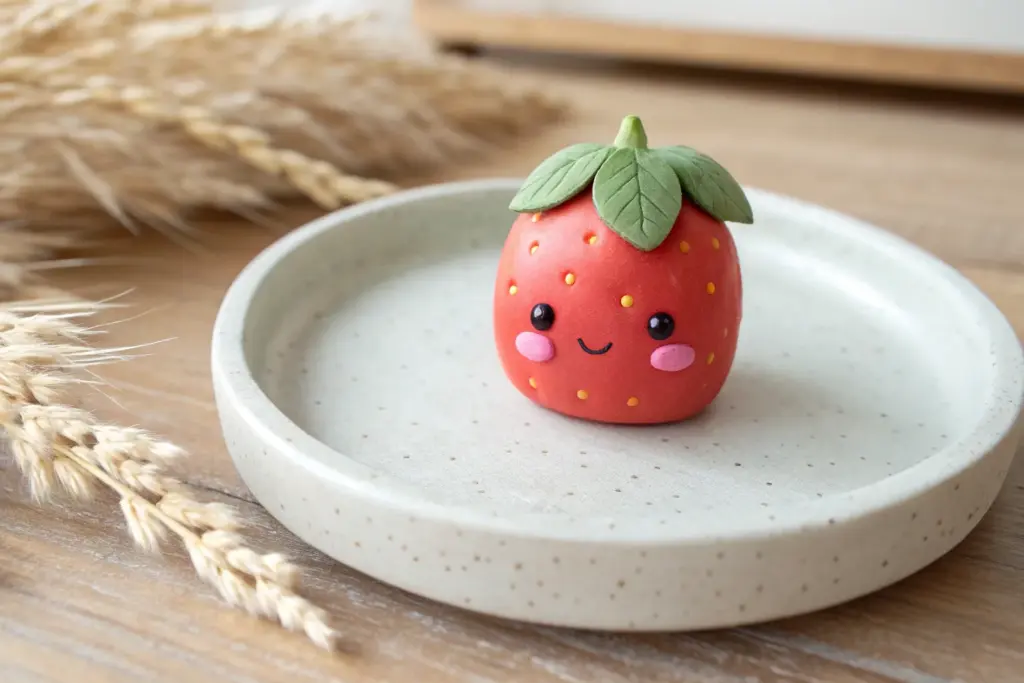
Strawberry and Avocado Friends
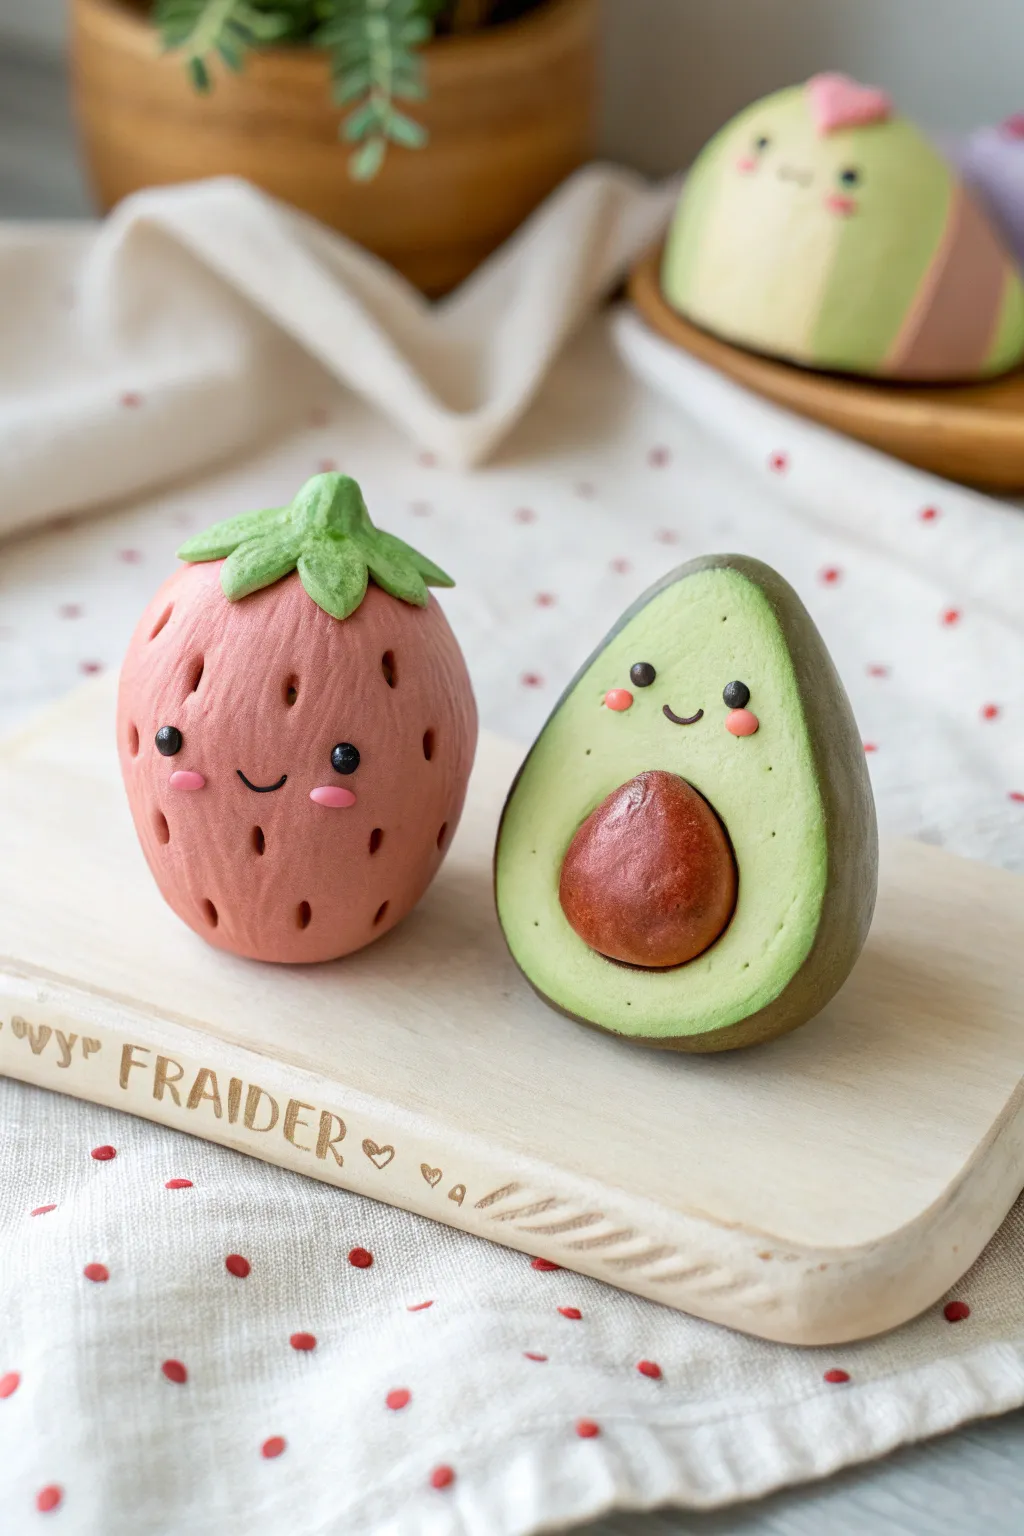
Create a pair of charming kitchen companions with this tutorial for a smiling strawberry and avocado set. These kawaii-style clay figures feature adorable blushed cheeks and simple expressions that make them perfect for beginner sculptors.
Detailed Instructions
Materials
- Polymer clay (pink, lime green, dark green, brown, black)
- Clay blending tools and dotting tools
- Pointed detailing tool or needle tool
- Rolling pin
- Aluminum foil (optional core)
- Soft pastel chalks (pink/red) for shading
- Gloss glaze (optional)
Step 1: Shaping the Strawberry
-
Base From:
Start by conditioning a ball of pink polymer clay about the size of a golf ball. Gently roll one end between your palms to taper it, creating a rounded cone or teardrop shape for the strawberry body. -
Seed Indentations:
Using a pointed detailing tool or a small dotting tool, press gently into the clay to create small, elongated indentations all over the surface. Leave the center front area smooth for the face. -
Leaf Cap:
Flatten a small piece of green clay. Cut out a star or flower shape with five or six points. -
Attaching Greens:
Place the green shape on top of the strawberry. Gently curve the tips of the leaves downward. -
Stem Detail:
Roll a tiny cylinder of green clay and attach it to the center of the leaves to act as the stem.
Fingerprint Fix
Use a tiny bit of baby oil or cornstarch on your finger to smooth out fingerprints before baking. It acts as a buffer and polishes the clay surface.
Step 2: Sculpting the Avocado
-
Color Mixing:
Prepare a pale lime green clay for the flesh and a darker olive or forest green for the skin. I like to keep the dark skin quite thin. -
Flesh Shape:
Form the light green clay into a pear shape, flattening the front face so it looks like a sliced half. -
Pit Cavity:
Use a large ball tool or your thumb to press a rounded indentation into the lower, wider part of the pear shape. -
Skin Wrap:
Roll out the dark green clay into a thin sheet. Wrap it around the curved back and sides of the light green shape, trimming the edges neatly where they meet the flat face. -
Creating the Pit:
Roll a ball of brown clay that fits snugly into the indentation you made earlier. Press it in securely so it protrudes slightly.
Make Them Magnet
Flatten the backs of the figures instead of keeping them 3D. Before baking, press a strong magnet into the back, remove it, glue it in after baking.
Step 3: Bringing Them to Life
-
Eye Sockets:
Use a small ball tool to make shallow indentations where the eyes will go on both the strawberry and avocado. -
Adding Eyes:
Roll tiny spheres of black clay. Place them into the eye sockets and press gently to flatten them slightly. -
Smiling Mouths:
Roll extremely thin snakes of black clay. Curve them into small ‘U’ shapes and press them onto the faces between the eyes. -
Blushing Cheeks:
Take tiny amounts of pink clay, flatten them into ovals, and place them under the eyes for a rosy look. -
Highlight Details:
If desired, add a microscopic dot of white clay to the black eyes for a ‘sparkle’ effect. -
Baking:
Bake the figures according to your clay package instructions (usually 275°F/135°C for 15-30 minutes). Let them cool completely.
Place these cheerful fruit friends on a shelf or desk where their smiles can brighten your day


Tiny Animal Figurines
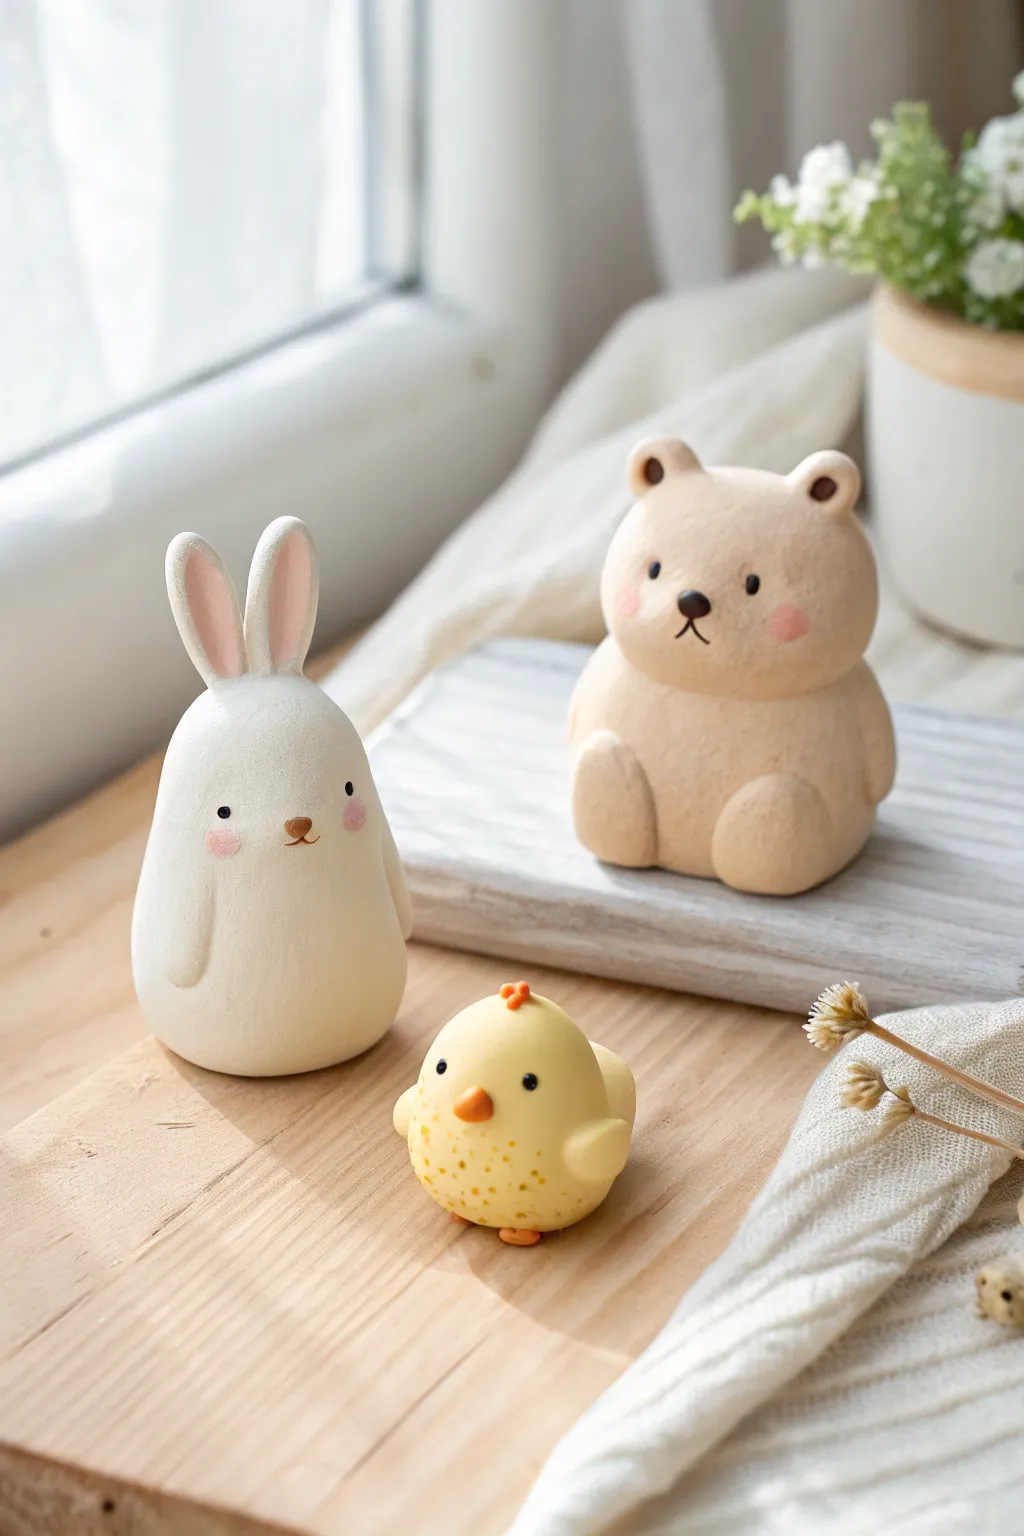
These utterly charming miniature figurines—a gentle bunny, a cozy bear, and a tiny chick—are perfect for beginners because they rely on simple, smooth shapes rather than complex sculpting. Their matte finish and pastel blush details give them a soft, modern look that fits perfectly on any windowsill or desk.
Step-by-Step Tutorial
Materials
- Polymer clay (white, beige/tan, pale yellow, orange)
- Black acrylic paint or black polymer clay for eyes/noses
- Soft pastel chalks (pink, peach)
- Small paintbrush (for pastels)
- Dotting tool or toothpick
- Mod Podge or matte varnish (optional)
- Clean work surface (ceramic tile or glass works best)
Step 1: Sculpting the Bunny
-
Base shape:
Start with a golf-ball-sized amount of white clay. Roll it into a smooth ball, then gently taper the top half to create a teardrop or pear shape with a stable, flat bottom. -
Adding ears:
Roll two small, equal logs of white clay. Flatten them slightly into long ovals. Press a smaller, flattened oval of pink clay (mix white with a speck of red) onto the center of each to create the inner ear. -
Attaching features:
Press the ears firmly onto the top of the head. Use a blending tool or your finger to smooth the seam where the clay joins so the ears look integral, not just stuck on. -
Tiny arms:
Roll two very small teardrops of white clay. Press these flat against the sides of the body, pointing downwards, to suggest resting arms.
Step 2: Crafting the Bear
-
Body formation:
Using beige or tan clay, create a rounded, slightly squat pear shape similar to the bunny but wider at the base. This gives the bear a seated, cuddly appearance. -
Legs and paws:
Roll two small balls of beige clay for the feet. Press them onto the front bottom of the body. For the arms, create two small sausage shapes and attach them to the sides, blending the shoulders into the body. -
The head:
The bear’s head is integrated into the body shape, but distinct ears are needed. Roll two tiny balls of beige clay. Press your smallest ball tool into the center of each to cup them, then attach them to the top of the head. -
Adding ear contrast:
Place a teeny dot of dark brown or black clay inside the cupped part of the ear for depth.
Smudged Clay?
Work lightest to darkest (white bunny first!). If dust or lint gets on your white clay, use a cotton swab dipped in rubbing alcohol or acetone to gently wipe the raw clay clean before baking.
Step 3: Making the Chick
-
Round form:
Take yellow clay and roll a nearly perfect sphere, slightly flattening the bottom so it doesn’t roll away. -
Wings:
Create two tiny, flat teardrop shapes from yellow clay. Attach these to the sides of the sphere, curling the tips slightly upward for a playful look. -
Beak and Comb:
Form a tiny orange cone for the beak and press it into the center of the face. For the comb, make a minuscule three-bump ridge out of orange clay and place it centrally primarily on top of the head.
Pro Tip: Texture
For a stone-like texture, gently tap the raw clay surface with an old toothbrush or a ball of aluminum foil before baking. This removes fingerprints and adds a matte, organic feel.
Step 4: Finishing Details
-
Painting faces:
Once you are happy with the forms, bake according to your clay package instructions. Let them cool completely. Using a dotting tool and black acrylic paint, add simple wide-set eyes to all three animals. -
Bear nose:
Paint a small, inverted triangular nose on the bear, connecting it with a tiny vertical line to an inverted ‘V’ mouth. -
Bunny nose:
Paint a tiny brown or pink ‘Y’ shape for the bunny’s nose and mouth area. -
Blushing cheeks:
This step brings them to life. Scrape a little pink soft pastel into dust. Use a dry, soft brush to gently dab this powder onto the cheeks of the bunny and bear. I find building this color slowly prevents it from looking too harsh. -
Chick speckles:
Use a darker yellow or light orange paint to add tiny freckle-like dots near the bottom of the chick’s belly for texture. -
Sealing:
If you want to protect the paint, apply a thin coat of matte varnish. Avoid glossy finishes to maintain that soft, bisqueware aesthetic.
Arranging your trio together creates an adorable scene that looks wonderful on a bookshelf or bedside table


Cat Paw Trinket Dish
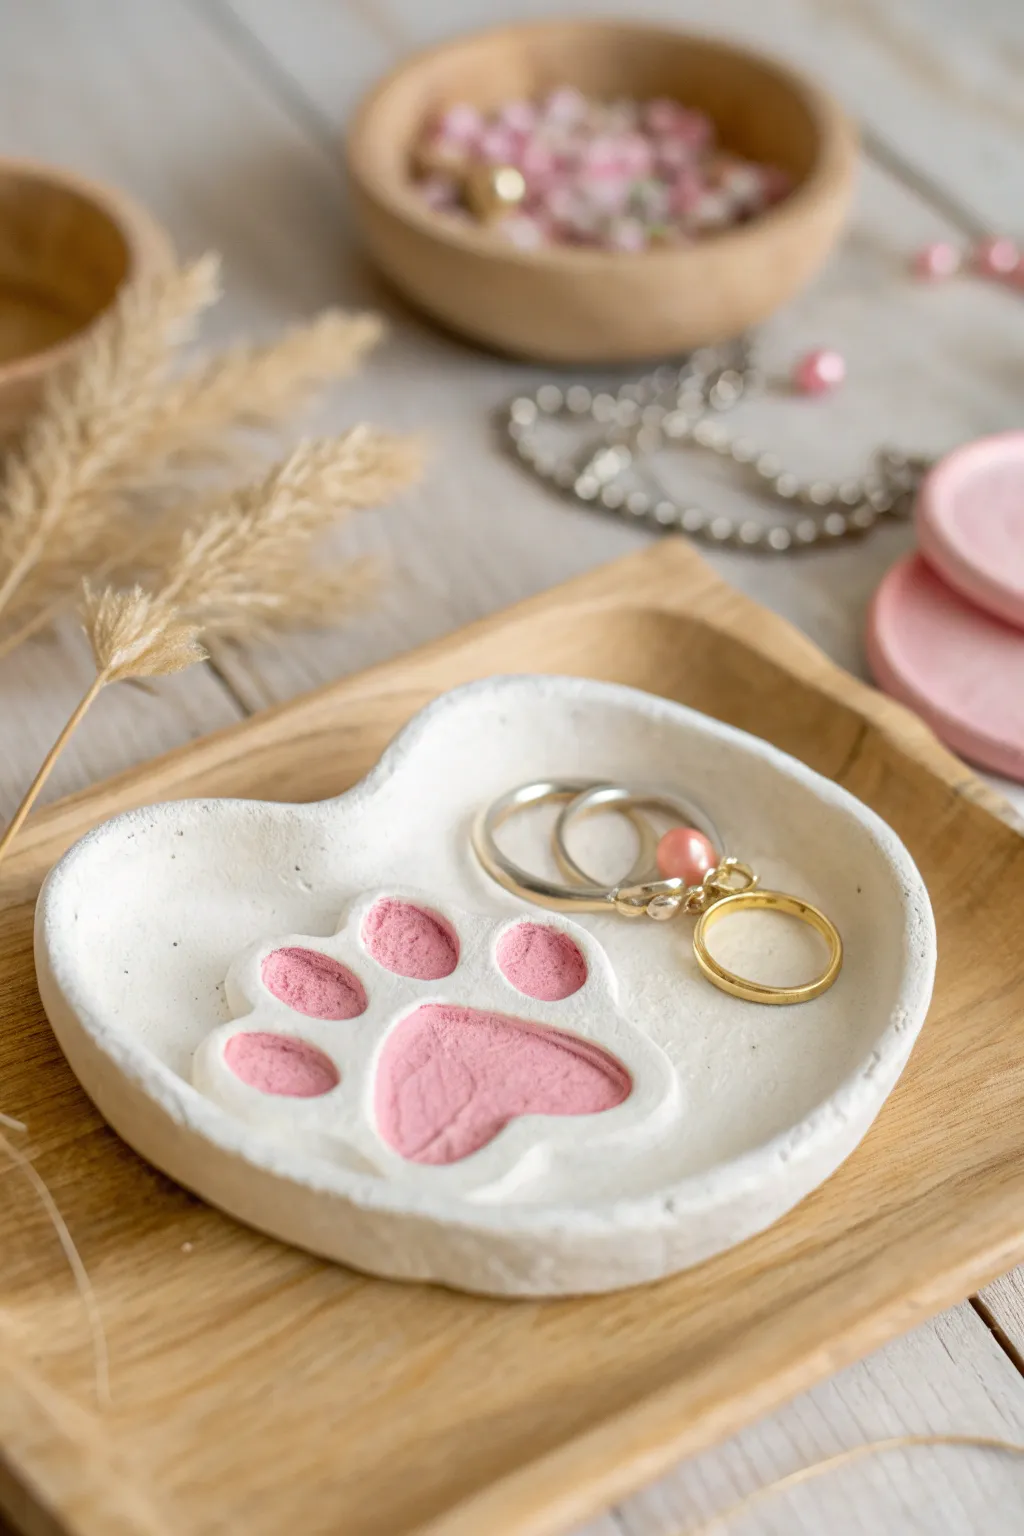
Keep your favorite rings and trinkets safe in this adorable paw-print dish. With its organic heart shape and sweet pink accents, it brings a touch of feline charm to any dresser or bedside table.
How-To Guide
Materials
- White sculpting clay (air-dry or polymer, depending on preference)
- Acrylic rolling pin
- Heart-shaped cookie cutter (large) or a paper template and craft knife
- Small circle cutter (optional)
- Sculpting tools or a dull needle tool
- Sandpaper (fine grit)
- Pink acrylic paint
- Small paintbrush
- Matte varnish or sealant
- Water and sponge (for smoothing)
Step 1: Shaping the Base
-
Prepare the clay:
Start by taking a generous ball of white clay and kneading it in your hands until it becomes soft, pliable, and free of cracks. -
Roll it out:
Place the clay on a smooth surface and use your acrylic rolling pin to flatten it into an even slab. Aim for a thickness of about 1/4 inch (6mm) to ensure the dish is sturdy. -
Cut the shape:
Use a large heart-shaped cookie cutter to press into the slab. If you don’t have a cutter, simply sketch a wide heart shape onto paper, cut it out, place it on the clay, and trace around it with a craft knife. -
Round the edges:
Dip your finger in a little water and gently run it along the cut edges of the heart to smooth out any sharpness or roughness. -
Form the rim:
Gently pinch and lift the edges of the heart upwards to create a shallow rim. You want an organic, slightly raised wall that will keep your jewelry from sliding off.
Step 2: Sculpting the Paw
-
Roll paw pads:
Pinch off four tiny pieces of clay for the toe beans and roll them into small balls. Make a slightly larger, triangular piece for the main pad. -
Position the main pad:
Place the large triangular pad in the lower center of the heart dish. Press it down gently so it adheres, flattening it slightly but keeping it raised. -
Add the toes:
Arrange the four small balls in an arc above the main pad. Press them down firmly enough to stick, ensuring they look like distinct little oval pads. -
Blend the seams:
For a seamless look, use a small sculpting tool to gently push the clay from the bottom of the pads into the base of the dish, creating a smooth transition where they meet. -
Final smoothing:
Take a slightly damp sponge and wipe over the entire piece to remove fingerprints and ensure the pads are smooth and rounded.
Smooth Operator
Keep a small bowl of water nearby while sculpting. A wet fingertip is the best tool for erasing cracks and smoothing the connection points between clay pieces.
Step 3: Finishing Touches
-
Let it dry:
Allow the clay to dry completely according to package instructions. If using air-dry clay, turn it over halfway through to ensure the bottom dries evenly. -
Sand imperfections:
Once fully cured, use fine-grit sandpaper to buff away any rough spots on the rim or the surface of the dish. -
Paint the paw:
Using a small brush, carefully paint just the top surfaces of the raised paw pads with a soft pink acrylic paint. I find distinct strokes give it a nice texture. -
Clean up edges:
If any pink paint strayed onto the white background, wait for it to dry and then touch it up with a bit of white paint. -
Seal the piece:
Apply a coat of matte varnish over the entire dish to protect the paint and give the clay a finished, professional look.
Make It Yours
Before the clay dries, stamp a name or initial into the side of the heart. You can also paint the rim gold for a touch of elegance.
Now you have a purr-fectly sweet spot to organize your daily accessories

The Complete Guide to Pottery Troubleshooting
Uncover the most common ceramic mistakes—from cracking clay to failed glazes—and learn how to fix them fast.
Mushroom Ring Holder Buddy
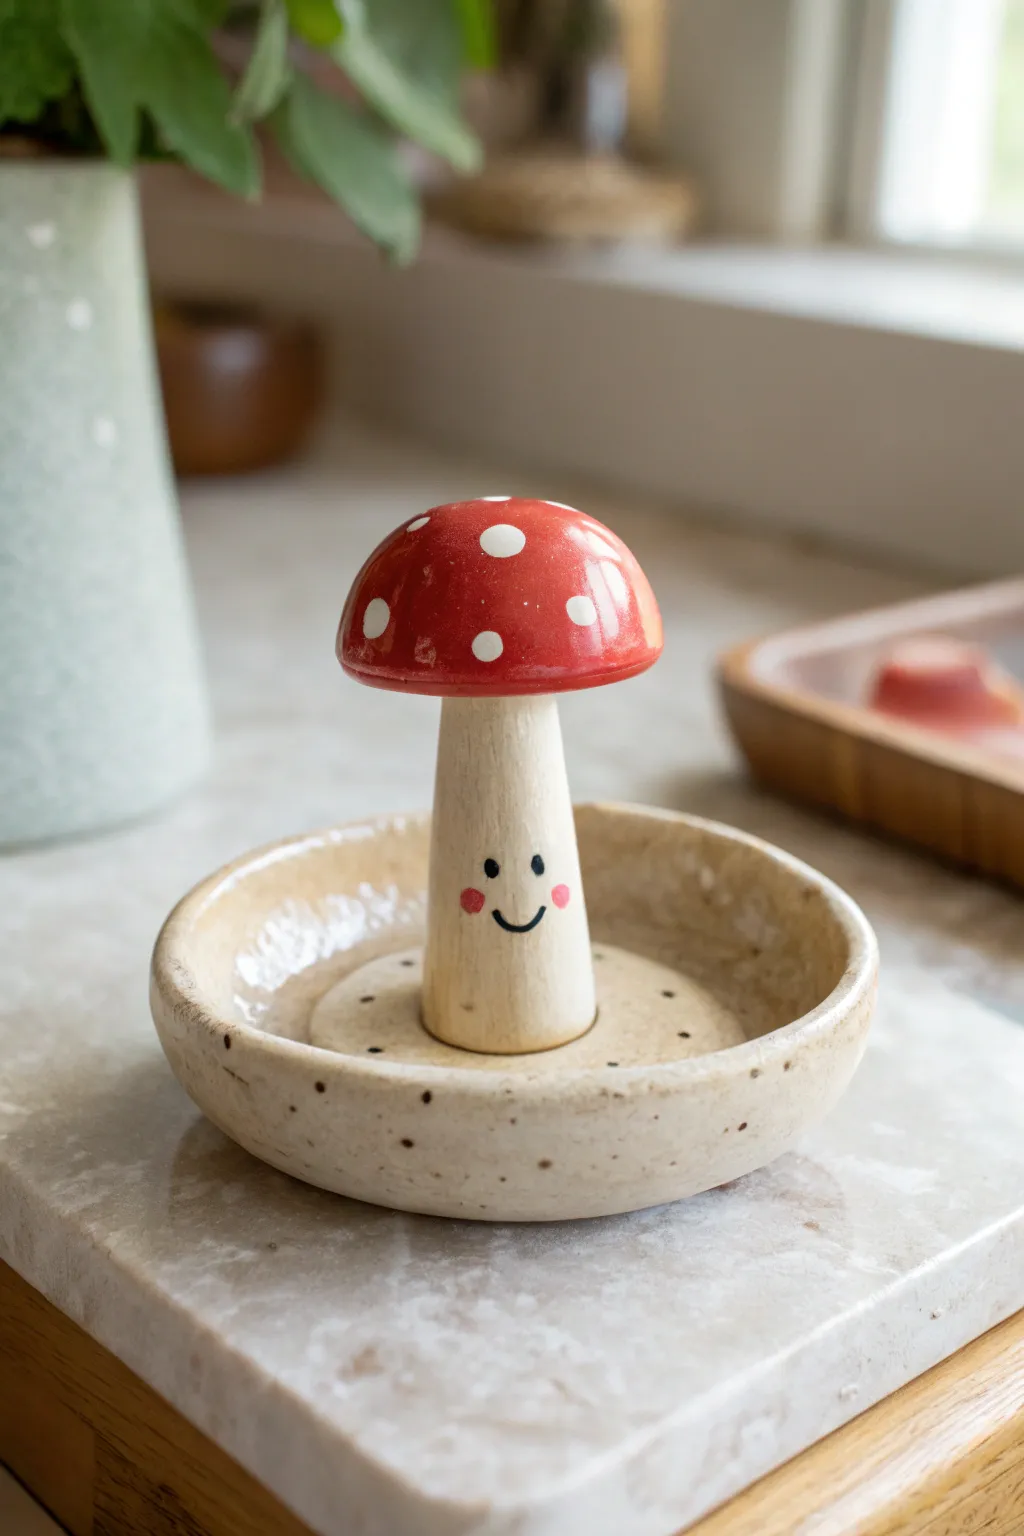
Keep your favorite jewelry safe with the help of this adorable little fungi friend. This ring holder combines a functional speckled dish with a cheerful mushroom centerpiece, perfect for adding a touch of cottagecore charm to your dresser.
Detailed Instructions
Materials
- White air-dry clay or polymer clay
- Acrylic paints (bright red, white, black, pink)
- Glossy varnish or glaze (polyurethane or resin-based)
- Small rolling pin
- Round cookie cutter (approx 4-inch diameter)
- Needle tool or toothpick
- Small fine-grit sandpaper
- Cup of water and sponge (for smoothing)
- Fine detail paintbrush
- Flat shader paintbrush
- Strong craft glue (optional, if assembling separately)
Step 1: Shaping the Base Dish
-
Prepare the clay:
Start by conditioning a ball of white clay in your hands until it’s soft and pliable. If you want the speckled look shown in the photo, you can mix in tiny bits of dried clay crumbs or pepper, though painting speckles later is easier. -
Roll the slab:
Roll the clay out onto a smooth surface to a thickness of about 1/4 inch. Try to keep the thickness even across the entire slab to prevent cracking. -
Cut the circle:
Use your round cookie cutter to punch out a clean circle. If you don’t have a cutter, trace a bowl with a needle tool. -
Form the rim:
Gently curve the edges of the circle upwards to create a shallow bowl shape. Use your thumb to smooth the transition between the base and the rim. -
Create the center mount:
Take a smaller ball of clay and flatten it into a thick disc (about 1.5 inches wide). Adhere this to the very center of your bowl using a bit of water or slip. This creates a sturdy platform for the mushroom.
Step 2: Sculpting the Mushroom
-
Form the stalk:
Roll a cylinder of clay that is slightly tapered at the top—this will be the stem. It need to be thick enough to be sturdy, roughly the width of your thumb. -
Attach the stalk:
Score the bottom of the stalk and the center of the dish where they will meet. Apply a little water or slip and press the stalk firmly onto the central platform you made earlier. -
Smooth the seams:
Take your time dragging clay from the base of the stalk down onto the dish to create a seamless, strong bond. I find using a slightly damp sponge here helps erase fingerprints. -
Shape the cap:
Roll a ball of clay and gently press your thumb into one side to create a hollow, umbrella-like cap shape. The top is rounded, while the underside should be relatively flat. -
Attach the cap:
Score and slip the top of the stalk and the underside of the cap. Press the cap onto the stalk, ensuring it sits straight. Smooth the connection underneath so it doesn’t wobble. -
Refine the surface:
Dip your finger in water and run it over the entire piece to smooth out any bumps or cracks. Poke tiny decorative holes around the base platform using a needle tool if you want the textured look from the original. -
Dry completely:
Let the sculpture dry for 24–48 hours depending on humidity. Flip it occasionally if possible to let the bottom breathe.
Wobbly Mushroom?
If the stalk leans while drying, insert a toothpick through the center of the stalk into the base for an internal ‘skeleton’ support.
Step 3: Painting and Finishing
-
Sand imperfections:
Once fully dry, use fine-grit sandpaper to gently buff away any rough spots on the rim or the mushroom cap. -
Paint the cap:
Using a flat brush, paint the entire mushroom cap with a vibrant, glossy red acrylic paint. You may need two coats for full opacity. -
Add the dots:
Dip the handle end of a paintbrush into white paint to stamp perfect circles onto the red cap. Vary the sizes slightly for a natural look. -
Create the face:
With your finest detail brush, paint two small black ovals for eyes and a tiny ‘U’ shape for the smile on the stalk. Add two soft pink dots for rosy cheeks. -
Speckle the dish:
Dilute some brown or black paint slightly. Dip an old toothbrush or stiff brush into it and flick the bristles with your finger to spray tiny speckles over the dish part, giving it that ceramic pottery look. -
Seal the piece:
Once all paint is bone dry, coat the entire project for a high-gloss varnish. This mimics the glazed ceramic look of the inspiration photo.
Level Up: Gem Details
Swap the painted white dots for small crushed glass pieces or real crystals pressed into the clay before drying for a magical, sparkly texture.
Place this cheerful little buddy on your nightstand and enjoy your new handmade organizer
Cloud and Star Earrings
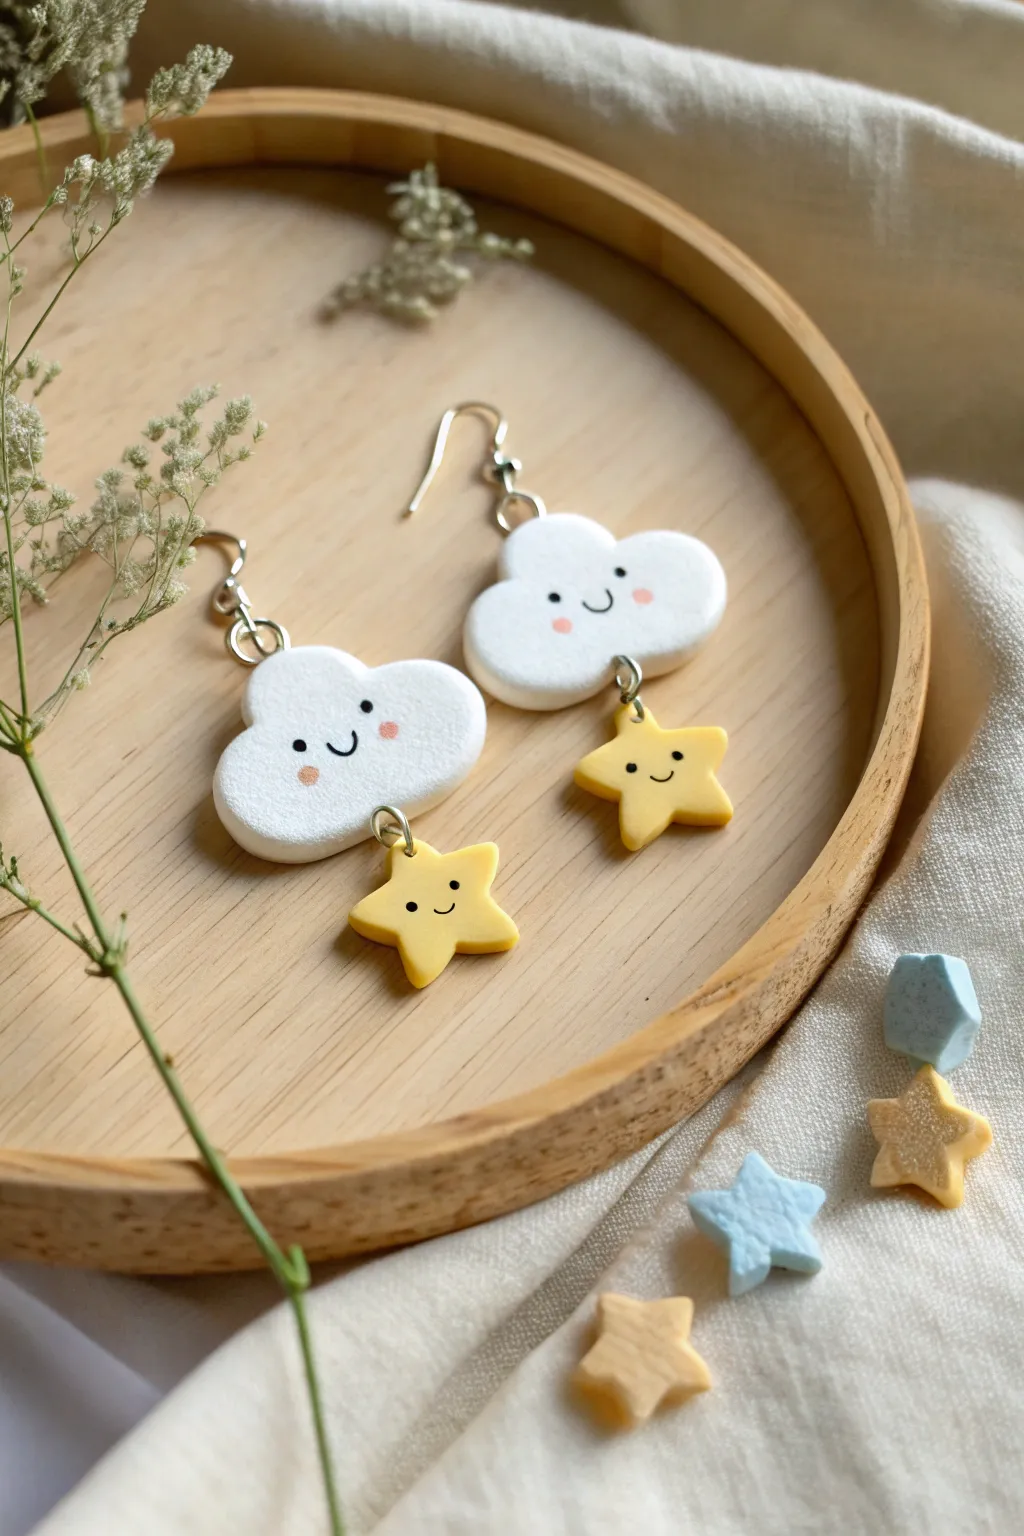
These whimsical earrings feature a cheerful white cloud accompanied by a tiny, smiling yellow star friend dangling below. The gentle expressions and soft pastel cheeks give them an adorable, kawaii-style aesthetic perfect for brightening any outfit.
How-To Guide
Materials
- White polymer clay
- Yellow polymer clay
- Rolling pin or pasta machine
- Cloud shaped micro-cutter (approx. 2cm)
- Star shaped micro-cutter (approx. 1cm)
- Black acrylic paint or fine detail pen
- Pink soft pastel chalk (for cheeks)
- Small dotting tool or toothpick
- Eye pins (silver tone)
- Jump rings (silver tone)
- Earring hooks (silver tone)
- Needle tool
- Jewelry pliers
- Gloss glaze (optional)
Step 1: Shaping the Sky
-
Condition the white clay:
Start by warming up your white polymer clay in your hands. Knead it thoroughly until it is soft, pliable, and free of any air bubbles or cracks. -
Roll out the slab:
Using your rolling pin or a pasta machine on a medium setting, roll the white clay out to a uniform thickness of about 3mm to 4mm. It needs to be thick enough to hold the eye pin securely. -
Cut the clouds:
Press your cloud-shaped cutter firmly into the white slab. Cut out two identical cloud shapes. If the edges are rough, gently smooth them with your fingertip. -
Insert top eye pins:
Take a silver eye pin and trim it if it’s too long. Carefully insert the straight end into the top center of each cloud. Make sure it goes in straight so it doesn’t poke out the sides. -
Prepare lower connection:
Insert a second eye pin into the bottom center of each cloud. This is where the star will eventually hang. Ensure the loop is facing the same direction as the top loop.
Clean Clay Tactic
White clay attracts dust like a magnet! Keep handy wipes nearby and clean your hands and tools thoroughly between colors to avoid smudges.
Step 2: Creating the Stars
-
Condition yellow clay:
Clean your hands or wear gloves to avoid transferring white lint, then condition the yellow clay until soft. -
Cut the stars:
Roll the yellow clay to the same thickness as the clouds (3-4mm). Use your small star cutter to punch out two stars. Gently tap the edges to round them slightly for a soft, puffy look. -
Add star hardware:
Insert a single eye pin into the top point of each yellow star. This needs to be secure, so push the pin down deeply into the body of the star.
Make it Sparkle
Before baking, brush a tiny amount of white mica powder or iridescent glitter over the white clouds to give them a magical, shimmering finish.
Step 3: Adding Faces & Baking
-
Pre-bake prep:
Place all four clay pieces (two clouds, two stars) on your baking tile or tray lined with parchment paper. -
Add rosy cheeks:
Scrape a little pink pastel chalk into a fine powder. Use a small, soft brush or a Q-tip to gently dab a small circle of pink powder onto the ‘cheeks’ of the unbaked clouds. -
Bake the pieces:
Bake the clay pieces according to the manufacturer’s instructions (usually around 275°F/135°C for 15-30 minutes). I prefer to tent them with foil to prevent the white clay from yellowing. -
Cool down:
Allow the pieces to cool completely before handling. The clay is fragile while hot. -
Paint the smiles:
Using a very fine detail brush with black acrylic paint or a specialized fine-tip marker, carefully draw two small dots for eyes and a tiny ‘u’ shape for the mouth on all four pieces.
Step 4: Assembly
-
Glaze (optional):
If you want a shiny finish or need to seal the paint, apply a thin coat of polyurethane gloss glaze and let it dry. -
Connect the parts:
Open a jump ring using two pairs of pliers (twist sideways, don’t pull apart). Thread it through the top loop of a star and the bottom loop of a cloud, then close it securely. -
Attach earring hooks:
Open the loop on your earring hook. Slide it onto the top eye pin of the cloud and close the loop. Repeat for the second earring.
Wear your new sky-themed accessories and enjoy the sunny vibes they bring


What Really Happens Inside the Kiln
Learn how time and temperature work together inside the kiln to transform clay into durable ceramic.
Smiley Cactus Desk Buddy
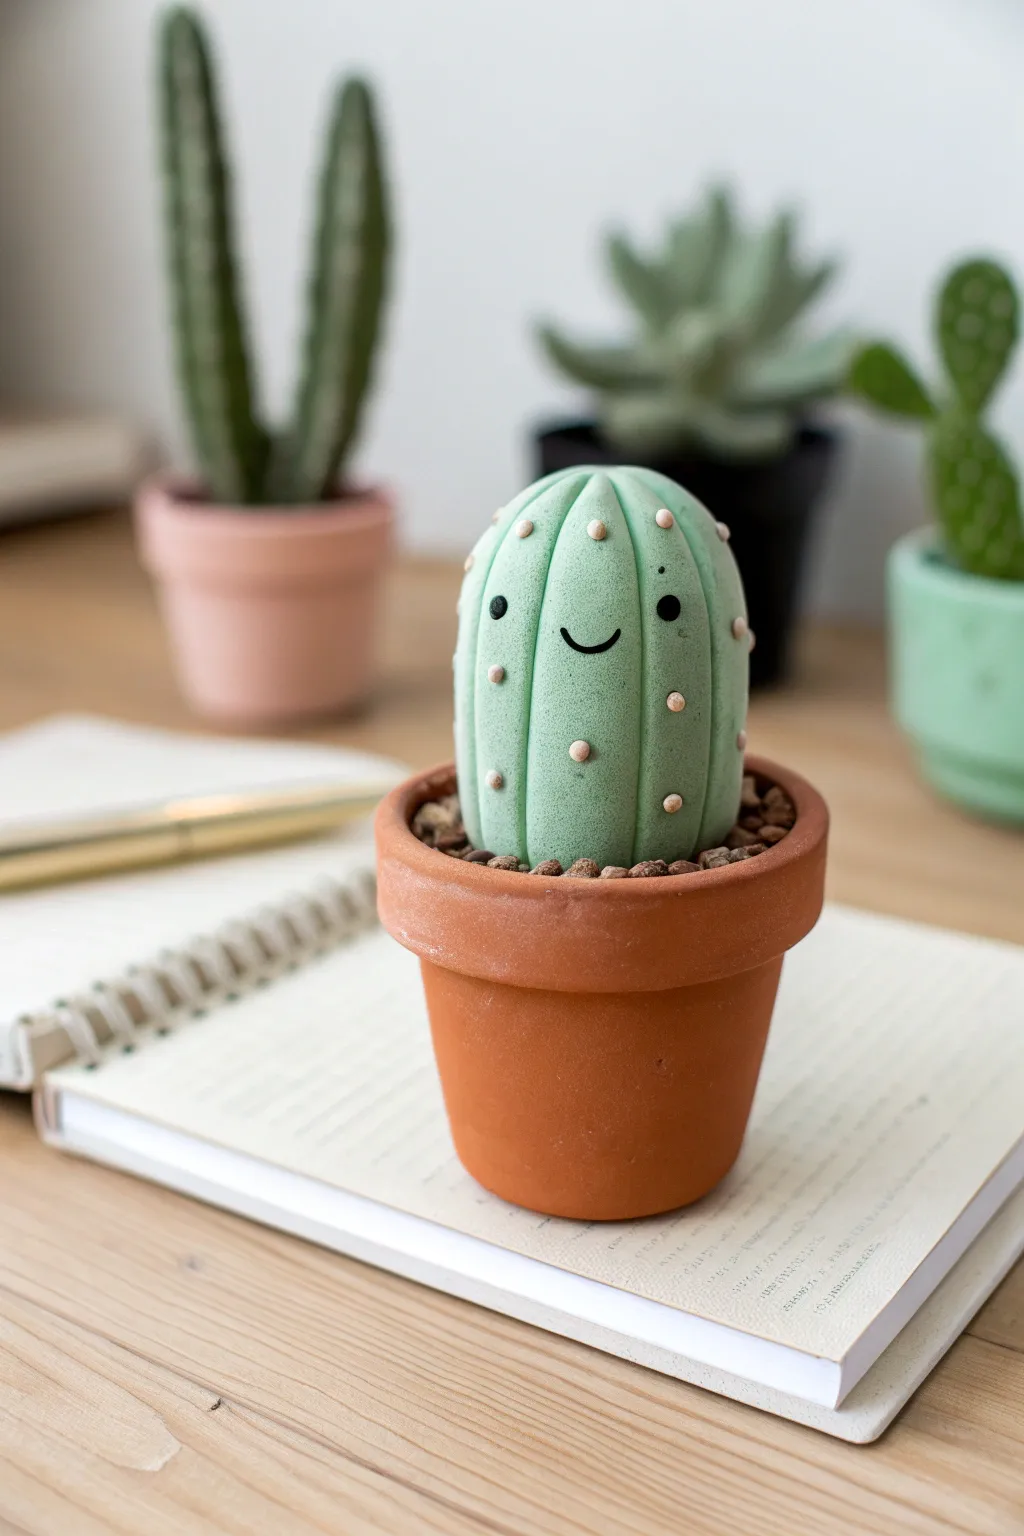
Brighten up your workspace with this adorable, maintenance-free succulent that never needs watering. With its sweet smile and chunky pastel shape, this project is a perfect introduction to modeling with polymer clay.
Detailed Instructions
Materials
- Pastel green polymer clay
- Terracotta-colored polymer clay (or a small miniature terracotta pot)
- Small amount of black polymer clay
- Tiny amount of beige or light pink clay
- Brown clay (or small pebbles/dried coffee grounds for soil)
- Needle tool or toothpick
- Ball stylus toll
- Blade or craft knife
- Gloss glaze (optional)
Step 1: Creating the Pot Base
-
Form the pot shape:
Start with a ball of terracotta-colored clay about the size of a walnut. Flatten the bottom slightly to create a stable base, then use your thumb to create a deep indentation in the top, pinching the sides to form a pot shape. -
Add the rim:
Roll a snake of the same terracotta clay and flatten it into a long strip. Wrap this strip around the very top edge of your pot to create the classic flowerpot rim. -
Texture the surface:
Smooth the seams carefully with your fingertip. For a realistic look, you can lightly tap the surface with an old toothbrush to give it a porous, earthen texture. -
Fill with soil:
Fill the inside of the pot with brown clay to act as the soil bed. It doesn’t need to be perfectly smooth; a bumpy texture works well here.
Step 2: Sculpting the Cactus
-
Shape the body:
Take a generous amount of pastel green clay and roll it into a very smooth, seamless ball. Then, gently roll it into a slight oval or egg shape to give the cactus some height. -
Create the segments:
Use a needle tool or the back of a craft knife to press vertical indentations all around the green shape. These lines should run from the very top center down to the bottom, mimicking the ribs of a cactus. -
Smooth the ribs:
After making the indentations, use your finger to gently soften the ridges between the lines so the cactus looks plump and rounded rather than sharp. -
Position the cactus:
Place your green cactus firmly onto the brown soil inside your terracotta pot. Press it down slightly to ensure a good bond between the clays. -
Add soil details:
I like to sprinkle tiny bits of leftover brown clay or real clean sand around the base of the cactus to simulate loose potting mix.
Clean Clay Tip
Work with light colors first! Black clay pigment transfers easily. If switching from black to light green, wash your hands and wipe your tools thoroughly with a baby wipe.
Step 3: Adding Details & Face
-
Make the eyes:
Roll two minuscule balls of black clay. Position them on the front of the cactus, wider apart than you might think, to create that cute ‘kawaii’ look. -
Press the eyes:
Gently press the black balls flat against the green clay so they become flush with the surface rather than sticking out. -
Create the smile:
Roll an incredibly thin thread of black clay. Cut a tiny u-shaped segment and carefully place it centered between and slightly below the eyes. -
Prepare the spines:
Roll many tiny balls of beige or light pink clay. These should be smaller than a grain of rice. -
Attach the spines:
Press these tiny dots onto the ‘ribs’ or high points of the green cactus segments. Space them out randomly, but keep them away from the face area. -
Texture the spines:
Take a needle tool and poke a tiny hole in the center of each beige dot to make them look like areoles where spines grow. -
Final inspection:
Check the whole piece for any fingerprints. You can smooth them away with a tiny drop of baby oil on your finger before baking. -
Bake the project:
Bake according to your polymer clay manufacturer’s instructions, usually around 275°F (135°C) for 15-30 minutes depending on thickness.
Blush It Up
Before baking, use a soft brush to dust a tiny bit of red chalk pastel powder on the distinct ‘cheeks’ under the eyes for an extra sweet expression.
This cheerful little companion is now ready to keep you company during your study sessions or work day
Pocket-Sized Heart Magnets
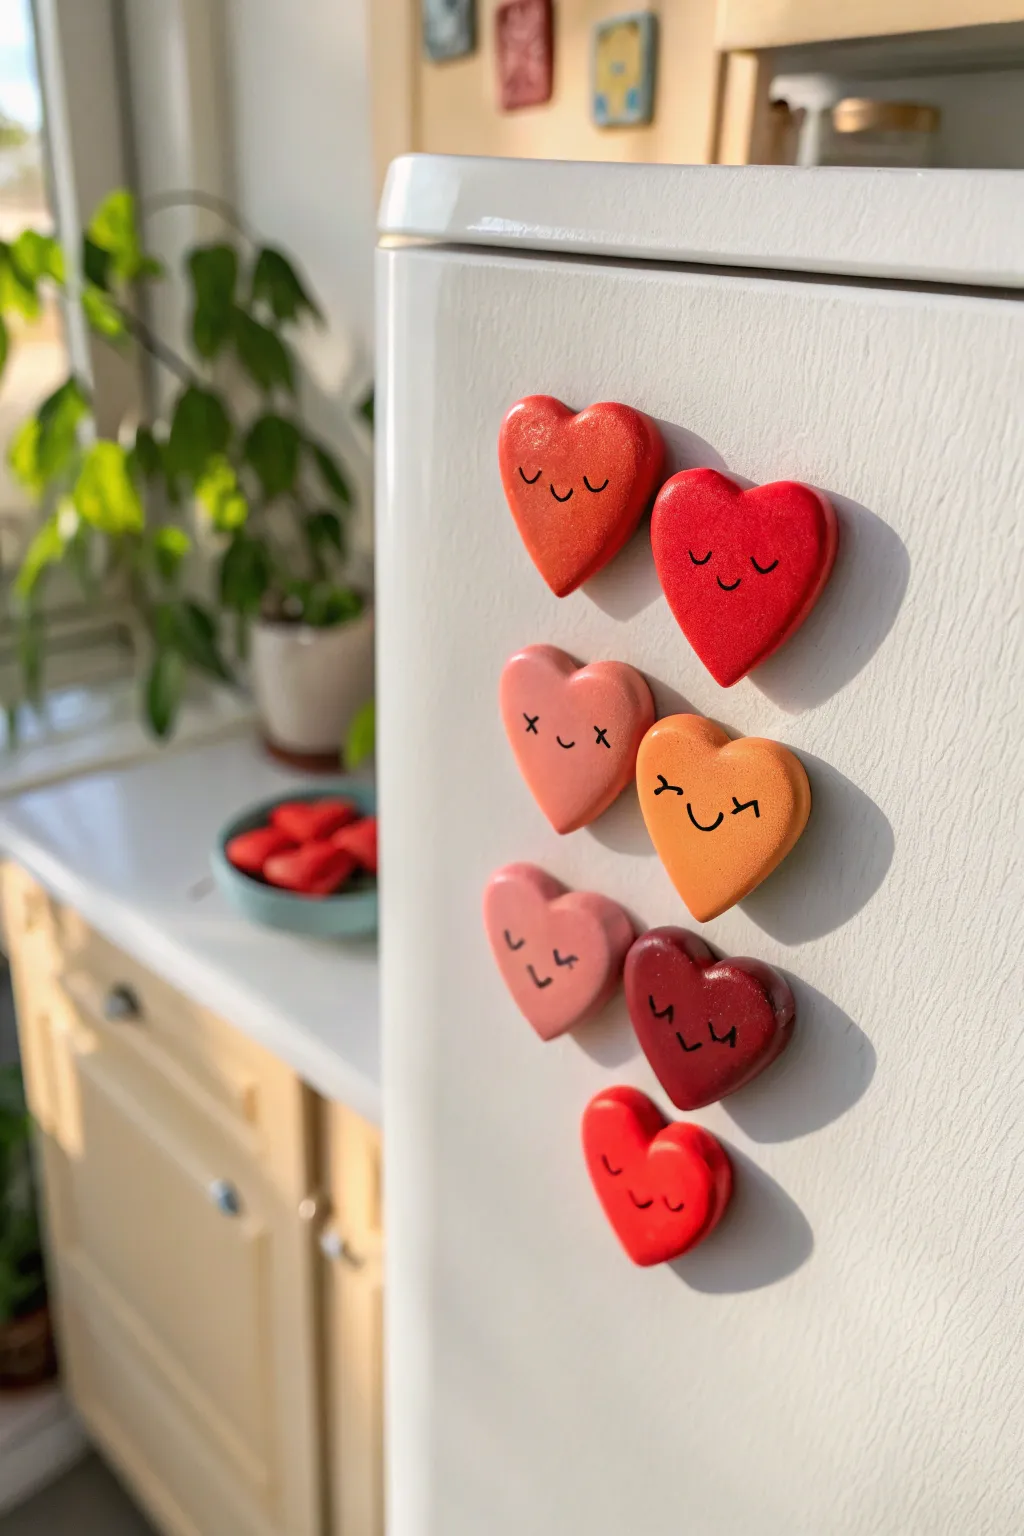
These adorable heart-shaped magnets perform double duty by holding up your favorite notes while adding a cheerful pop of personality to your kitchen. With their smooth, rounded edges and simple kawaii-style faces, they are the perfect quick crafting project to use up scrap clay.
Step-by-Step
Materials
- Polymer clay (red, pink, orange, coral)
- Heart-shaped cookie cutter (approx. 1.5 inches)
- Black acrylic paint or fine-tip permanent marker
- Small round magnets (neodymium recommended)
- Super glue (cyanoacrylate)
- Gloss glaze or polyurethane varnish (optional)
- Sandpaper (fine grit)
- Clay roller or pasta machine
- Needle tool or small paintbrush for details
Step 1: Shaping the Hearts
-
Preparation:
Begin by conditioning your polymer clay until it is soft and pliable. If you want custom shades like the coral or deep burgundy shown, mix your primary red with bits of orange or brown clay now. -
Rolling:
Roll the clay out into a thick slab, aiming for about 1/4 inch (6mm) thickness. We want these to be chunky and rounded, not flat like cookies. -
Cutting:
Use your heart-shaped cutter to punch out shapes. Because the clay is thick, wiggle the cutter gently to ensure a clean release. -
Softening Edges:
Remove the hearts from the cutter. Using your fingertips, gently tap and smooth the sharp ‘cut’ edges to create a pillowy, rounded contour known as a ‘cabochon’ finish. -
Embed Space:
Flip the hearts over. Press your magnet slightly into the back just to create an indentation, then remove the magnet. This ensures a flush fit later.
Clean Clay Tip
Keep baby wipes nearby to clean your hands when switching between red and lighter pink clays. Red pigment is strong and can easily stain lighter colors if you aren’t careful.
Step 2: Baking and Finishing
-
Baking:
Place your clay hearts on a ceramic tile or baking sheet lined with parchment paper. Bake according to the specific manufacturer’s instructions on your varying clay packages. -
Cooling:
Allow the hearts to cool completely in the oven with the door cracked, or on a wire rack. Don’t rush this, as warm clay is fragile. -
Sanding:
Once cool, inspect the edges. If there are any fingerprints or rough spots, buff them away gently with fine-grit sandpaper under running water. -
Painting Faces:
Using a very fine detail brush and black acrylic paint (or a marker), draw the simple faces. Try a mix of expressions: simple U-shapes for smiling eyes, little ‘x’ shapes for squinting, and small curved mouths. -
Drying:
Let the paint dry thoroughly. If you are impatient like me, a quick blast with a hair dryer on cool setting helps speed this up. -
Glazing:
For that protective shine seen in the photo, apply a thin coat of gloss glaze or varnish. This also seals the painted faces so they won’t rub off. -
Attaching Magnets:
Place a drop of super glue into the indentation you made earlier on the back. -
Setting:
Press the magnet firmly into the glue and hold for 10-15 seconds to ensure a strong bond.
Level Up: Glitter
Mix a tiny pinch of fine translucent glitter into the clay before rolling. It creates a subtle shimmer that mimics the stone-like texture seen in some of the magnets above.
Stick these cheerful hearts onto your fridge and enjoy a daily dose of cuteness every time you reach for a snack

TRACK YOUR CERAMIC JOURNEY
Capture glaze tests, firing details, and creative progress—all in one simple printable. Make your projects easier to repeat and improve.
Peas in a Pod Keychain
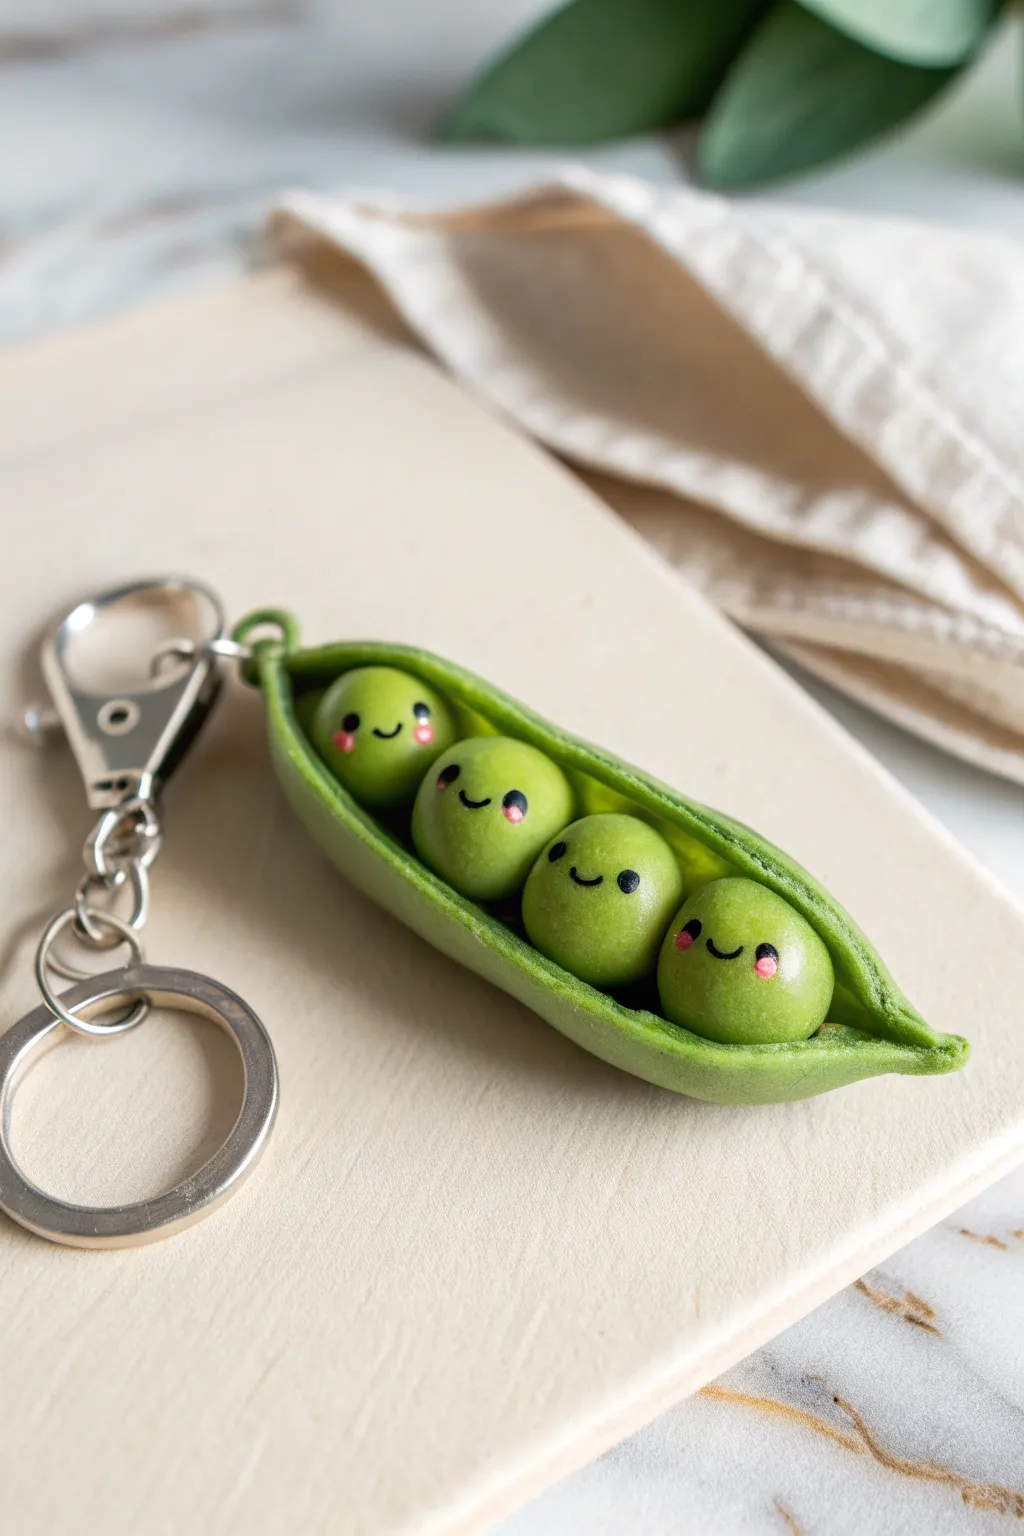
These four adorable friends nestled together make for the sweetest little accessory to keep your keys company. This polymer clay project captures a vibrant green pea pod with tiny, smiling faces that are sure to brighten your day.
Detailed Instructions
Materials
- Green polymer clay (pea green)
- Black acrylic paint or fine-tip black marker
- Pink acrylic paint or pink chalk pastel
- Gloss glaze or polyurethane varnish
- Metal keychain clasp with jump ring and screw eye pin
- Clay sculpting tools (needle tool/ball tool)
- Oven for baking
- Superglue (optional but recommended)
Step 1: Sculpting the Pod Base
-
Prepare the green clay:
Begin by conditioning a chunk of green polymer clay until it is soft and pliable in your hands. -
Create the pod shape:
Roll the clay into a log shape about 2.5 inches long, tapering both ends to points so it resembles a canoe or a thick green bean. -
Hollow out the center:
Using a modeling tool or your thumb, gently press down into the center of the log length-wise to create a boat-like cavity where the peas will sit. -
Refine the edges:
Pinch the walls of the pod slightly to thin them out, making sure they curve inward just a bit to hug the peas later. -
Add texture:
Take a needle tool or a stiff bristled brush and very lightly tap the surface of the pod to give it a realistic, organic texture instead of smooth plastic look.
Make Them Sparkle
Add a tiny white dot to the upper corner of each black eye using a toothpick. This ‘catchlight’ makes the peas look alive and extra cute.
Step 2: Creating the Peas
-
Roll spheres:
Take fresh green clay and roll four equal-sized balls. They should be just large enough to fit snugly inside your pod cavity. -
Check the fit:
Test the size by placing them into the pod. They should touch each other and fill the space from end to end without bulging out too much. -
Secure the peas:
Apply a tiny dab of liquid clay or translucent bake-and-bond to the bottom of the pod cavity, then press the four peas firmly into place. -
Insert the hardware:
screw a small metal eye pin into one of the tapered ends of the pod. I usually add a dot of liquid clay on the screw threads for extra security before baking.
Step 3: Adding Faces and Baking
-
Bake the clay:
Place your creation on a baking sheet or tile and bake according to your clay manufacturer’s specific instructions (usually 275°F for 15-30 mins). -
Cool completely:
Let the piece cool down fully before painting; painting on hot clay can cause the paint to crack or dry strangely. -
Paint the eyes:
Using a very fine detail brush and black acrylic paint, or a fine-tip permanent marker, draw two tiny dots for eyes on each pea. -
Add the smiles:
Connect the eyes with a tiny, curved U-shape for the mouth. Vary the expressions slightly if you want them to have individual personalities. -
Apply blush:
Dip a Q-tip or small brush into pink pastel dust or thinned pink paint and gently dab rosy cheeks just below the eyes.
Texturizing Trick
Use an old toothbrush to gently stipple the outside of the pod before baking. It creates a perfect natural vegetable skin texture effortlessly.
Step 4: Finishing Touches
-
Seal the piece:
Apply a coat of gloss glaze over the entire piece, or just on the eyes and peas if you want a contrasting matte pod. This protects the paint. -
Attach the clasp:
Once the glaze is dry, use pliers to open the jump ring on your keychain clasp and attach it to the eye pin loop on the pod. -
Close the ring:
Close the jump ring securely with your pliers, ensuring there’s no gap for the pod to slip through.
Now you have a charming handmade charm to carry with you everywhere you go
Ice Cream Cone Cutie
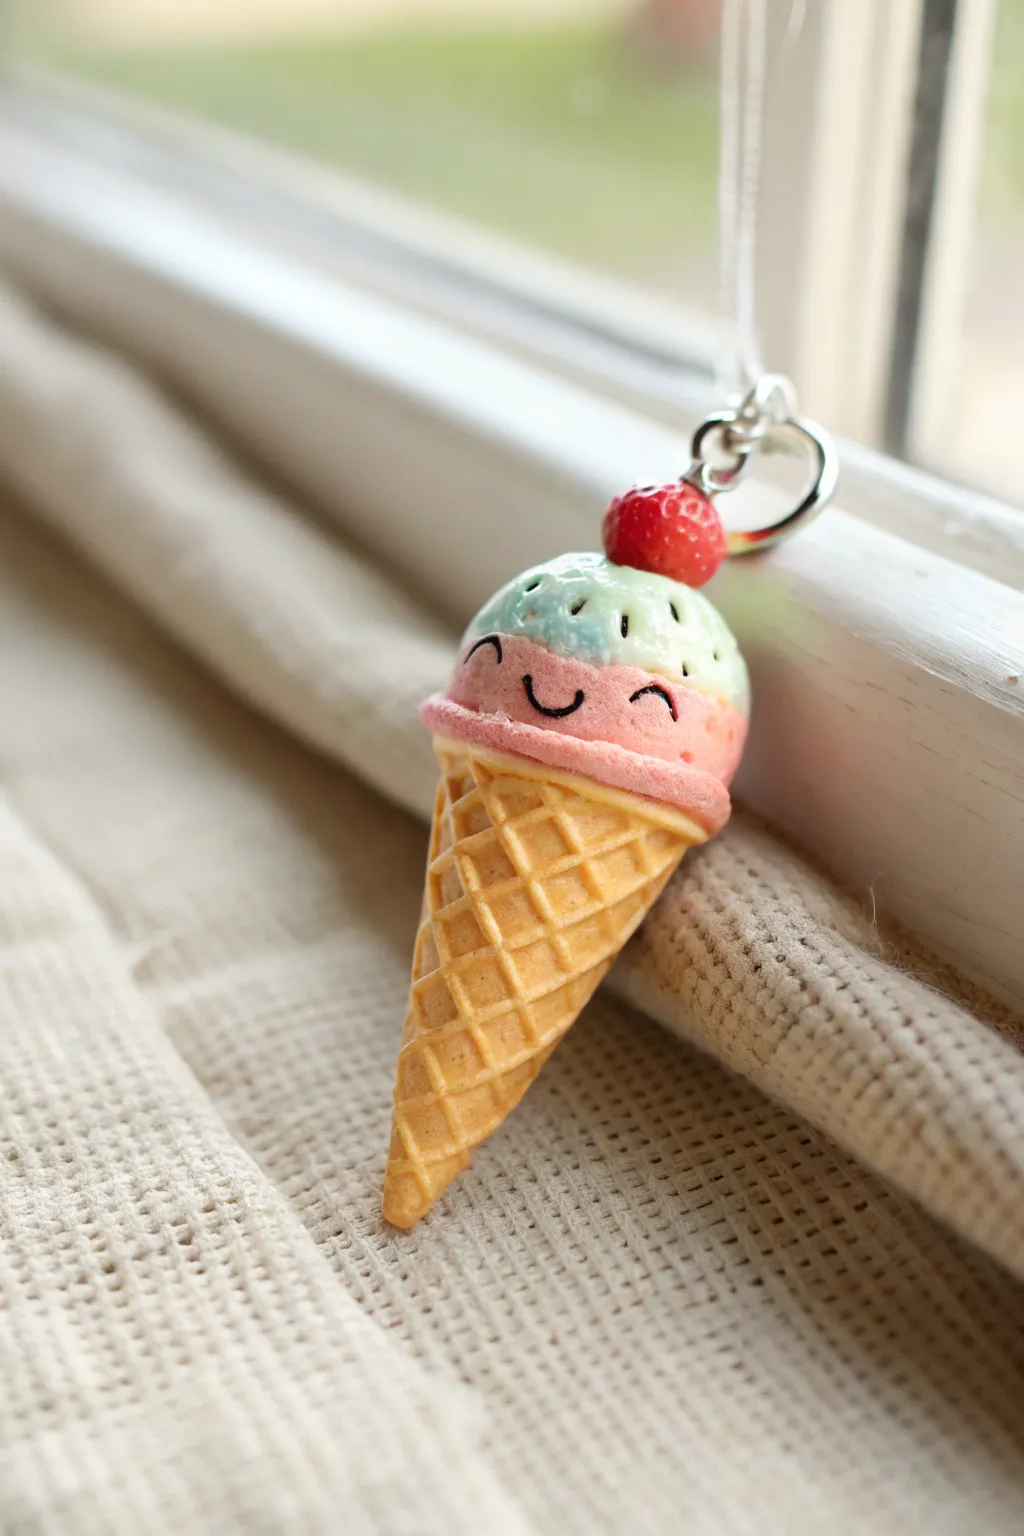
This adorable polymer clay charm captures the sweetness of summer with a smiling face and a tiny strawberry topper. It combines realistic waffle cone texture with kawaii details to create a perfect pendant or keychain accessory.
Step-by-Step Guide
Materials
- Polymer clay (beige/tan for cone, pink, mint green, red)
- Needle tool or toothpick
- Small ball tool
- Texture sheet or grid tool (optional for waffle pattern)
- Black acrylic paint
- Fine detail paintbrush
- Eye pin or screw eye
- Liquid clay (TLS)
- Gloss glaze or polyurethane
- Craft knife
Step 1: Shaping the Cone
-
Create the base:
Condition your beige or tan clay until soft, then roll it into a neat ball about the size of a marble. -
Form the cone shape:
Gently roll one side of the ball back and forth against your work surface to taper it into a cone. Flatten the top slightly by pressing it down gently. -
Texture the waffle pattern:
Use a needle tool or the back of a knife to press diagonal lines across the cone surface. Rotate and press diagonal lines in the opposite direction to create little diamond ‘waffle’ shapes. -
add texture detail:
For extra realism, poke a tiny dot in the center of each diamond shape using a needle tool, just like real waffle cones have.
Texturing Trick
Use a crumpled ball of aluminum foil rolled over the clay creates a perfect instant ice cream texture if you don’t want to use a toothbrush.
Step 2: Scooping the Ice Cream
-
Make the bottom scoop:
Roll a ball of pink clay slightly wider than the top of your cone. -
Attach the pink scoop:
Press the pink ball onto the flat top of the cone. Gently pull the edges downward just a little to create that ‘melting over the edge’ rim effect. -
Add texture to the ice cream:
Using a needle tool or an old toothbrush, gently tap the surface of the pink clay to give it a realistic, aerated ice cream texture. -
Create the top scoop:
Roll a slightly smaller ball of mint green clay. I like to marble in a tiny bit of white or blue for visual interest here. -
Stack the scoops:
Press the mint green ball securely on top of the pink layer. -
Blend the scoops:
Use a small ball tool to drag the mint clay down slightly into the pink clay in a few spots, mimicking how scoops squish together. -
Texture the top layer:
Repeat the texturing process on the mint scoop, ensuring there are no smooth fingerprints left behind.
Sticky Fingerprints?
If your clay is too soft and holding fingerprints, pop it in the fridge for 10 minutes to firm it up before you continue sculpting.
Step 3: Details & Hardware
-
Form the strawberry:
Roll a tiny bead of red clay. Pinch one end slightly to make it teardrop-shaped. -
Texture the berry:
Poke tiny holes all over the red clay with your finest needle tool to simulate seeds. -
Attach the cherry on top:
Place a dab of liquid clay on the very top of the mint scoop and press the strawberry into place. -
Insert hardware:
Trim an eye pin to the right length and push it through the strawberry and deep into the ice cream scoops to secure everything together. -
Bake the charm:
Bake according to your clay package instructions (usually 275°F/130°C for 15-30 minutes). Let it cool completely.
Step 4: Finishing Touches
-
Paint the face:
Using a very fine brush and black acrylic paint, carefully draw two closed, curved eyes and a small ‘U’ mouth on the pink layer. -
Glaze specifically:
For a wet look, apply a gloss glaze only to the strawberry and possibly the ice cream scoops, leaving the cone matte for contrast.
Once dry, string your new smiling friend onto a necklace or keychain and carry a little bit of sweetness with you everywhere
Happy Toast Mini
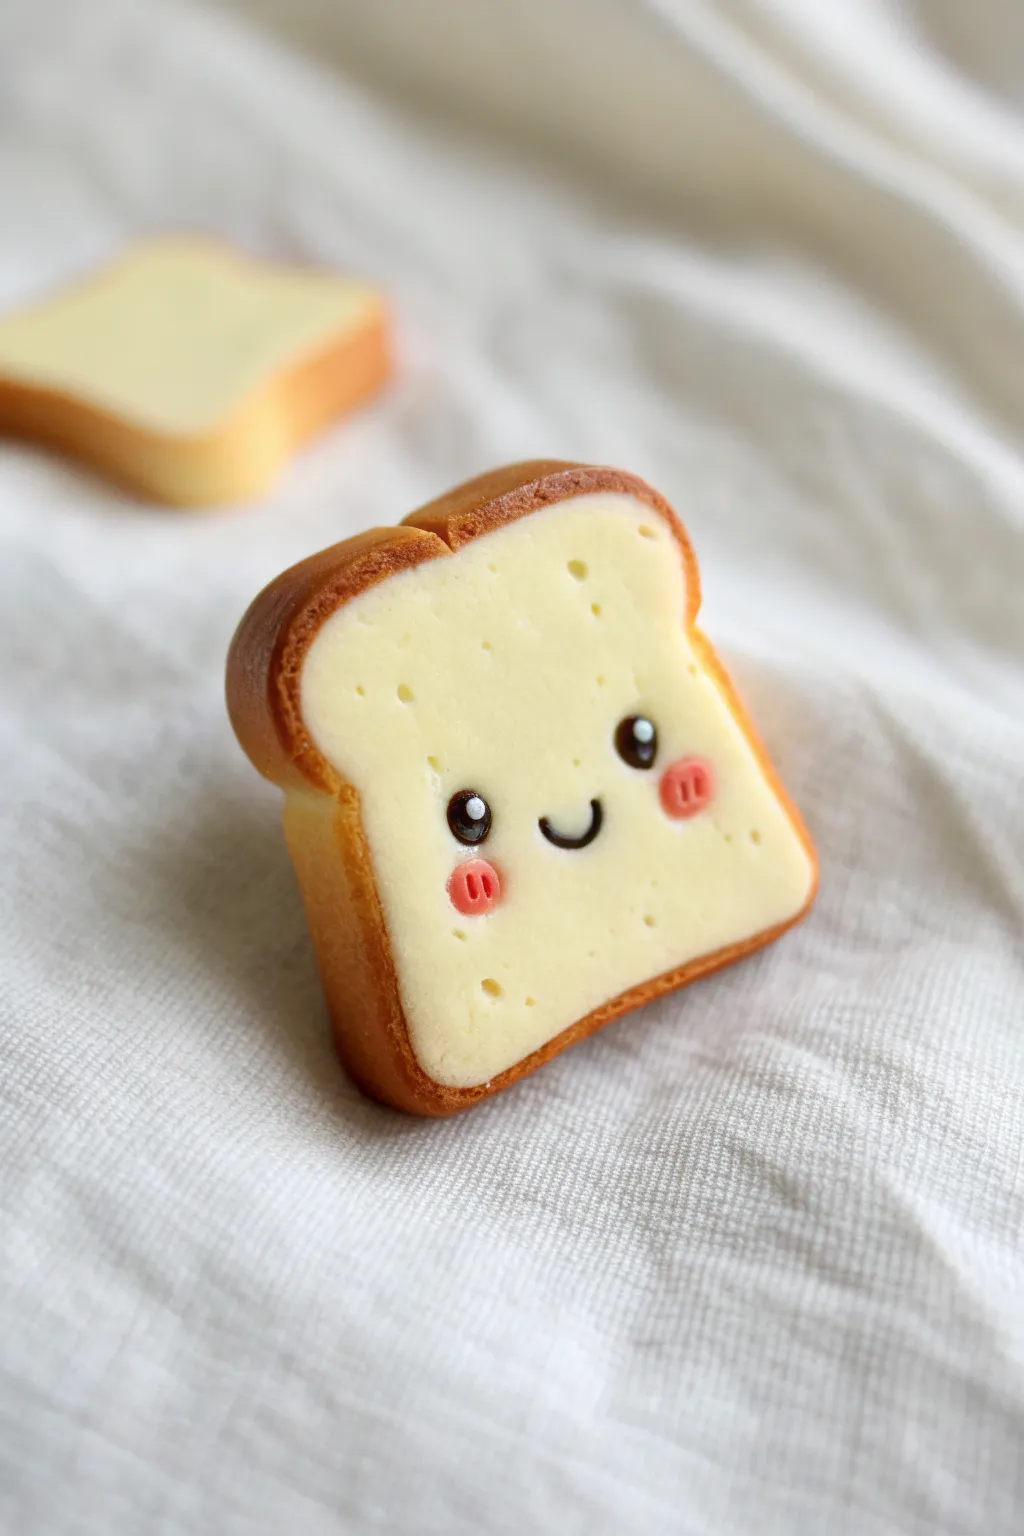
This adorable miniature toast slice brings a smile to breakfast time with its golden-brown crust and cheerful expression. The soft shading on the edges gives it a freshly baked look that contrasts perfectly with the creamy interior.
Detailed Instructions
Materials
- Polymer clay (white, translucent, yellow ocher/beige)
- Soft pastel chalks (yellow ocher, burnt sienna, dark brown)
- Black acrylic paint or clay
- Pink or red acrylic paint
- Dotting tools or toothpicks
- Needle tool
- Soft paintbrush for shading
- Rectangle clay cutter (optional)
- Gloss glaze (UV resin or polyurethane)
Step 1: Shaping the Loaf
-
Mix the Dough Color:
Start by conditioning your clay. Mix a large amount of white with a small pinch of yellow ocher and a roughly equal amount of translucent clay. This recipe creates a realistic, creamy bread color that isn’t too bright or opaque. -
Form the Base Shape:
Roll the clay into a thick slab, about 1/4 inch thick. You can use a rectangle cutter or simply shape a square by hand, gently rounding the bottom corners while keeping the top slightly wider. -
Create the Crown:
To get that classic toast shape, gently press an indentation into the center of the top edge using the side of a paintbrush handle. Smooth it out so it looks like the top of a loaf split naturally. -
Add Texture:
Take a stiff toothbrush or a crumpled ball of aluminum foil. Gently tap the entire surface of the front and back (but not the sides yet) to create a subtle, airy bread texture. -
Simulate Air Pockets:
Using a needle tool, poke a few random, deeper holes into the face of the toast. These mimic larger air bubbles found in real bread; just be sure not to go all the way through.
Step 2: Toasting the Edges
-
Prepare the Pastels:
Scrape some dust from your yellow ocher, burnt sienna, and dark brown variations of soft pastel chalk onto a piece of paper. -
Apply the Base Crust:
Using a soft, dry paintbrush, pick up the yellow ocher dust. Brush it along the outside edges (the crust) of the toast, wrapping slightly onto the front face. -
Deepen the Toast:
Switch to the burnt sienna dust. Apply this over the yellow ocher, concentrating on the very outer rim to create a rich, baked gradient. -
Add Charred Accents:
I like to use a tiny bit of the dark brown dust just on the sharpest corners and the top indentation to make it look crispy.
Realism Tip
Don’t over-texture the sides where the crust is. Real bread usually has a smoother crust compared to the porous inside. Keep the texture focused on the face.
Step 3: Bringing it to Life
-
Position the Eyes:
Use a medium-sized dotting tool dipped in black acrylic paint to place two eyes wide apart on the lower half of the toast. Alternatively, you can press two tiny balls of black clay into the surface. -
Add the Sparkle:
Once the black eyes are slightly set, use a needle tip or the smallest dotting tool to add a tiny white reflection dot in the upper corner of each eye. -
Paint the Smile:
With a fine detail brush or needle tool and black paint, draw a small, simple ‘U’ shape right between the eyes. -
Rosy Cheeks:
Dip a dotting tool into pink or light red paint. Place two oval-shaped blush marks directly underneath the outer edge of the eyes. -
Cheek Details:
For extra cuteness, use a clean needle tool to scratch two tiny vertical lines inside the wet pink paint of the cheeks. -
Baking:
Bake the piece according to your specific clay manufacturer’s instructions (usually 275°F/130°C for 15-30 minutes). Let it cool completely. -
Glazing:
Apply a coat of UV resin or localized gloss varnish only to the eyes and the mouth to make them shine. Keep the bread matte for realism.
Fixing Mistakes
If you apply too much pastel dust and the toast looks burnt, use a baby wipe or a q-tip dipped in rubbing alcohol to gently remove the excess powder before baking.
Now you have a freshly baked friend to keep you company on your desk or as a bag charm
Tiny Milk Carton Charm
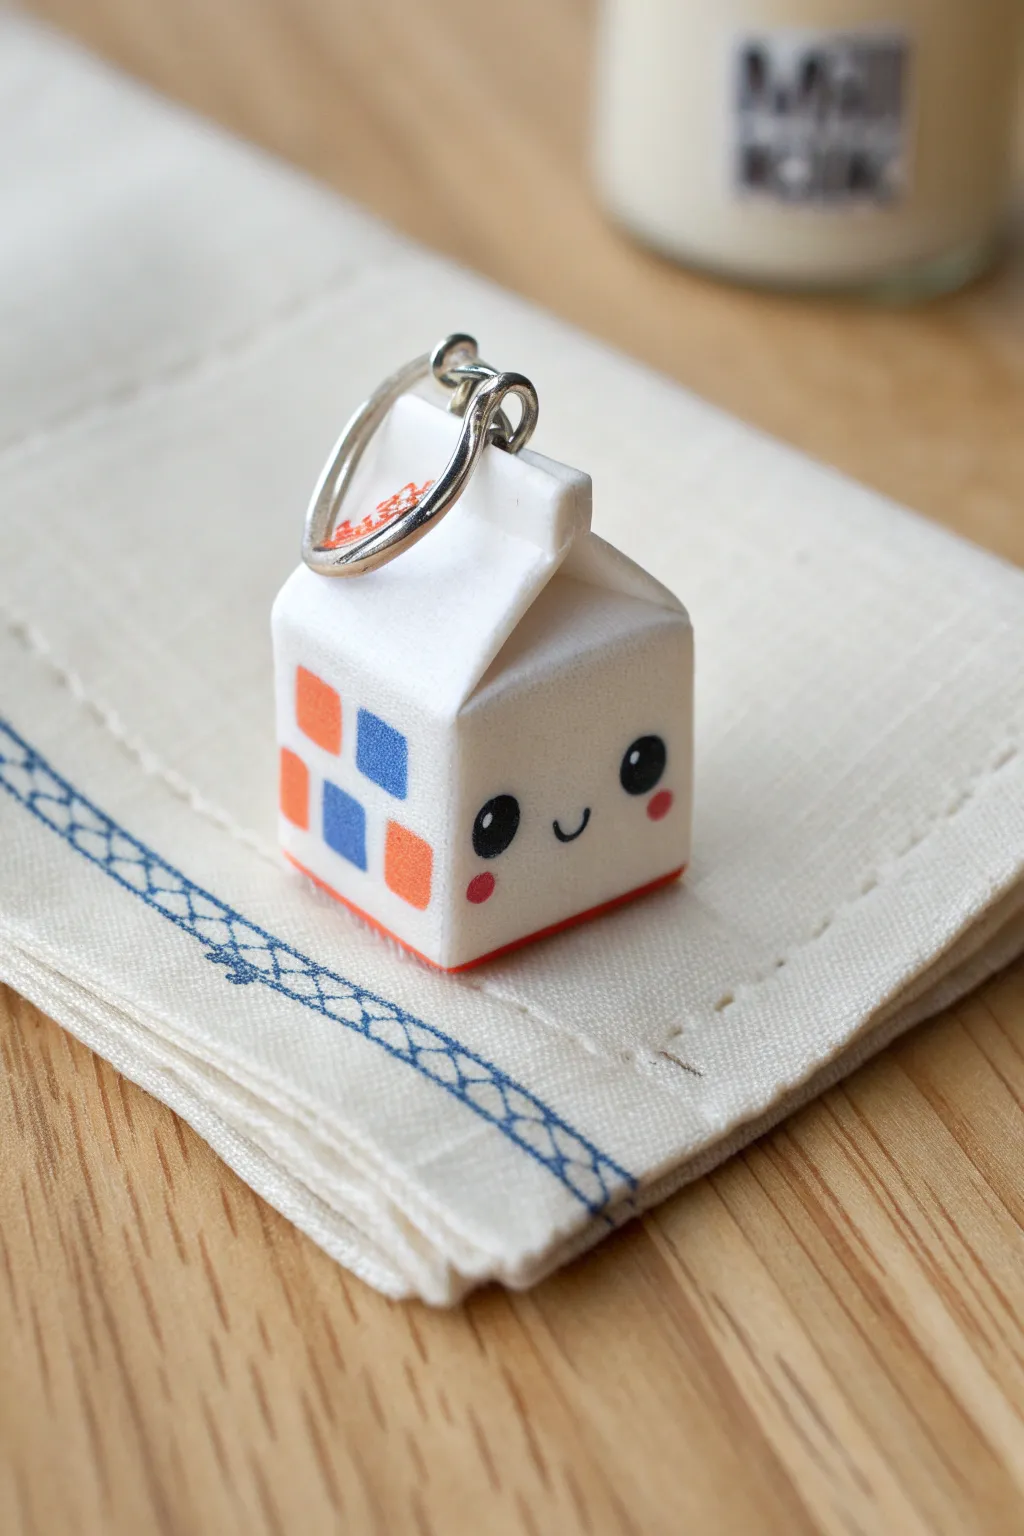
This adorable miniature milk carton charm brings a splash of cuteness to your keychain or bag. With its simple geometric shape and sweet kawaii face, this tiny clay project is as fun to make as it is to display.
How-To Guide
Materials
- White polymer clay
- Acrylic rolling pin
- Precision craft knife or clay blade
- Needle tool
- Headpin or eye screw
- Jump ring and keychain attachment
- Acrylic paints (black, white, pink, orange, blue)
- Fine detail paintbrush or dotting tools
- Matte glaze or varnish
- Ruler
- Oven for baking
Step 1: Shaping the Base
-
Condition the clay:
Start by thoroughly kneading your white polymer clay until it’s soft and pliable. Warm clay is essential for getting smooth edges without cracks. -
Form a block:
Roll the clay into a smooth ball, then gently press it against your work surface to flatten the bottom. Use your fingers and the flat side of your blade to shape it into a rectangular block, approximately 2cm tall by 1.5cm wide. -
Refine the sides:
Turn the block on each side repeatedly, pressing gently to ensure crisp, sharp corners and flat faces. The body of the carton should be a clean cuboid shape. -
Create the roof slant:
Pinch the top half of the rectangle gently to start forming the triangular roof shape. You don’t want a perfect point yet; aim for a tent-like structure. -
Define the top ridge:
Using your fingers, flatten the very top peak into a thin, rectangular ridge running horizontally across the carton. This mimics the sealed top of a real carton. -
Detail the folds:
Take your needle tool or the back of your knife and gently press an indentation into the side of the triangular roof section. This creates the look of the folded-in cardboard sides found on milk cartons.
Fingerprint Fix
White clay shows every spec of dust and fingerprint! Keep baby wipes nearby to clean your hands often, and lightly brush the raw clay with cornstarch to smooth out prints.
Step 2: Adding Hardware & Baking
-
Insert the finding:
Before baking, take a metal eye screw or a trimmed headpin bent into a loop. Insert it firmly into the center of the top ridge. If you want extra security, add a tiny dab of liquid clay or Bake & Bond to the shaft before inserting. -
Check symmetry:
Look at the carton from all angles to ensure it hasn’t warped while inserting the pin. Reshape slightly if needed to keep those lines straight. -
Bake the piece:
Place your charm on a baking tray or ceramic tile. Bake according to your specific clay brand’s instructions (usually around 275°F/130°C for 15-30 minutes). Let it cool completely before handling.
Pro Tip: Sharp Edges
To get perfectly sharp, boxy corners, try gently pressing your rectangular clay shape against a small mirror or glass block on each side before shaping the top.
Step 3: Painting & Decoration
-
Plan the face:
Once cool, lightly sketch the placement of the eyes and mouth with a pencil if you’re nervous about freehanding. The face should sit low on the front face for maximum cuteness. -
Paint the eyes:
Using a dotting tool or the end of a paintbrush handle dipped in black acrylic paint, stamp two solid circles for the eyes. Space them widely apart. -
Add the smile:
With your finest detail brush and black paint, draw a tiny, shallow ‘U’ shape between the eyes for the mouth. -
Paint the patterned side:
On the left side of the carton, paint small alternating squares. I usually do a checkerboard pattern using orange and blue paint to mimic a brand logo or nutrition info. -
Add rosy cheeks:
Dip a smaller dotting tool into pink paint and add tiny blush marks just below and outside the eyes. -
Highlight the eyes:
Once the black eye paint is fully dry, use a toothpick to add a tiny white dot to the upper right corner of each eye. This ‘catchlight’ brings the character to life. -
Add the rim detail:
Carefully paint a thin line of color (orange or red) along the very bottom edge of the carton to give it a finished look. Using the side of your brush against the edge can help keep it straight. -
Seal the charm:
Protect your paint job with a coat of matte glaze or polyurethane varnish. A matte finish looks more like paper cardboard than a glossy one. -
Assemble the keychain:
Open a jump ring with pliers, loop it through the eye screw on your charm, and attach it to your keychain ring. Close the jump ring securely.
Now your tiny dairy friend is ready to keep your keys company.
Mini Boba Drink Pal
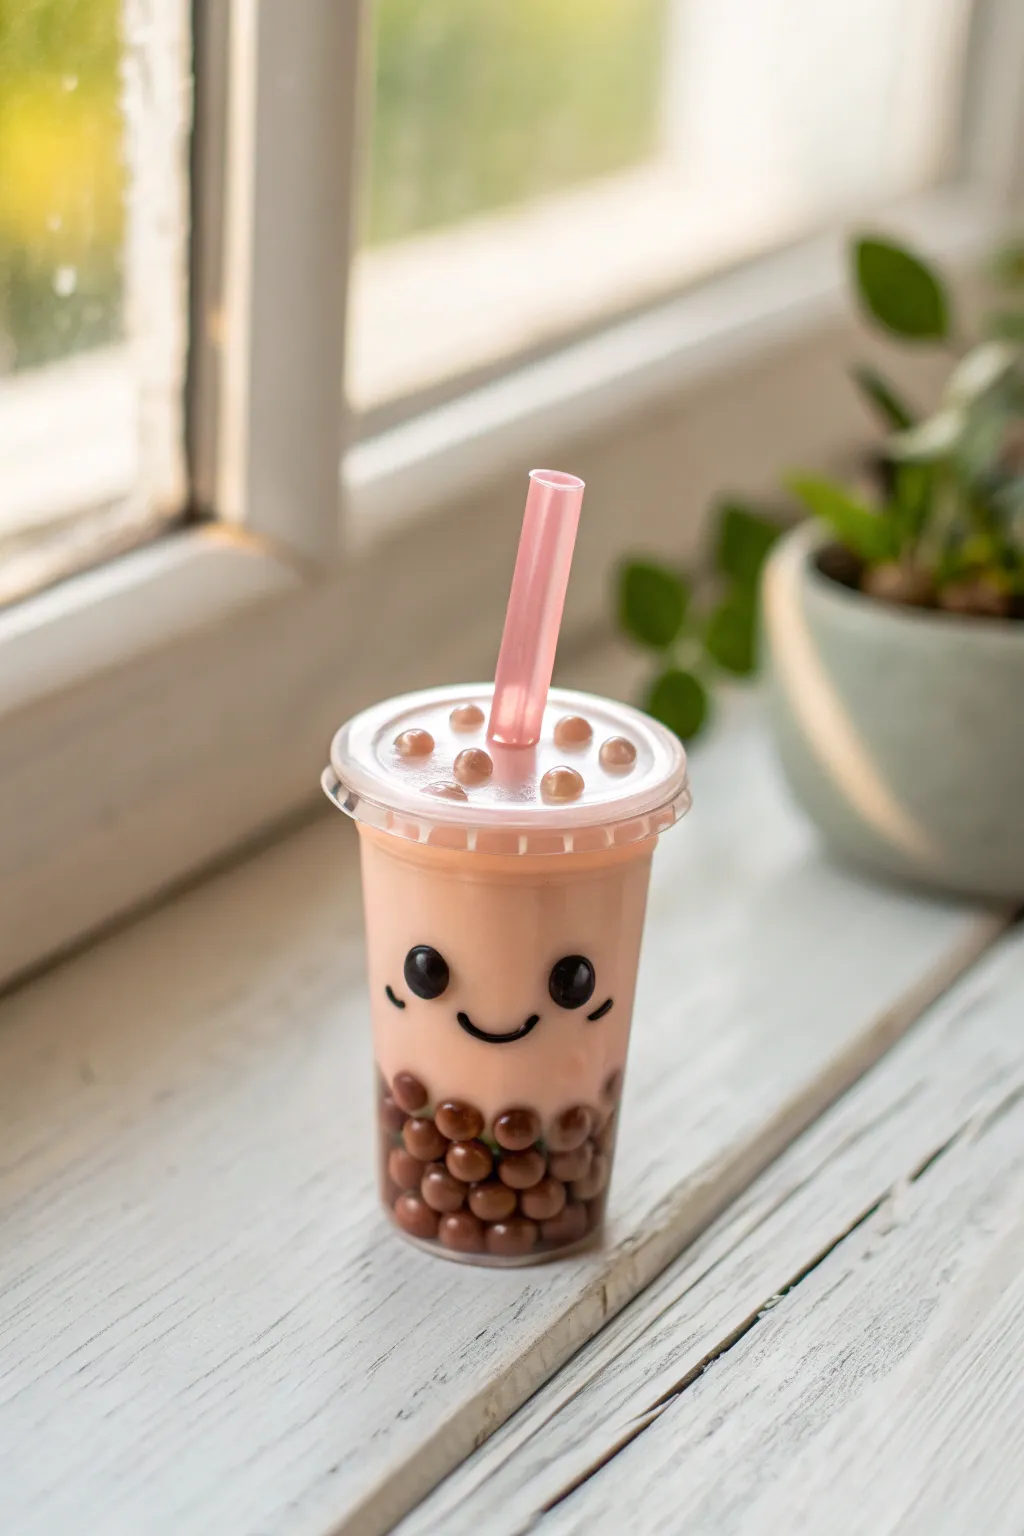
Create an adorably realistic tiny bubble tea that will never melt or spill. This polymer clay and resin project captures the joy of boba with suspended pearls, a creamy tea color, and a cheerful little smile.
Detailed Instructions
Materials
- Polymer clay (white, brown, translucent, pink)
- UV resin (clear)
- UV lamp
- Small plastic condiment cup or dollhouse miniature cup
- Clear plastic sheet (thin acetate or recycled packaging)
- Black acrylic paint
- Fine detail paintbrush or dotting tool
- Toothpick
- Gloss glaze (optional)
- Scissors
Step 1: Preparing the Pearls
-
Mix the boba color:
Start by mixing dark brown polymer clay with a very small amount of black to achieve that deep, cooked tapioca color. If you want a more translucent look, mix in a tiny bit of translucent clay. -
Roll the pearls:
Pinch off tiny pieces of the clay mixture and roll them into uniform spheres about 2-3mm in diameter. You will need a generous pile—enough to fill the bottom the cup and decorate the lid. -
Bake the pearls:
Place your tiny pearls on a tile or baking sheet. Bake them according to your clay package’s instructions (usually 275°F/135°C for 15 minutes), then let them cool completely.
Bubble Trouble?
If stubborn bubbles appear in your resin while mixing, briefly pass a lighter flame quickly over the surface before curing. The heat pops them instantly so your tea looks smooth.
Step 2: Creating the Drink
-
Mix the ‘tea’:
Instead of just using clay, we’ll use a mix of opaque clay and resin for a liquid look. Pack the bottom of your miniature cup with the baked brown pearls until it’s about one-third full. -
Prepare the liquid base:
Mix a small amount of clear UV resin with a tiny shaving of peach or pink pastel chalk (or a drop of resin dye). Stir gently with a toothpick to avoid micro-bubbles. -
Pour the first layer:
Pour the tinted resin over the pearls in the cup. Use a toothpick to guide the resin between the pearls so no large air pockets remain visible against the cup walls. -
Cure the base:
Place the cup under a UV lamp for 60-90 seconds until the bottom layer is solid. This prevents the pearls from floating up when we add the rest of the ‘milk tea’. -
Create the milky tea:
Prepare a larger batch of resin. This time, mix in enough white and peach/tan pigment (or shavings of soft clay) to make it opaque and creamy, resembling milk tea. -
Fill the cup:
Pour this opaque mixture into the cup, leaving just a millimeter or two of space at the top rim. Tap the cup gently on the table to release trapped bubbles. -
Insert the straw base:
Before curing, if you are making your own straw from clay, insert a small placeholder (like a piece of wire) to keep a channel open, or simply place your pre-made straw now if ready. Cure firmly under the UV lamp.
Step 3: The Lid and Details
-
Make the lid base:
Trace the rim of your cup onto a piece of clear acetate plastic and cut it out. This disk will simulate the sealed plastic film found on real boba cups. -
Attach the lid:
Apply a thin ring of clear UV resin to the rim of your cup. Place the acetate disk on top and cure it quickly to seal the drink. -
Shape the straw:
Roll a small snake of translucent pink clay. Flatten it gently and wrap it around a toothpick to form a hollow tube, or simply use a thick solid cylinder for ease. Trim to size. -
Bake the straw:
Bake the clay straw separately as per package instructions. I typicallyprop it up so it stays straight during baking. -
Assemble the top:
Use a dab of UV resin to attach the straw to the center of the lid. Arrange 5-6 leftover brown pearls around the base of the straw on top of the lid for that classic ‘bursting with boba’ aesthetic. -
Seal the top:
Coat the pearls and the lid surface with a final thin layer of clear resin or high-gloss varnish to make everything look wet and fresh.
Flavor Variations
Change the resin dye color to create different flavors! Use pastel purple for taro, pale green for matcha, or a vibrant orange for Thai tea to build a whole colorful menu.
Step 4: Bringing it to Life
-
Paint the eyes:
Using a dotting tool or the end of a paintbrush, place two solid black circles of acrylic paint in the center of the cup for eyes. -
Add the smile:
With an ultra-fine detail brush, paint a small, U-shaped mouth between the eyes. Add tiny slanted lines near the eyes for cheeks if desired. -
Highlight the eyes:
Once the black paint is dry, add a tiny white dot to the upper corner of each eye. This ‘catchlight’ is crucial for making the character look alive and cute.
Now you have a sweet little desk companion that looks delicious enough to sip
Animal Toothbrush Holder
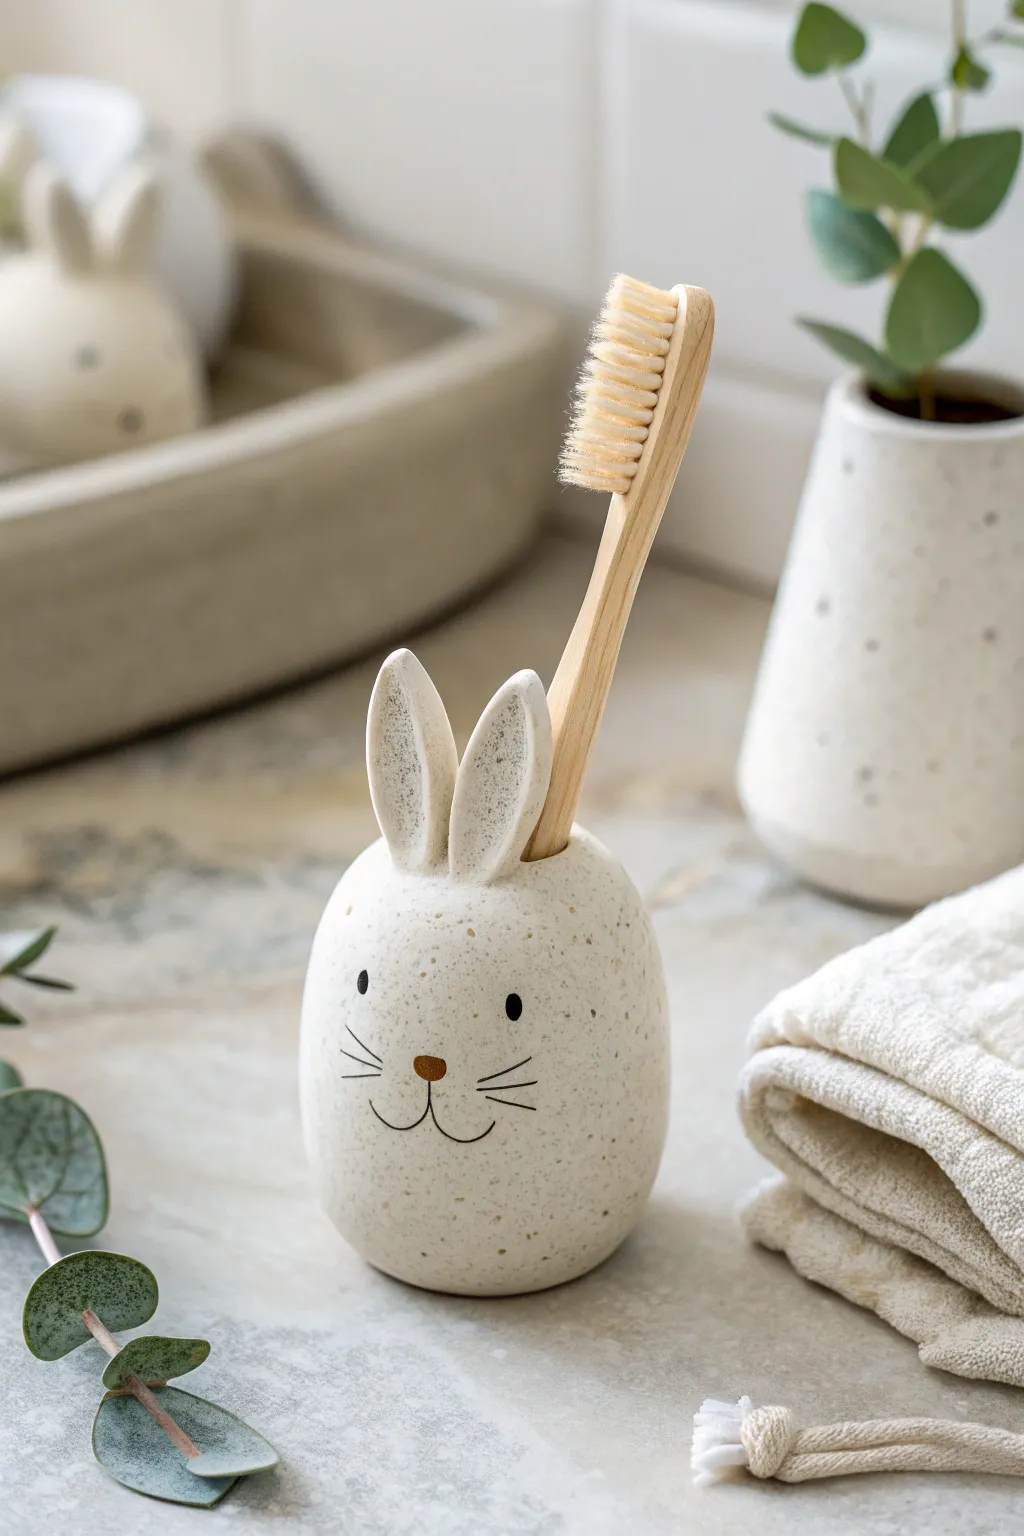
Transform a simple lump of clay into this adorable, speckled rabbit that keeps your toothbrush upright and ready. With its minimalist face and natural stone finish, this functional piece adds a touch of playful charm to any bathroom counter.
Step-by-Step Tutorial
Materials
- Air-dry clay or white polymer clay
- Rolling pin
- Clay sculpting tools (needle tool, smoothing tool)
- Small bowl of water (for smoothing)
- Acrylic paints (black, brown, cream/beige)
- Old toothbrush (for speckling)
- Fine detail paintbrush
- Clear waterproof varnish or sealant (matte finish)
- Sandpaper (fine grit)
Step 1: Shaping the Base Body
-
Form the main shape:
Start by conditioning your clay until it is soft and pliable. Roll a ball of clay roughly the size of a large lemon or a goose egg. Gently taper the top slightly to create a rounded egg shape, ensuring the bottom is flattened enough to stand stably on a flat surface. -
Create the toothbrush hole:
Using the handle of your actual toothbrush or a sculpting tool of similar diameter, press a hole vertically into the top center of the egg shape. I prefer to wiggle it slightly to ensure the opening is generous enough for easy use but deep enough (about 1.5 to 2 inches) to hold the brush securely. -
Smooth the surface:
Dip your finger in a little water and run it over the entire surface of the egg. Smooth out any fingerprints, cracks, or uneven lumps until you have a pristine, stone-like finish.
Weight it Down
If using lightweight air-dry clay, press a small, clean stone or a few metal washers into the bottom center before drying. This adds heft and prevents tipping when holding a heavy brush.
Step 2: Adding the Ears
-
Shape the ears:
Take two smaller pieces of clay and roll them into elongated tear-drop shapes. Flatten them slightly between your thumb and forefinger to resemble bunny ears. -
Attach the ears:
Score the bottom of the ears and the attachment points on the top of the egg shape (just behind the toothbrush hole). Apply a tiny bit of water or slip (liquid clay) to join them. Press firmly to adhere. -
Blend the seams:
Use a clay smoothing tool to blend the clay from the base of the ears down into the head so there is no visible seam. This structural integrity is crucial so they don’t snap off later. -
Detail the inner ear:
Use a rounded tool or your pinky finger to gently press an indentation into the center of each ear, giving them a realistic concave shape.
Cracks Appearing?
If you see hairline cracks as the clay dries, mix a tiny amount of fresh clay with water to make a paste. Fill the cracks, smooth it out with a finger, and let it dry again before painting.
Step 3: Painting and Finishing
-
Dry the sculpture:
Allow your clay piece to dry completely according to the package instructions. For air-dry clay, this might take 24-48 hours. Ensure it feels room temperature to the touch, not cool. -
Sand for smoothness:
Once dry, gently sand any rough spots or fingerprints with fine-grit sandpaper to achieve that professional ceramic look. -
Apply the base color:
Paint the entire bunny with a cream or off-white acrylic paint. You may need two coats to get solid, opaque coverage. -
Create the speckled effect:
Dilute a small amount of beige or light brown paint with water. Dip an old toothbrush into this mixture and flick the bristles with your thumb to spray fine speckles over the bunny. Repeat this sparingly with a tiny bit of grey for depth. -
Paint the face details:
Using your finest detail brush and black acrylic paint, add two small oval dots for eyes. Paint thin, delicate lines for the whiskers—three on each side. -
Add the nose and mouth:
Paint a small, soft brown oval for the nose right between the whisker sets. Draw a thin black anchor shape extending down from the nose to form the smiling mouth. -
Seal the piece:
This is the most critical step for a bathroom item. Apply 2-3 coats of a waterproof matte varnish, letting each coat dry fully in between. Pay special attention to coating the inside of the toothbrush hole to prevent water damage.
Now your bathroom has a cheerful new resident ready to start your day with a smile
Bear Photo or Card Stand
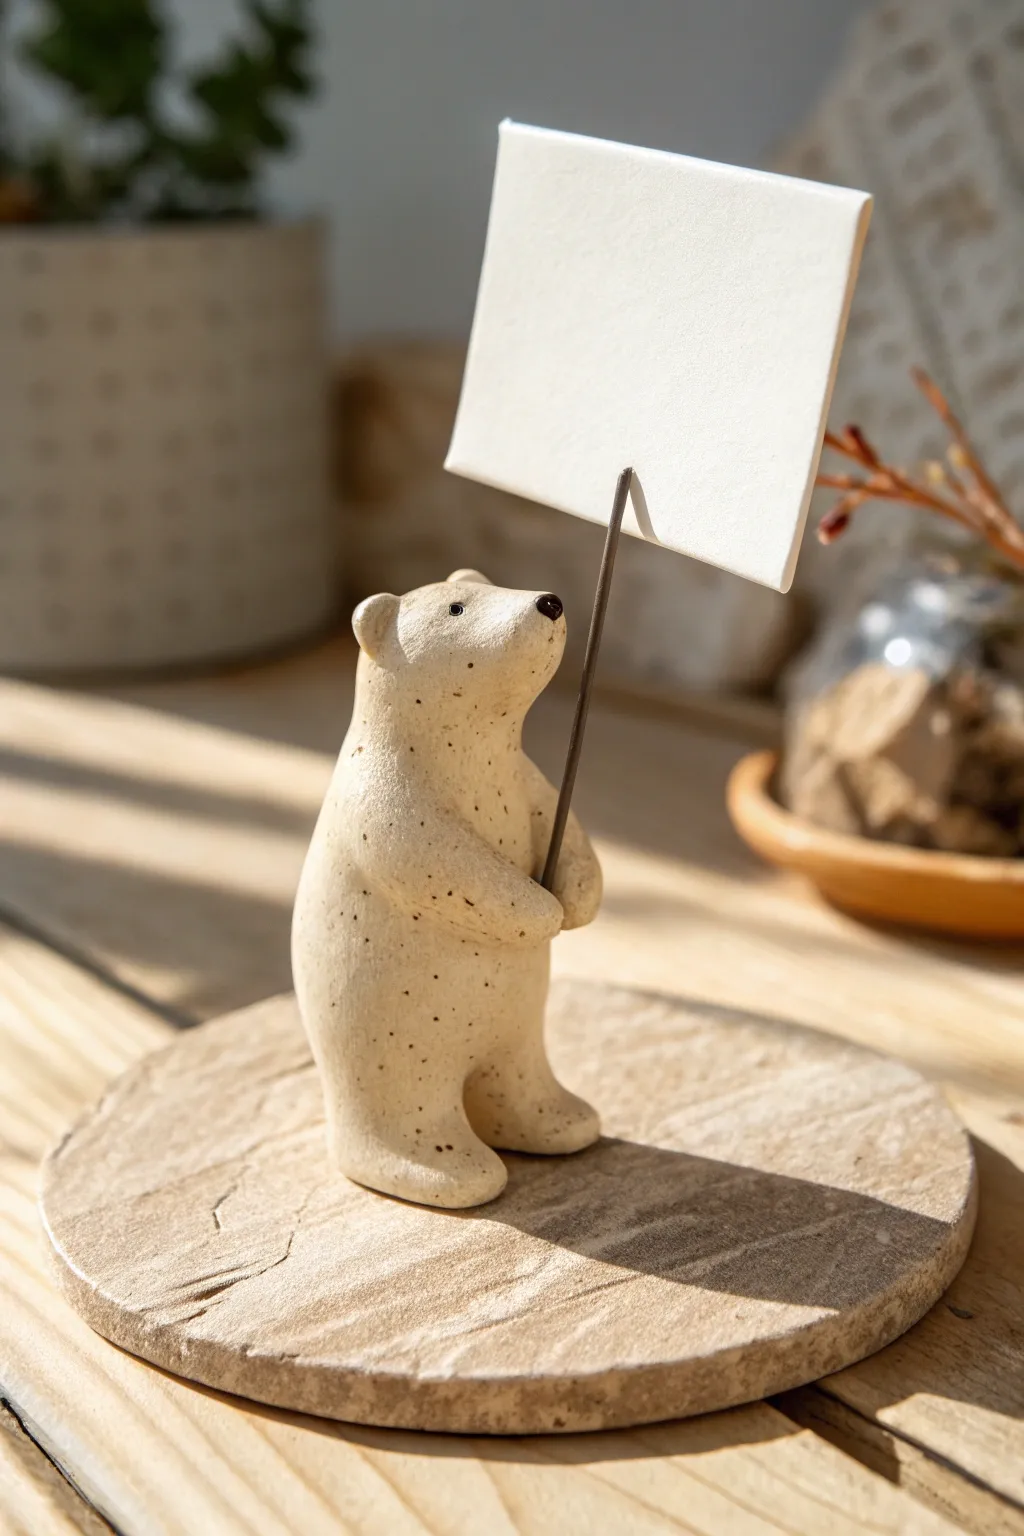
This charming little bear stands proudly on a stone-like base, holding up your favorite photos, notes, or place cards with a simple wire stem. Its rustic, speckled finish gives it a delightful handmade pottery feel without needing a kiln.
How-To Guide
Materials
- Air-dry clay (stone or speckled finish preferred)
- Black floral wire or 18-gauge craft wire
- Small rolling pin
- Round cookie cutter (approx. 3-4 inches)
- Black acrylic paint
- Small detail paintbrush or toothpick
- Sculpting tool or butter knife
- Water bonding slip (clay mixed with water)
- Needle nose pliers
- Fine-grit sandpaper
Step 1: Forming the Base
-
Prepare the slab:
Begin by rolling out a portion of your speckled clay into a flat slab, aiming for a consistent thickness of about 1/4 inch. -
Cut the circle:
Use your round cookie cutter to stamp out a perfect circle from the slab. If the edges are sharp, gently tap them down with your finger to soften the look. -
Add texture:
For that realistic stone effect seen in the photo, gently press a crumpled ball of foil or a real rough stone onto the surface of the disc to create subtle unevenness. -
Simulate cracks:
Use your sculpting tool to scratch shallow, wandering lines near the edge of the base to mimic natural slate fractures.
Step 2: Sculpting the Bear
-
Create the body:
Roll a medium-sized ball of clay into a thick cylinder shape that tapers slightly at the top for the neck area; it should be about 2-3 inches tall. -
Form the head:
Pull a small amount of clay upwards from the body to form the head, or attach a separate small ball using a bit of water to bond them seamlessly. -
Shape the snout:
Gently pinch the front of the face to pull out a small, rounded snout, keeping the transition smooth. -
Add the ears:
Roll two very small balls of clay. Flatten them slightly and attach them to the top of the head using a drop of water, blending the seams downward with a tool. -
Pull the legs:
At the bottom of the body, use your thumb to gently divide the base into two stubby legs, smoothing them so the bear stands stable on its own. -
Create the arms:
Roll two small sausage shapes for arms. Attach them at the shoulders and curve them forward as if the bear is holding something in front of its belly. -
Secure to the base:
Score the bottom of the bear’s feet and the center of your textured base with a tool. Add a dab of water slip and press the bear firmly onto the base.
Natural Speckles
If you can’t find pre-speckled clay, mix used coffee grounds or cracked black pepper into plain white clay before sculpting.
Step 3: Adding the Hardware
-
Prepare the wire:
Cut a piece of wire approximately 4-5 inches long using your pliers. -
Create the holder:
At the top end of the wire, coil it twice into a spiral or a flat loop (like a paperclip) that can tightly grip a card. -
Insert the wire:
While the clay is still wet, carefully push the straight end of the wire vertically through the bear’s hands and down into the base for stability. -
Adjust the grip:
Gently squeeze the clay hands around the wire so it looks like the bear is gripping the pole tightly.
Seasonal Switch
Make the wire removable! Insert a straw piece while sculpting, remove it after drying, and swap display wires for holidays.
Step 4: Finishing Touches
-
Smooth the surface:
Dip your finger in a little water and run it over the bear to remove any fingerprints or harsh sculpting lines. -
Let it dry:
Allow the entire piece to dry completely for 24-48 hours. I find that turning it occasionally helps the bottom of the base dry evenly. -
Paint the nose:
Once fully dry, use a toothpick or fine brush to dab a tiny spot of black paint onto the very tip of the snout. -
Add the eyes:
Place two minuscule dots of black paint for the eyes. Keep them small and spaced wide apart for that cute, minimal look.
Place a handwritten note or a small photo in the wire clip to bring your helpful little bear to life
Mini Bow Trinket Tray
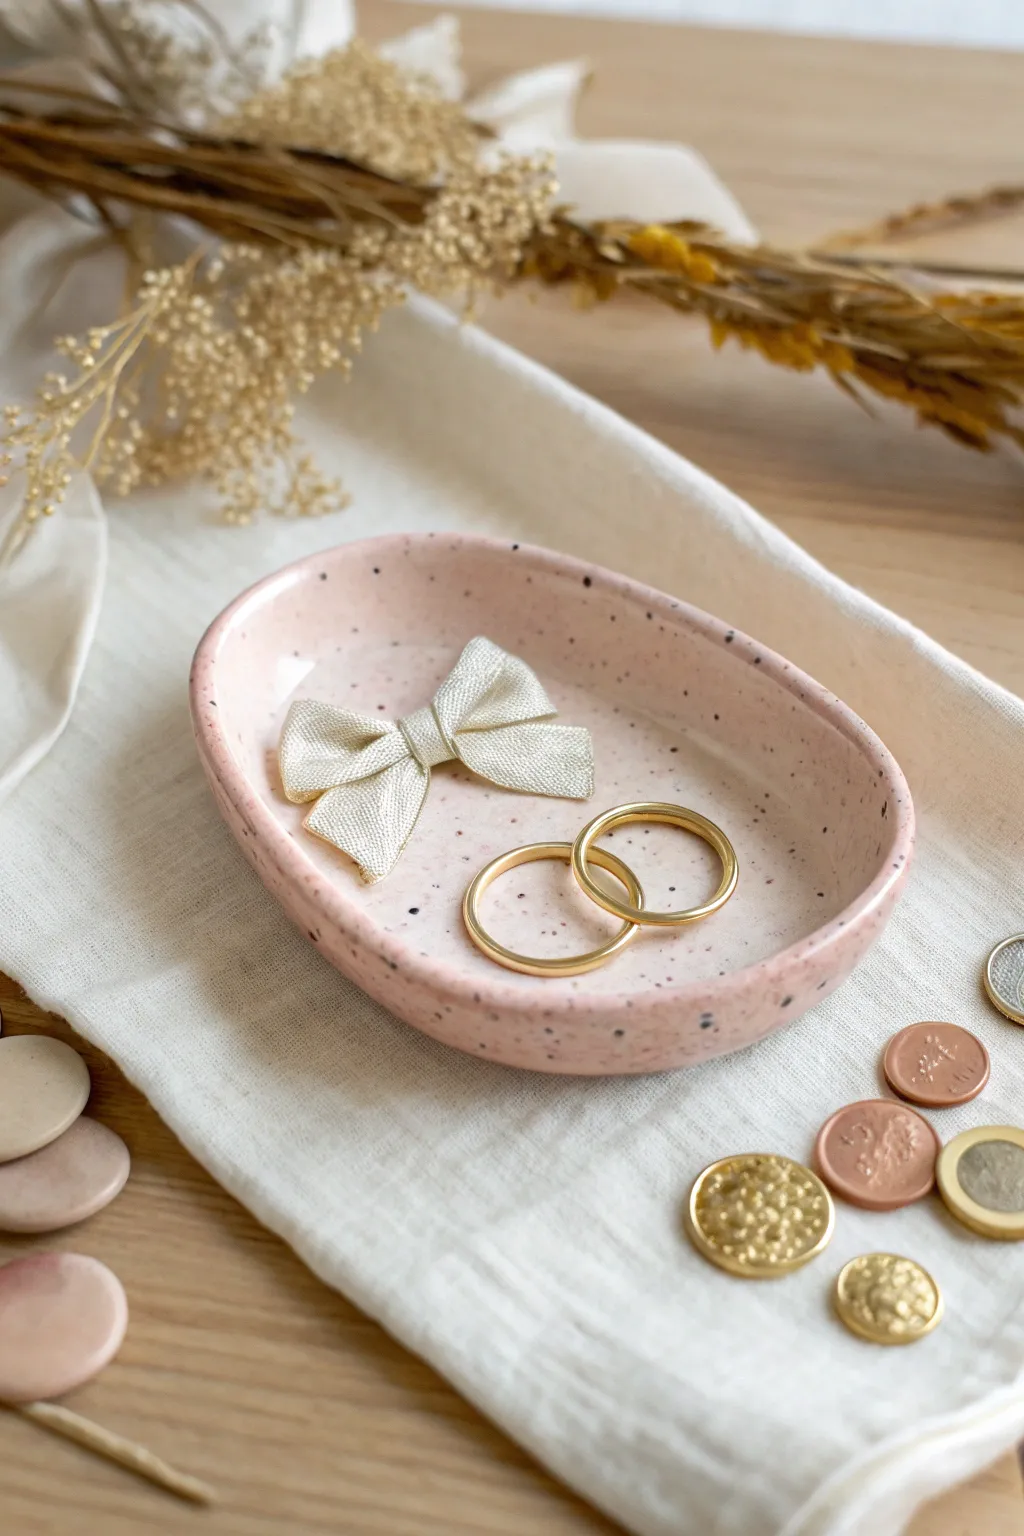
This charming oval trinket dish combines a soft, speckled pink finish with a delicate clay bow that looks deceptively like real fabric. It is the perfect bedside catch-all for your favorite rings or dainty earrings.
Step-by-Step
Materials
- Polymer clay (white and a small amount of red/pink)
- Faux granite or speckled polymer clay (or black pepper/dried tea leaves)
- Acrylic rolling pin
- Oval cutter or paper template
- Texture sheet (fabric or canvas weave pattern)
- A hobby knife or scalpel
- Liquid polymer clay (optional)
- Small blending tool or toothpick
- Sandpaper (fine grit)
- Gloss or matte varnish (optional)
Step 1: Prepping the Clay Base
-
Mix your custom color:
Begin by conditioning your white clay. Mix in a tiny dot of red or pink clay until you achieve a soft, pastel baby pink. Add in your speckled clay or a pinch of ground black pepper to create the granite effect. -
Roll out the slab:
Roll your conditioned pink clay into a thick slab, approximately 1/4 inch thick. Aim for an even thickness to ensure the tray sits flat later. -
Cut the oval shape:
Place your oval cutter or paper template onto the clay slab. Cut cleanly around the shape with your hobby knife, smoothing the edges with your finger to remove any sharp cuts. -
Form the rim:
Gently lift the edges of the oval upward with your thumbs to create a shallow lip. Smooth the interior curve so it transitions seamlessly from the base to the rim.
Step 2: Sculpting the Fabric-Look Bow
-
Create a thin sheet:
Roll a smaller piece of white or cream clay very thinly. I find a thickness of 2mm is perfect for mimicking delicate fabric ribbon. -
Add texture:
Press a fabric texture sheet or a piece of coarse linen firmly into the clay sheet to imprint a realistic weave pattern. -
Cut the ribbon strips:
Cut a long rectangular strip approx 1cm wide for the loops, and a small, short strip for the center knot. -
Form the loops:
Fold the ends of the long strip toward the center to create two loops, pressing them gently in the middle where they meet. -
Add the tails:
Cut two small triangles for the ribbon tails. Attach these to the back of the loop section, slightly angled outwards. -
Wrap the center:
Take the small center strip and wrap it vertically around the middle of the bow, covering the join where the loops meet. -
Attach to the tray:
Apply a tiny drop of liquid clay to the center of your pink tray. Place the bow on top, pressing down very lightly so you don’t crush the textured loops.
Uneven Rims?
If your tray’s rim looks wavy or uneven, place a smooth, lightweight bowl inside the tray while it bakes to help hold the raised shape in place.
Step 3: Baking and Finishing
-
Clean up:
Before baking, give the tray a once-over with a cotton swab dipped in rubbing alcohol to remove any fingerprints or lint. -
Bake the piece:
Place the tray on a ceramic tile or baking sheet. Bake according to your polymer clay manufacturer’s instructions, usually around 275°F (135°C) for 30 minutes. -
Cool slowly:
Let the tray cool down completely inside the oven (with the door slightly ajar) to prevent thermal shock or cracking. -
Sand the edges:
Once fully cool, use fine-grit sandpaper to buff the rim of the tray if there are any rough spots. -
Seal:
If you want a shiny finish like ceramic, apply a coat of gloss varnish. For a matte, natural stone look, you can leave it raw or use a matte sealant.
Make it Metallic
Before baking, dust the edges of the bow or the rim of the tray with gold mica powder for an elegant, gilded vintage look.
Place this sweet little tray on your dresser to keep your treasures safe
Speckled Star Paperweight
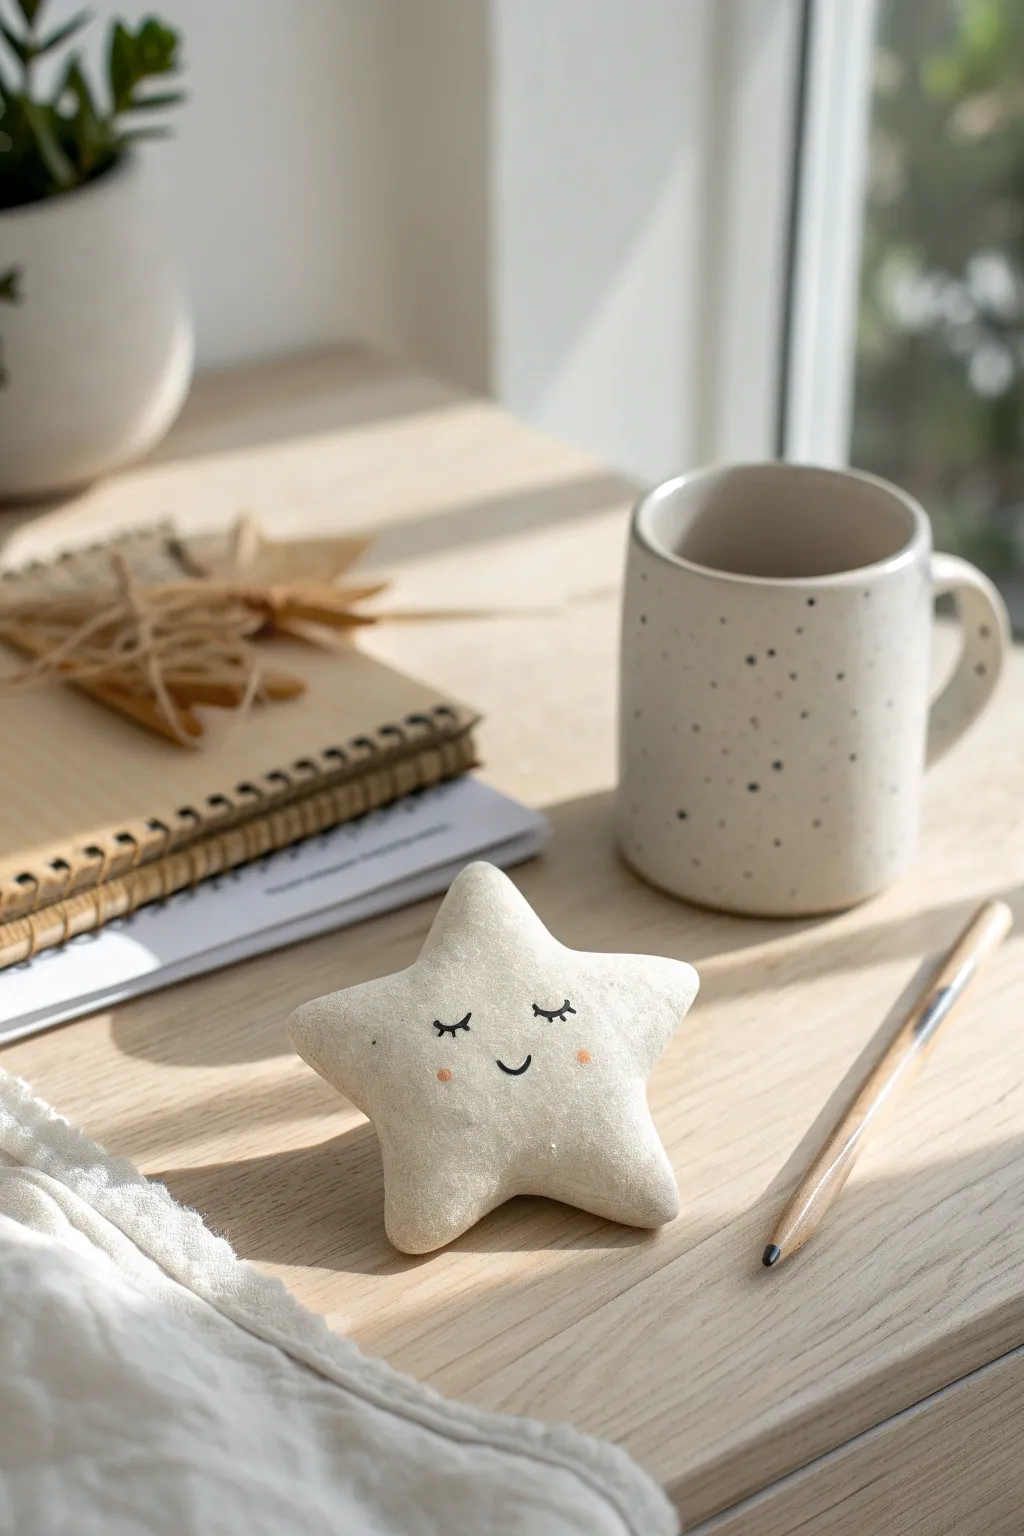
Bring a touch of celestial charm to your desk with this adorable, chunky star paperweight. Sculpted from clay and finished with a sweet, sleepy face, its rustic speckled texture gives it a warm, handmade feel that brightens any workspace.
How-To Guide
Materials
- White air-dry clay or polymer clay
- Rolling pin
- Star-shaped cookie cutter (approx. 3-4 inches wide)
- Black acrylic paint or fine-point permanent marker
- Small paintbrush
- Soft pink pastel chalk or diluted pink acrylic paint
- Old toothbrush (for speckling)
- Brown or grey acrylic paint (for speckles)
- Fine-grit sandpaper
- Matte sealant or varnish
Step 1: Shaping the Star
-
Condition the clay:
Start by taking a generous handful of white clay. Knead it thoroughly in your hands until it becomes soft, pliable, and free of cracks. If you’re using air-dry clay, dipping your fingers in a little water helps smooth it out. -
Roll it out:
Place the clay on a clean, flat surface. Use your rolling pin to flatten it into an even slab. Aim for a substantial thickness, about 1/2 to 3/4 of an inch, to give the paperweight a nice, chunky weight. -
Cut the shape:
Press your star-shaped cookie cutter firmly into the clay slab. Wiggle it slightly to ensure a clean cut all the way through, then lift the cutter away. -
Soften the edges:
Gently remove the excess clay from around the star. Using your fingertip and a tiny bit of water, smooth down the sharp edges created by the cutter. You want a soft, rounded look rather than crisp, sharp corners. -
Puff the center:
To get that lovely pillowy effect, gently press and shape the center of the star from the back or lightly squeeze the points inward to make the middle bulge slightly. It shouldn’t be flat like a cookie; give it some dimension. -
Smooth the surface:
Check the front surface for any fingerprints or dents. Lightly stroke the clay with a damp finger or a soft, damp sponge to ensure the face of the star is perfectly smooth for painting later. -
Let it dry:
Set your star aside to dry completely. If using air-dry clay, this might take 24-48 hours depending on thickness. Flip it over halfway through the drying process to ensure the back dries evenly.
Weight It Down
If using lightweight air-dry clay, embed a heavy metal washer or a small flat stone into the center of the clay slab before cutting out your star to give it proper paperweight heft.
Step 2: Adding Character & Details
-
Sand for perfection:
Once fully dry and hard, take a piece of fine-grit sandpaper and lightly buff away any remaining rough spots or uneven edges. Wipe away the dust with a dry cloth. -
Apply the base speckles:
Dilute a small amount of brown or grey acrylic paint with water until it’s very runny. Dip an old toothbrush into this mixture. -
Flick the paint:
Hold the toothbrush over your star and run your thumb across the bristles to flick tiny droplets of paint onto the surface. I like to practice on a scrap piece of paper first to control the spray density. Let this dry completely. -
Sketch the face:
Use a pencil to very lightly mark where the eyes and mouth will go. Place the eyes in the middle of the star’s body, spaced widely apart for a cuter look. -
Paint the features:
Using a very fine paintbrush dipped in black acrylic paint (or a permanent marker), carefully trace over your pencil lines. Draw two curved lines for sleepy closed eyes with small lashes, and a simple ‘U’ shape for a smile. -
Add rosy cheeks:
To give the star a sweet blush, dip your finger or a cotton swab into soft pink pastel dust or very diluted pink paint. Gently dab small circles onto the ‘cheeks’ just below the eyes. -
Seal the piece:
Protect your work by applying a coat of matte sealant or varnish. This will keep the marker from smudging and seal the clay against moisture.
Cracking Up?
If small cracks appear as the clay dries, don’t panic. Mix a tiny bit of fresh clay with water to create a paste (slip) and fill in the cracks, then smooth it over with your finger.
Now your desk has a silent, smiling companion to keep your papers organized and your spirits high
Plush-Inspired Chubby Critters
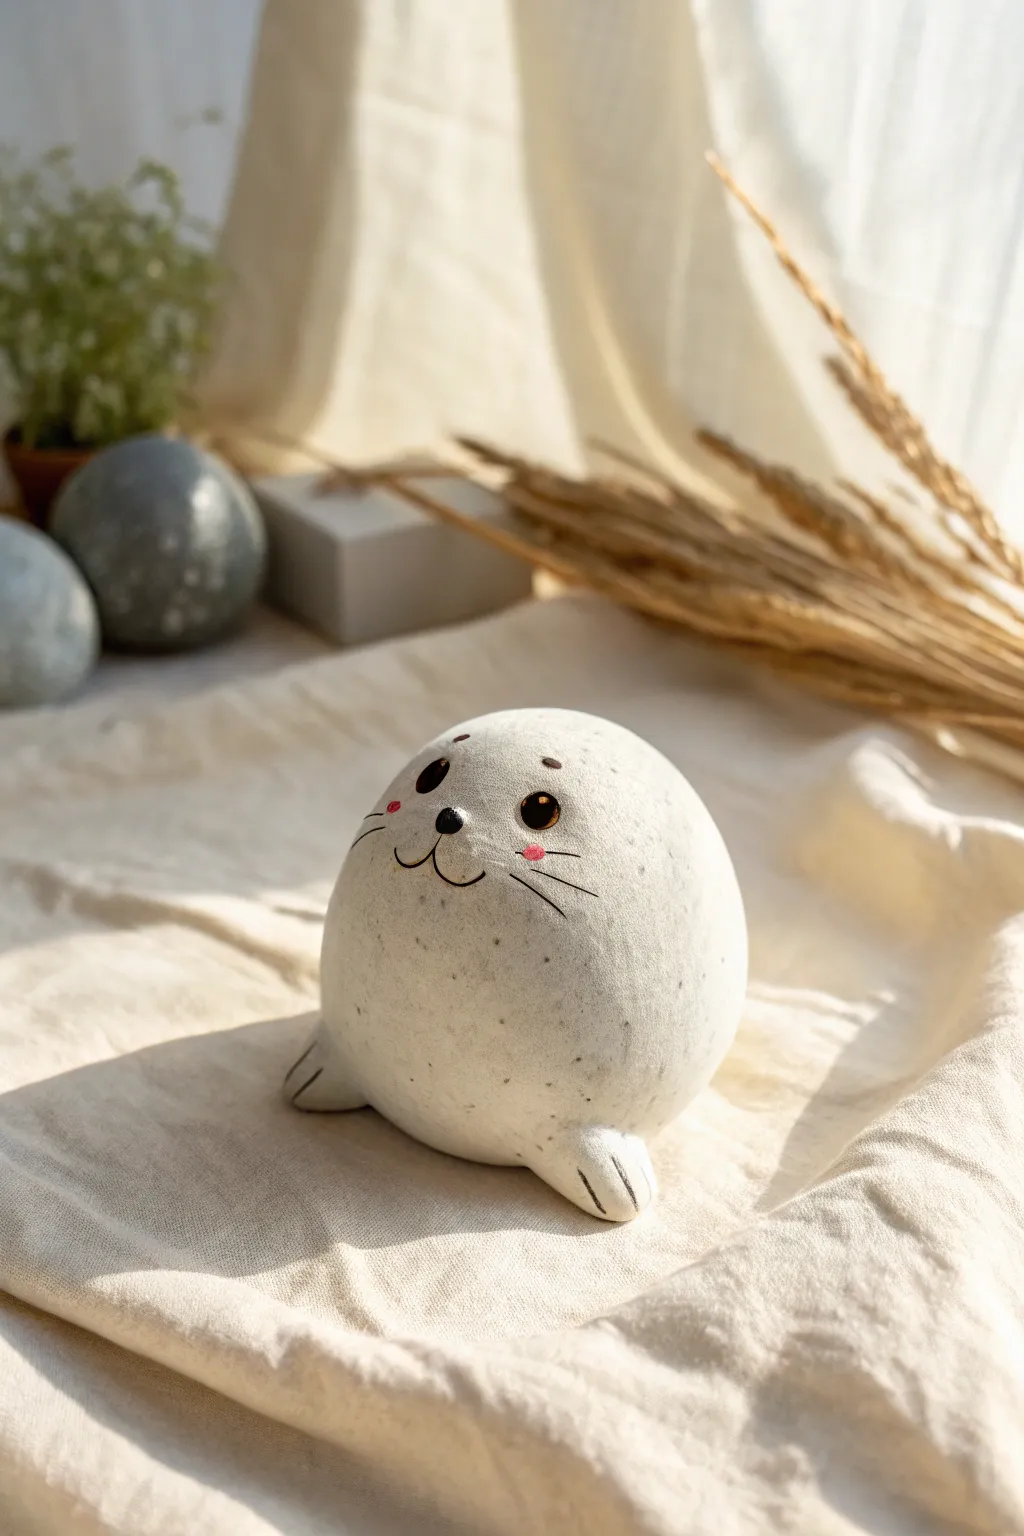
This ridiculously round little seal captures the essence of a plush toy in solid form, featuring a perfectly smooth egg shape and simple, endearing painted details. Its minimalist design relies on a clean, speckled finish to mimic the look of natural stone or pottery.
Step-by-Step
Materials
- White polymer clay or air-dry clay
- Rolling pin
- Smoothing tool or sponge
- Sculpting needle tool
- Black acrylic paint
- Pink acrylic paint
- Fine detail paintbrush (size 0 or 00)
- Old toothbrush (for speckling)
- Grey or diluted black acrylic paint (for speckles)
- Gloss varnish (optional, for eyes)
- Matte varnish (for the body)
Step 1: Shaping the Base
-
Prepare the Clay:
Start by conditioning your white clay until it is soft and malleable. Roll it into a smooth ball about the size of a tennis ball to remove any major air bubbles. -
Form the Egg Shape:
Gently gently roll the ball against your work surface, applying slightly more pressure on the top half to taper it. You want a distinct egg shape that is wider at the bottom for stability. -
Smooth the Surface:
Inspect the clay for any fingerprints or uneven spots. Use a slightly damp sponge (if using air-dry clay) or a smoothing tool and a drop of baby oil (for polymer clay) to create a flawless, seamless surface.
Step 2: Adding the Flippers
-
Create Flipper Balls:
Pinch off two small pieces of fresh white clay, rolling each into a tiny ball about the size of a large pea. -
Shape the Flippers:
Flatten these small balls slightly into teardrop shapes. These will become the front flippers. -
Attach to Body:
Press the flippers onto the bottom front of the seal’s body, spacing them widely apart so they stick out to the sides. Use your finger or a tool to blend the seam where the clay meets the body so it looks like one solid piece. -
Define Toes:
Using a needle tool or a dull knife edge, press two or three small indentations into the front edge of each flipper to create the suggestion of toes or webbing. -
Dry or Bake:
If using polymer clay, bake according to the package instructions. If using air-dry clay, allow it to dry completely (usually 24-48 hours) in a cool, dry place before painting.
Pro Tip: Seamless Blending
When attaching flippers, use the back of a spoon to smooth the clay seams. The curve of the spoon matches the round body perfectly without leaving sharp tool marks.
Step 3: Bringing it to Life
-
Prepare Speckling Paint:
Mix a very small amount of black acrylic paint with plenty of water to create a watery grey wash. Alternatively, use a grey paint thinned down heavily. -
Apply Speckles:
Dip an old toothbrush into the watery paint, wipe off the excess on a paper towel, and gently flick the bristles with your thumb to mist tiny speckles all over the white body. Keep this subtle; less is more. -
Draft the Face:
Once the speckles are dry, use a very light pencil mark to plan exactly where the eyes and nose will go. Aim for the upper third of the ‘egg’ to maintain that cute, chubby proportion. -
Paint the Snout Area:
Using black acrylic paint and your finest brush, paint the small nose—an inverted triangle with rounded corners. Paint a ‘3’ shape underneath it for the mouth. -
Paint the Eyes:
Paint two widely spaced black circles for eyes. I find it helps to start with a small dot and slowly spiral outward until you reach the desired size. -
Add Eye Highlights:
Wait for the black eye paint to dry completely. Then, using the tip of a toothpick dipped in white paint, add a tiny white reflection dot to the top right of each eye. -
Add Whiskers and Blush:
Paint three very thin black lines radiating from each cheek area for whiskers. For the blush, dilute a tiny bit of pink paint and dab two small ovals just under the eyes. -
Seal the piece:
Finish by applying a matte varnish over the whole body to protect the paint. For an extra touch of life, add a dot of gloss varnish specifically to the eyes and nose to make them look wet.
Troubleshooting: Blurry Paint
If your paint lines bleed or look fuzzy on air-dry clay, the clay might be too porous. Seal the clay with a clear matte sealer *before* painting the face details.
Place your little seal on a shelf or desk for a delightful dose of calm cuteness
Costumed Animal Minis
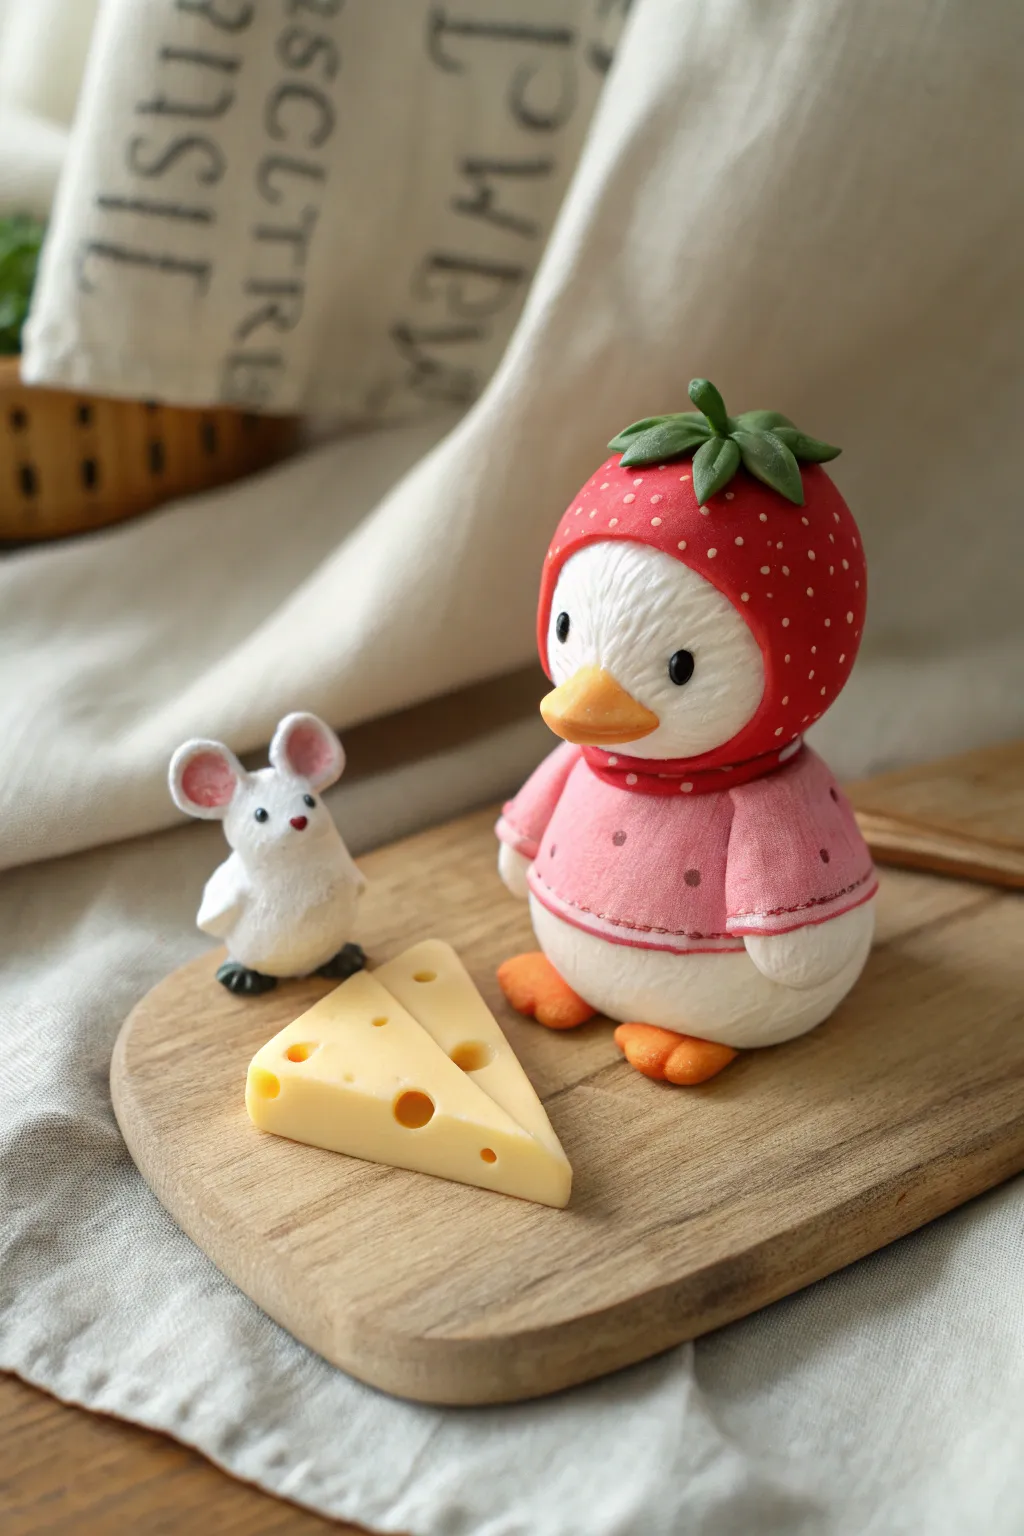
This adorable duo features a chubby white duck snug in a strawberry hood and pink sweater, accompanied by a tiny white mouse eyeing a slice of Swiss cheese. The soft matte finish and textured details give these polymer clay miniatures a cozy, storybook charm perfect for display.
How-To Guide
Materials
- Polymer clay (White, Red, Pink, Orange, Green, Pale Yellow, Black)
- Ball stylus tools (various sizes)
- Needle tool or toothpick
- Soft pastel chalks (pink, brown) for shading
- Small paintbrush
- Rolling pin or pasta machine
- Texture sponge or toothbrush
- Craft knife
- Baking tray and foil
Step 1: Sculpting the Duck Base
-
Whites of the eyes:
Start by conditioning your white clay until it is soft and pliable. Roll a large ball for the body (about the size of a golf ball) and a slightly smaller ball for the head. -
Connecting parts:
Press the head firmly onto the body. You can insert a small piece of wire or a toothpick between them for internal support if the clay feels heavy. -
Adding texture:
Using a stiff toothbrush or a texture sponge, gently tap the entire surface of the white clay to create a feathery, fur-like texture. Do this lightly so you don’t distort the round shapes. -
The beak:
Shape a small piece of orange clay into a rounded triangle. Press it onto the center of the face, smoothing the edges slightly to attach it securely. -
Sweet face:
Use a small ball tool to make two indentations above the beak. Press tiny balls of black clay into these sockets for the eyes, adding a microscopic dot of white clay to each for a highlight.
Clean Clay Tip
Keep baby wipes or hand sanitizer nearby. Clean your hands thoroughly before handling the white clay to avoid transferring red or pink lint onto the duck’s face.
Step 2: Dressing the Duck
-
Pink sweater body:
Roll out a sheet of pink clay. Cut a strip and wrap it around the duck’s body, just under the neck, trimming the excess at the back. -
Modeling sleeves:
Roll two small cones of pink clay for sleeves. Attach them to the sides of the sweater. Add small white balls of clay at the ends for the wings/hands poking out. -
Sweater details:
Using a needle tool, gently impress a stitching line along the bottom hem of the sweater. Use a darker pink marker or paint to add small polka dots to the fabric. -
Strawberry hood base:
Flatten a disc of red clay and drape it over the top of the duck’s head, molding it around the face to form a hood. Smooth the back so it blends seamlessly. -
Seedy texture:
Use a needle tool to poke shallow holes all over the red hood. Roll tiny, almost microscopic tear drops of pale yellow clay and press them into each hole to resemble strawberry seeds. -
Leafy top:
Create five or six small teardrop shapes from green clay. Flatten them slightly and attach them to the very top of the red hood, radiating outward. Add a small green stalk in the center. -
Orange feet:
Shape two flat, heart-like triangles from orange clay. Press them underneath the body for feet, using a knife to mark the toes.
Step 3: The Mouse & Cheese
-
Mouse body:
Roll a small white teardrop shape for the mouse’s body. Use the toothbrush again to texturize the surface. -
Ears and face:
Attach two small discs of white clay for ears, pressing pink concave centers into them with a ball tool. Add tiny black beads for eyes and a speck for the nose. -
Cheese wedge:
Cut a triangular wedge from pale yellow clay. Use ball tools of different sizes to press ‘holes’ into the sides and top of the cheese. -
Shading:
Before baking, brush a little pink pastel dust onto the duck’s cheeks and the mouse’s ears for a soft blush effect. -
Baking:
Bake all pieces according to your clay package instructions. I usually tent foil over them to prevent scorching the white clay.
Make it a Scene
Make a tiny picnic blanket from checkered clay or fabric scraps to place under the cheese, or craft a miniature basket for the mouse to sit in.
Once cooled, arrange your new friends on a shelf for an instant dose of happiness
Tiny Room Scene Keepsake
Capture the cozy charm of modern bohemian decor with this delightful miniature room scene. Using mostly polymer clay and a few simple tools, you’ll sculpt everything from a textured sofa to incredibly tiny houseplants, creating a keepsake that fits in the palm of your hand.
Detailed Instructions
Materials
- Polymer clay (white, rust/terracotta, brown, various greens, beige)
- Small pre-made wooden block or thick cardboard (for the base)
- Texture tools (toothbrush, sandpaper, needle tool, craft knife)
- Liquid polymer clay (optional)
- Acrylic paints (details for books/leaves)
- Fine wire or floral wire
- Super glue or tacky glue
- Rolling pin or pasta machine
- Oven for baking clay
Step 1: Setting the Foundation
-
Prepare the base:
Start with your base block. Roll out a thin sheet of white clay and cover the top and sides of your wooden block or cardboard platform to create a clean, modern floor and raised edge. -
Sculpt the rug base:
Roll a thin rectangle of beige clay for the rug area. Place it centrally on your base. Don’t worry about the pattern yet; we just need the shape defined. -
Create the rug texture:
Using a needle tool, score diagonal lines across the beige clay to mimic a woven texture. Press small strips of brown and cream clay into the surface to create the geometric shapes shown, then texture them heavily with a toothbrush to look like tufted wool.
Drooping Plants?
If your plant leaves flop over before baking, support them with small balls of aluminum foil or batting. Remove these supports only after the clay has fully cooled and hardened.
Step 2: Furnishing the Room
-
Build the sofa frame:
Form a rectangular block of white clay for the sofa seat and a thinner, taller rectangle for the back. Attach two curved armrest pieces to the sides. Press them together firmly to ensure the seams disappear. -
Add sofa texture:
This is the magic step: gently press rough sandpaper or a stiff-bristled brush all over the white sofa parts to mimic boucle fabric texture. -
Make the cushions:
Create a rust-colored rectangle for the seat cushion and press it into the sofa frame. For the throw pillows, shape a small square and a circle from rust and terracotta clay. Use a needle tool to press deep groove lines into the square pillow for a ribbed corduroy look. -
Attach the legs:
Insert four short pieces of dark wire or tiny cylinders of black clay into the bottom of the sofa for legs. I find baking the sofa separately at this stage helps keep its shape before final assembly. -
Craft the coffee table:
Shape a simple rectangular block from brown clay. Use a craft knife to scratch subtle wood grain lines into the surface. Place it on the rug in front of the sofa.
Step 3: Adding Greenery & Details
-
Pot the big plant:
Form a pot shape using terracotta clay. If you want a textured basket look, roll tiny snakes of clay and coil them around a core cylinder. -
Sculpt the Monstera leaves:
Flatten tiny balls of green clay into ovals. Use a craft knife to cut out small notches and holes (fenestrations) characteristic of a Monstera. Press these onto short lengths of green wire. -
Assemble the Monstera:
Insert your wired leaves into the clay pot. Bend the wires gently to give the plant a natural, drooping posture. -
Create smaller succulents:
For the smaller pots, make rough grey or brown cylinders. To make the spiky plant, roll a tiny ball of green clay and snip into it repeatedly with small scissors, pulling the snipped bits upward. -
Make the tiny books:
Stack paper-thin squares of white clay (pages) between two slightly larger rectangles of colored clay (covers). Once baked, you can use a fine-tip pen or paint to add titles. -
Final assembly:
Arrange all your furniture and plants on the base. If you baked pieces separately, use a dot of super glue to secure them in place now. -
Wall art:
Cut tiny rectangles of white clay for frames. You can either paint simple leaf designs inside them before baking or glue miniature printed images inside after baking. -
Final bake:
Bake the entire assembled piece (or remaining unbaked parts) according to your clay manufacturer’s instructions, usually around 275°F (130°C) for 15-30 minutes.
Clean Clay Tip
White clay picks up dust instantly. Keep baby wipes nearby and clean your hands and tools thoroughly before handling the white sofa or wall pieces to keep them pristine.
Place your tiny room on a shelf to add a permanent touch of cozy calm to your home workspace