When I need a quick creativity boost, I start dreaming up little clay aliens—because there are basically no rules, and that’s the fun part. Here are a bunch of approachable ideas you can sculpt in polymer clay or air dry clay, from classic characters to delightfully weird space critters.
Classic Grey Alien Figurine
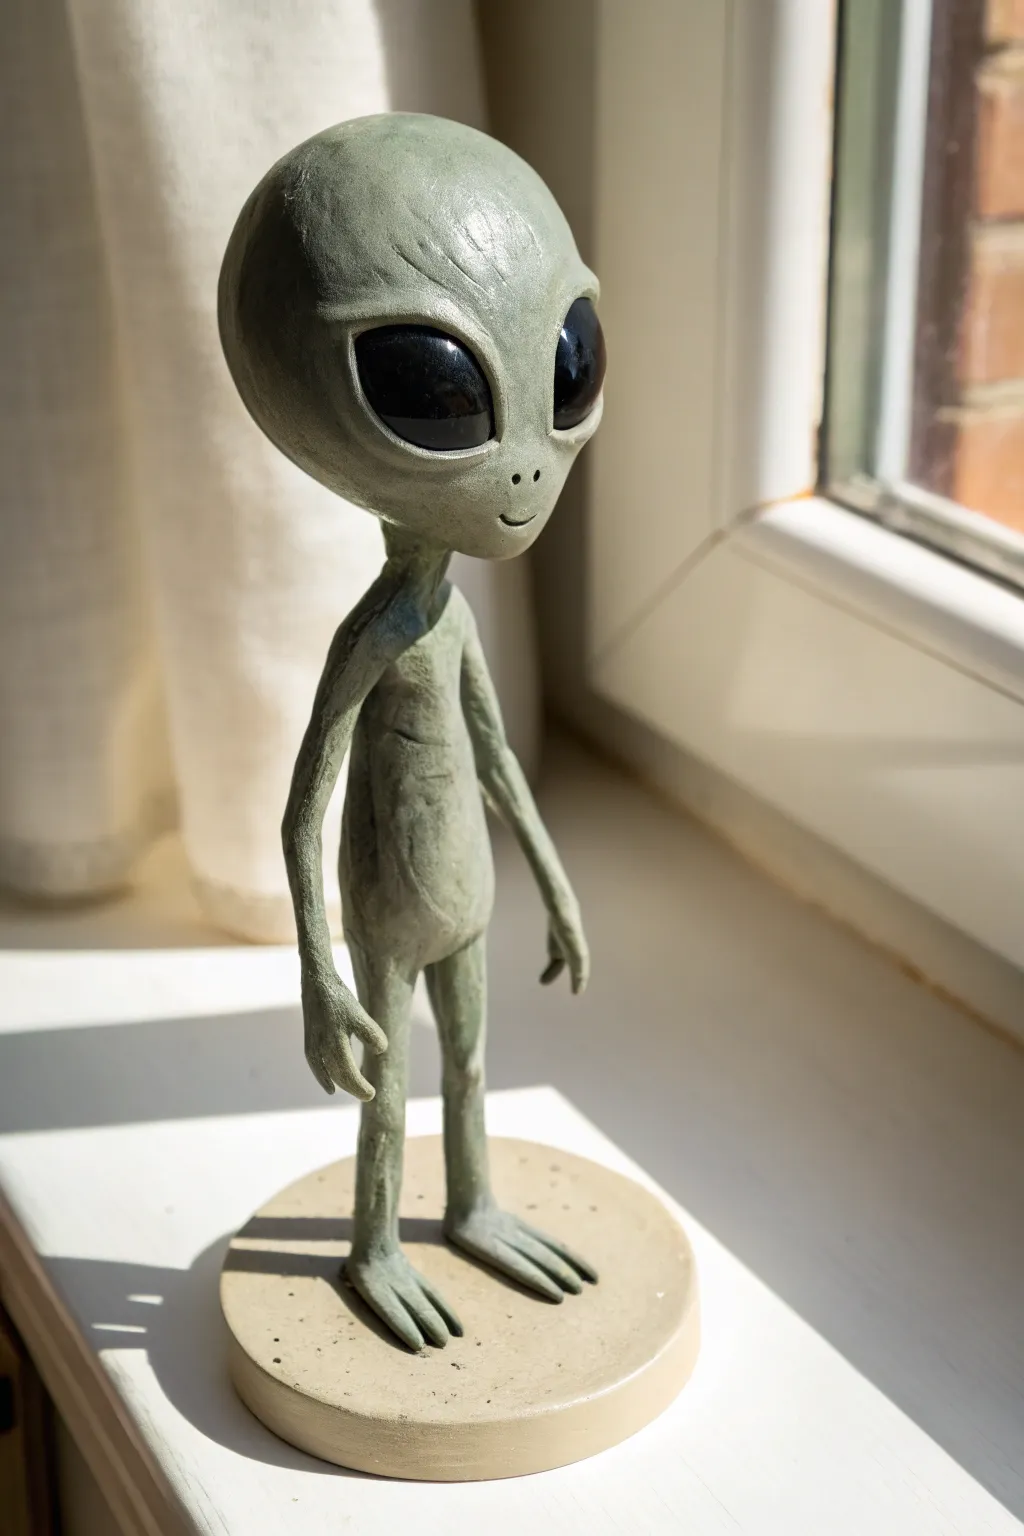
Capture the enigmatic charm of extraterrestrial folklore with this detailed figurine project. This guide walks you through sculpting the iconic oversized head, slender limbs, and large almond eyes that define the classic ‘Grey’ alien aesthetic.
How-To Guide
Materials
- Polymer clay (grey or beige)
- Armature wire (around 16-18 gauge)
- Aluminum foil
- Sculpting tools (ball styluses, needle tool, rubber shapers)
- Acrylic paints (olive green, black, white, lighter green)
- Gloss varnish or UV resin
- Fine grit sandpaper
- Round wooden or clay base
- Super glue or tacky glue
Step 1: Building the Skeleton
-
Form the armature:
Cut a length of wire and twist it to form a simple stick figure: a loop for the head, a spine, shoulders, hips, and legs. Leave extra length at the feet to mount it later. -
Anchor the base:
Drill two small holes into your precured clay base or wooden disc to receive the foot wires. Glue the wire frame into the base now for stability while sculpting. -
Bulk up with foil:
Crush aluminum foil tightly around the wire loop to form the basic shape of the large, bulbous head. Add small amounts of foil to the torso, but keep the limbs bare wire to maintain their slender look.
Smoother Surfaces
Before baking polymer clay, brush the entire surface with a little baby oil or clay softener. This melts away fingerprints and creates a professional, seamless skin finish.
Step 2: Sculpting the Head & Body
-
Cover the armature:
Sheet out your clay and wrap it around the foil head and torso. Smooth the seams together so you have a seamless base layer. -
Coat the limbs:
Roll thin snakes of clay and sheath the wire arms and legs. I like to keep the thighs slightly thicker than the calves to give it a surprisingly muscular but emaciated anatomy. -
Shape the cranium:
Add more clay to the top and back of the head to create that distinctive oversized braincase. Smooth it down towards a narrow, pointed chin. -
Position the eyes:
Using your thumb or a large ball tool, press deep, slanted indentations into the face where the large eyes will go. They should wrap slightly around the sides of the head. -
Refine facial features:
Add two tiny pinprick nostrils and a very subtle, thin line for the mouth. Keep the nose bridge barely visible; it should be almost flat against the face. -
Sculpt the hands and feet:
Attach small flattened tear-drop shapes for feet and blend them into the ankles. For the hands, cut three long, slender fingers from a flattened piece of clay and attach them to the wrists.
Step 3: Texture & Detailing
-
Add skin texture:
Use a needle tool or fine rake tool to etch faint wrinkles around the neck, elbows, and knees. The alien in the photo has a uniquely weathered skin texture. -
Refine the brow:
Build up slight ridges above the eye sockets to give the alien a contemplative or intense expression. -
Bake the sculpture:
Bake your figurine according to the clay manufacturer’s instructions. If using air-dry clay, allow it to cure for at least 24-48 hours.
Cosmic Glow Up
Mix glow-in-the-dark powder into your gloss varnish before applying it to the eyes. In daylight they look glossy black, but in the dark, they will stare back at you.
Step 4: Painting & Finishing
-
Base coat:
Mix an olive-grey color and apply a solid base coat over the entire skin surface. You may need two thin coats for full coverage. -
Apply a wash:
Water down some darker green or brownish paint significantly. Brush this into the crevices, wrinkles, and textured areas, then wipe the high points clean with a cloth to emphasize depth. -
Dry brush highlights:
Using a very light green or pale grey on a dry brush, gently dust the top of the head, shoulders, and knees to make the details pop. -
Paint the eyes:
Paint the eye sockets solid glossy black. Ensure the edges are crisp against the green skin. -
Gloss the eyes:
Paint a layer of high-gloss varnish or cure a drop of UV resin over just the black eyes. This gives them that wet, ‘living’ reflection. -
Finish the base:
Paint the base a neutral beige or sand color, adding speckles of darker brown to simulate stone or concrete.
Now you have your own personal contact from another world ready to display


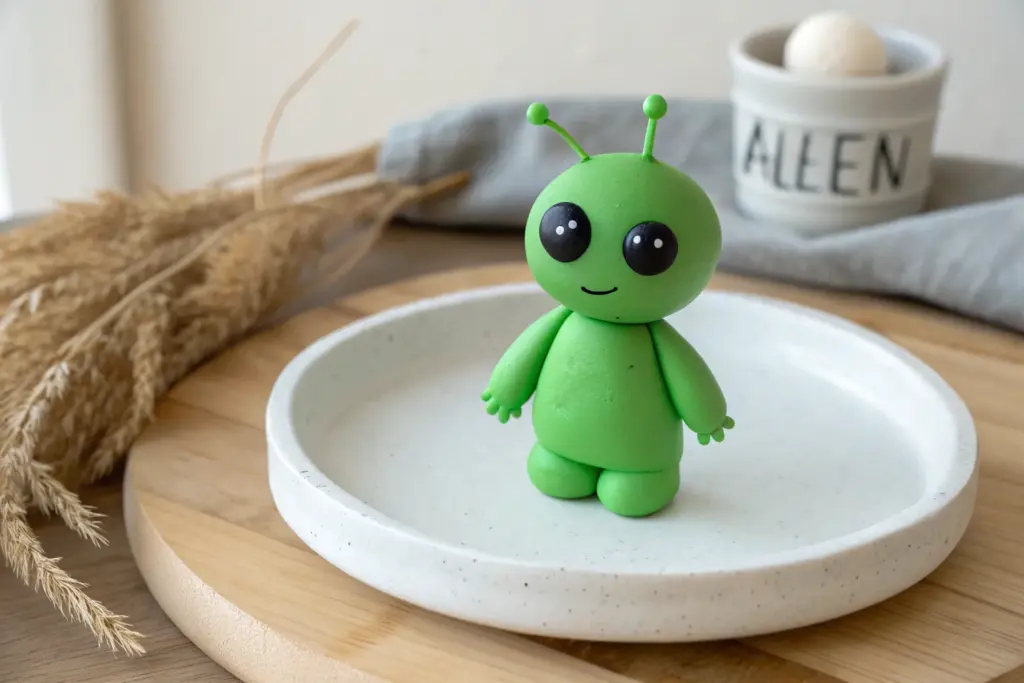
Cute Big-Eyed Alien Buddy
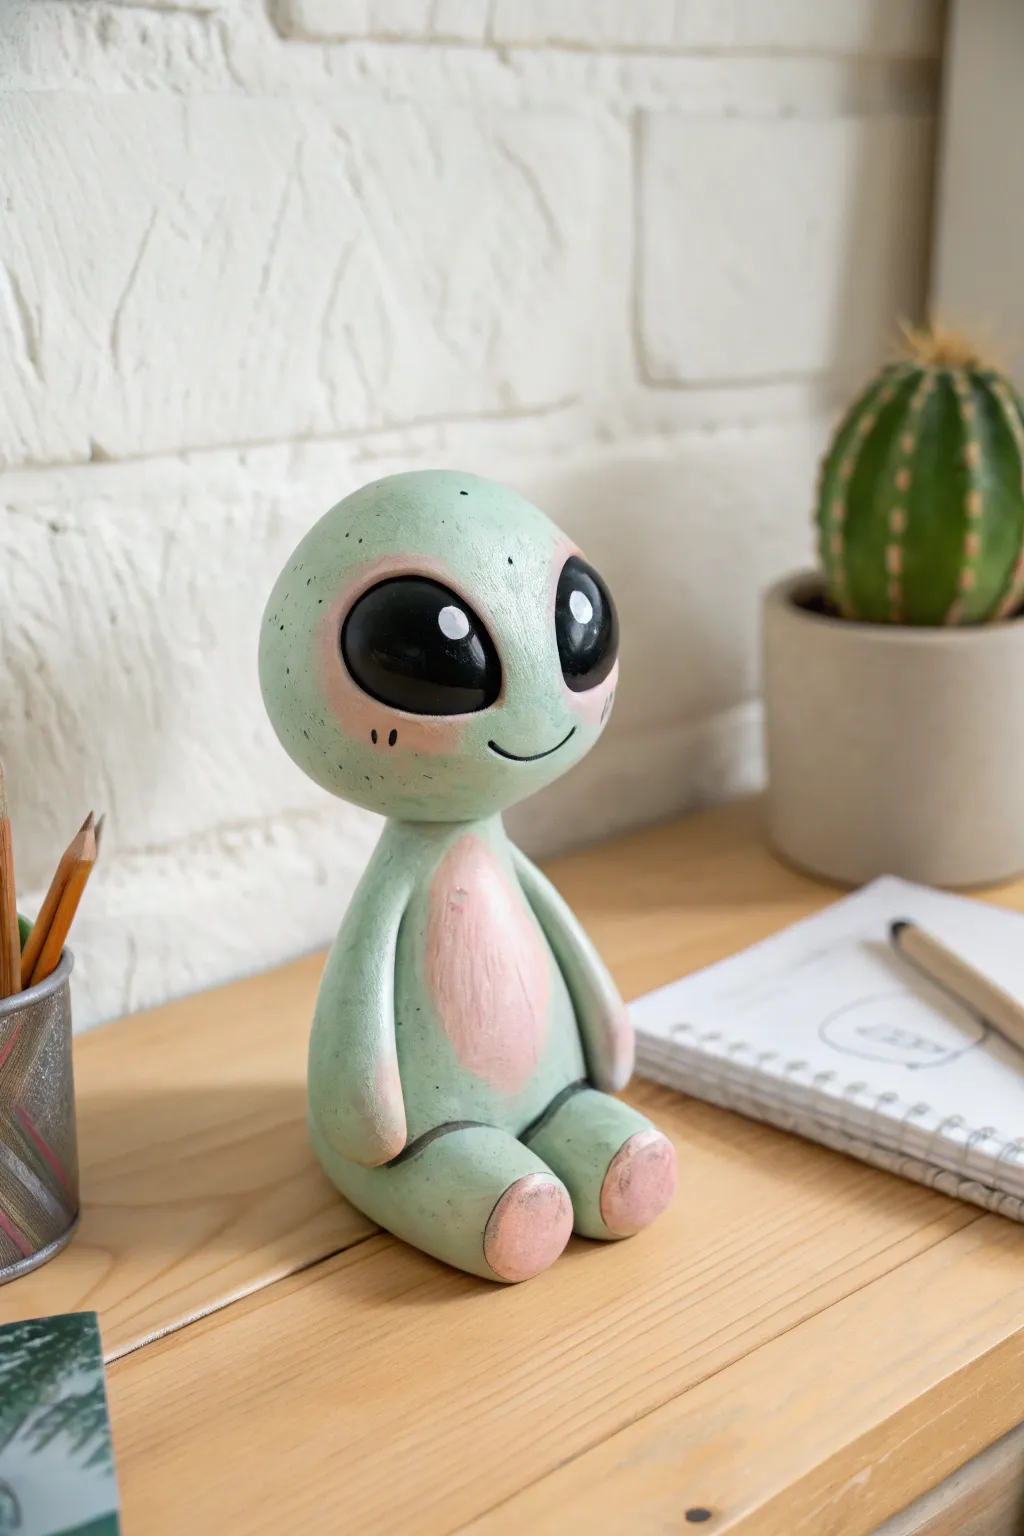
Sculpt your own adorable, wide-eyed outer space visitor using polymer clay. This sitting alien figure features a smooth, mint-green finish, iconic glossy black eyes, and charming pink accents for a friendly, approachable look.
Step-by-Step Tutorial
Materials
- Polymer clay (Mint Green, Light Pink, Black)
- Acrylic paint (White, Black – optional)
- High-gloss varnish or UV resin
- Sculpting tools (ball styluses, silicone shapers)
- Blade or craft knife
- Wire armature or toothpicks (for neck support)
- Soft pastel chalks (pink/blush) – optional
- Small paintbrush
Step 1: Sculpting the Head and Eyes
-
Form the head base:
Start by conditioning a large ball of mint green polymer clay. Roll it into a smooth sphere, then gently flatten the front face area while keeping the back rounded and bulbous to create that classic alien skull shape. -
Indent the eye sockets:
Using a large ball tool or your thumbs, press firmly into the middle of the face to create two large, teardrop-shaped indentations. These need to be deep enough to hold the eyes later. -
Create the eyes:
Shape two flat, teardrop-shaped pieces of black clay. These should fit perfectly into the sockets you just made. Press them in gently, smoothing the green clay edges to seamlessly hug the black inserts. -
Add facial details:
Use a small needle tool or a blade to carve a simple, curved smile line just below the eyes. For the tiny nostrils, make two minute pinpricks above the mouth.
Smoothing Secret
Before baking, lightly brush the raw clay with a little baby oil or clay softener. This removes fingerprints and creates that seamless, manufactured toy finish.
Step 2: Building the Body
-
Shape the torso:
Roll a smaller piece of mint green clay into a pear shape. Flatten the bottom so the figure can sit upright stably on its own. -
Add the belly patch:
Take a small pinch of light pink clay and flatten it into an oval. Press this onto the front of the tummy, smoothing the edges with a silicone tool until it blends flush with the green body. -
Form the legs:
Roll two small sausages of green clay for the legs. Slightly taper one end where it will attach to the body, and blunt the other end for the foot. -
Detail the feet:
Add small circles of pink clay to the soles of the feet. Attach the legs to the bottom sides of the torso, positioning them so they point forward as if the alien is sitting down. -
Create the arms:
Roll two long, thin noodle shapes for arms. Unlike the legs, keep these simple and relatively featureless to match the minimalistic style. -
Attach the arms:
Press the arms onto the shoulders, blending the clay at the seam. Let them hang loosely at the alien’s sides, curving slightly to rest near the hips.
Head Slumping?
If the head is too heavy for the neck during baking, prop it up with a small wad of paper towel or polyester fiberfill. This supports the chin without leaving flat spots.
Step 3: Assembly and Finishing
-
Attach head to body:
Insert a short piece of wire or a toothpick into the top of the torso for support. Push the head onto the support, ensuring the neck area is smoothed together so the head feels secure. -
Add blush effects:
I like using softly brushed pink pastel powder or very diluted pink acrylic paint around the eye sockets and cheeks to give the skin a flushed, organic texture. -
Bake the figure:
Bake the sculpture according to your clay package instructions. Usually, this is around 275°F (130°C) for 15-30 minutes, depending on thickness. -
Paint the eye reflections:
Once cool, use a tiny dotting tool or toothpick to add small white highlight dots to the black eyes. This spark of life is crucial for the cute look. -
Glaze the eyes:
Apply a thick coat of UV resin or high-gloss varnish strictly to the black eye areas. This makes them look like wet, glassy lenses, contrasting with the matte skin. -
Add final details:
If you want a rustic look like the photo, you can lightly dry-brush some darker green or grey speckles sparingly over the head to simulate skin texture.
Place your new extraterrestrial friend on a shelf or desk where he can observe earthling activities


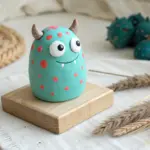
One-Eyed Blob Alien
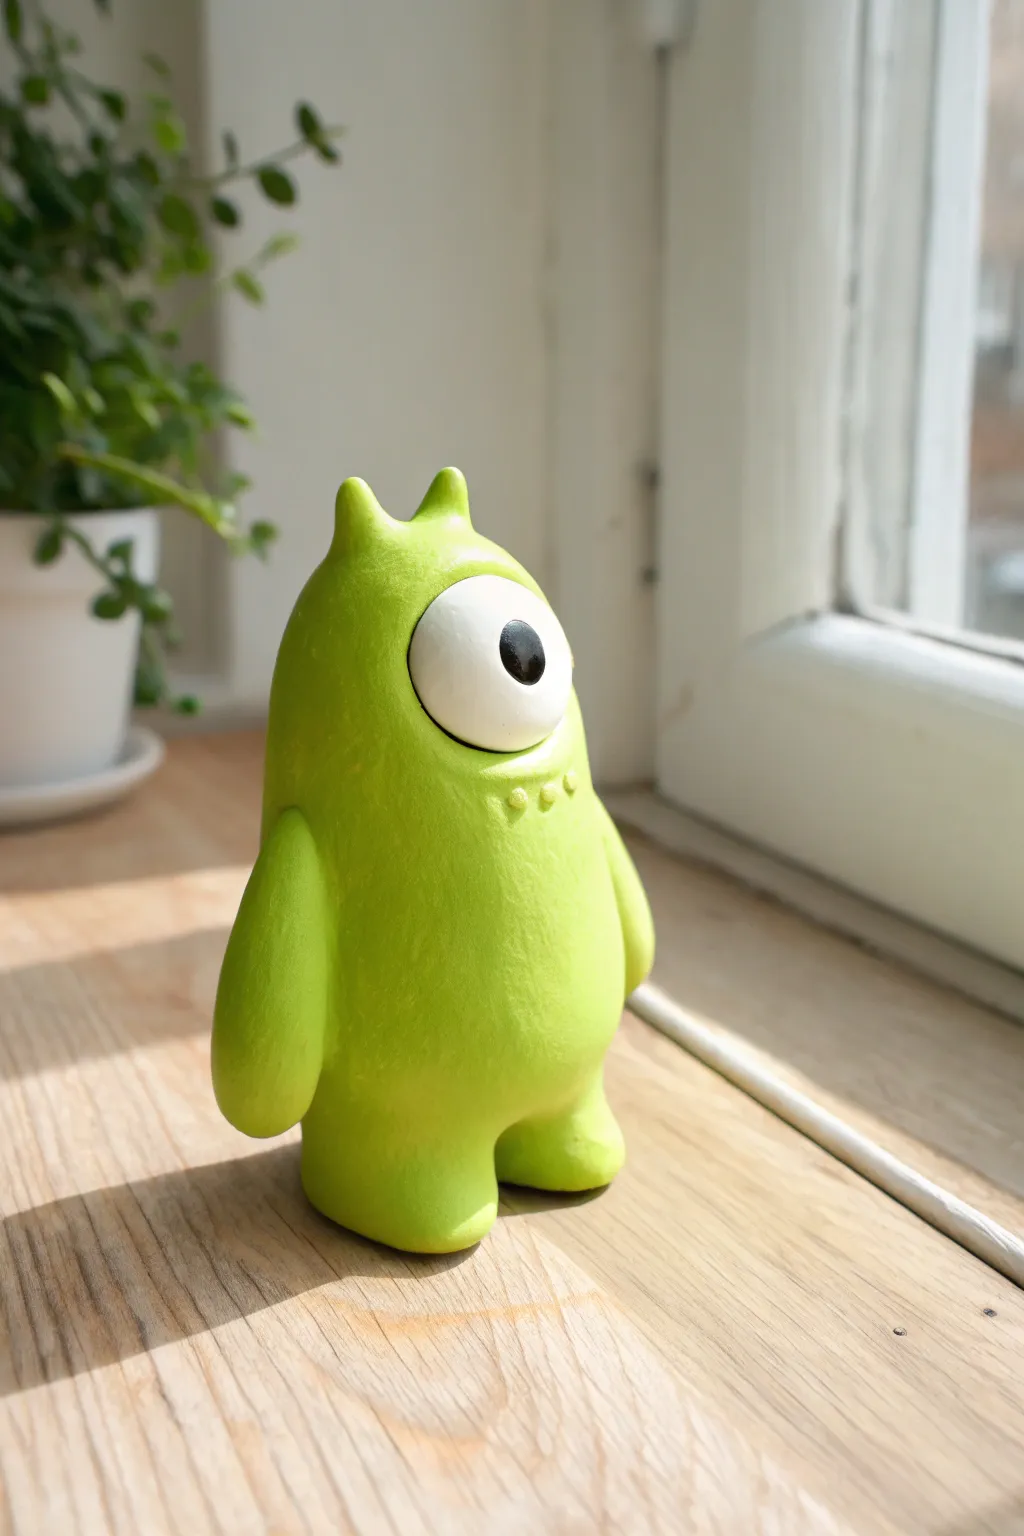
This charming, minimalist alien figurine is a perfect beginner sculpting project that relies on simple, soft shapes. With its bright lime green skin and single inquisitive eye, it adds a quirky touch to any windowsill.
Detailed Instructions
Materials
- Polymer clay (Lime Green/Chartreuse)
- Polymer clay (White)
- Polymer clay (Black)
- Aluminum foil
- Sculpting tool (needle or toothpick)
- Dotting tool or ball stylus
- Baking sheet
- Oven (for curing)
Step 1: Forming the Body Base
-
Create the core:
Crumple a small amount of aluminum foil into a tight oval shape, roughly the size of a large egg. This saves clay and keeps the figurine lightweight. -
Condition the green clay:
Take a large block of lime green clay and knead it thoroughly until it is soft and pliable. I find this usually takes about 2-3 minutes of working it in your hands. -
Wrap the core:
Flatten the green clay into a thick sheet and wrap it completely around the foil core. Roll it gently between your palms to smooth out any seams so it looks like a seamless blob. -
Shape the silhouette:
Gently taper the top of the oval slightly so it’s narrower than the bottom, giving the alien a pear-like silhouette. -
Add the feet:
Roll two small balls of green clay. Flatten the bottoms slightly and press them firmly onto the bottom of the body. Blend the seams upward into the body using your finger or a smoothing tool so they look integrated, not just stuck on.
Smooth Surface
Before baking, lightly brush the clay with a little baby oil or clay softener. This melts away fingerprints and gives the finish a professional, seamless look.
Step 2: Sculpting the Face and Limbs
-
Create the eye socket:
Use your thumb to press a shallow, circular indentation into the upper half of the face where the eye will go. -
Make the eyeball:
Roll a ball of white clay that fits perfectly into the indentation you just made. Press it in gently; it should bulge out significantly. -
Add the pupil:
Roll a tiny speck of black clay into a ball, flatten it, and place it in the center of the white eyeball. -
Sculpt the eyelid:
Roll a thin snake of green clay. Place it over the top half of the white eye to create an eyelid. -
Blend the eyelid:
Smooth the top edge of that green snake into the forehead so the eyelid looks like part of the skin, not a separate piece. -
Add the horns:
Form two very small, blunt cones from green clay. Attach them to the very top of the head, blending the base of the horns into the skull. -
Attach the arms:
Roll two sausage shapes for arms. Attach them to the sides of the body, letting them hang straight down. Because there are no hands or fingers, simply round off the ends. -
Create texture details:
Using a dotting tool, press three small indentations in a horizontal row just below the eye to suggest a mouth or decorative skin texture.
Eye Placement
If the white eye keeps looking ‘bulgy’ or falling out, deepen the socket indentation significantly. The eye should sit ‘in’ the face, not just on it.
Step 3: Finishing Up
-
Final smoothing:
Give the entire figure a once-over. Use a tiny bit of baby oil on your finger to smooth out any fingerprints. -
Check balance:
Stand the figure up on a flat surface to ensure it is balanced and doesn’t tip over. Press down slightly to flatten the feet if needed. -
Bake carefully:
Place your alien on a baking sheet and bake according to your clay manufacturer’s instructions (usually 275°F/135°C). -
Cool down:
Let the figure cool completely in the oven before moving it to prevent cracking.
Once cooled, your little one-eyed watcher is ready to guard your desk or bookshelf.


Multi-Armed Tentacle Alien
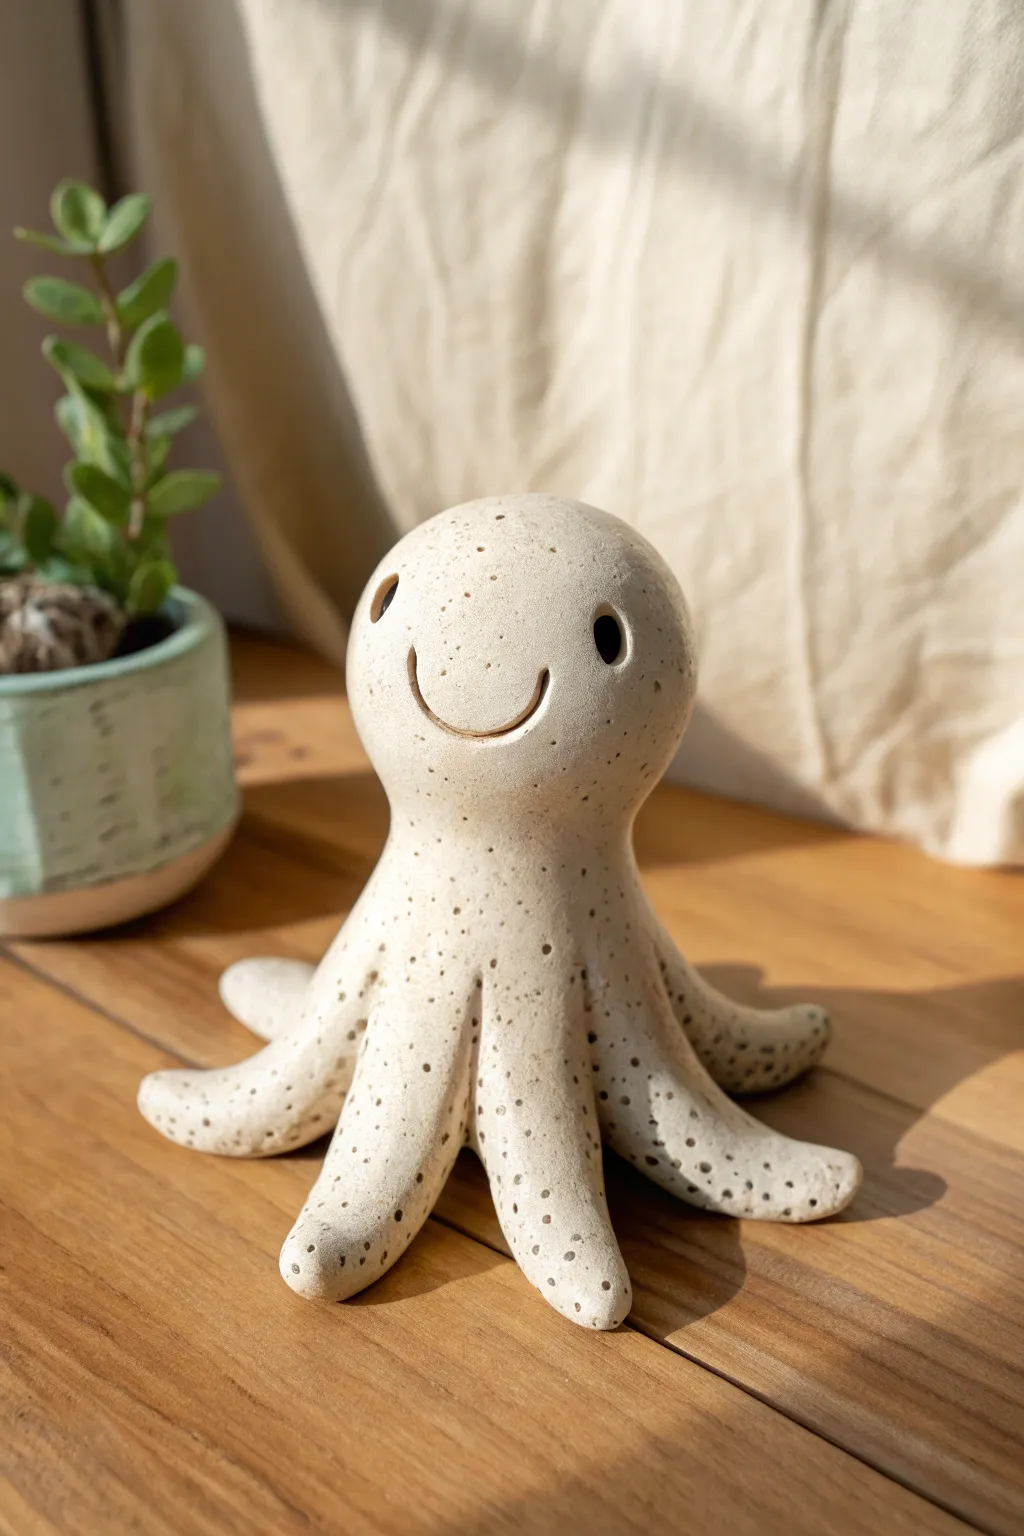
This charming, smiling creature brings a touch of whimsy to any shelf with its gentle curves and speckled finish. Its organic, bell-shaped head and sprawling tentacles create a delightful alien silhouette that is surprisingly simple to sculpt.
Step-by-Step Tutorial
Materials
- Speckled cream polymer clay (or plain white mixed with black pepper)
- Small carving tool or toothpick
- Ball stylus tool
- Smooth work surface (ceramic tile or glass)
- Aluminum foil (for armature)
- Needle tool
- Soft paintbrush (for smoothing)
- Baby oil or clay softener (optional)
Step 1: Foil Core & Head
-
Base armature:
Begin by crumpling a small piece of aluminum foil into a tight ball, roughly the size of a walnut. This will serve as the lightweight core for the alien’s head, saving clay and reducing baking time. -
Conditioning clay:
Condition your speckled clay until it is warm and pliable. If you don’t have pre-speckled clay, knead cracked black pepper or sand into white clay for that organic texture. -
Covering the core:
Flatten a portion of clay into a pancake and wrap it completely around your foil ball. Roll it aggressively between your palms to smooth out any seams until you have a perfect sphere. -
Shaping the bell:
Using your thumb and forefinger, gently pinch and pull the bottom third of the sphere downward to create a slight neck and a bell shape, resembling a lightbulb.
Clean Lines, Happy Face
Before carving the smile, lightly trace the line with a pencil or needle tool first. Once you are happy with the symmetry, carve deeper for the final look.
Step 2: Tentacles & Body
-
Creating the base:
Take a larger lump of clay and roll it into a thick, squat cylinder. This will be the central hub from which the tentacles emerge. -
Dividing the legs:
Place the cylinder on your work surface and use a blade or needle tool to make six to eight vertical cuts around the perimeter, stopping about halfway up the cylinder. -
Elongating limbs:
Gently pull and roll each cut section outward to form tapered tentacles. Keep the tips slightly rounded rather than sharp, as this adds to the friendly aesthetic. -
Dynamic posing:
Arrange the tentacles in a natural, sprawling pattern. I like to curve a few slightly upward or to the side so it doesn’t look too rigid or symmetrical. -
Attaching the head:
Place the head piece onto the center of the tentacle base. Blend the clay downwards from the neck into the body using a modeling tool so the two parts become one seamless unit.
Make it a Planter
Before baking, use a large dowel or carving tool to hollow out the top of the head. After baking, add a tiny air plant for a hairstyle that changes with nature.
Step 3: Face & Details
-
Making the eyes:
Use a medium-sized ball stylus to press two deep indents into the sides of the head for the eyes. Wiggle the tool slightly to widen the sockets. -
Adding the smile:
Use a needle tool or small carving tool to incise a wide, generous U-shape for the mouth. Keep the line consistent and clean. -
Enhancing the expression:
Use the tip of your tool to add massive dimples or end-points to the smile line, giving it that distinct joyful expression. -
Texture check:
If you are using plain clay and want more texture, lightly stipple the surface with a coarse sponge or toothbrush, being careful not to obscure the face. -
Final smoothing:
Dip a soft brush in a tiny bit of baby oil and brush over the entire sculpture to remove fingerprints. Pay special attention to the area where the tentacles meet the body. -
Baking:
Bake the piece according to your clay manufacturer’s instructions. A lower, slower bake is often safer for thicker pieces like this.
Place your little alien near a window to let the light play off its textured surface

The Complete Guide to Pottery Troubleshooting
Uncover the most common ceramic mistakes—from cracking clay to failed glazes—and learn how to fix them fast.
Alien With Goofy Tongue Face
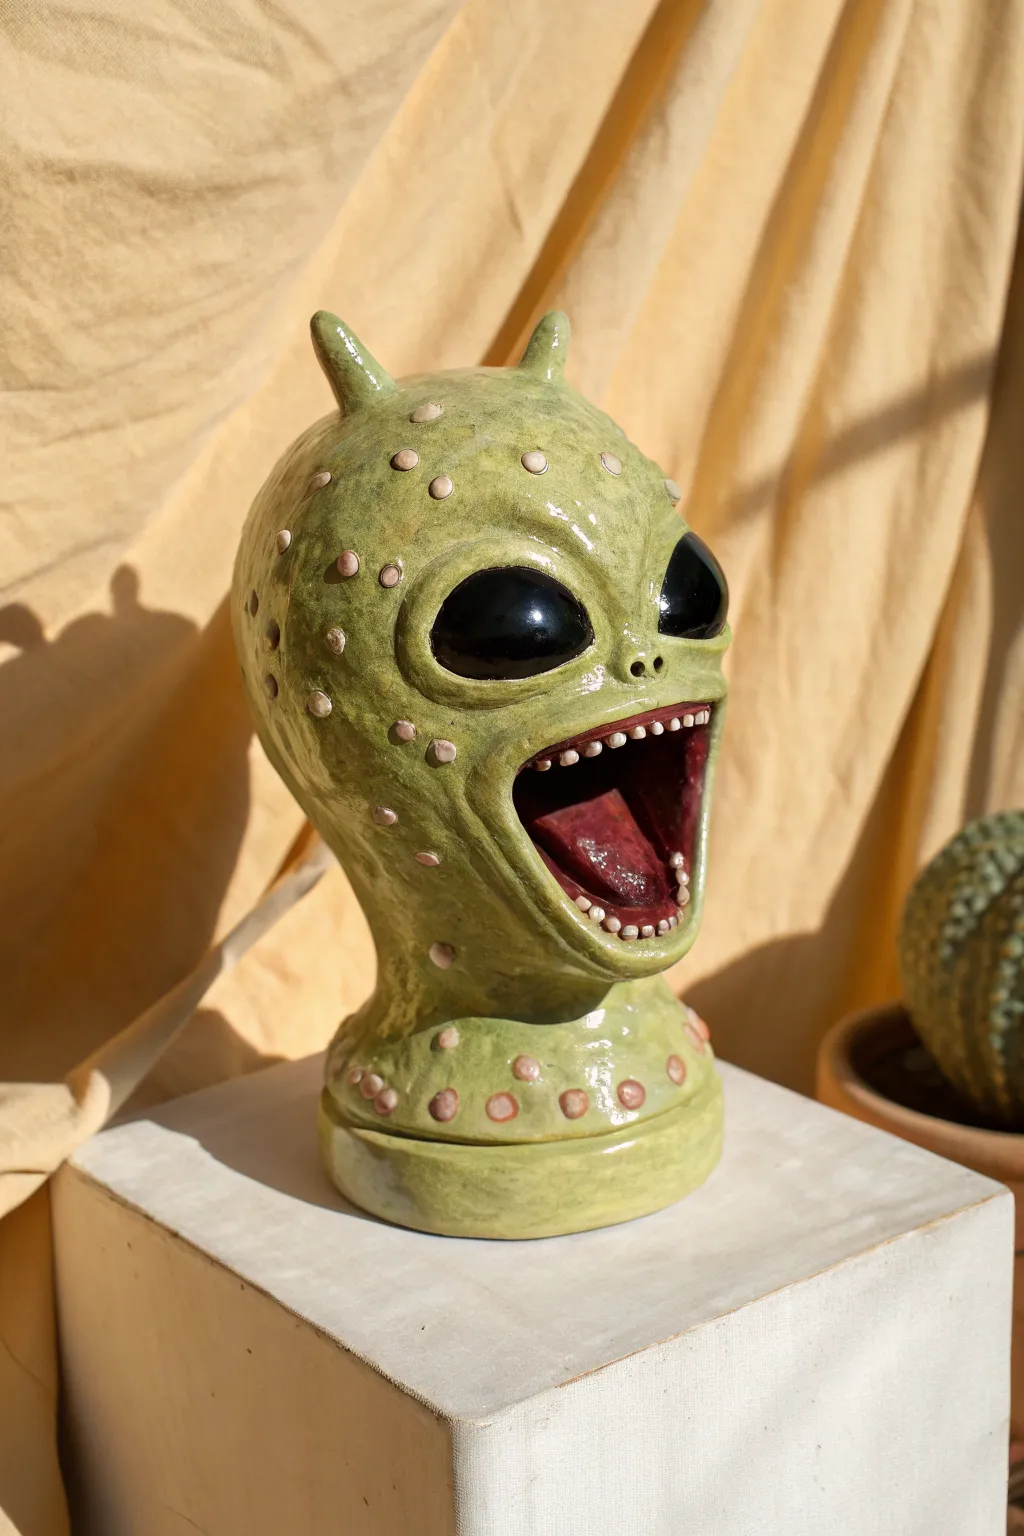
This whimsical ceramic sculpture captures a playful alien personality, complete with large black eyes and a bumpy, spotted texture. The wide-open mouth and glossy finish give it a lively, almost wet appearance that truly brings the character to life.
Step-by-Step Guide
Materials
- Earthenware or stoneware clay (white or light buff)
- Clay sculpting tools (needle tool, loop tool, wooden knife)
- Slip and score tool
- Underglazes (lime green, dark red, white, black)
- Clear glossy glaze
- Sponge and water bucket
- Kiln (or access to a firing service)
- Pottery wheel (optional, for the base)
Step 1: Forming the Base Structure
-
Build the base:
Start by throwing a small, sturdy cylinder on the wheel or hand-building a thick disk of clay about 1 inch high and 4 inches wide. This will serve as the neck pedestal. -
Pinch the head shape:
Using two large balls of clay, pinch out two hollow pinch pots. Score and slip the edges, then join them together to form a large, hollow egg shape. This will be the alien’s cranium. -
Connect head to base:
Score and slip the bottom of your egg shape and the top of your pedestal base. Firmly press them together and smooth the clay across the seam so it becomes one continuous unit. -
Add the antennae:
Roll two small, tapered coils of clay. Attach them to the top of the head using the score-and-slip method, blending the clay downward so they look like they are growing out of the skull.
Hollow it Out
Don’t forget to poke a hidden hole in the bottom or back of the head into the hollow cavity. This allows hot air to escape in the kiln so your alien doesn’t explode.
Step 2: Sculpting the Features
-
Map out the face:
Use a light touch with a needle tool to sketch where the large eyes and the wide mouth will go. Check for symmetry, but don’t worry if it’s slightly off—aliens are organic beings. -
Create the eye sockets:
Press your thumbs firmly into the clay where the eyes will be to create deep sockets. Build up a small ridge of clay around the perimeter to define the brow and cheekbones. -
Open the mouth:
Cut open the mouth area you sketched earlier. Push the clay walls outward to widen the jaw. I find it helpful to reinforce the inside of the jaw with a thin coil to keep it open during drying. -
Sculpt the tongue:
Form a flat, triangular slab of clay for the tongue. Attach it securely inside the mouth, curling the tip upward slightly for a dynamic look. -
Add teeth:
Roll tiny pellets of clay for teeth. Carefully score and slip them along the upper and lower ridges of the mouth opening.
Step 3: Detailing and Texture
-
Create the eyes:
Roll two smooth balls of clay that fit into your sockets. Score the sockets and the back of the eyes heavily, then press them in. Smooth the eyelids over the sides of the eyeballs. -
Apply the bumps:
Roll out dozens of small, flat discs of clay in varying sizes. Score and slip these all over the head, neck, and base to create the warty texture seen in the photo. -
Refine the surface:
Once the clay is leather hard, use a slightly damp sponge to smooth out any fingerprint marks, especially around the base of the bumps and antennae. -
Bisque fire:
Let the piece dry completely (slowly, to avoid cracks). Fire it to cone 04 (or your clay’s bisque temperature) in the kiln.
Cracked Seams?
If the head starts separating from the neck as it dries, wrap the join with wet paper towels and plastic to rehydrate, then compress the seam again with a wooden tool.
Step 4: Glazing and Finishing
-
Base color application:
Apply 2-3 coats of lime green underglaze to the entire skin surface, carefully working around the eyes and teeth. -
Paint the mouth details:
Use a deep red or maroon underglaze for the inside of the mouth and the tongue. Use a detail brush to carefully paint the teeth white. -
Detail the eyes and bumps:
Paint the large eyes with 3 coats of solid black underglaze. carefully dab a light pink or off-white underglaze onto the raised bumps. -
Apply clear glaze:
Once the underglaze is dry, coat the entire piece in a clear glossy glaze. This is crucial for achieving that slimy, wet alien look. -
Final firing:
Fire the piece again to the maturation temperature of your glaze and clay body (typically cone 05/06 or cone 5/6 depending on materials).
Now you have a wonderfully weird galactic friend to guard your plants.
Baby Alien in a Space Pod
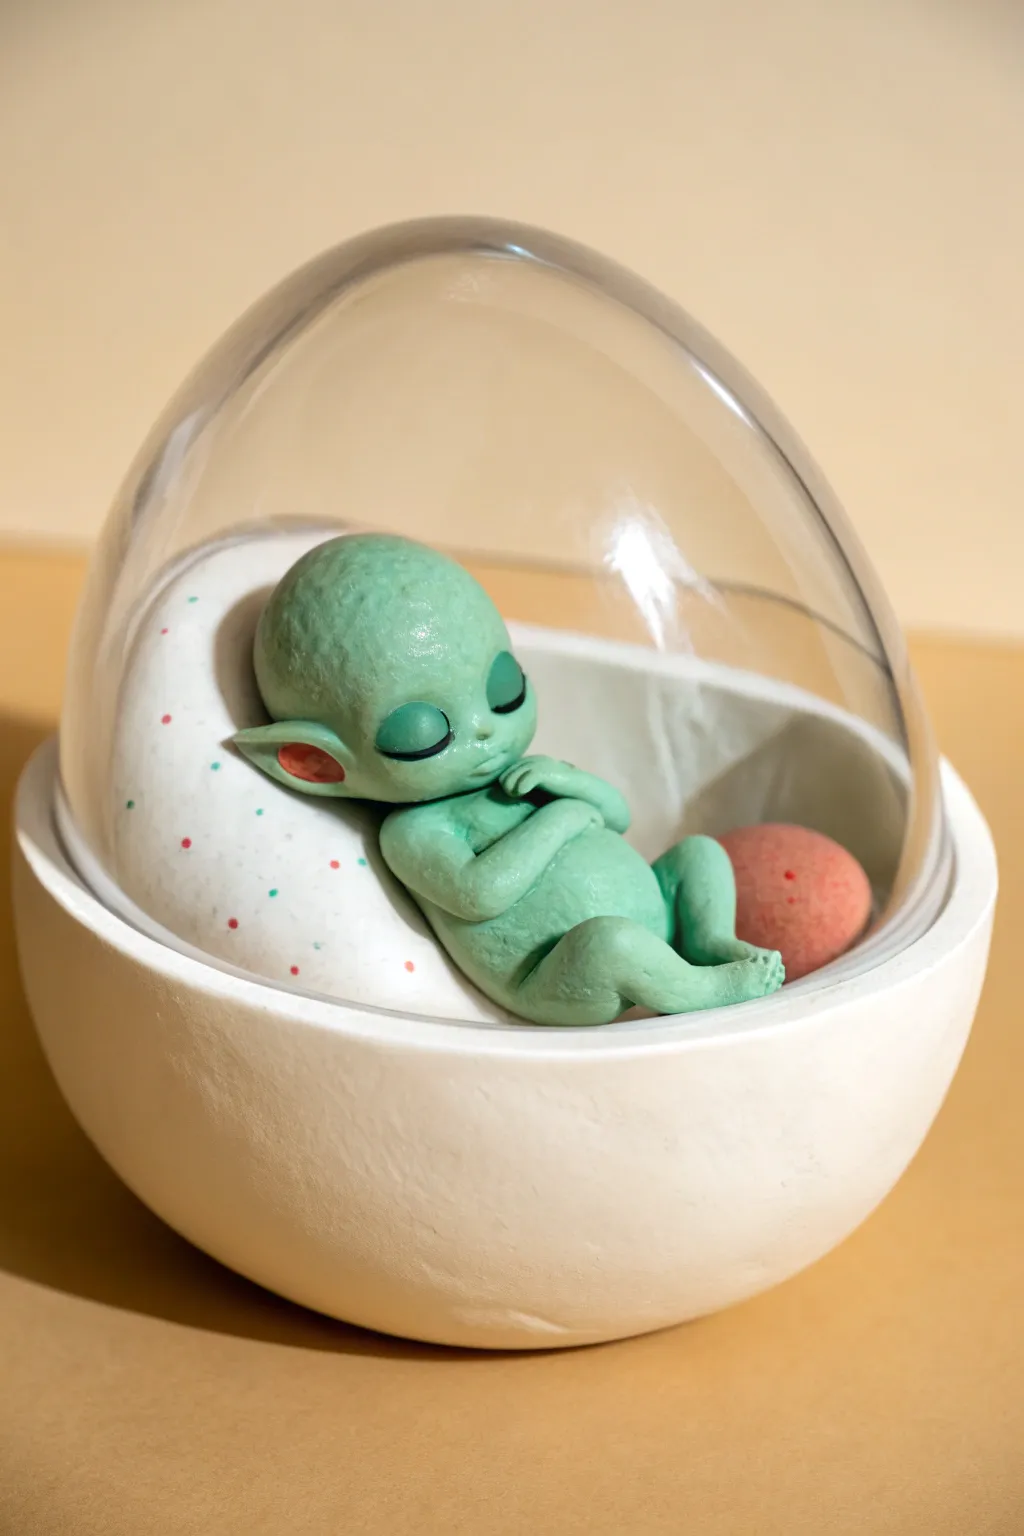
Create an adorable intergalactic nursery with this polymer clay project featuring a sleeping baby alien inside a modern space pod. The combination of smooth clay sculpting and a clear viewing dome gives this piece a polished, collectible toy aesthetic.
Step-by-Step Tutorial
Materials
- Polymer clay (Mint Green, White, Salmon/Pink)
- Acrylic paints (Dark Green, Red, White)
- Clear plastic fillable ornament half or small dome
- Sculpting tools (ball styluses, needle tool, flexible blade)
- Smooth foam ball or aluminum foil (for pod core)
- Fine grit sandpaper
- Matte varnish
- Gloss varnish or UV resin
- Baking sheet and oven
Step 1: Constructing the Pod Base
-
Form the core shape:
Start by creating a hemisphere shape using a ball of aluminum foil tightly compressed, or cut a smooth foam ball in half. This will be the armature for your pod. -
Cover with white clay:
Condition your white polymer clay until it is soft and pliable. Roll it into a thick sheet, about 1/4 inch thick. drape this over your armature bowl shape, smoothing it down the sides. -
Refine the surface:
Trim any excess clay from the rim to create a clean, flat edge. Use your fingers and a bit of clay softener or baby oil to smooth the outside surface until it looks seamless and modern. -
Create the interior cushion:
Roll a thick snake of white clay and flatten it slightly. Press this into the back interior curve of the pod to act as a pillow or headrest. -
Add texture details:
Take a tool with a small round tip and gently press random divots into the pillow area for a cushioned look. You can also add tiny dots of pink and red clay here for a speckled pattern. -
Pre-bake the base:
Bake the white pod base according to your clay package instructions for about 15 minutes to set the shape so you don’t squash it while adding the alien.
Clean Clay Tip
White clay attracts dust like a magnet. Keep a pack of baby wipes nearby and clean your hands and tools thoroughly before handling the white pod sections.
Step 2: Sculpting the Alien Baby
-
Shape the head:
Roll a sphere of mint green clay. Gently press the sides to narrow the jaw area, leaving the top bulbous to create that classic oversized alien cranium. -
Sculpt the facial features:
Use a ball tool to press deep, slanted indentations for the eyes. Add a tiny nose bump and use a needle tool to drag a small line for the sleeping mouth. -
Attach the ears:
Form two small teardrops of green clay. Flatten them and press a smaller piece of pink clay inside for the inner ear. Attach these to the sides of the head. -
Form the body:
Create a pear shape from green clay for the torso. Curve it slightly so the baby looks curled up in a fetal position. -
Add limbs:
Roll four small snakes of clay for arms and legs. Taper the ends. Attach the legs bent at the knees and the arms folded over the chest. -
Add hands and feet:
Use a needle tool or craft knife to carefully cut tiny slits at the ends of the limbs to distinguish three or four fingers and toes. -
Refine skin texture:
I like to gently dab the green clay surface with a toothbrush or stiff bristle brush to give it a realistic, porous skin texture rather than leaving it perfectly smooth. -
Position in the pod:
Place the assembled alien body onto the pre-baked white cushion. Ensure the head rests naturally against the back support. -
Add the space egg:
Roll a ball of salmon-colored clay and texture it slightly with a sponge. Nestle this ‘space egg’ or toy next to the baby’s feet.
Step 3: Finishing Touches
-
Final Bake:
Bake the entire piece again for the full duration recommended by your clay manufacturer to cure the green alien fully. -
Paint the eyes:
Once cool, paint the indented eye sockets with dark green or black acrylic paint. Add a tiny faint highlight line for dimension if you wish. -
Seal the piece:
Apply a matte varnish to the alien’s skin and the white pod. Use a high-gloss varnish or UV resin ONLY on the alien’s eyes to make them look wet and glassy. -
Attach the dome:
Take your clear plastic dome and fit it over the open half of the pod. If the fit is loose, a tiny rim of clear glue will secure it in place.
Make it Glow
Mix glow-in-the-dark powder into your mint green clay before sculpting. The baby alien will faintly illuminate inside the dark pod at night.
Place your finished pod on a shelf and enjoy the peaceful vibe of this extraterrestrial sleeper


What Really Happens Inside the Kiln
Learn how time and temperature work together inside the kiln to transform clay into durable ceramic.
Alien in a Simple Spacesuit
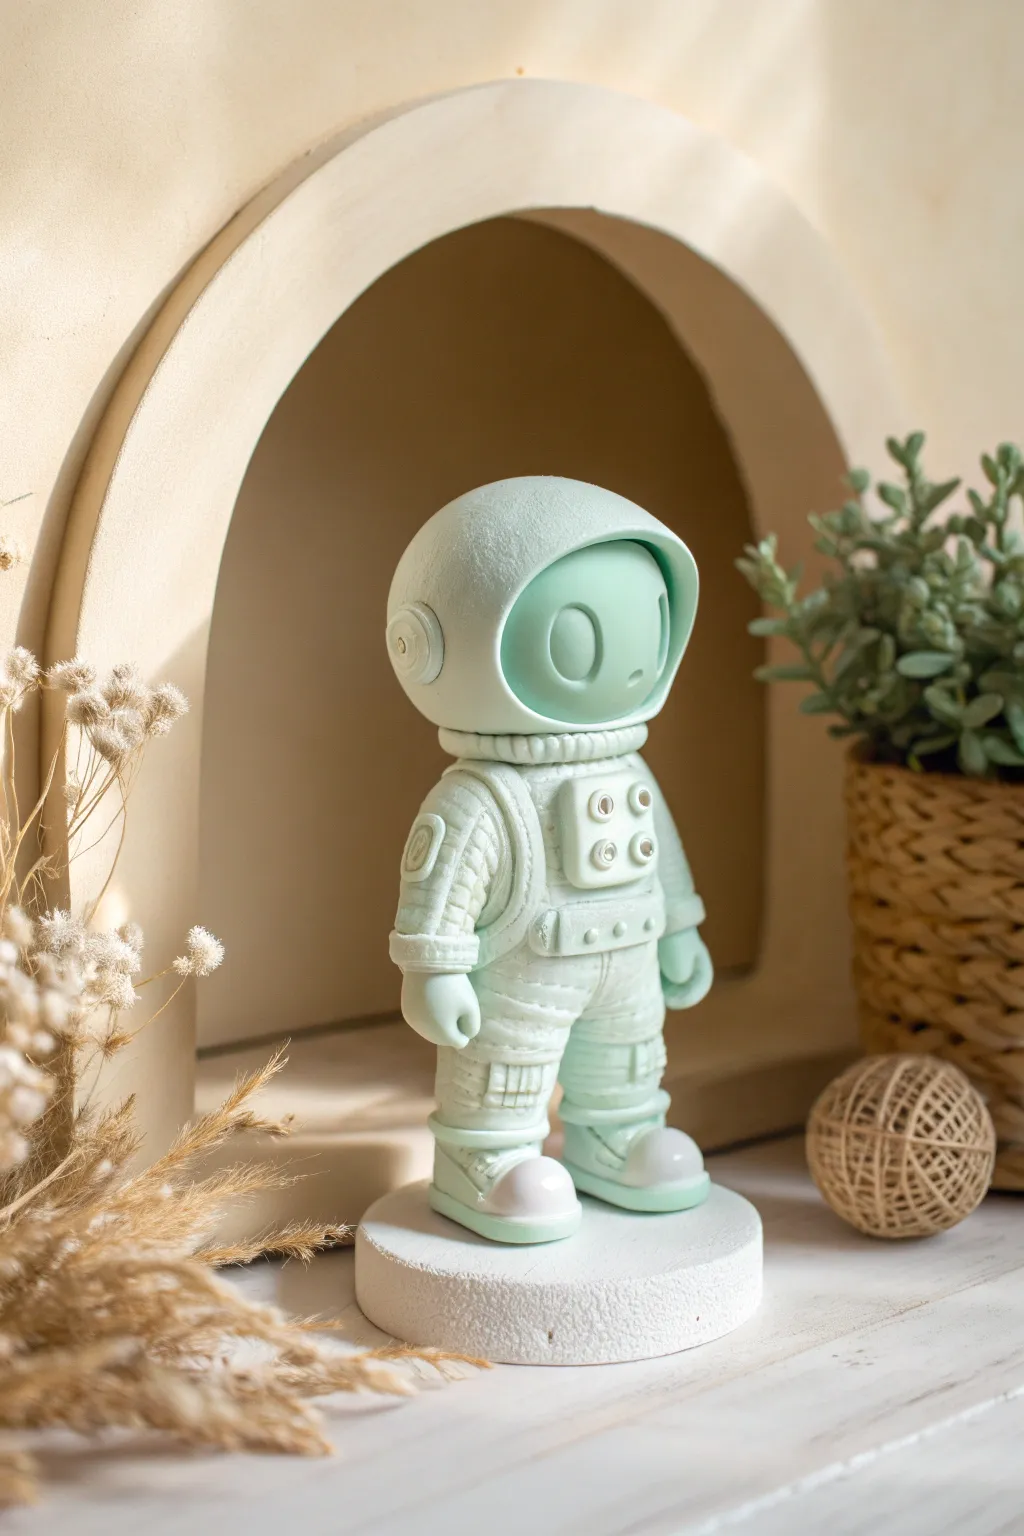
This adorable astronaut project uses soft monochromatic tones to create a sleek, modern space explorer. With its oversized helmet and sturdy boots, this figure captures a charming sense of wonder while maintaining an elegant, matte finish perfect for bookshelf decor.
Step-by-Step Guide
Materials
- Polymer clay (Mint Green or Pastel Blue)
- Polymer clay (White)
- Aluminum foil (for armature core)
- Armature wire (optional for stability)
- Clay sculpting tools (needle tool, ball stylus, rubber shaper)
- Texture sheet or stiff brush (for subtle fabric texture)
- Rolling pin
- Round cookie cutter (for the base)
- Oven for baking
- Matte varnish (optional)
Step 1: Building the Head and Helmet
-
Form the core:
Crumple a small ball of aluminum foil to act as the lightweight core for the astronaut’s large head. Cover it with a smooth, even layer of mint green clay. -
Shape the helmet:
Roll a larger sheet of mint clay and drape it over the head sphere, smoothing it down the back. Leave the front open for the faceplate area. -
Define the visor:
Use a ball stylus or your thumb to gently press an indentation into the face area. Smooth out the interior to create the visor’s recessed surface. -
Add the rim:
Roll a thin snake of clay and wrap it around the edge of the helmet opening. Blend the outer edge into the helmet while keeping the inner edge sharp. -
Create the eyes:
Roll two small ovals of mint clay and press them vertically onto the visor. I find placing them slightly wide apart adds to the cute, alien aesthetic. -
Detail the helmet ear:
Make small circular discs and attach them to the sides of the helmet where ears would be. Press a smaller circle inside for detail.
Step 2: Body and Suit Details
-
Construct the torso:
Form a rectangular block of clay for the body, slightly wider at the shoulders. Smooth the edges so it looks padded rather than boxy. -
Make the ribbed neck:
Create a thick disc of clay, score vertical lines around the edge to mimic tubing, and place it between the head and torso. -
Sculpt the legs:
Roll two thick cylinders for legs. Press them gently against the bottom of the torso and blend the seams at the hips. -
Add arm shapes:
Create two tapered cylinders for arms. Attach them at the shoulders, curving them slightly forward in a relaxed pose. -
Create the control panel:
Cut a small square of clay and attach it to the chest. Using a small ball tool, press four symmetrical indentations to resemble buttons. -
Add texture:
Use a needle tool or texture sheet to gently press a grid or fabric pattern onto the arms and legs, distinguishing the ‘fabric’ parts of the suit from the hard shell pieces.
Head Heavy?
If the head keeps tilting or falling off, insert a piece of wire or a toothpick through the neck and into the body before baking to act as an internal spine.
Step 3: Boots, Hands, and Finishing
-
Form the boots:
Shape two blocky feet from mint clay. Add a white clay cap to the toe area and a white rim around the sole for contrast. -
Attach the feet:
Press the legs firmly onto the boots. Use a rubber shaper to create a clean seam where the pant leg meets the boot. -
Sculpt simple hands:
Form small rounded mittens for hands—keep them simple without distinct fingers—and attach them to the ends of the sleeves. -
Piping details:
Add tiny strips of clay around the wrists like cuffs, and add small rectangular pockets to the thighs for extra realism. -
Prepare the base:
Roll out a thick slab of white clay and cut a perfect circle using your cookie cutter. Texture the surface slightly if you want a moon-surface look. -
Final assembly:
Place your astronaut onto the white base, pressing down firmly to bond the boots to the platform. -
Bake and finish:
Bake the piece according to your clay manufacturer’s instructions. Once cool, you can leave the matte finish or add a matte varnish for protection.
Clean Clay Tip
Pastel clay shows dust easily. Clean your hands and work surface thoroughly with baby wipes before starting, especially when switching to the white clay.
Now you have a serene space traveler ready to explore your desk area
Mini UFO With Tiny Pilot Alien
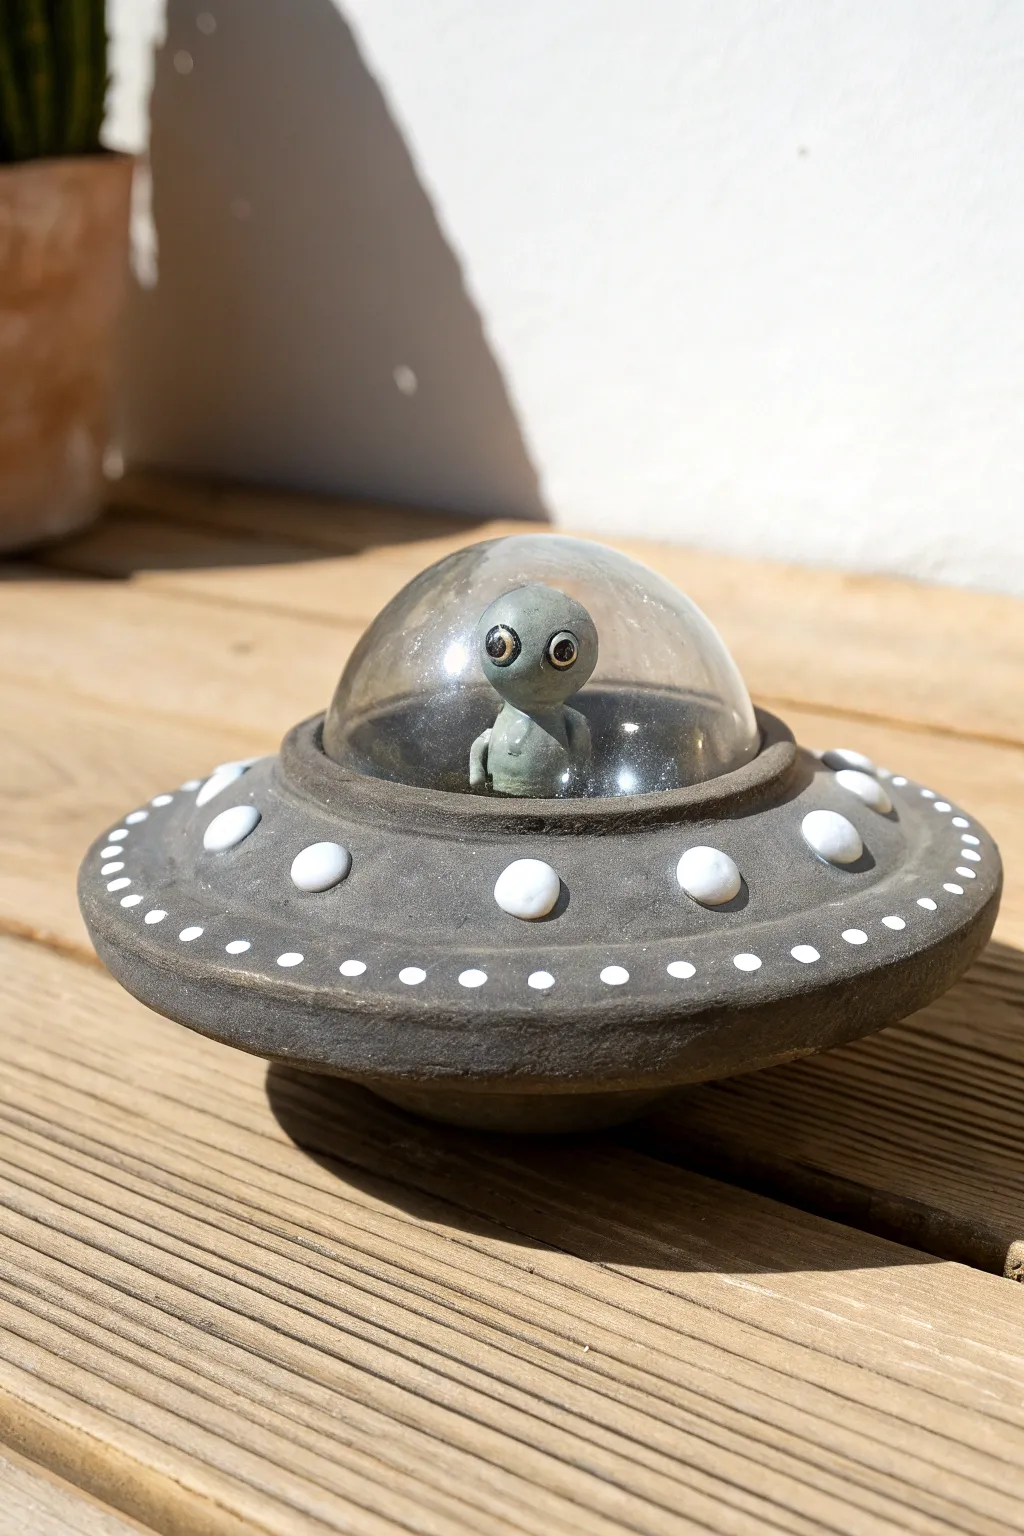
This charming project features a classic grey flying saucer with a clear dome cockpit and a tiny, wide-eyed alien pilot inside. By combining sculpted clay forms with a simple clear bauble half, you can create a playful interstellar vehicle perfect for a shelf or desk.
Step-by-Step Tutorial
Materials
- Air-dry clay or polymer clay (grey)
- Clear plastic fillable ornament ball (about 2-3 inches diameter)
- Small amount of light green or grey clay for the alien
- Googly eyes or black beads
- White acrylic paint
- Small round paintbrush
- Dotting tool or toothpick
- Strong craft glue (clear drying)
- Rolling pin
- Circle cutters (various sizes)
Step 1: Sculpting the Saucer Base
-
Prepare the main body:
Start by rolling a large ball of grey clay and flattening it slightly into a thick disc shape. This will form the core of the spaceship. -
Shape the saucer rim:
Pinch and pull the edges of your disc outwards to create a tapered, saucer-like rim, keeping the center slightly domed. -
Create the bottom hull:
Roll a smaller ball of grey clay and flatten it onto the bottom center of your main disc to create the underside of the engine area, blending the seams very smooth with a bit of water or slip. -
Form the cockpit seating:
Press your thumb into the top center of the saucer to create a shallow indentation where the alien pilot will eventually sit. -
Add the cockpit collar:
Roll a snake of grey clay and form a ring around the central indentation. Flatten it gently so it forms a raised collar that will eventually support the plastic dome. -
Check the fit:
Take one half of your clear plastic ornament ball and press it gently into the clay collar to ensure it fits snugly, then set the plastic aside.
Step 2: Creating the Pilot
-
Mold the alien body:
Using a small amount of light green or grey clay, roll a tiny teardrop shape for the torso and a slightly larger oval for the head. -
Assemble the figure:
Attach the head to the torso. I find that using a tiny piece of wire or a toothpick as an internal armature helps keep the head secure. -
Add facial features:
Press two small beads or googly eyes into the face. Alternatively, create indents and paint them black later for that classic wide-eyed look. -
Position the pilot:
Place the alien figure into the central indentation of the saucer. Secure it with a dab of glue or by blending the clay at the base of the torso into the ship floor. -
Let it dry:
Allow the entire clay structure to dry completely according to your clay package instructions before painting.
Dome Fitting Trick
Press the plastic dome into the wet clay slightly deeper than needed. Clay shrinks when drying; a deeper groove ensures the dome still fits later.
Step 3: Painting and Assembly
-
Paint the large lights:
Using white acrylic paint and a medium brush, paint large circles around the upper hull of the saucer to represent the main lights. -
Add detail dots:
Switch to a dotting tool or the end of a paintbrush handle to stamp a ring of tiny white dots along the very edge of the saucer rim. -
Refine the paint:
If the grey clay looks dull after drying, you can apply a light wash of dark acrylic paint to bring out the texture, wiping away the excess before it dries. -
Prepare the dome:
Ensure the inside of your clear plastic dome is clean and free of fingerprints. -
Attach the cockpit:
Apply a thin line of clear-drying strong glue to the rim of the plastic dome and press it firmly onto the clay collar you created earlier. -
Seal the join:
To hide the glue seam, roll a very thin snake of grey clay (or use grey paint) to outline the base of the plastic dome where it meets the ship.
Cloudy Dome?
If using superglue, the fumes can fog up the plastic dome permanently! Stick to Craft Glue or PVA glue which dries clear without distinct fumes.
Now you have a cosmic traveler ready to explore new worlds on your bookshelf

TRACK YOUR CERAMIC JOURNEY
Capture glaze tests, firing details, and creative progress—all in one simple printable. Make your projects easier to repeat and improve.
Alien Head Charms and Toppers
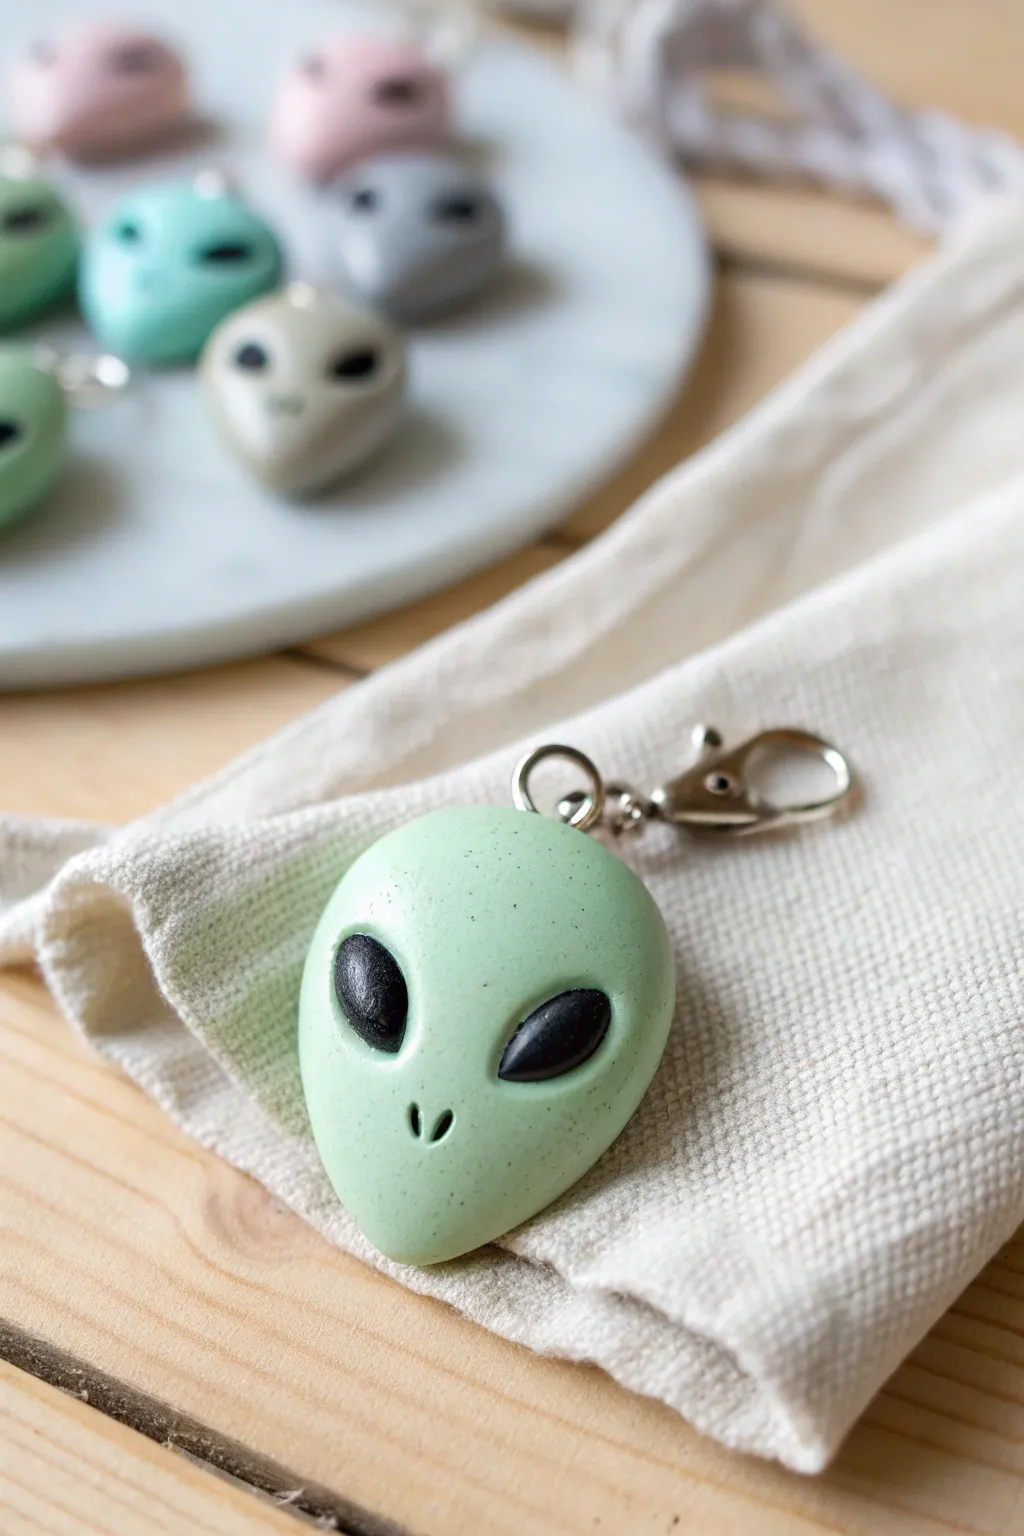
Embrace the extraterrestrial trend with these smooth, minimalist alien head charms that look surprisingly chic attached to keys or backpacks. The soft pastel green and simple black teardrop eyes give them a stylized, friendly appearance rather than a spooky one.
Detailed Instructions
Materials
- Polymer clay (pastel mint green)
- Polymer clay (black)
- Fimo gloss glaze or liquid polymer clay (for the eyes)
- Eye pin or screw eye hook
- Jump rings and lobster clasp
- Detailing tool or small knitting needle
- Smooth work surface (ceramic tile or glass)
- Oven (for baking)
- Needle-nose pliers
Step 1: Shaping the Head
-
Condition the base clay:
Start by taking a chunk of your pastel mint green polymer clay. Knead it thoroughly in your hands until it becomes warm, pliable, and free of any cracks. -
Form a ball:
Roll the conditioned clay between your palms to create a completely smooth sphere about the size of a large grape or small walnut. -
Create the signature jawline:
While keeping the top rounded, gently pinch and pull the lower half of the sphere to taper it into a rounded point. You want that classic inverted teardrop ‘Grey alien’ head shape. -
Flatten precisely:
Place your teardrop shaper on your work surface and press down gently with your palm. Don’t make it too thin like a pancake; aim for a nice, chubby dome shape that feels substantial. -
Smooth the surface:
Inspect the clay for fingerprints. I like to lightly buff the surface with my finger or a touch of cornstarch to ensure it’s perfectly matte and smooth before adding features.
Step 2: Adding Features
-
Mark eye placement:
Using a dotting tool or the back of a paintbrush, make two light indentations where the eyes will go. These should be large, slanted ovals placed widely apart on the upper half of the head. -
Deepen the sockets:
Gently press your thumbs or a large ball tool into those marked spots to create shallow, slanted depressions. This helps the black eyes sit flushing with the face later. -
Form the eye inserts:
Take a very small amount of black clay and divide it into two equal peas. Roll them into balls, then elongate them into tapered teardrop shapes. -
Insert the eyes:
Place the black teardrops into the sockets you created. Press them down gently so they fill the socket completely but remain slightly convex and bulging. -
Refine the eye shape:
Use your finger to smooth the edges of the black clay so it meets the green clay seamlessly without any gaps. -
Add the nose:
Using a needle tool or a very small detailing tool, poke two tiny, vertical nostrils close together near the bottom point of the face. Keep them subtle.
Fingerprint Fix
Is your smooth clay showing prints? Lightly brush the unbaked clay with a little baby oil or cornstarch and rub gently to buff them away instantly.
Step 3: Hardware & Finishing
-
Insert the hardware:
Take your screw eye pin or straight eye pin. If using a straight pin, bend the bottom into a hook or zigzag so it anchors well. Push it vertically into the center of the top of the head. -
Secure the clay:
Gently nudge the green clay back around the base of the metal pin to ensure a tight seal so it won’t pull out after baking. -
Bake the charm:
Place your alien on a parchment-lined baking sheet or ceramic tile. Bake according to your specific clay brand’s instructions (usually around 275°F/130°C for 15-30 minutes). -
Cool down:
Allow the piece to cool completely in the oven or on the counter. Do not handle it while hot, as the clay is still fragile. -
Glaze the eyes:
For that realistic ‘wet’ look seen in the photo, carefully paint a layer of gloss glaze or UV resin only on the black eyes. Cure or let dry completely. -
Attach the clasp:
Using your pliers, open a jump ring and loop it through the eye pin on the alien’s head. Add your lobster clasp to the ring, then close the jump ring securely.
Speckled Style
To get the stone-like texture seen in the photo, mix tiny amounts of black pepper or craft sand into your pastel clay before shaping the head.
Now you have a charming little visitor from the stars ready to guard your keys
Stacked Alien Totem Beads
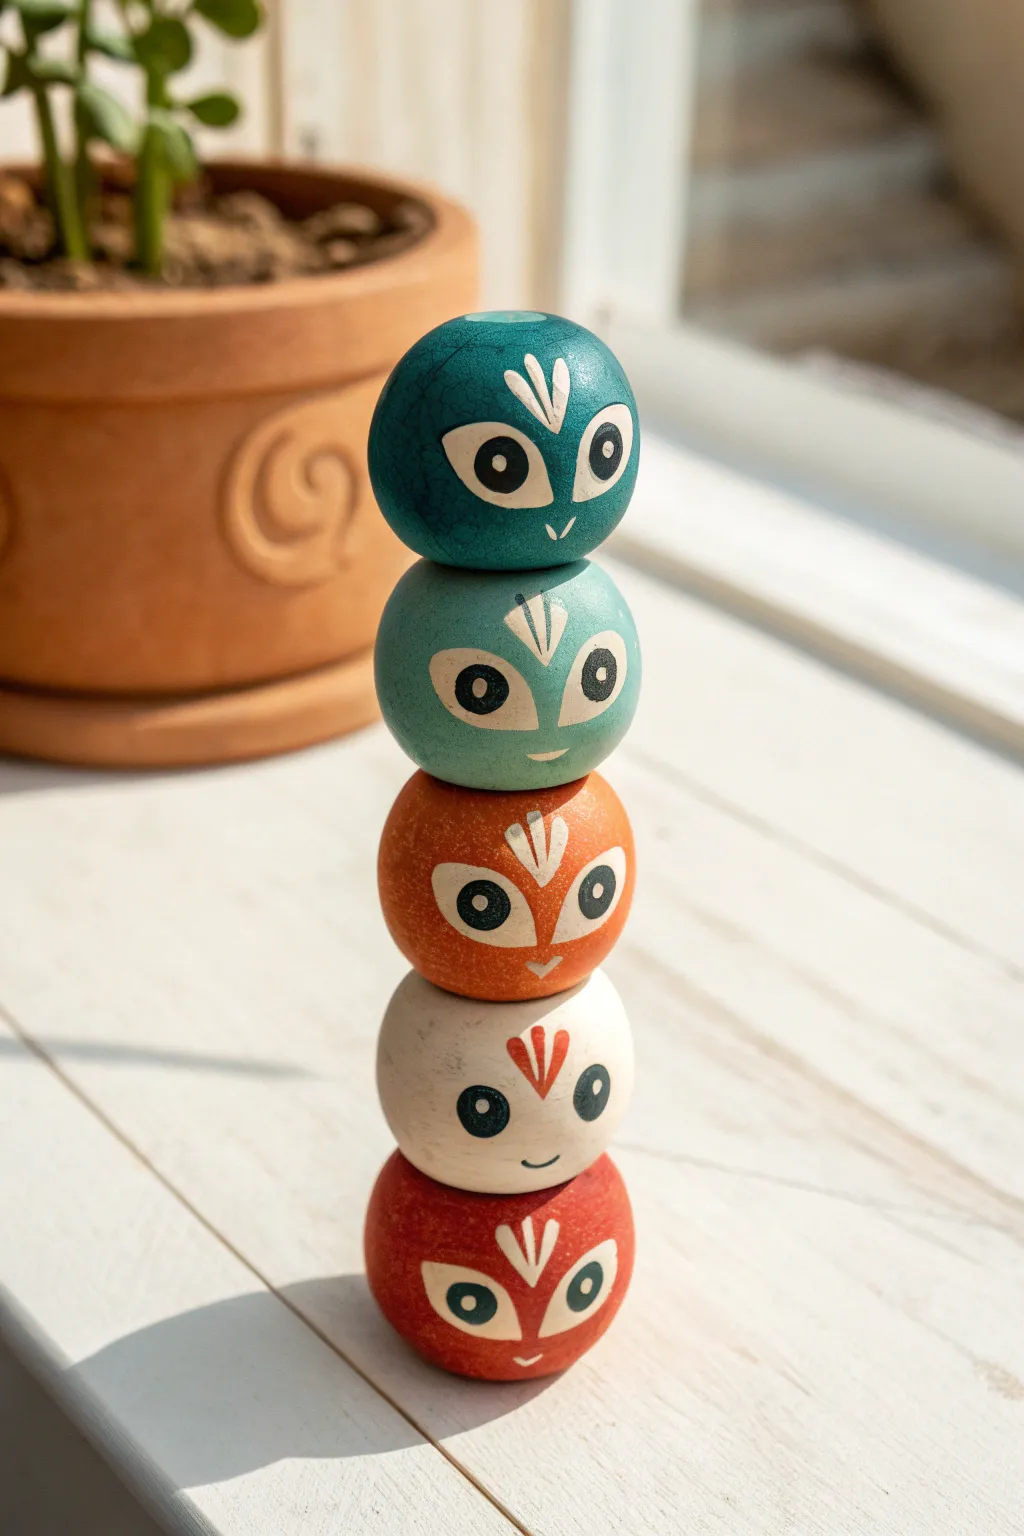
Create a charming stack of curious alien faces using simple spherical clay beads painted in earthy, muted tones. This vertical totem makes for a delightful desk ornament or a quirky addition to a potted plant, featuring expressive eyes and tribal-style markings.
How-To Guide
Materials
- Polymer clay or air-dry clay (white or neutral base)
- Acrylic paints (teal, mint green, rust orange, burnt red, cream/white)
- Fine detail paintbrush (size 0 or 00)
- Medium flat paintbrush
- Skewer or toothpick (for piercing)
- Sandpaper (fine grit)
- Matte or satin varnish
- Strong glue (optional, if permanently stacking)
Step 1: Shaping the Base Beads
-
Portion the clay:
Start by cutting your clay into five equal portions. You want each finished bead to be roughly 1 to 1.5 inches in diameter, so adjust your portion size accordingly. -
Roll spheres:
Roll each portion of clay between your palms to create smooth spheres. Don’t worry if they aren’t geometric perfection; a little organic irregularity adds character. -
Piercing the beads:
While the clay is still soft, carefully push a skewer or toothpick through the center of each sphere to create a hole. Rotate the skewer gently to ensure the hole is clean and open. -
Flatten contact points:
To help them stack securely later, gently tap the top and bottom of each sphere against your work surface to create small, flat areas around the holes. -
Curing or drying:
Bake your polymer clay according to package instructions or let your air-dry clay set completely. I usually let air-dry clay sit for at least 24 hours to ensure the core is dry. -
Sanding:
Once fully cured and cool, lightly sand any fingerprints or rough ridges with fine-grit sandpaper to create a smooth canvas for your painting.
Uneven Stacking?
If your beads wobble or won’t sit straight, use a small file or sandpaper to flatten the contact points further until they sit flush against each other.
Step 2: Painting the Base Colors
-
Select your palette:
Choose five distinct colors for the base of each alien. The example uses a dark teal at the top, followed by mint green, rust orange, cream, and a deep red at the bottom. -
Apply base coats:
Paint each bead in its solid color. You will likely need 2-3 thin coats to get opaque coverage, letting each coat dry fully before applying the next. -
The sponge technique:
For that slightly weathered, stone-like texture seen in the reference, lightly dab a second, slightly lighter or darker shade over the base coat using a dry piece of sponge or a stiff brush.
Step 3: Adding Faces and Details
-
Outline the eyes:
Using cream or white paint and your fine detail brush, paint two large, slanted almond shapes on the front of each bead. These are the eye sockets. -
Refine the eye shape:
While the white paint is wet, you can clean up edges, or wait for it to dry and touch up the surrounding base color to get crisp lines. -
Paint the pupils:
Add a large black or dark charcoal circle inside each white almond shape. This creates the classic ‘alien’ look. Make them slightly cross-eyed or looking in different directions for personality. -
Add catchlights:
Place a tiny white dot strictly in the upper right or left corner of each black pupil. This brings the character to life immediately. -
Forehead markings:
Paint a small, three-pronged decorative symbol on the forehead of each alien, resembling a sprouting plant or crown. Use white or a contrasting light color. -
Mouth details:
Paint a tiny, simple ‘v’ or curved line for the mouth near the bottom of the face. Keep it minimal to maintain the stylized aesthetic.
Pro Tip: Eye Placement
Paint the eyes slightly lower on the sphere than you think you should. This leaves room for the forehead symbol and makes the faces look cuter.
Step 4: Assembly
-
Sealing the beads:
Once all paint is bone dry, coat each bead with a layer of matte or satin varnish. This protects the paint from chipping and gives a finished look. -
Stacking order:
Arrange your beads in your preferred color order. If you want a permanent sculpture, apply a dab of strong glue between each bead as you stack them on a central dowel or skewer. -
Final check:
Ensure the faces are aligned vertically before the glue sets, so they are all peering out in the same direction.
Place your newly created alien totem on a sunny windowsill and enjoy their quirky company.
Glow-Accent Alien Eyes and Spots
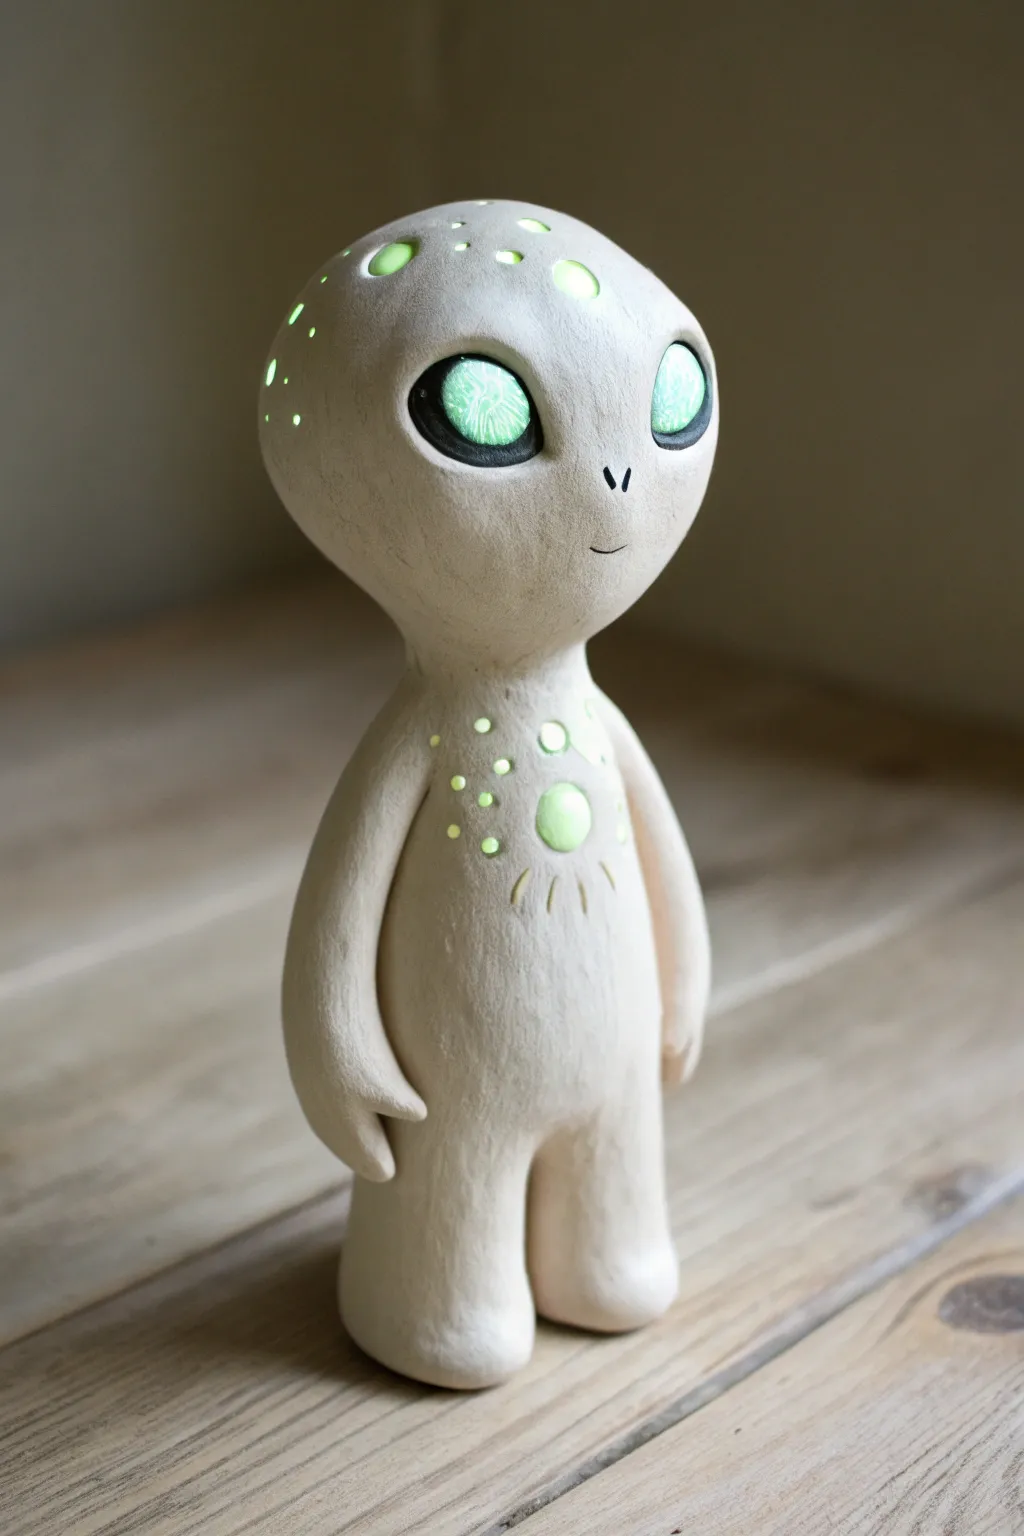
Create a charming extraterrestrial figurine that actually lights up the room using a clever combination of polymer clay and glow-in-the-dark pigment. This smooth, stone-textured sculpture features mesmerizing eyes and constellation-like markings that emit an eerie green aura when the lights go out.
Detailed Instructions
Materials
- White or light gray polymer clay (heavier, firm variety)
- Glow-in-the-dark powder (strontium aluminate, green)
- Black acrylic paint
- Translucent liquid clay (or UV resin)
- Sculpting tools (ball styluses of various sizes)
- Aluminum foil (for armature)
- Toothpick or wire
- Needle tool
- Fine-grit sandpaper (400-600 grit)
- Matte varnish
- Small paintbrush
Step 1: Sculpting the Base Form
-
Prepare the Armature:
Begin by scrunching aluminum foil into two main shapes: a larger, slightly flattened oval for the head and a smaller, elongated teardrop for the body. This saves clay and keeps the figurine lightweight. -
Connect the Pieces:
Insert a toothpick or small piece of wire into the top of the body foil and push the head foil onto it. This creates a sturdy neck connection so your alien doesn’t lose its head during baking. -
Sheet the Clay:
Condition your white or light gray clay until it is soft and pliable, then roll it out into a sheet about 1/4 inch thick. Cover the foil armature completely, smoothing the seams with your thumb to create a unified surface. -
Refine the Head Shape:
Focus on the head shape now, smoothing it into a classic ‘Grey alien’ silhouette—wider at the top and tapering down to a narrow chin. Keep the surface as smooth as possible. -
Form the Limbs:
Roll two thick logs for legs and blend them seamlessly into the bottom of the torso. Create two slender arms and attach them to the shoulders, smoothing the clay so the arms hang naturally at the sides.
Glow Intensity Tip
For maximum brightness, ‘charge’ your finished piece under a UV flashlight or strong sunlight for 60 seconds. The green will glow intensely against the dark eyes.
Step 2: Adding Details and Texture
-
Create Eye Sockets:
Using your thumbs or a large ball tool, press firmly into the face to create deep, slanted depressions for the large alien eyes. Make these divots deeper than you think you need, as they will be filled later. -
Sculpt Facial Features:
Use a needle tool or a very small stylus to indent two tiny nostrils and a simple, subtle smile. The minimalism is key here. -
Create Glow Pockets:
Using various sizes of ball tools, press circular indentations into the forehead and the center of the chest. Vary the sizes to create an organic, spotted pattern. -
Add Texture:
To mimic the stone-like finish seen in the photo, gently tap the entire surface of the clay with a stiff toothbrush or a ball of crinkled foil. Do not texture the inside of the eye sockets or the glow pockets. -
First Cure:
Bake the sculpture according to your clay manufacturer’s instructions. Let it cool completely before moving to the next phase.
Dripping Liquid Clay?
If your liquid clay mix is too runny and spills out of the holes, thicken it by letting the mix sit open for an hour or adding a pinch of cornstarch before filling.
Step 3: The Glowing Effects
-
Paint the Eye Sockets:
Paint the inside of the large eye sockets entirely black with acrylic paint. This dark background will make the glowing green pop intensely. Let the paint dry fully. -
Mix the Glow Medium:
In a small cup or palette, mix a generous amount of glow-in-the-dark powder with translucent liquid clay. You want a very high concentration of powder for the brightest glow. -
Fill the Markings:
carefully drip the glow mixture into the circular indentations on the head and chest. I like to use a toothpick for this to avoid overflowing the edges. The liquid clay should dome slightly. -
Create the Eyes:
Fill the eye sockets with the glow mixture, but don’t fill them to the brim immediately. Instead, add a swirl of the mix in the center to create that iris effect, leaving some black visible around the edges. -
Final Cure and Finish:
Bake the piece again to set the liquid clay (usually 15-20 minutes at the recommended temperature). Once cool, lightly sand any rough spots if necessary, then apply a coat of matte varnish to the body to protect the texture.
Place your little visitor on a nightstand to watch over the room with its gentle, otherworldly light
Alien Plant Hybrid Creature
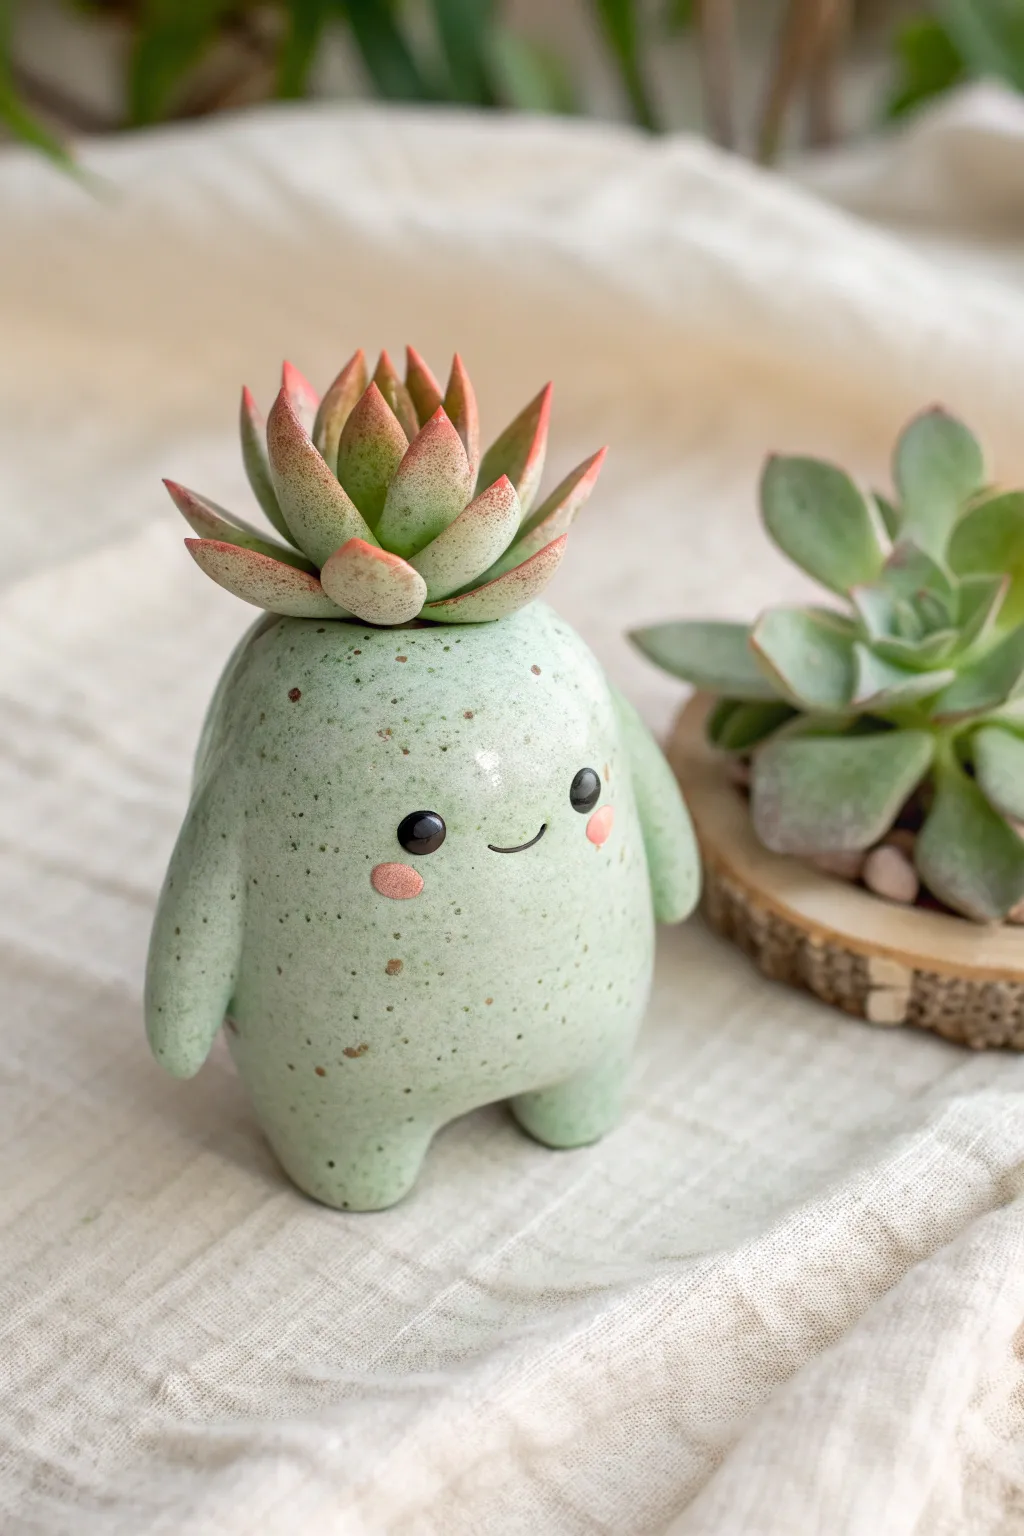
Transform a lump of clay into this adorable, speckled alien creature that doubles as a home for your favorite succulent. With its glossy finish and sweet blinking expression, this little green friend adds a touch of whimsy to any windowsill garden.
How-To Guide
Materials
- Light green polymer clay (speckled effect preferred)
- Black polymer clay
- Pink soft pastels or chalk
- Translucent liquid polymer clay (optional, for securing)
- Glossy polyurethane varnish or UV resin
- Sculpting tools (ball stylus, needle tool)
- Rolling pin
- Aluminum foil (for armature)
- Small succulent plant (real or faux)
Step 1: Forming the Body Base
-
Prepare the core:
Crumple a piece of aluminum foil into a smooth, oval egg shape. This will act as the lightweight core of your planter and save on clay usage. -
Create the cavity:
Press a thumb or a rounded tool into the top of your foil egg to create a depression where the plant will eventually sit. Make sure it’s deep enough for a small amount of soil or the base of a faux plant. -
Sheet the clay:
Roll out your speckled green clay into a sheet about 1/4 inch thick. If you can’t find pre-speckled clay, you can mix black pepper or brown embossing powder into plain pastel green clay. -
Cover the form:
Wrap the clay sheet around your foil armature. Smooth the seams carefully with your fingers or a silicone tool until the surface is seamless and uniform. -
Refine the shape:
Gently roll the covered form on your work surface to ensure it is symmetrical. Push the clay into the top depression to line the planting hole neatly.
Step 2: Adding Limbs and Features
-
Sculpt the legs:
Roll two small balls of green clay, slightly flattening them into sturdy cylinders. Attach these to the bottom of the body, blending the clay upwards so there are no visible seams. Tap the figure on the table to ensure it stands flat. -
Form the arms:
Create two elongated teardrop shapes from the green clay. Attach these to the sides of the body, positioned slightly lower than where you imagine the face will be. -
Blend the arms:
Use a modeling tool to smooth the shoulder connection point into the main body, leaving the hands free-hanging or resting against the belly. -
Mark the face:
Use a needle tool or very lightly press with a dotting tool to mark where the eyes and mouth will go. This helps ensure symmetry before committing to the final placement. -
Create eye sockets:
Press a medium-sized ball tool into the marked eye spots to create shallow indents. This helps the eyeballs sit securely rather than bulging out too much.
Pepper Grinder Trick
Mix coarse ground black pepper into translucent or light green clay. When baked, the pepper creates realistic organic speckles that look just like fired ceramic glaze.
Step 3: Bringing the Face to Life
-
Insert the eyes:
Roll two tiny balls of black clay. Place them into the sockets you created and flatten them gently. For a shiny look later, ensure the black clay is very smooth. -
Carve the smile:
Use a very fine needle tool or a small curved blade to impress a tiny, U-shaped mouth right between the eyes. Keep it simple and small for maximum cuteness. -
Apply blush:
Scrape a little pink pastel chalk into a powder. Use a soft brush or a cotton swab to dab this powder onto the cheeks, just below and to the outside of the eyes. -
Baking time:
Bake the piece according to your clay manufacturer’s instructions. Usually, this is around 275°F (130°C) for 15-30 minutes depending on thickness. Let it cool completely.
Variations
Try making a whole family of aliens in different pastel colors like lavender or baby blue, each with a different facial expression or arm position.
Step 4: Finishing Touches
-
Glaze the body:
Apply a coat of glossy varnish or UV resin over the entire green body to mimic a ceramic glaze. This makes the ‘speckles’ pop and gives it a professional finish. -
Highlight the eyes:
If you really want the eyes to shine, add a tiny drop of extra thick gloss or UV resin just on the black circles to make them look wet and alive. -
Final assembly:
Once the varnish is fully cured, transplant your small succulent into the top cavity. If using a faux plant, a dab of hot glue will keep it perfectly in place.
Now you have a charming little desk companion that never needs much more than a drop of water and a smile
Crystal-Back Alien Guardian
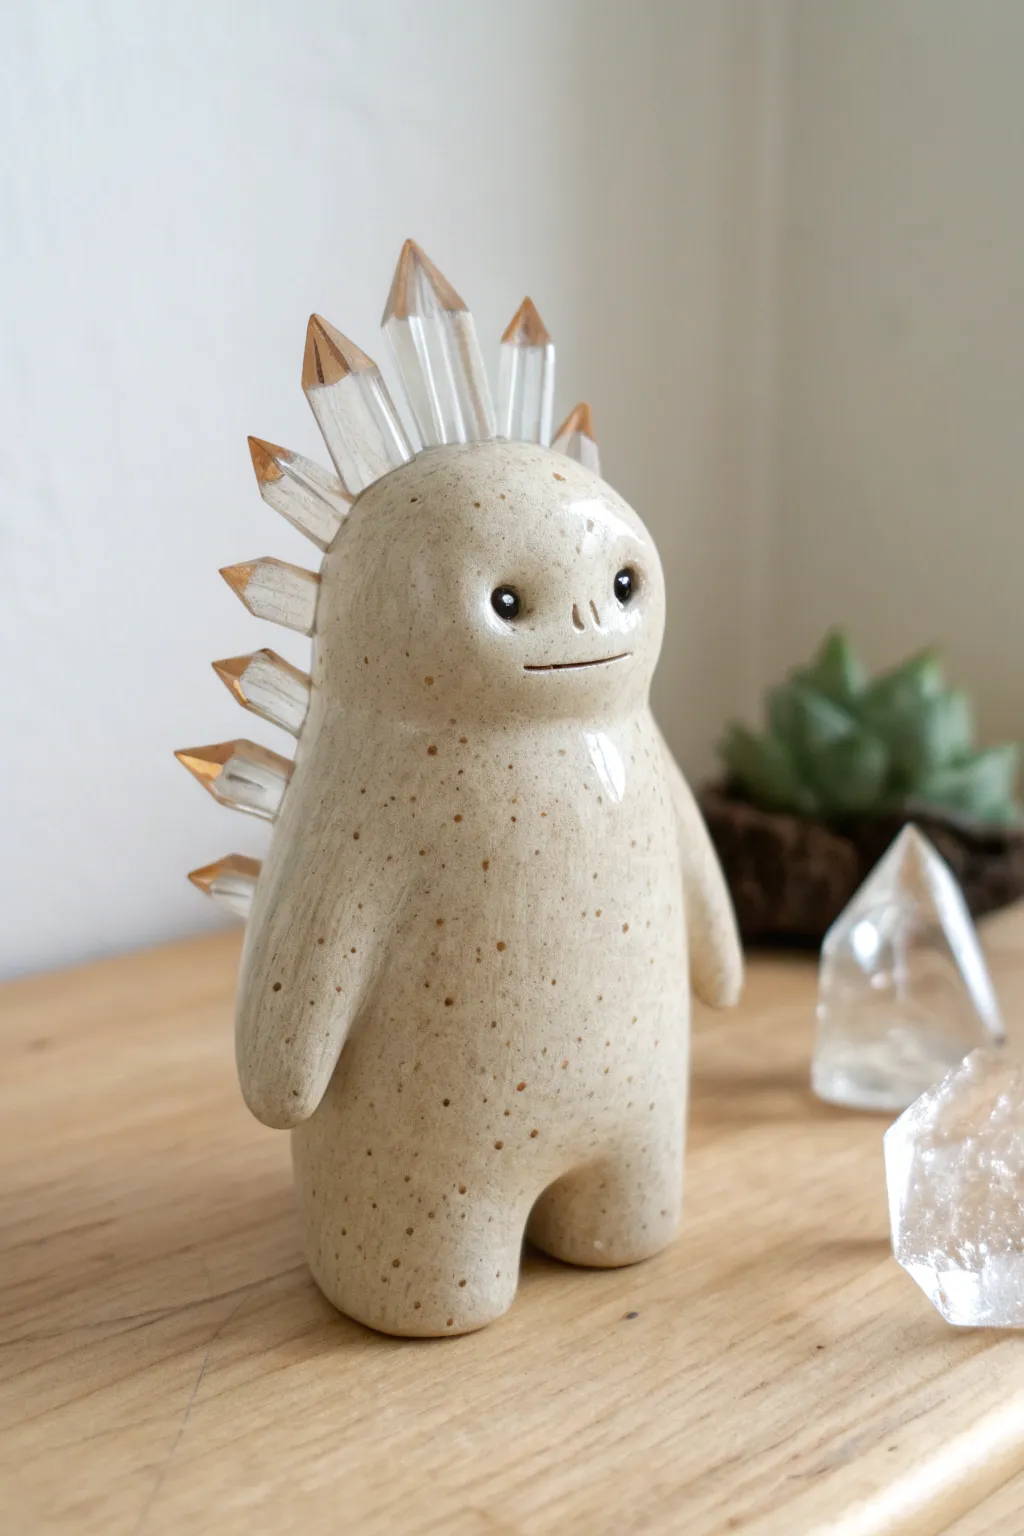
Create a mystical little friend with this charming clay project that combines earthy textures with crystalline magic. This speckled alien guardian features a row of quartz-like spikes down its back and a sweet, glossy face that brings it to life.
Step-by-Step Guide
Materials
- Speckled beige polymer clay (or stoneware clay if firing)
- Clear quartz points (small variety pack)
- Liquid polymer clay or strong adhesive (like E6000)
- Glossy glaze or polyurethane varnish
- Black acrylic paint
- Small dotting tool or toothpick
- Sculpting tools (smoothers, needle tool)
- Gold leaf or gold paint (optional for crystal tips)
- Oven (for polymer clay) or Kiln (for ceramic)
Step 1: Shaping the Base Body
-
Form the core:
Start with a medium ball of your speckled beige clay. Roll it between your palms to warm it up, then gently elongate it into a thick, rounded cylinder shape resembling a potato or a large bean. -
Define the legs:
At the bottom of your cylinder, use your thumb or a modeling tool to press an indentation into the center. Carefully separate and smooth two short, sturdy legs. Flatten the bottoms so the figure stands stable on its own. -
Sculpt the arms:
Take two smaller ropes of clay and attach them to the sides of the body. Blend the seams seamlessly at the shoulders, letting the arms hang naturally. I find it looks cuter if the hands are just simple rounded nubs without defined fingers. -
Smooth the surface:
Use a little bit of baby oil or water (depending on your clay type) on your fingertip to smooth out any fingerprints or join lines. The body should look like one continuous, organic shape.
Loose Crystals?
If crystals wobble after gluing, use a tiny snake of raw clay mixed with glue to pack the gap, then carefully heat set with a heat gun or hairdryer.
Step 2: Embedding the Crystals
-
Plan the spine:
Select about 7-9 clear quartz points that graduate in size. You’ll want the tallest ones for the top of the head and upper back, getting smaller as you go down. -
Create the slots:
Using a blade or needle tool, make a series of small, deep slits down the center of the figure’s head and back. Space them evenly to accommodate your chosen crystals. -
Insert the crystals:
Before baking, press the crystals into the clay to ensure a perfect fit, then gently remove them. If you leave them in during baking, the clay might crack as it shrinks or expands differently than the stone.
Step 3: Facial Details
-
Mark eye sockets:
Use a small ball tool to press two shallow indentations where the eyes will go. Place them wide apart for that innocent, alien look. -
Sculpt the nose:
Between the eyes, add two tiny vertical pinpricks for nostrils using a needle tool. Keep them very subtle. -
Carve the smile:
Use a thin blade to press a gentle, straight horizontal line for the mouth. It doesn’t need to curve much; a neutral expression works best for this guardian.
Cosmic Variation
Swap clear quartz for amethyst or aura quartz points to give your alien guardian different magical properties or color schemes.
Step 4: Baking and Assembly
-
Bake the figure:
Follow the manufacturer’s instructions for your specific clay. If using polymer clay, tent it with foil to prevent scorching the light beige color. -
Cool down:
Let the piece cool completely before handling. It will be slightly fragile while still warm. -
Secure the crystals:
Place a dab of strong adhesive or liquid clay into each slot on the back. Firmly press your quartz points back into their designated spots and let the glue cure fully.
Step 5: Finishing Touches
-
Paint the eyes:
Dip a dotting tool into black acrylic paint and carefully fill the eye indentations. Add a minuscule white dot for a reflection highlight once the black is dry. -
Gild the crystals (Optional):
For the look in the photo, brush a tiny amount of gold paint or apply gold leaf just to the very tips of the quartz points. -
Apply the glaze:
Coat the entire clay body with a high-gloss glaze. This makes the clay look like wet ceramic and protects your paint. Avoid glazing the crystals unless you want them extra shiny. -
Final cure:
If your glaze requires a final bake or UV light cure, do that now. Otherwise, let it air dry in a dust-free area.
Now you have a serene, sparkling guardian ready to protect your desk or bookshelf plants
Alien Pet Rock Face
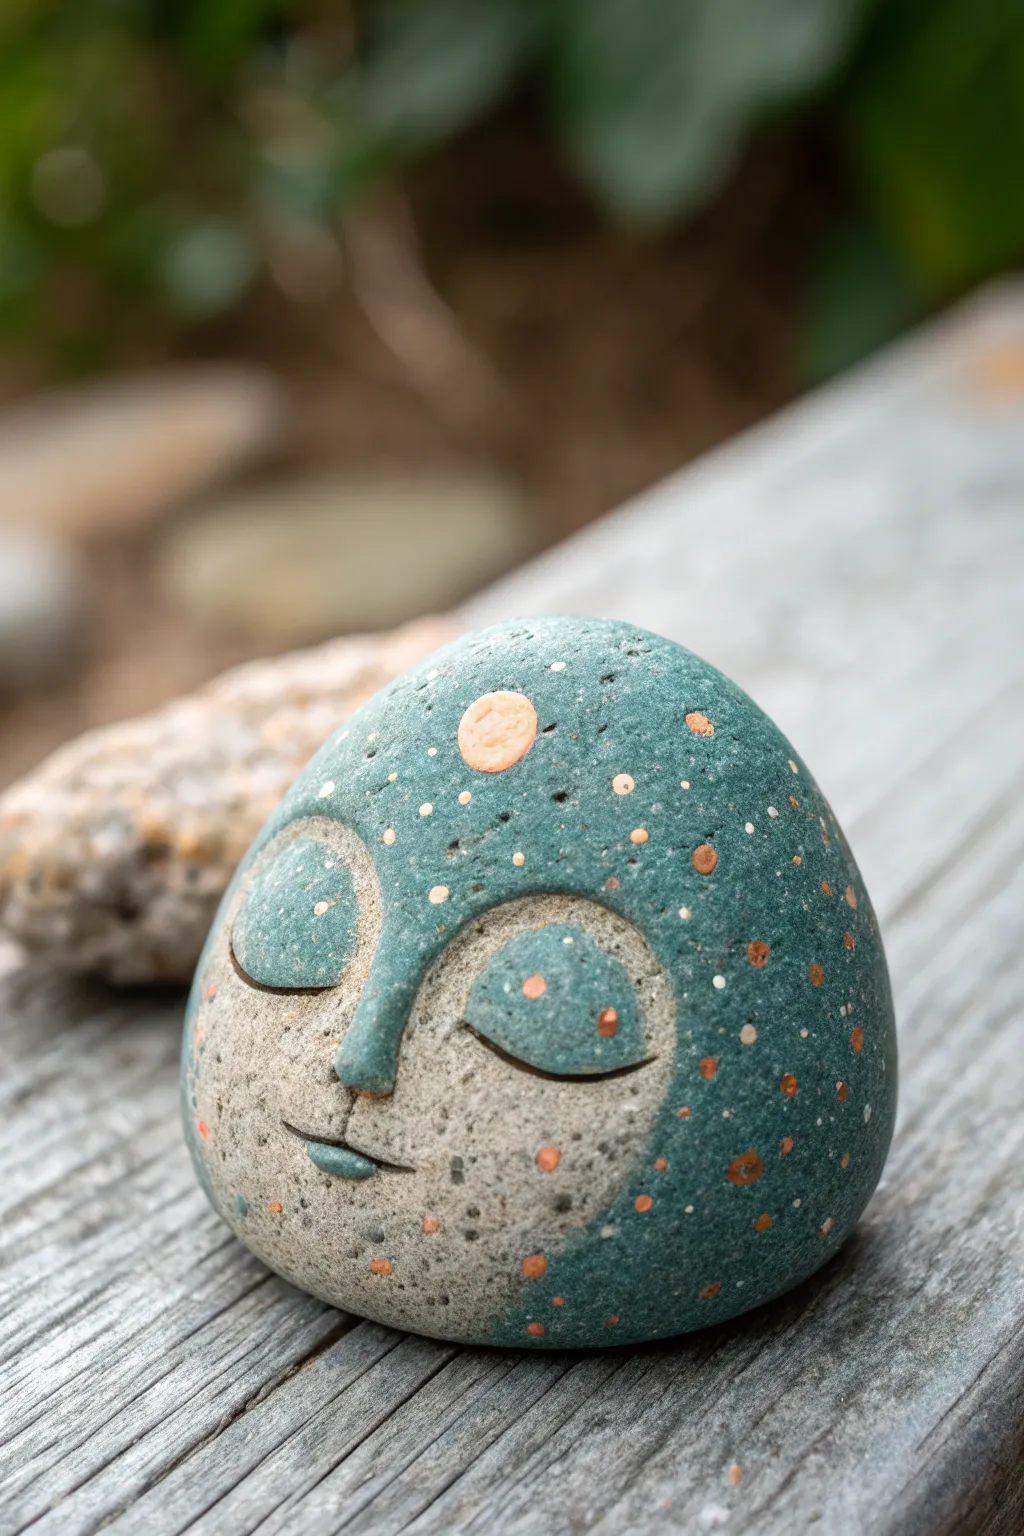
Transform a simple lump of gray clay into a serene, extraterrestrial being taking a cosmic nap. This project combines sculpting and delicate painting techniques to creating a smooth, speckled finish that feels both ancient and otherworldly.
Step-by-Step Tutorial
Materials
- Gray air-dry clay or polymer clay (stone color)
- Acrylic paints: Teal/Deep Sea Green, Terracotta Orange, Off-White
- Fine grit sandpaper
- Sculpting tools (needle tool, small loop tool)
- Small round paintbrush
- Detail brush or dotting tool
- Matte varnish or sealant
- Water and sponge for smoothing
Step 1: Shaping the Stone Base
-
Form the core:
Start with a ball of gray clay about the size of a tennis ball. Roll it firmly on your work surface to compress the clay and remove air bubbles. -
Create the pebble shape:
Gently flatten the bottom so it sits stable, then shape the rest into a smooth, rounded dome, mimicking a river stone. -
Smooth the surface:
Dip your finger or a small sponge in water and run it over the entire surface to erase any fingerprints or cracks. The smoother the base, the more rock-like the final result will be.
Stone Texture Trick
Mix a tiny pinch of sand or dried coffee grounds into your gray clay before sculpting to create natural speckles and authentic texture.
Step 2: Sculpting the Alien Face
-
Outline the face mask:
Using a needle tool, lightly etch a large heart-shaped or oval outline on the front. This area will remain the natural clay color, while the rest receives the ‘helmet’ paint. -
Add material for features:
Take two small, flat discs of clay for the eyelids and a small triangular wedge for the nose. Score and slip these pieces onto the face area within your etched outline. -
Blend the nose:
Using a modeling tool, seamlessly blend the edges of the nose wedge into the face so it looks like it emerges naturally from the stone. -
Sculpt the eyes:
Refine the eyelid discs into almond shapes. Create a distinct crease line where the eyelid meets the face to suggest closed eyes in deep meditation. -
Carve the mouth:
Press a small curved line for the mouth using a knife tool. I like to add tiny indentations at the corners to give a hint of a peaceful smile. -
Final smooth and dry:
Do one last pass with a damp sponge to soften harsh tool marks. Let the clay dry completely according to package instructions (24-48 hours for air-dry).
Cracks While Drying?
If small cracks appear as the clay dries, mix a slurry of clay and water (slip) and paint it into the cracks, then sand smooth once dry.
Step 3: Cosmic Painting
-
Sand for texture:
Once fully dry, lightly sand the surface with fine-grit sandpaper. This enhances the stone effect and gives the paint something to grip. -
Paint the helmet base:
Mix your teal or deep sea green paint. Carefully paint outside shape of face, covering the back and sides of the ‘stone,’ leaving the face area and the eyelids unpainted gray. -
Paint the eyelids:
Carefully paint the sculpted eyelids with the same teal color, keeping the edges crisp against the unpainted face. -
Add the third eye:
Paint a small, solid circle of terracotta orange in the center of the forehead area, just above the nose bridge. -
Create the starry speckles:
Using a dotting tool or the wrong end of a paintbrush, dip into the terracotta orange. Create random dots of varying sizes all over the teal sections. -
Add tiny details:
Switch to a very fine detail brush. Add tiny white or light gray specks amongst the orange dots to create depth, looking like distant stars. -
Highlight the lips:
Paint the lower lip or just the center of the mouth line with a tiny touch of teal to tie the color scheme together. -
Seal the artwork:
Once all paint is dry, apply a coat of matte varnish. This protects the paint while maintaining the natural, stony look.
Now you have a peaceful cosmic guardian to watch over your garden or desk
Moon Crater Diorama With Alien Tracks
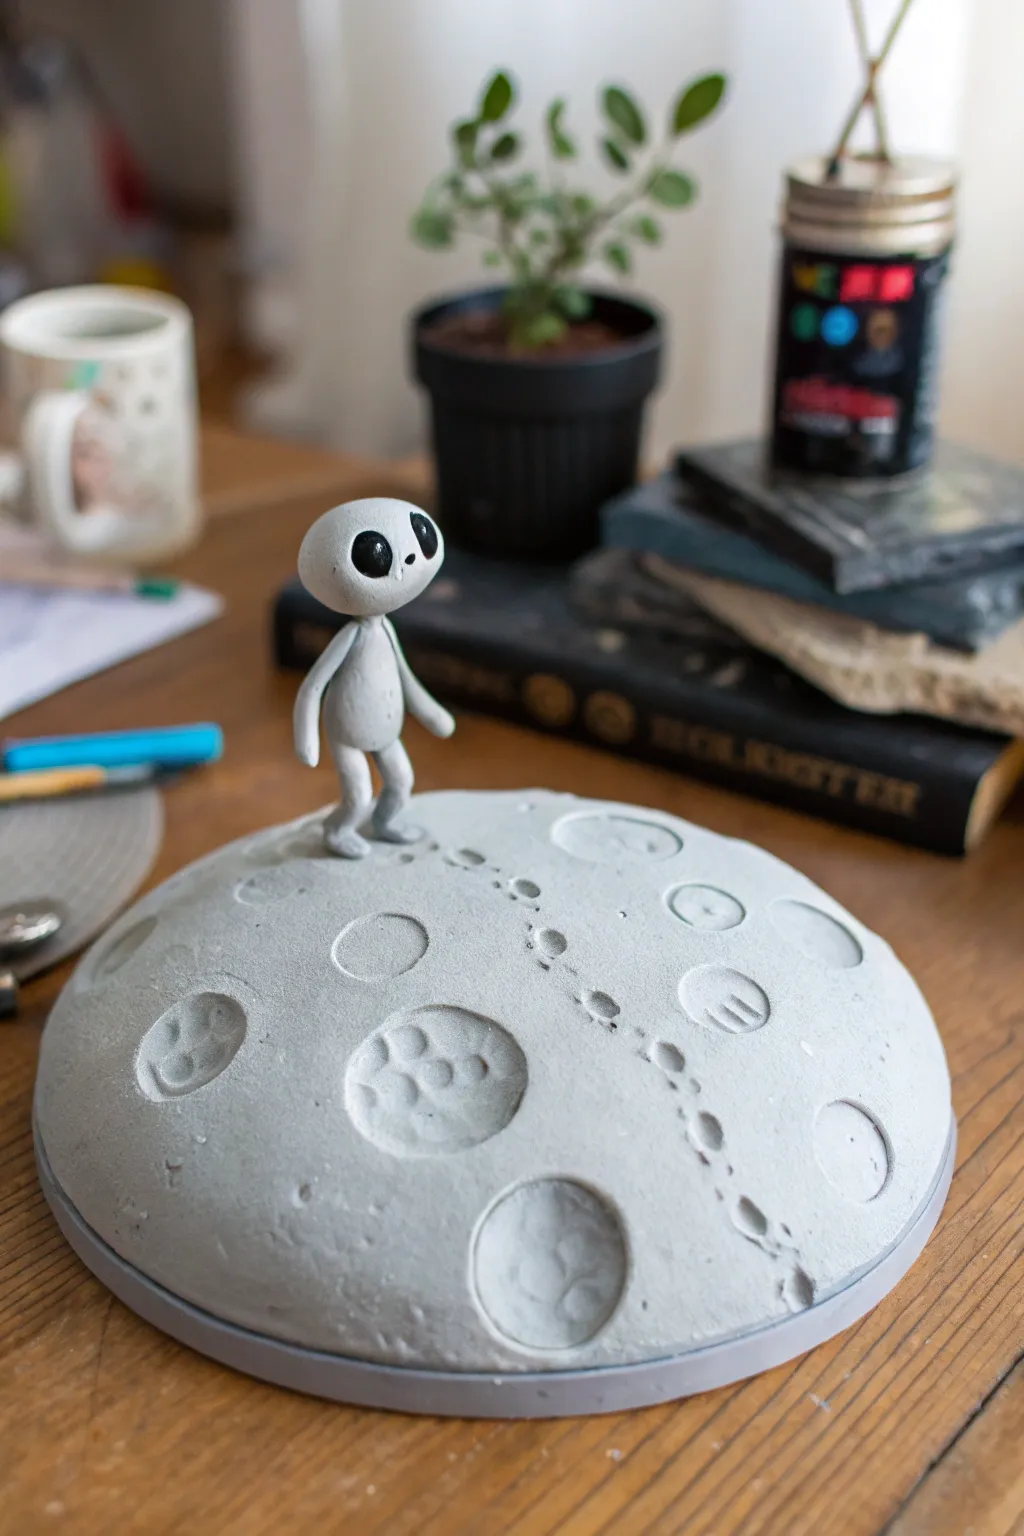
Create a charming scene featuring a curious grey visitor exploring a lunar landscape. This project combines simple figure sculpting with texturing techniques to produce a delightful moonwalk diorama.
Step-by-Step
Materials
- Air-dry clay (grey or white)
- Small styrofoam half-sphere (approx. 4-5 inches)
- Acrylic paints (light grey, dark grey, black, white)
- Basic sculpting tools
- Aluminum foil for armature
- Toothpick or wire
- Fine-grit sandpaper
- Various bottle caps or round objects (for crater stamps)
- Mod Podge or matte varnish
Step 1: Creating the Moon Surface
-
Base preparation:
Begin with your styrofoam half-sphere. If you want a heavier base, you can glue it to a circular wooden disc or cardboard cutout of the same diameter. -
Clay covering:
Roll out a sheet of grey air-dry clay to about 1/4 inch thickness. Gently drape it over the dome, smoothing it down with a bit of water to remove any seams or wrinkles. -
Adding texture:
Before the clay hardens, texture the surface. I like to dab a crumpled ball of aluminum foil lightly all over the dome to simulate rocky lunar dust. -
Creating craters:
Press various round objects into the soft clay to form craters. Use bottle caps of different sizes or the rounded end of a paintbrush handle. -
Crater detailing:
For added realism, use a sculpting tool to rough up the insides of the larger craters, making them look uneven and impact-worn. -
Footprints path:
Decide where your alien will stand. Using the end of a small, oval-shaped tool or a shaped piece of wire, press a trail of tiny footprints leading up to that spot.
Cracks in the Atmosphere
If the clay on the dome cracks while drying, mix a small slurry of fresh clay and water (slip) to fill the gaps, then sand smooth once dry.
Step 2: Sculpting the Visitor
-
Armature basics:
Form a tiny stick figure using wire or twisted foil. This needs to be small—about 2-3 inches tall—to match the scale of your moon. -
Head shape:
Roll a ball of clay into a smooth, slightly flattened teardrop shape for the head. It should be oversized compared to the body for that classic ‘grey alien’ look. -
Body formation:
Wrap a small amount of clay around the body armature. Keep the torso slender and slightly pear-shaped. -
Limbs attachment:
Roll thin snakes of clay for the arms and legs. Attach them to the torso, blending the seams thoroughly with a damp finger or modelling tool. -
Pose adjustment:
Position the figure so it looks like it’s walking or standing curiously. Make sure the feet are flat enough to stand on the base later. -
Assembly prep:
Insert a toothpick or short wire into the neck area of the body, then gently press the head onto it. Don’t glue yet; just ensure the fit is right. -
Drying time:
Allow all clay parts (the moon base, body, and head) to dry completely. This usually takes 24-48 hours depending on thickness.
Step 3: Painting and Assembly
-
Base painting:
Paint the moon dome a solid light grey. Once dry, dry-brush a lighter white-grey over the high points to accentuate the texture. -
Shadowing:
Wash a diluted dark grey paint into the craters and footprints to make them pop visually. -
Alien skin:
Paint the alien’s body and head a uniform pale grey. You might want two costs for solid coverage. -
The eyes:
Using a small detail brush, paint two large, slanted ovals in solid black on the face. Add a tiny white dot in the corner of each eye for a reflective glint. -
Final assembly:
Once all paint is dry, use strong craft glue to attach the head to the body, and the feet to the end of the footprint trail on the moon base. -
Sealing:
Finish with a coat of matte varnish to protect your sculpture and unify the finish.
Planetary Partner
Add a small wire coming out of the alien’s hand holding a tiny flag made of paper and a toothpick to claim the discovery.
Place your little lunar scene on a bookshelf or desk as a reminder to always keep exploring
Alien Mask Wall Hanging
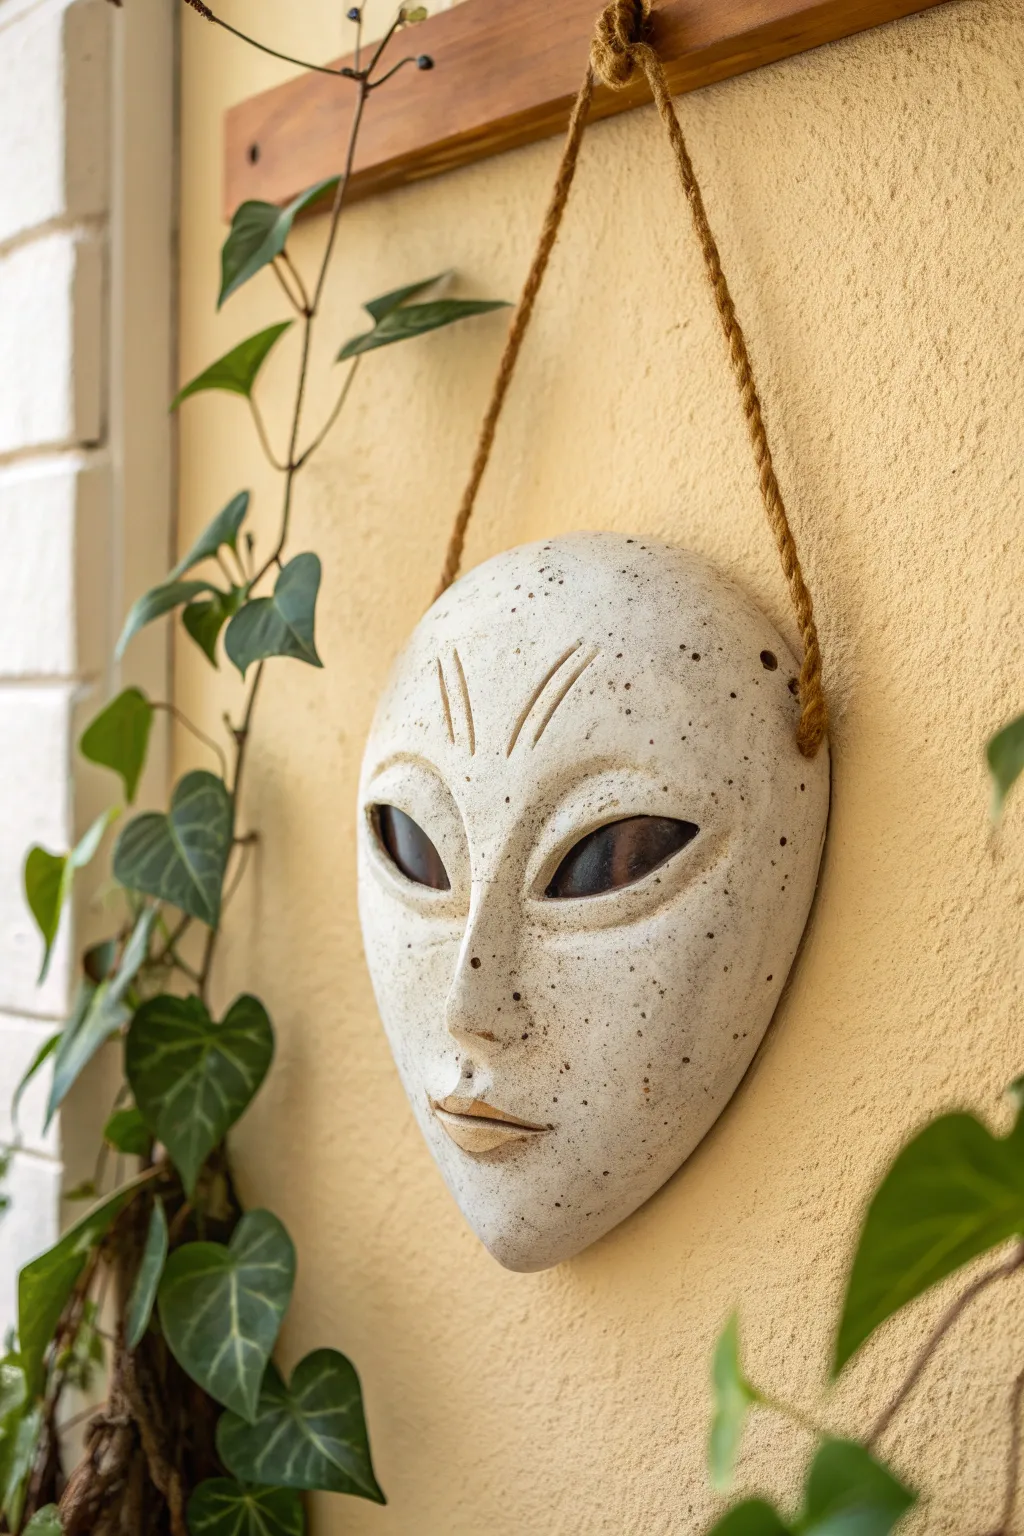
This striking wall hanging combines celestial mystery with earthy textures, featuring a stylized alien visage finished with a charming speckled glaze. The elongated face and large, hollow eyes create a captivating focal point perfect for a garden wall or eclectic indoor gallery.
Step-by-Step Guide
Materials
- White or light gray stoneware clay (grogged for strength)
- Clay rolling pin
- Pottery knife or fettling knife
- Loop sculpting tools
- Needle tool
- Bowl of water and slip
- Wooden sculpting rib
- Speckled ceramic glaze (matte white or cream)
- Black underglaze or acrylic paint (for eye sockets/mouth)
- Twine or thick jute rope
- Drill bit or large hole cutter tool
- Kiln (if firing) or Air-Dry Clay alternative
Step 1: Sculpting the Base Form
-
Prepare the slab:
Start by rolling out a generous slab of clay to approximately 1/4 to 1/2 inch thickness. You want it sturdy but not overly heavy. -
Cut the outline:
Using a needle tool, lightly sketch an elongated teardrop or egg shape onto the slab. The top should be wider than the chin. Once happy with the symmetry, cut the shape out with your fettling knife. -
Create the convex curve:
To give the mask its 3D volume, gently press the clay over a hump mold or a makeshift curved surface (like a bowl covered in plastic wrap). Smooth the edges downwards so the face curves outward. -
Define the features:
Mark the positions for the large, slanted almond-shaped eyes approximately halfway down the face. They should be significantly larger than human proportions. -
Hollow out the eyes:
Carefully cut out the eye shapes entirely. We will back-fill or paint these areas later to create depth. -
Build the nose bridge:
Roll a small coil of clay and attach it vertically between the eyes to form a long, slender nose. Score and slip the area first to ensure a strong bond.
Warped Face?
If the mask flattens while drying, prop the curve up with crumpled newspaper or foam underneath the center until it is bone dry.
Step 2: Refining and Detailing
-
Sculpt the nose:
Blend the nose coil seamlessly into the forehead and cheeks using a wooden tool or your thumb. I like to keep the bridge quite narrow and sharp to enhance the alien aesthetic. -
Form the mouth:
Add a very small strip of clay for the mouth area. Blend it in, then use a sculpting tool to create a simple horizontal slit with slightly defined lips. Keep the expression neutral. -
Add forehead markings:
Using a loop tool or modeling tool, carve two distinct vertical ridges or lines starting from the top of the nose bridge and fanning slightly outward onto the forehead. -
Create hanging holes:
While the clay is leather hard, use a large hole cutter or drill bit to create holes on the outer edges of the mask, roughly at eye level. Ensure they are wide enough for your rope. -
Smooth the surface:
Use a damp sponge or a soft rib to smooth out the entire surface of the mask. Remove any harsh tool marks, but don’t worry about perfection; a little texture adds character.
Cosmic Glow
For a sci-fi twist, mix glow-in-the-dark powder into the paint used for the eyes, so they emit a soft luminescence at night.
Step 3: Finishing and Assembly
-
Bisque fire or dry:
If using ceramic clay, dry the piece slowly under plastic to prevent warping, then bisque fire. If using air-dry clay, allow it to dry completely for 24-48 hours. -
Apply the speckled finish:
Apply a speckled matte white or cream glaze. If you don’t have speckled glaze, you can flick a toothbrush loaded with brown iron oxide or watered-down brown paint over a wet white base coat. -
Darken the features:
Paint the inside of the eye sockets and the depths of the mouth with black underglaze or acrylic paint. If you cut the eyes out completely, you can glue a piece of dark backing material behind them after the final firing. -
Final glaze fire:
Fire the piece again according to your glaze’s specific temperature instructions. Skip this step for air-dry clay and seal with a matte varnish instead. -
Attach the rope:
Cut a length of thick jute rope. Thread the ends through the side holes from the front to the back. -
Secure the knots:
Tie large, secure knots on the front side of the mask. The rustic knot is part of the visual charm, so leave a little excess rope visible.
Hang your new extraterrestrial observer on a textured wall and enjoy the conversation it starts
Wire-Limbed Alien With Extra-Long Pose
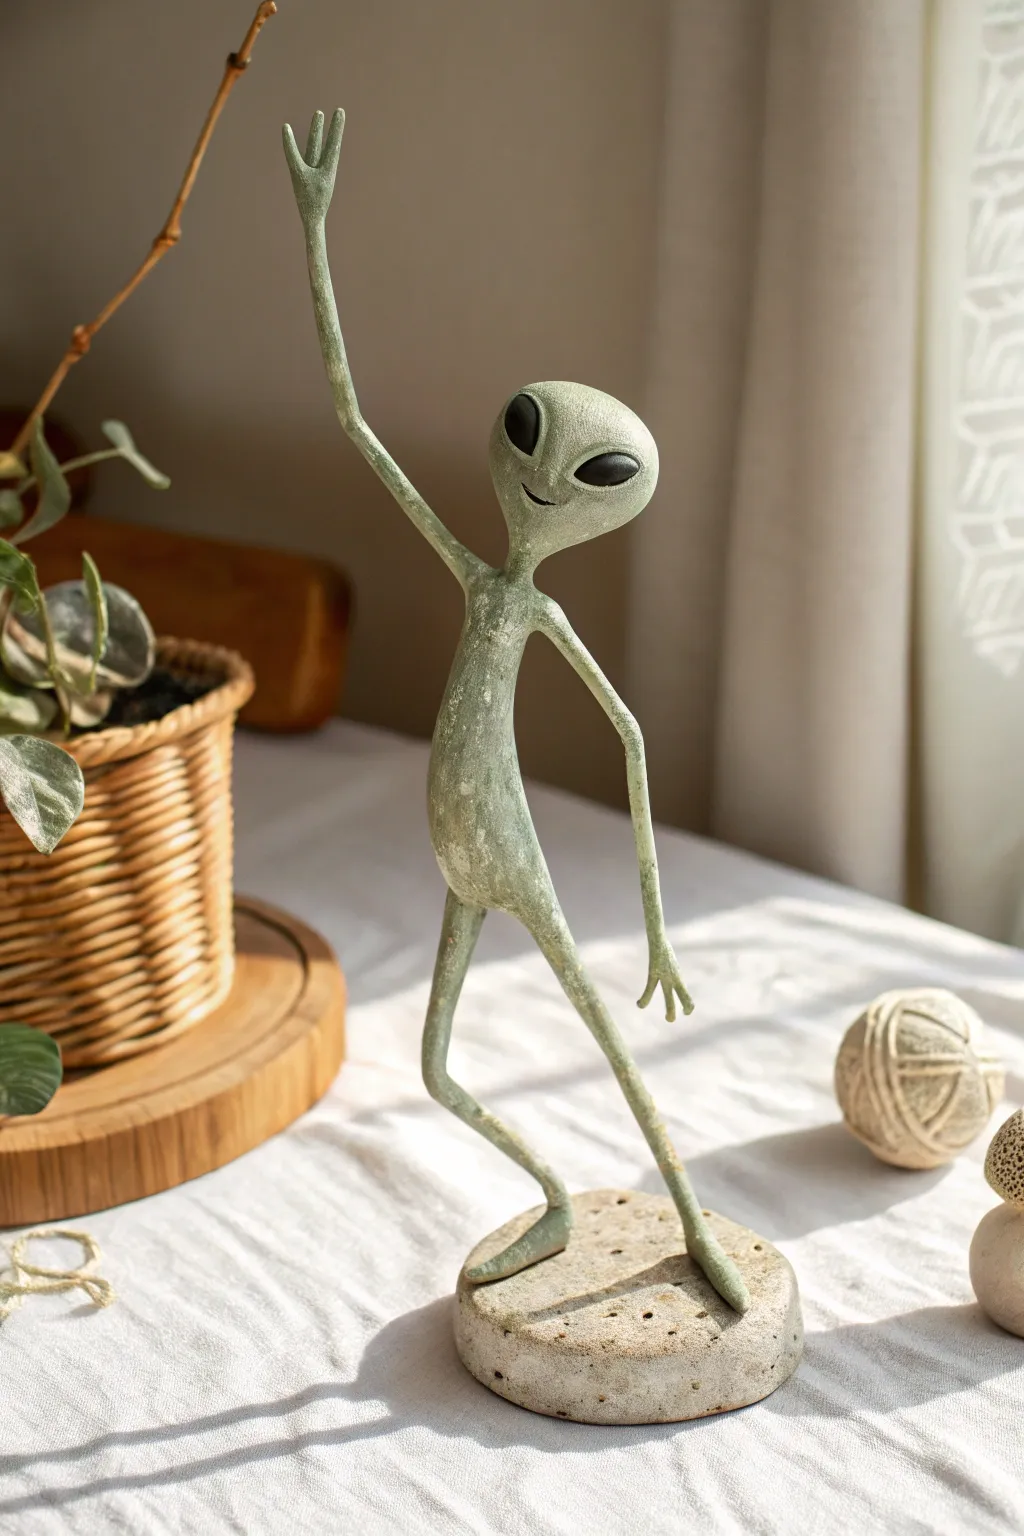
This whimsical project captures the classic extraterrestrial aesthetic with a twist, featuring exaggerated, spindly limbs and a friendly, waving posture. The finish mimics weathered stone or oxidized metal, giving this lanky visitor an ancient and mysterious charm.
Step-by-Step
Materials
- Strong armature wire (12-14 gauge for body, 18 gauge for fingers)
- Aluminum foil
- Air-dry clay (stone or grey color preferred)
- Circular wooden or stiff cardboard base (approx. 3-4 inches diameter)
- Acrylic paints: sage green, metallic silver, white, black
- Heavy body matte gel or texture paste
- Sculpting tools (needle tool, smoothing sponge)
- Pliers and wire cutters
- Fine-grit sandpaper
- Gloss varnish (for the eyes)
Step 1: Building the Skeleton
-
Twist the armature:
Cut two long lengths of your thicker armature wire. Twist them together to form a torso, leaving loose ends at the top for arms and the bottom for legs. Ensure the leg wires are extra long to account for the exaggerated height. -
Form the head loop:
At the very top of your twisted torso, create a small oval loop with the wire to act as the core for the head. This keeps the neck sturdy and prevents the heavy clay head from drooping later. -
Secure to the base:
Drill two small holes in your circular base if using wood, or puncture if using cardboard. Thread the foot wires through these holes and bend them flat underneath to anchor your alien firmly in a standing position. -
Bulk firmly with foil:
Wrap only the torso and the head loop tightly with aluminum foil. Keep the limbs bare wire for now, as we want them to remain extremely thin and spindly.
Cracking Limbs?
If the clay creates hairline cracks on the thin arms as it dries, mix a slurry of clay and water (slip) and paint it into the cracks, then sand smooth once dry.
Step 2: Sculpting the Form
-
Apply the initial clay layer:
Cover the foil torso and head with a thin, even layer of air-dry clay. Smooth this out with a damp sponge to get the basic teardrop shape of the body and the bulbous shape of the head. -
Wrap the limbs:
Taking very small snakes of clay, carefully wrap the wire arms and legs. You want to barely cover the wire to maintain that ‘skin and bones’ look. Blend these snakes seamlessly into the torso. -
Sculpt the hands:
At the ends of the arm wires, form three elongated fingers. I prefer to roll tiny tapered coils of clay and attach them individually, blending the wrists smooth with a dab of water. -
Define the facial features:
Press your thumbs gently into the face to create shallow sockets for the eyes. Add a tiny, subtle mouth line using a needle tool, giving him a slight, friendly smirk. -
Texture the base:
Cover your base with a layer of clay. Use a stiff bristled brush or a crumpled ball of foil to press texture into it, making it resemble porous rock or moon surface. Poke a few deeper holes for variety.
Cosmic Accessories
Before the clay dries, press small gears or metallic beads into the base to suggest crash-landed spaceship debris or futuristic tech.
Step 3: Refining and Painting
-
Sand for smoothness:
Once fully dry (allow 24-48 hours), use fine-grit sandpaper to remove any fingerprints or harsh lumps on the body. We want organic curves, not geometric angles. -
Create the base coat:
Mix sage green with a touch of metallic silver acrylic. Paint the entire figure, excluding the eyes. The metallic element gives it that slight otherworldly sheen. -
Add a texturizing wash:
Water down some white paint significantly. Brush this wash over the green body, then immediately dab it off with a paper towel. The white will settle into the clay’s natural imperfections, creating a mottled skin texture. -
Dry brush highlights:
Dip a dry brush into pure white paint, wipe almost all of it off, and lightly whisk it over the knees, elbows, and brow ridge to accentuate the form. -
Paint the eyes:
Fill the large eye sockets with solid black paint. You may need two coats to get a totally opaque, void-like finish. -
Finish the base:
Paint the circular base a sandy beige. Use a darker brown wash to flow into the textured holes you created earlier. -
Apply the final gloss:
Once everything is dry, apply a high-gloss varnish only to the black eyes. This makes them look wet and reflective, contrasting beautifully with the matte body.
Place your finished alien near a window where the light can catch those glossy eyes