Blue clay bead bracelets are my go-to when I want something instantly cute, beachy, and easy to stack. Here are my favorite cute blue clay bead bracelet ideas, starting with the classics and drifting into the fun, extra-creative ones.
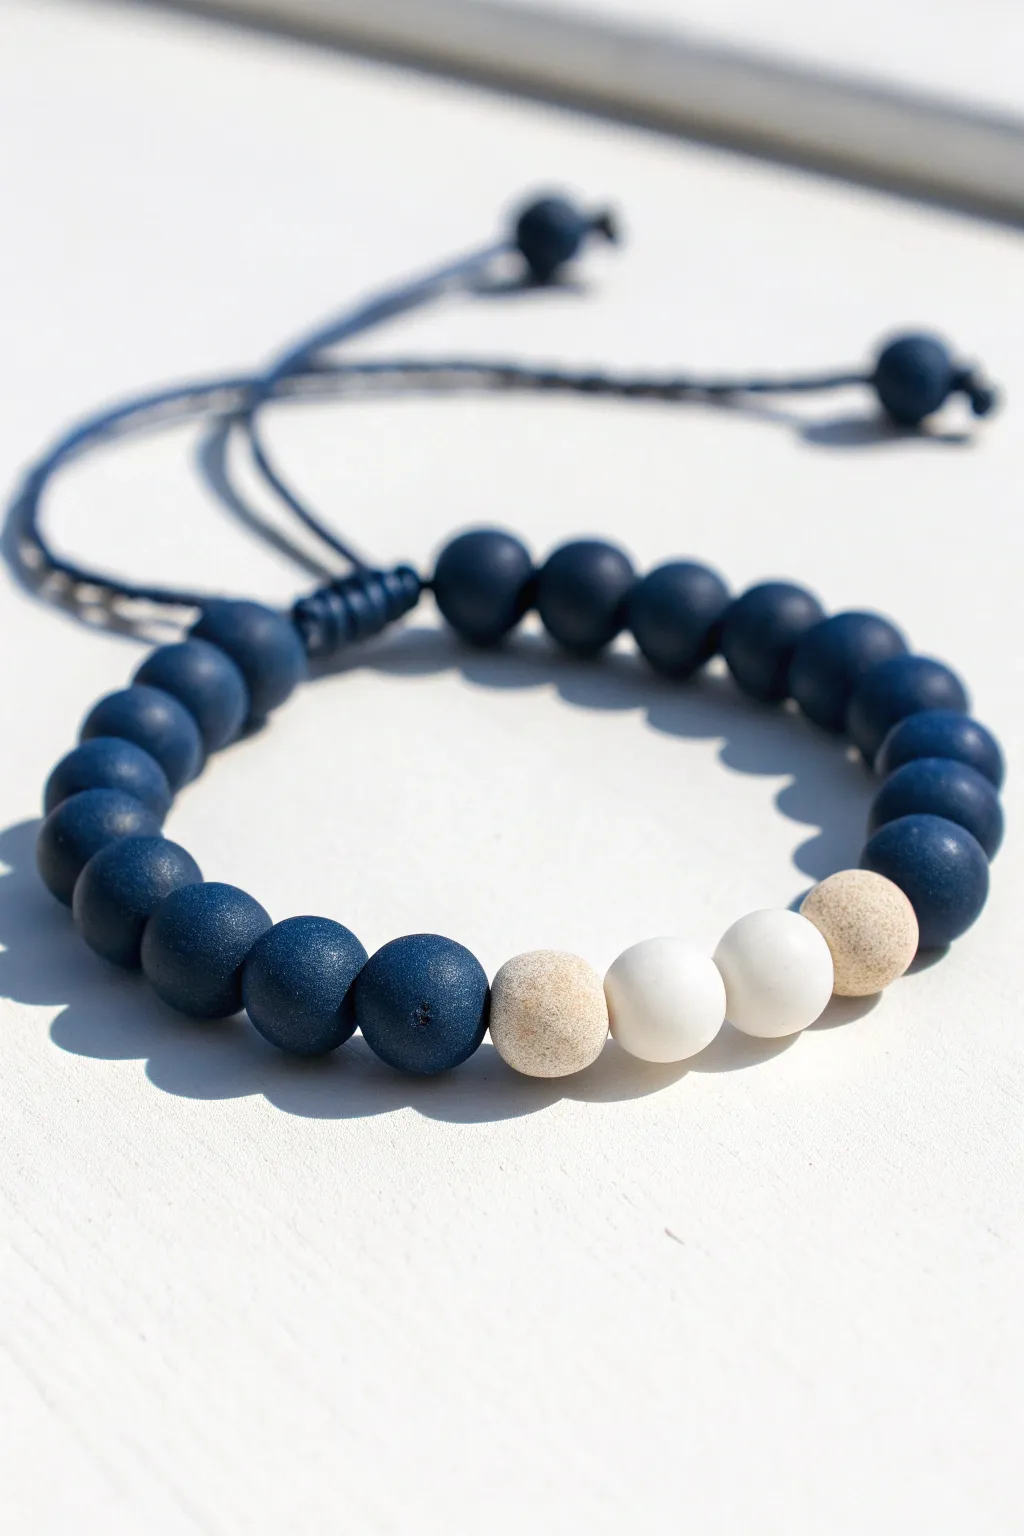
Classic Blue Heishi Stack
Capture the essence of a seaside getaway with this stunning stack of blue and white beaded bracelets. This project combines delicate gold chainwork with the casual elegance of matte heishi beads for a versatile accessory set.
Step-by-Step
Materials
- Fine gold-filled cable chain
- Gold jump rings (4mm)
- Gold lobster clasp
- 2 small crimp beads (gold)
- 3 focal beads for chain (2 matte white round, 1 periwinkle blue round, approx 4-6mm)
- Elastic stretch cord (0.8mm or 1mm)
- Matte heishi beads in light blue
- Matte heishi beads in medium denim blue
- Matte heishi beads in dark navy blue
- Matte heishi beads in white
- Gold spacer beads (textured balls or geometric shapes)
- Jewelry glue (e.g., G-S Hypo Cement)
- Chain nose pliers
- Wire cutters
- Ruler or measuring tape
Step 1: The Delicate Chain Bracelet
-
Measure and Cut Chain:
Begin by measuring your wrist circumference. Cut a length of fine gold cable chain that is roughly 1 inch shorter than your total desired length to account for the clasp and jump rings. -
Prepare the Chain:
Cut the chain exactly in the center to create two equal halves. This is where your three focal beads will sit. -
String the Focal Beads:
Thread one gold crimp bead onto a piece of scrap wire or a headpin to act as a temporary needle if the chain is too fine to thread directly. Slide on a white bead, then the periwinkle blue bead, and finally the second white bead. -
Attach to Chain:
Connecting these beads to the chain requires a small wire loop mechanism or, more simply, thread a piece of gold wire through the last link of the first chain half, through your three beads, and through the first link of the second chain half. Create wrapped loops on both sides to secure the beads in the center. -
Add Clasp Hardware:
Use your chain nose pliers to open a small jump ring. Attach it to one end of the chain and slide on the lobster clasp before closing the ring securely. -
Finish the Chain:
Attach a larger jump ring or a short extender chain to the opposite end to give the clasp something to grab.
Step 2: The Heishi Stretch Stack
-
Pre-Stretch the Cord:
Cut four pieces of elastic cord, each about 10-12 inches long. Give each piece a gentle tug to pre-stretch it; this prevents the bracelets from sagging later. -
Design Bracelet One (Light Blue):
For the first stretch bracelet, string approximately 6 inches of light blue matte heishi beads. Thread a single textured gold spacer bead onto the center of the strand for a subtle focal point. -
Design Bracelet Two (Gradient Mix):
On the second cord, create a pattern alternating between medium denim blue and dark navy beads. Insert a gold spacer bead about halfway through the design to match the others. -
Design Bracelet Three (White Accent):
String the white heishi beads for the third bracelet. Every inch or so, intersperse a single flat gold spacer or a very small gold seed bead to break up the white. -
Design Bracelet Four (Dark Navy):
Create the final strand using primarily dark navy round beads rather than flat discs for texture variety. Include a section of gold disc spacers near the knotting area. -
Check the Fit:
Wrap each un-knotted strand around your wrist to ensure they sit comfortably without pinching. Add or remove a few beads if necessary. -
Knot the Elastic:
For each bracelet, tie a surgeon’s knot (right over left, left over right twice). Pull the elastic tight from all four directions to secure the knot firmly. -
Secure the Knots:
Apply a tiny dot of G-S Hypo Cement or super glue directly onto the knot. I like to let this dry briefly, about 5-10 minutes, before trimming anything. -
Hide the Knots:
Once the glue is tacky but not fully hard, try to tuck the knot inside the hole of the nearest large bead if the hole size permits. -
Final Trim:
Trim the excess elastic cord close to the knot using sharp scissors or wire cutters, being careful not to snip the main cord.
Sticky Situation?
If your elastic knot keeps slipping before you can glue it, use a bead stopper or piece of tape to hold the ends while you tie your surgeon’s knot.
Mix Materials
Swap the gold spacers for crushed pearl pieces or tiny sea glass chips in the blue strands to emphasize the beachy texture further.
Slip on your new stack and enjoy the casual coastal vibes they bring to any outfit


Blue and White Coastal Stripe
Capture the essence of a seaside escape with this breezy blue and white bracelet featuring a classic striped pattern. The mix of flat clay heishi beads and textured accents creates a relaxed, beach-ready accessory that stacks perfectly with other summer favorites.
Detailed Instructions
Materials
- Polymer clay heishi beads (approx. 6mm) in matte denim blue
- Polymer clay heishi beads (approx. 6mm) in bright white
- 3 large round white beads (approx. 8-10mm), wood or ceramic
- 2 small wooden spacer beads (approx. 4-6mm)
- Light brown or tan waxed cotton cord (1.5mm thickness)
- Scissors
- Tape or a clipboard
- Beading needle (optional, but helpful for cord)
Step 1: Preparing the Cord
-
Measure and cut:
Cut a length of your waxed cotton cord to approximately 16 inches. This extra length is crucial for creating the adjustable sliding knot later. -
Anchor the cord:
Tape one end of the cord down to your workspace or clip it into a clipboard. This tension makes threading the beads significantly easier and prevents them from sliding off. -
Stiffen the tip:
If you aren’t using a needle, apply a tiny dab of glue or clear nail polish to the threading end of the cord and twist it into a sharp point. Let it dry for a minute to create a makeshift needle.
Loose Knot Trouble?
If your square knot slider unravels easily, the cord might be too silky. Use a tiny dot of superglue on the *cut ends* of the knotting cord only, ensuring it doesn’t touch the sliding center cords.
Step 2: Creating the Pattern
-
Begin the sequence:
Start by threading one small wooden spacer bead onto the cord. This acts as a warm, natural bookend to your blue and white pattern. -
Start the stripes:
Thread on your clay heishi beads in a specific repeating pattern: one blue, one white, one blue. This creates the thin coastal stripe effect. -
Continue the pattern:
Repeat the blue-white-blue sequence. If you look closely at the reference, the white beads act as thin dividers between pairs or single blue beads. -
Vary the rhythm:
For a more organic look, I sometimes alternate between ‘blue-white-blue’ and just two blue beads together. Aim for about 2.5 inches of this striped pattern. -
Add the focal point:
Once you’ve reached the center area, thread on your three large round white beads. These break up the stripes and sit right on top of the wrist. -
Mirror the design:
Continue beading on the other side of the white focal beads, mirroring the stripe pattern you created on the first half. -
Finish the strand:
End the beading sequence with your second small wooden spacer bead. Check that the beaded section measures roughly 6 to 6.5 inches total.
Step 3: The Sliding Closure
-
Secure the beads:
Tie a simple overhand knot snugly against the wooden spacer bead on both ends of the beaded section. This keeps your design centered. -
Position for closure:
Bring the two tail ends of the cord together so they overlap parallel to each other, forming a circle with the bracelet. -
Cut a knotting cord:
Cut a fresh piece of cord, about 8 inches long. This will be used to tie the macramé square knots over the overlapping main cords. -
Start the square knots:
Place the 8-inch cord under the two main cords. Tie a series of square knots (macramé style) over the main cords for about half an inch. -
Trim and seal:
Trim the excess tails of the knotting cord (not the main bracelet cords!) and carefully use a lighter or glue to seal the ends so the sliding mechanism doesn’t unravel. -
Finish the tails:
Tie a small knot at the very end of each main cord tail to prevent them from slipping through the slider. You can add a tiny bead here if you like.
Texture Twist
Swap the plain white spacer heishi beads for silver or gold metal disc beads. This adds a subtle shimmer that catches the sunlight and elevates the bracelet from casual beachwear to evening accessory.
Slide it on your wrist and enjoy the relaxed coastal vibe you’ve created


Light-to-Dark Blue Ombré

Capture the calm of the ocean with this sophisticated gradient bracelet. The project features handmade polymer clay beads in a seamless transition from pale sky blue to deep midnight navy.
How-To Guide
Materials
- Polymer clay (White, Bright Blue, Navy Blue)
- Beading wire or strong elastic cord
- Gold lobster clasp and jump rings
- Gold extension chain
- 2 Gold crimp beads
- Bead reamer tool or toothpick
- Acrylic roller or pasta machine
- Small round cutter (approx. 8mm)
- Oven geared for clay baking
- Wet/dry sandpaper (400-1000 grit) or a darker denim scrap
Step 1: Color Mixing
-
Prepare your base colors:
Condition your white, bright blue, and navy polymer clay separately until they are soft and pliable. You want them warm enough to mix smoothly without streaks. -
Create the lightest shade:
Take a large chunk of white clay and mix in a tiny pinhead-sized amount of bright blue. Knead thoroughly until the color is a uniform, very pale icy blue. -
Mix the mid-tones:
Create your next shade by mixing equal parts of white and bright blue. For the third shade, use the bright blue straight from the package (or mix a tiny bit of white if it’s too dark). -
Mix the dark tones:
Create the transition to dark by mixing bright blue with a small amount of navy. Finally, prepare a portion of pure navy clay for the darkest section of the gradient. -
Check the gradient:
Line up small balls of your custom mixes on your work surface. You should see a clear, pleasing step-by-step transition from light to dark. If a jump between colors looks too harsh, mix an intermediate shade.
Uneven Bead Sizes?
If your rolled beads vary too much in size, weigh each piece of raw clay on a jewelry scale before rolling. Aim for exactly 0.5g per bead for precision.
Step 2: Bead Formation
-
Sheet the clay:
Roll each of your color mixes into a sheet of uniform thickness. Using the thickest setting on a pasta machine or rolling with guides works best here. -
Cut equal portions:
Use your small round cutter to punch out circles from each color sheet. This creates equal-volume pieces of clay so your finished beads are all the same size. -
Roll into spheres:
Take each punched circle and roll it vigorously between your palms. I like to apply firm pressure at first to compress the clay, then lighten my touch to perfect the spherical shape. -
Create the bead holes:
Hold a bead gently between your thumb and forefinger to avoid squishing it. Using a toothpick or needle tool, pierce the center, twisting gently as you push through. -
Texture the surface:
To achieve the specific matte, slightly sandy look in the photo, gently roll the unbaked beads over a piece of coarse sandpaper or textured fabric. Don’t press too hard; you just want a surface imprint. -
Bake:
Arrange the beads on a baking sheet or specialized bead rack. Bake according to your clay manufacturer’s instructions (usually 275°F/130°C for 15-30 minutes). Let them cool completely.
Gold Dust Accent
Before baking, gently brush the darkest navy beads with a tiny amount of gold mica powder. This adds a subtle shimmer that matches the gold findings perfectly.
Step 3: Assembly
-
Layout the pattern:
Arrange your cooled beads on a bead board or towel. Start with the lightest beads in the center (or side, per your preference) and graduate outward to the darkest beads at the clasp ends. -
Prepare the wire:
Cut a length of beading wire about 9 inches long. String a crimp bead onto one end, followed by the jump ring attached to your lobster clasp. -
Secure the first end:
Loop the wire back through the crimp bead and use crimping pliers to squash it flat, securing the clasp. Trim the excess short tail. -
String the beads:
Begin threading your beads onto the wire, following your laid-out gradient pattern. Ensure the holes are clean; use a bead reamer if any clay residue blocks the way. -
Add the extension chain:
Once all beads are strung, thread a crimp bead onto the end. Add the jump ring connected to your extension chain. -
Final crimp:
Pass the wire back down through the crimp bead and into the first bead or two. Pull tight so there are no gaps, crimp the bead securely, and trim the excess wire close.
Now you have a stunning, professional-looking accessory ready to wear or gift.


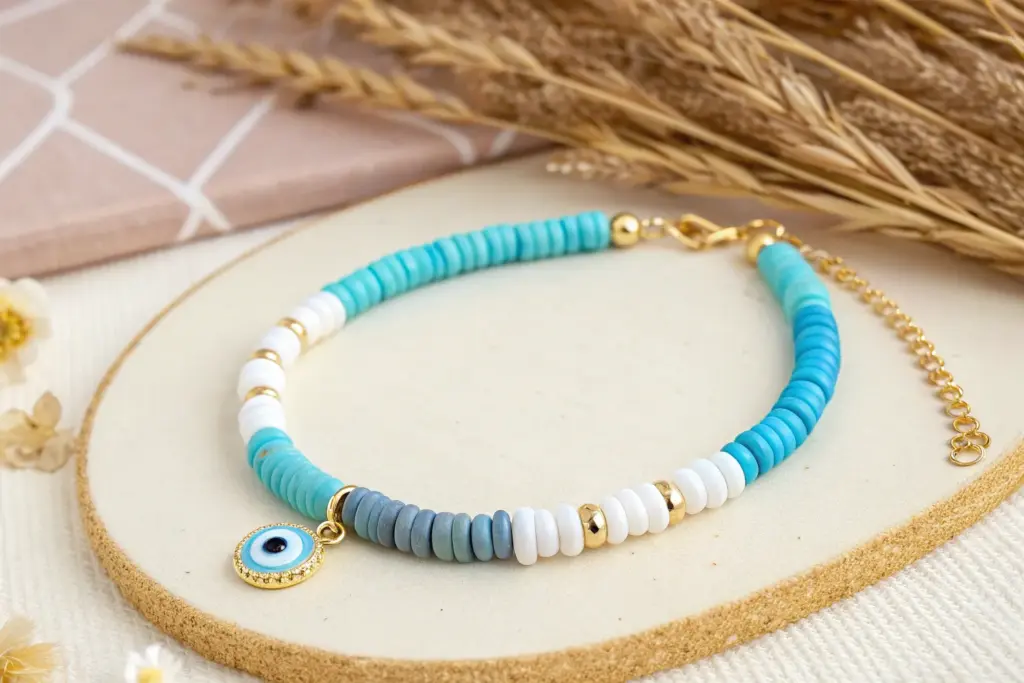
Turquoise Pop With Gold Spacers
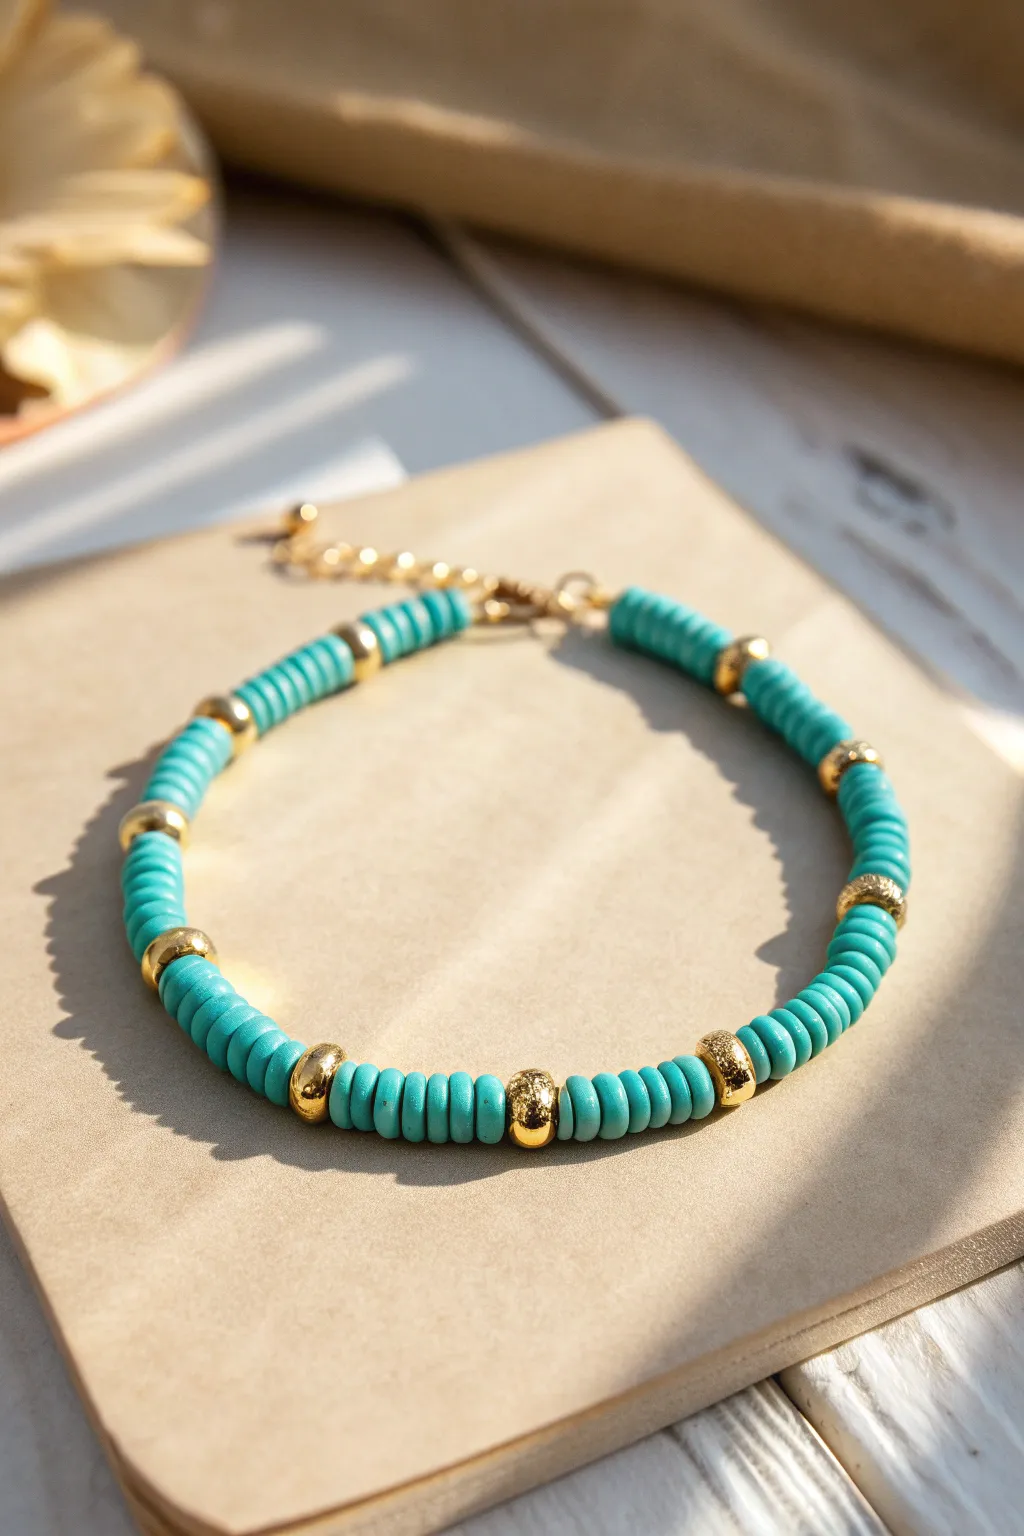
This elegant bracelet pairs the vibrant matte finish of turquoise heishi beads with the shine of polished gold spacers for a sophisticated pop of color. It’s a simple stringing project that delivers a look that feels both beachy and high-end.
Step-by-Step
Materials
- Turquoise polymer clay heishi beads (approx. 4-6mm)
- Gold round spacer beads (approx. 4-6mm)
- Beading wire (tiger tail or flexible beading wire)
- 2 Crimp beads
- 2 Crimp bead covers (gold, optional)
- 2 Wire guardians (gold)
- Gold jump rings
- Gold lobster clasp
- Gold extension chain (optional)
- Wire cutters
- Chain nose pliers
- Crimping pliers
Step 1: Preparation
-
Measure your wrist:
Wrap a measuring tape loosely around your wrist to determine the desired length. Add about an inch for ease and the clasp assembly. -
Cut the wire:
Cut a length of beading wire about 4-5 inches longer than your measured bracelet length. This gives you plenty of room to work with the ends without frustration. -
Plan your pattern:
Lay out a small section of your pattern on a bead board or towel. Looking at the design, the pattern consists of a block of turquoise beads followed by a single gold spacer. -
Determine spacing:
Count how many heishi discs you want between each gold bead. In the example, there are roughly 6-8 turquoise discs per section, but you can adjust this based on the thickness of your specific clay beads.
Uneven Spacing?
Clay beads often vary slightly in thickness. Instead of counting beads, measure the length of each turquoise section (e.g., 0.5 inches) to keep your gold spacers evenly distributed.
Step 2: Stringing the Beads
-
Secure the first end:
Thread a crimp bead onto one end of the beading wire. Follow it with a wire guardian. -
Loop the guardian:
Feed the wire through one side of the guardian, loop it around, and go down through the other side. Attach a jump ring to the loop of the guardian before tightening. -
Crimp the end:
Pass the tail of the wire back through the crimp bead. Use your crimping pliers to flatten or fold the crimp bead securely. I like to tug it gently to ensure it won’t slip. -
Add a crimp cover:
If using a crimp cover, place it over the flattened crimp bead and gently close it with chain nose pliers until it looks like a round gold bead. -
Start with turquoise:
Thread the tail of your wire into the first few beads to hide it. Begin stringing your first set of 6-8 turquoise heishi beads. -
Add the gold accent:
Slide on one gold round spacer bead. Make sure it sits flush against the clay beads. -
Repeat the pattern:
Continue alternating your block of turquoise discs with single gold spacers. Keep checking the length against your wrist as you work. -
Check consistency:
Occasionally push the beads together gently to ensure there are no large gaps of wire showing, but don’t pull so tight that the bracelet becomes stiff.
Step 3: Finishing Touches
-
Prepare the final end:
Once you reach your desired length, thread on a crimp bead and then your second wire guardian. -
Loop and secure:
Feed the wire through the guardian loop, attach the second jump ring (or the extension chain directly), and pass the wire back down through the crimp bead and into the last few turquoise beads. -
Tighten the wire:
Pull the wire snugly so there is no slack, but leave just a tiny bit of wiggle room so the bracelet drapes naturally around the wrist. -
Final crimp:
Use your crimping pliers to secure the final crimp bead. Trim the excess wire flush against the beads with your wire cutters. -
Attach hardware:
Open the jump ring on one end using two pairs of pliers (twist sideways, don’t pull apart) and attach your lobster clasp. Close the ring securely. -
Attach extension chain:
If you didn’t add it earlier, use the jump ring on the other end to attach your extension chain, finishing the piece with a professional look.
Precious Metals
Upgrade the look by using 14k gold-filled wire guards and spacer beads. They resist tarnish much better than plated base metals and match the high-end feel of heishi styles.
Wear your new turquoise creation stacked with gold bangles for a perfect summer vibe

The Complete Guide to Pottery Troubleshooting
Uncover the most common ceramic mistakes—from cracking clay to failed glazes—and learn how to fix them fast.
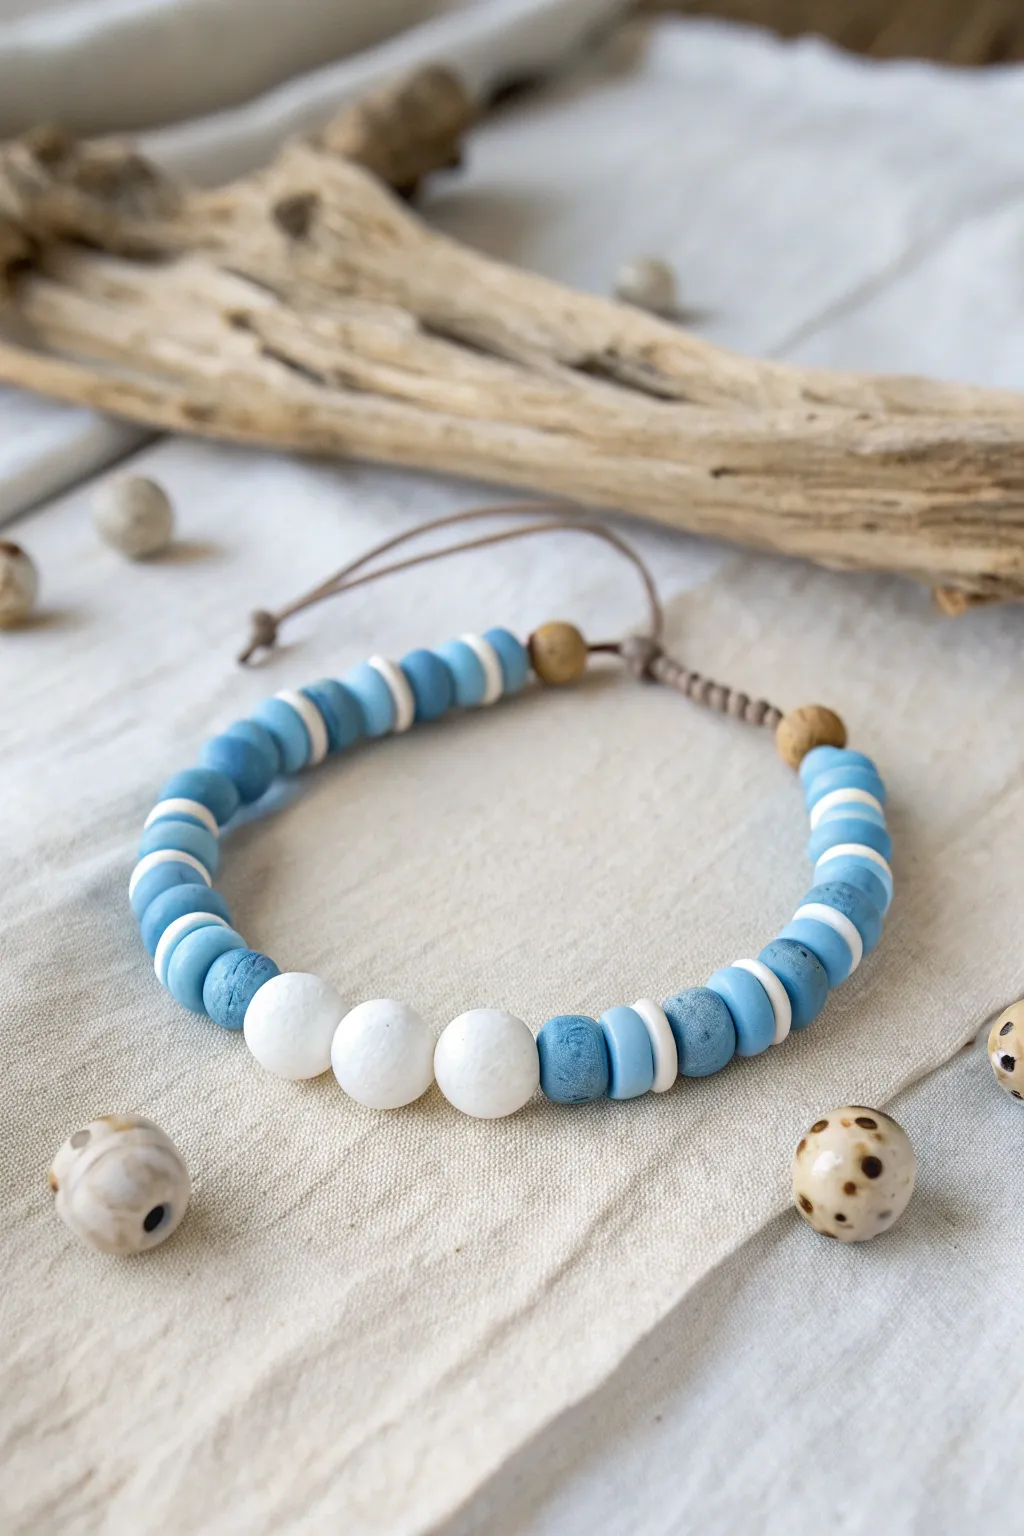
Navy Minimal With Tiny Accents
This sophisticated yet simple bracelet combines deep matte navy beads with contrasting textures of speckled beige and smooth white. The adjustable sliding knot closure adds a professional touch and ensures a comfortable fit for any wrist size.
Step-by-Step Guide
Materials
- Matte navy blue polymer clay beads (8mm or 10mm)
- Speckled beige polymer clay or stone beads (same size)
- Smooth white polymer clay or ceramic beads (same size)
- Navy blue waxed cord or nylon jewelry cord (0.8mm or 1mm)
- Scissors
- Measuring tape
- Lighter or clear thread glue
- Tape (masking or painter’s tape)
- Beading needle (optional, depending on hole size)
Step 1: Preparing the Cord
-
Measure and Cut:
Cut a piece of navy cord approximately 24 inches long. This will be your base strand where the beads sit. -
Create a Stopper Knot:
Tie a simple overhand knot about 6 inches from one end of the cord. This temporary knot prevents your beads from sliding off while you work. -
Cut the Closure Cord:
Cut a second, shorter piece of cord about 10-12 inches long. Set this aside; you will need it later for the sliding knot closure. -
Stiffen the Ends:
I like to quickly run a lighter flame over the working end of the long cord to stiffen it, creating a makeshift needle. Just be careful not to burn it too much.
Twisting while knotting?
If your macramé slider starts spiraling instead of laying flat, you likely forgot to alternate sides. Unravel and ensure you switch leading strands (left, then right) for every single knot.
Step 2: Pattern and Beading
-
Start with Navy:
Begin threading your matte navy beads onto the long cord. String approximately 8-10 navy beads, depending on your desired circumference. -
Add the First Accent:
Slide on one of the speckled beige beads next to the navy section. -
Center Feature:
Add the two smooth white beads. These will act as the bright focal point of the minimalist design. -
Complete the Accent:
Thread on the second speckled beige bead to mirror the other side. -
Finish the Sequence:
Finish by threading the remaining 8-10 navy beads to match the first section you created.
Step 3: Creating the Adjustable Closure
-
Check fit and secure:
Wrap the beaded strand around your wrist to check the size. If satisfied, remove the temporary stopper knot. -
Overlap the Ends:
Cross the two tail ends of your bracelet cord so they overlap by about 3 inches, forming a circle. -
Secure for Knotting:
Use tape to secure the overlapped cords to a table or flat surface. This keeps the tension steady while you tie the sliding knot. -
Begin the Square Knot:
Take your 10-inch cord piece and slide it under the overlapped section. Tie a regular overhand knot to secure it, keeping equal lengths on both sides. -
Tie the Left Side:
Take the left strand of the short cord, cross it *over* the main bracelet cords but *under* the right strand. -
Complete the Knot:
Take the right strand, go *under* the bracelet cords and up through the loop formed by the left strand. Pull tight. -
Alternate Sides:
Repeat the previous two steps, but start with the right strand this time. This alternating pattern creates a flat square knot. -
Repeat Until Finished:
Continue tying alternating square knots for about half an inch. This creates the ‘slider’ mechanism.
Texture Play
Swap the speckled beige beads for tiny unpolished wooden beads or lava stones. The organic texture of wood or lava contrasts beautifully against the smooth matte clay.
Step 4: Final Details
-
Trim the Slider:
Cut off the excess cord from your sliding knot (not the main bracelet cords!). Leave tiny stubs about 2mm long. -
Seal the Ends:
Carefully melt the tiny stubs with a lighter and press them flat against the knot (use the metal part of the lighter to press, not your finger) to seal it permanently. -
Add End Beads:
Thread one navy bead onto each tail end of the main bracelet cords. -
Tie End Knots:
Tie a secure overhand knot right after each end bead to keep it in place. Make sure the tails are even in length. -
Final Trim:
Trim any excess cord past the end knots and quickly singe the tips to prevent fraying.
Slide your new bracelet on and enjoy the sleek, modern look of your handmade accessory
Blue + Pearl-Look Sweetheart Mix
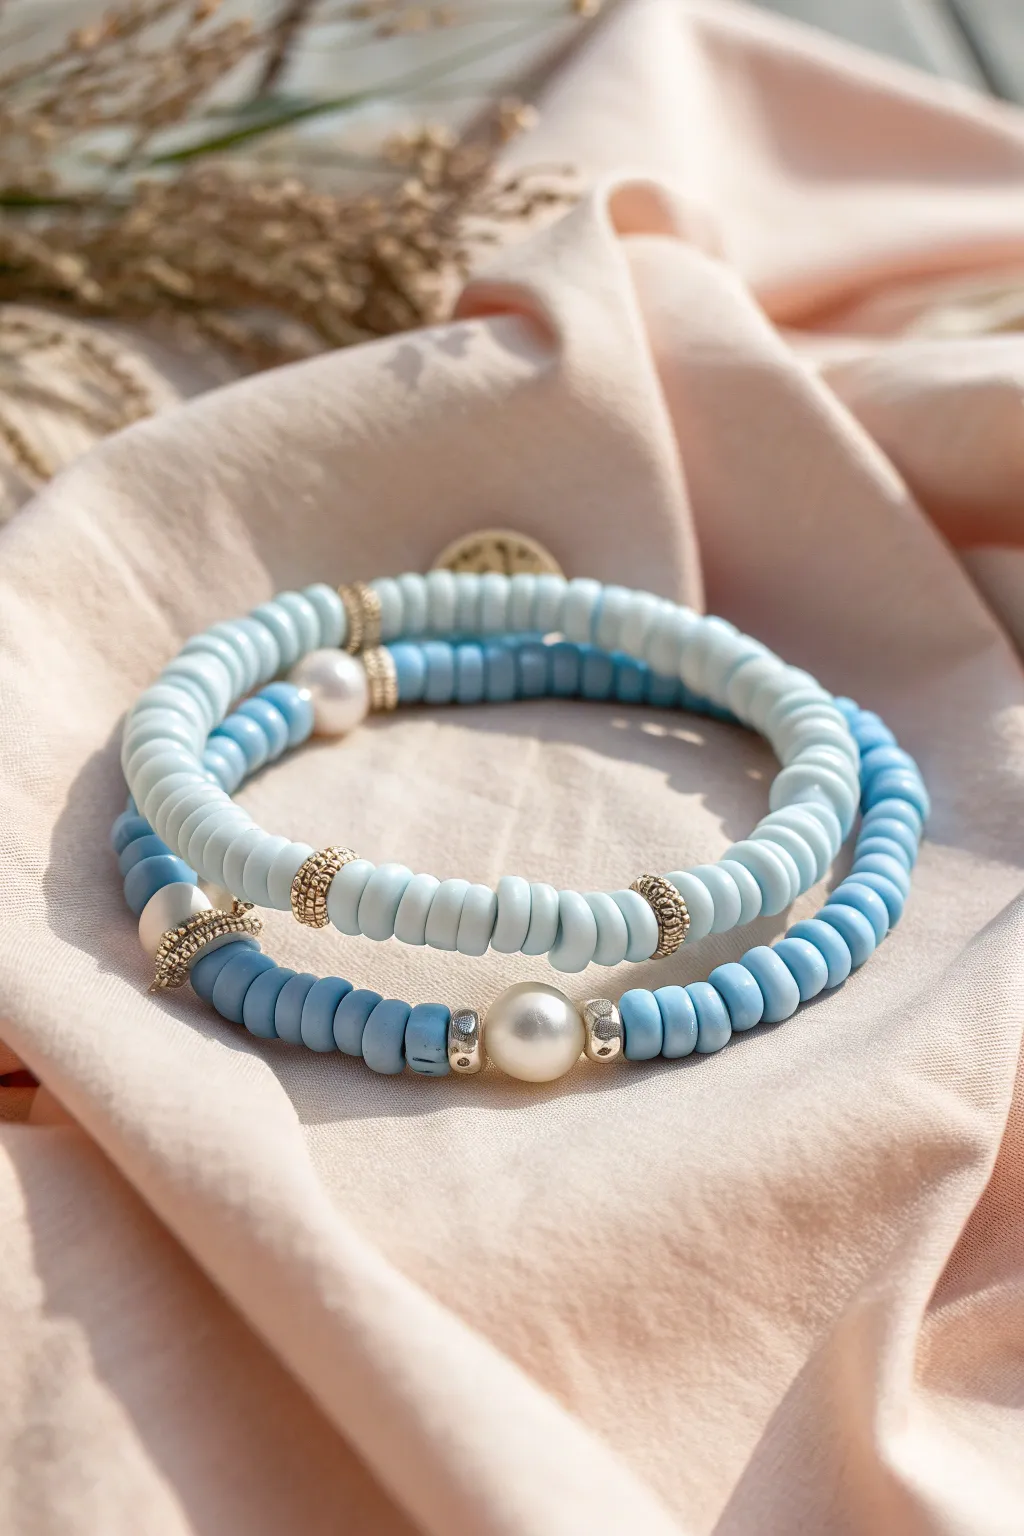
These charming bracelets combine the matte, casual texture of heishi clay beads with the classic elegance of pearls for a perfectly balanced accessory. The dual-tone blue palette creates a soothing, ocean-inspired look that pairs beautifully with gold accents.
How-To Guide
Materials
- Light blue flat clay heishi beads (approx. 6mm)
- Medium denim blue flat clay heishi beads (approx. 6mm)
- Gold tone ornate spacer beads (heishi style)
- Two large faux pearl beads (approx. 8-10mm)
- One medium faux pearl bead (approx. 6mm)
- Elastic beading cord (0.8mm recommended)
- Jewelry glue or clear nail polish
- Scissors
- Bead stopper or tape
- Optional: Gold logo charm or tag
Step 1: Planning the Design
-
Measure your wrist:
Wrap a piece of string around your wrist to find your comfortable size, then add about half an inch for a little movement. Cut two lengths of elastic cord that are at least 4 inches longer than this measurement to give yourself plenty of room for tying knots later. -
Secure the ends:
Attach a bead stopper or a piece of masking tape to one end of each elastic string so your beads don’t slide right off while you work. -
Sort your beads:
Separate your light blue and denim blue clay beads into two piles. This helps speed up the stringing process once you get into a rhythm.
Step 2: Creating the Light Blue Bracelet
-
String the base section:
Begin threading the light blue clay beads onto your first elastic cord. Continue adding these until you have covered about one-third of your desired bracelet length. -
Add first accent:
Slide on one gold ornate spacer bead, followed by a section of about 10 to 12 light blue beads. -
Insert the pearl feature:
Add another gold spacer, then the medium-sized pearl (6mm), and finish this focal point with a third gold spacer bead. -
Complete the pattern:
After the pearl section, add another set of 10 to 12 light blue beads, followed by one final gold spacer. -
Finish the strand:
Fill the rest of the string with light blue beads until the bracelet reaches your measured length. Double-check the size by wrapping it around your wrist before tying.
Loose Spacer Beads?
If your gold spacers have large holes and slip over the knot, place a tiny seed bead on either side of the knot to act as a stopper before hiding it.
Step 3: Creating the Denim Blue Bracelet
-
Start the second strand:
On your second piece of elastic, begin threading the denim blue clay beads. Create a solid section that is approximately 2 inches long. -
Prepare the focal point:
Slide on a gold spacer bead to mark the start of the centerpiece. -
Add the large pearl:
Thread one of the large (8-10mm) pearls onto the cord. Place a gold spacer immediately after it to frame the pearl beautifully. -
Create symmetry:
Add a short section of denim blue beads—about 5 or 6 beads works well here—and then slide on another gold spacer. -
Center secondary pearl:
Add the second large pearl, followed by a final gold spacer bead. -
Fill the remaining length:
Finish the strand with denim blue beads until it matches the length of your first bracelet. If you have a small gold charm or tag, you can slip it on near the knot area now.
Pro Tip: Bead Inspection
Clay beads can be uneven. Discard any beads that are significantly thinner or chipped to ensure your finished stack looks uniform and high-quality.
Step 4: Finishing Touches
-
Pre-stretch the elastic:
Gently pull on both ends of the strung bracelets. I always do this because it prevents the elastic from sagging the first time you wear it. -
Tie the surgeon’s knot:
Remove the bead stopper. Cross the ends left over right, then right over left, looping the top strand through twice before pulling tight. This creates a very secure surgeon’s knot. -
Secure with glue:
Dab a tiny drop of jewelry glue or clear nail polish onto the knot. Let it dry completely according to the glue’s instructions. -
Hide the knot:
Trim the excess elastic close to the knot, leaving about 2mm. Gently tug the bracelet so the knot slides inside the hole of a nearby bead, hiding it from view.
Now you have a stunning, beach-ready stack to wear or gift to a friend


What Really Happens Inside the Kiln
Learn how time and temperature work together inside the kiln to transform clay into durable ceramic.
Daisy Center in Blue Petals
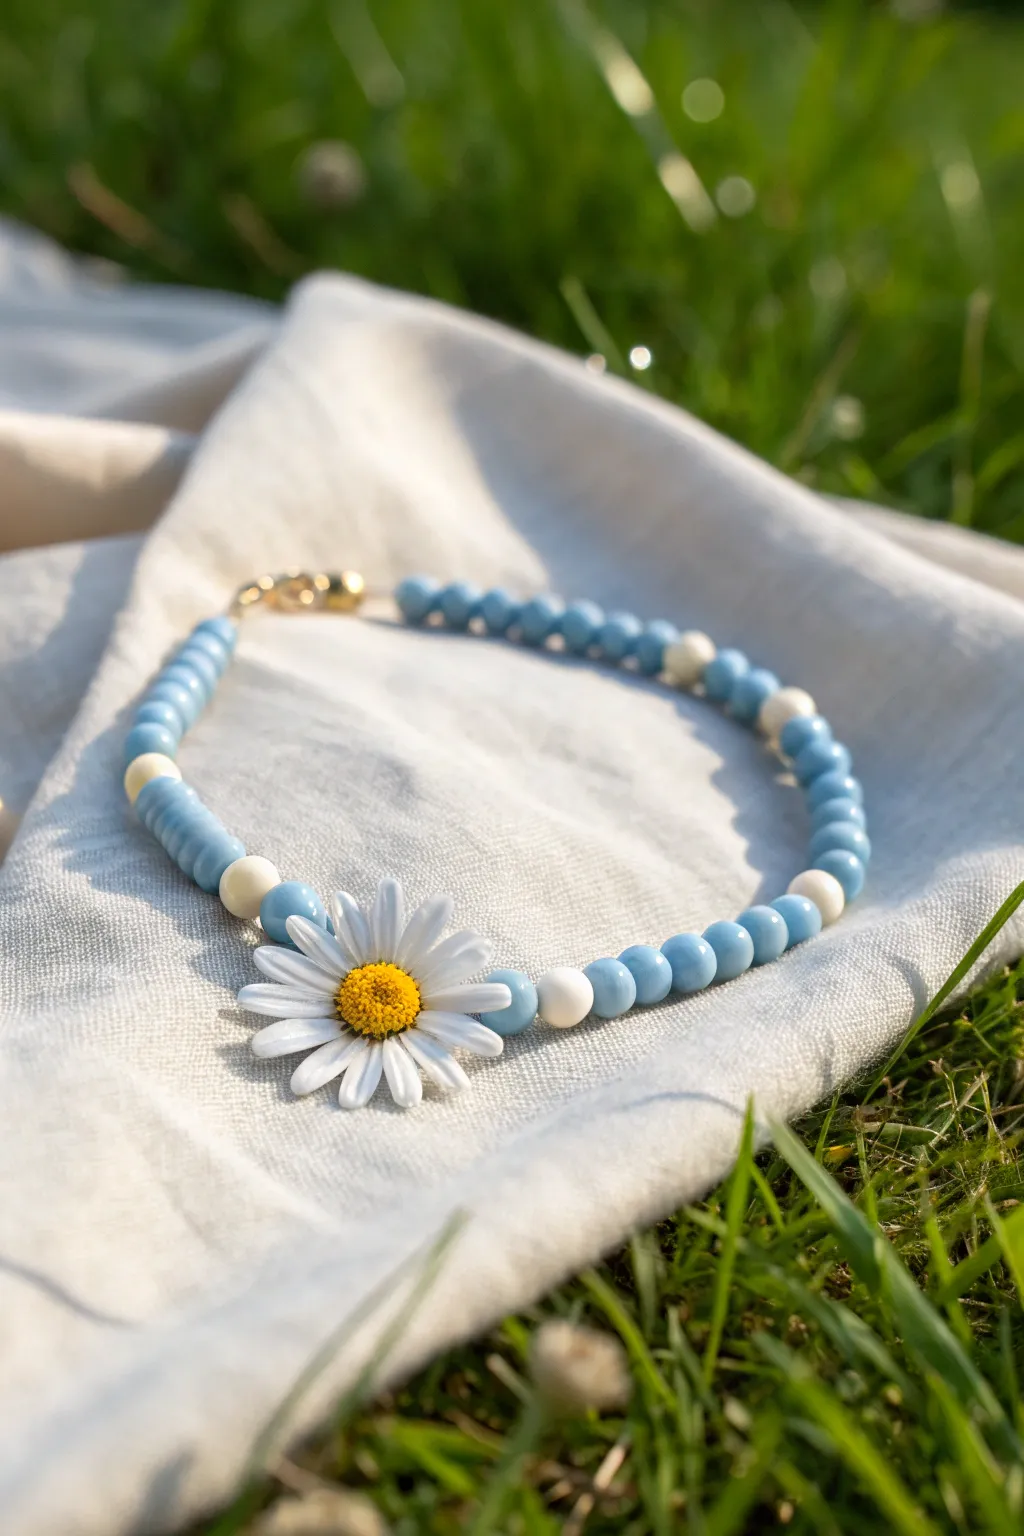
Capture the essence of spring with this charming beaded project featuring a prominent white daisy centerpiece. Soft baby blue beads alternate with creamy accents to create a delicate accessory perfect for sunny picnic days.
Detailed Instructions
Materials
- Large white daisy flower bead or charm (approximately 20mm)
- 6mm round baby blue ceramic or clay beads
- 6mm round cream or off-white ceramic beads
- Beading wire (flexible, 7-strand or 19-strand)
- 2 Gold crimp beads
- 2 Gold wire guardians (optional but recommended)
- 2 Gold crimp covers (optional)
- Gold lobster clasp
- Gold jump ring
- Crimping pliers
- Wire cutters
- Bead stopper or tape
Step 1: Preparation & Centerpiece
-
Measure the wire:
Cut a length of beading wire approximately 10 inches longer than your desired finished length. This extra slack is crucial for comfortable knotting and finishing. -
Secure one end:
Attach a bead stopper or a piece of tape to one end of the wire to prevent beads from sliding off while you work. -
Start the pattern:
Begin stringing from the center outward. Slide your large white daisy bead onto the wire, positioning it roughly in the middle of your strand. -
First side sequence:
On the right side of the daisy, thread on one blue bead to start the specific pattern seen in the inspiration image.
Pro Tip: Drape Check
Before crimping, hold the necklace or bracelet in a circle shape. If you crimp it while it’s straight, it will become too stiff to wear comfortably.
Step 2: Creating the Bead Pattern
-
Establish the rhythm:
Add a cream bead after the first blue one. The core pattern consists of five blue beads followed by one cream bead. -
String the first set:
Thread five baby blue beads onto the wire. Check that they sit snugly against the cream bead without gaps. -
Add a spacer:
Slide on another single cream bead. This acts as a visual break between the segments of blue. -
Repeat the sequence:
Continue adding sets of five blue beads followed by one cream bead until you reach about half of your desired length for this side. -
Mirror the other side:
Return to the center daisy. Repeat the exact same pattern on the left side: one blue, one cream, then the 5-blue-1-cream sequence. -
Check symmetry:
Lay the strand down flat. I always like to double-check that both sides have an equal number of repeating segments so the daisy stays perfectly centered. -
Adjust length:
If the strand is too short, add more blue beads to the ends rather than full segments to keep the pattern clean near the clasp. -
Final bead check:
Ensure the beads end symmetrically on both sides—ideally ending with a blue segment before the clasp hardware.
Step 3: Finishing the Clasp
-
String the crimp:
Remove the bead stopper from one side. Slide on a gold crimp bead, followed by a wire guardian. -
Attach the clasp:
Thread the wire through the first loop of the guardian, hook on the lobster clasp, and go down through the other guardian loop. -
Secure the crimp:
Pass the tail of the wire back through the crimp bead and pull tight, leaving a tiny bit of wiggle room for the clasp to move. -
Flatten:
Use your crimping pliers to flatten the crimp bead securely. Trim the excess wire tail close to the bead. -
Finish the other side:
Repeat the crimping process on the other end, attaching a gold jump ring instead of a lobster clasp. -
Cover crimps:
For a polished look, place a gold crimp cover over your flattened crimp beads and gently squeeze it shut until it looks like a round gold bead.
Level Up: Garden Party
Swap the single cream spacer beads for tiny gold balls or freshwater pearls to give the piece a more elegant, high-end jewelry finish.
Enjoy styling your fresh, floral accessory with your favorite spring outfits
Tiny Heart Charm on Blue Heishi
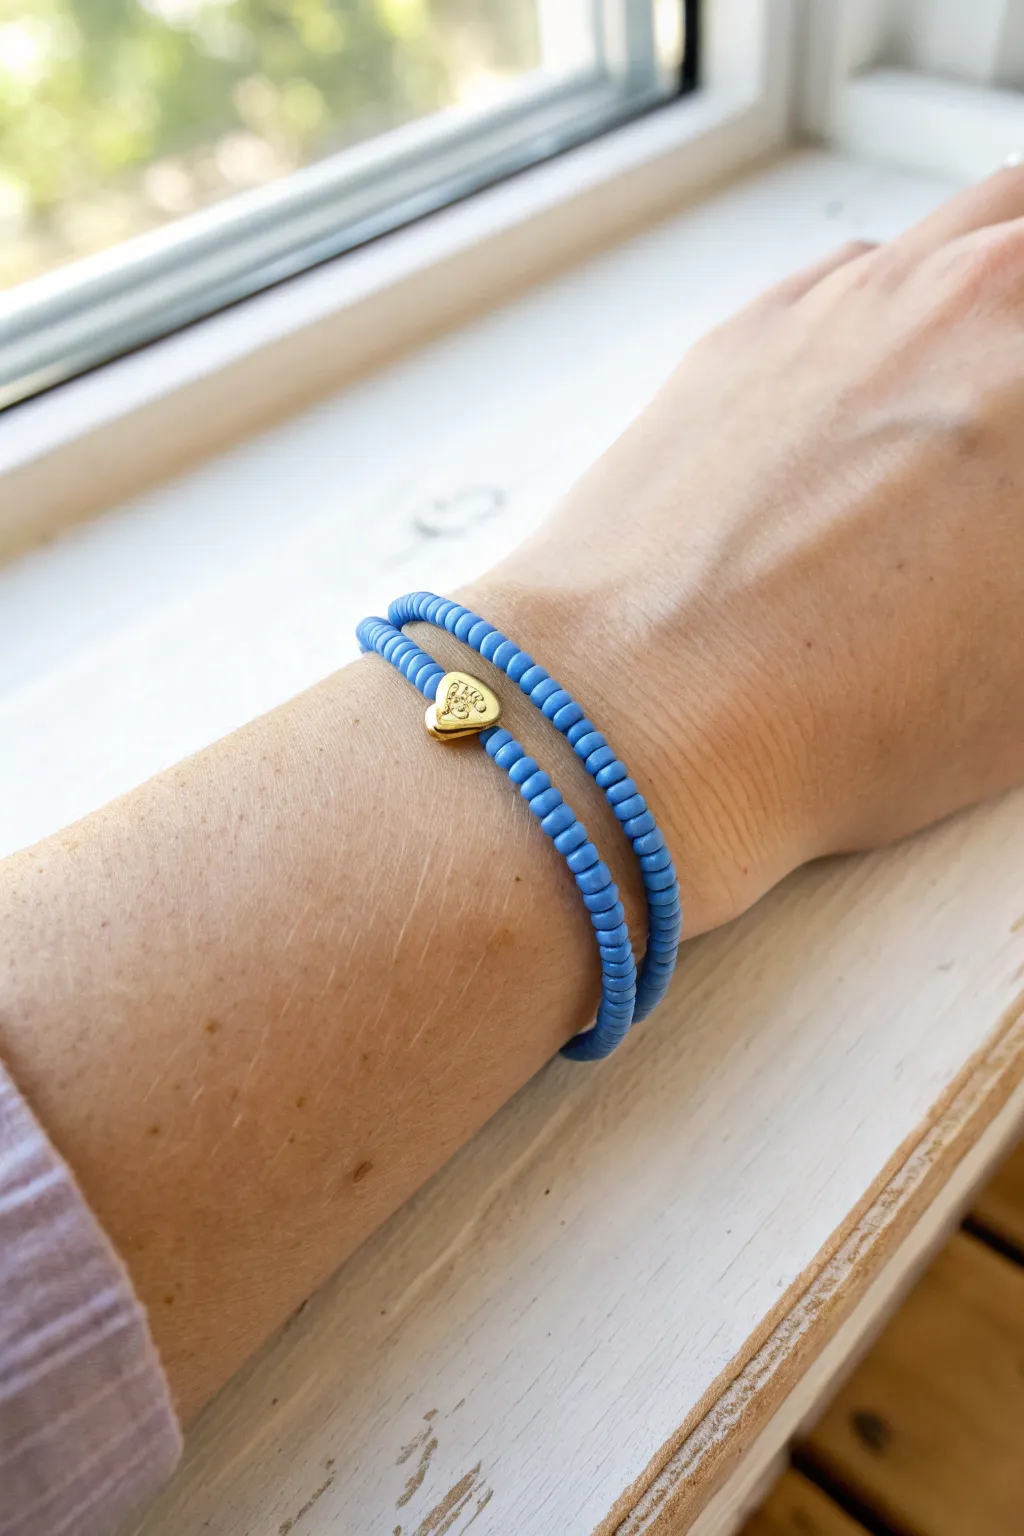
This delicate bracelet project combines the serene feel of cornflower blue seed beads with the elegant pop of a tiny gold heart charm. It’s a versatile accessory that looks lovely as a double-wrapped strand or worn as a single shimmering loop.
Step-by-Step Tutorial
Materials
- Matte or irregular cornflower blue glass seed beads (size 8/0 or 10/0)
- Small gold heart charm (about 6mm)
- Small gold jump ring (4-5mm)
- Strong elastic jewerly cord (0.5mm clear)
- Jewelry adhesive or clear nail polish
- Scissors
Step 1: Preparing the Foundation
-
Measure your cord:
Cut a piece of elastic cord about 12 inches long. This generous length gives you plenty of room to knot it securely without struggling with tiny ends. -
Pre-stretch the elastic:
Hold the cord firmly at both ends and give it several gentle tugs. Pre-stretching prevents the finished bracelet from sagging or becoming loose after you wear it a few times. -
Secure the first bead:
Thread one blue bead onto the cord and wrap the end around it loosely, or use a piece of tape on the tail end so your beads don’t slide off while you work.
Taming the Roll
If your bracelet keeps rolling up your arm, check your sizing. Elastic bracelets should sit snug but not tight against the skin to stay in place.
Step 2: Beading the Strand
-
Begin stringing:
Start threading the blue seed beads onto the cord. Keep the tension even, but don’t pull too tight. -
Check the length often:
Stop periodically to wrap the strand around your wrist. You want to bead enough length to fit comfortably—usually about 6.5 to 7 inches for an average wrist. -
Find the center point:
Once you have beaded approximately half of your desired length, pause to add the focal point. -
Prepare the charm:
Using your fingers or small pliers, open the gold jump ring just enough to slip the heart charm onto it. -
Add the charm to the strand:
Thread the elastic cord through the jump ring carrying the heart charm. It should now sit centrally among the blue beads. -
Finish beading:
Continue adding the remaining blue beads until you reach the full length required to encircle your wrist.
Step 3: Finishing Touches
-
Remove the stopper:
Carefully remove the tape or unloop the stopper bead from the beginning of your strand. -
Check fit one last time:
Wrap the strand around your wrist to ensure the ends meet comfortably without pinching your skin. -
Tie the surgeon’s knot:
Cross the ends of the elastic and loop one side through twice before pulling tight. This extra loop creates friction that holds the slick elastic better than a standard knot. -
Secure the knot:
Apply a tiny dab of jewelry adhesive or clear nail polish directly onto the knot. I find using a toothpick helps place the glue precisely without getting it on the beads. -
Let it cure:
Allow the glue to dry completely according to the manufacturer’s instructions before putting tension on it. -
Trim the excess:
Use sharp scissors to trim the tails of the elastic, leaving about 2mm sticking out to ensure the knot doesn’t slip undone inside a bead. -
Hide the knot:
Gently pull the elastic until the knot slips inside the hole of the nearest bead, making your finish invisible.
Double the Impact
Create a second identical beaded strand without a charm. Wear them stacked together for the layered look shown in the photo.
Enjoy the simple elegance of your new blue bracelet stack

TRACK YOUR CERAMIC JOURNEY
Capture glaze tests, firing details, and creative progress—all in one simple printable. Make your projects easier to repeat and improve.
Protective Eye Accent in Ocean Blues
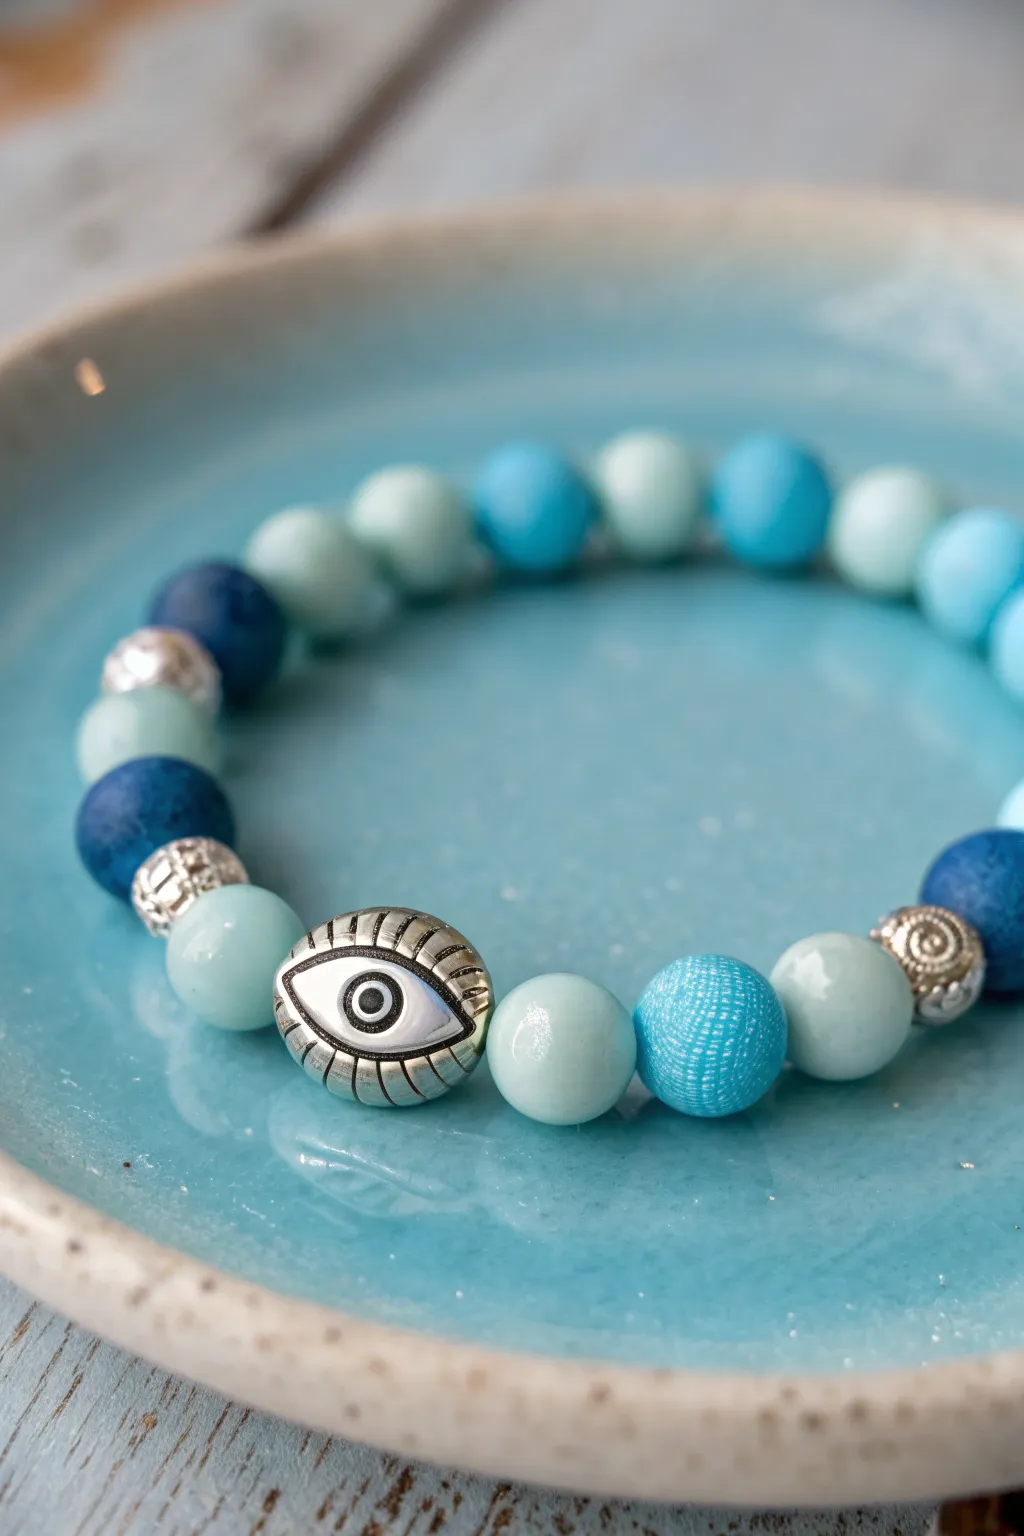
Channel the calming vibes of the sea with this beautiful beaded bracelet featuring a central evil eye charm. The blend of matte and glossy beads creates a lovely texture that perfectly mimics ocean tides.
How-To Guide
Materials
- Stretch cord (0.8mm or 1mm thickness)
- Silver-tone evil eye feature bead (oval or round)
- Light blue agate or jade beads (8mm, polished)
- Matte dark blue lapis lazuli or sodalite beads (8mm)
- Sky blue matte acrylic or wooden beads (8mm, textured)
- Silver metallic spacer beads (textured finish)
- Silver filigree or swirly metal beads
- Jewelry glue or clear nail polish
- Scissors
Step 1: Preparation and Design
-
Measure your wrist:
Cut a length of stretch cord about 10-12 inches long. This gives you plenty of extra room to tie knots comfortably. -
Pre-stretch the cord:
Hold the ends of the cord and give it a few firm tugs. This prevents the bracelet from loosening up immediately after you wear it. -
Secure the end:
Place a bead stopper or a piece of tape on one end of the cord so your beads don’t slide off while you work. -
Plan the layout:
Lay your beads out on a bead board or soft towel. Place the large silver evil eye bead in the very center as your focal point. -
Arrange the flanking beads:
On either side of the eye bead, place a light blue polished agate bead to create a soft transition.
Step 2: Stringing the Pattern
-
Start from the center:
Thread the central silver evil eye bead onto the cord first. -
Add first side beads:
Slide one light blue polished bead onto the right side of the eye, and another onto the left side. -
Incorporate texture:
On the right side, add a textured sky blue bead followed by a silver swirly metal bead. Mirror this exactly on the left side. -
Continue the pattern (Right side):
Add a matte dark blue bead, then a silver textured spacer bead, then a light blue agate bead. -
Continue the pattern (Left side):
Repeat the previous step on the left side: matte dark blue bead, silver spacer, light blue agate bead. -
Fill the rest:
Continue adding beads, alternating between the light blue, dark matte blue, and darker teal tones until you reach your desired length. Mix in the remaining silver accents randomly for an organic look. -
Check the fit:
Wrap the unfinished strand around your wrist. The ends should touch comfortably without stretching the cord yet.
Knot Slipping?
If your stretch cord feels too slippery to hold a knot, rub the ends with a little beeswax or rough them up gently with sandpaper before tying.
Step 3: Finishing Touches
-
Prepare to knot:
Remove the tape or bead stopper. Bring both ends of the cord together, ensuring there are no gaps between the beads. -
Tie the surgeon’s knot:
Cross the ends like a normal knot, loop one end through twice, and pull tight. I find this creates the most secure hold for stretchy jewelry. -
Secure the knot:
Tie a second standard overhand knot on top of the surgeon’s knot for extra security. -
Apply adhesive:
Dab a tiny drop of jewelry glue or clear nail polish directly onto the knot. Let it dry for a few minutes. -
Hide the knot:
Ideally, pull the knot inside the hole of the nearest large bead to conceal it. -
Trim excess:
Use your scissors to trim the excess cord tails close to the bead, being careful not to cut the main knot.
Add a Charm Dangle
Attach a small silver seashell or starfish charm to one of the silver spacer beads using a jump ring for extra beachy flair.
Now slip on your new accessory and enjoy the tranquil blue tones all day long
Blue Checkerboard Bead Pattern
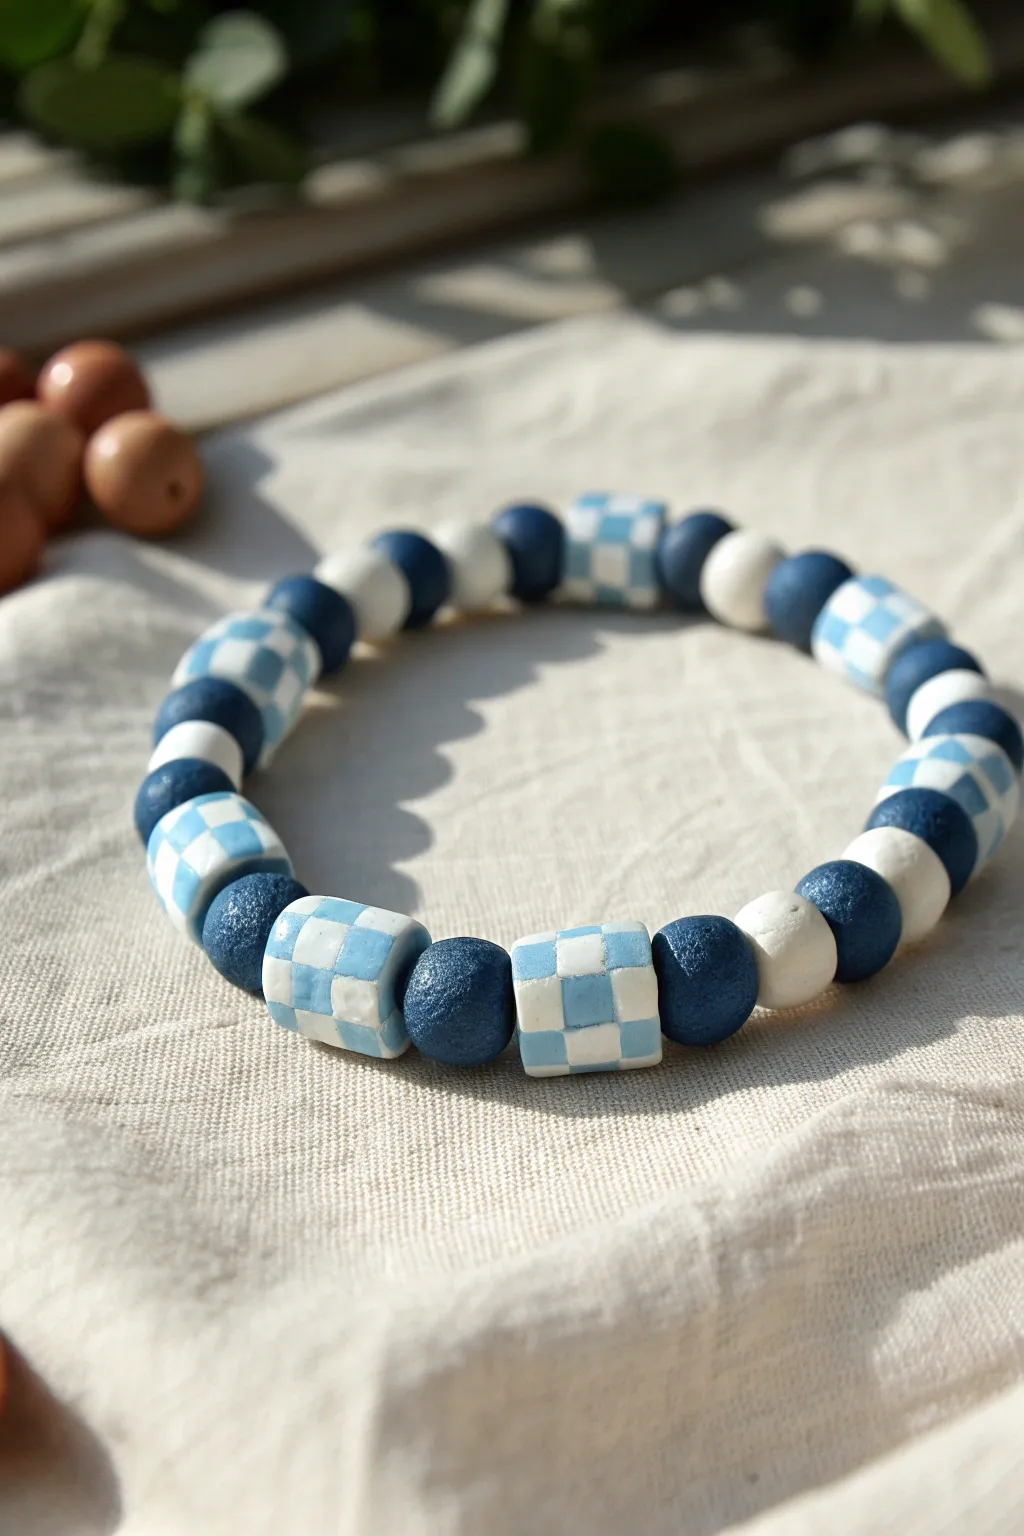
This trendy, handmade bracelet combines deep navy blue and crisp white in a playful checkerboard design. It features a satisfying mix of handmade spherical beads and checkerboard connector beads, strung together for a chunky, modern accessory.
Step-by-Step Tutorial
Materials
- Polymer clay in navy blue
- Polymer clay in white
- Rolling pin or pasta machine for clay
- Clay cutting blade
- Toothpick, needle tool, or bead piercer
- Elastic stretch cord (0.8mm or 1mm)
- Super glue or jewelry glue
- Ceramic tile or baking sheet
- Oven
- Gloss glaze (optional)
Step 1: Creating the Solid Beads
-
Condition the clay:
Start by warming up both the navy blue and white polymer clay separately in your hands. Knead and roll them until they are soft, pliable, and free of cracks. -
Portion the clay:
Pinch off small pieces of the navy blue clay. Aim for pieces that will roll into balls approximately 8-10mm in diameter. -
Roll blue spheres:
Roll each blue piece between your palms to create smooth, perfectly round spheres. You will need about 8-10 of these depending on your wrist size. -
Create texture (optional):
In the reference photo, the blue beads have a slight shimmer or texture. Use a piece of coarse sandpaper or a rough sponge to gently tap the surface of the raw clay balls to mimic this stone-like effect. -
Make the white beads:
Repeat the rolling process with the white clay, making slightly smaller spheres, around 6-8mm in diameter. Make about 4-6 of these.
Clean Cuts Matter
Chill your checkerboard cane in the fridge for 20 minutes before slicing. Harder clay slices cleaner, keeping the crisp squares from smudging.
Step 2: Building the Checkerboard Cane
-
Roll flattened sheets:
Roll out a sheet of white clay and a sheet of blue clay to the exact same thickness. A pasta machine on a medium setting works best here for consistency. -
Cut strips:
Using your clay blade, cut long, even strips from both colors. They should be perfectly square in cross-section (e.g., 4mm wide and 4mm thick). -
Stack the first layer:
Lay a white strip next to a blue strip, then another white strip. Press them gently together side-by-side to form a flat layer of three stripes. -
Stack the second layer:
Create a second layer on top of the first, but alternate the colors so a blue strip sits on top of a white one. This creates the checkerboard effect. -
Complete the block:
Add a third layer, following the alternating pattern again. Gently compress the square log (cane) from all sides to fuse the strips without distorting the square shape.
Step 3: Forming Checkerboard Beads
-
Slice segment beads:
Slice the square cane into thick segments, roughly 8-10mm long. These will become your focal checkerboard beads. -
Round the edges:
Gently tap the corners and edges of these square slices with your finger to soften them into a more rounded, cylindrical barrel shape, just like the image shows. -
Pierce the beads:
Use your needle tool or toothpick to carefully pierce a hole through the center of every bead—the solids and the checkerboards. Use a twisting motion to avoid squishing the shape. -
Bake carefully:
Arrange all beads on a ceramic tile or baking sheet. Bake according to your clay package instructions (usually 275°F/130°C for 15-30 minutes). -
Cool down:
Let the beads cool completely in the oven before handling them to ensure maximum durability.
Matte vs. Glossy
For the exact look in the photo, leave the beads unglazed for a natural matte finish. Add UV resin only if you want a high-gloss, glass-like shine.
Step 4: Assembly
-
Layout the design:
Once cool, arrange your beads on a table. The pattern in the image generally follows: Checkerboard -> Blue Solid -> White Solid -> Blue Solid -> Checkerboard. -
String the beads:
Cut a piece of elastic cord about 10 inches long. Thread your beads onto the cord following your laid-out pattern. -
Pre-stretch cord:
I always give the elastic a few gentle tugs before tying to prevent it from loosening later. -
Tie the knot:
Tie a strong surgeon’s knot (right over left, left over right twice). Pull tight. -
Secure and hide:
Add a tiny drop of super glue to the knot. once dry, snip the excess cord and tuck the knot inside one of the checkerboard beads.
Now you have a custom statement piece ready to wear or gift to a friend
Sea Charm Trio: Shell, Star, and Wave
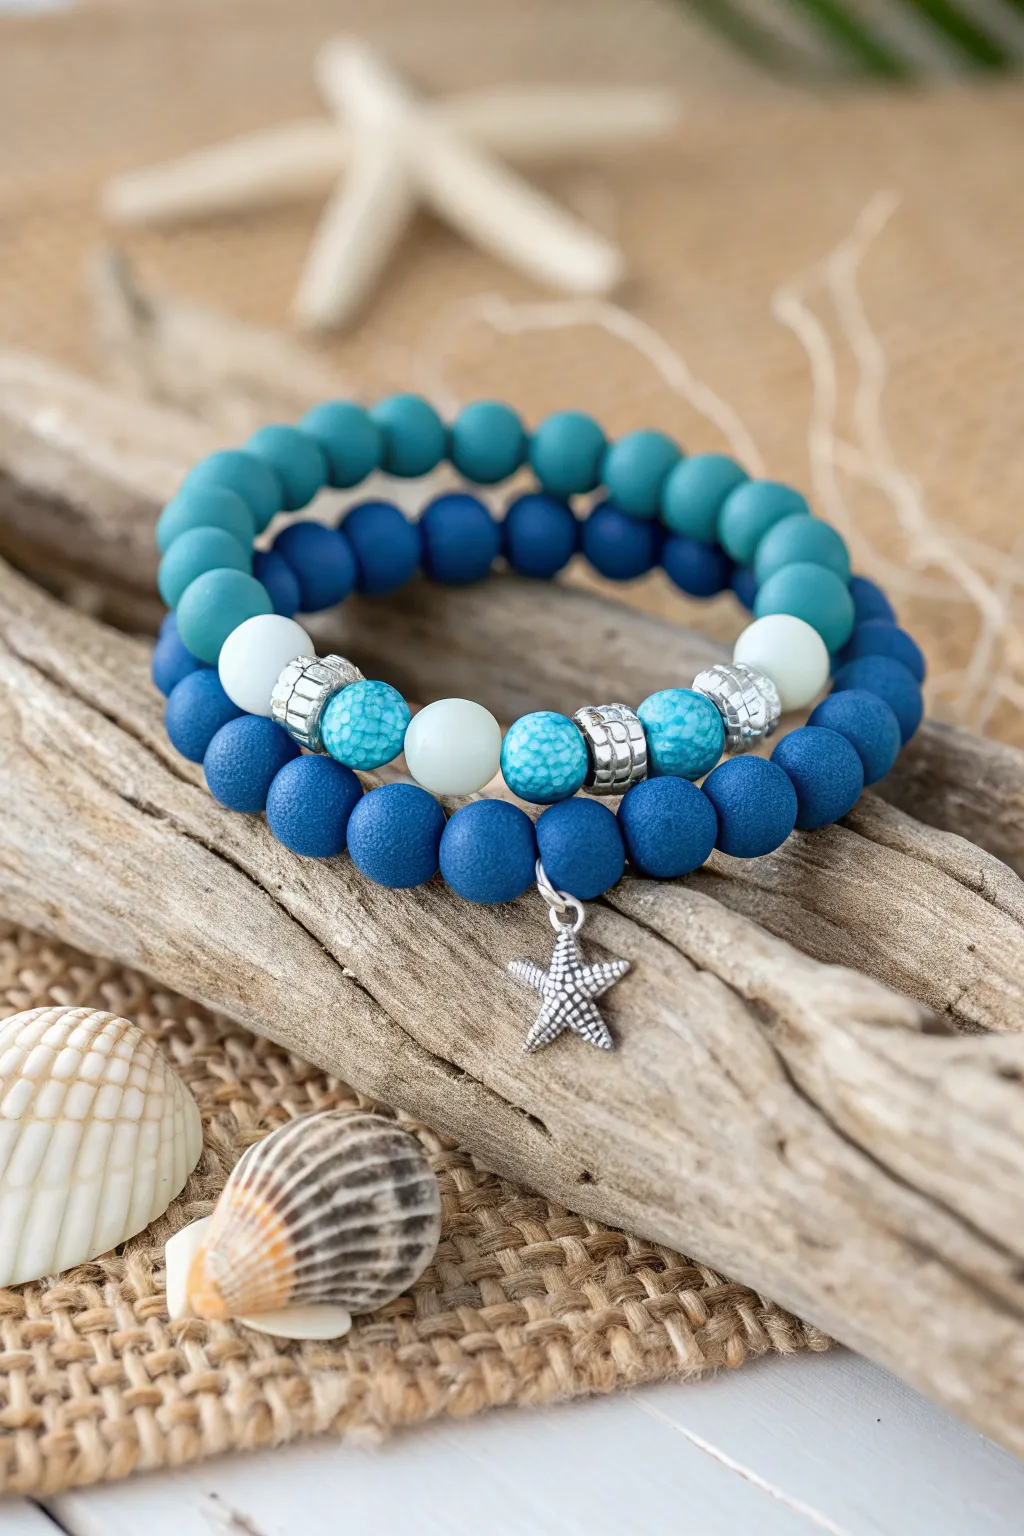
Capture the serene vibes of the ocean with this beautiful dual-bracelet set. Combining matte blue hues, speckled turquoise accents, and a delicate silver starfish charm, these bracelets are perfect for stacking or wearing solo on a sunny day.
Step-by-Step Guide
Materials
- Matte round beads (8mm) in teal/light blue
- Matte round beads (8mm) in navy/royal blue
- Glossy round beads (8mm) in white or light dove grey
- Three turquoise-colored textured glass or stone beads (8mm-10mm)
- Four decorative silver spacer beads with textured patterns
- One small silver starfish charm with a jump ring
- Elastic beading cord (0.7mm or 0.8mm clear)
- Hypo-cement or strong jewelry glue
- Scissors
Step 1: Planning Your Pattern
-
Measure your wrist:
Cut a piece of string to wrap loosely around your wrist to find your comfortable size, then cut two pieces of elastic cord about 3-4 inches longer than that measurement to allow for tying knots. -
Pre-stretch the cord:
Gently pull on both ends of your elastic strands a few times. This crucial step prevents the finished bracelets from stretching out and becoming loose after the first wear. -
Secure the ends:
Attach a piece of tape or a bead stopper to one end of each elastic cord so your beads don’t slide off while you are working.
Step 2: Creating the Solid Teal Strand
-
Start beading:
For the first bracelet (the top one in the image), thread your matte teal/light blue beads onto the cord one by one. -
Check the length:
Continue adding beads until the strand wraps comfortably around your wrist. Since this is a simple, single-color strand, uniformity is key, so check for any chipped beads as you go. -
Tie the knot:
Once sized correctly, tie a strong surgeon’s knot (right over left, left over right). Pull the elastic tight so the knot becomes small and compact.
Loose Knots?
If your elastic keeps slipping while tying, try doing a double overhand knot. Pulling all four distinct strands (the tails and the loops) outward at the same time tightens it effectively.
Step 3: Designing the Navy Charm Strand
-
Create the focal point:
For the second bracelet, we start with the center design. Slide on one silver spacer, one turquoise textured bead, another silver spacer, and then the middle turquoise bead. -
Add the charm:
Before adding the next spacer, slide on the jump ring holding your silver starfish charm so it sits right in the center of the design. -
Complete the center pattern:
Finish the focal section by adding the third turquoise bead, followed by a silver spacer, and finally the last turquoise bead and silver spacer. -
Add contrast beads:
On either side of your silver-and-turquoise center section, add one glossy white bead to create a bright pop of contrast. -
Fill the rest:
Finish the rest of the strand using the matte navy blue beads. I usually alternate adding them to the left and right sides of the pattern to keep the focal point perfectly centered. -
Verify sizing:
Wrap the strand around your wrist to ensure it matches the size of the teal bracelet you already made.
Level Up
Add a third ‘sand’ bracelet using beige wooden beads or matte tan stones to complete the beach palette trio.
Step 4: Finishing Touches
-
Secure the second knot:
Tie a surgeon’s knot for the navy bracelet just as you did for the first one, pulling firmly to secure it. -
Apply adhesive:
Dab a tiny drop of hypo-cement or jewelry glue onto both knots. Be careful not to get glue on the beads themselves, as it can ruin the matte finish. -
Hide the knots:
If the hole of a neighboring bead is large enough, gently tug the elastic so the knot slides inside the bead to hide it completely. -
Trim the excess:
Once the glue is fully dry (wait at least 15 minutes), use your scissors to trim the excess elastic tails as close to the knot as possible.
Enjoy styling your new ocean-inspired accessories with your favorite summer outfits
Blue Confetti Mix for a Playful Look
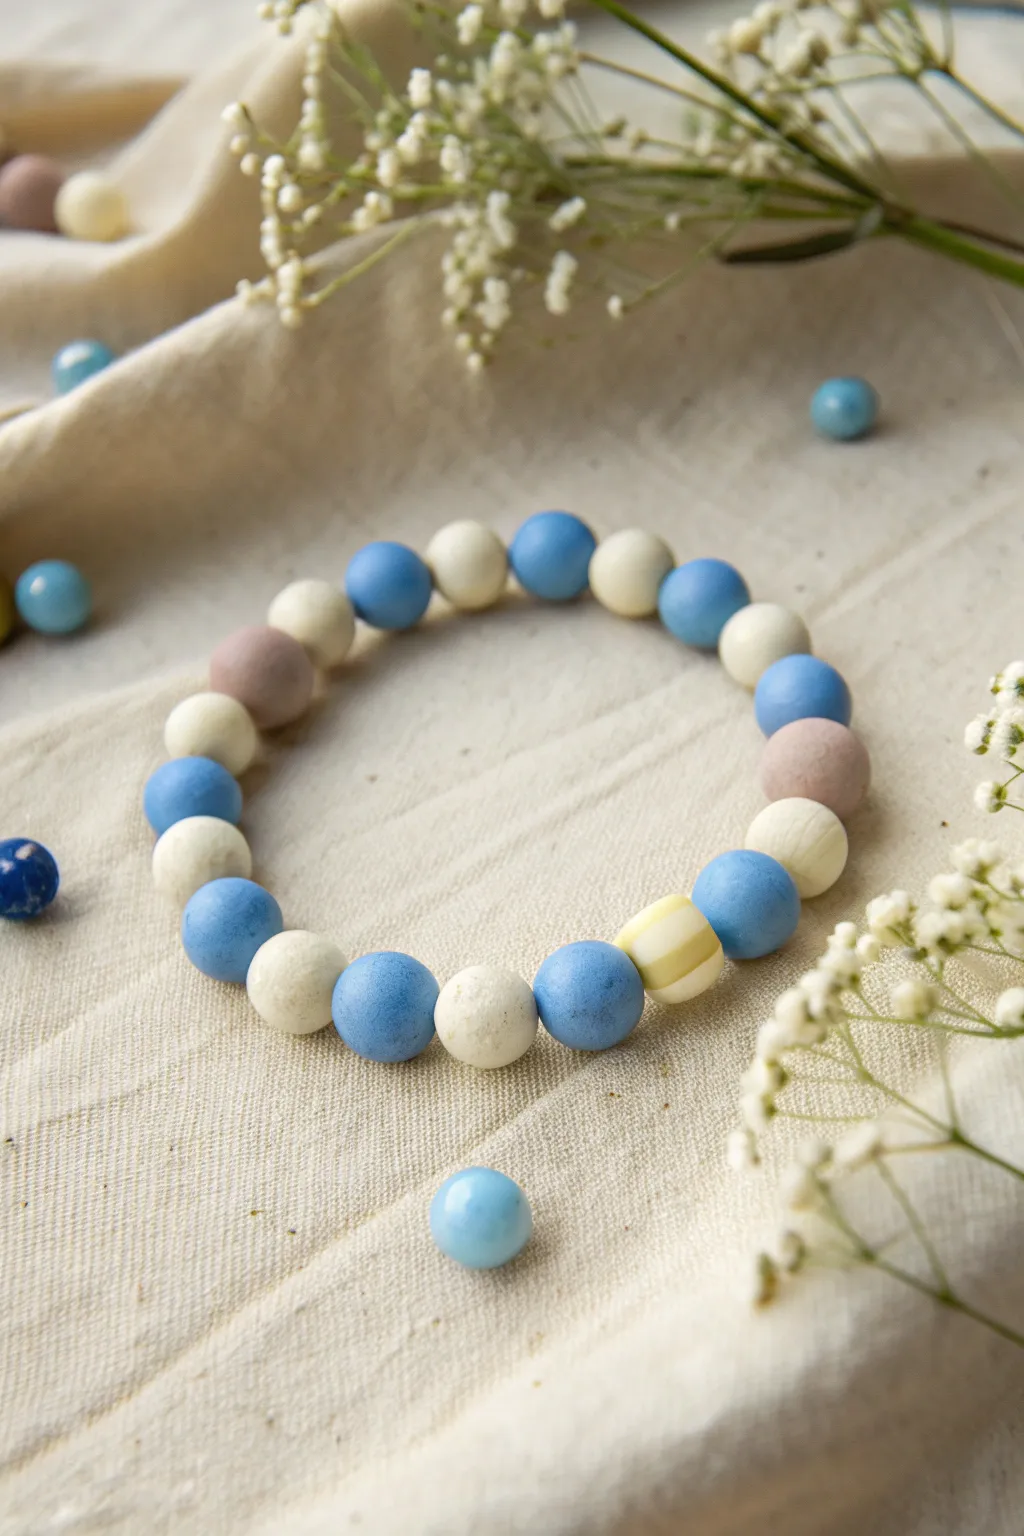
This charming bracelet combines matte polymer clay beads in soft blues and creams with a unique striped accent for a playful, textured look. It’s a beginner-friendly project that mimics the feel of stone or ceramic beads using lightweight clay.
Detailed Instructions
Materials
- Polymer clay (light blue, white/cream, dusty mauve/pink, yellow)
- Bead rolling tool or flat acrylic block
- Toothpicks or bead pins
- Baking sheet and parchment paper
- Elastic cord (0.8mm or 1mm)
- Super glue or jewelry adhesive
- Scissors
- Wet/dry sandpaper (400 and 800 grit)
- Needle tool or awl
Step 1: Creating the Solid Beads
-
Condition the Clay:
Begin by thoroughly kneading your light blue, white, and dusty mauve clay blocks separately until they are soft and pliable. This conditioning step is crucial to prevent cracks during baking. -
Portion the Clay:
Pinch off small, equal-sized pieces of clay from each color block. Aim for pieces that are roughly the size of a large pea to create beads approximately 8-10mm in diameter. -
Roll Spheres:
Roll each piece between your palms to form a rough ball. To get them perfectly round, I like to use a flat acrylic block and gently roll the balls in a circular motion on a work surface. -
Pierce the Holes:
Gently hold a clay sphere and slowly twist a toothpick or bead pin through the center. Twist as you push to avoid deforming the round shape. -
Refine the Shape:
Once the hole is pierced, the exit point might have a little raised lip of clay. smooth this down with your finger or gently roll the bead again with the pin still inside to re-establish the perfect sphere. -
Create Texture (Optional):
The beads in the image have a lovely matte, almost stone-like finish. You can achieve this by gently tapping the unbaked beads with a stiff toothbrush or a crumpled ball of aluminum foil.
Fingerprint Fix
Fingerprints stuck in your clay? Before baking, lightly brush the raw beads with a little cornstarch or baby oil to smooth out any ridges.
Step 2: Designing the Striped Focal Bead
-
Prepare Striped Layers:
Roll out a small sheet of cream clay and a very thin sheet of yellow clay. Stack them and cut a small section to create a layered block. -
Form the Focal Bead:
Gently roll this stacked piece into a ball. The colors will wrap around each other, creating a thick band or swirled effect similar to the yellow-striped bead in the photo. -
Check Size:
Ensure this focal bead is roughly the same size as your solid color beads so it integrates smoothly into the strand.
Step 3: Baking and Finishing
-
Arrangement for Baking:
Place all your pierced beads on a baking sheet lined with parchment paper. To keep them perfectly round, you can rest the toothpicks across the rim of an oven-safe dish so the beads are suspended. -
Bake:
Bake the beads according to the manufacturer’s instructions for your specific brand of polymer clay (usually around 275°F or 130°C for 15-30 minutes). -
Cool Down:
Allow the beads to cool completely before handling. If you try to string them while hot, they may be brittle or deform slightly. -
Sand for Matte Finish:
To get that soft, stone-like texture shown in the photo, lightly buff the cured beads under running water using wet/dry sandpaper. Start with 400 grit and finish with 800 grit.
Pro Tip: Baking Rack
Make a simple bead rack by folding a piece of cardstock into an accordion shape. Rest your toothpicks in the valleys to keep beads suspended.
Step 4: Assembly
-
Pre-stretch the Cord:
Cut a piece of elastic cord about 10 inches long.Pre-stretch it by pulling firmly on both ends several times; this prevents the bracelet from sagging later. -
String the Pattern:
Thread your beads onto the elastic. Follow an alternating pattern: Blue, White, Blue, White, occasionally swapping in a Dusty Mauve bead for variety. -
Add the Accent:
Place your yellow-striped focal bead slightly off-center or wherever you prefer the visual interest to land within the loop. -
Secure the Knot:
Once the strand is long enough to fit your wrist comfortably, tie a surgeon’s knot (right over left twice, then left over right). Pull tight to secure. -
Hide the Knot:
Apply a tiny drop of super glue to the knot. Once dry, trim the excess cord ends and gently tug the knot inside the hole of the nearest bead to hide it.
Now you have a handmade, matte-finish bracelet perfect for stacking or wearing solo
Blue Marble-Swirl Focal Beads
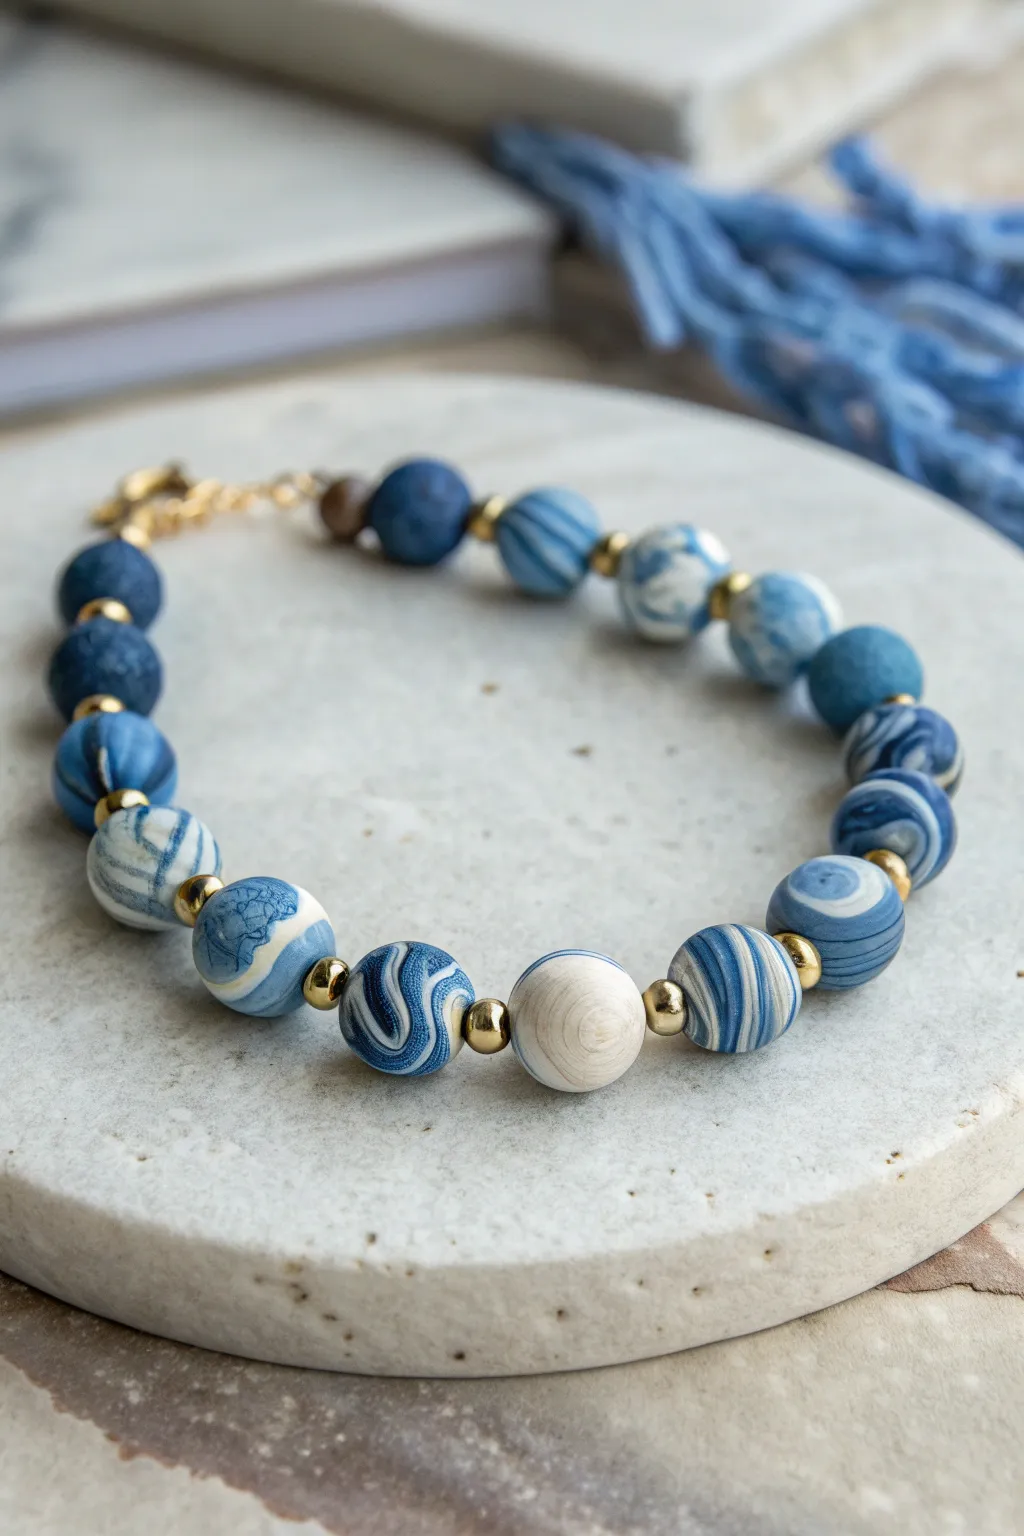
Capture the serene beauty of crashing waves with this stunning polymer clay bracelet featuring a mix of marbled, solid, and textured beads. The combination of denim blues, crisp whites, and gold spacers creates an elegant accessory perfect for everyday wear.
Step-by-Step Tutorial
Materials
- Polymer clay (Navy Blue, Denim Blue, White, Translucent)
- Small round bead roller
- Gold round spacer beads (3mm or 4mm)
- Jewelry elastic cord (0.8mm)
- Beading needle (optional)
- Jewelry glue or G-S Hypo Cement
- Toothpicks or bead reamer
- Oven for baking
- Gloss glaze or resin (optional)
- Sandpaper (wet/dry fine grit)
- Gold lobster clasp and jump rings
- Crimp beads and crimping pliers (if using wire instead of elastic)
Step 1: Creating the Clay Canes
-
Condition the clay:
Begin by conditioning your navy blue, denim blue, and white polymer clay separately until they are soft and pliable. Warm clay mixes better and cracks less. -
Create the marble mix:
Take a portion of white clay and a smaller portion of denim blue. Roll them into snakes, twist them together like a candy cane, fold in half, and twist again. Repeat this motion—twist, fold, roll—until distinct streaks appear but the colors haven’t fully blended into a new shade. -
Make the high-contrast swirl:
For the beads with sharp white lines, roll a thin sheet of white clay and lay it over a thick log of blue clay. Roll this into a cylinder (a ‘bullseye’ cane), then twist that cylinder gently to create a spiral effect. -
Prepare solid accent colors:
Set aside some plain navy blue and denim blue clay for the solid textured beads. I like to mix a tiny bit of translucent clay into the blues to give them a stone-like depth.
Stone Effect Tip
To make the solid blue beads look like real lapis lazuli, mix in tiny flecks of gold leaf or black pepper before baking for organic speckles.
Step 2: Forming the Beads
-
Portion the clay:
use a clay blade to slice your marbled logs and solid colors into equal-sized chunks. Aim for enough clay to make roughly 10mm to 12mm round beads. -
Roll the rounds:
Roll each chunk between your palms or use a bead roller to create smooth spheres. Pay attention to how the pattern moves; for marbled beads, rolling in a circular motion helps swirl the surface pattern. -
Add texture to solid beads:
For the darker blue solid beads, gently roll them over coarse sandpaper or dab them with a stiff toothbrush to create a matte, stone-like texture that contrasts with the smooth marbled ones. -
Pierce the holes:
Using a toothpick or a bead piercing pin, carefully drill holes through the center of each unbaked bead. Twist the tool as you push through to avoid deforming the sphere. -
Bake the beads:
Arrange your beads on a baking sheet lined with cardstock or parchment paper. Bake according to your specific clay brand’s instructions (usually 275°F/135°C for 15-30 minutes). -
Cool and finish:
Allow the beads to cool completely. If there are any fingerprints, lightly sand them securely with fine-grit wet sandpaper. For extra shine, you can apply a thin coat of gloss glaze to just the marbled beads.
Variation Idea
Swap the gold spacers for small wooden discs or silver beads to change the vibe from elegant to rustic beachy.
Step 3: Assembly
-
Plan the layout:
Lay out your beads on a bead board or a soft towel. Create a pattern alternating between your swirled marbled beads and the solid textured ones. -
Insert spacers:
Place a small gold spacer bead between every clay bead. This separation highlights the individual clay patterns and adds a professional metallic touch. -
String the beads:
Cut a length of elastic or beading wire. Thread the beads following your planned pattern. Ensure the focal bead (perhaps the lightest or most intricate swirl) sits in the center. -
Add the closure:
If using elastic, tie a secure surgeon’s knot, pull it tight, and hide the knot inside a bead hole with a dab of glue. If using wire, thread on a crimp bead and one half of the clasp, loop back through the crimp, and flatten it with pliers. Repeat on the other end. -
Final check:
Trim any excess cord or wire carefully. Give the bracelet a gentle tug to ensure everything is secure before wearing.
You now have a sophisticated, handcrafted piece of jewelry that captures the fluid beauty of ocean tides
Double-Strand Blue Wrap Bracelet
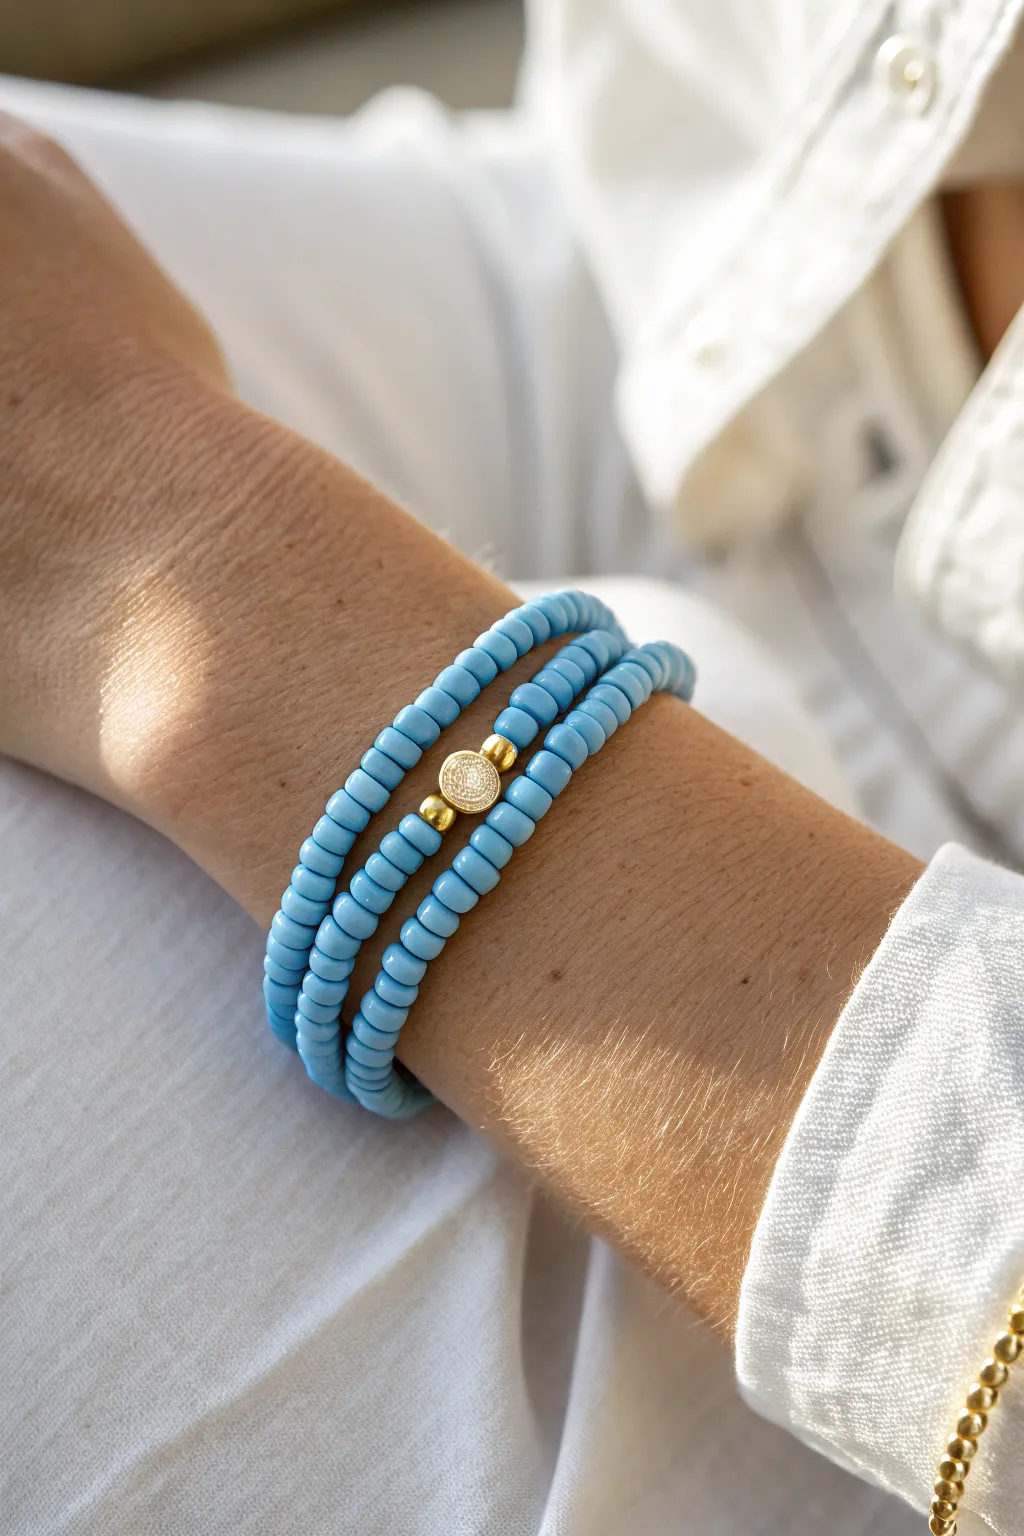
Embrace the calming hues of the sky with this versatile wrap bracelet that combines simplicity with a touch of elegance. The cool blue beads create a refreshing pop of color, while the central gold focal bead adds just the right amount of sophisticated shine.
Step-by-Step Guide
Materials
- Light blue polymer clay disc beads or matte glass seed beads (approx. 4mm size)
- Stretch cord (0.7mm or 0.8mm transparent elastic)
- 1 Round gold textured spacer bead (approx. 6-8mm)
- 2 Small gold round spacer beads (approx. 3-4mm)
- Jewelry glue (e.g., G-S Hypo Cement)
- Scissors
Step 1: Measuring & Prep
-
Measure your wrist:
Wrap the stretch cord around your wrist comfortably three times. Add about 6 extra inches to this length to account for tying the knot later. -
Cut the cord:
Snip the stretch cord to your measured length. Before beading, give the cord a few firm tugs to pre-stretch it; this helps prevent the bracelet from growing loose over time. -
Secure the end:
Place a piece of tape or a bead stopper on one end of the cord so your beads don’t slide off while you work.
Sticky Situation
If the knot keeps slipping out of the bead hole, try widening the hole slightly with a bead reamer tool, or simply dab clear nail polish on the knot instead of glue for a smoother finish.
Step 2: Stringing the Design
-
Start the blue base:
Begin threading on your light blue beads. You will need a lot of them, so I like to pour a small amount onto a bead mat to make picking them up easier. -
First section length:
Continue stringing the blue beads until you have a strand that covers roughly half of the total length required to wrap around your wrist three times. -
Add first gold spacer:
Slide one of the small gold round spacer beads onto the cord. -
Place the focal bead:
Add the larger, textured gold focal bead. This will sit in the center of the middle strand when worn. -
Finish the focal section:
Add the second small gold spacer bead immediately after the large focal bead to frame it perfectly. -
Complete the beading:
Resume stringing the light blue beads until you reach the end of your cord, leaving just enough tail to tie the knot. -
Check the fit:
carefully wrap the beaded strand around your wrist three times to ensure the size is correct and the gold beads sit where you want them.
Add Some sparkle
Replace every tenth blue bead with a tiny crystal or pearl bead to add subtle texture and catch the light as you move your wrist.
Step 3: Finishing Up
-
Tie the first knot:
Bring both ends of the cord together and tie a simple overhand knot, pulling it tight against the beads. -
Secure with a surgeon’s knot:
Tie a second knot, but this time loop the cord through twice before pulling tight. This is a surgeon’s knot and is much more secure for elastic. -
Apply adhesive:
Dab a tiny drop of jewelry glue directly onto the knot. Be careful not to get glue on the surrounding beads, as it can cloud the finish. -
Hide the knot:
If the holes of your blue beads are large enough, gently tug the cord to slide the knot inside the nearest bead to conceal it. -
Trim excess:
Once the glue is dry, trim the excess cord tail close to the bead, being careful not to cut the main knot.
Enjoy wearing your new layered look that captures the easygoing spirit of summer
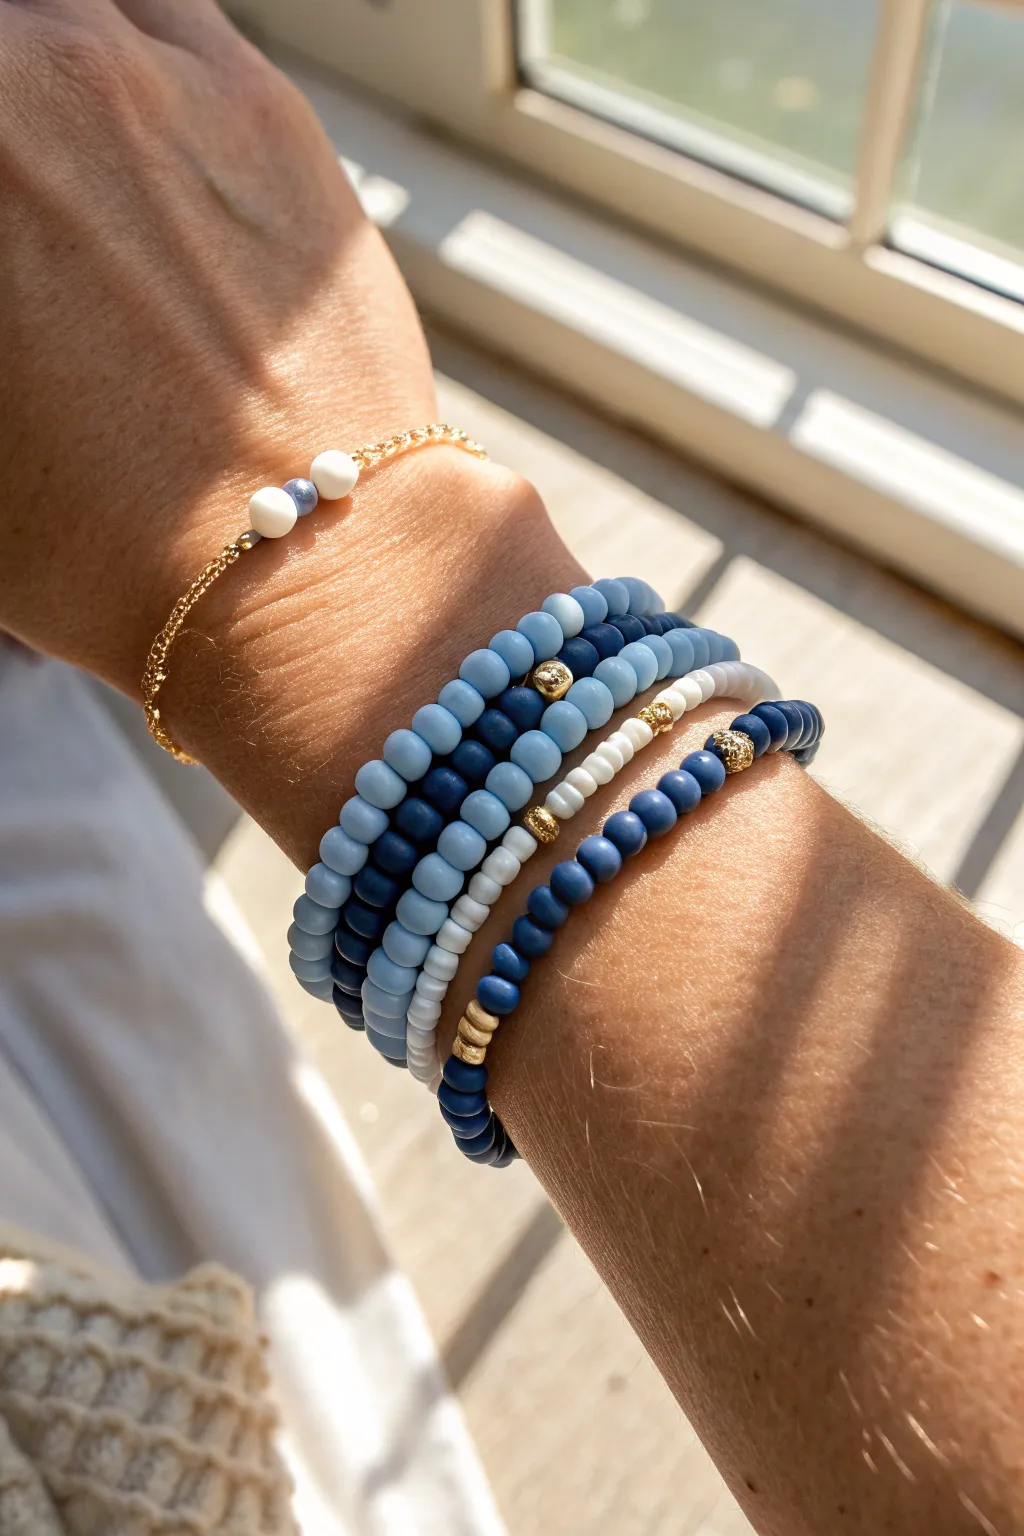
Mismatched Blues Mega-Stack With Textures
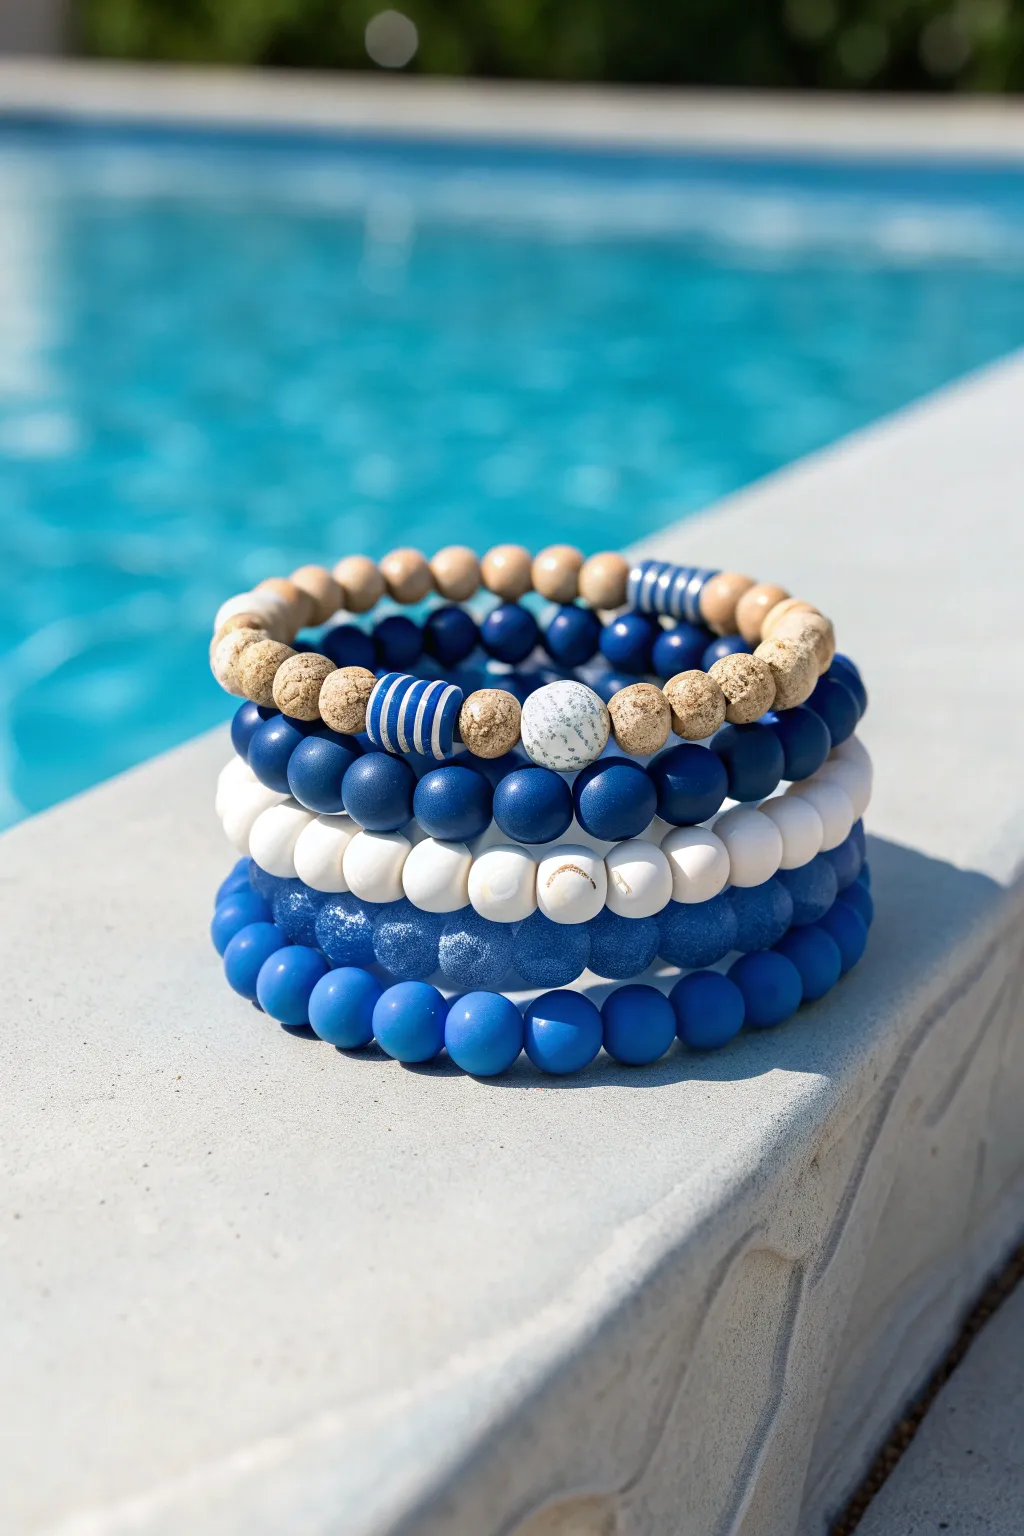
This stunning five-piece bracelet stack captures all the refreshing shades of summer water, from deep ocean navy to sparkling pool azure. By mixing matte, glossy, and textured beads with natural wood accents, you’ll create a sophisticated set that feels both casual and curated.
Detailed Instructions
Materials
- Stretch cord (0.8mm or 1mm thickness)
- Light unfinished wood beads (8mm)
- Textured cork-style wood beads (8mm, tan)
- Solid navy blue matte beads (8mm)
- Solid white matte beads (8mm)
- Glossy translucent dark blue beads (8mm, possibly with glitter effect)
- Bright royal blue matte beads (8mm)
- Large striped blue-and-white focal beads (10-12mm)
- White speckled accent bead (10mm)
- Scissors
- Super glue or jewelry cement
Step 1: Preparation
-
Measure and Cut:
Begin by cutting five lengths of stretch cord. Measure your wrist and add about 4-5 inches to each piece to ensure you have plenty of room for tying secure knots later. -
Pre-stretch the Cord:
Before stringing a single bead, give each piece of cord a firm tug a few times. This simple trick prevents the bracelets from stretching out and becoming loose after just a few wears.
Knot Slipping?
If your knots slip, try roughing up the ends of the elastic cord with sandpaper before tying, or switch to a GS Hypo Cement which remains flexible.
Step 2: Top Bracelet: The Textured Natural
-
Establishing the Pattern:
For the top bracelet, start by stringing about 8-10 smooth, light wooden beads to form the back half of the loop. -
Adding Texture:
Transition into the textured cork-style beads. Add 2 on either side of your focal area. -
Creating the Centerpiece:
In the very center, thread a striped blue-and-white bead, followed by a lighter textured bead, then your white speckled bead as the true center, reflecting the other side symmetrically.
Step 3: Second Bracelet: Deep Navy Matte
-
Simple Elegance:
This layer relies on color uniformity. String your solid navy blue matte beads continuously until the strand fits comfortably around your wrist. -
Check fit:
Wrap it around your wrist to ensure it sits flush without pinching; standard adult size is usually around 7 inches.
Pro Tip: Bead Board
Use a flocked bead board to lay out your five strands before stringing. It lets you visualize the stack’s color balance perfectly before committing.
Step 4: Third Bracelet: Crisp White
-
The Contrast Layer:
Using the matte white beads, string another full strand. I find that white beads can sometimes show dirt, so ensure your hands are clean before assembling this specific layer. -
Subtle Variation:
If you have slightly different shades of white or cream, you can mix a few in near the center to add depth, matching the gentle variation seen in the photo.
Step 5: Fourth Bracelet: Translucent Ocean
-
Adding Shimmer:
String the translucent dark blue beads. These beads have a slight ‘jelly’ or glittery finish that mimics deep water. -
Completing the Strand:
Continue until the length matches your previous bracelets exactly.
Step 6: Bottom Bracelet: Bright Royal Blue
-
Vibrant Foundation:
For the final bracelet at the bottom of the stack, use the bright royal blue matte beads. -
Stringing:
Thread them until the strand is complete. This lighter blue helps bridge the gap between the navy and the water background.
Step 7: Finishing Up
-
Tying the Knots:
For each bracelet, bring the ends together and tie a surgeon’s knot (right over left, left over right, and loop through twice). Pull tight. -
Securing with Glue:
Apply a tiny dot of super glue or jewelry cement directly onto the knot. Let it dry completely before trimming the excess cord. -
Hiding the Knot:
If the hole of a neighboring bead is large enough, gently tuck the knotted section inside it for a seamless finish.
Slide on your new stack of blues and enjoy the cool, coastal vibe they bring to your outfit