If you want a date night that’s cozy, creative, and actually lets you talk, modeling clay is my go-to. These ideas are all about making cute, low-pressure keepsakes together—no “artist” skills required.
Cute Blob Animal Duo
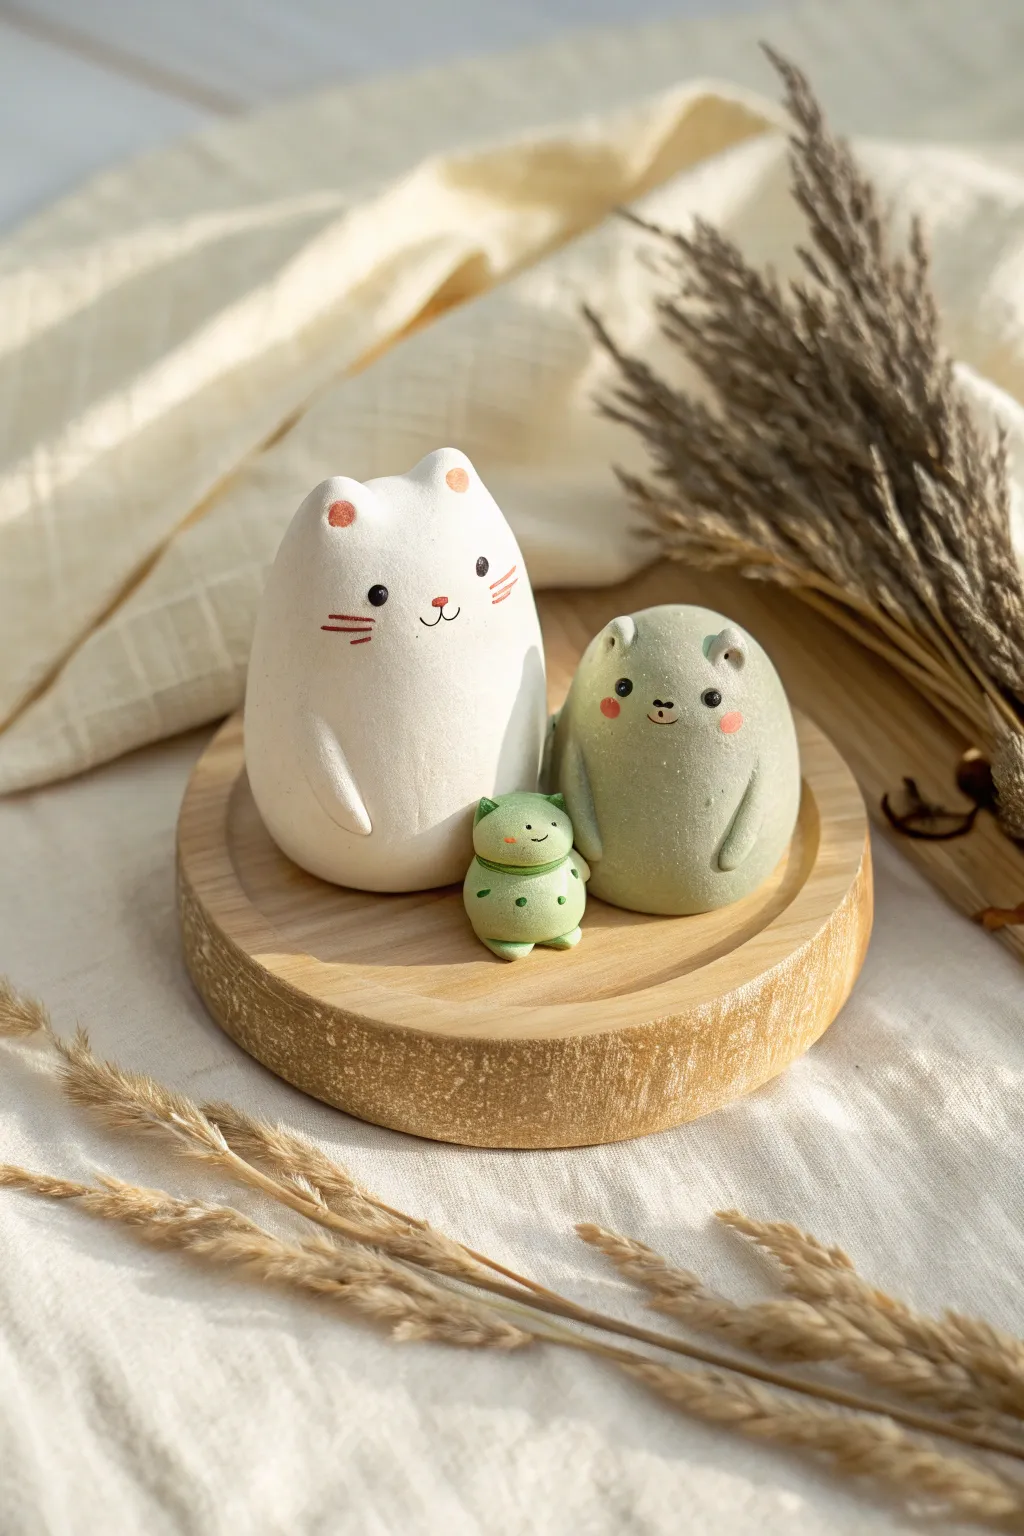
These adorable, smooth-finished figurines celebrate simplicity with their blob-like shapes and sweet, minimalist expressions. Perfect for a cozy crafting date, this trio features a larger white cat, a medium sage green bear, and a tiny froggie friend.
Step-by-Step
Materials
- Air-dry clay or polymer clay (white)
- Acrylic paints (white, sage green, pink, bright green, black)
- Fine-grit sandpaper
- Small cup of water
- Detail paintbrush (00 or 000 size)
- Modeling tool or toothpick
- Matte varnish or sealant
- Wooden coaster for display (optional)
Step 1: Shaping the Base Forms
-
Prepare the Clay:
Start by conditioning your clay until it is warm and pliable. Divide it into three portions: a large piece for the cat, a medium piece for the bear, and a very tiny piece for the small frog. -
Form the Cat Body:
Roll the largest portion into a smooth ball, then gently roll it into an elongated egg shape. Flatten the bottom exclusively by tapping it against your work surface so it stands upright securely. -
Shape the Cat Ears:
Instead of attaching separate ears, gently pinch the top of the egg shape on the left and right sides to pull up two small, triangular points. Smooth the clay between them so the head looks seamless. -
Cat Arms:
Roll two small, thin snakes of clay. Attach them vertically to the sides of the body, curving them slightly inward. Blend the top seam into the body so the arms look like they are resting against the tummy. -
Form the Bear Body:
Take the medium portion of clay and create a stouter, rounder egg shape than the cat. Again, tap the bottom flat to ensure stability. -
Add Bear Detail:
Pinch two small, rounded ears at the very top. Create two small arm coils similar to the cat’s and blend them onto the sides of the body. -
Create the Frog:
Roll the smallest bit of clay into two stacked spheres—a slightly larger bottom one and a smaller head. Press them together firmly. Add two minuscule balls on top for the eyes.
Cracking Clay?
If small cracks appear while air-drying, mix a tiny bit of fresh clay with water to make a paste (slip) and fill the cracks, then sand smooth once dry.
Step 2: Refining and Drying
-
Smoothing:
Dip your finger in a tiny bit of water and rub it gently over all the figurines to remove fingerprints or cracks. The goal is a super smooth, matte stone look. -
Drying Time:
Let the figures dry completely. If using air-dry clay, this may take 24-48 hours. If using polymer clay, bake according to the package instructions. -
Sanding:
Once fully cured, use fine-grit sandpaper to buff away any remaining imperfections or bumps. This step is crucial for that professional, ceramic-like finish.
Super Smooth Finish
Use a baby wipe to smooth the raw clay before it dries. It works better than water alone and won’t make the clay too mushy or sticky to handle.
Step 3: Painting and Details
-
Base Coats:
Paint the cat completely white (even if the clay was white, paint gives a uniform texture). Paint the bear a soft sage green. -
Frog Base:
Paint the tiny frog a brighter, leaf green. You might need two coats for full opacity. -
Face Mapping:
I like to lightly mark where the eyes and nose will go with a pencil first to ensure the faces are centered and symmetrical. -
Painting Eyes:
Using your smallest detail brush and black paint, dot two small, wide-set eyes on the cat and bear. Add tiny black dots to the frog’s elevated eye bumps. -
Mouths and Noses:
Paint a small, red triangular nose on the cat with a thin ‘w’ mouth and three whiskers on each cheek. Give the bear a black nose and a simple smile. The frog just needs a tiny straight line for a mouth. -
Rosy Cheeks:
Dip the back of your brush handle into pink paint and stamp small circles onto the bear’s cheeks. Paint the insides of the cat’s ears pink as well. -
Frog Details:
Paint a thin darker green line around the frog’s neck as a collar, and add three tiny dark green dots on its belly for texture. -
Sealing:
Finish by applying a coat of matte varnish to all figures to protect the paint and give them a soft porcelain feel.
Arrange your little family on a wooden coaster or shelf to bring a calm, friendly vibe to your space


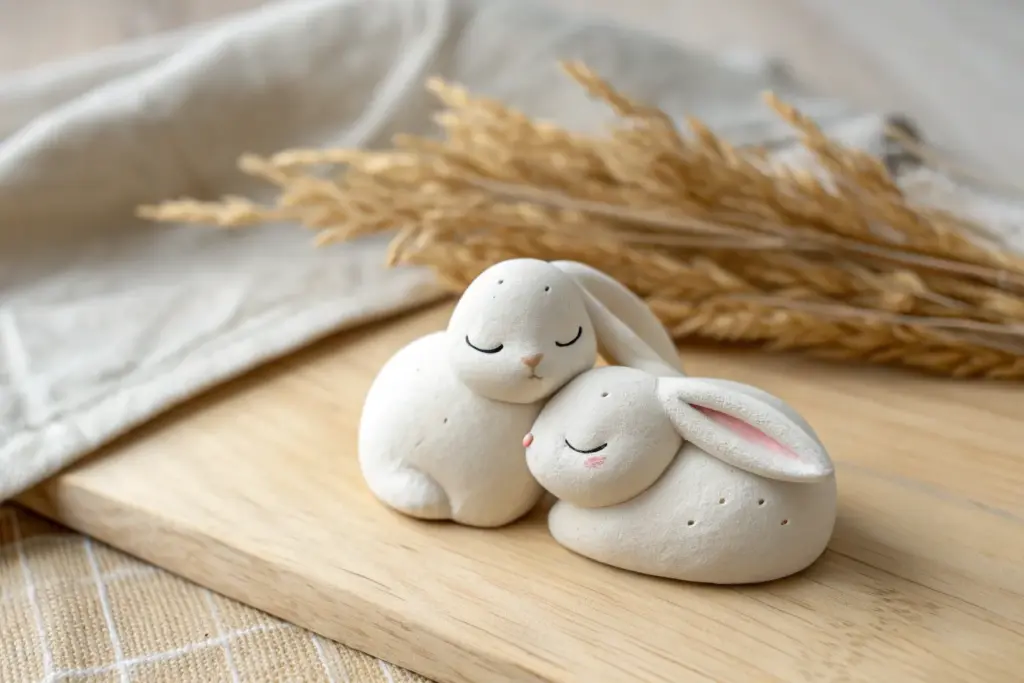
Two Marshmallows by a Campfire
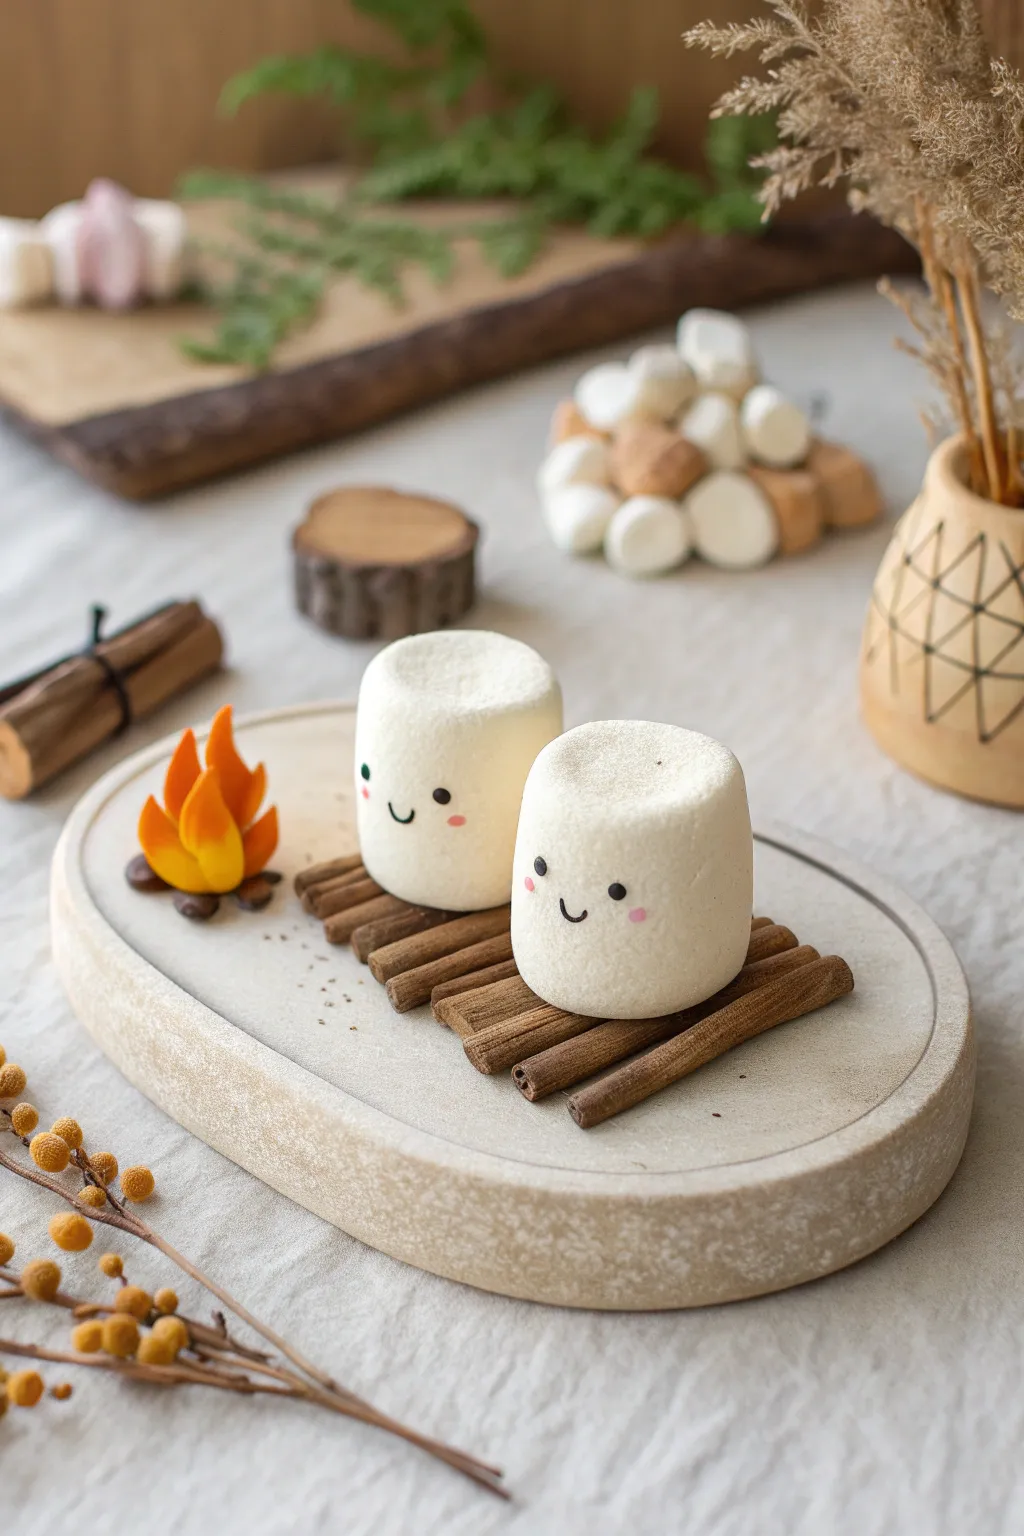
These adorable little marshmallow buddies are enjoying a warm evening by their very own tiny campfire. It’s a sweet and simple sculpture that perfectly captures the feeling of a cozy autumn night.
Step-by-Step Tutorial
Materials
- White airy modeling clay (foam clay or lightweight air-dry clay)
- Brown polymer clay or air-dry clay (for the logs)
- Orange, yellow, and red clay (for the fire)
- Black fine-tip marker or acrylic paint
- Pink chalk pastel or blush
- Small soft brush
- Cinnamon sticks (optional, for realism)
- Small oval display dish or coaster
- Sculpting tools (needle tool, small ball tool)
- Strong craft glue
Step 1: Building the Log Raft
-
Prepare the base logs:
If you want a rustic scent, use real cinnamon sticks. If using clay, roll out long, thin snakes of dark brown clay and cut them into varied lengths, roughly 2-3 inches long. -
Texture the wood:
Use a needle tool or a stiff brush to scratch wood grain textures lengthwise into your clay logs before they dry. If using cinnamon sticks, you can skip this step. -
Construct the raft:
Arrange about 7-9 logs side-by-side to create a rectangular platform. Ensure the ends are slightly uneven for a natural look. -
Secure the structure:
Glue the logs together directly on your oval display dish. I like to use a tiny bit of extra clay underneath as a hidden anchor to keep them from rolling apart.
Realistic Texture
Make the marshmallows look truly toasted by lightly dusting the top edges with light brown chalk pastel for a golden effect.
Step 2: Sculpting the Marshmallows
-
Form the bodies:
Take substantial balls of white foam clay or lightweight clay. Roll them into smooth cylinders with flat tops and bottoms, mimicking the shape of a classic marshmallow. -
Soften edges:
Gently press the sharp edges with your thumb to round them off slightly. You want them to look soft and squishy, not like rigid geometric cylinders. -
Create the texture:
To mimic the powdery surface of a marshmallow, you can gently dab the surface with a dry toothbrush or a piece of textured sponge. -
Add the blush:
Before drawing the faces, shave a tiny bit of pink chalk pastel into dust. Use a soft brush to gently apply rosy cheeks to the sides of the ‘face’ area. -
Position the marshmallows:
Apply a dab of glue to the bottom of each marshmallow and press them firmly onto the log raft. Set them slightly askew from each other for a friendly, conversational pose.
Step 3: Creating the Campfire
-
Make the fire ring:
Roll tiny balls of dark brown or grey clay to look like rocks. Arrange them in a small circle near the edge of the log raft on the display dish. -
Kindling base:
Place tiny slivers of brown clay or broken bits of cinnamon stick inside the rock circle to act as the wood fuel. -
Sculpt the flames:
Blend small amounts of yellow, orange, and red clay together, but don’t mix them fully—leave them marbled. Pull small teardrop shapes upward to resemble flickering flames. -
Assembly:
Cluster three or four flame shapes together, pressing their bases into the center of the rock ring. Curve the tips slightly for dynamic movement.
Level Up: Accessories
Create tiny clay graham crackers and a chocolate bar to place next to them, turning the scene into a full s’more assembly party.
Step 4: Finishing Touches
-
Draw the faces:
Once the white clay has formed a skin or dried, use a fine-tip black marker or a needle tool dipped in black paint to add two wide-set eyes. -
Add smiles:
Draw a tiny ‘U’ shape between the eyes for a happy mouth on each marshmallow. Keep the features small and centered to maximize the cuteness factor. -
Dusting details:
Scatter a pinch of real cinnamon or brown clay crumbs around the campfire base on the display dish to simulate ash and dirt.
Now you have a sweet little scene to keep on your desk that captures the warmth of a campfire all year round


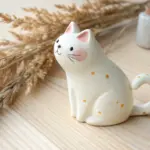
Pick-a-Color Mood Animals
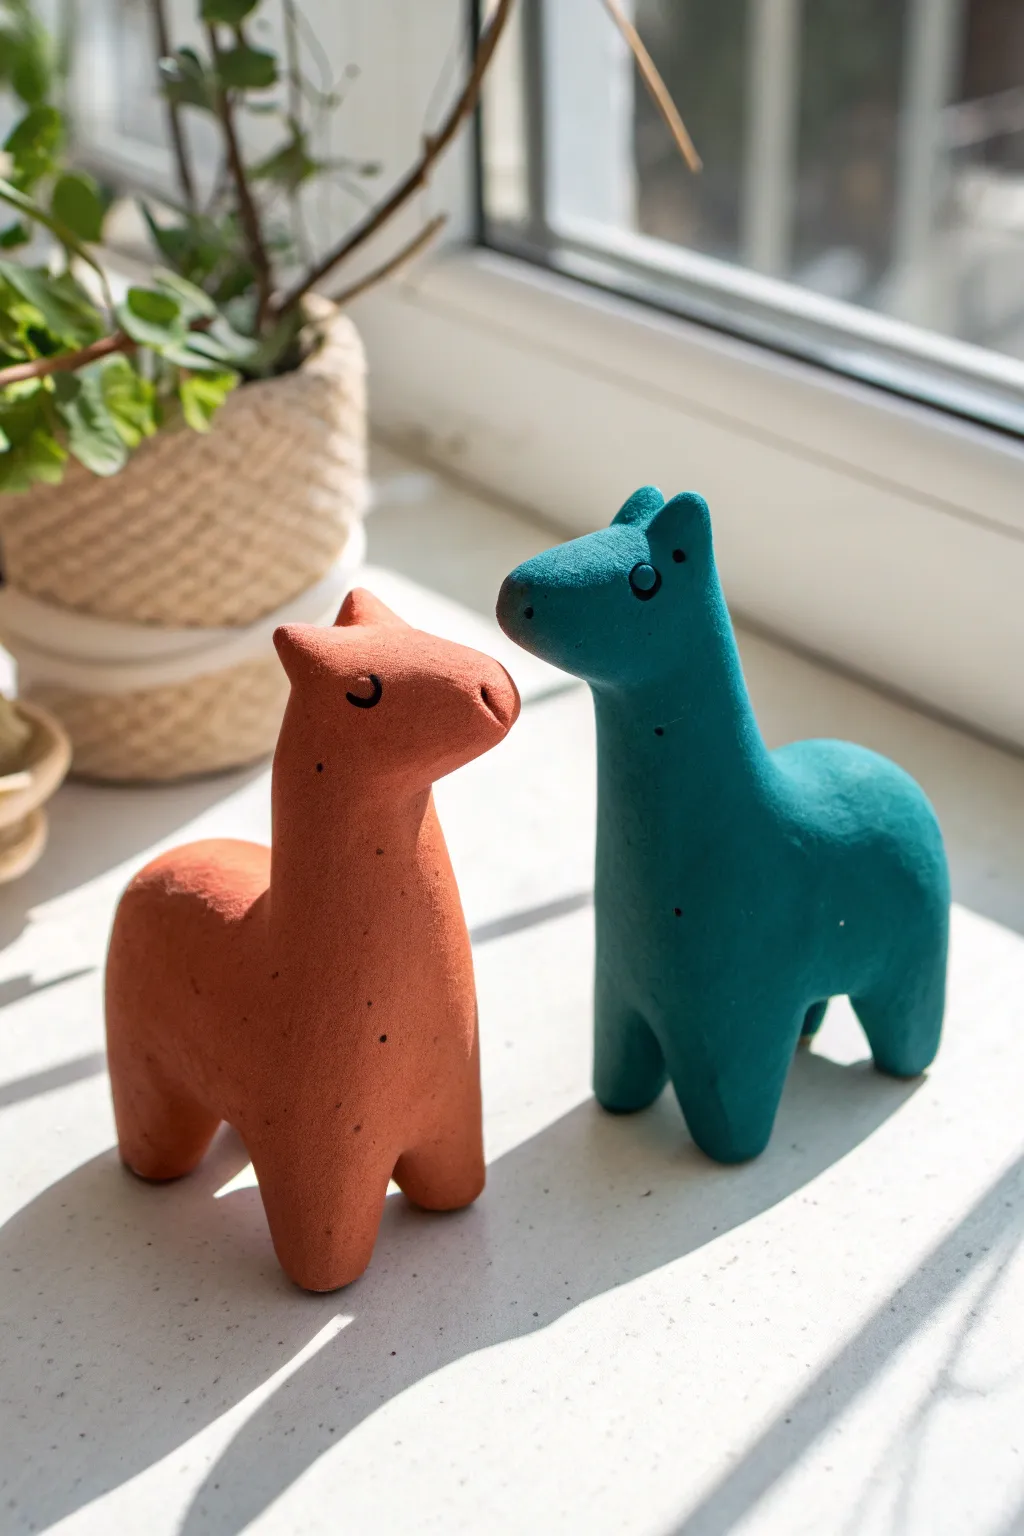
Capture the simple joy of connection with these minimalist clay animal figures, designed to reflect your current mood through color. With their smooth, rounded forms and gentle expressions, these charming little creatures make perfect windowsill companions for a relaxing afternoon crafting date.
Step-by-Step Guide
Materials
- Air-dry clay (white or pre-colored)
- Acrylic paints (Terracotta orange and Deep Teal)
- Fine grit sandpaper
- Small cup of water
- Fine tip black marker or black paint pen
- Sculpting tools (or a toothpick)
- Matte spray varnish (optional)
- Small paintbrush
Step 1: Shaping the Core
-
Prepare the clay:
Start by taking a handful of air-dry clay roughly the size of a plum. Knead it in your hands until it’s warm and pliable to remove any air bubbles. -
Form the torso:
Roll the clay into a smooth, thick cylinder. Gently curve the cylinder into a slight ‘U’ shape to establish the back and chest of the animal. -
Pull the legs:
Instead of attaching separate legs, pinch the four corners of your cylinder downwards. Pull the clay gently to form four short, sturdy nubs for legs. -
Refine the stance:
Press the figure down firmly onto your work surface. This flattens the bottom of the feet so your animal stands stable and upright. -
Smooth the body:
Dip your finger in a tiny bit of water and rub it over the torso and legs to erase any fingerprints or cracks.
Seamless Seams
To prevent limbs from popping off later, always ‘cross-stitch’ your clay joins. Drag clay across the seam in an X pattern before smoothing it out with water.
Step 2: Adding Character
-
Create the neck:
Roll a smaller coil of clay for the neck. Score both the top of the body and the bottom of the neck with a toothpick to create texture, then press them together. -
Blend the seams:
Using a modeling tool or your wet finger, drag the clay from the neck down onto the body until the join is completely seamless and smooth. -
Sculpt the head:
Form a small oval shape for the head. Attach it to the top of the neck, angling it slightly upwards or downwards depending on the mood you want to convey. -
Add ears:
Pinch two tiny triangles of clay. Attach them to the top of the head using a drop of water, smoothing the base of the ears into the skull so they look organic. -
Refine the snout:
Gently pinch the front of the face to slightly taper the nose. I find that keeping the features soft and rounded adds to the cute factor. -
Final smoothing:
Give the entire figure one last polish with a damp finger to ensure a velvety texture. Let the figures dry completely for 24-48 hours.
Step 3: Color and Details
-
Sand imperfections:
Once fully dry, use fine-grit sandpaper to gently buff away any rough spots or bumps on the surface. -
Apply base color:
Paint a solid coat of Terracotta orange on one animal and Deep Teal on the other. You may need two coats for full opacity. -
Draw the eyes:
After the paint is bone dry, use a fine-tip black marker or paint pen to draw simple eyes. For the sleepy look, draw a small ‘u’ shape with subtle eyelashes. -
Open eyes variation:
For an awake look, draw a small circle with a dot in the center. Position them on the sides of the head for that classic prey-animal gaze. -
Add simple nostrils:
Place two tiny dots near the end of the snout for nostrils. Keep them very small to maintain the minimalist aesthetic. -
Seal (optional):
Lightly mist the finished pieces with a matte spray varnish to protect the paint and give them a professional, finished look.
Speckled Finish
Mix coffee grounds or sand into your paint (or the clay itself) to give your animals a trendy, textured stoneware pottery look without a kiln.
Set your finished duo on a sunny ledge to brighten up your room


Tiny “First Date” Diorama
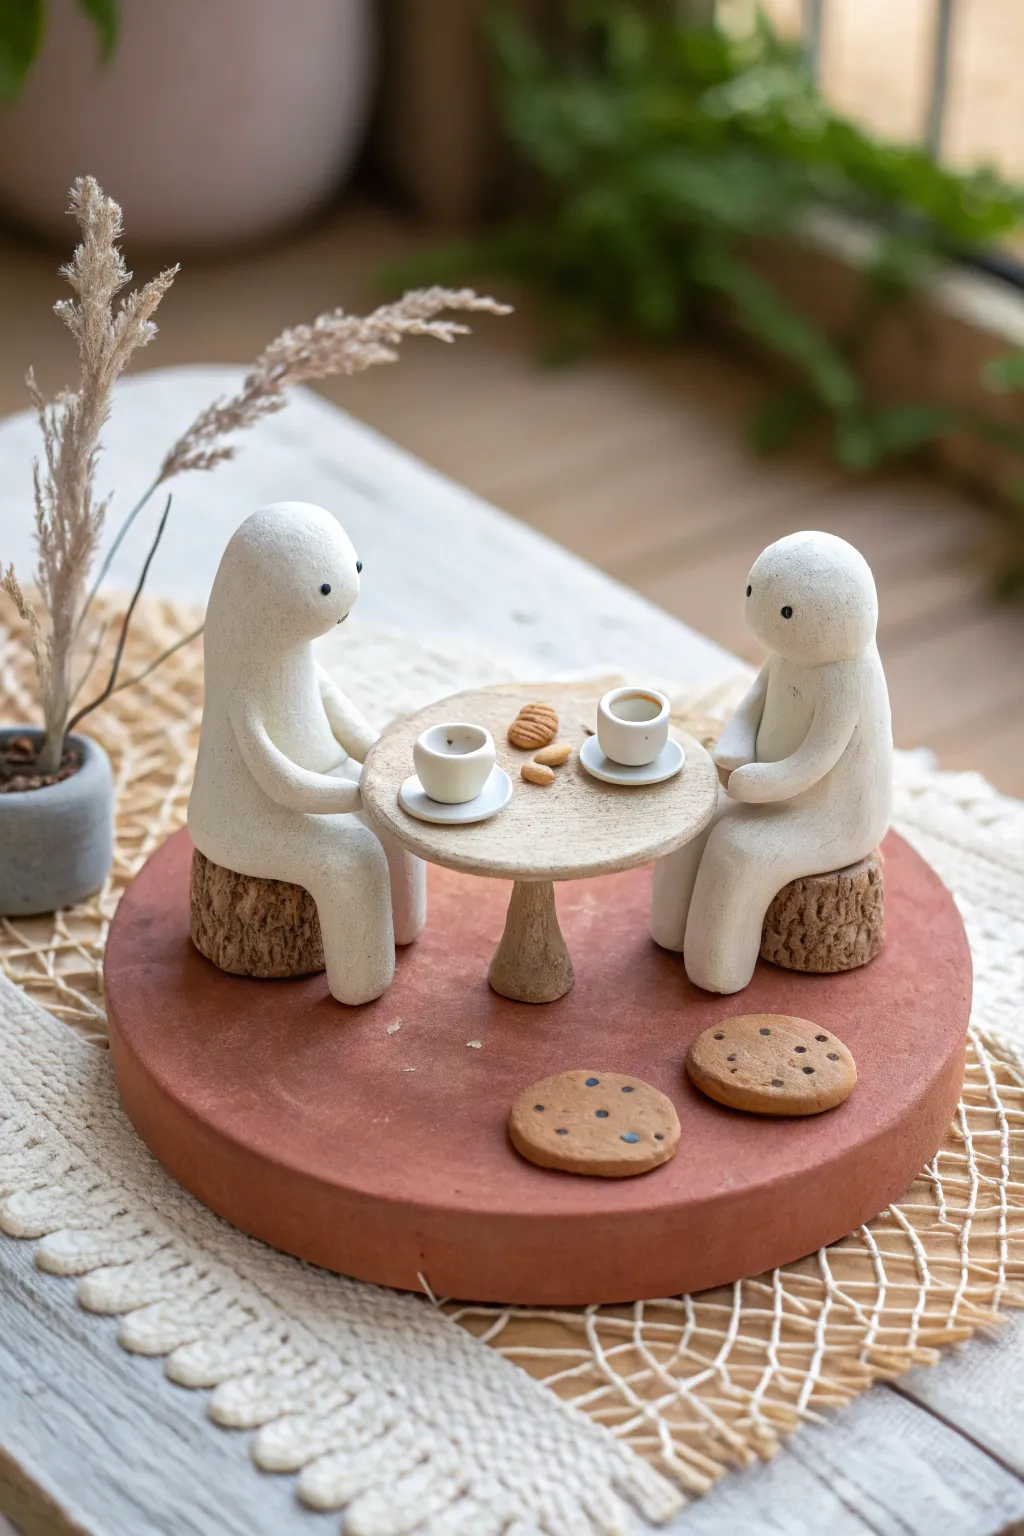
Capture the sweetness of a café rendezvous with this charming miniature diorama featuring two minimalist figures enjoying a quiet moment. Using simple shapes and earthy tones, you’ll sculpt a heartwarming scene complete with tiny mugs and realistic cookies.
Detailed Instructions
Materials
- White air-dry clay or polymer clay
- Terracotta-colored air-dry clay (for the base)
- Beige or light brown clay (for the table)
- Textured brown clay or paint (for log seats)
- Brown acrylic paint (various shades)
- Black acrylic paint
- Fine-tipped paintbrush
- Modeling tools (or a toothpick)
- Strong craft glue
- Rolling pin
- Circle cutter or small bowl
Step 1: Setting the Scene
-
Form the Base:
Start by taking a large portion of terracotta-colored clay and rolling it into a thick slab. Use a large circle cutter or trace around a bowl to cut out a perfect disc, about 5-6 inches in diameter. Smooth the edges with a bit of water on your finger. -
Create Log Seats:
Roll two short, thick cylinders from brown clay to act as stools. If your clay is smooth, use a needle tool or toothpick to scratch vertical lines into the sides, mimicking tree bark texture. -
Sculpt the Table:
For the tabletop, flatten a ball of beige clay into a small, uneven circle—it doesn’t need to be perfectly round, as a slightly organic shape looks more rustic. Attach this to a small, flared cone of clay that serves as the pedestal leg. -
Assemble Furniture:
Once the base, seats, and table pieces are shaped, arrange them on the terracotta disc while the clay is still slightly pliable to ensure they sit flat. If you are using polymer clay, you can bake these parts now to create a sturdy foundation.
Step 2: Sculpting the Figures
-
Shape the Bodies:
Roll two smooth teardrop shapes from white clay. These should be tall enough so that when the wide bottom sits on the log stool, the ‘head’ area clears the table height comfortably. -
Positioning:
Place the white forms onto the log seats. Gently bend them at the ‘waist’ area so they look like they are leaning in for conversation. I find it helpful to actually seat them at the table during this step to get the posture right. -
Adding Arms:
Roll two thin snakes of white clay for each figure. attach them at the shoulder area and curve them forward so their hands rest gently on the tabletop. -
Facial Details:
Using a very fine dotting tool or the tip of a toothpick dipped in black paint (or tiny bits of black clay), add two small, wide-set eyes to each face. Keep the expression minimal and sweet.
Texture Trick
Use a crumpled ball of aluminum foil to gently press texture onto the ‘stone’ figures before baking. It gives them a realistic, grainy finish.
Step 3: The Tiny Details
-
Make the Mugs:
Form two tiny cylinders from white clay. Use the rounded end of a paintbrush handle to indent the center, creating the cup shape. Add tiny handles if you’re feeling ambitious. -
Fill the Coffee:
Mix a tiny amount of brown paint or resin with water and drop it into the cups to simulate coffee, or simply press a small flat disc of dark brown clay inside the mugs. -
Saucers and Plates:
Flatten tiny balls of white clay to make saucers for the mugs. Make a slightly larger plate for the center of the table. -
Baking Pastries:
Sculpt incredibly small ovals from light brown clay. Texture them with a toothbrush or sandpaper to look like baked goods. Place a few on the center table plate. -
Floor Cookies:
Create two larger cookies to sit directly on the terracotta base. Flatten brown clay circles and press in tiny distinct ‘chocolate chips’ using dark brown clay bits or paint dots. -
The Potted Plant:
Mold a small grey pot shape. Stick a dried grassy sprig or a small faux plant stem into it. Place this accessory off to the side of the main scene.
Level Up: Real Moss
Glue tiny bits of preserved reindeer moss around the base of the log stools to make the scene look like it’s set in a magical forest garden.
Step 4: Finishing Touches
-
Final Assembly:
Glue the mugs to the saucers, and the saucers to the table near the figures’ hands. Secure the central cookie plate. -
Drying or Baking:
Allow the entire piece to dry completely (24-48 hours for air-dry clay) or bake according to your polymer clay package instructions. -
Matte Varnish:
Protect your work with a coat of matte varnish. This removes the ‘plastic’ look of polymer clay and gives the white figures a soft, stone-like texture.
Now you have a permanent reminder of cozy coffee dates to display on your shelf

The Complete Guide to Pottery Troubleshooting
Uncover the most common ceramic mistakes—from cracking clay to failed glazes—and learn how to fix them fast.
Blind Sculpt and Reveal Miniatures
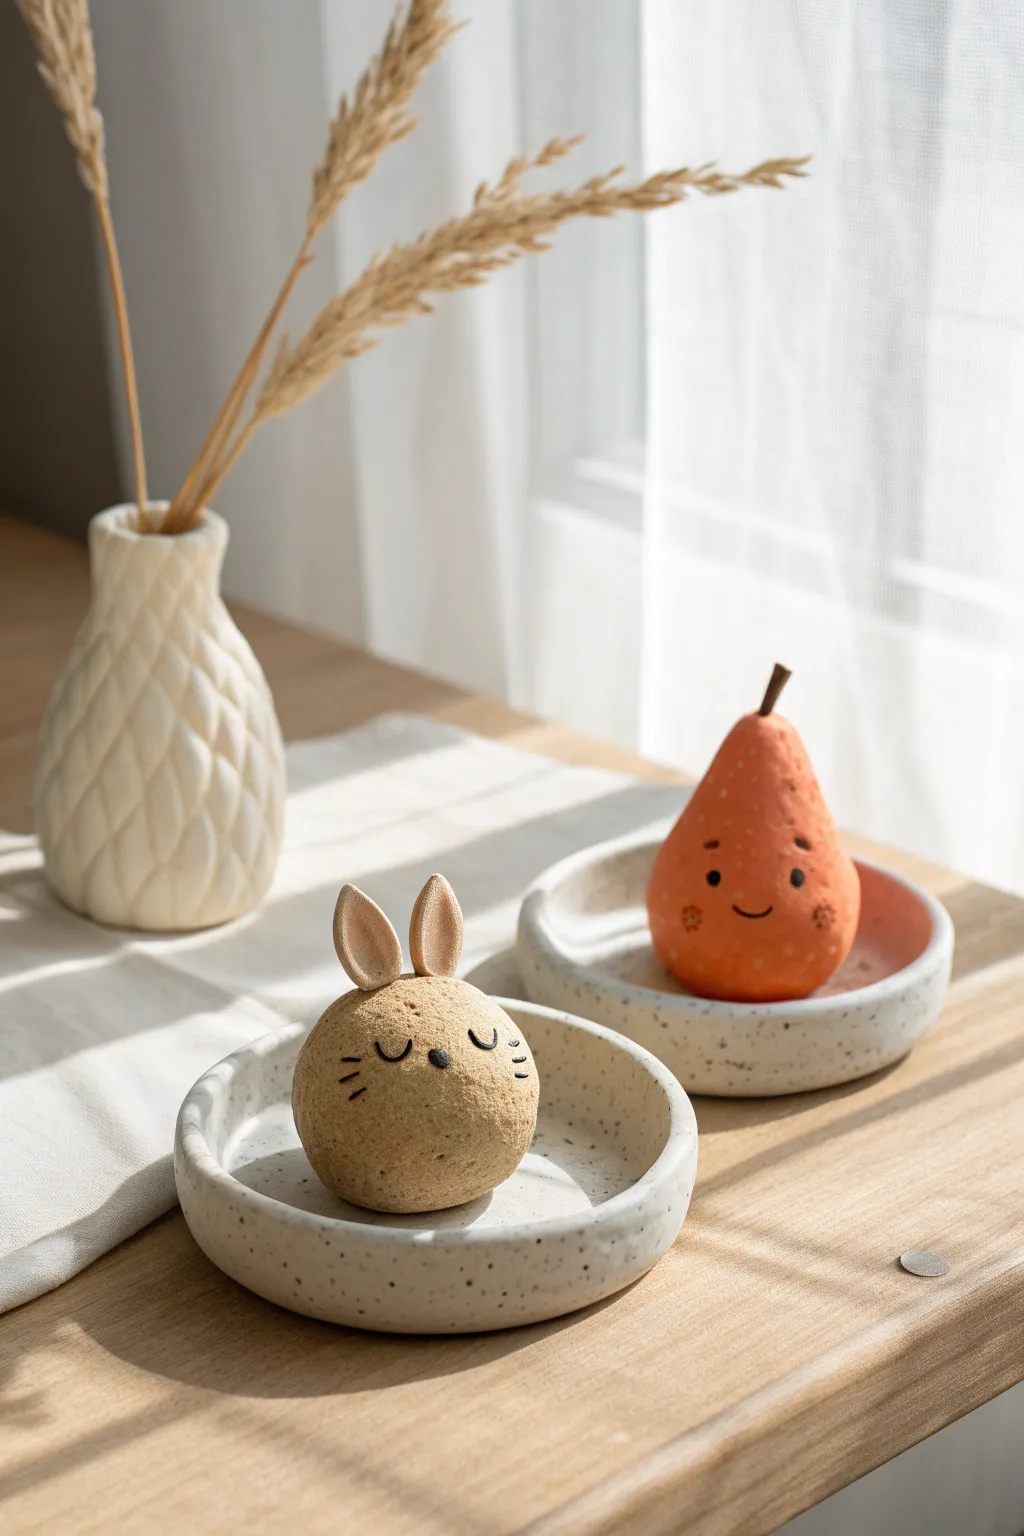
Create these adorable, miniature clay friends with simple shapes and joyful expressions. The textured, speckled finish gives them a charming, handmade pottery look without needing a kiln, perfect for a cozy afternoon crafting session.
Step-by-Step Tutorial
Materials
- Air-dry clay (white or beige)
- Acrylic paints (orange, black, beige/tan, earthy pink)
- Old toothbrush or stiff bristle brush
- Fine-point paintbrush
- Water cup
- Clay sculpting tools (or a toothpick)
- Matte sealant or varnish
- Rolling pin
- Cookie cutter or jar lid (approx. 3-inch diameter)
Step 1: Sculpting the Dishes
-
Roll the base:
Start by taking a medium chunk of air-dry clay and rolling it out on a flat surface until it is about 1/4 inch thick. Use a rolling pin for an even surface. -
Cut the circles:
Using a jar lid or a round cookie cutter, stamp out two identical circles. These will form the bases of your little display dishes. -
Form the rim:
Roll two long, thin snakes of clay. Coil one snake around the perimeter of each circle base, blending the seam where the snake meets the base using your thumb or a smoothing tool to create a seamless, raised rim. -
Create the texture:
To mimic the speckled stoneware look, gently tap the surface of the wet clay dishes with an old toothbrush. This creates tiny pores that will catch the paint later. -
Set aside to dry:
Place the dishes on a flat surface to dry completely. This usually takes 24 hours, depending on humidity.
Smoother Seams
dip your finger in water to smooth out fingerprints or cracks before the clay dries. Don’t use too much water, or the clay might get mushy and lose shape.
Step 2: Modeling the Characters
-
Shape the bunny body:
Roll a ball of clay about the size of a golf ball. Gently tap the bottom against your work surface to create a flat base so it sits stably. -
Form the ears:
Shape two small tear-drop pieces of clay. Flatten them slightly and use a modeling tool to create an indentation in the center of each ‘drop’ for the inner ear. -
Attach the ears:
Score the bottom of the ears and the top of the head (scratch cross-hatch marks), add a tiny dab of water, and press the ears firmly onto the head. Smooth the connection point with a tool. -
Shape the pear:
Roll another ball of clay, then gently roll the top half between your fingers to taper it into a classic pear shape—wider at the bottom, narrower at the top. -
Add the stem:
Roll a tiny, thin cylinder of clay for the stem. Attach it to the very top of the pear using the score-and-slip method or a tiny drop of water. -
Texture the characters:
Just like the dishes, lightly tap the entire surface of the bunny and the pear with your toothbrush to give them that organic, stone-like texture. -
Dry the figures:
Let both figurines dry completely alongside their dishes.
Step 3: Painting & Finishing
-
Base coat the bunny:
Mix a warm beige or sandy tan acrylic paint. Cover the entire bunny figure. I like to water the paint down slightly so it settles into the texture. -
Paint the dish interiors:
Paint the inside of the bunny’s dish a soft milky white or pale grey. For the pear’s dish, try a very subtle earthy pink tone for contrast. -
Speckle effect:
Dip your toothbrush into watered-down black or dark brown paint. Run your thumb across the bristles to flick tiny splatters over the dishes and the bunny to enhance the stone effect. -
Paint the pear:
Paint the body of the pear a vibrant orange-red. Paint the stem a dark chocolate brown. Once dry, add lighter orange or white dots across the body for visual interest. -
Draw the faces:
Using a very fine brush and black paint, add the sleepy eyes (two ‘U’ shapes) and nose to the bunny. For the pear, paint two small dots for eyes and a tiny smile. -
Add blush cheeks:
Mix a very watery pink paint or use a dry-brush technique to gently dab rosy cheeks onto the pear next to its smile. -
Seal the work:
Once all paint is fully dry, apply a coat of matte varnish to protect your creations and unify the finish.
Cracking Clay?
If cracks appear while drying, fill them with a ‘slip’ mixture (clay mixed with water into a paste) and smooth over. This patches the gap seamlessly.
Arrange your new little friends on a sunny shelf or desk to bring a smile to your face every day