Whenever I need a quick, happy project, I reach for rainbow clay beads and start planning color runs like I’m glazing a tiny kiln-load of joy. Here are my favorite rainbow clay bead bracelet ideas—ranging from classic, wear-anywhere patterns to playful, studio-experiment vibes.
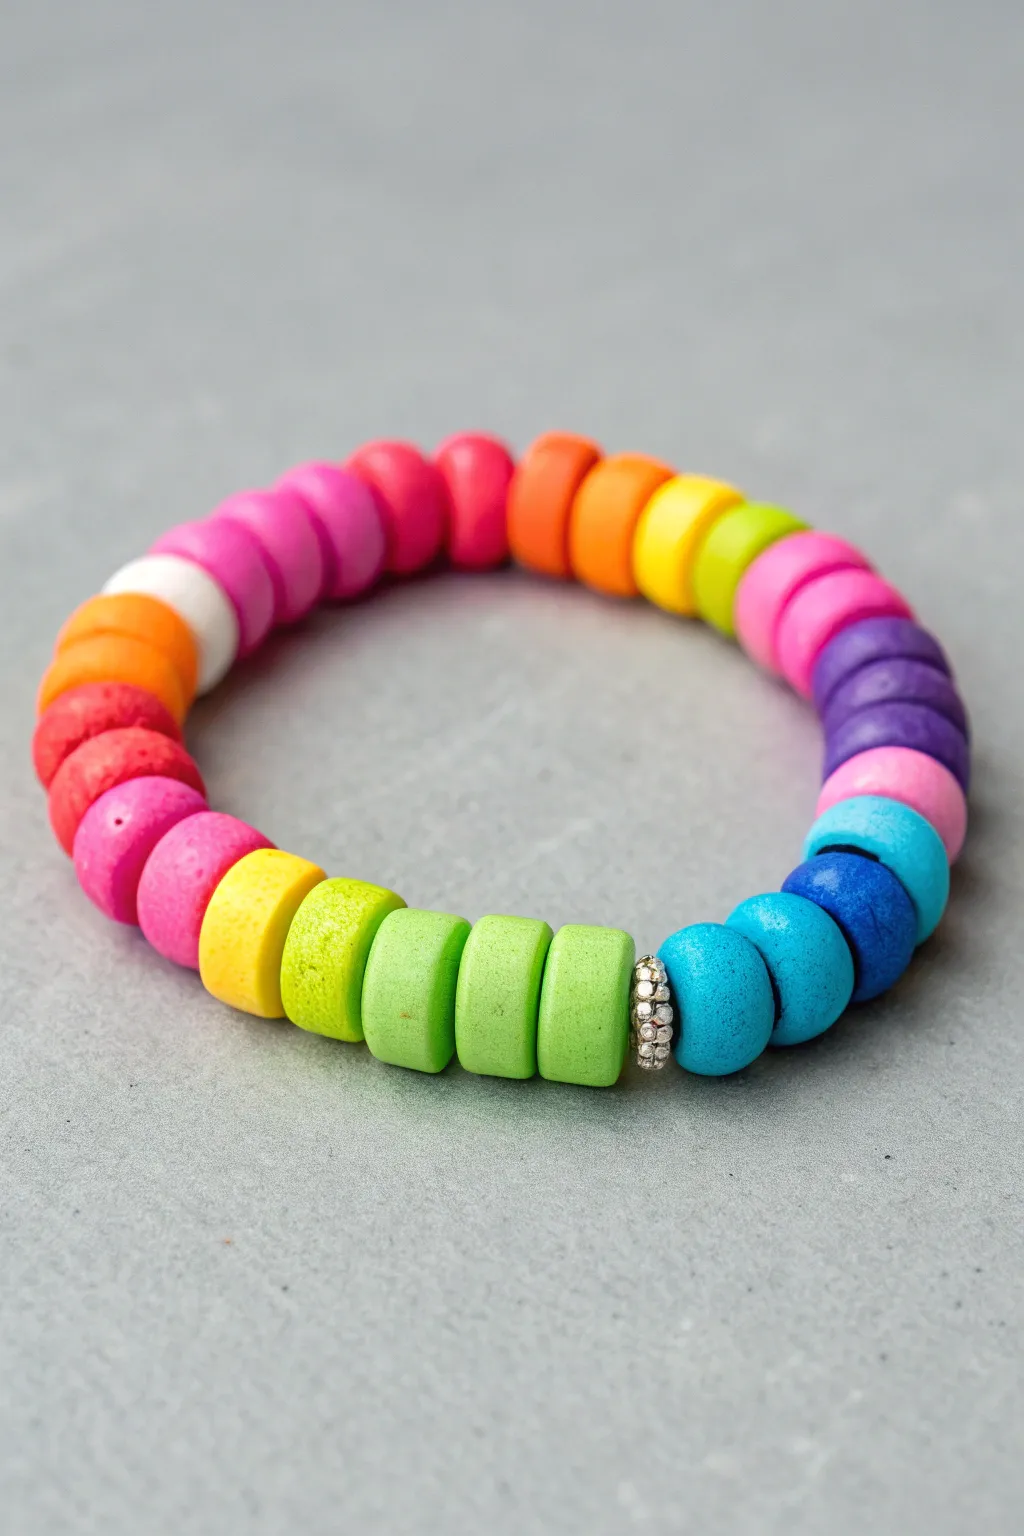
Chunky Color-Blocked Rainbow Bands
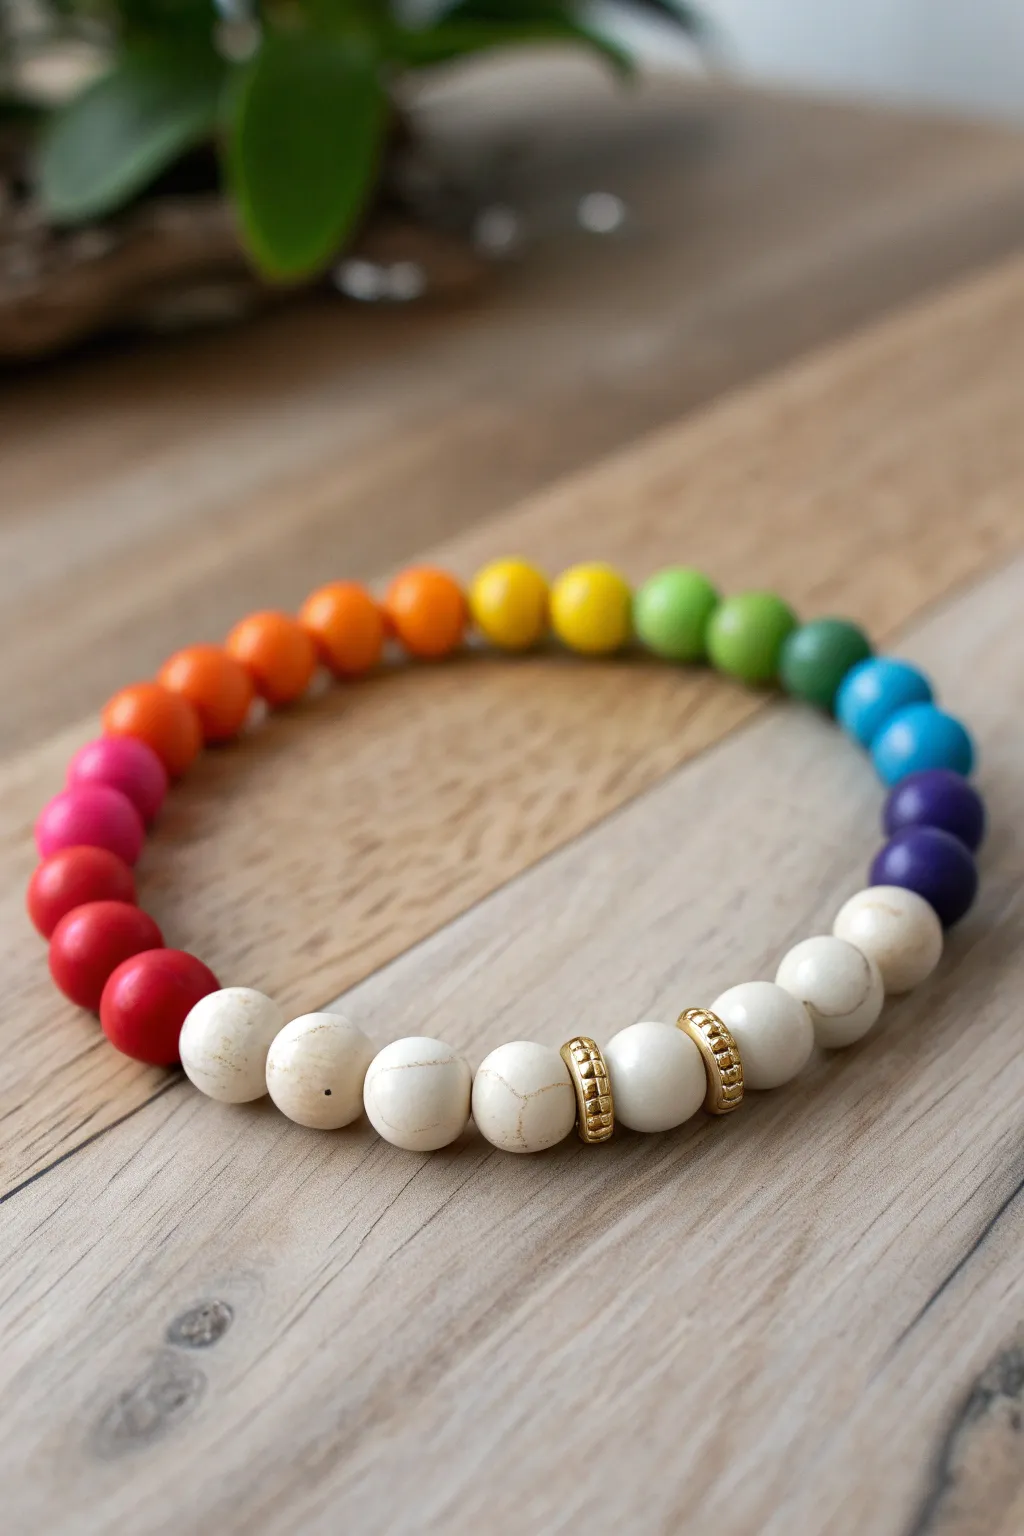
Embrace a playful, earthy aesthetic with this chunky rainbow bracelet, featuring matte, porous clay beads strung on a durable cord. The adjustable sliding knot closure adds a professional touch to this vibrant accessory, making it a perfect casual statement piece.
Step-by-Step Tutorial
Materials
- Large round clay beads (approx. 10-12mm) in rainbow colors: bright red, yellow, green, blue, purple, pink
- 2 Large speckled cream/white clay accent beads
- Dark brown waxed cotton cord or leather cord (1.5mm thickness)
- Scissors
- Ruler or measuring tape
- Clip or tape (to secure cord while knotting)
- Super glue or clear craft adhesive
Step 1: Preparing the Cord Base
-
Measure and cut:
Begin by measuring a generous length of your dark brown cord. You will need about 24 inches (60 cm) to allow plenty of room for knotting the adjustable closure later. -
Create the first stop knot:
Tie a simple overhand knot roughly 6 inches from one end. This will act as a stopper for your first bead and keep the central design centered. -
Check bead fit:
Before sliding everything on, do a quick test to ensure your cord fits through the bead holes comfortably but isn’t so loose that the knot pulls through.
Sliding Knot Stuck?
If your adjustable knot won’t slide, you likely pulled the square knots too tight. They need to be firm but leaving enough space for the inner cords to move.
Step 2: Stringing the Rainbow
-
Start with the accent bead:
Thread one of the large speckled cream clay beads onto the longer end of the cord and slide it down until it hits your stopper knot. -
Begin the color sequence:
Start your rainbow pattern. Based on the reference, you can begin with a bright red bead followed by a yellow bead. -
Add cool tones:
Continue stringing with a light green bead, then a teal or aqua bead, followed by a darker blue bead to transition into the cool spectrum. -
Transition to purples:
Add a purple or violet bead next. The matte texture of these clay beads gives the colors a lovely soft quality. -
Reverse or scramble:
For the second half of the bracelet, you can either mirror the rainbow or create a ‘scrambled’ rainbow look like the original piece. Add a pink bead, then a bright red one. -
Complete the sequence:
Finish the main color run with a bright blue bead, followed by a red-orange bead, a yellow bead, a green bead, and finally a blue bead. -
Finish with accent:
Cap off the beaded section by sliding on the second speckled cream bead. Push all beads snugly together. -
Tie the second stop knot:
Tie another overhand knot flush against the final cream bead to secure the entire row.
Step 3: Creating the Adjustable Closure
-
Form the circle:
Curve the bracelet into a circle, crossing the two tail ends of the cord over each other comfortably. I find it helpful to tape these crossed cords down to a table so they don’t wiggle. -
Cut the knotting cord:
Cut a separate piece of the browned cord, roughly 10 inches long. This will be used to make the sliding macramé knot. -
Tie the square knot base:
Slide this new short cord under the two crossed tail ends. Tie a basic overhand knot tightly around both tail ends to anchor it. -
Start the square knots:
Take the left side of the knotting cord, pass it over the central tails but under the right cord. Then take the right cord, pass it under the tails and up through the loop on the left. -
Tighten and alternate:
Pull the knot tight. Repeat the process starting with the RIGHT side this time. Continue alternating left and right to build a ‘square knot’ band about 0.5 inches wide. -
Finish the sliding knot:
Once the band is long enough, trim the excess from the knotting cord (not the bracelet tails!) close to the knots. -
Secure with glue:
Dab a tiny drop of super glue on the cut ends of the knotting cord to prevent fraying. Be extremely careful not to glue the sliding knot to the main bracelet cords underneath. -
Add tassel knots:
Finally, tie a small knot at the very end of each bracelet tail so the cord doesn’t slip out of the adjuster mechanism. Trim any excess.
Clean Cord Ends
To thread chunky beads easily, dip the cord tip in a bit of white glue or clear nail polish and let it dry hard. This creates a stiff ‘needle’ preventing fraying.
Now you have a durable, cheerful bracelet ready to stack with other favorites for a boho-chic vibe


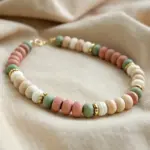
Pastel Rainbow Soft-Serve Palette
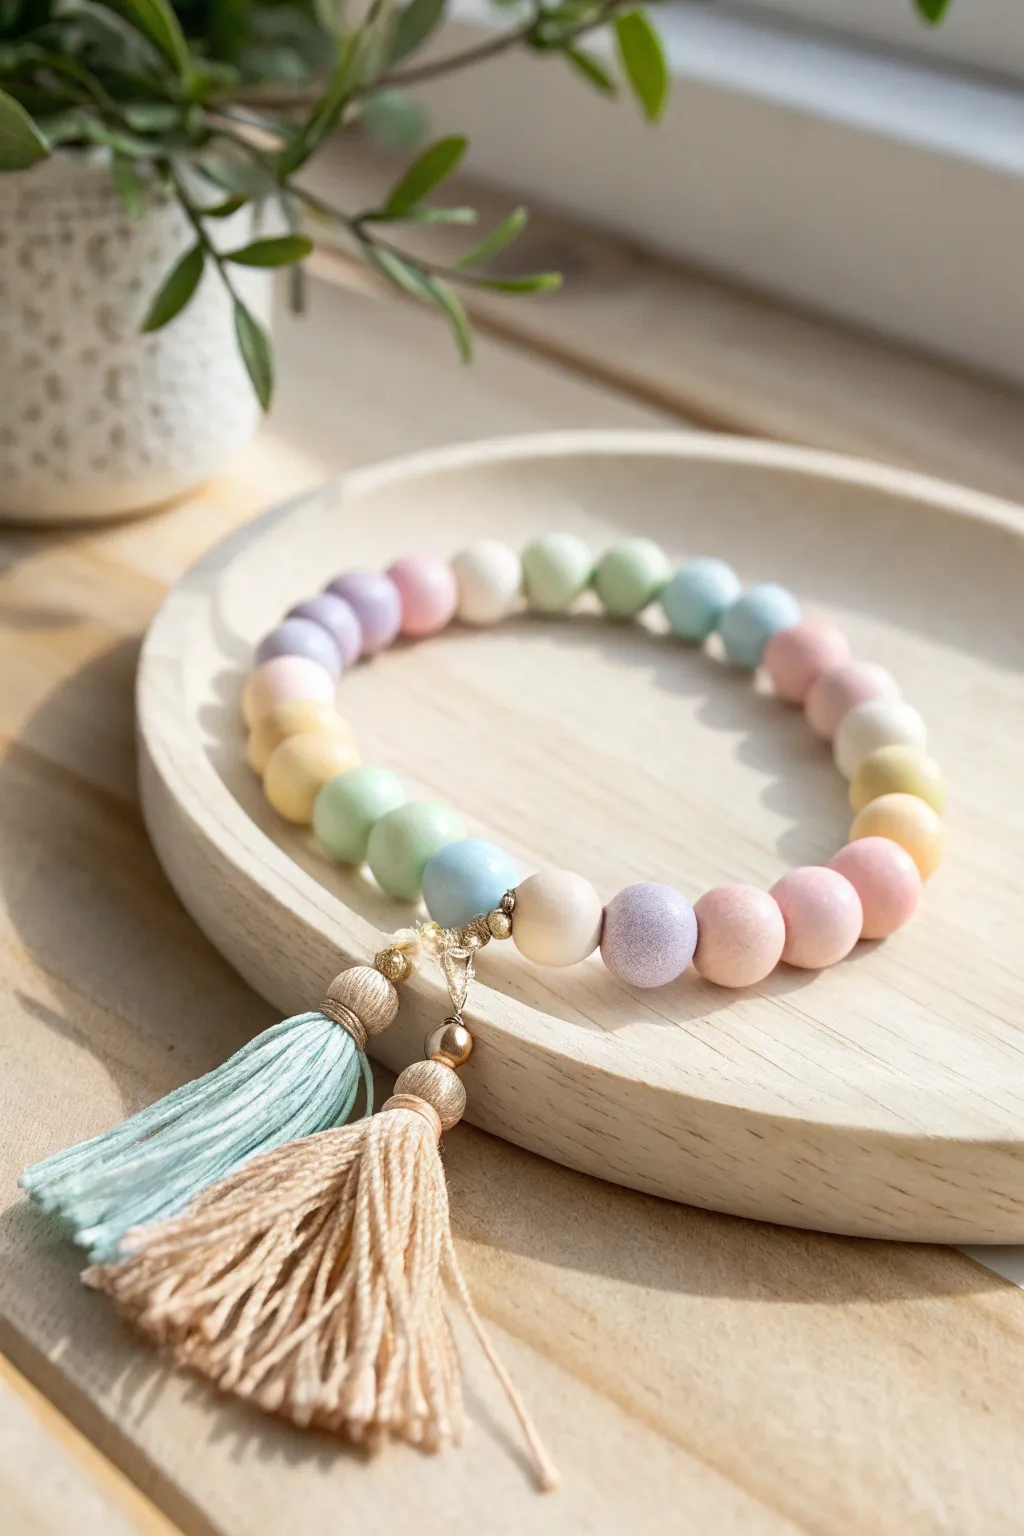
Embrace a softer side of the spectrum with this delicate wood and clay bead bracelet featuring a muted, ice-cream inspired palette. Finished with elegant dual tassels, this project combines simple stringing with a touch of bohemian flair for a sophisticated accessory.
Step-by-Step
Materials
- 10mm round wooden beads (painted or dyed in pastel colors: pink, peach, yellow, mint, blue, lilac, ivory)
- Elastic cord (0.8mm or 1mm thickness)
- Embroidery floss (light aqua blue and oatmeal beige)
- Gold finish decorative end caps (bell style) for tassels
- Small gold spacer beads (approx. 3-4mm)
- Larger gold decorative bead (optional, for connecting tassels)
- Jewelry glue or clear nail polish
- Scissors
- Beading needle (optional but helpful)
- Cardboard or tassel maker tool
- Tape
Step 1: Planning and Stringing
-
Measure your wrist:
Start by loosely wrapping the elastic cord around your wrist to find the desired length, then add about 3-4 inches excess on each end for easy knotting. Cut the cord. -
Pre-stretch the cord:
Give your cut piece of elastic a few firm tugs. This helps prevent the bracelet from stretching out permanently after you wear it the first time. -
Sort your palette:
Lay out your pastel beads on a bead board or soft cloth. I like to arrange them in a repeating soft rainbow gradient: lilac, blue, mint, yellow, peach, pink, repeating the sequence. -
Secure the end:
Place a piece of tape or a binder clip on one end of your elastic cord so the beads don’t slide right off as you work. -
Begin stringing:
Thread the beads onto the cord following your planned gradient pattern. The wooden beads usually have generous holes, but a beading needle can speed this up. -
Check the fit:
Once you have strung enough beads to wrap around your wrist comfortably, hold the ends together to check the size. It should be snug but not tight. -
Prepare for the knot:
Bring the two ends of the elastic together carefully, removing the tape or clip. -
Tie the surgeon’s knot:
Tie a standard overhand knot, but loop the end through twice instead of once before pulling tight. This creates a secure surgeon’s knot. Do not trim the ends yet.
Tassel Trouble?
If your tassels look frizzy or won’t lay flat, dampen them slightly with water and smooth them down with your fingers. Let them dry straight to set the shape.
Step 2: Creating the Tassels
-
Wind the first tassel:
Take your light aqua embroidery floss and wrap it around a piece of cardboard about 1.5 inches wide. Wrap it roughly 15-20 times for a medium fullness. -
Secure the top:
Cut a separate 6-inch piece of floss. Thread it under the wrapped loop at one end of the cardboard and tie it tightly at the top. -
Cut the loops:
Slide the wrapped floss off the cardboard and use sharp scissors to cut the loops at the bottom end, creating the fringe. -
Add the end cap:
Thread the top tying strings of your aqua tassel through a gold bell-style end cap. Pull the tassel up until the knot is hidden inside the cap. -
Make the second tassel:
Repeat this entire process with the oatmeal beige embroidery floss to create your second tassel. -
Knot the cap:
Once the cap is seated on the tassel, tie a knot with the emerging threads just above the cap’s hole to keep it in place, or add a dab of glue inside.
Pro Tip: Bead Holes
If a bead hole is clogged with paint, gently twist a small circular file or a sturdy T-pin inside the hole to ream it out before trying to thread the elastic.
Step 3: Assembly and Finishing
-
Attach tassels to bracelet:
Locate the long tails of your main bracelet knot. Thread one tail through the top loop/string of the aqua tassel and the other tail through the beige tassel. -
Add gold accents:
Slide a small gold spacer bead or a larger decorative gold bead onto the bracelet tails to sit between the main bracelet beads and the tassels. -
Final secure knot:
Tie the bracelet tails together again securely, enclosing the tassel attachment strings. Pull very tight. -
Lock with glue:
Apply a small drop of jewelry glue or clear nail polish to the final knot. Let it dry completely before moving it. -
Hide the knot:
If possible, slide an adjacent wooden bead over the knot to hide it. If the hole isn’t big enough, simply trim the excess elastic close to the knot after the glue is dry. -
Trim tassel ends:
Give your tassels a final haircut with sharp scissors to ensure the fringe is perfectly even and neat.
Now you have a charming, mellow-toned accessory perfect for stacking or wearing as a standalone statement piece


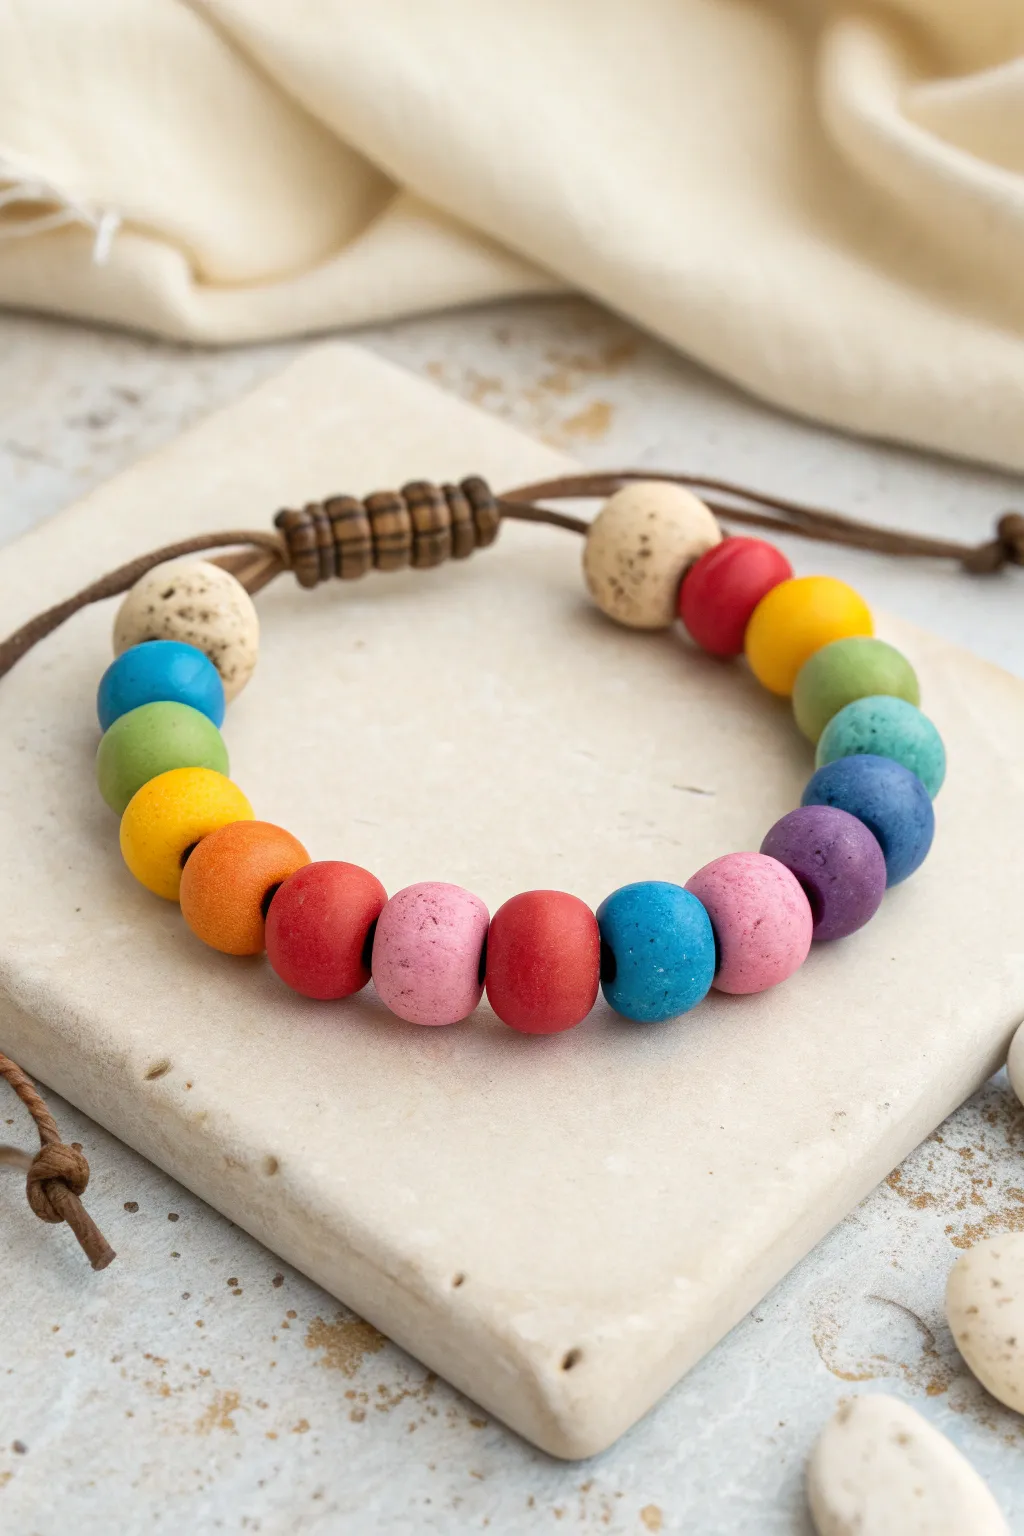
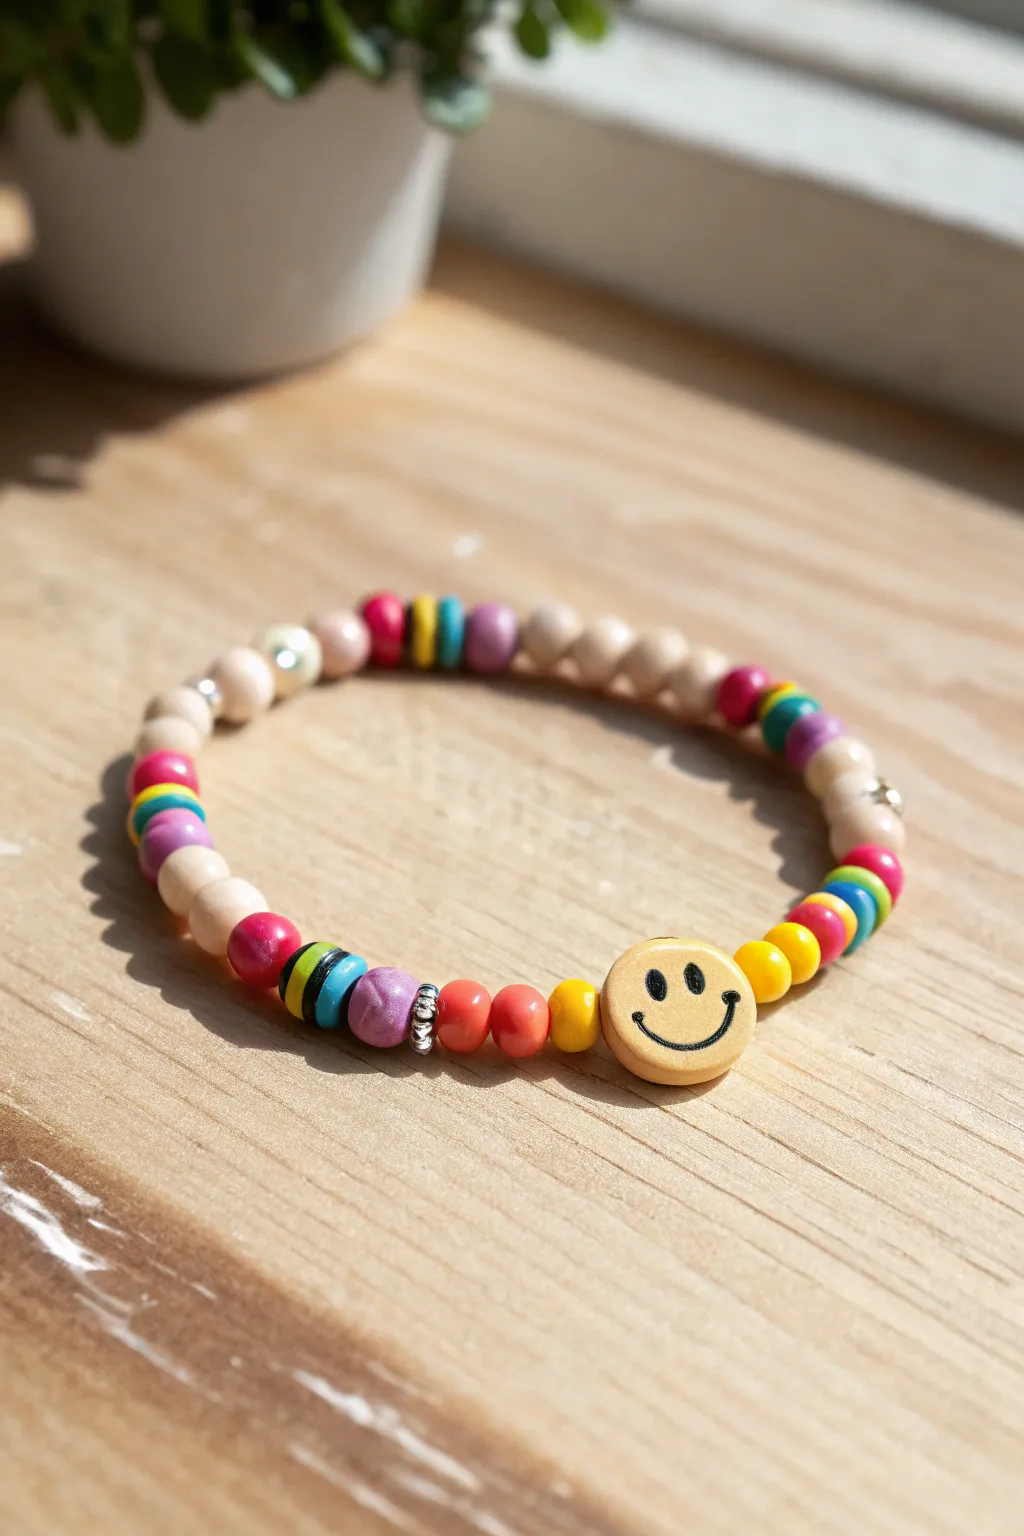
Neon Rainbow Pop Bracelet
Brighten up your accessory game with this vibrant, chunky bead bracelet that radiates pure joy. Featuring a playful mix of neon polymer clay discs and a single sparkling accent bead, this piece is a perfect summertime statement.
Detailed Instructions
Materials
- Thick polymer clay disc beads (approx. 6-8mm thick) in neon pink, orange, yellow, lime green, bright green, blue, purple, and white
- One silver rhinestone rondelle spacer bead
- Strong elastic cord (0.8mm or 1mm thickness)
- Super glue or jewelry adhesive
- Scissors
- Bead stopper or masking tape
Step 1: Planning and Preparation
-
Measure your cord:
Cut a piece of elastic cord about 10-12 inches long. This generous length gives you plenty of room to tie secure knots later without struggling with short ends. -
Secure the end:
attach a bead stopper to one end of your elastic cord. If you don’t have a stopper, a simple piece of masking tape folded over the end works perfectly to keep beads from sliding off. -
Pre-stretch the elastic:
Gently pull tightly on the elastic cord a few times. Pre-stretching prevents the bracelet from sagging or loosening up after you’ve worn it for a while.
Knot Strength Secret
Before tying, prestretch your elastic cord firmly 3-4 times. This prevents the bracelet from loosening later and helps your knots stay incredibly tight.
Step 2: Beading the Pattern
-
Start with the focal point:
Begin by threading the silver rhinestone rondelle bead onto the cord. This will act as the shiny center anchor for your color pattern. -
Add first color block:
On the right side of the silver bead, thread three light blue disc beads. All beads should sit snugly against each other. -
Create the gradient:
Continuing on that same side, add two darker blue beads followed by one light blue bead to start shifting the color spectrum. -
Introduce purples:
Thread on a section of pinks and purples: start with one light pink bead, then two purple beads, followed by two dark purple beads. -
Transition to warm tones:
Now add the warm section: two bright pink beads, then a block of three reddish-pink beads. -
Add orange and white:
Continue the pattern with two bright orange beads, followed by a single white bead as a palate cleanser, then two more orange beads. -
Finish the far side loop:
Add three hot pink beads. At this point, you have covered roughly half to two-thirds of the bracelet length. -
Complete the rainbow circle:
Add two orange beads, then two yellow beads, followed by one lime green bead. -
Coordinate the greens:
To finish the loop and meet back at the silver bead, thread three bright green beads. These should be the ones that will eventually sit next to the silver bead when tied.
Step 3: Finishing Touches
-
Check the fit:
Carefully wrap the beaded cord around your wrist to check the size. If it’s too loose, remove a bead or two; if too tight, add another green or blue bead near the ends. -
Prepare for tying:
Remove the bead stopper or tape while carefully holding both ends of the elastic cord so no beads escape. -
Tie the first knot:
Tie a simple overhand knot and pull it tight, ensuring there are no gaps between the beads but not so tight that the bracelet puckers. -
Secure with a surgeon’s knot:
Follow up with a surgeon’s knot—this is like a standard knot, but you loop the end through the circle twice before pulling tight. This extra loop adds significant security. -
Apply adhesive:
I like to place a tiny drop of super glue or jewelry cement directly onto the knot. Let this dry completely for a minute or two. -
Hide the knot:
Once dry, trim the excess elastic ends close to the knot. Gently pull on the adjacent beads to slide the knot inside the hole of the nearest bead, ideally the large silver rhinestone bead if the hole is large enough.
Letter Bead Swap
Replace the white ‘palate cleanser’ bead section with personalized letter beads to spell out a name or short word amidst the rainbow colors.
Slip on your colorful creation and enjoy the burst of neon energy it brings to your outfit


Rainbow Ombre Fade
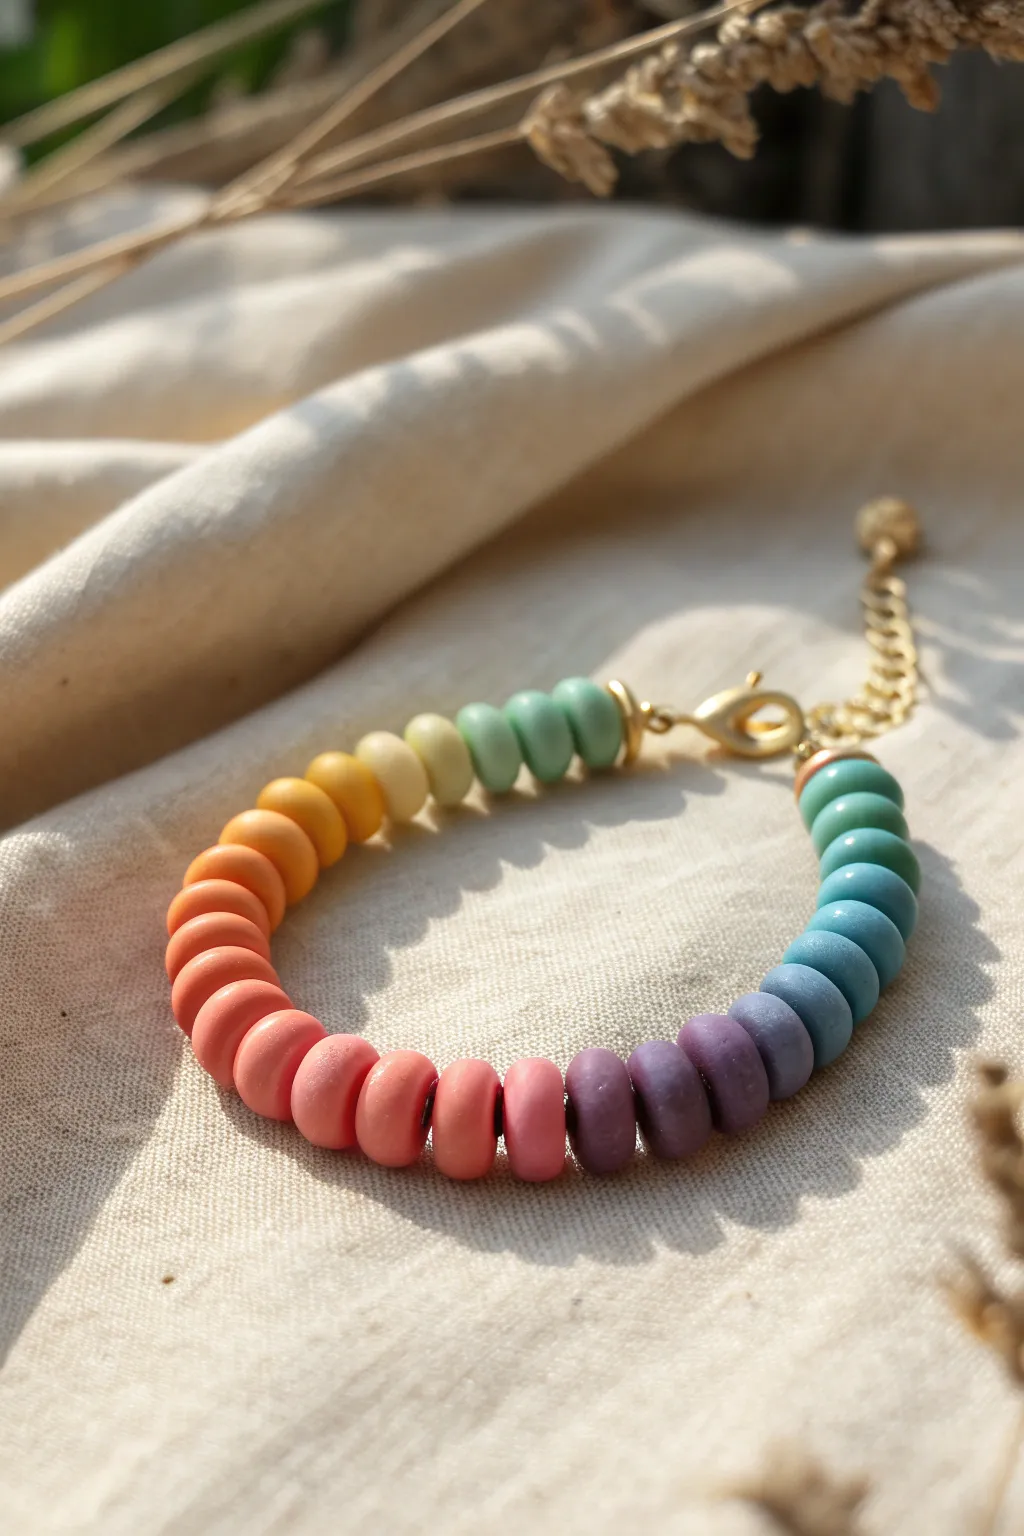
Embrace the soft side of the spectrum with this delicate rainbow ombre bracelet, featuring smooth clay disc beads in a dreamy pastel transition. The elegant gold chain extender adds a touch of sophistication, making it perfect for stacking or wearing solo as a cheerful statement piece.
How-To Guide
Materials
- Polymer clay (heishi) disc beads: pastel mint green, pale yellow, mustard yellow, peach, coral, salmon pink, hot pink, warm purple, cool purple, denim blue, teal
- Gold-plated lobster clasp
- Gold-plated extension chain (approx. 2 inches)
- Small gold jump rings (4mm or 5mm)
- Gold crimp beads (2)
- Gold wire guards (2, optional but recommended)
- Beading wire (such as 0.38mm or 0.45mm Tiger Tail)
- Wire cutters
- Chain nose pliers
- Flat nose pliers
Step 1: Planning the Pattern
-
Select your palette:
Gather your clay disc beads. Instead of a stark primary rainbow, look for muted, dusty tones to recreate the sophisticated look in the photo. You will need about 3-5 beads of each color. -
Arrange the gradient:
Lay out your beads on a bead board or a piece of felt. Create a smooth transition: start with mint greens, fade into yellows, then warm oranges, deepening into pinks, transitioning to purples, and finishing with blues and teals. -
Check the flow:
Look closely at your layout. Adjust the order so similar tones sit next to each other; for example, ensure the warm purple is bridge between the pink and the cool purple. -
Measure the length:
Arrange enough beads to cover about 6-6.5 inches of length, knowing the clasp and extender chain will add adjustability.
Step 2: Stringing the Beads
-
Prepare the wire:
Cut a piece of beading wire approximately 10 inches long to give yourself plenty of room to work. -
Secure the first end:
Slide a crimp bead onto one end of the wire, followed by a wire guard. Loop the wire back through the crimp bead to create a secure loop. -
Attach the clasp hardware:
Before crimping, slip a jump ring onto the wire guard loop (or directly onto the wire loop if skipping guards). I prefer attaching the clasp mechanism later, but you can add the jump ring now. -
Crimp firmly:
Use your flat nose pliers to flatten the crimp bead securely, locking the wire in place. Trim the short tail of the wire, leaving just a tiny bit to tuck into the first few beads. -
Begin stringing:
Thread your beads onto the wire in your pre-arranged order, starting with the mint/teal end. Ensure the first few beads slide over the short tail of the wire to hide it. -
Maintain the block pattern:
For the specific look in the photo, group the beads in solid blocks of color. Use about 3 to 4 beads of the exact same shade before switching to the next color in the gradient. -
Complete the strand:
Continue stringing until you reach the end of your pattern. The bracelet should end with the teal/blue tones if you started with mint, creating a cyclical rainbow feel. -
Check final fit:
Wrap the strand around your wrist to verify sizing before sealing it off.
Gradient Master Tip
To get that perfect “fade,” squint your eyes when arranging beads. If a color jumps out too much, replace it with a muted version or bridge it with an intermediate shade.
Step 3: Finishing Touches
-
Prepare the second crimp:
Slide a crimp bead onto the open end of the wire, followed by your second wire guard. -
Create the loop:
Thread the wire back down through the crimp bead and pull it tight, but leave a tiny bit of slack—about 1mm—so the beads can move flexibly and don’t buckle. -
Secure the end:
Flatten the crimp bead with your pliers. Trim the excess wire flush against the crimp bead. -
Attach the clasp:
Use your chain nose pliers to open a jump ring. Attach the lobster clasp to one end of your beaded strand and close the ring securely. -
Add the extender chain:
open another jump ring and attach the gold extension chain to the opposite end of the bracelet. This allows for adjustable sizing. -
Review connections:
Double-check that all jump rings are closed perfectly flush so the wire doesn’t slip out. -
Polish up:
Examine the clay beads for any dust or stray manufacturing bits and brush them off for a clean finish.
Add Some Sparkle
Insert a tiny gold spacer bead or a flat gold disc between every distinct color section to define the transition and add a luxurious metallic rhythm to the rainbow.
Enjoy wearing your handcrafted slice of sunshine on your wrist

The Complete Guide to Pottery Troubleshooting
Uncover the most common ceramic mistakes—from cracking clay to failed glazes—and learn how to fix them fast.
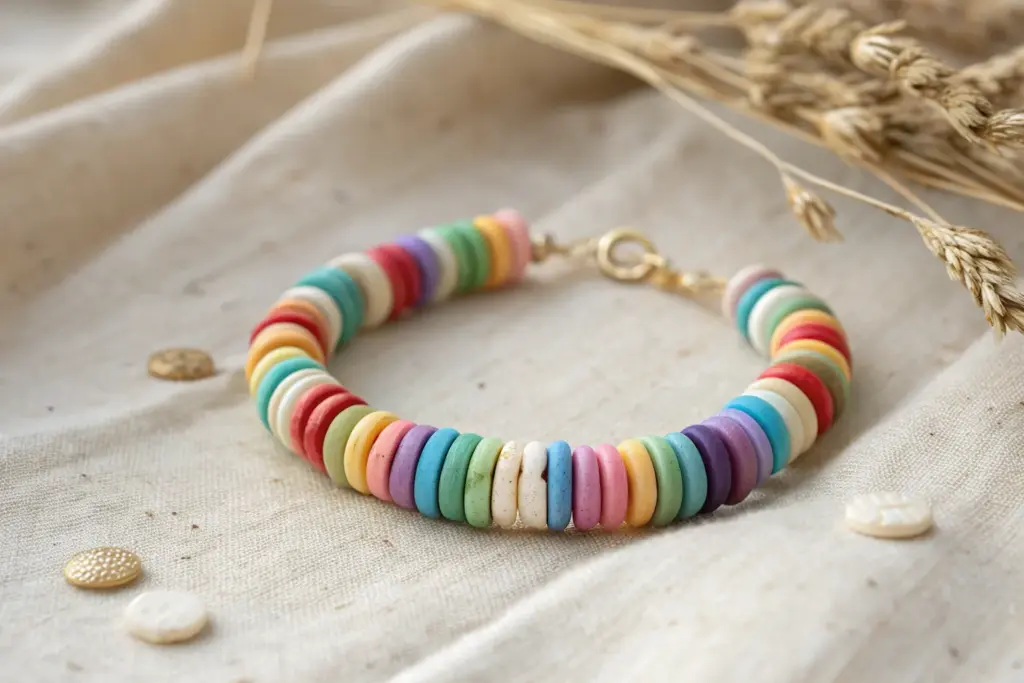
Rainbow With White Space Spacers
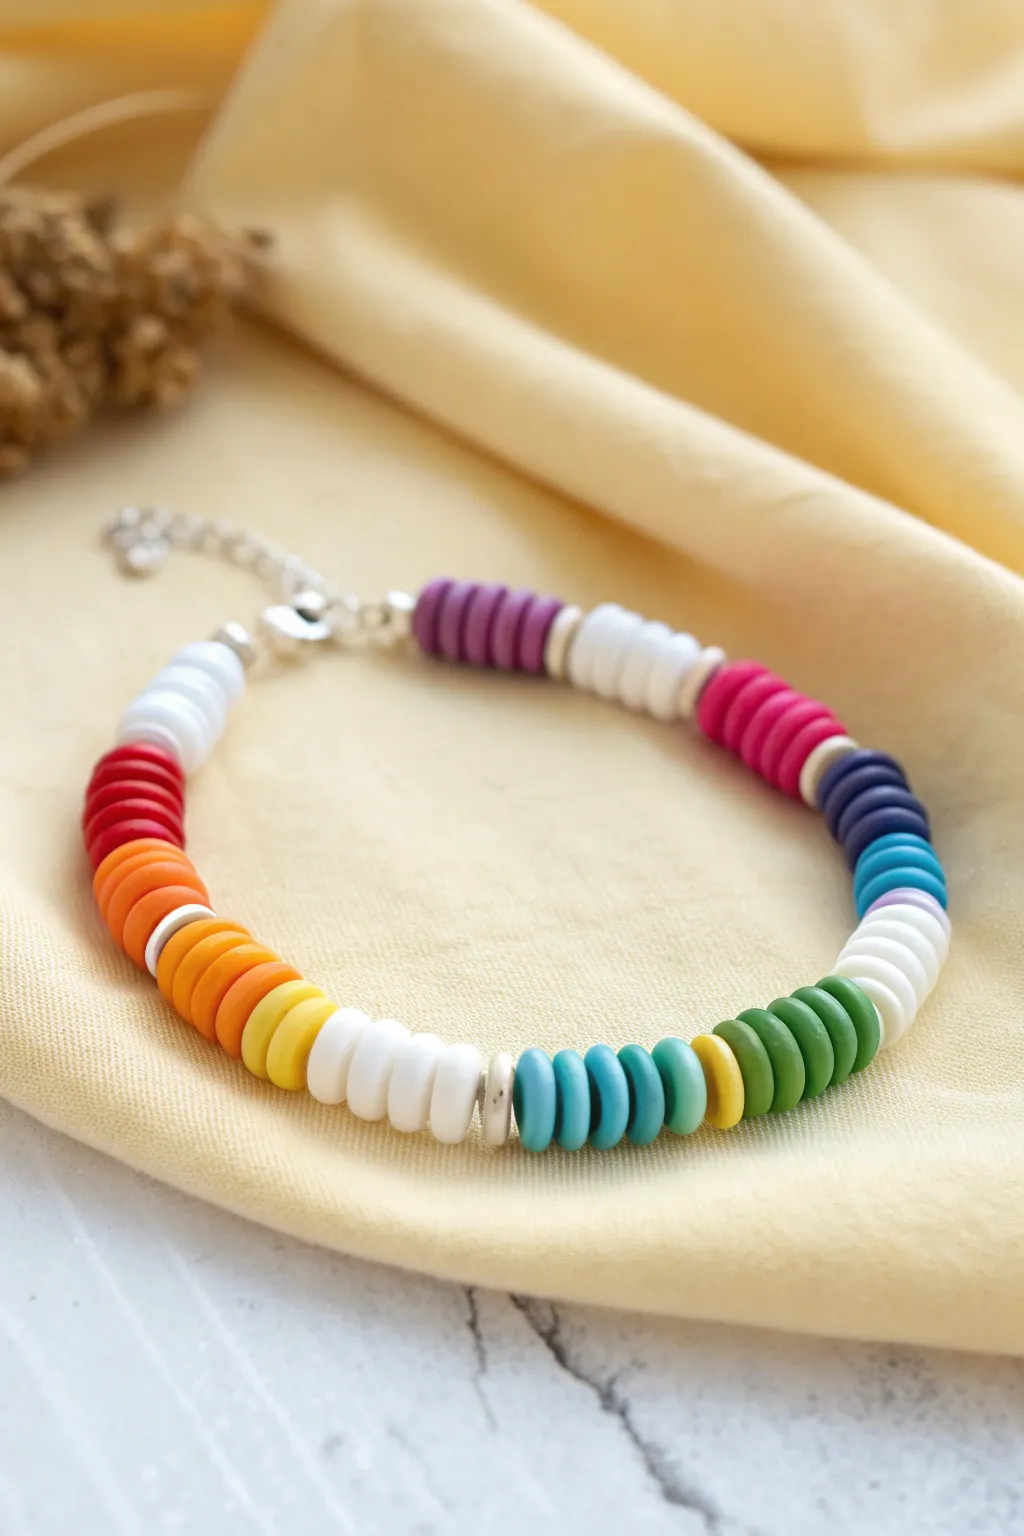
This cheerful design strikes a perfect balance between vibrant color and minimalist chic by breaking up a classic rainbow spectrum with crisp white spacers. The flat polymer clay discs create a comfortable, lightweight accessory that feels as good to wear as it looks.
Step-by-Step
Materials
- Polymer clay heishi beads (6mm or similar) in: Red, Orange, Mustard Yellow, Green, Teal/Blue, Purple, White
- Silver metal spacer beads (flat disc or ring shape, same diameter as clay beads)
- Beading wire or strong elastic cord (0.8mm)
- 2 Crimp beads
- 2 Crimp covers (silver)
- 2 Wire guards (optional but recommended for durability)
- Silver lobster clasp
- Silver extender chain
- Jewelry pliers (flat nose and crimping pliers)
- Wire cutters
- Bead stopper or tape
Step 1: Preparation and Initial Setup
-
Measure and cut:
Cut a length of beading wire approximately 10-12 inches long. This gives you plenty of extra room to work with the clasps without struggling. -
Secure the end:
Attach a bead stopper or a piece of tape to one end of the wire so your beads don’t slide off while you are designing your pattern. -
Sort your colors:
Pour out small piles of each color you plan to use. Arranging them in the order of the rainbow (red, orange, yellow, green, blue, indigo/purple) beforehand helps visualize the gradient.
Gaps are Showing?
If you see wire between beads, you didn’t pull tight enough before crimping. Don’t over-tighten, or the bracelet will be stiff and rigid. Aim for snug but flexible.
Step 2: Stringing the Pattern
-
Start with purple:
Begin stringing your beads. Based on the image, start with a block of about 5-6 purple clay beads. -
Add the first spacer:
Slide on one silver metal spacer bead. This metallic accent acts as a border between the color blocks. -
Insert the white block:
Thread on approximately 5 white clay beads. This white ‘negative space’ is the key feature of this specific design. -
Transition to red:
Add another silver spacer, followed by a block of 5-6 red beads. -
Continue the warm tones:
Without adding a white section yet, transition directly to your next color. Slide on about 5-6 orange beads. -
Add the orange-yellow separator:
Place a silver spacer bead after the orange section. -
Create a focal accent:
Add a small block of 4-5 mustard yellow/gold beads. -
More white space:
Add a silver spacer, followed by another block of about 6 white beads. This irregular spacing of white sections adds visual interest. -
Cool tones sequence:
Add a silver spacer, then a mix of blue and teal beads. You can alternate single beads here (teal, blue, teal, blue) for a textured look, or do a solid block of teal. -
Green section:
Add a silver spacer, a single yellow bead as a tiny pop of contrast, and then a block of 5-6 green beads. -
Final white block:
Finish the main pattern with a silver spacer, a block of different shades of blue/purple (like indigo), another spacer, and a final block of white beads.
Mix Up textures
Swap the plain silver spacers for rhinestone rondelles or tiny freshwater pearls between color blocks to elevate this from casual to dressy.
Step 3: Finishing the Bracelet
-
Check the length:
Wrap the unfinished strand around your wrist to check the sizing. Add or remove beads from the ends if necessary to get the perfect fit. -
Thread the crimp:
On the finishing end, thread on a crimp bead. If using a wire guard, thread the wire through one side of the guard, hook on the lobster clasp, and go back down through the guard. -
Pass back through:
Pass the tail of the wire back through the crimp bead and pull it taut, leaving a tiny bit of wiggle room so the bracelet isn’t stiff. -
Secure the crimp:
Use your crimping pliers to flatten or fold the crimp bead securely. I like to give it a gentle tug to ensure it is locked in place. -
Add crimp cover:
Place a crimp cover over the smashed crimp bead and gently squeeze it closed with pliers to make it look like a round silver bead. -
Repeat for the other end:
Remove the bead stopper from the starting end. Repeat the crimping process, but attach the extender chain instead of the clasp. -
Final trim:
Use your wire cutters to trim any excess wire tails close to the beads.
Now you have a vibrant, custom accessory perfect for stacking with other summery pieces
Rainbow With Metallic Spacer Accents
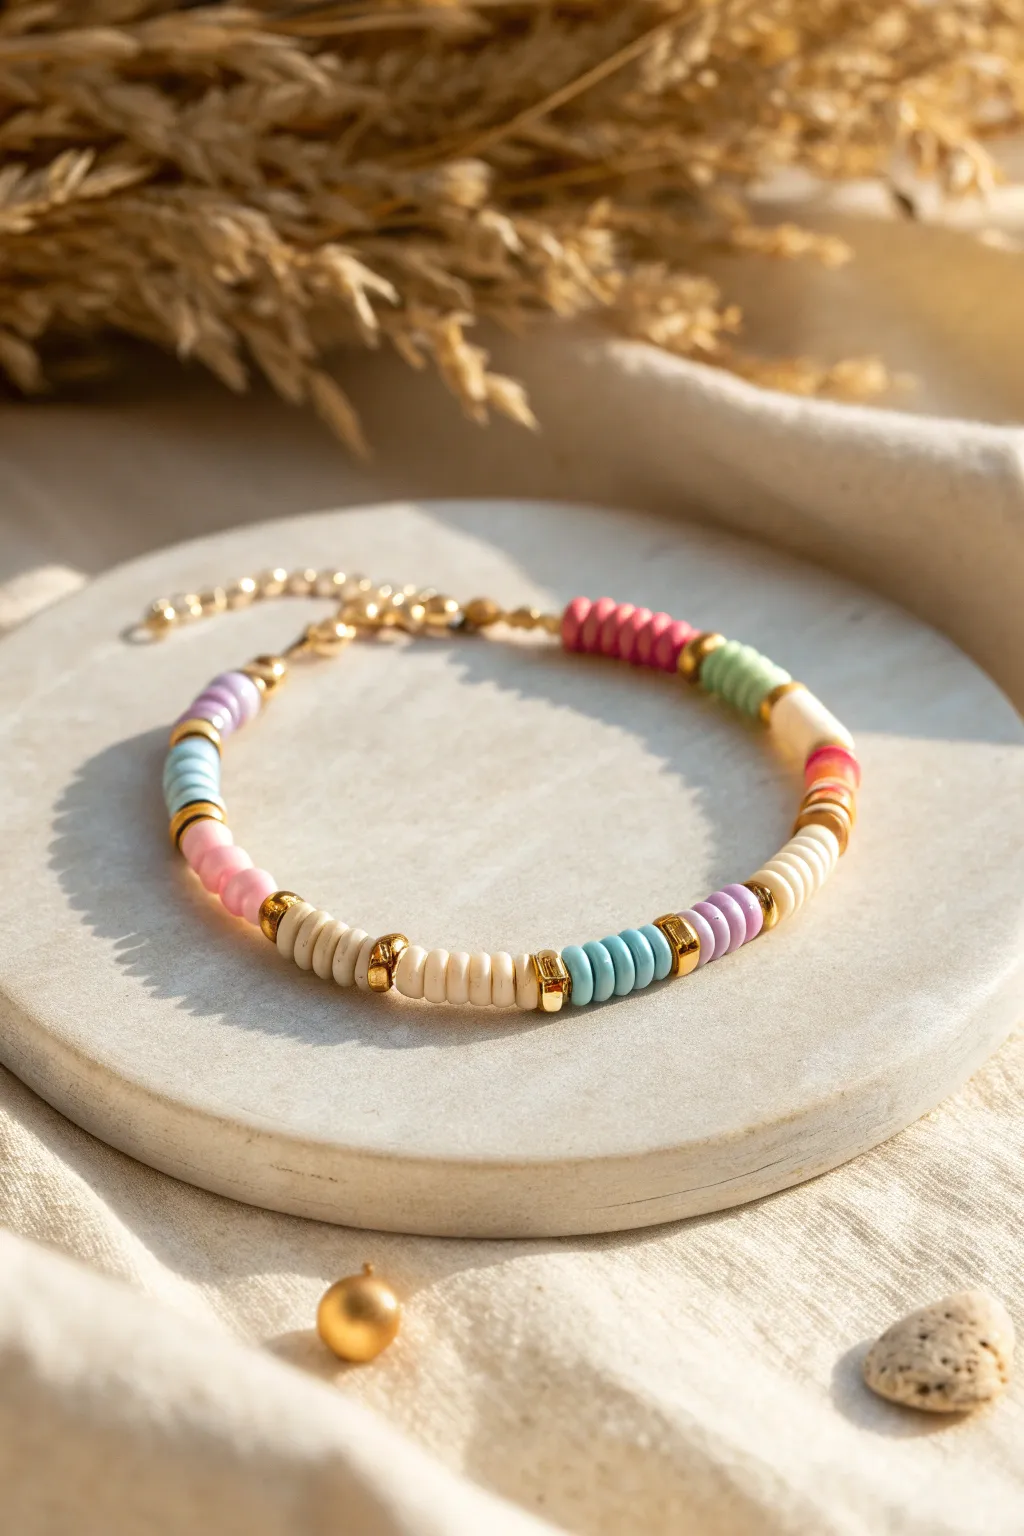
This effortlessly chic bracelet combines the earthy texture of creamy white discs with pops of soft pastel color and luxurious gold accents. The segmented design creates a rhythmic, balanced pattern that looks sophisticated enough to wear solo or stacked with your favorite gold jewelry.
Step-by-Step Tutorial
Materials
- Cream/off-white polymer clay heishi beads (6mm)
- Pastel polymer clay heishi beads (light blue, lavender, pink, magenta, mint green, coral)
- Gold tone metallic spacer beads (rounded or donut shape)
- Small gold tone round beads (3mm)
- Strong elastic beading cord (0.8mm recommended)
- Gold tone crimp covers
- Gold tone jump rings and lobster clasp
- Jewelry glue (such as G-S Hypo Cement)
- Beading needle (optional)
- Scissors
Step 1: Planning and Preparation
-
Measure your wrist:
Before cutting any cord, wrap a measuring tape around your wrist to find your size. Add about half an inch to this measurement for a comfortable fit, then cut a piece of elastic cord about 10-12 inches long to give yourself plenty of room for knotting. -
Pre-stretch the cord:
Give your elastic cord a few firm tugs. This pre-stretching helps prevent the bracelet from loosening up permanently after you wear it for the first time. -
Secure the end:
Place a piece of tape or a bead stopper on one end of the cord so your beads don’t slide off while you are working. If you’re using a beading needle, thread it onto the other end now.
Gold Preservation Pro Tip
Coat your gold spacer beads with a thin layer of clear nail polish before stringing. This simple step prevents tarnishing and keeps that metallic shine bright for much longer.
Step 2: Creating the Pattern
-
Start with gold hardware:
Begin by threading on a gold crimp bead (which we will hide later) or simply tie a starter knot if you prefer the hidden knot method. Thread on three small gold round beads to act as the connector near the clasp. -
First color segment:
String on about 5-6 lavender clay beads. This design relies on color blocking, so keep your counts consistent for a tidy look. -
Add the first spacer:
Slide on one gold metallic spacer bead. These gold accents are crucial as they break up the matte clay texture with a bit of shine. -
The blue segment:
Add your next block of color: 5-6 light blue clay beads. Follow this immediately with another gold spacer bead. -
The central neutral section:
Now for the main feature: thread on a longer section of the cream/off-white beads. Aim for about 10-12 beads here. This larger neutral block creates a nice negative space. -
Add a gold highlight:
Place a gold spacer bead, followed by just 2-3 cream beads, and then another gold spacer bead. I find this little interruption in the white pattern adds a lovely detailed touch. -
Continue the neutral bloack:
Finish the white section by adding another 10-12 cream beads to mirror the other side of the gold highlight. -
Pink segment:
Add a gold spacer, then string on 5-6 soft pink beads followed by another gold spacer. -
Complete the rainbow:
Continue this pattern—gold spacer, 5-6 colored beads, gold spacer—working through your remaining colors (magenta, mint, coral) until the bracelet reaches your desired length.
Level Up: Texture Play
Swap the standard gold spacers for faceted gold hematite beads or tiny freshwater pearls between color blocks. This adds an upscale, organic texture that feels more expensive.
Step 3: Finishing Touches
-
Close the loop:
Finish the strand with three small gold round beads to match the beginning. -
Attaching the clasp:
If using a clasp method: Thread the cord through a crimp bead, then through the loop of a jump ring attached to one side of the clasp. Loop back through the crimp bead. -
Secure the crimp:
Use flat-nose pliers to flatten the crimp bead securely. Cover it with a gold crimp cover for a professional finish. -
Repeat for the other side:
Repeat the previous step on the other end of the bracelet, attaching the other half of the clasp or an extension chain. -
Tie off (Elastic alternative):
If creating a continuous stretch bracelet without a clasp, simply remove the tape, bring the ends together, and tie a surgeon’s knot (right over left, left over right). Pull tight. -
Glue the knot:
Apply a tiny dot of jewelry glue to the knot. Let it dry for a moment before trimming the excess cord close to the knot. -
Hide the knot:
Gently tug the bracelet so the knot slides inside one of the gold spacer beads or heishi beads to hide it completely.
Now you have a stunning, boutique-worthy bracelet ready to add a splash of color to your daily outfit


What Really Happens Inside the Kiln
Learn how time and temperature work together inside the kiln to transform clay into durable ceramic.
Rainbow Smile Bead Centerpiece
Brighten your day with this playful, eclectic bracelet featuring a prominent smiley face centerpiece. By mixing polished wooden beads with splashes of rainbow-colored clay discs and vibrant accents, this design achieves a perfectly balanced, cheerful aesthetic.
Step-by-Step Guide
Materials
- Elastic stretch cord (0.7mm or 0.8mm)
- Natural wood beads (6-8mm, round)
- Large wooden smiley face bead (flat circle)
- Small polymer clay Heishi beads (assorted rainbow colors)
- Pink spherical beads (acrylic or wood)
- Silver spacer beads (textured or rhodium)
- Small solid-color seed beads or spacers (yellow, red)
- Scissors
- Hypo-cement or clear jewelry glue
- Bead stoppers or a piece of tape
Step 1: Preparation
-
Measure the cord:
Cut a piece of elastic cord about 10-12 inches long. This generous length gives you plenty of room to knot it securely later without struggling. -
Secure the end:
Attach a bead stopper or a piece of tape to one end of the cord to prevent your beads from sliding off as you work. -
Plan your pattern:
Lay out your beads on a soft surface or bead mat. Note that this design isn’t perfectly symmetrical; it relies on ‘clusters’ of color interspersed with natural wood tones.
Step 2: Creating the Centerpiece
-
Prepare the focal point:
Start by threading the large wooden smiley face bead. Position it initially in the middle of your cord. -
Right side accents:
On the right side of the smiley, thread two bright yellow beads followed by a larger pink bead. -
Add a rainbow cluster:
Continue on the right side by stacking 4-5 thin Heishi clay discs in a rainbow sequence—blue, green, yellow, orange, and red. -
Transition to wood:
Add a single pink bead after the discs, then begin stringing the natural wood beads. Thread about 5-6 wood beads. -
Adding variety:
Break up the wood section with a small pop of color—add a darker purple bead, then a stack of blue and green Heishi discs, followed by another wood bead.
Knot Slipping?
If your elastic knot feels insecure, try tying it while the cord is under tension. A dab of clear nail polish works if you don’t have jewelry glue.
Step 3: Beading the Left Side
-
Start the left sequence:
Move to the left side of the smiley face. Thread a single yellow bead, followed by two red-orange round beads. -
Add texture:
Insert a silver textured spacer bead here to add a little shine and break up the matte finishes. -
Left rainbow cluster:
Thread a larger purple bead, then create a distinct cluster: a blue Heishi disc, a black disc, a yellow disc, a green disc, and finally a magenta round bead. -
More wood intervals:
Thread two natural wood beads, then add another small colorful stack using pink, blue, and yellow Heishi discs. -
Completing the circle:
Continue adding natural wood beads to fill out the rest of the length until the bracelet wraps comfortably around your wrist. The goal is to have the colorful sections frame the front, while the wood beads make up the back portion.
Level Up: Personalized
Swap the random clay discs for letter beads to spell a name or short word like ‘HAPPY’ alongside the smiley for a custom touch.
Step 4: Finishing Up
-
Check the fit:
Wrap the beaded cord around your wrist to ensure it isn’t too tight. The beads should sit comfortably without gaps showing the cord. -
Pre-stretch the cord:
Gently pull tightly on both ends of the cord a few times. I find this pre-stretching step crucial because it prevents the bracelet from sagging after you wear it a few times. -
Tie the knot:
Remove the bead stopper and tie a surgeon’s knot (right over left, left over right, looping the top strand through twice on the second pass). -
Secure with glue:
Apply a tiny dab of jewelry glue or Hypo-cement specifically to the knot. Let it dry completely before trimming. -
Trim the ends:
Cut the excess elastic tail close to the knot. If possible, gently tug the knot inside one of the larger wood beads to hide it.
Slip on your new bracelet and enjoy the happy vibes it brings to your outfit
Rainbow And Pearl Mix
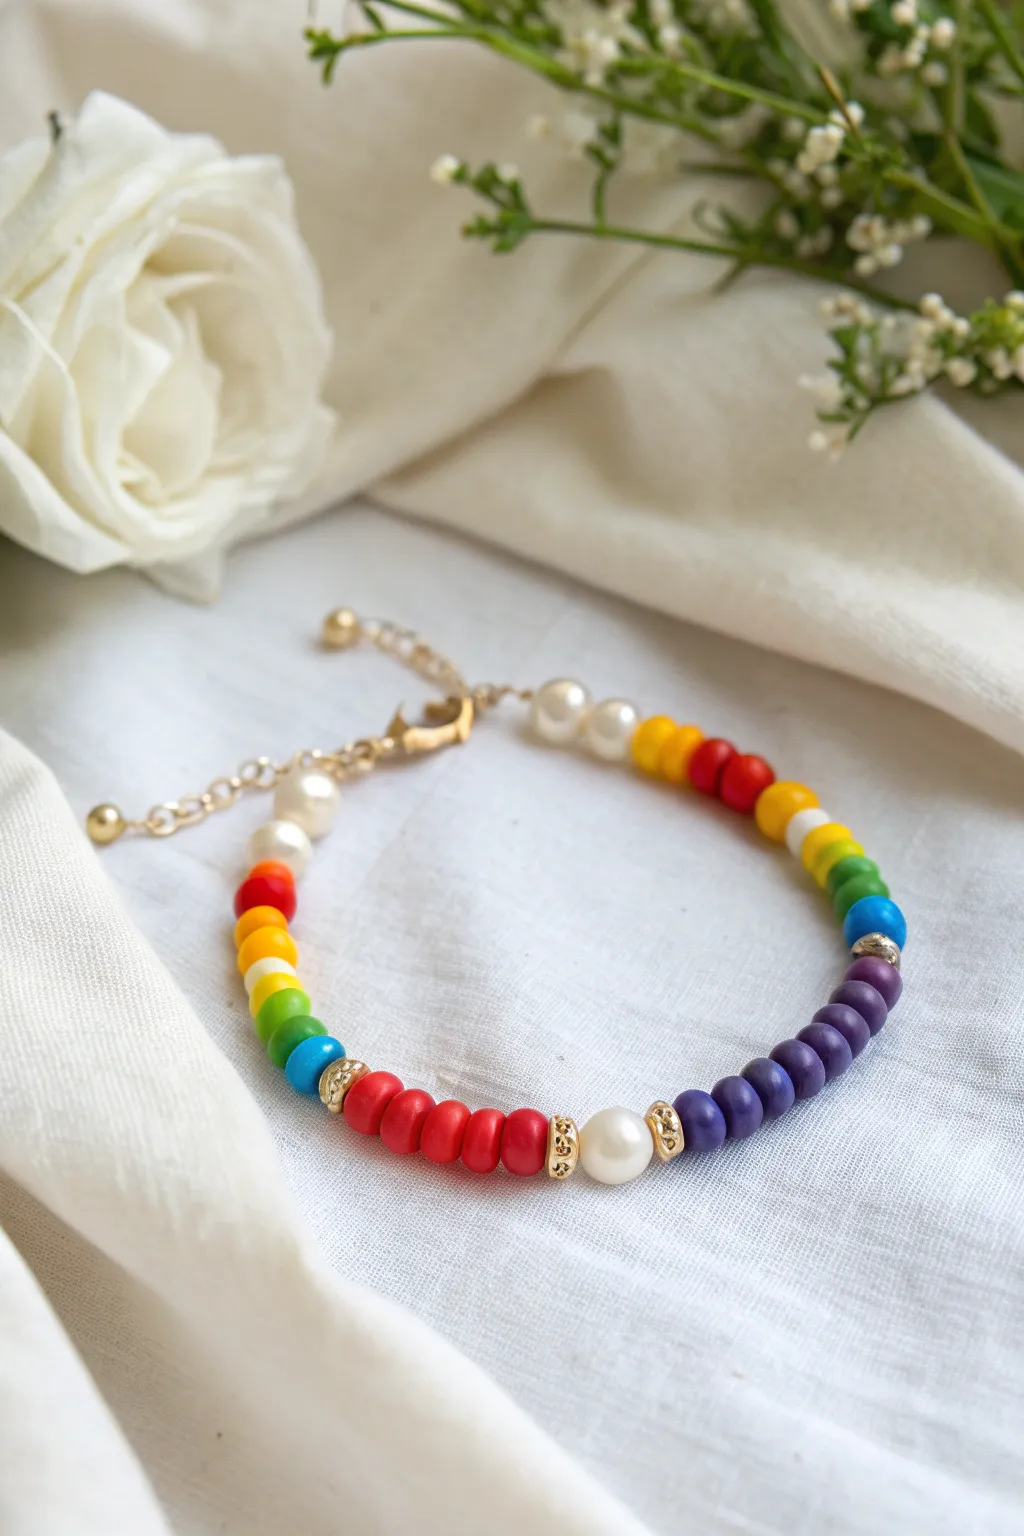
This elegant design strikes a lovely balance between playful vibrancy and classic sophistication by pairing bold rainbow clay beads with the soft luster of pearls. The segmented color blocking and gold accents create a structured yet cheerful accessory perfect for stacking.
Step-by-Step Tutorial
Materials
- Polymer clay heishi beads (red, orange, yellow, green, light blue, dark blue, purple)
- 6mm or 8mm faux pearl beads
- Gold tone spacer beads (rondelle or disc shape)
- Gold tone crimp beads
- Gold tone lobster clasp and extender chain
- Jump rings
- Beading wire (clear or gold-tinted)
- Wire cutters
- Flat nose pliers
- Crimp tool (optional, but recommended)
Step 1: Preparation and Initial Setup
-
Measure and Cut Wire:
Cut a piece of beading wire approximately 10 inches long. This gives you plenty of extra room to work with, even for a standard 7-inch wrist. -
Secure the First End:
Thread a crimp bead onto one end of the wire, followed by a jump ring attached to your extender chain. -
Loop and Crimp:
Pass the wire back through the crimp bead to create a small loop. Use your flat nose pliers or crimping tool to flatten the crimp bead securely, trimmed the excess tail wire. -
Start with Pearls:
Begin the beading pattern by threading on three to four pearl beads. This creates a soft, neutral start near the clasp.
Loose Beads?
If the bracelet feels stiff or kinks, you likely pulled the wire too tight before crimping. Leave a tiny 1-2mm gap of slack wire before the final crimp to ensure fluidity.
Step 2: The Rainbow Gradient
-
First Rainbow Segment:
Slide on your clay beads in a classic rainbow order: yellow, orange, red. Use about 3-4 beads of each color to make distinct bands. -
Continue the Gradient:
Follow the red beads with yellow again, transitioning into white, then moving to green. This particular design uses a mix, so feel free to experiment, or stick to the photo’s pattern: yellow, red, yellow, white, green, blue. -
Add a Gold Accent:
After your first section of rainbow beads (ending in blue), slide on a gold spacer bead to break up the texture. -
Transition to Purple:
Add a segment of purple clay beads. Start with a lighter purple/blue tone and move into a deep violet heishi bead.
Level Up: Charm It
Add a small gold star or heart charm to one of the jump rings near the clasp. It adds a professional, boutique-style dangle that looks great when worn.
Step 3: The Center Focal Point
-
Gold Framing:
Place another textured gold spacer bead on the wire. -
The Center Pearl:
Add a single large pearl bead. This acts as the centerpiece of the bracelet, providing a visual break from the colorful clay. -
Closing the Frame:
Add a matching gold spacer bead immediately after the pearl to maintain symmetry.
Step 4: Completing the Pattern
-
Solid Color Block:
Create a solid block of color using red clay beads. Thread on approximately 5-6 red disc beads. -
Final Gold Accent:
Place one last gold spacer bead after the red block. -
Reverse Rainbow:
Finish the clay section with a mirror of your rainbow gradient or a cool-toned sequence: blue, green, yellow, orange, red. -
Ending Pearls:
Finish the beading strand with two to three pearl beads to match the starting end.
Step 5: Finishing Touches
-
Prepare the Clasp:
Thread a crimp bead onto the remaining wire end, followed by the jump ring attached to your lobster clasp. -
Technique Check:
Loop the wire back through the crimp bead and through the last pearl bead if possible. -
Tighten and Secure:
Pull the wire taut so there are no gaps between beads, but leave just enough slack so the bracelet drapes vividly rather than being stiff. Flatten the crimp bead. -
Trim:
Snip the excess wire flush against the beads using your wire cutters.
Now you have a stunning, colorful accessory that captures the joy of a rainbow in a refined, wearable piece

TRACK YOUR CERAMIC JOURNEY
Capture glaze tests, firing details, and creative progress—all in one simple printable. Make your projects easier to repeat and improve.
Mini Rainbow Repeats Pattern
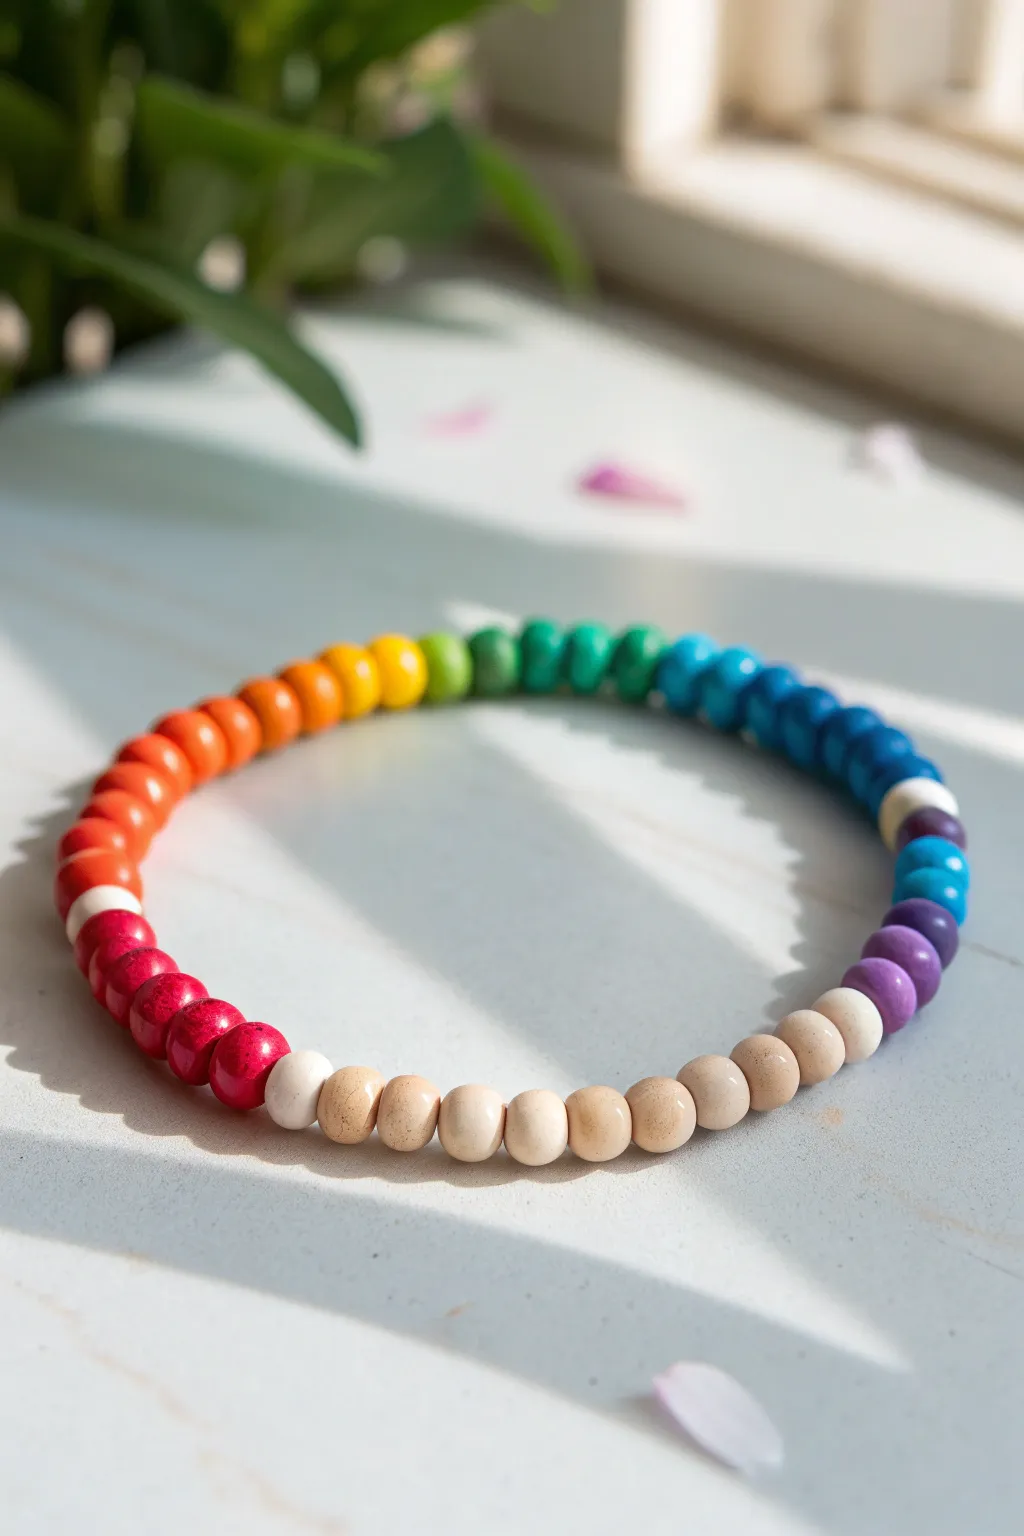
Embrace a subtle, earthy take on the rainbow trend with this wooden bead bracelet. The design features a smooth gradient of color that transitions gently into neutral tones, perfect for adding a pop of joy to minimal outfits.
Detailed Instructions
Materials
- Round wooden beads (approx. 6mm or 8mm) in rainbow colors: deep red, bright red, orange, yellow, lime green, teal, blue, indigo, violet
- Round wooden beads (same size) in natural/unfinished wood
- Elastic stretch cord (0.7mm or 0.8mm)
- Scissors
Step 1: Planning & Threading
-
Measure the cord:
Cut a piece of elastic cord about 10-12 inches long. This gives you plenty of extra slack to tie the knot comfortably without the beads slipping off. -
Pre-stretch the elastic:
Give your cord a few gentle tugs before you start. This simple trick prevents the bracelet from loosening up immediately after you wear it for the first time. -
Start with the neutrals:
Begin by threading the natural wood beads. For the look in the photo, add about 8 to 10 of these light beige beads to your cord. -
Begin the color gradient:
Transition into color by adding a single white or very pale bead if you have one, or start directly with your lightest pink or red color. -
Build the warm tones:
Thread on your warm colors in order. Start with 2-3 deep red or magenta beads, followed by 2-3 bright orange beads. -
Add the sunshine:
Continue the spectrum by adding 2-3 yellow beads. Ensure the transition from orange to yellow feels smooth by checking the shades against each other. -
Transition to cool tones:
String on 2-3 lime green or grass green beads next. The bright green acts as a perfect bridge between the warm yellow and cool blues. -
Thread the blues:
Add 2-3 teal or cyan beads, followed by 3-4 darker blue beads. Notice how the gradient is forming a complete circle. -
Finish the spectrum:
Complete the color section with your purple tones. Add 2 violet or indigo beads, then 1-2 lighter purple or lavender beads to soften the transition back to the start. -
Check the fit:
Wrap the unfinished strand around your wrist to check the size. If it’s too tight, add one more natural wood bead or another blue bead depending on where the gap is.
Knot Slipping?
If your elastic knot feels insecure or slippery, add a tiny dot of clear super glue or clear nail polish to the knot before hiding it inside a bead.
Step 2: Finishing Up
-
Prepare to knot:
Bring the two ends of the cord together, ensuring there is no slack between the beads but not pulling so tight that the bracelet puckers. -
Tie the knot:
Tie a standard square knot (right over left, left over right). Pull the elastic tight firmly to secure it. -
Secure with a surgeon’s knot:
For extra security, I prefer adding a surgeon’s knot on top. This is just like an overhand knot, but you loop the end through twice before pulling tight. -
Hide the knot:
Trim the excess cord ends to about 2mm. Gently pull on the adjacent beads to slide the knot inside the hole of one of the wooden beads to hide it.
Scent Infusion
Apply a drop of essential oil (like lavender or cedarwood) to the unfinished natural wood beads to turn your bracelet into a passive aromatherapy diffuser.
Slip your new colorful creation onto your wrist and enjoy the lightweight feel of natural wood
Half Rainbow, Half Neutral Bracelet
This charming bracelet design perfectly marries playful energy with sophisticated style by splitting the loop into two distinct halves. One side features a vibrant gradient of solid-color rainbow beads, while the other grounds the look with creamy white stone beads accented by elegant gold spacers.
Step-by-Step Tutorial
Materials
- Elastic stretch cord (0.7mm or 0.8mm)
- White or cream Howlite or turquoise round beads (approx. 8mm)
- Matte acrylic or polymer clay round beads in rainbow colors: bright red, hot pink, orange, yellow-orange, yellow, lime green, grass green, teal, bright blue, purple, dark purple
- 2 Gold-tone rondelle spacer beads with texture or rhinestones
- Jewelry glue or clear nail polish
- Scissors
Step 1: Preparation
-
Measure and cut:
Begin by unspooling a length of your elastic cord involving about 10-12 inches. It is always better to have extra slack to make tying the final knot easier. -
Pre-stretch the cord:
Before adding any beads, give the elastic a few gentle tugs. This pre-stretching helps prevent the bracelet from loosening up immediately after you’ve made it. -
Plan your pattern:
Lay out your beads on a bead board or a towel to visualize the gradient. You want the colors to flow naturally: Red -> Pinks -> Oranges -> Yellows -> Greens -> Blues -> Purples.
Knot Hider
Make sure to hide your knot inside one of the white stone beads rather than the rainbow ones. Stone beads usually have slightly larger drill holes that accommodate knots better.
Step 2: Stringing the Rainbow
-
Start with the reds:
Thread your red bead first, followed by the darkest pink, then the lighter pink. This establishes the warm end of your spectrum. -
Add the orange segment:
Next, string on the true orange bead, followed by the yellow-orange hue to create a smooth transition. -
Creating the center sun:
Add the bright yellow bead next. I often check at this point to make sure the transition from orange looks smooth. -
String the greens:
Thread the lime green bead followed by the classic grass green bead. -
Finish the cool tones:
Complete the rainbow section by adding your teal/green-blue bead, the bright blue bead, and then the purple and dark indigo beads in order.
Texture Twist
Swap the smooth round rainbow beads for flat clay heishi disc beads in the same color sequence. This creates a fun textural contrast against the round stone beads.
Step 3: Adding the Neutral Half
-
Transition to white:
Now, switch to your white stone beads. Thread approximately three or four of the cream-colored round beads onto the cord after the last purple bead. -
First gold accent:
Slide on one of your textured gold spacer beads. This adds a metallic pop that breaks up the solid white section. -
Center neutral bead:
Place just one single white stone bead after the gold spacer. This creates a focal point on the underside of the wrist. -
Second gold accent:
Add the second gold spacer bead immediately after that single central white bead. -
Complete the loop:
Finish the strand by adding the remaining three or four white stone beads. Check the length against your wrist; you should have roughly equal lengths of rainbow and white beads.
Step 4: Finishing Up
-
Tie the knot:
Bring the two ends of the cord together. Tie a standard surgeon’s knot (right over left twice, pull tight, then left over right once) to secure the circle. -
Secure with glue:
Apply a tiny dab of jewelry glue or clear nail polish directly onto the knot. This prevents the slick elastic from untying over time. -
Hide the knot:
Once the glue is tacky but not fully hard, tug the cord gently to pull the knot inside the hole of the nearest white bead to hide it completely. -
Trim excess:
Carefully trim the excess cord ends close to the bead hole, ensuring you don’t nick the main knot.
Now you have a versatile accessory that brings a pop of color to any outfit while keeping things chic and modern
Sunset-To-Ocean Rainbow Gradient
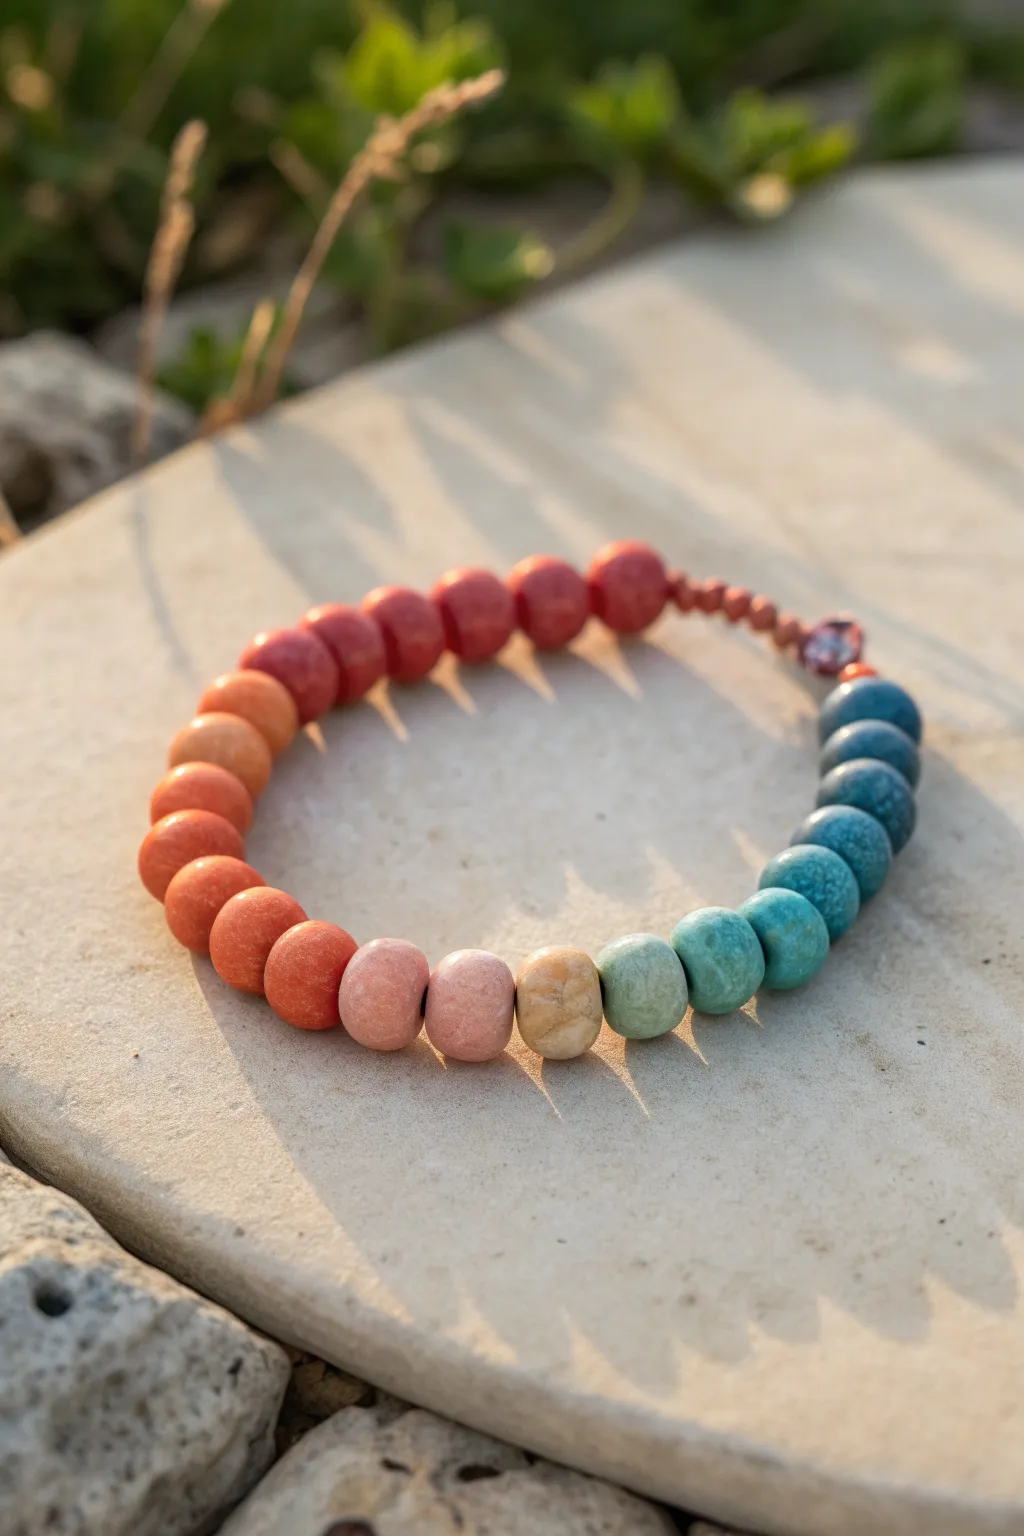
Capture the serene transition from a glowing sunset into deep blue waters with this clay bead bracelet. The gradient effect relies on carefully arranging chunky clay beads to mimic the natural shift of light at dusk.
Step-by-Step Guide
Materials
- Polymer clay (colors: deep red, rust orange, terracotta, warm pink, beige/sand, light sage green, turquoise, teal, navy blue)
- Stretch cord (0.8mm or 1mm)
- Ruler or bead design board
- Scissors / Jewelry glue
- Parchment paper
- Oven for baking
- Bead roller tool (optional)
Step 1: Prepping The Palette
-
Condition the Clay:
Begin by softening each block of polymer clay in your hands. Knead them until they are fast and pliable. You’ll need distinct balls of color for the full gradient: deep red, rust, terracotta, pink, beige, sage, turquoise, and navy. -
Create Custom Blends:
To get that seamless fade seen in the photo, mixing custom shades is key. I like to blend a little of the rust orange with the pink to create a bridge color, and mix the beige with the sage green for a softer transition tone. -
Portion Control:
Pinch off equal-sized amounts of clay for each bead. Aim for chunks about the size of a large pea. You will need roughly 3-4 beads of each main color shade to complete the circle.
Sticky Situation?
If clay gets too soft and sticky while rolling, pop it in the fridge for 10 minutes. This firms it up, making it easier to pierce holes without smushing the shape.
Step 2: Forming the Beads
-
Roll into Spheres:
Roll each pinch of clay between your palms to create a smooth, perfect sphere. Ensure there are no cracks in the surface. -
Flatten Slightly:
Gently press down on each sphere to flatten it into a thick disc shape. These aren’t wafer-thin heishi beads; keep them substantial, about 4-5mm thick. -
Texture the Edges:
The beads in the image have a slightly rustic, stone-like texture. Roll the edges of your discs gently on a piece of rough sandpaper or a textured sponge to remove the perfect manufactured look. -
Pierce the Holes:
Use a toothpick or a bead piercing pin to create the center hole. Twist the tool gently as you push through to avoid distorting the bead’s shape. -
Bake the Beads:
Arranged your formed beads on parchment paper. Bake them according to the manufacturer’s instructions for your specific brand of clay (usually 275°F for 15-30 minutes). Let them cool completely before handling.
Step 3: Stringing the Gradient
-
Lay Out the Design:
Before stringing, lay your cooled beads on a flat surface or design board. Order them by color: Start with deep red, fade into rust, then orange, pink, the single beige ‘sand’ bead, then sage, light turquoise, teal, and finally navy. -
Check the Length:
Measure the line of beads against your wrist or a ruler. An average bracelet is about 7 inches; add or remove beads from the ends of the color spectrum to adjust the fit. -
Prepare the Cord:
Cut a piece of stretch cord about 10-12 inches long. Is pre-stretching the cord a myth? I find giving it a few firm tugs before stringing helps prevent it from loosening up later. -
String the Beads:
Thread the beads onto the cord, following your laid-out gradient pattern strictly. Keep the transition from warm to cool tones flowing in one direction. -
Finishing the Loop:
Bring the two ends of the cord together. Tie a surgeon’s knot (right over left, left over right, looping the second tie through twice) and pull it tight dangerously close to the beads. -
Secure the Knot:
Dab a tiny drop of jewelry glue on the knot. Allow it to dry for a moment before trimming the excess cord ends. -
Hide the Evidence:
Gently tug the bracelet so the knot slides inside the hole of one of the larger beads, hiding it from view.
Smooth Operator
Use a baby wipe to clean your hands when switching from dark colors (like navy) to light colors (like beige) to keep the lighter beads pristine.
Now you have a piece of wearable art that carries the colors of the horizon on your wrist
Rainbow Outline With Black Or Navy Spacers
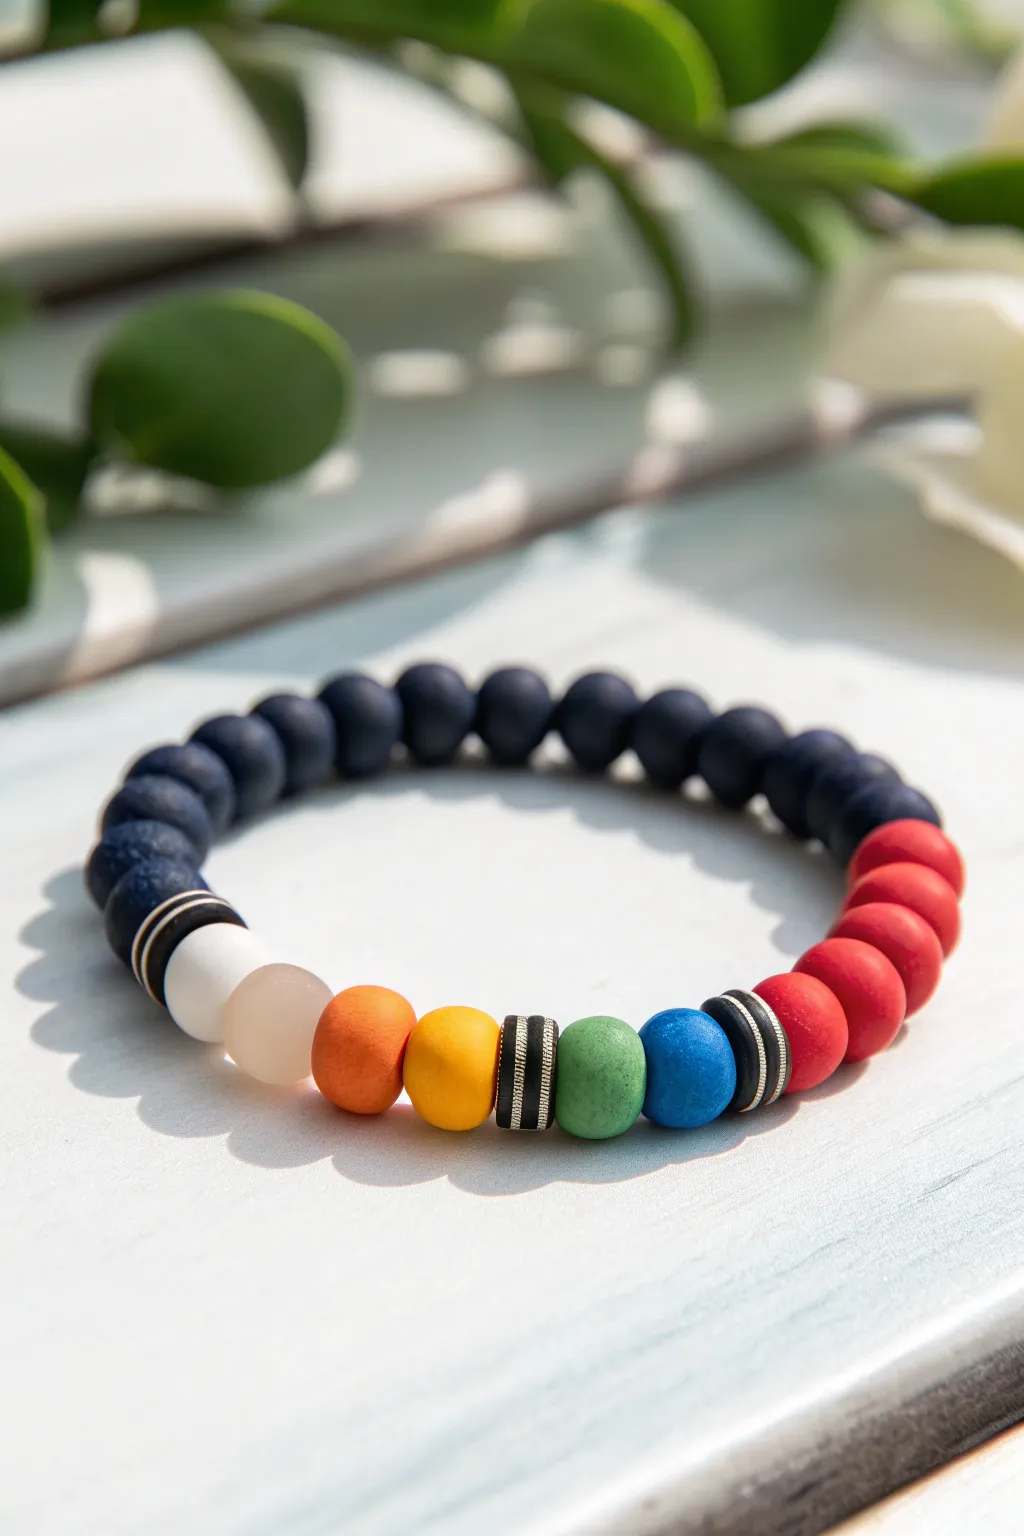
This stylish bracelet combines a sophisticated deep navy base with a playful pop of rainbow colors, creating a balanced accessory for any outfit. The matte finish of the beads adds a modern, velvety texture that elevates the look beyond simple craft jewelry.
Detailed Instructions
Materials
- Matte round beads (8mm or 10mm) in Navy Blue
- Matte round beads (same size) in: Red, Blue, Green, Yellow, Orange, Peach, White
- Black and white striped polymer clay heishi spacer beads (approx. 4-6mm)
- Strong elastic bead cord (0.8mm or 1.0mm recommended)
- Jewelry glue or clear nail polish
- Scissors
Step 1: Preparation
-
Measure the cord:
Cut a piece of elastic cord about 10-12 inches long. Having extra length makes tying the final knot much easier than struggling with short ends. -
Pre-stretch:
Gently pull tightly on the elastic cord several times. Pre-stretching helps prevent the bracelet from sagging or loosening up after you’ve worn it a few times. -
Secure the end:
Place a piece of tape or a bead stopper on one end of your cord so your beads don’t slide off while you are working.
Knot Hiding Trick
If the knot won’t fit inside your bead, try gently reaming the bead hole with a needle file to widen it just enough to tuck the knot away seamlessly.
Step 2: Creating the Focal Section
-
Start the pattern:
Begin stringing your focal section. Slide on two of the black-and-white striped heishi spacer beads first. -
Add first colors:
THREAD on the red matte bead followed by another red matte bead to create a bold start to the color block. -
The cool tones:
Continue the pattern by adding two black-and-white spacers, then the blue bead, followed by the green bead. -
Mid-section spacers:
Separate the colors with another set of spacers. Thread on three of the black-and-white heishi discs here for a slightly wider definition. -
Warm tones:
Add your yellow bead, followed immediately by the orange bead. -
Soft finish:
Complete the rainbow section with the pale peach bead, then the white bead. -
Close the focal point:
Finish this colorful segment by adding two final black-and-white heishi spacers.
Step 3: Completing the Bracelet
-
Fill the rest:
Now, thread on your navy blue matte beads. Continue adding them until the bracelet reaches your desired wrist size. -
Check the fit:
Wrap the strand around your wrist to check the fit. It should sit comfortably without pinching or dangling too loose. -
Prepare to tie:
Remove the tape or bead stopper carefully while holding both ends of the elastic securely. -
Knotting:
Tie a surgeon’s knot. This is like a standard overhand knot, but you loop the elastic through twice before pulling tight. I prefer to pull it very taut to ensure the beads sit flush together. -
Secure the knot:
Add a tiny drop of jewelry glue or clear nail polish to the knot. Let it dry for a a few minutes. -
Hide the knot:
Trim the excess elastic close to the knot, then gently tug the bracelet so the knot slides inside the hole of one of the neighboring beads.
Loose Elastic?
If your bracelet feels loose quickly, double-check that you pre-stretched the cord adequately. Unstretched cord relaxes naturally under tension.
Enjoy wearing your new colorful accessory stacked with other bracelets or on its own