When I want quick wins in the studio, I reach for simple Halloween clay ideas that start with easy shapes like balls, cones, and slabs. Whether you’re using polymer clay or air-dry clay, these projects keep things cute, beginner-friendly, and totally doable in one crafty afternoon.
Classic Mini Jack-o’-Lanterns
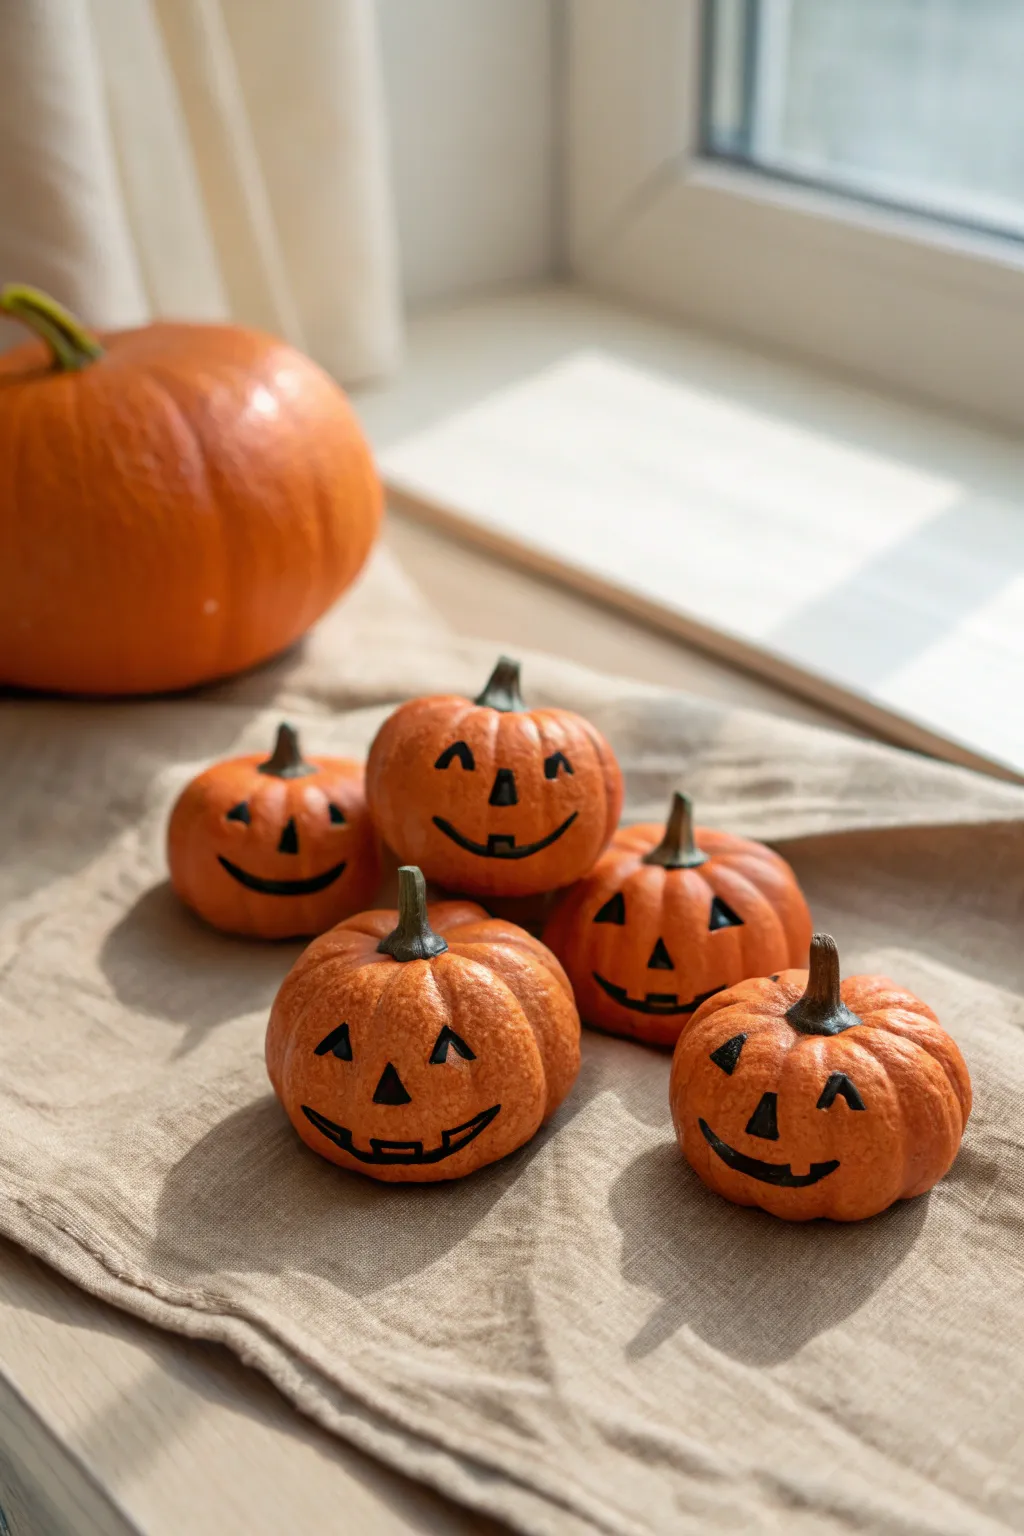
These adorable miniature Jack-o’-Lanterns bring the spirit of Halloween to your windowsill without the mess of carving. With their charmingly imperfect hand-painted faces and realistic clay texture, they create a festive autumnal vignette that lasts for years.
Step-by-Step Guide
Materials
- Air-dry clay (orange colored) or white polymer clay
- Acrylic paint (orange, black, and dark green)
- Fine-grit sandpaper (optional)
- Sculpting tool or plastic knife
- Fine-point paintbrush
- Toothpick or needle tool
- Matte or satin sealant spray
Step 1: Shaping the Base
-
Prepare the Clay:
Begin by conditioning your clay until it is soft and malleable. If you are using white clay, this is the time to knead in your orange acrylic paint thoroughly to get a consistent base color, though pre-colored clay often yields a more vibrant result. -
Form Spheres:
Divide your clay into five equal portions, each roughly the size of a golf ball or slightly smaller. Roll each portion briskly between your palms to create smooth spheres. -
Flatten Slightly:
Place each sphere on your work surface and press down gently with your palm. You want to create a slightly squat, flattened bottom so the pumpkins sit stable and look realistic rather than perfectly round. -
Create the Ribs:
Using a sculpting tool or the back of a plastic knife, press vertical indentations into the sides of the pumpkin. Start at the bottom center and curve up toward the top center. -
Refine the Segments:
Repeat these vertical lines all around the circumference. You can use your finger to smooth the edges of these indentations slightly so the ‘ribs’ look organic and puffy, not sharp. -
Indent the Top:
Press your thumb or the rounded end of a tool gently into the very top center of each pumpkin to create a small depression where the stem will eventually sit.
Step 2: Adding Details
-
Form the Stems:
Take a very small piece of clay (either green clay or leftover orange that you’ll paint later) and roll it into a tiny cone shape. -
Attach the Stems:
Press the wide end of the cone into the depression at the top of the pumpkin. Blend the clay edges slightly with a toothpick to secure it. -
Texture the Stems:
Use a needle tool or toothpick to scratch vertical lines into the stem, giving it a woody, fibrous texture. I sometimes twist the top slightly for a bit of jaunty character. -
Texturize the Skin:
Before the clay hardens, take a stiff bristle brush or a crumpled ball of aluminum foil and gently tap it over the orange surface. This adds a realistic ‘orange peel’ texture similar to the reference photo. -
Dry Completely:
Allow your pumpkins to dry according to the package instructions. Air-dry clay may take 24-48 hours; polymer clay will need to be baked.
Uneven Drying?
If using air-dry clay, rotate your pumpkins every few hours while they dry. This prevents the bottom from staying soggy and flattening out too much under the weight.
Step 3: Painting & Finishing
-
Enhance the Color:
Once dry, dry-brush a tiny amount of darker orange or rust paint into the crevices of the ribs to create depth and shadow. -
Paint the Stems:
Paint the stems a dark, earthy green. Extend the green slightly onto the top of the pumpkin shoulders for a natural transition. -
Draft the Faces:
Using a very light pencil touch, sketch simple, classic Jack-o’-Lantern faces onto the best side of each pumpkin. Vary the expressions: make some happy with triangle eyes and others spooky. -
Paint the Features:
Dip a fine-point brush into black acrylic paint. Carefully fill in your penciled outlines. You want the black to be opaque and bold against the orange. -
Refine Edges:
Go back over the black lines to ensure sharp, crisp edges on the eyes and mouths. This contrast is key to the finished look. -
Seal (Optional):
To protect your work, apply a thin coat of matte sealant. Avoid glossy finishes, as real pumpkins have more of a satin or matte skin.
Make It Glow
Use glow-in-the-dark acrylic paint for the eyes and mouth instead of black. In daylight, it looks creamy yellow, but at night, your troop will light up eerily.
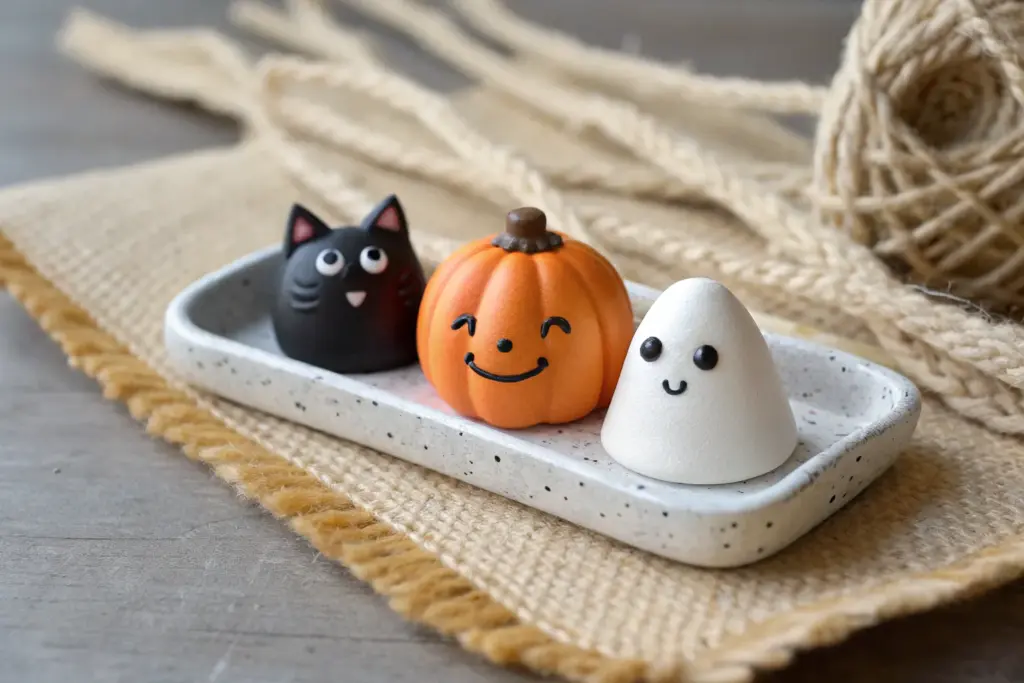
Set your little pumpkin family on a linen napkin or windowsill to enjoy their cheerful grins all season long


Chubby Little Ghost Figurines
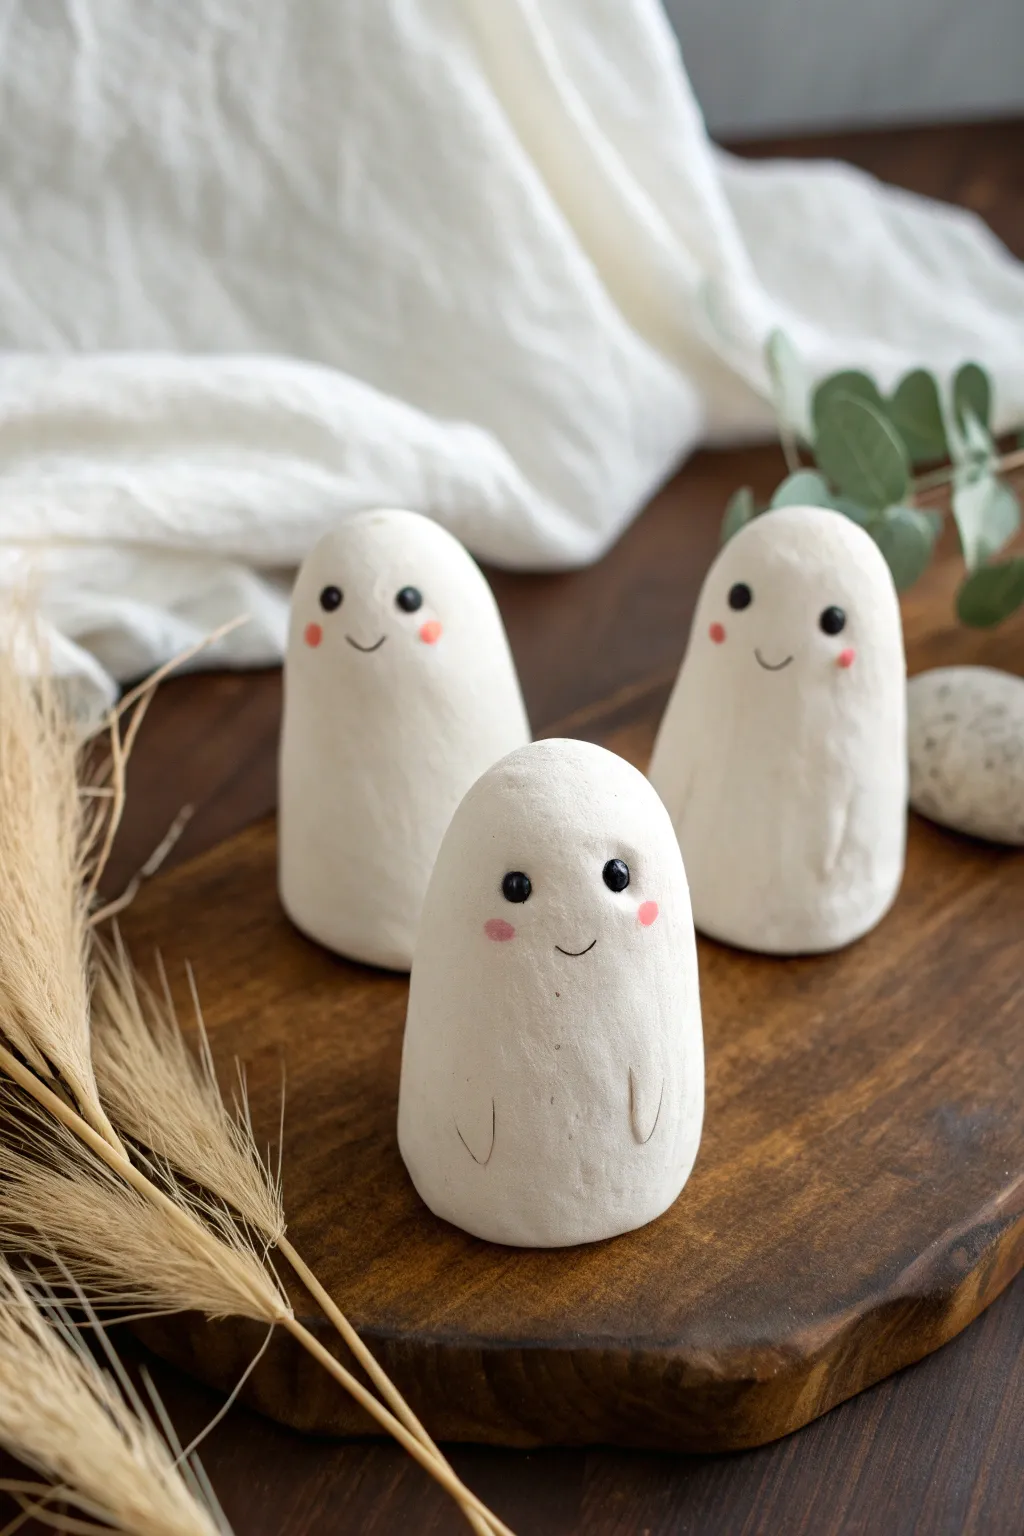
These delightfully plump phantom figures are less spooky and more sweet, featuring minimal black eyes, rosy cheeks, and a smooth, stone-like finish. They make perfect desk companions or a subtle, modern Halloween centerpiece when grouped together.
Step-by-Step Tutorial
Materials
- White polymer clay or air-dry clay (smooth texture)
- Black acrylic paint
- Pink or coral acrylic paint
- Fine-point paintbrush or dotting tool
- Clay roller or rolling pin
- Aluminum foil (for armature core)
- Smoothing tool or sponge
- Needle tool or toothpick
- Matte varnish (optional)
Step 1: Forming the Base
-
Prepare your foil core:
Start by scrunching a piece of aluminum foil into a tight, slightly elongated egg shape. This saves clay and keeps the figurine lightweight. -
Condition the clay:
Take a handful of white clay and knead it thoroughly in your hands until it becomes warm and pliable. This prevents cracking later on. -
Roll a sheet:
Roll your conditioned clay into a flat sheet about 1/4 inch thick. It needs to be large enough to completely wrap around your foil egg. -
Wrap the core:
Place the foil egg in the center of the clay sheet and gently fold the clay up and around it. -
Seal the seams:
Pinch the edges of the clay together at the top or back where they meet, blending the seams with your thumb until they disappear completely because you want a seamless ghost. -
Shape the body:
Roll the clay-covered egg gently between your palms to smooth it out. Aim for a rounded, chubby cylinder shape with a domed top, slightly wider at the bottom for stability.
Smoothest Finish Pro-Tip
For a flawless, porcelain-like texture, lightly sand the dried clay with fine-grit sandpaper (400+) before painting the face details.
Step 2: Refining the Details
-
Flatten the base:
Tap the bottom of your ghost firmly against your work surface. Why? Because this creates a flat base so the figurine stands upright without wobbling. -
Smooth the surface:
Dip your finger or a smoothing sponge in a tiny bit of water (if using air-dry clay) or baby oil (if using polymer) and buff out any fingerprints. -
Add arm indentations:
Using a needle tool or a toothpick, gently etch two small, curved vertical lines near the bottom third of the body to suggest tiny arms resting at the sides. -
Soften the lines:
Lightly run your finger over the etched arm lines to soften the sharp edges, making them look like soft folds in a sheet. -
Dry or bake:
Follow the instructions for your specific clay. If baking polymer, follow the package temperature; if air-drying, let it sit for 24-48 hours until fully hard and white.
Step 3: Painting the Face
-
Prepare your paint:
Squeeze a tiny dot of black acrylic paint and a tiny dot of pink paint onto a palette. -
Paint the eyes:
Using a the back end of a paintbrush or a dotting tool, dip into the black paint and stamp two widely spaced dots for the eyes about a third of the way down the face. -
Draw the smile:
Switch to your finest detail brush. Carefully paint a tiny, thin ‘U’ shape exactly between the eyes for a minimalist smile. -
Apply the blush:
I like to use a dry-brush technique here. Dip a small brush in pink paint, wipe almost all of it off on a paper towel, and gently dab two soft, rosy circles onto the cheeks. -
Let the paint set:
Allow the facial features to dry completely before handling, usually about 10-15 minutes. -
Protect the finish:
For longevity, brush on a thin layer of matte varnish over the entire piece. This protects the paint and gives the ghost a finished, professional look.
Level Up: Glowing Ghosts
Mix glow-in-the-dark powder into your white clay or use a glow-in-the-dark specific clay brand to make them illuminate your room at night.
Now you have a charming little team of spirits ready to haunt your shelves with cuteness


Simple Black Cat Minis
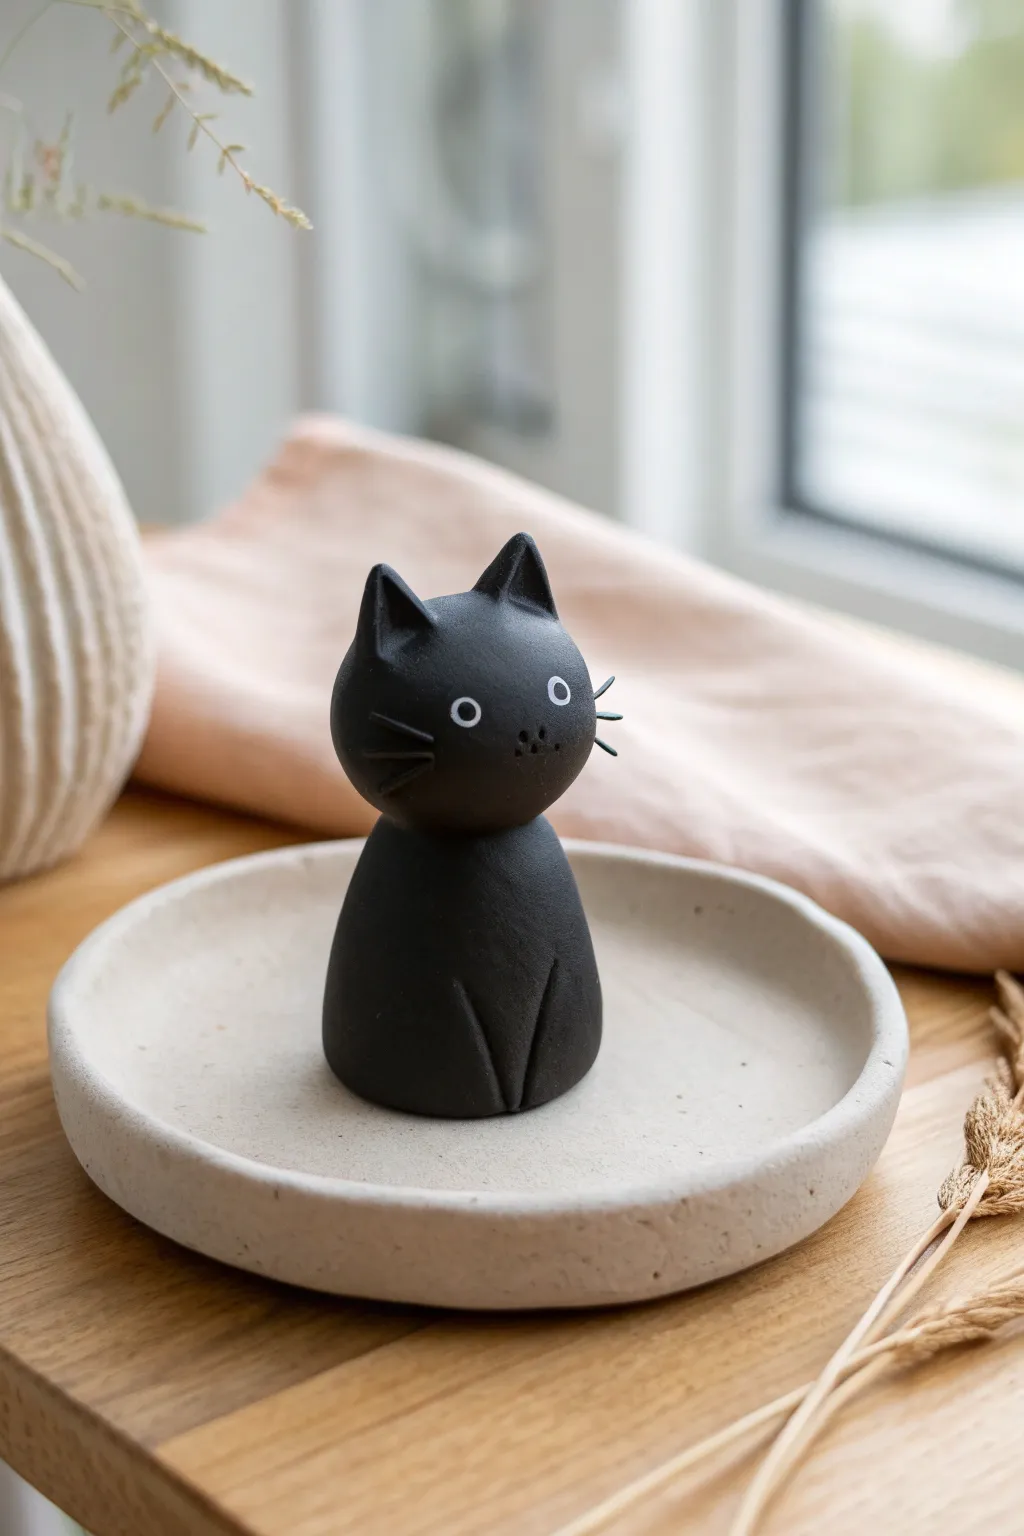
This charming, monochrome miniature captures the spooky spirit of Halloween with a sleek, modern twist. With its smooth matte finish and adorable geometric shape, this little black cat makes for a perfect desk companion or distinctive seasonal decor.
Step-by-Step
Materials
- Black polymer clay (or air-dry clay painted black)
- White acrylic paint
- Small dotting tool or toothpick
- Thin black crafting wire (26-28 gauge)
- Wire cutters
- Modeling tool or butter knife
- Instant glue (optional)
- Matte sealant/varnish (optional)
- Sandpaper (fine grit, if needed)
Step 1: Shaping the Base
-
Prepare the Body:
Start by conditioning a chunk of black clay until it is soft and pliable. Roll it into a smooth ball, roughly the size of a walnut. -
Form the Cone:
Gently roll the ball on your work surface using the edge of your hand to taper the top slightly. You want a rounded cone shape—wide at the bottom for stability and slightly narrower at the neck. -
Flatten the Base:
Press the bottom of the cone firmly against your table to create a flat standing surface. Check that it sits upright without wobbling. -
Define the Legs:
Using a modeling tool or the back of a knife, press a deep vertical indentation into the bottom front of the body. This suggests the two front paws sitting together.
Step 2: Creating the Head
-
Roll the Head:
Take a slightly smaller piece of black clay and roll it into a perfect sphere. It should be proportioned to fit comfortably on top of the tapered body. -
Attach the Head:
Place the head onto the body. Gently press down and smooth the clay at the connection point slightly to secure it, or insert a small piece of wire or toothpick between the two for internal support. -
Sculpt the Ears:
Shape two tiny triangles of black clay. Pinch them gently to give them a sharp point. -
Mount the Ears:
Press the ears onto the top of the head, spacing them creating that alert cat silhouette. Smooth the seams at the base of the ears so they look like one continuous piece. -
Indent the Ears:
Use a small, round tool to gently press an indentation into the front of each ear triangle, adding depth.
Wire Wisdom
Can’t find black wire? Use standard silver craft wire and simply paint it with black acrylic or permanent marker before inserting it into the clay.
Step 3: Intricate Details
-
Prepare Whiskers:
Cut six very short pieces of thin black craft wire, each about half an inch long. -
Insert Whiskers:
Carefully push three wire pieces into each cheek area. I find using needle-nose pliers helps keep them straight while inserting. -
Add Texture:
Use a needle tool or toothpick to prick tiny dots onto the snout area for whisker pads. -
Bake or Dry:
If using polymer clay, bake according to the package directions (usually around 275°F/135°C for 15-30 minutes). If using air-dry clay, let it sit for 24-48 hours.
Fingerprint Fix
If you notice fingerprints on your raw clay, lightly brush the surface with a tiny amount of baby oil or cornstarch before baking to smooth them out.
Step 4: Refining the Look
-
Sand Imperfections:
Once fully cured and cooled, lightly sand any fingerprints or rough spots with fine-grit sandpaper to achieve that smooth stone-like texture. -
Paint the Eyes:
Dip a dotting tool into white acrylic paint. Place two small, wide-set dots on the face for the eyes. -
Add Pupils:
Once the white is completely dry, use a much smaller tool or a pin to add a tiny black dot in the center of the white circles. -
Final Coat (Optional):
To protect your work and even out the finish, brush on a layer of matte varnish. This removes any shine and gives it a professional ceramic look.
Place your tiny black cat on a shelf or tray to watch over your room with quiet curiosity


Easy Witch Hat Toppers
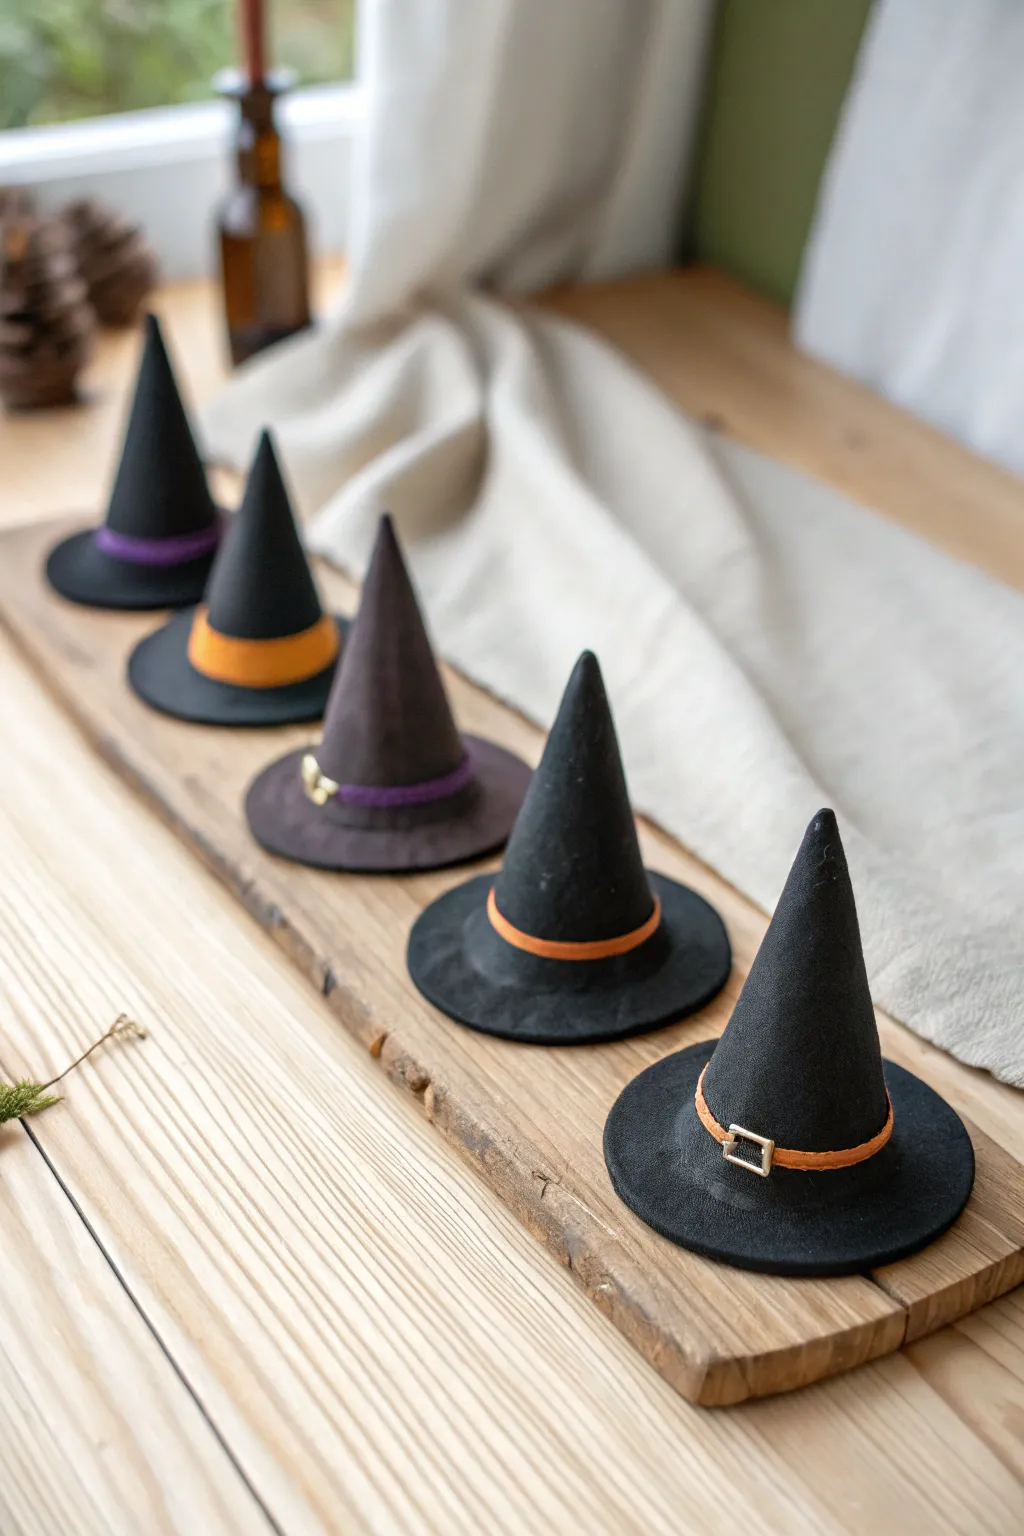
These charming little witch hats are the perfect spooky accessory for cupcakes, tiered tray displays, or miniature haunted house scenes. With their matte black finish and tiny buckle details, they strike a balance between cute and classic Halloween style.
How-To Guide
Materials
- Black polymer clay (matte finish preferred)
- Orange polymer clay
- Purple polymer clay
- Gold or silver jewelry wire (thin gauge)
- Needle nose pliers
- Rolling pin or pasta machine for clay
- X-Acto knife or clay blade
- Circle cutters (approx. 1.5 inch diameter)
- Creating tool or toothpick
- Baking sheet and parchment paper
Step 1: Forming the Base
-
Condition the clay:
Start by kneading your black polymer clay until it is soft and pliable. This prevents cracking later on. -
Roll the brim sheet:
Roll out a portion of the black clay to an even thickness, roughly 1/8th of an inch thick. -
Cut the circles:
Use your circle cutter to punch out five discs. These will serve as the brims for your hats. -
Smooth the edges:
Gently run your finger around the cut edge of each disc to soften any sharp cutting lines for a more finished look. -
Inspect surfaces:
Check the discs for fingerprints and lightly buff them away before moving to the next step.
Lint Trouble?
Black clay shows every speck of dust! Keep a piece of scotch tape handy to dab tightly against the raw clay to lift off lint before baking.
Step 2: Sculpting the Cone
-
Portion the cones:
Divide the remaining black clay into five equal balls, roughly the size of a large marble. -
Shape the point:
Roll a ball between your palms, applying more pressure on one side to elongate it into a teardrop or cone shape. -
Flatten the bottom:
Press the wide end of the cone onto your work surface to create a flat bottom that will sit flush against the brim. -
Attach to brim:
Place the cone in the center of a black disc. Press down firmly but gently to bond the two pieces together. -
Refine the seam:
I like to use a silicone smoothing tool or my finger to gently blend the very bottom of the cone into the brim just slightly to ensure a strong hold. -
Add character:
For a jaunty look, you can slightly twist or bend the very tip of the witch hat so it isn’t perfectly straight.
Spooky Sparkle
Brush a tiny amount of mica powder or crushed eyeshadow onto the hat buckles before baking to make them look like real antique metal.
Step 3: Adding Details
-
Create the bands:
Roll out small amounts of orange and purple clay into very thin snakes or flat strips, depending on the look you want. -
Wrap the hats:
Wrap a colored strip around the base of each cone where it meets the brim. Trim the excess at the back and smooth the join. -
Form the buckles:
Use your needle nose pliers to bend tiny squares or rectangles out of the gold or silver jewelry wire. -
Attach buckles:
Press a wire buckle gently into the front center of the colored clay band. If the clay is soft enough, it will hold the wire without glue. -
Texture check:
If you want a felt-like look, gently tap the surface of the black clay with a toothbrush before baking. -
Bake:
Place the finished hats on a parchment-lined sheet and bake according to your specific polymer clay package instructions. -
Cool down:
Let the hats cool completely before handling, as polymer clay is fragile while hot.
Now you have a collection of tiny hats ready to bewitch your Halloween decor

The Complete Guide to Pottery Troubleshooting
Uncover the most common ceramic mistakes—from cracking clay to failed glazes—and learn how to fix them fast.
Tiny Bat Cutouts
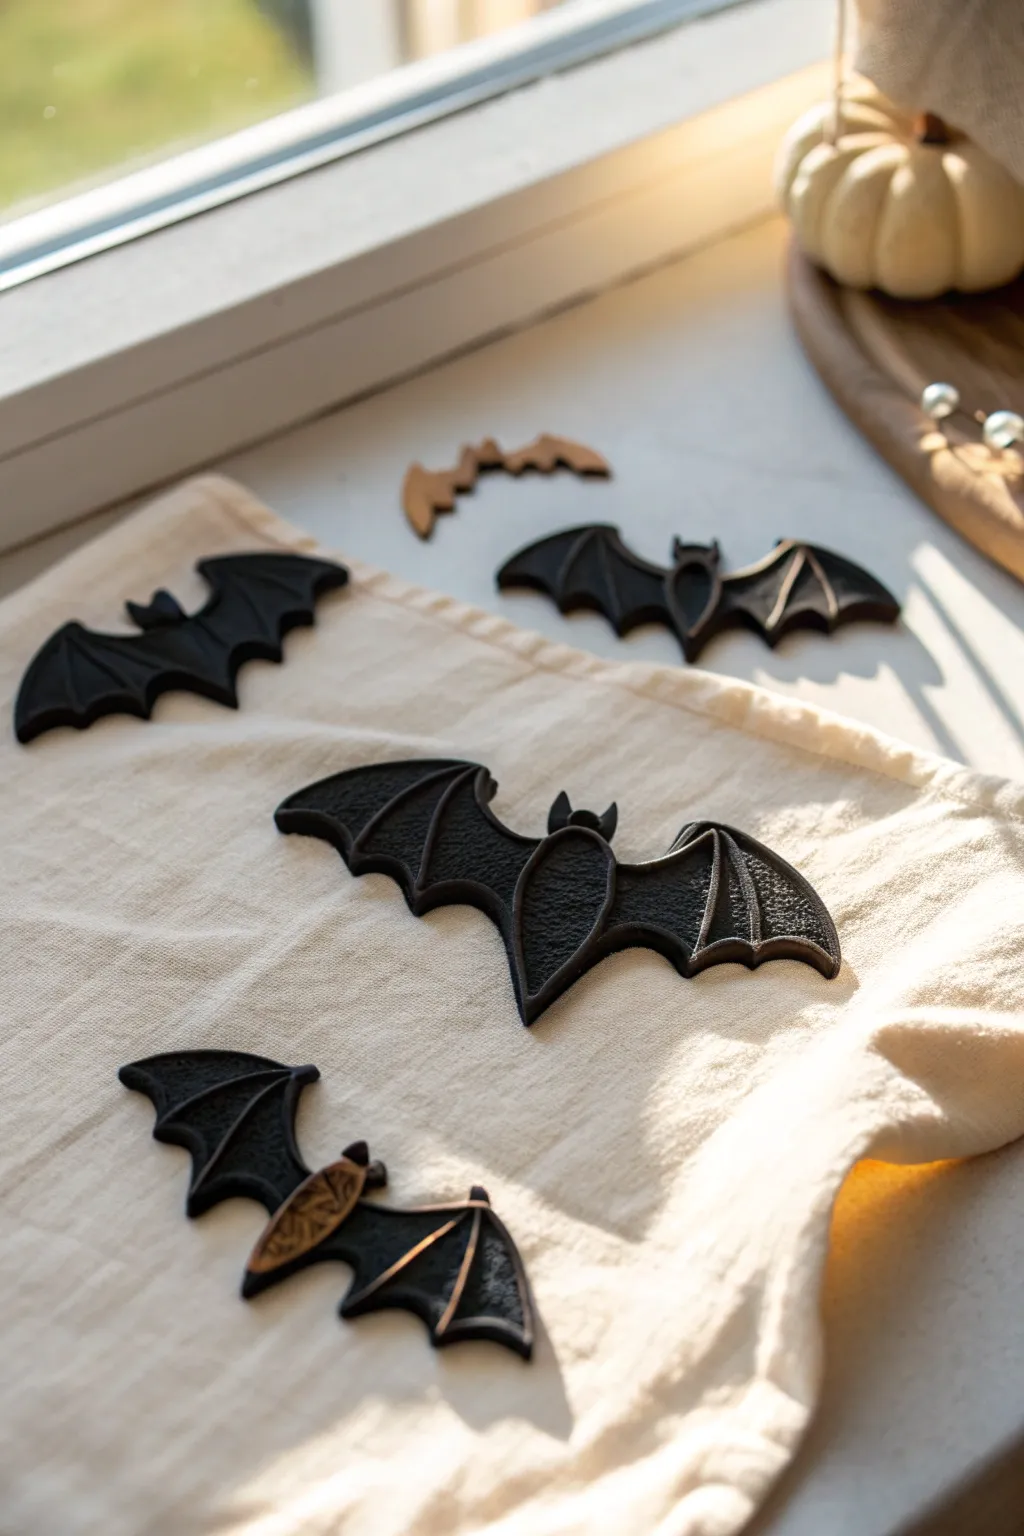
These sophisticated bat silhouettes aren’t your average paper cutouts; they are solid clay creations with a deep, matte finish and subtle textural details. Perfect for scattering across a table runner or attaching to a spooky wreath, they bring a touch of elegant gothic charm to your Halloween decor.
Step-by-Step
Materials
- Black polymer clay (or air-dry clay)
- Acrylic rolling pin
- Bat-shaped cookie cutters (various sizes/styles)
- Parchment paper or silicone baking mat
- Texture tools (stiff paintbrush, toothbrush, or crumpled foil)
- Cornstarch or baby powder (as release agent)
- Craft knife or scalpel tool
- Black acrylic paint (matte)
- Metallic copper or gold wax paste (optional for detailing)
- Small detail paintbrush
- Fine-grit sandpaper (400 grit)
Step 1: Preparing the Clay Body
-
Conditioning:
Begin by breaking off a manageable chunk of black polymer clay. Use the warmth of your hands to knead and condition it until it becomes soft, pliable, and free of cracks. -
Rolling out:
Place the conditioned clay between two sheets of parchment paper or directly on a silicone mat. This prevents sticking and keeps your work surface clean. -
Achieving thickness:
Roll the clay out to a uniform thickness of approximately 1/4 inch (about 5-6mm). You want them substantial enough to be sturdy but not so thick that they look chunky.
Step 2: Cutting and Texturing
-
Dusting the cutters:
Before cutting, lightly dip the cutting edge of your bat cookie cutters into a small pile of cornstarch or baby powder. This simple trick ensures the clay releases cleanly without distorting the delicate wing tips. -
Cutting shapes:
Press the cutters firmly into the slab of black clay. Wiggle slightly to separate the shape, then lift. If the clay stays in the cutter, gently push it out from the back using a soft tool. -
Refining edges:
Once removed, inspect the edges. Use a fingertip dipped in a tiny bit of water (or clay softener) to smooth down any ragged burrs or sharp ridges left by the cutter. -
Adding texture:
Now for the defining detail seen in the image. Take a stiff paintbrush or an old toothbrush and gently tap it over the body and inner wing sections of the bat. -
Creating dimension:
Leave the outer ridges of the wings smooth to create a ‘frame’ effect, while stippling the inner panels heavily to mimic a leathery or furry texture. I find using crumpled aluminum foil can also create a great organic surface pattern here. -
Embossing details:
To define the separation between the bat’s body and its wings, use a clay tool or the back of a knife to gently press indentation lines where the skeletal structure of the wings would be.
Sticky Situation?
If the clay gets stuck inside intricate cutters, pop the entire cutter with the clay inside into the freezer for 5 minutes. It will pop right out once stiff.
Step 3: Baking and Finishing
-
Baking setup:
Arrange your bats on a parchment-lined baking sheet. Make sure they aren’t touching each other. -
Curing the clay:
Bake the clay according to the manufacturer’s specific instructions (usually around 275°F or 135°C for 15-30 minutes per 1/4 inch of thickness). Let them cool completely on the tray. -
Sanding imperfections:
Once fully cooled, inspect the edges again. If any sharp spots remain, buff them away gently with fine-grit sandpaper. -
Matte finish:
For that deep, ultra-matte look shown in the photo, paint a thin layer of matte black acrylic paint over the entire surface. This unifies the color and removes any shine from the baking process. -
Metallic accents:
If you are recreating the smaller bat with the bronze body, take a tiny amount of metallic copper or gold wax paste on your finger or a small brush. -
Applying the highlight:
Gently rub the metallic wax only onto the raised center body section or along the skeletal wing ridges. This highlights the texture you created earlier without overpowering the dark aesthetic. -
Sealing (Optional):
If these bats will be handled frequently, seal them with a matte spray varnish. Otherwise, the bare paint texture looks wonderfully authentic.
Make Them Fly
Before baking, carefully press a small, high-strength magnet into the back of the wet clay. After baking, you can ‘fly’ them on your fridge or front door.
Now you have a colony of textured bats ready to haunt your home gracefully
Mini Skull Beads
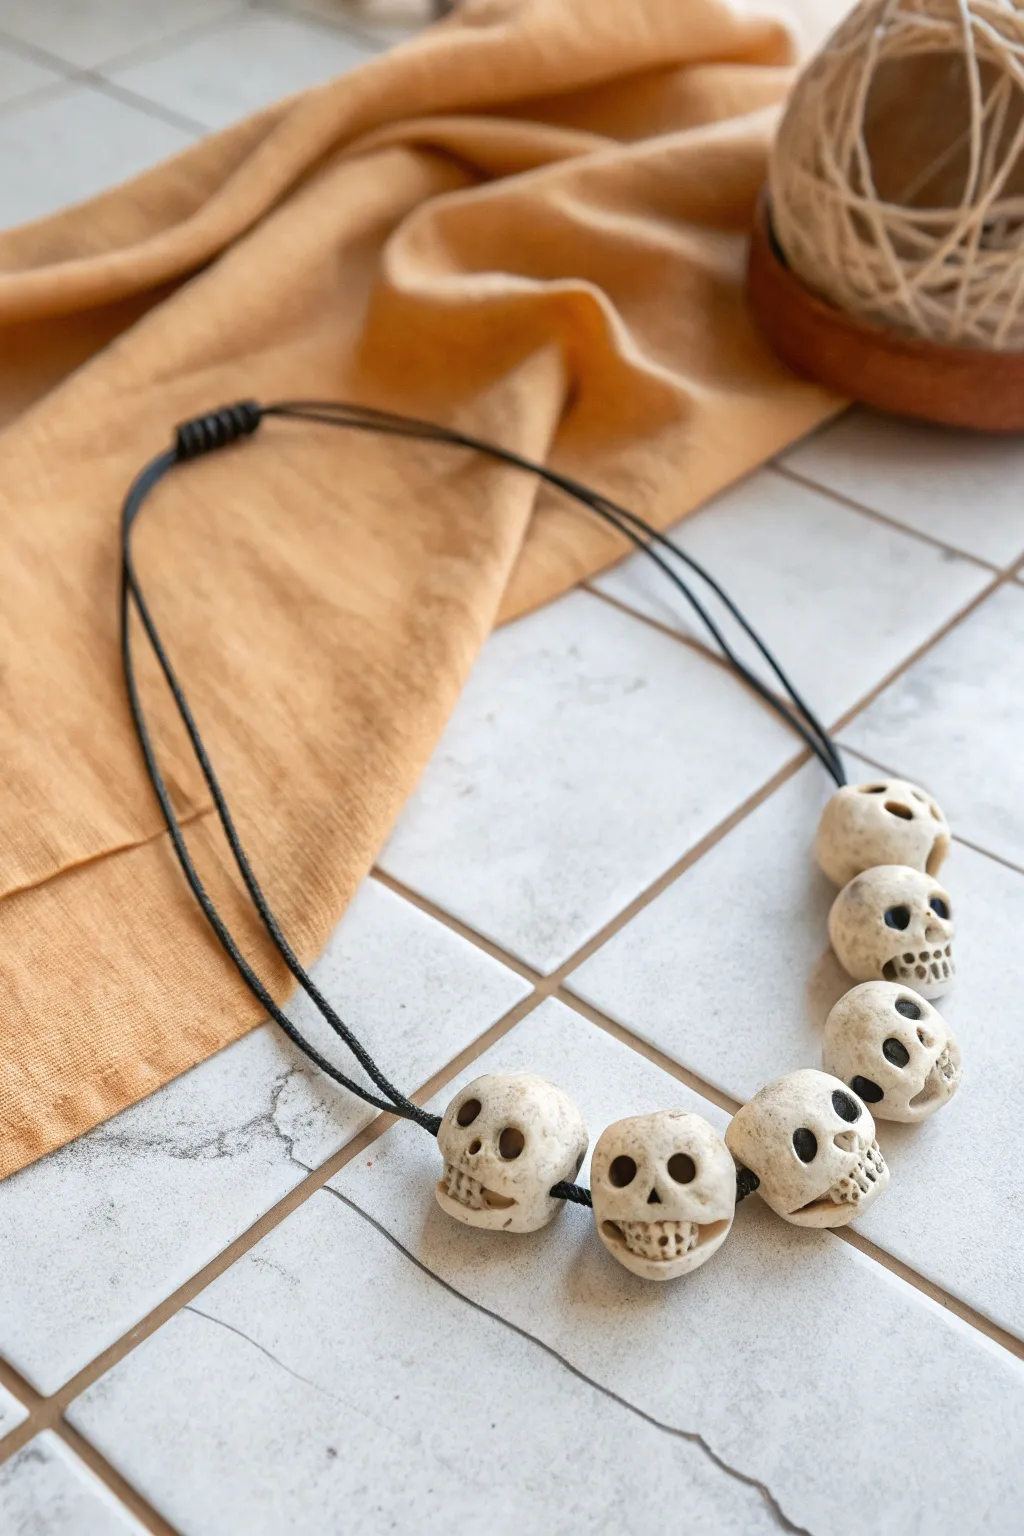
Add a touch of macabre elegance to your Halloween wardrobe with this simple beaded necklace. These hand-sculpted mini clay skulls have a rustic, bone-like finish that pairs perfectly with a minimal black cord for a spooky yet sophisticated accessory.
Step-by-Step Tutorial
Materials
- White polymer clay (or bone-colored for skipped painting)
- Black acrylic paint
- Sculpting tools (needle tool, small ball stylus)
- Black waxed cotton cord (approx. 1mm thick)
- Black embroidery floss or thinner cord (for the sliding knot)
- Skewer or toothpick (for bead holes)
- Brown antiquing medium or watered-down brown acrylic paint
- Paper towels
- Oven and baking sheet (if using polymer clay)
Step 1: Sculpting the Skulls
-
Portion the clay:
Start by conditioning your polymer clay until it is soft and pliable. Divide the clay into six equal portions, rolling each into a smooth ball about the size of a large marble or a grape. -
Shape the cranium:
Take one ball and gently pinch the bottom third to slightly elongate it, forming a subtle jawline. The shape should resemble a rounded lightbulb or pear, but keep the top quite spherical. -
Defined the eye sockets:
Use a medium-sized ball stylus tool to press deep indentations for the eye sockets. Place them slightly lower than the halfway point of the sphere to give the skull a classic high-forehead look. -
Carve the nose:
With a smaller tool or the tip of a detailing stick, press an inverted triangle or heart shape just below and between the eyes for the nasal cavity. -
Define the jaw:
Use a flat edge or your fingers to flatten the jaw area slightly. Press a horizontal line across the lower section to separate the upper and lower teeth areas. -
Detail the teeth:
Using a needle tool, score vertical lines across the mouth area to create individual teeth. For extra realism, I like to press tiny indentations above the teeth to suggest roots. -
Add side hollows:
Press the sides of the skull, just behind the eye sockets and above the jaw, to create the temporal hollows. This adds dimension and makes the ‘bone’ structure look more anatomical. -
Pierce the bead hole:
Carefully push a skewer or toothpick horizontally through the upper side of the skull, passing just behind the eye sockets. Ensure the hole is wide enough for your cord to pass through twice if needed. Wiggle the skewer gently to clean up the entry and exit points.
Pro Tip: Texture Hack
Before baking, gently roll a piece of sandpaper or a stiff toothbrush over the surface of the clay. It creates micropores that look exactly like real aged bone.
Step 2: Finishing and Assembly
-
Bake the beads:
Arrange your finished skulls on a baking sheet. Bake according to the manufacturer’s instructions for your specific brand of clay. Let them cool completely before handling. -
Apply a wash:
Mix a tiny drop of brown paint with water to create a thin wash. Brush this over the entire skull, letting it settle into the teeth, eyes, and side hollows. -
Wipe away excess:
Immediately wipe off the surface paint with a paper towel. This leaves the darker color in the crevices, giving the skulls an aged, weathered bone appearance. -
Darken the details:
Use a fine brush and undiluted black acrylic paint to fill in the eye sockets and the nose cavity completely. This creates the deep, hollow look seen in the photo. -
Seal the beads:
Once the paint is dry, you can apply a matte varnish if you want to protect the finish, though leaving them unvarnished maintains a natural bone texture. -
String the necklace:
Cut a long length of black waxed cord. Thread the skulls onto the cord one by one. The horizontal holes will allow them to sit side-by-side along the curve of the necklace. -
Tie spacing knots:
To keep the skulls grouped or separated as desired, tie a small overhand knot immediately before the first skull and after the last skull to keep them centered on the cord. -
Create the closure:
Overlap the two ends of the necklace cord. Using a separate piece of thinner cord or thread, tie a sliding square knot (macramé knot) over the overlapped section. Trim the excess ends of the knotting cord and seal with a tiny drop of glue, being careful not to glue the main cords.
Level Up: Glow Effect
Use glow-in-the-dark polymer clay as your base instead of white. The aged wash will still show up in daylight, but they’ll eerily illuminate at night.
Now you have a hauntingly stylish accessory ready for any Halloween gathering


What Really Happens Inside the Kiln
Learn how time and temperature work together inside the kiln to transform clay into durable ceramic.
Spiderweb Coasters
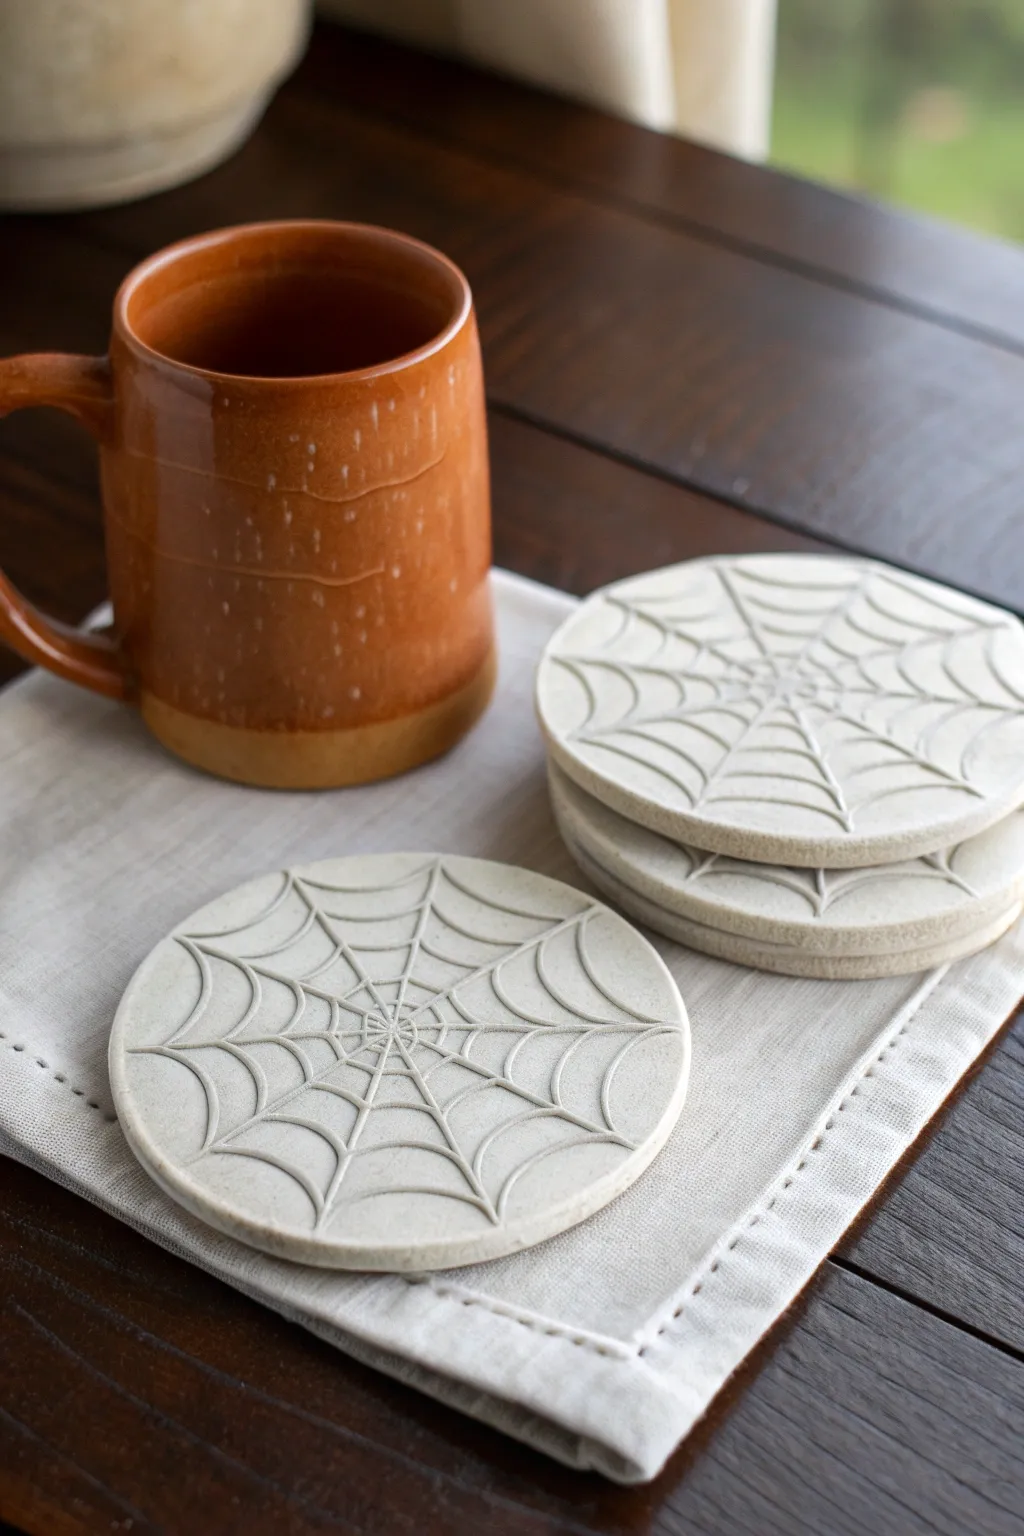
These understated spiderweb coasters add just the right amount of Halloween spirit without compromising your elegant decor. Featuring a crisp, incised web design on a matte stone-like finish, they are perfect for resting your morning brew.
How-To Guide
Materials
- White air-dry clay (stone effect optional) or earthen clay
- Rolling pin
- Circle cookie cutter (approx. 4 inches) or a bowl guide
- Needle tool or sharp toothpick
- Fettling knife or craft knife
- Small sponge
- Fine-grit sandpaper
- Clear matte acrylic sealer (for air dry) or matte glaze (for kiln fire)
- Ruler (optional but helpful)
Step 1: Preparation and Shaping
-
Condition the Clay:
Begin by grabbing a handful of your clay and kneading it thoroughly. You want to work out any air bubbles and warm it up so it’s pliable and crack-free. -
Roll out the Slab:
Place the clay on a clean, flat surface. Using your rolling pin, roll the clay out into an even slab. Aim for a thickness of about 1/4 to 1/3 inch—thick enough to feel substantial but thin enough to dry evenly. -
Cut the Circles:
Press your large circle cutter firmly into the slab to create your coaster rounds. If you don’t have a cutter large enough, place a bowl upside down on the clay and trace around it with a needle tool. -
Smooth the Edges:
Lift the circles carefully. Dip your finger in a little bit of water and run it along the cut edge to smooth out any sharpness or roughness left by the cutter.
Warping Woes?
If coaster edges curl up while drying, flip them over halfway through the drying process. Check frequently to keep them flat.
Step 2: Carving the Design
-
Mark the Center:
Find the approximate center of your clay circle and make a tiny, shallow dot with your needle tool. This will serve as the anchor for your web. -
Carve the Radial Lines:
Starting from that center dot, gently drag your needle tool outwards to the edge of the coaster to create a straight line. Repeat this around the circle like typical pizza slices. I usually aim for about 8 to 10 radial lines. -
Clean Up the Lines:
As you carve, tiny crumbs of clay might build up. Use a soft brush or your finger to gently sweep these away so the grooves stay crisp. -
Start the Webbing:
Beginning near the center, carve curved lines connecting the radial spokes. Instead of straight lines, scoop the curve inward towards the center to mimic the drape of a real spiderweb. -
Expand the Web:
Move outward about half an inch and repeat the connecting process, creating a second ring of swooping lines. Continue adding concentric rings until you reach the outer edge. -
Deepen the Grooves:
Go back over your lines a second time with slightly more pressure. You want the design to be visible and tactile, but be careful not to cut all the way through the slab.
Pro Tip: Texture Trick
For a speckled stone look like the photo, mix a pinch of used coffee grounds or cracked pepper into white clay before rolling.
Step 3: Finishing Touches
-
Final Smoothing:
Take a slightly damp sponge and very gently dab the surface. This softens the harsh ridges created by the carving tool, giving it that worn, stone-like appearance seen in the photo. -
Drying Phase:
Place the coasters on a wire rack or a piece of parchment paper to dry. If using air-dry clay, loosely cover them with plastic wrap for the first 12 hours to prevent curling, then let them air dry completely for 24-48 hours. -
Sand for Perfection:
Once fully dry (bone dry), use fine-grit sandpaper to buff the edges and surface lightly. This removes any lingering burrs or sharp points. -
Seal the Coasters:
To protect your coasters from coffee drips, apply a coat of clear matte acrylic sealer. If you are using ceramic clay, this is when you would apply a matte clear glaze and fire in the kiln. -
Add Felt Backing (Optional):
For extra furniture protection, cut a circle of felt slightly smaller than the coaster and glue it to the underside once the sealant is completely dry.
Stack your set of spooky coasters on the coffee table and enjoy a festive touch to your autumn mornings
Little Mummy Wrap Figures
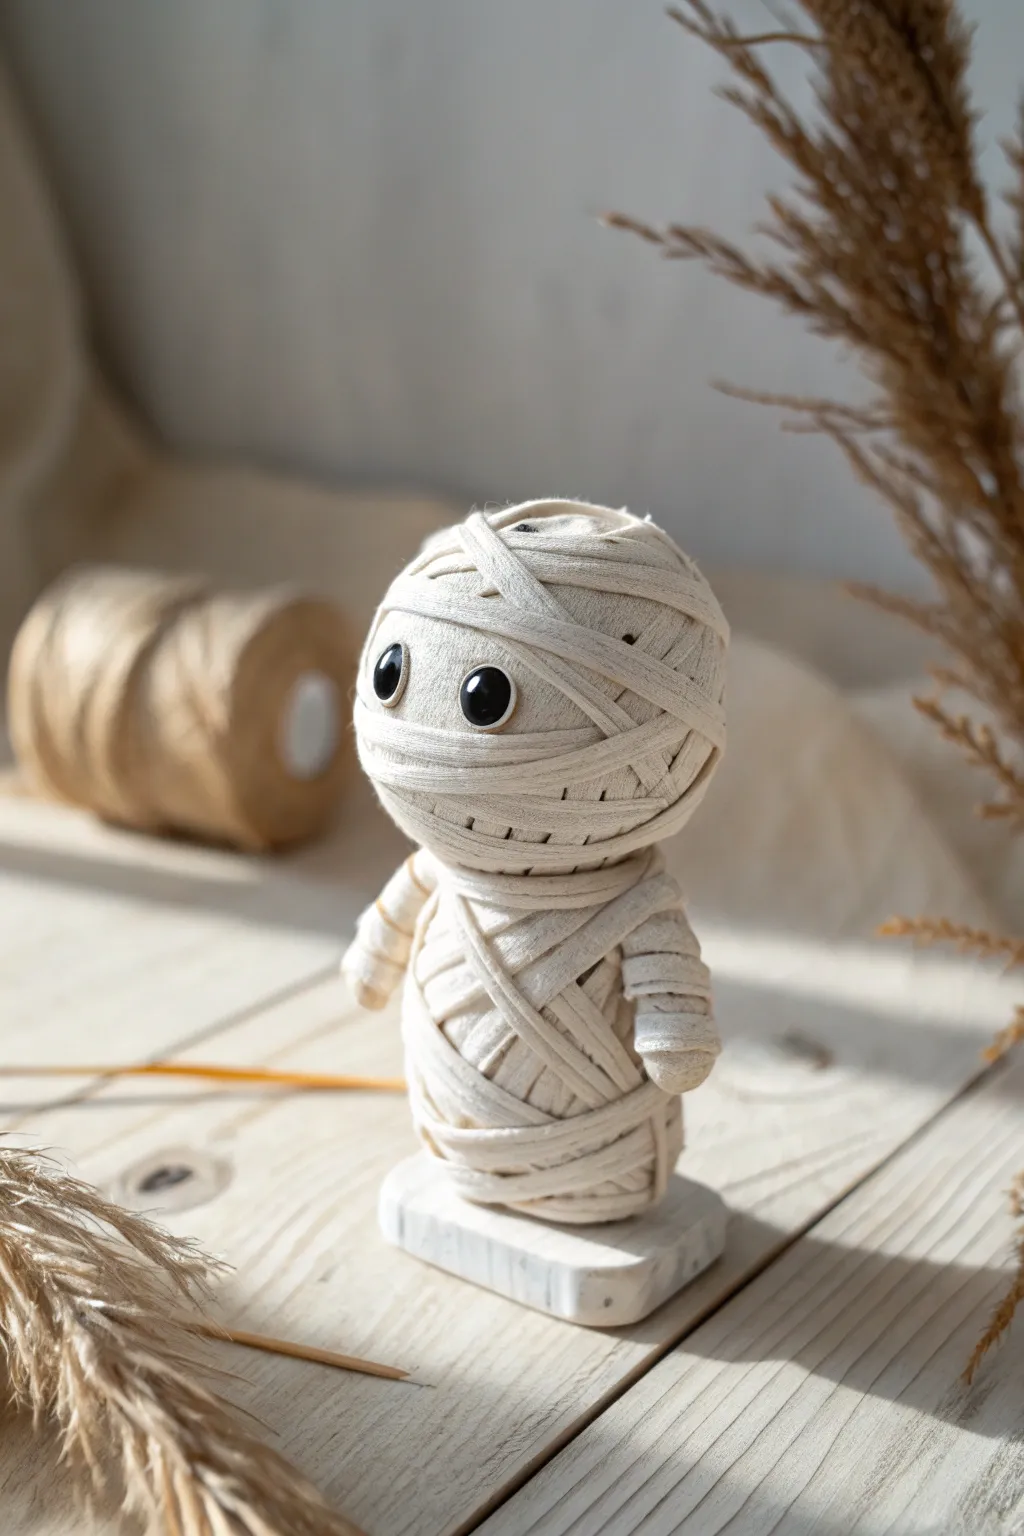
These adorable little mummies combine simple clay sculpting with the texture of fabric wrapping for a charming Halloween decoration. With wide, innocent eyes and a messy-chic wrapped look, they make perfect desktop companions or spooky shelf sitters.
Detailed Instructions
Materials
- White or beige air-dry clay
- Cotton yarn, cheesecloth strips, or white fabric ribbon (thin)
- Small rectangular wooden block or clay for the base
- Two small black beads (for eyes) or black polymer clay
- Craft glue or hot glue gun
- Toothpick or sculpting tool
- Scissors
- White acrylic paint (optional, for the base)
Step 1: Sculpting the Core
-
Form the body:
Start by taking a chunk of air-dry clay roughly the size of a large walnut. Roll it between your palms to create an oblong, pill-like shape for the mummy’s torso. -
Create the head:
Roll a second, slightly larger sphere of clay for the head. It should be rounder than the body to give that cute, bobblehead appearance. -
Connect the pieces:
Insert a toothpick halfway into the top of the body piece. add a dab of glue, and press the head firmly onto the exposed toothpick to secure the two parts together. -
Make the arms:
Roll two small, sausage-shaped logs of clay for the arms. They don’t need detailed fingers since they will be wrapped later. -
Attach the arms:
Press the arms onto the sides of the body. I like to blend the clay at the shoulder joint with my thumb so they don’t fall off during the wrapping process. -
Prepare the base:
Form a small rectangular slab of clay, or prepare your wooden block. If using clay, ensure the bottom is flat so it sits stable on a table. -
Stand it up:
Press the mummy’s feet firmly onto the base. If the clay is fresh, it should stick; otherwise, use a little water or glue (slip) to join them. Let the entire structure dry completely before moving on.
Step 2: Wrapping and Details
-
Start the wrap:
Apply a small dot of glue to the back of the mummy’s head. Press the end of your yarn or fabric strip there to anchor it. -
Wrap the head:
Begin winding the material around the head. Don’t be too neat; overlapping layers and slightly chaotic angles look best. -
Create the eye gap:
As you wrap the face, be careful to leave a horizontal gap in the middle where the eyes will go. You want the clay underneath to be visible here. -
Move to the body:
Bring the wrapping material down the neck and start crisscrossing over the chest and back. Add a tiny dot of glue occasionally to keep the wrap tight. -
Wrap the limbs:
Wind the material individually around each arm, spiraling down to the hand and then back up to the shoulder to secure. -
Finish wrapping:
Continue wrapping until the clay is mostly covered, leaving only hints of the white surface beneath. Secure the end of the strip at the back with a final spot of glue. -
Place the eyes:
Take your two black beads. Apply a tiny amount of strong glue to the back of each one. -
Set the gaze:
Press the eyes into the gap you left on the face. Placing them slightly wide apart creates a cuter, more innocent expression. -
Partially cover the eyes:
If needed, gently nudge a strand of the forehead wrapping down just slightly over the tops of the beads to make the eyes look integrated into the wrappings. -
Treat the base:
If you used a wooden block, consider painting it white or a weathered grey to match the aesthetic. If using a clay base, you can leave it natural or give it a quick white wash.
Use Coffee for age
Make the mummy look ancient! Before wrapping, dip your fabric strips or yarn in diluted coffee or tea and let them dry for a weathered, antique look.
Add a spooky prop
Before the clay dries, shape the mummy’s hand to hold a small item, like a tiny wire spider, a paper pumpkin, or a miniature lantern.
Now your little wrapped friend is ready to guard your candy bowl

TRACK YOUR CERAMIC JOURNEY
Capture glaze tests, firing details, and creative progress—all in one simple printable. Make your projects easier to repeat and improve.
Blocky Frankenstein Heads
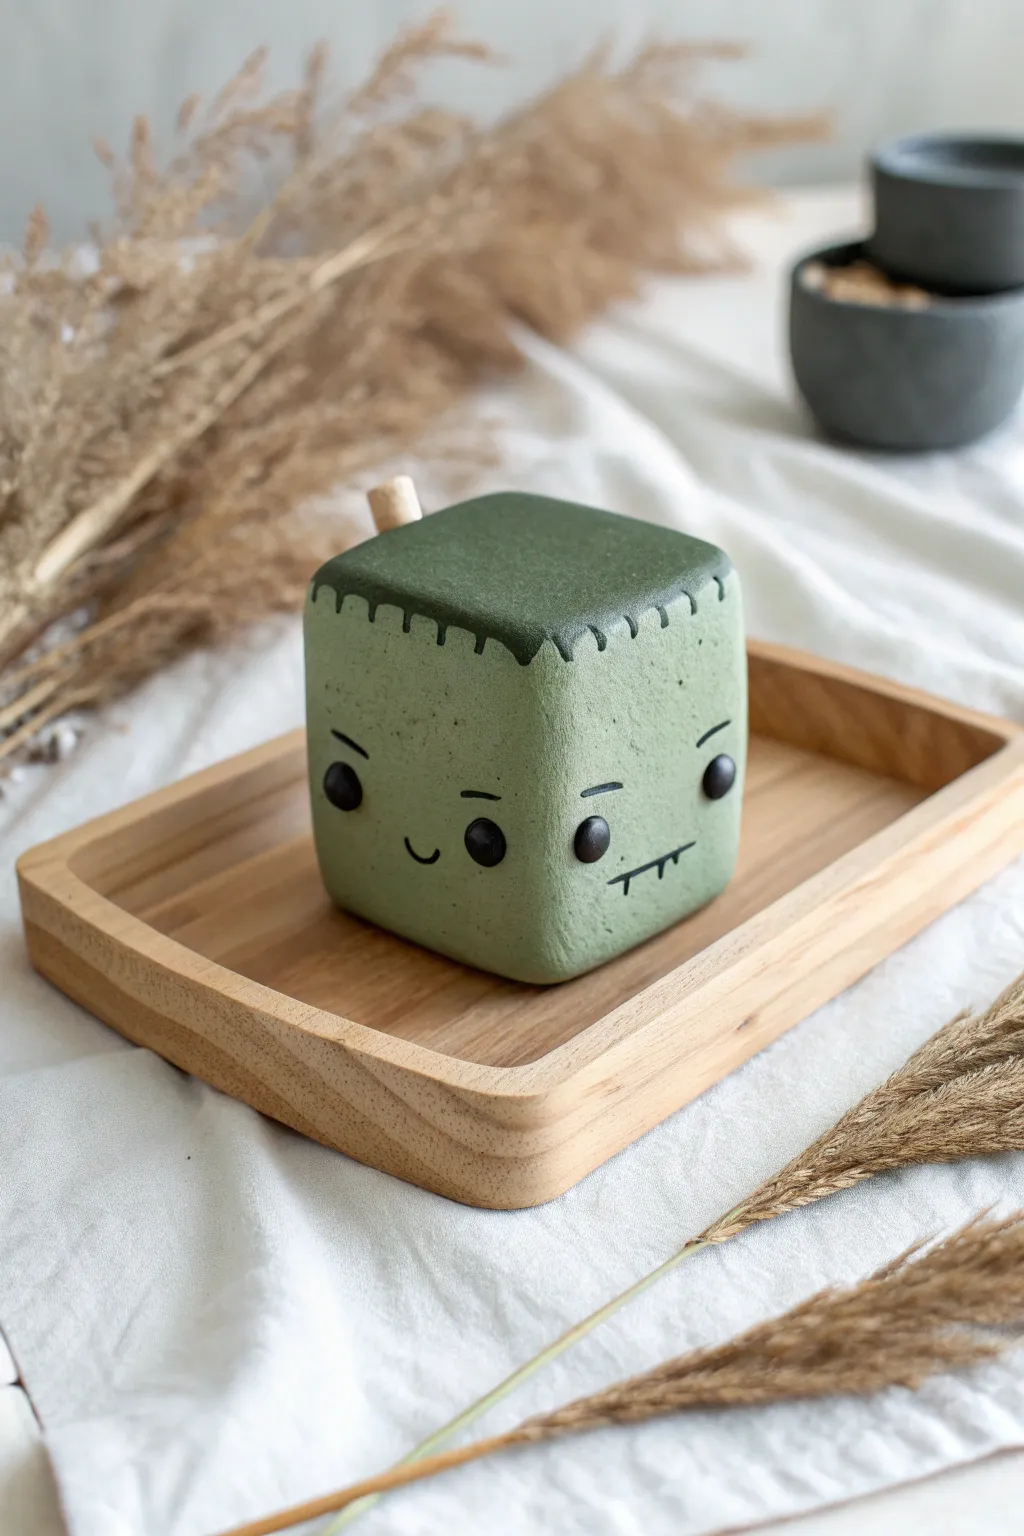
This adorable little monster puts a geometric twist on a classic Halloween icon, featuring a soft green cube shape with stitched details and tiny, expressive faces on two sides. The dual-expression design makes it a versatile desk buddy or a charming seasonal shelf decoration.
How-To Guide
Materials
- Polymer clay (Sage Green, Forest Green, Black, Beige/Wood-tone)
- Acrylic roller or pasta machine
- Sharp crafting blade or tissue blade
- Needle tool or toothpick
- Small ball stylus tool
- Flat, smooth work surface (ceramic tile or glass mat)
- Oven for baking
Step 1: Shaping the Base
-
Condition the Clay:
Begin by taking a large chunk of sage green polymer clay. Knead it thoroughly in your hands until it becomes warm, soft, and pliable, which prevents cracking later. -
Form a Ball:
Roll the conditioned clay into a smooth, tight sphere between your palms. Make sure there are no visible air bubbles or seams. -
Shape the Cube:
Place the ball on your work surface and gently press down to flatten the bottom. Rotate and press the other sides against the table or use an acrylic block to square off the edges. You want to create a slightly rounded, soft-edged cube rather than a sharp geometrical one. -
Smooth the Surfaces:
Lightly stroke each face of the cube with your finger to remove any fingerprints. If the clay feels too warm or sticky, I like to let it sit for a few minutes to firm up before detailing.
Clean Clay Tip
Keep baby wipes handy! Clean your hands thoroughly before switching from the dark green/black clay back to the light sage clay to avoid color transfer.
Step 2: Adding the Hair
-
Prepare the Hair Color:
Condition a smaller amount of forest green clay. Roll it out into a thin, flat sheet, about 2-3mm thick. -
Cut the Top Square:
Measure the top face of your sage green cube. Cut a square from the forest green sheet that is slightly larger than the top of your cube. -
Create the Bangs:
Place the dark green square primarily on top, letting the edges drape slightly over the sides. Gently press it down so it adheres to the cube. -
Sculpt the Stitch Marks:
Use a needle tool or a blunt knife tool to drag small, vertical indentations all along the edge where the dark hair meets the lighter face. This creates the ‘stitched’ hairline look typical of Frankenstein’s monster.
Fixing Fingerprints
If you smudge a feature while handling the cube, lightly brush the area with a tiny amount of baby oil or clay softener on your finger to smooth it out.
Step 3: Facial Features
-
Make the Eyes:
Roll four tiny balls of black clay. Position two on the front face and two on the adjacent side face. Press them gently into the clay to flatten them slightly into small discs. -
Add Eyebrows:
Roll out incredibly thin threads of black clay. Cut tiny segments and curve them slightly. Place them above the eyes to create expression—some angled for a ‘grumpy’ look, others rounded for a happy look. -
Create the Smile:
On the happy side, roll a thin black snake of clay and shape it into a ‘U’. Press it gently onto the face between the eyes. -
Create the Grumpy Mouth:
On the other side, place a straight black line for the mouth. Add two tiny vertical lines crossing the main mouth line to look like stitches or jagged teeth. -
Add the Bolt:
Roll a small cylinder of beige or wood-tone clay. Insert a small piece of wire or toothpick into the side of the head (near the top corner) for support, and slide the cylinder onto it to simulate the bolt.
Step 4: Finishing Up
-
Texture the Surface:
Take an old toothbrush or a stiff bristle brush and very gently tap the entire green surface of the cube. This gives it a matte, stone-like texture rather than shiny plastic. -
Final Inspection:
Check all sides to ensure your features are secure and there are no accidental fingernail marks. Smooth out any last imperfections. -
Bake:
Bake the piece according to your polymer clay manufacturer’s instructions (usually 275°F/135°C for 15-30 minutes depending on thickness). -
Cool Down:
Allow the cube to cool completely in the oven with the door slightly ajar to prevent thermal shock cracks.
Now you have a double-sided monster friend ready to bring some spooky cute vibes to your home decor
Googly Eyeball Magnets
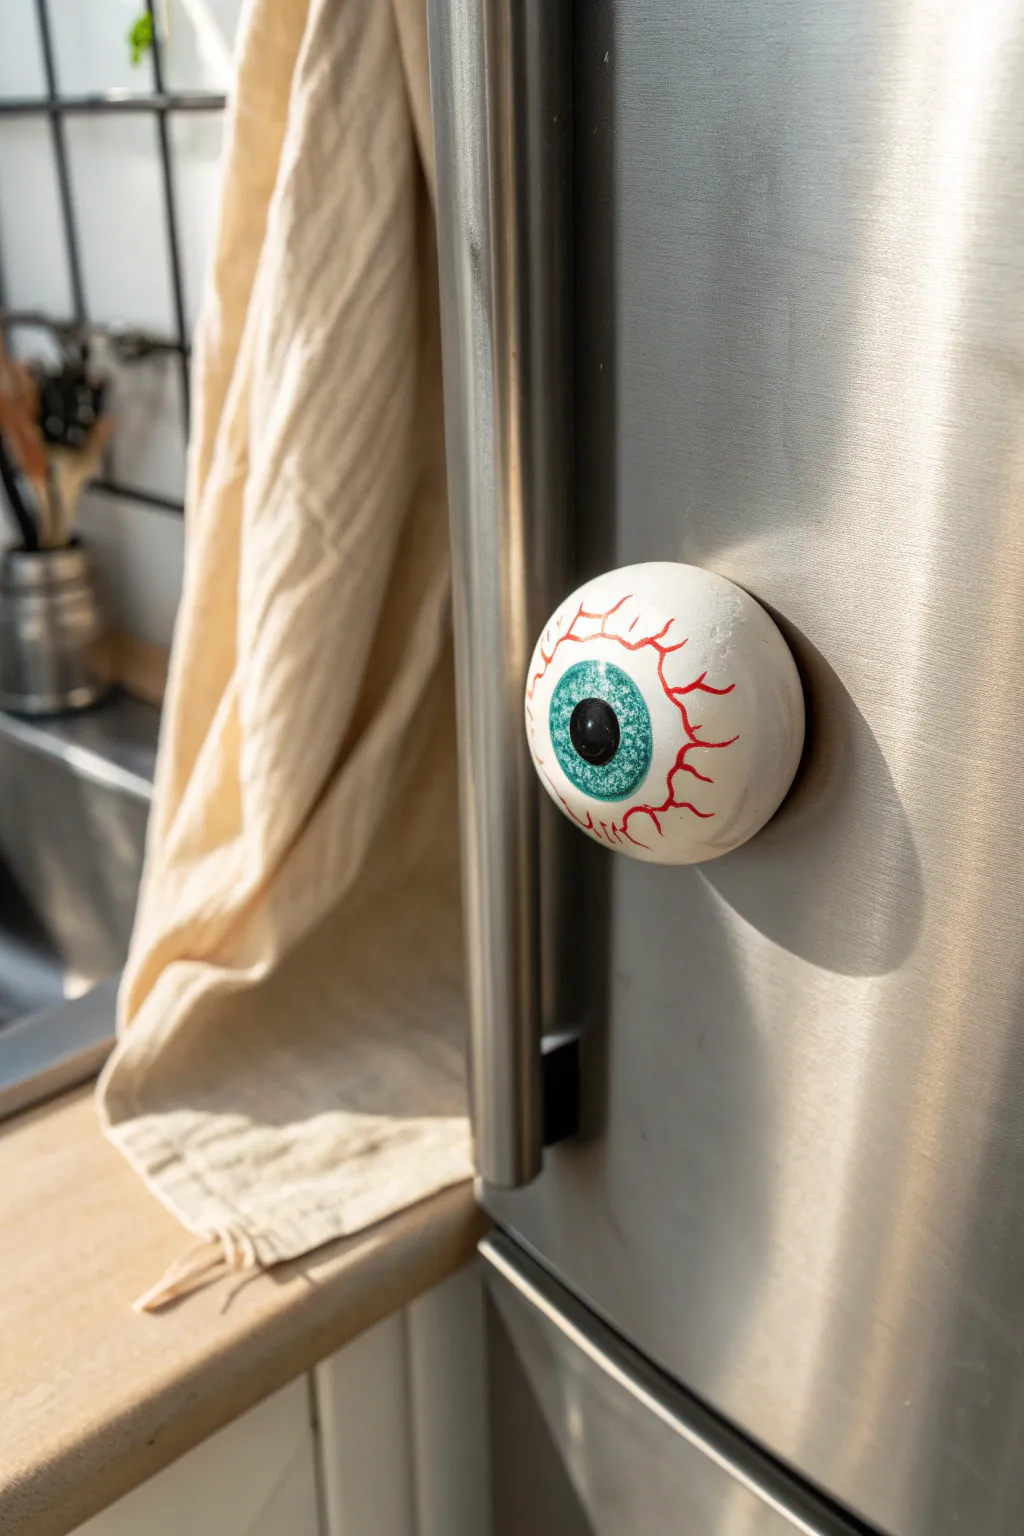
Add a touch of spooky surveillance to your kitchen with these disturbingly realistic eyeball magnets. Glossy, bloodshot, and surprisingly easy to make, they transform your fridge into a monster waiting to be fed.
Step-by-Step
Materials
- White polymer clay (or air-dry clay)
- Round magnet (strong ceramic or neodymium)
- Acrylic paints (Red, Black, Teal/Green, White)
- Fine detail paintbrush (size 0 or 00)
- Small flat paintbrush
- Gloss glaze or UV resin
- Superglue or E6000 (if using baked clay)
- Small ball tool or end of a paintbrush handle
- Aluminum foil (optional for core)
Step 1: Shaping the Base
-
Condition the clay:
Start by kneading your white polymer clay until it is soft and pliable. This prevents cracks from forming later. -
Form the sphere:
Roll a piece of clay into a smooth ball, roughly the size of a ping pong ball or slightly smaller. -
Flatten the back:
Press the ball gently onto your work surface to create a flat back. The shape should now look like a dome or a hemisphere. -
Embed the magnet (Method A):
If you want the magnet flush, press your magnet into the flat side to create an indentation, remove it, and glue it in *after* baking. -
Smooth the surface:
Use your finger and a tiny bit of water (or clay softener) to smooth out any fingerprints on the dome. The smoother the surface, the more realistic the final eye will look.
Uneven Glaze?
If your glaze pools or drips down the side, apply it in two thin coats rather than one heavy one, letting it dry in between.
Step 2: Adding the Iris and Pupil
-
Indent the iris:
Using your thumb or a large ball tool, gently press into the center of the dome to create a shallow, circular depression for the iris. -
Create the pupil hole:
Right in the center of that depression, use a smaller tool to press a tiny indentation for the pupil. This adds physical depth before painting. -
Bake the clay:
Bake your clay piece according to the package instructions. I usually tent it with foil to prevent the white clay from scorching or yellowing. Let it cool completely.
Glow in the Dark
Mix glow-in-the-dark powder into your white clay before shaping. When the lights go out, the eyeball will eerily glow green!
Step 3: Painting the Details
-
Paint the pupil:
Fill the center indentation with plain black acrylic paint. Let it dry. -
Base coat the iris:
Paint the larger depression around the pupil with a teal or green color. You can stipple the paint on for texture. -
Add iris details:
Mix a tiny bit of white with your teal paint. Using your finest brush, paint tiny lines radiating from the pupil outward to mimic the fibers of an iris. -
Highlight the eye:
Add a tiny dot of pure white paint on the edge of the pupil and iris. This ‘catchlight’ instantly brings the eye to life. -
Paint the veins:
Thin down your red acrylic paint with a drop of water so it flows like ink. Using your thinnest brush, paint jagged, wiggly lines starting from the outer edge towards the iris. -
Branch the veins:
Add smaller ‘Y’ shaped branches to your main red lines. Keep your hand loose; shaky lines actually look more realistic here.
Step 4: Finishing Touches
-
Apply the glaze:
Once the paint is totally dry, coat the entire front of the eyeball with a thick layer of high-gloss glaze or UV resin. -
Cure or dry:
Let the glaze dry or cure under a UV lamp. This step gives the eye that wet, organic look shown in the photo. -
Attach the magnet:
Flip perfectly cured eye over. Apply a strong dab of superglue or E6000 to the back and press your magnet into place. -
Wait for full cure:
Allow the glue to set for at least an hour before sticking it to your fridge to ensure a secure hold.
Now your kitchen has an extra set of eyes to watch over the midnight snacks
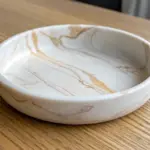
Mini Cauldron Trinket Dish
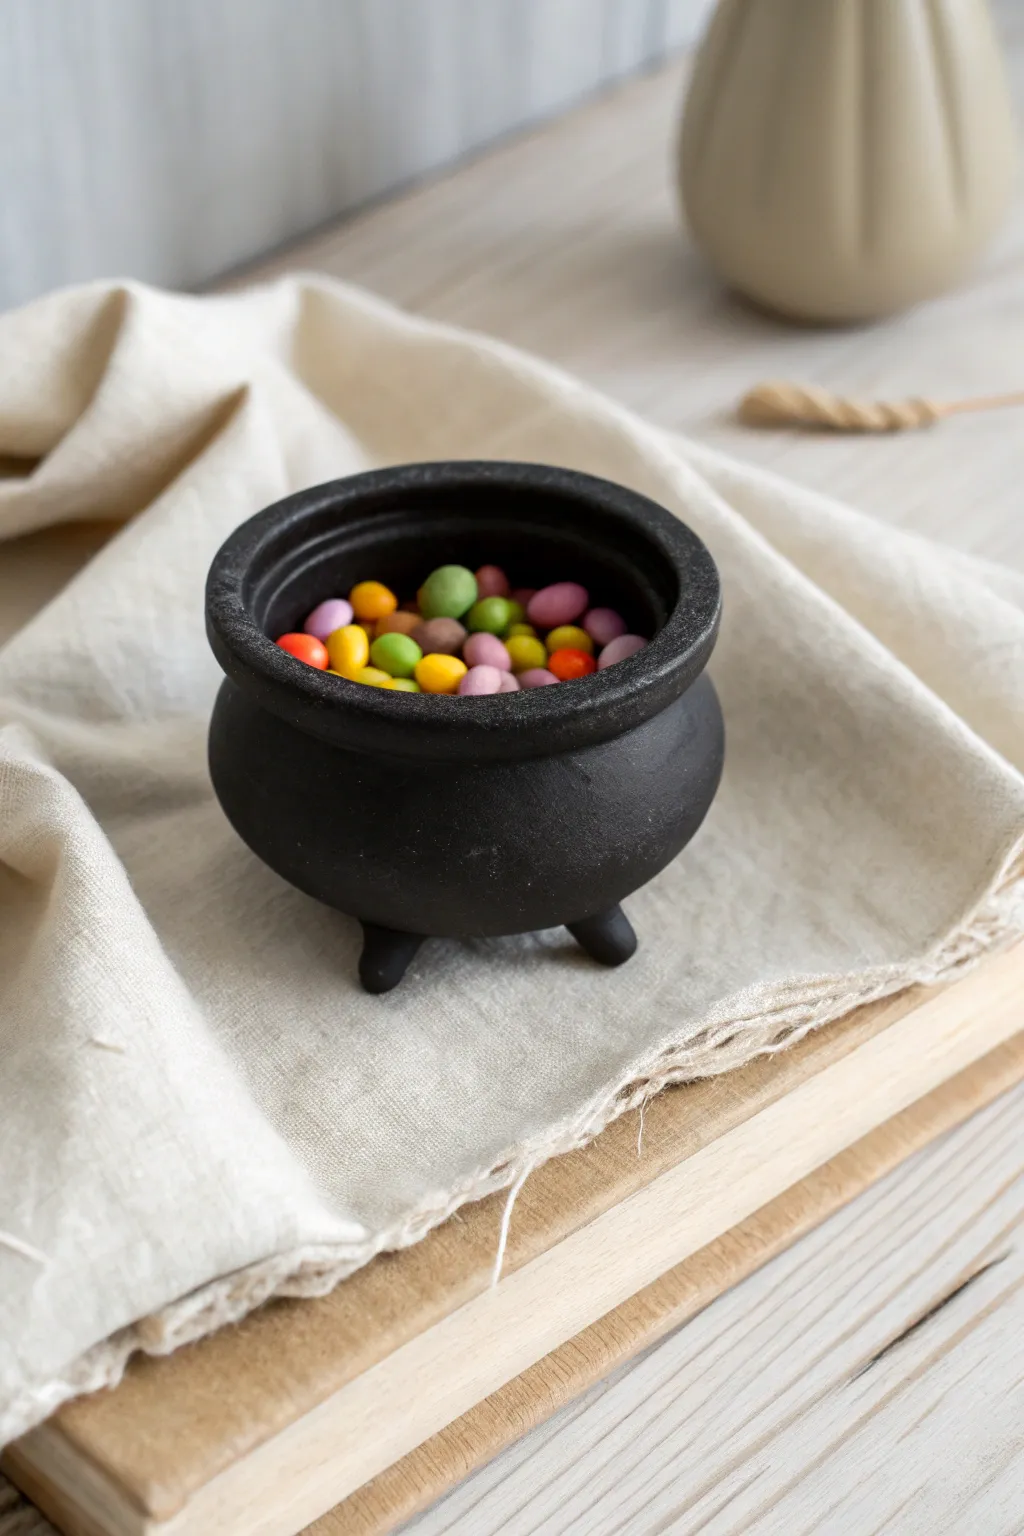
This adorable miniature cauldron is the perfect pinch pot project for beginners wanting a touch of spooky charm. Its matte black finish and chubby little legs make it ideal for holding candy, jewelry, or crystals on your Halloween altar.
How-To Guide
Materials
- Air-dry clay (preferably black, or white/terracotta)
- Acrylic paint (matte black)
- Sponge dabber or soft paintbrush
- Small bowl of water
- Rolling pin
- Craft knife or clay tool
- Fine-grit sandpaper (optional)
- Matte varnish or sealant
Step 1: Forming the Cauldron Body
-
Prepare the Clay:
Start by conditioning a ball of air-dry clay roughly the size of a tangerine. Knead it in your hands until it is warm, pliable, and free of any large cracks. -
Create the Pinch Pot:
Press your thumb into the center of the ball, but don’t push all the way through to the bottom. I like to leave about a quarter-inch at the base for stability. -
Shape the Walls:
Gently pinch the clay between your thumb and fingers, rotating the ball as you go to pull the walls upward. Aim for an even thickness all around. -
Round the Belly:
Push the walls slightly outward from the inside to create that classic, rounded cauldron belly shape. The top opening should be slightly narrower than the middle section. -
Smooth the Interior:
Dip your finger in a little water and run it along the inside of the pot to smooth out any fingerprints or rough patches.
Step 2: Adding Details and Feet
-
Form the Rim:
Roll a small snake of clay, enough to circle the opening of your pot. Flatten it slightly. -
Attach the Rim:
Score the top edge of your pot and the underside of the clay snake. Apply a little water or slip, then press the rim onto the opening. -
Blend the Seams:
Use a clay tool or your finger to blend the underside of the rim into the pot body so it looks like one solid piece. Leave the top edge defined. -
Make the Feet:
Roll three small balls of clay, roughly the size of marbles. Taper them slightly so they look like little cones or nubbins. -
Position the Feet:
Flip your cauldron gently upside down. Arrange the three feet in a triangle formation on the base. This ensures the best balance. -
Secure the Feet:
Score and slip the attachment points, then press the feet firmly onto the base. Smooth the clay around the connection point so they don’t pop off later. -
Check the Balance:
Turn the cauldron right-side up and gently tap it on the table to flatten the bottom of the feet slightly. Ensure it sits level and doesn’t wobble.
Cast Iron Texture Trick
Mix a tiny pinch of baking soda into your black paint before the final coat. It creates a gritty, authentic iron texture.
Step 3: Finishing Touches
-
Dry Completely:
Let your cauldron dry for at least 24-48 hours. Turn it over occasionally to ensure the bottom dries evenly. -
Sand Imperfections:
Once bone dry, use fine-grit sandpaper to gently buff away any rough fingerprints or sharp edges on the rim. -
Apply Base Coat:
If you didn’t use black clay, paint the entire cauldron (inside and out) with matte black acrylic paint. -
Texture the Surface:
For that cast-iron look seen in the photo, use a sponge dabber to apply a second coat of thick black paint. Dab it on rather than brushing to create a subtle texture. -
Seal the Project:
Finish with a coat of matte varnish to protect the paint without making it shiny, preserving that spooky witchy aesthetic.
Fixing Cracks
If hairline cracks appear while drying, don’t panic. Fill them with a paste made of clay and water, let dry, and sand smooth.
Now fill your little vessel with colorful candies and enjoy the magic you have made
Potion Bottle Pendants
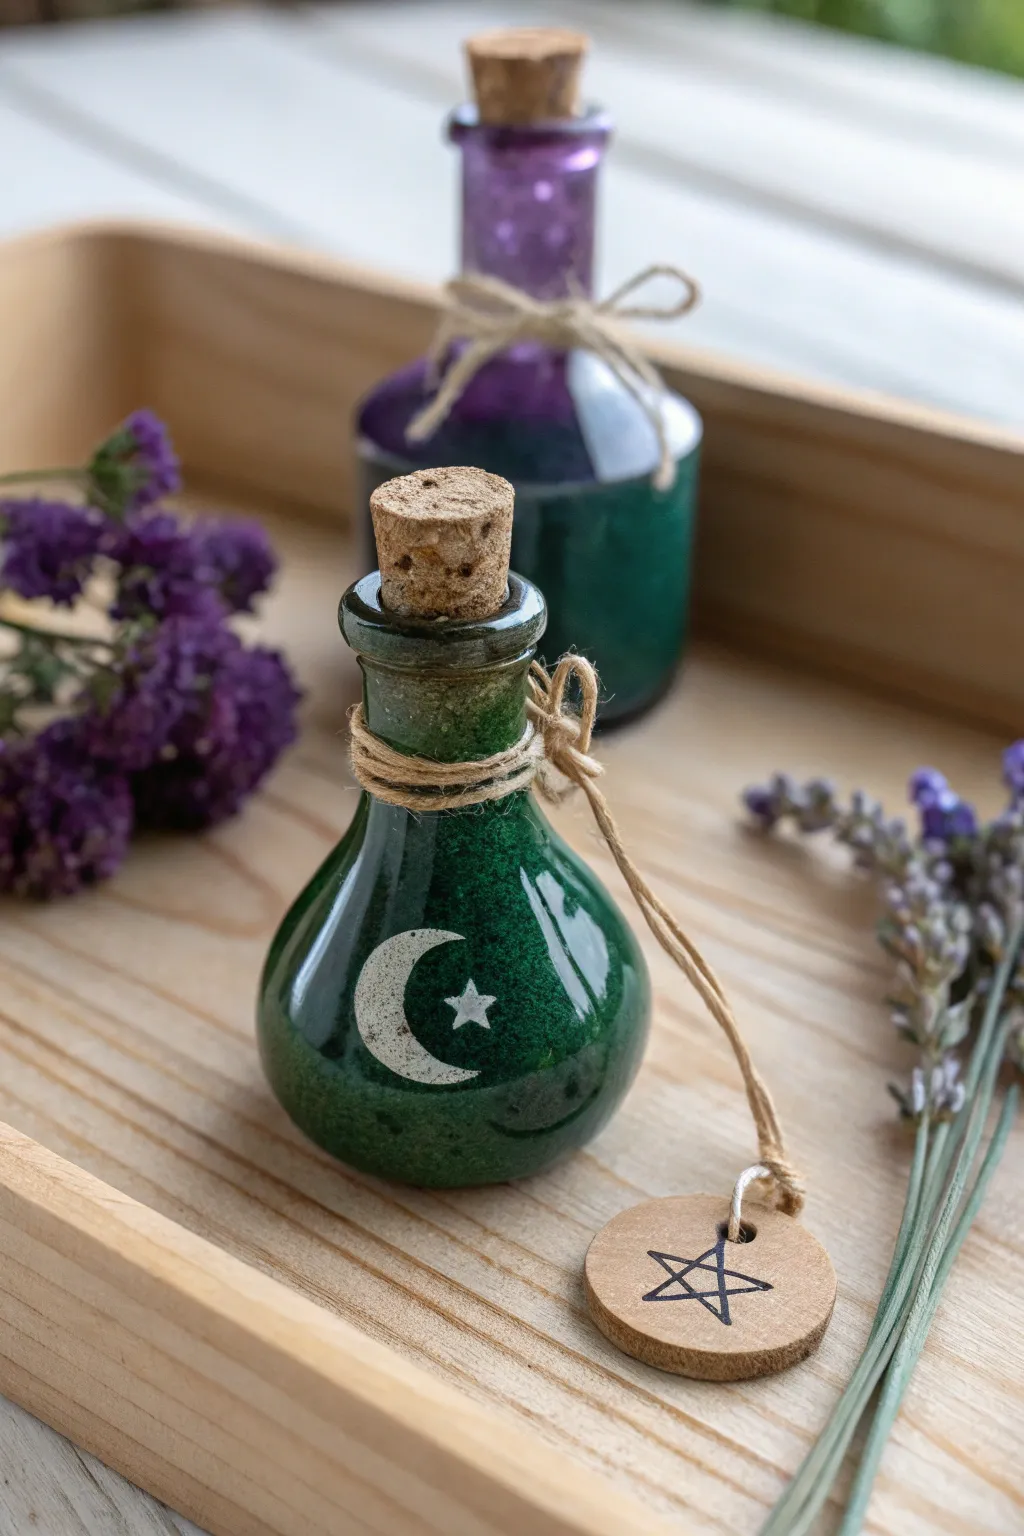
Bring a little magic to your Halloween decor with this enchanting clay potion bottle that looks like aged glass. Featuring a rustic twine wrapping and a mystical pentagram tag, it’s the perfect addition to any wizard’s shelf or costume.
Step-by-Step
Materials
- Polymer clay (translucent green or emerald)
- Small cork stopper (sized to your bottle neck)
- Jute twine or hemp cord
- Polymer clay (beige or sand color for the tag)
- Acrylic paint (white and black)
- Small detail paintbrush
- Fine-grit sandpaper
- Gloss varnish or resin (optional for shine)
- Rolling pin or pasta machine
- Clay sculpting tools
- Pin or needle tool
- Oven for baking
Step 1: Sculpting the Bottle Base
-
Condition the Crystal Clay:
Start by warming up your translucent green polymer clay in your hands until it is pliable. This prevents cracks and makes shaping much easier. -
Form the Bulb:
Roll the clay into a smooth ball about the size of a walnut. Gently press it onto your work surface to flatten the bottom so the bottle will stand on its own. -
Shape the Neck:
Pinch the top of the sphere and slowly pull the clay upward to create a tapered neck. Rotate the piece as you pull to keep it symmetrical. -
Refine the Lip:
At the very top of the neck, flatten the rim slightly. You can roll a tiny snake of clay and wrap it around the opening to create a pronounced lip, blending the seam downward with a sculpting tool. -
Size the Opening:
Check your cork stopper against the opening. Use the end of a paintbrush handle to widen the hole just enough so the cork fits snugly but doesn’t sink in completely.
Cloudy Bottle?
If your translucent clay looks milky after baking, try quenching it. Immediately drop the hot piece into ice water straight from the oven to increase clarity.
Step 2: Creating the Tag & Details
-
Roll the Tag Clay:
Take a small pinch of beige or sand-colored clay and roll it flat, approximately 2-3mm thick. -
Cut the Disc:
Use a small circle cutter or a bottle cap to cut a perfect circle for your hanging tag. -
Draw the Pentagram:
Using a needle tool or a fine-tip marker after baking, lightly etch or draw a five-pointed star onto the tag. Don’t worry if it looks rustic; that adds to the charm. -
Create the Hanging Hole:
Poke a hole near the top edge of the tag wide enough for your twine to pass through. -
Bake Components:
Place both your bottle and the tag on a baking sheet. Follow the temperature and time instructions specific to your brand of polymer clay.
Pro Tip: Hidden Core
Save clay by using a small ball of aluminum foil as the core. Build your bottle around it to make the piece lighter and use less material.
Step 3: Finishing Touches
-
Sand for Texture:
Once fully cooled, lightly sand the bottle with fine-grit sandpaper. This gives the surface a slightly aged, matte glass appearance and helps paint adhere. -
Paint the Crescent Moon:
With a fine detail brush and white acrylic paint, carefully paint a crescent moon shape on the widest part of the bottle’s belly. -
Add the Star:
Nestled inside the curve of the moon, paint a small five-pointed star. I find dotting the five points first helps keep the shape even. -
Distress the Painted Design:
Allow the white paint to dry, then very gently scratch or sand over it lightly to make the symbol look worn and ancient. -
Seal (Optional):
If you want a ‘wet’ glass look, coat the green bottle with a gloss varnish, avoiding the neck area where the twine will go. -
Ink the Pentagram:
Use a fine black marker or black paint to define the star on your clay tag. -
Wrap the Neck:
Cut a length of jute twine. Apply a tiny dot of glue to the back of the bottle neck and wrap the twine around 3-4 times. -
Attach the Tag:
Thread the end of the twine through the hole in your clay tag and secure it with a loose knot, letting it dangle freely. -
Insert the Stopper:
Finally, press the cork firmly into the top of the bottle to seal in your magical brew.
Now your mystical vessel is ready to hold imaginary potions or sit proudly on your altar.
Trick-or-Treat Bag Tags
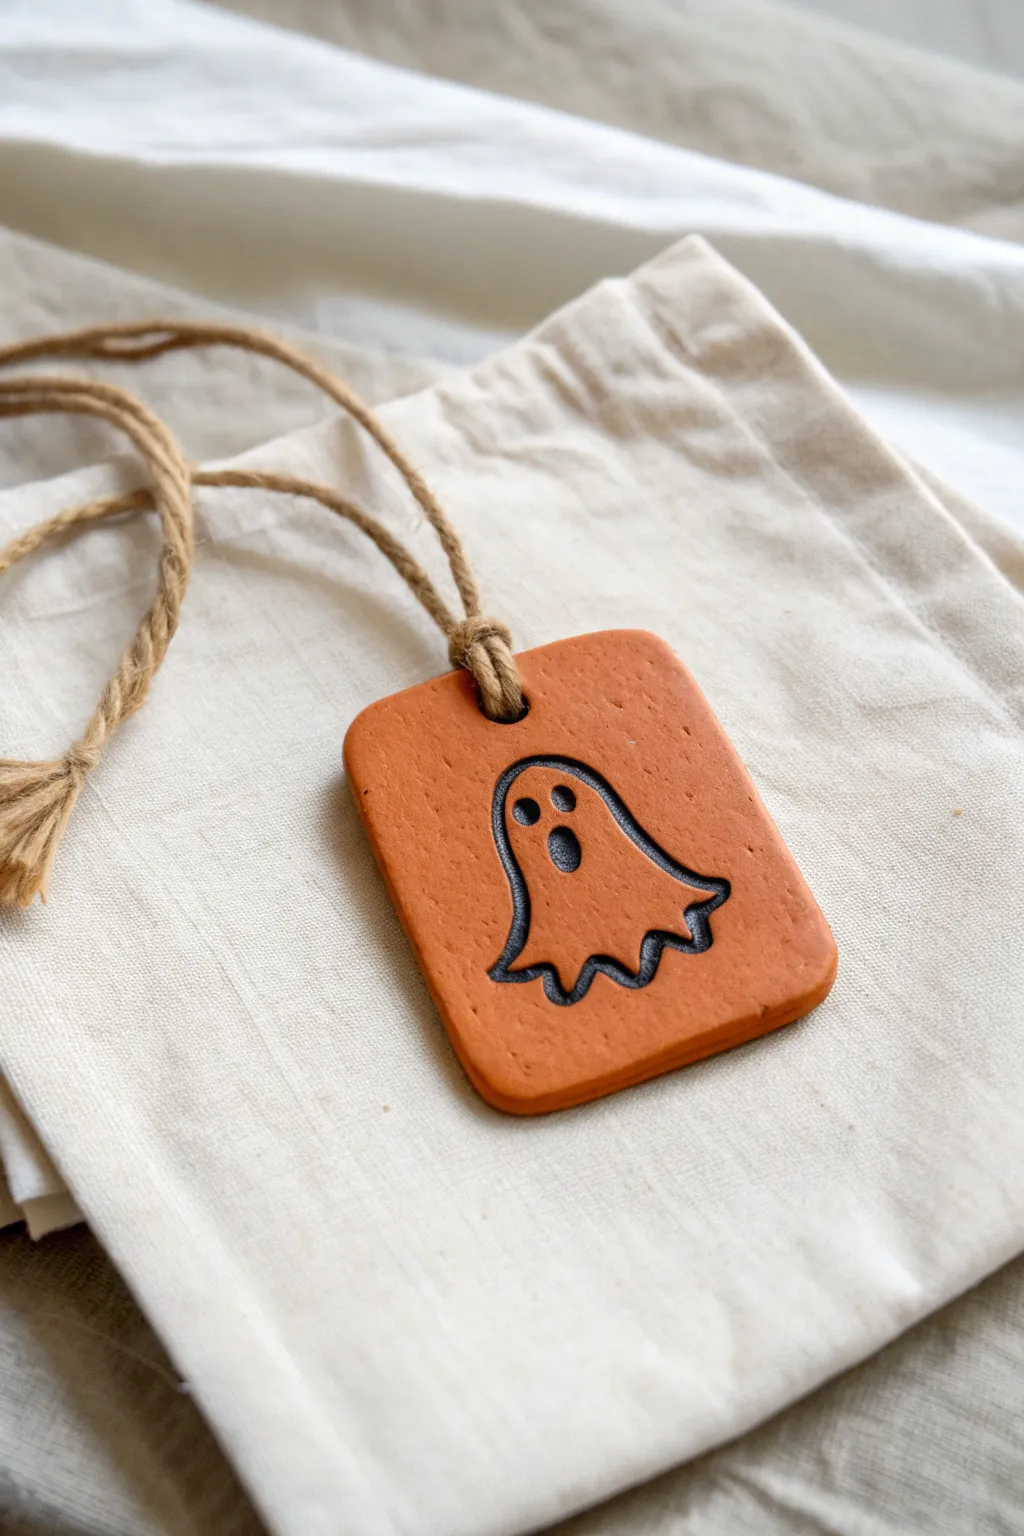
These charming terracotta-colored tags feature a recessed ghost design that adds a rustic, handmade touch to any trick-or-treat bag. The contrast between the warm clay tone and the dark, stamped impression creates a striking graphic look perfect for Halloween.
Step-by-Step Guide
Materials
- Terracotta colored polymer clay (or air-dry clay painted terracotta)
- Ghost-shaped rubber stamp or cookie cutter
- Rolling pin or clay pasta machine
- Rectangular clay cutter (approx. 2 x 3 inches) or sharp craft knife
- Black acrylic paint
- Paintbrush (fine tip)
- Paper towel or wet wipe
- Straw or large hole punch tool
- Natural jute twine
- Parchment paper or baking mat
Step 1: Preparing the Base
-
Condition the clay:
Begin by warming the terracotta polymer clay in your hands. Knead it thoroughly until it creates a soft, pliable consistency without any cracks. -
Roll out the slab:
Using a rolling pin or clay pasta machine, flatten the clay into an even slab. Aim for a thickness of about 1/4 inch (6mm) to ensure the tag is sturdy but not too heavy. -
Cut the rectangle:
Press your rectangular cutter firmly into the clay slab. If you are using a craft knife instead, measure and cut a rectangle, using a ruler to keep your lines straight. -
Soften the edges:
Gently tap the edges of the rectangle with your finger to round them off slightly. This removes the sharp, raw looking cut marks and gives the piece a finished, professional look. -
Create the hanging hole:
Use a drinking straw or a large hole tool to punch a clean circle near the top center of the rectangle. Make sure the hole is at least 1/4 inch away from the top edge to prevent breaking.
Clean Impressions
Dust your stamp lightly with cornstarch or baby powder before pressing it into the clay. This acts as a release agent and prevents the stamp from sticking and ruining the crisp lines.
Step 2: Adding the Design
-
Position the stamp:
Align your ghost stamp in the center of the clay rectangle below the hanging hole. Take a moment to ensure it is visually centered before committing to the impression. -
Press the impression:
Press the stamp down firmly and evenly into the clay. You want a deep, clean impression that will easily hold paint later, but be careful not to push all the way through the slab. -
Clean up imperfections:
Carefully lift the stamp straight up. If there are any stray bits of clay or rough edges around the ghost outline, smooth them gently with a rubber tipped tool or your fingertip. -
Bake or dry:
If using polymer clay, bake the piece according to the manufacturer’s package instructions (usually around 275°F for 15-30 minutes). If using air-dry clay, allow it to dry completely for 24-48 hours. -
Cool down:
Allow the clay tag to cool completely to room temperature before attempting any painting steps.
Uneven Texture?
If fingerprints are visible on your clay surface before baking, lightly brush a tiny amount of baby oil over the slab to smooth them out instantly.
Step 3: Finishing Touches
-
Apply the wash:
Load a fine paintbrush with black acrylic paint. Carefully paint inside the recessed ghost impression, filling the grooves completely. -
Wipe away excess:
Immediately after painting, lightly wipe the surface of the clay with a damp paper towel or wet wipe. The goal is to remove paint from the raised surface while leaving the black paint trapped in the deep grooves. -
Let the paint dry:
Set the tag aside for a few minutes to let the acrylic paint dry fully. I find this quick-drying step helps prevent smudging the crisp design. -
Prepare the twine:
Cut a length of natural jute twine, approximately 12-15 inches long depending on where you plan to hang the tag. -
Attach the string:
Fold the twine in half to create a loop. Push the folded loop through the hole in the tag from front to back. -
Secure the knot:
Pull the loose ends of the twine through the loop you just pushed through the hole. Pull tight to create a secure lark’s head knot against the top of the tag.
Tie this adorable rustic tag onto a goody bag or treat basket for an instant festive upgrade
Pumpkin Patch Garland Beads
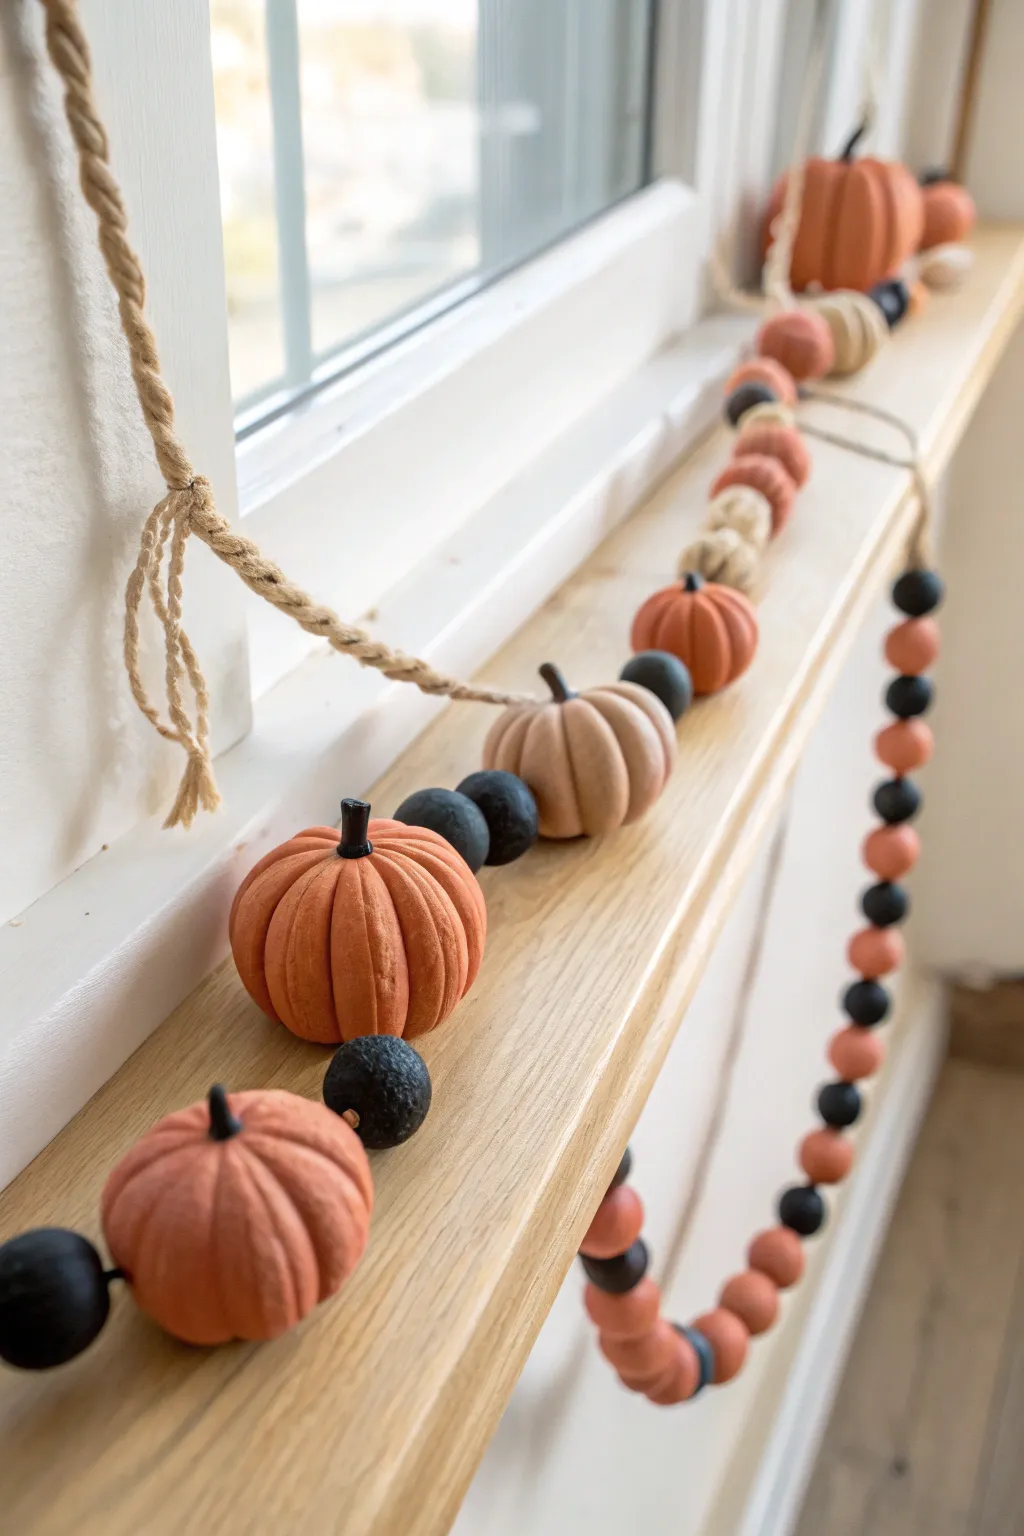
Bring the warmth of a pumpkin patch to your windowsill with this charming handmade garland. Featuring rustic clay pumpkins in muted autumnal tones and contrasting black beads providing a modern touch, this project captures the cozy essence of the season.
How-To Guide
Materials
- Polymer clay (terracotta orange, warm beige, and black)
- Black acrylic paint (if not using black clay)
- Jute twine or hemp cord (approx. 6 feet)
- Large eyed needle
- Sculpting tools (needle tool or toothpick, ball stylus)
- Small piece of twig or brown clay (for stems)
- Baking sheet with parchment paper
- Oven (for baking polymer clay)
- Matte varnish or sealant (optional)
Step 1: Sculpting the Pumpkin Beads
-
Portion the clay:
Begin by conditioning your orange and beige polymer clay until soft. Divide the clay into balls about the size of a walnut (roughly 1 to 1.5 inches in diameter). Varying the sizes slightly adds a more organic, natural feel. -
Create the basic shape:
Roll each portion into a smooth sphere between your palms. Once smooth, gently press the top and bottom of the sphere to flatten it slightly into a squat pumpkin shape. -
Add the segments:
Using a needle tool, a toothpick, or the side of a credit card, press vertical indentations from the top center down to the bottom center all around the sphere. Spacing them evenly creates the classic pumpkin ribbed look. I like to smooth the edges of these lines with my finger so they aren’t too sharp. -
Make the bead hole:
This is crucial: before adding a stem, use a needle tool or a skewer to pierce a hole horizontally through the center of the pumpkin. Ensure the hole is wide enough to accommodate your jute twine later. -
Form the stem:
For the stem, you have two options. You can sculpt a tiny cylinder from dark brown or black clay and press it into the top depression. Alternatively, press a small, real twig into the clay for a mixed-media look (remove the twig before baking and glue it back in afterward). -
Texturize (Optional):
To mimic the matte, slightly rough texture seen in the photo, gently dab the surface of your clay pumpkins with a stiff bristle brush or a crumpled ball of aluminum foil before baking.
Hole Sizing
Jute twine is thicker than standard thread. Always make your bead holes slightly larger than you think you need, as clay can sometimes shrink slightly during baking.
Step 2: Creating the Spacer Beads
-
Roll black spheres:
Take your black polymer clay and roll smaller spheres, approximately half the size of your pumpkins (about 0.5 to 0.75 inches). These will act as the contrasting spacers. -
Texture and pierce:
Give these black beads a similar textured finish by rolling them lightly over sandpaper or dabbing with a toothbrush. Poke a hole straight through the center, ensuring it aligns with the size of your twine. -
Bake the clay:
Arrange all your pumpkin and spacer beads on a parchment-lined baking sheet. Bake according to your clay manufacturer’s instructions (usually 275°F/135°C for 15-30 minutes per 1/4 inch of thickness). Let them cool completely.
Step 3: Stringing the Garland
-
Prepare the twine:
Cut a length of jute twine roughly 12-18 inches longer than your desired finished garland length to allow for knots and loops. -
Start the pattern:
Tie a secure loop at one end of the twine. Thread your needle onto the other end to help guide the twine through the beads. -
Thread the beads:
Begin stringing your beads. The pattern shown uses a mix of single black spacers between pumpkins on the main section, and a long tail of alternating black and terracotta beads at the ends. -
Create the pumpkin clusters:
For the main garland section, alternate your orange and beige pumpkins, separating them with one or two black spacer beads. Orient the pumpkins so the stems face upward. -
Finish the drape:
Once you have reached your desired length, tie off the end with another secure loop or a decorative tassel made from the same jute twine. -
Secure the stems:
If you used real twigs for stems and removed them for baking, create a dab of super glue in the top indentation and press your twigs permanently into place.
Rustic Paint Wash
Dilute brown acrylic paint with water and brush it over the baked pumpkins. Wipe it off immediately with a paper towel. The paint will stay in the grooves for depth.
Drape your finished garland across a mantel or shelf to enjoy those cozy autumn vibes
Silly Monster Mouth Clips
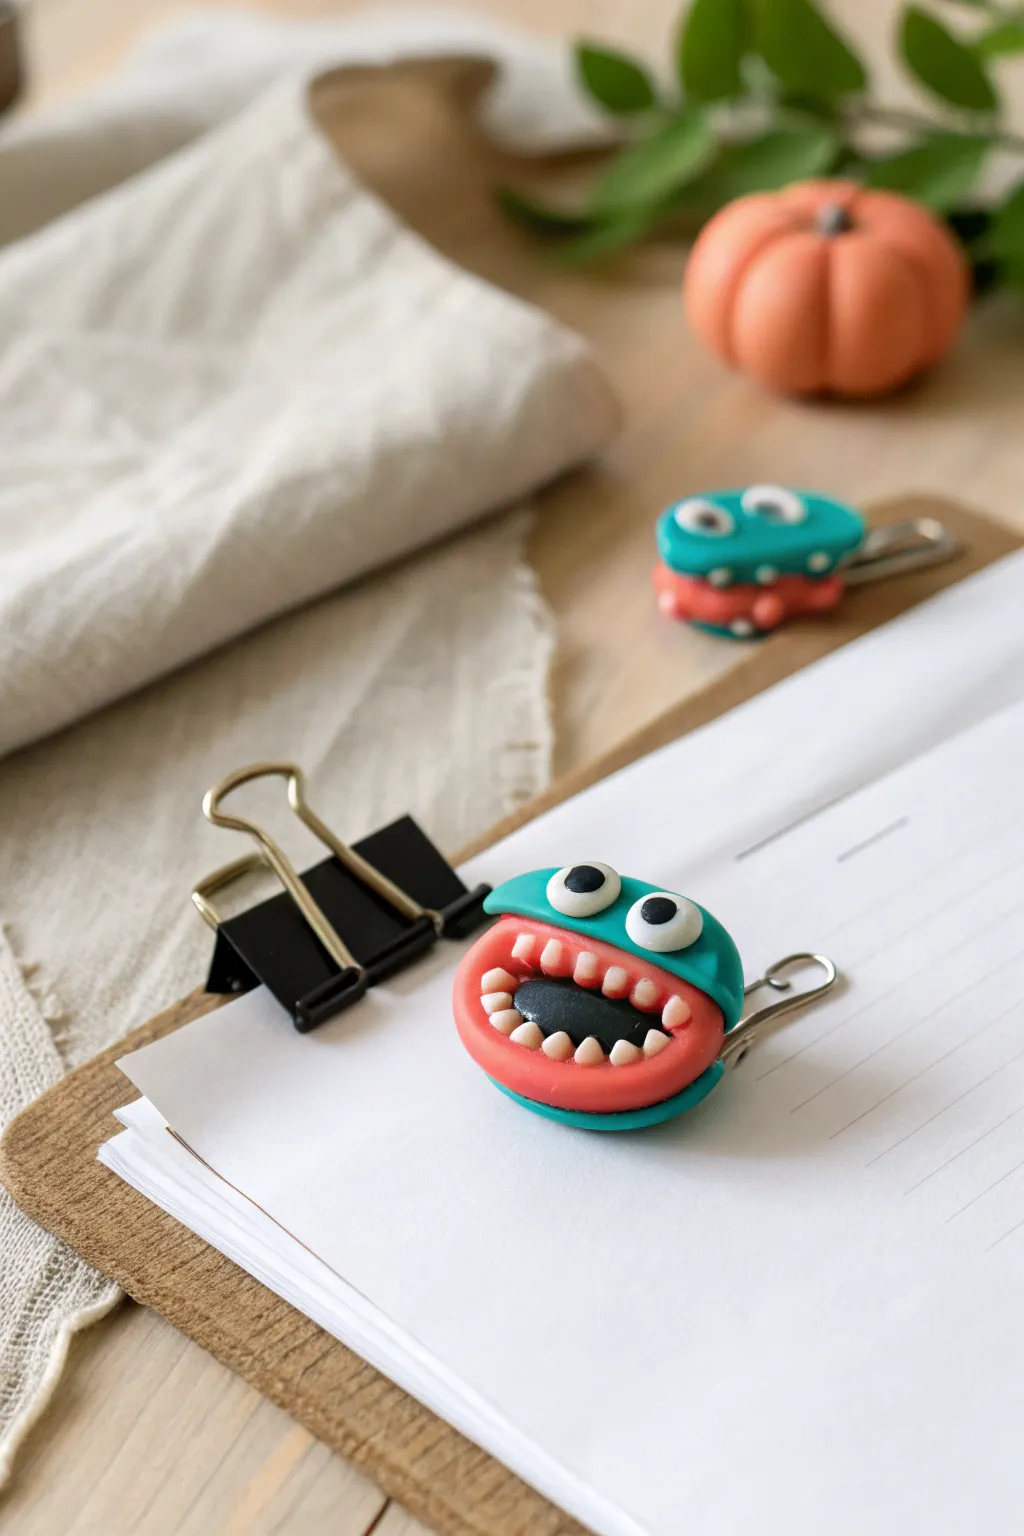
Transform boring office supplies into hilarious little monster companions with this simple clay project. These clips feature goofy eyes, snaggle-toothed grins, and bright colors perfect for adding a touch of Halloween fun to your paperwork.
Detailed Instructions
Materials
- Polymer clay (teal, coral red, black, and white)
- Large metal paper clips (2 inch size works best)
- Clay sculpting tools (needle tool, small ball tool)
- Baking sheet
- Parchment paper
- Craft knife
- Gloss glaze (optional)
Step 1: Forming the Base
-
Prepare the clip:
Wipe down your large paper clip with a little rubbing alcohol to remove any oils, creating a clean surface for the clay to grip. -
Roll the base slabs:
Take a small ball of teal clay and flatten it into an oval slab about 1/4 inch thick. This will be the foundation for the bottom jaw. -
Sandwich the clip:
Press the bottom loop of the paper clip gently into the teal oval. Add a thinner layer of teal clay on top to sandwich the metal wire completely, smoothing the seams so the wire is hidden. -
Create the upper jaw:
Repeat the process for the top section of the clip, making a slightly larger teal oval that overhangs a bit to form the monster’s forehead.
Adhesion Secret
Apply a tiny drop of liquid polymer clay or Bake & Bond onto the metal wire before sandwiching it. This acts as a ‘glue’ and prevents the baked clay from sliding off the metal later.
Step 2: Sculpting the Mouth
-
Make the gums:
Roll a snake of coral red clay. Flatten it gently and shape it into a U-shape to fit onto the bottom teal jaw piece. -
Shape the gum line:
Press this red U-shape onto the bottom jaw. Use a small ball tool to make little indentations where the teeth will eventually go. -
Add the inner mouth:
Roll a very small, flat oval of black clay. Place this inside the U-shape of the gums to create depth for the monster’s throat. -
Upper gums:
Create a matching red U-shape piece for the upper jaw, attaching it to the underside of the top teal piece so it mirrors the bottom gums.
Step 3: Teeth and Eyes
-
Roll tiny teeth:
Roll a thin snake of white clay and cut off tiny, rice-sized pieces. Roll these into small cones or rounded nuggets. -
Implant the teeth:
Using a needle tool, gently press each white tooth into the red gum indentations you made earlier. Vary the sizes slightly for a goofy, organic look. -
Form the eye sockets:
On top of the upper teal section, press two shallow dimples with your thumb or a large ball tool to seat the eyes. -
Create eyeballs:
Roll two balls of white clay and press them firmly into the sockets. They should bulge out slightly for that classic cartoon effect. -
Add pupils:
Roll tiny specs of black clay and press them onto the white eyeballs. Place them slightly askew—maybe one looking up and one down—to give the monster a silly expression.
Texture Upgrades
Before baking, use a stiff toothbrush to gently stipple the teal skin for a bumpy texture, or use a needle tool to add small warts in a contrasting color like lime green.
Step 4: Finishing Touches
-
Check adhesion:
Before baking, double-check that the clay is firmly gripping the metal wire. Gently pinch the clay around the wire edges one last time. -
Bake:
Place your monster clip on a parchment-lined baking sheet. Bake according to your polymer clay package instructions (usually 275°F for about 15-20 minutes). -
Cool down:
Let the clip cool completely on the baking sheet before handling. The metal will be hot and the clay is fragile until fully cool. -
Glaze (Optional):
For a wet, slobbery look, brush a coat of gloss glaze over the teeth, gums, and eyeballs once the piece is cool.
Now you have a brilliantly bizarre little buddy to keep your important papers safe and sound