Whenever I need a project that feels equal parts playful and impressive, I reach for clay castle builds. Here are my favorite clay castle ideas—from classic turrets and battlements to wild fantasy twists you can totally make at home.
Mini Fairy-Tale Castle
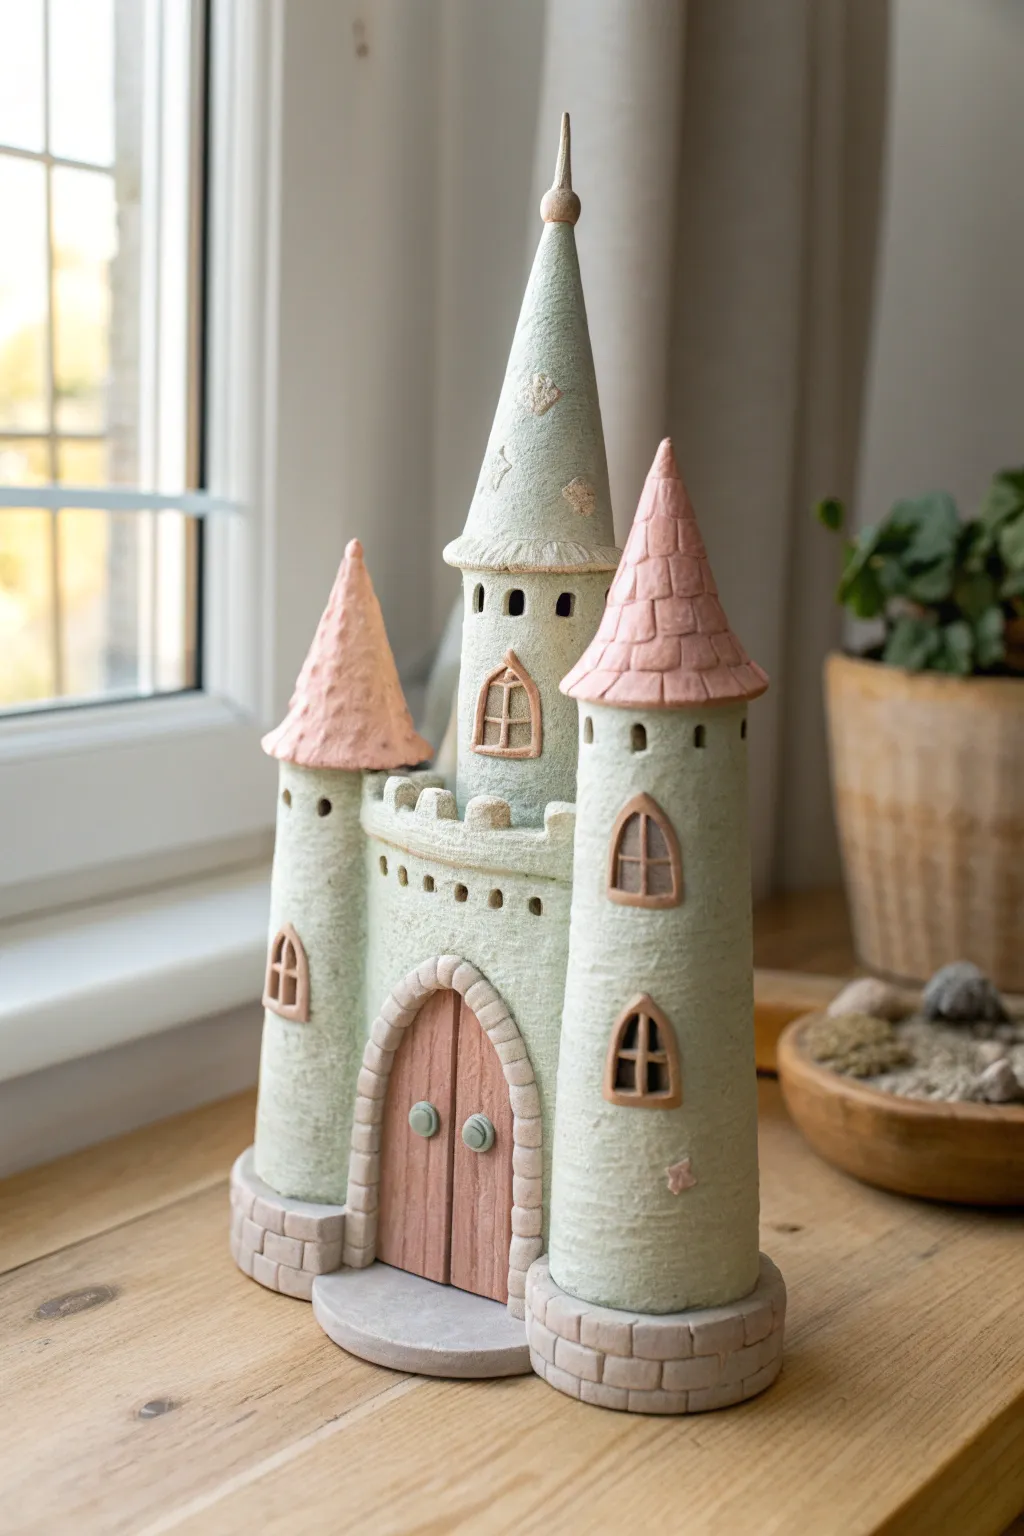
This enchanting miniature castle features soft sage green walls, blush pink rooftops, and charming architectural details that evoke a dreamy fairy-tale world. Standing on a sturdy stone-effect base, it makes a perfect centerpiece for a nursery shelf or a magical garden vignette.
How-To Guide
Materials
- Air-dry clay or polymer clay (white or grey base)
- Rolling pin
- Clay sculpting tools (knife tool, needle tool)
- Cardboard tubes or dowels (for structural support)
- Acrylic paints (Sage Green, Terra Cotta Pink, warm grey, antique white)
- Small flat brushes and detail brushes
- Texture sponge or stiff bristle brush
- Water and slip (if using air-dry clay)
- Sandpaper (fine grit)
Step 1: Constructing the Core
-
Prepare the supports:
Cut three cardboard tubes to varying heights: one tall central tower and two shorter flanking towers. These will act as the armature for your clay. -
Roll out the wall slabs:
Roll out a large, even sheet of clay approximately 1/4 inch thick. Measure the circumference of your tubes and cut rectangular slabs to wrap around each one. -
Wrap the towers:
Gently wrap the clay slabs around each tube. Score and slip the edges where they meet (or blend carefully if using polymer) to create a seamless cylinder. Leave the tops open. -
Connect the structures:
Position the two smaller towers on either side of the tall central tower. Use small snakes of clay to bridge the gaps between them, blending the clay smoothly so the three cylinders become one unified structure. -
Add the central wall:
Create a flat wall section to connect the front of the towers. Cut a crenelated pattern (the castle battlement ‘teeth’) along the top edge before attaching it firmly between the structures.
Slumping Towers?
If your towers sag while working, stuff the cardboard tubes with paper for extra rigidity, or let the clay firm up for 30 minutes before assembling the components.
Step 2: Architectural Details
-
Form the stone base:
Roll three thick strips of clay and wrap them around the base of each tower. Use a knife tool to carve deep horizontal and vertical lines, mimicking heavy foundation stones. -
Create the door frame:
Roll a long snake of clay and flatten it slightly. Arch it over the space between the two smaller towers to form the main entrance. Use a tool to impress individual stone markings around the arch. -
Fill the door:
Cut a flat piece of clay to fit inside the archway. Score vertical lines to resemble focused wood planks, then add two small round clay balls for door handles. -
Add windows:
Cut small arched window shapes from spare clay slabs. Frame them with thin clay borders and add tiny cross-strips for the panes. Attach these to the front of each tower at varying heights. -
Texture the walls:
Gently dab a texture sponge or a stiff brush over the smooth wall surfaces to give them a subtle, stucco-like limestone finish. I find this hides fingerprints perfectly.
Roof Fitting Tip
Roll a small ball of foil and press it into the wet tower top before making the roof. This creates a perfect custom ‘socket’ so the roof sits securely without sliding off.
Step 3: The Roofs & Finish
-
Shape the cones:
Form two shorter cones and one tall, slender cone from solid clay (or foil cores covered in clay) to fit atop your towers. -
Tile the roofs:
For the smaller roofs, start at the bottom and press small, flattened pellets of clay in overlapping rows to create shingles. For the tall central spire, you can simply texture the surface or add sparse decorative stars. -
Dry completely:
Allow the entire structure to dry or cure according to your clay manufacturer’s instructions. This may take 24-48 hours for air-dry clay. -
Base coat painting:
Paint the main walls in a soft sage green and the stone base in a warm grey. Paint the door and rooftops with a muted terra cotta or blush pink. -
Highlight and define:
Once dry, dry-brush a little antique white over the textured walls and roof tiles to catch the raised edges. Paint the window frames a darker clay tone to make them pop.
Place a small LED tea light behind the structure to see a warm glow peek through the windows


Classic Medieval Fortress Keep
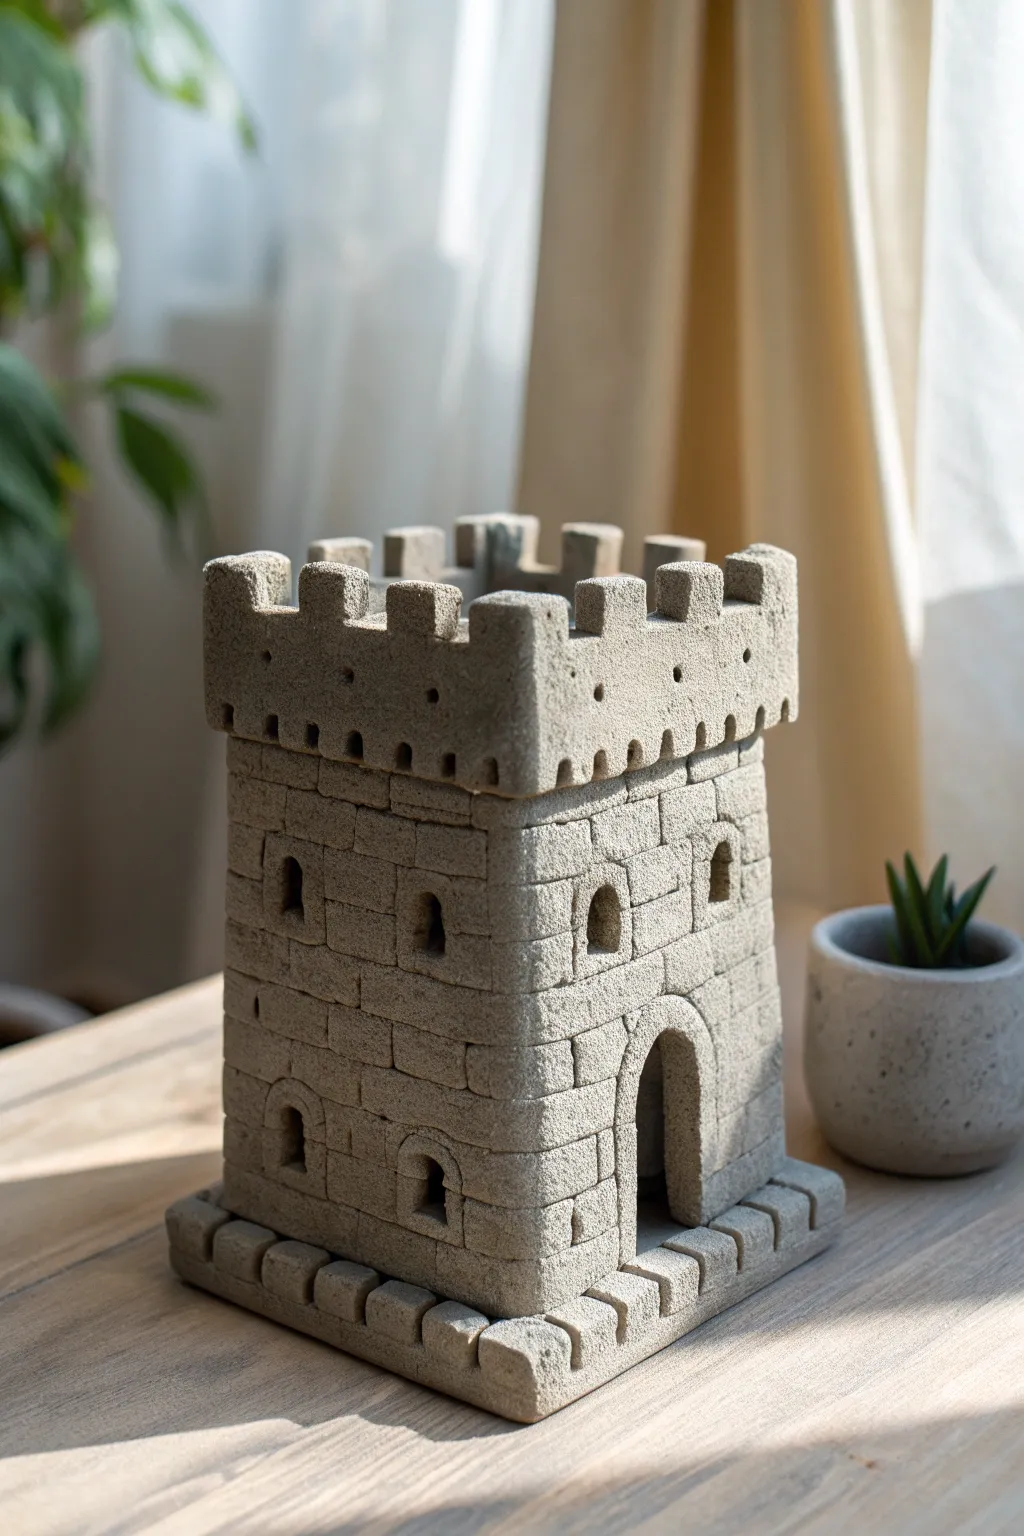
This classic medieval fortress keep combines sturdy architecture with a charmingly weathered aesthetic. The finished piece features a textured, sandy finish and precise brickwork that makes it look like it has stood guard for centuries.
Detailed Instructions
Materials
- Stoneware clay (grogged or speckled for texture)
- Slab roller or rolling pin
- Two long wooden guide strips (approx. 1/4 inch thick)
- Fettling knife or X-Acto blade
- Needle tool
- Ruler
- Slip and scoring tool (or serrated rib)
- Small trimming loop tool
- Wooden sculpting tool with a squared edge
- Rough sponge or piece of sandpaper (for texture)
- Cardboard or paper templates
Step 1: Preparing the Walls
-
Roll the Slabs:
Begin by rolling out your clay into an even slab using your guide strips to ensure a uniform thickness of about 1/4 inch. You will need enough surface area for four identical rectangular walls and a square roof piece. -
Cut the Wall Panels:
Using a ruler and your fettling knife, cut four identical rectangles. A good size for a tabletop piece is roughly 4 inches wide by 6 inches tall, but you can adjust these dimensions to your preference. -
Add Texture Early:
Before assembly, gently press a rough sponge or a crumpled ball of aluminum foil over the surface of the moist slabs. This establishes that gritty, stone-like base texture seen in the reference image. -
Cut the Openings:
On the front panel, cut a tall arched doorway centered at the bottom. On the other panels (or higher up on the front), carefully cut out small arched windows using your needle tool or a small cutter. -
Bevel the Edges:
To create seamless 90-degree corners, cut the vertical edges of your four wall panels at a 45-degree angle. This miter joint will make the tower much stronger than a simple butt joint.
Clean Cuts Tip
When cutting crenellations (the notches at the top), let the clay stiffen to ‘leather hard’ first. Soft clay will drag and warp; firmer clay cuts like cheese.
Step 2: Assembling the Keep
-
Score and Slip:
Score the beveled edges aggressively and apply a generous amount of slip. Stand the walls up and press them together to form a hollow rectangular prism. -
Reinforce the Seams:
On the inside of the tower, roll a very thin coil of clay and press it into the corners where the walls meet, smoothing it out to reinforce the structure. -
Refine the Outside Corners:
On the exterior, smooth the joined corners so the seam disappears. I find using a wooden rib here helps keep the walls flat while blending the clay. -
Attach the Roof Platform:
Cut a square slab that fits just inside the top of your tower walls. Score, slip, and lower it into place so it sits about 1/2 inch below the top rim, creating a sunken roof floor.
Step 3: Architectural Detailing
-
Carve the Brickwork:
Using a needle tool or a dull pencil, lightly sketch horizontal lines around the entire tower to serve as guides for your brick rows. Then, press in the vertical brick lines, staggering them row by row for a realistic masonry bond. -
Create the Upper Crenellations:
Roll a thick strip of clay (about 1/2 inch tall) to wrap around the very top of the tower. Adhere it securely, then use a square cutter or knife to remove alternating notches, creating the classic castle battlements. -
Add Decorative Corbels:
Just below the upper battlements, attach small, evenly spaced cubes of clay. Smooth them onto the wall to simulate corbels supporting the upper parapet. -
Form the Base Foundation:
Create a wider base by adhering a thick framing strip of clay around the bottom perimeter. Similar to the top, use a knife to cut notches into this base strip to mirror the crenellated style of the battlements. -
Deepen the Texture:
Go back over your brick lines with a sculpting tool to deepen the grooves. Gently tap the entire surface with a stiff bristle brush to enhance the sandy, weathered stone look. -
Detail the Windows:
Use a small loop tool to bevel the inside edges of the window arches, giving the illusion of thick, heavy stone walls. -
Final Surface Prep:
Once leather hard, sponge down any sharp crumbs of clay. If using fired ceramics, you can leave the clay unglazed if it has a nice stone color, or apply a matte iron oxide wash to highlight the texture after bisque firing.
Illumination Hack
Cut a hole in the bottom hidden by the base. This allows you to place an LED tea light underneath, making the windows glow warmly in the evening.
Now your fortress is ready to stand guard on your shelf or in your garden

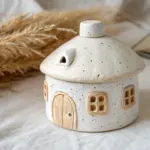
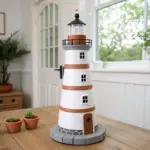
Simple Tower-Only Castle
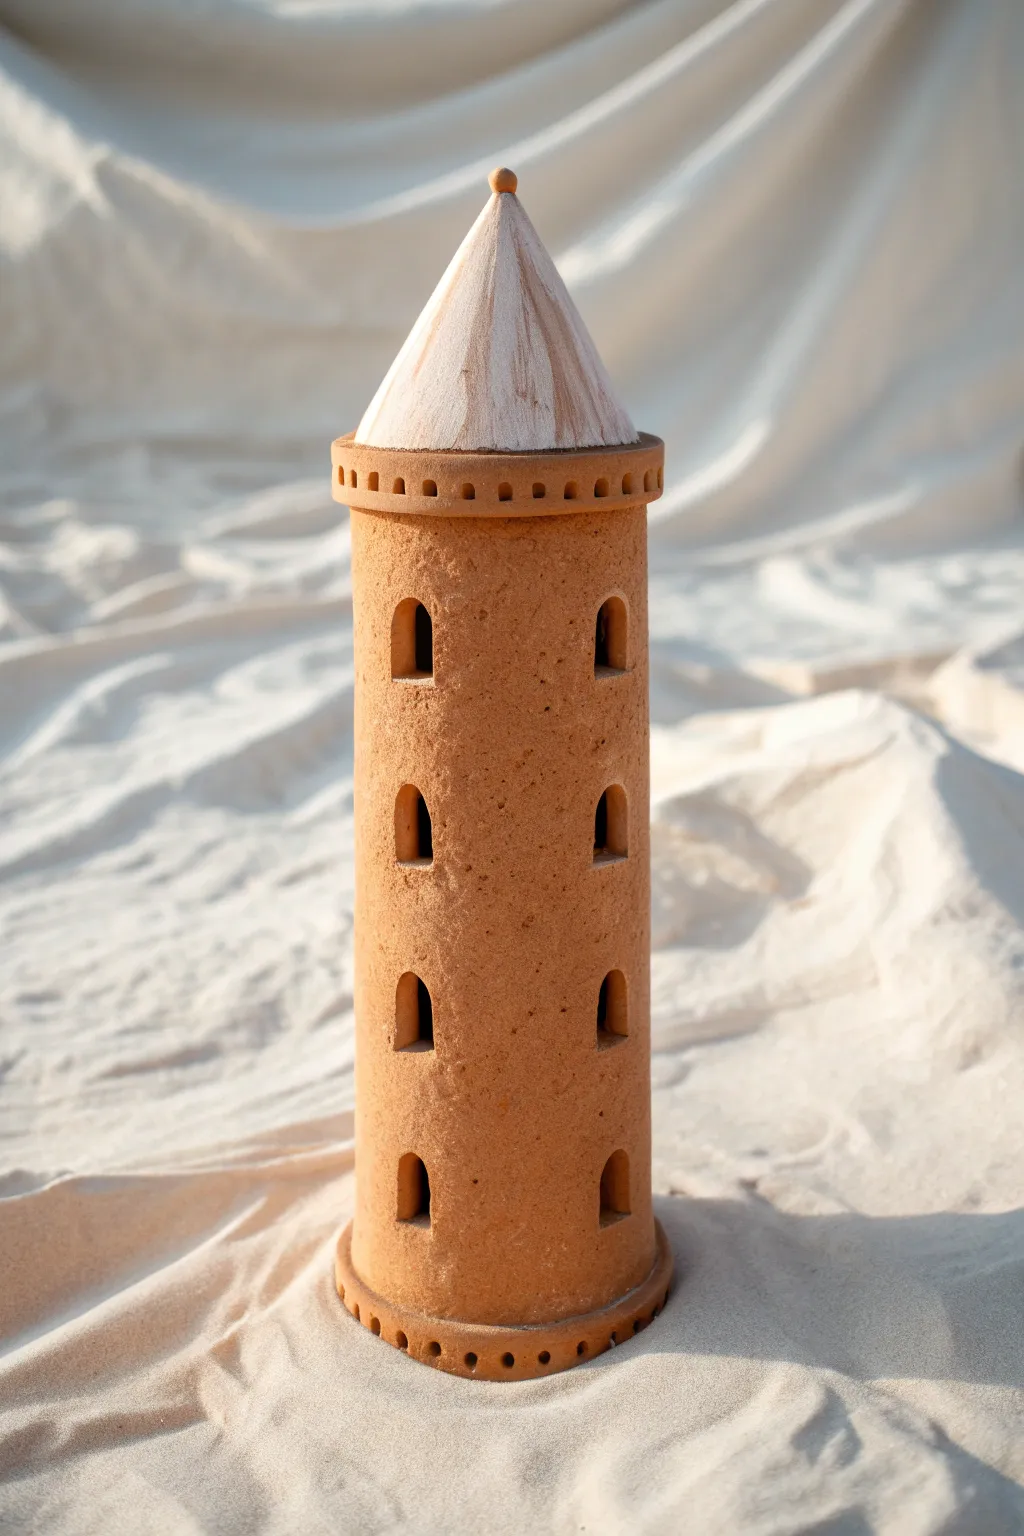
Standing solitary and dignified, this simple cylindrical watchtower captures the essence of medieval architecture with clean lines and warm earth tones. The project features four tiers of arched windows and a distinctive white-washed conical roof, making it a perfect starting point for learning structural coil and slab building.
Step-by-Step
Materials
- Terracotta or red earthenware clay (mid-fire)
- White clay slip or white acrylic paint
- Rolling pin
- Canvas mat or slab roller
- Cardboard mailing tube or PVC pipe (approx. 3-4 inches diameter) for use as a form
- Clay knife or fettling knife
- Needle tool
- Scoring tool or serrated rib
- Slip (clay glue)
- Small circle cutter or straw (for decorative holes)
- Small wooden modeling tool (for smoothing windows)
- Sponge
Step 1: Forming the Main Cylinder
-
Prepare the slab:
Start by rolling out a medium-sized slab of terracotta clay on your canvas mat. Aim for a consistent thickness of about 1/4 inch to ensure the walls are sturdy enough to stand but not too heavy. -
Cut the rectangle:
Measure the height you want your tower to be (around 10-12 inches works well) and the circumference of your tube form. Cut a clean rectangle from the slab based on these dimensions, adding a half-inch overlap for the seam. -
Wrap the form:
Wrap a layer of newspaper or paper towel around your cardboard tube or PVC pipe; this prevents the clay from sticking. Carefully wrap your clay slab around this prepared form. -
Secure the seam:
Score (scratch) and slip both edges of the clay where they meet. Press them firmly together to create a bond. I like to use a wooden tool to blend the clay across the seam until it disappears completely. -
Add the base:
Roll a small coil of clay and flatten it slightly into a strip. Attach this to the bottom of your cylinder as a footer, scoring and slipping it into place. This adds stability and visual weight. -
Decorate the base:
Using a small tool or the end of a paintbrush, press shallow, evenly spaced indentations all around this bottom footer ring to create a decorative, bead-like pattern. -
Stiffen the form:
Let the cylinder rest on the tube for about 30 minutes to firm up (leather hard stage) before gently sliding it off the form. Standing it up freely now prevents it from warping later.
Slumping Cylinder?
If the clay walls buckle when you remove the tube, the clay is too wet. Put it back on the form and let it dry for another hour until it reaches ‘leather hard’ stiffness.
Step 2: Carving Details & Roof
-
Mark window placement:
Lightly sketch the locations for your windows using a needle tool. You’ll want four vertical levels, with two windows visible on the ‘front’ face. Ensure they align vertically. -
Cut the arches:
Carefully cut out the arched window shapes. Keep your knife perpendicular to the clay wall for a clean cut. Remove the clay plugs gently. -
Smooth the openings:
Use a damp sponge or your finger to smooth the sharp edges of the window frames inside and out. This refined edge gives the piece a professional finish. -
Create the upper rim:
Roll another strip of clay similar to the footer. Attach this around the very top edge of the cylinder slightly overhanging outward. Score and slip to secure. -
Detail the rim:
Just like the base, press small, repetitive indentations into this upper rim to create the look of miniature crenellations or decorative stonework. -
Form the roof cone:
Roll a flat circle of clay. Cut a slit from the edge to the center. Overlap the cut edges to form a cone shape that fits the diameter of your tower top. Seal the seam well. -
Refine the roof:
Smooth the cone shape and attach a tiny ball of clay to the very peak using a drop of slip for the finial knob. -
Whitewash the roof:
Before firing (if using kiln clay) apply a layer of white slip to the roof section. If using air-dry clay, wait until fully dry and paint the roof with watered-down white acrylic for a weathered look. -
Final assembly:
Place the roof on top of the cylinder. You can choose to score and slip it permanently, or leave it removable to use the tower as a luminary candle holder.
Luminous Idea
Don’t attach the roof permanently! Leave it loose so you can place an LED tea light inside. The light will flicker beautifully through the arched windows at night.
Allow your castle tower to dry slowly away from direct drafts to prevent cracking before firing or sealing


Slab-Built Castle With Courtyard
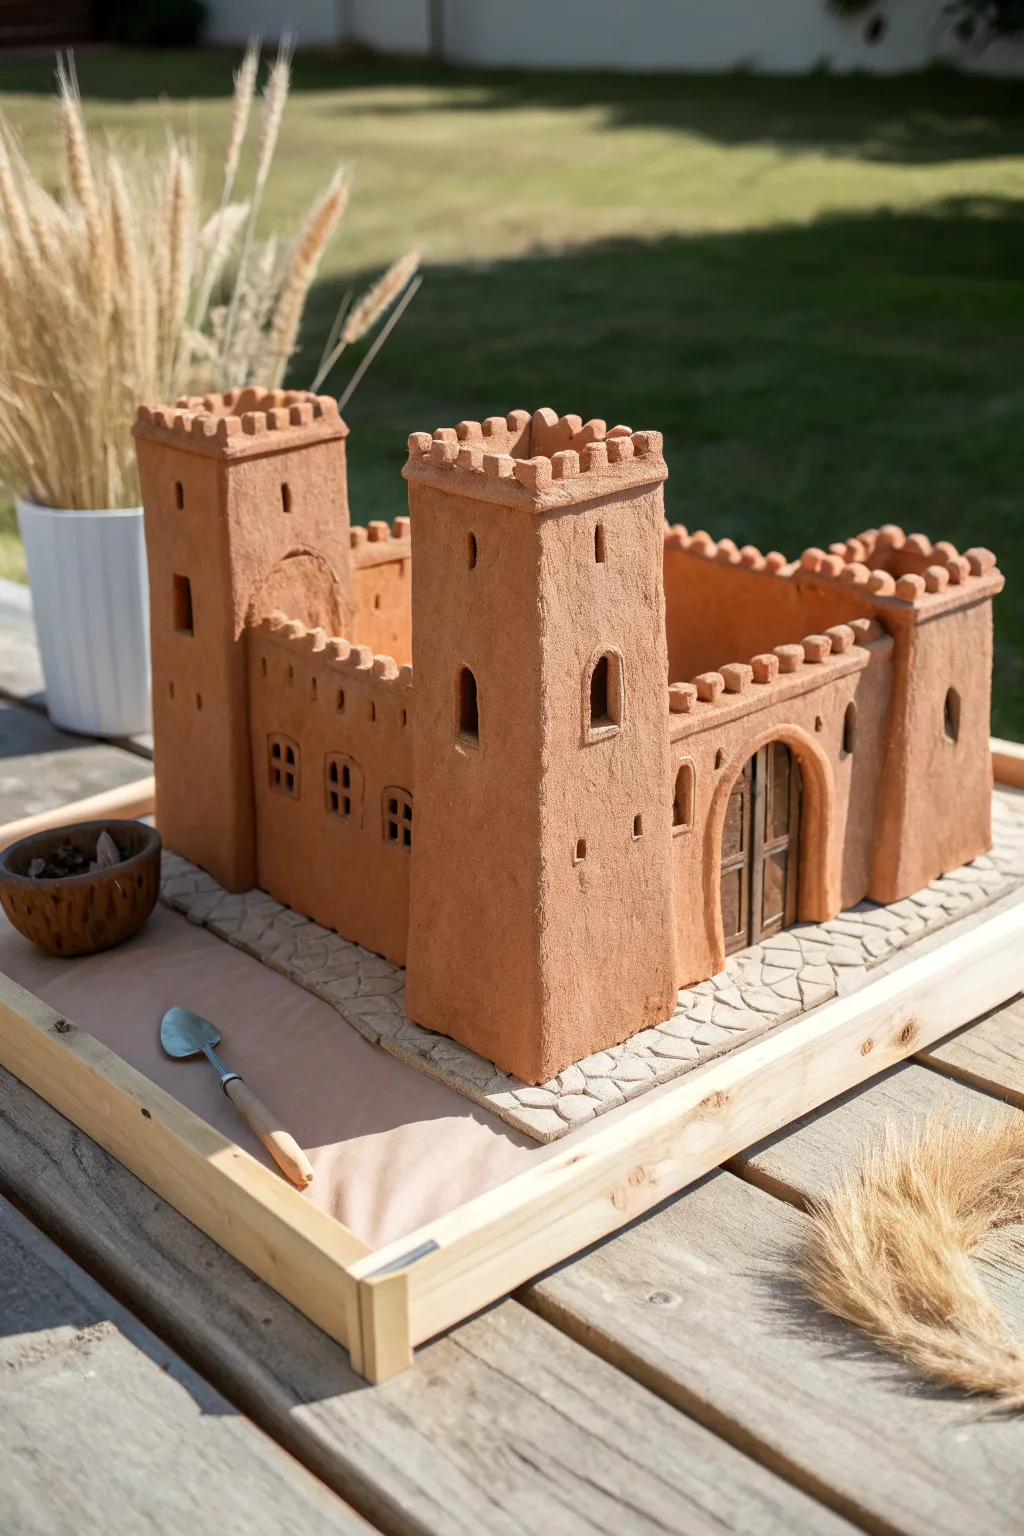
Construct a majestic slab-built fortress featuring soaring towers, protective crenellations, and a spacious central courtyard. The warm, earthy finish gives this architectural sculpture the timeless look of an ancient desert citadel.
Step-by-Step Tutorial
Materials
- Red earthenware or terracotta clay (approx. 5-7 lbs)
- Rolling pin and wooden guide strips (1/4 inch thick)
- Fettling knife or X-Acto blade
- Slip and scoring tool (or serrated kidney)
- Ruler and paper templates
- Wooden sculpting tools
- Textured mat or cobblestone roller
- Small square wash cutter (optional, for windows)
- Wooden tray for final display (optional)
Step 1: Preparing the Base and Slabs
-
Roll out the clay:
Begin by rolling out several large slabs of clay to a consistent 1/4 inch thickness using your guide strips. You will need enough material for a large square base, four towers, and connecting walls. -
Create the cobblestone floor:
Cut a large square slab for the foundation. While the clay is still plastic, press a cobblestone texture mat into the border area where the castle will sit, or hand-carve irregular stone shapes using a modeling tool to create a paved effect. -
Cut the wall components:
Using paper templates for accuracy, cut out four tall rectangles for each tower (16 total) and four lower rectangular strips for the connecting curtain walls. Let these slabs firm up to a ‘leather-hard’ state so they can stand unsupported.
Step 2: Constructing the Towers
-
Assemble the first tower:
Take four of your tall tower slabs. Score and slip the vertical edges thoroughly. I like to reinforce the inside seams with a thin coil of clay to ensure stability. -
Build the remaining towers:
Repeat the process for the other three towers. Ensure they are square and the walls are perpendicular to the work surface. -
Add crenellations:
For the battlements at the top of each tower, add a strip of clay slightly wider than the walls. Using a square cutter or knife, cut out alternating notches to create the classic castle tooth pattern. -
Carve architectural details:
Cut arched windows into the upper sections of the towers. Use a small loop tool to carve decorative trim around the windowframes to add depth and shadow.
Preventing Warped Walls
If your large flat walls start bending while drying, place a weighted bag of sand or dry rice inside the towers or against the walls to hold them straight until bone dry.
Step 3: Assembly and Detailing
-
Position the towers:
Place your four towers onto the cobblestone base at the corners. Score the bottom of the towers and the base where they meet, apply slip, and press them firmly into place. -
Install the connecting walls:
Attach the lower curtain walls between the towers using the score and slip method. Ensure the walls are set back slightly from the tower faces for visual interest. -
Detail the main gate:
On the front wall, cut a large archway. Roll out a slab with a wood-grain texture and cut it to fit behind the arch to simulate heavy wooden doors. Scribe vertical lines for planks and add tiny clay balls for hinge rivets. -
Add wall crenellations:
Just like the towers, add a strip of clay to the top of all connecting walls and cut the crenellation notches. This ties the whole structure together visually. -
Refine the surface:
Use a damp sponge to smooth any sharp edges or rough seams, but keep the natural grit of the terracotta visible to maintain that rustic, adobe aesthetic. -
Final drying and firing:
Let the castle dry very slowly under loose plastic for several days to prevent warping. Once bone dry, bisque fire the piece. You can leave it unglazed for a natural look or apply a matte wash.
Natural Texture
Instead of smoothing the clay perfectly, tap the surface with a stiff bristle brush or a rough stone while the clay is soft to create an authentic weathered stone stucco texture.
You now have a timeless clay fortress ready to defend your garden or bookshelf

The Complete Guide to Pottery Troubleshooting
Uncover the most common ceramic mistakes—from cracking clay to failed glazes—and learn how to fix them fast.
Coil-Turret Castle With Round Walls
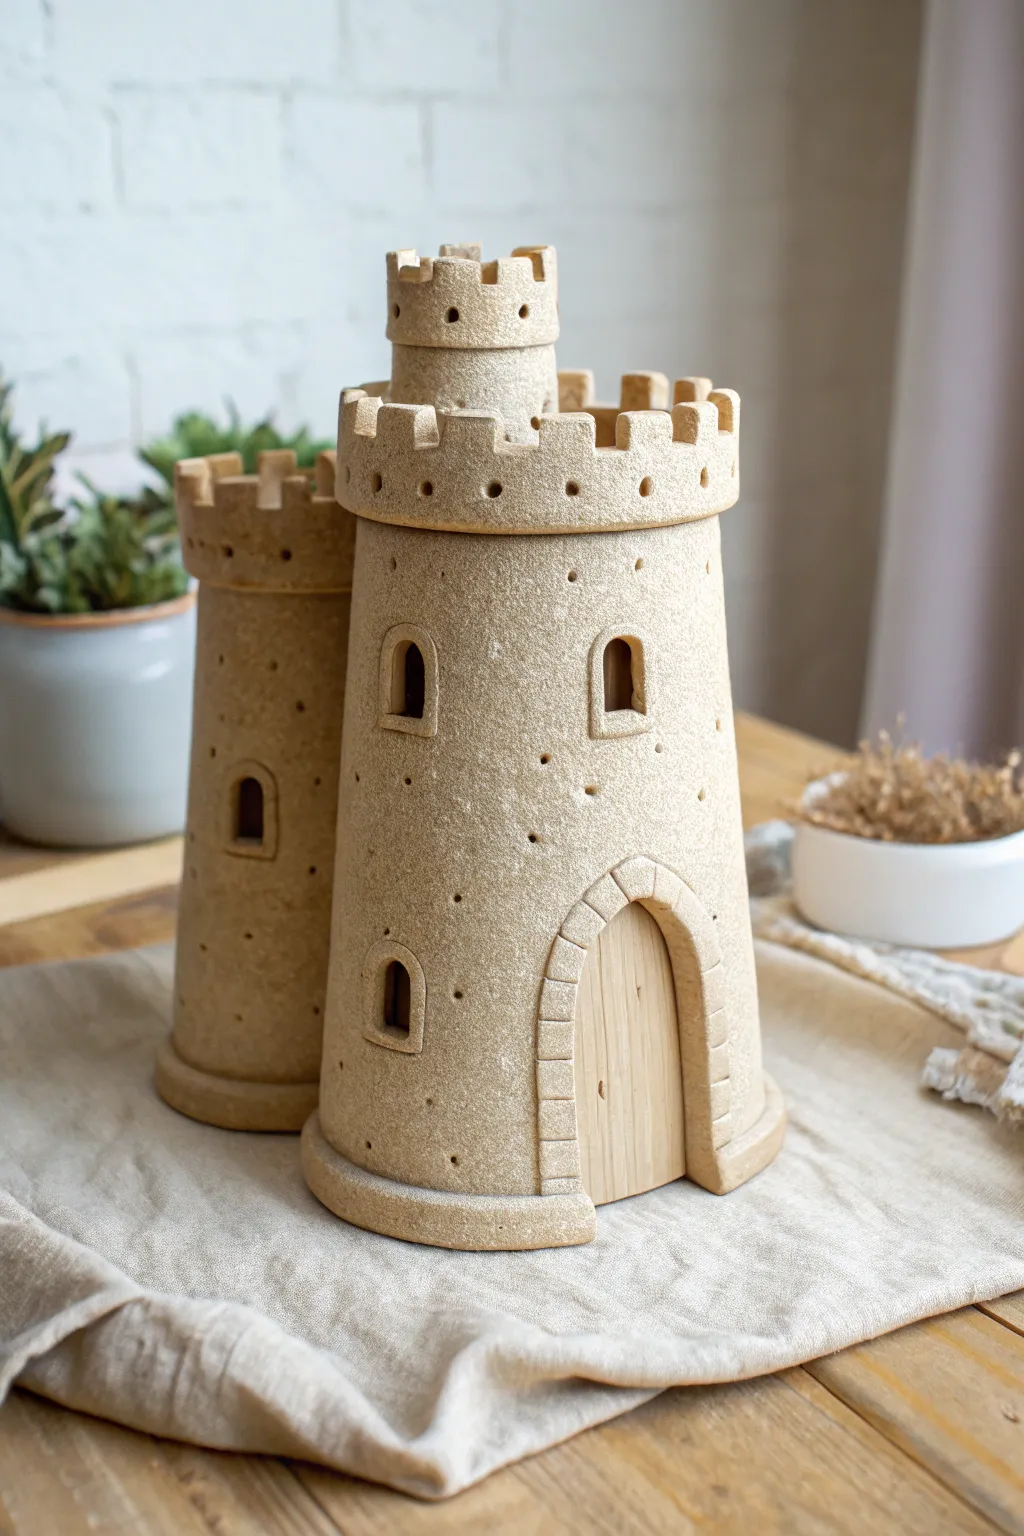
This charming ceramic castle features dual round turrets and a distinct speckled texture that mimics real sandstone. With its inviting wooden door and classic crenellated battlements, it feels like a miniature fortress straight out of a storybook.
Step-by-Step
Materials
- Stoneware clay (speckled or buff)
- Rolling pin
- Canvas mat or slab roller
- Circle templates (large and medium)
- Fettling knife
- Scoring tool and slip
- Wooden sculpting tools
- Small square clay cutter (optional)
- Hole punch tool or straw
- Balsa wood sheet (for door)
- Sander or texture sponge
- Clear matte glaze (optional)
Step 1: Constructing the Main Turret
-
Prepare the Slabs:
Begin by rolling out a consistent slab of clay, approximately 1/4 inch thick. Compress the clay on both sides with a rib to prevent warping. -
Cut the Base:
Cut a large circle for the base of the main tower. This will serve as the foundation, so make it slightly wider than you want the walls to be. -
Form the Cylinder:
Cut a large rectangular strip from your slab. The length needs to match the circumference of your base circle. Bevel the short edges at a 45-degree angle to create a seamless join. -
Assemble the Walls:
Score and slip the perimeter of the base and bottom edge of your rectangle. Stand the rectangle up, wrapping it into a cylinder. Join the beveled edges securely, smoothing the seam inside and out. -
Add the Roof Platform:
Cut a circle slightly larger than the top of your cylinder. Score, slip, and attach it to cap off the tower. This creates the ‘floor’ for the battlements. -
Create the Battlements:
Roll a narrow strip of clay about 1 inch tall. Wrap this around the top edge of the roof platform to create a rim. Use a square cutter or knife to notch out the classic castle crenellations.
Step 2: Adding the Secondary Tower
-
Build the Smaller Tower:
Repeat the cylinder construction process to make a second, shorter and narrower tower. This one should be sized to snuggle up against the main keep. -
Join the Structures:
Identify where the two towers will touch. Score and slip these contact points generously. Press them together firmly, and use a modeling tool to blend the clay at the seam for structural integrity. -
Top Turret Detail:
Fashion a very small third cylinder to place atop the main tower’s roof. Add its own tiny battlements to create a tiered lookout post.
Leaning Tower Troubles?
If your cylinder walls start slumping while building, stuff the inside loosely with paper towels or newspaper. This provides internal support until the clay stiffens.
Step 3: Detailing and Texture
-
Carve the Archway:
On the main tower, use a needle tool to trace a large arched doorway. Carefully cut this shape out and remove the clay. -
Frame the Door:
Roll a thin coil or strip and attach it around the door arch. Use a tool to impress lines into this strip, making it look like individual stone blocks. -
Cut Windows:
Cut small arched windows into both towers. I find it helpful to frame these with tiny strips of clay to add depth and shadow. -
Apply Texture:
Gently pat the entire surface with a coarse sponge or a crumpled ball of foil. This removes the ‘smooth’ clay look and creates that sandy, stone-like finish. -
Make the Vent Holes:
Using a small hole punch or straw, poke evenly spaced decorative holes around the battlements and scattered randomly on the walls for visual interest. -
Refine the Base:
Add a thick coil around the very bottom of the entire structure to ground it visually. Smooth it slightly so it looks like a foundation stone.
Lighting It Up
Make the bottom of the towers open instead of solid. This lets you place the finished castle over an LED tea light, turning the windows into glowing beacons.
Step 4: Finishing Touches
-
Dry and Bisque:
Allow the castle to dry slowly under plastic to prevent cracking at the seams. Once bone dry, bisque fire the piece according to your clay body’s specifications. -
Glazing:
To keep the raw stone look shown in the image, you might leave the outside unglazed or use a very matte, dry stoneware glaze. Fire the piece again. -
Door Installation:
Cut a piece of balsa wood to fit inside your arched doorway. Lightly sand it for a natural look and glue it into place from the inside once the ceramic is fully fired and cool.
Place your finished castle near a sunny window or some succulents to highlight its natural, sandy texture
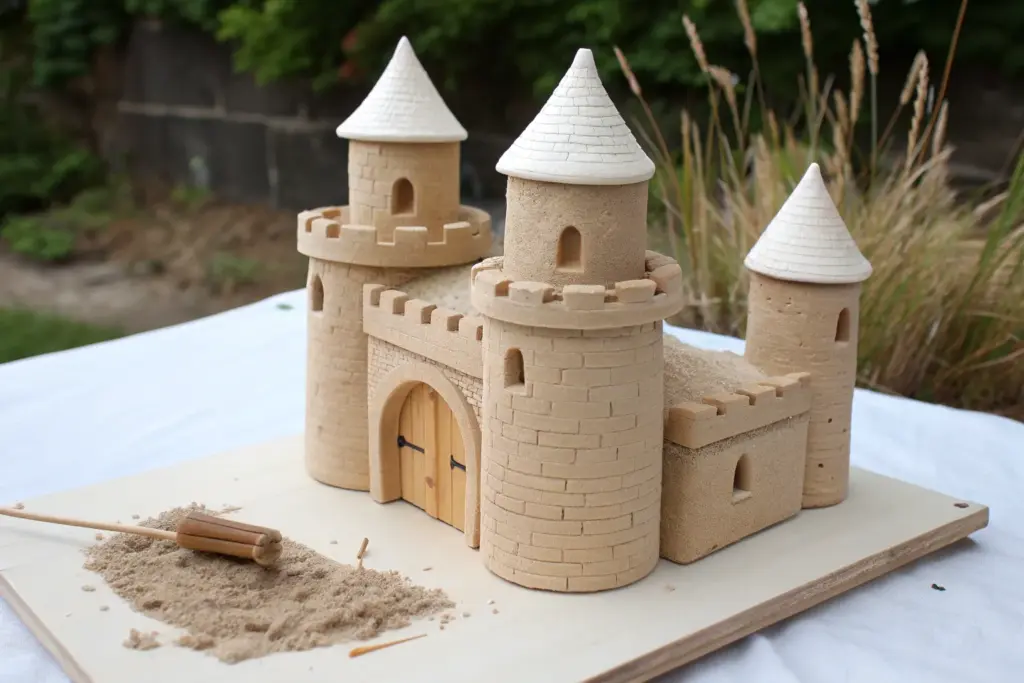
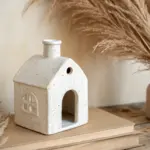
Castle Gate With Arched Portcullis Look
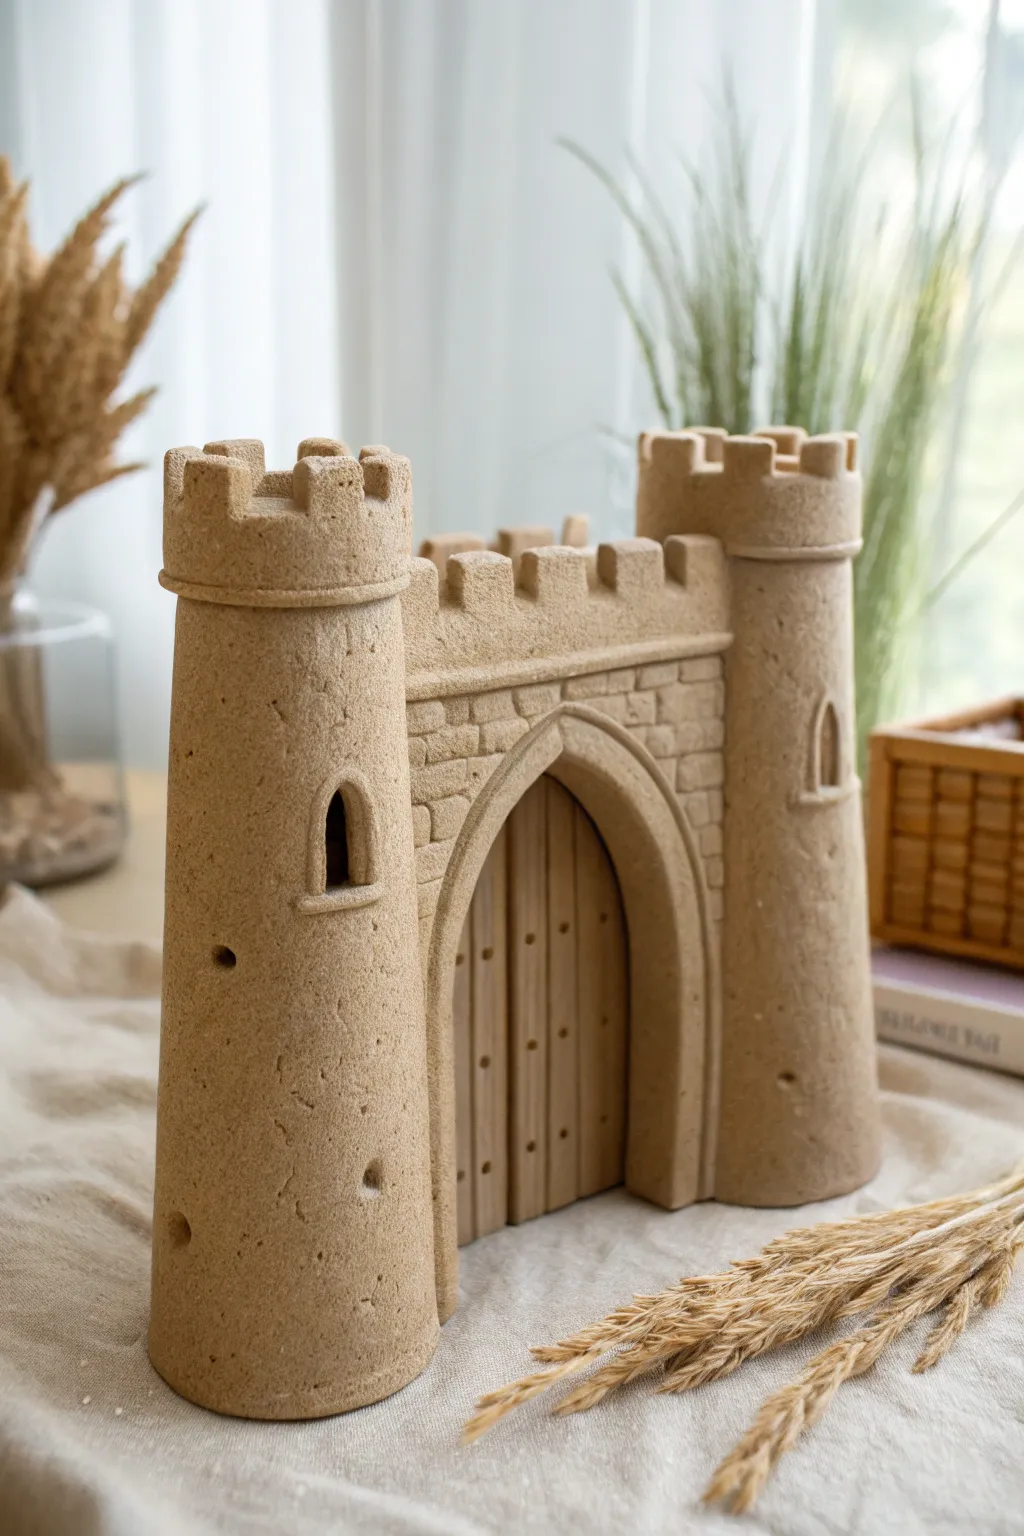
Create a charmingly rustic castle entrance that mimics the texture of real sandstone while maintaining the durability of hardened clay. This project features two classic round towers flanking a central arched gate with a distinct wooden door insert.
Step-by-Step Guide
Materials
- Stone-effect polymer clay or air-dry clay (sand/beige color)
- Wooden dowels or craft sticks (for the door)
- Texture sponge or stiff brush
- Rolling pin
- Cardboard or foil cores (for tower support)
- Craft knife or clay scalpel
- Needle tool
- Strong craft glue
Step 1: Forming the Main Structure
-
Prepare the supports:
Begin by creating armatures for your towers. You can use cardboard tubes (like toilet paper rolls cut to size) or tightly crumpled aluminum foil shaped into two identical cylinders. This saves clay and keeps the towers light. -
Roll out the clay:
Condition your stone-effect clay until it’s pliable. Roll it out into large, even slabs about 1/4 inch thick. You’ll need enough to wrap around both cylinders and create the connecting wall. -
Wrap the towers:
Carefully wrap a clay slab around each cylinder support. Smooth the seam where the clay meets, blending it with your thumb so the join is invisible. Trim the top and bottom to be flush with the support. -
Create the central wall:
Cut a rectangular slab of clay for the connecting wall. It should be slightly shorter than the towers. Position it between the two towers and blend the clay on the back side to join the three pieces into a single unit. -
Add the archway structure:
For the gatehouse effect, add a slightly thicker layer of clay to the front center of the connecting wall. Shape this into a rectangular protrusion where the arch will be carved later.
Slumping Walls?
If the clay sags while working, insert temporary crumpled foil balls inside the archway or windows to support the shape until the material begins to firm up or dry.
Step 2: Detailing and Texture
-
Cut the archway:
Using a craft knife, carefully cut out a large gothic-style arch (pointed at the top) from the center of the wall. Remove the clay inside the arch to create a deep recess for the door. -
Define the arch trim:
Roll a thin snake of clay and flatten it slightly. Apply this around the edge of your arch cut-out to create a decorative stone trim. Smooth the edges onto the main wall. -
Form the battlements:
Roll a strip of clay slightly wider than the circumference of your towers. Cut square notches out of the top edge to create the crenellations (the castle ‘teeth’). Wrap this strip around the top of each tower. -
Connect the wall battlements:
Repeat the previous process for the central wall, adding a straight strip with square notches along the top edge connecting the two towers. -
Carve the stonework:
Use a needle tool to lightly sketch horizontal lines across the central wall section above the arch. Add vertical lines staggered between them to create a brick or block pattern. -
Add windows:
Cut small arched windows into the upper section of each tower. Frame them with tiny sausages of clay, blending the edges to look like carved stone sills. -
Texturize the surface:
To get that realistic sandstone look, take a stiff texture sponge or an old toothbrush and firmly stipple the entire surface of the clay. I find this hides fingerprints and gives it an authentic aged feel. -
Add random weathering:
Use the rounded end of a paintbrush handle to poke a few small indentations randomly on the towers, simulating worn stone or pockmarks.
Weathered Effect
After the clay dries/cures, lightly brush a diluted darker brown paint into the crevices and brick lines, then wipe the surface clean to make the details pop.
Step 3: The Wooden Door Insert
-
Measure the opening:
Measure the height and width of the arched opening you created. You need to build a wooden door that fits snugly behind this frame. -
Assemble the planks:
Cut wooden coffee stirrers or craft sticks to the correct height. Glue them side-by-side onto a backing piece of cardstock or thin wood to create a planked surface. -
Shape the door top:
Once the glue is dry, trim the top of the wooden plank assembly into a point to match the gothic arch of your clay castle. -
Add door details:
Using a fine-tip marker or a tiny paintbrush with dark paint, add small dots in horizontal rows across the planks to represent iron nails or studs. -
Final assembly:
If using air-dry clay, wait for the castle to fully dry first. If baking polymer clay, bake the clay part first according to package instructions. Once hardened, glue the wooden door securely into the recessed archway from behind.
Place your finished castle gate on a shelf or use it as a focal point for a larger fantasy diorama to enjoy your handiwork


What Really Happens Inside the Kiln
Learn how time and temperature work together inside the kiln to transform clay into durable ceramic.
Working Drawbridge Castle
Construct a delightfully rugged fortress that looks like it was carved directly from sandstone cliffs. This project focuses on achieving realistic weathering and structural depth, resulting in a timeless piece of miniature architecture.
Detailed Instructions
Materials
- Stone-colored clay (e.g., speckled stoneware or air-dry clay mixed with fine sand)
- Rolling pin and guide strips
- Fettling knife or clay cutter
- Needle tool
- Cardboard tubes (various widths for tower forms)
- Old toothbrush or stiff bristle brush
- Clay slip or water
- Sponge
Step 1: Preparing the Components
-
Prepare the slabs:
Roll out a substantial amount of clay to a uniform thickness, about 1/4 inch thick. You will need enough for four cylindrical towers and a central wall section. -
Add instant texture:
Before cutting any shapes, take your toothbrush or a crumpled ball of aluminum foil and firmly press it over the entire surface of the clay slabs. This creates that weathered stone look right from the start. -
Building the main cylinders:
Cut rectangles sized to wrap around your cardboard tubes. Wrap the clay around the tubes to form cylinders, overlap the seams slightly, and blend the clay together until the seam disappears. You need two medium cylinders, one tall one, and one short wider one. -
Construct the gatehouse:
Cut a flat rectangular slab for the front central wall. Use your knife to cut a tall, gothic-style pointed archway in the center. Save the cutout piece; we won’t need it, but it’s good scrap clay.
Release Agent Trick
Wrap your cardboard tubes in a layer of newspaper or parchment paper before applying the clay. This ensures the tubes slide out easily once the clay begins to stiffen.
Step 2: Assembling the Structure
-
Connecting the main trio:
Stand the central gatehouse wall up. Position a medium cylinder on the right and the tall cylinder directly behind the gatehouse. Score (scratch) and slip (add water/glue) the contact points heavily, then press them together firmly. -
Adding the left tower:
Take your other medium cylinder and attach it to the left side of the gatehouse. Ensure the bottoms are flush with the table surface so the castle sits flat. -
The shorter annex:
Attach the widest, shortest cylinder to the far left side of the assembly. For the version in the photo, you can cut this cylinder in half vertically to create a C-shaped open wall rather than a closed tower. -
Reinforce foundations:
Roll thick coils of clay and wrap them around the base of each tower. Blend the top edge of the coil into the tower wall, but leave the bottom edge distinct to create a heavy stone foundation look.
Level Up: Glowing Keep
Leave the bottoms of the towers open and hollow. Once dry and fired (or hardened), you can place small LED tea lights underneath to make the windows glow warmly at night.
Step 3: Detailing and Refining
-
Create the battlements:
Roll a strip of clay and cut square notches out of the top edge to create the classic ‘castle teeth’ (crenellations). Wrap these strips around the top of the right tower, heavy back tower, and central gatehouse. -
Roofing the left tower:
Hand-form a solid cone of clay. Texture it heavily to mimic rough stone. Score and slip the bottom of the cone and place it atop the left tower, blending the seam securely. -
Adding architectural trim:
Add a thin strip of clay just below the battlements and under the conical roof to create a decorative stone variance. I find pressing a small square tool into this strip creates a nice dentil pattern. -
Carving windows:
Use a specialized loop tool or a small knife to carve out deep, arched windows in the towers. Smooth the edges of the cuts with a damp fingertip to remove sharp clay burrs. -
The stone ramp:
Shape a thick, rectangular slab for the drawbridge ramp. Place it in front of the gatehouse door. Use a needle tool to deeply score lines across it to resemble heavy wooden planks or stone slabs. -
Weathering the walls:
Use your needle tool to draw vertical cracks running down the towers. Don’t go all the way through the clay; just scratch the surface to simulate age and structural stress. -
Final texture pass:
Go over the entire piece once more with your stiff brush, especially over seams you blended, to ensure the stone texture is consistent everywhere.
Allow your fortress plenty of time to dry slowly under loose plastic before display or firing to prevent any cracks in your masonry.
Moat Base With “Water” Inlay
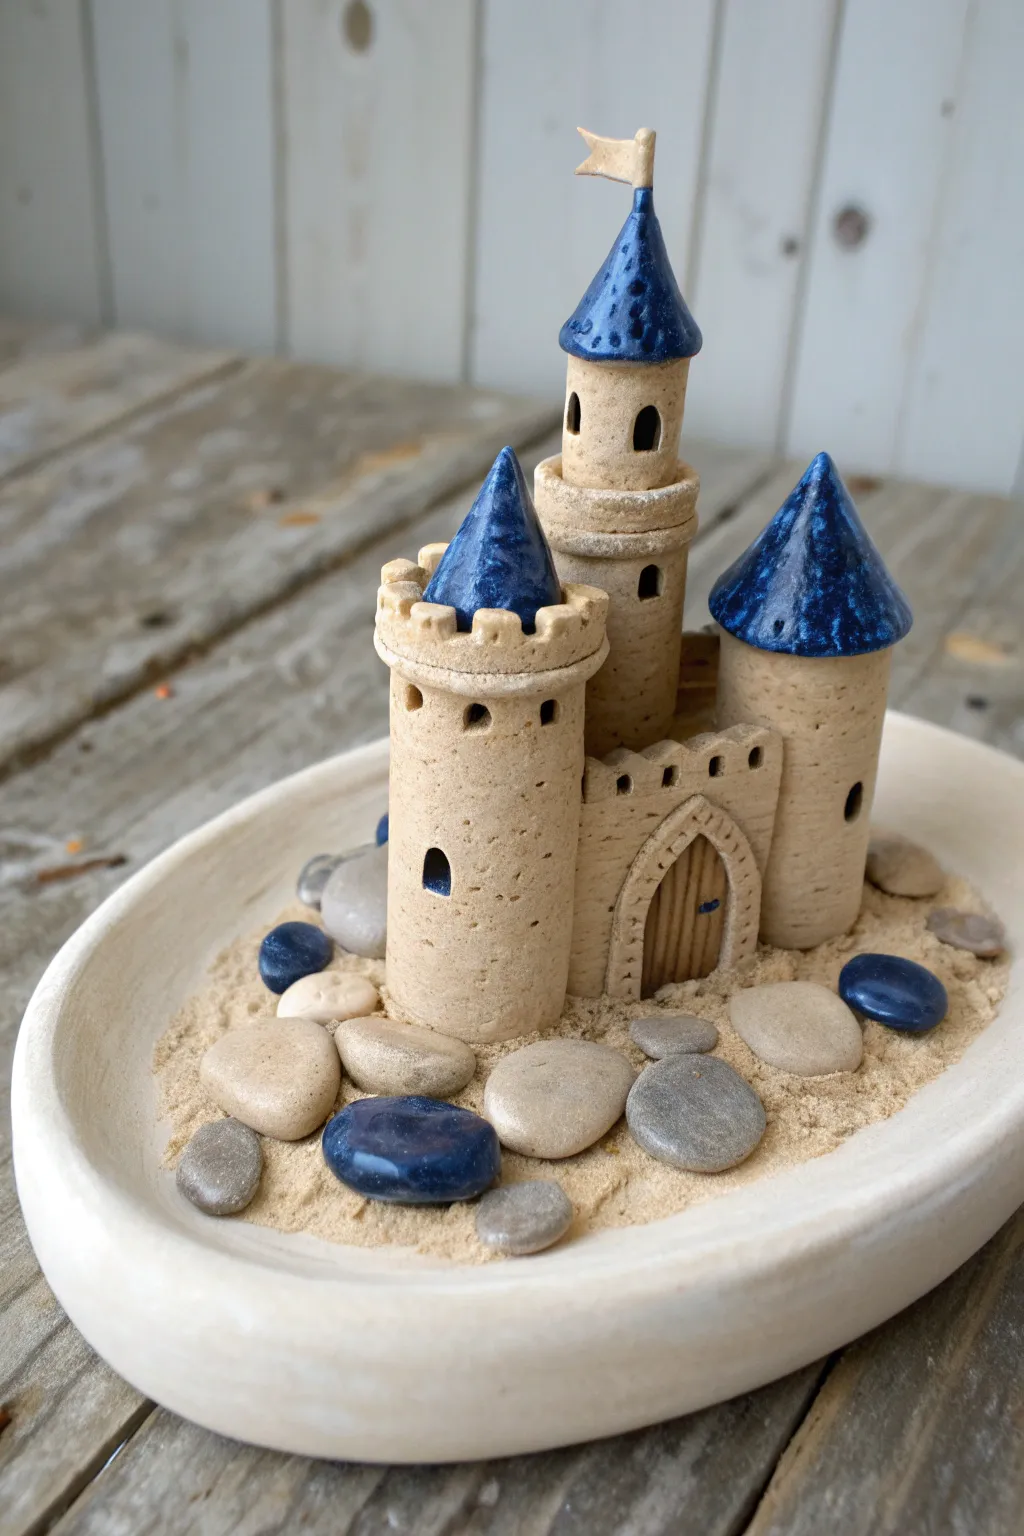
This charming tabletop sculpture captures the magic of a day at the beach with its sandy-textured clay body and vibrant blue-glazed roofs. Set within its own custom dish, the arrangement of polished river rocks and blue glass gems creates the perfect illusion of a surrounding moat.
Step-by-Step
Materials
- Buff stoneware clay (groggy texture preferred)
- Blue glaze (glossy finish)
- Clean crafting sand or silica sand
- Rolling pin and canvas mat
- Needle tool and fettling knife
- Slip and scoring tool
- Small oval bisque mold or paper template
- Smooth river pebbles (grey/beige)
- Blue glass gems or tumbled stones
- Small wooden flag (optional, finished post-firing)
Step 1: Sculpting the Base Dish
-
Roll the slab:
Begin by rolling out a medium-thick slab of clay, roughly 1/4 inch thick. This will form the reservoir base for your castle. -
Form the rim:
Cut an oval shape for the bottom and a long strip for the wall. Score and slip the strip onto the oval base to create a shallow dish with a lip about 1 inch high. Smooth the seams thoroughly so it holds sand. -
Texture the surface:
Before the clay hardens, gently press a real stone into the outside of the rim to give the dish an organic, handmade feel.
Uneven Roofs?
If your roof cones slump while drying, form them over paper cones or cardboard supports. Let them stiffen to leather-hard before attaching them to the towers.
Step 2: Building the Castle Towers
-
Create the main tower:
Roll a cylinder of clay for the central keep. It should be the tallest component. If it’s thick, hollow it out from the bottom to ensure even drying. -
Add the upper tier:
Attach a slightly narrower cylinder on top of the main base to create a second story. Use a needle tool to carve tiny arched windows into the upper section. -
Make side towers:
Form two shorter cylinders for the flanking towers. I prefer to make one slightly shorter than the other for visual interest. -
Form the battlements:
Roll thin strips of clay and wrap them around the tops of the lower towers. Use a square tool or knife to cut out notches, creating the classic crenellated castle look. -
Assemble the structure:
Score and slip all three towers together. They should be clustered tight, slightly overlapping for structural stability.
Adding Sparkle
For a magical touch, mix a tiny pinch of mica powder into the sand base. Under direct light, the ‘beach’ will glisten just like real wet sand in the sun.
Step 3: Roofing and Details
-
Shape the roofs:
Hand-shape three cones of clay. These will sit atop your towers. Test the fit before attaching them permanently. -
Add roof texture:
Before attaching, gently tap the surface of the cones with the back of a spoon or a texturing tool to create a hammered effect that will catch the glaze beautifully. -
Attach the roofs:
Score and slip the roofs onto the towers. Blend the seams underneath the overhang so they look like distinct architectural elements. -
Construct the gate:
Roll a small slab and cut out an arched wall section to connect the two front towers. Scratch wood grain lines into the door area and carve out individual stones around the archway. -
Puncture windows:
Use a small hole cutter or straw to create round or arched windows in the towers. Clean up any burrs with a damp sponge.
Step 4: Finishing and Assembly
-
Buff firing:
Once bone dry, bisque fire your castle and the oval dish to the appropriate cone for your clay body. -
Glazing technique:
Apply a rich, glossy blue glaze only to the conical roofs. Leave the rest of the castle and the dish as bare ceramic to mimic the texture of sand. -
Final firing:
Glaze fire the pieces. Ensure the bottoms are wiped clean so they don’t stick to the kiln shelf. -
Setting the scene:
Pour clean sand into the finished dish base. Nestle your castle into the center. -
Creating the moat:
Arrange the grey river stones around the castle base. Interject the blue glass gems among the rocks to simulate pools of water. -
The final touch:
If you added a small hole at the peak of the tallest roof, insert a tiny flag made of folded clay or paper attached to a toothpick.
This delightful display piece brings a permanent summer vibe to any shelf or windowsill

TRACK YOUR CERAMIC JOURNEY
Capture glaze tests, firing details, and creative progress—all in one simple printable. Make your projects easier to repeat and improve.
Stone Texture Block Castle
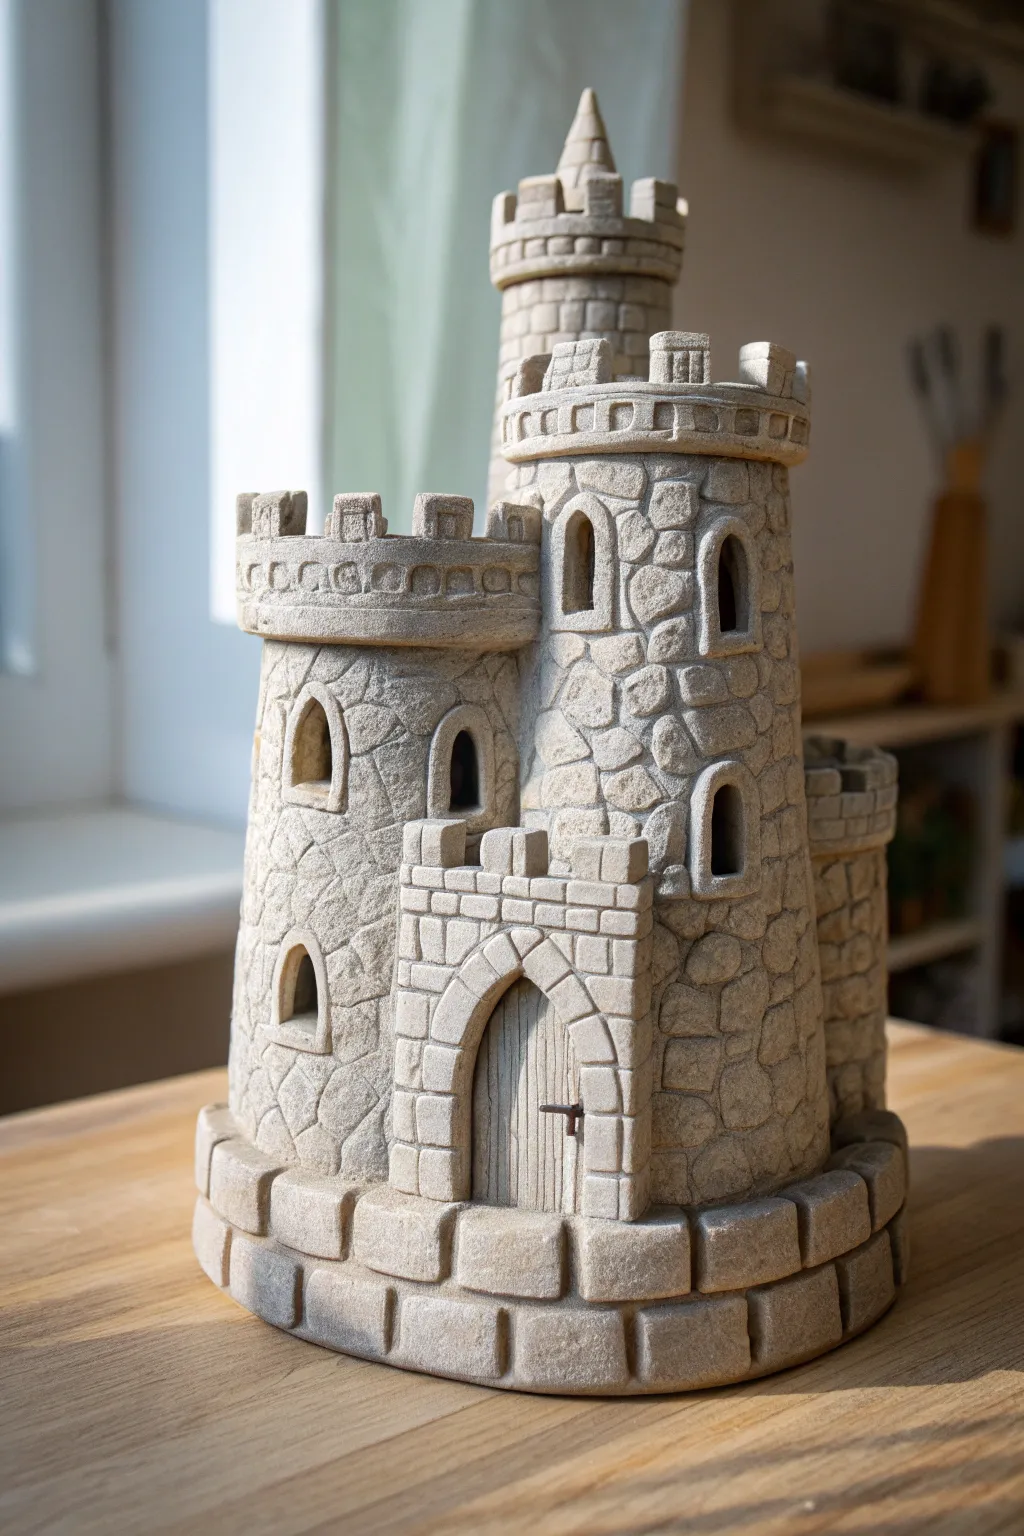
Construct a stunningly realistic miniature fortress that looks like it was carved from solid bedrock. This project focuses on building distinct towers and mastering the art of creating believable stone masonry textures using simple tools.
How-To Guide
Materials
- Air-dry clay (stone gray or terracotta)
- Rolling pin
- Cardboard tubes (various diameters) or PVC pipe sections
- Clay sculpting tools (specifically a needle tool and a small flat spatula)
- Texture tools: Aluminum foil ball, old toothbrush, real rocks
- Craft knife
- Slip (clay mixed with water)
- Ruler
- Wooden skewer
Step 1: Building the Foundation and Core
-
Prepare the supports:
Cut your cardboard tubes to different heights to form the skeleton of your castle. You’ll need one tall, thin tube for the main keep, a medium-sized wider tube for the secondary tower, and smaller sections for the side turret. -
Roll the slabs:
Roll out a large slab of clay to an even thickness of about 1/4 inch. Ensure the slab is large enough to wrap around your tallest tube structure. -
Wrap the towers:
Apply a thin layer of slip to your cardboard tubes. Measure and cut the clay slabs to fit around each tube, gently pressing the clay onto the cardboard and smoothing the seam where the edges meet so it becomes invisible. -
Create the base:
Form a thick, oval-shaped base slab about 1/2 inch thick. Place your clay-covered towers onto this base, pressing them firmly into position. I like to score and slip the bottom edges to ensure a permanent bond.
Cracking Clay?
If clay cracks while wrapping tubes, it’s too dry. Mist with water and smooth cracks immediately with slip. Let the structure dry slowly under loose plastic.
Step 2: Constructing Architectural Features
-
Form the entrance block:
Create a small, rectangular box shape from a clay slab and attach it to the front of the main towers to serve as the gatehouse. This should be slightly shorter than the towers. -
Carve the arched door:
Using a craft knife, carefully cut out a pointed Gothic arch shape from the front face of the gatehouse block. Save the clay piece you removed if you want to detail it separately. -
Add the door details:
Insert a recessed slab of clay inside the archway. Use a needle tool to draw vertical wood grain lines, and add a tiny coil to simulate a metal hinge or handle. -
Cut the windows:
Use your craft knife to cut small, arched window openings into the upper sections of the towers. Keep the edges sharp and clean for a crisp look. -
Build the battlements:
Roll out thin strips of clay and wrap them around the top of each tower. Use your knife to cut out alternating square notches to create the crenellations (the classic castle top look). -
Add the conical roof:
Fashion a cone shape for the tallest tower. Hand-form small tiles or bricks around the base of the cone before attaching it to the top battlements.
Lit from Within
Cut holes through the cardboard tubes behind the clay windows. Place a battery-operated LED tea light inside the bottom for a glowing nightlight castle.
Step 3: Texturing the Masonry
-
Initial surface prep:
Before carving individual stones, gently press a crumpled ball of aluminum foil or a real rock over the entire surface of the castle. This imparts a natural, gritty stone grain. -
Carve irregular stones:
Using a needle tool, carve the outlines of random, puzzle-piece shaped stones onto the main tower walls. Vary the sizes—some large boulders, some small filler stones—to avoid a repetitive brick pattern. -
Detail the cut stone areas:
For the gatehouse, battlements, and window frames, carve straighter, more uniform rectangular brick patterns. This visual distinction suggests these areas were built with ‘cut’ stone rather than rough fieldstone. -
Deepen the grout lines:
Go back over your carved lines with a slightly thicker tool or the edge of a spatula to widen the gaps between stones, making the masonry pop. -
Create the foundation bricks:
Add a strip of clay around the very bottom of the entire structure. Carve this into large, heavy rectangular blocks to create a solid-looking foundation footer. -
Refine edges:
Use a damp paintbrush to soften any sharp burrs of clay left from carving, smoothing them just enough without losing the stone texture. -
Final touches:
If desired, add tiny decorative elements like projecting corbels under the battlements using small cubes of clay.
Allow your fortress to dry completely before displaying it proudly on a shelf or using it as a majestic centerpiece
Pastel Fantasy Castle
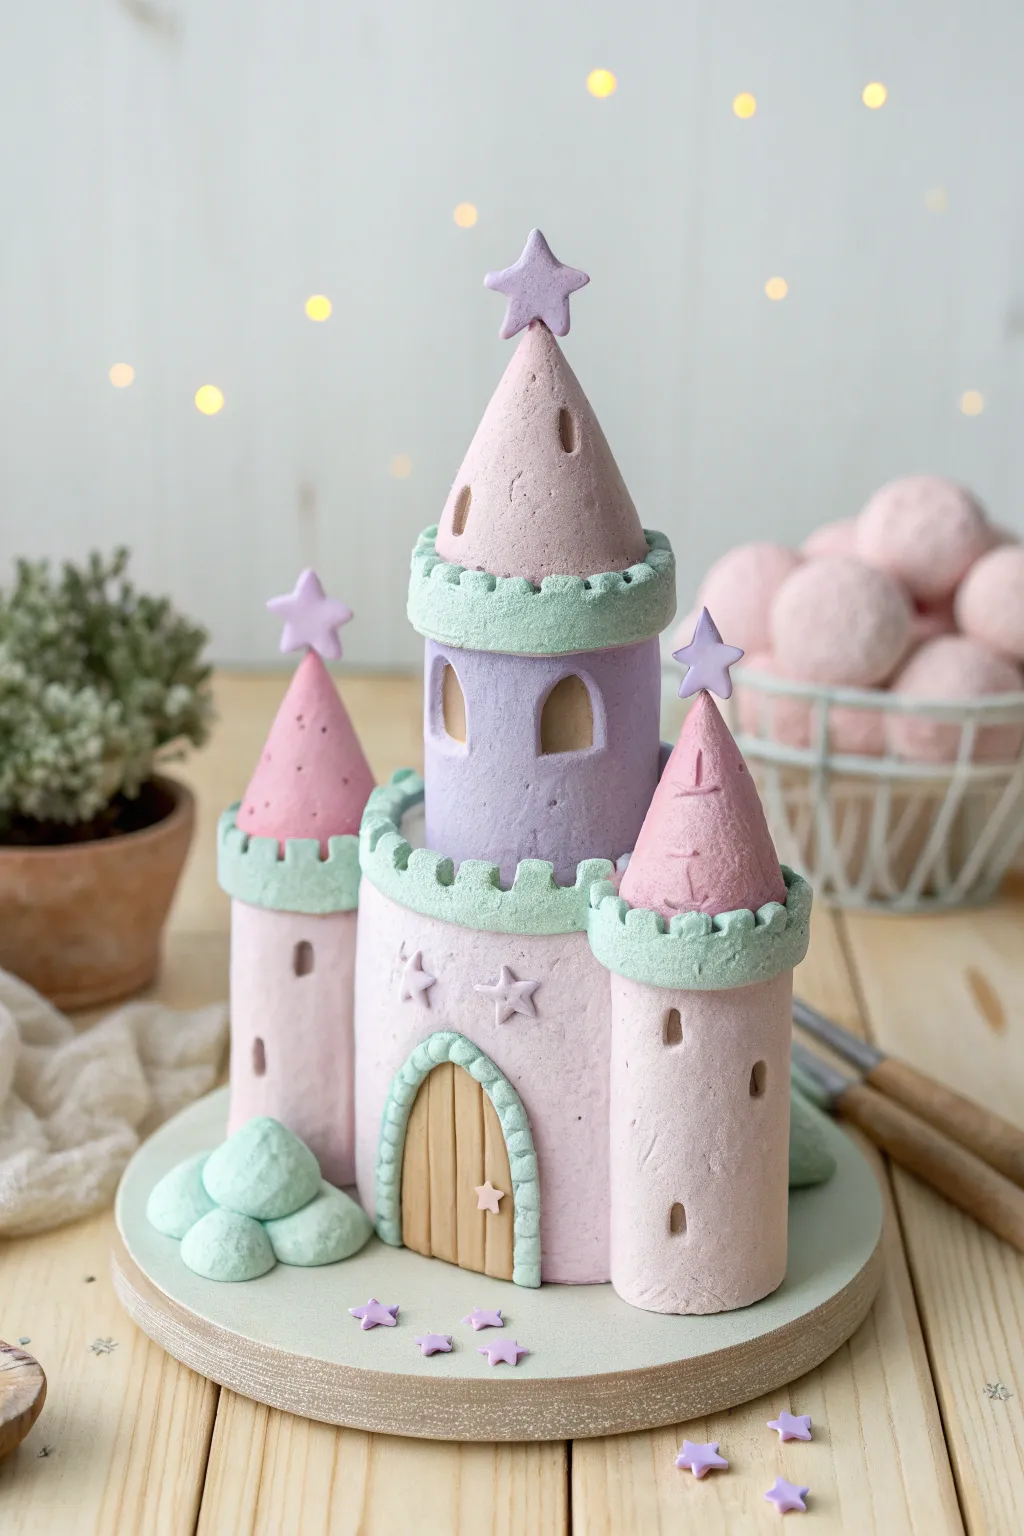
Transport yourself to a fairytale realm with this soft and whimsical castle sculpture. Featuring a gentle palette of mint, lilac, and blush pink, this project uses simple shapes and textures to create a magical centerpiece perfect for a nursery or fantasy display.
Step-by-Step Guide
Materials
- Air-dry clay or polymer clay (white base)
- Acrylic paints or clay pigments (pastel pink, lilac, mint green, beige)
- Rolling pin
- Clay knife or craft blade
- Texturing tool (stiff bristle brush or scrunched foil)
- Round cookie cutters (various sizes)
- Small star plunger cutter
- Wooden skewer or toothpick
- Cardboard or foil cores (optional, for structure)
- Strong craft glue or liquid clay
- Clear matte varnish
Step 1: Building the Foundations
-
Prepare your palette:
Begin by coloring your white clay into four distinct pastel shades: a soft blush pink, a calming lilac, a fresh mint green, and a warm beige for the door. Whether mixing paint into air-dry clay or conditioning colored polymer clay, aim for consistent, muted tones. -
Form the central tower:
Roll out a thick slab of pink clay to create the main castle body. Wrap this around a foil core or form a solid cylinder about 4 inches tall. Smooth the seam carefully with a little water or baby oil so it disappears completely. -
Construct the upper turret:
Using the lilac clay, form a slightly narrower cylinder that will sit atop the main pink base. This section should be about 2.5 inches tall. Ensure the top is flat to support the roof later. -
Create the side towers:
Mold two smaller cylinders from the pink clay for the flanking towers. These should be shorter than the main base, standing roughly 3 inches tall. I like to texture the surface immediately while the clay is soft by gently dabbing it with a stiff brush or a ball of toil for a stone-like effect. -
Assemble the structure:
Attach the two side towers to the main pink cylinder. If using air-dry clay, score the touching surfaces and use a little water/slip as glue. For polymer, use liquid clay. Place the lilac turret onto the center of the pink base.
Step 2: Adding Details & Roofs
-
Craft the battlements:
Roll out a strip of mint green clay. Use your knife to cut small squares out of the top edge to create a crenellated castle look. Wrap a strip around the top of each pink side tower and another around the top of the main central base. -
Shape the roofs:
Form two cones from the pink clay and one tall cone from the pink clay for the central tower. Use your fingers to pinch and elongate the tips slightly for a whimsical feel. Make a shallow indentation in the bottom of each cone so they sit securely. -
Install the roofs:
Place the two smaller pink cones onto the side towers, resting inside the mint green battlements. Place the tall pink cone on top of the lilac turret section. -
Carve the windows:
Using a small modeling tool or knife, carefully carve out arched windows. You’ll need two on the lilac tower level and small vertical slits on the side towers. Smooth the edges of the cutouts with a damp brush. -
Construct the main door:
Roll out your beige clay into an arch shape. Use a needle tool or the back of a knife to impress vertical lines, mimicking wood planks. Cut a smaller clay arch to frame it using mint green clay, adding texture to match the battlements.
Stone Texture Trick
To get that porous, realistic stone look without hours of carving, gently press a clean, rough kitchen sponge or a ball of crinkled aluminum foil against the wet clay surface.
Step 3: Magical Finishing Touches
-
Mount the door:
Attach the wooden door to the front center of the main pink base. Wrap the textured mint green frame around it securely. -
Add nature elements:
Create three small, rough mounds of mint green clay to look like stylized bushes or rocks. Arrange them at the base of the left tower to ground the scene. -
Punch out stars:
Roll a thin sheet of lilac clay and use your small star cutter to punch out several shapes. If you don’t have a cutter, carefully cut 5-point stars with a detail knife. -
Decorate the spires:
Attach one star to the very tip of each roof cone. Press them on gently so they stand upright. -
Apply surface details:
Adhere a few remaining stars to the front of the castle walls and one on the wooden door frame for extra charm. Scatter a few loose clay stars on the base around the castle. -
Final drying and sealing:
Allow the project to dry or bake according to your clay’s specific instructions. Once fully cured and cool, brush on a coat of matte varnish to protect the finish without adding too much shine.
Saggy Roofs?
If your cone roofs are drooping or losing their sharp point while drying, support them from the inside with a small cone made of cardboard or scrunched foil until they harden.
Now you have a charming miniature fortress ready to spark imagination in any room
Rainbow Roof Castle Silhouette
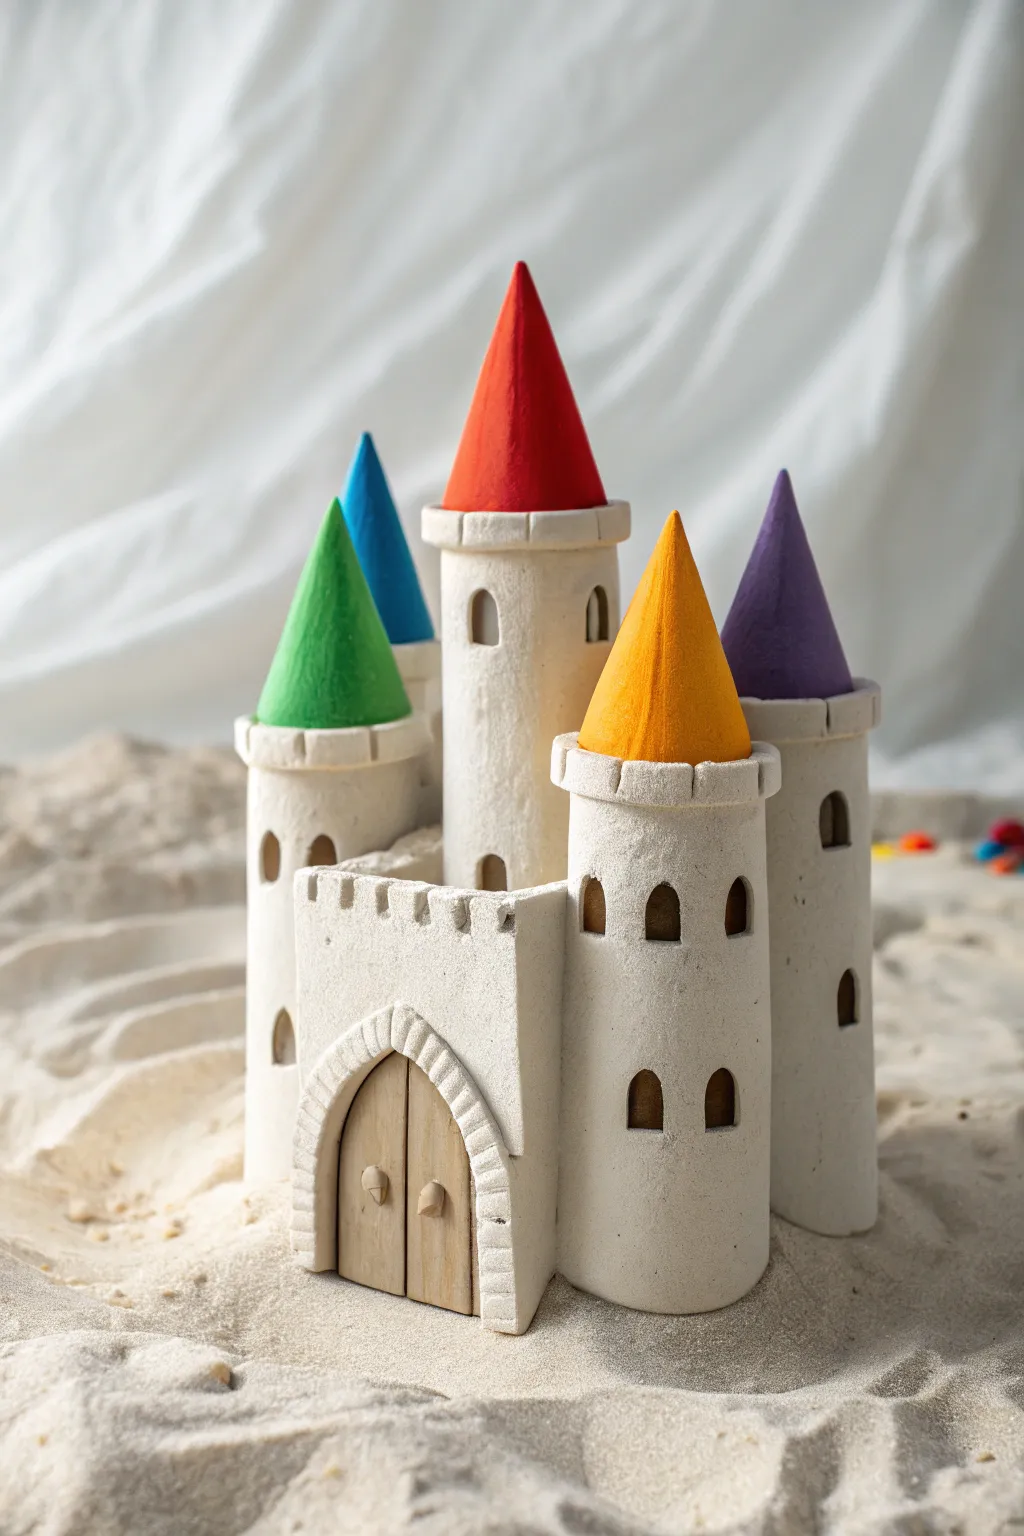
Bring a fairytale kingdom to life with this delightful clay structure, featuring a classic white fortress topped with vibrant, cone-shaped roofs. Perfect for a sandy diorama or a standalone shelf decoration, this project combines simple architectural shapes with bold pops of rainbow color.
Step-by-Step Tutorial
Materials
- White polymer clay (approx. 1lb block)
- Acrylic paints (Red, Orange, Green, Blue, Purple)
- Wooden craft sticks or balsa wood sheet
- Rolling pin
- Clay cutting blade or craft knife
- Small round cutter or straw (for windows)
- Needle tool or toothpick
- Sandpaper (fine grit)
- Textured sponge or toothbrush
- Liquid clay adhesive (optional)
- Paintbrushes (flat and fine round)
Step 1: Constructing the Towers
-
Prepare the clay:
Begin by conditioning your white polymer clay until it is soft and pliable. Divide the clay into four portions: one large for the central tower, and three smaller portions for the surrounding turrets. -
Roll the cylinders:
Roll each portion of clay into a smooth cylinder. The central tower should be the tallest and thickest, roughly 5-6 inches high, while the side towers should vary slightly in height between 3 and 4 inches. -
Texture the walls:
To mimic the look of stone or sanded stucco, gently press a textured sponge or an old toothbrush against the surface of all your clay cylinders. This removes fingerprints and adds realistic grit. -
Carve the battlements:
At the top of each cylinder, create a slightly wider rim by adding a thin strip of clay. Use your craft knife to cut out small notches along this rim to create classic castle battlements. -
Create windows:
Use a small arch-shaped cutter or freehand with a knife to cut recessed window shapes into the towers. Smooth the inside edges of these windows with a damp finger or a clay shaper tool.
Step 2: Building the Gatehouse
-
Form the entrance block:
Roll out a flat slab of clay about 1/2 inch thick. Cut a rectangular block that will serve as the front gatehouse, attaching it low across the front of your tallest tower arrangement. -
Add the archway:
Cut a large arch into the center of the rectangular block for the door. Roll a thin snake of clay, flatten it slightly, and score vertical lines into it to resemble stone bricks; wrap this around the door arch for a decorative frame. -
Detail the top edge:
Just like the towers, add a rim to the top of the gatehouse block and cut out square notches for the crenellations. -
Sculpt the wooden doors:
Cut two pieces of balsa wood or craft sticks to specific fit inside the archway. If you don’t have wood, sculpt a flat slab of clay to fit, scoring vertical wood grain lines into it and adding two tiny balls of clay for doorknobs. -
Assemble the base:
Press the towers and gatehouse together firmly. Blending the clay at the contact points on the back side will ensure structural stability during baking.
Sharper Cones
To get perfectly pointy roof cones, roll the clay into a ball first, then roll just one side against your surface with your finger, applying more pressure on the tip end.
Step 3: Roofing & Finishing
-
Shape the cones:
Form five distinct cones from the remaining white clay. Make sure the base of each cone is wide enough to rest comfortably on top of your tower battlements. -
Fit the roofs:
Place the cones onto the towers to check the fit, but remove them before baking if you want to paint them separately. I find painting easier when the cones aren’t permanently attached yet. -
Bake the structure:
Bake all clay pieces according to the manufacturer’s instructions on your clay package. Let the pieces cool completely before handling. -
Paint the roofs:
Using acrylic paints, paint each cone a different bold color: red for the center, orange, green, blue, and purple for the others. Apply two coats for opacity. -
Paint the door details:
If you used clay for the doors, paint them a light beige-brown to look like wood. Paint the inside recesses of the windows black or dark brown to create depth. -
Final assembly:
Once the paint is fully dry, glue the wooden doors into the archway and use a strong adhesive to permanently attach the rainbow cones to their respective towers.
Leaning Towers?
If your tall clay cylinders sag while working, insert a crumpled aluminum foil core or a wooden dowel inside each tower for invisible internal support.
Place your finished castle in a tray of sand to complete the magical scene
Mossy Woodland Castle
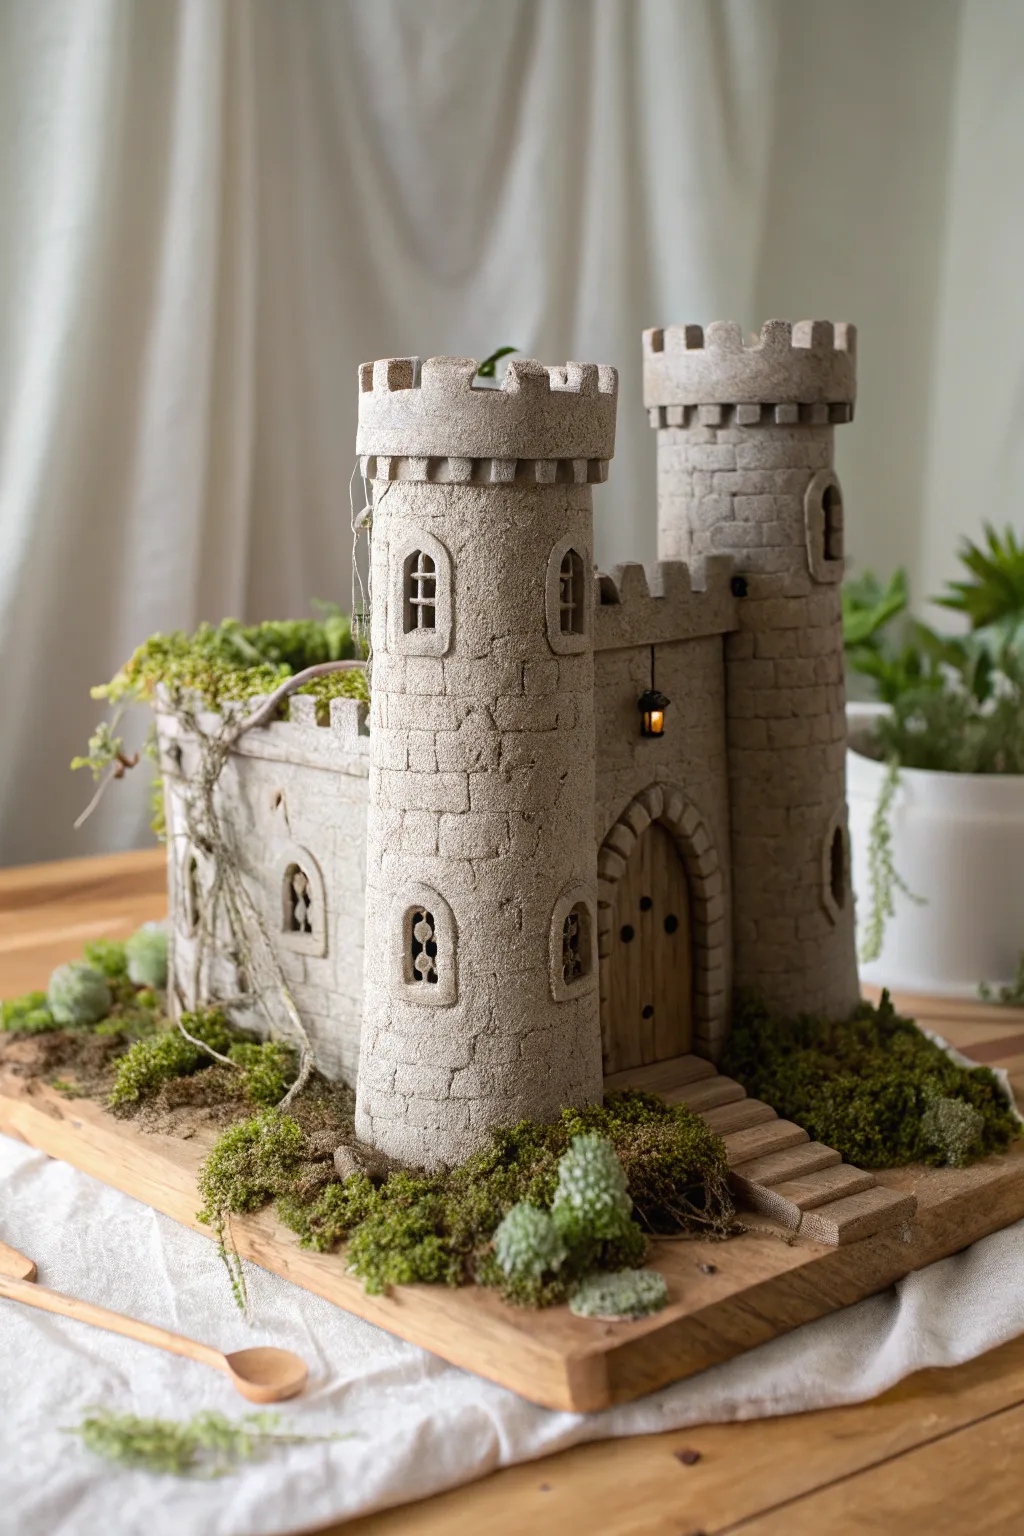
Transport yourself to a fairytale realm by crafting this enchanting miniature fortress, complete with weathered stone textures and creeping vines. This detailed tabletop sculpture captures the romantic decay of an ancient woodland castle, making it a perfect centerpiece or terrarium accent.
How-To Guide
Materials
- Air-dry clay or polymer clay (stone grey or white)
- Wooden base or plaque
- Rolling pin
- Cardboard tubes (various diameters for towers)
- Cardboard sheet (for walls)
- Craft knife and sculpting tools
- Texture roller or aluminum foil ball
- Acrylic paints (dark grey, light grey, brown, black)
- PVA glue or tacky glue
- Balsam wood scraps or popsicle sticks
- Preserved moss (various shades)
- Miniature LED lantern (optional)
Step 1: Planning and Structure
-
Prepare the Base:
Select a sturdy wooden board as your base. Consider staining it a warm oak color beforehand to contrast with the grey stone. Sand the edges for a polished look. -
Form the Towers:
Cut two cardboard tubes to slightly different heights to create the main towers. Wrap each tube in a thin, even sheet of rolled-out clay effectively hiding the cardboard core. -
Build the Central Wall:
Cut a piece of thick cardboard to serve as the front wall connecting the towers. Cover both sides with clay sheets and attach it securely between the two towers using slip (liquid clay) or glue. -
Create the Side Annex:
For the lower section on the left, build a boxy structure using cardboard and cover it with clay. This area will eventually hold the planted ‘garden’ section, so leave the top slightly recessed.
Natural Textures
Before the clay dries, gently press a real rough stone against the castle walls. It transfers a grain more realistic than any man-made tool can achieve.
Step 2: Sculpting Details
-
Texture the Stone:
This is the most crucial step for realism. Use a specialized texture roller or simply ball up a piece of aluminum foil and press it firmly all over the clay surfaces to mimic the pitted feel of sandstone. -
Carve the Bricks:
With a needle tool or small sculpting knife, carve horizontal lines around the towers and walls. Add vertical lines staggered between them to create individual brick shapes. Don’t make them too perfect; irregularity adds age. -
Construct the Battlements:
Roll out a thick strip of clay for the tops of the towers. Cut square notches (crenellations) out of the strip before wrapping it around the top of each tower. Blend the seam well. -
Add Windows and Archers:
Cut small arched windows into the towers. Frame them by adding a very thin ‘snake’ of clay around the edge and blending it outwards. For depth, press the clay inwards where the glass would be. -
Sculpt the Archway:
Create a grand entrance by layering an arch shape over the main door area. Carve individual large stones into this arch to make it look structurally supportive. -
Craft the Wooden Door:
Cut distinct planks from balsa wood or popsicle sticks. Glue them together to form an arched door shape that fits your entrance. Add tiny clay distinct dots for iron studs. -
Lay the Stairs:
Create small rectangular slabs of clay and stack them leading up to the main door. Keep the edges rough and textured to match the castle walls.
Step 3: Finishing and Nature
-
Dry and Prime:
Allow the structure to dry completely (24-48 hours for air-dry clay). Once hard, paint the entire rock surface with a dark grey or watered-down black acrylic wash to get into the crevices. -
Dry Brushing:
Dip a dry, stiff brush into light grey or unbleached titanium paint. Wipe almost all the paint off, then lightly whisk it over the raised textures. This highlights the ‘stone’ dramatically. -
Attach the Door and Light:
Glue the wooden door into the archway. If you have a miniature LED lantern, attach it beside the door now, perhaps drilling a small hole to hide wires inside the tower. -
Landscape with Moss:
Apply dabs of PVA glue along the base, on the steps, and creeping up the sides of the towers. Press clumps of preserved moss into the glue. I like to mix darker moss at the bottom and lighter greens higher up for variety. -
Add Vines:
Twist thin strands of preserved moss or dried roots to simulate old vines. Glue these hanging from the battlements or crawling up the side annex wall. -
Final Touches:
Add small bits of ‘rubble’ (tiny clay crumbs) near the base of the walls and glue moss between them to ground the castle into its landscape.
Cracking Clay?
If you see cracks forming as the clay dries, don’t panic. Mix a small amount of fresh clay with water to make a paste and fill the cracks, then smooth it over.
Step back and admire your ancient fortress as it stands guard over your tabletop kingdom
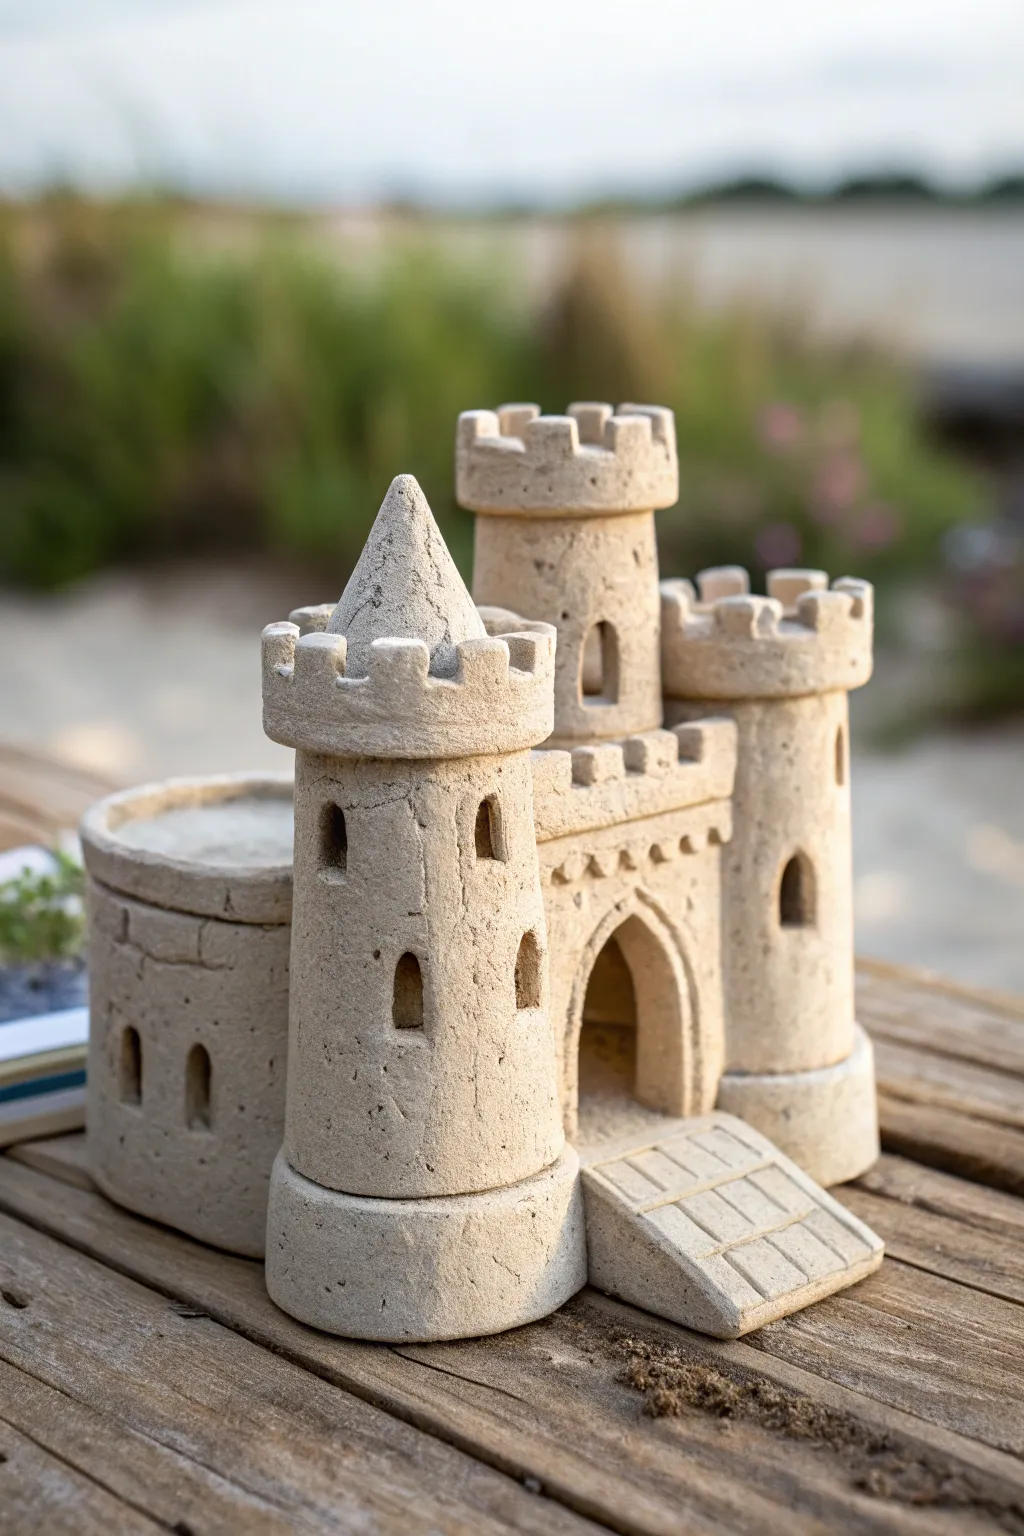
Sandcastle-Inspired Clay Castle
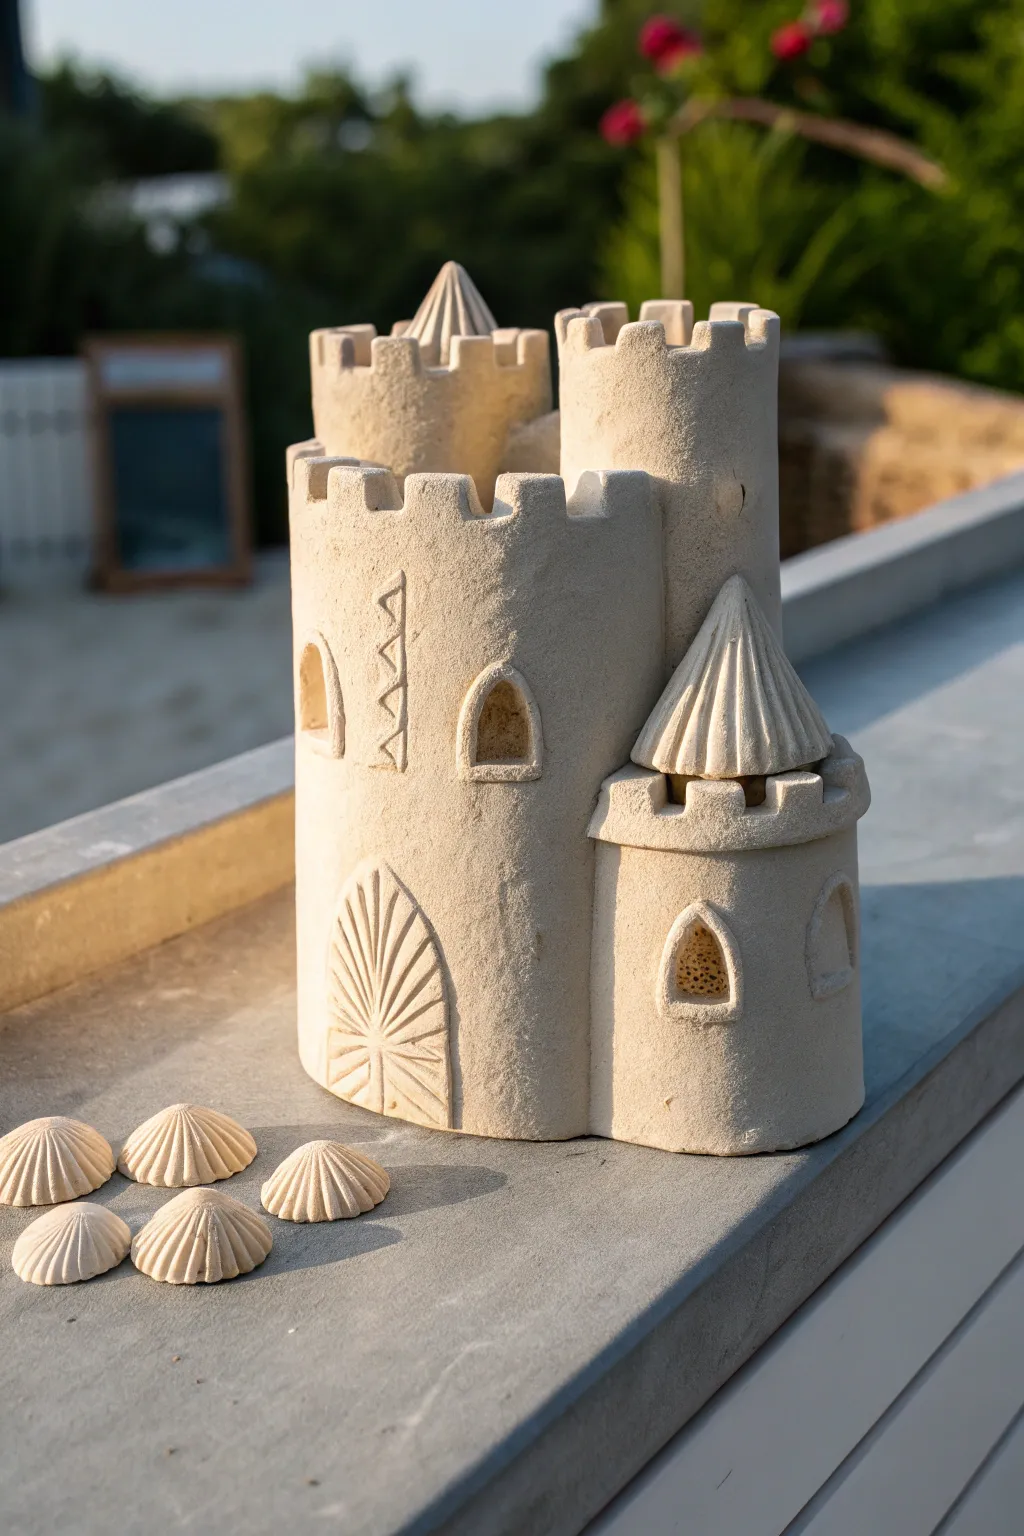
Bring the beach home with this delightful stoneware project that mimics the texture and charm of a perfect sandcastle. Featuring gentle turrets, arched windows, and a set of accompanying clay seashells, this sculpture captures the essence of summer memories in a permanent form.
Step-by-Step Tutorial
Materials
- Sandy-colored stoneware clay or groggy earthenware
- Rolling pin
- Fettling knife
- Clay sculpting tools (needle tool, loop tool)
- Slip (clay and water mixture)
- Scoring tool (or serrated rib)
- Cylindrical forms for support (e.g., various sizes of PVC pipe or sturdy cardboard tubes)
- Sponge
- Sandpaper (for post-firing finishing)
- Decorative texture tools (comb, stamps)
Step 1: Building the Foundation
-
Prepare the Slabs:
Begin by rolling out your clay into even slabs, roughly 1/4 inch thick. You will need enough clay for three main towers and a base. Let the slabs firm up slightly until they are leather-hard but still pliable. -
Cut the Base:
Cut a kidney-bean or oval shape from one slab to serve as the unified base for your castle. This ensures all components stay connected during the drying process. -
Form the Main Towers:
Cut three rectangular sections of varying heights for the tower walls. Wrap these slabs around your cylindrical forms (PVC pipe or tubes) to shape them into perfect rounds. -
Seaming the Cylinders:
Score the overlapping edges of your clay cylinders, apply slip, and press firmly to join. Smooth the seam with a rib tool so it becomes invisible. I find it helpful to leave the support tube inside for a few minutes while smoothing. -
Assemble the Structure:
Arrange the three cylinders on your base: the widest/tallest in the center, a medium one to the side, and the shortest one slightly forward. Score and slip the bottom edges to attach them securely to the base and to each other where they touch.
Step 2: Details & Architecture
-
Carve the Battlements:
On the top rim of the central and medium towers, use a fettling knife to cut out square notches, creating the classic crenelated look of a castle keep. -
Create the Roofs:
For the shortest tower and the rear turret, hand-model two cones from solid clay or small slabs. Texture them with vertical lines using a needle tool to mimic a ribbed or thatched roof appearance. -
Attach the Roofs:
Score the top rims of the designated towers and attach the conical roofs. Ensure a tight seal so no air is trapped inside if the cones are hollow. -
Form the Side Turret:
Roll a small coil and flatten it slightly to create an overhang or cornice for the shortest tower, then attach the ribbed roof on top of this rim. -
Carve the Entrance:
On the main central tower, lightly outline a large arch at the base. Use a needle tool to incise a sunburst or fan pattern into the clay to represent a wooden door. -
Add Windows:
Use a loop tool to gently carve out arched window recesses on the towers. You don’t need to cut all the way through; a deep recess creates a nice shadow. -
Detail the Windows:
For extra depth, push a small piece of sponge or a textured stamp into the recessed window area to create a darker, gritty texture that contrasts with the smooth walls.
Clean Cuts Tip
When cutting the battlements (crenelations), wait until the clay is a bit stiffer than leather-hard. This prevents the small square tabs from slumping or warping as you cut them.
Step 3: Texturing and Shells
-
Simulate Sand Texture:
Take a stiff bristle brush or a real sea sponge and stipple the entire surface of the castle walls. This breaks up the smooth clay surface and mimics the grainy look of packed sand. -
Add Geometric Accents:
Using a small carving tool, add decorative vertical zigzag patterns or small triangles beside the windows for a touch of architectural flair. -
Sculpt the Seashells:
Roll five small balls of clay. Flatten them slightly into domes and use a needle tool to press radiating lines from the center to the edge, creating a scallop shell effect. -
Refine Shell Edges:
Pinch the edges of each shell to create a scalloped rim. Place these loose shells around the castle base or leave them separate as decorative tokens. -
Final Smoothing:
Check all joints and rims. Run a damp finger over any sharp edges, especially on the battlements, to soften them slightly for a weathered look. -
Drying:
Cover the castle loosely with plastic for the first 24 hours to ensure the varying thicknesses dry evenly. Then, uncover and let dry completely to the bone-dry stage. -
Firing:
Bisque fire the piece. Since the goal is a sandy, matte finish, you may choose to leave the exterior unglazed or apply a very dry, matte oxide wash before the final firing.
Level Up: Night Light
Cut the windows completely out and leave the bottom of the towers open. After firing, you can place a battery-operated tea light inside to illuminate the fortress.
Place your finished castle on a shelf to keep a little bit of the seaside with you year-round
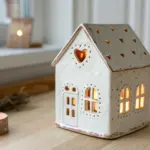
Castle Lantern Candle Holder
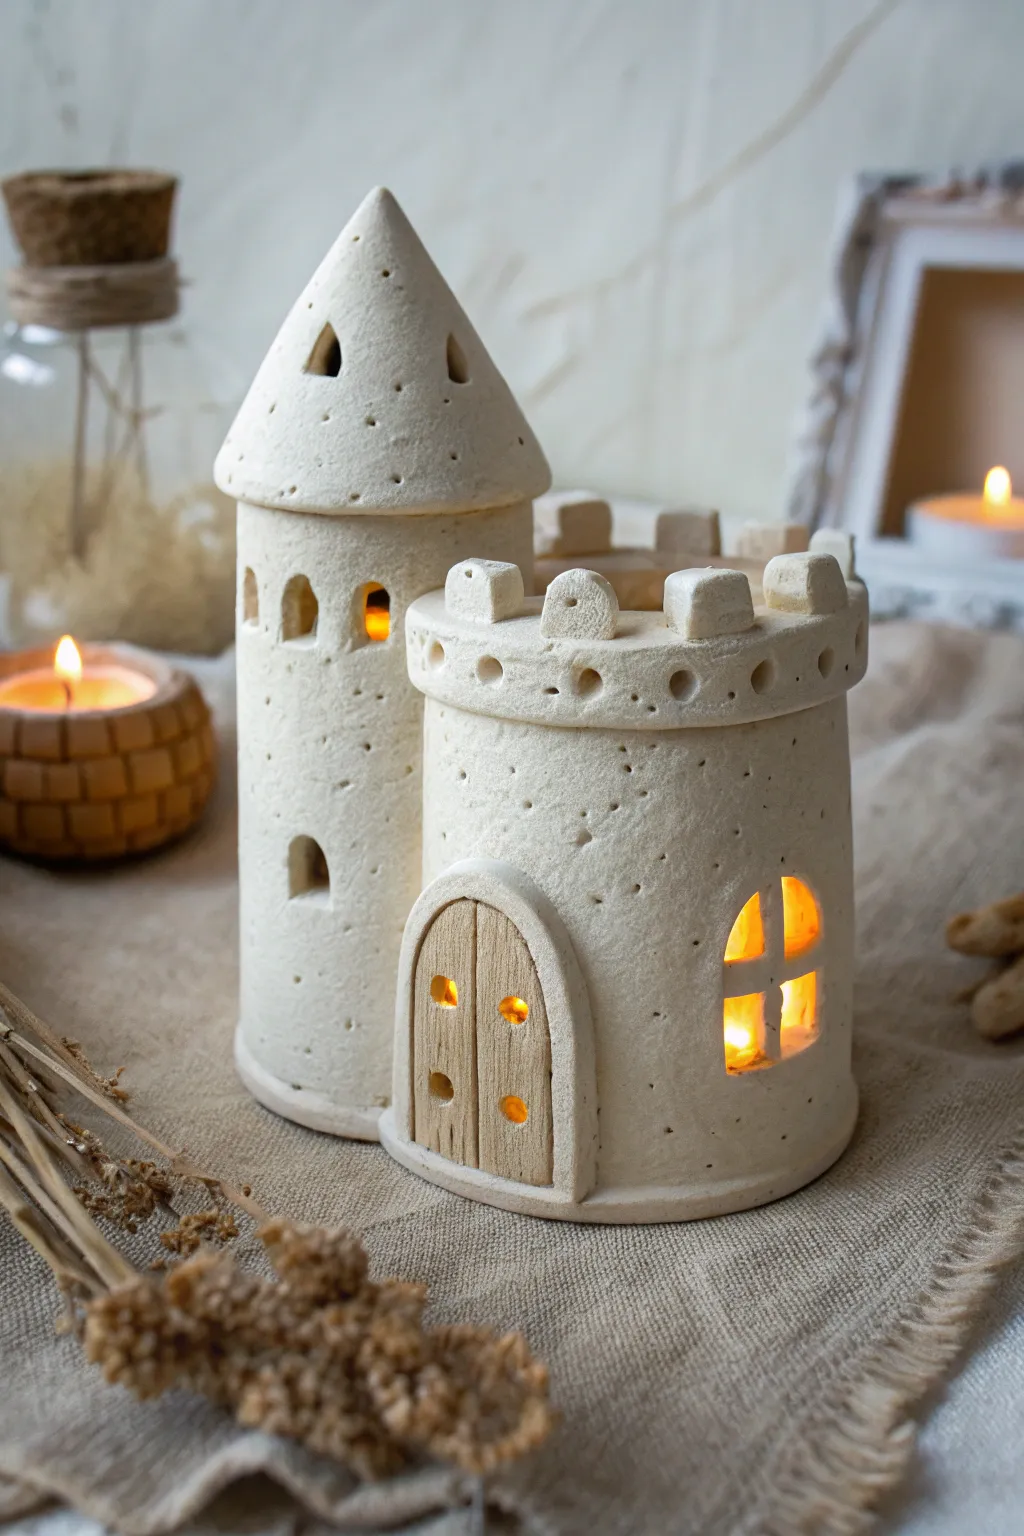
Bring a touch of fairytale magic to your home with this enchanting two-part clay castle lantern. Featuring varied heights, charming cutout windows, and a rustic stone texture, this project creates a cozy, warm glow perfect for any mantlepiece.
Step-by-Step Guide
Materials
- White stoneware or polymer clay (approx. 2-3 lbs)
- Rolling pin
- Canvas mat or non-stick work surface
- Empty paper towel roll and toilet paper roll (for armatures)
- Cardstock (for roof cone template)
- Needle tool or X-Acto knife
- Small circle cutter (approx. 1/4 inch)
- Fettling knife
- Scoring tool (or an old toothbrush)
- Slip (clay mixed with water)
- Wooden texture tool or stiff-bristled brush
- Small piece of textured wood veneer or balsa wood
- Sponge
- Tea lights (LED recommended)
Step 1: Forming the Base Towers
-
Roll the Slabs:
Begin by rolling out your clay into a consistent slab, roughly 1/4 inch thick. I find using guide sticks on either side of the rolling pin ensures an even thickness throughout. -
Cut the Walls:
From your slab, cut two rectangles. One needs to be tall enough for the main tower (approx. 6 inches tall) and wide enough to wrap around your paper towel roll. The second rectangle should be shorter (approx. 3.5 inches) for the lower turret. -
Wrap the Forms:
Wrap the paper rolls in a layer of parchment paper to prevent sticking. Carefully wrap the clay rectangles around their respective armatures. -
Join the Seams:
Score the overlapping edges of the clay, apply a generous amount of slip, and press firmly to join. Smooth the seam with your finger or a modeling tool so it disappears completely.
Step 2: Creating the Roof and Details
-
Shape the Conical Roof:
Cut a semi-circle from cardstock to use as a template, then trace and cut this shape from your remaining clay slab. Roll it into a cone shape, scoring and slipping the seam to join. -
Attach the Flange:
Add a thin strip of clay inside the base of the cone so it sits securely on top of your tall cylinder without sliding off. Test the fit, but remove it before joining the two tower pieces. -
Join the Towers:
Cut a vertical curve out of the smaller cylinder’s side so it sits flush against the taller tower. Score and slip the contact points heavily, then press them together to form a single unit. -
Add the Floor:
Stand your joined castle on a fresh piece of slab and trace the outline. Cut this ‘figure-8’ shape out, score the bottom edges of your walls, add slip, and attach the floor essentially sealing the bottom.
Clean Cuts Tip
Let the clay leather-harden slightly (about 30-60 mins) before carving windows. Soft clay tends to drag and warp, while firmer clay cuts cleanly.
Step 3: Carving & Texturing
-
Create the Doorway:
Use your needle tool to cut an arched doorway on the shorter tower. Save the clay cutout if you want to use it as a template for the wooden door later. -
Carve Windows:
Cut small arched windows into the tall tower. For the lower tower, cut a larger arched window and leave thin strips of clay (or add them back in) to create a windowpane cross. -
Add Crenellations:
For the lower tower’s battlement, cut a strip of clay and notch out square sections along the top edge. Loop this around the top rim of the lower cylinder, blending the bottom edge into the wall. -
Pierce the Details:
Using a small hole cutter or straw, poke a row of circular holes just below the battlements on the lower tower. Poke triangular or random holes in the conical roof for light to escape. -
Stone Texture:
Gently tap the entire exterior surface with a stiff-bristled brush or a balled-up piece of aluminum foil. This speckling creates the realistic stone effect seen in the photo.
Level Up: Magic Smoke
Instead of a tea light, place a cone incense burner inside the tall tower. The smoke will drift out through the roof vents for a mysterious effect.
Step 4: Finishing Touches
-
Make the Door:
Cut your balsa wood or veneer into a shape slightly larger than the door opening. Carve vertical lines to mimic planks and drill four small holes for light to shine through. -
Refine Edges:
Take a slightly damp sponge and smooth any sharp burrs around your window cutouts and the roof line, softening the look. -
Drying and Firing:
Allow the piece to dry slowly under loose plastic to prevent wraping. If using kiln clay, fire to bisque, glaze with a matte white or clear matte, and fire again. If using polymer, bake according to package instructions. -
Assembly:
Once finished and cooled, glue the wooden door behind the archway (on the inside). Place the conical roof on top, insert your tea lights, and enjoy the glow.
Enjoy the cozy atmosphere as soft light flickers through the stone windows of your handcrafted fortress
Dragon-Guarded Castle Tower
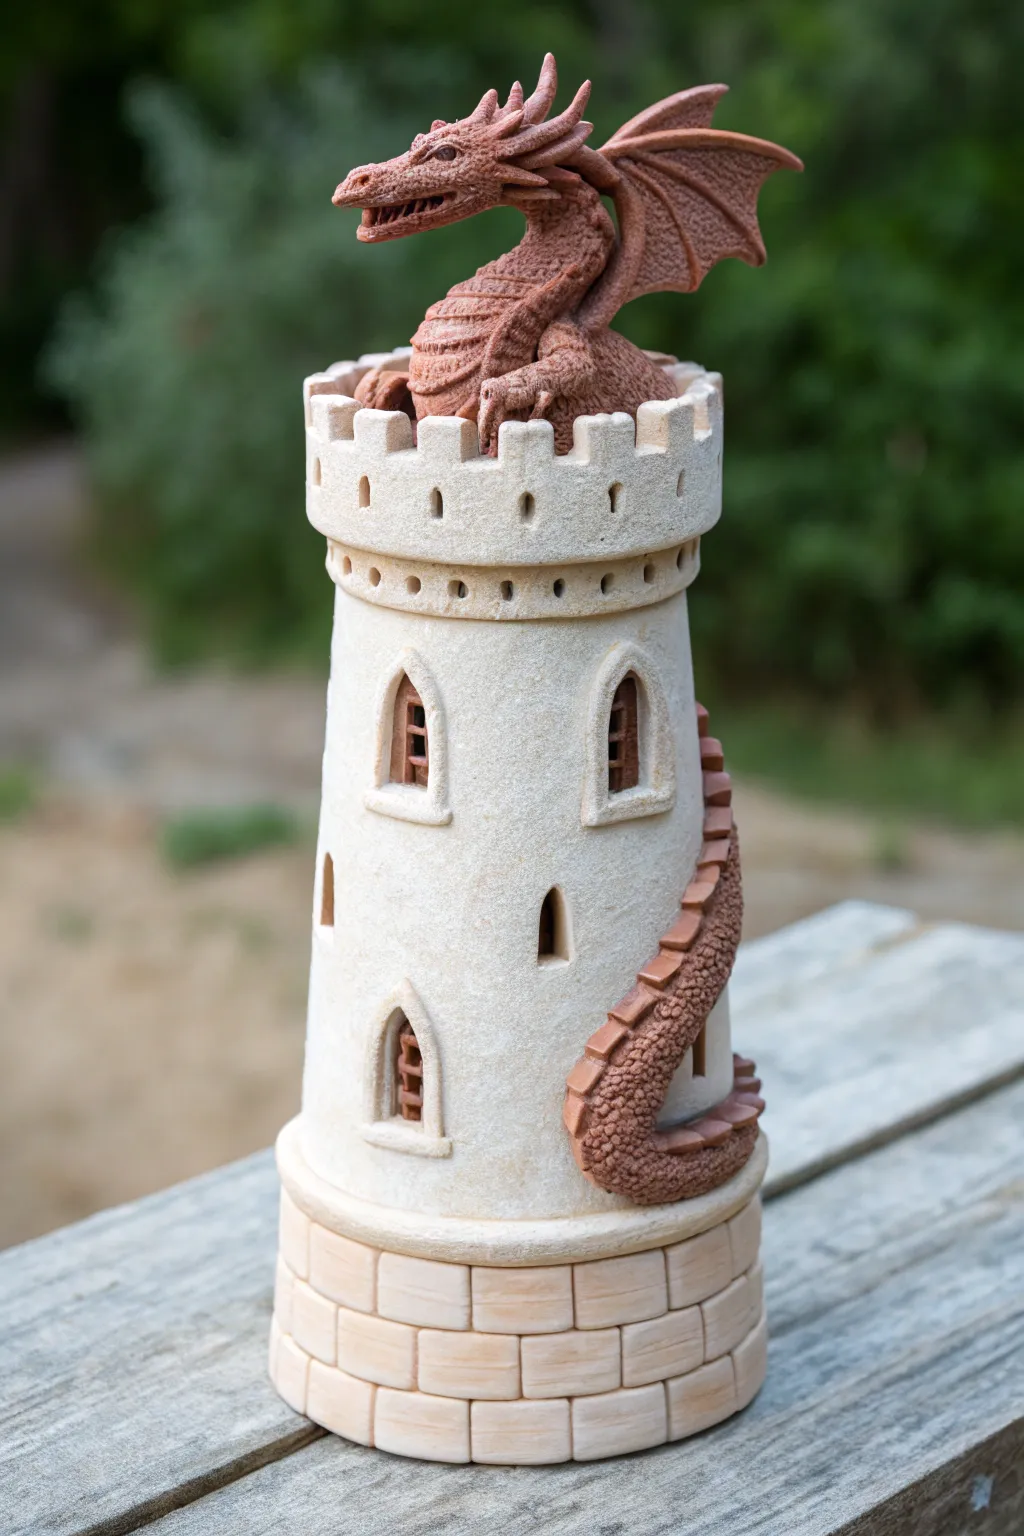
This majestic clay sculpture features a textured stone tower topped with battlements and guarded by a fierce, terracotta-colored dragon. The contrast between the pale stoneware of the tower and the reddish hue of the beast creates a striking fantasy piece perfect for garden decor or a bookshelf display.
Step-by-Step
Materials
- Light-colored stoneware clay (buff or white)
- Terracotta clay (or red earthenware)
- Rolling pin
- Fettling knife
- Scoring tool or serrated rib
- Slip (made from both clay bodies)
- Cylindrical form or tube (for tower support)
- Modeling tools (wooden and metal loop)
- Texture tools (sponge, toothbrush, or crumpled foil)
- Small square cutter (optional for bricks)
Step 1: Constructing the Tower Base
-
Prepare the clay slab:
Roll out a large slab of the light-colored stoneware clay to a uniform thickness of about 1/4 inch. Ensure the clay is firm enough to stand but soft enough to manipulate. -
Form the cylinder:
Cut a large rectangle from your slab. The height determines your tower’s stature. Wrap this rectangle around a paper-covered cardboard tube or cylindrical form to create the main tower body. Score and slip the seam thoroughly to join the edges, smoothing the outside so the join is invisible. -
Create the foundation:
Roll a thick strip of light clay to wrap around the base, creating a wider foundation. Attach this firmly to the bottom of your cylinder. -
Detail the stonework:
Using a needle tool or fettling knife, carve horizontal and vertical lines into the foundation strip to mimic large, heavy stone blocks. I like to press gently with a flat tool on the edges of each ‘block’ to give them a rounded, weathered look. -
Add windows:
Cut small arched windows into the tower body. Use a small amount of terracotta clay to form tiny frames or grates inside the window openings, adding immediate visual contrast.
Crack Prevention
Make sure the two clay types have similar shrinkage rates. If they differ significantly, the dragon might pop off the tower during firing.
Step 2: Building the Battlements
-
Form the parapet:
Create a slightly wider collar of clay and attach it to the top rim of your tower. This should overhang the main walls slightly. -
Cut the crenellations:
Carefully cut out square notches along the top edge of this collar to create the classic castle battlement look. Keep the cutouts evenly spaced for a professional finish. -
Add texture:
Texture the entire surface of the white clay tower by gently dabbing it with a stiff brush or a piece of coarse sponge. This removes the ‘smooth plastic’ look of fresh clay and simulates sandstone.
Step 3: Sculpting the Dragon
-
Rough out the body:
Using the terracotta clay, form a thick, teardrop-shaped lump for the dragon’s main body. Position this inside the battlements, ensuring it looks like the beast is settling into a nest. -
Attach the winding tail:
Roll a long, tapered coil of terracotta clay. Attach it starting from the dragon’s body, winding it down the side of the tower. Score and slip every point of contact heavily so it doesn’t detach during firing. -
Scale texture:
Use a small loop tool or the end of a straw to press scale textures into the dragon’s body and tail. Work from the tail tip upward toward the head so the scales overlap naturally. -
Sculpt the head:
Model the dragon’s head separately, giving it an elongated snout and defined jaw. Attach it to a thick neck coil extended from the body. -
Add wings and spikes:
Roll thin slabs for the wings, cutting them into bat-like shapes. Attach these to the back. Add small cones of clay down the spine and head for spikes. Finish by refining the facial features, using a needle tool for the eyes and nostrils.
Glowing Windows
Cut a hole in the bottom of the tower before firing. This allows you to place an LED tea light inside, making the windows glow warmly at night.
Now let your piece dry slowly to ensure the heavy dragon doesn’t warp the tower walls