Whenever I’m not sure what to make, I default to dog clay ideas—because a few simple shapes can turn into instant personality. Whether you’re using polymer clay or air-dry clay, these projects are meant to feel fun, doable, and totally forgiving.
Simple Sitting Puppy Figurine
This adorable sitting puppy figurine captures the heartwarming essence of a loyal friend looking up for a treat or a pat. With its smooth, speckled finish and sweet expression, it makes for a perfect beginner-friendly sculpting project.
How-To Guide
Materials
- Polymer clay or air-dry clay (cream or beige color)
- Small amount of brown clay (for the nose)
- Small amount of black clay (for the eyes)
- Speckled clay additive or black pepper/sand (optional for texture)
- Basic sculpting tools (needle tool, smooth ball tool)
- Thin wire or toothpick (for internal support)
- Clear matte varnish (optional)
Step 1: Forming the Main Body
-
Prepare the clay:
Start by conditioning your cream-colored clay until it is soft and pliable. If you want that speckled stoneware look shown in the photo, knead in a tiny pinch of cracked black pepper or brown sand to create the flecks. -
Shape the torso:
Roll a medium-sized ball of clay into a smooth pear shape. This will form the sitting body. Gently flatten the bottom so it sits stable on your work surface without wobbling. -
Create the head:
Roll a slightly smaller ball for the head. It shouldn’t be a perfect sphere; gently press it to create a slight oval shape for the snout area. -
Connect head and body:
Insert a small piece of creating wire or a toothpick into the top of the body pear. Push the head onto the exposed wire to secure it, blending the clay at the neck slightly if you want a seamless look, or leaving a slight indentation to simulate a collar line.
Natural Texture
To get that earthy, stoneware look without a kiln, use a clean toothbrush to gently tap the surface of the clay before drying. This mimics a grainy texture.
Step 2: Adding Key Features
-
Form the hind legs:
Roll two medium balls of clay for the rear haunches. Flatten them slightly into thick discs and press them firmly against the lower sides of the body. -
Shape the rear paws:
Attach smaller, rounded oblong shapes to the bottom front of the haunches to create the back paws. Use a smooth modeling tool to blend the seams where they join. -
Sculpt the front legs:
Roll two thick logs of clay for the front legs. Attach them vertically to the front of the body, blending the clay at the shoulder area so they look like they grow from the torso. -
Create the front paws:
Slightly flatten the bottom of the front leg logs and use a modeling tool to bulge the clay forward slightly, mimicking the shape of a dog’s foot. -
Detail the toes:
Using a dull knife or a specialized clay tool, press two distinct vertical lines into each of the four paws to create the toes. Round off the edges of these cuts so they look soft and organic, not sharp.
Make it Personal
Customize your pup by painting distinctive patches, adding a colorful clay collar, or sculpting a tiny bone or ball to place between its front paws.
Step 3: Refining the Face
-
Add the snout:
I like to add a small, flattened oval of clay to the lower front of the face to build up the muzzle area, blending the edges smoothly into the head. -
Attach the nose:
Take a tiny piece of brown clay and shape it into a rounded triangle. Press this firmly onto the top center of the muzzle you just created. -
Carve the mouth:
Use a needle tool or a thin blade to gently crave a vertical line down from the nose, curving it outwards at the bottom to create a simple, happy smile. -
Add freckles:
Take your needle tool and poke three tiny, shallow holes on either side of the muzzle to simulate whisker spots. -
Create the eyes:
Use a ball tool to make two small indentations for the eyes. Roll two tiny balls of black clay and press them into these sockets. The black should sit flush or slightly protruding for a lively look. -
Shape the ears:
Roll two flat teardrop shapes for the ears. They should be thick but tapered. -
Attach the ears:
Press the narrow end of the teardrops onto the sides of the head. Gently bend the wide part of the ear downward so it flops naturally against the cheek.
Step 4: Finishing Touches
-
Add the tail:
Roll a small cone of clay for the tail. Attach it to the lower back of the figurine, curving it slightly upward as if the dog is wagging it. -
Smooth the surface:
Dip your finger in a little water (or baby oil if using polymer clay) and gently run it over the entire sculpture to remove fingerprints and smooth out any harsh tool marks. -
Final cure:
Follow the drying or baking instructions for your specific type of clay. Once fully cured, the piece is complete.
Now you have a charming little companion ready to sit on your shelf or guard your desk


Floppy-Eared Dog With Sweet Face
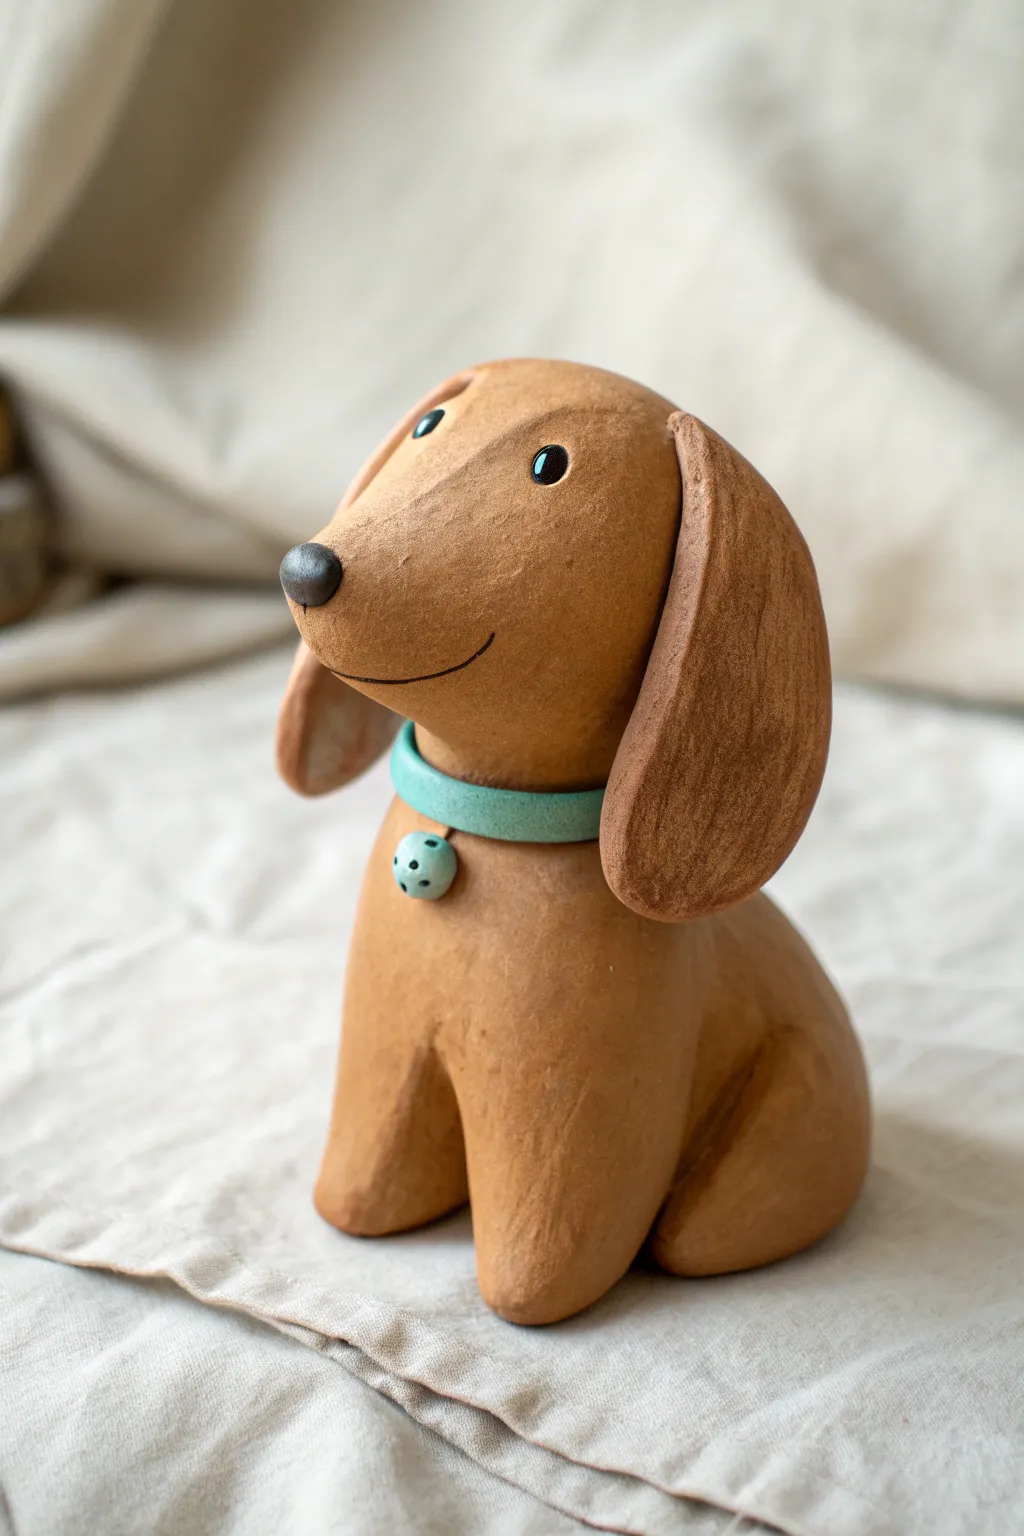
Capture the charm of a loyal pup with this earthenware clay project, featuring lovely floppy ears and a gentle expression. The smooth, terracotta-like finish and simple pastel collar give it a timeless, folk-art appeal that looks wonderful on any shelf.
Step-by-Step
Materials
- Terracotta-colored polymer clay or air-dry clay
- Light teal or mint green polymer clay (for collar)
- Black polymer clay (for eyes/nose)
- White or light grey clay (for eye highlights)
- Small ball tool or dotting tool
- Sculpting needle tool
- Acrylic roller or rolling pin
- Clay adhesive or ‘bake and bond’ (optional but helpful)
- Gloss varnish (optional for eyes/nose)
- Oven (if using polymer) plus baking sheet
Step 1: Sculpting the Body Base
-
Form the torso:
Begin with a baseball-sized amount of the terracotta clay. Roll it into a smooth ball, then gently elongate one side to create a tear-drop pear shape. This wider bottom will be the dog’s seated hips. -
Shape the legs:
Instead of attaching separate legs, use your thumbs to gently push into the front of the wide base, effectively ‘pulling’ two stout front legs out from the main mass. -
Refine the sitting posture:
Smooth out the separation between the front legs. For the back legs, press shallow, curved indentations into the sides of the hips to suggest the haunches are folded underneath. -
Create the chest:
Ensure the chest area rounds out slightly above the front legs. Tap the bottom of the figure on your work surface to create a flat, stable base so it won’t wobble.
Step 2: Creating the Head and Expression
-
Shape the head:
Roll a second piece of terracotta clay into a ball, slightly smaller than the body. Gently roll one side into a blunt cone shape to form the snout. -
Smooth the snout:
I like to gently curve the very tip of the snout upwards just a fraction—it gives the dog a more attentive look. Make sure the transition from snout to forehead is smooth but distinct. -
Attach the nose:
Take a very small pea-sized piece of black clay. Flatten it slightly and press it onto the tip of the muzzle. -
Sculpt the smile:
Using your needle tool, carve a sweeping, curved line starting from under the nose and reaching halfway up the cheek. A longer smile line creates that friendly personality. -
Add the eyes:
Press two small, deep indents with your ball tool where the eyes will go. Fill these with small balls of black clay, flattening them flush with the head surface. -
Apply the highlight:
Place a tiny speck of white clay in the upper right corner of each pupil. This ‘catchlight’ is crucial for bringing the character to life.
Head Won’t Stay Up?
If the head feels too heavy and causes sagging before baking, prop the snout up with a small wedge of cardboard or folded foil to support the chin until the clay hardens.
Step 3: Ears and Assembly
-
Form the floppy ears:
Roll two equal medium-sized balls of terracotta clay. Flatten them into elongated teardrops or ovals, about the length of the head itself. -
Create texture (optional):
If you want a rustic look like the example, lightly brush the clay surface with a rough sponge or stiff brush before attaching. -
Attach the ears:
Press the narrower top of each ear onto the sides of the head. Smooth the seam downwards so they look like they are growing naturally from the skull, draping heavily alongside the cheeks. -
Prepare the neck connection:
Insert a toothpick or a small piece of wire into the center of the body’s neck area to act as an armature. -
Add the collar:
Roll a thin snake of the mint green clay. Flatten it into a strip and wrap it around the top of the body’s neck, joining it at the back. -
Attach the head:
Push the head down onto the toothpick/wire armature until it rests snugly against the collar. Tilt the head slightly upward for a sweeter pose. -
Add the bell accent:
Roll a tiny ball of mint clay and press it onto the front of the collar. Use a needle tool to poke three small holes in a triangle pattern to mimic a jingle bell.
Customize the Coat
Before baking, use an old toothbrush to gently stipple the surface of the body. This creates a soft, short-haired fur texture instead of the smooth finish.
Step 4: Finishing Touches
-
Final smoothing:
Check the entire sculpture for fingerprints. You can use a tiny drop of baby oil on your finger to buff out any unwanted marks on polymer clay. -
Bake or dry:
If using polymer clay, bake according to the package instructions (usually 275°F/135°C for 15-30 minutes). If using air-dry clay, leave it in a cool, dry place for 24-48 hours. -
Seal the features:
Once cool or fully dry, apply a touch of gloss varnish only to the nose and eyes to make them shine wetly against the matte fur.
Place your new clay companion on your desk for a daily dose of loyalty and cuteness


Long-Body Dachshund Mini
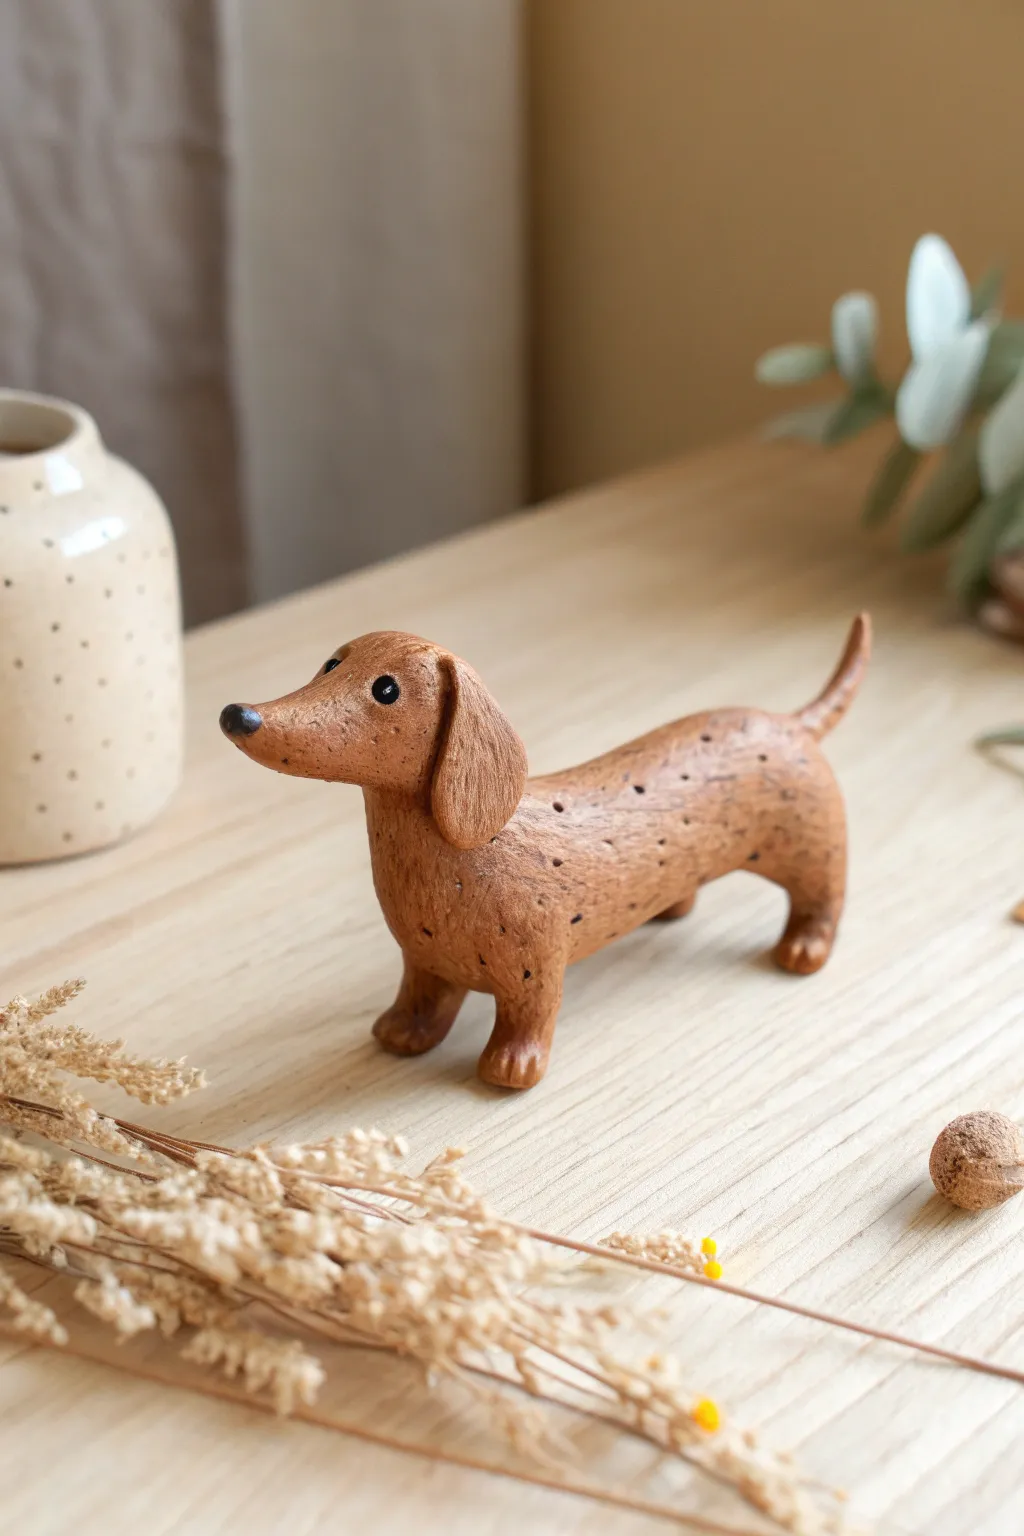
Capture the charm of a sausage dog with this stylized clay figurine that mimics a carved wooden texture. Its elongated body, perky tail, and sweet expression make it a delightful addition to any desk or shelf.
Step-by-Step Tutorial
Materials
- Polymer clay (terracotta or warm medium brown)
- Black polymer clay (tiny amount for eyes/nose)
- Modeling tools (needle tool, ball stylus)
- Texture sponge or stiff brush
- Aluminum foil (optional for core)
- Acrylic paint (dark brown/burnt umber)
- Paintbrush
- Paper towel
- Gloss varnish (optional for eyes/nose)
Step 1: Shaping the Base
-
Condition the clay:
Start by kneading your warm brown clay until it is soft and pliable. If the clay feels too stiff, the warmth of your hands will eventually loosen it up. -
Form the body:
Roll a log of clay into a smooth sausage shape, roughly three to four inches long. Slightly taper it towards the back where the tail will attach. -
Create the head:
Pull a portion of clay from the front of the log upwards and smooth it to form the neck. Alternatively, roll a separate teardrop shape for the head and blend it seamlessly onto the neck. -
Refine the snout:
Gently pinch and pull the front of the head to create a long, pointed snout characteristic of a dachshund. -
Attach the legs:
Roll four small, equal-sized energetic cylinders for the legs. Press them firmly onto the underside of the body, blending the seams with your thumb or a modeling tool so they are sturdy.
Sagging Mids
If the long body sags in the middle before baking, prop it up with a small folded piece of paper or cardboard underneath the belly until hard.
Step 2: Adding Details & Texture
-
Shape the paws:
Flatten the bottom of each leg slightly so the dog stands on its own. Use a needle tool to press two small indentations into the front of each paw to create toes. -
Make the ears:
Create two flat, teardrop-shaped pieces of clay. Attach them to the sides of the head, draping them down slightly to mimic floppy dachshund ears. -
Add the tail:
Roll a small, tapered cone for the tail. Attach it to the rear of the body, curving it upwards for a perky, happy look. -
Create the facial features:
Using tiny specs of black clay, roll three small balls. Press one onto the tip of the snout for the nose and the other two onto the face for eyes. Use a needle tool to gently press them in. -
Texturize the surface:
Gently press a texture sponge or the bristles of a stiff brush all over the body, ears, and tail. This removes fingerprints and gives the piece an organic, slightly rough finish. -
Add stippling details:
Use a needle tool to poke shallow, random holes across the back and sides. This mimics the porous look of wood or cork seen in the reference image.
Accessories
Give your pup personality by sculpting a tiny red collar, a bandanna, or a little sweater texture around the midsection before texturing.
Step 3: Finishing Touches
-
Bake the piece:
Place your dachshund on a baking sheet and bake according to your polymer clay manufacturer’s instructions (usually around 275°F or 130°C for 15-30 minutes). -
Cool down:
Let the sculpture cool completely before handling it to ensure the clay hardens properly. -
Apply a wash:
I like to water down some dark brown acrylic paint and brush it over the entire sculpture, making sure it gets into the texture and stippling holes. -
Wipe away excess:
Immediately wipe the wet paint off the surface with a paper towel. The paint will remain in the recesses, highlighting the ‘wood’ texture and stippled dots. -
Highlight the eyes:
For a bit of life, add a tiny dot of white paint to the eyes or coat the black clay nose and eyes with a gloss varnish for a wet look.
Now you have a charming little companion ready to sit faithfully on your desk


Spotted Dog With Easy Dot Pattern
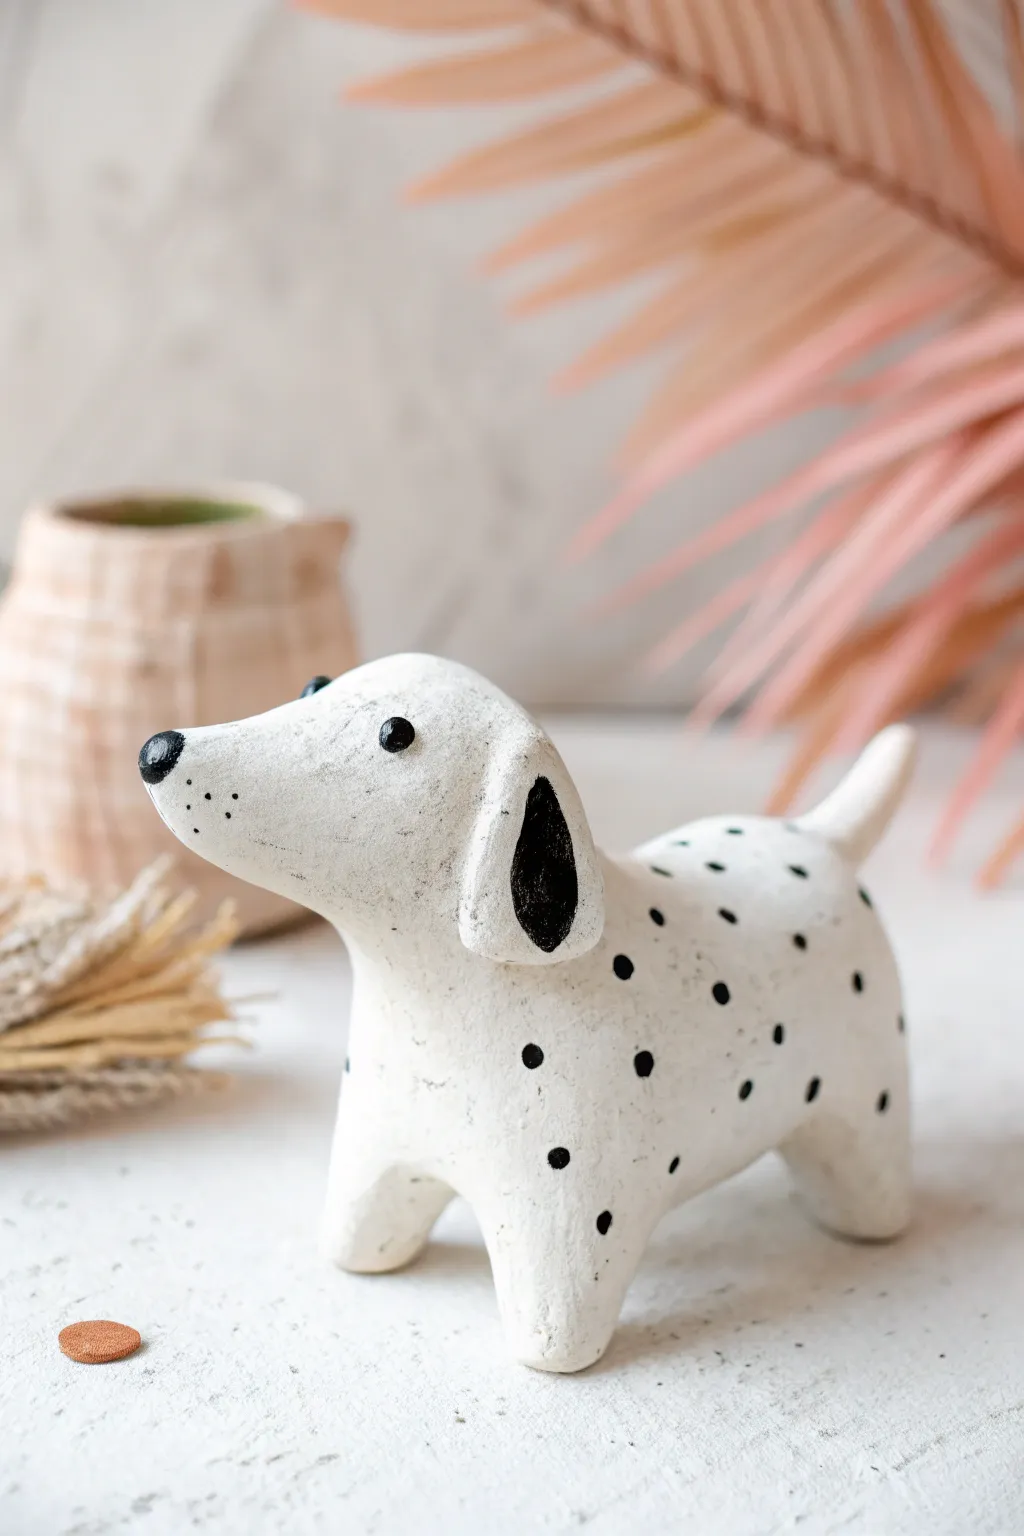
This charming, minimalist clay dog captures the essence of a Dalmatian with its crisp white body and playful black spots. The simple, rounded forms make it a perfect beginner sculpture that results in a sophisticated piece of shelf decor.
How-To Guide
Materials
- White air-dry clay (or polymer clay)
- Acrylic paint (black)
- Fine-point paintbrush
- Small bowl of water
- Sculpting tools (or a toothpick)
- Sandpaper (fine grit)
- Matte varnish (optional)
Step 1: Shaping the Body
-
Form the torso:
Start with a generous handful of white clay. Knead it until smooth and pliable, then roll it into a thick, elongated log shape. Generally, I like to tap the ends gently against the table to flatten them slightly, creating a stable base for the chest and rear. -
Create the legs:
Instead of attaching separate legs, gently pinch and pull the clay downwards from the four corners of your torso log. Use your thumb and forefinger to shape these into short, sturdy stumps. -
Refine the stance:
Press the figure onto your work surface to ensure it stands flat. Smooth out the transition between the belly and the legs so the clay flows seamlessly without cracks. -
Add the tail:
Roll a small snake of clay for the tail. Attach it to the upper rear of the torso, blending the clay downwards so it points perkily upward.
Step 2: Sculpting the Head
-
Shape the head:
Roll a separate ball of clay slightly smaller than the torso. Gently pinch one side to elongate it into a snout shape, keeping the nose rounded and blunt. -
Attach the head:
Score (scratch) the neck area of the body and the underside of the head. Add a dab of water (slip) to join them. Press firmly and smooth the clay across the seam until the neck looks solid. -
Form the ears:
Flatten two small ovals of clay. Attach these to the sides of the head, draping them down like floppy hound ears. Blend the top edge of the ear into the head for a seamless look. -
Final smoothing:
Dip your finger in a tiny bit of water and run it over the entire sculpture to remove fingerprints and bumps. Let the clay dry completely according to package instructions (usually 24-48 hours).
Use Water Sparingly
When smoothing clay, barely dampen your finger. Too much water makes air-dry clay slimy and can cause cracking as it dries.
Step 3: Adding Details
-
Sand the surface:
Once bone dry, inspect your dog for any rough spots. Use fine-grit sandpaper to gently buff the surface until it feels smooth like porcelain. -
Paint the nose:
Using a small brush and black acrylic paint, cover the very tip of the snout to create a cute, round nose button. -
Paint the eyes:
Just above the muzzle, dab two small solid black circles for eyes. Keep them relatively wide-set for a sweet expression. -
Define the ears:
Paint the entirety of the floppy ear shapes black. This heavy contrast really defines the character of the piece. -
Add whisker spots:
Using the very tip of your brush or a toothpick, add three tiny dots on either side of the muzzle to suggest whiskers. -
Create the body spots:
Now for the fun part: add black polka dots all over the body. Vary the spacing and keep them somewhat irregular to mimic a natural coat pattern. -
Seal (Optional):
To protect your paint job, apply a coat of matte varnish over the entire piece once the black paint is fully dry.
Cracks While Drying?
Make a paste of clay and water (slip) to fill cracks. Smooth it over the break, let it dry again, and sand it flush.
Place your new spotted friend on a desk or shelf to add a touch of whimsy to your room

The Complete Guide to Pottery Troubleshooting
Uncover the most common ceramic mistakes—from cracking clay to failed glazes—and learn how to fix them fast.
Two-Tone Herding Dog Color Blocks
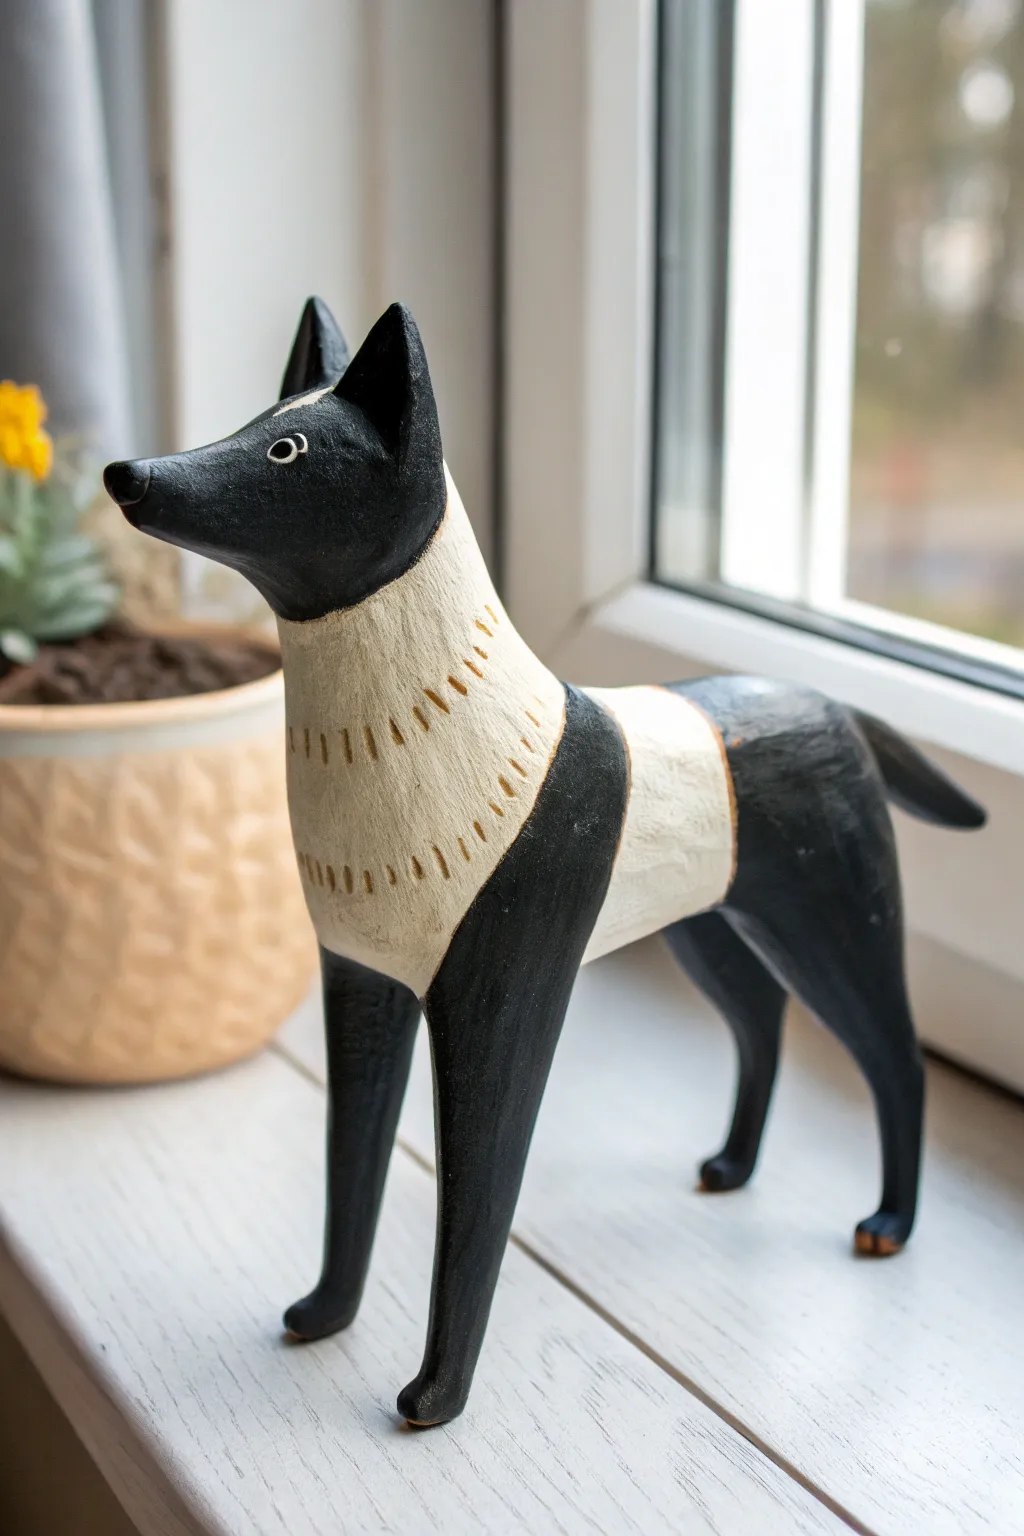
This stylized dog figurine captures the alert posture of a herding breed with a striking minimalist aesthetic. By combining smooth, blocky color transitions with subtle etched textures, you’ll create a sophisticated piece that looks fantastic on any windowsill.
Detailed Instructions
Materials
- White creative paper clay or air-dry clay (stone clay works best)
- Armature wire (approx. 14 gauge) for internal support
- Wire cutters
- Aluminum foil
- Wooden modeling tools (flat spatula and needle tool)
- Sandpaper (medium and fine grit)
- Acrylic paints: Carbon Black and Titanium White (or an off-white/cream)
- Small flat paintbrush
- Ultra-fine liner brush
- Matte or satin varnish
- Water cup
Step 1: Building the Form
-
Construct the Armature:
Cut two lengths of wire. Bend one into a U-shape for the front legs and neck, and the other for the hind legs and spine. Twist them together at the torso to create a basic stick-figure skeleton. -
Add Bulk with Foil:
Tightly wrap aluminum foil around the wire armature to build the core shape of the body, neck, and head. Keep the legs relatively thin as they will need clay coverage without becoming too chunky. -
Initial Clay Layering:
Roll out sheets of clay and wrap them over the foil form. Use your thumbs to mesh the seams together, smoothing the clay so it completely encapsulates the armature. -
Refining the Silhouette:
Add extra clay to the chest and hindquarters to create the distinct herding dog shape. I find it helpful to look at the silhouette from the side first, ensuring the chest is deep and the waist is tucked. -
Sculpting the Head:
Shape a tapered cone for the snout and attach two triangular ears. Blend the clay at the base of the ears seamlessly into the head so they don’t look stuck on. -
Defining the Legs:
Smooth clay down the leg wires, tapering them slightly toward the feet. Create small, rounded feet at the base, ensuring the dog stands flat and balanced. -
Adding the Tail:
Attach a small, pointed cone of clay to the rear for the tail. Blend the join smoothly into the rump. -
Smoothing and Drying:
Use a damp sponge or finger to smooth out any fingerprints or bumps. Set the figure aside to dry completely—this usually takes 24 to 48 hours depending on thickness.
Uneven Standing?
If the dog wobbles after drying, tape a piece of sandpaper to a flat table and gently rub the dog’s feet against it in a circular motion until level.
Step 2: Finishing and Decoration
-
Sanding the Surface:
Once fully dry, sand the entire figure. Start with medium grit to remove major bumps, then switch to fine grit for a silky smooth finish that mimics ceramic. -
Sketching the Pattern:
Lightly use a pencil to mark the boundaries of your color blocks. Draw a line around the neck for the collar area and another around the waist. -
Etching the Texture:
Using a needle tool or a sharp sculpting tool, press small vertical dash marks into the clay within the ‘white’ chest section. Create two rows of these dashes to simulate a stylized ruff of fur. -
Painting the Black Sections:
Paint the head, front legs, shoulders, and hindquarters with opaque carbon black acrylic. Use a steady hand near the pencil lines to keep the edge crisp. -
Painting the White Section:
Fill in the middle torso and neck area with an off-white or cream paint. You may need two coats to get solid coverage, especially inside the etched texture marks. -
Highlighting the Texture:
To make the recessed dash marks pop, consider mixing a tiny drop of brown into your cream paint and lightly washing it into the grooves, wiping away the excess on the surface. -
Adding Facial Details:
Using your finest liner brush, paint a small white circle for the eye. Once dry, add a tiny black pupil and a thin white outline around the eye for expression. -
Sealing the Piece:
Finish by applying a coat of matte or satin varnish over the entire dog. This unifies the paint sheen and protects your hard work from dust.
Texture Twist
Instead of etched dashes, try using the end of a small straw or a texture stamp on the white section before drying for a different geometric fur effect.
Place your sleek new guardian on a shelf and enjoy the modern charm it adds to the room
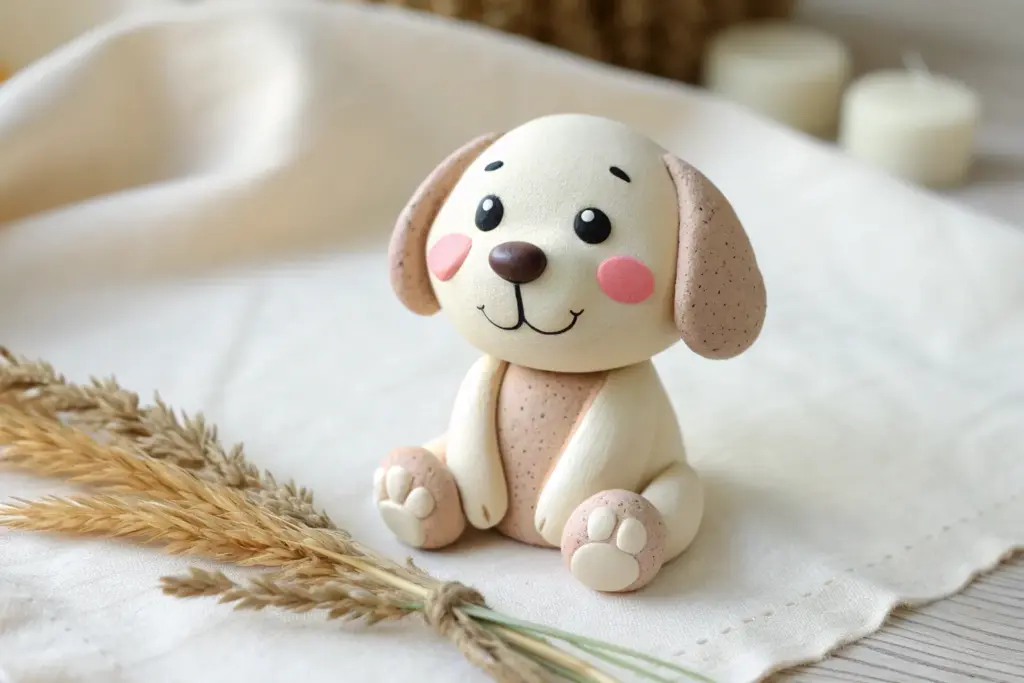
Short-Snout Dog With Wrinkle Lines
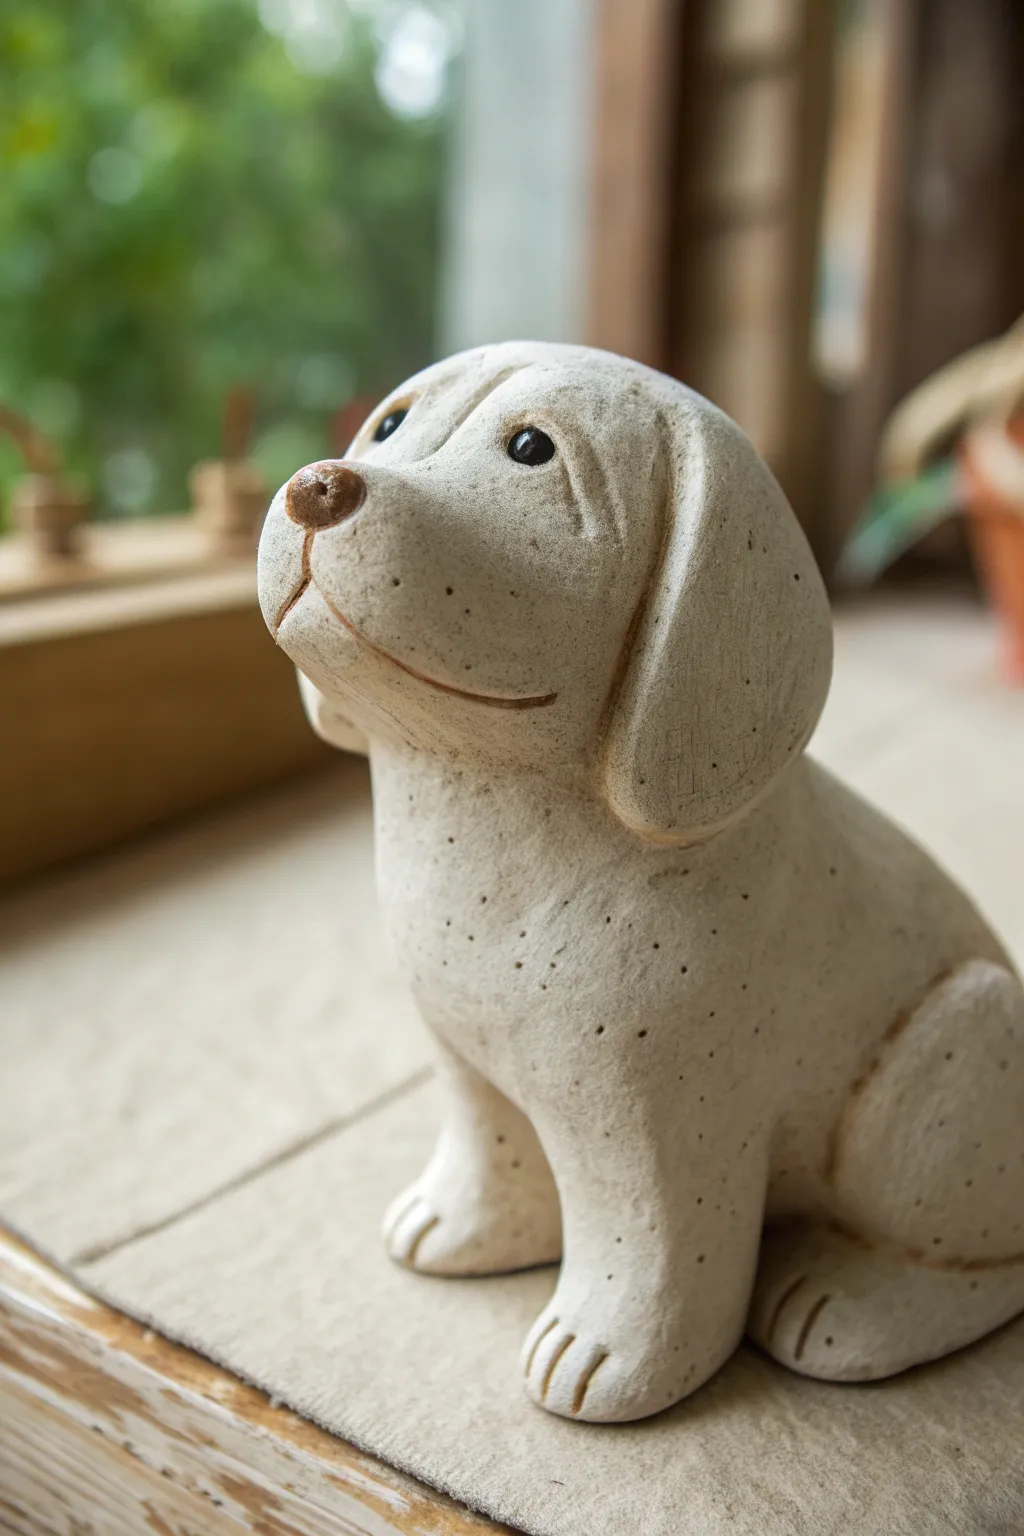
Capture the innocent gaze of man’s best friend with this textured clay project that mimics the look of carved sandstone. This sitting puppy features simple, expressive lines and a delightful speckled finish that gives it a timeless, rustic charm.
Step-by-Step Tutorial
Materials
- White or beige polymer clay (approx. 200g)
- Speckled clay additive or coarse black pepper/ground coffee (for texture)
- Basic sculpting tools (needle tool, ball stylus)
- Acrylic paints (black, terracotta brown)
- Small liner paintbrush
- Aluminum foil (for armature)
- Sandpaper or stiff bristle brush
- Matte varnish
Step 1: Forming the Base
-
Create the core:
Start by crumpling a piece of aluminum foil into a pear shape. This will save on clay and keep the sculpture lightweight. The bottom should be wider for the sitting posture. -
Prepare the clay:
Condition your clay until soft. If using plain clay, mix in a tiny pinch of speckled additive, black pepper, or dried coffee grounds to achieve that stony, granite-like texture seen in the photo. -
Cover the armature:
Flatten the clay into a sheet about 1/4 inch thick. Wrap this completely around your foil core, smoothing out all seams until you have a seamless organic shape. -
Shape the body:
Mold the clay while standing it upright. Gently press the top third to define the head area, and widen the base so it sits stably on your work surface.
Stone Texture Trick
Mix spent, dried coffee grounds into white clay before sculpting. It creates realistic speckling and texture that looks exactly like sandstone once baked.
Step 2: Sculpting the Head and Face
-
Add the snout:
Roll a separate small ball of clay and press it onto the front of the head area. Blend the edges seamlessly into the face using your thumb or a modeling tool to create a rounded muzzle. -
Define the mouth:
Using a curved blade or a needle tool, slice a long, gentle arc across the bottom of the muzzle. Curve the ends slightly upward to give the puppy a subtle, permanent smile. -
Carve the nose bridge:
Press a vertical indentation starting from the top of the forehead down to the nose. This central line adds character and separates the brow area. -
Sculpt the nose:
Attach a small, triangular piece of clay to the tip of the muzzle. Smooth it down, then use a small rounded tool to indent two nostrils on the front. -
Create eye sockets:
Use a ball stylus to press two distinct hollows on either side of the nose bridge. These should be fairly deep to hold the painted eyes later. -
Add the ears:
Form two teardrop shapes from fresh clay. Flatten them slightly and attach them to the sides of the head. Curve them forward so they frame the face, pressing the top connection point firmly to blend.
Step 3: Body Details and Texture
-
Form the front legs:
Roll two thick logs of clay. Attach them vertically to the front of the chest, blending the top smoothly into the body so they look like they are supporting the weight. -
Shape the back haunches:
Create two large oval shapes and press them onto the sides of the body, near the back. These represent the folded hind legs of a sitting dog. -
Define the paws:
At the base of the front legs and back haunches, use a knife tool to score three deep lines. These simple cuts effectively suggest toes. -
Texturizing:
Take a stiff bristle brush or a piece of crumpled foil and gently tap it all over the surface of the dog. I like to do this lightly to remove fingerprints and enhance the stone effect. -
Add decorative speckles:
Use a needle tool or toothpick to poke random, shallow accent holes across the chest and back, mimicking the porosity of natural stone.
Make it a Planter
Before baking, hollow out the back deeply with a spoon tool. After baking, fill the void with a tiny succulent or air plant for a functional garden guardian.
Step 4: Finishing Touches
-
Curving the tail:
Roll a small tapered snake of clay for the tail. Attach it to the lower back, wrapping it around the side of the haunch so it rests visibly against the body. -
Baking:
Bake the sculpture according to your clay manufacturer’s specific instructions. Allow it to cool completely before creating the painted details. -
Painting the eyes:
Using a fine liner brush, fill the eye sockets with gloss black acrylic paint. Add a tiny white dot if you want extra life, though the reference uses solid back. -
Detailing the nose and mouth:
Paint the nose nose pad with a warm terracotta brown. Mix a very watery brown wash and carefully run it into the mouth crevices and paw lines to accentuate the depth. -
Sealing:
Finish with a coat of matte varnish to protect the paint while maintaining that natural, unglazed stone appearance.
Place your new stony friend on a windowsill where the light can catch those delightful textured details


What Really Happens Inside the Kiln
Learn how time and temperature work together inside the kiln to transform clay into durable ceramic.
Curled-Up Sleeping Dog
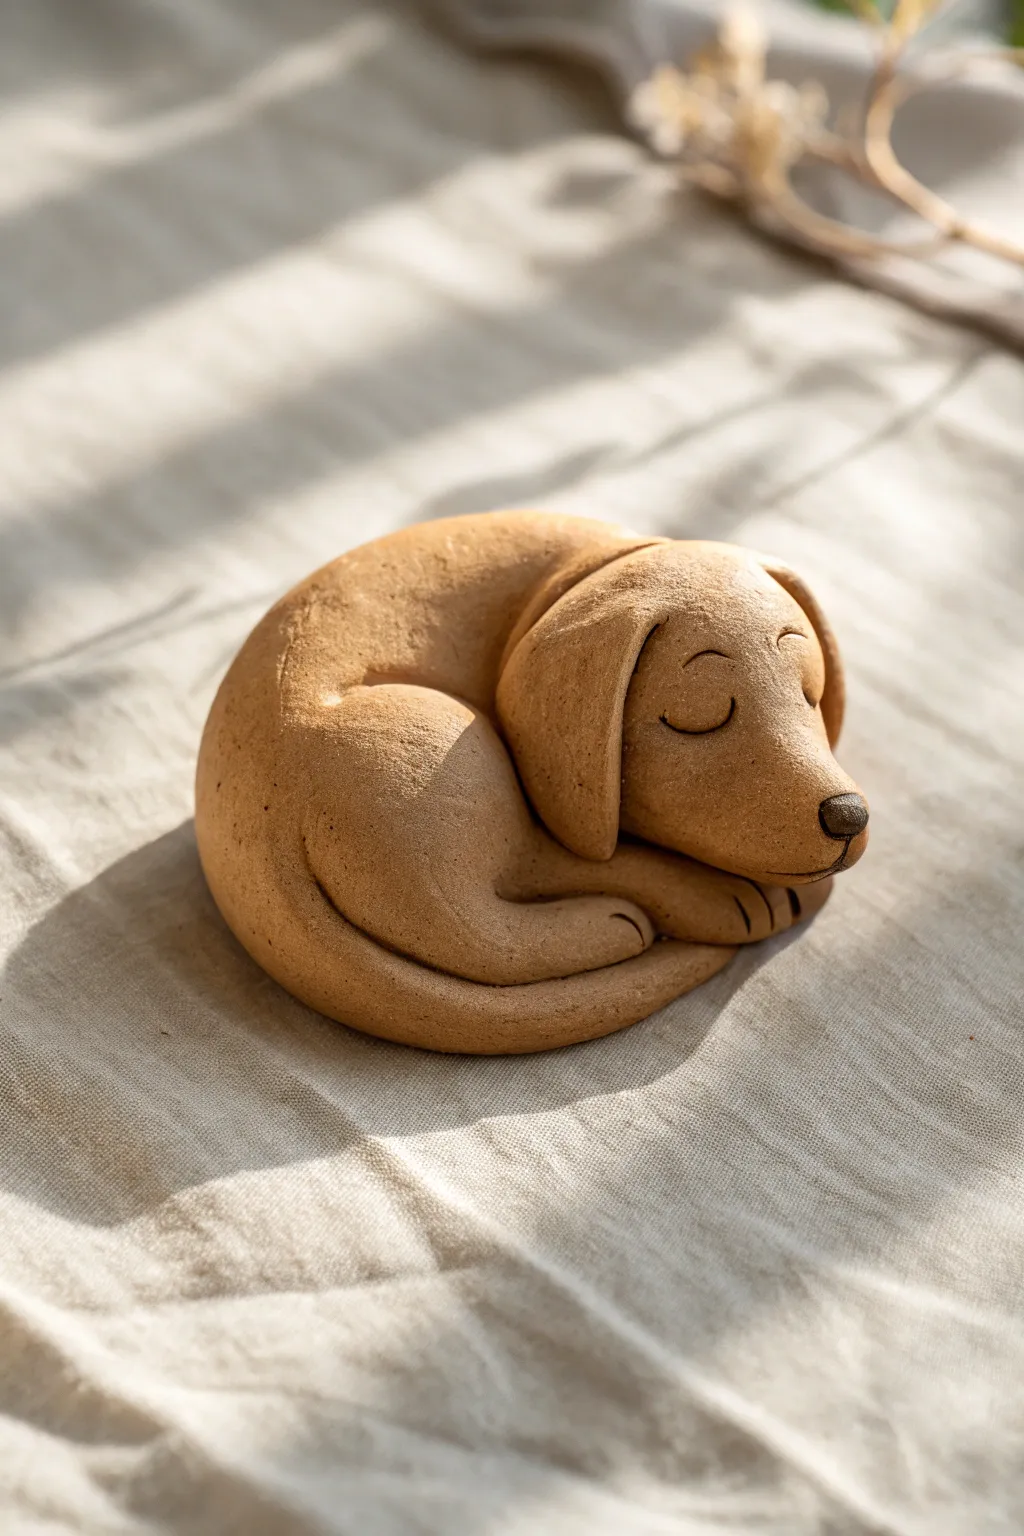
Capture the peaceful sweetness of a sleeping pup with this compact clay sculpture. The warm, earthy finish and smooth curves give this piece a timeless, comforting feel perfect for any shelf.
Step-by-Step Guide
Materials
- Earthenware clay or tan polymer clay
- Modeling tools (needle tool, small ball stylus)
- Small sponge
- Water slip (if using ceramic clay)
- Ruler
- Rolling pin
- Plastic wrap (optional, for smoothing)
Step 1: Forming the Base
-
Create the main mass:
Begin with a ball of clay roughly the size of a tangerine. Gently roll it into a thick, slightly flattened oval shape to serve as the dog’s body while it’s curled up. -
Define the head:
Pinch one end of the oval to form a smaller, rounded mound that sits slightly higher than the rest of the body. This will become the head resting on the paws. -
Smooth the transition:
Use your thumb to smooth the connection point between the head and body so it looks like one cohesive form rather than two separate lumps pushed together.
Step 2: Sculpting the Limbs and Tail
-
Carve the thigh:
Using a modeling tool or your thumb, press a gentle indentation into the side of the body to define the large, curved thigh muscle typical of a sitting or sleeping dog. -
Create the hind leg:
Roll a thick snake of clay, taper one end, and curve it around the bottom of the sculpture. Attach this securely, blending the seams so it wraps around the front toward the head. -
Add the front paws:
Form two small, flattened teardrop shapes. Place them directly under the chin area of the head, looking as if they are tucked in for warmth. -
Detail the toes:
Take a needle tool or knife and press two or three small lines into the ends of the paws and the hind leg to suggest toes. -
Wrap the tail:
Roll a long, tapering coil for the tail. Attach it starting at the dog’s rear and curve it all the way around the body until the tip meets the hind leg or tucks under the chin. -
Blend seams:
Go over every added piece with a small amount of slip or just your fingers to ensure they are fully integrated and smooth.
Cracks Appearing?
If you see tiny cracks forming while blending seams, your clay might be too dry. Dip your finger in water (or slip) and smooth over the area immediately to rehydrate the surface.
Step 3: Refining the Head
-
Shape the muzzle:
Gently pull and pinch the front of the head to create a distinct snout. It should look slightly squared off but soft at the edges. -
Attach the nose:
Roll a tiny triangle or oval of clay. Score the tip of the muzzle and press this piece on, smoothing the edges slightly so it doesn’t look like it will fall off. -
Add the ears:
Flatten two teardrop-shaped pieces of clay for floppy ears. Drape them over the sides of the head, pressing the top edge firmly to blend it into the skull. -
Position the ears:
Curve the bottom of the ears slightly forward or tuck them close to the cheek to mimic gravity pulling them down during sleep.
Pro Tip: Weighted Base
Before sealing the bottom, hollow out the underside slightly with a loop tool. This ensures even drying and prevents the sculpture from acting like a heavy rock that might crack in the kiln.
Step 4: Review and Finish
-
Mark the eyes:
Using a needle tool, carefully etch two downward-curving crescents on the face for closed eyelids. Keep the lines clean and simple. -
Define the mouth:
Draw a very subtle line under the snout for the mouth, curving it up slightly at the corner to give a contented expression. -
Final smoothing:
Wipe the entire sculpture with a slightly damp sponge to remove fingerprints and harsh tool marks. -
Surface texture:
I like to gently pat the surface with a finger or dry sponge to give it a soft, matte stone-like texture before letting it dry. -
Drying and firing:
Follow the specific instructions for your clay type regarding drying times and firing or baking temperatures.
Now you have a serene little canine friend to keep you company on your desk
Playful Dog With Tongue Out
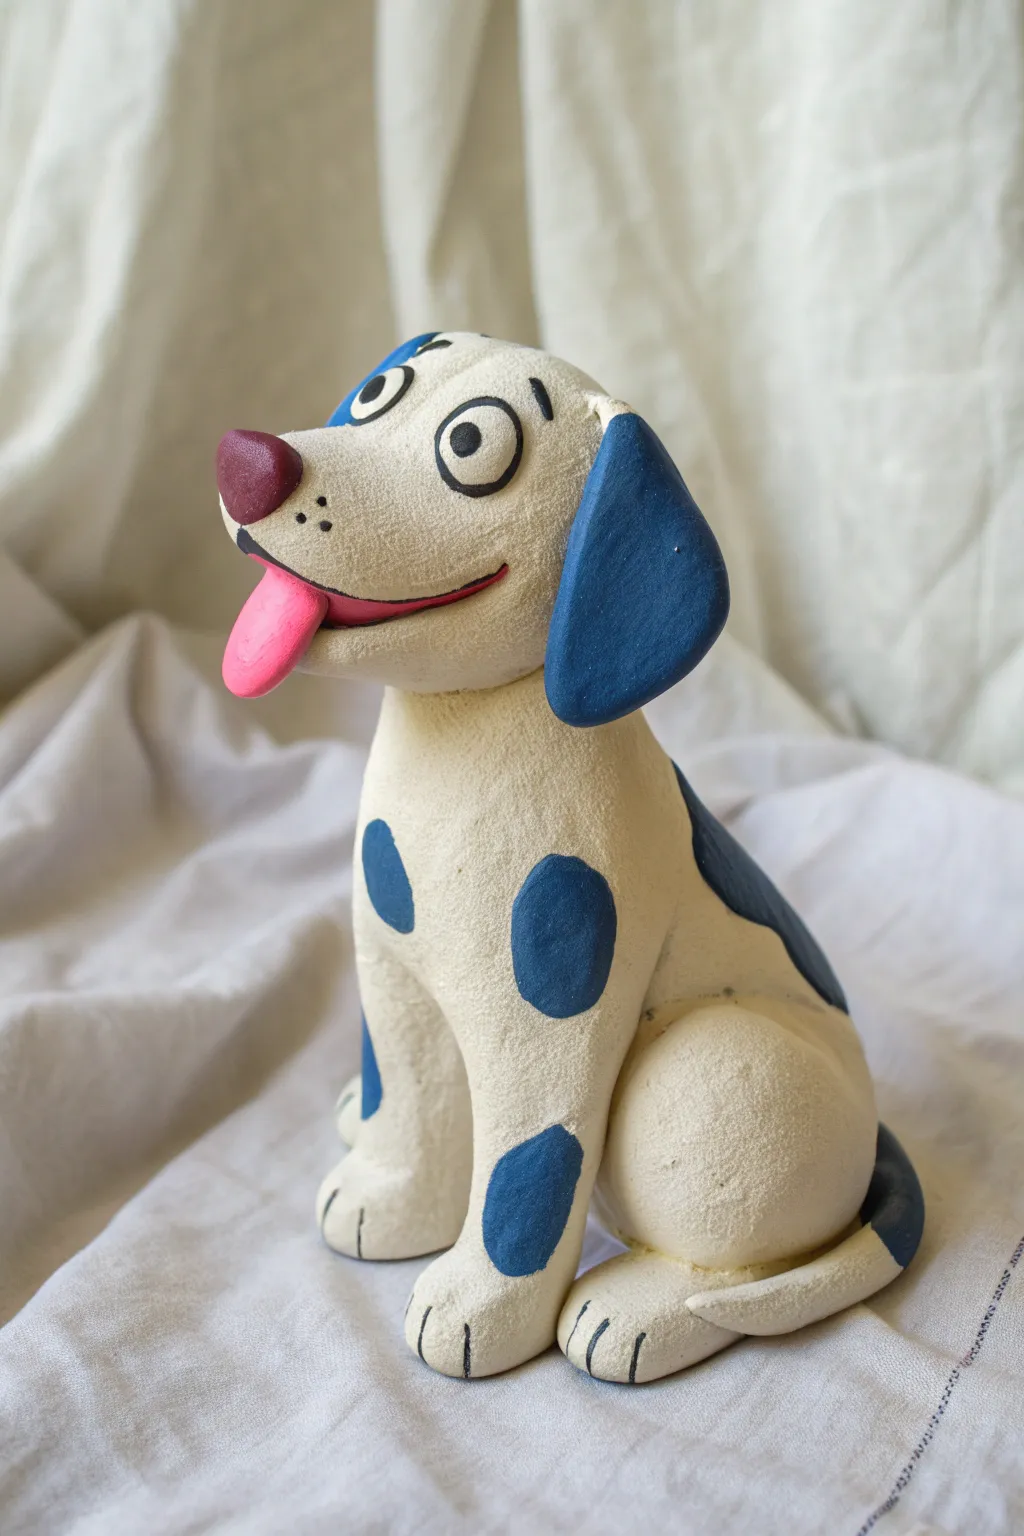
Capture the boundless enthusiasm of man’s best friend with this adorable clay sculpture. Featuring a textured white body, playful blue spots, and a goofy hanging tongue, this project is sure to bring a smile to anyone’s face.
Step-by-Step
Materials
- White polymer clay or air-dry clay (approx. 500g)
- Acrylic paints (White, Royal Blue, Maroon, Bright Pink, Black)
- Clay sculpting tools (needle tool, ball tool)
- Aluminum foil (for armature)
- Small paintbrush (flat and detail)
- Toothbrush or stiff bristle brush (for texturing)
- Water cup (if using air-dry clay) or oven (if polymer)
Step 1: Forming the Base Structure
-
Create the core:
Start by crumpling aluminum foil into two distinct shapes: a larger oval for the body and a smaller, slightly rounded sphere for the head. This saves clay and keeps the sculpture lightweight. -
Cover the body:
Condition your white clay until it is soft and pliable. Roll out a sheet roughly 1/4 inch thick and wrap it fully around the larger foil oval, smoothing the seams together to form the dog’s torso. -
Shape the head:
Repeat the covering process for the head foil ball. Once covered, gently pinch the front to elongate it slightly, creating the beginning not of the snout, but the base where the snout will attach. -
Connect the parts:
Insert a piece of wire or a toothpick into the neck area of the body and press the head firmly onto it. Smooth the clay across the neck seam to join them permanently.
Keeping it Textured
Don’t over-smooth the paint. Use a fairly dry brush when applying the white base coat to let the toothbrush texture you created earlier remain visible.
Step 2: Sculpting Features
-
Add the snout:
Roll a separate ball of clay and flatten it slightly into a muzzle shape. Press this onto the front of the face, blending the edges at the top while leaving the bottom jaw area distinct. -
Open the mouth:
Use a modeling tool to carve a deep smile line into the muzzle. Use your thumb to press an indentation into the lower jaw area to create space for the tongue. -
Attach the legs:
For the front legs, roll two sturdy cylinders and blend them onto the chest. For the back legs, create two thick, rounded shapes like drumsticks and press them onto the hips, blending the upper seams while defining the bent knee. -
Add the paws:
Flatten the ends of the legs slightly to form feet. Use a knife tool to gently press three lines into each paw to create distinct toes. -
Make the ears:
Shape two teardrop pieces of clay. Flatten them out and attach the narrow points to the top sides of the head, letting the wider ends flop down naturally. -
Tail time:
Roll a tapered snake of clay for the tail. Attach it to the rear, curving it around the side of the haunch so it rests visibly against the back leg. -
Create texture:
To mimic the rough look in the photo, take a toothbrush or a stiff brush and gently tap it all over the white surfaces of the dog. I find this creates a lovely organic fur effect that isn’t too messy.
Step 3: Adding Details & Color
-
Form the nose:
Roll a small, triangular piece of clay and press it onto the tip of the muzzle. -
Sculpt the tongue:
Create a flat, tongue-shaped oval. Attach it inside the mouth indentation you made earlier, letting it hang out over the side of the lower jaw. -
The eyes:
Make two large, flat circles of white clay and press them onto the upper face. These should be quite prominent to capture that cartoonish look. -
Dry or Bake:
If using polymer clay, bake according to package instructions. If using air-dry clay, allow the piece to dry completely for 24-48 hours before painting. -
Base coat:
Paint the entire body a creamy off-white color. Even if your clay was white, this unifies the surface texture. -
Blue spots and ears:
Paint the ears a solid royal blue. Add large, round blue spots on the flank, the shoulder, and just above the paws. -
Face details:
Paint the nose maroon and the tongue a bright pink. Use black paint to fill in the pupils on the white eye discs and add raised eyebrows for expression. -
Finishing touches:
Use a fine liner brush to add three small freckles on the muzzle and outline the smile line for clarity.
Heavy Head?
If the head keeps drooping while you work, prop it up with a small sponge or ball of scrap foil until the clay firms up or dries enough to support itself.
Now you have a charming, spotted companion ready to brighten up your shelf

TRACK YOUR CERAMIC JOURNEY
Capture glaze tests, firing details, and creative progress—all in one simple printable. Make your projects easier to repeat and improve.
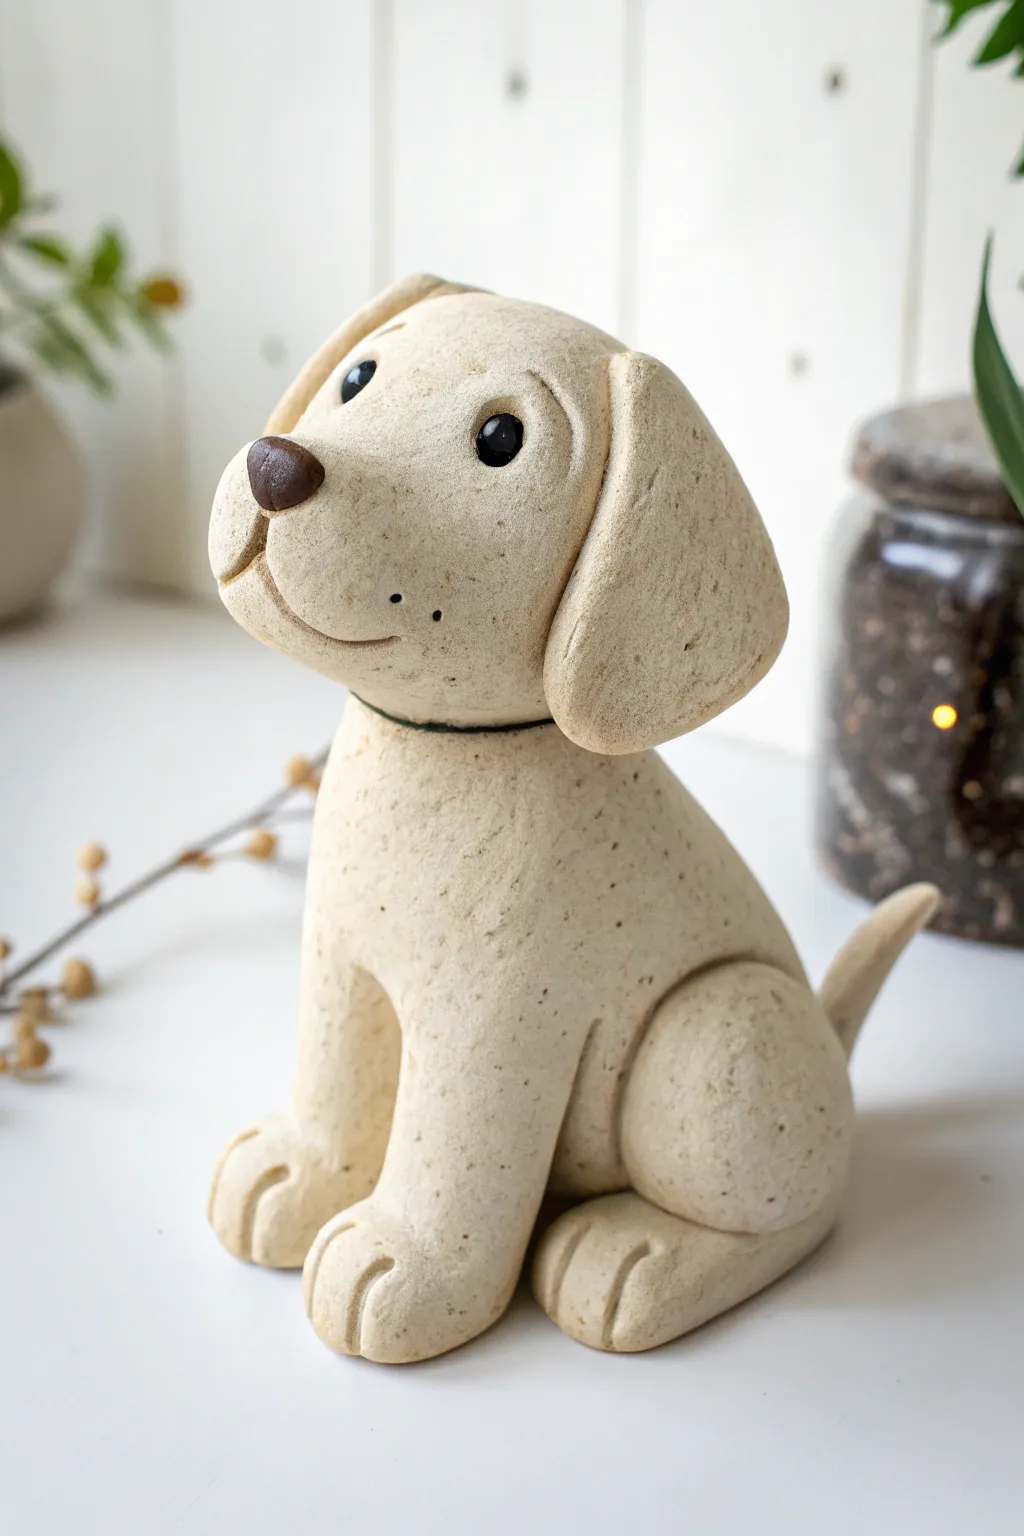
Standing Dog With Perky Ears
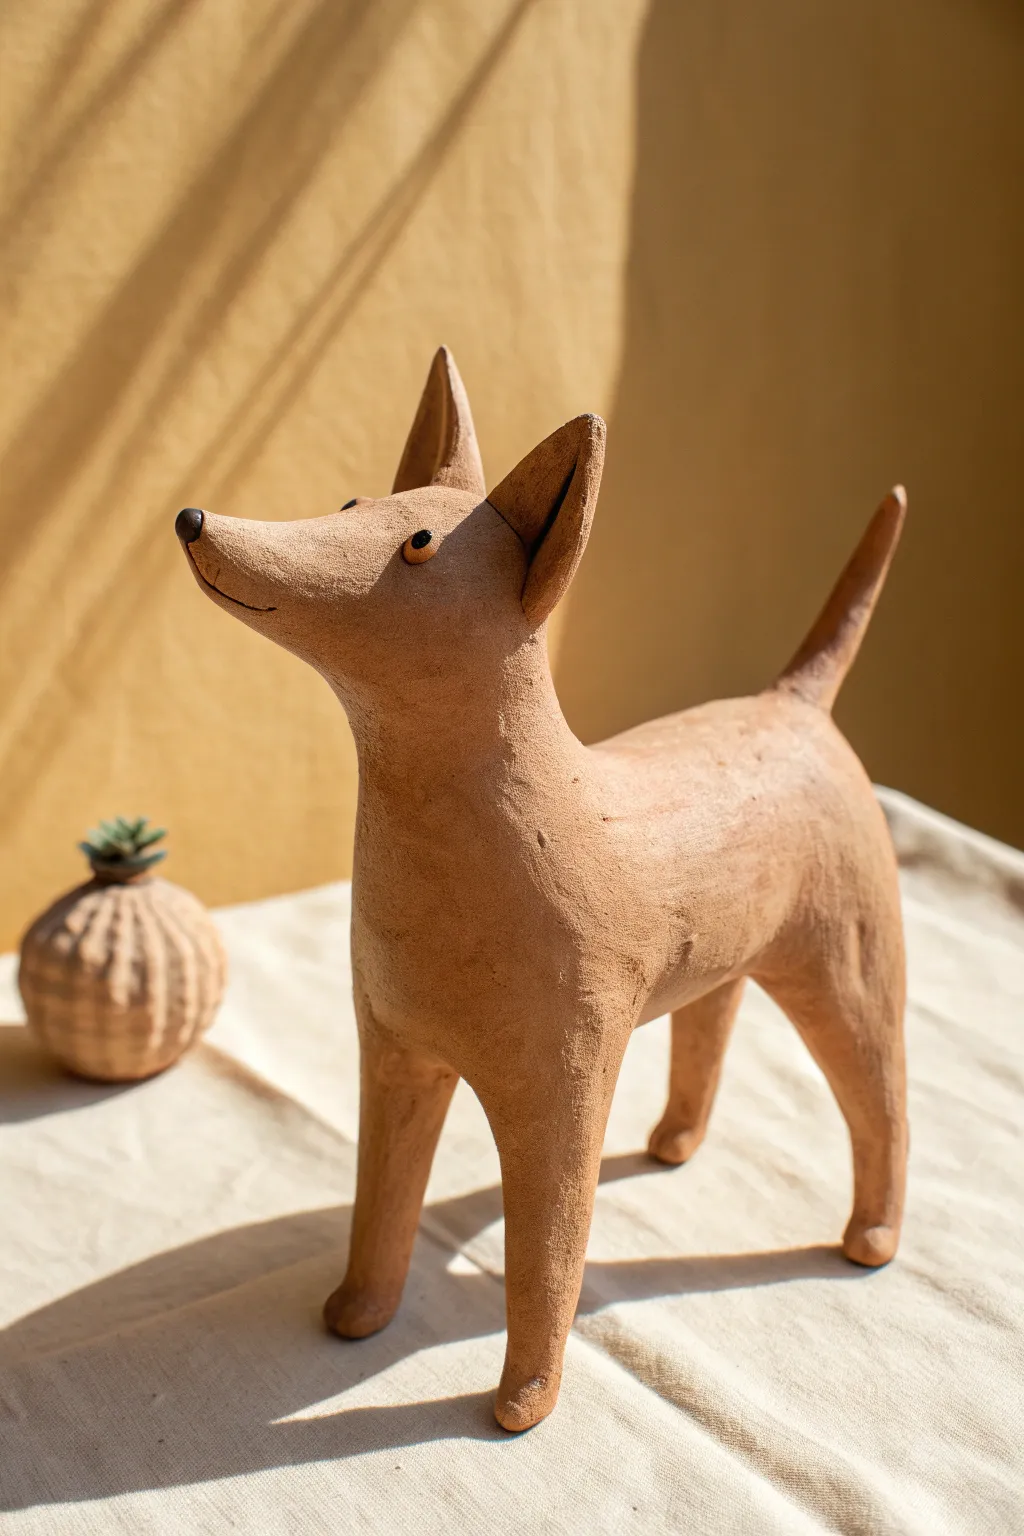
Capture the spirit of a curious companion with this minimalist terracotta dog sculpture. With its alert posture and charmingly simple features, this piece brings a warm, earthy character to any shelf or windowsill.
How-To Guide
Materials
- Terracotta air-dry clay or polymer clay
- Aluminum foil (for armature)
- Masking tape
- Clay sculpting tools (needle tool, smoother)
- Small bowl of water (for smoothing)
- Black acrylic paint or tiny black beads (for eyes)
- Black clay slip or paint (for nose)
- Fine-grit sandpaper
Step 1: Building the Core
-
Crumple the armature:
Start by scrunching aluminum foil into two main shapes: a slightly elongated oval for the body and a smaller, tapered cone shape for the head and snout. -
Connect the parts:
Join the head and body pieces together using masking tape, ensuring the head is angled slightly upward to mimic that alert, listening pose. -
Add limb supports:
Twist four smaller pieces of foil into cylinders for the legs—make the front ones slightly straighter and the back ones angled backward at the hock. -
Attach the tail:
Create a thin, tapered wire or tightly twisted foil piece for the tail and tape it to the rear of the body so it points cheerfully upward.
Keep it upright
If the legs start to sag under the weight of the body while shaping, prop the belly up on a small block or sponge until the clay begins to firm up.
Step 2: Adding the Clay
-
Sheet the clay:
Roll out your terracotta clay into a uniform sheet about a quarter-inch thick. -
Cover the form:
Wrap the clay sheet over your foil armature, pressing firmly to eliminate air pockets between the foil and the clay. -
Merge the seams:
Where the clay pieces meet, use your thumb or a smoothing tool to drag clay across the seam until it disappears entirely. -
Refine the legs:
Add extra clay to the upper thighs of the back legs to build muscle definition, blending it smoothly into the main body. -
Smooth the surface:
Dip your finger in a little water and run it over the entire sculpture to create that lovely, matte skin texture seen in the photo.
Step 3: Sculpting the Personality
-
Shape the snout:
Gently pull and taper the clay at the front of the head to create a long, pointed fox-like snout. -
Attach the ears:
Form two triangles of clay, slightly thick at the base. Score the bottom of the triangles and the top of the head, wipe with water, and press them firmly into place. -
Define the ear shape:
Using a modeling tool, make a shallow indentation inside each ear to give them depth, ensuring the tips remain sharp and perky. -
Create the smile:
Use a needle tool or the edge of a spatula to slice a gentle, curving line upward from the bottom of the snout to create a subtle smile. -
Add the nose:
Roll a tiny ball of black clay (or terracotta you will paint later) and attach it to the very tip of the snout. -
Place the eyes:
Press two small indentations on either side of the head, then insert tiny black clay balls or beads into the sockets.
Add a speckled coat
Mix dried coffee grounds or sand into your clay before sculpting. This creates a speckled, stone-like texture that adds instant visual interest.
Step 4: Finishing Touches
-
Check the balance:
Stand the dog up on a flat surface and gently adjust the legs if it wobbles; I usually tap the feet gently on the table to flatten the bottoms. -
Final smooth:
Do one last pass with a slightly damp sponge to remove any fingerprints, giving the surface a unified, rustic look. -
Dry partially:
Let the sculpture sit until it’s leather-hard—firm but still cold to the touch. -
Refine texture:
Once dry, lightly sand any rough spots, but try to keep some of the handmade texture visible.
Place your finished pup in a sunny spot where the shadows can play across its smiling face
Dog With Tiny Bone Accessory
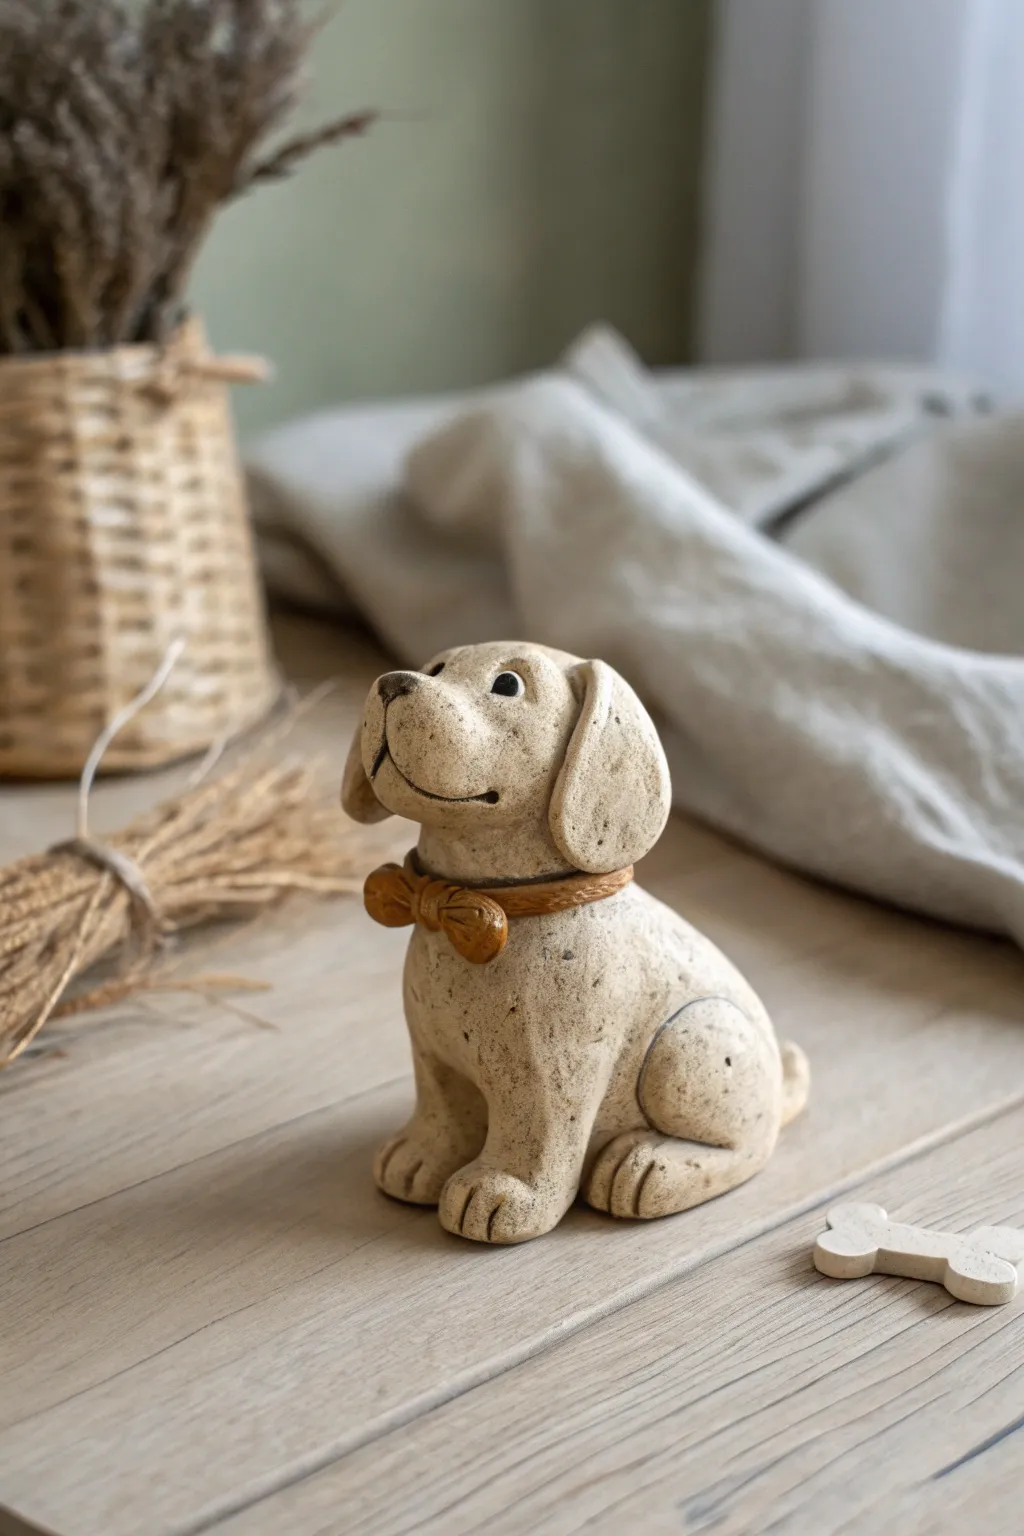
This adorable speckled dog sculpture captures the gentle innocence of man’s best friend, complete with a fetching bow tie and a tiny bone on the side. The textured, earthy finish gives it a timeless, handmade charm that looks wonderful on any shelf.
Step-by-Step Guide
Materials
- Speckled stoneware clay or polymer clay (color: granite/sand)
- Small amount of reddish-brown clay (for the bow tie)
- Black clay or acrylic paint (for eyes/nose)
- Clay sculpting tools (needle tool, blending tool)
- Water or slip (for joining)
- Rolling pin
- Small paintbrush
- Matte varnish (optional)
Step 1: Shaping the Body
-
Form the base:
Begin with a fist-sized ball of your main speckled clay. Roll it into a smooth pear shape, flattening the wider bottom slightly so it sits vividly on your work surface. This will serve as the dog’s seated body. -
Create the chest:
Gently press your thumb into the narrower top part of the pear shape to define the chest area, ensuring the transition from chest to belly is smooth and rounded. -
Make the legs:
Roll two thick, short logs for the front legs. Attach them vertically to the front of the body, blending the clay at the shoulders so they look integrated rather than just stuck on. -
Add back haunches:
Form two flattened tear-drop shapes for the rear legs. Press these onto the sides of the body near the base, curving them forward to mimic a seated posture. -
Detail the paws:
Use a needle tool or a dull knife to press three vertical indents into the bottom of each leg to distinguish the toes. I find slightly curving these lines adds a lot of character. -
Add a tail:
Roll a small, tapered cone and attach it to the lower back, curling it slightly around one side of the haunch.
Step 2: Sculpting the Head
-
Shape the head:
Roll a sphere slightly smaller than the body. Pinch the front gently to pull out a muzzle, keeping the overall shape rounded and soft like a puppy. -
Attach the head:
Score and slip (or use liquid clay/armature wire if needed depending on your medium) the neck area and press the head firmly onto the body. Tilt it upward slightly for that eager, looking-up expression. -
Create the ears:
Flatten two tear-drop pieces of clay. Attach them to the sides of the head, high up, and let them flop down naturally. Blend the connection point at the top of the head seamlessly. -
Refine the face:
Use a small ball tool to press indentations for the eye sockets. Use your needle tool to carve a gentle curve for the smiling mouth, adding small vertical ticks at the corners. -
The nose:
Press a small triangle of clay onto the tip of the muzzle. Smooth the edges so it sits naturally on the snout.
Keeping the Roundness
When handling the soft clay, cradle the form in a soft foam pad or a bunched-up cloth. This prevents you from accidentally flattening the bottom or back while working on the face details.
Step 3: Accessories and Finish
-
Make the collar:
Roll a very thin snake of the reddish-brown clay. Wrap it around the neck where the head joins the body to hide the seam and act as the collar. -
Sculpt the bow tie:
Create two small flattened triangles and join them at their points. Wrap a tiny band of clay around the center to complete the bow, then press this onto the front of the collar. -
Form the bone:
With leftover main clay, roll a small log. Split the ends with a tool and round them off to create the classic cartoon bone shape to sit beside your pup. -
Add eyes and nose color:
If using polymer clay, insert small black beads or clay balls for eyes. If using ceramic clay, paint the eyes and nose with underglaze or slip now, or use acrylics after firing. -
Texture and smooth:
Giving the piece a once-over with a slightly damp sponge or brush softens any harsh tool marks, enhancing the stone-like texture. -
Cure or fire:
Bake your polymer clay or fire your ceramic piece according to the manufacturer’s specific instructions for the clay body you chose.
Personalize the Collar
Before baking, use a needle tool to scratch a tiny texture or pattern into the bow tie, or use a customized clay stamp initials into the bone accessory.
Place your finished pup and his bone on a shelf where his cheerful upward gaze can greet you every day
Mini Dog Head Charms
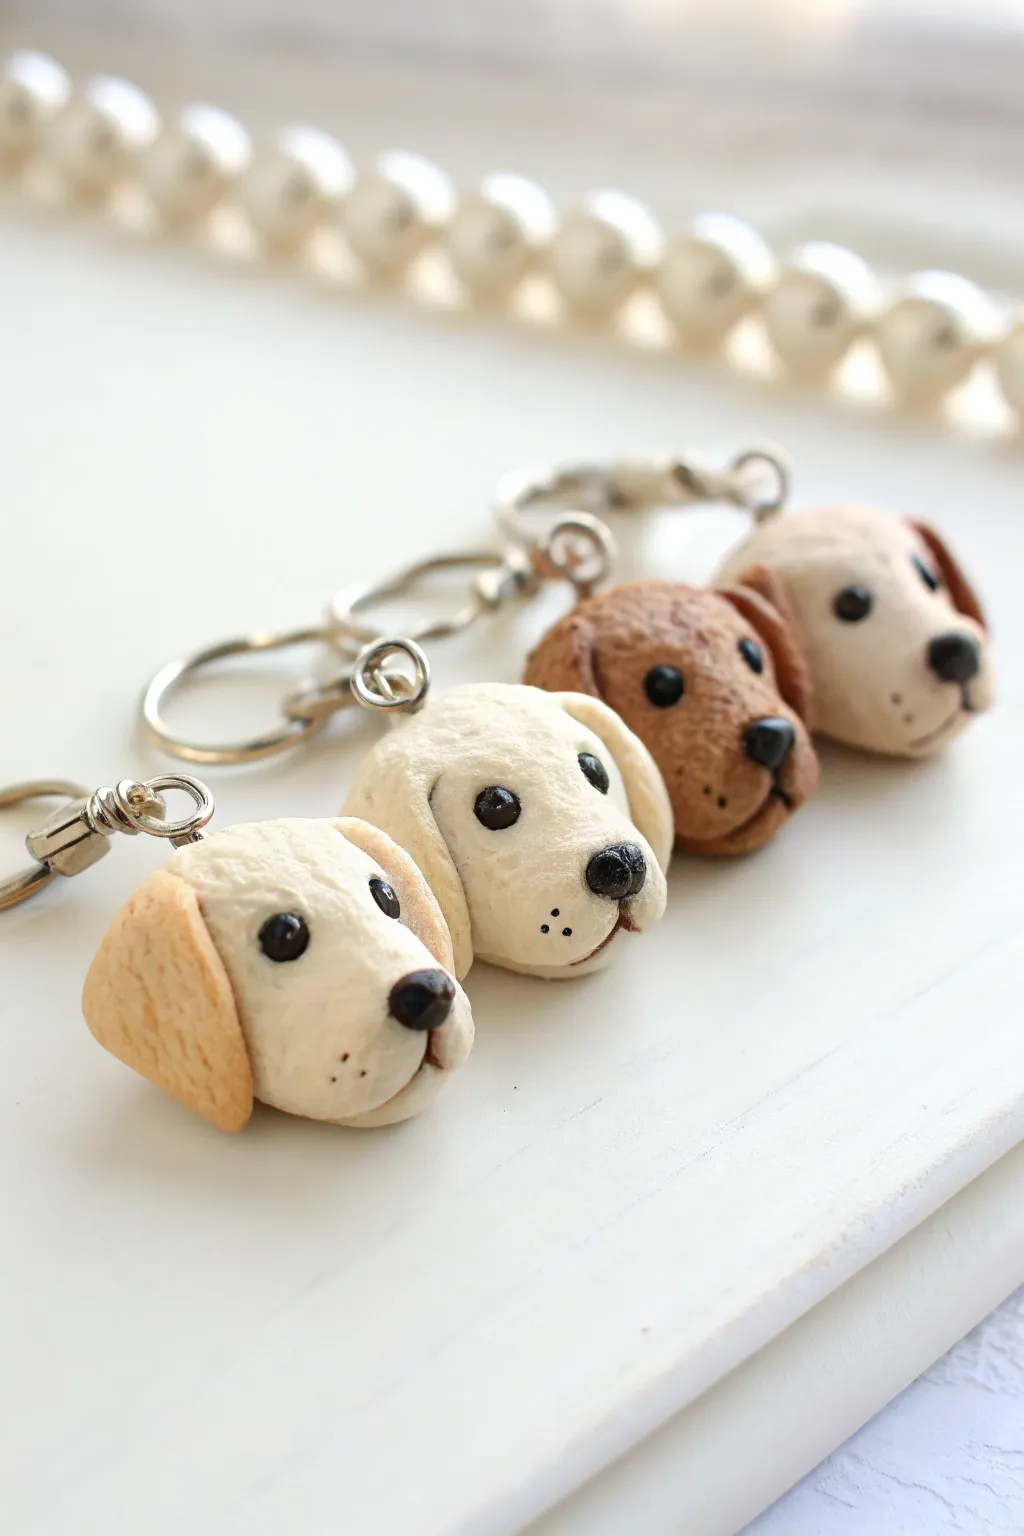
Capture the sweetness of a beloved pup with these adorable polymer clay head charms featuring floppy ears and tiny, soulful eyes. Their textured, biscuit-like finish gives them a handmade warmth perfect for keychains or zipper pulls.
How-To Guide
Materials
- Polymer clay (cream, light brown, chocolate brown, black)
- Small metal screw eye pins (one per charm)
- Keychain rings with jump rings
- Sculpting tools (needle tool, ball tool)
- Clean toothbrush or stiff brush (for texturing)
- Gloss glaze or polyurethane varnish (for eyes and nose)
- Small paintbrush
- Oven (for baking polymer clay)
Step 1: Shaping the Head Base
-
Form the main sphere:
Start by conditioning a small ball of cream or light brown clay, about the size of a large marble (approximately 2cm diameter). Roll it until it is perfectly smooth and free of cracks. -
Create the muzzle:
Gently pinch and pull one side of the sphere to create a slightly protruding, rounded muzzle shape. You want a soft, pear-like profile rather than a sharp snout. -
Refine the shape:
Using your fingers, smooth the transition between the forehead and the muzzle so it has a gentle slope typical of retrievers. -
Initial texturing:
Before adding features, take a clean toothbrush or a stiff-bristled brush and gently tap it all over the surface of the clay. This creates a realistic fur-like texture instead of a smooth, plastic look.
Secure That Pin
For extra durability, remove the screw eye after baking, add a drop of super glue to the hole, and screw it back in immediately.
Step 2: Adding Facial Features
-
Indent eye sockets:
Use a small ball tool to press two small indentations into the face where the eyes will go. Place them evenly on either side, just above the muzzle line. -
Place the eyes:
Roll two tiny, equal-sized balls of black clay. Place them into the sockets you created and press gently to secure them. They should bulge slightly but look embedded. -
Form the nose:
Shape a small triangle of black clay with rounded corners. Press this firmly onto the tip of the muzzle. -
Detail the mouth:
Use a needle tool or a thin blade to carefully impress a vertical line starting from the bottom center of the nose, curving out to the left and right to form the mouth clefts. -
Add whisker dots:
With the very tip of your needle tool, poke three small dots on each side of the muzzle to simulate whisker spots.
Breed Variations
Change the ear shape to triangles for a terrier, or mix clay colors to create patches and spots for a beagle or spaniel look.
Step 3: Ears and Assembly
-
Shape the ears:
Create two flattened teardrop shapes from clay that matches the head (or a slightly darker shade for contrast). These should be proportional to the head, roughly the length of the face. -
Texture the ears:
Just like the head, tap your texturing brush over the outer surface of these ear pieces. -
Attach the ears:
Press the wider, rounded top of each ear onto the sides of the head, blending the clay slightly at the connection point so they don’t fall off. Let them hang down naturally. -
Insert hardware:
Insert a metal screw eye pin into the top center of the head. I find twisting it in gently helps it grip better than just pushing it. -
Bake the charms:
Bake the pieces in your oven according to your specific clay manufacturer’s instructions (usually around 275°F/130°C for 15-30 minutes). Let them cool completely.
Step 4: Finishing Touches
-
Glaze the eyes and nose:
Using a very fine brush, apply a small dab of gloss glaze or varnish only to the black eyes and nose. This makes them look wet and alive against the matte fur. -
Attach keychain:
Once dry, use pliers to open the jump ring on your keychain hardware and loop it through the screw eye on the dog’s head. Close the ring securely.
Now you have a loyal little companion to keep your keys safe
Dog Paw Print Ornament
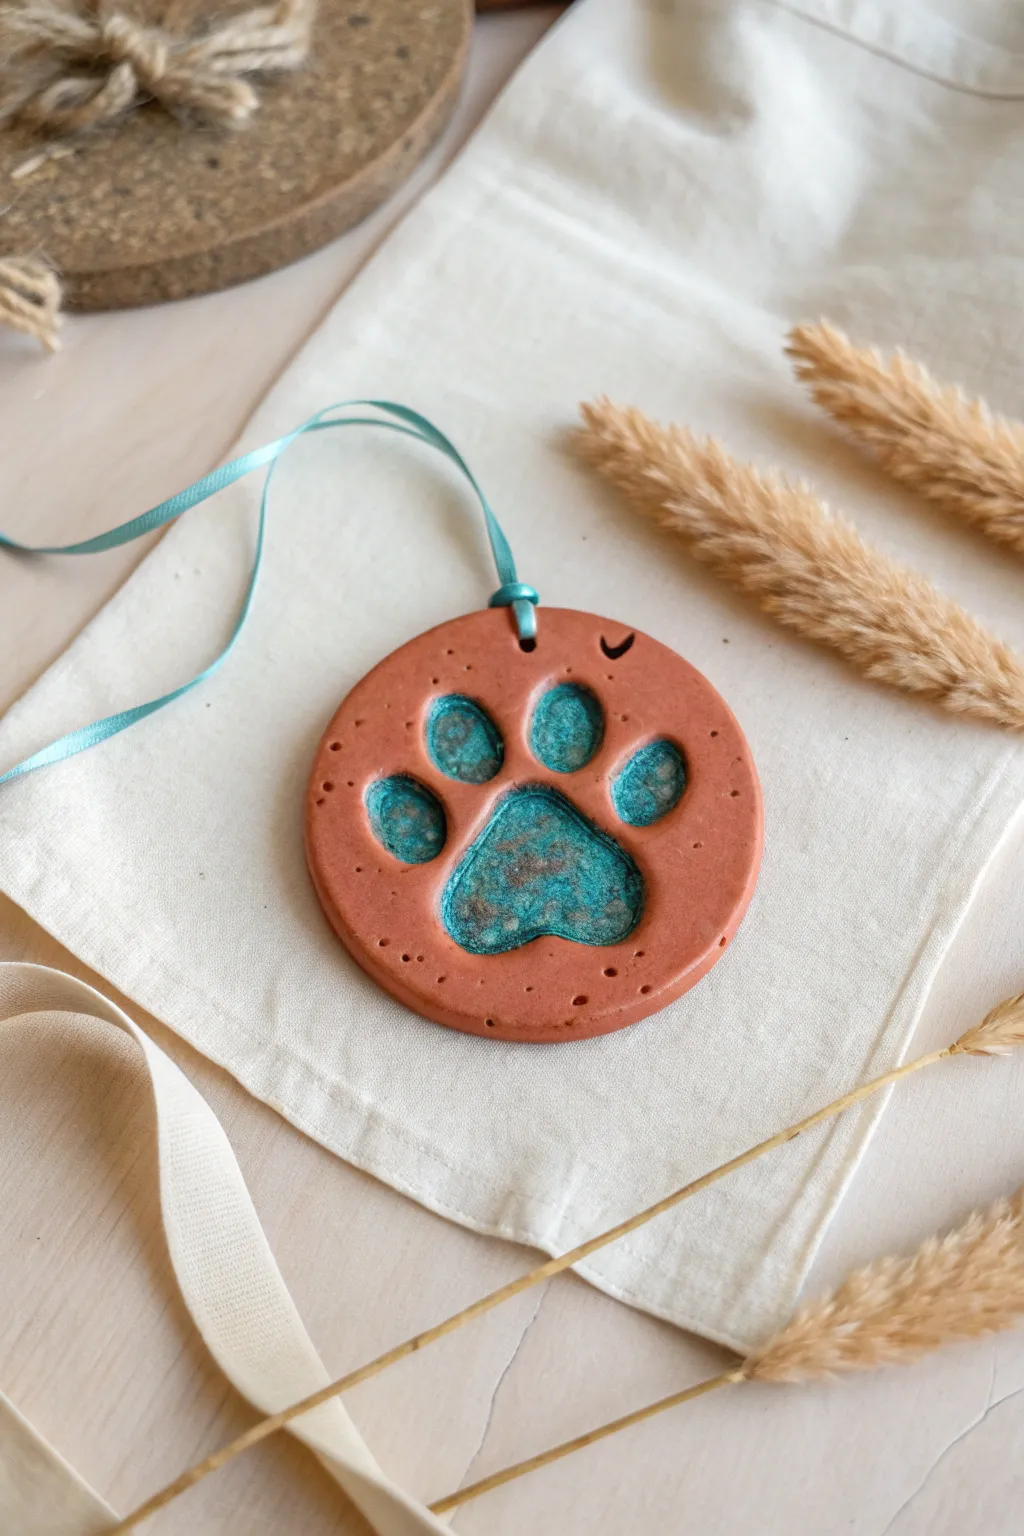
Immortalize your furry friend’s presence with this striking ornament that combines warm terracotta tones with a splash of oxidized copper magic. The satisfying contrast between the reddish-brown clay and the sparkling turquoise inlay makes this a standout piece for any dog lover’s home.
Step-by-Step Guide
Materials
- Red-brown polymer clay or air-dry terracotta clay
- Rolling pin
- Round cookie cutter (approx. 3-4 inches)
- Clean straw or small circular punching tool
- Turquoise glass frit, crushed turquoise stone, or turquoise resin pigment
- Clear UV resin or epoxy resin (if using frit/stone)
- UV light (if using UV resin)
- Small carving tool or toothpick
- Satin ribbon (teal or light blue)
- Sandpaper (fine grit)
- Gloss varnish or sealant (optional)
Step 1: Shaping the Base
-
Condition the clay:
Start by taking a generous ball of your terracotta-colored clay. Knead it in your hands until it is pliable and warm, which helps prevent cracking later on. -
Roll the slab:
Place the clay on a flat, clean surface. Using a rolling pin, roll it out evenly until it is about 1/4 inch thick. You want it substantial enough to take a deep impression without breaking. -
Cut the circle:
Press your round cookie cutter firmly into the clay to create a perfect circle. Remove the excess clay from around the edges before lifting the cutter. -
Create the hanging loop:
Near the top edge of the circle, use a straw or a small circular tool to punch a clean hole. This is where your ribbon will eventually go. -
Smooth the edges:
Dip your finger in a little bit of water (if using air-dry clay) or baby oil (if using polymer) and gently run it around the cut edge of the circle to soften any sharp ridges.
Cracked Clay?
If using air-dry clay and you see cracks forming as it dries, smooth a slurry of clay and water into the cracks immediately to patch them up before painting.
Step 2: Making the Impression
-
Press the paw:
This is the crucial moment. If your dog is cooperative, gently press their clean paw into the center of the clay disc. If you are working from a mold or tool, press the paw shape deeply into the center. You want defined wells for the filling. -
Add texture details:
Using a needle tool or toothpick, gently press tiny dots around the outer rim of the circle to create a decorative, rustic border. I like to vary the spacing slightly for a handmade look. -
Clean up the impression:
Sometimes the pressing action pushes clay up around the edges of the print. Use your small carving tool to smooth down any raised ridges so the surface remains relatively flat. -
Initial curing:
Bake the clay according to the package instructions (for polymer) or let it dry completely for 24-48 hours (for air-dry types). The clay must be hard before adding the inlay.
Step 3: Adding the Turquoise Inlay
-
Prepare the filling:
If using crushed stone or glass frit, carefully fill the recessed paw print areas with the granules. Fill them just nearly to the top, but not overflowing. -
Seal with resin:
Carefully drip your clear resin over the granules until they are fully saturated and have a smooth, glassy dome effect. Alternatively, mix turquoise pigment into resin and pour it directly into the wells. -
Cure the resin:
If using UV resin, place the ornament under a UV lamp for 2-4 minutes until hard and tack-free. For epoxy, leave it on a level surface overnight to cure. -
Check for bubbles:
Before the resin fully sets, look closely for air bubbles. Use a lighter quickly passed over the surface or a pin to pop them for a crystal-clear finish.
Glow Up
Mix a tiny amount of glow-in-the-dark powder into your resin or underneath the glass frit to make the paw print illuminate softly at night.
Step 4: Finishing Touches
-
Sand imperfections:
Once everything is fully cured, check the back and edges. If there are any rough spots, lightly sand them with fine-grit sandpaper. -
Seal the clay:
To protect the terracotta finish, you can apply a matte sealer over the clay parts, being careful to avoid the glossy resin paw pads. -
Thread the ribbon:
Cut a length of teal satin ribbon. Fold it in half, push the loop through the hole, and thread the loose ends through the loop to create a lark’s head knot.
Hang this beautiful commemorative piece in a sunny spot to watch the light catch that stunning turquoise inlay
Dog Face Fridge Magnet
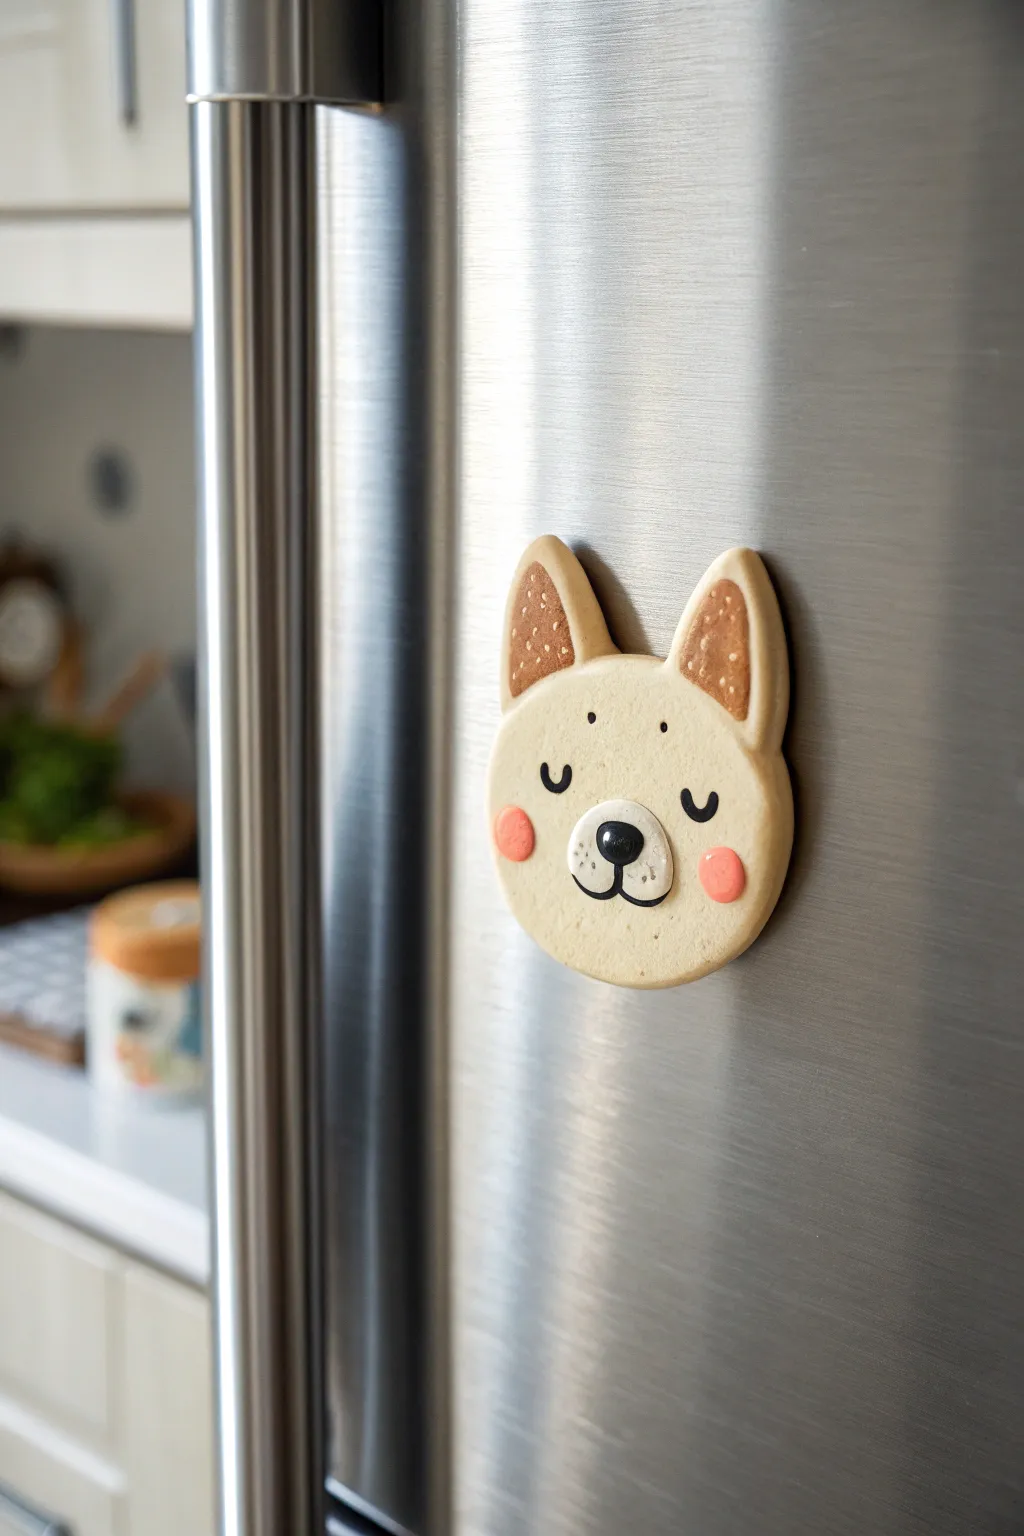
Brighten up your appliance with this serene, sleeping dog face magnet that captures pure canine contentment. Created with smooth polymer clay and simple shapes, this project features charming textural details and a sweet, minimalist expression.
Detailed Instructions
Materials
- Light beige polymer clay (base color)
- Tan or light brown polymer clay (ear detail)
- White polymer clay (muzzle)
- Black polymer clay (nose)
- Pastel pink polymer clay (cheeks)
- Needle tool or toothpick
- Small dotting tool or ball stylus
- Rolling pin
- Circle cutter (approx. 2-3 inches)
- Shape cutters or craft knife
- Black acrylic paint
- Fine detail paintbrush
- Strong round magnet
- Super glue or E6000
- Baking sheet and parchment paper
Step 1: Basic Shape Foundation
-
Condition the main clay:
Start by thoroughly conditioning your light beige polymer clay. Knead it in your hands until it is warm, pliable, and free of any cracks. -
Roll the slab:
Using your rolling pin, roll the beige clay out on a clean surface until it is approximately 1/4 inch thick. You want it substantial enough to hold the magnet but not too heavy. -
Cut the base circle:
Use your circle cutter to punch out a perfect round shape. If you don’t have a cutter, trace a glass rim and carefully cut around it with a craft knife. -
Form the ear triangles:
Roll out a small amount of the same beige clay, slightly thicker than the base. Cut two distinct triangles with slightly rounded tips for the ears. -
Attach the ears:
Press the bottom edge of each ear firmly against the top curve of the head circle. Use your finger or a clay tool to blend the seam on the back side so they are securely attached.
Clean Lines Pro Tip
Keep baby wipes handy while working. Wipe your hands and tools before switching from the black clay nose to the white muzzle to prevent smudging dark clay onto the pristine white areas.
Step 2: Adding Colored Details
-
Create inner ear panels:
Roll out the tan or light brown clay very thinly. Cut two smaller triangles that fit inside the beige ear shapes, leaving a small border around the edges. -
Texture the inner ears:
Place the brown triangles onto the beige ears. Take your needle tool and gently stipple the brown clay, poking tiny dimples all over to create a fuzzy, fabric-like texture. -
Make the muzzle:
Condition a small ball of white clay and flatten it into a soft oval shape. Place this centered on the lower half of the face. -
Sculpt the nose:
Roll a tiny pea-sized ball of black clay. Position it near the top center of the white muzzle oval and press it down just enough so it sticks but retains a rounded, dimensional look. -
Add rosy cheeks:
Take two small bits of pink clay and roll them into balls. Flatten them slightly and press them onto the face on either side of the muzzle.
Step 3: Face & Finishing
-
Paint the closed eyes:
Before baking, you can indent the eyes, or wait until after baking to paint them. I prefer painting on baked clay for crisp lines. If waiting, proceed to baking now. -
Bake the piece:
Place your dog face on a parchment-lined baking sheet. Bake according to your clay manufacturer’s instructions (usually 275°F for 15-30 minutes depending on thickness). -
Cool down:
Let the piece cool completely on the baking sheet. Moving it while hot can cause the clay to warp or crack. -
Paint facial features:
Using a fine detail brush and black acrylic paint, carefully paint two small ‘U’ shapes for the sleeping eyes. Paint a small vertical line connecting the nose to a ‘w’ shape for the mouth. -
Add muzzle details:
Dip your needle tool or a very fine dotting tool into black paint and add three tiny freckles on each side of the white muzzle. -
Seal the paint:
Once the paint is completely dry, apply a thin layer of matte varnish over just the painted areas or the whole face to protect it from kitchen grease and wear. -
Attach the magnet:
Flip the dog head over. Apply a strong dab of super glue or E6000 directly to the center of the back and press your round magnet firmly into the glue. -
Final cure:
Allow the glue to cure fully (follow package directions, usually 24 hours for max strength) before placing it on your fridge.
Uneven Surface?
If fingerprints are visible on the beige face before baking, lightly brush the raw clay with a little baby oil or cornstarch. Rub gently in a circular motion to smooth imperfections.
Now you have an adorable, customized companion to greet you every time you reach for a snack
Dog Planter Hugger Figure
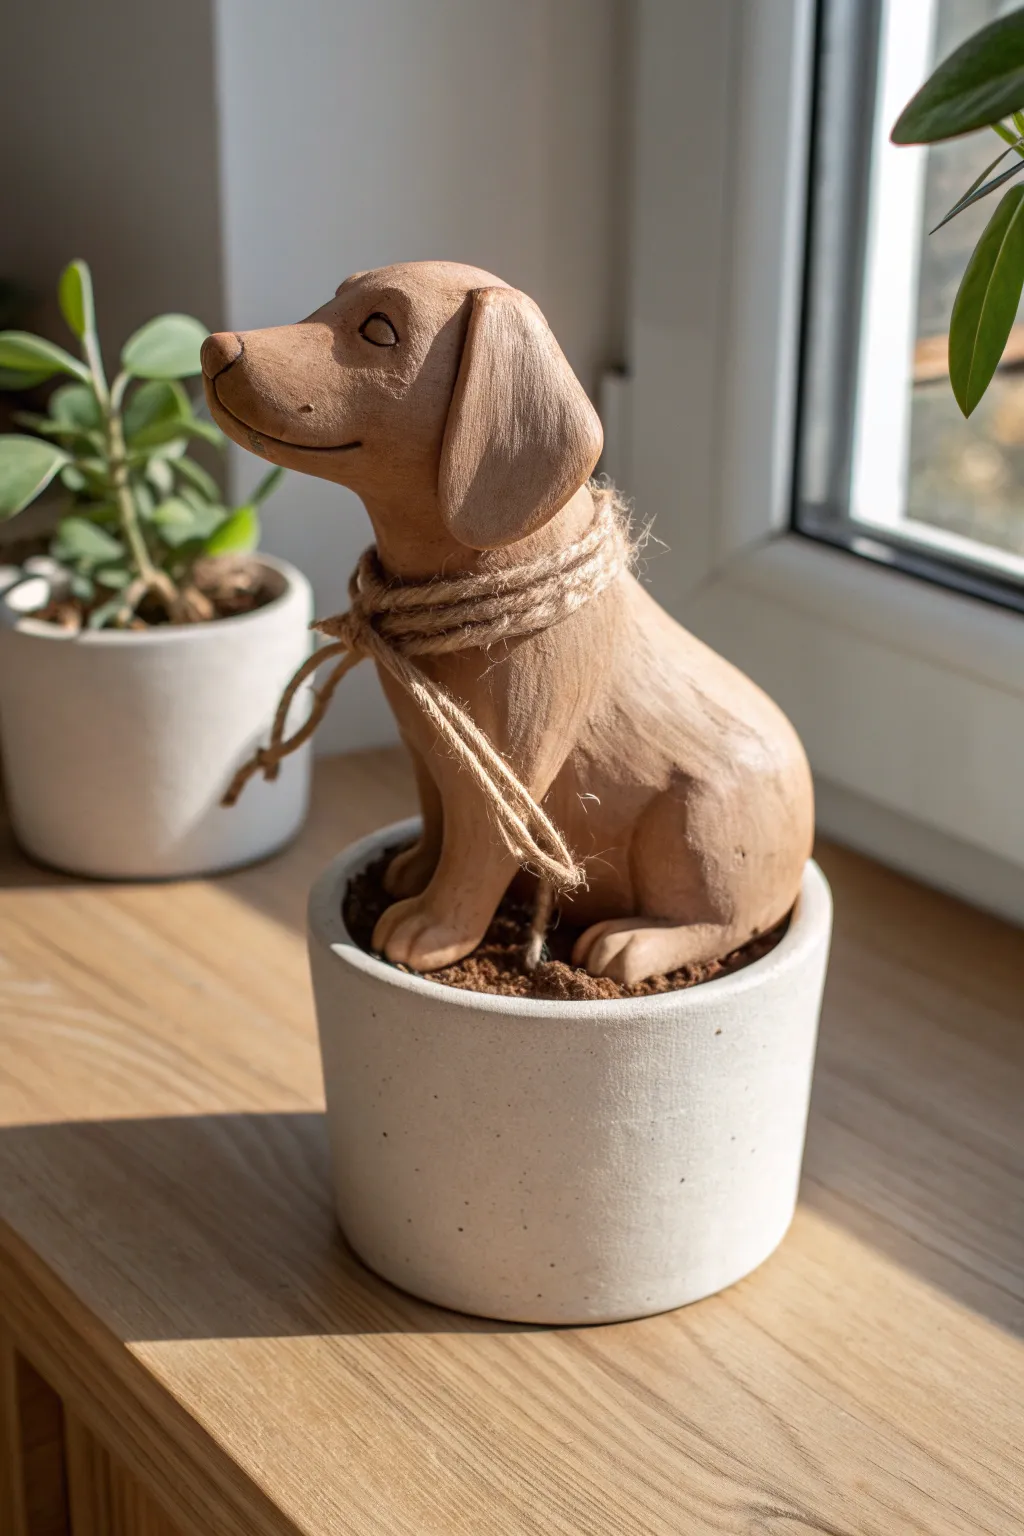
Add a touch of warmth to your indoor garden with this charming, unglazed clay dog figure that sits snugly inside a small planter. Its natural terracotta tone and simple twine collar give it a rustic, handcrafted feel that perfectly complements succulents or trailing vines.
Step-by-Step Guide
Materials
- Terracotta-colored air-dry clay or polymer clay
- Small white ceramic planter (for sizing)
- Aluminum foil
- Sculpting tools (needle tool, blending tool)
- Water (if using air-dry clay) or clay softener
- Jute twine
- Sponge or textured cloth
- Acrylic matte varnish (optional)
Step 1: Shaping the Base Form
-
Create the core:
Ball up a piece of aluminum foil into an elongated egg shape to serve as the armature for the dog’s body. This saves clay and reduces weight. -
Rough out the body:
Roll out a slab of your terracotta clay and wrap it completely around the foil egg. Smooth out the seams until you have a solid, egg-like clay shape. -
Check the fit:
Place this body shape into your specific planter pot to ensure it sits comfortably. The bottom should be slightly flattened so the dog sits stable without wobbling. -
Form the head:
roll a smaller ball of clay for the head. Shape one side into a protruding snout.
Cracks Appearing?
If you see hairline cracks while air-dry clay cures, mix a tiny bit of fresh clay with water to make a paste and fill them in immediately.
Step 2: Sculpting the Features
-
Attach the head:
Score and slip (scratch the surfaces and add a drop of water) the neck area, then firmly press the head onto the body. I like to blend the clay downwards with a tool to make the neck seamless. -
Add the front legs:
Roll two thick coils of clay. Attach them to the front of the body, blending the upper portion into the chest while leaving the bottom paws definition. -
Sculpt the rear legs:
Create two rounded shapes for the haunches and attach them to the sides of the lower body. Smooth them so they look like the dog is in a sitting position. -
Carve the paws:
Use a needle tool or knife to gently press indentation lines into the bottom of the front legs and rear feet to denote toes. -
Make the ears:
Flatten two teardrop shapes of clay. Attach them to the sides of the head, letting them flop down naturally. Blend the connection point at the top of the skull.
Smoother Blending
Dip your finger or tool in a tiny bit of water (or baby oil for polymer clay) to seamlessly blend joints without drag marks.
Step 3: Refining and Finishing
-
Detail the face:
Use a small loop tool or your thumb to press subtle indentations for the eye sockets. Add a small triangular piece for the nose tip. -
Create the eyes:
Carve almond-shaped outlines for the eyes. Use a needle tool to create the closed eyelid look shown in the image, giving the pup a peaceful expression. -
Add a smile:
Carve a long, gentle curve starting under the snout and moving up the cheek to create a subtle smile line. -
Texture the surface:
Before the clay dries, gently dab the entire surface with a damp sponge or textured cloth. This removes fingerprints and mimics a stone or rough ceramic texture. -
Dry the sculpture:
Allow the figure to dry completely. For air-dry clay, this may take 24-48 hours. If using polymer clay, bake according to the package instructions. -
Add the twine:
Cut a length of jute twine. Wrap it around the dog’s neck three or four times to create a decorative collar. -
Tie the knot:
Tie a loose knot in the front, letting the ends fray slightly for a rustic look. -
Final placement:
Place your finished dog into the pot. You can fill the surrounding space with decorative moss or brown shredded paper to simulate soil.
Now you have a loyal little companion to guard your windowsill plants all year round
Dog Bowl Pinch Pot With Paw Motif
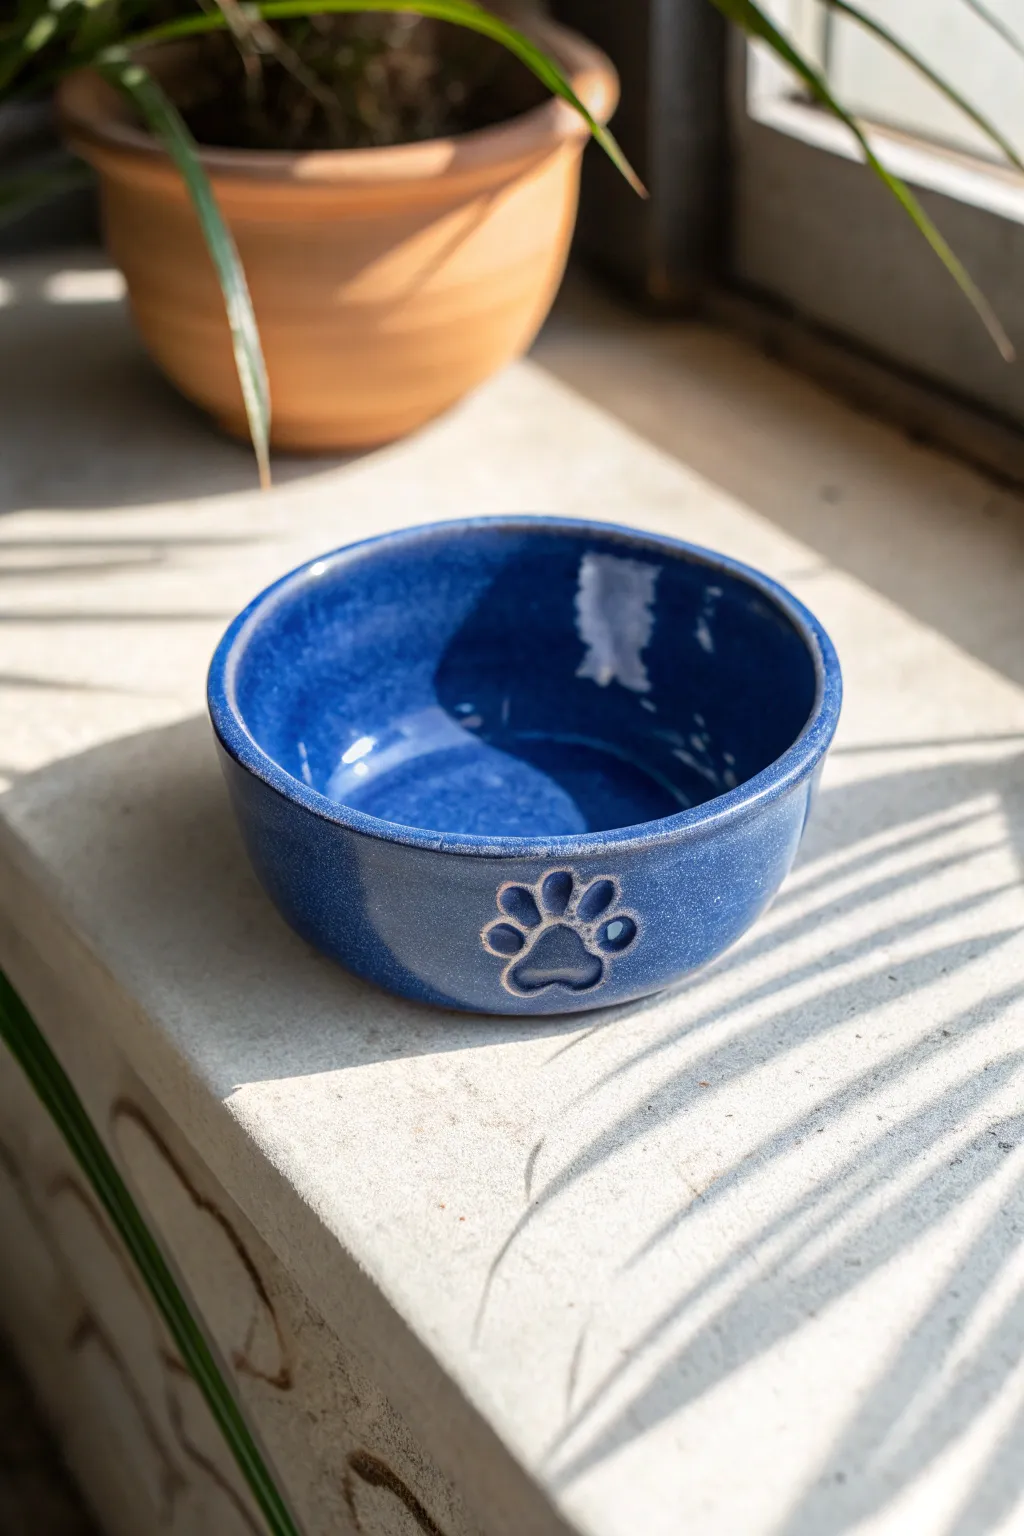
Treat your furry friend to a custom-made feeding station with this charming, deep blue ceramic bowl. Featuring a sweet paw print motif stamped right into the clay, this project transforms a simple pinch pot into a functional piece of art that catches the light beautifully on any windowsill.
How-To Guide
Materials
- Stoneware or earthenware clay (approx. 2 lbs)
- Potter’s needle tool
- Metal or rubber rib tool
- Sponge
- Paw print stamp (or small tools to carve)
- Deep sapphire blue glaze (food safe)
- Paintbrush (fan and detail brushes)
- Kiln access
Step 1: Forming the Base
-
Prepare the clay:
Start with a ball of clay roughly the size of a large grapefruit. Wedge it thoroughly to remove air bubbles, ensuring the consistency is uniform and pliable. -
Open the center:
Hold the clay ball in one hand and push your thumb firmly into the center, stopping about a half-inch from the bottom to leave enough thickness for the base. -
Pinch the walls:
Begin rotating the ball while rhythmically pinching the clay between your thumb and fingers. Work your way from the bottom up, aiming for an even wall thickness of about 1/4 inch. -
Expand the width:
As you pinch, gently pull the walls outward to create a wider, bowl-like shape rather than a tall cup. This stability is crucial so your pup doesn’t tip it over. -
Flatten the bottom:
Once the general shape is established, tap the bowl gently against your table surface to create a flat, stable bottom.
Step 2: Refining and Decorating
-
Smooth the interior:
Use a damp sponge or a rubber rib to smooth out finger marks on the inside. A smooth interior is essential for a food bowl to make cleaning easier later. -
Address the rim:
Gently compress the rim with your fingers or a piece of chamois leather. Level it out if it’s uneven, rounding the edges so they are soft against a dog’s tongue. -
Firm up slightly:
Let the bowl sit for about 30 minutes until it reaches a soft leather-hard stage. The clay needs to be firm enough to resist deforming when you press on it. -
Apply the motif:
Press a paw print stamp firmly into the exterior wall of the bowl. If you don’t have a stamp, I find using the rounded end of a paintbrush handle works perfectly to indent the pads manually. -
Clean up edges:
Use a detail tool to smooth any rough crumbs of clay that appeared around the edges of your paw print impression. -
Slow drying:
Cover the bowl loosely with plastic and let it dry slowly over several days to prevent warping before firing.
Stamp Clarity Tip
Dust your stamp lightly with cornstarch before pressing it into the clay. This acts as a release agent and prevents sticky clay from getting trapped in the detailed crevices.
Step 3: Glazing and Finishing
-
Bisque fire:
Fire the completely dry greenware in the kiln to bisque temperature (usually Cone 04 or 06, depending on your clay body). -
Wipe down:
Once cool, wipe the bisque piece with a damp sponge to remove any kiln dust that might resist the glaze. -
First coat application:
Using a soft fan brush, apply a generous coat of deep sapphire blue glaze to the entire bowl. Ensure the glaze flows into the deep recesses of the paw print. -
Layering for depth:
Apply two additional coats, letting each dry briefly in between. This builds the rich, opaque color seen in the photo. -
Detail check:
Check the paw print indentation. You want glaze in there, but not so thick that it fills the texture completely and obscures the design. -
Clean the distinct foot:
Wipe the bottom of the bowl completely clean of glaze with a sponge to prevent it sticking to the kiln shelf. -
Glaze fire:
Fire the piece for the final time according to your glaze instructions (typically Cone 5 or 6 for durable stoneware).
Personalize It
Instead of a generic paw, ask your pup to step on a slab of clay to make a messy custom stamp, or carve their name alongside the print for a truly bespoke bowl.
Once cooled, fill with fresh water or treats and watch your pet enjoy their handsome new dining accessory
Textured Fur Dog Using Simple Lines
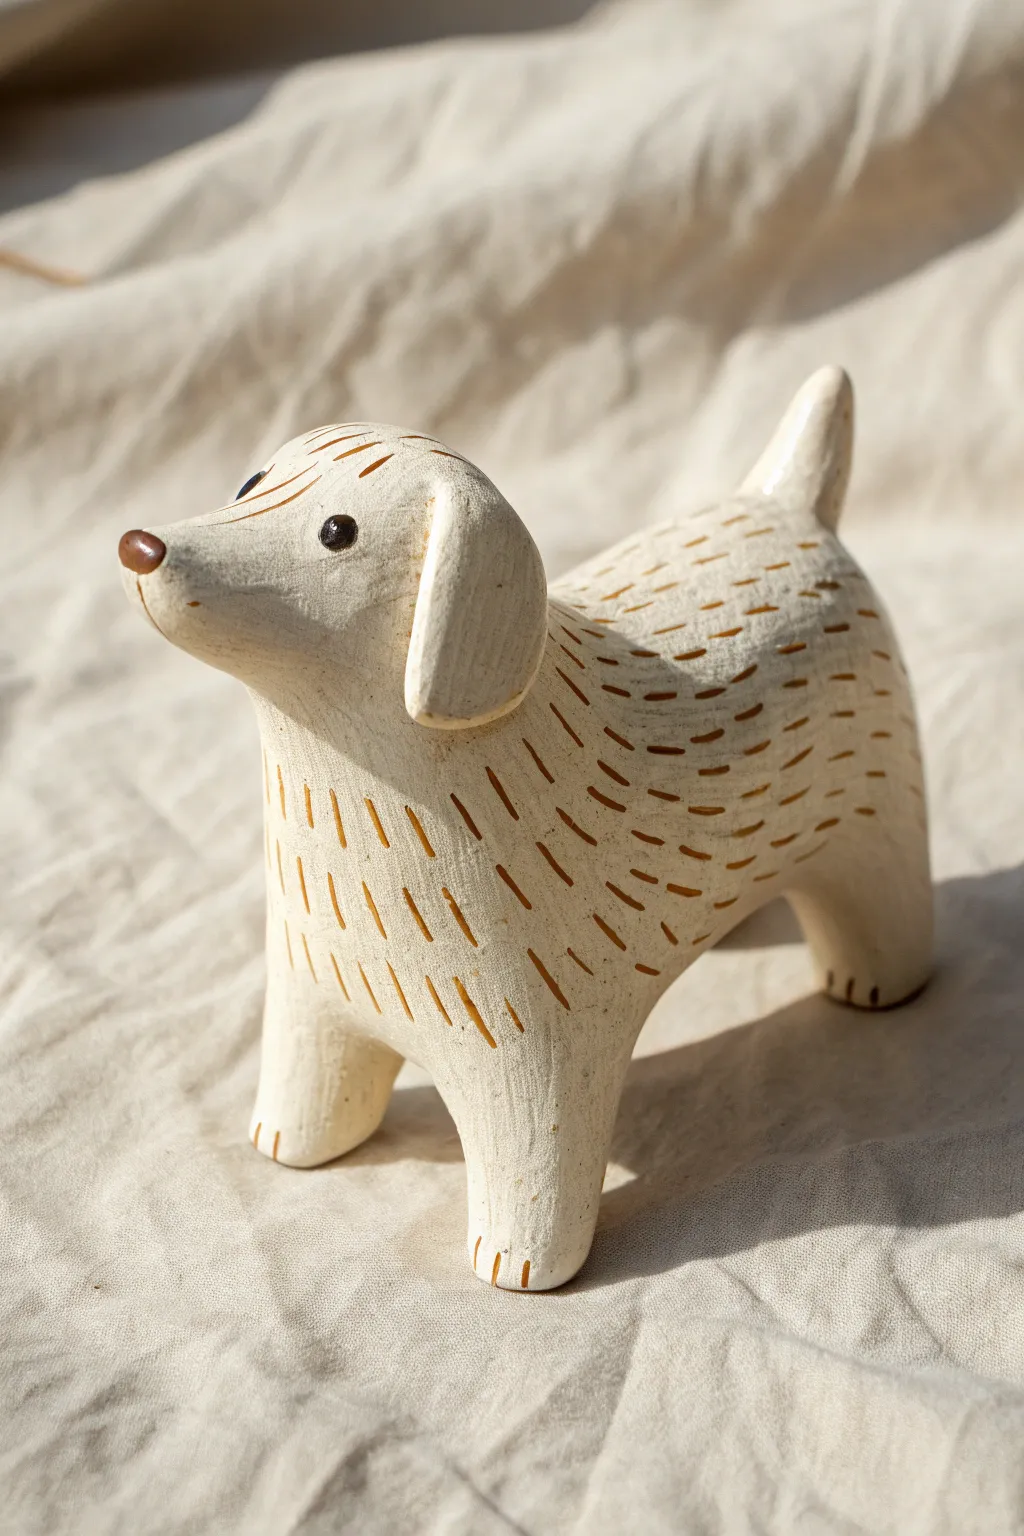
Create a charmingly simple dog sculpture that focuses on form and stylized texture rather than hyper-realism. This project uses basic clay shapes brought to life with carefully placed dashed lines to suggest a fluffy coat.
Step-by-Step Tutorial
Materials
- White stoneware or polymer clay (oven-bake)
- Modeling tools (or a butter knife)
- Needle tool or toothpick
- Slip (if using stoneware) or liquid clay (if polymer)
- Sponge and water
- Dark brown acrylic paint or underglaze
- Small round paintbrush
- Clear matte varnish (optional)
Step 1: Sculpting the Base Form
-
Form the body:
Start with a lump of clay about the size of a lemon. Roll it into a smooth, thick oblong shape, slightly thicker at the chest end. -
Pull the legs:
Instead of attaching separate legs, try gently pulling the four legs down from the main body mass. This creates sturdy, seamless limbs. Keep them short and stout for stability. -
Refine the stance:
Press the figurine onto your work surface to flatten the bottom of the paws. Ensure the body stands level and doesn’t tip over. -
Create the head:
Roll a smaller ball of clay for the head. Shape it into a teardrop to form a slight snout. The head should look rounded and friendly. -
Attach the head:
Score the neck area and the base of the head, adding slip or liquid clay. Press the head firmly onto the body, smoothing the seam until the neck transitions naturally into the shoulders. -
Shape the ears:
Flatten two small ovals of clay. Attach them to the sides of the head, blending the top edge so they hang down loosely like floppy spaniel ears. -
Add the tail:
Form a small, upward-pointing cone for the tail. Attach it to the rear, blending the bottom seam so it perks up happily.
Uneven Texture?
If your dashes look messy or retain ‘crumbs’ of clay, wait for the clay to firm up slightly (leather hard) before texturing. It cuts much cleaner than wet clay.
Step 2: Adding Texture and Details
-
Smooth the surface:
Before texturing, use a slightly damp sponge (or finger for polymer) to wipe away any fingerprints or lumps. The surface needs to be smooth for the texture to stand out. -
mark the fur pattern:
Using a needle tool or toothpick, press short, dashed lines into the clay. I find it works best to start at the neck and work backward toward the tail. -
Vary layer direction:
Ensure your dash marks follow the natural curve of a dog’s body—down the legs, around the ribs, and along the back. -
Detail the face:
Add a few lighter dashes on the forehead and ears, but leave the snout area mostly smooth to keep the face expressive. -
Define the paws:
Press two small vertical lines into the front of each foot to create simple distinct toes. -
Bake or fire:
Follow your specific clay’s instructions for drying, firing, or baking. Ensure it is fully hardened before painting.
Level Up: Color Contrast
Try using a speckled or iron-rich clay body. When fired, the natural speckles will complement the dashed texture for an even more organic, rustic look.
Step 3: Finishing Touches
-
Wash the texture:
To make the dashes pop, you can apply a very watered-down brown paint over the body and immediately wipe the surface with a damp cloth, leaving pigment only in the crevices. -
Paint the nose:
Use a small brush to paint a triangular, soft brown nose on the tip of the snout. -
Add the eyes:
Paint two small, solid black or dark brown dots for eyes. Keep them relatively small to maintain the minimalist aesthetic. -
Seal the work:
Protect your paint job with a coat of clear matte varnish if desired, mainly focusing on the painted areas like the nose and eyes.
Now you have a sweet, textured companion to sit on your shelf or desk
Balloon-Style Dog Sculpture
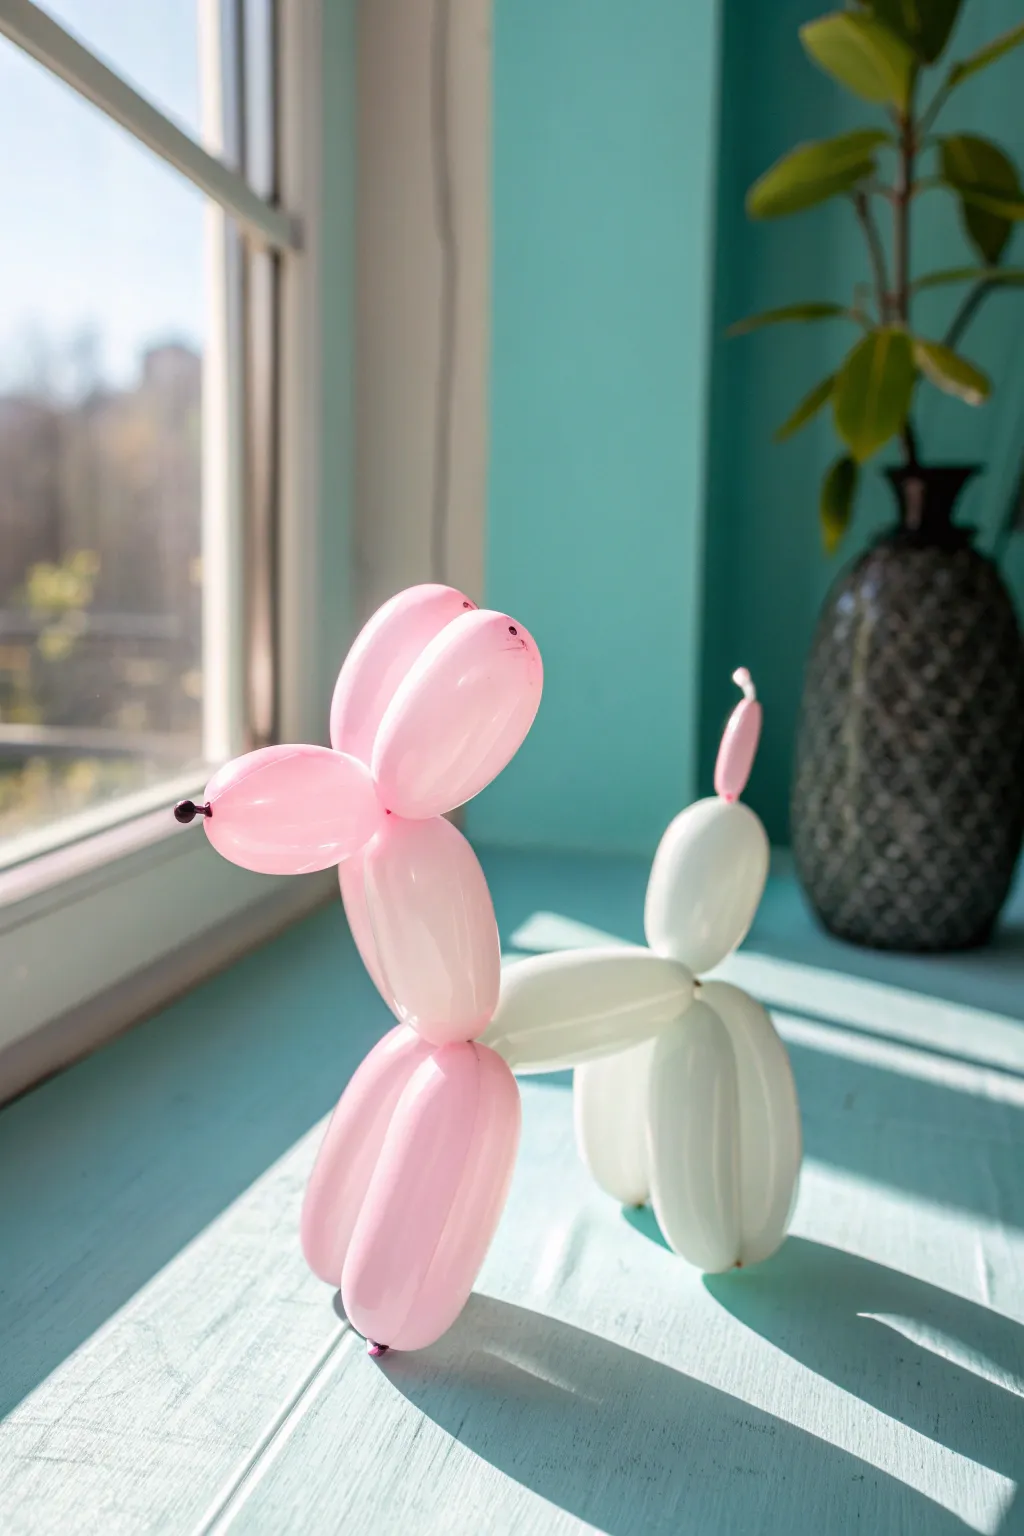
Capture the whimsical charm of a classic balloon animal without the risk of popping by sculpting this delightful faux-balloon dog. Using polymer clay in soft pink and white, you’ll recreate the distinct rounded segments and twisted joints that make this iconic shape instantly recognizable.
Step-by-Step
Materials
- Polymer clay (baby pink)
- Polymer clay (white)
- Clay cutting blade or craft knife
- Establishment tool or knitting needle (for detailing)
- Clear gloss varnish or glaze
- Soft paintbrush
- Small piece of wire or toothpick (internal armature)
- Black acrylic paint or fine-tip marker
- Oven for baking
Step 1: Sculpting the Pink Front
-
Condition the clay:
Start by warming up your pink polymer clay in your hands. Knead it thoroughly until it is soft, pliable, and free of cracks. -
Roll the main sausage:
Roll the pink clay into a smooth, even log or sausage shape. It should be about the thickness of a standard hot dog, roughly 3/4 inch in diameter. -
Create the nose segment:
Cut a short segment for the muzzle (snout). Roll the ends gently to round them off so it looks like an inflated balloon end, slightly tapered where the ‘knot’ would be. -
Form the ears:
Create two matching oval segments for the ears. These should be slightly longer than the nose piece. Pinch them together at one end to mimic the twist of a balloon. -
Connect head to neck:
Make a slightly shorter segment for the neck. Use a small piece of wire to connect the nose, ears, and neck pieces together at a central point, pressing the clay gently to simulate the tight twist of a balloon joint. -
Sculpt the front legs:
Roll two equal log shapes for the front legs. Round off the bottom ends completely so they look air-filled. Join them at the top to the base of the neck segment. -
Define the twists:
Use a modeling tool to deepen the creases where the clay segments meet. This indentation is crucial for selling the illusion of twisted latex.
Clean Breaks Only
If your clay segments are mushing together instead of looking like separate balloons, let the pieces sit in the fridge for 10 minutes to firm up before pressing them together.
Step 2: Forming the White Body & Assembly
-
Prepare the white clay:
Clean your hands thoroughly to avoid transferring pink pigment, then condition the white polymer clay until smooth. -
Shape the torso:
Roll a white cylinder for the dog’s main body. One end should connect to the pink front legs, and the other will hold the back legs. -
Create the back legs:
Fashion two white logs for the hind legs, matching the size of the pink front legs. Round the bottoms just as before and press them together at the top. -
Attach the tail:
Roll a small white ball and a tiny teardrop shape. Attach this to the rear of the body segment to create a cute, perky tail. -
Join the halves:
Insert a small support wire into the back of the pink leg section. Press the white torso onto this wire. I suggest smoothing the seam very slightly, but keeping a distinct line to show where the ‘balloons’ would meet. -
Add the balloon knot:
Roll a tiny speck of pink clay into a small ring or knot shape. Attach this to the very tip of the nose to represent the tied-off end of a balloon. -
Refine the surface:
Dip your finger in a little baby oil or clay softener and gently buff out any fingerprints. The surface needs to be immaculately smooth to look like plastic.
Step 3: Finishing Touches
-
Bake the sculpture:
Place your dog on a baking sheet or ceramic tile. Bake according to your specific clay manufacturer’s instructions (usually around 275°F/130°C). -
Cool down:
Let the sculpture cool completely in the oven before moving it. This prevents the clay from cracking due to thermal shock. -
Draw the details:
Using a fine-tip black marker or a tiny dot of acrylic paint, add two small eyes near the top of the muzzle and a little dot on the nose knot. -
Apply the gloss:
Brush on a thick, even coat of high-gloss polyurethane varnish or glaze. This is the most important step—it transforms the matte clay into shiny ‘latex’. -
Dry and display:
Allow the glaze to cure fully. If you missed any spots, add a second coat for that ultra-wet, squeaky-clean balloon look.
Make it Transparent
For an even more realistic look, use translucent polymer clay tinted with alcohol inks. The light will pass through slightly, mimicking thin rubber.
Enjoy your permanent piece of party decor that will never deflate