Butterflies are one of my favorite clay motifs because you can keep them super simple or go all-in with texture, pattern, and color. Here are my go-to butterfly clay ideas you can make with polymer clay, air-dry clay, or ceramic clay—whatever you’ve got on your table today.
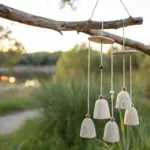
Classic Flat Butterfly Wall Hanging
This minimalist wall hanging captures the delicate beauty of a butterfly with a rustic, stone-like texture. Using simple carving techniques, a creamy white clay is transformed into an elegant piece of home decor that catches the sunlight beautifully through its gentle curves.
How-To Guide
Materials
- White or cream-colored air-dry clay (or salt dough)
- Butterfly template (paper)
- Rolling pin
- Parchment paper or canvas mat
- Sharp craft knife or scalpel
- Modeling tool or knitting needle (for etching)
- Small straw or circular cutter (approx. 5-7mm)
- Jute twine or hemp cord
- Fine-grit sandpaper
- Water and sponge for smoothing
- Matte clear sealant (optional)
Step 1: Shaping the Base
-
Prepare your template:
Begin by sketching a symmetric butterfly shape on paper or printing one out. Aim for a wingspan of about 6-8 inches for a substantial wall piece. Cut this template out with scissors to use as your guide. -
Condition the clay:
Take a large handful of air-dry clay and knead it in your hands until it becomes pliable and warm. This prevents cracking later on. -
Roll the slab:
Place the clay on parchment paper. Roll it out evenly to a thickness of approximately 1/4 inch (6mm). You want it thick enough to be sturdy but not so heavy that it pulls on the string. -
Cut the outline:
Lay your paper template gently on top of the clay slab. Using your sharp craft knife, trace around the perimeter carefully. Remove the excess clay and peel off the paper template. -
Smooth the edges:
Dip your finger in a little water and run it along the cut edges of the butterfly wings. This softens the sharp cut lines and gives the piece a more finished, ceramic look.
Stone Speckle Trick
Mix a small pinch of used coffee grounds or black pepper into your white clay before rolling. This instantly creates natural-looking ‘granite’ speckles without painting.
Step 2: Adding Details
-
Define the body:
Roll a small, separate sausage of clay for the butterfly’s body—head, thorax, and abdomen. I usually flatten the bottom slightly and score both the body and the center of the wings before attaching it with a dab of water to ensure a strong bond. -
Create the hanging mechanism:
Using a skewer or a very small straw, poke a hole horizontally through the upper part of the thorax (body section). Ensure the hole is wide enough for your jute twine to pass through later. -
Etch the primary veins:
With your modeling tool or a knitting needle, draw long, sweeping lines radiating from the body out toward the wing tips. Press firmly enough to create deep grooves that will catch shadows. -
Add secondary veins:
Add shorter lines in between the main veins, particularly on the lower wings. Keep the lines curved to mimic the natural structure of insect wings. -
Punch decorative holes:
Using a small circular cutter or the end of a drinking straw, press four distinct circles into the wings—one near the leading edge of each upper wing, and one near the center of each lower wing. These mimic the ‘eye spots’ often seen on real butterflies. -
Texturize the surface:
Take a stiff-bristled toothbrush or a crumpled ball of aluminum foil and gently tap it over the entire surface. This subtle stippling creates that lovely porous, stone-like texture visible in the finished piece. -
Final refining:
Check your etched lines again. If the texturing process softened them too much, re-trace the grooves lightly to ensure they remain crisp.
Step 3: Drying and Assembly
-
Dry the piece:
Allow the butterfly to dry flat on a wire rack for 24-48 hours. Turn it over halfway through the drying process to ensure the back dries evenly and prevents warping. -
Sand for perfection:
Once fully cured and hard, use fine-grit sandpaper to smooth any rough burrs on the edges or inside the punched holes. -
Seal (optional):
To protect against humidity while keeping the natural look, apply a thin coat of matte aesthetic sealant. Avoid glossy sprays, as they will ruin the stone effect. -
Attach the twine:
Cut a length of jute twine. Thread it through the horizontal hole in the butterfly’s body using a needle if necessary. Tie the ends together in a secure knot at your desired hanging length.
Wing Lift
Dry the butterfly over a slightly curved surface, like a large mailing tube or bowl, to give the wings a gentle upward flutter instead of being perfectly flat.
Hang your creation near a window where natural light can play across the textured grooves you’ve created.

Textured Butterfly Slab Imprint
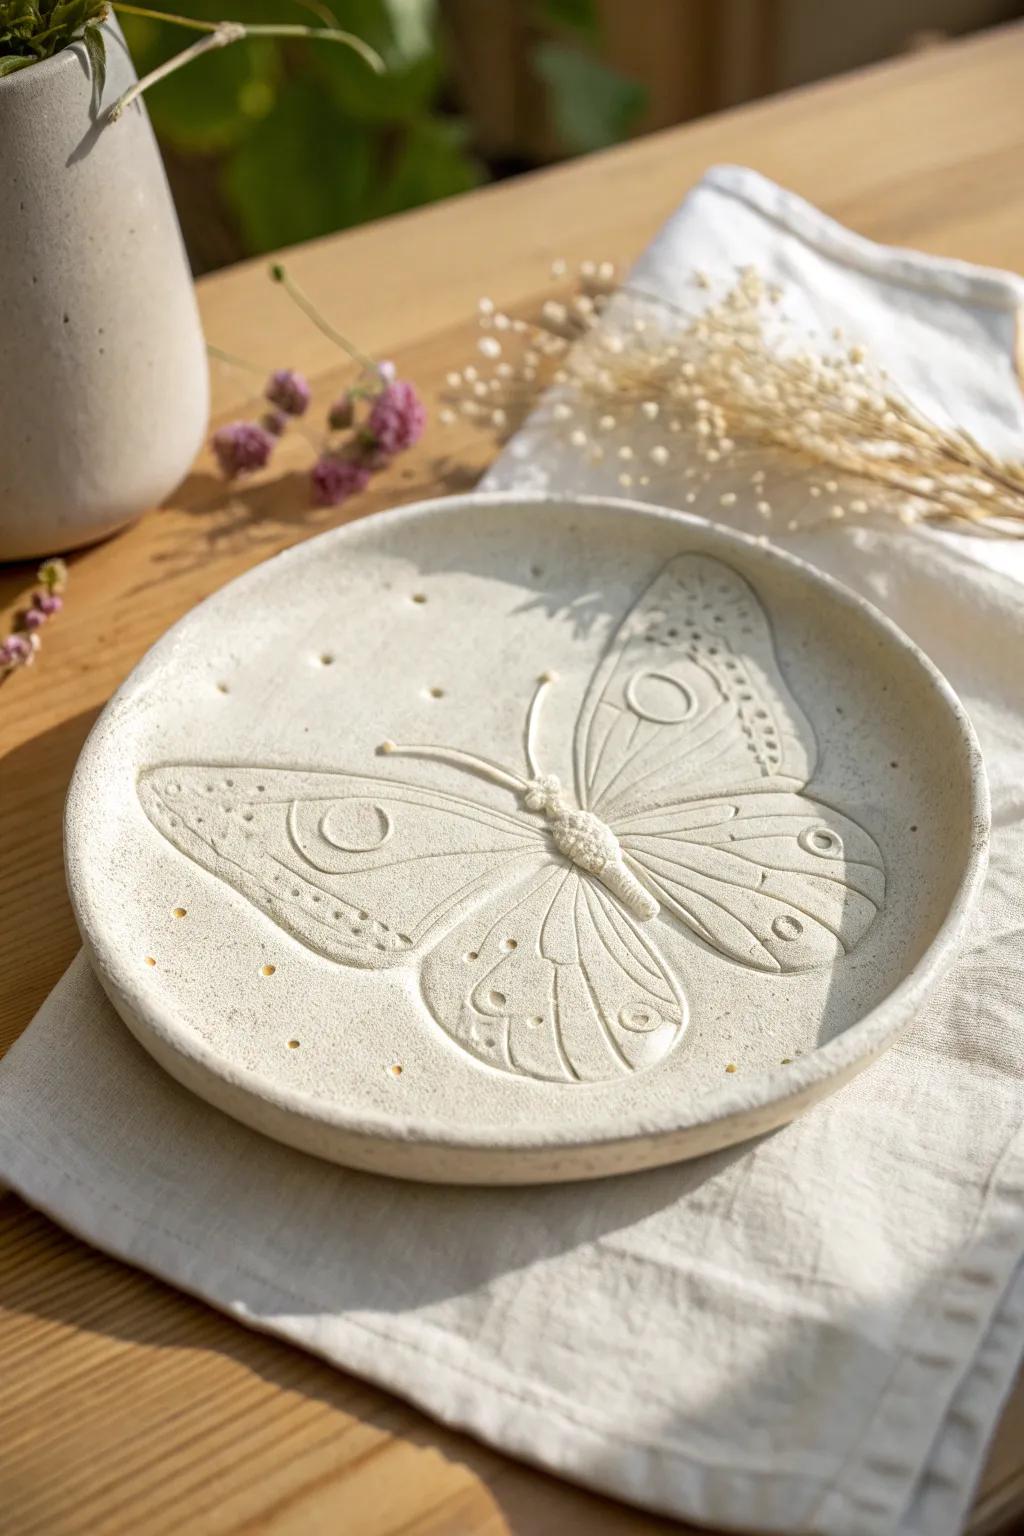
Capture the delicate details of nature with this elegant shallow dish, featuring a raised butterfly relief and subtle speckled texture. The milky white finish and organic shape make it a perfect catch-all for jewelry or a charming decorative accent.
Step-by-Step Guide
Materials
- Speckled cream stoneware clay (or white air-dry clay)
- Rolling pin
- Guide sticks (approx 1/4 inch thick)
- Paper butterfly template or large rubber stamp
- Needle tool
- Various loop tools for carving
- Modeling tool with a ball end
- Small sponge
- Shallow bowl or plaster mold (for forming)
- Canvas work surface
- Slip and scoring tool
Step 1: Prepping the Slab
-
Roll the foundation:
Begin by wedging your clay to remove air bubbles, then place it on your canvas. Use guide sticks on either side to roll out a smooth, even slab about 1/4 inch thick. -
Cut the circle:
Find a bowl or round template that’s roughly 6-8 inches in diameter. Place it gently on the slab and cut around it using a needle tool to create a perfect circle. -
Smooth the edges:
Dip your finger or a small sponge in a little water and run it along the cut edge of the circle. This compresses the clay particles and prevents future cracking.
Step 2: Creating the Butterfly Relief
-
Outline the design:
Lightly trace your butterfly design onto the center of the slab. You can do this freehand with a needle tool or by gently pressing a paper template onto the clay to leave a faint impression. -
Carve the negative space:
Using a small loop tool, carefully carve away the clay *around* the butterfly shape. You want the butterfly to remain at the original slab height while the background is recessed slightly. -
Refine the wings:
Once the background is lowered, use a modeling tool to smooth the transition between the raised butterfly and the base. You can gently slope the edges of the wings downward for a softer look. -
Add wing details:
Use a needle tool or a fine point tool to draw the veins and patterns inside the wings. Press firmly enough to create deep lines that will catch glaze later, but not so hard that you slice through. -
Create the body:
Roll a very small coil of loose clay to act as the butterfly’s body. Score the center of the wings, add a dab of slip, and press this coil into place to give the body extra dimension. -
Texture the body:
Use a needle tool to poke tiny holes or lines across the body coil, giving it a fuzzy, segmented texture. -
Decorate the wings:
Use the ball-ended tool to press small circles into the wings for the classic ‘eyes’ of the butterfly pattern. Vary the pressure to create different sized dots.
Cracking Up?
If small hairline cracks appear while carving dry clay, dampen your brush with a vinegar-water mix and smooth them out immediately.
Step 3: Finishing Touches
-
Add background texture:
For that magical, starry effect, use a small tool or the tip of a pencil to randomly press tiny dots into the background area surrounding the butterfly. -
Form the curve:
Ideally, wait unti the clay is leather hard so you don’t smudge your design. Carefully lift your slab and place it inside a shallow bowl or atop a slump mold to give the plate its curved rim. -
Refine the rim:
While it sits in the mold, double-check the rim. I like to run a damp sponge around it one last time to ensure it feels smooth to the touch. -
Dry slowly:
Cover the piece loosely with plastic to let it dry slowly over a few days. This helps prevent the rim from warping as it shrinks. -
Fire or seal:
If using ceramic clay, bisque fire and then glaze with a clear or matte white glaze that won’t obscure the texture. If using air-dry clay, allow to fully cure and seal with a matte acrylic varnish.
Gilded Wings
After the final firing or sealing, apply a tiny amount of gold luster or gold leaf to the impressed dots on the wings for a luxurious sparkle.
Place your finished dish on a sunlit table to let the shadows play across the intricate relief work


Cute Cartoon Butterfly With Big Eyes
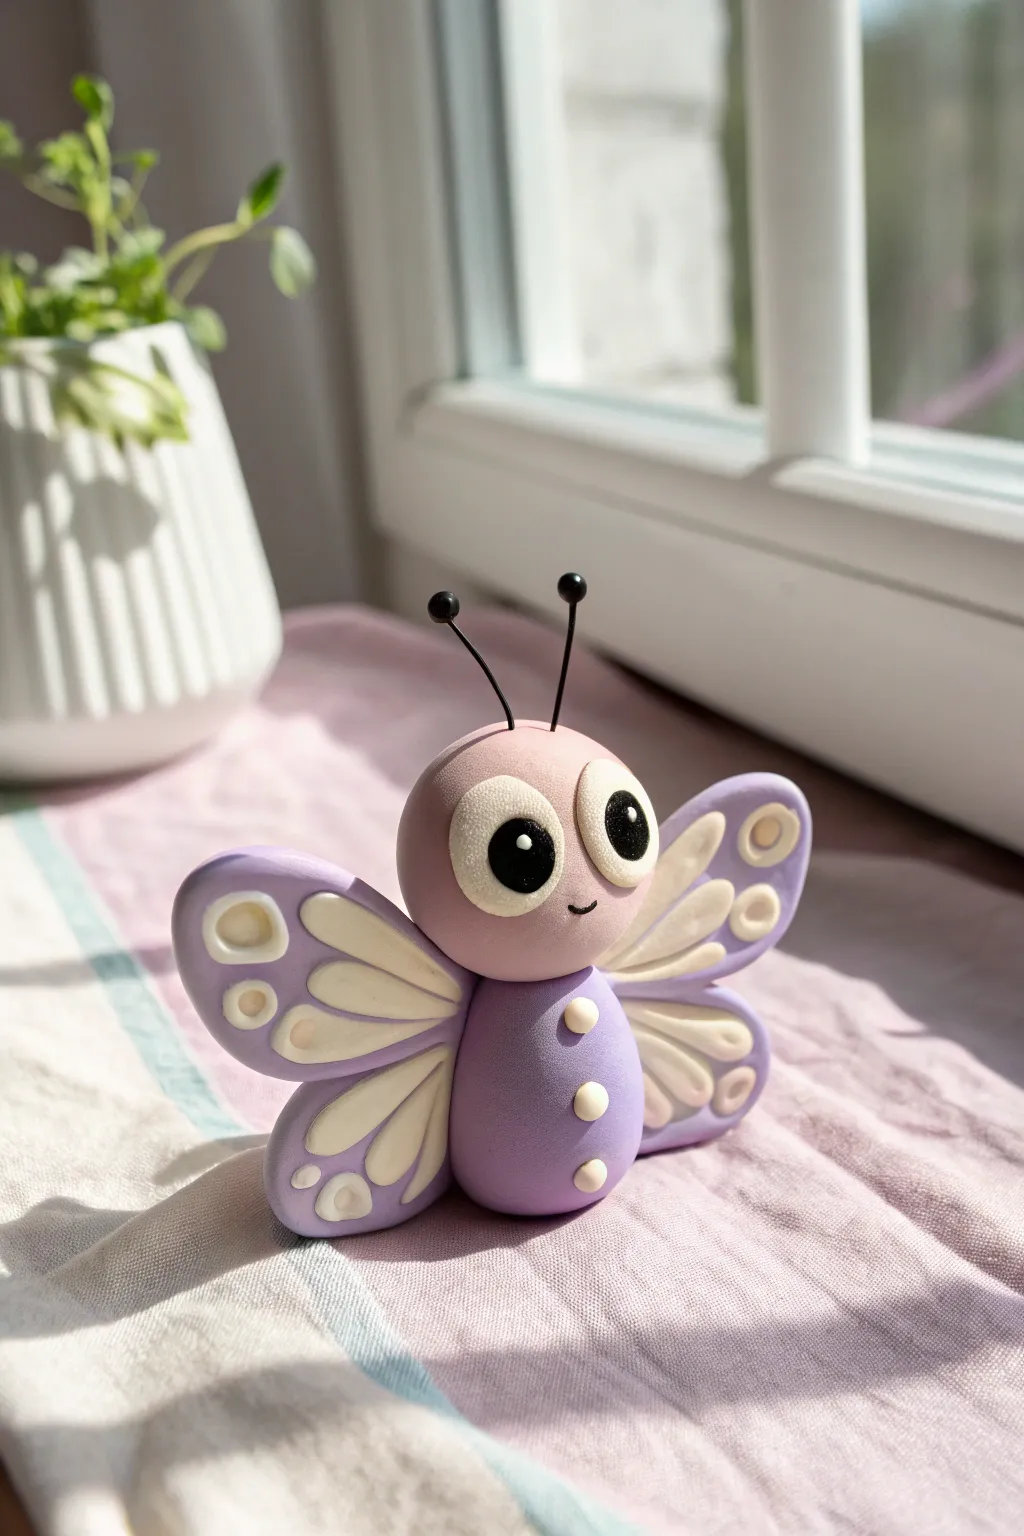
This adorable cartoon butterfly features oversized, expressive eyes and soft pastel hues, making it a perfect desk buddy or windowsill decoration. You’ll build a charming character using simple shapes like spheres and teardrops for a wonderfully clean, finished look.
Step-by-Step Tutorial
Materials
- Polymer clay or air-dry clay (Light Pink, Lavender, Purple, White, Black)
- Clay sculpting tools (dotting tool, needle tool)
- Black wire (thin gauge for antennae)
- Rolling pin
- Liquid clay adhesive or PVA glue
- Gloss glaze (optional for eyes)
Step 1: Body & Head Basics
-
Shape the body:
Begin with a golf-ball-sized amount of purple clay. Roll it into a smooth ball, then gently elongate it into a chubby oval or teardrop shape for the main body. Flatten the bottom slightly so it sits upright without wobbling. -
Create the head:
Take the light pink clay and roll a medium-sized sphere. This should be slightly wider than the top of the body piece. Smooth out any fingerprints. -
Attach head to body:
Press the pink head firmly onto the top of the purple body. If your clay is dry, use a tiny dab of liquid clay or water to secure the bond. Insert a small piece of toothpick or wire between them for hidden internal support. -
Add chest details:
Roll three tiny balls of white or cream clay. Flatten them slightly into small discs and press them vertically down the center of the purple body to mimic shirt buttons or natural markings.
Clean Seams
Use a silicone clay shapers or a rubber-tipped tool to blend the seams where the wing pieces join. This makes the wings look like one continuous organic shape rather than two stuck together.
Step 2: The Big Expressive Eyes
-
Form the eye sockets:
Using your thumbs or a large ball tool, gently create two shallow, wide indentations on the front of the pink face sphere to guide where the eyes will sit. -
Make the whites:
Roll two large balls of white clay and flatten them into ovals. Press these into the indentations you made. They should take up a significant portion of the face to get that cartoon look. -
Add pupils:
Roll two smaller balls of black clay. Flatten them and place them onto the white ovals. I find placing them slightly cross-eyed or pointing inward makes the character look cuter and innocent. -
Create the sparkle:
Roll two extremely tiny specks of white clay. Place one on the upper right side of each back pupil to create a ‘catchlight’ reflection.
Step 3: Face & Feelers
-
Sculpt the mouth:
Use a small needle tool or a clay knife to gently press a small, curved ‘smile’ line right between the eyes. -
Prepare antennae:
Cut two short lengths of black wire (about an inch long). Roll two tiny balls of black clay and push them onto the tips of the wires. -
Attach antennae:
Insert the bare ends of the wires into the top of the pink head. Angle them slightly outward for personality.
Add Texture
Before baking, lightly tap the purple body area with a clean toothbrush or stiff brush. This creates a soft, fuzzy texture that contrasts beautifully with the smooth head and wings.
Step 4: Wings & Assembly
-
Form the upper wings:
Take lavender clay and form two large teardrop shapes. Flatten them significantly until they are about 3-4mm thick. These will be the top wing sections. -
Form the lower wings:
Create two smaller teardrop shapes from the same lavender clay and flatten them. These should be roughly half the size of the upper wings. -
Make decorative markings:
Roll out a thin sheet of cream or white clay. Cut out elongated teardrops and small circles. Arrange these patterns on top of your flat lavender wings. -
Embed the decorations:
Once the cream patterns are arranged, gently roll over the entire wing with a rolling pin just once. This presses the pattern flush into the wing surface rather than letting it sit on top. -
Assemble the wings:
Press one small lower wing to the bottom of a large upper wing to create a single wing unit. Repeat for the other side. -
Attach to body:
Press the finished wing units onto the back of the purple body. Verify the balance to ensure the figure doesn’t tip backward. -
Final Smoothing:
Check over your butterfly for any fingerprints or dust. Use a drop of baby oil on your finger to smooth out imperfections before baking or drying.
Now let your clay dry or bake according to package instructions and enjoy your cheerful new friend

Butterfly Made From Basic Shapes
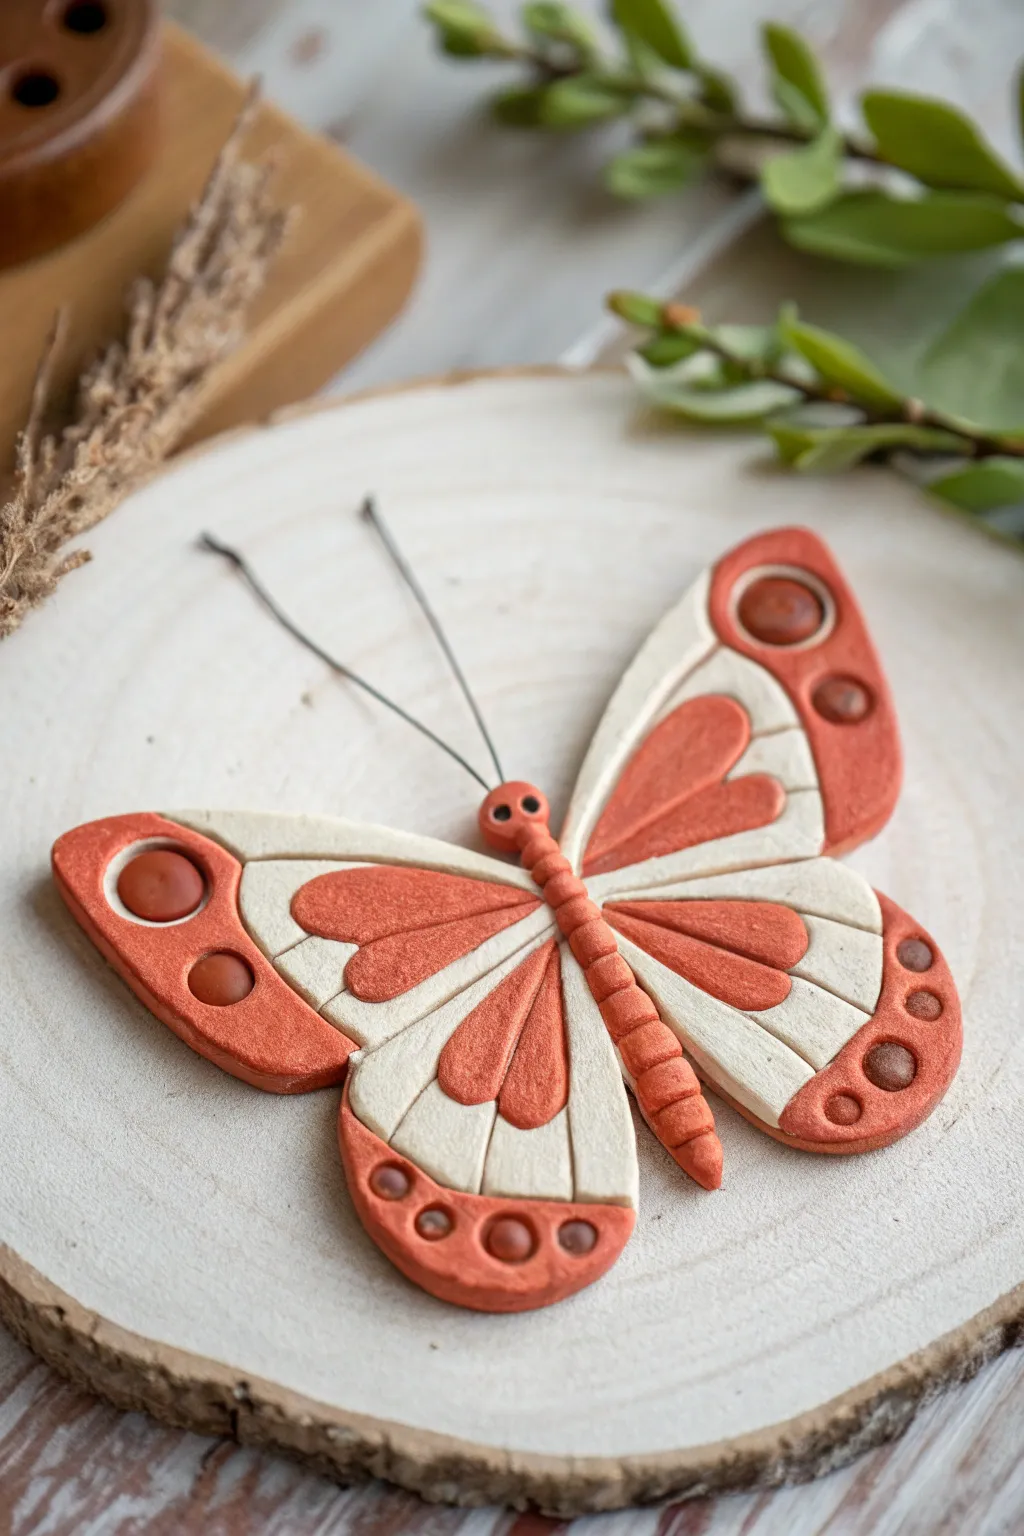
This charming clay butterfly combines earthy terracotta tones with creamy white accents for a delightful, nature-inspired piece. By breaking the design down into simple geometric shapes, you can easily sculpt this intricate-looking winged friend to perch on a shelf or hang as a pendant.
How-To Guide
Materials
- Polymer clay or air-dry clay (Terracotta orange and Cream/White)
- Clay sculpting tools (needle tool, small ball tool)
- Black wire (22 or 24 gauge) for antennae
- Rolling pin or pasta machine
- Craft knife or clay blade
- Small black beads or black clay for eyes
- Texture sponge or sandpaper (optional)
- Baking sheet and parchment paper (if utilizing polymer clay)
Step 1: Creating the Wing Base
-
Prepare the cream clay:
Condition your cream-colored clay until it is soft and pliable. Roll it out into a flat sheet, approximately 1/4 inch thick, ensuring an even surface. -
Cut the wing shapes:
Using a craft knife, cut out two large, elongated teardrop shapes for the upper wings and two slightly shorter, rounded shapes for the lower wings. -
Smooth the edges:
Gently tap the cut edges with your finger to round them off slightly so they aren’t sharp or boxy. Arrange them on your work surface in a butterfly formation, leaving a small gap in the center for the body. -
Add texture:
For a more organic look, I like to lightly press a texture sponge or fine sandpaper onto the surface of the white clay to give it a matte, stone-like finish.
Step 2: Sculpting the Body
-
Form the body segments:
Roll a small snake of terracotta clay. Cut it into several small, equal-sized pieces to create the segmented abdomen. -
Assemble the body:
Place the small orange segments in a line down the center gap between the wings, pressing them gently against each other and the wing edges to bond them. -
Taper the tail:
Ensure the segments get slightly smaller towards the bottom to create a tapered tail end. -
Create the head:
Roll a slightly larger ball of orange clay for the head and attach it to the top of the body column. Use a needle tool to create two small indents for eyes. -
Insert the eyes:
Place tiny specs of black clay or small seed beads into the indents you made on the head.
Sticky Situation?
If the clay sticks to your tools while sculpting the tiny dots, dip the tip of your tool in a little cornstarch or water (depending on clay type) before pressing.
Step 3: Decorating the Wings
-
create the outer wing detail:
Roll out a sheet of terracotta clay. Cut curved strips to frame the outer edges of the wings. The top wings should have a thicker tip, while the bottom wings have a rounded border. -
Attach the borders:
Press these orange strips onto the outer edges of the cream wings. Smooth the seams gently so they look like a single inlaid piece. -
Add the inner hearts:
Cut four elongated heart-like shapes from the orange clay sheet. These will form the inner decorative panels. -
Place inner panels:
Position one heart shape in the center of each wing section, pointing inward toward the body. Leave a border of cream clay visible around them. -
Define the veins:
Use a needle tool or the back of a knife to gently press lines radiating from the body outward across the cream sections, creating the look of wing veins. -
Sculpt circular accents:
Roll several tiny balls of orange clay and flatten them slightly. Create matching shallow divots in the orange wing borders. -
Insert accents:
Place the flattened balls into the divots on the wing tips—one large one for the top wing and three smaller ones descending on the bottom wing.
Make it a Magnet
Embed a strong round magnet into the back of the body before baking. Press it in flush with the clay so it will stick flat to your fridge later.
Step 4: Finishing Touches
-
Texture the orange clay:
Using a needle tool or stippling brush, gently tap the surface of all orange parts to give them a pitted, porous texture similar to the image. -
Insert antennae:
Cut two short lengths of black wire. Insert them into the top of the head clay while it is still soft. -
Final shaping:
Check the symmetry of your butterfly and gently nudge any parts that have shifted. Curve the wings upward slightly if you want a 3D effect. -
Bake or dry:
Follow the instructions for your specific clay type to cure or dry the finished piece completely.
Once dried or baked, your butterfly is ready to bring a touch of handcrafted warmth to your home decor

The Complete Guide to Pottery Troubleshooting
Uncover the most common ceramic mistakes—from cracking clay to failed glazes—and learn how to fix them fast.
Butterfly Magnet for the Fridge
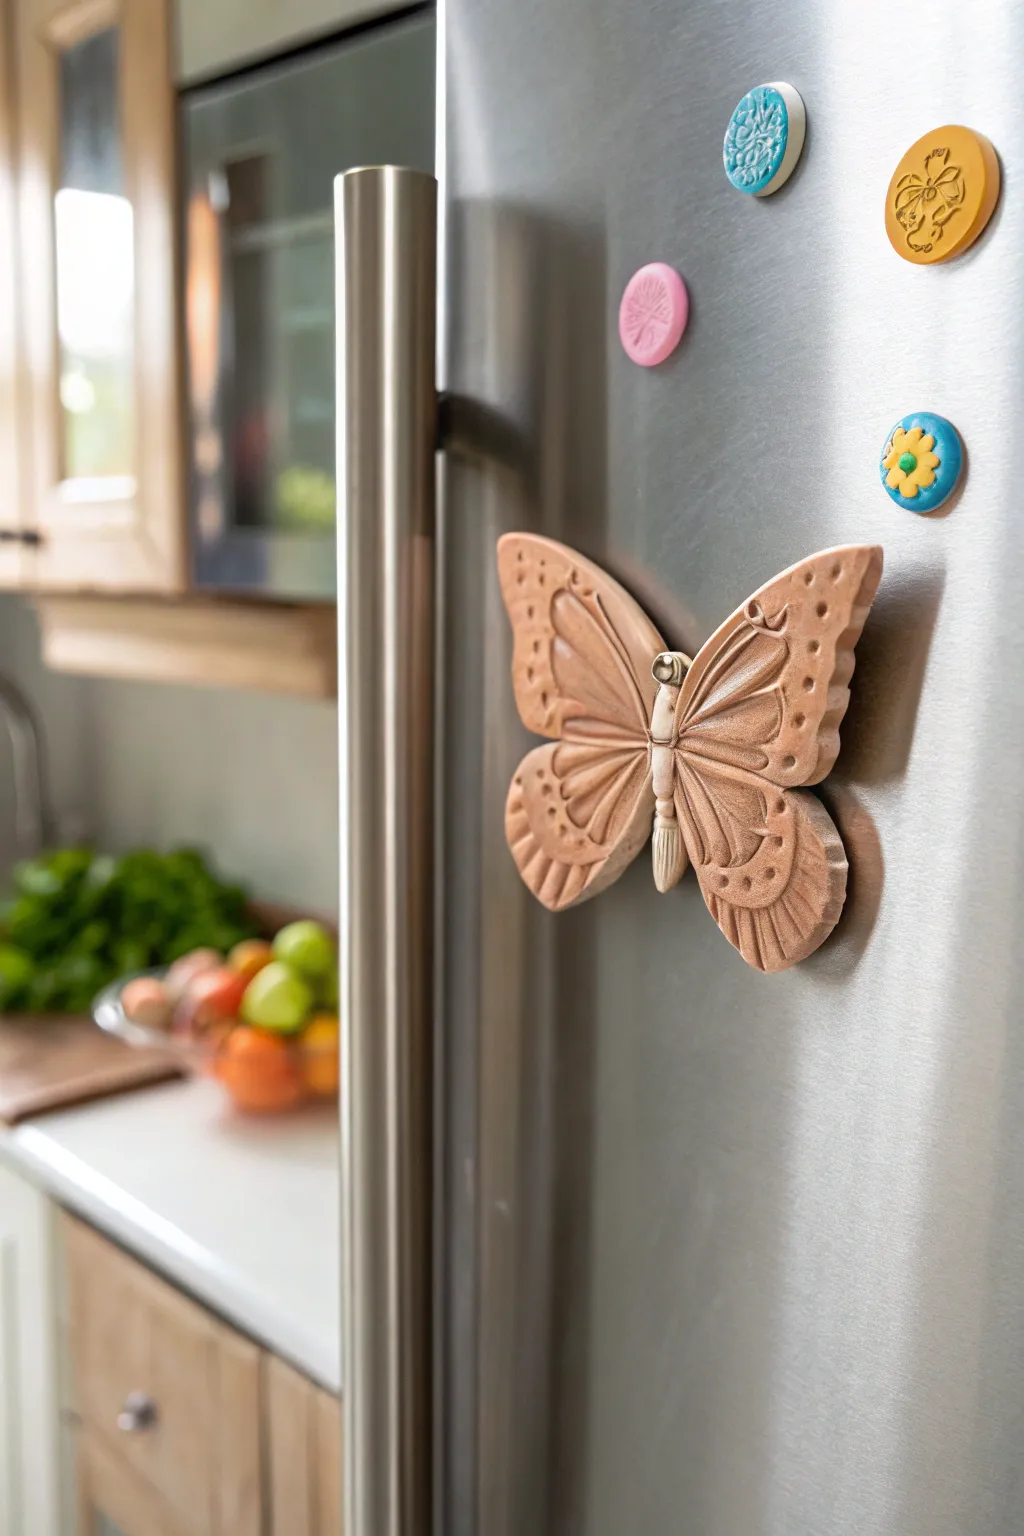
Bring a touch of organic warmth to your kitchen with this detailed clay butterfly magnet. Its terra cotta finish and sculpted textures give it a sophisticated, handcrafted look that stands out beautifully against stainless steel appliances.
Detailed Instructions
Materials
- Terra cotta colored polymer clay (or air dry clay painted later)
- Clay roller or pasta machine
- Pointed sculpting tool or needle tool
- Ball stylus tool (small and medium sizes)
- Craft knife or scalpel
- Wing template (hand-drawn or printed)
- Strong round craft magnet (neodymium recommended)
- Superglue or heavy-duty craft adhesive
- Gloss or satin varnish (optional for finish)
Step 1: Shaping the Base
-
Condition the Clay:
Begin by kneading your terra cotta polymer clay until it is soft and pliable. If the clay feels too stiff, warm it in your hands for a few minutes to ensure it won’t crack during sculpting. -
Roll Out the Slab:
Roll the clay out into a smooth, even slab that is approximately 1/4 inch thick. You want it substantial enough to hold the details but not so heavy that the magnet slides down the fridge. -
Cut the Butterfly Shape:
Place your paper butterfly template onto the clay or lightly sketch the outline directly onto the surface. Using your craft knife, carefully cut out the full silhouette, including the distinct upper and lower wing sections. -
Smooth the Edges:
Lift the cutout gently and use your fingertip to soften the sharp, cut edges of the clay. This gives the piece a more finished, ceramic-like appearance rather than a harsh cookie-cutter look.
Clean Cuts Tip
If your clay drags while cutting the outline, try putting the rolled slab in the fridge for 10 minutes. The slightly cooler clay will cut much cleaner without warping.
Step 2: Sculpting the Details
-
Define the Body:
Roll a small sausage shape of clay for the body and press it firmly down the center of the wings. Use a modeling tool to blend the underside of the body onto the wings so it attaches securely. -
Create the Head and Thorax:
At the top of the body, shape a rounded head and a slightly wider thorax section. I find using a small ball tool helps create smooth indentations for the eyes or neck area. -
Add Abdominal Texture:
For the lower part of the body (the abdomen), use a knife or needle tool to press horizontal lines across the clay, mimicking the segmented look of a real insect. -
Carve the Wing Veins:
Using a pointed sculpting tool, carve long, sweeping lines radiating from the body outward toward the wing edges. Press deep enough to create shadow, but be careful not to slice all the way through. -
Detail the Upper Wings:
On the top wings, carve a distinctive tear-drop or loop shape near the center. Add smaller radiating lines inside this shape to create a complex, veined texture. -
Add Decorative Dots:
Use your medium ball stylus to press a series of dots along the outer edges of the wings. A row of three or four indentations follows the curve of the upper wing nicely. -
Refine the Lower Wings:
Repeat the texturing on the bottom wings, adding fan-like lines at the very bottom edge. Press a series of smaller dots near the border to mirror the design on top. -
Add a Bright Eye Detail:
If you want to match the image exactly, press a tiny bead or a non-flammable rhinestone into the head area before baking, or create a small recess to glue one in later. -
Final Surface Texture:
Before baking, you can lightly tap the surface with a piece of coarse sponge or sandpaper to give the ‘smooth’ areas a slight stone-like grain.
Step 3: Finishing and Assembly
-
Bake the Clay:
Place your butterfly on a ceramic tile or baking sheet lined with parchment paper. Bake according to your polymer clay manufacturer’s instructions (usually 275°F/135°C for 15-30 minutes depending on thickness). -
Painting (Optional):
If you used plain clay instead of terra cotta color, now is the time to paint the entire piece with a reddish-brown acrylic paint. Wipe away excess paint with a damp cloth to let the dark color stay in the grooves, highlighting your carving. -
Dry Wash Technique:
To enhance the ‘carved wood’ or stone look, lightly brush a tiny amount of white or cream paint over the highest ridges of the wings. This makes the texture pop visually. -
Attach the Magnet:
Once the clay is completely cool and any paint is dry, turn the butterfly over. Apply a strong dab of superglue or E6000 to the center back and press your round magnet firmly into place. -
Let it Set:
Allow the glue to cure fully (usually 24 hours for maximum strength) before placing it on your refrigerator. This patience ensures your beautiful sculpture won’t pop off the magnet when the door slams.
Level Up: Antennae
Before baking, insert two short pieces of dark craft wire into the top of the head for antennae. Curve them slightly for a whimsical, realistic touch.
Now you have a stunning, artisanal magnet that turns your fridge into a mini art gallery
Butterfly Ring Dish With a Raised Butterfly
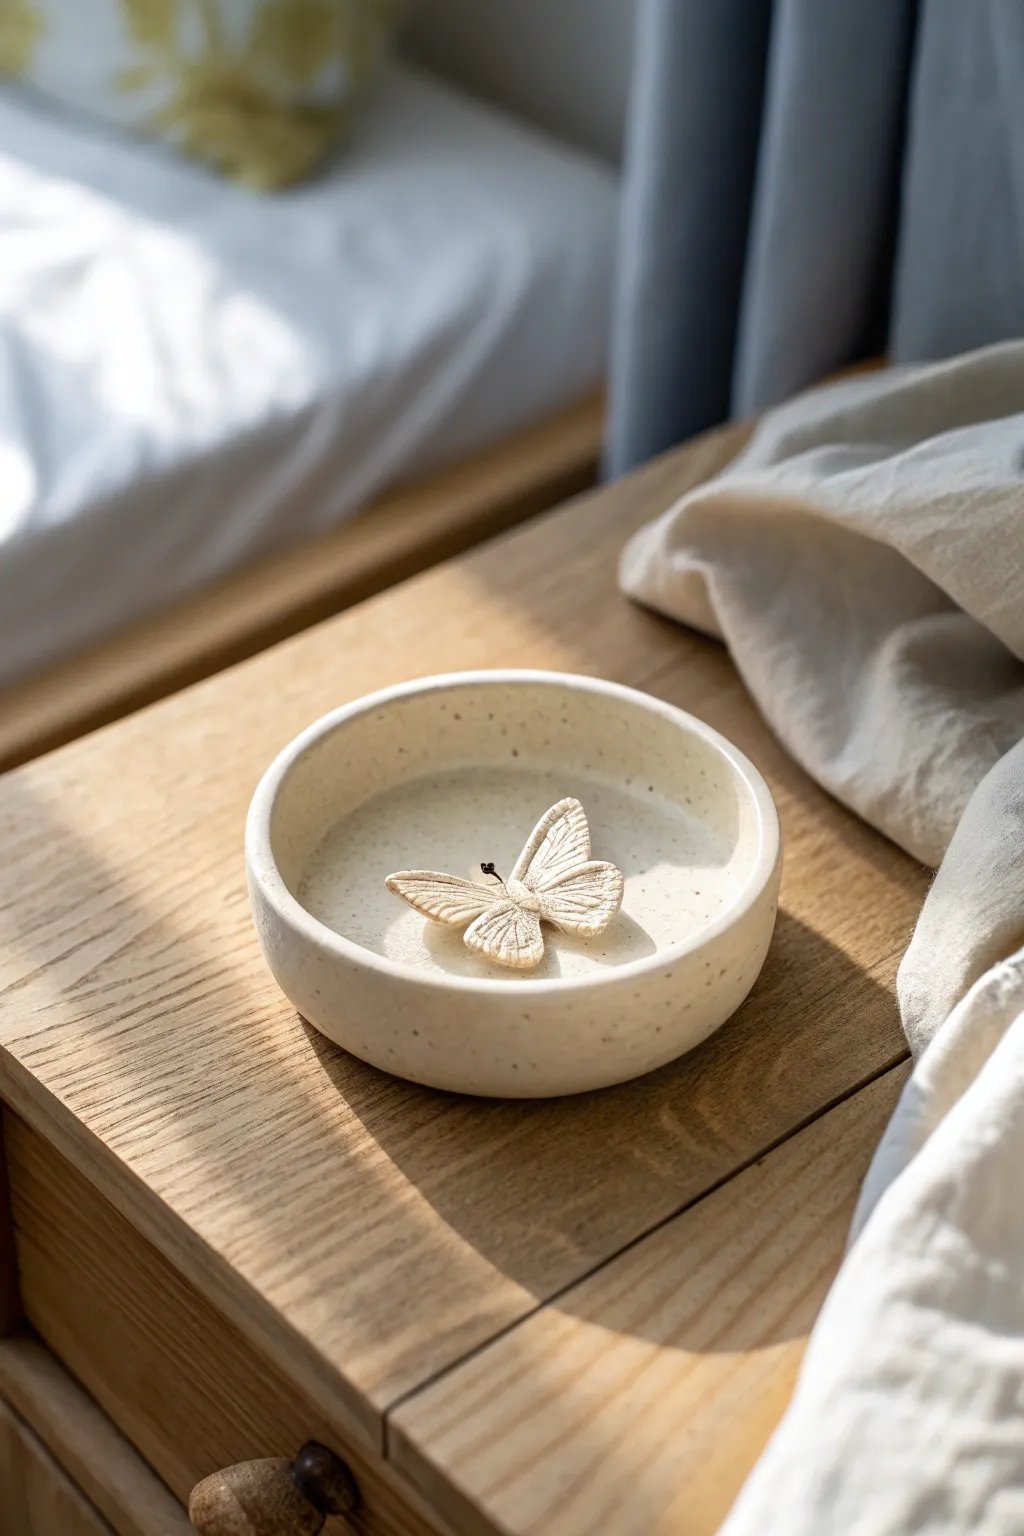
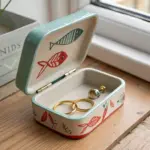
Embrace a minimalist, organic aesthetic with this lovely trinket dish, featuring a sculpted butterfly resting gently inside. The speckled cream texture gives it a professional ceramic look without needing a kiln, making it a perfect bedside companion for your rings.
Detailed Instructions
Materials
- White air-dry clay (or polymer clay)
- Speckled clay additive (or ground black pepper/dried tea leaves)
- Rolling pin
- Circle cutter or small bowl (approx. 4-5 inches)
- Small butterfly silicone mold (or sculpting tools for freehand)
- Water and slip brush
- Fine grit sandpaper
- Matte or satin varnish
- Small piece of wire or black thread (for antennae)
- Super glue (optional)
- Small sponge
Step 1: Preparing the Clay Base
-
Condition the Clay:
Begin by taking a handful of white air-dry clay. Knead it thoroughly until it is soft and warm. If you are using plain clay and want that speckled stoneware look, knead in a pinch of dried tea leaves, ground pepper, or specific clay speckle additives now. -
Roll the Slab:
Roll out the clay on a smooth surface to an even thickness of about 1/4 inch. Lift and rotate the clay occasionally as you roll to ensure it doesn’t stick to your work surface. -
Cut the Circle:
Use a circle cutter or place a small bowl upside down on the clay as a template. Cut around it with a craft knife to create a perfect circle. -
Form the Rim:
Gently lift the edges of the clay circle upwards to form the sides of the dish. I like to pinch and smooth the walls upwards, aiming for a consistent height of about 3/4 inch all around. -
Smooth the Edges:
Dip your finger or a small sponge in a little water and run it along the rim and the interior walls. Smooth out any cracks or fingerprints to ensure the dish looks seamless and polished.
Step 2: Sculpting the Butterfly
-
Shape the Wings:
Take a very small ball of clay and flatten it into two teardrop shapes for the upper wings and two smaller teardrops for the lower wings. Alternatively, press clay into a silicone butterfly mold if you have one. -
Add Texture:
If sculpting by hand, use a needle tool or a dull knife to gently press radiating lines into the wings. These lines should fan out from the center to mimic delicate wing veins. -
Form the Body:
Roll a tiny, thin sausage shape for the butterfly’s body. Place it in the center where the wings meet to connect them. -
Position Inside the Dish:
Score the bottom of the butterfly and the center of the dish with a needle tool. Apply a dab of clay slip (clay mixed with water) to the scored areas. -
Secure the Butterfly:
Press the butterfly firmly but gently into the center of the dish. To give it the ‘raised’ look seen in the photo, prop the wings up slightly with tiny bits of paper or foam while it dries, so they aren’t lying completely flat against the base.
Cracking Up?
If small cracks appear as the clay dries, mix a tiny amount of fresh clay with water to make a paste. Fill the cracks, smooth over, and let dry again.
Step 3: Finishing Touches
-
Add Antennae:
While the clay is still soft, use a needle tool to poke two tiny holes at the head of the butterfly. Cut two very small pieces of black wire or stiff thread. -
Insert Antennae:
Dip the ends of the wire/thread in a tiny bit of glue and insert them into the holes. This mixed-media touch adds a sharp, realistic detail. -
Let it Dry:
Allow the piece to dry completely. For air-dry clay, this usually takes 24 to 48 hours depending on humidity. Keep it away from direct heat to prevent cracking. -
Sand for Smoothness:
Once fully dry, take fine-grit sandpaper and gently buff the rim and outside of the dish. This makes the clay feel soft to the touch and removes any lingering imperfections. -
Seal the Dish:
Apply a coat of matte or satin varnish to the entire piece. This protects the clay and deepens the speckled color slightly. Let the varnish cure completely before use.
Make it Luxe
After the varnish dries, use a small brush to paint the very rim of the dish with gold leaf paint for an elegant, high-contrast finish.
Now you have a serene little spot to keep your favorite jewelry safe.


What Really Happens Inside the Kiln
Learn how time and temperature work together inside the kiln to transform clay into durable ceramic.
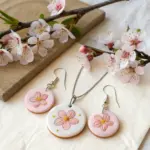
Butterfly Earrings in Simple Pairs
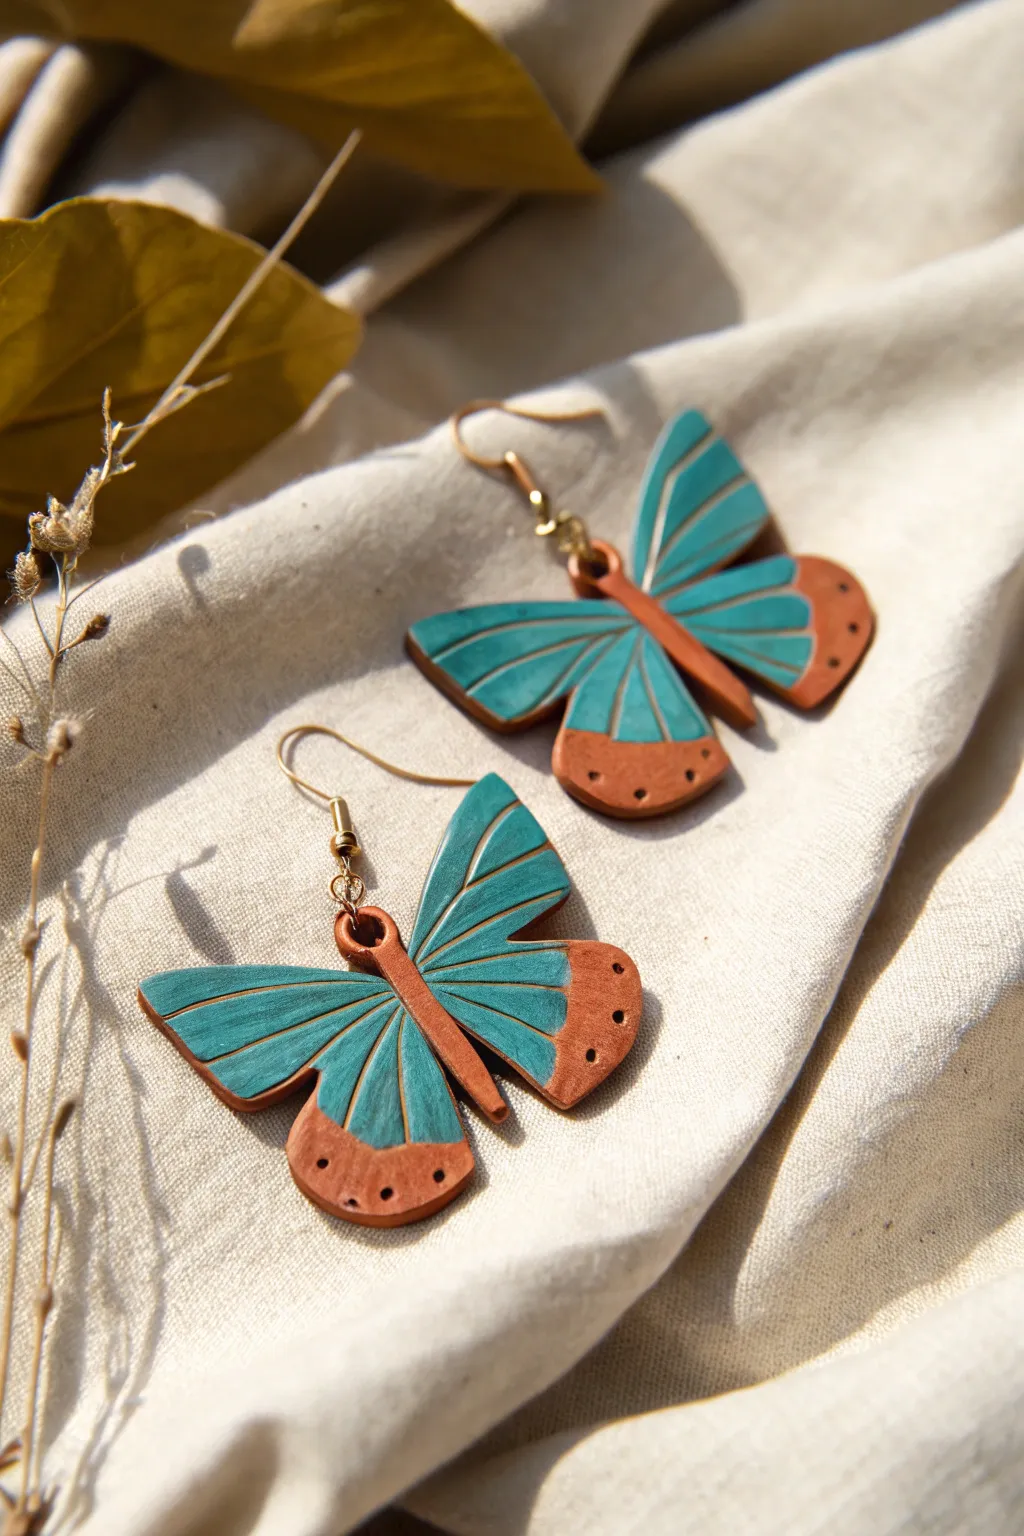
Capture the earthy elegance of these winged beauties with a simple yet striking slab technique. The combination of rich teal and warm terracotta clay creates a stunning contrast, perfect for everyday wear.
How-To Guide
Materials
- Polymer clay (Terracotta or Burnt Orange)
- Polymer clay (Teal or Turquoise)
- Liquid polymer clay (translucent)
- X-Acto knife or sharp clay blade
- Acrylic rolling pin or pasta machine
- Butterfly wing cutters (teardrop shapes work well) or a paper template
- Needle tool or toothpick
- Small jump rings (gold)
- Earring hooks (gold)
- Jewelry pliers
- Needle nose pliers
- Fine grit sandpaper (400/600)
- Matte varnish (optional)
Step 1: Preparing the Base
-
Condition the Clay:
Begin by thoroughly conditioning your terracotta clay until it is soft and pliable. Do the same for a smaller amount of teal clay. -
Roll the Sheets:
Roll out the terracotta clay to a thickness of about 3mm—this will form the main structural body and the edges of the wings. -
Create the Teal Inlays:
Roll out the teal clay slightly thinner, perhaps 2mm. This will sit inside the terracotta frame.
Clay Smudging?
If teal clay smudges onto the terracotta border, use a Q-tip dipped in rubbing alcohol to gently wipe the orange clay clean before baking.
Step 2: Shaping the Wings
-
Cut the Terracotta Base:
Using a template or freehand cutting with your blade, cut out two large upper wing shapes and two smaller lower wing shapes from the terracotta sheet. -
Cut the Teal Panels:
Now, cut matching shapes from the teal clay, but make them about 2-3mm smaller on all sides than the terracotta pieces. -
Layer the Clay:
Place the teal cutouts directly on top of the terracotta bases. Center them carefully so a consistent border of terracotta remains visible around the edge. -
Merge the Layers:
Gently roll over the combined pieces with your acrylic roller just enough to press them together without distorting the shape too much. This ensures they bond well.
Pro Tip: Depth Effect
After baking, run a wash of diluted brown acrylic paint into the vein grooves and wipe off the surface. This highlights the texture beautifully.
Step 3: Adding Details
-
Incise the Veins:
Using the back of your knife blade or a needle tool, press firmly into the teal clay to create the radiating lines of the wing veins. Start from the inner corner and fan outward. -
Deepen the Lines:
Go over your lines a second time to ensure they are deep enough to remain visible after baking, but be careful not to slice all the way through the base. -
Create the Bodies:
Roll a small snake of terracotta clay for the butterfly body. It should be long enough to connect the upper and lower wings. -
Assemble the Wings:
Press the upper and lower wing sets onto the sides of the central terracotta body. Use a tiny dab of liquid clay at the connection points for a secure bond. -
Blend the Seams:
On the back of the earring, use a modeling tool to gently smooth the clay where the wings meet the body so it becomes one solid unit. -
Add Decorative Dots:
Use your needle tool to poke three distinct holes or indentations along the bottom edge of the lower wings for that decorative, primitive texture shown. -
Create the Hanging Loop:
At the top of the body or the upper wing corner, use a needle tool to pierce a hole for the jump ring. Ensure it is not too close to the edge to prevent breakage.
Step 4: Finishing
-
Bake:
Bake the pieces according to the manufacturer’s instructions for your specific brand of polymer clay (usually 275°F for 15-30 minutes). -
Cool Down:
Allow the earrings to cool completely inside the oven or on the baking sheet before handling them. -
Sand and Refine:
Once cool, lightly mist the edges with water and sand them with fine-grit sandpaper to remove any fingerprints or rough cutting marks. -
Buff or Seal:
I prefer to buff them with a soft cloth for a natural sheen, but you can add a layer of matte varnish if you want extra protection. -
Attach Hardware:
Use your pliers to open a jump ring, thread it through the hole you made earlier, and attach the earring hook. Close the jump ring securely.
Enjoy wearing your unique, handcrafted butterflies that bring a touch of nature to any outfit
Butterfly Pendant With Symmetry Lines
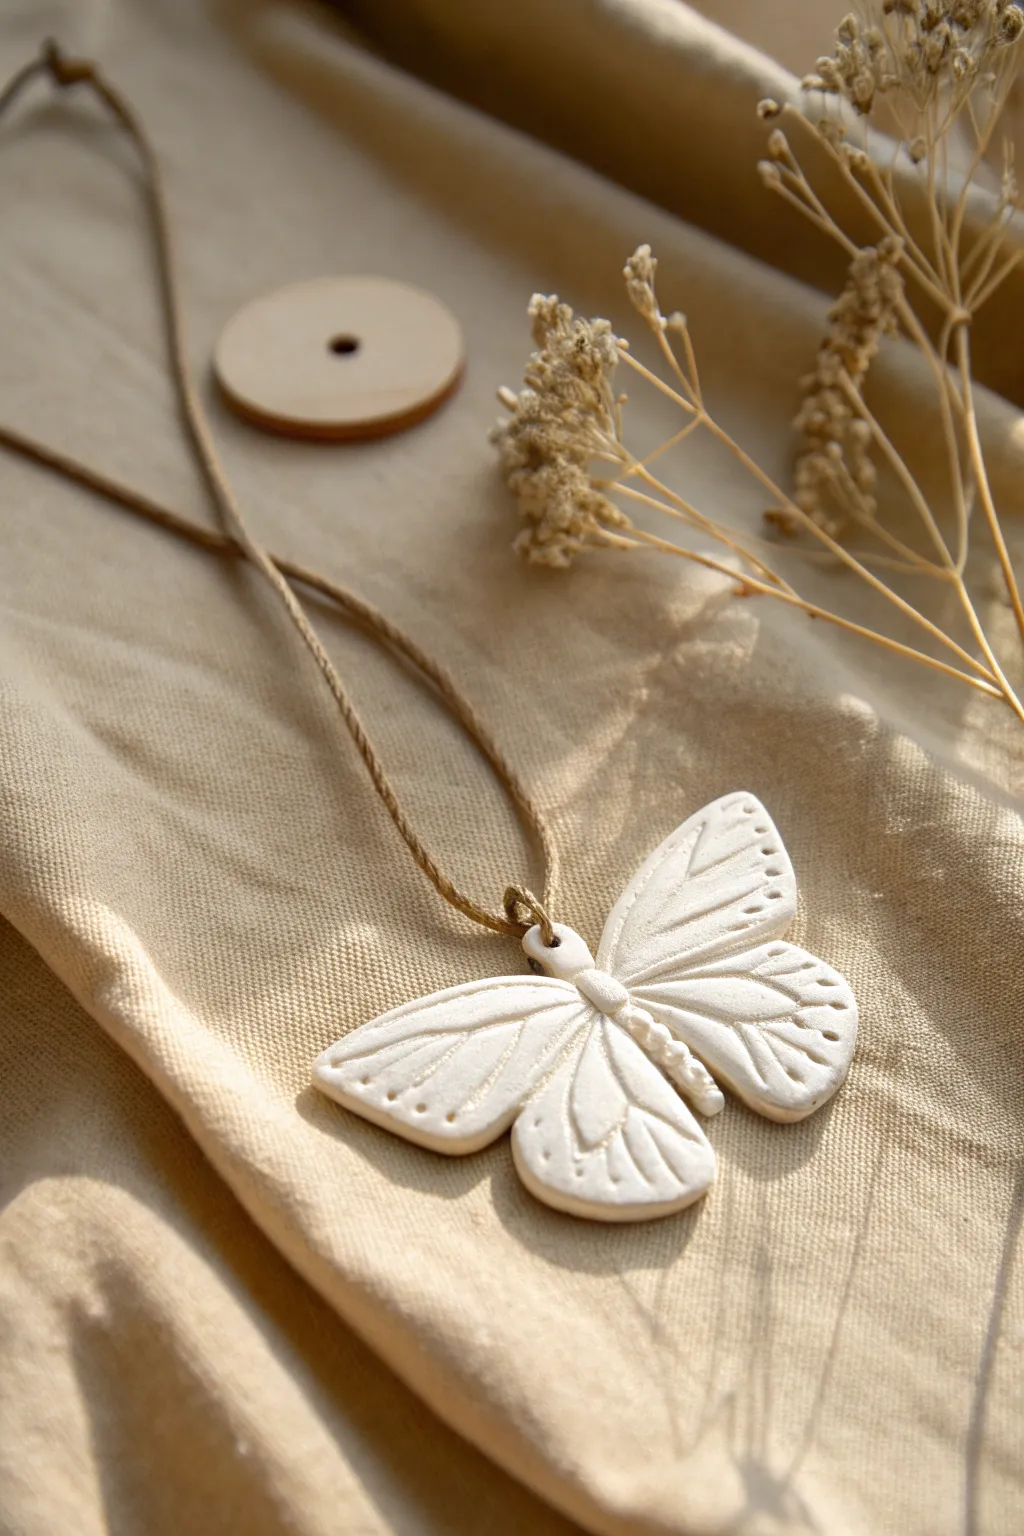
Capture the delicate beauty of nature with this simple yet stunning clay pendant project. Featuring clean symmetry lines and a minimalist white finish, this handcrafted piece adds a touch of bohemian elegance to any outfit.
Step-by-Step Tutorial
Materials
- White styling clay (air-dry clay, polymer clay, or white cold porcelain)
- Rolling pin
- Parchment paper or silicone mat
- Butterfly template (drawing or printed)
- Needle tool or toothpick
- Modeling tool (small rounded tip)
- X-acto knife or craft scalpel
- Fine-grit sandpaper (400-600 grit)
- Twine or hemp cord
- Straw or small circle cutter (for hole)
- Matte varnish (optional)
Step 1: Shaping the Base
-
Condition the clay:
Start by kneading a small ball of your white clay until it is soft, pliable, and free of cracks. Warmth from your hands will help smoothen the consistency. -
Roll out the slab:
Place your clay on parchment paper to prevent sticking. Use a rolling pin to flatten the clay into an even slab, aiming for a thickness of about 4-5mm. -
Trace or draft the shape:
Lightly place your paper butterfly template onto the clay. You can gently trace around it with a dull pencil to leave an impression, or if you feel confident, freehand the outline directly. -
Cut the silhouette:
Using your craft knife or scalpel, carefully cut along the outline of the butterfly. Keep the blade vertical to ensure clean, straight edges rather than beveled ones. -
Smooth the edges:
Dip your finger in a tiny bit of water (for air-dry clay) or baby oil (for polymer) and gently run it along the cut edges to soften any harsh sharpness.
Symmetry Hack
Draw your design on one half of the clay, then gently fold the paper template over to impress slightly on the other side before carving.
Step 2: Adding Details
-
Create the body:
Roll a very thin, small tapered coil of fresh clay. Place this vertically in the center of your butterfly shape to form the thorax and abdomen. -
Blend the body:
Gently press the body coil onto the base. Use a small modeling tool to smooth the edges of this coil so it adheres firmly to the wings without flattening the rounded top. -
Add segmentation:
Press horizontal lines across the lower part of the body using the side of your needle tool to create a segmented insect texture. -
Mark the symmetry lines:
Using a needle tool, draw the main veins of the wings. Start from the body and pull the lines outward toward the wing tips, pressing deep enough to see but not cut through. -
Emboss smaller veins:
Add shorter, branching lines inside the wing sections for realistic detailing. I prefer to vary the pressure here—lighter touch for the smaller veins creates nice depth. -
Create the heavy indentations:
Use a rounded modeling tool to press deeper grooves between the major wing sections, giving the pendant a slightly sculpted, 3D relief effect. -
Add decorative stippling:
Poke a series of small, evenly spaced holes along the outer edges of the wings using your needle tool. This adds a lovely decorative border. -
Punch the hanging hole:
Use a straw or a small circle cutter to remove a clean hole at the very top of the butterfly’s head or upper wing area for the cord.
Cracking Clay?
If small cracks appear while drying air-dry clay, mix a tiny bit of fresh clay with water to make a paste and fill the gaps, then sand smooth.
Step 3: Finishing Touches
-
Dry or bake:
Follow your specific clay’s instructions. For air-dry clay, let it sit for 24-48 hours, flipping it occasionally for even drying. For polymer, bake at the manufacturer’s recommended temperature. -
Refine the surface:
Once fully cured and hard, gently sand the edges and surface with fine-grit sandpaper to remove any fingerprints or rough burrs. -
Seal (Optional):
To protect the white finish from dirt, apply a thin coat of matte varnish. This keeps the natural look while adding durability. -
String it up:
Cut a length of hemp or natural twine. Thread it through the hole you created. -
Secure the cord:
Tie a simple knot at the base of the pendant if you want it fixed in place, and knot the ends of the cord to your desired length to complete the necklace.
Enjoy wearing your handcrafted piece of nature or gift it to someone special who loves organic style

TRACK YOUR CERAMIC JOURNEY
Capture glaze tests, firing details, and creative progress—all in one simple printable. Make your projects easier to repeat and improve.
Layered Butterfly Wings for 3D Pop
Capture the delicate beauty of a butterfly using sturdy, stone-effect clay for a piece that feels both organic and modern. This project uses simple sculpting techniques to create detailed veins and lifelike dimension without requiring advanced tools.
How-To Guide
Materials
- Stone-effect polymer clay (e.g., Fimo granite or Sculpey granite)
- Small rolling pin
- Paper template of a butterfly wing
- X-Acto knife or craft scalpel
- Modeling tool with a small ball end
- Needle tool or toothpick
- Small piece of cardstock or loose paper
- Baking sheet with parchment paper
- Oven (if using polymer clay)
Step 1: Shaping the Wings
-
Condition the clay:
Begin by kneading your stone-effect clay until it is pliable and warm. This particular type of clay can be a bit crumbly at first, so take your time working it until it holds together well without cracking. -
Roll flat sheets:
Roll the clay out onto a non-stick surface to a thickness of about 3-4mm. You want it substantial enough to support its own weight but thin enough to look delicate. -
Cut the wing shapes:
Place your paper butterfly template onto the rolled clay. Using your scalpel, carefully cut around the outline. Trace and cut the two large upper wings and the two smaller lower wings separately. -
Smooth the edges:
Gently run your finger along the cut edges of the clay wings to soften the sharp cut lines. This gives the finished piece a more natural, organic appearance rather than a harsh cutout look. -
Create main veins:
Using a blunt needle tool or a dull knife edge, lightly press the primary vein lines into the wings. Start from the base (where the wing attaches to the body) and radiate outward. -
Detail secondary veins:
Add smaller, branching veins between the main lines. Vary the pressure slightly so these lines are fainter than the primary veins. -
Add texture:
Take your needle tool and prick tiny, shallow holes along the outer margins of the upper wings for extra detail, mimicking the patterns found on real butterfly wings.
Clean Cuts Only
If your scalpel drags the clay, dip the blade in cool water or cornstarch before cutting. This prevents sticking and keeps your wing edges crisp.
Step 2: Assembly and Dimension
-
Form the body:
Roll a small log of clay for the butterfly’s body. Taper it slightly at the tail end and leave a distinct rounded section at the top for the head. -
Texture the body:
Lightly stipple the surface of the body using the needle tool to give it a fuzzy, insect-like texture. -
Attach the lower wings:
Press the two lower wings gently onto the underside of the body piece. You can use a tiny drop of liquid clay or scoring to ensure a strong bond. -
Attach the upper wings:
Position the larger upper wings so they slightly overlap the top edge of the lower wings. Press them firmly into the side of the body. -
Support the lift:
The key to the 3D ‘pop’ is drying position. Place folded pieces of cardstock or crumpled paper underneath the wings to prop them up at an angle while you work. I usually aim for a V-shape. -
Blend the seams:
Use your small ball tool to gently blend the clay where the wings meet the body, ensuring there are no visible gaps and the connection is seamless. -
Refine the head:
Define the head area by slightly pinching the neck. Use the needle tool to mark where the eyes would be. -
Add antennae:
Roll out two very thin filaments of clay. Carefully attach them to the top of the head. Curve them gently outward for a natural look. -
Final check:
Look over the sculpture for any fingerprints. Gently buff them out or add texture over them. Ensure the wings are still symmetrical and supported by your paper props. -
Bake:
Bake the butterfly according to your clay manufacturer’s instructions. Leave the paper props in place while baking—paper won’t burn at the low temperatures required for polymer clay.
Drooping Wings?
If wings sag before baking, use stiffer cardstock folded into a ‘V’ shape underneath. Don’t remove these supports until the clay is 100% cool.
Once cooled, your granite-style butterfly is ready to perch on a shelf or be glued to a planter for a permanent touch of nature
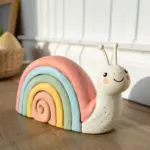
Butterfly With Coiled Body Segments
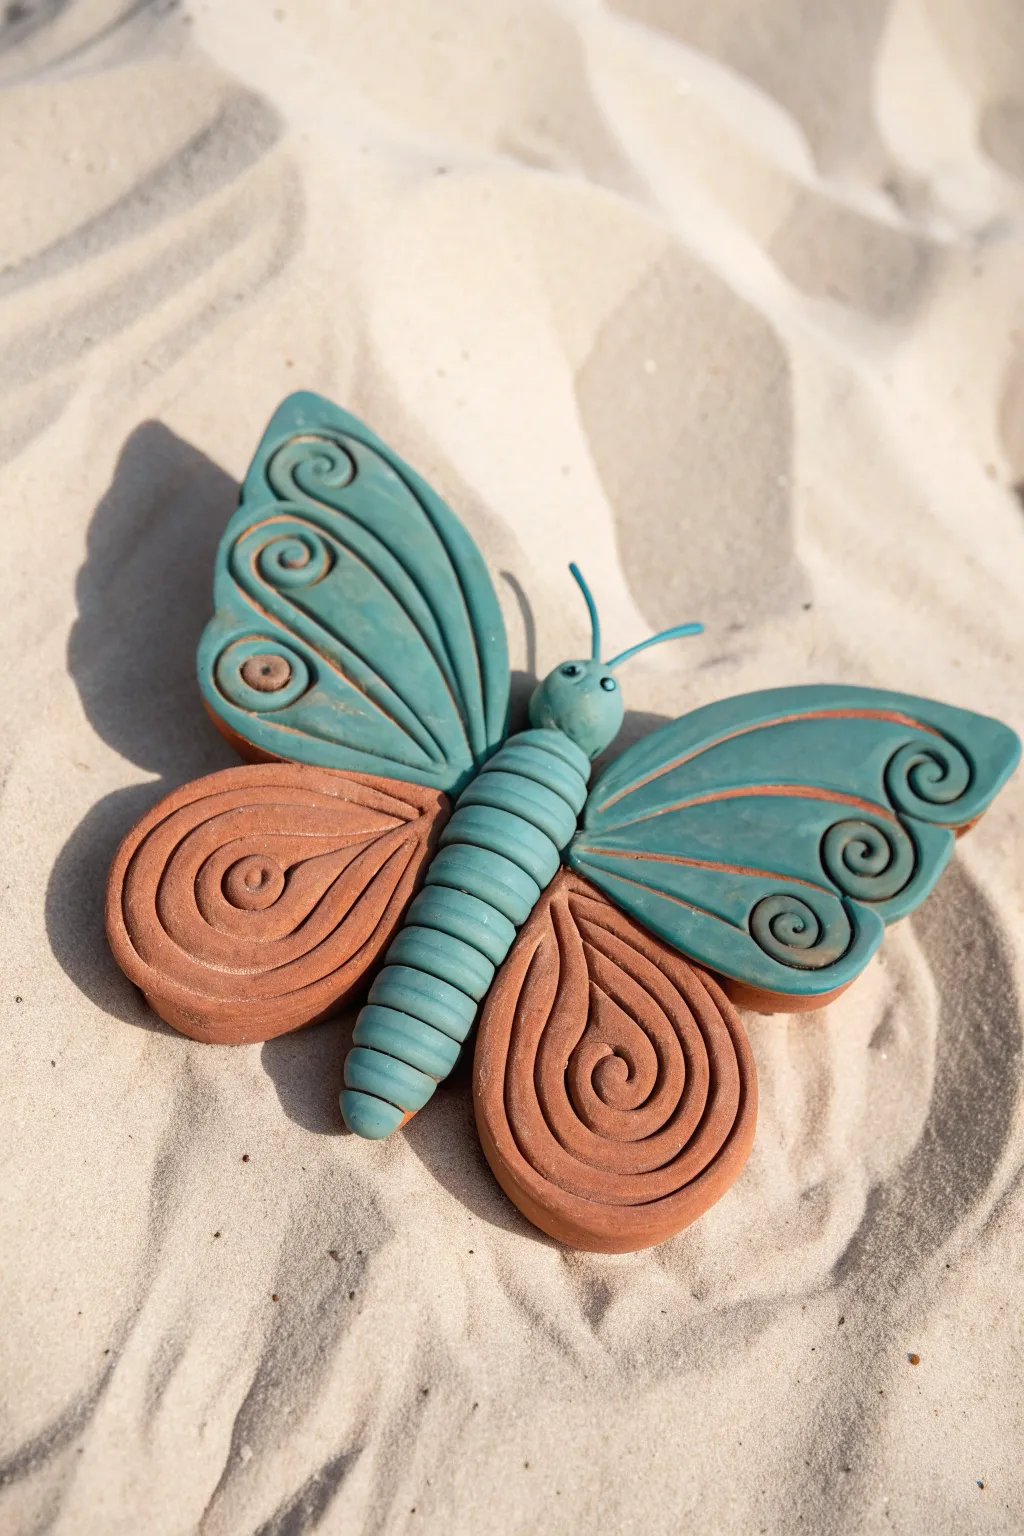
This charming garden sculpture combines earthy terracotta tones with a splash of cool turquoise for a whimsical, nature-inspired look. The standout feature is its segmented body, created by stacking individual clay coils to form a caterpillar-like texture.
Step-by-Step Tutorial
Materials
- Polymer clay or air-dry clay (Terracotta color)
- Polymer clay or air-dry clay (Turquoise/Teal color)
- Clay carving tools (needle tool, small ball stylus)
- Rolling pin
- Cutting blade or craft knife
- Strong craft glue or liquid clay (if using polymer)
- Gloss varnish (optional)
Step 1: Creating the Segmented Body
-
Form the base core:
Start by rolling a small log of scrap clay or solid turquoise clay to act as the core support for the body. This should be about 3 inches long and tapered slightly at the tail. -
Roll turquoise coils:
Take your turquoise clay and roll out a long, even ‘snake’ about the thickness of a pencil. -
Wrap the segments:
Instead of one long spiral, cut individual rings from your coil snake. Wrap each ring around your base core, stacking them snugly against each other from the tail moving upward to create distinct segments. -
Smooth the seams:
Where the ends of each ring meet on the underside of the body, gently blend the clay together so it doesn’t unravel. -
Shape the head:
Roll a smooth, round ball of turquoise clay for the head. Attach it firmly to the top of your stacked body segment. -
Add facial details:
Use a small ball stylus to poke two indentations for eyes. Roll two very thin short strips of turquoise clay for antennae and attach them to the top of the head.
Cracking at the Seams?
If your clay cracks where the wings join the body, use a ‘snake’ of clay underneath the junction as a hidden reinforcement bridge to strengthen the bond.
Step 2: Sculpting the Wings
-
Prepare the wing slabs:
Roll out a slab of terracotta clay and a slab of turquoise clay to about 1/4 inch thickness. -
Cut the wing shapes:
Cut out four teardrop shapes for the wings. You will need two larger shapes for the upper wings (turquoise) and two slightly rounder shapes for the lower wings (terracotta). -
Create the lower wing texture:
For the terracotta lower wings, use a carving tool to impress a large spiral design starting from the center and swirling outward. I find using a ball-tipped tool creates a smoother groove than a sharp needle. -
Modify the upper wings:
Take your turquoise upper wings and refine the shape to be slightly pointed at the top outer corner. -
Add upper wing swirls:
Roll three thin snakes of turquoise clay. Coil them into tight spirals and press them onto the outer edge of the upper wing to create raised relief details. -
Carve the rays:
Use a needle tool or knife to carve deep grooves radiating from the inner corner (where the body will be) out toward the spiral edges on the upper wings. -
Add the accent dot:
Press a small disk of terracotta clay into the lower section of the upper wing for a decorative ‘eye spot’ contrast.
Step 3: Assembly and Finishing
-
Attach wings to body:
Press the wings firmly against the sides of the segmented body. If using polymer clay, a dab of liquid clay helps; for air-dry, scratch the connection points and use a little water/slip. -
Curve the wings:
Before the clay sets, gently lift the outer edges of the wings upward to give the butterfly a sense of movement and flight, rather than lying completely flat. -
Cure or dry:
Bake your piece according to the polymer clay package directions, or let it air dry completely (usually 24-48 hours) in a safe, dry spot. -
Final touches:
Once fully cured or dry, you can lightly sand any rough fingerprints. Brush on a matte or satin varnish if you want to protect the finish for outdoor use.
Smoother Spirals
To get perfectly smooth spirals without fingerprints, lightly dampen your finger with water (for air-dry) or baby oil (for polymer) while smoothing the coils.
Place your finished butterfly in a potted plant or on a shelf to add a peaceful, artistic touch to your space
Butterfly Antennae With Curled Tips

This rustic butterfly sculpture combines warm, terracotta-toned clay with clean white accents for a beautiful contrast. The standout feature is the elegant, curly wire antennae that give the piece a whimsical, handcrafted charm perfect for wall decor.
Detailed Instructions
Materials
- Terracotta colored polymer or air-dry clay
- White polymer or air-dry clay
- Copper or rust-colored craft wire (18-20 gauge)
- Round nose pliers
- Rolling pin or clay roller
- Clay knife or craft blade
- Small ball stylus tool
- Strong craft glue (if using air-dry clay)
- Small dotting tool or toothpick
- Liquid clay or ‘bake and bond’ (if using polymer clay)
Step 1: Creating the Base Wings
-
Preparing the clay:
Condition your terracotta-colored clay until it is soft and pliable. Roll it out to an even thickness of about 1/4 inch (6mm) to ensure sturdiness. -
Drafting the shape:
Lightly sketch a butterfly outline onto the clay slab or use a paper template. You’ll need two distinct upper wing sections and two smaller, rounded lower wing sections. -
Cutting the wings:
Use your craft knife to carefully cut out the four wing shapes. Smooth the edges with your finger to remove any sharp cuts or stray bits of clay. -
Adding texture:
Around the outer edges of each wing, create a decorative border. Firmly press a small ball stylus or the end of a paintbrush into the clay to make evenly spaced circular indentations.
Wire Wiggle Fix
If the antennae feel loose inside the raw clay, create a tiny hook or “L” shape at the hidden end before inserting. This anchors the wire inside the clay body so it can’t slide out.
Step 2: Adding the White Accents
-
Rolling the white clay:
Clean your hands thoroughly to avoid staining, then condition and roll out the white clay much thinner than the base, approximately 1/8 inch. -
Shaping the teardrops:
Cut or mold elongated teardrop shapes. You will need larger ones for the upper wings and slightly smaller, curvier ones for the lower wings. -
Attaching the accents:
Place the white teardrops onto the terracotta wings. If using polymer clay, a tiny dab of liquid clay helps them adhere; for air-dry clay, score the back slightly and add a touch of water or slip. -
Detailing the white sections:
Use a needle tool or toothpick to draw a subtle central vein down the middle of each white teardrop, adding little dots along the line for extra texture.
Step 3: Body and Assembly
-
Forming the body:
Roll a log of terracotta clay for the butterfly’s body. I suggest tapering one end to a point for the tail and keeping the head slightly rounded. -
Detailing the body:
Using a knife, press horizontal lines across the lower abdomen to create segmentation. Use a small tool to indent two eyes on the head. -
Wing attachment:
Press the wings gently onto the underside of the body. Blend the clay where they meet the body underneath to ensure a strong bond, or use glue after baking/drying.
Antique Finish
Once the clay is fully cured, rub a tiny amount of brown acrylic paint into the textured dots and crevices, then wipe the surface clean with a damp cloth to age the piece.
Step 4: The Curled Antennae
-
Cutting the wire:
Cut two equal lengths of copper-colored wire, roughly 4-5 inches each. -
Curling the tips:
Grip the very end of one wire with your round nose pliers. Rotate your wrist to curl the wire inward into a tight spiral, creating that signature whimsical look. -
Shaping the stem:
Gently curve the remaining straight part of the wire so it arches outward naturally. -
Insertion:
Insert the straight ends of the antennae deep into the top of the clay head. If the clay is soft, you can bake/dry it with the wire in place; otherwise, drill small holes after hardening and glue them in.
Hang your finished butterfly on a wall or place it on a shelf to bring a touch of earthy nature indoors
Monarch-Inspired Butterfly Wing Pattern
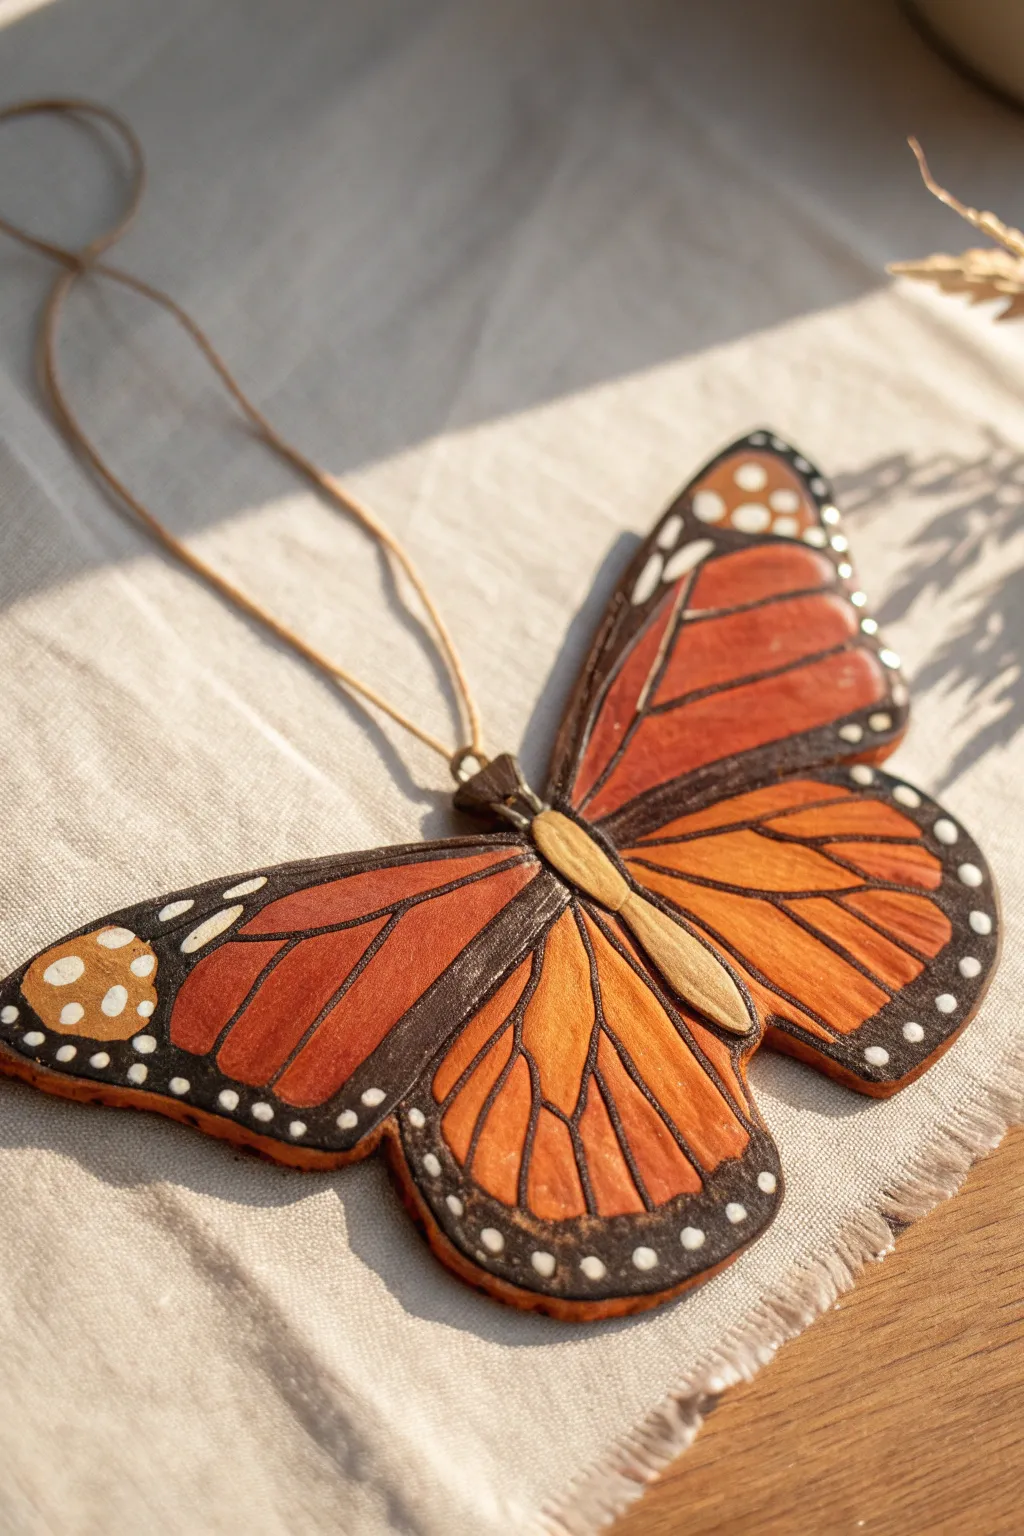
Capture the delicate beauty of a Monarch butterfly with this surprisingly sturdy clay ornament. With its warm burnt orange tones and intricate black veining, this project combines simple sculpting with detailed painting to create a keepsake that looks almost ready to take flight.
Step-by-Step
Materials
- White or terracotta air-dry clay (or polymer clay)
- Butterfly wing template (printed or hand-drawn)
- Rolling pin
- X-acto knife or clay scalpel
- Carving tool or needle tool
- Acrylic paints (bright orange, burnt sienna, black, white, gold/yellow)
- Fine detail paintbrushes (sizes 0 and 00)
- Small metal screw eye pin
- Jute twine or waxed cord
- Fine-grit sandpaper
- Matte or satin varnish
Step 1: Shaping the Form
-
Prepare the clay slab:
Begin by conditioning your clay until it is smooth and pliable. Roll it out on a non-stick surface to a uniform thickness of about 1/4 inch (6mm). If you want the butterfly to be sturdier, keep it slightly thicker in the center. -
Cut the silhouette:
Place your butterfly template lightly onto the clay. Using your X-acto knife, carefully trace around the entire outline, cutting cleanly through the slab. remove the excess clay and smooth the raw edges with a damp finger. -
Define the body:
Roll a small, thin snake of clay for the butterfly’s body. Place this directly down the center of your wing shape. Use a sculpting tool to blend the underside of the body onto the wings so it attaches securely, leaving the top distinct and rounded. -
Add texture and suspension:
Use a needle tool to gently scribe lines into the body to mimic segments. At the very top of the head, carefully insert the metal screw eye pin. Twist it in securely; adding a tiny dab of fluid clay or glue on the threads can help it hold. -
Dry and refine:
Allow the clay to dry completely according to the package instructions (usually 24-48 hours for air-dry clay). Once solid, use fine-grit sandpaper to gently smooth any rough edges on the wing tips, but accept the organic feel of the material.
Step 2: Painting the Details
-
Base coat the wings:
Mix a bright orange with a touch of burnt sienna to get that rich Monarch hue. Paint the wing sections, leaving a small gap where the black veins will go, although full coverage works too since the black will cover it. -
Paint the body:
Paint the central body segment a pale yellow-gold or tan color, distinct from the wings. It creates a nice visual center before we add the darker details. -
Draft the veins:
Using a very faint pencil line, sketch out the characteristic vein pattern of a Monarch. This acts as a roadmap so your painting remains symmetrical on both sides. -
Apply the black borders:
Load a fine brush with opaque black acrylic. Carefully paint the thick borders around the outer edges of all four wing sections. I find it easiest to anchor my pinky finger on the table to keep my hand steady for these curves. -
Paint interior veins:
Switch to your finest detail brush (size 00). Paint the thin black veins radiating from the body to the outer borders. Keep the pressure light to maintain thin, delicate lines. -
Add the signature dots:
Dip the non-brush end (the handle tip) or a dotting tool into white paint. Gently stamp clusters of small white dots along the thick black outer borders of the wings. Vary the sizes slightly for a natural look. -
Highlight the body:
Add a very thin wash of brown paint into the crevices of the body segments to emphasize the texture you carved earlier.
Paint Smudges?
If black paint strays onto the orange, wait for it to dry completely. Then, carefully paint over the mistake with opaque orange paint to cover it up.
Step 3: Finishing Touches
-
Seal the artwork:
Once the paint is thoroughly dry, apply a coat of matte or satin varnish. This protects the paint from chipping and gives the clay a finished, professional sheen. -
String it up:
Thread a length of jute twine or waxed cord through the metal eyelet at the top. Tie a secure knot, creating a loop long enough to hang on a branch or hook.
Natural Texture
Before the clay dries, gently press a real leaf onto the surface. This imprints subtle veins that add incredible depth once painted.
Hang your finished butterfly near a window where the light can highlight the rich colors of your handiwork
Fantasy Butterfly in Pastel Gradient
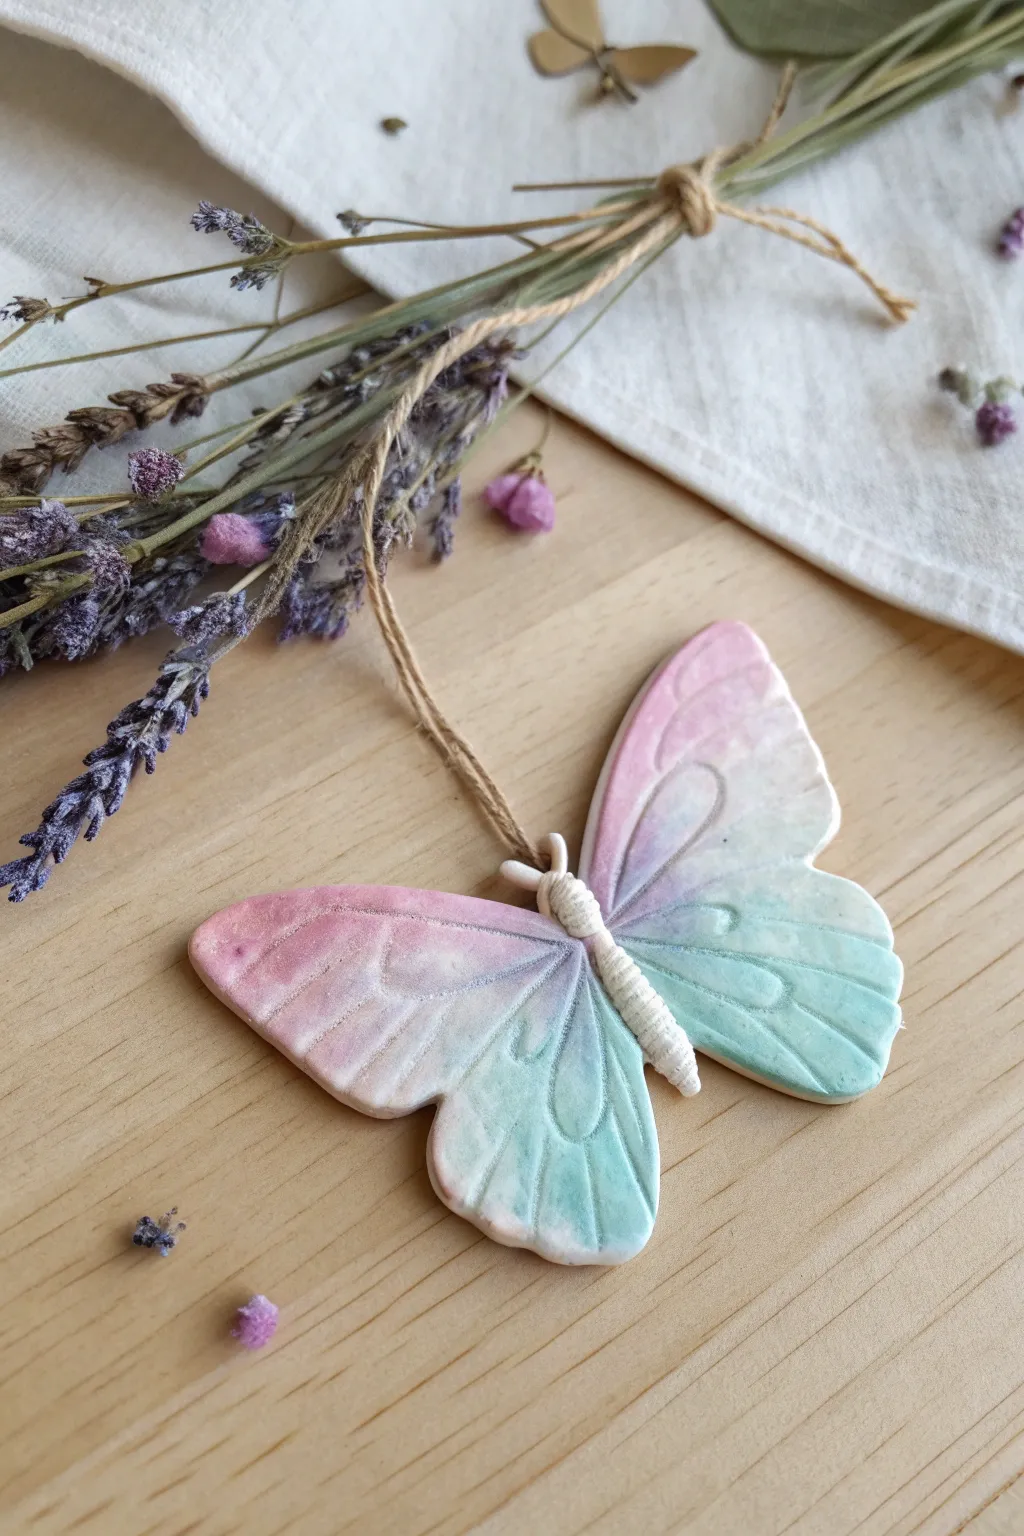
Capture the delicate beauty of spring with this soft, gradient-hued butterfly ornament. Using blended pastel clay and simple texturing techniques, you’ll create a dreamlike piece perfect for hanging on branches or gifting.
Step-by-Step Tutorial
Materials
- White air-dry clay or polymer clay
- Pink and teal soft pastels (chalk style) or powdered pigments
- Soft paintbrush for dusting
- Butterfly cookie cutter or paper template
- Clay roller or rolling pin
- Basic clay sculpting tools (needle tool or toothpick)
- Natural jute twine
- Fine-grit sandpaper
- Matte sealant or varnish (optional)
Step 1: Shaping the Base
-
Preparation:
Begin by conditioning your white clay until it is soft and malleable. Roll it out into a smooth slab approximately 1/4 inch thick, ensuring an even surface without cracks. -
Cutting the Shape:
Press your butterfly cutter firmly into the clay. If you are using a paper template, lay it gently on the slab and carefully trace around it with a needle tool to cut out the silhouette. -
Smoothing Edges:
Lift the butterfly shape and gently run your finger dipped in a little water (for air-dry clay) or baby oil (for polymer) along the cut edges to soften any harsh lines. -
Piercing the Hole:
Use a needle tool or toothpick to create a small hole near the top center of the butterfly, right where the wings meet the body. Wiggle the tool slightly to ensure the hole is large enough for your twine.
Step 2: Texturing and Coloring
-
Creating Wing Segment Lines:
With a sculpting tool or a dull knife, lightly press indented lines into the wings to mimic veins. Curve these lines outward from the body toward the wing tips for a natural look. -
Detailing the Body:
Roll a very thin snake of clay for the butterfly’s central body. Place it down the center and press lightly to adhere. Use a needle tool to press horizontal lines across this body segment to give it a ribbed texture. -
Applying the Pink Gradient:
Scrape some dust from your pink soft pastel stick. Using a soft, dry brush, pick up the pigment and gently tap it onto the upper sections of the wings. -
Applying the Teal Gradient:
Repeat the process with teal pastel dust, concentrating heavily on the bottom wing tips and fading upward. I like to let the colors overlap slightly in the middle to create a soft purple transition. -
Softening the Blend:
Take a clean, dry brush or your finger and very gently rub the pigments into the raw clay to blur any harsh specks and set the gradient deep into the surface.
Pigment isn’t sticking?
If the clay is too dry, the chalk dust won’t adhere. Lightly mist air-dry clay with water or wipe polymer clay with a tiny bit of baby oil before brushing on the powder.
Step 3: Finishing Touches
-
Drying or Baking:
Follow your specific clay’s instructions. If baking polymer clay, place it on a parchment-lined sheet. For air-dry clay, let it sit in a cool, dry place for 24-48 hours, flipping it occasionally to prevent warping. -
Sanding:
Once fully cured, check the edges for any rough spots. Use fine-grit sandpaper to lightly buff the rim of the wings for a professional, smooth finish. -
Adding the Antenna:
Cut a short piece of jute twine. Fold it in half to create a loop for hanging, but tie a knot about half an inch down to simulate the antenna feel. -
Creating the Wrapped Body:
Instead of a clay body, you can wrap twine around the center indentation as shown in the image. Thread the twine through the hole, wrap it snugly around the center ‘waist’ of the butterfly several times, and secure with a dab of glue on the back. -
Final Assembly:
Tie off the ends of your twine loop securely. If you want to protect the pastel dust from smudging, apply a very thin coat of matte spray varnish over the wings.
Add some shimmer
Mix a pinch of pearlescent mica powder into your pastel dust before applying. It gives the wings an ethereal, magical glimmer when the light hits them.
Hang your lovely creation near a window and enjoy the peaceful vibe it brings to your space
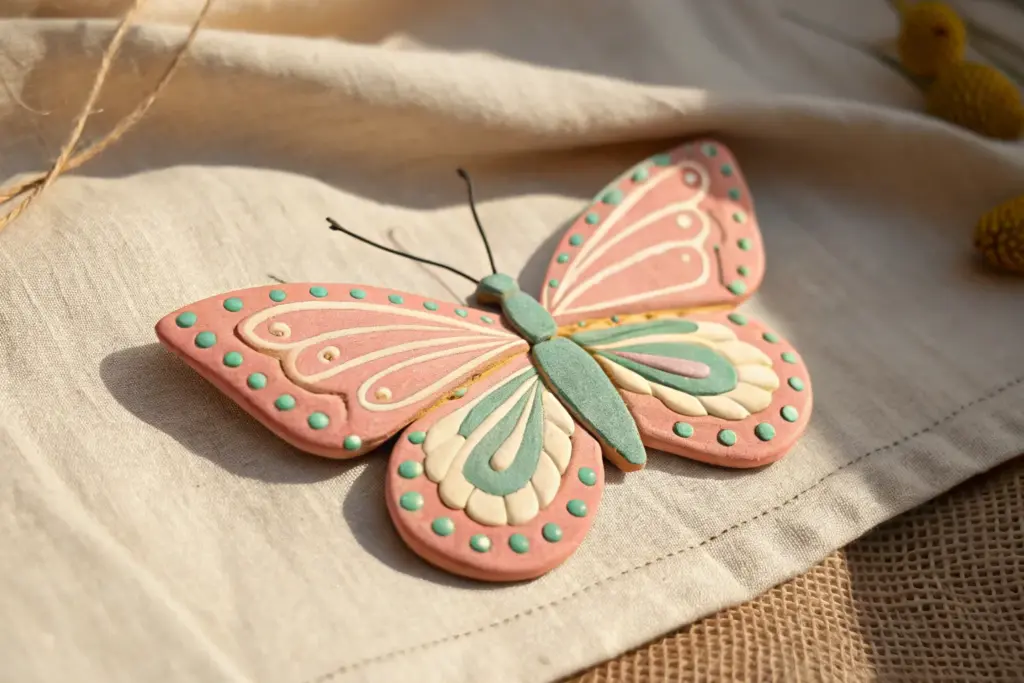
Butterfly With Painted Dot-and-Stripe Details
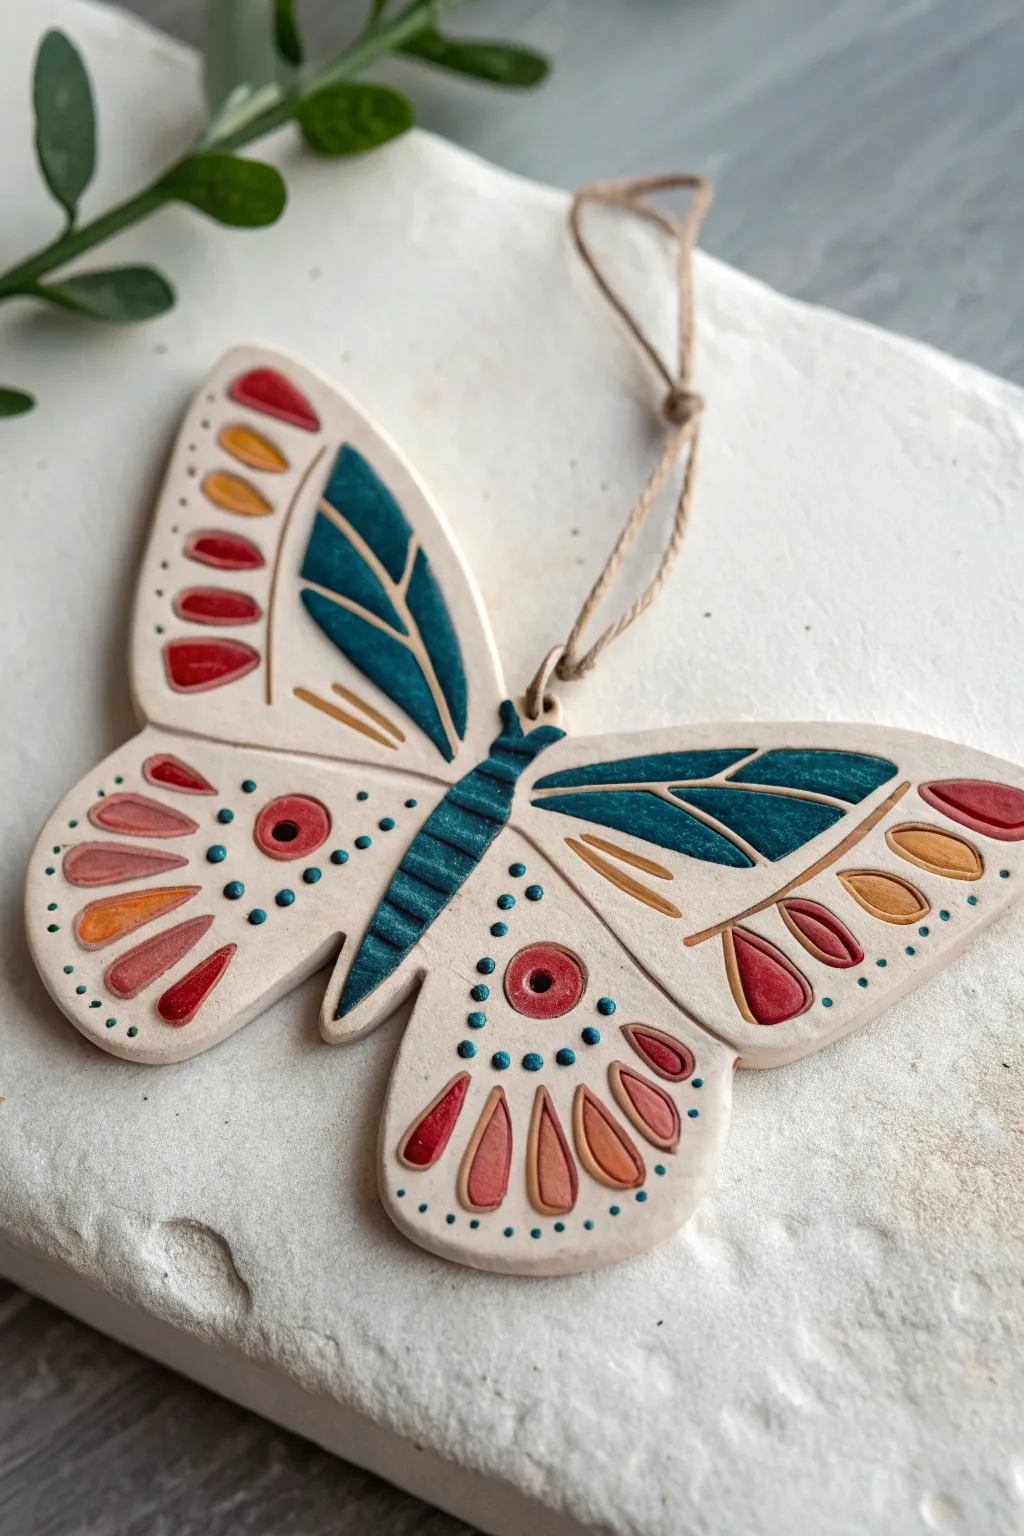
This charming butterfly ornament combines earthy terracotta tones with deep teal accents for a modern bohemian look. Using simple carving techniques and precise painting, you’ll transform plain clay into a detailed keepsake perfect for hanging.
How-To Guide
Materials
- Air-dry clay or polymer clay (white or cream)
- Butterfly cookie cutter (large) or printed template
- Craft knife or scalpel
- Rolling pin
- Needle tool or toothpick
- Fine-grit sandpaper
- Acrylic paints: Deep teal, terracotta/rust, warm yellow-ochre, cream
- Fine detail paintbrushes (sizes 0 and 00)
- Small dotting tool or toothpick
- Matte varnish or sealant
- Jute twine
- Parchment paper
Step 1: Shaping and Carving
-
Roll the clay:
Start by conditioning your clay until it’s pliable, then roll it out on parchment paper to an even thickness of about 1/4 inch (6mm). This thickness ensures the ornament is sturdy enough to hang without being too heavy. -
Cut the shape:
Press your butterfly cutter firmly into the clay. If you don’t have a cutter, place a paper template on top and carefully trace around it with a craft knife to get that classic winged silhouette. -
Smooth the edges:
Dip your finger in a little water and gently run it along the cut edges of the clay to smooth out any roughness or jagged bits left by the cutter. -
Create the hanging hole:
At the very top of the head—or right between the upper wings depending on balance—pierce a hole using a straw or a large needle tool. Make sure it’s wide enough for your jute twine to pass through later. -
Carve the dividing lines:
Using a needle tool, lightly score the lines that separate the body from the wings. I prefer to press the tool in rather than drag it to keep the lines clean and prevent clay crumbs. -
Detail the wing segments:
Lightly etch the large curved shapes on the upper and lower wings where the teal and yellow sections will go. Use the image as a guide to place these curved triangles symmetrically. -
Add texture to the body:
Press horizontal lines across the central body section to create a segmented insect abdomen look. -
Dry and sand:
Allow the clay to dry completely according to the package instructions (usually 24-48 hours for air-dry clay). Once fully hard, gently sand the edges and surface with fine-grit sandpaper for a professional finish.
Clean Lines Hack
If you struggle with steady painting, use an indented carving technique. Press your design deeply into the raw clay.
Step 2: Painting and Assembly
-
Base coat the wings:
Since the clay is already cream, you might leave it raw, but painting a layer of matte cream acrylic provides a better surface for the next colors and seals the porous material. -
Fill the body:
Paint the central body section with deep teal acrylic. Use a steady hand to keep the paint within the segmented lines you carved earlier. -
Paint the upper wing panels:
Fill the large, curved triangular sections on the upper wings with the same deep teal. Use your smallest brush to get crisp edges along the carved borders. -
Add the wing accents:
Paint the smaller teardrop shapes on the lower wings using terracotta/rust and warm yellow-ochre paints. Alternating these colors creates that lovely rhythm seen in the reference. -
Detail the stripes:
Add the thin lines inside the teal wing panels using a very fine liner brush and cream or light yellow paint to mimic veins. -
Create the teal dots:
Dip a small dotting tool or the back of a paintbrush into the teal paint. Carefully place rows of dots along the clear sections of the lower wings, following the curve of the wing edge. -
Add red details:
Paint the small circular ‘eye spots’ on the lower wings with terracotta paint. Once dry, add a tiny dark dot in the center for depth. -
Seal the piece:
Once all paint is thoroughly dry, apply a coat of matte varnish. This protects the intricate paint job and gives the clay a finished, ceramic-like feel without making it too shiny. -
Attach the hanger:
Cut a length of jute twine, thread it through the hole you made earlier, and tie a secure knot to create a hanging loop.
Make it Sparkle
Mix a tiny pinch of gold mica powder into your varnish for the final coat. It adds a subtle shimmer.
Hang your beautiful handmade moth in a sunlit window or on a festive branch to enjoy its earthy charm
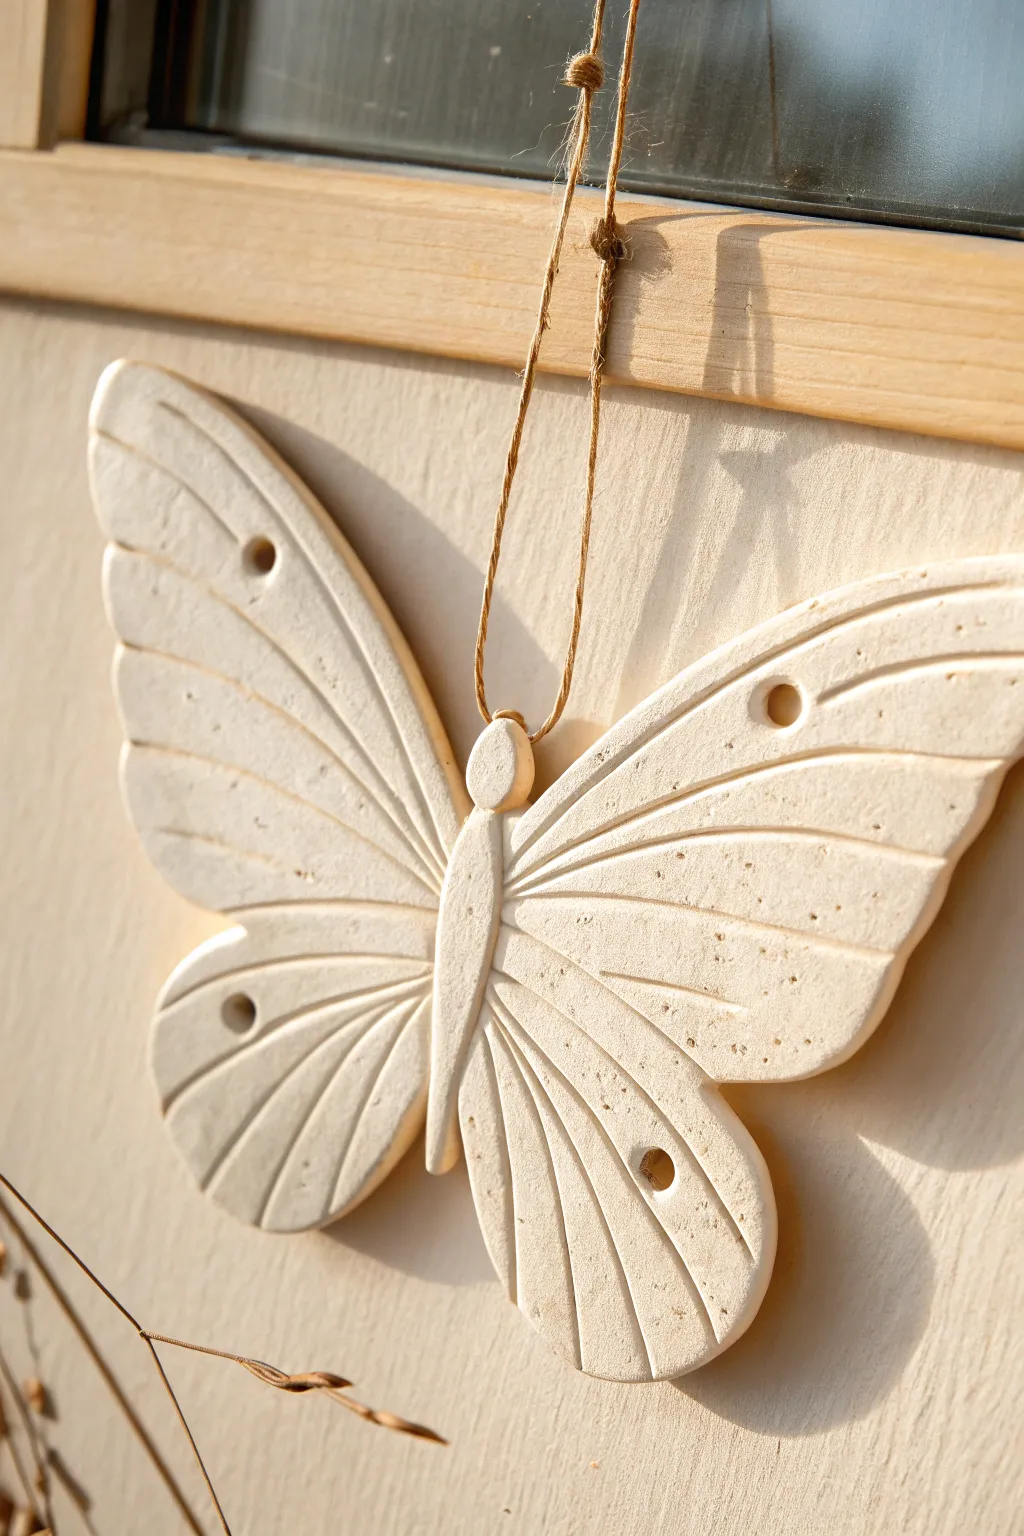
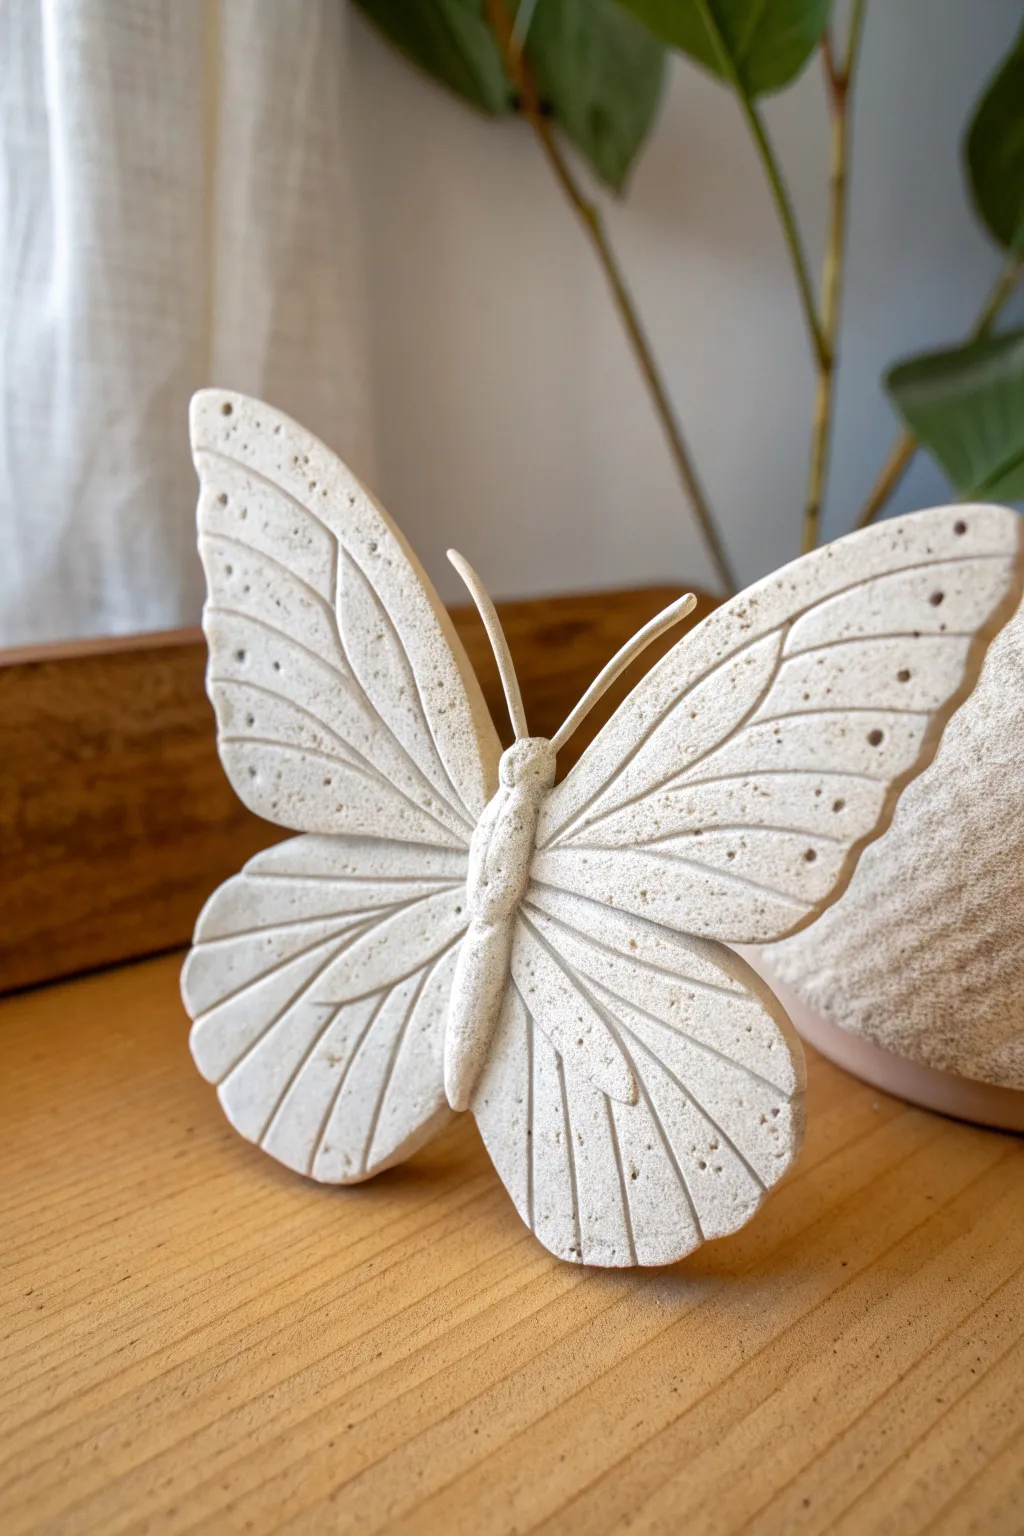
Butterfly Wing Veins Carved for Realism
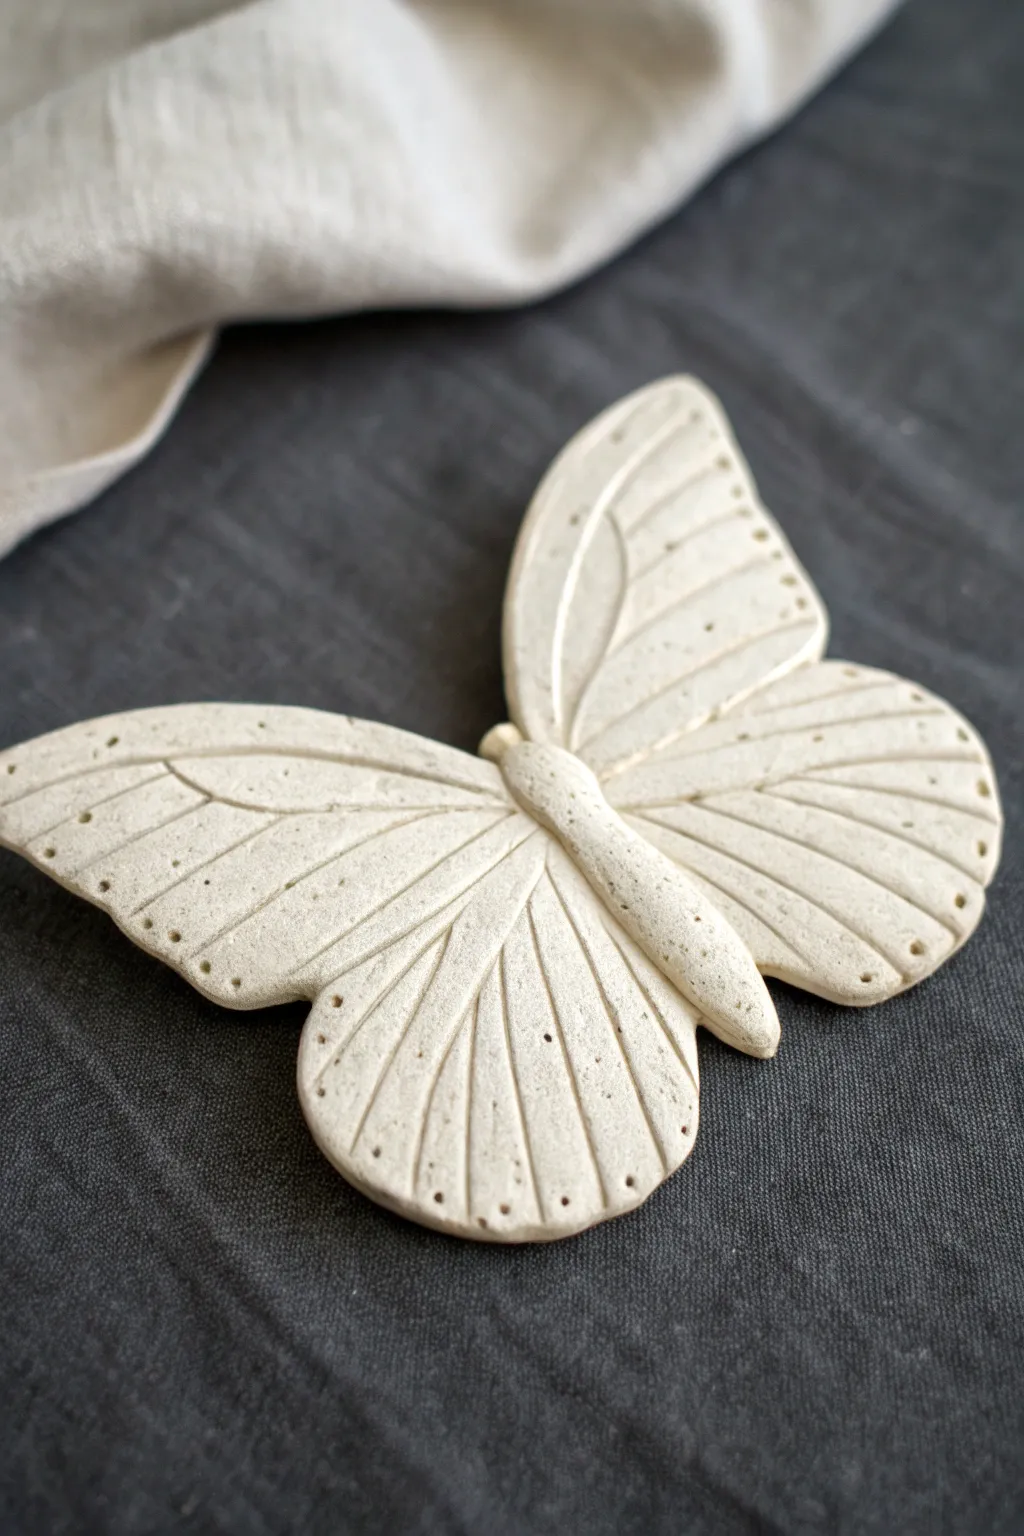
This elegant clay butterfly captures the delicate beauty of nature with realistic, hand-carved wing veins. The light, speckled clay body gives it an organic, fossil-like appearance that adds a serene touch to any space.
Detailed Instructions
Materials
- White or speckled stoneware clay (rolled slab)
- Butterfly paper template
- Fettling knife or craft knife
- Needle tool
- Small carving loop tool
- Modeling tool (rounded tip)
- Smoothing sponge
- Rolling pin
- Canvas or working board
Step 1: Shaping the Base
-
Prepare the Clay Slab:
Begin by rolling out your clay slab to an even thickness of about 1/4 inch. Ensure the clay is smooth and free of air bubbles by compressing it gently with a rib tool. -
Trace the Outline:
Place your butterfly template lightly onto the clay. Using a needle tool, trace the outer silhouette of the butterfly wings and body without cutting all the way through yet. -
Cut the Shape:
Use a fettling knife or sharp craft knife to cut along your traced lines. Make sure to hold the knife vertically to get clean, straight edges. -
Smooth the Edges:
Once the shape is cut, dip your finger or a small sponge in water and run it along the cut edges to soften any sharpness or burrs left by the knife.
Clean Lines Tip
Wait until the clay is leather hard before doing the final deep carving. The clay will be firmer and won’t drag, resulting in much cleaner, crisper vein lines.
Step 2: Sculpting Dimensions
-
Define the Body:
Roll a small coil of additional clay to form the thorax and abdomen. Score and slip the center of the wings, then attach this coil to create a raised, cylindrical body. -
Blend the Body:
Use a modeling tool to seamless blend the edges of the added body coil into the wings so it looks like one cohesive piece rather than stuck on. -
Create Wing Separation:
Where the forewing meets the hindwing, gently carve a shallow groove or indent to visually separate the upper and lower sections while keeping them attached. -
Lift the Wings:
To give the butterfly a lifelike appearance, gently prop up the wings with small pieces of foam or balled-up paper so they dry at a slight upward angle, simulating flight.
Step 3: Detailing the Veins
-
Mark Main Vein Channels:
Using your needle tool, very lightly sketch the main directional lines where the veins will flow, radiating outward from the body to the wing edges. -
Carve Primary Veins:
Using a needle tool or a very fine carving tool, deepen these sketched lines. I find it helpful to vary the pressure—pressing harder near the body and lightening up near the tips. -
Add Secondary Veins:
Draw shorter, branching veins between the main lines, particularly on the larger forewings, to create that intricate network found in nature. -
Texture the Body:
Lightly stipple the central body piece with a stiff brush or needle tool to differentiate its texture from the smooth wings. -
Add Dotted Details:
Using the tip of a small drill bit or a blunt needle tool, press tiny repeating dots along the outer margins of the wings and along the veins for decorative texture.
Add Color Depth
After bisque firing, apply a dark oxide wash (like iron oxide) and wipe it back. Typical of fossil styles, the dark color will remain deep in the carved veins.
Step 4: Refining and Finishing
-
Softening the Carving:
Carving can leave jagged crumbs of clay. Take a barely damp sponge and wipe it gently over the engraved lines to smooth them without erasing the detail. -
Check Symmetry:
Take a moment to look at the butterfly from directly above to ensure the vein patterns on the left and right wings are roughly symmetrical. -
Final Drying:
Let the piece dry slowly under loose plastic to prevent warping, especially since the wings are propped up. -
Firing:
Fire the piece according to your clay body’s instructions. For this look, a matte white glaze or leaving the raw clay unglazed (if high-fired stoneware) works beautifully.
Once fired, this lovely ceramic creature makes a perfect wall hanging or a serene tabletop accent
Marbled Clay Butterfly Wings
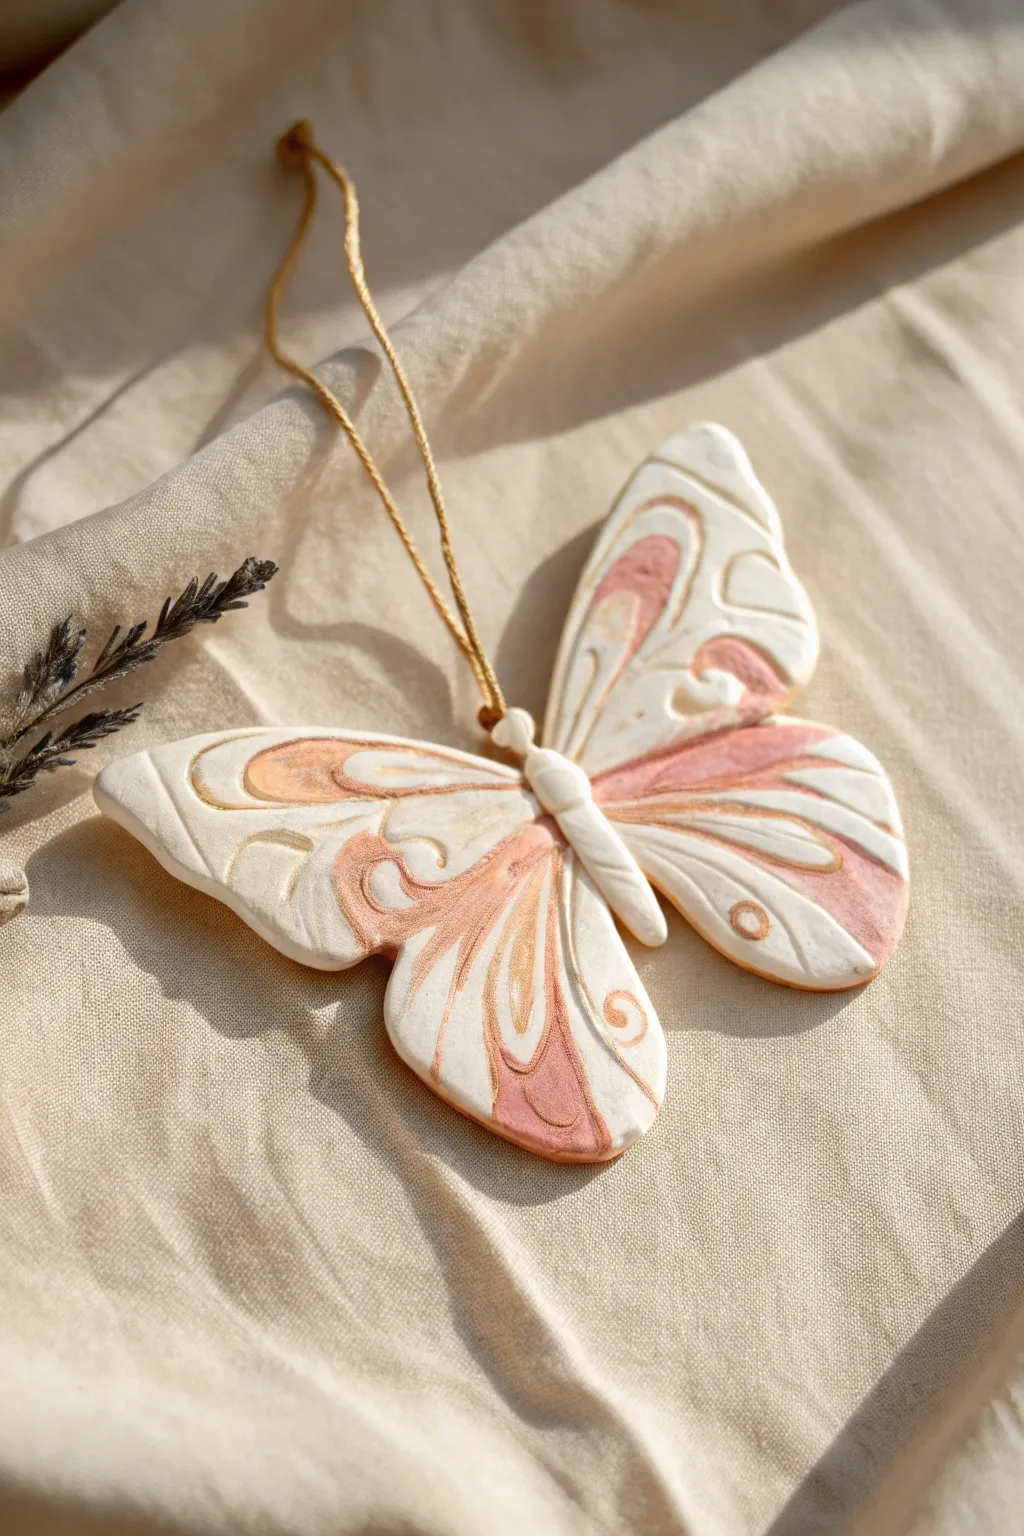
Capture the delicate beauty of a butterfly with this elegant clay ornament, featuring soft swirls of blush and gold. The marbling technique creates organic, one-of-a-kind patterns, while simple carving adds dimension to the wings.
Step-by-Step Tutorial
Materials
- White polymer clay
- Blush pink or light peach polymer clay
- Gold polymer clay or mica powder
- Butterfly shaped cutter (approx. 3-4 inches wide)
- Acrylic rolling pin
- Detail needle tool or toothpick
- Small ball stylus tool
- Twine or gold cord for hanging
- Parchment paper or ceramic tile
- Oven for baking
Step 1: Creating the Marbled Slab
-
Condition the clay:
Begin by kneading your white, blush pink, and gold clays separately until they are soft and pliable. You’ll need about 70% white, 20% pink, and 10% gold for the ratio shown in the photo. -
Form logs:
Roll each color into a thin ‘snake’ or log shape. The white log should be the thickest, while the gold and pink can be thinner. -
Twist together:
Twist the three colored logs together into one large rope. Fold this rope in half and twist it again. -
Repeat and roll:
Repeat the folding and twisting process 2-3 times. Be careful not to over-mix, or the colors will turn muddy instead of distinct swirls. -
Create a ball:
Roll the twisted rope into a tight ball. You should see the distinct striations of color wrapping around the surface. -
Flatten the slab:
Place the ball on your parchment paper or tile. Using the acrylic roller, flatten the ball into a smooth slab about 1/4 inch thick. This thickness ensures the ornament is sturdy but not too heavy.
Muddy Colors?
If your colors are blending into a single greyish tone, you have over-mixed. Stop twisting earlier next time. The distinct lines of color come from barely mixing the clays before rolling.
Step 2: Shaping and Detailing
-
Cut the shape:
Position your butterfly cutter over the most attractive part of the marbled pattern. Press down firmly to cut the shape and gently peel away the excess clay. -
Smooth the edges:
Dip your finger in a tiny bit of water (or baby oil) and gently run it along the cut edges of the butterfly to smooth out any roughness from the cutter. -
Add the body:
Take a small scrap of white clay and roll it into a thin, tapered worm shape for the butterfly’s body. Place this gently down the center line of the wings. -
Texture the body:
Use a knife or needle tool to press horizontal lines across the body segment to mimic the segmented thorax and abdomen of an insect. -
Outline the wings:
Using your needle tool or a small carving tool, gently carve indented lines that follow the curve of the wings. I find that mirroring the wing shape creates the most cohesive look. -
Add deep details:
Carve slightly deeper distinctive teardrop shapes into the upper and lower wings to create ‘cells’ within the wing pattern, exposing the marbled layers beneath. -
Create dots:
Use the ball stylus to press small circular indentations into the tips of the wings for added texture. -
Pierce the hole:
Use a tool to poke a hole through the top of the head area (or through the top wing depending on balance) large enough for your hanging cord.
Gilded Edges
After baking, run a gold leafing pen or brush a tiny bit of gold paint along the carved grooves and the outer edge of the wings to make the details really pop and shine.
Step 3: Finishing Touches
-
Bake the ornament:
Bake the clay according to the manufacturer’s instructions on the package (usually around 275°F/135°C for 15-30 minutes). Let it cool completely inside the oven to prevent cracking. -
Seal (Optional):
If you want a glossy finish or added durability, brush on a thin layer of matte or satin polymer clay varnish. -
Add the hanger:
Thread a length of gold twine or cord through the hole you created earlier. -
Knot the cord:
Tie a secure knot at the base near the butterfly’s head, and then tie the ends together to form a loop for hanging.
Hang your beautiful butterfly creation in a sunny window or on a branch to enjoy its subtle shimmer
Butterfly Cane Slices for Tiny Decorations
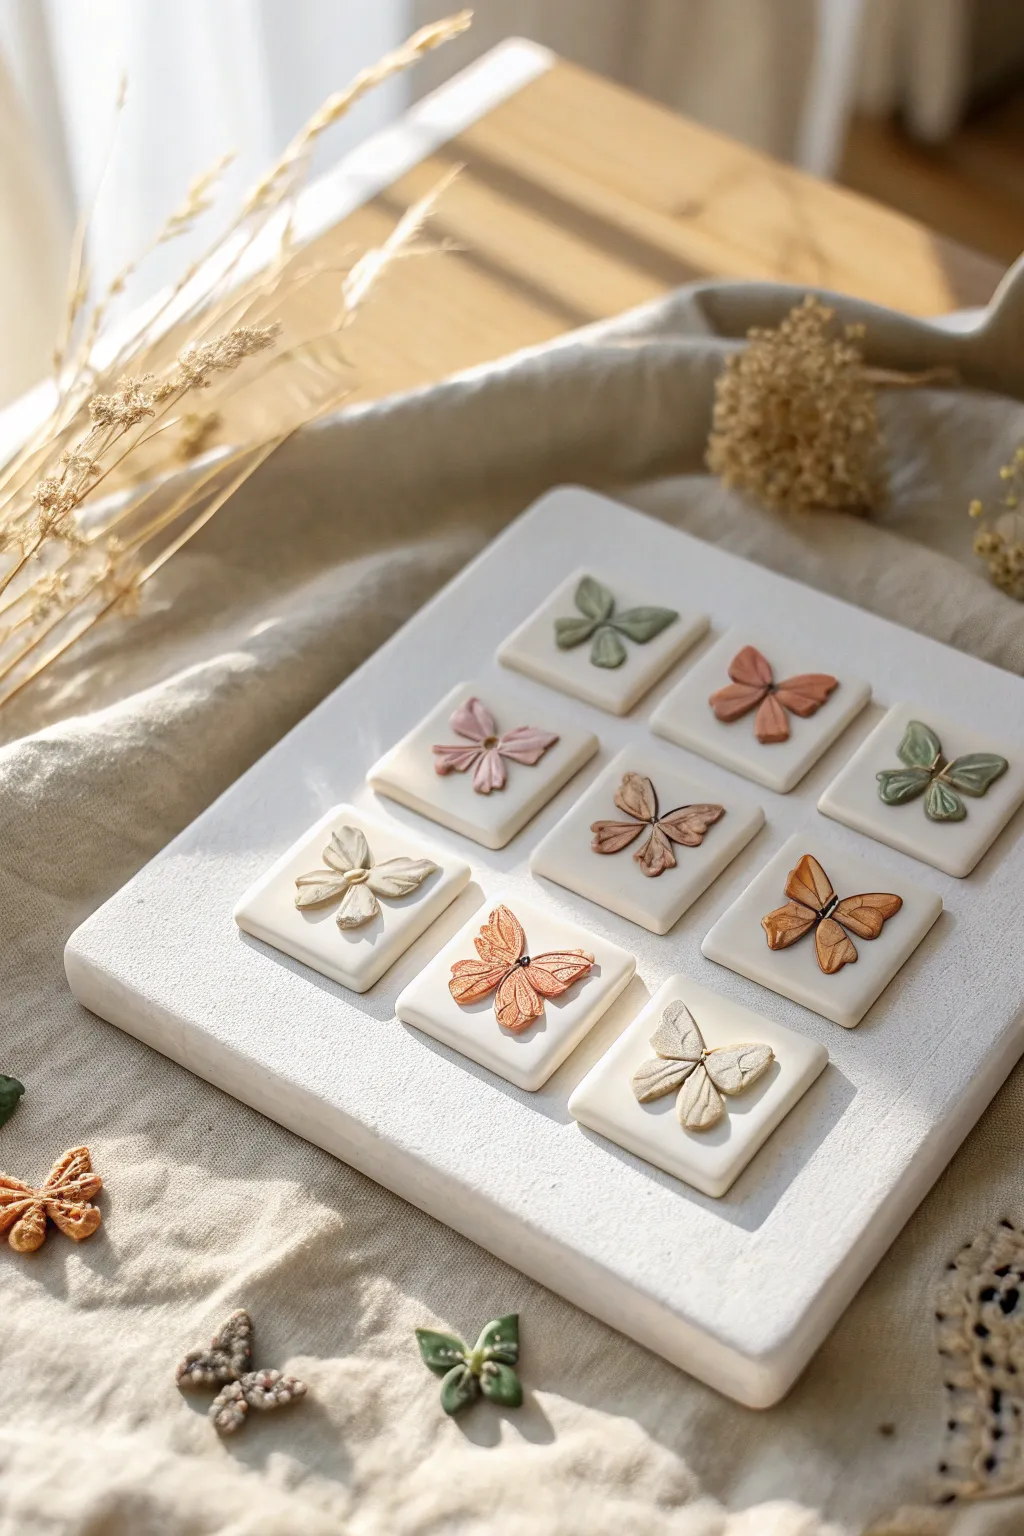
Create a gallery-worthy display with these serene, nature-inspired clay tiles featuring delicate butterfly motifs. This project combines soft, muted color palettes with tactile relief techniques for a finished piece that feels both organic and modern.
Step-by-Step
Materials
- Polymer clay (white, sage green, dusty pink, terracotta, beige)
- Square clay cutter (approx. 1.5 inches)
- Acrylic rolling pin
- Detail needle tool or Clay shaper tool
- Liquid polymer clay (translucent)
- Large rectangular wooden board or thick clay slab for the base
- Cornstarch (for release)
- Oven and baking sheet
- Sandpaper (fine grit)
Step 1: Preparing the Canvas Tiles
-
Condition the white clay:
Begin by thoroughly conditioning your white polymer clay until it is soft and pliable. Roll it out into an even sheet, roughly 4mm thick, to ensure the tiles have a substantial, high-quality feel. -
Cut the squares:
Use your square cutter to punch out nine identical tiles. If the clay sticks, lightly dust the cutter with cornstarch before pressing down. -
Smooth the edges:
Gently tap the edges of each square with your finger to soften any sharp cuts. Place these squares on your baking tile or sheet, spacing them out so you have room to work on each one.
Sticky Situation?
If your wing clay gets too soft to handle, pop it in the fridge for 10 minutes. Cooler clay is firmer and holds fine detail much better without distorting.
Step 2: Sculpting the Butterflies
-
Mix your colors:
Prepare your pastel palette by mixing small amounts of colored clay with white. Aim for muted, earthy tones like sage, dusty rose, and sand. -
Create teardrop shapes:
For a single butterfly, roll two larger teardrops for the upper wings and two smaller teardrops for the lower wings. -
Flatten the wings:
Gently press these teardrops flat between your fingers. They should be thin but not fragile. -
Assemble the wings:
Place the four wing sections directly onto the center of a white tile, with the points of the teardrops meeting in the middle. Press lightly to adhere them to the raw base. -
Add the body:
Roll a very tiny, excessively thin snake of dark brown or black clay. Place a small segment in the center where the wings meet to form the butterfly’s body. -
Add texture details:
Using a needle tool, gently impress lines radiating from the center of the wings outward to mimic veins. Be careful not to slice all the way through the clay. -
Refine the edges:
Use a silicone shaper or dull tool to gently ruffle or shape the outer edges of the wings for a more organic, fluttery appearance. -
Repeat the process:
Continue this sculpting process for all nine tiles, varying the colors and wing shapes slightly to give each butterfly individual character.
Texture Pro Tip
Before baking, lightly brush the butterfly wings with a dry, soft brush and cornstarch to remove fingerprints and give a soft, matte velvet texture.
Step 3: Baking and Assembly
-
First bake:
Bake the butterfly tiles according to your clay manufacturer’s instructions. Usually, this is around 275°F (130°C) for 30 minutes. Let them cool completely. -
Prepare the display board:
While the tiles cool, prepare your large rectangular base. You can use a painted wooden board or create a large, thick slab of white clay (baked separately) for a seamless look. -
Arrange the composition:
Lay out your cooled tiles on the base in a 3×3 grid. Measure equal spacing between them to ensure the final piece looks professional and balanced. -
Secure the tiles:
Apply a thin layer of liquid polymer clay or strong craft glue to the back of each tile and press them firmly onto the base. -
Final cure (if using clay base):
If you attached the tiles to a raw clay base using liquid clay, bake the entire assembly again to bond them permanently. Otherwise, simply let the glue dry. -
Matte finish:
I prefer to leave the finish natural to mimic the look of unglazed ceramic, but you can gently sand any rough edges on the base board for a clean, crisp outline.
Now you have a stunning, minimalistic piece of wall art that brings a touch of quiet nature into your home
Butterfly Mosaic From Scrap Clay Pieces
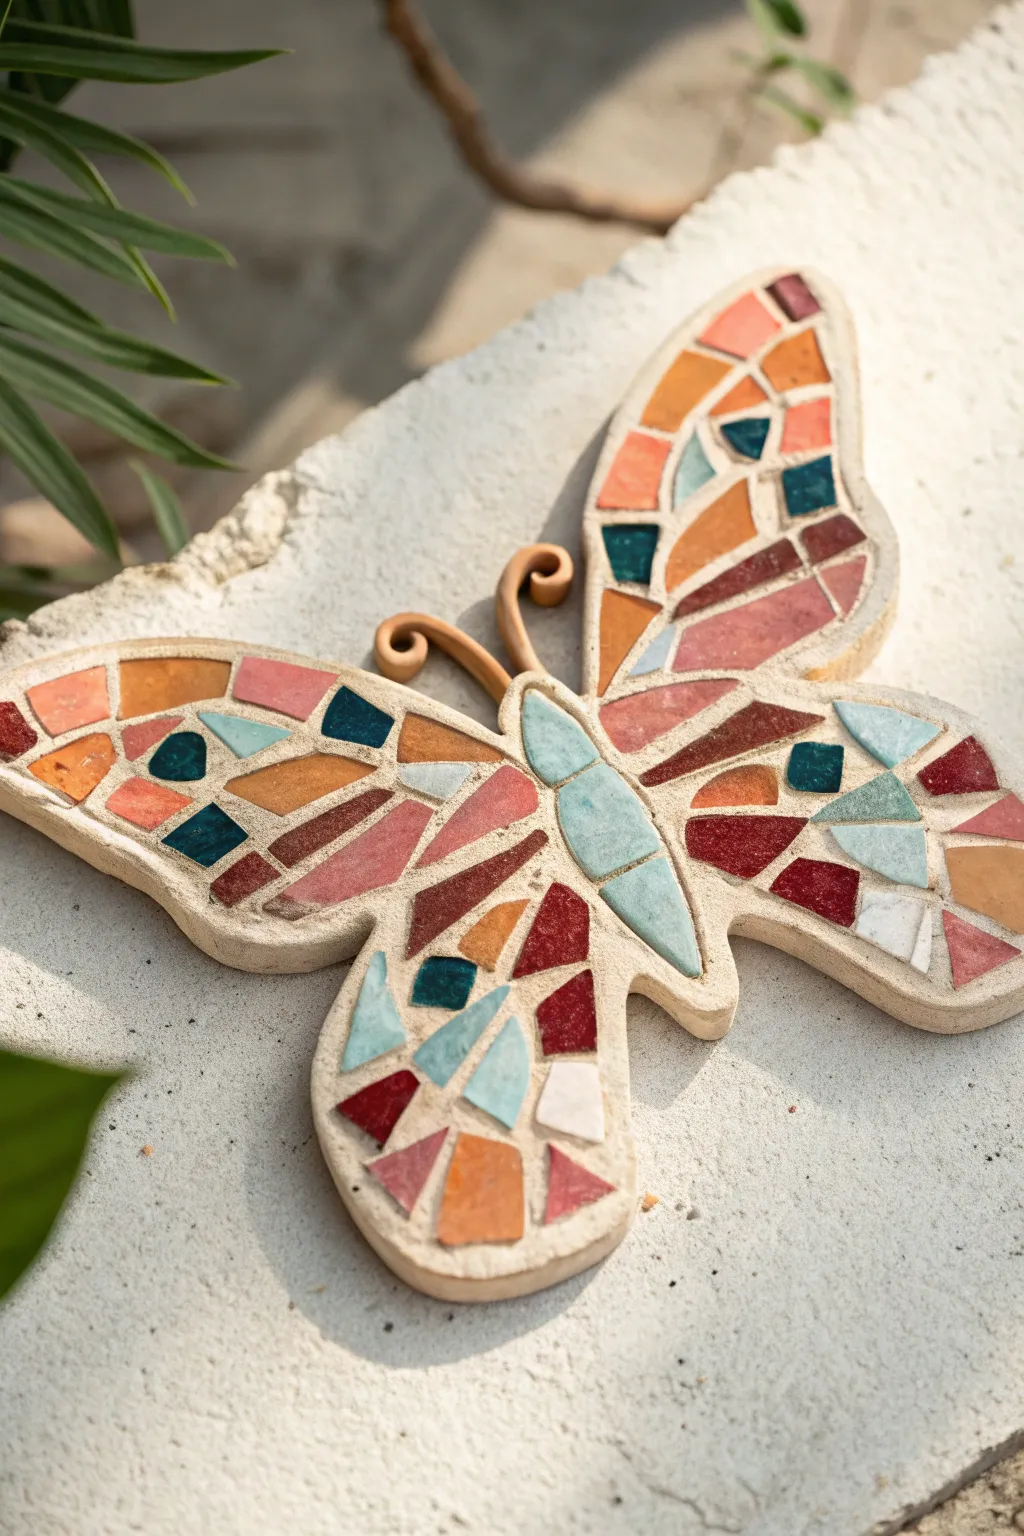
Transform leftover bits of polymer or air-dry clay into a stunning garden accent or wall hanging. This project uses a butterfly-shaped base as a canvas for a colorful, textured mosaic that mimics the look of stained glass.
Detailed Instructions
Materials
- Scrap clay in various colors (air-dry or polymer)
- Neutral-colored clay for the base (beige or stone effect)
- Rolling pin or pasta machine
- Craft knife or clay blade
- Butterfly template (paper)
- Structure paste (optional, for grouting effect)
- Sponge or soft brush
- Varnish or sealant (matte or gloss)
- Wire (optional, for antennae)
Step 1: Preparing the Base
-
Roll the foundation:
Begin by conditioning your neutral base clay. Roll it out into a thick, sturdy slab, roughly 1/4 inch thick to ensure it doesn’t crack easily. -
Cut the shape:
Place your paper butterfly template onto the slab. Carefully trace around the perimeter with a craft knife to cut out the main butterfly silhouette. -
Create the texture:
Use a toothbrush or a crumpled ball of aluminum foil to gently tap the surface of the base clay. This gives it a stone-like texture that contrasts beautifully with the smooth mosaic tiles later. -
Add dimension:
If you want the wings to look slightly lifted, place small props (like crumpled foil or folded paper) under the wing tips while drying or baking. Smooth the edges with a bit of water or clay softener to remove sharp cutting lines.
Step 2: Creating the Tiles
-
Flat slabs:
Gather your scrap colored clay. Roll each color out thinly—much thinner than your base—to create flat sheets of red, orange, teal, and beige. -
Cutting geometric shapes:
Using a sharp blade, cut these colored sheets into random geometric shapes: triangles, trapezoids, and irregular polygons. Keep them roughly the same relative scale. -
Create the body:
Cut three or four larger, rounded rectangular pieces from a teal or light blue slab to serve as the butterfly’s central body segments. -
Hardening the tiles:
Before assembling, you need the tiles to be firm. If using polymer clay, bake these flat pieces for a short duration. If using air-dry clay, let them dry until leather-hard so they hold their shape during handling.
Uneven Surfaces?
If tiles are popping off or won’t lay flat, the base may be too curved. Gently press the base flat again before the final cure, or use a stronger adhesive like super glue after baking.
Step 3: Assembly
-
Map out the design:
Lay your hardened tiles onto the raw (or slightly damp) base without pressing them down yet. Arrange them loosely to ensure you like the color distribution, keeping a small gap between each piece to simulate grout lines. -
Embed the body:
Start by pressing the central body segments gently into the center of the butterfly base. -
Attach the wings:
Work section by section on the wings. I find it helpful to press the tiles into the base clay firmly enough that they sit flush but don’t sink completely. -
Secure the pieces:
If the base is too dry to grab the tiles, use a small dab of liquid clay (for polymer) or water/slip (for air-dry) on the back of each tile as a glue. -
Add antennae:
Roll two thin coils of beige clay and curl the ends. Attach these to the top of the head area, blending the clay at the join point for security.
Texturing Tip
Before cutting your colored tiles, press a piece of sandpaper or fabric onto the raw clay slab. This subtle texture makes the final mosaic tiles look more like weathered stone or ceramic.
Step 4: Finishing Touches
-
Simulate grout:
If desired, fill the gaps between tiles with a textured structure paste or a thin coil of the base clay to create a true mosaic look, though leaving the base visible works perfectly too. -
Final cure:
Follow the manufacturer’s instructions to fully cure or dry the entire assembled piece. Since the base is thick, it may need extra time. -
Seal and protect:
Once completely cool or dry, apply a coat of varnish. A matte finish looks very natural, while gloss will make the colored tiles pop like glass.
Display your beautiful upcycled butterfly on a sunlit ledge to let the colors truly shine