Whenever I need a feel-good project, I reach for modeling clay and start shaping little animals from the simplest blobs and coils. Here are my favorite clay animal ideas—starting with the classic crowd-pleasers and ending with the playful, quirky ones that always spark new characters.
Classic Cute Clay Cat Figurines
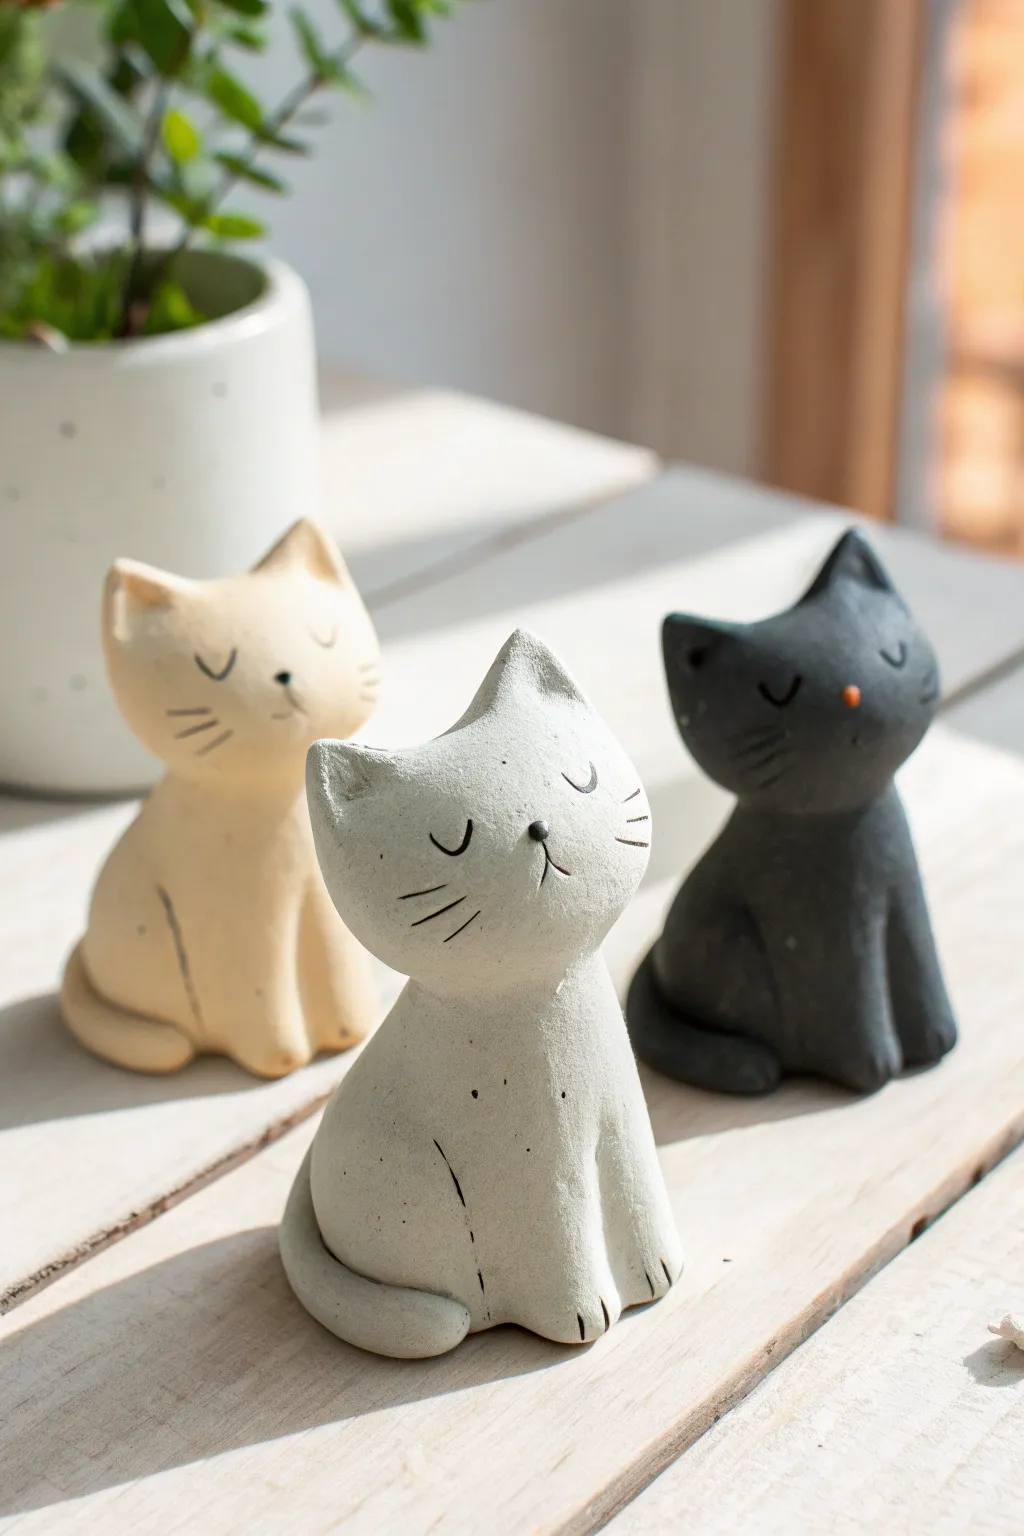
Capture the serene charm of felines with these stylized, matte-finish clay figurines. Their simple shapes and rough, stone-like texture create a modern, elegant decor piece perfect for any shelf.
Step-by-Step Guide
Materials
- Air-dry clay or polymer clay (white or grey base)
- Acrylic paints (black, white, cream/beige)
- Fine grit sandpaper or a sanding sponge
- Modeling tools (or a toothpick and a butter knife)
- Water and a small sponge (for smoothing)
- Fine detail paintbrush
- Matte varnish or sealant
Step 1: Shaping the Base Body
-
Form the main lump:
Start with a ball of clay about the size of a tangerine. Roll it until it’s smooth and free of major cracks, warming it in your hands to make it pliable. -
Shape the teardrop:
Gently roll one side of the ball to create a fat teardrop or pear shape. The bottom wider part will be the seated body, and the tapered top will become the head. -
Separate the head:
Using your thumb and forefinger, gently pinch around the ‘neck’ area about one-third of the way down from the top. Don’t make the neck too thin; just define where the head stops and the body starts. -
Flatten the base:
Press the bottom of the figurine firmly onto your work surface so it sits flat and stable. The body should lean slightly forward for a cute posture.
Step 2: Sculpting the Features
-
Pinch the ears:
At the top of the head, pinch two small triangles of clay upwards to form the ears. Smooth the transition between the ears and the skull so it looks like one solid piece. -
Refine the face shape:
Gently press the front of the face to flatten it slightly, giving you a surface for the painted details later. I like to tilt the head upward a tiny bit for a proud look. -
Define the front legs:
Use a modeling tool or a dull knife to score two vertical lines down the front center of the chest. This suggests the two front legs tucked neatly together. -
Add the tail:
Roll a small snake of clay and attach it to the back, wrapping it around the side of the body toward the front paws. Blend the clay at the attachment point on the back so it doesn’t fall off. -
Texture the surface:
Instead of smoothing everything perfectly, dab the surface lightly with a crumpled piece of aluminum foil or a stiff brush to mimic that stone-like texture seen in the photo. -
Initial Drying:
Let the figurines dry completely. For air-dry clay, this usually takes 24-48 hours. Turn them occasionally to ensure the bottom dries too.
Cracks Appearing?
If air-dry clay cracks while drying, mix a tiny bit of fresh clay with water to make a paste (slip) and fill the crack. Smooth it over and let it dry again.
Step 3: Finishing and Painting
-
Sand for finish:
Once fully dry (and baked if using polymer), lightly sand any sharp bumps. Don’t over-sand, as you want to keep that organic, handmade look. -
Base coat application:
Paint each cat in a solid matte color. Use a creamy beige for one, a soft grey for the second, and a charcoal black for the third. You may need two coats for full coverage. -
Paint the nose:
Using your finest brush, paint a tiny upside-down triangle or heart for the nose. Use black paint for the light cats and a terracotta orange for the black cat. -
Add the eyes:
Paint two small curved arches for sleepy, closed eyes. Ensure they are symmetrical and placed halfway down the face. -
Detail the whiskers:
With a very light touch, paint three thin lines on each cheek for whiskers. Keep these lines delicate and slightly varying in length. -
Highlight the paws:
Paint small vertical ticks at the bottom of the front legs to suggest toes. -
Seal the work:
Apply a coat of ultra-matte varnish. Avoid glossy finishes, as the charm of these figures relies on their soft, stony appearance.
Granite Effect
To get a true stone look, flick tiny specks of watered-down brown or black paint onto the dried clay using an old toothbrush before sealing.
Arranging your trio of cats together creates a peaceful little vignette for your home


Easy Puppy With Floppy Ears
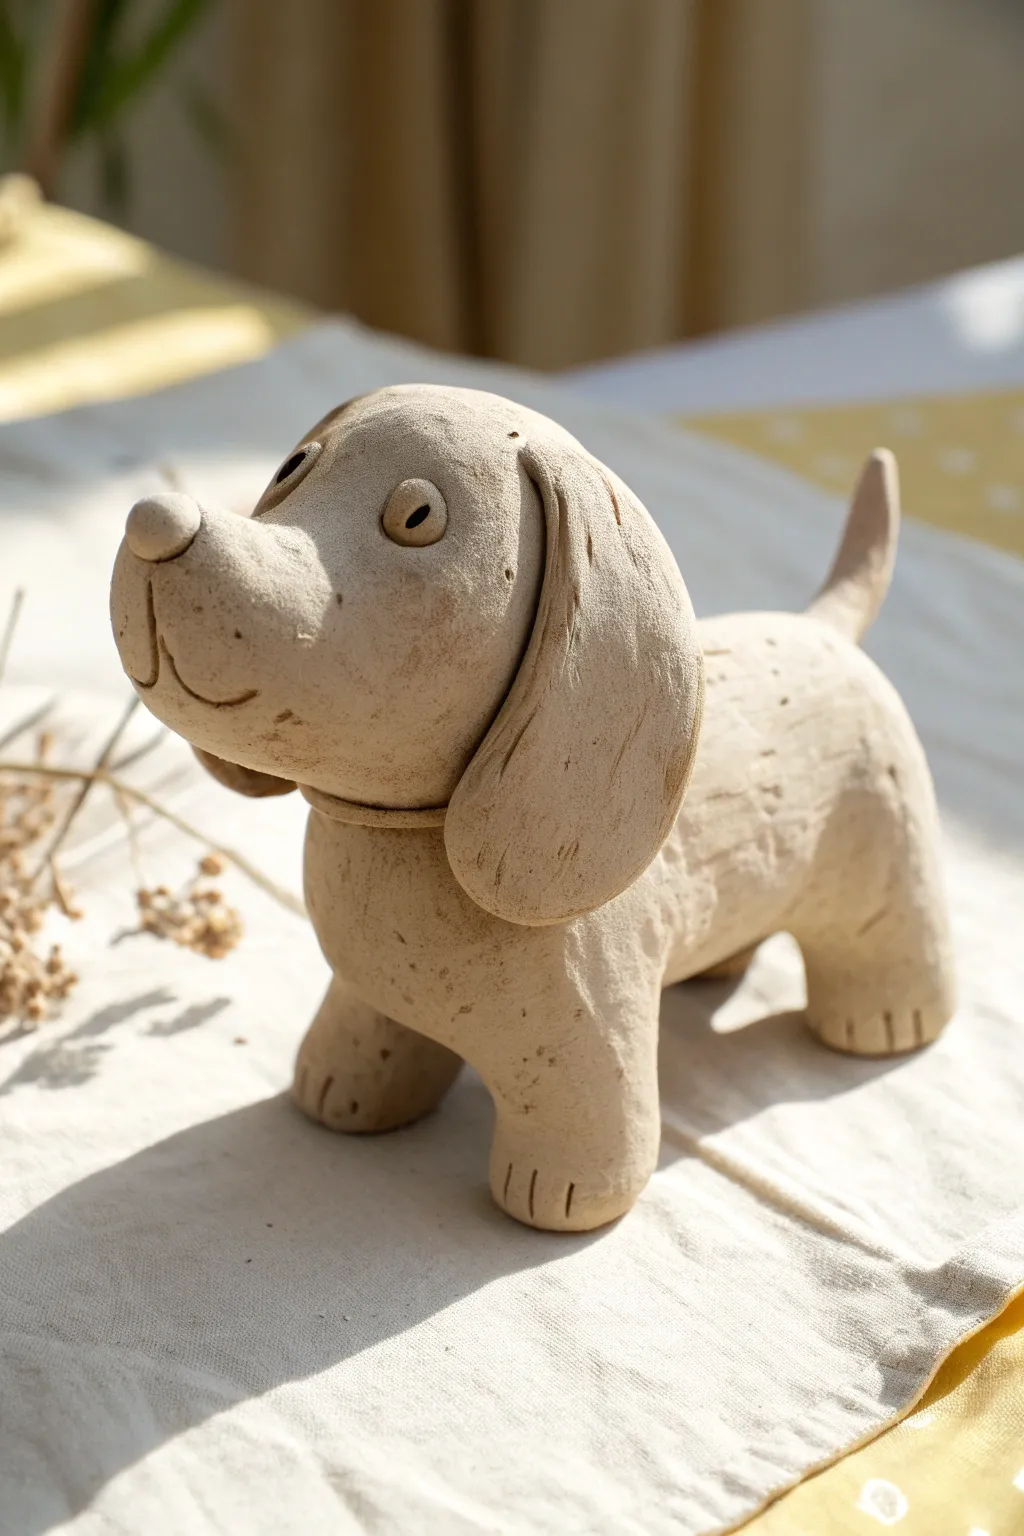
Create a charming, rustic puppy sculpture that captures a distinct personality with simple clay shapes and texture. This project focuses on building a sturdy four-legged form with adorable floppy ears and a textured, stone-like finish.
How-To Guide
Materials
- Natural white or light grey air-dry clay (or firing clay)
- Small cup of water
- Pointed sculpting tool or toothpick
- Wooden modeling tool (optional)
- Sponge
Step 1: Forming the Body and Legs
-
Shape the torso:
Begin with a large handful of clay, rolling it into a smooth, thick cylinder. This will be the main body of your puppy, so ensure it looks substantial and well-rounded. -
Create the legs:
Pull four equal-sized balls of clay from your supply. Roll each into a short, stout log shape, ensuring they are thick enough to support the weight of the body. -
Attach the legs:
Score the underside of the body and the tops of each leg with a needle tool to create rough hatch marks. Apply a dab of water (or slip) to these scratched areas. -
Secure the join:
Press the legs firmly onto the body. Use your thumb or a modeling tool to smooth the clay from the leg up onto the body, blending the seam until it disappears completely. -
Add paw details:
Once the dog is standing stably, use a knife or thin finishing tool to press three vertical indentations into the front of each foot to suggest toes.
Step 2: Sculpting the Head and Tail
-
Form the head shape:
Roll another large ball of clay, slightly smaller than the body. Determine which side will be the face and gently pinch and pull the clay forward to create a rounded muzzle. -
Refine the snout:
Attach a small button of clay to the very tip of the muzzle for a nose. Use your tool to carve a simple, curved mouth line below the nose, giving him a gentle smile. -
Attach the head:
Score and slip the neck area on the body and the bottom of the head. Press them together firmly. I like to add a thin coil of clay around the neck seam to look like a collar, which also helps reinforce the connection. -
Make the tail:
Roll a small, tapered cone of clay. Attach this to the rear of the body, pointing upwards at a jaunty angle, blending the base so it looks like a natural extension of the spine.
Pro Tip: Hollow Core
If making a large puppy, wrap a clay slab around a crumpled ball of newspaper for the body. This reduces weight and drying time significantly.
Step 3: Prominent Features and Texture
-
Create the eyes:
Roll two small spheres of clay and flatten them slightly. Press these onto the face above the muzzle. Use a tool to poke a pupil hole into the center of each, giving the dog a focused gaze. -
Model the ears:
Flatten two thick teardrop shapes of clay. These should be large and heavy. Attach the narrow point to the top sides of the head, letting the wide part flop down naturally against the cheek. -
Add brow details:
Use a needle tool to lightly create curved eyebrow lines above the eyes to enhance the puppy’s expression. -
Clean up surfaces:
Check the sculpture for any unwanted fingerprints. You can dampen a sponge and lightly pat the surface to remove sharp edges, but don’t over-smooth it; we want to keep some texture. -
Add texture:
To mimic the stone-like look in the photo, take a stiff bristle brush or a crumpled ball of foil and gently tap it all over the clay surface to create a pitted, organic texture. -
Final drying:
Set your puppy in a safe place away from direct heat to dry slowly. This helps prevent cracking, especially where thick parts join.
Troubleshooting: Sagging Legs
If the legs squash under the body weight, the clay is too wet. Let the leg cylinders firm up (dry slightly) for 20 minutes before attaching the body.
Now you have a loyal clay companion ready to sit on your desk or shelf


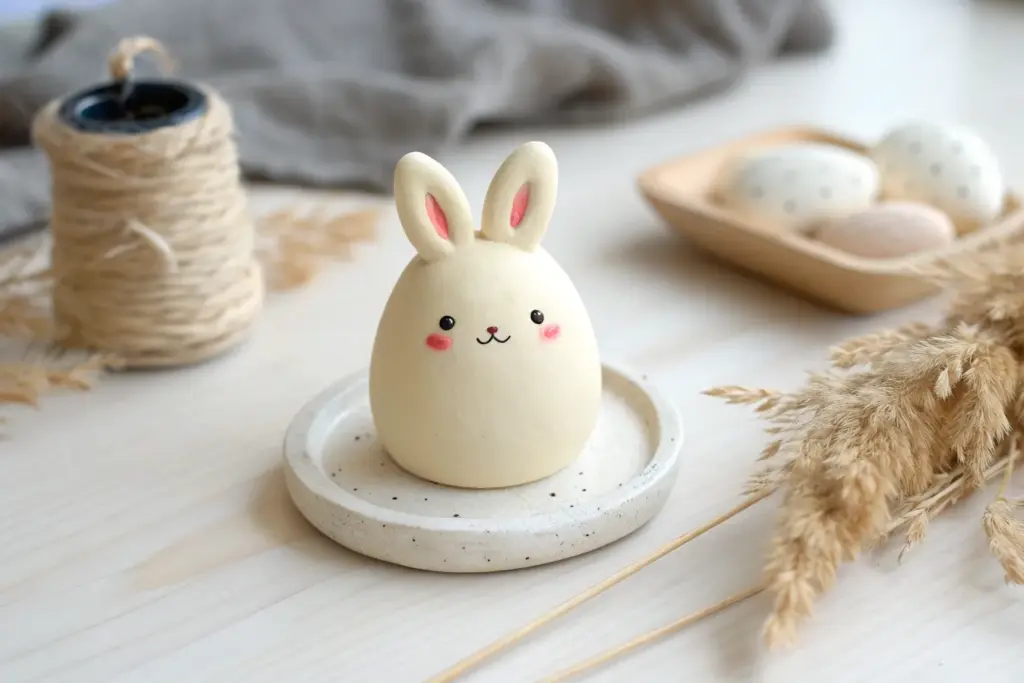
Chubby Bunny With Tiny Paws
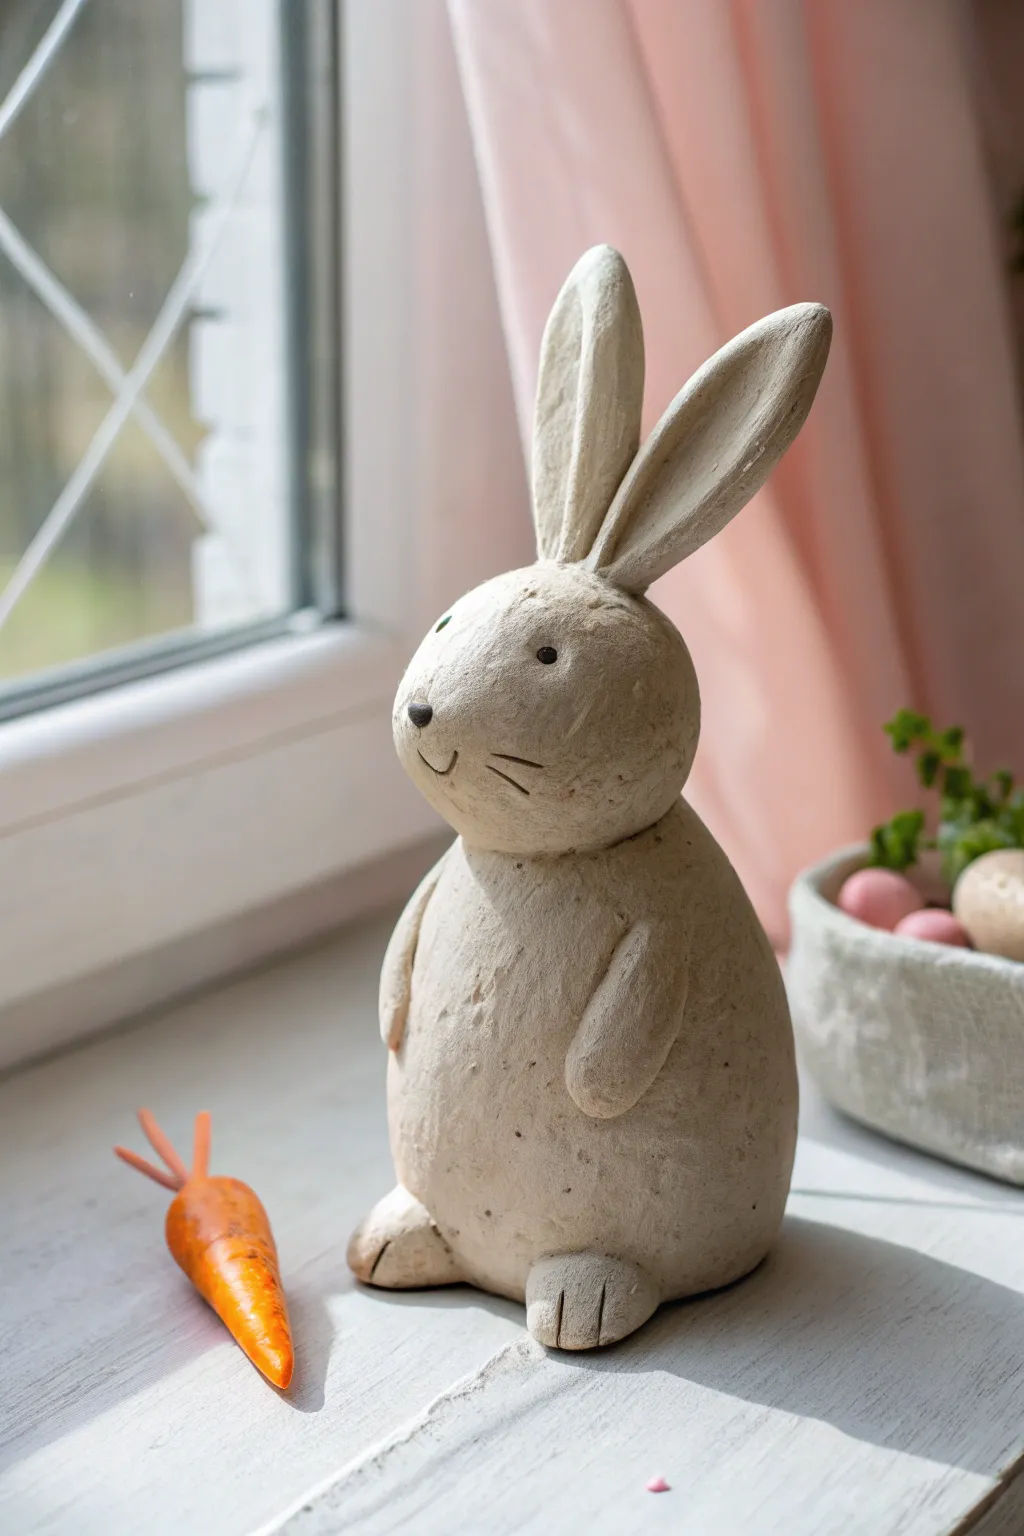
Create a charming, rustic rabbit figurine that looks like carved stone but is easily shaped from air-dry clay. This project features a wonderfully round silhouette with prominent ears and tiny, detailed paws, perfect for adding a touch of spring to your windowsill.
Detailed Instructions
Materials
- Stone-colored air-dry clay (or white clay + grey acrylic paint)
- Aluminum foil
- Water and a small sponge
- Modeling tools (or a toothpick)
- Black acrylic paint
- Fine-grit sandpaper
- Texture sponge or old toothbrush
Step 1: Forming the Base
-
Create the core:
Crumple aluminum foil into two distinct balls: a larger oval for the body (about the size of a large orange) and a smaller sphere for the head. This saves clay and keeps the figurine lightweight. -
Join the core parts:
Push the head sphere onto the top of the body oval. Use a little masking tape if needed to secure them together firmly before adding clay. -
Cover with clay:
Roll your clay out into a thick sheet, roughly 1/4 inch thick. Wrap the clay entirely around your foil armature. -
Smooth the seams:
Dip your finger in water and blend all the seams where the clay edges meet. I find it helpful to roll the covered shape gently on the table to ensure a smooth, unified surface.
Step 2: Sculpting the Body
-
Define the neck:
Gently press around the area where the head meets the body to create a subtle neck indentation, but keep the transition soft to maintain that chubby look. -
Attach the arms:
Roll two small sausage shapes of clay for the arms. Press them onto the sides of the body, curving them slightly forward so they rest on the belly. -
Blend the limbs:
Use a modeling tool to smooth the upper edges of the arms into the body, leaving the bottom rounded to resemble paws. -
Shape the feet:
Create two flattened oval shapes for the feet and attach them to the bottom front of the body. They should stick out just slightly. -
Add paw details:
Use a knife tool or toothpick to press two lines into the end of each foot to create toes.
Ears Keep Drooping?
If the ears won’t stand up, insert a toothpick halfway into the head and slide the ear onto the protruding part for invisible structural support.
Step 3: Ears and Face
-
Form the ears:
Roll two long, tapered logs of clay. Flatten them slightly to resemble long bunny ears, making one end slightly pointed. -
Attach the ears:
Score the top of the head and the bottom of the ears with a scratching tool. Add a dab of water (slip) and press the ears firmly onto the head. -
Blend the connection:
Smooth the clay from the base of the ears down onto the head so they stand up straight without wobbling. -
Add facial features:
Roll a tiny ball for the nose and press it onto the center of the face. Use a tool to carve a small ‘J’ shape for the mouth and add whiskers with light scratches. -
Create the eyes:
Use the rounded end of a paintbrush to make two indentations for the eyes. Don’t go too deep; just mark the spot.
Weathered Stone Look
Mix a very watery wash of brown/grey paint. Brush it over the dry clay, then immediately wipe it off with a rag. Paint stays in the crevices for depth.
Step 4: Texturing and Finishing
-
Apply stone texture:
This is crucial for the rustic look: take a coarse sponge or an old toothbrush and dab it all over the wet clay surface. This removes fingerprints and creates a pitted, stone-like finish. -
Let it dry:
Allow the bunny to dry completely for at least 24-48 hours. Turn it occasionally so the bottom dries evenly. -
Sanding:
Once dry, lightly sand any sharp peaks or rough unnatural bumps, but leave the overall texture intact. -
Painting details:
Paint the tiny nose tip and inside the eye indentations with black acrylic paint. You can dilute the paint slightly for a softer look.
Place your little stone-like bunny near a window or plant pot to enjoy its rustic charm


Sweet Teddy Bear Minis
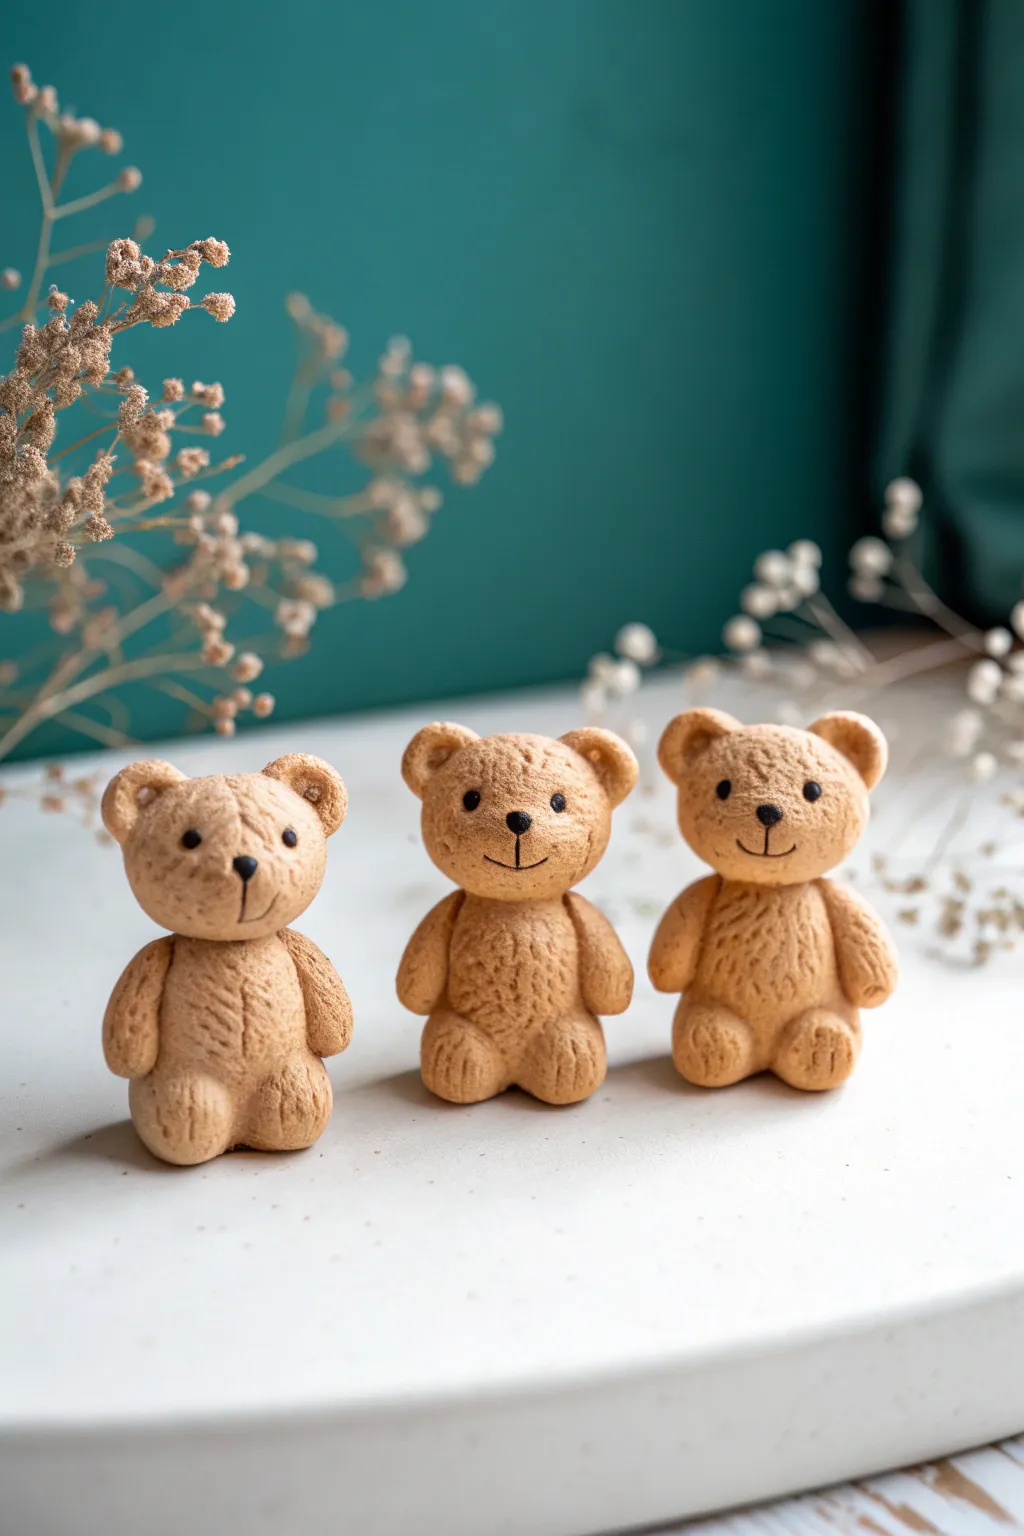
These adorable teddy bear figurines have a charming, rustic look that mimics the texture of freshly baked biscuits. With their simple shapes and heartwarming expressions, they make perfect little desk companions or handmade gifts.
Step-by-Step Guide
Materials
- Light brown air-dry clay or polymer clay (biscuit color)
- Black clay or acrylic paint for details
- Pointed sculpting tool or toothpick
- Clean, old toothbrush or stiff bristle brush
- Small ball tool
- Smooth work surface
Step 1: Shaping the Bodies
-
Create the Torso:
Start by rolling a medium-sized ball of light brown clay into a smooth sphere. Gently flatten the bottom so it sits upright securely without tipping over. -
Form the Head:
Roll a second, slightly smaller ball for the head. Place it directly on top of the torso. Press gently to adhere them, blending the clay at the neck seam slightly if needed for stability. -
Add the Ears:
Pinch off two very small, pea-sized pieces of clay. Roll them into balls and press them onto the top corners of the head. Use your ball tool to make a tiny indentation in the center of each ear.
Pro Tip: Realistic Fur
Work in sections! Texture the back of the bear before attaching the arms so you don’t squash the fur on the front while holding it.
Step 2: Adding Limbs
-
Create the Arms:
Roll two small sausages of clay for the arms. They should be tapered slightly at the top. Attach them to the sides of the body, just below the neck, pressing them vertically against the torso. -
Attach the Legs:
Form two chubby oval shapes for the feet. Attach these to the bottom front of the torso. They should look like stubby paws that help stabilize the sitting bear. -
Smooth the Joins:
Use your finger or a smoothing tool to gently merge the seams where the limbs meet the body, ensuring nothing falls off later.
Step 3: Texturing and Details
-
Apply the Fur Texture:
This is the secret to the biscuit look. Take your old toothbrush or a stiff brush and tap it repeatedly all over the surface of the bear. I like to do this quite firmly to get a deep, fuzzy texture. -
Refine the Paws:
Using a toothpick or a knife tool, press two or three small vertical lines into the bottom of each foot to suggest toes. -
Create the Muzzle:
Add a tiny, flattened oval of clay to the center of the face for the muzzle. Texture this lightly as well so it matches the rest of the fur.
Troubleshooting: Falling Heads
If the head keeps sliding off the round body, insert a small piece of toothpick or wire into the neck to act as an internal anchor.
Step 4: Facial Features
-
Add the Nose:
Take a microscopic speck of black clay, roll it into a ball, and press it onto the top center of the muzzle. If you don’t have black clay, you can paint this later. -
Place the Eyes:
Use your pointed tool to make two small indentations for eye sockets above the muzzle. Insert tiny balls of black clay into these holes. -
Draw the Mouth:
With a very sharp tool or needle, carefully incise a vertical line down from the nose and curve it into a smile, or simply press a small ‘Y’ shape. -
Final Adjustments:
Check the bear from all angles. If the texturing got flattened while adding the face, gently re-tap those areas with your brush. -
Dry or Bake:
Follow your specific clay’s instructions to cure the piece. If using air-dry clay, leave it in a dry spot for at least 24 hours.
Enjoy displaying your delightful trio of textured bears on a shelf or windowsill

The Complete Guide to Pottery Troubleshooting
Uncover the most common ceramic mistakes—from cracking clay to failed glazes—and learn how to fix them fast.
Simple Oval Penguin Buddy
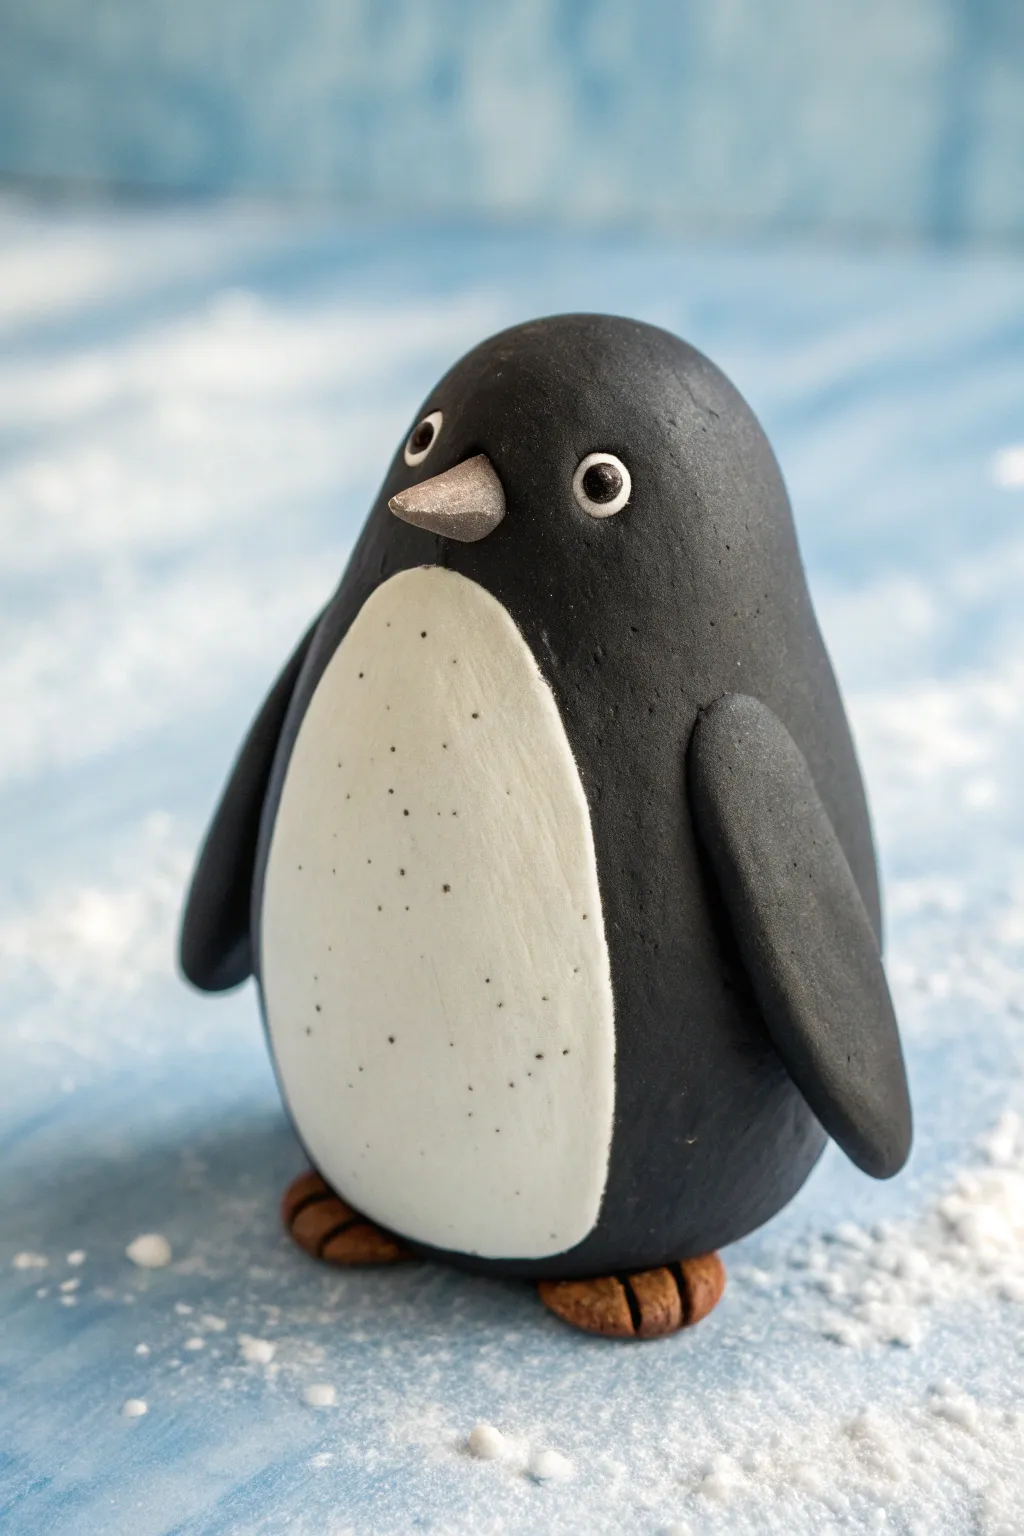
This adorable little penguin starts with a basic oval shape but gains so much personality through simple details. With its sleek black body, textured belly, and curious expression, it is the perfect frosty friend to create for winter.
Step-by-Step Tutorial
Materials
- Black modeling clay (polymer or air-dry)
- White modeling clay
- Brown modeling clay
- Grey or silver modeling clay
- Modeling tools (needle tool or toothpick, rolling pin)
- Craft knife
- Parchment paper or non-stick mat
Step 1: Shaping the Main Body
-
Prepare the black clay:
Start by conditioning a large chunk of black clay in your hands until it becomes soft and pliable. Roll it into a smooth ball to remove any cracks. -
Form the oval:
Gently shape the black ball into a tall, smooth oval. Flatten the bottom slightly against your work surface so the penguin stands up on its own without wobbling. -
Refine the head shape:
Use your fingers to subtly smooth the top of the oval into a rounded dome shape for the head, keeping the overall form sleek and continuous.
Step 2: Creating the Belly
-
Prepare the white clay:
Clean your hands thoroughly to avoid transferring black clay, then condition a smaller piece of white clay. -
Create a flat sheet:
Roll the white clay flat using a rolling pin until it is about 3mm thick. It needs to be thin enough to conform to the body shape. -
Cut the oval shape:
Using a craft knife, cut out a tall, elongated oval shape that is slightly wider at the bottom and narrower at the top. -
Attach the belly:
Press the white oval onto the front of the black body. Gently smooth the edges with your finger so the white clay blends slightly into the black, creating a seamless look. -
Add texture:
Take a needle tool or toothpick and gently prick shallow dots all over the white belly area. I find this creates a nice, fluffy feather effect compared to smooth clay.
Clean Hands, Clean Clay
Keep wet wipes nearby! Black clay stains easily. Always clean your hands and tools thoroughly before handling the white clay to keep the belly pristine.
Step 3: Adding Wings and Feet
-
Form the wings:
Roll two medium-sized balls of black clay. Flatten them into elongated teardrop shapes to form the flippers. -
Attach the wings:
Press one wing onto each side of the body. Angle them slightly backward and smooth the shoulder connection point so they look integrated into the body. -
Make the feet:
Take two small pieces of brown clay and roll them into flattened semicircles. -
Detail the toes:
Use a knife tool to press two indentations into the front of each brown piece to represent toes. -
Position the feet:
Place the feet under the bottom front of the penguin, angling them outward slightly for a cute stance.
Winter Scene Display
Make a habitat! Sprinkle baking soda or shredded coconut around your finished penguin to create a glistening snow scene for your new buddy.
Step 4: Bringing the Face to Life
-
Create the beak:
Shape a small piece of grey or silver clay into a sharp cone. Attach this to the center of the face, just above the white belly line. -
Make the eye sockets:
Use a small ball tool or the end of a paintbrush handle to press two shallow indentations where the eyes will go. -
Add the eye whites:
Roll two tiny balls of white clay and press them into the sockets. Flatten them gently so they don’t bulge out too much. -
Add the pupils:
Roll incredibly tiny specks of black clay—smaller than a poppy seed—and press them into the center of the white eyes. -
Final smoothing:
Gently run your finger over the surface of the black clay one last time to remove any fingerprints before setting the project aside to cure.
Now your penguin is ready to chill on your desk or shelf, bringing a bit of icy charm to your day
Round Frog Blob Desk Pal
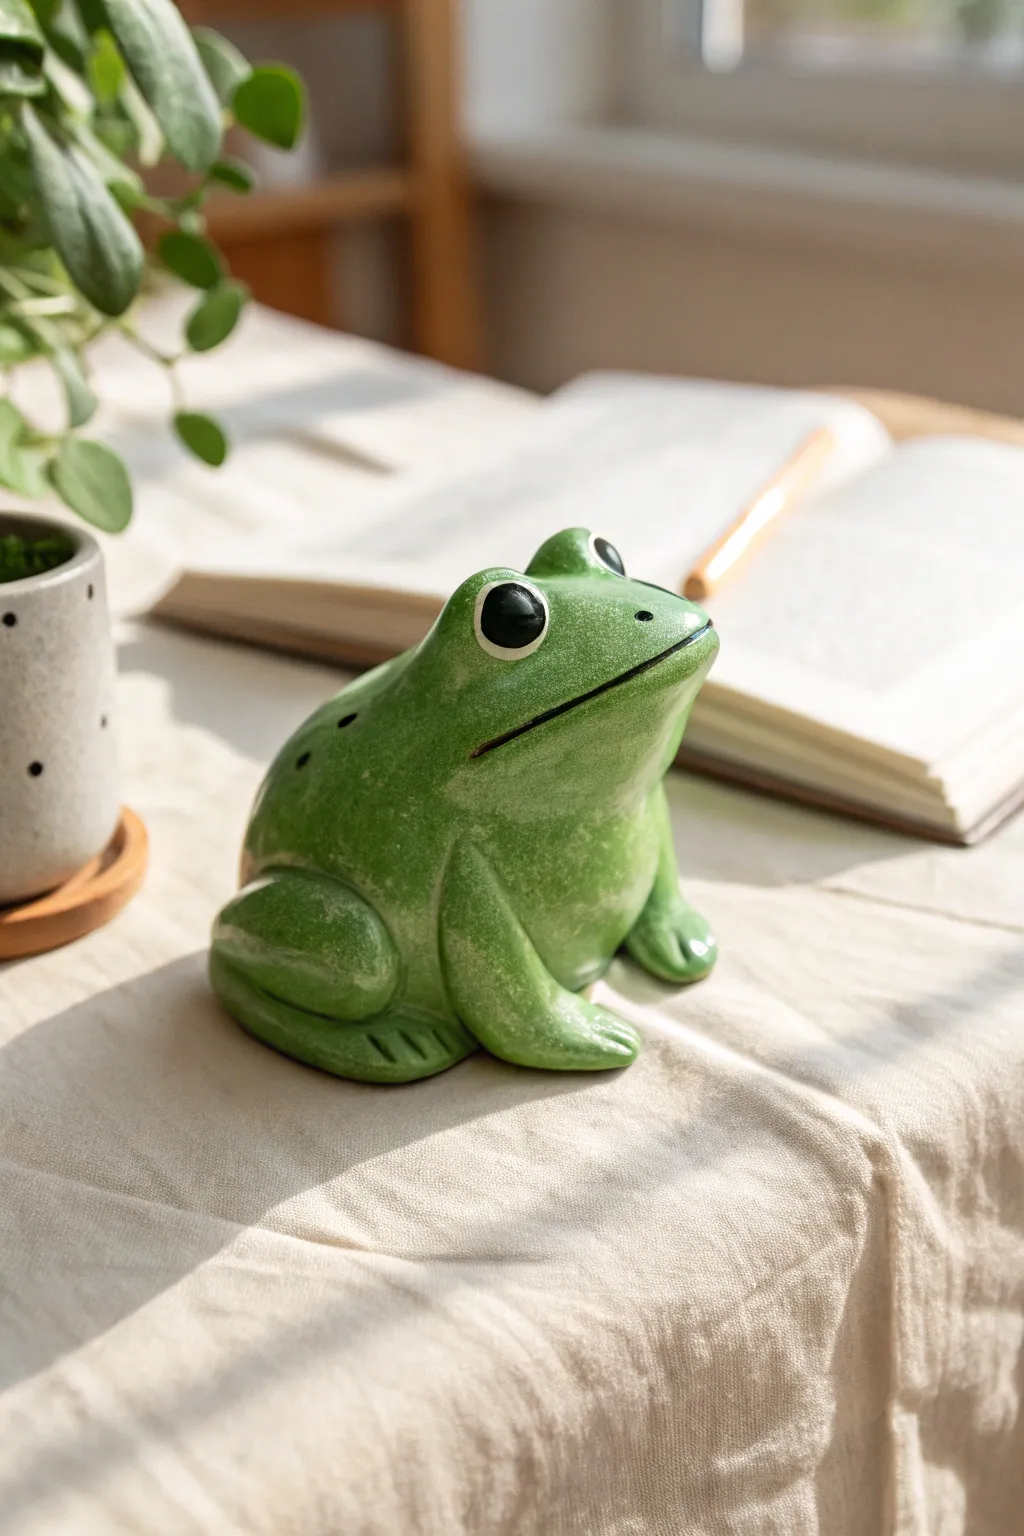
This charming desk companion features a satisfyingly round body and an attentive expression that brings a bit of nature indoors. Its smooth, slightly textured green finish and bright eyes make it a delightful project for clay enthusiasts looking to create a functional paperweight or cute decor piece.
Detailed Instructions
Materials
- Air-dry clay or polymer clay (green)
- Acrylic paints (dark green, black, white, light green)
- Fine-grit sandpaper
- Glossy varnish or glaze
- Modeling tools (or a toothpick and spoon)
- Water cup and small sponge (for smoothing)
- Aluminum foil (for the core)
Step 1: Forming the Base
-
Create the core:
Start by crumpling a small amount of aluminum foil into a tight, slightly flattened ball shape. This saves clay and keeps the frog lightweight. -
Cover the core:
Roll out a thick slab of your green clay and wrap it fully around the foil core. Smooth the seams until you have a seamless, large egg-like shape. -
Shape the body:
Gently press the ‘egg’ onto your work surface to flatten the bottom so it sits stable. Push the front slightly upward to imply the chest of the frog.
Cracking Clay?
If you see cracks forming as your air-dry clay cures, mix a tiny bit of fresh clay with water to make a paste (slip) and fill the cracks, then smooth over.
Step 2: Sculpting Features
-
Add the back legs help:
Roll two thick sausage shapes of clay. Attach one to each side of the rear body, bending them to create the visible ‘haunch’ of the frog’s leg. -
Blend the legs:
Use a sculpting tool or your thumb to blend the seams of the legs into the main body so they look like one continuous piece, not just stuck on. -
Extend the toes:
Flatten the tips of the back legs against the table. Use a knife tool to score lines, creating simple toes. -
Create front arms:
Roll two smaller, shorter logs of clay for the front arms. Position them vertically under the chest area, blending the top shoulder area into the body. -
Define the face:
Press gently into the clay where the eyes will go to create shallow sockets. This helps secure the eyes later. -
Form the eye mounds:
Roll two small balls of green clay and place them into the sockets you made. Blend the back and bottom edges into the head, leaving the front round and protruding. -
Carve the mouth:
Use a thin blade tool to slice a wide, long smile line across the front of the face. Curve it slightly downward at the edges for a natural froggy expression. -
Texture the skin:
I like to take a coarse sponge or a crumpled ball of foil and lightly tap it all over the green skin to give it that realistic, slightly bumpy amphibian texture.
Step 3: Finishing Touches
-
Initial Drying:
Allow the clay to dry completely according to package instructions. If using air-dry clay, turn it occasionally to let the bottom breathe. -
Refining the surface:
Once hard, lightly sand any rough fingerprints or sharp edges with fine-grit sandpaper, being careful not to sand away your skin texture. -
Paint the details:
Paint the eye mounds black in the center, leaving a rim of green around them. Use a fine brush to paint a thin black line inside the mouth crevice for depth. -
Add highlights:
Dry brush a lighter green shade very lightly over the top of the head and the knees to accentuate the texture. -
The eye sparkle:
Using the tip of a toothpick or a dotting tool, place a tiny white dot on the upper right side of each back pupil. This brings the frog to life immediately. -
Seal the work:
Coat the entire frog with a generous layer of high-gloss varnish. This mimics the look of wet frog skin and protects your paint job.
Go Botanical
Before baking or drying, sculp a tiny clay lily pad or a pink lotus flower and attach it to the top of the frog’s head for extra personality.
Place your shiny new friend on a stack of books or beside a plant for the perfect habitat


What Really Happens Inside the Kiln
Learn how time and temperature work together inside the kiln to transform clay into durable ceramic.
Mini Sea Turtle With Patterned Shell
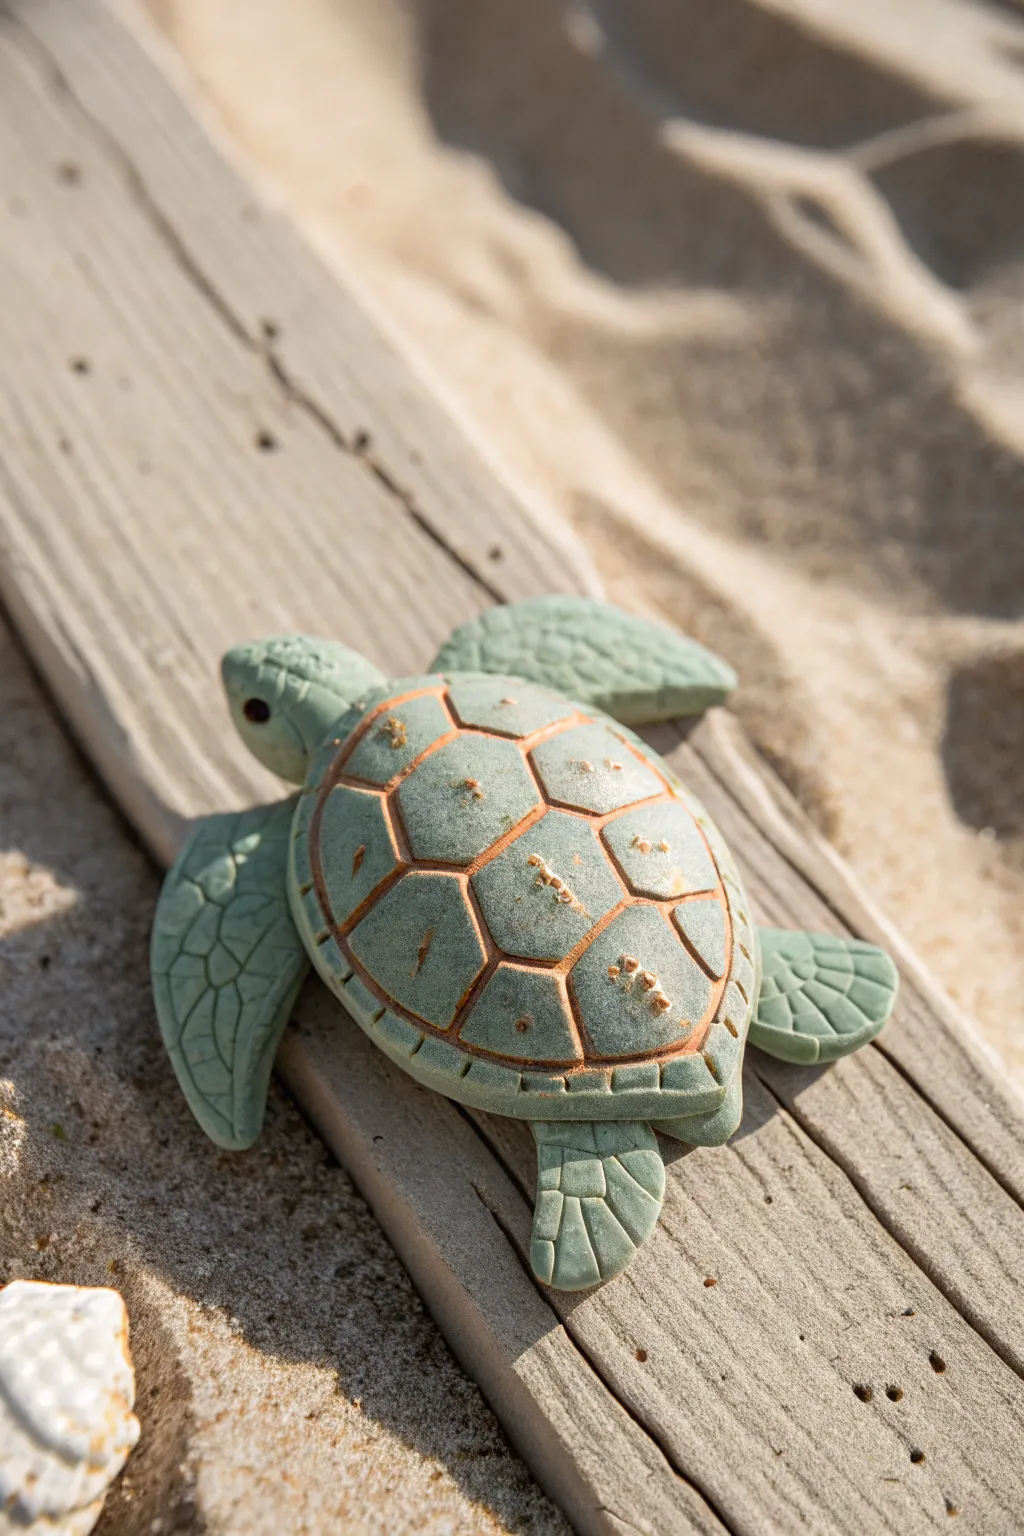
Capture the essence of marine life with this beautifully textured sea turtle project. Using muted green clay and a simple wash technique, you’ll create a realistic shell pattern that looks like it has weathered the ocean tides.
How-To Guide
Materials
- Sage or moss green polymer clay
- Burnt orange or terracotta acrylic paint
- Paper towel or soft rag
- Ball stylus tool (medium size)
- Needle tool or toothpick
- Small craft knife
- Driftwood or stiff cardboard (optional for display)
Step 1: Shaping the Base
-
Form the Body:
Start with a ball of sage green clay roughly the size of a walnut. Flatten it slightly into an oval dome shape to form the main shell (carapace). Smooth out any fingerprints. -
Create the Head:
Roll a smaller ball of the same green clay into a teardrop shape. Attach the wider end to the front of the shell, blending the clay underneath so it stays secure. -
Make the Flippers:
Roll four smaller balls of clay. Flatten and shape two into long, paddle-like front flippers and two into shorter, rounded rear flippers. -
Attach Limbs:
Press the front flippers under the front shoulders of the shell and the rear flippers underneath the back. Use your thumb to smooth the connection points on the underside. -
Add the Tail:
Form a tiny cone of clay and attach it to the very back center of the turtle, blending it seamlessly into the underside of the shell.
Natural Texture Hack
Before baking, gently press a piece of rough sandpaper or a real rock against the shell. This imitates the pitted, organic surface of a real sea turtle better than any tool.
Step 2: Detailing & Texturing
-
Outline the Shell Scutes:
Using a needle tool, lightly scratch a hexagonal pattern onto the shell. Start with a central row of three hexagons, then add the surrounding shapes to complete the scute pattern. -
Deepen the Lines:
Once you are happy with the spacing, go back over your lines with the needle tool, pressing deeper to create distinct grooves between the shell plates. -
Texture the Skin:
Take your needle tool and gently press intersecting lines into the flippers and the top of the head to mimic wrinkled, leathery reptile skin. -
Add Facial Features:
Use a small ball stylus to press indentations for the eyes on either side of the head. You can insert tiny black beads or small balls of black clay into these sockets. -
Shell Rim Detail:
Use a craft knife or needle tool to make small, vertical notches all around the bottom rim of the shell for added realism.
Step 3: Finishing the Look
-
Add Surface Texture:
Gently tap the surface of the shell with a rough stone, sandpaper, or a toothbrush to give it a porous, stone-like texture rather than a smooth plastic look. -
Bake the Clay:
Bake your turtle according to the clay manufacturer’s instructions. Usually, this is around 275°F (135°C) for 15-30 minutes, depending on thickness. -
Cool Down:
Allow the piece to cool completely before moving to the painting stage. The clay needs to be hard to accept the wash properly. -
Apply the Wash:
Mix a small amount of burnt orange acrylic paint with water. Brush this wash liberally over the entire shell, ensuring it gets into the deep grooves. -
Wipe Back:
Immediately wipe the surface with a paper towel. I like to be fairly aggressive here, removing almost all paint from the raised areas so the orange only remains in the cracks. -
Final Highlights:
If desired, dry brush a tiny amount of lighter green or beige on the very tops of the shell scutes to emphasize the texture further.
Sandy Display
Glue your finished turtle onto a piece of weathered driftwood. Brush white glue around the base and sprinkle real sand to create a permanent beach scene.
Now you have a charming little sea voyager ready to display on your desk or shelf
Tiny Fish With Big Fins
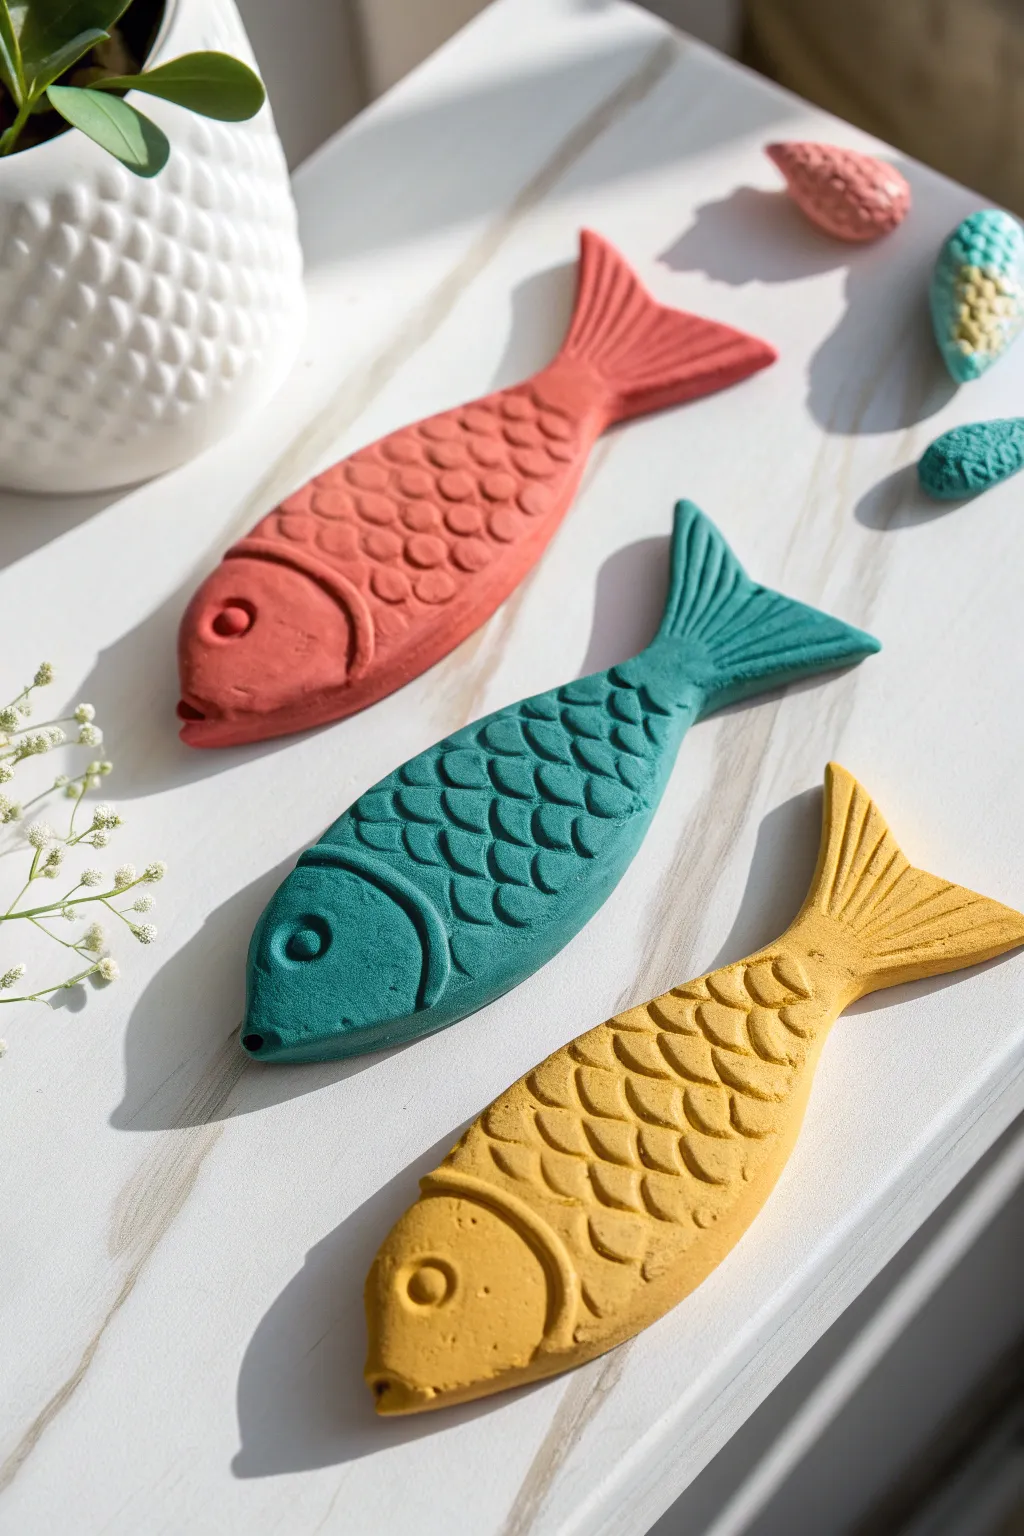
These charming fish figurines bring a splash of seaside joy to any shelf with their matte, vibrant finish and deeply textured scales. The simple shapes combined with detailed impressions give them a modern, handcrafted ceramic look without needing a kiln.
Step-by-Step
Materials
- Air-dry modeling clay (white or pre-colored)
- Acrylic paints (coral red, teal, mustard yellow)
- Clay roller or rolling pin
- Pointed sculpting tool or toothpick
- Small U-shaped clay cutter or metal piping tip (for scales)
- Small ball tool
- Craft knife
- Fine-grit sandpaper
- Matte varnish (optional)
Step 1: Shaping the Bodies
-
Condition the clay:
Start by taking a chunk of your clay and kneading it thoroughly until it is soft, pliable, and free of cracks. If you are using white clay, you will paint it later; if using colored clay, separate your colors now. -
Roll the base thickness:
Roll out the clay on a smooth surface to an even thickness of about 1/4 inch. You want it sturdy enough to hold the impressions without warping. -
Cut the outline:
Using a craft knife, cut out a simple, elongated fish silhouette. It should look like a stretched teardrop for the body, narrowing towards the tail. Don’t worry about the fins yet. -
Refine the edges:
Dip your finger in a little water and smooth down the cut edges of the clay body to remove any sharp corners or clay crumbs. -
Add the tail fin:
Cut a separate triangle shape for the tail fin. Score the narrow end of the body and the attachment point of the fin, add a dab of water (or slip), and press them firmly together, blending the seam slightly.
Scale Tool Hack
Don’t have a U-cutter? Cut a firm plastic drinking straw in half lengthwise. It creates the perfect curved tool for stamping consistent, scallop-shaped fish scales.
Step 2: Pressing the Details
-
Define the head:
Use a sculpting tool or a dull knife to gently press a curved line distinguishing the head area from the rest of the body. This creates the ‘gill’ line. -
Create the eye:
In the center of the head area, use a small ball tool to press a concave circle. Then, add a tiny dot of clay back into the center for a pupil, or simply press a smaller hole for a stylized look. -
Scale texture:
This is the most crucial step. I find using a small U-shaped cutter works best, but the rounded end of a metal piping tip or a cut straw works too. Press rows of ‘scales’ into the body, starting near the tail and moving forward toward the head. -
Offset the rows:
As you move to the next row of scales, offset the impressions slightly so they nest between the two scales behind them, creating a classic fish scale pattern. -
Fin detailing:
On the tail fin, use your knife or a needle tool to draw deep, fanned lines radiating from the body outward to mimic the texture of fins. -
Add a mouth:
Use the side of a small tool to press an indentation at the very front tip of the fish to create a small, open mouth.
Step 3: Finishing Touches
-
Drying time:
Let the fish dry completely according to your clay package instructions. This usually takes 24-48 hours. Flip them halfway through to ensure even drying. -
Sanding:
Once fully dry, gently sand any rough edges or fingerprints with fine-grit sandpaper, being careful not to sand away your stamped textures. -
Base coat painting:
If you used white clay, paint each fish in a solid, matte color—coral red, deep teal, and mustard yellow work beautifully together. Use a stiff brush to get paint into the deep crevices of the scales. -
Wipe back technique:
For added depth, you can paint a slightly darker shade into the crevices and quickly wipe the surface with a damp cloth, leaving the darker color only in the deep textures. -
Final matte seal:
To permit that stone-like look in the photo, finish with a matte varnish spray. Avoid glossy finishes if you want to replicate the natural, earthy aesthetic shown here.
Fixing Cracks
If you see tiny cracks forming as the clay dries, mix a small amount of fresh clay with water to make a paste and fill the cracks immediately, smoothing with a fingertip.
Arranging these colorful swimmers together creates a wonderful sense of movement on any flat surface

TRACK YOUR CERAMIC JOURNEY
Capture glaze tests, firing details, and creative progress—all in one simple printable. Make your projects easier to repeat and improve.
Curled-Tentacle Octopus Cuties

This adorable octopus figurine features a smooth, oversized head and eight charmingly curled tentacles. With its gentle lavender hue and dainty spotted details, this project is a perfect introduction to sculpting cute critters.
How-To Guide
Materials
- Polymer clay (Lavender/Light Purple)
- Polymer clay (Black for eyes)
- Polymer clay (White for highlights)
- Acrylic paint (thinned white or lighter purple)
- Dotting tool or small ball stylus
- Pointed sculpting tool or clay knife
- Gloss varnish or clear nail polish
- Clean work surface (tile or glass mat)
- Oven for baking (if using polymer clay)
Step 1: Shaping the Head
-
Condition the Clay:
Warm up your lavender clay in your hands by rolling and squishing it until it becomes soft, pliable, and free of cracks. -
Roll the Sphere:
Pinch off a generous portion of the conditioned clay, roughly the size of a golf ball or slightly larger depending on your desired scale. -
Smooth the Ball:
Roll this piece between your palms to create a perfectly smooth, seamless sphere. This will be the main head and body. -
Check Symmetry:
Examine the sphere from all angles to ensure it is round. Gently tap the bottom on your work surface to create a slightly flattened base for stability.
Step 2: Creating the Tentacles
-
Prepare Tentacle Sections:
Take the remaining lavender clay and divide it into eight equal-sized small portions. -
Roll the Logs:
Roll each small portion into a tapered log or cone shape, thicker at one end and thinning out to a point at the other. -
Attach the Tentacles:
Flip the head sphere upside down. Press the thick ends of the eight tentacles onto the flattened bottom of the head in a circle, blending the seams with your finger or a tool so they join seamlessly. -
Curl the Tips:
Flip the octopus back upright. Take the thin end of each tentacle and gently curl it upwards or sideways into a tight spiral. I like to vary the tightness of the curls slightly for a more organic feel. -
Add Sucker Details:
Use a small dotting tool to gently impress rows of tiny circles along the underside of each lifted tentacle curl to simulate suckers. Alternatively, attach tiny flattened balls of lighter clay.
Smooth Seams
To erase fingerprints, lightly brush the unbaked clay with a little baby oil or clay softener before baking.
Step 3: Facial Features
-
Indent Eye Sockets:
Using a larger ball tool, press two indentations into the front of the face where you want the eyes to sit. Keep them wide-set for cuteness. -
Insert Eyes:
Roll two small balls of black clay and press them firmly into the sockets. Flatten them slightly so they aren’t bulging too much. -
Create the Smile:
Use a curved tool, a straw cut in half, or a needle tool to gently carve a small, U-shaped mouth centered below the eyes. -
Eyebrows:
With a fine needle tool or a very thin marker post-baking, mark two small arches above the eyes for expression.
Tentacles falling off?
If tentacles won’t stick, score/scratch both joining surfaces and add a drop of liquid clay or bake & bond gel.
Step 4: Finishing Touches
-
Spotted Texture:
take very watered-down white or light pink acrylic paint (or liquid clay). Use a toothpick or fine dotting tool to apply random, subtle speckles over the top of the head. -
Bake:
Follow the heating instructions on your specific package of polymer clay. Usually, this is around 275°F (135°C) for 15-30 minutes. -
Cool Down:
Allow the figurine to cool completely before handling it further to prevent fingerprints or distortion. -
Gloss the Eyes:
Once cool, apply a tiny drop of gloss varnish or clear nail polish to just the black eyes. This gives them that lifelike sparkle.
Place your new curled-tentacle friend on a desk or shelf to bring a smile to your day
Spiral-Shell Snail in Rainbow Colors
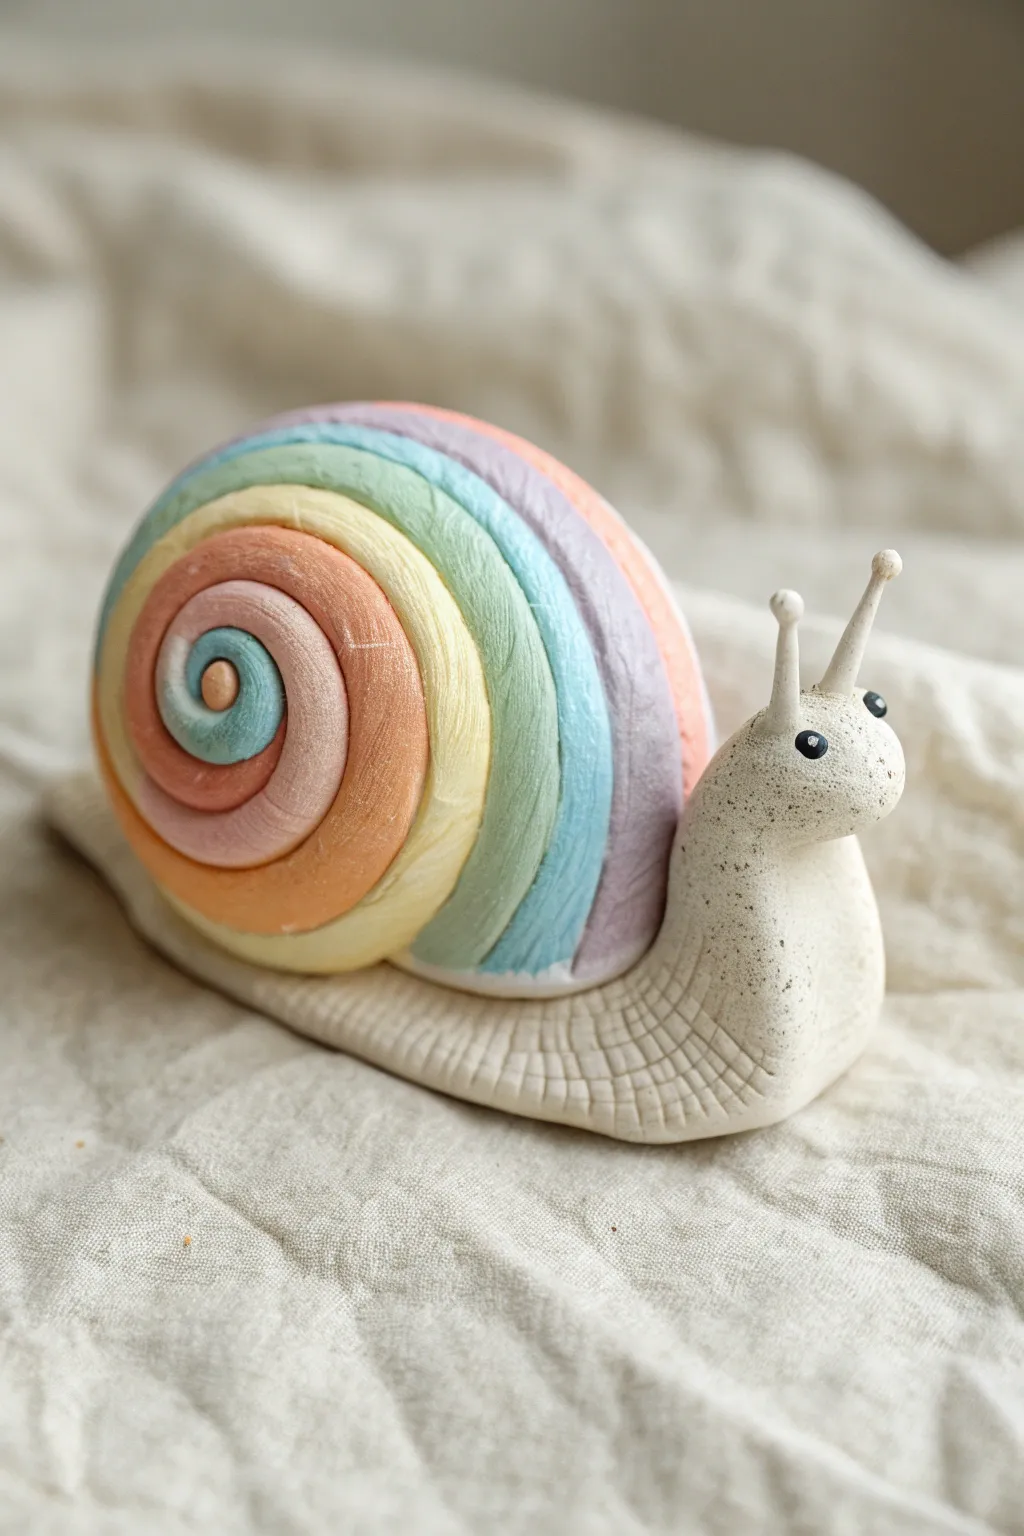
Bring a touch of whimsical spring magic to your shelf with this charming clay snail featuring a soft, pastel-colored spiral shell. The project combines simple coil techniques with delightful textures, making it a perfect afternoon craft that results in a sturdy, speckled friend.
Detailed Instructions
Materials
- Air-dry clay or polymer clay (white)
- Acrylic paints (pastel pink, peach, yellow, mint green, light blue, lavender)
- Clay tools (needle tool, smooth modeling tool)
- Texture sponge or old toothbrush
- Rolling pin
- Water (for smoothing)
- Black acrylic paint or fine marker (for eyes)
- Wire armature (optional for horns)
- Matte varnish
Step 1: Forming the Body
-
Base Shape:
Start with a generous handful of white clay. Knead it until pliable, then roll it into a thick log shape. Taper one end slightly for the tail and keep the other end blunt and rounded for the head potion. -
Define the Head:
Gently pinch and bend the thicker end upwards to create the snail’s neck and head. Smooth out the transition so it curves naturally rather than creating a sharp angle. -
Flatten the Base:
Press the entire bottom of the snail body gently onto your work surface to create a flat base. This ensures your snail will stand upright without wobbling. -
Create Texture:
Use a needle tool or a small knife to gently score a cross-hatch pattern along the sides of the body, focusing on the tail area. This mimics the wrinkled skin of a real snail. -
Speckled Effect:
To achieve the stone-like texture seen in the photo, take an old toothbrush or a stiff bristle brush and gently stipple the surface of the head and neck. This creates tiny pores and irregularities. -
Adding Horns:
Roll two very small, thin coils of clay for the eye stalks. Attach them to the top of the head. I find using a tiny drop of water or liquid clay helps them stick better. Top each stalk with a tiny ball.
Step 2: Creating the Rainbow Shell
-
Prepare Color Strands:
Divide your remaining clay into six equal portions. Mix your pastel acrylic paints into each portion to create: pink, peach, yellow, mint, blue, and lavender clay. Alternatively, you can sculpt in white and paint later. -
Roll the Coils:
Roll each colored portion into a long, even snake. Try to keep them all the same thickness, roughly the width of a pencil. -
Refine the Strands:
Lightly flatten the tops of your coils with a rolling pin just a tiny bit; this gives the shell a slightly more organic, ridged look rather than perfect tubes. -
Start the Spiral:
Take your innermost color (teal/blue in the image) and roll it into a tight center swirl. This is the ‘eye’ of the shell. -
Layering Colors:
Wrap the next color (peach/pink) around the center swirl. Cut the ends at an angle to blend the seam where the strip starts and ends. -
Building Outward:
Continue wrapping each colored coil around the growing spiral in rainbow order (or the order shown: blue center, peach, yellow, green, blue, purple, pink outer). Press them gently together so they bond. -
Smoothing the Shell:
Once your disc is purely round and large enough, gently cup it in your hands to dome it slightly, giving it a 3D shell form rather than a flat coaster shape.
Crack Control
If you see tiny cracks forming while air-dry clay dries, smooth a slurry of clay and water into the gaps with your finger immediately to patch them up before painting.
Step 3: Assembly and Details
-
Attach Shell to Body:
Score the back of the snail body and the bottom of the shell. Add a little clay slip or water, then press the shell firmly onto the creature’s back. -
Blend the Seams:
Use a modeling tool to gently push a little clay from the underside of the shell onto the body to lock it in place, hiding this join underneath so it’s not visible. -
Dry Time:
Let the sculpture dry completely. If using air-dry clay, this might take 24-48 hours. If using polymer, bake according to package instructions. -
Speckling Paint:
Dilute a small amount of grey or black paint with water. Dip a toothbrush in it and flick the bristles with your thumb to spray tiny speckles over the white body for that stony look. -
The Eyes:
Using the handle end of a paintbrush or a dotting tool, dab two solid black dots onto the snail’s face. Once dry, add a tiny white highlight speck to bring it to life. -
Seal It:
Finish your piece with a coat of matte varnish to protect the colors and unify the sheen of the clay.
Glossy Shell
Make the shell pop by using a high-gloss varnish on just the rainbow spiral part, while keeping the snail’s body matte and textured for contrast.
Place your cheerful new friend near a potted plant or on a windowsill to catch the light
Adorable Farm Animal Trio Set
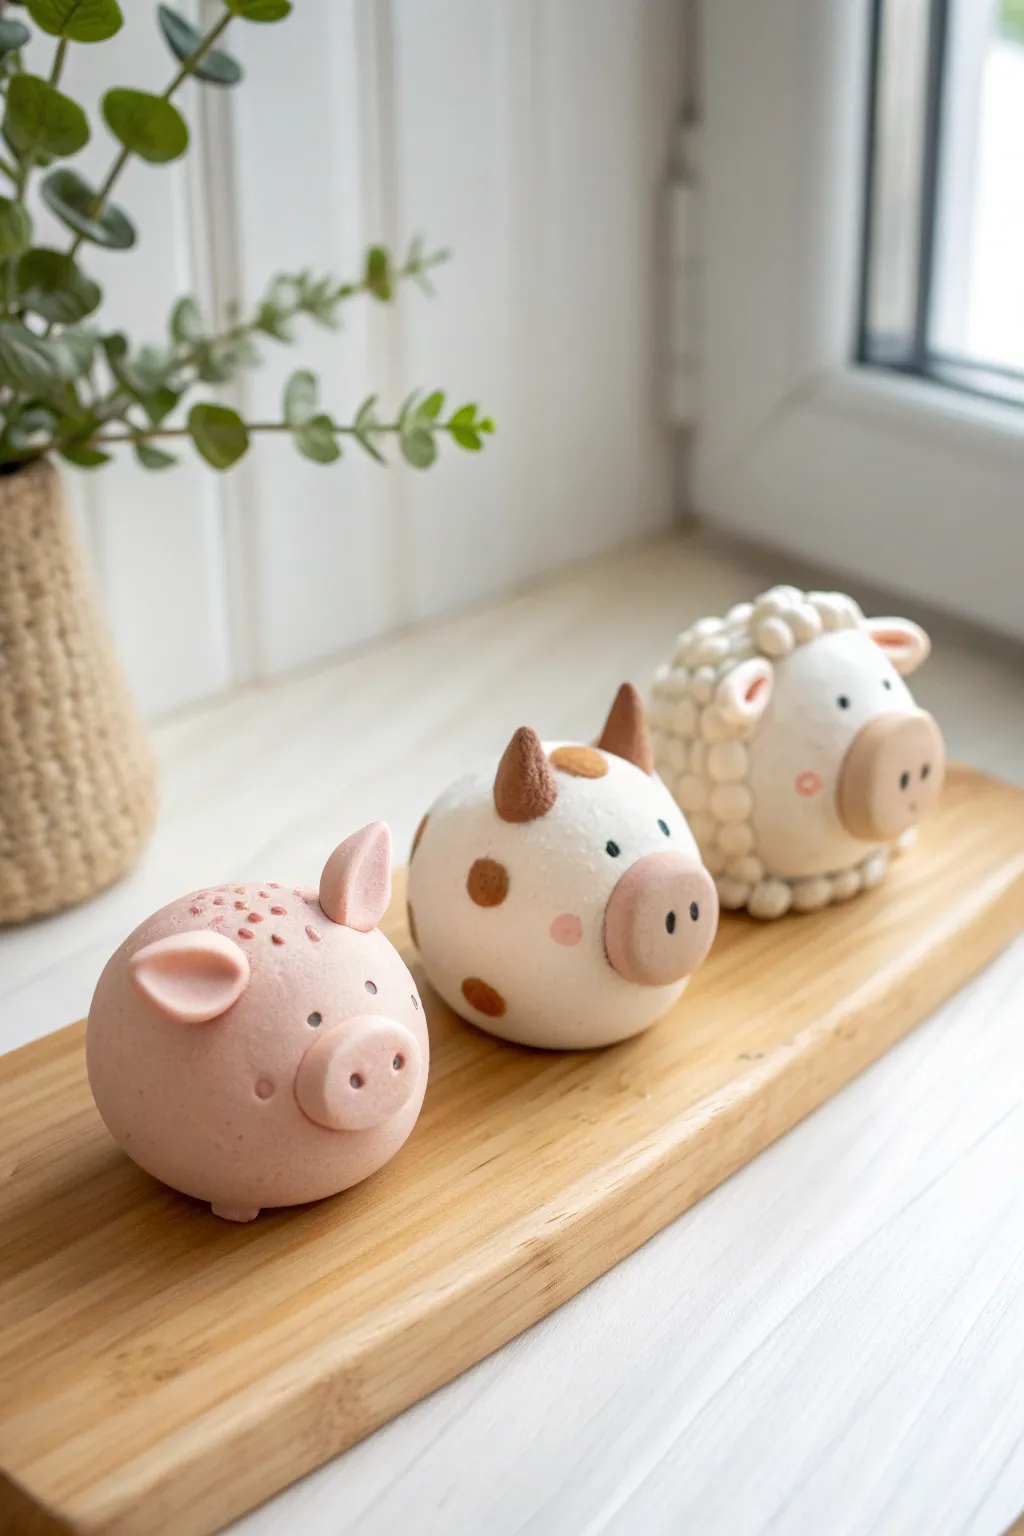
Bring the farm to your windowsill with this adorable set of spherical animals: a blushing pig, a spotted cow, and a woolly sheep. Created from smooth modeling clay, these round characters feature minimalist details and pastel tones that make them perfect as nursery decor or cute desk companions.
Step-by-Step Tutorial
Materials
- Air-dry clay or polymer clay (white, light pink, dark brown, tan)
- Clay sculpting tools (ball stylus, needle tool)
- Rolling pin
- Aluminum foil (for optional core)
- Small paintbrush
- Water (for smoothing)
- Matte varnish (optional)
Step 1: Shaping the Bases
-
Create the core spheres:
Start by rolling three evenly sized balls of clay. For the pig, mix white with a tiny bit of red to get a pale pink. For the cow and sheep, use plain white clay. If you want to save clay, you can crunch aluminum foil into a tight ball first and coat it in clay. -
Smooth the surfaces:
Roll each sphere gently between your palms to remove any cracks or fingerprints. Use a drop of water on your finger to buff out stubborn lines, ensuring a perfectly round canvas for your animals. -
Flatten the bottoms:
Gently tap the bottom of each sphere against your work surface. This creates a small flat spot so your animals will sit stable without rolling away.
Seamless Merging
When attaching pieces like ears or snouts, use a silicone tool or your finger to smooth the clay edges together. This prevents parts from popping off later.
Step 2: Crafting the Pig
-
Add the snout:
Roll a small oval from the same pink clay and press it onto the front center of the sphere. Use a medium ball tool to indent two nostrils. -
Form the ears:
Shape two small triangles of pink clay. Pinch the corners gently and attach them near the top of the head, folding the tips forward slightly for a floppy look. -
Create the tail:
Roll a tiny, thin snake of pink clay and curl it into a corkscrew. Attach this to the back of the pig. -
Detail the eyes:
Using a needle tool or small ball stylus, press two small indentations for eyes. Fill these with tiny dots of dark brown clay, or paint them in after the clay dries. -
Add texture:
Using a needle tool, gently stipple the top of the pig’s head with tiny dots to suggest a bit of hair or texture.
Cracks Appearing?
If air-dry clay cracks while drying, mix a tiny bit of fresh clay with water to make a paste (slip) and fill in the cracks, then smooth it over.
Step 3: Creating the Cow
-
Apply the spots:
Take small pieces of brown and tan clay and flatten them into irregular organic shapes. Press these firmly onto the white sphere so they sit flush with the surface. -
Attach the muzzle and horns:
Create a pale pink oval for the muzzle (lighter than the pig) and attach it. Roll two small brown cones for horns and place them on top of the head. -
Refine the face:
Add nostril indentations to the muzzle and tiny dark clay eyes widely spaced above it. Add blush by rubbing a tiny bit of pink pastel or clay on the cheeks.
Step 4: Sculpting the Sheep
-
Texture the body:
Instead of a smooth finish, roll dozens of tiny white clay balls. Press these all over the back two-thirds of the sphere to create a bumpy ‘wool’ texture. -
Shape the face:
Keep the front face area smooth. Add a tan oval for the nose/muzzle area to distinguish it from the white wool. -
Add ears and details:
Make small teardrop shapes for ears using white clay with pink interiors. Tuck them just behind the face but in front of the wool texture. -
Final touches:
Add the eye indentations and nostrils similar to the other animals. I find that keeping the expression simple maintains the cohesive style of the trio.
Let your little farm friends dry completely before arranging them on a shelf to brighten your room
Woodland Critters With Mask Markings
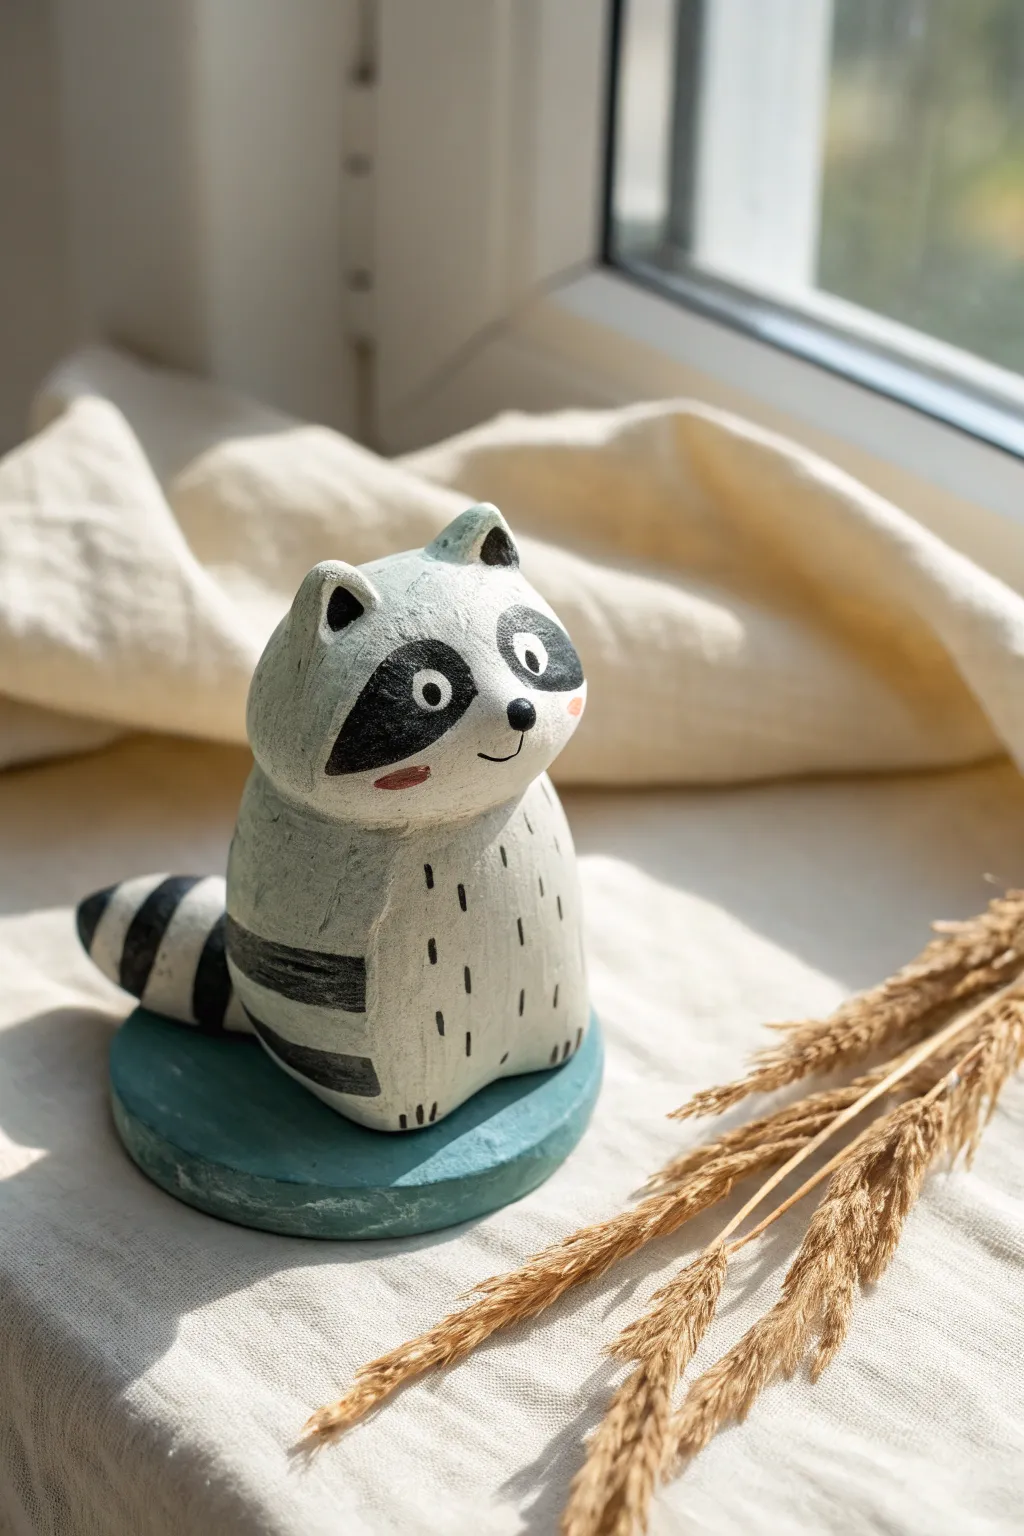
Create a charming woodland companion with this simple yet expressive clay project. This raccoon features a stylized, minimalist shape with bold painted details and sits proudly on its own teal base, perfect for brightening up a windowsill.
Detailed Instructions
Materials
- Air-dry clay or polymer clay (white or grey)
- Acrylic paints (black, white, teal/turquoise, pink)
- Fine detail paintbrush
- Medium flat paintbrush
- Clay sculpting tools (smoothers, needle tool)
- Small cup of water
- Sandpaper (fine grit)
- Matte varnish (optional)
Step 1: Sculpting the Base Form
-
Form the Body:
Start with a ball of clay roughly the size of a tangerine. Roll it between your palms to smooth it out, then gently gently taper the top third to create a rounded pear or teardrop shape. This will be the combined head and body. -
Create the Base:
Take a separate piece of clay and flatten it into a thick disc, about 1/2 inch thick and slightly wider than the bottom of your raccoon body. Smooth the edges so it looks like a clean stone slab. -
Add the Ears:
Pinch two small triangles of clay. Attach them to the very top of the head shape. Blend the clay downwards into the main body so there are no visible seams, keeping the points pert and upright. -
Shape the Tail:
Roll a small cone of clay for the tail. It should be thick at one end and taper to a soft point. The tail in this design is quite stubby and cute. -
Assemble the Figure:
Score (scratch) the bottom of the body and the top of the base disc, add a dab of water or slip, and press them firmly together. Do the same to attach the tail to the lower back of the raccoon, wrapping it slightly around the side. -
Refine and Smooth:
Use a little water on your finger to smooth out any fingerprints or cracks. You want a relatively smooth surface, but a little handmade texture adds character. Let the sculpture dry completely according to your clay’s instructions.
Wobbly Raccoon?
If the head feels too heavy, insert a toothpick or crumpled foil core into the body while sculpting. This reduces weight and adds internal stability.
Step 2: Painting the Details
-
Base Coat:
If your clay isn’t already a bright white, paint the entire raccoon body white. Give it two coats if necessary for solid coverage. Paint the disc base a muted teal or turquoise color. -
Paint the Mask:
Using a fine brush and black paint, outline two large, slanted tear-drop shapes for the raccoon’s mask. I like to start with just the outline to ensure symmetry before filling them in with solid black. -
Add Eyes and Nose:
Once the black mask is dry, add white circles inside the black patches for eyes, followed by tiny black pupils. Paint a small black nose right between the bottom of the mask patches. -
Create Fur Texture:
Using your finest brush, paint small, vertical dashed lines scattered across the raccoon’s chest and belly. These minimalist marks suggest fur without needing complex sculpting. -
Stripes and Rosy Cheeks:
Paint broad black stripes across the tail and the lower back area. Finally, add tiny pink ovals just under the eyes for cheeks and use a very light grey or diluted black to define the inner ears. -
Finishing Touches:
Inspect your work for any stray paint marks. Once fully dry, you can apply a matte varnish to protect your new friend from dust and handling.
Textured Finish
Before painting, gently tap the damp clay with a stiff toothbrush. This creates a subtle stone-like texture that catches the paint beautifully.
Now you have a sweet little forest guardian ready to watch over your desk or shelf
Flat-Wing Butterflies With Bold Spots
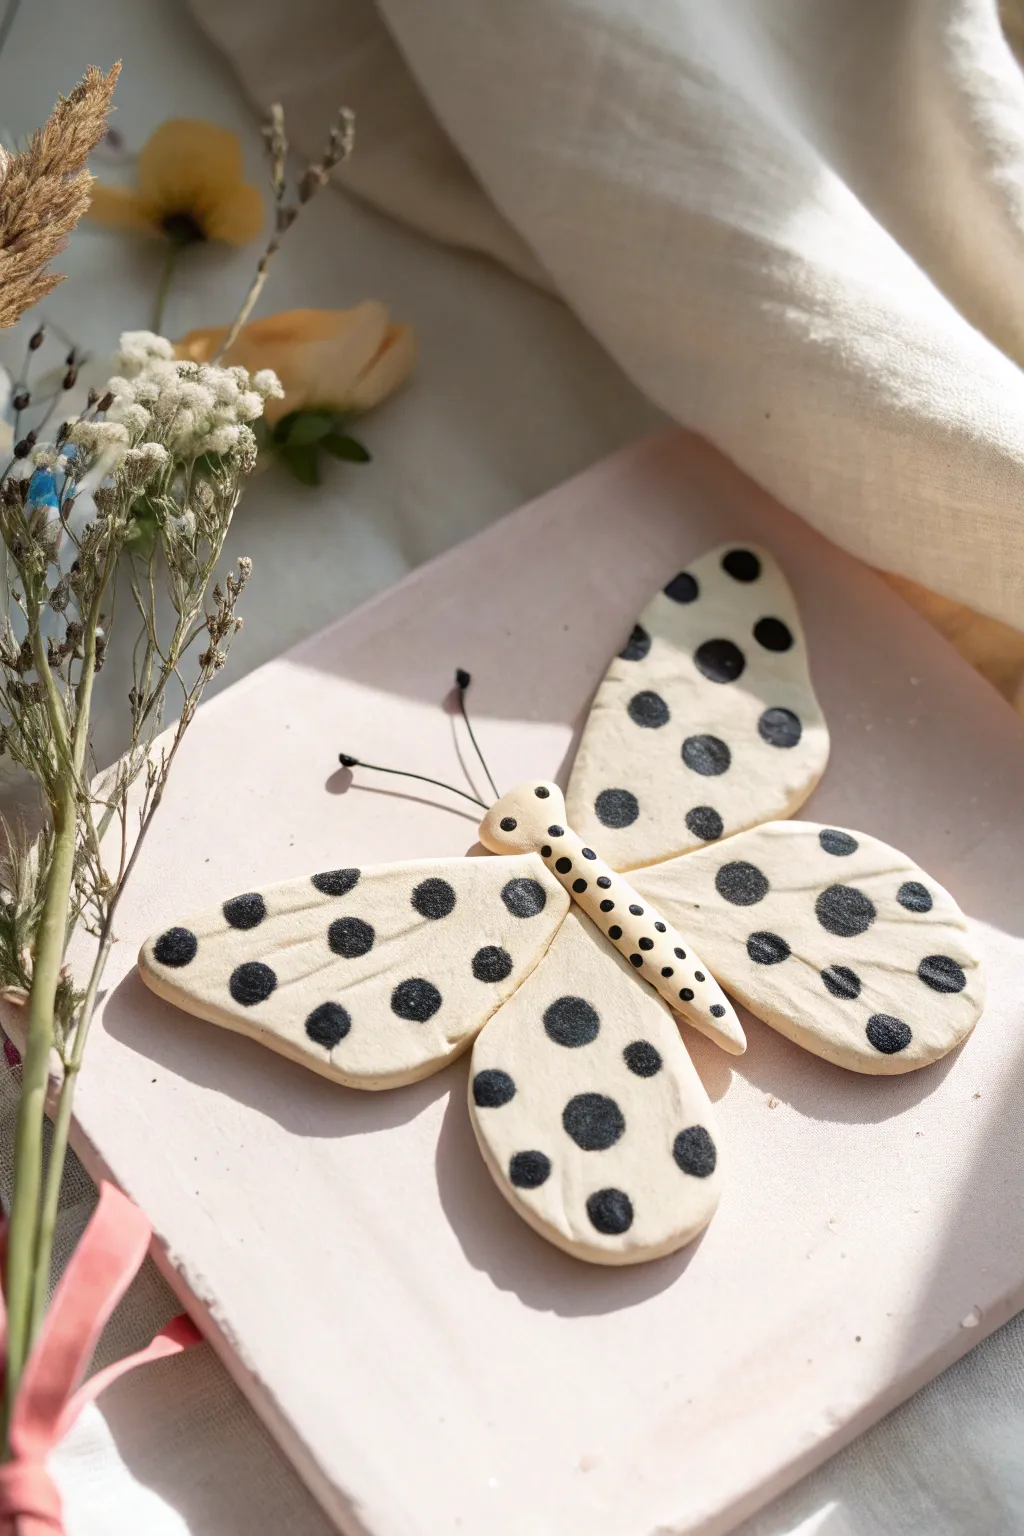
Create a minimalistic, charming butterfly sculpture using smooth modeling clay and bold monochromatic details. This project focuses on simple shapes flattened to perfection, adorned with striking black polka dots for a graphic, modern look.
Step-by-Step
Materials
- Cream or off-white air-dry clay or polymer clay
- Rolling pin
- Clay knife or craft blade
- Black acrylic paint
- Small round paintbrush or dotting tool
- Two thin black wires or stiff headpins
- Sandpaper (fine grit)
- Parchment paper or non-stick mat
Step 1: Shaping the Body
-
Form the Torso:
Start by pinching off a small amount of clay, roughly the size of a large grape. Roll it into a smooth ball between your palms to remove any cracks. -
Elongate the Shape:
Gently roll the ball back and forth on your work surface to create a tapered cylinder or ‘carrot’ shape. The top end should be slightly rounded for the head, while the bottom tapers to a dull point. -
Refine the Head:
Use your fingers to subtly pinch the wider end to distinguish the head area from the rest of the thorax. It doesn’t need to be a separate ball, just a slight definition.
Clay Cracking?
If using air-dry clay, cracks can appear as it shrinks. Dip a finger in water and smooth a little fresh clay paste (slip) into the crack, then let it dry again.
Step 2: Crafting the Wings
-
Prepare Clay Slabs:
Take a larger portion of clay and roll it out flat on your non-stick mat until it is about 1/4 inch thick. Aim for an even thickness throughout. -
Cut the Top Wings:
Using your clay knife, cut out two elongated teardrop shapes for the upper wings. They should be roughly twice the length of the body. -
Cut the Bottom Wings:
Cut two slightly smaller, rounder teardrop shapes for the lower wings. I like to lay these next to the top wings as I cut to ensure the proportions look balanced. -
Smooth the Edges:
Dip your finger in a tiny bit of water (for air-dry clay) or baby oil (for polymer) and run it along the cut edges of all four wings to soften any harsh angles. -
Position the Wings:
Arrange the four wings on your workspace in their final butterfly formation. The pointed ends of the teardrops should all meet in the center.
Step 3: Assembly and Detail
-
Attach the Body:
Place your prepared body cylinder directly on top of where the four wings meet in the center. Press it down gently but firmly to bond the clay pieces together. -
Insert Antennae:
Cut two short lengths of black wire, about 1 inch long. detailed with a tiny bend or loop at the tip if desired. Push them into the top of the head while the clay is still soft. -
Dry or Bake:
Let the sculpture dry completely according to your clay’s instructions. If using air-dry clay, flip it occasionally to prevent curling. If using polymer, bake as directed. -
Sand for Smoothness:
Once fully cured and hard, gently sand the edges and surface with fine-grit sandpaper to achieve a porcelain-like finish.
Pro Tip: Perfect Circles
Instead of freehand painting, use the flat end of a drill bit or the back of a brush handle dipped in paint to stamp perfect, solid circles onto the wings.
Step 4: Painting the Pattern
-
Mix the Paint:
Squeeze out a small amount of black acrylic paint. Ensure it is opaque enough to cover in one coat; add a drop of water if it feels too thick. -
Paint Large Spots:
Using a small round brush, paint large circles randomly across the wings. Vary the placement so it feels organic rather than perfectly symmetrical. -
Add Body Details:
Switch to a smaller brush or dotting tool. carefully paint a row of small dots running down the length of the body segment. -
Paint the Eyes:
Add two tiny black dots on either side of the head for eyes. -
Final Touches:
Fill in any empty spaces on the wings with smaller dots to balance the composition, then allow the paint to dry completely.
Place your finished spotted butterfly on a decorative tray or shelf to add a touch of nature-inspired whimsy to your room
Color-Block Caterpillar Segments
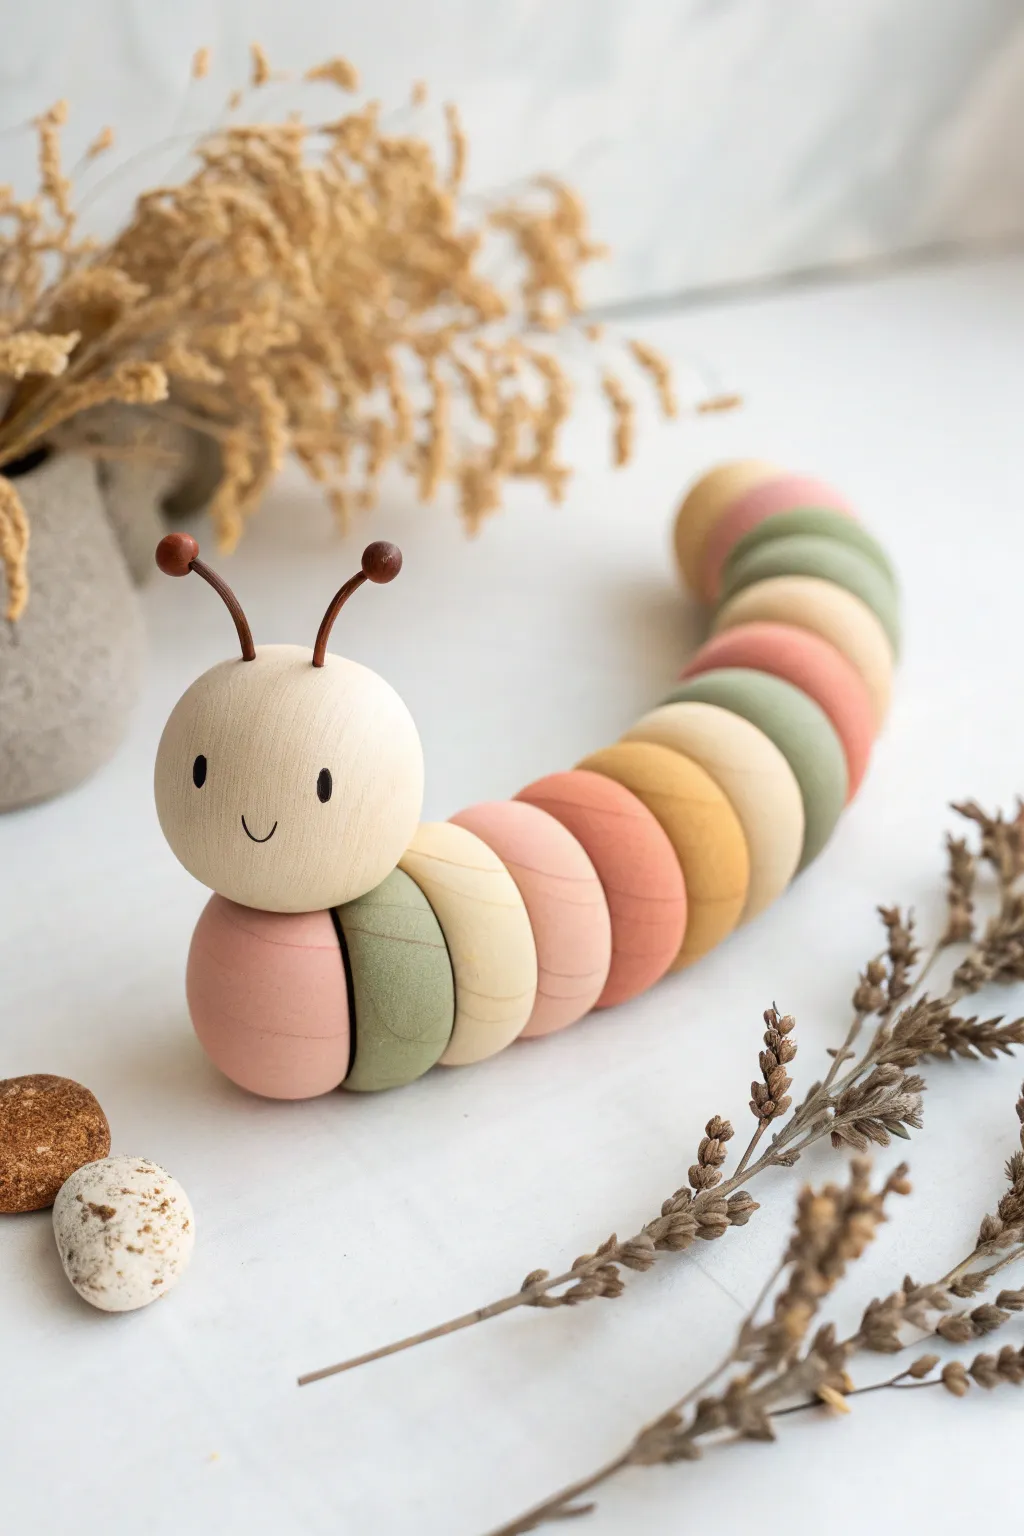
This charming little crawler features smooth, rounded segments in a soothing palette of earthy pastels. With a friendly wooden-style head and gently curved body, it makes for a delightful nursery decoration or a sweet handmade toy.
Step-by-Step Guide
Materials
- Polymer clay (white, beige/wood tone, sage green, dusty pink, terracotta, mustard yellow)
- Acrylic roller
- Circle cutters (approx. 1 inch diameter)
- Needle tool or toothpick
- Liquid polymer clay (bakeable adhesive)
- Black acrylic paint
- Fine detail paintbrush or dotting tool
- Flexible floral wire or jewelry wire (brown)
- Two small wooden beads (for antennae tips)
- Matte varnish (optional)
- Sandpaper (fine grit)
Step 1: Creating the Segments
-
Mix colors:
Start by mixing your clay to achieve those soft, distinctive color-blocked shades. You’ll need a sage green, a dusty rose pink, a muted mustard yellow, and a warm terracotta. If your colors are too bright, mix in a tiny pinch of brown or beige to mute them down. -
Roll the clay:
Take your first color—let’s start with the pink tone you see at the neck—and roll it into a thick sheet, about 3/4 of an inch thick. You want these to be chunky. -
Cut the circles:
Using your circle cutter, punch out a thick disk. Repeat this process for all your colors. You will need about 10-12 segments depending on how long you want your caterpillar to be. -
Smooth the edges:
The cutter leaves sharp edges, but we want a rounded, organic look. Use your thumb to gently smooth and dome the edges of each disk until they look like slightly flattened spheres or puffy marshmallows. -
Texture the sides:
To mimic the wooden texture seen in the photo, you can very lightly drag a piece of coarse sandpaper horizontally across the curved sides of the segments before baking. This adds a subtle grain.
Segments Won’t Stick?
If the segments come apart after baking, simply use superglue to reattach them. The flat contact points make this an easy fix that is invisible once dried.
Step 2: Assembly & Head
-
Form the head:
Roll a ball of beige or light wood-colored clay. This should be slightly larger than your body segments, perfectly spherical but slightly flattened on the bottom so it sits stable. -
Curve the body:
Arrange your colored disks in a serpentine pattern on your baking tile. Press them gently against each other so they make contact, alternating colors as shown (pink, green, cream, apricot, terracotta). -
Bonding:
Apply a small dab of liquid polymer clay between each segment where they touch. This acts as a glue during baking to ensure the caterpillar stays as one solid piece. -
Attach the head:
Press the beige head onto the front of the first body segment, using a drop of liquid clay for security. I find it helpful to insert a small piece of wire between the head and neck for extra structural support. -
Prepare antennae holes:
Use your needle tool to poke two small holes on top of the head where the antennae will go. Do this before baking so you don’t crack the clay later. -
Bake:
Bake the entire assembly according to your specific clay package’s instructions (usually 275°F for 15-30 minutes). Let it cool completely.
Pro Tip: Faux Wood Effect
Mix translucent clay into your beige head color. Streaking it slightly without fully blending creates a realistic wood grain depth.
Step 3: Finishing Details
-
Sand the surface:
Once cool, inspect your piece. If there are any fingerprints, gently buff them away with wet/dry sandpaper under running water. -
Paint the face:
Using a very fine brush or a dotting tool, dab two small ovals of black paint for the eyes. Add a tiny, thin ‘U’ shape between them for the smile. -
Assemble antennae:
Cut two short lengths of brown wire (about 1 inch long). Glue a tiny wooden bead to one end of each wire. -
Insert antennae:
Dip the bottom ends of the wires into a strong glue (like superglue or E6000) and insert them into the pre-made holes on the head. -
Seal:
To protect the paint and give the clay that smooth, finished look, apply a thin coat of matte varnish over the entire piece.
Set your colorful creature on a shelf or desk and enjoy the whimsical charm it adds to the room
Tiny Animal Charms for Keychains
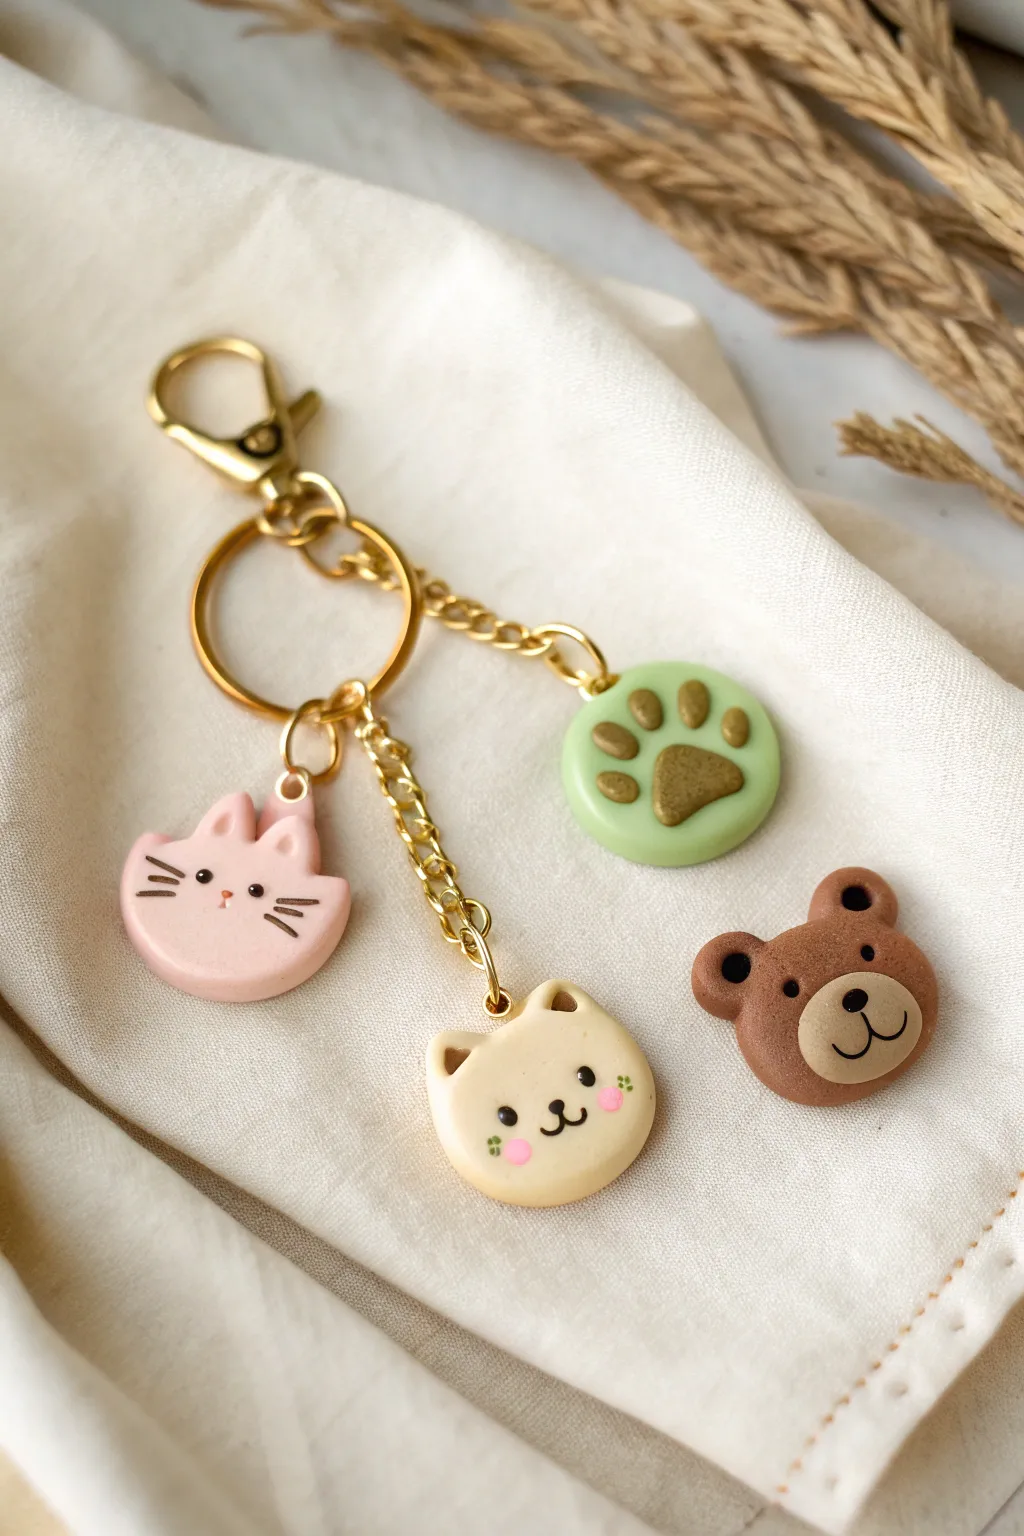
These adorable animal face charms are perfect for adding a touch of cuteness to your keys or bag. Crafted from polymer clay with simple shapes and sweet expressions, they feature a smooth, gentle finish and delicate gold hardware.
Detailed Instructions
Materials
- Polymer clay (light pink, cream/beige, chocolate brown, soft green)
- Clay tools (ball styluses, needle tool)
- Gold screw eye pins (small)
- Gold keychain hardware (keyring with chain, jump rings, lobster clasp)
- Black and pink acrylic paint (or fine tip markers)
- Gloss glaze (UV resin or water-based varnish)
- Oven for baking polymer clay
- Pliers (needle-nose and flat-nose)
Step 1: Sculpting the Shapes
-
Prepare the clay:
Begin by conditioning your polymer clay until it is soft and pliable. You’ll need separate balls for the pink cat, cream dog, and brown bear. -
Form the base heads:
Roll minimal amounts of clay into smooth balls, then gently flatten them into thick, rounded discs about the size of a quarter. -
Shape the cat ears:
For the pink cat, pinch the top two corners of the disc gently to form triangular ears. Use a tool to smooth the transition so the ears look integral to the head. -
Add dog and bear ears:
Create tiny spheres of cream and brown clay. Attach two to the top of the cream disc for the dog, and two to the brown disc for the bear. Use a ball tool to indent the centers slightly. -
Create the paw print:
Flatten a ball of light green clay into a thick circle. Press a larger ball of brown clay into the center for the main pad, and shape three smaller brown accents as toes above it. -
Refine the snouts:
For the bear and dog, add a tiny, flattened oval of lighter clay (like the light beige used on the bear’s snout) to create a muzzle area.
Clean Clay Pro-Tip
Keep baby wipes or rubbing alcohol nearby. Clean your hands and tools between colors (especially before touching white or cream clay) to avoid transferring lint or dark pigments.
Step 2: Details & Assembly
-
Insert hardware:
Carefully screw a small gold eye pin into the top center of each charm before baking. I like to add a dab of liquid clay or bake-and-bond on the threads for extra security. -
Bake the charms:
Place your creations on a baking sheet or tile. Bake according to your specific clay brand’s instructions (usually 275°F/135°C for 15–30 minutes). -
Cool down:
Allow the clay pieces to cool completely before handling them; they are fragile when hot. -
Paint the faces:
Using a very fine detail brush and black acrylic paint, carefully draw the eyes, nose, and mouth. Add whiskers for the cat and tiny dots for eyes. -
Add blushing cheeks:
Dip a stylus or the end of a toothpick into pink paint and gently dot it onto the cheeks of the cat and dog to give them a sweet, flushed look. -
Seal the charms:
Once the paint is fully dry, coat the charms with a layer of gloss glaze or UV resin to protect the paint and give them a professional shine. -
Prepare the chains:
Using your pliers, separate lengths of small gold chain. You will need different lengths if you want the charms to stagger as shown in the photo. -
Connect the charms:
Open a jump ring with two pairs of pliers (twist, don’t pull). Thread it through the eye pin on a charm and attach it to the end of a chain length. -
Attach to main ring:
Connect the other ends of the chains to the main gold keyring using larger jump rings. Attach the lobster clasp to the top of the assembly.
Uneven Baking Fix
If your lighter clay colors are browning or scorching in the oven, tent a piece of aluminum foil over the charms while baking to protect them from direct heat.
Now you have a custom set of tiny friends to keep your keys company wherever you go
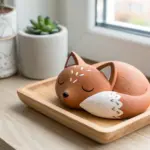
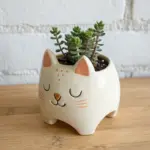
Whimsical Food-Hybrid Animals
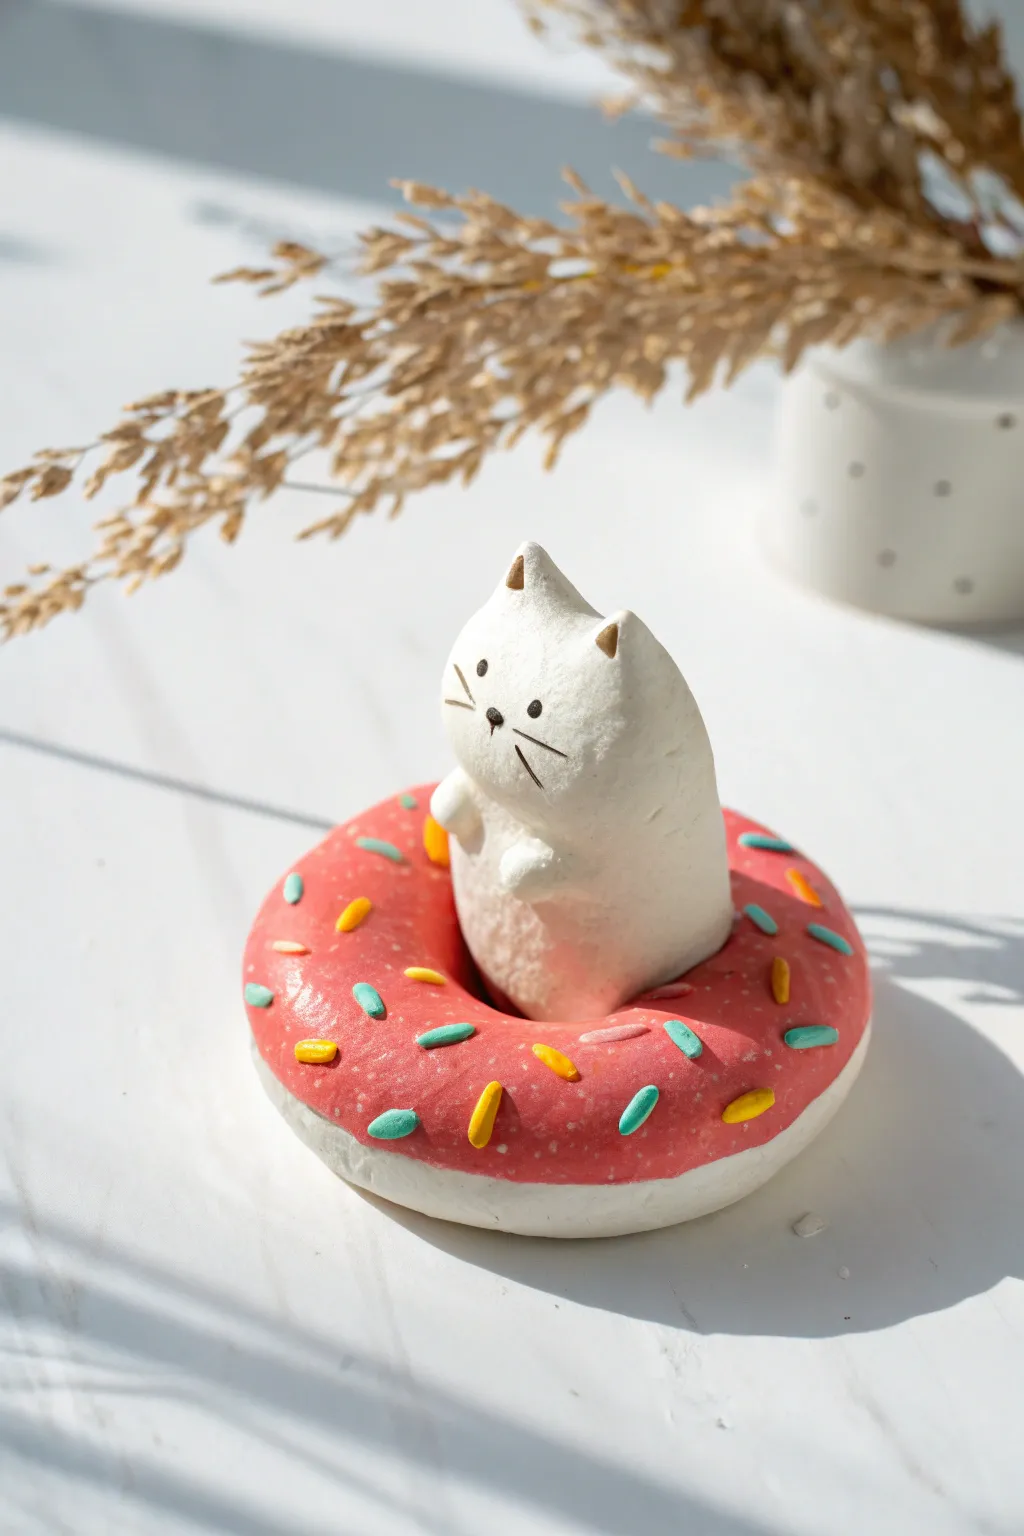
This charming project combines a chubby white cat with a sweet sprinkled treat for an adorable desk companion. The scene features a smooth, minimalist feline popping out of the center of a pink-frosted donut, creating a whimsical food-hybrid sculpture.
Step-by-Step Guide
Materials
- White creative paper clay or air-dry clay
- Acrylic paints (pink, yellow, cyan/blue, black, brown)
- Fine-grit sandpaper
- Sculpting tools (needle tool, small ball tool)
- Water for smoothing
- Small paintbrush
- Matte sealant or varnish
Step 1: Sculpting the Cat
-
Form the body:
Start with a lump of white clay about the size of a golf ball. Roll it into a smooth egg shape, slightly flattening the bottom where it will sit inside the donut. -
Shape the head:
Gently pinch the top of the egg shape to define the head area without creating a separate neck piece; the goal is a seamless, chubby silhouette. -
Add ears:
Pinch two small triangles at the very top of the head for ears. Keep them short and slightly rounded at the tips for a cute, soft look. -
Create the paws:
Roll two very small balls of clay. Attach them to the front of the body, just below the ‘neck’ area, blending the back edges so they look like little nubby arms resting on the donut. -
Smooth the surface:
Dip your finger in a little water and gently rub out any fingerprints or cracks on the cat’s body until it is completely smooth.
Cracking Clay?
If small cracks appear while the donut is drying, mix a small amount of fresh clay with water to make a paste. Fill the cracks, smooth over with a damp finger, and let it dry again.
Step 2: Creating the Donut Base
-
Roll the donut ring:
Take a larger amount of clay and roll it into a thick snake. Join the ends together to form a ring, ensuring the hole in the center is wide enough to accommodate the cat’s bottom. -
Fit the pieces:
Place the cat sculpture into the center of the ring to test the fit. The cat should look like it is emerging from the dough. Adjust the donut hole size if necessary. -
Texture the donut:
Use a toothbrush or a ball of tin foil to gently texture the bottom half of the donut ring to give it a realistic baked-good appearance. -
Apply the frosting:
Roll out a thin, flat sheet of clay. Cut a wavy, irregular ring shape from it and drape it over the top of the donut base, smoothing the edges down to look like melted icing. -
Add sprinkles:
Roll tiny, rice-sized grains of clay. Press them gently into the soft ‘frosting’ clay in a random pattern. Ensure they stick well by dabbing a tiny bit of water if the clay feels dry. -
Join and dry:
Permanently attach the cat to the donut using a little water or slip (clay mixed with water). Let the entire piece dry completely, which usually takes 24-48 hours depending on humidity.
Make it a Photo Holder
Before the clay dries, insert a coiled wire note holder into the top of the cat’s head. It turns this cute sculpture into a functional memo or photo stand for your desk.
Step 3: Painting and Finishing
-
Sand imperfections:
Once fully dry, use fine-grit sandpaper to buff away any rough spots on the cat’s white body, keeping it pristine and smooth. -
Paint the frosting:
Paint the wavy frosting layer with a bright, opaque pink acrylic paint. Use a steady hand to keep a clean line where the frosting meets the ‘dough’. -
Color the sprinkles:
Using a very fine detail brush, paint the individual sprinkles in alternating colors of yellow, cyan, and white to make them pop against the pink. -
Add cat details:
Paint the inside of the ears with a soft gold or light brown. Use a fine liner brush and black paint to draw two small eyes, a tiny nose, and three whiskers on each cheek. -
Final touches:
Paint the bottom dough section of the donut white (or leave natural if your clay is off-white). I prefer adding a top coat of matte varnish to protect the paint without making it look plastic.
Now you have a sweet desktop friend that looks good enough to eat but is strictly for admiring
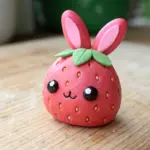
Mix-and-Match Chimera Animal Mashups
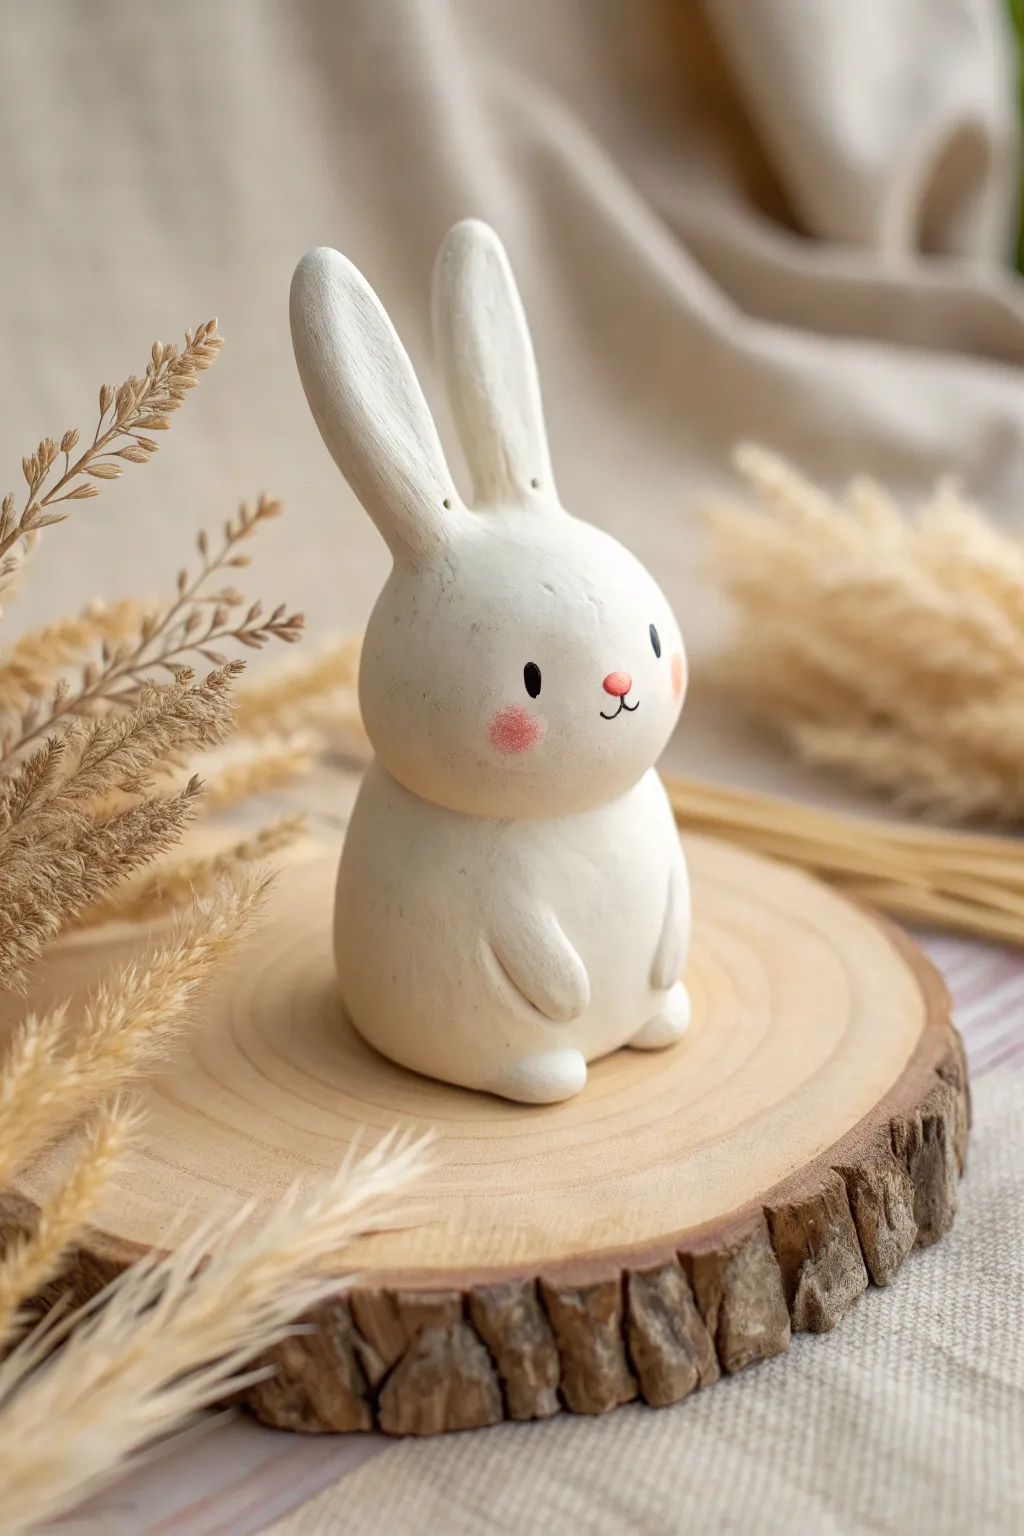
This adorable bunny figurine combines a minimalist aesthetic with the charm of hand-sculpted clay. Its smooth, rounded forms and sweet expression make it a perfect beginner project that results in a professional-looking decoration.
Step-by-Step
Materials
- White polymer clay (or air-dry clay)
- Clay sculpting tools (needle tool, smoothing tool)
- Acrylic paint (black, pink)
- Small fine-point paintbrush
- Ball stylus tool
- Aluminum foil (for armature core, optional)
- Matte varnish or sealant
Step 1: Sculpting the Base Form
-
Condition the clay:
Start by warming up your white clay in your hands, kneading it until it is soft, pliable, and free of cracks. -
Shape the body:
Roll a large portion of clay into a smooth ball. Gently press it onto your work surface to flatten the bottom so the bunny sits securely without wobbling. -
Taper the top:
Using your palms, gently narrow the top portion of the ball slightly to create a pear-like shape where the head will attach, keeping the bottom heavy and rounded. -
Form the head:
Roll a second, slightly smaller ball for the head. It should be proportional to the body but slightly flattened on the bottom where it connects. -
Connect head and body:
Place the head atop the body. Use a blending tool or your thumb to drag clay across the seam, smoothing the two pieces together until the neck joint is invisible.
Step 2: Adding Features and Limbs
-
Shape the ears:
Roll two equal logs of clay. Flatten them gently into long ovals, tapering one end to a rounded point and keeping the base slightly thicker. -
Attach the ears:
Press the base of the ears onto the top of the head. Blend the seams thoroughly with a small tool so they look like they grew naturally from the head. -
Create tiny paws:
Roll two small, bean-shaped pieces for the arms. Use a needle tool or knife to make faint indentations for toes if desired, though a smooth look works well too. -
Attach the arms:
Press the arms against the front of the body, curving them slightly inward as if the bunny is holding its belly. Blend the upper edges into the shoulder area. -
Add the feet:
Create two small, flattened ovals for the feet. Place them under the front of the body so they just peek out, providing extra stability.
Clean Clay Pro-Tip
White clay picks up dust easily. Keep a pack of wet wipes nearby and clean your hands and tools thoroughly before handling white clay to keep it pristine.
Step 3: Refining and Baking
-
Smooth the surface:
Dip your finger in a tiny bit of water (for air-dry clay) or baby oil (for polymer clay) and gently rub out any fingerprints or tool marks. -
Add ear details:
Use a needle tool or toothpick to poke two tiny holes near the base of the ears or on the ears themselves for texture. -
Final inspection:
Look at the figurine from all angles to ensure symmetry. Gently adjust the ears or head tilt to give it personality. -
Cure the clay:
Bake according to your polymer clay package instructions, or let air-dry clay sit for 24-48 hours until fully hardened.
Level Up: Texture
Before baking, use a stiff-bristled toothbrush to gently tap the surface of the clay. This creates a soft, stone-like texture that mimics unglazed ceramic.
Step 4: Painting the Expression
-
Paint the eyes:
Using a small ball stylus or the back of a paintbrush dipped in black paint, dot two small eyes widely spaced on the face. -
Add the nose:
With a fine brush and pink paint, draw a tiny oval nose centered between and slightly below the eyes. -
Draw the mouth:
Using the thinnest brush or a micro-pen, draw a very delicate ‘w’ shape directly under the nose for the mouth. -
Apply blush:
I like to dry-brush a tiny amount of pink paint on the cheeks for a rosy effect. Wipe most of the paint off the brush first, then gently stipple it on. -
Seal the piece:
Once the paint is completely dry, coat the entire figurine in a matte varnish to protect the surface and give it a finished ceramic look.
Now you have a sweet little companion to sit on your shelf or gift to a friend