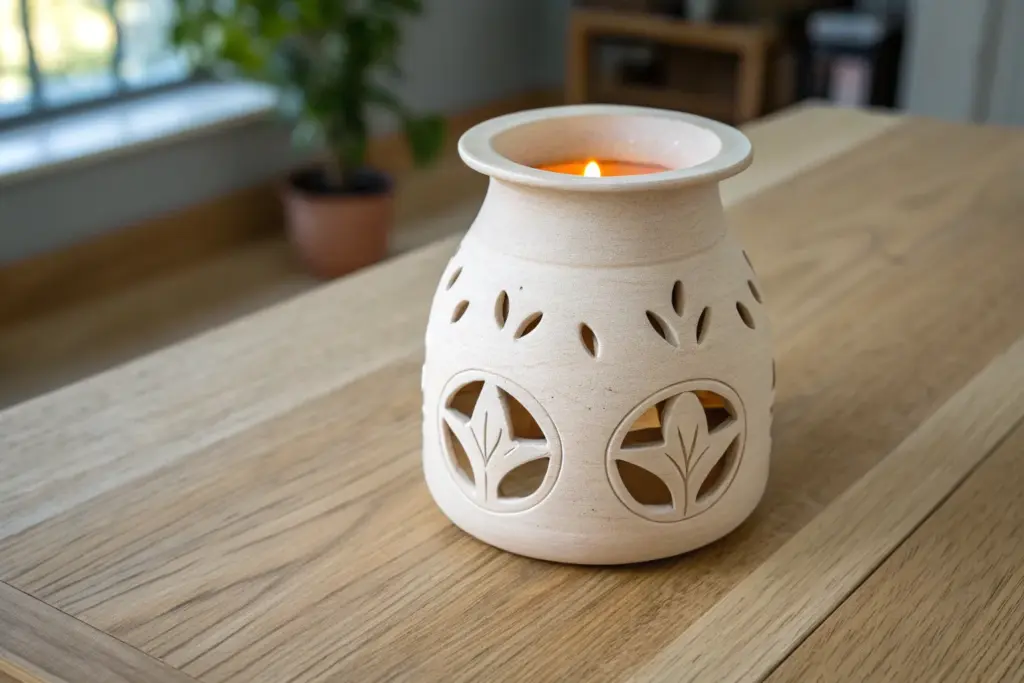
Clay lanterns are basically little sculptures that come alive the moment you add a light inside. I love how a few smart cutouts and textures can turn a simple clay form into glowing shadow patterns all over your space.
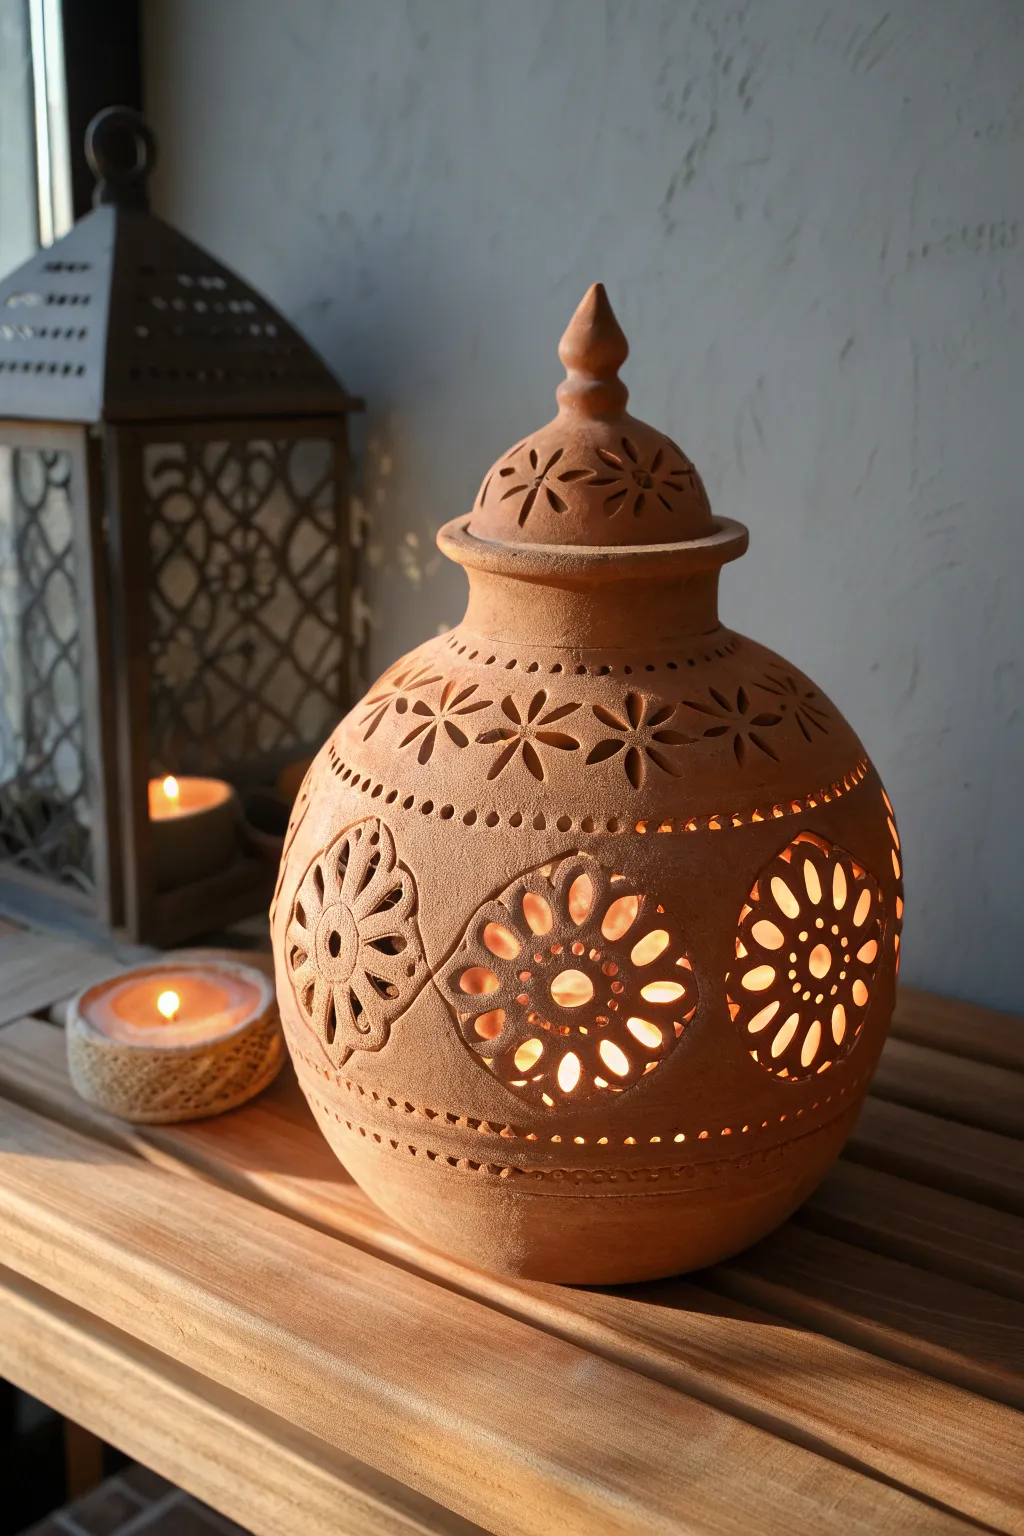
Classic Pierced Cylinder Lantern
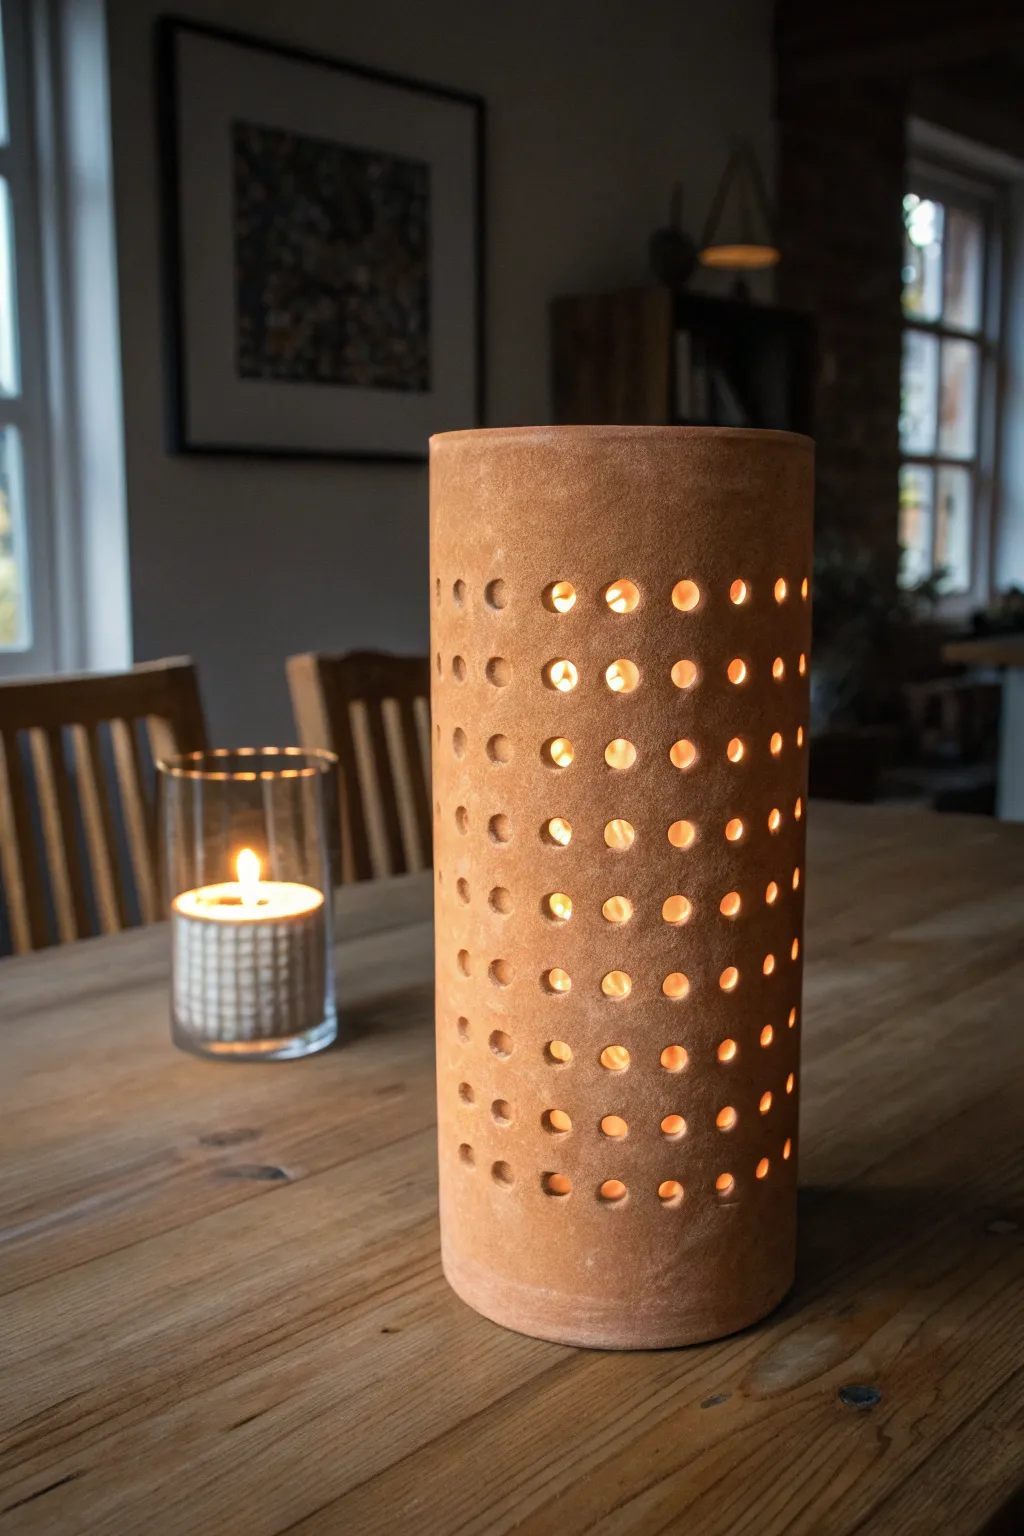
Embrace the warmth of natural clay with this sleek yet rustic cylindrical lantern. Its uniform grid of pierced holes creates a stunning play of light and shadow, perfect for adding cozy ambiance to any dining table or mantle.
Detailed Instructions
Materials
- Earthenware or stoneware clay (terracotta color recommended)
- Rolling pin
- Canvas mat or slab roller
- Cylindrical form (PVC pipe or large mailing tube, approx. 4-5 inches diameter)
- Newspaper
- Fettling knife or needle tool
- Serrated rib tool
- Rubber kidney rib
- Hole punch tool or circular clay cutter (approx. 0.5 inch diameter)
- Ruler or measuring tape
- Slip (clay mixed with water)
- Sponge
Step 1: Preparing the Slab
-
Roll the slab:
Begin by wedging your clay thoroughly to remove air bubbles. Roll out a large, rectangular slab on your canvas mat to a consistent thickness of about 1/4 to 3/8 inch. -
Smooth the surface:
Use a rubber kidney rib to compress the clay slab on both sides. This aligns the clay particles, preventing warping later, and gives you that smooth, professional finish. -
Measure and cut:
Determine the height of your finished lantern—the example is quite tall, perhaps 10-12 inches. Cut a clean rectangle using your ruler and fettling knife. The length should be the circumference of your tube form plus an inch for overlap.
Clean Cuts Pro-Tip
When punching holes, wait until the clay is stiff leather-hard. If the clay is too wet, the distinct circular shapes will deform and get oval-shaped as you pull the tool out.
Step 2: Building the Cylinder
-
Prepare the form:
Wrap your PVC pipe or cardboard tube in a layer of newspaper. I like to tape the paper lightly so it stays put—this step is crucial so the clay doesn’t stick to the form. -
Form the cylinder:
Carefully lift your clay slab and wrap it around the paper-covered form. Bring the two straight edges together to meet. -
Score and slip:
At the seam where the edges meet, rough up the clay surfaces with a serrated rib or needle tool. Apply a generous amount of slip to the scored areas. -
Join the seam:
Press the edges firmly together. You can bevel cut the edges for a flush seam or overlap them slightly and blend the clay until the join is invisible. Smooth over the seam with your rubber rib. -
Stiffen the clay:
Let the cylinder rest on the form for a while until it becomes ‘leather hard’—firm enough to hold its shape but still workable. This usually takes a few hours depending on humidity. -
Remove the form:
Once the clay is firm, carefully slide the PVC pipe out, then peel away the newspaper from the inside.
Level Up: Texture
Before rolling your cylinder, gently press a textured fabric or canvas into the slab. This adds a subtle, tactile surface that catches the light beautifully, just like the image.
Step 3: Piercing the Design
-
Mark the grid:
Using a ruler and a needle tool, lightly scratch a grid pattern onto the surface of the cylinder. This ensures your holes will be evenly spaced in columns and rows. -
Punch the first row:
Take your circular cutter and press it through the clay wall at your first mark. Twist slightly and pull to remove the plug of clay. -
Continue the pattern:
Work your way down the cylinder, punching holes at every intersection of your grid. Support the clay wall from the inside with your other hand to prevent it from collapsing under the pressure. -
Clean the edges:
Once all holes are punched, wait for the clay to dry a bit more. Then, use a damp sponge or your finger to smooth the sharp edges of each hole for a finished look. -
Check stability:
Ensure the bottom rim is flat by setting the cylinder gently on a level surface. You can tap it lightly to level it out if needed.
Step 4: Finishing
-
Slow drying:
Cover the finished piece loosely with plastic to let it dry very slowly. This helps prevent cracks, especially around the punched holes where tension can build. -
Bisque fire:
Once bone dry, fire the piece in a kiln to bisque temperature (usually cone 04). -
Glaze or leave raw:
To match the reference image, leave the exterior unglazed to show off the natural terracotta texture. You might choose to apply a clear matte glaze to the inside for durability. -
Final firing:
Fire the piece a final time according to your clay body’s specifications.
Place a pillar candle inside your new creation and watch the warm light dance through the grid pattern


Slab-Built Box Lantern With Windows
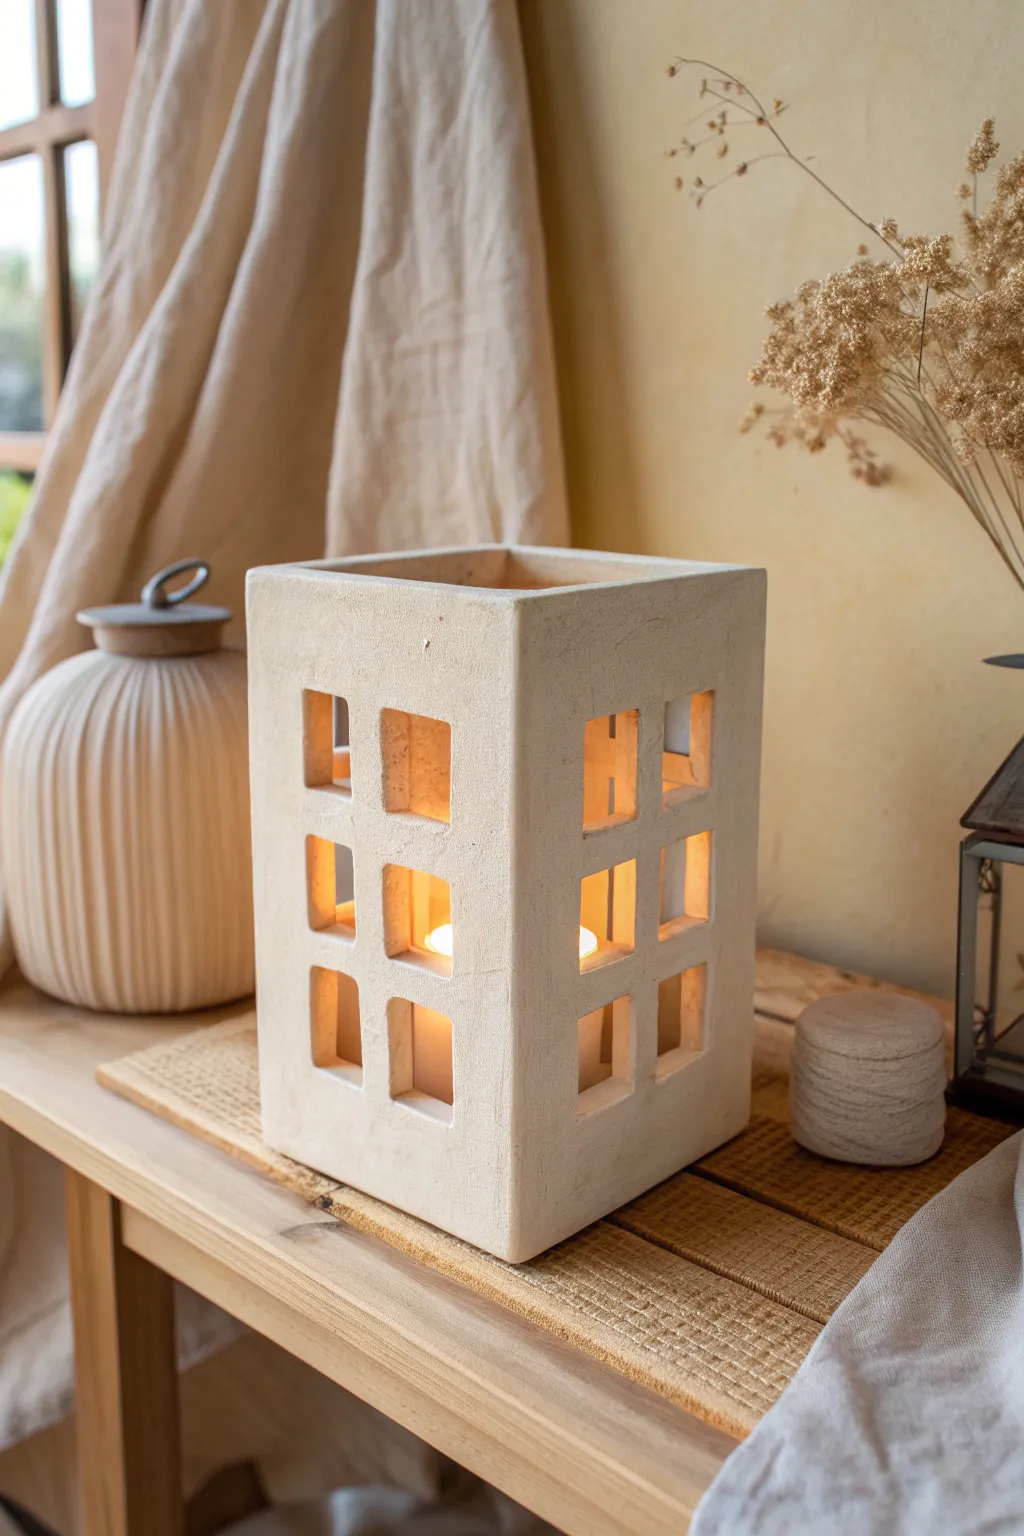
This rustic, architectural lantern brings a warm glow to any corner with its structured grid of window cutouts. Built from sturdy clay slabs, its textured, matte finish gives it an earthy, timeless appeal perfect for housing pillar candles.
Step-by-Step Guide
Materials
- Stoneware clay body (groggy for strength)
- Rolling pin
- Two wooden guide strips (approx. 1/4 inch thick)
- Ruler
- Needle tool or fettling knife
- Square or rectangular clay cutter (optional, for uniform windows)
- Scoring tool or serrated rib
- Clay slip
- Wooden paddle
- Sponge
- Matte white or cream glaze
Step 1: Preparing the Slabs
-
Roll the clay:
Begin by wedging your clay thoroughly to remove air bubbles. Place the clay between two wooden guide strips on a canvas surface and use a rolling pin to create an even slab about 1/4 inch thick. -
Cut the walls:
Using a ruler and needle tool, measure and cut four identical tall rectangular panels for the walls (approx. 5×9 inches) and one square base (5×5 inches). I like to verify the fit by holding them up against each other before the clay stiffens. -
Dry to leather hard:
Layout the slabs on a flat board. Let them dry to a soft leather-hard stage where they are stiff enough to hold their shape upright but can still be cut without chipping.
Step 2: Carving the Grid
-
Map the windows:
On the two opposing wall slabs, lightly sketch a 2×3 grid of rectangular windows using your needle tool. Leave distinct borders between the openings to ensure structural integrity. -
Create the opposing pattern:
For the other two walls, sketch a slightly different pattern if desired, or repeat the same grid. In the example shown, some sides feature a 2×3 grid while others might have variations. -
Excise the windows:
Carefully cut out the marked rectangles. If you have a small square cookie cutter, you can use it to ensure uniformity; otherwise, use a fettling knife for sharp corners. Remove the excess clay. -
Smooth the openings:
Use a damp sponge or your finger to gently smooth the sharp edges of the window cutouts. This creates a softer, more finished look rather than a sharp, mechanized edge.
Mitered Corners Pro-Tip
Cut wall edges at 45-degree angles before joining. This creates a seamless corner joint and increases surface area for the slip, making the box much stronger.
Step 3: Construction
-
Score and slip the base:
Take your square base piece and aggressively score the four edges. Apply a generous amount of clay slip to the scored areas. -
Attach the first wall:
Score the bottom edge of your first wall panel. Press it firmly onto the base. Use a small coil of soft clay on the inside seam to reinforce the joint, smoothing it flat. -
Assemble remaining walls:
Score and slip the side edges of the standing wall and the next panel. Attach the second wall at a 90-degree angle. Repeat until all four walls are attached to the base and each other. -
Paddle the form:
Once the box is constructed, gently tap the outside corners with a wooden paddle. This helps seal the seams tightly and straightens any warping that happened during handling. -
Refine the rim:
Running a damp sponge along top rim, level it out. You want a slightly rustic feel, so it doesn’t need to be surgically perfect, but it should be visually level.
Fixing Sagging Walls
If walls slump during assembly, the clay is too wet. Use a heat gun briefly to stiffen them or prop the walls with crumpled newspaper gently stuffed inside until dry.
Step 4: Finishing
-
Texture the surface:
Take a slightly coarse sponge or a serrated rib and lightly drag it across the exterior surfaces. This creates the subtle, stone-like texture seen in the original piece. -
Slow drying:
Loosely cover the lantern with plastic to allow it to dry slowly and evenly. This is crucial for box shapes to prevent the corners from cracking as they shrink. -
Bisque fire:
Once bone dry, fire the piece to bisque temperature (usually Cone 04) in a kiln. -
Glazing:
Apply a matte white or cream glaze. Pour it quickly over the piece or dip it, ensuring the glaze doesn’t pool too thickly in the window corners. Wipe the foot clean. -
Final firing:
Fire again to the maturity temperature of your clay and glaze combination.
Place a pillar candle inside your new lantern and enjoy the geometric shadows it casts on your walls


Leaf Cutout Garden Lantern
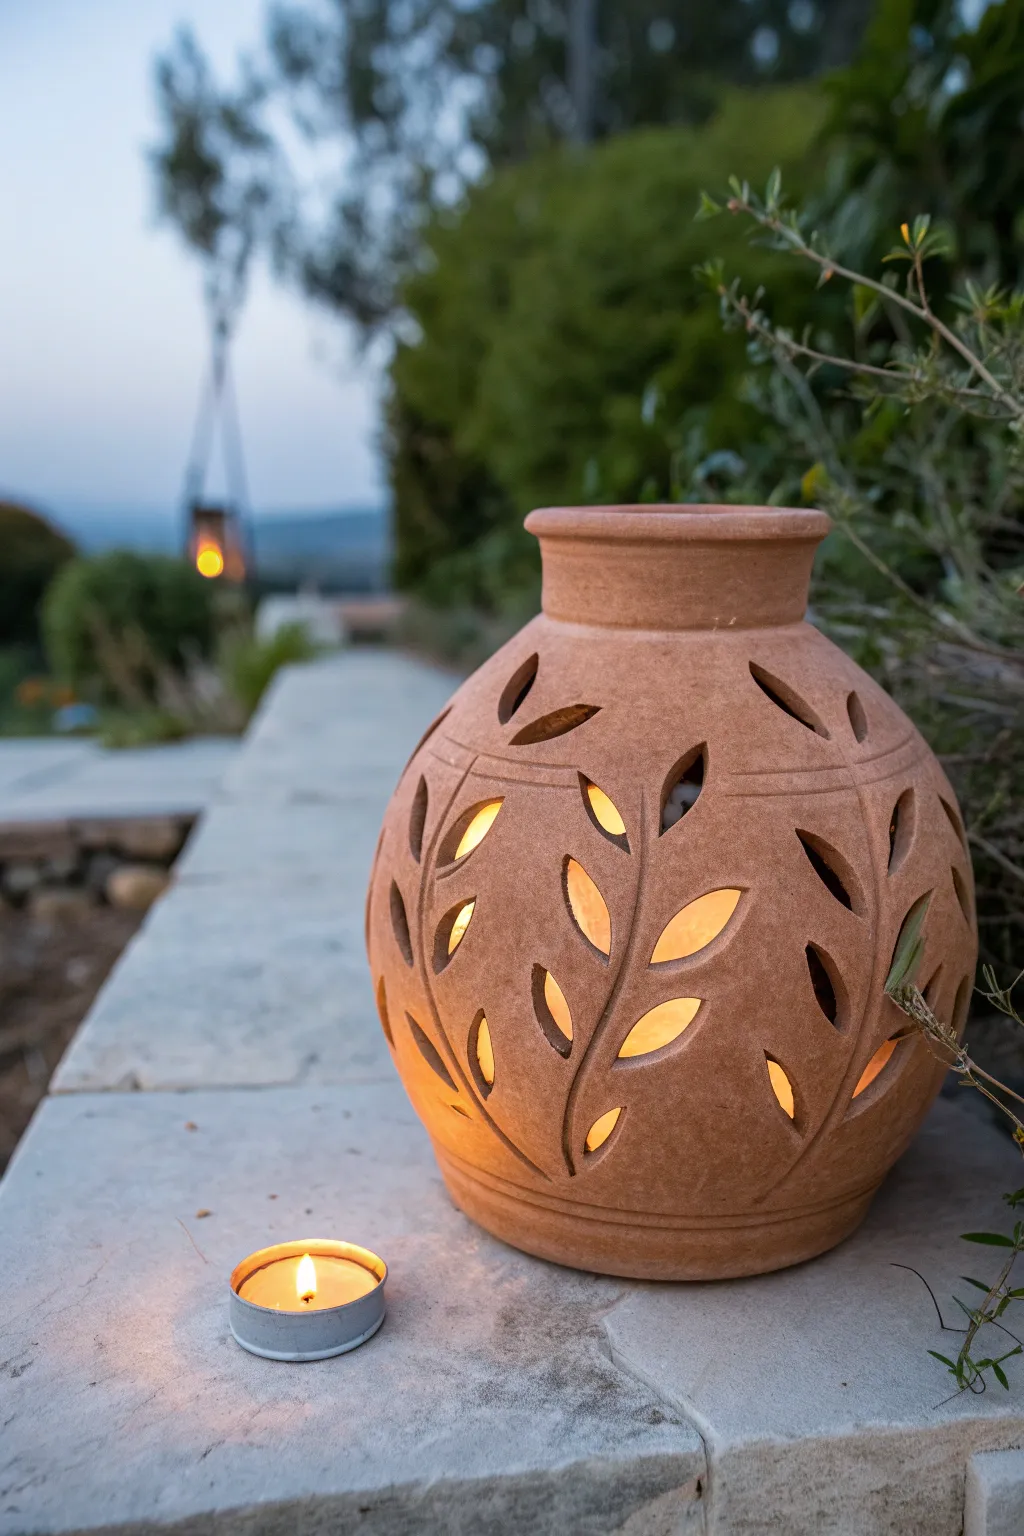
Illuminate your garden evenings with this rustic terracotta lantern, featuring elegant leaf motifs carved directly into the clay. The warm, earthy tones and dancing candlelight create a cozy, inviting atmosphere perfect for outdoor relaxation.
Step-by-Step Tutorial
Materials
- Appropriate amount of clay (terracotta or reddish stoneware clay)
- Pottery wheel (or coil/slab building materials if hand-building)
- Sponge
- Loop tools and kidney scraper
- Needle tool or sharp X-Acto knife
- Leaf template (cardstock or paper)
- Small carving tool or fettling knife
- Smoothing tool or chamois leather piece
- Kiln for firing (or instructions for air-dry clay if preferred)
Step 1: Forming the Vessel
-
Prepare the clay:
Begin by wedging your clay thoroughly to remove air bubbles. This is crucial for avoiding cracks later on, especially given the cutouts we will be making. -
Throw the base shape:
Center your clay on the wheel and open it up. Slowly pull the walls upward, aiming for a rounded, bulbous belly shape that tapers inward at the neck. -
Refine the neck and rim:
Shape a distinct neck and flare the rim slightly outward. The rim should be sturdy enough to handle, but elegant. Use a rib tool to smooth the exterior profile. -
Score decorative lines:
While the wheel is spinning slowly, use a needle tool to lightly score two parallel horizontal lines around the shoulder as a border for your design. -
Dry to leather hard:
Let the piece dry until it is leather hard. Ideally, the clay should feel firm like cheddar cheese—hard enough to hold its shape when cut, but soft enough to carve easily.
Step 2: Carving the Foliage
-
Plan the design layout:
Lightly sketch a flowing vine pattern vertically on the pot using a needle tool. I like to freehand this for a more organic look, curving the stems gently upward. -
Sketch the leaves:
Draw the outline of almond-shaped leaves branching off your vine stems. Vary the angles to make it look natural. -
Cut out the negative space:
Using a sharp fettling knife or X-Acto blade, carefully cut out the leaf shapes. Pierce the wall perpendicularly and slice cleanly. Remove the clay scraps immediately. -
Create the stems:
Instead of cutting them out, carve shallow grooves for the central stems connecting the leaves. This adds surface texture without compromising structure. -
Refine the edges:
Once all leaves are cut, use a damp sponge or a small smoothing tool to soften the sharp edges of every cutout. This prevents chipping and gives a professional finish.
Slumping Walls?
If the pot sags while carving, the clay is too wet. Stop immediately, cover the rim loosely with plastic, and let the body dry for another 2-3 hours before resuming.
Step 3: Finishing and Firing
-
Clean the interior:
Check the inside of the pot for any clay burrs or crumbs created during carving and gently brush or sponge them away. -
Final drying:
Allow the finished greenware to dry completely. This must be done slowly to prevent warping around the cutout areas. -
Bisque fire:
Fire the piece in a kiln to bisque temperature (around Cone 04). Since this is a rustic look, you can leave it unglazed to maintain the matte terracotta texture. -
Optional glazing:
If you prefer a shinier finish or water resistance, apply a clear glaze and fire a second time. However, the raw clay look mimics the photo best. -
Add illumination:
Place a tea light or small LED pillar candle inside your new lantern and enjoy the leaf shadows it casts.
Level Up: Colored Light
Line the interior with translucent vellum paper or colored tissue paper before inserting an LED light to diffuse a soft, colored glow through the leaf openings.
Watching the flickering light play through your handcrafted leaves brings a magical serenity to any patio space

Vine Wrap Perforation Pattern
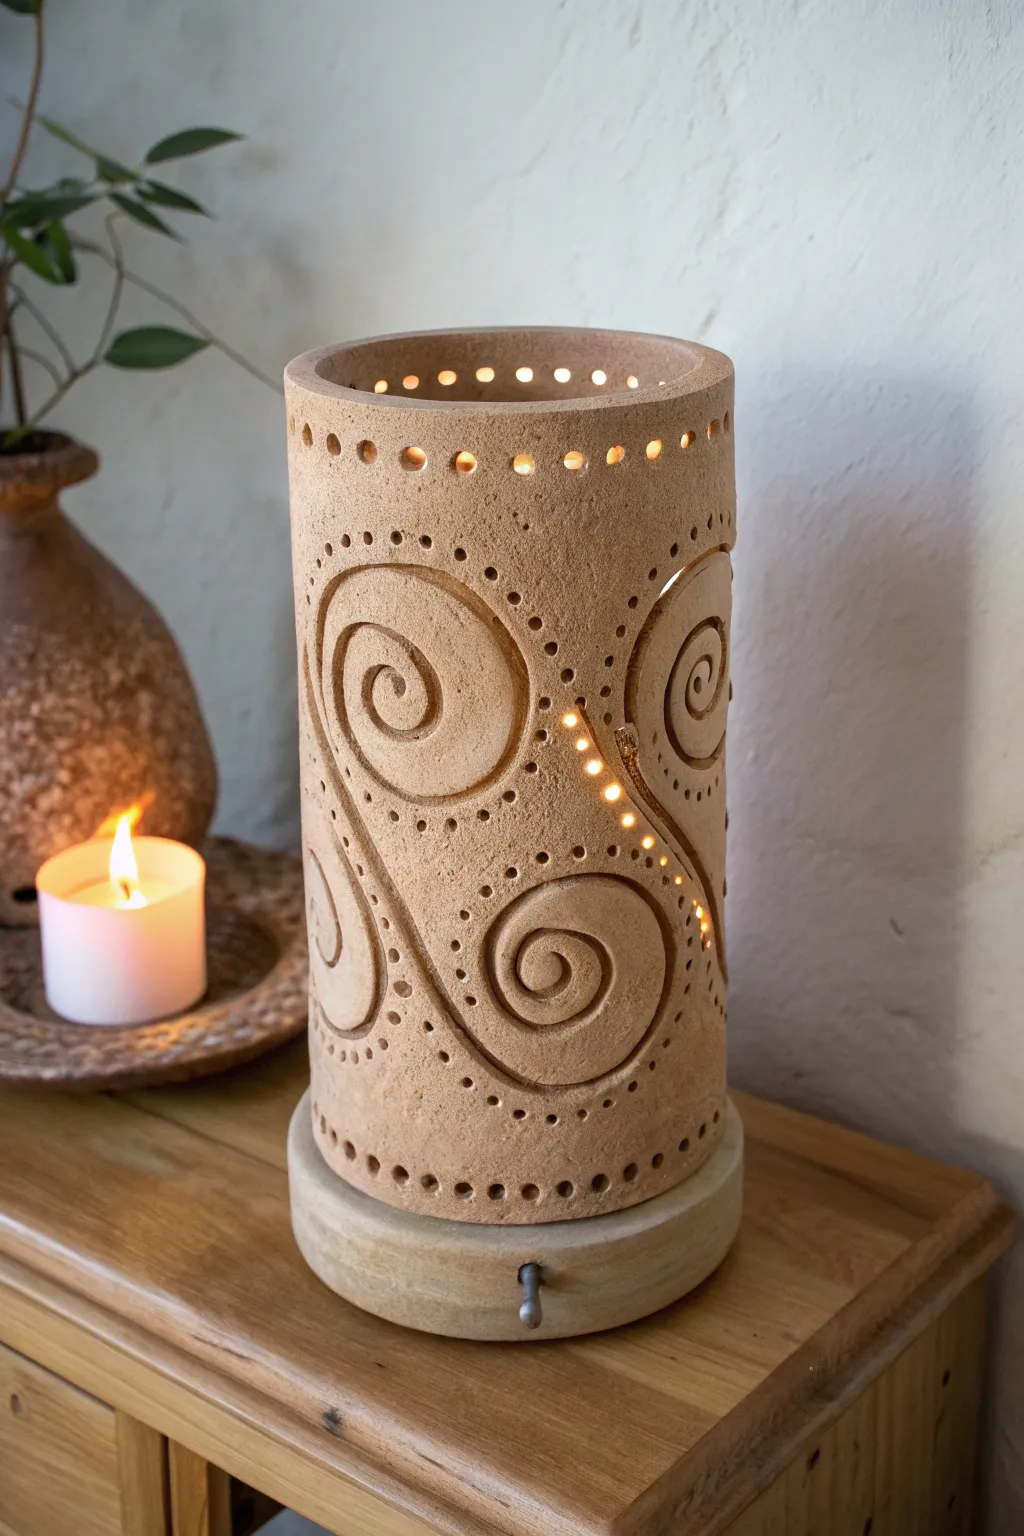
This rustic ceramic lantern features deeply carved spirals that evoke organic vine growth, punctuated by delicate perforations that cast a warm, stippled light. The natural stoneware finish adds an earthy charm, making it a perfect centerpiece for cozy evenings.
Step-by-Step Guide
Materials
- Stoneware clay (groggy for texture)
- Circular clay cutter or needle tool
- Piping tube or rolling pin (for slab building)
- Wooden sculpting tools (various profiles)
- Loop tool (for carving)
- Drill bit or small hole punch tool
- Slip and scoring tool
- Sponge and water
- Wooden base plinth (optional, for lamp kit)
- Lamp fittings (cord, bulb socket, switch)
- Pottery wheel (optional, can be slab built)
Step 1: Forming the Cylinder
-
Prepare the Clay Slab:
Roll out a consistent slab of stoneware clay, approximately 3/8-inch thick. If you want that lovely granular texture seen in the photo, choose a clay body with grog or sand. -
Cut to Size:
Measure and cut a rectangular strip that will form your cylinder. Ensure the height is around 10-12 inches and the length creates a diameter of about 4-5 inches when rolled. -
Form the Shape:
Carefully curve the slab into a cylinder. Bevell the edges at a 45-degree angle where they meet to create a stronger, seamless join. -
Seal the Seam:
Score the beveled edges aggressively and apply slip. Press the edges together firmly. I like to run a wooden rib inside and outside the seam to compress the clay and make the join invisible.
Step 2: Carving the Design
-
Sketch the Spirals:
Once the cylinder is leather-hard (firm but still cool to the touch), lightly sketch your vine pattern. Draw large, sweeping S-curves that spiral inward at the ends, wrapping around the form. -
Define the Relief:
Using a loop tool, carve out the negative space around your spiral lines. You aren’t cutting all the way through; you are creating depth so the spirals stand out in relief. -
Refine the Edges:
Use a smooth wooden modeling tool to round over the sharp edges of your carved spirals. This softness gives the stone-like, organic appearance. -
Add Dot Texture:
With a blunt point tool, press small divots into the recessed areas around the spirals. These dot trails follow the curves of the vines, enhancing the flow of the design.
Clean Cuts Matter
When punching holes, wait until the clay is leather-hard. If it’s too wet, the holes will deform; too dry, and the clay might crack under pressure.
Step 3: Perforation and Finishing
-
Drill Light Holes:
Select specific tracks within your design—like the channels between spirals—to pierce completely. Use a small hole punch or drill bit to create clean, round holes that will let light escape. -
Detail the Rim:
Punch a consistent row of holes around the very top rim of the lantern for a crown of light. Smooth the rim with a damp sponge so it isn’t sharp. -
Base Construction:
If making the ceramic base shown, cut a thick disk of clay slightly wider than your cylinder. Create a groove or tunnel for the electrical cord to exit. -
Attach or Separate:
You can leave the cylinder as a sleeve that sits over the base (for easier bulb changing) or score and slip it to attach permanently. The example shows a separate sleeve style. -
Drying:
Dry the piece slowly, covered loosely with plastic for the first few days to prevent warping, especially around the cutout areas. -
Bisque Fire:
Fire the piece to bisque temperature (usually cone 04). Since the aesthetic is raw stone, you might skip glazing entirely or use a very matte wash. -
High Fire:
Fire to the maturity temperature of your clay body. High firing will make the unglazed clay durable and water-resistant. -
Electrical Assembly:
Install a simple lamp kit into the base. Thread the cord through your pre-made channel and secure the socket in the center.
Smoother Shadows
Sand the interior of your holes lightly after the bone-dry stage. Rough edges inside usually block light and create fuzzy, unappealing shadows on the wall.
Place your finished lantern in a dark corner to watch the spiral patterns dance on the walls

The Complete Guide to Pottery Troubleshooting
Uncover the most common ceramic mistakes—from cracking clay to failed glazes—and learn how to fix them fast.
Starry Night Pinprick Lantern
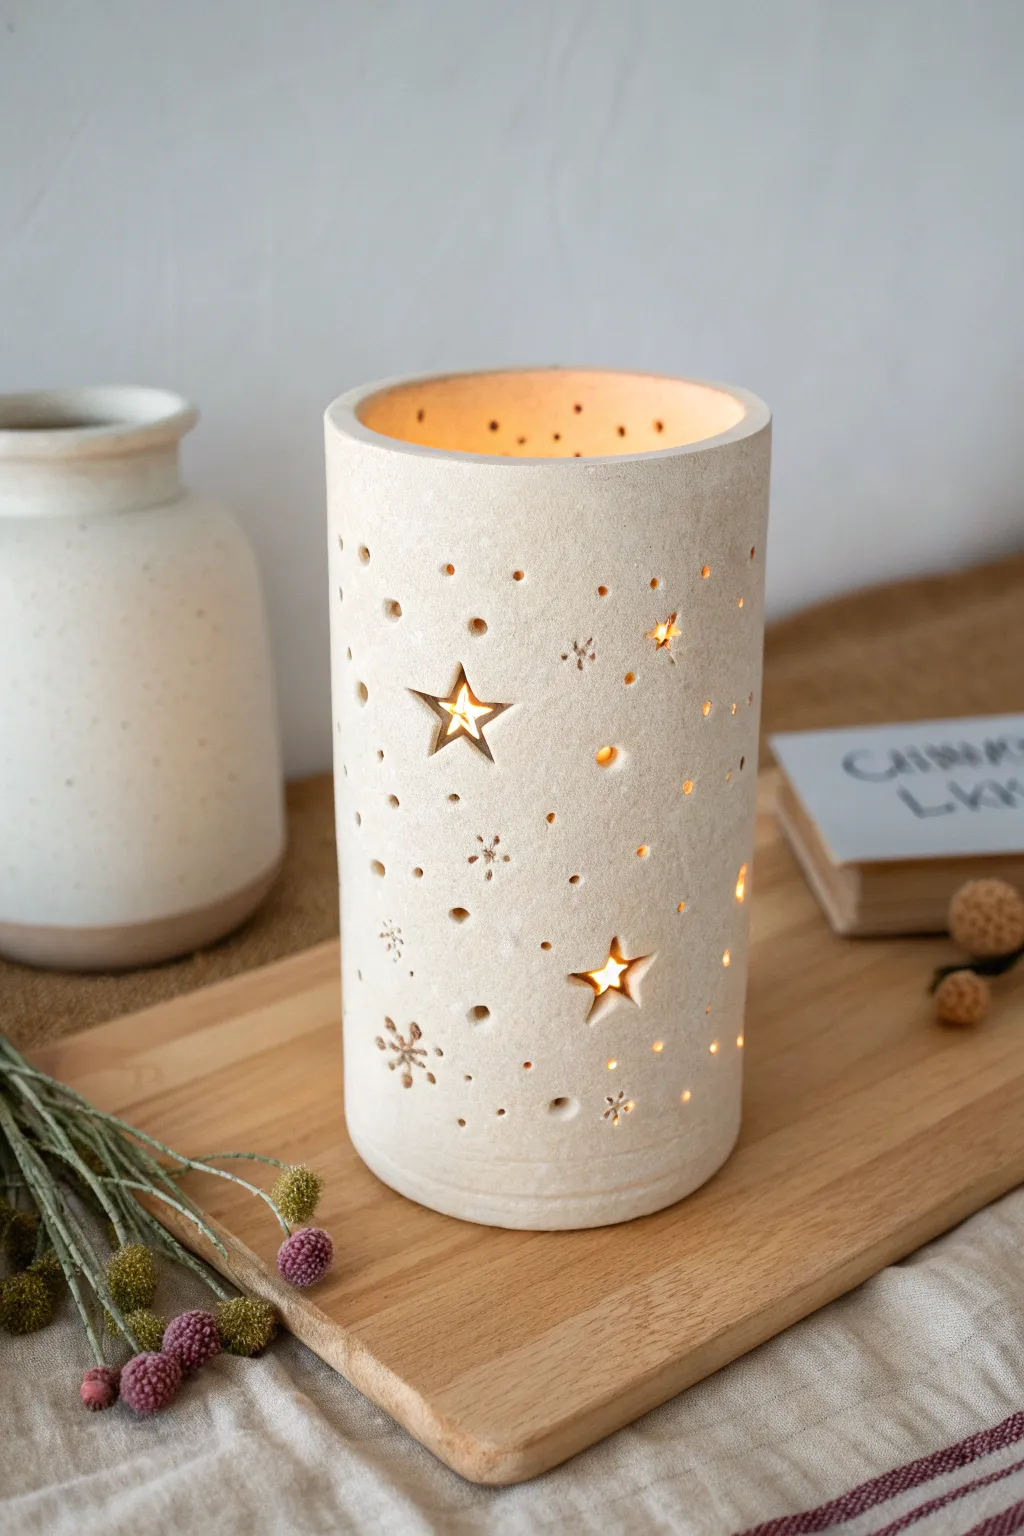
This elegant lantern mimics the quiet beauty of a night sky with its simple cylindrical form and delicate light play. The matte, speckled clay finish warms up any corner, while the cut-out stars enhance the cozy glow of your favorite candle.
Detailed Instructions
Materials
- White or speckled stoneware clay (or white polymer clay)
- Rolling pin
- Canvas mat or non-stick work surface
- Sharp crafting knife or scalpel (X-Acto)
- Small star-shaped cookie cutters (optional)
- Various sized drill bits or hole punch tools
- Cylindrical form (like a PVC pipe or glass jar)
- Newspaper
- Slip and scoring tool (if using ceramic clay)
- Sponge
- Sandpaper (fine grit)
Step 1: Shaping the Cylinder
-
Roll the Slab:
Begin by rolling out your clay on a canvas mat or non-stick surface. Aim for a consistent thickness of about 1/4 inch, ensuring it is even throughout to prevent cracking during drying. -
Measure and Cut:
Using a ruler, measure a rectangle that is roughly 10 inches wide and 6 inches tall for a medium-sized lantern. Cut this rectangle out cleanly with your craft knife. -
Prepare the Form:
Wrap your cylindrical form (like a sturdy glass jar or PVC pipe) loosely with a sheet of newspaper. This acts as a barrier so the clay doesn’t stick to the mold later. -
Form the Tube:
Carefully lift your clay slab and wrap it around the prepared form. Bring the two short ends together to meet. -
Score and Slip:
If using ceramic clay, score (scratch) the meeting edges and apply a little slip (clay water) before pressing them firmly together. If using polymer clay, smooth the seam together with your fingers until invisible. -
Smooth the Seam:
Work up and down the seam on both the inside and outside, blending the clay until the join is seamless. I find a slightly damp sponge helps erase the join lines perfectly.
Clean Cuts Matter
When punching holes, twist the tool as you pull it out. This pulls the clay waste out cleanly rather than pushing it inside the cylinder, saving cleanup time later.
Step 2: Creating the Galaxy
-
Mark Star Placement:
While the clay is still supported by the internal form, lightly mark where you want your largest star cutouts to go. Leave plenty of negative space between them. -
Cut the Stars:
Using your sharp craft knife or a small star cutter, carefully remove the star shapes. If the clay is very soft, let it firm up for 20 minutes before cutting to keep the edges sharp. -
Add Pinpricks:
Take your various drill bits or a needle tool and poke holes of differing sizes around the stars. Create clusters and trails to mimic distant constellations. -
Detail the Snowflakes:
For the snowflake details seen in the design, simply scratch thin, shallow lines into the surface using a needle tool, rather than cutting all the way through. -
Remove the Form:
Once the clay is ‘leather hard’ (stiff but still cold to the touch), carefully slide the internal cylinder out. Peel away the newspaper lining. -
Level the Rim:
Check the top and bottom rims. If they are uneven, gently slice off any excess with your knife or use a rasp to level them so the lantern sits flat.
Make it Sparkle
After firing, paint the inside of the lantern with gold or metallic acrylic paint. When the candle is lit, the interior will reflect a warmer, more radiant light.
Step 3: Finishing Touches
-
Smoothing Edges:
Use a damp sponge or your finger to soften the sharp edges of your star cutouts and the top rim. You want a smooth, finished look, not sharp, jagged clay. -
Drying:
Allow the piece to dry slowly under a loose plastic sheet for a day or two to prevent warping, then uncover it to dry completely. -
Refining:
Once bone dry (or after baking if using polymer), lightly sand any rough spots or burrs created by the hole punching. -
Firing or Baking:
Fire the piece in a kiln according to your clay body’s specifications (usually bisque fire, then glaze fire if desired, though this matte look is often unglazed). For polymer clay, bake according to package instructions.
Place a tea light inside and watch your personal galaxy come to life.
Geometric Triangle Cutout Lantern
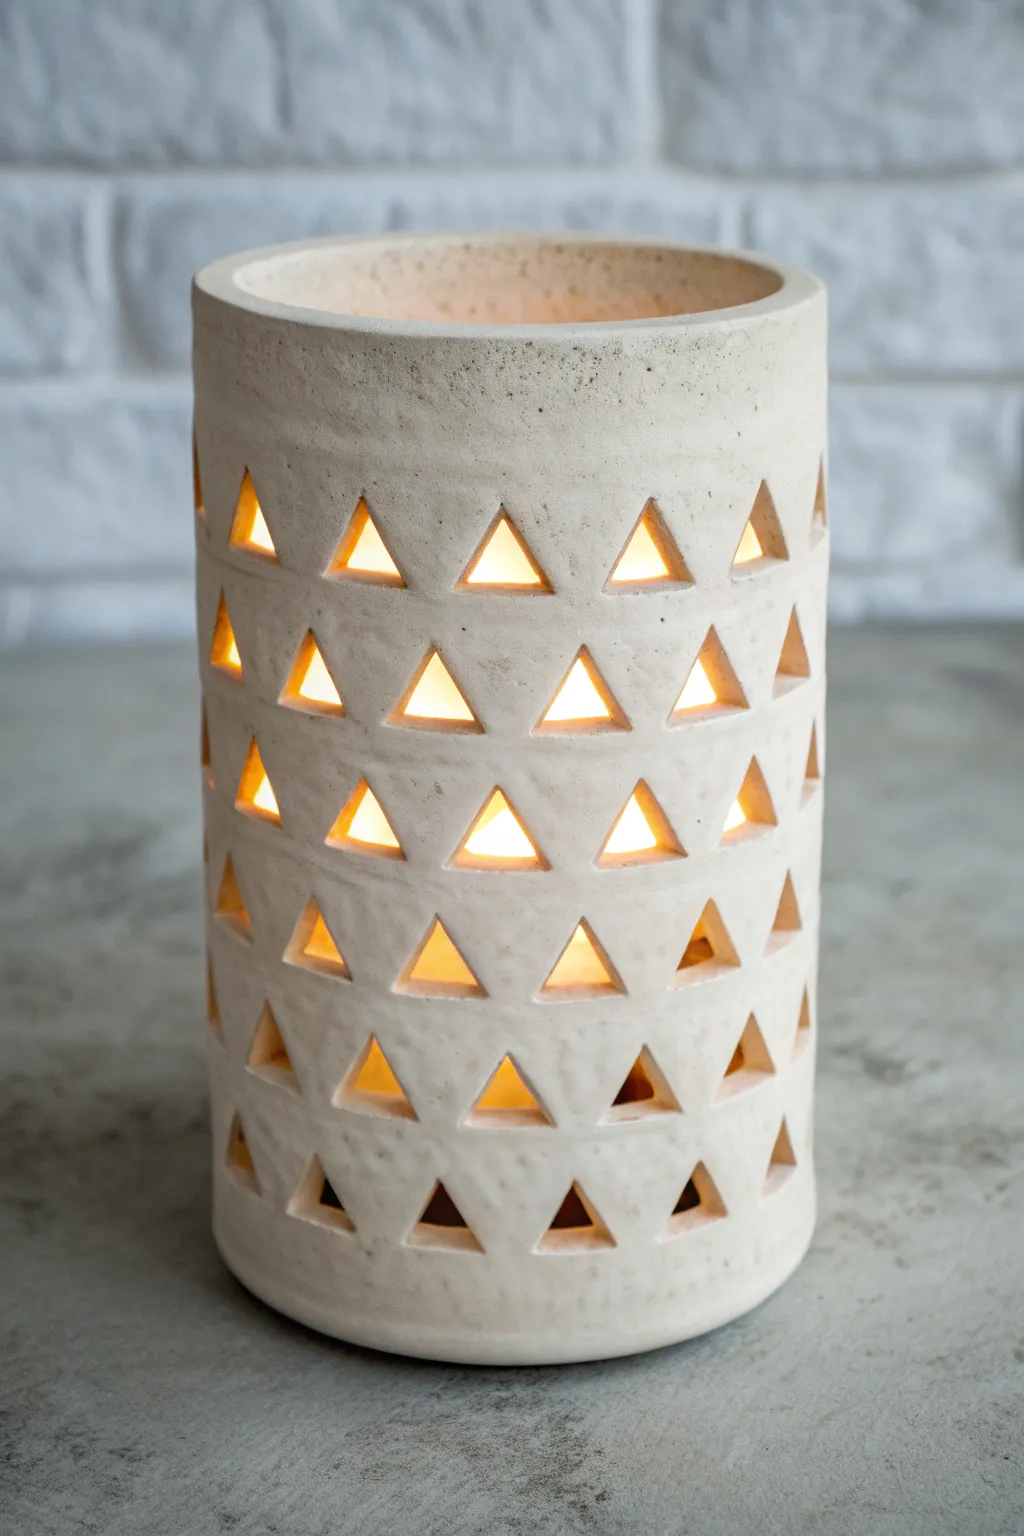
This minimalist cylindrical lantern combines the rugged beauty of speckled clay with the clean lines of geometric design. The gentle glow filtering through the triangular cutouts creates a warm, pattern-rich ambiance perfect for cozy evenings.
Step-by-Step Guide
Materials
- White stoneware clay with speckles (or plain white clay)
- Rolling pin
- Two wooden guide slats (approx. 1/4 inch thick)
- Canvas mat or cloth work surface
- Cylindrical form (PVC pipe or sturdy mailing tube, approx. 4-5 inch diameter)
- Newspaper
- Fettling knife or craft knife
- Triangle cutter (small metal cookie cutter) or X-Acto knife
- Scoring tool (or fork)
- Slip (clay and water mixture)
- Sponge
- Smoothing rib (rubber or wood)
- Ruler
Step 1: Preparing the Clay Slab
-
Wedge the clay:
Begin by thoroughly wedging your clay to remove any air bubbles. This ensures a uniform consistency and prevents potential explosions in the kiln later. -
Set up your workspace:
Lay down your canvas mat to prevent sticking. Place the two wooden guide slats on either side of your clay ball; these will help you roll a perfectly even slab. -
Roll the slab:
Using the rolling pin on top of the guide slats, roll the clay out into a long rectangle. You want it roughly 1/4 inch thick. Make sure the rectangle is long enough to wrap around your chosen cylinder form with a little overlap. -
Smooth the surface:
Take your rubber rib and gently compress the clay surface on both sides. This aligns the clay particles, making it stronger and erasing the texture of the canvas.
Step 2: Forming the Cylinder
-
Prepare the form:
Wrap your PVC pipe or mailing tube in a sheet of newspaper. This acts as a barrier so the clay won’t stick to the form and allows you to slide the cylinder off easily later. -
Cut to size:
Trim the top and bottom of your clay rectangle to create straight, parallel edges. Ensure the height is what you desire for the final lantern. -
Wrap and score:
Lift the slab and wrap it around the newspaper-covered form. Where the ends meet, cut through both layers at a 45-degree angle (a beveled cut) to create a larger surface area for joining. -
Join the seam:
Score the beveled edges aggressively with your tool and apply a generous amount of slip. Press the edges firmly together. -
Reinforce the seam:
Use a wooden tool or your thumb to smear the clay across the seam line, blending it until invisible. I prefer to smooth the inside seam first, then the outside.
Clean Cuts Hack
Wait until the clay is true leather-hard before cutting. If the clay is too soft, the knife will drag and deform the triangles. Use a thin plastic sheet over the clay when punching to soften edges.
Step 3: Creating the Geometric Pattern
-
Initial firming:
Let the cylinder sit on the form for about 30-45 minutes until it is ‘leather hard’—stiff enough to hold its shape but soft enough to cut. Carefully slide the supportive form out. -
Mark vertical guides:
Using a ruler, lightly scratch horizontal lines around the cylinder to serve as guides for your rows of triangles. This keeps the pattern orderly. -
Cut the first row:
Using your triangle cutter or a sharp knife, punch out the first row of triangles along the top. If hand-cutting, try to keep the spacing consistent, though slight variations add handmade charm. -
Offset the second row:
For the next row down, position the triangles so they sit between the two triangles above them (like a brick pattern). This creates the dynamic geometric look. -
Continue the pattern:
Work your way down the cylinder, row by row. If the clay starts to feel too flimsy, pause and let it firm up for another 20 minutes before continuing. -
Clean the edges:
Once all cutouts are made, use a damp sponge or a soft brush to smooth the sharp edges of each triangle. Remove any little burrs of clay.
Warping Woes
If your cylinder ovalizes while drying, it’s drying unevenly. Rotate the piece gently every few hours and keep it away from drafts. You can also lightly stuff it with newspaper while it dries.
Step 4: Finishing Touches
-
Dry slowly:
Place a piece of plastic loosely over the lantern to let it dry very slowly. This helps prevent the cylinder from warping out of round. -
Bisque fire:
Once bone dry, fire the piece to bisque temperature (usually Cone 04) in a kiln. -
Glaze (optional):
For the look in the image, leave the exterior unglazed to show the clay texture, or apply a clear matte glaze. You can glaze the interior white to reflect more light. -
Final firing:
Fire the piece again to the maturation temperature of your specific clay body.
Place a tea light or LED pillar inside and enjoy the mesmerizing shadows cast by your new handmade lantern


What Really Happens Inside the Kiln
Learn how time and temperature work together inside the kiln to transform clay into durable ceramic.
Mandala Lace Carved Lantern
Bring warmth to your evenings with this spherical clay lantern featuring intricate lace-like cutouts. The natural terracotta finish combined with the radiating flower patterns creates a mesmerizing play of light and shadow when illuminated from within.
Detailed Instructions
Materials
- Terracotta air-dry clay or kiln-fire earthenware clay
- Potter’s wheel (optional, can be hand-built)
- Spherical mold or balloon (if hand-building)
- Fettling knife
- Loop tools for trimming
- Various sizes of circular hole cutters or straw
- Small carving knife or X-Acto blade
- Sponge and water
- Scoring tool or serrated rib
- Slip (clay mixed with water)
Step 1: Forming the Base Vessel
-
Prepare the clay:
Begin by wedging your terracotta clay thoroughly to remove air bubbles. You want a smooth, pliable consistency that will hold its shape without slumping. -
Create the main sphere:
Throw a spherical pot on the wheel, closing the neck slightly but leaving an opening wide enough for a hand if you plan to refine the inside later. Alternatively, if hand-building, coil clay around a sturdy spherical mold or use two pinch pots joined together. -
Refine the shape:
Smooth the exterior surface with a rib tool to erase finger marks or coil lines. The surface needs to be pristine before you start carving. -
Form the collar:
Build a slight vertical neck at the top opening. This rim will support the lid later. Ensure it is perfectly round so the lid fits snugly. -
Throw the lid:
Create a separate, smaller domed piece for the lid. Pull a small decorative knob at the very top. Measure the lid’s base frequently against the pot’s opening to ensure a perfect fit. -
Initial drying:
Let both the pot and lid dry to a ‘leather-hard’ state. This is crucial; the clay must be firm enough to be carved without warping, but soft enough to cut easily.
Slumping Walls?
If the sphere walls sag while carving, the clay is too wet. Stop immediately and let it stiffen. You can also loosely stuff the inside with newspaper for temporary support.
Step 2: Carving the Patterns
-
Map out the design:
Lightly scratch horizontal guidelines around the belly of the pot to demarcate the three main bands: the upper flower row, the central large medallions, and the lower border. -
Outline the main medallions:
Sketch three or four large circles evenly spaced around the widest part of the sphere. Inside these, lightly draw the petal shapes for your main mandala flowers. -
Carve the large petals:
Using a sharp carving knife, carefully cut out the negative space within the large flower petals. Remove the clay gently to keep the lines crisp. I find it helpful to support the wall from the inside with my other hand while cutting. -
Add detail holes:
Use a small circular cutter to punch a hole in the center of each large flower. Add smaller punched holes around the flower perimeter to create the ‘lace’ effect. -
Carve the upper band:
Above the main medallions, carve a row of smaller, starlike flowers. These are simpler shapes—just five or six straight cuts radiating from a center point. -
Punch the decorative borders:
Use a very small hole cutter or a straw to create the dotted lines that separate your design sections. Pierce a row above the main medallions and another row near the base. -
Carve the lid:
Repeat the small starlike flower motif on the lid dome, ensuring the cuts go all the way through to allow heat to escape.
Step 3: Finishing and Firing
-
Clean the edges:
Once the carving is complete, wait for the clay to dry a bit more. Then, use a damp sponge or a soft brush to smooth any sharp burrs left by the carving tools. -
Check transparency:
Hold the pot up to a bright light to check your cutouts. Ensure no clay crumbs are blocking the holes. -
Final drying:
Allow the piece to dry completely. This must be a slow process—cover it loosely with plastic for the first day or two to prevent the delicate carved areas from cracking due to uneven shrinkage. -
Surface smoothing:
Gently sand the exterior with fine-grit sandpaper if you want an ultra-smooth finish, being extremely careful around the fragile lattice areas. -
Firing:
If using traditional clay, bisque fire the piece in a kiln. If using air-dry clay, allow it to cure fully according to the package instructions. -
Seal (optional):
For air-dry clay, apply a matte sealant to protect the surface. For ceramic clay, leave it unglazed to maintain that raw, earthy terracotta texture shown in the reference.
Pro Tip: Clean Cuts
Don’t just push the knife through; use a sawing motion. For round holes, twist the tool as you pull it out to remove the clay plug cleanly without tearing the edges.
Place a tea light inside your finished vessel and enjoy the dancing shadows it casts on your walls
Floral Carved Panel Lantern
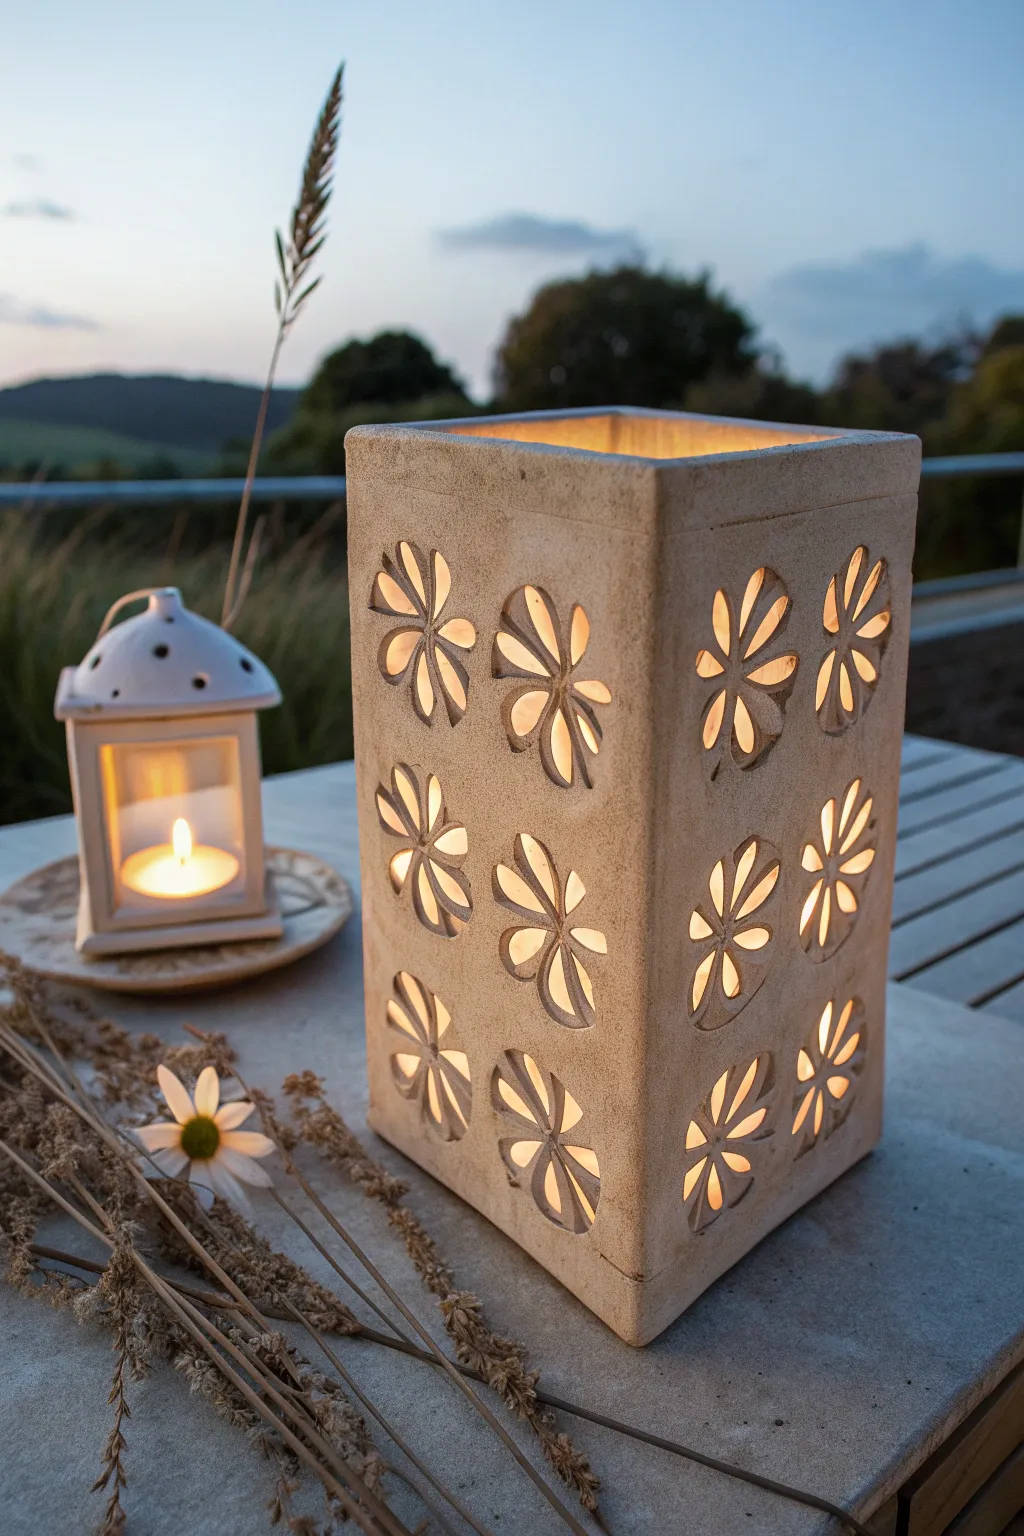
Bring a warm, artisanal glow to your evenings with this structured yet delicate clay lantern. Featuring clean square lines softened by rhythmic floral cutouts, this project balances geometric stability with organic charm.
Step-by-Step
Materials
- Stoneware clay slab (approx. 1/4 inch thick)
- Square template (paper or cardboard, approx. 4×8 inches)
- Square base template (4×4 inches)
- Needle tool
- Fettling knife
- Small teardrop-shaped cookie cutter (optional)
- X-acto knife or small loop tool
- Slip and scoring tool
- Smoothing rib (rubber or wood)
- Sponge
- Rolling pin and guide sticks
- Ruler
Step 1: Preparing the Slabs
-
Roll out the clay:
Begin by rolling out a consistent slab of stoneware clay. Use guide sticks on either side of your rolling pin to ensure a uniform 1/4 inch thickness throughout, which is crucial for structural integrity. -
Cut the panels:
Place your rectangular template (roughly 4×8 inches) onto the slab. Using a fettling knife, carefully cut out four identical side panels. Then, cut out one 4×4 inch square for the base. -
Firm up the clay:
Let the cut slabs sit on a ware board until they reach a ‘leather-hard’ state. They should be stiff enough to stand up without bending but still hold moisture. I usually check them after about an hour.
Slumping Walls?
If walls buckle during assembly, the clay is too wet. Let panels dry flat for another 30 mins, or prop up the walls with crumpled newspaper inside until stiff.
Step 2: Carving the Design
-
Mark the grid:
Lightly trace a 2×3 grid on each side panel using a needle tool or ruler. This will help you center the six flower motifs evenly on each face. -
Draft the petals:
In the center of each grid square, lightly sketch a six-petal flower. The petals should be simple teardrop shapes radiating from a center point, leaving enough negative space between them for stability. -
Excavate the petals:
Using an X-acto knife, carefully cut out each petal shape. Alternatively, if you have a small teardrop cutter, press it gently to cut the shapes cleanly. -
Refine the edges:
Once the shapes are removed, use a damp sponge or fingertip to smooth the sharp edges of the cutouts. This creates a softer, more finished look when the light shines through.
Step 3: Assembly
-
Miter the edges:
For a seamless corner, cut the long edges of your four side panels at a 45-degree angle. This allows them to fit together snugly. -
Score and slip:
Aggressively score the mitered edges and the edges of the base square. Apply a generous amount of clay slip to all scored areas. -
Construct the box:
Stand one side panel up on the base and attach a second side panel, pressing the mitered corner firmly together. Repeat until all four walls are up. -
Reinforce the seams:
Roll a very thin coil of clay and press it into the interior corners where the walls meet. Smooth this coil down to mechanically lock the walls together. -
Smooth the exterior:
Use a rib tool to smooth the exterior corners, blending the clay so the seam disappears completely. The goal is to make it look like a solid block of stone.
Make it Shine
Apply a white engobe or underglaze to the *interior* walls before assembly. This reflects more candlelight outward, making the lantern glow brighter at night.
Step 4: Finishing Touches
-
Final sponging:
Wipe down the entire piece with a slightly damp sponge to remove any fingerprints or burrs. -
Slow drying:
Cover the lantern loosely with plastic to let it dry very slowly. This prevents the corners from warping or cracking as the clay shrinks. -
Firing:
Bisque fire the piece. For the look in the image, apply a matte, stone-textured glaze or a simple wash before the final firing to maintain that natural, earthy aesthetic.
Once fired and filled with a candle, enjoy the beautiful dancing shadows your handiwork casts across the table

TRACK YOUR CERAMIC JOURNEY
Capture glaze tests, firing details, and creative progress—all in one simple printable. Make your projects easier to repeat and improve.
Textured Impression With Punched Holes
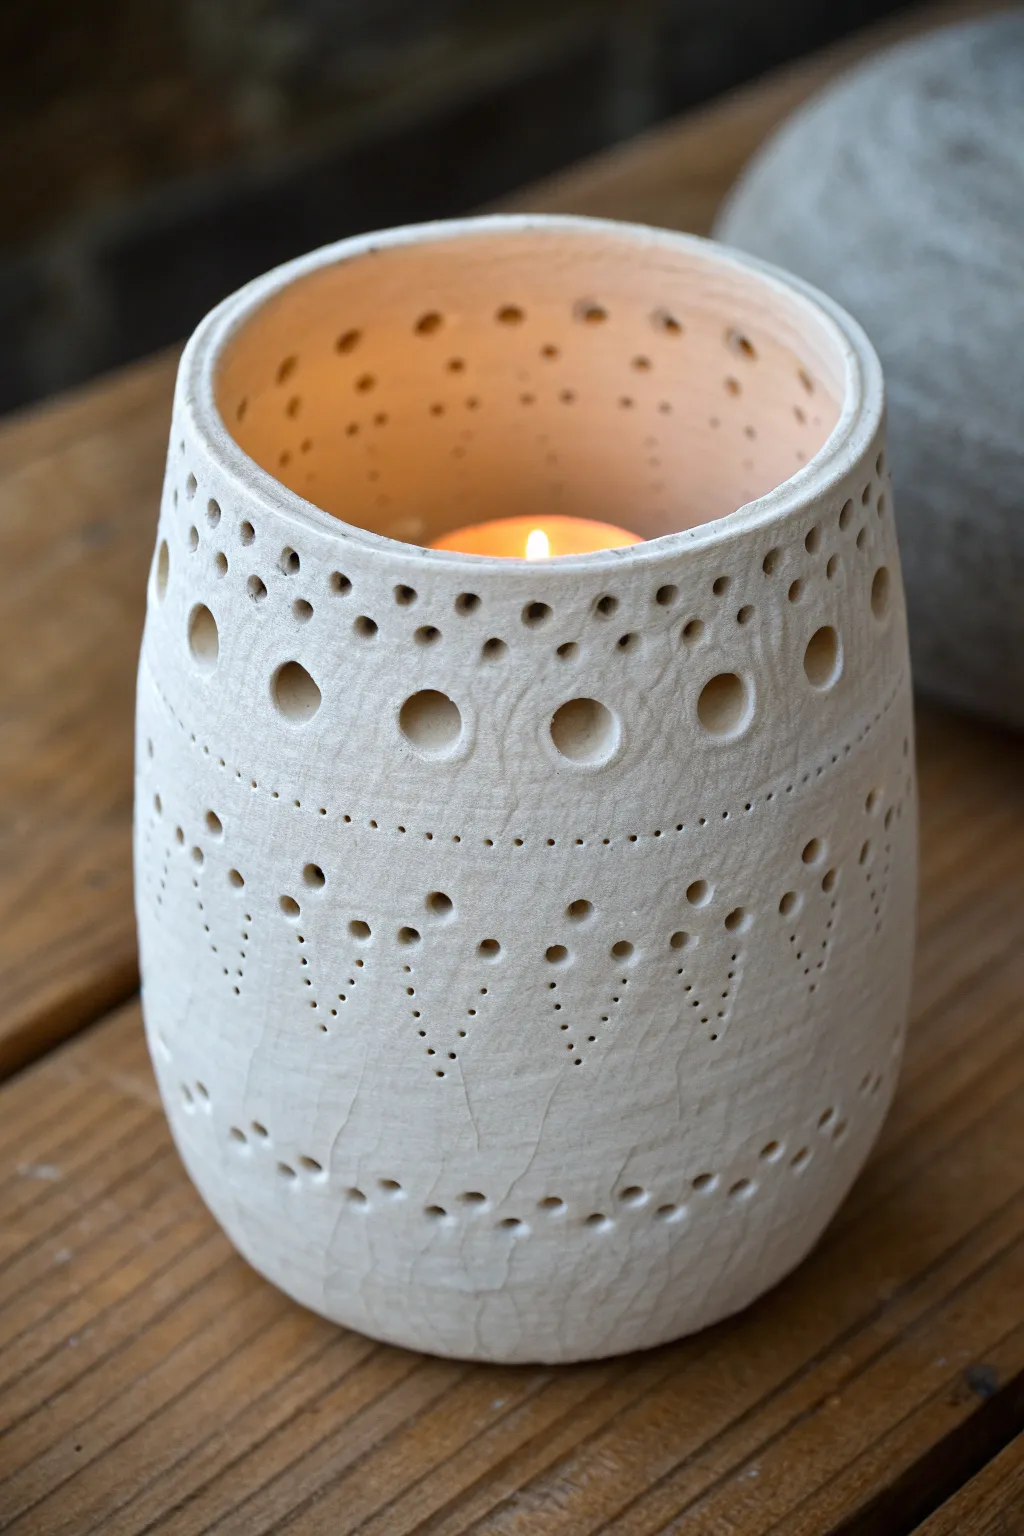
This elegant clay lantern combines a minimalist, matte white finish with intricate punched patterns that cast mesmerizing shadows when lit. The design features a gently tapered barrel shape adorned with rows of varying hole sizes, creating a textured, lace-like effect.
Step-by-Step Guide
Materials
- White stoneware or earthenware clay (with fine grog)
- Rolling pin
- Canvas working mat or board
- Cylindrical form or wide PVC pipe (for shaping)
- Hole cutters or drill bits (various sizes: large, medium, small)
- Needle tool
- Metal rib or kidney scraper
- Sponge
- Slip (clay mixed with water)
- Scoring tool (or fork)
- Sanding sponge or fine grit sandpaper
Step 1: Forming the Cylinder
-
Prepare the Clay Slab:
Begin by wedging your white clay thoroughly to remove air bubbles. Roll it out into an even slab about 1/4 inch thick. A consistent thickness is crucial for structural integrity during firing. -
Cut to Size:
Measure the circumference of your chosen cylindrical mold (or decide on a specific diameter). Cut a rectangular strip from your slab that is long enough to wrap around your form with a slight overlap, and tall enough for your desired lantern height. -
Shape the Cylinder:
Wrap the clay slab loosely around your PVC pipe or cylindrical mold. If you don’t have a mold, you can free-hand this by bringing the short ends together to form a tube. -
Join the Seam:
Score both ends of the slab where they will overlap. Apply slip to the scored areas. Press the ends firmly together to create a bond. -
Smooth the Connection:
I prefer to use a metal rib here to smooth the seam on both the inside and outside until the join is invisible. This also compresses the clay particles for strength. -
Shape the Barrel Form:
With the cylinder standing upright, gently push the walls outward from the inside using a sponge or curved rib while supporting the outside. Create a soft barrel curve, slightly wider in the middle than at the rim and base.
Hole Distortion?
If holes deform while punching, let the clay stiffen to ‘leather hard’ first. Soft clay squishes; firmer clay cuts cleanly. Support the wall from the inside with your hand as you punch.
Step 2: Designing the Texture
-
Map Out Guidelines:
Using a needle tool, very lightly scribe horizontal guidelines around the cylinder. These will mark where your rows of holes will sit. The design features a top band, a middle divider line, and a lower pattern section. -
Create the Top Holes:
For the upper section closest to the rim, use a medium-sized hole cutter. Punch random scattered holes above the main decorative band to create the ‘starry sky’ look near the opening. -
Punch the Main Band:
Below the scattered holes, punch a distinct row of large circular holes. Space them evenly around the circumference. Just above this row, punch a corresponding row of much smaller holes to frame the larger ones. -
Add Texture Details:
Between the large and small holes of the main band, use a needle tool or very small drill bit to create tiny divots or prick marks. This adds a rougher, dimpled texture that contrasts with the clean punched holes. -
Scribe the Dotted Line:
About halfway down the lantern, create a horizontal divider. Instead of drawing a solid line, prick a row of tiny, closely spaced dots all the way around the vessel.
Glow Up
Paint the interior with a gold or copper wash before the final firing. When a candle is lit inside, the metallic inner wall will reflect a significantly warmer, richer glow through the holes.
Step 3: Completing the Lower Pattern
-
Layout the Triangles:
For the bottom half, visualize a series of V-shapes or inverted triangles. Mark the center point for the base of each V. -
Punch the V-Pattern:
Using a medium-small hole cutter, punch holes in V-formations. Start with a single hole at the bottom point, then two above it, then wider, creating the shape of an arrow pointing down. -
Detail the Triangles:
Between the main punched holes of these V-shapes, add rows of tiny pin-pricks using your needle tool. These lines of dots should echo the V-shape, reinforcing the geometric pattern. -
Finish the Base:
Near the very bottom edge, add a final horizontal row of medium-sized holes to anchor the design visually.
Step 4: Finishing Touches
-
Clean Up Edges:
Once the clay is leather hard, use a damp sponge or your finger to smooth out any sharp burrs created by the hole punching. The edges should feel soft to the touch. -
Dry Slowly:
Let the lantern dry slowly under loose plastic. Because there are so many holes, the clay can dry unevenly and crack if rushed. -
Bisque Fire:
Fire the piece to bisque temperature (usually Cone 04). Since the beauty is in the raw texture, you may choose to skip glazing or just use a clear matte glaze on the inside. -
Final Sanding:
After firing, use a sanding block to lightly sand the exterior if you want a truly smooth, stone-like feel. Be careful dust doesn’t clog the tiny holes.
Place a tea light inside and watch your handcrafted patterns dance across the walls in the evening light
House-Shaped Cottage Lantern
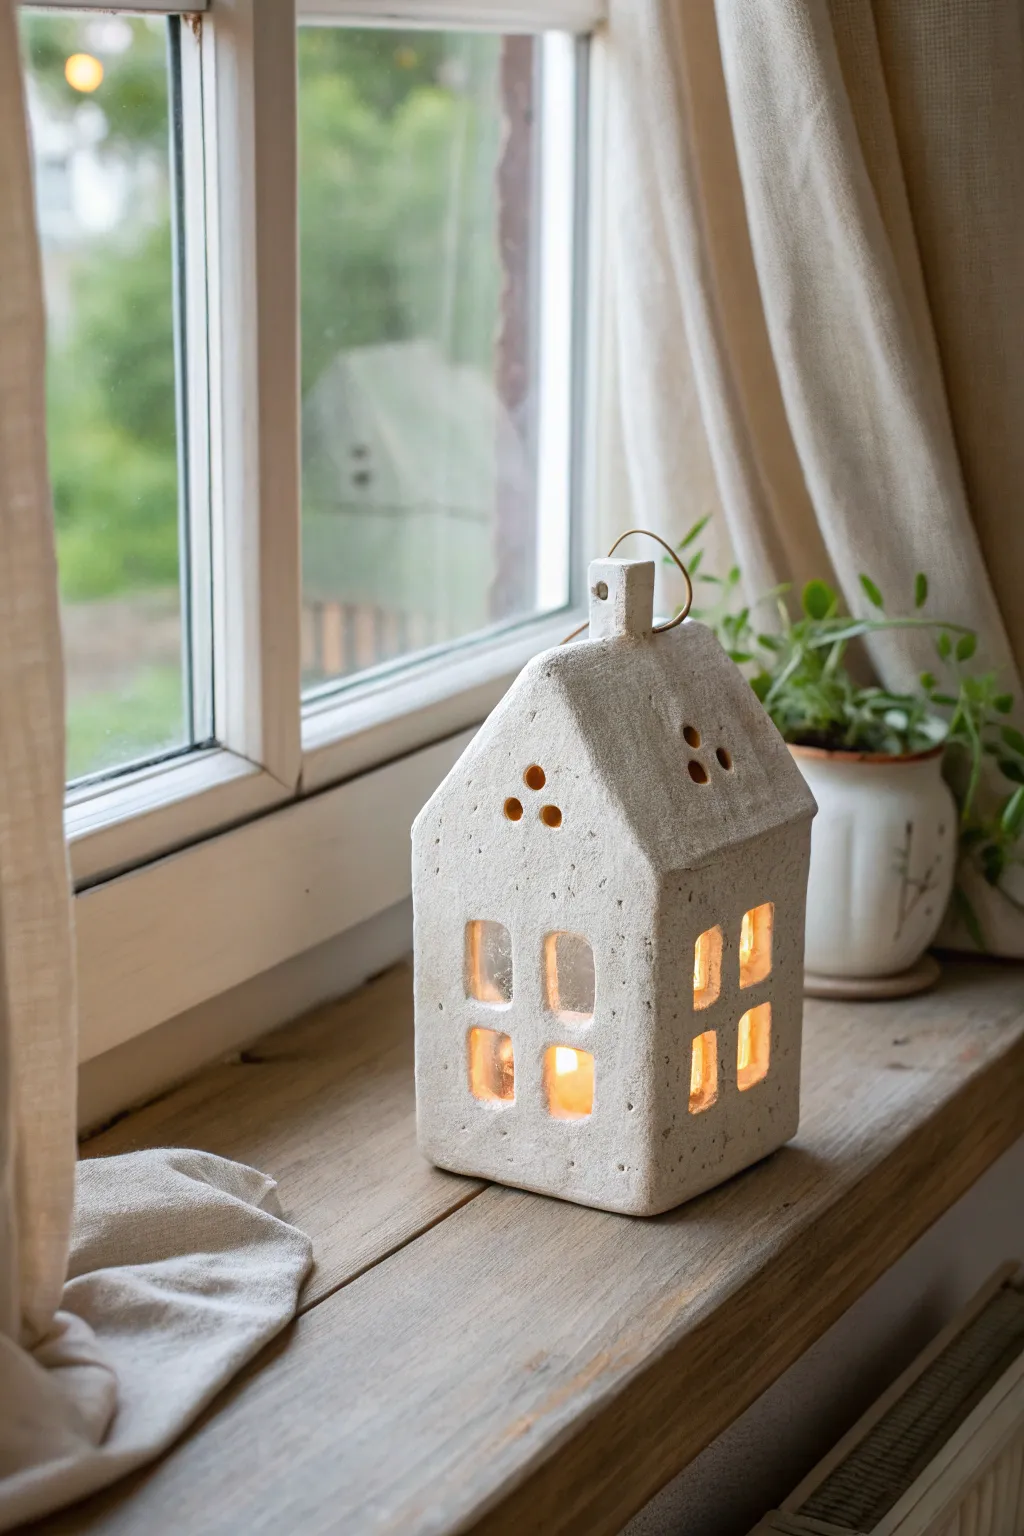
Capture the cozy charm of a Scandinavian cottage with this simple yet stunning clay lantern project. Its textured white surface and warm, inviting glow make it perfect for windowsill displays or mantel decoration.
Step-by-Step
Materials
- White air-dry clay (or polymer clay)
- Rolling pin
- Parchment paper or craft mat
- Craft knife or scalpel
- Ruler
- Small square cookie cutter (optional, for windows)
- Drinking straw or small circular cutter
- Cardboard (for templates)
- Slip (clay mixed with water) or clay glue
- Pottery sponge
- Acryllic paint (white or cream, optional)
- Matte sealant spray
- Thin crafting wire (brass or copper)
Step 1: Planning and Cutting
-
Create templates:
Draft your house shape on cardboard first. You’ll need two identical pentagon shapes for the front and back (a rectangle base with a triangular top) and two rectangles for the side walls. Make the sides slightly shorter than the roofline start. -
Roll the clay:
Knead your clay until it’s pliable and smooth. Roll it out on parchment paper to an even thickness of about 1/4 inch (6mm). Using guide sticks on either side of your roller helps keep the thickness consistent. -
Cut the walls:
Place your cardboard templates onto the rolled clay. Using a sharp craft knife held vertically, carefully cut around the edges of all four wall pieces. Don’t discard the scraps yet—you’ll need them for the roof. -
Cut the roof slabs:
Cut two rectangular slabs for the roof. These should be slightly wider than your house to create a small overhang and long enough to meet at the peak. -
Create texture:
Before assembly, gently tap the surface of the clay with a stiff bristle brush or a crumpled ball of aluminum foil. This gives the lantern that lovely, stone-like aged texture seen in the photo.
Creating the Glow
Use battery-operated LED tea lights instead of real flame candles. They are safer for air-dry clay and won’t create soot marks on your white roof interior.
Step 2: Adding Details
-
Cut the windows:
On the front and side panels, mark where your windows will go. Use a small square cutter or your craft knife to carefully remove four window panes per side. Keep them somewhat irregular for a rustic feel. -
Add ventilation holes:
Use a drinking straw to punch three small holes in a triangular pattern near the peak of the front and back panels. These are decorative but also help heat escape if using a real candle. -
Smooth the edges:
Dip your finger in a little water and gently run it along all cut edges, especially inside the window frames, to soften any sharp or jagged bits.
Step 3: Assembly
-
Score and slip:
Score (scratch) the edges where the walls will connect. Apply a little slip (clay and water mush) or clay glue to these roughed-up areas. -
Construct the base:
Stand the walls up, pressing the scored seams together firmly. I find it helpful to place a small box or block inside the structure temporarily to support the walls while they bond. -
Reinforce the seams:
Roll a very thin snake of clay and press it into the interior corners of your house to reinforce the joints. Smooth this out with a modeling tool or your finger. -
Attach the roof:
Score the top edges of the walls and the contact points of the roof slabs. Place the roof pieces on, pressing gently to seal them to the walls and to each other at the peak. -
Add the chimney:
Form a small rectangular cube of clay for the chimney. Punch a hole through it horizontally with a skewer (for the wire handle later). Score and attach it to the roof peak. -
Final texture check:
Inspect your seams. If you smoothed them too much, re-apply your texture with the foil ball to ensure the joints blend invisibly with the rest of the house.
Sagging Roof?
If the roof sags during assembly, prop it up internally with crumpled paper towels or a sponge. Leave this support inside until the clay is leather-hard.
Step 4: Finishing Touches
-
Drying:
Allow the house to dry slowly away from direct heat or sunlight. This usually takes 24-48 hours. Turn it occasionally if possible to let air reach all sides. -
Sanding:
Once fully dry, use fine-grit sandpaper to gently smooth any unintentionally sharp corners or rough spots on the bottom. -
Painting (Optional):
If you want a pure white finish or used a different colored clay, apply a coat of matte white acrylic paint. Dab it on with a sponge rather than brushing to preserve the stone texture. -
Attach the handle:
Cut a short length of brass wire and bend it into a loop. Insert the ends into the hole you made in the chimney and twist or bend them secure.
Now place your charming little house on a shelf, switch on the light, and enjoy the cozy atmosphere.
Pagoda Roof Lantern
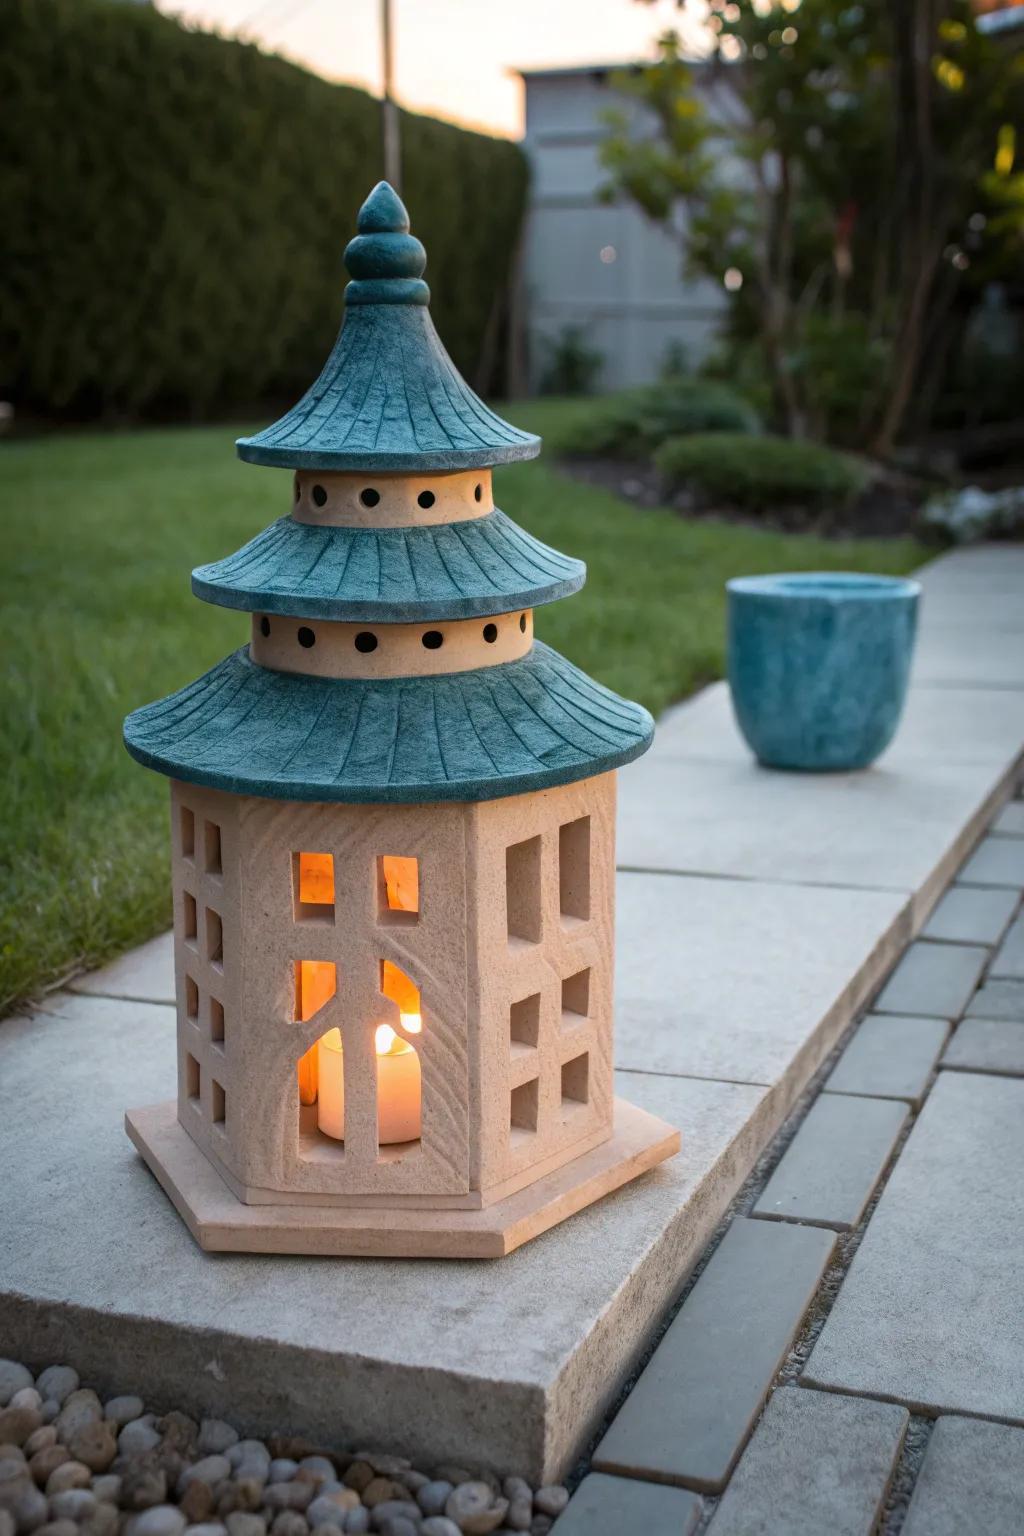
Bring a touch of Zen serenity to your outdoor space with this stunning three-tiered ceramic lantern. Featuring a classic pagoda silhouette with teal-glazed roofs and a warm terracotta base, this handcrafted piece beautifully houses a glowing candle.
Step-by-Step Guide
Materials
- Stoneware clay (groggy for structural integrity)
- Pottery wheel (optional, for slab building alternative)
- Rolling pin and guide sticks (for slab building)
- Circle cutter or compass tool
- Fettling knife
- Loop tool for carving
- Slip and scoring tool
- Teal or verdigris potting glaze
- Clear matte glaze (optional for body)
- Kiln access
- Small sponge
Step 1: Constructing the Base Structure
-
prepare slabs:
Roll out a large slab of stoneware clay to a uniform thickness of about 3/8-inch. Let it stiffen slightly to a leather-hard state so it can hold its shape during assembly. -
cut base hexagon:
Using a hexagon template, cut out the bottom foundation piece. This needs to be slightly wider than the walls to form the protruding base lip shown in the image. -
form the walls:
Cut a long rectangular strip for the main body walls. Measure the perimeter of your hexagon base to determine the length. Score and slip the short ends to join them into a cylinder, or create six individual panels if you prefer sharp corners. -
shape the hexagon:
Gently press your cylinder onto the hexagonal base to conform it to the six-sided shape. I find placing a hexagon paper template inside helps keep the angles sharp while joining. -
secure base to walls:
Score and slip the bottom of the wall unit and attach it firmly to the center of your hexagonal base slab. Use a small coil on the interior seam to reinforce the connection.
Wobbly Roofs?
If your roof cones slump during firing, support them underneath with a small, disposable clay pinch pot or kiln props to maintain the angle.
Step 2: Carving Details and Roofs
-
sketch windows:
Lightly trace your window designs onto the leather-hard walls. The design features a mix of small square grids and larger vertical rectangular openings. -
cut windows:
Use a sharp fettling knife or scalpel to carefully cut out the negative space. Smooth the cut edges with a damp sponge or finger to remove sharp burrs. -
form roof slabs:
Roll out three circular slabs of decreasing size for the tiered roofs. Cut a wedge out of each circle and join the seams to create three shallow cones. -
add roof texture:
Using a modeling tool or the edge of a ruler, press radial lines from the center to the edge of each cone to mimic roof tiles or shingles. -
create spacer rings:
Create two smaller hexagonal or cylindrical rings that will sit between the roof tiers. Punch small round holes in these spacers for ventilation and aesthetic detail. -
assemble the tiers:
This is a stackable design. Ensure the bottom of the first roof fits securely over the main lantern body. You may need to add a small interior flange to keep it from sliding off. -
add the finial:
Hand-build a small, decorative finial—like a lotus bud or sphere—and attach it to the very peak of the smallest, top-most roof cone.
Electric Upgrade
Cut a small notch or hole near the bottom of the base slab before firing. This allows you to feed a waterproof electrical cord through for permanent lighting.
Step 3: Glazing and Firing
-
bisque fire:
Let the entire piece dry slowly under plastic to prevent warping, especially the roof cones. Once bone dry, bisque fire the pieces in the kil according to your clay body’s specifications. -
masking:
Apply wax resist to the main body and the spacer rings if you want to keep the raw, sandy clay texture visible as seen in the photo. -
glaze application:
Brush or dip the three roof sections and the finial in a teal or verdigris-colored glaze. Ensure the glaze gets into the textured lines for depth. -
clean feet:
Wipe away any glaze from the bottom of each separate component so they don’t fuse to the kiln shelf. -
glaze fire:
Fire the final piece to the glaze maturity temperature. Once cool, stack the pieces in the garden and place a candle or LED light inside.
Enjoy the peaceful ambiance created by the warm light filtering through your handmade clay structure
Lidded Jar Lantern With Vent Holes
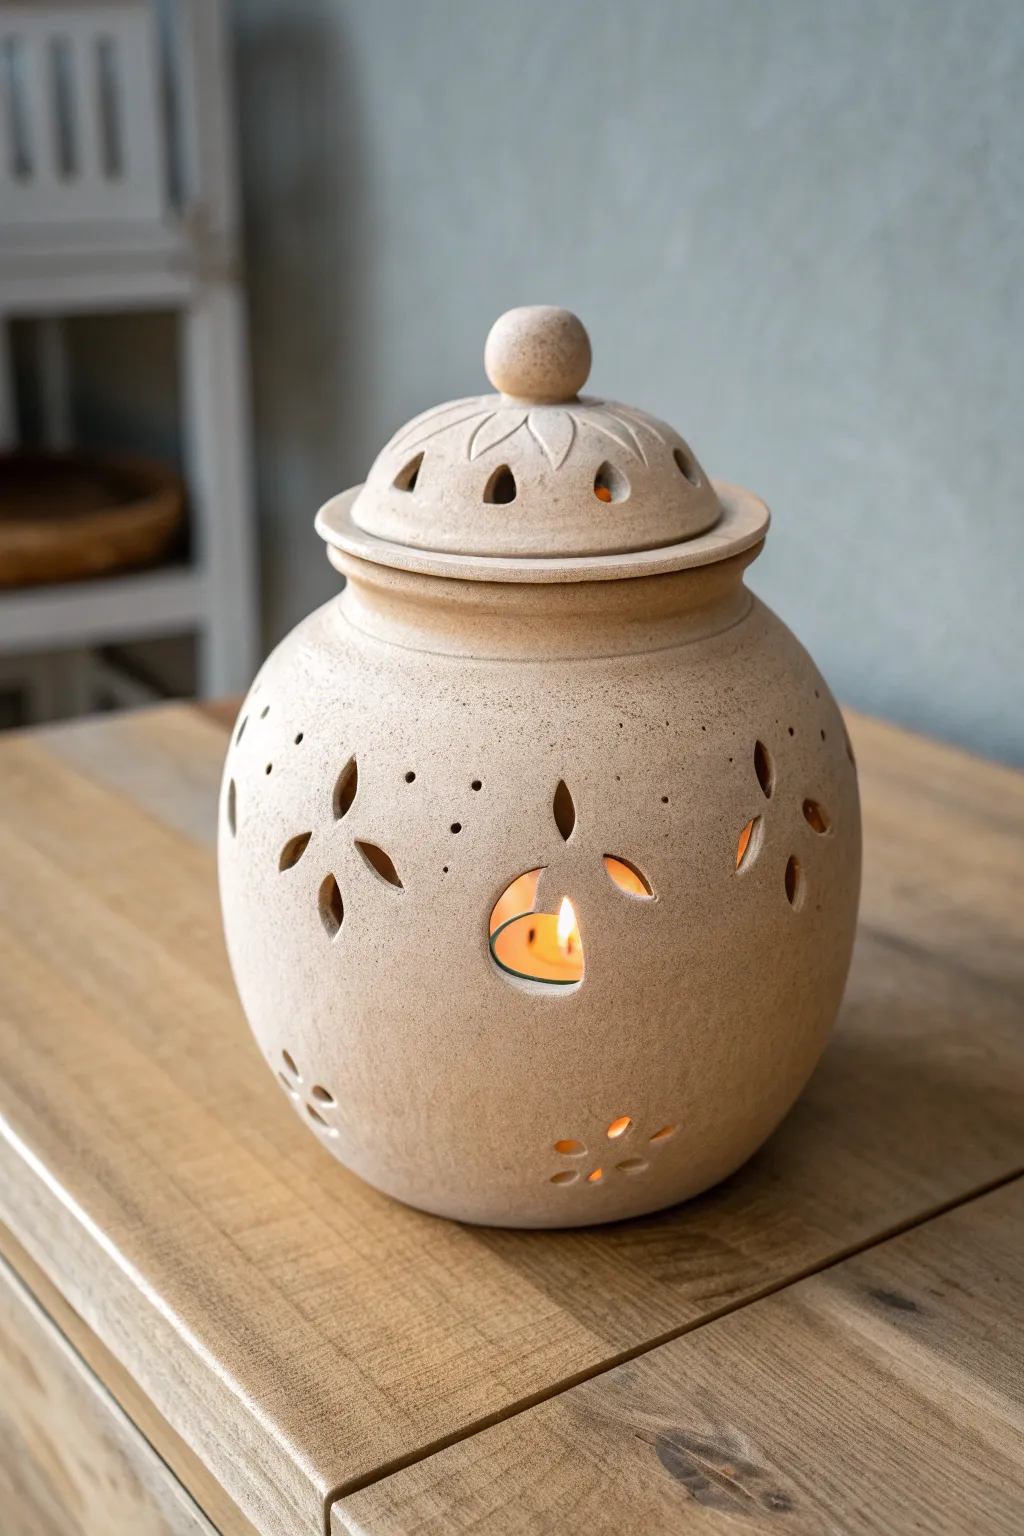
This rustic, nature-inspired vessel functions as both a sturdy jar and a delicate light source. With its unglazed, speckled finish and floral cutouts, it casts warm, leafy shadows while safely shielding the candle within.
Step-by-Step
Materials
- Stoneware clay (speckled or sand-coloured)
- Pottery wheel (or supplies for coil building)
- Potter’s needle tool
- Small teardrop-shaped hole cutter
- Rib tool (wood or metal)
- Sponge
- Wire cutter
- Calipers (optional but helpful for lid sizing)
- Fettling knife
- Smooth sanding stone or fine sandpaper
Step 1: Throwing the Form
-
Center the clay:
Start with a ball of well-wedged clay, about 3-4 lbs, and center it firmly on your wheel bat. -
Open the base:
Open the clay to create a floor that is approximately 4-5 inches wide, ensuring it has enough thickness to support the walls. -
Pull the cylinder:
Pull the walls up into a basic cylinder first to establish an even thickness from bottom to top. -
Shape the belly:
Gently push the walls outward from the inside while supporting the outside to create a round, bulbous ‘belly’ shape. -
Collar the neck:
Choke the moving clay inward at the top to create a narrower neck and a defined rim called a gallery for the lid to sit on. -
Measure the gallery:
Use calipers to measure the exact inner diameter of the gallery seating area so you can throw a perfectly fitting lid. -
Throw the lid:
Using a smaller lump of clay (off the hump or centered flat), throw a domed lid that matches your caliper measurements, adding a simple knob at the top.
Clay Too Soft?
If your walls slump while cutting holes, stop immediately. The clay is too wet. Cover it loosely and let it stiffen for 3-4 hours before trying to cut again.
Step 2: Trimming and Carving
-
Leather hard stage:
Allow both the pot and lid to dry to a leather-hard state; the clay should be firm enough to handle without deforming but soft enough to carve. -
Trim the footing:
Flip the jar over on the wheel, center it, and trim away excess weight from the bottom to create a neat foot ring. -
Plan the design:
Lightly sketch a floral pattern around the belly of the jar using a needle tool; group leaves in clusters of three or four. -
Cut the main petals:
Use a sharp fettling knife or a specialized teardrop cutter to remove clay for the larger leaf shapes. -
Add detail holes:
Pierce smaller decorative holes around the main cutouts using a small drill tool or needle tool to add texture. -
Carve the lid vents:
Cut small triangular or teardrop vents into the dome of the lid; these are crucial for letting heat escape so the candle doesn’t snuff itself out. -
Detail the knob:
I like to add subtle vertical texture lines or leaf veins onto the lid’s dome and knob for extra character. -
Clean the edges:
Once the cutouts are stiff, use a slightly damp sponge or a soft brush to smooth any sharp burrs created by the cutting tools.
Step 3: Finishing
-
Bone dry drying:
Let the piece dry very slowly under loose plastic to prevent the delicate cutout areas from cracking due to uneven drying. -
Bisque fire:
Fire the piece in a kiln to Cone 04 (or according to your clay body’s specs) to harden it into bisque ware. -
Sand the exterior:
Since this piece is intended to be left unglazed to show the raw clay texture, sand the exterior lightly with fine sandpaper to make it pleasant to touch. -
Final firing:
Fire the piece again to its maturity temperature (e.g., Cone 5 or 6) without glaze, or with a clear matte glaze on the inside only for easier wax removal.
Aromatic Add-on
Make the lid gallery slightly deeper to hold a few drops of essential oil. The heat from the candle below will gently warm the clay and diffuse the scent.
Place a tealight inside and enjoy the dancing patterns on your walls
Arch Window Moroccan-Inspired Lantern
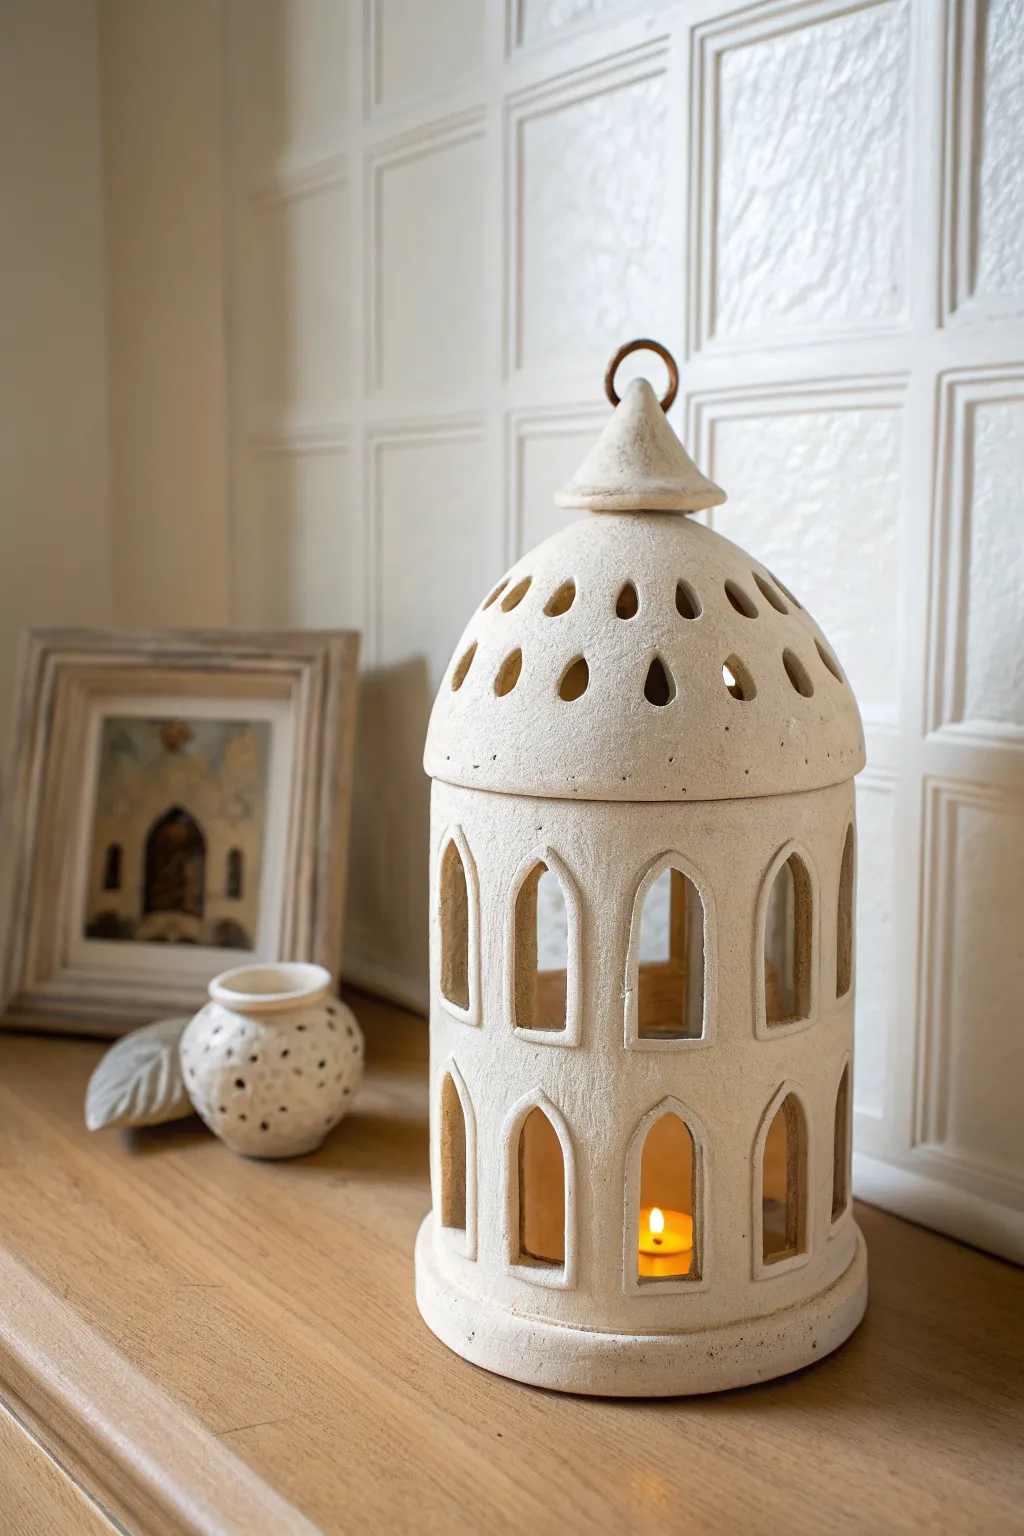
Bring the warmth of Moroccan architecture into your home with this stunning dual-piece lantern. Featuring elegant arched windows and a teardrop-pierced dome, the unglazed finish offers a rustic, organic texture that glows beautifully when lit.
Step-by-Step Guide
Materials
- Light grogged stoneware clay (cream or beige firing)
- Rolling pin
- Canvas work surface or slab mat
- Rectangular template (for the body)
- Dome mold or small bowl (approximately 5-6 inches diameter)
- Fettling knife
- Needle tool
- Various hole cutters or teardrop cutters
- Scoring tool or serrated rib
- Slip (clay mixed with water)
- Wooden modeling tools
- Sponge
- Small metal ring (copper or brass) for the handle
Step 1: Forming the Base Cylinder
-
Roll the main slab:
Begin by rolling out a medium-sized slab of clay to a consistent thickness of about 1/4 inch. Smooth it out with a rib to compress the clay particles, which helps prevent warping later. -
Cut the rectangle:
Using your rectangular paper template, cut the main body of the lantern. The length should equal the circumference of your desired base plus a small overlap for the seam. -
Create the cylinder:
Stand the slab up and curve it into a cylinder. Score and slip the overlapping edges thoroughly, then press them together firmly to create a seamless vertical join. -
Add the floor:
Roll a smaller slab and cut a circle that matches the diameter of your cylinder. Score and slip the bottom edge of the cylinder and the edge of the circle, then attach them to create the floor of the lantern. -
Secure the base seam:
Roll a very thin coil of clay and press it into the interior seam where the floor meets the wall. Smooth this coil down with a wooden tool to reinforce the connection. -
Add a decorative rim:
For that distinct tiered look at the bottom shown in the photo, attach a slightly wider strip of clay around the very base of the cylinder, blending the top edge into the wall but leaving the bottom edge crisp.
Step 2: Carving the Arches
-
Map the windows:
Once the cylinder is leather-hard (firm but not dry), use a ruler to lightly mark two rows of windows. Ensure they are spaced evenly around the circumference. -
Cut the arches:
Using a needle tool or specialized cutter, carefully cut out the tall, narrow arched windows. I find it helpful to support the wall from the inside with my other hand while cutting to prevent the clay from deforming. -
Refine the edges:
Smooth the cut edges of each window with a damp sponge or a chamois cloth. You want to remove any sharp burrs or crumbs of clay for a professional finish. -
Create the gallery:
To ensure the lid sits securely, add a small internal flange or ‘gallery’ just inside the top rim of the cylinder, or simply ensure the top rim is perfectly flat and level.
Slumping Walls?
If the cylinder walls start to buckle while you cut the windows, stop immediately. The clay is too wet. Let it stiffen to a firm leather-hard state before continuing.
Step 3: Sculpting the Dome Lid
-
Form the dome:
Drape a fresh slab of clay over a hump mold or a bowl covered in plastic wrap to create the rounded top shape. Trim the edges so the diameter matches your cylinder base. -
Pierce the teardrops:
While the dome is leather-hard but still on the mold for support, use a teardrop cutter or knife to create the two rows of decorative holes. Angle your cuts slightly inward for clean shadows. -
Build the finial:
Hand-build a small conical shape for the very top. Create a small loop or hole at the peak where the metal ring will eventually go. -
Attach the finial:
Score and slip the center of the dome and the base of your cone finial, attaching them securely. Smooth the transition so it looks like one continuous piece. -
Insert the handle:
If firing to a temperature your metal can withstand, insert the copper ring now. Otherwise, create the hole and insert the ring after the final firing.
Level Up: Shadow Play
Carve the inside edges of the window frames at a 45-degree angle. This beveling technique allows more candlelight to spill out, creating wider, softer patterns.
Step 4: Finishing and Firing
-
Final smoothing:
Go over the entire piece with a slightly damp sponge. Pay special attention to the window corners and the rim where the lid meets the base. -
Texture application:
To achieve the specific sandy texture in the photo, you can gently pat the surface with a coarse sponge or lightly press sand into the leather-hard surface before it dries. -
Slow drying:
Loosely cover the lantern with plastic to let it dry very slowly. This equalization of moisture is critical to prevent the thin window struts from cracking. -
Bisque fire:
Fire the piece to bisque temperature (usually cone 04). Since the look is raw clay, you likely won’t glaze it, or you might apply a clear matte glaze to the inside only. -
Final fire:
Fire to the maturity temperature of your specific clay body. The piece in the image relies on the natural color of the stoneware.
Place a beeswax tealight inside and enjoy the tranquil atmosphere your handcrafted lantern creates
Rippled Surface Lantern With Slit Cutouts
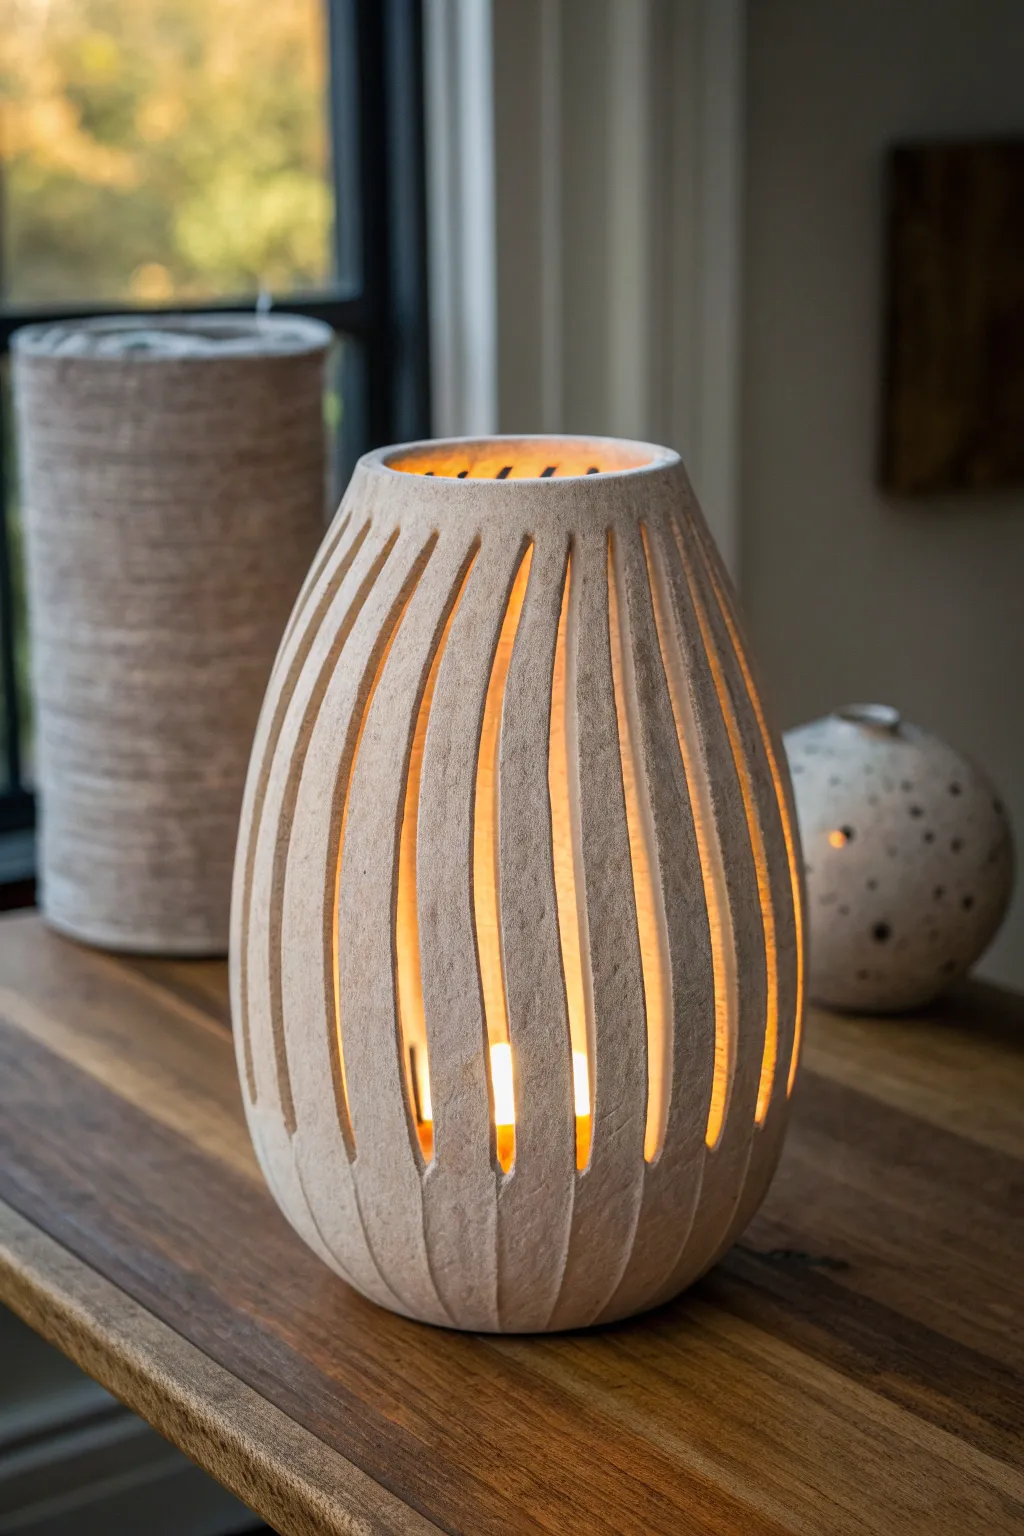
Illuminate your space with the warm glow of this textured lantern, featuring organic vertical slits that cast captivating shadows. The design balances rustic, unglazed stoneware with precise, repetitive cuts for a modern sculptural feel.
Detailed Instructions
Materials
- Stoneware clay (groggy or sandy texture preferred)
- Pottery wheel or rolling pin, canvas, and slab strips
- Rib tool (serrated and smooth)
- Needle tool
- Fettling knife or X-Acto knife
- Loop trimming tools
- Sponge
- Water bowl
- Plastic wrap for slow drying
Step 1: Forming the Base Shape
-
Prepare the clay:
Begin with about 3-4 pounds of well-wedged stoneware clay. If you are throwing on the wheel, center your clay into a tall, narrow cone to prepare for lifting the walls. -
Establish the cylinder:
Pull the walls up into a tall cylinder. Focus on keeping the walls as even as possible, aiming for a thickness of about 1/4 inch throughout. -
Shape the ovoid form:
From the inside, gently bellow out the belly of the cylinder. Place your outside hand slightly higher than your inside hand to guide the clay inward as you reach the top, creating a closed-in, egg-like silhouette. -
Refine the rim:
Collar the top opening until it is roughly 3-4 inches wide. Compress the rim with a chamois or your finger to ensure it is sturdy and smooth. I find a slightly thickened rim helps prevent warping later. -
Alternative: Coil building:
If hand-building, roll out long, even coils. Stack them gradually, smoothing the interior and exterior completely as you go, mimicking the ovoid shape.
Slumping Walls?
If the walls start to bend inward while cutting, your clay is too wet. Stop immediately. Stuff the interior with crumpled newspaper to support the shape and let it sit for 2-3 hours before trying again.
Step 2: Adding Texture
-
Initial stiffening:
Allow the form to dry to a soft leather-hard stage. It should be firm enough to hold its shape but soft enough to accept texture easily. -
Apply vertical ripples:
Using a serrated rib or a texturing comb, drag vertical lines from the bottom to the top of the vessel. Follow the curve of the pot. Don’t worry about perfect straightness; organic waviness adds character. -
Smooth the ridges:
Gently wipe the surface with a slightly damp sponge or a soft rubber rib. This knocks down the sharp burrs of clay while leaving the visual texture of the vertical striations intact.
Clean Cuts Pro Tip
When cutting the slits, wipe your knife blade with a damp sponge after every single cut. Clay residue on the blade creates drag, which leads to ragged edges and tearing.
Step 3: Carving the Light Slits
-
Dry to leather-hard:
This is the most crucial drying step. Wait until the clay is a true leather-hard. If it’s too soft, the walls will collapse when you cut; too dry, and it will crack. -
Mark the guides:
Lightly sketch vertical lines with a needle tool where your cuts will go. Divide the circumference evenly to ensure your pattern wraps around perfectly. -
Make the initial incisions:
Using a sharp fettling knife or X-Acto blade, slice along your guide lines. Support the wall from the inside with your other hand to prevent the pressure from deforming the sphere. -
Widen the openings:
Go back over your cuts, removing a thin sliver of clay (about 1/8 to 1/4 inch wide) to create the actual opening. Taper the cuts at the top and bottom so they fade elegantly into the solid clay. -
Clean the edges:
wait for the pot to dry slightly more, then use a damp sponge or a small smoothing tool to round off the sharp edges of each cut. This creates a more finished, professional look.
Step 4: Finishing and Firing
-
Bottom finishing:
Turn the pot over (carefully supporting the fragility of the slashed walls) and trim a clean foot ring. This lifts the lantern slightly and gives it a floating appearance. -
Slow drying:
Cover the piece loosely with plastic. Because the slats expose so much surface area, the piece will try to dry unevenly. Slow drying over 5-7 days prevents warping. -
Bisque fire:
Fire the piece to cone 04 (or your clay’s specific bisque temperature). -
Surface treatment:
To match the photo, leave the exterior unglazed to highlight the raw clay texture. You may apply a light iron wash and wipe it back to accentuate the vertical texture lines. -
Glaze firing:
Fire to the maturity temperature of your clay body (likely Cone 5/6 or Cone 10). Because there is no heavy glaze, you don’t need to worry about drips blocking the slits.
Place a tea light or LED candle inside your finished vessel to enjoy the rhythmic dance of light and shadow