
Whenever I’m brainstorming clay cross projects in the studio, I like to start with shapes that feel calm and classic, then layer on meaning through texture and details. Here are my favorite clay cross ideas—from simple keepsakes to decorative pieces that can turn into real little heirlooms.
Simple Cutout Cross Ornaments
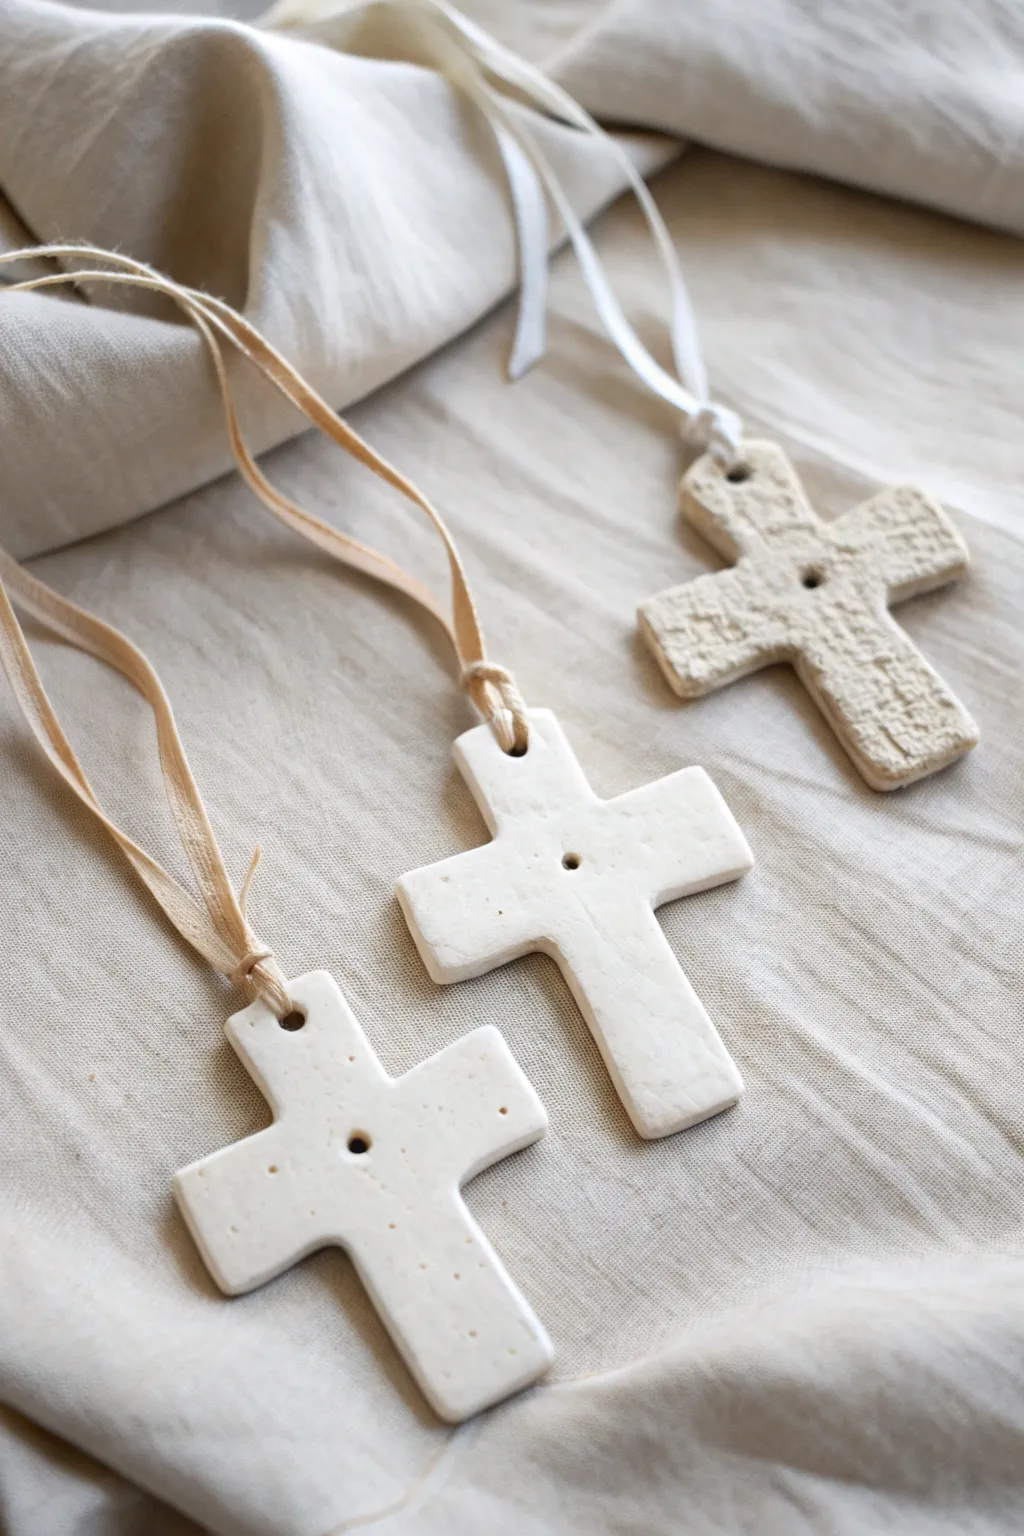
These charming ornaments embody a simple, handcrafted aesthetic with their soft edges and varied textures. Whether you prefer a sleek, speckled white finish or a rustic, textured beige, this project results in beautiful keepsakes perfect for gifting or decor.
Step-by-Step
Materials
- Air-dry clay (white and natural/terracotta)
- Rolling pin
- Parchment paper or canvas mat
- Cross-shaped cookie cutter (approx. 3-4 inches)
- Straw or small circular cutter
- Sandpaper 220-grit
- Water bowl and sponge
- Burlap or textured fabric (optional for texturing)
- Natural twine or silk ribbon
- Clear matte or gloss varnish (optional)
Step 1: Preparation and Shaping
-
Prepare your workspace:
Lay down parchment paper or a canvas mat on a flat surface to prevent the clay from sticking. This also makes cleanup much easier later. -
Condition the clay:
Take a handful of air-dry clay and knead it in your hands for a minute or two until it feels pliable and warm. This removes air bubbles and prevents cracking. -
Roll out the slab:
Using your rolling pin, roll the clay out to an even thickness of about 1/4 inch. If you want uniform thickness, place two rulers on either side of the clay to guide your rolling pin. -
Add texture (optional):
To recreate the textured cross seen in the example, gently press a piece of rough burlap or textured fabric onto the clay surface before cutting. Roll over it once lightly to imprint said pattern. -
Cut the shapes:
Press your cross-shaped cookie cutter firmly into the clay. Wiggle it slightly to ensure a clean cut, then lift the cutter. Carefully peel away the excess clay from around your shape.
Keep it Straight
To prevent warping as the clay dries, place a light book or a flat board gently on top of the crosses once they are leather-hard (partially dry but firm).
Step 2: Refining and Drying
-
Create the hanging hole:
Use a drinking straw or a small circular cutter to punch a hole near the top center of the cross toward the upper arm. Twist the straw as you pull it out for a clean edge. -
Smooth the edges:
Dip your finger or a small sponge into a little water and gently run it along the cut edges of the cross. This softens the sharp angles for that pillowy, handmade look shown in the white crosses. -
Add gentle dimples (optional):
For the speckled look on the smooth crosses, you can gently poke the surface with a toothpick or needle tool in random spots, just barely breaking the surface. -
Initial drying phase:
Place your crosses on a flat board lined with parchment paper. Let them dry for 24 hours in a draft-free area. -
Flip for even drying:
After the first day, flip the crosses over to allow the bottom side to dry equally. This is crucial to prevent the arms of the cross from warping or curling upwards.
Cracked edges?
If small cracks appear while drying, mix a tiny bit of fresh clay with water to make a paste (slip) and fill in the crack with your finger, then smooth it over.
Step 3: Finishing Touches
-
Sanding imperfections:
Once fully cured (usually 48-72 hours), inspect your crosses. Use fine-grit sandpaper to gently buff away any remaining rough spots on the edges. -
Clean off dust:
Wipe the crosses down with a slightly damp cloth or a dry tack cloth to remove all sanding dust before proceeding. -
Seal the refined crosses:
For the smooth white crosses, apply a coat of clear gloss or satin varnish to seal the clay and give it a slight sheen. I find a soft synthetic brush works best here to avoid streak marks. -
Leave textured crosses natural:
For the beige textured cross, leave it raw for an organic feel, or apply a very matte varnish if you need to protect it from humidity. -
Prepare the hanging material:
Cut a length of natural twine or soft silk ribbon, approximately 8-10 inches long. Fold it in half to create a loop. -
Attach the ribbon:
Thread the folded loop through the hole from front to back, then pull the loose ends through the loop to create a lark’s head knot, or simply tie it off at the top.
Now you have a set of handcrafted ornaments ready to hang or give as meaningful gifts


Smooth Pocket Comfort Crosses
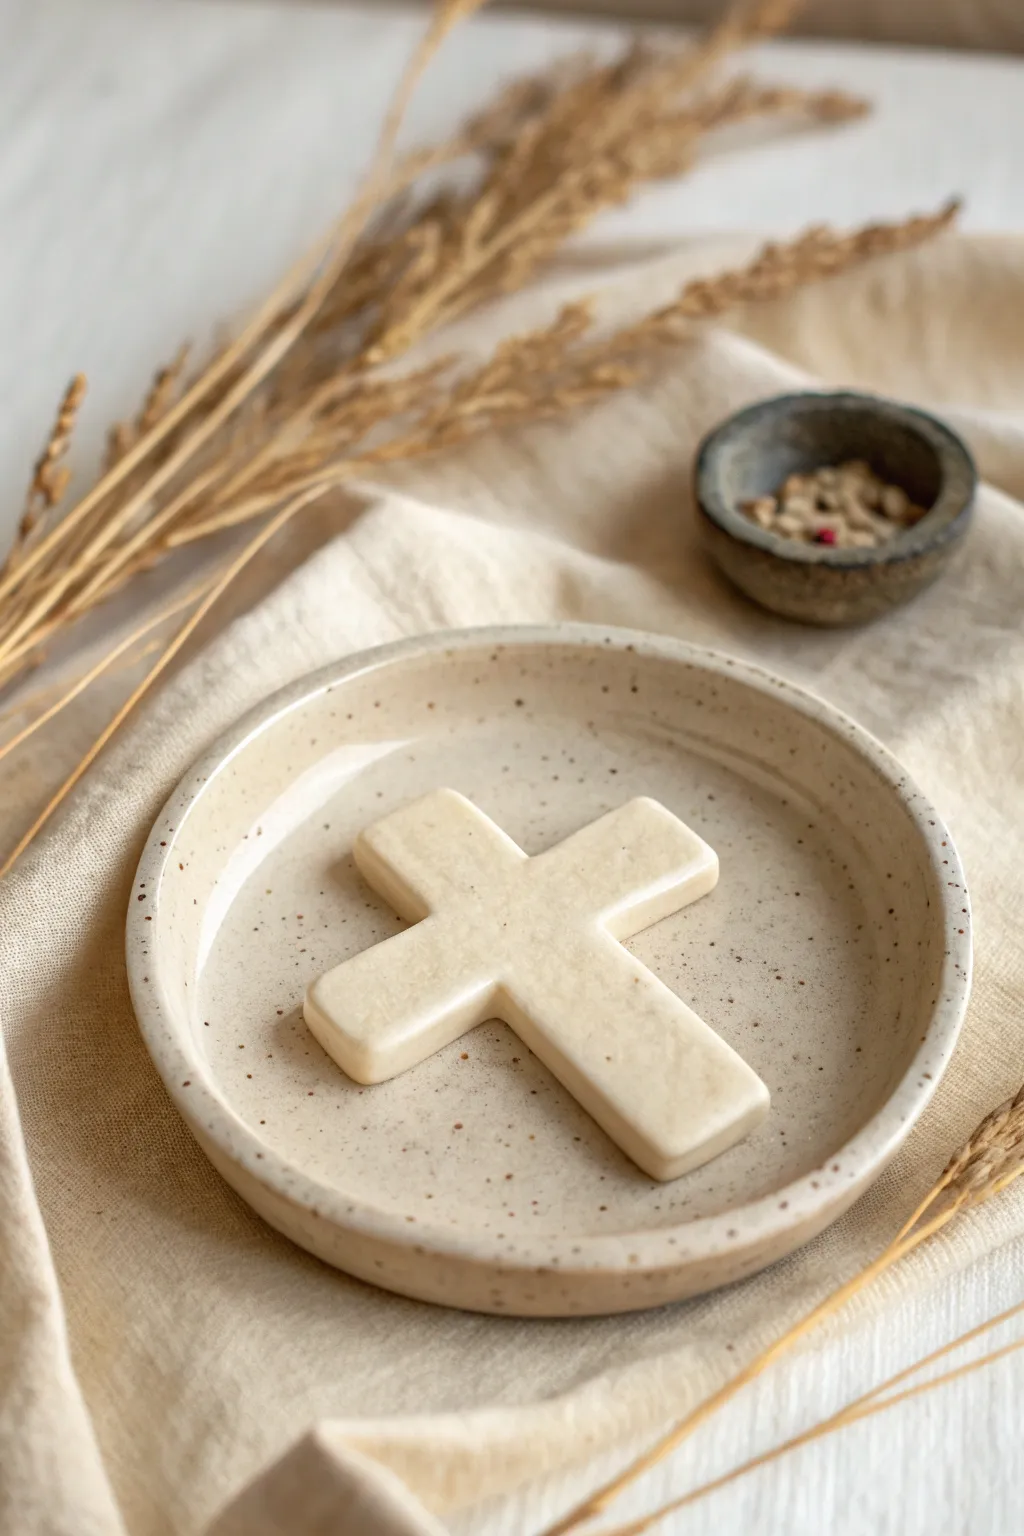
Create a tactile source of comfort with this beautifully simple, smooth clay cross that fits perfectly in the palm of your hand. Its soft, rounded edges and polished finish give it a serene, minimalist look ideal for gifting or personal reflection.
Step-by-Step Guide
Materials
- White or beige polymer clay (or air-dry stone clay)
- Acrylic rolling pin
- Sharp craft knife or tissue blade
- Fine-grit sandpaper (400, 600, and 1000 grit)
- Small bowl of water (for smoothing)
- Parchment paper or ceramic tile (work surface)
- Clear satin or matte varnish (optional)
- Soft detailed paintbrush
- Buffing cloth (denim or soft cotton)
Step 1: Shaping the Foundation
-
Condition the clay:
Begin by warming a block of polymer clay in your hands. Knead it thoroughly until it is soft, pliable, and free of any air bubbles or cracks. This conditioning step is crucial for achieving that ultra-smooth finish later. -
Roll a smooth slab:
Place the clay on your parchment paper or tile. Using the acrylic roller, flatten the clay into an even slab that is approximately 1/4 to 1/2 inch thick. You want it substantial enough to feel comforting in the hand. -
Cut the basic shape:
Use your craft knife to cut a simple cross shape. Start with the vertical bar, then cut the horizontal crossbar. Don’t worry about perfect proportions yet; just aim for a clean, blocky cross outline. -
Soften the corners:
Use your fingers to gently push the sharp corners inward. I like to tap the ends against the work surface to blunt them slightly before starting the real smoothing work.
Step 2: Refining and Smoothing
-
Round the edges:
Using the pads of your thumbs, stroke the edges of the clay repeatedly to round them over. The goal is to eliminate any hard angles so the entire piece feels organic and soft. -
Smooth the surface:
Dip your finger lightly into the bowl of water. Gently rub the surface of the clay in circular motions to smooth out fingerprints and minor imperfections. If using polymer clay, you can use a tiny drop of baby oil instead of water. -
Check symmetry:
Hold the cross up and look at it from different angles. Nudge the arms gently if one side looks longer or thicker than the other, keeping the curves fluid. -
Final pre-bake polish:
Give the clay one last gentle rub with a smooth finger to ensure a flawless surface before baking or drying.
Seamless Finish Tip
To avoid flat spots on the back while baking polymer clay, rest the rounded cross on a bed of cornstarch or polyester batting
Step 3: Hardening and Finishing
-
Bake or dry:
If using polymer clay, bake according to the manufacturer’s package instructions (usually around 275°F/135°C for 15-30 minutes). If using air-dry clay, let it sit in a cool, dry place for 24-48 hours. -
Cool completely:
Allow the cross to cool down completely (or dry fully) before moving on. It will be hardest once fully cool. -
Initial light sanding:
Take your 400-grit sandpaper and wet it slightly. Gently sand any uneven spots or fingerprints that survived the sculpting phase. -
Refining the touch:
Switch to 600-grit sandpaper, then finish with 1000-grit. Sand in circular motions under a trickle of water if possible. This transforms the texture from ‘clay-like’ to something resembling smooth stone. -
Buff to a sheen:
Vigorously rub the dry cross with a piece of denim or a soft cotton cloth. The friction creates heat which helps buff polymer clay to a natural, subtle sheen without needing glaze. -
Optional sealing:
If you prefer a sealed look or used air-dry clay, apply a very thin layer of satin varnish with a soft brush. Let it dry completely.
Fixing Fingerprints
Can’t get rid of stubborn fingerprints? Lightly brush the raw clay with baby oil before baking to help level the surface textures
This comforting little cross is now ready to be carried in a pocket or displayed in a quiet corner of your home


Rustic Slab-Built Wall Cross
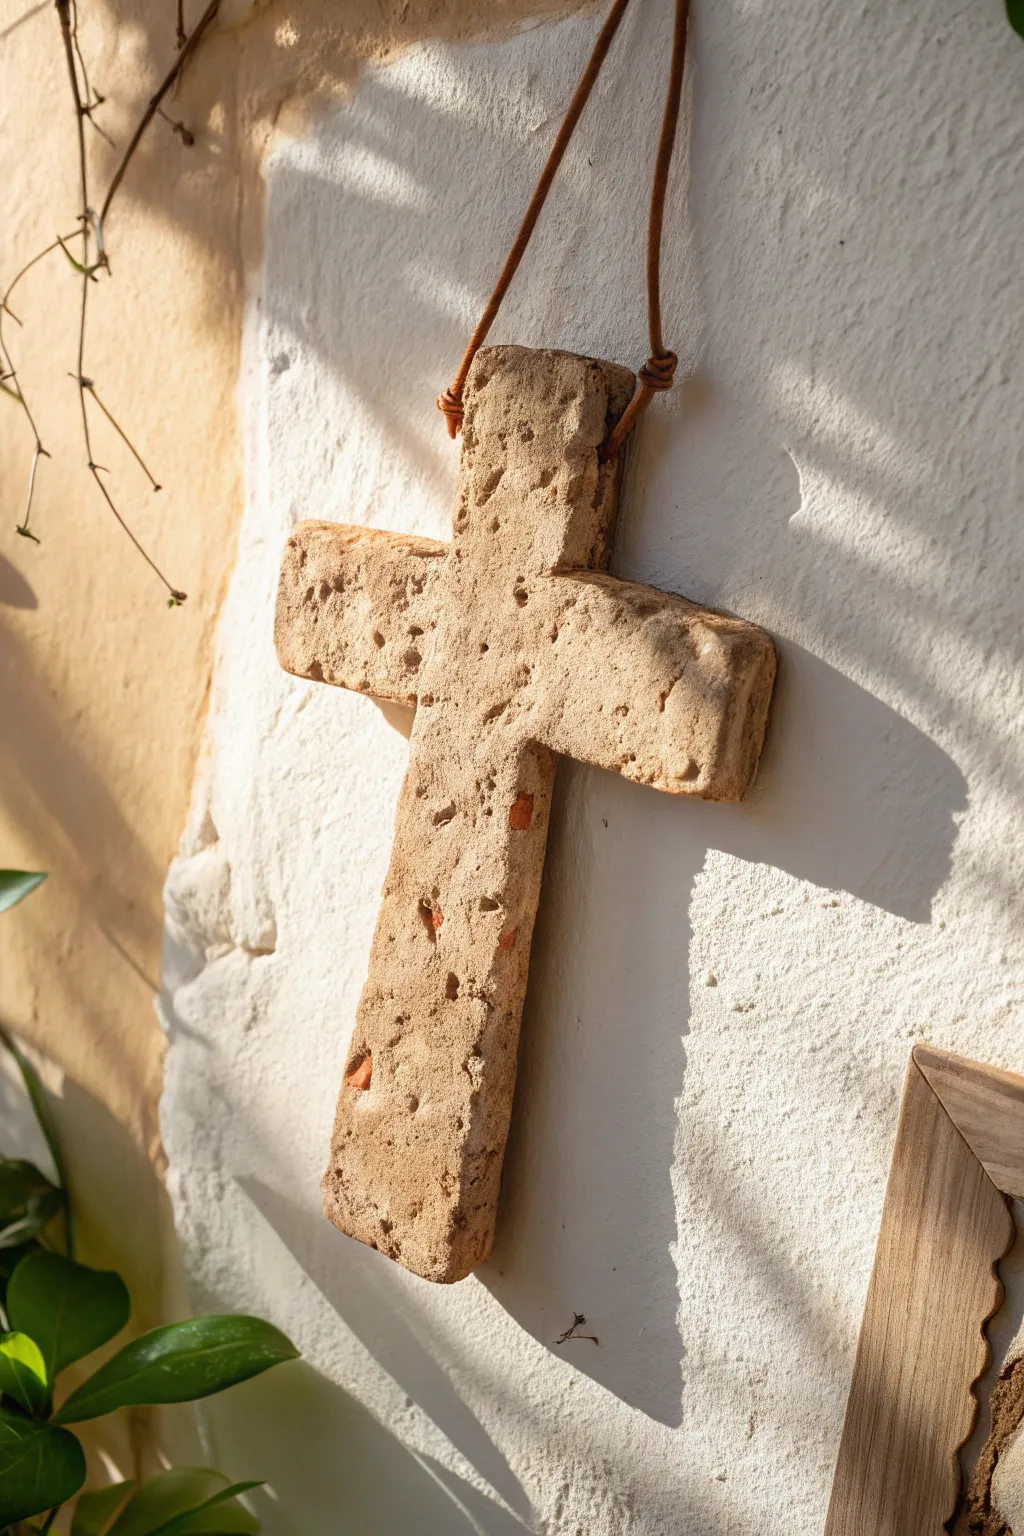
Embrace the natural beauty of imperfection with this rustic stoneware cross, featuring a deeply textured, pitted surface that mimics ancient stone. The warm, sandy tones and rugged edges give it a timeless, archaeological feel perfect for hanging in a sunlit corner.
How-To Guide
Materials
- Heavily grogged stoneware clay (buff or sand colored)
- Canvas or heavy fabric mat for rolling
- Rolling pin
- Fettling knife or needle tool
- Ruler or straight edge
- Coarse salt, crushed dry clay, or large grog (for texture)
- Wooden sculpting tool or paddle
- Leather cord or jute twine
- Small drill bit (approx. 5-6mm)
- Sponge and water
- Kiln (or access to a firing service)
Step 1: Preparation and Forming
-
Prepare the Clay Slab:
Begin by taking a substantial chunk of your stoneware clay and wedging it briefly to remove air bubbles. Flatten it onto your canvas mat. -
Roll to Thickness:
Use your rolling pin to create an even slab. For this substantial look, aim for a thickness of about 3/4 inch to 1 inch. Do not roll it too thin, as the rustic aesthetic relies on visual weight. -
Add Texture Inclusions:
Sprinkle coarse materials like rock salt, crushed dry clay bits, or extra-large grog over the surface of the wet slab. -
Embed the Texture:
Roll over the slab one more time with firm pressure. This presses the textural elements deep into the clay body, creating the foundation for that weathered, pitted look later. -
Measure the Dimensions:
Using a ruler, lightly mark out your cross shape. A classic proportion is a vertical bar that is longer than the horizontal bar. A good starting size is roughly 8 inches tall by 5 inches wide. -
Cut the Shape:
With a fettling knife held vertically, cut along your marked lines. Keep your cuts straight, but don’t worry about surgical precision just yet.
Step 2: Refining and Texturing
-
Create Rough Edges:
Instead of smoothing the cut edges perfectly, tap them gently with a wooden paddle or the flat side of a ruler. This squares them off while keeping a hand-hewn appearance. -
Enhance Surface Pitting:
Use a rough stone or a stiff texture tool to press randomly into the surface. If you see spots that look too smooth, gouge out small divots to mimic natural erosion. -
Soften the Corners:
Gently rub the sharp corners with your finger or a slightly damp sponge. You want the cross to look like it has been worn smooth by time, not freshly sliced. -
Drill Holes for Hanging:
At the top of the vertical bar, create a horizontal hole running completely through from left to right. Ensure the hole is wide enough to accommodate your leather cord later. -
Check Hole Clearance:
Clean up any clay burrs around the exit and entry points of the hole so the cord won’t snag.
Preventing Warping
Thick slabs love to warp. Flip your cross daily while it dries, and cover it loosely with plastic for the first 24 hours to ensure the edges don’t dry faster than the center.
Step 3: Firing and Assembly
-
Slow Drying:
Place the cross on a wire rack or between two pieces of drywall to dry slowly. Uneven drying can cause warping, which ruins the straight slab effect. -
Bisque Fire:
Once bone dry, fire the piece to bisque temperature (usually cone 04). If you used rock salt for texture, ensure your kiln is well-ventilated, or pick the salt out before firing. -
Optional Staining:
I prefer to leave the raw clay body exposed, but if you want more depth, wipe a diluted iron oxide wash over the surface and sponge it off, leaving darker color only in the pits. -
Final Glaze Fire:
Fire the piece to maturity (Cone 5-6 or 10, depending on your clay). High firing often brings out beautiful toasty speckles in stoneware. -
Attach the Cord:
Thread a leather cord through the top hole. Tie a simple rustic knot on the front side at the connection point (like a lark’s head knot or simple overhand loops) to secure it. -
Final Adjustments:
Tie the loose ends of the leather cord together at your desired hanging length and trim any excess.
Rustic Texture Trick
Throw your wet clay slab onto concrete or a rough wooden board before cutting. The clay will pick up the natural grain or grit, adding instant, authentic character to the back and sides.
Hang your finished stoneware cross on a textured wall to let the light play across its ancient-looking surface


Painted Color-Block Cross Design
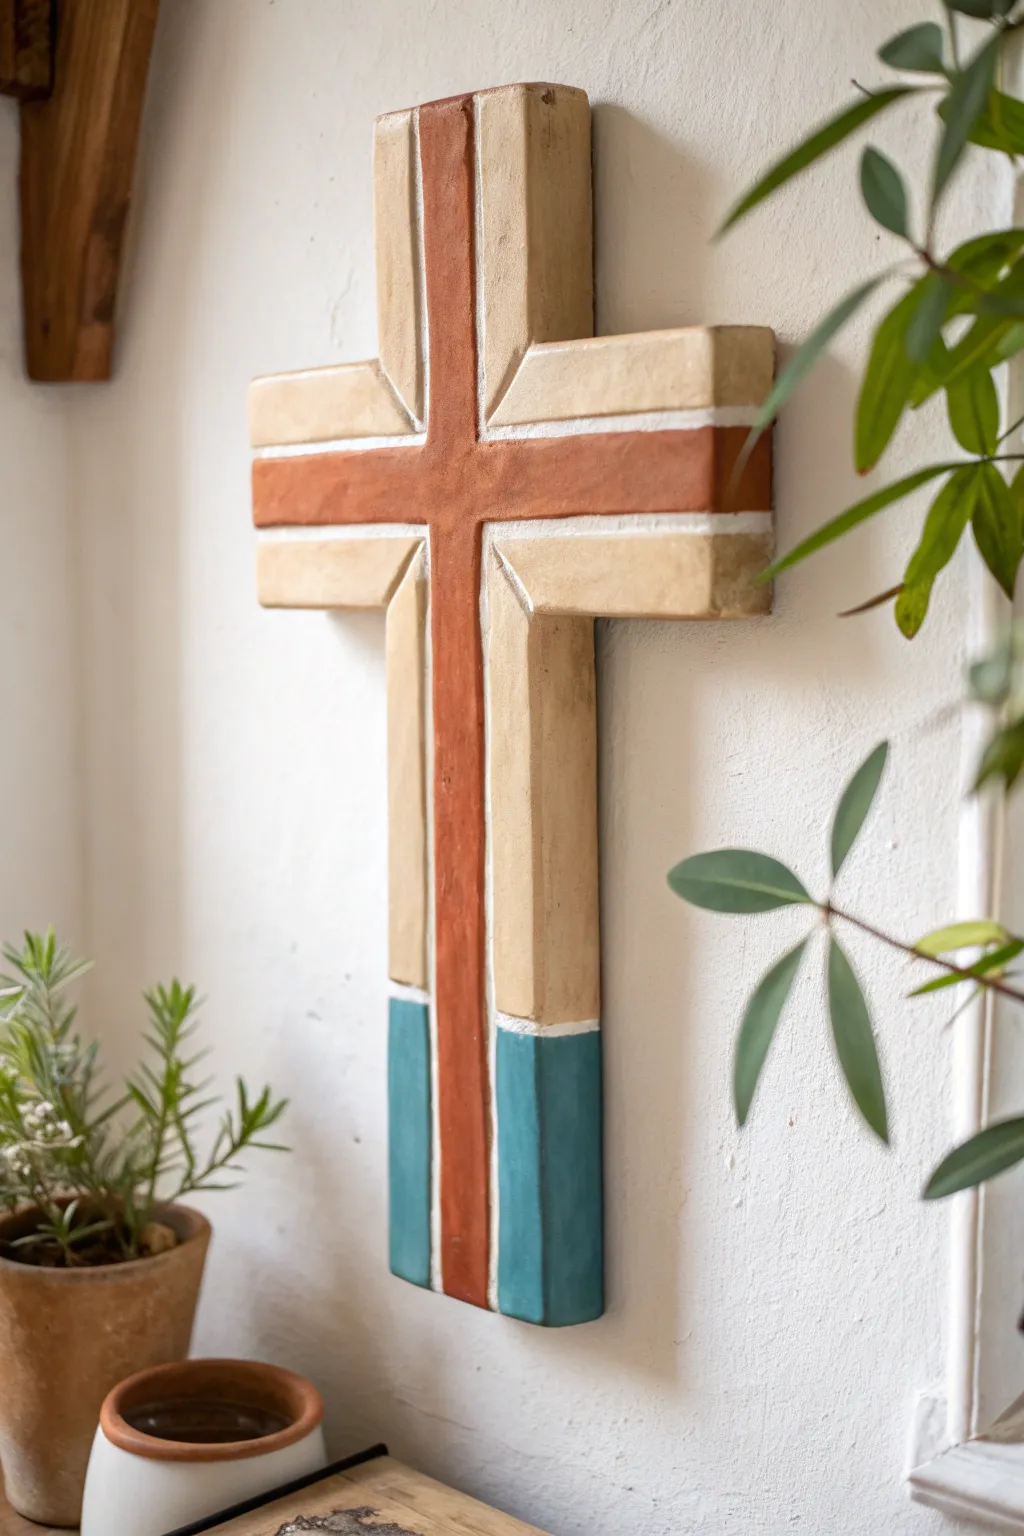
This striking wall piece combines rustic texture with modern geometric design, featuring a central terracotta cross flanked by creamy beige arms and anchored with teal blocks. The unique beveled cuts add depth and dimension, mimicking the look of inlaid stone or tile work.
Step-by-Step
Materials
- Air-dry clay or polymer clay (approx. 2-3 lbs)
- Rolling pin
- Ruler and straight edge
- Clay carving tools (knife and needle tool)
- Medium and fine grit sandpaper
- Acrylic paints: Terra cotta/rust, cream/beige, teal, and white
- Small flat paintbrushes and a fine liner brush
- Matte spray sealant or varnish
- Gorilla glue or strong craft adhesive (if assembling separate pieces)
- Strong backing cardboard or thin wood (optional for reinforcement)
- Wall hanging hardware (sawtooth hanger)
Step 1: Shaping the Foundation
-
Roll the slab:
Begin by conditioning your clay and rolling it out into a thick, even slab, approximately 1/2 inch thick. You want substantial weight for this piece. -
Outline the cross:
Using a ruler, lightly sketch the overall cross shape onto the clay surface with a needle tool. Aim for a bold, blocky silhouette rather than a thin, delicate one. -
Cut the perimeter:
Use a sharp clay knife to cut out the main cross shape. Keep your knife perpendicular to the mat to ensure clean, straight sides. -
Smooth the edges:
Dip your finger in a little water and run it along the cut edges to smooth out any roughness or clay crumbs.
Texturizing Trick
Before drying, gently press a piece of canvas or rough fabric onto the clay surface. This imitates the grainy texture of real kiln-fired terracotta.
Step 2: Carving the Relief Details
-
Mark the center channel:
Measure a central vertical stripe and horizontal stripe to form the inner ‘cross’ shape. These should be about 1 inch wide. -
Define the sections:
Use a carving tool to deeply score lines separating the central terracotta cross from the surrounding beige panels. Don’t cut all the way through; you are creating deep grooves to simulate separate tiles. -
Create the beveled cuts:
Where the horizontal arms meet the vertical post, carve 45-degree angled cuts into the beige sections. This creates that specific geometric ‘inlaid’ look seen in the photo. -
Mark the lower blocks:
Measure about 3-4 inches from the bottom of the vertical layout and score a horizontal line across the side panels to delineate where the teal color will go. -
Refine the grooves:
Go back over all your internal lines with a modeling tool to widen them slightly. These grooves will eventually be painted white to look like grout.
Step 3: Drying and Painting
-
Allow to dry:
Let the clay dry completely according to package instructions. For a piece this thick, it may take 48-72 hours. Flip it occasionally to prevent warping. -
Sand the surface:
Once bone dry, lightly sand the surface and edges to remove any sharp burrs or imperfections. -
Paint the central cross:
Paint the central vertical and horizontal strips with a rust or terracotta color. I like to use a dabbing motion here to enhance the texture. -
Paint the beige panels:
Fill in the upper and middle side sections with a creamy beige or warm sandstone color. -
Add the teal accents:
Paint the bottom-most side rectangular sections with a dusty teal or deep turquoise. -
The grout lines:
Using a fine liner brush and white paint, carefully fill in the deep grooves you carved earlier. This creates the separation between the colored ‘blocks.’ -
Clean up edges:
If any white paint spilled onto the colored sections, touch them up with the appropriate color for crisp, clean lines.
Preventing Warping
If the clay starts curling up while drying, weigh it down with a heavy book placed on top of a paper towel. This ensures the back stays perfectly flat.
Step 4: Finishing Touches
-
Seal the piece:
Spray the entire cross with a matte sealant. This protects the paint and creates a unified finish without adding unwanted gloss. -
Attach hardware:
Flip the dried cross over. Use strong adhesive (like epoxy or heavy-duty craft glue) to attach a sawtooth hanger to the back. -
Final cure:
Allow the glue on the hanger to cure fully for at least 24 hours before hanging the piece on the wall.
Hang your new geometric cross in a well-lit spot to highlight the dimensional carving

The Complete Guide to Pottery Troubleshooting
Uncover the most common ceramic mistakes—from cracking clay to failed glazes—and learn how to fix them fast.
Lace-Imprinted Texture Cross
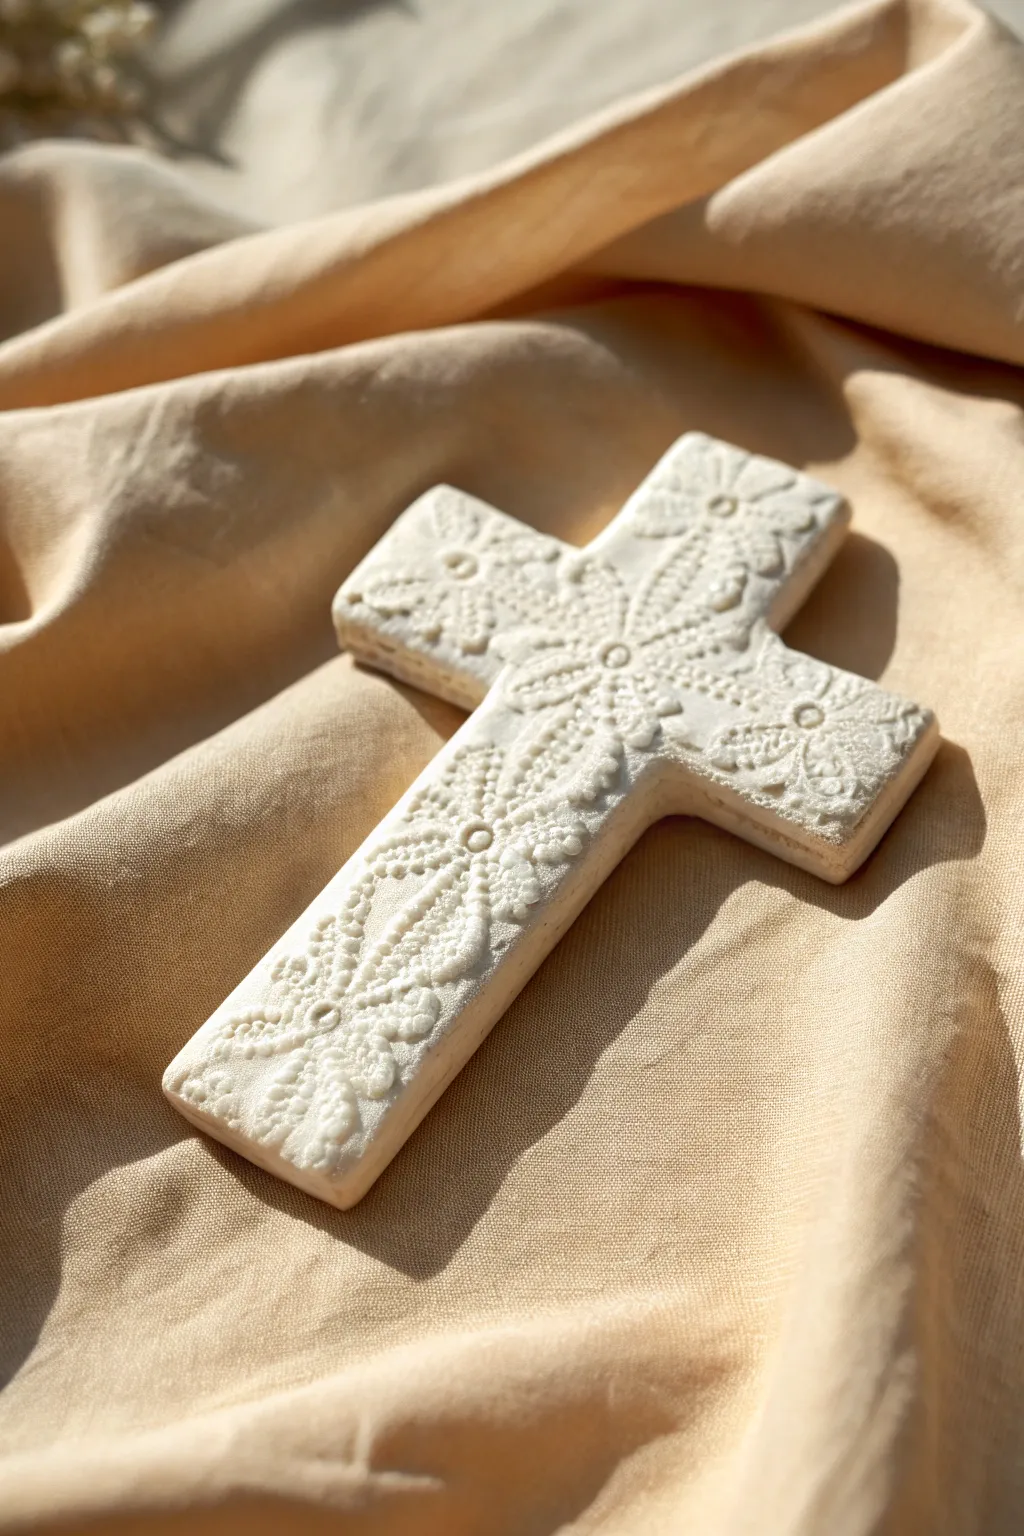
Capture the timeless elegance of vintage lace with this beautiful clay project. By pressing intricate fabrics directly into the surface, you create a sophisticated texture that looks far more complex than it actually is to achieve.
Step-by-Step Tutorial
Materials
- White polymer clay or air-dry clay (smooth finish)
- Small rolling pin or acrylic roller
- Paper cross template (printed on cardstock)
- A piece of textured lace or a crochet doily
- sharp craft knife or X-Acto blade
- Fine-grit sandpaper (optional)
- Parchment paper or non-stick work mat
- Two paint stirrers or craft sticks (for depth guides)
- Cornstarch or baby powder
Step 1: Preparation and Rolling
-
Prepare your workspace:
Lay down parchment paper or a non-stick silicone mat to protect your work surface and prevent sticking. -
Condition the clay:
Take a generous ball of white clay and knead it thoroughly in your hands until it becomes soft, pliable, and free of cracks. -
Set up depth guides:
Place your two paint stirrers or craft sticks on either side of your clay ball to act as rails for your rolling pin, ensuring an even thickness. -
Initial flattening:
Press the clay ball flat with your palm, creating a rough pancake shape between your guides. -
Roll out the slab:
Use the rolling pin to flatten the clay into a smooth, even slab. I like to flip the clay once or twice during this process to ensure the bottom remains smooth.
Clean CuT Tip
Chill your clay slab in the fridge for 10 minutes after texturing but before cutting. Firmer clay resists dragging under the knife for sharper corners.
Step 2: Creating the Texture
-
Prepare the lace:
Lightly dust your chosen piece of lace or crochet doily with a tiny bit of cornstarch or baby powder to prevent it from bonding to the clay. -
Position the pattern:
Lay the lace directly onto your smooth clay slab. Consider how the pattern radiates; centering a flower or starburst motif can create a lovely focal point. -
Impress the design:
Gently roll over the lace with your rolling pin. Apply firm, even pressure just once—avoid rolling back and forth, which can blur the crisp details. -
Reveal the texture:
Carefully peel back the lace from one corner to reveal the imprinted design.
Step 3: Cutting and Finishing
-
Place the template:
Lay your paper cross template gently on top of the textured clay. Move it around until the pattern aligns perfectly with the arms of the cross. -
Cut the shape:
Holding the craft knife vertically, carefully trace around the template. Use smooth, connecting strokes rather than sawing motions to keep the edges clean. -
Remove excess clay:
Lift away the excess clay scrap from around the cross shape, leaving your cutout piece on the parchment paper. -
Smooth the edges:
Dip your finger in a little water (for air-dry clay) or baby oil (for polymer) and run it gently along the cut edges to soften any harsh angles. -
Dry or Bake:
Follow the manufacturer’s instructions for your specific clay. If baking polymer clay, ensure it rests on a perfectly flat baking sheet to avoid warping. -
Final sanding:
Once fully cured or dried, check the edges for any roughness. A quick pass with fine-grit sandpaper will give it that professional, polished look. -
Optional sealing:
For longevity, you can brush on a matte varnish, though leaving the raw clay finish maintains that soft, organic appearance shown in the photo.
Antique Finish
After baking, rub a light wash of brown acrylic paint into the grooves and wipe the surface clean. This highlights the lace details beautifully.
Now you have a serene, hand-crafted piece ready to display or gift as a thoughtful keepsake
Bead-Pressed Salt Dough Cross Keepsakes
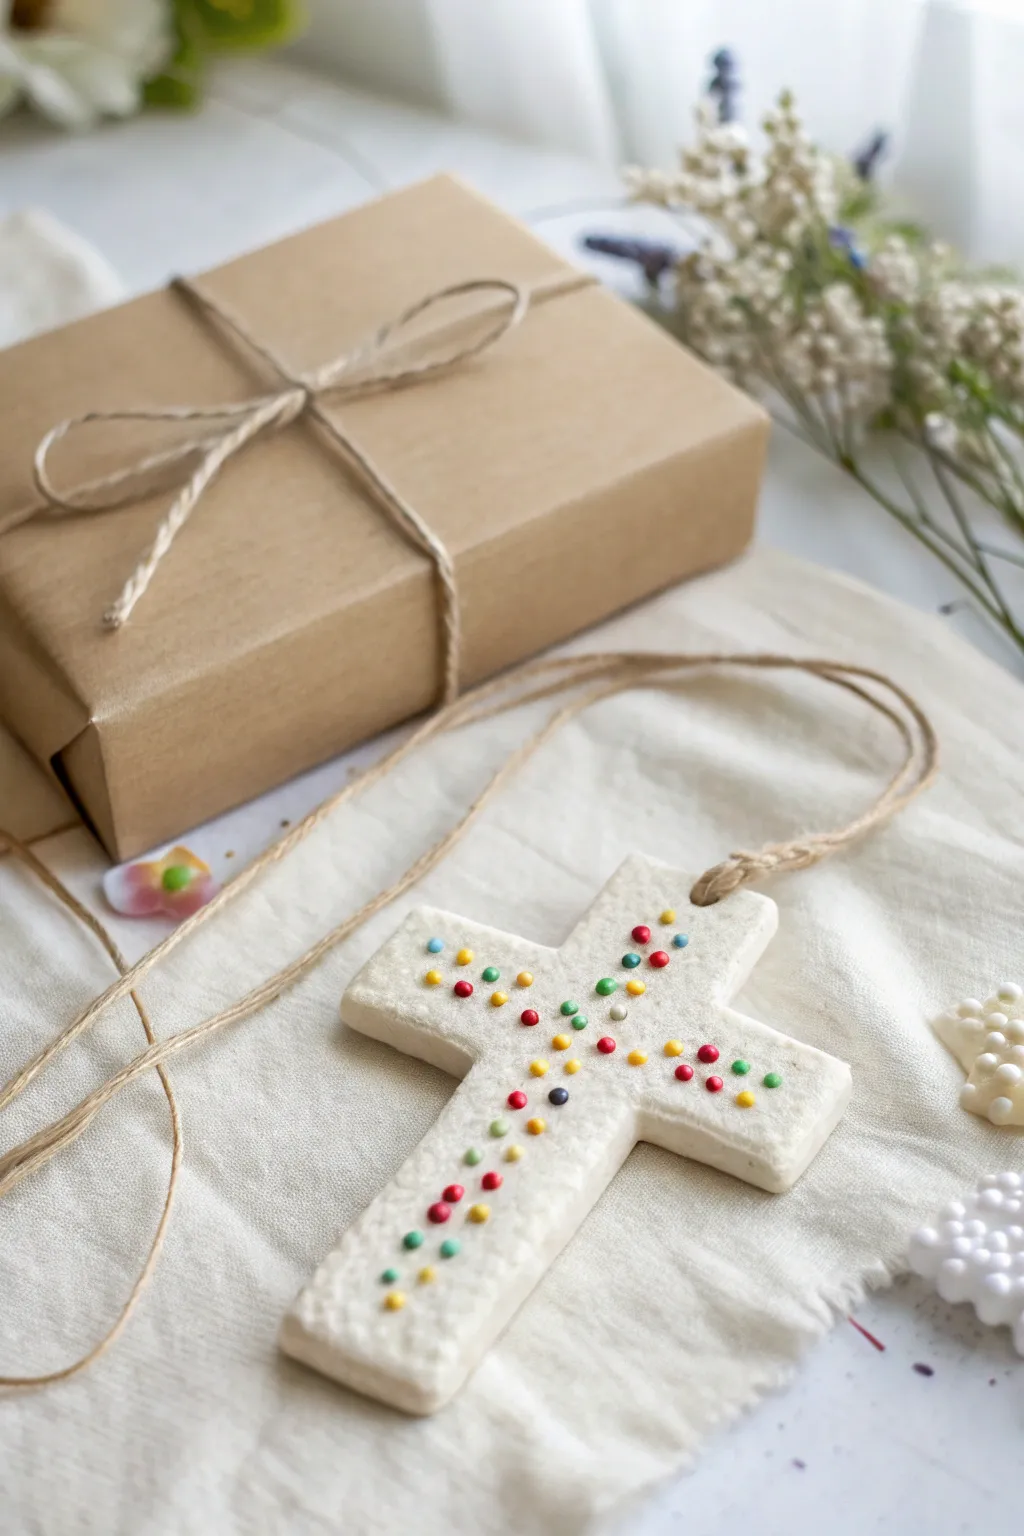
Create a charming, textured keepsake with this simple bead-pressed cross project. Using classic salt dough basics and vibrant seed beads, this craft results in a lovely, rustic ornament perfect for gifting or hanging as a quiet reminder of faith.
How-To Guide
Materials
- All-purpose flour (2 cups)
- Salt (1 cup)
- Water (approx. 1 cup)
- Small colorful seed beads (red, yellow, blue, green)
- Rolling pin
- Parchment paper
- Cross cookie cutter (or knife/template)
- Jute twine or hemp cord
- Straw or skewer (for hole punching)
- Baking sheet
- Clear acrylic sealant (optional)
Step 1: Preparing the Dough
-
Mix dry ingredients:
In a large mixing bowl, combine two cups of all-purpose flour and one cup of salt. stir them together until they are evenly distributed. -
Add water gradually:
Slowly pour in the water a little at a time while mixing. You want a firm, pliable dough that isn’t sticky. If it feels too wet, just sprinkle in a bit more flour. -
Knead the dough:
Transfer the mixture to a clean surface and knead it for about 5 to 10 minutes until it feels smooth and elastic. I find this step oddly therapeutic and essential for a crack-free finish. -
Roll it out:
Place the dough on a sheet of parchment paper. Roll it out to an even thickness, aiming for roughly 1/4 inch thick so it’s sturdy but not too heavy.
Pro Tip: Bead Security
If you’re worried about beads falling out later, dip each bead in a tiny dot of white craft glue before pressing it into the soft dough.
Step 2: Shaping and Decorating
-
Cut the cross shape:
Press your cross-shaped cookie cutter firmly into the dough. If you don’t have a cutter, you can print a paper template, lay it on the dough, and trace around it with a sharp paring knife. -
Clean the edges:
Gently lift away the excess dough scrap. smooth down any rough or jagged edges on the cross with your fingertip and a tiny drop of water. -
Create the texture:
Using a textured object like a piece of burlap, a new kitchen sponge, or even a paper towel, gently press down onto the surface of the damp dough to give it a subtle, pebbled texture. -
Plan bead placement:
Decide on your pattern. The example shows a scattered, confetti-like arrangement, but you can also do lines or specific shapes. -
Insert the beads:
One by one, press the small seed beads into the dough. Push them deep enough so the dough slightly ‘hugs’ the bead; this ensures they won’t pop out after baking. -
Make the hanging hole:
Using a drinking straw or a thick skewer, punch a clean hole near the top center of the vertical arm of the cross.
Troubleshooting: Puffing Up
If your dough puffs up while baking, your oven might be too hot. Stick to low heat (200°F) and bake longer rather than turning up the temperature.
Step 3: Baking and Finishing
-
Bake slowly:
Transfer the parchment paper with the cross onto a baking sheet. Bake in a preheated oven at a low temperature, around 200°F (95°C), for 2-3 hours. -
Flip halfway:
Carefully flip the cross over halfway through the baking time to ensure the bottom dries out completely and stays flat. -
Cool down:
Once hard and dry, remove the cross from the oven and let it cool completely on a wire rack. -
Seal (Optional):
To protect against moisture, you can brush on a coat of matte or satin clear acrylic sealer or Mod Podge. -
Prepare the hanger:
Cut a length of jute twine, about 12-16 inches long depending on where you want to hang it. -
Loop the twine:
Fold the twine in half. Push the folded loop end through the hole from front to back. -
Secure the knot:
Pull the loose ends of the twine through the loop you just pushed through the hole and pull tight to create a lark’s head knot.
Hang your finished cross in a sunny window or wrap it up beautifully as a handmade gift for someone special


What Really Happens Inside the Kiln
Learn how time and temperature work together inside the kiln to transform clay into durable ceramic.
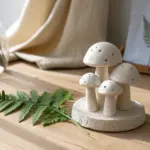
Tiny Flowers on a Cross Surface
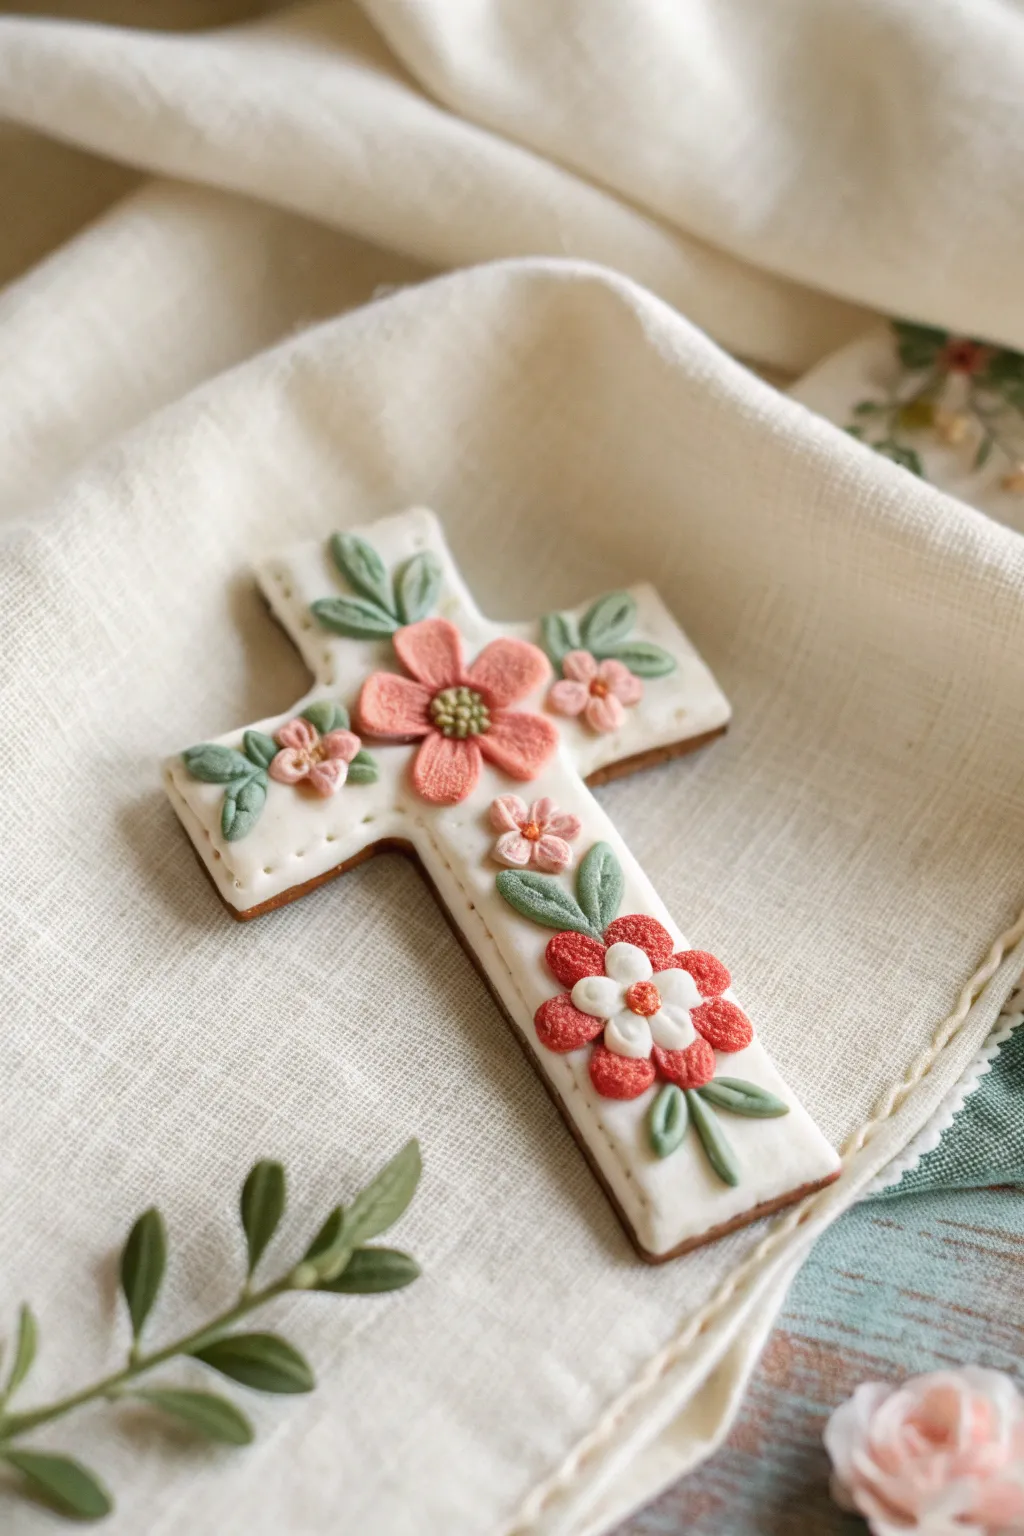
Capture the charm of springtime with this dainty clay project that features intricate miniature blooms on a classic cross shape. The finished piece has a soft, matte texture reminiscent of sugar art, making it a perfect keepsake or thoughtful handmade gift.
Detailed Instructions
Materials
- White polymer clay (for the base)
- Polymer clay in accent colors: peach/coral, deep red, soft pink, sage green, moss green, yellow/orange
- Cross-shaped cookie cutter (approx. 3-4 inches)
- Acrylic rolling pin
- Parchment paper or ceramic tile (for baking)
- Needle tool or toothpick
- Small ball tool
- Liquid polymer clay (optional, for adhesion)
- Smooth work surface
- Oven for baking
Step 1: Creating the Base
-
Condition the clay:
Start by thoroughly conditioning your white polymer clay until it is soft and pliable. This prevents cracks and ensures a smooth surface for your miniature flowers. -
Roll out the slab:
Use your acrylic rolling pin to roll the white clay into a slab approximately 1/4 inch thick. You want it substantial enough to hold the weight of the embellishments without warping. -
Cut the shape:
Press the cross-shaped cutter firmly into the clay. If the edges are ragged, gently smooth them with your finger or a soft brush dipped in a tiny bit of baby oil. -
Add stitch details:
Using a needle tool, gently press small holes around the perimeter of the cross to mimic a stitched edge. Space them evenly, about 2-3mm apart, being careful not to push all the way through the clay.
Clean Clay Tip
White clay picks up dust easily. Wipe your hands and tools with a wet wipe or alcohol swab before handling the white base, and handle the colored flowers carefully to avoid staining.
Step 2: Sculpting the Blooms
-
Form the large main flower:
For the focal peach flower near the intersection, roll five tiny balls of coral-colored clay. Press them onto the surface to flatten into petals, arranging them in a circle. -
Texture the petals:
Use your needle tool to draw a central line down each peach petal, creating a veined look. I find pressing gently near the center helps lift the petal edges slightly for a 3D effect. -
Add the center:
Place a small ball of green clay in the center of the peach flower. Poke it repeatedly with the tip of your needle tool to create a pollen-like texture. -
Create the smaller pink flowers:
Repeat the petal process with soft pink clay to make smaller blooms on the left and right arms of the cross. These only need three or four tiny petals each. -
Sculpt the bottom distinctive flower:
For the red and white flower at the bottom, form a base of red petals first. Then, layer a smaller five-petal white flower directly on top. -
Finish the layered flower:
Add a tiny orange dot to the center of the white layer. This creates a lovely contrast against the deep red background petals. -
Make the tiny filler buds:
Roll incredibly small spheres of pink and coral clay. Group them in threes or place them singly near the main flowers to act as buds or filler blooms.
Add a Hanging Loop
Before baking, insert a small metal eye pin into the top edge of the cross. Secure it with a dab of liquid clay. This transforms your creation into a beautiful ornament or pendant.
Step 3: Adding Greenery and Baking
-
Roll teardrop shapes:
Mix your sage and moss green clays to get a natural variation. Roll tiny teardrop shapes between your fingers to form the leaves. -
Attach the leaves:
Press the rounded end of the teardrops near the flowers and let the pointed ends extend outward. Add slight curves to the leaves so they don’t look stiff. -
Detail the leaves:
Use a knife tool or needle to score a vein down the center of each leaf. This simple step adds immense realism to the piece. -
Check adhesion:
If your clay feels dry and the pieces aren’t sticking well, brush a tiny amount of liquid polymer clay on the back of the flowers and leaves before placing them. -
Final inspection:
Look over the piece for any lint or fingerprints. Smooth out imperfections gently with a brush. -
Bake:
Place your cross on a ceramic tile or parchment-lined tray. Bake according to your brand of clay’s instructions (usually 275°F/135°C for 15-30 minutes per 1/4 inch of thickness). -
Cool down:
Allow the cross to cool completely in the oven with the door slightly ajar. This gradual cooling helps prevent thermal shock cracks.
Once cooled, your floral cross is ready to be displayed on a shelf or hung on a wall as a delicate piece of art
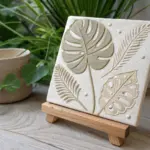
Vine-and-Leaf Relief Cross
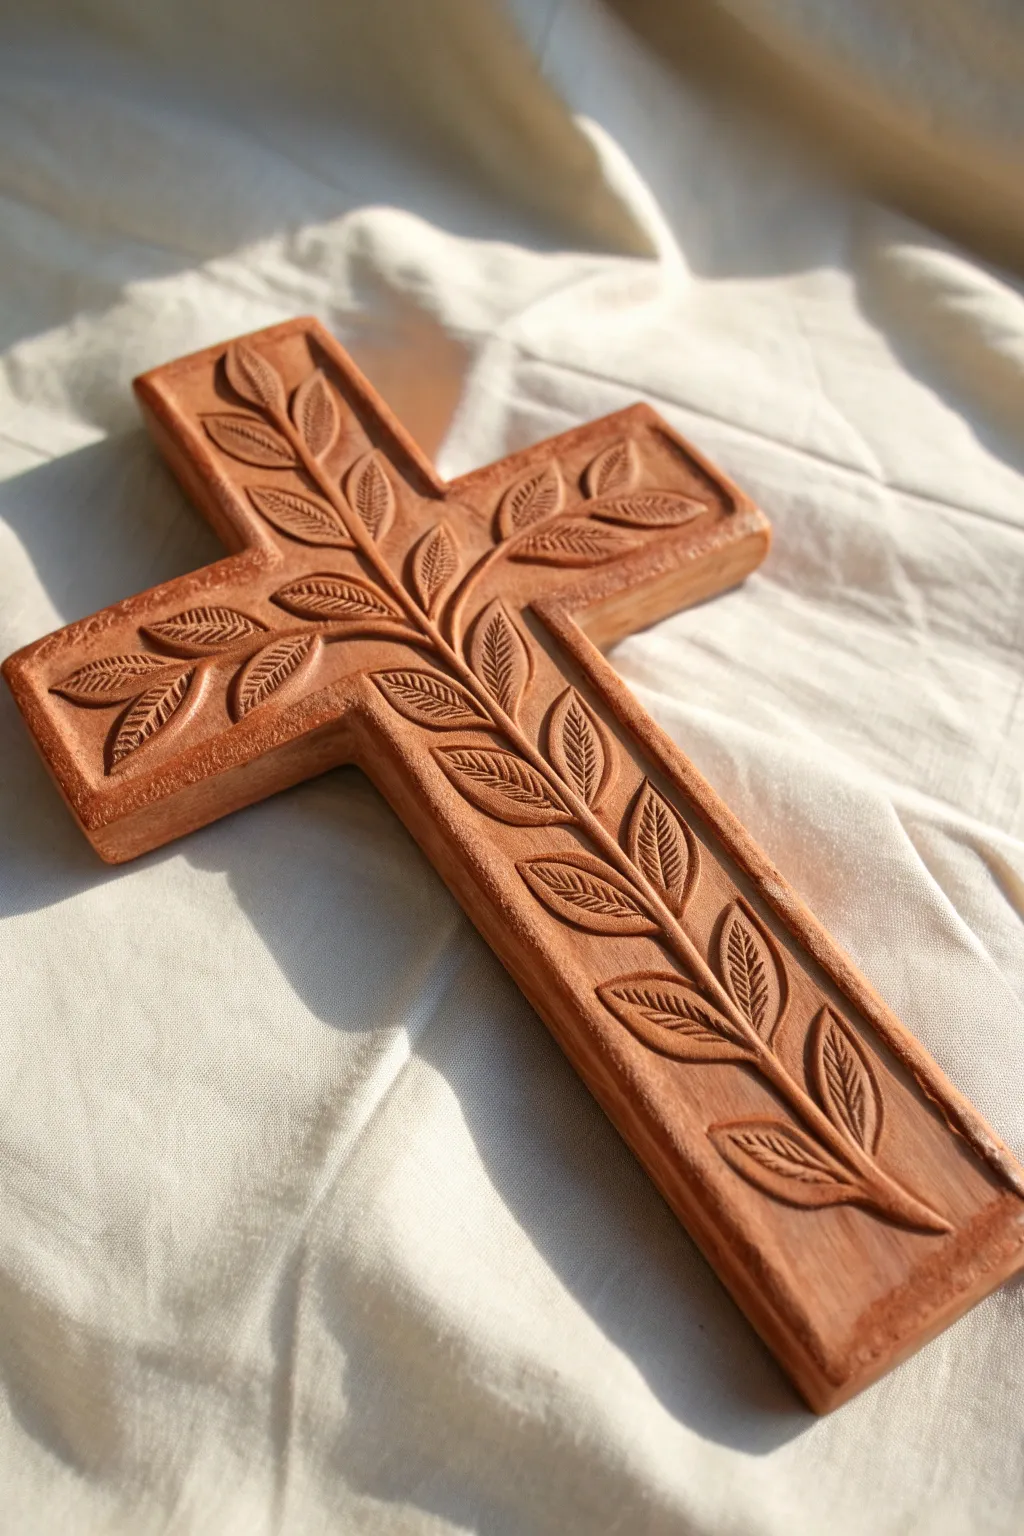
This project captures the timeless beauty of nature with a sophisticated vine-and-leaf design etched in varying depths of relief. Using terracotta-colored clay, you will sculpt a piece that feels both rustic and refined, perfect for wall mounting or display.
How-To Guide
Materials
- Terracotta-colored polymer clay or air-dry clay (approx. 1 lb)
- Rolling pin
- Ruler
- Craft knife or scalpel
- Fine-point sculpting needle tool
- Small loop tool or ribbon tool
- Rubber-tipped shaping tools
- Smoothing sponge
- Cardstock (for template)
- Fine-grit sandpaper (optional)
- Matte spray varnish
Step 1: Shaping the Base
-
Prepare the template:
Cut a simple cross shape from cardstock. A good size is roughly 8 inches tall by 5 inches wide, with arms adhering to a width of roughly 1.5 inches. -
Condition the clay:
Warm the clay in your hands and knead it until it is pliable and free of cracks. If using air-dry clay, keep a small bowl of water nearby to keep it moist. -
Roll out the slab:
Roll the clay into an even slab, approximately 3/4-inch thick. You want a substantial thickness to allow for the relief carving without weakening the structure. -
Cut the cross form:
Place your cardstock template onto the clay slab. Using a sharp craft knife held vertically, cut cleanly around the perimeter. Remove the excess clay. -
Smooth the edges:
Dip your finger or a smoothing sponge in a tiny bit of water and run it along the cut edges to soften the sharp corners, slightly rounding them off.
Clean Lines Pro-Tip
Wipe your loop tool with a damp cloth after every few scoops. Clay buildup on the tool dulls the blade and causes dragging, ruining the smooth background effect.
Step 2: Carving the Relief Design
-
Sketch the vine:
Using the needle tool, very lightly sketch a central S-curve line starting from the bottom of the cross and reaching up toward the intersection. Extend curved lines into the horizontal arms. -
Outline the leaves:
Along your sketched stem, lightly outline almond-shaped leaves in alternating pairs. Ensure the leaves near the top and ends of the arms are slightly smaller for perspective. -
Excavate the background:
Use a small loop tool to carefully remove a thin layer of clay *outside* your sketched leaves and vine. You are lowering the background to make the design pop. -
Detail the main stem:
Roll a very thin snake of clay and press it onto the central vine line if you need more height, or simply refine the existing raised stem using a modeling tool to round it over. -
Refine leaf shapes:
With a rubber-tipped tool, gently press the edges of each leaf down towards the background, creating a pillowing effect in the center of the leaf. -
Carve leaf veins:
Take the needle tool or scalpel and incise a central vein down each leaf. Then, carve tiny, angled diagonal lines for the secondary veins. Deep, clean cuts look best here. -
Add texture to the stem:
Add tiny, subtle vertical striations along the main vine stem to mimic wood or bark texture.
Step 3: Finishing Touches
-
Final smoothing:
Check the background areas for tool marks. Gently smooth these down with a damp brush or fingertip, being careful not to smudge your detailed carving. -
Create a hanging hole:
If you plan to hang the cross, flip it over carefully and hollow out a small notch or keyhole near the top back. I find it safest to support the front on a soft foam pad during this step. -
Dry or bake:
Follow the instructions for your specific clay. If baking polymer, use an oven thermometer. If air-drying, let it sit for at least 48 hours away from direct heat. -
Sand and polish:
Once fully cured, use fine-grit sandpaper to buff away any burrs on the outer edges. Wipe clean with a tack cloth. -
Seal the surface:
Apply a light coat of matte spray varnish. This deepens the terracotta color and protects the fine vein details from dust accumulation.
Clay Cracking?
If small cracks appear while sculpting air-dry clay, dip a paintbrush in water and create a ‘slip’ directly over the crack, smoothing it in circular motions.
Once sealed and hung, the light will catch the intricate grooves of your leaves, bringing this peaceful symbol to life.

TRACK YOUR CERAMIC JOURNEY
Capture glaze tests, firing details, and creative progress—all in one simple printable. Make your projects easier to repeat and improve.
Stamped Pattern Cross Tiles
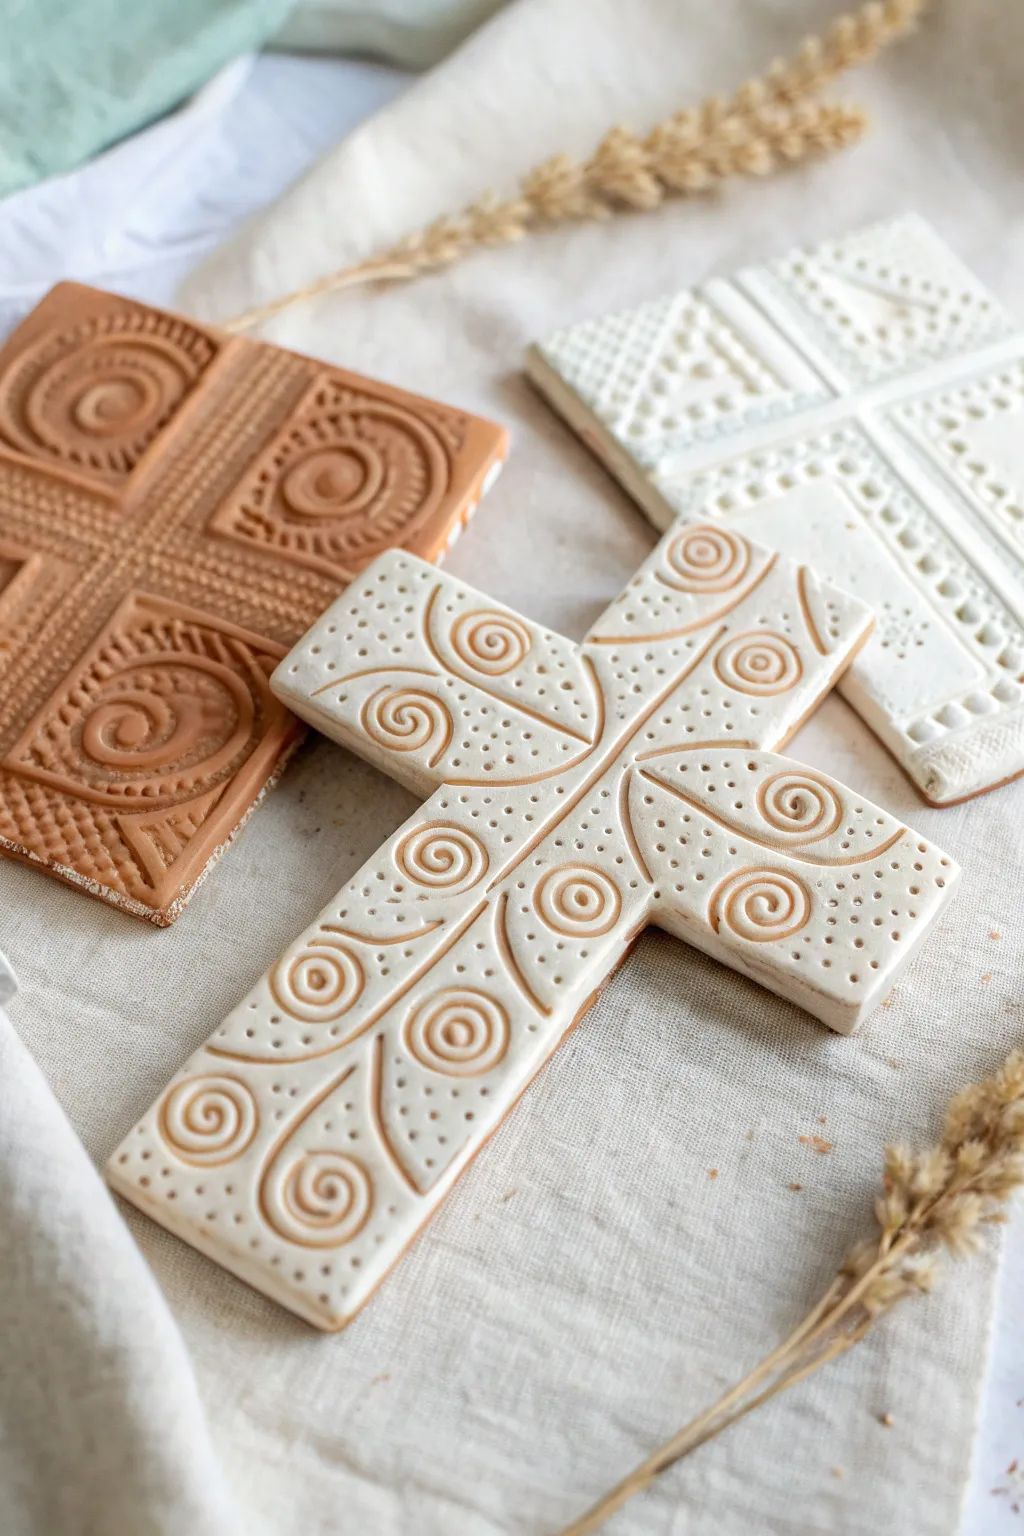
These beautifully textured crosses combine geometric precision with organic warmth, using simple stamping techniques to create intricate relief patterns. The dual-tone effect highlights every swirl and dot, giving these handmade pieces an old-world, ceramic tile aesthetic.
Step-by-Step Tutorial
Materials
- Air-dry clay (white and terracotta colored)
- Rolling pin
- Parchment paper or canvas mat
- Cross-shaped cookie cutter (large) or paper template with knife
- Square cookie cutter (optional for tile version)
- Various stamps (swirls, spirals, small circles)
- Needle tool or toothpick
- Small round piping tip (for perfect dot impressions)
- Acrylic paint (burnt sienna or terracotta color)
- Water and paper towels
- Fine grit sandpaper
- Matte spray sealant
Step 1: Shaping the Base
-
Prepare the workspace:
Lay down parchment paper or a canvas mat to prevent sticking. This surface allows you to turn the clay easily without distorting it. -
Roll the clay:
Take a generous ball of white air-dry clay and roll it out to a uniform thickness, approximately 1/4 inch thick. Aim for an even surface to ensure the final piece dries flat. -
Cut the shape:
For the standalone cross (center in image), use a large cross cutter or place a paper template on the clay and trace around it with a needle tool or fettling knife. Clean up any rough edges with a slightly damp finger. -
Cut the tiles (optional):
If making the square tile versions, simply cut a precise square. Lightly score a cross shape into the center as a guide for your stamping, without cutting all the way through.
Stamp Cleanliness
Work cleanly! If your stamps start sticking to the clay, dust them lightly with cornstarch before pressing them down. This releases the tool easily without pulling up the clay.
Step 2: Stamping and Texturing
-
Plan the design:
Before pressing into the final piece, gently lay your tools on the surface to visualize spacing. I find it helpful to test stamp patterns on a scrap piece of clay first. -
Create the heavy lines:
Using a blunt modeling tool or the handle of a paintbrush, press deep, curved lines radiating from the center of the cross outwards to define the main sections. -
Stamp the focal points:
Press a small spiral stamp firmly into the center of each section created by your lines. Ensure the impression is deep enough to hold a wash later. -
Add dot details:
Use the back of a drill bit, a stylus, or a small piping tip to press rows of dots into the negative spaces. Vary the pressure to create inconsistent, organic texture. -
Smooth the distortions:
Stamping often spreads the clay slightly. Gently push the outer edges of the cross back inwards to regain the sharp geometric outline.
Step 3: The Inlay Wash & Finish
-
Dry thoroughly:
Allow the clay to dry completely for at least 24-48 hours. It must be bone dry before you apply the wet wash. -
Sand the edges:
Once dry, gently use fine-grit sandpaper to smooth the outer edges and surface, removing any burrs created during stamping. -
Apply the wash:
Dilute burnt sienna or terracotta acrylic paint with water until it’s very runny. Brush this mixture generously over the entire textured surface, ensuring it sinks into every crevices. -
Wipe back:
Immediately wipe the surface with a damp paper towel. The goal is to remove paint from the high points (keeping them white) while leaving the pigment trapped in the stamped depressions. -
Repeat if needed:
If the pattern isn’t dark enough, let the first layer dry and repeat the wash process until you have the desired contrast. -
Seal the piece:
Finish with a light coat of matte spray sealant to protect the clay and the paintwork from moisture and fading.
Natural Texture
Don’t have professional pottery stamps? Use found objects like button patterns, lace, screw heads, or even pen caps to create unique, intricate impressions in the clay.
Now you have a timeless piece of decor that looks like it was kiln-fired in a professional studio
Pebbled Stone-Look Cross Texture
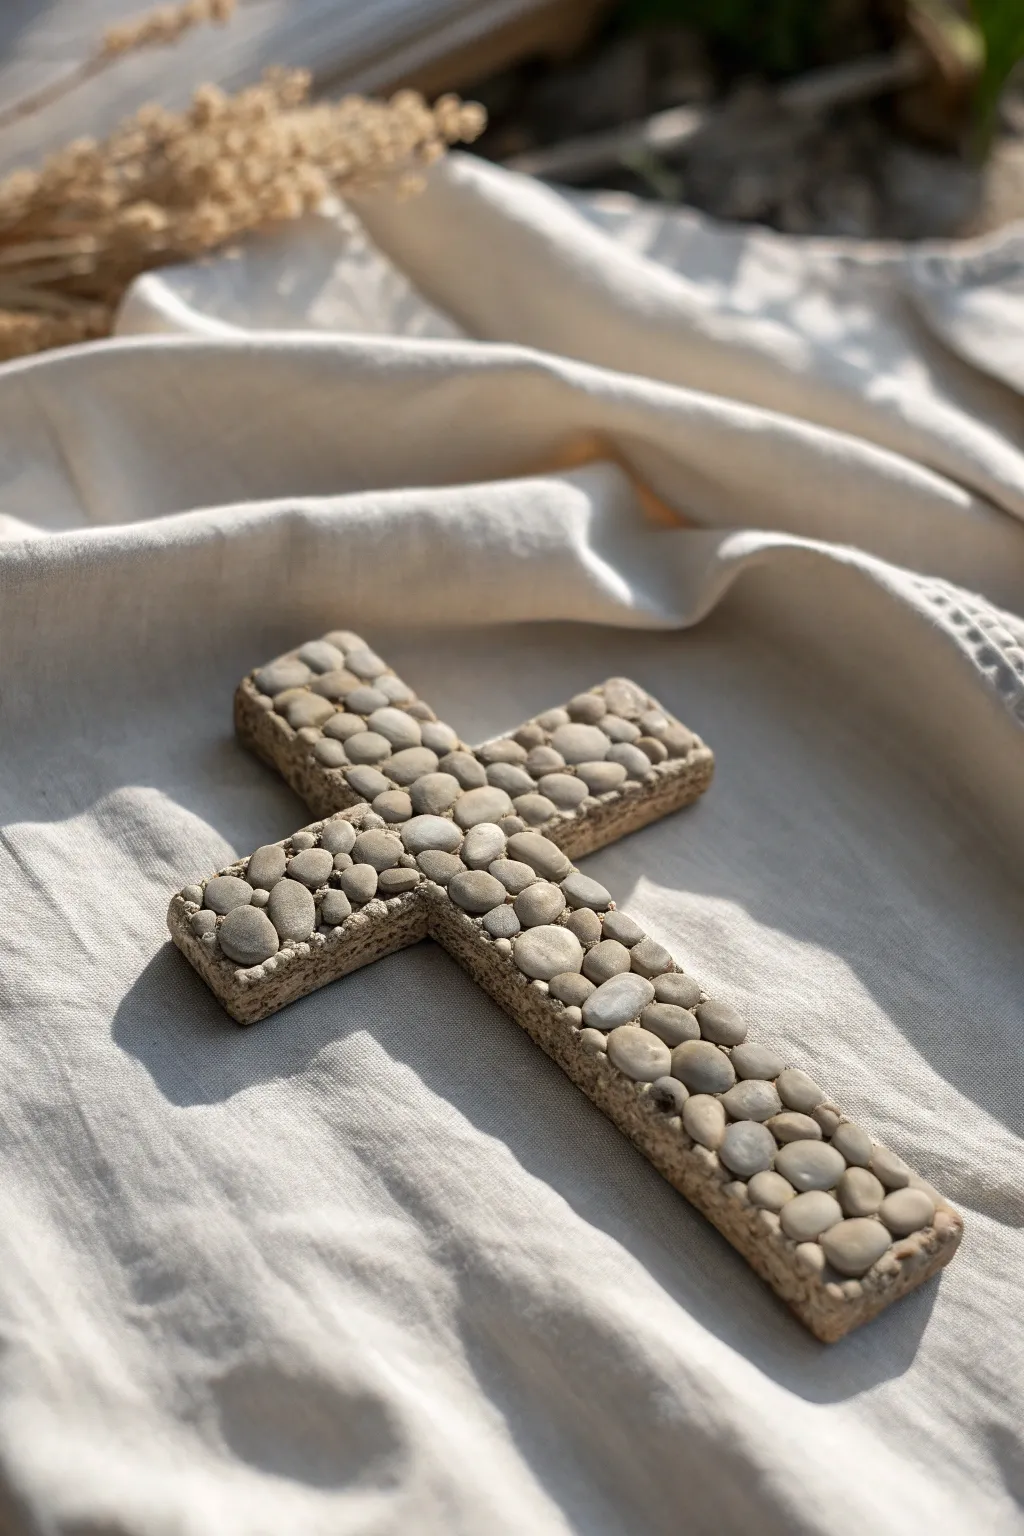
Bring a touch of nature indoors with this contemplative and textural piece. By embedding smooth, small river pebbles into a clay base, you can achieve a serene, grounded aesthetic perfect for rustic or coastal decor.
Step-by-Step
Materials
- Air-dry clay (stone gray or natural earth tone)
- Small river pebbles or smooth gravel (varied shades of gray/beige)
- Rolling pin
- Parchment paper or craft mat
- Sharp craft knife or clay cutter
- Ruler
- Cardboard or paper for template
- Small bowl for water
- Fine-grit sandpaper (optional)
- Matte varnish or sealant (optional)
Step 1: Preparation and Shaping
-
Create a template:
Before handling the clay, sketch or print a simple cross shape onto a piece of cardboard or stiff paper. Cut it out to use as your guide. A standard size of about 6-8 inches tall works well for this level of detail. -
Condition the clay:
Take a generous handful of air-dry clay and knead it in your hands until it becomes pliable and warm. If the clay feels too dry or crumbly, dip your fingers in water and work it in. -
Roll out the slab:
Place the clay onto a sheet of parchment paper to prevent sticking. Use a rolling pin to flatten the clay into an even slab, aiming for a thickness of about 1/2 inch to 3/4 inch. It needs to be thick enough to support the stones. -
Cut the shape:
Lay your cardboard template gently on top of the rolled clay. Using a sharp craft knife or clay tool, trace around the template, cutting straight down to create clean, vertical edges. -
Refine the edges:
Remove the excess clay. Dip your finger in a little water and run it along the cut edges of the cross to smooth out any roughness or sharpness left by the knife. -
Texture the sides:
To mimic the rough look seen in the photo, take a rough stone or a crumpled ball of aluminum foil and gently press it against the vertical sides of the cross. This gives the base a more organic, stone-hewn appearance.
Stone Sorting Secret
Use a colander to separate tiny grit from usable pebbles. It saves time hunting for the right size stone while the clay is wet.
Step 2: Embedding the Stones
-
Sort your stones:
Pour out your pebbles and quickly sort them by size. You will need a mix of slightly larger ones for the center areas and tiny ones to fill gaps. -
Plan the center:
Start at the intersection of the cross. Select a medium-sized pebble and press it gently into the center point. Don’t push it all the way through, just enough so the clay grips it securely. -
Moisten the surface:
If the clay surface has started to dry out while you were sorting, lightly brush a tiny amount of water or clay slip (water mixed with clay) onto the area you are working on to act as an adhesive. -
Build the lines:
Work outwards from the center along each arm of the cross. Place stones side-by-side, trying to keep them somewhat level with each other. I like to fit them together like a puzzle to minimize the gaps. -
Mind the edges:
As you reach the edges of the cross arms, choose stones that naturally curve or taper if possible. Ensure no stones overhang the clay edge significantly, as this might make them prone to falling off later. -
Fill the gaps:
Look for the tiny triangular gaps between the larger round stones. Use your smallest gravel pieces to fill these voids. This creates the dense, paved look shown in the inspiration image. -
Check adhesion:
Once all stones are placed, gently press down on the entire surface with a flat hand or a small board to ensure every stone is bedded firmly into the clay. The clay should hug the bottom third of each stone.
Loose Stones?
If a pebble pops out after drying, don’t panic. A small dab of clear super glue or E6000 will reattach it permanently to the hardened clay divot.
Step 3: Finishing Touches
-
Initial drying:
Let the cross sit undisturbed on the parchment paper for at least 24 hours. Keep it away from direct heat sources to prevent the clay from cracking as it shrinks. -
Flip and dry:
After the top feels dry to the touch, very carefully flip the cross over to let the bottom breathe. Let it dry for another 24-48 hours depending on humidity. -
Clean the stones:
Once fully cured, inspect the stones. If there is any clay haze on the pebbles, use a damp cloth or a soft toothbrush to gently scrub the stone tops clean. -
Seal (Optional):
For a finished look, apply a matte varnish over the entire piece. This will deepen the color of the stones slightly and ensure the clay remains durable.
Place your finished mosaic cross on a mantel or shelf where the natural light can highlight the beautiful texture of the stones
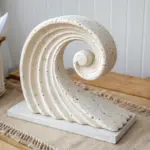
Layered Cross-on-Cross Dimension
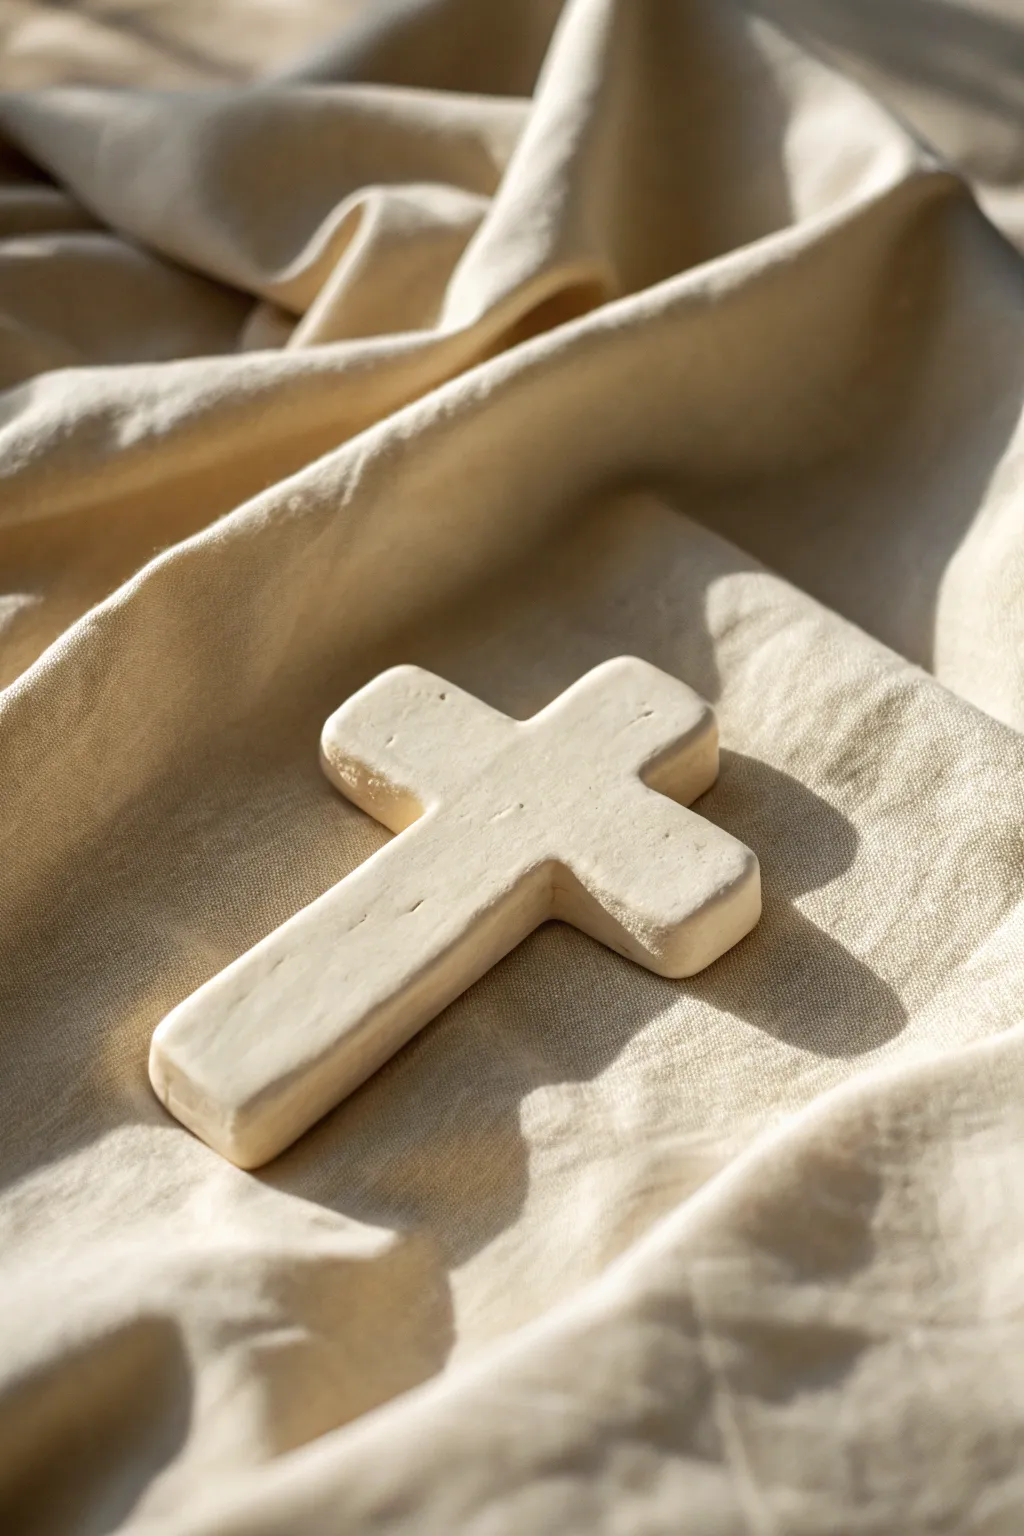
This project centers on creating a minimalist, smooth cross with a soft, biscuit-like finish that feels comforting to the touch. The design relies on clean edges and a thick, substantial build to create beautiful shadows against any surface.
How-To Guide
Materials
- White or sandstone polymer clay (or air-dry clay)
- Acrylic rolling pin
- Parchment paper or baking mat
- Sharp clay blade or tissue blade
- Cross template (printed paper)
- Fine grit sandpaper (400 and 800 grit)
- Water bowl (for smoothing)
- Small flat brush
Step 1: Preparing the Base
-
Condition the Clay:
Begin by warming your clay block in your hands. Knead and fold it repeatedly until it is completely pliable and free of any air pockets or cracks. -
Create a Thick Slab:
Place your clay on the parchment paper. Use your rolling pin to roll it out to a uniform thickness of about 1/2 inch to 3/4 inch. We want this cross to have significant weight and dimension. -
Check for Bubbles:
Inspect the surface closely. If you see any tiny air bubbles trapped under the surface, gently pierce them with a needle tool and smooth the area down with your finger. -
Template Placement:
Cut out your paper cross template and lay it gently on top of the rolled clay slab. Press it down very lightly just so it doesn’t shift while you cut.
Cracks Appearing?
If using air-dry clay, minor surface cracks can appear while drying. Mix a tiny bit of fresh clay with water to make a paste and fill them in.
Step 2: Shaping the Form
-
The Vertical Cuts:
Using your sharp clay blade, make straight, downward cuts along the long vertical sides of the template. Try to make these cuts in a single motion to avoid jagged hesitations. -
Cutting the Arm:
Carefully cut the horizontal arms of the cross. Be mindful of the corners where the arms meet the vertical post; precise 90-degree angles are key here. -
Isolating the Shape:
Remove the excess clay from around the cross shape. Peel away the paper template. -
Softening the Edges:
Dip your finger into a little bit of water (or clay softener). Gently run your fingertip along every sharp top edge to slightly round it over. This creates that soft, worn-stone look rather than a sharp manufactured plastic edge. -
Smoothing the Sides:
Inspect the vertical walls of the cross. If the blade dragged, use your damp finger or a smooth modeling tool to buff out those drag marks.
Stone Effect
Mix a pinch of black pepper or used coffee grounds into the white clay before rolling. This creates tiny speckles that mimic natural stone.
Step 3: Refining and Finish
-
Adding Organic Texture (Optional):
If you want the surface to look slightly more organic like the reference, lightly tap the surface with a smooth stone or the back of a spoon to create subtle unevenness. -
The Drying/Baking Phase:
Follow your specific clay’s instructions. For polymer clay, bake on a tile or cardstock at the recommended temperature. For air-dry clay, let it sit undisturbed for at least 24-48 hours. -
Initial Sanding:
Once fully cured and cooled, take your 400-grit sandpaper and gently sand any harsh corners or fingerprints. I find circular motions work best to avoid flat spots. -
Polishing:
Switch to highest grit sandpaper (800+) to buff the surface until it feels almost creamy to the touch. -
Dust Removal:
Wipe the entire piece down with a barely damp cloth to remove the fine sanding dust. -
Sealing (Optional):
For a truly matte, stone-like finish, you can leave polymer clay unvarnished. If using air-dry clay, apply a coat of ultra-matte varnish to protect it from moisture.
Now you have a serene, tangible symbol of faith that looks beautiful displayed on a shelf or bedside table
Heart-Centered Cross Medallion
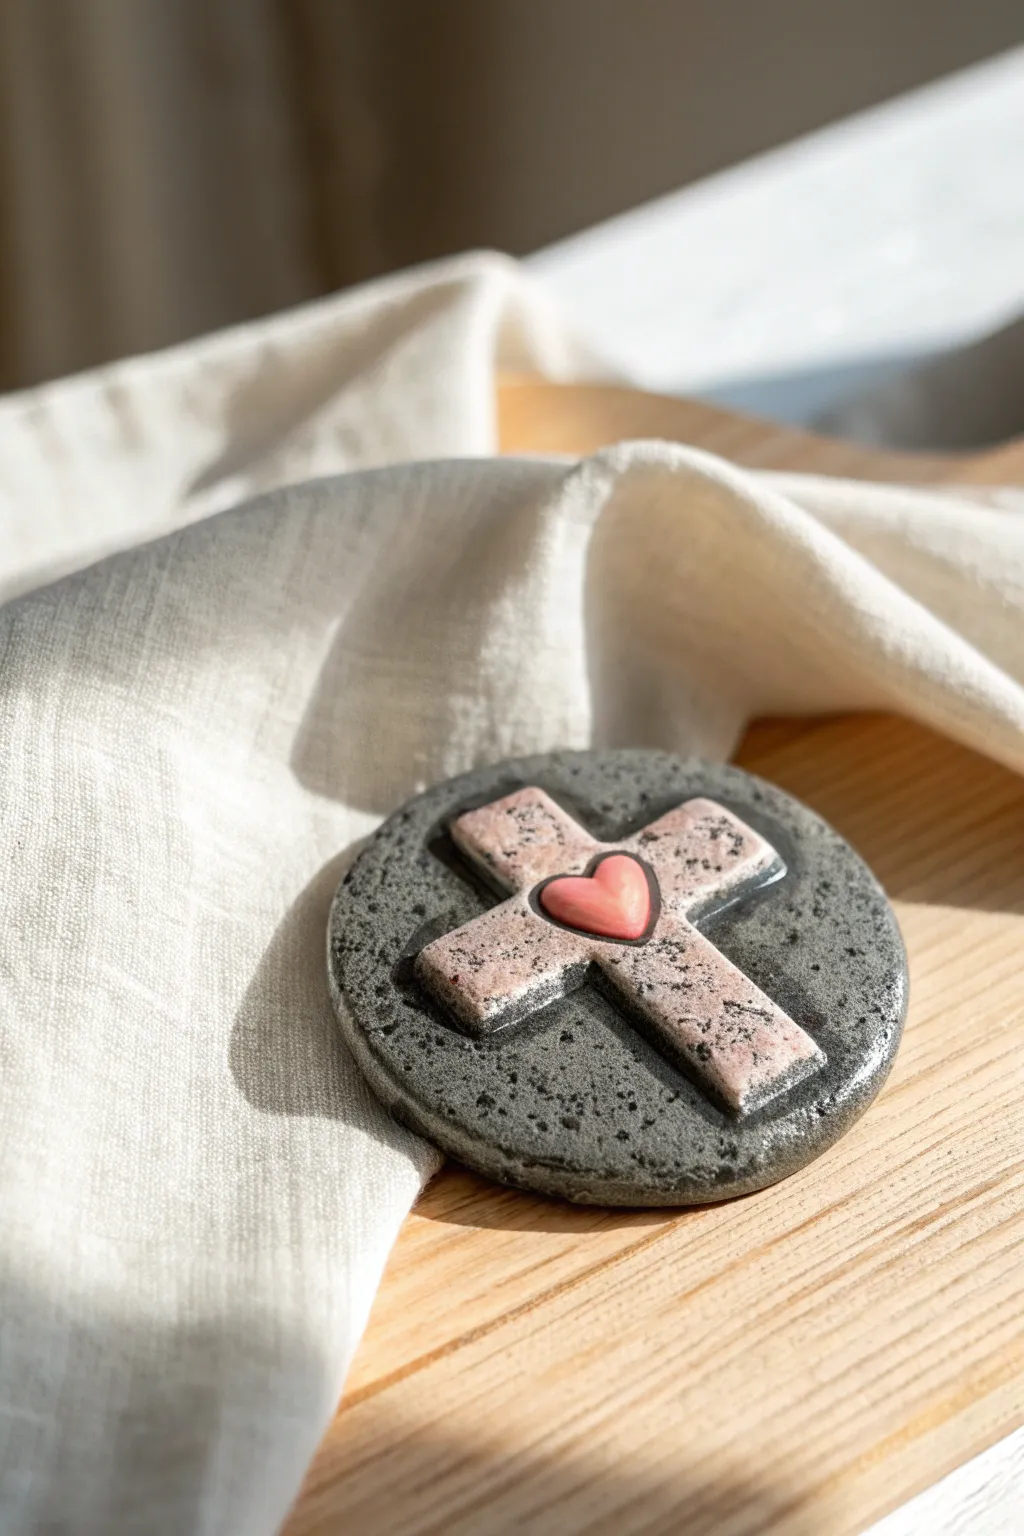
This rustic piece combines the grounded look of speckled stone with the softness of a pink cross and heart. It serves as a beautiful tactile reminder of faith and makes for a comforting pocket stone or a thoughtful handmade gift.
Step-by-Step
Materials
- Polymer clay (granite or speckled grey effect)
- Polymer clay (soft rose pink or dusty pink)
- Polymer clay (bright coral pink for the heart)
- Round cookie cutter (approx. 2-3 inches)
- Small cross cutter (or craft knife)
- Acrylic roller or rolling pin
- Liquid polymer clay (optional, for adhesion)
- Needle tool
- Gloss glaze (optional, for finish)
- Sandpaper (fine grit)
Step 1: Creating the Stone Base
-
Prepare the base clay:
Begin by conditioning your block of granite-effect polymer clay until it is soft and malleable. This specific type of clay often mimics river rock perfectly. -
Roll out the slab:
Use your acrylic roller to flatten the clay into a slab that is roughly 1/4 inch thick. You want a substantial, weighty feel to the final medallion. -
Cut the circle:
Press your round cookie cutter firmly into the slab to create a clean circle. If the clay sticks to the cutter, wiggle it slightly before lifting. -
Soften the edges:
Using your fingertips, gently tap and smooth the sharp cut edges of the circle to give it a naturally worn, stone-like appearance.
Stone Effects
Don’t have granite clay? Mix translucent clay with black pepper and fine glitter to create your own faux-stone look.
Step 2: Forming the Cross
-
Roll the cross color:
Condition and roll out a slab of the soft rose pink clay. Aim for a thickness slightly thinner than your base, perhaps 1/8 inch. -
Cut the cross shape:
Use a cross-shaped cutter on the pink clay. If you don’t have a specific cutter, I find sketching the shape lightly with a needle tool first helps before cutting it out with a craft knife. -
Texture the cross:
Before attaching it, gently press a piece of coarse sandpaper or a stiff brush against the pink clay surface to give it a weathered, pitted texture that matches the rustic vibe. -
Attach to base:
Apply a very thin smear of liquid polymer clay to the back of the cross and press it firmly into the center of your grey medallion.
Step 3: Adding the Heart
-
Create the heart indentation:
Use a small ball tool or the rounded end of a paintbrush to gently press a depression into the center intersection of the cross where the heart will sit. -
Shape the heart:
Take a tiny amount of the coral pink clay and roll it into a ball, then pinch one side to form a teardrop shape. -
Refine the heart:
Flatten the teardrop slightly and use a needle tool to create the top cleft of the heart, refining the shape until it fits the scale of the cross. -
Place the heart:
Set the heart into the center indentation you made earlier. Press it down gently so it bonds with the cross layer beneath.
Clean Lines
If the clay distorts when lifting it from the work surface, try rolling it out on a piece of parchment paper so you never have to lift it.
Step 4: Finishing Touches
-
Enhance texturing:
Inspect the piece. If the handling smoothed out your stone texture too much, stipple the grey areas again with a toothbrush or stiff bristle brush. -
Bake:
Bake the piece according to your specific clay brand’s manufacturer instructions, usually around 275°F (135°C) for 30 minutes per 1/4 inch of thickness. -
Cool down:
Allow the medallion to cool completely in the oven before removing it. This helps prevent thermal shock cracks. -
Glaze (Optional):
For the look in the photo, the finish is mostly matte with a slight sheen. You can brush a thin layer of satin or gloss glaze over just the heart and cross to make them pop against the matte stone background.
This meaningful medallion is now ready to be held close or displayed as a symbol of love
Grapes and Wheat Symbol Cross
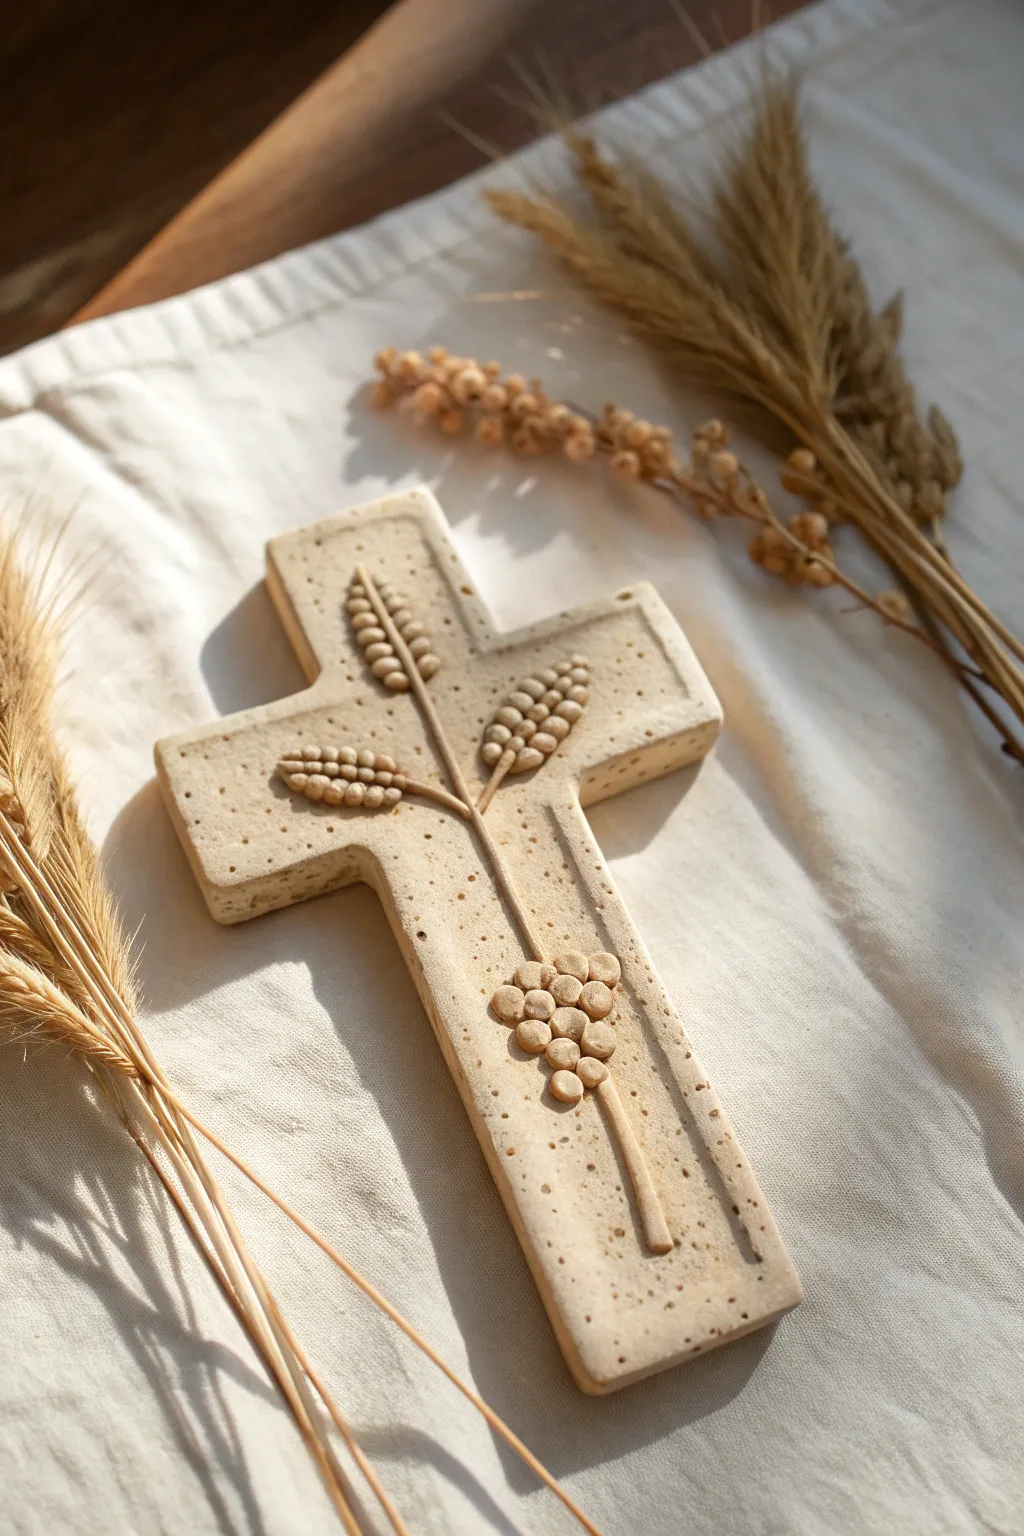
This serene clay project captures the essence of communion symbols with a beautifully textured finish resembling natural stone. The combination of raised wheat stalks and clustered grapes creates a tactile, spiritual piece perfect for display or gifting.
Detailed Instructions
Materials
- Air-dry clay (stone or natural color) or polymer clay
- Rolling pin
- Craft knife or clay cutting tool
- Paper template of a cross shape
- Needle tool or toothpick
- Small ball stylus tool
- Old toothbrush or stiff bristle brush
- Clay slip or water (for joining)
- Fine-grit sandpaper
- Clear matte sealant (optional)
Step 1: Base Construction
-
Prepare the clay:
Begin by conditioning your clay until it is soft and pliable. Roll it out into a slab that is approximately 1/4 to 1/2 inch thick, ensuring it is even throughout. -
Cut the shape:
Place your paper cross template onto the clay slab. Using a craft knife, carefully trace around the template to cut out the main cross shape. Remove the excess clay. -
Add texture:
To achieve that beautiful limestone look, gently tap the entire surface of the cross with an old toothbrush or a stiff bristle brush. This creates a natural, pitted stone texture. -
Smooth the edges:
Dip your finger in a little water and run it along the cut edges of the cross to soften any sharp corners, blending the texture slightly over the sides. -
Create the border:
Use a needle tool to lightly score a straight line running parallel to the edge on the left and right sides of the lower vertical bar, creating a recessed border effect.
Sticky Situation?
If your clay sticks to the table or rolling pin, lightly dust your work surface with cornstarch or use parchment paper. This helps release the slab easily.
Step 2: Sculpting the Wheat
-
Form the stems:
Roll out thin, delicate snakes of clay for the wheat stems. You will need one long central stem and two shorter ones branching out. -
Attach the stems:
Score the surface of the cross lightly where the stems will go. Apply a tiny amount of water or slip, then press the stems gently onto the cross, arranging them so they branch outward near the top. -
Make wheat grains:
Roll small, rice-sized grains of clay. You will need about 15-20 grains for this design. -
Assemble the wheat heads:
Starting at the tip of a stem, attach the grains in a ‘V’ pattern, working your way down. Press them flat gently so they adhere well. -
Detail the grains:
Use a needle tool or small knife to press a shallow indentation down the center of each wheat grain to mimic the natural crease of the seed.
Step 3: Adding the Grapes
-
Roll grape spheres:
Create about 10-12 small, pea-sized balls of clay. Try to vary the sizes very slightly for a more organic look. -
Arrange the cluster:
Position the balls in a triangular cluster shape near the bottom of the central stem. I find it works best to place the bottom grape first and build upwards. -
Secure the fruit:
Ensure each grape is securely attached with a dab of slip. Press them down gently just enough to flatten the back against the cross without losing their round shape. -
Extend the stem:
Roll a slightly thicker stem segment and attach it below the grape cluster, extending almost to the bottom edge of the cross.
Pro Tip: Realistic Variance
Mix a tiny pinch of dried coffee grounds or sand into your clay before rolling. This adds authentic speckling and grit that looks exactly like real sandstone.
Step 4: Finishing Touches
-
Re-texture:
If you smoothed out too much of the stone texture while attaching the relief elements, go back in with your toothbrush and gently tap the empty spaces again. -
Add speckling:
Use a needle tool or the tip of a toothpick to poke randomly scattered, deeper holes across the surface. This mimics the porous nature of aged stone. -
Dry properly:
Place the cross on a flat surface or a wire rack to dry. If using air-dry clay, flip it occasionally to prevent warping. -
Sand and seal:
Once fully cured, use fine-grit sandpaper to smooth any rough burrs on the edges. Finish with a matte sealant if you want to protect the surface without making it shiny.
Enjoy the peaceful process of creating this symbolic piece and finding the perfect spot to display it
Dove Relief Cross Motif
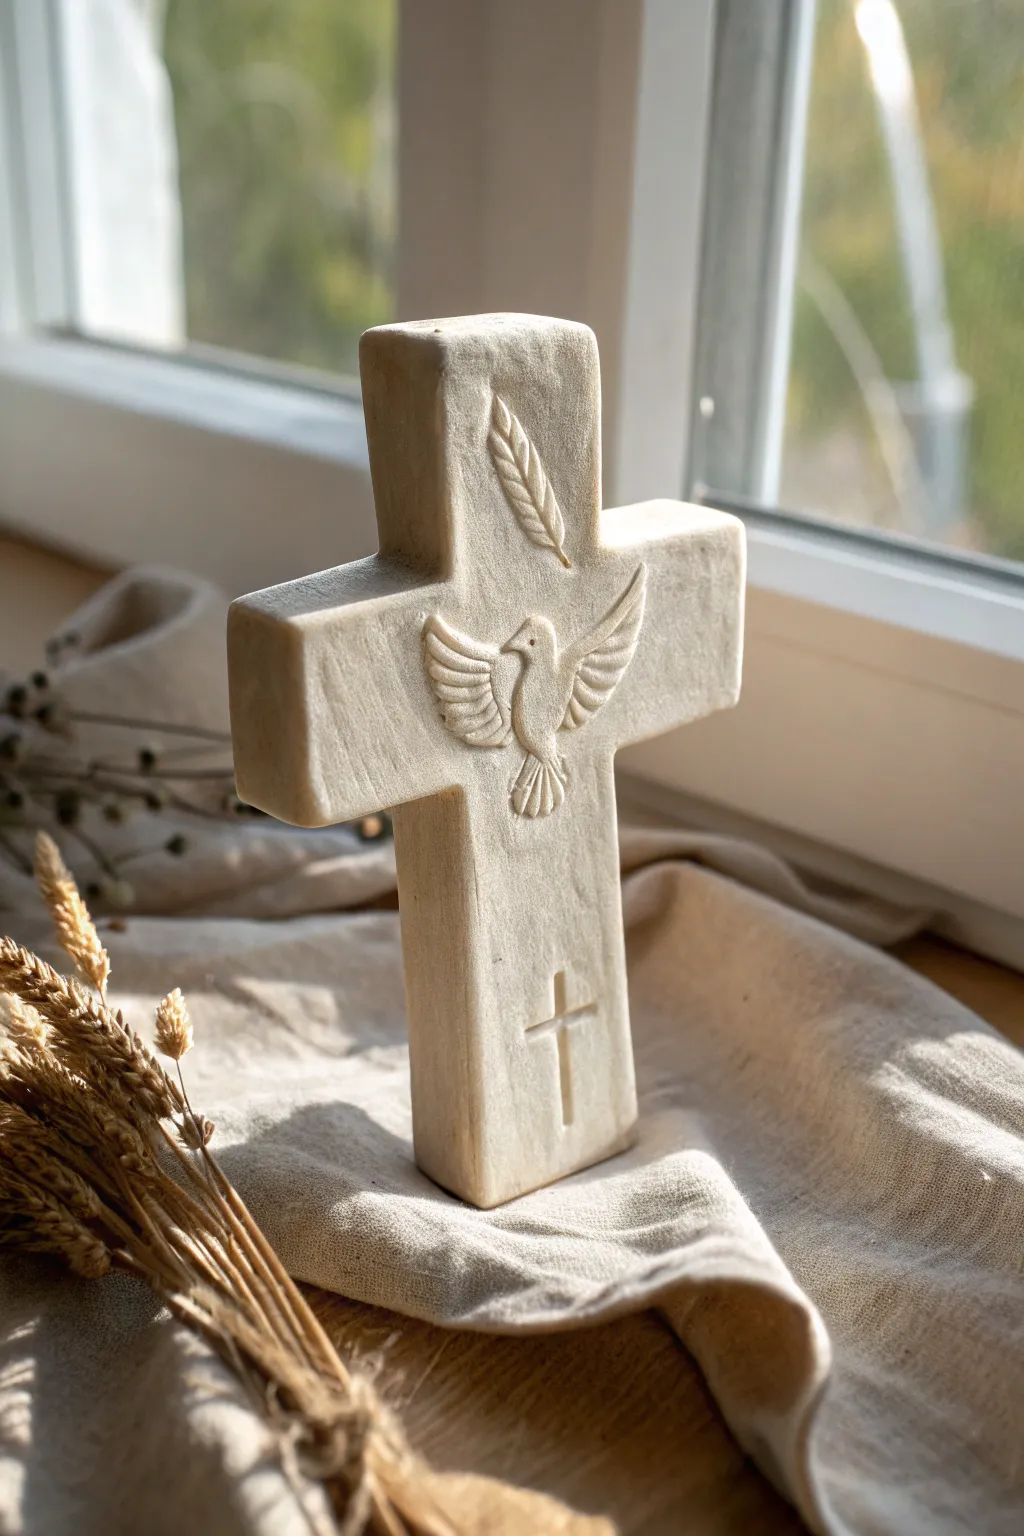
This project creates a serene, stone-effect cross featuring delicate relief work of a dove and olive leaf. The creamy finish and subtle texture give it the appearance of being hand-carved from limestone, perfect for a memorial or confirmation gift.
Step-by-Step Guide
Materials
- White air-dry clay (stone effect or plain)
- Rolling pin
- Cross template (cardboard or paper)
- Craft knife or scalpel
- Clay carving tools (needle tool, small loop tool)
- Small bowl of water
- Fine-grit sandpaper
- Acrylic sealer (matte)
- Damp sponge
- Ruler
Step 1: Shaping the Foundation
-
Prepare the slab:
Begin by rolling out a substantial slab of white air-dry clay. Aim for a thickness of about 3/4 inch (approx. 2cm) to give the cross a solid, stone-like weight and ensure it can stand upright. -
Cut the cross shape:
Place your cardboard template onto the clay. Using a sharp craft knife held perpendicular to the table, cut out the main cross outline cleanly. Keep the excess clay handy for the relief details later. -
Refine the edges:
Once cut, dip a finger in water and smooth the sharp vertical edges of the cross. You want them slightly softened to mimic worn stone rather than sharp, fresh cut edges. -
Create surface texture:
Before adding details, gently dab the entire surface with a damp sponge or a crumpled ball of foil. This removes the smooth ‘manufactured’ look and adds a subtle organic grain.
Step 2: Sculpting the Reliefs
-
Form the dove body:
Take a small pinch of leftover clay and roll it into a teardrop shape. Flatten it slightly and position it in the very center of the cross intersection. This forms the dove’s torso. -
Add the wings:
Shape two smaller teardrops for wings. Attach them to the torso using the score-and-slip method: scratch the back of the wing and the cross surface, add a drop of water, and press firmly. -
Detail the feathers:
Using a needle tool or a small knife, gently press lines into the wings to simulate feathers. Fan them out towards the tips for a realistic flight appearance. -
Sculpt the tail:
Add a small fan shape at the bottom of the dove body. Press vertical indentations into this piece to create the look of tail feathers. -
Add the upper leaf:
Roll a thin coil of clay for the leaf stem and a flattened oval for the leaf itself. Attach this above the dove, tilted slightly to the right. Carve a central vein and small diagonal lines for leaf texture. -
Incise the lower cross:
For the small cross at the bottom, you can either add thin strips of clay (relief) or interpret the image as an incised carving. To match the photo’s raised look, roll two very thin clay snakes and press them into a cross shape near the base.
Sticky Situation
If your relief pieces (dove/leaf) keep sliding off while you work, your base clay might be too dry. Score the surface more aggressively and use a wetter slip paste.
Step 3: Finishing and Sealing
-
Smooth the joins:
Use a small, damp brush to blend the edges where your relief pieces meet the main cross block. This makes the design look carved from a single piece rather than stuck on. -
Initial drying:
Lay the cross flat on a wire rack or mesh screen to dry. Because it is thick, I recommend turning it over every 10-12 hours to ensure even drying and prevent warping. -
Sanding:
Once fully cured (usually 24-48 hours depending on humidity), take your fine-grit sandpaper and gently buff any sharp burrs or fingerprints, focusing on the corners. -
Enhancing the stone look:
To deepen the stone effect, dilute a tiny drop of brown or beige acrylic paint with lots of water. Brush this wash over the piece and immediately wipe it off with a rag, leaving pigment only in the recessed carvings. -
Protective coat:
Finish by applying a matte acrylic sealer or varnish. This protects the clay from moisture and preserves that soft, chalky appearance characteristic of limestone.
Stone Texture Trick
For a hyper-realistic sandstone texture, mix a teaspoon of baking soda or used coffee grounds directly into your white clay before rolling out the initial slab.
Place your finished cross on a windowsill where sunlight can catch the relief details for a peaceful display
Mosaic-Inlay Cross With Tiny Pieces
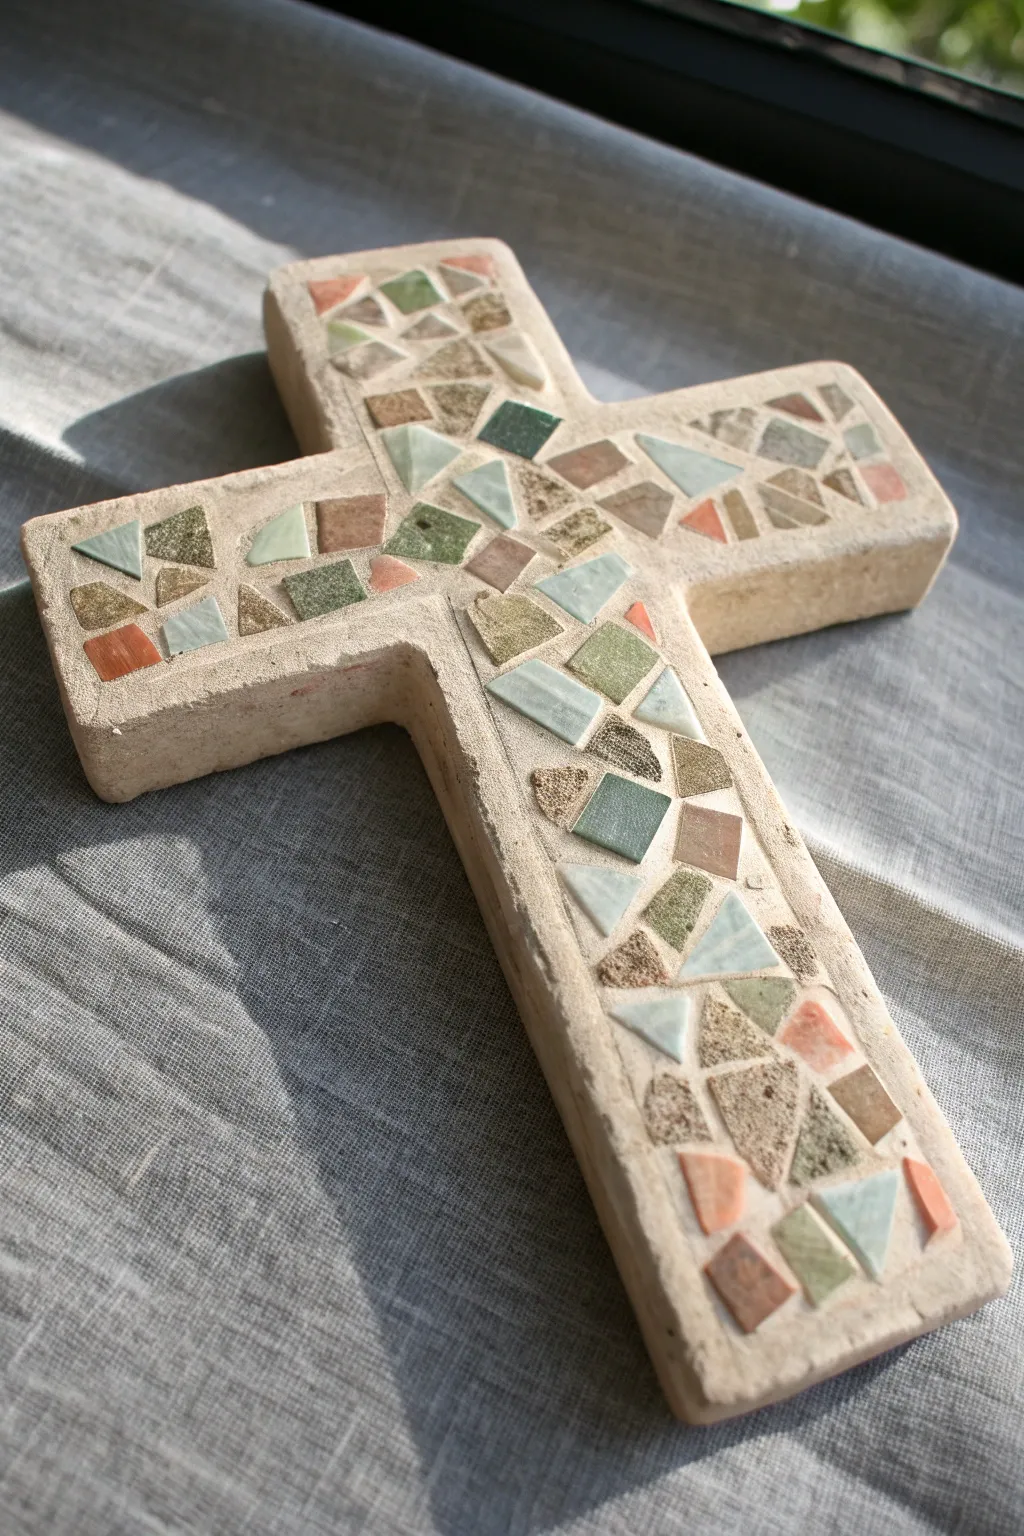
This rustic project combines the solidity of a cast stone look with the delicate geometry of mosaic art. By embedding tiny, irregularly shaped tiles into a cross form, you’ll create a textured, spiritual art piece perfect for quiet corners or garden spaces.
Step-by-Step Tutorial
Materials
- Plaster of Paris or casting concrete mix
- Cross-shaped silicone or plastic mold (approx. 8-10 inches)
- Assorted ceramic or glass mosaic tiles (earth tones: sage green, terracotta, beige)
- Tile nippers or wheeled mosaic cutters
- PVA glue or mosaic adhesive
- Sanded grout (neutral beige or light sandstone color)
- Mixing bucket and stirring stick
- Fine-grit sandpaper
- Sponge and water
- Sealer (optional, matte finish)
Step 1: Casting the Base
-
Prepare the mold:
Ensure your cross mold is clean and dry. If using a rigid plastic mold, lightly mist it with a mold release spray or a tiny amount of vegetable oil to ensure the casting pops out easily later. -
Mix the casting medium:
Mix your Plaster of Paris or concrete according to the package instructions. Aim for a consistency similar to pancake batter—not too runny, but pourable. -
Pour the form:
Slowly pour the mixture into the mold, filling it to the top. Tap the sides of the mold gently on your work surface to release any trapped air bubbles. -
Level the back:
If the mixture mounds up, use a straight edge or a scrap of cardboard to scrape across the top of the mold, creating a flat back for the cross. -
Cure and demold:
Allow the casting to dry completely. This usually takes 24-48 hours depending on humidity and material. Once fully hard, carefully pop the cross out of the mold. -
Sand the edges:
Use fine-grit sandpaper to smooth any rough ridges or sharp corners left by the mold, giving the stone a weathered, softened look.
Step 2: Creating the Mosaic
-
Prepare the tiles:
Using your tile nippers, cut your larger ceramic pieces into small, geometric shards. Aim for triangles, irregular quadrilaterals, and trapezoids rather than perfect squares. -
Dry fit the design:
Before gluing, lay the pieces directly onto the stone cross to plan your spacing. Leave larger gaps between pieces (about 1/8 to 1/4 inch) to allow the grout to show through prominently. -
Apply the adhesive:
Lift one piece at a time, apply a small dot of PVA glue or mosaic adhesive to the back, and press it firmly onto the stone surface. -
Work in sections:
Start at the intersection of the cross beams and work your way out toward the ends. I find this helps keep the pattern balanced. -
Allow adhesive to set:
Let the glue dry completely. This usually takes a few hours, but check your specific glue instructions. The tiles must be immovable before grouting.
Uneven is Better
Don’t stress about perfect alignment. The charm of this piece comes from the irregular spaces and mismatched angles of the geometric shards.
Step 3: Grouting and Finishing
-
Mix the grout:
Prepare your sanded grout with water until it reaches the consistency of peanut butter. A sanded grout is essential here to match the rough texture of the stone base. -
Apply the grout:
Scoop the grout onto the mosaic face. Use a rubber float or your gloved fingers to press the grout firmly into all the crevices between the tiles. -
Remove excess:
Wipe away the bulk of the excess grout with your float or hand, trying to expose the tops of the tiles while leaving the gaps filled. -
Clean the surface:
Wait about 10-15 minutes for the grout to haze over slightly. Then, use a damp (not dripping) sponge to gently wipe the surface. Rinse the sponge frequently. -
Final polish:
Once the grout is fully dry (usually overnight), use a dry cloth to buff any remaining haze off the tiles to make the colors pop. -
Seal (optional):
If you plan to keep this outdoors, apply a matte stone sealer over the entire cross to protect it from moisture.
Add Metallic Flair
Mix in a few pieces of gold-leafed glass or mirrored tile among the earth tones. They will catch the light beautifully against the matte stone.
Display your finished cross on a wall or shelf where the natural light can highlight the textures of the stone and tile.
Faux Patina Turquoise Cross Finish
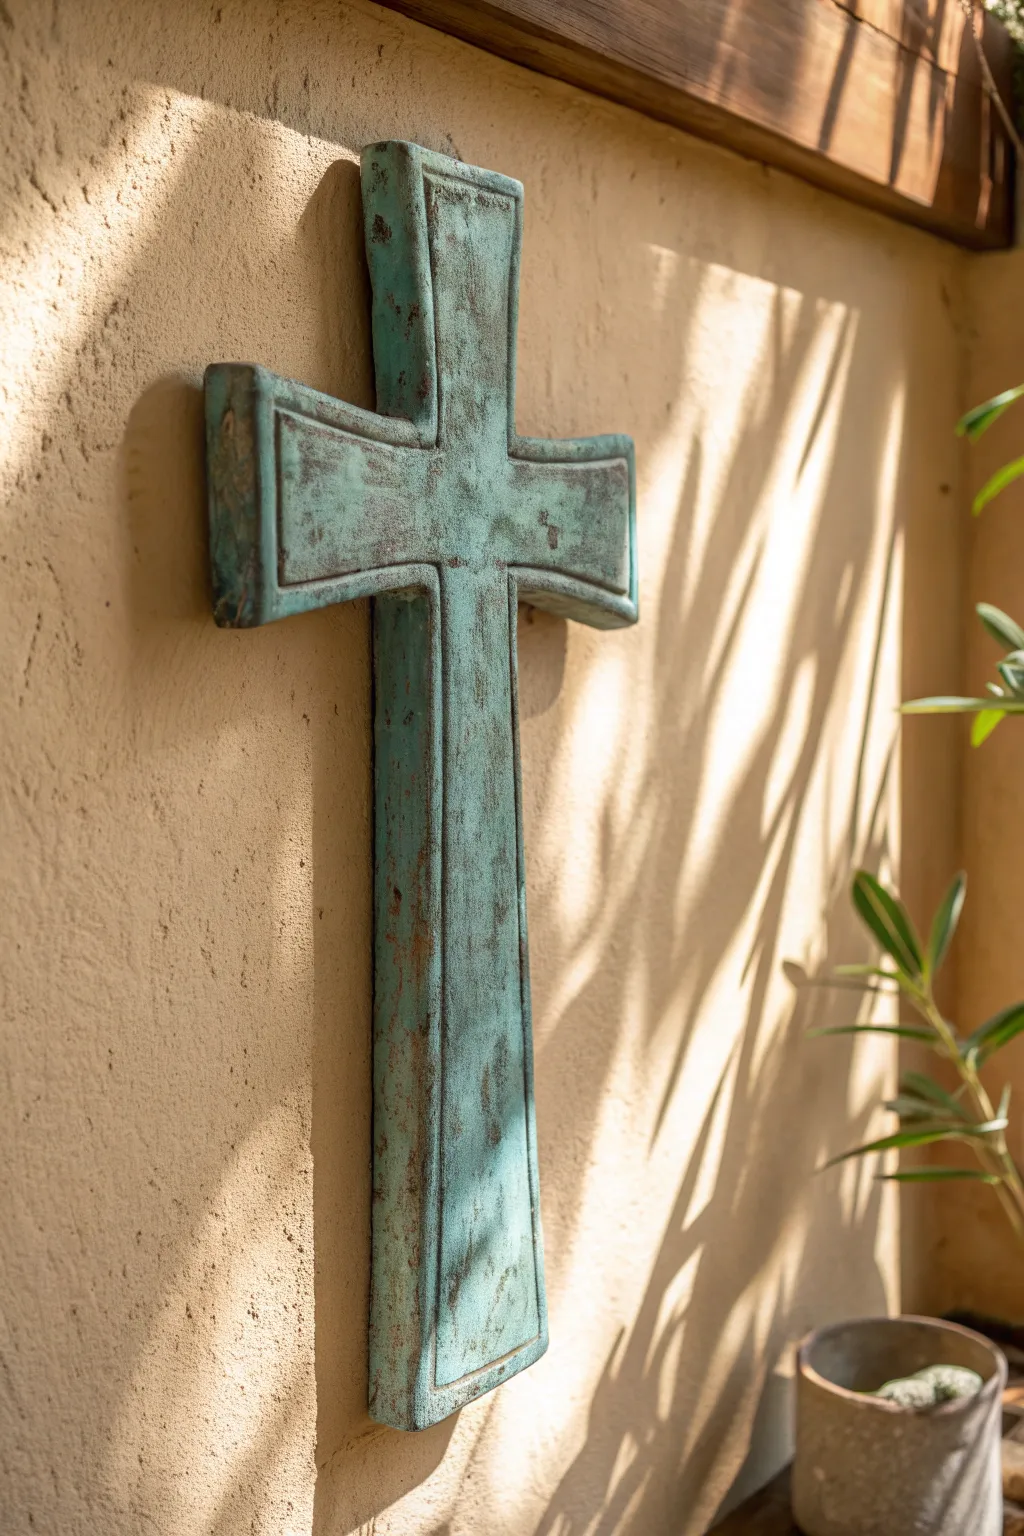
Learn to give plain materials the ancient, weathered look of oxidized copper with this convincing faux finish technique. The final result mimics the beautiful turquoise patina found on statues and roofs that have aged gracefully in the elements.
How-To Guide
Materials
- Air-dry jumping clay or polymer clay
- Rolling pin
- Ruler
- Craft knife or clay slicer
- Cardboard or wood template (cross shape)
- Sandpaper (medium and fine grit)
- Metallic copper or bronze acrylic paint
- Turquoise or teal acrylic paint
- Dark brown or burnt umber acrylic paint
- Dark wax or antique glaze (optional)
- Sea sponge
- Paper towels
- Protective matte varnish
- Clay sculpting tools (optional)
Step 1: Shaping the Base
-
Prepare your workspace:
Lay down a non-stick mat or parchment paper to work on so your clay doesn’t stick to the table. -
Roll out the clay:
Condition your clay by kneading it until pliable, then roll it out to a consistent thickness of about 1/2 to 3/4 inch. -
Cut the cross shape:
Place your cross template over the clay and carefully cut around the perimeter using a sharp craft knife or clay slicer. Clean up any jagged edges with your fingers or a smoothing tool. -
Add dimension:
To mimic the recessed channel seen in the photo, lightly press a smaller ruler or a sculpting tool into the surface of the clay, tracing an inner border about half an inch from the edge. -
Create texture:
Before the clay dries, gently tap the surface with a crumpled ball of aluminum foil or a stiff-bristle brush. I like to focus on the edges to simulate worn metal. -
Dry completely:
Allow the sculpted cross to dry fully according to your clay package instructions. For thick air-dry clay, this might take 24-48 hours. -
Sand and smooth:
Once hardened, use medium grit sandpaper to smooth out any unintentional bumps on the sides, then wipe away the dust with a damp cloth.
Step 2: Faux Patina Painting
-
Apply the base coat:
Paint the entire cross, including the sides and back, with a rich metallic copper or bronze acrylic paint. This represents the ‘new’ metal underneath. -
Second metallic layer:
Apply a second coat of metallic paint if needed to ensure solid, opaque coverage. Let this base layer dry completely. -
Mix the patina wash:
Dilute your turquoise or teal paint with a little water until it has a milky consistency. You want it to be translucent rather than solid. -
Apply the wash:
Generously brush the watered-down turquoise paint over the textured front surface, ensuring it gets into all the dents and the recessed inner border. -
Wipe back:
While the turquoise paint is still wet, gently wipe the high points of the cross with a paper towel or rag. This leaves the blue color in the crevices while revealing the copper on the raised surfaces. -
Identify spots for more oxidation:
Look for areas where water would naturally collect, like corners and the deep inner channel. Dab a little extra undiluted turquoise paint here for a thicker patina look. -
Add depth:
In the deepest crevices, apply a tiny amount of diluted burnt umber paint. This adds a ‘dirty’ aged look that contrasts nicely with the bright teal. -
Highlighting:
Once all paint is dry, use a technique called dry-brushing: dip a dry brush into your metallic copper paint, wipe most of it off, and very lightly skim it over the highest edges to make the metal shine again.
Natural Texture
For an even stone-like texture before painting, press coarse sea salt into the wet clay surface. Let it dry completely, then brush the salt away to leave perfect little pits.
Step 3: Finishing Touches
-
Seal the piece:
Apply a matte varnish or sealant spray to protect the paint job. Avoiding glossy finishes helps maintain the realistic look of oxidized metal. -
Attach hanger:
Once the varnish is dry, glue a strong D-ring or sawtooth hanger to the back of the cross using heavy-duty construction adhesive or epoxy.
Ancient Relic
Mix a tiny amount of baking soda into your turquoise paint. As it dries, it creates a crusty, chalky texture that looks exactly like real chemical corrosion on copper.
Hang your finished piece in a spot where the light can catch the subtle metallic glint underneath the weathering
Cutout Negative-Space Window Cross
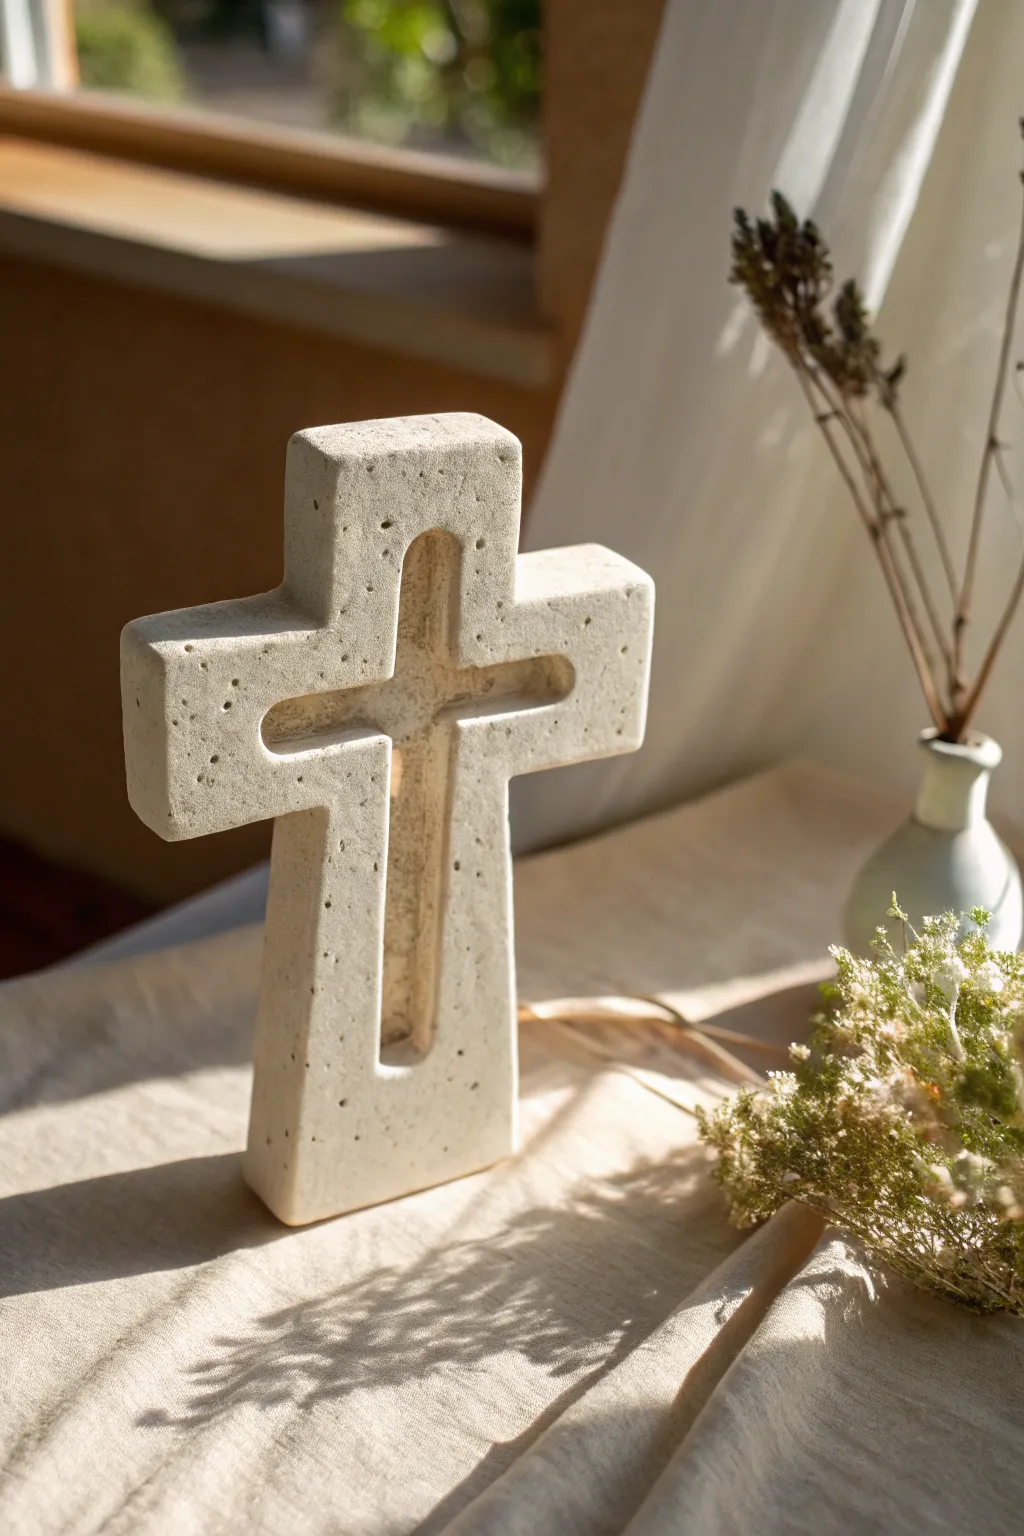
This minimalist cross achieves a beautiful balance between solid form and open space, featuring a central cutout that mimics light passing through a window. The final piece has a lovely speckled, stone-like texture that gives it a timeless, architectural feel perfect for any mantel or shelf.
Step-by-Step
Materials
- White or light beige air-dry clay (or stoneware if firing)
- Rolling pin
- Two wooden guide strips (approx. 1 inch thick)
- Ruler
- Sharp craft knife or scalpel
- Fettling knife or wire clay cutter
- Small carving tool or ribbon tool
- Sponge
- Cup of water
- Coarse sandpaper
- Old toothbrush (for speckling)
- Black or dark grey acrylic paint (watered down)
Step 1: Prepping the Slab
-
Prepare your workspace:
Set up a clean, flat work surface covered with canvas or a clay mat to prevent sticking. Place your two wooden guide strips on either side of your working area to ensure an even thickness. -
Roll the clay:
Take a remarkably large portion of clay—you want this cross to be substantial and self-standing. Roll it out between your guide strips until you have a smooth, thick slab about 1 inch deep. -
Smooth the surface:
Before cutting, run a damp kidney tool or sponge lightly over the surface to remove any canvas textures or rolling pin marks. This pre-smoothing saves time later.
Keep it Straight
Use a carpenter’s square when drafting your initial outline. It ensures your cross arms are perfectly perpendicular at 90 degrees, preventing a lopsided look.
Step 2: Shaping the Form
-
Draft the outline:
Using a ruler and a needle tool, very lightly score the outline of your cross onto the slab. Aim for wide arms and a sturdy base to ensure stability. -
Cut the outer shape:
Hold your fettling knife or craft blade perfectly vertical. Slice straight down through the clay along your scored lines. Avoid dragging the knife; instead, use a clean downward chopping motion or a steady pull to keep the walls crisp. -
Mark the center window:
Measure inward from your outer edges to mark the internal cross shape. This negative space ‘window’ should be proportional to the outer shape, leaving a border of about 1 to 1.5 inches of clay all around. -
Excavate the center:
Carefully cut out the inner cross shape. Because the clay is thick, you might need to cut halfway down, flip the piece carefully, and cut from the other side to meet in the middle. -
Refine the edges:
Once the center block is removed, dip your finger in water and smooth the sharp corners slightly. You want the edges defined but not razor-sharp.
Step 3: Adding Texture and Detail
-
Create the recessed border:
To get the architectural look seen in the photo, use a small ribbon tool to carve a shallow bevel or inset channel right along the edges of the inner cutout. -
Round the inset:
Smooth this carved channel with a damp sponge so it looks like a soft, molded transition rather than a sharp gouge. -
Simulate stone texture:
Take a stiff-bristled brush or a crumpled ball of aluminum foil and gently press it into the clay surface randomly. This breaks up the smooth ‘plastic’ look of the clay. -
Initial drying phase:
Let the cross stand upright or lay flat on a drying rack. Rotate it occasionally so it dries evenly. I like to cover it loosely with plastic for the first day to prevent cracking.
Faux Granite
Mix dried coffee grounds or coarse sand directly into your wet clay before rolling. This adds internal texture that reveals itself beautifully when you sand the dried piece.
Step 4: Finishing Touches
-
Sand the surface:
Once the clay is bone dry (or fired, if using ceramic clay), use coarse sandpaper to rough up the flat surfaces further, enhancing the stone effect. -
Mix the speckle wash:
Mix a tiny drop of dark grey or black acrylic paint with a generous amount of water. You want a dirty water consistency, not paint. -
Apply the speckles:
Dip an old toothbrush into the wash. Hold it over the cross and run your thumb across the bristles to flick tiny droplets onto the surface. -
Vary the density:
Concentrate some speckles near the corners and crevices to simulate natural stone weathering. -
Seal the piece:
If you used air-dry clay, apply a matte varnish to protect the finish without adding an unnatural shine. If fired, you can leave it bare for a raw stone texture.
Place your finished cross near a window where the light can shine through the center cutout