If you’re craving a project that’s quick, goofy, and weirdly satisfying, air dry clay is basically the perfect playground. I’m sharing my favorite funny air dry clay ideas that lean into silly faces, tiny characters, and those “why did I make this?” moments we all secretly love.
Silly Blob Monsters With Big Expressions
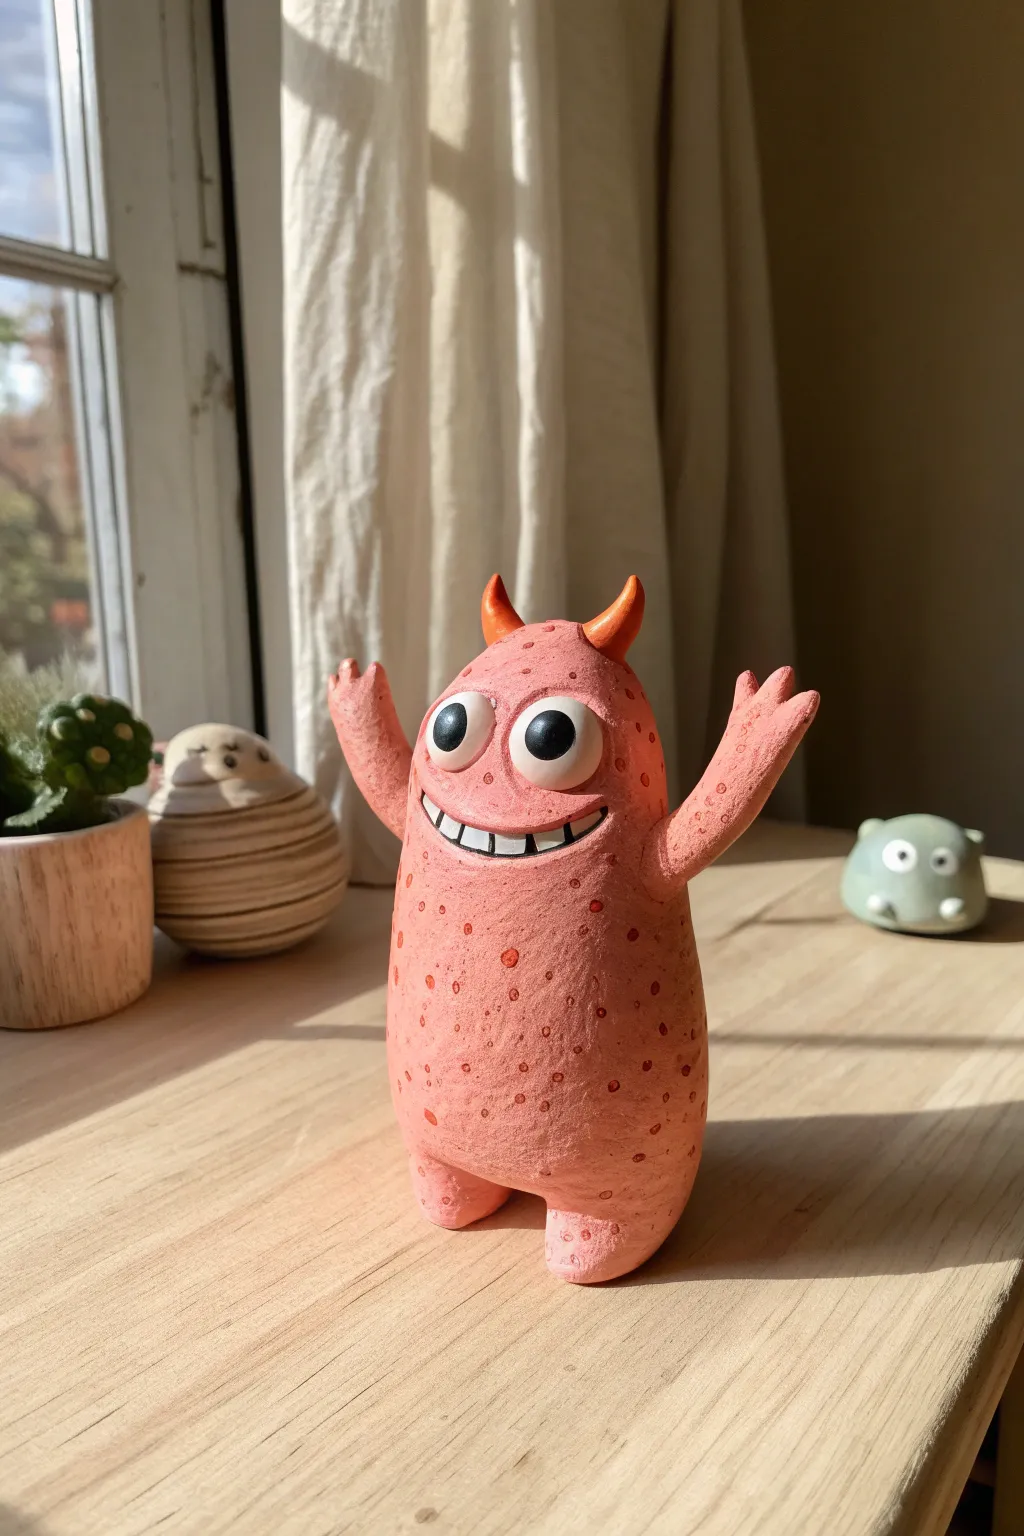
This joyful pink creature is guaranteed to bring a smile to your face with its wide grin and enthusiastic wave. Perfect for beginners, this project combines simple shapes with expressive details for a blob monster that looks ready for a hug.
Step-by-Step Guide
Materials
- Air dry clay (white or pre-colored pink)
- Pink acrylic paint (light/salmon tone)
- Orange acrylic paint
- White acrylic paint
- Black acrylic paint
- Small paintbrush
- Detail brush
- Ball stylus tool or rounded chopstick
- Cup of water
- Toothpicks (optional for armature support)
Step 1: Sculpting the Body
-
Form the base:
Start with a generous handful of air dry clay. Roll it into a smooth ball first to remove cracks, then gently elongate it into a stout, pill-like cylinder that is slightly wider at the bottom for stability. -
Pull small feet:
Instead of attaching separate feet, pinch the bottom corners of your cylinder and gently pull downward to create two nubby little legs. Tap the bottom against your work surface so the monster stands flat on its own. -
Add the arms:
Roll two small snakes of clay for the arms. Attach them high on the sides of the body, blending the clay seamlessly at the shoulder point. Position the arms angling upward in a ‘surprise!’ or waving gesture. -
Create hands:
Flatten the ends of the arms slightly. Using a small clay knife or toothpick, cut two notches into each flattened end to create three distinct, stubby fingers.
Cracks happen
If cracks appear while drying, don’t panic! Mix a tiny bit of fresh clay with water to make a paste (slip) and fill the cracks, then sand smooth once dry.
Step 2: Adding Personality
-
Make the eyes:
Roll two medium-sized balls of white clay (or plain clay) and press them onto the upper center of the face, right next to each other. They should protrude slightly like bug eyes. -
Sculpt the grin:
Roll a thin worm of clay and curve it into a wide U-shape directly under the eyes. Press it onto the face, then flatten it gently to become the smiling mouth base. Smooth the edges so it isn’t too bulky. -
Define the teeth:
Take a sculpting tool or the edge of a credit card and press vertical lines into the flattened mouth strip to designate the teeth. -
Craft the horns:
Shape two tiny cones of clay. Attach them to the very top of the head using a drop of water as ‘glue.’ Curve the tips slightly outward for a playful devilish look. -
Smooth it out:
Dip your finger in a tiny bit of water and run it over the entire sculpture to smooth out fingerprints and join lines. Let the figure dry completely, usually for 24-48 hours.
Make it yours
Give your monster a prop! Before the clay dries, mold a tiny heart, star, or flower and place it in one of the open hands so it dries attached.
Step 3: Painting and Finishing
-
Base coat:
Once dry, paint the entire body (excluding eyes, mouth, and horns) with a salmon-pink acrylic paint. I usually apply two thin coats for opaque coverage. -
Paint the horns:
Use a bright orange paint for the horns. While the paint is wet, you can blend a tiny bit of the body’s pink at the base of the horns for a smoother transition. -
Detail the face:
Paint the eyeballs crisp white. Carefully paint the teeth white as well. Outline the smile and fill in gaps between teeth with a very fine line of black paint. -
Add pupils:
Using your smallest brush or the back of a paintbrush handle, dot large black circles onto the white eyes. Placing them slightly cross-eyed or looking in different directions adds maximum silliness. -
Create texture:
Mix a slightly darker shade of pink (or reddish-pink) and thin it with water. Dip a toothbrush or stiff brush in it and flick it over the body to create speckles, or paint tiny dots by hand for a controlled spotted texture. -
Final touches:
Add tiny highlight dots of white paint to the black pupils to bring the character to life.
Set your goofy new friend on a shelf or windowsill to keep watch over your other plants and treasures


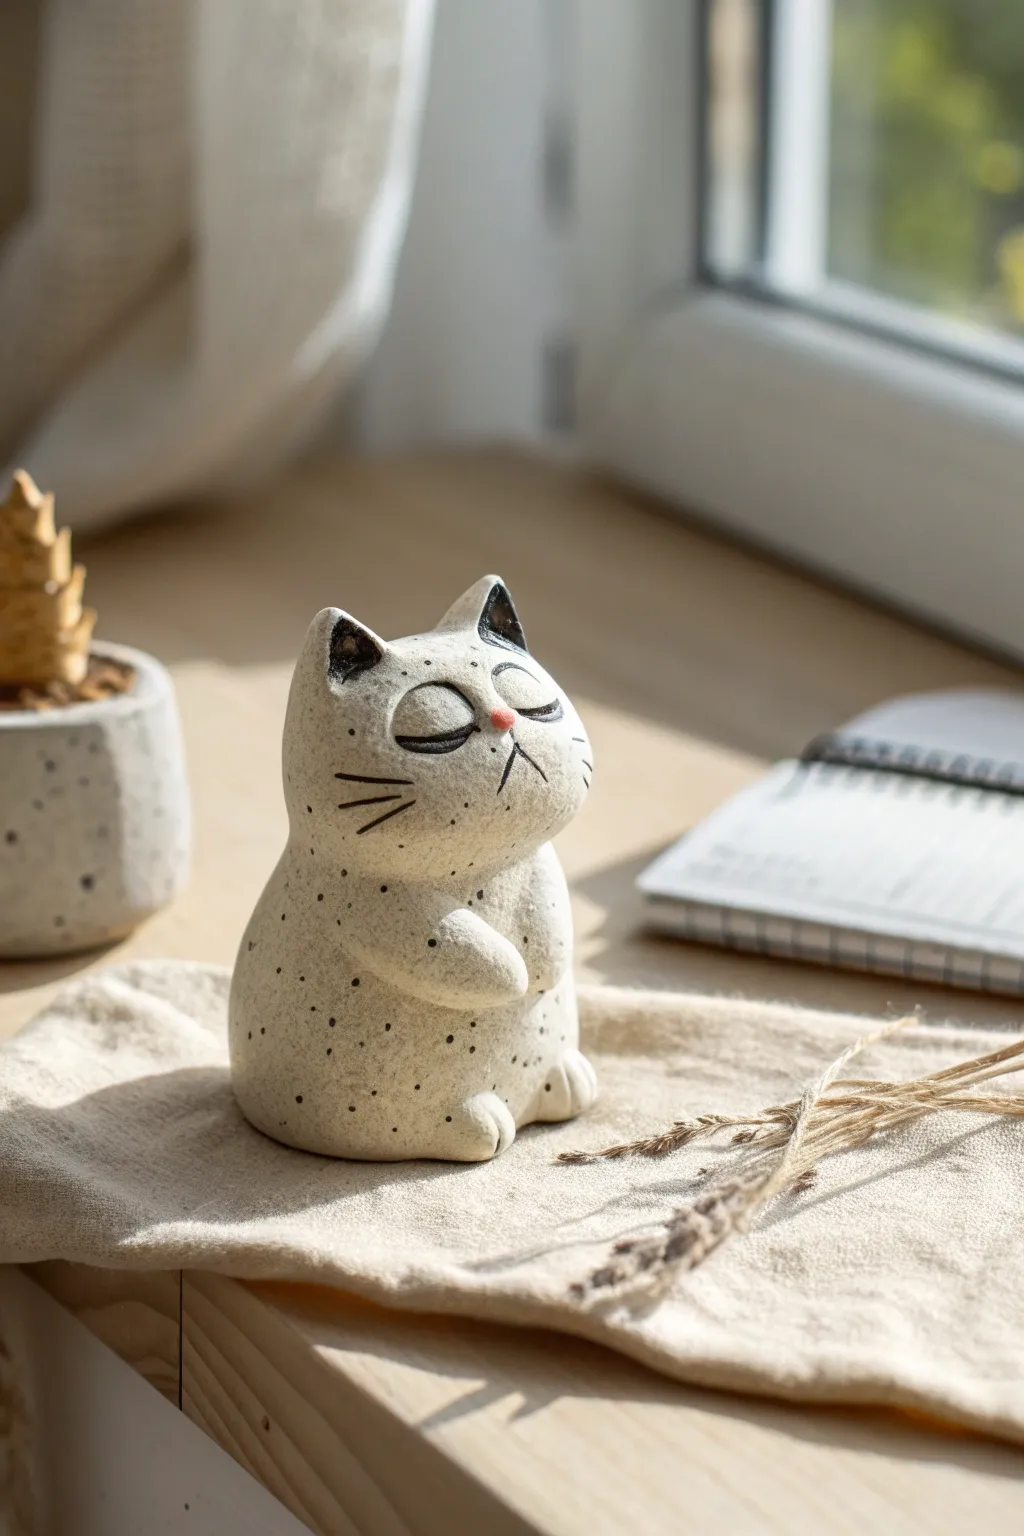
Animals Doing Human Things
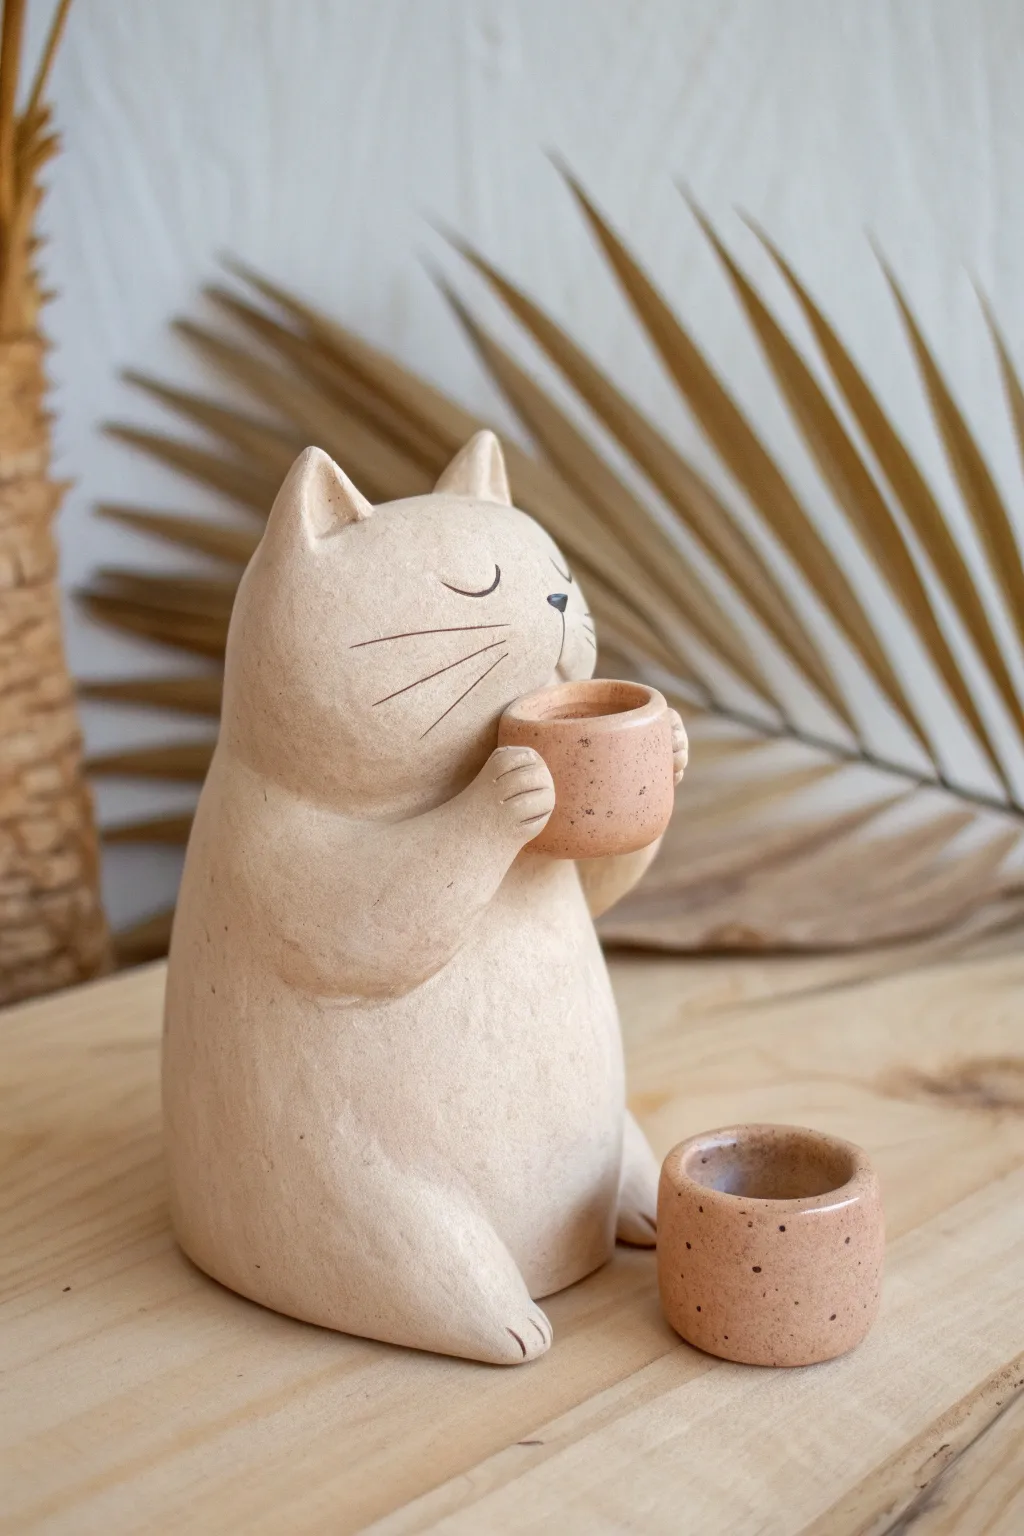
This serene figurine captures the essence of a tranquil morning ritual, featuring a charmingly rotund cat enjoying a warm beverage. With its smooth, unpainted finish and minimalist features, this project creates a sophisticated yet whimsical piece of decor perfect for a desk or shelf.
Step-by-Step Tutorial
Materials
- High-quality air dry clay (white or natural stone color)
- Small rolling pin
- Modeling tools (or a toothpick and a dull knife)
- Small cup of water
- Sponge or fine-grit sandpaper
- Acrylic paint (black for details, terracotta/brown speckles)
- Fine detail paintbrush
- Matte varnish or sealant
Step 1: Shaping the Base Figure
-
Form the main body:
Start with a large handful of clay, rolling it into a smooth, solid ball. Gradually elongate it into a pear shape that is wider at the bottom to ensure stability. -
Create the head:
Gently pinch and mold the top third of the pear shape to define a rounded head. It should flow seamlessly into the body without a distinct, thin neck. -
Add the ears:
Pinch two small triangles of clay at the very top of the head. Smooth the seams downwards so the ears look like they are naturally growing from the skull, not just stuck on. -
Shape the legs:
At the base of the body, pull out two small stumps for the legs. They should be short and stubby, extending forward slightly to help the figure sit securely. -
Form the arms:
Roll two small sausages of clay for the arms. Attach them high on the chest, positioned as if they are ready to hold something close to the mouth. -
Blend the seams:
Use a little water on your finger or a smoothing tool to blend the clay where the arms join the body. The goal is a seamless, solid look.
Cracks Appearing?
If you see small cracks while drying, mix a tiny bit of clay with water to make a paste (slip) and fill them in. Smooth it over with your finger.
Step 2: Crafting Accessories & Details
-
Make the tiny mug:
Roll a small ball of clay, roughly the size of a marble. Press your thumb into the center to create the hollow of the mug, keeping the walls thick and sturdy. -
Position the mug:
Place the clay mug between the cat’s paws. Gently press the paws into the sides of the mug to secure it, blending the clay slightly where they touch. -
Add a second vessel:
Create a matching small bowl or cup using the same technique as the first mug. This piece will sit separately on the table next to your cat. -
Detail the paws:
Use a toothpick or a dull knife to press three small indentations into the ends of the paws and feet to suggest toes. -
Carve the whiskers:
Very lightly score three lines on each cheek for whiskers. I like to keep these strokes quick and light to mimic the fine nature of hair. -
Define the face:
Use a needle tool or toothpick to carve two small arches for closed, sleeping eyes and a tiny ‘Y’ shape for the nose and mouth.
Step 3: Finishing Touches
-
Smooth the surface:
Dip your finger or a sponge in water and go over the entire sculpture to remove fingerprints and bumps. The smoother the clay now, the better it will look later. -
Drying time:
Let the sculpture dry completely for 24-48 hours. Turn it occasionally to ensure the bottom dries evenly. -
Sanding:
Once bone dry, use fine-grit sandpaper to gently buff away any remaining imperfections or rough spots. -
Painting details:
Using a very fine brush and black paint, carefully trace over the carved eye and whisker lines. Paint a tiny black triangle for the nose. -
Speckled effect:
To mimic the ceramic look in the photo, dilute some brown paint and flick it off a toothbrush onto the mugs, or paint tiny dots manually. -
Seal the work:
Apply a coat of matte varnish to protect the clay and give it a finished, professional sheen.
Natural Texture
Instead of acrylic paint details, try using coffee or tea to stain the clay for an organic, aged look that matches the earthy vibe.
Enjoy the peaceful vibe your new clay companion brings to your workspace


Toothbrush Holders That Look Like They’re Eating

Turn your bathroom vanity into a playful scene with this adorable little clay creature that happily devours your toothbrush. Its speckled finish and wide, goofy grin make oral hygiene just a little bit more entertaining every morning.
Detailed Instructions
Materials
- Air-dry clay (white or speckled/granite effect)
- Acrylic rolling pin
- Small cup of water
- Clay tools (needle tool, blending tool)
- Sandpaper (fine grit)
- Acrylic paints (black, white, dusty pink/terracotta)
- Fine detail paintbrush
- Gloss varnish or clear sealant (waterproof is essential)
Step 1: Shaping the Creature
-
Form the base:
Start with a generous handful of air-dry clay. Roll it into a smooth ball in your palms to remove any major cracks, then gently elongate it into a thick, rounded cylinder or capsule shape. -
Establish the stance:
Tap the bottom of your cylinder firmly against your work surface. You want the base to flatten slightly so the monster stands upright securely without wobbling. -
Create the mouth cavity:
Using your thumb or a large ball tool, press deeply into the top center of the shape. Widen this hole gently until it’s large enough to hold a toothbrush handle comfortably—test it with a real toothbrush if you need to check the size. -
Add the feet:
Roll two very small balls of clay for the feet. Flatten them slightly and score the clay (scratch the surface) where they will attach to the bottom front of the body. Use a dab of water to join them securely. -
Detail the toes:
Take a needle tool or a dull knife edge and gently press three lines into each foot to create little toes. This tiny detail adds a lot of character. -
Attach the arms:
Create two small, thin logs of clay for arms. Attach them flush against the sides of the body using the score-and-slip method so they look like they are resting relaxed at the monster’s sides. -
Smooth everything out:
Dip your finger in a little water and run it over all the joints—where the arms and feet meet the body—to make them seamless. Smooth out the main body surface to remove fingerprints.
Wobbly Monster?
If the base isn’t flat after drying and the figure rocks, tape a sheet of coarser sandpaper to a table and rub the bottom of the dried clay figure in circles until perfectly flat.
Step 2: Drying and Refining
-
Let it dry:
Allow your monster to air dry completely. This usually takes 24-48 hours depending on humidity. Rotate it occasionally so the bottom dries evenly. -
Sand the surface:
Once bone dry, take fine-grit sandpaper and gently sand the entire piece. Focus on rounding off the top rim of the toothbrush hole and removing any rough bumps on the body. -
Dust it off:
Wipe the sculpture down with a slightly damp cloth or a dry brush to remove all the clay dust before painting.
Make it a Set
Make a slightly shorter, wider version to hold a razor or a tube of toothpaste, giving your toothbrush monster a little bathroom buddy.
Step 3: Painting the Personality
-
Paint the mouth:
Mix a dusty pink or terracotta color. Paint a large, semi-circle shape on the front of the body for the open mouth. The top edge should be flat and the bottom curved. -
Add the teeth:
Using a fine brush and white paint (or a white paint pen), draw the teeth along the top flat edge of the mouth. A simple row of connected rectangles works best for that goofy look. -
Add rosy cheeks:
Using the same dusty pink color, dab two small circles just outside the corners of the mouth to create blushing cheeks. -
Paint the hands and feet tips:
Add a touch of the pink paint to the very tips of the arms and the toes for a cute, soft accent. -
Draw the details:
Using black paint and a very fine brush (or a fine-tip permanent marker), outline the mouth and teeth. Add two small dots for eyes above the mouth, small eyebrows, and a tiny nose dot. -
Create the speckles:
Dilute some grey or brown paint with water. Load an old toothbrush or stiff brush, and run your thumb across the bristles to flick tiny speckles all over the body. I find doing a test spray on paper first helps control the splatter size.
Step 4: Sealing
-
Waterproof the piece:
This is crucial for bathroom items. Apply at least two coats of a waterproof gloss or matte varnish, covering the inside of the hole and the bottom of the feet thoroughly.
Now you have a charming little sink companion ready to hold your brush


Whale Or Shark Phone Holder With A Grin
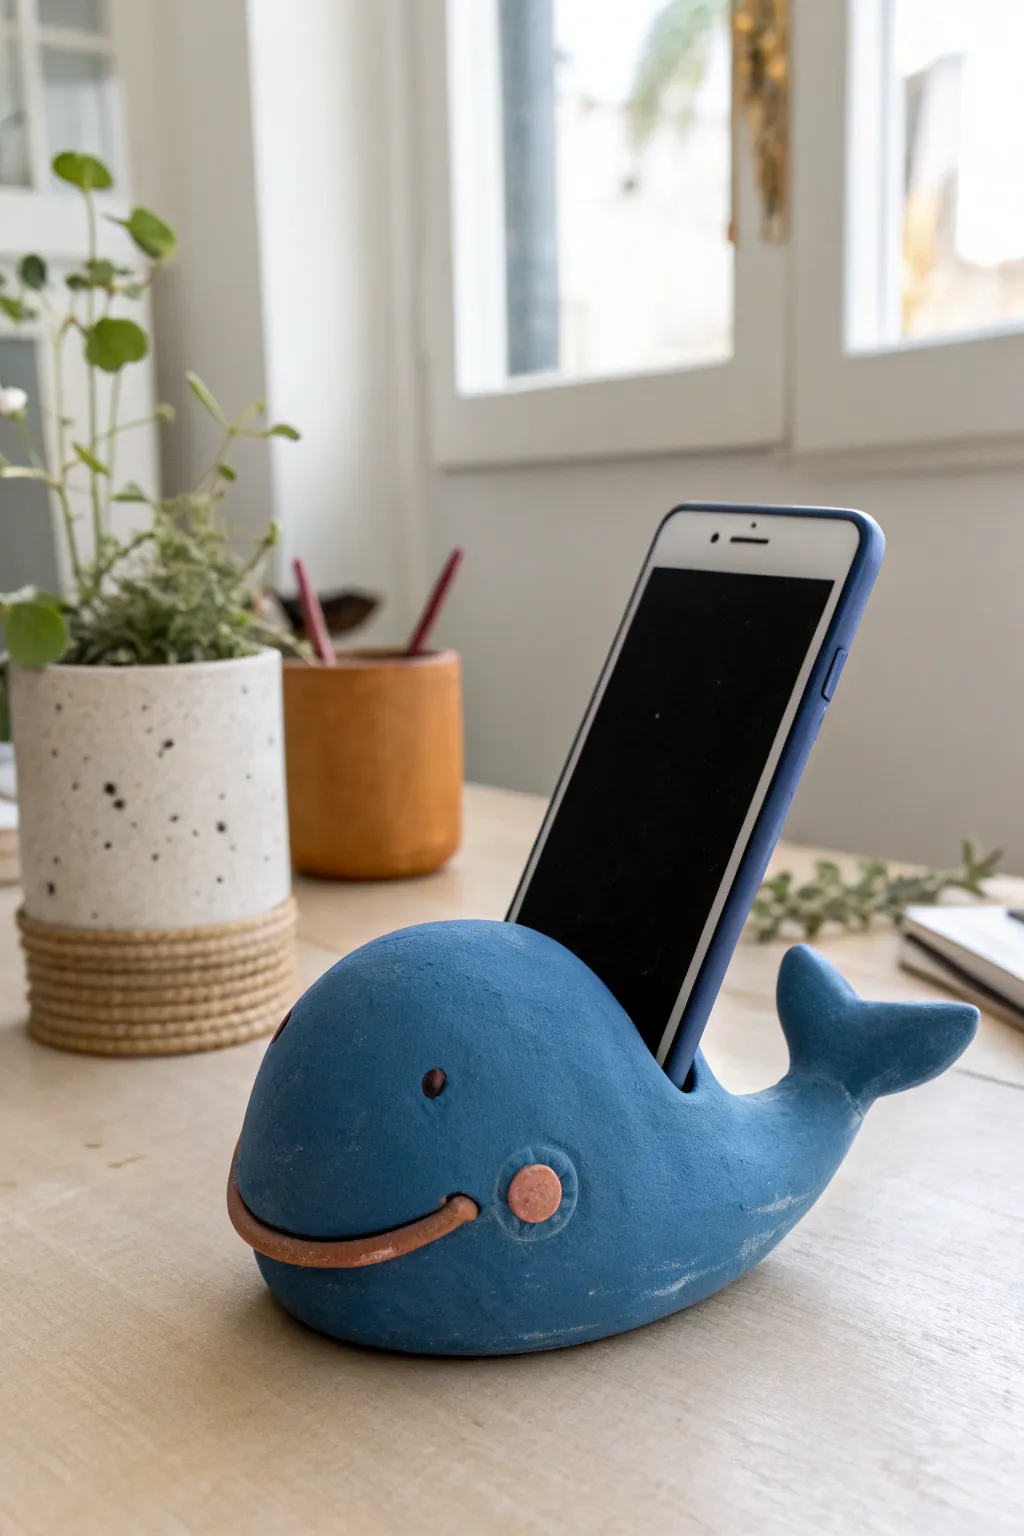
This adorable desktop companion does double duty as a sturdy phone holder and a charming piece of decor. With its wide, cheerful grin and sturdy tail fin, this blue whale is sculpted from air-dry clay to keep your device upright and accessible.
Step-by-Step Tutorial
Materials
- Air dry clay (white or grey)
- Rolling pin
- Clay knife or craft knife
- Water in a small cup
- Sponge or smoothing tool
- Acrylic paints (deep blue, light pink, black, brown)
- Paintbrushes (medium flat, small detail)
- Varnish or sealant (matte or gloss)
- Sandpaper (fine grit)
- Your phone (for sizing)
Step 1: Sculpting the Body
-
Form the base:
Start with a large ball of air-dry clay, roughly the size of a large orange. Knead it well to condition it, then roll it into a thick, smooth teardrop shape. This will become the whale’s main body. -
Flatten the bottom:
Gently tap the wider, rounder end of the teardrop onto your work surface to create a flat stable base so the whale won’t roll over. -
Shape the tail:
Pull and curve the narrower end of the teardrop upward. Flatten the very tip horizontally to form the flukes (tail fins), pinching the center to create the characteristic V-shape. -
Create the phone slot:
Take your phone (or a piece of cardboard of similar thickness) and gently press it into the back of the whale, just behind the head area but before the tail curves up. You want a groove deep enough to hold the phone securely. -
Refine the groove:
Remove the phone and use a clay knife to neaten the edges of the slot. Make it slightly wider than your phone to account for clay shrinkage as it dries. -
Add the smile:
Roll a very thin snake of clay about 3 inches long. Attached this to the front of the rounded face in a wide U-shape to form the grinning mouth. Use a little water to blend the edges onto the main body so it doesn’t fall off. -
Attach the cheeks:
Roll two small balls of clay and flatten them into discs. Score the back of these discs and the area on the whale’s face where the cheeks go. Apply a dab of water and press them onto the ends of the smile. -
Detail the cheeks:
Using a small tool or skewer, poke a tiny indentation into the center of each cheek disc for added texture. -
Smooth everything out:
Dip a sponge or your finger in water and gently rub over the entire sculpture to remove fingerprints and smooth out any cracks. Pay special attention to the joints where pieces were attached. -
Dry completely:
Set your whale aside in a cool, dry place. Depending on the thickness, it may take 24-48 hours to dry fully. Turn it occasionally to ensure the bottom dries evenly.
Don’t Rush the Groove
Make the phone slot 10-15% wider than your actual device. Air-dry clay shrinks as it cures, and you don’t want a holder that’s too tight to use.
Step 2: Painting and Finishing
-
Sand imperfections:
Once fully dry, inspect your whale. If there are rough spots or sharp edges, lightly gently buff them away with fine-grit sandpaper. -
Base coat:
Paint the entire body blue. I usually apply two thin coats rather than one thick one to get opaque, even coverage without brush strokes. Let the first coat dry before adding the second. -
Paint the grin:
Use a steady hand and a small brush to paint the raised mouth snake a warm brown or terra cotta color. -
Highlight the cheeks:
Paint the circular cheek discs a soft, peachy pink. This pop of color really brings the character to life. -
Add the eyes:
Using a very fine detail brush or the wrong end of a paintbrush, dot two small black eyes just above the smile line. -
Add eye highlights:
Once the black paint is dry, add a tiny speck of white to each eye to give it a glint of life. -
Scuffing (Optional):
For a rustic, matte look like the example, you can very lightly sand the painted surface in a few spots to let the clay texture show through, though this depends on your taste. -
Seal the piece:
Protect your hard work with a coat of matte varnish. This will prevent the paint from chipping when you slide your phone in and out.
Make it a Shark!
Add a triangular dorsal fin on the back (behind the phone slot) and paint the body grey. Use white triangles for teeth instead of the smile roll.
Your cheerful new desk buddy is now ready to hold your phone while you work or watch videos

The Complete Guide to Pottery Troubleshooting
Uncover the most common ceramic mistakes—from cracking clay to failed glazes—and learn how to fix them fast.
Grumpy Mini Cats As Desk Buddies
This charming little desk buddy captures a mood of serene stubbornness with its closed eyes and folded paws. The speckled, stone-like finish gives it a professional ceramic look without needing a kiln.
Step-by-Step Guide
Materials
- White air-dry clay (stone or granite effect clay is ideal, or plain white)
- Black acrylic paint
- Pink or coral acrylic paint
- Fine-point paintbrush or toothpick
- Old toothbrush (if using plain clay)
- Water in a small cup
- Clay sculpting tools (needle tool, smoothing tool)
- Matte varnish or sealant
Step 1: Sculpting the Base Form
-
Form the body:
Start with a ball of clay roughly the size of a tangerine. Roll it until smooth, then gently shape it into a rounded pear shape. The bottom should be wide and flat so it sits stably, tapering slightly towards the top for the head. -
Define the head:
Unlike a snowman where you stack balls, pinch and mold the top third of the pear shape to define the head area. It should effortlessly blend into the body, suggesting a chubby cat with no distinct neck. -
Shape the ears:
Pinch two small triangles of clay from the top of the head. Smooth them upwards to create distinct, pointy ears. Use a little water on your finger to smooth out any cracks where the ears join the skull.
Cracks Appearing?
If small cracks appear while drying, mix a tiny bit of fresh clay with water to make a paste (slip) and fill them in, then sand smooth once dry.
Step 2: Adding Details & Limbs
-
Create the front paws:
Roll two small, bean-sized logs of clay. Attach these to the center of the chest area, pressing them firmly so they look like they are folded or resting on a belly. I find blending the seams with a rubber tool helps them stay put. -
Form the back feet:
Roll two smaller balls for the hind paws. Flatten them slightly and attach them at the very bottom front of the figurine, poking out from under the belly. -
Detail the paws:
Use a needle tool or a knife to gently press two or three lines into each paw to create the toes. -
Smooth the surface:
Before the clay hardens, dip your fingertip in water and polish the entire surface to remove fingerprints and bumps. This smoothness is key for the final look. -
Dry the sculpture:
Let the figurine sit for 24-48 hours until completely dry and hard. Turn it over occasionally so the bottom dries evenly.
Try a Glossy Nose
After your matte varnish dries, add a tiny drop of clear glossy nail polish or UV resin just to the pink nose for a cute, wet-nose create effect.
Step 3: Painting & Finishing
-
Create the speckled effect:
If you didn’t use granite-effect clay, here is the trick: dilute black paint with water. Dip an old toothbrush into the mixture and run your thumb across the bristles to flick tiny speckles all over the white body. -
Paint the ears:
Using a fine brush and undiluted black paint, fill in the inner triangles of the ears. A steady hand works best here to keep the lines crisp. -
Draw the facial features:
Paint two downward-curving crescents for the closed, grumpy eyes. Add a small inverted ‘Y’ shape below them for the mouth. -
Add whiskers:
Carefully paint three short, straight lines on each cheek for the whiskers. -
The pink nose:
Paint a tiny, soft triangle or oval using the pink or coral paint right at the center where the eyes and mouth meet. -
Seal the artwork:
Once all paint is fully dry, apply a coat of matte varnish. This protects the paint and gives the clay a cohesive, finished texture.
Place your grumpy little friend near a window or plant to add a touch of zen to your workspace
Mini “Accidental” Lumps Turned Into Characters
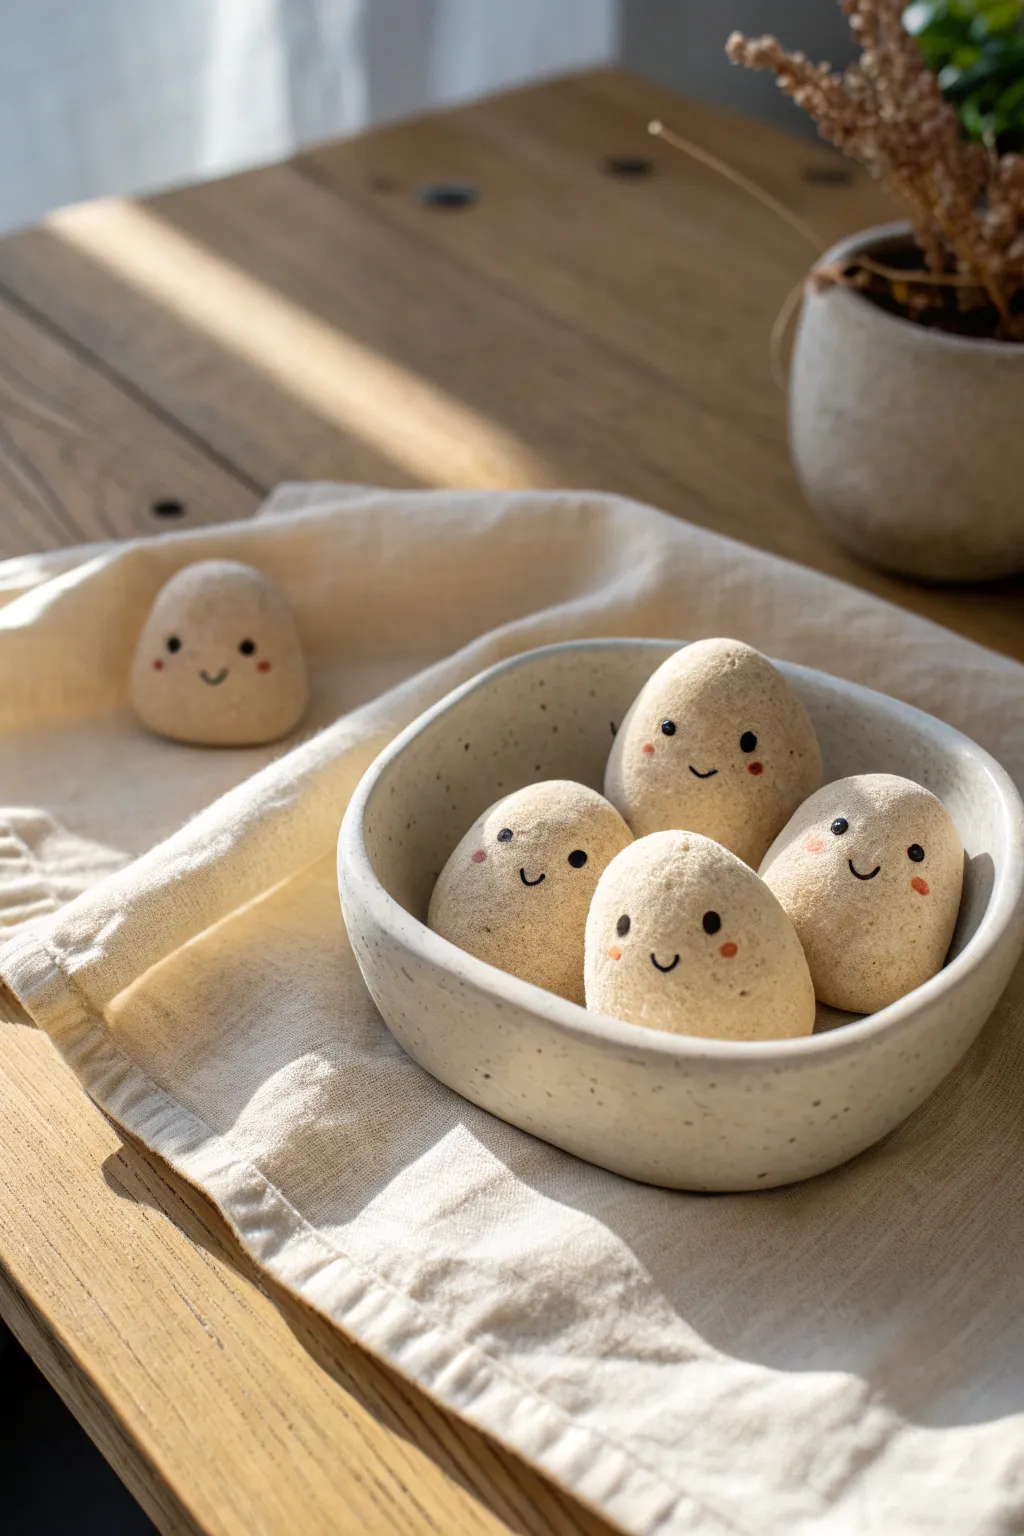
These simple, charming little characters celebrate the imperfect, lump-like nature of air dry clay. With their textured, stone-like finish and minimalist faces, they look adorable gathered in a bowl or scattered across a desk.
Step-by-Step Guide
Materials
- White or grey air dry clay
- Old toothbrush or stiff bristle brush
- Fine-grit sandpaper
- Black acrylic paint
- Soft pink acrylic paint (or chalk pastel)
- Fine detail paintbrush (size 0 or 00)
- Small dotting tool or toothpick
- Matte varnish spray (optional)
Step 1: Shaping the Bodies
-
Portion the clay:
Pinch off small amounts of clay about the size of a ping pong ball or a slightly large egg. -
Roll into spheres:
Roll each piece between your palms to create a smooth ball, warming the clay so it doesn’t crack. -
Create the egg shape:
Gently taper the top of the sphere just slightly so it resembles a natural river stone or a chubby egg. -
Flatten the base:
Tap the bottom of each shape firmly against your work surface so the character will stand upright on its own. -
Add texture:
While the clay is still wet, take an old toothbrush and gently stipple the entire surface. -
Refine the texture:
Don’t press too hard, just enough to break the smooth manufactured look of the clay and give it a porous, stone-like appearance. -
Allow to dry:
Let your clay lumps sit for at least 24-48 hours until they are completely white and bone dry throughout.
Cracks appearing?
If small cracks form while drying, mix a tiny bit of fresh clay with water to make a paste and fill them in before painting.
Step 2: Painting the Faces
-
Sand bottoms:
Once fully dry, briefly run the bottom of each piece over fine-grit sandpaper to ensure it sits perfectly flat. -
Plan the features:
Decide where the ‘front’ is; usually, the smoothest patch amidst your texture works best for the face. -
Dot the eyes:
Dip the back end of a paintbrush or a dotting tool into black acrylic paint and place two small, wide-set dots for eyes. -
Paint the smile:
Using your finest brush (size 00) and slightly thinned black paint, paint a tiny, U-shaped smile right between the eyes. -
Add cheeks:
Mix a very watery wash of pink paint, or scrape some powder off a pink pastel chalk. -
Apply blush:
Dab the pink gently onto the cheeks using your pinky finger or a dry fluffier brush for a soft, diffused look. -
Protect the finish:
If you want to seal them without losing the stone texture, mist them lightly with a matte varnish spray.
Natural Speckles
For a granite look, flick a toothbrush loaded with watered-down brown or grey paint over the dried clay before adding faces.
Enjoy your collection of quiet little clay companions on your shelf


What Really Happens Inside the Kiln
Learn how time and temperature work together inside the kiln to transform clay into durable ceramic.
Tiny Mushroom People With Awkward Vibes
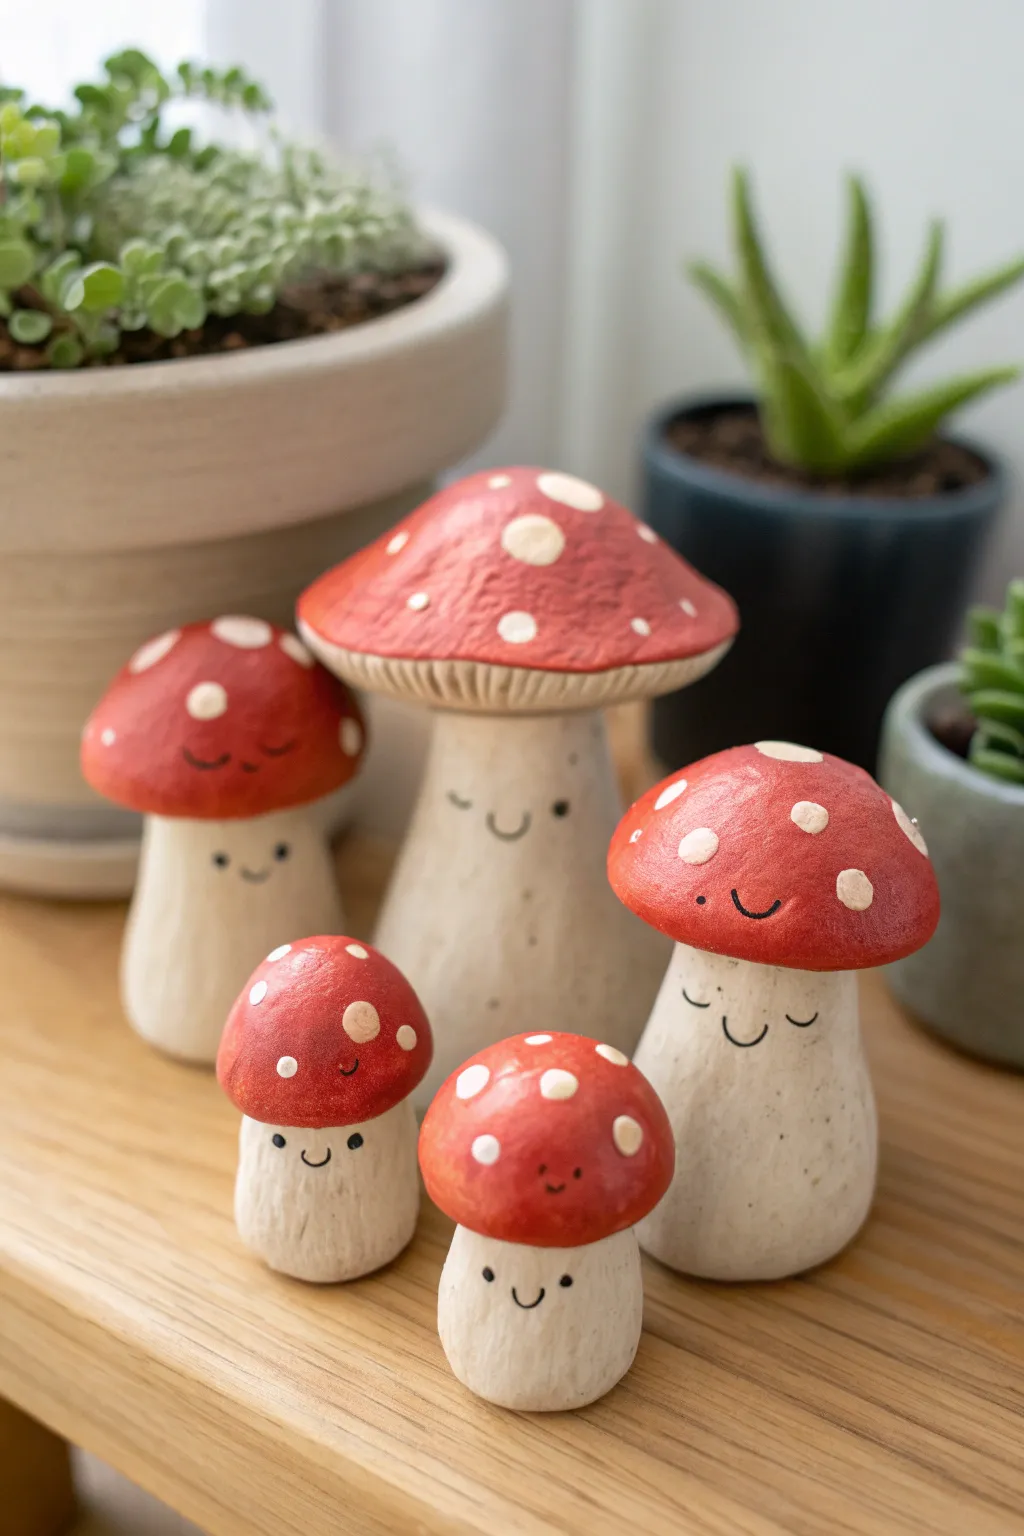
Sculpt a charming little family of fungi that brings a touch of woodland magic to your desk or shelf. These air dry clay figures feature textured stems, vibrant caps, and tiny painted faces that give them a quirky, lovable personality.
Step-by-Step
Materials
- White air dry clay
- Acrylic paints (Red, Burnt Sienna, Cream/Off-White, Black)
- Aluminum foil
- Sculpting tool set (needle tool, small spatula)
- Small paintbrush (sizes 0 and 2)
- Cup of water
- Sandpaper (fine grit)
- Matt varnish or sealant
Step 1: Forming the Stems
-
Prepare the foil cores:
To save clay and reduce drying time, crumple small pieces of aluminum foil into thick, slightly tapered cylinder shapes. Make five of these in varying sizes, ranging from tall and sturdy to short and squat. -
Base layer of clay:
Roll out pieces of white air dry clay into flat sheets about a quarter-inch thick. Wrap one sheet around each foil core, smoothing the seam where the clay meets itself. -
Shape the base:
Gently tap the bottom of each stem against your work surface to create a flat, stable standing area. The figures need to stand upright without wobbling. -
Refine the shape:
Using your thumb and water, smooth the clay upward, slightly narrowing the neck near the top where the cap will sit. I like to leave the bottom slightly bulbous for that classic mushroom look. -
Add stem texture:
Take a needle tool or a stiff bristled brush and lightly drag it vertically up the stem. These shallow striations mimic the natural texture of mushroom stalks.
Keep it Textured
Don’t over-smooth the stems! The small vertical drag marks add realism and catch the paint beautifully later.
Step 2: Sculpting the Caps
-
Create the cap cores:
Similar to the stems, create five flattened dome shapes out of aluminum foil. This keeps the heads from being too heavy and toppling your figures. -
Cover with clay:
Cover the foil domes with a smooth layer of clay. Ensure the top surface is nice and rounded, smoothing away any fingerprints with a bit of water. -
Detail the gills:
Flip the caps over. Use a knife tool to score fine lines radiating from the center to the edge on the underside. This creates the ‘gills’ of the mushroom. -
Attach cap to stem:
Score the top of the stem and the center underside of the cap. Apply a little water or slip (clay mixed with water) to both scored areas and press them firmly together. Blend the clay slightly at the connection point if needed for stability. -
Final smoothing:
Give the entire figure a once-over with a damp finger to soften any harsh edges. -
Allow to dry:
Set your mushroom family in a dry, well-ventilated area. Let them cure for at least 24-48 hours until they are completely hard and room temperature to the touch.
Step 3: Painting and Personality
-
Sanding:
Once fully dry, use fine-grit sandpaper to gently smooth out any unintentional bumps on the cap or stem that distract from the shape. -
Base coat the stems:
Paint the stems with a cream or off-white acrylic paint. You may need two coats to get a solid, opaque finish that covers the gray tone of dried clay. -
Paint the caps:
Mix a bright red with a tiny touch of brown (Burnt Sienna) to get that earthy, natural woodland red. Paint the entire top surface of the caps. -
Add the dots:
Using the handle end of a paintbrush, dip it into pale cream paint and dot it onto the red caps. Vary the size of the dots for a more organic feel. -
Draw the faces:
With your smallest detail brush (size 0) and black paint diluted slightly with water, paint tiny, simple faces. Use small dots for eyes and simple curved lines for smiles. Place some on the stems and some directly on the caps for variety. -
Protect your work:
Finish the project by applying a coat of matte varnish. This protects the paint from chipping and gives the mushrooms a professional, finished texture.
Forest Floor Base
Glue dried moss or small pebbles to the bottom of the stems to make them look freshly plucked from the ground.
Arrange your little mushroom clan near a houseplant to create a secret garden scene
Goofy Magnet Faces For The Fridge
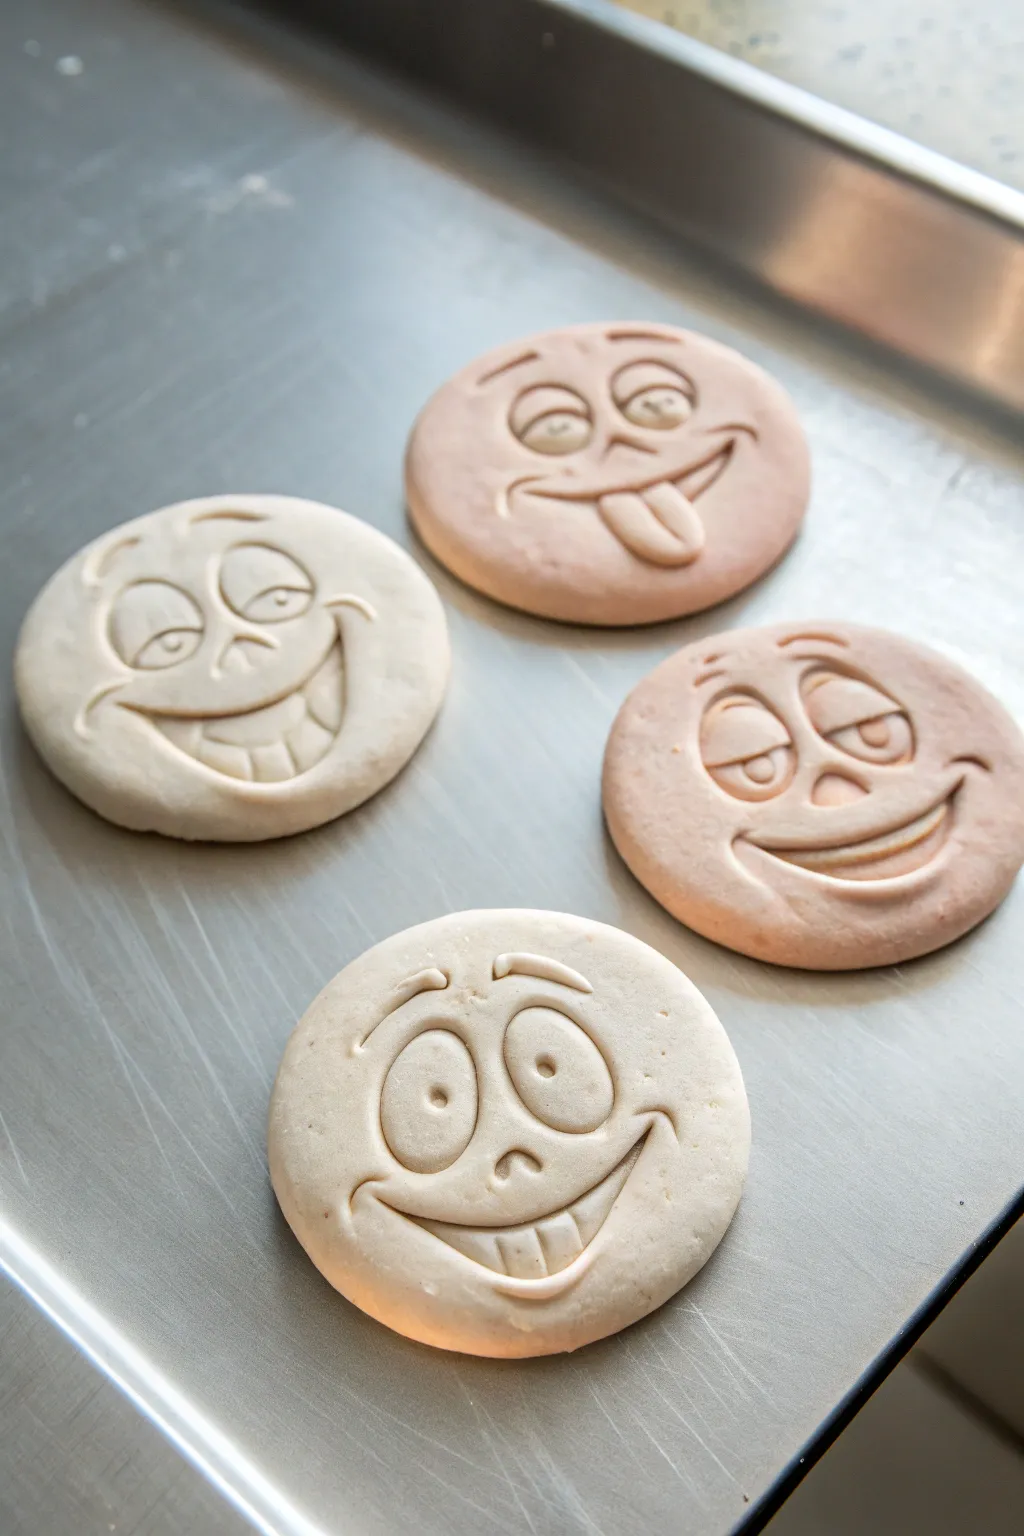
Brighten up your refrigerator door with these hilariously expressive magnet faces sculpted from air-dry clay. These smooth, round discs feature embedded cartoon personalities ranging from blissful smiles to silly tongues-out expressions, perfect for holding up your grocery lists.
Step-by-Step Guide
Materials
- Air-dry clay (white and terracotta/brown)
- Circular cookie cutter (approx. 3-4 inches)
- Rolling pin
- Parchment paper or non-stick mat
- Sculpting tools (ball styluses, rubber shapers)
- Small knife or clay blade
- Water in a small cup
- Strong round magnets
- Strong craft glue (E6000 or similar)
- Fine-grit sandpaper (optional)
Step 1: Preparation & Base Shaping
-
Prepare the clay colors:
Start by conditioning your air-dry clay. If you want the two-tone look seen in the photo, keep your white clay separate from a terracotta or brown clay. You can also mix a tiny amount of brown into white to create a light beige tone. -
Roll out the slab:
Place a ball of clay on your parchment paper. Using the rolling pin, roll it out until it is an even slab, approximately 1/4 to 1/2 inch thick. It needs to be thick enough to hold the deep facial impressions without breaking. -
Cut the circles:
Press your circular cookie cutter firmly into the slab to create clean, perfect rounds. Lift the excess clay away from the circles rather than trying to move the circles themselves, which helps prevent warping. -
Smooth the edges:
Dip your finger lightly in water and run it around the cut edge of each circle to soften the sharp angle left by the cutter, creating a pillowy, cookie-like edge.
Step 2: Sculpting the Features
-
Plan the expressions:
Decide on your four personalities. The example features a wide-eyed grin, a sleepy smile, a tongue-out face, and a classic toothy grin. Lightly sketch the placement of eyes and mouths with a needle tool if you need a guide. -
Create eye sockets:
For faces with open eyes, use a medium ball stylus or your thumb to gently depress the area where the eyes will go. This adds dimension rather than just sticking eyes on top of a flat surface. -
Form the eyeballs:
Roll small balls of clay for the eyes. Flatten them slightly and press them into the sockets. For the sleepy or half-closed eyes, shape the ball into a half-moon or oval before pressing it down. -
Add eyelids and details:
Roll very thin snakes of clay to create eyelids. Place them over the top or bottom of the eyeballs to create heavy or sleepy lids. Use a small ball tool to indent the pupils. -
Sculpt the eyebrows:
Roll small tapered snakes for eyebrows. Curve them high for surprise or low and slanted for a relaxed look. Press them firmly onto the forehead area, blending the edges slightly with a rubber tool. -
Carve the mouth shape:
Use a clay knife or a curved carving tool to slice the main smile line. Gently pry the clay open slightly to create depth. For open mouths, recess the area inside the lips. -
Add lips and tongues:
Roll thin coils of clay to outline the smiles, blending the outer edges into the cheek to look like lips. For the tongue-out face, shape a small flattened teardrop of clay and press it coming out of the mouth opening. -
Detail the teeth:
For the toothy grins, flatten a small strip of clay inside the mouth area. Use a knife tool to score vertical lines, creating the separation between teeth. -
Final smoothing:
Dip a soft brush or your finger in a tiny bit of water and gently brush over the entire face to remove fingerprints and harsh tool marks. This gives it that smooth, molded plastic look.
Smooth Operator
Keep a piece of plastic wrap over the clay circles while you press down the initial shapes. This softens the edges of your tool marks instantly for a cartoonish finish.
Step 3: Drying & Assembly
-
Begin the drying process:
Let the faces dry on a flat surface lined with parchment paper. I find flipping them over gently after about 12 hours helps the backs dry evenly without curling. -
Wait for full cure:
Allow them to dry completely for 24-48 hours depending on humidity. The clay should turn a lighter, chalkier color when fully dry. -
Sand imperfections:
Once bone dry, use fine-grit sandpaper to gently buff away any rough spots on the edges or surface. -
Attach the magnets:
Apply a dab of strong craft glue to the back of the clay disc. Press a strong round magnet into the glue. Let the glue cure completely according to the bottle instructions.
Make Them Pop
Once dry, use pastel chalk shavings and a soft brush to add rosy cheeks or shading to the eyelids before sealing with a matte varnish.
Now you have a set of quirky characters ready to hold up your most important notes

TRACK YOUR CERAMIC JOURNEY
Capture glaze tests, firing details, and creative progress—all in one simple printable. Make your projects easier to repeat and improve.
Tiny Butt Planters With Cheeks
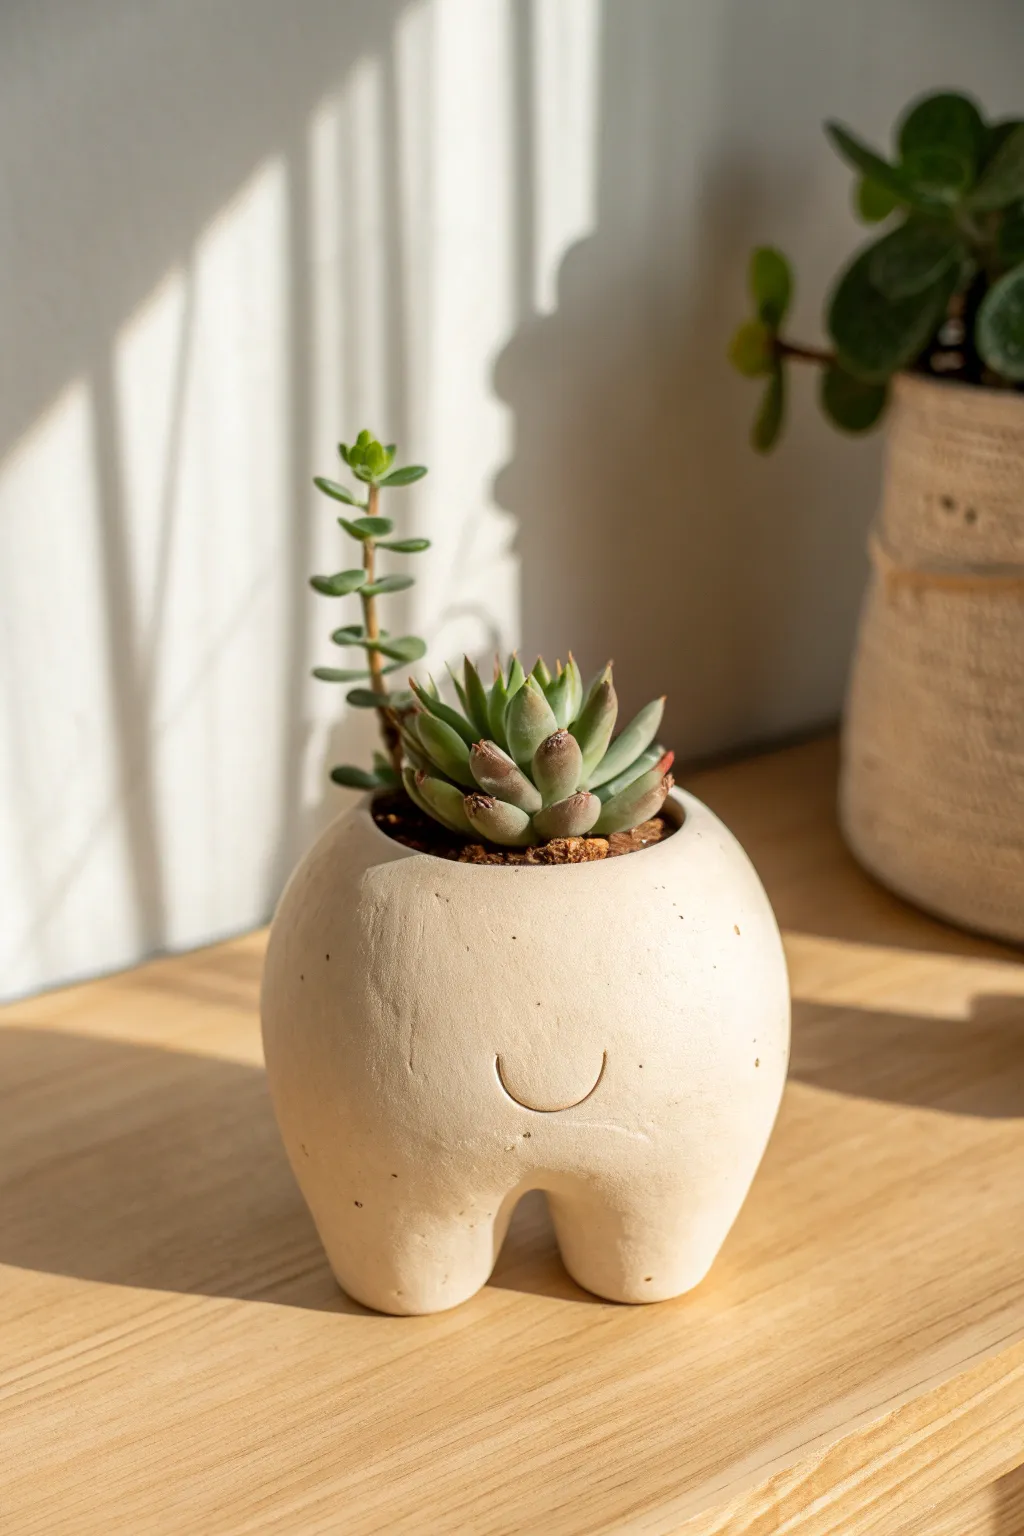
Add a touch of playful humor to your succulent collection with this adorable, minimalist planter shaped like a tiny bottom. Its rounded form and subtle curve detail make it a charming, understated conversation piece that looks great on any sunny shelf.
Step-by-Step
Materials
- Air dry clay (white or cream)
- Small rolling pin
- Clay sculpting tools (specifically a needle tool and a blending tool)
- Water in a small cup
- Sponge
- Fine-grit sandpaper
- Clear acrylic sealant (matte finish)
- Succulent potting soil
- Small succulent plants
Step 1: Shaping the Base
-
Prepare the Clay:
Start with a ball of clay roughly the size of a large orange. Knead it well to remove air bubbles and warm it up, ensuring it’s pliable and smooth. -
Form the Body:
Roll the clay into a smooth sphere. Gently tap the top against your work surface to flatten it slightly—this will eventually become the opening for your plant. -
Create the Legs:
Turn the sphere over. Using your thumbs, gently press into the bottom center to create a divide, separating the clay into two distinct, stubby sections. -
Refine the Stance:
Mold these two sections into rounded, short legs. Stand the pot up to ensure it is balanced and doesn’t tip over. If it wobbles, gently press the pot down onto the table to flatten the bottoms of the feet slightly.
Leg Stability Fix
If the legs start to splay out under the weight of the body while sculpting, prop them up with small balls of aluminum foil or paper towels until the clay starts to firm up.
Step 2: Hollowing and Detailing
-
Open the Pot:
Flip the pot back over to the top. Using your thumbs, press into the center and gently pinch outwards to create the hollow cavity. Keep the walls about 1/4 to 1/2 inch thick for stability. -
Smooth the Inside:
Dip your finger in a little water and smooth the interior walls, blending any cracks that may have formed during the pinching process. -
Add the ‘Cheek’ Detail:
On the front of the pot (the side without the leg split), use a needle tool or a small carving tool to draw a simple upward-curved semi-circle heavily low on the belly. -
Carve the Lines:
To give the illusion of cheeks, deepen the curved line slightly, softening the edges with a wet finger so it looks like a soft indentation rather than a sharp cut. -
Polish the Surface:
Use a damp sponge to wipe down the entire exterior. I like to spend extra time here smoothing out fingerprints to get that matte, ceramic look.
Make it Speckled
For a stone-like effect, mix small amounts of dried coffee grounds or black pepper into your clay before sculpting. It adds instant texture without needing paint.
Step 3: Finishing Touches
-
Let it Dry:
Place your creation in a safe spot away from direct heat. Allow it to air dry for 24 to 48 hours until it turns a unified chalky white color and feels hard. -
Sand for Smoothness:
Once fully dry, take fine-grit sandpaper and gently sand away any remaining rough patches or uneven bumps, paying attention to the rim. -
Seal the Clay:
Apply a coat of matte clear acrylic sealant to the entire pot, inside and out. This is crucial for air dry clay to prevent it from dissolving when you water your plants. -
Second Coat:
After the first coat dries, apply a second layer of sealant to ensure it is water-resistant. Let this cure completely according to the bottle instructions. -
Planting:
Fill the cavity with succulent potting soil and gently nestle your chosen plants inside. A rosette succulent combined with a taller stalk creates a nice height contrast.
Now your delightfully cheeky planter is ready to bring a smile to anyone who spots it
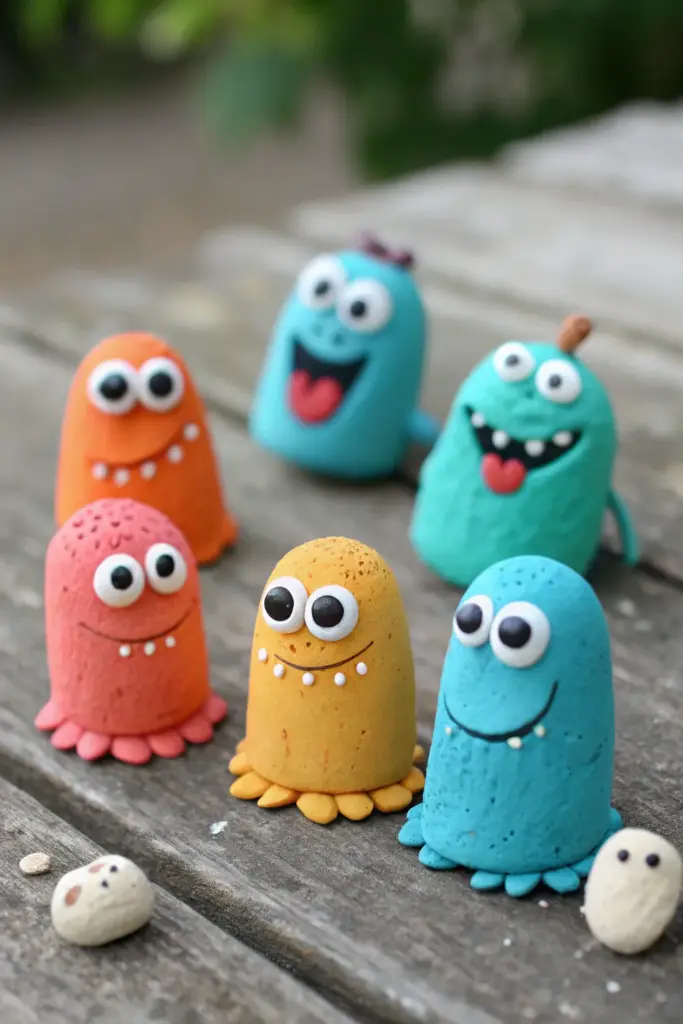
Weird Little Finger Puppets With Faces

These quirky little characters are bursting with personality, featuring goofy expressions and vibrant colors. Molded from air dry clay, they make perfect finger puppets or adorable desk companions that seem ready to start a conversation.
Step-by-Step Tutorial
Materials
- Air dry clay (white or pre-colored)
- Acrylic paints (pink, orange, yellow, teal, light blue, white, black)
- Clear matte varnish or sealant
- Sculpting tools (ball styluses, simple plastic knife)
- Small paintbrush
- Water cup
- Toothpicks (for texture)
- Your own finger (for sizing)
Step 1: Shaping the Bodies
-
Prepare the clay:
Knead a walnut-sized ball of air dry clay until it is smooth and pliable. If you want colored clay from the start, mix acrylic paint directly into the white clay now, or plan to paint them later. -
Form the base shape:
Roll the clay into a smooth cylinder with a rounded top, resembling a thimble or a small ghost. -
Create the finger hole:
Gently press your index finger into the bottom of the cylinder to create a hollow cavity. Rotate your finger slightly to widen it, ensuring the walls remain about 1/4 inch thick for durability. -
Smooth the surface:
Dip your finger in a tiny bit of water and rub it over the exterior to remove any cracks or fingerprints.
Step 2: Adding Feet & Features
-
Add tentacle feet (optional):
For the bottom-row characters, roll small, pea-sized balls of clay. Flatten them slightly and attach 6-8 of them around the bottom rim of the body. -
Blend the seams:
Use a sculpting tool or your finger to smooth the clay from the top of the ‘feet’ onto the main body so they are securely attached. -
Sculpt large eyes:
Roll two small white balls of clay for eyes. Press them firmly onto the upper face area. For mismatched hilarity, make one eye slightly larger than the other. -
Carve the mouth:
Use a plastic knife or a specialized clay tool to carve out a mouth. You can make a simple curved line for a smile, or scoop out a deeper ‘D’ shape for an open mouth. -
Add dimension:
For open mouths, shape a tiny tongue from a small piece of clay and press it inside. For teeth, roll minuscule rice-grain shapes and attach them to the mouth edge. -
Create texture:
I like to take a stiff bristle brush or a textured sponge and gently tap the surface of the clay body to give it a slightly pitted, organic look before it dries. -
Let it dry:
Set your figures aside to dry completely. This usually takes 24-48 hours depending on the brand of clay and humidity.
Sticky Situation?
If the clay is sticking to your finger while making the hole, lightly coat your skin with a tiny bit of cornstarch or baby oil before inserting it.
Step 3: Painting & Details
-
Base coat:
If you didn’t pre-color your clay, apply two coats of acrylic paint to the body. Use bright, saturated colors like coral pink, mustard yellow, and sky blue. -
Paint the eyes:
Paint the sculpted eye balls pure white. Let the white dry completely before proceeding. -
Add pupils:
Use a small dotting tool or the wrong end of a paintbrush dipped in black paint to create the pupils. Make them gaze in different directions to give each puppet a unique personality. -
Detail the mouth:
Paint the inside of open mouths dark brown or black. Paint tongues pink or red, and carefully dot any sculpted teeth with white. -
Add cheeks and specks:
Dilute a darker shade of the body color (or use brown/black) and flick a toothbrush or use a fine brush to add tiny speckles for texture. -
Seal the work:
Once all paint is dry, apply a thin layer of matte varnish to protect your puppets from wear and tear.
Make ‘Em Hairy
Before the clay dries, push short bits of wire or yarn into the tops of their heads to create funny hairstyles or alien antennae.
Now you have a whole crew of silly finger friends ready to put on a show