I love working with ivy because it can be neat and sculptural one day, then wildly lush and drapey the next—depending on the planter you give it. Here are my favorite ivy planter ideas that show off those trailing vines and climbing stems in ways that feel totally doable at home.
Classic Terra Cotta Pot With Ivy Spill
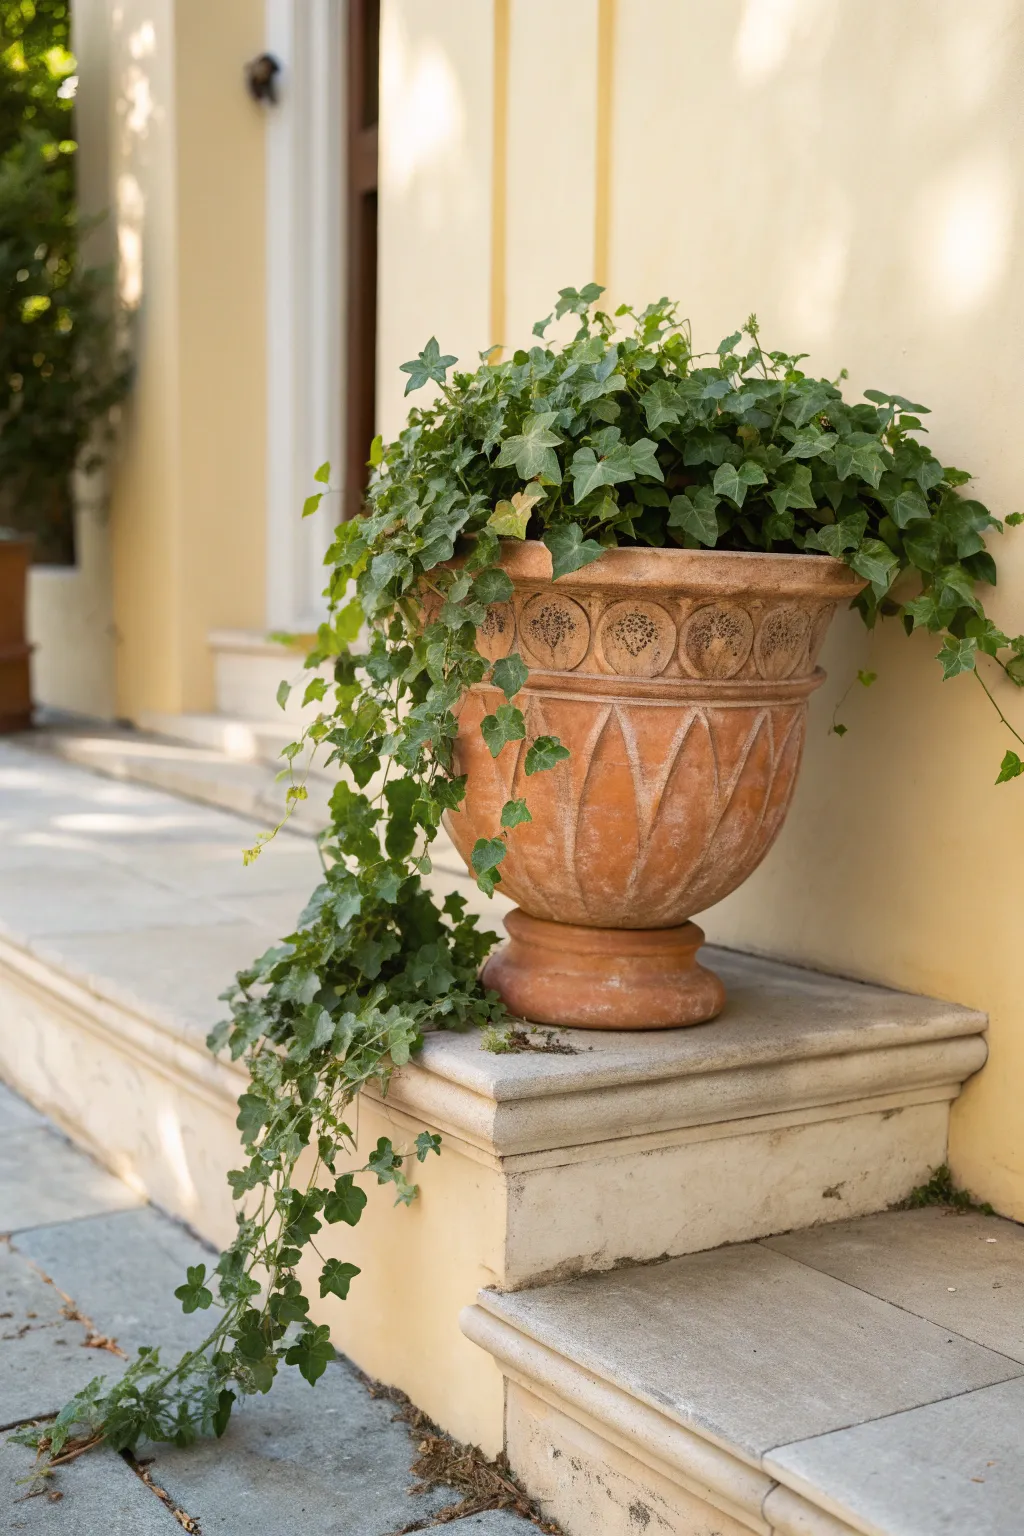
Bring timeless elegance to your entryway with this classic terra cotta planter overflowing with lush English ivy. The dramatic spill of vines creates a stunning visual bridge between the architectural details of the pot and your garden steps.
Step-by-Step
Materials
- Large decorative terra cotta urn (approx. 18-24 inches diameter)
- Potting soil mix (well-draining)
- Perlite or pumice (optional for drainage)
- Broken pottery shards or gravel (for the drainage hole)
- Mature English Ivy plants (Hedera helix) – at least 3-4 gallon-sized plants for instant fullness
- Slow-release fertilizer granules
- Watering can
- Gardening gloves
- Trowel
Step 1: Preparation
-
Choose your location:
Select a spot on your porch or steps that receives bright, indirect light. Ivy can scorch in direct, harsh midday sun but thrives in dappled shade. -
Prepare the pot drainage:
Before adding soil, place a large curved pottery shard or a layer of gravel over the drainage hole at the bottom of your terra cotta urn. This prevents soil from washing out while ensuring excess water can escape. -
Mix the soil:
In a wheelbarrow or bucket, mix your potting soil with a handful of perlite if the mix seems heavy. Ivy hates soggy roots, so aeration is key. -
Fill the planter:
Fill the urn with your soil mix until it reaches about 2-3 inches from the rim. Lightly pat it down to remove large air pockets, but keep the texture relatively loose.
Soak the Pot
Before planting, soak your unglazed terra cotta pot in water for 30 minutes. This hydrates the clay so it doesn’t immediately suck all the moisture out of your new plant’s soil.
Step 2: Planting
-
Plan your arrangement:
Take your ivy plants out of their nursery pots. Look for the plants with the longest runners or vines; these will be your ‘spillers’. -
Position the spillers:
Dig a hole near the front edge of the pot—the side that faces the steps or walkway. Place your longest-vined ivy plant here, angling the root ball slightly so the vines naturally fall over the rim. -
Fill the center:
Place the remaining ivy plants behind the front spiller to fill out the center and back of the pot. You want a dense, crowded look right from the start for that established feel. -
Secure the plants:
Fill in the gaps between the root balls with more potting mix. Use your fingers to tuck soil firmly around the roots, ensuring the plants are stable. -
Tease the vines:
Gently untangle the long vines from the front plant. I like to manually drape them over the decorative relief of the pot so they hang straight down rather than getting bunched up on the soil surface.
Layered Heights
For more drama, plant a tall, spikey element like Dracaena or an ornamental grass in the very center, letting the ivy act purely as a groundcover and spiller around the base.
Step 3: Styling and Care
-
Water thoroughly:
Water the planter immediately until you see water trickling from the base. This settles the soil around the roots. -
Initial feeding:
Sprinkle a tablespoon of slow-release fertilizer granules over the soil surface and lightly scratch it in with a small hand rake or fork. -
Arrange the cascade:
Once the plant is watered and settled, arrange the longest vines so they touch the surface below. If they aren’t quite long enough yet, position them to maximize their length visually. -
Clean the pot:
Wipe down the outside of the terra cotta with a damp cloth to remove any soil smudges or dust from planting, letting that warm clay color shine. -
Prune for shape:
Snip off any leaves that look damaged or yellow. If some vines are sticking up awkwardly instead of trailing, you can gently pin them down to the soil with a floral pin until they learn to trail. -
Ongoing maintenance:
Check the soil moisture daily, especially with terra cotta which wicks moisture away. The soil should feel cool and slightly damp, but never soggy.
Enjoy the effortless charm this simple yet dramatic planter adds to your outdoor space

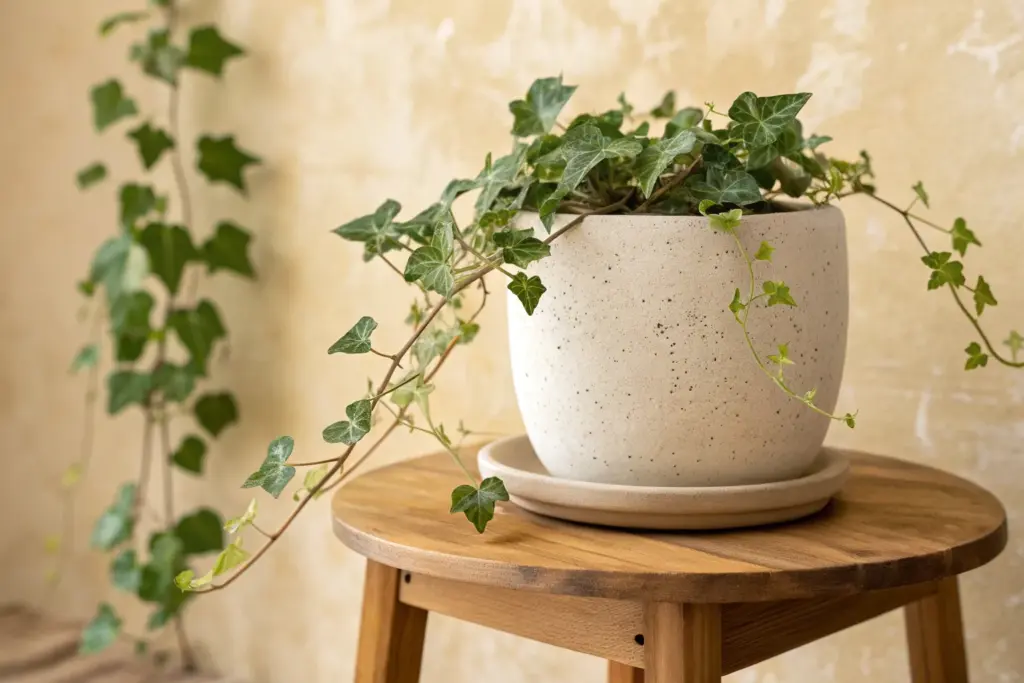
Hanging Planter With Cascading Ivy
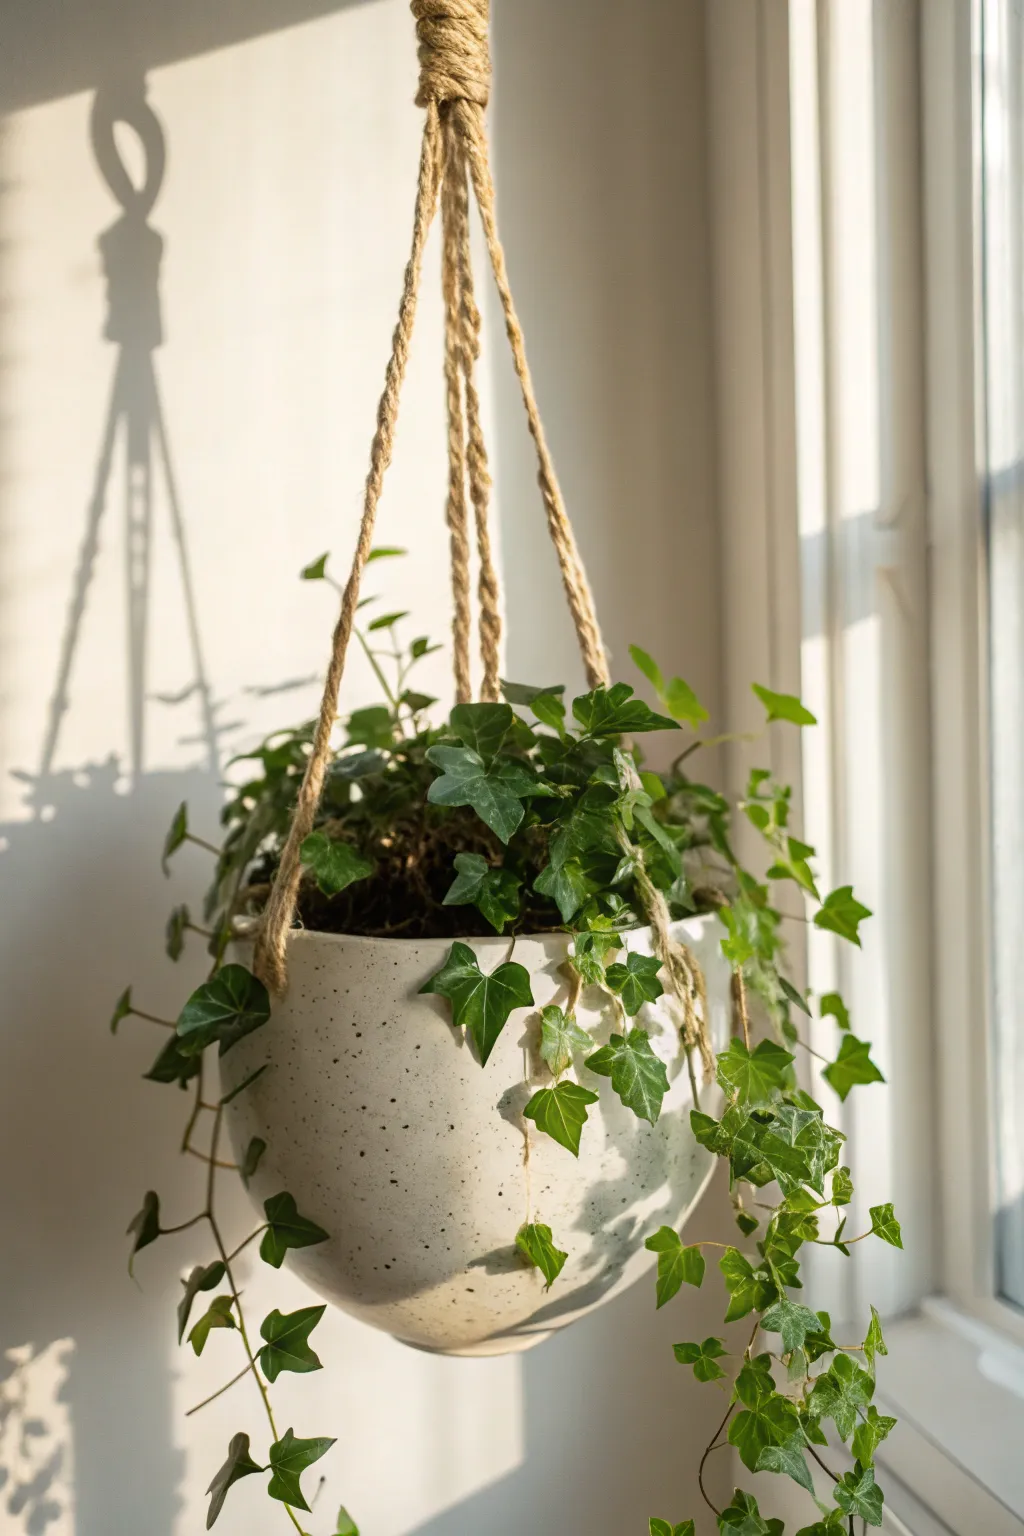
Bring a touch of organic warmth to your window with this simple yet stunning hanging planter project. By combining a classic speckled pot with rustic jute rope, you create the perfect frame for trailing English Ivy to cascade through the sunlight.
Step-by-Step Tutorial
Materials
- A round, ceramic hanging planter (white with black speckles)
- English Ivy plant (Hedera helix) with trailing vines
- Thick jute or hemp rope (approx. 1/4 inch diameter)
- Potting soil mix well-draining
- Pea gravel or small stones (for drainage)
- Scissors
- S-hook or ceiling hook for installation
Step 1: Preparing the Potting Base
-
Check for drainage:
Inspect the bottom of your speckled ceramic pot. If there isn’t a pre-drilled hole, I recommend adding a shallow layer of pea gravel or small stones to the bottom to prevent root rot. -
Add first soil layer:
Pour a few inches of well-draining potting soil over your drainage layer. You want the plant to sit at a level where the soil surface is about an inch below the pot’s rim. -
Prepare the plant:
Gently remove your English Ivy from its nursery pot. Squeeze the sides lightly to loosen the root ball without breaking the delicate trailing stems. -
Positioning:
Place the ivy in the center of the pot. Arrange the longer vines so they naturally drape over the edges, ensuring they aren’t tangled or trapped under the leaves. -
Backfill:
Fill the gaps around the root ball with more potting soil. Press down gently with your thumbs to secure the plant and eliminate large air pockets.
Natural Twists
To get the extra-coiled look on the ropes, wet the jute slightly before twisting and let it dry under tension. This sets the shape permanently.
Step 2: Creating the Rope Suspension
-
Determine rope length:
Decide how low you want the planter to hang. Cut three separate lengths of jute rope, making them about 1.5 times longer than your desired hang height to account for knots. -
Secure to pot:
Thread one end of each rope through the pre-drilled holes in the rim of your ceramic planter. If your pot has no holes, you’ll need to create a macramé cradle instead. -
Knot the base:
Tie a sturdy overhand knot on the inside of the pot for each rope end. Pull upward firmly to ensure the knots are large enough not to slip through the holes. -
Check balance:
Hold all three ropes together above the pot and lift it. Verify that the pot hangs level; adjust your interior knots if one side dips lower than the others. -
Twist the rope:
For that textured look seen in the photo, tightly twist the fibers of the jute rope as you hold them taut upright.
Unbalanced Pot?
If the pot tilts despite even ropes, the soil density might be uneven. Rotate the pot or shift a heavier soil section to counterbalance the tilt.
Step 3: Final Assembly
-
Define the top knot:
Gather all three ropes at your desired hanging height. Wrap a separate, long piece of jute rope horizontally around the main bundle to create a ‘gathering knot’. -
Secure the wrap:
After wrapping tightly for about 1-2 inches, tuck the end of the wrapping rope under the coils and pull tight to secure it seamlessly. -
Create the loop:
Tie the remaining top ends of the three main ropes into a strong loop for hanging, or simply knot them together if you plan to use an S-hook. -
Trim excess:
Snip off any scraggly ends from your top knot for a clean, professional finish. -
Arrange the vines:
Carefully weave the trailing ivy vines through and around the jute ropes. Let some hang free while intertwining others slightly with the suspension cords for a lush, integrated look. -
Water and hang:
Give the plant a light initial watering to settle the soil. Hang your new creation near a window that gets bright, indirect light to cast those beautiful shadows.
Enjoy the calming atmosphere your new hanging ivy brings to the room


Window Box With Draping Ivy Edge
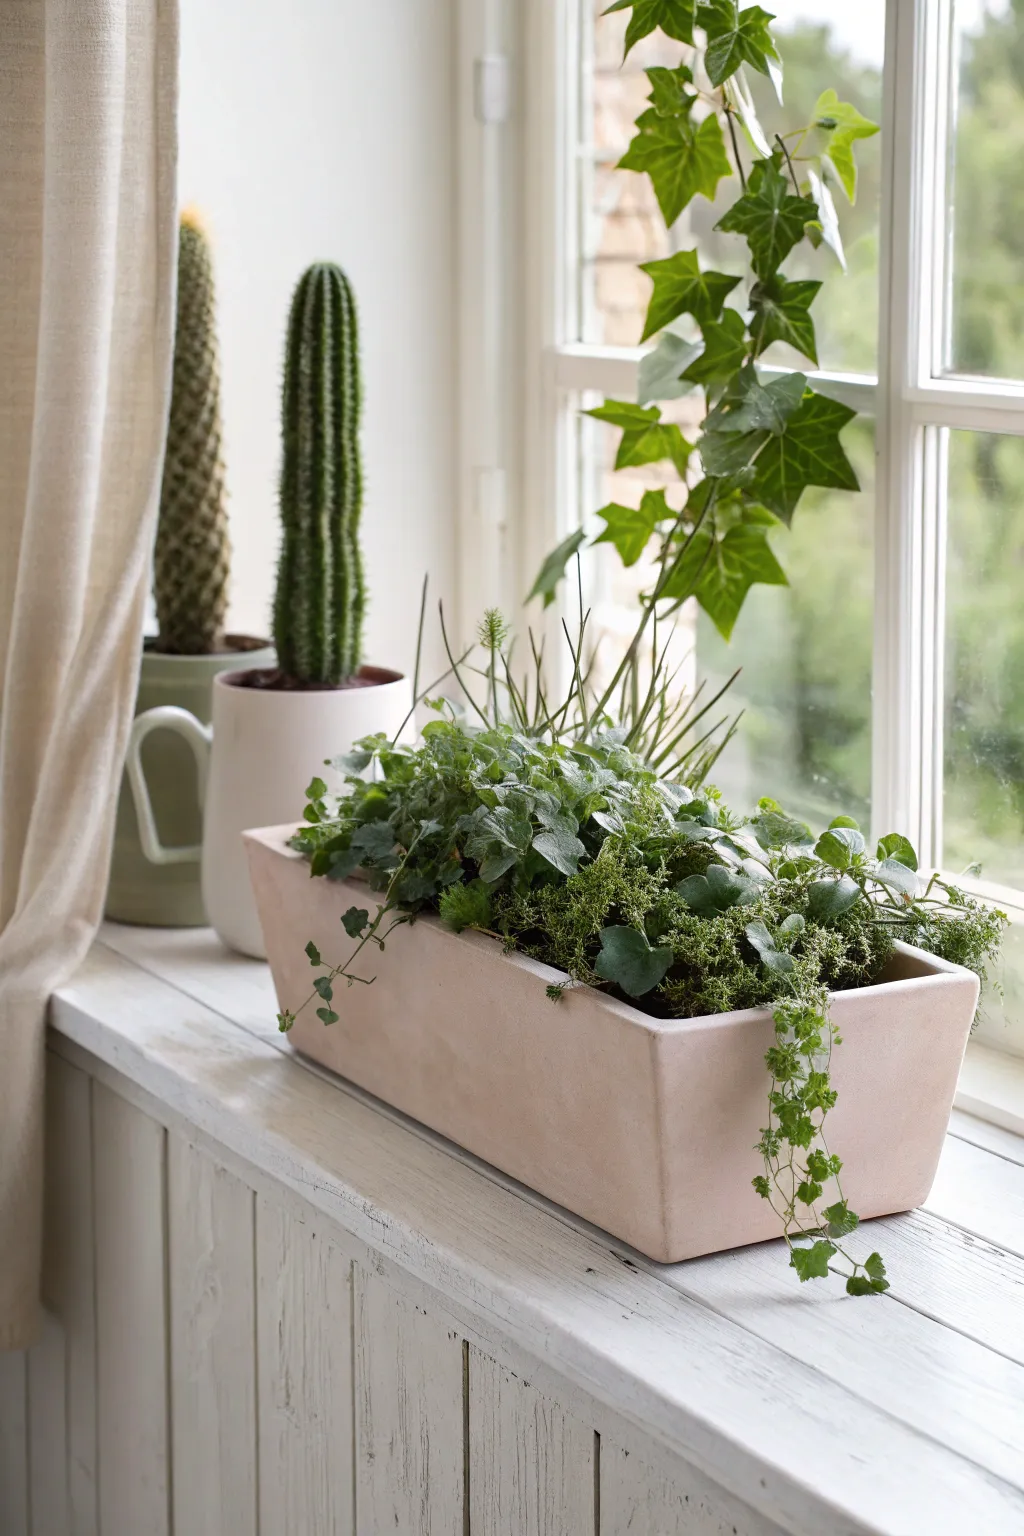
Bring a fresh, verdant touch to your windowsill with this mixed planter arrangement that balances vertical height with soft, cascading edges. The combination of structured horsetail reeds and delicate, trailing ivy creates a textural masterpiece perfect for brightening up an indoor view.
How-To Guide
Materials
- Rectangular planter box (terracotta or ceramic, approx. 12-16 inches long)
- Small gravel or expanded clay pebbles (for drainage)
- Premium indoor potting soil
- English Ivy (Hedera helix) – 2 small starter plants
- Horsetail Reed (Equisetum) or ornamental grass – 1 medium plant
- Baby’s Tears (Soleirolia soleirolii) or Irish Moss – 2 small starter plants
- Watering can
- Gardening gloves
- Small trowel
Step 1: Preparing the Planter
-
Select the Right Container:
Begin with a rectangular planter box that fits your windowsill depth. The one shown has a matte, pale terracotta finish which contrasts beautifully with the dark greens. -
Create a Drainage Layer:
Since indoor window boxes often lack drainage holes to protect the sill, pour a 1-inch layer of small gravel or expanded clay pebbles across the bottom of the container. -
Add the Base Soil:
Fill the planter about halfway with high-quality indoor potting soil. Don’t pack it down just yet; keep it loose to accommodate the root balls of your plants.
Humidity Hack
Baby’s Tears and ferns love moisture. Place a small saucer of water hidden behind the planter to increase local humidity without overwatering
Step 2: Arranging the Vertical Elements
-
Position the Horsetail:
Remove the Horsetail Reed or ornamental grass from its nursery pot. Gently tease the roots if they are bound tight. -
Place for Height:
Set the Horsetail in the center of the planter, slightly toward the back. This creates the vertical backdrop for the lower plants. -
Secure the Roots:
Add a scoop of soil around the base of the Horsetail to keep it upright while you work on the rest of the composition.
Step 3: Adding Texture and Volume
-
Prepare the Ground Cover:
Take your container of Baby’s Tears or Irish Moss and gently divide it into two or three smaller clumps if necessary. -
Fill the Mid-Ground:
Nestle these mossy clumps on either side of the central grass, towards the middle of the planter width. This creates that lush, carpeted look seen in the photo. -
Soil Check:
Add soil in the gaps between plants, ensuring the root balls are all sitting at roughly the same level, about an inch below the planter’s rim.
Variations
Swap the Horsetail for Snake Plant (Sansevieria) for a more sculptural, low-light tolerant version that still provides vertical interest
Step 4: Planting the Cascading Edge
-
Prepare the Ivy:
Select your English Ivy plants. Look for ones that already have long tendrils starting to grow. -
Position for Trailing:
Plant the ivy at the very front corners and edges of the box. Tilt the root ball slightly forward so the vines naturally fall over the rim rather than growing straight up. -
Weave and Tuck:
If there are interior vines, weave them gently through the mossy ground cover to integrate the look, but ensure the longest strands hang freely over the side.
Step 5: Finishing Touches
-
Fill and Tamp:
Fill the remaining gaps with potting soil. I always use my fingers to gently tamp down the earth around each plant base to eliminate air pockets. -
Clean the Leaves:
Brush off any stray soil particles from the delicate leaves of the Baby’s Tears and Ivy using a soft, dry brush. -
Initial Watering:
Water the arrangement slowly and thoroughly. Stop when the soil feels moist to the touch but not soggy, adhering to the needs of the indoor plants chosen. -
Placement:
Place the finished box on a bright windowsill. Ensure the trailing ivy has room to drape vertically down the front of the sill for the full effect.
Enjoy watching your mini garden flourish as the ivy slowly creeps further down the wall


Shallow Bowl Planter for Tabletop Ivy
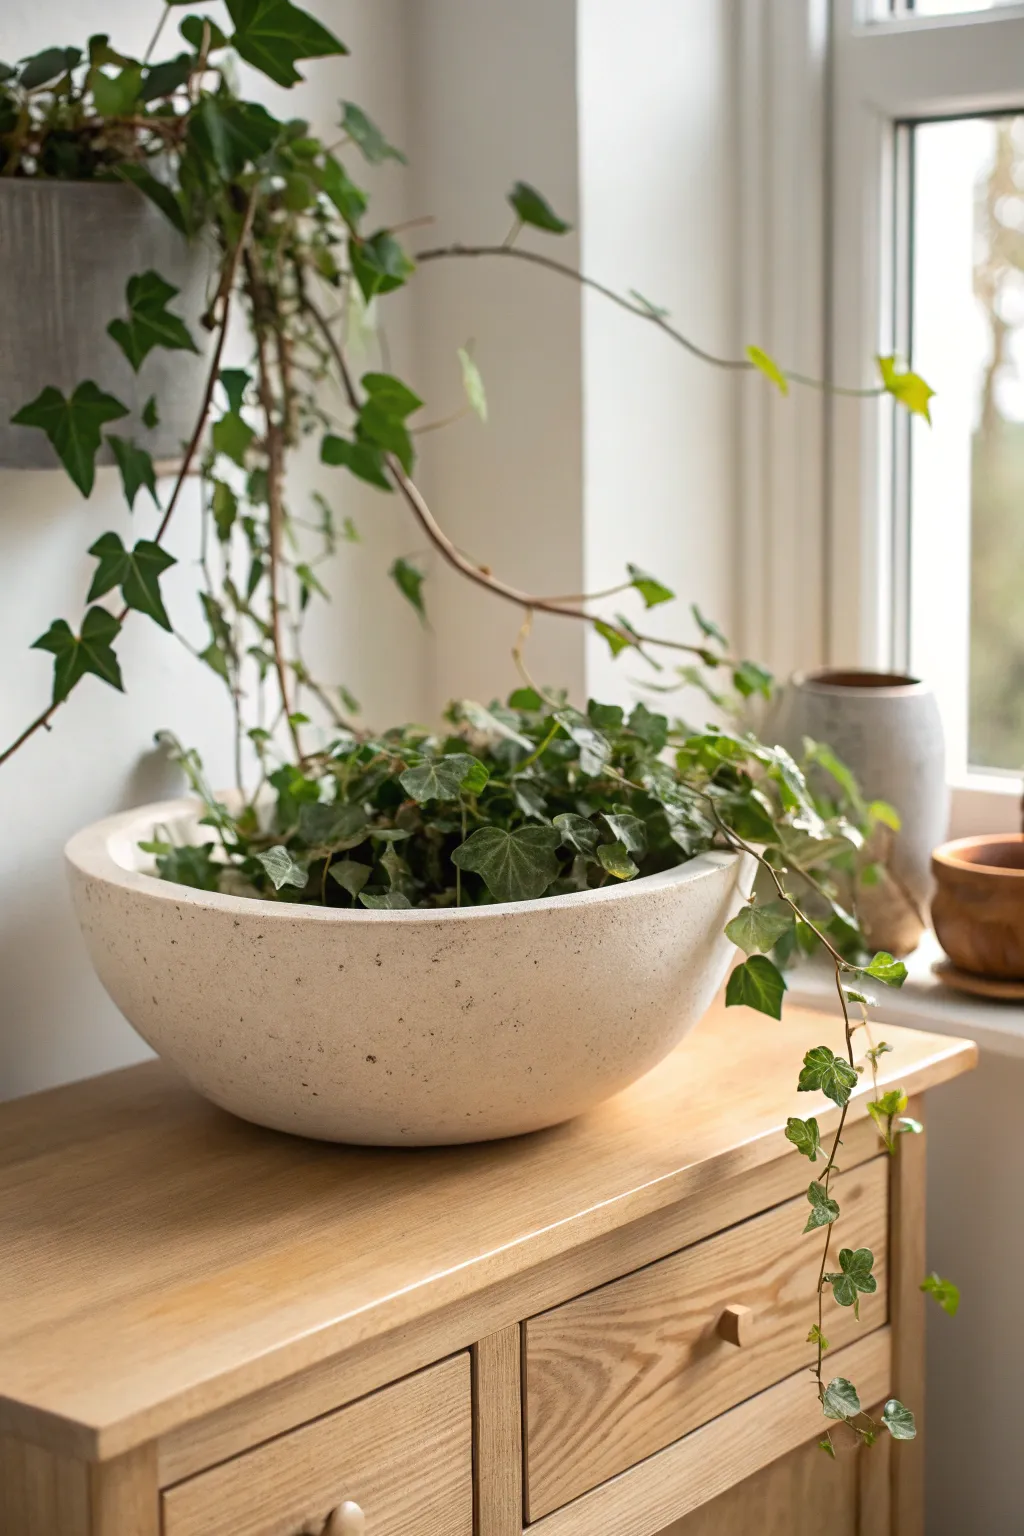
Transform a simple tabletop into a verdant display with this shallow bowl planter arrangement. The wide, low profile of the vessel allows the ivy to spill dramatically over the edges while maintaining a modern, understated elegance perfect for bright sideboards.
How-To Guide
Materials
- Wide, shallow bowl planter (approx. 12-14 inches diameter, stone or concrete finish)
- English Ivy (Hedera helix) plants (3-4 small nursery pots)
- Small bag of high-quality potting mix
- Perlite or pumice for drainage
- Small drainage rocks or pebbles
- Sheet moss or preserved moss (optional)
- Trowel
- Watering can with a thin spout
Step 1: Preparing the Vessel
-
Check for drainage:
Inspect your shallow bowl. If it lacks drainage holes, you can drill one carefully using a masonry bit, or commit to being very careful with watering. For this tutorial, we will assume you need to create a drainage layer regardless. -
Create the base layer:
Pour a 1-inch layer of small drainage rocks or pebbles across the bottom of the bowl. This reservoir is crucial for shallow planters where roots sit close to the bottom. -
Mix your soil:
In a separate bucket, combine your potting soil with a handful of perlite. Ivy likes moisture but hates soggy feet, so I always ensure the mix is light and airy. -
Fill the bowl halfway:
Add your soil mixture on top of the rocks, filling the bowl just about halfway. Create a slight mound in the center to give the arrangement some height.
Step 2: Planting the Ivy
-
Unpot the plants:
Gently squeeze the sides of your nursery pots to loosen the root balls. Carefully slide the ivy plants out, keeping the soil intact around the roots. -
Loosen the roots:
tease the bottom of the root balls with your fingers. Since they are going into a shallow container, you may need to gently flatten the root mass slightly so it fits the depth. -
Arrange the center:
Place your fullest, bushiest ivy plant right in the center of the slight mound you created. This anchors the look. -
Position the trailers:
Take the remaining plants and position them around the central plant. Orient them so their longest vines are facing outward towards the rim of the bowl. -
Fill the gaps:
Scoop more soil mix into the gaps between the root balls. Use your fingers to gently firmly press the soil down to eliminate air pockets, but don’t pack it like concrete. -
Top up the soil:
Add soil until it is about half an inch below the rim of the bowl. This lip is important so water doesn’t spill over when you irrigate.
Pro Tip: Mind the Gap
Leave a small gap between the soil line and the bowl rim. This ‘water reservoir’ prevents messy overflow when you water, protecting your furniture.
Step 3: Styling and Finishing
-
Direct the vines:
This is the artistic part. Choose three to four distinctive vines and gently drape them over the edge of the bowl. Let them hang naturally rather than forcing them into a symmetrical pattern. -
Prune for shape:
Snip off any leaves that look damaged or are sticking up awkwardly in the center. You want a lush, low carpet effect in the middle with spills on the side. -
Clean the foliage:
Ivy can get dusty. Wipe the larger leaves gently with a damp cloth or give the whole arrangement a gentle misting to make the green pop against the pale stone. -
Add a top dressing:
If you have exposed soil that distracts from the clean look, tuck small pieces of sheet moss around the base of the stems. This also helps retain moisture. -
Initial watering:
Water the planter slowly using a thin-spouted can. aim for the soil, not the leaves, and stop as soon as the soil feels moist to the touch. -
Final placement:
Place the bowl on your wooden sideboard or table. Ensure the trailing vines have room to dangle freely without getting crushed against a wall.
Level Up: Mix Texture
Combine different ivy varieties! Mix a solid green ‘Baltic’ ivy in the center with a variegated ‘Glacier’ ivy on the edges for stunning visual depth.
Enjoy the calm, organic texture this living centerpiece brings to your room

The Complete Guide to Pottery Troubleshooting
Uncover the most common ceramic mistakes—from cracking clay to failed glazes—and learn how to fix them fast.
Wall Pocket Planters for Ivy Trails
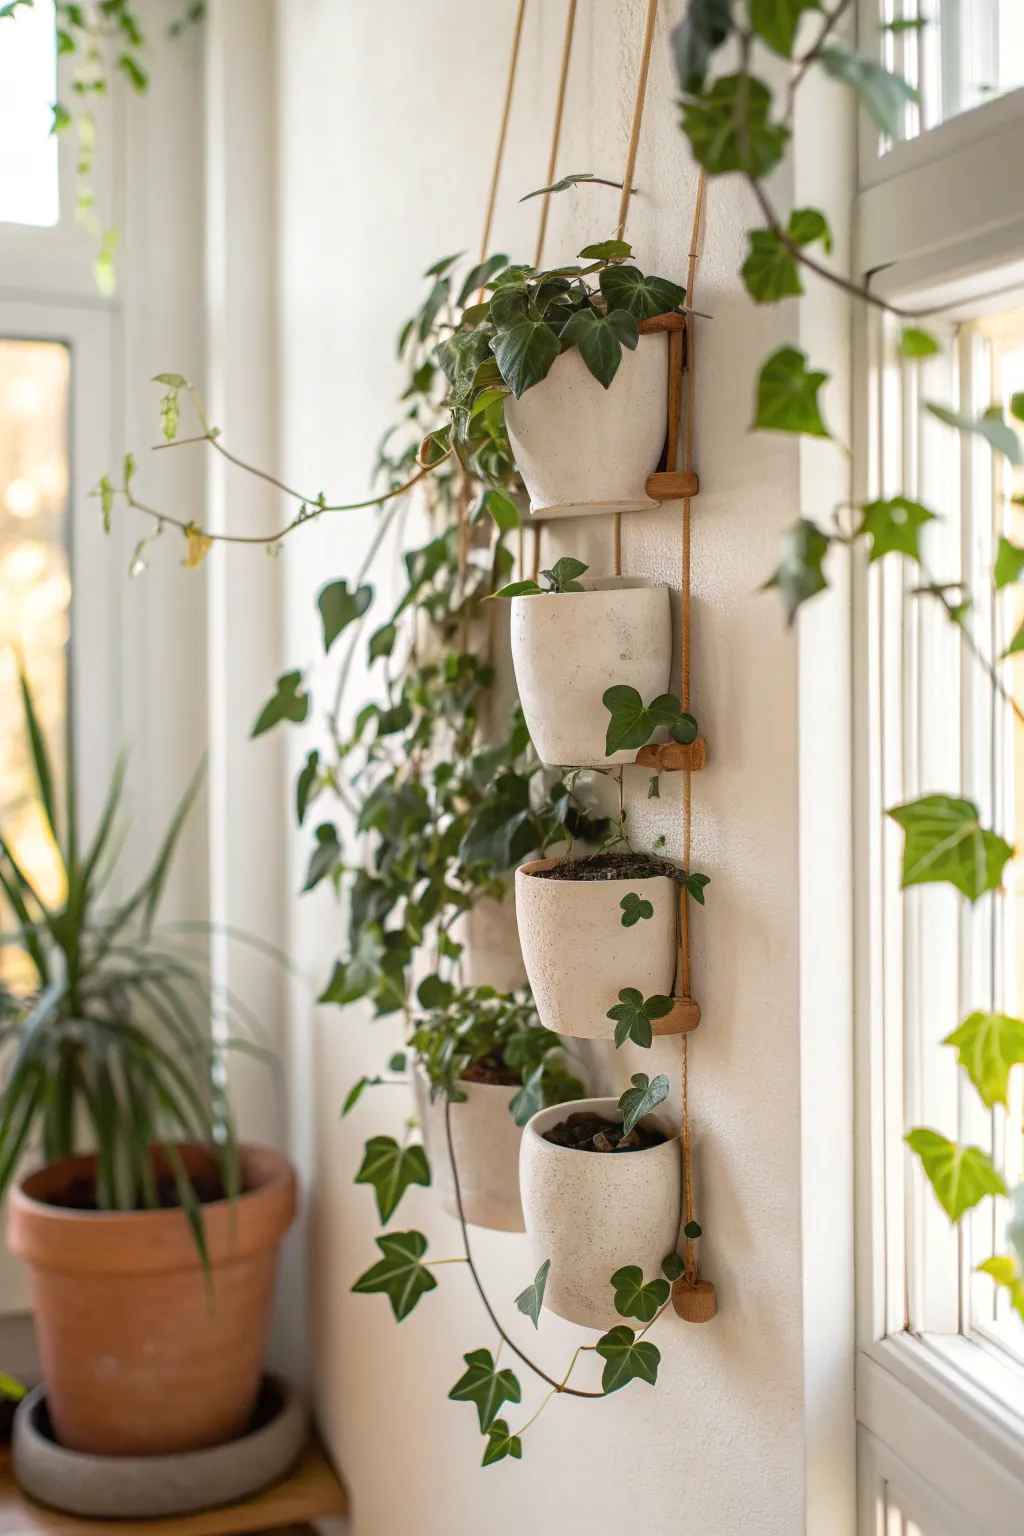
Create a stunning vertical garden feature with this minimalist hanging planter system. By suspending simple white pots on a rope-and-dowel ladder, you can turn a blank wall into a cascading waterfall of ivy.
Step-by-Step
Materials
- 4-5 small white ceramic pots (approx. 4-6 inches diameter)
- Strong natural jute or sisal rope (approx. 1/4 inch thick)
- Wooden dowels (diameter must be thick enough to support pot weight, approx. 3/4 inch)
- Hand saw
- Sandpaper (medium grit)
- Drill with bit matching your rope diameter
- Wall hook or ceiling anchor for suspension
- Measuring tape
- Scissors
- Wood stain or varnish (optional)
Step 1: Preparing the Support Structure
-
Measure your pots:
Measure the diameter of your pots just below the rim. This measurement determines how far apart your vertical ropes need to be so the pot rests securely without slipping through. -
Cut the dowels:
Using your hand saw, cut the wooden dowel into segments. Each segment should be about 2-3 inches wider than your pot’s diameter to allow room for knots on either side. -
Smooth the edges:
Sand the cut ends of your dowels to remove any splinters or rough patches. I like to slightly round the edges for a softer, more finished look. -
Drill the guide holes:
Mark a spot about 1/2 to 3/4 inch from each end of every dowel rod. Carefully drill a hole straight through these marks to thread your rope. -
Optional: finish the wood:
If you prefer a darker tone or want to protect the wood from moisture, apply a light coat of stain or varnish now and let it dry completely.
Stability Pro-Tip
Add a dab of clear super glue to the knots underneath the dowels once you are sure of the spacing. This prevents them from slipping over time under the weight of wet soil.
Step 2: Assembling the Ladder
-
Cut the main ropes:
Cut two equal lengths of rope. Calculate the length based on your desired total height plus an extra 2 feet for knots and hanging loops. -
Start the first rung:
Thread one end of the left rope through the left hole of your first dowel (this will be the top rung). Do the same with the right rope and the right hole. -
Secure with knots:
Tie a sturdy overhand knot in the rope directly underneath the dowel on both sides. Ensure the knots are at the exact same height so the dowel sits level. -
Determine vertical spacing:
Decide how much vertical space you want between pots. A gap of 8-10 inches usually works well for ivy to trail comfortably. -
Add subsequent rungs:
Measure down your desired distance from the first knots. Thread the next dowel onto the ropes and tie new supporting knots underneath it. Repeat this process for all remaining dowels. -
Check for level:
Periodically hold the ladder up by the top ends to ensure all rungs are hanging straight horizontally before tightening your knots fully. -
Create the hanging loop:
Gather the top ends of both ropes together. Tie them into a strong loop or attach them to a metal ring for hanging.
Level Up: Invisible Look
Swap the natural rope for high-strength clear fishing line or thin steel cable for a modern ‘floating’ illusion where the pots seem to hover against the wall.
Step 3: Mounting and Planting
-
Prepare the pots:
Ensure your pots have drainage holes. If they will be indoors, consider using a nursery pot inside the decorative pot to make watering easier without drips. -
Install the mount:
Install a sturdy wall bracket or ceiling hook capable of supporting the combined weight of the pots, soil, and water. -
Hang the structure:
Place the rope ladder onto your hook. Step back to check that it hangs freely and isn’t twisting against the wall. -
Insert the pots:
Carefully lower a pot into the space between the ropes above each dowel. The rim of the pot should catch on the ropes or the dowel itself, holding it suspended. -
Add the greenery:
Plant your ivy into the pots. Gently arrange the trailing vines to weave around the ropes for a lush, integrated look.
Now you have a living wall sculpture that brings vibrant life to any vertical space in your home
Trellis Pot That Lets Ivy Climb
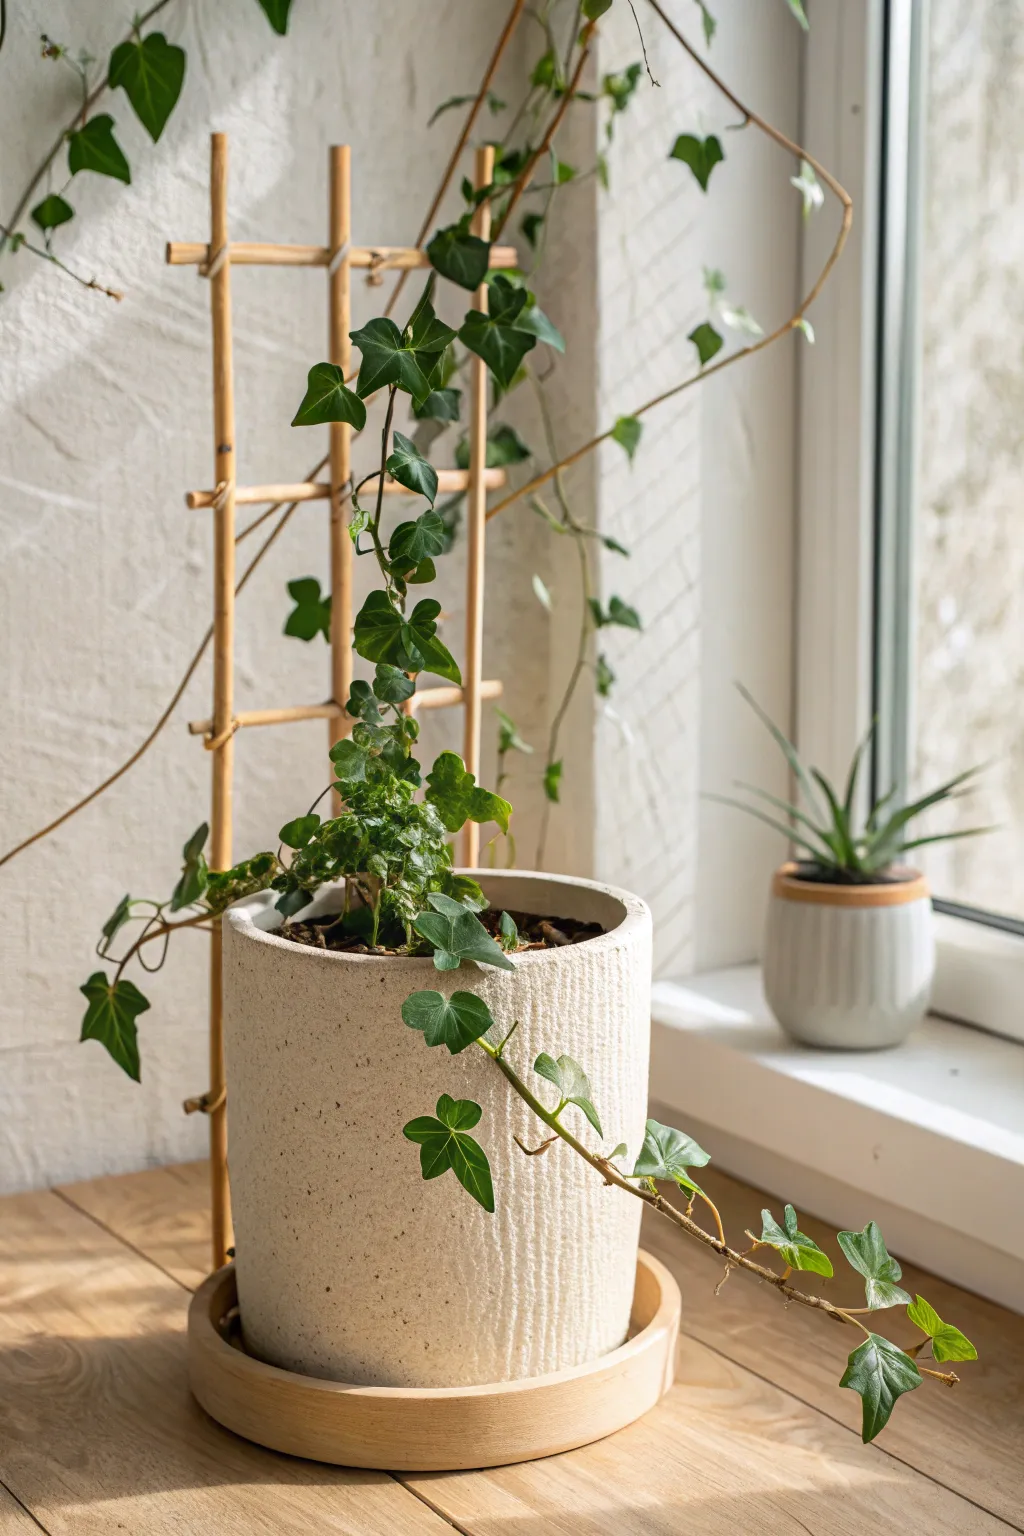
Transform a simple stone-textured pot into a vertical garden feature with this custom-built bamboo trellis. The natural wood tones paired with the rough, speckled ceramic create an organic, architectural look that encourages your ivy to reach new heights.
Step-by-Step Guide
Materials
- Tall cylindrical planter (stone effect or textured ceramic)
- Wooden planter saucer (round)
- Thin bamboo stakes or wooden dowels (approx. 5-7mm diameter)
- Natural jute twine or thin raffia
- Pruning shears or small saw
- Measuring tape
- English Ivy plant (Hedera helix)
- High-quality potting soil
- Small pebbles for drainage
- Wood glue (optional)
Step 1: Preparing the Foundation
-
Select the vessel:
Begin with a tall, cylindrical pot that features a tactile, stone-like texture. A height of around 8-10 inches works best to give the trellis stability. -
Prepare drainage:
Add a layer of small pebbles to the bottom of your pot, filling it about an inch deep. This step is crucial for ivy, which dislikes sitting in standing water. -
Base soil layer:
Fill the pot about halfway with fresh, well-draining potting soil. Do not pack it down too tightly; keep it airy for the roots. -
Position the saucer:
Place your wooden saucer underneath the pot. Ensure the wood tone matches or complements the bamboo you’ll use for the trellis.
Step 2: Constructing the Trellis
-
Cut vertical stakes:
Measure three lengths of bamboo. They should be roughly twice the height of your pot. Cut them to size using shears or a small saw. -
Cut horizontal rungs:
Cut shorter pieces of bamboo for the horizontal supports. You will need about 4-5 pieces, each wide enough to span the distance between your vertical stakes. -
Arrange the layout:
Lay your vertical stakes on a flat surface, spacing them evenly. Place the horizontal rungs across them to visualize the ladder-like structure. -
Begin lashings:
Using the jute twine, tie the horizontal rungs to the vertical stakes. A simple square lashing works well here—wrap the twine in a crisscross pattern around the joint. -
Tighten joints:
Pull the twine tight and knot it securely at the back. I find a tiny dab of wood glue under the twine helps keep everything from sliding down later. -
Repeat the process:
Work your way up the trellis, attaching all horizontal rungs. Leave the bottom 4-5 inches of the vertical stakes bare, as these will be buried in soil.
Uneven Trellis?
If your horizontal rungs keep slipping down the vertical poles, use a small craft knife to carve tiny notches in the vertical stakes where the twine will sit.
Step 3: Planting and Training
-
Insert the trellis:
Push the bare ends of your bamboo structure firmly into the soil at the back of the pot. Ensure it stands straight and feels secure against the pot’s inner wall. -
Add the ivy:
Remove your ivy from its nursery pot and gently loosen the roots. Place it in the planter, positioning the main root ball slightly forward of the trellis. -
Fill with soil:
Add the remaining soil around the root ball and the trellis base, pressing down gently to secure the stakes in place. -
Select climbing vines:
Identify the longest, healthiest vines on your plant. These will be the leaders for your vertical growth. -
Initial training:
Gently weave a few vines through the lower rungs of the trellis. Be careful not to snap the stems; they should rest naturally against the wood. -
Secure loose vines:
If a vine won’t stay put, use a small piece of twine to loosely tie it to the bamboo. Do not strangle the stem; leave room for growth. -
Trailing aesthetic:
Leave one or two shorter vines free to drape over the front edge of the pot. This creates a balanced look between the upward climb and the downward trail. -
Watering in:
Water the plant thoroughly until moisture seeps into the saucer, helping settle the soil around the trellis base.
Encourage climbing
To train ivy faster, mist the aerial roots on the stems. Humidity encourages them to grip onto the textured bamboo surface naturally without ties.
Place your new planter in bright, indirect light and watch your living sculpture take shape over the coming weeks


What Really Happens Inside the Kiln
Learn how time and temperature work together inside the kiln to transform clay into durable ceramic.
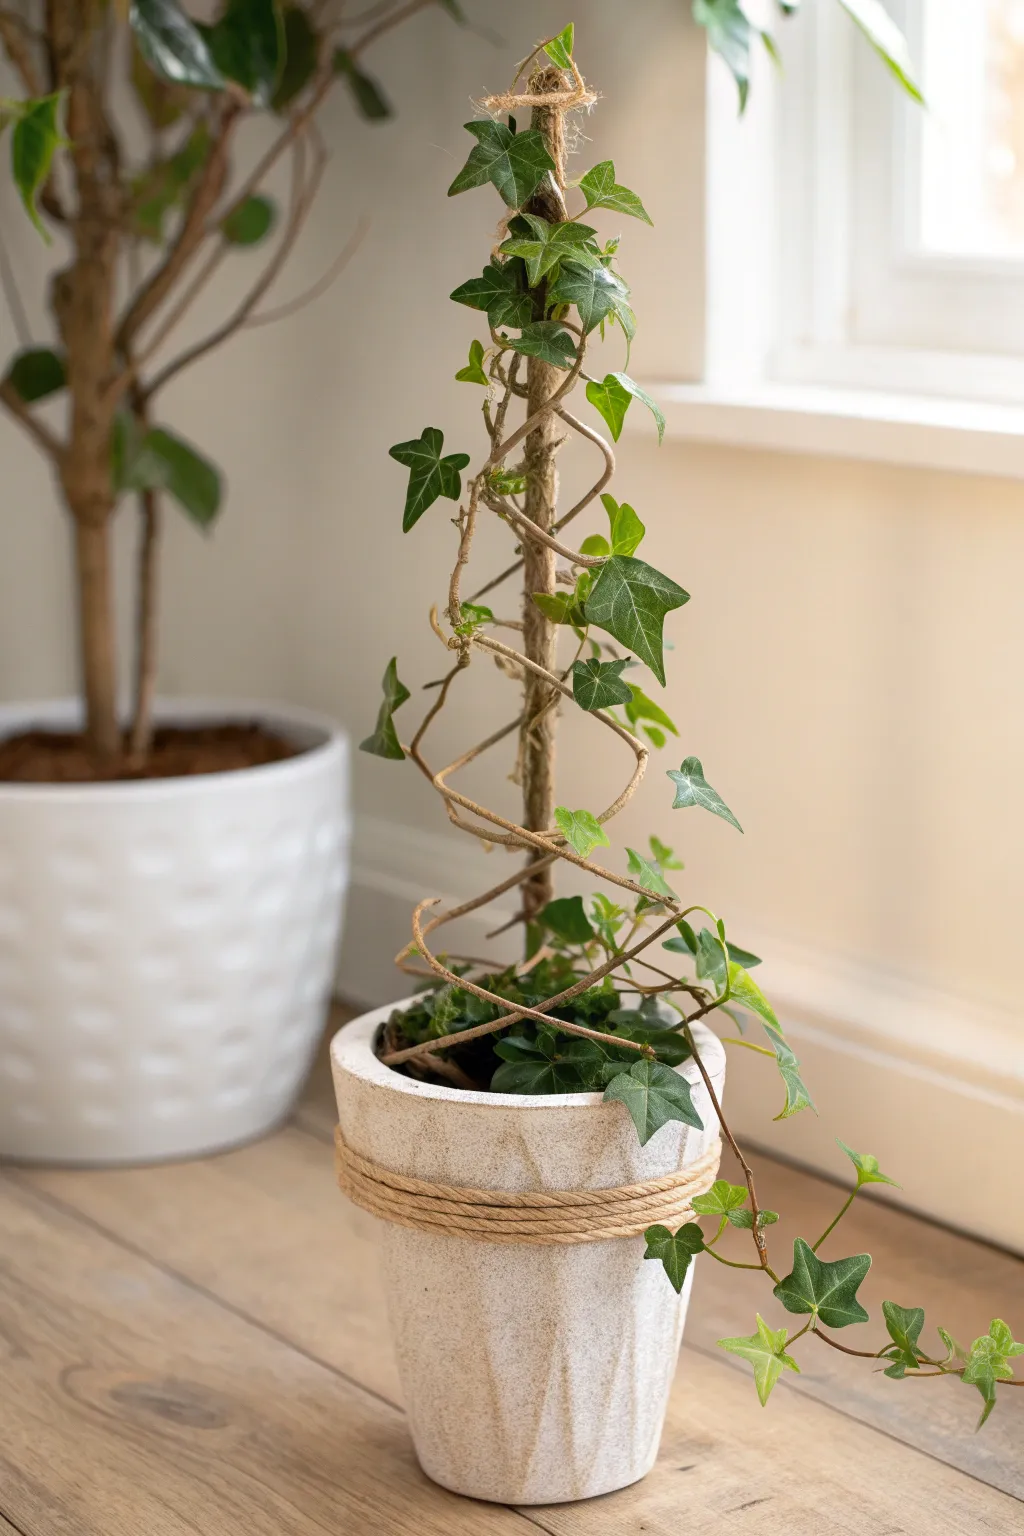
Obelisk Tower Planter for Ivy

Elevate a simple trailing ivy into a structured, architectural piece with this elegant obelisk planter project. By training vines upward on a stark black frame, you create a living sculpture that adds height and sophistication to any indoor corner.
Step-by-Step
Materials
- Terracotta pot (approx. 8-10 inch diameter)
- Matching terracotta saucer
- Black metal garden obelisk (pyramid style, scaled to fit pot diameter)
- English Ivy (Hedera helix) or similar climbing plant
- High-quality potting soil
- Small trowel
- Garden twist ties or soft plant velcro
- Pruning shears
- Small pebbles or drainage rocks (optional)
Step 1: Preparing the Foundation
-
Select the right vessel:
Begin with a terracotta pot that has a diameter roughly 1-2 inches wider than the base of your obelisk. Ensure it has a drainage hole to prevent root rot. -
Add drainage layer:
If you wish, place a thin layer of small pebbles at the bottom of the pot. This is totally optional, but I find it helps keep drainage holes clear over time. -
Fill with soil base:
Fill the pot about two-thirds full with fresh potting soil. Tap the pot gently on your work surface to settle the soil without compacting it too tightly. -
Position the plant:
Remove your ivy from its nursery container. Gently tease the roots apart if they are pot-bound. -
Center the roots:
Place the root ball in the center of the terracotta pot. The top of the root ball should sit about an inch below the pot’s rim.
Loose Vines?
If vines slip down despite tying, use tiny, discreet hair clips or orchid clips temporarily. They grip the metal frame quickly and can be removed once the ivy’s aerial roots take hold.
Step 2: Installing the Structure
-
Insert the obelisk:
Carefully lower the black metal obelisk over the plant. You want the plant to be inside the pyramid structure. -
Secure the legs:
Push the legs of the obelisk deep into the soil until they hit the bottom or feel very stable. The bottom ring of the obelisk should rest near the soil surface. -
Backfill with soil:
Add more potting soil around the roots and the obelisk legs. Fill until the soil level is even with the initial root ball. -
Firm the soil:
Press down firmly around the base of the plant and the metal legs to secure everything in place. Water thoroughly now to settle air pockets.
Step 3: Training the Vines
-
Identify main runners:
Sort through the ivy vines and identify the longest, healthiest runners. These will be your primary climbers. -
Begin winding:
Take a long vine and gently wrap it spirally around one of the vertical bars of the obelisk. Aim for a relaxed, natural spiral rather than a tight coil. -
Secure the base:
Use a small piece of soft garden tie to secure the vine to the lowest horizontal rung. Tie it loosely so you don’t crush the stem. -
Continue upward:
Guide the vine up to the next horizontal section. Weave it in and out of the vertical bars if length allows to help it hold itself up. -
Attach at intervals:
Add another loose tie every 4-6 inches as needed. The plant will eventually attach itself, but it needs this initial guidance. -
Handle shorter vines:
Let shorter vines drape naturally over the pot’s edge for a lush, overflowing look, or twine them around the lower rungs to thicken the base. -
Encourage the stray runner:
If you have a very long, adventurous runner like the one in the example image, let it reach out freely for a bit of dramatic flair before eventually training it back in.
Aged Pot Look
To match the rustic vibe, rub plain yogurt onto the exterior of your new terracotta pot before planting. Let it sit in a shady spot for a few weeks to encourage moss growth and a weathered patina.
Place your new topiary in bright, indirect light and turn it weekly to ensure even growth on all sides
Ivy Ball Topiary in a Simple Pot
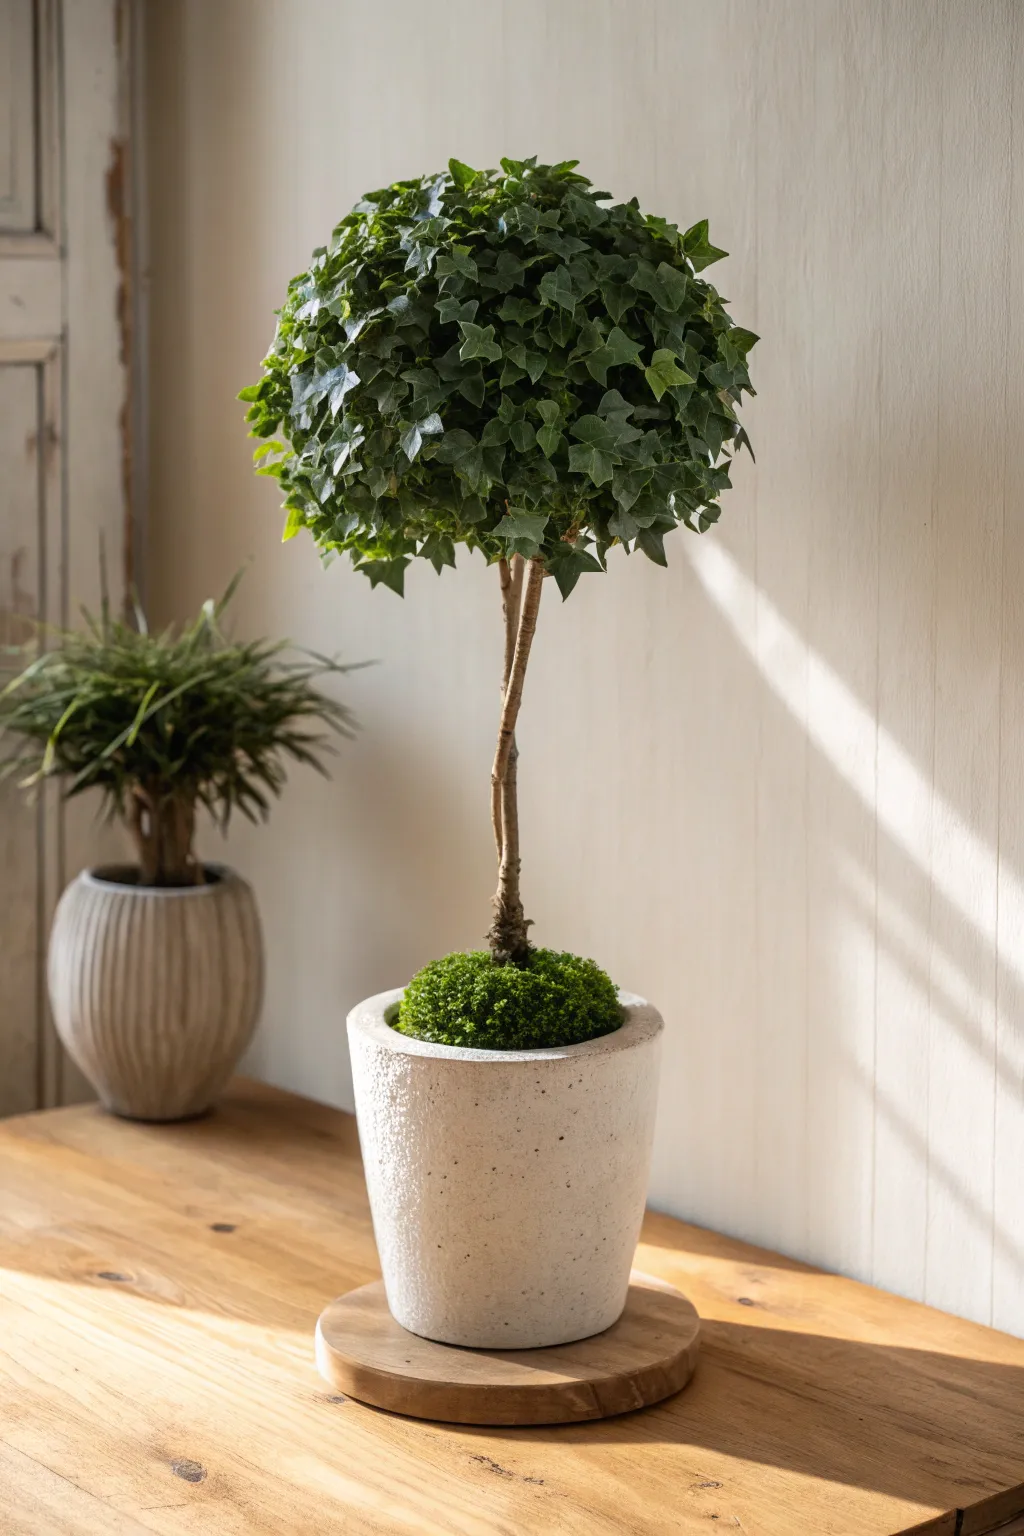
Bring a touch of formal elegance indoors with this classic ivy ball topiary, featuring dense greenery atop a slender, natural trunk. This project transforms a few simple materials into a structured, architectural living sculpture that looks beautiful on any console or side table.
Detailed Instructions
Materials
- Small-leaved English Ivy plants (3-4 small pots)
- Sphagnum moss or wire topiary frame (approx 8-10 inch diameter)
- Straight, sturdy branch or wooden dowel (approx 18 inches)
- Floral wire or green gardening twine
- Textured white ceramic pot (approx 6-8 inch diameter)
- Potting soil mix
- Preserved sheet moss or pincushion moss for covering soil
- Gravel for drainage
- Pruning shears
Step 1: Preparing the Base
-
Prepare the pot:
Start by ensuring your white ceramic pot has a drainage hole. If not, drill one carefully or create a deep drainage layer with an inch of gravel at the bottom to prevent root rot. -
Anchor the stem:
Insert your sturdy branch or dowel into the center of the pot. Hold it perfectly upright while filling the pot firmly with potting soil until it is about two inches from the rim. -
Compact the soil:
Press the soil down firmly around the base of the stick. The success of the topiary depends on this central support being completely rigid and unable to wobble.
Leggy Vines?
If your ivy looks sparse, don’t worry. Pinning vines horizontally around the ball stimulates new growth points along the stem, filling gaps faster.
Step 2: Creating the Green Sphere
-
Attach the frame:
Secure your wire sphere frame or a ball of compacted sphagnum moss to the very top of the stick. If using a wire frame, use floral wire to bind the trunk to the bottom of the cage securely. -
Plant the ivy:
Plant your small ivy starts around the base of the central stick. I like to use three or four plants to ensure the final ball looks lush and full from the start. -
Train the vines upward:
Gently untangle the long ivy runners. Gather them together and wrap them spirally up the central stick. -
Secure the trunk:
Use small pieces of green twine to tie the vines loosely to the stick as they travel upward. This creates that twisted, natural trunk look shown in the photo. -
Reach the sphere:
Once the vines reach the bottom of the wire ball or moss sphere, begin distributing them evenly around the surface.
Step 3: Shaping and Finishing
-
Cover the form:
Wrap the vines over and around the sphere form. Tuck the ends of the vines into the wire cage or use floral pins to secure them into the moss ball. -
Fill the gaps:
Look for any bald spots where the underlying frame is visible. Redirect a vine to cover these areas, pinning it in place to encourage growth in that direction. -
Trim for density:
Snip off the very tips of the longest vines. This tip-pruning encourages the plant to branch out laterally, which is crucial for creating that dense, solid ‘ball’ appearance over time. -
Top-dress the soil:
Take your preserved mound moss or fresh pincushion moss and arrange it densely over the exposed potting soil at the base. -
Shape the base moss:
Tuck the edges of the moss down the sides of the pot rim to create a gentle, rounded mound effect rather than a flat surface. -
Clean up:
Wipe down the sides of the white pot with a damp cloth to remove any soil smudges or moss debris. -
Final inspection:
Rotate the pot slowly to ensure the ball looks symmetrical from all angles. Tuck in any stray leaves that are sticking out too far.
Misting Magic
Ivy loves humidity but hates wet feet. Mist the leaves daily to keep them crisp and deter pests like spider mites, especially in winter.
Place your new topiary in bright, indirect light and enjoy the structured elegance it adds to your space

TRACK YOUR CERAMIC JOURNEY
Capture glaze tests, firing details, and creative progress—all in one simple printable. Make your projects easier to repeat and improve.
Hoop Form Ivy Wreath Planter
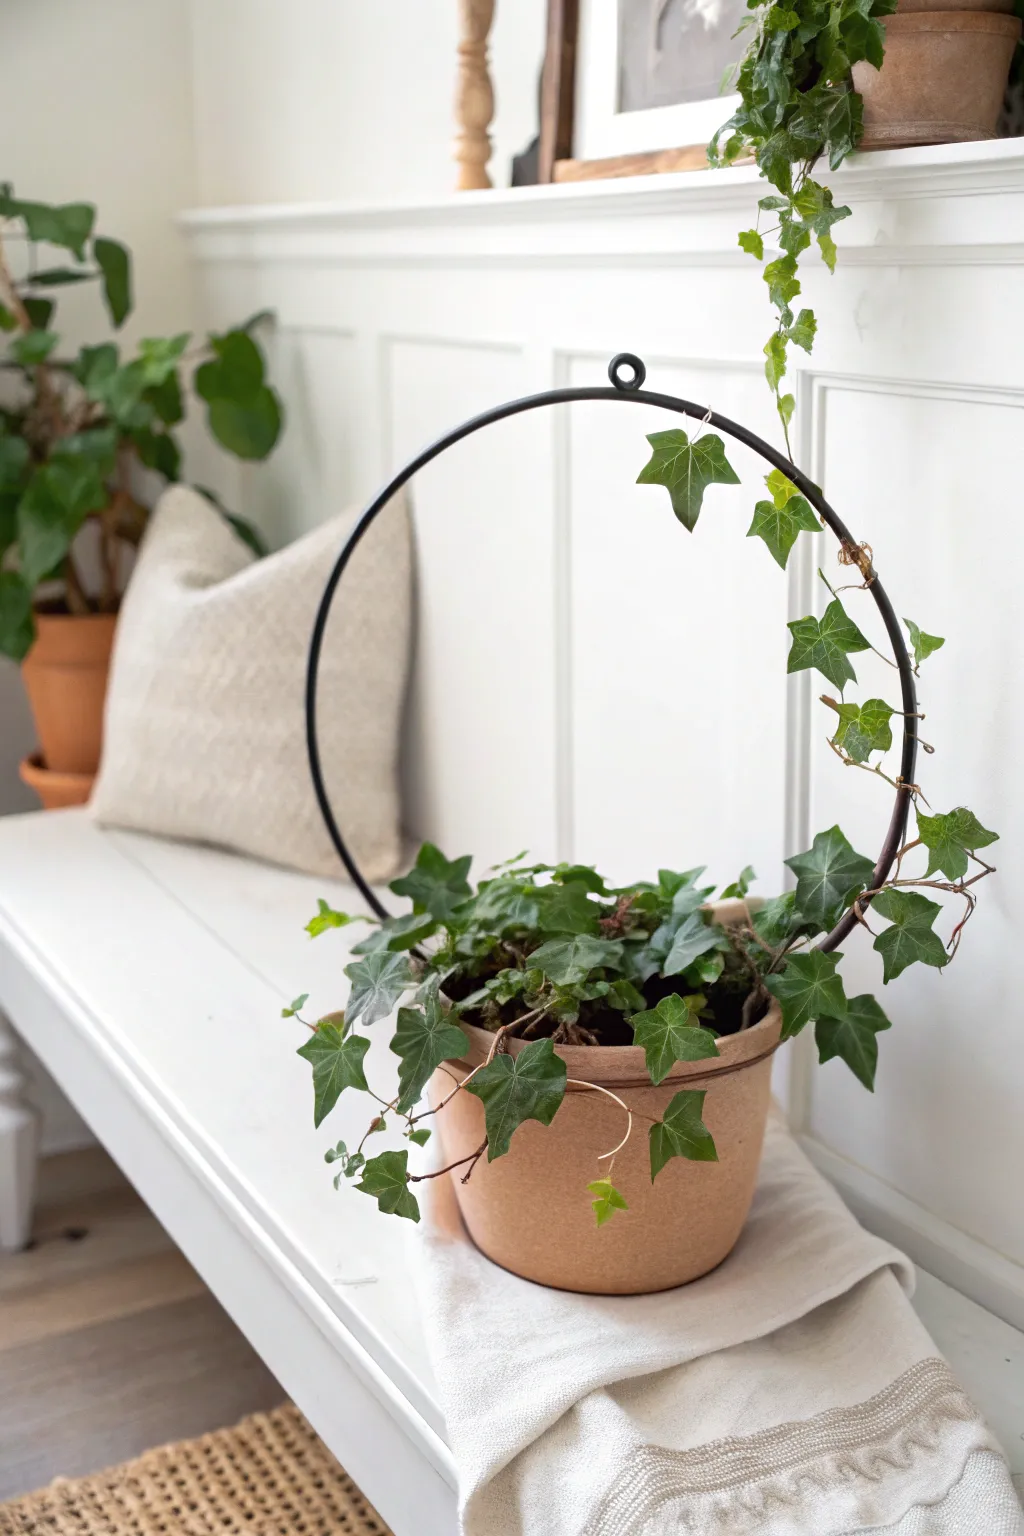
Transform a simple pot of ivy into living art with this minimalist hoop trellis. The clean black circle creates a striking geometric contrast against the organic, trailing vines, making it a perfect statement piece for a bright corner or entryway bench.
Step-by-Step Guide
Materials
- Terracotta pot (standard clay, approx. 6-8 inch)
- English Ivy plant (Hedera helix)
- Black metal hoop trellis (approx. 10-12 inch diameter)
- Potting soil mix
- Small shovel or trowel
- Floral wire or green twist ties
- Pruning shears
- Watering can
- Rooting hormone (optional, if propagating)
- Soft cloth (for cleaning the pot)
Step 1: Preparation and Planting
-
Clean the terracotta:
Before potting, give your terracotta pot a quick wipe with a damp cloth to remove any dust or retail stickers. If the pot is old, soak it in a vinegar-water solution to remove mineral deposits. -
Prepare the soil base:
Fill the bottom third of your terracotta pot with potting soil. English ivy prefers well-draining soil, so ensure the mix isn’t too heavy. -
Position the plant:
Remove your ivy from its nursery container. Gently loosen the root ball with your fingers to encourage outward growth. -
Center the ivy:
Place the ivy in the center of the terracotta pot. The top of the root ball should sit roughly an inch below the pot’s rim to allow for watering space. -
Fill the voids:
Add soil around the sides of the root ball, pressing down firmly but gently with your fingertips to eliminate large air pockets. Leave the longest vines free and draped over the sides used for now.
Loose Loop?
If the vines keep sliding down the smooth metal, use tiny dabs of clear floral arrangement glue or rough up the metal surface slightly with sandpaper for better grip.
Step 2: Installing the Hoop
-
Insert the trellis legs:
Take your black metal hoop trellis and identify the prongs at the bottom. Position the hoop so it bisects the pot directly through the center of the plant. -
Secure the trellis:
Push the prongs deep into the soil until the bottom curve of the hoop rests just above or lightly touches the soil surface. This depth provides necessary stability. -
Pack the soil:
Once the trellis is inserted, tamp down the soil around the insertion points again to ensure the metal frame doesn’t wobble.
Step 3: Training the Vines
-
Identify leader vines:
Sort through the ivy foliage and select two or three of the longest, healthiest vines. These will be your main climbers for the hoop shape. -
Initial wrap:
Gently lift one long vine and wrap it loosely around the right side of the metal hoop. Follow the natural curl of the stem to prevent snapping. -
Secure with ties:
Use small pieces of floral wire or green twist ties to loosely secure the vine to the metal. Don’t pull tight; just guide it. I usually hide these ties under leaves for a cleaner look. -
Balance the left side:
Repeat the process on the left side with another long vine, winding it upwards to meet the first one. -
Overlap the top:
Where the vines meet at the top of the hoop near the loop detail, cross them over each other. Secure this junction with a bit more wire if they are likely to slip. -
Tuck wandering stems:
Take shorter vines and weave them through the lower base of the trellis to create a lush, full look near the soil line. -
Prune excess growth:
Snip off any dead leaves or unruly stems that refuse to conform to the hoop shape. This encourages new growth where you actually want it. -
Water thoroughly:
Water the plant until moisture drips from the drainage hole. This settles the soil around both the roots and the trellis spikes.
Make it Shine
Add fairy lights wrapped around the black hoop before training the ivy. The hidden wire blends with the vines, creating a magical glowing wreath at night.
Now you have a structured, architectural plant display that grows more beautiful with time
Spiral Frame Ivy Topiary
Transform a simple potted ivy into a sculptural masterpiece with this elegant spiral topiary project. The climbing vines naturally follow the twisting frame, creating a structured yet organic focal point for any bright windowsill.
Step-by-Step
Materials
- Small potted ivy plant (English Ivy or similar vining variety)
- Tall tapered ceramic pot (white or light stone finish)
- Thick gauge crafting wire (copper or brass works well)
- Central wooden stake or dowel (approx. 18-24 inches)
- Jute twine or rustic rope
- Potting soil
- Wire cutters
- Pliers
- Small gardening shears
Step 1: Preparing the Pot and Base
-
Select the vessel:
Begin with a tall, tapered ceramic pot. The one in the image has a textured, slightly faceted vertical pattern which adds nice visual interest without overpowering the plant. -
Add drainage:
Ensure your pot has a drainage hole. If not, drill one carefully or add a layer of gravel at the bottom to prevent root rot. -
Secure the decorative rim:
Take a length of generous jute rope or twine and wrap it three times around the upper rim of the pot. Knot it securely but discreetly in the back, or use a dab of hot glue to hold the ends in place for that rustic accent. -
Prepare the soil base:
Fill the pot about halfway with high-quality potting soil mixed with a bit of perlite for drainage.
Natural Texture Hack
Soak your jute rope in coffee or tea for 10 minutes before wrapping the pot rim. This ages the twine instantly, giving it a weathered, antique garden look.
Step 2: Constructing the Spiral Frame
-
Insert the central stake:
Place your wooden stake or dowel directly in the center of the pot. Push it down firmly so it feels stable; this will be the spine of your topiary. -
Shape the wire spiral:
Cut a long length of thick gauge wire. I find it easiest to anchor one end to the bottom of the stake, then gently bend the wire outward and around to create a cone-like spiral shape. -
Adjust the spiral width:
Make the bottom loops wider and the top loops tighter, creating a tapered cone shape that points toward the top of the stake. -
Attach to the stake:
Secure the wire to the wooden stake at the very top using a small piece of twine or by crimping the wire tightly with pliers. -
Plant the ivy:
Remove your ivy from its nursery pot and gently loosen the roots. Place it in the pot at the base of your new structure, filling in with more soil until sturdy.
Step 3: Training the Vines
-
Identify main runners:
Look through your ivy plant and select the longest, healthiest vine runners. -
Start the wrap:
Gently lift a vine and begin winding it around the heavy wire spiral. You want to follow the wire’s curve naturally. -
Secure with ties:
If the vine slips, use tiny pieces of natural jute twine or specialized plant velcro to loosely tie the stem to the wire. Be careful not to pinch the stem. -
Fill the center:
Take a second runner and train it straight up the central wooden stake to create a lush, green core. -
Trim excess growth:
Snip off any small, erratic shoots that refuse to follow the shape or crowd the base too much. This encourages the plant to put energy into the main climbing vines. -
Position trailing vines:
Leave one or two smaller vines unattached so they can spill romantically over the edge of the pot, just like in the example photo. -
Top knot detail:
Finish the look by tying a small, neat bow of jute twine at the very top of the stake where the wire meets the wood.
Double Spiral Twist
Create a double helix effect by using two separate wires starting from opposite sides of the pot base. It doubles the climbing surface for faster coverage.
Place your new topiary in indirect sunlight and watch as it grows thicker and more lush over time
Hand-Built Planter With Ivy Leaf Texture
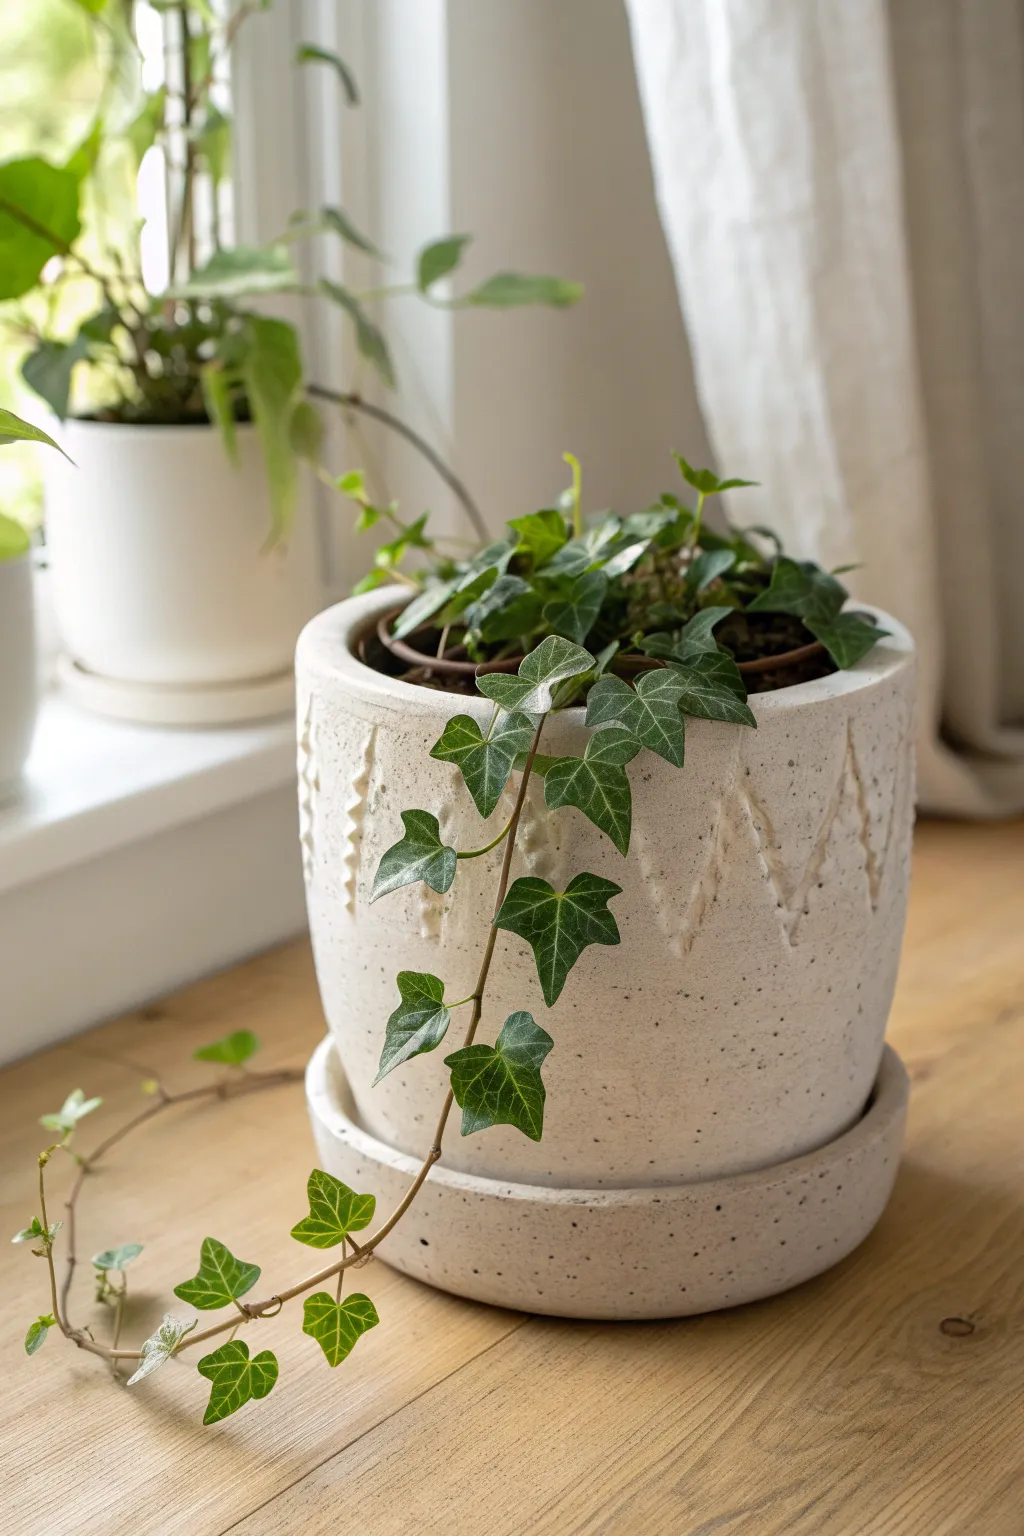
Create this charming, speckled ceramic planter that features subtle chevron carving and a custom-fitted saucer. The slightly rustic, hand-built aesthetic perfectly complements trailing ivy plants, letting the greenery take center stage.
Step-by-Step Guide
Materials
- Speckled stoneware clay (white or cream body with manganese speckles)
- Pottery wheel (or slab roller/rolling pin for hand-building)
- Needle tool
- Carving tool (ribbon tool or loop tool)
- Ribs (wooden and rubber)
- Sponge
- Wire cutter
- Matte white glaze (optional, or leave raw if clay is vitrified)
- Kiln
Step 1: Throwing the Pot and Saucer
-
Prepare the clay:
Begin by wedging about 2-3 pounds of speckled stoneware clay to remove air bubbles. Divide the clay, reserving a smaller portion (about 0.5-0.75 lbs) for the saucer and the rest for the main pot. -
Center and open:
Center the larger ball of clay on your wheel head. Open the center and pull up the walls to form a cylinder. Aim for a height of about 5-6 inches and a width of roughly 6 inches. -
Shape the vessel:
Using a rib tool on the inside and your hand on the outside, gently belly out the form slightly to create a soft, rounded curve that tapers back in just a bit at the rim. Keep the rim thick and rounded for durability. -
Smooth the surface:
Run a rubber rib over the exterior while the wheel is spinning slowly to compress the clay and remove any throwing lines, creating a smooth canvas for your carving later. -
Throw the saucer:
Using the smaller clay ball, throw a low, wide dish for the saucer. Ensure the diameter is about 1 inch wider than the base of your pot so it fits comfortably. Create a slight lip about 0.5 inches high.
Clean Lines
When carving the chevron pattern, pull the tool towards you rather than pushing away. This gives you greater control over the depth and helps prevent the tool from slipping.
Step 2: Carving and Detailing
-
Leather hard stage:
Allow both the pot and saucer to dry to a leather-hard state. The clay should be firm enough to handle without deforming but still soft enough to carve easily. -
Trim the bases:
Place the pieces back on the wheel (or use a banding wheel) to trim the excess weight from the bottom. Carve a distinct foot ring on the saucer and a flat, stable bottom for the pot. -
Mark the pattern:
Lightly sketch a zigzag or chevron pattern around the upper third of the pot using a needle tool. I find it helpful to mark equal vertical divisions first to keep the peaks and valleys even. -
Carve the relief:
Using a small ribbon or loop tool, gently carve out clay along your marked lines. Vary the depth slightly—pressing deeper at the ‘points’ of the chevron helps catch the light and emphasize the texture. -
Add vertical interest:
Between the chevron peaks, add small, vertical dashed gouges or ‘stitch’ marks to mimic the texture seen in the image. This adds that lovely handmade character. -
Clean up burrs:
Once the carving is complete, use a slightly damp sponge to soften any sharp edges or clay burrs created by the carving tools. -
Drainage hole:
Don’t forget to use a hole cutter tool to punch a drainage hole in the center bottom of the main pot.
Step 3: Finishing and Firing
-
Bisque fire:
Load your bone-dry pieces into the kiln and bisque fire them according to your clay body’s specifications (usually Cone 04). -
Glazing strategy:
For this specific look, the raw clay body is the star. If your clay is fully vitrified at high fire, you can leave the exterior unglazed to show off the speckles. If you prefer a glaze, choose a very sheer, matte white. -
Interior glazing:
It is best to glaze the interior of the pot to make it waterproof. Pour a liner glaze inside, swirl to coat, and pour out the excess. -
Wax resist:
Apply wax resist to the bottom of the pot and the entire saucer (if leaving unglazed) or just the foot rings to prevent sticking in the kiln. -
Final firing:
Fire the pieces to maturity (typically Cone 6 or Cone 10 for stoneware). The heat will bring out the dark manganese embellishments in the clay body.
Make it Mossy
Before the final firing, dab a very thin wash of iron oxide or a watered-down green underglaze into the deep recesses of the carving to give it an aged, garden-weathered look.
Now you have a stunning, minimal home for your trailing ivy that looks like it came straight from a boutique studio.
Pedestal Planter for Maximum Ivy Drape
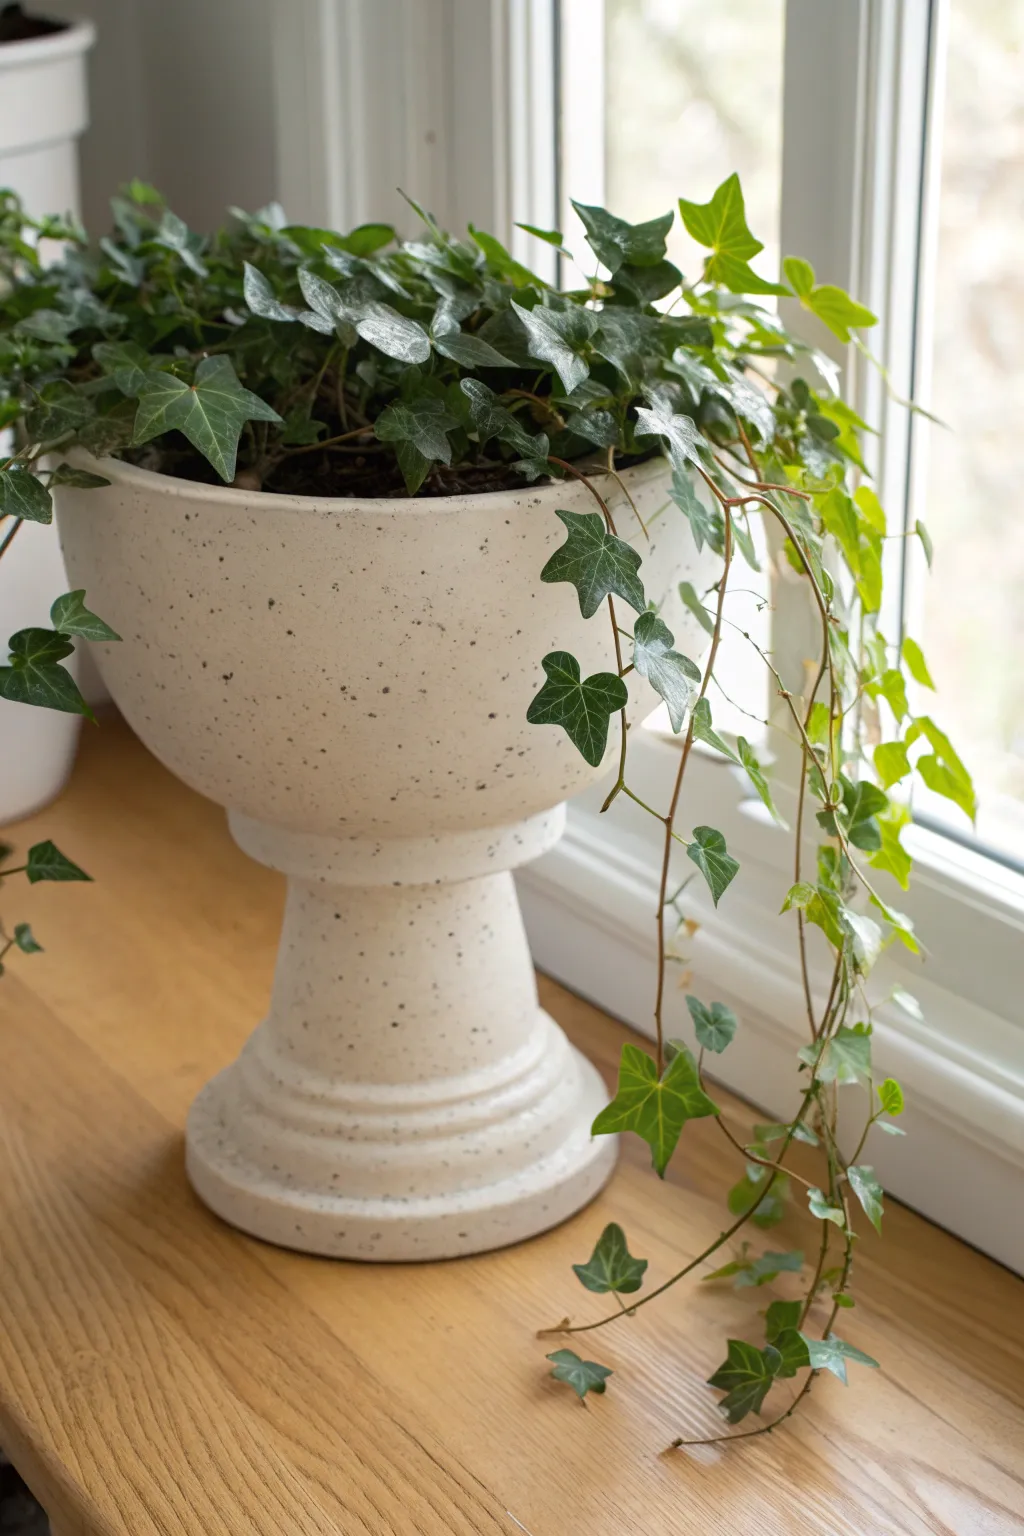
Elevate your standard ivy from a simple window accent to a sculptural masterpiece with this custom faux-stone pedestal planter. This project transforms a basic ceramic or plastic urn into a high-end, speckled vessel that perfectly showcases the cascading tendrils of trailing vines.
How-To Guide
Materials
- Plastic or ceramic pedestal urn planter (approx. 8-10 inches diameter)
- Sandpaper (120-grit)
- Primer spray paint (white or grey)
- Cream or off-white matte spray paint
- Acrylic craft paint (black or dark grey)
- Acrylic craft paint (taupe or light brown)
- Old toothbrush
- Clean rags or paper towels
- Clear matte sealant spray
- English Ivy plant (Hedera helix)
- Quality potting soil
Step 1: Preparation and Base Coat
-
Prepare the surface:
Begin by thoroughly cleaning your pedestal urn to remove any dust or grease. If the surface is very glossy, lightly scuff it with 120-grit sandpaper to help the paint adhere better. -
Apply the primer:
In a well-ventilated area, spray a coat of primer over the entire planter. Focus on getting even coverage rather than a thick coat, which can cause drips. -
Let it dry completely:
Allow the primer to dry according to the manufacturer’s instructions, usually about one hour. -
Apply the base color:
Spray the planter with your cream or off-white matte paint. Hold the can about 8-10 inches away and use sweeping motions. Two thin coats are better than one heavy coat to achieve a smooth, ceramic-like finish. -
Inspect coverage:
Check for any spots you might have missed, especially under the lip of the bowl or around the detailed ridges of the pedestal base. Catch these now before moving to the texturing phase.
Toothbrush Technique
For finer mist-like speckles, hold the toothbrush further away (12 inches). For larger, bolder spots, hold it close (4 inches) and flick harder.
Step 2: Creating the Speckled Stone Effect
-
Prepare the speckling paint:
Mix a small amount of black acrylic paint with a tiny drop of water on a paper plate or palette. The consistency should be slightly fluid but not runny. -
Load the toothbrush:
Dip the bristles of an old toothbrush into the thinned black paint. Tap off the excess on a paper towel so it isn’t dripping. -
Flick the paint:
Hold the toothbrush near the planter and run your thumb across the bristles to flick tiny droplets of paint onto the surface. Practice on a piece of cardboard first to get the feel for the distance and pressure. -
Vary the density:
Move around the planter, applying more speckles in some areas and fewer in others to create a natural, organic stone look. I like to concentrate a few more speckles near the base for visual weight. -
Add dimension with taupe:
Repeat the splatter process with the taupe or light brown paint. This second color adds depth and makes the darker speckles look less flat and more like genuine pottery glazing. -
Blot large drops:
If you accidentally create a blob that is too large, gently dab it with a corner of a paper towel while wet to lift it or smear it slightly for a different texture. -
Seal the finish:
Once the speckles are completely dry (give it at least an hour), spray the entire planter with a clear matte sealant. This protects your paint job from water damage when watering your ivy.
Step 3: Planting and Styling
-
Add drainage:
Ensure your planter has a drainage hole. If not, drill one now or add a layer of pebbles at the bottom, though a hole is always safer for ivy. -
Fill with soil:
Fill the bowl of the pedestal about halfway with high-quality potting soil. -
Position the ivy:
Remove your English Ivy from its nursery pot. Gently loosen the root ball and place it in the center of the planter. -
Arrange the vines:
Look at the natural growth of the vines. rotate the plant until the longest, fullest trails are positioned where they will drape dramatically over the edge. -
Fill and tamp:
Fill in the remaining space around the roots with soil, pressing down gently but firmly to eliminate air pockets. -
Water and settle:
Water the plant thoroughly until water runs out the bottom. Clean off any mud splashes from your beautiful new faux-stone finish. -
Final placement:
Place the pedestal on a bright windowsill where the vines can receive indirect sunlight and trail freely without obstruction.
Aged Patina Finish
After sealing, rub a bit of watered-down brown paint into the grooves of the pedestal base, then wipe it off immediately to create an antique look.
Enjoy the timeless beauty this classical pedestal brings to your indoor garden display
Stacked Tier Planters With Ivy Cascades
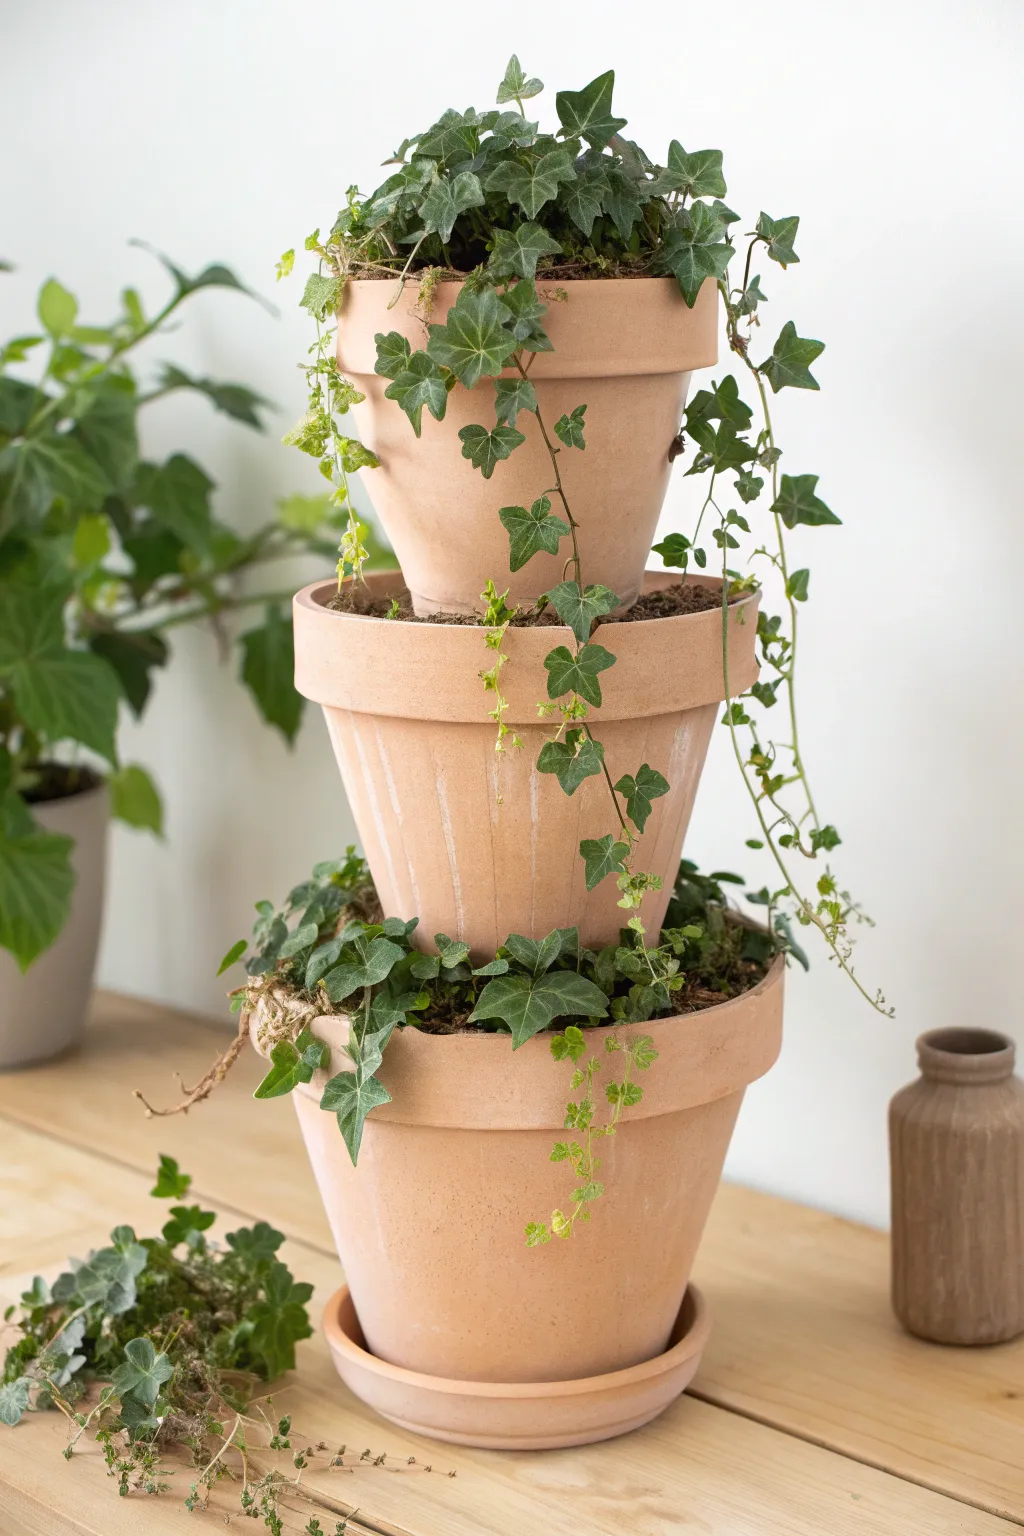
Create a vertical garden masterpiece with this charming tiered planter, perfect for adding height and greenery to small spaces. The warm terracotta tones contrasted with cascading ivy vines create a rustic, elegant display that looks beautiful indoors or out.
Step-by-Step Tutorial
Materials
- Three terracotta pots (Small: 6-inch, Medium: 8-inch, Large: 10-inch)
- One 10-inch terracotta saucer (matching the large pot)
- Two smaller terracotta saucers (sized to fit upside down inside the large and medium pots)
- English Ivy plants (Hedera helix), approximately 4-6 small starter plants
- High-quality potting soil
- Strong outdoor adhesive or construction glue (optional but recommended for stability)
- Landscape fabric or coffee filters
- Small hand trowel
- Watering can
- Gloves
Step 1: Preparation and Base Structure
-
Clean Your Pots:
Begin by thoroughly cleaning all three terracotta pots and saucers, even if they are new. Remove any stickers and wipe away dust with a damp cloth to ensure the clay is porous and clean for planting. -
Soak the Terracotta:
I like to submerge the pots in water for about an hour before planting. Terracotta is extremely thirsty and will wick moisture away from your new plants if dry; soaking prevents this shock. -
Prepare the Base:
Place the largest saucer on your work surface. Set the largest (10-inch) pot directly into this saucer. This forms the foundation of your tower. -
Drainage Hole Cover:
Place a small scrap of landscape fabric or a coffee filter over the drainage hole of the large pot to keep soil in while letting water flow through. -
Create the Internal Support:
Take one of the smaller, hidden saucers and place it face-down (upside down) in the center of the large pot’s bottom. This acts as a sturdy platform for the next tier to sit on. -
Fill the Base Layer:
Fill the large pot with potting soil, packing it around the upside-down saucer until the soil is level with the top of that internal saucer platform.
Straightening Up
If your tower leans, the internal saucers aren’t level. Pack soil very firmly underneath the upside-down saucers before stacking the next pot to create a rock-solid, flat foundation.
Step 2: Building the Tiers
-
Stack the Second Pot:
Place the medium (8-inch) pot directly onto the upside-down saucer hidden in the soil of the base pot. Center it carefully. -
Secure for Stability (Optional):
For extra security, apply a dab of construction adhesive to the bottom of the medium pot before placing it on the internal saucer. If you plan to disassemble it later, skip this step. -
Prepare the Second Tier:
Just like the first layer, place the second small internal saucer upside down inside the medium pot to create the platform for the top tier. -
Add Soil to Middle Tier:
Fill the medium pot with soil around the internal saucer, creating a ring of soil ready for planting. -
Top the Tower:
Place the smallest (6-inch) pot on top of the hidden saucer inside the medium pot. Center it perfectly to ensure the tower doesn’t lean. -
Final Soil Fill:
Fill the top pot with soil, leaving about an inch of space from the rim for easy watering. Add more soil to the lower external rings if settling occurred.
Herb Garden Twist
Mix varying textures by planting ivy in the bottom tier, trailing thyme in the middle, and rosemary on top. This creates a functional kitchen garden with the same lush aesthetic.
Step 3: Planting and Styling
-
Loosen Root Balls:
Gently remove your ivy plants from their nursery containers. Tease the roots gently with your fingers to encourage them to spread into the new soil. -
Plant the Base:
Tuck 3-4 ivy plants into the ring of soil in the bottom pot. Angle them slightly outward so the vines naturally spill over the edge. -
Plant the Middle:
Place 2-3 smaller ivy starts in the middle ring. Try to position them in the gaps between the plants below to create a full, lush look. -
Crown the Top:
Plant the fullest ivy plant in the very top pot. Arrange the trailing vines so they drape down one side, connecting the visual flow from top to bottom. -
Clean Up:
Brush away any loose soil from the terracotta rims using a dry paintbrush or soft cloth to keep that crisp orange clay visible. -
Initial Watering:
Water each tier gently, starting from the top and working your way down. Use a rosette attachment on your watering can to avoid displacing the fresh soil. -
Arrange the Vines:
Manually guide a few longer tendrils from the top and middle tiers to drape over the lower pots. You can gently pin them into the soil of the lower tiers to encourage rooting.
Place your new tiered planter in a spot with bright, indirect light and enjoy the vertical greenery
Self-Watering Planter for Thirsty Ivy
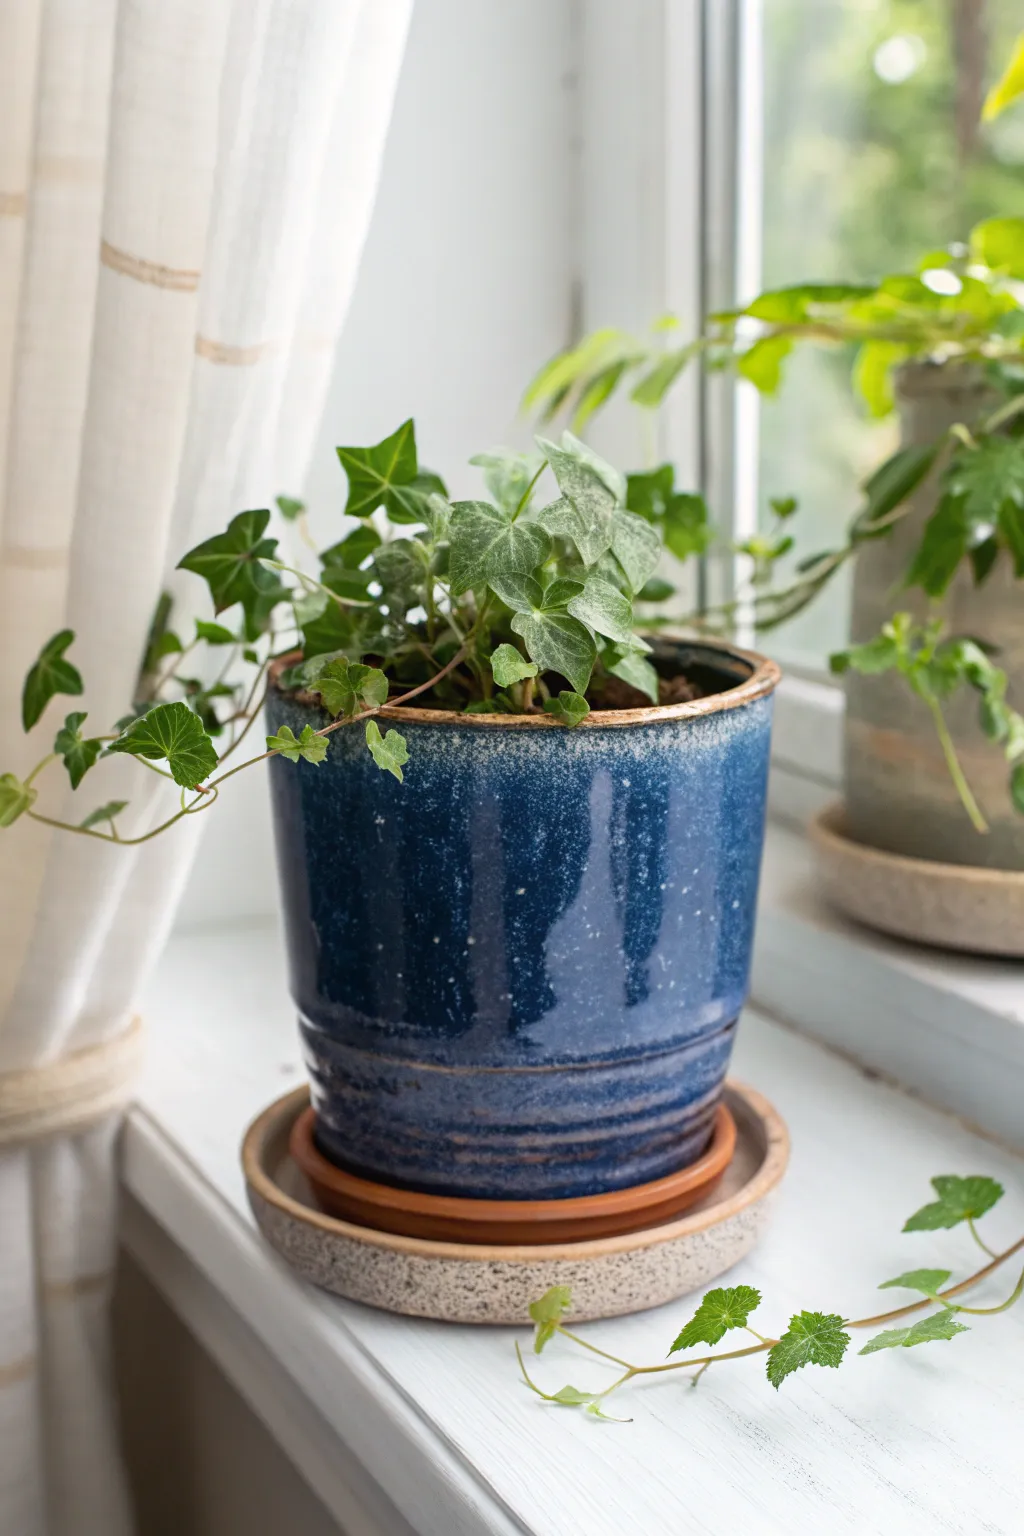
Transform a standard ceramic pot into a striking, deep blue vessel that perfectly complements the vibrant green of English ivy. This project focuses on glazing and layering techniques to achieve a rich, speckled finish that mimics high-end pottery.
How-To Guide
Materials
- Bisque-fired ceramic pot (6-8 inch diameter)
- Deep cobalt blue reactive glaze
- Clear gloss glaze
- Sponge or sea sponge
- Soft fan brush
- Detail brush
- Terracotta saucer (sized to fit inside the larger saucer)
- Larger speckled beige ceramic saucer
- English ivy plant
- Potting soil mix
- Kiln (or access to a firing service)
Step 1: Preparing the Ceramic Base
-
Clean the bisque:
Start with your bisque-fired pot. Wipe it down thoroughly with a damp sponge to remove any dust or debris from the initial firing. This ensures the glaze adheres properly. -
Mask the rim:
If you want that exposed clay look on the very top rim, carefully apply a thin line of wax resist along the upper edge. I prefer to use a steady hand and a small brush for this. -
Wax the foot:
Flip the pot over and generously apply wax resist to the bottom foot ring. This prevents the glaze from fusing your pot to the kiln shelf during firing.
Step 2: Glazing Application
-
First coat of blue:
Using a soft fan brush, apply a smooth, even coat of deep cobalt blue reactive glaze to the exterior of the pot. Brush horizontally around the pot to follow its natural shape. -
Let it dry:
Allow the first coat to dry until it is no longer cool to the touch. This usually takes about 15-20 minutes depending on humidity. -
Second coat for depth:
Apply a second coat of the blue glaze. This time, brush vertically to cross-hatch the layers, ensuring full coverage and a deeper color saturation. -
Create the mottled texture:
While the second coat is still slightly damp, take a slightly moistened sea sponge. Lightly dab it randomly over the surface to lift tiny specks of glaze or create thickness variations. -
Add the speckled effect:
Dip a toothbrush into a lighter blue or white glaze. Run your thumb over the bristles to flick tiny droplets onto the pot’s surface. This mimics that cosmic, starry look. -
High gloss finish:
Once the blue layers are bone dry, apply a final thin coat of clear gloss glaze over everything to seal the color and give it that brilliant shine.
Glaze Crawling?
If bare spots appear after firing, your bisque might have been dusty or the glaze too thick. Wash, dry thoroughly, and re-glaze thinner next time.
Step 3: Firing and Assembly
-
Fire the pot:
Place your pot in the kiln and fire it according to the glaze manufacturer’s instructions, typically to Cone 5 or 6 for stoneware durability. -
Cool down:
Allow the kiln to cool completely before opening. Thermal shock can crack your new creation, so patience is key here. -
Prepare the saucer system:
While the pot cools, grab your terracotta saucer and the larger speckled beige saucer. Place the terracotta one inside the beige one. -
Plant the ivy:
Fill the bottom of your fired blue pot with a layer of potting soil. Gently remove your ivy from its nursery pot and place it in the center. -
Fill and tamp:
Fill in the sides with more soil, pressing down gently to remove air pockets but keeping the soil aerated enough for roots. -
Arrange the vines:
Gently tease the ivy vines so they cascade naturally over the edge of the blue pot. Position a few vines to trail down towards the window sill. -
Final placement:
Set your planted blue pot onto the terracotta saucer stack. Place the whole assembly on a bright window sill with indirect light.
Make it Self-Watering
Drill a hole in the inner terracotta saucer and insert a wick into the soil. Fill the outer beige saucer with water for a passive hydration system.
Enjoy the calming presence of your handmade blue planter as the ivy grows and trails in the sunlight
Face Planter With Ivy Hair

Transform a simple corner of your home into a peaceful sanctuary with this creative planting project that turns trailing ivy into a lush, green hairstyle. The serene expression of the ceramic face pot pairs beautifully with the wild, cascading growth of English ivy, creating a living piece of art.
Detailed Instructions
Materials
- White ceramic face planter (approx. 6-8 inch opening)
- English Ivy (Hedera helix) or similar trailing plant
- High-quality potting mix
- Perlite or pumice for drainage
- Small gravel or pebbles
- Watering can with a narrow spout
- Gardening shears or scissors
Step 1: Preparation
-
Select your vessel:
Choose a white ceramic planter shaped like a human head or face. Look for one with a serene, closed-eye expression to match the peaceful vibe of the example. -
Check drainage:
Inspect the bottom of your pot. If there isn’t a drainage hole, you’ll need to exercise extreme caution with watering or drill one carefully using a ceramic bit. -
Clean the planter:
Wipe the interior and exterior of the planter with a damp cloth to remove any dust or retail stickers, ensuring a clean canvas for your plant. -
Create a drainage layer:
Place a 1-inch layer of small gravel or pebbles at the very bottom of the pot. This helps prevent root rot by keeping the soil from sitting in standing water.
Hair Stylist Secret
Rotate the pot every few days. Ivy grows toward the light, so turning it ensures the ‘hair’ grows evenly on all sides rather than leaning one way.
Step 2: Planting Process
-
Prepare the soil mix:
In a separate bowl, mix your potting soil with a handful of perlite. I like to aim for a ratio of about 3 parts soil to 1 part perlite to ensure the ivy roots can breathe. -
Add base soil:
Fill the planter about one-third to halfway full with your prepared soil mix, creating a comfortable bed for the root ball. -
Prepare the ivy:
Gently remove your ivy plant from its nursery pot. Carefully loosen the roots with your fingers if they are tightly wound in a circle. -
Position the plant:
Place the ivy into the planter. Arrange the plant so the trailing vines cascade over the sides, mimicking the look of long hair. -
Adjust the height:
Ensure the top of the plant’s root ball sits about an inch below the rim of the planter to prevent water from spilling over later. -
Fill the gaps:
Scoop more soil mix into the gaps around the root ball. Use your fingers to gently tuck the soil down, eliminating large air pockets without packing it too tightly. -
Top dressing:
Add a final thin layer of soil on top to cover any exposed roots, smoothing it out evenly.
Step 3: Styling and Maintenance
-
Initial styling:
Gently separate the vines. Drape longer strands over the ‘shoulders’ of the pot and allow shorter, bushier growth to pile up on top like a voluminous crown. -
Pruning for shape:
Snip off any dead or yellowing leaves. If a vine looks too long or straggly, trim it back to a leaf node to encourage fuller growth at the top. -
Watering:
Water the plant thoroughly until moisture just begins to reach the bottom layer. Use a narrow spout to direct water into the soil, avoiding the ceramic face. -
Clean up:
Wipe away any soil smudges from the white ceramic face with a damp cloth to restore its pristine, serene look. -
Placement:
Place your new planter in a spot with bright, indirect light. The shadow play on the textured ceramic adds depth to the sleeping face expression.
Leggy Growth?
If the ‘hair’ looks thin or sparse, pinch off the tips of the longest vines. This forces the plant to branch out closer to the soil for a fuller look.
Enjoy the calming presence of your new green friend as it grows into its wild hairstyle
Mini Polymer Clay Planters for Ivy Cuttings
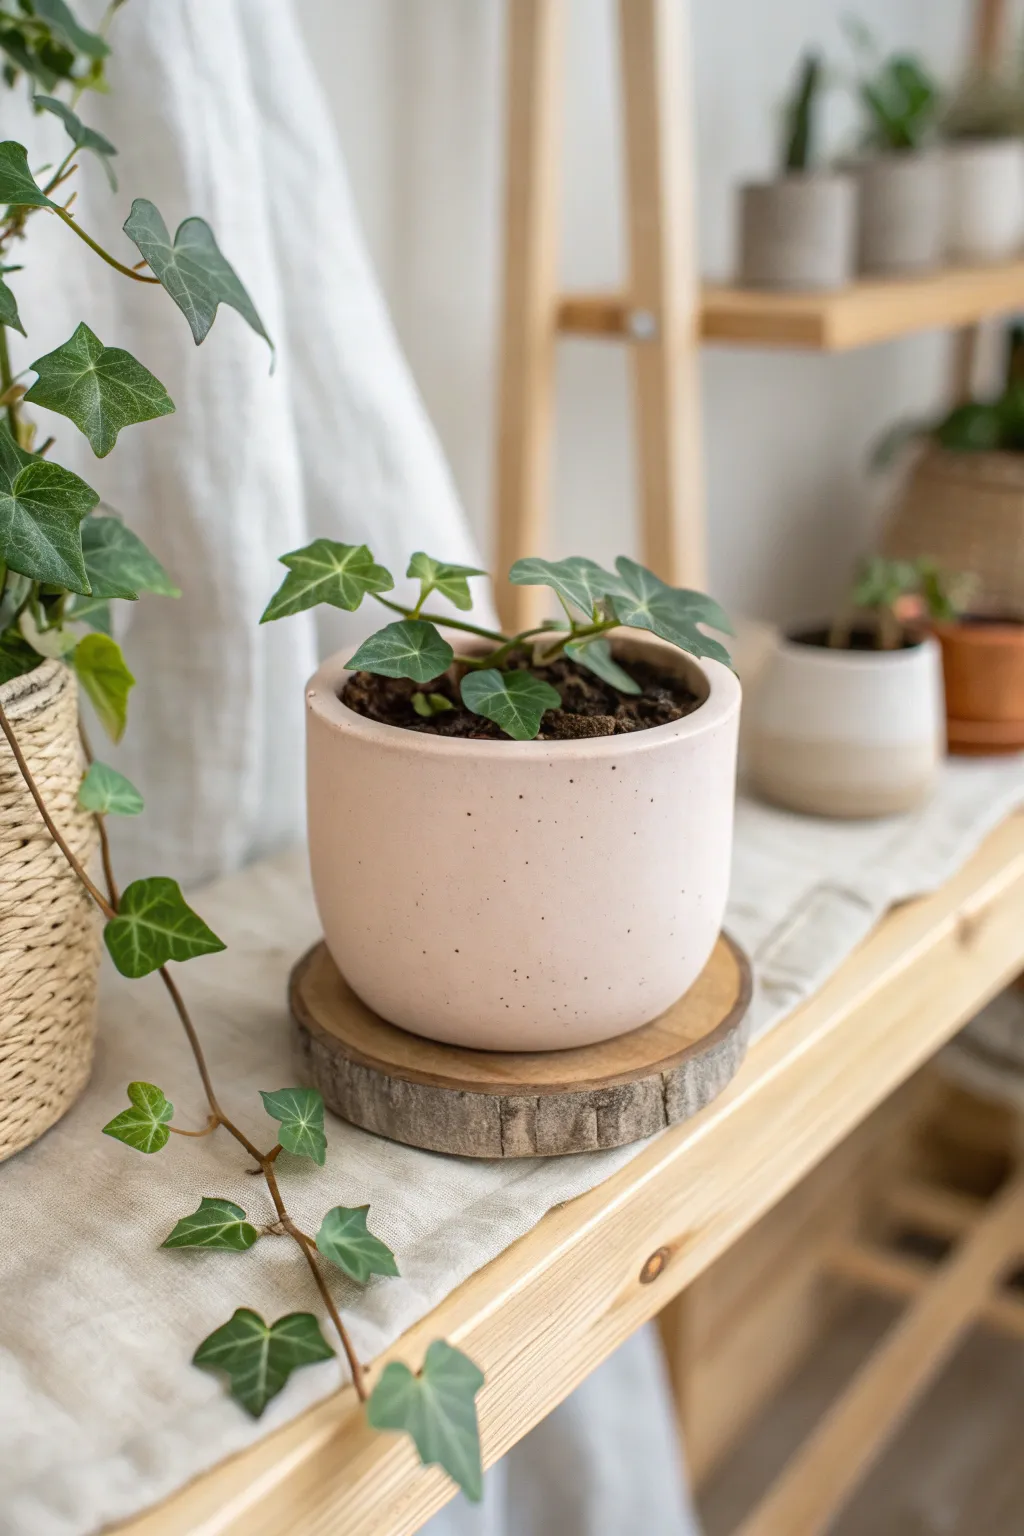
Create a charming home for your smallest ivy cuttings with this petite, minimalist planter. The soft blush tone and delicate speckling mimic the look of high-end ceramic stoneware without needing a kiln.
How-To Guide
Materials
- Light pink polymer clay (soft finish)
- White polymer clay (optional, for mixing)
- Coarse black pepper or dried coffee grounds
- Rolling pin or acrylic roller
- Circle cookie cutter (approx. 3-4 inches)
- Clay blade or craft knife
- Small glass jar or smooth cylinder (to use as a mold)
- Parchment paper
- Oven
- Cornstarch (for release)
- Fine grit sandpaper (400-600 grit)
- Matte spray varnish
Step 1: Preparing the Speckled Clay
-
Condition the clay:
Start by warming the light pink clay in your hands, kneading it until it becomes soft and pliable. If the pink is too vibrant, mix in a small amount of white clay to achieve that soft, pastel blush hue seen in the inspiration. -
Add the speckles:
Flatten your conditioned clay into a pancake shape. Sprinkle a generous pinch of coarse black pepper or dried used coffee grounds onto the surface. -
Incorporate the texture:
Fold the clay over the speckles and knead thoroughly. Continue folding and rolling until the black flecks are evenly distributed throughout the entire ball of clay. -
Roll out the slab:
Place the clay on a sheet of parchment paper to prevent sticking. Use your roller to create a long, even strip of clay, aiming for a thickness of about 1/4 inch for stability.
Step 2: Building the Form
-
Cut the base:
Using your circle cutter or a knife around a template, cut a circular base from your rolled slab. Set this aside on a baking sheet lined with parchment. -
Measure the walls:
Measure the circumference of your base circle. With a straight edge and your blade, trim the remaining clay strip into a clean rectangle that matches that length, plus a tiny bit of overlap. -
Prepare the mold:
Take your glass jar or cylinder and lightly dust the outside with cornstarch. This acts as a release agent so the clay doesn’t fuse to the glass. -
Shape the cylinder:
Wrap the rectangular clay strip around the dusted jar. Bring the two short ends together. -
Seal the seam:
Gently press the two ends together. Use your finger or a clay tool to smooth the seam downward, blending the clay until the line disappears and the wall is continuous. -
Attach the base:
Place the clay-wrapped jar directly onto the circle base you cut earlier. Press the bottom edge of the wall firmly onto the base. -
Blend the bottom joint:
Use a modeling tool or your finger to smooth the clay from the wall down onto the base, ensuring a watertight seal. I find using a slight dragging motion helps merge the pieces seamlessly. -
Refine the rim:
While the clay is still supported by the jar, gently smooth the top rim with your finger to soften any sharp cutting lines.
Seamless Smooth Tip
Use a tiny amount of baby oil or clay softener on your fingertip when blending the seam. It melts the clay slightly, making invisible joins much easier to achieve.
Step 3: Baking and Finishing
-
Bake the pot:
Place the clay (still on the jar for support) into the oven. Follow the specific temperature and time instructions on your polymer clay package, usually around 275°F (135°C) for 15-30 minutes. -
Cool down:
Once baked, turn off the oven and let the pot cool completely inside. This gradual cooling helps prevent cracking. -
Remove the mold:
Carefully slide the glass jar out of the hardened clay pot. If it sticks, a gentle twist usually breaks the seal created by the cornstarch. -
Sand for perfection:
Take your pot to a sink or bowl of water. Wet sand the outside using 400-600 grit sandpaper to remove any fingerprints and make the surface ultra-smooth like ceramic. -
Rinse and dry:
Wash off any sanding residue and dry the pot thoroughly with a lint-free cloth. -
Seal the surface:
Spray a light coat of matte varnish over the exterior to protect the finish and seal in the pepper speckles. -
Pot your ivy:
Once the varnish is dry, fill your new mini planter with soil and nestle in your fresh ivy cuttings.
Clay Sagging?
If the clay walls slide down the jar before baking, pop the whole assembly in the fridge for 20 minutes. Firming up the clay makes it hold its shape better during handling.
Now you have a charming custom planter ready to brighten up any small corner of your home