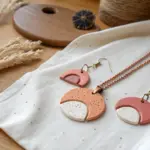
When I’m dreaming up clay earring designs, I always start by playing with shape first, then letting color and texture do the talking. Here are my favorite clay earring design ideas—from classic crowd-pleasers to the extra-fun styles that make you stop and stare.
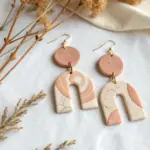
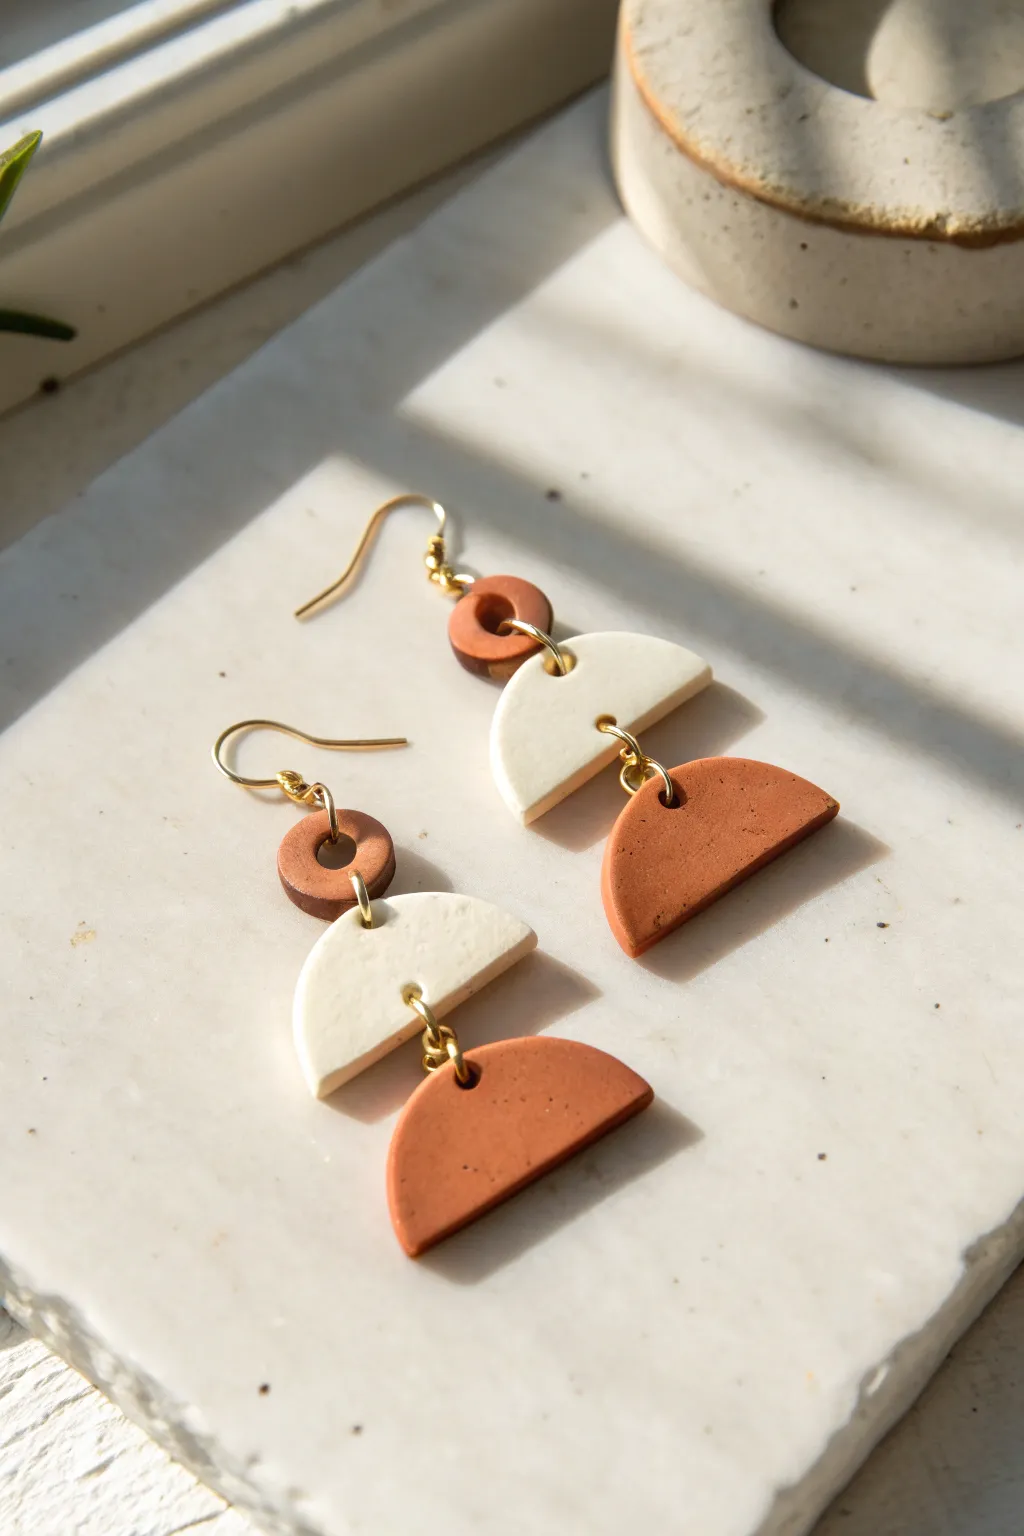
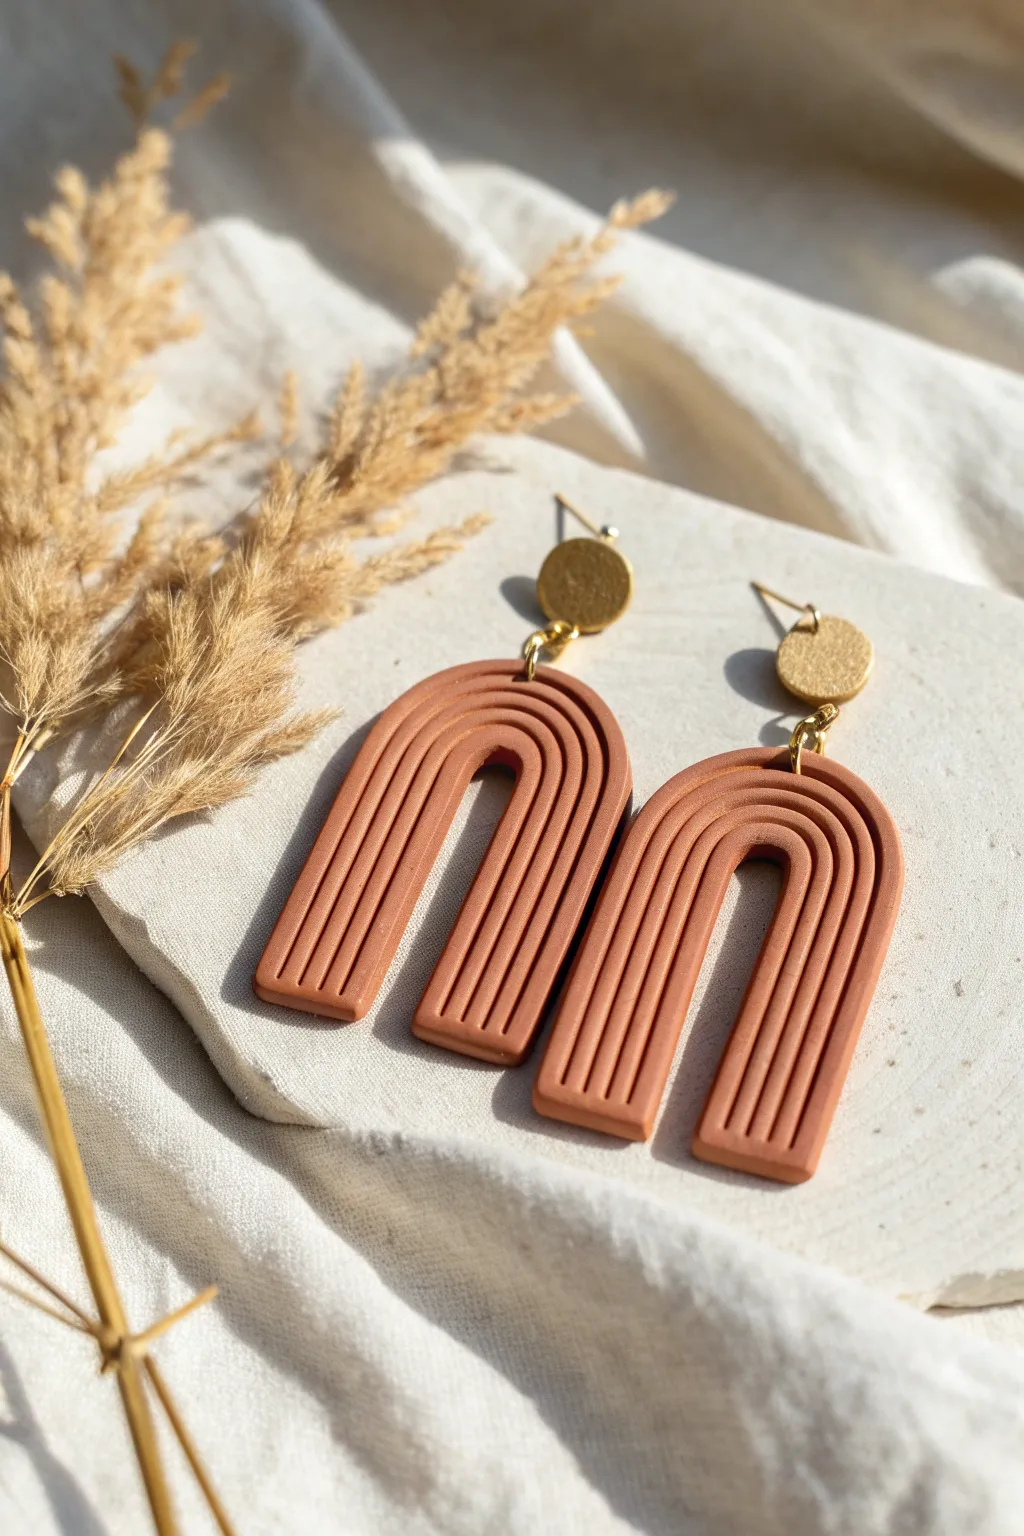
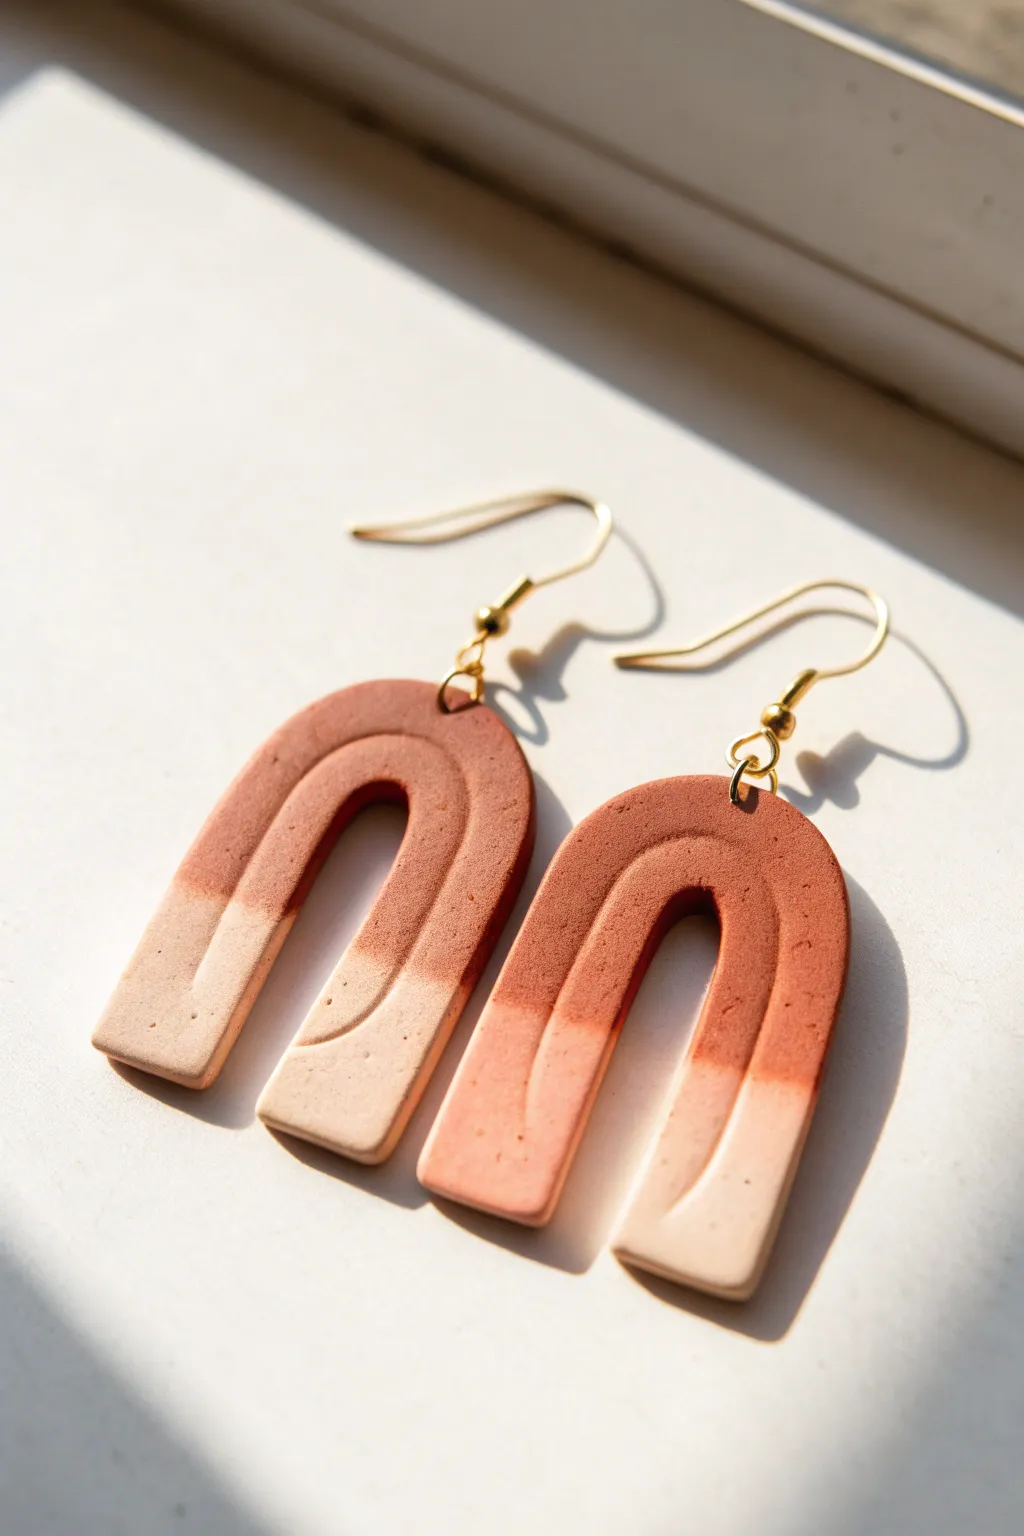
Arch and Rainbow Dangles
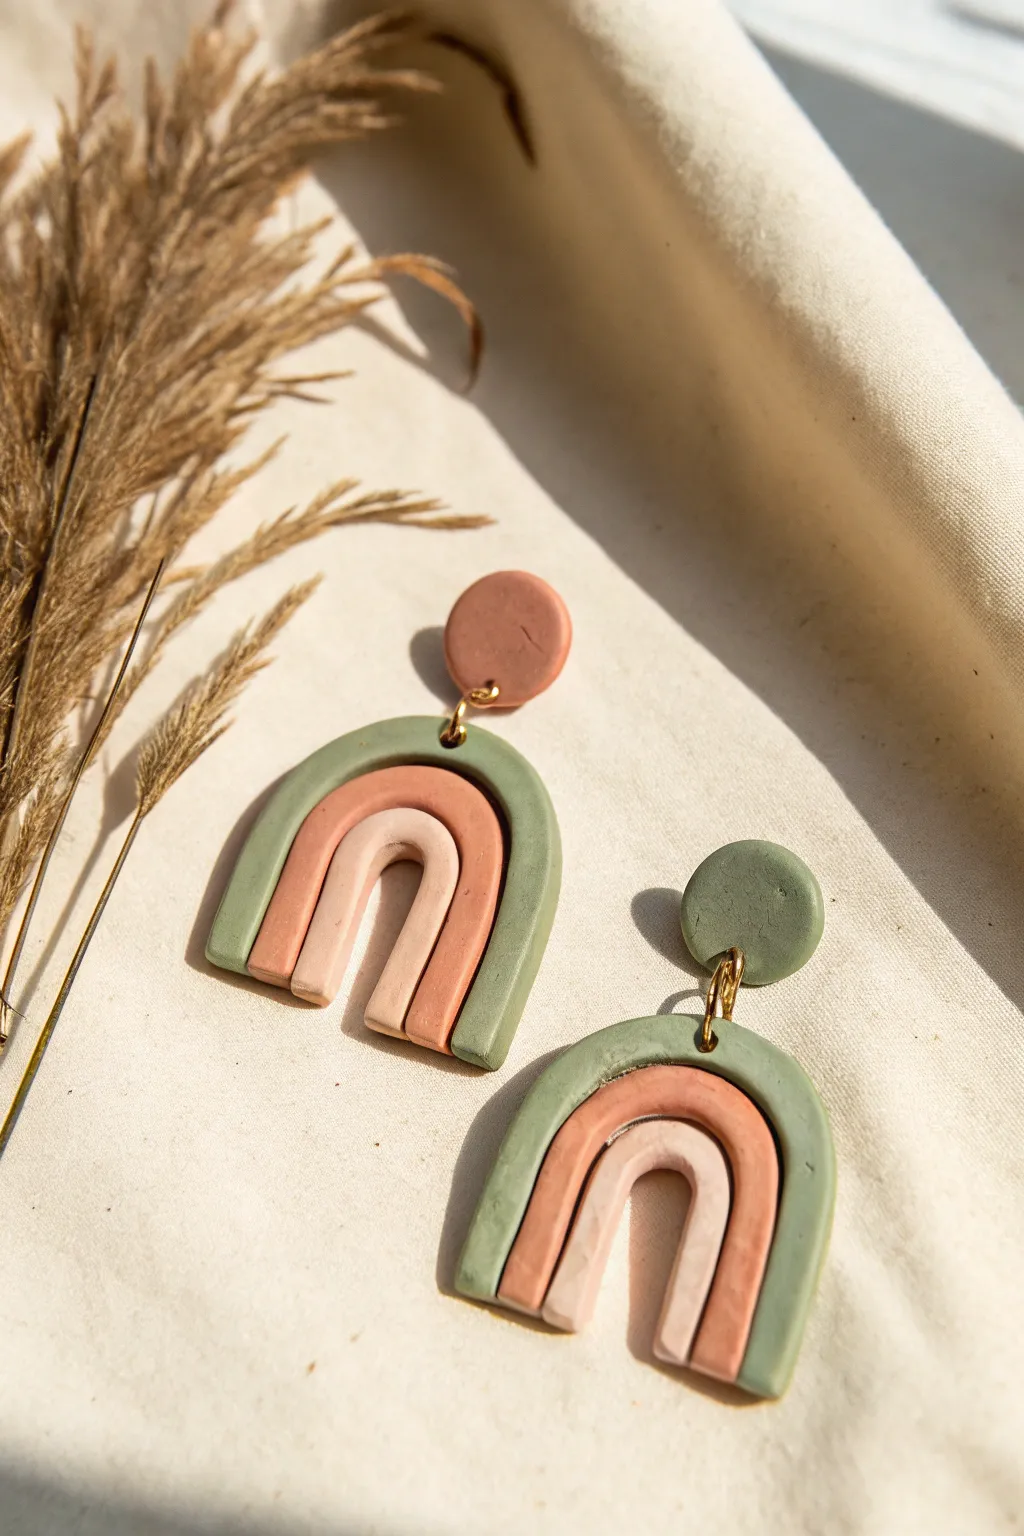
Embrace the natural beauty of asymmetry with these earthy, mismatched rainbow dangles. Featuring a soothing palette of sage green, terracotta, and soft blush, these earrings combine simple geometric shapes into a sophisticated statement piece.
Step-by-Step Guide
Materials
- Polymer clay in Sage Green, Terracotta/Rust, and Pale Blush/Beige
- Acrylic rolling pin
- X-Acto knife or tissue blade
- Small circular clay cutter (approx. 10mm)
- Clean ceramic tile or glass work surface
- Jump rings (gold finish)
- Earring posts and backs
- Super glue or jewelry resin
- Needle tool or small drill bit
- Parchment paper
- Oven (for baking)
Step 1: Preparing the Clay
-
Condition the clay:
Start by warming up your three clay colors—Sage Green, Terracotta, and Pale Blush—by kneading them in your hands until they are soft and pliable. This prevents cracking later. -
Roll out ropes:
Take a small portion of each color and roll them on your work surface into long, even snakes. Aim for a thickness of about 3-4mm for each strand. -
Check consistency:
Lay the three ropes side-by-side to ensure they are the same thickness. If one is too thick, roll it out gently with the palm of your hand to match the others.
Step 2: Forming the Arches
-
Create the inner arch:
Cut a segment of the Pale Blush rope and curve it into a tight ‘U’ shape on your tile. This will be the smallest, innermost layer of your rainbow. -
Add the middle layer:
Take a segment of the Terracotta rope and gently wrap it around the outside of the Blush arch. Press them together lightly so they bond without flattening the rounded shape. -
Add the outer layer:
Finally, wrap a segment of the Sage Green rope around the Terracotta layer to complete the rainbow. -
Repeat for the second earring:
Repeat the previous three steps to create a second identical rainbow arch. I like to build them side-by-side to ensure they are the same size. -
Trim the bottoms:
Using your tissue blade or X-Acto knife, make a single straight cut across the bottom of the arches to sever the uneven tails. This creates a clean, flat base.
Clean Cuts
Before trimming the bottom of your arches, put the clay in the fridge for 10 minutes. Cold clay cuts cleaner and won’t smush under the blade pressure.
Step 3: Creating the Studs
-
Roll out a slab:
Take your leftover Sage Green and Terracotta clay. Roll each color out into a small, flat sheet, approximately 3mm thick. -
Cut the circles:
Using your small circular cutter, punch out one circle from the Terracotta slab and one circle from the Sage Green slab. This creates the asymmetrical, mismatched look shown in the photo. -
Smooth the edges:
Gently tap the edges of the cut circles with your finger to remove any sharp ridges left by the cutter.
Textured Twist
Before baking, gently roll a piece of sandpaper or a textured fabric over the flat circle studs to give them a stone-like surface finish.
Step 4: Assembly Prep and Baking
-
Pierce holes:
Use a needle tool to poke a hole near the bottom edge of each circle stud. Then, poke a hole at the top center of the outermost green arch on both rainbow pieces. Ensure holes are large enough for your jump rings. -
Bake the pieces:
Place your tile with the clay pieces into the oven. Bake according to the manufacturer’s instructions on your clay package (usually around 275°F or 130°C for 15-30 minutes). -
Cool down:
Allow the pieces to cool completely before determining if you need to do any sanding. If the bottoms of the arches aren’t perfectly straight, you can lightly sand them now.
Step 5: Final Assembly
-
Attach the posts:
Use super glue to attach metal earring posts to the back of the circular studs. Let the glue set thoroughly. -
Connect the parts:
Using two pairs of pliers, twist open a jump ring. Thread it through the hole in the green stud and the hole in a rainbow arch, then twist it closed. -
Finish the pair:
Repeat the connection process for the terracotta stud and the second rainbow arch. Ensure the jump rings are closed tightly so the dangle doesn’t slip off.
Wear these beauties with a simple linen top to let the muted tones really shine


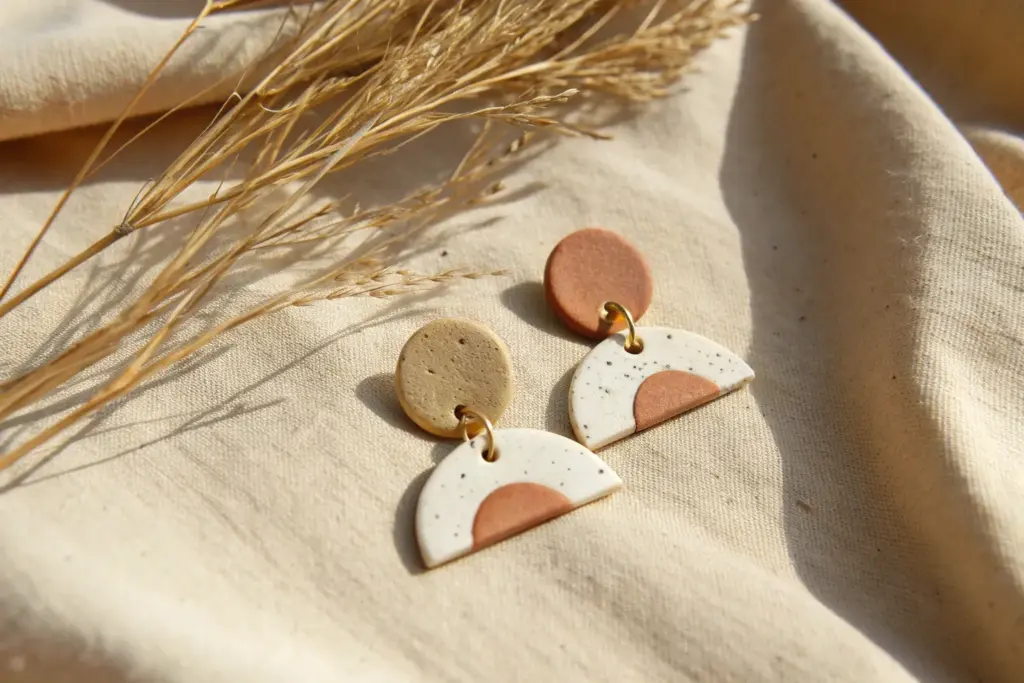
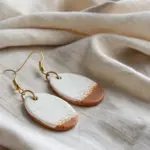
Oval Drops in Earth Tones
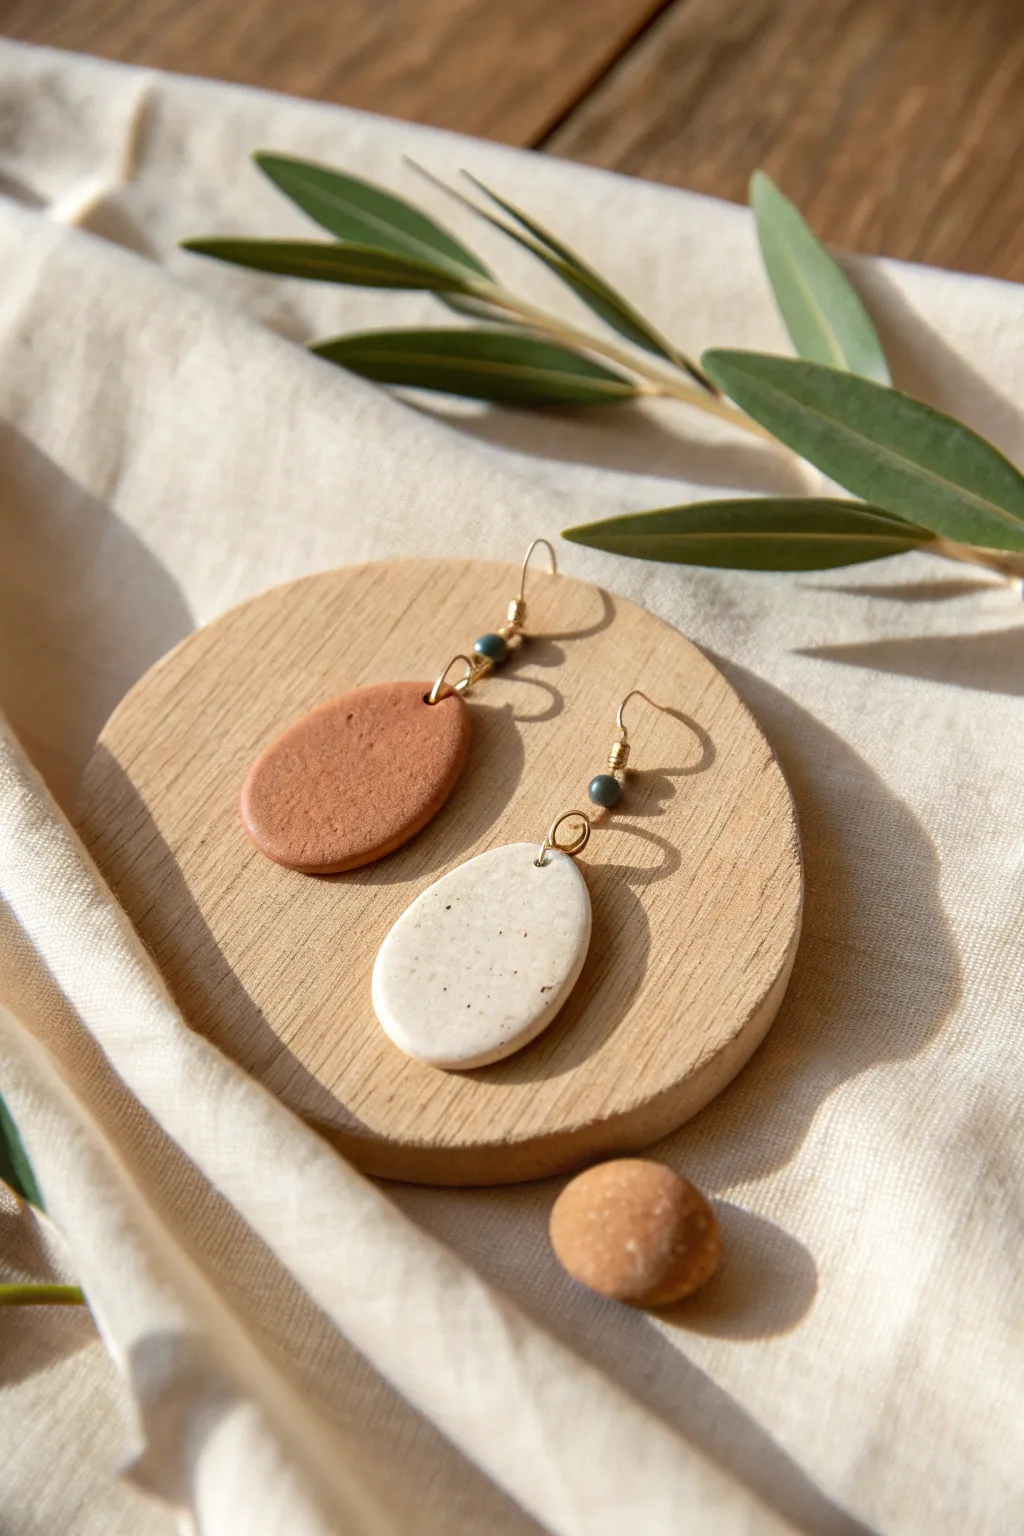
Embrace the beauty of nature with these elegantly simple mismatched oval drop earrings. Featuring a textured terra cotta clay and a speckled stone-effect cream, this design balances organic warmth with modern lines.
How-To Guide
Materials
- Polymer clay in Terra Cotta (rust)
- Polymer clay in Granite or Speckled Cream
- Rolling pin or acrylic roller
- Oval clay cutter (medium sized)
- Hand drill or needle tool
- Sandpaper (fine grit)
- Small jump rings (gold finish)
- Gold finish earring hooks (fishhook style)
- Small beads (matte green or teal)
- Jewelry pliers (round nose and flat nose)
- Oven for baking
Step 1: Clay Conditioning & Shaping
-
Condition the terra cotta:
Begin by taking a small block of the terra cotta clay. Knead it in your hands until it becomes soft, pliable, and warm to the touch, ensuring there are no air bubbles trapped inside. -
Roll out the slab:
Using your acrylic roller or rolling pin, flatten the terra cotta clay into an even slab. Aim for a thickness of about 3mm to 4mm—thick enough to be sturdy but light enough for comfortable wear. -
Add texture (optional):
If you want that slightly weathered look seen in the photo, gently press a piece of coarse sandpaper or a texture sponge onto the surface of the clay slab before cutting. -
Prep the speckled clay:
Repeat the conditioning and rolling process with your speckled cream or granite-effect clay. Try to get this slab to the exact same thickness as the terra cotta one for a balanced pair. -
Cut the ovals:
Press your oval cutter firmly into the clay. Cut one oval from the terra cotta slab and one from the speckled slab. If the edges are jagged, gently smooth them with your finger. -
Pierce the holes:
Use a needle tool or toothpick to poke a small hole fairly close to the top edge of each oval. Make sure the hole is large enough for your jump rings to fit through later. -
Bake firmly:
Place your clay pieces on a ceramic tile or baking sheet lined with parchment paper. Bake according to your specific clay brand’s instructions (usually around 275°F or 130°C for 15-30 minutes).
Uneven Surfaces?
If fingerprints are visible on your raw clay, lightly brush the surface with a tiny amount of baby oil or cornstarch before baking to smooth them out completely.
Step 2: Finishing & Assembly
-
Cool and inspect:
Allow the pieces to cool completely inside the oven or on the counter. Once cool, check the edges for any sharpness. -
Sand the edges:
I usually take a piece of fine-grit sandpaper and run it lightly over the edges and the backs of the pieces to ensure a professional, smooth finish. -
Prepare the beaded link:
Take a headpin or a piece of wire and thread on one of your small matte green beads. Create a small loop above the bead using your round nose pliers, trimming excess wire if necessary. -
Alternative bead method:
If you are connecting directly to the earring hook, some hooks allow you to slide a bead right onto the shaft of the hook before the loop; check if your findings allow this simpler method. -
Open the jump rings:
Using two pairs of pliers, twist a gold jump ring open laterally (never pull it apart outwards) to preserve its shape. -
Connect the clay:
Slide the jump ring through the hole in the top of your terra cotta oval. Before closing it, attach your beaded link or the loop of your earring hook. -
Close the ring:
Twist the jump ring back into a closed position, ensuring the ends meet perfectly flush so the clay doesn’t slip out. -
Repeat for the second earring:
Perform the same assembly steps for the speckled cream oval, ensuring the total length matches the first earring. -
Final polish:
Give the clay a quick rub with a soft cloth (denim works great) to buff up the surface slightly without making it glossy.
Level Up: Mix & Match
Create a truly custom look by mixing the two clay colors together partially to create a third ‘marbled’ oval for a coordinating necklace pendant.
Enjoy wearing your new handcrafted accessories that bring a touch of earthy elegance to any outfit


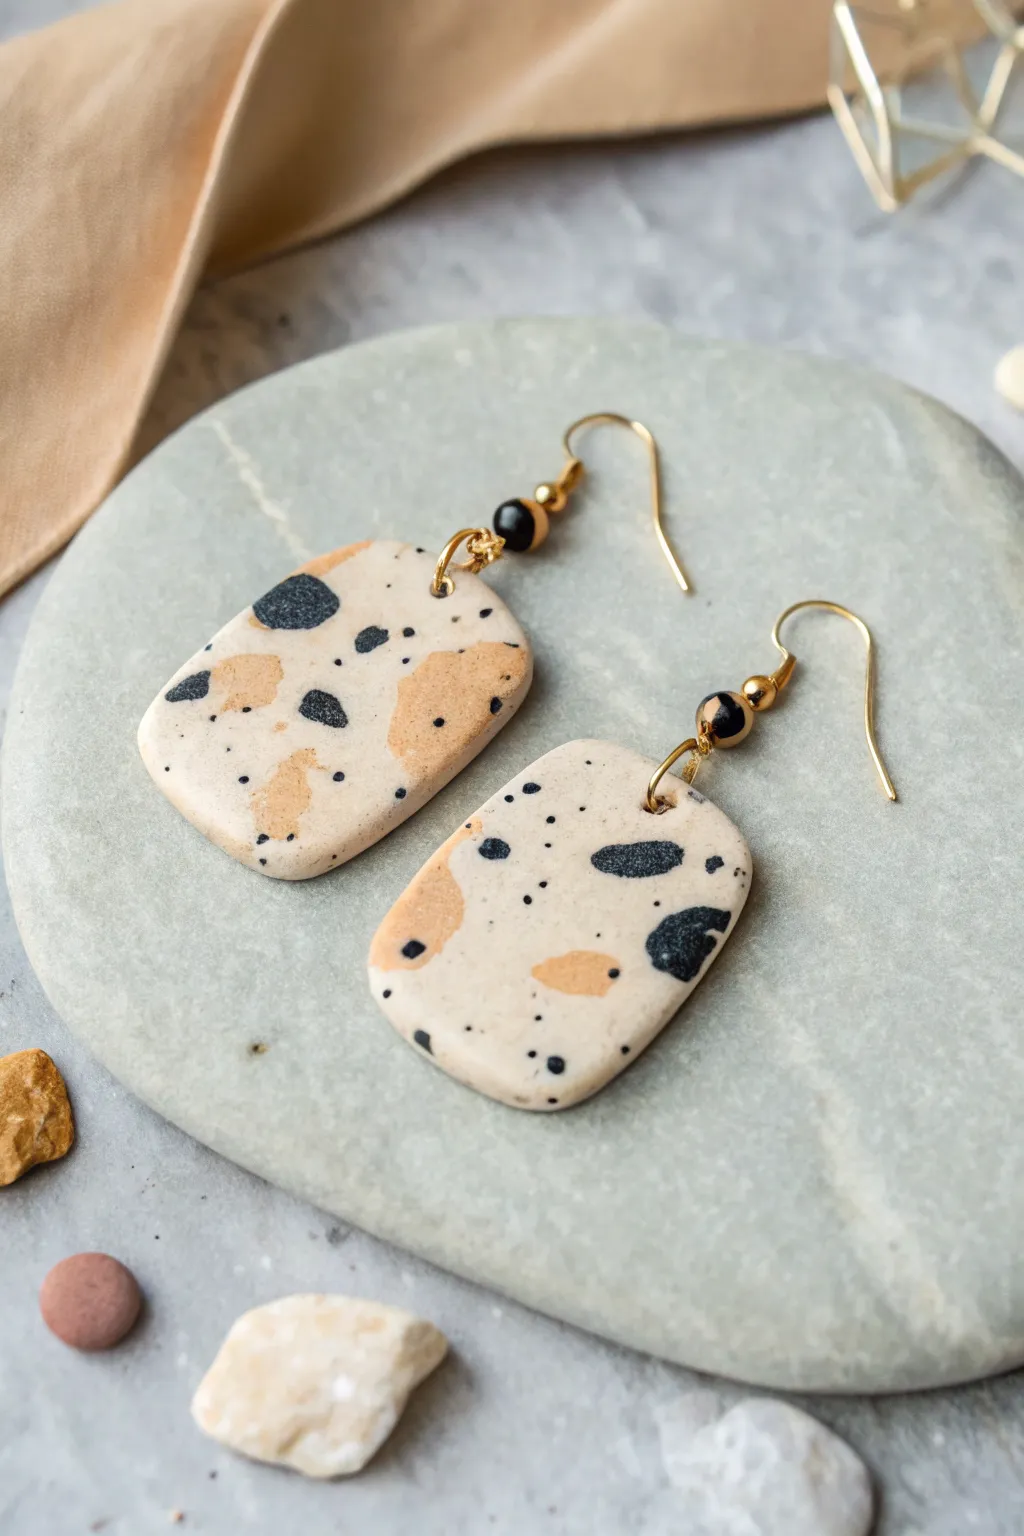
Terrazzo Speckle Slab Cuts
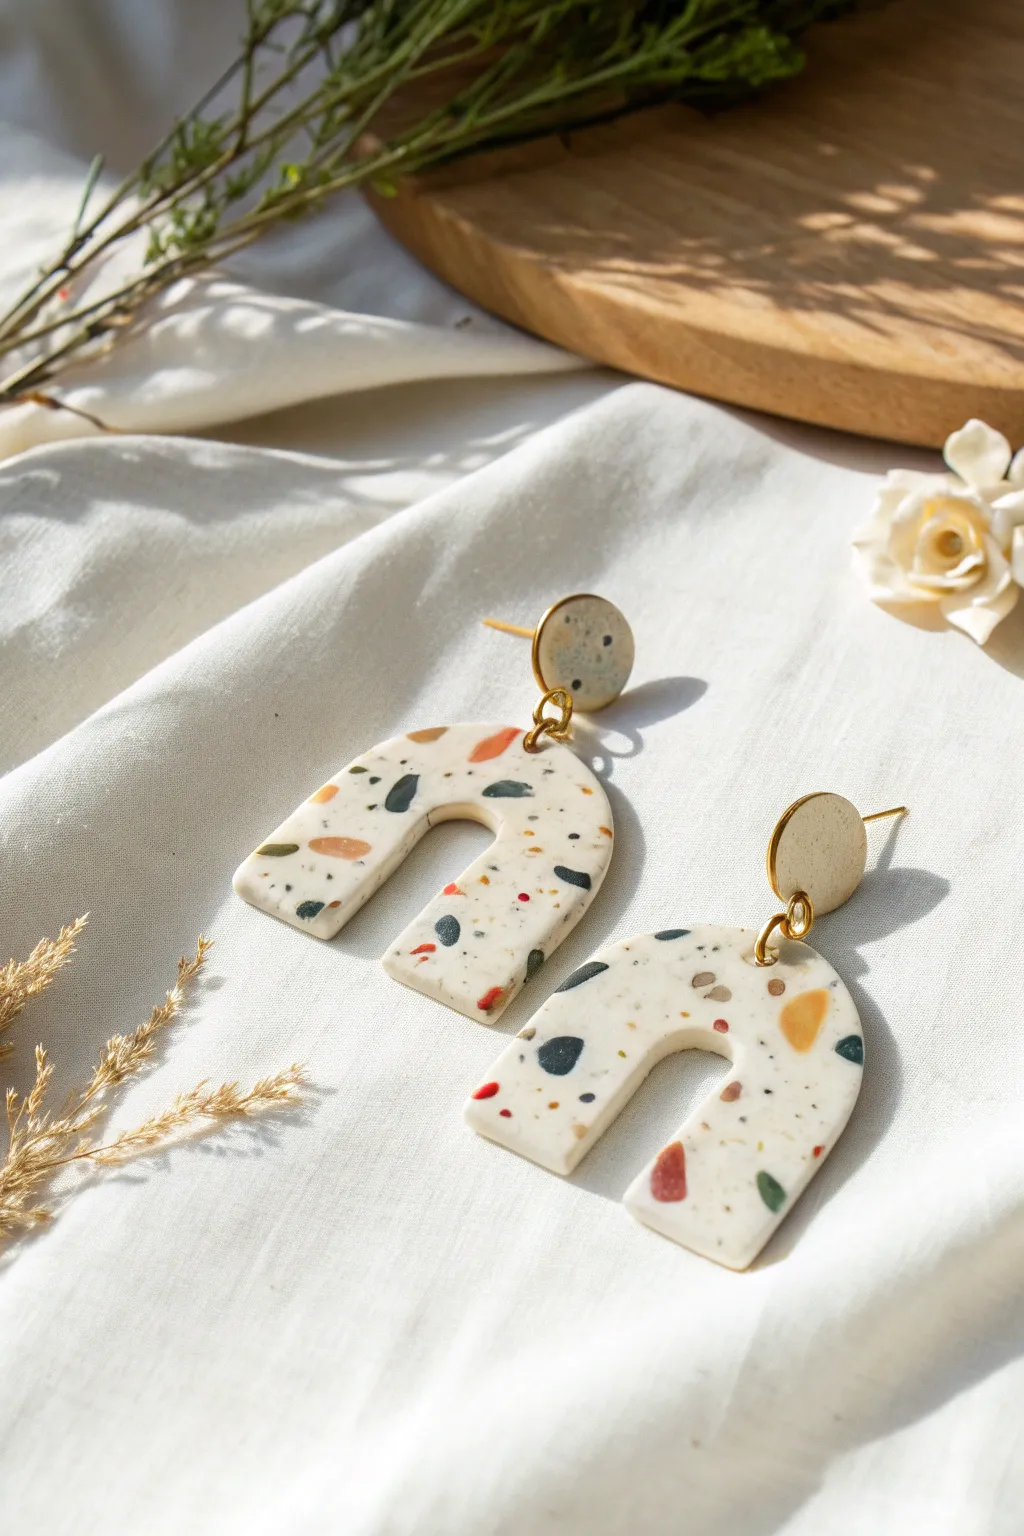
Embrace the playful yet sophisticated look of terrazzo with these handmade polymer clay earrings. The design features a creamy white base scattered with organic chips of earthy terracotta, mustard, charcoal, and grey, cut into a modern arch shape.
Step-by-Step Tutorial
Materials
- Polymer clay (White or Ecru for base)
- Polymer clay (Terracotta, Mustard Yellow, Dark Grey, Black, Green)
- Clay roller or pasta machine
- Tissue blade or X-Acto knife
- U-shaped or Arch clay cutters (medium size)
- Small circle clay cutters (approx. 10mm)
- Parchment paper or ceramic tile
- Rolling pin
- Needle tool or hand drill
- Jump rings (gold)
- Earring posts and backs
- Super glue or E6000
- Fine-grit sandpaper (optional)
- Pliers
Step 1: Preparing the Clay Palette
-
Condition the base:
Start by thoroughly conditioning your white or ecru clay. Knead it in your hands until it is warm and pliable, then run it through your pasta machine or use a roller to create a smooth, thick sheet about 3mm thick. -
Prep the colored fragments:
Condition small amounts of your accent colors—terracotta, mustard, grey, and green. Roll these out into very thin sheets, much thinner than your base layer. -
Create the chips:
Tear the thin sheets of colored clay into tiny, irregular scraps. Alternatively, roughly chop them with your blade. You want a variety of sizes, from mere specks to slightly larger, chunky shards.
Clean Cuts
To prevent the clay from sticking inside your cutters, dip the cutting edge into a small pile of cornstarch or water before pressing down into the slab.
Step 2: Creating the Terrazzo Slab
-
Arranging the pattern:
Place your white base sheet on your work surface. Gently sprinkle your colored clay chips over the white slab. Don’t overthink placement; random scattering creates the most authentic stone look. -
Embedding the chips:
Once you are happy with the distribution, cover the clay with a piece of parchment paper. Use your roller to gently press the chips down into the base clay so they are flush with the surface. -
Smoothing the slab:
Roll over the slab firmly in different directions. This stretches the chips slightly and ensures a completely smooth, unified surface. The slab should end up around 2-3mm thick.
Step 3: Cutting and Baking
-
Cut the shapes:
Use your U-shaped cutter to punch out two arch shapes from the most visually interesting parts of your slab. Then, cut two small circles for the stud tops. -
Refine the edges:
Before lifting the shapes, gently smooth the cut edges with your fingertip to remove any stray clay bits or fingerprints. -
Add holes:
Use a needle tool to pierce a hole at the top center of each arch and the bottom center of each circle stud. Make sure the hole is big enough for your jump rings. -
Bake carefully:
Place the pieces on a ceramic tile or parchment-lined baking sheet. Bake according to your brand of clay’s instructions—usually 275°F (135°C) for about 30 minutes. Tent with foil to prevent yellowing.
Earthy Texture
Mix black pepper or dried tea leaves into your white base clay before adding the colored chips to create an even more organic, speckled stone effect.
Step 4: Assembly and Finishing
-
Sanding (Optional):
Once cooled, if you notice rough edges, wet sand them gently with fine-grit sandpaper for a professional finish. I find doing this under running water keeps dust down. -
Attach posts:
Apply a small dab of strong glue to the back of the circle studs and press the flat pad of the earring post onto the clay. Let this dry completely. -
Connect the pieces:
Open a jump ring by twisting it sideways with pliers. Thread it through the hole in the arch and the hole in the stud. -
Close the ring:
Twist the jump ring back into a closed circle, ensuring the two clay pieces hang freely and the ends of the ring meet flush.
Wear your new modern art pieces with pride or gift them to a friend who loves unique accessories

Soft Marble Swirl Earrings
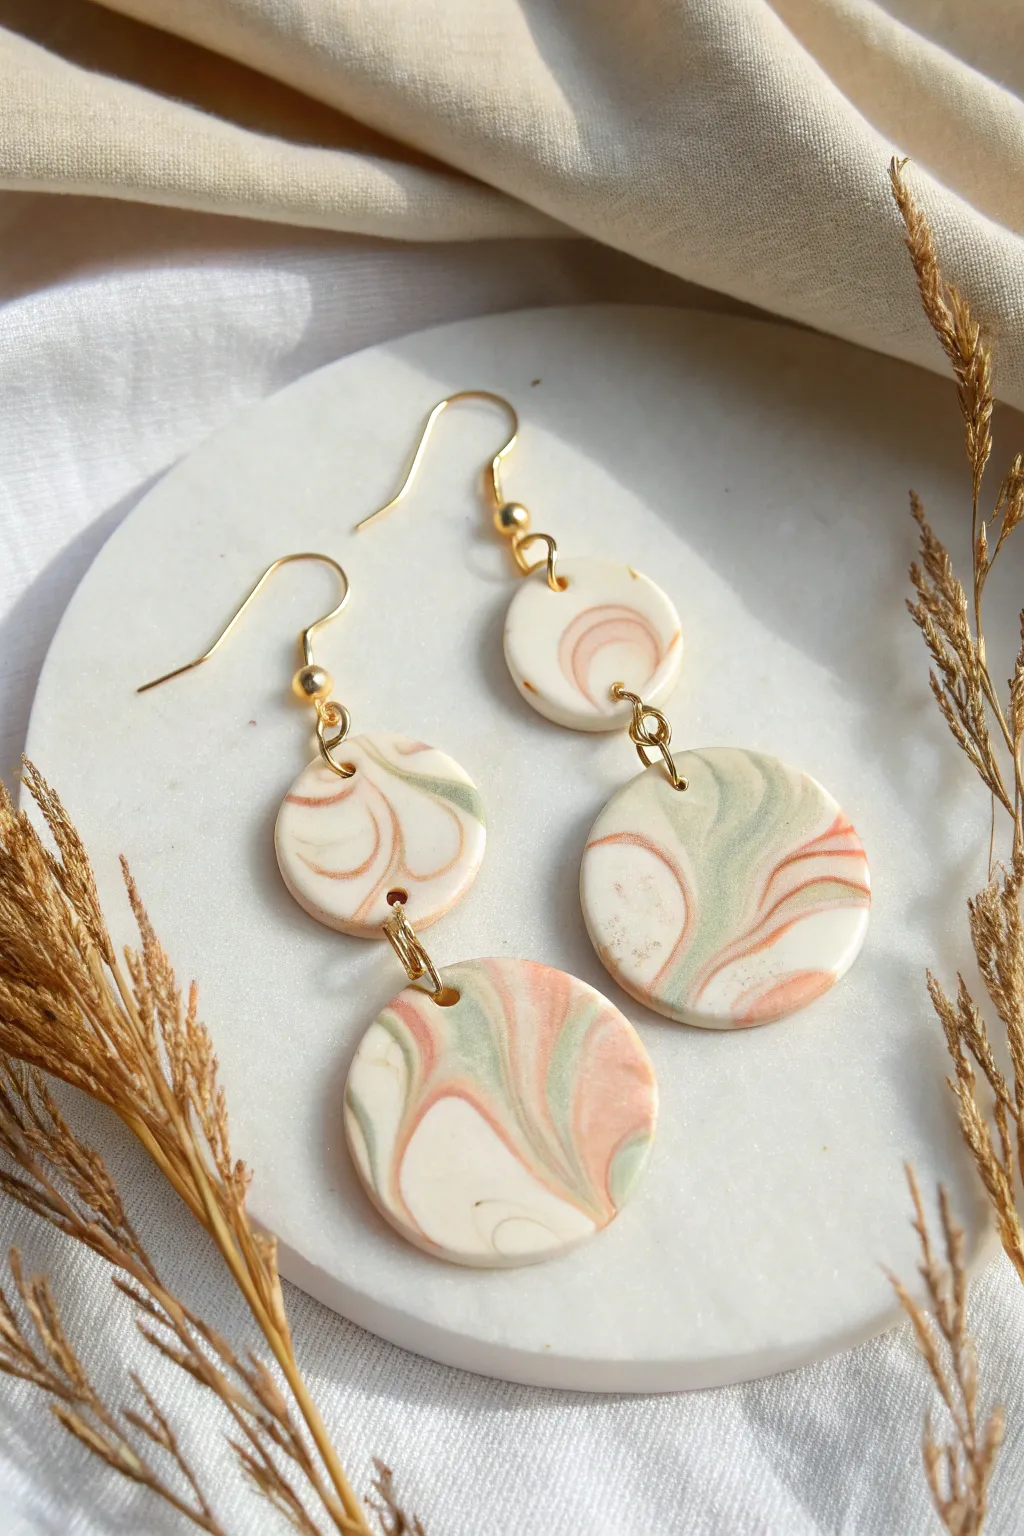
Capture the delicate beauty of a sunrise with these soft, marbled polymer clay earrings. Featuring a dreamy blend of cream, blush pink, and sage green swirls, these dangles add an elegant, artistic touch to any outfit.
Step-by-Step Guide
Materials
- Polymer clay (white, beige/cream, soft blush pink, sage green)
- Gold leaf or metallic gold powder (optional)
- Acrylic roller or pasta machine
- Circle clay cutters (two sizes: 15mm and 25mm approx.)
- Exacto knife or clay blade
- Dremel tool or hand drill with small bit
- Jump rings (gold, 6mm)
- Fishhook earring wires (gold)
- Jewelry pliers (flat nose and round nose)
- Parchment paper or ceramic tile for baking
- Glossy glaze or UV resin (optional for finish)
- Fine-grit sandpaper (400 to 1000 grit)
Step 1: Preparing the Pattern
-
Condition the clay:
Start by kneading each color of polymer clay—white, beige, blush pink, and sage green—individually until they are soft and pliable. This prevents cracks later on. -
Form logs:
Roll each conditioned color into a long, thin snake or log shape. You’ll want the white and beige logs to be slightly thicker than the colored ones to keep the base light and airy. -
Twist together:
Gather your clay snakes into a bundle. Holding both ends, gently twist them together into a single, spiraled rope. -
Fold and roll:
Fold the twisted rope in half and roll it out again into a snake. Repeat this twist-fold-roll process 2 or 3 times. Be careful not to over-twist, or the colors will turn muddy instead of marbled. -
Create the slab:
Ball up your marbled clay and place it on your work surface. Using your acrylic roller or pasta machine, flatten it into a slab about 3mm thick. You should see beautiful, organic swirls appearing.
Step 2: Cutting and Baking
-
Inspect the swirl:
Look closely at your slab to find the most pleasing swirling patterns. If you want a touch of shimmer, brush a tiny amount of gold powder onto the surface before cutting. -
Cut the shapes:
Using your circle cutters, press firmly into the clay. For each earring, cut one small circle (for the top stud/connector) and two larger circles (for the cascading dangles). -
Smooth the edges:
Before lifting the shapes, gently run your finger over the cut edges to smooth them down, or use a piece of plastic wrap over the clay before cutting for a domed edge effect. -
Create holes:
If you don’t have a drill for later, use a toothpick or needle tool now to poke holes near the top and bottom of the middle circle, and just the top of the bottom circle. The smallest top circle needs two holes on opposite sides. -
Bake:
Transfer your shapes to a ceramic tile or baking sheet lined with parchment paper. Bake according to your clay manufacturer’s instructions (usually 275°F/135°C for 30 minutes). -
Cool down:
Allow the pieces to cool completely in the oven or on a wire rack. I find letting them cool slowly prevents brittleness.
Muddy Colors?
If your marbling looks brown or undefined, you likely over-mixed. Next time, stop kneading as soon as streaks appear. Less is more with light pastels.
Step 3: Assembly and Finish
-
Sand for smoothness:
Once cool, dip your sandpaper in water and gently sand the edges of your circles to remove any sharp bits or irregularities for a professional finish. -
Drill holes (if needed):
If you didn’t poke holes earlier, use a Dremel or hand drill to carefully create holes near the edges where the rings will connect. -
Buff or glaze:
For a matte look like the photo, simply buff the surface with a soft cloth. If you prefer high shine, add a thin layer of gloss glaze or UV resin now. -
Open jump rings:
Using two pairs of pliers, twist your gold jump rings open sideways (never pull them apart). This maintains their strength. -
Connect the tiers:
Thread a jump ring through the bottom of the smallest circle and the top of the middle circle. Close the ring securely. Repeat to connect the middle circle to the large bottom circle. -
Attach earring hooks:
Open the small loop on your fishhook earring wire. Slide it onto the top hole of the smallest circle. -
Final check:
Close the earring wire loop securely. Hold the earring up to ensure all circles face forward. Repeat the assembly for the second earring.
Golden Touch
For a luxe upgrade, press jagged flakes of gold leaf individually onto the slab before the final roll. It adds a chic, geological vein texture to the marble.
Now you have a stunning pair of unique, hand-marbled earrings ready to wear or gift

The Complete Guide to Pottery Troubleshooting
Uncover the most common ceramic mistakes—from cracking clay to failed glazes—and learn how to fix them fast.
Clean Color-Block Geometrics
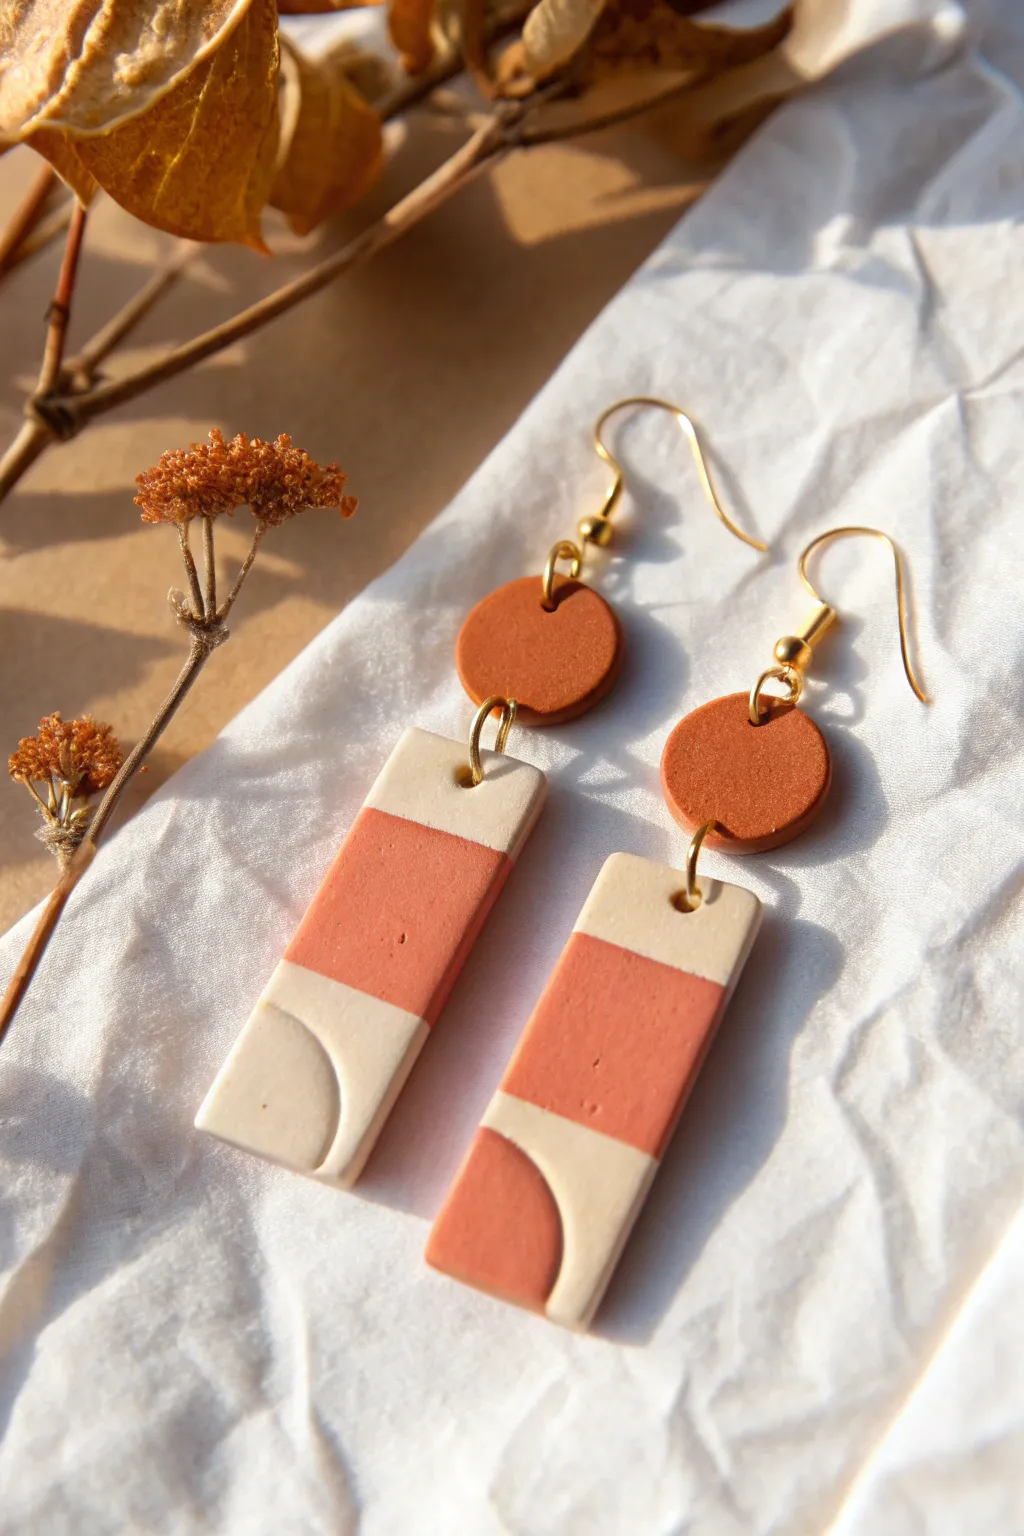
Embrace earthy warmth with these sophisticated color-blocked earrings that combine modern geometric shapes with a soft, boho palette. The clean lines of the rectangular drops contrast beautifully with the organic circular studs, creating a perfectly balanced accessory for everyday wear.
How-To Guide
Materials
- Polymer clay (Terracotta/Rust color)
- Polymer clay (Cream or beige color)
- Acrylic rolling pin or pasta machine
- Small circle cutter (approx. 10-12mm)
- Medium rectangular cutter (approx. 1 inch by 0.4 inch)
- Straight tissue blade
- Needle tool or small drill bit
- Jump rings (gold finish)
- Ear wires or stud posts (gold finish)
- Jewelry pliers (flat nose and round nose)
- Parchment paper or ceramic tile for baking
- Fine grit sandpaper (optional)
Step 1: Preparing the Clay
-
Condition the clay:
Start by thoroughly kneading both your terracotta and cream clays separately until they are soft, pliable, and free of air bubbles. Warm hands help speed up this process. -
Roll out the sheets:
Using your acrylic roller or pasta machine, roll the cream clay out to a uniform thickness, about 2-3mm. This will be your main base color. -
Prepare the accent color:
Roll out the terracotta clay to the exact same thickness as the cream clay. Consistency here is key for a smooth final surface.
Step 2: Constructing the Slabs
-
Cut the base rectangles:
Using your rectangular cutter, punch out two identical shapes from the cream clay sheet. Set them on your work surface or tile. -
Cut the center stripes:
From your terracotta sheet, use your tissue blade to cut a long strip that is the same width as your rectangles. Then, slice this strip into two smaller segments that will fit across the middle of your cream rectangles. -
Create the bottom accents:
Use the small circle cutter to punch a circle from the terracotta clay. Cut this circle into quarters using your blade to create two equal pie-slice shapes. -
Assemble the design:
This is the ‘slab’ technique in miniature. Slice out the middle section of your cream rectangle where the stripe will go and replace it with the terracotta piece. Do the same for the bottom corner—remove a corner of cream clay and puzzle-piece in the terracotta quarter-circle. I like to alternate the corners (bottom left on one, bottom right on the other) for asymmetry. -
Smooth the seams:
Place a piece of parchment paper over your assembled rectangles. Gently rub repeatedly with your finger or a roller to fuse the seams together until the surface feels completely smooth and unified.
Fixing Smudges
If red clay smudges onto the cream during smoothing, dip a Q-tip in a tiny bit of acetone or rubbing alcohol and gently wipe the surface before baking to clean it up.
Step 3: Cutting and Baking
-
Final cut:
Once fused, use your rectangular cutter again over the exact same spot to trim any spreading edges, ensuring crisp, sharp sides. -
Create the top studs:
Punch out two circles from the remaining terracotta clay sheet for the top components of the earrings. -
Pierce holes:
Using a needle tool, carefully poke a hole at the top of each rectangle and the bottom of each circle stud. Make sure the hole is big enough for your jump rings. -
Bake:
Arrange pieces on a ceramic tile or baking sheet lined with parchment. Bake according to your specific clay brand’s instructions (usually 275°F/130°C for 30 minutes). Let them cool completely before handling.
Textured Touch
Before baking, lightly press a piece of sandpaper or a toothbrush onto the clay surface to give it a stone-like, matte texture that hides fingerprints perfectly.
Step 4: Assembly
-
Sand and buff:
If there are any rough edges or fingerprints, gently sand them away with fine-grit sandpaper or a buffing tool for a professional finish. -
Connect the pieces:
Open a jump ring with your pliers using a twisting motion. Thread it through the hole in the rectangle and the hole in the circle stud, then close it securely. -
Add ear wire:
Attach another jump ring to the top of the circle stud (if you made a top hole) or adhere a flat post to the back of the circle using strong jewelry glue if you prefer a stud style. The image shows a hook wire, which requires a second hole at the top of the circle.
Enjoy wearing your handcrafted geometric art.
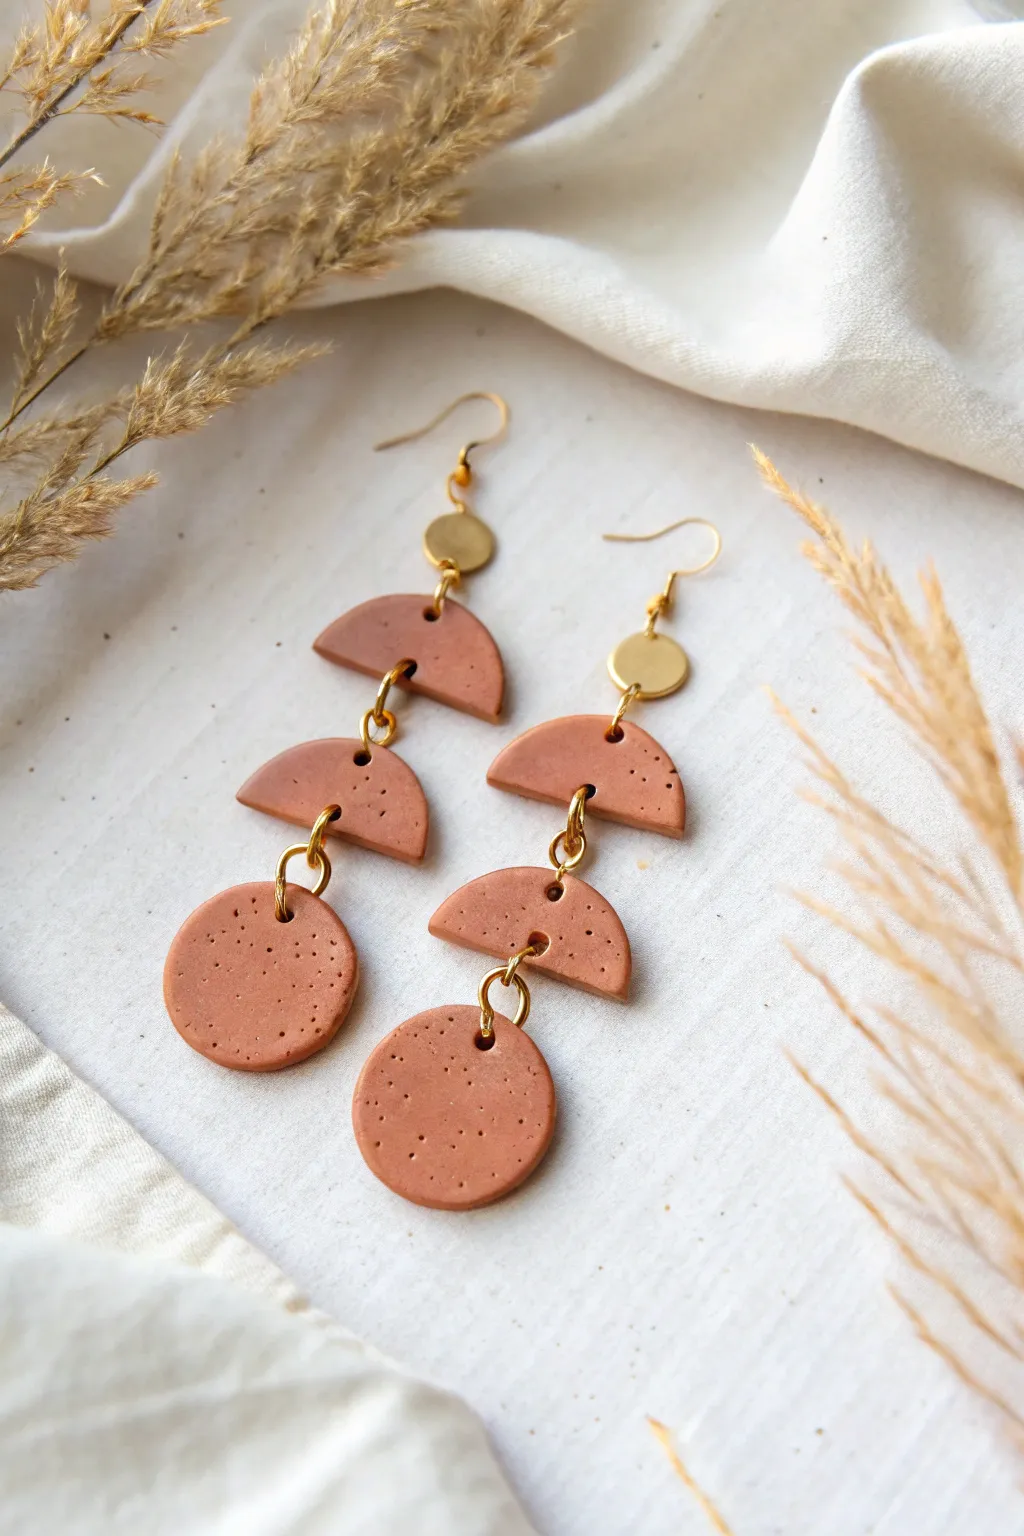
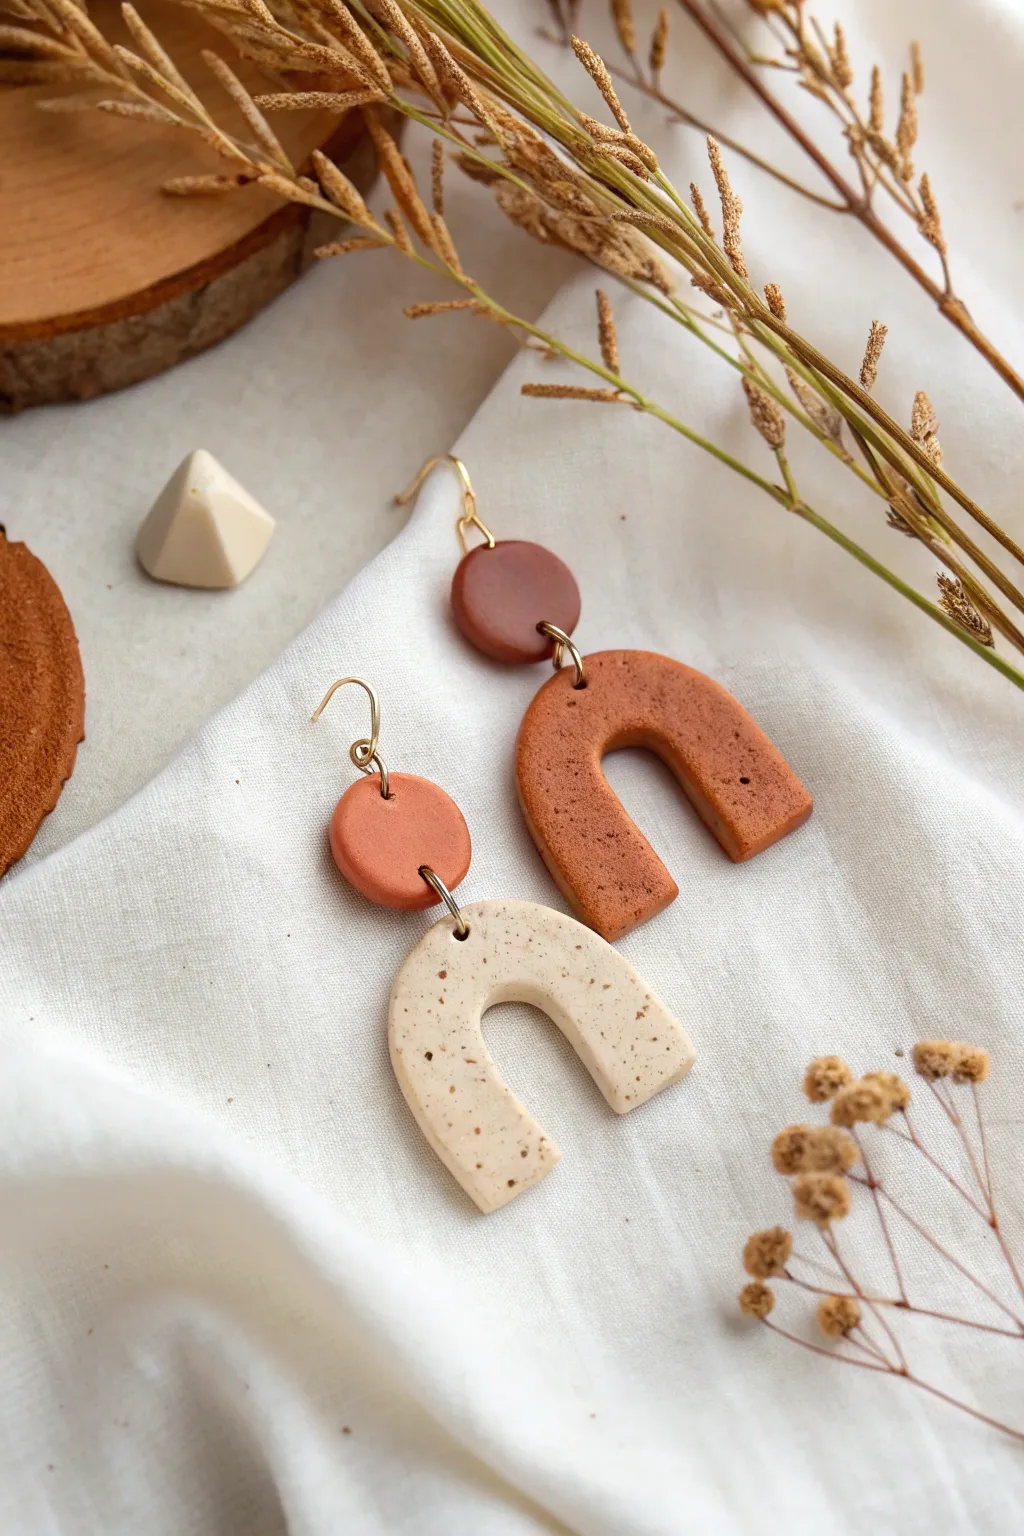
Half-Moon and U-Shape Minis
Embrace earthy warmth with these elegant three-tier drop earrings, featuring a mix of organic circles and semi-circles. The combination of rich terracotta and speckled cream clay creates a modern boho aesthetic perfect for everyday wear.
Step-by-Step Tutorial
Materials
- Polymer clay (terracotta/rust color)
- Polymer clay (cream or ecru color)
- Black pepper or dried vanilla specks (optional, for texture)
- Small circle cutter (approx. 0.5 inch)
- Medium circle cutter (approx. 1 inch)
- Clay roller or pasta machine
- Tissue blade or craft knife
- Hand drill or pin vibe
- Jump rings (gold finish)
- Earring hooks (gold finish)
- Needle nose pliers
- Parchment paper
- Oven
Step 1: Preparing the Clay
-
Condition the clay:
Start by warming the terracotta clay in your hands, kneading it until it is soft and pliable. Do the same for the cream clay separately to avoid color transfer. -
Mix the speckled effect:
To achieve the stone-like look seen in the white sections, mix a tiny pinch of ground black pepper or vanilla bean specks into the cream clay. Knead thoroughly until the specks are evenly distributed. -
Roll out sheets:
Roll both the terracotta and the speckled cream clay into flat sheets. Aim for an even thickness of about 3mm (or setting 1 on most pasta machines) to ensure durability.
Step 2: Cutting and Shaping
-
Cut the top circles:
Using your small circle cutter, punch out two circles from the terracotta clay. These will form the top tier of your earrings. -
Create center holes in circles:
Use a much smaller cutter or a drinking straw to punch a hole directly in the center of the terracotta circles, turning them into donut shapes. -
Cut large circles for semi-circles:
For the middle and bottom tiers, use your medium cutter to punch out two circles from the cream clay and two from the terracotta clay. -
Halve the circles:
Take your tissue blade and carefully slice the medium circles in half to create semi-circles. You will need two cream semi-circles and two terracotta semi-circles for this pair. -
Smooth the edges:
Gently gently rub the cut edges with your fingertip to soften any sharpness or irregularities left by the blade. -
Pierce assembly holes:
Before baking, use a needle tool or toothpick to poke holes for the jump rings. Pierce the top and bottom of the terracotta donuts, the center top and center bottom of the cream semi-circles, and just the center top of the terracotta semi-circles.
Smooth Operator
Before baking, dip a Q-tip in rubbing alcohol or acetone and lightly brush over the clay surface. This removes fingerprints and lint for a professional finish.
Step 3: Baking and Assembly
-
Bake the pieces:
Arrange your clay pieces on a parchment-lined baking sheet. Bake according to your specific clay brand’s instructions (usually 275°F/135°C for 15-30 minutes). -
Let them cool:
Allow the pieces to cool completely on the baking sheet. I prefer to let them sit for an hour to ensure they harden fully before handling. -
Open jump rings:
Using two pairs of pliers, twist your gold jump rings open laterally (top to bottom, not pulling apart). -
Connect middle and bottom:
Slide a jump ring through the top hole of a terracotta semi-circle and connect it to the bottom hole of a cream semi-circle. Close the ring securely. -
Connect top and middle:
Use another jump ring to connect the top hole of the cream semi-circle to the bottom hole of the terracotta donut. -
Attach earring hooks:
Finally, open the loop on your earring hook (or use a small jump ring) and attach it to the top hole of the terracotta donut. Repeat the assembly for the second earring.
Don’t Burn It
If your oven has hot spots, tent a piece of aluminum foil over the baking tray to protect the white clay from scorching or yellowing.
Enjoy styling these modern geometric pieces that add a subtle artistic touch to any outfit


What Really Happens Inside the Kiln
Learn how time and temperature work together inside the kiln to transform clay into durable ceramic.
Botanical Stamp Imprint Drops
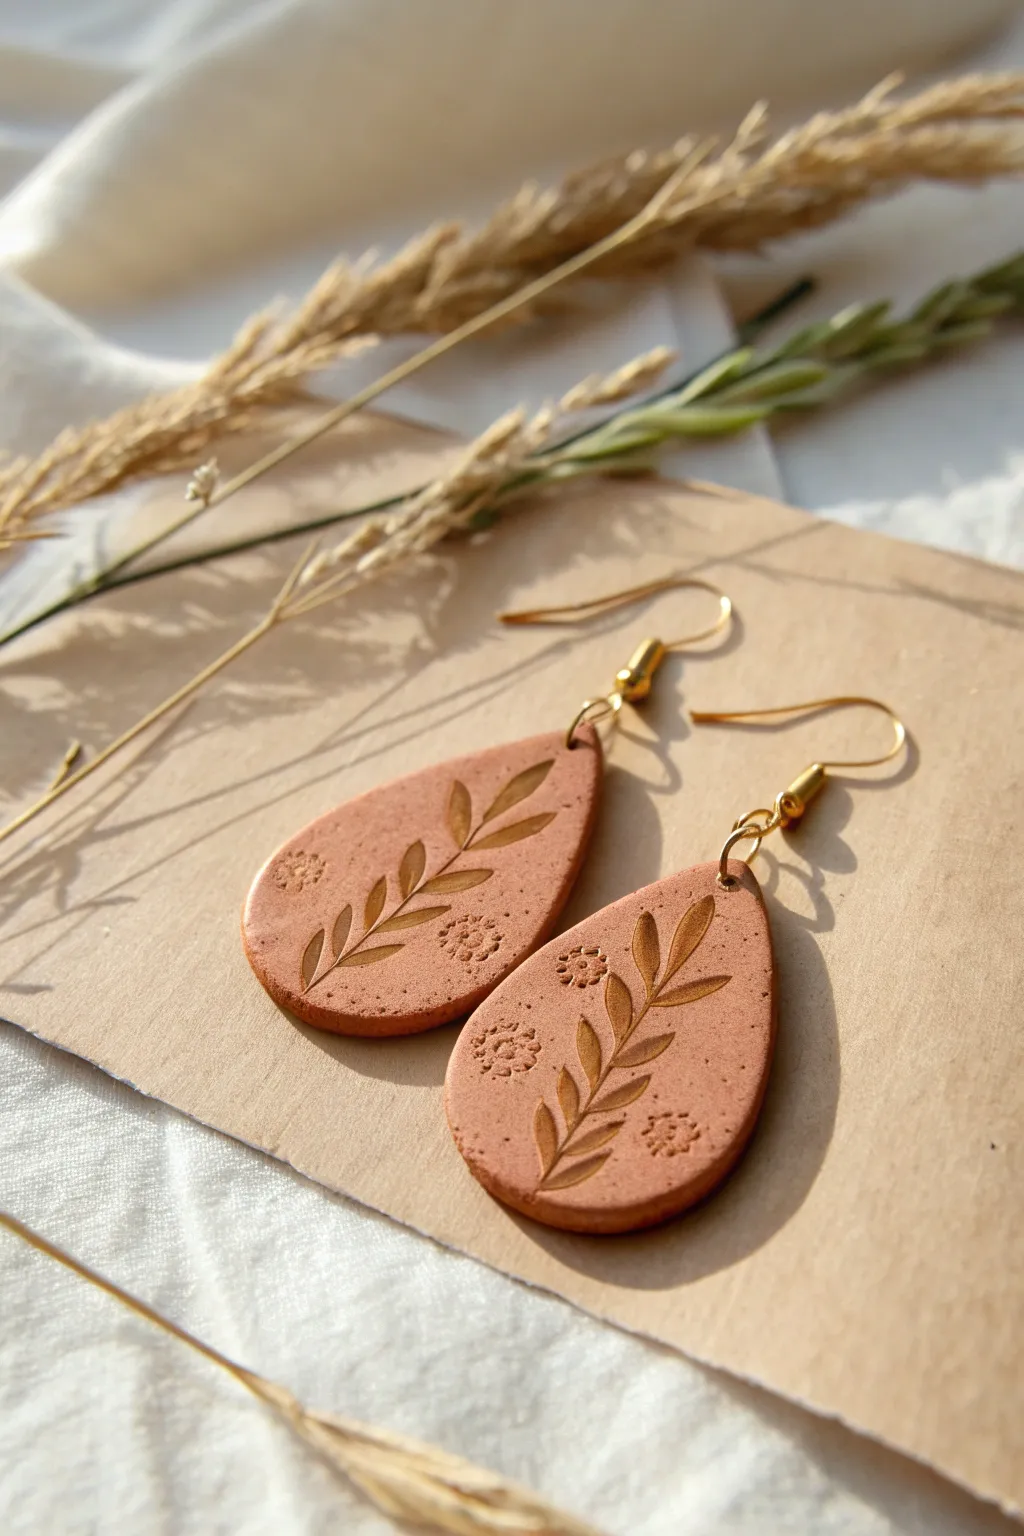
Embrace earthy elegance with these teardrop earrings that mimic the look of natural terracotta pottery. Featuring delicate botanical impressions and a warm, speckled finish, they bring a touch of nature-inspired beauty to any outfit.
Detailed Instructions
Materials
- Terracotta or rust-colored polymer clay
- Speckled granite or translucent polymer clay (for mixing)
- Teardrop-shaped clay cutter (medium size)
- Botanical stamps (leaf sprig and small flowers)
- Acrylic rolling pin
- Depth guides or playing cards (approx. 2-3mm thickness)
- Small twist drill or needle tool
- Gold tone jump rings (6mm)
- Gold tone earring hooks
- Jewelry pliers (flat nose and round nose)
- Gloss or satin polyurethane varnish (optional)
- Fine-grit sandpaper (400-600 grit)
- Cornstarch or baby powder (as release agent)
- Ceramic tile or baking sheet
Step 1: Preparing the Clay
-
Condition the Clay:
Start by warming the terracotta polymer clay in your hands. Knead and fold it repeatedly until it is soft, pliable, and free of cracks. -
Create the Stone Effect:
To achieve that natural, speckled look seen in the photo, mix a very small amount of granite-effect clay or translucent clay with black pepper flakes into your terracotta base. Knead until thoroughly incorporated. -
Roll Out the Slab:
Place your clay on a smooth work surface or ceramic tile. Use your acrylic roller and depth guides to roll the clay into an even slab, aiming for a thickness of about 2.5mm to 3mm. -
Smoothen Surface:
Check for any air bubbles or fingerprints. Gently smooth over the surface with your finger or a little cornstarch to ensure a pristine canvas for stamping.
Step 2: Stamping and Cutting
-
Dust the Stamps:
Dip your botanical stamps lightly into cornstarch or baby powder. Tap off the excess. This crucial step prevents the clay from sticking to the detailed crevices of the stamp. -
Stamp the Central Motif:
Press the leaf sprig stamp firmly into the clay. Apply even pressure to ensure all the veins and stems imprint clearly without pushing all the way through the slab. -
Add Accents:
Using the smaller flower stamps, add decorative accents around the main leaf branch. I usually place a couple near the base and one near the tip for balance. -
Cut the Shapes:
Position your teardrop cutter over the stamped design. Align it so the botanical motif is centered or artistically asymmetrical, then press down firmly to cut the shape. -
Refine Edges:
Gently lift the cutter. If the clay pulls up slightly, gently push it back down. Remove the excess clay from around the cut shapes. -
Pierce Holes:
Use a needle tool or a small straw to create a hole at the very top of the teardrop for the jump ring. Ensure the hole is not too close to the edge to prevent tearing.
Stamp Stuck?
If your stamp pulls the clay up, you didn’t use enough release agent. Lightly dust the clay surface AND the stamp with cornstarch before trying again.
Step 3: Baking and Finishing
-
Bake:
Transfer the tile with your clay pieces directly to the oven. Bake according to the manufacturer’s instructions (typically 275°F or 130°C) for 30 minutes to ensure durability. -
Cool Down:
Allow the earrings to cool completely inside the oven or on a wire rack. Polymer clay is fragile when hot, so patience here prevents warping. -
Sand the Edges:
Once cool, use fine-grit sandpaper to gently smooth any rough edges or seams on the sides of the earrings. Wipe away dust with a damp cloth. -
Highlighting (Optional):
To make the stamped design pop, you can lightly brush a tiny bit of darker brown acrylic paint into the grooves and wipe the surface clean immediately, leaving shadow in the impressions.
Antique Wash
After baking, rub diluted brown acrylic paint over the piece and wipe off the surface quickly. The paint stays in the grooves, making the pattern pop.
Step 4: Assembly
-
Open Jump Rings:
Use two pairs of pliers to twist open a 6mm gold jump ring. Remember to twist the ends away from each other (front to back) rather than pulling them apart. -
Attach Components:
Thread the open jump ring through the hole in the clay teardrop. Add the gold earring hook onto the jump ring as well. -
Close and Secure:
Use your pliers to twist the jump ring back into a closed position, ensuring the ends meet perfectly flush so the hook doesn’t slip out. -
Final Check:
Repeat for the second earring. Double-check that both hooks are facing the correct direction so the botanical design faces forward when worn.
Enjoy wearing these warm, earthy pieces that carry a little bit of garden charm wherever you go
Ribbed and Grooved Statement Pieces
These statement earrings combine the earthy warmth of terracotta with a modern, architectural ribbed texture. The clean lines and bold arch shape make them a versatile accessory that feels both handcrafted and high-end.
Step-by-Step Guide
Materials
- Terracotta polymer clay (e.g., Fimo Soft or Souffle)
- Gold polymer clay (for the studs)
- Acrylic roller or pasta machine
- U-shaped clay cutter (medium to large size)
- Small circle cutter (approx. 10mm)
- Flexible tissue blade
- Extruder tool with a small square or rectangle disc
- Wait, alternatively: A fine needle tool or clay sculpting tool (if hand-carving grooves)
- Liquid polymer clay (Bake & Bond)
- Two gold jump rings (6mm or 8mm)
- Two earring posts and backings
- Super glue or UV resin
- Hand drill or dremel with fine bit
- Pliers
- Sandpaper (400-1000 grit)
Step 1: Prepping the Base
-
Condition the Clay:
Begin by thoroughly conditioning your terracotta clay until it is soft and pliable. Warm clay prevents cracking later. -
Roll the Slab:
Roll out a slab of terracotta clay to a medium thickness, roughly 3mm or setting 3 on a pasta machine. Ensure it is even. -
Cut the Base Arches:
Use your U-shaped cutter to punch out two identical arch shapes. These will serve as the base for our ribbed texture. Set them aside on a ceramic tile.
Sticky Situation?
If extruded clay strips keep breaking, your clay is likely too dry or old. Mix in a few drops of clay softener or baby oil and re-condition thoroughly until elastic.
Step 2: Creating the Ribbed Texture
-
Extrude Clay Strings:
The cleanest way to get this look is an extruder. Load more conditioned terracotta clay into your extruder with a small square disc attached. Push out long, even strings of clay. -
Apply Liquid Clay:
Brush a very thin layer of liquid polymer clay onto the surface of your cut-out arches. This acts as the glue. -
Place the Strips:
Carefully lay the extruded square strings onto the arch, following the curve. Start from the outer edge and work your way inward, pressing them gently side-by-side so they touch but maintain their individual definition. -
Alternative: The Carving Method:
If you don’t have an extruder, roll a thicker slab (5mm). Use a ruler and a sculpting tool to carefully press deep, parallel distinctive grooves following the U-shape. -
Clean the Edges:
Once the base is covered with strips, take your U-shaped cutter again. Align it perfectly over the original shape and press down to trim off the excess overhang of the strips for a clean, flush edge. -
Smooth the Ends:
Use your fingertip or a silicone smoothing tool to gently tap down the cut ends of the strips at the bottom of the arch so they look finished, not ragged.
Level Up
Brush a tiny amount of cornstarch or mica powder over the ribbed texture before baking to prevent lint from sticking and to add a subtle matte dimension.
Step 3: Making the Studs
-
Create the Tops:
Condition a small amount of gold polymer clay. Roll it to about 2-3mm thickness. -
Texturing:
Before cutting, press a piece of coarse sandpaper or a toothbrush onto the clay surface to give it a rough, stone-like texture similar to the image. -
Cut the Circles:
Use your small circle cutter to punch out two discs.
Step 4: Baking and Assembly
-
Drill Holes (Pre-Bake Option):
Use a needle tool or toothpick to poke a hole at the very top center of each terracotta arch and the bottom center of each gold stud. Ensure the holes are large enough for your jump rings. -
Bake:
Arrage all pieces on a ceramic tile or parchment-lined baking sheet. Bake according to your clay brand’s instructions (usually 275°F/130°C for 30 minutes). I personally bake for 45 minutes to ensure maximum durability. -
Cool and Sand:
Let the pieces cool completely. If any edges are sharp, lightly sand them with fine-grit sandpaper, being careful not to sand off the ribbing details. -
Drill (If Needed):
If you didn’t make holes before baking, use a hand drill now to create the connection points. -
Attach Earring Posts:
Glue the flat earring posts to the back of the gold studs using super glue. For extra security, cover the pad with a dab of UV resin and cure it. -
Connect the Pieces:
Use pliers to open a jump ring. Loop it through the hole in the arch and the hole in the stud, then twist it closed securely.
Enjoy styling these sophisticated arches with your favorite neutral outfits

TRACK YOUR CERAMIC JOURNEY
Capture glaze tests, firing details, and creative progress—all in one simple printable. Make your projects easier to repeat and improve.
Linked Shapes With Swingy Movement
These warm, earthy earrings feature a delightful kinetic energy thanks to their multi-part construction. The speckled terracotta finish gives them an organic, stone-like feel that perfectly blends modern shapes with rustic textures.
Step-by-Step
Materials
- Terracotta or rust-colored polymer clay
- Coarse black pepper or dark sand (for speckling)
- Small round cutter (approx. 10mm)
- Medium round cutter (approx. 20mm)
- Flexible tissue blade
- Acrylic rolling pin
- Hand drill or pin vibe
- 2 flat brass circle charms (approx. 8mm)
- 10 Gold jump rings (6mm)
- 2 Gold earring hooks
- Jewelry pliers (flat nose and round nose)
- Baking tile or parchment paper
Step 1: Preparing the Clay
-
Condition the base:
Begin by warming up your terracotta polymer clay in your hands. Knead and roll it until it is soft, pliable, and free of any air bubbles. -
Add texture:
Flatten the conditioned clay slightly and sprinkle a pinch of coarse black pepper or fine decorative sand onto the surface. This creates that faux-stone speckled finish without needing special effect clay. -
Integrate the speckles:
Fold the clay over the inclusions and knead thoroughly again. I like to twist and fold the clay multiple times to ensure the specks are evenly distributed throughout the batch. -
Roll out the slab:
Using your acrylic rolling pin or a pasta machine on a medium setting (about 2-3mm thick), roll the clay into a smooth, even sheet.
Sticky Situation?
If clay sticks to your cutters, dip them in cornstarch or water before cutting. This acts as a release agent and keeps your circles perfectly round.
Step 2: Cutting the Shapes
-
Cut the circles:
Using your medium round cutter, punch out six full circles from the clay slab. -
Create semi-circles:
Take four of the cut circles. Using your flexible tissue blade, cut them exactly in half to create eight semi-circles. You will need four semi-circles per earring. -
Refine the edges:
Gently smooth the cut edges of all shapes with your finger to remove any sharp lines or burrs left by the cutters. -
Plan the layout:
Arrange your pieces on your tile to visualize the earring: one brass stud at the top (mental placeholder), followed by two clay semi-circles, ending with a full circle at the bottom.
Step 3: Assembly Prep & Baking
-
Pierce holes:
Before baking, use a needle tool or toothpick to poke holes for the jump rings. For the semi-circles, you need a hole at the top (curved side) and bottom (flat side). For the bottom full circle, just one hole at the top. -
Check hole size:
Ensure the holes are large enough to accommodate your jump rings comfortably, remembering that clay doesn’t shrink much but holes can close up slightly. -
Bake the pieces:
Place your clay pieces on a baking tile lined with parchment paper. Bake according to the manufacturer’s instructions for your specific brand of clay—usually 275°F (135°C) for 30 minutes. -
Cool and finish:
Allow the pieces to cool completely. If any edges are rough, you can lightly sand them with fine-grit sandpaper for a professional finish.
Pro Tip: Pepper Power
Don’t use fine table pepper; it can burn or look like dirt errors. Coarse ground pepper or dried coffee grounds give the best granite-style speckle effect.
Step 4: Final Assembly
-
Open jump rings:
Using two pairs of jewelry pliers, twist your jump rings open laterally (side-to-side, not pulling apart) to preserve their round shape. -
Connect the bottom tier:
Thread a jump ring through the hole of the bottom full circle and the flat edge of the lower semi-circle. Close the ring securely. -
Connect the middle tier:
Use another jump ring to connect the top curved edge of that lower semi-circle to the flat edge of the upper semi-circle. -
Attach the brass element:
Connect the top of the upper semi-circle to the small brass stamping disc using a jump ring. -
Add the hook:
Finally, attach the ear wire hook to the top of the brass disc. Repeat the entire assembly process for the second earring.
Enjoy the gentle sway of your new statement earrings every time you turn your head
Tiny Raised Floral Appliqués
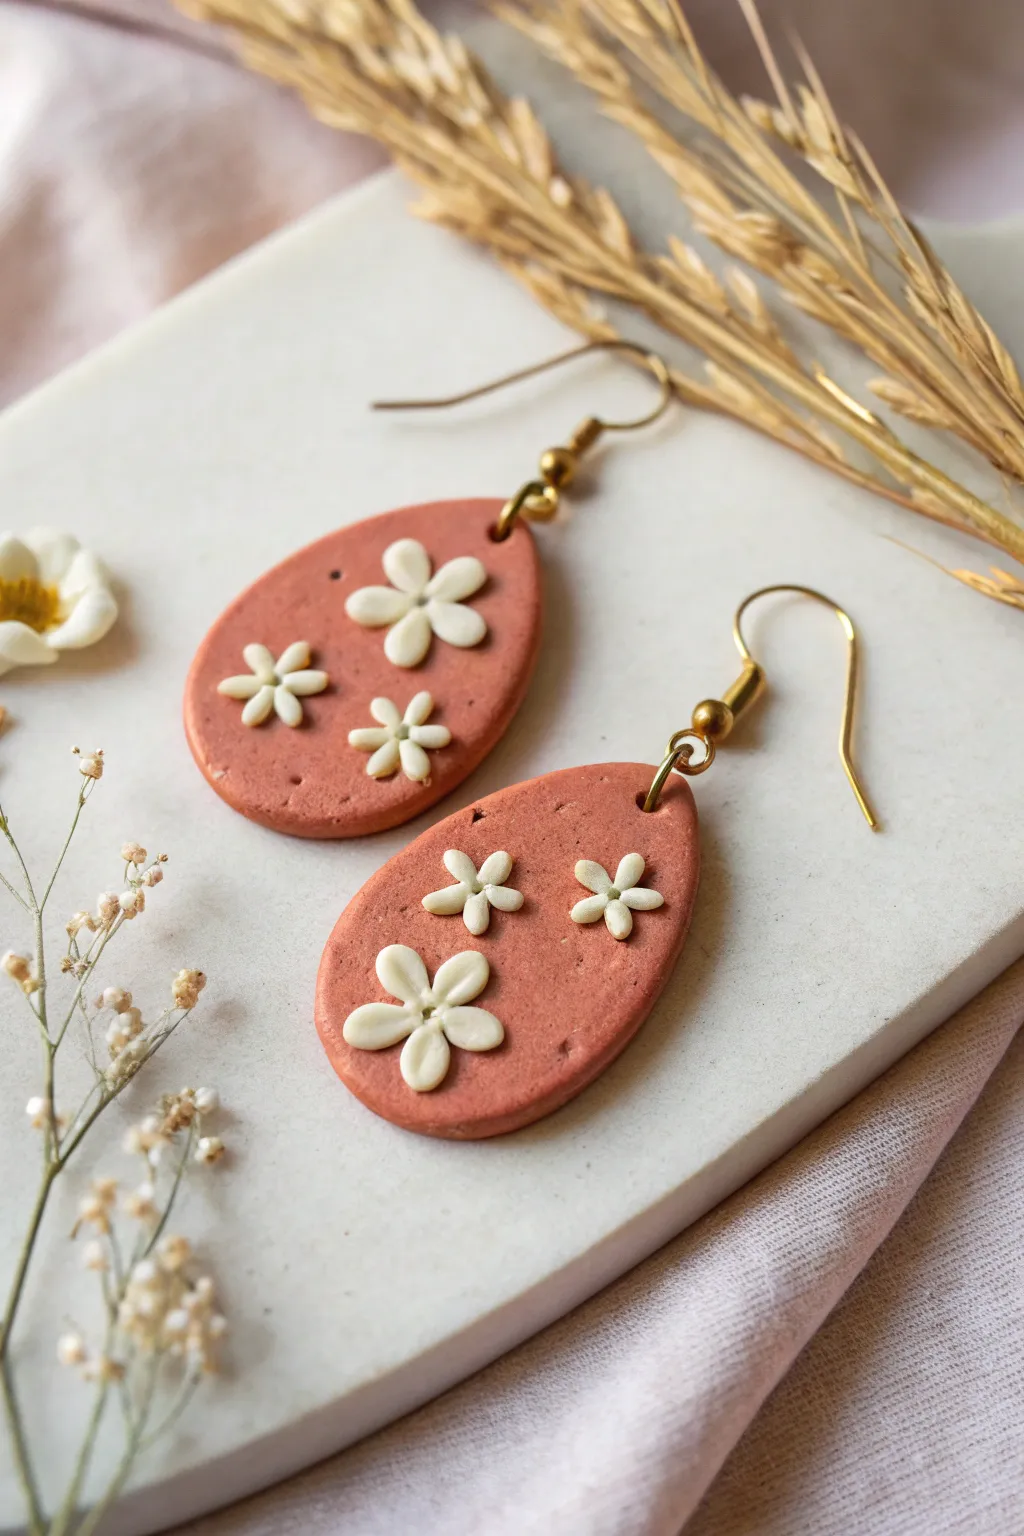
These teardrop earrings capture the warmth of the earth with a textured terracotta base and delicate, raised white floral appliqués. The contrast between the rugged, speckled background and the smooth, precise petals creates a stunning tactile finish perfect for any season.
Detailed Instructions
Materials
- Polymer clay in terracotta/brick red
- Polymer clay in white
- Liquid polymer clay (translucent or matching terracotta)
- Teardrop clay cutter (approx. 1.5 – 2 inches)
- Acrylic roller or pasta machine
- Coarse sandpaper or a stiff toothbrush for texturing
- Needle tool or toothpick
- Ball stylus tool (small)
- Small jewelry pliers
- 2 Gold earring hooks (fishhook style)
- 4 Gold jump rings (small)
- Hand drill or pin vibe (if not pre-punching holes)
- Oven thermometer
- Black pepper or dried coffee grounds (optional for speckling)
Step 1: Base Preparation
-
Condition the Clay:
Begin by conditioning your terracotta polymer clay until it is soft and pliable. If you want that realistic stony look shown in the image, mix in a pinch of coarse black pepper or dried coffee grounds at this stage. -
Roll the Slab:
Roll the conditioned clay out to an even thickness, aiming for about 3mm thick. Using depth guides or the middle setting on a pasta machine ensures they are uniform. -
Add Texture:
This step is key to the rustic look. Press coarse sandpaper or tap a stiff toothbrush firmly all over the surface of the clay slab to create a pitted, stone-like texture. -
Cut the Shapes:
Using your teardrop cutter, press firmly into the textured slab to cut out two shapes. Smooth the edges gently with your finger to remove any stray bits of clay. -
Pierce Holes:
Use a needle tool or small straw to punch a hole at the very top point of each teardrop for the hardware later. Make sure the hole is big enough for your jump rings.
Step 2: Creating the Appliqués
-
Prepare White Clay:
Clean your hands and tools thoroughly before handling the white clay to keep it pristine. Condition a small amount until soft. -
Form Tiny Petals:
Roll extremely tiny balls of white clay—you will need about 15-18 balls per earring depending on your desired flower density. Each ball should be no larger than a peppercorn. -
Shape the Teardrops:
Roll each tiny white ball slightly between your fingers to form a rice grain or tiny teardrop shape. These will become your petals. -
Apply Liquid Clay:
Dab a microscopic dot of liquid polymer clay onto the terracotta base where you want the center of a flower to sit. This acts as the glue. -
Assemble the Flower:
Place 5 or 6 white petal shapes in a circle on top of the liquid clay dot. I find using a needle tool to pick up and place these tiny pieces makes positioning much easier. -
Secure the Petals:
Using a small ball stylus or the blunt end of a needle tool, press gently into the center of the flower where all the petals meet. This secures them to the base and creates the flower shape. -
Indent Petals:
For extra detail, use the side of your needle tool to press a tiny indentation down the center length of each petal, giving them a more organic look. -
Repeat the Design:
Continue creating flowers in various sizes—some large, some smaller—scattered across the surface. Leave some negative space so the terracotta texture shines through.
Clean Clay Pro-Tip
White clay picks up dust instantly. Keep a scrap piece of ‘garbage clay’ nearby and roll it in your hands immediately before touching the white clay to pull off any invisible dust from your fingers.
Step 3: Baking and Assembly
-
Final Check:
Look closely for any lint or fingerprints. Use a q-tip with a bit of rubbing alcohol to gently clean the white petals if needed. -
Bake:
Place the earrings on a ceramic tile or baking sheet lined with parchment paper. Bake according to your clay manufacturer’s instructions—usually around 275°F (135°C) for 30-45 minutes. -
Cool Down:
Turn the oven off and let the pieces cool completely inside while the door is slightly ajar. Sudden cooling can sometimes cause brittleness. -
Open Jump Rings:
Using two pairs of pliers, twist (don’t pull) your jump rings open laterally. -
Attach Hardware:
Slide the open jump ring through the hole in the clay teardrop, add the earring hook, and twist the ring closed securely.
Level Up: Bee Center
Add a tiny ball of yellow clay or gold leaf to the center of each flower before baking. It adds a pop of dimension and makes the daisies look even more realistic against the clay.
Now you have a gorgeous pair of dimensional earrings ready to wear or gift.
Floral Cane Slice Accents
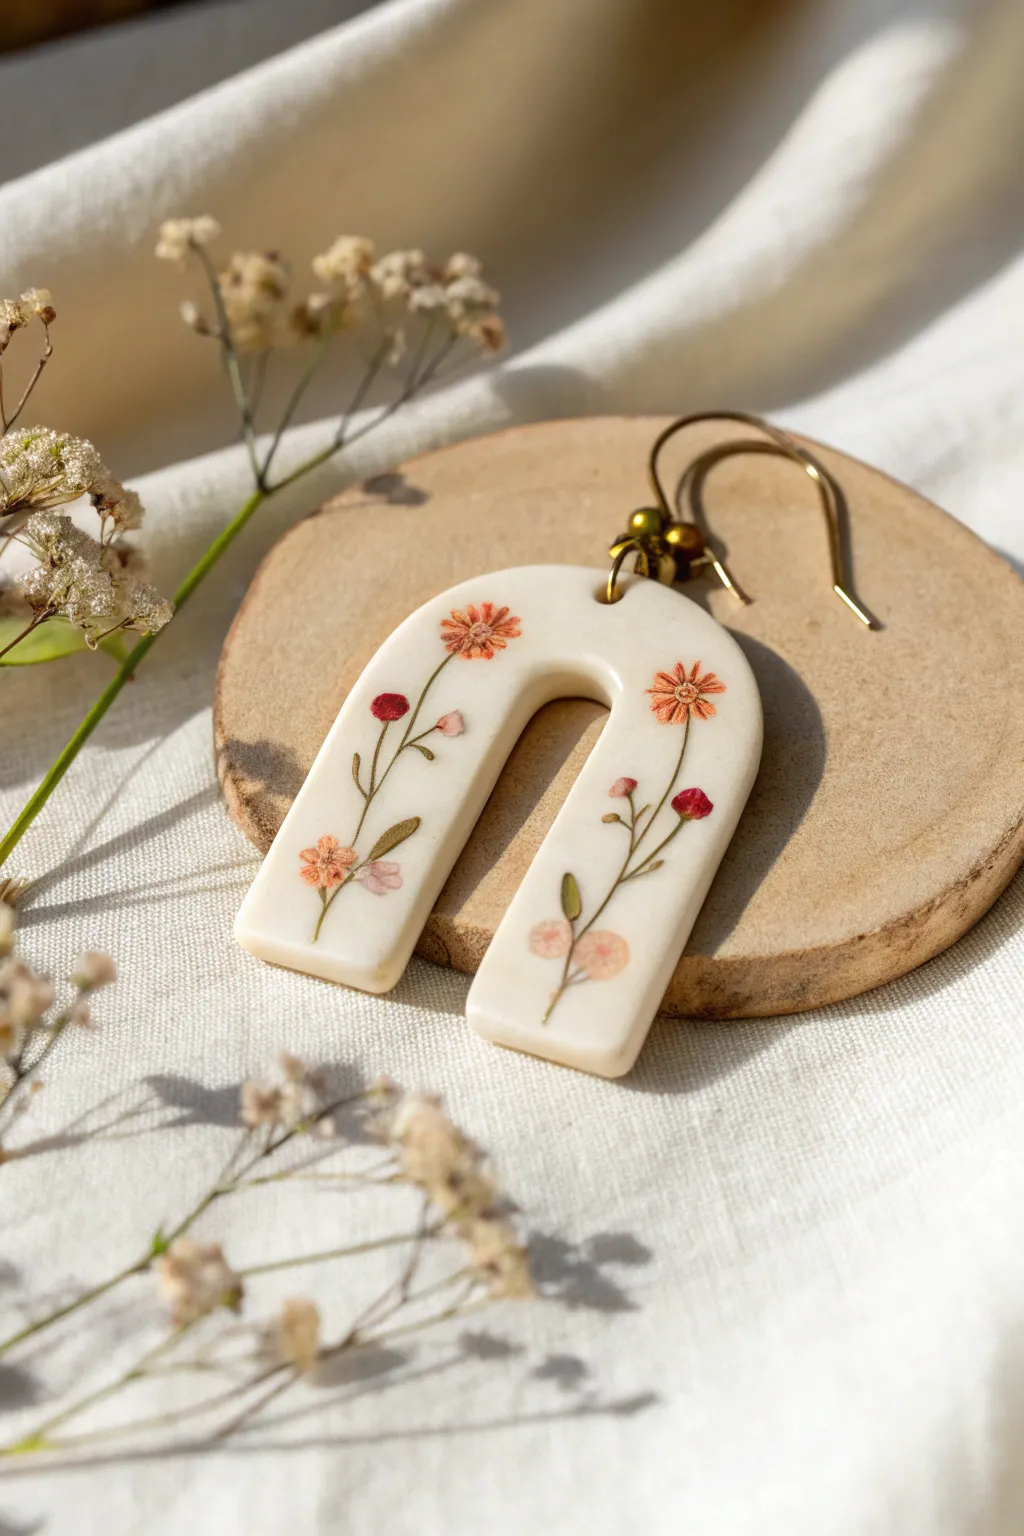
Capture the delicate beauty of a summer meadow with these cream-colored arch earrings. Featuring intricate floral motifs that look hand-painted but are actually achieved with clever transfer techniques, this design combines a classic arch shape with a romantic, botanical aesthetic.
How-To Guide
Materials
- Polymer clay (cream or off-white)
- Floral water-slide transfer paper or pre-printed transfer sheets
- U-shaped clay cutter (medium size)
- Acrylic rolling pin
- Clay machine (pasta machine) optional
- Bowl of water (for transfers)
- Tweezers
- UV resin or polyurethane gloss varnish
- UV lamp (if using resin)
- Hand drill or dremel tool with small bit
- Jump rings (gold)
- Earring hooks (gold)
- Small round nose pliers
Step 1: Base Preparation
-
Condition the Clay:
Begin by thoroughly conditioning your cream-colored polymer clay. Knead it in your hands until it is pliable and warm, ensuring there are no air bubbles trapped inside. -
Roll the Slab:
Roll out the clay to a uniform thickness, approximately 3mm to 4mm. A pasta machine set to a medium setting works best, but an acrylic roller with depth guides is a perfect alternative. -
Smooth the Surface:
Before cutting, gently wipe the surface of the clay with a lint-free cloth or a baby wipe to remove any dust or fingerprints. A smooth canvas is essential for the decal to adhere properly. -
Cut the Shape:
Position your U-shaped cutter over the slab. Press down firmly and evenly to cut out your arch shape. Gently wiggle the cutter to release the clay without distorting the edges. -
Refine Edges:
Use your finger or a silicone tool to gently smooth the raw edges of the cut shape, rounding them slightly for a professional finish before baking.
Step 2: Floral Application
-
Prepare the Transfers:
Cut out your floral motifs from the water-slide transfer sheet. Trim as close to the design as possible to minimize the visible transparent border. -
Soak the Decal:
Place the cut embellishment into a small bowl of room temperature water. Let it soak for about 30-60 seconds until the decal slides easily off the backing paper. -
Position the Design:
Lightly dampen the surface of your unbaked clay arch with a drop of water. This helps you slide the decal into position. I find using tweezers here gives me much better precision than my fingers. -
Slide and Place:
Gently slide the floral film off the backing paper and onto the clay. Arrange the stems so they curve naturally along the arch shape: one stem rising up the left side, and another on the right. -
Smooth Bubbles:
Once positioned, gently dab the decal with a paper towel or soft cloth to absorb excess water and push out any trapped air bubbles beneath the film. -
Bake the Pieces:
Place the decorated clay piece on a ceramic tile or baking sheet. Bake according to your brand of clay’s instructions (usually around 275°F/135°C for 30 minutes). Let it cool completely.
Decal Curling?
If the decal edges curl up on the raw clay, your clay might be too oily. Lightly wipe the clay surface with alcohol on a cotton swab before applying the transfer to help it grip.
Step 3: Finishing Touches
-
Seal the Design:
To protect the decal and give the piece a porcelain-like shine, apply a thin, even layer of UV resin or gloss varnish over the front surface. Ensure you cover the edges of the decal completely. -
Cure or Dry:
If using UV resin, place the piece under a UV lamp for 2-3 minutes until fully cured and hard. If using varnish, allow it to air dry completely in a dust-free area. -
Drill Holes:
Using a hand drill or Dremel, carefully drill a small hole at the very top center of the arch. Go slowly to avoid cracking the resin coating. -
Attach Hardware:
Twist open a gold jump ring using your pliers. Thread it through the drilled hole. -
Connect Ear Wire:
Before closing the jump ring, slip on your earring hook. Close the jump ring securely, ensuring the ends meet flush so the ring doesn’t fall off.
Golden Hour Glow
Mix a tiny amount of translucent gold shimmering powder into your resin topcoat. It will add a subtle, sun-kissed sparkle to the cream background without overpowering the flowers.
Now you have a stunning, nature-inspired jewelry piece ready to wear or gift
Checkerboard and Simple Grid Patterns
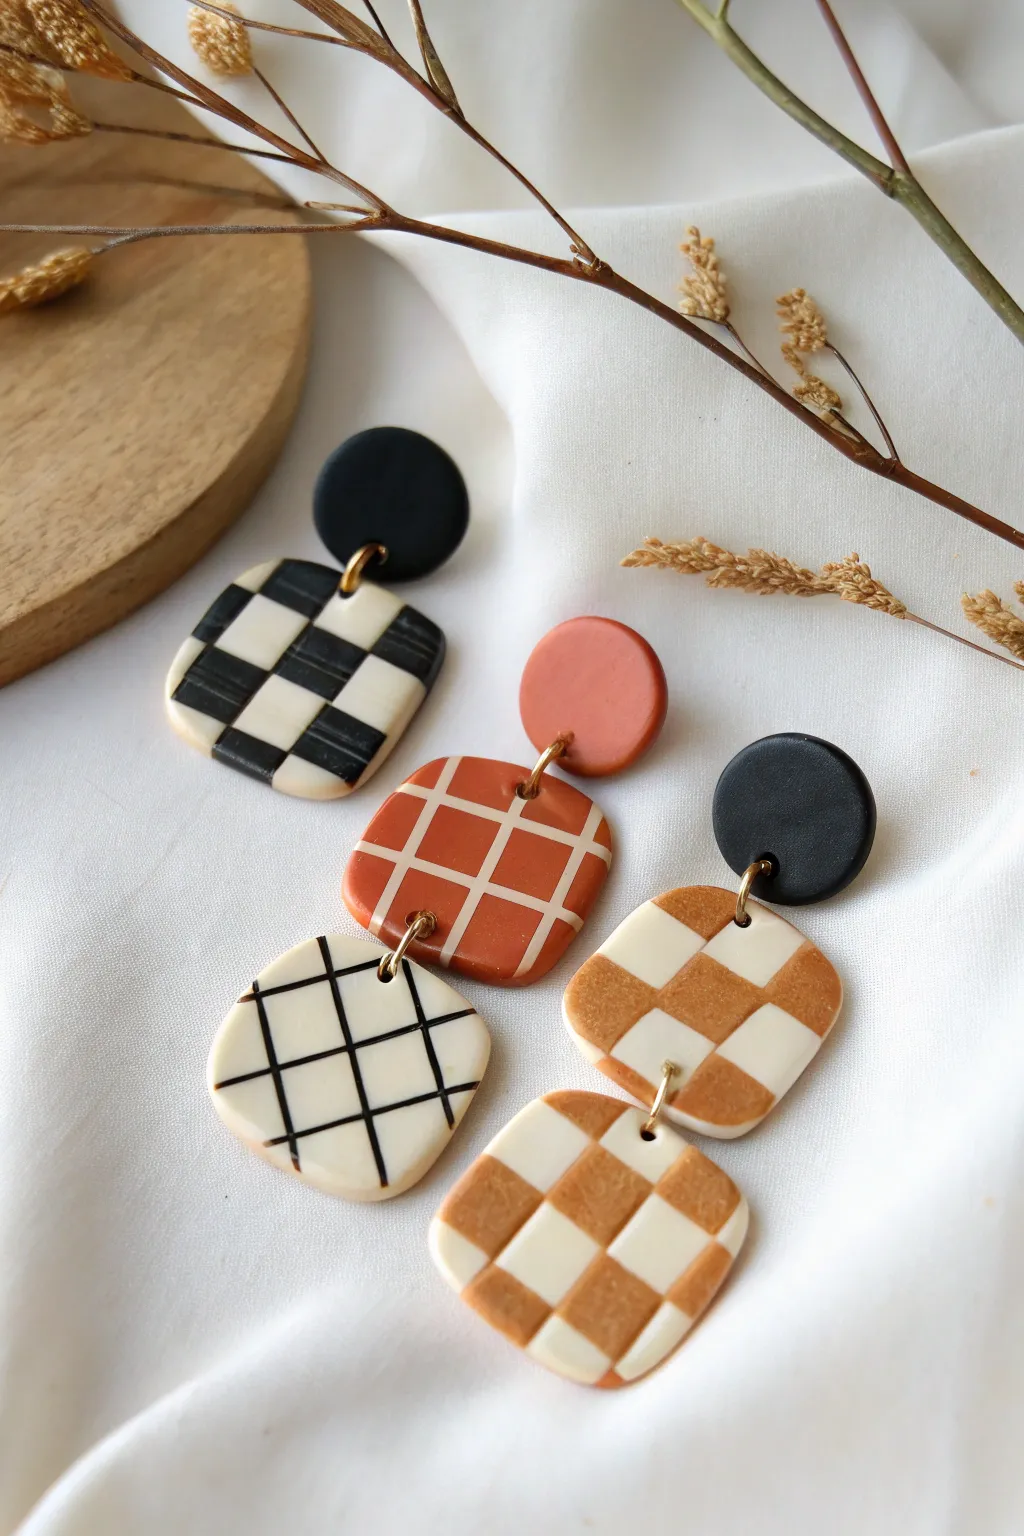
These statement earrings combine classic geometric patterns with warm, earthy tones for a trendy, modern aesthetic. Whether you prefer a bold checkerboard or a delicate grid, this project teaches three distinct variations using simple polymer clay techniques.
Step-by-Step Tutorial
Materials
- Polymer clay (black, white, terracotta/rust, light tan/beige)
- Clay roller or pasta machine
- Square clay cutters (medium size, rounded corners preferred)
- Circle clay cutters (small for studs, approximately 10-12mm)
- Tissue blade or sharp craft knife
- Needle tool or hand drill
- Jump rings (gold)
- Earring posts and backs
- Super glue or liquid clay
- Rolling pin
- Smooth work surface (ceramic tile or glass)
Step 1: Creating the Checkered Cane
-
Condition the Clay:
Start by conditioning your white and black clay (for the black check) or white and tan clay (for the tan check) until soft and pliable. -
Form Logs:
Roll the two chosen colors into square logs of equal size. Aim for about 1/4 inch thickness for chunky checks. -
Stack and Slice:
Lay the square logs next to each other to form a 2×2 grid, alternating colors like a chessboard. Press them firmly together to adhere. -
Elongate the Cane:
Gently squeeze and pull the square cane to make it longer and thinner, maintaining the square shape, until the checks are your desired size. -
Slice the Slabs:
Use your tissue blade to slice thin, even square slabs off the end of your cane. You will need one slice for each earring.
Clean Cuts Pro Tip
Before cutting your shapes, place a piece of plastic wrap over the clay. Press the cutter down through the plastic for soft, beveled edges that require minimal sanding later.
Step 2: Creating the Grid Pattern Slabs
-
Prepare Base Colors:
Roll out a sheet of terracotta clay and a sheet of cream clay to a medium thickness (about 3mm). -
Make Thin Strings:
Extrude or hand-roll extremely thin ‘snakes’ of contrasting clay. I like to use white clay for the terracotta base and black for the cream base. -
Apply Vertical Lines:
Lay the thin strings vertically across your base slab, spacing them evenly to create columns. -
Apply Horizontal Lines:
Overlay a second set of strings horizontally to complete the grid. Gently roll over the slab with an acrylic roller to embed the strings flush into the base. -
Cut the Shapes:
Using your square cutter, punch out your grid shapes. Try to center the grid lines for a symmetrical look.
Step 3: Assembly and Baking
-
Cut the Studs:
Roll out plain sheets of black and terracotta clay. Use your small circle cutter to punch out the stud tops. -
Add Texture (Optional):
If you want a matte look like the photo, lightly press a piece of sandpaper on the surface, or leave them smooth. -
Punch Holes:
Using a needle tool, create holes for the jump rings near the top edge of the squares and the bottom edge of the circle studs. For the three-tier design, add holes at both top and bottom of the middle piece. -
Bake:
Bake all pieces on a tile or parchment-lined tray according to your clay manufacturer’s temperature instructions, usually for 30-45 minutes. -
Cool and Sand:
Allow the pieces to cool completely. Sand any rough edges with high-grit sandpaper. -
Attach Posts:
Glue earring posts to the back of the circle studs using strong super glue or by baking them on with a dab of liquid clay. -
Connect the Pieces:
Open your jump rings with pliers. Thread them through the holes to connect your studs to the dangles. -
Final Check:
Ensure all jump rings are closed tightly so the dangles swing freely but stay secure.
Fixing Smudged Grids
If your grid lines smudge while rolling, use a baby wipe or a Q-tip dipped in rubbing alcohol to gently clean the surface color off the base slab before baking.
Now you have a stylish set of geometric earrings ready to wear or gift
Ombre Gradient Slab Earrings
Achieve a stunningly earthy gradient with these arch earrings, blending rich terracotta hues into soft cream tones. The subtle speckled texture and carved details give them a sophisticated, artisanal finish perfect for everyday wear.
Step-by-Step
Materials
- Polymer clay (terracotta/rust and beige/cream)
- Black pepper or dried coffee grounds (for speckling)
- Acrylic rolling pin or pasta machine
- U-shaped or Arch clay cutters used for slab cutting
- Tissue blade
- Detail needle tool or toothpick
- Gold french hook ear wires
- Gold jump rings (4-6mm)
- Jewelry pliers
- Hand drill or pin vise
- Fine grit sandpaper
Step 1: Preparing the Gradient Slab
-
Condition the clay:
Begin by thoroughly conditioning your terracotta and beige polymer clays separately until they are soft and pliable. This prevents cracks later on. -
Add texture:
Mix a tiny pinch of ground black pepper or very fine dried coffee grounds into both clay colors. Knead well so the speckles are evenly distributed throughout the dough. -
Form triangles:
Roll each color into a sheet of equal thickness. Cut a right-angled triangle from each color, ensuring they are roughly the same size. -
Join the colors:
Place the two triangles together to form a rectangle or square, pressing the diagonal seam gently so the distinctive colors touch. -
Fold and roll technique:
Run the clay sheet through your pasta machine on a wide setting. Fold the sheet in half, bringing the bottom color up to the top color (keeping like colors together), and run it through again. -
Repeat the process:
Continue this folding and rolling process about 15-20 times. You will see the center seam blur creates a smooth transition from dark to light. -
Final roll out:
Once satisfied with the gradient, roll the sheet out to your final desired thickness, usually about 3mm for durability.
Fixing Muddy Colors
If your gradient looks muddy or gray in the middle, you may have folded the sheet wrong. Always fold bottom-to-top, aligning each color with itself, not side-to-side.
Step 2: Cutting and Refining
-
Cut the shapes:
Position your U-shaped cutter so the gradient flows vertically from dark at the top to light at the bottom. Press down firmly to cut your shapes. -
Smooth the edges:
Gently gently run your finger along the cut edges to smooth out any harsh lines or loose bits of clay before baking. -
Add carved details:
Using a needle tool, carefully score a curved line following the shape of the arch on one side. Press extremely lightly—you just want an indentation, not a cut. -
Create holes:
Use a toothpick or a small straw to punch a hole at the very top center of the arch for your hardware. Ensure it’s not too close to the edge. -
Bake carefully:
Place the pieces on a baking sheet lined with parchment paper. Bake according to your clay manufacturer’s instructions, typically around 275°F (135°C).
Step 3: Assembly
-
Cool and sand:
Allow the pieces to cool completely. If there are any rough spots on the edges, lightly buff them with fine-grit sandpaper or a denim scrap. -
Open the jump ring:
Using two pairs of pliers, twist a gold jump ring open sideways (never pull it apart). -
Attach hooks:
Slide the jump ring through the hole in the clay arch, then add the loop of the french hook ear wire. -
Close the hardware:
Twist the jump ring closed securely so the gap disappears completely, ensuring your earring won’t slip off. -
Final check:
Give the earrings a gentle wipe with a soft cloth to remove any sanding dust or fingerprints.
Add Gold Leaf
Before baking, press tiny flecks of gold leaf onto the transition line where the colors meet. This adds a chic metallic pop that highlights the ombre effect.
Now you have a beautifully blended pair of earrings ready to complement any outfit
Faux Stone and Granite Looks
These sophisticated dangles mimic the organic beauty of terrazzo stone with a modern, minimalist twist. Using neutral tones combined with striking black accents, you create a faux granite finish that pairs perfectly with almost any outfit.
Step-by-Step Tutorial
Materials
- Polymer clay (Beige/Ecru, Light Tan, Black)
- Acrylic rolling pin or clay machine
- Tissue blade or flexible clay cutter
- Rectangular soft-corner clay cutter (approx. 1 inch)
- Hand drill or small clean toothpick
- Gold-plated earring hooks (French hook style)
- Gold jump rings (6mm)
- Small black spacer beads (stone or glass)
- Gold bead caps or small gold spacer beads
- Flat-nose jewelry pliers
- Parchment paper or ceramic tile
Step 1: Preparing the Base
-
Condition the clay:
Start by conditioning your beige or ecru clay thoroughly until it is soft and pliable. This will serve as the main canvas for your stone effect. -
Roll out the slab:
Roll the conditioned beige clay into a slab approximately 3mm thick. It needs to be thick enough to hold the hardware but thin enough to be lightweight. -
Prepare the inclusions:
Take a small amount of light tan clay and a tiny amount of black clay. Roll these into very thin sheets, much thinner than your base slab.
Clean Edges Only
Use a piece of plastic cling wrap over the clay before pressing down your cutter. This creates a beautifully domed, soft edge that requires zero sanding later.
Step 2: Creating the Terrazzo Pattern
-
Tear the tan pieces:
Tear small, irregular chunks of the thin tan clay sheet. Place these randomly on your beige base slab. These should be larger than the black specks, acting as the ‘stone’ aggregates. -
Add black accents:
Cut or tear very tiny pieces of the black clay. Sprinkle them across the slab, ensuring some land on the beige background and a few overlap the tan patches for a natural look. -
Create fine grit:
For the tiniest black speckles, I like to grate a bit of baked black clay or finely chop raw clay with a razor blade and dust it over the surface. -
Embed the pattern:
Place a sheet of parchment paper over your speckled slab. Use your acrylic roller to gently press the tan and black pieces flush into the beige base. Roll until the surface is completely smooth.
Step 3: Cutting and Baking
-
Cut the shapes:
Position your rectangular cutter over an area of the pattern you find pleasing. Press down firmly to cut out two identical shapes. -
Smooth the edges:
Gently lift the cut pieces. Use your fingertip to lightly smooth the raw edges, removing any loose bits of clay or sharp corners created by the cutter. -
Pierce holes:
Use a toothpick or a small needle tool to puncture a hole at the very top center of each rectangle. Ensure the hole is large enough for your jump ring. -
Bake the clay:
Place the pieces on a ceramic tile or baking sheet lined with paper. Bake according to your brand’s specific package instructions (usually 275°F/135°C for 30 minutes). -
Cool down:
Allow the pieces to cool completely before handling. This ensures the clay hardens fully and prevents fingerprints on the warm surface. -
Sand (optional):
If there are any rough spots on the edges after baking, lightly sand them with fine-grit sandpaper for a professional finish.
Add Some Sparkle
Mix a tiny pinch of gold leaf flakes into the terrazzo pattern before rolling it flat to give the faux stone a subtle, high-end shimmer.
Step 4: Assembly
-
Prepare the bead link:
Thread a gold ball pin (or a piece of wire looped at the bottom) through the black spacer bead, sandwiched by tiny gold caps or beads if desired. -
Attach the wire loop:
Create a loop at the top of your beaded section using round-nose pliers, but don’t close it yet. -
Connect the clay:
Open a jump ring with your flat-nose pliers. Loop it through the hole in your baked clay piece and the bottom loop of your bead component. -
Add the hook:
Attach the top loop of the bead component to the base of the gold earring hook. Close the loop securely. -
Final check:
Ensure all jump rings and wire loops are tightly closed so the components don’t slip apart during wear.
Now you have a stunning pair of faux-stone earrings ready to elevate your style
Mismatch Sets That Still Feel Cohesive
Embrace the beauty of asymmetry with this mismatched set that balances earth tones and playful textures. By swapping the color palettes between the top studs and the hanging arches, you create a cohesive pair that feels intentional and artfully modern.
Detailed Instructions
Materials
- Polymer clay in rust, dark brown, and cream/white
- Coarse black pepper or dried coffee grounds (for speckling)
- Clay roller or pasta machine
- Circle clay cutters (small, approx. 1cm)
- Arch clay cutter (medium)
- Clay slicing blade
- Hand drill or needle tool
- Gold jump rings (6-8mm)
- Gold earring hooks
- Jewelry pliers (flat nose and round nose)
- Baking tile or parchment paper
- Oven
Step 1: Preparing the Clay
-
Color mixing:
Begin by conditioning your three main clay colors: rust, dark brown, and cream. Knead each piece until it is soft and pliable. -
Adding texture:
To achieve the organic, stoneware look, knead a pinch of coarse black pepper or dried coffee grounds into the rust and cream clays. Fold and roll repeatedly until the specs are evenly distributed throughout the material. -
Rolling out:
Roll each color into a slab of even thickness, approximately 3mm to 4mm. A pasta machine set to a medium-thick setting works best for uniformity, but an acrylic roller with depth guides creates great results too.
Uneven Speckles?
If your pepper or grounds aren’t spreading evenly, try rolling the clay into a long snake, twisting it, and folding it back on itself a few times before rolling it flat again.
Step 2: Cutting and Shaping
-
Cutting the tops:
Use your small circle cutter to punch out one circle from the light rust clay and one circle from the dark brown clay. These will be the connector pieces. -
Cutting the arches:
Press your arch cutter firmly into the speckled cream slab to create the first dangling element. Repeat this process on the speckled rust slab for the second arch. -
Smoothing edges:
Gently run your finger dipped in a tiny bit of cornstarch or baby oil along the cut edges of all four pieces to smooth out any harsh lines or burrs left by the cutters. -
Creating holes:
Using a needle tool, carefully pierce a hole at the very bottom center of each circle piece. Then, pierce a hole at the top center of each arch piece. Ensure the hole is large enough to fit your jump rings but not so close to the edge that the clay might tear.
Gloss It Up
For a ceramic glaze effect, coat just the arch pieces with a high-gloss polyurethane varnish or UV resin after baking. Leave the top circles matte for contrast.
Step 3: Baking and Assembly
-
Baking:
Arrange your pieces on a ceramic tile or parchment-lined baking sheet. Bake according to your brand of clay’s specific instructions (usually around 275°F/135°C for 30 minutes). I usually tent a piece of foil over the tray to prevent scorching. -
Cooling:
Allow the pieces to cool completely in the oven or on the counter. The clay is fragile while hot and reaches full strength only after cooling. -
Opening jump rings:
Use two pairs of pliers to twist open a gold jump ring. Remember to twist the ends away from each other (front to back), never pull them apart, to maintain the circle’s shape. -
Connecting the pieces:
Slide the dark brown circle and the speckled rust arch onto one jump ring and close it tight. Repeat for the rust circle and cream arch pair. -
Drilling the top hole:
If you didn’t pierce holes for the earring hooks before baking, use a small hand drill to carefully bore a hole at the top of each circle piece now. -
Attaching hooks:
Open the loop at the base of your earring hook using pliers. Slide it through the top hole of the circle piece and twist it closed. -
Final check:
Ensure all jump rings are fully closed so the pieces don’t slip out. Check that the arches swing freely.
Wear your new mismatched set with confidence knowing you have a truly unique accessory