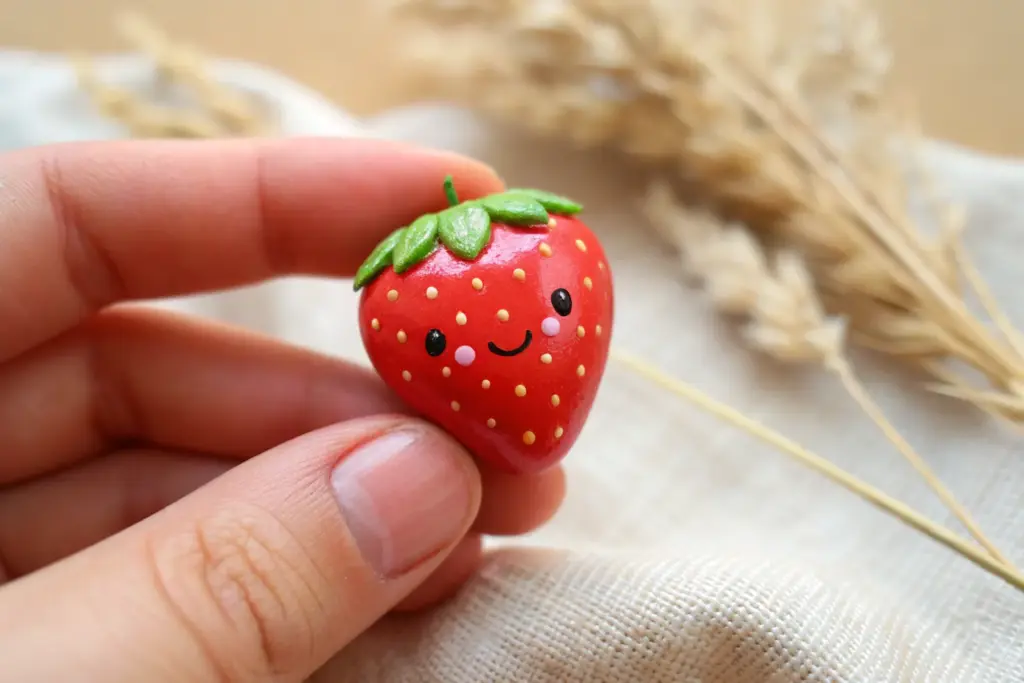
Whenever I want a low-pressure clay session, I go straight for small small cute clay ideas—the kind you can finish in one sitting and still squeal a little when they’re done. Think miniature shapes, simple faces, and tiny details that make your pieces feel like little pocket friends.
Tiny Smiling Food Charms
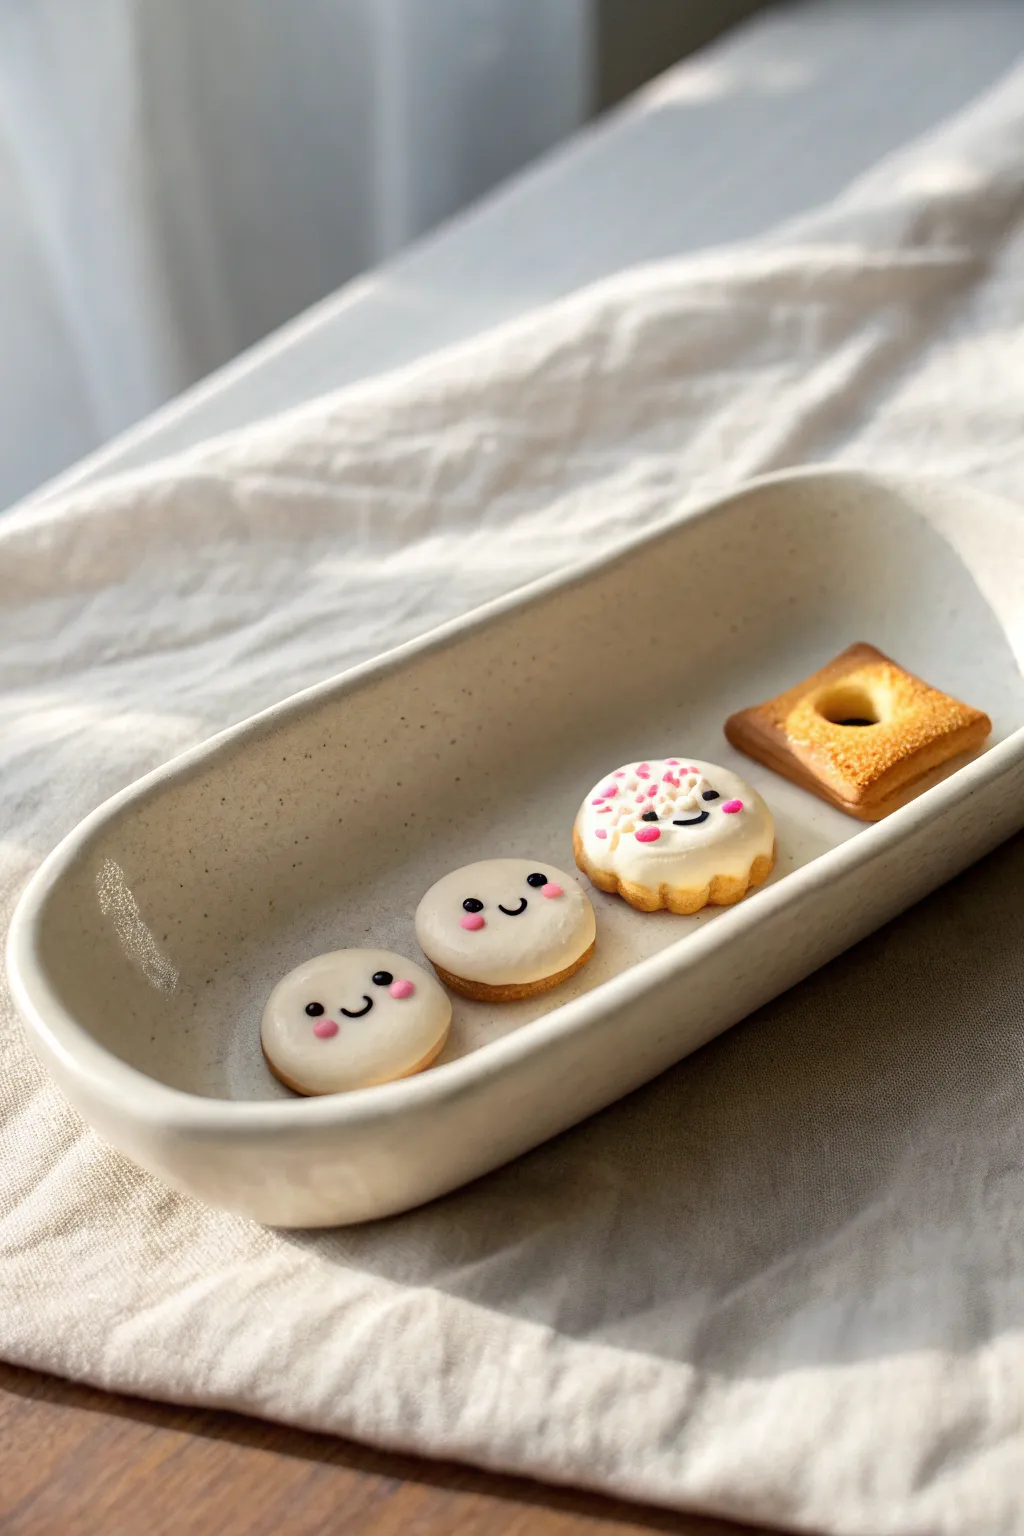
These miniature polymer clay cookies are guaranteed to bring a smile to your face with their kawaii expressions and realistic textures. You’ll create a charming set featuring two smooth frosted rounds, a sprinkled flower cookie, and a golden-brown toasted biscuit, all nestled in a simple handmade dish.
Step-by-Step Guide
Materials
- Polymer clay (white, beige/tan, black, pink)
- Liquid polymer clay (white)
- Chalk pastels (orange, brown, yellow ochre)
- Soft paintbrush for shading
- Detailing needle tool or toothpick
- Small round cutter (approx. 1-1.5cm)
- Small scalloped/flower cutter
- Small square cutter
- Dotting tool or ball stylus
- Gloss varnish or UV resin (optional for wet look)
- Blade or craft knife
- Ceramic tile or parchment paper
Step 1: Base Cookie Forms
-
Mix the Dough Color:
Start by conditioning your beige or tan polymer clay. You want a color that resembles baked shortbread, so if your beige is too pale, mix in a tiny speck of brown or yellow to warm it up. -
Roll the Slab:
Roll out the tan clay to a medium thickness, about 3-4mm. You want them thick enough to look like sturdy cookies but not chunky. -
Cut the Rounds:
Use your small round cutter to punch out three circles. Two will become the smiley faces, and one will be the base for the scalloped cookie. -
Cut the Square:
Punch out one square shape from the same tan slab. Use a smaller round tool or straw to create a centered hole, mimicking a classic butter cookie. -
Texture the Edges:
I find that gently rolling the sides of the cut shapes against a piece of sandpaper or using a toothbrush gives them a realistic baked crumb texture.
Sticky Situation?
If your black clay smears onto the white frosting, lift it off with a piece of tape instead of wiping. Wiping will stain the pristine white surface.
Step 2: Baking & Shading
-
Create the Baked Look:
Scrape some brown, orange, and yellow ochre chalk pastels into fine dust. Using a soft fluffy brush, pick up a mix of the dusts. -
Shade the Cookies:
Gently brush the pastel dust around the edges of all your cookie shapes. For the square one, shade the top surface heavily to make it look well-toasted. -
Shape the Flower Base:
Take one of your round clay circles and gently pinch the edges or use a scalloped cutter to trim it, creating a flower-like silhouette. -
Pre-bake:
Bake these base pieces according to your clay package instructions (usually 15 minutes is enough for this stage) and let them cool completely.
Make ‘Em Sparkle
Mix fine iridescent glitter into your white liquid clay before icing the cookies. It gives a sugary, crystallized effect perfect for faux sweets.
Step 3: The Frosting Layer
-
Prepare the Icing:
Mix a small amount of white polymer clay with liquid clay (or use pre-made white liquid clay) to create a thick frosting consistency. It should be spreadable but not runny. -
Frost the Rounds:
Carefully spread a generous dome of the white mixture onto the tops of two round cookies. Let it naturally settle to create a smooth, domed finish. -
Frost the Flower:
Apply the frosting to the scalloped cookie, following the curves of the edges but leaving a tiny rim of the tan cookie showing underneath. -
Add Sprinkles:
While the frosting on the flower cookie is wet, use a needle tool to place tiny bits of pink clay or real polymer sprinkles onto the top half.
Step 4: Faces & Finishing
-
Create the Eyes:
Roll extremely tiny balls of black clay. Position them wide apart on the wet white frosting of the three frosted cookies. Press them in gently so they sit flush. -
Add the Smiles:
Roll an incredibly thin snake of black clay. Cut tiny curved segments and place them centered between the eyes for a joyful expression. -
Rosy Cheeks:
Roll tiny balls of pink clay and flatten them slightly. Place them just under the eyes on the two round cookies and the flower cookie. -
The Simple Dish:
Quickly fashion a long, shallow oval shape from white or speckled clay. Curve the edges up to form a rim to hold your treats. -
Final Bake:
Place the decorated cookies (and the dish) back in the oven for a full cure (typically 30 minutes at 275°F/130°C). -
Glaze:
Once cool, apply a matte varnish to the cookie bases and a gloss varnish to the white frosting to make it look like hardened royal icing.
Arranging these tiny smiling treats on your desk is sure to brighten even the busiest afternoon


Micro Fruit Slices With Faces
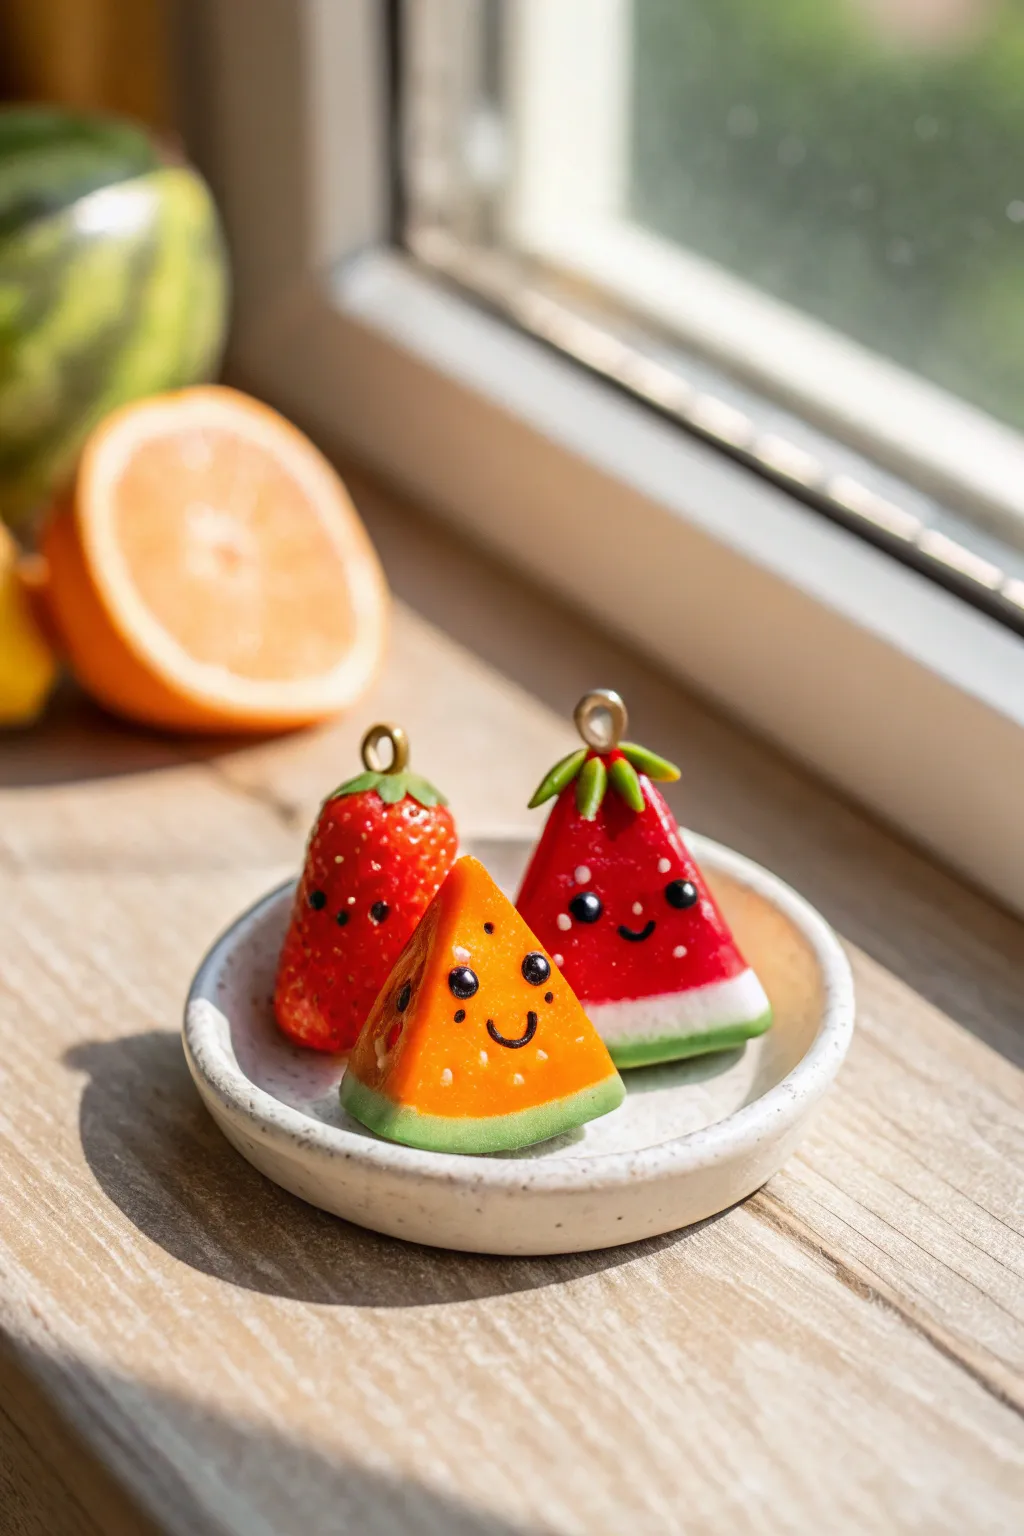
These adorable little fruit slices smile right back at you with their tiny painted faces and glossy finish. Perfect for beginners, this project turns simple geometric shapes into a trio of a strawberry, watermelon, and cantaloupe slice that look good enough to eat—but are definitely for wearing.
Step-by-Step Tutorial
Materials
- Polymer clay (colors: red, bright orange, translucent white, leaf green, yellowish-green)
- Black acrylic paint
- Fine detail paintbrush (000 or smaller)
- Dotting tools or a toothpick
- Liquid polymer clay or gloss glaze
- Eye pins (silver or gold tone)
- Scalpel or craft knife
- Needle tool
- Texture sponge or sandpaper (optional)
- Oven for baking
Step 1: Shaping the Fruit Bases
-
Mix the colors:
Start by conditioning your red and orange clays. For a more realistic fruit flesh look, I like to mix a tiny amount of translucent clay into the red and orange; this gives them a juicy, slightly see-through quality once baked. -
Form the strawberry:
Take a marble-sized ball of red clay and roll it into a teardrop shape. Flatten the bottom slightly so it can stand, but keep the top tapered. -
Texture the strawberry:
Using a needle tool, gently poke small indents all over the red surface to mimic seeds. Don’t press too deep, just enough to catch the light. -
Create the melon wedges:
Roll a ball of red clay and a ball of orange clay. Flatten them slightly into thick disks, then cut them into triangular wedges using your craft knife. You want them to look like thick, substantial slices. -
Add the rinds:
Roll out a thin sheet of translucent white clay and a slightly thicker sheet of green clay (darker green for watermelon, lighter green for cantaloupe). -
Layer the rinds:
Wrap a strip of the translucent white around the curved bottom edge of your red wedge. Repeat with the green layer over the white. Smooth the seams with your finger so it looks like one cohesive piece. -
Finish the cantaloupe rind:
Repeat the previous step for the orange wedge, using the yellowish-green clay for the outer skin.
Step 2: Details & Hardware
-
Make the strawberry leaves:
Take a tiny amount of green clay and flatten it. Cut a small star or flower shape using a cutter or your knife. Place this ‘cap’ on top of the strawberry. -
Refine the leaves:
Use a needle tool to drag the edges of the green cap downwards slightly, making them look like leaves hugging the fruit. Add a tiny green stem in the center. -
Insert eye pins:
Trim your metal eye pins if they are too long. Carefully insert one into the top center of each fruit piece. If the clay distorts, gently reshaping it with your fingers. -
Bake the clay:
Place your fruits on a ceramic tile or baking sheet lined with parchment paper. Bake according to your customized clay brand’s instructions (usually 275°F/130°C for 15-30 minutes). Let them cool completely.
Uneven Rinds?
If your white and green rind layers look messy, try chilling the clay for 10 minutes before slicing the wedge. Cold clay holds sharp edges much better when cut.
Step 3: Bringing Them to Life
-
Paint the seeds:
For the watermelon, mix a tiny drop of black paint with water. Use a fine brush to paint small teardrop seeds on the red surface. -
Paint the strawberry seeds:
For the strawberry, you can either paint tiny yellow dots inside the indents you made earlier or leave the texture as is for a simpler look. -
Add the faces:
Dip a dotting tool or the end of a toothpick into black acrylic paint. Dot two eyes onto each fruit slice. -
Draw the smiles:
Using your finest brush, carefully paint a small ‘U’ shape between the eyes for a happy mouth. Keep the line thin and delicate. -
Add eye highlights:
Once the black paint is dry, use a toothpick with a speck of white paint to add a tiny ‘catchlight’ reflection in the upper corner of each eye. This creates that signature kawaii sparkle. -
Seal with glaze:
Apply a coat of gloss glaze or UV resin over the fruit parts (avoiding the rinds if you want them matte) to make them look wet and juicy.
Pro Tip: Tiny texture
Before baking the orange slice, gently press a piece of sandpaper against the orange ‘flesh’ area. This mimics the porous texture of real melon perfectly.
String these onto a necklace chain or attach earring hooks for a fruity accessory set that is ready to wear


Chibi Animal Pebble Buddies
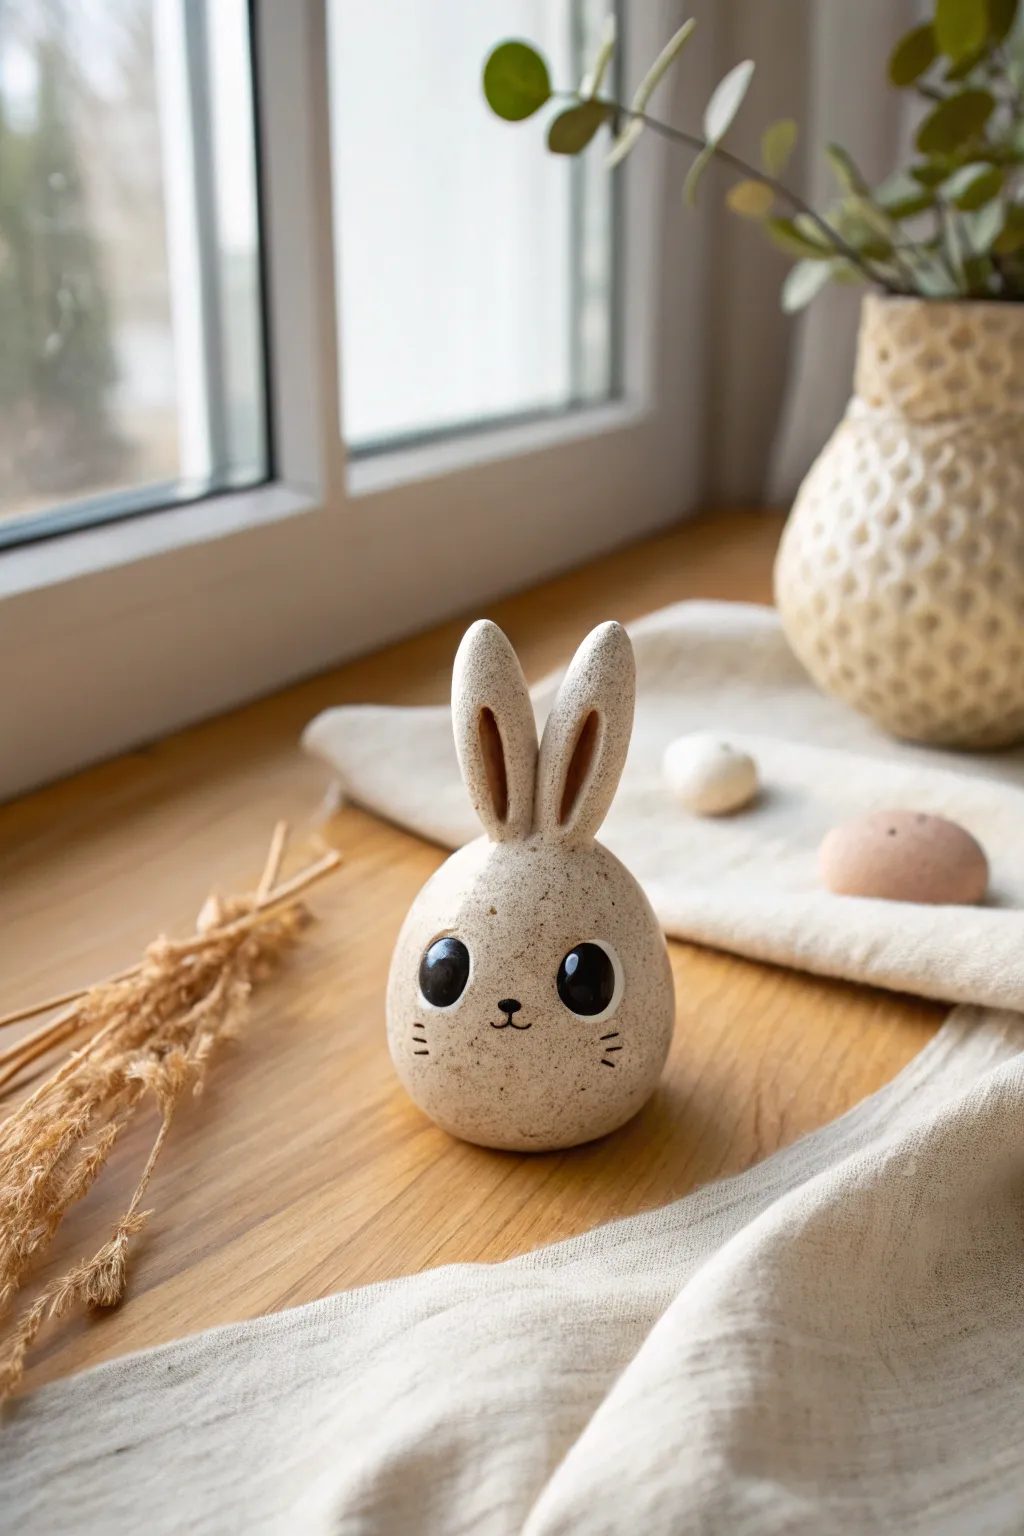
This adorable miniature rabbit combines the simplicity of a smooth pebble shape with charming, expressive details. Its neutral, speckled finish gives it a modern ceramic look that fits perfectly in any cozy nook or on a windowsill.
How-To Guide
Materials
- Beige or stone-effect polymer clay (pre-speckled)
- Black acrylic paint
- Fine detail paintbrush (size 00 or 000)
- Dotting tool or ball stylus
- Clay blending tool or toothpick
- Matte varnish or glaze
- Clean work surface
- Oven for baking (if using polymer clay)
Step 1: Basic Form
-
Condition the clay:
Start by taking a chunk of your speckled beige clay about the size of a golf ball. Knead it thoroughly in your hands until it becomes warm, soft, and pliable to prevent cracks later. -
Roll the body:
Roll the conditioned clay into a smooth ball between your palms. Once round, gently taper the top half just slightly to create an egg-like shape, keeping the bottom wide and flat so it stands stably. -
Check stability:
Place your egg shape on your work surface. Tap the bottom gently against the table to flatten it slightly, ensuring your bunny won’t wobble or tip over.
Stone Texture Secret
If you can’t find speckled clay, mix coarse black pepper or dried used coffee grounds into regular beige clay to mimic granite.
Step 2: Sculpting the Ears
-
Shape the ear logs:
Take two smaller pieces of the same clay, each about the size of a large pea. Roll them into short, thick logs or carrot shapes. -
Flatten and refined:
Gently press each log flat with your thumb. Pinch the top ends to make them rounded but slightly tapered, mimicking the soft curve of a bunny ear. -
Create the inner ear:
Using a small ball tool or the rounded end of a paintbrush, press an indentation into the center of each ear. This hollow creates depth and shadow. -
Attach the ears:
Place the ears on top of the egg body, spacing them slightly apart. I find pressing them down firmly ensures a good mechanical bond. -
Blend the seams:
Use a clay blending tool or a toothpick to smooth the clay from the base of the ears onto the head. The seam should disappear completely for a seamless, ceramic look.
Step 3: Painting and Finishing
-
Bake or dry:
If using polymer clay, bake according to the manufacturer’s instructions (usually around 275°F/135°C for 15-30 minutes). If using air-dry clay, let it sit for at least 24 hours until fully hard. -
Prepare the paint:
Squeeze a tiny drop of black acrylic paint onto a palette. Consistency is key here; you want it fluid enough to flow but thick enough to be opaque. -
Map out the face:
Before committing with paint, you can lightly mark where you want the eyes and nose with a pencil to ensure symmetry. -
Paint the eyes:
Using your largest dotting tool or the back of a paintbrush handle dipped in black paint, press two large, round dots low on the face for the eyes. -
Add the catchlights:
Wait for the black eye paint to dry completely. Then, using a tiny dotting tool or a toothpick with white paint, add a small white reflection dot in the upper corner of each eye to bring them to life. -
Paint the nose and mouth:
With your finest detail brush, paint a very small inverted triangle for the nose between the eyes. Draw two tiny curved lines extending downward for the mouth. -
Add whiskers:
Using the very tip of your detail brush, flick three short, horizontal lines on each cheek. Keep these strokes extremely light and delicate. -
Seal the piece:
Once all paint is bone dry, apply a coat of matte varnish over the entire piece to protect the surface and enhance the stone-like finish.
Seasonal Variation
Add a tiny clay flower crown around the ears or paint the bottom half in pastel colors to look like a decorated Easter egg.
Place your little stone bunny near a potted plant for a sweet, natural companion


Mini Dino Nugget Figurines
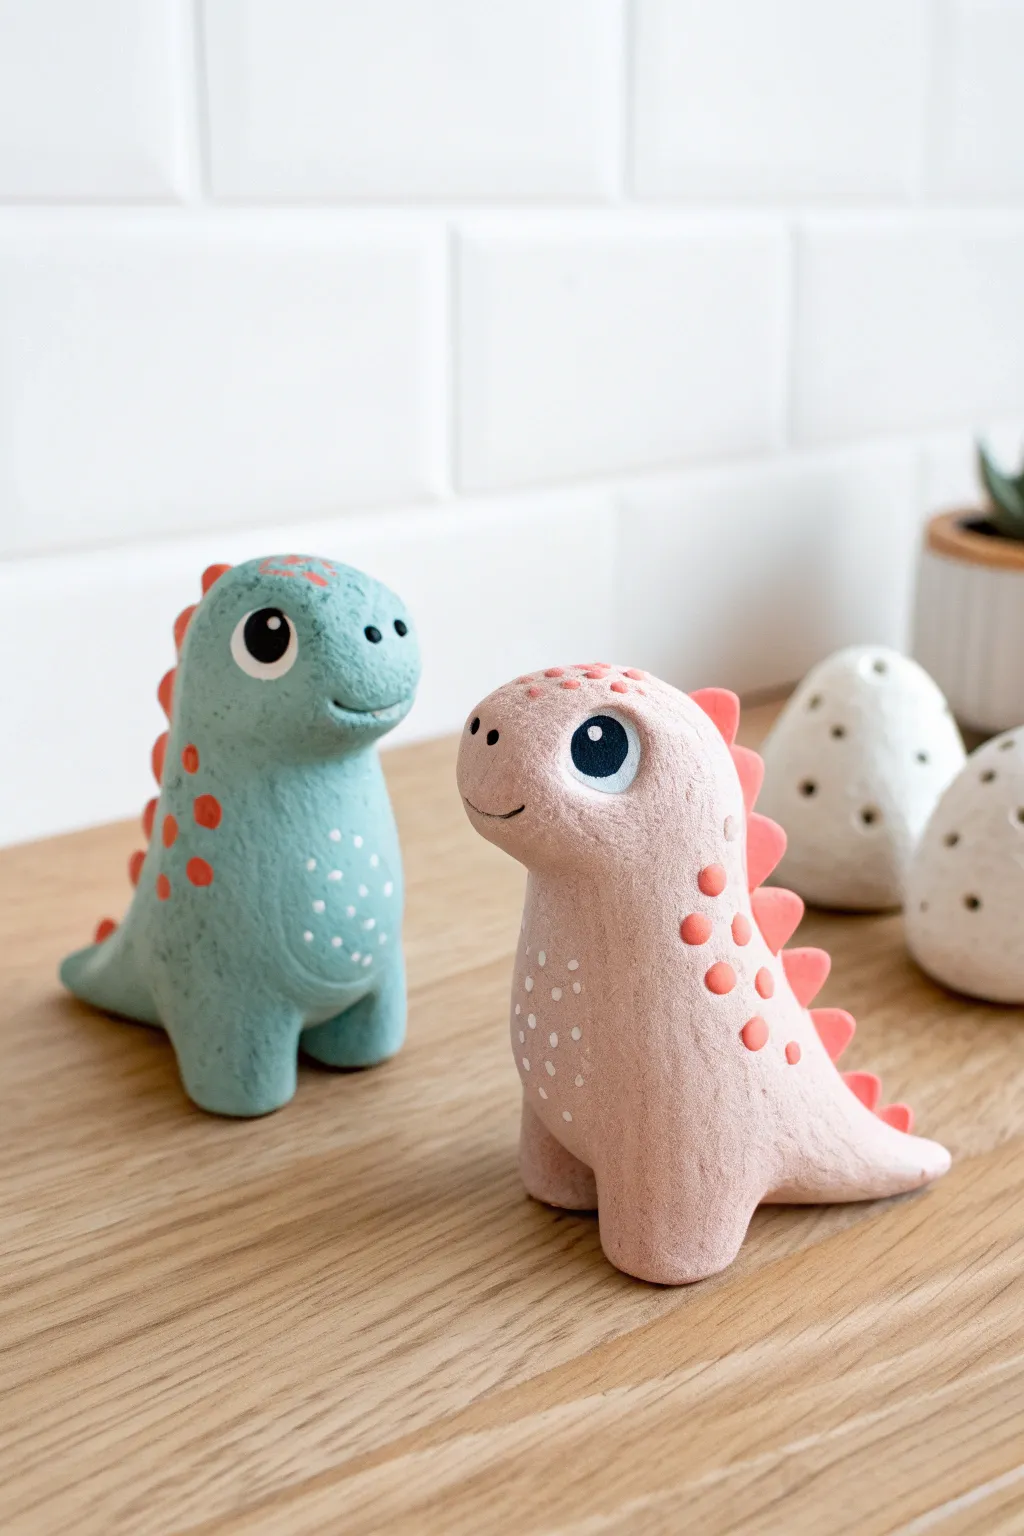
These adorable dinosaur figurines bring a touch of whimsy to any shelf with their soft, stone-like texture and sweet expressions. Whether you choose to make the teal T-Rex or the pink Brachiosaurus-style buddy, they are surprisingly simple to sculpt and paint.
Step-by-Step
Materials
- Air-dry clay (stone effect or plain white)
- Acrylic paints (teal, dusty pink, orange/coral, white, black)
- Small blending sponge or texture tool
- Fine detail paintbrush (size 0 or 00)
- Medium flat paintbrush
- Sculpting tools (needle tool and ball stylus)
- Water cup
- Aluminum foil (for armature core, optional)
- Matte varnish or sealant
Step 1: Sculpting the Body
-
Form the base:
Start by conditioning your clay until it is soft and pliable. Roll a ball of clay about the size of a golf ball for the body. If you want to save clay or reduce weight, you can use a small ball of crumpled aluminum foil as a core. -
Shape the dinosaur torso:
Gently manipulate the ball into a pear shape. For the teal dino, keep the shape taller and upright. For the pink dino, you might want to elongate the neck slightly by pulling the clay upwards and smoothing it. -
Add the legs:
Roll two smaller logs of clay for the thick legs. Attach these to the bottom of the body. Use a sculpting tool to blend the seams upwards until the legs look like a seamless extension of the torso. -
Refine the tail:
Pinch the back of the clay shape and gently pull outward to form a short, thick tail. Smooth it down so it curves naturally against the ground, which also helps stabilize the figure so it stands on its own. -
Sculpt the head:
Define the head shape. For the teal dino, give it a rounded snout. For the pink dino, make the face slightly flatter. Use a ball stylus to gently press small indentations where the eyes will eventually be painted.
Save Your Shape
If the clay is too soft and the head starts drooping, insert a hidden toothpick through the neck and into the body for internal support while it dries.
Step 2: Adding Details & Texture
-
Create the texture:
To achieve that organic, stone-like finish seen in the photo, gently dab the entire surface of the damp clay with a coarse sponge or a crumpled ball of aluminum foil. Do this lightly so you don’t deform the shape. -
Attach the spikes:
Roll tiny triangles or cones of clay for the back spikes. Carefully score and slip (scratching the surface and adding a drop of water) to attach them down the spine of the dinosaur. Blend the bases slightly. -
Refine facial features:
Use a needle tool or the edge of a credit card to press a gentle curve for the mouth. Make sure the expression looks happy and soft. Poke two tiny nostrils above the mouth. -
Let it dry:
Allow your dinosaurs to dry completely. This usually takes 24-48 hours depending on humidity and thickness. I prefer to rotate them carefully halfway through drying to ensure the bottom hardens evenly.
Step 3: Painting & Finishing
-
Base coat:
Once dry, paint the teal dinosaur with a muted blue-green and the other with a dusty pink acrylic paint. Use a flat brush and apply thin layers to preserve the clay’s texture. -
Paint the spikes:
Using a coral or bright orange paint, carefully color the spikes on the back. A small detail brush works best here to avoid getting orange on the body color. -
Paint the eyes:
Fill the eye indentations with a circle of white paint first. Once dry, add a large black circle, leaving a small white rim. Finally, add a tiny white dot in the black pupil for a ‘sparkle’ effect. -
Add spots and patterns:
Using the back of a paintbrush handle or a dotting tool, dab orange spots onto the teal dino’s back. For the bellies, use white paint to add delicate, tiny stippled dots for a speckled tummy look. -
Final touches:
If you want the texture to pop even more, you can do a very light dry-brushing of a lighter shade over the skin. Finish with a matte varnish to protect your new prehistoric friends.
Dino Decor
Turn these into functional decor by flattening the backs and gluing strong magnets to them, or add a loop of wire before drying to make hanging ornaments.
Place your finished figurines near a small succulent or plant to create a cute Jurassic habitat on your desk

The Complete Guide to Pottery Troubleshooting
Uncover the most common ceramic mistakes—from cracking clay to failed glazes—and learn how to fix them fast.
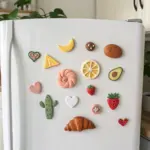
Teeny Mushroom Sprout Friends

Create a cheerful family of forest friends that bring a touch of whimsy to any shelf. These adorable mushrooms feature realistic wood-grain stems topped with charming spotted caps and sweet, smiling faces.
Step-by-Step Tutorial
Materials
- White or beige polymer clay
- Aluminum foil (for armature)
- Acrylic paints (burnt sienna, cream, white, black, pink)
- Fine detail paintbrush
- Texture tool or needle tool
- Gloss varnish (optional)
- Matte varnish (optional)
- Oven for baking clay
Step 1: Shaping the Stems
-
Form the Base:
Start by rolling a ball of beige polymer clay. If you want larger mushrooms like the ones in the back, you can create a small cone of aluminum foil first to bulk it out and save clay. -
Shape the Cylinder:
Roll the clay into a thick cylinder that is slightly wider at the bottom, creating a sturdy base so your mushroom stands upright easily. -
Add Wood Texture:
Using a needle tool or a sharp blade, gently scratch vertical lines up and down the stem. Vary the depth and length of these lines to mimic organic wood grain. -
Refine the Shape:
Gently press the top of the stem to flatten it slightly, creating a stable platform for the cap to sit on later. -
Repeat for Family:
Create 3-5 stems in varying heights and widths to make a diverse little mushroom family.
Paint Beading Up?
If acrylic paint beads up on the baked clay, wipe the clay with a little rubbing alcohol or acetone on a cotton pad before painting to remove surface oils.
Step 2: Creating the Caps
-
Prepare Cap Clay:
Take a new portion of clay—you can use white or pre-colored clay—and roll it into a smooth ball. -
Form the Dome:
Press your thumb into the center of the ball while rotating it to hollow it out, creating a dome shape that fits over your stems. -
Fit Check:
Place the raw clay cap onto the raw clay stem. Press down gently to adhere them together. You can use a tiny bit of liquid clay or translucent liquid sculpey as ‘glue’ if they aren’t sticking well. -
Bake the Mushrooms:
Arrange your mushrooms on a baking sheet. Bake according to your polymer clay package instructions (usually 275°F/135°C for 15-30 minutes depending on thickness). Let them cool completely.
Step 3: Painting and Details
-
Base Coat the Stems:
Mix a very light wash of burnt sienna and cream acrylic paint. Brush this over the textured stems, then quickly wipe away the excess with a paper towel. The dark paint will stay in the grooves, highlighting the wood grain effect. -
Paint the Caps:
Paint the caps with a warm reddish-brown or terracotta acrylic paint. I like to sponge the paint on for a more natural, matte texture rather than distinct brush strokes. -
Add the Spots:
Using the handle end of a paintbrush or a dotting tool, dip into white paint and create irregular spots all over the caps. Make some dots large and some tiny for variety. -
Paint the Faces:
Using your finest detail brush and black paint, carefully draw small, wide U-shapes for smiles and small arches for happy, closed eyes. -
Add Cheeks:
Mix a tiny bit of pink paint with water to make a glaze. Dab two soft pink circles on the cheeks for a blushing look. -
Sealing:
Once dry, protect your work. Use a matte varnish for the stems to keep them looking like wood, and a satin or gloss varnish for the caps if you want them to look dewy.
Forest Floor Display
Glue your finished mushrooms onto a slice of creating raw wood or a flat stone, and surround their bases with preserved moss for a permanent display.
Set your happy mushroom family on a windowsill to catch the light and make you smile
Baby Sea Creature Minis
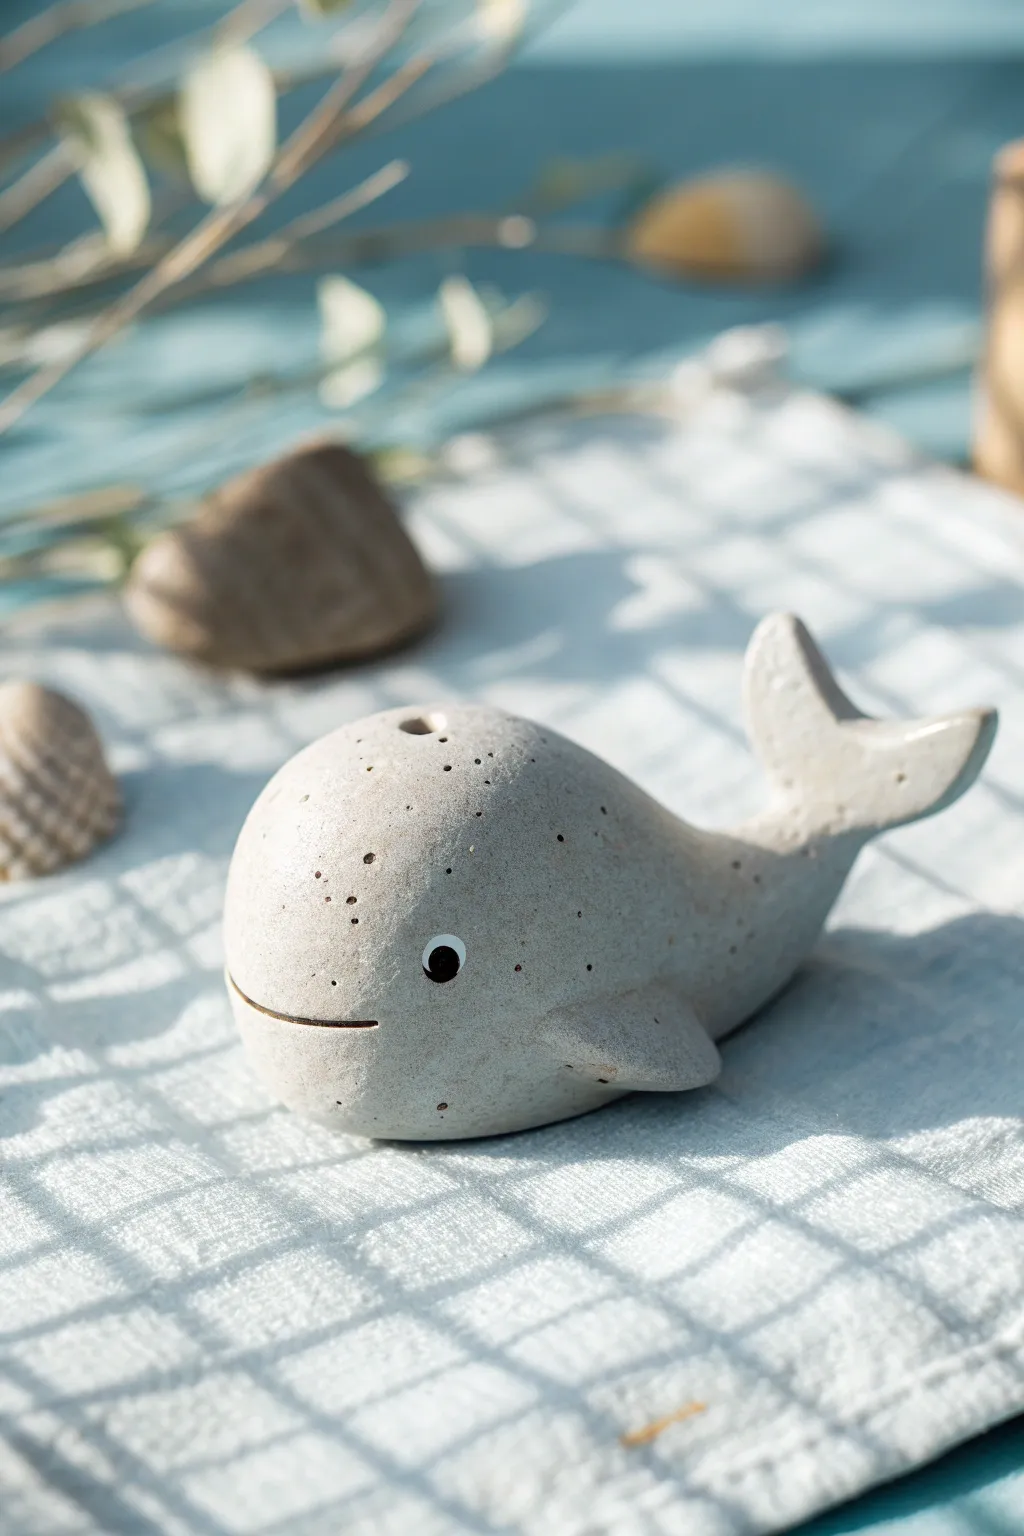
This adorable miniature whale captures the ocean’s charm with a minimalist, speckled finish that mimics natural stone or sand. Its rounded form and simple expression make it a perfect beginner sculpting project that looks effortlessly sophisticated.
Step-by-Step Guide
Materials
- Polymer clay (white or light beige)
- Fine black pepper or black embossing powder (for speckles)
- Black acrylic paint
- Small dotting tool or toothpick
- Gloss glaze (optional)
- Needle tool or X-Acto knife
- Small paintbrush
- Curved sculpting tool
Step 1: Preparing the Clay
-
Mix the faux-stone base:
Start by conditioning your white or beige polymer clay until it is soft and pliable. Flatten it into a pancake shape. -
Add texture:
Sprinkle a generous pinch of fine black pepper or black embossing powder over the flattened clay. This is the secret to getting that organic, sandy stoneware look without buying special clay. -
Blend the speckles:
Fold the clay over the speckles and knead thoroughly. Continue folding and rolling until the black specks are evenly distributed throughout the entire ball.
Natural Texture
Use a toothbrush to gently tap the surface of the unbaked clay. This creates a subtle pitted texture that mimics real stone.
Step 2: Shaping the Body
-
Form the main shape:
Roll your conditioned clay into a smooth, seamless ball about the size of a walnut. -
Create the teardrop:
Gently roll one side of the ball against your work surface to elongate it into a fat teardrop shape. The rounded end will be the head, and the tapered end will become the tail. -
Curve the tail:
Bend the tapered tail section upward in a gentle curve. Smooth out any creases that form at the bend with your finger. -
Flatten the base:
Tap the belly of the whale gently against your table so it has a stable, flat bottom and won’t wobble.
Step 3: Sculpting Details
-
Form the tail flukes:
Flatten the very tip of the tail tail. Use your needle tool or knife to cut a small ‘V’ notch in the center, then round off the corners to create two distinct flukes. -
Refine the tail:
Smooth the edges of the flukes so they look organic and soft, blending the connection point into the main body. -
Make the fins:
Roll two small, pea-sized balls of clay. Flatten each into a small triangle or petal shape to serve as the side fins. -
Attach the fins:
Press the fins onto the lower sides of the whale’s body. Use a sculpting tool to blend the back edge of the fin into the body so it looks like one solid piece. -
Create the blowhole:
Use a medium-sized ball styluses or the rounded end of a paintbrush handle to press a distinct indentation into the very top of the head.
Ocean Diorama
Create a tiny display by placing your whale on a slice of blue agate or a small mirror to simulate water, surrounded by tiny seashells.
Step 4: Adding Personality
-
Carve the mouth:
Using a needle tool or a thin, curved blade, press a long, gentle smile line across the front of the face. I find rocking the tool slightly helps prevent dragging the clay. -
Bake the piece:
Bake the clay according to the manufacturer’s instructions for the specific brand you used. Let it cool completely before painting. -
Paint the eye:
Dip a large dotting tool or the back of a brush into black acrylic paint. Simply lay down one solid black circle for the eye. -
Add the highlight:
Once the black paint is fully dry, use a very fine pin or toothpick to add a tiny white dot reflection in the eye to bring it to life. -
Finishing touch:
If desired, apply a matte varnish to the body for a natural stone feel, or gloss just the eye to make it shine.
This serene little whale makes a calming desk companion or a sweet handmade gift for ocean lovers


What Really Happens Inside the Kiln
Learn how time and temperature work together inside the kiln to transform clay into durable ceramic.
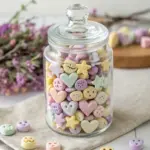
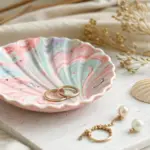
Micro Heart Pocket Tokens

These miniature heart-shaped tokens act as sweet pocket charms or functional rustic buttons for your crafting projects. Their soft, matte finish and dusty pastel palette give them an organic, handmade feel that looks beautiful gathered in a ceramic bowl.
Detailed Instructions
Materials
- Polymer clay (pastels: dusty rose, sage green, cream, terracotta, lavender)
- Small heart-shaped cutter (approx. 1 inch)
- Acrylic roller or pasta machine
- Ceramic tile or parchment paper
- Small dotting tool or toothpick
- Cornstarch or baby powder (for texture)
- Needle tool
- Fine-grit sandpaper (optional)
- Baking sheet
Step 1: Preparing the Clay
-
Condition the clay:
Start by taking small amounts of your different polymer clay colors. Knead each color individually in your hands until it becomes soft, pliable, and warm to the touch. -
Mix custom shades:
To achieve the muted, earthy look from the photo, try mixing a tiny bit of beige or white into your brighter colors. I often mix terracotta with white to get that soft peach tone seen in the bowl. -
Roll out sheets:
Using your acrylic roller or a pasta machine on a medium setting, roll each color out onto a smooth surface. Aim for a thickness of about 3mm to 4mm—thick enough to be sturdy but thin enough to look delicate. -
Add matte texture:
Lightly dust the surface of your rolled clay with a small amount of cornstarch or baby powder. Rub it gently over the surface; this removes fingerprints and gives the final piece that velvety, stone-like finish.
Sticky Cutter?
If the clay sticks inside your small cutter, dip the cutter into your cornstarch or water before pressing it into the clay. It will release the shape cleanly every time.
Step 2: Shaping and Detailing
-
Cut the hearts:
Press your small heart-shaped cutter firmly into the clay sheets. Lift the cutter and gently push the clay shape out. -
Soften the edges:
After cutting, run your finger lightly around the perimeter of each heart to smooth down any sharp cutting ridges. They should look soft and tumbled, not sharp. -
Mark the center:
Visualize a small triangle in the center of the heart where the button holes will go. Use a needle tool to make three tiny guide divots first to ensure your spacing is symmetrical. -
Create the button holes:
Using a blunt dotting tool or a thick toothpick, press vertically into your guide marks to create the three distinct holes. Press deep enough to go through, but be gentle so you don’t distort the heart shape. -
Refine the back:
Flip the heart over carefully. If the tool poked through and left rough exit marks, gently smooth them flat with your fingertip.
Scented Tokens
Use porous air-dry clay instead of polymer. Once dry, add a drop of essential oil to the back. They become cute, reusable drawer fresheners.
Step 3: Baking and Finishing
-
Arrange for baking:
Place your finished hearts onto a ceramic tile or a baking sheet lined with parchment paper. Leave a little space between each one. -
Bake the batch:
Bake according to your polymer clay manufacturer’s instructions (usually around 275°F or 130°C for 15-30 minutes). I prefer to bake them slightly longer at a lower temp to prevent any scorching on the light colors. -
Cool down:
Allow the hearts to cool completely on the baking sheet. They will harden fully as they return to room temperature. -
Sanding touch-up:
If there are any rough spots on the edges after baking, extremely light sanding with fine-grit sandpaper can polish them away. -
Final dusting (optional):
For an extra rustic effect, you can dust them one last time with a tiny bit of cornstarch and wipe off the excess, leaving just a hint of powder in the crevices.
Fill a small dish with your new collection or sew them onto a card for a heartfelt gift
Tiny Star And Moon Sprinkles
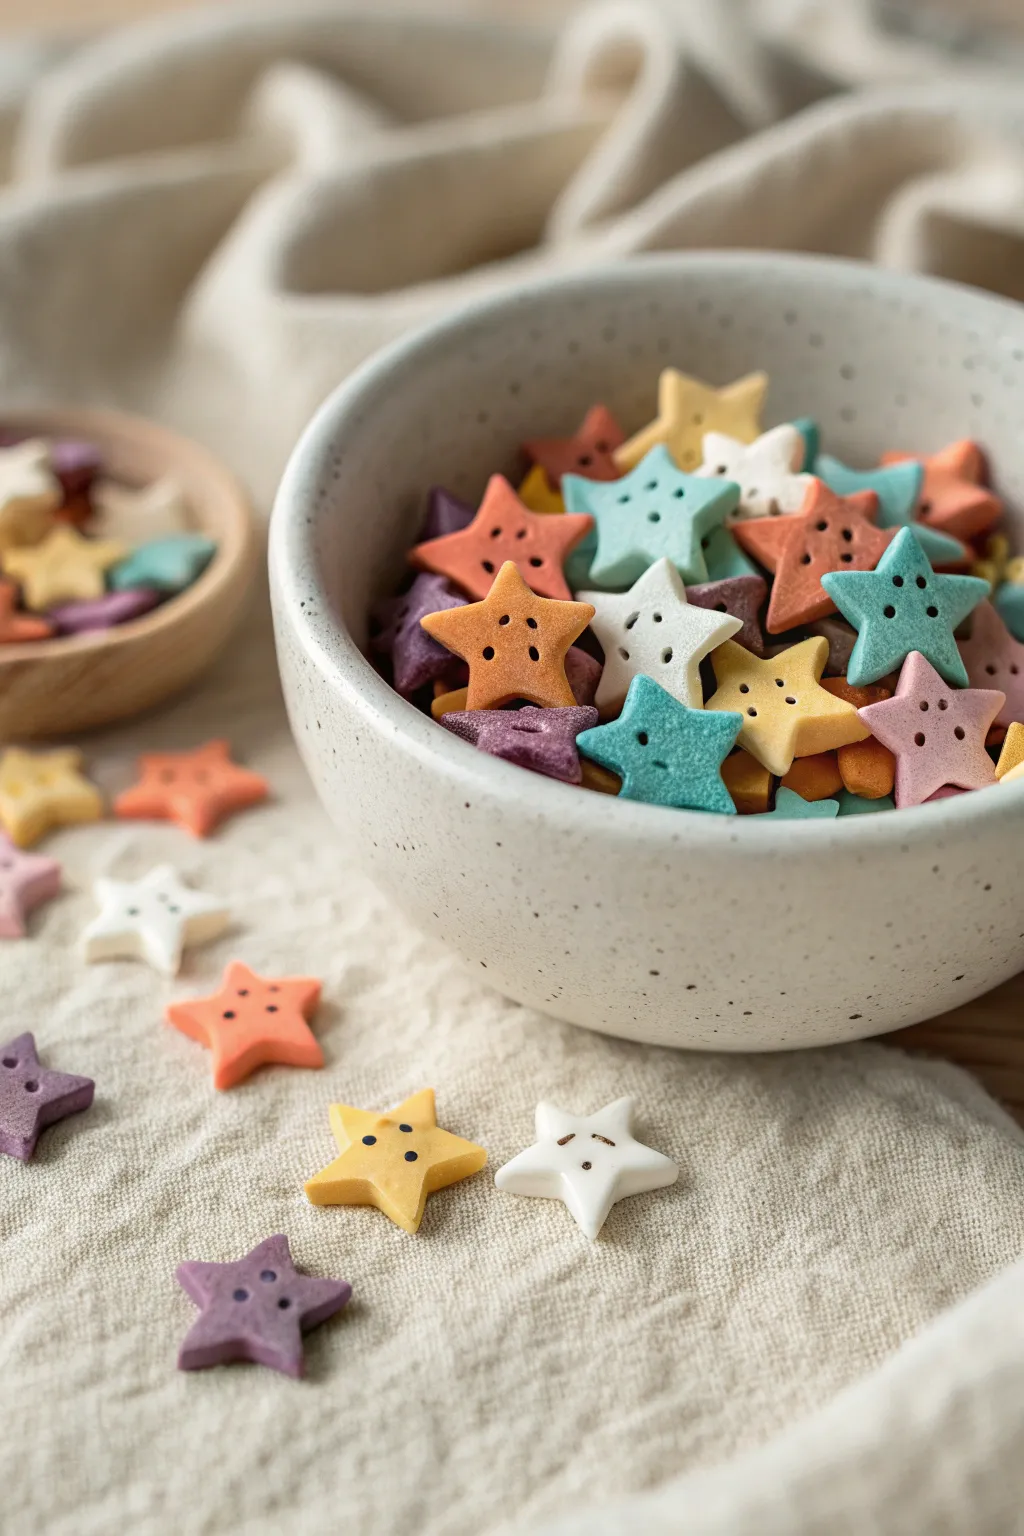
These adorable star-shaped clay buttons are perfect for embellishing larger crafts, using as play scatter, or adding a whimsical touch to mixed media art. With their soft matte finish and tiny button-hole details, they look almost good enough to eat.
Step-by-Step Guide
Materials
- Polymer clay in pastel colors (teal, peach, yellow, purple, white, pink)
- Small star-shaped fondant cutter or clay cutter (approx. 0.5 – 1 inch)
- Acrylic rolling pin or pasta machine
- Parchment paper or a ceramic tile
- A dull needle tool, toothpick, or small dotting tool
- Cornstarch or baby powder (for release)
- Soft-bristle brush (optional, for texturing)
- Oven for baking
Step 1: Preparing the Clay
-
Condition the colors:
Begin by taking small portions of each polymer clay color. Knead each piece thoroughly in your hands until it is soft, pliable, and free of cracks. -
Mix custom shades:
If your packaged colors are too vibrant, mix in a tiny amount of white clay to achieve the soft pastel palette seen in the photo. Aim for a milky teal, a soft apricot, and a barely-there lavender. -
Roll out sheets:
Using an acrylic roller or a pasta machine, roll each color into a flat sheet. You want a thickness of about 3-4mm—thick enough to look chubby and cute, but not so thick they won’t bake through.
Clean Cuts Every Time
dip your cutter into cornstarch before every single cut. This prevents the clay from sticking inside the tiny corners of the star shape.
Step 2: Cutting and Shaping
-
Prevent sticking:
Before cutting, lightly dust your work surface or the clay sheet with cornstarch. This helps the small shapes release cleanly from the cutter. -
Cut the stars:
Press your small star cutter firmly into the clay sheet. Wiggle it slightly and lift. If the clay stays in the cutter, gently poke it out from the back with a blunt tool. -
Soften the edges:
Once cut, the edges might be sharp. Gently tap the edges with your finger to round them over slightly, giving them a softer, tumbled look. -
Add texture (optional):
For a speckled, stone-like appearance, use an old toothbrush to gently stipple the surface, or mix in some ground black pepper or specialized granite-effect clay before rolling.
Step 3: Adding Details
-
Create the button holes:
Take your needle tool or a small dotting tool. In the center of each star, press two small indentations side-by-side to mimic button holes. -
Clean the holes:
Ensure the holes are clean and identical. If you push too hard and distort the star shape, gently nudge the points back into place. -
Inspect for lint:
Polymer clay loves dust. I usually give everything a quick check under bright light and gently wipe away any stray dust fibers with a drop of baby oil on my finger. -
Arrange for baking:
Place all your finished stars on a parchment-lined baking sheet or a ceramic tile, ensuring they aren’t touching each other.
Distorted Shapes?
If your stars are squishing as you eject them, let the rolled clay sheet sit in the fridge for 10 minutes before cutting to firm it up.
Step 4: Baking and Finishing
-
Bake the batch:
Bake according to your clay manufacturer’s instructions. Typically, this is around 275°F (130°C) for 15-20 minutes, given their small size. -
Cool completely:
Let the stars cool down fully before handling them. They are fragile when warm and harden as they return to room temperature. -
Matte finish:
The stars in the photo have a matte, natural look. If your clay is shiny after baking, you can lightly buff them with a piece of denim or super-fine steel wool to knock back the sheen. -
Final display:
Pour your finished stars into a small ceramic bowl to admire your colorful collection before using them.
Fill a jar with these little stars for a burst of permanent pastel joy on your desk

TRACK YOUR CERAMIC JOURNEY
Capture glaze tests, firing details, and creative progress—all in one simple printable. Make your projects easier to repeat and improve.
Mini Donut Stud Earrings
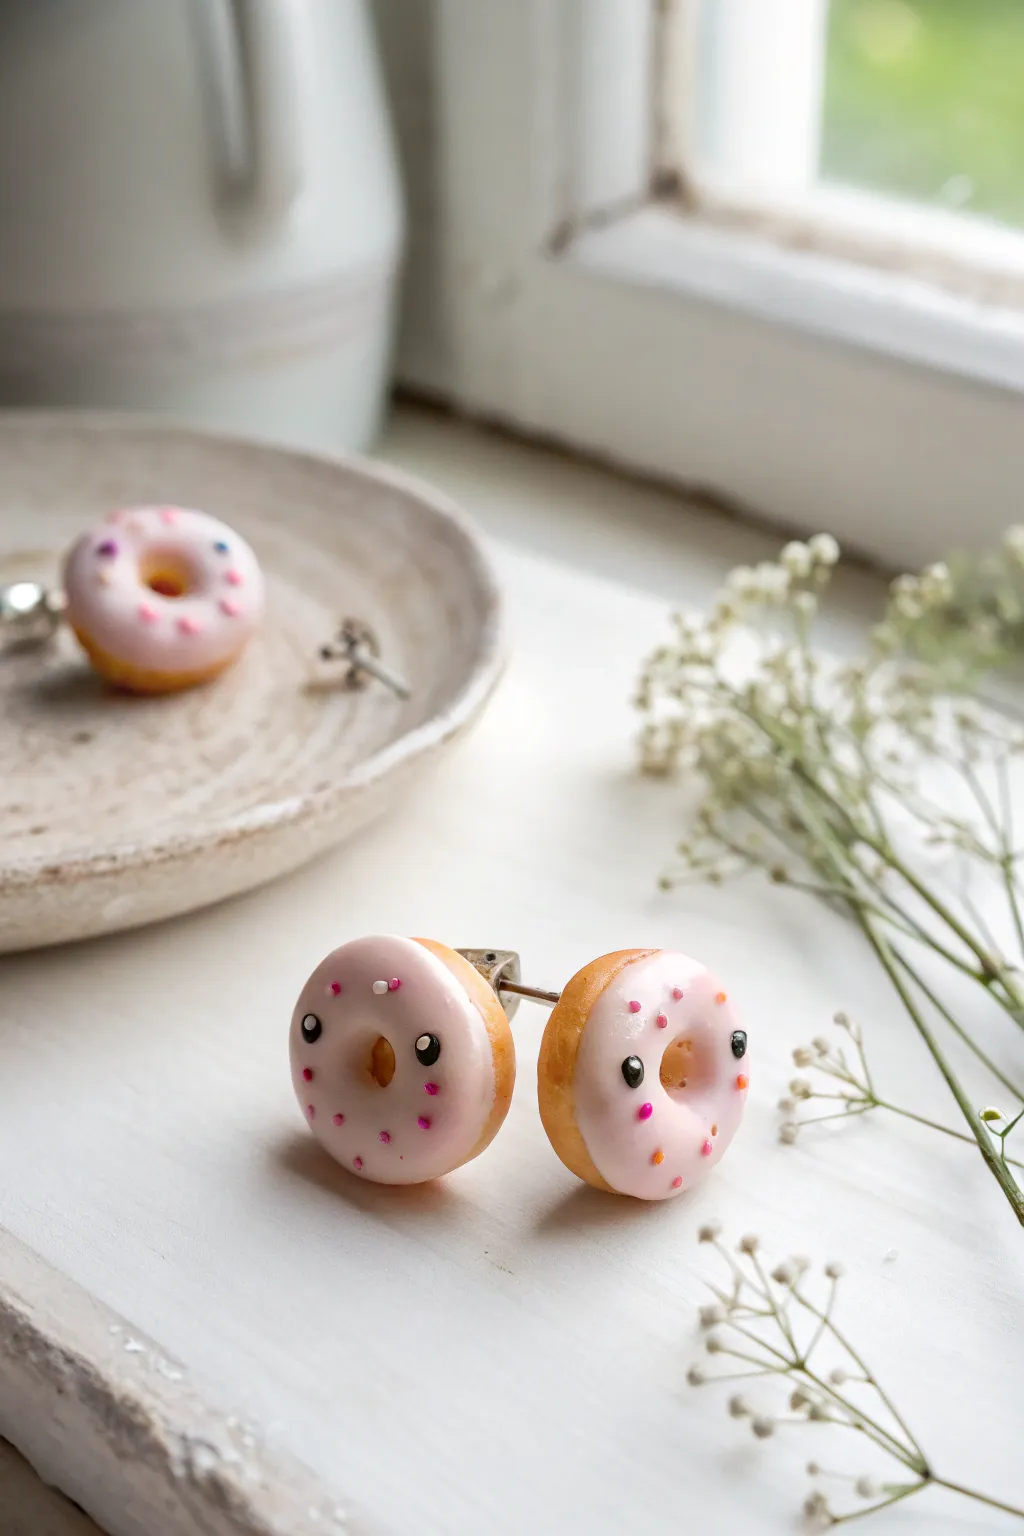
These adorable stud earrings feature tiny, golden-brown donuts topped with pink icing and sweet kawaii faces. They are a perfect beginner polymer clay project that adds a touch of whimsy to your jewelry collection.
Step-by-Step Tutorial
Materials
- Polymer clay (dough/beige color)
- Polymer clay (soft pink)
- Liquid polymer clay (translucent)
- Soft pastels (ochre/orange-brown) for shading
- Acrylic paint (black and white)
- Ball stylus tool or toothpick
- Needle tool
- Small paintbrush
- 2 Flat-pad earring posts
- Strong jewelry glue (like E6000)
- Gloss glaze or UV resin (optional)
- Miniature ‘sprinkles’ (clay bits or store-bought)
Step 1: Frying the Dough
-
Mix the perfect dough:
Condition your beige or dough-colored polymer clay until it is soft and pliable. If the color is too yellow, mix in a tiny speck of white and brown to achieve a realistic baked-goods tone. -
Shape the base:
Roll two small balls of the dough clay, each about 0.8 to 1 cm in diameter. Try to make them as identical in size as possible so your earrings match. -
Flatten the rounds:
Gently press each ball down onto your work surface with your finger to create a flattened disc shape, ensuring the edges remain slightly rounded like a real donut. -
Punch the hole:
Using a needle tool or a small dotting tool, poke a hole directly through the center of each disc. Wiggle the tool slightly to widen the hole, smoothing out any rough edges. -
Add texture:
For a realistic fried texture, take an old toothbrush or a crumpled ball of aluminum foil and very lightly tap it over the surface of the donut bases. -
Baking shading:
Scrape some ochre or light brown soft pastel into a powder. Using a dry paintbrush, dust the sides and bottom edges of the donuts to simulate a golden-brown baked look. I find this really helps them look less ‘plastic’.
Sticky Situation?
Can’t get the posts to stick? Rough up the back of the baked clay with sandpaper before gluing to give the adhesive more grip.
Step 2: Icing & Decoration
-
Prepare the icing:
Mix a small amount of pink polymer clay with liquid translucent clay (or a clay softener) until you reach a frosting-like consistency. It should be thick enough to hold its shape but fluid enough to look smooth. -
Apply the glaze:
Using a needle tool or toothpick, carefully spread the pink mix onto the top of each donut. Let it drip slightly down the sides organically, but keep the center hole clear. -
Add sprinkles:
Before the ‘icing’ cures, gently press tiny bits of colored clay, micro-beads, or glitter into the pink surface to act as sprinkles. If using clay bits, roll hair-thin snakes of colorful clay and slice them into tiny segments. -
First bake:
Bake the donuts according to the instructions on your specific brand of polymer clay. Let them cool completely before moving to the painting step.
Level Up: Scented!
Before baking, mix a tiny drop of vanilla or strawberry fragrance oil into the clay. Your earrings will smell as sweet as they look.
Step 3: Faces & Finish
-
Paint the eyes:
Dip a fine-point dotting tool or the tip of a toothpick into black acrylic paint. Carefully place two dots on the front of the donut for the eyes, spacing them somewhat wide for that cute ‘kawaii’ look. -
Add highlights:
Once the black paint is dry, use a sewing needle dipped in white paint to add a tiny sparkle dot in the corner of each eye. This creates the life-like expression. -
Seal the charm:
Apply a coat of gloss glaze or UV resin over the top of the donut (icing and face) to protect the paint and give it a delicious sugary shine. -
Attach the hardware:
Apply a drop of strong jewelry glue to the flat pad of your earring post. Press it firmly against the back of the baked donut. -
Final cure:
Allow the glue to cure fully (usually 24 hours) to ensure the heavy donut doesn’t pop off the post while you are wearing it.
Enjoy wearing your sweet new accessories or gift them to a friend with a sweet tooth
Micro Photo Or Note Stand Critters
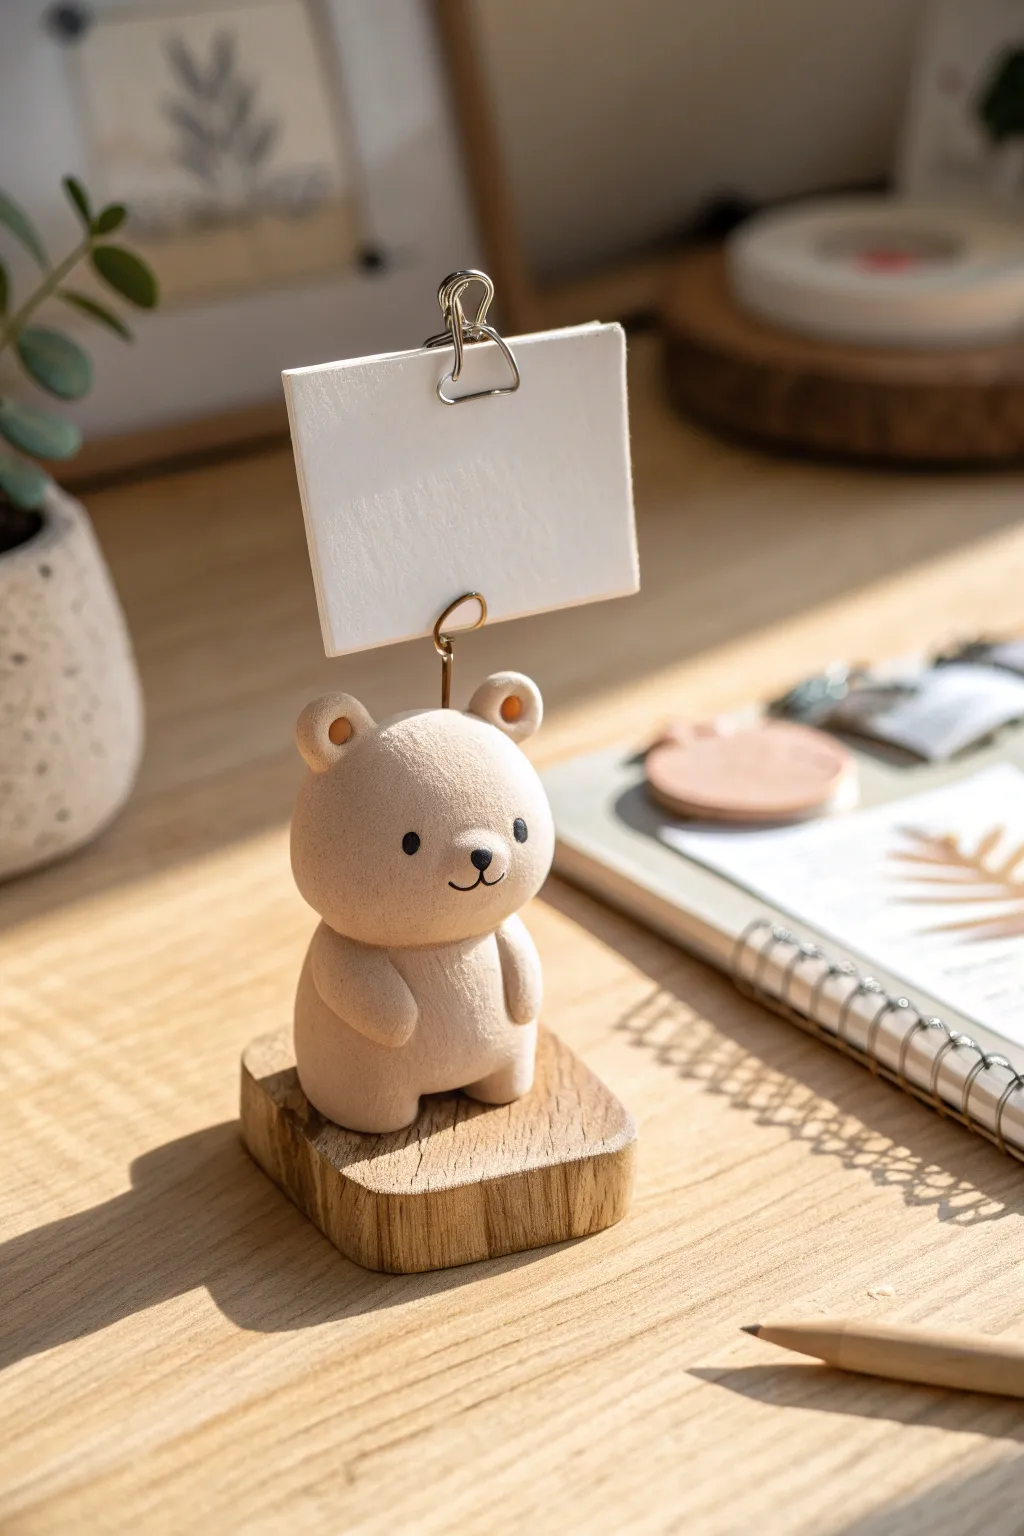
This charming little desktop companion combines the warmth of natural textures with functional whimsy. Modeled to look like carved wood or textured stoneware, this sweet bear securely holds your important reminders or favorite mini photos.
Detailed Instructions
Materials
- Beige or tan polymer clay (approx. 2 oz)
- Small rectangular wooden base (approx. 2×1.5 inches)
- Thick gold craft wire or a pre-made photo clip holder
- Ball stylus tool
- Needle tool or toothpick
- Black acrylic paint
- Fine detail paintbrush
- Old toothbrush (for texturing)
- Strong craft glue (E6000 or similar)
- Small pliers
- Cardstock for the note
Step 1: Shaping the Bear
-
Prepare the clay:
Begin by conditioning your beige or tan clay until it is soft and pliable. Roll a large portion into a smooth ball for the head, slightly flattening it into an oval shape. -
Form the body:
Roll a second, slightly larger cylinder shape for the body. Gently press the head onto the top of the body piece, blending the clay at the neck seam lightly so they stick together but retain their distinct shapes. -
Add the legs:
Create two small matching logs for legs. Attach them to the bottom front of the body, smoothing the seams so the bear looks like it is in a standing position. -
Create the arms:
Roll two tear-drop shapes for the arms. Press them against the sides of the body, curving them slightly inward as if the bear is resting its hands on its belly. -
Sculpt the ears:
Roll two tiny balls of clay for the ears. Press them onto the top corners of the head. Use the large end of a ball stylus to make circular divots in the center of each ear. -
Texture the surface:
To mimic the matte, slightly sandy texture of the reference image, take an old toothbrush and gently tap the bristles all over the surface of the unbaked clay. Be careful not to alter the main shapes.
Texture Secret
For an ultra-realistic stone look, mix a pinch of black pepper or real sand into your clay before sculpting.
Step 2: Adding the Mechanism
-
Prepare the wire:
If you are making your own clip, cut a 4-inch piece of gold wire. Use round-nose pliers to spiral one end into a double loop (like a paperclip) to hold the paper. Leave a straight stem about 1.5 inches long. -
Insert the wire:
Carefully push the straight end of the wire down into the center of the bear’s head. I recommend pulling it back out, adding a tiny dab of liquid clay or glue to the wire, and re-inserting it for a permanent hold. -
Baking:
Bake the clay figure according to the manufacturer’s instructions on your package (usually 275°F for 15-30 minutes). Let it cool completely before handling.
Unsteady Bear?
If the bear tips over, sand the bottom of the feet flat after baking but before gluing to the wood base.
Step 3: Finishing Touches
-
Paint the face:
Using a very fine detail brush and black acrylic paint, add two small dots for the eyes. Paint a small, soft triangular nose and a thin ‘W’ shape for the mouth. -
Add ear details:
Mix a tiny amount of orange or terra cotta paint with water to make a glaze. Lightly tint the inside of the ear divots for a subtle pop of color. -
Mount to base:
Apply a strong adhesive to the bottom of the bear’s feet. Press the figure firmly onto the center of your wooden base and hold for 30 seconds. -
Create the note:
Cut a small rectangle of thick cardstock or watercolor paper to serve as your note. Find a decorative metal binder clip or paperclip and attach it to the top of the paper. -
Final assembly:
Slide your decorative paperclip onto the wire holder to complete the look.
Now your desk has a delightful little guardian ready to keep your most important memo right at eye level
Teeny Cable Saver Animals
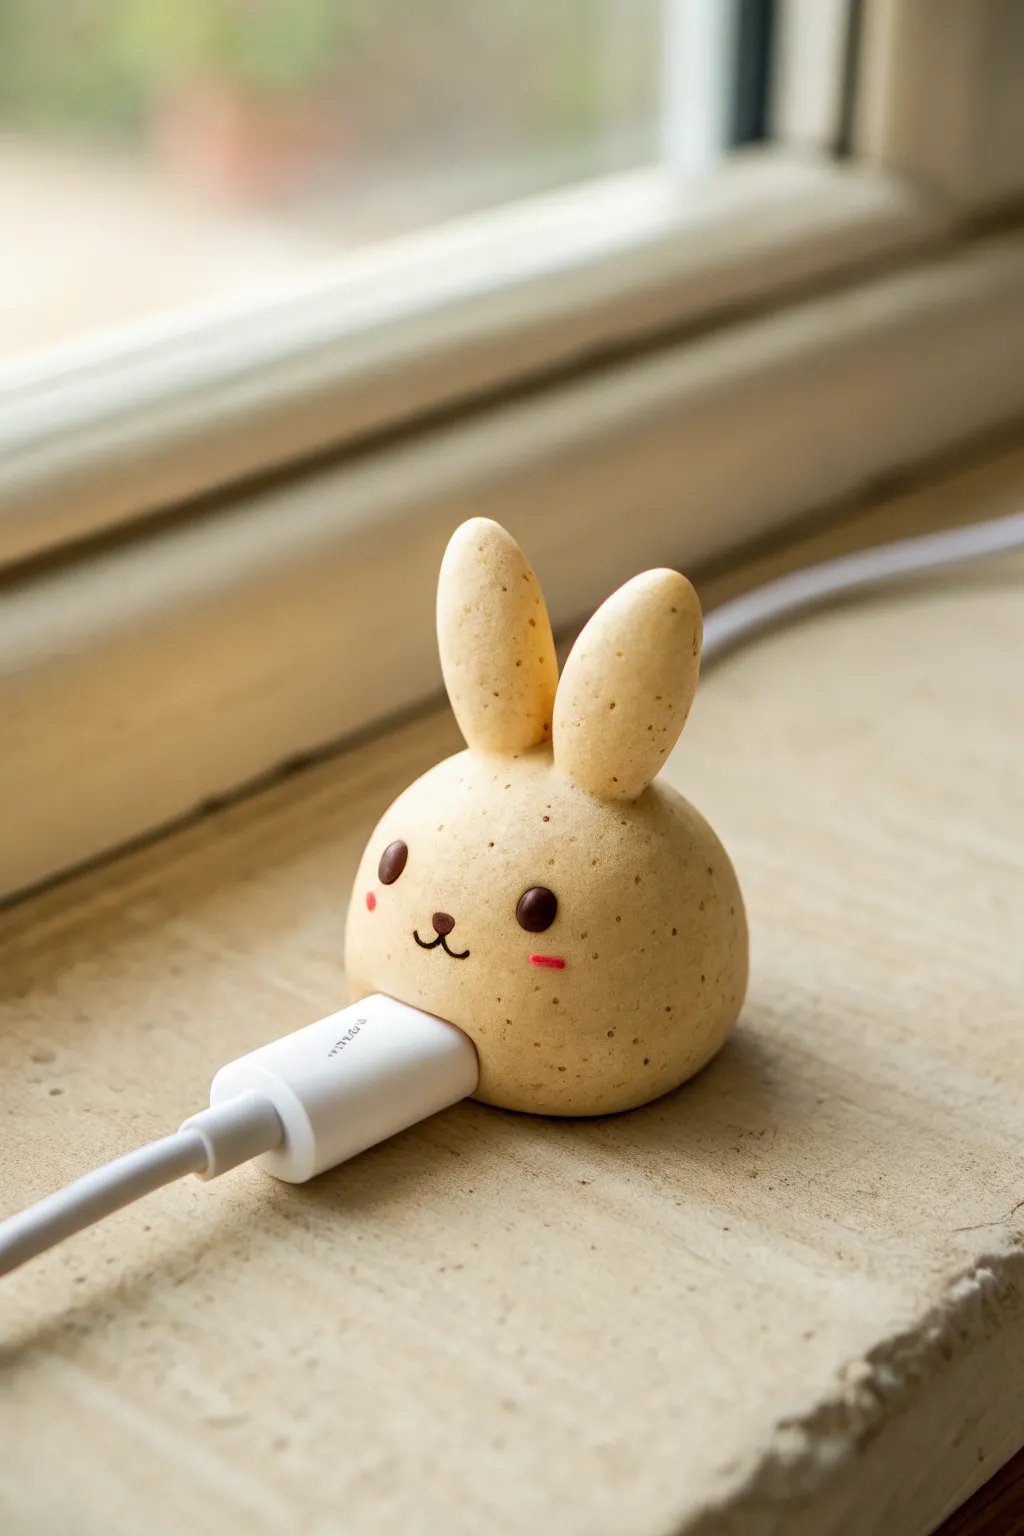
Keep your charging cables safe from fraying with this adorable, potato-textured bunny protector. It looks like a freshly baked cookie or a speckled potato, adding a tiny burst of whimsy to your desk setup while gripping your cord securely.
Step-by-Step Guide
Materials
- Polymer clay (beige/tan color)
- Polymer clay (dark brown chocolate color)
- Polymer clay (bright pink)
- Black acrylic paint (optional, for mouth)
- Coarse ground black pepper or dried used coffee grounds
- Standard phone charging cable (for sizing)
- Modeling tools (or a toothpick)
- Sharp craft knife
- Baking sheet and parchment paper
- Oven (for baking polymer clay)
Step 1: Prepping the Dough
-
Texture the clay:
Start with a walnut-sized ball of beige polymer clay. To get that distinct potato-skin or cookie-dough look, mix in a very small pinch of coarse black pepper or dried coffee grounds. Knead the clay thoroughly until the speckles are evenly distributed throughout the ball. -
Form the base shape:
Roll your textured clay into a smooth, slightly flattened sphere. This will be the main head of the bunny. It should be roughly 1 inch in diameter, or large enough to comfortably house the plug end of your cable. -
Create the cable channel:
Flip the sphere over to what will be the bottom. Using a modeling tool or the back of a paintbrush, press a groove or channel running lengthwise along the bottom. This is where the wire part of the cable will sit.
Step 2: Sculpting the Features
-
Fit the cable:
Take your charging cable (unplugged!) and gently press the plastic connector head into the front of the sphere to create a custom indentation. You want the bunny to look like it is ‘chomping’ the cable, so ensure the fit is snug but not too tight to remove later. -
Refine the mouth:
With the cable impression made, use your craft knife to clean up the edges of the opening. I find it helpful to slightly flare the opening so the cable slides in easily after baking. -
Shape the ears:
Take two smaller pieces of the beige clay and roll them into elongated tear-drop shapes. Flatten them slightly to resemble bunny ears. -
Attach the ears:
Press the wider bottom of the ears onto the top of the head. Blend the clay seams downward using a silicone tool or your finger so the ears are securely attached and look seamless.
Clean Clay Tip
Baby wipes are your best friend. Wipe your hands and tools before touching the beige clay to prevent transferring dust or lint that will show up on the light color.
Step 3: Adding the Face
-
Make the eyes:
Roll two tiny specks of dark brown clay into balls. Press these firmly onto the face, spacing them wide apart for that cute ‘kawaii’ look. Flatten them gently so they don’t protrude too much. -
Add rosy cheeks:
Take two microscopic amounts of pink clay. Roll them into tiny ovals or rectangles and press them onto the cheeks, just below and slightly outside the eyes. -
Draw the mouth:
You can either roll an incredibly thin snake of dark brown clay to form the ‘w’ shaped mouth, or simply use a needle tool to etch the mouth shape into the clay now and fill it with paint after baking. The etched look is often cleaner for beginners. -
Final smoothing:
Give the entire piece a gentle rub with your finger to remove any fingerprints. Check that the opening for the charger hasn’t warped during the detailing process.
Make a Set
Create different animals using the same base shape! Try rounded ears for a bear, triangular ones for a cat, or floppy ears for a dog to organize all your cords.
Step 4: Baking and Finishing
-
Baking prep:
Place your bunny on a parchment-lined baking sheet. To help the cable channel stay open, you can loosely crumple a tiny piece of aluminum foil into the shape of your cable connector and wedge it in the mouth opening. -
Bake:
Bake the clay according to the manufacturer’s instructions on your package (usually around 275°F or 135°C for 15-30 minutes). Do not overbake, or the beige will darken too much. -
Cool down:
Let the bunny cool completely on the baking sheet. Polymer clay is still slightly soft when hot and hardens as it cools. -
Final touches:
If you etched the mouth earlier, dilute a tiny drop of brown or black acrylic paint and wash it over the etched lines, wiping away the excess immediately so paint remains only in the grooves. -
Installation:
Once fully cured and cool, slide your charging cable into the bottom channel and push the connector head into the mouth. Your cable is now protected.
Now you have a charming little companion to brighten up your workspace and protect your cables
Mini Calendar Critter Blocks
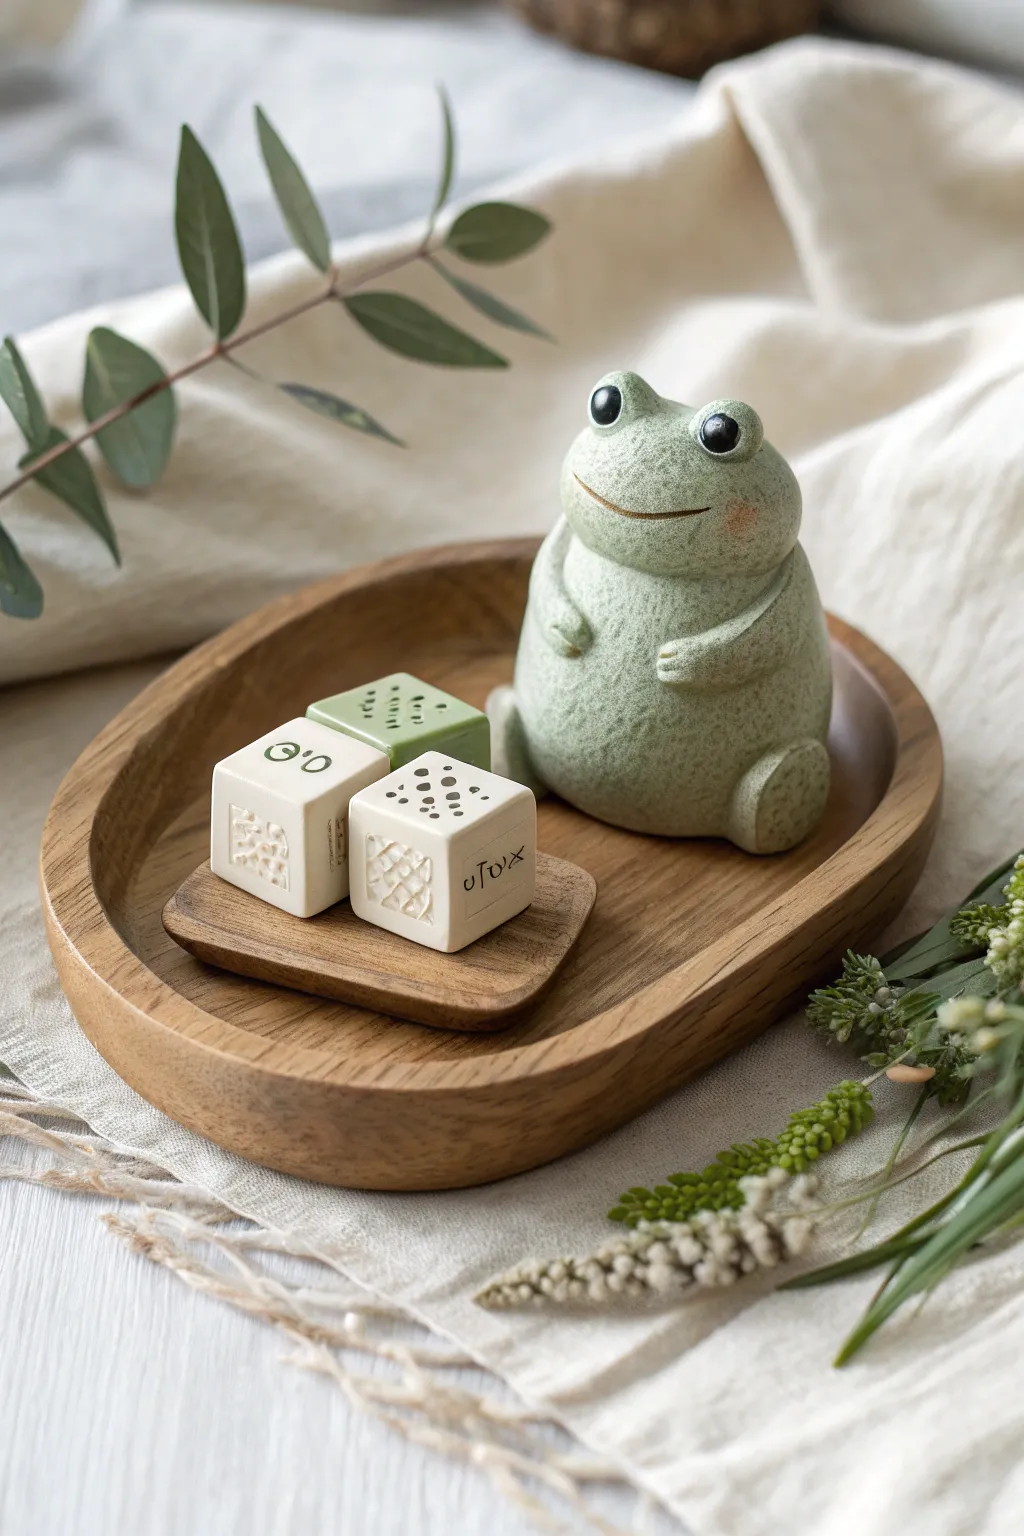
Create a charming desktop companion with this textured clay frog and a set of mini calendar blocks. The speckled stone effect on the frog combined with the neat, geometric dice makes for a functional yet adorable piece of decor.
Detailed Instructions
Materials
- Polymer clay (Sage Green, Cream/Off-White, Moss Green)
- Acrylic paints (Black, White, Burnt Sienna)
- Texturing tools (stiff brush, sandpaper, or salt for texture)
- Clay carving tools or needle tool
- Small square clay cutters (optional for dice)
- Fine-point stylus or detailing tool
- Soft blush or pastel chalk (pink)
- Matte varnish
- Small wooden tray and coaster (for display)
Step 1: Sculpting the Frog Body
-
Create the base form:
Start by conditioning a large ball of sage green polymer clay. Roll it into a smooth, slightly pear-shaped oval to form the main body of the frog, ensuring it sits flat on your work surface. -
Add texture:
Before adding limbs, gently tap the entire surface of the body with a stiff toothbrush or a ball of crumpled foil. This creates the stone-like, speckled skin texture seen in the photo. -
Form the legs:
Roll two smaller balls of the same green clay for the legs. Slightly flatten them and press them onto the bottom sides of the body, blending the seams at the back but leaving a defined ‘thigh’ shape at the front. -
Add the feet:
Attach small, flattened ovals to the bottom of the legs to create feet. You can use a needle tool to make tiny indentations for toes if you desire a detailed look. -
Sculpt the arms:
Roll two small sausage shapes for the arms. Attach them to the upper chest area, curving them slightly inward so the frog looks like it’s holding its belly or resting its hands politely. -
Define the face:
Use a clay tool to carve a wide, shallow curve for the mouth. It should be slightly asymmetrical to give the frog a quirky, friendly expression.
Fixing Smooth Spots
If you accidentally smooth out the ‘stone’ texture while attaching limbs, wait until the very end and re-texture everything at once with a stiff brush before baking to ensure a uniform finish.
Step 2: Facial Details & Refining
-
Make the eyes:
Create large, prominent eye sockets by pressing a ball tool into the top of the head. Roll two balls of black clay and press them firmly into these sockets. -
Add eye highlights:
For that spark of life, place a tiny dot of white clay or paint a speck of white acrylic on the upper right side of each black eye. -
Apply blush:
Using a soft brush, gently dust a little pink pastel chalk or blush onto the frog’s cheeks, right under the eyes, for a rosy glow. -
Final texture check:
Go over any areas where your fingerprints might have smoothed out the texture, re-applying the stippling effect with your toothbrush or tool.
Make It Magnetic
Embed small magnets inside the cream dice and the frog’s hands before baking. This lets the frog actually ‘hold’ the date blocks securely!
Step 3: Crafting the Calendar Dice
-
Shape the blocks:
Cut two cubes from cream clay and one from a darker moss green clay. Try to keep the edges sharp and the sides even; a square cutter helps maintain consistency here. -
Add the greenery block details:
For the green block (the month or season indicator), use a needle tool to etch tiny leaf or grass patterns into the top face. -
Carve the number blocks:
On the cream blocks, lightly etch numbers or decorative symbols. I prefer to use a very fine stylus to press dots or small lines that mimic text or dates. -
Inking the details:
Once the carving is done, you can gently rub a tiny amount of diluted brown or black paint into the grooves to make the designs pop, wiping away excess from the surface immediately. -
Add side textures:
On the sides of the cream blocks, create a basket-weave or lattice texture by pressing a tool in a cross-hatch pattern, adding visual interest to the plain sides.
Step 4: Baking & Finishing
-
Bake the pieces:
Place your frog and dice on a baking sheet. Follow the temperature instructions specifically for your brand of polymer clay, usually baking for about 15-20 minutes per 1/4 inch of thickness. -
Cool down:
Let the pieces cool completely inside the oven if possible to prevent cracking. Touching them while hot can leave fingerprints or distort the shapes. -
Varnish:
Apply a thin layer of matte varnish to the frog to protect the surface paint and blush without making it look plasticky. The dice can be left natural or matte varnished as well. -
Assemble display:
Arrange your finished frog on the wooden tray and stack the dice on the small coaster to complete the desktop calendar setup.
Set your new little friend on your desk to brighten your daily routine.