If you’ve got a block of blue clay and you want something cute now (not “someday”), you’re in the right creative headspace. These ideas stick to simple shapes, cozy details, and that satisfying monochrome look that makes everything feel extra polished.
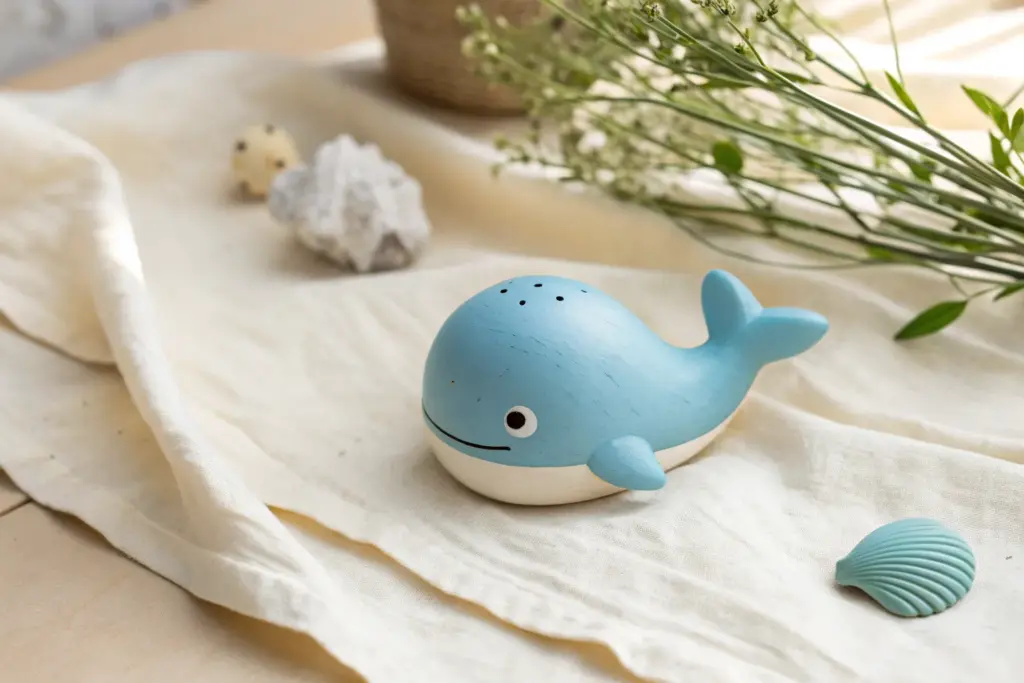
Mini Blue Whale Buddy
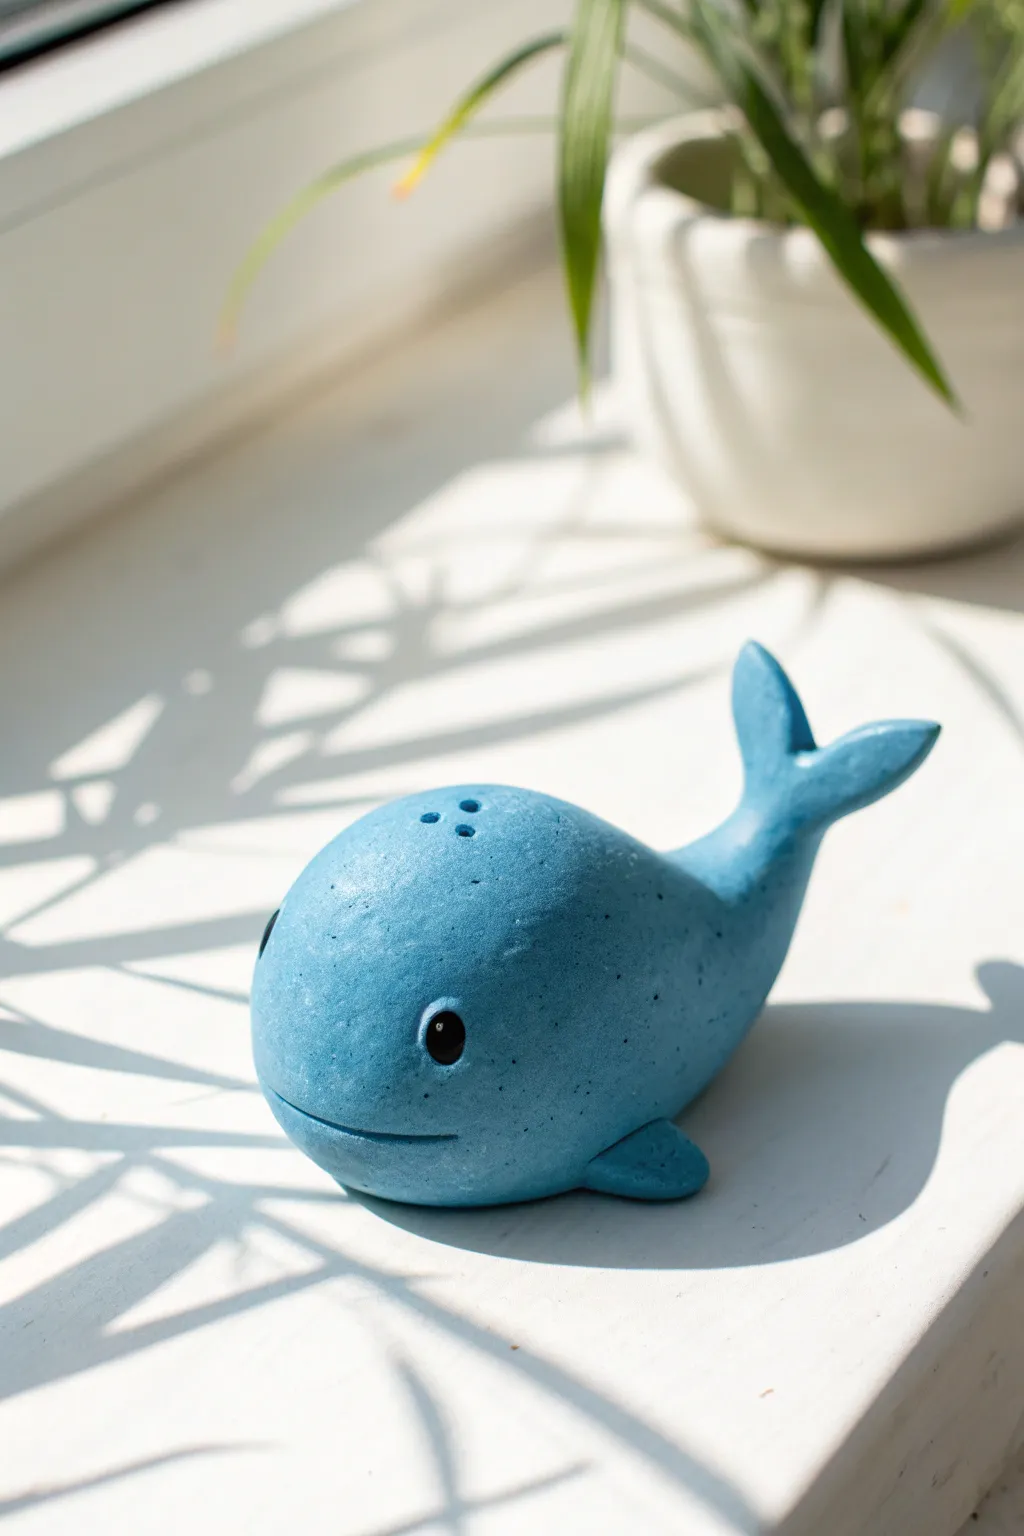
Sculpt a serene little ocean friend to brighten up your desk or windowsill. This charming mini whale features a smooth, rounded form and a speckled stone-like finish that gives it a wonderfully tactile quality.
Step-by-Step
Materials
- Blue polymer clay (or air-dry clay)
- Black clay (tiny amount for eyes)
- Sculpting tools (needle tool, ball stylus)
- Soft paintbrush
- Aluminum foil (optional, for core)
- Black acrylic paint (for speckles)
- Toothbrush (for speckling)
- Matte varnish
Step 1: Shaping the Body
-
Prepare the clay:
Start by conditioning your blue clay until it is soft and malleable. Roll it into a smooth, seamless ball about the size of a tangerine. -
Form the basic shape:
Gently roll one side of the ball between your palms to taper it into a teardrop shape. The rounded end will be the head, and the tapered end will become the tail. -
Curve the tail:
Bend the tapered tail section upward in a gentle curve. Smooth out any creases that form at the bend with your thumb. -
Flatten the base:
Press the whale gently onto your work surface to flatten the bottom slightly. This ensures your buddy will sit stable without rolling over.
Cracks in the Deep?
If you see tiny cracks after smoothing, dip your finger in water (for air-dry clay) or baby oil (for polymer) and rub gently in circles to massage the clay back together.
Step 2: Adding Fins and Flukes
-
Create the tail flukes:
Take a small piece of blue clay and shape it into a triangle. Cut a slit down the middle of the wide end and pull the two sides apart to create the classic whale tail shape. -
Attach the tail:
Score the tip of the body’s tapered end and the base of the tail flukes. Press them together firmly and blend the clay using a sculpting tool until the seam disappears. -
Make the side fins:
Roll two small pea-sized balls of blue clay. Flatten them into rounded triangular fin shapes. -
Attach the fins:
Position the fins low on the sides of the body. Press them on and blend the connecting edge smoothly into the body so they look like they naturally grow from the form.
Step 3: Facial Details
-
Indent the eye sockets:
Use a medium-sized ball stylus to press two small indentations on either side of the head where the eyes will go. -
Add the eyes:
Roll two tiny spheres of black clay. Place them into the eye sockets and press gently to secure them; adding a tiny highlight of white paint later can bring them to life. -
Carve the mouth:
Use a needle tool or a thin clay blade to slice a long, curved smile line across the lower front of the face. -
Enhance the smile:
I like to use a silicone shaping tool to gently round the edges of the mouth cut so it looks soft and friendly rather than sharp. -
Create the blowhole:
On the very top of the head, use a needle tool to poke three small holes arranged in a tiny triangle to represent the blowhole.
Ocean Floor Texture
Before baking, gently roll a textured rock or a piece of crumpled aluminum foil over the whale’s back to give it a weathered, realistic skin texture.
Step 4: Finishing Touches
-
Smooth the surface:
Check the entire sculpture for fingerprints. Lightly buff them away with a drop of baby oil on your finger or a soft brush. -
Bake or dry:
Follow the manufacturer instructions for your specific clay. If using polymer clay, bake it in the oven; for air-dry clay, leave it in a draft-free spot for 24-48 hours. -
Create the speckles:
Dilute a small drop of black acrylic paint with water. Dip an old toothbrush into the mixture and run your thumb over the bristles to flick tiny specks onto the whale’s back. -
Seal the work:
Once the paint is fully dry, apply a coat of matte varnish to protect your whale and give it that finished, professional look.
Place your new aquatic companion near a window for a daily dose of calm


Easy Blue Octopus With Ball Tentacles
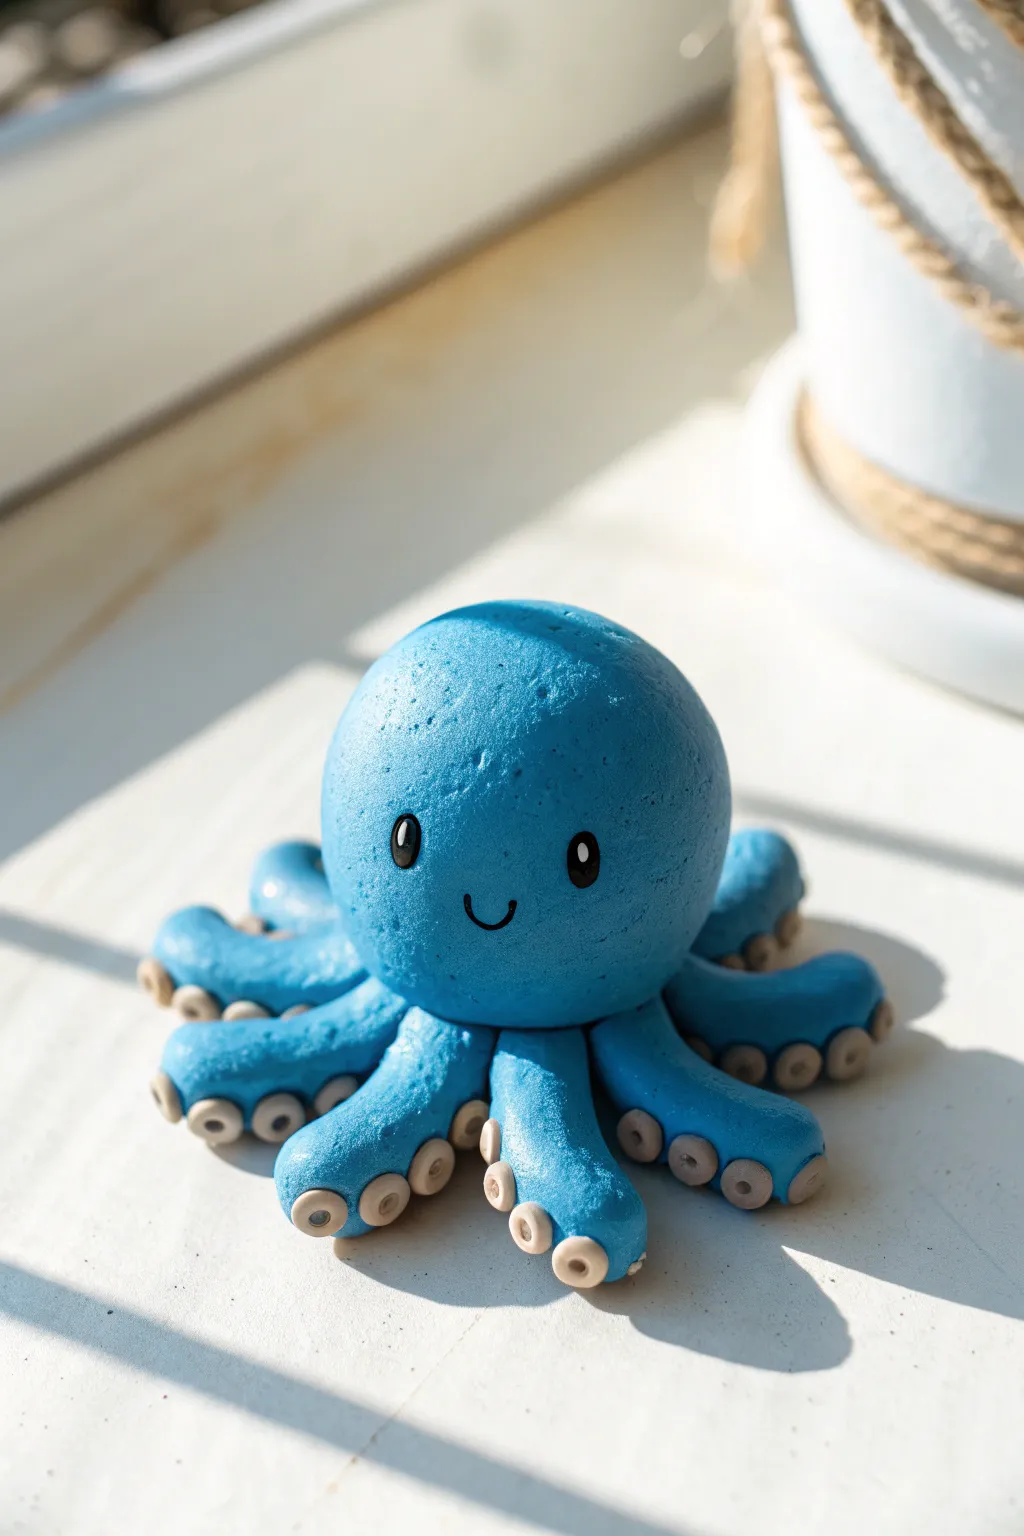
This charming, bright blue octopus features a perfectly round head and eight playful tentacles adorned with tiny, ring-like suction cups. It has a smooth, semi-matte finish that catches the light beautifully, making it a delightful little desk companion.
Detailed Instructions
Materials
- Bright blue polymer clay
- Light beige or tan polymer clay
- Two small black spherical beads (for eyes)
- Black fine-point permanent marker or acrylic paint
- Clay sculpting tools (needle tool, small ball tool)
- Clean, smooth work surface
- Rolling pin (optional)
- Oven (if using polymer clay)
Step 1: Shaping the Base
-
Condition the blue clay:
Start by warming up a generous amount of blue clay in your hands. Knead it thoroughly until it is soft, pliable, and free of cracks. -
Form the head:
Roll the blue clay into a large, smooth sphere. This will be the main body and head of your octopus. Aim for a shape that is slightly flattened at the bottom so it sits stable. -
Smooth the surface:
Inspect the sphere for any fingerprints or seams. Gently rub them away with your finger or a smoothing tool until the surface looks flawless. -
Prepare the tentacle clay:
Take the remaining blue clay and divide into eight equal portions. Roll each portion into a small ball first to ensure consistent sizing.
Loose Legs?
If tentacles inhibit sticking, score the clay (scratch cross-hatch marks) on both joining surfaces and add a drop of liquid clay or water.
Step 2: Creating the Tentacles
-
Roll the cylinders:
Roll each blue ball into a tapered cylinder or ‘snake’ shape. One end should be slightly thicker (to attach to the body) and the other slightly rounded but thinner. -
Attach the first tentacle:
Press the thicker end of a tentacle against the underside of the head sphere using a blending tool to merge the clay seams together smoothly so it looks like one solid piece. -
Position the leg:
Curve the tentacle outwards, giving it a gentle wave or bend so it looks relaxed on the surface. -
Attach remaining legs:
Repeat this process for the other seven legs, spacing them evenly around the base of the head in a radial pattern. I like to vary the curve of each leg slightly to give it more personality. -
Double-check connections:
Use your smoothing tool to ensure all eight legs are securely blended into the main body, leaving no visible gaps.
Step 3: Adding Details
-
Make the suction cups:
Roll out a very thin snake of the beige or tan clay. Slice it into many tiny, equal-sized discs. -
Apply the cups:
Press 3-4 beige discs onto the underside or side of each blue tentacle. Space them out nicely from the tip moving inward. -
Detail the cups:
Take a small ball tool or a blunt needle tool and press into the center of each beige disc. This creates the hollow ring shape characteristic of octopus suckers. -
Insert the eyes:
Press two small indentations into the front of the face where you want the eyes. Push the black beads securely into these spots. -
Draw the mouth:
Using a needle tool, gently impress a small, curved smile line between and slightly below the eyes. -
Refine the texture:
Look over your sculpture one last time. If you want a textured look like the image, you can gently dab the surface with a sponge or toothbrush, avoiding the eyes and mouth area. -
Bake or Dry:
Follow the manufacturer’s instructions for your specific clay to bake or air-dry your creation. -
Final touches:
Once hardened and cool, use a fine-point black marker to darken inside the smile line you impressed earlier to make the expression pop.
Level Up: Glossy Finish
Apply a coat of water-based polyurethane varnish or UV resin to the eyes and mouth after baking to make them look wet and alive.
Now you have a wonderful aquatic friend to brighten up your shelf


Round Bluebird Charm
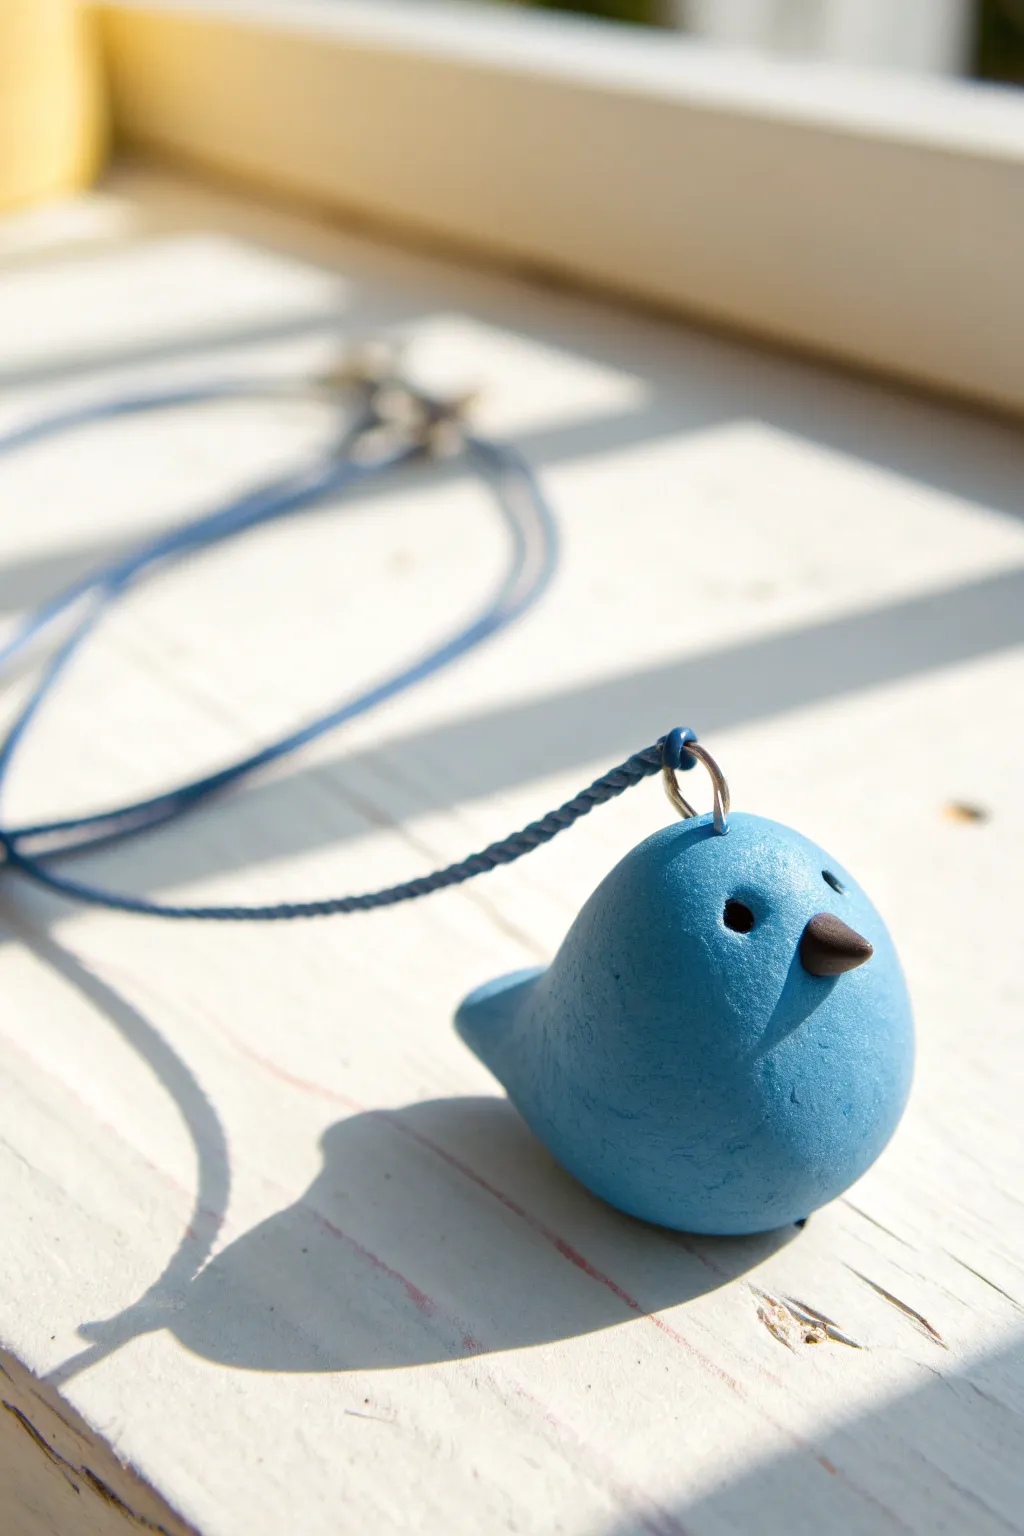
Create a sweet, minimalist bluebird charm that captures the innocence of spring in a simple round form. This pendant features a soft matte blue finish, a tiny beak, and a matching cord necklace, making it perfect for everyday wear or a thoughtful handmade gift.
Step-by-Step Guide
Materials
- Blue polymer clay (or air-dry clay)
- Dark brown or black polymer clay (tiny amount)
- Metal jump ring (silver tone)
- Eye pin or head pin (optional, for structure)
- Needle tool or toothpick
- Blue waxed cotton cord
- Jewelry clasp and crimp ends
- Oven (if using polymer clay)
- Baking sheet and parchment paper
- Fine-grit sandpaper (optional)
Step 1: Sculpting the Body
-
Condition the clay:
Begin by taking a chunk of your blue clay about the size of a walnut. Knead it thoroughly in your hands until it becomes soft, pliable, and warm to the touch. -
Form the base shape:
Roll the blue clay into a smooth, seamless ball between your palms. Inspect it for any cracks or lint, gently smoothing them away with your finger. -
Create the bird profile:
While keeping the overall shape round, gently pinch one side of the sphere to create a small, triangular protrusion. This will form the bird’s tail feathers. -
Refine the tail:
Use your thumb to slightly flatten the top of the tail section so it flows smoothly from the round back, giving it a cute, upswept look. -
Shape the head area:
The body and head are one unit in this design, so just ensure the front of the sphere opposite the tail is rounded and full.
Step 2: Adding Details
-
Make eye sockets:
Using a needle tool or a small dotting tool, press two small, symmetrical indentations into the front of the face for the eyes. Don’t go too deep; just enough to create a shadow. -
Color the eyes:
Take two minuscule specks of black clay, roll them into balls, and press them firmly into the eye sockets. Alternatively, you can paint the inside of the holes black after baking. -
Form the beak:
Pinch off a tiny amount of dark brown clay. Roll it into a very small cone shape. -
Attach the beak:
Press the flat end of the dark cone onto the center of the face, slightly below the eyes. If the clay is dry, you might need a tiny dab of liquid clay or water (for air-dry types) to help it stick. -
Insert the hardware:
Take a metal jump ring. Carefully press it into the very top center of the bird’s head so that half the ring is submerged and the loop remains open on top. -
Secure the ring:
I like to gently smooth the blue clay around the base of the inserted metal wire to ensure it doesn’t pull out later. -
Texture check:
Before baking, check for fingerprints. Because this has a matte, stone-like look, you can gently tap the surface with a toothbrush to remove shine and add a subtle texture.
Loose Jump Ring?
If the metal ring feels loose after baking, don’t panic. Put a tiny drop of super glue or E6000 on a toothpick and carefully dab it where the metal meets the clay to secure it permanently.
Step 3: Finishing
-
Bake or dry:
Place the bird on parchment paper. If using polymer clay, bake according to the package instructions (usually 275°F/135°C for 15-30 minutes). If using air-dry clay, let it sit for 24-48 hours. -
Cool down:
Let the charm cool completely before handling. It creates a stronger bond. -
Prepare the cord:
Cut a length of blue waxed cotton cord to your desired necklace length. -
String the charm:
Thread the cord directly through the metal jump ring you embedded in the bird’s head. -
Finish the necklace:
Attach your crimp ends and clasp to the cord using pliers, or tie adjustable sliding knots for a simpler finish.
Speckled Stone Effect
Mix black pepper or dried tea leaves into your blue clay before rolling. This creates a realistic ‘granite’ or speckled egg finish that adds amazing organic texture.
Wear your cheerful little bluebird and enjoy the smile it brings to your day


Simple Blue Fish With Stamped Scales
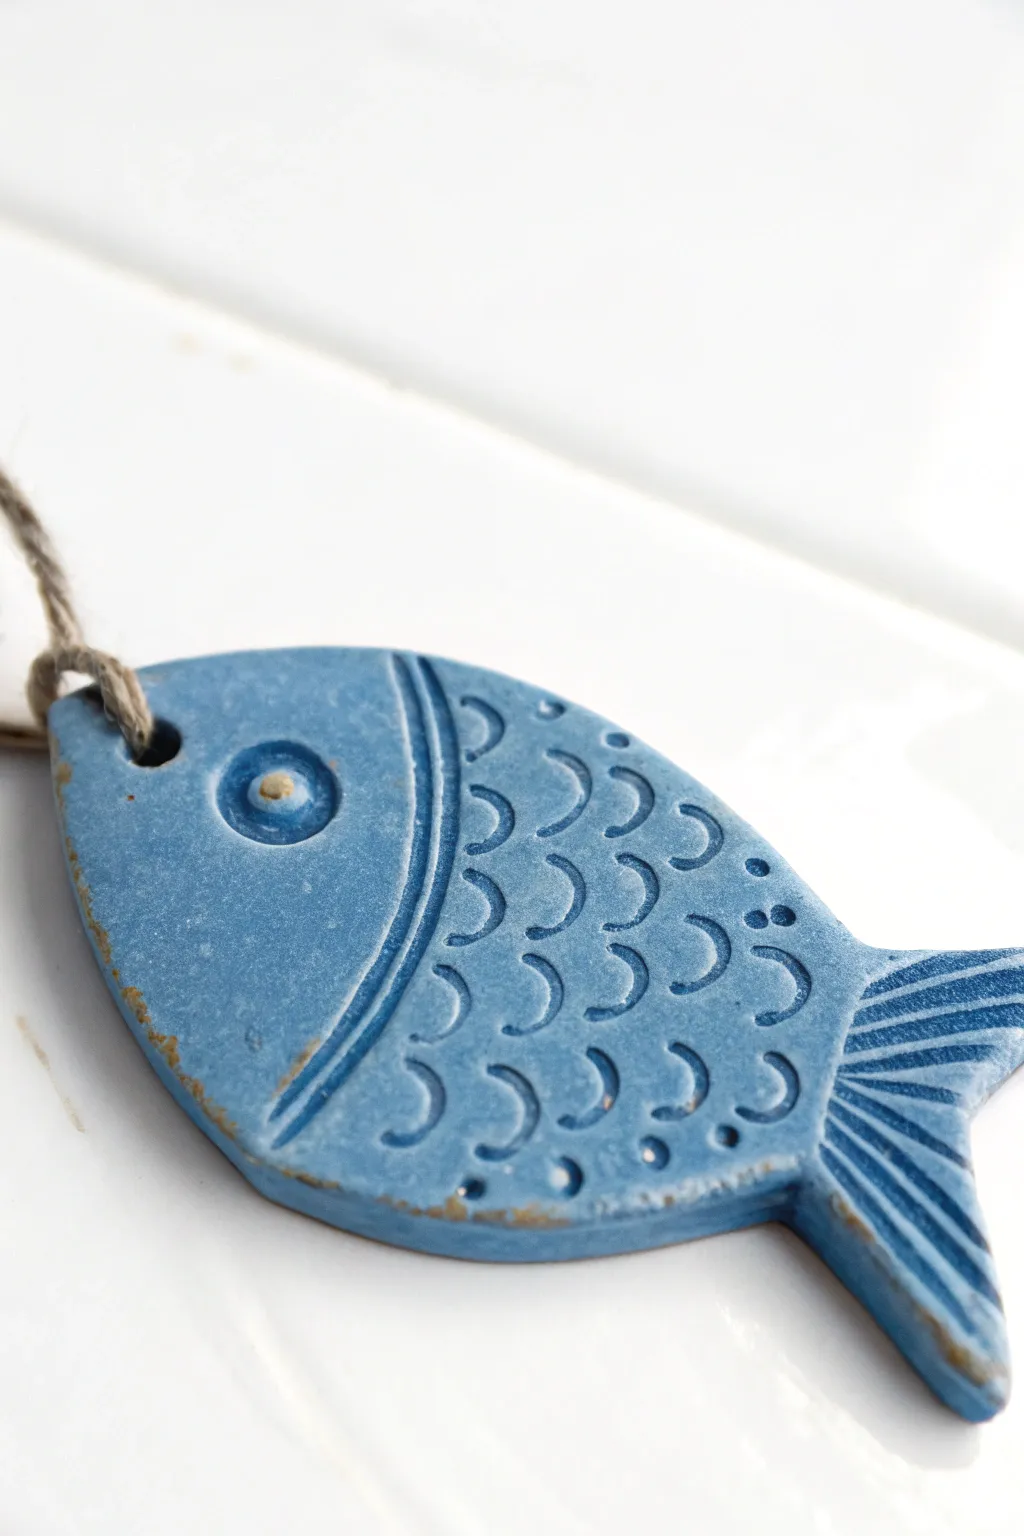
Capture the spirit of the sea with this delightfully rustic blue clay fish. Featuring simple stamped scales and a weathered finish, this project brings a touch of nautical whimsy to any space.
Step-by-Step
Materials
- Air-dry clay or polymer clay (white or terracotta)
- Acrylic rolling pin
- Fish-shaped cookie cutter (optional) or craft knife
- Small round piping tip or drinking straw (for scales)
- Stylus tool or old ballpoint pen
- Toothpick or skewer
- Blue acrylic paint (matte finish)
- Brown antiquing wax or watered-down brown paint
- Sandpaper (fine grit)
- Jute twine
- Clear matte varnish (optional)
Step 1: Shaping the Foundation
-
Condition the clay:
Start by kneading a handful of your chosen clay until it is soft, pliable, and free of cracks. Warmth from your hands will make this easier. -
Roll it out:
Using an acrylic rolling pin, flatten the clay to a uniform thickness of about 1/4 inch. If you are using terracotta clay, the brown undertones will look great later, but white clay works well too. -
Cut the shape:
Press a fish-shaped cookie cutter into the clay to create your base. Alternatively, you can lightly sketch a simple fish outline with a toothpick and cut it out carefully using a craft knife. -
Smooth the edges:
Dip your finger in a little water and run it along the cut edges of the fish to smooth out any roughness or sharp corners left by the cutter. -
Create the hanging hole:
Use a skewer or a straw to punch a clean hole near the top of the fish’s head (the mouth area). Make sure it’s large enough for your twine to thread through later.
Fixing Cracks
If you see hairline cracks while drying, worry not! Mix a tiny bit of fresh clay with water to make a paste and fill them in before painting.
Step 2: Adding Textural Details
-
Define the head:
Using a modeling tool or the dull side of a butter knife, gently press a curved line to separate the head section from the body. I like to make a second parallel line right next to it for emphasis. -
Make the eye:
Press a small circular object, like the end of a marker cap or large straw, into the head area to form the outer ring of the eye. Use a smaller tool to make the pupil in the center. -
Stamp the scales:
Take a small round piping tip or cut a plastic straw in half lengthwise to create a ‘C’ shape. Press this tool gently into the clay body, starting from the gill line and working toward the tail in staggered rows. -
Detail the tail:
Use a toothpick or clay knife to press radiating lines into the tail fin, fanning them out to mimic the texture of real fins. -
Add floating accents:
For extra interest, poke a few tiny dots randomly between the scales near the tail or belly using the tip of a toothpick. -
Dry the piece:
Allow the clay to dry completely according to the package instructions. Flip it over halfway through the drying process to prevent curling.
Step 3: Painting and Finishing
-
Apply base color:
Paint the entire front and sides of the fish with a matte blue acrylic paint. You may need two coats for opaque coverage. Let this dry fully. -
Distress the edges:
Once the blue paint is bone dry, take fine-grit sandpaper and gently sand the raised edges, the rim of the fish, and parts of the tail. -
Reveal the clay:
Continue sanding until the underlying clay color peeks through the blue, giving it that worn, drifted look. -
Create an antique wash:
Mix a tiny drop of brown paint with water (or use antiquing wax). Brush it over the textured areas and immediately wipe most of it off with a paper towel. This leaves dark shadows in the stamped impressions. -
Seal the work:
If desired, apply a coat of clear matte varnish to protect the finish without making it too shiny. -
Add the hanger:
Cut a length of jute twine, thread it through the hole you made earlier, and tie a secure knot to create a rustic loop for hanging.
Level Up: Ombre Effect
Paint the top half darker blue and blend into a lighter blue or white at the belly before sanding for a realistic dimensional look.
Now you have a charming piece of handmade coastal decor ready to display

The Complete Guide to Pottery Troubleshooting
Uncover the most common ceramic mistakes—from cracking clay to failed glazes—and learn how to fix them fast.
Cute Blue Dolphin Desk Buddy
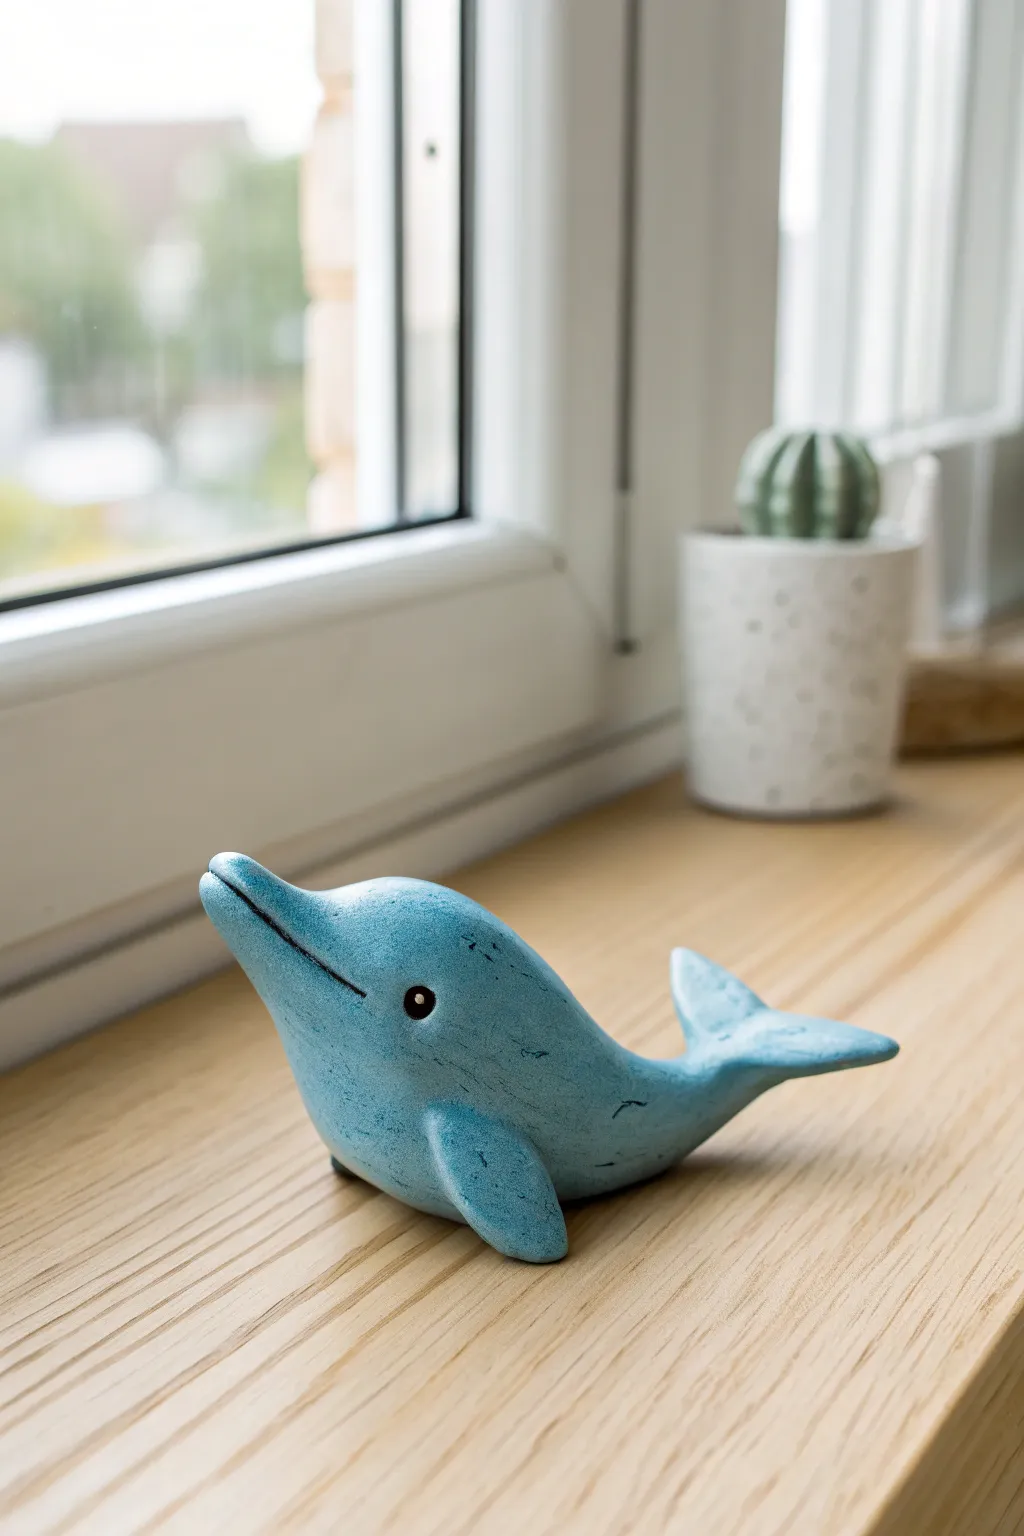
This adorable little dolphin figurine brings a splash of ocean charm to your workspace with its friendly smile and rustic blue finish. Its stylized, curved shape is perfect for beginners looking to practice simple sculpting techniques.
How-To Guide
Materials
- Blue polymer clay (or air-dry clay)
- Black acrylic paint
- Fine-point paintbrush or toothpick
- Sculpting tools (needle tool, smoothing tool)
- Foil (for armature, optional)
- Matte or satin varnish
- Old toothbrush (adding texture)
Step 1: Shaping the Main Body
-
Create the base form:
Start with a large ball of blue clay. If you want to save clay, crunch a small piece of aluminum foil into a tight teardrop shape to use as a core, then wrap your blue clay evenly around it. -
Elongate into a teardrop:
Roll the ball between your palms, applying more pressure on one side to create a smooth, tapered teardrop shape. This will become the dolphin’s body and tail. -
Define the curve:
Gently bend the wider end upward to form the head and chest area, while curving the tapered tail end slightly upwards in the opposite direction to enact that classic jumping pose. -
Sculpt the snout:
Pinch the very front of the wide end to pull out a distinct, rounded snout. Blend the transition area back into the forehead so it looks natural but defined.
Drooping Fins?
If the side flippers keep sagging while you work, prop them up with little balls of paper or cardboard. Leave these props in place during baking or drying.
Step 2: Adding Fins and Flippers
-
Make the tail fluke:
Flatten a small ball of clay into a triangle, slice a notch in the wide end, and round off the tips. Attach this to the very end of your tapered tail section. -
Blend the seams:
Use a silicone tool or your finger to smooth the clay where the tail meets the body until the seam disappears completely. -
Form the pectoral fins:
Create two smaller, flattened teardrop shapes for the side flippers. They should be relatively thick to match the chunky style of the dolphin. -
Attach the flippers:
Press one flipper onto each side of the lower body. Angle them slightly backward and smooth the attachment point into the body, leaving the tip free. -
Add the dorsal fin:
Create a curved triangular fin for the back. Place it centered on the highest point of the dolphin’s arched back and blend the bottom edge seamlessly.
Make it Splash
Create a small, flat puddle shape out of white or light blue clay to act as a stand. Glue your dolphin onto it so it looks like it’s emerging from water.
Step 3: Detailing and Texture
-
Carve the mouth:
Using a needle tool or a dull knife, cut a long, curving line along the snout to create a deep smile. I find extending the line slightly further back gives it a much happier expression. -
Add surface texture:
To get that rustic, stone-like look seen in the photo, gently tap an old toothbrush or a ball of crinkled foil over the surface of the clay. Don’t overdo it; just add subtle random markings. -
Add ‘scratches’:
Use a needle tool to scratch a few intentional, sparse horizontal lines on the body to mimic the weathered look of the original artwork. -
Define the eye socket:
Press a small ball-end tool into the side of the head to create a divot where the eye will go.
Step 4: Finishing Touches
-
Bake or dry:
If using polymer clay, bake according to the package instructions (usually 275°F/135°C for 15-30 minutes). If using air-dry clay, let it sit for 24-48 hours until fully hard. -
Paint the eyes:
Dip a toothpick or fine brush into black acrylic paint. Carefully fill in the eye socket divot you created earlier. -
Highlight the smile:
Using a very dry brush with a tiny amount of black paint (or a diluted black wash), trace the very deepest part of the mouth line to make it pop. -
Enhance texturing:
Do a very light ‘dry brush’ of dark blue or black paint over the textured scratches to emphasize the weathered effect, then wipe away any excess immediately. -
Seal the piece:
Once the paint is totally dry, coat your dolphin with a matte or satin varnish to protect the finish without making it too shiny.
Place your new dolphin friend on your desk for a daily dose of cheerfulness
Blue Starfish Fridge Magnet
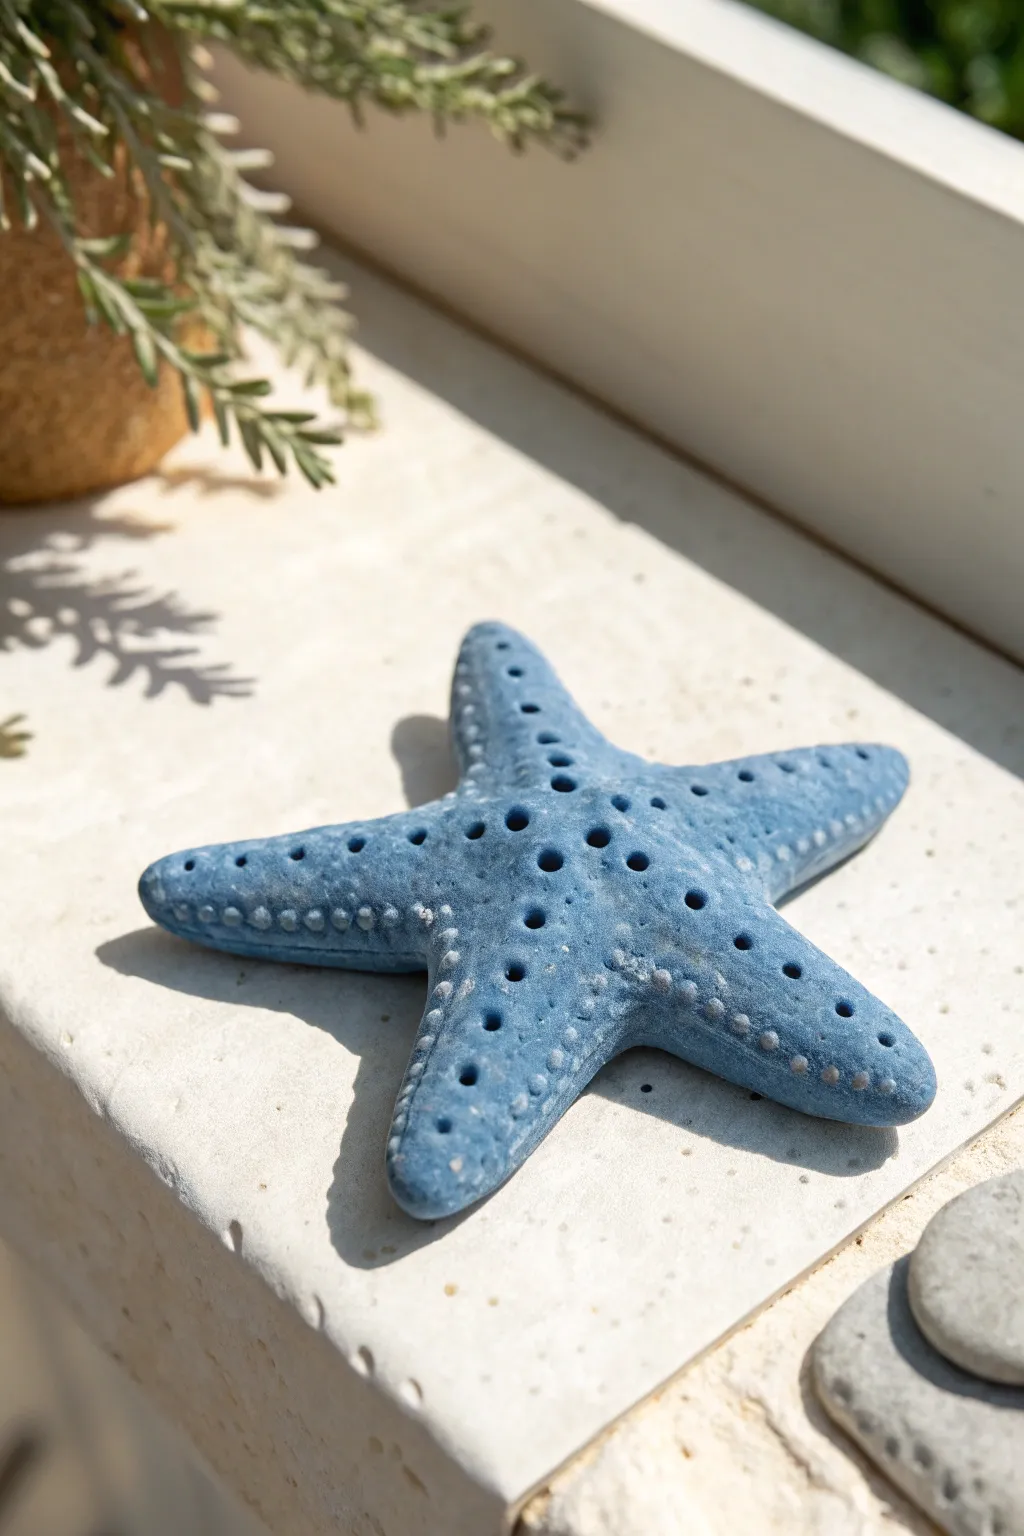
Bring a touch of the seaside into your kitchen with this remarkably realistic starfish magnet. Using air-dry clay and a special texturing technique, you’ll create a matte, porous finish that mimics the look of weathered blue stone or coral found on a beach walk.
Step-by-Step
Materials
- Blue air-dry clay (or white clay + blue acrylic paint)
- Small disk magnet
- Super glue or strong craft adhesive
- Toothpick or needle tool
- Old toothbrush or stiff bristle brush
- Fine-grit sandpaper
- Acrylic rolling pin
- Modeling tool or dull knife
- Wax paper or silicone mat
Step 1: Fomring the Base
-
Prepare the Clay:
Start with a ball of blue air-dry clay about the size of a walnut. If you are mixing white clay with paint, knead a drop of blue and a tiny touch of black acrylic into the white clay until you have a uniform, muted slate-blue color. -
Create the Initial Shape:
Flatten the ball slightly on your work surface into a thick disk. Use your fingers to gently pull five points outwards from the center, establishing the rough skeleton of the starfish. -
Refine the Arms:
Gently roll each of the five points between your thumb and forefinger to elongate them into tapered arms. Aim for a slightly organic look where the arms aren’t perfectly symmetrical, just like in nature. -
Flatten the Bottom:
Press the entire shape gently onto your work surface to ensure the back is perfectly flat. This is crucial for the magnet to sit flush later. -
Smooth the Edges:
Use a little water on your fingertip to smooth out the transition areas between the arms, softening any sharp creases.
Problem Solver: Cracking
If you see tiny cracks forming while drying, mix a small amount of clay with water to make a paste (slip) and fill the cracks. Smooth over with a damp finger immediately.
Step 2: Adding Texture and Detail
-
Initial Surface Texturing:
To get that weathered, stony look, take an old toothbrush or a stiff bristle brush and tap it firmly all over the top surface of the starfish. Don’t drag the brush; just stipple straight down to create tiny pores. -
Create Central Pores:
Using a toothpick or a needle tool, poke a line of distinct, deeper holes running down the center line of each arm. These holes should vary slightly in size for realism. -
Detail the Sides:
Add a second row of smaller, shallower holes along the lower edges of the arms. I find it helpful to angle the tool slightly outward for these side details. -
Enhance the Stone Effect:
crumple a small ball of aluminum foil and gently roll or press it over the clay surface. This adds larger, random divots that break up the uniform brush texture. -
Emulate Wear:
Lightly press a dry sponge onto the tips of the arms to rough them up slightly, mimicking how a real starfish might be worn down by the tide.
Step 3: Finishing Touches
-
Dry the Clay:
Allow the starfish to dry completely according to your clay package instructions. This usually takes 24-48 hours. Flip it over halfway through to ensure the bottom dries evenly. -
Sand for Finish:
Once bone dry, take fine-grit sandpaper and very lightly sand the top surface. This knocks down any sharp clay burrs from the texturing and enhances the matte, stone-like feel. -
Highlighting (Optional):
If you want to bring out the texture more, dry brush a tiny amount of white or pale grey paint over the raised areas. Keep this extremely subtle. -
Attach the Magnet:
Apply a dot of super glue or strong craft adhesive to the center of the flat back of the starfish. -
Secure the Backing:
Press the magnet firmly into the glue and hold for a few seconds. Let the glue cure completely before placing your new art on the fridge.
Pro Tip: Realistic Color
Don’t use a single flat blue. Knead in very small streaks of white or grey clay but stop before they fully blend. This marbling mimics natural stone varitation perfectly.
Now you have a durable piece of ocean-inspired decor to hold your favorite photos or notes


What Really Happens Inside the Kiln
Learn how time and temperature work together inside the kiln to transform clay into durable ceramic.
Blue Sea Turtle Pebble Figurine
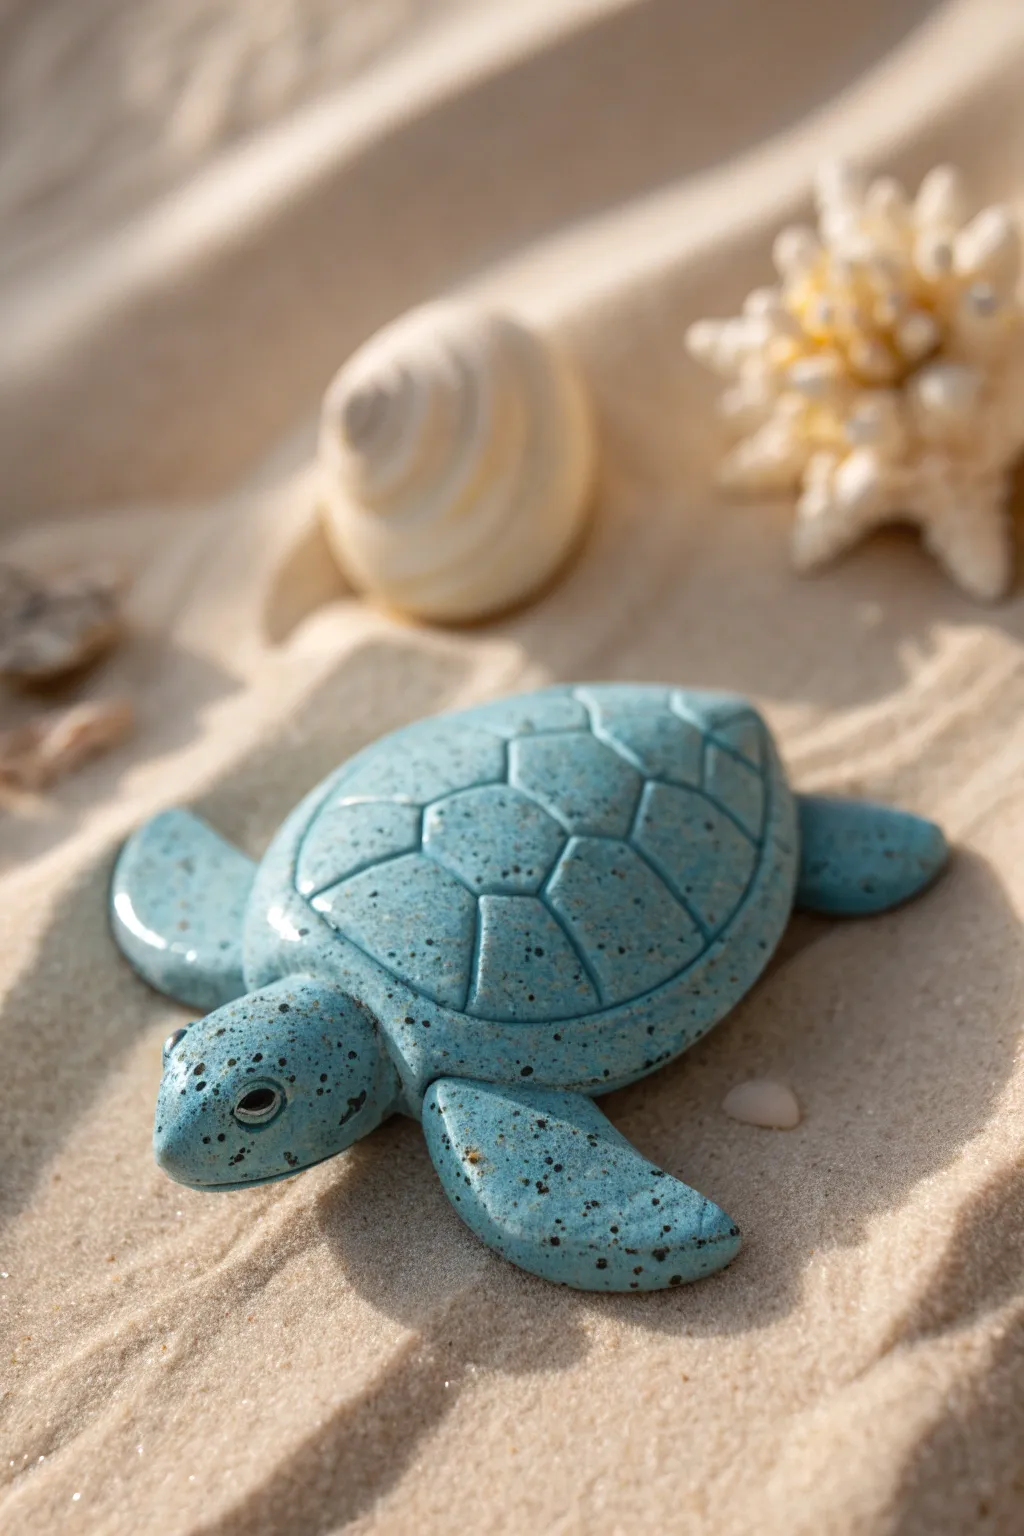
Transform a simple lump of clay into a serene ocean wanderer with this delightful sea turtle figurine. The unique speckled finish mimics the texture of polished granite or sea glass, making it a perfect little guardian for your desk or shelf.
Step-by-Step Tutorial
Materials
- Polymer clay (light blue or turquoise)
- Black pepper (coarse ground) or black craft sand
- Sculpting tools (needle tool, small ball tool)
- Smooth work surface (ceramic tile or granite slab)
- Acrylic roller
- Gloss varnish or resin (optional)
- Oven (for baking instructions based on clay brand)
Step 1: Creating the Speckled Clay
-
Condition and Prep:
Begin by conditioning your light blue polymer clay until it is soft and malleable. Warm clay is much easier to work with and less prone to cracking. -
Add Texture:
To achieve that stony, speckled look, flatten the clay slightly and sprinkle a pinch of coarse ground black pepper or fine black craft sand onto it. -
Mix Thoroughly:
Fold the clay over the speckles and knead thoroughly. Continue folding and rolling until the black specks are evenly distributed throughout the blue clay.
Step 2: Shaping the Body
-
Form the Shell:
Roll about two-thirds of your mixed clay into a smooth ball. Gently press it onto your work surface to flatten the bottom, doming the top to create the main carapace (shell). -
Smooth the Dome:
Use your thumb to smooth out any fingerprints on the dome. I like to use a tiny bit of baby oil on my finger to get it perfectly glass-smooth. -
Make the Head:
Take a smaller piece of clay and roll it into a teardrop shape. Flatten the wider end slightly where it will attach to the body. -
Attach the Head:
Press the flattened end of the head underneath the front edge of the shell. Blend the clay seams underneath so it is securely attached. -
Create Fins:
Roll four smaller balls of clay. Shape two into larger, elongated teardrops for the front flippers and two into shorter, rounded triangles for the back flippers. -
Flatten and Curve:
Flatten the flippers gently. Give the front flippers a slight backward curve to simulate swimming motion. -
Assemble the Limbs:
Attach the flippers to the underside of the shell body. The large ones go near the head, angling back, and the small ones at the rear.
Sticky Situation?
If the clay gets too soft and sticky from the heat of your hands, pop it in the fridge for 10 minutes. This firms it up, making fine detailing much easier to handle.
Step 3: Detailing and Baking
-
Refine the Connection:
Use a silicone smoothing tool or your finger to smooth the seams where the fins meet the body, ensuring the turtle looks like one solid stone piece. -
Carve the Shell Rim:
Using a needle tool, lightly score a continuous line just above the bottom edge of the shell to create the marginal scutes (the rim of the shell). -
Map the Central Scutes:
Draw a hexagon in the very center of the shell’s back using the needle tool. Don’t press too hard; you just want to indent the surface. -
Finish Shell Pattern:
From the points of the central hexagon, draw lines extending out to the rim line you created earlier. This creates the classic turtle shell pattern. -
Deepen the Lines:
Go over your sketched lines with a slightly blunter tool to deepen the grooves, making the segments puff out slightly. -
Add Eyes:
Use a small ball tool to make indentations on the sides of the head. Roll tiny balls of leftovers or plain black clay and press them into these sockets. -
Final Inspection:
Check the whole piece for lint or accidental nail marks. Smooth them out gently. -
Bake:
Bake the figurine according to your specific polymer clay package directions (usually around 275°F/135°C for 15-30 minutes). -
Cool Down:
Let the turtle cool completely in the oven before removing it. This prevents thermal shock and cracking.
Level Up: Glossy Shell
After baking and cooling, apply a coat of UV resin or polyurethane gloss varnish only to the top of the shell. This makes it look wet, like it just emerged from the ocean.
Place your little turtle on some sand or a shelf to enjoy your handcrafted piece of the ocean
Easy Blue Seahorse Pendant
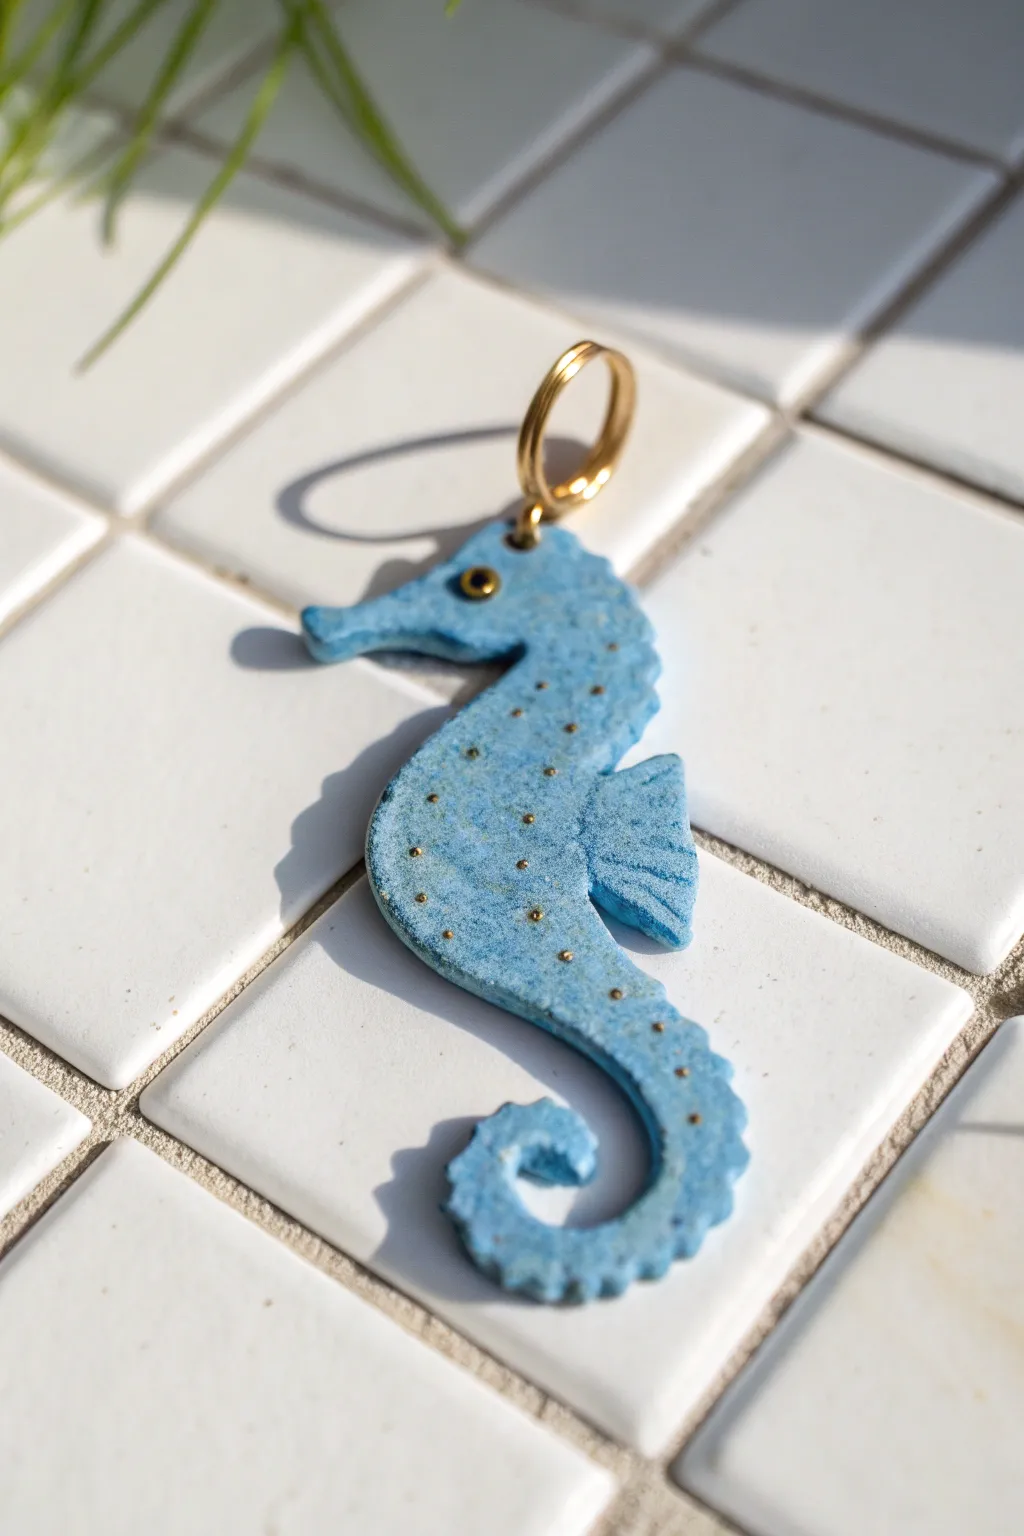
This whimsical pendant captures the magic of the ocean with its textured blue finish and delicate gold accents. It’s a surprisingly simple project that results in a professional-looking charm perfect for keychains or necklaces.
Step-by-Step Guide
Materials
- Polymer clay (light blue)
- Small amount of sand or salt (for texture)
- Gold acrylic paint or gold leaf pen
- Small black bead (for the eye)
- Gold jump ring
- Clay sculpting tools (needle tool, small blade)
- Rolling pin
- Parchment paper
- Fine-point paintbrush or dotting tool
- Gloss varnish (optional)
Step 1: Sculpting the Base
-
Condition the Clay:
Begin by warming the light blue polymer clay in your hands until it becomes soft and pliable. This prevents cracks later on. -
Create Texture:
Mix a tiny pinch of fine sand or salt into the clay. Knead it thoroughly to distribute the particles, giving the finished piece that organic, stone-like speckle you see in the photo. -
Roll It Out:
Flatten the clay into a slab about 1/4 inch thick on a piece of parchment paper. Try to keep the thickness consistent. -
Cut the Shape:
Using a needle tool or a small knife, carefully cut out the silhouette of a seahorse. Start with the curved head, move down the belly, and taper into the curled tail. -
Refine the edges:
Smooth out any rough cut marks with your fingertip or a soft silicone tool. The curves should be gentle and flowing.
Step 2: Adding Details
-
Shape the Snout:
Gently pinch and elongate the snout area slightly so it creates a distinct, tube-like nose characteristic of seahorses. -
Form the Tail Curl:
Use your fingers to emphasize the curl at the bottom of the tail. Ensure the very tip tucks inward nicely. -
Create the Dorsal Fin:
Cut a separate small, fan-shaped triangle from your remaining clay slab for the fin. -
Texturize the Fin:
Use your needle tool to press vertical lines into the fin relative to the body, mimicking shimmering ribbed cartilage. -
Attach the Fin:
Press the fin firmly onto the middle of the seahorse’s back. You can blend the seam very slightly underneath, but keep the top edge distinct. -
Add Spine ridges:
Using the needle tool again, create small notches or ridges all along the outer curve of the head and down the back to give it a spiny silhouette. -
Place the Eye:
Press a small black bead into the side of the head. I find pushing it in slightly deeper than surface level keeps it secure after baking. -
Punch the Hole:
Use a straw or a larger needle tool to poke a clean hole at the very top of the head for your hardware.
Clean Edges Trick
Before baking, lightly brush the edges of your clay with a touch of cornstarch or baby oil. This smooths out fingerprints and tool marks instantly.
Step 3: Baking and Finishing
-
Bake:
Place the parchment paper with your creation onto a baking sheet. Bake according to your specific clay package instructions (usually around 275°F/135°C for 15-30 minutes). -
Cool Down:
Let the piece cool completely before handling. It will be slightly soft when hot but hardens as it reaches room temperature. -
Gold Dotting:
Dip a fine dotting tool or toothpick into gold paint. Apply tiny, random dots across the body and tail for a magical shimmer. -
Rim the Eye:
Carefully paint a tiny ring of gold around the black bead to make the eye pop. -
Seal (Optional):
If you want extra durability, brush on a thin layer of matte or gloss varnish once the paint is dry. -
Add Hardware:
Open a gold jump ring using two pairs of pliers. Thread it through the hole you made earlier and close it securely.
Ocean Ombre
Mix a tiny bit of white clay into the belly area and darker blue on the spine before cutting the shape to create a natural gradient effect.
Now you have a charming oceanfriend ready to hang on your bag or keys

TRACK YOUR CERAMIC JOURNEY
Capture glaze tests, firing details, and creative progress—all in one simple printable. Make your projects easier to repeat and improve.
Tiny Blue Jellyfish With Short Tentacles
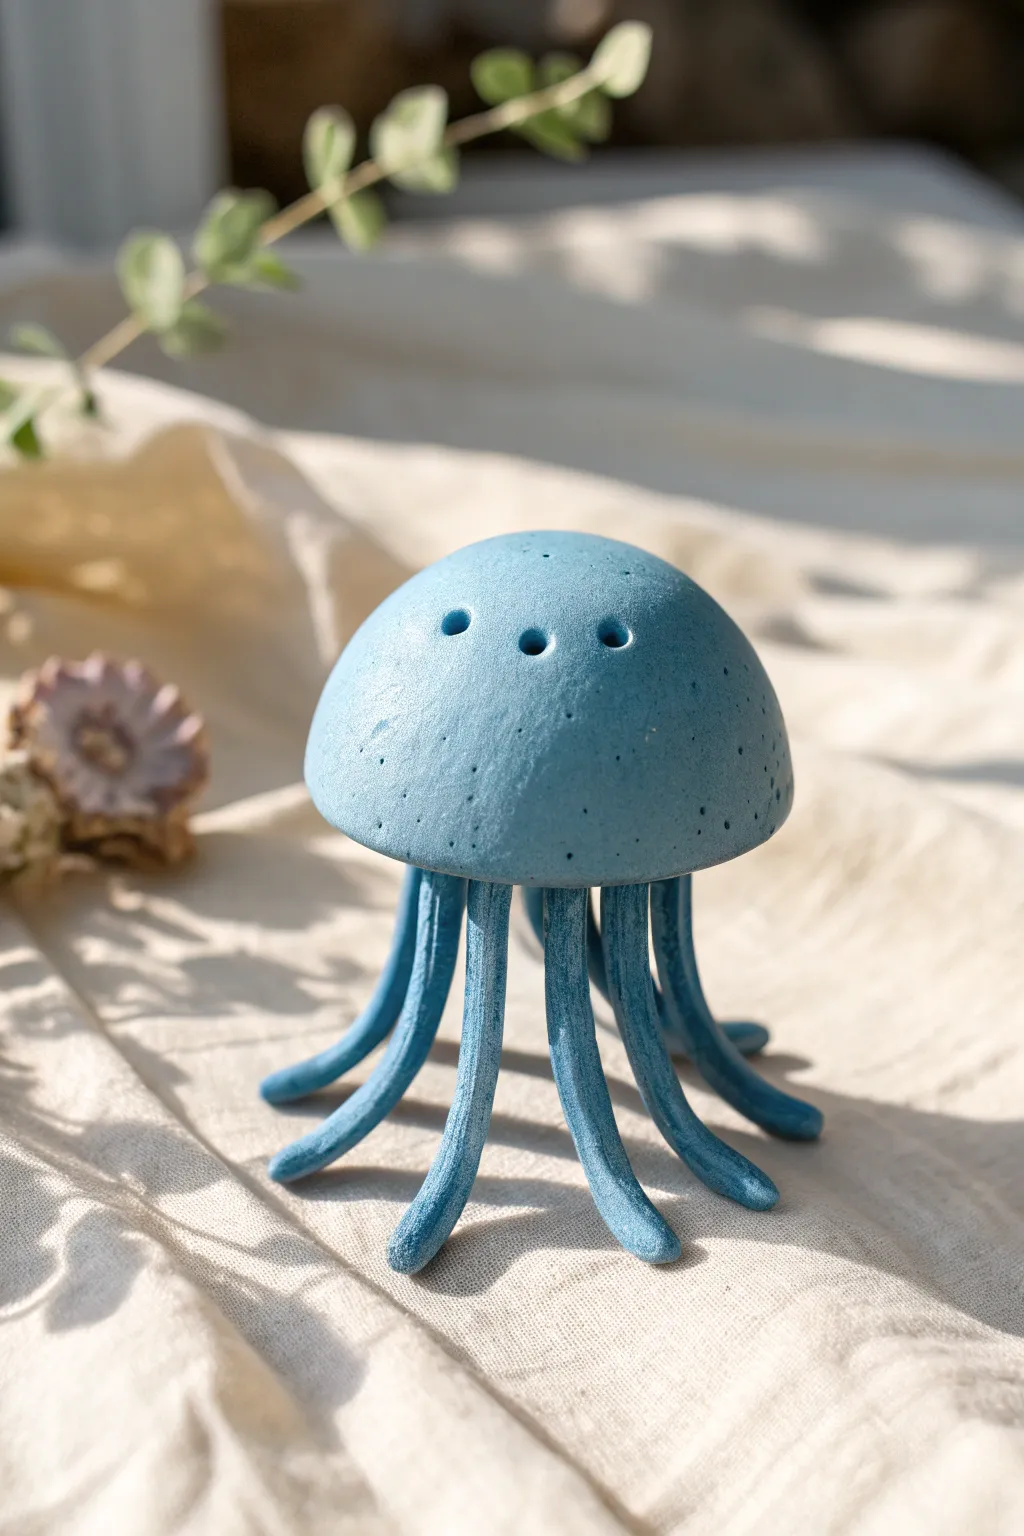
Bring a splash of the ocean to your desk with this whimsical mini jellyfish sculpture. Its charming, speckled blue dome and gracefully curved tentacles make it a perfect beginner project that captures the peaceful movement of sea life.
Step-by-Step Tutorial
Materials
- Air-dry clay or polymer clay (white)
- Acrylic paint (light azure blue and darker teal)
- Fine-grit sandpaper
- Small rolling pin
- Needle tool or toothpick
- Small ball stylus tool
- Paintbrushes (flat shader and fine detail)
- Gloss or matte varnish (optional)
- Water cup (for smoothing)
- Aluminum foil (for armature)
Step 1: Shaping the Dome
-
Prepare the core:
Start by scrunching a small piece of aluminum foil into a semi-circle or mushroom cap shape; this will act as the lightweight core for the jellyfish’s head and save on clay. -
Roll out the clay:
Condition your clay until it’s soft and pliable, then roll a portion of it into a flat sheet about 1/4 inch thick. -
Cover the form:
Drape the clay sheet over your foil dome, gently pressing it down to adhere to the shape. -
Trim and smooth:
Trim away the excess clay at the bottom edge with a craft knife or needle tool, then smooth the surface with a little water on your finger to remove any fingerprints or cracks. -
Refine the rim:
Use your thumb to gently round off the bottom edge of the dome so it isn’t sharp or jagged; you want a soft, organic look. -
Create the pores:
Using a small ball stylus or the back of a paintbrush, press three distinct holes near the top center of the dome, arranged in a small triangle. -
Add texture:
Take a toothbrush or stiff-bristled brush and lightly tap it randomly around the dome to create tiny, subtle indentations that mimic natural sea textures.
Step 2: Creating the Tentacles
-
Roll coils:
Roll out several long, snake-like coils of clay, aiming for a thickness roughly equal to a pencil lead. -
Cut to size:
Cut the coils into segments about 2 to 3 inches long; you’ll need roughly 8 to 10 pieces depending on how full you want the skirt to be. -
Taper the ends:
Gently roll one end of each segment between your fingers to create a rounded, tapered point. -
Attach the legs:
Flip the dome upside down. Score the underside rim and the flat top of each tentacle, add a dab of water or liquid clay, and press the tentacles firmly onto the inside edge of the dome. -
Blend the seams:
Use a modeling tool to smooth the clay where the tentacle joins the body so the connection is invisible and strong. -
Pose the jellyfish:
Flip the jellyfish back over and stand it up. Arrange the tentacles so they curve outward and support the weight of the head, giving it a ‘walking’ or floating appearance. -
Dry completely:
Allow the sculpture to dry fully according to your clay’s package instructions; I prefer to let air-dry clay sit for at least 24 hours to ensure the legs don’t warp.
Smooth Moves
Use a drop of baby oil on your finger instead of water to smooth polymer clay without making it sticky or mushy.
Step 3: Painting and Finishing
-
Sand imperfections:
Once dry, gently use fine-grit sandpaper to smooth out any rough patches on the dome or tentacle tips. -
Base coat:
Paint the entire sculpture with a light azure blue acrylic paint. -
Apply a wash:
Dilute a darker teal paint with water and brush it over the sculpture, letting it settle into the texture pits and the three top holes. -
Wipe back:
Before the wash dries, gently wipe the raised surfaces with a damp paper towel or sponge; this highlights the texture while leaving the deeper color in the recesses. -
Speckle effect:
Dip an old toothbrush into slightly watered-down dark blue paint and flick the bristles with your thumb to mist tiny speckles over the dome. -
Seal the piece:
Finish with a clear matte varnish to protect the paint and give the clay a finished, ceramic-like feel.
Glow Up
Mix glow-in-the-dark powder into your clay or paint so your jellyfish emits a gentle bioluminescent light at night.
Place your finished jellyfish near a sunny window or among some seashells to enjoy your handcrafted piece of the ocean
Blue Snail With a Swirl Shell
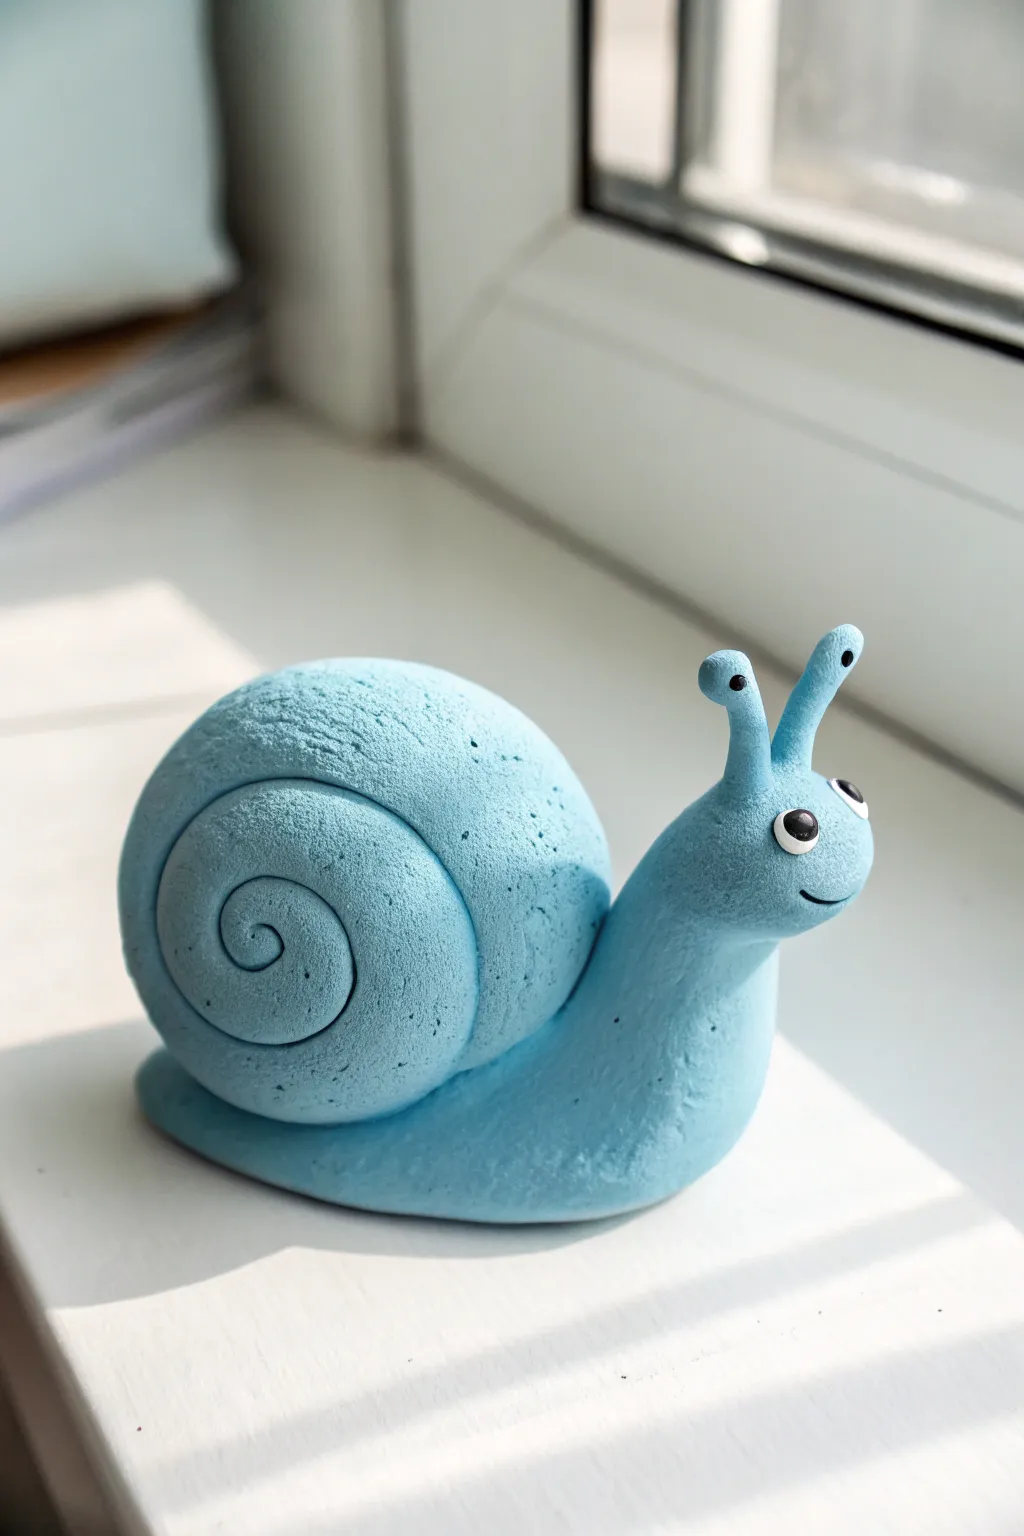
This charming little snail project captures a friendly cartoon character coming out of its shell. With its textured finish and cheerful expression, it makes for a delightful desk companion or a cute gift.
Step-by-Step Guide
Materials
- Light breeze blue air-dry clay (or polymer clay)
- White clay (small amount)
- Black clay (small amount)
- Black acrylic paint (optional, for mouth/pupils)
- Fine-point modeling tool or toothpick
- Ball tool (small)
- Rolling pin (optional)
- Water (for smoothing)
Step 1: Shaping the Shell
-
Prepare the clay sphere:
Start with a large ball of blue clay, roughly the size of a tangerine. Roll it firmly between your palms until it is perfectly smooth and free of cracks. -
Form the starting coil:
Instead of rolling a long snake, we will sculpt the spiral directly into the ball to keep it solid. Gently flatten one side of the sphere slightly so it can stand upright. -
Etch the spiral:
Using a modeling tool or a toothpick, press into the center of the rounded side to mark the start of the spiral. Draw a spiraling line outward, carving deeper as you go to define the shell’s segments. -
Deepen the grooves:
Go back over your spiral line with a rounded tool or your finger to soften the edges. You want the shell to look like a continuous coiled tube rather than just a ball with a line drawn on it. -
Add texture:
If you want that slightly porous, natural look seen in the photo, gently tap the surface of the shell with a stiff brush or a textured sponge.
Step 2: Creating the Body
-
Form the base:
Take a second piece of blue clay, about half the volume of the shell. Roll it into a thick, elongated teardrop shape. -
Shape the neck:
Bend the thicker end of the teardrop upwards to create the snail’s neck and head. The bottom part should remain flat against your work surface. -
Flatten the tail:
Gently press down on the thinner tail end so it fans out slightly, creating a stable base for the snail to glide on. -
Attach the shell:
Place the shell onto the back of the body. You might need to press it down firmly or score the clay where they join. I usually use a dab of water here to act as glue and smooth the seam where the shell meets the body.
Shell Rolling Trouble
If your shell collapses while detailing the spiral, let the clay ball sit for 15 minutes to firm up slightly before carving. This stiffness helps it hold the shape better.
Step 3: Face and Details
-
Make eyestalks:
Roll two small, thin cylinders of blue clay for the eyestalks. Round off the tops so they look like little matchsticks. -
Attach eyestalks:
Press the eyestalks onto the top of the head. Blend the clay at the base of the stalks downward into the head so they are securely attached and don’t flop over. -
Add sensory bumps:
Using the tip of a toothpick or a tiny ball of black clay, add a microscopic dot to the very top of each eyestalk. -
Create the main eyes:
Roll two small balls of white clay and flatten them slightly. Press them onto the face area, just below the stalks. -
Add pupils:
Add tiny balls of black clay to the center of the white eyes. Alternatively, you can wait for the clay to dry and paint these black dots on later. -
Carve the smile:
Use the edge of your modeling tool or a small straw cut in half to imprint a curved, happy mouth on the side of the face. -
Final smoothing:
Dip your finger in a little water and gently run it over the entire sculpture to remove any fingerprints and refine the matte texture.
Texture Tip
To get that specific porous, stone-like texture visible in the image, gently dab the wet clay with a crumbled ball of aluminum foil before the final drying phase.
Let your little blue friend dry completely in a safe spot away from direct heat
Mini Blue Mushroom Buddy
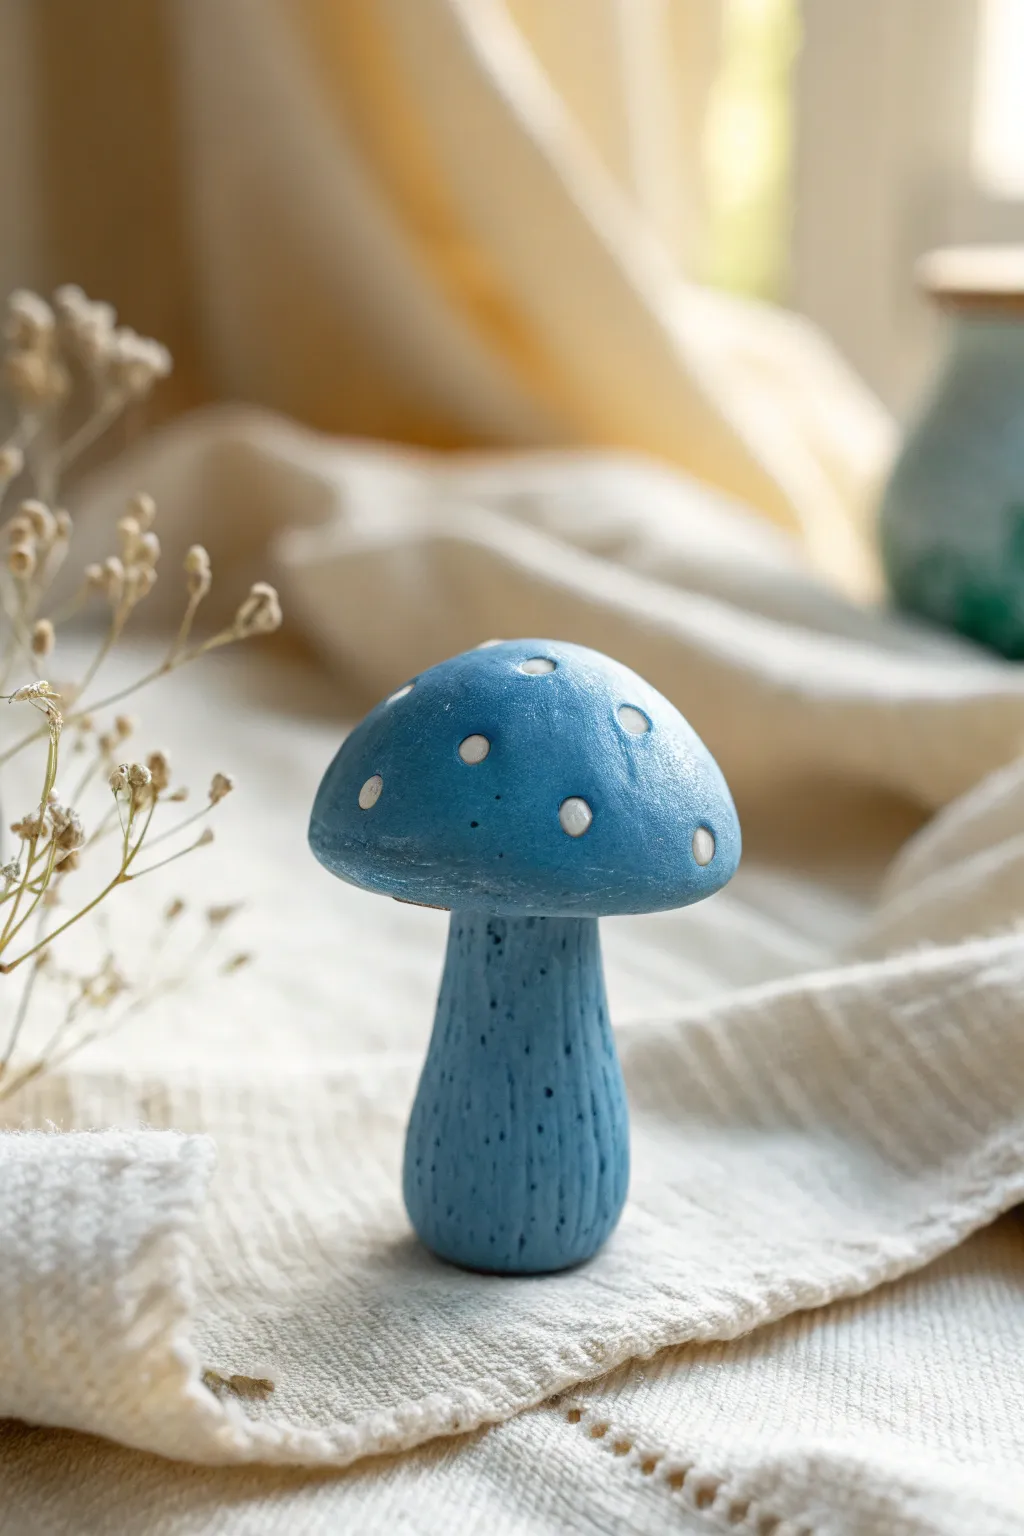
Sculpt a whimsical little forest friend with this charming blue mushroom project. Its textured stem and speckled cap make it perfect for adding a magical touch to moss terrariums or desk displays.
Step-by-Step Tutorial
Materials
- Polymer clay (blue and white)
- Acrylic rolling pin
- Detail needle tool or toothpick
- Ball stylus tool
- Soft paintbrush
- Aluminum foil (optional for core)
- Gloss or matte varnish (optional)
- Baking sheet and parchment paper
- Oven (for baking polymer clay)
Step 1: Forming the Base
-
Condition the Clay:
Start by taking a chunk of blue polymer clay about the size of a walnut. Knead it thoroughly in your hands until it becomes soft, pliable, and warm to the touch to prevent cracks later. -
Shape the Stem:
Roll about two-thirds of the clay into a thick cylinder. Gently pinch and roll one end to be slightly narrower for the top, while pressing the bottom against your work surface to create a stable, slightly bulbous base. -
Refining the Silhouette:
Stand the stem up and check the balance. Smooth the sides with your fingers to ensure it stands straight without tipping. The shape should resemble a bowling pin that has been shortened. -
Adding Texture:
Using a needle tool or toothpick, gently scratch vertical lines up and down the stem. Vary the length and depth of these lines to mimic the natural fibrous texture of a real mushroom stalk. -
Poking Details:
Intersperse the vertical lines with small poked holes using the tip of your tool. I like to cluster these near the base to give it an earthy, organic feel.
Step 2: Creating the Cap
-
Roll the Cap Ball:
Take the remaining blue clay and roll it into a smooth, perfect sphere. Verify that it is slightly wider than your stem so it will overhang nicely. -
Dome Shaping:
Place the sphere on your work surface and gently press down with the palm of your hand to flatten the bottom while keeping the top rounded. You want a thick, semi-circle dome shape. -
Hollowing the Connection:
Flip the cap over and use your thumb or a large ball tool to create a slight indentation in the center of the flat side. This socket will help the cap sit securely on the stem. -
Prepare the Spots:
Condition a very small amount of white clay. Roll it into a thin snake, then slice off tiny, equal-sized bits to create the spots. -
Applying the Spots:
Roll each tiny white slice into a ball and press them randomly onto the blue cap. Use your finger to flatten them until they are flush with the surface of the blue clay. -
Texturing the Cap:
For a stone-like finish, very lightly tap the surface of the blue clay with an old toothbrush or a ball of aluminum foil, avoiding the white spots if you want them to remain smooth.
Fixing Smudges
If blue clay smears onto your white dots, dip a cotton swab in rubbing alcohol or nail polish remover and gently wipe the white clay clean before baking.
Step 3: Assembly and Finish
-
Attach Cap to Stem:
Place the cap onto the tapered top of the stem. Press down firmly but gently to bond the raw clay pieces together without squashing the stem’s texture. -
Blend the Seam:
If extra security is needed, take a tiny snake of blue clay, wrap it under the cap where it meets the stem, and smooth it out with a silicone tool to hide the joint. -
Final Inspection:
Do a 360-degree check of your mushroom. Smooth out any accidental fingerprints, especially on the smooth white dots. -
Baking:
Place your mushroom on a parchment-lined baking sheet. Bake according to your specific polymer clay package instructions (usually around 275°F or 135°C for 15-30 minutes per 1/4 inch thickness). -
Cooling:
Allow the mushroom to cool completely in the oven before moving it. This helps prevents thermal shock cracks. -
Varnishing:
Once cool, you can apply a matte varnish to protect the surface or leave it raw for a natural matte clay look.
Natural look
Mix a tiny speck of black or translucent clay into your blue clay before starting. This makes the color less artificial and gives it a deeper, stonelike appearance.
Now your little mushroom is ready to add a spot of wonder to your shelf.
Blue Cloud With Raindrop Charms
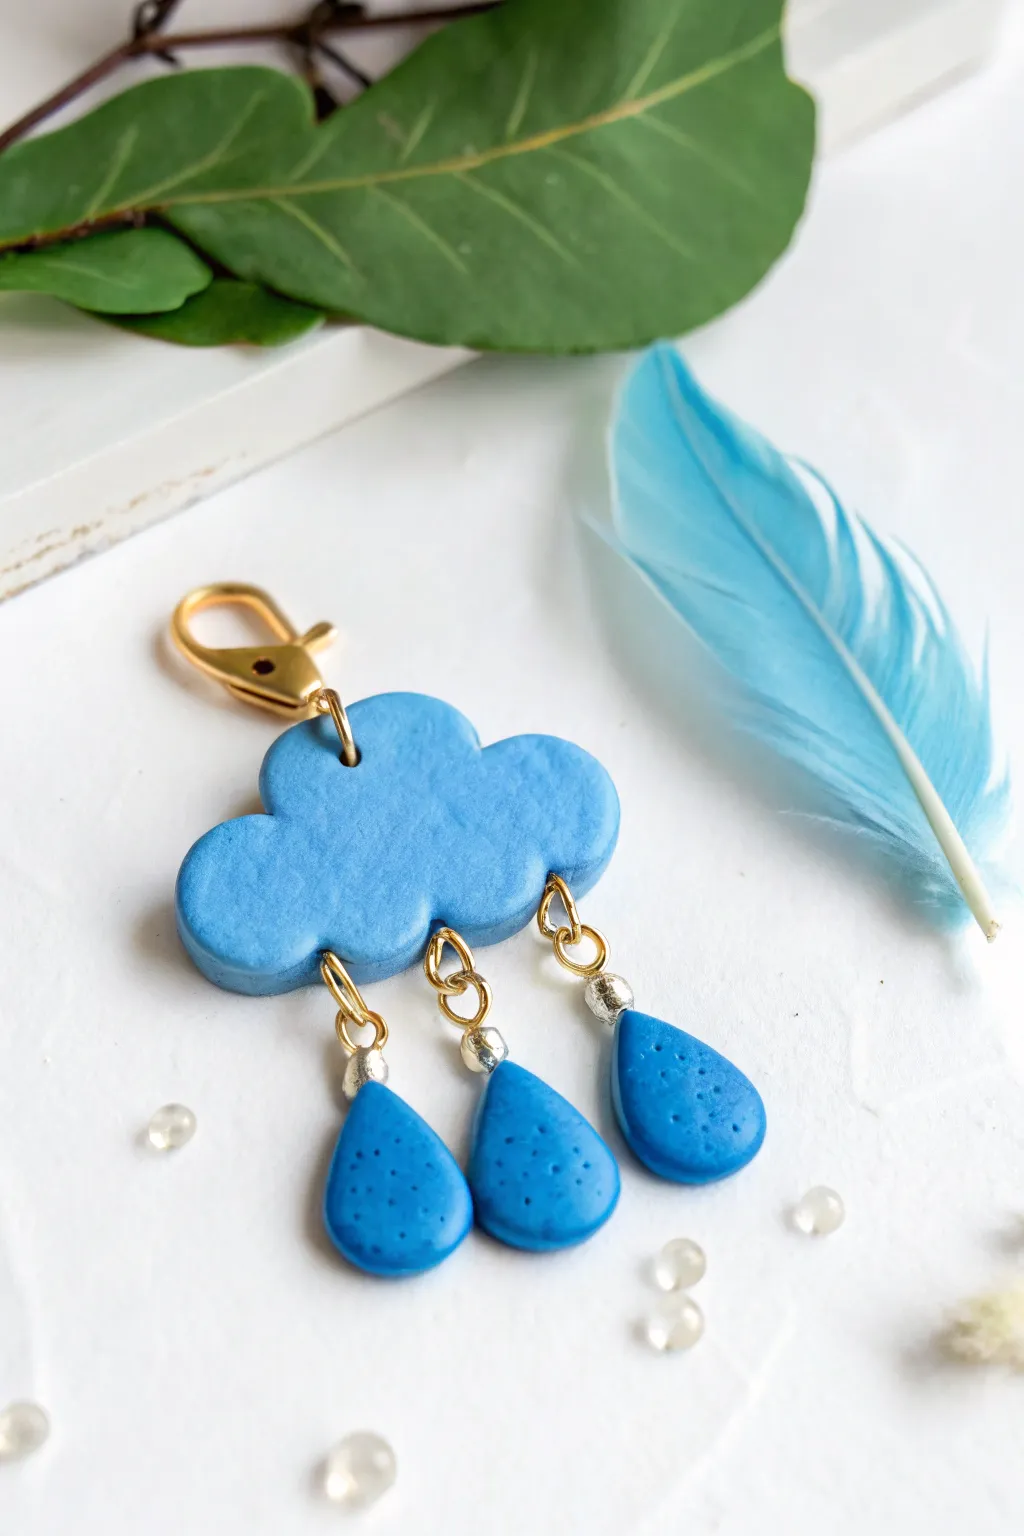
Brighten up your bag or keyring with this charming little rain cloud, crafted from soft polymer clay. Featuring dainty raindrops that sway freely on gold chain, its playful splash of blue adds a touch of handmade magic to any stormy day.
Detailed Instructions
Materials
- Light blue polymer clay
- Medium blue polymer clay (slightly darker for contrast if desired)
- Clay roller or pasta machine
- Cloud-shaped clay cutter (approx. 1.5 – 2 inches)
- Small teardrop cutter or craft knife
- Needle tool or toothpick
- Ball stylus tool (very small)
- Gold-tone jump rings (4mm and 6mm)
- Gold-tone eye pins (optional for structure)
- Gold-tone lobster clasp
- Small jewelry pliers (round nose and flat nose)
- Silver spacer beads or crimp beads
- Baking sheet and parchment paper
- Gloss glaze (optional)
Step 1: Shaping the Cloud Base
-
Condition the Clay:
Begin by warming the light blue clay in your hands, kneading it until it is soft and pliable. This conditioning prevents cracks during baking. -
Roll It Out:
Roll the clay onto a clean work surface or through a pasta machine to a thickness of about 1/4 inch (6mm). You want it sturdy enough to hold the findings without breaking. -
Cut the Shape:
Press your cloud-shaped cutter firmly into the clay. If the clay sticks, gently tap the cutter or use a blade to lift the shape free. -
Refine the Edges:
Use your fingertip to gently smooth the sharp edges cut by the tool. I like to lightly tap the edges inward to give the cloud a puffier, softer look. -
Create Attachment Holes:
Using a needle tool, carefully pierce a hole at the very top center of the cloud for the clasp. Then, pierce three evenly spaced holes along the bottom edge for the raindrops. Ensure the holes are large enough for your jump rings.
Step 2: Crafting the Raindrops
-
Form Teardrops:
Roll three small balls of the medium blue clay. Gently pinch and roll one end of each ball between your fingers to taper it into a classic teardrop shape. -
Flatten Slightly:
Place the teardrops on your work surface and press down very lightly so they are flat but still hold a rounded, 3D quality. -
Add Texture:
Take a needle tool or the tip of a toothpick and gently poke shallow dents into the surface of each raindrop to create a speckled texture. -
Pierce the Tops:
Make a horizontal hole through the narrow top part of each teardrop. Wiggle the tool slightly to ensure the hole is clear all the way through. -
Bake the Clay:
Arrangement your cloud and raindrops on a parchment-lined baking sheet. Bake according to your clay manufacturer’s instructions (typically 275°F/135°C for 15-30 minutes). Let them cool completely before handling.
Smooth Moves
Before baking, lightly brush the clay with a tiny amount of baby oil or cornstarch to smooth away any fingerprints without distorting the shape.
Step 3: Assembly
-
Prepare the Drop Links:
Open three small gold jump rings using your pliers. Slide on a raindrop and then close the ring securely. -
Add Decorative Beads:
Thread a second jump ring through the first one. Before attaching it to the cloud, you can slide a small silver spacer bead onto the ring for extra sparkle, as seen in the photo. -
Connect to Cloud:
Attach these jump ring assemblies to the three holes at the bottom of the cloud. Use your pliers to twist the rings closed tightly so the drops don’t slip off. -
Attach the Clasp:
Open a larger jump ring and thread it through the top hole of the cloud. Slide your gold lobster clasp onto this ring and close it securely. -
Final Polish:
Check all connections to ensure they are secure. If you prefer a shiny finish, adhere a thin layer of gloss glaze to the clay parts now.
Hole Preservation
If the clay holes squish closed while you handle the pieces, re-insert the needle tool and leave it in while you perform the final shaping touches.
Clip this adorable accessory onto your favorite bag and enjoy the rainy vibes all year round
Easy Blue Dragon Hatchling
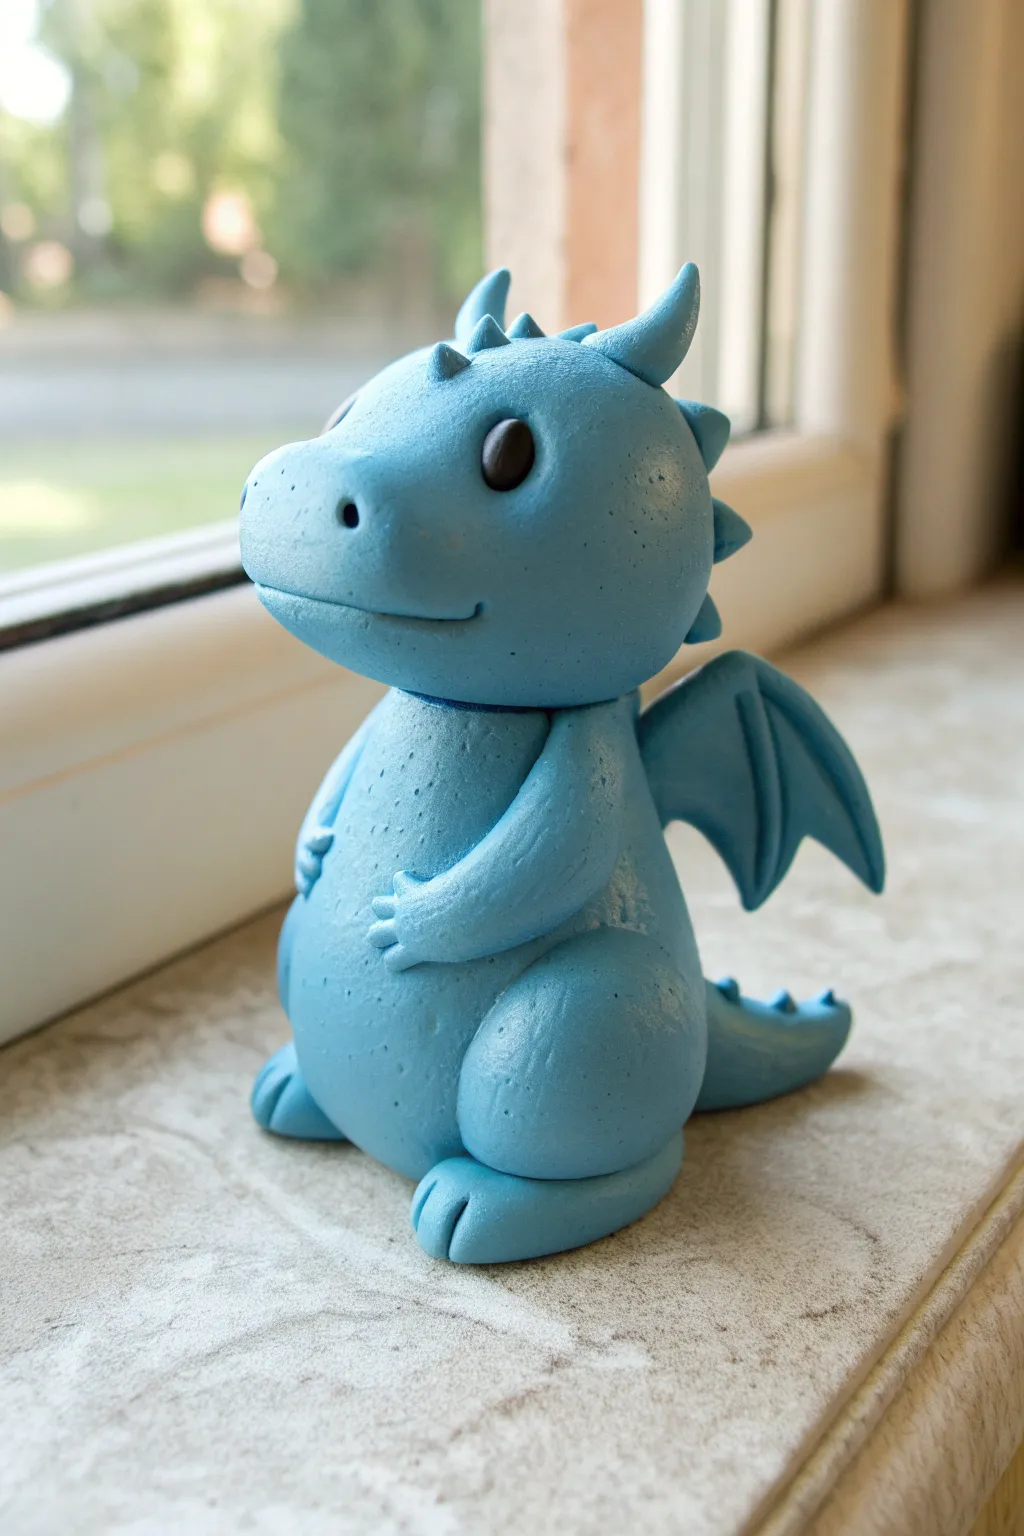
Create your own pocket-sized fantasy companion with this adorable blue dragon figurine. Featuring smooth curves, tiny wings, and a friendly expression, this project is perfect for mastering basic clay shaping techniques.
Step-by-Step
Materials
- Light blue polymer clay (or air-dry clay)
- Black polymer clay
- Clay sculpting tools (needle tool, ball tool)
- Small rolling pin
- Hobby knife
- Aluminum foil (optional, for armature)
- Toothpick or wire (for structural support)
Step 1: Body & Head Construction
-
Form the Body Area:
Start with a medium-sized ball of blue clay. Roll it into a smooth pear shape, slightly flattening the bottom so it sits securely on your work surface. This will be the dragon’s chubby tummy. -
Shape the Head:
Roll a slightly smaller ball of blue clay for the head. Gently press it into a rounded rectangle shape, softening the edges to give it a chubby, cartoonish look. -
Connect the Components:
Insert a short piece of toothpick or wire into the top of the body. Push the head onto the exposed wire to secure it, ensuring the head sits flush against the neck area. -
Smooth the Seam:
Use your thumb or a blending tool to gently smooth the clay where the neck meets the body, though a distinct separation is also cute for this style.
Droopy Wings?
If the wings sag while the clay is soft, prop them up with wedges of cardstock or crumpled paper towel until the clay hardens or is baked.
Step 2: Limbs & Features
-
Create the Thighs:
Roll two small balls of blue clay. Press them against the lower sides of the body and flatten them slightly into rounded teardrop shapes to form large, sturdy thighs. -
Add the Feet:
Make two smaller flattened ovals for feet. Attach them to the bottom of the thighs. Use a knife tool or needle to press two small indentations into each foot for toes. -
Sculpt the Arms:
Roll two generous sausage shapes for the arms. Taper one end slightly and attach the thicker end to the shoulder area. -
Detail the Hands:
Curve the arms so they rest on the dragon’s belly. Use your knife tool to carefully cut small slits at the end of each arm to create simple fingers. -
Make the Tail:
Roll a cone of blue clay. Attach the wider end to the lower back of the dragon, curving the tip upwards behind one of the legs. Blend the seam thoroughly.
Step 3: Face & Wings
-
Eyes and Nostrils:
Use a medium ball tool to press two sockets for the eyes. Gently press two tiny pinholes near the front of the snout for nostrils. -
Insert the Eyes:
Roll two tiny spheres of black clay. Place them into the eye sockets you created, flattening them slightly so they don’t bulge out too much. -
Carve the Smile:
Using a needle tool or a curved blade, carefully impress a wide, gentle smile line across the muzzle, connecting it visually to the cheek area. -
Form the Wings:
Flatten a piece of blue clay and cut out two triangular bat-wing shapes. Use a tool to impress lines simulating the wing structure. -
Attach the Wings:
Press the wings firmly onto the dragon’s upper back. You can blend the clay at the attachment point to ensure they don’t fall off during baking or drying. -
Add Spikes:
Roll several tiny cones of blue clay. Arrange them in a line starting from the top of the head, going down the neck, and trailing onto the the tail. -
Texture the Skin:
I find that lightly tapping the surface with a stiff bristled brush or a balled-up piece of foil gives the dragon a lovely, organic skin texture instead of being perfectly smooth.
Make it Sparkle
Brush the finished dragon with mica powder before baking, or add a coat of pearlescent glaze after it dries for a magical, shimmering scale effect.
Place your finished dragon on a shelf to watch over your room
Chubby Blue Dinosaur Figure
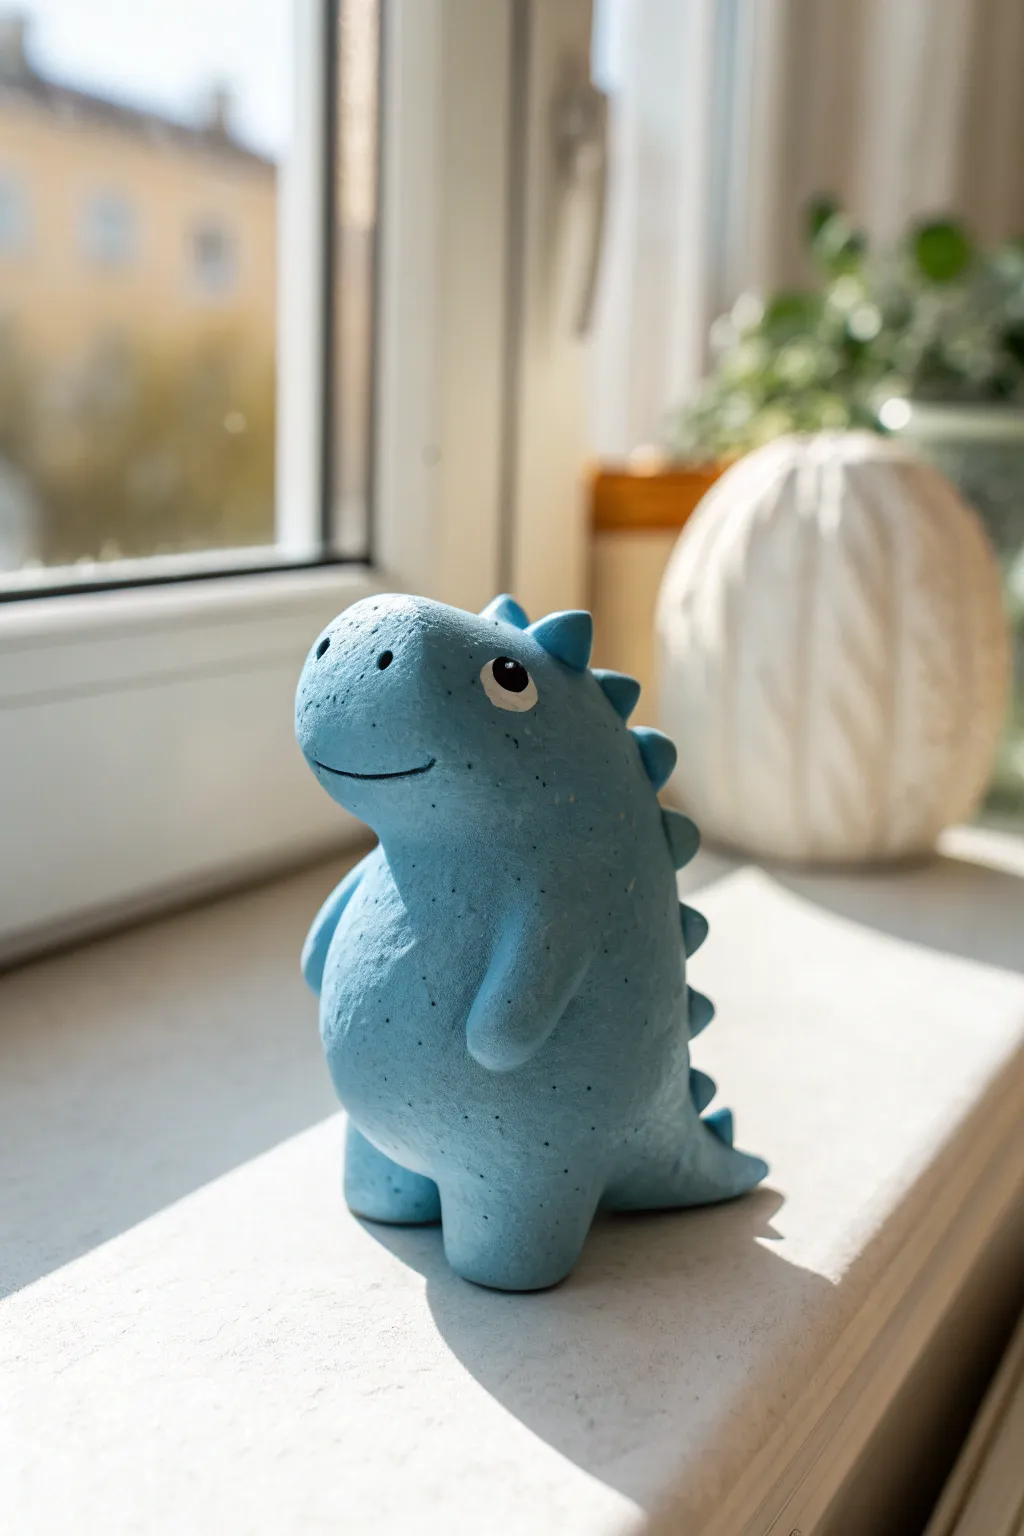
This adorable little dinosaur features a round, comforting shape and a pleasing matte blue finish with charming speckles. With its friendly smile and simple construction, it’s a perfect beginner project that brings a touch of whimsy to any windowsill.
Step-by-Step Guide
Materials
- Light blue polymer clay or air-dry clay
- Small amount of white clay (for eyes)
- Black acrylic paint or black clay (for pupils)
- Clay sculpting tools (needle tool, smoothing tool)
- Old toothbrush or stiff bristle brush
- Clear matte varnish (optional)
Step 1: Shaping the Body
-
Form the base:
Start with a large ball of light blue clay, roughly the size of a tangerine. Roll it between your palms until it is completely smooth and free of cracks. -
Create the pear shape:
Gently gently squeeze the upper third of the ball to elongate it slightly, creating a chubby pear shape. The bottom should remain wide and heavy to keep the figure stable. -
Define the head:
Using your thumb, smooth the transition between the narrower top (head) live and the wider bottom (body) so there is a gentle curve rather than a distinct neck. -
Add texture:
Take an old toothbrush or a stiff bristle brush and gently tap it all over the surface of the clay. This creates a stone-like, speckled texture that adds character to the finished piece.
Stone Effect
Mix a pinch of black pepper or dried tea leaves into your light blue clay before sculpting. This creates a natural, embedded speckled texture without painting.
Step 2: Adding Limbs and Tail
-
Make the legs:
Roll two small, equal-sized balls of blue clay. Flatten them slightly into thick discs and attach them to the bottom front of the body to form stubby feet. -
Set the tail:
Roll a cone shape about an inch long. Attach the wider end to the lower back of the dinosaur, blending the clay seams upward into the body so the join disappears. -
Curve the tail:
Gently curve the tip of the tail so it rests flat against the surface, helping to support the figure’s weight. -
Form the arms:
Create two small teardrop shapes from the blue clay. Press these against the sides of the belly, pointing downward. -
Blend the arms:
Use a smoothing tool to blend the top (shoulder) part of the arm into the body, leaving the rounded bottom of the arm distinct and slightly raised.
Make it Functional
Press a small hole into the top of the dinosaur’s head before curing to turn this figure into a cute holder for dried flowers or incense sticks.
Step 3: Details and Face
-
Create the spines:
Roll about 6-8 tiny balls of blue clay. Pinch each one into a small triangle or pyramid shape. -
Attach the spines:
Starting at the top of the head and working down to the tail, press these triangles onto the center of the back. Space them evenly. -
Make the eye sockets:
Use a ball-headed tool or the back of a paintbrush to press a small, shallow indentation on the side of the head where the eye will go. -
Add the whites of the eyes:
Roll a tiny ball of white clay, flatten it, and press it into the indentation you just made. -
Add pupils:
Place a minuscule dot of black clay (or paint it later) onto the white circle to act as the pupil. Position it slightly forward so the dino looks ahead. -
Carve the mouth:
Use a needle tool or a thin blade to carefully slice a curved smile into the snout area. I find drawing a light guide line first helps get the expression right. -
Add nostrils:
Poke two tiny holes above the smile for the nostrils.
Step 4: Finishing Touches
-
Refine texture:
Check if your handling smoothed out any of the texture from earlier. Re-tap with the toothbrush in areas like the spine or tail if needed. -
Add speckles:
If you want the speckled look shown in the photo, dip a stiff brush in diluted dark blue or black paint and flick fine droplets onto the raw clay (or wait until baked/dried if you prefer more control). -
Cure:
Bake the figure according to your polymer clay package instructions, or let it air-dry completely for 24-48 hours if using air-dry clay.
Place your new friendly dinosaur in a sunny spot to enjoy his company
Blue Lake Monster With a Curved Neck
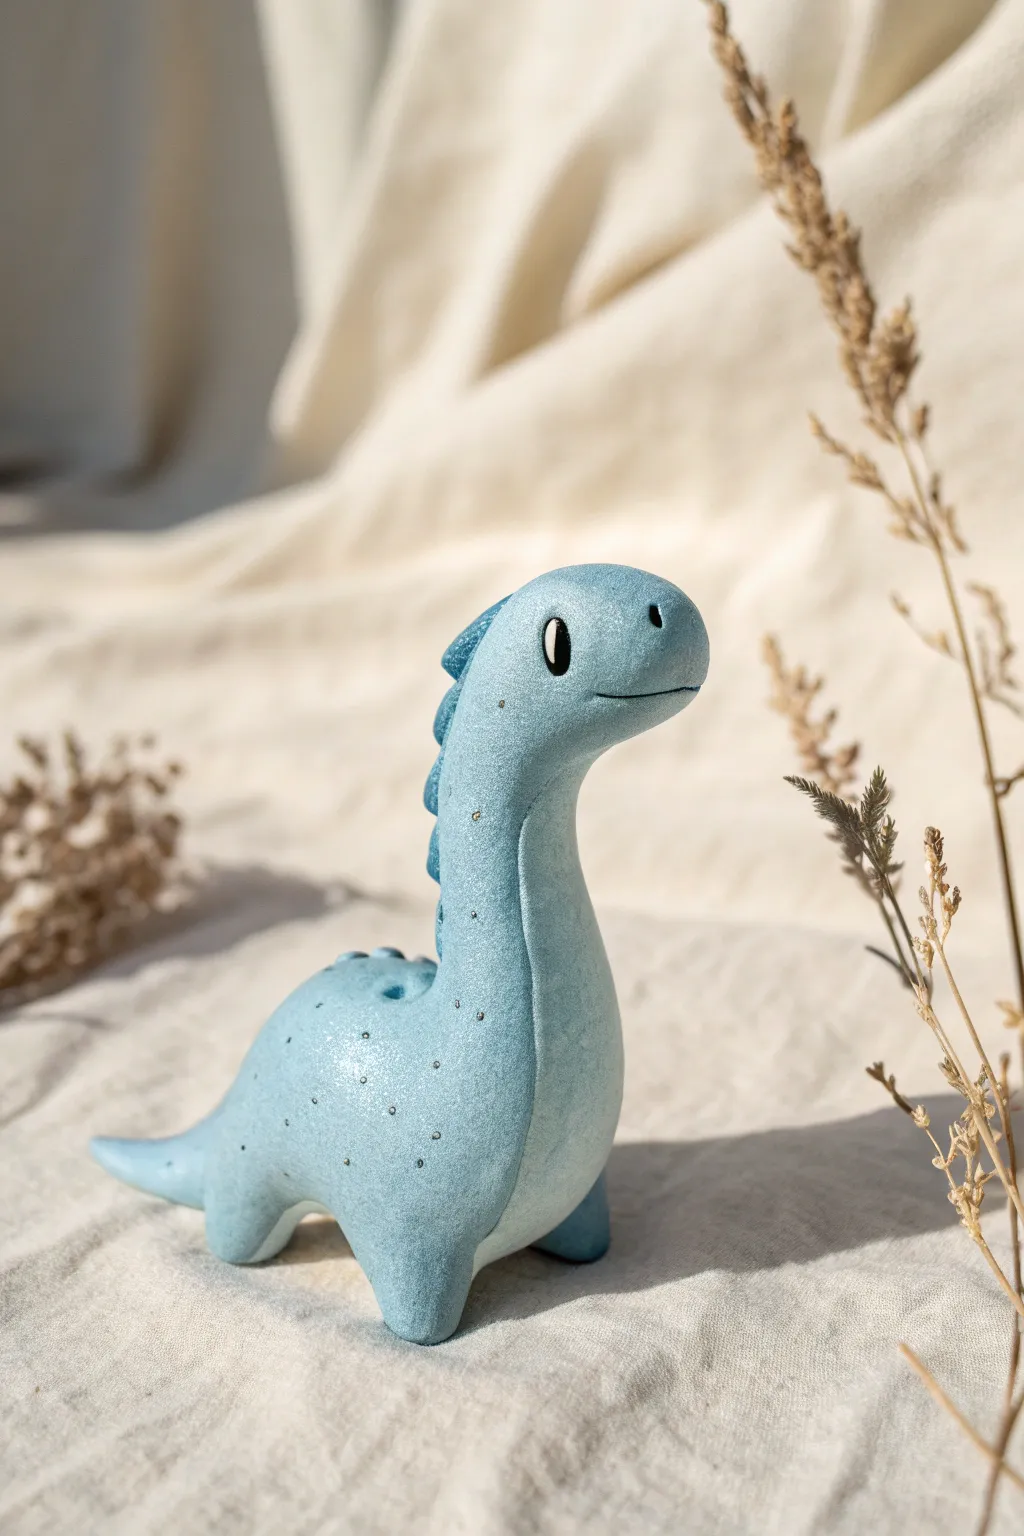
Sculpt your own legendary creature with this charming blue lake monster featuring a gracefully curved neck and subtle shimmering details. The soft, speckled finish gives this friendly beast a magical, aquatic appearance perfect for displaying.
Step-by-Step Tutorial
Materials
- Light blue polymer clay
- Dark blue polymer clay (for spikes and details)
- Black polymer clay (tiny amount for eyes)
- White polymer clay or white acrylic paint
- Fine silver glitter or mica powder
- Sculpting tools (needle tool, ball stylus)
- Baking sheet and parchment paper
- Satin glaze (optional)
- Soft brush
- Oven
Step 1: Forming the Body
-
Prepare the Clay:
Start by conditioning a large portion of light blue clay until it is soft and pliable. Mix in a pinch of fine silver glitter or mica powder to achieve the subtle sparkly effect seen in the photo. -
Shape the Base:
Roll the clay into a large, smooth oval for the body. Gently taper one end slightly to create the area where the tail will eventually extend. -
Form the Neck:
Create a thick, sturdy cylinder of clay for the neck. It needs to be substantial enough to support the head without drooping. -
Attach and Smooth:
Press the neck cylinder onto the front of the body oval. Use your fingers or a smoothing tool to blend the seam completely so the clay looks like one continuous piece. -
Curve the Neck:
Gently bend the neck backwards and then slightly forwards at the top to create a graceful ‘S’ curve. The head area should be looking straight ahead. -
Sculpt the Head:
Mold the top of the neck into a rounded head shape. Press lightly into the front to create a slight snout profile.
Seamless Blending
To erase fingerprints and blend seams perfectly, lightly brush a tiny amount of baby oil or clay softener over the joints before baking.
Step 2: Legs and Tail
-
Make the Stout Legs:
Roll four equal-sized balls of light blue clay. Flatten the bottoms to create sturdy stump-like legs. -
Attach Legs:
Looking at the underside of the body, press the four legs firmly into place. Blend the seams upward into the body to ensure they don’t fall off during baking. -
Shape the Tail:
Pull the tapered end of the body out further to form a short, pointed tail. You can give it a little upward flick for extra character. -
Check Balance:
Set your creature down on a flat surface. Adjust the legs and center of gravity so it stands stably without tipping.
Step 3: Adding Details
-
Create Dorsal Spikes:
Take your darker blue clay and roll tiny little pyramids or triangles. These will form the ridge down the back. -
Apply the Ridge:
Starting from the back of the head and going down the neck, press the dark blue spikes in a row. I like to graduate the size, making them smaller near the tail. -
Add Spots:
To mimic the speckled texture, use a needle tool to gently prick small indentations over the body. You can also press tiny flecks of glitter directly into the surface if you want more sparkle. -
Form the Eyes:
Press small indentations on either side of the head using a ball stylus. Roll tiny ovals of black clay and press them into these sockets. -
Eye Highlights:
Add a tiny speck of white clay or a dot of white paint to the upper corner of the black eye for a life-like glint. Add a carved smile line with a needle tool. -
Bake and Finish:
Bake the figure according to your clay manufacturer’s instructions (usually 275°F/135°C for 15-30 minutes). Once cooled, you can apply a satin glaze to protect the finish.
Drooping Neck?
If the neck keeps bending down, insert a piece of twisted wire or a toothpick into the center of the body and neck for internal support.
Place your finished blue monster on a shelf where it can keep watch over your room
Whale-Shaped Blue Phone Holder
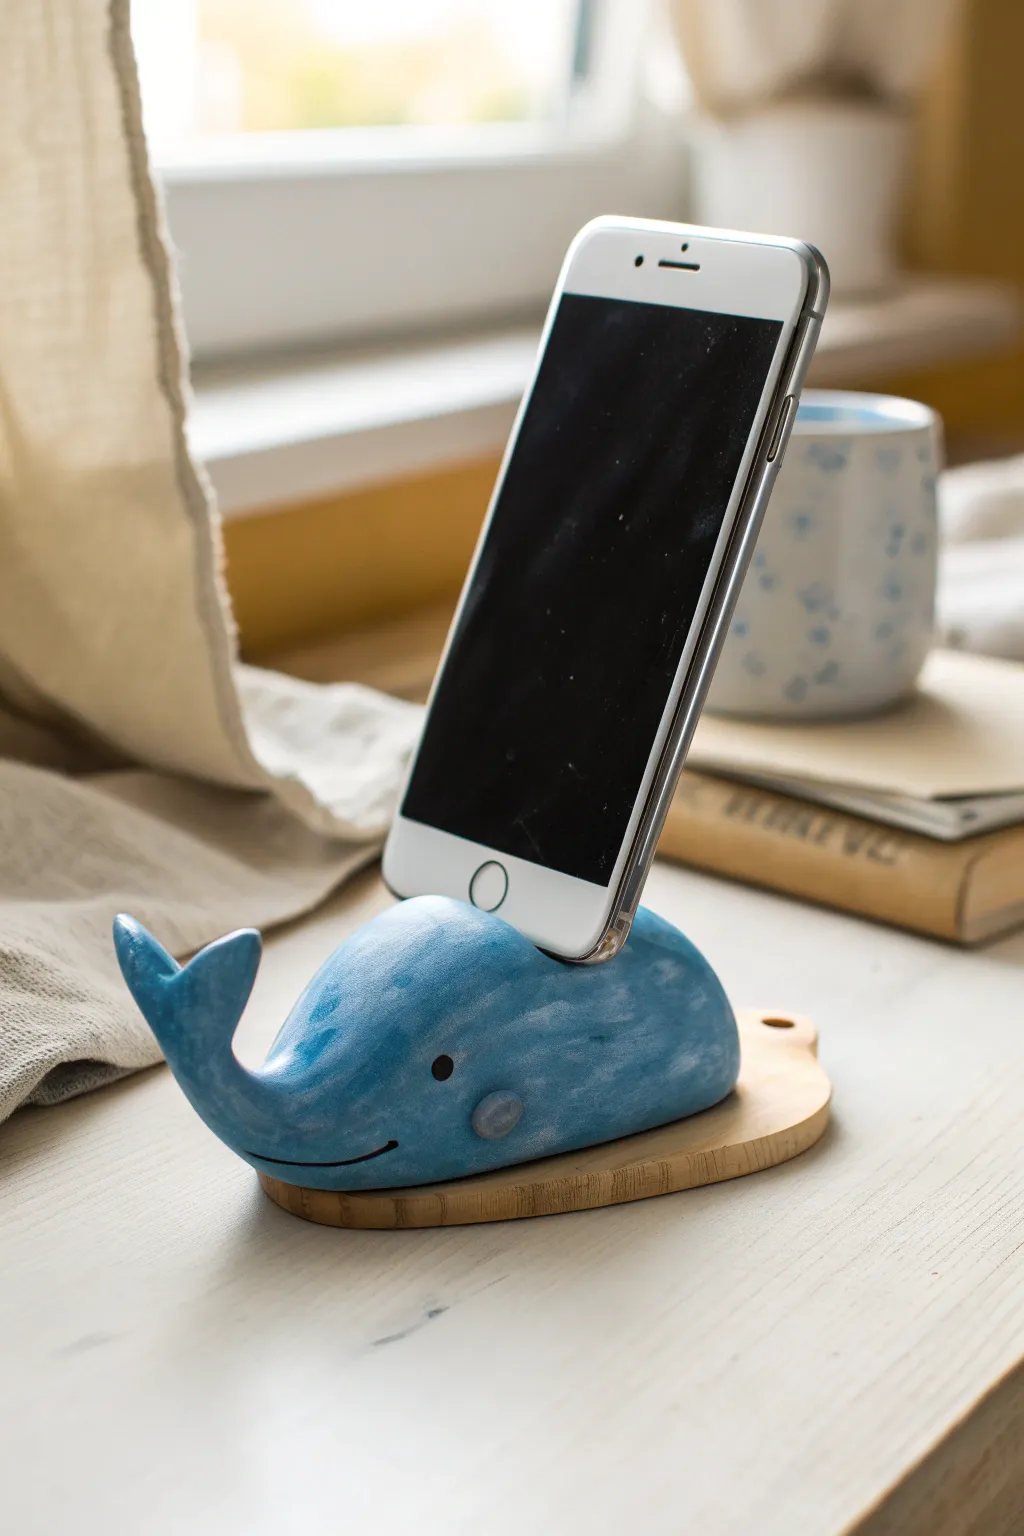
Bring a splash of the ocean to your desk with this charming blue whale phone holder. Its sturdy clay body and wooden base create a functional yet adorable accessory perfect for propping up your device.
How-To Guide
Materials
- Light blue polymer clay or air-dry clay
- Small wooden plaque or coaster (oval shape)
- Black acrylic paint or marker
- Sculpting tools (needle tool, smoother)
- Rolling pin
- Strong craft glue (e.g., E6000)
- Clear matte varnish
- Sandpaper (fine grit)
- Your phone (for sizing)
Step 1: Shaping the Whale Body
-
Condition the clay:
Start by kneading your blue clay until it is soft and pliable. If you are using polymer clay, the warmth of your hands will make it easier to work with. -
Form the base shape:
Roll the clay into a large, smooth log. One end should be significantly thicker for the head, while the other tapers down for the tail. -
Flatten the bottom:
Gently press the log onto your work surface to create a flat bottom. This ensures the whale sits stably on the wooden base later. -
Curve the tail:
Bend the tapered end upwards to create the curve of the whale’s tail. Pinch the very end slightly to flatten it for the flukes. -
Sculpt the flukes:
Use a knife or sculpting tool to split the flattened tail tip down the middle. Gently spread the two halves apart and round the edges to form the classic whale tail shape. -
Define the head:
smooth and round out the larger front end of the log to create a bulbous, friendly whale head.
Unwanted Fingerprints?
Before baking or drying, lightly brush the clay with a tiny amount of baby oil or cornstarch. This smoothes out fingerprints for a flawless finish.
Step 2: Creating the Phone Groove
-
Measure your device:
Wrap your phone loosely in a piece of paper or plastic wrap to protect it. Gently press the bottom edge of the phone into the top of the whale’s back to mark the width. -
Carve the slot:
Remove the phone and use a carving tool to deepen the indentation you just made. Aim for a groove about half an inch deep and slightly wider than your phone to recount for shrinkage if using air-dry clay. -
Angle the holder:
Ensure the slot is angled slightly backward so the phone will lean comfortably without tipping over. -
Test the fit:
Carefully place your protected phone back into the slot to check stability. Adjust the depth or angle if necessary.
Weighted Balance
If you have a large phone, embed a few heavy metal washers inside the bottom of the clay body before shaping it to prevent the stand from tipping over.
Step 3: Adding Details and Finishing
-
Add side fins:
Roll two small balls of blue clay and flatten them into teardrop shapes. Attach one to each side of the whale’s body, blending the edges seamlessly for a smooth look. -
Create the face:
Use a small ball tool or the end of a paintbrush to indent eye sockets. Add a tiny smile using a needle tool or by impressing a curved wire. -
Texture the surface (optional):
For a rustic look like the example, I like to gently rub the surface with my finger or a lightly textured sponge to give it a matte, handmade finish rather than perfect smoothness. -
Cure or dry:
Bake the polymer clay according to package instructions, or let air-dry clay sit for 24-48 hours until fully hardened. -
Paint facial features:
Once dry, use a fine-tip brush with black paint or a permanent marker to fill in the eyes and trace the smile line. -
Seal the piece:
Apply a coat of clear matte varnish to protect the clay from scratches and give it a professional finish. -
Prepare the wooden base:
While the varnish dries, sand the wooden plaque lightly to ensure a smooth surface. -
Assemble the stand:
Apply a generous amount of strong craft glue to the flat bottom of the clay whale. Press it firmly onto the center of the wooden plaque and let it cure completely before use.
Now you have a helpful little sea creature ready to keep your phone safe and visible on your desk