A clay cube is basically the perfect blank canvas—six tidy little “walls” that beg for texture, color, and personality. Here are my favorite clay cube ideas that keep the build simple but make the finished piece feel totally you.
Classic Clay Cube Lidded Box
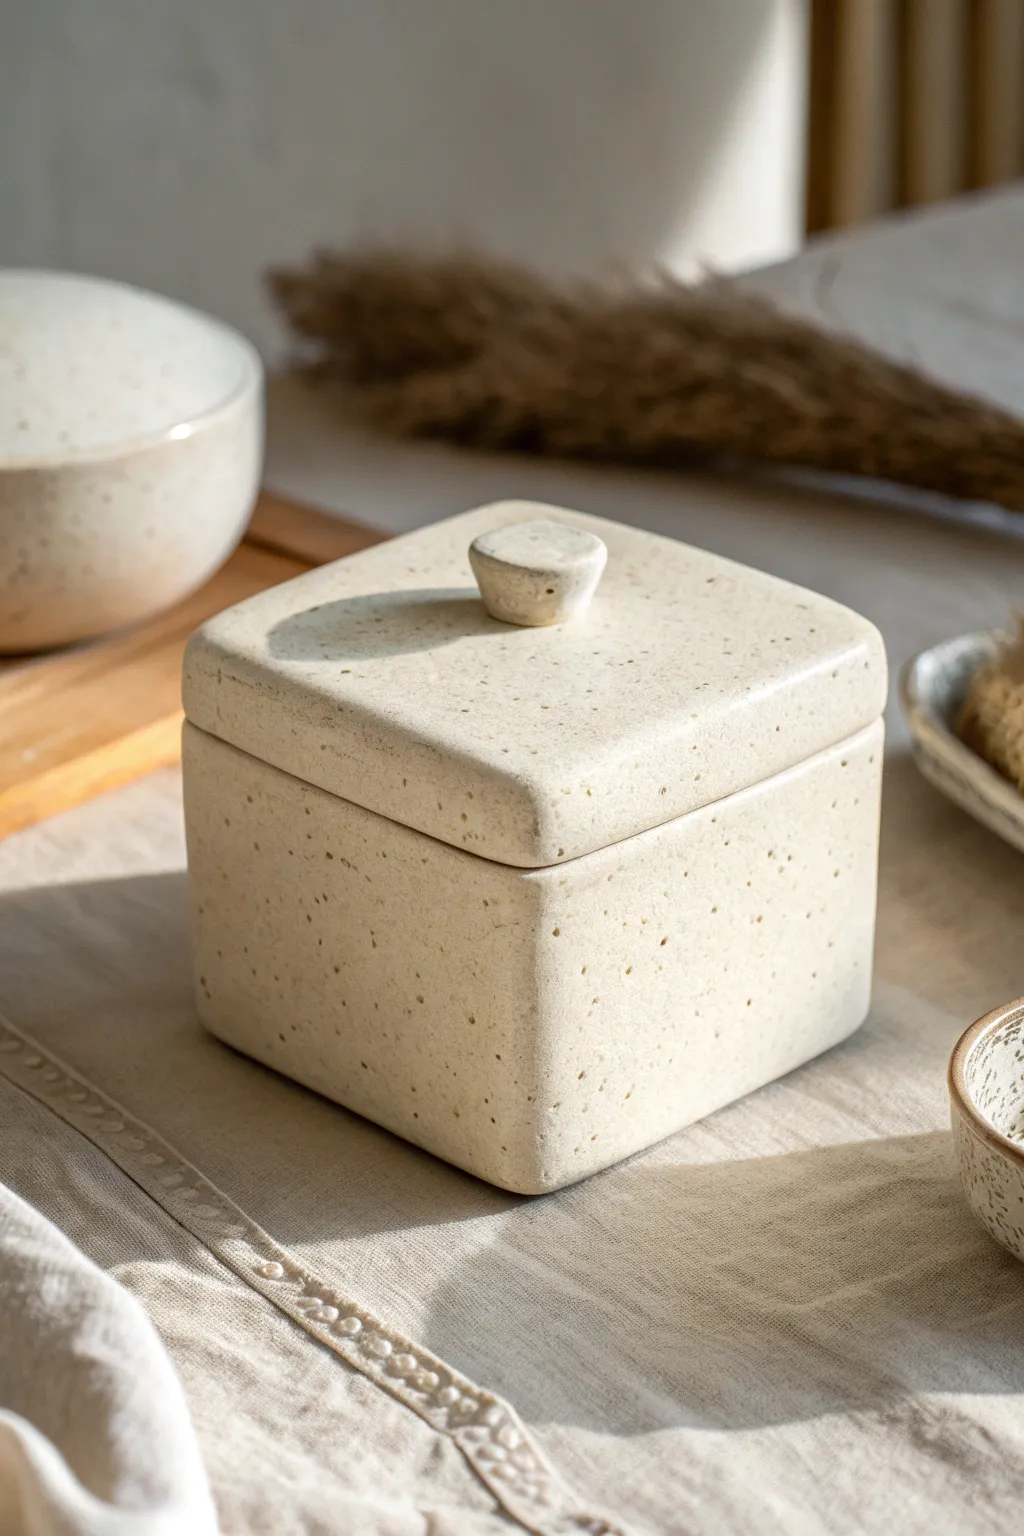
This minimalist lidded box features soft, rounded corners and a charming speckled finish that evokes natural stone. Perfect for storing trinkets or serving sugar, its simple geometry is achieved through precise slab building techniques tempered with hand-smoothing.
Detailed Instructions
Materials
- Speckled cream stoneware clay (e.g., groggy white)
- Rolling pin
- Two wooden guide strips (approx. 1/4 inch thick)
- Fettling knife or clay cutter
- Ruler and square
- Scoring tool or serrated rib
- Slip (clay and water slurry)
- Wooden paddle
- Damp sponge
- Mudtool rib (flexible)
- Matte white or clear glaze (depending on clay body)
Step 1: Preparing the Slabs
-
Roll the clay:
Wedge your speckled clay thoroughly to remove air bubbles. Place it between your wooden guide strips and roll it out into a consistent slab. The guides ensure an even thickness, which is crucial for box construction. -
Compress the slab:
Run a flexible rib over the surface of the clay in multiple directions. This compression aligns the clay particles, reducing the chance of warping later, and smooths out the canvas texture from the rolling surface. -
Let it firm up:
Allow the slab to dry to a ‘leather-hard’ state. You want it stiff enough to hold its shape when lifted, but soft enough to be cut and joined. I usually leave mine uncovered for about an hour, checking frequently.
Step 2: Cutting and Assembly
-
Measure your templates:
Using a ruler and square, mark out your pieces. You will need a base square (e.g., 4×4 inches) and four wall rectangles. The length of the walls needs to account for the thickness of the clay if you are doing butt joints, or cut them at 45-degree angles for mitered corners. -
Cut the pieces:
Slice the clay cleanly using a sharp fettling knife. For this specific look, I recommend slightly over-cutting and trimming later to ensure a tight fit. -
Score the edges:
Rough up all the edges that will touch one another using a serrated rib or needle tool. Scoring creates texture for the slip to grab onto. -
Apply slip and join:
Brush a generous amount of slip onto the scored edges. Press the first wall onto the base firmly. Repeat with the remaining three walls, adding a coil of clay into the interior corners for reinforcement. -
Paddle into shape:
Once all four walls are up, use a wooden paddle to gently tap the outside walls. This strengthens the joints and helps square up the form.
Warped Walls?
If your walls are bowing inward, your clay was likely too soft during assembly. Stuff the box with crumpled newspaper or foam to support the walls while they stiffen up.
Step 3: Creating the Interior Ledge
-
Add a flange:
For the lid to sit securely, you need a gallery or flange. Roll a small coil or cut a thin strip of clay and attach it to the interior top rim of the box, positioned about 1/4 inch down from the edge. -
Smooth the flange:
Blend this strip seamlessly into the interior walls so it looks like it was carved from a solid block. Ensure the top surface of this ledge is flat so the lid doesn’t wobble.
Pro Tip: Seamless Look
To barely see the seams, compress the corner joints with a pony roller or the back of a spoon before smoothing. This marries the clay particles deeper than just the surface.
Step 4: The Lid and Finishing Details
-
Cut the lid:
Measure the top opening of your box and cut a square slab to match perfectly. It should sit flush with the exterior walls. -
Form the knob:
Shape a small lump of clay into a tapered, organic cylinder. Flat on top and slightly wider at the top than the bottom, this geometric knob mirrors the box’s shape. -
Attach the knob:
Score the center of the lid and the bottom of the knob. Apply slip and press the knob firmly into place. Clean up any excess slip immediately with a brush. -
Round the edges:
The box in the image has soft, tactile edges. Use a slightly damp sponge or a soft rib to round over all sharp corners and rims. You want to remove that ‘sharp cheddar’ look of freshly cut slabs. -
Dry slowly:
Place the lid on the box with a piece of paper or plastic in between to prevent sticking. Wrap the entire piece loosely in plastic to let it dry very slowly, which prevents warping. -
Bisque fire:
Once bone dry, fire the piece to bisque temperature (usually cone 04). -
Glaze application:
Dip or spray the box with a matte or satin semi-transparent glaze. This allows the natural speckles of the clay body to show through, creating that stony texture. Avoid thick, opaque gloss glazes. -
Final firing:
Glaze fire to the maturity temperature of your clay (likely cone 5 or 6 for stoneware).
Enjoy using your beautifully understated ceramic box for treasures or table service


Straight-Seam vs. Offset-Seam Lid Cube
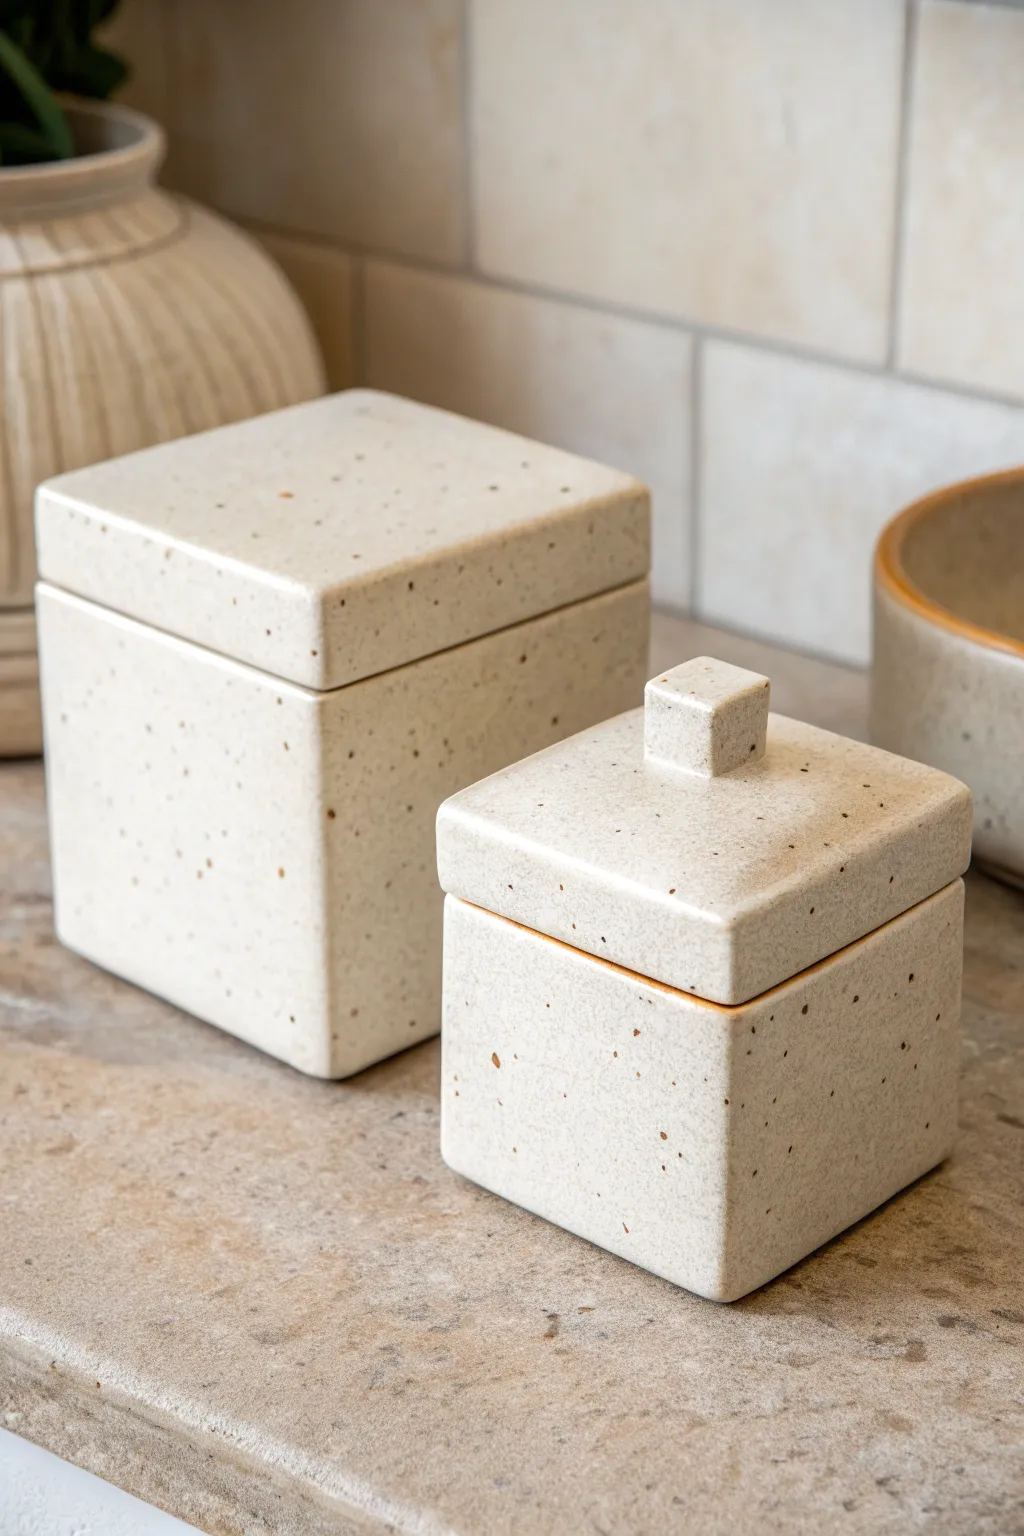
These elegant, square-sided vessels bring a modern, architectural feel to any vanity or countertop. With their earthy speckled finish and clean lines, they strike the perfect balance between functional storage and sculptural art.
Step-by-Step Guide
Materials
- White stoneware or polymer clay (approx. 2 lbs)
- Speckled clay additive or coarse sand (if not using pre-speckled clay)
- Rolling pin with guide rings
- Sharp clay blade or X-Acto knife
- Ruler or square template
- Slip and scoring tool (for stoneware) or liquid clay (for polymer)
- Smooth work surface or canvas mat
- Sponge and water
- Clear matte glaze (for stoneware) or matte varnish (for polymer)
- Kiln (for stoneware) or home oven (for polymer)
Step 1: Preparing the Slabs
-
Wedging and Mixing:
Begin by thoroughly wedging your clay to remove air bubbles. If you aren’t using a pre-speckled clay body, knead in your speckling additive or coarse sand now to achieve that natural, stony texture seen in the photo. -
Rolling Out:
Roll the clay out into a large, consistent slab. Aim for a thickness of about 1/4 inch (6mm). Using guide rings on your rolling pin helps ensure perfectly even walls, which is crucial for a geometric shape like a cube. -
Cutting the Walls:
For the larger cube, measure and cut five identical squares for the base and four walls. For a 4-inch cube, cut 4×4 inch squares. Repeat this process for the smaller cube using scaled-down dimensions (e.g., 2.5 inches). -
Cutting the Lids:
Cut two additional squares for the lids. These should be exactly the same dimensions as your base squares so they sit flush with the exterior walls. -
Adding Flanges:
To keep the lids secure, you’ll need an inner flange. Cut strips of clay about 1/2 inch wide. Measure them to fit just inside the perimeter of your lid squares, creating a ‘lip’ that will slide inside the box.
Clean Bevels
Cut wall edges at 45-degree angles before joining. This mitered joint creates a stronger bond and sharper, cleaner corners than butt joints.
Step 2: Assembling the Cubes
-
Scoring Edges:
Score the edges of your base and wall pieces where they will join. If using stoneware, apply slip; for polymer, a thin line of liquid clay works as adhesive. -
Building the Box:
Attach two opposite walls to the base first, pressing the seams firmly. Use a square tool inside the corners to ensure they stand at a perfect 90-degree angle. -
Completing the Structure:
Attach the remaining two walls. I like to reinforce the interior seams by rolling a very thin ‘snake’ of clay and pressing it into the joy, then smoothing it out completely. -
Smoothing Mechanics:
Use a rib or a straight edge to smooth the exterior seams until they are invisible. The goal is for the box to look like a solid block of stone. -
Lid Assembly:
Flip your lid squares over. Attach the flange strips you cut earlier, arranging them slightly indented from the edge so the lid will seat comfortably inside the box walls. Smooth these connections thoroughly.
Step 3: Detailing and Finishing
-
Creating the Knob:
For the smaller container, form a small solid cube of clay (approx. 0.75 inches). Score and slip the center of the smaller lid and attach this cube firmly as a handle. -
Refining Edges:
Once assembled, run a slightly damp sponge over all sharp corners to soften them just a hair—this prevents chipping later and gives that sophisticated ‘soft ceramic’ look. -
Drying:
Let the pieces dry slowly. Cover them strictly with plastic for the first day, then loosely for the next few days to prevent warping. -
Bisque Fire:
If using stoneware, fire to cone 04. If using polymer clay, bake according to the manufacturer’s instructions for the thickness of your clay. -
Glazing:
Apply a clear matte glaze to the exterior to highlight the natural speckles without adding shine. For the interior, a glossy white liner glaze makes cleaning easier. -
Final Fire:
Fire the final glaze kiln load. Ensure the lids are fired separately from the bases (or use wax resist on contact points) so they don’t fuse together.
Texture Play
Before the clay dries, gently press a piece of rough linen or canvas into the surface to give it a subtle, tactile woven texture beneath the glaze.
Place your finished geometric vessels together to create a stunning, serene vignette.

Wavy Cut-Line Clay Cube Box

This elegant cube box features a natural speckled stone finish enhanced by distinctive wavy lines that serve as both decoration and separation for the lid. The organic, flowing curves contrast beautifully with the geometric cube shape, while the gold inlay adds a touch of understated luxury.
Detailed Instructions
Materials
- Speckled polymer clay (e.g., Fimo Effect Granite or Premo Granite)
- Rigid tissue blade or clay slicer
- Flexible wavy blade
- Acrylic roller or pasta machine
- Square cookie cutter or square template
- Ruler
- Needle tool
- Gold acrylic paint
- Fine grit sandpaper (400 and 800 grit)
- Small paintbrush
- Oven (for curing)
- Cornstarch (optional release agent)
- Super glue or liquid clay (for joining)
- Rubbing alcohol
Step 1: Preparing the Base Form
-
Condition the Clay:
Begin by thoroughly conditioning your speckled clay until it is pliable and warmed up. This prevents cracks during forming. -
Create the Sheets:
Roll out the clay into an even sheet, roughly 1/4 inch thick. A pasta machine set to the thickest setting works perfectly here for consistency. -
Cut the Panels:
Using a square cutter or a template and ruler, cut out six identical squares of clay. These will form the top, bottom, and four sides of your cube. -
Miter the Edges:
For a seamless look, use your rigid blade to cut 45-degree bevels on all edges of the side panels where they will meet. Do not bevel the top and bottom panels yet.
Step 2: Assembling the Cube
-
Construct the Walls:
Join the four side walls together to form an open square tube. I like to score the mitered edges slightly and add a touch of liquid clay to ensure a strong bond. -
Attach the Base:
Place the bottom square panel onto the tube, blending the seams smoothly with a modeling tool or your finger. -
Attach the Top:
Repeat the process for the top panel, effectively sealing a hollow cube of air inside. Ensure all seams are blended perfectly so it looks like a solid block. -
Smooth the Form:
Gently rub all surfaces with a finger dipped in a little cornstarch to remove fingerprints and refine the sharp corners into softer, rounded edges.
Clean Cuts Pro Tip
Chill the assembled hollow clay cube in the refrigerator for 20 minutes before slicing the lid. Cold clay is firmer and distorts significantly less under the pressure of the blade.
Step 3: Creating the Wave Details
-
First Wave Cut (The Lid):
Locate a point about one-third of the way down from the top of the cube. Carefully use your flexible wavy blade to slice completely through the cube horizontally. This separates the lid from the base. -
Clean the Cut:
Gently separate the two pieces. If the clay deformed slightly during cutting, gently reshape the walls back into a perfect square alignment. -
Create the Inner Lip:
Roll a strip of clay and attach it to the inside rim of the bottom piece, projecting upwards. This ‘collar’ will hold the lid in place securely. -
Carve the Decorative Line:
On the bottom half of the box, use a needle tool or the wavy blade to gently carve a shallow groove that mimics the wave pattern of the lid cut. This is just surface decoration, not a through-cut. -
Bake Phase One:
Bake the separated lid and box according to your clay package instructions (usually 275°F/135°C for 30 minutes). Let them cool completely.
Level Up: Texture
Before baking, gently press a coarse sandpaper sheet or a clean toothbrush against the clay surface. This enhances the faux-stone effect and adds a tactile, realistic grit.
Step 4: Finishing Touches
-
Sanding:
Once cool, wet sand the exterior with 400 grit and then 800 grit sandpaper for a smooth, matte stone finish. Wipe away dust with a damp cloth. -
Gold Inlay Application:
Using a fine brush, paint gold acrylic into the decorative carved groove on the body and along the visible wavy edge where the lid meets the base. -
Clean Up Edges:
If painting outside the lines happens, quickly wipe the surface with a cloth dampened with a little rubbing alcohol before the paint sets. -
Final Seal (Optional):
If you want extra protection for the gold paint, apply a very thin layer of matte varnish over the painted areas only.
Place your new stone-effect box on a shelf to hide small treasures or organize your desk aesthetics


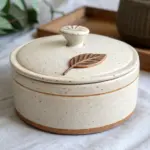
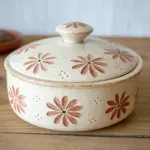
Flower-Top Lid Handle Cube
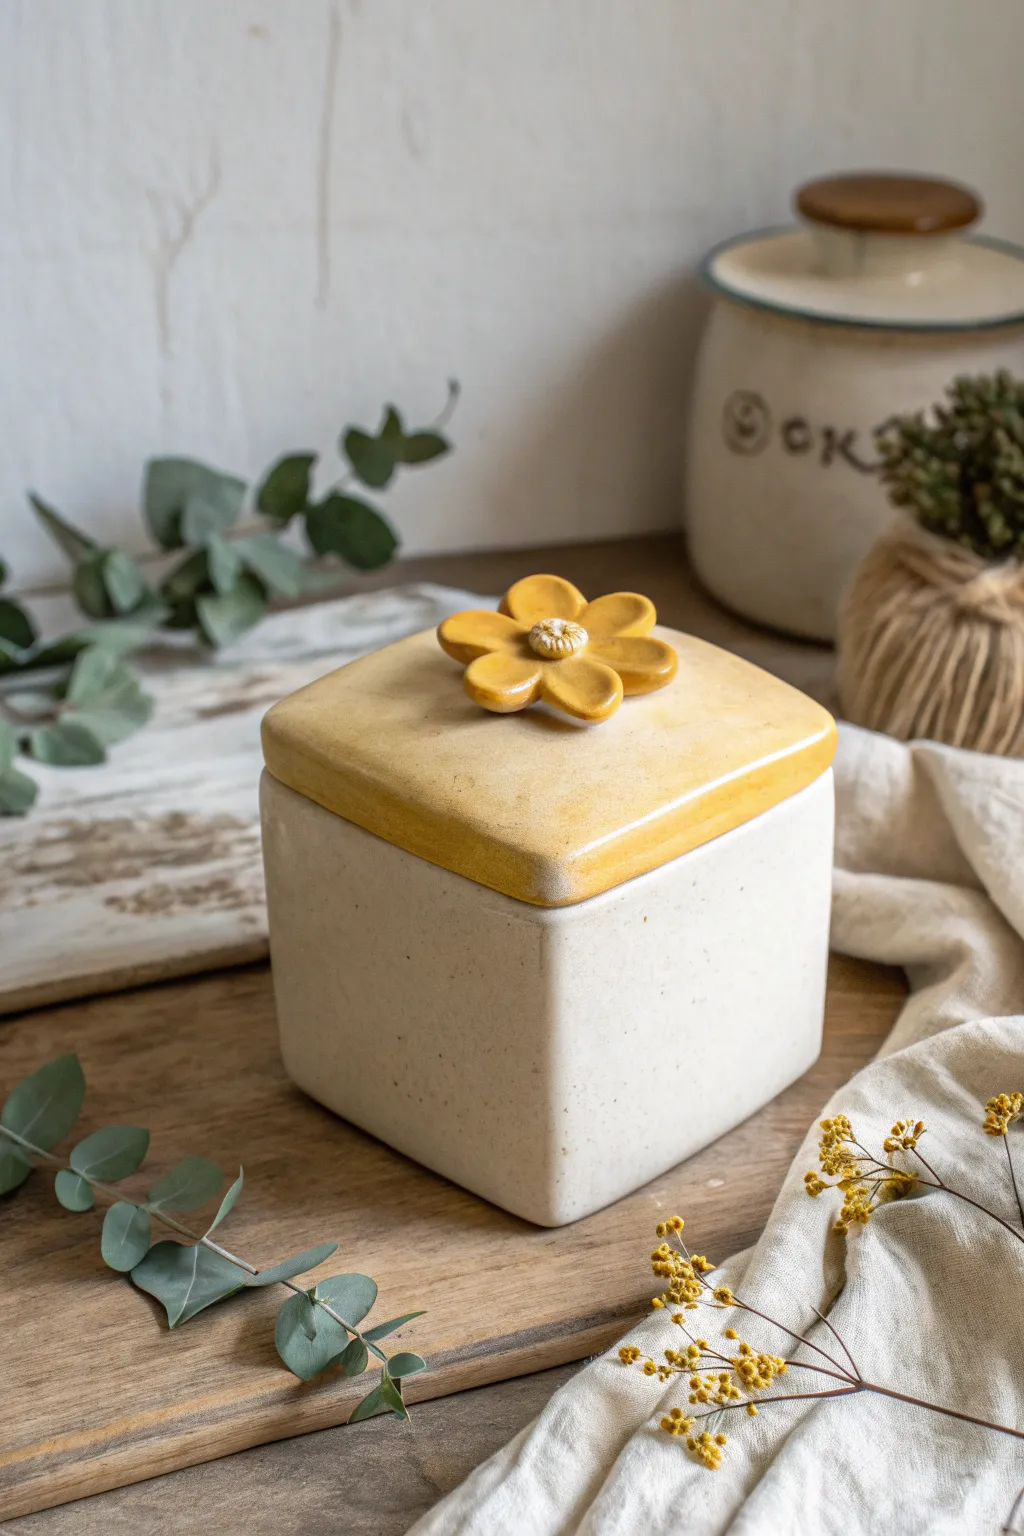
This charming ceramic cube features a speckled, creamy base and a warm yellow lid adorned with a sculpted flower handle. It combines simple slab-building techniques with delicate hand-modeling to create a functional piece perfect for storing trinkets or dry goods.
Step-by-Step Tutorial
Materials
- Speckled stoneware clay (or white clay with speckles added)
- Rolling pin
- Guide sticks (approx. 1/4 inch thickness)
- Ruler
- Fettling knife or needle tool
- Square template (paper or cardboard, approx. 4×4 inches)
- Slip and scoring tool (or serrated rib)
- Yellow underglaze or glaze (mustard tone)
- Clear or white glossy glaze
- Small sponge
- Modeling tools
Step 1: Building the Cube Base
-
Roll the Slabs:
Begin by rolling out your speckled clay to an even thickness of about 1/4 inch, using guide sticks to ensure uniformity. Smooth the surface with a rib to compress the clay particles. -
Cut the Walls:
Using your square template, cut out five identical squares from the slab. These will form the four walls and the bottom of your cube. -
Dry to Leather Hard:
Let the slabs sit until they reach a leather-hard state. They should be firm enough to hold their shape without bending but still soft enough to join. -
Bevel the Edges:
For cleaner corners, cut a 45-degree bevel on the vertical edges of your wall pieces and all edges of the base piece. This creates a stronger miter joint. -
Score and Slip:
Aggressively score the beveled edges and apply a generous amount of slip. This ‘glue’ is crucial for structural integrity during firing. -
Assemble the Cube:
Press the walls onto the base and against each other. Apply firm pressure to ensure a tight seal. I like to use a small coil of soft clay on the inside seams to reinforce the joints. -
Refine the Shape:
Use a paddle or flat board to gently tap the outside walls, ensuring they are perfectly straight and the cube is square. Smooth the outside seams so they disappear completely.
Uneven Lid?
If the lid rocks, place a piece of sandpaper on a flat surface and gently figure-8 the dry clay lid over it before firing to level the bottom.
Step 2: Creating the Lid
-
Cut the Lid Top:
Cut another square slab slightly larger than your cube’s opening to account for shrinkage and overhang. Smooth the edges nicely with a damp sponge. -
Add a Flange:
Flip the lid over. Measure the inside opening of your cube creates a small square coil or slab frame to attach to the underside of the lid. This flange prevents the lid from sliding off. -
Round the Corners:
Gently soften the sharp corners and top edges of the lid with your fingers or a sponge to give it that pillowy, handmade look seen in the photo.
Step 3: Sculpting the Flower Handle
-
Form the Petals:
Roll five or six small balls of clay. Flatten each into a teardrop shape to create petals. Keep them relatively thick and chunky for durability. -
Attach the Petals:
Score and slip the center of the lid. Arrange the petals in a circle, pressing them down firmly so they adhere to the lid surface. -
Create the Center:
Roll a small ball of clay for the flower center. Describe texture on it by poking it gently with a needle tool or pressing a piece of textured fabric into it. -
Attach the Center:
Score and slip under the center ball and press it firmly into the middle of the petals. Smooth out any visible connection points underneath the petals if possible.
Use Textured Clay
Swap smooth clay for a grogged body or heavy speckle clay. After glazing, the texture will break through the white glaze for a deeper rustic feel.
Step 4: Glazing and Finishing
-
Bisque Fire:
Once bone dry, fire the piece to bisque temperature (usually cone 04) to prepare it for glazing. -
Wax the Feet and Flange:
Apply wax resist to the bottom of the cube and the flange area where the lid touches the base to prevent the lid from sticking during the glaze firing. -
Glaze the Lid:
Apply a warm mustard-yellow glaze or underglaze to the top of the lid and the flower. If using underglaze, cover it with a clear coat after. -
Glaze the Base:
Dip or brush the base of the cube with a milky white or clear glaze that allows the clay’s natural speckles to show through. -
Final Fire:
Fire the piece to the maturity temperature of your clay and glaze (likely cone 5 or 6). Allow to cool slowly to prevent thermal shock.
Now you have a delightful, functional storage cube that brings a touch of nature indoors

The Complete Guide to Pottery Troubleshooting
Uncover the most common ceramic mistakes—from cracking clay to failed glazes—and learn how to fix them fast.
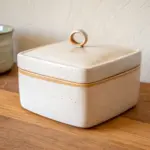
Geometric Knob Handle Clay Cube
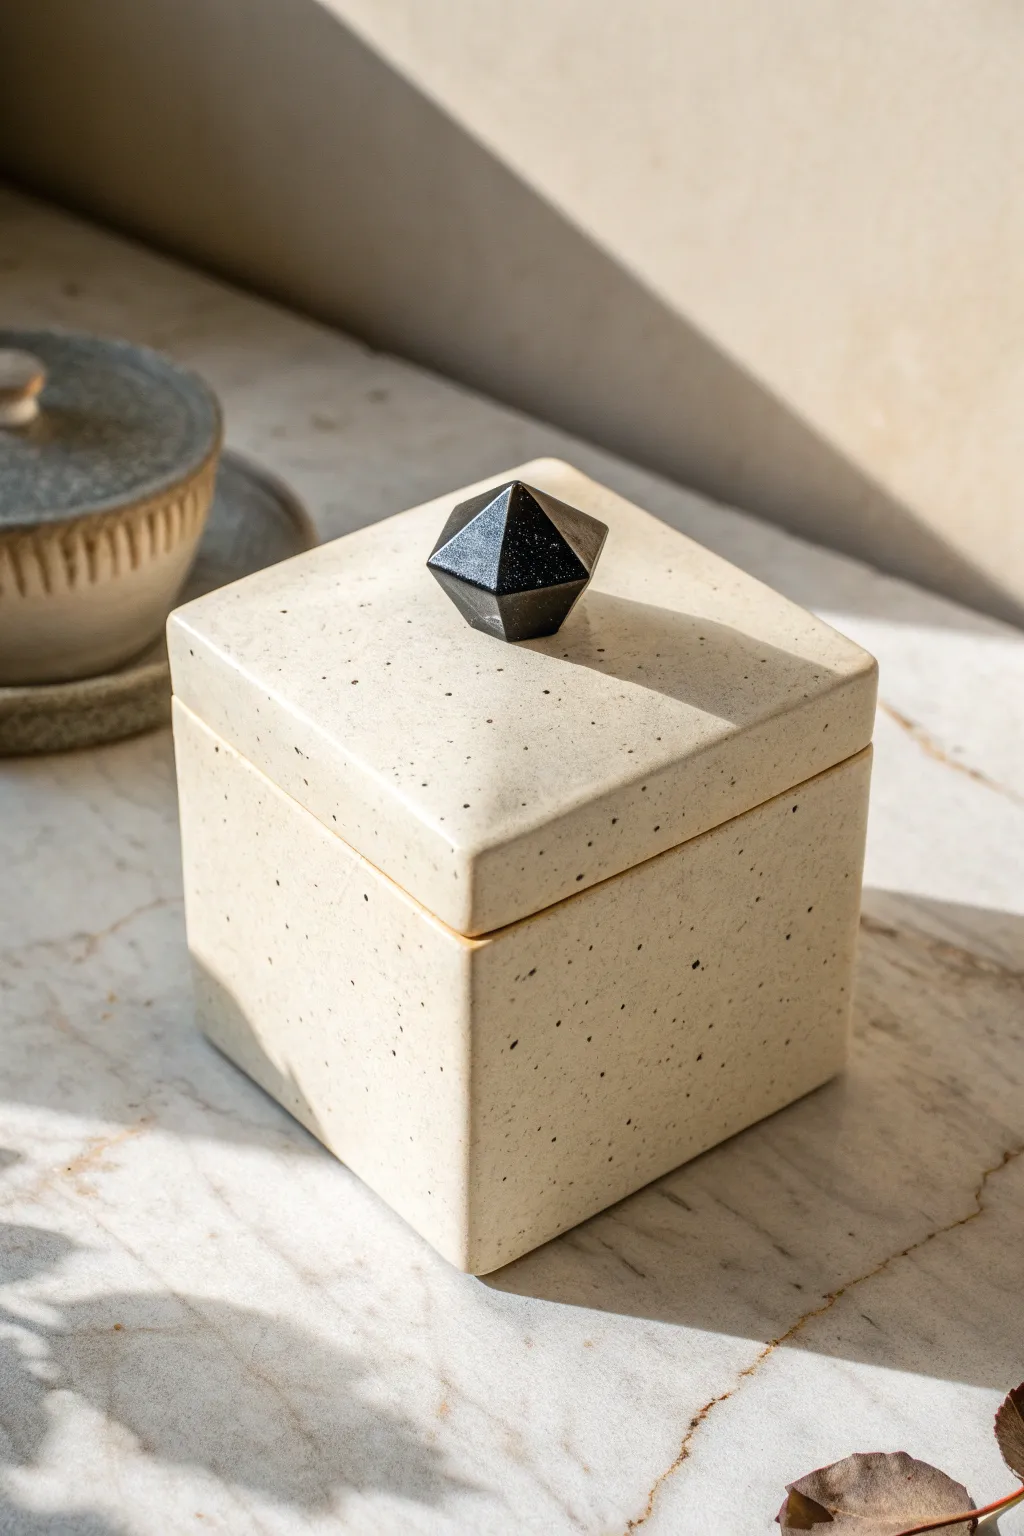
This minimalist stoneware box features a creamy, speckled finish paired with a striking, geometric black knob. The contrast between the smooth, pale vessel and the sharp, dark facets creates a sophisticated piece perfect for storing jewelry or trinkets.
Detailed Instructions
Materials
- Speckled buff stoneware clay
- Rolling pin with ¼ inch guide sticks
- Slab roller (optional)
- Sharp clay knife or fettling knife
- Ruler and set square
- Score and slip tool (serrated rib)
- Clay slip
- Small geometric silicone mold (gem shape)
- Black porcelain or black-stained clay
- Clear glossy glaze
- Sponge
- Kiln
Step 1: Forming the Cube Body
-
Roll the Slab:
Begin by wedging your speckled buff clay to remove air bubbles. Roll it out into a uniform slab that is approximately ¼ inch thick. Using guide sticks here ensures the walls of your box will be perfectly even. -
Measure and Cut:
Using a ruler and set square, measure out five identical squares. A 4-inch square is a good starting size. Cut these shapes precisely with your sharp knife, keeping the blade perpendicular to the table for straight edges. -
Bevel the Edges:
For the crispest corner joints, cut a 45-degree angle (miter) along the edges of your squares where they will join. Leave the bottom edges of the side panels flat, but bevel the sides and the perimeter of the base piece. -
Score and Slip:
Rough up the beveled surfaces with a serrated rib or needle tool. Apply a generous amount of clay slip to these scored areas. This ‘glue’ is crucial for strength. -
Assemble the Walls:
Attach two opposite side walls to the base first, pressing them firmly into place. Then, add the remaining two sides. Use a small coil of soft clay on the interior seams to reinforce the joints, blending it smooth with a modeling tool. -
Refine the Shape:
Once the basic cube is assembled, gently paddle the outside with a flat wooden paddle to sharpen the corners and ensure the walls are straight. Let this stiffen to leather-hard.
Step 2: Creating the Lid and Knob
-
Cut the Lid:
Measure the outer dimensions of your now-assembled box. Cut a square slab slightly larger than the box opening (about 1/8 inch overhang) or exactly flush, depending on your visual preference. The example image uses a flush fit. -
Create the Flange:
To keep the lid from sliding off, cut a smaller square or strips of clay to attach to the underside of the lid slab. This inner rim should fit loosely inside the box opening. -
Form the Geometric Knob:
For that perfect polyhedral shape, press a small ball of black porcelain or black-stained clay into a silicone gem mold. Alternatively, you can hand-carve a small block of black clay with a sharp knife once it’s leather hard to create the facets. -
Attach the Knob:
Find the exact center of your lid top. Score and slip both the underside of the black geometric knob and the center point of the lid. Press them together firmly. -
Clean Up:
Use a damp sponge to smooth all edges of the box and lid. I find that wrapping a sponge around my finger helps get into the interior corners without marring the surface.
Straight Edges Pro-Tip
Let the slabs stiffen to soft leather-hard BEFORE assembling. Wet slabs tend to slump, making it impossible to get those sharp, architectural 90-degree angles.
Step 3: Glazing and Firing
-
Bisque Fire:
Allow the piece to dry completely slowly, covered loosely with plastic to prevent warping. Fire to cone 04 (or your clay’s specific bisque temperature). -
Wax the Knob:
Apply a wax resist carefully to the black geometric knob. This will keep it unglazed, essentially leaving it matte or raw, providing a nice textural contrast against the glossy box. -
Apply Clear Glaze:
Dip the box and lid into a clear, glossy glaze. The clear glaze will seal the surface while allowing the natural speckles of the clay body to show through. -
Wipe the Feet:
Ensure the bottom of the box and the contact points where the lid meets the box are completely free of glaze. Use a clean sponge to wipe these areas thoroughly. -
Glaze Fire:
Place the lid separately from the box in the kiln (do not fire it on the box unless you have wicked the contact points perfectly or used alumina hydrate). Fire to the maturation point of your clay, likely cone 5 or 6.
Uneven Lid Troubleshooting
If the lid rocks or doesn’t sit flat after drying, gently sand the rim of the box on a flat surface with sandpaper while it is bone dry (greenware) before the first firing.
Now you have a sleek, modern storage vessel that highlights the beauty of simple geometric forms
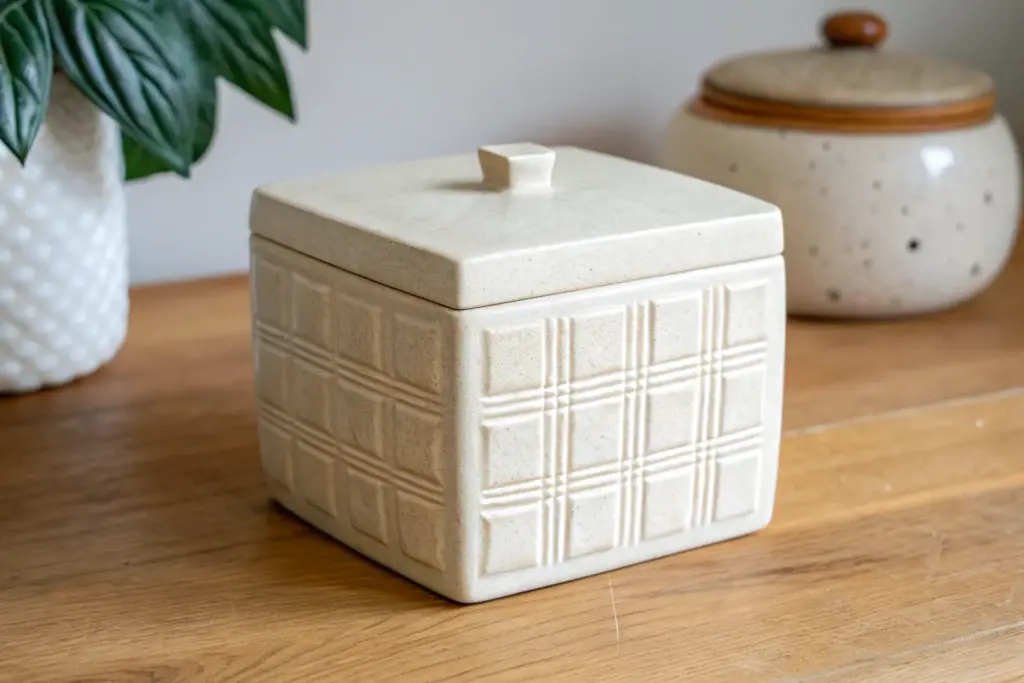
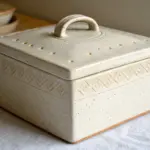
Carved Groove-and-Grid Clay Cube
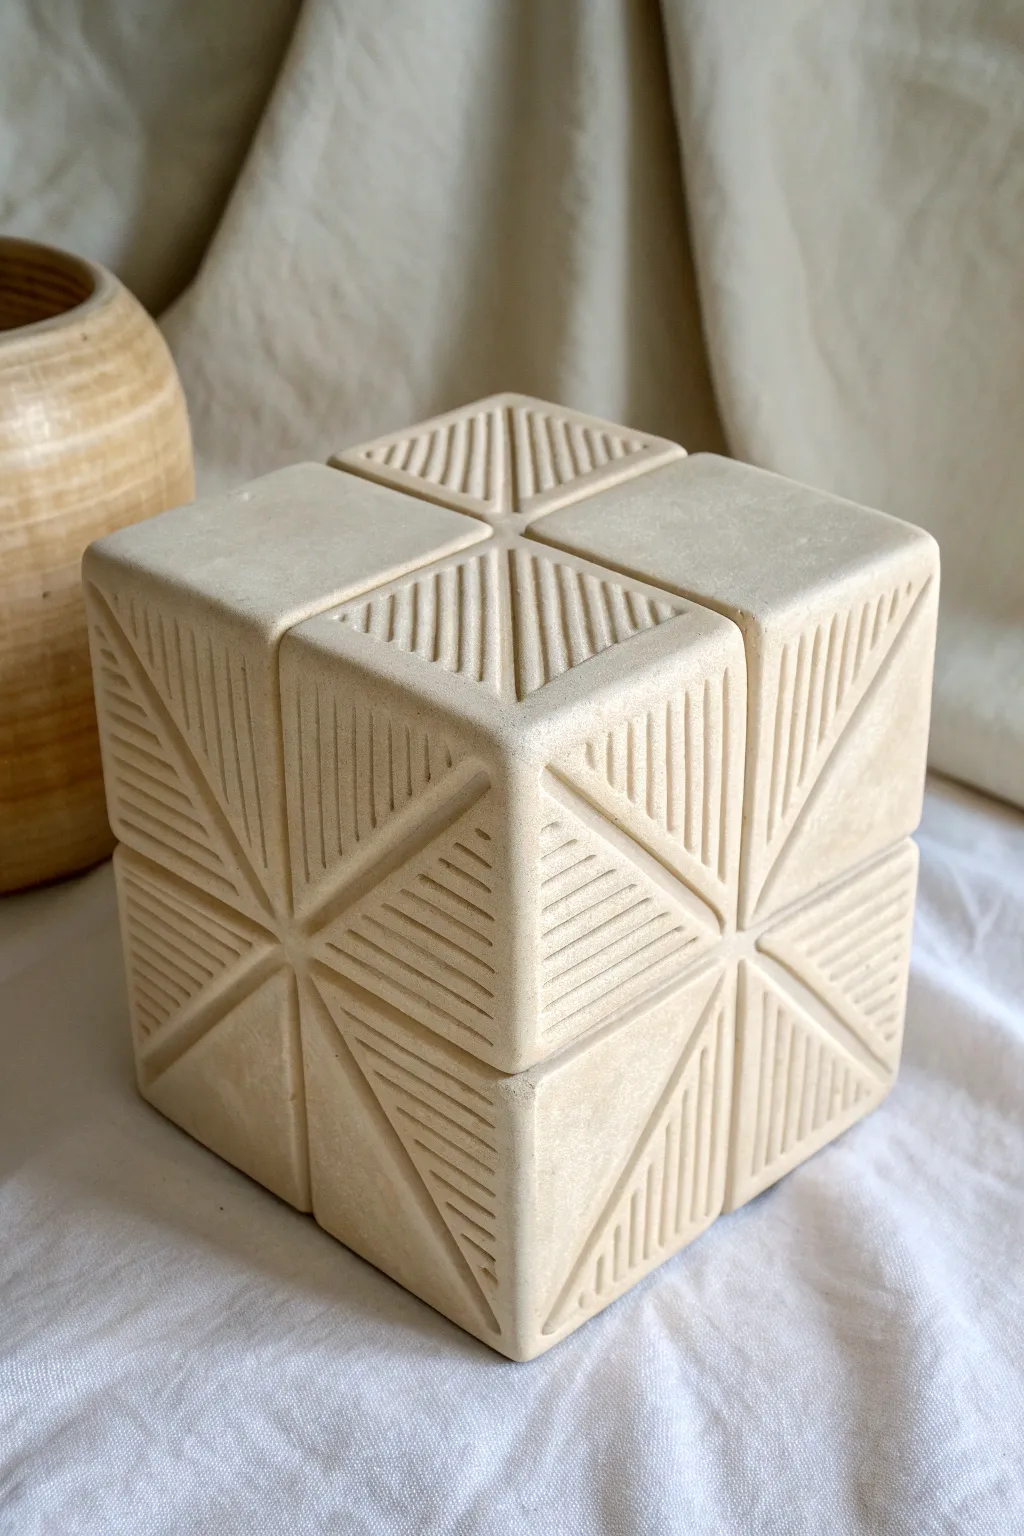
This sophisticated clay project transforms a simple geometric form into a stunning sculptural piece with deep, precise relief carving. The finished cube features a creamy, matte stone-like finish and an intricate pattern of intersecting triangles and parallel lines that play beautifully with light and shadow.
Step-by-Step Guide
Materials
- White sculpture clay or stoneware (smooth, no grog)
- Rolling pin and guide sticks (1/4 inch)
- Cutting mat or canvas board
- Fettling knife or sharp craft blade
- Ruler or set square
- Score and slip tool (needle tool + brush)
- Ribbon carving tools (square and V-tip)
- Loop tool for hollowing (optional)
- Rubber kidney rib
- Sponge and water
- Fine sandpaper
Step 1: Fomation & Construction
-
Prepare slabs:
Begin by rolling out your selected clay body into a consistent slab. Using 1/4 inch guide sticks ensures uniform thickness, which is crucial for even drying and preventing warping later. -
Cut the faces:
Using a ruler and your sharp blade, cut six identical squares. A standard 4×4 inch square works well for a manageable desktop sculpture, but you can scale this up if desired. -
Bevel the edges:
Carefully cut a 45-degree angle (miter) along the edges of all six squares. This allows them to join seamlessly at the corners, creating a sharper, more professional box shape than a simple butt joint. -
Score and slip:
Aggressively score the beveled edges and apply a generous amount of slip. I find that using a slightly thicker slip here acts almost like a glue, giving structural integrity to the box form. -
Assemble the box:
Join the sides together, pressing firmly to seal the seams. Work bottom-up, attaching four walls to the base first, then adding the lid. Use a wooden paddle to gently tap the walls straight and square. -
Refine the surface:
Once assembled, smooth the seams with a rubber rib until they disappear completely. The cube should look like a solid block. Pierce a tiny pinhole in the bottom to allow air to escape during firing.
Step 2: Drafting the Design
-
Grid layout:
Wait until the clay reaches ‘leather hard’ stage—firm but still carveable. Divide each face into four equal quadrants by lightly scribing a cross through the center. -
Diagonal divisions:
Within each of the four quadrants, draw a diagonal line from the center of the cube face to the outer corner. This creates the triangular base for your pattern. -
Deep channel marking:
Carve deep, straight channels along the main grid lines (the cross) to separate the quadrants. This gives the illusion that the cube is made of four smaller blocks joined together.
Uneven Drying?
If walls start bowing inward as they dry, your slab was likely too wet during assembly. Stuff the interior with crumpled newspaper before sealing the final side to support the shape from within.
Step 3: Carving & Detail
-
Establish the pattern:
The pattern alternates direction. In one triangle, the lines run horizontal; in the neighbor, they run vertical. Lightly sketch these parallel lines before committing to the cut. -
Carve the grooves:
Using a square-tipped ribbon tool or a V-gouge, carefully carve out the clay between your sketched lines. Maintain consistent depth and spacing for that uniform, architectural look. -
Clean the edges:
As you carve, small burrs of clay will accumulate. Wait until the clay is bone dry to brush these away, as trying to remove them while damp can smear the crisp lines. -
Smooth the plains:
Leave the triangular sections between the carved areas smooth and flat. Use a slightly damp sponge or the back of a spoon to burnish these uncarved areas for contrast.
Texture Play
Apply black underglaze into the carved grooves and wipe the surface clean with a damp sponge. This ‘inlay’ technique makes the geometric pattern pop dramatically.
Step 4: Finishing
-
Drying:
Cover the cube loosely with plastic for the first 24 hours to slow down drying, which prevents corner cracks. Then, unveil it and let it dry completely to the bone-dry stage. -
Bisque fire:
Fire the piece to bisque temperature (usually Cone 04). Since this design relies on shadow and texture, glazing isn’t strictly necessary if you used a beautiful clay body. -
Surface treatment:
For the finish seen in the photo, leave the raw clay unglazed or apply a very thin matte wash or underglaze that enhances the stone-like texture without filling in the grooves.
Place your geometric sculpture on a shelf where side lighting can accentuate the deep relief carving shadows


What Really Happens Inside the Kiln
Learn how time and temperature work together inside the kiln to transform clay into durable ceramic.
Sgraffito Doodle Clay Cube
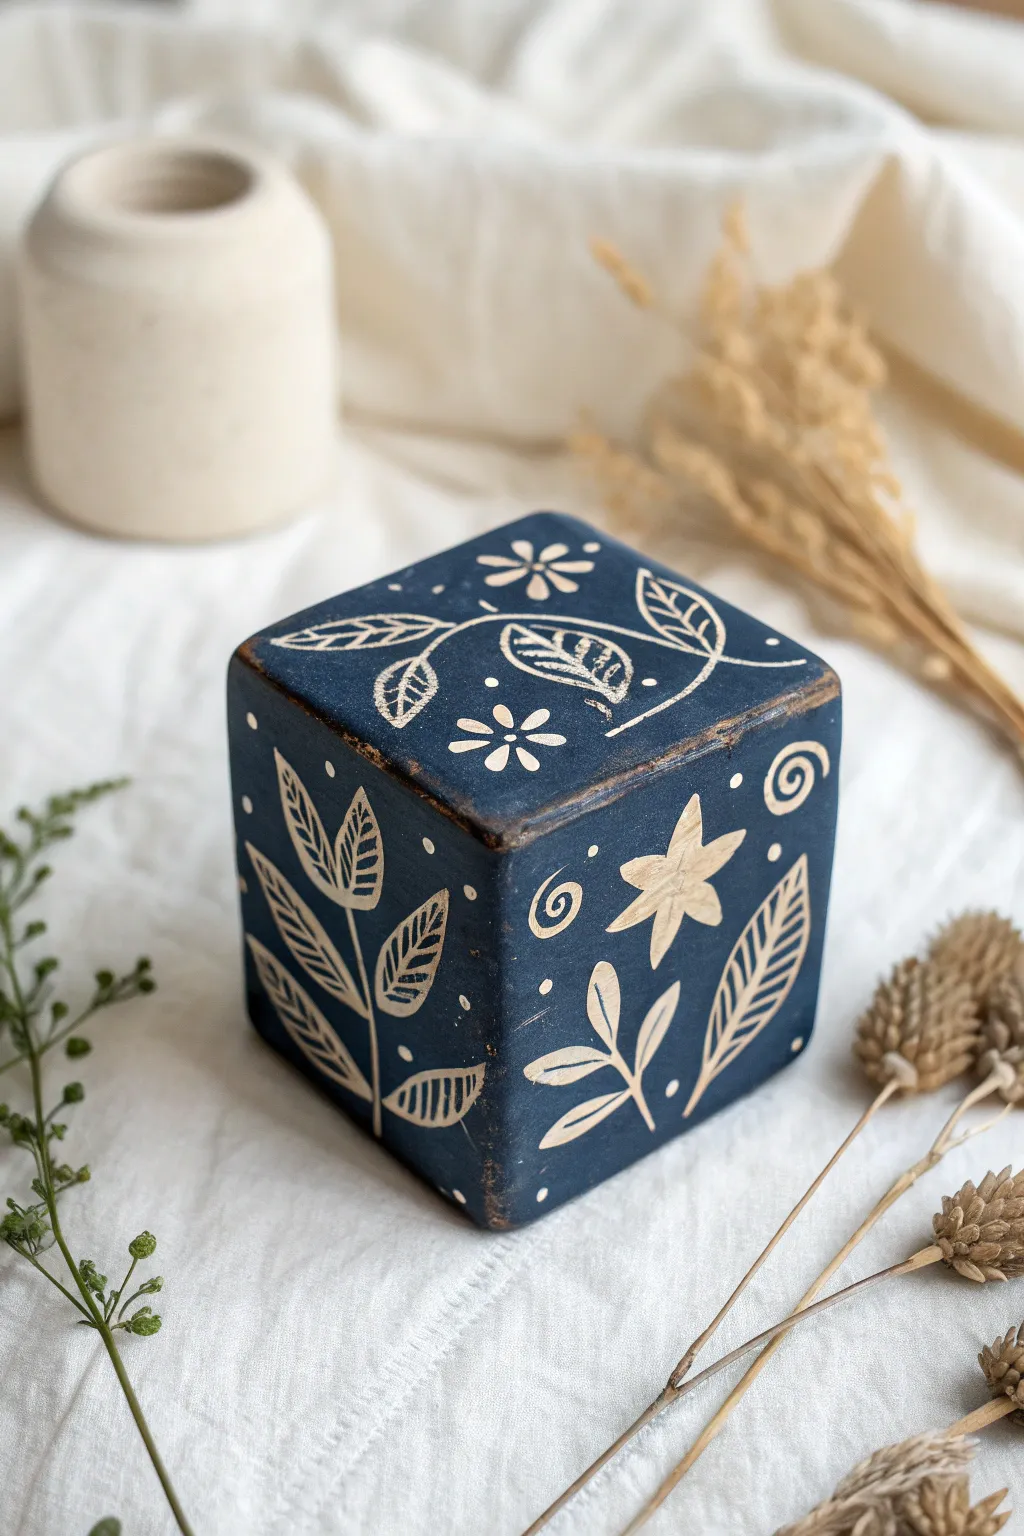
This charming project combines the sturdy geometric form of a block with delicate, folk-art-inspired floral doodles. By layering deeply pigmented slip over lighter clay and carving through it, you’ll achieve a striking contrast that feels both modern and handmade.
Detailed Instructions
Materials
- White stoneware or porcelain clay
- Rolling pin
- Fettling knife
- Ruler
- Dark blue decorating slip or underglaze
- Soft fan brush
- Sgraffito loop tool (small)
- Needle tool
- Scoring tool (or serrated rib)
- Slip (casting slip or vinegar water)
- Potter’s sponge
Step 1: Construction
-
Roll your slab:
Begin by rolling out your white clay on a canvas board to an even thickness of about 1/4 inch. For a cube like this, consistency is key, so using guide sticks or slat rails is really helpful. -
Plan your cuts:
You will need six identical squares to form a perfect cube. Using your ruler and needle tool, lightly mark out six 3×3 inch squares (or your preferred size) on the slab. -
Cut the walls:
Using the fettling knife, cut out your six squares. Keep the knife straight up and down to ensure 90-degree edges, which helps the seams fit snugly later. -
Check consistency:
Allow the clay squares to stiffen until they are ‘leather hard.’ They should be firm enough to hold their shape without bending but still soft enough to be scored and scratched. -
Bevel the edges:
For the crispest corners, cut a 45-degree bevel on all four interior edges of each square. This miter joint creates a much stronger and cleaner cube than simply overlapping the sides. -
Score and slip:
Rough up the beveled edges with a scoring tool and apply a generous amount of joining slip or vinegar. -
Assembly:
Press the walls together to form the cube. I find it easiest to build the four walls on top of the base first, adding the ‘lid’ square last. Use a paddle to gently tap the sides ensures everything is squared up. -
Refine the surface:
Smooth the seams with a rib or your finger. Don’t worry if the edges look a bit worn—that adds to the rustic charm—but make sure the faces are relatively smooth.
Step 2: Deco & Carving
-
Apply the blue:
Once the constructed cube is firmly leather hard, apply 2-3 coats of dark blue decorating slip or underglaze. Let each coat lose its sheen before applying the next to get solid, opaque coverage. -
Let it set:
Allow the blue layer to dry until it’s no longer tacky to the touch. If you carve too soon, the clay will pill up; too late, and it will chip. -
Sketch the design:
Using a very light touch with a dull pencil or the back of a needle tool, faintly map out your floral stems. Center your main flowers on the faces for a balanced composition. -
Carve the stems:
Using a small loop tool, carve out the main vine lines. Press just firmly enough to slice through the blue layer and reveal the white clay body underneath. -
Add the leaves:
Carve ovals attached to the stems. Inside the leaves, use the needle tool or a fine point carving tool to add the interior veins. Mixing thick outlines with thin details makes the design pop. -
Detail the flowers:
Carve out the petals for the star-shaped flowers and the smaller daisy motifs. For the solid petals, simply scrape away all the blue slip within the petal shape. -
The doodle accents:
Fill the negative space with tiny white dots, swirls, and spirals. These whimsical fillers give the piece its sketchbook doodle energy. -
Distress the edges:
Gently gently sandpaper or scrape the sharp corners of the cube to reveal a bit of the white clay. This faux-wear mimics the look of a vintage wooden block. -
Clean up:
Use a soft brush to sweep away the clay crumbs (burrs). Avoid wiping with a wet sponge, as this can smear the blue slip back into your clean white lines. -
Final steps:
Bisque fire the piece, then apply a clear matte glaze to seal it before the final glaze firing to cone 6 (or whatever temperature your clay requires).
Chipped Lines?
If your carving lines look jagged or chipped, your clay is likely too dry. Mist the cube lightly with water, wrap it in plastic tailored for 2-3 hours to rehydrate slightly, and try again.
Make it a Rattle
Before sealing the final side of your cube during construction, wrap a small ball of clay in newspaper and drop it inside. The paper burns away in the kiln, leaving a ceramic rattle.
Place your finished cube on a shelf or desk as a delightful piece of tactile art you made yourself
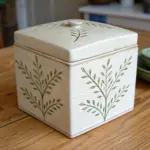
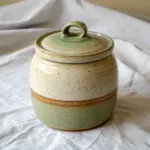
Slip-Trailed “Frosted” Clay Cube
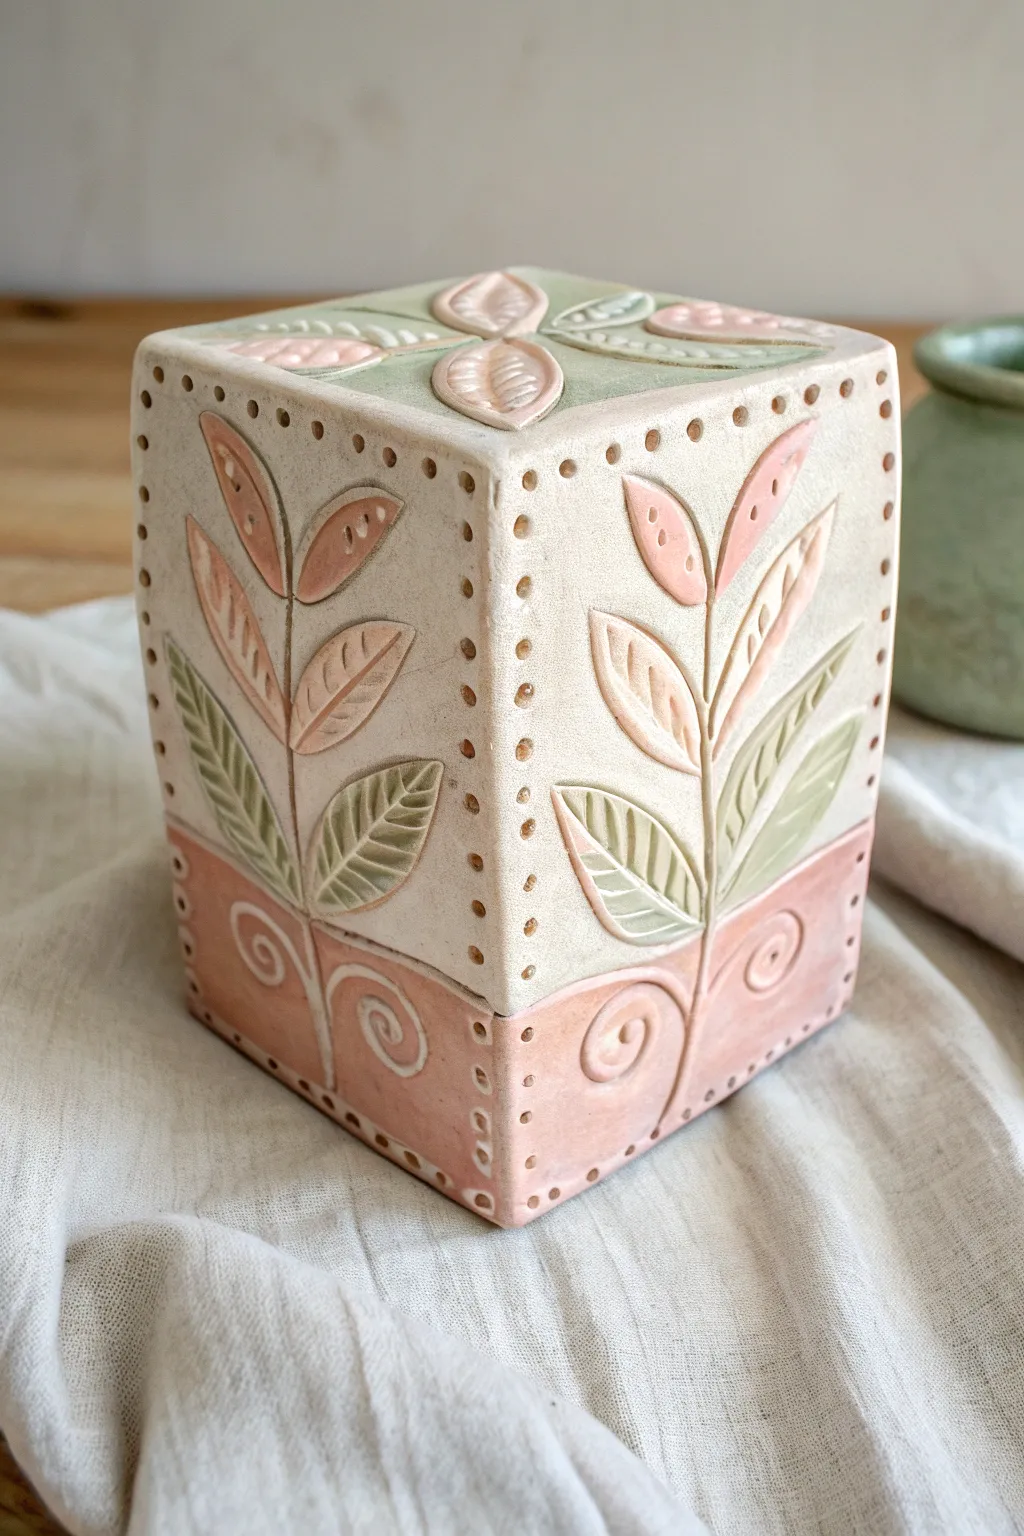
This charming ceramic cube combines crisp slab-building with delicate surface decoration reminiscent of folk art. With its soft pastel palette of sage greens and terracotta pinks against a creamy clay body, it creates a lovely sculptural object or a unique lidded box.
Step-by-Step
Materials
- White stoneware or porcelain clay body
- Rolling pin and guide strips (canvas covered)
- Fettling knife or creative cutter
- Scoring tool (serrated rib)
- Slip (made from your clay body)
- Underglazes (Sage Green, Salmon/Terracotta Pink)
- Loop carving tools (small and medium)
- Needle tool
- Small drill bit or hole punch tool (for the dots)
- Soft synthetic brushes
- Sponge
- Clear matte glaze (optional)
Step 1: Slab Construction
-
Roll your slabs:
Begin by rolling out a consistent slab of white stoneware clay, approximately 1/4 inch thick. Compress the clay on both sides with a rib to align the particles and prevent warping later. -
Cut the templates:
Using a paper template or ruler, cut six identical squares. For a 4-inch cube, ensure your cuts are perfectly straight and perpendicular. Let these slabs stiffen to a soft leather-hard stage so they can hold their weight. -
Bevel the edges:
For the crispest corners, bevel the edges of all your squares at a 45-degree angle. This allows for a stronger miter joint that hides the seam better than a butt joint. -
Assemble the walls:
Score and slip the beveled edges thoroughly. Assemble four walls first, pressing the joints firmly together. Use a small coil on the interior seams to reinforce them, smoothing it out completely. -
Add top and bottom:
Attach the bottom and top slabs using the same score-and-slip method. Once the box is sealed, gently paddle the exterior with a wooden paddle to sharpen the square shape and ensure straight walls.
Step 2: Drafting and Carving
-
Map the design:
Lightly sketch your design onto the leather-hard clay using a needle tool or soft pencil. Draw a horizontal line separating the bottom third (the ‘pot’ section) from the top area where the botanical leaves will grow. -
Carve the relief:
Using a small loop tool, carve away the background around your leaf shapes and the dividing line. You want the leaves and the bottom band to remain raised while the area around them is recessed slightly. -
Incise details:
Switch to a sharp needle tool or a very fine v-tip carving tool. Carve the veins inside the leaves and the swirling flourish designs on the bottom pink band. Keep your lines confident and flowing. -
Create the dotted border:
Along every vertical corner edge and horizontal border, create a row of small, uniform indentations. You can use a dull pencil tip, the back of a drill bit, or a specialized dotting tool for this texture.
Use a Balloon
Trapped air supports the shape! Build the box fully sealed. The air inside prevents walls caving in while you work. Cut a tiny vent hole only when you are done decorating.
Step 3: Color and Finish
-
Apply underglaze colors:
Once the carving is clean and any burrs are sponged away, apply your underglazes. Paint the bottom band and the top floral elements in a soft salmon pink. Use a sage green for the lower leaves on the vertical sides. -
Refine the contrast:
I like to carefully wipe back any underglaze that strayed onto the background ‘white’ areas with a damp, clean brush. This enhances the contrast between the colored relief and the raw clay body. -
Bisque fire:
Allow the cube to dry slowly under loose plastic to prevent corner cracking. Once bone dry, bisque fire the piece to Cone 04 (or your clay’s appropriate temp). -
Glazing:
For the finish shown, apply a thin coat of clear matte glaze. Alternatively, you can leave the exterior unglazed if your clay body vitrifies nicely, simply waxing the pot to seal it for a raw, stone-like texture. -
Final wipe:
If glazing, ensure the dotted indentations aren’t completely flooded with glaze, which might obscure the texture. Wipe the foot clean and fire to your final temperature.
Lidded Variation
Turn this into a functional jar by slicing the top inch off with a wire cutter *after* the cube is fully assembled but before decorating. Add a gallery flange inside to keep the lid secure.
Display your botanical cube on a shelf where its tactile surfaces and gentle geometry can be fully appreciated

TRACK YOUR CERAMIC JOURNEY
Capture glaze tests, firing details, and creative progress—all in one simple printable. Make your projects easier to repeat and improve.
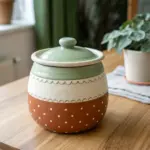
Color-Blocked Clay Cube Sides
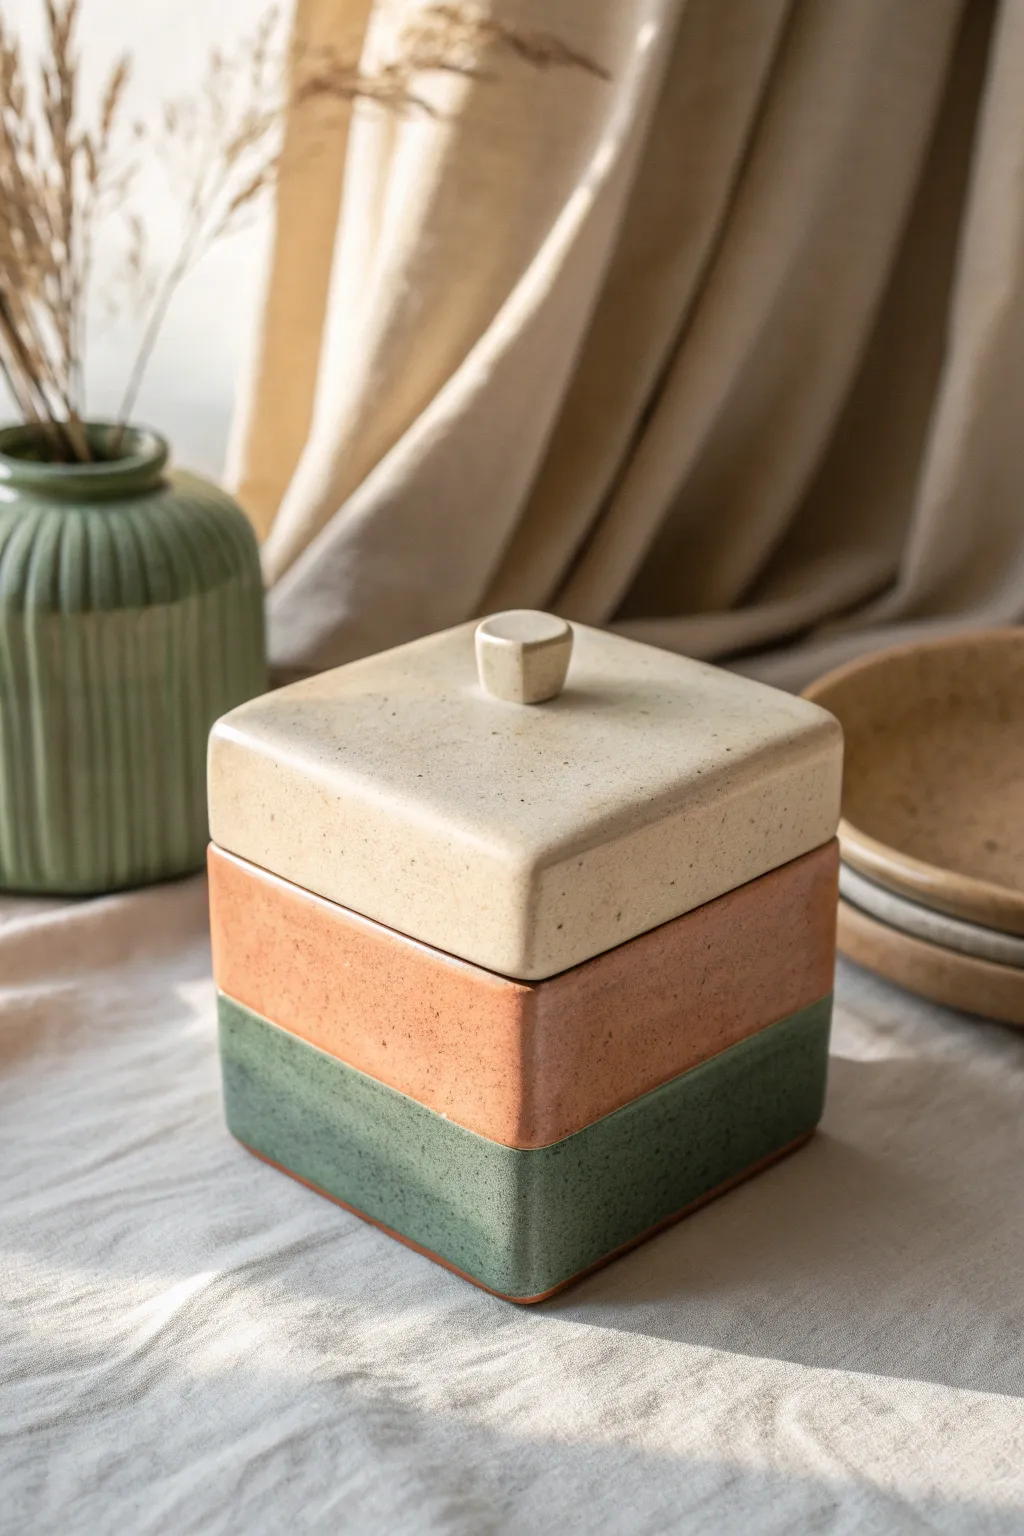
This elegant square stacking vessel brings a touch of modern earthiness to your decor with its distinct color-blocked layers. By using colored slips or three different clay bodies, you’ll create a seamless gradient from deep sage green through warm terracotta to a creamy speckled beige.
How-To Guide
Materials
- Three clay bodies (or white clay + mason stains): Sage Green, Terracotta, Cream/Beige
- Rolling pin
- Two wooden thickness strips (approx. 1/4 inch)
- Square template (paper or cardboard, approx. 4×4 inches)
- Fettling knife or X-Acto blade
- Scoring tool and slip
- Ruler
- Smoothing rib (rubber or metal)
- Sponge
- Small knob mold or sculpting tool
- Clear matte glaze
Step 1: Preparing the Slabs
-
Prepare your clay colors:
If you aren’t using pre-colored clay types, mix mason stains into plain white stoneware clay. You’ll need a sage green batch, a terracotta orange batch, and a speckled cream batch. -
Roll out the slabs:
Using your wooden guide strips to ensure even thickness, roll out slabs of each of the three clay colors. Aim for a thickness of about 1/4 inch for sturdy walls. -
Cut the clay strips:
Using a ruler and fettling knife, cut long rectangular strips from each color slab. The height of the strips depends on how tall you want each color block to be; for this look, aim for roughly 1.5 inches per color. -
Cut the base and lid:
Using your square template, cut one square from the green clay (for the base) and one square from the cream clay (for the lid). -
Condition the edges:
Wait until the clay reaches a ‘soft leather hard’ stage before assembling. This prevents sagging while still allowing for strong attachments.
Step 2: Construction & Assembly
-
Assemble the bottom tier:
Take the green strips and cut them to fit the perimeter of your green base. Miter the corners at a 45-degree angle for a cleaner seam. -
Score and slip the base:
Rough up the edges of the base and the bottom of the green wall strips. Apply slip, then press the walls firmly onto the base. -
Reinforce the bottom seams:
Use a thin clay coil on the interior seam where the wall meets the floor, blending it smooth with a modeling tool. -
Add the middle tier:
Score the top rim of the green walls. Prepare your terracotta orange strips, mitering the corners. Apply slip and stack this orange layer directly onto the green rim. -
Add the top tier:
Repeat the previous step with the cream-colored clay strips, building the final layer on top of the terracotta section. -
Blend the exterior vertical seams:
On the corners where walls meet, blend the clay together firmly. Be careful not to smear the different colors into each other too much horizontally; clean your tool between color zones.
Clean Color Lines
When smoothing the horizontal seams between colors, use a soft flat brush slightly dampened with water rather than a rib to avoid smearing the colors.
Step 3: Finishing Touches
-
Refine the shape:
Use a flat paddle or board to gently tap the sides of the box. This compresses the walls and ensures the cube is perfectly square. -
Smooth the surface:
Run a damp sponge or rubber rib over the exterior. I like to work horizontally within each color band first to avoid dragging green clay up into the cream section. -
Make the lid:
Take your cream square slab. To keep it from sliding off the finished pot, add a small, interior flange (a smaller square of clay) on the underside. -
Attach the knob:
Roll a small ball of cream clay and tap it into a slightly tapered cylinder shape. Score and slip the center of the lid, then attach this knob securely. -
Final drying and bisque:
Dry the piece slowly, preferably covered loosely with plastic for a few days to prevent warping at the seams. Bisque fire according to your clay’s specifications. -
Glazing:
Apply a clear matte glaze to the interior for functionality. For the exterior, you can leave the raw clay unglazed for texture, or use a very thin matte clear coat to enhance the colors.
Warping Walls?
If your square walls start bowing inward or outward during drying, place a foam block or crumpled newspaper inside the box to support the shape.
Now you have a stunning geometric vessel perfect for storing small treasures or simply admiring on a shelf
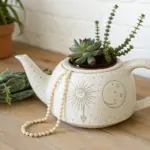
Cube Planter With a Drain Hole
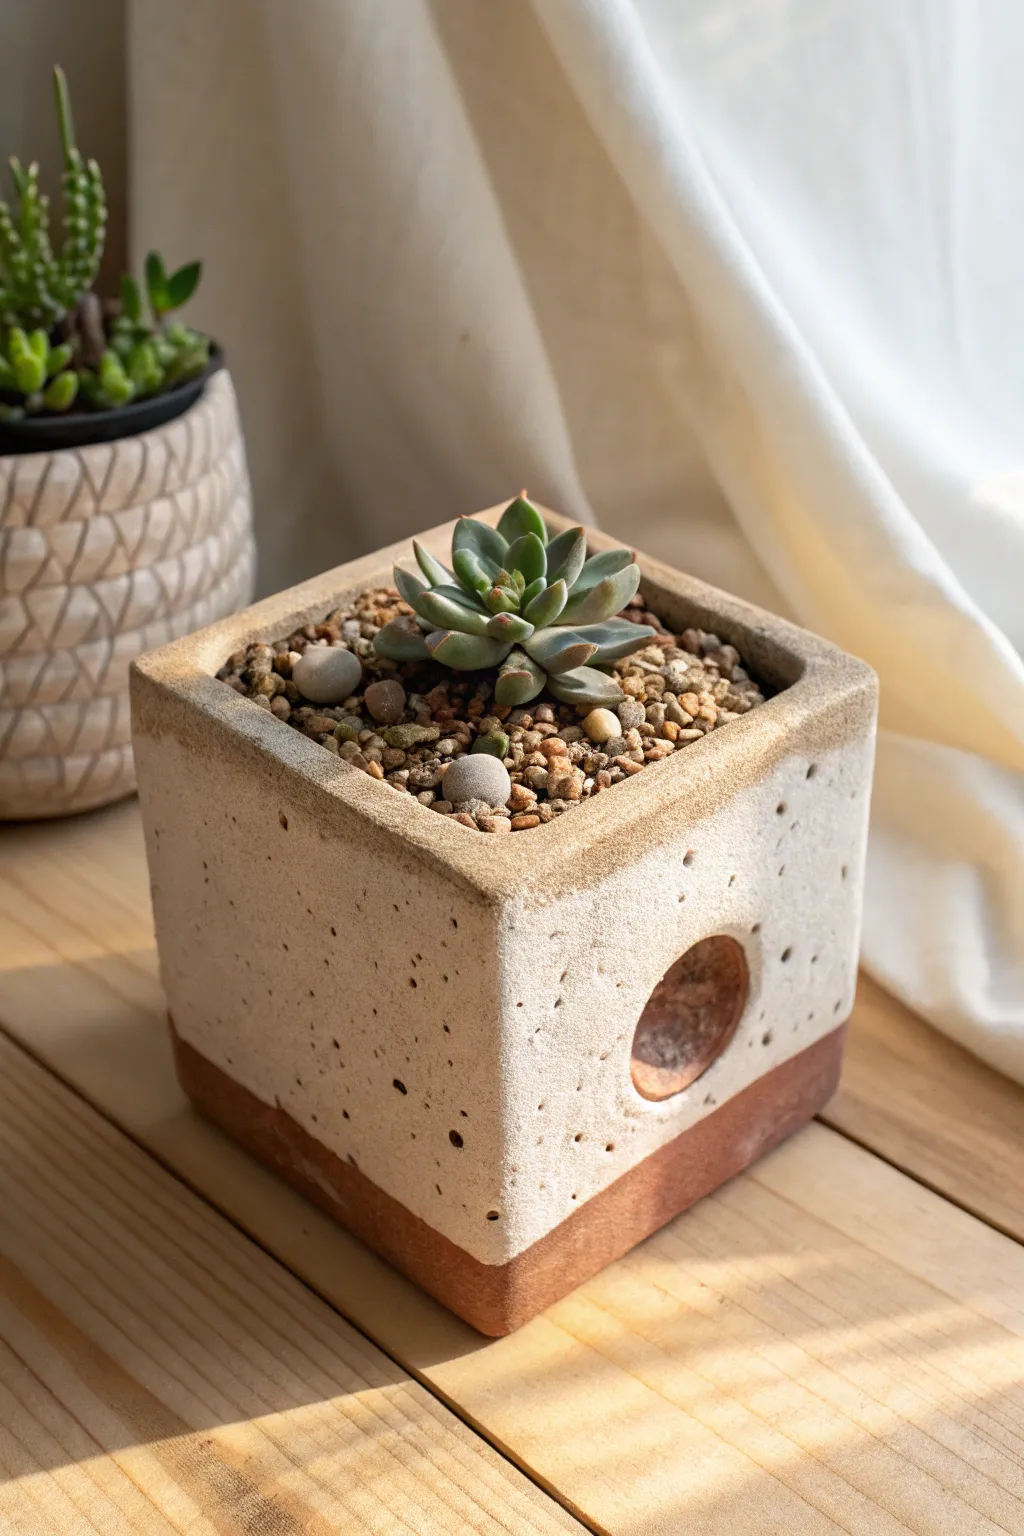
This geometric planter combines raw, speckled stoneware texture with warm terracotta accents for a modern, earthy look. The unique side cutout adds structural interest while the cube shape provides a perfect home for your favorite succulents.
Step-by-Step Tutorial
Materials
- Speckled buff stoneware clay (or polymer clay with faux speckles)
- Terracotta colored clay or underglaze
- Rolling pin
- Two 1/4-inch wooden slats (thickness guides)
- Ruler
- Needle tool or fettling knife
- Circular cookie cutter (approx. 1 inch)
- Scoring tool or serrated rib
- Slip (clay and water mixture)
- Sponge
- Small paintbrush
Step 1: Preparing the Slabs
-
Roll the main slab:
Begin by wedging your speckled buff clay to remove air bubbles. Place the clay between your two wooden thickness guides and roll it out into a long, even slab. -
Measure and cut walls:
Using your ruler and needle tool, measure and cut a long rectangle that will form the four walls. The height should be the desired height of your cube (e.g., 4 inches). The length needs to be four times the width plus a little extra for joining. -
Create the texture:
If your clay isn’t naturally gritty, you can gently press a piece of coarse sandpaper or a rough stone against the surface to create that pitted, organic texture seen in the photo. -
Cut the base:
Cut a separate square slab for the bottom of the planter. Make sure it is slightly smaller than the outer dimensions of your walls so the walls can sit around it or on top of it, depending on your preferred construction method.
Clean Corner Tip
When joining slab walls, cut the ends at a 45-degree bevel angle (miter joint). This creates a stronger seamless corner than a simple butt joint and hides the connection line.
Step 2: Assembling the Cube
-
Form the walls:
Stand the long rectangle up on its edge. Gently score the clay at the points where the corners will be, then fold it into a square shape. -
Join the seam:
At the corner where the two ends meet, score both edges thoroughly and apply a generous amount of slip. Press them firmly together. -
Attach the base:
Score the bottom edges of your wall frame and the outer edges of your base square. Apply slip and press the walls onto the base. Use a modeling tool to smooth the interior seam to ensure it is watertight. -
Refine the shape:
Use a flat wooden paddle to gently tap the exterior walls. This helps straighten the sides and sharpen the 90-degree corners.
Step 3: Adding Details
-
Cut the feature hole:
Choose one side of the cube to be the front. Position your small circular cutter slightly below the center line and to the right. Press gently to cut a clean hole through the wall. -
Smooth the cutout:
I find that using a slightly damp finger to smooth the sharp edges of the circle cutout immediately creates a more finished, professional look. -
Prepare the accent clay:
Roll out a thin strip of terracotta-colored clay. Alternatively, if you are glazing later, you can mask off the bottom section. However, using colored clay creates the most authentic two-tone effect. -
Apply the bottom trim:
Score the bottom 3/4 inch of the planter’s exterior. Wrap the thin terracotta strip around the base, pressing firmly to adhere it. Blend the seam where the strip ends. -
Add the top rim:
If you want the top rim to have that warm, toasted look, you can either apply a very thin coil of terracotta clay to the lip or simply use a sponge with iron oxide wash or stain later. For this project, applying a thin specific iron-wash to the rim before firing works best. -
Texture the accents:
Gently tap the new terracotta bottom trim with a stiff brush to match the gritty texture of the main body so it doesn’t look too smooth and separate.
Troubleshooting Warping
If your cube walls start to bow inward while drying, place a crumpled ball of newspaper inside the planter to gently support the walls until the clay stiffens.
Step 4: Finishing Touches
-
Drill drainage:
Don’t forget the plants’ health. Flip the cube over and use a hole cutter or drill bit to create a drainage hole in the center of the bottom slab. -
Dry slowly:
Loosely cover the planter with plastic. Let it dry very slowly over several days to prevent the flat walls from warping or cracking at the seams. -
Bisque fire:
Once bone dry, fire the piece to bisque temperature (usually vertically cone 04). -
Glaze interior (optional):
To keep the outside matte and raw, pour a clear glaze only on the inside of the planter, swirling it around and pouring out the excess. -
Final firing:
Fire to the maturation temperature of your specific clay body (likely cone 5 or 6 for stoneware). The heat will bring out the natural speckles in the buff clay.
Once kiln-fired and cooled, your geometric planter is ready to be filled with gritty soil and a striking succulent.
Cutout Lantern Clay Cube
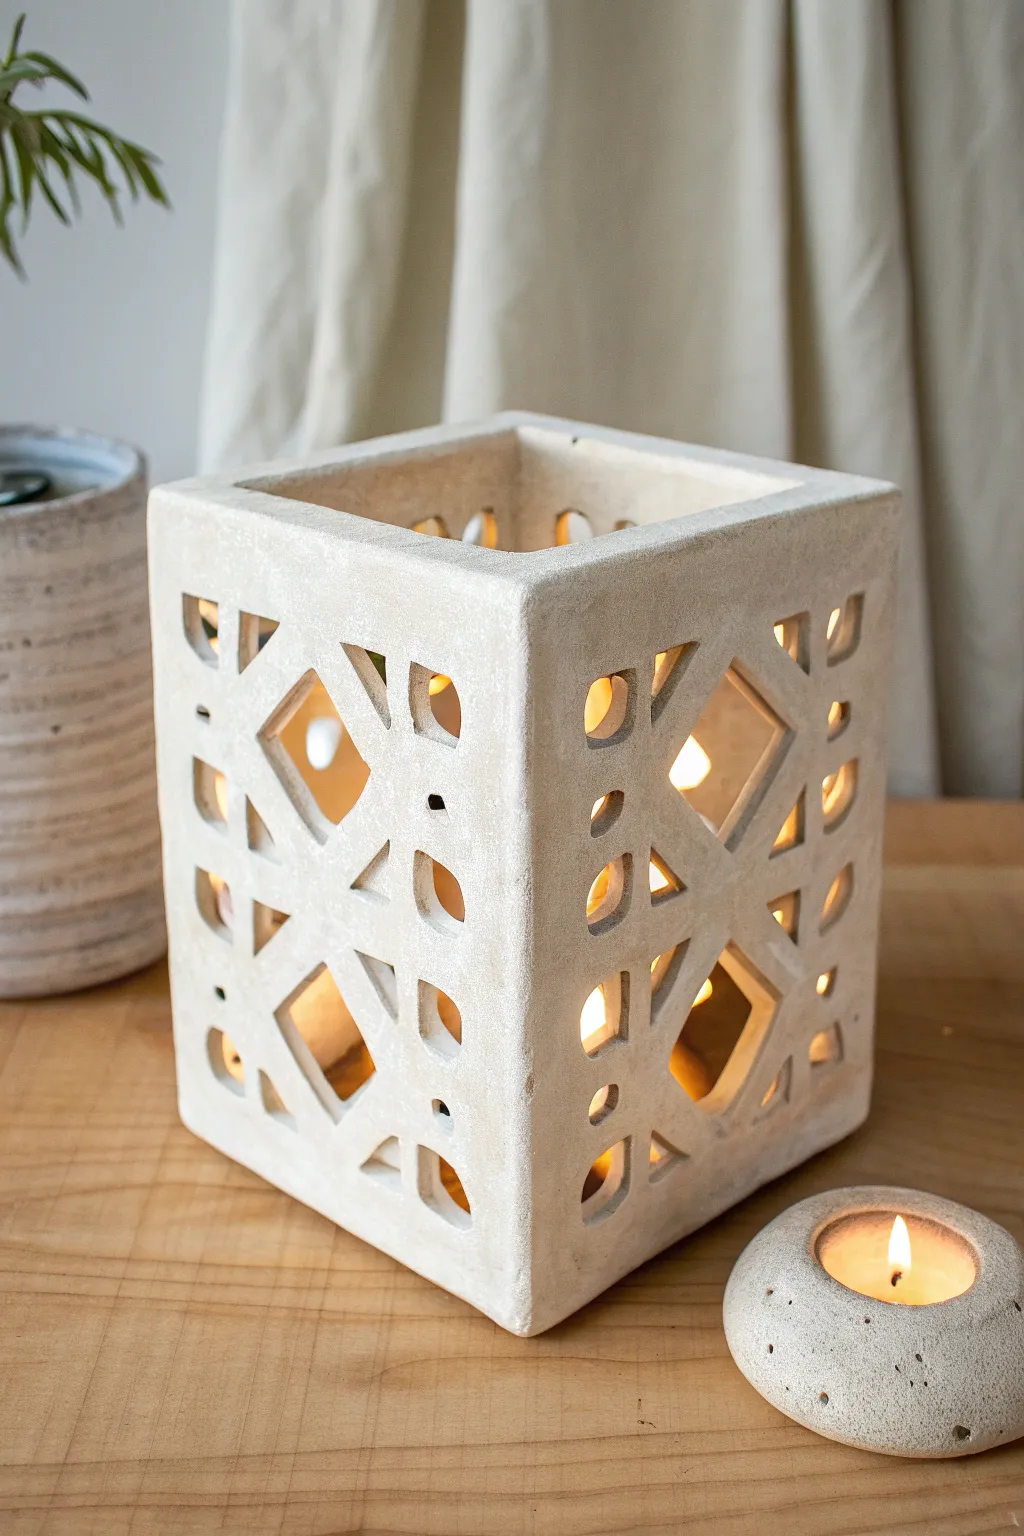
Transform a simple block of air-dry clay or white cement into an enchanting light source that casts intricate shadows. This rustic-modern cube features hand-carved geometric cutouts that create a warm, inviting atmosphere when illuminated from within.
Detailed Instructions
Materials
- White classic air-dry clay or casting concrete
- Square container mold (milk carton or silicone)
- Ruler
- X-Acto knife or craft scalpel
- Small geometric clay cutters (optional)
- Fine-grit sandpaper (220 grit)
- Sponse and water
- Tea light candle or LED puck light
- Rolling pin (if using slab method)
- Clay slip (slurry)
Step 1: Forming the Cube Base
-
Prepare your clay:
Begin by wedging your air-dry clay thoroughly to remove air bubbles. This prevents cracking later. Roll out five even slabs of clay, each about 1/4 inch thick. I find using guide sticks on either side of the rolling pin ensures perfect uniformity. -
Cut the panels:
Measure and cut five identical squares for the four walls and the base using your ruler and craft knife. For a standard tea light holder, 4×4 or 5×5 inch squares work perfectly. -
Dry fit the pieces:
Stand the four wall pieces up around the base piece to ensure your measurements are correct and the corners meet cleanly before you begin joining them. -
Score and slip:
Score the edges of the base and the bottom edges of your wall panels with a needle tool or fork. Apply a generous amount of clay slip (clay mixed with water) to these rough areas to act as glue. -
Assemble the box:
Press the walls onto the base and against each other at the corners. Use a small coil of clay on the inside corners to reinforce the seams, smoothing it out with your thumb or a modeling tool. -
Initial smoothing:
Smooth the outside seams with a slightly damp sponge to make the box look like a single solid unit. Let the cube stiffen slightly until it is leather-hard—firm to the touch but still carveable.
Clean Corner Tip
When cutting out shape corners, don’t drag the knife around the turn. Cut past the corner slightly in both directions to create a clean intersection, then lift the scrap out.
Step 2: Carving the Design
-
Map your grid:
Using a ruler and a light touch with a needle tool, lightly sketch an ‘X’ across each face of the cube to find the center. This will be the guide for your symmetrical pattern. -
Sketch the pattern:
Draw the geometric diamond and triangle shapes onto the clay surface. You can create a paper stencil first if you want identical patterns on all four sides. -
Begin the cutouts:
Carefully insert your X-Acto knife straight into the clay along your pencil lines. Cut out the larger central diamond shapes first to release tension in the clay. -
Detail cutting:
Move on to the smaller triangles and squares near the corners. Use a ‘stab and drag’ motion for cleaner corners rather than trying to drag the knife through the clay continuously. -
Cleanup cuts:
Remove the cutout clay pieces gently. Use a small, damp brush to smooth the raw inner edges of your cutouts immediately, as this is much harder to do once dry. -
Refine the top edge:
Check the top rim of the cube. If it became distorted during cutting, gently paddle it flat with a wooden spoon or slice a thin layer off the top for a crisp, level edge.
Step 3: Finishing and Sealing
-
Slow drying:
Loosely cover the cube with plastic wrap to let it dry slowly over 24-48 hours. Drying too fast can cause the delicate latticework to warp or crack. -
Sanding:
Once fully bone dry, wear a dust mask and gently sand the flat surfaces with fine-grit sandpaper to remove any fingerprints or texture from the canvas. -
Dust removal:
Wipe the entire piece down with a barely damp sponge or microfiber cloth to remove all clay dust from the sanding process. -
Surface treatment:
Leave the clay raw for a matte, stone-like focal point, or apply a matte acrylic varnish for durability. If you used white cement, a stone sealer will prevent staining. -
Light it up:
Place a tea light or small LED candle inside. The geometric holes will now project a beautiful array of patterned light onto your table.
Faux Stone Texture
Mix a small amount of used coffee grounds or sand into your clay body before rolling out the slabs. Once sanded, this creates a speckled, organic stone effect.
Enjoy the cozy ambiance created by your handcrafted geometric lantern