I never get tired of that little moment when the lights go out and your clay work suddenly turns into pure magic. Here are my favorite glow-in-the-dark polymer clay ideas—each one begging for a light-on vs. lights-off photo so you can really see the transformation.
Glow Filigree Drop Earrings
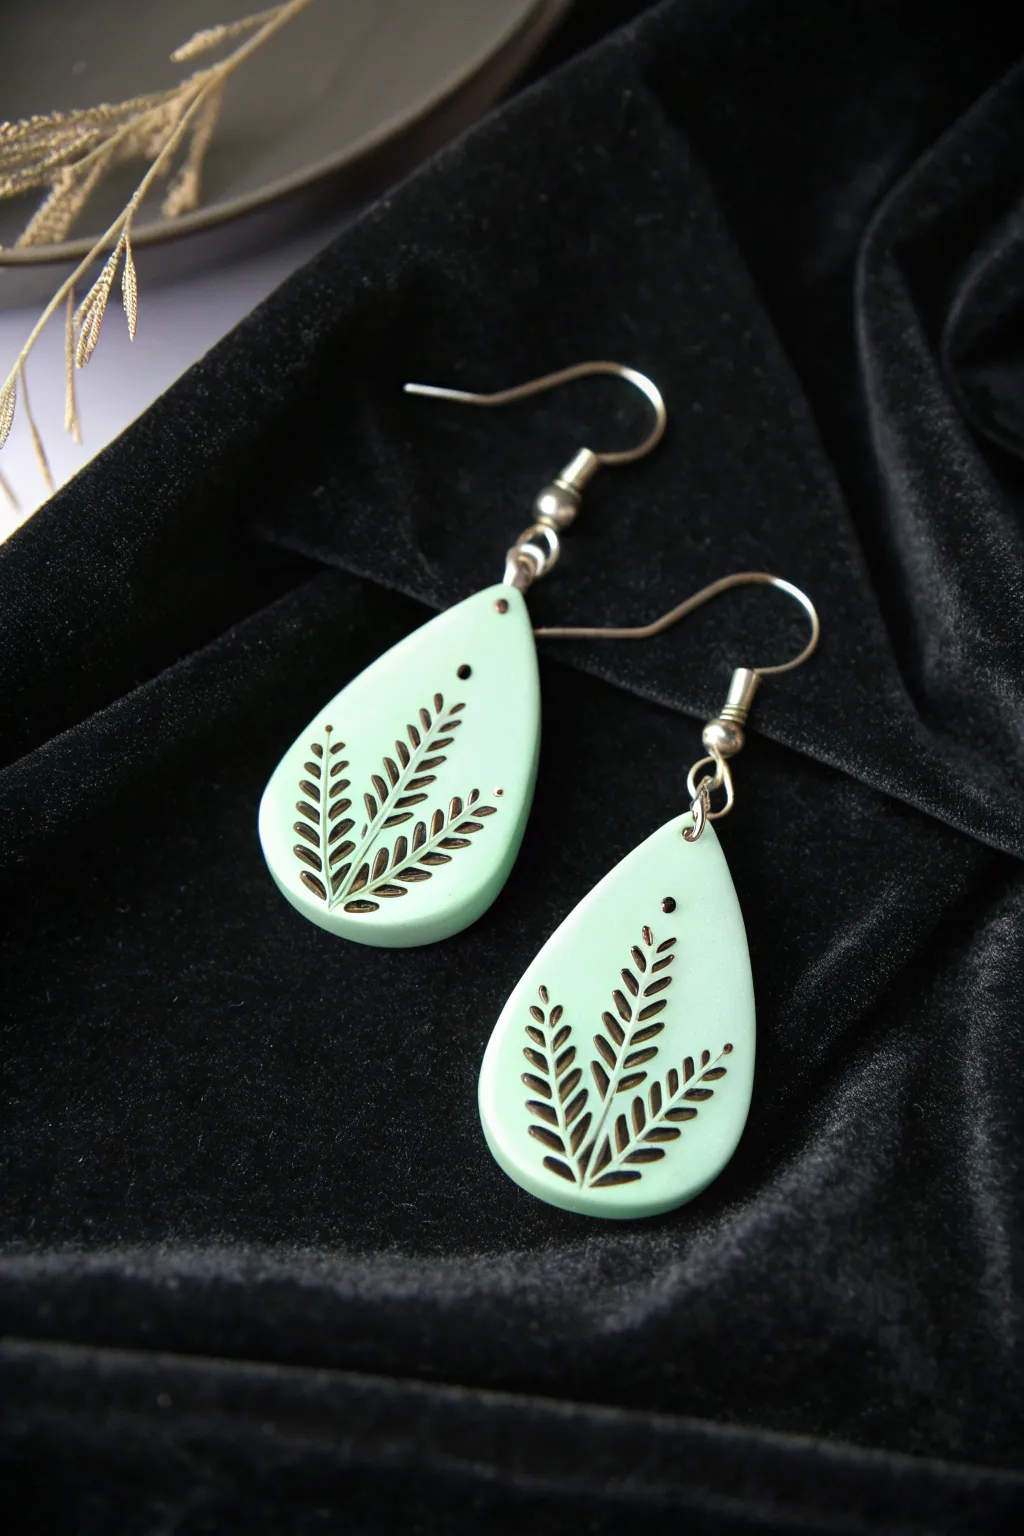
These teardrop earrings combine the soft, ethereal hue of glow-in-the-dark mint clay with a striking, nature-inspired filigree design. The dark, recessed leaf patterns create a beautiful contrast by day and a mysterious silhouette against the glowing background by night.
Step-by-Step Guide
Materials
- Glow-in-the-dark polymer clay (tinted mint green or mixed with a small amount of green clay)
- Teardrop-shaped clay cutter (approx. 1.5 inches)
- Texture sheet or rubber stamp with a small fern or leaf pattern
- Brown or antique bronze acrylic paint
- Paper towels or baby wipes
- Clay roller or pasta machine
- Ceramic tile or baking sheet
- Hand drill or needle tool
- Silver ear wires and jump rings
- Jewelry pliers
- Gloss glaze or resin (optional)
Step 1: Preparing the Clay Base
-
Condition the Clay:
Begin by thoroughly conditioning your glow-in-the-dark polymer clay. If you need to achieve the mint color shown, mix a tiny speck of green or turquoise clay into the glowing base until fully blended. -
Roll the Sheet:
Roll the clay out into an even sheet, approximately 3mm to 4mm thick. You want it sturdy enough to hold the imprint without becoming too heavy for earrings. -
Check for Smoothness:
Inspect the surface for any air bubbles or lint. Smooth the surface gently with your fingertip or a piece of plastic wrap if needed.
Paint Stuck Everywhere?
If acrylic paint dried on the raised surface, lightly buff the top of the earring with fine-grit sandpaper (1000 grit or higher) to reveal the clean mint clay underneath.
Step 2: Adding Texture and Cutting
-
Impress the Pattern:
Select your leaf or fern texture stamp. Press it firmly and evenly into the clay sheet to create deep, clear indentations. I prefer to spray a little water on the stamp first to prevent sticking. -
Cut the Shapes:
Position your teardrop cutter over the most attractive part of the textured pattern. Press down purely vertical to cut two matching shapes. -
Refine Edges:
Gently lift the shapes and smooth the cut edges with your finger to remove any stray bits of clay. -
Drill Holes:
Use a needle tool to poke a hole near the top point of each teardrop. Make sure the hole is large enough for your jump rings but not so close to the edge that it might tear.
Dual Glow Effect
Before baking, dust the indented texture with glow powder in a different color (like blue) before stamping, creating a two-tone glow effect in the dark.
Step 3: Baking and Antiquing
-
Bake the Pieces:
Place the clay teardrops on a ceramic tile and bake according to the manufacturer’s instructions (usually 275°F for 15-30 minutes). Let them cool completely. -
Apply Paint:
Squeeze a small amount of brown or antique bronze acrylic paint onto a palette. Brush the paint generously over the textured surface, ensuring it gets deep into the stamped grooves. -
Wipe Away Excess:
Before the paint dries completely, take a slightly damp paper towel or baby wipe and gently wipe across the surface. This removes paint from the raised areas while leaving the dark color in the recesses. -
Repeat if Needed:
If the pattern isn’t dark enough, repeat the painting and wiping process until you have a crisp, high-contrast design. -
Allow to Dry:
Let the paint dry fully. At this stage, you can apply a thin layer of gloss glaze or UV resin if you want a shiny finish, though the matte look is also lovely.
Step 4: Assembly
-
Open Jump Rings:
Use your pliers to twist a jump ring open sideways (never pull it apart). -
Attach Findings:
Thread the jump ring through the hole in the clay teardrop and loop the ear wire onto the ring. -
Close and Secure:
Twist the jump ring closed securely so there is no gap. Repeat for the second earring.
Now you have a stylish pair of earrings that look elegant by day and magically luminous by night


Tiny Star and Moon Studs
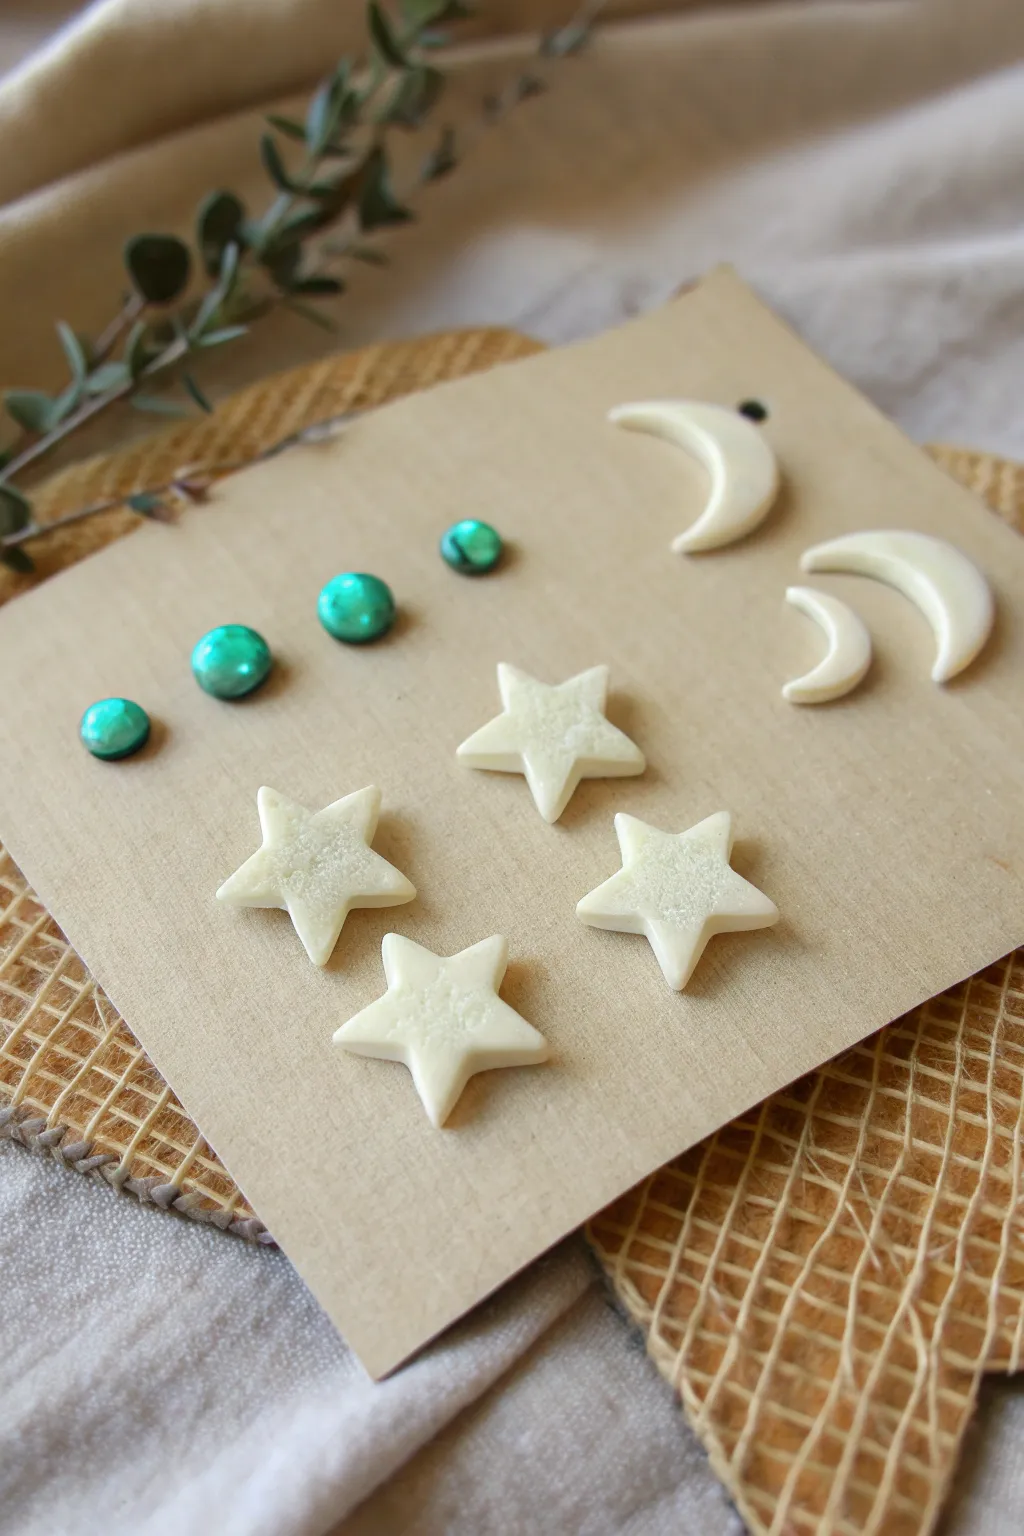
Capture the magic of the night sky with these delicate earring studs featuring luminous stars, crescent moons, and shimmering teal accents. This project combines simple cutters with glow-in-the-dark polymer clay for a stunning, subtle accessory that truly shines when the lights go out.
Detailed Instructions
Materials
- Glow-in-the-dark polymer clay (white/translucent base)
- Teal or turquoise pearl/metallic polymer clay
- Tiny star cutters (approx. 10-12mm)
- Tiny crescent moon cutters
- Tiny circle cutter (approx. 4-5mm)
- Acrylic rolling pin or pasta machine
- Cornstarch or baby powder (as release agent)
- Earring posts (flat pad style, surgical steel)
- Strong jewelry glue (E6000 or gel superglue)
- Gloss glaze or UV resin (optional for teal studs)
- Ceramic tile or glass sheet for baking
- Sandpaper (fine grit)
Step 1: Preparing the Clay
-
Condition the glow clay:
Start by thoroughly conditioning your white glow-in-the-dark polymer clay. Knead it in your hands until it is pliable and warm, ensuring the luminescent pigments are evenly distributed. -
Roll the sheet:
Using your acrylic roller or a pasta machine on a medium setting (approx. 2-3mm thick), roll the conditioned glow clay into a smooth, even sheet. Place this sheet directly onto your baking tile to minimize distortion later. -
Condition the teal clay:
Repeat the conditioning process with your teal or turquoise pearl clay. This color adds a lovely contrast to the pale glow pieces. -
Roll the teal sheet:
Roll the teal clay out to a similar thickness as the glow clay, again placing it on a flat work surface or directly onto the tile.
Clean Cuts Every Time
Place a piece of cling wrap over your clay sheet before cutting. This creates depressed, beveled edges on your shapes, eliminating the need for sanding later.
Step 2: Cutting and Shaping
-
Dust the cutters:
To prevent sticking, lightly dip your star and moon cutters into a small pile of cornstarch or baby powder before each cut. This helps release the clay cleanly. -
Cut the moons:
Press the crescent moon cutter firmly into the white glow sheet. Gently wiggle it slightly to ensure the clay separates from the surrounding sheet, then lift. Repeat to make at least three or four moons for a matching set. -
Cut the stars:
Using the star cutter, cut out four to five star shapes from the same glow sheet. If the points stick in the cutter, use a soft brush to gently push them out from the back. -
Cut the teal circles:
Using the smallest circle cutter, punch out four small rounds from the teal clay sheet. These will become the small round accents shown in the image. -
Smooth the edges:
Once all shapes are cut and excess clay is removed, gently tap the edges of each piece with your finger to soften the sharp cut lines, giving them a more finished, pillow-like look. -
Texture the stars (optional):
For the slightly sugary texture seen in the photo, you can gently lightly press a piece of coarse sandpaper or a toothbrush onto the surface of the stars before baking.
Cosmic Glitter Level Up
Mix a tiny pinch of fine holographic glitter into your translucent glow clay before rolling. It adds sparkle in daylight without ruining the glow effect.
Step 3: Baking and Assembly
-
Bake the pieces:
Bake the clay pieces in a preheated oven according to the manufacturer’s instructions (usually 275°F/130°C for 15-30 minutes). I usually tent a piece of foil over them to prevent the white clay from yellowing. -
Cool down:
Allow the pieces to cool completely on the tile before attempting to move them. They are fragile while warm. -
Sand the backs:
Once cool, lightly sand the back of each clay piece on a sheet of fine-grit sandpaper. This creates a slightly rough surface that helps the glue bond stronger. -
Attach the posts:
Apply a tiny dot of strong jewelry glue to the flat pad of an earring post. Press the post firmly onto the center back of a clay shape. -
Repeat for all studs:
Continue gluing posts to all your moons, stars, and teal circles. Let the glue cure fully for 24 hours before wearing. -
Glaze the teal studs:
To replicate the shiny finish on the teal studs in the photo, carefully apply a drop of UV resin or gloss varnish to just the teal circles. Cure or dry completely.
Enjoy styling your new celestial collection or display them on a cute card for a handmade gift


Inlaid Glow Stripe Ring
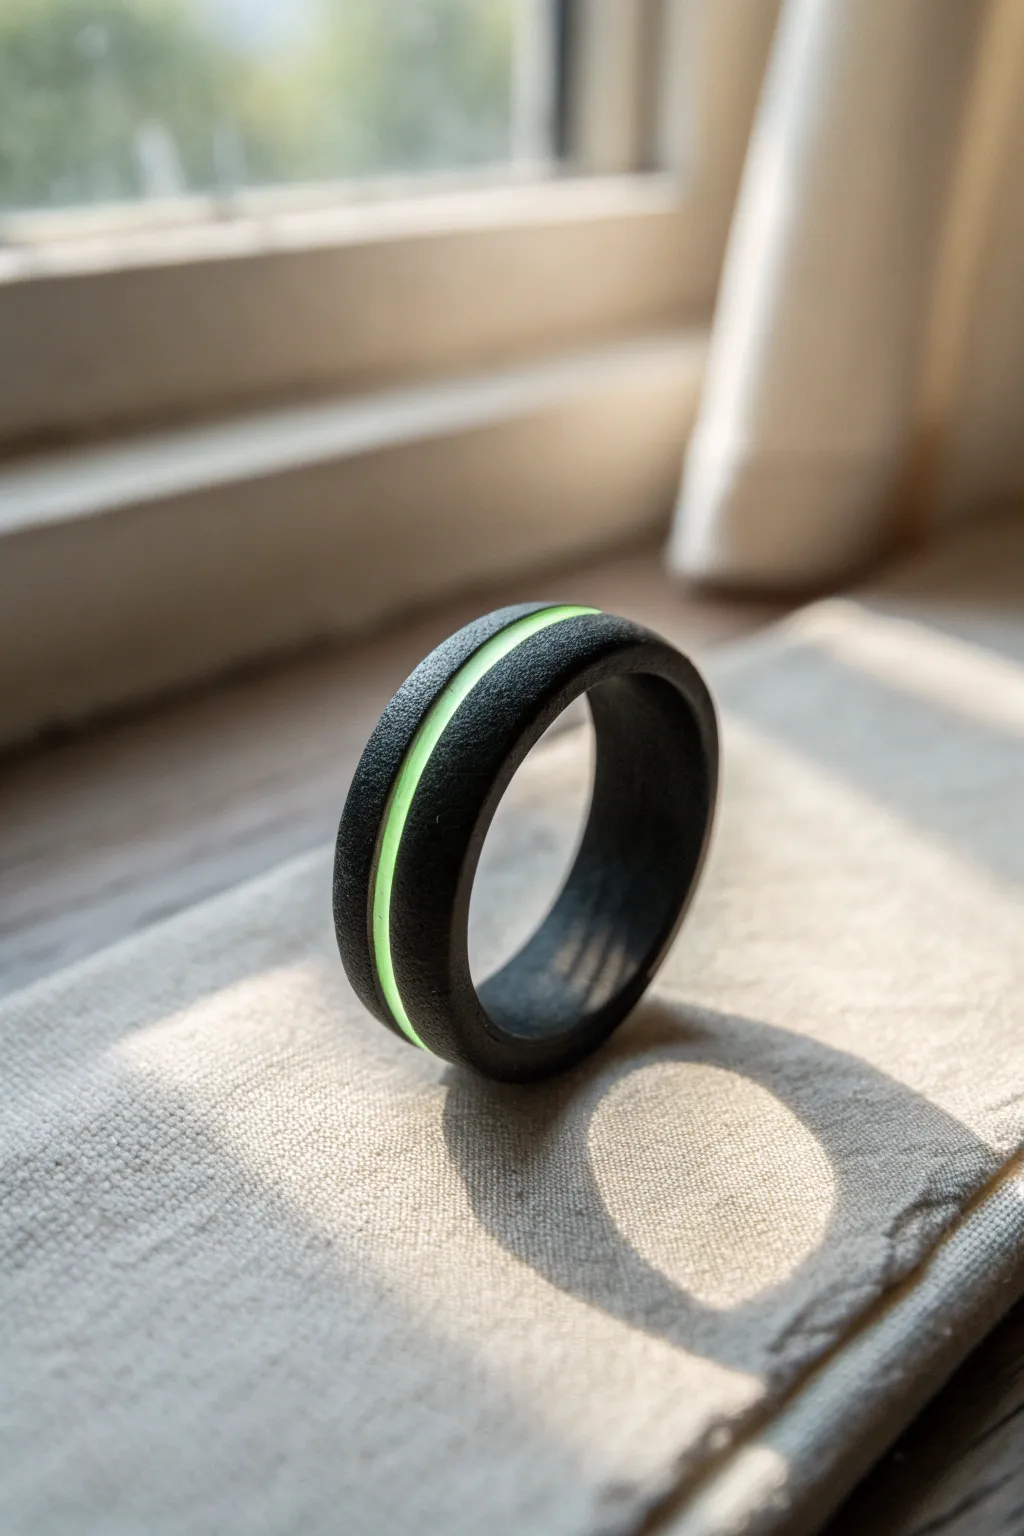
This sleek, masculine design combines the rugged look of distressed stone with a futuristic beam of light. By inlaying a potent glow powder mixture into a dark, textured base, you create a ring that looks modern by day and electrifying by night.
Step-by-Step Tutorial
Materials
- Black polymer clay (firm consistency)
- Translucent liquid polymer clay
- High-grade glow-in-the-dark powder (strontium aluminate)
- Ring mandrel or metal ring core blank
- Craft knife or scalpel
- Sandpaper (grits from 400 to 2000)
- Coarse sponge or toothbrush for texturing
- UV resin (optional for sealing)
- Pasta machine or acrylic roller
Step 1: Base Construction
-
Condition the Clay:
Begin by conditioning your black polymer clay until it is pliable but firm. If you are using a metal ring core, roll a sheet of black clay on the thickest setting of your pasta machine. If creating a solid clay ring, roll a thick snake instead. -
Form the Band:
Wrap the clay sheet around your metal core or form the snake around a ring mandrel sized slightly larger than your target finger size. Smooth the seam carefully so it blends invisibly. -
Check Consistency:
Ensure the band has a uniform width and thickness all the way around. I find it helpful to spin the mandrel between my palms to check for high spots. -
Texture the Surface:
Before baking or cutting, lightly press a coarse sponge or an old toothbrush against the outer surface of the raw clay. This creates that ‘stone-like’ matte finish seen in the image rather than a shiny plastic look. -
Create the Channel:
While the clay is still on the mandrel, use a steady hand and a sharp craft knife to carve a deep channel around the exact center of the band’s circumference. Aim for a groove roughly 2mm wide and 1mm deep. -
First Bake:
Bake the black ring base according to your specific clay brand’s instructions (usually 275°F/130°C for 30 minutes). Let it cool completely before removing it from the mandrel.
Glow is too dim?
You didn’t use enough powder. The ratio is key—you want as much powder as the liquid clay can hold while still being spreadable. Also, confirm you bought Strontium Aluminate, not zinc sulfide.
Step 2: Inlay Application
-
Mix the Glow Agent:
In a small cup, mix translucent liquid polymer clay with a generous amount of glow powder. The mix should be thick—like toothpaste—not runny, to ensure maximum brightness and minimal shrinkage. -
Fill the Channel:
carefully apply the glow mixture into the channel you carved earlier. Overfill it slightly, as the liquid clay tends to settle and shrink a tiny amount during curing. -
Remove Air Bubbles:
Let the ring sit for about 10 minutes to allow air bubbles to rise. Pop any visible surface bubbles with a needle tool to prevent craters in your finished stripe. -
Wipe Excess:
If you dripped any liquid clay onto the textured black rim, wipe it away immediately with a bit of rubbing alcohol on a cotton swab. -
Secondary Bake:
Place the ring back into the oven. Liquid clay requires high heat to clarify, so ensure your oven is accurate. Bake for another 20-30 minutes and let it cool.
Dual-Tone Glow
Mix two different colors of glow powder (like blue and green) and swirl them gently in the channel with a toothpick before baking for a galaxy nebula effect.
Step 3: Refining and Finish
-
Initial Sanding:
The glow stripe will likely be slightly raised. Use 400-grit sandpaper to sand the stripe flush with the black band. Wet sanding (dipping the paper in water) keeps the dust down and prevents scratching. -
Re-texturing (If Needed):
If sanding smoothed out too much of the black clay’s texture, lightly tap a piece of rough sandpaper against the black areas to re-disturb the surface without scratching the glowing stripe. -
Polishing the Glow:
Move up to higher grit sandpapers (1000, then 2000), focusing specifically on the glow stripe to make it smooth and allow light to penetrate easily. -
Final Buff:
Buff the ring with a denim cloth. This leaves the black clay matte (preserving the stone look) but makes the translucent glow stripe shine subtly. -
Optional Seal:
For extra durability, you can apply a tiny amount of matte varnish to the whole ring, or just gloss UV resin over the stripe to make it pop even more.
Wear your ring into a dark room to test the charge and enjoy your custom illuminated accessory


Cute Glow Charm Keychain Set
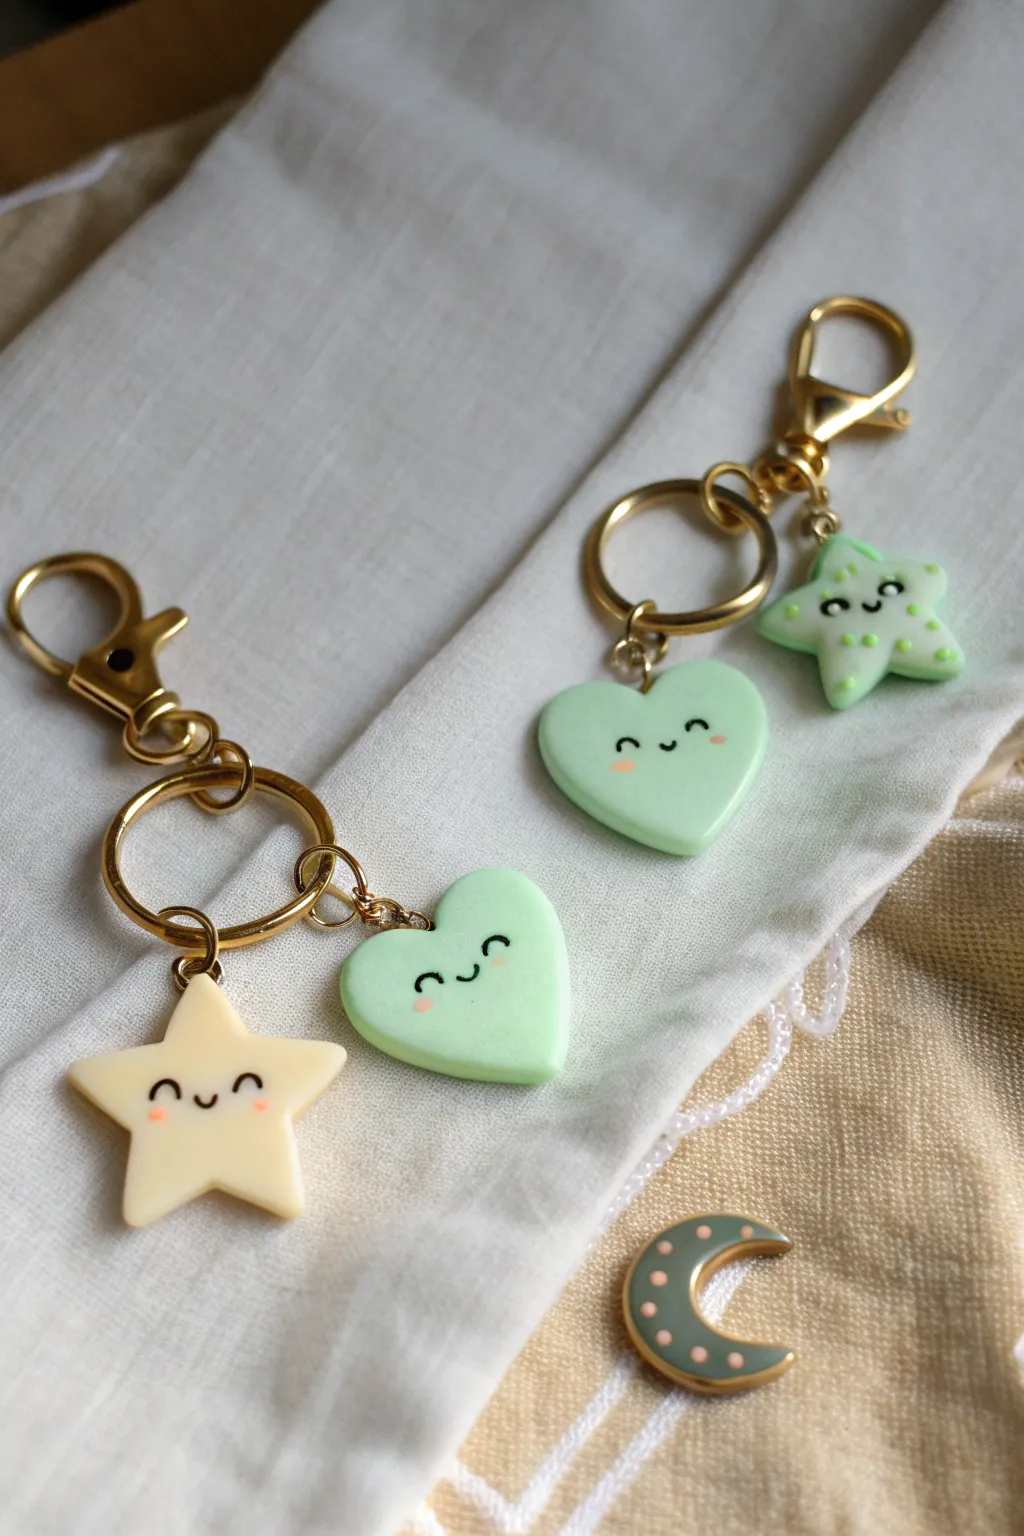
These adorable pastel charms combine simplicity with a magical surprise when the lights go out. Featuring sweet smiling stars and hearts on gold hardware, they make perfect friendship gifts or personal accessories.
Detailed Instructions
Materials
- Polymer clay (glow-in-the-dark base)
- Pastel yellow and mint green polymer clay (or chalk pastels to tint)
- Small heart and star clay cutters
- Gold screw eye pins
- Gold jump rings
- Gold lobster clasp keychains (snap hooks)
- Acrylic paint (black and pink)
- Fine detail paintbrush or dotting tool
- UV resin or gloss glaze (optional)
- Needle nose pliers
- Oven
Step 1: Shaping the Charms
-
Prepare the Clay Colors:
Start by conditioning your glow-in-the-dark polymer clay until it’s soft and pliable. Divide it into two portions to create your pastel bases. -
Tint the Clay:
Mix a very small amount of yellow clay into one portion and a tiny bit of mint green into the other. You want to keep the colors pale so the glow effect remains strong. -
Roll Out the Slab:
Roll your clay out to a thickness of about 1/4 inch (6mm). Using rolling guides or playing cards on either side of your roller helps ensure an even surface. -
Cut the Shapes:
Press your star and heart cutters firmly into the clay. For the set shown, you’ll need one yellow star, one green star, and two green hearts. -
Soften the Edges:
Gently tap the edges of your cut shapes with your finger to round them slightly, removing any sharp lines left by the cutter for a softer, puffier look. -
Add Eye Pins:
Carefully screw a small gold eye pin into the top center of each shape. I recommend twisting it in slowly to avoid distorting the clay shape.
Step 2: Baking and Decorating
-
Bake the Pieces:
Place your charms on a ceramic tile or baking sheet lined with parchment paper. Bake according to your specific clay brand’s instructions (usually 275°F/135°C for 15-30 minutes). -
Cool Down:
Allow the clay pieces to cool completely before handling them. They harden fully as they cool. -
Paint the Faces:
Using a very fine brush or a toothpick, paint two small U-shapes for smiling eyes and a tiny U-shape in the center for the mouth using black acrylic paint. -
Add Rosy Cheeks:
Dip a dotting tool or the end of a paintbrush into pink acrylic paint. Dab two small dots gently underneath the eyes to create blushing cheeks. -
Detail the Green Star:
For the green star variant, use a slightly darker green paint or clay bits to add small dots on the star’s points for extra texture. -
seal the Charms (Optional):
For durability and shine, coat the front and sides of the charms with a thin layer of UV resin (cure under a lamp) or a glossy water-based varnish. This protects the painted faces.
Glow Potency Tip
To maximize brightness, use translucent clay mixed with high-quality strontium aluminate glow powder instead of pre-colored glow clay.
Step 3: Assembly
-
Open Jump Rings:
Using two pairs of pliers, twist your jump rings open sideways (never pull them apart outward) to preserve their shape. -
Attach to Keychain:
Loop a large jump ring through the bottom loop of your gold lobster clasp keychain. -
Connect the Charms:
Slide the eye pin of your clay charm onto the jump ring. For the double-charm look, add a small length of gold chain or a smaller jump ring to one charm so they hang at slightly different heights. -
Secure the Hardware:
Twist the jump rings closed tightly, ensuring the ends meet perfectly flush so your charms don’t slip off.
Make it Sparkle
Mix ultra-fine holographic glitter into your clay before baking, or dust the surface with mica powder for a celestial shimmer.
Charge your new keychains under a lamp and watch them light up the dark

What Really Happens Inside the Kiln
Learn how time and temperature work together inside the kiln to transform clay into durable ceramic.
Glow Initial Bag Tag
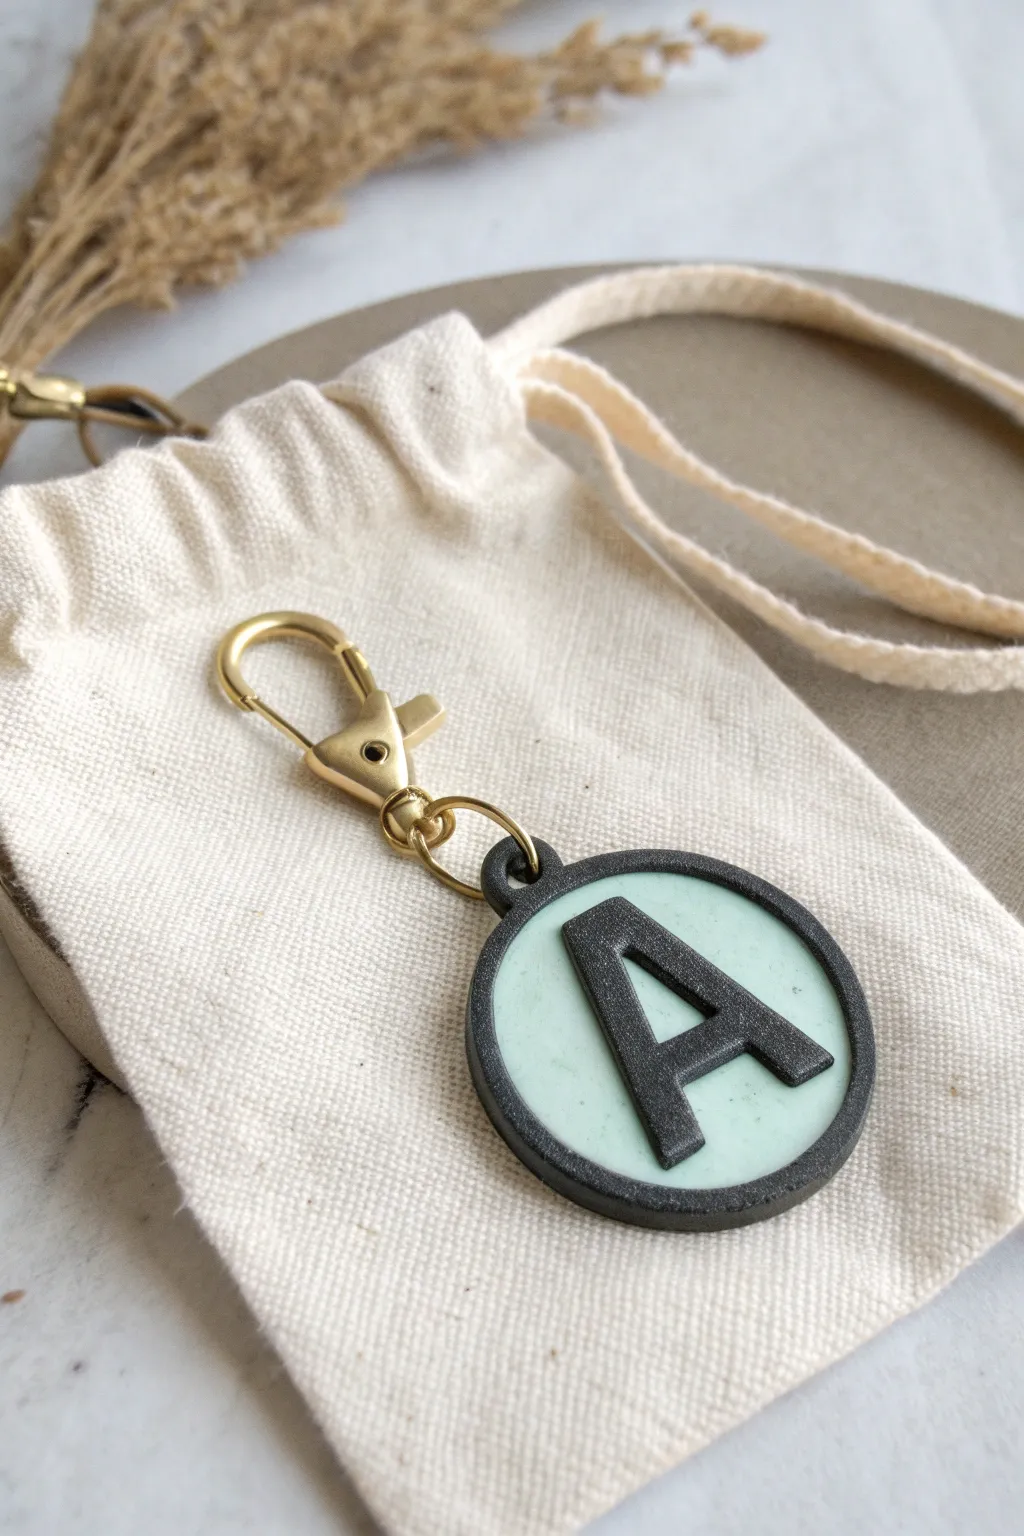
This modern monogram tag combines sleek black lines with a soft, glowing mint background for a high-contrast accessory. It’s perfect for adding a personalized touch to keys, backpacks, or zippers that stands out day and night.
How-To Guide
Materials
- Glow-in-the-dark polymer clay (mint green or white)
- Black polymer clay (preferably with subtle glitter or granite effect)
- Circle clay cutter (approx. 1.5 – 2 inches)
- Small letter cutter kit or craft knife
- Rolling pin or pasta machine
- Gold jump ring (10mm or larger)
- Gold lobster clasp keychain hardware
- Hand drill or small pin drill
- Needle tool
- Baking sheet and parchment paper
- UV resin (optional, for sealing)
- Fine-grit sandpaper (optional)
Step 1: Prepping the Base
-
Condition the glow clay:
Start by thoroughly kneading your glow-in-the-dark clay. It needs to be soft and pliable to avoid air bubbles. Once conditioned, roll it out to a medium thickness, about 4mm. -
Cut the inner circle:
Using your main circle cutter, punch out a clean circle from the glow clay. This disk will form the glowing background canvas for your initial. -
Smooth the edges:
Gently run your finger around the edge of the glow circle to soften any sharp cuts left by the cutter, ensuring it’s a smooth, perfect round shape. -
Condition the black clay:
Now, condition your black clay. If you want the subtle texture seen in the photo, mix in a tiny pinch of silver glitter or translucent clay, or use a ‘granite’ effect clay.
Clean Edges Trick
Use a piece of plastic wrap between your clay and the cutter. This creates a beautifully rounded, domed edge rather than a sharp, harsh cliff.
Step 2: Creating the Frame and Letter
-
Roll the black sheet:
Roll out the black clay slightly thinner than your glow base. You want it sturdy but not bulky. -
Cut the outer ring:
To make the rim, you’ll need two cutters. First, use a cutter slightly larger than your glow circle to cut a black disk. Then, center your original circle cutter inside that black disk and cut again to create a ring. -
Attach the rim:
Carefully lift the black ring and place it around your glow circle. I find it helps to gently press the seam where they meet to bond them without distorting the shape. The fit should be snug. -
Cut the initial:
Using the remaining rolled black clay, use a letter cutter or a sharp craft knife to cut out your desired initial. Make sure the font is bold enough to stand out against the background. -
Position the letter:
Place the black letter directly onto the center of the glow circle. Press down gently to ensure it adheres well to the base layer. -
Add the loop tab:
Fashion a small, thick loop or u-shape out of black clay. Attach this to the top edge of the black rim. This is where your hardware will eventually go, so ensure the bond is strong by blending the clay downward slightly. -
Pierce the hole:
Using a needle tool or toothpick, create a hole in the center of the small black tab you just added. Make sure the hole is large enough to accommodate your jump ring later.
Step 3: Baking and Assembly
-
Bake the piece:
Place your tag on a parchment-lined baking sheet. Bake according to the manufacturer’s instructions for your specific brand of clay—usually around 275°F (135°C) for 30 minutes. -
Cool down:
Let the tag cool completely on the baking sheet. Moving it while warm can warp the shape. -
Sand (optional):
If there are any rough edges or fingerprints, lightly wet-sand the edges with fine-grit sandpaper for a professional finish. -
Drill (if needed):
If your hole closed up during baking, use a small hand drill to reopen it cleanly. -
Attach hardware:
Open your large gold jump ring using pliers. Thread it through the hole in the tag’s tab. -
Secure the clasp:
Before closing the jump ring, slide on the gold lobster clasp. Close the jump ring securely so there is no gap.
Level Up: Resin Finish
Coat just the center glow area with UV resin to create a glassy, domed effect while leaving the black rim matte for a distinct texture contrast.
Now you have a stylish, functional tag that looks great by day and helps you locate your bag in the dark
Glow Bat and Moon Brooches
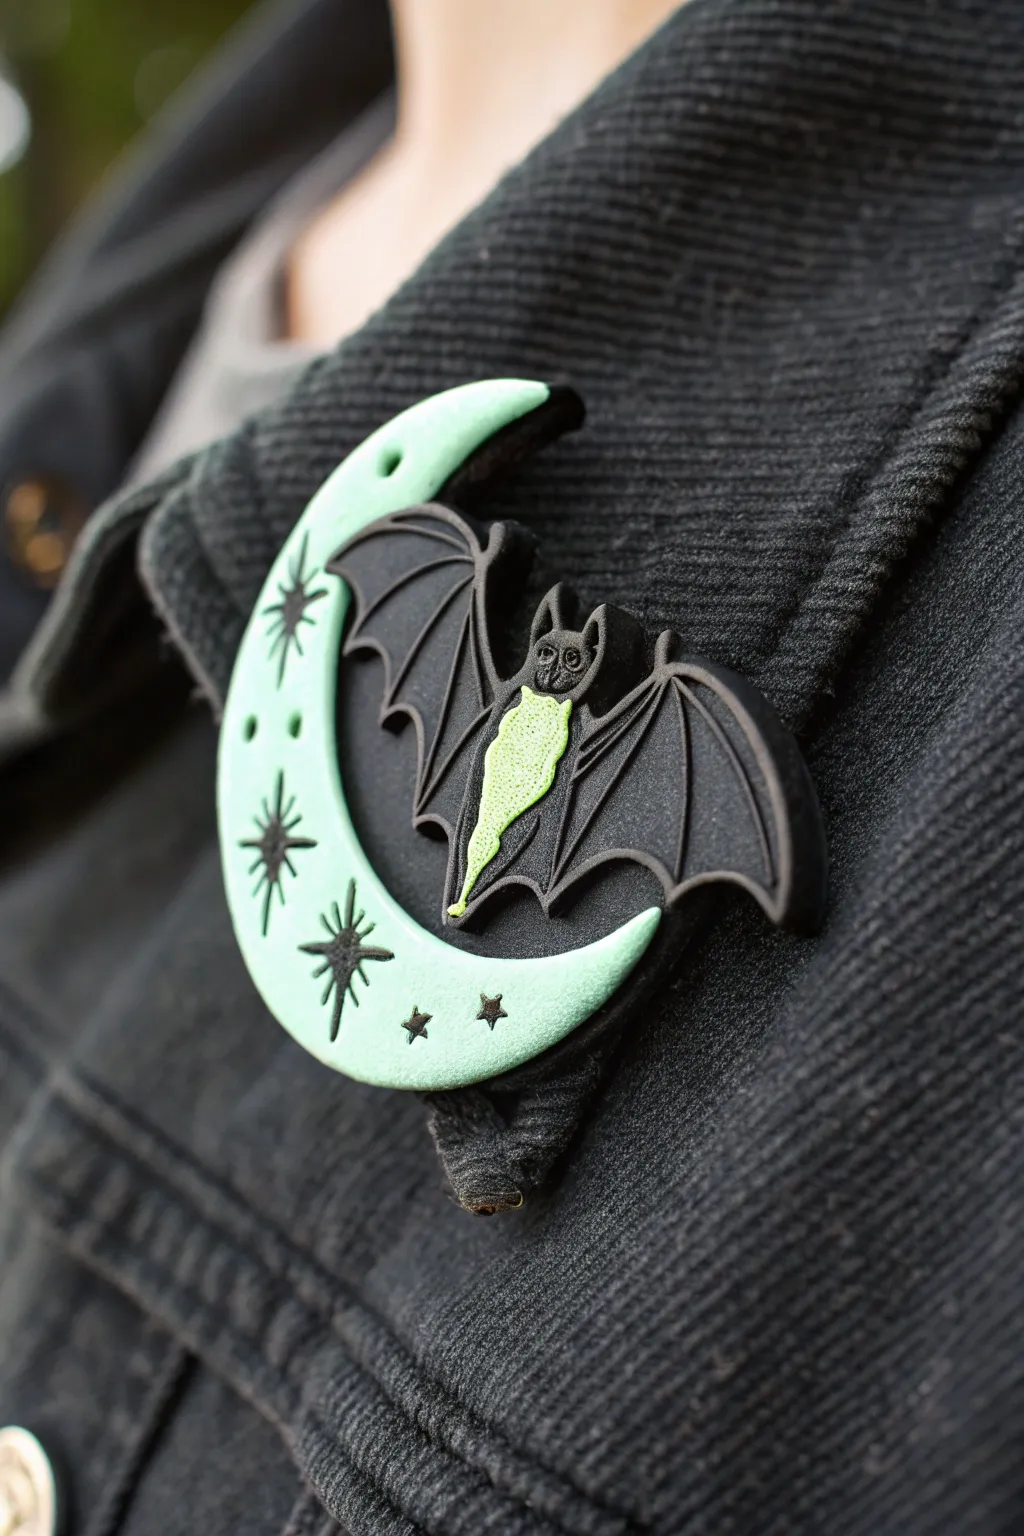
Embrace the night sky with this striking polymer clay brooch featuring a matte black bat perched upon a luminous crescent moon. The clever use of glow-in-the-dark clay for the moon and bat body creates a stunning contrast against the dark wings and corduroy textures.
Step-by-Step Guide
Materials
- Glow-in-the-dark polymer clay (green tint)
- Black polymer clay
- Liquid polymer clay (black and clear)
- Black acrylic paint
- Fine detail paintbrush (0 or 00 size)
- Needle tool or awl
- Clay roller or pasta machine
- Bat and moon cutters (optional, but helpful)
- X-acto knife
- Brooch pin back or safety pin
- Super glue or E6000
- Sandpaper (various grits)
- Oven
Step 1: Shaping the Moon
-
Prepare the glow base:
Condition your glow-in-the-dark polymer clay until it is soft and pliable. Roll it out into a sheet approximately 4-5mm thick. Since this is the structural base, you want it sturdy, not distinctively thin. -
Cut the crescent:
Use a large circle cutter to cut a round shape, then offset the cutter slightly and cut again to remove a section, leaving a crescent moon shape. Alternatively, use a paper template and trace the crescent shape with your X-acto knife. -
Smooth the edges:
Gently tap the raw edges of the moon with your finger to round them off slightly. This prevents sharp edges that can chip later. -
Add texture (optional):
If you want the moon to look cratered like the photo, you can lightly texture the surface with a piece of sandpaper or a stiff brush, though a smooth finish works beautifully too.
Sticky Situation
Is the black clay staining the glow clay? Clean your hands and tools thoroughly with baby wipes or alcohol between colors. Work on the glow parts first, then the black.
Step 2: Sculpting the Bat
-
Form the bat body:
Take a very small amount of glow-in-the-dark clay and roll it into a tiny elongated teardrop shape for the bat’s body. Press this gently onto the center of the moon curve to ensure it fits. -
Create the wings:
Condition the black clay and roll it out thinner than the moon base, about 2-3mm. Cut out two wing shapes using a cutter or freehand with a knife. Each wing should have scalloped bottom edges to mimic bat anatomy. -
Attach wings to body:
Place the wings on either side of the glowing body teardrop. Blend the clay seams slightly where the wings meet the body using a sculpting tool so they bond during baking. -
Add wing details:
Roll extremely thin snakes of black clay to create the ‘fingers’ or bones of the wings. Lay them continuously from the top of the wing down to the points of the scalloped edges. Press them down gently to fuse. -
Sculpt the head:
Roll a tiny ball of black clay for the head and press it atop the body. Pinch two minuscule triangles for ears and attach them. Use your needle tool to indent tiny eye sockets and a nose. -
Secure the bat:
Apply a tiny dab of liquid clay (clear or black) to the back of the bat assembly and press it firmly onto the crescent moon. Ensure the wings curve slightly over the moon’s edge for a dynamic look. -
Refine the body:
Using a needle tool, add tiny texture marks to the glow-in-the-dark body to simulate fur. This adds a nice tactile element against the smooth moon.
Glow Up
For maximum brightness, ‘charge’ your finished brooch under a UV lamp or direct sunlight for a minute before wearing it in the dark. The contrast will be incredible.
Step 3: Stars & Baking
-
Engrave the stars:
Using a needle tool or a very fine engraving tip, scratch starburst patterns and tiny stars directly into the raw glow clay of the moon. Vary the sizes for interest—some large eight-point stars and some tiny four-point ones. -
Pre-bake check:
Check for any lint or fingerprints. Use a little rubbing alcohol on a brush to smooth away imperfections on the black clay. -
Bake:
Bake the piece according to your clay manufacturer’s instructions (usually 275°F/130°C for 15-30 minutes). I tend to tent foil over the piece to prevent the glow clay from yellowing. -
Cool down:
Let the piece cool completely inside the oven or on a wire rack before handling.
Step 4: Finishing Touches
-
Paint the stars:
Dilute a small drop of black acrylic paint with water. carefully paint into the engraved star grooves. Quickly wipe away the excess surface paint with a damp paper towel, leaving the black paint trapped only inside the engraved lines. -
Attach the backing:
Flip the brooch over. Sand the back lightly to create a rough surface for adhesion. -
Glue the pin:
Apply a strong adhesive like E6000 or super glue (gel type is best) to the pin backing and press it firmly onto the back of the moon. -
Seal (Optional):
If you want a matte finish like the photo, leave the clay as is. If you prefer protection, apply a thin coat of matte varnish, avoiding the pin mechanism.
Pin your spooky creation to a denim jacket or bag and enjoy the subtle glow whenever you step into the shadows


The Complete Guide to Pottery Troubleshooting
Uncover the most common ceramic mistakes—from cracking clay to failed glazes—and learn how to fix them fast.
Enchanted Glow Mushrooms
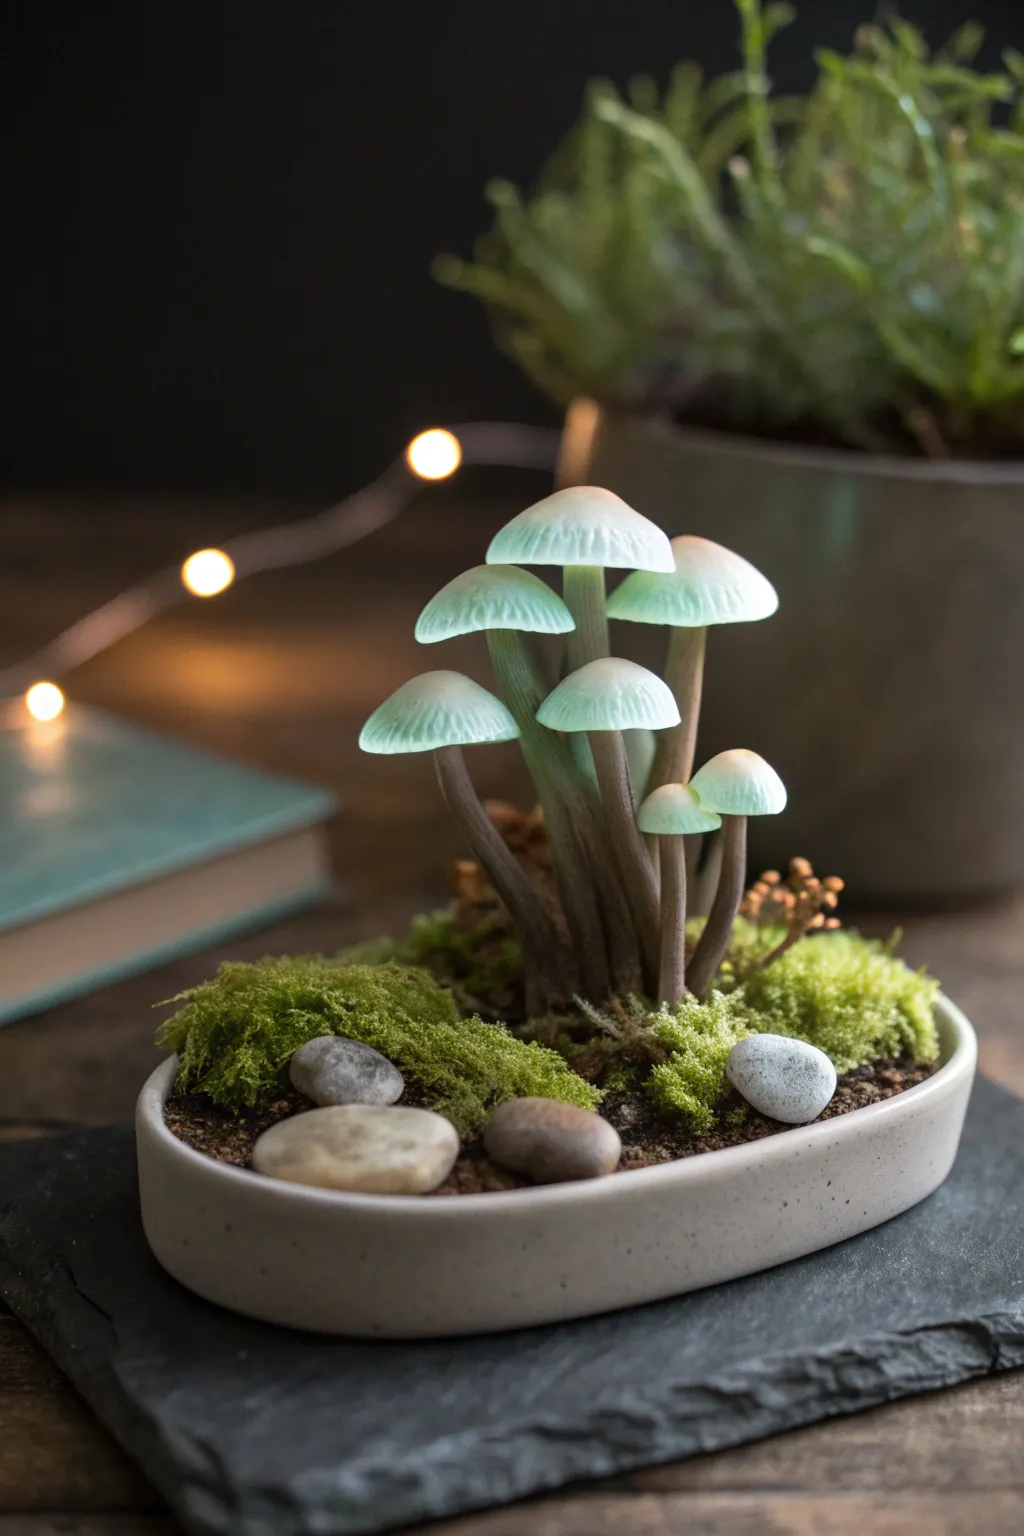
Bring a touch of woodland magic indoors with this delicate glowing mushroom sculpture. Featuring slender, realistic stems and translucent caps that luminesce in the dark, this piece sits nestled in a bed of moss for a complete terrarium effect.
Detailed Instructions
Materials
- Glow-in-the-dark polymer clay (neutral/white)
- Brown polymer clay
- Grey polymer clay
- Translucent liquid polymer clay
- Small oval ceramic dish or planter base
- Dried moss (preserved reindeer or sheet moss)
- Small smooth river stones
- Coffee grounds or brown acrylic paint (for soil texture)
- Needle sculpting tool
- Wire armature (thin gauge floral wire)
- Soft pastel chalks (brown, grey, moss green)
- Paintbrush
- Super glue or strong craft adhesive
Step 1: Creating the Stems
-
Prepare the armature:
Cut varied lengths of thin floral wire, ranging from 1 to 3 inches. You will need about seven or eight wires for the cluster shown. -
Mix the stem color:
Blend the brown and grey polymer clay together to create a muted, earthy taupe shade. This shouldn’t be too uniform; slight marbling looks more organic. -
Wrap the wires:
Take small snakes of your stem mixture and sheath each wire. Roll them between your fingers or on your work surface until they are smooth and tapered. -
Texture the stalks:
Use a needle tool to gently scratch vertical striations up and down the stems. This mimics the fibrous texture found in nature. -
Add shading:
Brush a little brown pastel dust near the base of the stems and some grey dust near the top to create depth before baking.
Step 2: Sculpting the Caps
-
Form the cap base:
Roll small balls of glow-in-the-dark clay. Flatten them slightly into dome shapes, varying the sizes from pea-sized to small marble-sized. -
Shape the domes:
Press your thumb gently into the underside of each dome to hollow it out, creating the classic umbrella shape. -
Create the gills:
Flip the caps over. Using your needle tool or a craft knife, press fine lines radiating from the center to the edge to simulate gills under the cap. -
Refine the top:
On the top side, use your finger to gently pull the center into a slight point or nipple shape, characteristic of mycenoid mushrooms. -
Tint the glow:
I like to dust the very top center of the caps with a tiny amount of pale green or blue pastel to enhance the ghostly look without blocking the glow. -
Assemble and bake:
Join the caps to the stems. Since the wire is there, you can push the stem gently into the underside of the cap. Bake according to your clay manufacturer’s instructions, usually around 275°F (135°C).
Drooping Stems?
If your mushroom stems are bending during baking, prop them up with polyester fiberfill or bake the stems first, then attach the caps and bake again.
Step 3: Planting the Garden
-
Prepare the base:
Fill your small ceramic oval dish with a base of scrap clay or floral foam, leaving just enough room at the top for your ‘soil’. -
Secure the mushrooms:
Once cooled, insert the wire bottoms of your mushroom cluster into the center of the base. Use super glue to fix them in a natural, grouped arrangement. -
Create the soil:
Mix liquid polymer clay with dried coffee grounds or brown paint to make a textured paste. Spread this over the base and around the mushroom stems. -
Add rocks:
Press two or three small river stones into the wet soil mixture, sinking them slightly so they look embedded. -
Apply the moss:
Tuck pieces of preserved moss around the stones and the base of the stems, covering all the remaining soil areas to create a lush forest floor. -
Final touches:
If you used liquid clay for the soil, give the whole piece a quick final bake (protecting the moss if necessary) or let the glue/paint mixture dry completely.
Fairy Ring Upgrade
Add tiny snail shells or a miniature fairy door against one of the larger stones to transform this nature study into a fantasy story piece.
Turn off the lights and watch your miniature forest come to life with a soft, ethereal glow
Bioluminescent “Sea Plant” Sculpture
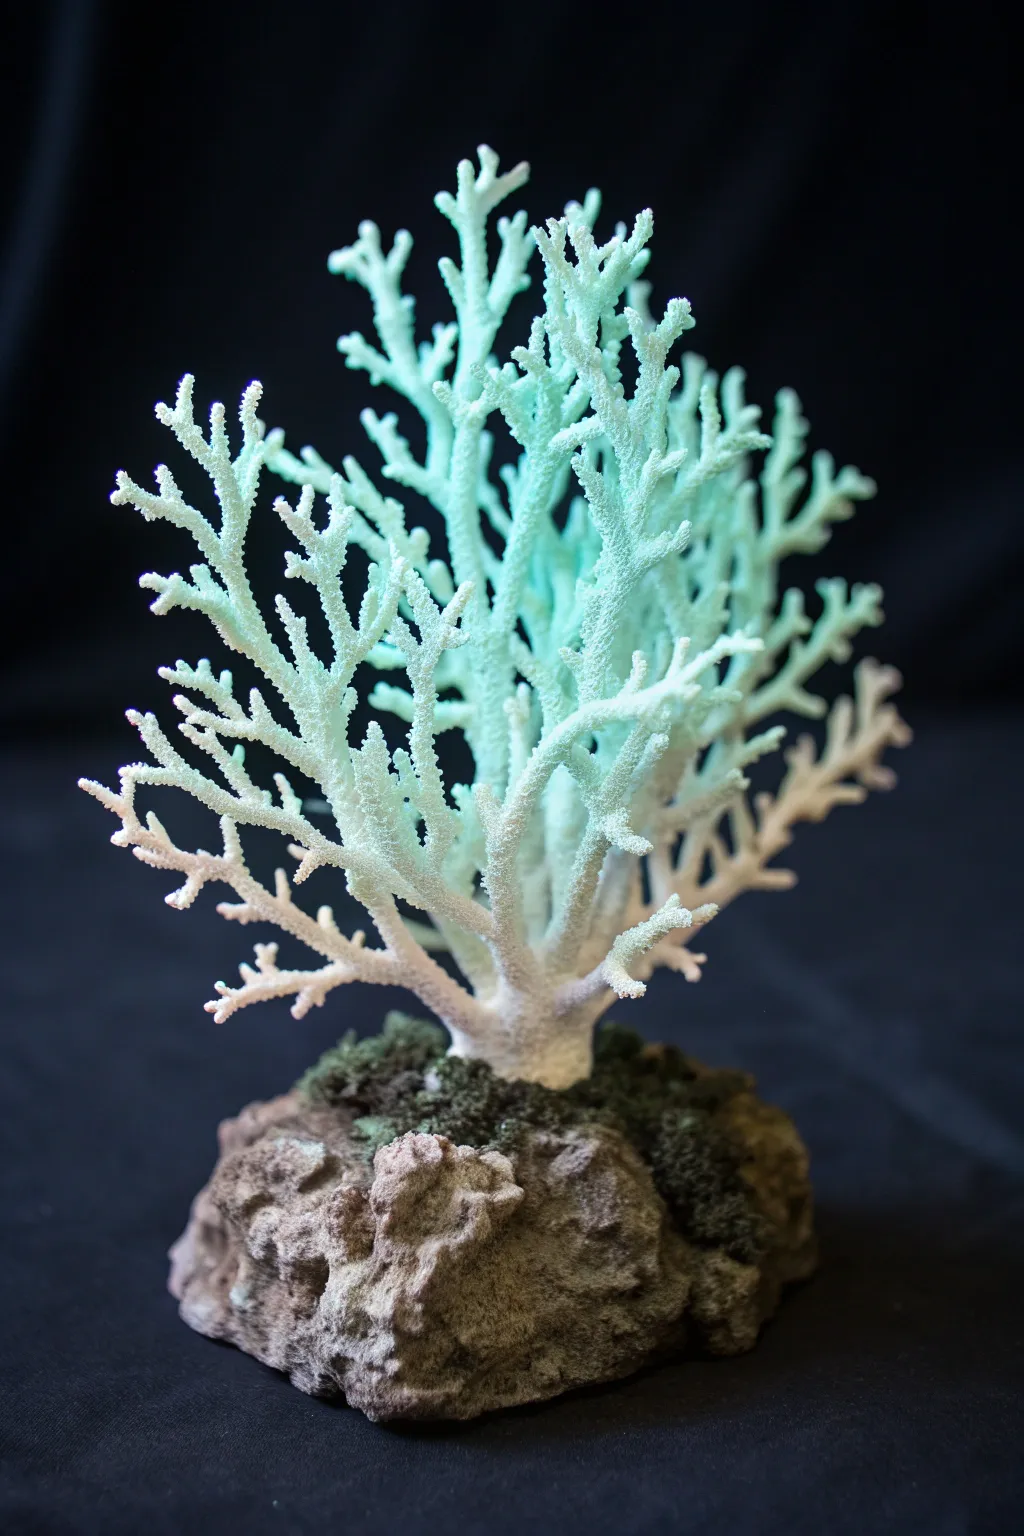
Bring the eerie beauty of the deep ocean into your home with this stunningly realistic coral sculpture. By combining textured rock bases with delicate, glowing branches, you’ll create a piece that looks like bleached bone by day and a magical sea plant by night.
Step-by-Step Tutorial
Materials
- Glow-in-the-dark polymer clay (blue or green)
- White polymer clay
- Translucent polymer clay
- Aluminum wire (armature wire, approx. 1mm-2mm)
- Thinner floral wire (for smaller branches)
- Wire cutters
- Needle tool or stiff toothbrush (for texturing)
- Liquid polymer clay (Bake & Bond)
- Acrylic paints (dark grey, black, brown, moss green)
- Create-A-Rock or textured stone clay (optional, for base)
- Sponge or stiff paintbrush
- Heat gun or oven
Step 1: Constructing the Base
-
Form the core:
Begin by crumpling a tight ball of aluminum foil to act as the core of your rock base, creating an irregular, natural shape about the size of a fist. -
Apply the clay layer:
Sheet out a mix of scrap clay or stone-textured clay and wrap it completely around your foil core, pressing it firmly into the crevices to ensure no air remains trapped. -
Texture the rock:
Use a real rock, a crumpled ball of foil, or a stiff wire brush to pound texture into the clay surface, making it look porous and weathered rather than smooth. -
Insert the main anchor:
Cut a 4-inch piece of thick aluminum wire and insert it vertically into the center of the rock base where you want the coral to grow; bake the base according to your clay’s package instructions to set it.
Drooping Branches?
If thin branches sag while baking, build a temporary support structure using crumpled aluminum foil or mounds of baking soda underneath them.
Step 2: Building the Coral Armature
-
Create the skeleton:
Once the base creates a sturdy foundation, twist thinner floral wires around the main anchor wire, branching them out like a tree to form the spreading shape of the coral. -
Secure the branches:
Use a dab of liquid polymer clay or superglue at the junction points of the wires to stop them from sliding around while you work. -
Mix the glowing clay:
Condition your glow-in-the-dark clay by mixing it with a small amount of translucent clay and white clay; this creates a milky look that diffuses the light better than raw glow clay.
Step 3: Sculpting the Coral
-
Coat the wire:
Apply a thin layer of liquid polymer clay (Bake & Bond) to the wire armature to help the solid clay adhere. -
Apply the clay:
Roll small snakes of your glowing clay mixture and press them onto the wires, smoothing the seams so the transition between branches is fluid and organic. -
Fade the colors:
For a realistic look, blend pure white clay at the very base of the stem and the very tips of the branches, creating a gradient into the glowing blue-green center. -
Create the coral texture:
This is the most critical step—vigorously tap the entire surface of the soft clay with a stiff toothbrush or a needle tool to create thousands of tiny pores, mimicking the calcified surface of real coral. -
Add tiny branches:
Roll very tiny, short spikes of clay and attach them randomly along the main branches, blending them in and texturing them immediately to add density. -
Bake the sculpture:
Prop up any drooping branches with polyester fiberfill or tissue paper and bake the entire piece again to cure the coral structure.
Under the Sea
Embed tiny seashells or crushed glass into the rock base before baking to simulate glistening wet sand or hidden treasures.
Step 4: Painting and Finishing
-
Wash the rock:
Dilute dark grey and brown acrylic paint with water and wash it over the rock base, wiping away the excess so the dark color settles only in the deep textures. -
Dry brush highlights:
Once the dark wash is dry, use a virtually dry brush with light grey or beige paint to tickle the high points of the rock, emphasizing the rough texture. -
Add mossy details:
Stipple a thick, dark green paint into the crevices where the coral meets the rock to simulate algae or moss growth. -
Final inspection:
Check for any shiny spots on the coral branches and lightly sand them or matte varnish them if necessary, as real dry coral is extremely matte.
Turn off the lights to see your underwater masterpiece glow with a ghostly, bioluminescent light

TRACK YOUR CERAMIC JOURNEY
Capture glaze tests, firing details, and creative progress—all in one simple printable. Make your projects easier to repeat and improve.
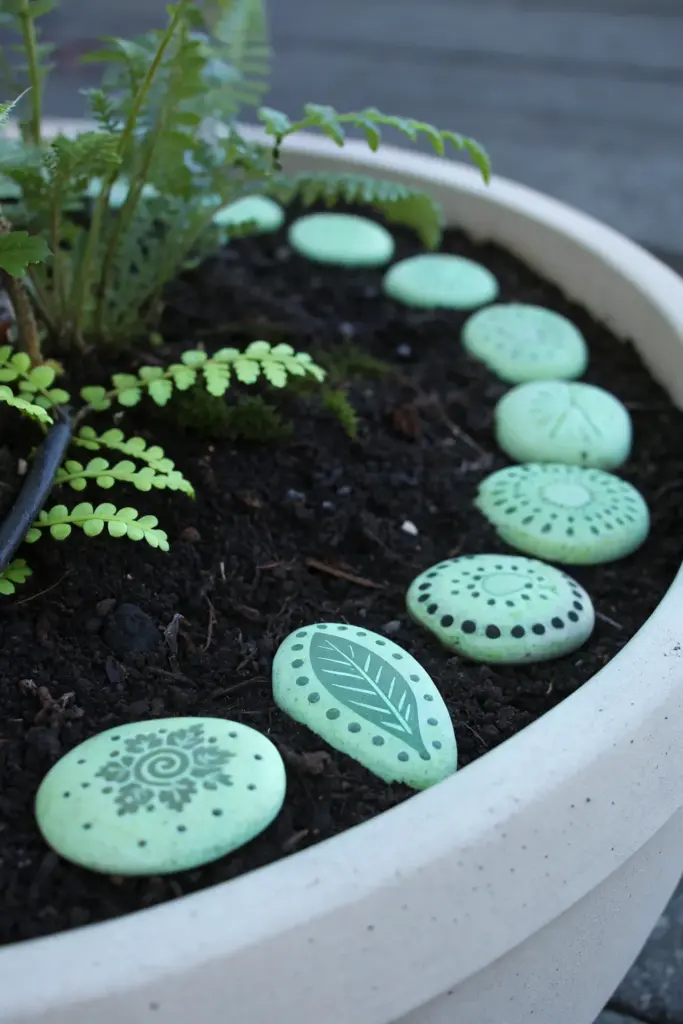
Glow Fairy Garden Path Pebbles
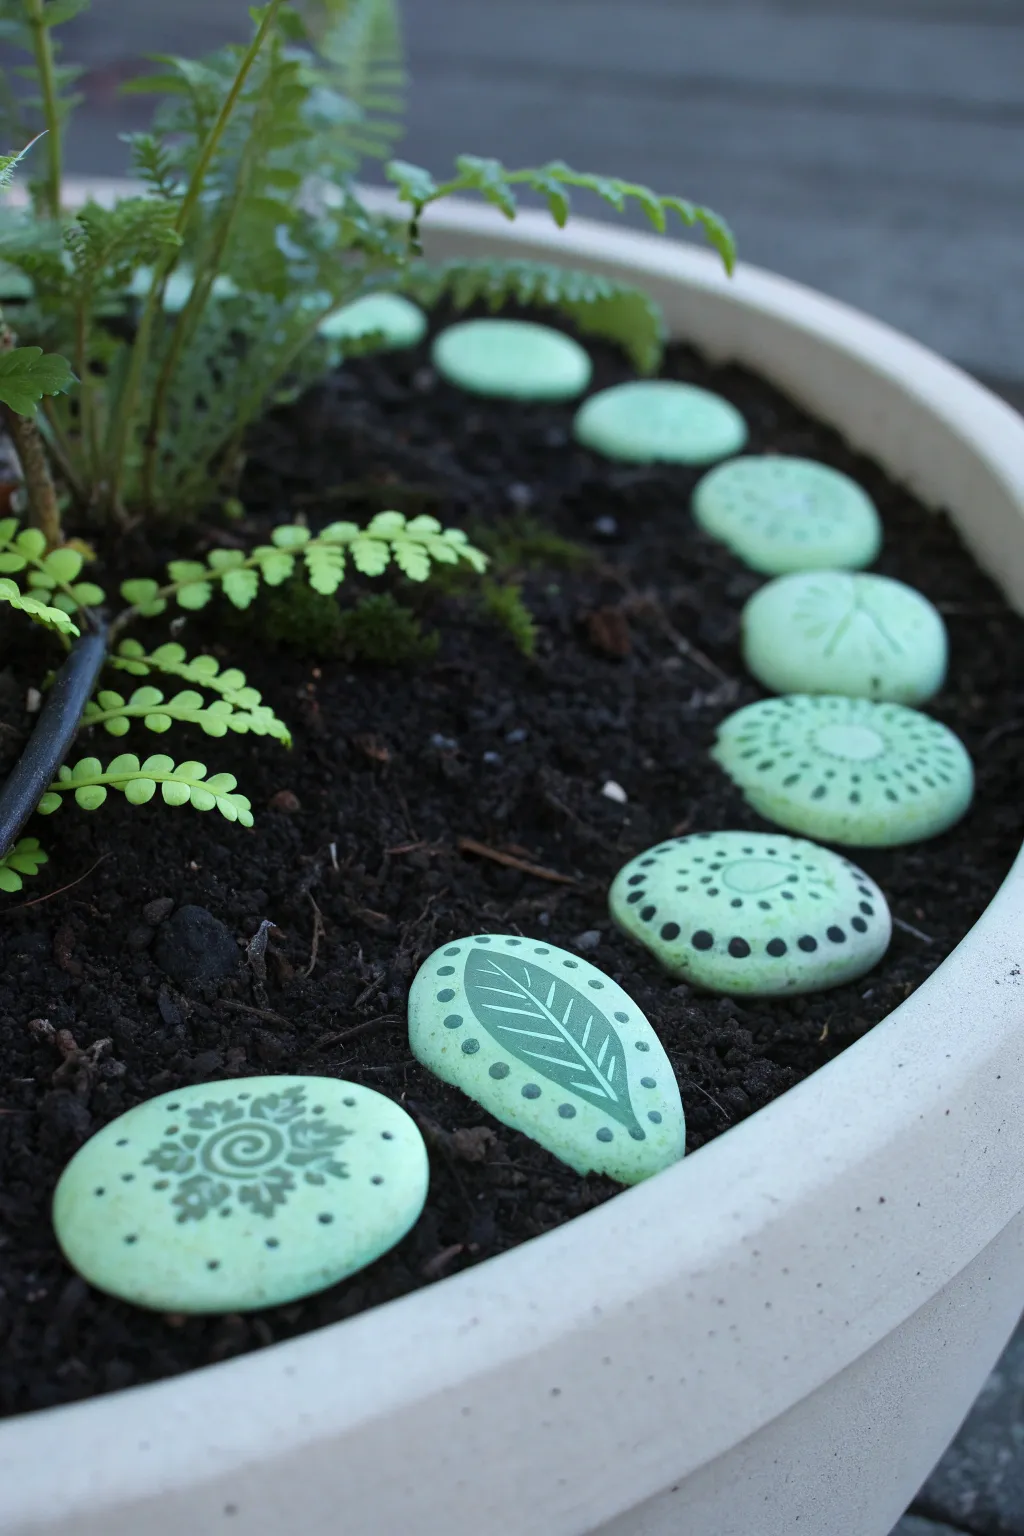
Bring a touch of magic to your potted plants with these charming glow-in-the-dark garden stones. Crafted from polymer clay and decorated with nature-inspired stamps, they charge by day to create a secret, glowing path for garden fairies at night.
Detailed Instructions
Materials
- Glow-in-the-dark polymer clay (green tint)
- Dark green acrylic paint
- Small rubber stamps (leaves, spirals, mandalas)
- Acrylic roller
- Circle cutters (various small sizes)
- Glossy water-based polyurethane varnish
- Paper towels or sponge
- Baking sheet
- Parchment paper
Step 1: Shaping the Stones
-
Condition the Clay:
Start by taking your glow-in-the-dark polymer clay and kneading it thoroughly in your hands until it becomes soft, warm, and pliable. This conditioning step is crucial to prevent cracks later on. -
Form a Sheet:
Using an acrylic roller, roll the clay out on a clean work surface. Aim for a thickness of about 1/4 inch (6mm) so the stones feel substantial and durable. -
Cut the Circles:
Use your circle cutters to punch out shapes. Vary the sizes slightly if you want a more organic look, but keeping them uniform creates a neat, tidy path. -
Soften the Edges:
Gently press around the rim of each cut circle with your thumb and forefinger. You want to smooth out the sharp cut edge into a rounded, pebble-like curve. -
Create dimpled texture:
For a few of the stones, you can lightly press your thumb into the center to create a slight concavity, making them look naturally worn.
Paint Smearing?
If the paint smears while stamping, wait for it to become slightly tacky on the stamp before pressing down. Too wet and it slides; too dry and it won’t transfer.
Step 2: Stamping and Decorating
-
Select your Stamps:
Choose small rubber stamps with bold patterns. Finer details might get lost, so look for clear spirals, simple leaves, or geometric dots. -
Ink the Stamps:
Instead of using an ink pad, lightly dab a thin layer of dark green acrylic paint onto the stamp surface using a sponge or brush. This ensures the design stands out against the glow clay. -
Test the Impression:
I usually do a quick test stamp on a scrap piece of clay first. This helps gauge how much pressure you need to get a crisp image without squashing the pebble shape. -
Stamp the Stones:
Press the painted stamp firmly into the center of your clay pebbles. Lift straight up to avoid smearing the paint. -
Add Dotted Accents:
Dip the non-brush end of a paintbrush into the dark green paint. Dot it around the stamped design to create borders or radiating patterns on the plain stones. -
Let Paint Dry:
Allow the acrylic paint to dry completely on the raw clay before moving to the oven. This usually takes about 20 minutes.
Supercharge the Glow
For the brightest glow, use a UV flashlight to charge the stones quickly. Placing them near a fluorescent grow light also charges them much faster than standard bulbs.
Step 3: Baking and Finishing
-
Prepare for Baking:
Line a baking sheet with parchment paper. Arrange your decorated pebbles on the sheet, ensuring they aren’t touching each other. -
Bake:
Bake the stones according to the manufacturer’s instructions for your specific brand of polymer clay. Typically, this is around 275°F (135°C) for 15-30 minutes. -
Cool Down:
Once the baking time is up, turn off the oven and let the stones cool down slowly inside, or remove them and let them sit until they reach room temperature. -
Varnish for Protection:
To protect the paint from moisture in the soil, apply a coat of glossy water-based polyurethane varnish. Brush it over the top and sides. -
Seal the Bottoms:
Once the tops are dry, flip them over and seal the bottoms as well. This full seal is important since they will be sitting in damp dirt. -
Arrange the Path:
Place the finished pebbles into your planter, gently pressing them into the soil to form a winding walkway.
Now you can enjoy the soft, ethereal glow guiding the way through your indoor garden every night