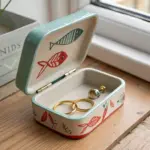
If you’re anything like me, you’re always looking for a cute little spot to drop your rings and earrings so they don’t vanish into the void. These clay jewelry tray ideas are my favorite mix of pretty and practical—easy enough for a chill studio day, but polished enough to look gift-worthy.
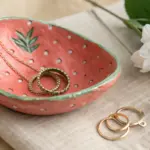
Classic Round Ring Dish
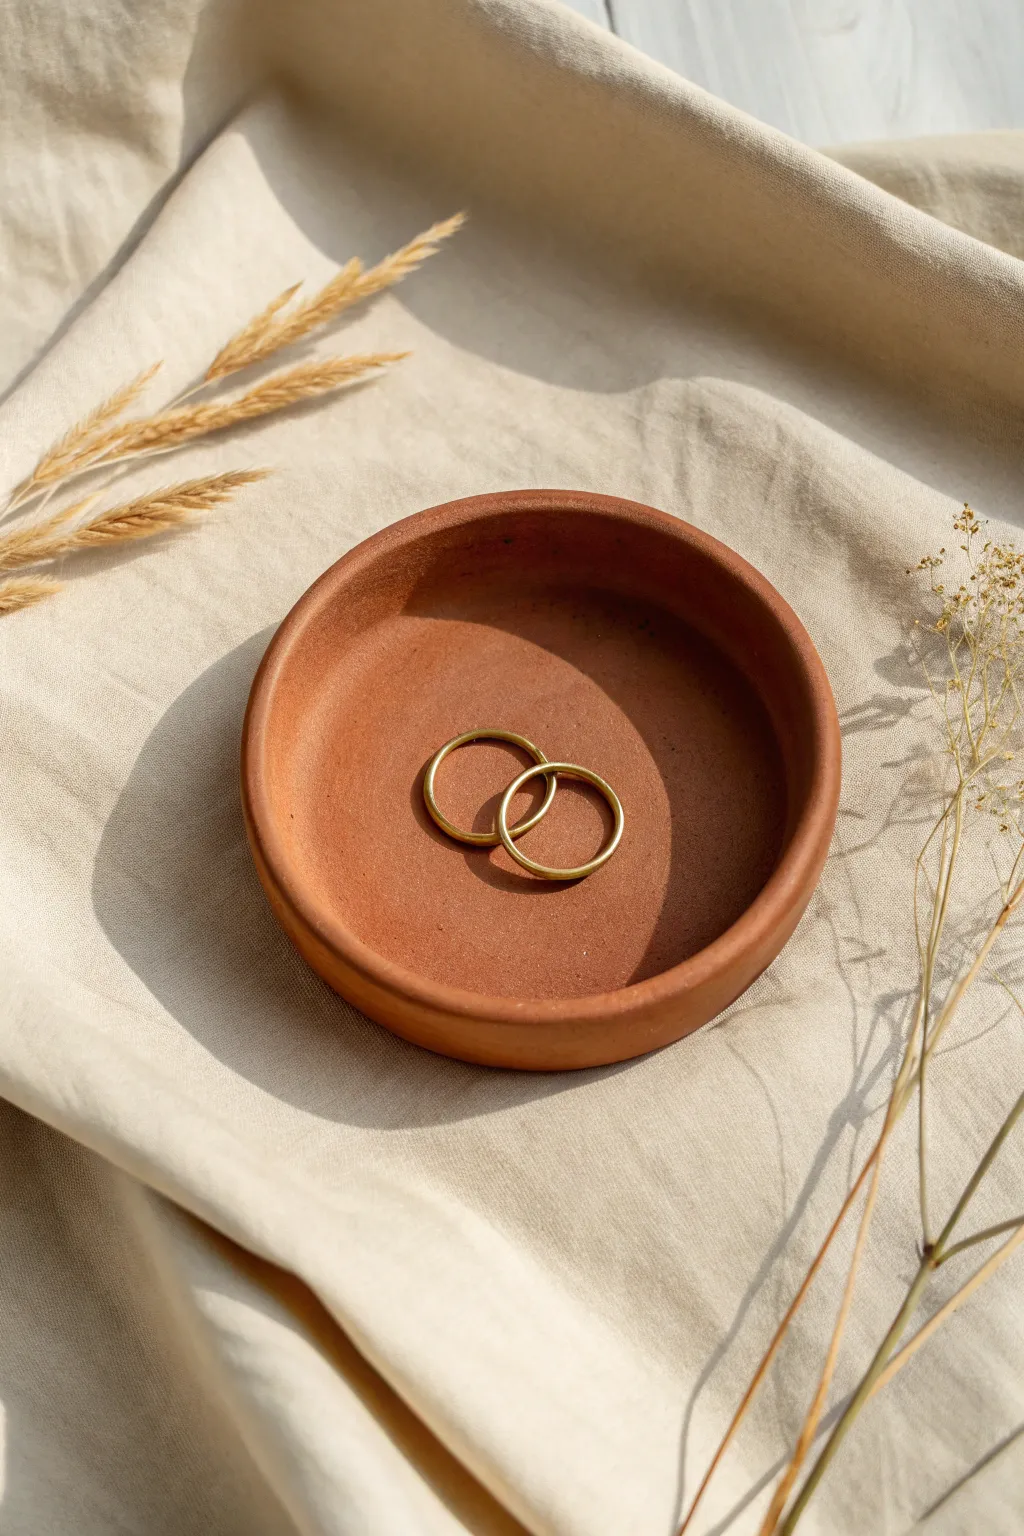
Embrace the beauty of simplicity with this classic round ring dish that features the warm, earthy tones of natural terracotta. Its understated design and organic texture create the perfect resting spot for your favorite gold bands.
Step-by-Step Tutorial
Materials
- Terracotta air-dry clay (or oven-bake polymer clay in a terracotta shade)
- Round cookie cutter or a bowl (approx. 4-5 inches diameter)
- Rolling pin
- Parchment paper or canvas mat
- Small bowl of water
- Sponge or soft paintbrush
- Fine-grit sandpaper (300-400 grit)
- Matte varnish or sealant (optional)
Step 1: Shaping the Base
-
Prepare your workspace:
Lay down your parchment paper or canvas mat on a flat surface to prevent sticking. This ensures you can easily move the clay later without warping it. -
Condition the clay:
Take a handful of terracotta clay and knead it in your hands until it becomes soft, warm, and pliable. This helps remove air bubbles and prevents cracking later. -
Roll it out:
Place the clay ball onto your mat and use the rolling pin to flatten it. Aim for an even thickness of about 1/4 inch. Rotate the clay occasionally so it doesn’t stick. -
Cut the circle:
Press your round cookie cutter or invert a bowl onto the clay slab to cut out a perfect circle. Remove the excess clay from around the edges and set it aside for future projects. -
Smooth the edges:
Dip your finger lightly in water and run it along the cut edge of the circle. This softens the sharp cut line and creates a more finished look right from the start.
Step 2: Forming the Rim
-
Pinch the perimeter:
Gently lift the edges of the circle. Using your thumb on the inside and your index finger on the outside, start pinching the clay upwards to create a raised rim. -
Shape the wall:
Work your way around the circle multiple times, slowly pressing and shaping the wall. Keep the height consistent, aiming for a rim that stands about 1/2 to 3/4 inch tall. -
Level the bottom:
As you lift the sides, the bottom might warp slightly. Gently press the center of the dish back down flat against your work surface to ensure it sits stably. -
Refine the curve:
Smooth the transition between the floor of the dish and the inner wall. I like to use the back of a spoon for this to create a seamless, rounded curve inside. -
Check for symmetry:
Look at the dish from eye level. Adjust any high or low spots on the rim by gently patting them down or pinching them up slightly.
Cracks Appearing?
If you see hairline cracks while drying, mix a tiny bit of fresh clay with water to make a paste (slip). Fill the cracks, smooth over, and let dry again.
Step 3: Finishing Touches
-
Sponge smooth:
Dip a sponge or soft brush in water (don’t soak it, just dampen) and gently wipe the entire surface. This erases fingerprints and creates that sleek, professional texture. -
Initial dry:
Let the clay dry according to the package instructions. For air-dry clay, leave it in a cool, dry place for 24-48 hours. Turn it over halfway through to let the bottom breathe. -
Sand imperfections:
Once fully dry (and hardened), take your fine-grit sandpaper and lightly sand the rim and any rough spots. The goal is a velvety smooth finish. -
Dust off:
Wipe away all sanding dust with a dry cloth or a soft brush to ensure a clean surface before sealing. -
Seal the piece:
Apply a thin layer of matte varnish if you want to protect the clay from moisture while keeping that natural look. Let it cure completely before placing jewelry inside.
Pro Tip: Thickness
Use two wooden dowels or rulers of the same thickness on either side of your clay while rolling. This acts as a guide for a perfectly even slab every time.
Now you have a timeless, handcrafted piece that beautifully displays your daily treasures


Simple Pinch-Pot Trinket Tray
This charmingly rustic trinket tray embraces the imperfections of hand-building with its organic pinch-pot form. The white clay body is flecked with darker mineral speckles, creating a minimalist yet textured home for your daily jewelry.
Step-by-Step
Materials
- White stoneware clay with speckles (or plain white air-dry clay)
- Black pepper or dried coffee grounds (if using plain air-dry clay)
- Rolling pin
- Canvas mat or non-stick surface
- Small bowl of water
- Sponge
- Needle tool or clay knife
- Clear matte glaze (for kiln firing) or matte acrylic varnish (for air-dry)
Step 1: Preparing the Clay
-
Condition the clay:
Take a ball of clay roughly the size of a large orange. Knead it in your hands to warm it up and remove any large air bubbles. -
Add faux speckles (Optional):
If you are using plain air-dry clay and want the speckled look from the photo, knead in a pinch of course ground black pepper or dried coffee grounds until evenly distributed. -
Form the base ball:
Roll the clay firmly between your palms or on your work surface until you have a smooth, round sphere.
Make it Smooth
For a smoother interior, I suggest using the back of a spoon to burnish and compress the inside floor while the clay is still leather hard.
Step 2: Shaping the Pinch Pot
-
Make the opening:
Hold the sphere in your non-dominant hand. Gently press your thumb into the center of the ball, stopping about a half-inch from the bottom. -
Begin pinching:
Starting from the bottom and working your way up, use your thumb and fingers to gently pinch the clay walls. Rotate the ball constantly to keep the thickness even. -
Widen the form:
Instead of pinching straight up like a cup, gently pull the walls outward to create a wide, shallow bowl shape suitable for holding necklaces. -
Check the floor:
Press the interior bottom flat with your fingers or a damp sponge to create a stable surface for your jewelry to rest on. -
Refine the rim:
The rim in the photo is slightly uneven and organic. Tap the rim gently with your finger to smooth any sharp edges, but don’t aim for perfect symmetry.
Cracks on the Rim?
If the rim cracks while widening, your clay is too dry. Dab a little water (or vinegar slip) on the crack and compress it back together immediately.
Step 3: Refining and Drying
-
Smooth the surface:
Dip a sponge in water and wring it out mostly dry. Wipe the interior and exterior to smooth out fingerprints and bring the texture of the clay (or your speckled additives) to the surface. -
Flatten the base:
Gently tap the entire bowl down onto your table to flatten the bottom so it won’t wobble on your dresser. -
Initial drying:
Let the piece sit until leather hard—usually a few hours depending on humidity. This makes it safer to handle for final touch-ups. -
Clean the edges:
Once firm, use a damp finger to rub away any tiny crumbs or sharp bits on the rim that might scratch your skin later. -
Full dry:
Allow the clay to dry completely. For air-dry clay, this takes 24-48 hours; for kiln clay, wait until bone dry before firing.
Step 4: Finishing
-
Bisque fire:
If using ceramic clay, bisque fire the piece to cone 04. -
Glaze application:
Apply a clear matte glaze to the interior and rim. If using air-dry clay, apply a matte sealant or varnish to protect the surface. -
Wiping the foot:
Ensure the bottom of the tray is free of glaze (or sealant) so it doesn’t stick to the kiln shelf or your drying surface. -
Final cure:
Glaze fire the piece according to your clay’s instructions (usually cone 6) or let your air-dry varnish cure fully.
Now your handmade tray is ready to keep your favorite rings and chains organized in style

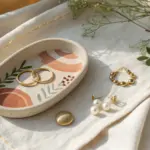
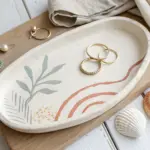

Marbled Clay Swirl Tray
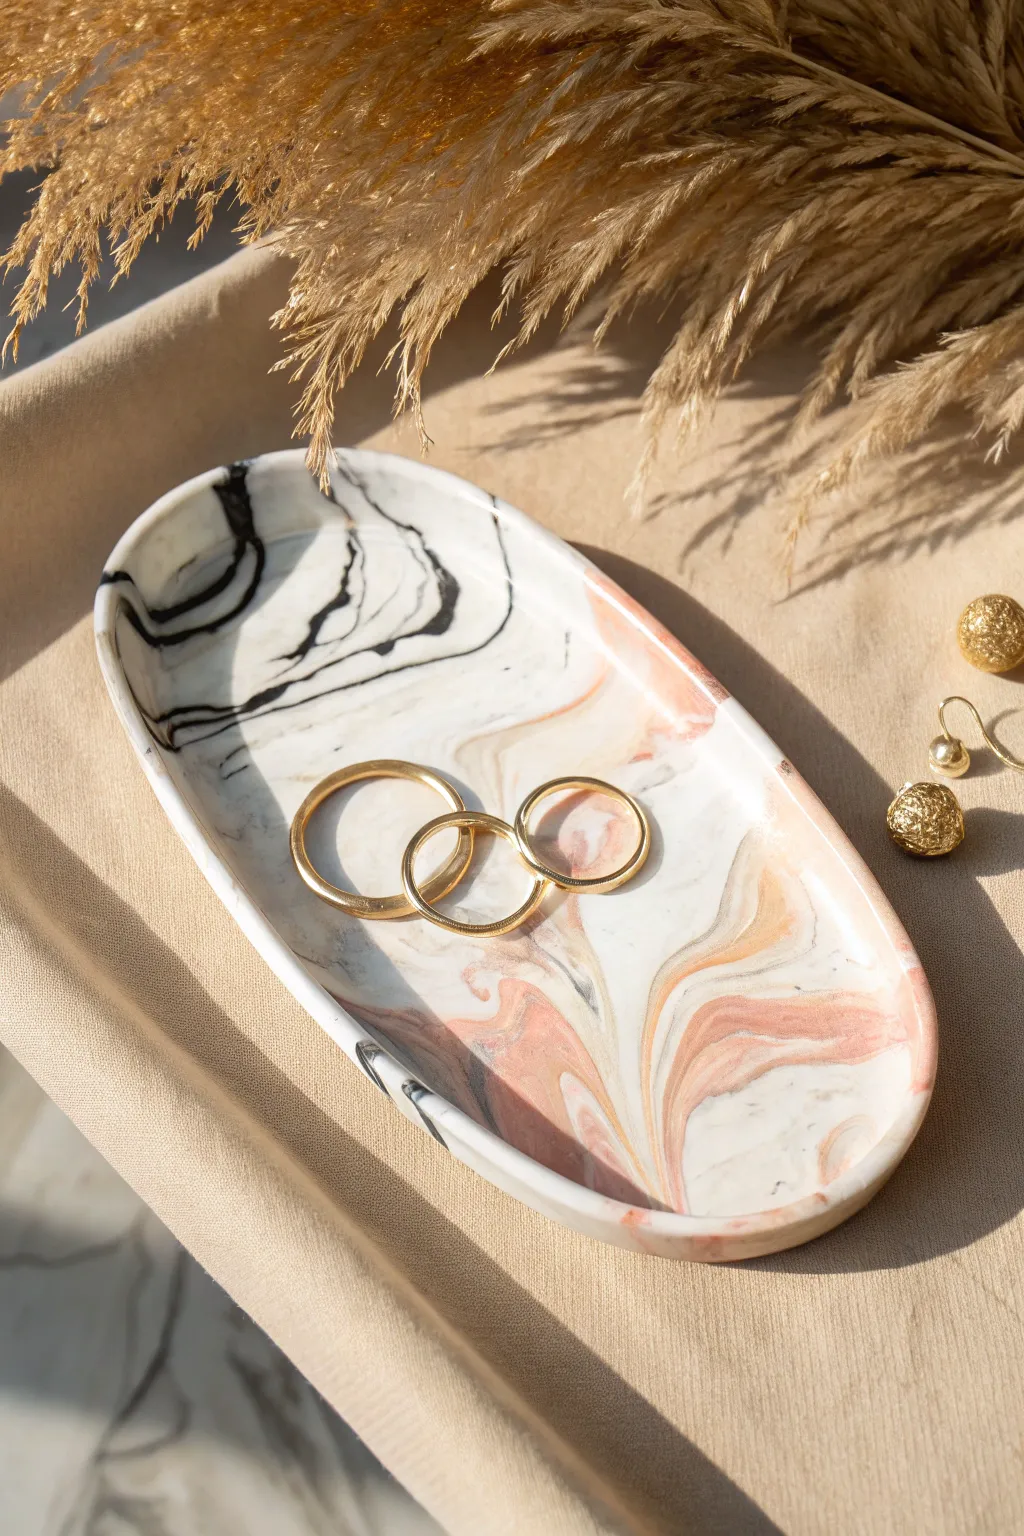
This elegant oval tray combines classic black and white veining with warm peach tones for a sophisticated, modern look. The organic swirls create a mesmerizing pattern that turns a simple jewelry catchall into a functional piece of art.
Step-by-Step Guide
Materials
- White polymer clay (approximately 2oz)
- Black polymer clay (very small amount)
- Peach or salmon-colored polymer clay (small amount)
- Rolling pin or acrylic roller
- Oval clay cutter or paper template and craft knife
- Parchment paper or baking mat
- Sandpaper (various grits from 400 to 1000)
- Small bowl or curved surface (oven-safe)
- Matte finish varnish (optional)
Step 1: Preparing the Pattern
-
Condition the base:
Start by thoroughly conditioning your white polymer clay until it is soft and pliable. Roll it into a thick log shape, about 4 inches long. -
Prepare the accent colors:
Condition small amounts of black and peach clay. Roll these into very thin, distinct snakes. You will need significantly less accent color than white base. -
Apply the colors:
Lay the thin accent snakes lengthwise along the white log. Group the black strands on one side and the peach strands on the opposite side to mimic the specific color separation seen in the photo. -
Twist and fold:
Gently twist the entire log like a candy cane. Fold the twisted log in half, and twist it again. This process begins to marble the colors without muddying them. -
Create the slab:
Roll the twisted clay into a ball, compressing it tightly to remove air bubbles. Using your acrylic roller, flatten the ball into a slab about 1/4 inch thick. Roll in different directions to stretch the marbling pattern.
Clean Lines Pro Tip
To keep the separation between the black and peach distinct, wipe your roller with a baby wipe or alcohol in between rolling different color sections to prevent color drag.
Step 2: Shaping and Baking
-
Cut the shape:
Place your oval cutter or paper template over the most attractive section of the marbled slab. Press down firmly or trace with your craft knife to cut out the oval shape. -
Smooth the edges:
Before lifting the clay, gently run your finger along the cut edge to soften any sharp ridges left by the cutter. This reduces sanding time later. -
Form the curve:
Carefully lift the oval slab and place it into a shallow, oven-safe bowl or draped over a curved form. Ideally, choose a form that allows for a gentle, consistent slope towards the center. -
Refine the rim:
While the clay is on the form, check that the rim is even. You can slightly curl the edges upward with your fingertips to emphasize the dish shape. -
Bake:
Bake the clay according to the manufacturer’s instructions for your specific brand (usually around 275°F or 130°C for 15-30 minutes). Let it cool completely inside the oven to prevent cracking.
Step 3: Finishing Touches
-
Wet sanding:
Once cooled, take the tray to a sink or bowl of water. Using wet/dry sandpaper, start with 400 grit to smooth edges and the surface. -
Polishing:
Move up to higher grits like 800 and 1000. Sanding under water keeps dust down and creates a buttery smooth finish that feels professional to the touch. -
Gold accenting (optional):
If you want to add a touch of luxury, I sometimes paint the very rim of the dish with liquid gold leaf paint, though the natural marble look is beautiful on its own. -
Seal (optional):
For a matte look like the photo, leave the clay bare after sanding or apply a thin coat of matte varnish. Avoid glossy glaze to maintain the natural stone appearance.
Level Up: Texture
Add tiny flecks of gold leaf or translucent clay into your initial log before twisting. This creates faux-quartz depth that sparkles slightly when the light hits.
Place your favorite rings and earrings in this chic tray and enjoy the organic beauty of your handmade marbling


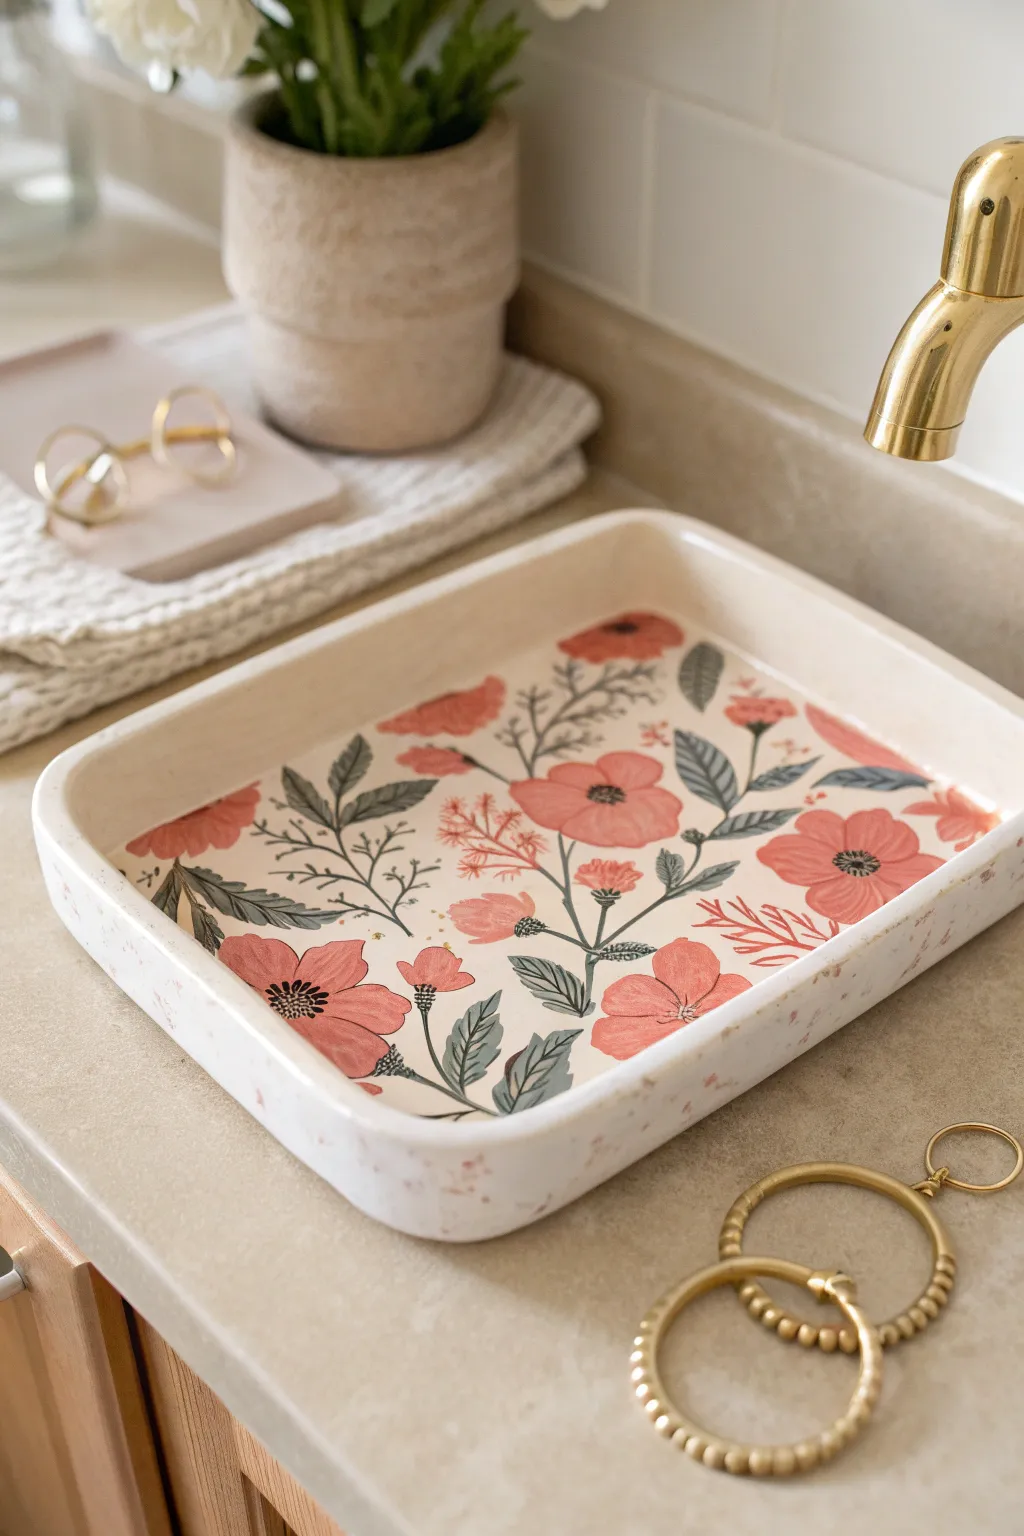
Terrazzo Speckle Jewelry Tray
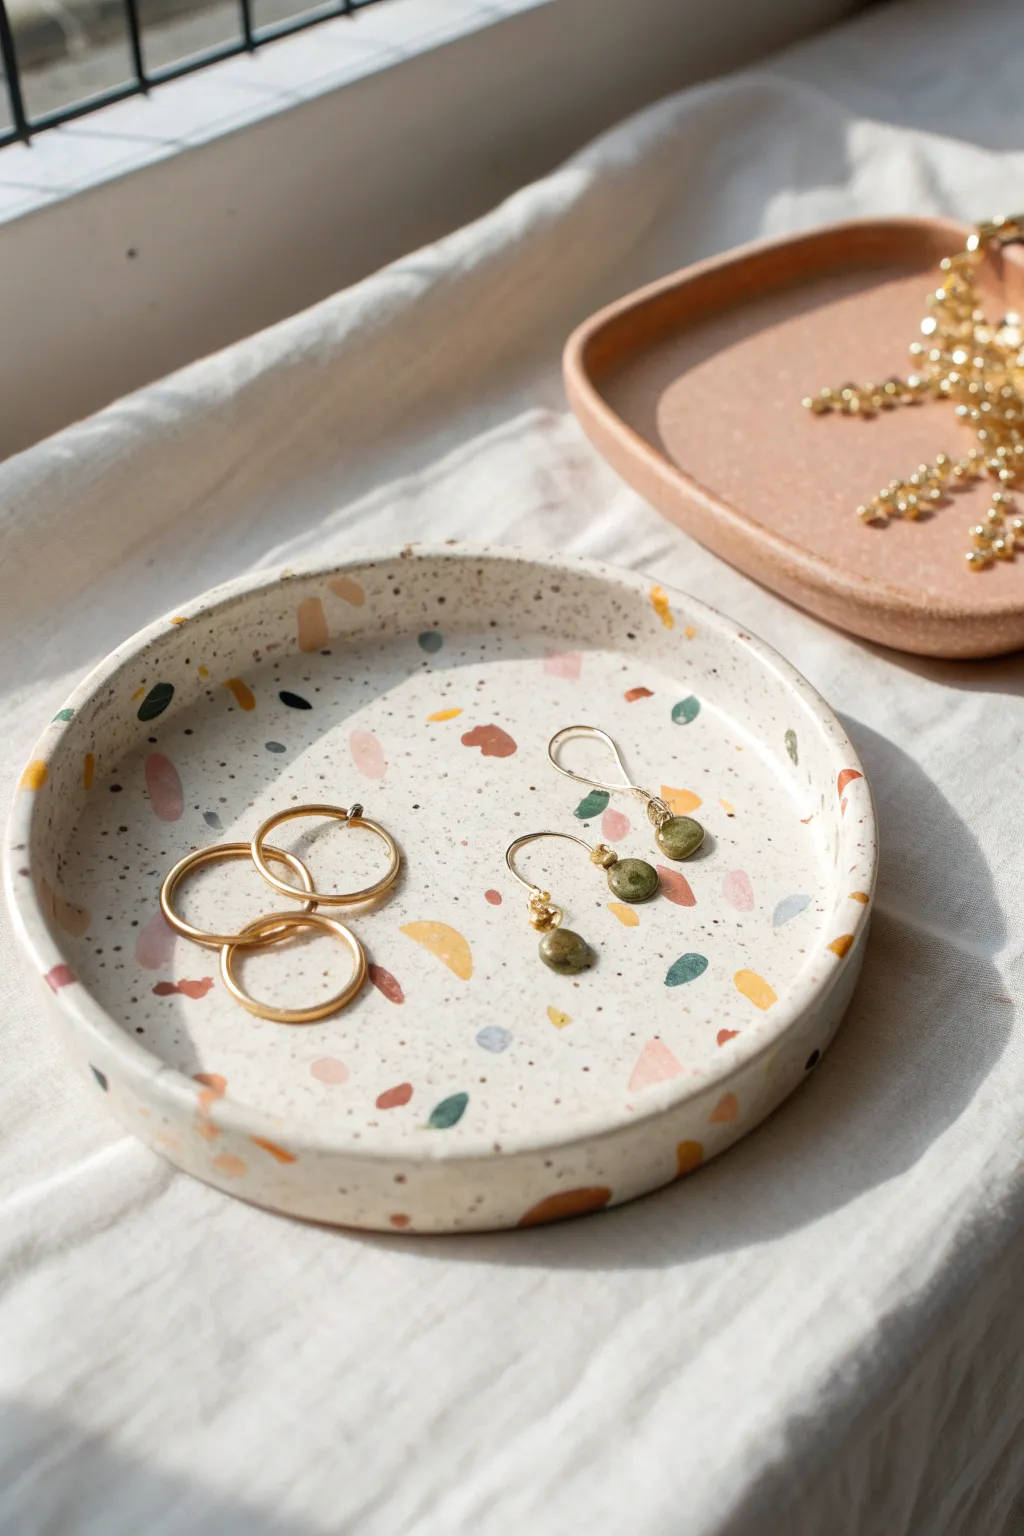
Bring a touch of modern artistry to your vanity with this charming terrazzo-style trinket dish. Featuring a creamy white base scattered with vibrant, multicolor chips and delicate speckles, this piece perfectly mimics the look of high-end ceramic or actual terrazzo stone.
Step-by-Step
Materials
- Polymer clay (White or beige for base)
- Polymer clay (Small amounts of terracotta, mustard yellow, teal, and black)
- Acrylic rolling pin
- Circle clay cutter or craft knife
- Rolling guides or playing cards (for even thickness)
- Sandpaper (various grits from 400 to 1200)
- Oven-bake clay adhesive or liquid clay (optional)
- Used toothbrush or stiff bristle brush
- Black acrylic paint
- Gloss or matte varnish (optional)
Step 1: Prepping the Terrazzo Chips
-
Condition the colors:
Begin by conditioning small amounts of your colored clays—terracotta, mustard, teal, black, and maybe a soft pink. Roll them out into very thin sheets, roughly 1-2mm thick. -
Bake the sheets:
I prefer to partially bake these thin colored sheets for about 10-15 minutes at the recommended temperature. This makes them brittle and easier to chop into authentic-looking hard chips rather than soft smears. -
Create the chips:
Once the colored sheets are cool, chop them up using a craft knife or break them apart by hand into small, irregular shards. Aim for a variety of sizes, from tiny specks to larger triangles.
Clean Colors
Keep baby wipes nearby to clean your hands and roller between steps. Polymer clay picks up dust easily, and you want your white base to stay pristine before adding the colored chips.
Step 2: Forming the Base
-
Roll the base slab:
Condition a large block of white or beige polymer clay until pliable. Roll it out into a smooth slab about 1/4 inch thick. Use rolling guides to ensure the surface is perfectly level. -
Apply the chips:
Scatter your pre-baked colored chips onto the white slab. Press them gently into the surface so they adhere but don’t disappear completely. -
Embed the terrazzo:
Cover the slab with parchment paper and roll over it again firmly with your acrylic roller. This forces the colored chips into the white base, creating a uniform, flat surface. -
Cut the shape:
Use a large circle cutter or a bowl as a template to cut out the base of your tray. Save the excess speckled clay for the rim.
Step 3: Assembling the Tray
-
Create the rim strip:
Gather the excess clay, roll it into a long snake, and flatten it into a long strip about 1/2 inch wide. You may need to add more chips to this strip if the pattern has become distorted. -
Attach the rim:
Wrap the strip around the circumference of your circular base. Where the ends meet, slice through both layers at a diagonal angle for a seamless join. -
Blend the seams:
On the outside and inside of the tray, use a modeling tool or your finger to gently smudge the clay from the rim down onto the base, blending the seam until it is invisible. -
Smooth the edges:
Run your finger along the top edge of the rim to round it off slightly, removing any sharp angles from the construction process. -
Add the fine speckles:
To achieve that fine, sandy texture seen in the photo, dip an old toothbrush into slightly watered-down black acrylic paint. Run your thumb over the bristles to flick tiny droplets across the unbaked clay. -
Final Bake:
Bake the fully assembled tray according to your clay manufacturer’s instructions, usually around 275°F (130°C) for 30 minutes. Let it cool completely in the oven to prevent cracking.
Gilded Edge
Use a gold leaf pen to paint the very top rim of the dish after baking. The metallic accent contrasts beautifully with the matte terrazzo texture and elevates the design.
Step 4: Finishing Touches
-
Wet sanding:
Under running water, use wet/dry sandpaper to sand the surface. Start with a coarse grit to expose the sharp edges of the colored chips and move to finer grits for a silky smooth finish. -
Buffing:
After sanding, dry the piece thoroughly. You can vigorously rub the tray with a piece of denim or a soft cotton cloth to bring out a natural sheen. -
Seal (Optional):
If you plan to use this near moisture or want a glossy ceramic look, apply a thin coat of water-based polyurethane varnish to protect the surface.
Now you have a stylish spot to keep your favorite rings and earrings safe and displayed beautifully

The Complete Guide to Pottery Troubleshooting
Uncover the most common ceramic mistakes—from cracking clay to failed glazes—and learn how to fix them fast.
Gold-Rimmed Edge Tray
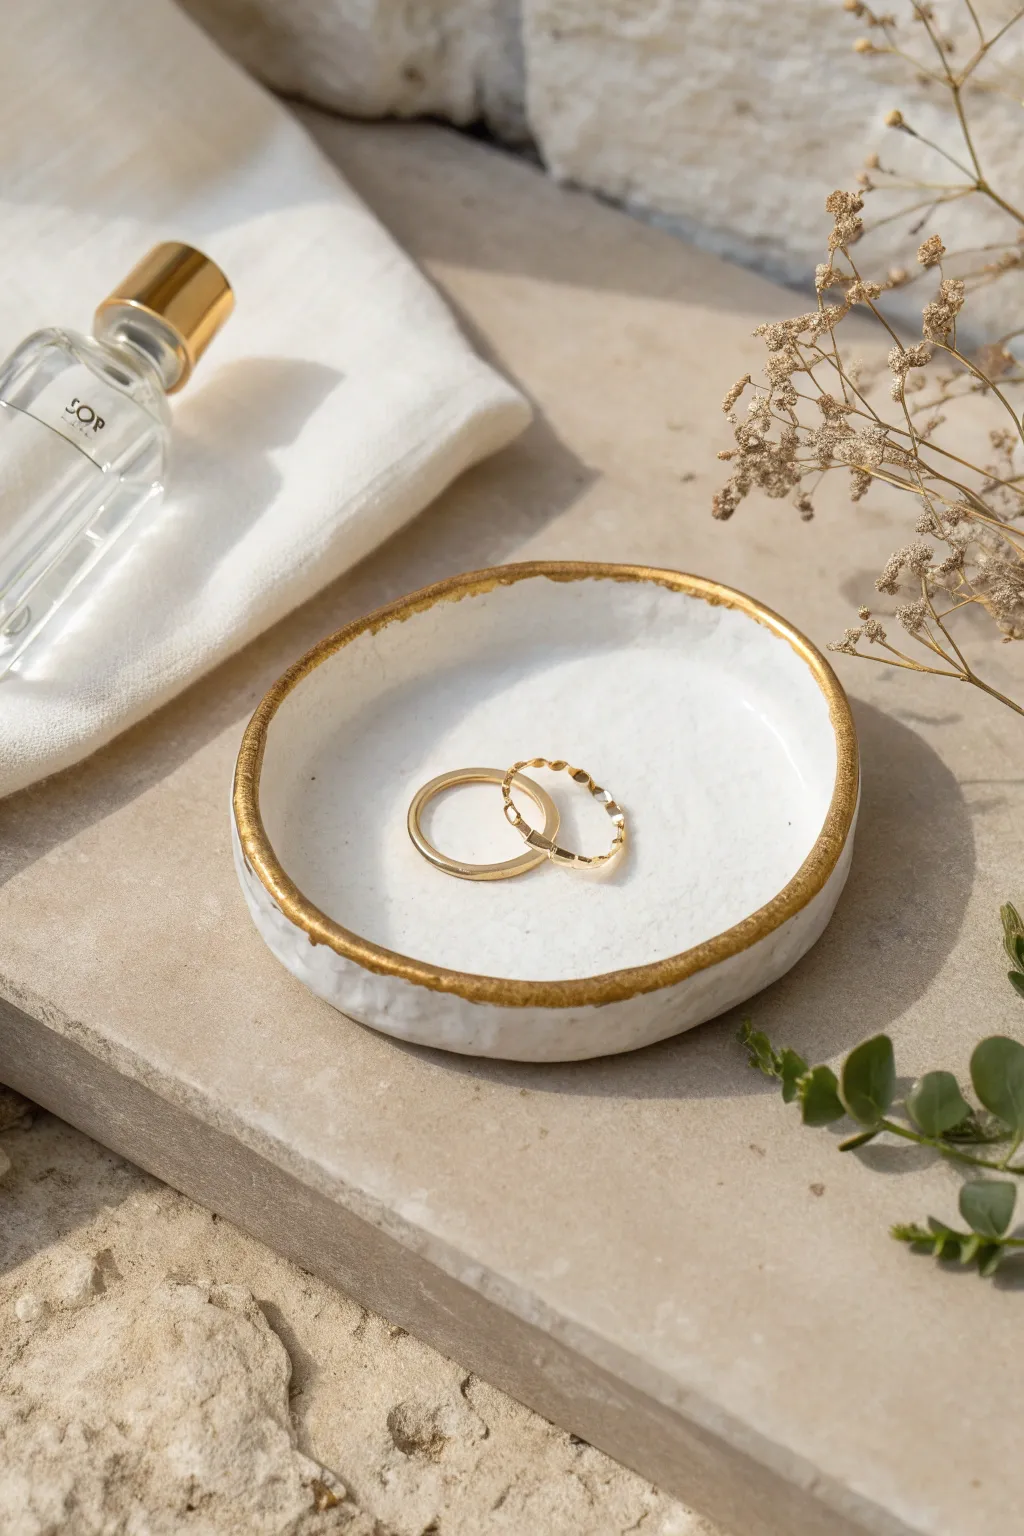
This elegant trinket dish combines the raw, textured beauty of white clay with a luxurious glimmer of metallic gold. The uneven, organic rim creates a handmade charm that feels both rustic and sophisticated, perfect for holding your favorite rings.
Step-by-Step Guide
Materials
- White air-dry clay (or polymer clay)
- Rolling pin or smooth glass jar
- Circle cutter (approx. 4 inches) or a bowl to trace
- Small bowl for shaping (drying form)
- Craft knife or needle tool
- Fine-grit sandpaper (220-400 grit)
- Liquid gold leaf or metallic gold enamel paint
- Small, fine-tip paintbrush
- Gloss varnish or clear sealant (optional)
- Sponge or textured cloth (optional for surface texture)
Step 1: Shaping the Clay Base
-
Condition the CLay:
Begin by taking a handful of white clay. Knead it thoroughly in your hands to warm it up and remove any air bubbles, ensuring the clay is pliable and smooth. -
Roll it Out:
Place your clay on a smooth, clean surface or a silicone mat. Use your rolling pin to flatten the clay to an even thickness of about 1/4 inch. -
Create Texture (Optional):
If you want the subtle, pitted texture seen in the photo, gently press a textured cloth or a rough sponge onto the clay surface before cutting. -
Cut the Circle:
Place your circle cutter or an inverted bowl onto the rolled clay. Press down firmly to cut your shape, or trace around the bowl with a craft knife. -
Refine the Edges:
Lift away the excess clay. dampen your fingertip with a little water and run it along the cut edge to smooth out any harsh sharpness or crumbs. -
Form the Curve:
Gently lift your clay circle and drape it into your small shaping bowl. You don’t want a deep bowl shape, just a shallow curve, so press it lightly to conform to the bottom. -
Create the Organic Rim:
Instead of pressing the rim perfectly flat against the bowl, use your fingers to pinch and gently warp the edge slightly. This irregularity gives it that artisan, organic look. -
Initial Drying:
Let the clay sit in the mold for about 24 hours (or according to package directions) until it is firm enough to hold its shape. -
Flip and Dry:
Once firm, remove the tray from the bowl and flip it upside down on a drying rack. This ensures the bottom dries completely and prevents warping.
Fixing Cracks
If tiny hairline cracks appear while drying, mix a tiny bit of fresh wet clay with water to make a paste (slip) and fill the cracks. Smooth over and let dry again.
Step 2: Finishing and Gilding
-
Sand for Smoothness:
When the clay is bone dry, take your fine-grit sandpaper and lightly buff the edges and any rough spots on the surface. Wipe away the dust with a barely damp cloth. -
Apply Sealer (Optional):
If you plan to use this near moisture or want a glossy finish, apply a coat of clear varnish now and let it dry completely before adding gold. -
Prepare the Gold:
Shake your liquid gold leaf or metallic paint well. Dip your fine-tip brush into the paint, ensuring you don’t overload it. -
Paint the Rim:
Carefully run the brush along the very top edge of the rim. I like to let the brush slip slightly onto the inner and outer walls to create an imperfect, painterly line. -
Add Depth:
Go back over the rim a second time if the gold looks translucent. Dab a tiny bit of extra gold into any small crevices or dips on the rim for emphasis. -
Final Cure:
Allow the gold paint to cure fully according to the manufacturer’s instructions. Liquid leaf often dries quickly, but give it time to harden.
Level Up: Speckled Effect
Before rolling your clay, kneed in cracked black pepper or dried tea leaves. This creates a faux-stone look that pairs beautifully with the gold rim.
Place your finished tray on your nightstand to add a touch of handmade luxury to your daily routine
Stamped Pattern Ring Tray
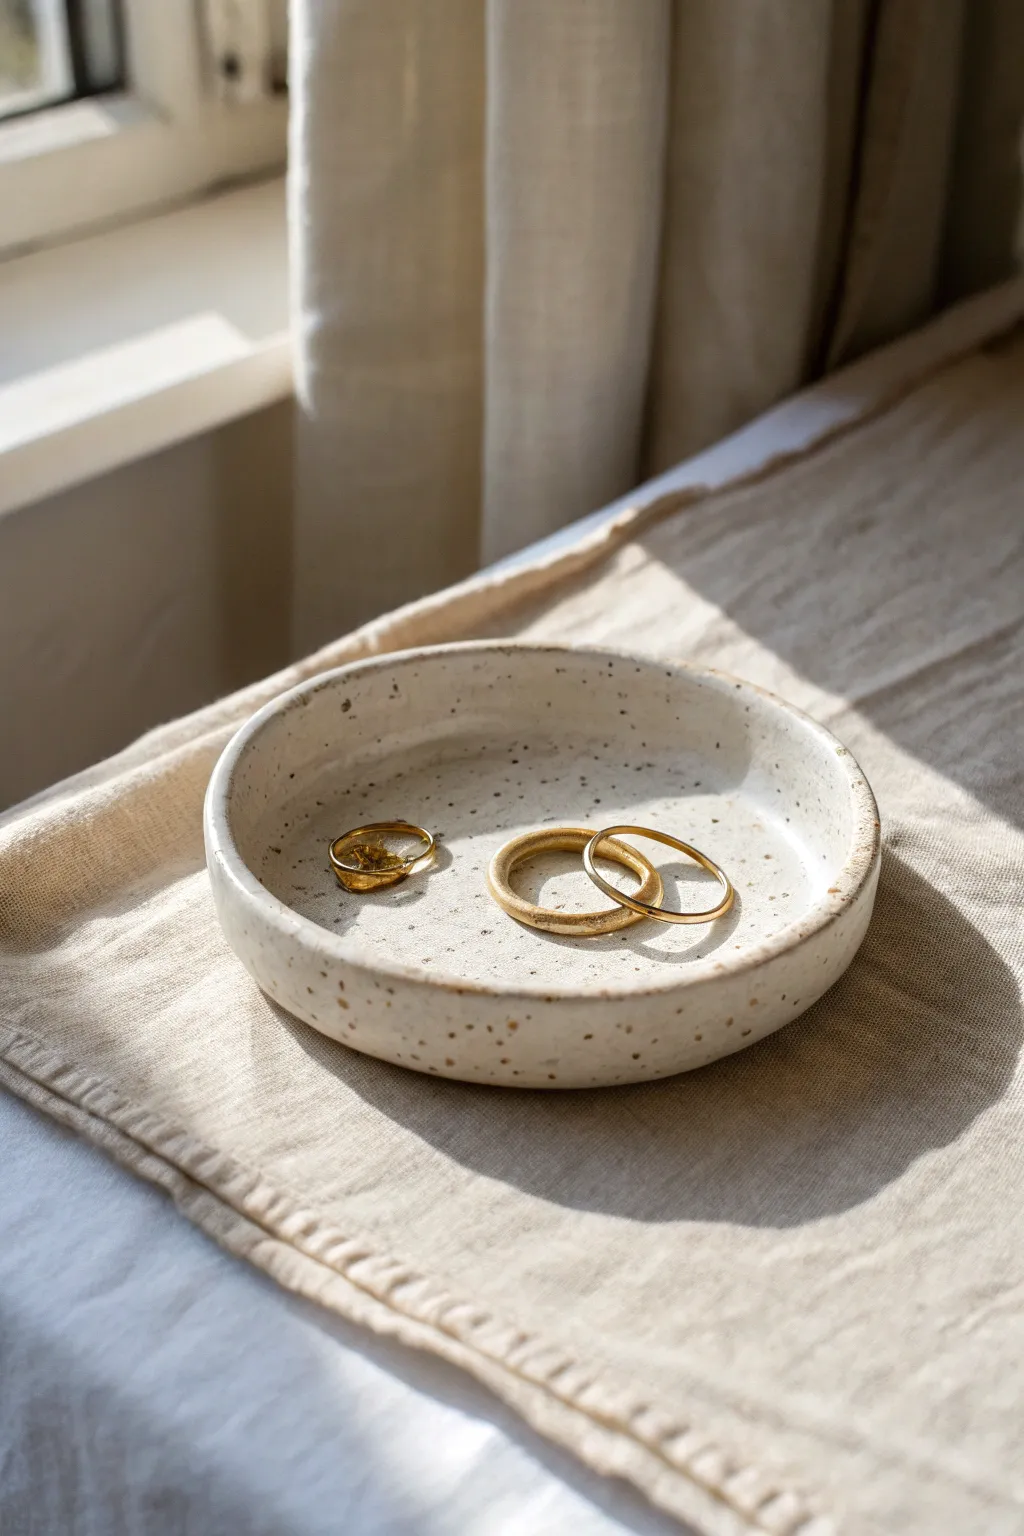
This minimalist jewelry tray combines a rustic, hand-formed shape with a sophisticated speckled finish that mimics high-end stoneware. The subtle texture and creamy glaze create the perfect neutral backdrop for gold rings and everyday treasures.
How-To Guide
Materials
- White air-dry clay or polymer clay
- Rolling pin or smooth glass jar
- Circle cutter (approx. 4-5 inches) or a bowl to trace
- Small bowl for molding (slump mold)
- Faux stone spray paint (cream/granite texture)
- Glossy clear varnish or sealant
- Fine grit sandpaper (320-400 grit)
- Small sponge
- Kraft paper or parchment paper
Step 1: Shaping the Base
-
Condition the clay:
Start by taking a handful of your clay and kneading it thoroughly in your hands until it becomes warm, pliable, and free of cracks. -
Roll out the slab:
Place the clay on a sheet of parchment paper. Use your rolling pin to flatten it into an even slab, aiming for a thickness of about 1/4 inch. -
Check for smoothness:
Run your fingers lightly over the surface to ensure there are no major lumps or air bubbles, smoothing them down if necessary. -
Cut the circle:
Use a large circle cutter or place an inverted bowl onto the clay and trace around it with a craft knife to create your perfect round base. -
Smooth the edges:
Dip your finger in a tiny bit of water and run it along the cut edge of the circle to soften the sharp angle, giving it a more handmade pottery look. -
Form the rim:
Gently lift the edges of the circle upwards. I prefer to pinch the clay slightly between my thumb and forefinger to create a vertical wall about 1/2 inch high. -
Refine the shape:
Once the walls are up, smooth the seam where the wall meets the base on the inside of the tray using a wet fingertip or a clay shaping tool. -
Add character:
Don’t aim for machine perfection; gently push the rim slightly unevenly in a few spots to replicate the organic feel seen in the reference photo.
Rim Perfection
To get a uniform rim height, try rolling a long ‘snake’ of clay and attaching it to the flat base rather than pinching walls up from the slab.
Step 2: Drying and Finishing
-
Let it dry completely:
Allow the tray to dry undisturbed for at least 24-48 hours. It should turn white and feel chalky to the touch when fully cured. -
Sand imperfections:
Once fully dry, take your fine-grit sandpaper and lightly buff the rim and surface to remove any fingerprints or harsh ridges. -
Wipe it down:
Use a slightly damp sponge or cloth to wipe away all the sanding dust. The surface needs to be perfectly clean for the finish to adhere. -
Apply the speckled base:
In a well-ventilated area, shake your faux stone spray paint vigorously. Apply a light, even coat to the entire tray, holding the can about 10 inches away. -
Layer the texture:
Let the first coat dry for 15 minutes, then apply a second coat to build up that dense, speckled stoneware spacing. -
Enhance the speckles:
If your spray paint is too subtle, you can flick a toothbrush dipped in diluted brown acrylic paint over the dried tray for extra speckling. -
Seal for durability:
Once the texture paint is bone dry, apply a glossy clear varnish. This seals the texture and mimics the shiny glaze of fired ceramic. -
Final cure:
Let the varnish cure according to the bottle’s instructions before placing any jewelry inside to avoid tackiness.
Vintage Gold Rim
Once the glaze is dry, paint just the very top edge of the rim with gold liquid leaf. Looking for a delicate, uneven line adds elegance.
Place your warm, speckled tray on your nightstand to hold your favorite rings safely


What Really Happens Inside the Kiln
Learn how time and temperature work together inside the kiln to transform clay into durable ceramic.
Lace-Imprint Vintage Tray
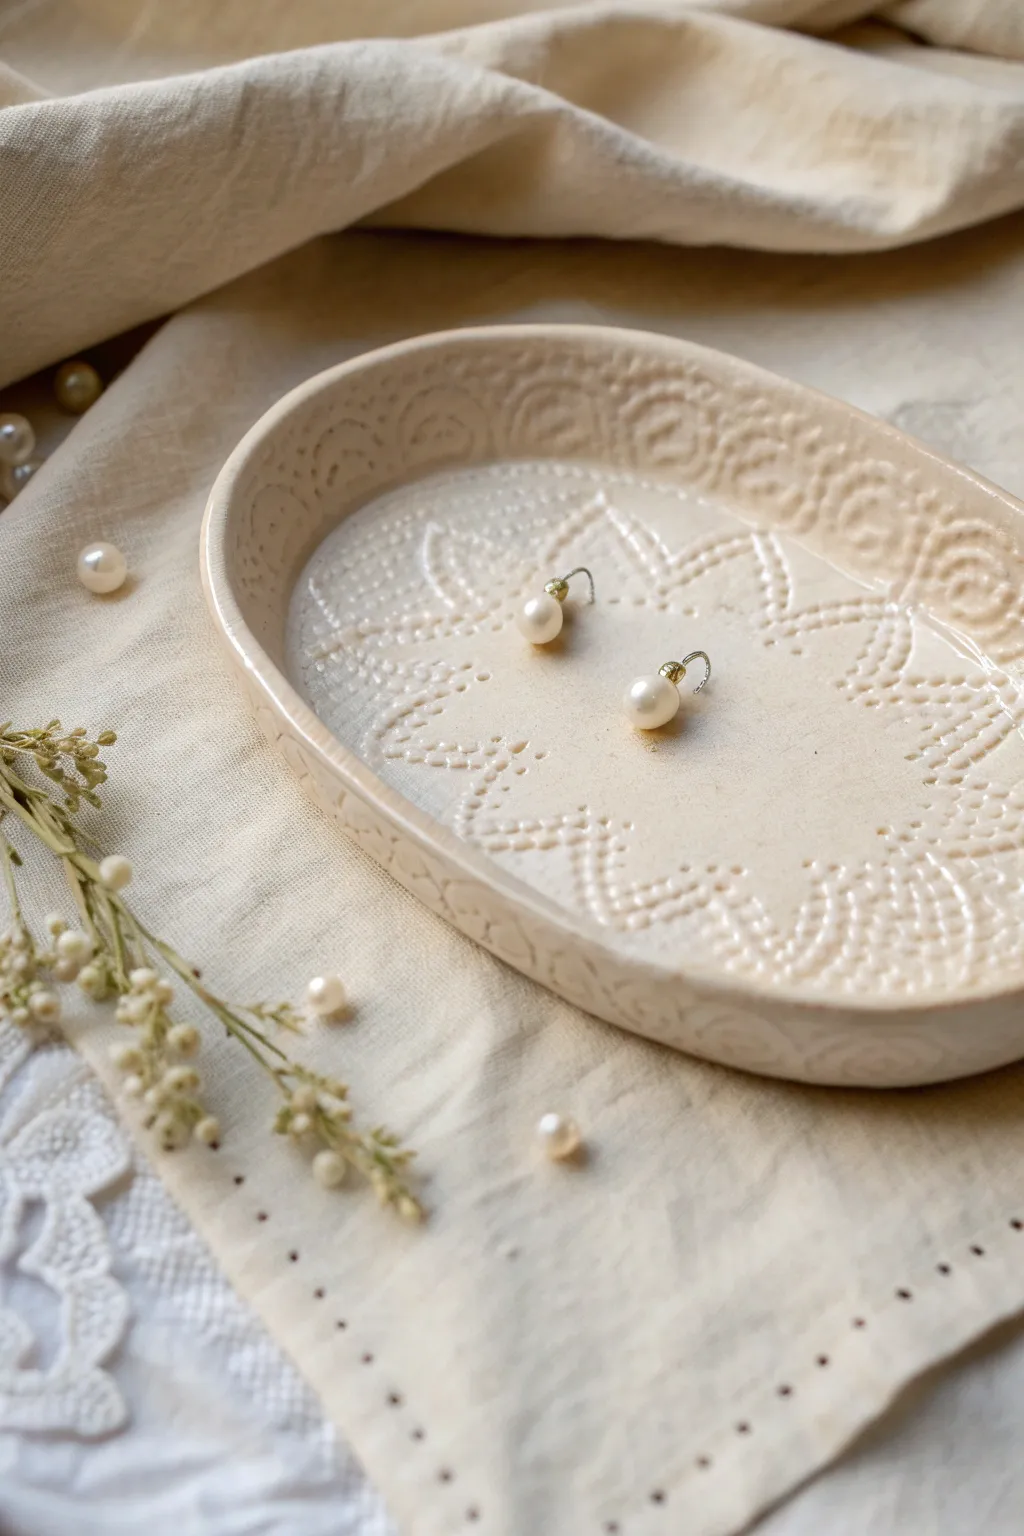
Capture the delicate beauty of vintage textiles in permanent form with this elegant, oval jewelry tray. The subtle texture of lace pressed into cream-colored clay creates a timeless piece perfect for holding your most treasured pearls.
Step-by-Step
Materials
- White or cream-colored air-dry clay (or polymer clay)
- Small rolling pin
- Oval cookie cutter or a paper oval template
- Vintage lace doily or lace fabric scraps
- Craft knife or scalpel
- Small bowl relative to your oval size (for shaping)
- Fine-grit sandpaper (400-600 grit)
- Clear matte or satin varnish
- Medium soft paintbrush
- Water and sponge for smoothing
Step 1: Preparation and Rolling
-
Condition the Clay:
Begin by working a fist-sized ball of clay in your hands. Knead it thoroughly until it is warm, pliable, and free of any air bubbles that could cause cracks later. -
Initial flattening:
Place the clay on a clean, smooth work surface. Use the palm of your hand to flatten the ball into a thick pancake shape. -
Roll to thickness:
Using your rolling pin, roll the clay out evenly. Aim for a consistent thickness of about 1/4 inch (6mm). If you go too thin, the tray might be fragile; too thick, and it will look chunky. -
Smooth the surface:
Dip your finger or a small sponge in a tiny bit of water and gently glide it over the surface of the clay to remove any fingerprints or rolling marks.
Fixing Cracks
If hairline cracks appear while drying, mix a tiny amount of fresh clay with water to make a paste (slip). Rub this into the cracks, let dry, and sand smooth.
Step 2: Creating the Texture
-
Position the lace:
Select a section of your lace doily that has a distinct, beautiful pattern. Lay it carefully over the smoothed clay slab. -
First pass impression:
Gently press the lace into the clay with your fingers first to secure it in place so it doesn’t shift. -
Deepen the pattern:
Take the rolling pin and roll over the lace with firm, even pressure. I like to stand up for this part to really get my weight behind it ensuring a deep, crisp impression. -
Reveal the design:
Find a corner of the lace and peel it back slowly and carefully to reveal the imprinted texture underneath.
Guilded Edge
For a luxe upgrade, use a small detail brush to paint the very rim of the dried tray with liquid gold leaf or metallic acrylic paint before sealing.
Step 3: Cutting and Shaping
-
Cut the shape:
Place your oval cutter or paper template over the most attractive part of the textured area. Press down the cutter or trace around the template with a craft knife to cut out the oval shape. -
Refine the edges:
Dip your finger in water again and very gently smooth the cut edges of the oval to remove any sharp bits or drag marks from the knife. -
Prepare the mold:
Take your small bowl and turn it upside down, or place the clay inside right-side up depending on the desired curve. For this project, placing it inside a larger shallow bowl works best to cradle the shape. -
Form the curve:
Gently lift your clay oval and place it into the bowl. Press it down lightly so it takes on the concave shape of the bowl, lifting the edges slightly to create a rim.
Step 4: Finishing Touches
-
Dry completely:
Allow the clay to dry undisturbed. Air-dry clay typically takes 24-48 hours depending on humidity. Don’t rush this step or the tray may warp. -
Sand for perfection:
Once fully dry and hard, use the fine-grit sandpaper to gently buff the rim and the underside of the tray until it feels silky smooth. -
Clean dust:
Wipe the entire piece with a slightly damp cloth or a dry soft brush to remove all sanding dust from the crevices of the lace pattern. -
Seal the piece:
Apply a thin, even coat of matte or satin varnish to the entire tray. This protects the clay from moisture and dirt while maintaining that natural, ceramic look.
Now you have a stunning, bespoke vessel ready to cradle your favorite jewelry pieces
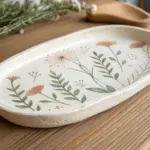
Pressed-Flower Keepsake Tray
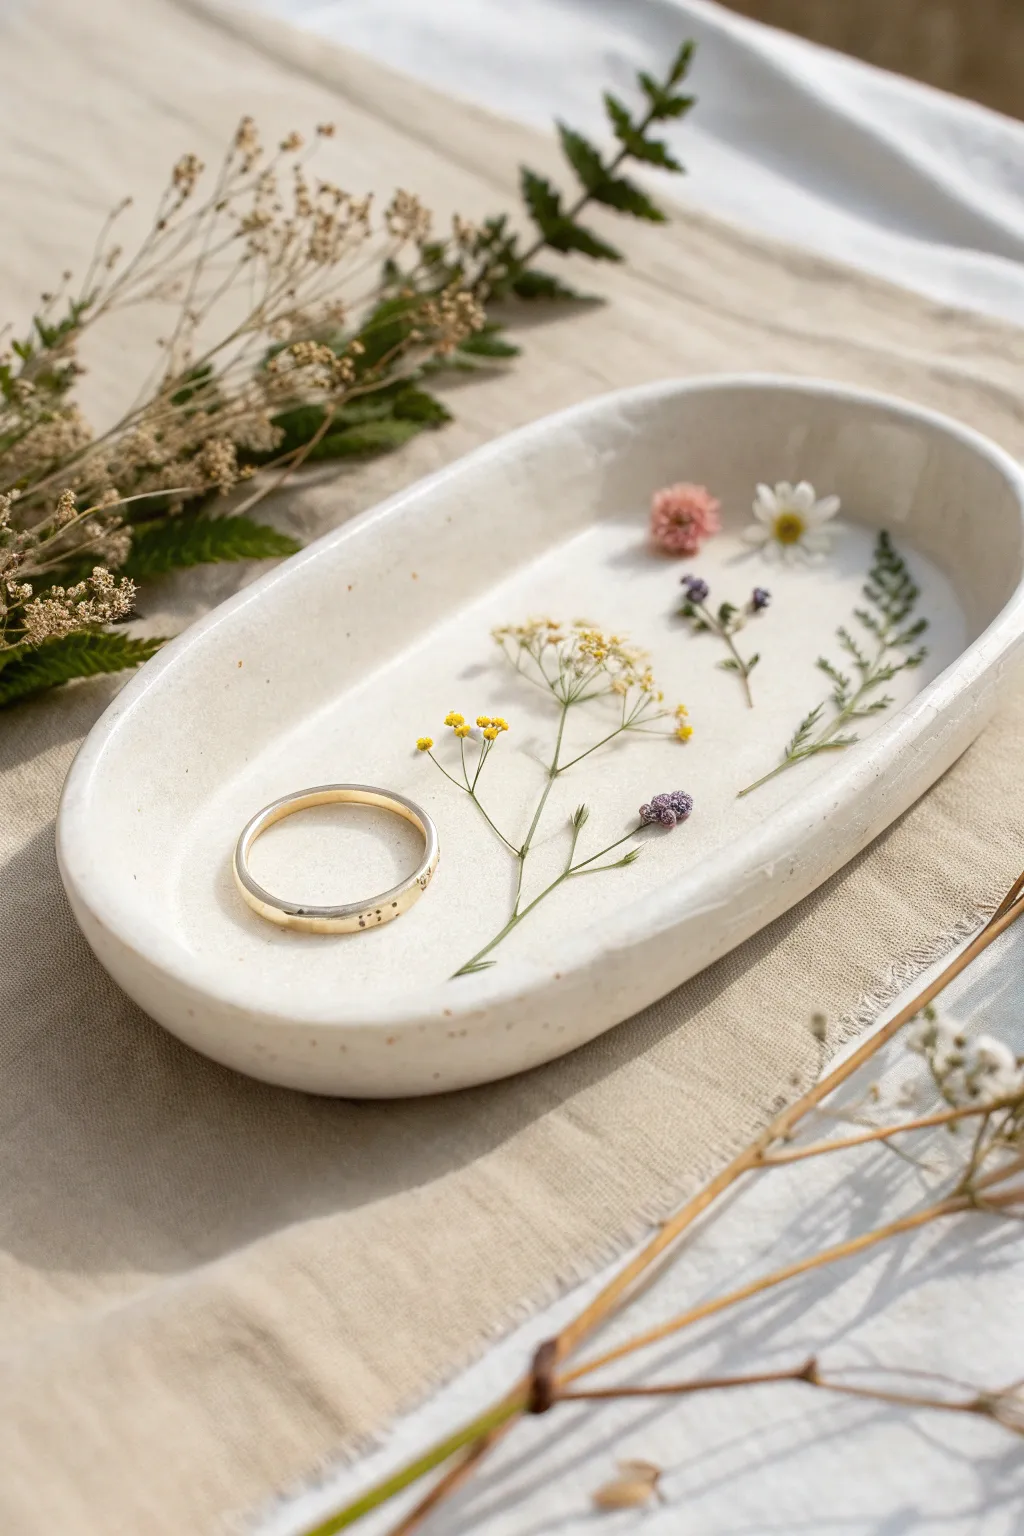
Capture the delicate beauty of nature in this minimalist, speckled clay tray. By pressing real blooms directly into the clay’s surface before sealing, you create a permanent, romantic resting place for your most treasured rings.
Step-by-Step
Materials
- White or cream polymer clay (approx. 2 oz)
- Speckle inclusions (fine black pepper or brown clay shavings)
- Assorted dried pressed flowers (fern, baby’s breath, small daisies)
- Acrylic rolling pin
- Oval clay cutter or paper template with craft knife
- Smooth work surface (ceramic tile or glass mat)
- Small bowl or sponge (for shaping)
- Gloss glaze or resin (optional, for sealing)
- Soft paintbrush
- Sandpaper (fine grit)
Step 1: Preparation & Base
-
Condition the clay:
Begin by warming the white polymer clay in your hands until it becomes soft and pliable. If you want that natural, ceramic-speckled look seen in the photo, kneed in a tiny pinch of cracked black pepper or extremely fine shavings of dark brown clay. -
Roll the slab:
Place your conditioned ball of clay onto your smooth work surface. using the acrylic roller, flatten it into an even sheet. Aim for a thickness of about 1/4 inch—thick enough to hold its shape but delicate enough to look refined. -
Smooth the surface:
Check the surface for any fingerprints or lint. Lightly run your finger or a little baby oil over the clay to ensure it is perfectly smooth before moving on.
Sticky Situation?
If your clay sticks to the table, roll it out on parchment paper instead. This also makes it easier to transfer the soft clay into a baking form without stretching the oval shape out of distortion.
Step 2: Botanical Arrangement
-
Select your florals:
Choose small, dainty dried flowers. The example uses a tiny fern tip, a clover-like bloom, and baby breath stems. Ensure they are fully dried and flattened; fresh flowers will burn or rot in the oven. -
Compose the design:
Lay your flowers gently onto the rolled clay without pressing yet. Arrange them in a loose, organic pattern, leaving negative space for where your rings will eventually sit. I prefer to use tweezers for this part to avoid marring the clay surface. -
Embed the botanicals:
Once happy with the placement, place a piece of parchment paper over the flowers. Gently roll over the paper with your rolling pin just once or twice. You want the flowers to sit flush with the clay surface, essentially becoming part of the slab.
Step 3: Shaping & Curing
-
Cut the shape:
Remove the parchment paper carefully. Place your oval cutter over the design and press down firmly to cut your shape. If you don’t have a cutter, lay a paper oval template on top and trace around it carefully with a craft knife. -
Smooth the edges:
Lift the excess clay away. Dip your finger in a little water or cornstarch and very gently run it along the cut edge to soften any sharp corners left by the blade. -
Form the curve:
Carefully lift your clay oval. Determine the curve you want; you can either pinch the edges upward slightly with your fingers for a freeform look or lay the clay inside a shallow, oven-safe bowl to give it a uniform curve. -
Bake the tray:
Place the tray (and its form, if using one) onto a baking sheet. Bake according to your brand of clay’s specific instructions—usually around 275°F (135°C) for 15-30 minutes. -
Cool down:
Once the baking time is up, turn off the oven but leave the door slightly ajar. Let the clay cool completely inside the oven to prevent cracking from thermal shock.
Gilded Rim
After baking and cooling, use a small detail brush to paint a thin line of liquid gold leaf along the very top edge of the rim. This adds a luxurious contrast to the rustic, natural florals.
Step 4: Finishing Touches
-
Sanding edges:
Once fully cool, inspect the edges. If they feel rough, use a fine-grit sandpaper (wet sanding with a little water is best) to buff the rim until it feels like polished stone. -
Sealing the florals:
To protect the delicate dried flowers from moisture or wear, apply a thin coat of gloss glaze or a thin layer of UV resin over the entire inside surface. This also mimics the shiny glaze of ceramic ware. -
Final cure or dry:
Allow the glaze to air dry completely, or cure the resin under a UV lamp, ensuring the surface is tack-free and glossy.
Place your favorite ring inside and enjoy this little piece of everlasting spring on your dresser

TRACK YOUR CERAMIC JOURNEY
Capture glaze tests, firing details, and creative progress—all in one simple printable. Make your projects easier to repeat and improve.
Decoupage Pattern Jewelry Tray
Transform plain clay into a vibrant vanity staple with this simple decoupage technique. The rectangular tray features softly rounded edges and a speckled stone finish, providing the perfect frame for a blooming floral print inside.
Step-by-Step Tutorial
Materials
- White polymer clay (approx. 2 blocks)
- Faux granite or speckled effect clay (for mixing)
- Rolling pin or acrylic roller
- Rectangular baking dish or specific clay mold
- Sharp craft knife
- Fine-grit sandpaper (400-600 grit)
- Floral patterned tissue paper or napkin
- Decoupage medium (e.g., Mod Podge Matte)
- Soft flat paintbrush
- Polyurethane varnish or clay glaze
Step 1: Shaping the Base
-
Condition the clay:
Begin by conditioning your white clay until it is soft and malleable. To achieve the speckled look shown in the image, mix in a small amount of granite-effect clay. Knead them together until the speckles are evenly distributed but the base remains predominantly white. -
Roll out the slab:
Roll the clay out on a smooth work surface to a consistent thickness of about 1/4 inch. If you want a perfectly even surface, use depth guides or slats on either side of your roller. -
Cut the rectangle:
Place your rectangular template or baking dish on the clay to gauge the size. Use a craft knife to cut a rectangle that is roughly 2 inches larger on all sides than your desired finished floor size, allowing material for the walls. -
Form the walls:
You can either drape the clay inside a baking dish to take its shape or hand-build the walls. For the hand-building method, gently lift the edges of your rectangle and pinch the corners together to create a tray shape. -
Smooth the shape:
Work around the perimeter, smoothing the corners so they become rounded rather than sharp geometric angles. The walls should stand straight up with a slight organic curve. Dip your finger in a little baby oil to smooth out any fingerprints. -
Bake the tray:
Place the tray on a ceramic tile or baking sheet. Bake according to the manufacturer’s instructions for your specific brand of polymer clay (usually 275°F for 15-30 minutes). Let it cool completely before moving to the next phase.
Step 2: Applying the Decoupage
-
Prepare the surface:
Once the tray is cool, lightly sand any rough edges on the rim with fine-grit sandpaper. Wipe away all dust with a slightly damp cloth to ensure a clean bonding surface. -
Cut the pattern:
Take your floral tissue paper or napkin. If using a napkin, peel away the bottom white layers so you are left with only the single, thin printed sheet. Trace the bottom shape of your tray onto the paper and cut it out slightly smaller than the base to ensure it fits flat without creeping up the walls. -
Apply the base coat:
Brush a thin, even layer of decoupage medium directly onto the bottom floor of the interior tray. Make sure you get all the way to the edges where the floor meets the wall. -
Position the paper:
Carefully place your floral paper onto the wet medium. Start from the center and gently smooth it outwards to release any trapped air bubbles. Be extremely gentle here, as wet tissue tears easily. -
Seal the pattern:
Dip your soft brush into the decoupage medium again. Apply a top coat over the paper, extending slightly past the paper’s edge onto the clay to create a seal. Use light strokes to avoid ripping the wet paper. -
Dry and repeat:
Allow this layer to dry for about 20 minutes until it is clear and tacky-free. I tend to apply a second thin coat just to be safe, ensuring the paper is fully encapsulated.
Smoother Cuts
When cutting your decoupage paper, use a rotary cutter instead of scissors for long straight lines. It prevents jagged edges that are hard to hide later.
Step 3: Finishing Touches
-
Clean the edges:
If any decoupage medium dried clumpily on the plain clay walls, carefully scrape it away with your fingernail or a damp cotton swab before the final seal. -
Final varnish:
To make the tray durable and water-resistant for bathroom use, coat the entire interior (pattern and walls) with a polyurethane varnish or a dedicated polymer clay glaze. A matte or satin finish looks best to mimic the stone texture. -
Cure the finish:
Let the final varnish cure for at least 24 hours before placing any jewelry or items inside the tray.
Gilded Rim
Add a touch of luxury by painting the very top rim of the tray with liquid gold leaf. This frames the floral pattern and matches gold jewelry perfectly.
Now you have a lovely, durable catch-all that brings a permanent bouquet to your countertop
Scalloped Edge Trinket Tray
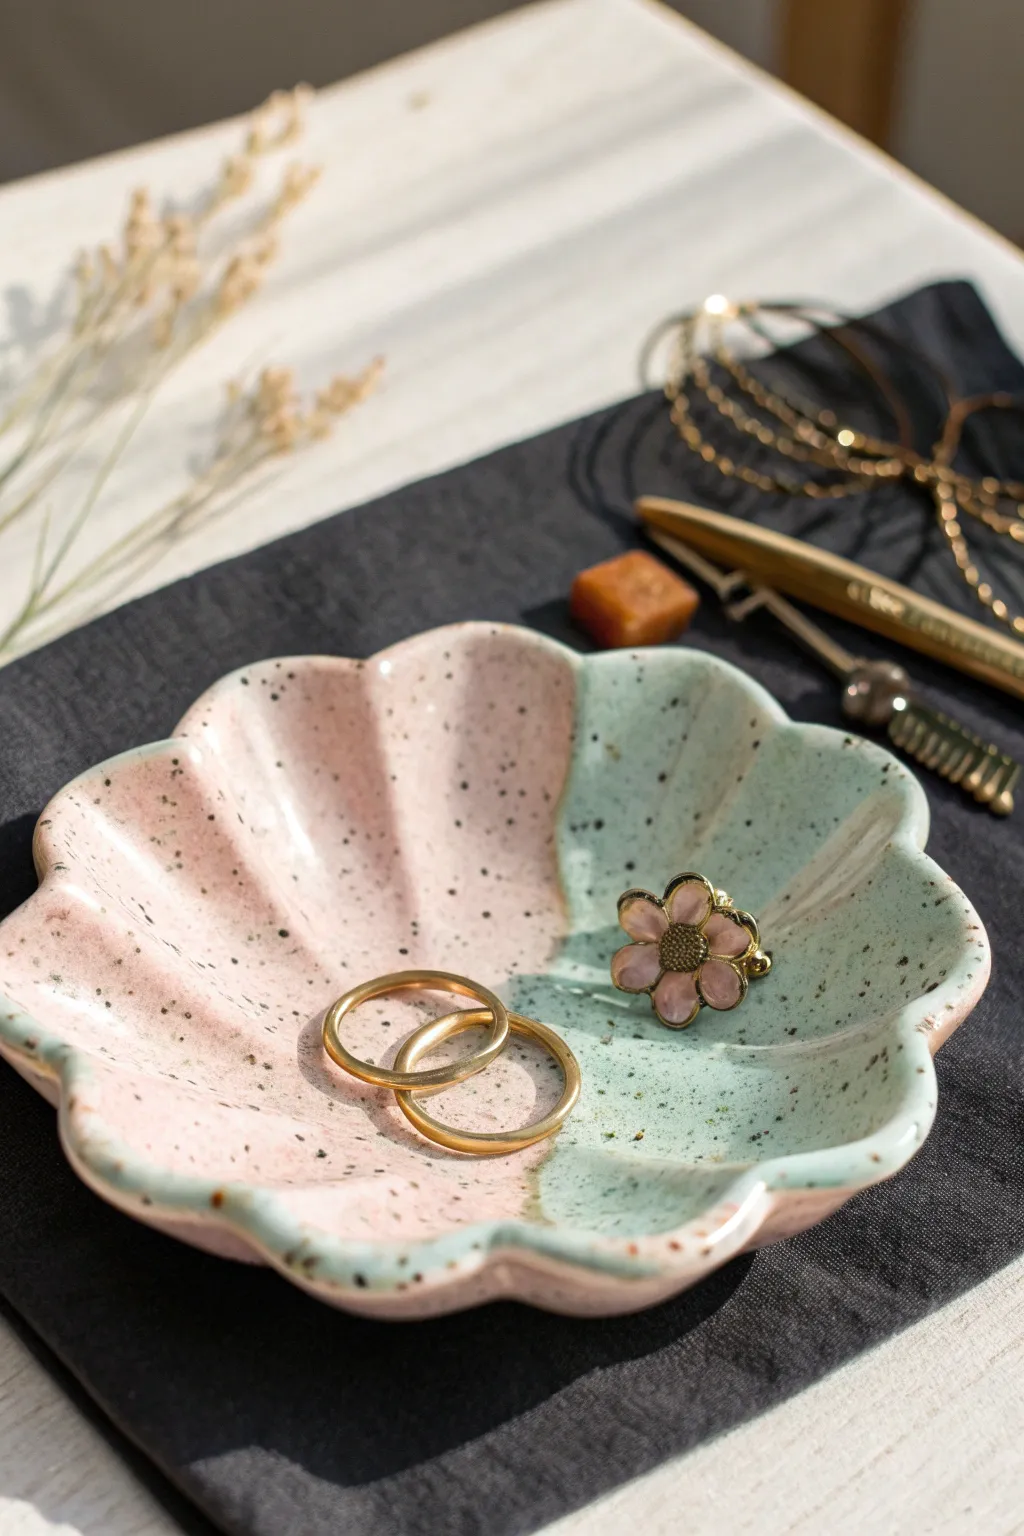
This charming, seashell-inspired trinket dish combines soft pink and mint green glazes for a dreamy, retro aesthetic. The gentle scalloped edges and speckled finish give it an organic feel, perfect for holding your favorite rings or dainty earrings.
Step-by-Step
Materials
- White air-dry clay or polymer clay
- Rolling pin
- Circle template or bowl (approx. 4-5 inches)
- Craft knife or clay needle tool
- Smooth work surface (silicone mat or parchment paper)
- Small bowl or sphere mold for shaping
- Sponge or water for smoothing
- Acrylic paints (pastel pink, mint green, black)
- High-gloss varnish or resin
- Old toothbrush or stiffness bristle brush
- Paintbrushes (flat and fine)
Step 1: Shaping the Clay
-
Condition the clay:
Begin by kneading your white clay until it is soft, pliable, and free of cracks. If it feels too dry, add a tiny drop of water or baby oil depending on your clay type. -
Roll it out:
Roll the clay onto your work surface until it is an even thickness, roughly 1/4 inch thick. Aim for a consistent slab to ensure the dish sits flat later. -
Cut the base circle:
Place your bowl or circle template lightly onto the clay. Trace around it with your craft knife to cut out a perfect circle, then peel away the excess clay. -
Create the scallops:
Using your thumb or the rounded end of a tool, gently press into the edge of the circle at regular intervals. Push the clay slightly inward to create indented curves, forming a flower-like or scalloped perimeter. -
Refine the edges:
Dip your finger in a little water (for air-dry clay) and run it along the cut edges. Smooth down any sharpness or jagged bits so the rim is soft and rounded. -
Add texture (optional):
To mimic the shell grooves seen in the inspiration, use a modeling tool or the back of a knife to gently press radial lines starting from the center and extending toward each scallop dip. -
Form the curve:
Carefully lift your clay circle and place it inside a slightly larger bowl or over a sphere mold. Let gravity gently pull the center down to create a shallow dish shape. -
Dry completely:
Allow the clay to dry fully according to the package instructions. I find it helpful to rotate the piece occasionally so air touches all sides.
Uneven Scallops?
If your hand-pressed scallops look irregular, use a large bottle cap or a round cookie cutter to ‘bite’ evenly spaced semi-circles out of the edge before smoothing.
Step 2: Painting and Glazing
-
Sand imperfections:
Once hardened, use fine-grit sandpaper to gently smooth out any bumps or rough spots on the rim, wiping away the dust with a barely damp cloth. -
Mask the division:
Decide where you want the color split to be—roughly down the middle feels balanced. You can use painter’s tape for a sharp line or freehand it for a more organic look. -
Apply the pink base:
Paint one half of the dish with a soft pastel pink acrylic. You may need two thin coats to get solid, opaque coverage without brushstrokes. -
Apply the mint base:
Paint the other half with a muted mint green. Ensure the two colors meet neatly in the center valley of the dish. -
Create the speckles:
Dilute a small harsh of black paint with water until it’s inky. Dip an old toothbrush into this mixture. -
Splatter effect:
Hold the brush over the dish and run your thumb across the bristles to flick tiny specks of black paint onto the surface. Practice on paper first to control the spray. -
Seal the piece:
Once the paint is bone dry, apply a high-gloss varnish or a thin layer of UV resin. This gives it that ceramic-like shine and protects the paint from scratches. -
Rim detail:
For a subtle finishing touch, you can add a faint wash of darker color or metallic gold to the very edge of the rim to define the scalloped shape.
Pro Tip: Seamless finish
When painting the two halves, slightly feather the paint where the pink and green meet rather than creating a hard line. This makes the transition look like glazed pottery.
Now you have a delicate, custom-made resting spot for your daily jewelry
Heart-Shaped Jewelry Tray
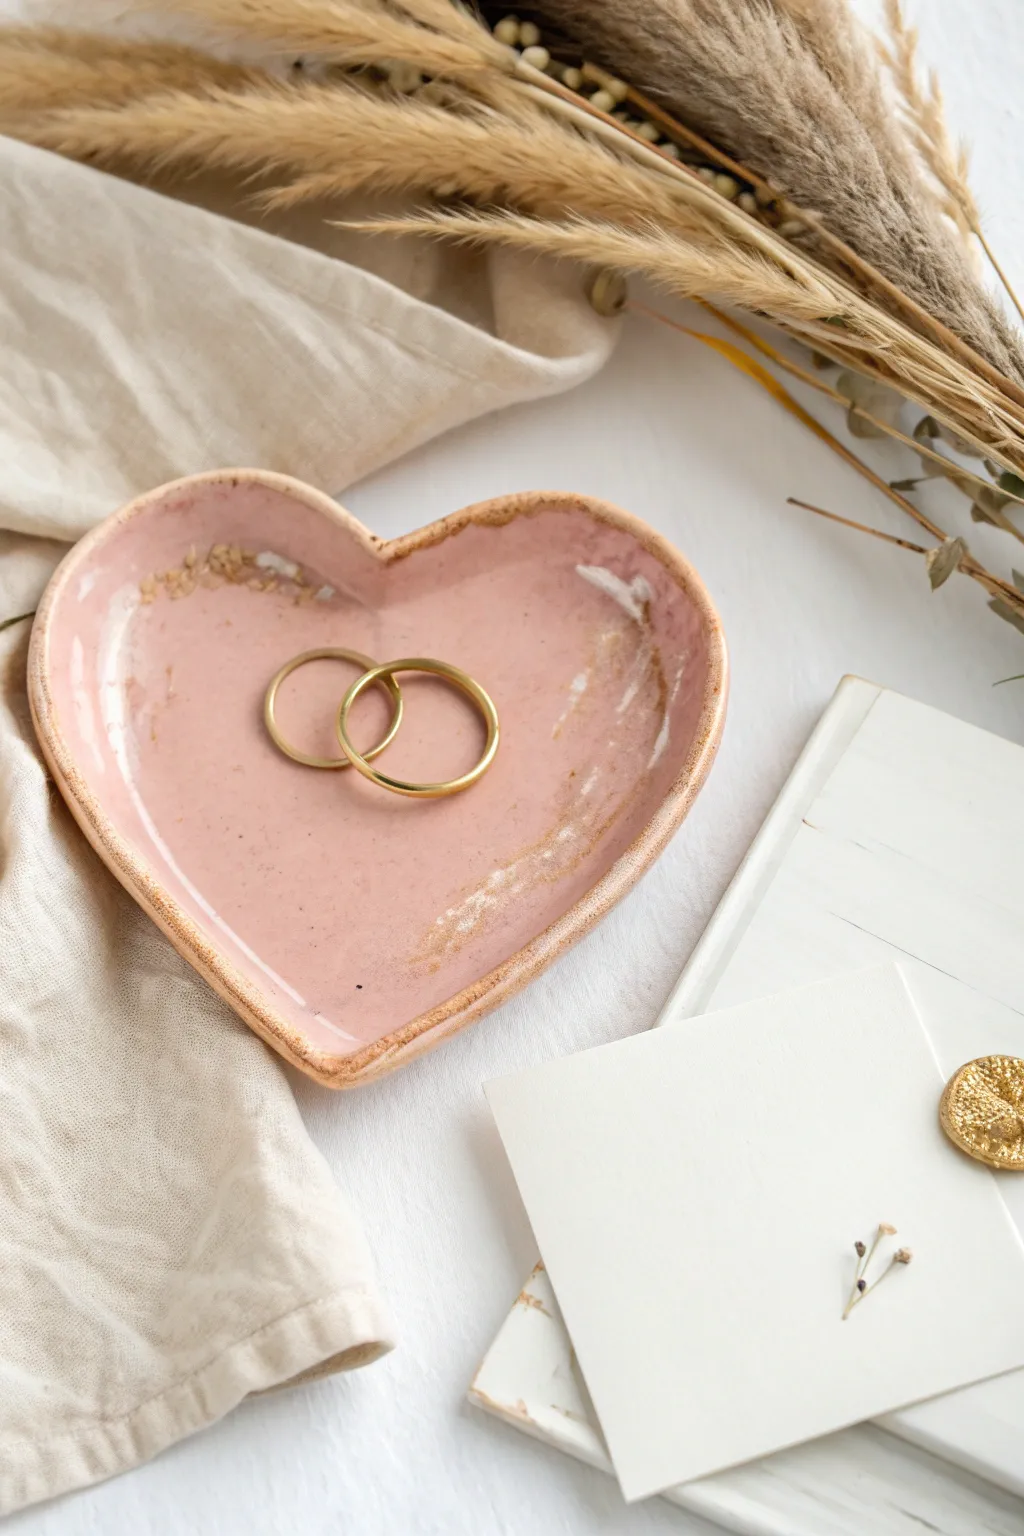
This charming heart-shaped tray combines a soft blush pink glaze with rustic, uneven edges plated in gold for a vintage feel. It’s the perfect bedside catch-all for your favorite rings and adds a touch of romance to any vanity.
Step-by-Step Tutorial
Materials
- Air-dry clay (white) or polymer clay
- Rolling pin
- Heart-shaped cookie cutter (approx. 4-5 inches wide) or paper template
- Small bowl of water
- Sponge or craft foam
- Sandpaper (fine grit)
- Acrylic paint (blush pink/dusty rose)
- Liquid gold leaf or metallic gold acrylic paint
- Glossy varnish or sealant (Mod Podge or resin)
- Paintbrushes (soft bristle and fine detail)
- Palette or paper plate
Step 1: Shaping the Clay
-
Condition the clay:
Begin by kneading a ball of air-dry clay in your hands until it becomes soft, pliable, and free of cracks. If you are using polymer clay, warm it up well. -
Roll it out:
Place the clay on a smooth surface or parchment paper. Use a rolling pin to flatten it to a consistent thickness of about 1/4 inch. Avoid going too thin, as the edges need to be substantial. -
Cut the heart shape:
Press a heart-shaped cookie cutter firmly into the rolled clay. Alternatively, place a paper heart template on top and carefully trace around it with a craft knife or clay tool. -
Soften the edges:
Dip your finger into a little bit of water and run it gently along the cut edges of the heart to smooth out any sharpness or crumbles from the cutting process. -
Create the rim:
Gently curb up the edges of the heart with your fingertips to create a shallow bowl shape. Pinch the sides slightly to give it that handmade, slightly irregular rustic lip seen in the photo. -
Add texture (optional):
For that slightly worn look, you can lightly tap the surface with a crumpled piece of aluminum foil or a textured sponge, though keeping it mostly smooth works well for jewelry. -
Dry the form:
Allow the clay to dry completely according to the package instructions. For air-dry clay, this usually takes 24-48 hours. I like to flip it over halfway through the drying process to ensure the bottom dries evenly.
Smooth Moves
To get a fingerprint-free finish before drying, lightly brush the raw clay with a damp soft watercolor brush or a little baby oil if using polymer clay.
Step 2: Painting and Finishing
-
Sand imperfections:
Once fully dry and hard, take a piece of fine-grit sandpaper and lightly buff away any rough spots on the rim or surface. Wipe away the dust with a damp cloth or sponge. -
Apply the base color:
Mix a dusty rose or blush pink acrylic paint. Apply a coat to the entire inside of the tray. The strokes don’t need to be perfect; a little variation adds to the ceramic look. -
Build opacity:
Let the first coat dry, then apply a second coat if needed for a solid, opaque pink finish. Let this dry completely before moving to the accents. -
Add the gold rim:
Dip a fine detail brush into liquid gold leaf or metallic gold paint. Carefully paint the top edge of the rim. Don’t worry about a perfect line; let the gold waiver slightly onto the inner surface to mimic a glaze drip. -
Create distressing:
Using a very dry brush with a tiny amount of gold paint, lightly dry-brush a few random spots inside the tray, focusing near the edges or the dip of the heart, to create a worn, vintage effect. -
Seal the piece:
Once the paint is fully cured, apply a coat of glossy varnish or sealant over the entire tray. This mimics the look of fired ceramic and protects the paint from scratching. -
Final dry:
Let the varnish cure for at least 24 hours before placing any jewelry inside to ensure the surface is non-tacky and durable.
Marbled Magic
Mix a tiny bit of white clay into your pink clay but don’t blend fully. Roll it out to create varied streaks of white and pink for a natural stone effect.
Your beautiful new tray is now ready to keep your daily treasures safe and stylish
Monstera Leaf Jewelry Tray
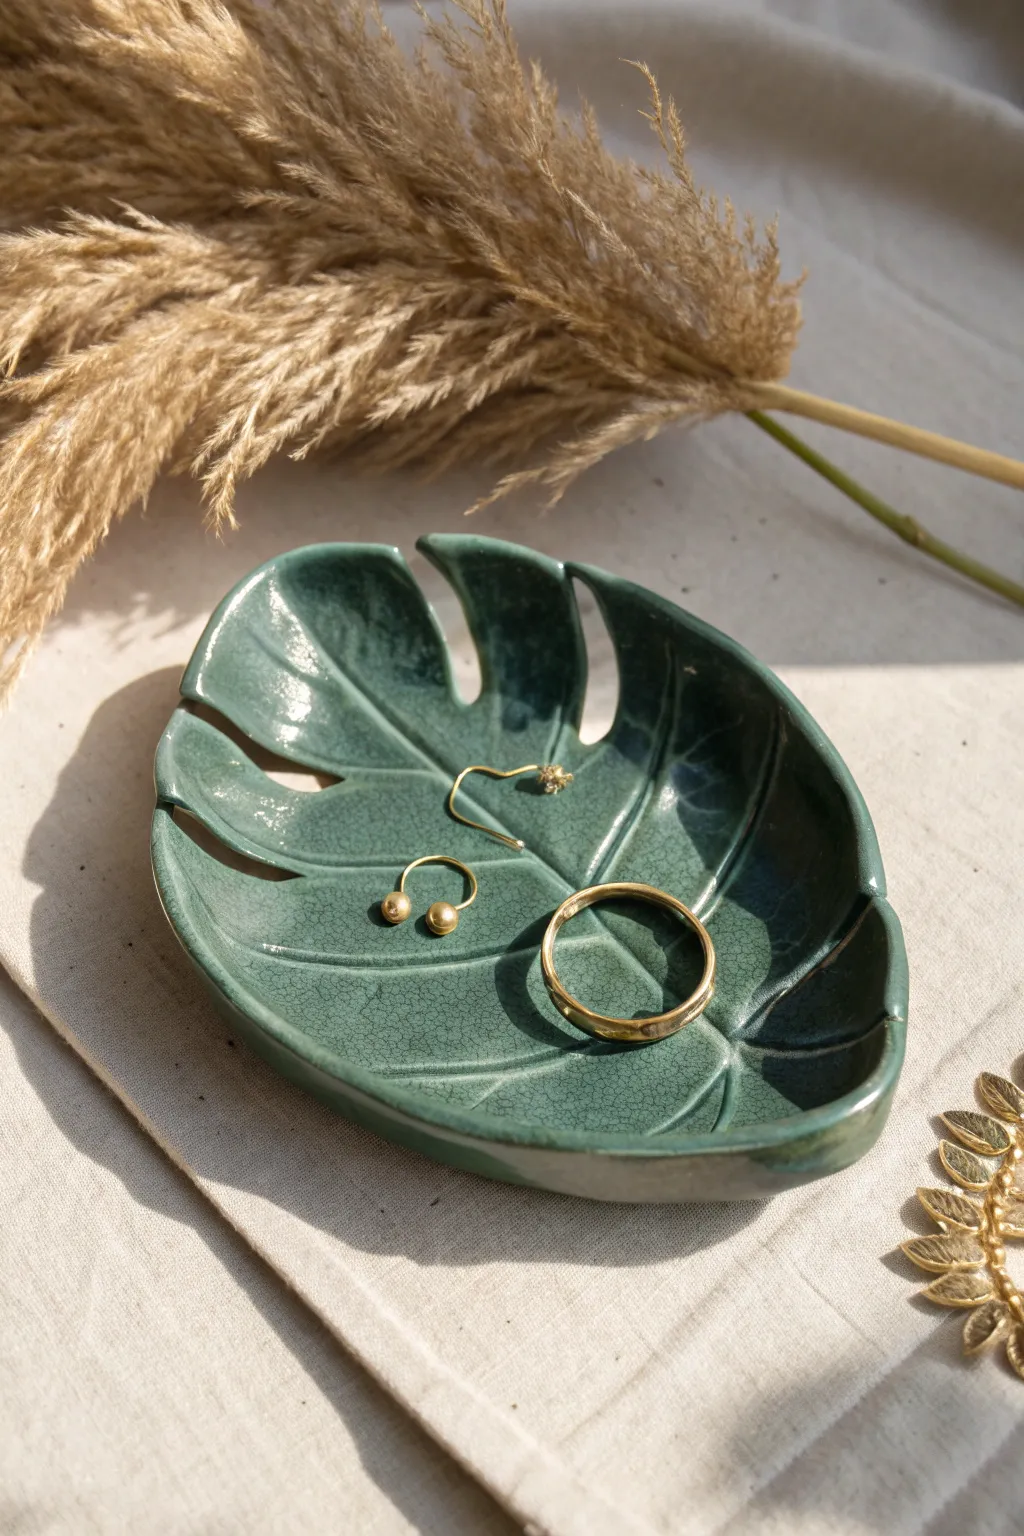
Bring a touch of botanical elegance to your vanity with this Monstera leaf jewelry dish. Featuring a deep teal glaze with a distinctive crackle finish, this organic-shaped tray is perfect for holding your favorite rings and studs.
How-To Guide
Materials
- Air-dry clay or polymer clay (white)
- Monstera leaf template (printed or hand-drawn on paper)
- Rolling pin
- Parchment paper or canvas mat
- Craft knife or scalpel
- Needle tool
- Small bowl or curved surface (for drying form)
- Sandpaper (fine grit)
- Deep teal acrylic paint or ceramic glaze (if firing)
- Crackle glaze medium (top coat)
- High-gloss varnish (if using acrylics)
- Soft synthetic brushes
- Sponge
Step 1: Shaping the Leaf
-
Prepare the workspace:
Lay down a piece of parchment paper or a canvas mat to prevent the clay from sticking to your table. If using polymer clay, condition it in your hands until it is pliable. -
Roll the slab:
Roll out a ball of clay into an even slab, aiming for a thickness of about 1/4 inch (6mm). Try to keep it uniform so the drying process is even. -
Apply the template:
Place your Monstera leaf paper template gently onto the clay slab. Lightly trace the outline with a needle tool without cutting all the way through yet. -
Cut the shape:
Using a sharp craft knife or scalpel, carefully cut along the traced outline. I find it easiest to pull the knife towards me for smoother curves. -
Create the fenestrations:
Cut out the internal slots and holes that give the Monstera its iconic look. Clean up any jagged edges with your finger dipped in a little water. -
Add vein details:
Take your needle tool and gently score a central vein line down the middle of the leaf. Add smaller, branching veins extending toward the edges for texture. -
Smooth the edges:
Dip a sponge or your fingertip in water and run it along the cut edges of the clay to round them off and remove any sharpness.
Step 2: Forming and Drying
-
Create the curve:
To give the tray a functional bowl shape, gently lift the clay leaf and place it inside a shallow bowl or drape it over a curved object. -
Refine the form:
Press lightly so the clay takes the shape of the bowl, but ensure the leaf tips aren’t folded awkwardly. You want a gentle, organic scoop. -
Let it dry:
Allow the clay to dry completely according to the package instructions. For air-dry clay, this usually takes 24-48 hours. Don’t rush this part! -
Sand imperfections:
Once fully hard, inspect the edges. Use fine-grit sandpaper to buff away any remaining rough spots or unevenness on the rim.
Fixing curling edges
If using air-dry clay, edges might curl up while drying. Gently flip the piece every few hours or weigh down the center lightly with a small sandbag to keep it even.
Step 3: Painting and Glazing
-
Apply base color:
Paint the entire tray with a deep teal acrylic paint. You may need two coats to get an opaque, rich color. Let it dry completely. -
Add crackle effect:
Apply a layer of crackle medium over the teal paint. Follow the specific instructions on your medium’s bottle, as some require painting while tacky. -
Highlight the cracks:
If your crackle medium is clear, the teal will just look fractured. To enhance the look seen in the photo, you can do a darker wash over the cracks once formed and wipe away the excess. -
Seal the piece:
Finish with a high-gloss varnish to mimic the look of glazed ceramic. This also protects the paint from scratches.
Gold Rim Upgrade
For an extra luxurious touch, paint the very rim of the leaf with metallic liquid gold leaf after the varnish has dried. It frames the teal color beautifully!
Place this lovely leaf on your bedside table to catch your daily accessories in style
Moon and Stars Ring Dish
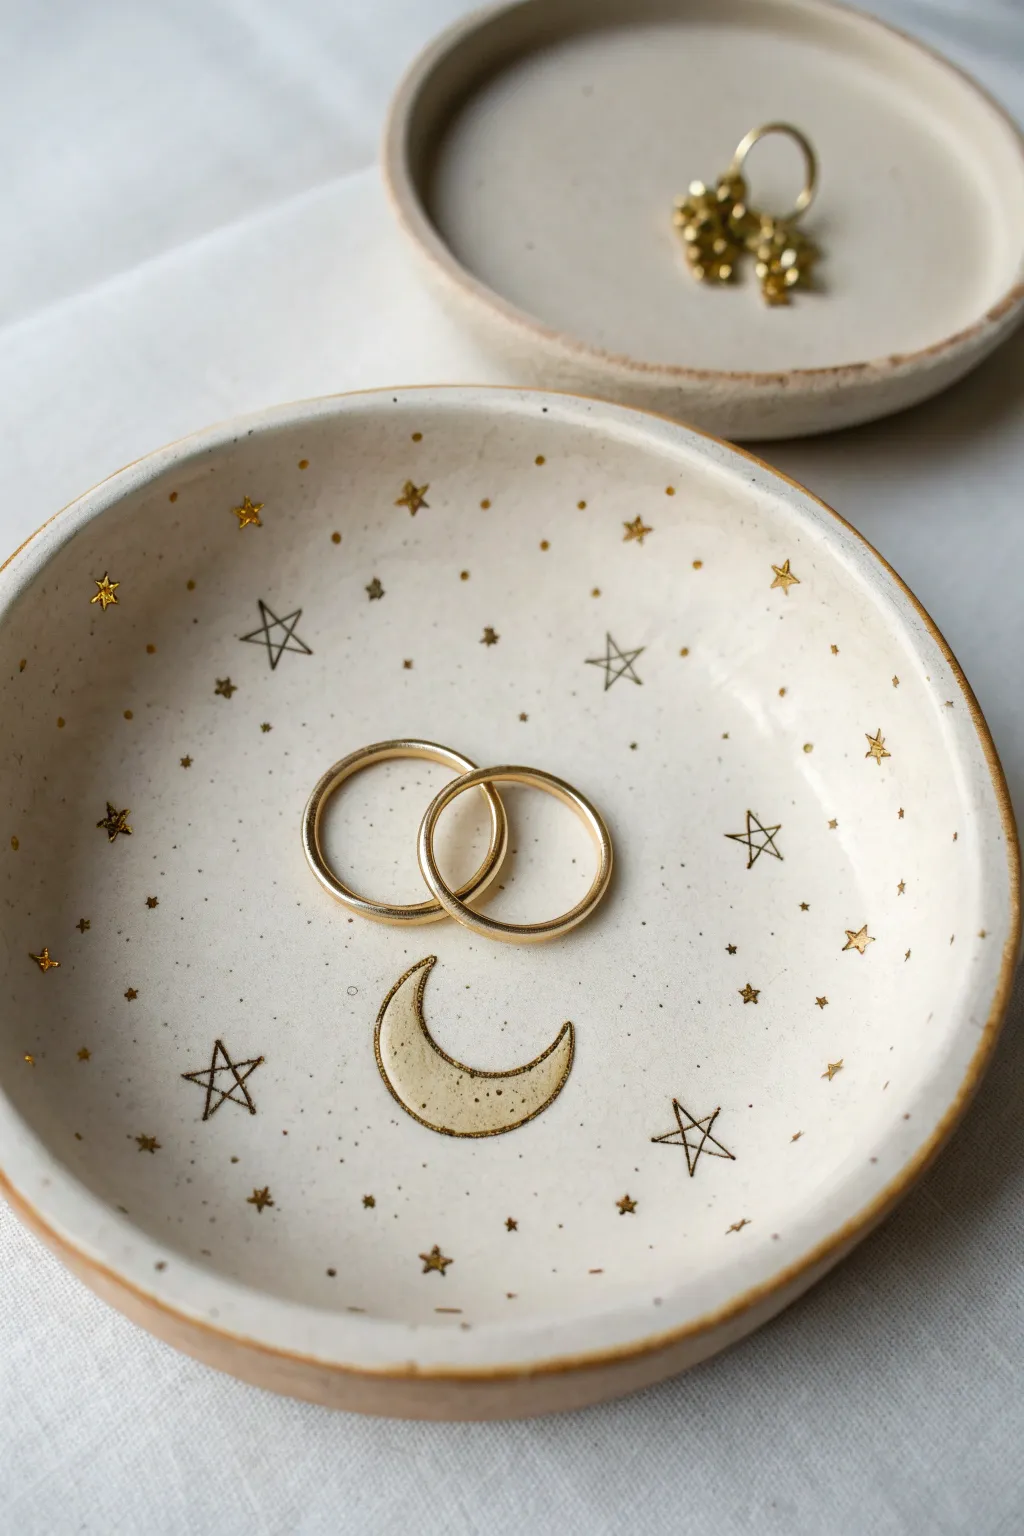
Capture the magic of the night sky with this enchanting clay ring dish featuring delicate starbursts and a golden crescent moon. The speckled pottery finish and hand-painted metallic details make this tray feel like a timeless, cosmic treasure.
Step-by-Step Tutorial
Materials
- Air-dry clay (white or light earthenware)
- Non-stick rolling mat or parchment paper
- Rolling pin
- Circle cutter or small bowl (approx. 4-5 inches)
- Bowl for shaping
- Fine-grit sandpaper
- Acrylic paints: Cream/Off-white, Black, Metallic Gold
- Fine detail paintbrush (0 or 00 size)
- Old toothbrush (for speckling)
- Gloss varnish or sealant
Step 1: Shaping the Clay Base
-
Prepare the clay:
Begin by kneading a ball of air-dry clay until it is soft, pliable, and free of air bubbles. If the clay feels too dry, you can dampen your hands slightly with water. -
Roll out the slab:
On your parchment paper or rolling mat, roll the clay out evenly until it is about 1/4 inch thick. Aim for a consistent thickness to prevent cracking during the drying process. -
Cut the circle:
Use a large circle cookie cutter or press a small bowl upside down onto the clay slab to use as a template. Carefully cut around the edge with a craft knife to create a perfect circle. -
Smooth the edges:
Dip your finger in a little water and run it along the cut edge of the circle. This smooths out any roughness or sharp bits left from cutting. -
Create the curve:
Lift your clay circle and gently place it inside a slightly larger bowl to give it a curved, dish-like shape. Press very gently so it takes the form of the bowl without thinning the clay.
Step 2: Decorating and Refining
-
Dry completely:
Let the dish dry in a cool, dry place for at least 24–48 hours. I find that flipping the clay out of the shaping bowl halfway through helps the bottom dry more evenly. -
Sand for smoothness:
Once fully cured and hard, use fine-grit sandpaper to gently buff the rim and the interior surface. Wipe away all dust with a slightly damp cloth or paper towel. -
Base coat:
Paint the entire dish with a creamy off-white acrylic paint to mimic the look of glazed pottery. You may need two thin coats for full opacity. -
Create the speckled effect:
Dilute a tiny drop of brown or black paint with water. Dip an old toothbrush into this mixture and flick the bristles with your thumb to spray fine speckles across the dish surface.
Clean Lines Hack
If painting fine lines with a brush is difficult, use an ultra-fine tip permanent marker or paint pen for the black stars. It offers much more control than a brush.
Step 3: Adding Cellular Details
-
Paint the golden moon:
Using your fine detail brush and metallic gold paint, draw a crescent moon shape near the bottom center of the dish. Fill it in carefully. -
Outline the moon:
Once the gold is dry, use a very steady hand (or a permanent fine-liner pen) to outline the crescent moon thinly in black to make it pop. -
Draw open stars:
Using the black paint or pen, draw several five-pointed open stars scattered around the dish. Keep the lines thin and delicate. -
Add gold starbursts:
Switch back to your gold paint. Add small solid stars and tiny dots randomly throughout the empty spaces to create a twinkling galaxy effect. -
Layer gold on open stars:
For a bit of dimension, you can add tiny touches of gold inside the points of your black outline stars, though keeping them simple works beautifully too. -
Gild the rim:
Load your brush with gold paint and run it along the very top edge of the dish rim. This frames the design and gives it a finished, high-end look. -
Seal the piece:
Finish by applying a coat of gloss varnish over the entire dish. This protects your painted design and gives the clay a ceramic-like shine.
Constellation Customization
Instead of random stars, use a reference image to paint your own zodiac constellation or the Big Dipper into the center of the dish for a personal touch.
Now you have a gorgeous handmade vessel to keep your favorite rings safe and sound
Boho Arch Trinket Tray
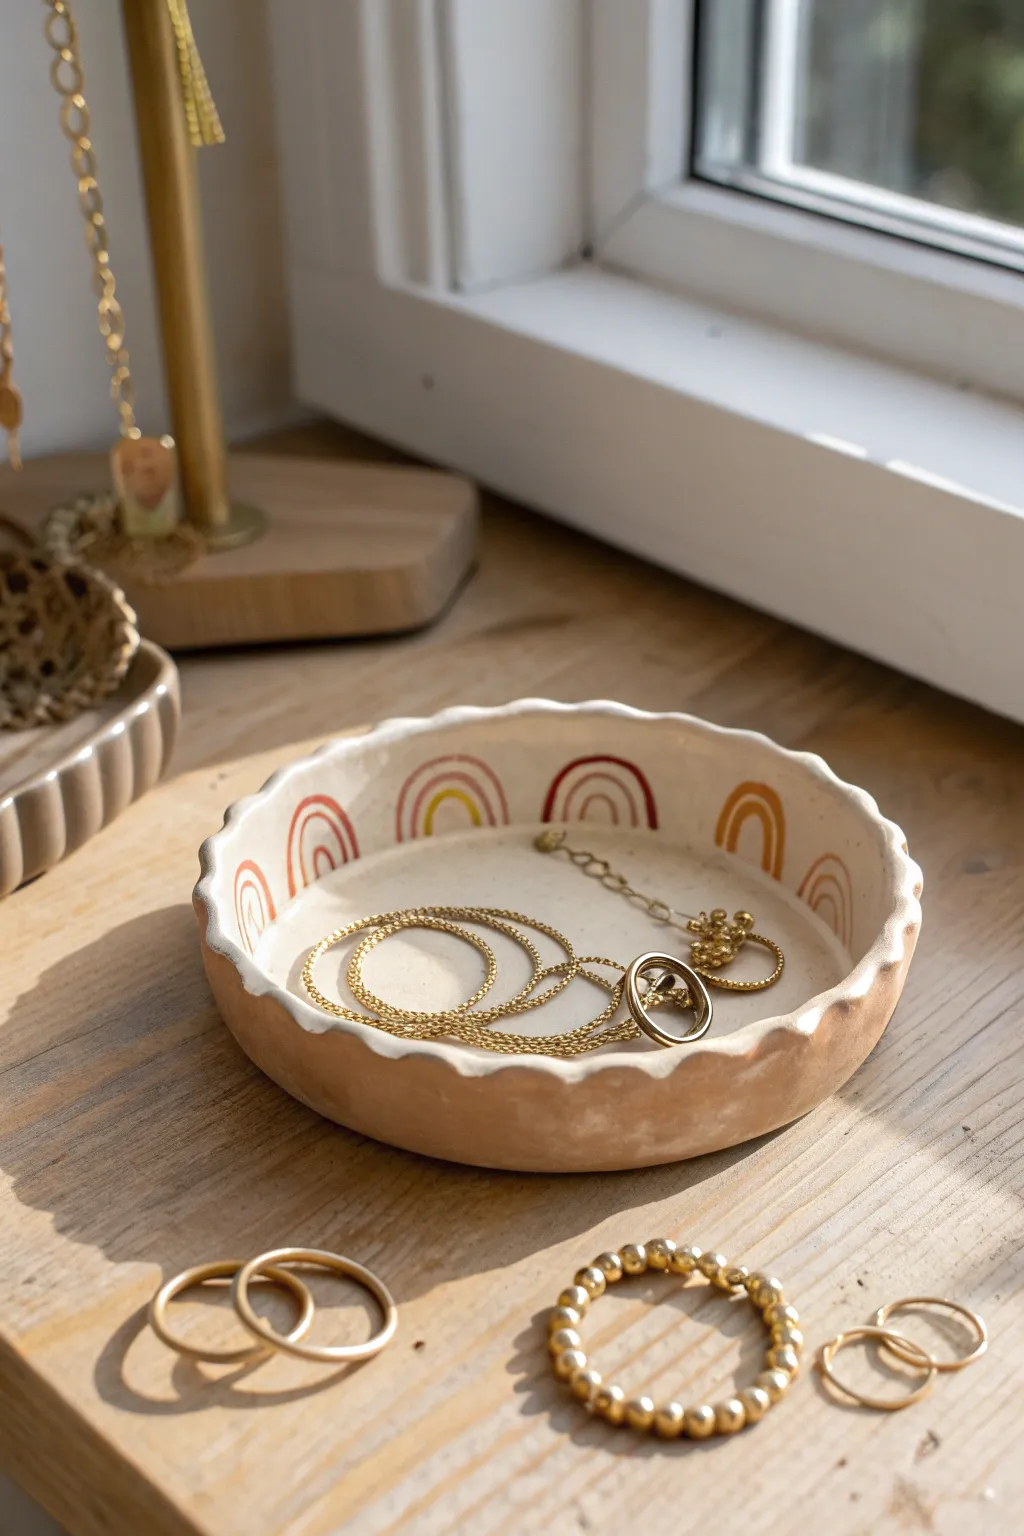
This charming, handmade jewelry dish brings warmth to any dresser with its scalloped edges and earthy rainbow motifs. The hand-painted arches and natural clay texture create exactly the kind of effortless bohemian vibe perfect for holding your favorite rings and chains.
Step-by-Step
Materials
- Air-dry clay (white or light beige)
- Rolling pin
- Circular template (bowl or large lid approx. 4-5 inches)
- Craft knife or clay cutter
- Small bowl of water
- Sponge or fine-grit sandpaper
- Acrylic paints (terracotta, burnt orange, mustard yellow, beige)
- Fine detail paintbrush
- Gloss or matte varnish (sealant)
Step 1: Shaping the Clay Base
-
Condition the Clay:
Begin by grabbing a handful of air-dry clay and kneading it in your hands until it feels warm and pliable. This conditioning step prevents cracking later on. -
Roll It Out:
On a clean, flat surface or a craft mat, roll the clay out to an even thickness of about 1/4 inch. Try to keep it uniform so the tray sits flat. -
Cut the Circle:
Place your circular template (like a cereal bowl) onto the rolled clay and carefully cut around it using your craft knife to get a perfect circle. -
Create the Rim:
Gently lift the edges of the circle upwards to form a shallow dish shape. Use your thumbs to press the center down slightly while cupping the sides. -
Scallop the Edges:
To achieve that wavy, flower-like rim, use your thumb and forefinger to pinch sections of the rim evenly around the circumference. Push gently inward with one finger while supporting the clay on either side to create the soft indentations. -
Smooth Imperfections:
Dip your finger into the bowl of water and run it along the rim and inside the dish. Smoothing out fingerprints or rough textures now saves sanding time later. -
Dry Completely:
Set your tray in a safe, dry place away from direct heat. Let it dry for at least 24-48 hours until it turns a chalky white and feels hard to the touch.
Step 2: Painting and Finishing
-
Sand for smoothness:
Once fully dry, take a piece of fine-grit sandpaper and lightly buff the edges and surface. Focus on the scalloped rim to ensure there are no sharp peaks. -
Apply Base Coat:
Mix a creamy beige color using white and a tiny dot of brown acrylic paint. Cover the entire inside of the tray with this neutral base coat for a clean canvas. -
Paint the Outer Rim:
For the outside and the very top edge of the rim, mix a darker, sandy tan color. Paint the exterior and let the color wrap just slightly over the lip of the scallops. -
Outline the Arches:
Using your finest brush and a terracotta paint, carefully draw the largest arch shape inside each scalloped indentation. I find it easiest to anchor my elbow on the table for steady lines. -
Fill the Arches:
Paint a second, smaller arch inside the first one using a burnt orange or rust hue. Leave a thin line of the beige base showing between the two for definition. -
Add the Center Arch:
Complete the rainbow motif by painting a tiny, solid semi-circle of mustard yellow in the very center of each arch stack. -
Clean Up Lines:
If any paint went astray, use a clean damp brush or a tiny bit of the beige base paint to touch up the negative space between the rainbows. -
Seal the Project:
After the paint is bone dry, apply a coat of varnish over the entire dish. This protects the intricate painting and gives the clay a durable finish suitable for holding jewelry.
Smooth Operator
To get perfectly smooth arches, try rotating the tray itself as you paint the curve, rather than just moving your wrist.
Gilded Touch
Make it luxurious by painting the very top rim of the scallops with liquid gold leaf or metallic gold paint for visible shine.
Now you have a stunning, custom piece to organize your daily accessories in style
Three-Section Divider Jewelry Tray
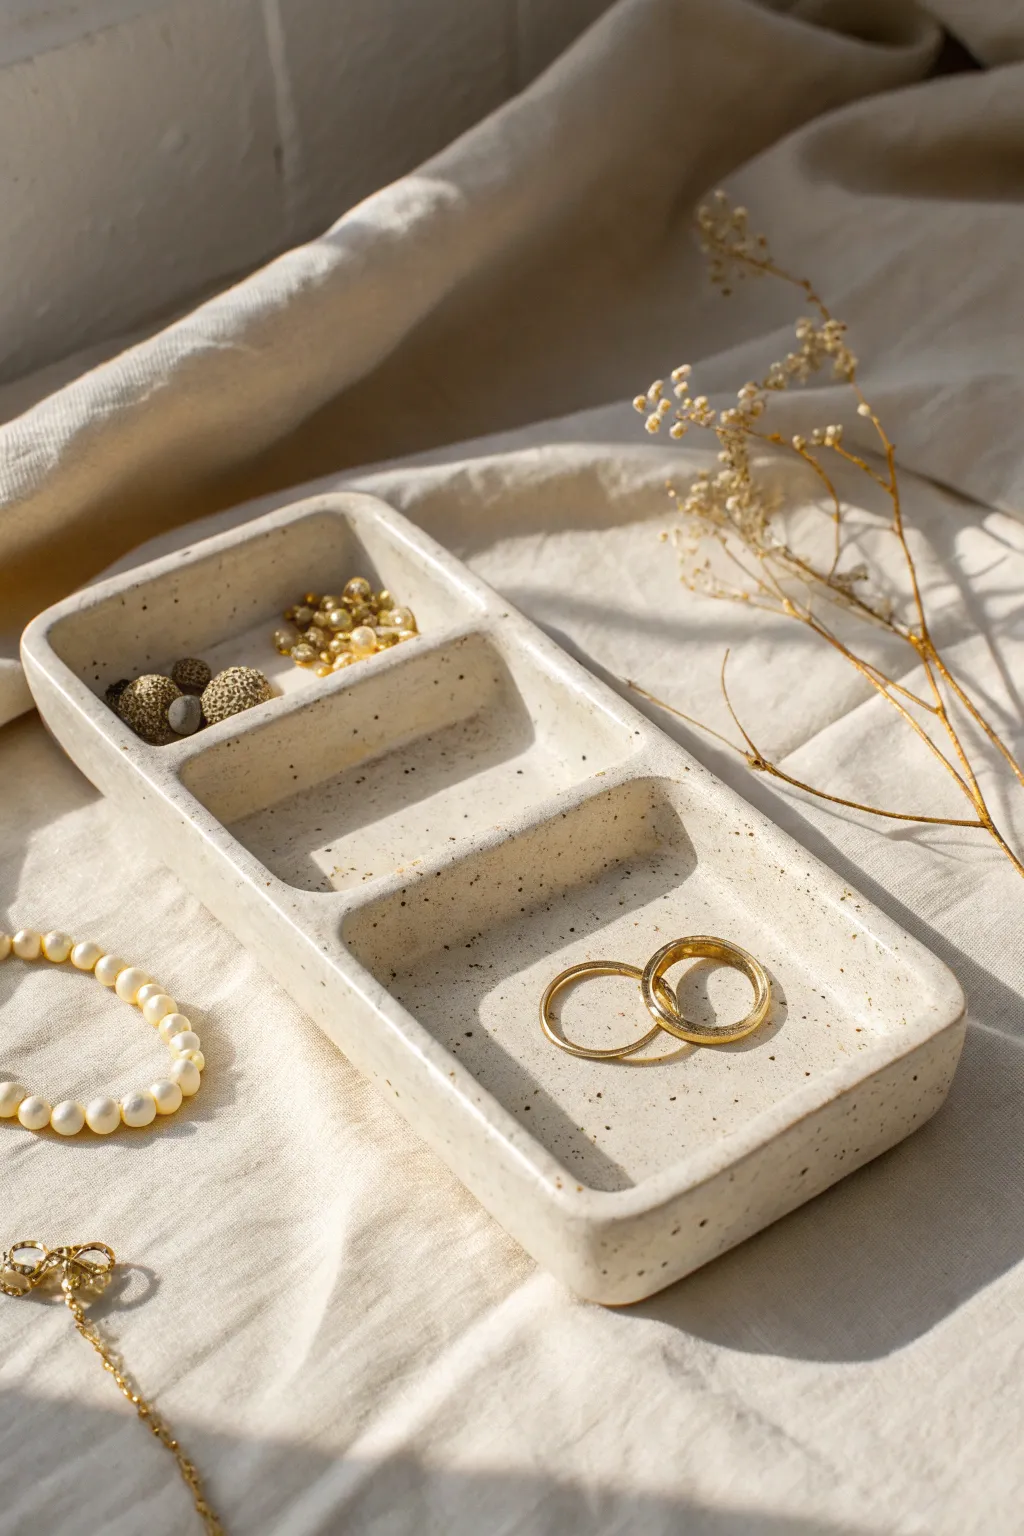
Keep your jewelry organized with this elegant, minimalist tray featuring three distinct compartments for separating rings, earrings, and delicate chains. The soft cream finish with subtle dark speckles gives it a sophisticated, modern ceramic look without needing a kiln.
Detailed Instructions
Materials
- Air-dry clay (white or cream)
- Rolling pin
- Ruler
- Clay knife or X-Acto blade
- Small bowl of water
- Fine-grit sandpaper (220-400 grit)
- Acrylic paint (cream/off-white)
- Acrylic paint (dark brown or black for speckling)
- Old toothbrush or stiff bristle brush
- Gloss or satin varnish/sealant
- Smooth work surface or silicone mat
Step 1: Shaping the Base and Walls
-
Prepare the clay:
Begin by taking a substantial chunk of air-dry clay and kneading it until it is pliable and warm. This conditioning helps prevent cracks later on. -
Roll the slab:
On your smooth work surface, roll the clay out into a long rectangle. Aim for a consistent thickness of about 1/4 inch to ensure durability. -
Cut the base template:
Using your ruler and knife, cut precise straight lines to form a clean rectangle for the base. A size of roughly 4 inches by 8 inches works well for a jewelry tray. -
Cut the wall strips:
From the remaining rolled clay, cut long strips that are the same thickness as your base. These should be about 3/4 inch tall to create the outer walls. -
Score and slip:
Take your knife and make small hatch marks (scoring) along the outer edges of your base rectangle and on one side of your wall strips. Dab a little water (slip) on these roughed-up areas. -
Attach the outer walls:
Press the wall strips firmly onto the edges of the base. I find it helpful to wiggle them slightly as I press down to create a vacuum seal between the clay pieces.
Fixing Cracks
If hairline cracks appear while drying, mix a tiny bit of fresh clay with water to make a paste. Fill the crack, smooth it over, and let dry again.
Step 2: Creating Dividers and Refining
-
Measure the inserts:
Measure the interior width of your tray. Cut two more strips of clay to this exact length to serve as the inner dividers. -
Install the dividers:
Decide where you want your compartments. Score and slip the ends of the dividers and the contact points on the interior walls, then slide them into place. -
Reinforce the seams:
Roll very thin coils of clay (snakes) and press them into the bottom seams where the walls meet the floor. Smooth these out with your finger or a modeling tool to seamless join everything. -
Smooth the edges:
Dip your finger in water and run it along the top rims and corners. You want to round off any sharp edges to mimic the soft pottery look in the photo. -
Dry properly:
Set the tray aside in a cool, dry place. Let it dry for at least 24-48 hours. Turning it gently once the top is firm can help the bottom dry evenly.
Step 3: Finishing and Speckling
-
Sand for smoothness:
Once fully dry, use fine-grit sandpaper to buff away any fingerprints or bumps. Wipe away the dust with a slightly damp cloth. -
Apply base color:
Paint the entire tray with your cream or off-white acrylic paint. You may need two coats for opaque coverage, letting it dry completely in between. -
Prepare the speckle mix:
Dilute a small drop of dark brown or black paint with water until it has an inky consistency. -
Flick the speckles:
Dip an old toothbrush into the diluted paint. Hold it over the tray and run your thumb across the bristles to flick tiny splatters of paint onto the surface for that stone effect. -
Seal the piece:
Protect your work by applying a coat of gloss or satin varnish. This gives it a ceramic-like sheen and protects the paint from scratches.
Make it Luxe
After the sealant dries, use a gold leaf pen to paint the very top rim of the tray walls for a chic, metallic gilded edge.
Now your beautiful new tray is ready to display your favorite accessories on your vanity.