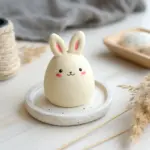
When I’m craving a quick, happy project, I reach for clay toys—they’re small, playful, and totally doable with simple shapes. Whether you’re using air dry clay, polymer clay, or basic modeling clay, these ideas are all about cute characters and sturdy little playthings you can actually enjoy afterward.
Chubby Cat Pocket Pal
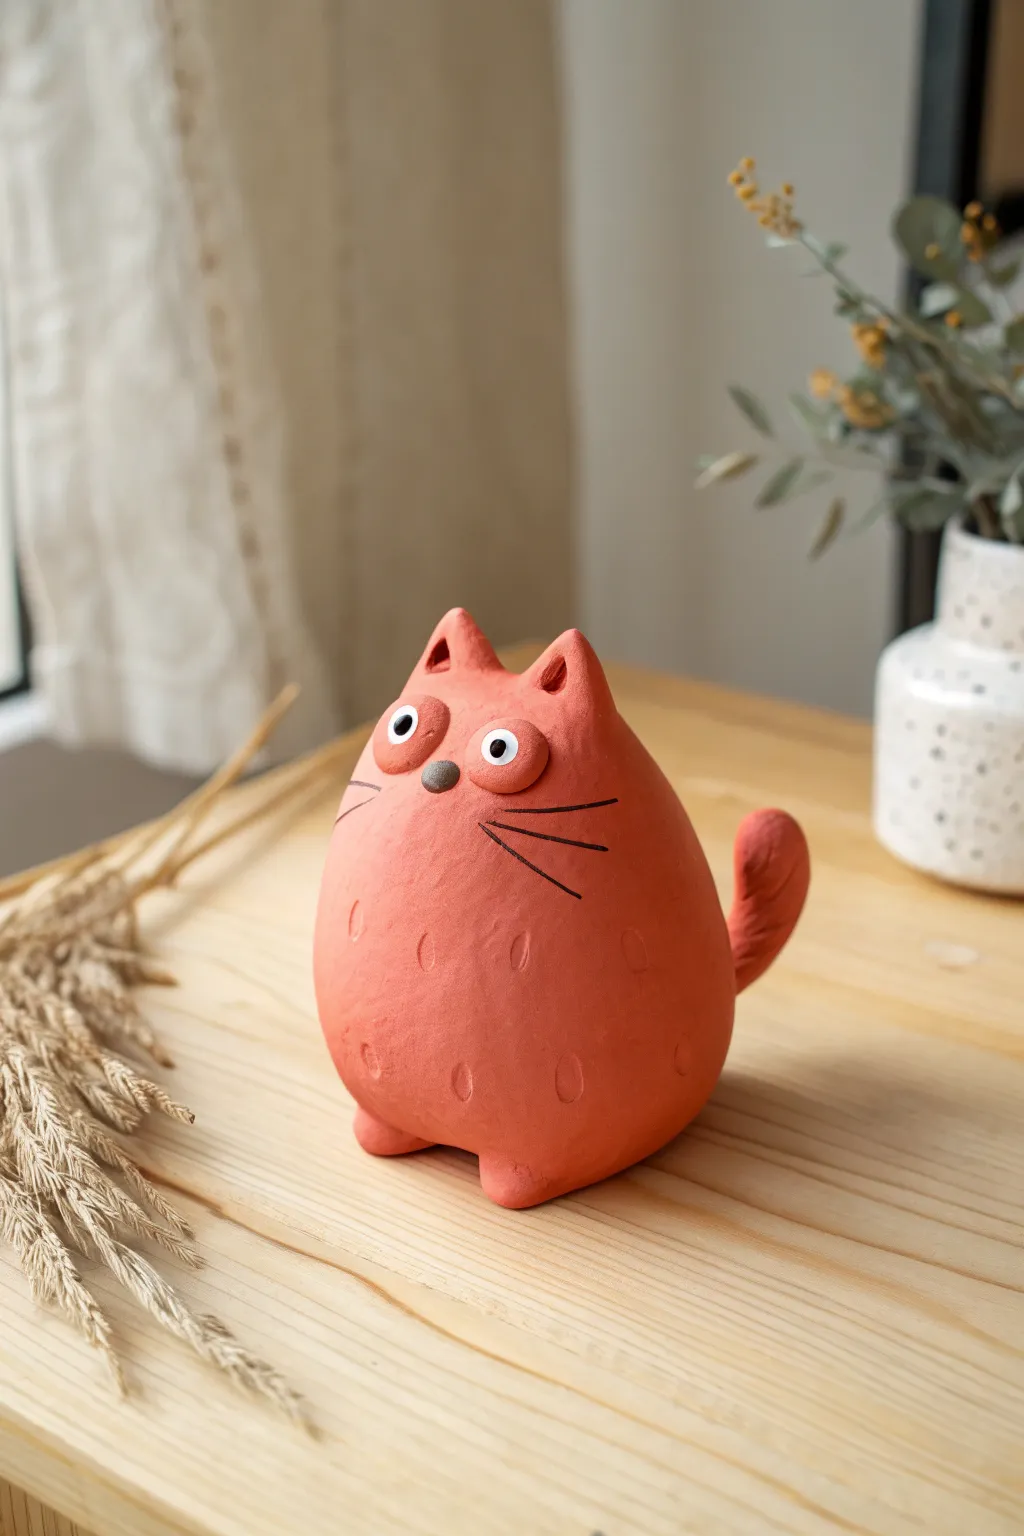
This charmingly plump feline figurine captures hearts with its simple silhouette and expressive eyes. Made from terracotta-colored clay, this chubby pocket pal is perfect for beginners looking to practice basic sculpting and texture techniques.
Step-by-Step
Materials
- Red-brown polymer clay or air-dry clay (terracotta color)
- White clay (for eyes)
- Black clay (for pupils)
- Black acrylic paint or fine-tip marker
- Small dotting tool or toothpick
- Sculpting tools (smoothers, needle tool)
- Matte varnish (optional)
Step 1: Shaping the Base
-
Form the Body:
Start with a generous handful of red-brown clay. Roll it into a smooth ball first to remove cracks, then gently gently taper the top just slightly to create a very fat teardrop or egg shape. This will be the main body. -
Flatten the Base:
Press the bottom of your egg shape firmly onto your work surface. You want a nice, flat base so the cat sits stably without rolling over. -
Pull the Ears:
Instead of attaching separate ears, pinch the top of the tapered head on the left and right sides. Gently pull the clay upward to form two small, triangular ears that are integrated seamlessly into the head. -
Refine the Ears:
Use a small ball tool or the rounded end of a paintbrush handle to press a small indentation into the front of each ear triangle, giving them depth.
Step 2: Adding Features & Limbs
-
The Tail:
Roll a small sausage of the same red clay, tapering one end to a point. attach the thicker end to the lower back of the body, curving the tail upward against the side of the cat. Blend the seam well so it doesn’t fall off. -
Tiny Feet:
Roll two very small balls of red clay. Flatten them slightly and attach them to the bottom front of the body to serve as protruding little paws. Blend the back edges into the main body. -
Eye Sockets:
Press two shallow indentations into the face area where you want the eyes to go. This helps the eyeballs sit securely rather than just bulging out too much. -
Whites of the Eyes:
Take two small pieces of white clay and roll them into balls. Press them flat into the sockets you just created. They should be relatively large to give that surprised look. -
Pupils:
Roll two tiny, minuscule specks of black clay. Press these into the center of the white circles. -
The Nose:
Roll a small, oval-shaped piece of dark grey or brown clay (you can mix a little black into your red clay for this). Place it horizontally right between and slightly below the eyes.
Cracks Appearing?
If you see tiny cracks forming while smoothing air-dry clay, dip your finger in water and gently rub the area in a circular motion to rehydrate and seal the clay.
Step 3: Texture & Details
-
Body Texture:
Using a small loop tool or the side of a toothpick, gently press small, shallow vertical indentations all over the cat’s belly and sides. This faux-fur texture adds a lovely rustic quality. -
Smoothing:
Check the figurine for any accidental fingerprints. Use a smoothing tool or a touch of water (if using air-dry clay) or baby oil (if using polymer) to buff them out. -
Baking or Drying:
If using polymer clay, bake according to the package instructions (usually around 275°F/130°C for 15-30 minutes). If using air-dry clay, let it sit undisturbed for 24-48 hours. -
Whiskers:
Once hardened and cool, use a fine-tip black marker or a very thin brush with black acrylic paint to draw three long whiskers on each cheek. -
Muzzle Definition:
Draw a tiny vertical line extending downward from the nose to suggest the mouth.
Make it a Rattle
Before sealing the base, hollow out the inside slightly and add a few dried beans or beads wrapped in foil. Now your cute figurine doubles as a gentle shaker toy.
Place your little red clay cat on a shelf where its wide-eyed expression can greet you every day


Sweet Penguin Mini Figure
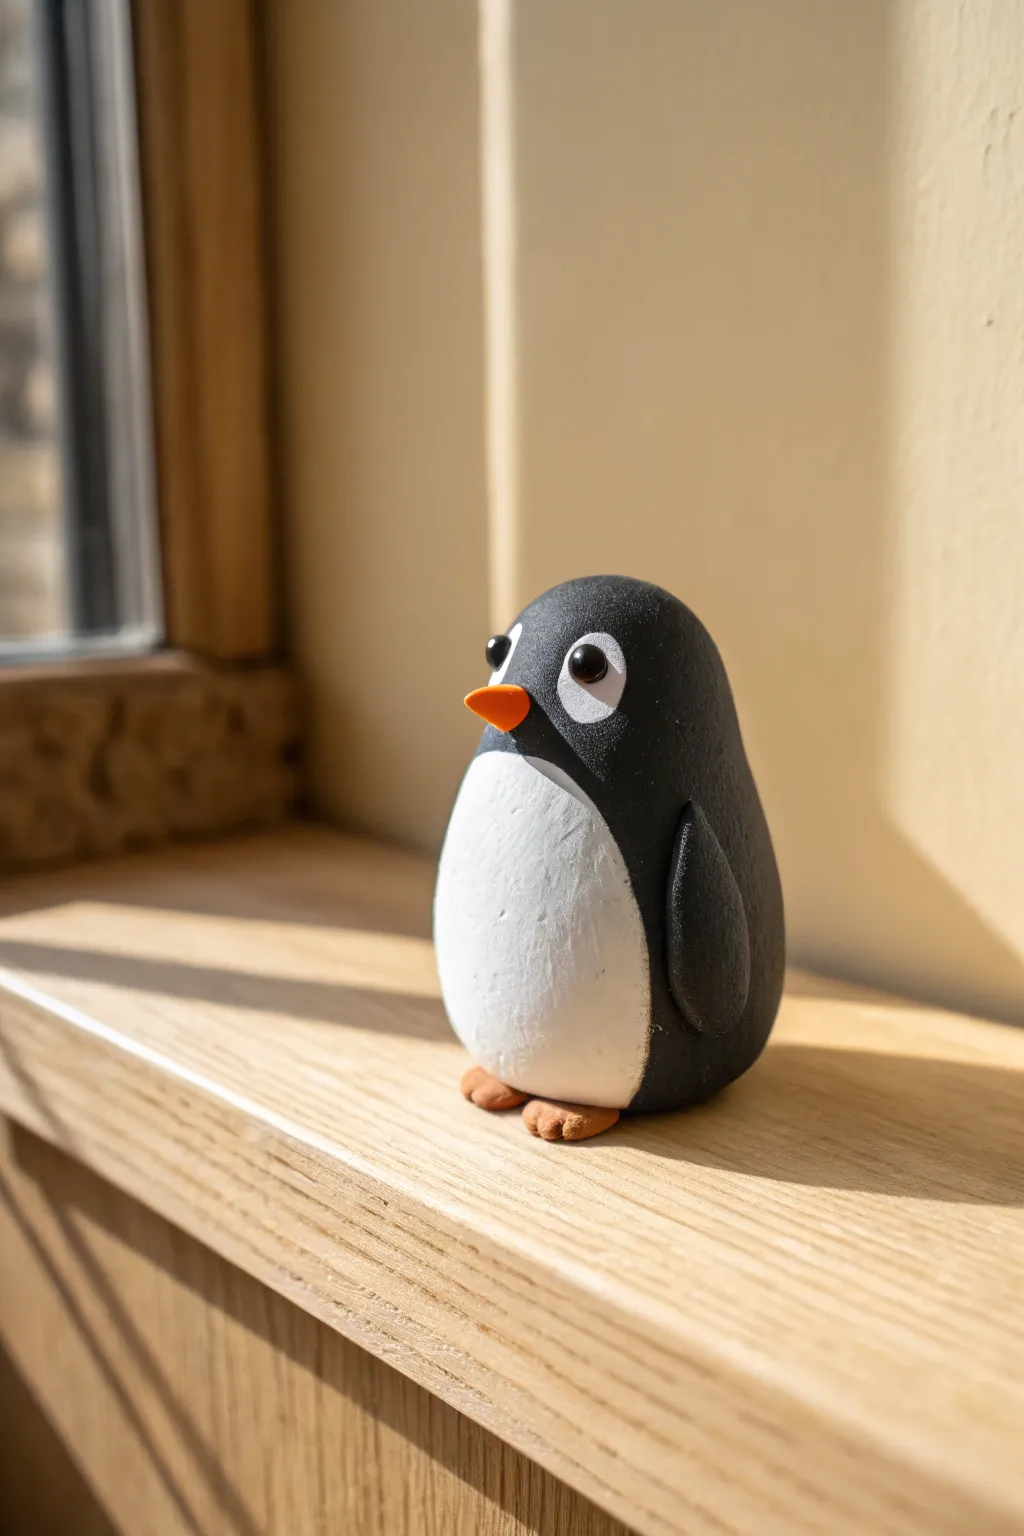
This adorable penguin mini figure captures the heartwarming charm of Antarctic wildlife in a compact, handcrafted form. With its smooth, rounded silhouette and expressive eyes, this matte-finish clay project makes for a perfect desk companion or windowsill inhabitant.
Detailed Instructions
Materials
- Black polymer clay (or air-dry clay)
- White polymer clay (or white acrylic paint)
- Orange polymer clay
- Clay sculpting tools (needle tool and ball stylus)
- Smooth work surface (glass or ceramic tile)
- Oven (if using polymer clay)
- Optional: Matte varnish
- Fine-grit sandpaper
- Rubbing alcohol (for smoothing)
Step 1: Shaping the Core
-
Form the Body:
Start by conditioning a substantial ball of black clay until it is soft and pliable. Roll it into a smooth egg shape, flattening the bottom slightly so it sits upright securely without tipping over. -
Refine the Silhouette:
Gently taper the top of the egg shape to distinguish the head area from the body. I like to keep this transition subtle rather than creating a distinct neck, as it maintains that cute, chubby penguin aesthetic. -
Create the Belly:
Roll a smaller ball of white clay and flatten it into a very thin oval sheet. If you plan to paint the belly later instead, skip this step and proceed with just the black form. -
Attach the Belly Patch:
Press the white oval onto the front of the black body. Use your thumb to gently smear the edges of the white clay outward so it merges seamlessly with the black clay, creating a smooth surface transition.
Smudged White Clay?
If black clay stains complete white parts, use a q-tip dipped in rubbing alcohol or acetone to gently wipe the white areas clean before baking.
Step 2: Adding Features
-
Craft the Flippers:
Make two small teardrop shapes from black clay. Flatten them significantly so they look like little paddles. -
Attach the Wings:
Press the rounded end of the teardrops onto the sides of the body where the ‘shoulders’ would be. Smooth the seam at the top, leaving the tips slightly raised from the body to add dimension. -
Shape the Beak:
Take a tiny amount of orange clay and roll it into a small cone. Pinch the sides slightly so it isn’t perfectly round, giving it a more triangular beak shape. -
Position the Beak:
Place the beak in the center of the face area, slightly above where the white belly patch ends. Press firmly to adhere. -
Form the Feet:
Create two small orange balls and flatten them into discs. Use a needle tool or knife to press two indentations into the front edge of each disc to create toe shapes. -
Attach the Feet:
Lift the penguin carefully and slide the orange feet underneath the front of the body. Adjust them so they poke out just enough to be visible and add stability.
Winter Wear
Before baking, add a tiny clay scarf or earmuffs in a bright color like red or blue to give your penguin a seasonal twist.
Step 3: The Eyes and Finish
-
Make Eye Base:
Roll two very small balls of white clay and flatten them into circles. Place these on the head, spacing them evenly above the beak. -
Add Pupils:
Roll two slightly smaller balls of black clay. Press these into the center of the white eye circles. Ensure they are positioned symmetrically to avoid a cross-eyed look. -
Add Highlights:
For that spark of life, take tiny specks of white clay and press them into the upper right corner of each black pupil. This reflection creates the lovable expression seen in the photo. -
Smooth Imperfections:
Dip your finger or a brush in a little rubbing alcohol and gently rub away any fingerprints or lint on the black clay. This ensures a professional, smooth finish. -
Bake or Dry:
If using polymer clay, bake according to the manufacturer’s instructions (usually 275°F/135°C for 15-30 minutes). If using air-dry clay, allow it to set for at least 24 hours. -
Final Touches:
Once cool or dry, check for any roughness. You can very lightly sand the bottom if it’s uneven. Avoid varnishing if you want to keep the matte, modern look shown in the image.
Place your new chilly friend on a sunny shelf and enjoy the simple whimsy it brings to your space


Bunny-in-a-Carrot Surprise Toy
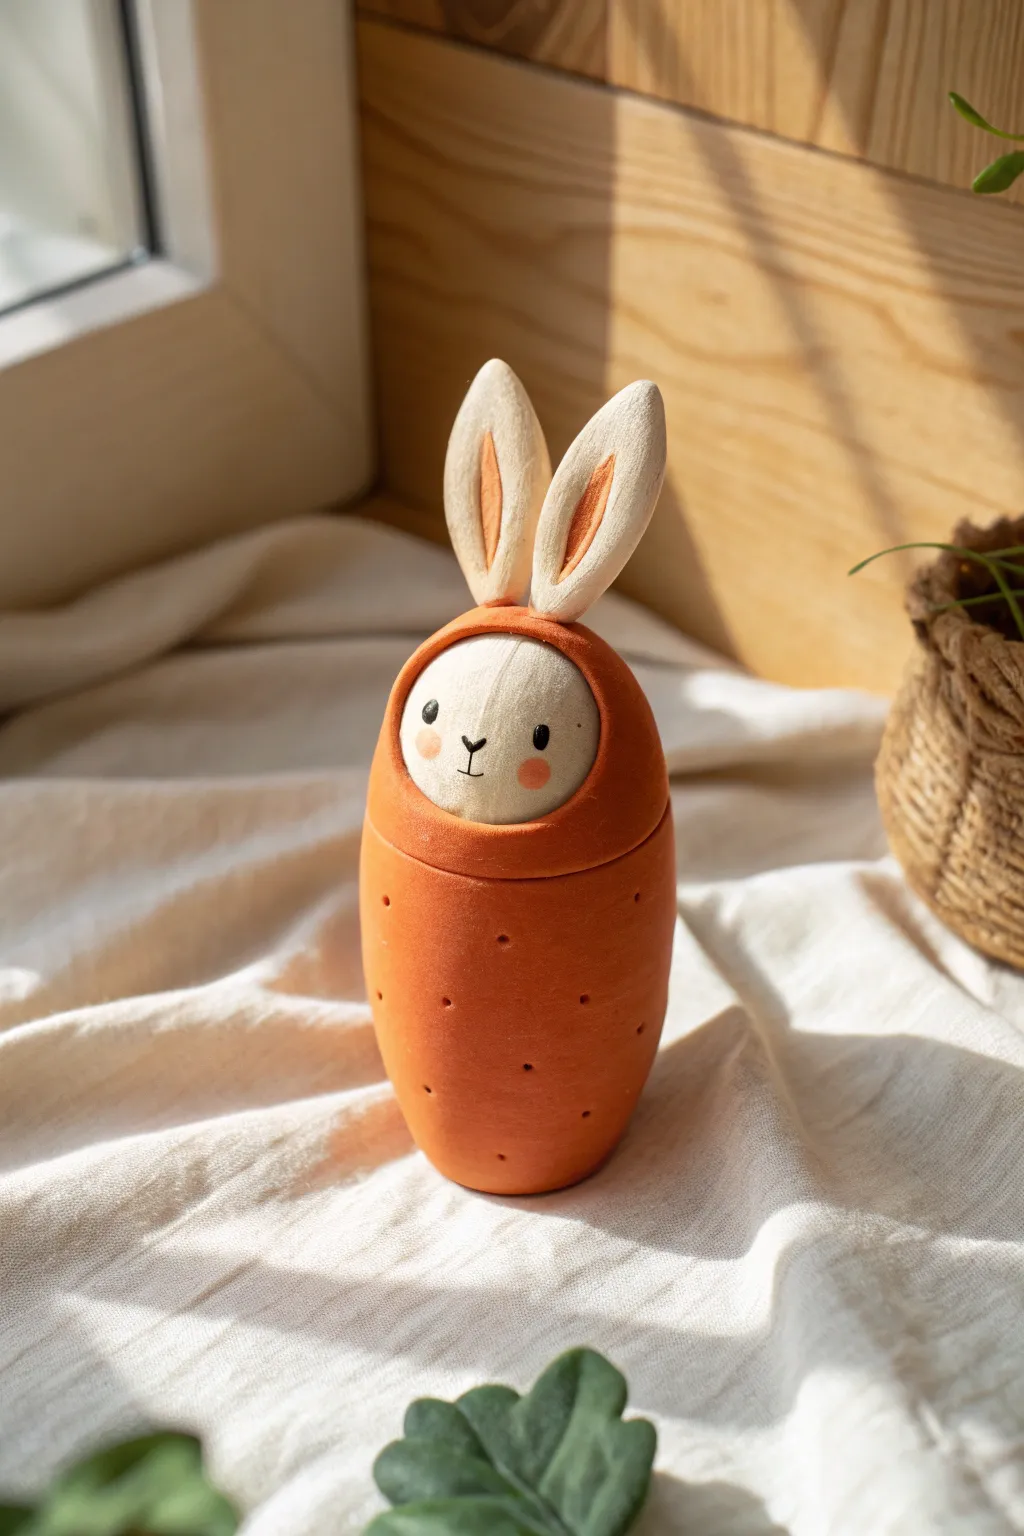
This adorable clay project combines the sweetness of a spring bunny with the playful shape of a carrot, functioning as a clever little lidded container. With its warm terracotta tones and simple painted face, it makes for a charming shelf decoration or a unique way to hide a small gift.
Step-by-Step Guide
Materials
- Air-dry clay (white or light grey)
- Acrylic paints (burnt orange, creamy white, soft pink, black)
- Fine grit sandpaper
- Sculpting tools (needle tool/toothpick, smoothing tool)
- Basic paintbrush set (including a fine liner)
- Aluminum foil
- Rolling pin
- Water cup for smoothing
- Matte sealant or varnish
Step 1: Shaping the Carrot Base
-
Prepare the foil core:
Crumple a piece of aluminum foil into a slightly tapered cylinder shape to act as the core for your carrot base. This saves clay and keeps the figurine light. -
Form the base cylinder:
Roll out a sheet of clay to about 1/4 inch thickness. Wrap this around your foil core, smoothing the seams together with a little water until invisible. -
Refine the taper:
Gently roll the clay cylinder on your work surface to create a smooth, rounded bottom that tapers slightly upward, mimicking a plump carrot root. Ensure the bottom is flat enough to stand on its own. -
Create the rim:
At the top of the cylinder, flatten the clay edge carefully. This needs to be a clean, distinct rim because the lid will sit here later. -
Add texture:
Using a needle tool or toothpick, gently press small, random holes or dimples into the surface of the carrot body to simulate vegetable texture.
Loose Lid?
If the lid is too loose after drying, apply a thin layer of fresh clay or heavy acrylic medium to the inner flange, let it dry, and sand to fit.
Step 2: Sculpting the Bunny Lid
-
Shape the head:
Roll a ball of solid clay that is slightly diameter-matched to your carrot base. This will become the bunny’s head and the ‘lid’ of the container. -
Form the hood:
Create a thinner strip of clay and drape it over the top and back of the head ball, blending it down to form the top of the carrot ‘hood’ that surrounds the face. -
Create the flange:
Underneath the head, sculpt a small ridge or lip of clay that fits snugly inside the rim of your carrot base. Test the fit frequently; it should slide in easily but not wobble. -
Sculpt the ears:
Shape two long, teardrop pieces of clay. Flatten them slightly and use a sculpting tool to press an indentation into the center of each, creating the inner ear. -
Attach the ears:
Moisten the base of the ears and press them firmly onto the top of the hood. Blend the clay at the seam so they stand upright and secure.
Make it Sweet
Before the clay dries, customize the carrot texturing by pressing real dried lavender stems into the surface for an organic botanical pattern.
Step 3: Painting and Finishing
-
Dry and sand:
Allow both pieces to dry completely (24-48 hours depending on humidity). Once dry, gently sand any rough spots, especially around the rim where the pieces connect. -
Base coat the carrot:
Paint the entire bottom section and the ‘hood’ area of the lid with a warm burnt orange acrylic paint. Apply two coats for opacity. -
Paint the bunny:
Paint the face area and the outer rims of the ears with a creamy white. I like to let this dry briefly before doing a second layer to ensure the orange doesn’t bleed through. -
Detail the ears:
Carefully paint the indented centers of the ears with the burnt orange color to match the carrot body. -
Add facial features:
Using your finest brush or a toothpick dipped in black paint, add two small dots for eyes and a tiny ‘Y’ shape for the nose and mouth. -
Apply blush:
Dilute a tiny drop of pink paint with water and gently dab it directly onto the cheeks for a soft, rosy effect. -
Seal the project:
Finish with a coat of matte varnish to protect the paint and give the clay a professional, soft-touch look.
Pop the lid on your new creation and enjoy the whimsical surprise of a bunny hiding in plain sight


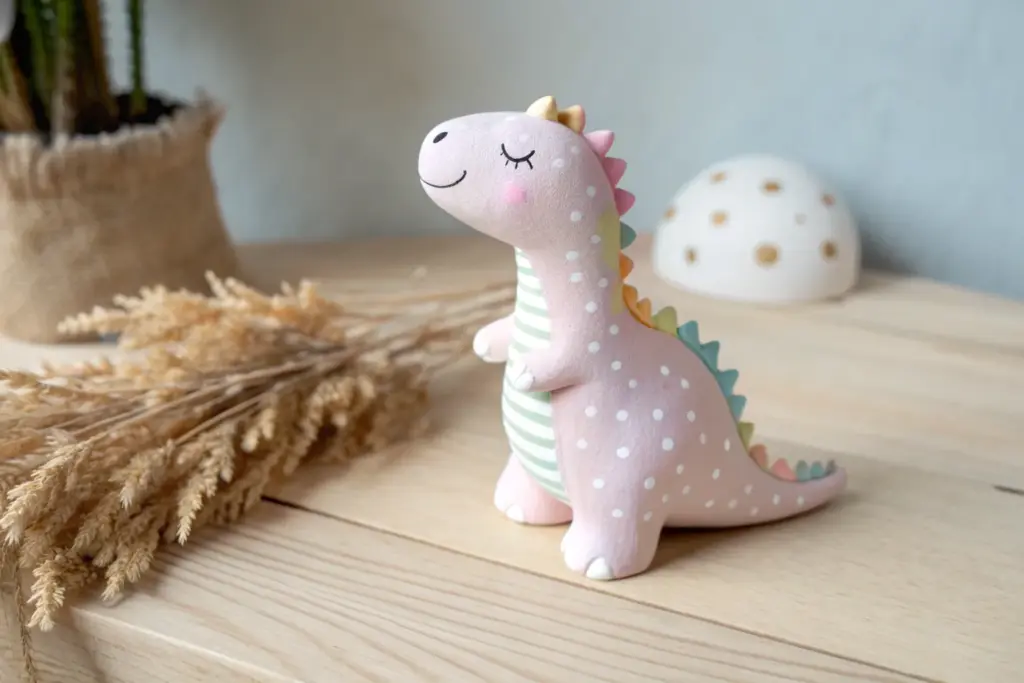
Friendly Dinosaur Buddy
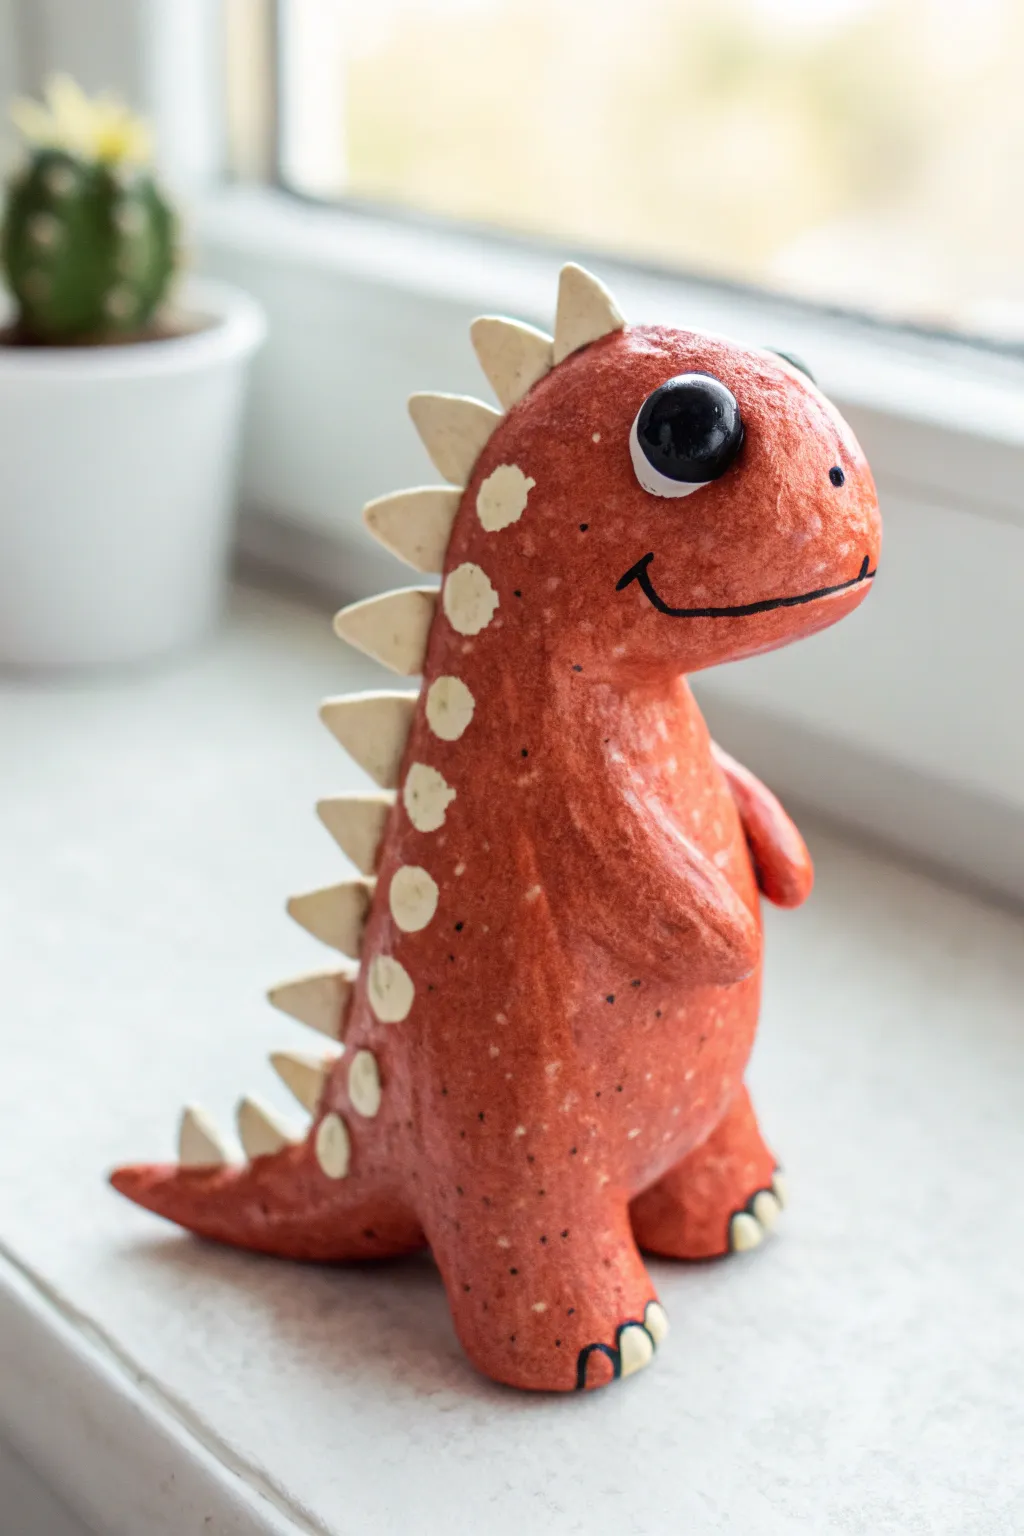
Bring the Jurassic era to your windowsill with this adorable, chunky dinosaur sculpture. Featuring a textured, stone-like finish and playful cream-colored spikes, this friendly reptile is the perfect whimsical companion for your houseplants.
Detailed Instructions
Materials
- Air-dry clay (terracotta color or white)
- Acrylic paints (burnt orange, cream/off-white, black, white)
- Sculpting tools (needle tool, smoother)
- Water cup and sponge
- Paintbrushes (medium flat, small detail)
- glossy varnish or sealant (optional)
- Aluminum foil (for armature)
- Toothpicks (optional for structural support)
Step 1: Forming the Body
-
Create the core:
Start by crumpling a piece of aluminum foil into a pear shape. This will be the main body and head of your dinosaur, saving clay and reducing weight. The top part should be rounder for the head. -
Cover with clay:
Roll out a slab of your air-dry clay to about 1/4 inch thickness. Wrap this around your foil armature, smoothing the seams together with a bit of water until the foil is completely hidden. -
Shape the snout:
Add a small ball of clay to the front of the head area to build up a rounded snout. Blend the edges seamlessly into the main head shape using your thumb or a modeling tool. -
Pull the tail:
At the bottom back of the body, gently pinch and pull the clay outward to form a thick, tapered tail. You want it to be substantial enough to help balance the figure when it stands. -
Add the legs:
Roll two short, thick cylinders for the legs. Attach them to the bottom of the body, blending the clay upwards. Press the artwork gently onto a flat surface to flatten the feet and ensure it stands upright on its own.
Smooth Operator
Keep a small bowl of water nearby while sculpting. Dipping your finger in water helps smooth out cracks instantly, but don’t over-wet the clay or it gets slushy.
Step 2: Adding Details & Features
-
Sculpt the arms:
Roll two small teardrop shapes for the arms. Attach them high on the chest, smoothing the rounded shoulder end onto the body while leaving the tapered hands free. -
Create the spikes:
Roll out a small snake of clay and cut it into small triangular sections. Start attaching these triangles down the center of the dinosaur’s back, starting from the top of the head all the way to the tail. -
Secure the spikes:
Use a little slip (clay mixed with water) to score and slip each spike if the clay feels dry. Gently blend the base of each triangle into the spine so they don’t fall off later. -
Initial drying:
Let the sculpture dry completely. Depending on the thickness of your clay, this could take 24 to 48 hours. It should feel room temperature and hard to the touch.
Step 3: Painting and Finishing
-
Base coat:
Paint the entire body with a reddish-orange or terracotta acrylic paint. I like to use a dabbing motion with the brush to enhance the textured, stone-like look of the clay. -
Paint the spikes:
Using a smaller brush, carefully paint the triangular spikes in a cream or off-white color. You may need two coats here to cover the orange base. -
Add the spots:
Using the same cream color, paint a row of circular spots down the side of the body, parallel to the spikes. Make them slightly larger near the top and smaller near the tail. -
Paint the belly:
Lightly dry-brush a lighter shade of orange or cream on the belly area to give the dinosaur some dimension and roundness. -
Create the eyes:
Paint large, round black circles for the eyes. Once dry, add a small white dot in the upper corner of each eye to create a lively reflection. -
Draw the smile:
Use a very fine detail brush or a black paint pen to draw a wide, curved smile extending from the snout to the cheek. Add small nostrils on the snout as well. -
Details on feet:
Paint small cream-colored triangles or semi-circles at the ends of the feet to represent claws. -
Add texture speckles:
For that stony look, mix a little black paint with water and flick it off an old toothbrush onto the figure to create tiny, natural speckles. -
Seal the work:
Coat the eyes with a glossy varnish to make them shine. You can leave the body matte or use a satin varnish for protection.
Legs Won’t Stick?
If the legs keep falling off, insert a half-toothpick into the body and push the leg onto the exposed end. This acts as an internal bone for extra support.
Place your new prehistoric friend near a window to catch the light

The Complete Guide to Pottery Troubleshooting
Uncover the most common ceramic mistakes—from cracking clay to failed glazes—and learn how to fix them fast.
Tiny Turtle With Big Eyes
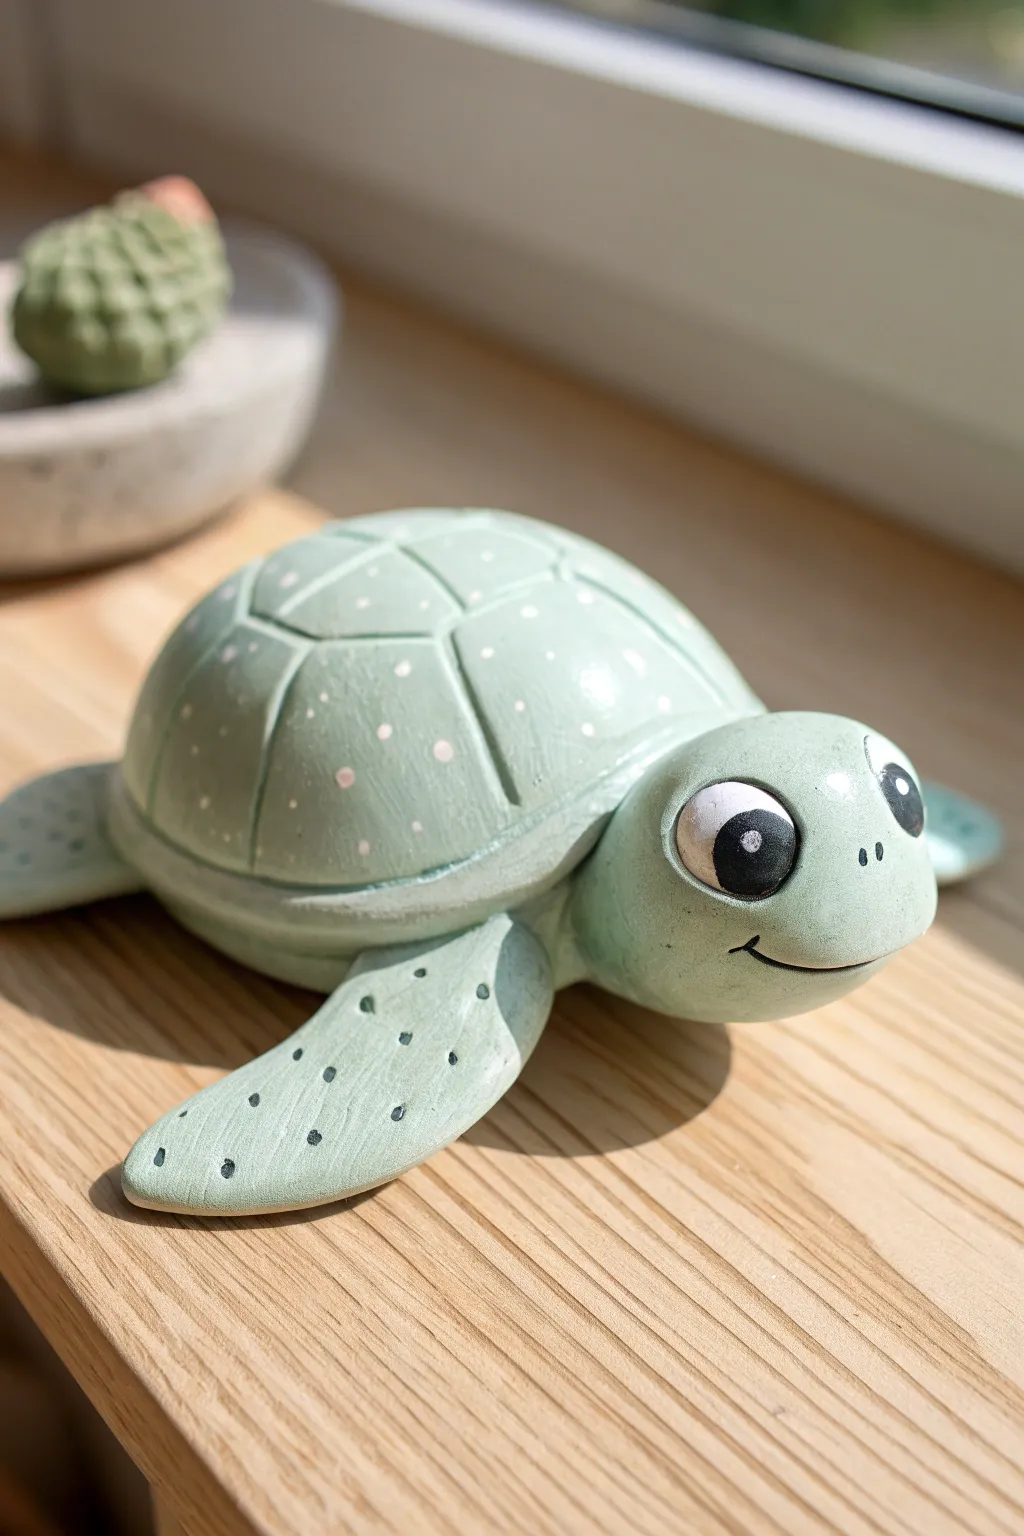
This adorable little sea traveller features a wonderfully smooth, pastel green finish and irresistibly large cartoon eyes. Perfect for a windowsill companion, this clay project combines simple shapes with precise painting techniques to bring a friendly character to life.
How-To Guide
Materials
- Polymer clay or air-dry clay (grey or white base)
- Acrylic paints: Pastel mint green, white, black, darker teal/grey
- Fine grit sandpaper
- Sculpting tools (needle tool, smooth modeling tool)
- Foil (for the core armature)
- Small round paintbrush
- Detail brush (size 0 or 00)
- Matte spray varnish
Step 1: Sculpting the Body
-
Create the core:
Start by scrunching a small piece of aluminum foil into a flattened hemisphere shape. This saves clay and keeps the turtle lightweight. -
Cover with clay:
Roll your clay into a sheet about 1/4 inch thick. Wrap it smoothly over the foil dome, sealing the bottom and smoothing out any fingerprints with a bit of water (if using air-dry) or baby oil (if using polymer). -
Form the head:
Roll a separate ball of clay for the head, slightly smaller than a ping-pong ball. Gently flatten the back where it will attach to the body. -
Attach the head:
Score the clay (make scratch marks) where the head meets the shell. Use a little slip or liquid clay as glue and press the head firmly onto the front of the shell, smoothing the seam underneath so it looks integrated. -
Shape the flippers:
Create four teardrop shapes from clay. Flatten them gently to make the flippers. The front two should be larger than the back two. -
Attach the limbs:
Attach the flippers under the edge of the shell, curving the front ones slightly backward as if the turtle is mid-swim. Blend the clay seams on the underside.
Wobbly Head?
If the head keeps drooping while the clay is wet, prop it up with a small wedge of crumpled foil or a sponge until the clay creates a firm skin or cures.
Step 2: Detailing and Refining
-
Carve the shell:
Using a needle tool or a dull knife, lightly carve the hexagonal pattern onto the shell. Start with a central shape and work your way out to the edges. -
Deepen the lines:
Go over your carved lines a second time to ensure they are deep enough to hold definition after painting, but keep the edges soft. -
Add facial features:
Use a smooth modeling tool to gently press indentations where the eyes will go. Carve a small, curved smile line just under the snout. -
Smoothing:
Before drying or baking, do a final pass with a damp sponge or finger to remove any harsh tool marks, ensuring that ceramic-smooth finish. -
Curing:
Allow your turtle to dry completely (24-48 hours for air-dry) or bake according to your polymer clay manufacturer’s instructions.
Step 3: Painting the Character
-
Sanding:
Once hardened, use fine-grit sandpaper to buff out any bumps. I find this step crucial for getting that professional, ‘store-bought’ texture. -
Base coat:
Apply two to three thin coats of pastel mint green acrylic paint over the entire turtle. Let each coat dry fully before adding the next to avoid streaks. -
Shell details:
Mix a very watery wash of darker teal or grey paint. Run this into the carved grooves of the shell, then immediately wipe the surface with a damp paper towel, leaving the dark color only in the cracks. -
Painting the eyes:
Paint large white circles in the eye indentations. Once dry, add large black circles inside, leaving a rim of white. Add a tiny white dot in the black pupil for that spark of life. -
Adding spots:
Using the dark teal/grey color on your finest brush, add tiny dots to the tips of the flippers. Add lighter, white or pale pink dots randomly on the shell for texture. -
The final smile:
Carefully trace the carved mouth line with black paint and add two tiny nostrils above the mouth. -
Sealing:
Finish the project with a coat of matte spray varnish to protect the paint and unify the sheen.
Smooth Operator
Dip your finger in water (for air-dry clay) or baby oil (for polymer) and rub in circles to buff away fingerprints before the clay hardens.
Place your new shelled friend in a sunny spot to watch over your room
Smiling Octopus Desk Buddy
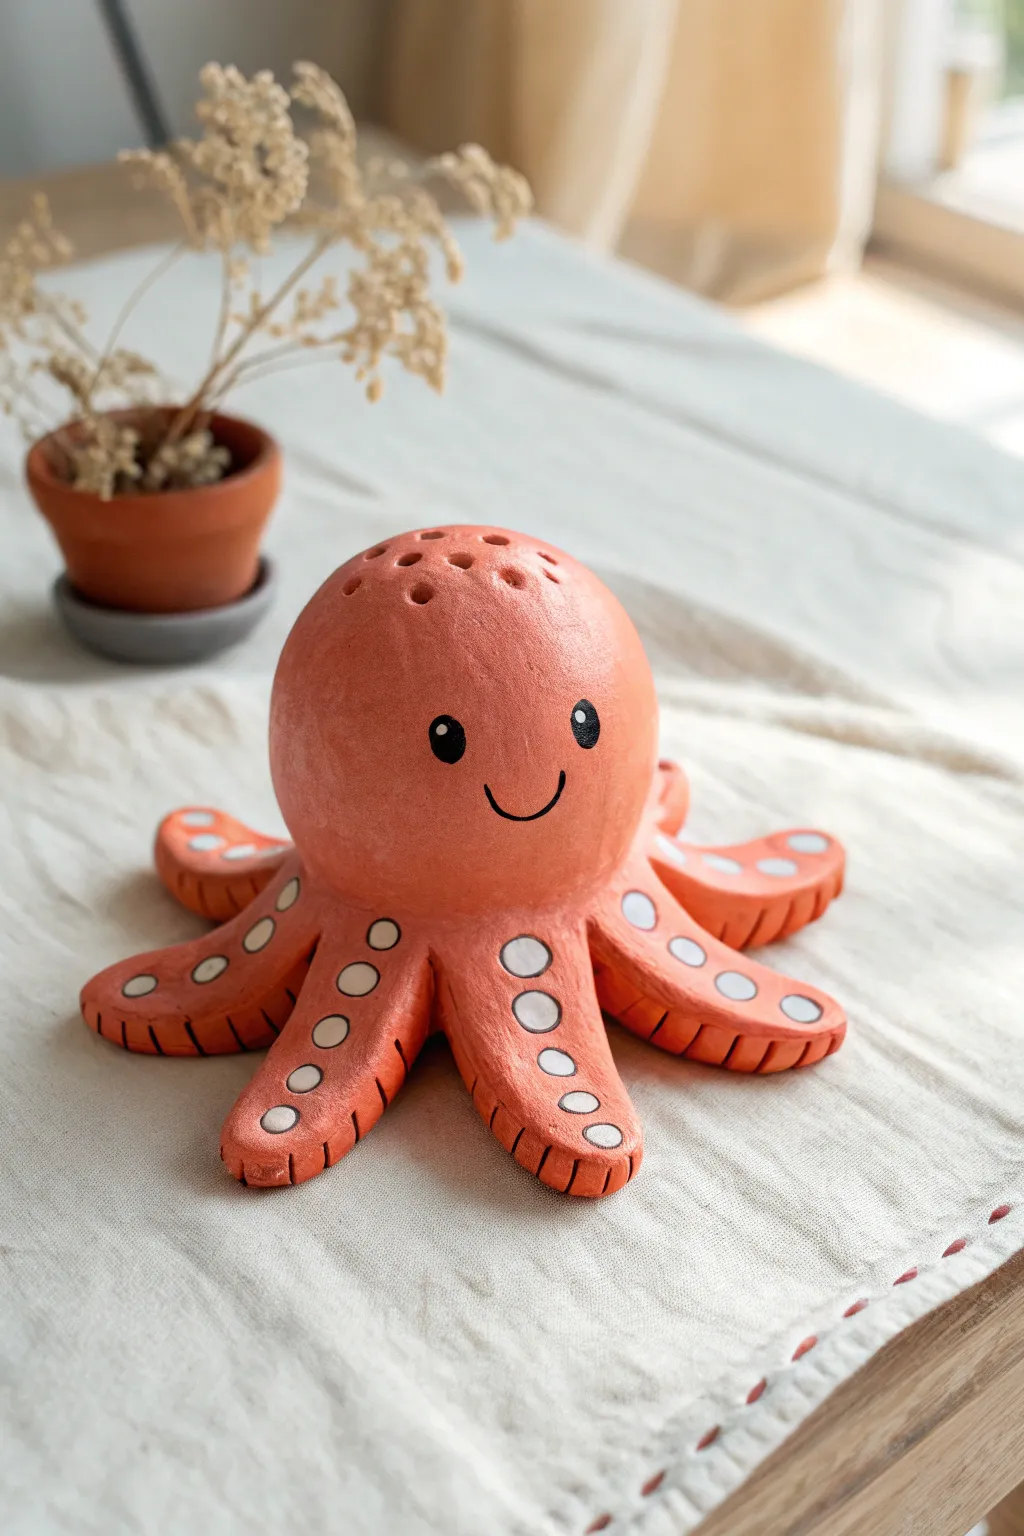
Brighten up your workspace with this charming terracotta-colored clay octopus, featuring a friendly smile and decorative suction cups. With its hollow head punched with holes, it doubles as a cute holder for dried flowers or incense sticks.
Step-by-Step
Materials
- Air-dry clay or polymer clay (white or terracotta)
- Acrylic paints (terracotta orange, white, black)
- Small paintbrush (detail round)
- Larger paintbrush (flat)
- Clay sculpting tools (specifically a needle tool or toothpick)
- Small rolling pin
- Aluminum foil (for armature)
- Water and sponge (for smoothing)
- Varnish or sealant (matte or satin)
Step 1: Sculpting the Base Form
-
Form the core:
Start by crumpling a ball of aluminum foil into a tight sphere roughly the size of a tennis ball. This will be the armature for the head, saving clay and reducing weight. -
Cover the armature:
Roll out a sheet of clay to about a quarter-inch thickness. Drape it over your foil ball, smoothing the seams together until the foil is completely encased in a smooth dome. -
Shape the tentacles:
Roll eight thick logs of clay, tapering them slightly at one end to creating a tentacle shape. They should be roughly 3-4 inches long. -
Flatten the tips:
Gently press down on the wider, non-tapered end of each tentacle to create a flat attachment point for the body. -
Attach the tentacles:
Score the bottom of the head and the attachment points of the tentacles with a needle tool. Apply a little water or slip (liquid clay) and press the tentacles firmly onto the base of the head in a radial pattern. -
Blend the seams:
Use a sculpting tool and your fingers to smooth the clay where the tentacles meet the head. The transition should be seamless so the legs look like extensions of the body. -
Curve the legs:
Gently bend and curve the tentacles outward and slightly upward at the tips to give the octopus a dynamic, ‘crawling’ movement. Ensure the bottom remains flat enough for stability.
Step 2: Adding Details & Drying
-
Create the top holes:
Using a toothpick or a small skewer, pierce a pattern of holes into the very top of the head. I like to arrange them in a small circle or random cluster. -
Detail the tentacles:
With a knife or needle tool, press small, evenly spaced vertical notches along the outer edges of each tentacle to simulate texture. -
Smooth the surface:
Dip a sponge or your finger in a tiny bit of water and rub it gently over the entire sculpture to remove fingerprints and bumps. -
Allow to cure:
Let your octopus dry completely according to your clay’s instructions. For air-dry clay, this might take 24-48 hours.
Smooth Operator
If using air-dry clay, keep a small bowl of water nearby. Wetting your fingers slightly helps blend seams flawlessly and prevents cracking.
Step 3: Painting & Finishing
-
Base coat:
Paint the entire sculpture with a terracotta orange acrylic paint. You may need two coats for full, opaque coverage. -
Paint the suction cups:
Once the orange is dry, use a small round brush to paint rows of white circles down the center of each tentacle to creating the suction cups. -
Draw the face:
Using a very fine brush and black paint, add two solid black circles for eyes and a simple U-shape for the smile. -
Add eye highlights:
Dip the back end of a paintbrush handle into white paint and dot it onto the upper right corner of each black eye to bring the character to life. -
Seal the piece:
Finish by applying a coat of matte or satin varnish to protect the paint and give the clay a finished, professional look.
Make it Functional
Before the clay dries, widen the holes on top slightly to fit incense sticks, or hollow out the head entirely to use it as a tiny planter.
Place your little cephalopod on your desk and enjoy his cheerful company while you work


What Really Happens Inside the Kiln
Learn how time and temperature work together inside the kiln to transform clay into durable ceramic.
Mini Unicorn Figurine
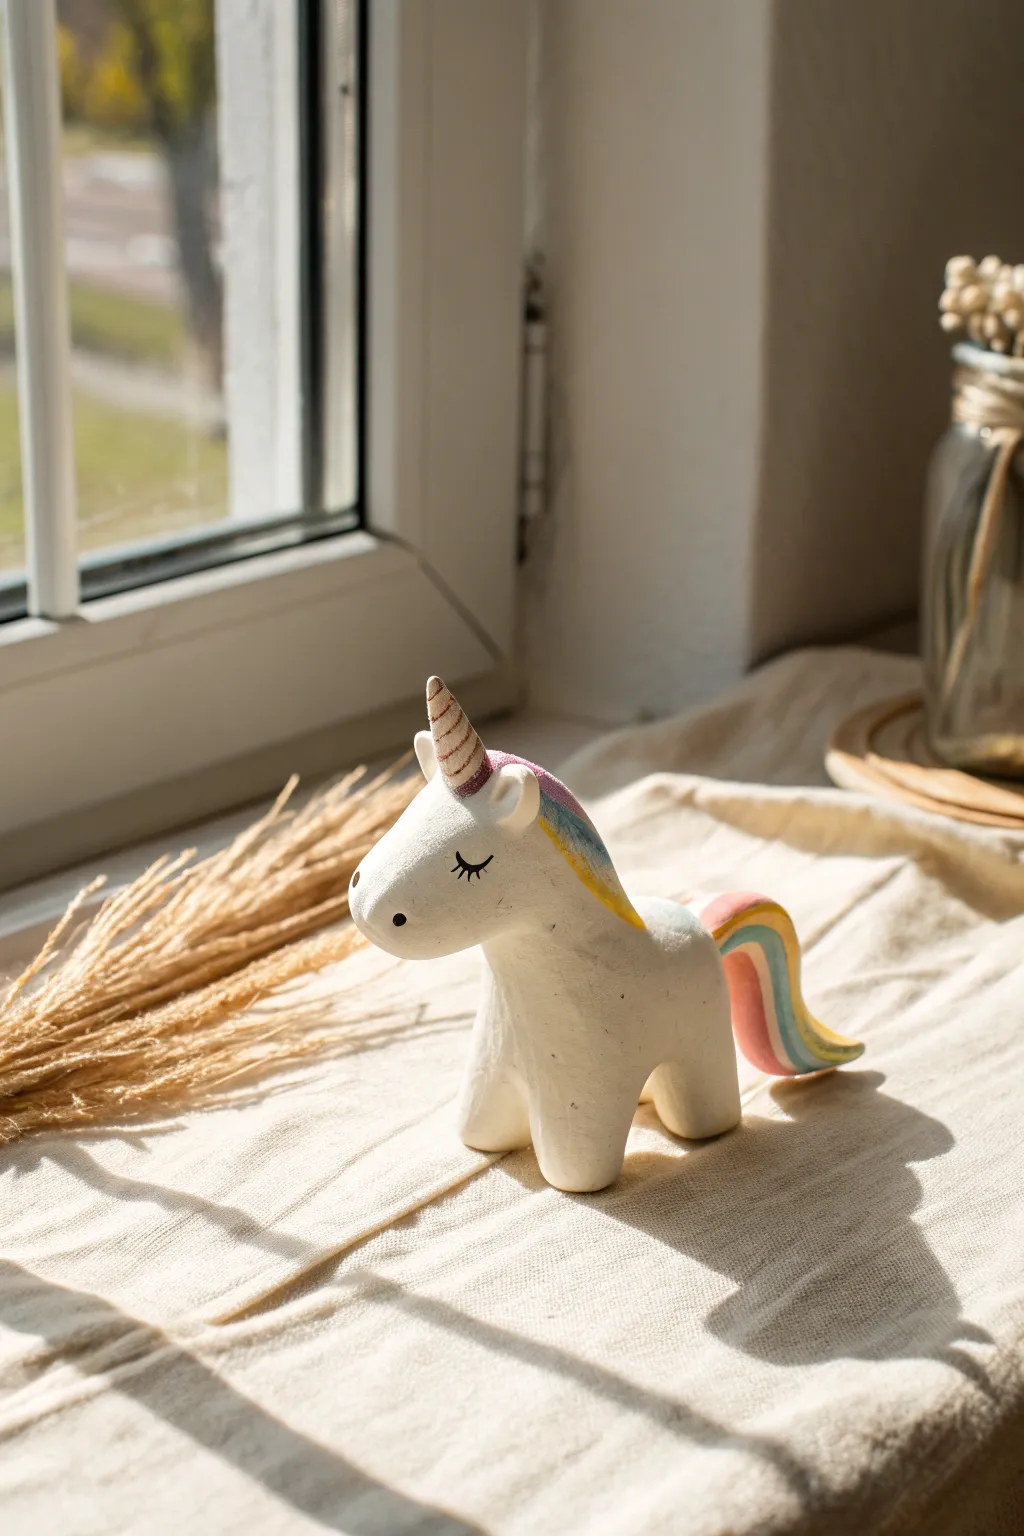
This whimsical little unicorn figurine is crafted from stark white clay and finished with delicate painted details. Its charming closed eyes and vibrant rainbow mane make it a sweet addition to any windowsill or shelf display.
Detailed Instructions
Materials
- White polymer clay or air-dry modeling clay
- Acrylic paints (pink, yellow, blue, turquoise, black, white)
- Metallic bronze or gold paint
- Fine detail paintbrush (size 0 or 00)
- Small round sculpting tool or toothpick
- Rolling pin
- Varnish or sealant (matte or satin finish)
Step 1: Basic Shape Structure
-
Form the body:
Start with a medium ball of white clay. Knead it until soft, then roll it into a smooth, thick cylinder. Pinch one end slightly to define where the neck will start. -
Shape the legs:
From the bottom of your cylinder, gently pull down four small nubs to create the legs. You can use a sculpting tool to split the clay and form distinct front and back legs. Flatten the bottoms so the figure stands stably. -
Sculpt the head:
Roll a slightly smaller ball of clay for the head. Gently elongate it into an oval shape to create a snout, keeping the back of the head rounded. -
Attach the head:
Place the head onto the neck portion of the body. Smudge the clay downward from the neck to the body to create a seamless join. I like to use a tiny bit of water or liquid clay here to ensure a strong bond. -
Add ears:
Pinch two tiny triangles of clay. Attach them to the top of the head, gently blending the base of each ear into the skull so they don’t pop off later.
Wobbly Unicorn?
If the sculpting phase leaves your unicorn top-heavy, gently tap the feet on a flat surface to create wider, flatter bases before curing the clay.
Step 2: Adding Magical Details
-
Create the horn:
Roll a very thin snake of clay, tapering it to a point at one end. Twist it gently to create a spiral texture, cut it to size, and attach it to the center of the forehead. -
Form the mane base:
Make a flat, elongated strip of clay that will serve as the mane. Press it onto the head between the ears and let it drape down the side of the neck. -
Sculpt the tail:
Roll another tapered snake of clay for the tail. Curl it slightly upwards and attach it to the rear of the unicorn, blending the attachment point smoothly. -
Refine the surface:
Check the entire figure for fingerprints. Dip your finger in a little water (for air-dry clay) or baby oil (for polymer) and gently smooth the surface until it looks pristine. -
Curing process:
Let the figure dry completely if using air-dry clay (usually 24-48 hours), or bake according to the package instructions for polymer clay. Let it cool fully before painting.
Step 3: Painting and Finishing
-
Paint the horn:
Using your fine brush, carefully paint the spiral horn with metallic bronze or gold paint. You may need two thin coats for opaque coverage. -
Start the rainbow mane:
Paint the mane in segments. Start with a stripe of pink near the forehead, followed by yellow, turquoise, and dusty blue as you move down the neck. -
Paint the tail:
Mirror the mane’s colors on the tail. Paint the curve closest to the body pink, transitioning through the rainbow colors to the tip. -
Add facial features:
Using the finest brush you have and black paint, draw a small arc with lashes for the sleeping eye. Dot a tiny nostril near the tip of the snout. -
Interior ear details:
Mix a very pale pink and paint just the inside curve of the ears to give them depth. -
Seal the work:
Once the paint is bone dry, apply a coat of matte or satin varnish to protect your unicorn from dust and scratches.
Level Up: Galaxy Style
Instead of a rainbow mane, paint the hair dark blue or purple and speckle it with white ‘stars’ and glitter for a celestial, space-themed unicorn.
Place your charming creation near natural light to let those colors truly shine
Alien Mini Monster Character
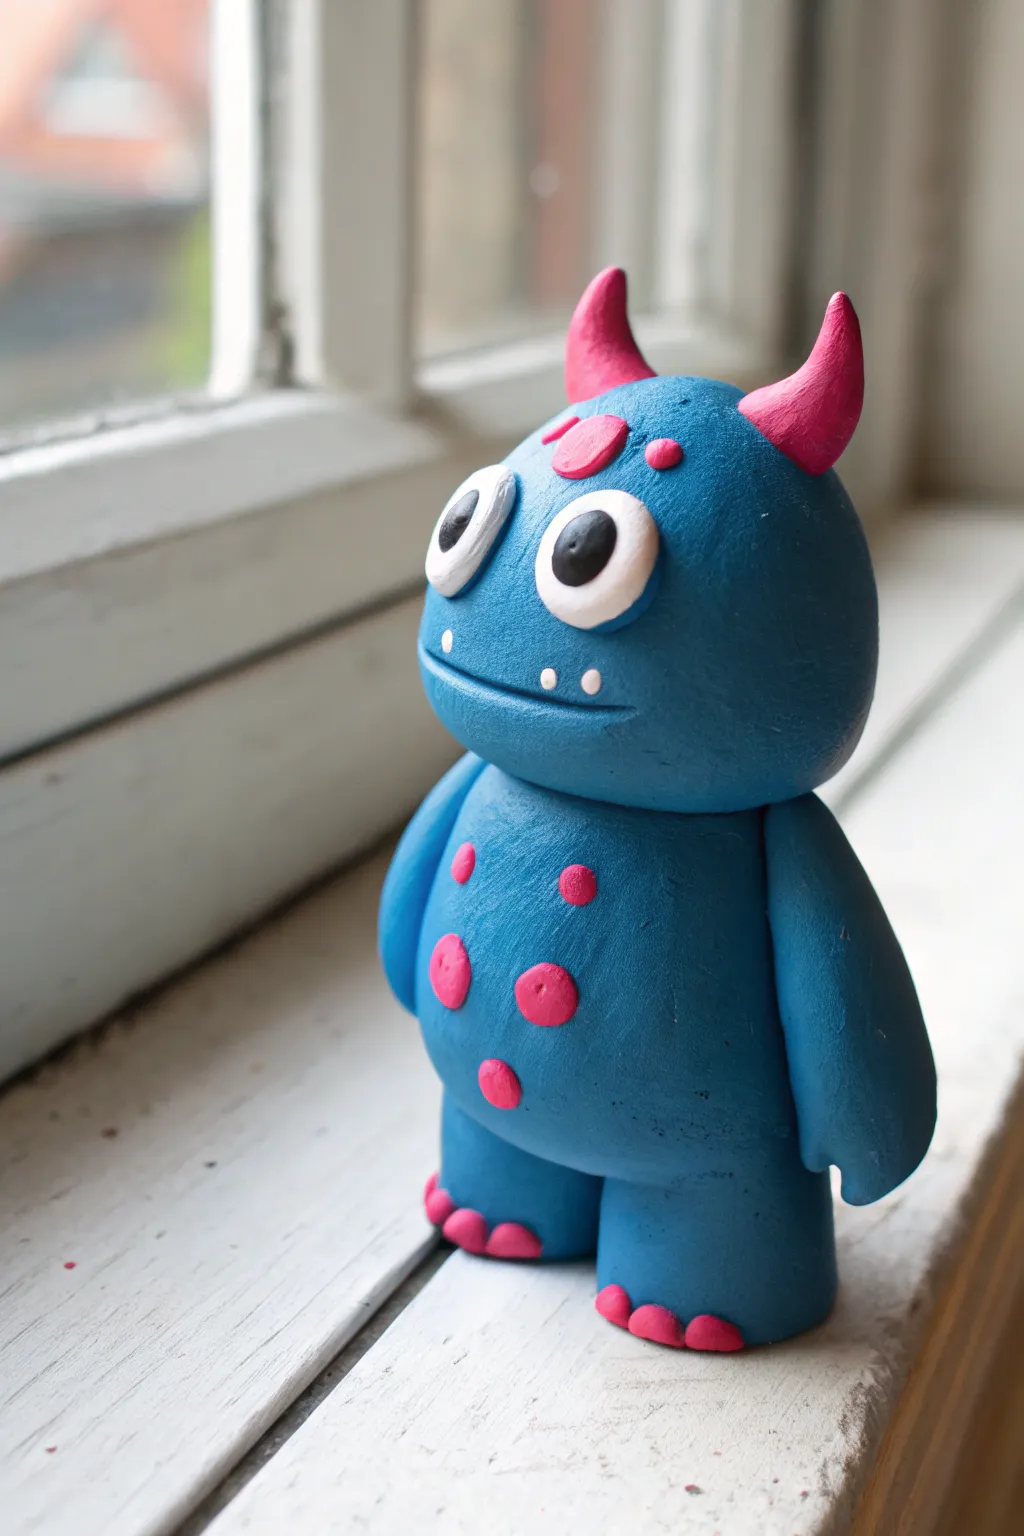
Sculpt your very own pint-sized companion with this adorable blue alien monster tutorial. Featuring a delightfully round belly, goofy googly-style eyes, and hot pink accents, this smooth-finished character is perfect for guarding your windowsill.
Step-by-Step Tutorial
Materials
- Blue polymer or air-dry clay (approx. 100g)
- Hot pink polymer or air-dry clay (approx. 20g)
- White clay
- Black clay
- Clay sculpting tools (needle tool, modeling ball tool)
- Rolling pin or smooth round object
- Craft knife
- Aluminum foil (optional, for armature)
- Oven (if using polymer clay) or drying space
Step 1: Shaping the Base Body
-
Form the torso:
Start by conditioning a large chunk of blue clay until it’s soft and pliable. Roll it into a smooth ball, then gently flatten the sides and bottom to create a rounded, pill-shaped cylinder for the main body. -
Create the head:
Take a slightly smaller amount of blue clay—about two-thirds the size of the body—and roll it into a sphere. Flatten the bottom slightly where it will join the neck. -
Connect the core:
Firmly press the head onto the body cylinder. If you want a seamless look, use your thumb or a modeling tool to smudge the clay across the seam, smoothing it until the neck join disappears completely. -
Define the mouth:
Using a craft knife or a thin spatula tool, cut a horizontal slit into the lower third of the head sphere. Gently press the tool inward to create a slight indentation, giving the monster a gentle smile.
Drooping Horns?
If the horns keep falling off or drooping while working, insert chaotic bits of toothpick or wire into the head first, then slide the clay horns over them for hidden structural support
Step 2: Creating the Limbs
-
Sculpt the legs:
Roll two equal-sized balls of blue clay. Flatten the tops and bottoms to create thick, sturdy cylinders that will support the figure’s weight. -
Attach the legs:
Press the legs firmly onto the bottom of the body. Wiggle them slightly to create a strong bond, ensuring the figure stands upright without tipping over before smoothing the seams. -
Shape the arms:
Create two elongated teardrop shapes from blue clay for the arms. They should be thicker at the shoulder end and taper slightly toward the ‘hand’ end. -
Attach the arms:
Affix the arms to the sides of the body just below the neck area. Blend the clay at the shoulder attachment point so the arms look like they grow naturally from the torso.
Step 3: Adding Facial Features
-
Form the eye whites:
Roll two medium-sized balls of white clay. Flatten them into thick discs and press them onto the upper half of the face, positioning them close together but not touching. -
Add pupils:
Take two small bits of black clay and roll them into tiny balls. press these flat onto the white discs. I like to place them slightly off-center to give the monster a goofy, confused expression. -
Create white freckles:
Roll three tiny specks of white clay into minuscule balls. Press these onto the cheek area below the eyes to act as cute highlights or alien freckles.
Fingerprint Assassin
To remove stubborn fingerprints before baking, lightly dip a soft paintbrush in cornstarch or baby powder and dust the figure. It smooths the surface instantly
Step 4: Pink Details & Horns
-
Shape the horns:
Roll two small cones of hot pink clay. Gently curve the tips slightly to give them a natural horn shape. -
Mount the horns:
Press the base of each pink cone onto the top of the head, spacing them wide apart. Blend the base slightly with a small ball tool if needed for stability. -
Make belly spots:
Create five or six small balls of pink clay in varying sizes. Flatten them into dots and press them randomly onto the monster’s belly and chest area. -
Add head spots:
Add three more flattened pink dots to the top of the forehead, between the horns, graduating their size from large to small. -
Create toes:
Roll extremely small balls of pink clay—three for each foot. Press them against the bottom front edge of the blue legs to simulate little toes or claws.
Step 5: Finishing Up
-
Smooth the surface:
Check the entire figure for fingerprints. Lightly brush over the clay with a tiny bit of baby oil (if using polymer) or water (if using air-dry) to smooth everything out. -
Bake or dry:
Follow the instructions for your specific clay type. If baking, place the monster on a baking sheet and bake at the recommended temperature. If air-drying, leave it in a cool, dry place for 24-48 hours.
Once the clay has fully hardened, your little blue monster is ready to stand guard on your desk or shelf

TRACK YOUR CERAMIC JOURNEY
Capture glaze tests, firing details, and creative progress—all in one simple printable. Make your projects easier to repeat and improve.
Stackable Ring Tower Toy
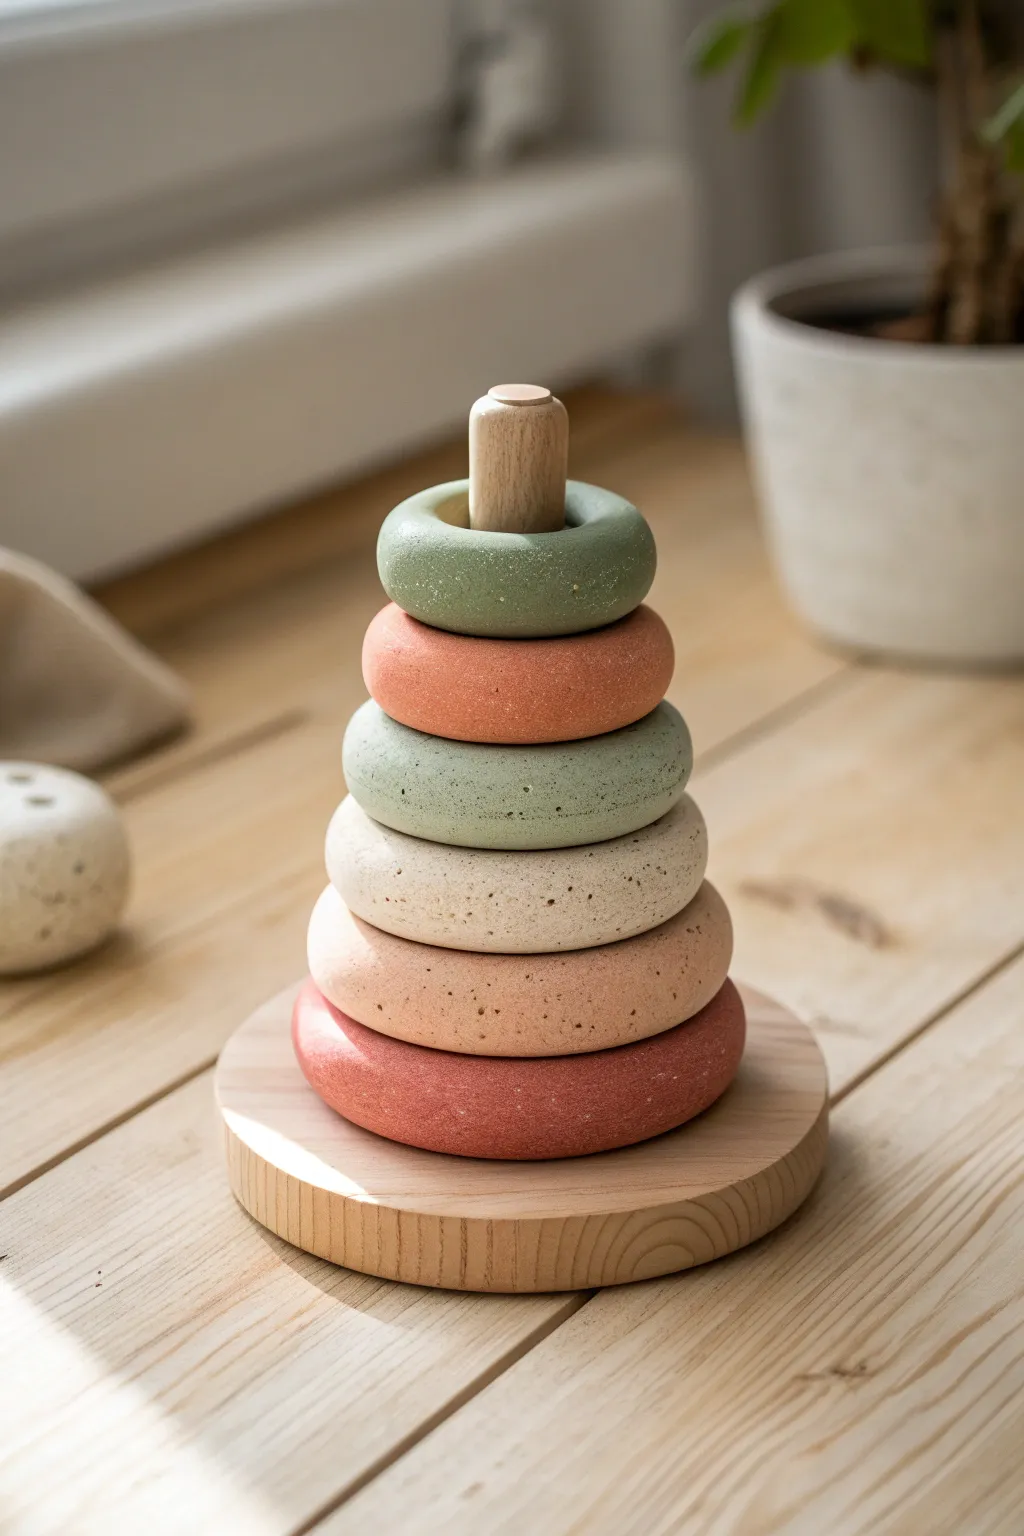
Create a soothing, Montessori-inspired toy using polymer or air-dry clay with a stone-like finish. This stackable ring tower features a calming palette of sage, terracotta, and sand, offering a tactile and visual treat for any playroom shelf.
Step-by-Step Tutorial
Materials
- Polymer clay (white, terracotta, sage green, beige)
- Faux granite or speckle mix potting soil/black pepper (for texture)
- Wooden base interact with a 1-inch dowel
- Rolling pin
- Circle cutters (graduated sizes)
- Craft knife
- Sandpaper (fine grit)
- Matte varnish or sealant
- Acrylic roller
- Ruler
Step 1: Preparing the Clay Base
-
Mix your colors:
Start by conditioning your polymer clay blocks. You’ll want to create a gradient or specific palette; for this look, mix a deep terracotta, a lighter peach, a creamy beige, a soft sage, and a deeper moss green. -
Add the speckled texture:
To achieve that organic, stone-like appearance, knead a small pinch of coarse black pepper or specialized granite-effect granules into each color ball. I find this creates a more convincing natural stone look than painting speckles on later. -
Size your portions:
Separate your clay into six portions, ranging from large to small. The largest ball will form the base ring, and the smallest will be the top ring.
Stone Effects
For a sandy texture, mix dried used coffee grounds or craft sand into the clay. It changes the tactile feel beautifully.
Step 2: Shaping the Rings
-
Roll out snakes:
Take your largest portion of clay (the rusty red color) and roll it into a thick, even snake. Aim for a thickness of about 3/4 of an inch. -
Measure the length:
Wrap the snake around your wooden dowel to estimate the length needed, but make the hole significantly larger than the dowel itself so it slides easily. Cut the excess clay with a craft knife. -
Join the ends:
Press the two cut ends of the clay snake together. Smooth the seam thoroughly with your finger or a sculpting tool until the join is invisible. -
Flatten slightly:
Gently press the ring down onto your work surface with an acrylic block or the palm of your hand to flatten the top and bottom slightly. This helps the rings stack stably rather than rolling off. -
Smooth the edges:
Use your fingers to round off the sharp edges created by flattening. The goal is a soft, pebble-like silhouette rather than a sharp geometric cylinder. -
Repeat for all sizes:
Continue this process for the remaining five colors, making each ring slightly smaller in diameter than the last. Ensure the central hole remains consistent—use a dedicated circular cutter to re-punch the center if it warps.
Make It wobble
Use a rounded wooden base instead of a flat plaque. This turns the static stacker into a fun balancing wobble toy.
Step 3: Baking and Finishing
-
Prepare for baking:
Place your formed rings on a ceramic tile or baking sheet lined with parchment paper. Check one last time that the holes are perfectly circular. -
Bake the clay:
Bake according to your specific polymer clay manufacturer’s instructions (usually around 275°F or 130°C for 15-30 minutes depending on thickness). Watch clearly to ensure the lighter colors don’t scorch. -
Cool down:
Allow the rings to cool completely in the oven with the door slightly ajar. This prevents thermal shock and cracking. -
Sand the surfaces:
Once cool, take fine-grit sandpaper and wet-sand the rings under a trickle of water. This removes fingerprints and reveals more of the speckled texture buried inside the clay. -
Seal the deal:
Focusing on durability, apply a thin coat of matte water-based varnish. This protects the finish without making the toy look plasticky. -
Assemble the base:
While the rings dry, prepare your wooden base. Sand a round wooden plaque and glue a 1-inch thick wooden dowel into the center. Ensure the dowel is shorter than the total height of your stacked rings. -
Final assembly:
Slide your finished rings onto the wooden stand, largest to smallest to complete your organic, handcrafted toy.
Now you have a timeless, heirloom-quality toy that looks as beautiful on a shelf as it is fun to play with
Mini Tic-Tac-Toe Game Tokens
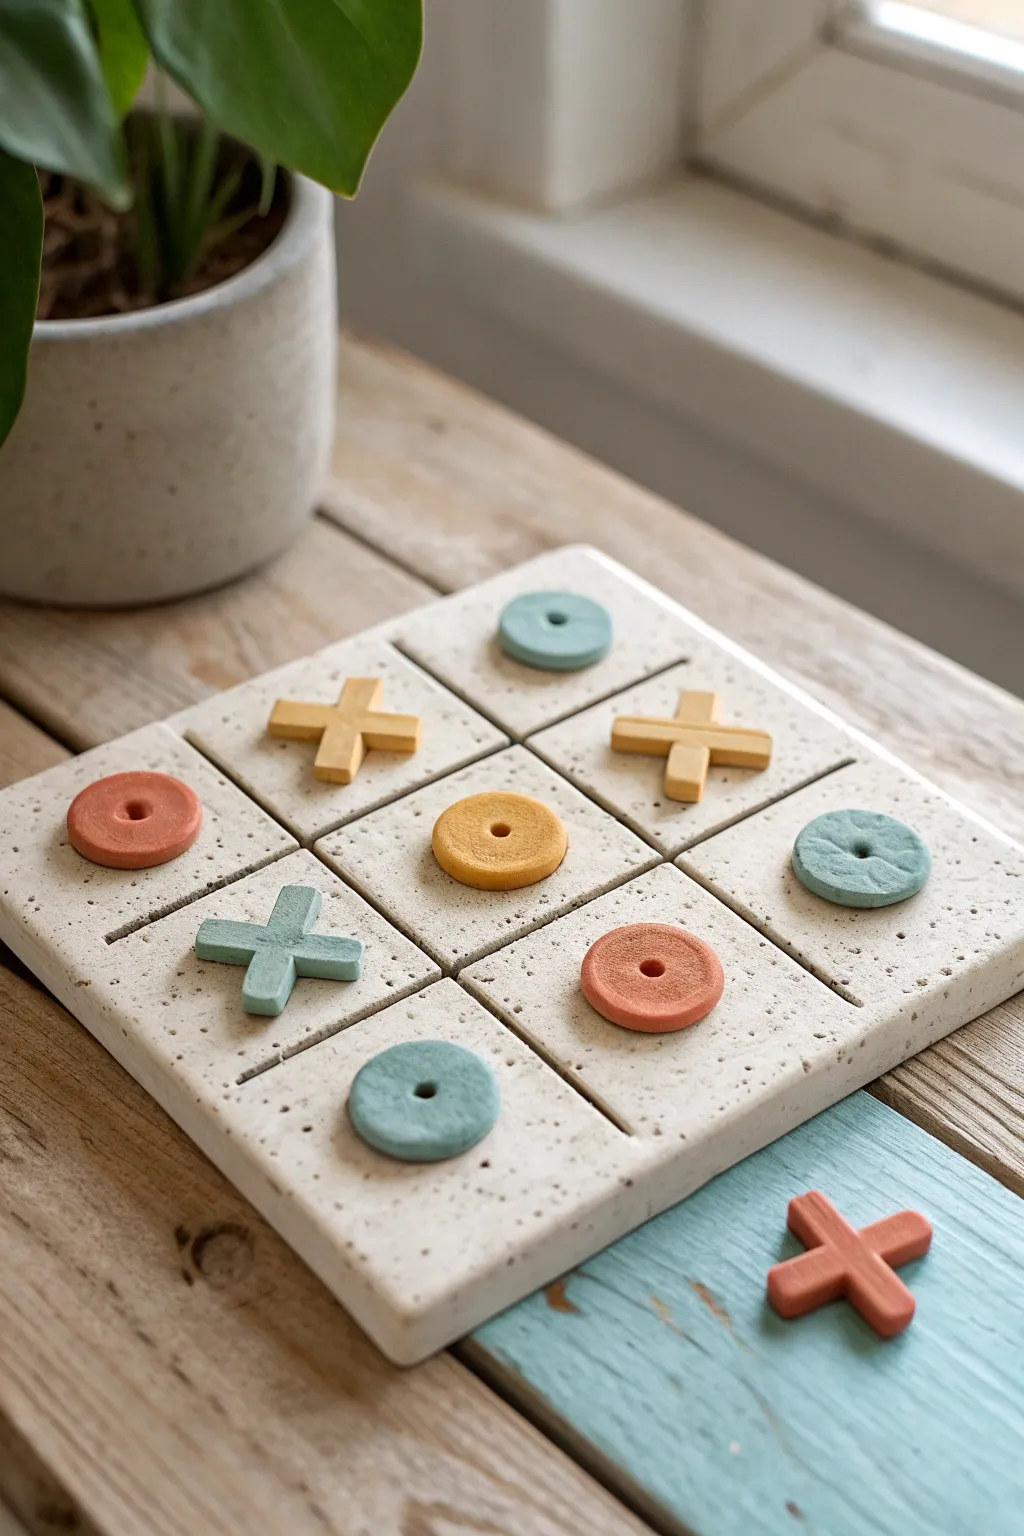
Create a modern, functional game set that doubles as minimalist decor using speckled clay. This project features a chunky, grooved board and delightfully tactile X and O playing pieces in a soft, muted color palette.
Step-by-Step
Materials
- White or cream polymer clay (approx. 8 oz)
- Fimo/granite effect clay or coarse black pepper (for specks)
- Small amounts of colored polymer clay (terracotta, mustard yellow, sage green, light blue)
- Acrylic roller
- Square clay cutter (approx. 4-5 inches) or craft knife
- R ruler
- Clay sculpting tool or wooden skewer
- Small circle cutter (approx. 0.75 inch)
- Hobby knife or blade
- Oven and baking sheet
- Parchment paper
- Fine-grit sandpaper (optional)
Step 1: Creating the Board Base
-
Prepare the speckled mixture:
Start by conditioning your white base clay until pliable. To achieve the stone look, mix in a small amount of granite-effect clay. If you don’t have effect clay, I like to knead in a pinch of ground black pepper or dried tea leaves for an organic speckled texture. -
Roll the slab:
Roll out the speckled clay on a clean surface. Aim for a thickness of at least 1/4 inch (6mm) to ensure the board feels substantial and sturdy. -
Cut the square:
Use a large square cutter to punch out the main board shape. If you don’t have a cutter this size, measure a perfect square with a ruler and carefully cut it out with your craft knife. -
Mark the grid lines:
Using a ruler, lightly mark where the tic-tac-toe grid will go. You need two vertical lines and two horizontal lines, evenly spaced, dividing the square into nine equal sections. -
Impress the grooves:
Take a blunt sculpting tool or the side of a ruler and press firmly into your markings to create deep grooves. Wiggle the tool slightly to widen the channels so they are clearly visible. -
Smooth the edges:
Gently run your finger along the cut edges of the square to soften any sharp corners. This gives the finished piece a more polished, ceramic-like feel.
Step 2: Crafting the Game Pieces
-
Mix your colors:
Divide your remaining white clay into four small portions. Mix a different colored clay into each portion to create pastel shades: terracotta, mustard, sage, and sky blue. You can also mix in some speckles here to match the board. -
Roll clay for tokens:
Roll out each colored clay portion to a medium thickness, slightly thinner than the board itself. -
Cut the O pieces:
Use the small circle cutter to punch out five circular tokens. I suggest making a mix of colors (e.g., terracotta and blue) or keeping one team uniform. -
Detail the O centers:
Use a small stylus tool or the back of a paintbrush to press a dimple into the center of each circle token, making them look like stylized donuts. -
Form the X slabs:
For the X pieces, you can cut thin strips from your rolled clay using a blade. -
Assemble the X shapes:
Cut the strips into short segments. Cross two segments over each other and gently press the intersection to bond them. Make five of these X tokens. -
Refine the shapes:
inspect all your pieces. If the X tokens look a bit rough, gently tap the ends against your work surface to blunt them.
Uneven Grid Lines?
If your grid lines look wobbly, re-place the ruler into the groove and press down firmly again. Do this before baking to straighten and deepen the lines.
Step 3: Baking and Finishing
-
Prepare for baking:
Place the board and all ten game pieces on a baking sheet lined with parchment paper. Ensure the board is on a perfectly flat area of the sheet so it doesn’t warp. -
Bake the project:
Bake according to your clay manufacturer’s instructions. Usually, this is around 275°F (130°C) for 15-30 minutes, depending on thickness. -
Cool down:
Let everything cool completely on the baking sheet. Moving the clay while it’s still warm can cause distortions. -
Sand for perfection:
Once cool, use a little fine-grit sandpaper to buff away any fingerprints or sharp edges on the sides of the board.
Make it Magnetic
Glue small magnets into the bottom of the tokens and embed washers into the board before baking to make a travel-friendly magnetic set.
Set up your grid and enjoy a quick game on your handsome new handmade board
Build-a-Bug Creature Kit
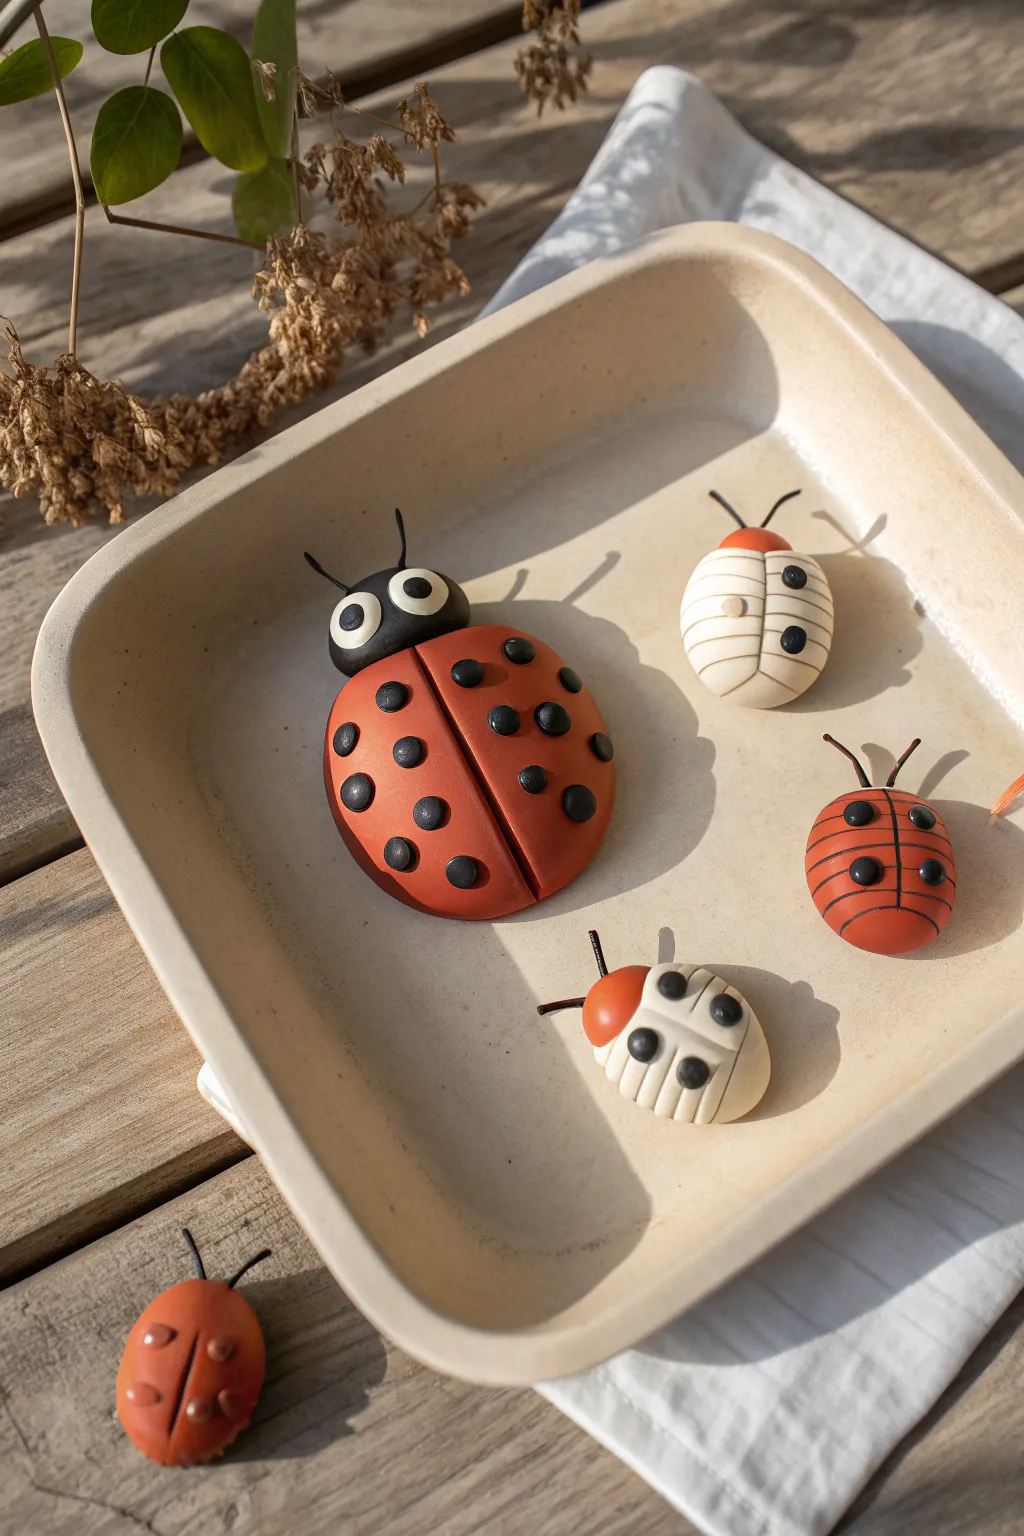
Bring a miniature garden to life with these delightful polymer clay beetle friends, featuring a charming mix of bright colors and simple graphic patterns. This project results in a polished, toy-like collection of bugs that are perfect for display or gentle play.
Step-by-Step Tutorial
Materials
- Polymer clay in red, black, white, cream/beige, and burnt orange
- Rolling pin or clay machine
- Small circle cutter or straw
- Modeling tools (blade, needle tool)
- Thin black wire for antennae
- Wire cutters
- Baking sheet and parchment paper
- Oven (for curing)
Step 1: Creating the Big Ladybug
-
Form the base:
Start by conditioning a large ball of red clay until it is pliable, then flatten the bottom slightly against your work surface so it sits like a dome. This will be the main body. -
Divide the wings:
Use a straight blade or a needle tool to drag a deep line straight down the center of the red dome, creating the illusion of two separate wing cases. -
Add the head:
Roll a smaller ball of black clay, flatten the back side, and press it firmly against the front of the red body. Smooth the clay slightly underneath to join them securely. -
Make the eyes:
Flatten two small balls of white clay into discs and place them on the black head. Add tiny black pupils to the center of each white disc for a cartoonish look. -
Create spots:
Roll out a thin sheet of black clay and use a small circle cutter or a straw to punch out several dots. Press these gently onto the red wings. -
Insert antennae:
Cut two short pieces of thin black wire. Carefully poke them into the top of the black head piece.
Step 2: Crafting the Striped Potato Beetles
-
Shape the bodies:
Roll balls of cream or beige clay into oval shapes. Flatten the bottoms so they don’t roll away. -
Add the thorax:
For one beetle, attach a small semi-circle of burnt orange clay to the front. For another, keep it entirely cream-colored. -
Create horizontal stripes:
I like to use a dull blade to gently press horizontal indentations across the back of the cream bodies to create a segmented texture. -
Detail the markings:
Roll tiny, rice-sized pieces of black clay. Press these into the horizontal grooves you created to simulate the beetle’s striped markings. -
Add sensory details:
Just like the ladybug, insert two small wire pieces for antennae at the front of each beetle.
Fingerprints showing?
If you see fingerprints on your smooth domes, lightly brush the raw clay with a little baby oil or cornstarch before baking to smooth them out.
Step 3: Making the Orange Firebug
-
Form the teardrop shape:
Take burnt orange clay and roll it into a rounded teardrop or oval shape for the body. -
Apply the grid pattern:
Roll extremely thin snakes of black clay. Lay one down the center of the back, and several horizontally across the body to create a grid or ladder pattern. -
Press and smooth:
Gently roll over the body with your finger or a roller to embed the thin black lines flush with the orange surface. -
Finish with dots:
Add four prominent black dots to the quadrants created by your grid lines.
Make them glossy
After baking and cooling, apply a coat of water-based polyurethane varnish or UV resin to the shells. This makes them look like shiny, hard beetle wings.
Step 4: Baking and Finishing
-
Prepare for baking:
Arrange all your finished bugs on a baking sheet lined with parchment paper, ensuring they aren’t touching. -
Bake:
Bake the clay according to the manufacturer’s instructions on your package (usually around 275°F or 135°C for 15-30 minutes depending on thickness). -
Cool down:
Let the bugs cool completely on the tray before handling them to ensure the clay hardens fully.
Arrange your new collection on a tray or shelf to add a whimsical touch to your room