
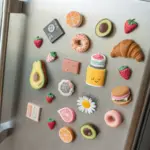
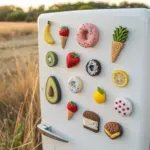
If you’ve got a little bit of clay and a couple magnets, you’re seriously minutes away from the cutest fridge upgrade. These simple clay magnet ideas are all about easy shapes, bold color, and that perfectly handmade charm.
Classic Heart Magnets
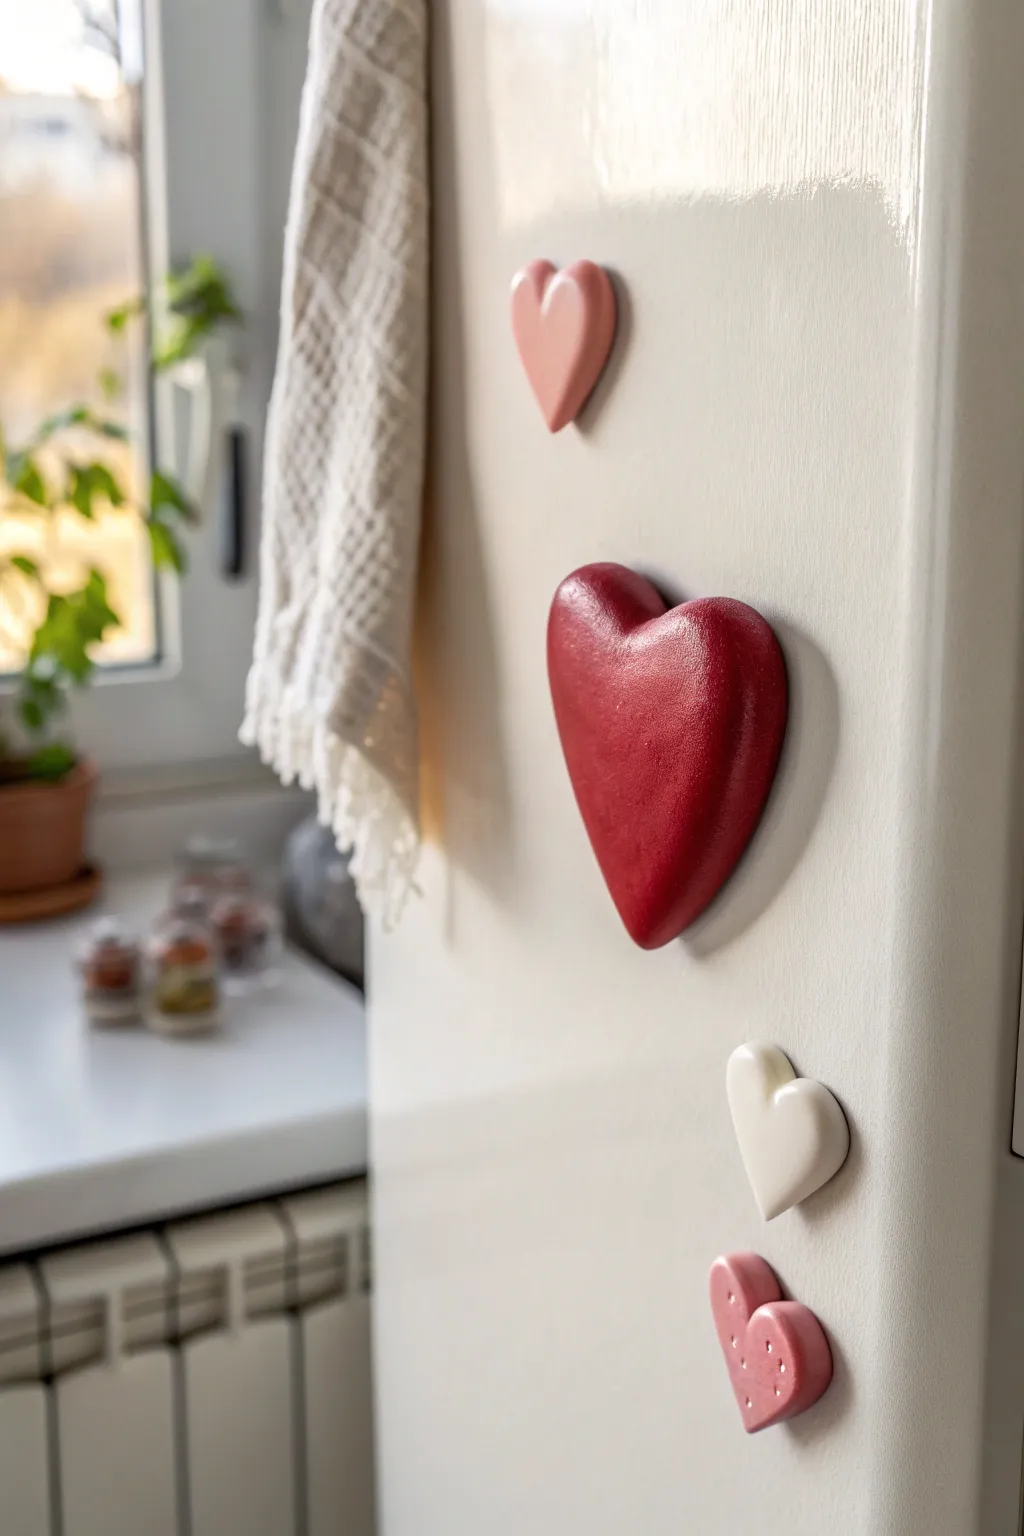
These charming, puffy heart magnets are a timeless way to add a touch of love to your refrigerator door. Their smooth, rounded edges and soft finish give them a high-quality, ceramic feel without the need for a kiln.
Step-by-Step Tutorial
Materials
- White air-dry clay or polymer clay
- Rolling pin
- Heart-shaped cookie cutters (various sizes)
- Fine-grit sandpaper (320-400 grit)
- Acrylic paints (Red, Pink, White)
- Soft synthetic paintbrushes
- Gloss or satin varnish (optional for finish)
- Strong craft magnets
- Super glue or E6000 adhesive
- Small bowl of water (for smoothing)
Step 1: Shaping the Hearts
-
Condition the clay:
Start by kneading a chunk of your clay in your hands until it becomes warm, pliable, and free of cracks. This ensures a smooth surface later. -
Roll it out:
Use a rolling pin to flatten the clay on a clean work surface. Aim for a thickness of about 1/4 inch to 1/2 inch to get that nice, puffy look seen in the photo. -
Cut the shapes:
Press your heart-shaped cookie cutters firmly into the clay. Try to wiggle them slightly before lifting to ensure a clean cut. -
Soften the edges:
Remove the excess clay. The cut edges will likely be sharp or squared off. Dip your finger in a little water and gently rub the edges to round them over, creating a soft, pillowy cushion effect. -
Add texture (optional):
For the smallest pink heart at the bottom, use a toothpick or a dotting tool to gently press small indentations into the clay before it dries. -
Allow to dry:
Place your clay hearts on a flat surface lined with parchment paper. If using air-dry clay, let them sit for 24-48 hours, flipping them halfway through to ensure even drying.
Cracked Clay?
If small cracks appear during drying, mix a tiny bit of fresh clay with water to make a paste (slip) and fill the cracks. Sand smooth once dry.
Step 2: Refining and Painting
-
Sand for smoothness:
Once fully cured, inspect your hearts. Use fine-grit sandpaper to buff away any fingerprints or uneven bumps, wiping away the dust with a damp cloth afterward. -
Base coat:
Apply a base coat of white acrylic paint to all the hearts, even if you plan to paint them red later. This makes the top colors pop more vibrantly. -
Paint the red heart:
Paint the largest heart with a deep, rich red acrylic. You may need two to three thin coats for complete opacity. -
Paint the pink hearts:
Mix a little red into your white paint (or use a pre-mixed pastel pink) for the top and bottom hearts. Apply smooth, even strokes. -
Paint the white heart:
Give the remaining heart a fresh coat of pure white or cream paint for a clean, porcelain look. -
Highlight the dots:
If you added the small indentations to the bottom pink heart, use a fine detail brush to fill them with white paint or simply let the glaze catch the light in the texture. -
Seal the surface:
To achieve that slight sheen visible in the image, apply a coat of satin or gloss varnish. This also protects the paint from chipping.
Step 3: Assembly
-
Prepare the back:
Flip the hearts over once the varnish is completely dry. If the backs are uneven, sand them briefly so the magnet will sit flush. -
Attach the magnets:
Place a dab of strong adhesive like E6000 on the center of the back of each heart. -
Secure the hold:
Press a round craft magnet firmly into the glue. I usually let these cure upside down overnight to maximize the bond strength before sticking them to the fridge.
Make it Sparkle
Mix just a pinch of fine glitter into your varnish coat for a subtle shimmer that catches the kitchen light without overpowering the color.
Now you have a heartwarming set of custom magnets ready to hold up your grocery lists and photos


Stars and Moon Minis
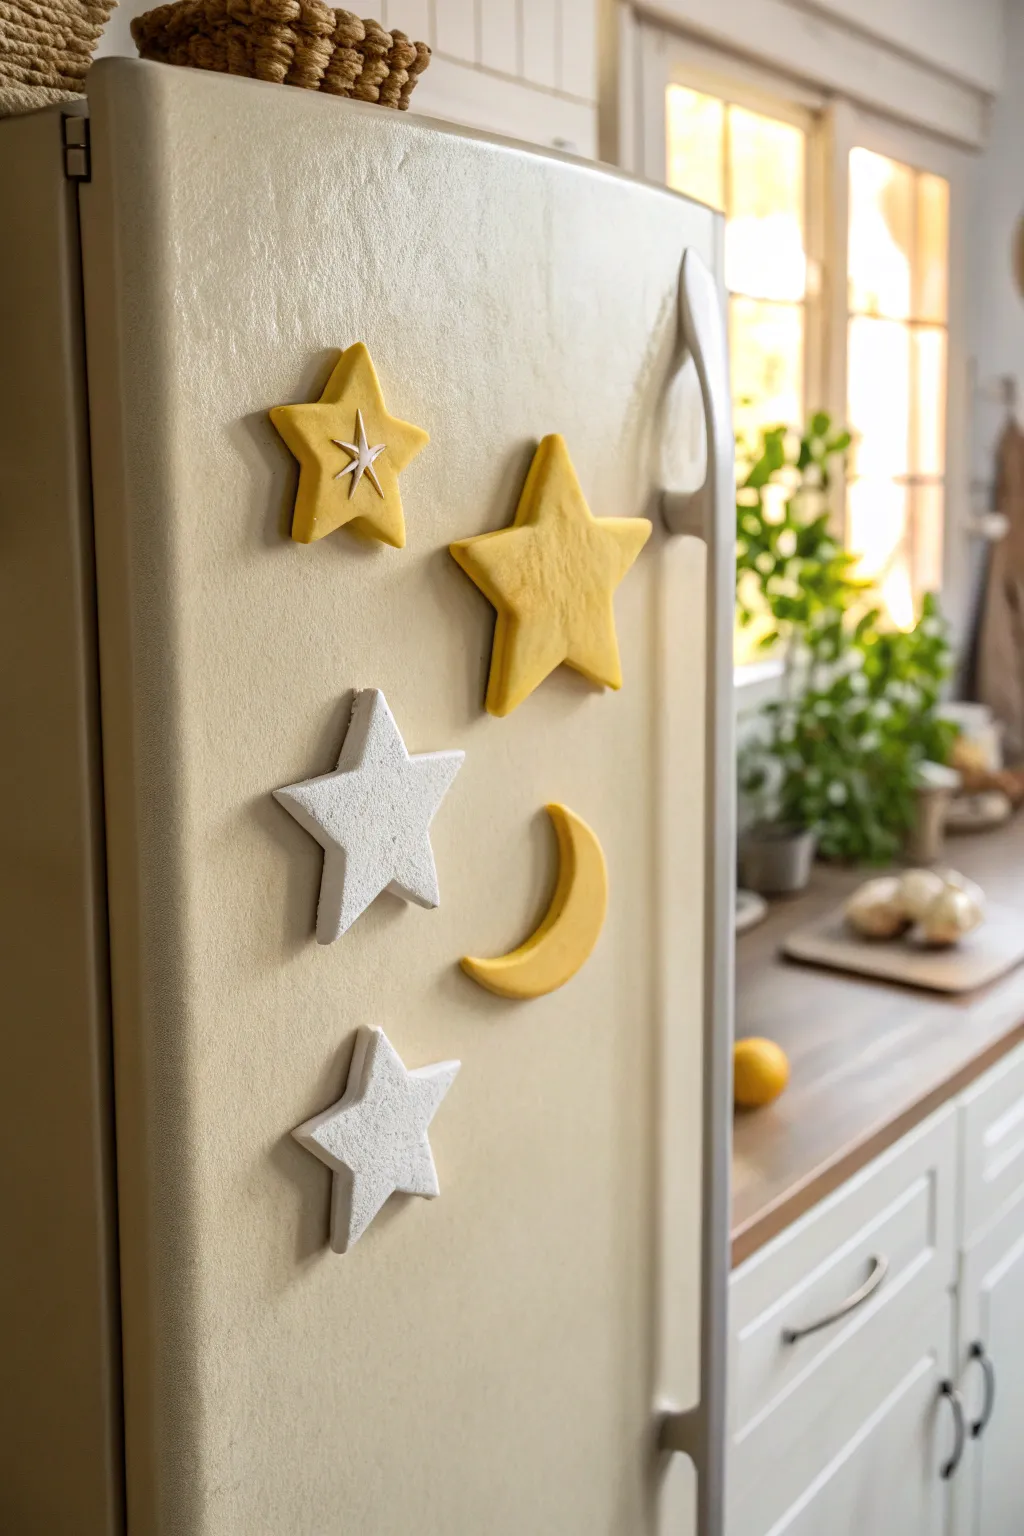
Bring the night sky into your kitchen with these charming, puffy star and moon magnets. Their soft, matte finish and gentle pastel yellow and white tones give them a cozy, handmade feel perfect for brightening up any appliance.
How-To Guide
Materials
- Air-dry clay or polymer clay (white)
- Acrylic paint (pastel yellow)
- Rolling pin
- Star-shaped cookie cutters (varying sizes)
- Round cookie cutter (for the moon)
- Sandpaper (fine grit)
- Strong craft glue or E6000
- Round ceramic magnets
- Detail tool or toothpick
- Parchment paper
Step 1: Shaping the Stars
-
Prepare the workspace:
Lay down a sheet of parchment paper to prevent sticking. Take a generous amount of white clay and condition it in your hands until it’s soft and pliable. -
Roll the clay:
Roll out the clay to a uniform thickness of about 1/4 inch. You want these to be quite thick and chunky to match the reference look. -
Cut the star shapes:
Use your star-shaped cookie cutters to press out several stars. For this set, you’ll need three medium-sized stars. -
Smooth the edges:
After cutting, dip your finger in a little water (if using air-dry clay) and gently run it along the cut edges to soften them. The goal is a rounded, soft look rather than sharp angles.
Uneven Edges?
If your clay drags while cutting, let it sit for 5 minutes to firm up slightly. You can also dip your cutter in cornstarch before pressing down for a cleaner release.
Step 2: Crafting the Moon and Details
-
Cut the moon shape:
To make the crescent moon, cut a circle using a round cutter. Then, offset the cutter slightly and cut into the circle again to slice off a crescent shape. -
Soften the moon:
Just like the stars, smooth the inner and outer curves of the moon with your fingertip to ensure it looks pillowy. -
Create the etched star:
Take one of the stars designated to be yellow. Using a detail tool or toothpick, carefully press a simple star design into the center. Don’t drag the tool; instead, press straight down to create clean indentations. -
Dry the pieces:
Set all your clay pieces aside on a flat surface to dry completely. Follow the manufacturer’s instructions for drying times, usually 24-48 hours for air-dry clay.
Ultra-Smooth Finish
For a seamless look, sand your dried clay pieces with a slightly damp sponge before painting. It acts like ultra-fine sandpaper without creating dust.
Step 3: Painting and Finishing
-
Sand imperfections:
Once fully dry, inspect your pieces. Use fine-grit sandpaper to gently buff away any rough spots or fingerprints, wiping away the dust afterwards. -
Mix the yellow paint:
Mix a small amount of yellow acrylic paint with white to achieve a soft, buttery pastel yellow. -
Paint the yellow pieces:
Paint the moon, one plain star, and the etched star with your yellow mix. I prefer using a soft synthetic brush here to minimize brushstrokes. -
Detail the etched star:
For the etched star, carefully paint inside the indented grooves with white paint to make the design pop against the yellow surface. -
Paint the white stars:
Paint the remaining two stars with plain white acrylic paint to give them a clean, uniform finish that matches the texture of the yellow ones. -
Seal the surface (Optional):
If you want extra protection, apply a matte varnish. Avoid glossy finishes to maintain the soft, biscuit-like appearance shown in the image.
Step 4: Assembly
-
Apply glue:
Flip all the dry, painted shapes over. Apply a generous dab of strong craft glue or E6000 to the center of the back of each shape. -
Attach magnets:
Press a round ceramic magnet firmly into the glue on each piece. Let the glue cure completely according to the package directions.
Arrange your new celestial cluster on the fridge to enjoy a touch of starlight every day

Simple Daisy Flower Magnets
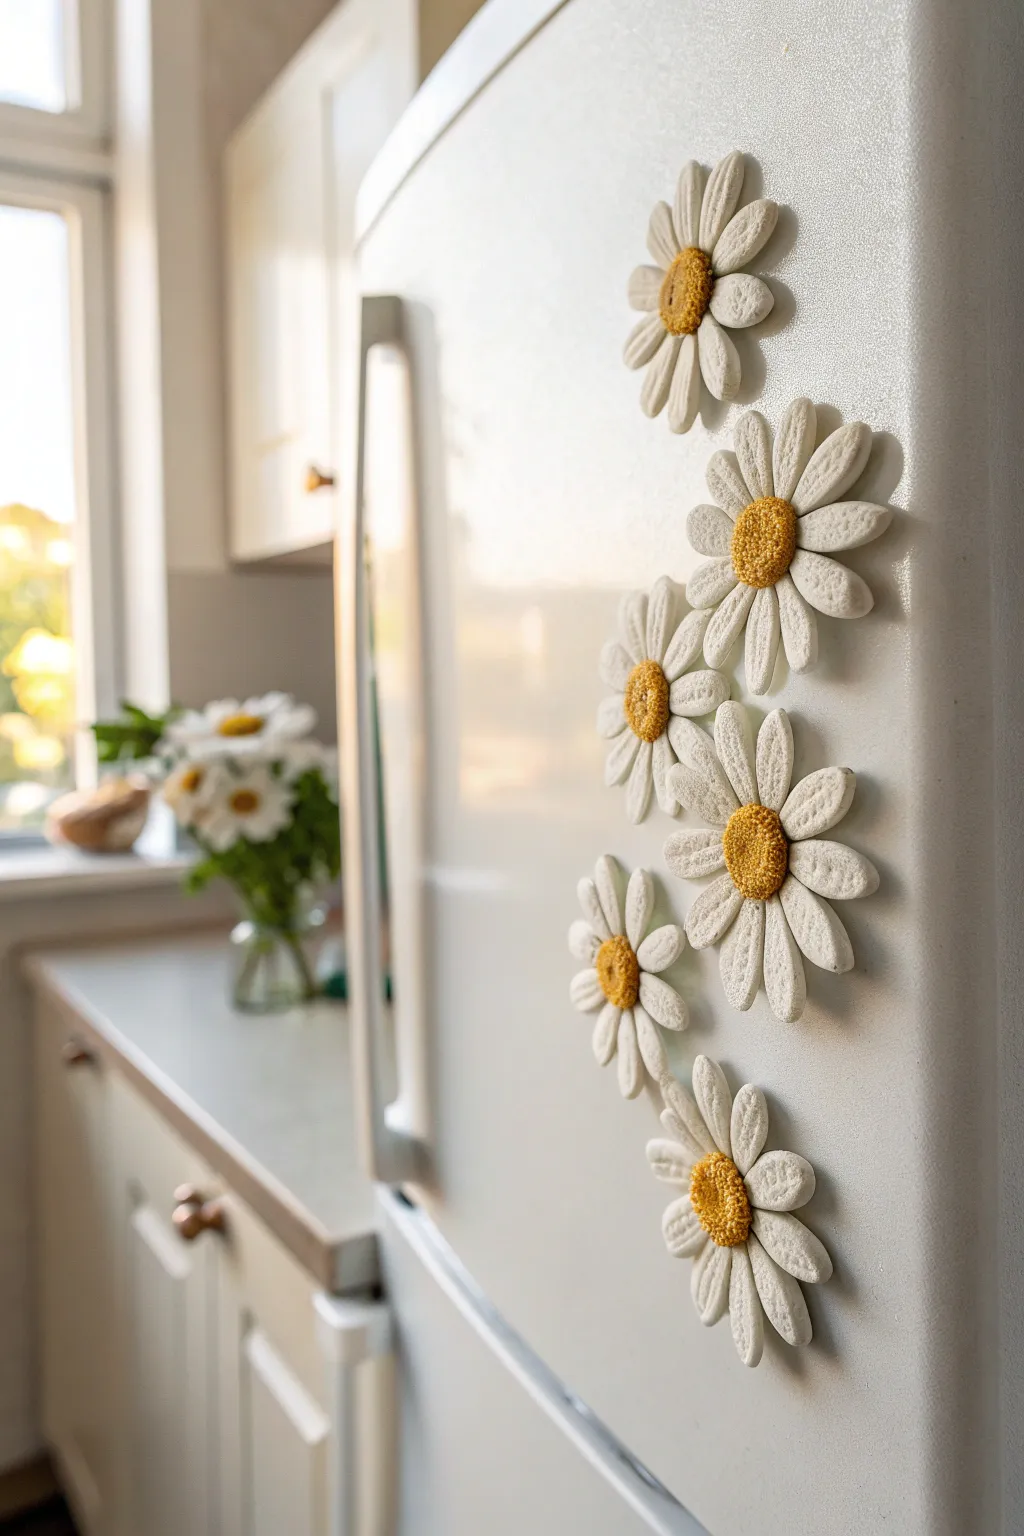
Bring a burst of everlasting spring to your refrigerator with these charming clay daisy magnets. Their brilliant white petals and sunny yellow centers feature a lovely speckled texture that gives them an earthy, handmade porcelain feel.
Step-by-Step Tutorial
Materials
- White air-dry clay (or polymer clay)
- Small round magnet discs
- Yellow ochre acrylic paint
- Rolling pin
- Daisy flower cookie cutter (or paper template)
- Modeling tool or toothpick
- Clean toothbrush or sponge (for texturing)
- Fine-grit sandpaper
- Super glue or heavy-duty craft glue
- Matte spray varnish (optional)
Step 1: Shaping the Petals
-
Condition the Clay:
Start by kneading a chunk of your white air-dry clay until it’s soft, pliable, and free of cracks. If it feels too dry, dip your fingers in water and work it in. -
Roll it Out:
Roll the clay onto a smooth surface to an even thickness of about 1/4 inch (6mm). This thickness ensures the magnets are sturdy but not too heavy to slide down the fridge. -
Cut the Shapes:
Use a daisy-shaped cookie cutter to press out your flower bases. If you want a more organic look or don’t have a cutter, you can hand-cut an oval for the center and attach individual teardrop-shaped logs for petals. -
Refine the Edges:
Dip your finger in a little water and gently smooth any rough edges left by the cutter so the petals look soft and finished. -
Define the Petals:
Take a modeling tool or the side of a toothpick and gently press a central indentation down the length of each petal to give it dimension and a slightly cupped shape.
Step 2: Creating the Centers
-
Form the Center Ball:
Roll a small ball of fresh clay, roughly the size of a marble, and flatten it slightly into a disc shape. -
Create Texture:
Before attaching it to the flower, take a clean toothbrush or a piece of rough sponge and tap it repeatedly over the surface of the center disc. This creates that pollen-like, stippled texture seen in the photo. -
Attach the Center:
Score the back of the textured disc and the center of your flower base with a needle tool. Apply a tiny dab of water or liquid clay (if using polymer) and press the center firmly onto the flower. -
Add Surface Detail:
To mimic the stone-like finish in the image, lightly dab your texture tool (sponge or toothbrush) over the *petals* as well. Use a lighter touch here than on the center; you just want a subtle matte surface.
Magnet Sliding?
If the clay flower is heavy and slides down, stick a second magnet directly next to the first one on the back to double the gripping strength.
Step 3: Finishing and Assembly
-
Dry Completely:
Place your finished daisies on a piece of parchment paper to dry. Air-dry clay typically takes 24-48 hours depending on thickness and humidity; I suggest flipping them halfway through to ensure the backs dry evenly. -
Sand Smooth:
Once bone dry, inspect the edges. If there are any sharp points or burrs, lightly sand them away with fine-grit sandpaper. -
Paint the Center:
Dip a small brush into yellow ochre acrylic paint. Carefully paint only the textured center disc. Use a stippling motion (up and down dabbing) to force the paint into the tiny texture holes. -
Let Paint Dry:
Allow the yellow paint to dry fully. If you prefer a brighter look, you can dry-brush a tiny bit of lighter yellow on the raised bumps. -
Seal (Optional):
To protect against kitchen grease or moisture, give the flowers a light coat of matte spray varnish. -
Attach the Magnet:
Flip the flower over. Apply a strong dot of super glue or E6000 to the back center. -
Press and Hold:
Press your round magnet disc into the glue. Hold it firmly for 30 seconds to ensure a tight bond before letting it cure completely according to the glue instructions.
Realistic Textures
Instead of a toothbrush, press a real piece of coarse linen fabric or sandpaper onto the clay surface for a subtle, natural stone effect.
Pop these onto your fridge door to enjoy a fresh floral vibe regardless of the season

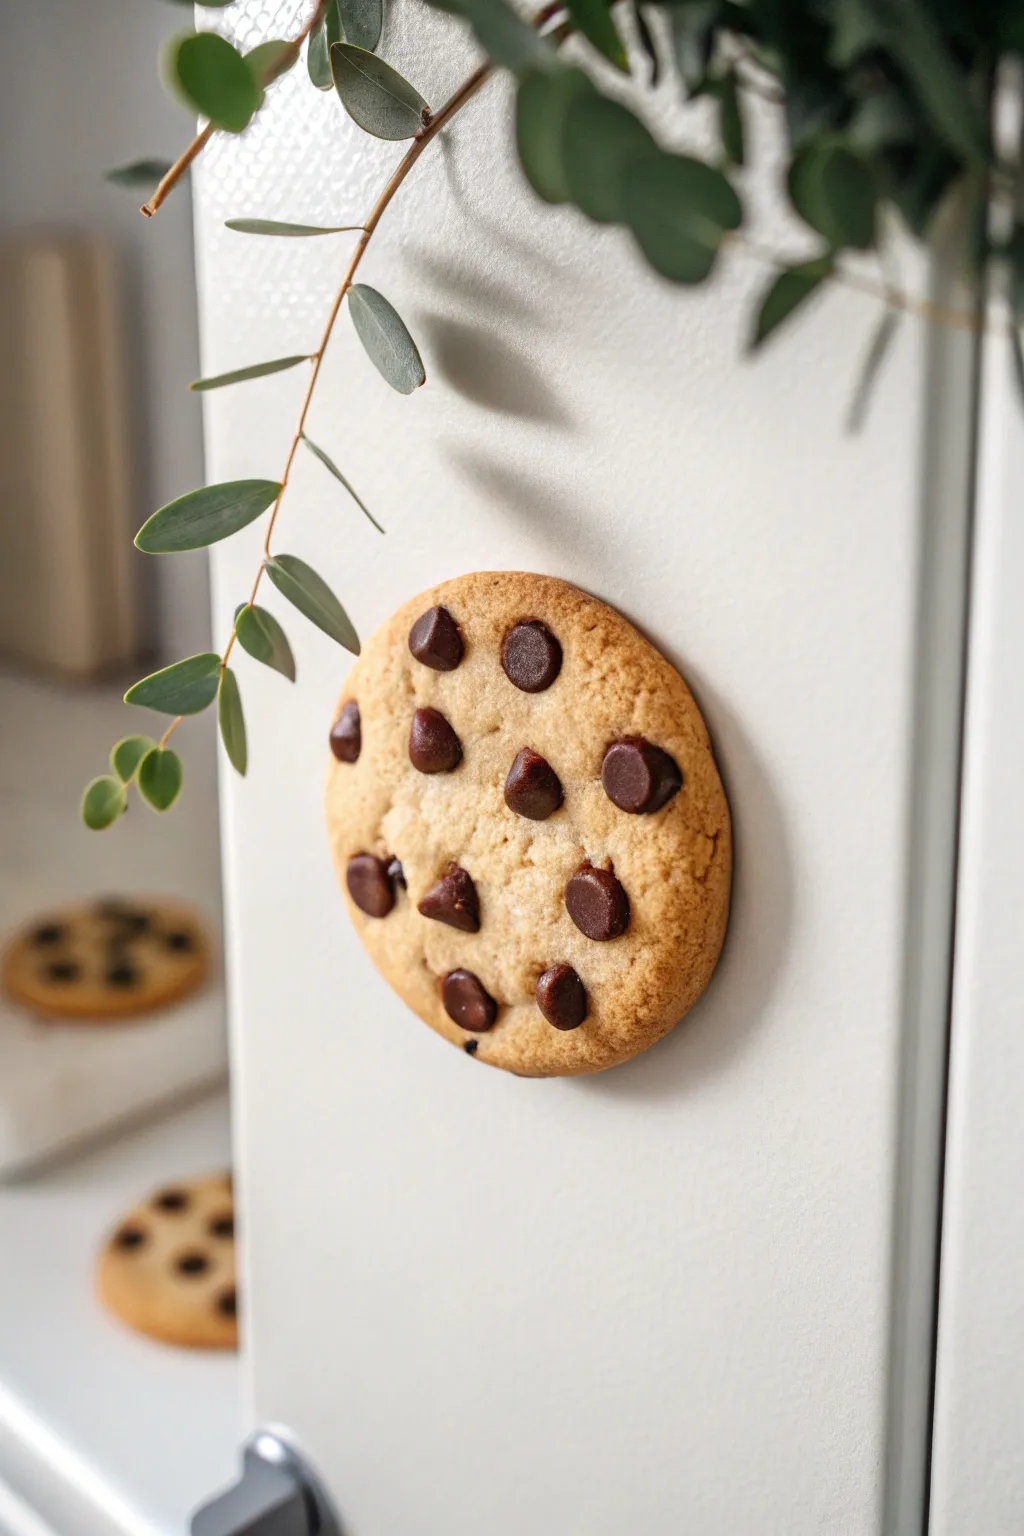
Smiley Face Dot Magnets
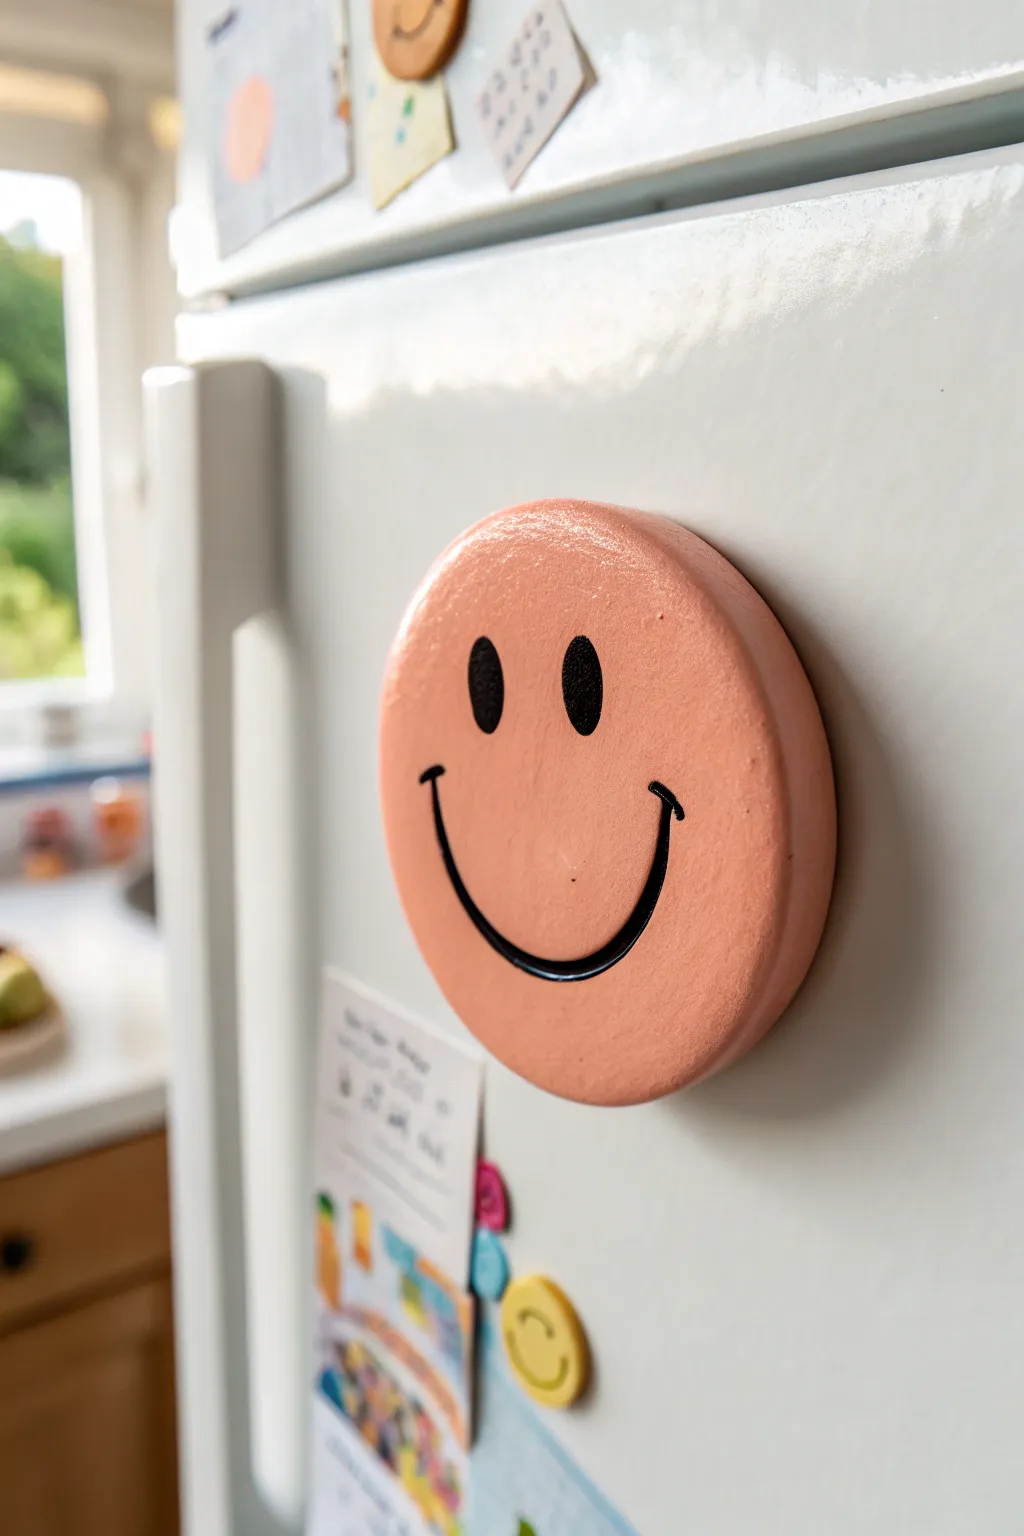
Bring a pop of retro cheer to your kitchen with this chunky, glossy smiley face magnet. Its soft peach hue and bold black features give it a trendy, minimalist look that is surprisingly simple to achieve.
Step-by-Step
Materials
- Air-dry clay or polymer clay (white)
- Round cookie cutter (approx. 2-3 inches)
- Acrylic paint (peach/salmon pink and black)
- Fine detail paintbrush
- Flat paintbrush
- Rolling pin
- Sandpaper (fine grit)
- Gloss varnish or glaze
- Strong round magnet
- Super glue or E6000
- Parchment paper or craft mat
Step 1: Shaping the Clay
-
Condition the clay:
Start by taking a handful of your clay and kneading it in your hands until it becomes soft, pliable, and free of cracks. This ensures a smooth final surface. -
Roll it out:
Place the clay on a sheet of parchment paper. Use your rolling pin to flatten it into an even slab. Aim for a thickness of about 1/4 inch so the magnet has a nice, chunky profile. -
Cut the circle:
Press your round cookie cutter firmly into the clay slab. Give it a little wiggle before lifting it up to ensure a clean cut. -
Smooth the edges:
Dip your finger in a tiny bit of water and run it gently around the cut edge of the circle to smooth out any roughness or sharp ridges left by the cutter. -
Dry completely:
Set the clay circle aside on a flat surface to dry. If using air-dry clay, this usually takes 24-48 hours; flip it halfway through to prevent warping. If using polymer clay, bake according to the package instructions.
Smooth Surface Secret
Use a rolling pin with guide rings or place two identical magazines on either side of your clay while rolling to ensure perfectly even thickness.
Step 2: Painting and Finishing
-
Sand imperfections:
Once the clay is fully hardened, lightly sand the edges and surface with fine-grit sandpaper if there are any bumps. Wipe away the dust with a barely damp cloth. -
Mix the base color:
Prepare your palette with a peach or salmon pink shade. You can mix white with a touch of orange and pink to get that soft pastel look shown in the photo. -
Apply the base coat:
Paint the entire front and sides of the clay circle with your flat brush. I like to let this dry briefly and apply a second or third coat for fully opaque coverage. -
Draft the face:
Lightly pencil in the smiley face design. Draw two vertical ovals for eyes and a wide U-shape for the smile to ensure everything is centered. -
Paint the features:
Using your finest detail brush and black acrylic paint, carefully fill in the eyes. They should be tall ovals rather than perfect circles. -
Define the smile:
Paint the smile line with a steady hand. Add the small perpendicular ‘cheek’ lines at the ends of the smile for that classic retro expression. -
Let paint cure:
Allow the black paint to dry completely. This is crucial before the next step to avoid smearing your crisp lines. -
Add the gloss:
Apply a generous coat of gloss varnish or glaze over the entire front and sides. This gives the magnet that shiny, finished ceramic look. -
Attach the magnet:
Flip the dry piece over. Apply a dot of strong adhesive like super glue or E6000 to the center of the back. -
Press and hold:
Press your round magnet firmly into the glue and hold it for 30 seconds to ensure a secure bond. Let the glue cure fully before stick it to your fridge.
Stamped Texture
Before drying, gently press stamps or textured fabric into the wet clay to add a subtle tactile pattern behind the painted face.
Now you have a happy little face to greet you every time you open the fridge

The Complete Guide to Pottery Troubleshooting
Uncover the most common ceramic mistakes—from cracking clay to failed glazes—and learn how to fix them fast.
Tiny Rainbow Arc Magnets
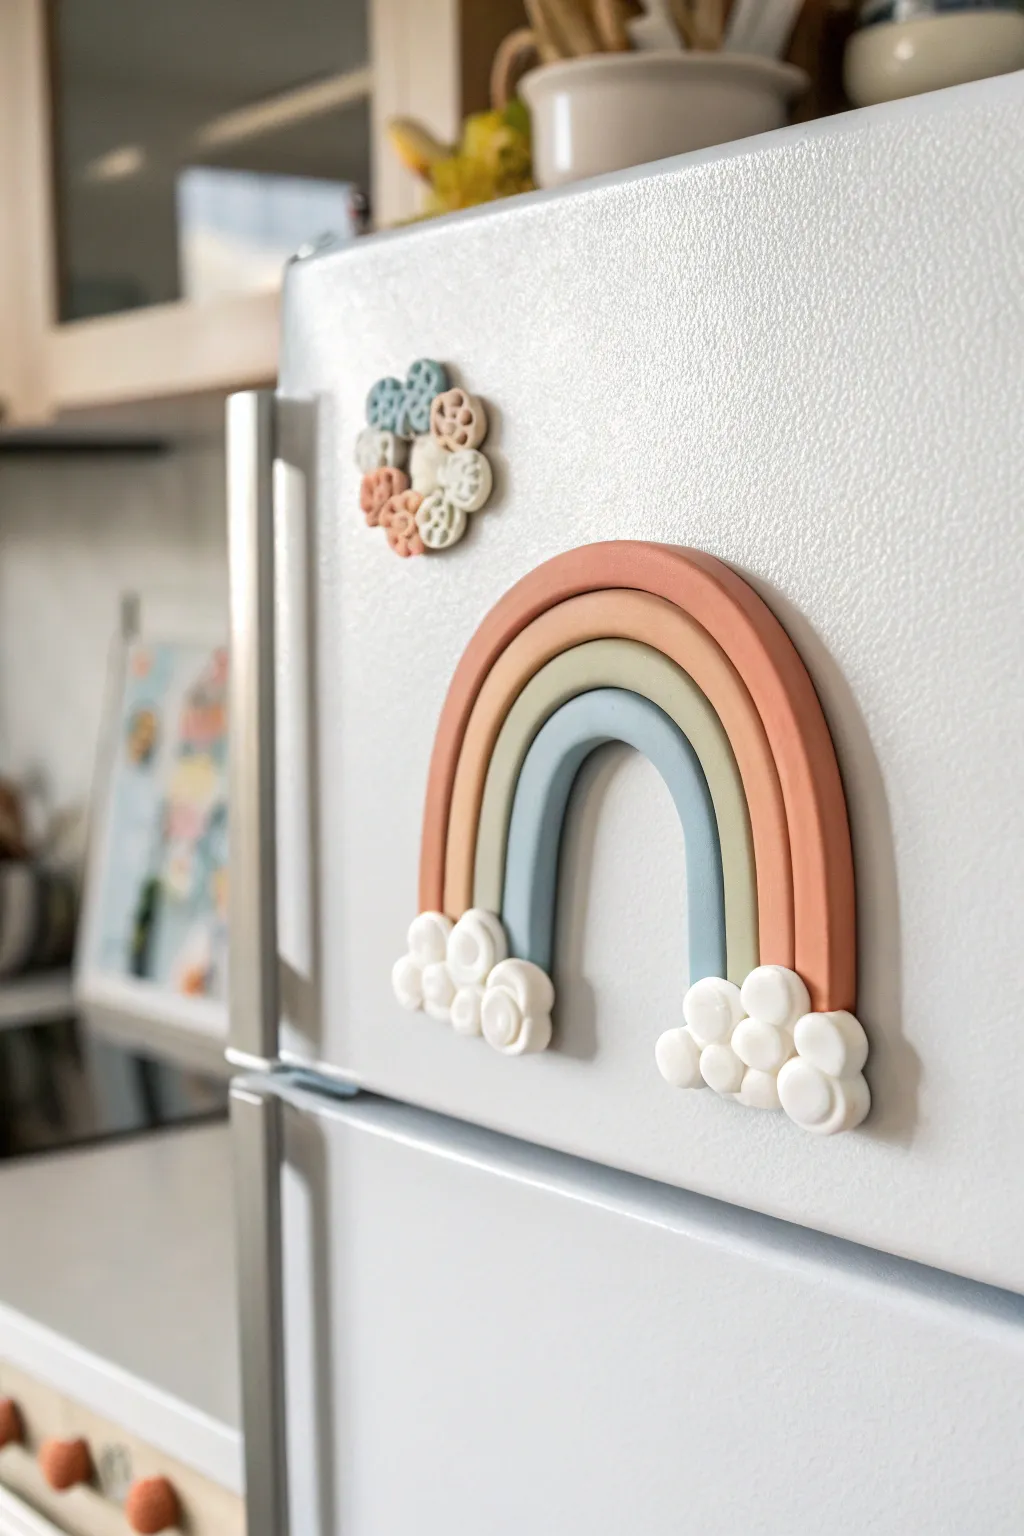
Brighten up your refrigerator door with this charmingly muted boho rainbow. Featuring clean lines and textured cloud puffs, this polymer clay project brings a trendy, sculptural touch to your kitchen decor.
Detailed Instructions
Materials
- Polymer clay (burnt orange, beige/skin tone, sage green, dusty blue, white)
- Acrylic rolling pin or clay machine
- Clay blade or craft knife
- Small circle cutter (approx. 1cm diameter)
- Ceramic tile or baking sheet
- Strong magnets (neodymium recommended)
- Strong adhesive (E6000 or super glue gel)
- Oven
Step 1: Prepping the Clay
-
Condition the colors:
Begin by thoroughly kneading your four main colors: burnt orange, beige, sage green, and dusty blue. Getting the clay warm and pliable is crucial for crack-free rolling. -
Roll the snakes:
Roll each colored ball of clay into a long, even snake. Aim for a thickness of about 5-6mm for a chunky, substantial look. -
Uniform sizing:
Use an acrylic block to gently roll over the snakes to ensure they are perfectly round and of equal thickness.
Smooth Seams
Brush a tiny amount of baby oil or clay softener between the arches before pressing them together to help them fuse securely during baking.
Step 2: Forming the Arc
-
Start the arc:
Take the blue snake (the smallest inner arch) and curve it into a tight U-shape on your work surface. -
Layer the green:
Wrap the sage green snake snugly around the outside of the blue arch. Gently press them together so they adhere without smashing the round profile. -
Add the beige:
Repeat the process with the beige snake, wrapping it around the green layer. Ensure no gaps remain between the colors. -
Finish with orange:
Wrap the final burnt orange snake around the exterior to complete the rainbow shape. -
Trim the base:
Using a sharp clay blade, make a clean, straight cut across the bottom of the rainbow legs so they are perfectly flush and even.
Texture Twist
Before baking, gently tap the white cloud sections with a clean toothbrush or sandpaper to add a realistic, fluffy texture.
Step 3: Creating the Clouds
-
Prepare white clay:
Condition your white clay and roll it out into a flat sheet, approximately 3mm thick. -
Cut circles:
Use your small circle cutter to punch out roughly 12-14 small white discs. -
Make bubble shapes:
Take some of the leftover white scraps and roll them into tiny balls of varying sizes. -
Form the cloud base:
Cluster three or four of the small white balls at the base of each rainbow leg, pressing them gently onto the colored strands. -
Add dimension:
Take your flat white cut-out circles and layer them over the ball clusters. Gently press the center of each circle with your finger or a round tool to give them a cupped, puffy ‘popcorn’ appearance. -
Review the shape:
Ensure the cloud structures cover the raw cut ends of the rainbow strands nicely.
Step 4: Baking & Assembly
-
Bake the clay:
Place your rainbow on a ceramic tile or parchment-lined baking sheet. Bake according to your specific clay brand’s instructions (usually 215°F/102°C to 275°F/135°C for 15-30 minutes). -
Cool down:
Allow the piece to cool completely in the oven or on a wire rack. While still warm, the clay is fragile. -
Attach the magnet:
Apply a dot of strong adhesive to the back of the rainbow, specifically where the arches provide a flat surface area. -
Final set:
Press your round magnet firmly into the glue and let it cure fully before placing it on your fridge.
Now your fridge has a stylish, cheerful pop of color that looks professionally handmade
Cloud and Raindrop Magnets
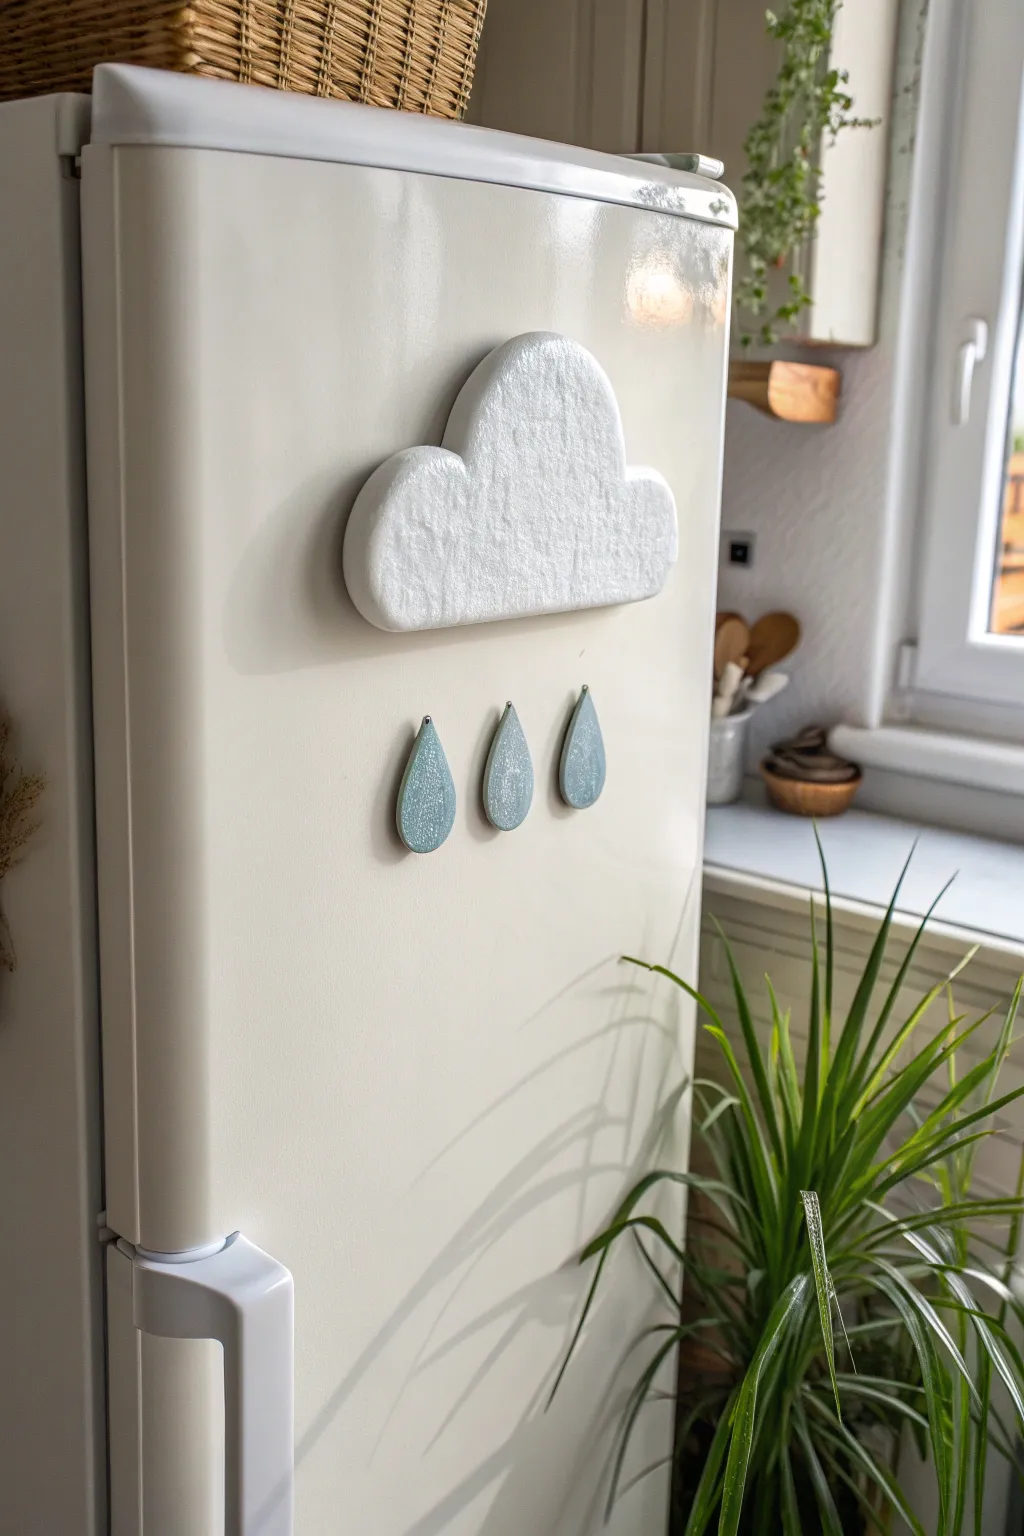
Add a touch of dreamy charm to your kitchen with this textured cloud and rain magnet set. The pearlescent finish and subtle surface patterns give these simple shapes a sophisticated, handmade feel.
Step-by-Step Tutorial
Materials
- Air-dry clay (white)
- Small rolling pin
- Cloud cookie cutter (or printed template and craft knife)
- Teardrop cookie cutter (small)
- Texturing tool (crumpled aluminum foil or coarse sandpaper)
- Acrylic paints: Pearl white, Metallic light blue/teal
- Gloss varnish or sealant
- Strong round magnets
- Super glue or E6000
- Fine-grit sandpaper
- Paintbrushes (flat and detail)
Step 1: Shaping the Elements
-
Prepare the clay:
Start by kneading a generous amount of air-dry clay until it is warm, pliable, and free of cracks. -
Roll it out:
Roll the clay onto a smooth surface to a thickness of about 1/4 inch (6mm). Ensure the thickness is even so the magnets sit flat later. -
Add texture:
Before cutting, lightly press a ball of crumpled aluminum foil or a piece of coarse sandpaper over the entire surface of the clay. This creates the stone-like texture seen in the photo. -
Cut the cloud:
Position your cloud cutter on the textured clay and press down firmly. If you don’t have a cutter, trace a cloud shape with a needle tool and carefully cut it out with a craft knife. -
Cut the raindrops:
Use a small teardrop cutter to create three matching raindrops from the remaining textured clay. I find it helpful to make an extra one just in case. -
Soften the edges:
The cutting process can leave sharp, ragged edges. Dip your finger in a little water and gently run it along the sides of the shapes to smooth them out, creating a nice rounded bevel. -
Drying time:
Place your shapes on a drying rack or parchment paper. Let them dry completely for at least 24-48 hours, flipping them occasionally to prevent warping.
Uneven Texture?
If the texture looks too faint after painting, lightly wipe the wet paint with a damp cloth to reveal the clay texture beneath before sealing.
Step 2: Decorating & Assembly
-
Sand imperfections:
Once fully bone-dry, lightly sand the back and the edges with fine-grit sandpaper to remove any rough spots. Avoid sanding the textured front face. -
Base coat the cloud:
Paint the entire cloud shape with pearl white acrylic paint. The metallic sheen will catch on the texture you created earlier. -
Layer the white:
Apply a second or third coat of pearl white as needed to get full, opaque coverage, letting the paint dry between layers. -
Paint the rain:
Paint the three raindrops with a metallic light blue or teal acrylic. This contrasts beautifully with the white fridge and cloud. -
Dry brush highlights:
For extra dimension, lightly dry brush a tiny amount of the pearl white over the high points of the blue raindrops. -
Seal the work:
Apply a coat of gloss varnish to all pieces. This intensifies the pearl effect and protects the clay from kitchen grease or moisture. -
Attach magnets:
Flip the dried pieces over. Place a small dot of super glue or E6000 on the back center of each raindrop and two dots on the back of the cloud. -
Secure and set:
Press strong round magnets firmly into the glue. Allow the adhesive to cure fully according to the manufacturer’s instructions before placing them on your fridge.
Sparkle Upgrade
Mix ultra-fine iridescent glitter into your varnish coat for raindrops that truly glimmer when the light hits them.
Now you have a charming little weather system to hold your grocery lists and photos


What Really Happens Inside the Kiln
Learn how time and temperature work together inside the kiln to transform clay into durable ceramic.
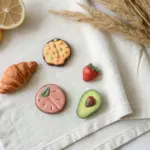
Fruit Slice Magnet Set
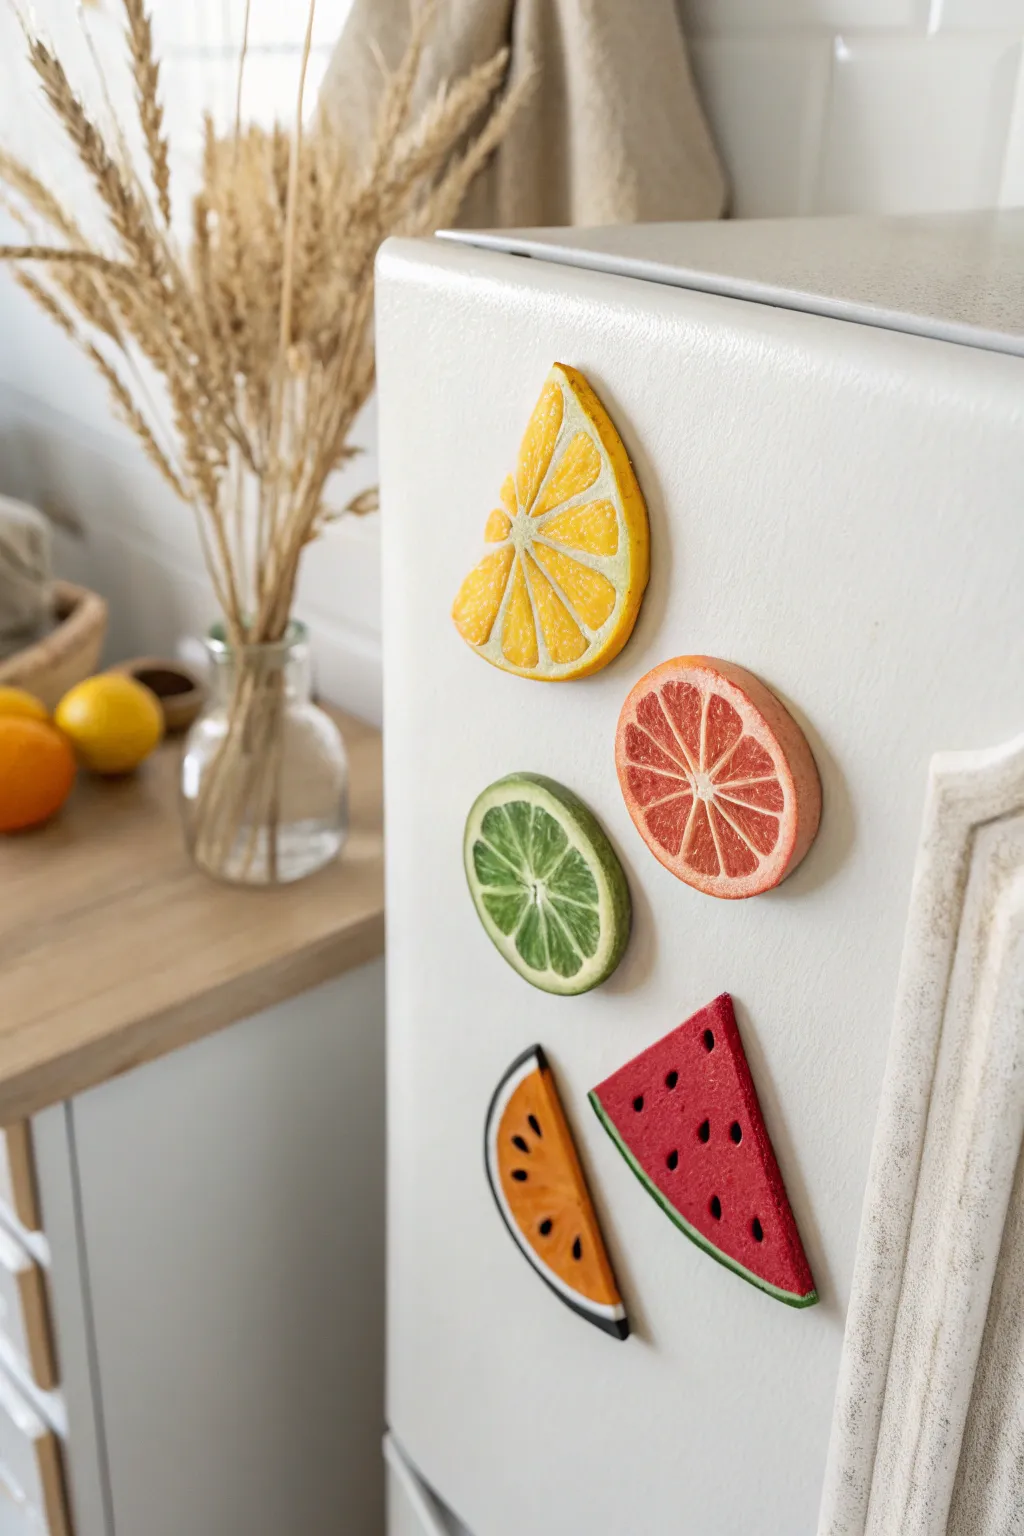
Brighten up your kitchen with these impossibly fresh-looking fruit slice magnets that capture the texture of real citrus rinds and melon seeds. The project uses simple layering techniques to achieve realistic details, making your fridge look like a vibrant farmers market display.
Step-by-Step
Materials
- Polymer clay (yellow, orange, pink/red, green, white, black)
- Circle clay cutters (various sizes)
- Craft knife or scalpel
- Needle tool or toothpick
- Balling tool (small and medium)
- Sandpaper or texture sponge
- Strong round magnets
- Super glue (liquid or gel)
- Oven for baking
- Rolling pin or pasta machine
- Glazed ceramic tile or baking sheet
Step 1: Creating the Citrus Segments
-
Prepare the base colors:
Start by conditioning your polymer clay until it is soft and pliable. You will need translucent or opaque colors for the fruit flesh: yellow for lemon, grapefruit pink for grapefruit, and lime green for the lime. -
Create the segments:
Roll your fruit-colored clay into a thick log, about 1 inch in diameter. Then, flatten this log slightly so it isn’t perfectly round, or keep it round for a standard slice. -
Add the pith lines:
Slice the log into 6-8 equal pie-shaped wedges using your craft knife. Roll out a very thin sheet of white clay. -
Reassemble the fruit:
Place a thin layer of the white sheet between each colored wedge as you press them back together into a round log shape. This creates the white membrane lines between fruit segments. -
Wrap the rind:
Roll a thicker sheet of white clay and wrap it around the entire reconstructed cylinder to form the inner pith. Follow this with a final thin layer of colored clay (yellow, orange, or green) for the outer skin. -
Reduce and slice:
Gently roll the cane to reduce its size to your desired magnet diameter. I prefer to let it rest in the fridge for 10 minutes before slicing it into 1/4 inch thick gorgeous disks.
Juicy Realism
Mix translucent clay with your fruit colors (1:1 ratio). This adds depth and makes the fruit flesh look genuinely juicy once baked.
Step 2: Texturing and Detailing
-
Texture the flesh:
Take a needle tool and gently prick and drag the surface of the colored fruit segments. This mimics the juicy vesicles of real citrus fruit. Do not texture the white pith lines. -
Texture the rind:
Use a piece of sandpaper or a texture sponge to gently tap the outer colored rim of the slice. This gives it that specific bumpy citrus skin look. -
Shape the slices:
To match the reference image, cut some full circles in half to create semi-circle lemon or lime wedges. For the teardrop shape, gently pinch the top of a semi-circle.
Smudged Colors?
If red clay stains your white clay while working, clean your hands and tools with baby wipes or rubbing alcohol between switching colors.
Step 3: Making the Melons
-
Form the watermelon base:
Roll a sheet of red clay and cut a triangle shape. Roll a thin strip of white clay and a slightly thicker strip of green clay. -
Attach the rind:
Press the white strip to the bottom edge of the red triangle, followed by the green strip. Smooth the seams gently with your finger so they bond. -
Seed details:
Use a small ball tool to press tiny indentations into the red flesh. Roll tiny teardrops of black clay and press them into these holes for seeds. -
Create the orange melon:
Repeat the process with orange clay for the flesh and a dark green-black rind. Use slightly larger black teardrops for the papaya-style seeds shown in the image.
Step 4: Baking and Assembly
-
Bake the pieces:
Place all your fruit slices on a ceramic tile or baking sheet lined with parchment paper. Bake according to your clay manufacturer’s instructions (usually 275°F for 15-30 minutes). -
Cool down:
Allow the clay pieces to cool completely. They are fragile when hot, so patience is key here. -
Attach magnets:
Flip the hardened fruit slices over. Apply a drop of strong super glue to the back of each piece. -
Final set:
Press a round magnet firmly into the glue and let it cure undisturbed for at least an hour to ensure a permanent bond.
Now your kitchen has a fresh squeeze of color that looks good enough to eat
Pizza Slice Triangle Magnets
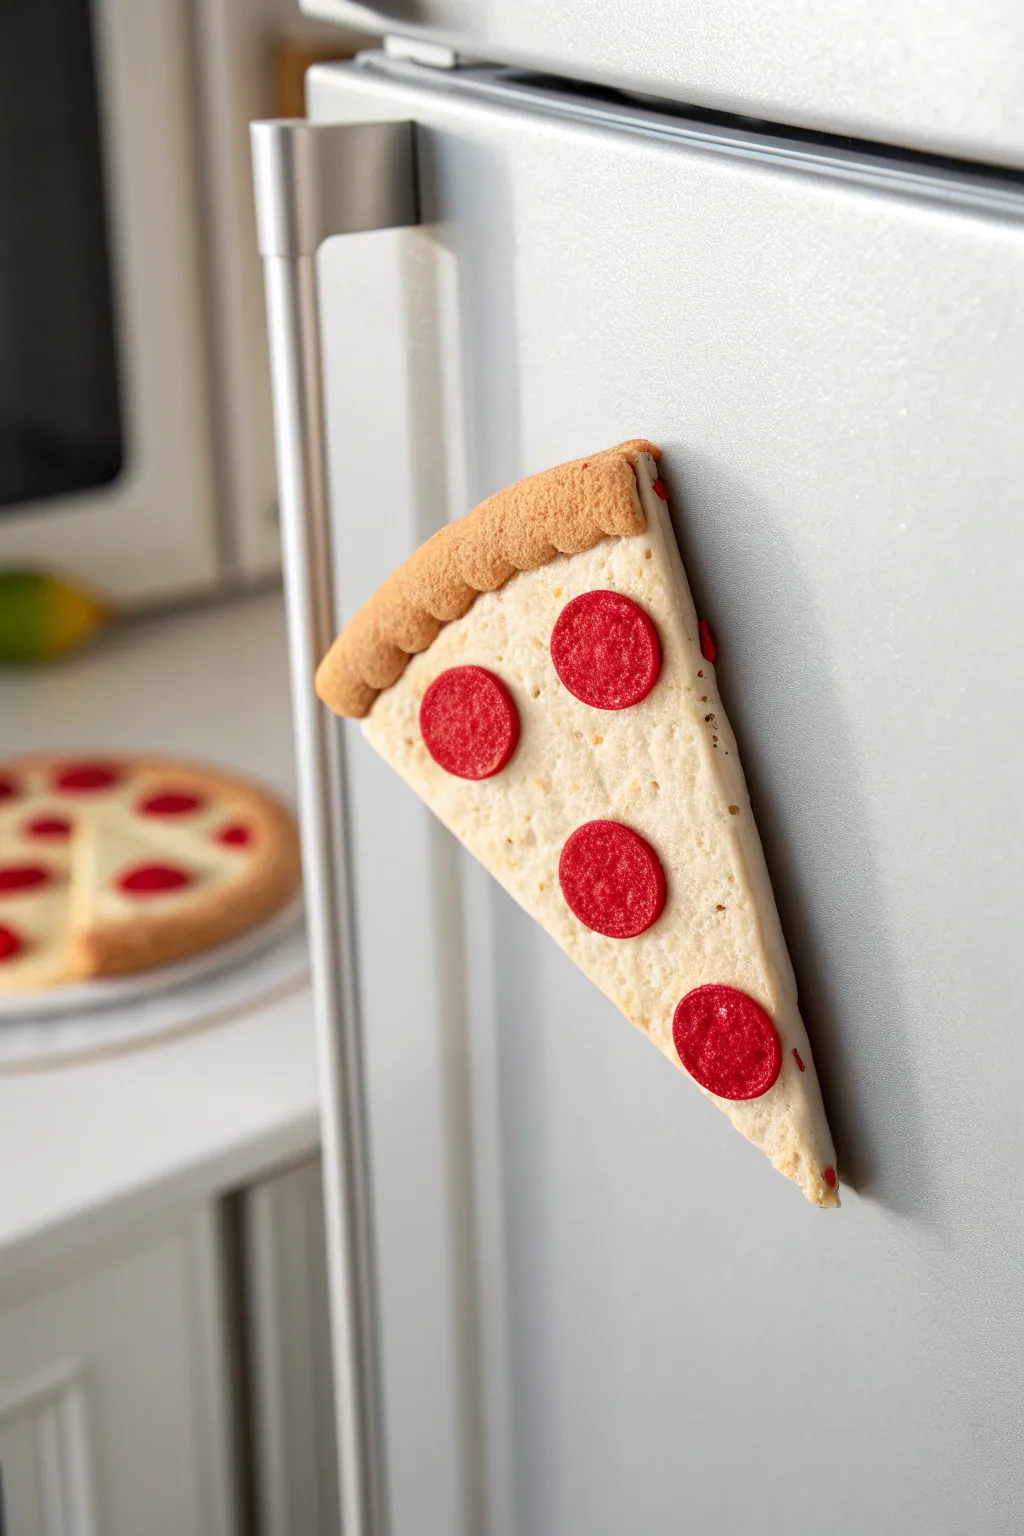
Add a delicious touch to your fridge with this realistic-looking pizza slice magnet that looks good enough to eat. With its textured golden crust, creamy melted cheese effect, and bright pepperoni toppings, this fun project is a perfect introduction to food sculpting.
Step-by-Step Tutorial
Materials
- Polymer clay (white, beige/tan, red)
- Translucent liquid polymer clay (optional but recommended for cheese effect)
- Texture tools (toothbrush, needle tool, or ball of foil)
- Acrylic paints (yellow ochre, burnt sienna)
- Small paintbrush or makeup sponge
- Rolling pin or pasta machine
- Craft knife or clay blade
- Strong round magnet or adhesive magnetic strip
- Super glue (cyanoacrylate)
- Oven for baking
Step 1: Sculpting the Base
-
Mix Your Dough Color:
Start by conditioning your beige or tan polymer clay. If it looks too dark, mix in a little white to get a raw dough color. -
Form the Triangle:
Roll the clay out to about 1/4 inch thickness. Use your craft knife to cut a long, isosceles triangle shape, representing a classic New York-style slice. -
Create the Crust:
Roll a snake of the same dough-colored clay, roughly the thickness of a pencil. Attach this to the short edge of your triangle. -
Blend the Seam:
Using a blending tool or your finger, carefully smooth the seam where the crust snake meets the flat triangle on the back side so it becomes one solid piece. -
Texture the Crust:
This is the secret to realism: take an old toothbrush or a crumpled ball of aluminum foil and tap it firmly all over the raised crust area to create a baked bread texture.
Secret Sauce Tip
Mix liquid polymer clay with white clay to make a ‘sauce’. Apply this before baking for an ultra-realistic melted cheese look that pools around the toppings.
Step 2: Adding the Toppings
-
Prepare the Cheese Layer:
Mix white clay with a tiny speck of yellow to make a creamy cheese color. Roll it out very thinly. -
Apply the Cheese:
Lay the thin sheet of cheese clay over the flat part of your triangle, stopping just before the crust. Trim the excess edges with your knife so it mirrors the slice shape perfectly. -
Texture the Cheese:
Use a needle tool or stiff brush to poke and stipple the surface of the cheese layer. This mimics the bubbly, uneven texture of melted mozzarella. -
Slice the Pepperoni:
Roll out a small amount of red clay until it is quite thin. Use a small round cutter or the cap of a pen to punch out several perfect circles. -
Texture the Meat:
Gently tap the surface of each pepperoni circle with your toothbrush to give it a meaty texture, rather than leaving it perfectly smooth. -
Place the Pepperoni:
Arrange the pepperoni slices on top of the cheese. Press them down gently so they look embedded in the cheese rather than just floating on top.
Level Up: Supreme Slice
Don’t stop at pepperoni! Crumble tiny bits of brown clay for sausage, green strips for peppers, and black slivers for olives to create a loaded supreme pizza.
Step 3: Finishing Touches
-
Shade the Crust:
Using dry pastels shaved into powder or a tiny bit of watered-down brown acrylic paint, lightly brush the top of the crust to give it a ‘baked’ golden-brown look. -
Add Cheese browning:
I like to dab a tiny bit of the same golden-brown shade on the high points of the cheese texture to look like oven spots. -
Bake the Clay:
Bake your piece in the oven according to the manufacturer’s instructions for your specific brand of polymer clay. -
Cool Down:
Allow the slice to cool completely. The clay will harden fully as it returns to room temperature. -
Attach the Magnet:
Turn the slice over. Apply a drop of super glue to the back of the slice and press your magnet firmly into place. -
Final Seal:
Optionally, you can brush a matte varnish over the crust and a satin varnish over the cheese and pepperoni to make them look greasy and delicious.
Your savory slice is now ready to hold up your grocery lists in style

TRACK YOUR CERAMIC JOURNEY
Capture glaze tests, firing details, and creative progress—all in one simple printable. Make your projects easier to repeat and improve.
Fried Egg Magnets
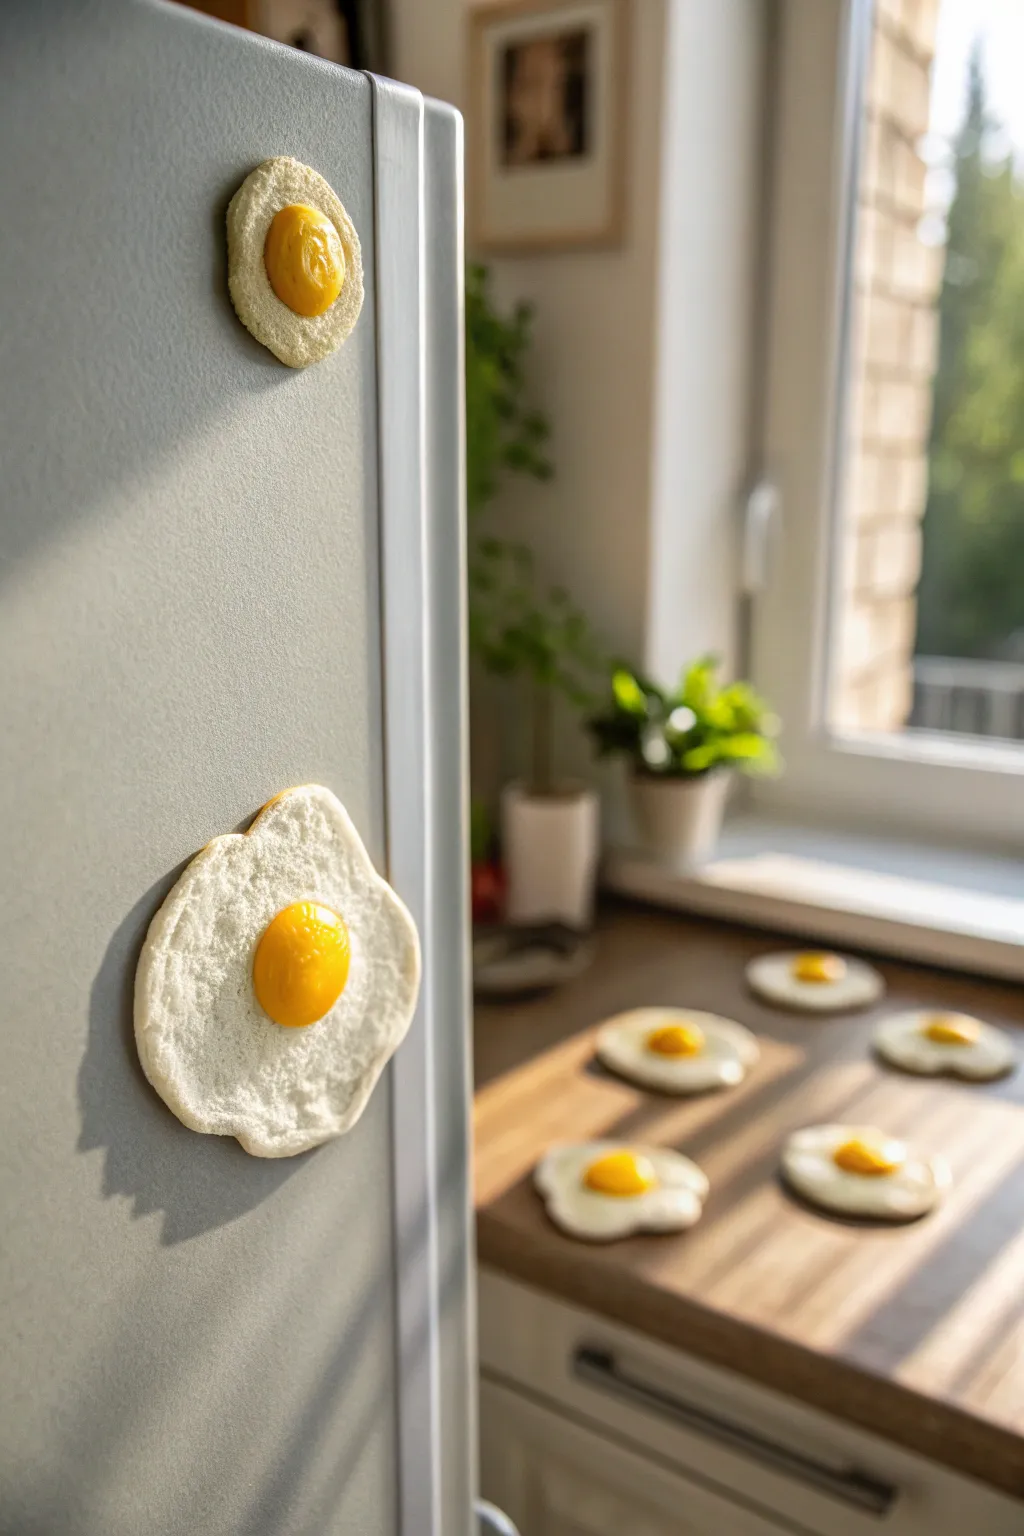
Add a touch of whimsy to your refrigerator with these surprisingly realistic fried egg magnets. Using simple clay techniques, you’ll capture that perfect bubbly texture of cooked egg whites and a glossy, vibrant yolk that looks good enough to eat.
Detailed Instructions
Materials
- White bakeable polymer clay
- Translucent bakeable polymer clay
- Yellow bakeable polymer clay
- Orange bakeable polymer clay
- Liquid polymer clay (clear)
- Small round strong magnets
- Texturing tool (stiff toothbrush or sandpaper)
- Dotting tool or small ball stylus
- Chalk pastels (brown/ochre)
- Gloss glaze or UV resin
- Super glue (cyanoacrylate)
- Baking sheet and parchment paper
Step 1: Creating the Egg White Base
-
Condition the clay:
Start by conditioning your white polymer clay until it is soft and pliable. You want it warm enough so it doesn’t crack when flattened. -
Mix for opacity:
I like to mix a very small amount of translucent clay into the white block—about a 1:4 ratio. This helps the finished egg look like cooked protein rather than stark white plastic. -
Form organic shapes:
Pull off a piece of clay about the size of a walnut and flatten it onto your work surface. Use your fingers to push the edges out unevenly, creating that natural, irregular splatter shape of a cracked egg. -
Thin the edges:
Gently press down along the very perimeter of your shape to make the edges slightly thinner than the center, creating a nice crispy-looking boundary. -
Add primary texture:
Take your stiff toothbrush or a texturing sponge and firmly press it all over the surface of the white clay. Don’t be shy here; cooked eggs are full of tiny bubbles and pockets. -
Detail the bubbles:
To enhance realism, use a dotting tool to poke slightly larger, distinct ‘air bubbles’ randomly around the white, especially near where the yolk will sit.
Crispy Edges
For ultra-realistic crispy edges, tear tiny bits of the clay edge off with tweezers before baking to make it look jagged and fried.
Step 2: Forming the Perfect Yolk
-
Mix the yolk color:
Combine yellow clay with a tiny pinch of orange to get a rich, sunny yolk color. If you want a more raw look, add a bit of translucent clay here as well. -
Shape the dome:
Roll a small ball of your yellow mixture, sized to fit your white base. Flatten the bottom slightly so it sits stable, but keep the top nice and high. -
Attach the yolk:
Place a drop of liquid polymer clay in the center of your textured white base to act as ‘glue,’ then press the yellow dome gently onto it. -
Create the membrane look:
Smear the very bottom edge of the yellow clay downward just slightly into the white base using a sculpting tool. This mimics the thin membrane connecting the yolk to the white.
Pepper It Up
Before glazing, sprinkle real ground black pepper or tiny black micro-beads onto the egg and seal them in for a seasoned look.
Step 3: Finishing and Baking
-
Shade the edges:
Scrape some brown or ochre chalk pastel into a powder. Using a dry paintbrush, lightly dust the thin outer edges of the egg white to give it that ‘crispy fried’ appearance. -
Prepare for baking:
Transfer your eggs onto a parchment-lined baking sheet. Double-check that you haven’t smudged your texture while moving them. -
Bake the clay:
Bake according to your clay manufacturer’s instructions. Usually, this is around 275°F (135°C) for 15-20 minutes depending on thickness. -
Cool down:
Let the eggs cool completely on the baking sheet. If you glaze them while hot, the finish can turn cloudy. -
Glaze the yolk:
Apply a thick coat of gloss glaze or UV resin specifically to the yellow yolk. This gives it that wet, fresh-cracked liquid shine. -
Glaze the white (optional):
For a greasy diner-style egg, you can lightly dab a semi-gloss glaze over the textured white areas, but keeping it matte usually looks more natural. -
Attach the magnet:
Flip the creation over and use a dab of super glue to attach your magnet to the back, directly behind the yolk area for the best balance.
Pop these on your fridge and enjoy your zero-calorie breakfast art all day long
Cookie and Chocolate Chip Magnets
These magnets look so realistic you might accidentally reach for a glass of milk. With just a few simple texturing techniques, you can transform basic polymer clay into a golden-brown, chocolate-studded treat perfect for your fridge.
Step-by-Step Tutorial
Materials
- Beige or “cookie dough” colored polymer clay
- Dark brown polymer clay
- Translucent liquid polymer clay (optional)
- Pastel chalks (yellow ochre, orange, burnt sienna)
- Soft paintbrush
- Old toothbrush or stiff bristle brush
- Aluminum foil (crumpled into a ball)
- Needle tool or toothpick
- Strong round ceramic or neodymium magnets
- Super glue (cyanoacrylate)
- Gloss glaze (optional)
Step 1: Shaping the Dough
-
Mix the base color:
Start by conditioning your beige polymer clay until it is soft and pliable. If the color looks too flat, I like to mix in a tiny pinch of translucent clay to give it that realistic, slightly buttery depth. -
Form the cookie ball:
Roll a piece of dough into a sphere about 1.5 inches in diameter, or whatever size you want your final magnet to be. -
Flatten the shape:
Press the ball down onto your work surface with your palm to create a thick disc. Don’t make it perfectly flat; keep the center slightly mounded like a freshly baked cookie. -
Refine the edges:
Gently tap the edges inward with your finger to dull any sharp rim created by flattening. Cookies naturally spread, so irregular edges are actually desirable here.
Too Pale?
If your cookie looks raw after baking, apply more brown chalk pastel powder and rebake for 5 minutes to set the color.
Step 2: Adding Texture and Baking Detail
-
Initial texturing:
Take your old toothbrush or stiff brush and tap it vigorously all over the surface of the clay disc. This creates the porous crumb texture of a baked good. -
Deepen the texture:
Roll a ball of crumpled aluminum foil over the surface, pressing firmly. This adds larger, more random divots and imperfections that mimic the pockets of air in cookie dough. -
Create chip pockets:
Use the rounded end of a paintbrush handle or a small ball tool to make indentations where you plan to place your chocolate chips later. -
Shading for a baked look:
Scrape some pastel chalks onto a piece of paper to create powder. Use a soft brush to dust yellow ochre over the whole cookie. Then, brush burnt sienna primarily on the edges and raised bumps to simulate browning.
Make it a Bite
Use a scalloped cookie cutter to remove a ‘bite’ from the side of the dough before texturing for a fun twist.
Step 3: Creating the Chocolate Chips
-
Prepare the chocolate clay:
Condition your dark brown clay. Roll it into a thin snake or log. -
Cut the chips:
Slice small, irregular chunks off the log. Chocolate chips in homemade cookies aren’t perfect cones, so varying sizes look best. -
Shape the chips:
Roll each chunk briefly between your fingers to soften the cut edges, then press them into slight pyramid or morsel shapes. -
Insert the chips:
Press the chocolate chips firmly into the indentations you made earlier on the cookie base. Ensure they are embedded well so they don’t pop off later. -
Optional melting effect:
For a slightly melted look, you can dab a tiny amount of translucent liquid clay around the base of the chips before baking.
Step 4: Finishing Up
-
Bake the project:
Bake the clay according to the manufacturer’s instructions on the package. Usually, this is around 275°F (130°C) for 15–30 minutes. -
Cool down:
Let the cookie cool completely before handling. It will be slightly soft when hot but hardens as it cools. -
Attach the magnet:
Flip the cookie over. Apply a drop of strong super glue to the center of the back and press your magnet onto it firmly. -
Secure the bond:
Allow the glue to cure fully undisturbed for a few hours to ensure the magnet won’t detach when pulled off the fridge. -
Add a glossy touch:
If you want the chocolate chips to look slightly melty and shiny, carefully paint a little gloss glaze just on the dark brown chips, leaving the cookie matte.
Enjoy the confused looks from guests when they realize these delicious snacks are actually holding up your grocery list
Tiny Cactus Pot Magnets
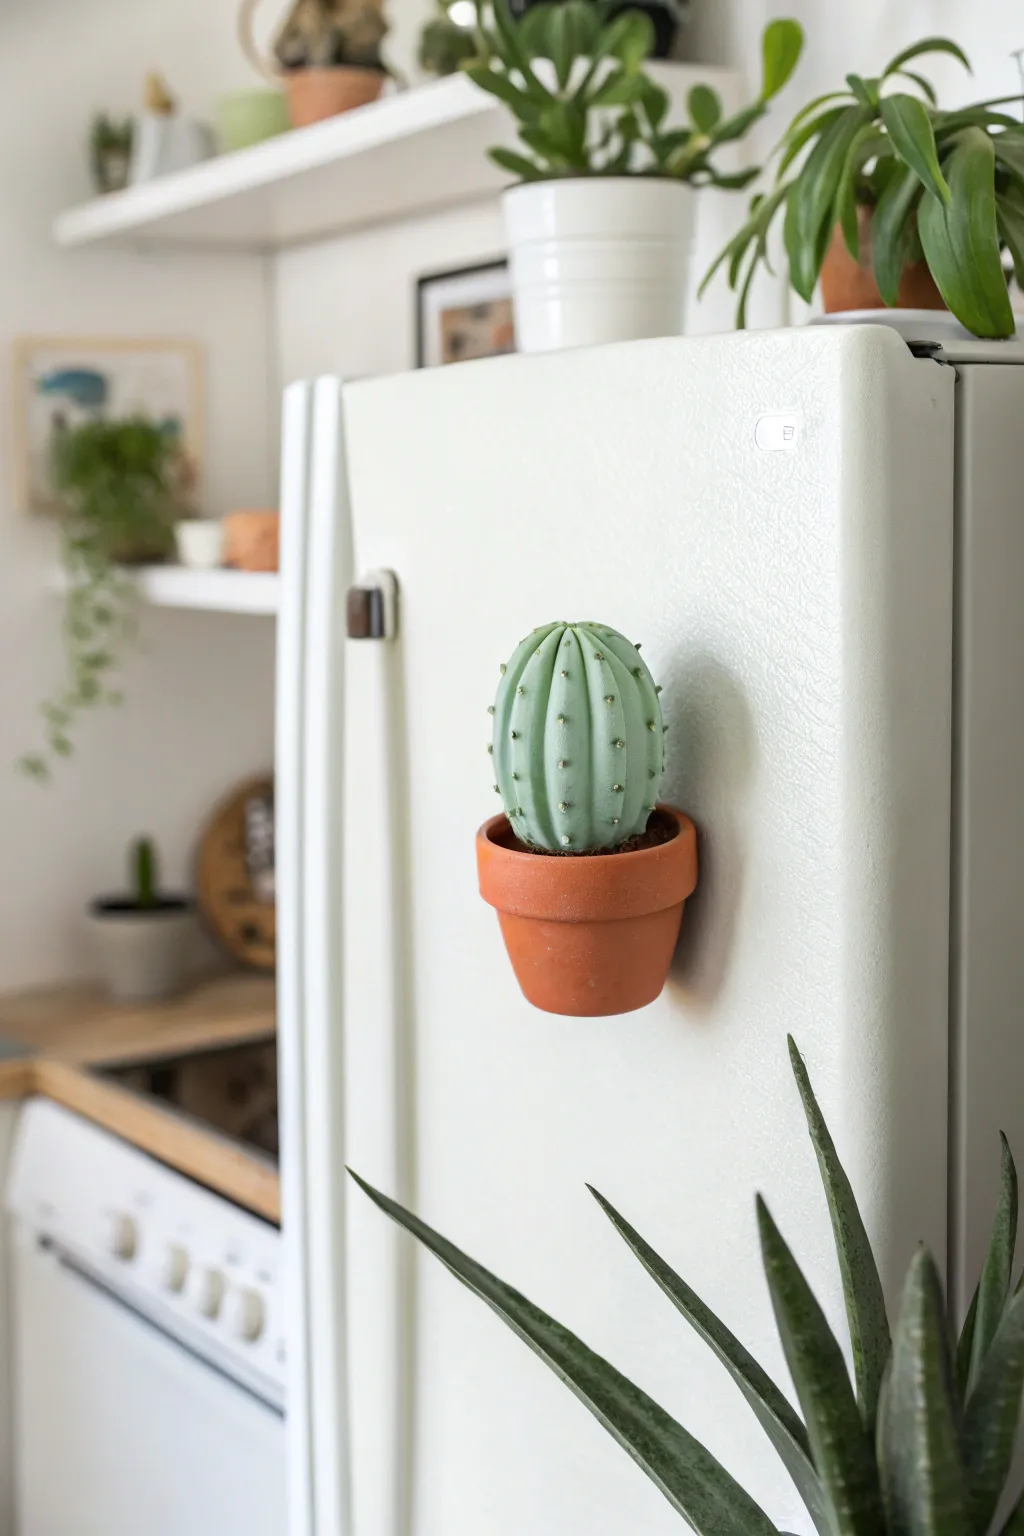
These adorable faux succulents combine real terracotta charm with sculpted clay to create a refrigerator magnet that looks surprisingly realistic. This project uses a tiny clay pot as a base for a plump, rounded cactus that will never need watering.
Step-by-Step Guide
Materials
- Tiny terracotta clay pot (approx. 1-1.5 inches)
- Polymer clay in muted sage green or pale cactus green
- Polymer clay or brown acrylic paint (for the soil)
- Sculpting tools (needle tool or toothpick)
- Strong round craft magnet
- Super glue (E6000 or strong cyanoacrylate)
- White acrylic paint (optional, for spines)
- Fine detail paintbrush
- Aluminum foil
- Oven for baking clay
Step 1: Preparing the Base
-
Prepare the pot:
Start with a clean, dry miniature terracotta pot. Since the magnet needs a flat surface to adhere to later, ensure the back of the pot is clean. If your pot is round, you might need to carefully sand one side slightly flat to help the magnet sit better, though a strong glue usually works on the curve. -
Fill the bottom:
Crumple a small ball of aluminum foil and press it firmly into the bottom of the pot. This acts as a filler so you don’t waste clay filling the entire unseen volume. -
Create the soil layer:
Take a scrap of brown polymer clay—or even use the green clay if you plan to paint over it later—and flatten it into a disk. Press this over the foil ball, creating a concave surface just below the rim of the pot to resemble soil.
Magnet Sliding?
Since the pot is curved, the magnet needs a bridge. Use a small ball of epoxy putty between the pot and magnet to fill the gap and create a perfectly flat mount.
Step 2: Sculpting the Cactus
-
Form the main shape:
Condition your sage green polymer clay until soft and pliable. Roll it into a smooth sphere that is slightly wider than the opening of your pot. -
Test the fit:
Place the sphere onto the soil base to check the proportions. It should look like a round ball cactus resting snugly in the pot. -
Create vertical ribs:
Use a needle tool, the side of a toothpick, or a clay spacing tool to gently press vertical indentations into the sphere. Start at the top center and press down towards the base, creating distinct segments like a peeled orange. -
Refine the segments:
Repeat this around the entire circumference. I like to smooth the edges of each segment slightly with my finger so they look puffy and organic rather than sharp. -
Add the spines:
Using a very fine needle tool, poke tiny, shallow holes in rows down the center of each vertical rib. These holes will hold the paint later to mimic spines. -
Secure to the pot:
Gently press the finished cactus shape onto the soil layer in the pot. If the clay isn’t sticking well to the baked terracotta, a dab of liquid clay or ‘Bake and Bond’ can help secure it. -
Texture the soil:
If any soil is visible around the edges, use an old toothbrush or a ball of foil to tap texture into it, making it look gritty like real dirt.
Step 3: Finishing Touches
-
Bake the piece:
Place the entire assembly (clay pot and all) on a baking sheet. Bake according to the clay manufacturer’s instructions—usually around 275°F (130°C) for 15-20 minutes depending on thickness. -
Cool down:
Let the pot cool completely before handling. The terracotta will hold heat longer than the clay, so be careful. -
Paint the spines:
Once cool, dip a very fine detail brush or the tip of a toothpick into white acrylic paint. Carefully dot a tiny amount of paint into each of the spine holes you created earlier. -
Paint the soil (optional):
If you didn’t use brown clay for the base, paint the visible surface around the cactus with dark brown acrylic paint. You can even glue actual dried coffee grounds here for hyper-realism. -
Seal (optional):
To protect the paint, you can add a coat of matte varnish over the cactus. Avoid glossy finishes as real cacti usually have a matte, waxy skin. -
Attach the magnet:
Apply a generous amount of E6000 or strong super glue to the back of the terracotta pot. Press your round magnet firmly into the glue. -
Final dry:
Let the glue cure for at least 24 hours. To keep the magnet from sliding while drying, rest the pot horizontally with the magnet facing up until set.
Pro Tip: Realistic Texture
Before baking, lightly dust the raw green clay with a bit of cornstarch or baby powder. This removes fingerprints and gives the cactus a soft, matte bloom just like the real plant.
Pop your new botanical creation onto the fridge and enjoy a touch of greenery.
Easy Animal Face Magnets
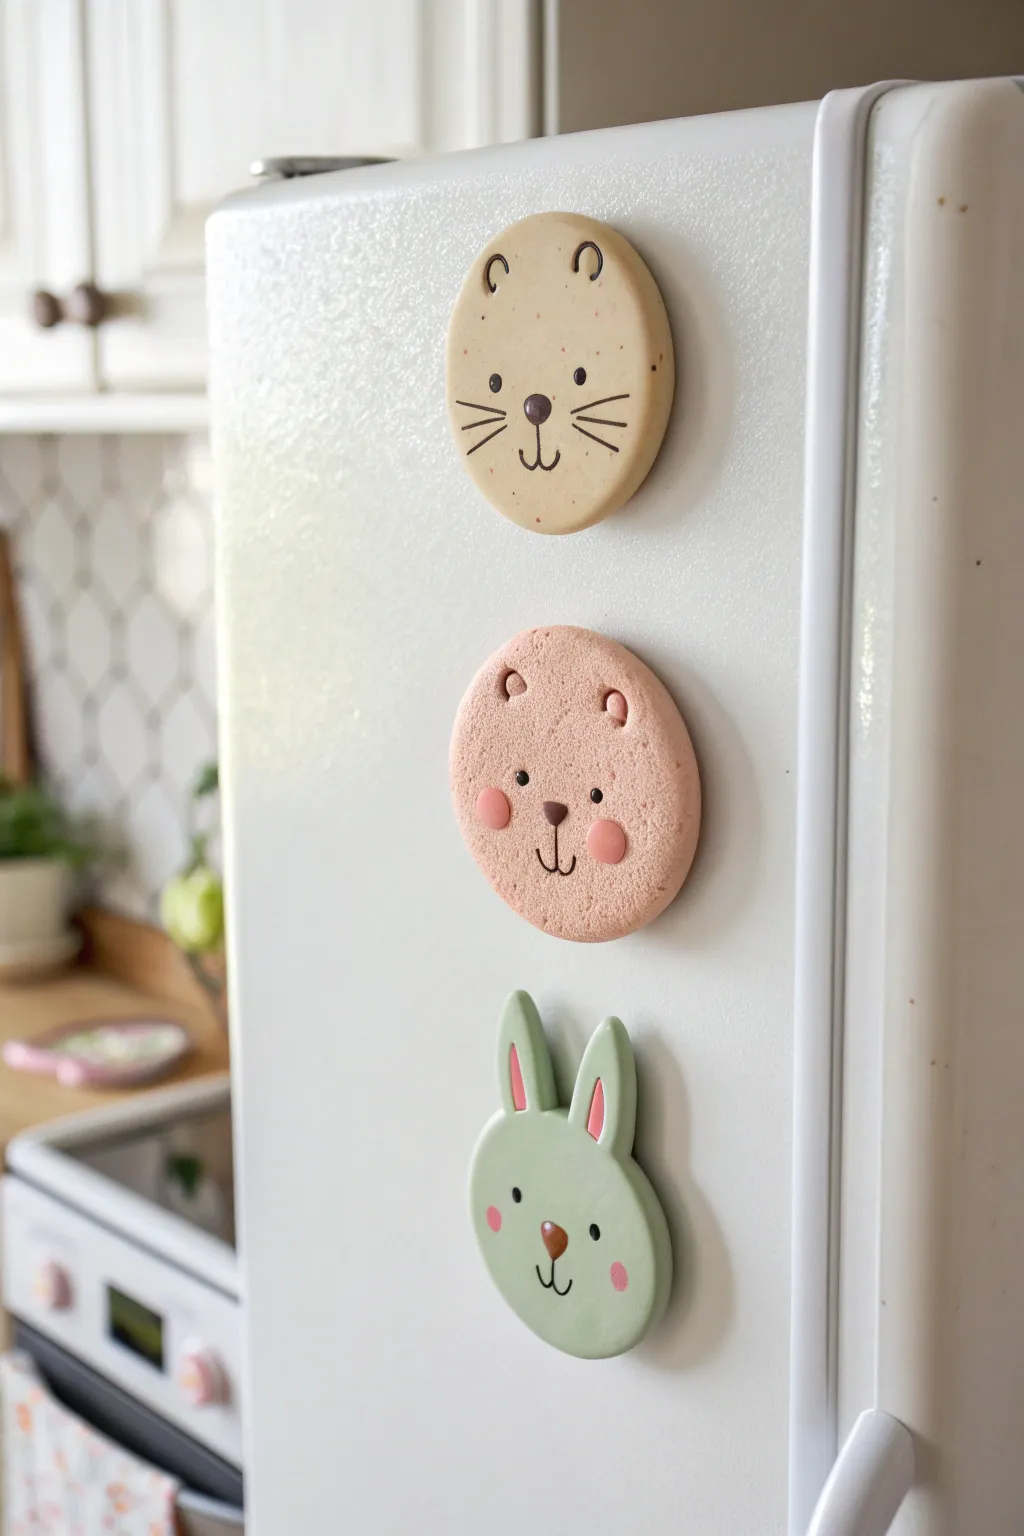
Brighten up your appliance with this charming set of three animal face magnets: a speckled kitten, a rosy-cheeked bear, and a gentle green bunny. Modeled from polymer clay, these circle-based designs feature simple, clean lines and delightful facial expressions that add a touch of sweetness to any kitchen.
Detailed Instructions
Materials
- Polymer clay (beige, pastel pink, soft mint green, brown, black)
- Circle cookie cutter (approx. 2-3 inches)
- Rolling pin
- Small ball tool or detail stylus
- Needle tool
- Baking sheet with parchment paper
- Strong round craft magnets
- Strong craft glue (e.g., E6000) or super glue
Step 1: Prepping the Base Shapes
-
Condition the clay:
Start by kneading your beige, pink, and mint green polymer clay separately until each is soft, pliable, and free of cracks. -
Roll out the slab:
Using your rolling pin, roll each color out to an even thickness of about 1/4 inch. If you want the speckled look seen on the beige magnet, knead in tiny bits of brown clay before rolling. -
Cut the circles:
Press your circle cookie cutter firmly into each color slab to create three perfect discs. Smooth the edges with your fingertip to remove any harsh cut lines. -
Add texture (optional):
For the pink bear, invite a bit of organic texture by gently pressing a piece of coarse sandpaper or a toothbrush onto the surface before adding features.
Clay Too Soft?
If your clay feels sticky or mushy and fingerprints are everywhere, pop it in the fridge for 10 minutes. Cooling it down firms it up, making it much easier to smooth out details without distortion.
Step 2: Sculpting the Beige Cat
-
Indent the ears:
Unlike typical pointed ears, this design uses negative space. Use a small ball tool to press two small indents near the top edge of the beige circle to suggest ears. -
Create the heavy line details:
Roll very thin ‘snakes’ of black or dark brown clay. Press two tiny curved pieces into the ear indents. -
Add facial features:
Place a small dark brown oval for the nose in the center. Use needle-thin ropes of clay to form the mouth anchor line and the simple whiskers radiating from the cheeks. -
The eyes:
Press two tiny beads of dark clay for eyes, spacing them widely for that cute character look.
Make ‘Em Sparkle
After baking, brush a thin layer of satin or gloss glaze over just the eyes and noses. This makes them look wet and lively against the matte finish of the fur.
Step 3: Crafting the Pink Bear
-
Form the ears:
Roll two small balls of pink clay and flatten them slightly. Press them onto the top back edge of the pink circle so they peek over the top. -
Add inner ear detail:
Press a small tool into the center of each ear to create a little shadow or ‘cup’ shape. -
Apply the nose and mouth:
Place a chocolate-brown triangle nose in the middle. Use a needle tool to scratch in the mouth lines, or lay down very thin clay threads for a raised effect. -
Cheeks and eyes:
Flatten two tiny balls of slightly darker pink clay for the rosy cheeks. Add two wide-set black clay dots for eyes.
Step 4: Building the Green Bunny
-
Shape the ears:
Roll two elongated teardrop shapes from mint green clay. Flatten them and attach them securely to the top of the green circle. -
Pink ear inserts:
Take tiny bits of pink clay, roll them into thin teardrops, and press them into the center of the green ears. -
Face details:
Add a small brown heart-shaped nose. Use your needle tool or a clay marker to draw the mouth lines. -
Final touches:
Add the black dot eyes and two tiny pink circles for subtle blush marks on the cheeks.
Step 5: Baking and Assembly
-
Bake the clay:
Place all three animals on a parchment-lined baking sheet. Bake according to your polymer clay package instructions (usually 275°F/135°C for 15-30 minutes). -
Cool down:
Allow the pieces to cool completely on the tray. Moving them while hot can cause warping or cracking. -
Attach magnets:
Flip the cooled animals over. Apply a dab of strong glue to the back center of each. -
Secure and dry:
Press a magnet firmly into the glue on each piece. I like to let this dry undisturbed overnight to ensure a bond that withstands daily fridge door slams.
Once the glue is fully cured, your adorable zoo is ready to hold up your most important notes and photos
Letter and Monogram Magnets
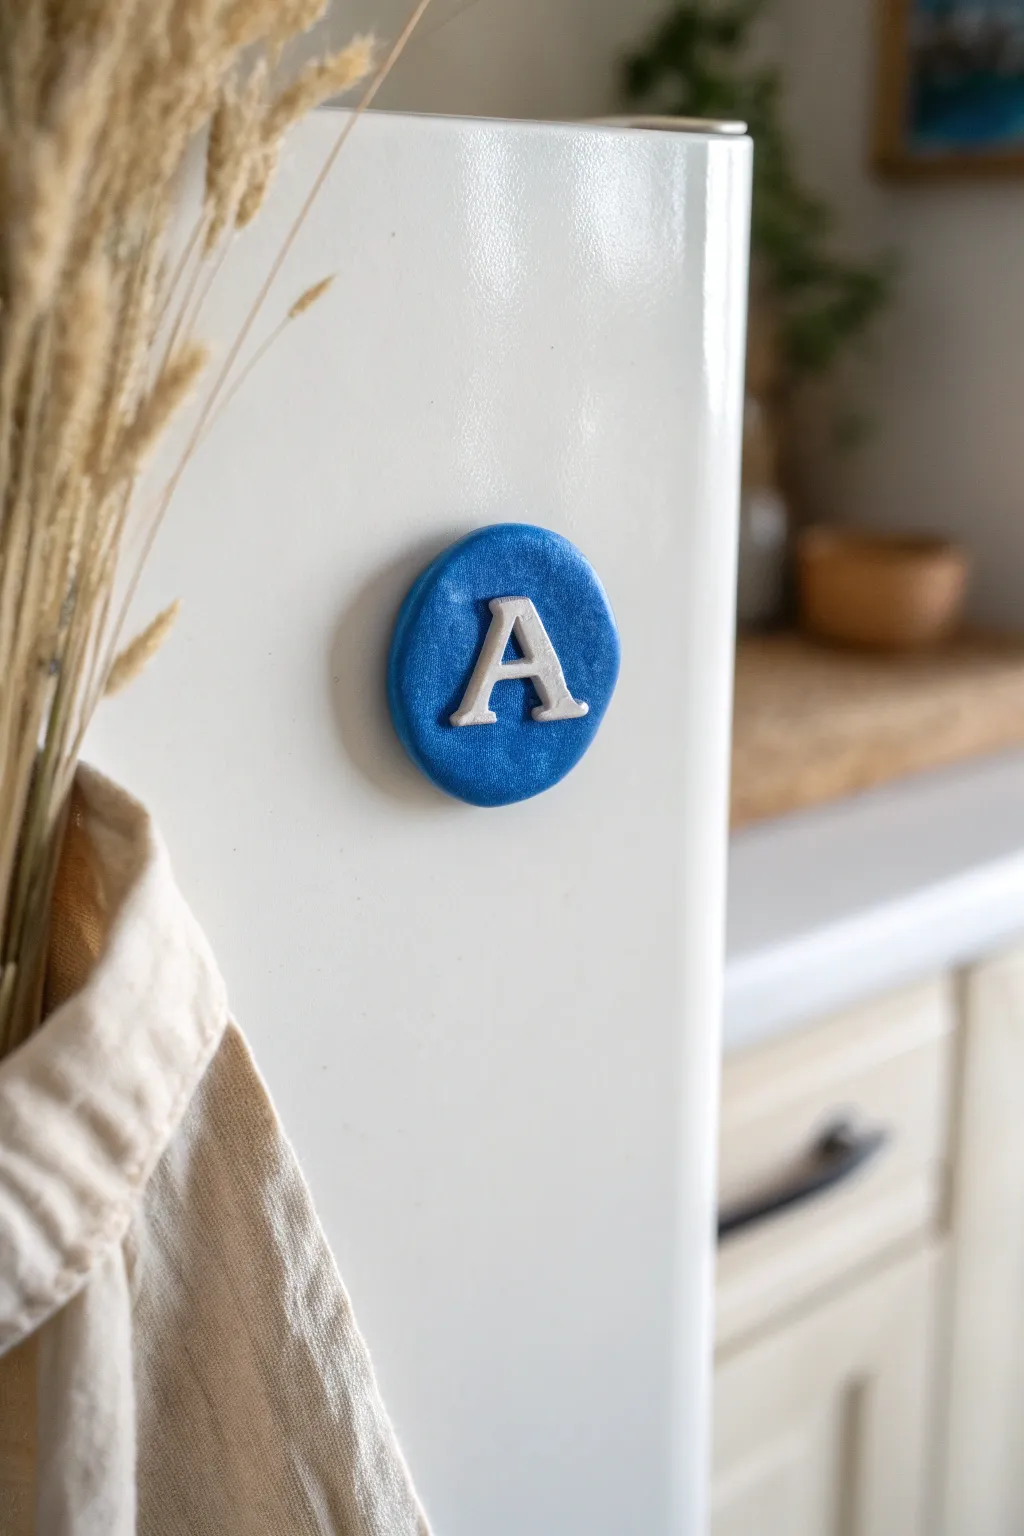
Personalize your fridge or filing cabinet with this charmingly simple monogram magnet. The project combines a metallic blue base with a classic serif letter for a look that feels both handmade and polished.
Step-by-Step Guide
Materials
- Polymer clay (metallic blue)
- Polymer clay (white)
- Small round cookie cutter (approx. 1.5 inch)
- Small letter mold or stamp (serif style)
- Acrylic rolling pin or glass jar
- Parchment paper or ceramic tile
- Super glue or strong craft adhesive
- Round magnet
- Cornstarch (optional release agent)
- Craft knife
Step 1: Creating the Blue Base
-
Condition the clay:
Start by taking a small portion of the metallic blue polymer clay. Knead it thoroughly in your hands until it becomes soft, pliable, and warm to the touch. -
Roll it out:
Place the blue clay onto a piece of parchment paper or a smooth ceramic tile. Using your acrylic roller, flatten the clay into an even slab. -
Check the thickness:
Aim for a thickness of about 1/4 inch (6mm). You want it substantial enough to hold the magnet but not so heavy that it slides down the fridge. -
Cut the circle:
Press your small round cookie cutter firmly into the blue clay slab. Give it a tiny wiggle to ensure a clean cut. -
Release the shape:
Lift the cutter away and carefully peel away the excess clay from the outside. If the circle sticks to the surface, slide a craft blade underneath to lift it without distorting the shape. -
Smooth the edges:
Gently run your fingertip around the circumference of the blue circle to soften the sharp cut edge, giving it that nice organic, rounded look shown in the photo.
Sticky Situation?
If your clay sticks to the table or cutter, pop the rolled slab in the fridge for 10 minutes. The cold firms it up, making it release much cleaner.
Step 2: Forming the Letter
-
Prep the white clay:
Clean your hands to avoid transferring blue pigment, then condition a very small amount of white polymer clay until soft. -
Dust the mold:
If you are using a silicone mold for the letter, I find it helpful to lightly dust the inside with a tiny bit of cornstarch to prevent sticking. -
Press and fill:
Press the white clay firmly into your letter mold. Ensure it fills every serif and corner completely. -
Trimming excess:
Use a flexible blade or craft knife to slice off any excess white clay from the back of the mold so the letter will sit flat. -
Demold carefully:
Gently flex the mold to pop the white letter out. If you are hand-sculpting instead of molding, roll thin snakes of white clay and shape them into your desired letter on a flat surface.
Step 3: Assembly and Baking
-
Position the letter:
Place the white letter directly onto the center of the unbaked blue circle. Do not use glue yet; the raw clay will bond to itself. -
Secure the bond:
Very gently press the letter down so it adheres to the blue base without smashing the delicate shape. -
Bake the piece:
Transfer your project (still on the tile or parchment) to a baking sheet. Bake according to your polymer clay package instructions, usually around 275°F (135°C) for 15-30 minutes. -
Cool completely:
Remove from the oven and let the clay cool completely. It will be slightly soft while hot but hardens as it returns to room temperature. -
Attach the magnet:
Flip the hardened clay piece over. Apply a dab of strong super glue or E6000 to the center of the back. -
Final cure:
Press the round magnet into the glue and let it sit undisturbed for at least 24 hours (or per glue instructions) to ensure a permanent hold.
Clean Edges Only
Before baking, use a cotton swab dipped in a little rubbing alcohol or acetone to gently wipe away any fingerprints or lint specks on the clay surface.
Pop this on your fridge for an instant custom touch to your kitchen decor
Faux Terrazzo Slab Magnets

Bring a trendy, architectural touch to your kitchen with these faux terrazzo magnets that mimic the look of real stone without the heavy weight. By embedding colored clay chips into a neutral base, you create a sophisticated speckled pattern that’s surprisingly easy to achieve.
Step-by-Step Tutorial
Materials
- Polymer clay in a base color (sand, beige, or white)
- Polymer clay in varied accent colors (terracotta, sage green, ochre, black)
- Rolling pin or pasta machine
- Tissue blade or sharp craft knife
- Rectangular cookie cutter (approx. 2×3 inches) or ruler
- Parchment paper or ceramic tile work surface
- Strong craft magnets
- Super glue (cyanoacrylate) or E6000
- Fine-grit sandpaper (400 to 1000 grit)
- Matte or satin polymer clay varnish (optional)
Step 1: Creating the Chips
-
Condition accent colors:
Start by conditioning your small amounts of accent clay (terracotta, sage, ochre, and black) until they are soft and pliable. -
Flatten the accents:
Roll each accent color into a very thin sheet. You want these to be quite delicate, roughly the thickness of cardstock. -
Bake the sheets:
Place these thin sheets on parchment paper and bake them for only about 10–15 minutes at the temperature recommended on your clay package. Use a lower time since they are so thin. -
Cool and chop:
Once bakes and fully cooled, the sheets will be brittle. Use your fingers to crumble them or a blade to chop them into irregular, jagged chips of varying sizes.
Smearing Chips?
If chips smear while sanding, the clay wasn’t baked enough. Bake for another 15 mins. Always wet sand under running water to keep the clay cool and prevent dust.
Step 2: Forming the Slab
-
Prepare the base:
Condition your neutral base color thoroughly. I like to mix a little translucent clay into my beige to give it a more realistic stony depth. -
Mix in the chips:
Flatten your base clay slightly and sprinkle a generous amount of your pre-baked colored chips onto the surface. -
Incorporate the inclusions:
Fold the clay over the chips and roll it out, then fold and roll again. Repeat this process until the colorful flecks are distributed evenly throughout the block. -
Roll the final slab:
Roll the clay out into a thick slab, approximately 1/4 inch thick. You want it substantial enough to hold the magnet and look like a stone tile. -
Smooth the surface:
If the surface looks bumpy, roll over it gently with an acrylic roller to push any protruding chips flush with the clay surface.
Add Sparkle
For a granite effect, mix small amounts of gold leaf flakes or black glitter into the base clay along with your colored chips before forming the final slab.
Step 3: Shaping and Finishing
-
Cut the shape:
Use a rectangular cutter or a blade and ruler to cut a clean rectangle from your slab. The example shown is a tall vertical rectangle. -
Soften the edges:
Gently tap the corners and edges with your finger to round them off slightly. This prevents the sharp ‘cookie cutter’ look and mimics tumbled stone. -
Final bake:
Bake the finished slab according to the package directions, usually 275°F (135°C) for 30 minutes for this thickness. Let it cool completely. -
Sand for exposure:
This is the magic step. Wet sand the surface of the magnet using 400 grit sandpaper, moving up to 1000 grit. This reveals the sharp edges of the chips inside and creates a smooth, stone-like surface. -
Buff and seal:
Buff the piece with a soft cloth (like denim) to create a natural sheen. If you prefer a wet look, apply a thin coat of satin varnish. -
Attach the magnet:
Apply a dab of strong super glue or E6000 to the back of the slab and press your magnet firmly into place. Let it cure fully before placing it on the fridge.
Your stylish new magnets are ready to organize your notes with a modern flair