I love how clay carving can take a plain form and turn it into something you can’t stop looking at (or touching). These clay carving ideas are the kind I reach for at that sweet leather-hard stage, when the surface is firm enough to hold crisp detail.
Clean Vertical Flutes
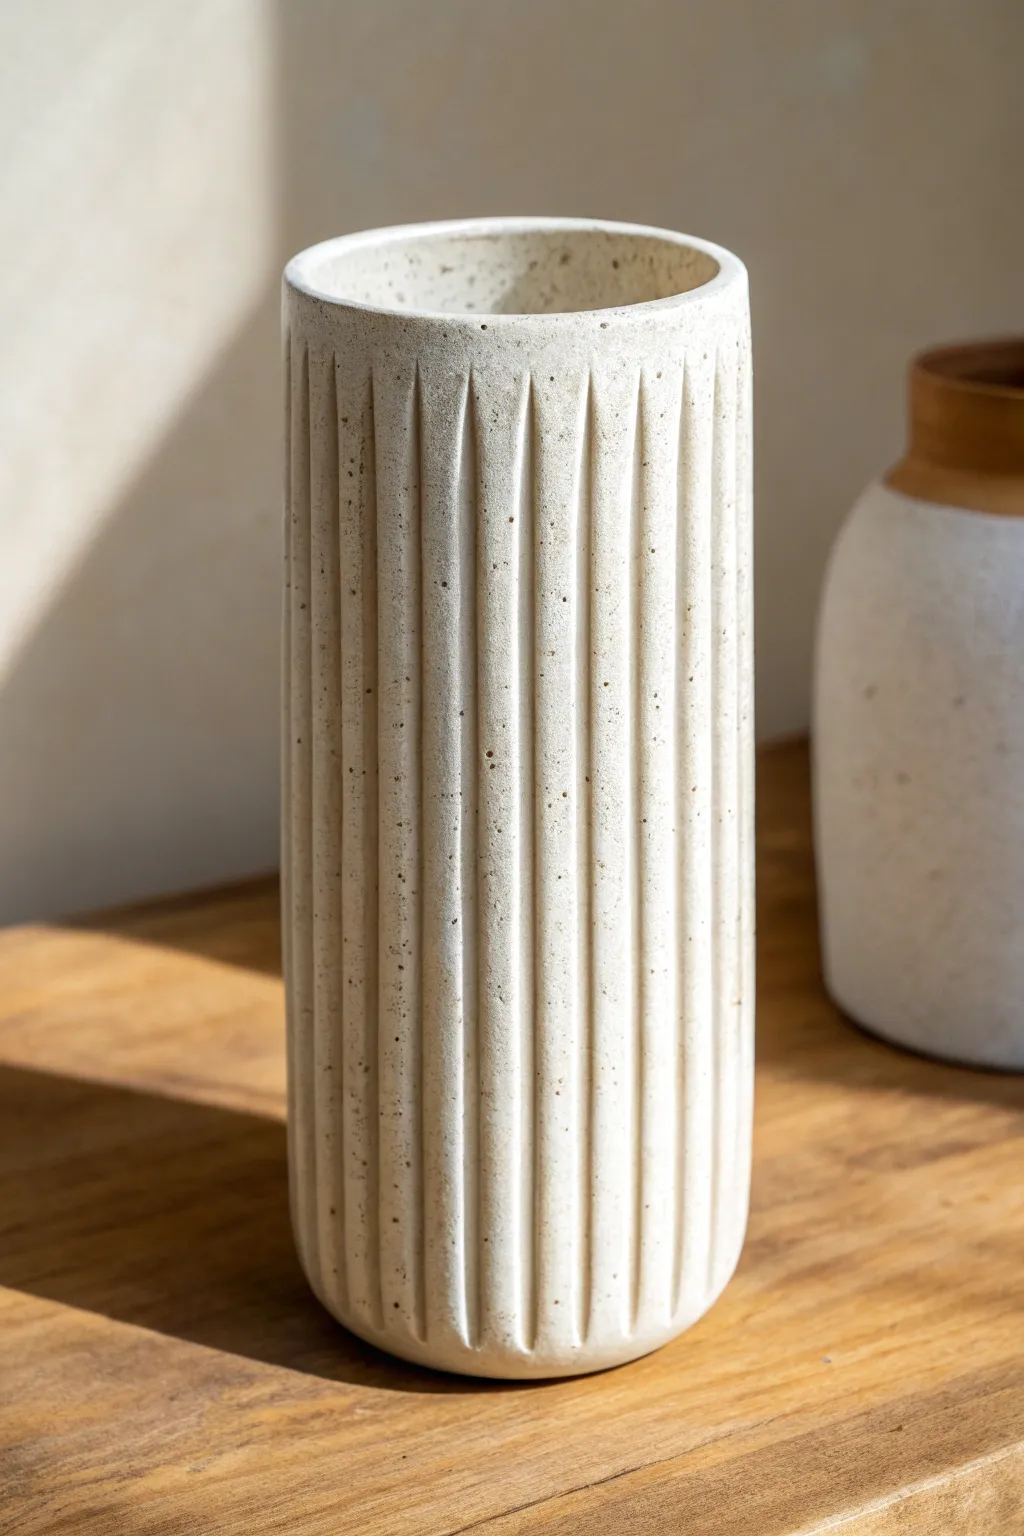
Master the art of subtraction with this stunning fluted vase project, featuring clean vertical lines carved into speckled stoneware. The textured clay body combined with rhythmic, deeply carved grooves creates a modern yet timeless architectural piece.
Step-by-Step
Materials
- Speckled buff stoneware clay (or white clay with added grog)
- Rolling pin and guide sticks (or slab roller)
- Cylindrical mold or strong cardboard tube (approx. 4-inch diameter)
- Scoring tool and slip
- Wooden modeling tool or paddle
- Loop tool (medium round profile)
- Flexible metal rib
- Sponge
- Ruler
- Needle tool
- Matte white glaze (optional/thin application)
Step 1: Forming the Cylinder
-
Prepare the slab:
Roll out a consistent slab of speckled stoneware clay to about 3/8-inch thickness using guide sticks to ensure an even surface. -
Cut to size:
Measure and cut a rectangle that corresponds to your mold’s circumference plus a small overlap for the seam, and your desired height (around 9-10 inches). -
Form the tube:
Wrap the slab around your cylindrical form. If using a cardboard tube, I like to wrap it in newsprint first so the clay doesn’t stick. -
Connect the seam:
Score and slip the overlapping edges thoroughly. Press them together firmly and compress the seam with a wooden rib until it disappears completely. -
Add the base:
Roll a small separate slab for the base. Score and slip the bottom edge of your cylinder and attach it to this slab. Trim away the excess clay with a needle tool. -
Smooth the surface:
Use a flexible metal rib to smooth the entire exterior of the cylinder, removing any canvas marks or fingerprints. This blank ‘canvas’ is crucial for clean carving. -
Round the bottom edge:
Gently gently paddle or smooth the bottom edge so it curves slightly inward, creating a soft transition rather than a sharp 90-degree angle.
Wobbly Lines?
If you struggle to pull straight lines freehand, gently rest your pinky finger against the side of the pot as a stabilizer while you pull the tool downward.
Step 2: Carving the Flutes
-
Leather hard stage:
Allow the cylinder to dry until it is leather hard. Ideally, it should be firm enough to hold its shape without the mold but soft enough to carve smoothly without chipping. -
Mark vertical guides:
Using a ruler, lightly mark the top and bottom of the cylinder to create even spacing for your flutes. You don’t need full lines, just tick marks to guide your tool. -
Test your tool:
On a scrap piece of leather-hard clay, test your loop tool. You want a tool that removes a clean, U-shaped strip of clay in one pass. -
Start the first carve:
Place your loop tool just below the rim. Pull downward with steady, even pressure in a straight line, stopping just before the curve of the base begins. -
Clean the exit:
As you reach the bottom of the stroke, slowly lift the tool out of the clay to create a tapered end to the flute, rather than an abrupt stop. -
Create the rhythm:
Rotate the vase and carve the next flute. Leave a narrow, raised ‘wall’ between each groove. Try to keep these walls consistent in width. -
Refine the edges:
Once all flutes are carved, let the piece stiffen slightly more. Then, run a damp finger or a soft sponge very lightly over the sharp edges to soften them without erasing the detail. -
Check the interior:
Inspect the inside of the vase and use a sponge on a stick to smooth any imperfections or seams that might have become visible during handling.
Make it Pop
After bisque firing, rub a black oxide wash into the grooves and wipe it back with a sponge. This darkens the deep recesses and highlights the texture.
Step 3: Finishing
-
Slow drying:
Cover the vase loosely with plastic to ensure slow, even drying. This prevents the vase from warping or cracking due to the varying thicknesses created by carving. -
Bisque fire:
Fire the piece to cone 04 (or your clay’s bisque temperature). -
Glazing approach:
To maintain the raw texture seen in the reference, you might choose to leave the exterior unglazed if the clay is vitreous, or use a very thin matte wash. -
Glaze the interior:
Pour a liner glaze inside the vase to make it fully waterproof/functional, then carefully wipe any drips off the exterior carving. -
Final wipe down:
If leaving the outside raw, sponge it clean to ensure there is no dust in the grooves before the final firing. -
Final fire:
Fire to the maturity temperature of your clay body (likely Cone 6 or 10 depending on your stoneware).
Place your finished vase near a window where the sunlight can catch the ridges and cast shadows into those beautiful deep grooves.


Classic Banding Lines and Rings
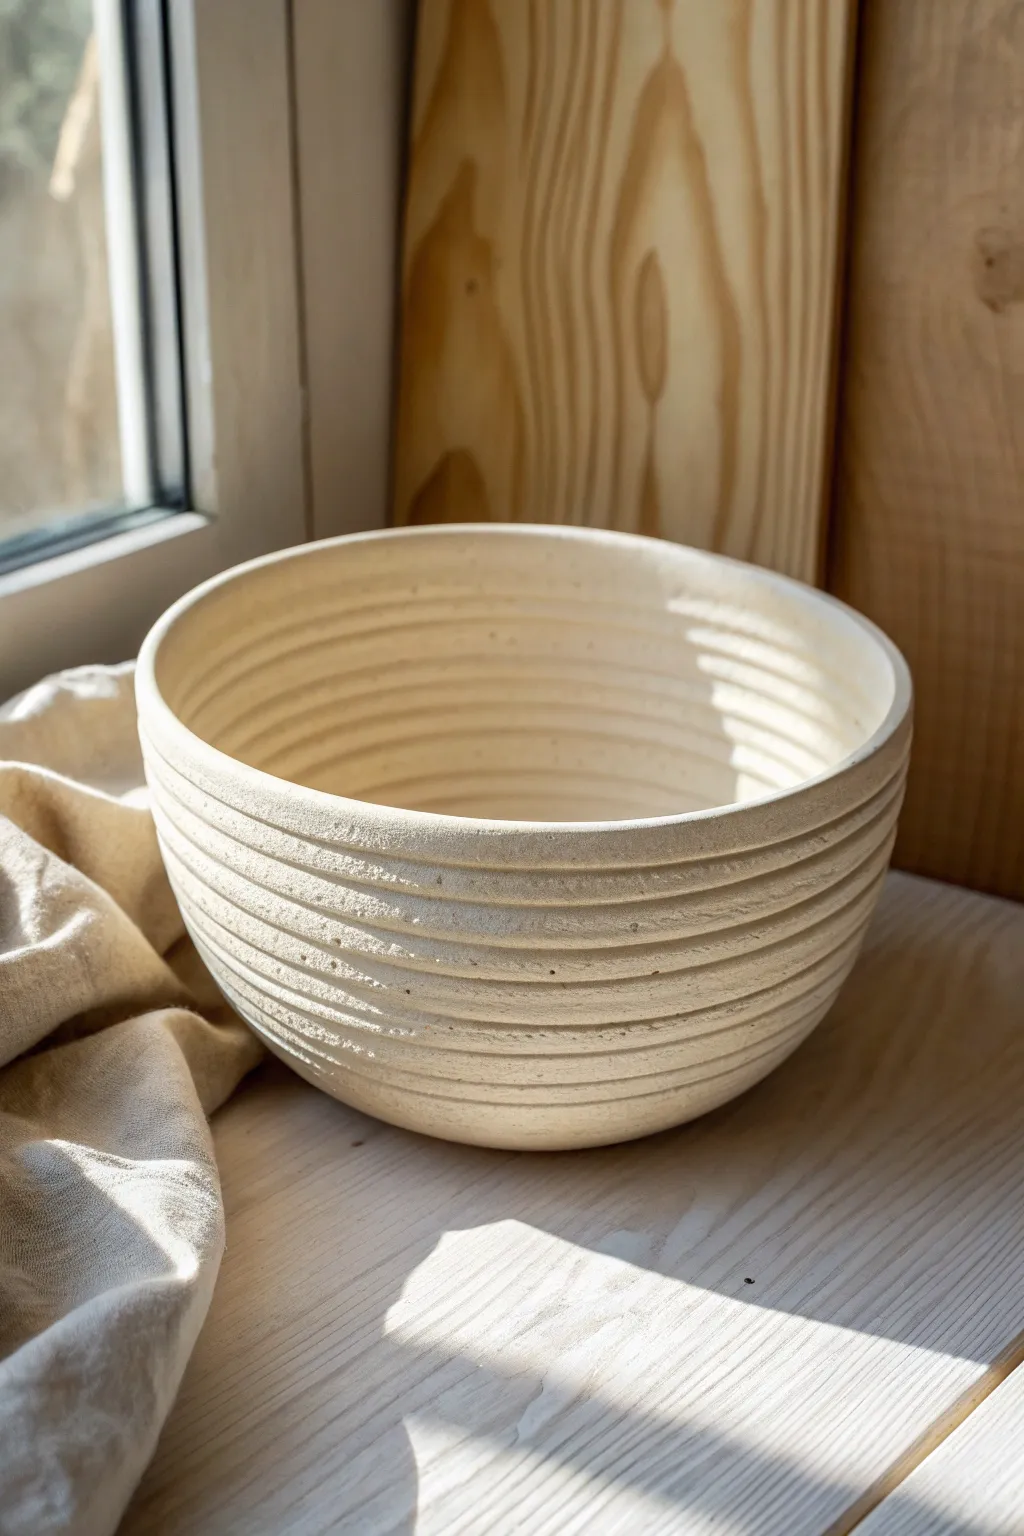
This project captures the rustic simplicity of hand-turned pottery with a continuous, rhythmic spiral texture that feels wonderful to hold. The unglazed finish highlights the raw beauty of the clay body, creating a piece that looks equally at home in a modern kitchen or a country cottage.
Step-by-Step Guide
Materials
- Stoneware clay (groggy or smooth, buff color)
- Pottery wheel
- Throwing sponge
- Wire cutter
- Rib tool (wooden or silicone)
- Loop tool (medium rounded or square edge)
- Trimming tools
- Needle tool
- Bat for wheel
Step 1: Throwing the Form
-
Center the clay:
Begin with about 2-3 pounds of well-wedged clay. Secure it firmly to the wheel head and center it using steady pressure and consistent wheel speed. -
Open the form:
Push your thumbs into the center to open the clay, leaving about a half-inch floor thickness to allow for later trimming. -
Pull the walls:
Pull the walls up into a simple, deep U-shape. Aim for a consistent thickness of roughly 1/4 inch or slightly thicker, as we will be carving into the surface later. -
Refine the curve:
Use a rib on the inside of the bowl to create a smooth, continuous curve from the floor to the rim. Compress the rim gently with a chamois or sponge. -
Dry to leather hard:
Cut the bowl from the wheel using a wire tool. Let it dry until it reaches a firm leather-hard stage—it should be sturdy enough to handle without warping but soft enough to carve easily.
Step 2: Carving the Texture
-
Secure for trimming:
Place the bowl upside down on the wheel head. Use small lugs of clay to secure it perfectly centered, or use a Giffin Grip if you have one. -
Trim the foot:
Trim excess clay from the bottom to create a defined foot ring. Keep the profile rounded to match the interior curve. -
Flip and secure:
Flip the bowl right-side up. Make sure it is perfectly centered again before securing it to the wheel. -
Select your tool:
I prefer using a medium-sized loop tool with a sturdy wire for this texture. The shape of the loop will determine the profile of your grooves. -
Begin the spiral:
With the wheel spinning at a slow to medium speed, start at the very rim of the bowl. Press the tool gently against the clay to engage. -
Create the continuous line:
Slowly move your hand downward while maintaining steady pressure. The rotation of the wheel combined with your downward movement will create a continuous spiral. -
Maintain spacing:
Try to keep your hand movement speed consistent relative to the wheel speed. This creates even spacing between the ridges. -
Carve the interior:
Repeat the process on the inside if desired, starting from the rim and working your way down to the center swirl. -
Smooth the ridges:
Once the carving is complete, run a slightly damp sponge or a soft rib very lightly over the textured surface to soften any sharp burrs without removing the design.
Groove Variation
Change your hand speed while carving! Moving faster creates wider spacing between rings; slower movement creates a dense, tight texture.
Step 3: Finishing
-
Slow drying:
Cover the bowl loosely with plastic to allow it to dry slowly and evenly. This prevents the rim from warping. -
Bisque fire:
Once bone dry, bisque fire the piece to cone 04 (or your clay body’s recommendation). -
Glazing decision:
To match the reference image, leave the exterior unglazed or apply a thin matte wash. Alternatively, apply a breaking glaze that will pool in the grooves to highlight the texture. -
Final firing:
Glaze fire to maturity. If leaving unglazed, ensure your clay body can be vitrified sufficiently to be functional.
Wobbly Lines?
Uneven lines usually mean your elbows aren’t anchored. Tuck your elbows firmly into your ribs or rest them on your knees for stability.
Enjoy the tactile feel of your new bowl every time you use it


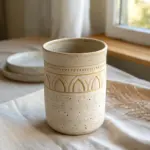
Scalloped Scale Pattern
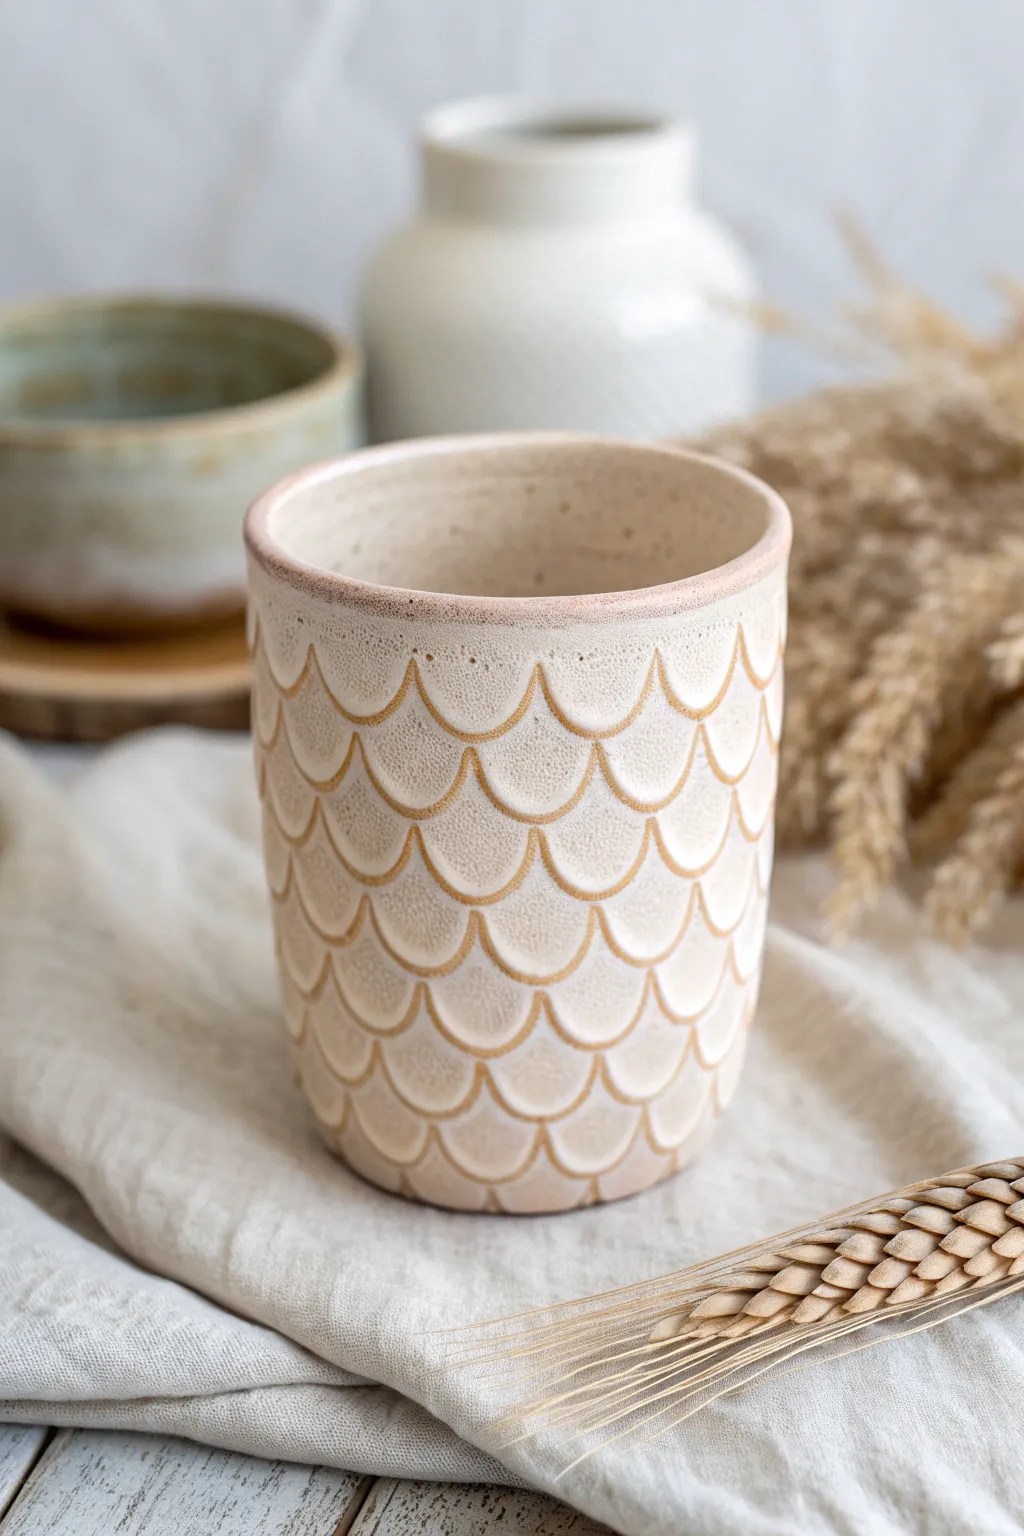
Transform a simple clay cylinder into a textured masterpiece with this delicate scalloped scale design. The pattern creates a rhythmic, tactile surface that feels wonderful in the hand, enhanced by a soft cream glaze that breaks beautifully over the carved edges.
Detailed Instructions
Materials
- Stoneware clay body (buff or white speckle)
- Pottery wheel (or slab building tools)
- Wire cutter
- Loop carving tool (small, U-shaped)
- Sponge
- Rib tool (metal or rubber)
- Cream or oatmeal reactive glaze
- Small paintbrush (for wax resist)
- Wax resist emulsion
Step 1: Forming the Base
-
Throw the cylinder:
Begin by throwing a simple, straight-walled cylinder on the wheel. Aim for a wall thickness of about 1/4 inch, slightly thicker than a standard mug, to allow depth for carving without puncturing the wall. -
Refine the shape:
Use a rib tool to smooth the exterior and compress the clay particles. Define a gentle curve at the bottom where the wall meets the base, ensuring a comfortable hold. -
Smooth the rim:
Compress the rim with a piece of plastic or soft leather (chamois). A rounded, smooth rim is crucial since the rest of the cup will be highly textured. -
Leather hard drying:
Let the piece dry slowly to a leather-hard state. The clay should be firm enough to handle without deforming but soft enough to carve easily—think of the consistency of cheddar cheese. -
Trim the foot:
Place the cup back on the wheel (or use a Giffin Grip) to trim the bottom. Create a neat, defined foot ring that complements the vertical walls.
Consistent Curves
Use a loop tool with a fixed width. This ensures every single scale is exactly the same size, which makes the pattern look professional and uniform without measuring.
Step 2: Carving the Scales
-
Mark the grid:
Lightly scratch a faint horizontal guide line around the top rim where you want your pattern to start. You can freehand the rest, or lightly incise a grid if you want mathematical precision. -
Start the top row:
Using your U-shaped loop tool, carve the first row of scallops just below the rim. Push the tool into the clay and drag it downward in a ‘U’ motion, shallower at the top and deeper at the bottom of the stroke. -
Offset the second row:
Begin the second row. Place the top of your cut directly below the center point of the scale above it. This brick-lay or offset pattern is key to the fish-scale look. -
Establish a rhythm:
Continue carving row by row, working your way down the cup. I like to rotate the piece on a banding wheel to keep a steady rhythm and consistent depth. -
Adjust depth:
As you carve, vary the pressure slightly to create a concave scoop within each scale. This creates the shadows that define the pattern. -
Resolve the bottom:
When you reach the bottom, fade the pattern out gently or stop abruptly at a clean line above the foot, depending on your preference. -
Smooth the burs:
Once the carving is complete, let the cup dry a bit more. Then, gently rub the surface with a scrubby pad or finger to knock off any sharp little crumbs of clay without losing the crisp edges.
Uneven Spacing?
If your rows don’t meet up perfectly at the end of a circle, cheat the last few scales slightly wider or narrower. The texture hides minor adjustments well.
Step 3: Glazing and Finishing
-
Bisque fire:
Fire the piece in the kiln to cone 04 (or your clay’s specified bisque temperature) to prepare it for glazing. -
Clean the bisque:
Wipe down the bisque-fired cup with a damp sponge to remove any kiln dust, which can cause pinholes in your glaze. -
Apply wax resist:
Paint wax resist carefully onto the foot ring and slightly up the bottom edge to ensure clean lines and prevent the pot from sticking to the kiln shelf. -
Dip into glaze:
Dip the entire cup into a cream or oatmeal-colored reactive glaze for about 3 seconds. A reactive glaze is perfect here because it will thin out on the high points (showing the clay color) and pool in the carved recesses. -
Check the rim:
If the glaze looks too thick on the rim, wipe it back slightly with a sponge. You want the rim color to break, revealing the toasted clay color underneath, just like in the reference image. -
Clean the foot:
Use a sponge to wipe any stray glaze droplets off the waxed foot area. -
Glaze fire:
Fire to the final maturity temperature of your clay and glaze (typically Cone 5 or 6 for stoneware). Let the kiln cool naturally before unloading.
Enjoy your morning coffee in a vessel that feels as good as it looks


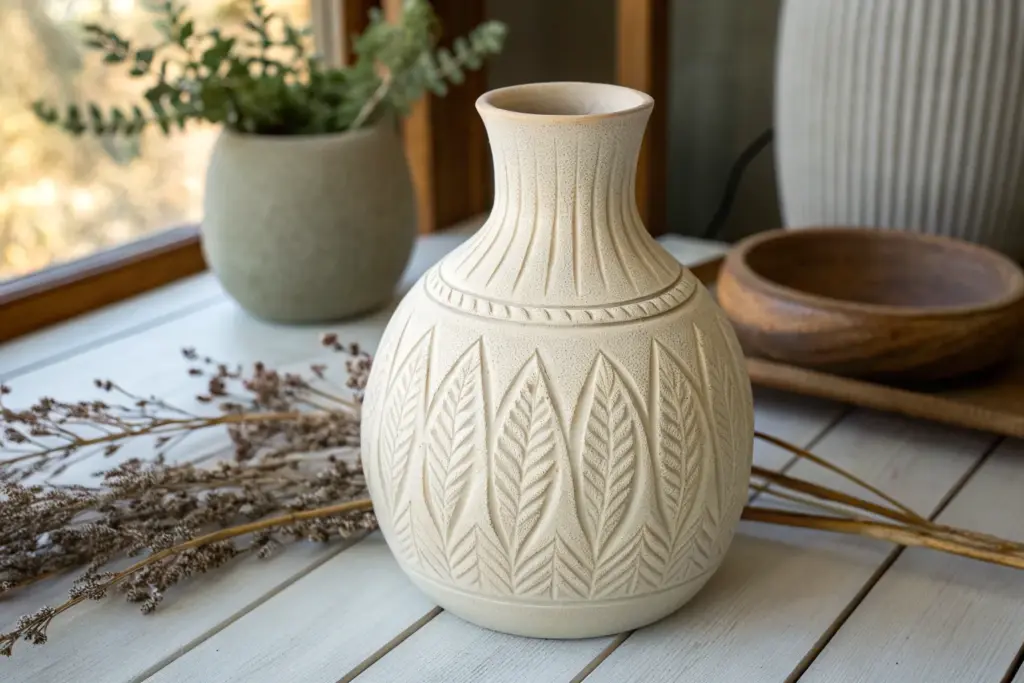
Carved Leaves and Veins
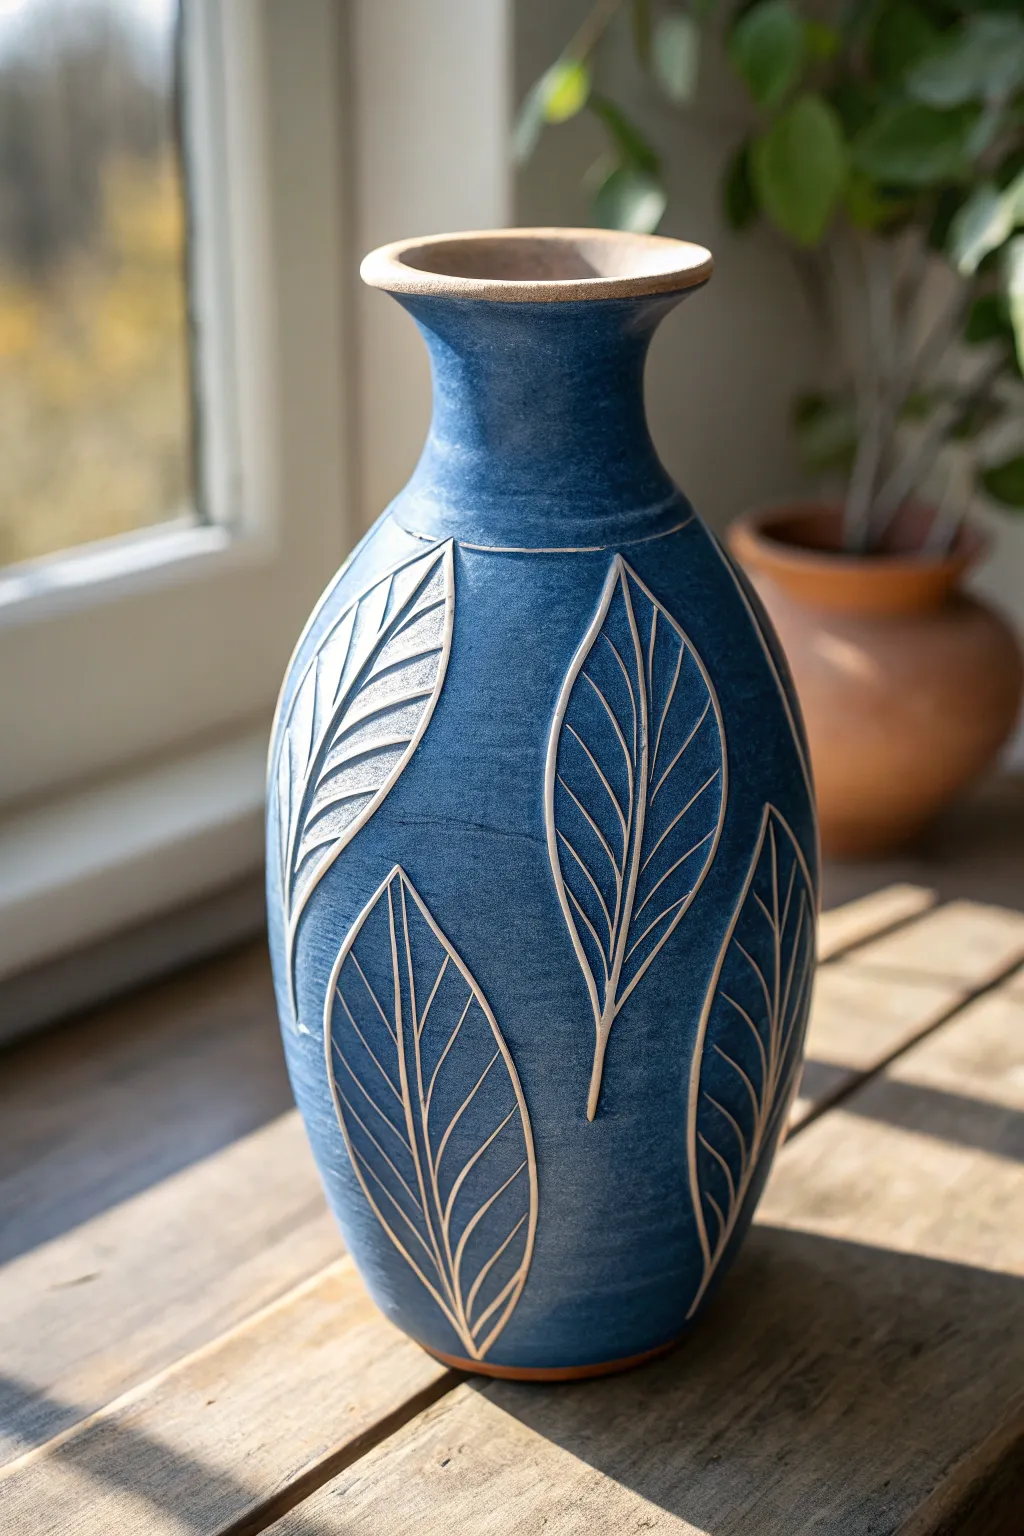
This elegant vase project showcases the beauty of sgraffito, a technique where you carve through a layer of colored slip to reveal the contrasting clay body underneath. The result is a striking pattern of crisp white leaves dancing across a deep, textured denim-blue surface.
Step-by-Step Tutorial
Materials
- Stoneware clay (buff or white firing)
- Pottery wheel (or coil building tools)
- Blue underglaze or colored slip (cobalt based)
- Wide application brush
- Loop tool (small/fine)
- Needle tool
- Carving tool (V-tip or U-tip)
- Sponge
- Clear glaze (transparent)
- Wire cutter
- Rib tool
Step 1: Forming the Vessel
-
Throw the base form:
Begin by centering your clay on the wheel. Open the center and pull the walls up to create a tall cylinder, aiming for a height of about 10-12 inches depending on your preference. -
Shape the belly:
Gently push the walls outward from the inside to form a rounded belly. The widest point should be slightly below the vertical center of the vase. -
Create the neck:
Collar the clay inward near the top to narrow the neck significantly. This creates the elegant bottleneck shape that will contrast with the rim. -
Flare the rim:
Using your thumbs, gently flare the very top of the clay outward to form a distinct, flat-topped rim. Smooth this area with a chamois or sponge. -
Trim and dry:
Once thrown, wire cut the vase from the bat but leave it in place to firm up to leather-hard. Once firm enough to handle, trim the foot to create a clean bottom edge.
Chippy Edges?
If the slip chips off while carving rather than cutting smoothly, the clay is too dry. Mist the area lightly with water, wrap it in plastic for an hour, and try again.
Step 2: Applying Color
-
Prepare surface:
Wipe the leather-hard vase with a slightly damp sponge to remove any dust or burrs. The surface needs to be smooth for the slip to sit evenly. -
Apply the slip:
Using a wide, soft brush, apply 2-3 even coats of deep blue underglaze or slip. I like to rotate the vase on a banding wheel to ensure consistent coverage without obvious brushstrokes. -
Wait for the sheen to leave:
Allow the slip to dry until it is no longer shiny and feels cool to the touch, but not chalky. If it’s too wet, your carving will be messy; too dry, and it will chip.
Depth Matters
Vary your carving pressure. Deep cuts for the leaf outline and lighter, shallower scratches for the inner veins create a more dynamic, illustrative look.
Step 3: Carving the Design
-
Map the layout:
Lightly trace the outline of large, lance-shaped leaves using a needle tool. Don’t press hard; just scratch the surface enough so you can see your spacing. -
Carve the outlines:
Using a sharp carving tool (a V-tip works best here), carve along your traced lines. Apply consistent pressure to cut through the blue layer and reveal the bare clay. -
Add the central vein:
Carve a strong, single line down the center of each leaf, starting from the base and tapering off just before the tip. -
Detail the ribs:
Carve curved diagonal lines branching from the central vein to the outer edges of the leaf. Keep these lines thinner than the outline for a delicate look. -
Refine edges:
Check your carved lines for any clay crumbs or jagged edges. A soft, dry brush can sweep away debris without smudging the blue slip. -
Rim detail:
Create a distinct line just below the neck where the blue slip ends and the raw clay rim begins to define the transition.
Step 4: Finishing
-
Bisque fire:
Let the vase dry completely (bone dry). Fire it in the kiln to a bisque temperature suitable for your specific clay body (usually Cone 04 or 06). -
Clean the bisque:
Wipe the bisqued piece with a wet sponge to remove any dust created during firing, which could prevent the glaze from adhering properly. -
Apply clear glaze:
Dip the entire vase into a clear, transparent glaze. This will seal the piece and make the blue pop while keeping the carved lines visible. -
Final wipe:
Wipe the bottom of the foot clean of any glaze to prevent it from fusing to the kiln shelf. -
Glaze fire:
Fire the vase a second time to your clay’s maturity temperature (e.g., Cone 5, 6, or 10) to vitrify the clay and melt the glaze.
Place your finished vase near a window where the light can catch the texture of your carving work

The Complete Guide to Pottery Troubleshooting
Uncover the most common ceramic mistakes—from cracking clay to failed glazes—and learn how to fix them fast.
Petal Medallions Around a Bowl
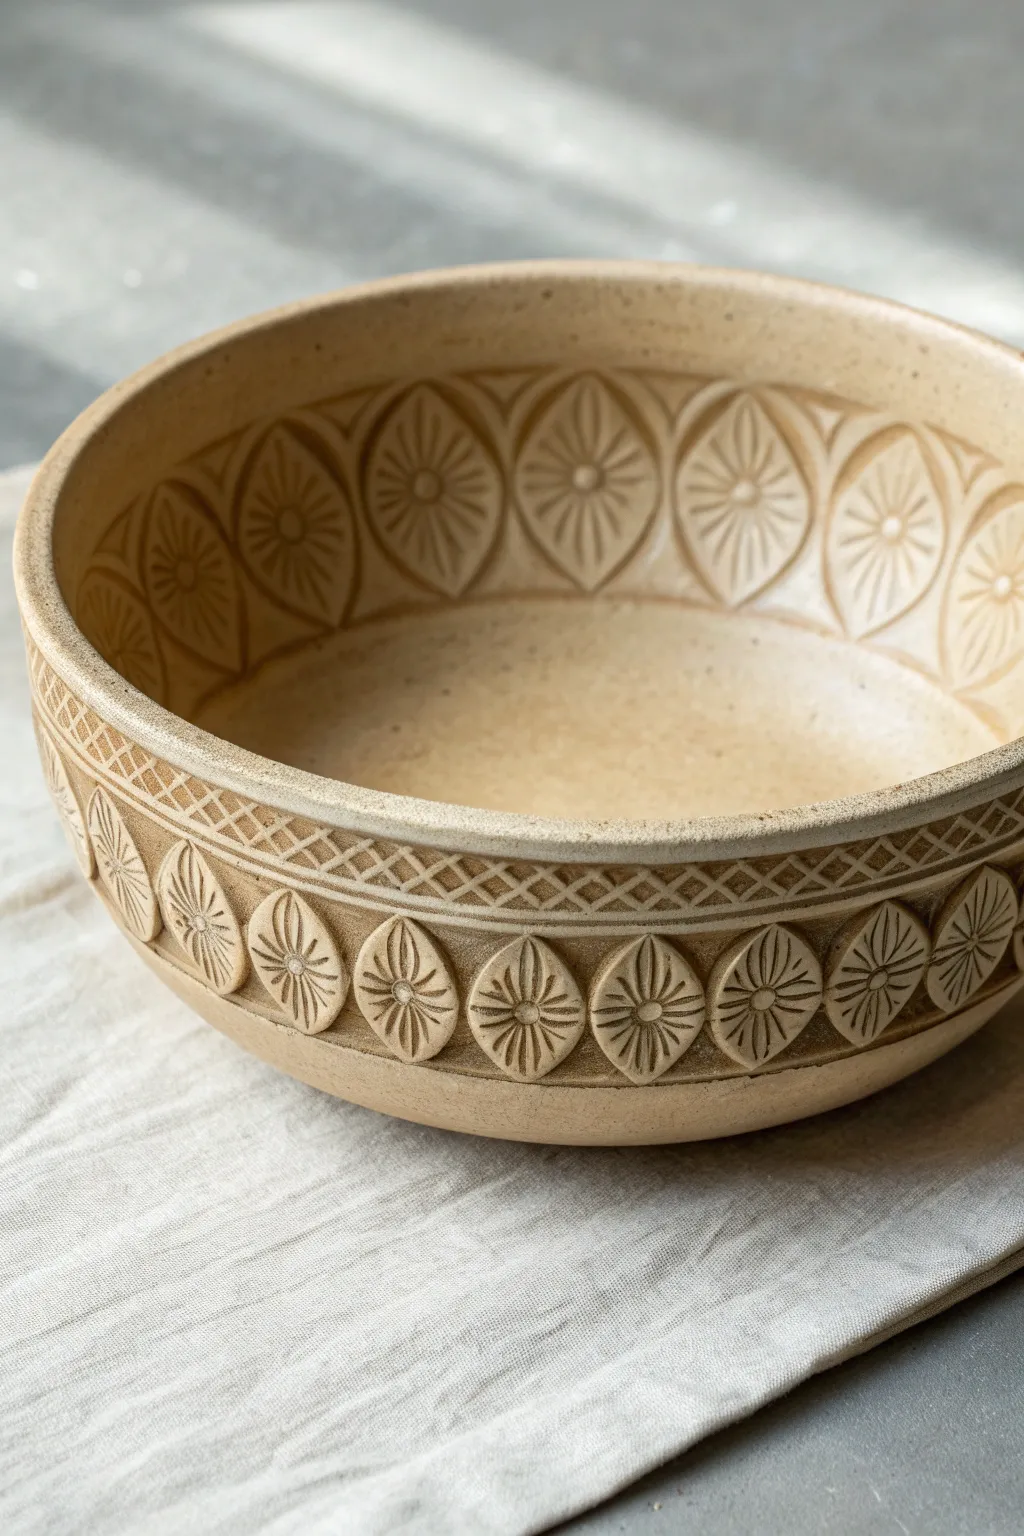
This project transforms a simple wheel-thrown or hand-built bowl into an elegant statement piece featuring repetitive petal medallions and geometric lattice bands. The natural, unglazed finish highlights the crispness of the carving, giving the vessel a timeless, tactile quality.
Step-by-Step
Materials
- Stoneware clay (buff or light brown speckle)
- Pottery wheel (or slab roller/pin for hand-building)
- Loop tools (small and medium)
- Needle tool
- Sgraffito tool or fine stylus
- Small carving gouge (u-tip or v-tip)
- Flexible metal rib
- Sponge
- Ruler or measuring tape
Step 1: Forming the Base
-
Throw the bowl:
Begin by throwing a medium-sized bowl on the wheel with steep, vertical sides. Aim for a wall thickness of about 3/8 inch to allow ample depth for carving without puncturing the form. -
Refine the rim:
Compress the rim well with a shammy or sponge to ensure it is smooth and rounded. A squared-off rim can also work, but the rounded edge complements the organic medallions. -
Dry to leather hard:
Allow the piece to dry slowly until it reaches a sturdy leather-hard stage. It should be firm enough to handle without warping but soft enough to carve cleanly. -
Trim the foot:
Flip the bowl and trim a neat foot ring. While the bowl is inverted, you can smooth the exterior surface one last time with a flexible metal rib to remove any throwing lines.
Uneven Spacing?
If your medallions don’t fit perfectly around the rim at the end, slightly adjust the width of the final two ovals or leave a small vertical bar as a purposeful design break.
Step 2: Mapping the Design
-
Mark the exterior bands:
Place the bowl back on a banding wheel. Using a needle tool, lightly score two parallel horizontal lines around the exterior upper rim to define the area for the lattice pattern. -
Mark the medallion placement:
Below the lattice band, lightly trace the oval shapes for the exterior medallions. I find it helpful to create a simple paper template of the oval shape to ensure consistent size and spacing around the circumference. -
Outline the interior medallions:
Repeat the process on the interior rim. Use your paper template to trace a matching row of ovals just below the inner lip of the bowl.
Step 3: Carving the Details
-
Carve the exterior lattice:
Using a fine sgraffito tool or knife, carve diagonal lines in one direction within the top exterior band. Then, carve diagonal lines in the opposite direction to create a diamond lattice grid. -
Define the oval borders:
Switch to a small U-tip gouge. Carve a distinct channel around the perimeter of each traced oval on both the interior and exterior to separate the medallion from the background. -
Carve the radiating lines:
Inside each oval medallion, using a fine sharp tool, carve straight lines radiating from the center point out to the edge, like the spokes of a wheel or flower petals. -
Add the central dot:
Press a small circular tool or the back of a drill bit into the center of each medallion to create the small ‘button’ detail that anchors the radiating lines. -
Create the background texture:
Using a larger loop tool, gently carve away the negative space between the ovals on the exterior. This slightly raises the medallions, giving them a relief effect. -
Clean up burrs:
Once the carving is complete, let the bowl dry slightly more. Then, use a stiff brush or a slightly damp sponge to gently knock off any sharp clay crumbs or burrs created during carving.
Layer the Texture
For added depth, apply a dark iron oxide wash over the carving and wipe it back with a sponge. The dark color will remain in the recessed lines, making the pattern pop.
Step 4: Finishing
-
Bisque fire:
Fire the completely dry bowl to cone 04 (or your clay body’s bisque temperature) to prepare it for the final steps. -
Wax resist application:
If you want to keep the raw clay look shown in the image, apply wax resist carefully over the carved areas. -
Glazing (Optional):
Apply a clear matte glaze to the interior for food safety, or leave the exterior unglazed to maintain the texture. Wipe away any glaze that gets into the deep crevices if you prefer high contrast. -
Final firing:
Fire the piece to maturity (Cone 5, 6, or 10 depending on your clay). The heat will harden the clay and set the design permanently.
Once cooled, your bowl is ready to display as a stunning example of relief carving technique
Geometric Grid and Crosshatch
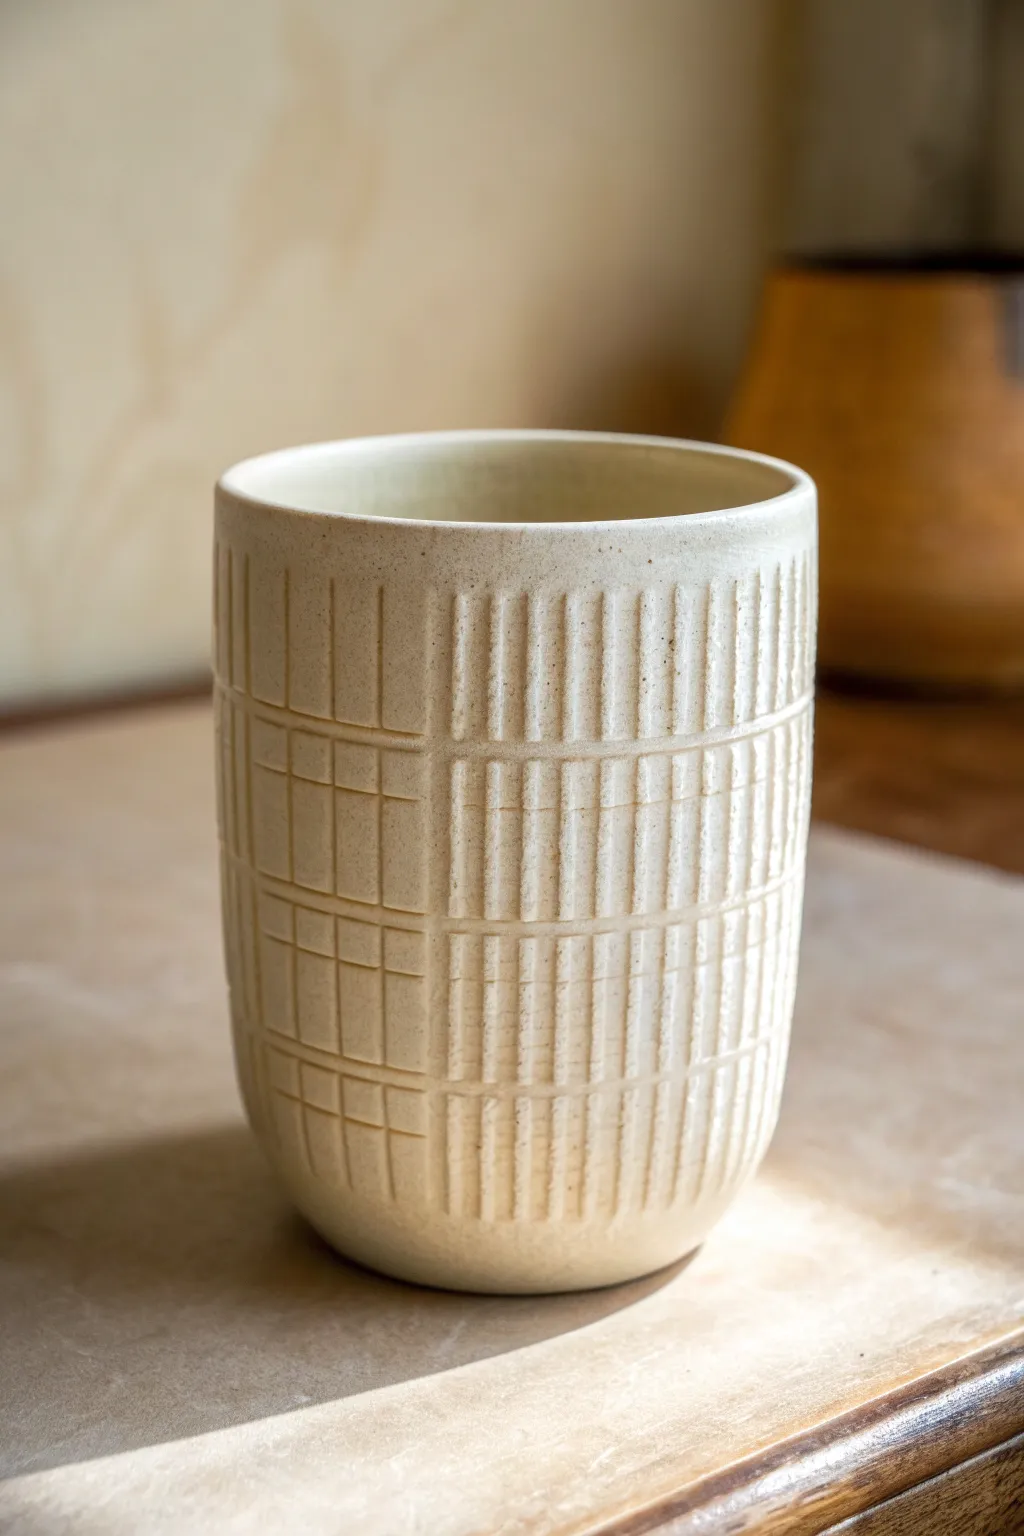
This project transforms a simple clay cylinder into a tactile piece of art featuring a rhythmic interplay between vertical stripes and open grid blocks. The finished tumbler has a satisfying matte, creamy texture that highlights the depth of the carving.
Step-by-Step Tutorial
Materials
- Stoneware clay (buff or white)
- Pottery wheel (or slab roller/rolling pin for hand-building)
- Wire cutter
- Rib tool (metal and rubber)
- Needle tool
- Loop tool or small carving gouge (square tip preferred)
- Ruler or measuring tape
- Sponge
- Matte cream or white glaze
- Kiln
Step 1: Forming the Vessel
-
Throw the cylinder:
Center your clay on the wheel and throw a tall, straight-walled cylinder. Aim for walls slightly thicker than usual—about 1/4 to 3/8 inch—to accommodate the carving depth without piercing through later. -
Refine the shape:
Using a rib tool, smooth the exterior walls. Create a gentle curve at the very bottom where the wall meets the foot, giving the cup a soft, rounded base rather than a sharp angle. -
Define the rim:
Compress the rim with a piece of chamois or your sponge to ensure it is smooth and pleasant to drink from. A slightly rounded rim works best with the geometric harshness of the grid. -
Leather hard drying:
Allow the piece to dry slowly to a leather-hard state. It should be firm enough to hold its shape perfectly when touched, but soft enough to carve into like stiff cheddar cheese. -
Trim the foot:
If you threw the piece on a wheel, flip it over and trim a clean foot ring. If hand-building, smooth the bottom surface to ensure it sits flat.
Step 2: Mapping the Grid
-
Measure the circumference:
Use a flexible ruler or a strip of paper to measure the circumference of your cup. You need to divide this space evenly into sections for the alternating pattern. -
Mark vertical divisions:
Lightly score vertical guidelines around the cup with a needle tool. Spacing these about 1.5 to 2 inches apart works well to create the blocky structure seen in the example. -
Mark horizontal bands:
Decide on the height of your rows. Use the needle tool to lightly scribe horizontal rings around the entire vessel, essentially creating a large grid of empty squares on the surface.
Clean Lines Pro-Tip
Wait until the clay is almost ‘bone dry’ to brush away carving crumbs. If you brush while it’s still damp, you’ll smear the texture back into the grooves.
Step 3: Carving the Texture
-
Plan the pattern:
Visualize a checkerboard. One square will have dense vertical stripes, and the adjacent square will have a wider, window-pane grid pattern. -
Carve the vertical stripes:
Start with the striped blocks. Using a small, square-tipped loop tool, carve vertical channels from the top to the bottom of that specific block. Keep the lines parallel and tightly spaced. -
Maintain consistent depth:
Apply even pressure as you pull the tool down. You want the texture to handle the glaze well, so try to make the grooves deep enough to catch shadows but not structurally compromising. -
Carve the window-pane blocks:
Move to the alternating ‘window’ blocks. Carve two or three distinct vertical lines spaced widely apart within the block. -
Cross the lines:
In those same window-pane blocks, carve horizontal lines that intersect the verticals, creating smaller sub-squares. This creates the ‘grid’ look that contrasts with the simple stripes. -
Clean up burrs:
Once all carving is complete, let the piece dry slightly more. Then, use a stiff brush or a slightly damp sponge to gently knock off any clay crumbs or sharp burrs left by the tools.
Uneven Spacing?
If your circumference doesn’t divide perfectly, create one ‘feature’ column of a different texture to hide the awkward gap where the pattern meets.
Step 4: Finishing
-
Bisque fire:
Load the bone-dry tumbler into the kiln and bisque fire it according to your clay body’s specifications (usually Cone 04 or 06). -
Glaze application:
Dip the cup into a matte cream or white glaze. A matte finish is crucial here because a glossy glaze might obscure the fine details of the carving with too much reflection. -
Wipe the foot:
Clean the bottom of the cup thoroughly with a sponge to prevent it from sticking to the kiln shelf. -
Glaze firing:
Fire the piece a second time to the glaze’s maturity temperature (e.g., Cone 6 or 10). I always check the test tiles first to ensure the glaze doesn’t run too much, which would fill in the texture.
Once fired, fill your new textured tumbler with your favorite beverage and enjoy the unique feel of the grid under your fingers


What Really Happens Inside the Kiln
Learn how time and temperature work together inside the kiln to transform clay into durable ceramic.
Chevron and Herringbone Cuts
This elegant cylindrical vessel showcases how simple geometric cuts can create stunning texture on a plain clay surface. The alternating bands of intricate herringbone and bold chevron patterns catch the light beautifully, making this a perfect project for refining your carving skills.
Detailed Instructions
Materials
- Stoneware clay (buff or white)
- Circular bat or banding wheel
- Rolling pin and guide sticks (or slab roller)
- Cylindrical mold (PVC pipe or large can)
- Fettling knife
- Scoring tool (serrated rib)
- Slip
- Carving tool (V-tip loop tool or specialized carving set)
- Ruler or measuring tape
- Divider or needle tool
- Smooth rubber rib
Step 1: Forming the Cylinder
-
Prepare the Clay Slab:
Begin by rolling out an even slab of clay, approximately 3/8-inch thick. Using guide sticks or a slab roller ensures the wall thickness remains consistent, which is crucial for even drying later. -
Cut to Size:
Measure the circumference of your cylindrical mold. Cut a rectangle from your slab that matches this length plus a small overlap allowance, and set the height to your desired vessel depth. -
Construct the Walls:
Wrap the slab around your mold. Score and slip the connecting edges thoroughly, then press them firmly together to create a seamless vertical join. Smooth the seam inside and out with a rubber rib. -
Attach the Base:
Roll a separate, slightly thicker piece for the base. Place your cylinder on top, trace the circle, and cut it out. Score and slip both the bottom of the cylinder wall and the edge of the base, then compress the connection well. -
Refine and Dry:
Clean up the rim and base edges with a damp sponge. Let the vessel dry slowly until it reaches a sturdy ‘leather hard’ state. The clay needs to be firm enough to hold its shape against the pressure of the carving tool, but soft enough to cut cleanly.
Keep it Sharp
Carve when the clay is leather hard—like cheddar cheese. If it’s too soft, the clay drags; too hard, it chips. Sharpen not just your tools, but your timing.
Step 2: Drafting the Design
-
Mark Horizontal Bands:
Place your pot on a banding wheel. Using a needle tool held steady against the side, spin the wheel to lightly scribe horizontal guidelines. -
Define the Zones:
Create four main zones: a smooth top rim, a narrow upper detail band, a wide central section for the large chevrons, and a narrow lower detail band mirroring the top one. -
Create Vertical Guides:
Use a ruler to mark vertical ticks around the circumference at regular intervals. These invisible vertical grids will help keep your diagonal cuts consistent and prevent the pattern from drifting.
Step 3: Carving the Texture
-
Start the Upper Band:
Begin with the narrow band just below the rim. I find it easiest to make all the right-slanting diagonal slashes first, moving around the entire pot. -
Complete the Upper Herringbone:
Go back around and make the opposing left-slanting cuts to form the ‘V’ shapes. Keep your tool angle shallow to scoop out clay rather than digging too deep. -
Carve the Central Chevrons:
Move to the large middle section. These chevrons are much taller and spaced wider than the detail bands. Carve bold, deep diagonal lines that mirror the angle of your upper band. -
Deepen the Relief:
For this central section, you may want to make a second pass or use a wider V-tip tool to really define the ridges and shadows, giving the piece a robust architectural look. -
Carve the Lower Band:
Repeat the tighter herringbone process on the bottom band. Try to align the points of these V’s with the points of the large chevrons above for visual harmony. -
Clean Up Burrs:
Once the carving is done, let the piece dry slightly more. Then, gently brush away any clay crumbs or sharp ‘burrs’ with a stiff paintbrush or your finger; don’t use a wet sponge or you’ll wash out the crisp details.
Go Geometric
Swap the central chevron pattern for vertical fluting or a deeply carved diamond trellis to change the aesthetic while keeping the same border structure.
Step 4: Finishing
-
Slow Drying:
Cover the pot loosely with plastic to equalize the moisture content, preventing the thinner carved areas from drying faster than the thicker rims. -
Smooth the Rim:
Give the top uncarved rim one final check for smoothness, as this is where hands will touch the pot most often. -
Bisque Fire:
Fire the piece to bisque temperature once fully bone dry. -
Glazing:
Apply a clear or translucent matte glaze. Since the texture is the star here, avoid heavy opaque glazes that might pool in the grooves and obscure your hard work.
Enjoy the interplay of shadow and light on your finished textured vessel
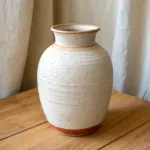
Dot-and-Dash Stippling Texture
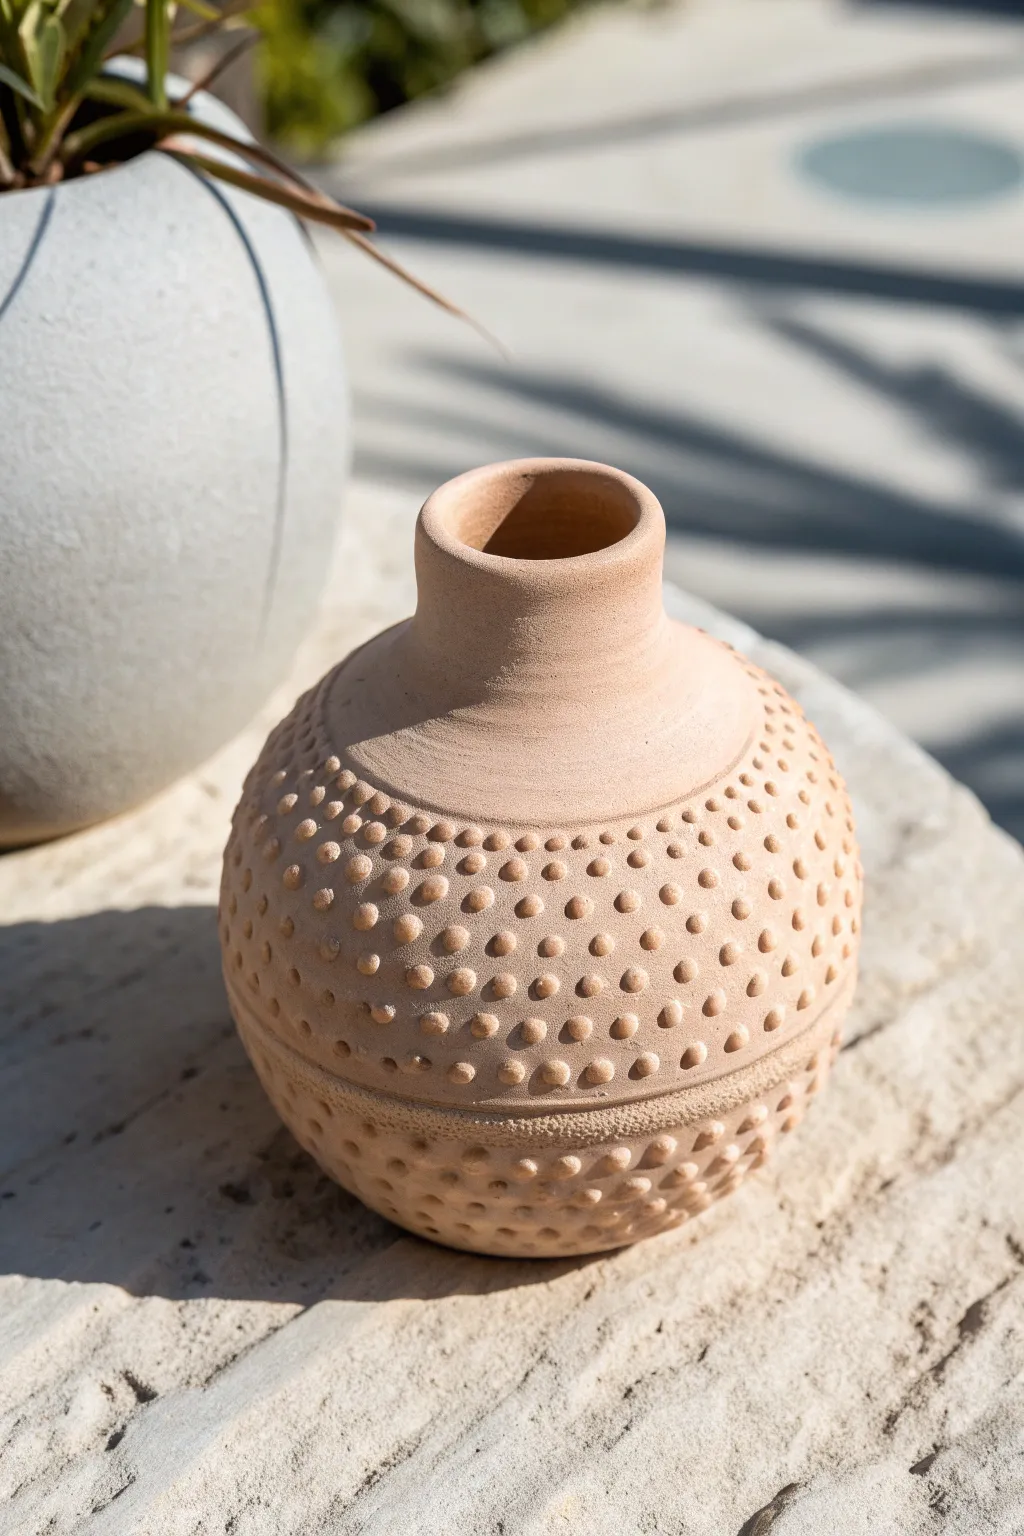
This earthy, tactile vase celebrates the beauty of raw clay with a mesmerizing grid of raised dots. The combination of smooth, thrown forms and repetitive, rhythmic texture creates a piece that begs to be touched.
Step-by-Step Guide
Materials
- Terracotta or stoneware clay (body)
- Pottery wheel
- Throwing tools (sponge, ribs, wire cutter)
- Slip trailer or bulb syringe
- Thick slip (made from the same clay body)
- Needle tool
- Loop tool or trimming tools
- Damp sponge
Step 1: Throwing and Trimming
-
Center and open:
Begin with about 2-3 lbs of well-wedged clay on the wheel. Center it firmly and open the vessel, keeping the floor relatively narrow to support the bulbous shape you’ll create later. -
Pull the cylinder:
Pull the walls up into a cylinder. Aim for an even thickness throughout, slightly thicker at the rim to support the neck. -
Shape the belly:
Using a rib inside, gently push the walls outward to create a rounded, spherical body. Be careful not to let the walls collapse; keep the wheel speed moderate. -
Collar the neck:
Collar the top third of the clay inward to form a distinct shoulder and a vertical, cylindrical neck. Smooth the transition with a metal kidney rib. -
Refine the surface:
While the wheel is spinning slowly, use a soft rib to smooth the entire exterior surface. This clean canvas is crucial for the texture to pop later. -
Dry to leather hard:
Wire the pot off the bat but leave it on a board. Let it dry until it reaches a sturdy leather-hard stage. It needs to be firm enough to handle without warping. -
Trim the foot:
Place the pot back on the wheel (use a chuck if necessary due to the neck) and trim a clean foot ring. Define a distinct horizontal line or groove about an inch up from the bottom to separate the lower textured band.
Dots Falling Off?
If slip dots detach as they dry, your base pot was likely too dry. Score the surface very lightly with a textured rib before piping to give the slip something to grab onto.
Step 2: Creating the Stippled Texture
-
Prepare the slip:
Mix a thick slip using the same clay body. It should be the consistency of cake frosting—stiff enough to hold a peak but fluid enough to pipe. -
Fill the applicator:
Load your slip trailer or bulb syringe. Test the flow on a scrap piece of clay first to ensure the dots come out round and don’t runny. -
Mark horizontal guides:
Place the pot on a banding wheel. Lightly etch horizontal guide lines around the belly of the vase with a needle tool. These will help keep your rows of dots straight. -
Pipe the first row:
Starting at the top shoulder, squeeze small, uniform dots of slip along your first guide line. Try to maintain consistent spacing between each dot. -
Continue the pattern:
Work your way down the pot, row by row. Stagger the dots (brick-lay pattern) or align them in a grid, depending on your preference. The example uses a fairly aligned grid pattern. -
Texture the lower band:
For the bottom section below the incised line, create a rougher texture. You can stipple this area more densely or use a coarse sponge to dab slip on for a contrasting, gritty finish. -
Add separation lines:
If you want distinct zones like the original image, leave small horizontal bands smooth between sections of dots, or use a carving tool to create a deeper groove separating the main body from the foot area. -
Clean up peaks:
Once the slip dots have stiffened slightly (but aren’t bone dry), gently pat down any sharp peaks with a slightly damp sponge or your fingertip to round them off. -
Slow drying:
Cover the vase loosely with plastic. Because you’ve added wet slip to drier clay, slow drying is essential to prevent the dots from cracking or popping off. -
Bisque fire:
Once bone dry, bisque fire the piece to the appropriate temperature for your clay body (usually Cone 04 or 06). -
Finish:
Leave the exterior unglazed to highlight the raw clay texture, or apply a very thin matte wash. Glaze the interior with a liner glaze for functionality.
Level Up: Ombré Effect
Mix a mason stain into your slip for the dots. As you move down the rows, add more stain to the slip to create a color gradient from light to dark.
Place your finished vase in a spot with side lighting to really make those beautiful shadows dance across the surface

TRACK YOUR CERAMIC JOURNEY
Capture glaze tests, firing details, and creative progress—all in one simple printable. Make your projects easier to repeat and improve.
Sgraffito Silhouette Panels
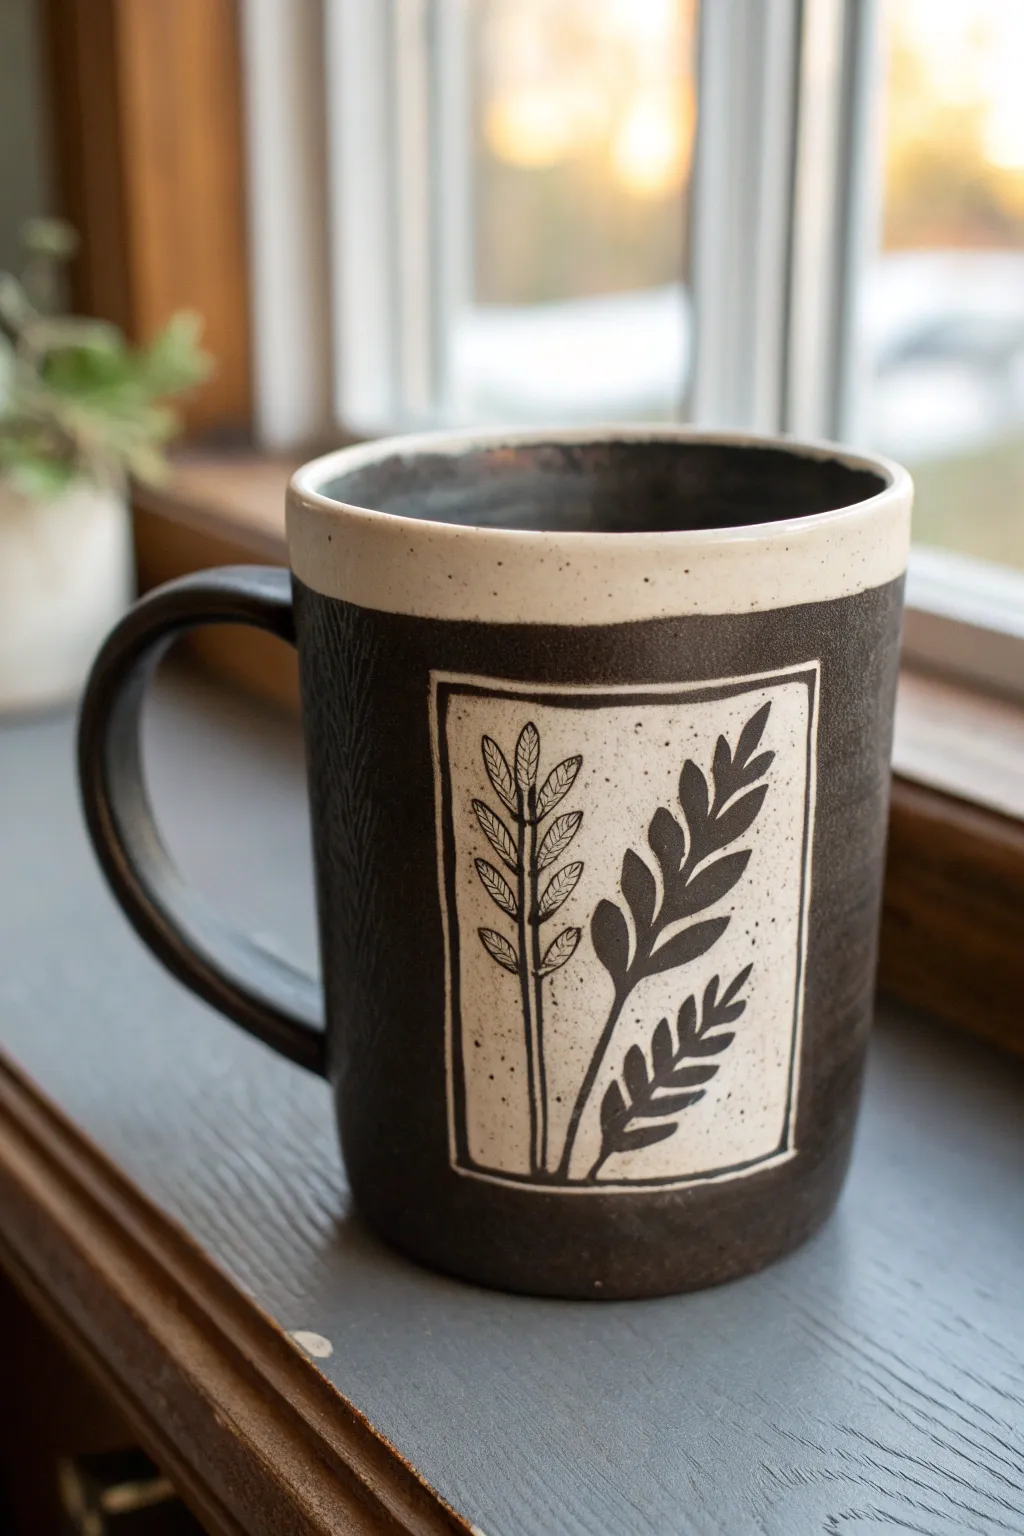
This project combines sleek, dark aesthetics with organic lines by using a framing technique that highlights the carving. The striking contrast between the deep chocolate slip and the raw speckled clay body creates a cozy, modern vessel perfect for morning coffee.
Detailed Instructions
Materials
- Leather-hard clay mug (wheel-thrown or hand-built)
- Black or dark brown underglaze (or colored terra sigillata)
- Flat, wide synthetic brush
- Pencil
- Small loop carving tool (or sgraffito tool)
- Needle tool
- Ruler (optional)
- Damp sponge
- Clear matte or satin glaze
Step 1: Prepping the Canvas
-
Check clay consistency:
Ensure your mug is at a solid leather-hard stage. It should be firm enough to handle without warping but soft enough to carve into easily. -
Define the rim:
Decide on the width of your unglazed rim. I like to leave about an inch of space at the top to create that nice two-tone effect. -
Apply the underglaze:
Using a flat, wide brush, apply 2-3 even coats of black underglaze to the exterior of the mug below your rim line. Don’t worry about the panel area yet; cover the whole lower section. -
Allow to stiffen:
Let the underglaze dry until it is no longer tacky to the touch. This usually takes about 10-15 minutes depending on humidity.
Step 2: Creating the panel
-
Outline the frame:
Use a pencil or a very light touch with a needle tool to scratch out a rectangle on the side of the mug. This will be your ‘window’ for the botanical design. -
Clear the background:
Using a small loop tool, gently scrape away the black underglaze *inside* your rectangular outline. You want to reveal the raw clay body underneath. -
Clean the edges:
Go back over the interior edges of your rectangle to ensure they are crisp and straight. A sharp corner makes the design look much more professional. -
Refine the surface:
If your carving left the raw clay rough, smooth it slightly with a finger or a barely damp sponge, but be careful not to smudge the surrounding black border into the clean space.
Crisp Lines Only
Wait until the clay is truly leather-hard. If it’s too wet, the clay will burr and create jagged edges. If too dry, the underglaze might chip off.
Step 3: Carving the Details
-
Sketch the silhouette:
Lightly draw your botanical design inside the clear panel using a pencil. For this look, sketch one tall, thin stem and a fuller, fern-like branch to the right. -
Fill the silhouette:
Here is the reverse-thinking part: you are now going to re-apply the black underglaze inside your sketched leaves. Carefully paint the leaf shapes black again. -
Let it dry again:
Wait for these new painted leaf shapes to dry completely before you start the final carving details. -
Carve the stems:
Using your finest sgraffito tool or needle tool, carve a single line down the center of the painted stems to suggest veins or structure. -
Detail the thin plant:
For the thinner plant on the left, carve tiny hash marks or veins inside the small leaves to give them texture. -
Outline the box:
Carve a thin line around the inner perimeter of your rectangle, creating a ‘double frame’ effect that separates the drawing from the dark outer mug.
Oops! Smudged Paint?
If you accidentally smudge black underglaze onto the white panel, don’t wipe it while wet! Let it dry fully, then gently scrape it off with a razor blade.
Step 4: Finishing
-
Bisque fire:
Once the mug is bone dry, bisque fire it according to your clay body’s specifications (usually Cone 04 or 06). -
Glaze application:
Dip the interior of the mug into your clear glaze. For the exterior, brush a clear matte glaze over the entire piece, including the sgraffito panel. -
Wipe the rim (optional):
If you want the top beige section to feel raw like the photo, wax resist it before glazing or wipe the glaze off very thoroughly with a sponge. -
Final firing:
Glaze fire the piece to maturity. The clear glaze will seal the underglaze and make the black pop against the toasted clay body.
Enjoy using your new handcrafted mug, where the tactile carving adds a beautiful touch to your daily routine
Carved Slip Inlay Lines (Mishima)
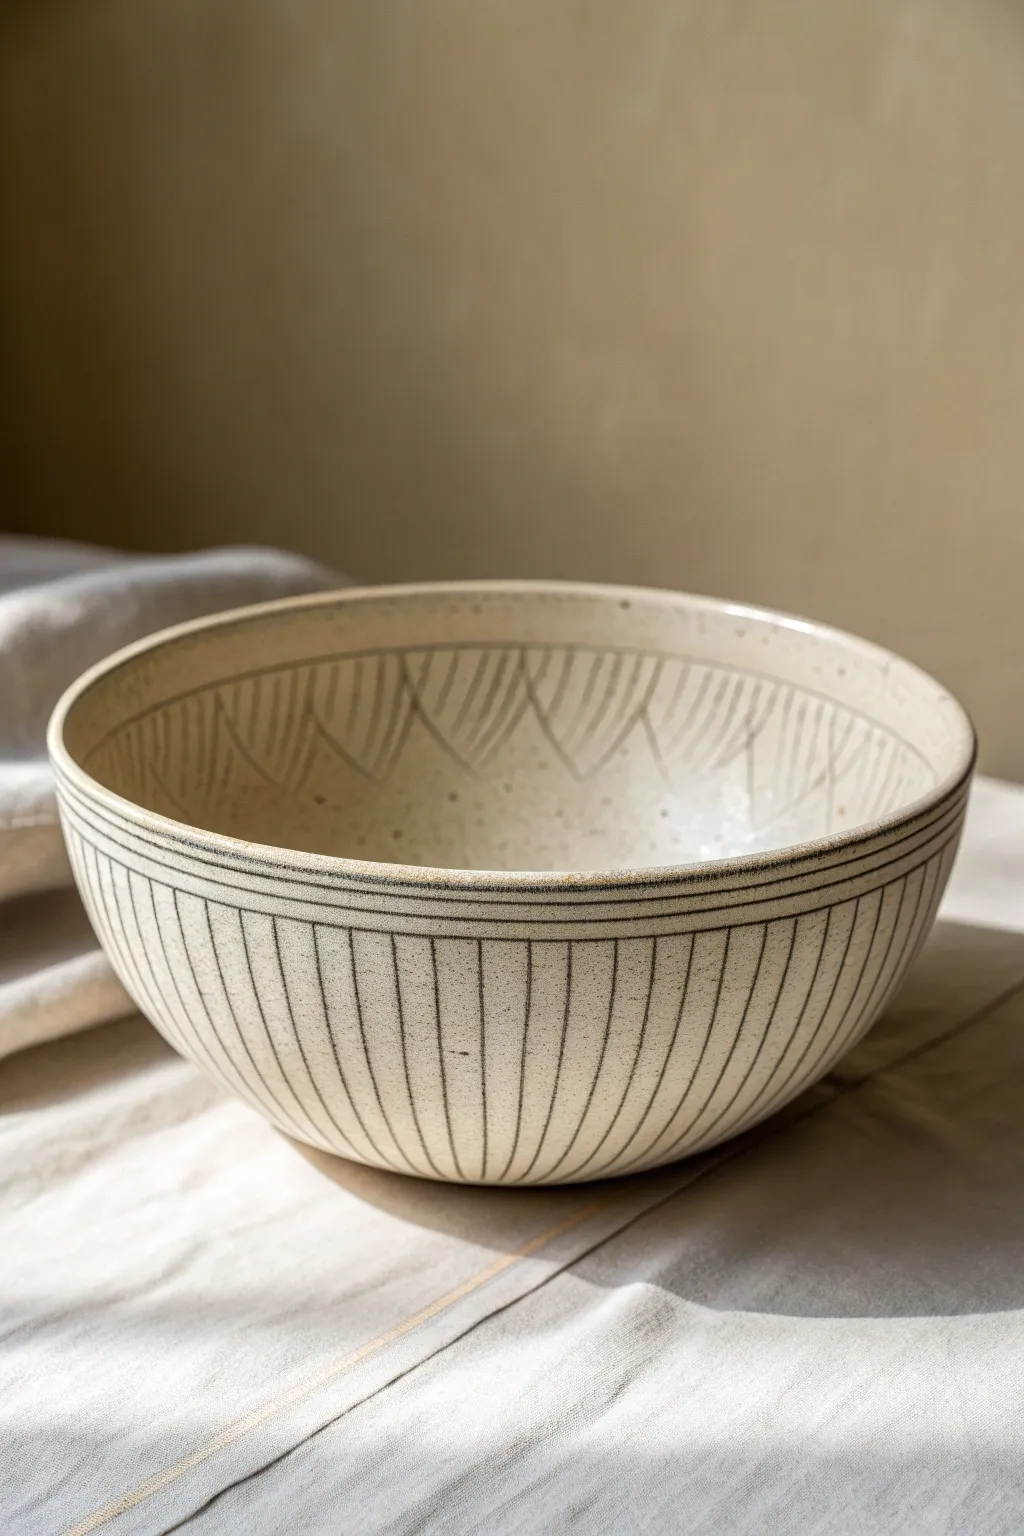
This elegant ceramic bowl combines the classic mishima inlay technique with a modern, pinstriped aesthetic. By carving distinct patterns into the surface and filling them with contrasting slip, you will achieve a crisp, graphic design that highlights the form of your vessel.
How-To Guide
Materials
- Leather-hard stoneware bowl
- Carving tool (needle tool, sgraffito tool, or specialized mishima tool)
- Black underglaze or slip
- Stiff paintbrush
- Flexible metal rib
- Sponge
- Clear transparent glaze
- Pottery wheel (helpful for banding, but a banding wheel works too)
- Wax resist (optional)
Step 1: Planning and Carving the Exterior
-
Preparation:
Ensure your thrown or hand-built bowl is at the perfect leather-hard stage. It should be firm enough to hold its shape without warping but soft enough to carve smoothly without chipping. Wipe the surface with a barely damp sponge to smooth any imperfections. -
Marking the Rim:
Place your bowl on a banding wheel or pottery wheel. Using a needle tool, lightly score two horizontal parallel lines just below the exterior rim. These will frame your vertical stripes. -
Spacing the Stripes:
To ensure even spacing, lightly mark four equidistant points around the bowl’s circumference at the base. Then divide those sections in half, and in half again, until you have your desired stripe density. -
Carving Vertical Lines:
Using a sharp carving tool, draw long, confident vertical lines from the bottom of the bowl up to the lower horizontal rim line you created earlier. Maintain consistent pressure to ensure the depth is uniform. -
Cleaning the Burrs:
Once all vertical lines are carved, gently run a finger or a very slightly damp sponge over the surface to knock off the largest clay burrs. Don’t scrub too hard, or you might blur the crisp edges.
Step 2: Interior Design
-
Interior Banding:
Moving to the inside of the bowl, carve two horizontal rings parallel to the rim, similar to the exterior. This creates a border for the interior pattern. -
Carving the Chevrons:
Create a zig-zag or chevron pattern between the interior rim band and the center of the bowl. I find it helps to mark the top peaks first to keep the spacing even before connecting the diagonal lines. -
Adding Detail:
Inside each triangular shape formed by the zig-zags, curve several smaller lines downward, resembling a stylized fan or fern pattern. Keep these lines lighter and closer together for a delicate look.
Smearing Issues?
If black slip keeps smearing across the uncarved clay, your underglaze is likely too wet or your sponge is too soaked. Let it dry longer and wring your sponge continuously.
Step 3: Applying Slip and Revealing the Design
-
Applying Underglaze:
Using a stiff paintbrush, generously apply black underglaze or slip over all the carved areas. Don’t worry about being messy; the goal is to completely fill the carved crevices. -
Drying Time:
Let the underglaze dry until it loses its sheen and is no longer tacky. If you start the next step too soon, you’ll smear the dark pigment into the pristine clay body. -
Scraping Excess:
Take a flexible metal rib and gently scrape the surface of the bowl. This is the magic moment where the black remains only in the carved recessed lines, revealing the sharp pattern. -
Wiping Clean:
If a slight haze remains after scraping, use a clean, damp sponge to wipe the surface. Rinse the sponge frequently to avoid spreading black streaks. -
Final Bisque Fire:
Allow the bowl to bone dry completely before loading it into the kiln for a bisque firing. -
Glazing:
After the bisque fire, apply a clear, transparent glaze to the entire piece. This will seal the clay and make the black inlay pop with high contrast. -
Final Firing:
Fire the bowl to the maturity temperature of your clay and glaze combination.
Color Pop
Instead of black slip, try a dark navy cobalt or a deep oxide wash. You can also mix a mason stain into white slip for a colorful inlaid line.
Your finished bowl will have a timeless, graphic quality that looks beautiful on any table
Rhythmic Chatter-Style Grooves
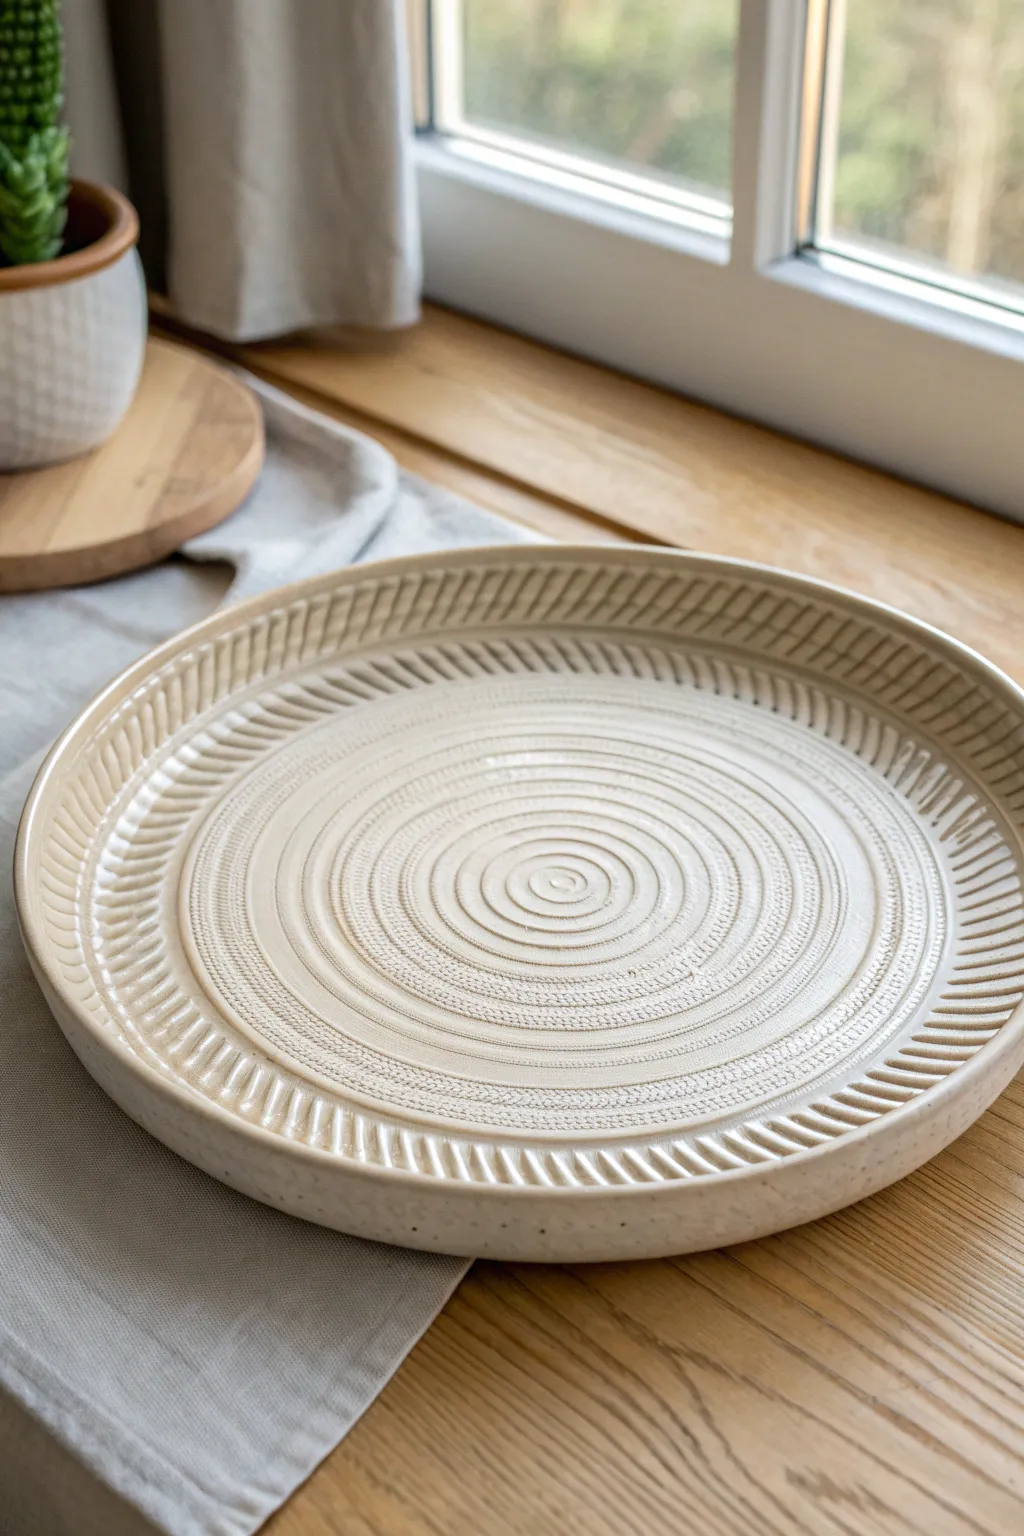
This elegant platter combines the meditative joy of concentric circles with the tactile satisfaction of rhythmic carving, resulting in a piece that feels both modern and timeless. The subtle speckle of the clay body peeking through a milky glaze highlights the carved texture beautifully.
Step-by-Step Guide
Materials
- Speckled stoneware clay (approx. 3-4 lbs)
- Potter’s wheel
- Throwing tools (sponge, wire tool, ribs)
- Chatter tool or loop tool (small)
- Carving tool (U-shape gouge or ribbon tool)
- Wide trimming tool
- Bat for wheel
- Soft brush
- Transparent or semi-opaque white glaze
Step 1: Throwing the Foundation
-
Center wide:
Begin by centering your speckled clay on the bat. Since this is a platter, focus on flattening your mound into a wide, low puck shape rather than a tall cone. -
Open the floor:
Open the clay all the way to your desired floor width, leaving about a 1/2 inch thickness for the base. Compress the floor thoroughly with a rib to prevent S-cracks later. -
Establish the rim:
Pull up the remaining clay at the edge to form a low wall. Then, gently angle this wall outwards to create a wide, sloping rim that is distinct from the flat floor. -
Refine the profile:
Use a wooden or metal rib to clean up the transition between the flat floor and the angled rim. The rim should be substantial enough to support carving but elegant in form. -
Dry to leather hard:
Wire the platter off the bat but leave it in place if possible, or carefully slide it onto a ware board. Allow it to stiffen to a solid leather-hard state—too soft, and the carving will look sloppy.
Clean Lines Pro-Tip
Carve when the clay is on the stiffer side of leather-hard. If it’s too wet, the tool will drag and create burrs. If you get burrs, let it dry completely before brushing them off.
Step 2: Creating the Central Spiral
-
Center specifically:
Place the leather-hard platter back on the wheel. Secure it with Giffin Grips or clay lugs. The piece needs to run perfectly true for the concentric circles to work. -
Start the spiral:
Get the wheel spinning at a medium-slow, consistent speed. Using a small loop tool or a specialized chatter tool, start at the very center of the floor. -
Work outward:
Press the tool gently into the clay and slowly move your hand toward the rim while the wheel spins. This creates a continuous spiral groove. Maintain consistent pressure for even depth. -
Vary the texture:
As you move outward, you can slightly vibrate your hand or use a chatter tool’s natural bounce to create the subtle ‘dashed’ texture seen in the reference image’s concentric lines. -
Finish the floor:
Stop the spiral exactly where the floor meets the angled rim. Use a soft brush to sweep away the clay crumbs from the grooves.
Contrast Level-Up
Apply a dark oxide wash (like iron oxide) to the carved areas and wipe it back before glazing. This will make the spiral and rim textures pop dramatically against a light glaze.
Step 3: Carving the Rim
-
Mark the rhythm:
Stop the wheel completely. You’ll be carving the rim manually. Visualize the spacing for your diagonal cuts; you want them close together for a ribbed effect. -
The first cut:
Using a U-shaped carving gouge or ribbon tool, make a diagonal cut on the rim. Start from the outer edge and pull inward toward the floor, lifting pressure as you reach the transition point. -
Find the flow:
Continue making identical diagonal cuts all the way around the rim. I find it helpful to rotate the wheel slightly after every few cuts to keep my hand position consistent. -
Check consistency:
Aim for the ridges between cuts to be sharp and uniform. The ‘valley’ of the cut should be smooth and rounded. -
Clean boundaries:
Ensure the bottom of each rim cut lines up neatly with the edge of your central spiral area, creating a defined border between the two textures.
Step 4: Finishing and Glazing
-
Smooth the edges:
Once bone dry, gently run a green scouring pad over the sharpest carved ridges to prevent them from being razor-sharp after firing. -
Bisque fire:
Fire the piece to cone 04 (or your clay body’s bisque temperature). -
Apply glaze:
Pour a transparent or semi-opaque milky white glaze over the platter. Pouring usually results in a more even coat on large flat surfaces than dipping. -
Reveal the texture:
If the glaze looks too thick in the grooves, you can gently wipe the high points with a damp sponge. This ensures the clay’s speckles and the carving depth remain visible. -
Final fire:
Glaze fire to maturity (likely cone 5/6 for stoneware). The glaze should pool slightly in the spiral and grooves, accentuating the design.
Your finished platter will be a stunning centerpiece that invites touch and admiration at any table setting
Faceted Planes With Crisp Edges

This stunning faceted cup combines the organic warmth of speckled stoneware with crisp, modern geometry. The interplay between raw clay and deep blue glaze highlights the carved planes, creating a tactile piece that catches the light beautifully.
Step-by-Step Tutorial
Materials
- Speckled stoneware clay body
- Pottery wheel
- Wire clay cutter
- Sponge
- Rib tool
- Sharp carving tool (wire loop or fettling knife)
- Small paddle (optional)
- Deep indigo/navy glaze
- Clear glaze (optional for interior)
- Wax resist
- Kiln
Step 1: Throwing the Form
-
Center and Open:
Begin by centering a ball of speckled clay on your wheel head. Open the clay as you normally would for a cylinder, but aim for slightly thicker walls than usual—about 1/2 inch thick—to allow plenty of material for carving later. -
Pull the Walls:
Pull the walls up into a simple cylinder shape. You don’t need to worry about curves right now; a straight-sided cylinder provides the best canvas for geometric carving. -
Refine the Rim:
Smooth and compress the rim with a chamois or your sponge. A defined, rounded rim contrasts nicely with the sharp angles you will carve later. -
Initial Drying:
Cut the piece from the wheel and let it dry to a firm leather-hard state. It needs to be stiff enough to hold its shape against the pressure of the knife, but soft enough to slice cleanly without crumbling.
Clean Cuts Only
Commit to each cut! Using a cheese cutter wire or sharp blade in one decisive slicing motion creates smoother planes than whittling away small bits.
Step 2: Carving the Facets
-
Plan Your Grid:
Lightly mark a grid around your pot if you want perfect symmetry, or trust your eye for a more organic feel. I find visualizing three horizontal bands helps organize where the triangles will sit. -
Carve the Top Row:
Using a sharp wire loop tool or a cheese cutter, slice downward diagonal planes starting just below the rim. Create a row of downward-pointing triangles all around the top circumference. -
Carve the Bottom Row:
Move to the base and carve upward diagonal planes. These cuts should create upward-pointing triangles that interlock with the shapes above, establishing a diamond or zig-zag pattern. -
Connect the Middle:
Remove the remaining clay in the middle band to connect your top and bottom facets. The goal is to create sharp ridges where the planes meet, forming a continuous geometric tessellation. -
Refine the Edges:
Once all bulk clay is removed, use a damp sponge or your finger to very gently smooth the sharpest burrs, but be careful not to round over the crisp lines that define the facets. -
Dry and Bisque:
Allow the piece to dry completely to bone dry. Fire it in a bisque kiln according to your clay body’s specifications.
Clay Crumbing?
If the clay drags or crumbs as you carve, it’s too dry. Wrap it in damp paper towels and plastic for a few hours to rehydrate the surface before trying again.
Step 3: Glazing and Finishing
-
Wax the Pattern:
Apply wax resist to the upper facets of the pot. Follow the carved lines carefully, covering the top row of triangles and the rim so they remain unglazed and show off the raw speckled clay. -
Glaze the Interior:
Pour a liner glaze (clear or a soft neutral) inside the cup, swirl to coat, and pour out the excess. Wipe any drips off the rim immediately. -
Dip the Exterior:
Dip the base of the cup into a deep indigo or navy blue glaze. The wax resist you applied earlier will prevent the glaze from sticking to the upper section, creating that sharp, dipped geometric line. -
Clean the Line:
After the glaze dries slightly, use a damp sponge to wipe away any tiny beads of glaze that might be sitting on top of the wax resist to ensure a razor-sharp transition. -
Rim Detail:
For the thin blue line on the rim seen in the image, carefully paint a very thin band of the blue glaze right along the top edge, or wipe back the glaze just enough to expose the clay depending on your preference. -
Final Fire:
Fire the piece in your glaze kiln to the appropriate cone temperature (likely Cone 6 or 10 depending on your clay). The heat will melt the glaze into a glassy finish while the raw clay matures into a warm, toasty tone.
Now you have a structured, tactile vessel ready for your morning coffee or a small succulent
Carved Windows and Cutouts
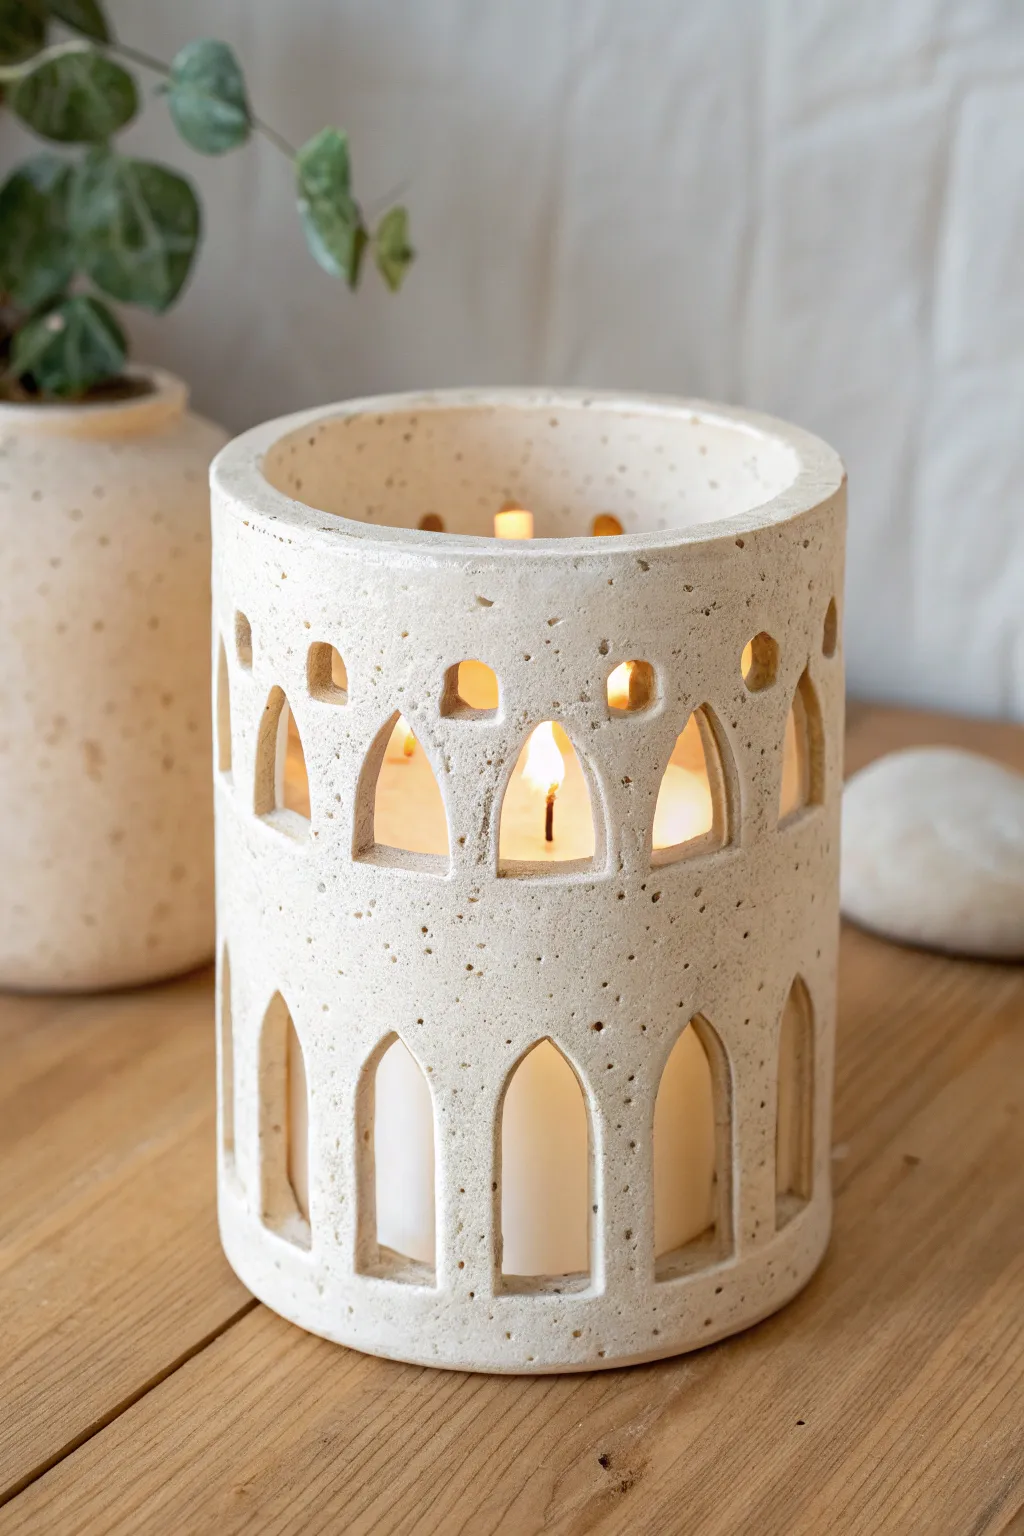
Transform simple slab-built cylinders into miniature architectural wonders with this window-carved luminary project. The speckled clay body and rough texture give it the appearance of ancient stone, creating a warm, historic glow when lit from within.
How-To Guide
Materials
- Speckled stoneware clay (mid-fire)
- Rolling pin
- Guide sticks (1/4 inch thickness)
- Rectangular template (paper or craft foam)
- Needle tool
- Fettling knife
- Scoring tool (or serrated rib)
- Slip
- Small carving loop tool (or specialized window cutter)
- Detail carving knife (X-Acto or similar)
- Smoothing sponge
- Plastic wrap
Step 1: Forming the Cylinder
-
Prepare the slab:
Begin by wedging your speckled clay to remove air bubbles. Roll it out into a long slab, using 1/4 inch guide sticks on either side to ensure an even thickness throughout the entire piece. -
Cut the rectangle:
Place your rectangular template onto the slab. The length should equal the circumference of your desired cylinder plus a little overlap for the seam. Cut around the template cleanly with a fettling knife. -
Create the texture:
Before standing the wall up, consider the surface. The example shows a natural, slightly rough texture. I like to gently pass a rib over the surface without compressing it too much, leaving the natural ‘tooth’ of the clay exposed. -
Bevel the edges:
Cut 45-degree bevels on the two short ends of your rectangle—one bevel facing up, and the other facing down. This ensures a seamless join when the clay is rolled. -
Form the cylinder:
Carefully lift the slab and curl it into a cylinder shape. Score the beveled edges aggressively and apply slip, then press the ends together firmly. -
Seal the seam:
Reach inside and smooth the seam with your finger or a tool. Do the same on the outside, blending the clay until the join is invisible. Gently re-round the cylinder if it got distorted.
Clean Cuts Pro Tip
When carving windows, let the clay get slightly firmer than usual leather hard. If your knife drags, wrap the piece in plastic for an hour to equalize moisture before trying again.
Step 2: Planning and Carving
-
Let it stiffen:
This is crucial: allowing the cylinder to dry to a ‘leather hard’ state. If you carve too soon, the walls will collapse; wait too long, and the clay will be too brittle to cut cleanly. -
Mark the grid:
Using a needle tool and a very light touch, lightly scratch horizontal guidelines around the cylinder to divide it into two ‘stories’ or levels for your windows. -
Sketch the arches:
Lightly sketch your arch shapes directly onto the clay. For the bottom row, draw tall, narrow gothic arches. For the top row, draw slightly wider, shorter arches. -
Add upper details:
Above the top row of arches, sketch small square or rectangular ‘clerestory’ windows. Ensure they are aligned with the peaks of the arches below them for visual balance. -
Cut the main windows:
Using a sharp detail knife, carefully cut out the negative space of the arches. Support the wall from the inside with your other hand to prevent cracking while you cut. -
Refine the cutouts:
Once the main chunk of clay is removed, use the knife to clean up the corners and curves. The edges should be sharp and distinct. -
Carve the small windows:
Cut out the small upper squares. These are tiny, so proceed slowly. If the clay is stuck in the hole, gently push it inward rather than pulling it out to avoid tearing the exterior. -
Cut the bevels:
To mimic the look of thick stone walls, use a small carving tool to slightly bevel the outer edge of each window frame. This catches the light beautifully.
Step 3: Finishing Touches
-
Clean the crumbs:
Once the clay is visibly dry (bone dry), use a stiff paintbrush to sweep away any clay crumbs or burrs left from carving. Do not use water at this stage, or you risk washing away the sharp edges. -
Bisque fire:
Fire the piece to cone 04 (or your clay’s specific bisque temperature). This sets the shape permanently. -
Glaze application:
Apply a matte, creamy white glaze or a clear matte glaze if your clay body is naturally beautifully speckled. Avoid thick, runny glazes that might fill in your intricate window carvings. -
Final wipe:
Wipe the bottom of the cylinder clean with a sponge to prevent it from sticking to the kiln shelf. -
Glaze fire:
Fire to the maturation temperature of your clay and glaze (likely cone 5 or 6 for stoneware). Let it cool completely before inserting a candle.
Level Up: Shadow Play
Carve the windows at an inward-slanting angle rather than straight through. This maximizes the ‘halo’ effect of the candlelight casting shadows through the arches.
Enjoy the soothing atmosphere as candlelight dances through the arches of your handmade lantern
Honeycomb Lattice Carving
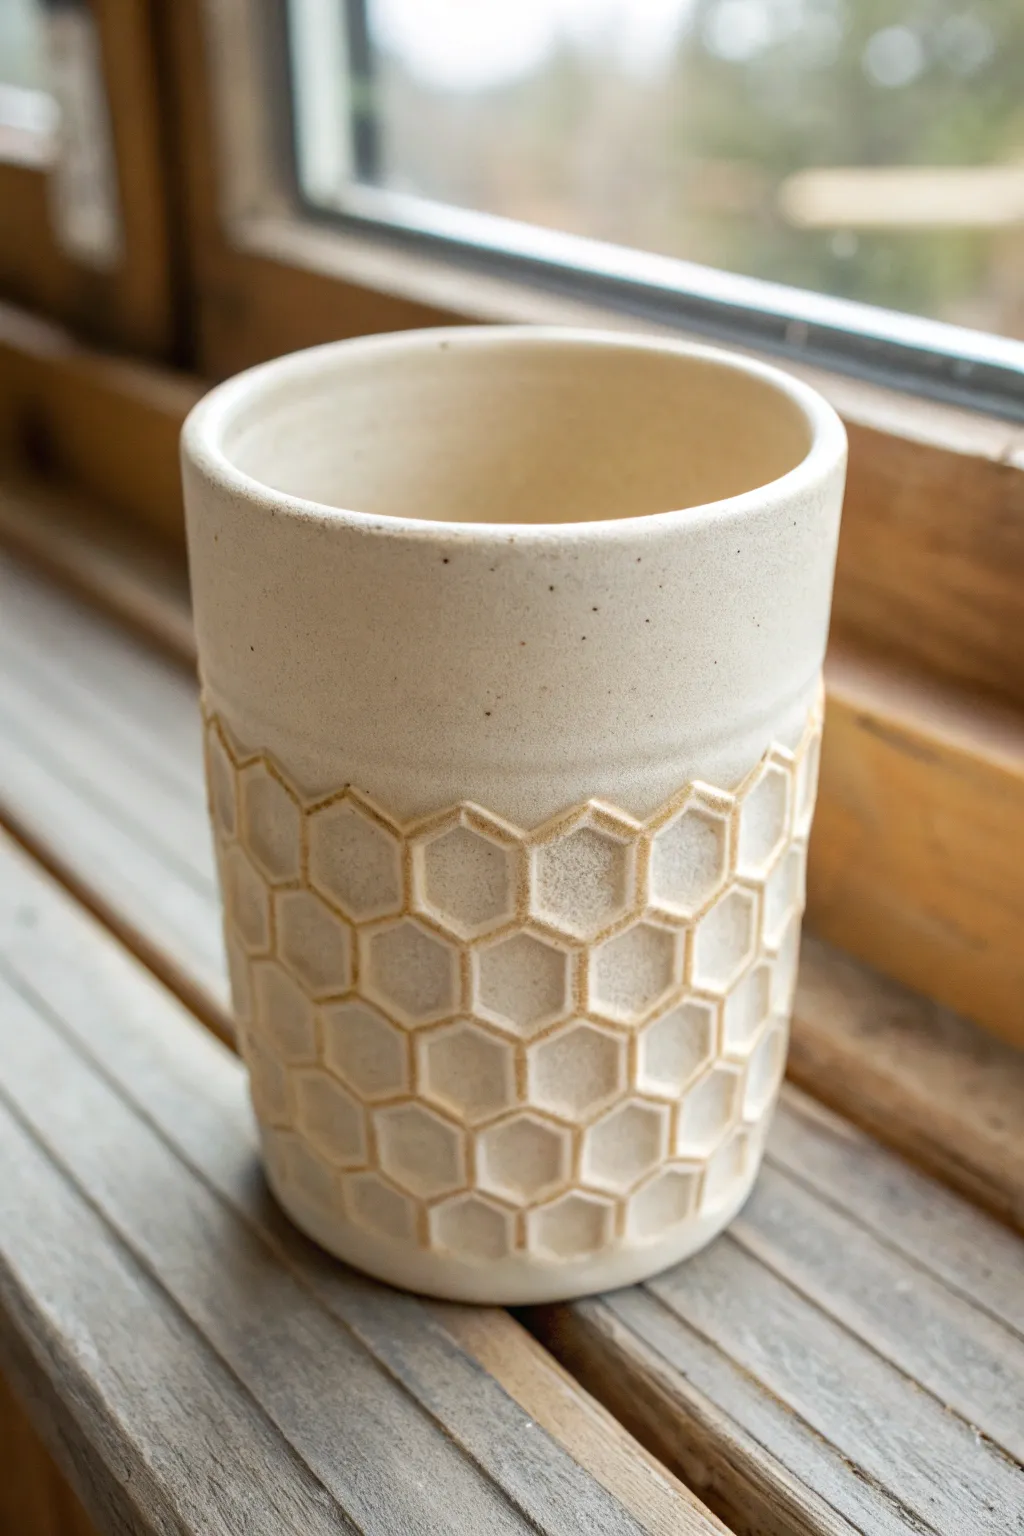
This project combines the sleek simplicity of a cylindrical tumbler with the organic, repeating beauty of a honeycomb lattice. The result is a tactile, speckled ceramic cup where the glaze breaks beautifully over carved hexagonal ridges, perfect for your morning coffee.
Step-by-Step Guide
Materials
- Stoneware clay (speckled buff recommended)
- Pottery wheel (or slab roller/rolling pin)
- Wire cutter
- Rib tool (metal and rubber)
- Needle tool
- Carving tool (small loop tool or specific sgraffito tool)
- Hexagon cutter (optional but helpful)
- Ruler
- Sponge
- White matte or satin glaze
Step 1: Forming the Base Vessel
-
Prepare the clay:
Begin by wedging about 1 to 1.5 pounds of speckled stoneware clay to remove any air bubbles. This clay body is ideal because the iron speckles will show through the glaze later. -
Throw a cylinder:
Center your clay on the wheel and open it up. Plll the walls up into a tall, straight cylinder. Aim for walls that are slightly thicker than your usual final preference—perhaps ¼ inch—to accommodate the carving depth without piercing through. -
Refine the shape:
Use a metal rib to smooth the outside walls and remove throwing rings. This smooth canvas is crucial for a clean geometric pattern. Create a slight inward taper at the rim if you prefer a more contained shape. -
Dry to leather hard:
Allow the piece to dry slowly until it reaches a leather-hard state. It should be firm enough to handle without deforming but soft enough to carve into easily. -
Trim the foot:
Place the leather-hard cylinder back on the wheel (upside down) and trim the bottom. Define the foot ring now, as handling it later during carving might be risky.
Uneven Honeycombs?
Print a hexagon pattern on paper, wrap it around the cup like a stencil, and trace through it with a needle tool for perfect symmetry.
Step 2: Drafting the Honeycomb Lattice
-
Mark the boundaries:
Decide where your pattern will start and stop. I like to leave the top third of the cup smooth for a comfortable lip feel, so lightly score a horizontal line around the circumference where the carving will begin. -
Create a grid:
Using a ruler and a needle tool, lightly scratch a grid or guide marks around the cylinder. If you are free-handing, this helps keep the hexagons aligned. -
Imprint the pattern:
If you have a hexagon cookie cutter or clay cutter, gently press it into the surface to create your outline. If not, use your needle tool to sketch the interlocking hexagons, starting from the bottom and working your way up to your boundary line.
Go Geometric
Instead of hexagons, try carving triangles or scales. The technique remains the same, but the vibe changes completely.
Step 3: Carving the Texture
-
Select your tool:
Choose a small loop tool with a flat edge or a specialized carving tool. The goal is to remove the interior of the hexagon while leaving a raised ridge for the outline. -
Carve the centers:
Carefully shave away the clay inside each hexagon outline. You want to create a concave scoop or a flat recessed area, leaving the ‘walls’ of the honeycomb standing proud. -
Bevel the edges:
For a softer look, gently slope the carving depth so it is deepest in the center of the hexagon and shallower near the ridges. -
Clean up burrs:
As you carve, little crumbs of clay will accumulate. Don’t brush them off with your finger yet, as you might smear them. Wait for them to dry slightly, then use a soft brush to sweep them away. -
Smooth the ridges:
Once the carving is complete, run a slightly damp sponge or a finger over the raised ridges to soften any sharp corners. This ensures the cup is comfortable to hold.
Step 4: Finishing and Glazing
-
Bisque fire:
Let the piece bone dry completely, then fire it to cone 04 (or your clay body’s bisque temperature). -
Apply wash (optional):
To enhance the depth, you can apply an iron oxide wash to the carved areas and wipe it back, leaving color only in the recesses. This emphasizes the ‘breaking’ look. -
Glaze application:
Dip or brush on a white matte or satin glaze. A glaze that breaks (thins out) over edges is essential here. It will slide off the raised honeycomb ridges, revealing the toasted clay color underneath, while pooling white in the center of the hexagons. -
Check the rim:
Wipe the rim with a damp sponge to ensure the glaze is smooth where your lips will touch. -
Glaze fire:
Fire the piece to maturity (typically cone 5 or 6 for stoneware). The heat will cause the speckles to bleed through the white glaze, creating that lovely rustic finish.
Once cooled, fill your new textured tumbler with a hot drink and enjoy the tactile experience of your handiwork
Topographic Contour Map Lines
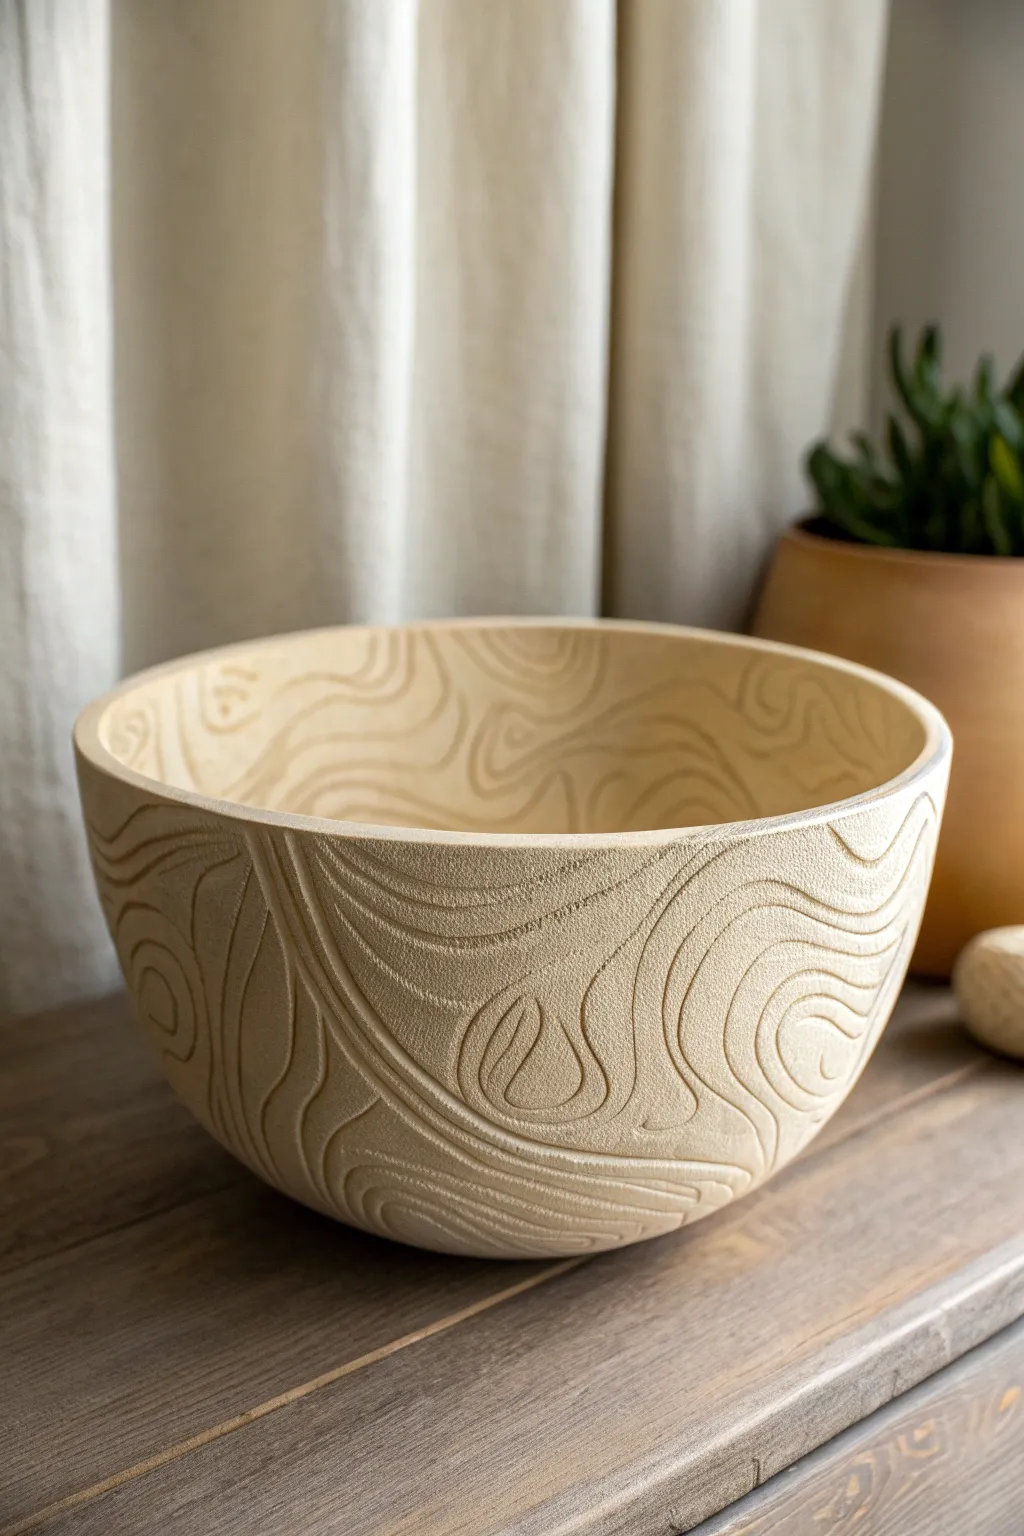
This project transforms a simple clay vessel into a tactile landscape inspired by topographic maps. The flowing, organic lines are carved directly into leather-hard clay, creating a stunning play of light and shadow across the bowl’s surface.
Detailed Instructions
Materials
- Light-colored stoneware clay (smooth body preferred)
- Pottery wheel (or slab roller/molds for hand-building)
- Loop tool (small, rounded wire)
- Needle tool
- Ribs (metal and rubber)
- Sponge
- Wire cutter
- Soft-bristle brush
- Clear matte glaze
Step 1: Forming the Base Vessel
-
Throwing the Form:
Begin by centering a generous ball of light stoneware clay on your wheel. Open the center and pull up the walls to create a deep, rounded bowl shape, aiming for a consistent wall thickness of about 3/8 of an inch to allow depth for carving without puncturing through. -
Refining the Curve:
Use a flexible metal rib to shape the exterior, ensuring a smooth, continuous curve from the base to the rim. This smooth canvas is essential for the carving stage. -
Smoothing the Rim:
Compress the rim with a piece of plastic or chamois leather. A rounded, slightly thickened rim adds visual weight and durability to the finished piece. -
Drying to Leather Hard:
Allow the bowl to dry slowly until it reaches the leather-hard stage. The clay should be firm enough to hold its shape when handled but soft enough to carve easily without chipping. -
Trimming the Foot:
Flip the bowl over and trim a neat foot ring. While the focus is on the body carving, a clean foot elevates the entire piece.
Cracked Lines?
If clay chips while carving, it’s too dry. Mist it with water, wrap it in plastic, and wait 3-4 hours. If it smears or sticks to the tool, let it dry longer
Step 2: Mapping the Terrain
-
Sketching the Guidelines:
With the bowl right-side up, use a needle tool to very lightly scratch your main topographic ‘islands’ onto the exterior surface. These shapes should be organic and irregular, like puddles or abstract clouds. -
Connecting the Regions:
Draw connecting lines that flow between your main shapes. I like to imagine how water would flow around obstacles to help these lines feel natural. -
Transitioning to the Interior:
Don’t stop at the rim; sketch continuing lines that spill over the edge and down into the bowl’s interior, creating a seamless 3D effect.
Pro Tip: Depth Variation
Vary your carving pressure slightly. Making some grooves deeper than others creates richer shadows and makes the topographic effect look more realistic
Step 3: Carving the Contours
-
Selecting the Right Tool:
Choose a small loop tool with a U-shaped wire. A sharp tool is critical here to ensure clean cuts rather than dragging the clay. -
Starting the Main Channels:
Begin carving along your sketched guidelines. Apply steady, moderate pressure to remove a ribbon of clay, creating a groove approximately 2-3mm deep. -
Adding Parallel Lines:
Work outward from your initial grooves, carving subsequent lines that parallel the first ones. Vary the spacing slightly—some areas should have dense, tight lines (steep terrain) and others wider spacing (flat terrain). -
Handling the Rim:
When carving over the rim, lighten your pressure slightly to avoid distorting the edge. Follow the curve carefully as you transition from the outside wall to the inside. -
Carving the Interior:
Continue the pattern inside the bowl. This can be tricky due to the angle, so support the outside of the bowl with your hand directly behind where you are carving inside. -
Checking for Burrs:
Pause frequently to brush away clay crumbs. Use a soft brush to gently sweep out the carved grooves, removing any loose bits that could stick during firing.
Step 4: Finishing and firing
-
Softening Edges:
Once the carving is complete and the pot is bone dry, run a slightly damp sponge over the surface very lightly. You don’t want to erase the texture, just take the sharpness off the carved ridges. -
Bisque Fire:
Load the bowl into the kiln for a bisque firing to cone 04 (or your clay’s specific range). -
Glazing:
Apply a clear matte glaze or a very light translucent wash. Avoid thick, opaque glazes which will fill in the grooves and hide all your hard work. -
Final Firing:
Glaze fire the piece to maturity. A stoneware firing (cone 5-6) typically results in a durable, stone-like finish that suits this aesthetic perfectly.
The result is a beautifully textured vessel that invites touch and exploration
Carved Lettering Bands
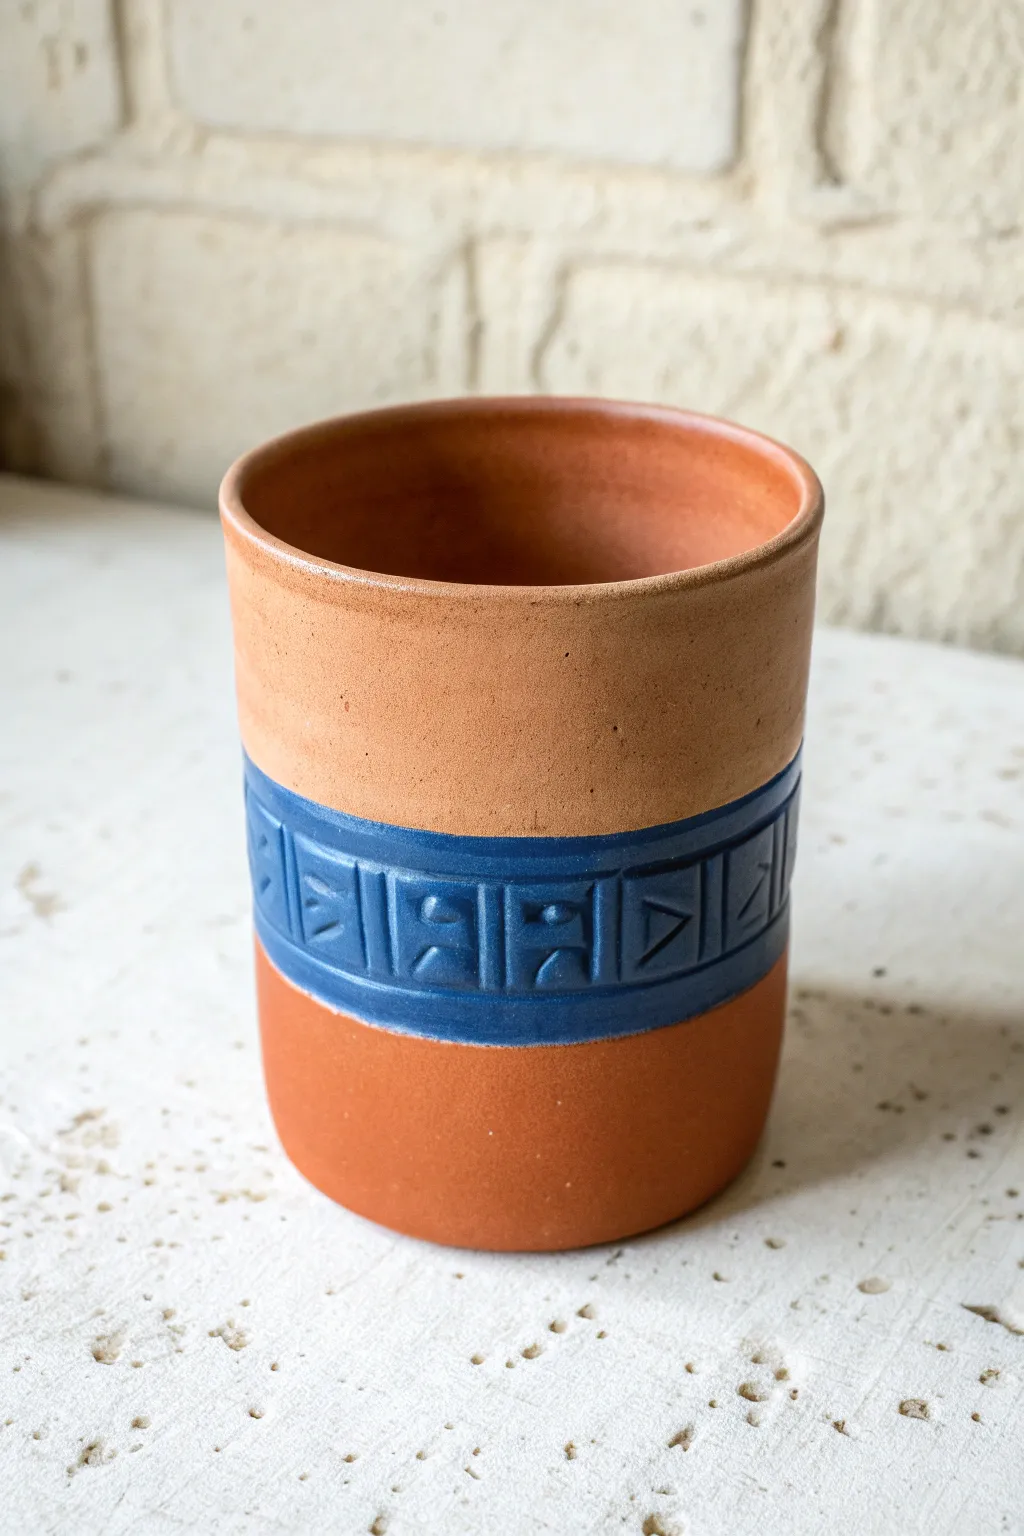
Create a stunning tactile experience with this terracotta tumbler, featuring a bold central band of carved geometric motifs. The contrast between the warm, raw clay body and the cool blue inlaid glaze highlights the intricate carving work perfectly.
Step-by-Step Guide
Materials
- Stoneware clay (terracotta color recommended)
- Small carving tools (loop tool or stylus)
- Pottery wheel (or slab roller for hand-building)
- Sponge
- Ruler or calipers
- Blue underglaze or slip
Step 1: Forming the Vessel
-
Prepare the Clay:
Begin by wedging your terracotta clay thoroughly to remove air pockets and ensure an even consistency. -
Throw the Cylinder:
Center your clay on the wheel and throw a simple, straight-walled cylinder. Aim for a height of about 4-5 inches and an even wall thickness. -
Refine the Rim:
Compress the rim with a chamois or sponge to ensure it is smooth and pleasant to drink from. -
Initial Drying:
Allow the cup to dry to a firm leather-hard stage. It needs to be sturdy enough to handle carving pressure without warping. -
Trimming:
Turn the cup over on the wheel and trim the foot and lower walls to remove excess weight and define the shape.
Step 2: Carving the Band
-
Mark the Band:
Using a ruler or calipers, lightly score two horizontal parallel lines around the middle of the cup to define where your carving band will sit. -
Divide the Space:
Lightly mark vertical guidelines within the band to create even sections for your recurring pattern. -
Sketch the Design:
With a needle tool, very faintly scratch your geometric shapes or stylized lettering into the blocked-out sections. -
Carve the Borders:
Use a small square-ended carving tool to deepen the top and bottom horizontal lines, creating a recessed border for your design. -
Carve the Motifs:
Carve out the negative space around your shapes using a small loop tool, leaving the geometric figures raised. I prefer to work slowly here to keep the edges crisp. -
Clean Up Burrs:
Once the carving is complete, use a soft brush or a damp sponge to smooth away any sharp clay burrs or crumbs.
Sharp Lines Pro Tip
Let the cup dry slightly past leather-hard before the final clean-up sponge. Harder clay crumbles away cleanly rather than smearing.
Step 3: Glazing and Finishing
-
Bisque Fire:
Fire the piece in the kiln to bisque temperature (usually Cone 04 or 06) to prepare it for glazing. -
Apply Underglaze:
Brush a thick coat of deep blue underglaze specifically into the carved band area, ensuring it gets into all the recessed nooks. -
Wipe Back:
Using a clean, damp sponge, carefully wipe the surface of the band. This removes glaze from the raised areas and leaves color only in the carved recesses and background. -
Clear Glaze (Optional):
For a fully food-safe interior, pour a clear liner glaze inside the cup, swirl to coat, and pour out the excess. -
Clean the Exterior:
Ensure the raw clay parts of the exterior are free of any stray glaze splashes. -
Final Fire:
Fire the cup to the maturity temperature of your clay body (e.g., Cone 5 or 6) to vitrify the clay and set the glaze.
Uneven Drying?
If the rim dries faster than the base, wrap the top edge loosely with plastic while the bottom catches up.
Enjoy your new custom tumbler with your morning coffee
Light-and-Shadow Channel Carving
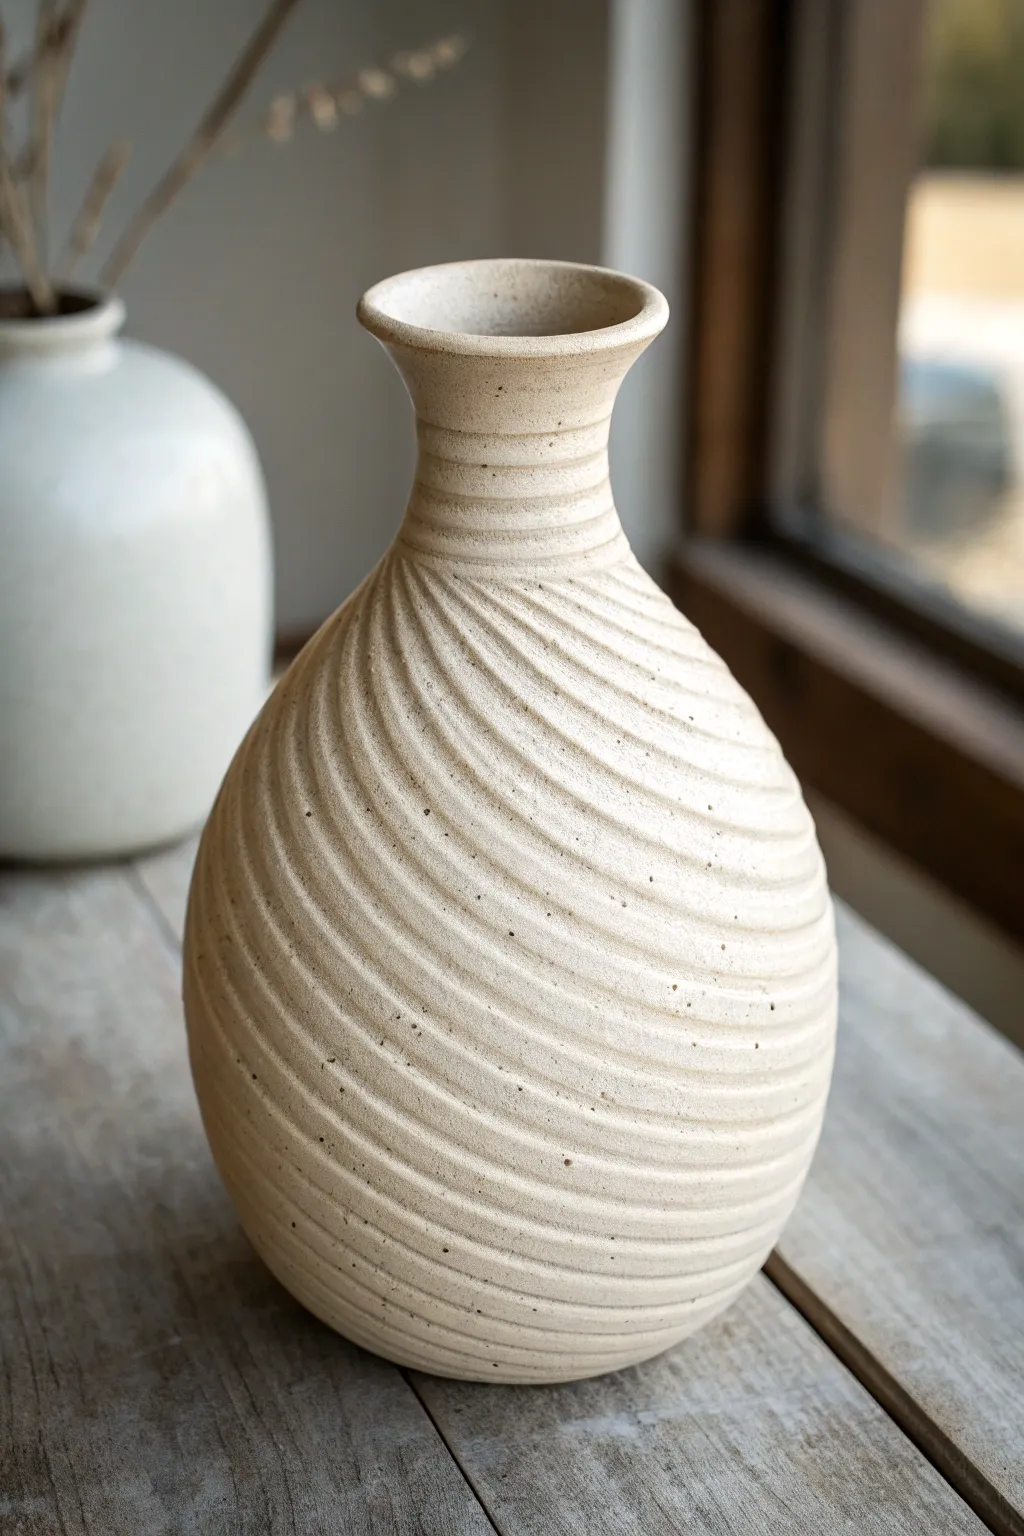
Embrace the play of light and shadow with this textured stoneware vase project. By carving deep, rhythmic channels into a classic bottle form, you create a piece that feels both organic and elegantly structured, showcasing the natural beauty of speckled clay.
Detailed Instructions
Materials
- Speckled stoneware clay (approx. 3-4 lbs)
- Pottery wheel
- Throwing sponge and bucket of water
- Wire cutter
- Ribs (metal and wooden)
- Small loop tool or pear-shaped trimming tool
- Needle tool
- Chamois cloth
- Clear matte glaze
- Kiln
Step 1: Throwing the Base Form
-
Prepare the Clay:
Begin by thoroughly wedging your speckled stoneware clay to remove any air bubbles. Center the clay on the pottery wheel head, ensuring a solid, stable mound before opening. -
Open and Pull:
Open the clay and establish a flat floor about 3-4 inches wide. Compress the floor well to prevent cracking. Begin pulling up the walls, aiming for a tall cylinder initially. -
Shape the Belly:
Once you have height, use a rib on the inside to gently push the walls outward, creating a rounded, bulbous belly. Support the outside with your other hand or a flexible metal rib to maintain a smooth curve. -
Collar the Neck:
Gradually collar the top third of the clay inward to form a narrow neck. Do this in stages, compressing the rim after each collaring pass to keep the clay particles tight and prevent buckling. -
Define the Rim:
Flare the very top opening slightly to create a distinct, rolled rim. Use a chamois cloth to compress and smooth this edge for a professional finish. -
Refine the Surface:
Before taking the pot off the wheel, use a metal rib to remove all throwing lines and slurry. The surface needs to be pristine and smooth to serve as a clean canvas for your carving. -
Dry to Leather Hard:
Wire the pot off the wheel and let it dry slowly until it reaches a sturdy leather-hard stage. It should be firm enough to handle without deforming, but soft enough to carve easily.
Clean Lines
Carve when clay is ‘cheddar cheese’ hard. Too wet, the tool drags; too dry, it chatters. This specific hardness ensures the crispest ridges.
Step 2: Carving the Channels
-
Plan the Spiral:
Visualize the flow of the spiral. Lightly scratch a guide line with a needle tool starting from the bottom of the belly and curving up towards the neck if you need a reference, though freehand often looks more organic. -
Start the First Channel:
Using a small loop tool, begin carving at the base. Pull the tool upwards in a long, continuous diagonal sweep, following the curve of the pot. Maintain consistent pressure to keep the depth uniform. -
Establish the Rhythm:
Turn the pot slightly and carve the next channel parallel to the first. The ridge left between the two cuts should be sharp and distinct. I find it helpful to look at the negative space between cuts to keep the spacing even. -
Navigate the Curves:
As you carve over the bulbous belly and up into the narrow neck, adjust your hand angle. The channels will naturally hug the form’s contours, appearing wider at the belly and tighter at the neck. -
Carve the Neck Detail:
For the neck itself, transition the spirals into more horizontal rings, or continue the spiral all the way to the rim depending on your preference. In this project, the texture continues seamlessly up to the flared lip. -
Clean the Burrs:
After carving the entire surface, let the pot dry slightly more. Then, gently brush away the clay crumbs (burrs) with a soft brush. Don’t use a sponge here, or you’ll wash away the crisp edges of your carving. -
Smooth the Edges:
Once fully bone dry, lightly run a finger or a very fine sanding sponge over any extremely sharp ridges just to break the edge so it isn’t dangerous to the touch.
Uneven Spacing?
Don’t panic if channels vary slightly in width. This variation adds handmade character. Just ensure you don’t cut too deep and breach the wall.
Step 3: Firing and Glazing
-
Bisque Fire:
Load the vase into the kiln for a bisque fire (usually Cone 04). This hardens the clay and prepares it for glazing. -
Apply Clear Glaze:
Dip the bisqued vase into a clear matte glaze. A transparent glaze is crucial here; it protects the piece while allowing the natural speckles of the clay body to show through. -
Wipe the Foot:
Use a damp sponge to completely wipe any glaze off the bottom foot of the vase to prevent it from sticking to the kiln shelf. -
Glaze Fire:
Fire the vase to the final temperature required by your clay body (typically Cone 5 or 6 for stoneware). Once cooled, the channels will catch the light, emphasizing the sculptural form.
Now you have a stunning, textural vessel that celebrates the tactile nature of raw clay.