A good succulent tray is basically a tiny living landscape you get to rearrange with your own two hands. I love how one shallow container can look calm and minimal or totally lush and crowded—depending on your mood and your plants.
Classic Succulent Tray in a Shallow Ceramic Dish
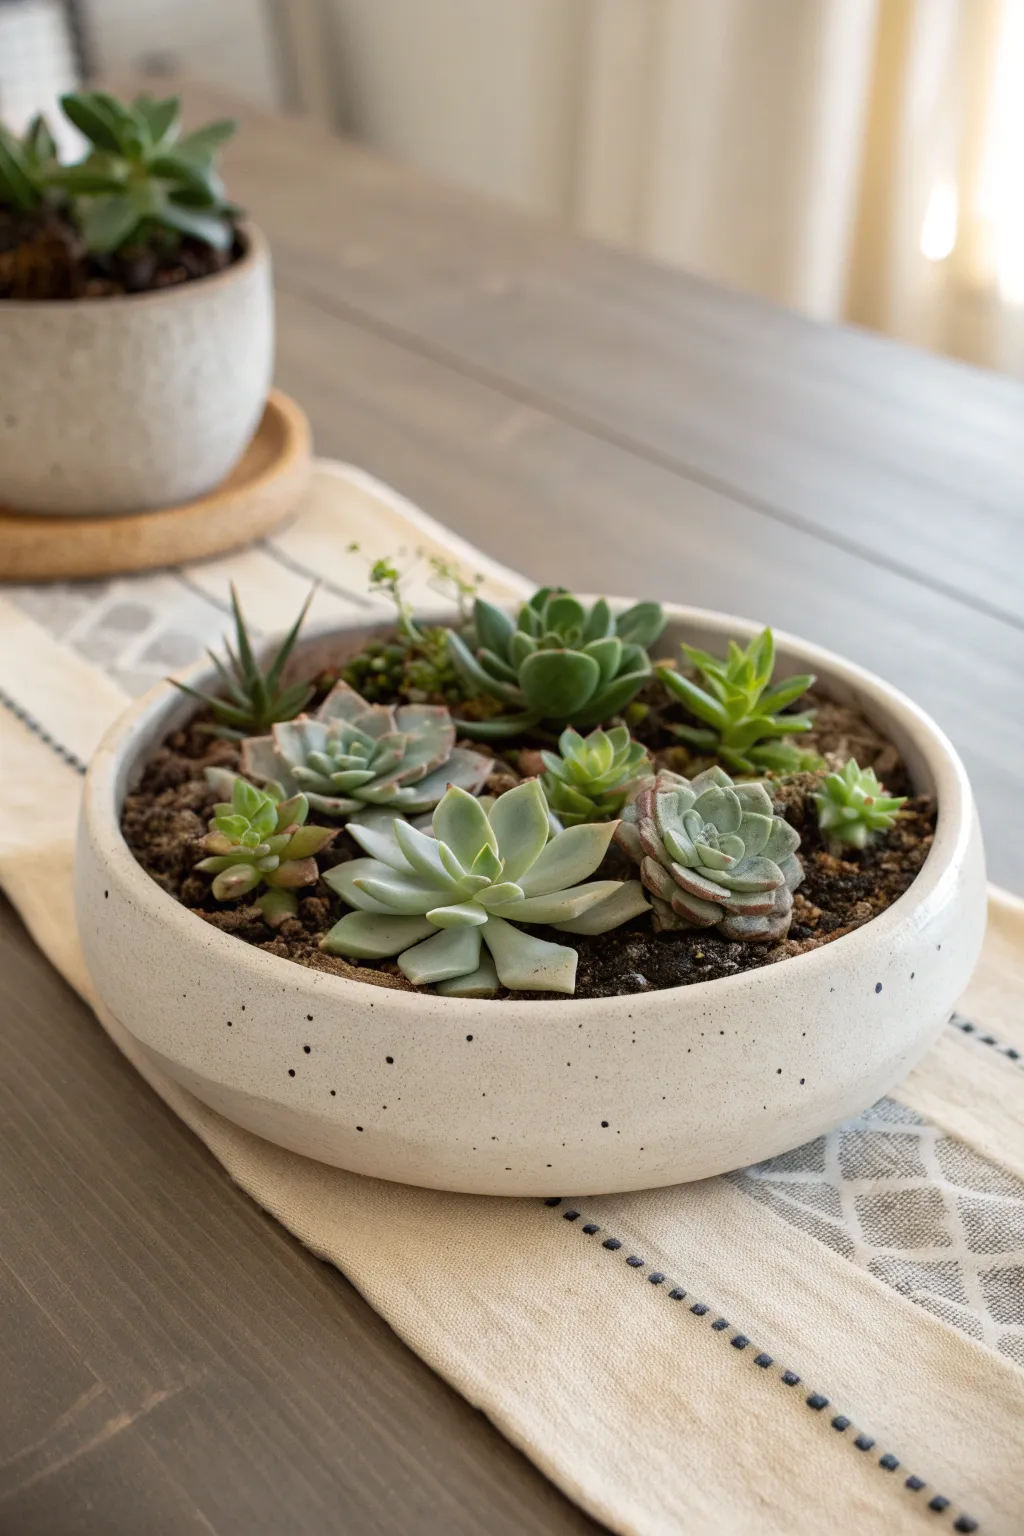
Bring a touch of modern greenery to your table with this clean and elegant succulent arrangement. Featuring a speckled shallow ceramic dish filled with a variety of textures and rosette shapes, this centerpiece is as easy to maintain as it is beautiful to look at.
Step-by-Step
Materials
- Shallow, round ceramic planter (white with speckles, approx. 8-10 inches wide)
- Succulent potting mix (cactus soil)
- Small gravel or perlite (for drainage)
- Assorted succulent plugs (2-inch sizes): includes Echeveria, Haworthia, and Sedum varieties
- Small trowel or spoon
- Soft paintbrush (for cleaning leaves)
- Water spray bottle or squeeze bottle
Step 1: Preparing the Base
-
Choose the right vessel:
Select a shallow, bowl-like planter. The one in the image is a creamy white, speckled ceramic that contrasts beautifully with the dark soil and green leaves. Ensure it has a drainage hole; if not, you’ll need to be extremely careful with watering. -
Create a drainage layer:
If your pot lacks a drainage hole, add a thin layer of small gravel or pebbles to the very bottom. This helps keep standing water away from the delicate roots. -
Add the soil foundation:
Fill the bowl about halfway with specialized cactus or succulent potting mix. This soil is gritty and fast-draining, which is essential for preventing root rot. -
Create a slight mound:
I like to create a very subtle mound in the center of the soil rather than keeping it perfectly flat. This adds a little dimension to the final arrangement and helps showcase the central plants.
Droopy Leaves?
If leaves look shriveled or wrinkly, the plants are thirsty. If they look translucent or mushy, you are overwatering. Let the soil dry out completely.
Step 2: Arranging the Plants
-
Plan the layout:
Before planting, arrange your unpotted succulents on a table to test the composition. Place the largest rosette (like the pale Echeveria) slightly off-center as a focal point. -
Prepare the roots:
Gently remove the succulents from their nursery pots. Massage the root balls lightly to loosen tight roots and shake off excess old soil. -
Plant the anchor piece:
Start by planting the largest succulent—the pale, powdery blue-green Echeveria—toward the front-center of the bowl. Dig a small divot, place the roots in, and tuck soil around unique. -
Add height and texture:
Place the taller, darker green succulent (likely a Sedum or similar rosette) behind the main focal point. This creates visual depth. -
Fill the perimeter:
Work your way around the edges. Add the Haworthia (the spiky one) on the left side for a textural contrast against the smooth echeverias. -
Group smaller varieties:
Tuck the smaller rosettes and compact sedums into the gaps. Notice how the arrangement isn’t perfectly symmetrical; clustering a few small ones together looks more natural. -
Vary the colors:
Try to alternate shades. Place the reddish-tinged succulents next to bright green ones to make each individual plant pop against its neighbor.
Top Dressing
Add a layer of decorative sand or small white pebbles on top of the soil for a polished, professional floral shop look that also holds moisture in.
Step 3: Finishing Touches
-
Secure the plants:
Once all plants are in position, take a handful of fresh soil and carefully fill in the gaps between the root balls. Press down firmly but gently to secure them. -
Check the soil level:
Ensure the soil line is slightly below the rim of the bowl so dirt doesn’t spill over when you water or move the tray. -
Clean the leaves:
It’s almost inevitable that soil will get stuck in the rosette leaves during planting. Use a soft, dry paintbrush to gently sweep away any dirt particles from the crevices. -
Initial watering:
Wait about two to three days before watering to let any damaged roots heal. When you do water, use a squeeze bottle to target the soil directly, avoiding the leaves.
Place your new arrangement on a well-lit table and enjoy the organic calm it brings to your space

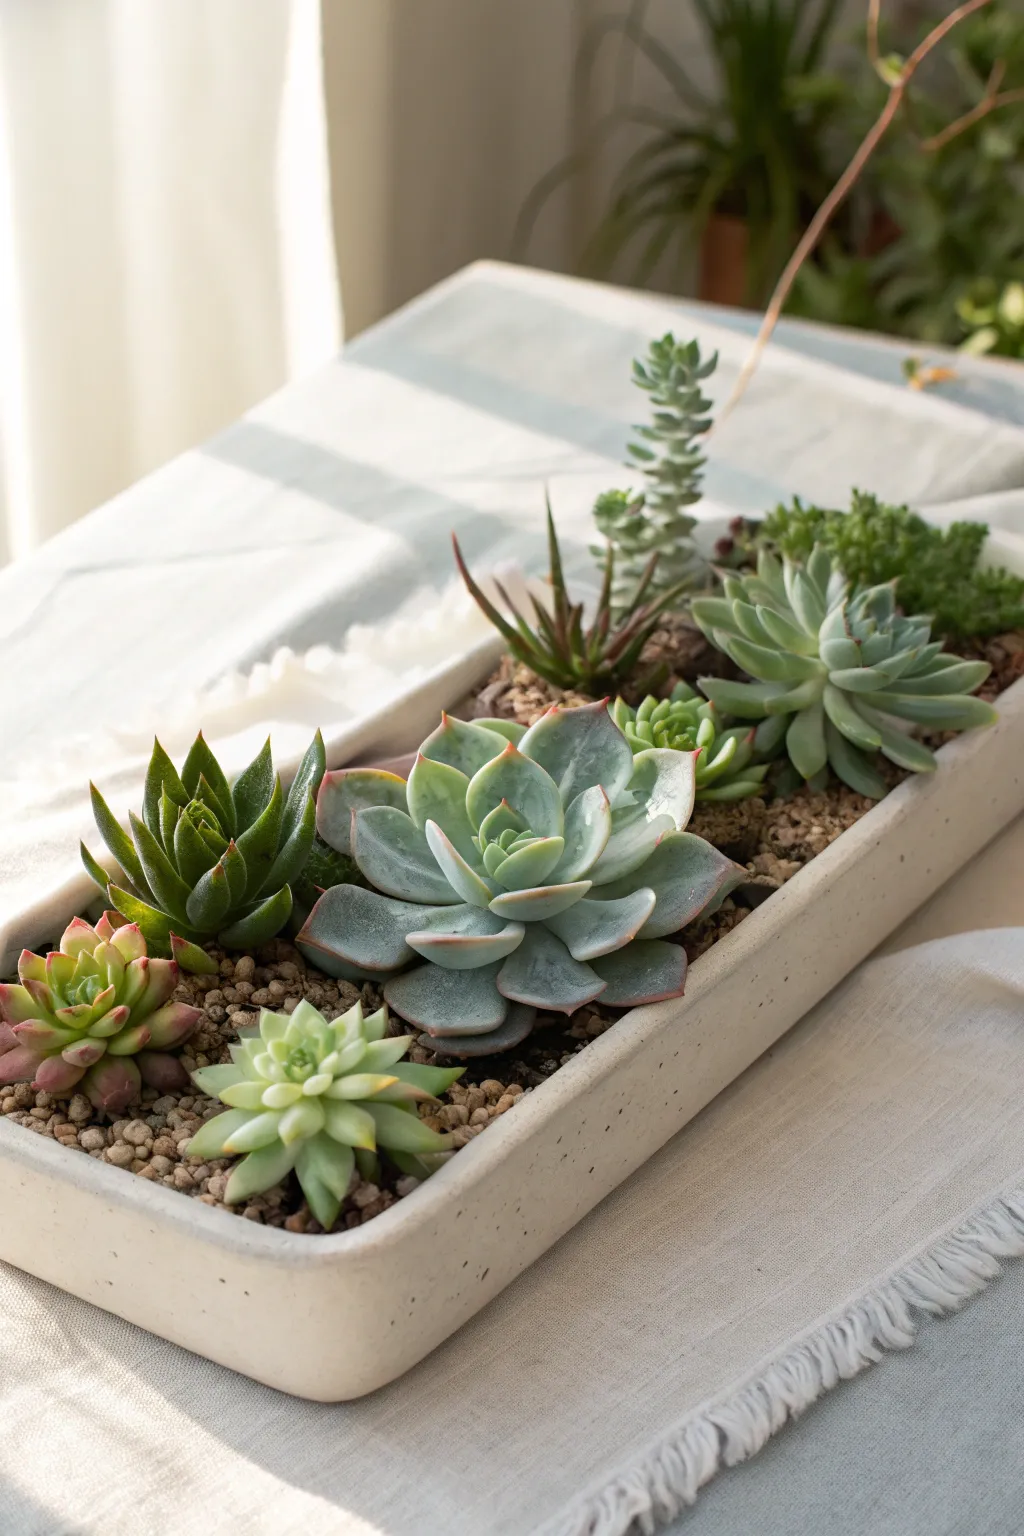
Long Windowsill Succulent Tray Trough
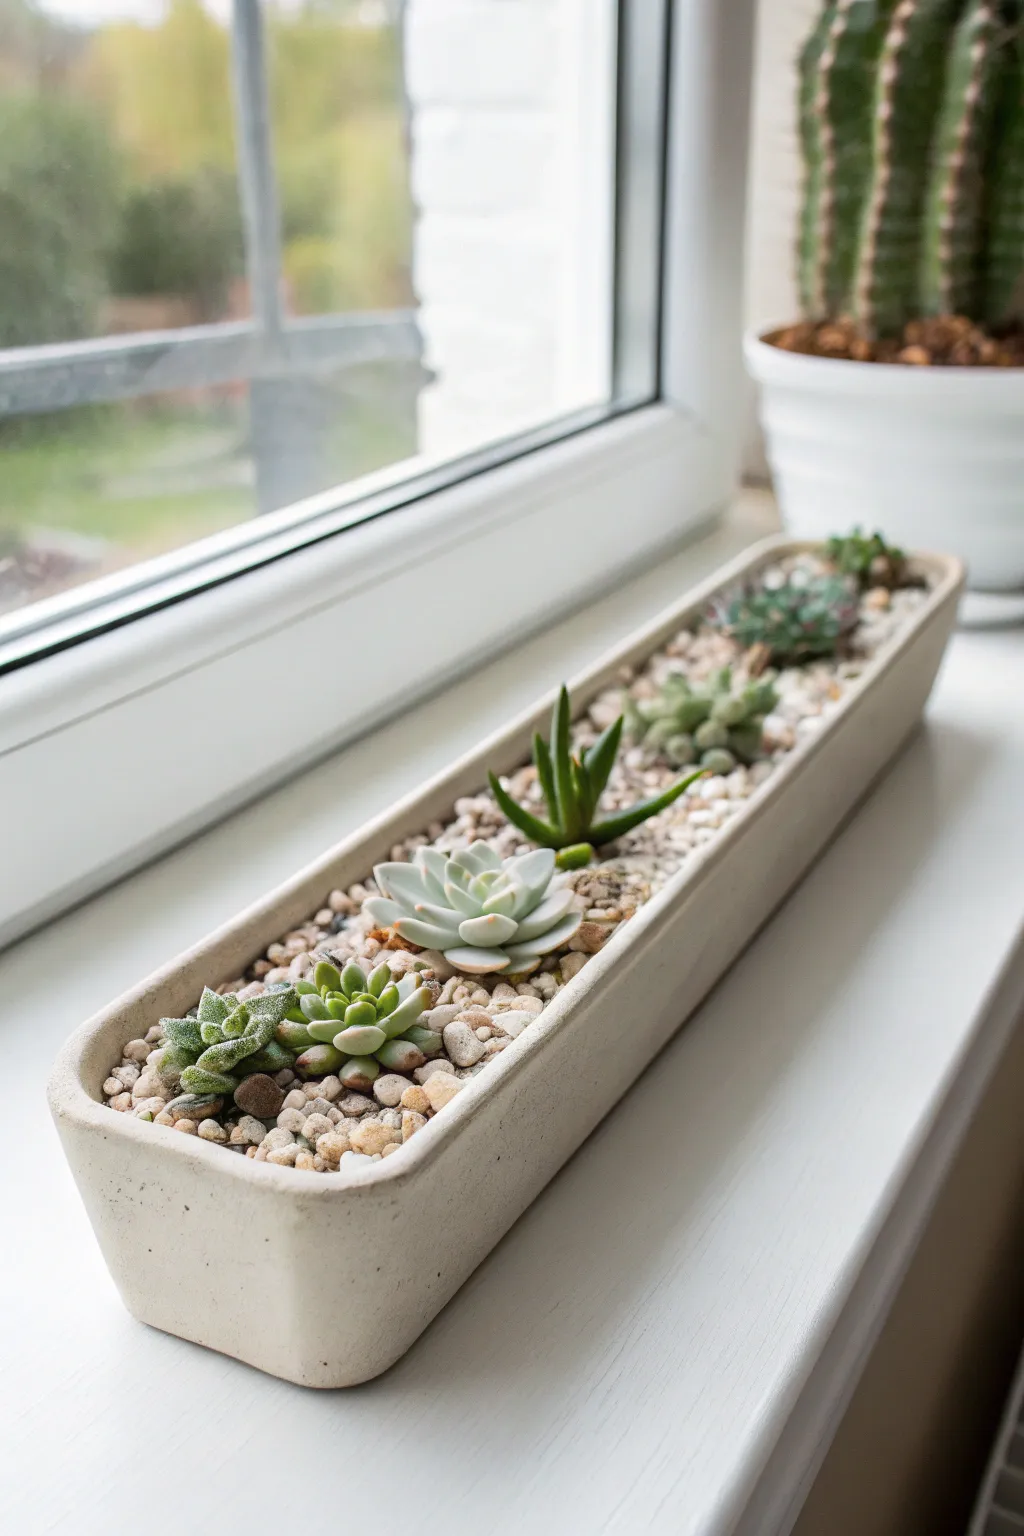
Bring minimalist elegance to your narrow windowsills with this clean-lined concrete trough planter. The elongated shape perfectly houses a row of diverse succulents, creating a low-profile garden that thrives in natural light.
How-To Guide
Materials
- Rapid-set cement mix or concrete crafting mix
- Long rectangular container (for the outer mold)
- Smaller, slightly narrower rectangular container (for the inner mold)
- Non-stick cooking spray or petroleum jelly
- Mixing bucket and stir stick
- Sandpaper sheets (120 and 220 grit)
- Drill with masonry bit (optional)
- Succulent potting soil
- Small decorative pebbles or gravel (neutral tones)
- Assorted small succulents (approx. 2-inch pots)
Step 1: Creating the Mold
-
Select your containers:
Find two long, rectangular containers to serve as your molds. A long cardboard box or plastic bin works well for the outer shell, provided it fits your windowsill dimensions. -
Prepare the inner form:
For the inner void where the plants will live, find a slightly smaller, long container. Alternatively, you can construct a custom form using sturdy foam core board taped securely together. -
Lubricate the molds:
Generously coat the inside of your larger container and the outside of your smaller container with cooking spray or petroleum jelly. This release agent is crucial for removing the concrete later without damage.
Step 2: Pouring the Concrete
-
Mix the concrete:
Follow the package instructions to mix your rapid-set cement. You want a consistency similar to peanut butter or thick pancake batter—pourable but not watery. -
Pour the base layer:
Pour about 1 inch of the wet concrete mixture into the bottom of the larger outer mold. Tap the mold gently on the table to release air bubbles and level the mix. -
Insert the inner mold:
Center your smaller container on top of the wet concrete base. Press it down gently, but ensure you leave at least a half-inch gap at the bottom for the planter floor. -
Weigh it down:
Place rocks or heavy weights inside the inner mold to prevent it from floating up as you pour the walls. This keeps the void space consistent. -
Fill the walls:
Carefully scoop or pour the remaining concrete into the gap between the two molds. -
Release trapped air:
Vibrate the mold again by tapping the sides and lifting/dropping it gently on the work surface. This helps the concrete settle into corners and brings bubbles to the surface.
Vibrate for Smoothness
To get that super smooth, store-bought look, use an orbital sander (without sandpaper) held against the outside of your mold while wet to vibrate bubbles out.
Step 3: Demolding and Finishing
-
Let it cure:
Allow the concrete to set undisturbed for at least 24-48 hours. I usually give it an extra day just to be safe, especially if the weather is humid. -
Remove the inner mold:
Wiggle the inner container gently to loosen it. If you used foam core, you can carefully cut or dismantle it to pull it out. -
Release the outer mold:
Turn the outer mold upside down and support the concrete as it slides out. If it sticks, tap the bottom gently with a rubber mallet. -
Sand the edges:
Using 120-grit sandpaper, smooth down the top rim and any rough corners. Follow up with 220-grit for a polished, soft finish that won’t scratch your hands. -
Add drainage (optional):
If your planter needs drainage, flip it over and carefully drill 2-3 holes in the bottom using a masonry bit. Start slow to avoid cracking the base.
Cracking Issues?
If your concrete cracks while drying, it likely dried too fast. Mist it with water occasionally while it cures, or cover the mold with plastic wrap to retain moisture.
Step 4: Planting the Succulents
-
Add soil base:
Fill the trough about halfway with succulent-specific potting soil. This gritty mix drains fast, which determines the health of your plants. -
Arrange your plants:
Remove your succulents from their nursery pots. Gently massage the root balls to loosen tight roots, then position them in a line along the trough. -
Secure with soil:
Fill the gaps around the root balls with more soil, pressing down lightly with your fingers or a spoon to anchor them in place. -
Top dressing:
Pour a layer of small, decorative pebbles over the exposed soil. This not only looks polished but prevents soil splash-up and keeps moisture off the plant leaves. -
Final clean up:
Use a soft brush to sweep any stray soil or dust off the concrete rim and succulent leaves.
Now you have a sleek, modern home for your favorite plants that looks custom-made for your space
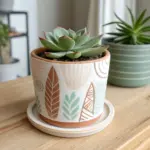
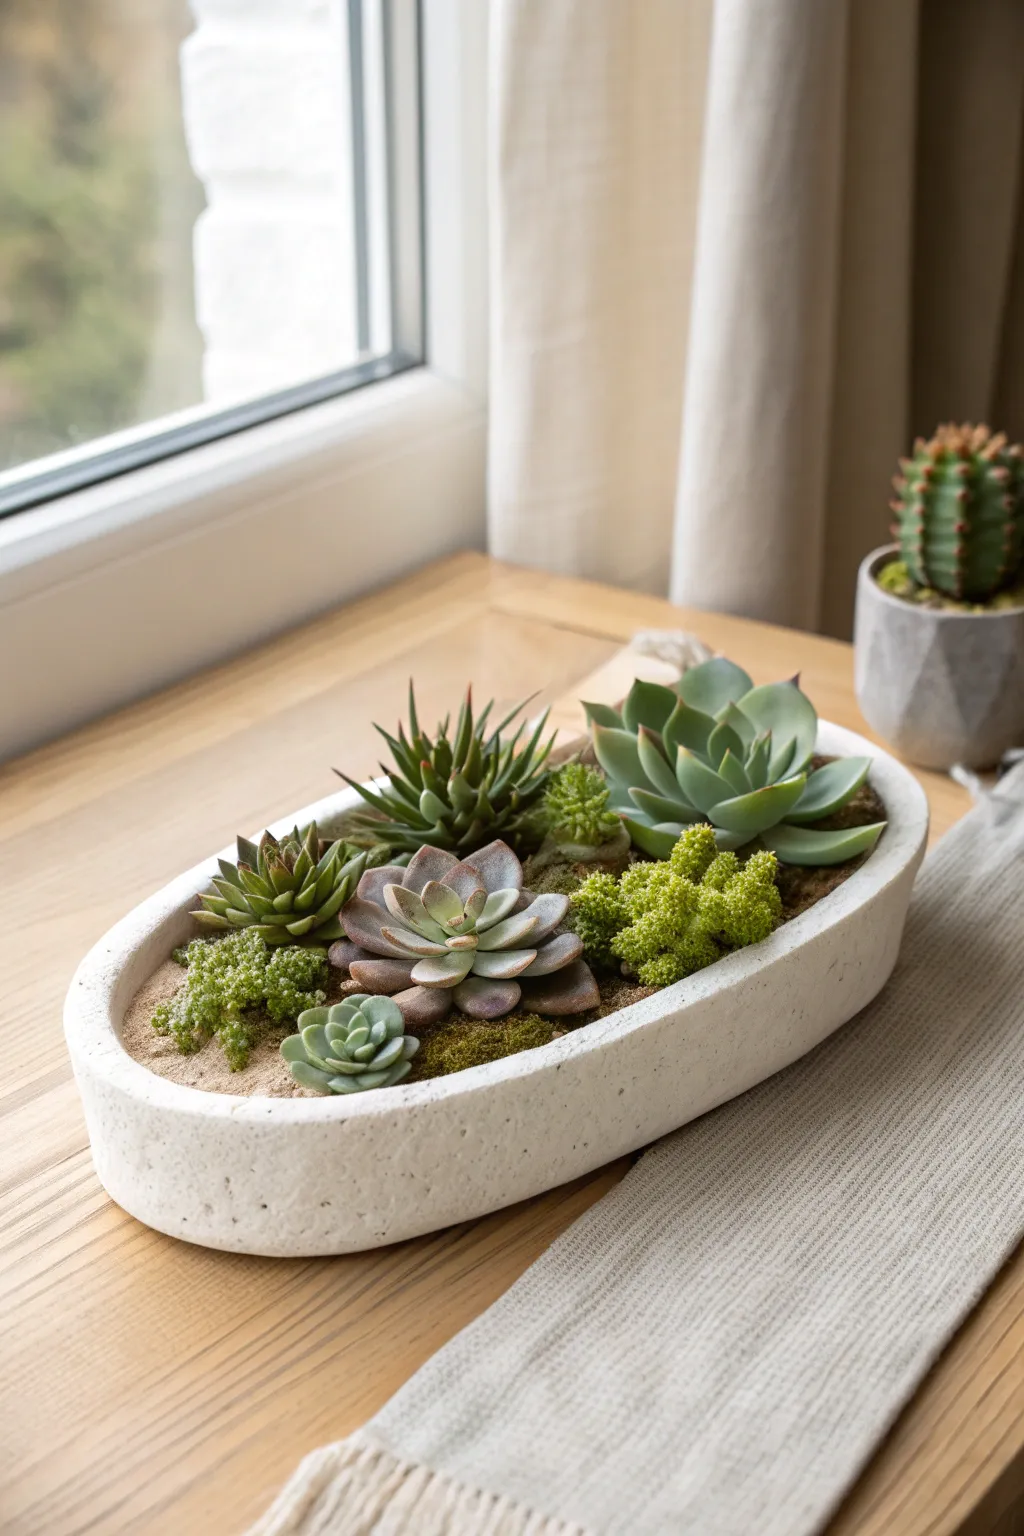
Minimal Spaced-Rosette Succulent Tray

Achieve a clean, contemporary aesthetic with this minimalist rectangular planter that focuses on negative space and texture. By combining stark white river rocks with vibrant, rosette-shaped succulents, you create a calming centerpiece perfect for a coffee table or windowsill.
Step-by-Step
Materials
- Rectangular white ceramic planter (approx. 12-14 inches long)
- Small rosette succulents (Echeveria ‘Agavoides’ or similiar) – 3 main plants
- Tiny succulent pups or cuttings (optional accents)
- Cactus/Succulent potting soil mix
- Large white polished river rocks (1-2 inches)
- Small beige or white gravel/pebbles
- Drainage mesh or coffee filter (for drainage hole)
- Chopstick or long tweezers
- Small brush (for cleaning leaves)
Step 1: Preparation & Base Layer
-
Prepare the vessel:
Begin with a clean rectangular ceramic planter. If it has a drainage hole, cover it with a small piece of mesh or a coffee filter to keep the soil in while letting water escape. -
Add the soil base:
Fill the planter about halfway with your cactus potting mix. You don’t want it too full yet, as you need room to position the root balls. -
Clean the succulents:
Gently remove your three main succulents from their nursery pots. Crumble away most of the old soil from the roots to ensure they can settle easily into the new container. -
Trim dead leaves:
Inspect the base of each rosette and pluck off any dried or shriveled lower leaves to keep the final look crisp and healthy.
Rot Prevention
Ensure no wet soil touches the bottom leaves. Use the top dressing stones to lift the foliage slightly off the dirt, keeping leaves dry and healthy.
Step 2: Planting the Rosettes
-
Position the center focus:
Place the healthiest, most symmetrical succulent in the exact center of the planter. Nest it slightly into the soil but keep the rosette hovering just above the rim. -
Add flanking plants:
Set the other two succulents on either side of the center one, aiming for equal spacing. Ideally, leave about 1 to 2 inches of gap between the leaves of neighboring plants. -
Fill with soil:
Using a spoon or small scoop, carefully fill the spaces around the roots with more cactus mix. Avoid getting soil deep inside the rosette leaves. -
Secure the plants:
Gently press down on the soil around the base of each plant with your fingers or the back of a spoon to stabilize them. -
Check the height:
Ensure all three plants are sitting at roughly the same height. The soil surface should be about half an inch below the rim to accommodate the top dressing.
Pro Design Tip
Choose rosettes with slightly red or distinct tips (like Echeveria Agavoides). The color pop against the stark white stones creates stunning visual contrast.
Step 3: Creating the Stone Scape
-
Layer the fine gravel:
Pour a thin layer of the small beige gravel over the surface of the soil. This acts as a foundation and fills the tiny crevices that larger rocks can’t reach. -
Place anchor stones:
Select your largest white river stones. Place these deliberately between the succulents, creating a barrier that separates the plants visually. -
Fill the perimeter:
Tuck medium-sized white stones along the edges of the planter, sliding them under the outer leaves of the succulents to prop them up slightly. -
Create variation:
I prefer to mix the rock sizes slightly rather than making them uniform. Add a few smaller white stones in gaps between the large ones for a natural, albeit polished, look. -
Expose the gravel:
Leave small patches where the underlying beige gravel peeks through the large white stones, adding depth and texture to the white field.
Step 4: Finishing Details
-
Clean the rosette centers:
Use a soft brush or a gentle puff of air to remove any soil particles or dust that might have fallen into the center of the rosettes during planting. -
Check for stability:
Give the stones a gentle nudge to make sure they are secure and won’t shift easily if the tray is moved. -
Optional accent:
If you have tiny succulent pups, you can tuck one or two near the base of a larger stone for a ‘sprouting’ effect, or leave them on the table alongside the tray as decorative props. -
Final wipe down:
Wipe the exterior ceramic rim with a damp cloth to remove any smudges or dust. -
Water cautiously:
Wait about a week before watering to let any damaged roots heal dry. When you do water, use a squeeze bottle to target the soil specifically, avoiding the leaves.
Now you have a serene, structured botanical display that brings a moment of calm to any room


Jam-Packed Mosaic Succulent Tray
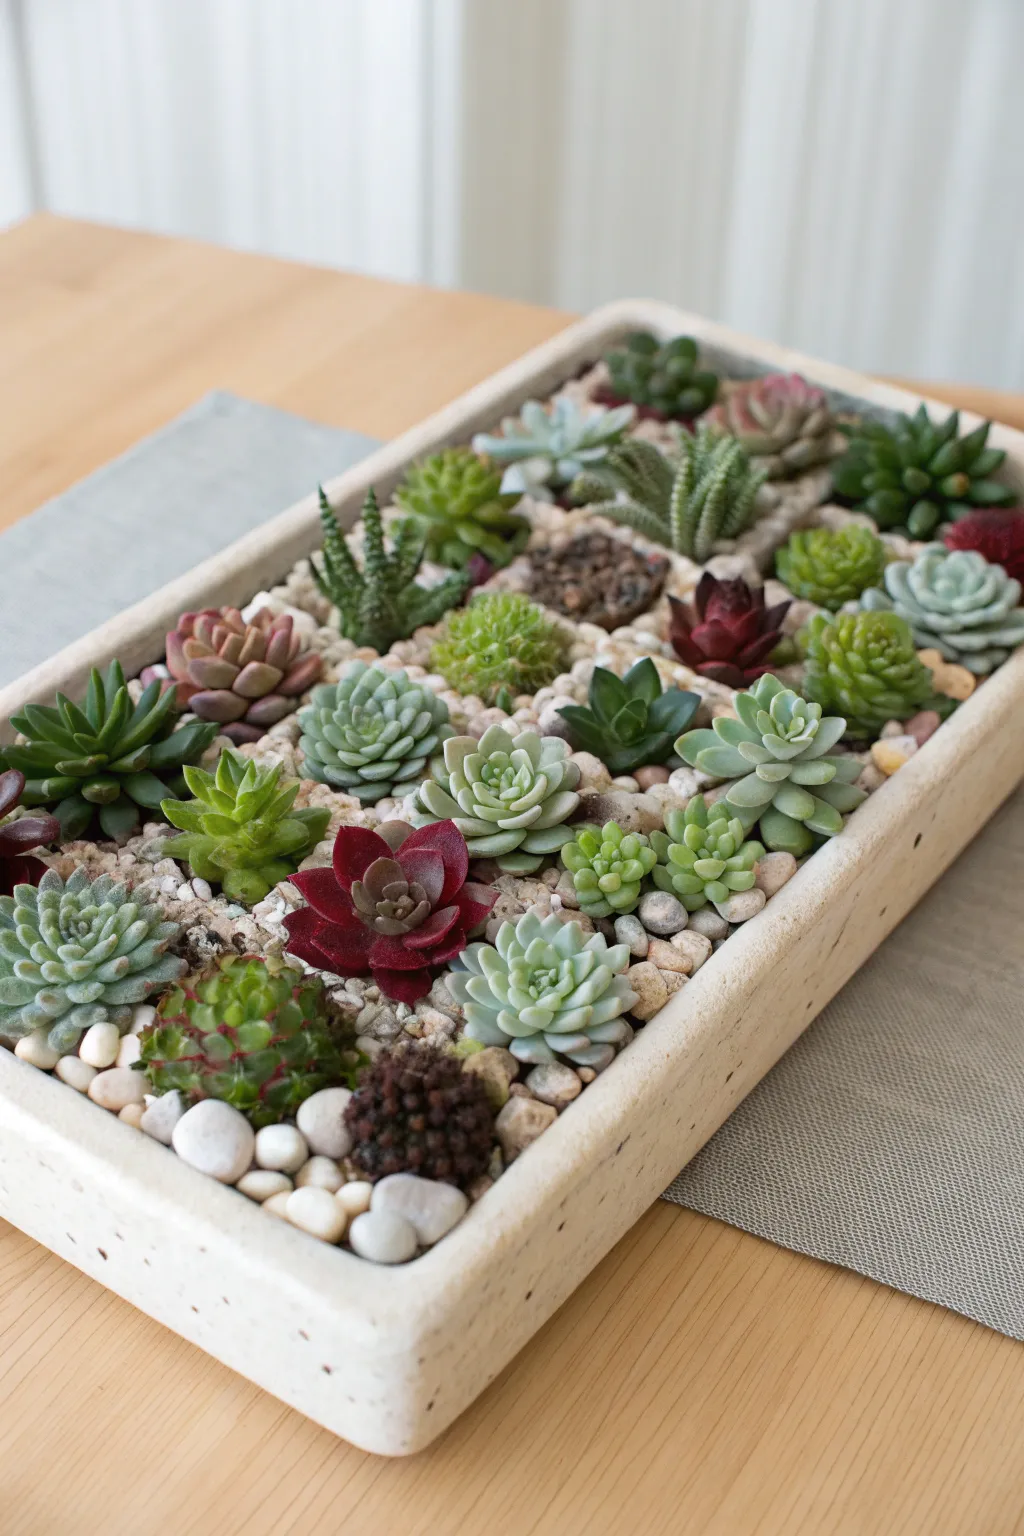
Create a living tapestry with this jam-packed succulent tray that mimics the intricate beauty of a mosaic. The tight arrangement of rosettes in varying shades of green, red, and blue creates a lush, low-profile centerpiece perfect for a bright table.
Step-by-Step Tutorial
Materials
- Rectangular shallow ceramic planter (cream or off-white with speckles)
- Succulent and cactus potting mix
- 20-25 small succulent plugs (1-2 inch size)
- Assortment of Echeveria, Haworthia, and Sempervivum varieties
- Small white or beige top dressing pebbles (fine grit)
- Long tweezers or chopsticks
- Small spoon or scoop
- Squeeze bottle with a narrow spout for watering
Step 1: Tray Preparation
-
Select the vessel:
Choose a shallow, rectangular tray (about 2-3 inches deep) made of ceramic or concrete. Ensure it has at least one drainage hole at the bottom to prevent root rot. -
Add the base layer:
Fill the bottom of the tray with your succulent soil mix, leaving about an inch of space from the top rim. Pat it down gently but don’t compact it too tightly, as the roots need to breathe.
Rot Prevention
Wait a few days before the first watering. This allows any roots damaged during the tight packing process to callous over, preventing root rot.
Step 2: Plant Selection & Prep
-
Unpot the succulents:
Gently remove your small succulents from their nursery pots. For this dense look, you need smaller plugs, ideally around 1 to 2 inches in diameter. -
Clean the roots:
Massage the root balls to loosen the soil. Shake off excess dirt so the root system is smaller and easier to tuck into tight spaces. I like to remove any dead lower leaves at this stage to keep things tidy. -
Plan your layout:
Before planting, arrange the plants on a table next to the tray. Group them by color and texture—mix spiky Haworthias with smooth Echeverias and red Sempervivums to create contrast.
Color Pop Secret
To get those vibrant reds and purples seen in the photo, place the finished tray in a spot that gets plenty of bright, indirect sunlight to ‘stress’ the plants lightly.
Step 3: Designing the Mosaic
-
Start at the corners:
Begin planting by placing four distinct succulents in the corners of the tray. This anchors your design and sets the boundaries for the grid. -
Create the center row:
Plant a row down the center length of the tray. Use slightly larger or taller succulents here to give the arrangement a subtle sense of height, though the overall look should remain fairly flat. -
Fill the gaps:
Start filling in the remaining spaces. The goal is a ‘jam-packed’ look, so place the plants very close together, almost touching. -
Vary the textures:
As you plant, alternate between rosette shapes and spiky varieties. Place a deep red plant next to a pale blue or bright green one to make the colors pop. -
Use tweezers for tight spots:
As the tray fills up, use long tweezers to hold the smaller plants by their base and gently push their roots into the soil without damaging the neighboring leaves. -
Adjust the positioning:
Step back and look at the composition. If two similar plants are right next to each other, swap one out now while the soil is still loose. -
Secure the plants:
Once all plants are in, use your fingers or the back of a spoon to gently firm the soil around their bases, ensuring they aren’t wobbly.
Step 4: Finishing Touches
-
Clean the leaves:
Use a soft brush (like a makeup brush) or a gentle puff of air to remove any soil that may have fallen into the rosettes during planting. -
Add top dressing:
Using a small spoon, carefully sprinkle the fine decorative pebbles into the small crevices between the plants. This hides the soil and gives that finished, mosaic effect. -
Level the grit:
Use the handle of the spoon or a chopstick to push the pebbles down so they sit flush and cover all visible dirt patches. -
Initial watering:
Wait about 2-3 days before watering to let any broken roots heal. Then, use a squeeze bottle to water specifically at the base of the plants, avoiding getting water in the center of the rosettes.
Place your beautiful living mosaic on a bright windowsill and enjoy the variety of textures and colors every day

The Complete Guide to Pottery Troubleshooting
Uncover the most common ceramic mistakes—from cracking clay to failed glazes—and learn how to fix them fast.
Thriller-Filler-Spiller Succulent Tray Layout
This elegant succulent tray combines the raw, industrial texture of a shallow concrete planter with the soft, geometric beauty of diverse succulents. By carefully layering gravel and selecting plants with varying heights and rosette shapes, you’ll create a miniature, sun-drenched landscape that feels both modern and serene.
Step-by-Step
Materials
- Shallow rectangular planter (concrete or ceramic, approx. 12-16 inches long)
- Small gravel or pumice (neutral tones like beige/grey)
- Succulent potting soil mix
- Large Echeveria rosette (blue-green)
- Small Echeveria or Sempervivum (red-tipped)
- Light green starry succulent (Sedum nussbaumerianum or similar)
- Dark green pointed succulent (Haworthia or Aloe)
- Tall, vertical succulent (vertical Senecio or similar)
- Trailing or textural filler succulent (Sedum reflexum ‘Blue Spruce’)
- Small trowel or spoon
- Soft brush (for cleaning leaves)
- Watering can with narrow spout
Step 1: Base Preparation
-
Select the container:
Choose a shallow, rectangular vessel. A concrete planter with thick walls works best to mimic the aesthetic in the photo, providing a neutral, stone-like backdrop for the colorful plants. -
Check drainage:
Ensure your planter has drainage holes at the bottom. If it doesn’t, drill 2-3 small holes or add a shallow layer of activated charcoal at the very bottom to assist with moisture management, though drainage holes are always superior. -
Add first soil layer:
Fill the bottom of the tray with specialized succulent soil. You want enough soil to cover the roots, but leave about 1.5 inches of space from the top rim to accommodate the topdressing later.
Step 2: Arranging the ‘Thrillers’ and Anchors
-
Position the star player:
Take your largest blue-green Echeveria (the big rosette). Remove it from its nursery pot and gently loosen the root ball. Place it slightly off-center to the right to act as the focal point. -
Add vertical height:
Locate your taller, vertical succulent. Position this behind and slightly to the left of the main rosette. This creates the ‘thriller’ height element that breaks the horizontal line. -
Plant the dark contrast:
Insert the dark green pointed succulent (like an Aloe or Haworthia) to the left of the center. The deep green spikes add necessary texture against the softer rosettes.
Leggy Plants?
If your rosettes start stretching tall with gaps between leaves, they need more light. Move the tray closer to the window or add a grow light
Step 3: Filling the Landscape
-
Insert the corner rosette:
Place the small, sharp-leafed dark green succulent (like an Agavoides) in the front left corner. Angle it slightly outward so it looks like it’s reaching for light. -
Add color accents:
Tuck the small, red-tinged succulent (Sempervivum) next to the dark green corner plant. This pop of red warmth balances the cool tones of the concrete. -
Place the pale green star:
Nestle the light green starry succulent in the front foreground, roughly centered but slightly left of the main large rosette. Its lighter color will brighten the lower section. -
Fill the gaps:
Use the creeping or textured sedum (like ‘Blue Spruce’) to fill the empty space on the far right. This acts as the ‘spiller’ or textural filler that softens the edge of the planter. -
Secure plants:
Gently backfill with more succulent soil around all root balls. Press the soil down firmly but carefully with your fingers or a spoon handle to eliminate air pockets and secure the plants upright.
Design Tip
Keep the soil level lower than you think. You need at least 0.5 inches of space purely for the decorative stones to hide the dirt completely
Step 4: The Finishing Touches
-
Apply topdressing:
Scoop small beige or grey gravel over the exposed soil. I typically use a teaspoon for this part to get close to the plant stems without burying the bottom leaves. -
Level the surface:
Spread the stones evenly so they create a flat, uniform surface flush with the rim of the planter. This stone mulch prevents soil splash and retains moisture. -
Clean the arrangement:
Take a soft, dry paintbrush and gently dust off any soil particles or stray gravel bits that may have lodged inside the rosette leaves during planting. -
Initial watering:
Wait about 2-3 days before watering to let any damaged roots heal. When you do water, use a narrow spout to aim directly at the gravel, avoiding the rosette centers. -
Placement:
Set your finished tray in a spot with bright, indirect light. A windowsill with sheer curtains, similar to the setting in the photo, provides the perfect diffused glow.
Enjoy watching your miniature desert garden settle into its new sunny home
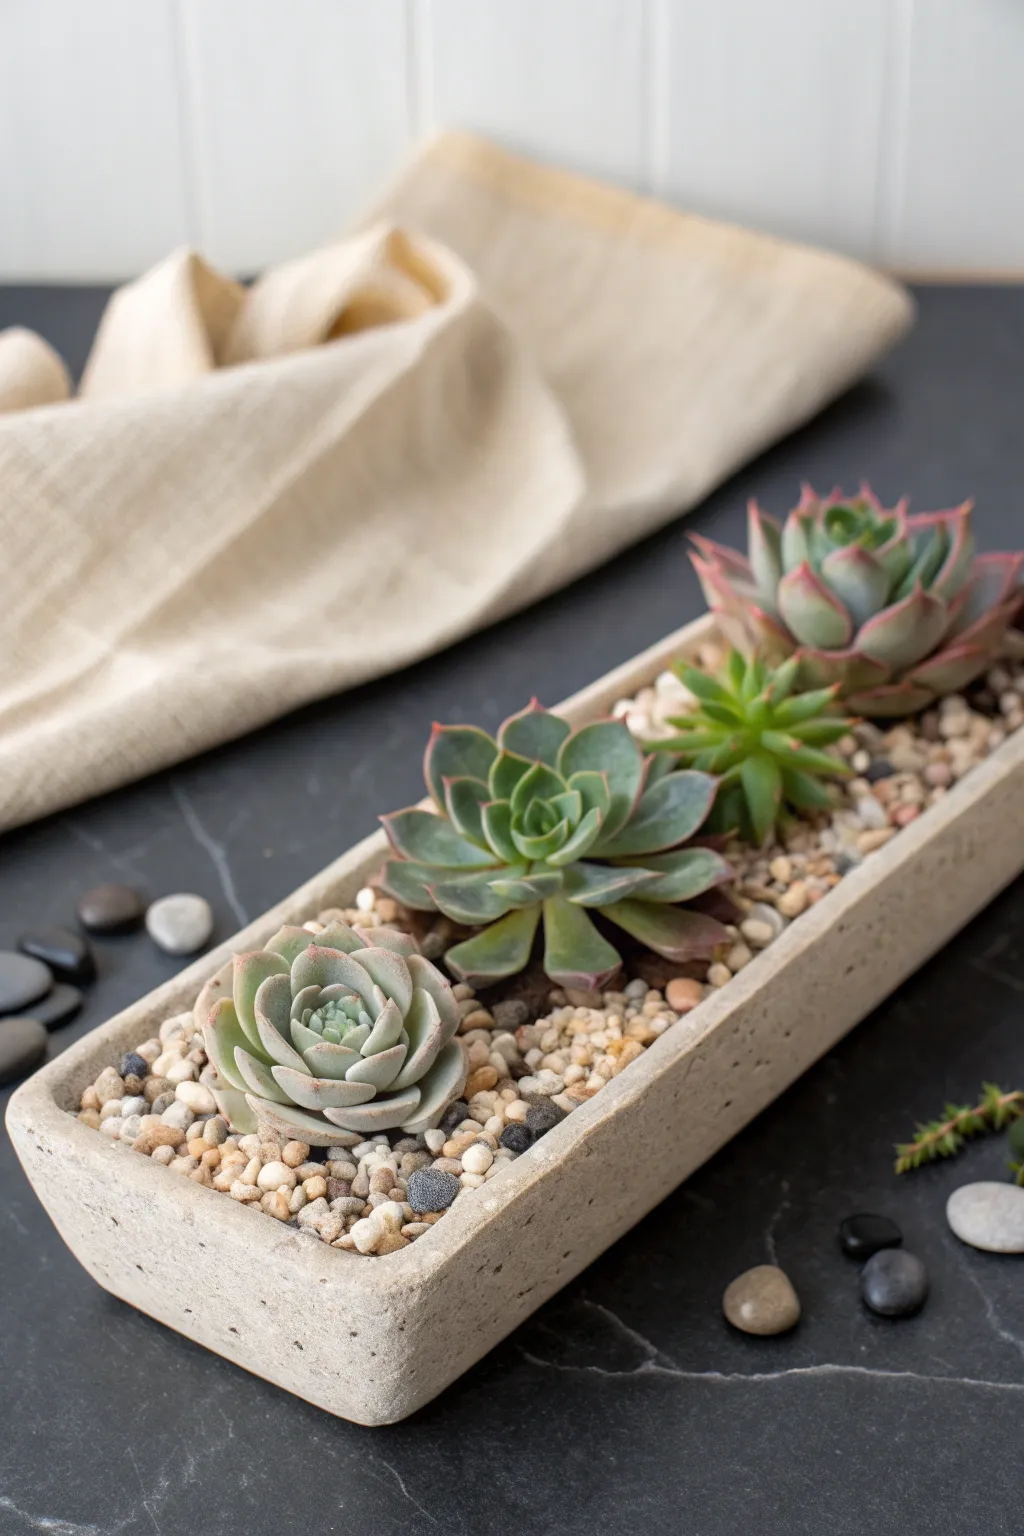
Zen Stone-and-Sand Succulent Tray

Bring a moment of calm to your desk or table with this minimalist arrangement that blends the clean lines of a Zen garden with the vibrant life of succulents. The contrast between the fine white sand, smooth river stones, and architectural plants creates a peaceful, modern centerpiece.
Detailed Instructions
Materials
- Rectangular ceramic planter (white speckled finish)
- Cactus/Succulent potting soil mix
- Fine white decorative sand
- Small polished river rocks (black and grey mix)
- Assorted small succulents (e.g., Echeveria, Haworthia)
- Small scoop or spoon
- Soft paintbrush (for cleaning)
- Chopstick or blending tool
Step 1: Base Preparation
-
Prepare the Vessel:
Begin with a clean rectangular planter. If your container has drainage holes, ensure they are covered with a small piece of mesh or a pottery shard to keep the soil in while allowing water to escape. -
Add the Soil Base:
Fill the bottom of the planter with your cactus potting mix. You want a layer about 1.5 to 2 inches deep, leaving ample room at the top for the decorative sand layer. -
Level the Surface:
Gently shake the planter side-to-side to settle the soil. Use the back of a spoon to tamp it down slightly, creating a flat, even surface for your plants to rest on.
Step 2: Planting and Composition
-
Plan Your Spacing:
Set your succulents (still in their nursery pots) on top of the soil to visualize the spacing. For this Zen look, aim for a balanced, linear arrangement with breathing room between each plant. -
Unpot the First Succulent:
Starting from one end, carefully remove a succulent from its pot. Gently loosen the root ball with your fingers to free up the roots without damaging them. -
Position the Plant:
Dig a small shallow well in the soil and place your first succulent. I find it helpful to slightly mound the soil up to the base of the plant to keep it stable. -
Continue Planting:
Repeat this process for the remaining succulents, working your way down the line. Ensure they are standing straight and are centered width-wise in the container. -
Secure the Roots:
Once all plants are in, press the soil firmly around the base of each one. The soil level should be about half an inch below the rim of the planter to accommodate the top dressing.
Fixing Grimy Sand
If soil mixes with your white sand during watering, let it dry completely. Then, use a spoon to scoop out the dirty patch and replace it with fresh, clean sand.
Step 3: The Zen Details
-
Apply the Sand Layer:
Using a small scoop or spoon, carefully pour the fine white sand over the exposed soil. Use enough to completely hide the dirt, creating a pristine white blanket across the tray. -
Smooth the Sand:
Use a chopstick or the handle of your paintbrush to gently smooth the sand, getting it into the corners and evenly distributed between the plants. -
Clean the Leaves:
Inevitably, some sand will get stuck in the succulent leaves. Use a soft, dry paintbrush to gently sweep away any stray grains from the foliage. -
Select Your Stones:
Pick out a handful of smooth river stones in varying sizes and shades of grey and black. You want a mix that feels natural but curated. -
Cluster the Rocks:
Place the stones strategically around the base of the succulents. Don’t cover the entire surface; arrange them in small, irregular clusters near the stems to create visual weight and contrast. -
Final Adjustments:
Take a step back and look at the composition. Nudge a stone or two if needed to balance the negative space, ensuring the white sand remains a prominent feature. -
Water Sparingly:
Use a squeeze bottle or a dropper to water directly at the base of the plants, avoiding the sand to keep it clean and white. Wait a few days before the first watering to let roots heal.
Raking Patterns
Use a miniature rake or a fork to draw simple, wavy lines in the open sand areas for an authentic Japanese rock garden effect.
Enjoy the serenity your new miniature landscape brings to your space


What Really Happens Inside the Kiln
Learn how time and temperature work together inside the kiln to transform clay into durable ceramic.
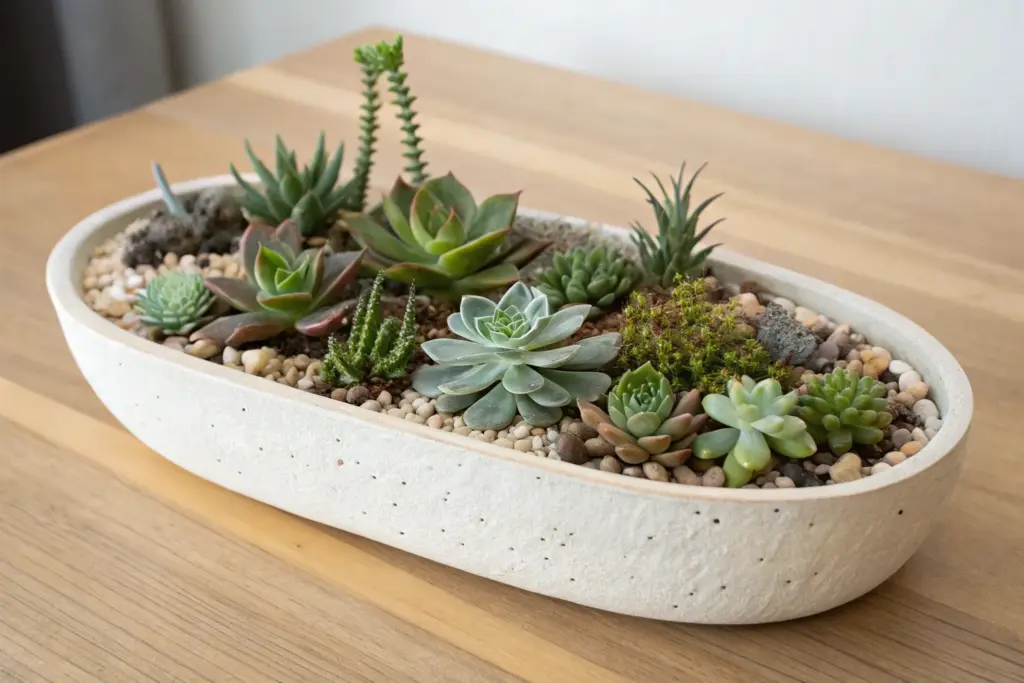
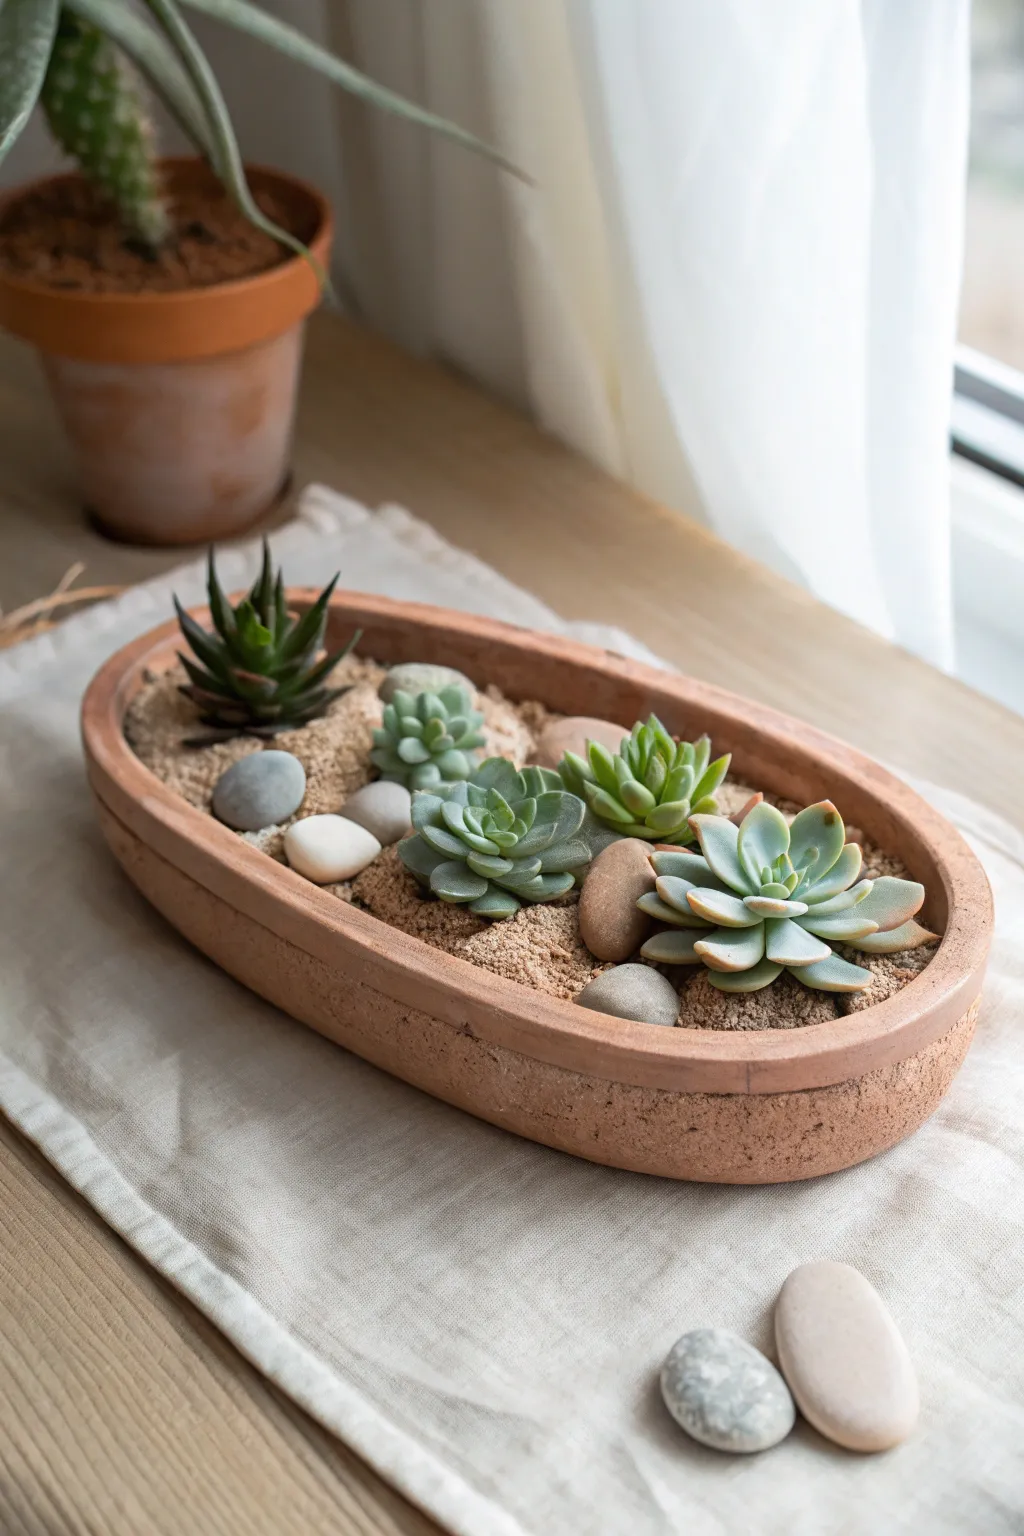
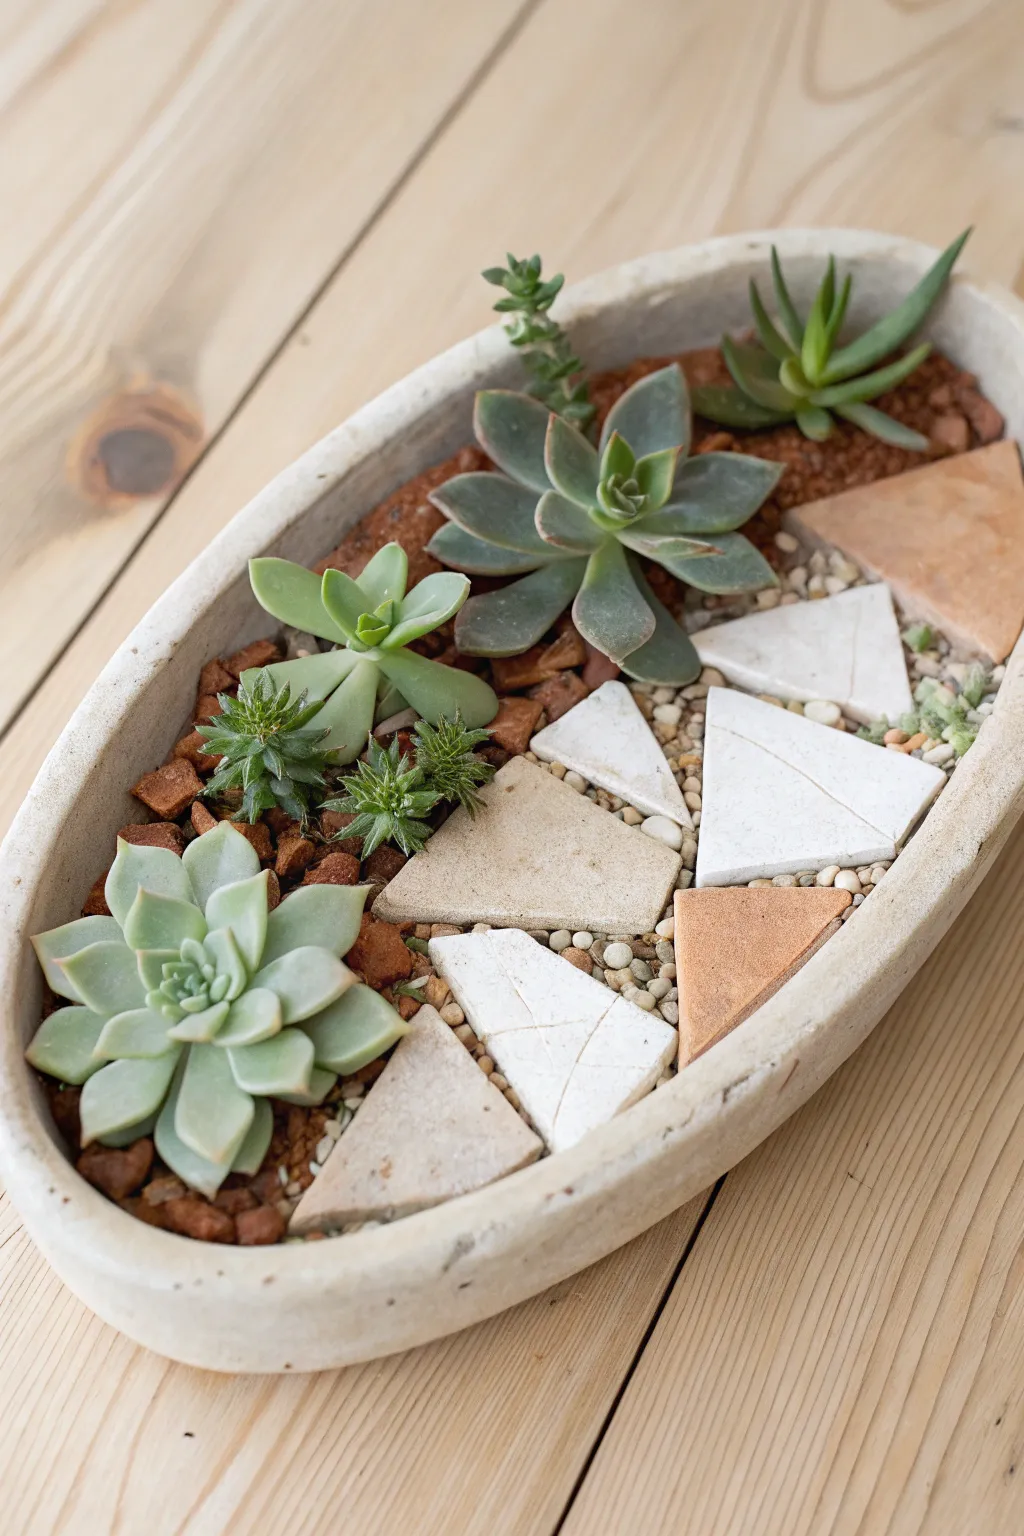
Rustic Dough-Bowl Style Succulent Tray
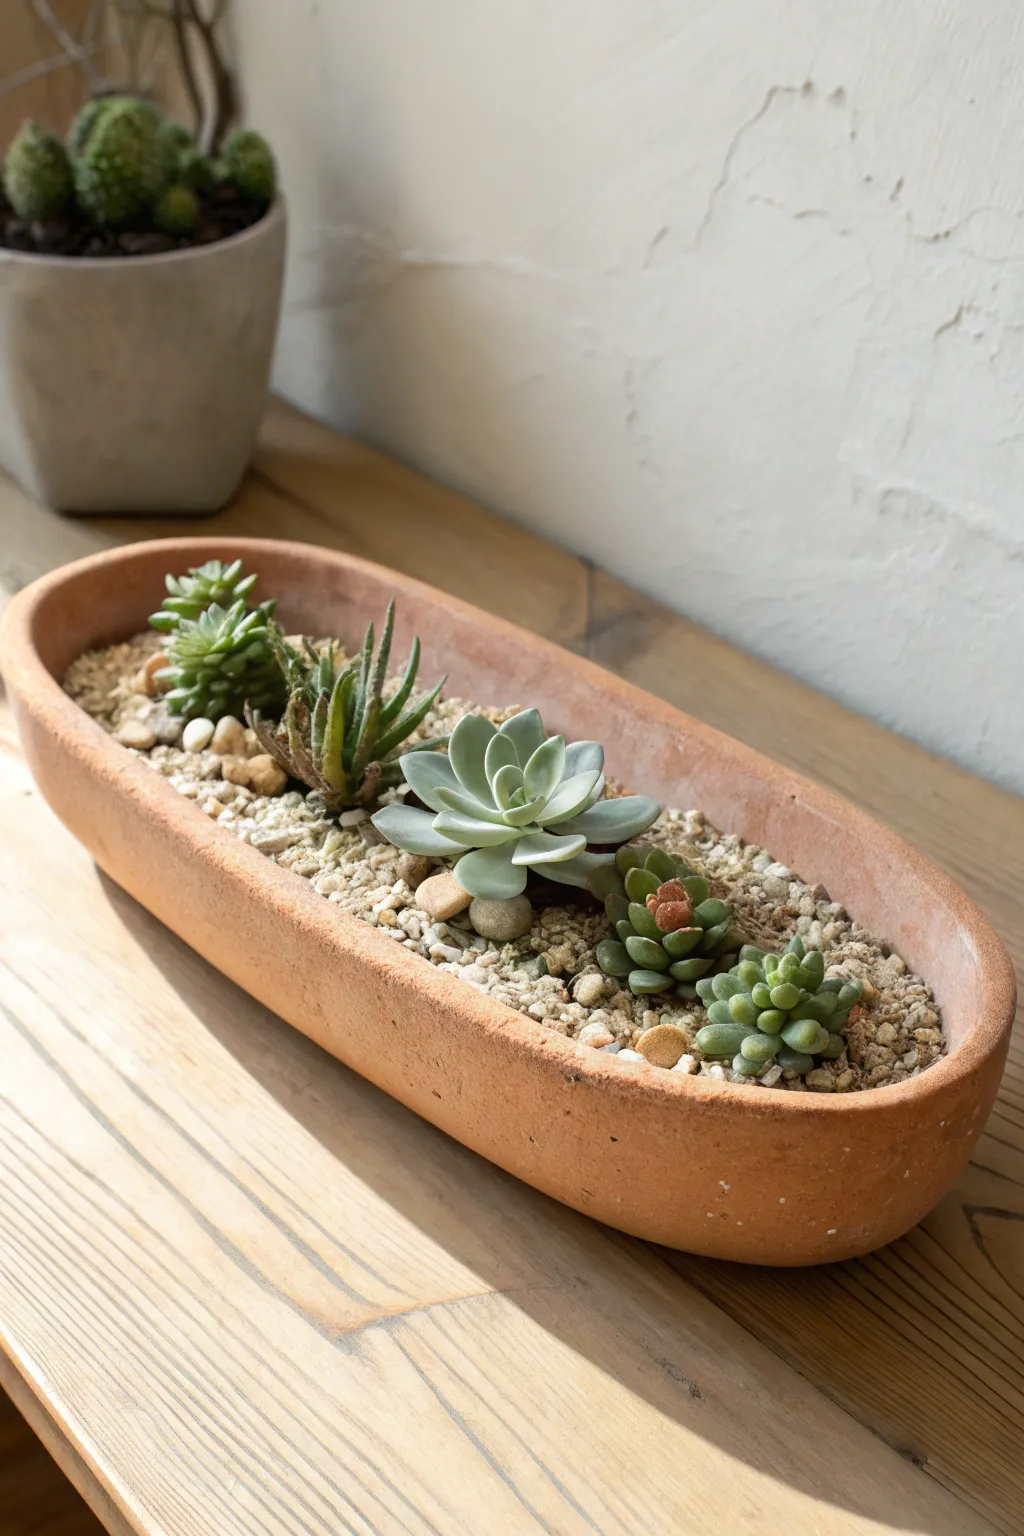
Embrace rustic simplicity with this elongated terracotta arrangement that perfectly captures the warm, earthy aesthetic of a traditional dough bowl. This low-profile design is an ideal centerpiece for long dining tables or windowsills, showcasing a curated line of textural succulents.
Step-by-Step Guide
Materials
- Oval or boat-shaped terracotta planter (approx. 12-14 inches long)
- Succulent/Cactus potting soil mix
- Light-colored gravel or coarse sand for top dressing
- Small decorative river stones or pebbles
- Assorted small succulents (e.g., Echeveria, Haworthia, Sedum)
- Small trowel or scoop
- Soft bristle brush (e.g., a clean paintbrush)
- Drainage mesh or coffee filter (optional)
Step 1: Preparation
-
Check Drainage:
Inspect your terracotta trough for a drainage hole. If one is present, cover it with a small piece of mesh or a coffee filter to keep soil in while letting water out. -
Create a Base Layer:
Add a thin layer of succulent soil to the bottom of the container. Since this vessel is shallow, you don’t need a huge amount of depth, just enough to seat the roots comfortably.
Step 2: Planting
-
Plan Your Spacing:
Before unpotting, set your nursery plants inside the trough to visualize the arrangement. Aim for a linear flow, perhaps placing the largest rosette (like the silvery Echeveria) near the center or slightly off-center as a focal point. -
Unpot the First Succulent:
Gently squeeze the nursery pot of your first plant (a Haworthia or Aloe works well for height) to loosen the roots. Carefully remove it, brushing away excess soil from the root ball to make it compact. -
Position the Plant:
Place the first succulent into the soil derived layer. Ensure the base of the plant sits slightly below the rim of the terracotta planter so there is room for the top dressing later. -
Backfill:
Scoop a small amount of soil around the roots to stabilize the plant. I like to use a small spoon for these narrow spaces to avoid spilling soil everywhere. -
Add Variety:
Move on to your next plant, selecting one with a contrasting texture or color, such as the pale green Echeveria shown in the center. Nest it close to the first, but leave a tiny gap for airflow. -
Continue the Line:
Proceed with the remaining plants, perhaps adding smaller clustering succulents like Sedum or ‘Jelly Beans’ towards the ends. The goal is a balanced but asymmetrical look. -
Secure the Plants:
Once all plants are in, fill all remaining gaps with succulent soil. Gently tamp the soil down with your fingers or the end of your brush to eliminate air pockets, ensuring the plants stand upright.
Plant Won’t Stand Up?
If a top-heavy succulent keeps tipping over, use the larger decorative river stones to prop it up until the roots anchor firmly into the new soil.
Step 3: Finishing Touches
-
Clean House:
Use your soft bristle brush to gently sweep away any stray soil particles from the leaves of the succulents. Terracotta is porous, so wipe any soil smudges off the rim now before they stain. -
Add Top Dressing:
Carefully pour the light-colored gravel or coarse sand over the exposed soil. Use a teaspoon to guide the gravel under the leaves of the rosette succulents, covering the dark soil completely. -
Place Accent Stones:
Nestle a few larger, smooth river stones or pebbles specifically near the bases of the plants or in slightly larger gaps. This mimics a natural desert floor and adds visual weight. -
Level the Surface:
Gently shake the container side-to-side very slightly to help the gravel settle evenly. Use the handle of your brush to nudge gravel into tight corners. -
Watering In:
Wait about a week before the first watering to allow any broken roots to heal. After that, water sparingly, directing the stream onto the soil, not the leaves. -
Sun Acclimatization:
Place your finished tray in a bright spot with indirect light initially, gradually moving it into stronger sun if your specific plant varieties require it.
Level Up: Color Pop
Introduce a singular succulent with stress colors (like reddish tips) among green ones to create a striking focal point without breaking the rustic vibe.
Now you have a serene, desert-inspired accent piece ready to warm up your sunniest windowsill
Low Concrete-Style Succulent Tray Centerpiece
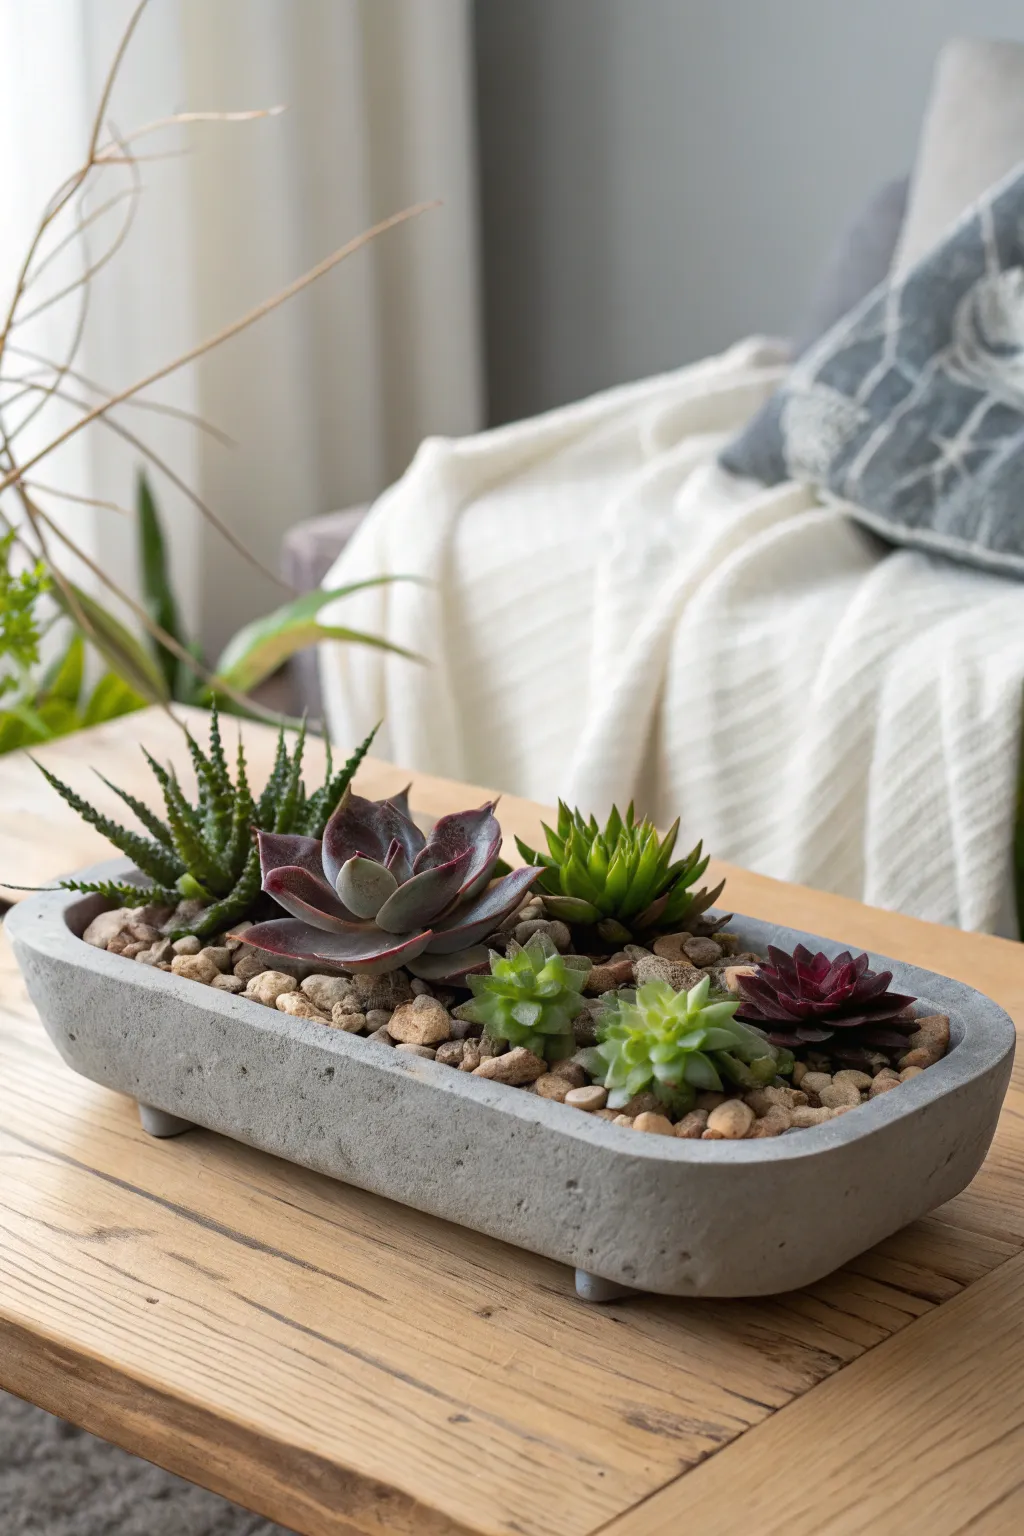
Bring a touch of industrial elegance to your living space with this sleek, low-profile concrete planter. Its simple rectangular form and textured finish provide the perfect understated stage for a vibrant collection of rosette succulents.
Detailed Instructions
Materials
- Rapid-set cement mix or concrete crafting mix
- Two rectangular plastic containers (one slightly smaller than the other to act as the mold)
- Non-stick cooking spray or petroleum jelly
- Mixing bucket and stir stick
- Sandpaper (medium and fine grit)
- Small drainage hole drill bit (masonry bit)
- Succulent soil mix
- Small river rocks or pea gravel (beige/tan tones)
- Assorted succulents (e.g., Echeveria, Haworthia, Sempervivum)
- Painter’s tape or weights (heavy rocks/sand)
Step 1: Casting the Concrete Planter
-
Prepare the Molds:
Clean both plastic containers thoroughly. Apply a generous coat of cooking spray or petroleum jelly to the *inside* of the larger container and the *outside* of the smaller container. This release agent is crucial for removing the dry concrete later without cracking it. -
Mix the Concrete:
In your mixing bucket, combine the concrete mix with water according to the package instructions. You want a consistency similar to thick pancake batter or peanut butter—pourable but not watery. -
Pour the Base:
Pour the concrete into the larger container until it reaches a depth of about 1 to 1.5 inches. This will form the solid bottom of your planter. -
Tap for Bubbles:
Gently lift and tap the container against your work surface several times. This vibration helps release trapped air bubbles, ensuring a smoother surface finish. -
Insert the Inner Mold:
Center the smaller container inside the larger one, pressing it down onto the wet concrete. Ensure there is an even gap all the way around the perimeter for the walls. -
Weight It Down:
The inner container will want to float up, so fill it with heavy rocks, sand, or water to keep it weighed down. Alternatively, use strong painter’s tape to strap it securely across the top of the outer mold. -
Fill the Walls:
If the displacement didn’t fill the sides completely, carefully spoon more concrete mixture into the gap between the two containers until it matches your desired height. -
Cure:
Let the mold sit undisturbed for at least 24 to 48 hours. I usually prefer waiting the full 48 hours to ensure the corners don’t crumble during removal. -
Demold:
Gently wiggle the inner container to remove it first. Then, turn the larger container upside down and tap deeply to release the concrete casting. -
Refine the Edges:
Once fully dry, use medium-grit sandpaper to smooth out any rough top edges or sharp corners. Finish with fine-grit sandpaper for a polished look. -
Add Drainage:
Using a masonry bit and a slow drill speed, carefully drill 2-3 small drainage holes in the bottom of the planter to prevent root rot.
Bubble Trouble?
For a smoother finish, tap the mold vigorously for 2 minutes after pouring. For a rustic, pitted look like the photo, tap less to keep some air pockets trapped.
Step 2: Planting and Styling
-
Base Layer:
Add a very thin layer of gravel at the bottom of the trough to assist with drainage, then fill the planter about halfway with succulent-specific soil. -
Arrange the Plants:
Remove your succulents from their nursery pots and loosen the root balls gently. Arrange them in the tray, placing the taller Haworthia or Aloe varieties on the ends or back, and the lower rosettes like Echeveria in the center. -
Secure Position:
Fill in the empty spaces around the root balls with more soil, pressing down firmly with your fingers or a spoon handle to stabilize the plants. -
Clean Up:
Use a small, soft brush to dust off any soil that may have fallen onto the leaves of the succulents. -
Top Dressing:
Cover the exposed soil with a layer of beige river rocks or pea gravel. This top dressing not only looks polished but also keeps soil moisture consistent and prevents splashing when watering. -
Final Settlement:
Give the arrangement a very light watering (using a squeeze bottle directed at the roots) to help the soil settle around the fresh plantings.
Tint It Up
Mix liquid concrete pigment or powdered oxide into your wet cement batch before pouring to create charcoal, terracotta, or marbled color effects.
Place your finished tray on a coffee table where it can catch bright, indirect light and enjoy your handcrafted living sculpture

TRACK YOUR CERAMIC JOURNEY
Capture glaze tests, firing details, and creative progress—all in one simple printable. Make your projects easier to repeat and improve.
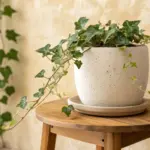
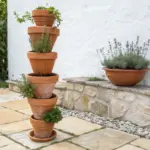
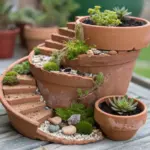
Tiered Succulent Tray Display
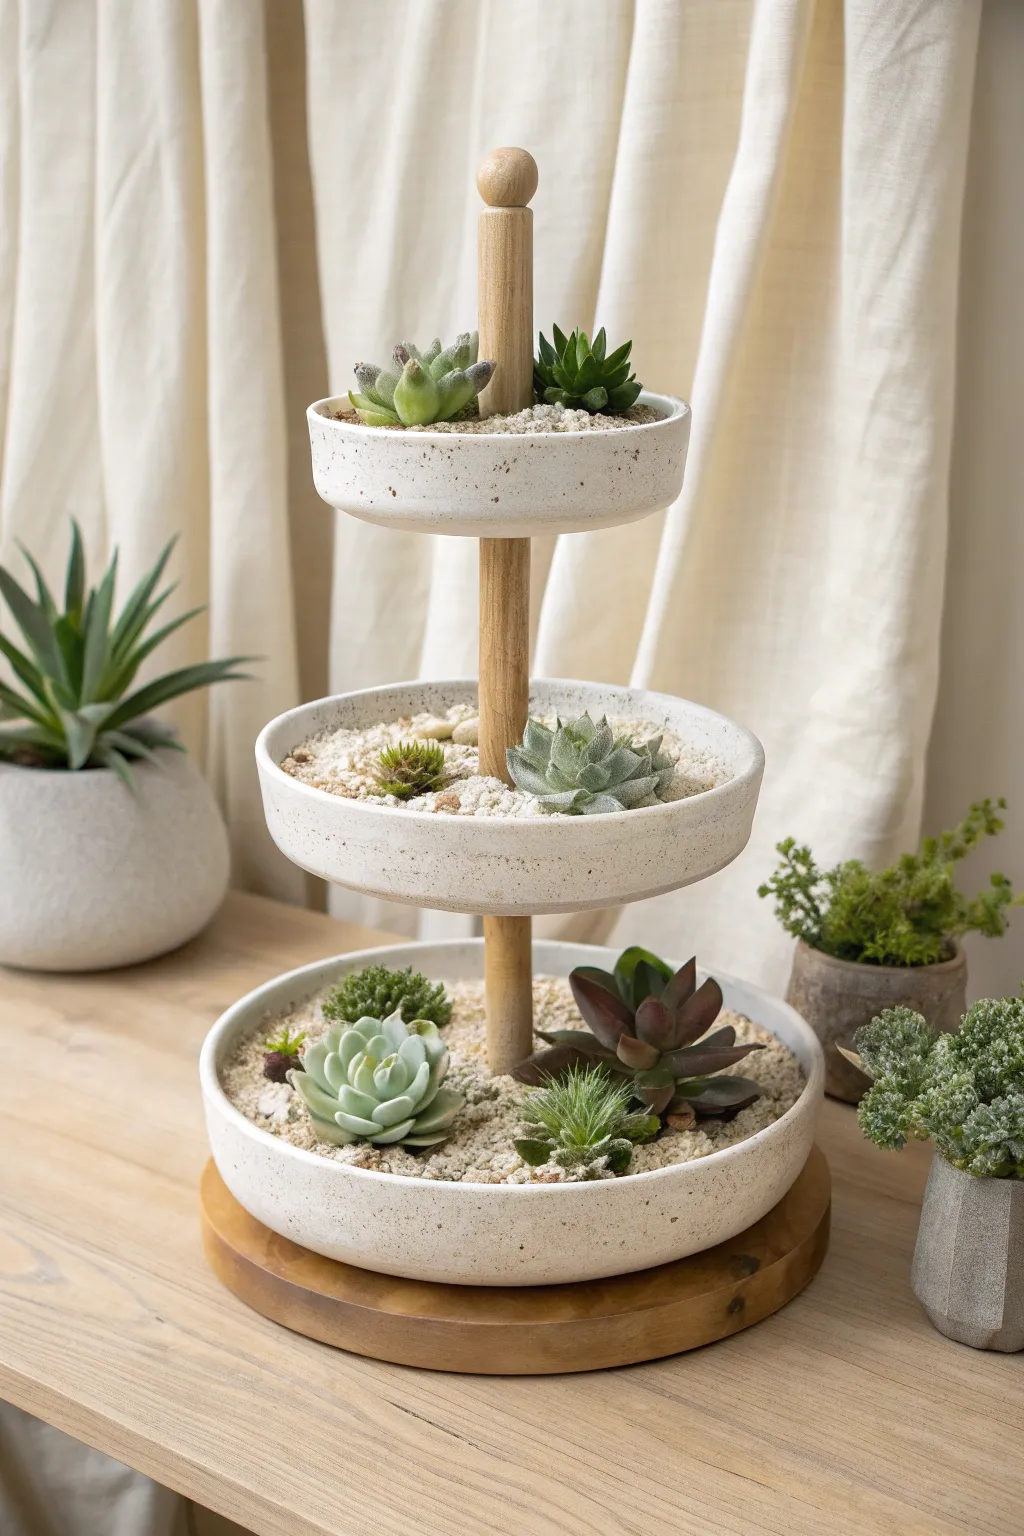
Elevate your plant collection literally and figuratively with this minimalist three-tiered display that maximizes vertical space. Combining speckled ceramic style with natural wood tones, this project creates a stunning architectural centerpiece perfect for grouping small, light-loving succulents.
Step-by-Step
Materials
- Three shallow bowls or saucers (graduated sizes: approx. 10″, 8″, and 6″ diameter)
- Wooden dowel (1 inch diameter, cut into three segments)
- Round wooden base plaque/disc (slightly larger than bottom bowl)
- Small wooden finial or cap
- Drill with spade bit or hole saw (matching dowel diameter)
- Construction adhesive or strong epoxy
- Stone-textured spray paint (creamy white/speckled)
- Matte clear sealant spray
- Succulent potting soil
- Light-colored decorative gravel or coarse sand
- Assorted small succulents (e.g., Echeveria, Haworthia, Sempervivum)
- Sandpaper (medium grit)
- Masking tape
Step 1: Preparing the Structure
-
Cut the dowels:
Begin by cutting your sturdy wooden dowel into three segments. For the spacing shown, you’ll need one piece around 3 inches (top), and two pieces around 5-6 inches long for the main supports. -
Drill the bowls:
Carefully drill a central hole through the bottom of the two larger bowls using a diamond-tipped hole saw for ceramic or a standard bit for plastic/resin bowls. The hole should match your dowel diameter exactly. The smallest top bowl does not need a hole. -
Texture the bowls:
To achieve that high-end stoneware look on inexpensive plastic or terracotta saucers, apply 2-3 coats of stone-textured spray paint. I find that light, even mists prevent drips and create a more realistic speckle. -
Seal the finish:
Once the texture paint is fully dry, apply a coat of matte clear sealant. This step is crucial because it protects the finish from moisture when you water your plants later. -
Prep the wood:
Sand the dowel segments, finial, and the wooden base plaque until smooth. If you prefer a warmer tone, apply a light coat of natural wood stain or wax, but keep the ends raw for better glue adhesion.
Wobbly Structure?
If the dowels feel unstable, drive a long screw upward through the wooden base into the first dowel for an internal anchor, or use ‘washer’ shaped wood scraps between tiers for support.
Step 2: Assembly
-
Mount the base:
Mark the exact center of your wooden base plaque. Apply strong construction adhesive to one end of a longer dowel segment and press it firmly onto the center mark. Let this cure for at least an hour to ensure a stable foundation. -
Install the first tier:
Slide the largest bowl onto the dowel, seating it on top of the base. If necessary, use a small amount of adhesive underneath the bowl where it meets the wood to prevent wobbling. -
Add the second level:
Glue the second long dowel segment directly onto the top of the first dowel, sandwiching the base of the first bowl securely if your hole was tight, or gluing it to the bowl’s interior center if using a solid stacking method. -
Attach the middle bowl:
Slide the medium-sized bowl onto the second dowel. Ensure it sits level before proceeding. -
Secure the top tier:
Attach the shorter (3-inch) dowel piece on top of the previous section. Glue the smallest bowl onto the flat top of this final dowel segment. -
Final touches:
Glue the decorative finial into the center of the top bowl. Let the entire structure cure overnight so the adhesive reaches maximum strength before adding any weight.
Step 3: Planting and Styling
-
Layer the soil:
Add a shallow layer of succulent-specific potting mix to each tier. Since these trays are shallow, maximize soil depth where possible, slightly mounding it towards the center dowel. -
Position the plants:
Remove your succulents from their nursery pots and gently loosen the roots. Arrange the largest rosettes, like Echeveria, on the bottom tier for visual weight. -
Plant the upper tiers:
Place smaller, lighter varieties like small Aloe or Haworthia on the middle and top tiers. I like to leave negative space between plants to keep the look airy and modern. -
Add top dressing:
Carefully pour light-colored decorative gravel or coarse sand over the exposed soil. Use a spoon to guide the gravel around the delicate leaves without burying them. -
Clean up:
Use a soft brush (like a makeup brush) to dust off any soil or sand particles that stuck to the succulent leaves or the rim of the bowls.
Pro Tip: Drainage
Since this tiered design makes drainage holes tricky, keep your plants happy by misting lightly rather than heavy watering, or mix extra perlite into your soil to prevent root rot.
Now you have a chic, space-saving display that turns a handful of small plants into a cohesive vertical garden
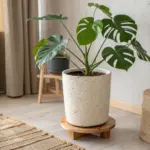
Wall-Mounted Succulent Tray Shelf Garden
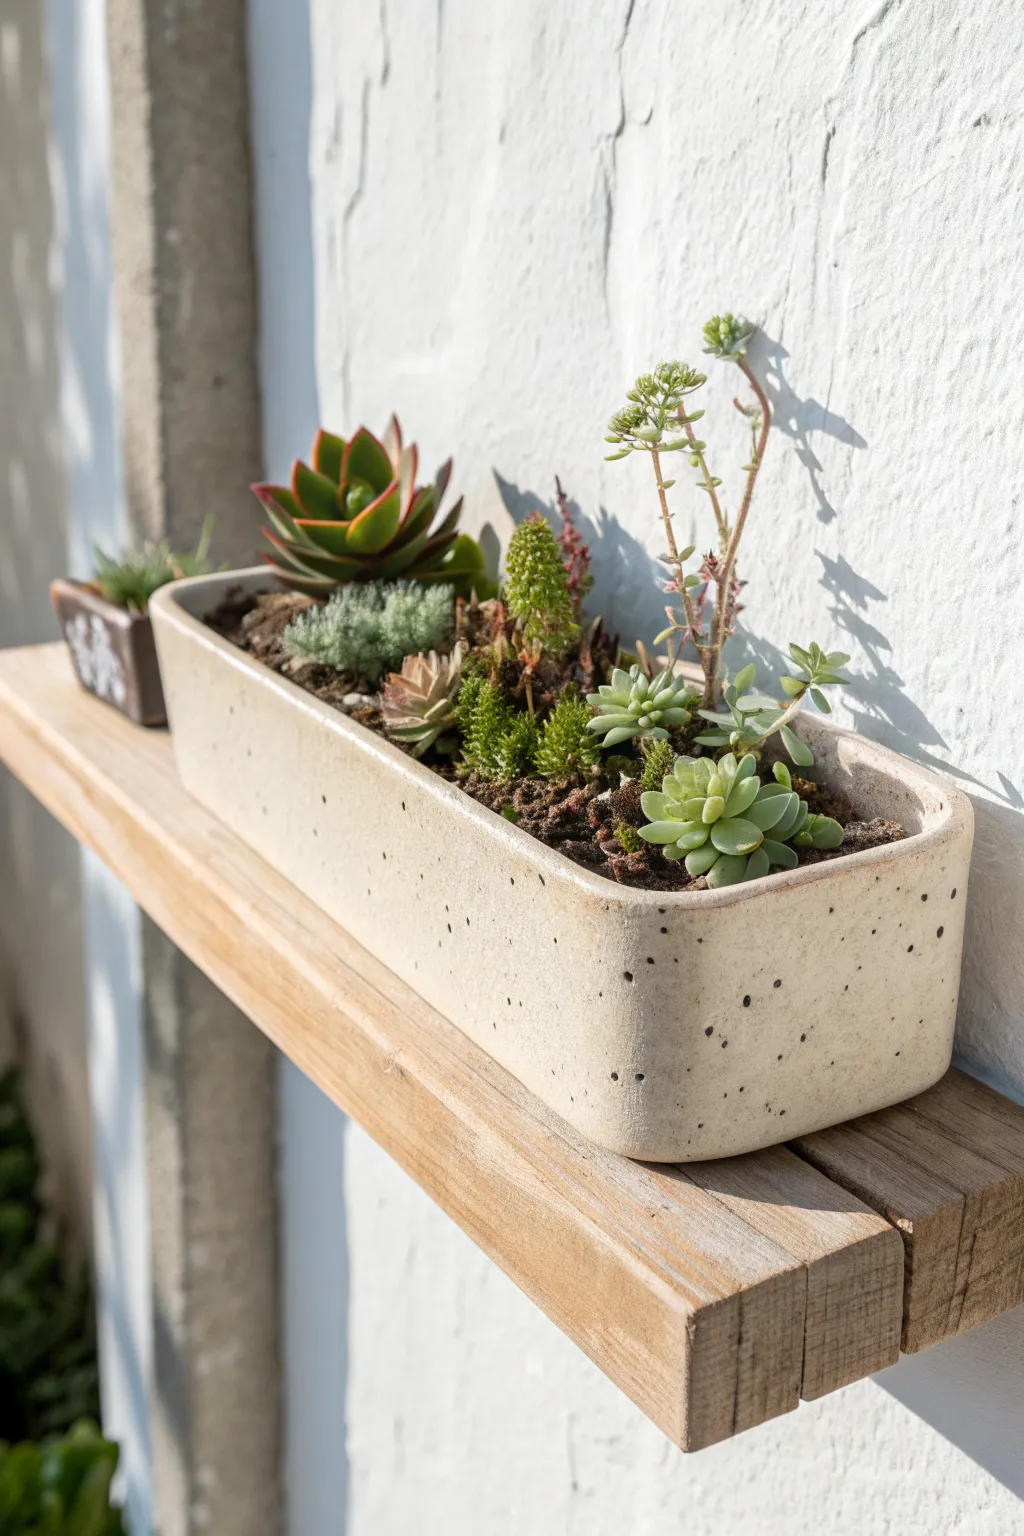
Transform a blank outdoor wall into a vibrant growing space with this minimalist floating shelf display. By combining a hand-potted stoneware-style planter with a rustic wooden ledge, you create a charming vertical garden that feels both modern and organic.
Step-by-Step Guide
Materials
- Rectangular ceramic or concrete planter (shallow, cream-colored with speckles)
- Wooden plank (approx. 1×4 inch or similar, cut to length)
- Wall brackets or floating shelf hardware
- Succulent potting mix (sandy, well-draining)
- Assorted small succulents (e.g., Echeveria, Sedum, Crassula)
- Small pebbles or gravel for drainage
- Drill and wall anchors (appropriate for stucco/outdoor walls)
- Level
- Small trowel or spoon
- Soft bristle brush
- Sandpaper (medium grit)
Step 1: Preparing the Shelf
-
Cut and Sand:
Begin by sourcing a piece of lumber that is slightly deeper than your chosen planter. Cut it to a length that extends a few inches past the planter on either side. Give the rough sawn ends a quick rub with sandpaper to smooth them out while keeping the rustic texture intact. -
Determine Placement:
Hold the shelf up against your wall to find the perfect height. Since this is likely an outdoor stucco wall, look for a spot that gets bright but indirect sunlight during the hottest part of the day. -
Install Brackets:
Attach your chosen mounting hardware to the wall. If you want the ‘floating’ look shown in the photo, use concealed floating shelf brackets. Ensure you drill into a stud or use masonry anchors suitable for the wall texture. -
Mount the Shelf:
Slide your wooden plank onto the brackets. Use a level to ensure it sits perfectly flat. I like to give it a firm wiggle test to make sure it can handle the weight of a soil-filled pot.
Loose Soil?
If soil washes out during watering, use a top dressing of decorative gravel or sand. It keeps the soil in place and gives a professional finish.
Step 2: Potting the Arrangement
-
Prepare the Planter:
Select a shallow, rectangular planter. If yours doesn’t have drainage holes, drill 2-3 small holes in the bottom to prevent root rot, as succulents hate sitting in water. -
Add Drainage Layer:
Pour a thin layer of small gravel or pebbles across the bottom of the planter. This helps keep the soil aerated and further protects roots from standing water. -
Fill with Soil:
Add your succulent-specific potting mix, filling the container about two-thirds of the way up. Create small divots where you plan to place your main plants. -
Place Larger Succulents:
Start by positioning your focal point plant—in this case, the larger rosette Echeveria with reddish tips. Place it slightly off-center for a balanced look. -
Add Height and Texture:
Next, tuck in taller, upright succulents like Crassula or Sedum varieties towards the back or sides to create vertical interest and prevent the arrangement from looking too flat. -
Fill Gaps:
Fill the remaining spaces with low-growing ground cover succulents, such as Sedum ‘Blue Spruce’ or small jelly bean plants. Pack them snugly but gently.
Sun Stress for Color
To get those vibrant red tips on your Echeveria, slowly increase its sun exposure. This ‘sun stress’ brings out beautiful blushing colors.
Step 3: Finishing Touches
-
Top Up Soil:
Carefully spoon in extra soil around the roots of all your new additions, pressing down gently with your thumb to secure them. -
Clean Up:
Take a soft bristle brush and gently sweep away any stray soil particles that might be stuck in the crevices of the succulent leaves or on the rim of the clean white pot. -
Water In:
Give the arrangement a light watering directly at the soil level, avoiding the leaves if possible. Let the excess water drain out completely before moving it. -
Position on Shelf:
Lift the heavy planter and center it on your mounted wooden shelf. Ensure it’s stable and won’t slide off. -
Optional Companion:
If your shelf is long enough, add a tiny matching pot with a single small succulent next to the main tray, as seen in the inspiration image, to create a sense of scale.
Enjoy your vertical garden oasis as it grows and settles into its sunny new home
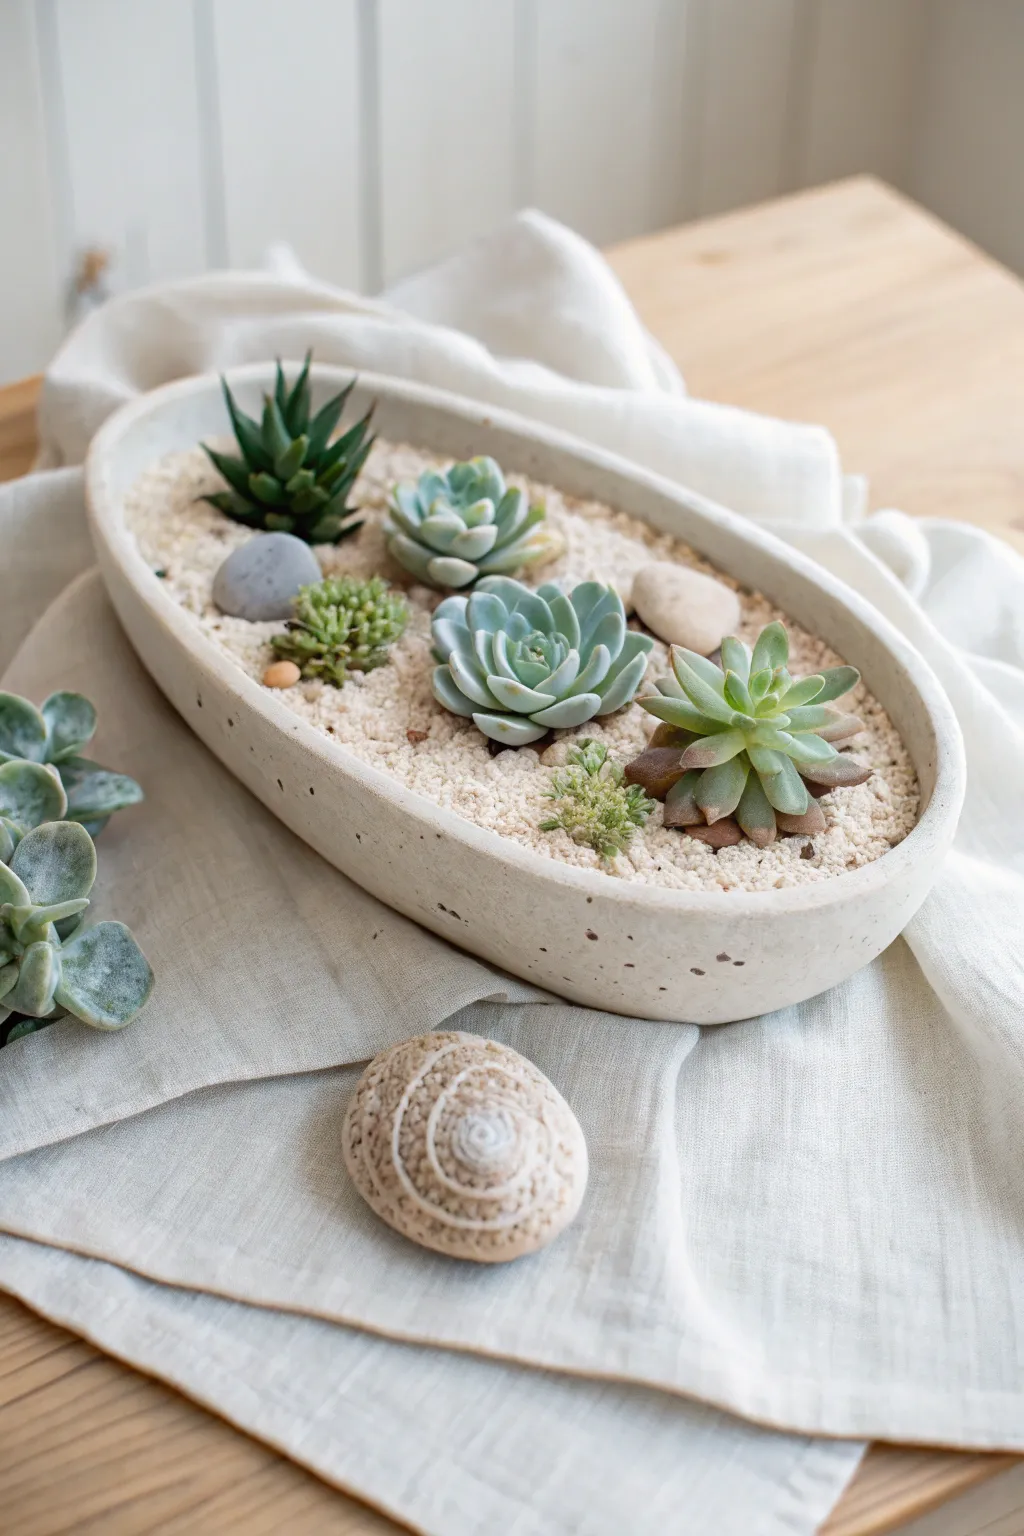
Mini Desert Landscape Succulent Tray
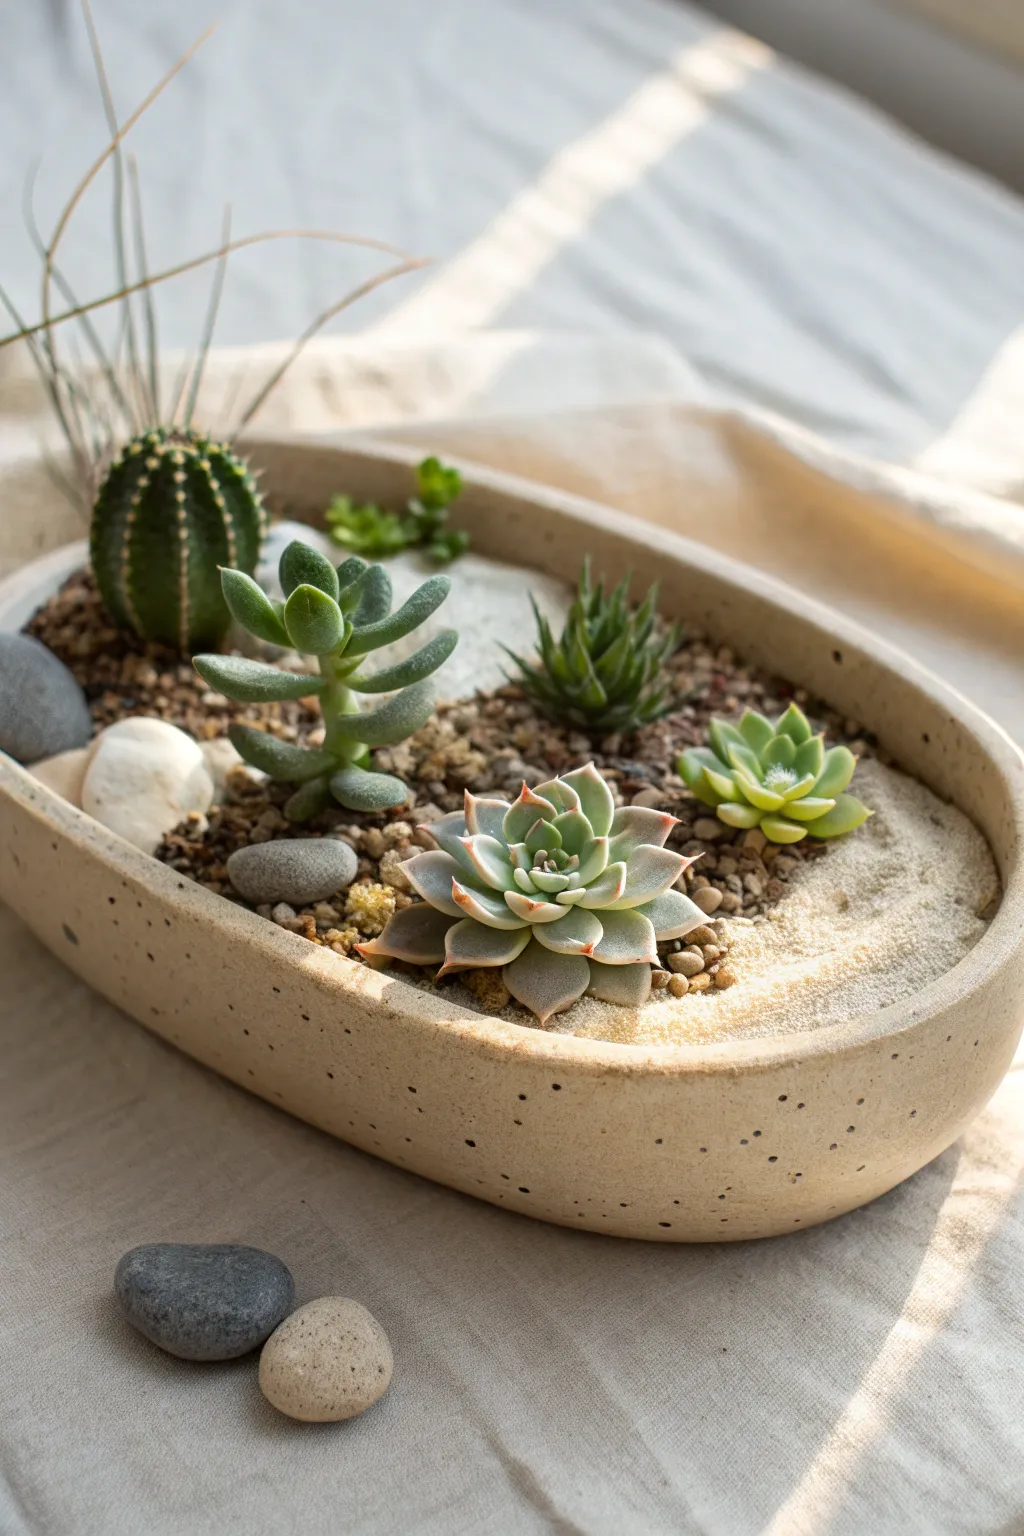
Transform a simple ceramic dish into a serene, sun-drenched desert scape with this elegant succulent arrangement. By combining different textures of sand, gravel, and carefully selected plants, you’ll create a miniature world that feels both organic and artfully composed.
Step-by-Step Tutorial
Materials
- Oval ceramic planter (approximately 8-10 inches long, shallow)
- Succulent and cactus soil mix
- Small barrel cactus (Echinocactus or similar)
- Pachyphytum or similar rounded-leaf succulent
- Haworthia (pointed leaf succulent)
- Echeveria ‘Lola’ or similar rosette succulent
- Tiny miniature succulent cluster (like Sedum)
- Coarse grit or small brown gravel
- Fine white or beige decorative sand
- Large decorative river stones (grey and cream)
- Tweezers or long chopsticks
- Spoon or small scoop
- Small bristle brush
Step 1: Base Preparation
-
Clean the vessel:
Begin with a clean, dry oval ceramic planter. Ensure it has a drainage hole; if not, add a thin layer of activated charcoal at the very bottom to keep the soil fresh. -
Add the soil foundation:
Fill the planter about three-quarters full with your specialized succulent soil mix. You want enough depth for roots, but leave space at the top for your decorative topdressing layers. -
Create the terrain:
Before planting, gently contour the soil. Create a slight mound towards the back left side where the cactus will go, giving the landscape a bit of natural unevenness rather than a flat surface.
Step 2: Planting the Landscape
-
Position the cactus:
Start with the small barrel cactus. Using tongs or thick gloves, nestle it into the soil on the far left side. This anchors the composition with height. -
Place the tall succulent:
Plant the Pachyphytum (the rounded-leaf vertical succulent) slightly to the right of the cactus. Angle it just slightly so it looks like it’s reaching for the light. -
Add the rosette centerpiece:
Position your large Echeveria rosette in the front-center area. This is the focal point, so make sure it sits securely and isn’t tilted too far forward. -
Fill the background:
Tuck the spiky Haworthia behind the Echeveria and slightly to the right, creating a nice textural contrast with the softer leaves in front. -
Insert the tiny details:
Place the tiny Sedum cluster or miniature succulent at the very back edge, behind the cactus. It adds depth without stealing the show. -
Secure the roots:
Use your spoon or fingers to gently firm the soil around each plant base, ensuring there are no large air pockets trapped near the roots.
Loose plants?
If tall succulents feel wobbly after planting, use small varying sizes of pebbles wedged gently under the base of the stem to prop them up until roots anchor them.
Step 3: The Hardscape Finish
-
Lay the primary gravel:
Carefully spoon the coarse brown grit or gravel over the soil surface, focusing on the left and center areas first. Use tweezers to get the gravel underneath the lower leaves of the succulents. -
Create the sand dune:
Pour the fine white/beige sand on the far right side of the tray. I like to let it spill naturally towards the center, creating a gradient where it meets the darker gravel. -
Blend the transition:
Where the sand meets the gravel, use a chopstick to slightly disturb the line so the materials mix organically, avoiding a harsh, straight border. -
Place the feature stones:
Nestle a large grey river stone near the cactus on the left. Place a smaller cream-colored stone near the front edge among the gravel. -
Add the second accent stone:
Position a medium-sized grey stone tucked near the Pachyphytum. These stones mimic boulders in a real desert and help stabilize the soil. -
Clean the scene:
Use a small, soft brush to gently sweep any stray grains of sand or soil off the succulent leaves and the cactus spines. -
Final adjustment:
Step back and check the balance. If the sand looks too flat, use a tool to create tiny ripples or divots for a wind-blown effect.
Add a skeleton
For a true desert vibe, place a tiny piece of bleached driftwood or a miniature animal skull replica in the sand area to enhance the arid theme.
Place your finished tray in a bright spot where the morning light can highlight the textures of your new miniature landscape
Color-Gradient Succulent Tray Arrangement
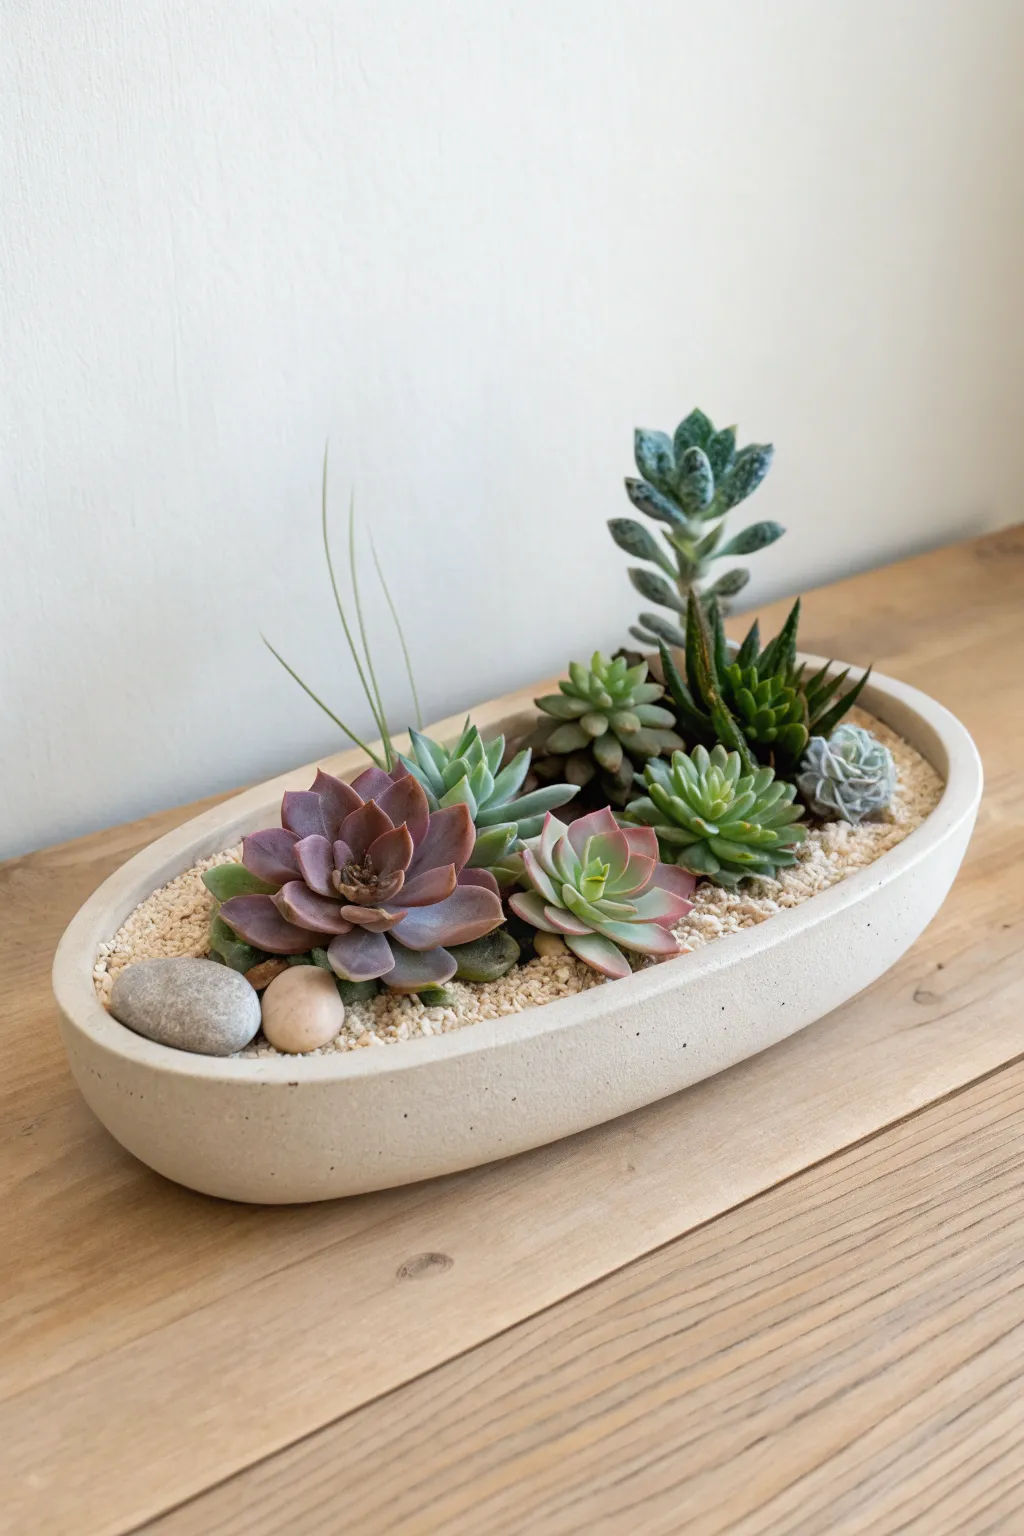
This elegant arrangement brings together a soft palette of amethyst, sage, and deep greens in a sleek, minimalist planter. By grouping succulents with varying heights and textures, you can create a centerpiece that feels both curated and naturally whimsical.
How-To Guide
Materials
- Shallow oval planter (concrete or matte white ceramic)
- Succulent potting soil mix
- Light-colored decorative gravel or top dressing sand
- Assorted succulents (e.g., Purple Pearl Echeveria, Haworthia, Pachyverium)
- One small air plant or tall grass accent (optional)
- Two smooth river stones
- Small shovel or spoon
- Long tweezers
- Squeeze bottle or spray bottle for watering
- Drainage mesh or coffee filter
Step 1: Base Preparation
-
Check Drainage:
Inspect your oval planter for a drainage hole. If it has one, cover it with a small piece of mesh or a cut coffee filter to keep the soil in while letting water escape. -
Add Soil Layer:
Fill the planter about two-thirds full with the succulent potting mix. Level it out gently with your hand, leaving enough space at the top for the plants and top dressing. -
Create a Slight Mound:
I like to create a very subtle mound in the center of the soil, rather than keeping it perfectly flat. This adds a bit of dimension to the final look.
Color Harmony Tip
Choose plants that share cool undertones—silvers, purples, and blue-greens mimic a sunset gradient and look more cohesive than mixing warm and cool tones.
Step 2: Selecting and Placing Plants
-
Prepare the Tallest Plant:
Start with your tallest succulent (like the grey-green Pachyverium seen on the right). Gently massage its root ball to loosen old soil before planting. -
Position the Focal Point:
Place this tall plant towards the right side of the tray, slightly off-center. This establishes the high point of your visual gradient. -
Add Mid-Height Texture:
Next to the tall plant, nestle in a spiky succulent like a Haworthia or Aloe. The deep green spikes provide a great contrast to the softer leaves nearby. -
Anchor the Left Side:
On the far left, position your largest rosette, such as an Echeveria ‘Purple Pearl’ or similar violet-hued variety. Angle it slightly outward so the rosette faces the viewer. -
Fill the Middle Ground:
Bridge the gap between the purple rosette and the tall right-side cluster with medium-sized green echeverias. Try to place them snugly but not crushed together. -
Tuck in Accent Plants:
Identify any small gaps. Use long tweezers to insert smaller ‘filler’ succulents or offsets, like the tiny silvery rosette near the far right edge. -
Add Height Variation:
If you have wispy grass or a tall, thin air plant, place it behind the purple rosette on the left side to balance the height of the composition without adding visual weight.
Step 3: Finishing Touches
-
Secure Roots:
Once all plants are placed, use a spoon to add more soil around the root balls, firming it down gently with your fingers or the back of the spoon. -
Clean the Leaves:
Use a soft brush or a gentle puff of air to remove any loose soil particles that may have landed on the delicate leaves. -
Apply Top Dressing:
Carefully pour the light-colored gravel or coarse sand over the exposed soil. Use a spoon to guide the gravel under the leaves for a clean, professional finish. -
Place River Stones:
Position two smooth, grey river stones near the purple rosette on the left. Nestling them into the gravel adds a Zen-like quality and visually grounds the large bloom. -
Final Adjustment:
Take a step back and check your arrangement. If any plant feels loose, use the tweezers to tuck a little more gravel around its base for stability.
Drooping Leaves?
If leaves start to look shriveled or droopy after a week, the arrangement is thirsty. If leaves turn translucent or mushy, withhold water immediately to prevent rot.
Place your new arrangement on a bright windowsill and enjoy the serene atmosphere it creates
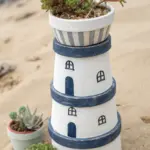
Coastal Pebble Succulent Tray Theme
Bring the serene feeling of a beach walk into your home with this minimalist coastal-inspired succulent arrangement. Featuring a sleek, oval concrete vessel and soft, sandy textures, this project balances organic greenery with calmness of sea-washed stone.
Detailed Instructions
Materials
- Shallow oval concrete planter (approx. 10-12 inches long)
- Succulent potting soil mix
- Coarse beige sand or fine gravel (top dressing)
- Assorted small succulents (e.g., Echeveria, Haworthia, Sedum)
- Smooth river rocks or beach pebbles (grey and tan)
- Small decorative spiral shell/stone
- Small trowel or spoon
- Soft bristle brush
- Chopstick or unseen poking tool
Step 1: Preparing the Base
-
Clean the vessel:
Start by wiping out the inside of your concrete planter to remove any dust or debris. Since concrete is porous, ensure it is completely dry before adding any material. -
Add drainage layer (optional):
While this shallow planter may not have a drainage hole, adding a very thin layer of small pebbles at the very bottom can help prevent root rot if you tend to overwater. -
Fill with soil:
Add your succulent potting soil mix to the planter. You want to fill it up to about 1 inch below the rim. -
Level the surface:
Use the back of a spoon or your trowel to gently pat down the soil creates a relatively flat surface. Do not pack it too tightly, as the roots need to breathe.
Sand Pouring Tip
Use a folded index card or a paper funnel to direct the sand precisely between the tight leaves of the succulents to avoid a mess.
Step 2: Planting the Succulents
-
Arrange your layout:
Before planting, set your potted succulents on top of the soil to test the spacing. Aim for an asymmetrical, organic look rather than perfect rows. -
Create the first pocket:
Start with the spiky Haworthia (the dark green one) on the left side. Use a spoon to dig a small depression in the soil. -
Plant the anchor piece:
Gently remove the Haworthia from its nursery pot, loosen the roots slightly, and nestle it into the hole. -
Add the central rosettes:
Position the pale blue-green Echeverias towards the center. I like to stagger them slightly so one sits a bit further back than the other. -
Place the accent plants:
Add the smaller, textured succulents—like the tiny Sedum clumps—near the front left and back right to fill gaps without crowding. -
Plant the reddish rosette:
Finally, place the larger succulent with reddish-brown tips on the far right side to balance the visual weight of the darkened Haworthia on the left. -
Secure the plants:
Use your fingers or a chopstick to gently push soil around the base of each plant, ensuring they are sitting upright and secure.
Step 3: Applying the Finish
-
Apply the top dressing:
Carefully pour the coarse beige sand or fine gravel over the exposed soil. A small spoon works best here to get underneath the leaves without burying them. -
Cover completely:
Continue adding the sand until all the dark potting soil is hidden. This layer should be about 0.5 to 1 inch thick, coming up just below the rim of the planter. -
Position larger stones:
Place a smooth grey stone near the left cluster and a tan stone near the right cluster. Press them slightly into the sand so they look settled naturally. -
Add tiny details:
Scatter a few tiny pebbles or a very small shell fragment near the front for added texture, keeping the look sparse and uncluttered. -
Clean the leaves:
Take a soft bristle brush and gently sweep away any stray grains of sand that may have landed on the succulent leaves during the process. -
Final check:
Inspect the arrangement from all angles. Smooth out any bumps in the sand with your spoon to ensure that pristine, windswept beach look.
Loose, Wobbly Plants?
If a succulent won’t stand straight, tuck a small pebble under its base leaves for temporary support until the roots establish.
Place your finished tray on a linen cloth or wooden table to enjoy a slice of coastal calm every day
Coil-Rim Handmade Clay Succulent Tray
Hand-building pottery adds a beautiful, organic touch to indoor gardening, and this low-profile oval tray is perfect for showcasing a collection of succulents. The natural terracotta tone and simple rolled rim create a warm, earthy frame for softly colored Echeveria and Haworthia varieties.
Step-by-Step
Materials
- Terracotta air-dry clay or kiln-fire clay
- Rolling pin
- Canvas mat or heavy fabric scraps
- Clay knife or fettling knife
- Oval paper template (approx. 10″ x 4″)
- Rib tool or old credit card
- Rough sandpaper (100 grit)
- Small bowl of water
- Sponge
- Cactus/succulent soil mix
- Decorative top-dressing sand
- Assorted small river stones
- 3-5 small succulent plugs
Step 1: Sculpting the Tray Base
-
Prepare the workspace:
Lay down your canvas mat to prevent the clay from sticking to your table. Take a substantial chunk of terracotta clay and knead it well to remove air bubbles—this makes the clay more pliable and less prone to cracking later. -
Roll the slab:
Using your rolling pin, flatten the clay into a smooth slab about 1/4 inch thick. Try to keep the thickness consistent across the entire surface for even drying. -
Cut the shape:
Place your paper oval template onto the slab. Using your fettling knife, trace around the template to cut out the base of your tray. Smooth the rough cut edges gently with your finger. -
Texture the exterior (optional):
Looking at the reference, the texture is slightly pitted and gritty. You can gently press a piece of coarse sandpaper or a rough stone against the clay surface that will become the outside wall to mimic this earthy finish.
Cracking Clay?
If you see tiny cracks forming while working, your clay is getting too dry. Mist it lightly with water or wrap it in a damp paper towel for 10 minutes to rehydrate before continuing.
Step 2: Building the Walls
-
Create the wall strips:
Roll out another slab of clay, slightly thinner than the base. Cut a long strip (or two strips to join) that is approximately 1.5 inches tall. This will form the vertical sides of the tray. -
Score and slip:
Score (scratch hatch marks) along the top edge of your oval base and the bottom edge of your wall strip. Dab a little water or clay slip onto the scored areas to act as glue. -
Attach the walls:
Stand the strip up along the edge of the base, pressing it firmly into place. If you need to join two strips to go all the way around, overlap the ends slightly and blend the clay together until the seam disappears. -
Smooth the interior:
Use a rib tool or your thumb to drag a little clay from the wall down onto the base on the inside. This creates a strong seal and prevents water from leaking later.
Step 3: Adding the Coil Rim
-
Roll a coil:
Roll a snake of clay between your palms or on the table until it’s an even cylinder, roughly the thickness of a pencil or small marker. -
Attach the rim:
Score the very top edge of your vertical wall. Place the coil on top. I find it easiest to work in sections, pressing the coil down gently to fuse it to the wall without flattening fit completely. -
Define the lip:
Unlike a perfectly smooth pot, this tray has a distinct ‘separation’ line below the rim. Use a modeling tool or a wooden skewer to gently press under the coil on the outside, creating a slight indentation that visually separates the rim from the wall. -
Final smoothing:
Run a damp sponge over the rim and any sharp edges to soften them. You want the piece to look hand-formed, so don’t worry about perfect symmetry.
Make It Glossy
Want a more finished look? After your tray is bone dry, apply a coat of diluted terracotta-colored acrylic paint before sealing to deepen the red tone.
Step 4: Finishing and Planting
-
Dry and fire (or seal):
Let the tray dry slowly away from direct heat to prevent warping. If using kiln clay, fire it according to manufacturer instructions. If using air-dry clay, allow it to cure fully (24-48 hours) and then seal the inside with a waterproof varnish to protect it from moisture. -
Add drainage layer:
Once finished, place a shallow layer of small pebbles or grit at the bottom of the tray to help with drainage, as shallow trays dry out quickly but can also hold water if not careful. -
Fill with soil:
Add your cactus soil mix, leaving about half an inch of space from the top rim. -
Arrange the plants:
Remove your succulents from their nursery pots. Place a taller aloe or haworthia (like the dark green one in the image) on one side for height, and cluster rosettes like Echeveria in the center and opposite side. -
Top dressing:
Spoon warm-toned sand over the exposed soil to create that clean desert look. Use a soft brush to sweep any stray sand grains off the succulent leaves. -
Place decorative stones:
Nestle a few smooth, grey and white river stones among the plants. This adds contrast and helps anchor the smaller succulents visually.
Place your finished tray on a sunny windowsill where the light can highlight the texture of the clay and the soft hues of the succulents
Air-Dry Clay Faux Succulent Tray Decor
Bring a touch of everlasting greenery to your windowsill with this ultra-realistic faux succulent tray made entirely from air-dry clay. The textured faux-concrete base and diverse succulent shapes create a high-end botanical look without any watering required.
Step-by-Step Guide
Materials
- White or light gray air-dry clay
- Rolling pin
- Oval template (paper or cardboard, approx. 12″ long)
- Craft knife
- Water in a spray bottle
- Sandpaper (medium and fine grit)
- Acrylic paints: sage green, purple, deep green, white, reddish-brown
- Paintbrushes (detail and flat)
- Faux moss (reindeer moss or sheet moss)
- Fine sand or textured stone paste
- Clear matte sealant spray
- Modeling tools (ball stylus, needle tool)
- Small scissors
Step 1: Sculpting the Concrete Tray
-
Prepare the Base Clay:
Start by conditioning a large chunk of air-dry clay until it is pliable. Roll it out to a uniform thickness of about 1/4 inch on a non-stick surface. -
Cut the Shape:
Place your oval template onto the rolled clay and cut around it using a craft knife. Reserve the excess clay for the walls. -
Build the Walls:
Roll a long snake of clay and flatten it to create a strip about 1.5 inches tall. Attach this strip around the perimeter of your oval base, scoring the edges and using a little water to bond them securely. -
Smooth and Texturize:
Blend the seams inside and out until they act as one solid piece. To mimic the porous look of concrete, gently dab the wet clay surface with a crumpled ball of aluminum foil or a stiff-bristled brush. -
Dry the Tray:
Let the tray dry completely for 24-48 hours. I find turning it over halfway through helps the bottom dry evenly.
Cracking Clay?
If small cracks appear as the tray dries, mix a tiny bit of fresh clay with water to make a paste (slip) and fill the cracks, then smooth over.
Step 2: Creating the Clay Succulents
-
Large Rosette Base:
For the large echeveria, roll a small ball of clay for the center. Pinch small flattened teardrop shapes of clay to form individual leaves. -
Assemble the Echeveria:
Attach leaves in a spiral pattern around the center base, starting small at the top and getting larger toward the bottom. Curve the tips slightly upward for realism. -
Sculpt Spiky Varieties:
Create the spiky aloe-like plant by rolling tapered logs of clay. Flatten slightly and press them together at a central base point, angling them outward. -
Form the Sedum:
To make the bright green clusters (sedum), roll many tiny balls of clay. Cluster them tightly together on a small mound of clay, poking them with a needle tool to add texture. -
Make the Purple Rosette:
Create a smaller rosette similar to the first, but with slightly thicker, chubbier leaves to mimic a darker Graptopetalum variety. -
Dry the Plants:
Set all your clay plant sculptures on a sheet of parchment paper to dry fully, usually overnight.
Realistic texture
Before the clay dries, gently press a real succulent leaf into the clay leaves to transfer authentic veining and texture instantly.
Step 3: Painting and Assembly
-
Paint the Tray:
Once dry, sand any sharp edges on the tray. Sponge on off-white or very light gray acrylic paint to enhance the concrete effect. -
Color Characteristics:
Paint the large rosette a dusty blue-green, adding a touch of white to the tips. For the smaller rosette, use a muted purple-grey, blending into green at the center. -
Detailing the Spikes:
Paint of the spiky plant deep green, and carefully dry-brush reddish-brown onto the very tips for a sun-stressed look. -
Vibrant Greens:
Coat the sedum clusters in a bright, yellow-green acrylic to make them pop against the muted tones. -
Filling the Base:
Fill the tray with a layer of scrap clay or floral foam to add height, leaving about half an inch of space at the top. -
Positioning Plants:
Glue your painted clay succulents into the tray. I like to group the largest ones off-center for a balanced composition. -
Adding Ground Cover:
Apply craft glue to the visible spaces between the succulents. Sprinkle fine sand over some areas and press tufts of faux reindeer moss into others for texture contrast. -
Final Seal:
Spray the entire arrangement with a clear matte sealant to protect the paint and give the clay a finished, unified sheen.
Place your maintenance-free masterpiece near a window to catch the light and fool your guests with its realism
Polymer Clay Accent “Stones” for Succulent Trays
Elevate your indoor garden with this sleek, modern succulent tray featuring realistic faux-stone accents and a custom concrete-style planter. It combines the organic beauty of succulents with the industrial chic of concrete textures for a sophisticated centerpiece.
How-To Guide
Materials
- Polymer clay (white, black, translucent, and beige/tan)
- Rectangular concrete planter mold (or cardboard to make a form)
- Rapid-set cement mix
- Mixing bucket and stir stick
- Cooking oil or mold release spray
- Sandpaper (various grits from 200 to 800)
- Acrylic paint (thinned black or dark grey for washing)
- Potting soil mixed with perlite
- Small gravel or decorative pebbles (natural tones)
- Three to four medium succulents (Echeverias and Sedums work well)
- Gloss or satin varnish (optional for wet-look stones)
- Oven for baking clay
Step 1: Crafting the Faux Stones
-
Mix your base colors:
Begin by conditioning your polymer clay blocks. Take a large chunk of white and mix in very small amounts of black and translucent clay to create a base grey. Create a second batch using beige and white for lighter stones. -
Marbling technique:
To achieve a natural river-rock look, roll your clay colors into snake shapes. twist them together, fold, and twist again. Don’t overmix; you want visible streaks of color to mimic sedimentary layers. -
Shaping the pebbles:
Pinch off varying sizes of clay, ranging from dime-sized to quarter-sized pieces. Roll them into balls and then flatten slightly into smooth, organic oval shapes. They shouldn’t be perfect circles. -
Adding texture:
Use a rough stone or a piece of crumpled aluminum foil to gently press texture onto the surface of a few stones, leaving others smooth for variety. This subtle detail adds incredible realism. -
Baking:
Arrange your shaped stones on a baking sheet lined with parchment paper or a ceramic tile. Bake according to the manufacturer’s instructions on your specific brand of clay (usually around 275°F for 15-30 minutes). -
Sanding and finishing:
Once cooled, wet sand the stones under running water, starting with lower grit paper and moving to higher grits. This removes fingerprints and gives them that polished river-stone feel.
Stone Realism Trick
Mix dried coffee grounds or black pepper into your translucent clay before baking. This creates tiny speckles that perfectly mimic granite or sandstone textures.
Step 2: Casting the Concrete Tray
-
Prepare the mold:
If you are using a silicone mold, ensure it is clean. If making a custom form from cardboard, tape all seams securely with packing tape and spray the interior liberally with cooking oil or mold release. -
Mix the cement:
In your bucket, combine the rapid-set cement with water according to package directions. Aim for a consistency similar to peanut butter—thick but pourable. -
Pour and vibrate:
Pour the cement into your mold. Immediately tap the sides of the mold vigorously or drop it gently on the table repeatedly. This releases trapped air bubbles, ensuring a smooth finish like the one in the photo. -
Creating the cavity:
If using a two-part mold, insert the inner form now and weigh it down. If using a single block method, you will need to carve later, but a nestling mold is much easier for beginners. -
Curing time:
Allow the concrete to cure undisturbed. While rapid-set dries quickly, I prefer waiting at least 24 hours to ensure the corners don’t chip when de-molding. -
Demolding and sanding:
Carefully peel back the mold or cut away the cardboard. Use medium-grit sandpaper to smooth down the top rim and any sharp edges on the exterior.
Step 3: Assembly and Styling
-
Base layer:
Fill the bottom inch of your concrete tray with potting soil mixed with plenty of perlite for drainage, since shallow trays often lack drainage holes. -
Plant placement:
Remove your succulents from their nursery pots, gently loosening the roots. Arrange them in a line, spacing them evenly. In this project, we used alternating varieties like Echeveria and Sedum for visual rhythm. -
Top dressing:
Carefully spoon your real gravel or decorative pebbles around the base of the plants, covering all exposed soil. Use a small brush to sweep any dust off the succulent leaves. -
Highlighting with faux stones:
Take your handmade polymer clay stones and nestle them decoratively among the gravel and real plants. Place a few larger ones near the prominent rosettes to create focal points. -
Final touches:
Scatter a few leftover polymer clay stones and real dark river rocks on the table surface next to the tray to extend the aesthetic beyond the container.
Level Up: Color Gradient
Make your faux stones in a gradient of colors (white to grey to black) and arrange them in an ombre pattern from one end of the tray to the other.
Enjoy the calming, Zen-like atmosphere this modern planter brings to your space
Broken Pottery Shard Succulent Tray Mosaic
Transform broken pottery into a modern landscape feature with this elegant succulent arrangement. By combining triangular ceramic shards with varied textures of gravel, create a striking geometric mosaic that guides the eye through lush greenery.
Step-by-Step Guide
Materials
- Shallow oval concrete planter (approx. 10-12 inches)
- Succulent potting soil mix
- Various succulents (Echeveria, Sedum, Crassula pieces)
- Broken ceramic or terracotta shards (triangular shapes)
- Small white paving pebbles
- Crushed terracotta gravel or red lava rock
- Chopstick or long tweezers for placement
- Small scoop or spoon
- Protective gloves
Step 1: Preparing the Base
-
Select your vessel:
Begin with a shallow, oval-shaped concrete planter. Ensure it has a drainage hole at the bottom to prevent root rot, which is crucial for succulents. -
Add first soil layer:
Fill the bottom third of the planter with a well-draining succulent or cactus mix. This base layer doesn’t need to be perfectly level yet, just substantial enough to support the roots. -
Arrange primary plants:
Remove your largest Echeveria from its nursery pot. Gently loosen the root ball and nestle it into the left side of the planter, allowing the rosette to sit just below the rim. -
Position secondary succulents:
Place a taller, darker succulent (like an Echeveria ‘Black Prince’ or similar) towards the center-right to create a focal point. Add a smaller, trailing succulent near the back edge for height variation. -
Backfill with soil:
Carefully add more soil around the root balls of your positioned plants. I find using a small spoon helps get soil into tight crevices without burying the leaves. -
Firm the foundation:
Gently press down on the soil around the base of each plant to secure them. Leave the top inch of the planter rim free of soil to accommodate the decorative top dressing.
Shard Safety Pro-Tip
Sand the sharp edges of your broken pottery pieces with coarse sandpaper or a sanding block before placing them to prevent cuts during maintenance.
Step 2: Creating the Mosaic Path
-
Select your shards:
Sort through your broken pottery pieces. Look specifically for triangular or trapezoidal shapes in contrasting colors like white ceramic and raw terracotta. -
Dry fit the design:
Before placing them permanently, lay the shards on a flat surface to plan your pattern. Aim for a jagged, zipper-like arrangement where the triangles almost interlock but leave gaps for pebbles. -
Place the anchor shards:
Begin placing the largest flat shards on the soil surface in the empty space on the right side of the planter. Press them down slightly so they sit level and won’t wobble. -
Fill the gaps:
The spaces between your ceramic shards are just as important as the shards themselves. Carefully sprinkle small white pebbles into the gaps between the white ceramic pieces. -
Set the contrast:
Use a chopstick to push the pebbles deep into the crevices, ensuring the white ceramic shards look like stepping stones embedded in a gravel path.
Level Up: Color Logic
Match gravel colors to the shards! Surround white shards with white grit and terracotta shards with red grit to make the mosaic pieces look larger.
Step 3: Finishing Touches
-
Apply the red top dressing:
On the left side of the planter, around the green rosettes, pour a layer of crushed terracotta gravel or red lava rock. This rusty color makes the green leaves pop. -
Blend the transition:
Let the red gravel meet the edge of your white pottery mosaic naturally. Avoid a perfectly straight line; organic curves look better. -
Add tiny filler plants:
If you have small ‘pups’ or cuttings (like tiny Sedum pieces), tuck one or two into the soil near the edges of the mosaic path for a ‘growing through the cracks’ look. -
Clean the leaves:
Use a soft brush or a puff of air to remove any stray dust or gravel grains from the succulent rosettes. -
Initial watering:
Wait 3-5 days before watering to let any roots callous over. When you do water, focus the stream on the soil or gravel, not firmly on the decorative shards.
Your miniature desert landscape is now ready to brighten up any sunny windowsill or tabletop
Repurposed Metal Sheet Succulent Tray Garden
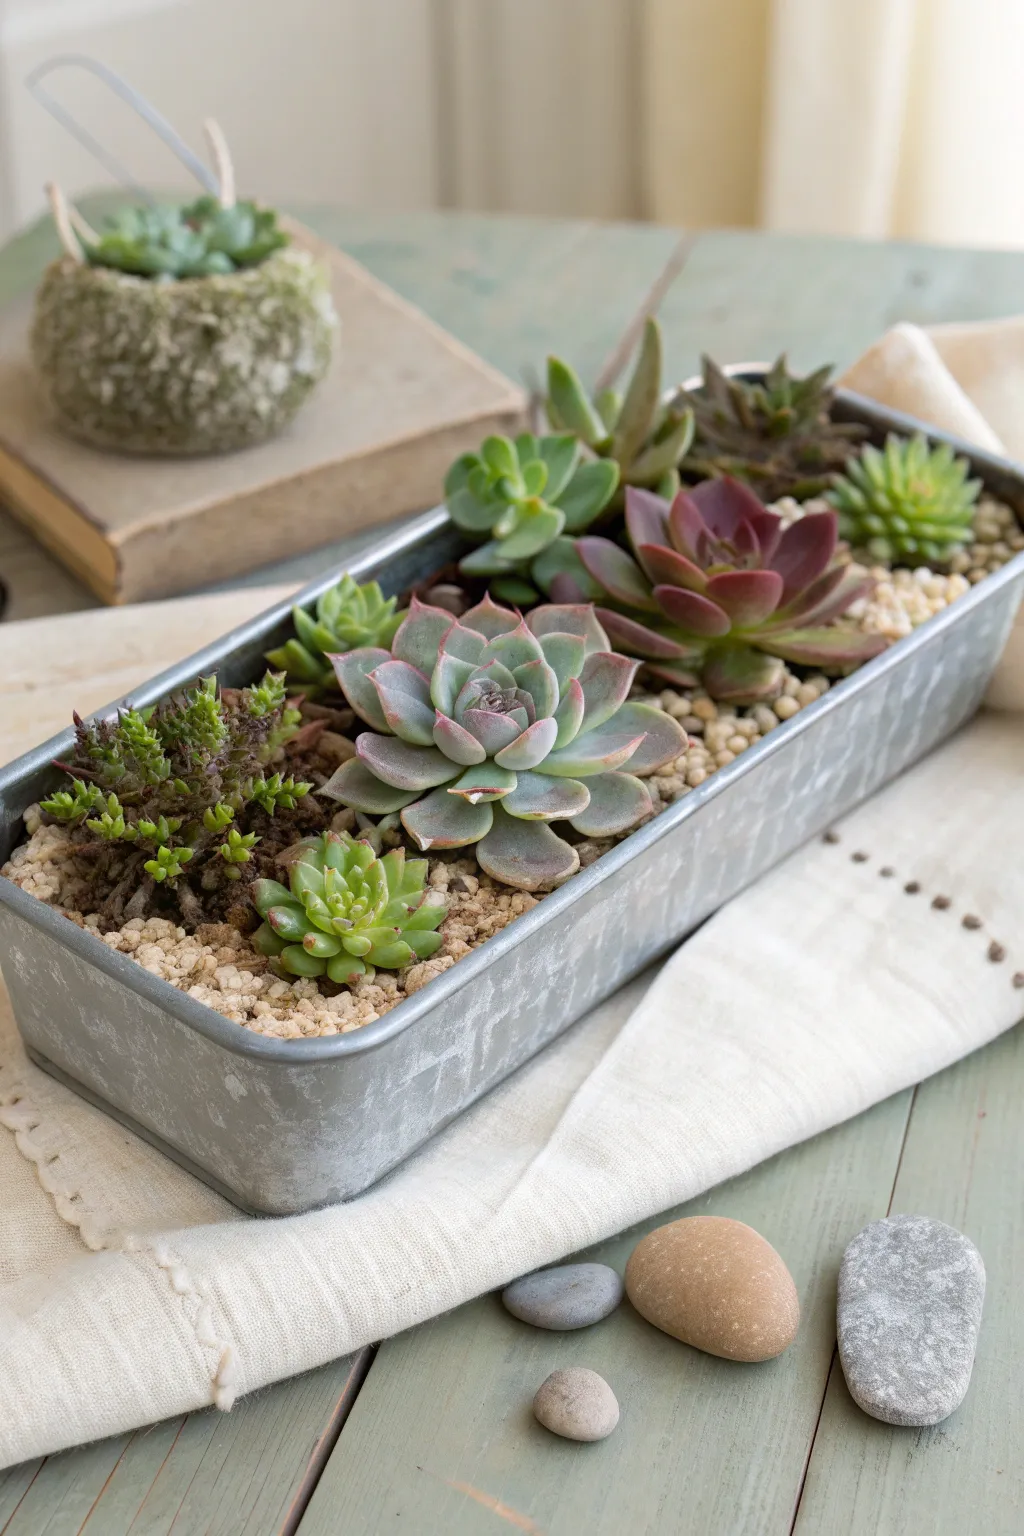
Bring a touch of farmhouse charm to your table with this elongated galvanized metal planter. This low-maintenance arrangement combines a variety of colorful succulents with contrasting top dressing for a clean, professional finish.
Detailed Instructions
Materials
- Rectangular galvanized metal tray (approx 12-14 inches long)
- Succulent and cactus potting mix
- Small gravel or pumice for drainage layer
- Light-colored decorative top dressing (sand or fine gravel)
- Medium Echeveria rosette (blue-green with pink tips)
- Dark Echeveria ‘Black Prince’ or similar purple variety
- Sedum nussbaumerianum (coppertone stonecrop)
- Small cluster of Sempervivum (hens and chicks)
- Trailing succulent cuttings (optional)
- Long tweezers or chopsticks
- Small brush (for cleaning leaves)
- Drill with metal bit (if tray lacks holes)
Step 1: Tray Preparation
-
Check for Drainage:
Examine the bottom of your galvanized tray. If it is watertight, you must add drainage to prevent root rot. -
Drill Holes:
Flip the tray over and carefully drill 4-6 holes evenly spaced along the bottom using a metal drill bit. I usually place a scrap piece of wood underneath to protect my work surface. -
Add Drainage Layer:
Pour a thin layer of small gravel or pumice into the bottom of the tray, just enough to cover the metal surface. -
Fill with Soil:
Add your succulent soil mix, filling the tray to about 3/4 of its depth. Don’t pack it down tight yet; keep it loose for planting.
Loose Leaves?
If leaves fall off during planting, don’t throw them away. Place them on top of dry soil in a separate dish; they will eventually sprout tiny new baby plants.
Step 2: Planting Arrangement
-
Layout Design:
Before unpotting, arrange your succulents in their nursery pots inside the tray to visualize the spacing. Aim for varying heights and textures. -
Center Piece:
Start with your largest rosette (the blue-green Echeveria). Gently remove it from its nursery pot, loosen the root ball slightly, and nestle it near the center but slightly off to one side. -
Add Height and Color:
Place the darker purple succulent next to the main rosette to create contrast. Ensure the leaves aren’t squished against each other. -
Fill the Ends:
Plant the taller Sedum varieties or trailing plants near one end of the tray. -
Add Texture:
Fill the remaining space on the opposite end with clustering varieties like Sempervivum or small Sedum cuttings. -
Secure the Roots:
Once all plants are positioned, use a spoon or small scoop to fill the gaps between root balls with more soil mix. -
Tamp Down:
Gently press the soil down around the base of each plant to secure them, ensuring the soil level is about half an inch below the rim.
Step 3: Finishing Touches
-
Apply Top Dressing:
Carefully pour the light-colored decorative gravel over the exposed soil. Use a spoon to get into tight spaces between the plants. -
Tuck and Tidy:
Use long tweezers or chopsticks to nudge the gravel underneath the leaves of the rosettes. This keeps wet soil off the foliage, which helps prevent rot. -
Clean Up:
Take a soft, dry brush and gently sweep away any stray dirt or gravel dust from the succulent leaves. -
Initial Watering:
Wait 3-5 days before watering to allow any broken roots to callous over. When you do water, soak the soil until water drips from the bottom holes.
Rustic Patina
To age a shiny new tray instantly, spray it with a mixture of vinegar and salt before planting. Leave it outside overnight to develop an authentic weathered dullness.
Place your completed tray in a bright spot and enjoy the minimalist beauty of your new garden
Modular Mini-Pot Succulent Tray Swap-Out
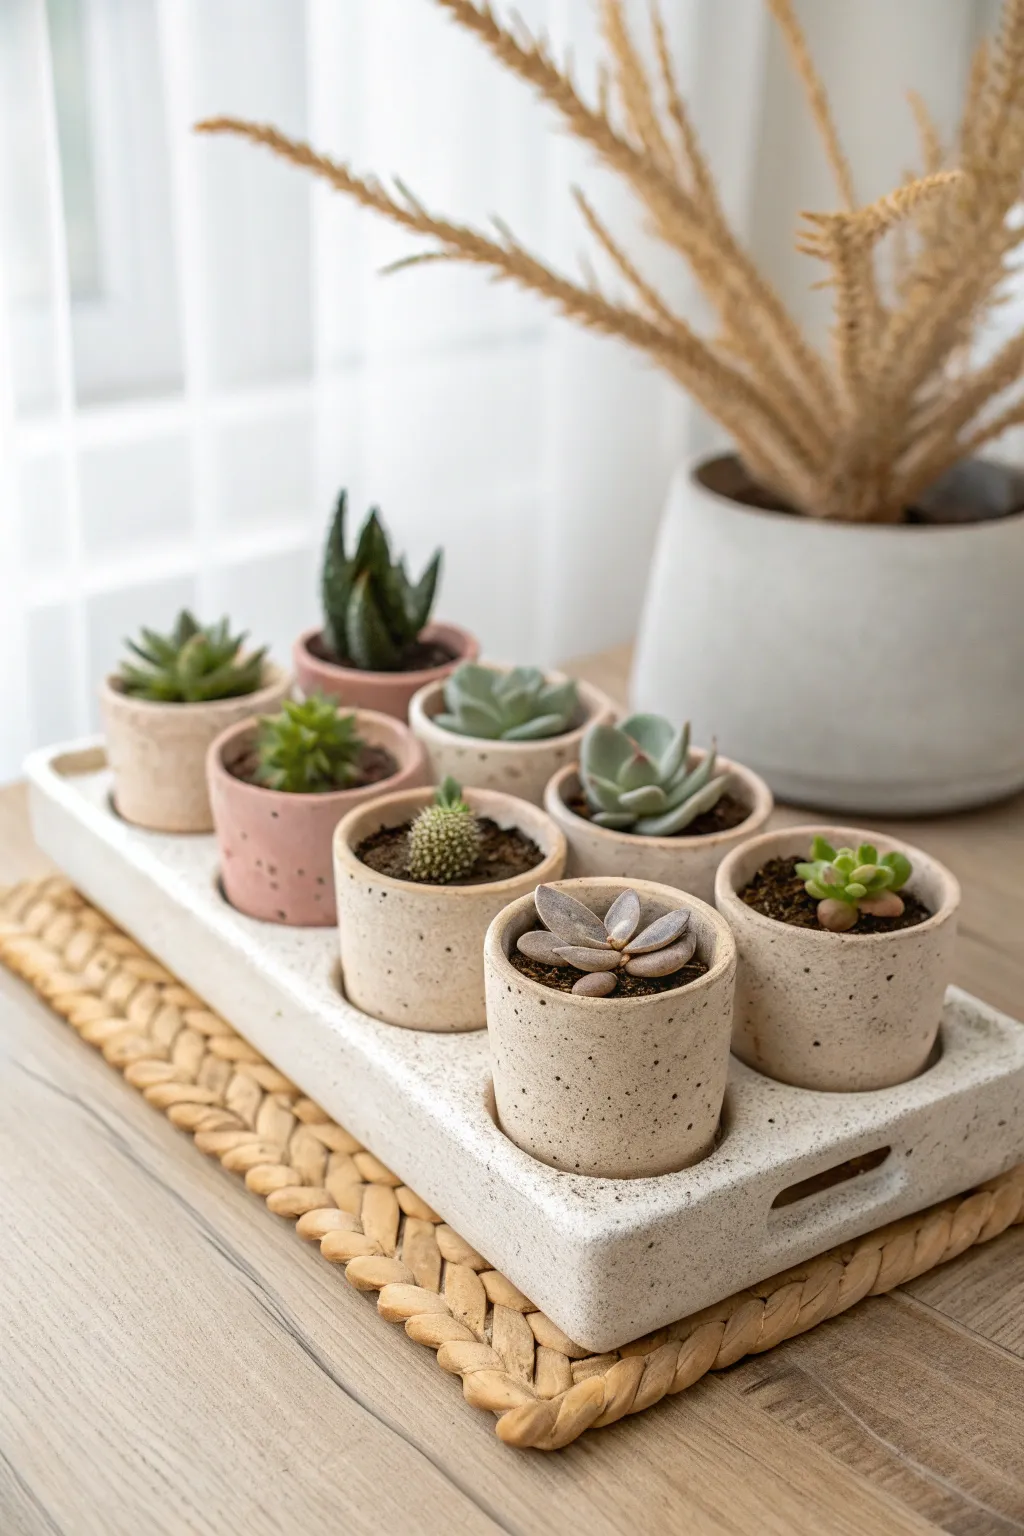
Create a unified, modern home for your succulent collection with this custom-molded tray and matching mini-pots. The speckled concrete finish gives it a high-end, store-bought look while the modular design lets you easily rotate your plants.
Step-by-Step Guide
Materials
- Rapid-set cement or plaster of Paris
- Fine sand (for speckling, preferably dark or mixed color)
- Rectangular mold (silicone or repurposed smooth plastic container)
- 7 small plastic cups (to use as negative space placeholders)
- 7 small matching silicone molds or small paper cups (for the pots)
- Cooking spray or petroleum jelly (release agent)
- Mixing bucket and stick
- Fine-grit sandpaper (220-400 grit)
- Clear matte concrete sealer
- Small succulents and potting soil
Step 1: Creating the Base Tray
-
Prep the main mold:
Clean your large rectangular mold thoroughly. If you are using a repurposed container, ensure the inside is perfectly smooth. Apply a thin, even coat of release agent to the interior. -
Prepare the placeholders:
Take your 7 small plastic cups—these will create the holes for the pots. Coat their exteriors with release agent. Arrange them in the main mold to check spacing, ensuring a staggered pattern like the reference image. -
Mix the succulent tray medium:
In your bucket, mix the cement or plaster according to the package instructions. To achieve that trendy speckled look, I like to mix in a few tablespoons of fine dark sand or even dry coffee grounds at this stage. -
Pour the base layer:
Pour the mixture into the rectangular mold until it reaches your desired tray height (about 1.5 to 2 inches). Tap the mold firmly on the table repeatedly to release trapped air bubbles. -
Insert placeholders:
Press the 7 lubricated small cups into the wet mix. You may need to weight them down with small stones or tape them across the top of the mold to keep them from floating up. -
Define the handles:
While the mix is still workable, use a sculpting tool or a greased oblong object to create the indented handle shapes on the short sides of the tray. -
Cure the tray:
Let the tray sit undisturbed for at least 24 hours, or per your material’s specific curing time. Don’t rush this step or corners might crack.
Step 2: Casting the Mini-Pots
-
Prepare pot molds:
Set up your 7 small pot molds. If using paper cups, you’ll need a smaller cup to press inside to create the hollow space. Grease everything generously. -
Mix the pot batch:
Mix a second batch of cement or plaster, ensuring you use the same ratio of sand/speckles so the pots match the tray perfectly. -
Cast the vessels:
Pour the mix into your molds, then press your inner form (a smaller cup or object) into the center to create the planting cavity. Weight these down so the walls stay even. -
Specific color variation:
For the pink pot seen in the design, mix a tiny drop of red acrylic paint or concrete pigment into a small portion of the wet mix before pouring that specific mold. -
Demold everything:
Once fully cured, gently twist and pull the tray and pots from their molds. Remove the inner placeholders carefully.
Stuck placeholders?
If cup placeholders won’t budge from the cured concrete, pour hot water inside the cup (not the concrete). The heat often expands the plastic enough to break the seal, or melts rigid plastic slightly.
Step 3: Finishing Touches
-
Sanding imperfections:
Use fine-grit sandpaper to smooth out any rough top edges on the tray and the rims of the pots. You want a matte, soft-touch finish. -
Drilling drainage (optional):
If your small molds didn’t include drainage holes, use a masonry bit to carefully drill a small hole in the bottom of each mini-pot. -
Sealing the concrete:
Apply a clear matte sealer to both the tray and the pots. This protects the porous material from water damage when you water your plants. -
The final assembly:
Fill each mini-pot with cactus soil and your chosen succulents, then nest them into the recesses of your beautiful new tray.
Add geometric flair
Before pouring, use hot glue to attach shapes inside the mold walls. When demolded, these will leave cool embossed patterns or lines on the side of your tray.
Enjoy the calm, organized beauty this stone-texture set brings to your bright sunny windowsill