When I want a quick, satisfying jewelry project, I always reach for heishi clay beads—they’re simple, colorful, and ridiculously stackable. Here are my favorite heishi heishi clay bead bracelet ideas to help you build that “one more bracelet” wrist stack you’ll actually wear.
Soft Pastel Candy Mix
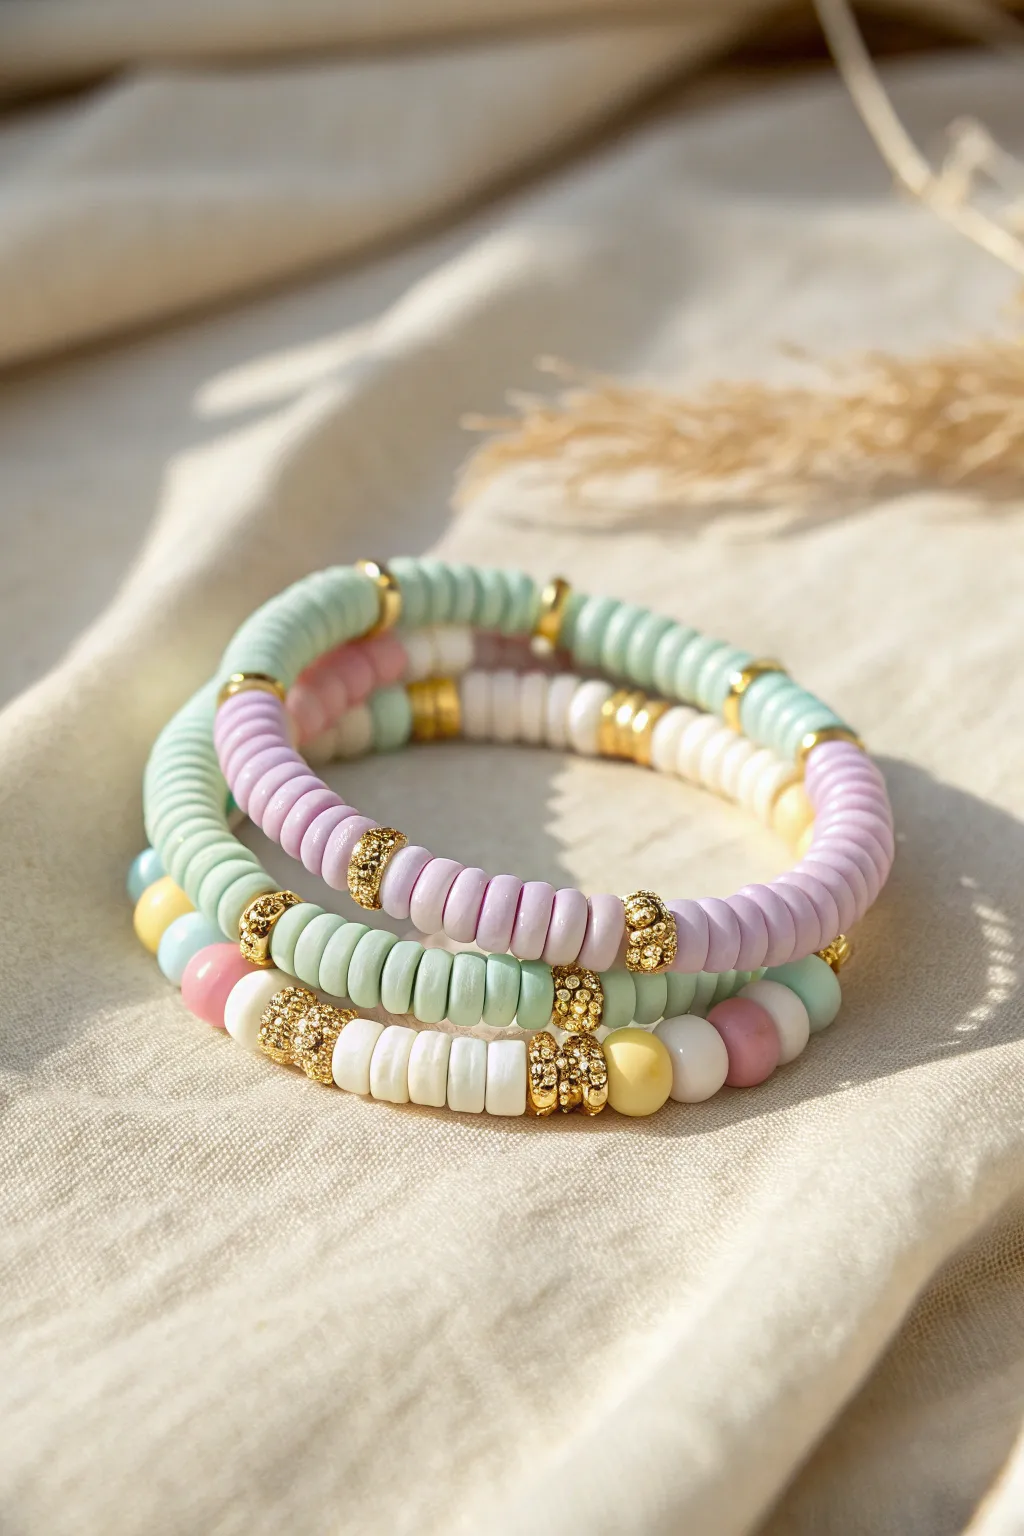
Embrace the sweetest side of jewelry making with this trio of soft pastel heishi bead bracelets. Combining matte textures, creamy colors, and sparkling gold accents creates a sophisticated stack that looks good enough to eat.
How-To Guide
Materials
- 6mm Heishi polymer clay disc beads (mint green, lavender, white/cream)
- 6mm matte round acrylic beads (pale yellow, baby pink, baby blue)
- Gold rhinestone spacer beads (barrel or rondelle shape)
- Gold flat spacer discs
- 0.8mm clear elastic stretch cord
- Jewelry glue or clear nail polish
- Sharp scissors
- Beading needle (optional but helpful)
- Tape or bead stopper
Step 1: Planning and Prep
-
Measure your wrist:
Wrap a flexible measuring tape around your wrist comfortably. Add about half an inch to this measurement to ensure the bracelets aren’t too tight. -
Cut the cord:
Cut three lengths of elastic cord, making each one about 10-12 inches long. This extra length gives you plenty of room to tie secure knots later. -
Secure the ends:
Place a piece of tape or a bead stopper on one end of each cord to prevent your beads from sliding off while you work.
Step 2: The Lavender & Mint Bracelet
-
Start the pattern:
Begin by threading about 15-20 lavender heishi beads. This creates the first large color block. -
Add a gold accent:
Slide on a textured gold rhinestone spacer bead to break up the color. -
Switch to mint:
Thread on a section of mint green heishi beads equal in length to your lavender section. -
Insert another accent:
Add another gold rhinestone spacer bead. -
Repeat and check size:
Continue alternating these color blocks separated by gold spacers until the strand wraps comfortably around your wrist.
Sticky Situation?
If your glue turns white or cloudy on the elastic, switch to a clear flexible jewelry cement like G-S Hypo Cement. It dries completely invisible and doesn’t brittle.
Step 3: The Mint & White Bracelet
-
Begin the second strand:
On your second cord, start with a long section of mint green heishi beads, perhaps slightly longer than the sections in the first bracelet for visual variety. -
Use flat spacers:
Instead of the rhinestone beads, use simple flat gold disc spacers for this bracelet to keep the stack from looking too busy. -
Create the white section:
String a section of white or cream heishi beads, followed by another flat gold spacer. -
Finish the pattern:
Alternate mint and white sections with the flat gold spacers until you reach your desired length.
Make It Personal
Swap the central gold spacer on the mint bracelet for a single letter bead or a gold charm like a star or heart to add a personalized focal point to your stack.
Step 4: The Mixed Candy Bracelet
-
Mix shapes and textures:
For the bottom bracelet shown in the stack, we will mix standard heishi discs with round matte beads. -
String the focal section:
Thread a pattern of: one gold rhinestone spacer, three white heishi beads, and another gold rhinestone spacer. -
Add round beads:
Slide on a pale yellow matte round bead, followed by a baby pink round bead. These larger beads add dimension. -
Create varied textures:
Continue the pattern by adding a short run of mint green heishi beads, then perhaps a blue round bead. -
Let creativity flow:
I like to keep this strand more random than the others, mixing the round matte beads in between short stacks of white and mint heishi beads until the strand is full.
Step 5: Finishing Touches
-
Pre-stretch the cord:
Before tying, gently pull on the ends of the elastic. This ‘pre-stretching’ prevents the bracelet from sagging after the first time you wear it. -
Tie the surgeon’s knot:
Remove the tape. Cross the ends, loop one side through twice, and pull tight. Repeat this process for a very secure knot. -
Hide the knot:
Apply a tiny drop of jewelry glue to the knot. While wet, try to slide the knot inside the hole of a neighboring bead if possible. -
Trim excess:
Once the glue is fully dry, trim the excess elastic cord close to the bead, being careful not to cut the main knot.
Slide your new bracelet stack onto your wrist and enjoy the soft pop of color they add to your day


Black-and-White Graphic Stripes
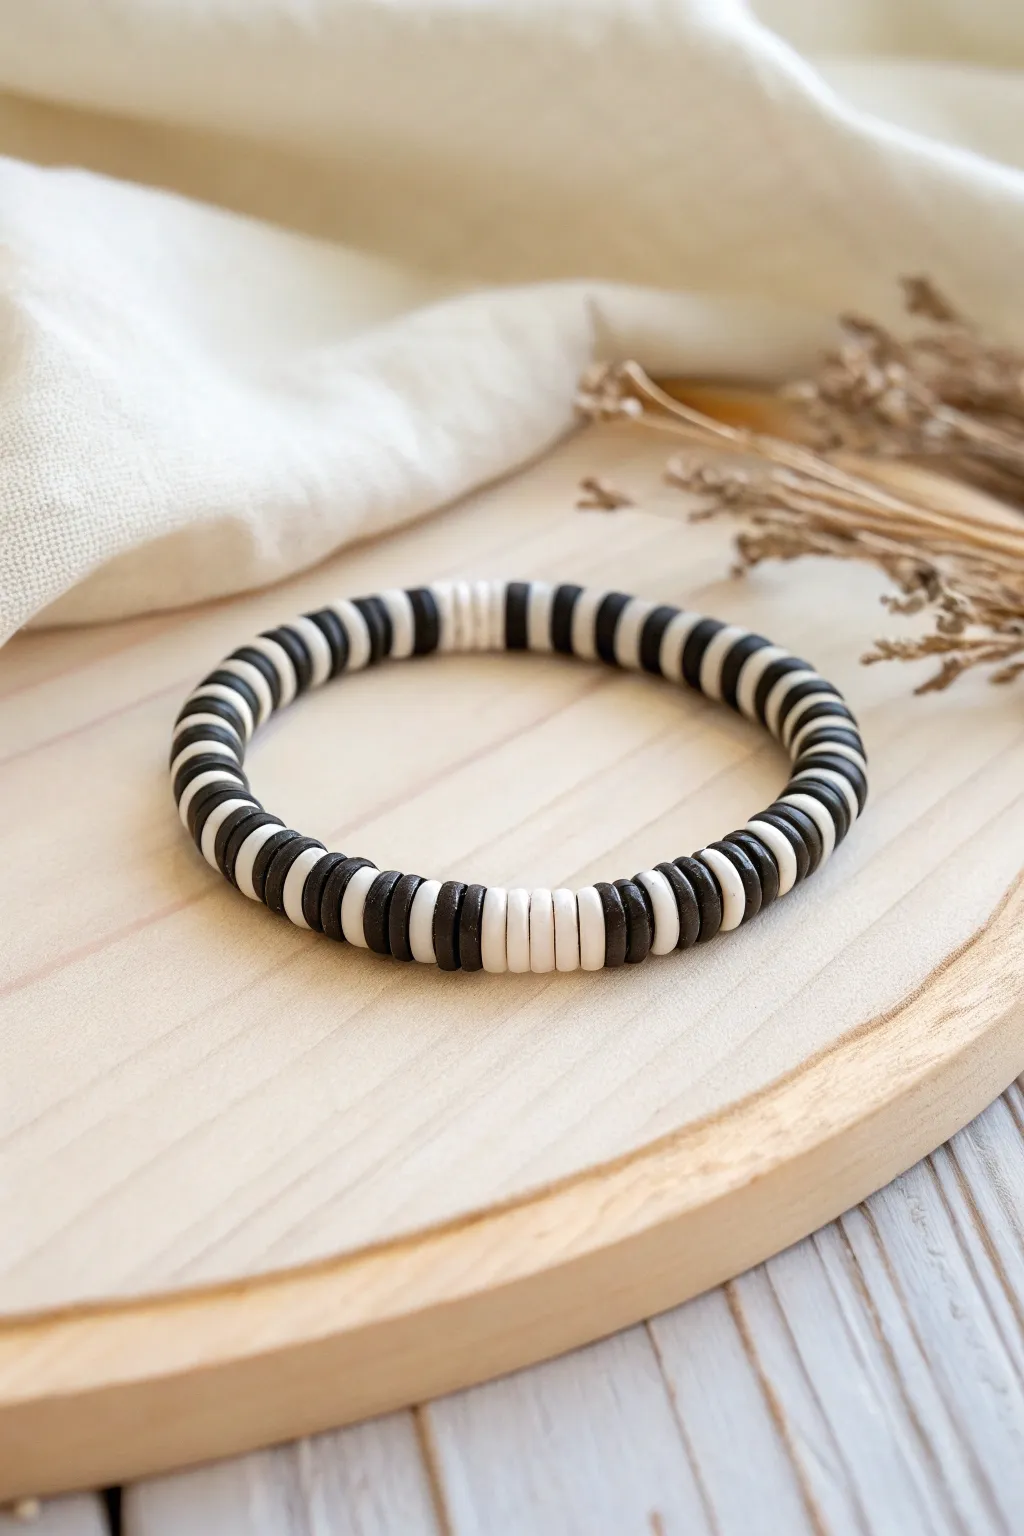
Embrace a bold, monochromatic look with this striking heishi bead bracelet pattern. By alternating clusters of black and white clay discs, you create a sophisticated rhythm that elevates a simple stringing project into a modern accessory essential.
Detailed Instructions
Materials
- 6mm Polymer clay heishi beads (Black)
- 6mm Polymer clay heishi beads (White or Cream)
- 0.8mm Elastic stretch cord (clear)
- Super glue or jewelry adhesive
- Scissors
- Bead stopper or masking tape
- Measuring tape to size your wrist
Step 1: Preparation
-
Measure your wrist:
Before you begin, wrap a measuring tape around your wrist to find your exact size. Add about half an inch to this measurement to ensure a comfortable fit that isn’t too tight. -
Cut the cord:
Cut a length of elastic cord about 10-12 inches long. This generous length gives you plenty of room to tie knots later without struggling with short ends. -
Secure the end:
Attach a bead stopper to one end of your elastic cord. If you don’t have a stopper, a simple piece of masking tape folded over the end works perfectly to keep beads from sliding off. -
Pre-stretch the elastic:
Gently tug on your cut piece of elastic a few times. This ‘pre-stretching’ technique helps prevent the bracelet from stretching out permanently after you wear it the first time.
Step 2: Creating the Pattern
-
Establish the rhythm:
The key to this specific look is avoiding a simple 1:1 alternation. Start by stringing a small block of color to anchor the pattern. -
Start with white:
String 5 white heishi beads onto the cord. This creates a solid block of white that serves as a focal point in the pattern. -
Transition to stripes:
Follow the white block with 2 black beads, then 1 white bead. Then add 2 black beads again. This begins the transition into the darker section. -
Build the main sequence:
Now, create the primary repeating pattern: String 2 black beads followed by 1 white bead. Repeat this ‘2-black, 1-white’ sequence three times. -
Vary the rhythm:
To mimic the organic feel of the photo, switch briefly to a ‘1-black, 1-white’ alternation for about an inch of length. This subtle change breaks up visual monotony. -
Return to blocks:
String another solid block of white beads—try using just 3 or 4 here for variation. Irregularity is part of the charm. -
Fill the length:
Continue stringing, mixing the ‘2-black, 1-white’ pattern with occasional solid blocks of 3-4 black beads until you reach your desired length. -
Check the fit:
Wrap the beaded cord around your wrist to check the size. Ideally, the ends should meet comfortably with no gap between beads.
Fixing Gaps
If you see cord between beads, you didn’t pull the elastic tight enough while knotting. Undo the knot if possible or restring; correct tension keeps the stack solid.
Step 3: Finishing Touches
-
Prepare for the knot:
Remove the bead stopper or tape carefully, holding both ends of the elastic firmly so no beads escape. -
Tie the first knot:
Bring the two ends together and tie a simple overhand knot. Pull it tight, but be gentle so the elastic doesn’t snap. -
Secure with a surgeon’s knot:
For the second knot, loop the end through twice before pulling tight. This creates a surgeon’s knot which is much more secure for slick elastic cord. -
Hide the knot:
Apply a tiny dot of jewelry glue to the knot. While the glue is still tacky, gently slide an adjacent bead over the knot to hide it inside. -
Trim the excess:
Once the glue is fully dry, use your scissors to trim the excess elastic tails as close to the bead as possible without cutting the knot itself.
Add a Pop
Introduce a single gold spacer bead or a solitary bright color (like neon pink) into the pattern for a chic, modern asymmetrical accent.
Now you have a sleek, monochromatic accessory ready to stack or wear solo


Chunky Color-Block Sections
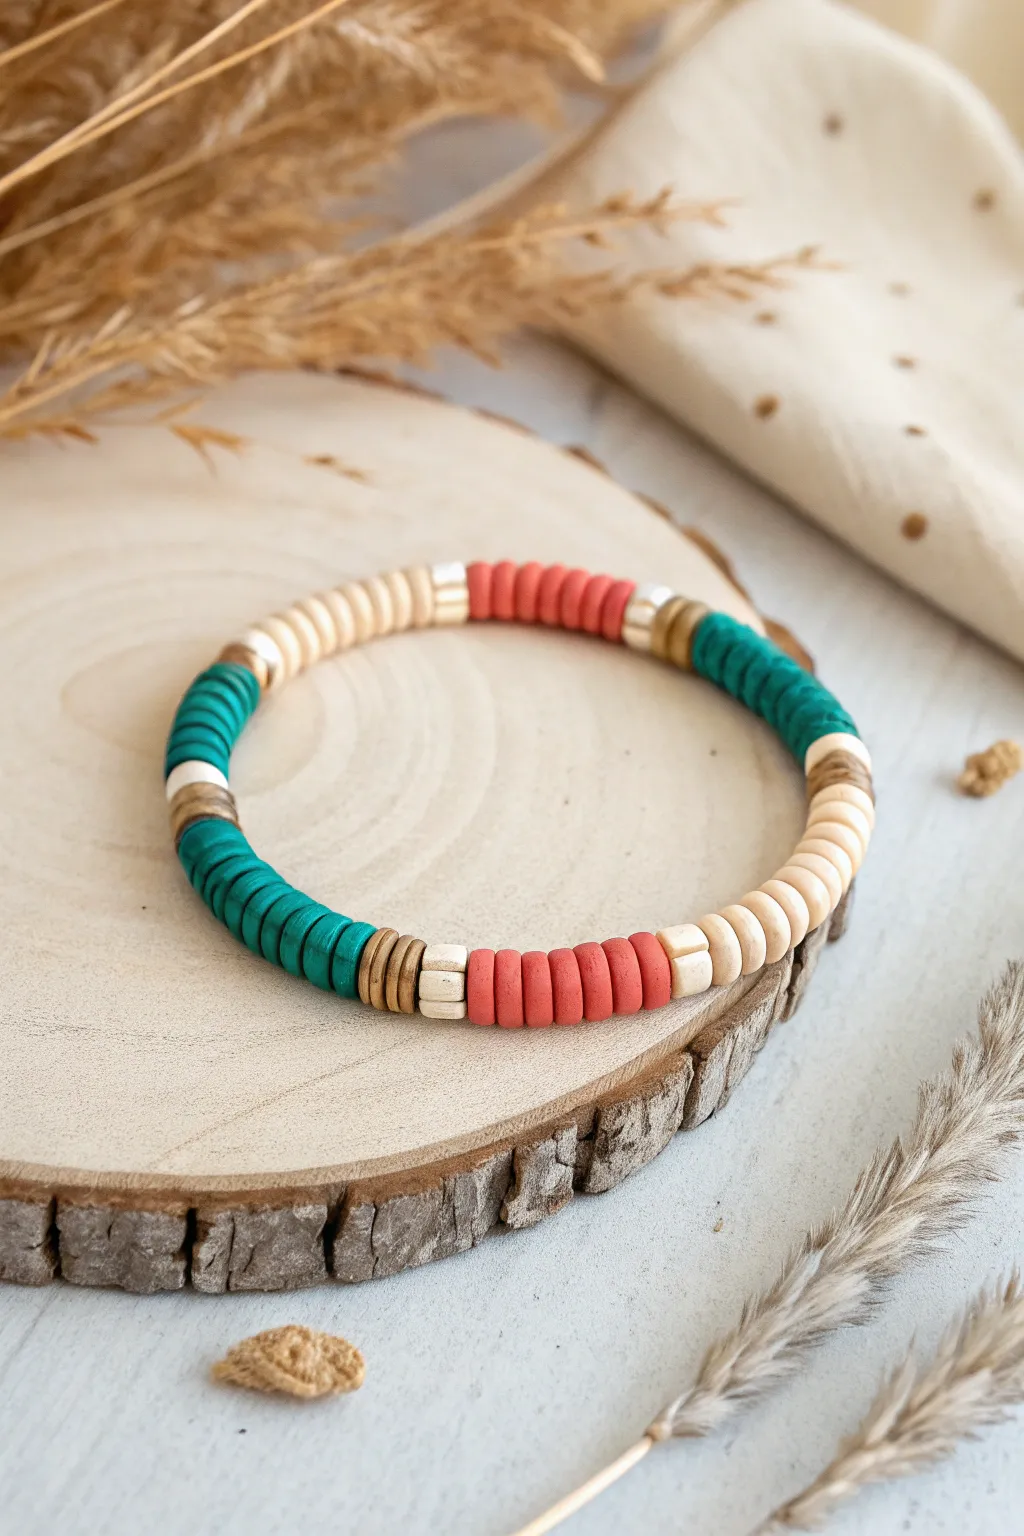
Capture the essence of a beach sunset with this chunky color-block bracelet featuring distinct sections of turquoise, coral, and cream. The clever use of gold spacers and natural wood tones adds texture and depth, making it a sophisticated accessory for any season.
Step-by-Step Guide
Materials
- 6mm Polymer clay heishi beads (Turquoise/Teal)
- 6mm Polymer clay heishi beads (Coral/Terracotta)
- 6mm Polymer clay heishi beads (Cream/Beige)
- 6mm Flat antique gold spacer beads
- 6mm Natural wood or coconut shell spacer beads
- 0.8mm clear elastic stretch cord
- Super glue or jewelry knot cement
- Scissors
Step 1: Planning and Stringing
-
Measure and Cut:
Begin by cutting a piece of elastic cord about 10-12 inches long. This generous length gives you plenty of room to knot the bracelet securely later without struggling with tight ends. -
Pre-stretch the Cord:
Before adding any beads, firmly pull the elastic cord between your hands a few times. This pre-stretching prevents the bracelet from drooping or loosening shortly after you start wearing it. -
Secure the End:
Place a bead stopper or a simple piece of tape on one end of the cord so your beads don’t slide off while you work. -
Start the Teal Section:
Thread on approximately 10-12 turquoise clay heishi beads. This forms your first solid block of color. -
Add Texture:
Slide on three antique gold spacer beads followed by one cream bead, and then another three gold spacers. This creates a metallic, textured break between the color blocks. -
Create the Coral Block:
Add your second major color block by stringing about 10-12 coral or terracotta heishi beads. -
Insert Wood Accents:
Transition to the next section by adding a specific pattern: one cream bead, two thin wood or coconut shell spacers, and one more cream bead. -
String the Cream Section:
Thread on a longer section of cream/beige heishi beads. Aim for about 15-18 beads here to make this neutral section slightly dominant. -
Repeat the Pattern:
Continue the pattern by adding a small wood spacer section (cream bead, two wood spacers, cream bead) followed by another block of 10-12 turquoise beads. -
Add the Second Coral Block:
Create a separator using your gold spacers (three gold, one cream, three gold), then add your final block of 10-12 coral beads. -
Check the Fit:
Wrap the unfinished strand around your wrist. The ends should meet comfortably without gaps. If it’s too tight, add a few more cream beads to the neutral section; if too loose, remove a couple of colored beads.
Knot Slipping?
If your elastic knot feels insecure, try roughening the cord ends slightly with sandpaper before tying, or switch to a GS Hypo Cement glue for a flexible, permanent bond.
Step 2: Finishing the Bracelet
-
Prepare to Knot:
Remove the bead stopper or tape carefully, ensuring you keep a firm grip on both ends of the elastic. -
Tie the First Knot:
Cross the ends and tie a simple overhand knot. Pull it tight, but be gentle so you don’t snap the cord. -
Tie a Surgeon’s Knot:
For the second knot, cross the ends again but loop one end through the circle twice instead of just once. Pull this knot firmly down on top of the first one. -
Secure with Glue:
Place a tiny drop of super glue or jewelry cement directly onto the knot. I find using a toothpick helps apply the glue exactly where needed without making a mess. -
Hide the Knot:
While the glue is still slightly tacky, slide one of the beads (preferably one with a larger hole, like the cream beads) over the knot to conceal it. -
Trim the Excess:
Once the glue is completely dry (check your glue’s instructions), use your scissors to snip off the excess elastic cord close to the bead.
Pattern Play
Swap the solid color blocks for an ombre effect by mixing shades of teals and blues in one section, or replace the wood spacers with freshwater pearls for a luxe upgrade.
Slip on your new bracelet and enjoy the earthy, vibrant pop of color on your wrist


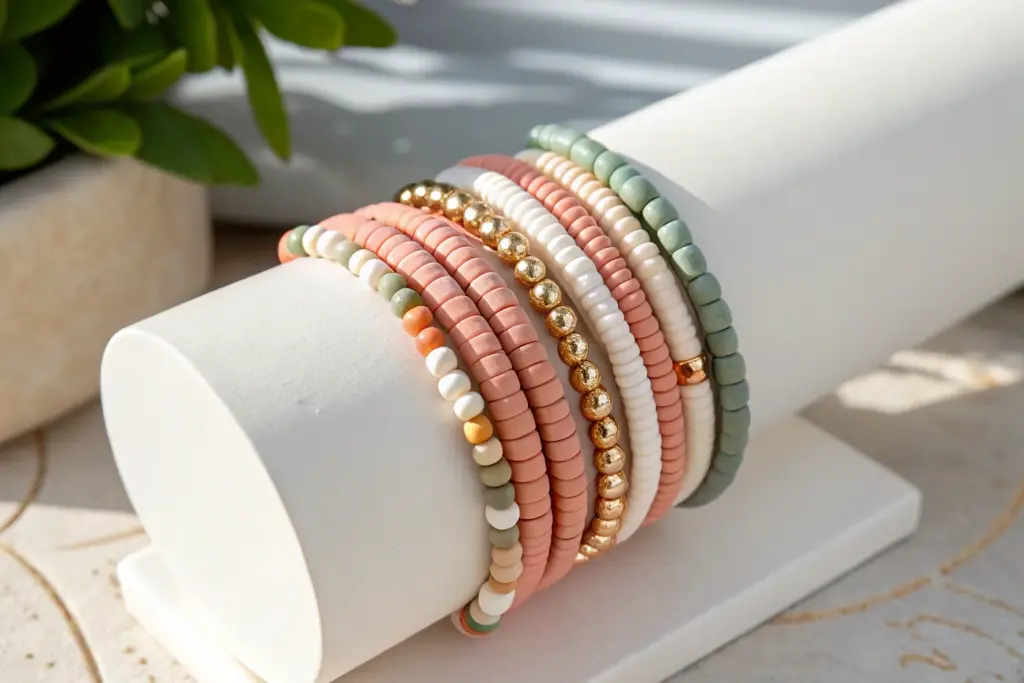
Spacer Rhythm Pattern
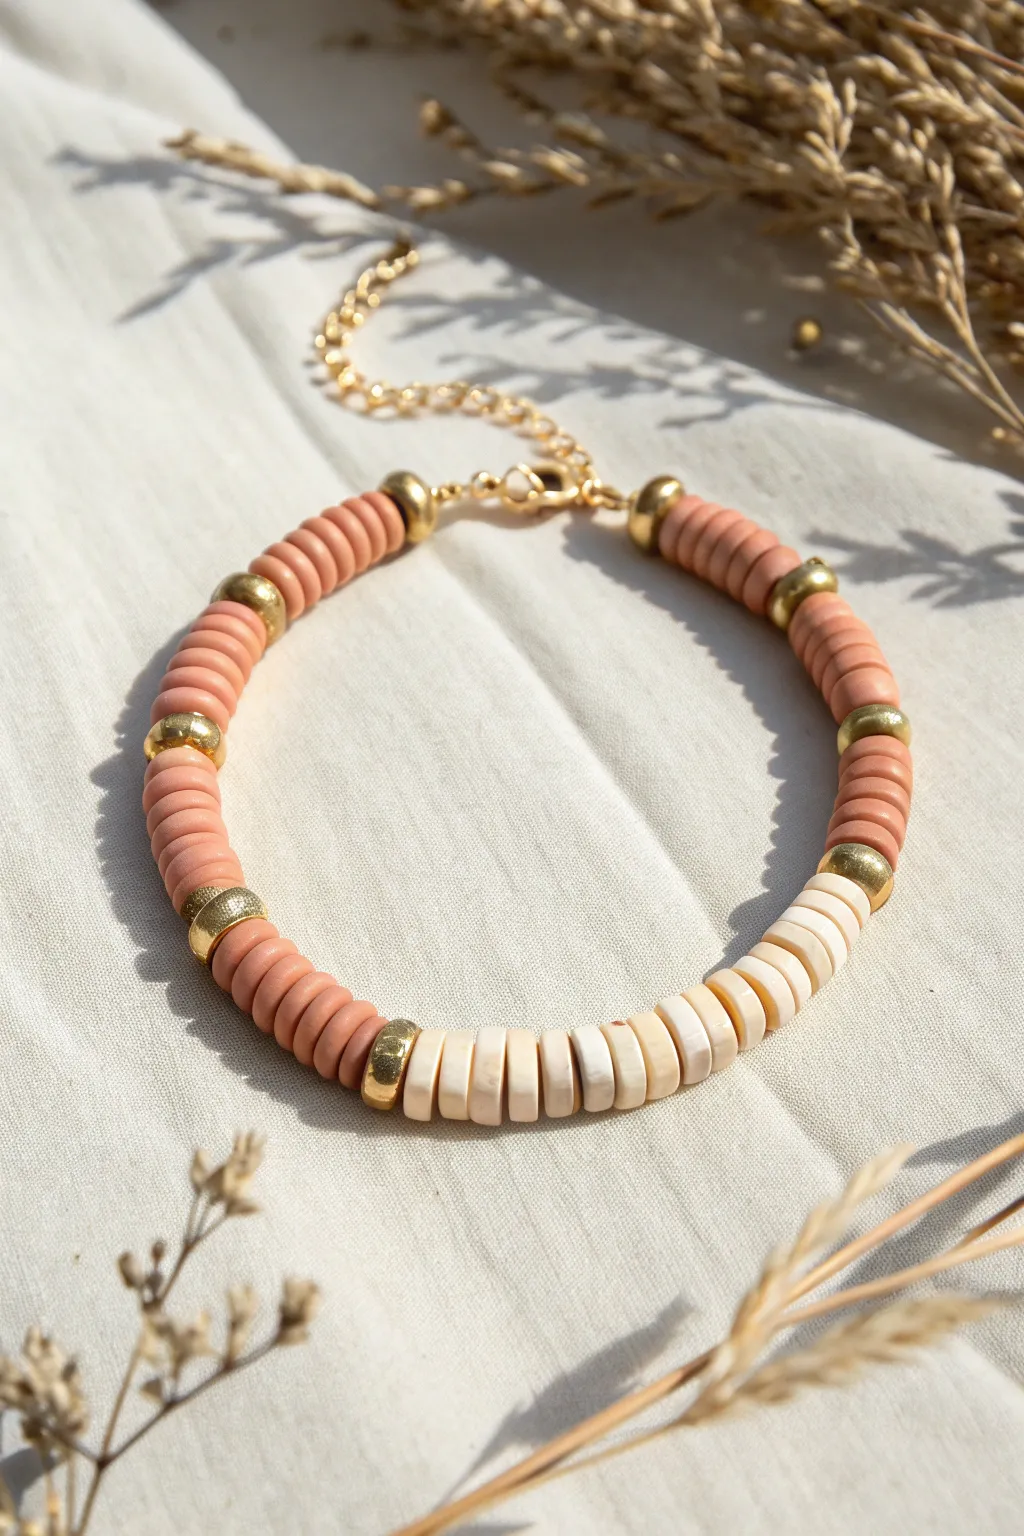
This elegant bracelet balances earthy salmon tones with creamy whites, punctuated by the sophisticated shine of metallic gold spacers. The “rhythm” of the gold beads creates a structured, high-end look that elevates simple clay discs into a boutique-worthy accessory.
Step-by-Step Guide
Materials
- 6mm Heishi polymer clay beads (salmon/terracotta color)
- 6mm Heishi beads (cream/off-white, can be shell or clay)
- 4mm – 5mm Gold spacer beads (metallic finish, rondelle or nugget shape)
- Gold beading wire or strong transparent elastic cord (0.8mm)
- Gold lobster clasp
- Gold extension chain
- 2 Gold jump rings (4-5mm)
- 2 Gold tube crimp beads
- Measuring tape
- Scissors or wire cutters
- Flat-nose pliers
Step 1: Planning and Preparation
-
Measure your wrist:
Wrap a measuring tape loosely around your wrist to determine your desired length. Add about 0.5 inches to this measurement to account for the thickness of the beads. -
Cut the cord:
Cut a piece of beading wire or elastic cord that is at least 4 inches longer than your target length. This extra length makes finishing the ends much easier. -
Attach the first crimp:
If using wire, thread one crimp bead onto the end, followed by the gold extension chain (or a jump ring). Loop the wire back through the crimp bead. -
Secure the start:
Slide the crimp bead close to the chain loop, but leave a tiny bit of wiggle room. Use your flat-nose pliers to flatten the crimp bead securely, locking the wire in place. -
Hide the tail:
Plan to tuck the short tail of the wire into the first few beads you string to keep it neat.
Tightness Trouble?
If the bracelet feels stiff and doesn’t drape nicely over your wrist, you likely pulled the wire too tight before crimping. Leave a tiny 1-2mm gap of slack near the clasp to allow the beads to rotate flexible.
Step 2: Stringing the Salmon Pattern
-
Start with gold:
Begin by threading one gold spacer bead onto the wire. This hides the crimp slightly and starts the pattern with a clean metallic edge. -
First salmon sequence:
Thread on approximately 7 salmon-colored clay heishi beads. This creates your first block of color. -
Add a spacer:
Slide on a gold spacer bead. These gold beads act as the “rhythm” keepers in this design. -
Second salmon sequence:
Add another set of 7 salmon beads. I find it helps to double-check that this stack is the same height as your first stack for symmetry. -
Repeat the rhythm:
Add a gold spacer, followed by a third set of 7 salmon beads. -
Continue the pattern:
Continue this pattern (Spacer – 7 Salmon Beads) until you have completed about five or six distinct sections of the salmon color.
Step 3: Creating the Focal Point
-
Transition with gold:
After your final block of salmon beads, add one gold spacer bead to mark the transition. -
Add the cream section:
Now, thread on the cream-colored heishi beads. You want a solid block of white here, roughly equal to the length of two salmon sections combined (about 14-15 beads). -
End the focal section:
Cap off the cream section with another gold spacer bead.
Varied Texture
Instead of polymer clay for the white section, try using white puka shell chips or natural white turquoise. The irregular edges of natural stone add a fantastic organic texture against the smooth clay.
Step 4: Finishing the Loop
-
Complete the circle:
Resume your salmon pattern on the other side if you are centering the white block, or simply continue until the bracelet reaches your measured length. The design in the image is asymmetrical, ending shortly after the white block. -
Add the final crimp:
Thread on your second crimp bead, followed by the lobster clasp. -
Loop and secure:
Pass the wire back through the crimp bead and pull it tight so the beads are snug but not stiff. Flatten the crimp bead with your pliers. -
Trim excess:
Trim the excess wire close to the crimp bead. If possible, tuck the very end into the adjacent bead hole for a smooth finish.
Fasten your new bracelet and enjoy the sophisticated rhythm of your design

The Complete Guide to Pottery Troubleshooting
Uncover the most common ceramic mistakes—from cracking clay to failed glazes—and learn how to fix them fast.
Sunset Gradient Stack
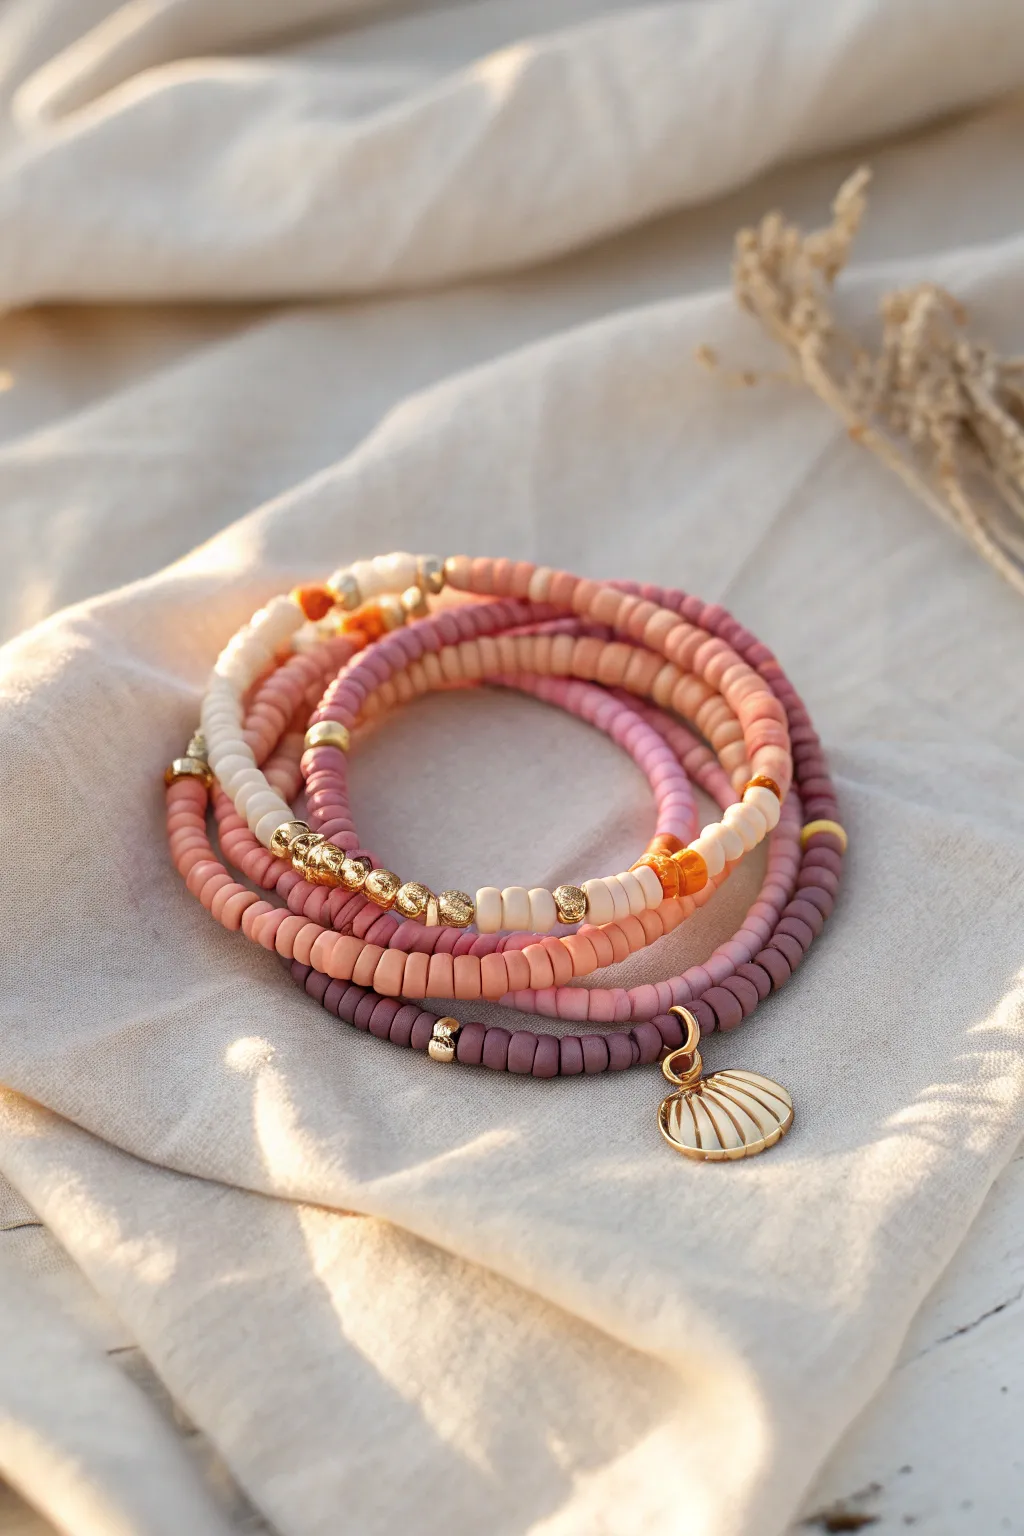
Capture the warmth of golden hour with this stunning five-strand bracelet stack featuring a rich gradient of mauves, peaches, and sandy creams. The mix of matte heishi beads and gleaming gold accents, finished with a delicate shell charm, creates a sophisticated bohemian look perfect for summer wear.
Step-by-Step Guide
Materials
- 6mm heishi polymer clay beads in: deep mauve/plum, dusty rose, terracotta/peach, light coral, and cream
- Gold tone heishi spacer beads (flat discs)
- Gold tone accent beads: faceted rounds, smooth rounds, and floral spacers
- Gold tone sea scallop shell charm
- Gold tone jump ring (5-6mm)
- 0.8mm elastic crystal stretch cord
- Jewelry glue or clear nail polish
- Scissors
Step 1: Planning and Prep
-
Measure your wrist:
Wrap a piece of string around your wrist to find your comfortable size, then add about half an inch for a good fit. Cut five lengths of elastic cord, making sure each is at least 3-4 inches longer than your final measurement to make knotting easier. -
Pre-stretch the cord:
Gently give each piece of elastic a few tugs before you begin stringing. This step is crucial because it prevents the bracelets from stretching out and becoming loose after you wear them for the first time.
Knot Slipping?
If your elastic feels slick and knots won’t hold, dust the knot area with a tiny bit of baking soda before adding the superglue. This creates an instant, rock-hard bond.
Step 2: Creating the Solid Base Strands
-
String the deep mauve strand:
Start your first bracelet using primarily the deep mauve/plum heishi beads. Thread them continuously until you reach your desired length. -
Add the charm connector:
Opposite the knotting point (roughly the middle of the strand), thread on two gold faceted round beads and slip a gold jump ring between them. You will attach the shell charm here later. -
Create the dusty rose strand:
For the second bracelet, use the dusty rose heishi beads. To add texture, intersperse a single flat gold spacer disc every 1.5 inches or so, keeping the look mostly solid but with a hint of shine. -
String the peach strand:
Build the third bracelet using the terracotta or peach beads. In the center of this strand, create a focal section by adding a sequence of three gold flat disc spacers.
Step 3: Designing the Mixed Gradient Strands
-
Begin the coral mix:
The fourth bracelet uses light coral beads as the base. Start stringing about 2 inches of coral beads. -
Build the gold focal point:
Create a heavy gold accent section in the middle of this strand. Thread a pattern like: gold spacer, gold faceted bead, gold floral spacer, gold faceted bead, and gold spacer. -
Finish the coral strand:
Resume stringing with the light coral heishi beads until you match the length of your other bracelets. -
Start the cream and gold mix:
For the final and lightest bracelet, use the cream or off-white heishi beads. I like to make this one the most intricate to balance the darker solid strands. -
Insert intermittent gold accents:
As you string the cream beads, randomly or regularly insert small groups of gold spacer beads or single gold round beads. Aim for an uneven, organic rhythm rather than a strict pattern. -
Add color pops:
To tie the stack together, insert 3-4 beads from the darker color families (like the terracotta or mauve) into this cream strand at two different points.
Design Balance Tip
When stacking 5+ bracelets, keep 2-3 strands mostly solid color. Too many patterned strands can look chaotic; solid bands anchor the gradients and let the gold accents pop.
Step 4: Finishing Touches
-
Attach the charm:
Open your gold jump ring using pliers or your fingers. Slide the loop of the gold scallop shell charm onto the ring, then hook it onto the jump ring you placed on the deep mauve bracelet earlier. Close the ring securely. -
Check fit and lengths:
Hold the unknotted ends of all five bracelets together and wrap them around your wrist. Ensure they fit comfortably as a group and sit nicely next to each other. -
Knot the ends:
For each bracelet, tie a surgeon’s knot (a square knot with an extra loop through). Pull the elastic tight from all four strands to secure it firmly. -
Secure the knots:
Place a tiny drop of jewelry glue or clear nail polish on each knot. Let this dry completely before trimming, creating a permanent bond that won’t slip. -
Hide the knots:
Once the glue is dry, trim the excess elastic close to the knot. Gently tug the beads adjacent to the knot to slide it inside the hole of a nearby bead, hiding it from view.
Slip on your new stack and enjoy the warm, sunset vibes on your wrist every time you look down
Charm Drop Between Heishi Sections
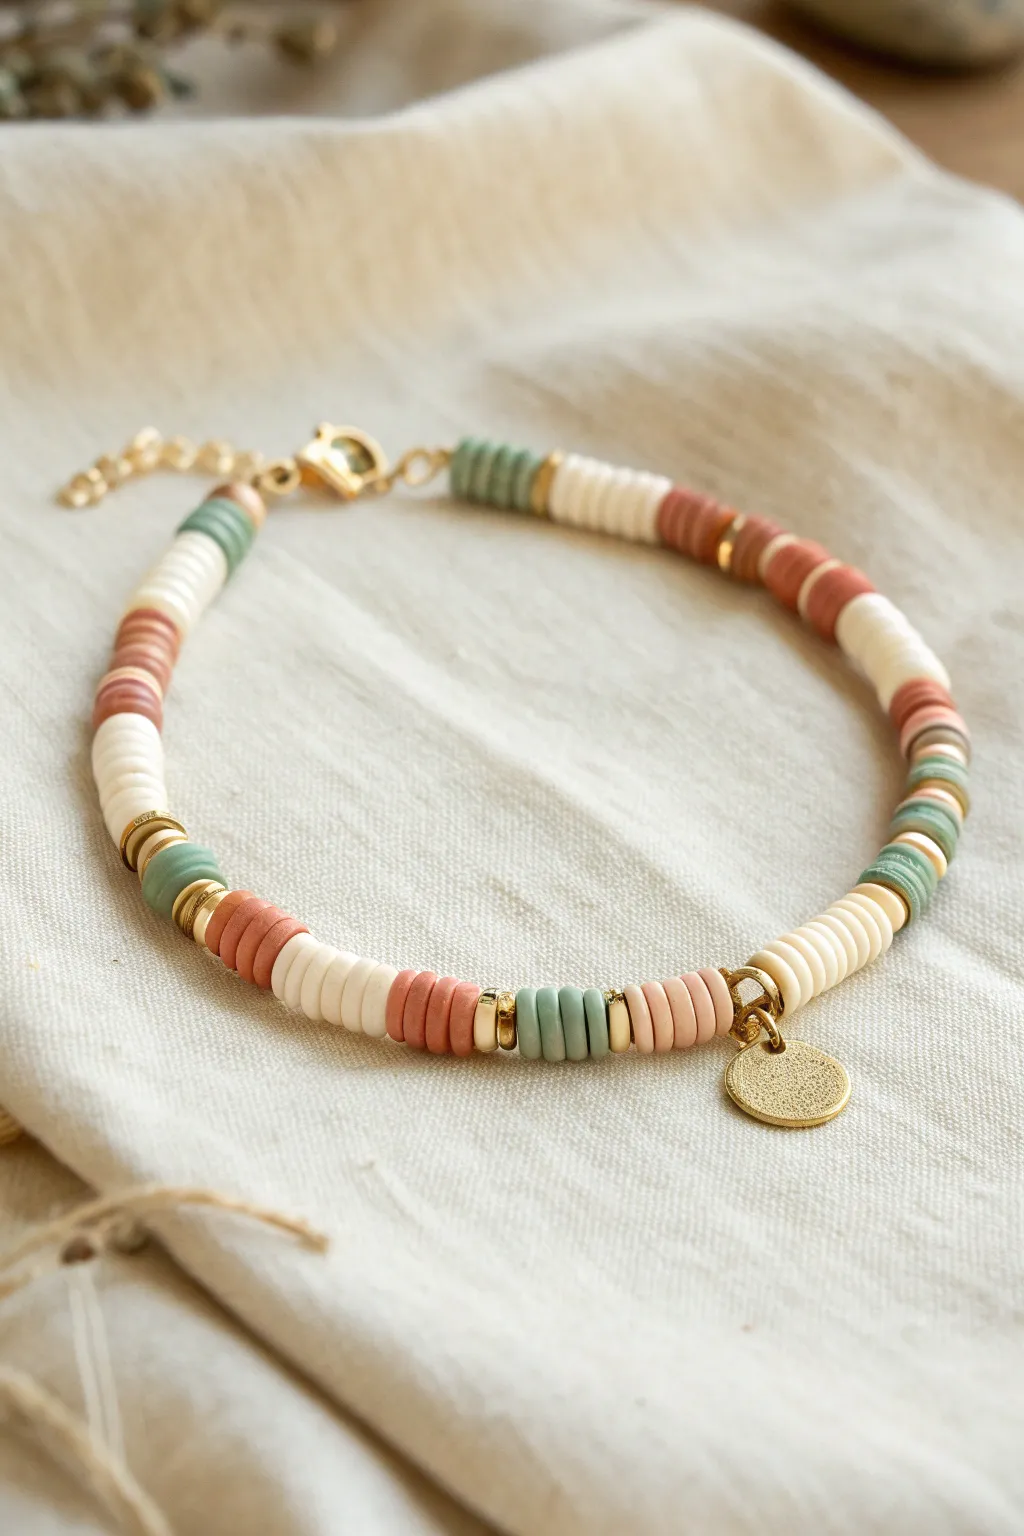
This elegant bracelet balances soft, earthy tones of sage, terra cotta, and cream with the luxe shine of gold hardware. The segmented pattern and delicate charm drop create a sophisticated look perfect for stacking or wearing solo.
Step-by-Step Tutorial
Materials
- Heishi polymer clay disc beads: Sage green
- Heishi polymer clay disc beads: Terra cotta (rust)
- Heishi polymer clay disc beads: Cream/off-white
- Gold-tone metal disc spacer beads (heishi style)
- Gold-tone blank coin charm or textured disc charm
- Gold-tone jump ring (approx 5-6mm)
- Beading wire (0.38mm or 0.45mm)
- Jewelry crimp beads (2mm)
- 3mm Gold crimp covers (optional)
- Small gold lobster clasp
- Gold extension chain (approx 1-2 inches)
- Wire cutters
- Flat nose pliers or crimping pliers
Step 1: Planning the Pattern
-
Measure and Cut:
Cut a piece of beading wire approximately 9-10 inches long. This generous length gives you plenty of room to work with the crimps and clasp without beads sliding off the ends. -
Secure the End:
Before you start beading, place a piece of tape or a bead stopper on one end of the wire. This simple step saves you from the frustration of losing your beads as you work. -
Start the Pattern:
Begin stringing your beads. The pattern relies on color blocking. Start with a section of roughly 8-10 cream beads. -
Add a Flash of Gold:
Slide on a single gold disc spacer bead. This will act as the defining border between your color sections. -
Introduce Color:
Add a section of terra cotta beads. Aim for a slightly shorter section here, perhaps 5-6 beads, to create variable rhythm in the pattern. -
Repeat Gold Spacers:
Add another gold disc spacer after the terra cotta section.
Spacer Bead Gaps
If your gold spacers look too thin or disappear between the clay beads, try stacking two gold spacers together. This doubles the visual impact and prevents them from getting lost.
Step 2: Building the Body
-
Add Green Tones:
Thread on a section of sage green beads. Match the length to the terra cotta section (about 5-6 beads) to keep the visual weight balanced. -
Continue the Sequence:
Repeat this sequence: Gold Spacer > Cream Section > Gold Spacer > Terra Cotta Section > Gold Spacer > Sage Green Section. Adjust the lengths of sections randomly if you prefer a more organic feel. -
Mid-Point Check:
Continue until you have beaded approximately half the desired length of the bracelet (usually about 2.5 to 3 inches). Pause here to prepare the charm.
Step 3: Attaching the Charm
-
Direct Threading:
Unlike adding a charm later with a jump ring, thread the gold jump ring directly onto the beading wire at this center point. This integrates the charm seamlessly into the bead line. -
Attach the Charm:
Using your flat nose pliers, carefully open the jump ring you just threaded (twist it laterally, don’t pull apart). Slide on your gold coin charm and close the ring securely. -
Finish the Beading:
Resume your beading pattern on the other side of the charm, mirroring the sequence you established in the first half until the bracelet reaches about 6.5 to 7 inches total length.
Natural Texture
Mix in a few genuine wooden disk beads or substitute the gold charm for a freshwater pearl to give the bracelet a beachy, organic vibe perfect for summer wear.
Step 4: Finishing Touches
-
Prepare the Clasp:
Remove the tape from the starting end. Slide a crimp bead onto the wire, followed by the loop of your lobster clasp. -
Secure the Clasp:
Loop the wire back through the crimp bead. Pull it snug but not rigid—you want the bracelet to drape naturally. Use your crimping pliers to flatten the crimp bead securely. -
Hide the Wire:
Trim the excess wire tail close to the crimp bead, or tuck it back into the first few heishi beads for extra security. -
Finish the Other End:
Repeat the crimping process on the other end of the bracelet, but this time attach the extension chain instead of a clasp. -
Cover the Crimps:
For a polished look, gently close a gold crimp cover over each flattened crimp bead using your pliers. This makes the finish look like a solid gold bead.
Your stylish heishi bracelet is now ready to add a touch of handcrafted elegance to your wrist


What Really Happens Inside the Kiln
Learn how time and temperature work together inside the kiln to transform clay into durable ceramic.
Marbled and Mixed-Size Heishi Combo
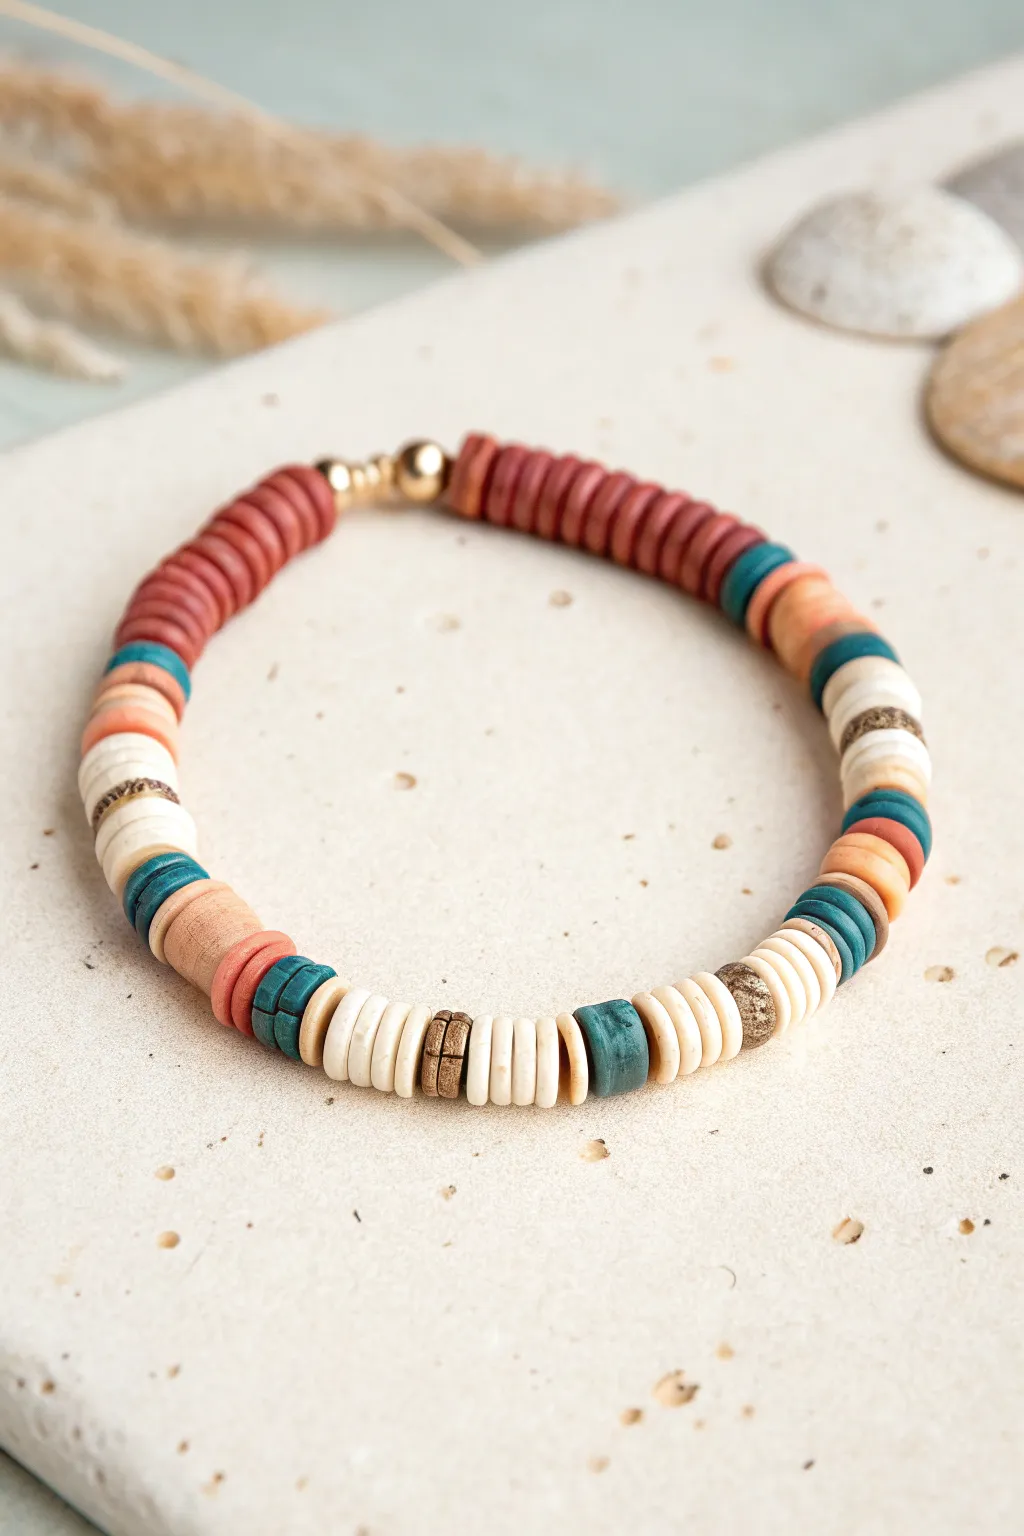
This stunning bracelet blends mixed textures and earthy tones for a sophisticated take on the classic heishi trend. By combining matte polymer clay discs with metallic spacers and natural coconut shell accents, you’ll create a piece that feels both organic and polished.
Step-by-Step Guide
Materials
- Matte polymer clay heishi beads (6mm) in: terracotta, cream, teal, and peach
- Textured metallic spacer beads (antique gold or brass finish)
- Coconut shell or wood heishi spacer beads (thin)
- Stretch cord (0.8mm crystal string)
- Gold crimp beads or knot covers
- Gold ball spacer bead (approx. 4mm)
- Jewelry glue (like G-S Hypo Cement)
- Scissors or jewelry snips
- Bead stopper or tape
Step 1: Planning and Sorting
-
Measure your wrist:
Cut a piece of stretch cord about 10-12 inches long. This generous length ensures you have plenty of room to knot comfortably later. Attach a bead stopper or a piece of tape to one end. -
Layout your pattern:
Using a bead design board or a soft towel, start planning your sequence. The beauty of this design lies in its asymmetrical blocks of color. We will arrange the pattern linearly before threading.
Knot Security
Pre-stretch your elastic cord before stringing! Give it a few firm tugs. This prevents the bracelet from loosening up after the first time you wear it.
Step 2: Creating the Terracotta Block
-
Start the main color block:
Begin by threading approximately 20-25 of the terracotta/dark salmon clay beads. This creates the solid ‘back’ section of the bracelet shown at the top of the image. -
Add the first transition:
After the terracotta block, add one teal bead to act as a bold separator.
Uneven Beads?
Heishi beads vary in thickness. If one looks too thin or wonky, just discard it. Sorting out imperfect discs makes the final stack look high-end and store-bought.
Step 3: Building the Mixed Pattern
-
Initial mixed sequence:
Thread two peach beads, followed by a stack of four cream beads. This introduces the lighter tones. -
Add texture:
Slide on one textured metallic spacer or a dark coconut shell bead to break up the smooth clay texture. -
Cream stack:
Add three more cream beads, then a single teal bead, followed by three more cream beads. I find varying these small white sections keeps the eye moving. -
Introduce wood and peach:
Thread a larger wooden or textured bead, followed by three peach beads, one terracotta bead, then a teal bead.
Step 4: Creating the Focal Section
-
Central white block:
String a pattern of: two cream beads, one metallic spacer, five cream beads, one metallic spacer, and two cream beads. This creates a bright focal point on the wrist. -
Mirror the transition:
Add a teal bead to bookend the white section. -
Secondary peach section:
Add a slightly larger block of 5-6 peach or light coral beads. -
Final mixed accents:
Finish the patterning with a random mix: one teal bead, two cream beads, one metallic spacer, and finally two cream beads. -
Check the length:
Wrap the strand around your wrist. The ends should touch comfortably without stretching the cord. Add or remove cream beads from the ends if you need to adjust size.
Step 5: Finishing the Bracelet
-
Add the gold accent:
Thread the single large gold ball bead onto one end of the cord. This acts as a decorative cover for your knot area. -
Tie the surgeon’s knot:
Remove the bead stopper. Cross the two ends of the elastic, loop one over the other twice, and pull tight. Repeat this knotting process 2-3 times to secure it. -
Secure with glue:
Apply a tiny drop of jewelry glue directly onto the knot. Let it dry for a few minutes until tacky but set. -
Hide the knot:
Trim the excess cord ends close to the knot, then carefully pull the cord so the knot slides and disappears inside the large gold ball bead or one of the adjacent clay beads.
Now you have a chic, earth-toned accessory perfect for stacking or wearing solo