Clay pockets are one of my favorite little projects because they’re equal parts cute décor and actually useful storage. If you’ve got a blank wall and a pile of tiny stuff (or a few air plants begging for attention), these clay wall pockets are about to be your new obsession.
Classic Envelope Wall Pocket
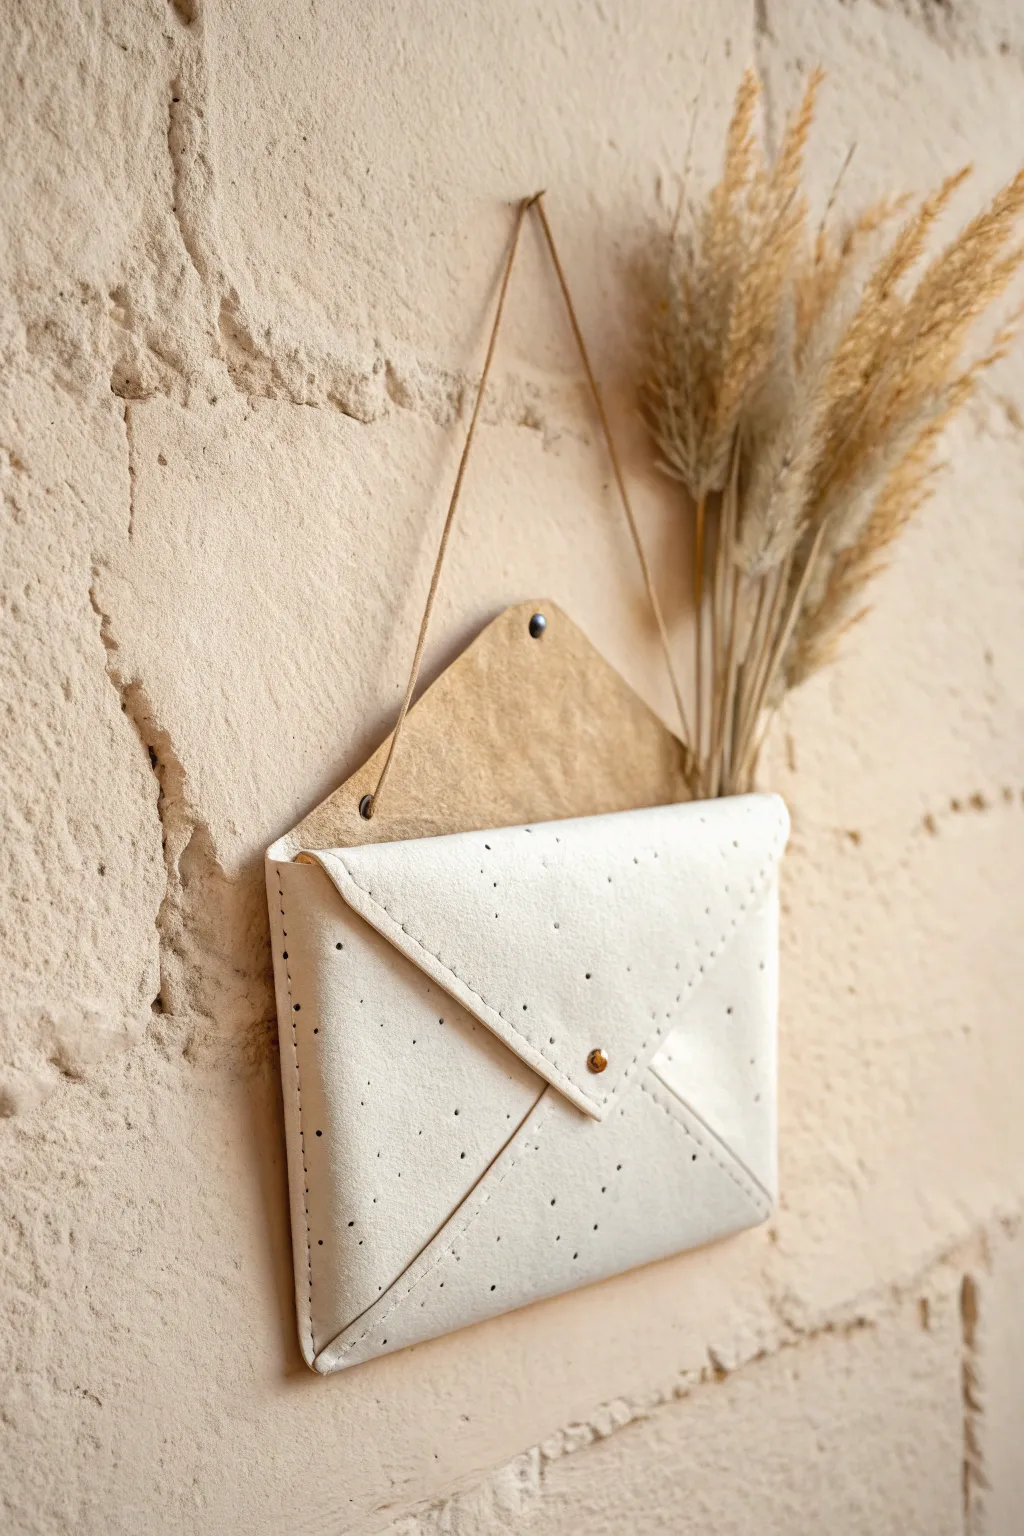
This charming wall pocket borrows the timeless shape of a classic open envelope to hold dried florals or small keepsakes. Crafted from air-dry or polymer clay with a delicate speckled texture, its clean lines and minimalist hardware create a modern, elegant piece of decor.
Step-by-Step Guide
Materials
- White polymer clay or air-dry clay (approx. 500g)
- Fimo leather-effect clay (optional, for flexibility)
- Rolling pin or pasta machine
- Envelope paper template (self-made)
- Craft knife or scalpel
- Coarse black pepper or dried coffee grounds (for speckling)
- Ruler
- Awl or toothpick
- Small gold brad or embellishment
- Leather cord or twine
- Sandpaper (fine grit)
- Clay adhesive or heavy-duty glue (if using polymer)
Step 1: Preparing the Clay
-
Condition the Clay:
Begin by thoroughly kneading your white clay until it is soft and pliable. If you want the finished pocket to have a slight flex like real leather, mixing in some leather-effect Fimo is a great trick. -
Add Texture:
To achieve that organic speckled look seen in the photo, sprinkle a small pinch of coarse black pepper or dried coffee grounds onto the clay. -
Integrate the Speckles:
Fold the clay over the speckles and knead again until the particles are evenly distributed throughout the block. -
Roll It Out:
Roll the clay out into a large, flat sheet. Aim for an even thickness of about 3-4mm. Using a pasta machine here helps ensure uniformity, but a rolling pin with guide rings works beautifully too.
Pro Tip: Cardboard Core
To shape the perfect pocket volume, wrap a piece of cardboard in cling film and insert it into the envelope before curing. Slide it out once hard.
Step 2: Constructing the Shape
-
Draft Your Template:
Create a paper template of an open envelope. You need a large rectangular body with a triangular flap at the top, and two side flaps and a bottom flap that will eventually fold inward. -
Cut Out the Clay:
Place your template onto the rolled clay sheet. Use a sharp craft knife to trace around the paper, cutting cleanly through the clay. Remove the excess. -
Texture the Edges:
Before folding, use an awl or a specific stitching wheel tool to gently press small indentations along the perimeter of what will be the front geometric panels. This mimics stitched leather. -
Form the Pocket:
Fold the bottom flap up and the two side flaps inward so they meet in the center, just like constructing a real paper envelope. Do not fold the top triangular flap down; leave it open. -
Secure the Seams:
Where the clay layers overlap (the bottom and side flaps), gently press them together. If using air-dry clay, use a dab of water (slip) to join them. For polymer, a little liquid clay helps bond these seams. -
Punch Hanging Holes:
While the clay is still wet/uncured, use a cocktail stick or small straw to punch two holes in the upper triangular flap (the back panel) for the hanging cord.
Step 3: Finishing Touches
-
Add the ‘Button’:
Press a small gold brad or a tiny ball of gold clay into the point where the lower envelope flaps meet. This adds a realistic closure detail. -
Refine the Form:
I like to gently stuff the pocket with a little crumpled foil or tissue paper at this stage. This ensures the pocket stays open and holds its volume while drying or baking. -
Cure the Clay:
Bake the project according to your clay package instructions (usually 230°F/110°C for polymer) or let it air dry for 24-48 hours. Ensure it is fully hardened. -
Sand and Smooth:
Once fully cured and cool, gently sand any rough edges with fine-grit sandpaper for a polished, professional finish. -
String It Up:
Thread a length of thin leather cord or twine through the holes you punched earlier. Knot the ends securely. -
Final Display:
Fill your new ceramic envelope with lightweight dried grasses or flowers and hang it on a neutral wall.
Troubleshooting: Cracking?
If using air-dry clay and you see cracks forming, patch them immediately with a slurry of water and fresh clay, then smooth with a damp finger.
Now you have a stylish, handcrafted vessel ready to bring a touch of texture to your wall decor
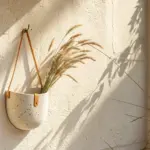


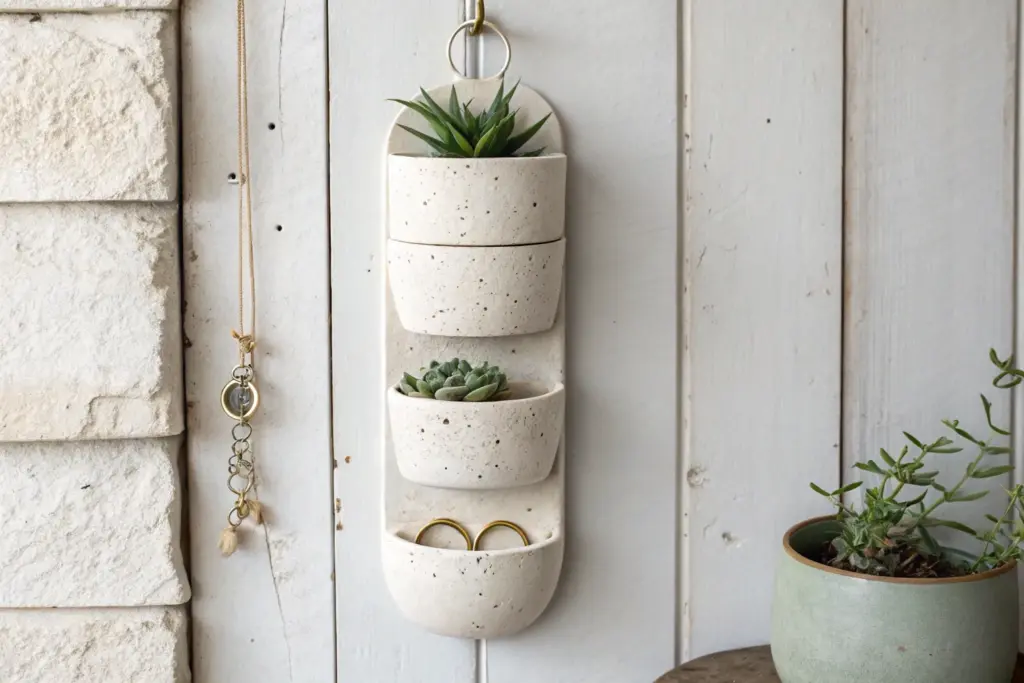
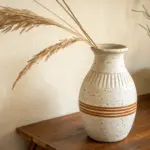
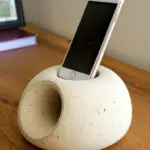
Rounded Half-Moon Clay Pocket
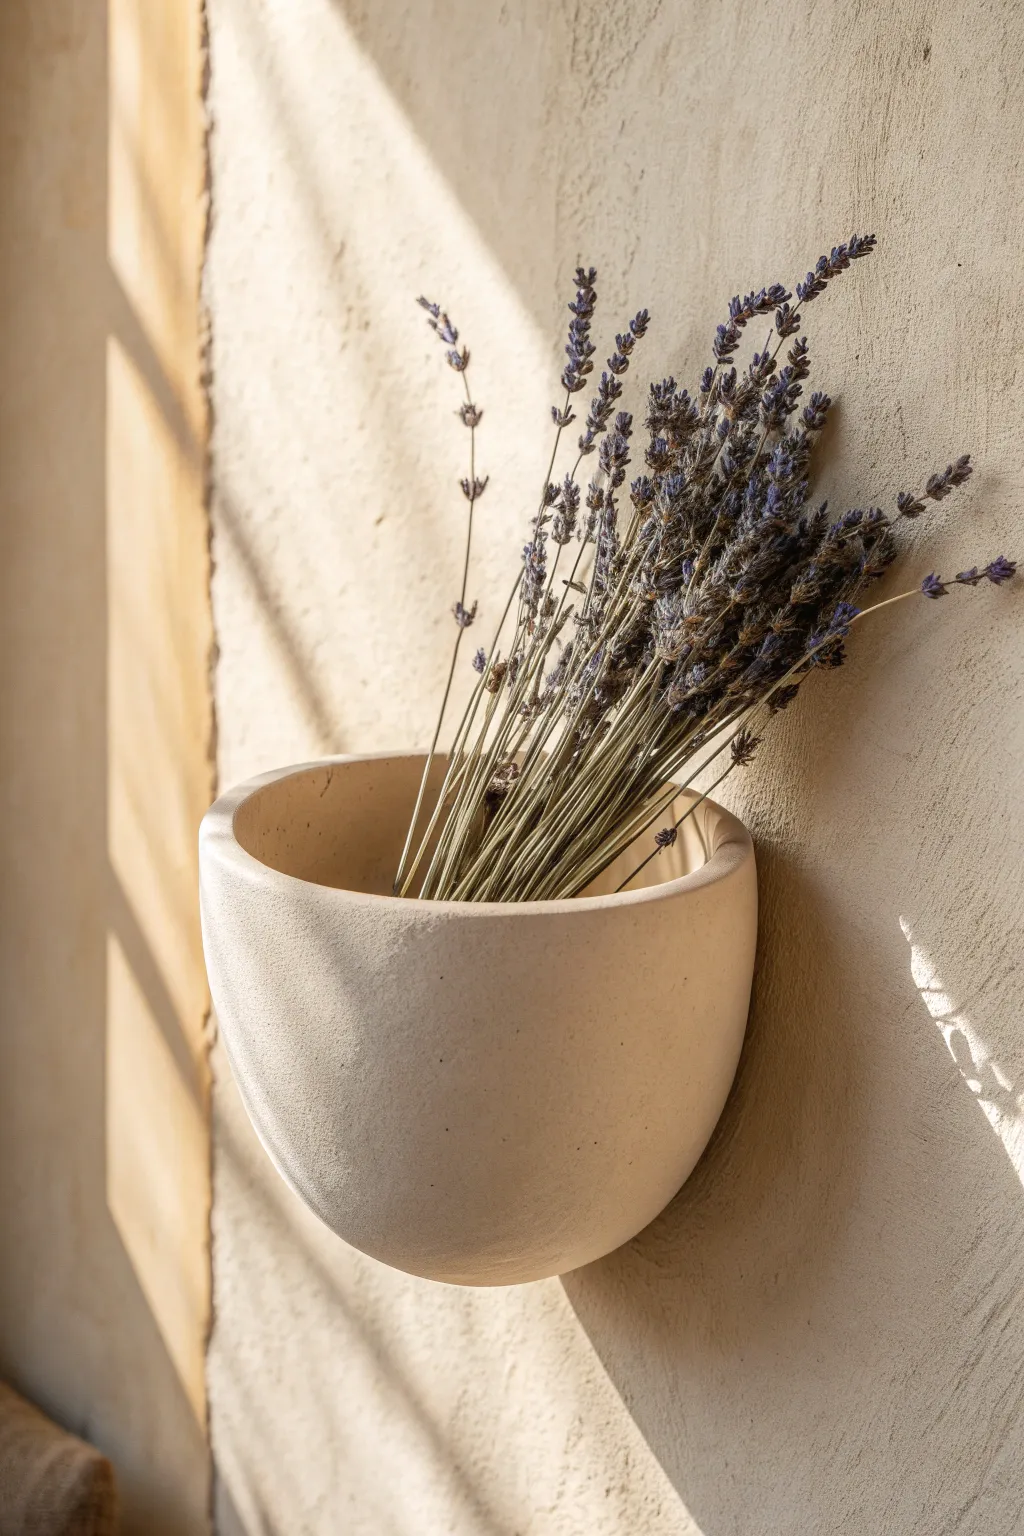
This rounded half-moon pocket brings a touch of Mediterranean warmth to your wall with its smooth, sandy texture and soft curves. It serves as the perfect minimalist vessel for dried botanicals like lavender, creating a piece that feels both organic and architectural.
Detailed Instructions
Materials
- Air-dry clay (white or terracotta)
- Rolling pin
- Large bowl or half-sphere mold (for shaping)
- Sharp craft knife
- Sponge
- Water cup
- Sandpaper (medium and fine grit)
- Acrylic paint (cream or beige)
- Baking soda (to add texture to paint)
- Matte sealant spray
- Mounting hardware (adhesive strips or pre-made hanging hole)
Step 1: Shaping the Clay Body
-
Prepare your clay:
Start by kneading a large block of air-dry clay until it is warm and pliable. Remove any air bubbles to prevent cracks later. -
Roll the slab:
Roll the clay out into a uniform slab, approximately 1/4 inch thick. Aim for a consistent thickness to ensure even drying. -
Cut the primary shape:
Using a bowl or round template as a guide, cut a large circle out of your clay slab with your craft knife. -
Form the pocket:
Drape the clay circle over the bottom of your half-sphere mold or bowl. Gently press it down so it takes the curved shape, smoothing it with your hands. -
Create the flat back:
Using your craft knife, slice off the back portion of the curved clay while it’s still on the mold. You want to create a flat, vertical plane where the pocket will sit flush against the wall. -
Refine the rim:
Trim the top edge to create the opening. It should be a clean, horizontal cut about halfway down the sphere form. -
Create a hanging mechanism:
If you plan to hang this with a nail, use a straw or tool to poke a clean hole in the back flat side near the top edge. I find it safer to make this hole slightly larger than needed as clay shrinks when drying.
Cracking Up?
If small cracks appear during drying, mix a tiny amount of fresh clay with water to make a paste (slip). Fill the cracks, smooth over, and let dry again.
Step 2: Refining and Drying
-
Smooth with water:
Dip your sponge in water and wring it out well. Gently wipe the entire surface of the clay to remove fingerprints and smooth out imperfect cuts. -
Initial drying phase:
Let the clay dry on the mold for about 24 hours to hold its shape. Keep it away from direct heat sources to prevent warping. -
Remove and flip:
Carefully pop the clay off the mold. Turn it upside down or on its side to let the interior dry completely. This usually takes another 24-48 hours. -
Sand the surface:
Once bone dry, use medium-grit sandpaper to level out any bumps on the exterior. Switch to fine-grit paper for a silky smooth finish. -
Clean off dust:
Wipe the entire piece down with a slightly damp cloth to remove all sanding dust before painting.
Step 3: Texturing and Finishing
-
Mix textured paint:
Mix your beige or cream acrylic paint with a teaspoon of baking soda. This creates a fluffy, plaster-like texture that mimics the sandy look in the photo. -
Apply base coat:
Paint the entire exterior of the pocket. Use a dabbing motion with your brush rather than long strokes to enhance the stone-like texture. -
Layering color:
If you want depth, lightly sponge on a slightly lighter shade of cream over the high points while the base is tacky. -
Seal the piece:
Once the paint is fully dry, spray the pocket with a matte sealant. This protects the finish without adding an artificial sheen. -
Arrange the florals:
Place your dried lavender stems inside. Let them fan out naturally, leaning against the back wall for that effortless look.
Make it Waterproof
To use fresh flowers instead of dried ones, coat the *inside* with multiple layers of waterproof varnish or resin to prevent the clay from melting.
Hang your new clay pocket in a sunny spot to enjoy the subtle shadows cast by its curve


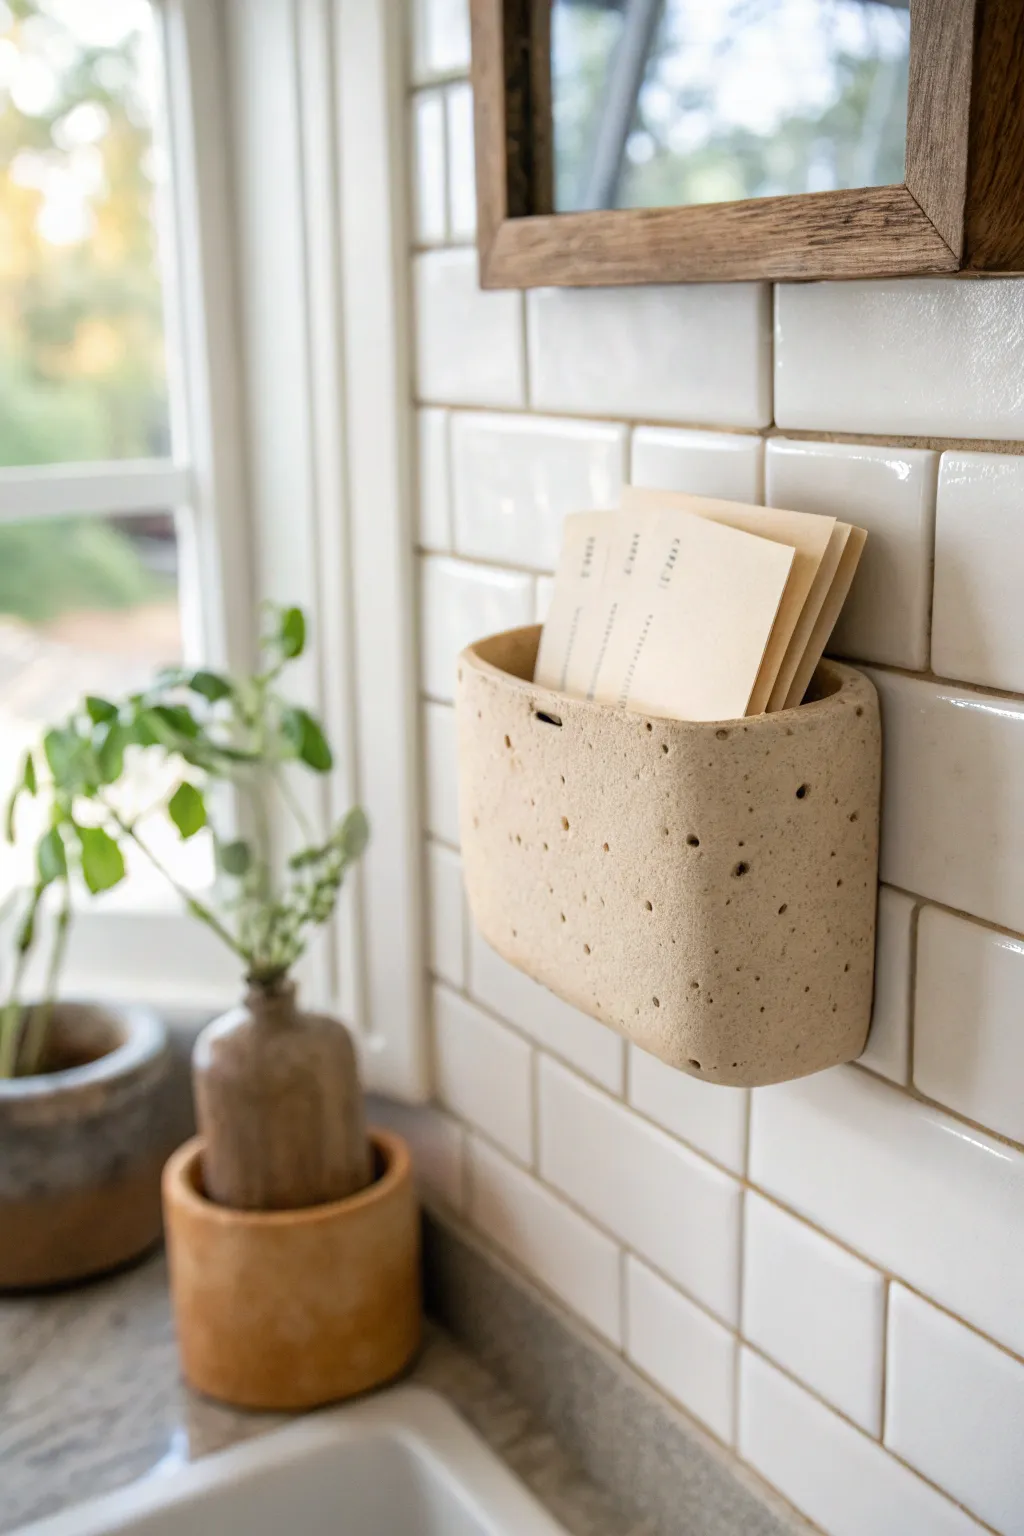
Minimal Slot Pocket for Mail
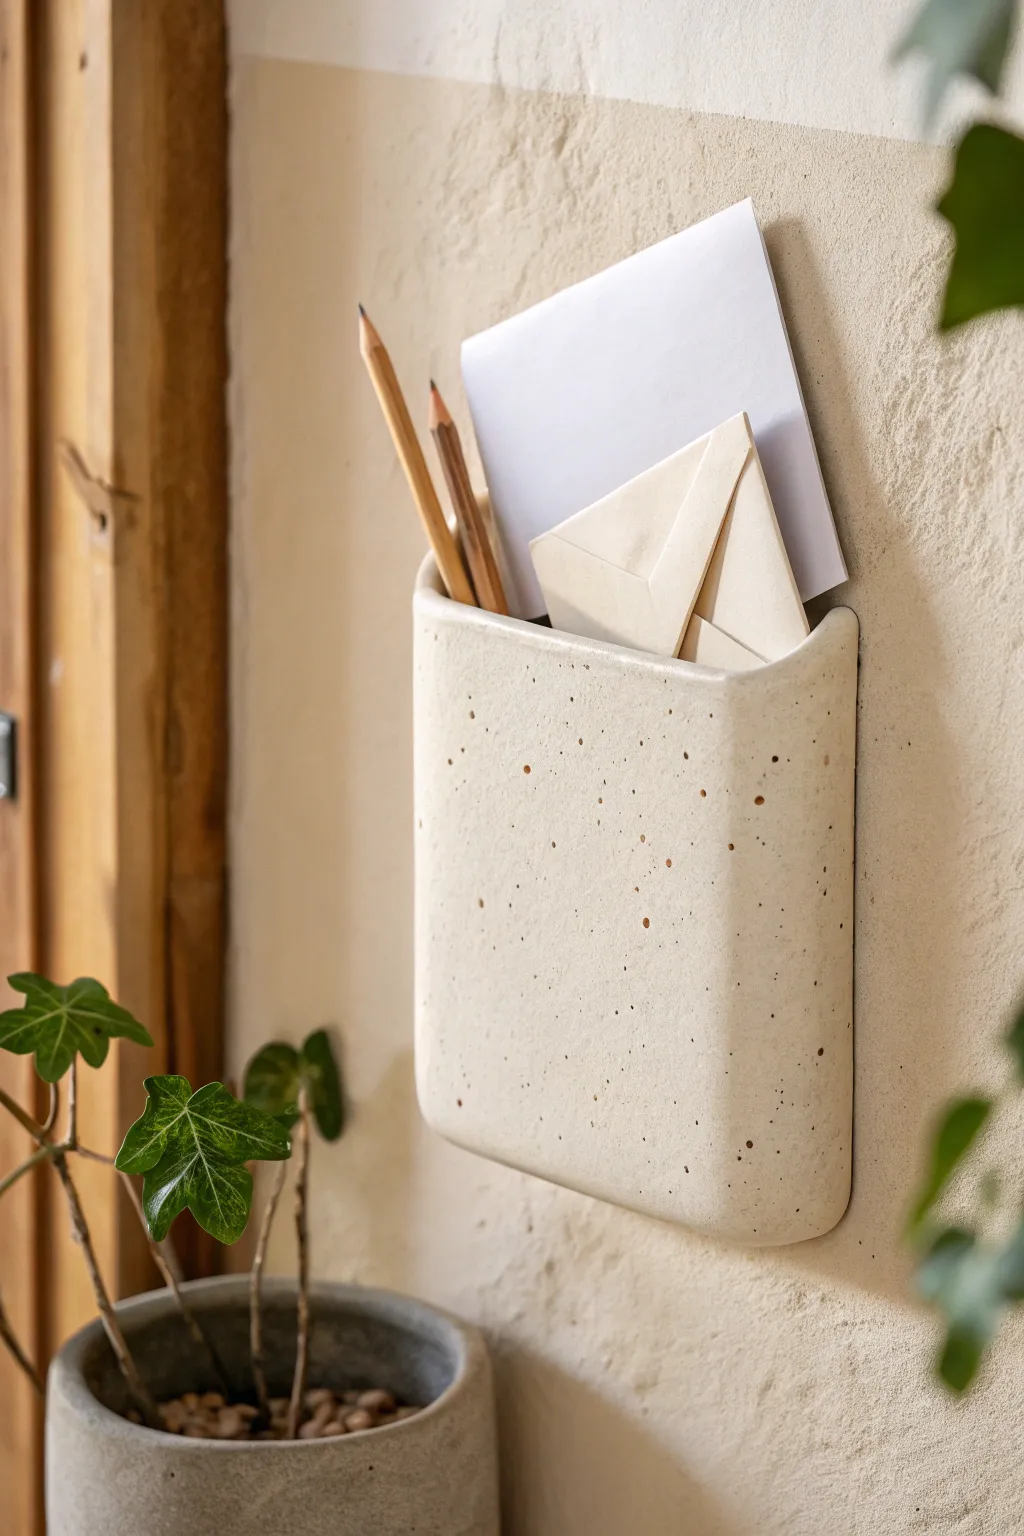
This minimalist wall pocket combines functionality with earthy charm, featuring a subtle speckled texture and a soft, matte finish. It’s perfectly sized for holding letters or a few favorite pencils, adding a peaceful organizational element to any corner.
How-To Guide
Materials
- White polymer clay or air-dry clay (approx. 500g)
- Speckling agent (dried coffee grounds, cracked pepper, or faux granite clay inclusions)
- Rolling pin
- Sharp clay blade or X-Acto knife
- Ruler
- Cardboard or cardstock (for templates)
- Slip (liquid clay or water/clay loose mixture)
- Sanding sponge (fine grit)
- Matte sealant or varnish
- Mounting hardware (keyhole hanger or strong adhesive strips)
Step 1: Preparation & Slab Building
-
Create the speckled mix:
If using plain white clay, knead in a small pinch of your speckling agent. Don’t overdo it—you want a subtle, scattered look like stone, not a solid color change. Knead until evenly distributed. -
Roll the slab:
Roll your clay out on a smooth surface to a uniform thickness of about 1/4 inch (6mm). This thickness ensures the pocket is sturdy enough to hold weight without cracking. -
Cut the templates:
While the clay rests, cut your cardboard templates. You will need a large rectangle for the back (approx. 4×6 inches) and a smaller rectangle for the front. -
Cut the main shapes:
Place your templates on the clay slab and cut around them cleanly with your blade. Save the excess trimming for the side connector piece. -
Create the side strip:
Cut a long, narrow strip of clay, about 1 inch wide. This will act as the spacer that creates the pocket depth. Measure the perimeter of the front piece (sides and bottom) to ensure this strip is long enough to wrap around it.
Cracks Appearing?
If using air-dry clay, cracks often mean it’s drying too fast. Cover the piece loosely with plastic wrap while it dries to slow down the evaporation process.
Step 2: Assembly
-
Score the edges:
Using a needle tool or fork, rough up the edges of the back panel, the front panel, and the long strip where they will connect. -
Apply slip:
Dab a generous amount of slip (or liquid clay if using polymer) onto the scored areas to act as glue. -
Attach the side strip:
Carefully guide the long strip around the U-shape of the front panel’s edge. Press firmly to bond them. -
Reinforce the seam:
On the inside of the pocket, use a modeling tool or your finger to smooth the clay from the strip onto the front panel, erasing the seam for extra strength. -
Mount to the back:
Place this U-shaped assembly onto the larger back panel. Align the bottom edges perfectly. The back panel should be taller than the front. -
Smooth the exterior:
Where the side strip meets the back panel, blend the clay outward gently to create a seamless transition. I prefer using a slightly damp sponge here to blur the lines.
Make it Functional
Embed tiny rare earth magnets into the clay on the inside back panel before it dries. This turns the organizer into a magnetic key holder as well.
Step 3: Shaping & Finishing
-
Soften the corners:
Gently tap and rub the sharp 90-degree corners of the pocket with your fingertips to round them off, mimicking the organic soft curves seen in the photo. -
Add a mounting hole:
If you plan to use a nail, use a straw or tool to punch a clean hole near the top center of the back panel. Alternatively, you can carve a keyhole slot. -
Final smooth:
Check for fingerprints. A final wipe with a drop of baby oil (for polymer) or water (for air-dry) smooths everything out perfectly. -
Cure or dry:
Bake the piece according to package directions if using polymer clay, or let air-dry clay sit for 24-48 hours until bone dry. -
Sand for texture:
Once fully hardened, use a fine-grit sanding sponge over the entire surface. This reveals more of the speckles and gives that professional stone-like finish. -
Seal (Optional):
Apply a coat of ultra-matte varnish to protect against smudges, though leaving it raw preserves the natural texture best.
Hang your new pocket near the doorway and enjoy a clutter-free entry


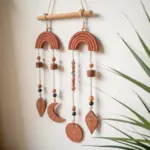
Air Plant Clay Pocket Planter
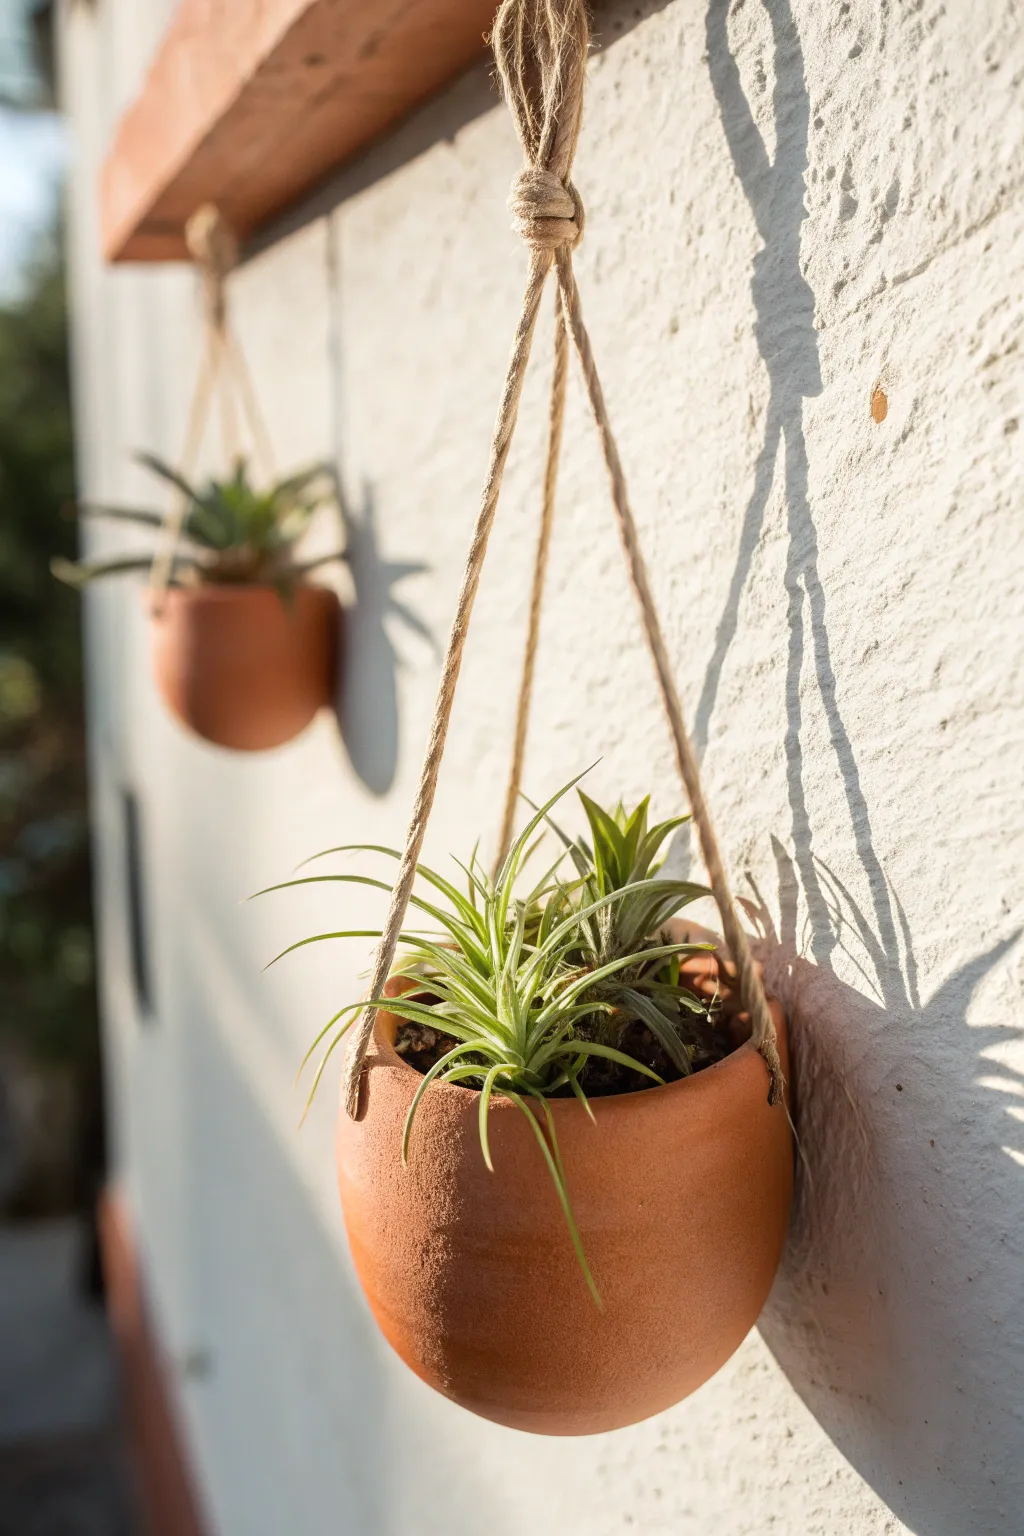
These warm, terracotta-hued hanging pods bring a touch of earthy charm to any vertical space. The simple, rounded forms are suspended by rustic twine, creating the perfect cozy nest for your favorite air plants.
Step-by-Step
Materials
- Air-dry clay (terra cotta color)
- Small bowl or sphere mold (e.g., a styrofoam ball or heavy balloon)
- Rolling pin
- Circle cookie cutter or glass (approx. 4-5 inches diameter)
- Plastic wrap
- Straw or wooden skewer
- Sandpaper (fine grit)
- Jute twine or hemp cord
- Scissors
- Water bowl and sponge
- Matte sealant or acrylic varnish (optional)
Step 1: Shaping the Clay Pocket
-
Prepare your clay:
Begin by taking a generous handful of terra cotta air-dry clay. Knead it in your hands for a minute or two until it is warm, pliable, and free of any air bubbles. -
Roll out the slab:
On a smooth surface or canvas mat, roll the clay out to an even thickness of about 1/4 inch. Try to keep the thickness consistent so the pot dries evenly. -
Cut the base circle:
Use your large circle cutter or the rim of a wide glass to punch out a perfect circle from the rolled clay slab. This will form the main body of your pocket. -
Prep the mold:
Take your sphere mold—I usually use a small styrofoam ball or a smooth plastic bowl—and cover it tightly with a layer of plastic wrap to prevent sticking. -
Form the curve:
Gently drape your clay circle over the mold. Instead of pressing it flat against the mold, cup it gently in your hands to create a deep, bowl-like curve without flattening the clay texture. -
Refine the rim:
Smooth the edges of the circle with a damp finger. You want the rim to look organic but finished, removing any sharp angles left by the cutter.
Smooth Moves
Use a slightly damp sponge to smooth the clay surface before drying. This reduces sanding time later and creates that professional, burnished ceramic look.
Step 2: Creating the Hanging Mechanism
-
Punch the holes:
While the clay is still wet, use a straw or skewer to poke two holes on opposite sides of the rim, about 1/2 inch down from the top edge. Make sure these are large enough for your twine to pass through later. -
Clean the holes:
If the hole punching pushed clay out the back, gently smooth that area down with a wet fingertip so the interior remains tidy. -
Initial drying:
Allow the clay to dry on the mold for at least 24 hours. Keep it in a cool, dry place away from direct heat to prevent cracking. -
Remove and finish drying:
Once the outside feels firm, carefully peel the clay pocket off the mold and remove the plastic wrap. Let it dry for another 24 hours upside down so the interior hardens completely. -
Sand for smoothness:
When the pot is bone dry and turns a lighter color, take your fine-grit sandpaper and lightly buff the exterior. Focus on any rough spots on the rim or bumps on the bottom curve.
Crack Control
If you see tiny hairline cracks appearing as it dries, mix a small amount of fresh clay with water to make a paste (slip) and fill them in immediately.
Step 3: Assembly and Hanging
-
Seal the clay:
While optional, applying a coat of matte varnish will protect the clay from humidity. Brush it on inside and out and let it dry completely. -
Cut the twine:
Cut a length of jute twine around 24 to 30 inches long, depending on how low you want the planter to hang. -
Thread the suspension:
Thread one end of the twine through the left hole from the outside in, and the other end through the right hole from the outside in. -
Knot the ends:
Tie a sturdy double knot on the *inside* of the pot at each end of the twine. Trim the excess close to the knot so it sits flush against the inner wall. -
Create the top loop:
Pull the main loop of twine up above the pot. Tie a simple overhand knot at the very top to create a loop for hanging on a hook locally or on a wall peg. -
Add nature:
Nestle your air plant inside the pocket. Since there are no drainage holes at the bottom, remove the plant when watering and let it dry before placing it back in.
Now you have a charming floating garden ready to brighten up your wall

The Complete Guide to Pottery Troubleshooting
Uncover the most common ceramic mistakes—from cracking clay to failed glazes—and learn how to fix them fast.
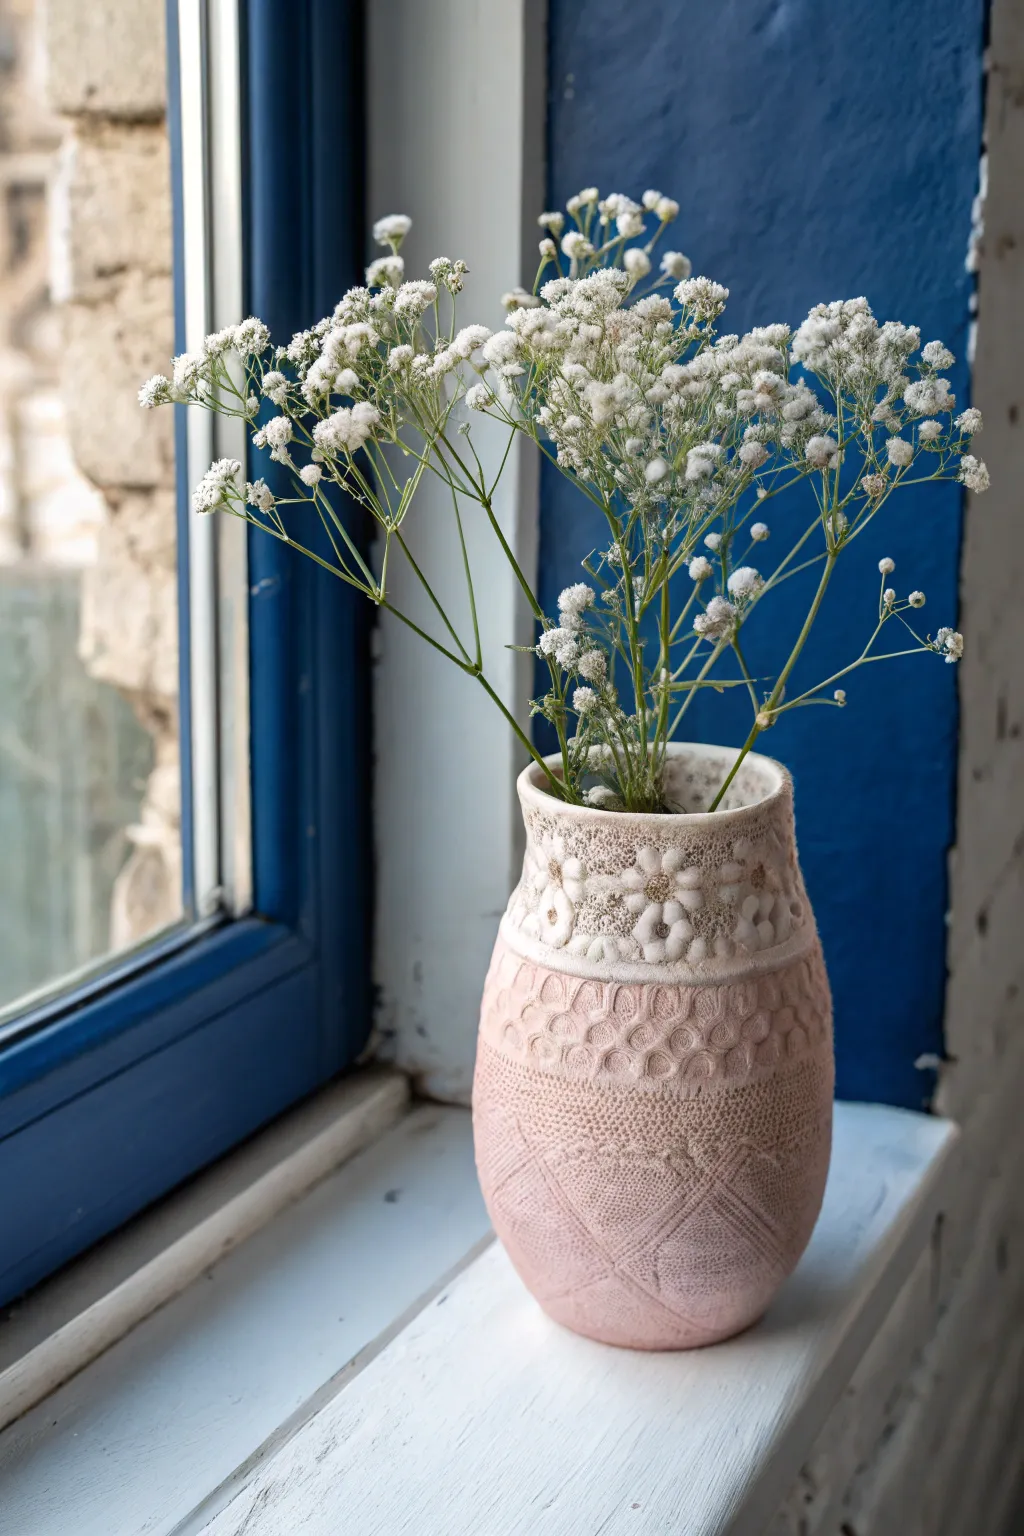
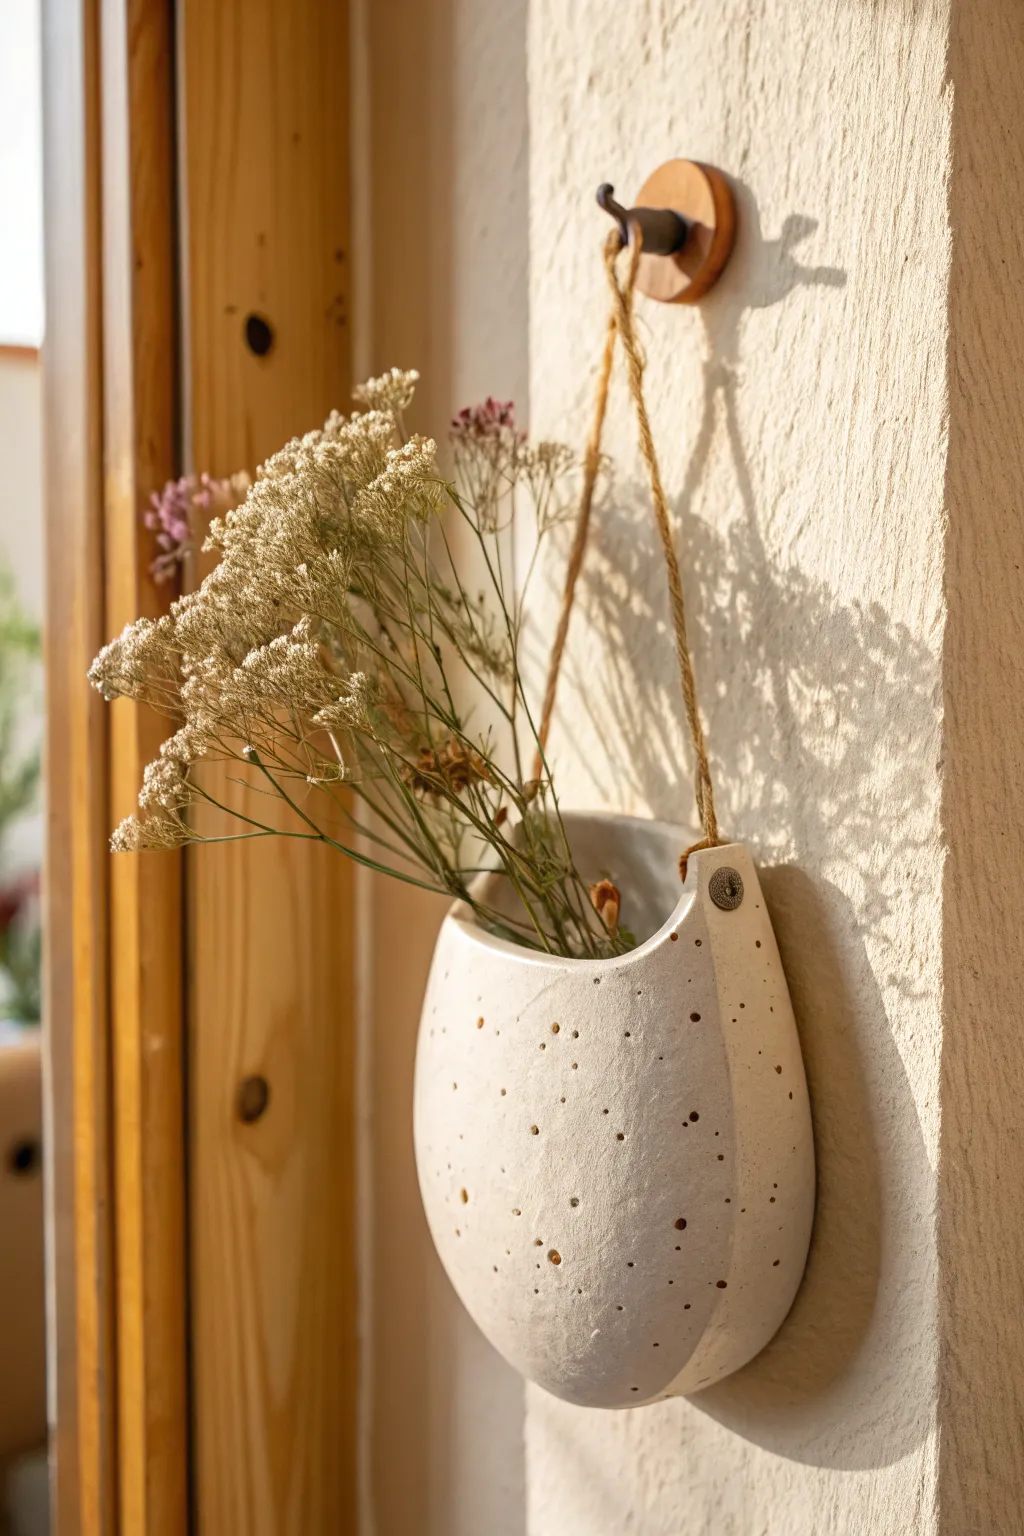
Dried Flower Bud Vase Pocket

Embrace the beauty of imperfection with this lovely, organic-shaped bud vase designed to hold dried floral arrangements. With its creamy, speckled finish and soft, rounded edges, this piece brings a calm, earthy aesthetic to any corner of your home.
How-To Guide
Materials
- White or cream-colored stoneware clay body (cone 6)
- Speckle additive (granular manganese or ilmenite) or pre-mixed speckled clay
- Rolling pin
- Canvas work surface
- Needle tool
- Flexible metal rib
- Sponge
- Scoring tool (or serrated rib)
- Pottery slip
- Matte cream or clear glaze
- Kiln access
Step 1: Preparing the Slab
-
Wedge the clay:
Start with a ball of soft stoneware clay about the size of a grapefruit. If you are using a plain clay body, wedge in a small amount of granular manganese or prepared speckles now to achieve that scattered, peppered look seen in the photo. -
Roll out the slab:
Place your clay on a canvas surface to prevent sticking. Use a rolling pin to flatten the clay into an even slab, aiming for a thickness of about 1/4 to 3/8 of an inch. -
Compress the surface:
Take a flexible rib tool and gently run it over both sides of the slab. This aligns the clay particles to prevent warping later and smooths out the canvas texture.
Step 2: Forming the Cylinder
-
Cut the rectangle:
Decide on the height of your vase. Using a ruler and needle tool, cut a rectangle from your slab. For a vase similar to the image, a rectangle roughly 6 inches tall by 9 inches wide works well. -
Score the edges:
Score the two shorter vertical edges of your rectangle thoroughly. This roughs up the surface to ensure a strong bond. -
Apply slip and join:
Apply a generous amount of slip to the scored areas. Gently curve the slab to bring the ends together, overlapping them slightly or butting them against each other depending on your preference. Press the seam firmly. -
Smooth the seam:
Use your fingers or a modeling tool to blend the clay across the seam on both the inside and outside until the join is invisible. Support the wall from the inside with one hand while smoothing the outside.
Visible Seams?
If your vertical seam keeps cracking open as it dries, wrap the vase tightly in plastic for 24 hours to re-hydrate the join, then compress it again with a wooden rib.
Step 3: Shaping and Refining
-
Add the base:
Roll out a small leftover piece of slab. Place your cylinder on top of it and trace around the base with a needle tool. Score and slip the bottom edge of the cylinder and the new base circle, then attach them firmly. -
Curve the bottom:
To get that soft, tapered look at the bottom, use a paddle or your hands to gently gently tap the lower walls inward. You want the base to feel slightly narrower than the mid-section, creating an elegant curve. -
Soften the rim:
The rim in the reference image is distinctively thick and rounded. Use a damp sponge or a piece of chamois leather to compress and round over the top edge. Avoid making it too sharp; a blunt, soft rim adds to the rustic charm. -
Refine the surface:
Once the clay is leather hard, use a metal rib to scrape away any unevenness or finger marks. I like to leave just a hint of hand-building texture so it doesn’t look factory-made. -
Check for speckles:
Smooth over the surface one last time with a slightly damp sponge. This often reveals the speckles bit more clearly by engaging the clay surface.
Pro Tip: Rounded Bottom
To get that perfectly rounded bottom edge, gently tap the base against your table at a 45-degree angle while rotating the pot. This bevels the sharp corner into a soft curve.
Step 4: Firing and Finishing
-
Bisque fire:
Allow your vase to dry slowly and completely, ideally covering it loosely with plastic for a day or two before uncovering. Fire it to a bisque temperature (usually cone 04). -
Glaze application:
Dip or brush your vase with a matte cream or sheer white glaze. The glaze needs to be translucent enough to let the dark clay speckles show through, just like in the photo. -
Glaze firing:
Fire the vase again to the maturity temperature of your clay and glaze (typically cone 6 for stoneware). Ensure the piece doesn’t touch other items in the kiln. -
Arrange your florals:
Once cool, fill your vase with a selection of dried botanicals like bunny tails, wheat, and billy buttons in warm autumnal tones to complete the look.
Your finished speckled vase is now ready to bring a touch of nature’s quiet elegance into your living space
Leaf-Imprint Texture Pocket
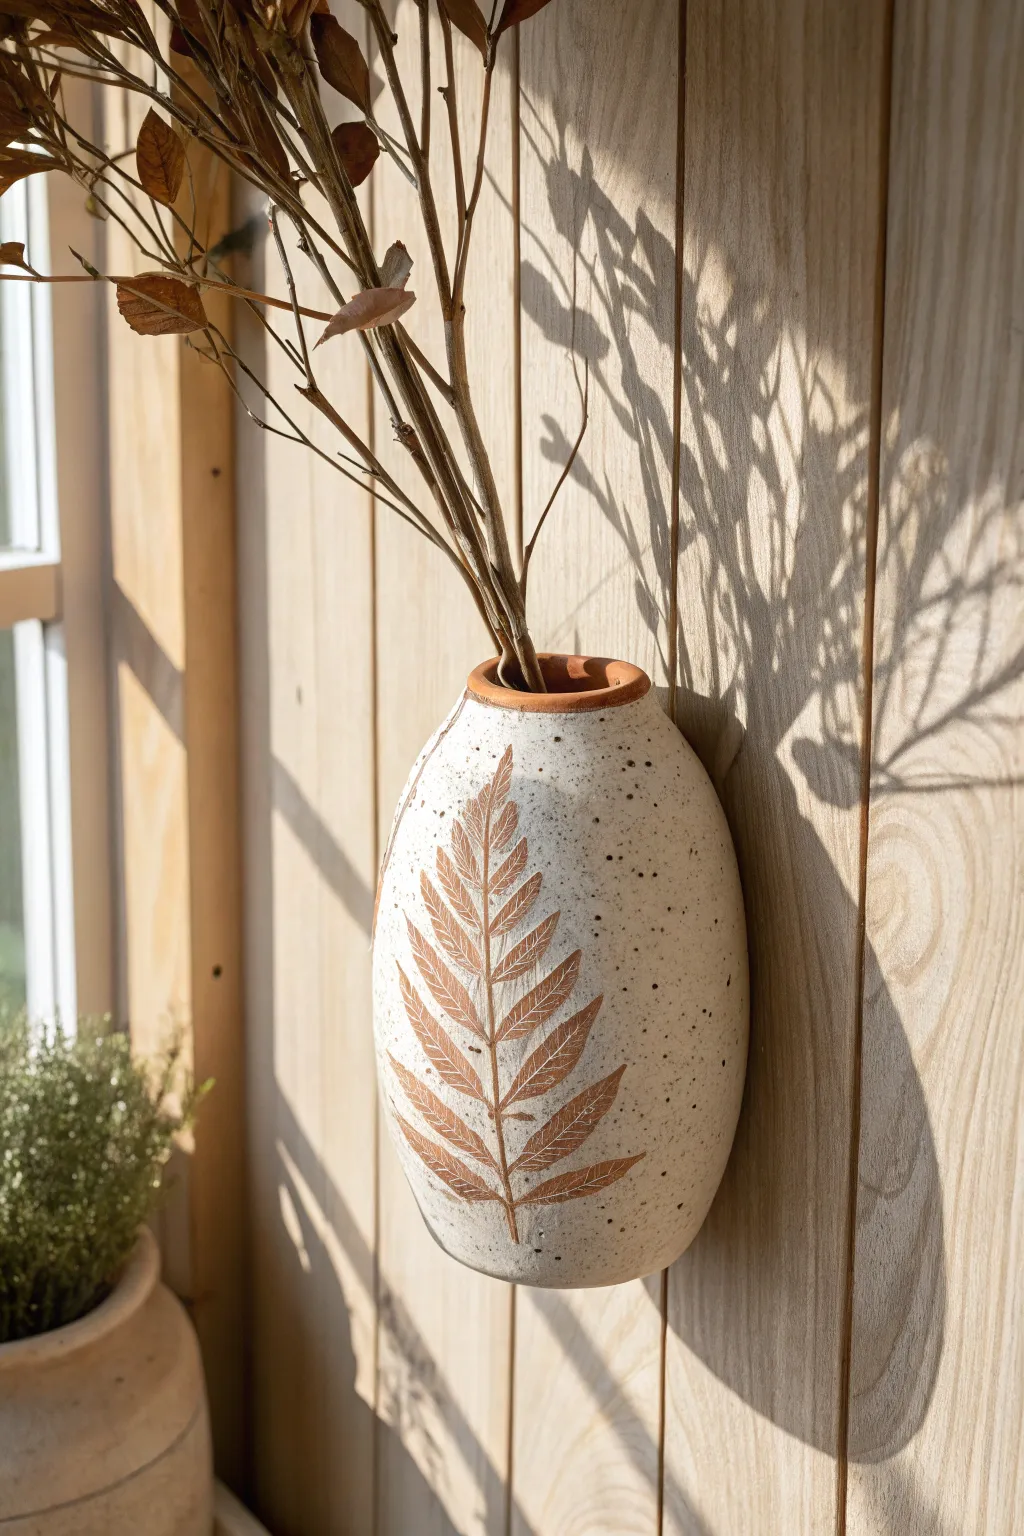
Bring a touch of woodland charm to your walls with this rustic hanging planter featuring a prominent fern leaf impression. The natural speckled finish and warm terracotta tones create a cozy, organic vessel perfect for dried botanicals.
Step-by-Step Tutorial
Materials
- Air-dry clay (white) or polymer clay
- Rolling pin
- Real fern leaf (fresh is best for impressions)
- Pottery tools (needle tool, rib tool)
- Small bowl or balloon (for shaping)
- Craft knife
- Terracotta acrylic paint
- Black acrylic paint
- Old toothbrush
- Clear matte varnish or sealant
- Small sponge brush
- Sandpaper (fine grit)
- Water and small cup
Step 1: Shaping the Pocket
-
Roll the clay:
Start by conditioning your clay until it’s pliable, then roll it out into a smooth slab about 1/4 inch thick. Aim for an oval or oblong shape that is roughly twice the size of your desired finished pocket. -
Impress the leaf:
Place your fern leaf vein-side down onto the center of the slab. Gently roll over it with your rolling pin to embed the veins deep into the clay without cutting through it. -
Cut the shape:
Using a needle tool or craft knife, cut out a large oval shape around the leaf imprint. This will be the front of your pocket. -
Create the back:
Roll out a second piece of clay for the back of the pocket. Cut a matching oval shape, perhaps slightly flatter on the top edge where the opening will be. -
Form the volume:
To give the pocket its bulging shape, I like to gently drape the front piece (leaf side out) over a wad of newspaper or a small curved object while it firms up slightly.
Natural Texture Hack
Use a fresh, stiff fern rather than a dried one. The moisture in a fresh leaf makes it more flexible and leaves a cleaner, deeper impression without crumbling.
Step 2: Assembly and Refining
-
Score and slip:
Score the edges of both the front and back pieces where they will join. Apply a little water (slip) to the scored areas to act as glue. -
Join the halves:
Press the edges together firmly, leaving the top open. Use a rib tool or your fingers to smooth the seam completely so it looks like one continuous piece. -
Refine the rim:
Smooth the top opening edge with a little water on your finger. If you want a rim detail like the reference, roll a very thin coil of clay and attach it around the opening, blending it seamlessly on the inside. -
Make the hanging hole:
Turn the pocket over and create a small hole in the back panel near the top using a straw or tool, ensuring it’s large enough for a nail head. -
Dry and sand:
Allow the clay to dry completely according to package instructions (usually 24-48 hours). Once dry, gently sand any rough edges or fingerprints with fine-grit sandpaper.
Change the Look
Try using sage green paint for the leaf inlay and a gold rim instead of terracotta for a more modern, botanical illustration style.
Step 3: Painting and Finishing
-
Reveal the leaf:
Dilute the terracotta acrylic paint with a tiny bit of water. Paint it into the fern indentation, ensuring it gets into the deep veins. -
Wipe back:
Immediately use a slightly damp cloth to wipe the paint off the surface of the clay. The paint will remain in the recessed leaf impression, highlighting the design. -
Paint the rim:
Use the same terracotta color to paint the rim of the opening to frame the piece. -
Create the speckles:
Dip an old toothbrush into watered-down black paint. Run your thumb across the bristles to flick tiny speckles across the entire surface of the pocket. -
Seal the piece:
Once all paint is dry, apply a coat of clear matte varnish to protect the surface and give it a finished ceramic look. -
Final touches:
Let the varnish cure completely before hanging the pocket and filling it with lightweight dried botanicals.
Hang your new clay pocket in a sunny spot to enjoy the subtle play of shadows across the textured surface


What Really Happens Inside the Kiln
Learn how time and temperature work together inside the kiln to transform clay into durable ceramic.
Lace-Pressed Vintage Texture Pocket
Capture the elegance of antique textiles with this beautifully textured vase project. By pressing various fabrics into soft clay, you’ll create a seamless blend of floral lace and geometric patterns that feels both rustic and refined.
How-To Guide
Materials
- Air-dry clay or polymer clay (white or light terracotta)
- Rolling pin
- Vintage lace doily or trim (floral pattern)
- Burlap or distinct heavy-weave fabric
- Honeycomb or netting fabric scrap
- Clay sculpting tools (knife tool, smoother)
- Cylindrical mold (glass jar or cardboard tube)
- Acrylic paints (pale pink, white, warm beige)
- Sponge or soft cloth
- Matte sealant or varnish
Step 1: Preparing the Slab
-
Roll out the clay:
Begin by conditioning your clay until it is pliable and smooth. Roll it out into a large, rectangular slab about 1/4 inch thick. Aim for a size that will wrap around your chosen cylindrical mold with a little overlap. -
Cut to size:
Using a ruler and a clay knife, trim the edges of your slab to ensure straight lines. Measure the height of your jar or tube and cut the clay slightly taller to allow for shaping the rim later.
Step 2: Creating the Textures
-
Plan the zones:
Visualize your vase in horizontal thirds. The top will feature the floral lace, the middle will use the netting, and the bottom will showcase the heavy woven fabric. -
Press the bottom texture:
Lay your burlap or heavy-weave fabric over the bottom third of the clay slab. Use your rolling pin to press firmly, rolling over the fabric once to imprint the cross-hatch pattern deep into the clay. -
Add the middle section:
Place the honeycomb or netting fabric in the center band of the slab. I like to overlap the textures just slightly to avoid awkward gaps. Roll firmly to impress this geometric design. -
Apply the lace detail:
Position your vintage floral lace along the top third of the slab. Press it gently but firmly with the roller, ensuring the flower centers make a distinct impression. -
Refine the impressions:
Peel back all the fabrics carefully. If any areas look faint, you can lay the fabric back down and press specifically on those spots with your thumb or a small tool.
Seamless Transitions
Use a ball stylus tool to lightly obscure the lines where different texture fabrics meet, blending them into a unified design.
Step 3: Assembling the Vase
-
Wrap the form:
Carefully lift your textured clay slab and wrap it around your cylindrical mold (a glass jar works perfectly for stability). Bring the two vertical edges together. -
Join the seam:
Where the edges meet, blend the clay together. Since you have texture on the front, try to fuse the seam from the inside or back surface, or create an intentional overlap if blending ruins the pattern. -
Shape the neck:
Gently taper the top of the clay inward to create a narrower neck for the vase, molding it slightly away from the jar rim if possible, or shaping it directly against the glass. -
Form the rim:
Smooth the very top edge with a little water on your finger. You can create a distinct band at the top, separating it from the lace texture below, for a finished look. -
Dry completely:
Allow the vase to dry fully according to your clay’s instructions. If using air-dry clay, this may take 24 to 48 hours. Keep it on the mold initially to prevent slumping.
Clay Cracking?
If small cracks appear while the clay dries around the mold, smooth a tiny bit of fresh clay slip (water + clay) into the fissure immediately.
Step 4: Finishing and Painting
-
Base coat:
Once dry and hardened, apply a base coat of pale pink acrylic paint mixed with a little beige. Cover the entire exterior surface. -
Whitewash technique:
Mix white acrylic paint with a small amount of water. Brush this wash over the textured areas, letting the liquid settle into the deep recesses of the lace and netting patterns. -
Wipe back:
Immediately use a damp sponge or cloth to wipe away the excess white paint from the raised surfaces. This reveals the pink base color on the high points while leaving white in the deep textures. -
Dry brush highlights:
Dip a dry brush into pure white paint, offload most of it on a paper towel, and lightly graze the tops of the lace flowers to make them pop. -
Seal:
Finish with a coat of clear matte varnish to protect the paint and give the vase a ceramic-like feel without excessive shine.
Fill your new textured vessel with dried blooms like baby’s breath to complete the nostalgic aesthetic
Scalloped Rim Clay Pocket
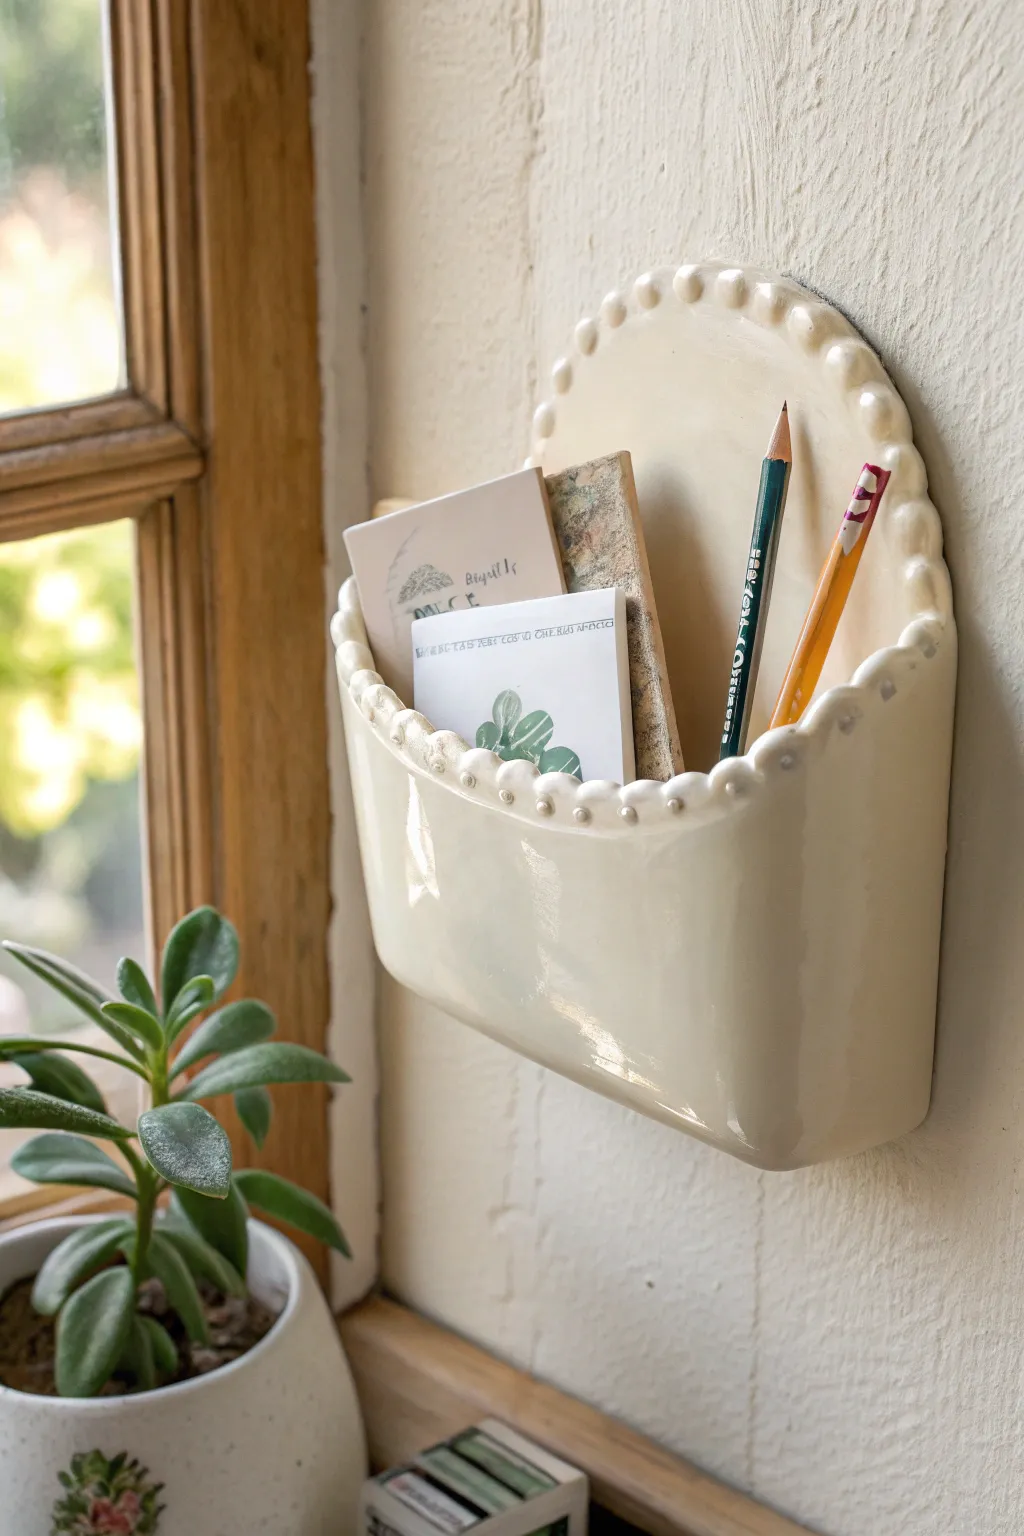
This charming ceramic wall pocket features a soft, creamy glaze and a distinctive beaded rim that adds a touch of vintage elegance to any corner. Its curved, half-moon silhouette is perfect for holding notes, mail, or a few favorite pencils next to a sunny window.
Detailed Instructions
Materials
- White earthenware or stoneware clay
- Rolling pin
- Canvas work surface
- Needle tool or fettling knife
- Paper template (half-circle shape)
- Slip (clay mixed with water)
- Scoring tool (or serrated rib)
- Small round piping tip or straw (for bead making)
- Smoothing sponge
- Clear or cream-colored glossy glaze
- Kiln (or air-dry clay alternatives for a decorative-only version)
Step 1: Preparing the Slab
-
Roll the clay:
Begin by wedging your clay to remove air bubbles, then roll it out into an even slab about 1/4 inch thick on your canvas cloth. -
Smooth the surface:
Use a rib tool or a damp sponge to compress the clay slab on both sides, removing any canvas textures or rolling pin marks. -
Cut the back panel:
Using a paper template or a circular object as a guide, cut out a large semi-circle or tombstone shape. This will be the tall back piece that rests against the wall. -
Cut the front pocket:
Cut a smaller, rectangular strip that is slightly wider than the back panel to allow for the outward curve of the pocket.
Keep it Straight
When attaching the front pocket, stuff the inside with crumpled newspaper or foam to support the curved shape while it dries to leather-hard.
Step 2: Assembling the Form
-
Shape the pocket:
Gently curve the rectangular front piece so it forms a ‘U’ shape that will fit against the bottom half of the backing plate. -
Score the edges:
Thoroughly score the side and bottom edges of the back panel where the pocket will attach, as well as the corresponding edges on the pocket piece itself. -
Apply slip:
Dab a generous amount of slip onto the scored areas to act as glue. -
Join the pieces:
Press the front pocket onto the back panel firmly. I usually work my way from the bottom center outwards to ensure the curve is symmetrical. -
Reinforce the seam:
Roll a very thin coil of clay and press it into the interior seam where the pieces meet, smoothing it down with a modeling tool to ensure a watertight bond.
Step 3: Adding the Scalloped Detail
-
Create clay beads:
Roll many small, pea-sized balls of clay. Try to keep them consistent in size, or use a small hollow punch to cut identical circles from a thin slab. -
Score the rim:
Lightly score along the entire top rim of the front pocket and the exposed upper arch of the back panel. -
Attach the beads:
Slip and score each small ball, pressing them gently along the rim one by one. Space them closely so they touch, creating a continuous beaded line. -
Refine the shape:
Once all beads are attached, gently run a damp finger or soft brush over them to smooth out fingerprints and integrate them slightly into the main body. -
Add a hanging hole:
Use a straw or hole cutter to create a small hole near the top center of the back panel for hanging later.
Add Vintage Flair
After applying the white glaze, wipe it back slightly on the beads with a damp sponge before firing to reveal the clay texture for a rustic look.
Step 4: Finishing
-
Slow drying:
Loosely cover the piece with plastic to let it dry slowly. This prevents the seams from cracking as the clay shrinks. -
Bisque fire:
Once bone dry, fire the piece to bisque temperature according to your clay body’s specifications. -
Glazing:
Dip or brush on a creamy white gloss glaze. Be careful not to let the glaze pool too thickly in the crevices of the beaded rim, or you might lose the detail. -
Final wipe:
Wipe the foot (bottom) of the piece clean with a sponge to prevent it from sticking to the kiln shelf. -
Glaze fire:
Fire the piece a second time to the glaze maturity temperature to achieve that glossy, finished surface.
Hang your finished pocket near a desk or window to instantly add handmade warmth and organization to your space

TRACK YOUR CERAMIC JOURNEY
Capture glaze tests, firing details, and creative progress—all in one simple printable. Make your projects easier to repeat and improve.
Two-Hole Twine-Hung Pocket
This elegant hanging vase combines the raw beauty of speckled clay with a simple folded slab technique. Its creamy, matte finish and rustic twine suspension make it the perfect vessel for showcasing dried botanicals like lavender against a sunlit wall.
How-To Guide
Materials
- Speckled buff stoneware clay (approx. 1-2 lbs)
- Rolling pin
- Canvas mat or cloth for rolling
- Fettling knife or needle tool
- Rib tool (wooden or silicone)
- Small round cutter or drinking straw (approx. 5mm)
- Slip and scoring tool (or fork)
- Sponge
- Jute twine
- Clear matte glaze (optional, for a sealed finish)
Step 1: Creating the Slab Base
-
Prepare the clay:
Begin by wedging your speckled buff clay thoroughly to remove air bubbles and ensure an even consistency. This is crucial for slab work to prevent warping later. -
Roll out the slab:
Place the clay on your canvas mat and roll it out into an even slab. Aim for a thickness of about 1/4 inch (6mm). Keep the rolling pin steady to avoid uneven ridges. -
Smooth the surface:
Take your rib tool and gently compress the clay slab on both sides. This aligns the clay particles, making it stronger and giving you that lovely smooth finish shown in the photo. -
Cut the rectangle:
Using a fettling knife and a ruler (or straight edge), cut a clean rectangle. For the size shown, aim for approximately 5 inches wide by 9 inches tall.
Keep it clean
Work with clean hands when handling light-colored clay. Colored lint or dust will show up as specks after firing, distracting from the natural speckle of the clay body.
Step 2: Forming the Pocket
-
Create the fold:
Gently lift the broad side of the rectangle and curve it around to meet the other side, forming a cylinder. Don’t press the edges together yet; just check the shape to ensure it isn’t too narrow. -
Pinch the bottom:
Instead of adding a separate base piece, we will pinch the bottom closed. Gently squeeze the bottom edges of the cylinder together to form a sealed, curved line. I find smoothing this seam with a damp sponge immediately helps blend the join seamlessly. -
Refine the shape:
Insert your hand or a dowel inside the pocket to gently push the walls outward, creating that soft, bulbous volume near the bottom while keeping the top slightly more open. -
Score and slip the seam:
Where the side edges meet, score both surfaces with a needle tool or fork and apply a dab of slip. Press them firmly together to create the vertical back seam. -
Smooth the join:
Use a wooden modeling tool or your finger to smooth the vertical seam on the outside and inside so it disappears completely. The back should look as clean as the front.
Warping walls?
If the pocket opening starts to droop or fold in on itself while wet, stuff the inside loosely with scrunched-up newspaper to support the shape while it dries to leather hard.
Step 3: Adding Details and Finishing
-
Punch the hanging holes:
About 1 inch down from the top rim, use a small circle cutter or a drinking straw to punch two clean holes on the front face of the pocket. Space them roughly 2 inches apart. -
Punch rear holes (optional):
If you want the twine to pass through the back as well, punch corresponding holes on the back wall of the pocket, directly behind the front ones. -
Smooth the rim:
Run a damp chamois or a very slightly wet sponge along the top rim and the edges of the holes to soften any sharp angles left by cutting. -
Dry slowly:
Loosely cover the pocket with plastic and let it dry slowly to the leather-hard stage, then uncover to bone dry. This slow drying prevents the vertical seam from cracking. -
Bisque fire:
Fire the piece to cone 04 (or according to your clay body’s instructions) for the bisque firing. -
Glaze application:
To maintain the raw clay look, apply a thin coat of clear matte glaze, or leave the exterior unglazed if the clay is vitreous enough. If glazing, wipe the foot clean and fire to the final temperature (likely cone 5 or 6). -
Attach the twine:
Cut a long length of jute twine. Thread it through one hole from the outside in, loop it inside, and back out the other hole. Tie a sturdy knot above the center to create the hanging triangle. -
Secure the suspension:
Create a loop at the very top of your twine triangle for hanging, ensuring the pocket hangs straight before tightening your final knots.
Hang your finished pocket in a sunny spot and fill it with fragrant dried herbs for a timeless, earthy accent
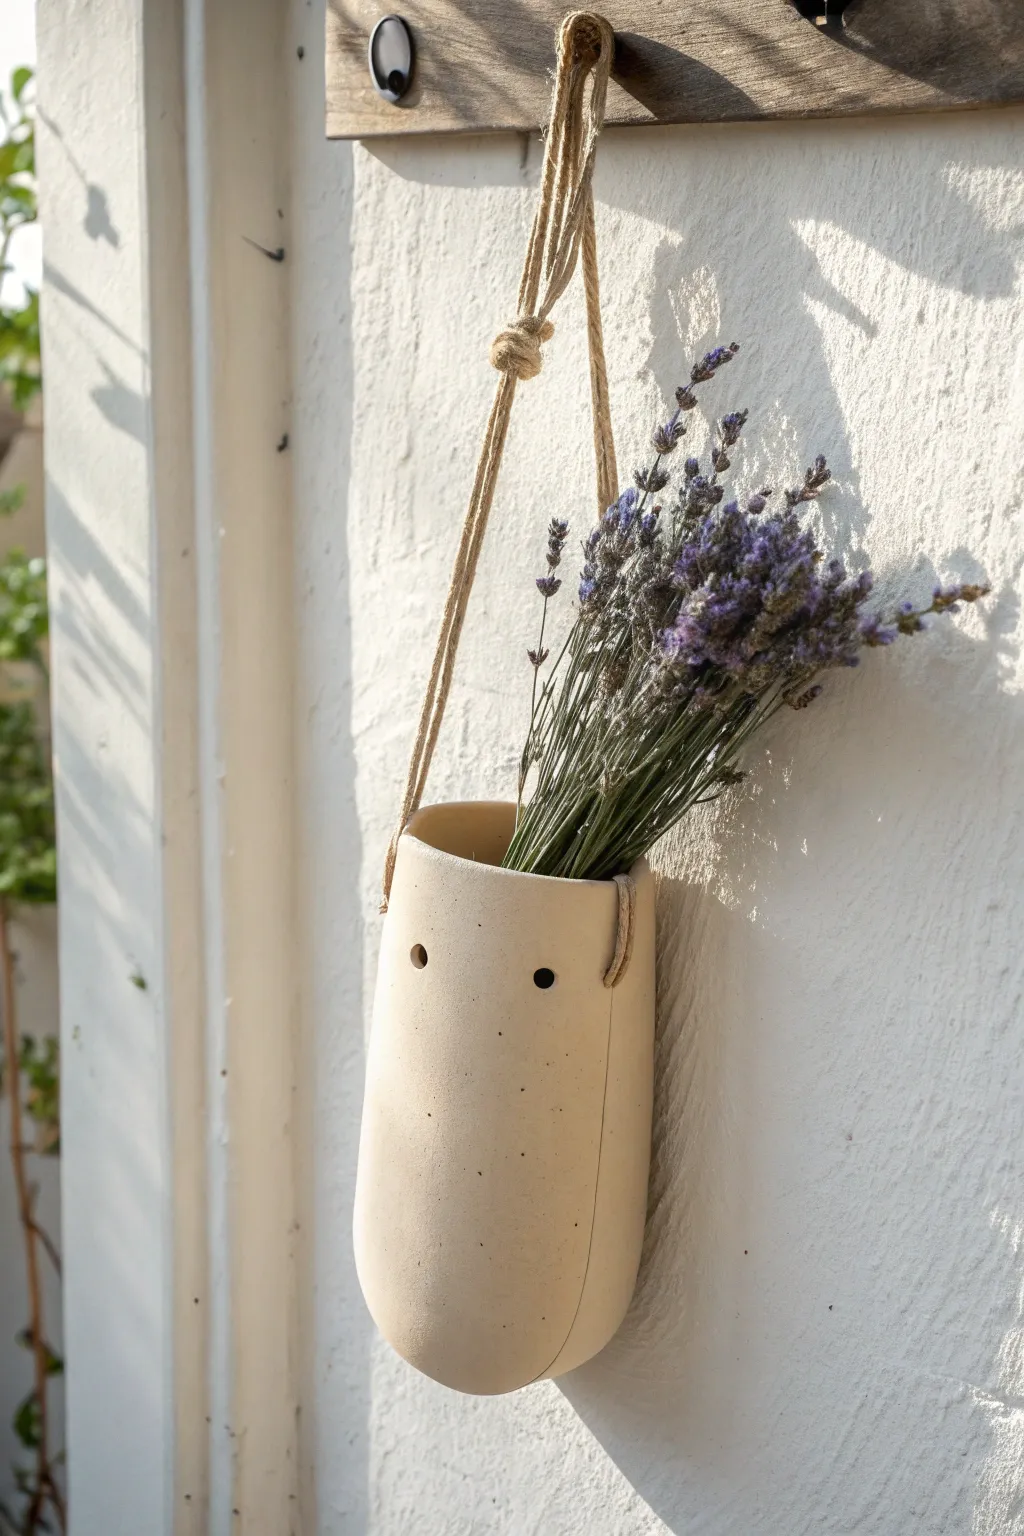
Single Hole Peg-Hung Pocket
This charming, egg-shaped wall pocket adds a touch of rustic minimalism to any vertical space. Crafted from white clay with subtle indented details, it’s the perfect vessel for displaying dried blooms or air plants.
Step-by-Step
Materials
- White or cream-colored air-dry clay (or polymer clay)
- Rolling pin
- Carving tool or needle tool
- Small bowl (for water)
- Sponge
- Dowel or thick skewer (approx. 5mm diameter)
- Sandpaper (fine grit)
- Jute twine or decorative cord
- Acrylic matte varnish (optional)
- Wax paper or canvas work surface
- Small decorative button or bead (optional)
Step 1: Shaping the Clay
-
Roll the Slabs:
Begin by conditioning your clay until it’s pliable. Roll out two even slabs of clay, aiming for a thickness of about 1/4 inch. Keep the thickness consistent to prevent cracking during drying. -
Cut the Back Panel:
Using a needle tool, cut a tall, elongated U-shape from one slab. This will be the back of the pocket that rests against the wall. It should be roughly 6-7 inches tall. -
Cut the Front Panel:
Cut a second U-shape from the other slab. This one should be slightly wider and shorter than the back piece to create the bowed-out ‘pocket’ volume. -
Form the Pocket:
Gently curve the front panel so it arches outward. Score the edges of both the back panel and the curved front panel where they will meet. -
Join the Seams:
Apply a little water (slip) to the scored edges and press the front panel onto the back panel. Smoothing the seam together with your thumb or a modeling tool is crucial for a strong bond. -
Reinforce the Join:
Roll a very thin coil of clay and press it into the interior seam where the two pieces join. Smooth this out completely so it’s invisible, reinforcing the structure.
Crack Prevention
If you see hairline cracks forming while air-drying, mix a tiny bit of fresh clay with water to make a paste and fill them in immediately before they expand.
Step 2: Adding Details & Finishing
-
Refine the Shape:
Use a damp sponge to smooth out any fingerprints or rough edges. Gently tap the bottom of the pocket on your work surface to flatten it just slightly. -
Create Texture:
Using the blunt end of a skewer or a small styler tool, gently poke random indentations all over the front surface. Don’t go all the way through; just create shallow divots for texture. -
Add Suspension Holes:
At the very top of the back panel, poke a hole on the left and right sides using your dowel. Ensure these are at least 1/2 inch away from the edge to prevent tearing. -
Dry the Piece:
Allow the pocket to dry completely according to your clay manufacturer’s instructions. I like to prop the pocket opening with a crumpled paper towel to keep it from sagging while wet. -
Sand Smooth:
Once bone dry, gently sand the edges and the surface to remove any sharp burrs or unevenness. Wipe away the dust with a slightly damp cloth. -
Seal (Optional):
If you want a smoother finish or extra durability, apply a coat of matte acrylic varnish. Let it dry completely before handling. -
Attach the Cord:
Cut a length of jute twine roughly 12 inches long. Thread one end through the left hole from back to front, and tie a secure knot on the front side. -
Secure the Second Side:
Thread the other end of the twine through the right hole. Adjust the length to your preference and tie the second knot on the front. -
Add Decorative Element:
For a finished look akin to the example, you can glue a small clay button or a wooden bead over the visible knots on the front face of the pocket.
Speckled Effect
To mimic stoneware speckles, knead coarse ground pepper or dried coffee grounds into your white clay before rolling it out.
Fill your new pocket with dried lavender or baby’s breath and hang it near a window so the texture catches the light
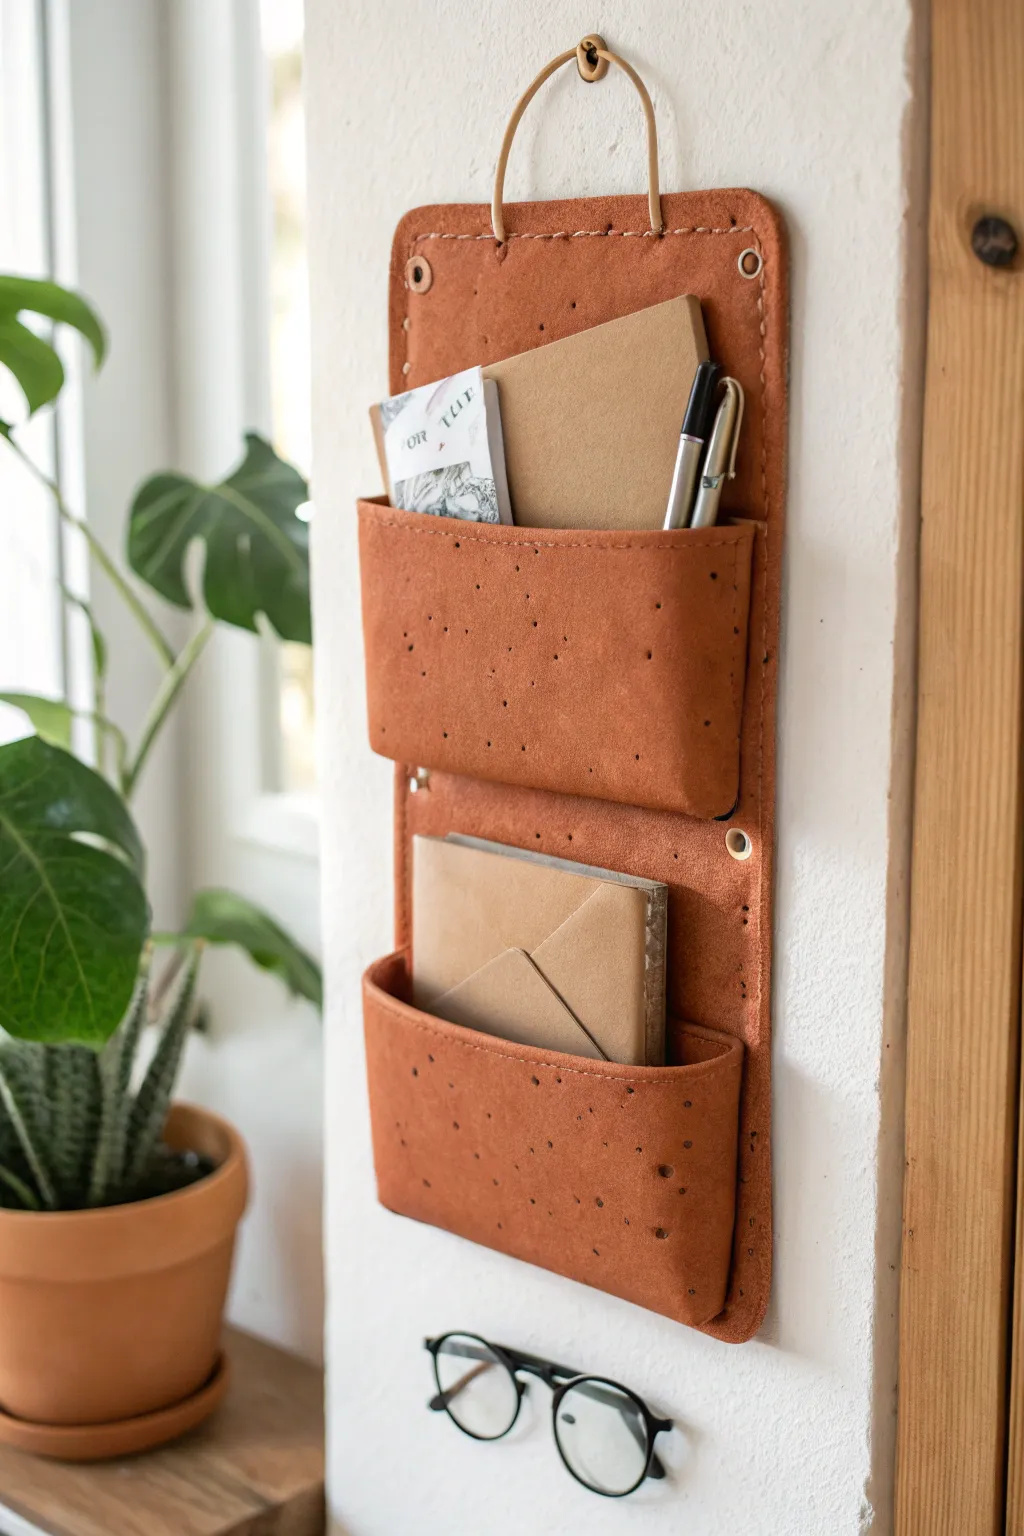
Tiny Clay Pocket for Keys
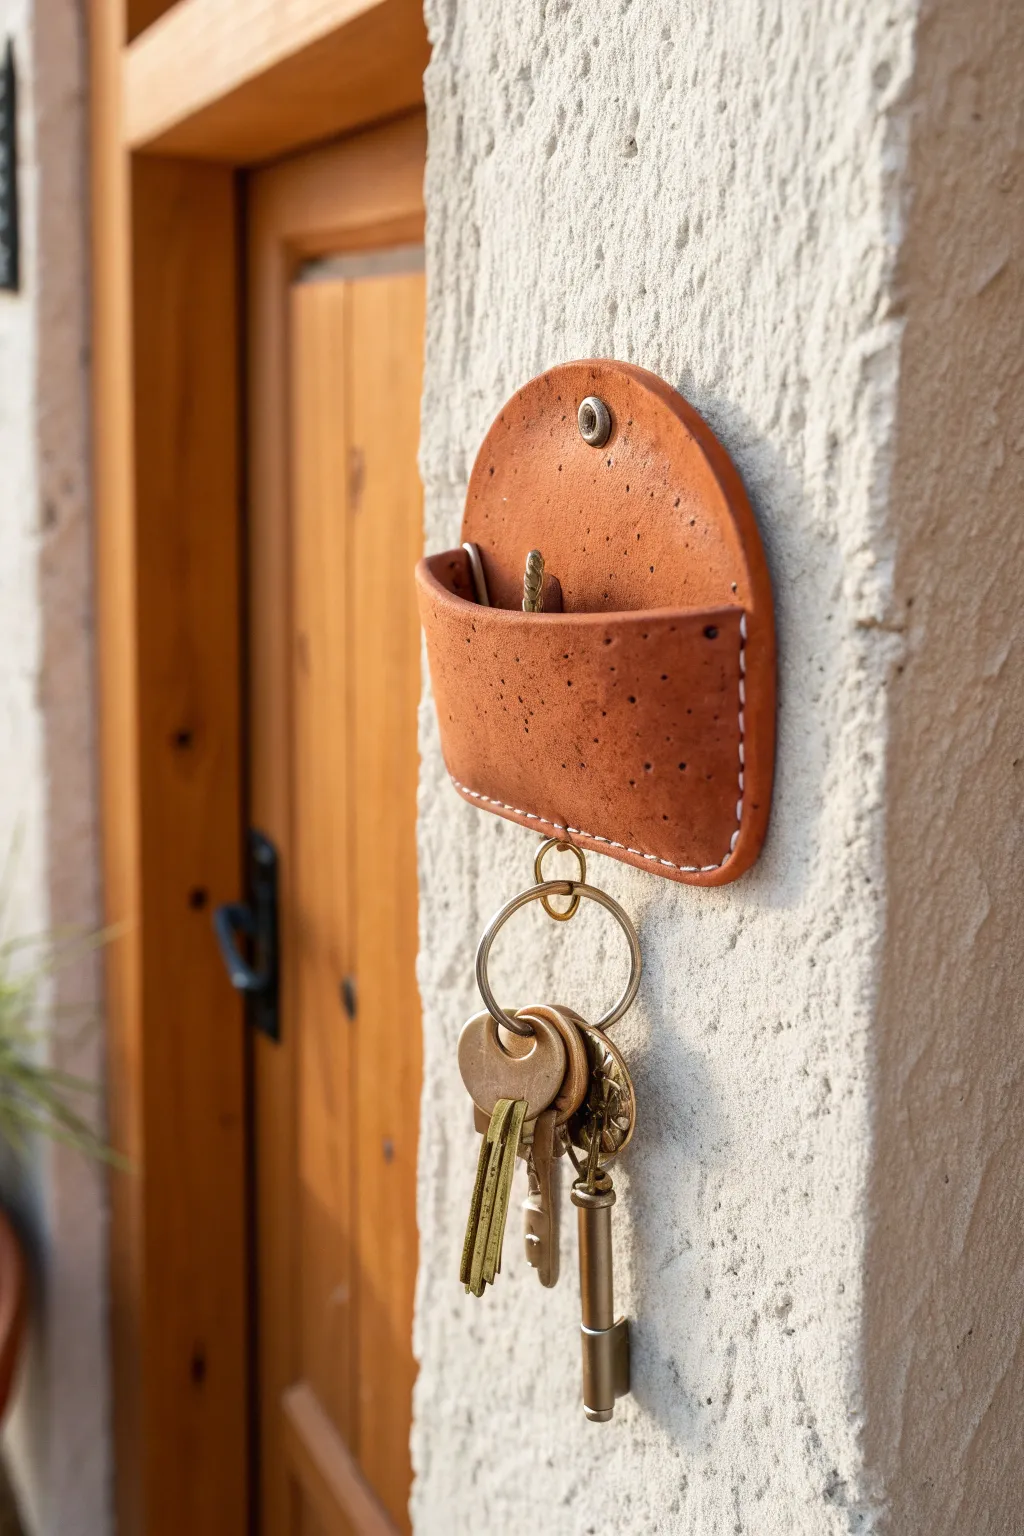
This charming wall-mounted pocket mimics the look of stitched leather but is actually crafted from durable polymer clay. Its warm, speckled terra cotta finish adds a rustic touch to any entryway while keeping your keys organized and accessible.
How-To Guide
Materials
- Terra cotta or rust-colored polymer clay
- Rolling pin or clay machine
- Circle cutter (approx. 4-5 inches diameter)
- Craft knife or clay blade
- Liquid polymer clay (bakeable adhesive)
- Needle tool or thick tapestry needle
- White or cream embroidery floss (or waxed thread)
- Strong craft glue (E6000 or similar)
- Small metal D-ring or large jump ring
- Mounting hardware (screw or heavy-duty mounting tape)
- Texture sponge or toothbrush (optional)
- Oven
Step 1: Shaping the Clay
-
Condition the clay:
Begin by kneading your terra cotta polymer clay until it is soft and pliable. If you want to achieve the speckled look shown in the image, you can mix in a tiny amount of black pepper or black sand. -
Roll out a slab:
Use your rolling pin or clay machine to create an even slab about 1/4 inch thick. A consistent thickness creates a more professional leather-like appearance. -
Texture the surface:
For that authentic worn texture, gently pat the surface of the clay slab with a texture sponge, a crumpled ball of aluminum foil, or an old toothbrush. -
Cut the primary circle:
Use your large circle cutter to punch out a perfect circle from the textured slab. This will form the main body of the pocket. -
Create the pocket flap:
Use your blade to cut a straight line across the circle, removing the bottom third. Keep the larger piece—this semicircle will be the back plate. -
Cut the front piece:
Roll out a second piece of clay, slightly thinner than the first. Cut a rectangular strip that is wide enough to bow out slightly when attached to the backplate, creating the pocket void.
Clean Edges Tip
cornstarch can stop your clay from sticking to cutters. Dip your blade or circle cutter into a little powder before slicing for crisp, clean edges.
Step 2: Assembly and Baking
-
Curve the front:
Gently curve the rectangular strip into a ‘U’ shape that matches the width of your backplate. -
Secure the edges:
Apply a thin line of liquid polymer clay along the curved edge of the backplate where the pocket will sit. Press the edges of the front strip firmly onto the backplate, blending the seams on the very edge slightly to seal them. -
Trim the excess:
If the front pocket piece overhangs the backplate, use your craft knife to carefully trim it flush for a clean silhouette. -
Add the mounting hole:
At the top center of the backplate, use a small circle cutter or a straw to punch a hole where the screw will eventually go. -
Create stitch holes:
Before baking, use a needle tool to poke evenly spaced holes along the perimeter of the pocket section. Ensure the holes go all the way through both layers. -
Insert hardware attachment:
At the bottom center of the pocket, carefully press a small D-ring or metal loop into the clay if you want a dedicated hanging spot, or simply create a hole for a jump ring later. -
Bake the piece:
Place your clay pocket on a tile or baking sheet. Bake according to the manufacturer’s instructions for your specific brand of clay, usually around 275°F (135°C) for 30 minutes.
Step 3: Finishing Touches
-
Cool down:
Allow the piece to cool completely in the oven before handling to prevent cracking. -
Sew the faux stitching:
Thread a needle with white embroidery floss. Sew through the pre-punched holes using a simple running stitch or backstitch to mimic the look of sewn leather. -
Secure the thread:
Knots can be bulky, so I prefer to secure the ends of the thread on the back of the piece with a tiny dot of super glue. -
Add the key ring:
Attach a large split ring for your keys to the bottom loop or hole you created earlier. -
Mount to the wall:
Position the pocket on your wall and secure it with a screw through the top hole. Alternatively, use heavy-duty double-sided mounting tape for a drill-free option.
Leather Look
After baking while the clay is still warm, rub a tiny bit of brown acrylic paint into the texture and wipe it off immediately to highlight the ‘grain’.
Now you have a stylish and functional spot to drop your keys every time you walk through the door
Bathroom Pocket for Cotton Rounds
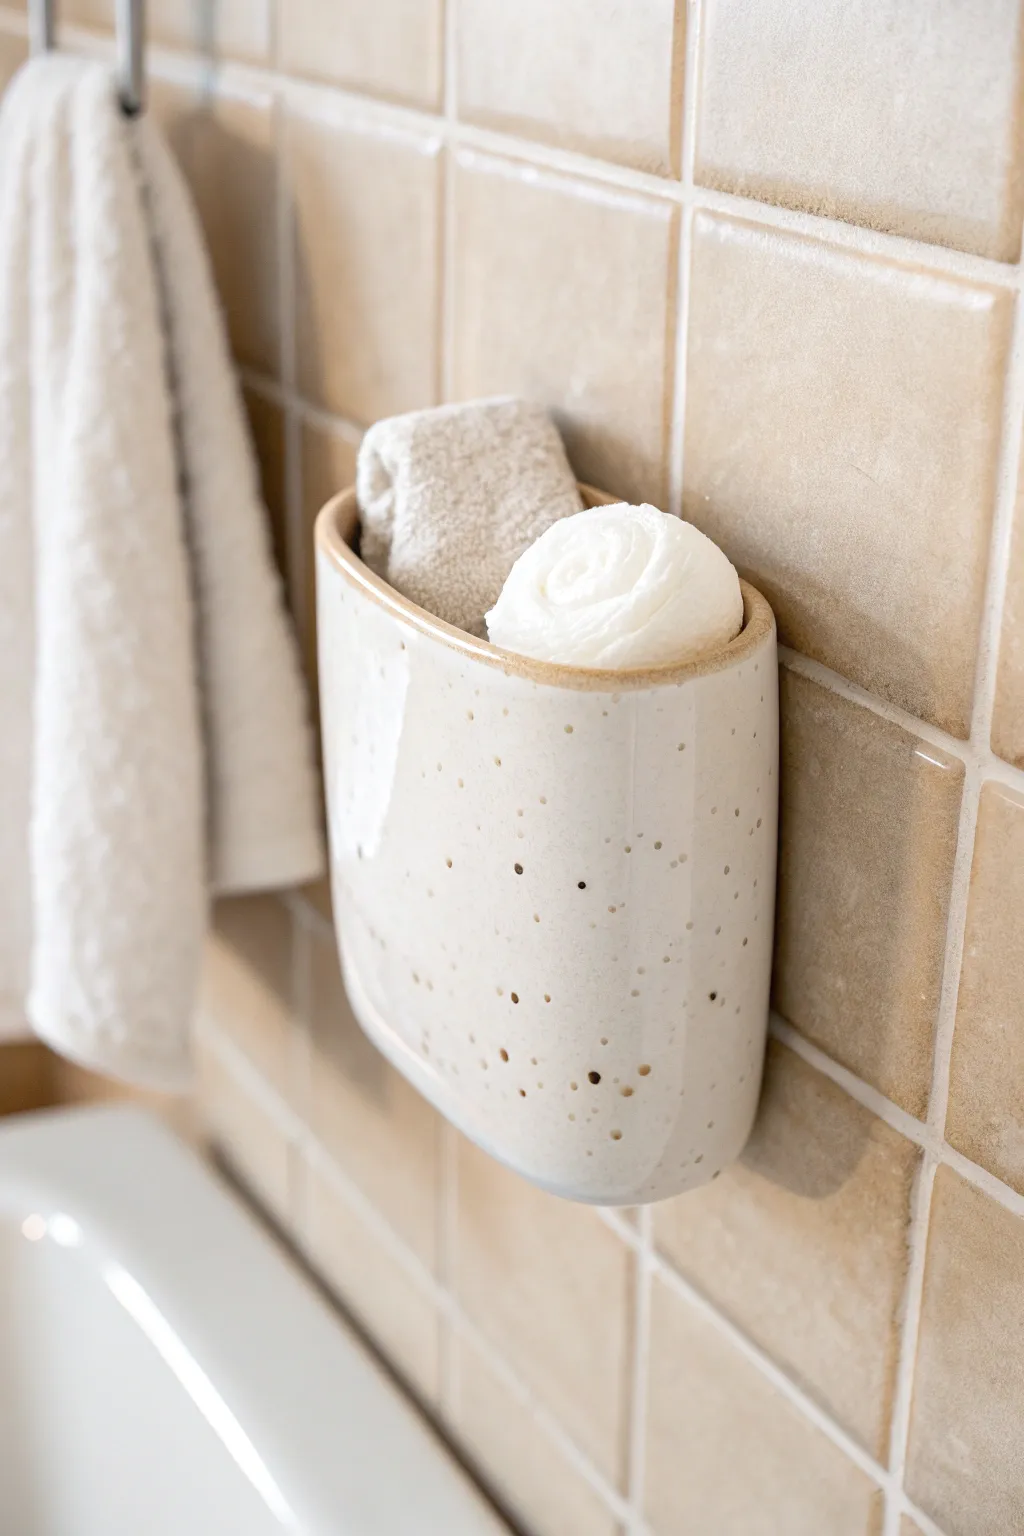
Keep your bathroom essentials tidy with this charming handmade ceramic wall pocket. Featuring a soft, creamy glaze with natural speckles and a warm exposed clay rim, this functional piece adds a touch of organic elegance to your daily routine.
Detailed Instructions
Materials
- Stoneware clay (preferably speckled or buff)
- Rolling pin
- Canvas work surface or slab mat
- Fettling knife or clay needle tool
- Paper template (approx. 5×7 inches)
- Scoring tool (serrated rib)
- Slip (clay mixed with water)
- Wooden modeling tool
- Sponge
- Creamy white glaze (glossy or satin)
- Paintbrush (fan brush recommended)
- Kiln for firing
Step 1: Forming the Slab Pocket
-
Create a template:
Before touching the clay, sketch a shape onto paper that resembles a deep letter ‘U’ with flat sides. It should be wide enough to hold a stack of cotton rounds comfortably. Cut this out to use as your guide. -
Roll the slab:
Roll out your stoneware clay on a canvas surface until it is an even thickness, roughly 1/4 inch. Ensure the slab is large enough to cut two copies of your template plus a long strip for the sides. -
Cut the shapes:
Place your paper template on the slab and trace around it with a needle tool. Cut out two identical ‘U’ shapes—one for the front and one for the back. -
Cut the side strip:
Measure the perimeter of the curved bottom and sides of your ‘U’ shape. Cut a long rectangular strip of clay the same thickness as your main pieces and about 2-3 inches wide. This will create the depth of the pocket. -
Prepare the edges:
Score the edges of both ‘U’ shapes and the long edges of the rectangular strip. I like to be thorough here to ensure a really strong bond that won’t crack during drying. -
Apply slip:
Generously dab slip onto all the scored areas. The slip acts as the glue that will hold your pocket together. -
Attach the back wall:
Layout the rectangular strip along the scored edge of the back ‘U’ piece. Press it firmly into place, curving the strip gently to follow the contour of the shape. -
Attach the front wall:
Place the front ‘U’ piece onto the other side of the strip, aligning the edges carefully. Depending on the stiffness of your clay, you might need to support the inside lightly with crumpled newspaper to keep it from sagging.
Step 2: Refining and Mounting
-
Secure the seams:
Use a wooden modeling tool to blend the seams on both the outside and inside where possible. Smooth the clay over the join so it becomes one solid piece. -
Add a hanging hole:
On the back panel of the pocket, cut a small keyhole or circular hole near the top center. This is crucial for mounting firmly to the wall later. -
Smooth the surfaces:
Once the pocket is assembled, take a slightly damp sponge and wipe down the entire piece to remove fingerprints and rough textures, paying special attention to the rim. -
Dry slowly:
Loosely cover the piece with plastic and let it dry very slowly over several days to prevent warping. Once bone dry, bisque fire it in the kiln according to your clay’s specifications.
Clay Texture Tip
If you don’t have speckled clay, add granular manganese or iron filings to regular white clay. Wedge it in thoroughly to create artificial speckles that pop through the glaze.
Step 3: Glazing and Finishing
-
Wax the back:
Apply wax resist to the entire back surface of the pocket and around the hanging hole so glaze doesn’t adhere there during firing. -
Wax the rim:
Carefully paint a thin line of wax resist along the very top edge of the rim. This will leave the raw clay exposed, creating that lovely contrast seen in the inspiration image. -
Apply the glaze:
Dip the pocket into a creamy white glaze, or brush it on if you prefer. Because the clay itself is speckled, a semi-translucent white or cream works best to let those natural iron spots show through. -
Check for drips:
Inspect the waxed areas and wipe away any stray droplets of glaze with a damp sponge. -
Final firing:
Fire the piece a second time to the glaze temperature appropriate for your materials (typically cone 5 or 6 for stoneware).
Make It a Set
Make two sizes! Use the 5×7 version for cotton rounds, and create a taller 3×8 slim version to hold toothbrushes or makeup brushes right next to it.
Once fired, hang your new organizer on a sturdy hook and enjoy clean, accessible storage
Kitchen Pocket for Recipe Cards
This rustic, wall-mounted pocket brings an organic warmth to modern kitchen tiles. Crafted with a speckled clay body and left unglazed on the outside, its textured surface is perfect for keeping your favorite recipe cards right at eye level.
Step-by-Step
Materials
- Speckled stoneware clay (approx. 2 lbs)
- Available wall space for measuring
- Rolling pin
- Two 1/4 inch wooden slats (thickness guides)
- Fettling knife or clay cutter
- Flexible rib tool
- Scoring tool or serrated kidney
- Slip (clay mixed with water)
- 3/4 inch circular clay hole cutter or drill bit
- Sponge
- Heavy-duty mounting tape or ceramic epoxy (for installation)
Step 1: Preparation & Slab Construction
-
Prepare your workspace:
Begin by cleaning a flat surface and laying down a piece of canvas or a slab mat to prevent sticking. Wedge your speckled stoneware clay thoroughly to remove air bubbles. -
Roll the slab:
Place the 1/4 inch wooden slats on either side of your clay ball. Using the rolling pin, roll the clay out until the pin rests flat on the guides, ensuring an even thickness throughout. -
Smooth the surface:
Take your flexible rib tool and gently compress the clay surface. Run it across the slab in multiple directions to smooth out the canvas texture and align the clay particles, which helps prevent warping later. -
Cut the back panel:
Measure and cut a rectangle for the back panel. A good size for standard recipe cards is about 6 inches wide by 5 inches tall. Use your fettling knife for clean, straight cuts. -
Cut the front pocket:
Cut a second, longer rectangle that will become the front pocket. This piece needs to be the same height (5 inches) but significantly wider (approx. 9-10 inches) to allow it to curve outward and hold items.
Step 2: Assembly & Shaping
-
Taper the edges:
On the shorter vertical sides of your front pocket piece, use your fingers to slightly thin or taper the edges where they will attach to the back panel. -
Score the connection points:
Using a serrated kidney or needle tool, rough up the texture along the two vertical sides and the bottom edge of the back panel. Do the same on the corresponding connection edges of the front piece. -
Apply slip:
Generously dab slip onto all the scored areas. The slip acts as the glue, so don’t be shy with it. -
Attach the front panel:
Curve the front rectangle and press sides onto the back panel. Allow the front to bow outward naturally. I find minimal pressure works best here to keep the curve uniform. -
Secure the bottom:
Pinch the bottom edges together to close the pocket. You may need to trim excess clay if the bowed front overhangs the flat back panel. -
Reinforce the seams:
Roll a very thin coil of clay and press it into the interior seams where possible for added strength, smoothing it down with a modeling tool.
Slumping Issues?
If the front pocket sags while wet, stuff the inside loosely with crumpled newspaper or paper towels to support the curve until the clay stiffens.
Step 3: Texturing & Detailing
-
Refine the shape:
Stand the pocket upright gently. Use a damp sponge to round over any sharp edges on the rim. The goal is a soft, stone-like aesthetic, so avoid perfecting the angles too much. -
Add surface texture:
To mimic the porous look in the example, use a stiff-bristled toothbrush or a needle tool to create random stippling and small indentations across the front surface. -
Create mounting holes:
Flip the pocket over. Using a hole cutter, create two keyhole slots or simple holes near the top of the back panel for hanging on nails, or leave flat if you plan to use adhesive strips. -
Dry slowly:
Loosely cover the piece with plastic sheeting. Let it dry very slowly over several days to prevent the seams from cracking as the clay shrinks. -
Bisque fire:
Once bone dry, fire the piece to Cone 04 (or according to your clay body’s bisque temperature) in a kiln. -
Glazing (Optional):
To keep the raw look, only glaze the *inside* of the pocket with a clear liner glaze to make it easy to clean. Leave the outside raw to show off the speckles. -
Final firing:
Fire again to maturity (usually Cone 5 or 6). Once cool, use heavy-duty mounting tape or install onto wall hooks to finish your kitchen organizer.
Make It Yours
Before drying, press real herbs (like rosemary or sage) into the wet clay surface, then peel them away for a subtle, botanical fossil impression.
Enjoy the organized simplicity this handmade touch brings to your cooking space
Name-Stamped Gift Clay Pocket

This charming, rustic wall pocket brings a touch of organic warmth to any room with its creamy, speckled finish and wildflower bouquet. Perfect for displaying dried grasses or blooms, its handcrafted clay texture feels both modern and timeless.
How-To Guide
Materials
- White or cream air-dry clay (or polymer clay)
- Rolling pin
- Circle template or bowl (approx. 6-7 inches diameter)
- Craft knife or clay cutter
- Small sponge
- Water cup
- Brown and black acrylic paint
- Old toothbrush or stiff bristle brush
- Jute twine or rustic cord
- Large straw or piping tip (for hole punching)
- Sandpaper (fine grit)
- Matte sealer or varnish
Step 1: Shaping the Pocket
-
Preparing the Clay:
Start by conditioning your clay. Knead a generous handful until it’s soft, pliable, and free of cracks. If you are using air-dry clay, keep your hands slightly damp to prevent drying out too quickly. -
Rolling the Slab:
Roll the clay out on a smooth surface to an even thickness of about 1/4 inch. Try to keep the pressure consistent so the wall pocket has sturdy, uniform walls. -
Cutting the Base Circle:
Place your circle template or bowl onto the rolled clay. Use your craft knife to trace around it, cutting out a perfect circle. This will form the main body of your pocket. -
Creating the Pocket Fold:
Gently lift the bottom edge of the circle and fold it upwards. You don’t want to fold it exactly in half; aim to cover about two-thirds of the circle, leaving a curved back panel exposed at the top. -
Sealing the Edges:
Press the edges of the folded section firmly against the back layer where they meet. Using a bit of water on your finger or a sponge, smooth this seam together until the two layers fuse into one solid piece. -
Refining the Form:
Gently puff out the pocket from the inside using your fingers to ensure there is space for stems. Smooth over any fingerprints or rough edges with a damp sponge for a polished look.
Natural Texture
Before folding the clay, gently press a textured fabric or canvas onto the surface to give it a subtle, woven imprint.
Step 2: Adding Details and Finishing
-
Punching Hanging Holes:
On the exposed back panel (the semi-circle sticking up), mark two points near the edges for your twine. Use a large straw or piping tip to punch clean holes through the clay. -
Drying Process:
Allow the pocket to dry completely according to your clay’s instructions. I usually prop the pocket open slightly with a crumpled paper towel so it doesn’t sag while drying. -
Sanding Imperfections:
Once fully dry and hard, take your fine-grit sandpaper and gently sand away any sharp edges or rough texture on the seams, ensuring a smooth, stone-like feel. -
Creating the Speckle Effect:
Dilute a small amount of brown and black acrylic paint with water until it’s quite thin. Dip an old toothbrush into this mixture. -
Splattering:
Hold the toothbrush over your project and run your thumb across the bristles to flick tiny droplets of paint onto the surface. Practice on paper first to control the speckle size. -
Adding Dimension:
For a varied look, add a few slightly larger ‘grog’ spots by dipping a toothpick in undiluted brown paint and dotting it randomly on the surface. -
Sealing the Piece:
Apply a coat of matte sealer or varnish to protect the clay and the paint finish. This also gives it a more finished, ceramic appearance. -
Attaching the Hanger:
Cut a length of jute twine. Thread the ends through the holes from front to back and tie sturdy knots securely behind the holes. -
Final Styling:
Arrange a bouquet of dried grasses, wheat, and small wildflowers inside the pocket. The natural tones of the dried florals complement the speckled clay perfectly.
Cracking Seams?
If the folded edges start to crack while drying, create a ‘slip’ paste (clay mixed with water) and fill the cracks, then smooth over again.
Hang your new creation on a sunny wall and enjoy the simple, handcrafted beauty it adds to your space
Geometric Faceted Wall Pocket
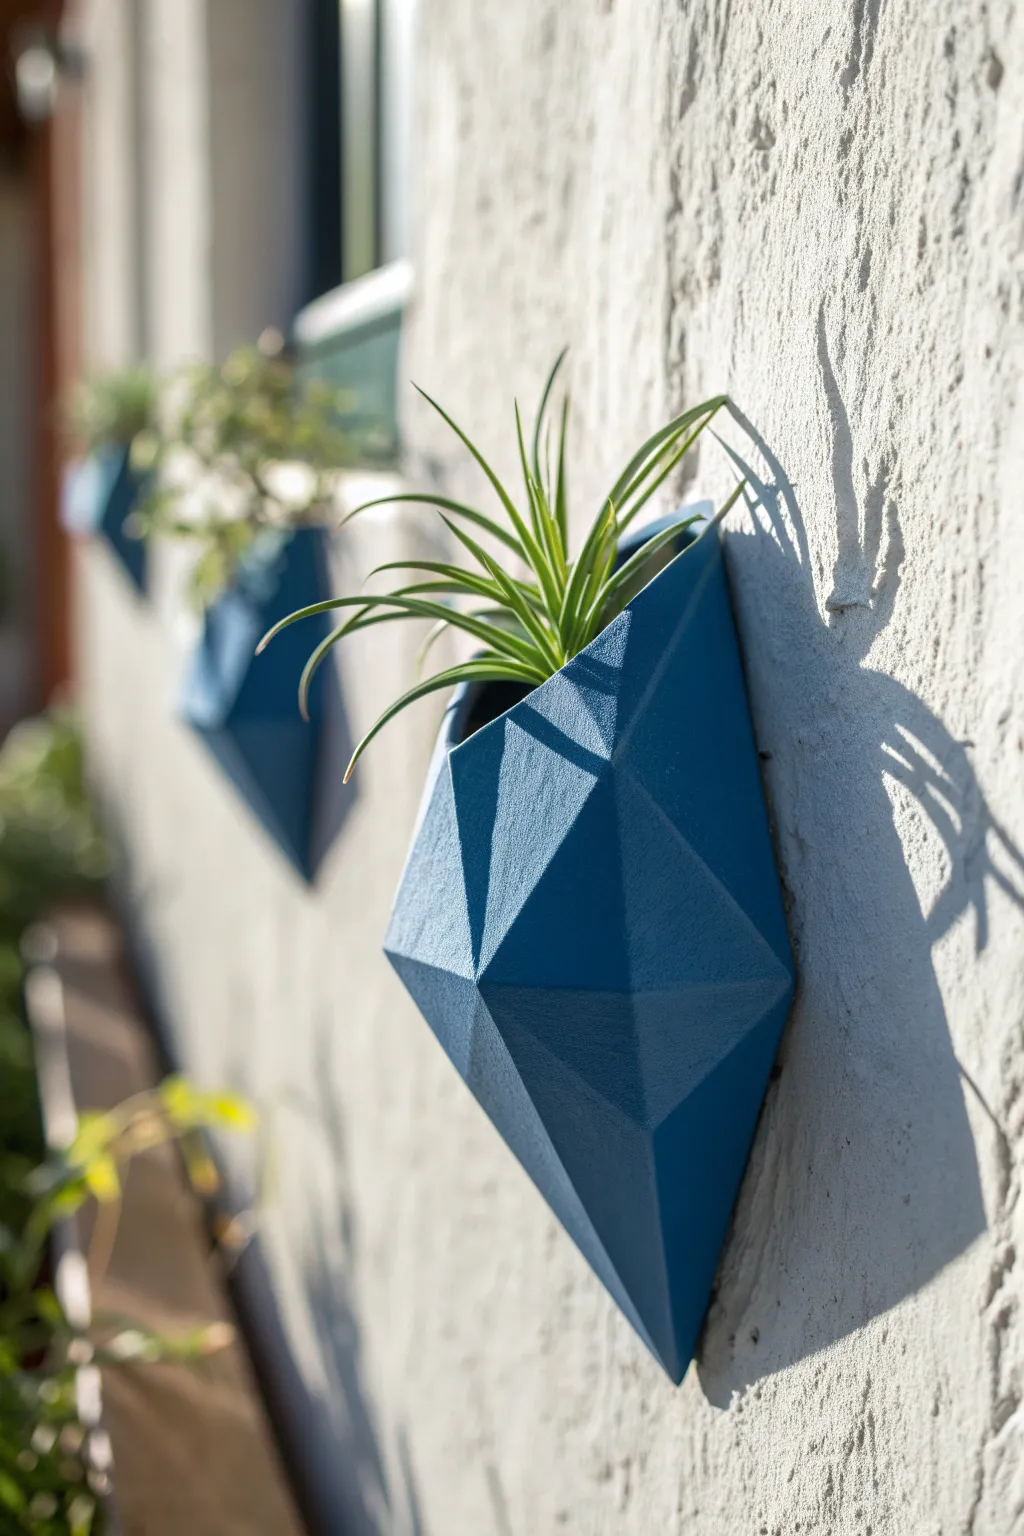
Transform your walls with these striking, geometric planters that look like oversized sapphires emerging from the stone. Their sharp, multi-faceted design catches the light beautifully, creating a modern home for air plants or succulents.
Detailed Instructions
Materials
- White polymer clay or air-dry clay (approx. 1lb)
- Rolling pin or pasta machine
- Sharp craft knife or clay blade
- Cardstock or thick paper (for template)
- Ruler
- Sandpaper (fine grit)
- Acrylic paint (deep teal or denim blue)
- Matte varnish or sealant
- Aluminum foil
- Strong adhesive (like E6000) or integrated clay loop for hanging
- Paintbrush
Step 1: Planning and Forming the Core
-
Draft your template:
Sketch an elongated diamond shape on cardstock. Draw a horizontal line across the top third to mark the opening. From the widest points, draw angled lines down to a sharp bottom point and up to the top corners to create the multi-faceted look. -
Create a foil armature:
Crumple aluminum foil into a solid, elongated diamond cone shape. This will act as the internal support for your clay and save material. Flatten the back side completely against a table so it sits flush against a wall. -
Condition the clay:
Knead your clay until it is soft and pliable. If using polymer clay, this warms it up; for air-dry clay, ensure it isn’t too dry. I usually roll it out to about 1/4 inch thickness for stability.
Sharp Edge Secret
Freeze the unbaked clay for 10 minutes before the final carving. The firmer clay allows for much sharper, cleaner cuts without squishing the shape.
Step 2: Sculpting the Geometric Shape
-
Cover the armature:
Drape your rolled slab of clay over the front of your foil form. Gently press it onto the foil, ensuring the back remains open or flat depending on your hanging method. -
Establish the main ridge:
Pinch the center of the clay vertically to create a prominent central ridge line running down the front. This is the spine of your geometric design. -
Carve the facets:
Using your sharp blade, carefully shave away clay to create flat, planar surfaces. You aren’t just smoothing it; you are carving distinct flat shapes—triangles and trapezoids—that meet at sharp angles. -
Refine the edges:
Use the flat side of your blade or a ruler to press against the planes, sharpening the ridges where the facets meet. The crisper these lines, the more ‘gem-like’ the final piece will look. -
Create the pocket:
At the top, ensure there is a deep enough opening for your plant. If you covered the top with clay, slice it open cleanly and smooth the inner rim. Remove some foiled interior if necessary to make room for roots. -
Add a hanging mechanism:
On the flat back, attach a small clay loop or create a keyhole opening. Alternatively, leave the back flat and plan to glue on a sawtooth hanger after baking/drying.
Slumping Sides?
If the clay walls sag while drying, prop the facets with small cardboard triangles taped to your work surface to hold the angles until fully hard.
Step 3: Hardening and Finishing
-
Cure the clay:
Bake (for polymer) according to package instructions or let air-dry (for air-dry clay) for 24-48 hours. Prop it up carefully so the back stays flat during this process. -
Remove the armature:
Once fully cured and hard, carefully dig out the aluminum foil from the inside if you need more depth for the plant. If it’s just for air plants, you might leave the foil deep inside. -
Sand for perfection:
Lightly sand the flat planes with fine-grit sandpaper. This isn’t to round the edges, but to make the flat surfaces perfectly smooth and remove fingerprints. -
Wipe down:
Remove all sanding dust with a slightly damp cloth or tack cloth to ensure a clean surface for painting.
Step 4: Painting and Styling
-
Base coat:
Apply a base coat of deep blue acrylic paint. Use a flat brush and paint in the direction of the facets to maintain the geometric feel. -
Add texture:
To mimic the stone-like texture in the image, dab a slightly lighter shade of blue onto the surface using a dry sponge or stippling brush. This creates a speckled, matte concrete look. -
Seal the work:
Finish with a matte varnish spray. Avoid glossy sealants, as the matte finish helps emphasize the stony, architectural quality of the facets. -
Insert flora:
Once dry, tuck your air plant or succulent into the pocket. The vibrant green will pop beautifully against the deep, rocky blue.
Now you have a stunning piece of modern wall art that brings a touch of geometric elegance to your space
Color-Blocked Painted Clay Pocket
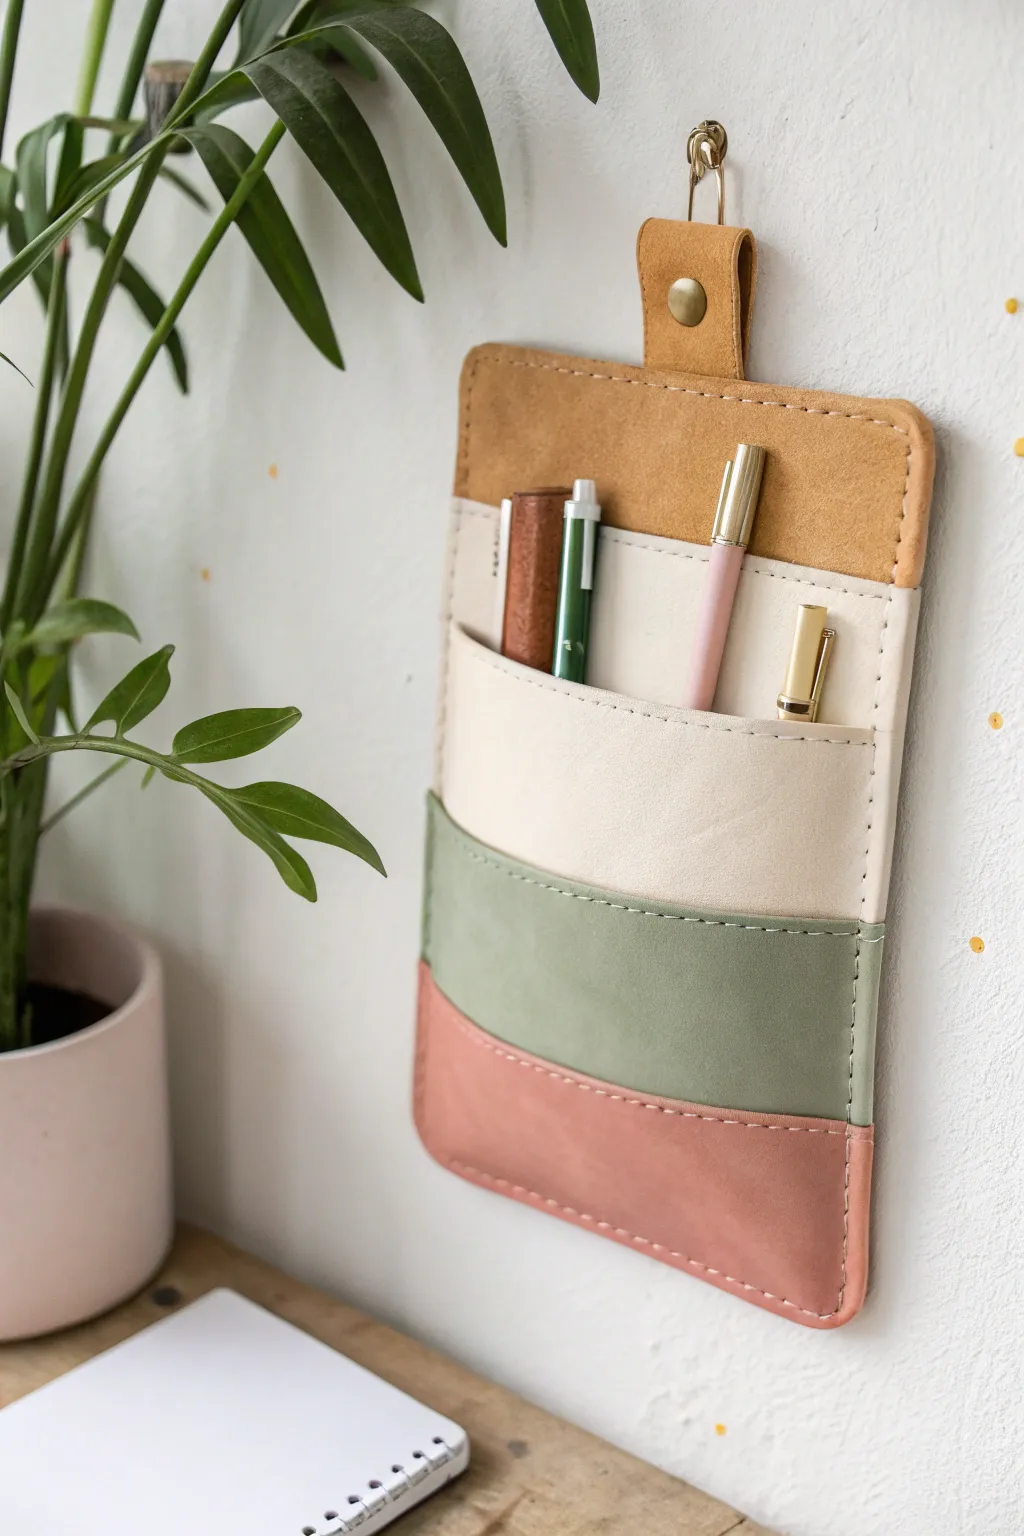
Transform polymer clay into a chic, leather-look organizer perfect for holding pens and small desk essentials. This project uses clever texturing and color-blocking to achieve a high-end, functional wall accessory without a single stitch of thread.
How-To Guide
Materials
- Polymer clay (white or conditioned scrap)
- Acrylic rolling pin
- Clay knife or craft blade
- Sandpaper or a texture sponge (coarse)
- Ruler
- Needle tool or toothpick
- Parchment paper
- Oven-safe baking sheet
- Acrylic paints (mustard yellow, cream, sage green, terracotta/salmon)
- Paintbrushes (flat and fine detail)
- Gold tone jump ring or D-ring
- Strong craft glue (E6000 or similar)
- Matte spray varnish
Step 1: Shaping the Clay Base
-
Roll the main slab:
Begin by conditioning your clay until it is pliable. Roll it out into a large, even rectangle about 1/4 inch thick. This will serve as the backing for your entire pocket organizer. -
Cut to size:
Using your ruler and craft knife, trim the clay into a neat rectangle with rounded corners at the top. Aim for roughly 5 inches wide by 7 inches tall, though you can adjust this to fit your stationery. -
Create the pocket layers:
Roll out a second slab of clay, slightly thinner than the backing. Cut three curved strips that are the same width as your backing piece. These will become the tiered pockets. -
Add the hanging loop:
Cut a small strip of clay, fold it over to create a loop, and press it firmly onto the top center of the backing piece. Poke a hole through it horizontally if you plan to insert hardware later, or simply mold it to look like a leather tab.
Step 2: Texturing and Faux Stitching
-
Apply leather texture:
Before assembling, press a piece of sandpaper or a coarse texture sponge gently over the surface of all clay pieces. This imparts a subtle grain that mimics real leather. -
Assemble the pockets:
Layer the three curved strips onto the backing piece, starting from the bottom and working up. Gently press the edges down to seal them to the backing, but leave the top edges open to form the pockets. -
Add stitch details:
Using a needle tool, carefully press small, evenly spaced indentations along the perimeter of the entire piece and along the top edge of each pocket layer. These faux stitches really sell the leather effect. -
Simulate hardware:
Roll a tiny ball of clay and flatten it slightly onto the center of the hanging loop to mimic a brass rivet. -
Final shaping:
Insert balls of parchment paper or foil inside the pockets to keep them puffed open during baking. This ensures your pens will fit later.
Leather-Look Pro Tip
For an ultra-realistic leather texture, crumple up a ball of aluminum foil and roll it gently over the raw clay surface before cutting your shapes.
Step 3: Baking and Painting
-
Bake the piece:
Transfer your clay creation to a baking sheet lined with parchment paper. Bake according to your customized clay package instructions—usually around 275°F (135°C) for 30 minutes per 1/4 inch of thickness. -
Cool down:
Allow the clay to cool completely in the oven or on a wire rack. It should be hard and rigid before you start painting. -
Base coat the sections:
Paint the top section of the backing and the hanging loop in mustard yellow. Paint the top pocket cream, the middle pocket sage green, and the bottom pocket a terracotta salmon shade. Use multiple thin layers for full coverage. -
Paint the details:
With a fine detail brush, paint the faux rivet on the loop with metallic gold paint. -
Highlight the stitching:
I find that mixing a slightly darker shade of paint than the pocket color and carefully filling in the stitch indentations creates amazing depth. -
Finish and seal:
Once all paint is dry, coat the entire piece with a matte spray varnish to protect the surface and eliminate any glossy paint sheen. -
Add hardware:
If you created a hole for it, attach a gold jump ring through the top loop for hanging.
Pocket Pop-Up Fix
If the clay pockets sag or flatten during baking, the parchment stuffing wasn’t dense enough. You can carefully re-heat and gently pry them open while warm, but prevention is key.
Now you have a stylish, customized organizer ready to tidy up your workspace
Folk Art Pattern Clay Pocket
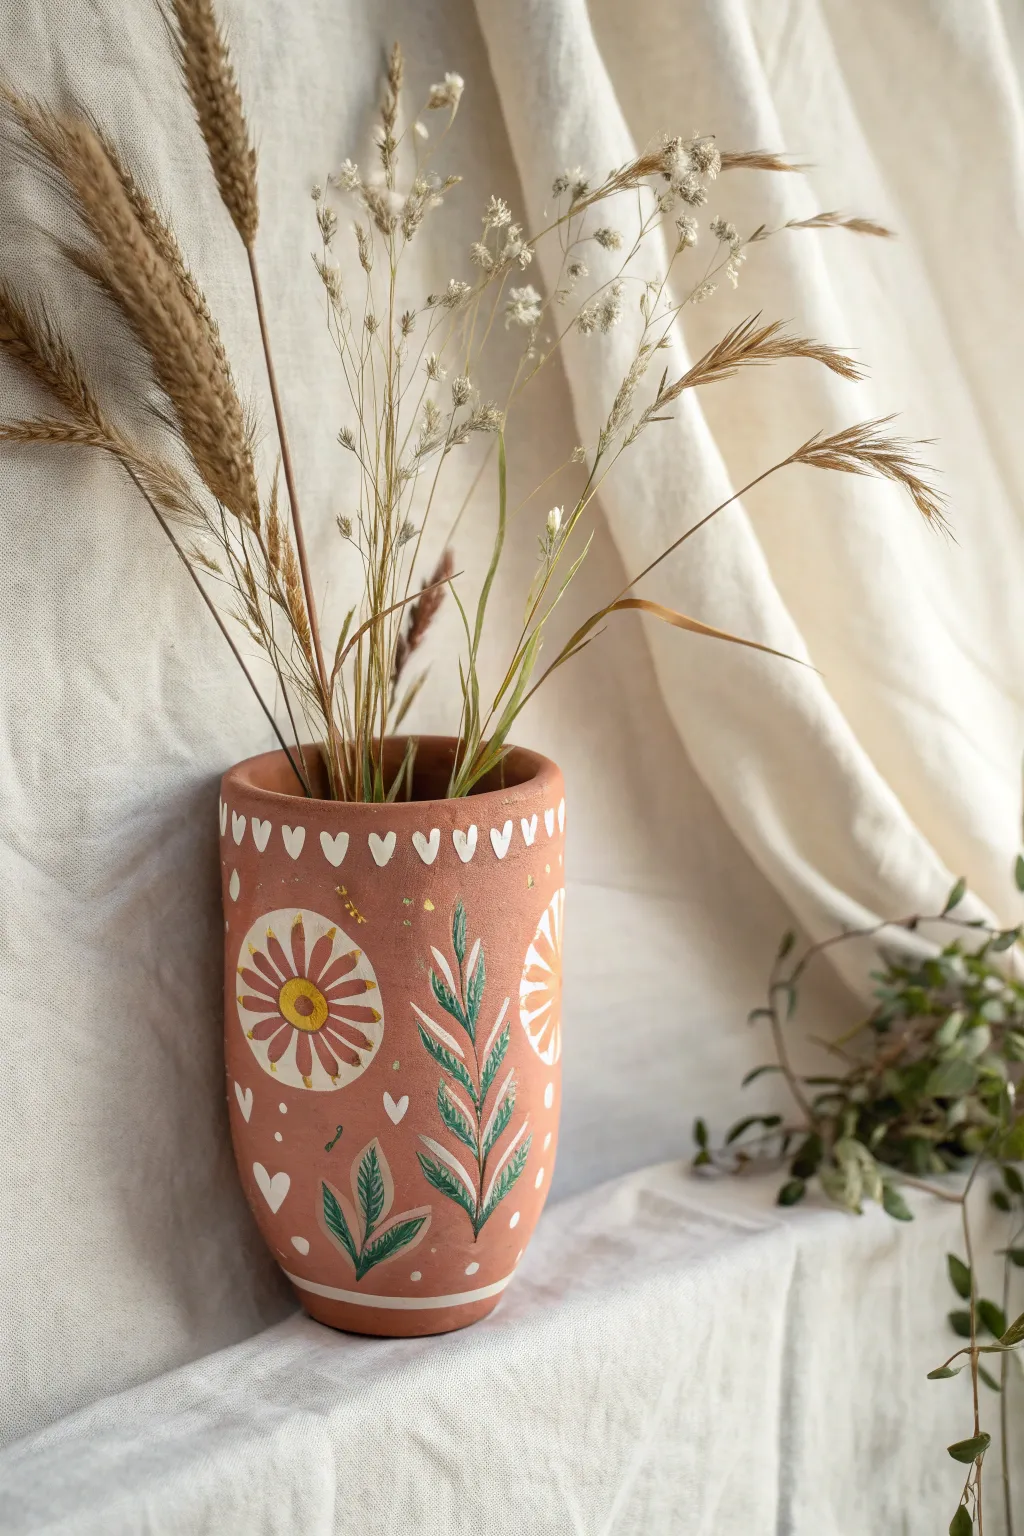
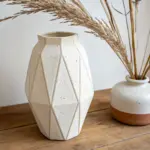
Embrace the warmth of natural clay with this charming folk-art inspired vase project, perfect for displaying dried grasses. Using a simple cylindrical form as your canvas, you’ll hand-paint whimsical daisies and leafy ferns to create a vessel that feels both rustic and refined.
Detailed Instructions
Materials
- Red-brown air-dry clay (or terracotta if firing)
- Rolling pin
- Cylindrical mold (like a glass jar or PVC pipe) wrapped in parchment paper
- Clay knife or exacto blade
- Slip (clay mixed with water) or scoring tool
- Sponge and water bowl
- Acrylic paints (White, Yellow, Green)
- Fine detail paintbrushes (liner or round size 0/1)
- Matte spray varnish or sealant
- Dried flowers or grasses for display
Step 1: Building the Clay Vessel
-
Roll the Slab:
Begin by rolling out a generous slab of your red-brown air-dry clay to an even thickness of about 1/4 inch. Ensure it is wide enough to wrap fully around your chosen cylindrical mold. -
Cut the Rectangle:
Measure the height and circumference of your mold. Use your knife to cut a clean rectangle from the slab that matches these dimensions, adding a tiny bit of overlap for the seam. -
Form the Body:
Wrap the rectangular clay slab around your parchment-lined mold. Where the two edges meet, score the clay surfaces with a tool (making scratch marks) and add a little slip/water to act as glue. -
Seal the Seam:
Press the edges firmly together and smooth over the seam with your thumb or a damp sponge until the line disappears and the cylinder is seamless. -
Create the Base:
Roll a small ball of clay and flatten it into a circle slightly larger than the bottom of your cylinder. Score and slip the bottom edge of the cylinder and the top of the base circle. -
Attach and Smooth:
Press the cylinder onto the base. Use your thumb or a modeling tool to blend the clay from the base up into the walls, ensuring a watertight seal. Trim any excess clay from the bottom edge. -
Refine the Shape:
With wet fingers, smooth the entire surface of the vase. Pay special attention to the rim; round it off gently so it isn’t sharp. I find that using a slightly damp sponge here creates the smoothest finish for painting later. -
Dry Completely:
Carefully remove the mold if the clay is stiff enough to stand, or let it firm up for an hour first. Allow the vase to dry fully for 24-48 hours until it turns a lighter color and feels hard.
Smooth Surface Trick
Before painting, lightly sand the dried clay with fine-grit sandpaper (400+) to remove any fingerprints or bumps for a professional finish.
Step 2: Painting the Folk Pattern
-
Heart Border:
Using a fine brush and white acrylic paint, create a rim border by painting small, downward-facing hearts or ‘V’ shapes spaced evenly around the top edge. -
Base Daisy Shape:
Identify the central spots for your large flowers. Paint a solid white circle for the center, surrounded by elongated oval petals radiating outward. Don’t worry about perfect symmetry; the hand-painted look adds charm. -
Adding Color:
Once the white petals are dry, mix a warm dusty pink (or use the terracotta background as negative space if you prefer) to add definition lines inside the petals. Paint a bright yellow center in the middle of the flower. -
Fern Stems:
Between the flowers, paint tall, curving vertical lines in green to serve as the stems for your botanical fern elements. -
Fern Leaves:
Paint small, angled strokes coming off the green stems to create the fern leaves. Add white highlights to one side of the leaves to give them dimension and make them pop against the dark clay. -
Lower Leaves:
Paint larger, broader leaf shapes near the bottom of the vase using green, again accenting the veins or edges with fine white lines. -
Filler Details:
Fill any large empty spaces with tiny white hearts, dots, or small clusters of dots to enhance the folk-art aesthetic. -
Lower Stripe:
Finish the design by painting a clean, single white horizontal line around the bottom of the vase, about half an inch from the base. -
Sealing:
Once all paint is completely dry, spray the vase with a matte clear coat. This protects the acrylic paint and gives the clay a finished look without making it too glossy.
Seam Splitting?
If the vertical seam cracks while drying, fill it with a paste made of clay scraps and water (slip), smooth it over, and let dry again.
Fill your new handmade vessel with dried wheat or wildflowers to complete the rustic look
Stacked Double Pocket Organizer
This rustic, functional wall organizer mimics the look of stitched leather but is actually crafted from polymer clay. With its warm terracotta tones and functional double-pocket design, it offers a stylish spot for notebooks, pens, and mail.
Step-by-Step Tutorial
Materials
- Polymer clay (terracotta or leather-effect)
- Rolling pin or clay machine
- Ruler and craft knife
- Texturing sponge or sandpaper
- Needle tool or awl
- Liquid polymer clay (optional)
- Waxed cord or thick embroidery thread
- Large sewing needle
- Leather cord for hanging
- Oven
Step 1: Preparing the Clay Sheets
-
Condition the clay:
Begin by thoroughly conditioning your terracotta or leather-effect polymer clay until it is pliable and smooth. The warmer it gets, the easier it will be to roll out without cracking. -
Roll the main slab:
Roll out a large, rectangular slab for the back panel. Aim for a thickness of about 3-4mm to ensure it’s sturdy enough to hold weight. You want this base piece to be roughly 4 inches wide by 10 inches tall. -
Create pocket slabs:
Roll out two smaller rectangles for the pockets. These should also be 4 inches wide but roughly 3.5 inches tall. Keep the thickness consistent with your back panel. -
Add texture:
To achieve that weathered, organic look seen in the photo, gently press a coarse sponge, sandpaper, or even a crumpled ball of foil onto the surface of all clay pieces. This removes the plastic-like sheen. -
Introduce speckling:
If your clay is a solid color, simulate the cork or leather speckles by flicking a toothbrush with diluted dark brown acrylic paint over the raw clay, or by incorporating tiny bits of black pepper or dark clay shavings into the surface.
Fixing Warping
If your large back panel curls during baking, place a heavy book on it while it’s still warm (right out of the oven) and let it cool under the weight to flatten it out.
Step 2: Construction and Baking
-
Trim edges:
Use a ruler and craft knife to cut clean, straight edges on all your rectangles. Round the top two corners of the main back panel for a softer silhouette. -
Round pocket corners:
Similarly, round the bottom corners of each pocket piece to match the aesthetic of the main panel. -
Mark stitching holes:
Before baking, use a needle tool or awl to pierce holes along the perimeter of where you will stitch. You need holes along the sides and bottom of both pocket pieces, and corresponding holes on the back panel where they will attach. -
Create hanging holes:
Don’t forget to punch two larger holes at the very top of the back panel for the leather hanging cord. -
Position the pockets:
Lay the pocket pieces onto the back panel to double-check alignment. If you want a seamless bond in addition to stitching, apply a thin layer of liquid polymer clay (like a glue) to the U-shaped contact areas on the back of the pockets. -
Bake the project:
Place the assembled pieces flat on a parchment-lined baking sheet. If pieces are separate, bake them flat; if you bonded them with liquid clay, bake them assembled. Follow the temperature instructions on your clay package, usually around 275°F (130°C) for 30 minutes. -
Cool down:
Let the clay cool completely before moving it. This is crucial as warm clay is fragile.
Flexible Clay
For a truly functional pocket that bends slightly without snapping, use a specific brand like Sculpey Soufflé or Fimo Leather-Effect, which remains flexible after baking.
Step 3: Assembly and Finishing
-
Stitch the pockets:
Thread a large needle with waxed cord or thick thread in a contrasting cream color. Use a running stitch or blanket stitch to sew the pockets securely to the back panel through your pre-made holes. -
Reinforce the top edge:
For extra detail, add a decorative line of stitching across the top open edge of each pocket, even though it doesn’t attach to anything. This mimics a hemmed fabric look. -
Add eyelets (optional):
If you want a more industrial finish, you can set small metal eyelets into the holes for the hanging cord, though bare clay works fine too. -
Attach the hanger:
Thread a loop of leather cord through the top two holes. Knot the ends on the front side to create visible decorative knots, or on the back for a cleaner look. -
Final inspection:
Check all stitches are tight and knots are secure. Your faux-leather organizer is now ready to be hung.
Hang your new organizer near a desk or entryway to keep your essentials stylishly sorted
Sculptural Ripple Edge Statement Pocket
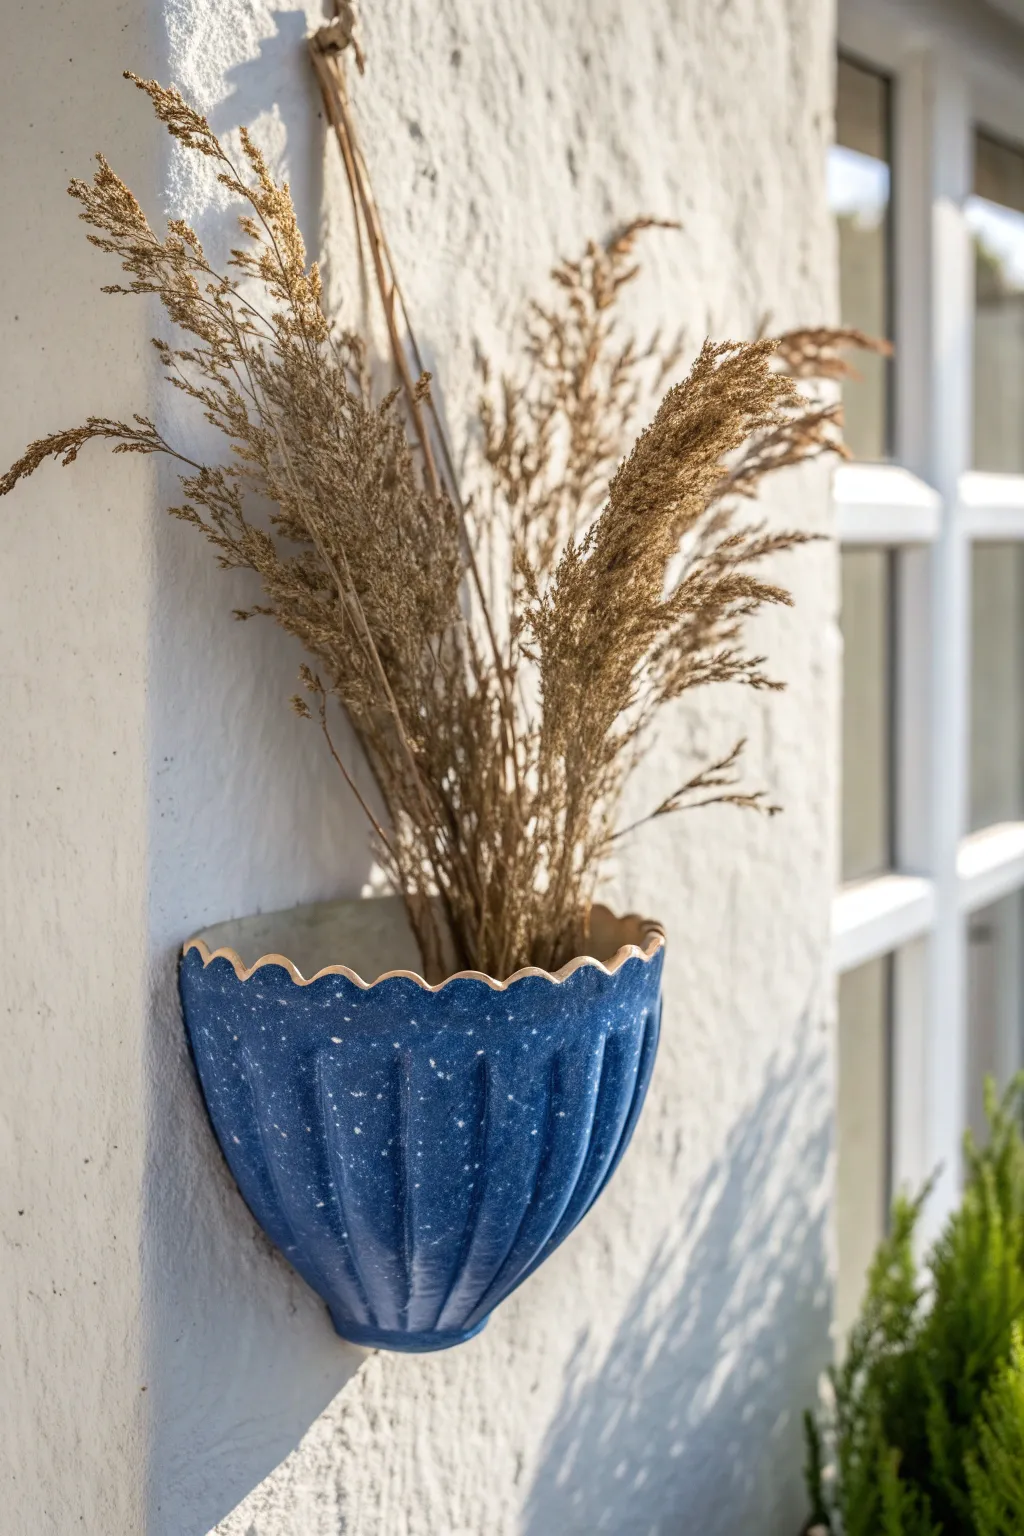
This deep blue wall pocket combines a classic fluted texture with a playful scalloped rim for a striking piece of vertical decor. Its speckled glaze finish mimics the night sky, creating a perfect contrast for holding dried grasses or faux botanicals.
Detailed Instructions
Materials
- White stoneware clay (about 2-3 lbs)
- Rolling pin and guide sticks (1/4 inch)
- Canvas work surface
- Large half-circle template (paper or cardstock)
- Needle tool
- Modeling tool or wooden rib
- Small round loop tool or carving tool
- Scoring tool (serrated rib)
- Slip (clay mixed with water)
- Deep cobalt blue underglaze
- White underglaze (for speckling)
- Clear matte or satin glaze
- Old toothbrush
- Sponge
Step 1: Forming the Pocket
-
Prepare the slab:
Begin by wedging your white stoneware clay to remove air bubbles. Roll it out on your canvas surface into a consistent slab, using guide sticks to maintain a thickness of approximately 1/4 inch. -
Cut the primary shape:
Cut a large semi-circle from paper to use as a template. Lay it on the slab and cut around it with a needle tool. You will also need a separate flat back piece, slightly smaller than the front curve, so cut a matching D-shape for the back panel. -
Texture the surface:
Before assembling, create the fluted texture on the flat slab that will become the front. Use a modeling tool or a wooden rib to gently press vertical indentations into the clay, spacing them evenly. Don’t press too hard; you just want to establish the valleys of the flutes. -
Refine the flutes:
To make the ridges pop, I like to use a damp sponge or your finger to smooth the spaces between the indentations, softening the edges so the fluting looks organic rather than mechanical. -
Shape the curve:
Gently bend the textured front slab into a curve. Be careful not to crack the clay; if it feels stiff, drape it over a curved mold or a bunched-up towel to help it hold the shape while it stiffens slightly.
Slumping Issues?
If the front pocket sags while attaching, stuff the inside with crumpled newspaper or plastic bags to support the curve while the seams set up and stiffen.
Step 2: Assembly and Detail
-
Score the edges:
Take your flat back panel and the curved front piece. thoroughy score the edges where they will meet—along the sides and the bottom curve of the back panel. -
Join the pieces:
Apply slip to the scored areas. Press the curved front onto the back panel firmly. Smooth the seam on the outside with a rib, and reinforce the inside seam with a small coil of clay if necessary to ensure it is watertight. -
Create the scalloped rim:
Once assembled, turn your attention to the top rim. Using a small round cookie cutter or a bottle cap as a guide, remove semi-circles of clay along the top edge to create the scalloped design. -
Clean the edges:
Use a damp sponge or a chamois cloth to smooth the cut edges of the scallops. Sharp edges become very sharp after firing, so take time to round them off nicely. -
Add a hanging hole:
Don’t forget the functionality. Use a hole cutter or straw to punch a clean hole in the top center of the back panel for mounting on a wall nail. -
Slow drying:
Cover the piece loosely with plastic to let it dry slowly. Because the front is curved and the back is flat, uneven drying can cause warping. Check it daily until it is bone dry. -
Bisque fire:
Fire the piece to cone 04 (or your clay’s specific bisque temperature) to prepare it for glazing.
Step 3: Glazing and Finishing
-
Apply base color:
Apply 2-3 coats of deep cobalt blue underglaze to the exterior. Let each coat dry before applying the next to ensure solid, opaque coverage. -
Create the starry effect:
Dip an old toothbrush into white underglaze (slightly watered down). Run your thumb over the bristles to flick tiny white specks across the blue surface. Practice on paper first to control the splatter size. -
Highlight the rim:
Carefully wipe the very edge of the scalloped rim with a damp sponge to reveal the raw clay body, or paint it with a contrasting tan underglaze to frame the blue field. -
Apply clear glaze:
Once the underglaze is completely dry, apply a coat of clear matte or satin glaze over the entire piece (except the very back touching the kiln shelf). -
Final firing:
Fire the piece to cone 5/6 (mid-range stoneware) or the temperature appropriate for your specific clay and glaze combination.
Go Botanical
Instead of carving flutes, press actual large dried leaves or corn husks into the slab before assembly to create a texture that mimics the fluted lines naturally.
Hang your new pocket near a window to catch the light on those beautiful blue ridges