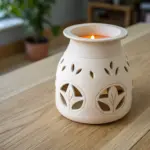
There’s something extra satisfying about turning a flat sheet of clay into a glowing little sculpture you can actually use. These clay slab lantern ideas are all about clever construction plus pierced cutouts that make the light do the prettiest things.
Classic Pierced Cylinder Lantern
Elegance meets simplicity in this tall, slab-built lantern featuring a galaxy of pierced light. The natural, stony texture of the clay combines with a rhythmic pattern of circular cutouts to cast a warm, speckled glow perfect for cozy evenings.
Step-by-Step Guide
Materials
- Stoneware clay with fine grog (white or speckled)
- Rolling pin and guide strips (3/8 inch thickness)
- Hole punch tools or varying diameter circular cutters (drills bits work too)
- Flexible metal rib
- Serrated rib / scoring tool
- Slip (clay mixed with water)
- Banding wheel (optional but helpful)
- Sponge
- Fettling knife
- Cylindrical form for support (like a mailing tube or PVC pipe wrapped in newspaper)
Step 1: Preparing the Slab
-
Roll out the clay:
Begin by wedging your clay to remove air bubbles, then roll out a rectangular slab. Use guide sticks or a slab roller to ensure an even thickness of about 3/8 inch. You want it sturdy enough to stand tall but thin enough for light to pass through the holes effectively. -
Create the texture:
While the slab is flat, compress both sides with a flexible metal rib. If you want that specific sandy, stony look shown in the image, you can lightly dab the surface with a coarse sponge or roll it over a piece of canvas to gently disturb the perfect smoothness. -
Measure and cut:
Determine the circumference of your cylinder. Measure your support tube and add a little extra for the overlap joint. Cut the slab into a clean rectangle using a ruler and fettling knife. Save the excess clay for the next step.
Clean Cuts Every Time
Allow the clay to reach a stiff leather-hard state before punching. If the clay is too wet, the holes will distort; too dry, and it may crack.
Step 2: Forming the Cylinder
-
Bevel the edges:
For a seamless look, cut a 45-degree angle on the two short ends of your rectangle. Cut one bevel facing up and the opposite end facing down, so they will overlap perfectly without adding bulk. -
Stand and shape:
Carefully lift the slab and wrap it around your newspaper-covered support form. Bring the beveled edges together. -
Score and slip:
Rough up the beveled areas with your serrated tool and apply a generous amount of slip. Press the edges together firmly to create a bond. -
Blend the seam:
Use a wooden tool or your thumb to blend the clay across the seam on both the outside and inside. I like to smooth this area with a rib until the join is completely invisible, making the cylinder look like a continuous tube. -
Let it firm up:
Allow the cylinder to stiffen slightly to ‘leather hard.’ It needs to hold its shape when we start punching holes, but shouldn’t be too dry to cut.
Glow Up
Instead of leaving the clay raw, sponge on a light wash of iron oxide and wipe it back. This will settle into the texture and punch holes, highlighting the depth.
Step 3: Piercing the Design
-
Plan your spacing:
Visually divide the cylinder. The image highlights a denser cluster of holes in the middle section, fading out toward the top and bottom. You can lightly mark zones with a needle tool if you feel nervous about free-handing. -
Punch large holes:
Using your largest circular cutter, punch varying holes randomly around the cylinder. Twist the tool gently as you push through to keep the edges clean. Support the wall from the inside with your other hand to prevent warping. -
Add medium details:
Switch to a medium-sized cutter. Fill in the gaps between the large holes, creating an organic, scattered pattern. Keep the spacing irregular to maintain that ‘starlight’ aesthetic. -
Finish with micro-dots:
Use a small drill bit or a tiny straw to add the smallest dots. These tiny pinpricks of light add depth and texture to the composition. -
Clean the edges:
Once all holes are punched, wait for the clay to dry a bit more. Then, take a slightly damp sponge or a soft brush to smooth the sharp edges of every cutout. This phase takes patience but ensures a professional finish.
Step 4: Firing and Finishing
-
Slow drying:
Cover the top loosely with plastic to ensure the rim dries at the same rate as the thicker base. Let the piece dry completely over several days. -
Smooth sanding:
Once bone dry (greenware), give the exterior a very light sanding with fine grit sandpaper to enhance the stone-like texture. Always wear a mask during this step. -
Bisque fire:
Fire the piece to bisque temperature (usually cone 04 or 06). -
Glazing decision:
To match the reference image, leave the exterior unglazed to show off the raw clay body. If you want easier cleaning inside, you can pour a clear glaze into the interior, swirl it, and pour it out. -
Final firing:
Fire to the maturity temperature of your clay body (likely cone 5/6 or 10).
Place a pillar candle or LED light inside your finished vessel and enjoy the mesmerizing play of light and shadow


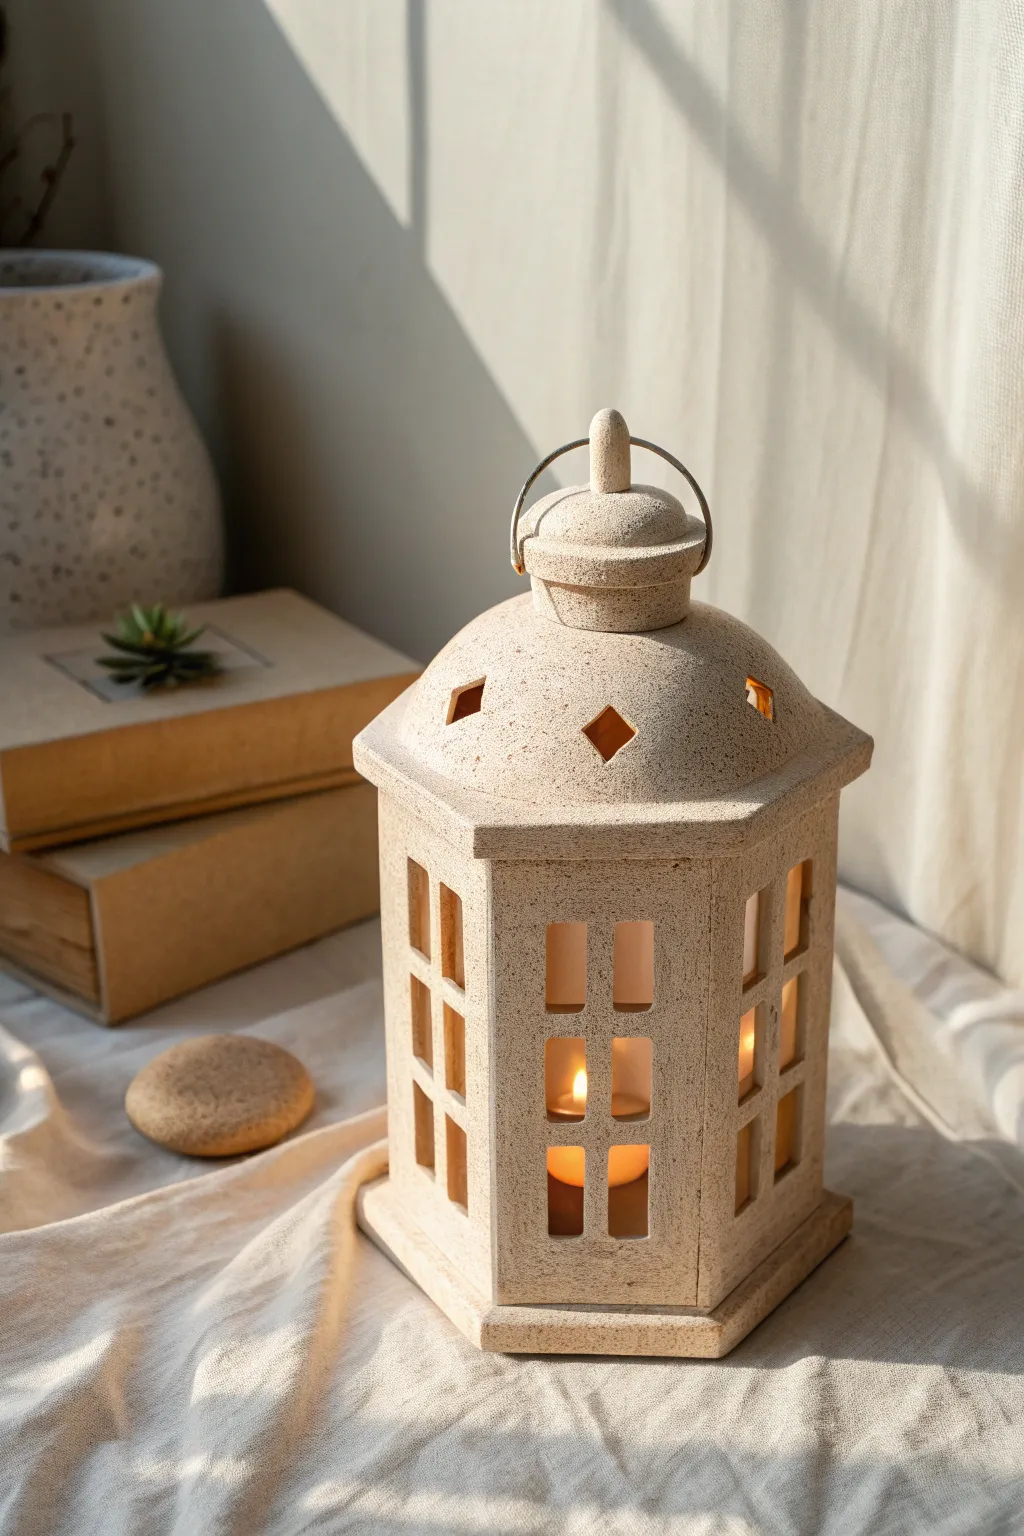
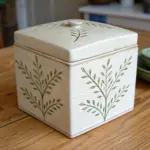
Simple Square Box Lantern
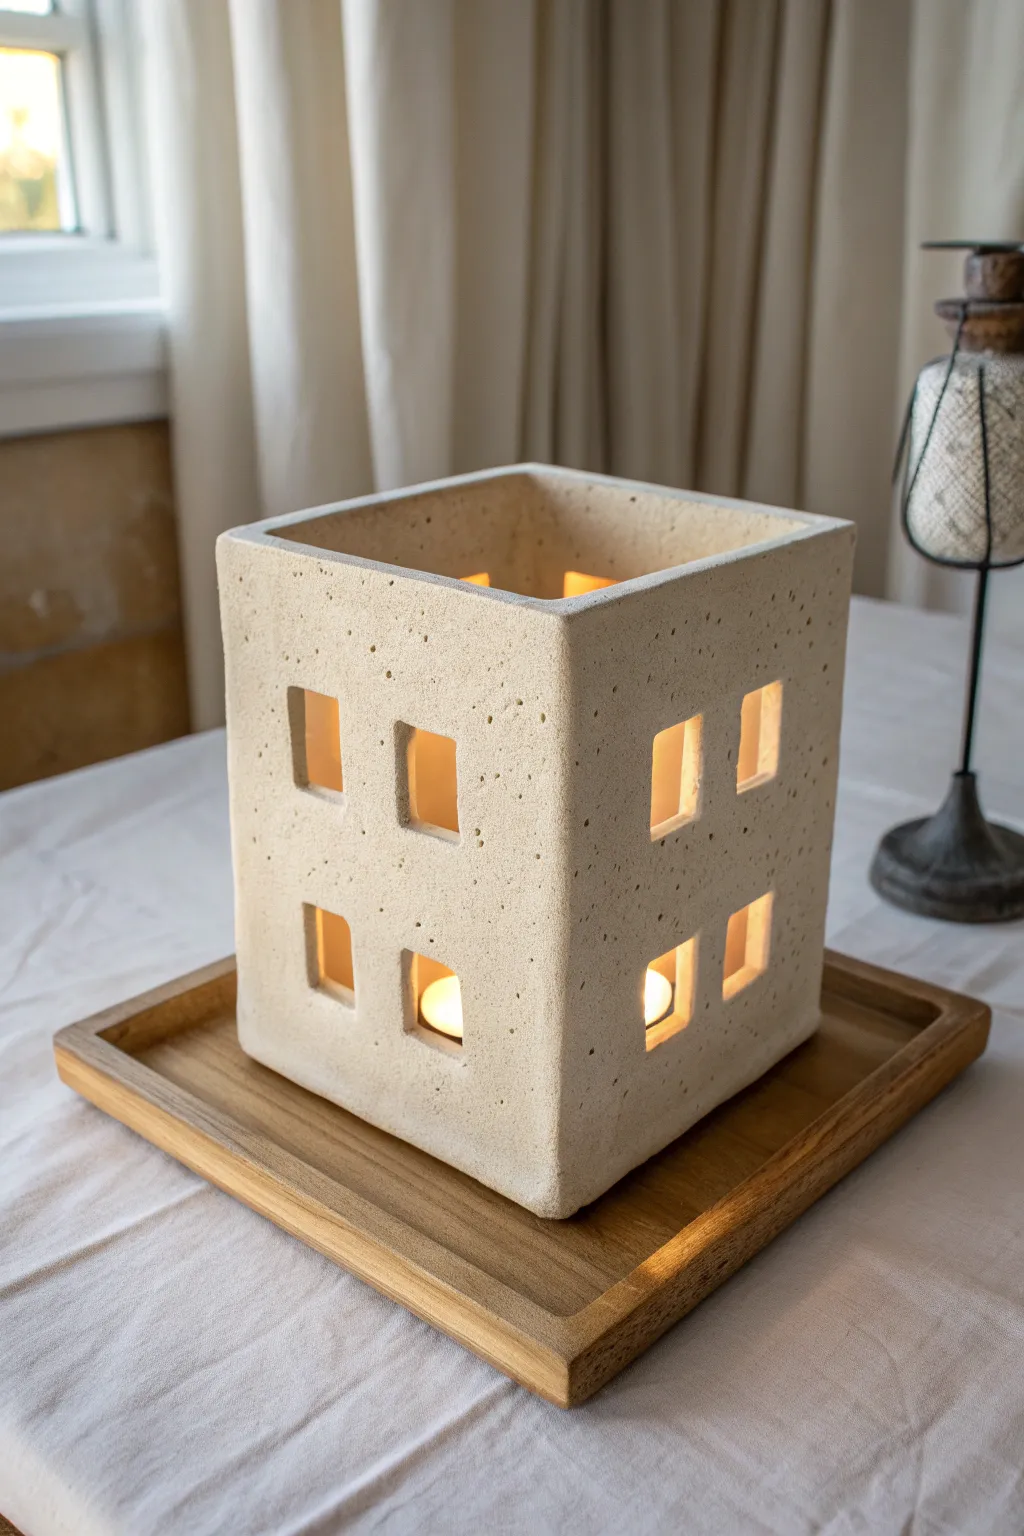
Embrace the beauty of modern minimalism with this sturdy, textured stoneware lantern. By cutting simple geometric windows into thick slabs of clay, you create a warm, architectural luminary that casts beautiful patterns when lit.
Step-by-Step
Materials
- Stoneware clay (groggy/textured clay recommended)
- Rolling pin
- Two 1/4-inch wooden thickness strips (slats)
- Fettling knife or X-Acto blade
- Ruler or reliable straight edge
- Paper template (square)
- Square cookie cutters (approx. 1 inch)
- Serrated rib tool or scoring tool
- Slip (clay mixed with water)
- Wooden modeling tool
- Sponge
Step 1: Slab Preparation
-
Wedging the Clay:
Begin by thoroughly wedging your stoneware clay to remove any air bubbles. For this project, you need a nice, homogenous consistency to ensure the walls stand straight. -
Rolling the Slabs:
Place your clay between the two 1/4-inch thickness strips. Roll the clay out into a large, even sheet. The strips ensure your walls are perfectly uniform, which is crucial for a clean geometric shape. -
Adding Texture (Optional):
I like to gently dab the surface with a coarse sponge or roll over it with a textured fabric at this stage if the clay body isn’t naturally gritty enough. The lantern in the reference has a lovely, stony surface. -
Measure and Cut:
Using your ruler and fettling knife, cut four identical squares for the walls (approx. 6×6 inches) and one slightly smaller square for the base. Double-check your measurements; precision is key here. -
Leather Hard Stage:
Let the slabs sit uncovered for about 30-60 minutes until they reach a ‘soft leather hard’ stage. They need to be stiff enough to support their own weight but soft enough to cut windows without cracking.
Step 2: Creating the Windows
-
Marking Positions:
Lightly sketch a grid on your four wall slabs to guide your window placement. The design shown uses four windows per side, arranged in a balanced 2×2 grid. -
Cutting the Openings:
Use your square cookie cutter to stamp out the windows. If you don’t have a cutter, use a ruler to cut them manually with a knife. Clean up any rough edges immediately with a damp brush. -
Beveling the Edges:
With your fettling knife, cut a 45-degree angle (miter) on the vertical edges of all four wall slabs. This ensures a specialized corner joint that looks seamless from the outside.
Clean Cuts Pro-Tip
When cutting the square windows, support the back of the slab with a piece of foam or scrap drywall. This prevents the clay from bowing inward when you press the cutter down.
Step 3: Assembly
-
Score and Slip:
Score (scratch) the beveled edges of your walls and the outer edges of the base slab. Apply a generous amount of clay slip to all scored areas. -
Attaching the First Wall:
Press the first wall onto the base slab firmly. You might need to prop it up with a small box or tool initially. -
Building the Box:
Attach the remaining walls, working your way around the base. Press the beveled corners together firmly to create a tight bond. -
Reinforcing Interior Seams:
Roll very thin coils of clay (like spaghetti). Place these into the interior corners where the walls meet. Smear the coil into the joint using a modeling tool to reinforce the connection. -
Cleaning Exterior Corners:
Use a wooden rib or paddle to gently tap the outside corners, compressing the joint and sharpening the 90-degree angle. This removes the seam line.
Level Up: Lid Addition
Make a fifth square slab slightly larger than the top opening. Cut a central hole for heat escape and add small tabs underneath to keep it in place, creating a fully enclosed light box.
Step 4: Finishing Touches
-
Smoothing the Rim:
Run a damp sponge along the top rim of the lantern to round it off slightly and remove any sharp burrs left from cutting. -
Final Surface Check:
Look over the piece for any smudges or fingerprints. If you want that pitted, stone-like texture, you can tap a stiff bristle brush over any areas that became too smooth during handling. -
Slow Drying:
Loosely cover the finished box with plastic to let it dry very slowly. Uneven drying causes warping, which ruins the square shape. -
Firing:
Bisque fire the piece. For the finish shown, apply a matte, stone-colored glaze or simply fire the clay to maturity if it has a nice natural color, then enjoy your new lantern.
Place a tea light inside and watch the warm light flicker through your handcrafted architectural windows


Lidded Lantern With Easy Lift Knob
This elegant lantern project combines structural slab building with delicate cut-out work to create a timeless, stone-textured luminary. The hexagonal shape offers multiple window panes for light to spill through, while the custom-fitted lid and knob add a professional finish.
Detailed Instructions
Materials
- Stoneware clay body with speckles (or speckled buff)
- Rolling pin and guide sticks/slats (1/4 inch thickness)
- Hexagon template (paper or cardstock)
- Rectangular wall template
- Fettling knife or X-Acto blade
- Needle tool
- Scoring tool (serrated rib or needle)
- Slip (clay mixed with water)
- Small square or rectangular cookie cutters (optional, for windows)
- Wooden paddle
- Sponge
- Small metal wire (nichrome or heavy gauge craft wire) for handle
- Clear matte glaze or transparent glaze
Step 1: Preparing the Slabs
-
Roll out the clay:
Begin by rolling out a medium-sized slab of speckled stoneware clay. Use guide sticks to ensure an even thickness of about 1/4 inch, which provides enough stability for the walls without being too heavy. -
Cut the base and walls:
using your templates, cut out one hexagon for the base and six identical rectangular panels for the walls. Keep the excess clay wrapped in plastic for the lid later. -
Stiffen the slabs:
Let the cut pieces sit on a ware board until they reach a ‘soft leather-hard’ state. They should hold their shape when lifted but still be flexible enough to bend slightly without cracking.
Step 2: Constructing the Body
-
Bevel the edges:
For a clean hexagonal join, cut the long vertical edges of your six wall panels at a 30-degree angle. This ensures they fit together snugly. -
Score and slip the first seal:
Score the edges of the hexagonal base and the bottom of your first wall panel. Apply slip generously and press the wall firmly onto the base. -
Assemble the perimeter:
Continue adding wall panels around the base, scoring and slipping the vertical beveled edges as you join them. Smooth the seams on the inside with a coil of clay if needed for reinforcement. -
Refine the shape:
Once all six walls are attached, gently paddle the outside seams to compress the joins and ensure the hexagon shape is symmetrical. -
Cut the windows:
With the walls vertical and stable, sketch a grid layout for the windows. Carefully cut out the rectangular panes using a sharp blade. I prefer to leave the cutouts in place until the clay stiffens a bit more to prevent warping, then pop them out.
Clean Cuts Pro-Tip
When cutting out window panes, wait until the clay is true leather-hard. If it’s too soft, the thin mullions between windows will distort and sag.
Step 3: Creating the Lidded Roof
-
Form the dome:
Roll a new slab and drape it over a hexagonal hump mold or a bowl with a similar diameter to your lantern body to create a gentle dome shape. -
Trim the rim:
Trim the edges of the dome into a hexagon shape that is slightly larger than your lantern body, creating an overhanging eave. -
Add a flange:
On the underside of the lid, attach a small coil of clay in a hexagonal shape that fits just *inside* the lantern walls. This flange prevents the lid from sliding off. -
Construct the knob:
Create a tiered knob by stacking a small cylinder of clay and a rounded button shape on top. hollow it out slightly if it’s thick to prevent explosions in the kiln. -
Attach handle loops:
Form two small clay loops or lugs and attach them to the side of the knob assembly. These will hold the metal wire handle later. -
Ventilation details:
Cut small diamond shapes into the dome of the lid. These aren’t just decorative; they allow hot air from the candle to escape.
Fixing a Wobbly Lid
If the lid rocks after firing, use a circular sanding motion with the lid on the body using a dab of valve grinding compound to grind them into a perfect fit.
Step 4: Finishing Touches
-
Texture the surface:
Using a sponge or a stiff brush, tap the surface of the clay gently to bring out the grog and create a stone-like texture. -
Dry and fire:
Allow the piece to dry slowly under loose plastic to prevent uneven shrinkage. Once bone dry, bisque fire the lantern. -
Glaze application:
Apply a thin coat of clear matte glaze or a wash to highlight the speckled clay body without obscuring the texture. -
Install the handle:
After the final glaze firing, bend a piece of heavy gauge wire into a simple arc and hook ends through the lugs on the knob.
Place a tea light inside and enjoy the warm, geometric shadows this piece casts in your home

No-Lid Lantern With Scalloped Rim
This whimsical clay lantern features intricate arched windows and a delightful double-tiered roof with heart cutouts. The rustic, speckled finish and warm candlelight create a cozy atmosphere perfect for any mantle or tabletop.
How-To Guide
Materials
- Speckled stoneware clay (mid-fire)
- Rolling pin and guide strips (approx. 1/4 inch thick)
- Circle cutter or template (for base and roof tiers)
- Needle tool and fettling knife
- Small heart-shaped cutter
- Small round hole punch or straw
- Slip and score tool
- Sponge and water
- Matte cream or white glaze
- Wire loop or handle (optional)
- Kiln
Step 1: Creating the Main Cylinder
-
Roll the slab:
Begin by rolling out a medium-sized slab of speckled stoneware clay to a uniform 1/4-inch thickness using your guide strips. Smooth both sides with a rib to compress the clay particles. -
Measure and cut:
Cut a long rectangular strip for the lantern body. You’ll need it to be tall enough for your windows (about 6-7 inches) and long enough to wrap around your base circle (approx. 14-16 inches). -
Cut the windows:
Before assembling the cylinder, lay the slab flat. Use a needle tool to sketch and then cut out arched window shapes. Leave framing strips in the windows to create a pane effect. -
Add texture details:
With the slab still flat, use a small punch or needle tool to poke vertical rows of small dots between the window frames for added decorative texture. -
Form the cylinder:
Score and slip the short ends of your rectangle. Stand it up and curve it into a cylinder, pressing the seam firmly together. Smooth the seam inside and out so it disappears. -
Attach the base:
Cut a circle of clay slightly larger than the cylinder’s diameter. Score and slip the bottom rim of the cylinder and the edge of the base circle, then attach them firmly.
Slumping Scallops?
If the scalloped roof edges droop while softness persists, prop them up with small wads of paper towel or newspaper underneath until the clay stiffens to leather-hard.
Step 2: Crafting the Scalloped Roof
-
Cut the roof tiers:
You will need two strips for the roof tiers. Cut one wider strip for the bottom tier and a narrower strip for the top cupola section. -
Create scallops:
On one long edge of both strips, use a round cutter or freehand cutting to create a repeating scalloped pattern. Smooth the edges with a damp sponge. -
Punch roof details:
On the scalloped edge of the larger strip, punch a small hole in the center of each scallop. On the smaller strip (the top tier), punch small heart shapes. -
Form the roof base:
Create a domed or slanted disc that fits over the main cylinder. Attach the large scalloped strip around the edge of this disc so it overhangs slightly like a skirt. -
Assemble the cupola:
Form a small cylinder with the heart-cutout strip. Create a small cap for it, perhaps adding a clay loop or inserting a wire handle at the very top. -
Attach tiers:
Score and slip to attach the cupola to the center of the main roof section. Then, attach the entire roof structure to the top of the main lantern body.
Clean Cuts Pro-Tip
Wait until the slab is leather-hard before cutting the intricate window panes. If the clay is too soft, the thin frames will drag and warp as you pull the knife through.
Step 3: Finishing and Firing
-
Slow drying:
Loosely cover the lantern with plastic to let it dry slowly. This is crucial for preventing warping in the delicate window frames. -
Bisque fire:
Once bone dry, bisque fire the piece to the appropriate cone for your clay body (usually Cone 04 or 06). -
Glazing:
Dip or brush the lantern with a matte cream or white glaze. Make sure to wipe the bottom of the foot clean. -
Glaze removal:
I like to gently wipe back some of the glaze on the edges or raised dots with a damp sponge to let the speckled clay body show through more clearly. -
Final firing:
Fire the piece again to the maturation temperature of your glaze and clay (likely Cone 5 or 6). Once cool, place a votive inside to test the glow.
Enjoy the warm, flickering patterns your new lantern casts on the walls.

The Complete Guide to Pottery Troubleshooting
Uncover the most common ceramic mistakes—from cracking clay to failed glazes—and learn how to fix them fast.
Mitered-Corner Minimal Lantern
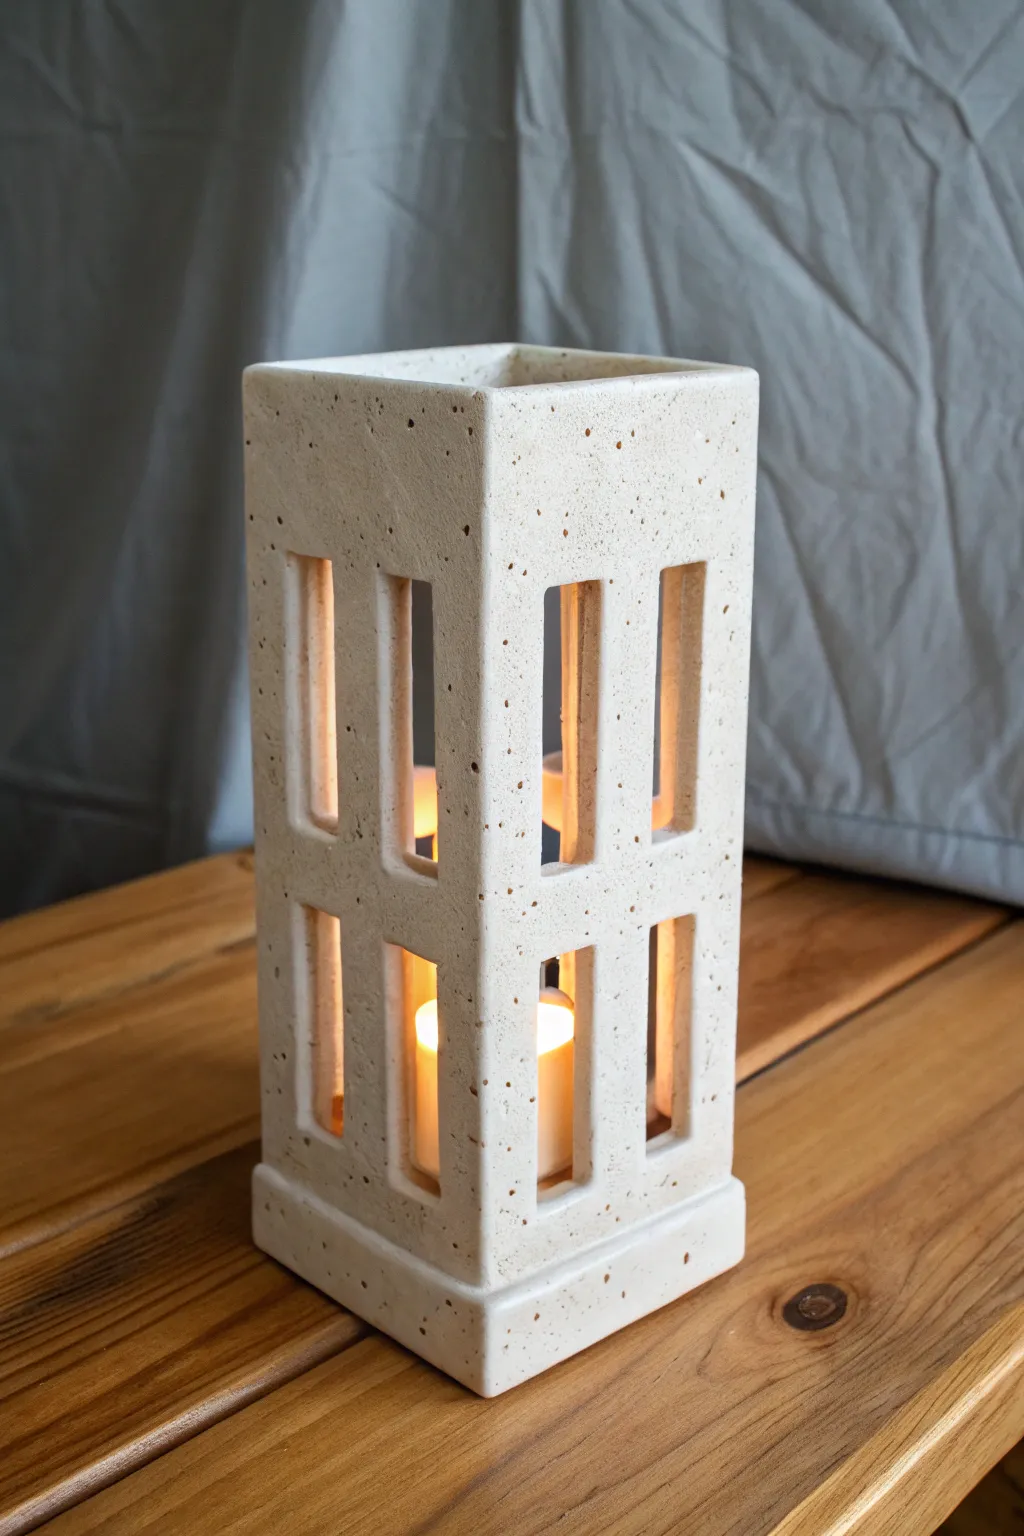
This elegant lantern mimics the look of carved limestone with its speckled clay body and precise vertical cutouts. Its mitered construction creates clean, sharp edges, making it a perfect modern accent for both indoor tablescapes and outdoor patios.
Step-by-Step Tutorial
Materials
- Speckled stoneware clay (mid-fire)
- Slab roller or rolling pin with thickness strips
- Fettling knife
- Metal rib
- Ruler or architectural triangle
- Bevel cutter (45-degree angle tool)
- Miter tool
- Score and slip tool
- Wooden paddle
- Sponge
- Tea light or LED candle
Step 1: Preparing the Slabs
-
Roll the main slab:
Begin by rolling out a consistent slab of speckled stoneware clay to approximately 1/4 inch thickness. Ensure the slab is large enough to cut four identical rectangular walls and a square top if desired, though this design is open-top. -
Smooth the surface:
Compress the clay on both sides using a metal rib. This aligns the clay particles to prevent warping and creates that smooth, stone-like finish seen in the final piece. -
Cut wall panels:
Measure and cut four identical rectangles. For the proportions shown, aim for approximately 4 inches wide by 10 inches tall. Keep your cuts perfectly straight using a metal ruler. -
Miter the edges:
Using a bevel cutter or by carefully angling your fettling knife, cut a 45-degree angle along the long vertical sides of all four panels. The bevel should slant inward so the exterior face is wider than the interior face.
Warping Walls?
If your tall walls start bowing inward during drying, place a crumpled newspaper column inside the lantern to provide gentle internal support until bone dry.
Step 2: Creating the Windows
-
Template the design:
Create a paper template for the window cutouts to ensure symmetry. The design features two vertical rectangular slots on the top half and two matching slots on the bottom half, separated by a horizontal clay bridge. -
Trace and slice:
Lightly trace your template onto each of the four separate walls while they are leather hard. Use a sharp fettling knife or X-acto blade to cut out the windows. I find it helpful to cut slightly inside the line and clean it up later. -
Refine the openings:
Once the initial clay is removed, use a damp sponge or a slightly moist paintbrush to smooth the inside edges of each window cutout. Sharp edges can chip after firing, so a slight rounding is beneficial. -
Stiffen the slabs:
Allow the four wall panels to dry to a firm leather-hard stage. They need to be stiff enough to stand vertically without bowing but soft enough to accept scoring and slipping.
Make it Glow
Before firing, carve tiny additional pinholes randomly around the cutouts. These will look like stars when the lantern is lit in a dark room.
Step 3: Assembly
-
Score and slip:
Generously score the mitered edges of all four panels. Apply clay slip to the scored areas. -
Construct the tower:
Stand two panels up and press their mitered edges together to form a corner. Repeat until all four walls are joined, forming a tall rectangular tube. -
Reinforce the seams:
On the interior corners, run a thin coil of soft clay up the seam and blend it in smoothly to reinforce the joint. This structural support is crucial for taller forms. -
Paddle the corners:
Gently tap the exterior corners with a wooden paddle. This compresses the miter joint and sharpens the 90-degree angle, giving it that crisp architectural look.
Step 4: The Base and Finishing
-
Create the base:
Roll a smaller, slightly thicker slab for the base. Cut a square that is roughly 1/2 inch wider than the footprint of your tower. -
Attach the tower:
Score and slip the bottom edge of your lantern tower and the center of the base slab. Press the tower firmly onto the base. -
Add the step detail:
To mimic the stepped base in the image, you can either trim the excess base slab to create a ledge or adhere a strip of clay around the bottom perimeter of the tower. -
Final texture check:
Wipe down the entire piece with a damp sponge to remove any joining slip or fingerprints. This also reveals the lovely grog or speckles in the clay body. -
Dry and fire:
Dry the piece slowly under loose plastic to prevent uneven shrinkage. Once bone dry, bisque fire, then fire to maturity (likely cone 6) without glaze to maintain the matte, stone texture.
Place a warm LED candle inside and enjoy the peaceful geometric shadows this piece casts
Leaf-and-Vine Cutout Wrap
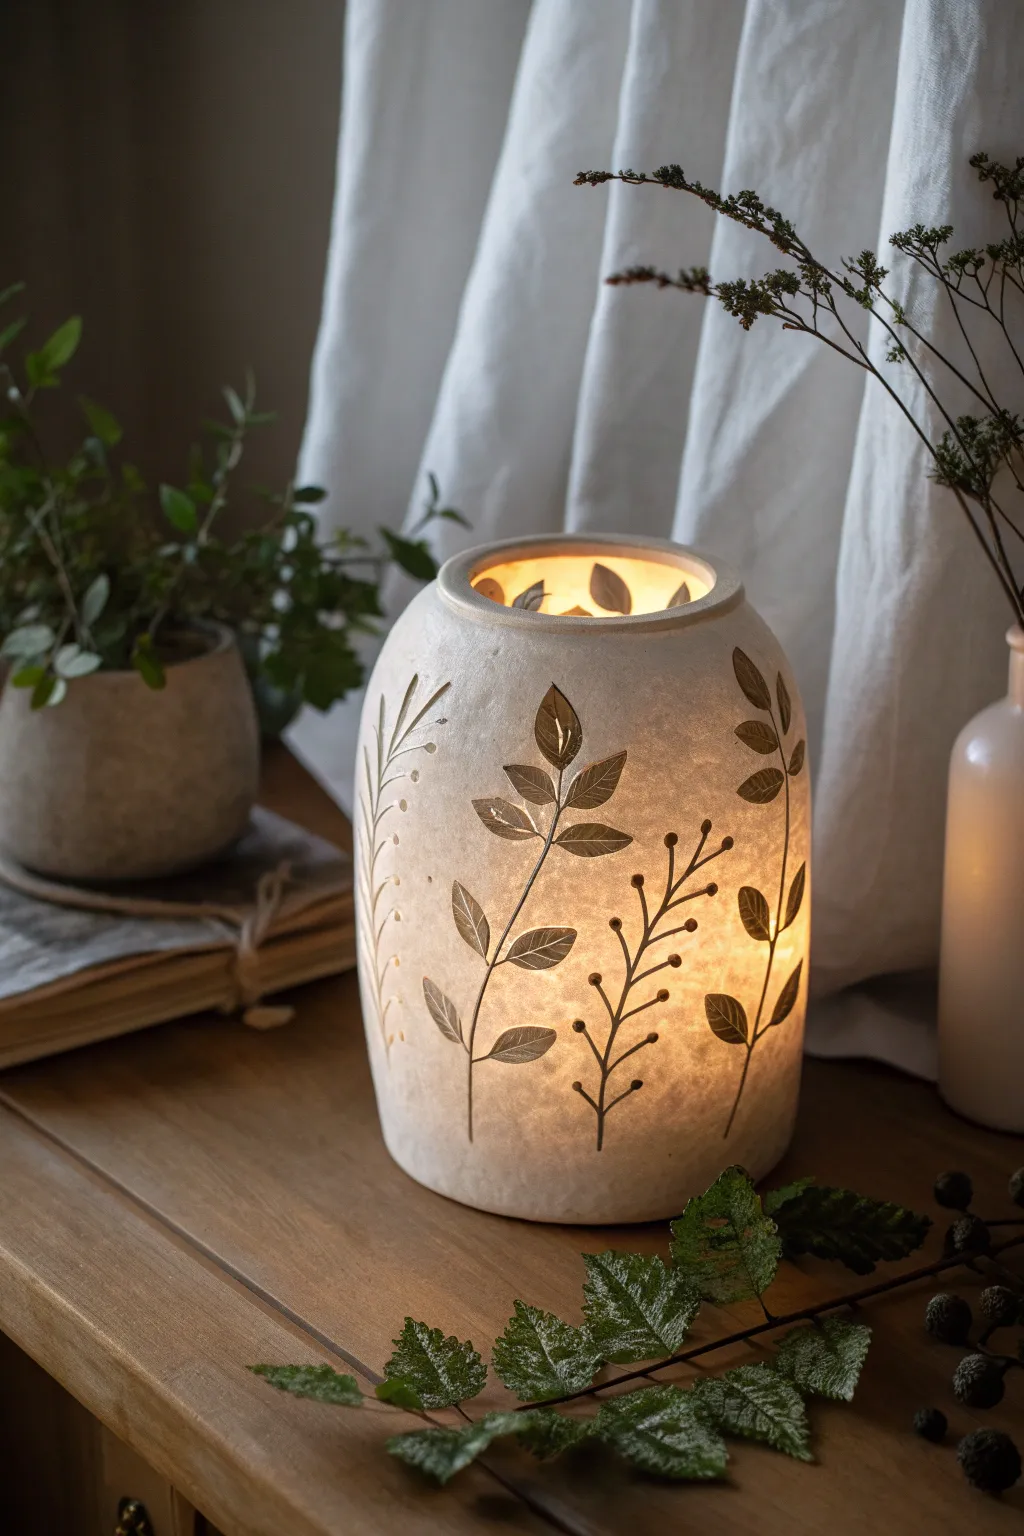
This elegant lantern combines the soft, organic warmth of white clay with delicate botanical patterns that come alive when illuminated. The wrapped slab construction creates a seamless, modern form, while the hand-etched leaves and cutouts cast enchanting shadows for a cozy atmosphere.
Step-by-Step Guide
Materials
- White stoneware or polymer clay (translucent works well for polymer)
- Rolling pin with guide rings
- Canvas or non-stick work surface
- Cylindrical mold (PVC pipe, glass jar, or sturdy cardboard tube wrapped in paper)
- Needle tool
- X-Acto knife or sharp clay blade
- Botanical templates or stencils (optional)
- Small loop tool or carving set
- Fine grit sandpaper
- Slip and scoring tool (if using ceramic clay)
- Liquid clay (if using polymer clay)
- Matt varnish (optional)
Step 1: Preparing the Slab
-
Prepare the clay:
Begin by wedging your clay thoroughly to remove air bubbles, which is crucial for structural integrity during firing or baking. If using polymer clay, condition it until it’s pliable and smooth. -
Roll out the slab:
Roll your clay into a large, even rectangle. Aim for a thickness of about 1/4 inch (6mm). Using guide rings on your rolling pin helps ensure the thickness is uniform, which is important for even light diffusion. -
Measure and cut:
Measure the height and circumference of your chosen cylindrical mold. Cut a precise rectangle from your clay slab that matches these dimensions, adding a small overlap allowance (about 1/2 inch) for the seam. -
Smooth the surface:
Use a damp sponge (ceramic) or a smooth rib tool/acrylic roller (polymer) to erase any canvas texture or fingerprints from what will be the outside face of your lantern.
Step 2: Designing the Botanicals
-
Sketch the layout:
Before wrapping the clay, lightly trace your vine and leaf patterns onto the flat slab using a needle tool. Keep the pressure very light so you can smooth out errors if needed. -
Carve the stems:
Using a needle tool or a fine carving point, deeply score the main vine lines. I like to vary the pressure slightly to create stems that feel organic rather than perfectly machine-made. -
Outline the leaves:
Carve the outlines of the leaves attached to your stems. Create a mix of larger, prominent leaves and smaller, delicate sprigs to balance the design. -
Add leaf details:
Inside each leaf outline, gently scratch in the central vein and tiny side veins. This texture will catch the light beautifully later. -
Create cutouts:
Select a few specific leaves or negative spaces between the vines to cut out completely. Use your X-Acto knife to carefully remove the clay, creating windows for the light to escape. -
Clean the edges:
Once the cutouts are removed, gently smooth the raw interior edges of each hole with a damp brush or fingertip to remove clay burrs.
Clean Cuts Every Time
Let the clay leather-harden slightly (ceramic) or chill it in the fridge (polymer) for 15 minutes before cutting. Firmer clay resists dragging and yields sharper cutout edges.
Step 3: Forming the Cylinder
-
Prepare the mold:
Wrap your cylindrical mold in a sheet of paper or newsprint. This acts as a barrier so the clay doesn’t stick to the form and can slide off easily later. -
Wrap the slab:
Carefully lift your decorated slab and wrap it around the mold. Align the clay so the bottom edge is perfectly flush with the work surface to ensure the lantern stands straight. -
Join the seam:
Bring the edges together. For ceramic clay, score both edges and add slip. For polymer, use a thin line of liquid clay. Press the overlap firmly to join. -
Blend the join:
Use a modeling tool to smooth the seam on both the inside and outside until the joint is invisible. You don’t want a visible line interrupting your seamless cylinder. -
Shape the rim:
Gently curve the top rim inward slightly to create a rounded, finished lip. This softens the silhouette and hides the thickness of the slab.
Slumping Walls?
If the clay sags when you remove the mold, the slab was too wet or thin. Leave the mold inside until the clay is leather-hard (stiff but cold) to support the weight.
Step 4: Finishing Touches
-
Dry or Bake:
If using ceramic clay, cover loosely with plastic and let it dry slowly to the bone-dry stage. For polymer clay, bake according to the manufacturer’s instructions while still on the heat-safe mold (if applicable) or after carefully removing it. -
Sand edges:
Once dry (or baked and cooled), use fine-grit sandpaper to smooth the top rim and bottom edge. Check for any sharp spots near the leaf cutouts. -
Surface refinement:
Lightly wipe the surface with a damp sponge (ceramic) or buff with a soft cloth (polymer) to enhance the ‘stone’ look. -
Final cure/fire:
Fire the ceramic piece to bisque and glaze temperature (a clear matte glaze works well inside). If using polymer, apply a matte varnish if desired for protection.
Place a tea light or LED candle inside and enjoy the warm, patterned glow of your handmade lantern


What Really Happens Inside the Kiln
Learn how time and temperature work together inside the kiln to transform clay into durable ceramic.
Geometric Grid Window Lantern
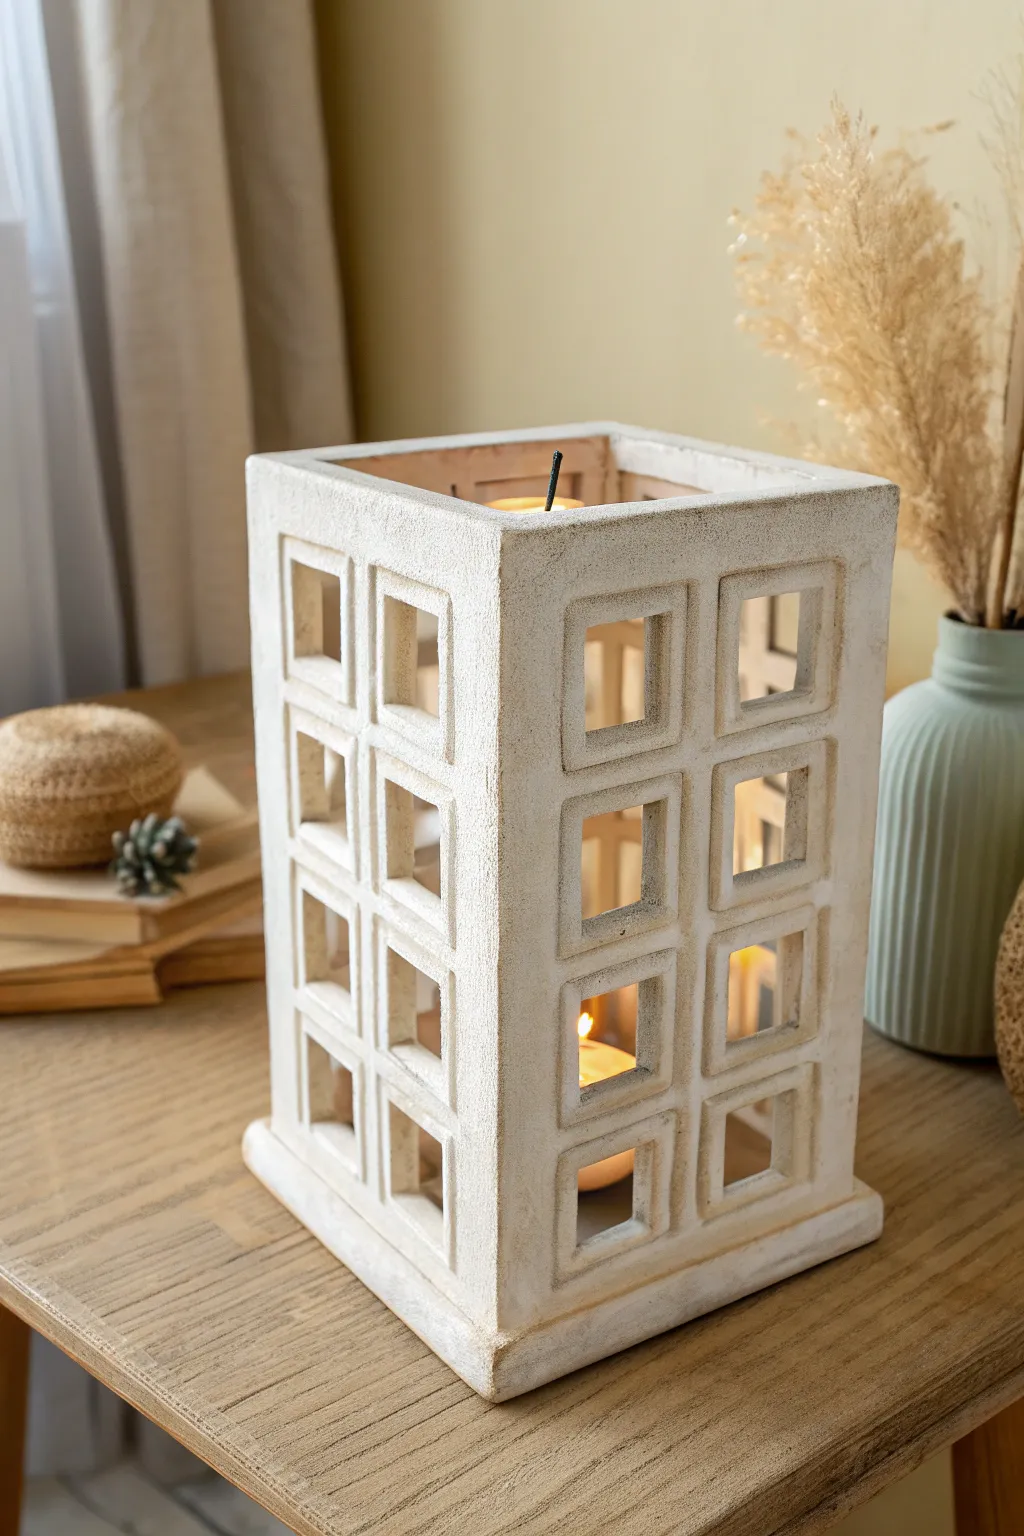
This striking lantern mimics the clean lines of modernist architecture with its repeating geometric grid and textured, stone-like finish. By layering slabs to create recessed windows, you’ll build a sturdy piece that casts beautiful, structured shadows when lit.
Step-by-Step Tutorial
Materials
- Light-colored stoneware or earthenware clay (with grog for texture)
- Rolling pin and guide sticks (approx. 1/4 inch thick)
- Square cookie cutters (two sizes: one larger for the frame, one smaller for the window)
- Fettling knife or craft knife
- Ruler and set square
- Slip and scoring tool
- Wooden paddle
- Sponge and water
- White or cream matte glaze (or underglaze)
- Kiln
Step 1: Preparing the Slabs
-
Roll out the clay:
Begin by rolling out a substantial amount of clay to an even thickness of about 1/4 inch. Use guide sticks on either side of your roller to ensure the thickness is perfectly uniform, which is crucial for a geometric build. -
Cut the main walls:
Measure and cut four identical rectangular slabs for the walls. A good starting size is roughly 5 inches wide by 9 inches tall, but you can adjust based on your preference. Use a set square to ensure your corners are true right angles. -
Cut the base:
Cut a square slab for the base that is slightly larger than the footprint of your assembled walls. This extra lip adds visual stability to the bottom of the lantern. -
Firm up the slabs:
Let these slabs dry to a stiff leather-hard stage. They need to be rigid enough to stand up without warping, especially since we will be cutting many holes into them.
Warping Walls?
If walls bow inward while cutting windows, place a piece of foam inside the tower during assembly, or let the slabs dry longer horizontally before standing them up.
Step 2: Creating the Grid Pattern
-
Mark the grid:
On each wall slab, lightly score a grid pattern to guide your window placement. For the design shown, you’ll want two columns of four windows each. Leave ample borders at the top, bottom, and sides for structural integrity. -
Cut the inner windows:
Using your smaller square cutter or a knife, cut out the eight window openings on each wall slab. Remove the clay cleanly. -
Create the raised frames:
Roll out a fresh, thinner slab of clay (about 1/8 inch). Use the larger square cutter to cut a square, then center the smaller cutter inside it to remove the middle. This creates a square ‘frame’. -
Attach the frames:
Score and slip the area around each window cutout on your main wall slabs. Place a clay frame over each opening, pressing it down firmly to bond it. This creates the stepped, architectural relief. -
Refine the edges:
Once frames are attached, use a damp sponge or a modeling tool to smooth the transition between the added frame and the main wall. You want it to look like a single carved piece rather than two stuck-together parts.
Step 3: Assembly
-
Bevel the edges:
Cut 45-degree bevels (miter joints) on the long vertical edges of your four wall slabs. This ensures a seamless corner connection. -
Score and slip corners:
Aggressively score the beveled edges and apply a generous amount of slip. I find that getting the slip just a bit tacky before joining helps the pieces grab instantly. -
Construct the tower:
Stand the walls up and press the corners together. Use a set square again to check that the tower is perfectly rectangular and not twisting. -
Reinforce the interior:
Roll thin coils of clay and press them into the interior corners of the lantern walls to reinforce the joints. Smooth these coils flat so they aren’t visible. -
Attach the base:
Score the bottom edges of your assembled tower and the top face of your base slab. Press the tower firmly onto the center of the base. -
Add the footer trim:
To mimic the image, add a small strip of clay around the very bottom where the walls meet the base, creating a molding or footer effect. Smooth this onto the base.
Make it Gothic
Swap the square windows for arch shapes to create a lantern that looks like a miniature cathedral tower, or use circle cutters for a bubbly 60s modern vibe.
Step 4: Finishing and Firing
-
Final smoothing:
Use a damp sponge to smooth all sharp corners and erase any fingerprints. Pay special attention to the inside of the window headers. -
Creating texture:
If your clay is too smooth, gently tap the surface with a stiff-bristled brush or a stone to give it that slightly weathered, sandy texture seen in the photo. -
Drying:
Dry the piece very slowly under loose plastic to prevent the grid from cracking due to uneven shrinkage. -
Bisque fire:
Fire the piece to cone 04 (or your clay’s bisque temperature). -
Glazing:
Apply a matte white or cream glaze. A wash technique, where you wipe back some glaze with a sponge, highlights the texture beautifully. -
Final fire:
Glaze fire the piece according to your clay and glaze specifications.
Place a tea light or LED candle inside and enjoy the warm geometric glow of your new centerpiece
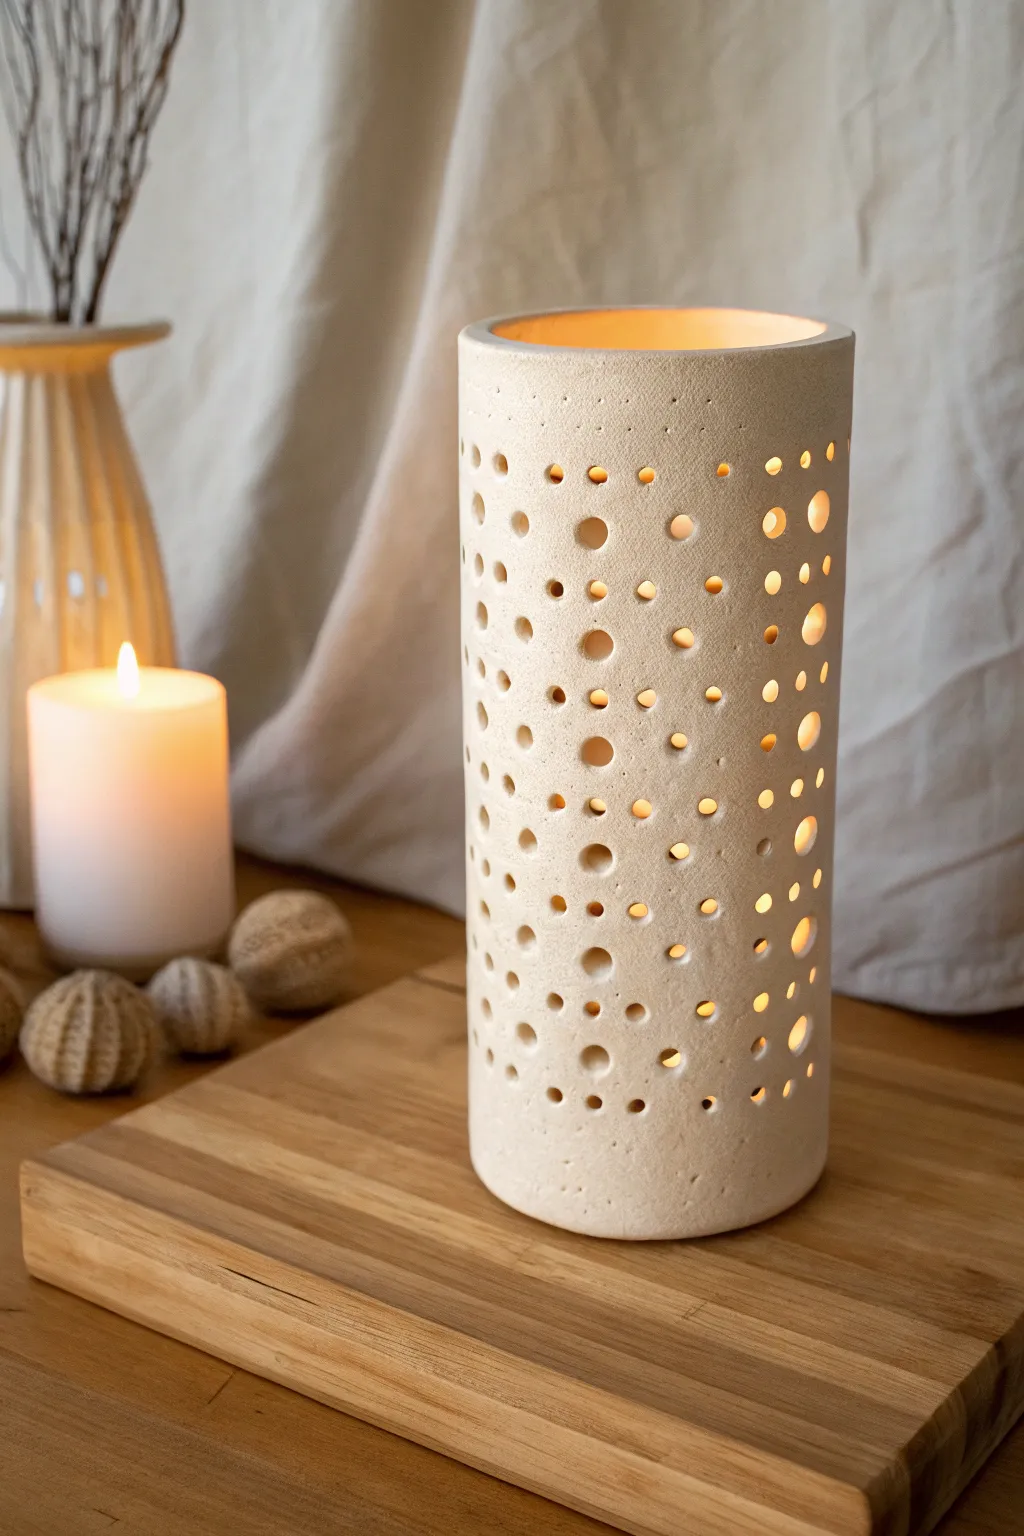
Constellation Dot-Pierced Night Lantern
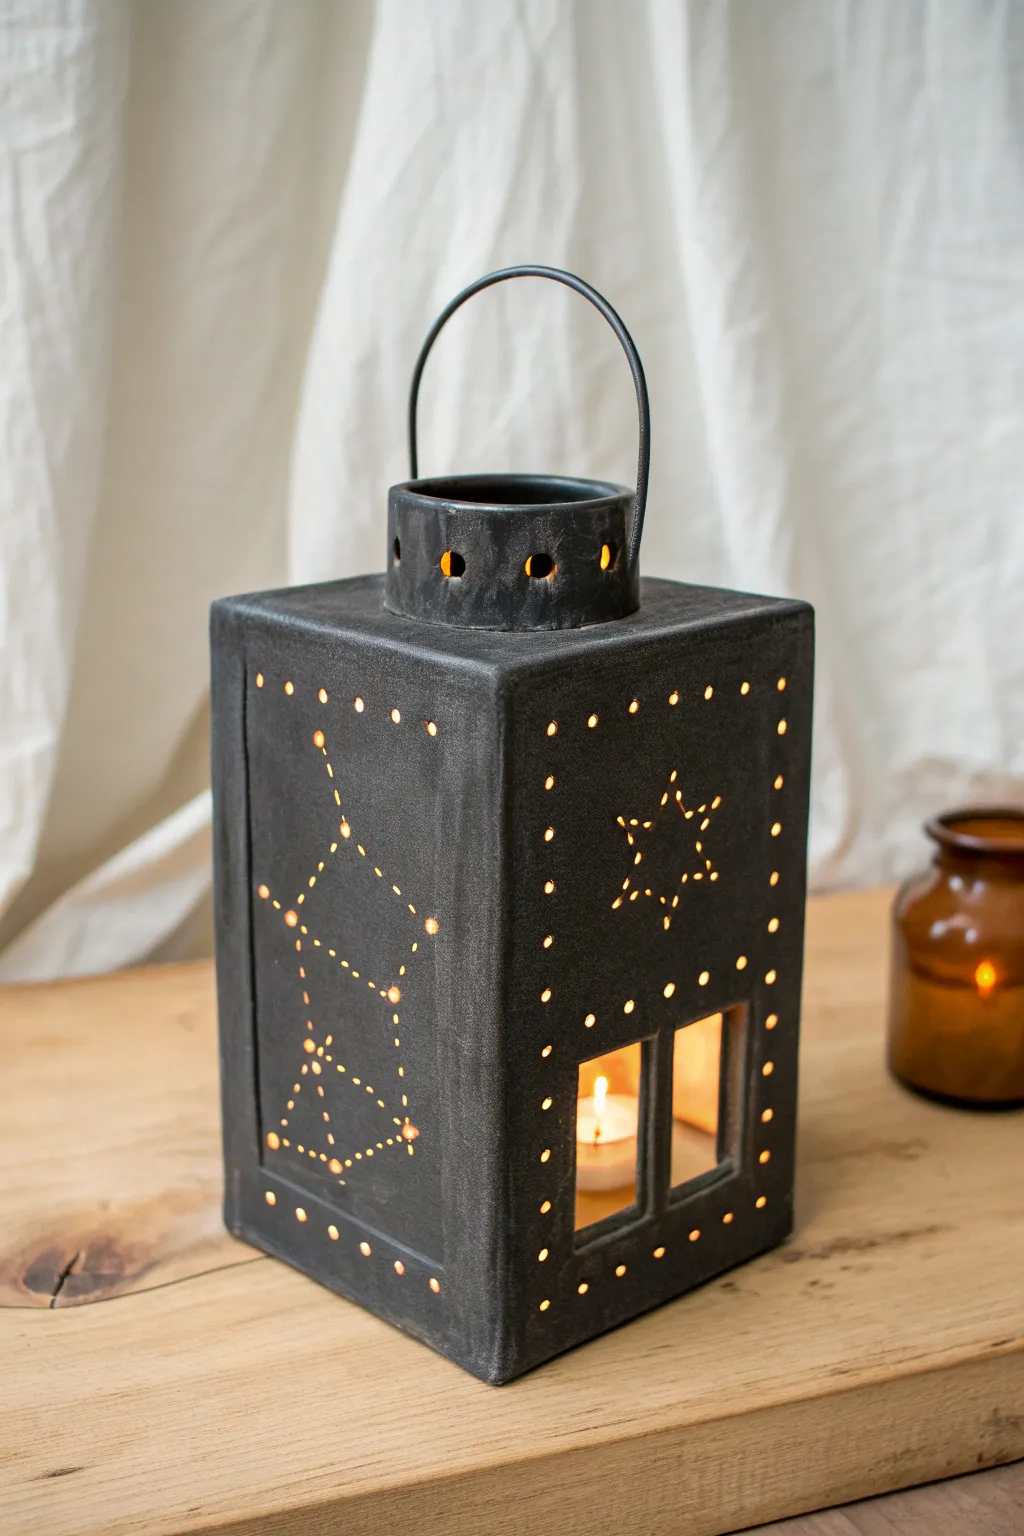
Bring the night sky into your living room with this geometric, sleek black clay lantern pierced with delicate star patterns. The warm glow of a tealight shines through pinhole constellations and rectangular windows, creating a cozy and magical atmosphere.
How-To Guide
Materials
- Black stoneware clay or charcoal-colored polymer clay
- Rolling pin and guide sticks (approx. 1/4 inch thick)
- Fettling knife or X-Acto blade
- High-temperature wire (nichrome) for the handle
- Template paper and pencil
- Needle tool or small drill bit for piercing
- Slip and score tool (if using ceramic clay)
- Round cookie cutter or small jar lid (for the top)
- Ruler
- Tealight candle
Step 1: Slab Preparation & Cutting
-
Roll the clay:
Begin by rolling out your black clay onto a canvas or non-stick surface. Use guide sticks to ensure an even thickness of about 1/4 inch, which provides enough stability for the walls without being too heavy. -
Create templates:
Sketch your lantern dimensions on paper first. You’ll need four rectangular panels for the sides (tall and narrow) and a square base. For the chimney, measure a strip that matches the circumference of your cookie cutter. -
Cut the shapes:
Lay your paper templates onto the clay slab. Using a sharp fettling knife or blade, hold the blade vertical and cut out your four walls, the base, and the chimney strip. Keep the edges crisp and straight. -
Leather hard stage:
Allow the clay slabs to dry until they are ‘leather hard’—stiff enough to hold their shape upright but still soft enough to carve and join. This is crucial for structural integrity.
Clean Punctures Tip
When piercing holes, support the clay from behind with a sponge or your hand to prevent the back from blowing out. Lightly sand the surface after it’s bone dry to remove burrs.
Step 2: Designing the Night Sky
-
Plan the constellations:
Lightly trace your desired constellations (like Cassieopeia or the Big Dipper) and a large six-pointed star onto the leather-hard panels using a pencil or stylus. Don’t press too deep; just mark the surface. -
Pierce the stars:
Use a needle tool to poke holes along your traced lines. Vary the spacing slightly for visual interest. I like to gently twist the tool as I pull it out to keep the hole clean. -
Create the border:
Add a border of pierced dots around the perimeter of each panel to frame the design, spacing them evenly about half an inch apart. -
Cut the candle windows:
On the front panel, measure and cut out two small rectangular windows near the bottom. These will allow the candlelight to flicker visibly and make it easier to place the tealight inside later.
Step 3: Assembly & Finishing
-
Score and slip:
Rough up the edges of your base and side panels with a serrated rib or needle tool. Apply clay slip (a mixture of clay and water) to these scored areas to act as glue. -
Construct the box:
Attach the four walls to the base and to each other. Press the seams firmly together. Use a small coil of soft clay on the inside corners to reinforce the joints and smooth it out with your finger. -
Form the chimney:
Curve your chimney strip into a circle, joining the ends. Cut small decorative holes or arches around the rim if desired, as seen in the top piece of the photo. -
Attach the lid:
Cut a square top piece with a hole in the center for the chimney. Attach this to the main lantern body, then attach the chimney ring over the hole. Smooth all outer seams for a sleek, monolithic look. -
Install the handle:
Before the clay fully dries, poke two holes on opposite sides of the chimney rim. Thread your high-temperature nichrome wire through to create a bail handle, curving it into a semi-circle. -
Final drying:
Cover the piece loosely with plastic to let it dry slowly and evenly, preventing warping. Once bone dry, fire it according to your clay’s specific temperature instructions.
Warping Walls?
If your walls start to lean or warp during assembly, propping them up with boxes or jars on the outside until the moisture evaporates further helps lock the square shape.
Once fired, place a tea light inside and watch your personal galaxy illuminate the room

TRACK YOUR CERAMIC JOURNEY
Capture glaze tests, firing details, and creative progress—all in one simple printable. Make your projects easier to repeat and improve.
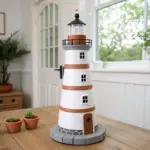
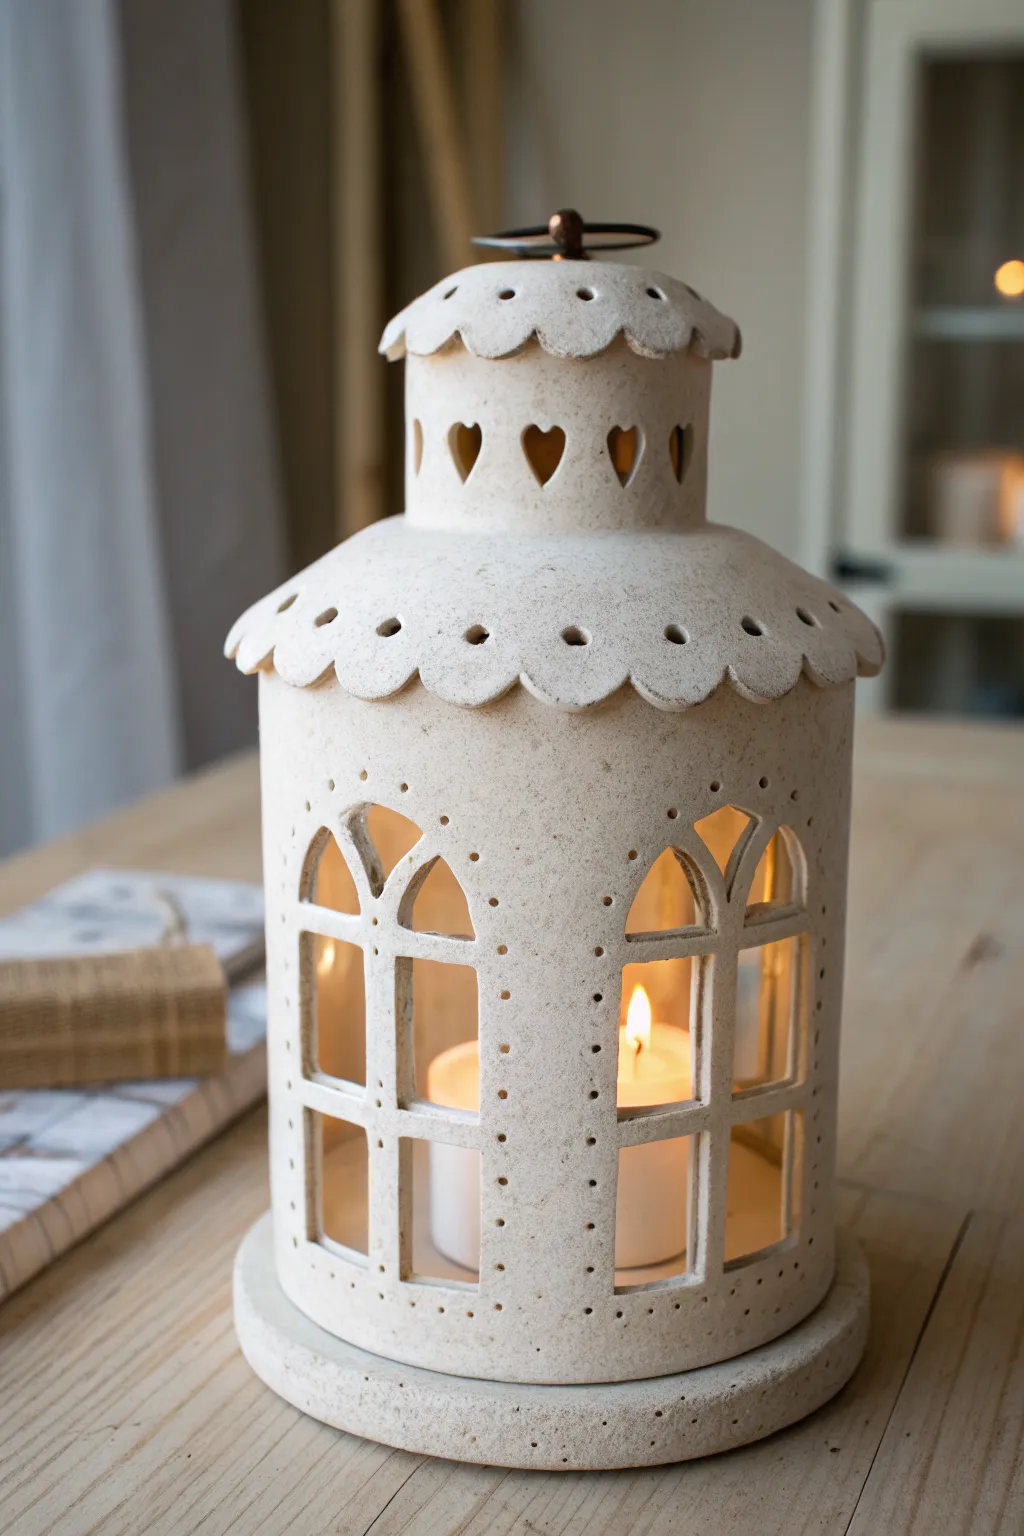
Arched Window Cutout Lantern

Capture the charm of old-world architecture with this elegant slab-built lantern featuring repeating arched windows. The light, speckled stoneware clay gives it a natural, grainy texture that glows beautifully when a candle is lit inside, casting warm shadows through the carefully carved openings.
Step-by-Step Tutorial
Materials
- Speckled buff stoneware clay (or similar light-colored clay with additives)
- Rolling pin with thickness guides (approx. 1/4 inch or 6mm)
- Ruler and square tool
- Needs tool or potter’s knife (fettling knife)
- Paper template (3 inches x 8 inches)
- Small arch template (paper or cardstock)
- Serrated rib or scoring tool
- Slip (clay slurry)
- Canvas or slab mat
- Small sponge
- Paddle tool (wooden)
- Wooden sculpting tool or finger for smoothing seams
Step 1: Preparing the Slabs
-
Wedge the Clay:
Begin by thoroughly wedging your speckled buff clay to remove air bubbles and ensure an even consistency, which is crucial for structural integrity. -
Roll Out the Slab:
Roll your clay into a large, consistent slab about 1/4 inch thick. Using guide sticks or rolling pin rings is highly recommended here to keep the walls uniform. -
Compress the Clay:
Take a rubber rib and smooth over the surface of the slab on both sides; this compresses the clay particles, reducing the chance of warping later. -
Cut the Walls:
Using your large rectangular template (approx. 3×8 inches for a tall lantern), cut out four identical rectangles. These will form the four walls of your tower. -
Dry to Leather Hard:
Let the slabs sit on a porous board until they reach a leather-hard state. They should be firm enough to stand up without bending but still soft enough to cut and join.
Warping Walls?
If walls start bowing inward during assembly, place a temporary cardboard tube or crumpled newspaper inside the tower to support the shape while the seams stiffen up.
Step 2: Carving the Arches
-
Mark Grid Lines:
Lightly sketch a grid on your slabs to ensure your windows align perfectly. You want two columns of windows and three rows. -
Trace the Arches:
Place your small arch template onto the clay and trace the shape lightly with a needle tool. Repeat this, creating six windows on each of the four slab panels. -
Cut the Openings:
carefully cut out the negative space of the arches using a sharp fettling knife or scalpel. Keep your knife perpendicular to the table for clean, straight edges. -
Smooth the Edges:
Once the clay is removed, dip your finger or a small sponge in water and gently round off the sharp cut edges of each window to give it a finished, soft look.
Step 3: Assembly
-
Miter the Edges:
Bevel the long vertical edges of your four wall panels at a 45-degree angle. This miter joint creates a stronger corner and hides the seam better than a butt joint. -
Score and Slip:
Rough up the mitered edges with your serrated rib and apply a generous amount of slip. I like to let the slip sit for a moment to get tacky before joining. -
Construct the Pipe:
Stand the walls up and press the corners together to form a rectangular tube. Reach inside to gentle press the seams together, ensuring a solid bond. -
Reinforce Seams:
Roll a very thin coil of clay and press it into the interior corners. Smooth this coil out completely so it disappears into the wall. -
Paddle the Shape:
Gently tap the outside corners with a wooden paddle to sharpen the angles and compress the joints further.
Add a Roof
Make a pyramid-shaped lid with a chimney hole to turn this open lantern into a fully enclosed house. Just ensure the chimney is wide enough for heat to escape.
Step 4: Base and Finish
-
Create the Base:
Roll out a separate square of clay slightly larger than the footprint of your lantern. This will serve as the detached coaster-style base shown in the image. -
Smooth Top Rim:
Check the top rim of your lantern tower. If it’s uneven, use a rasp or knife to level it, then sponge it smooth. -
Final Cleanup:
Go over the entire piece with a slightly damp sponge to remove any fingerprints or maker’s marks, paying close attention to the window cutouts. -
Dry Slowly:
Tent the lantern loosely with plastic to let it dry very slowly. Uneven drying in a piece with this many cutouts can lead to cracking. -
Fire:
Bisque fire the piece, then glaze if desired (though the raw clay look requires no glaze on the outside), and fire to maturity.
Place a pillar candle on the base, set the tower over it, and enjoy the cozy architectural glow in your home
Texture-First Slab Lantern
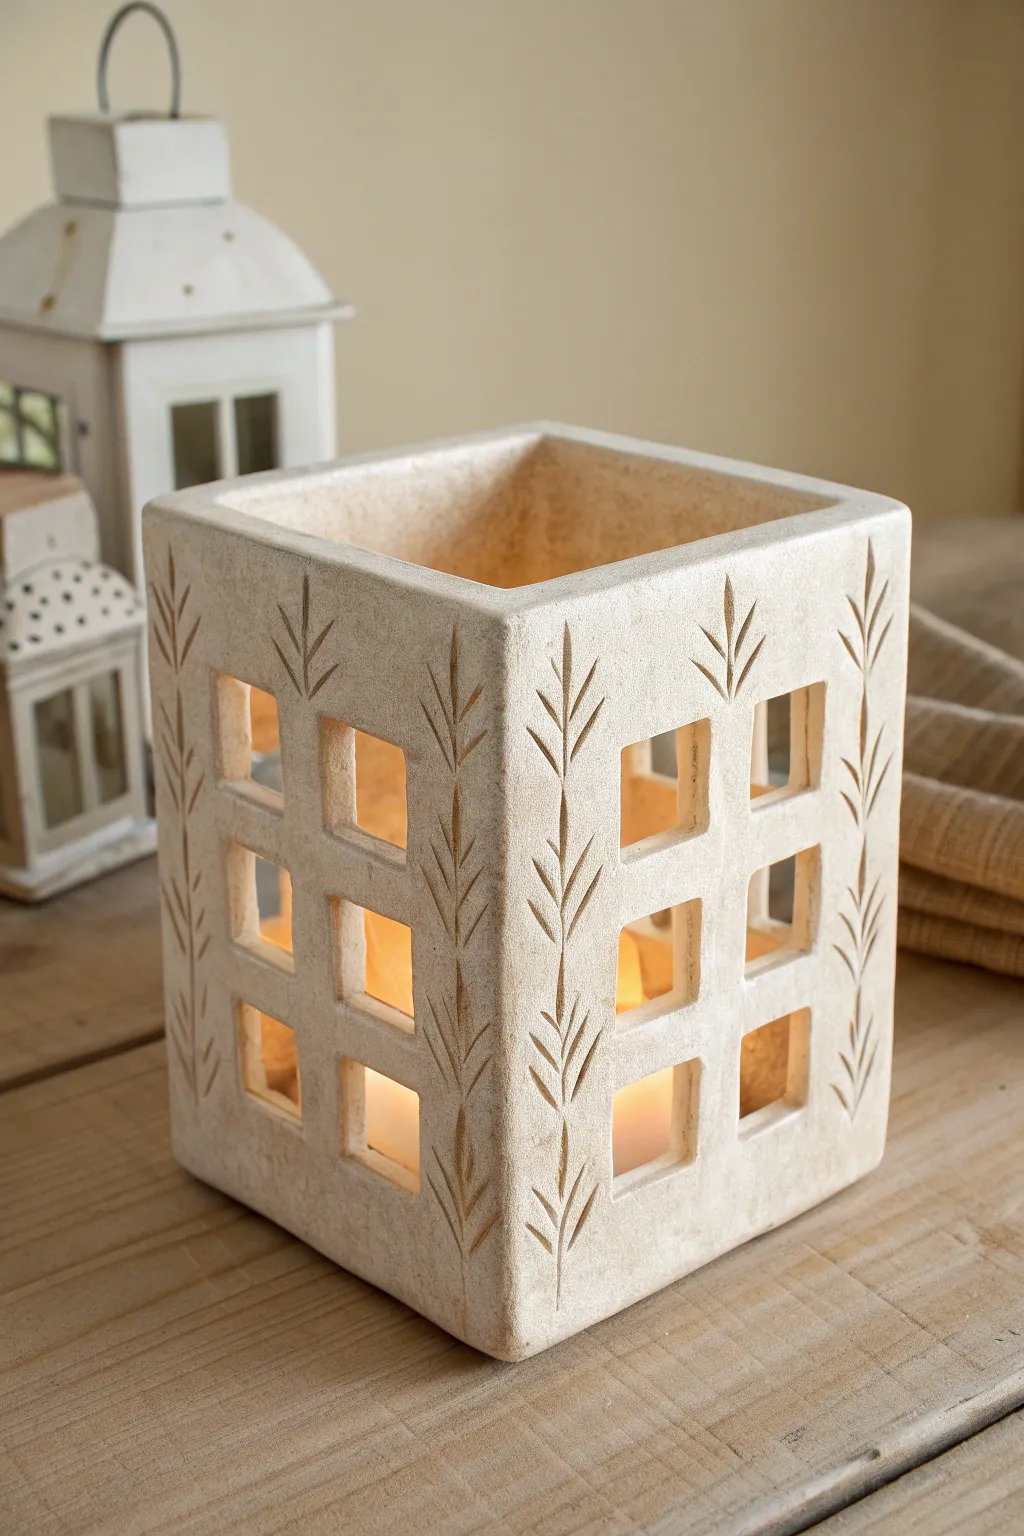
This project combines precise geometric cutouts with organic, nature-inspired carvings to create a stunning textured lantern. The warm, sandy clay body gives it a timeless, rustic feel that glows beautifully when illuminated from within.
Detailed Instructions
Materials
- Stoneware clay with grog or sand (for texture)
- Rolling pin
- Two 1/4-inch wooden thickness slats
- Ruler
- Fettling knife
- Square cookie cutter (approx. 1 inch)
- Needle tool
- Scoring tool (serrated rib)
- Slip (clay mixed with water)
- Canvas working surface
- Paddle tool
- Sponge
Step 1: Preparing the Slabs
-
Roll the clay:
Begin by wedging your clay thoroughly to remove air bubbles. Place the clay between two 1/4-inch wooden slats on your canvas and roll it out until it is perfectly even. I find that a slightly thicker slab works best for this lantern to ensure the walls stand straight without warping. -
Smooth the surface:
Use a flexible rib or a slightly damp sponge to compress the clay surface on both sides. This removes the canvas texture and aligns the clay particles, which helps prevent cracking later. -
Measure and cut walls:
Using a ruler and fettling knife, cut four identical rectangles. Based on the image, a size of roughly 6 inches wide by 7 inches tall works well. Be sure your corners are perfect 90-degree angles. -
Cut the base:
Cut a square base slab that matches the width of your walls (6×6 inches). Set all five pieces aside on a ware board until they reach a ‘leather hard’ state. They should be firm enough to hold their shape but soft enough to carve.
Step 2: Creating the Design
-
Mark the grid:
On each of the four wall slabs, use your ruler to lightly mark vertical lines dividing the slab into three equal columns. The center column will hold your windows. -
Punch the windows:
Using a small square cookie cutter, press through the clay in the center column to create a vertical stack of three or four windows. Keep the spacing consistent between them. -
Refine the cutouts:
The cookie cutter might leave ragged edges. Once the clay is popped out, use a damp brush or your finger to smooth the interior edges of each square window so they look clean and sharp. -
Sketch the botanical pattern:
With a needle tool, lightly sketch vertical leaf stems running down the solid columns of clay on either side of the windows. These should run the full height of the slab. -
Carve the leaves:
Using the needle tool or a small carving tool, deepen your sketch lines. Create the ‘V’ shaped leaves branching off the main stem. Use short, confident strokes to mimic the incised look in the photo.
Warping Walls?
If your slabs slump during assembly, they are too wet. Let the pieces sit until they are truly ‘leather hard’—stiff like cheddar cheese—before standing them up.
Step 3: Assembly
-
Score edges:
Score the bottom edge of all four wall pieces and the four sides of the base slab. Also score the vertical sides where the walls will connect to each other. Apply a generous amount of slip to all scored areas. -
Attach the first wall:
Press the first wall firmly onto the base. Use a square wooden block inside the corner to ensure it sits perpendicular to the base. -
Construct the box:
Attach the remaining three walls, working your way around the base. Press the vertical seams together firmly. I like to add a tiny coil of clay on the interior seams and smooth it out for extra structural integrity. -
Clean the corners:
On the outside, wipe away excess slip from the seams. You can gently paddle the corners to sharpen them and ensure the box looks perfectly square. -
Carve corner details:
The botanical pattern in the image wraps around the corners. Once the box is assembled, carve an additional vertical stem and leaf pattern directly over the corner seams. This cleverly hides the join lines. -
Final dry:
Let the lantern dry very slowly under loose plastic for the first 24 hours to prevent warping, then uncover it to dry completely before bisque firing.
Pro Tip: Clean Cuts
When cutting out the square windows, let the clay firm up slightly first. If the clay is too soft, the cutter will drag and deform the square shape when you pull it out.
Once fired, place a tea light inside to see your carved shadows dance on the table
Layered Double-Wall Shadow Lantern
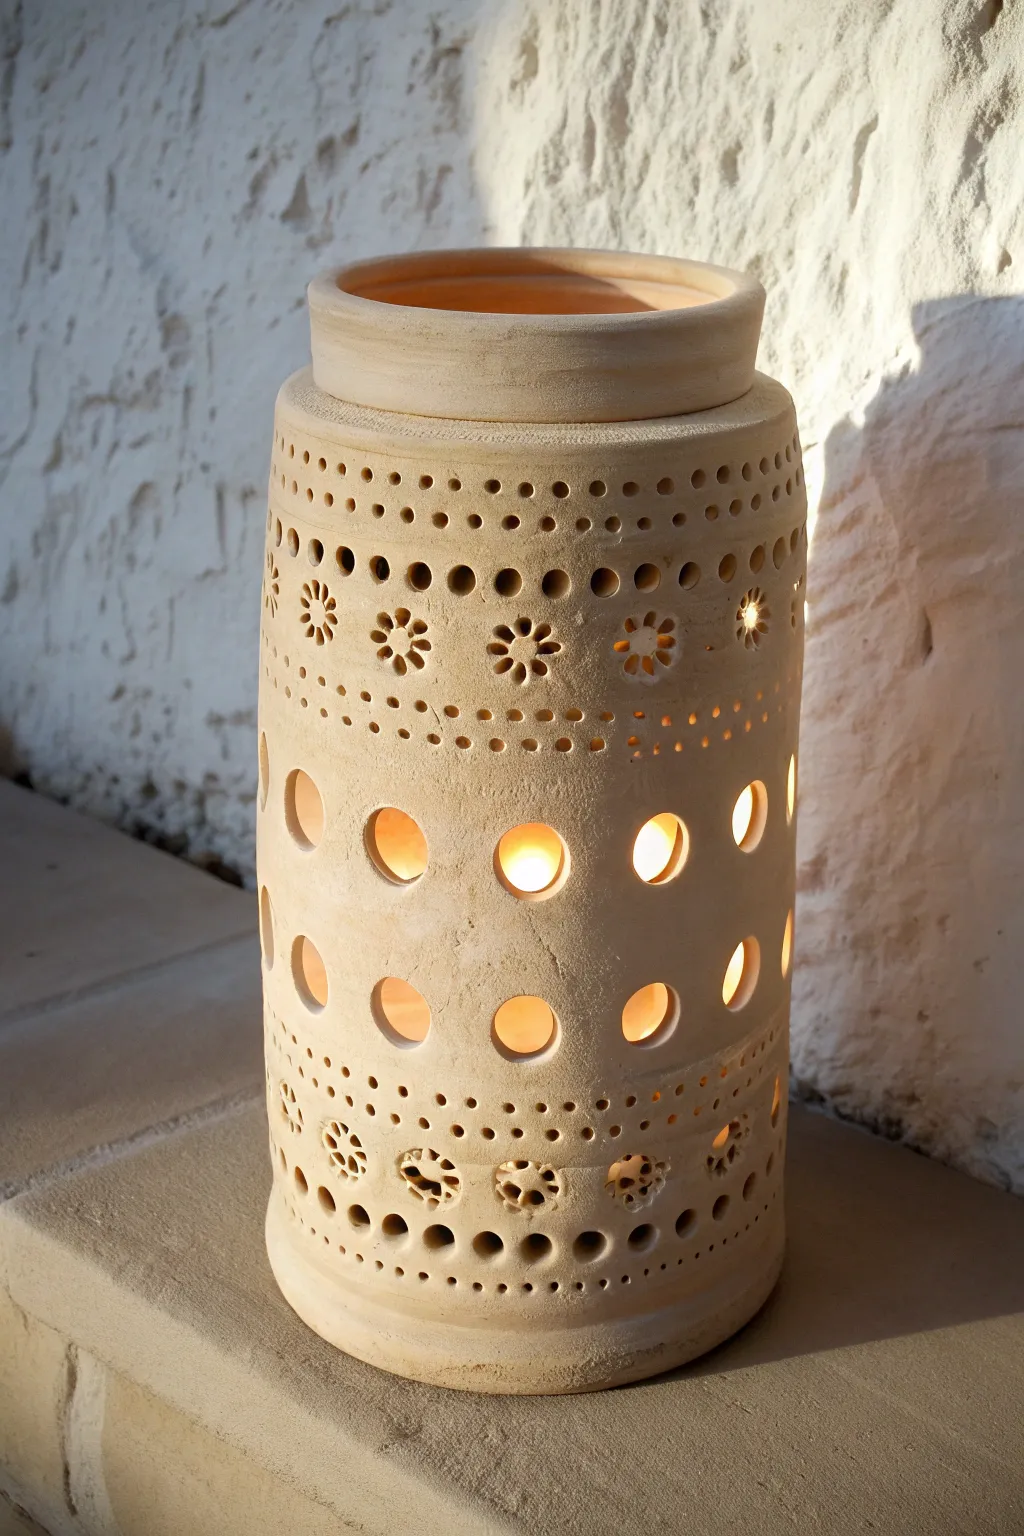
This project transforms a simple clay slab into a stunning cylindrical luminary that casts mesmerizing shadows. With its natural fired finish and intricate pierced patterns, it creates a warm, inviting atmosphere perfect for summer evenings on the patio.
Step-by-Step
Materials
- Stoneware clay slab (approx. 1/4 inch thick)
- Cylindrical form or large rolling pin (for shaping)
- Hole punch tools (various sizes)
- Needle tool
- Fettling knife
- Scoring tool (serrated rib)
- Slip
- Wooden paddle
- Ware board or canvas
- Sponge
Step 1: Prepping the Slab
-
Roll out the clay:
Begin by rolling out a consistent slab of stoneware clay to about 1/4 inch thickness. Compress the clay with a rib on both sides to align the particles, which helps prevent warping later. -
Cut to size:
Measure the circumference of your intended cylindrical form. Cut a rectangular strip of clay that matches this length plus an inch for overlap, and decide on your desired height. -
Texture stage:
Allow the slab to stiffen slightly to a soft leather-hard stage. This makes cutting intricate holes much cleaner than working with wet, sticky clay.
Clean Cuts Tip
If your hole cutters are sticking, dip them in cornstarch or vegetable oil before pressing into the clay. This releases the plug effortlessly.
Step 2: Creating the Patterns
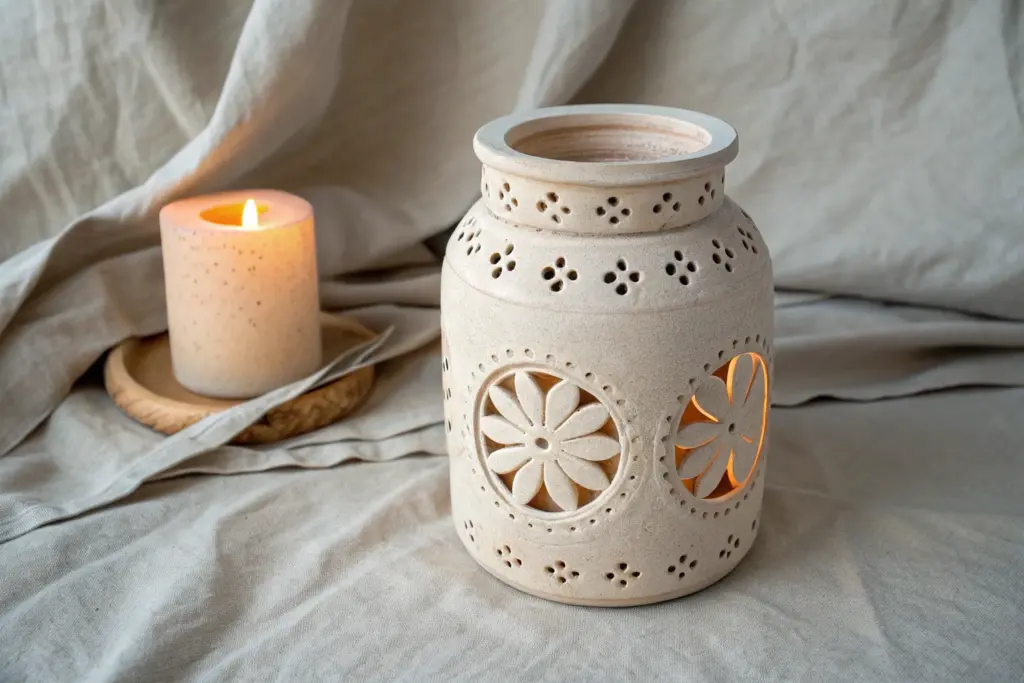
-
Plan the design grid:
Lightly trace horizontal guide lines with a needle tool to divide your lantern into bands. This ensures your patterns stay level as they wrap around the form. -
Punch the borders:
Using a small circular punch tool, press a row of tiny holes along the top and bottom edges of what will be your main decorative band. -
Create the flowers:
For the floral band, stamp a central hole first. Then, punch five or six surrounding holes to create petals. Smooth any rough edges inside the cutouts immediately with a damp brush. -
Excise the main windows:
In the central section, use a larger circle cutter (about 1 inch diameter) to create two staggered rows of windows. While cutting, support the clay from underneath so the pressure doesn’t distort the slab. -
Detail the base:
Repeat the floral and small-dot patterns near the bottom edge to mirror the top design, giving the piece a cohesive, balanced look.
Inner Glow
Paint the interior with a white slip or glaze before firing. A white interior reflects more candlelight out through the holes than bare clay.
Step 3: Forming the Cylinder
-
Bevel the edges:
Cut the short ends of your rectangle at 45-degree angles in opposite directions. This creates a stronger, more seamless join when wrapped. -
Score and slip:
Aggressively score the beveled edges and apply a generous amount of slip. -
Wrap the form:
Stand the slab up and wrap it around your cylindrical mold (or just shape it by hand if the clay is stiff enough). Press the beveled edges together firmly. -
Weld the seam:
Use a wooden tool to smudge the clay across the seam line, blending it until invisible. Support the inside wall with your other hand while doing this.
Step 4: Adding the Rim and Finish
-
Create the double rim:
Roll a thick coil or cut a narrow strip of slab. attach this to the top opening to create the stepped rim effect seen in the photo. Score and slip this addition thoroughly. -
Smooth and refine:
Use a damp sponge to smooth the rim and the bottom edge. Check all your cutout holes one last time to remove any sharp burrs. -
Dry slowly:
Cover the lantern with plastic loosely to let it dry very slowly. This is crucial for cylindrical forms to avoid cracking at the seam. -
Fire:
Bisque fire the piece, and then fire to the maturation temperature of your specific clay body. I find leaving it unglazed highlights the natural stone texture beautifully.
Place a tea light inside your finished vessel and enjoy the intricate dance of light on your walls
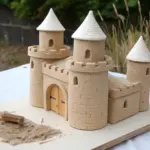
Roof-Top Pagoda Style Lantern
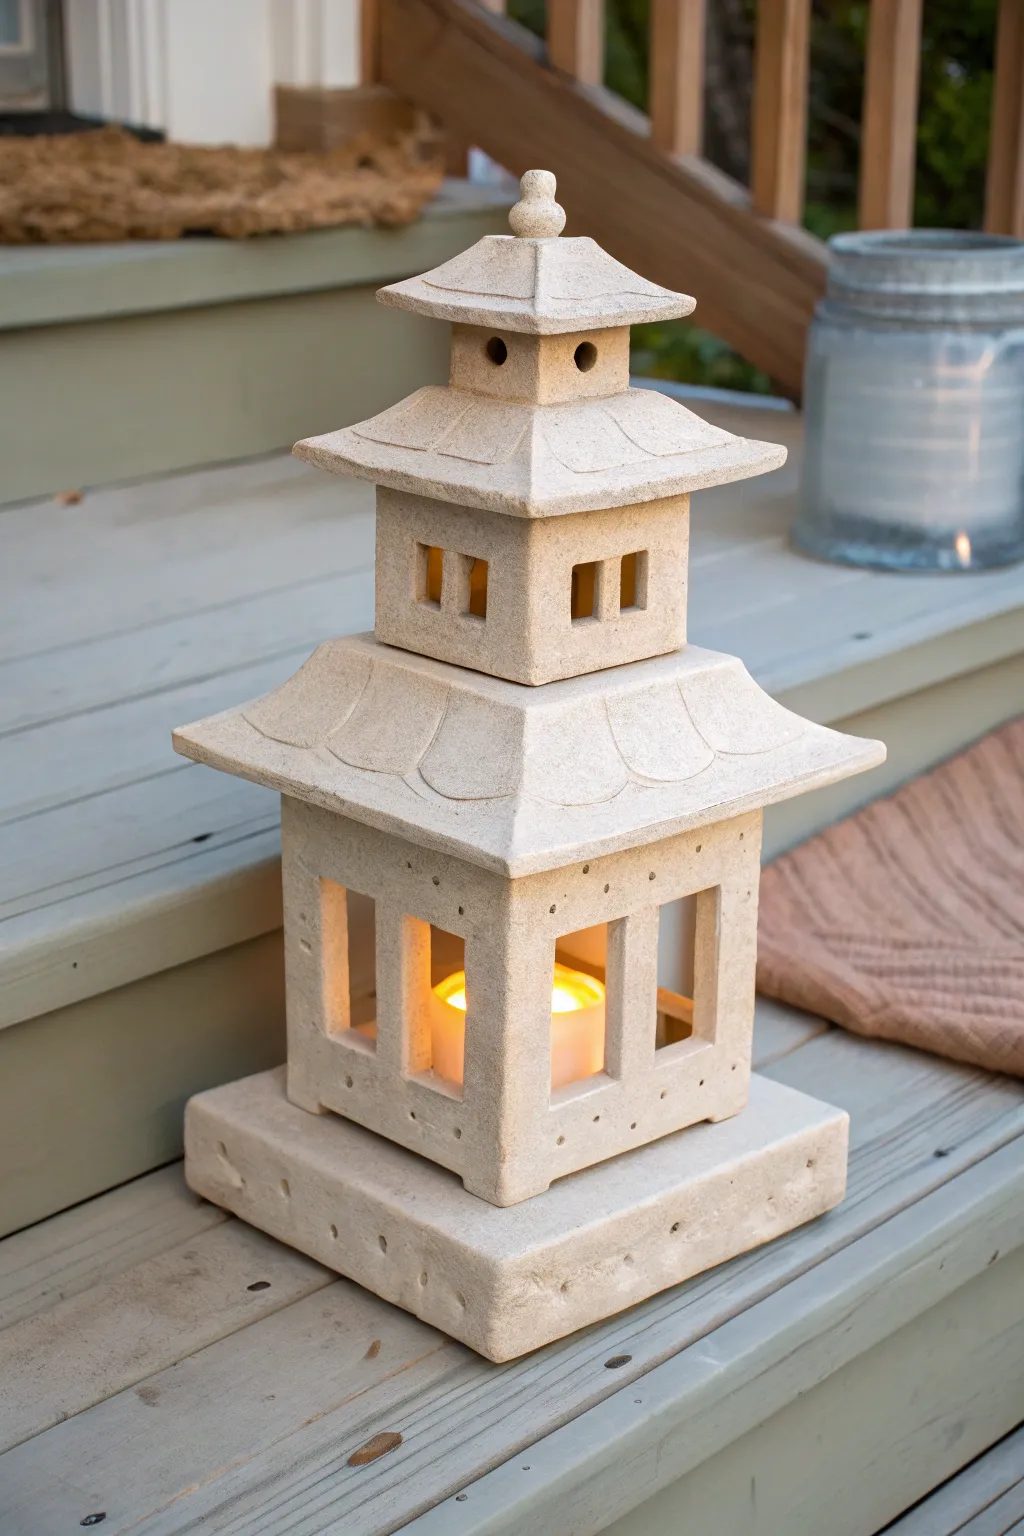
Bring a touch of Zen serenity to your outdoor space with this architectural clay slab lantern. Modeled after traditional stone pagodas, this multi-tiered structure features elegant flared roofs and geometric cutouts that cast a warm, inviting glow.
Detailed Instructions
Materials
- Stoneware clay body (groggy texture recommended)
- Rolling pin and guide sticks (1/4 inch thickness)
- Clay knife or fettling knife
- Ruler and square
- Slip and scoring tool
- Cardboard or stiff paper for templates
- Wooden paddle
- Loop tool for carving
- Sponge and water
- Kiln and glaze (optional stone-effect glaze)
Step 1: Preparation & Base Construction
-
Template Creation:
Begin by drawing your templates on cardboard. You will need squares for the base and floors, rectangular walls for the two main tiers, and trapezoidal shapes for the roof sections. Accuracy here ensures a stable structure later, so take your time measuring. -
Slab Rolling:
Roll out a substantial amount of clay to a uniform 1/4-inch thickness. Using guide sticks under your rolling pin is crucial for maintaining even walls that won’t warp during firing. -
Cutting the Base:
Cut a large square slab for the foundational plinth. To create the visual weight shown in the photo, you can build a hollow box for the base or simply double-layer your slabs. -
Texturing the Base:
Before the clay hardens, use the end of a paintbrush to gently press small, evenly spaced indentations along the vertical edge of the base slab to mimic stylized stonework.
Clean Connect
Use a ‘negative space’ paper template when cutting windows. Lay the paper on the wall and trace around it, ensuring all windows are identical in size and placement.
Step 2: Building the Main Chamber
-
Wall Assembly:
Cut four rectangular walls for the main lower chamber. When the clay is leather-hard, bevel the vertical edges at a 45-degree angle. Score and slip these edges thoroughly to join them into a perfect square box. -
Window Cutouts:
While the box is stable but not bone dry, use a sharp knife to cut out large rectangular windows on each face, leaving a sturdy central pillar on each side. Smooth the interior cuts with a damp sponge. -
Adding Texture:
Using a needle tool or small drill bit, add a row of decorative holes just above the window frames and near the bottom edge, mirroring the texture on the base. -
Attaching the Floor:
Score and slip the bottom of your main chamber walls and attach them securely to the prepared base plinth. Use a small coil of clay on the interior seam to reinforce the joint.
Step 3: Roofing & Upper Tiers
-
Forming the Lower Roof:
Cut four trapezoidal slabs for the main roof. Unlike a standard pyramid, gently curve the bottom edges of these slabs upward before they dry to achieve that distinct pagoda flare. -
Assembling the Roof:
Join the four roof panels together. I like to use a temporary cardboard interior support to hold the shape while the slip sets. Place this roof assembly on top of the main chamber. -
Roof Details:
Once the roof is firm, use a loop tool to carve subtle scalloped lines onto the surface, suggesting overlapping roof tiles or shingles. -
The Second Tier:
Construct a smaller, square box for the second level, similar to the first but scaled down. Cut smaller, dual square ‘windows’ into these walls for light ventilation. -
Upper Roof Construction:
Repeat the roof construction process for the smaller top tier, ensuring the flare matches the style of the lower roof. Attach this smaller roof to the second tier walls. -
The Final Assembly:
Stacking the components needs care. Score and slip to attach the second tier onto the flat center of the lower roof. Ensure everything is centered visually.
Glow Up
Before firing, cut a hole in the bottom of the base or the back of the first tier large enough to feed a cord through if you plan to use an electric light instead of a candle.
Step 4: Finishing Touches
-
Creating the Finial:
Roll a small ball of clay and shape it into a finial—a small knob or teardrop shape works well. Attach this to the very peak of the top roof to cap off the pagoda. -
Refining Edges:
Go over the entire piece with a slightly damp sponge to remove sharp burrs or rough join lines. The goal is a simulated stone look, so it doesn’t need to be glass-smooth, just tidy. -
Drying:
Dry the lantern slowly under plastic for several days. Because of the joined sections and varying thickness, slow drying prevents cracking. -
Firing and Glazing:
Bisque fire the piece. For the final finish, apply a matte, stone-textured glaze in a beige or light grey tone to replicate the sandstone look in the image. Avoid glossy glazes to maintain the natural aesthetic.
Place your finished pagoda in a quiet corner of your garden and enjoy the peaceful ambiance it creates
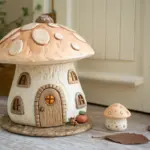
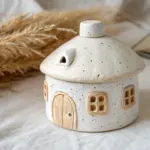
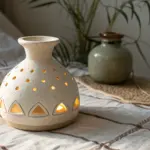
Little House Slab Lantern
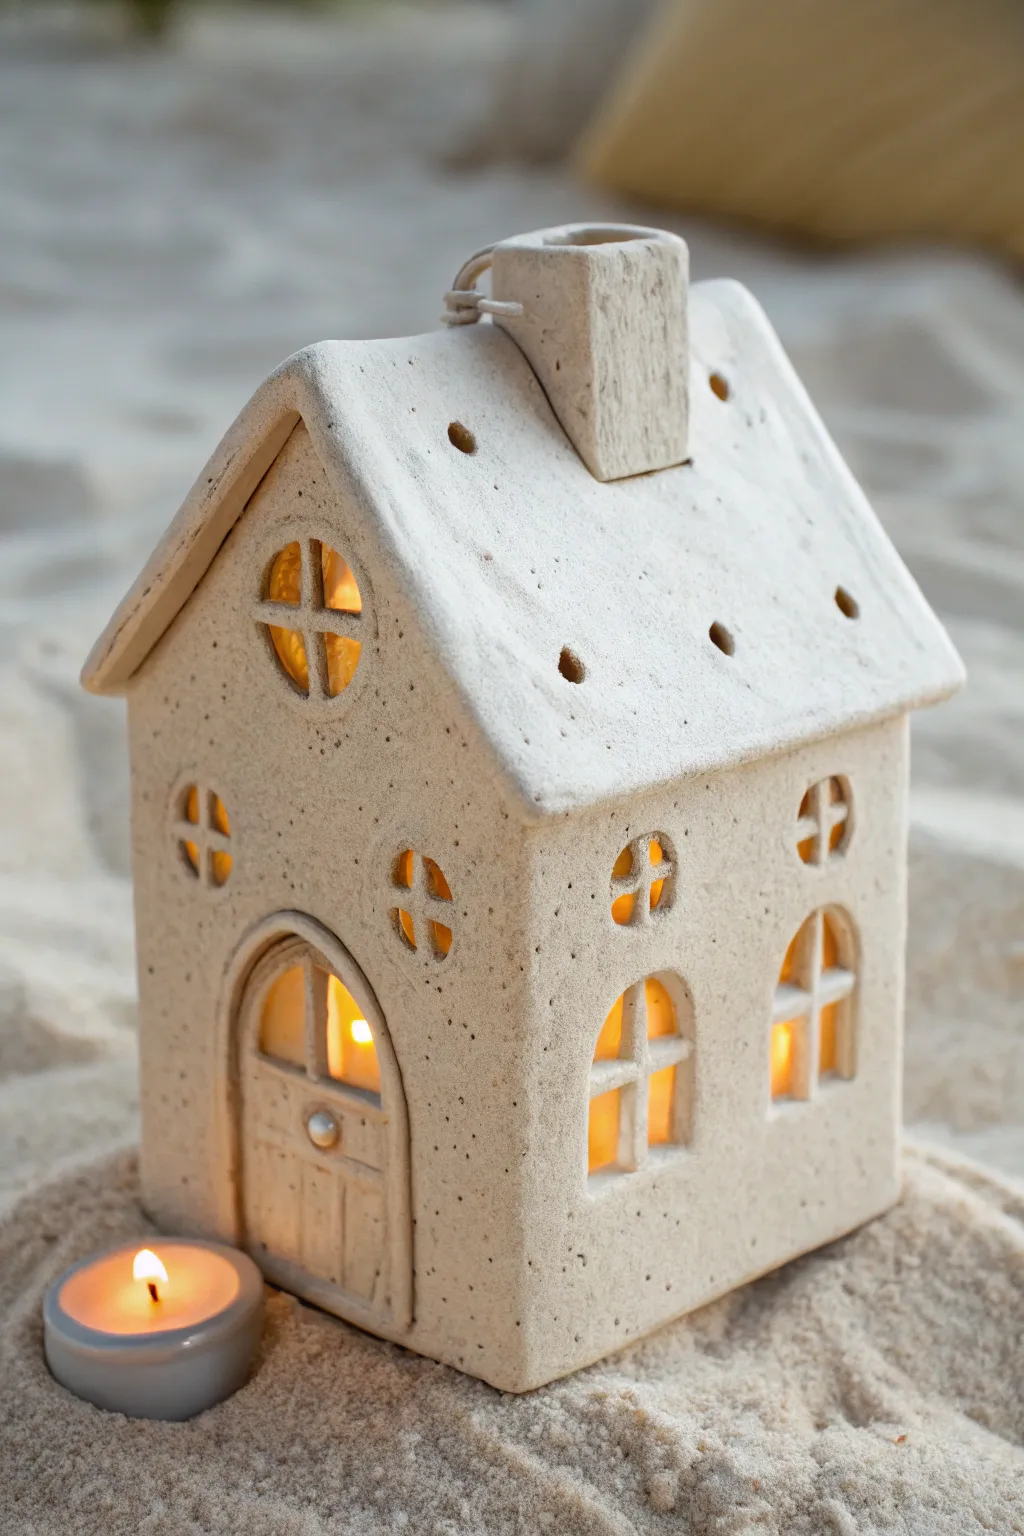
Bring a cozy warmth to your home with this charming ceramic cottage lantern, complete with arched windows and a textured finish. The soft, rustic white clay glows beautifully when illuminated from within, making it a perfect centerpiece for calm evenings.
How-To Guide
Materials
- White earthenware or stoneware clay (with fine grog for texture)
- Rolling pin
- Two 1/4 inch thick wooden guide strips
- Fettling knife or craft knife
- Paper templates (walls, roof, chimney)
- Slip (clay and water mixture)
- Scoring tool or old fork
- Small round cutter or straw (for roof vent holes)
- Modeling tool or skewer
- Sponge
- Sandpaper (for post-firing)
- Clear or white satin glaze (optional)
Step 1: Preparation and Cutting
-
Roll the Slabs:
Begin by wedging your clay to remove air bubbles. Place the clay between your two wooden guide strips and roll it out into a smooth, even slab. This ensures uniform thickness for sturdy walls. -
Cut the Components:
Using your paper templates, cut out two pentagon shapes for the front and back walls (square bottom with a triangle top), two rectangular side walls, and two rectangular roof panels. Don’t forget the small rectangles for the chimney. -
Shape the Doorway:
On the front wall panel, use a needle tool to trace a large arched doorway. Carefully cut this arch out completely, but save the clay piece—you will modify it to create the recessed door later. -
Create Window Openings:
Cut out arched windows on the side panels and a circular window near the peak of the front panel. Keep the shapes simple for now; we will add the crossbars separately for a cleaner look. -
Stiffen the Slabs:
Let your cut pieces sit on a ware board for about 30-60 minutes until they reach a ‘leather-hard’ state. They should hold their shape when lifted but still be flexible enough to join.
Step 2: Assembly and Detail
-
Score and Slip:
Score the vertical edges of all your wall panels to create a rough texture. Apply a generous amount of slip to these scored areas to act as your glue. -
Construct the Walls:
Stand the walls up and press the scored edges together. Reinforce the inside corners by smoothing a small coil of soft clay into the seams to ensure a strong bond. -
Add the Roof:
Bevel the top edges of the walls slightly so the roof sits flush. Score, slip, and attach the two roof panels, pressing the peak seam together gently but firmly. -
Install the Chimney:
Assemble your small chimney box. Cut a V-notch at the bottom so it fits over the roof peak, then score and attach it. I prefer to place it slightly off-center for a whimsical look. -
Make the Recessed Door:
Take the clay arch piece you saved earlier and trim it down slightly so passing light can escape around the edges. Score vertical lines into it to mimic wooden planks and add a tiny ball of clay for a doorknob. -
Attach the Door:
Attach the door slab from the *inside* of the house, positioning it slightly recessed behind the framed opening to give the house depth. -
Craft Window Crossbars:
Roll very thin coils or cut tiny strips of clay. Carefully place them into your window openings to form crosses, using a drop of water to adhere them to the window frames. -
Texture the Surface:
Using a sponge or a stiff brush, gently tap the exterior surfaces of the house. This creates a stone-like, stucco texture that catches the light beautifully. -
Ventilation Holes:
Use a small hole cutter or a straw to poke random holes across the roof. These modify the lighting effect and allow heat to escape if you use real candles. -
Smoothing Edges:
Check all corners and cutouts. Gently smooth any sharp or ragged burrs with a slightly damp finger or sponge for a professional finish.
Clean Lines Tip
When cutting windows, let the clay firm up slightly more than usual. This prevents the delicate frames from warping or dragging while you run the knife through.
Step 3: Finishing
-
Drying:
Cover the house loosely with plastic for the first day to equalize moisture, then uncover and let it dry slowly and completely for several days. -
Bisque Fire:
Fire the completely dry piece in a kiln to cone 04 (or according to your clay’s specific temperature). -
Glazing (Optional):
For the sandy look in the photo, leave the clay unglazed or apply a very thin matte white wash. If you want a shiner finish, brush on a clear satin glaze. -
Final Firing:
Fire the piece a second time to mature the clay or set the glaze. Once cool, place a battery-operated tea light inside.
Creative Spark
Before firing, press dried herbs or lace into the wet clay walls to create intricate, embossed fossil-like patterns instead of the stucco texture.
Light a candle inside your new creation and enjoy the intricate shadows it casts on your walls
Spiral Wrap Slab Lantern
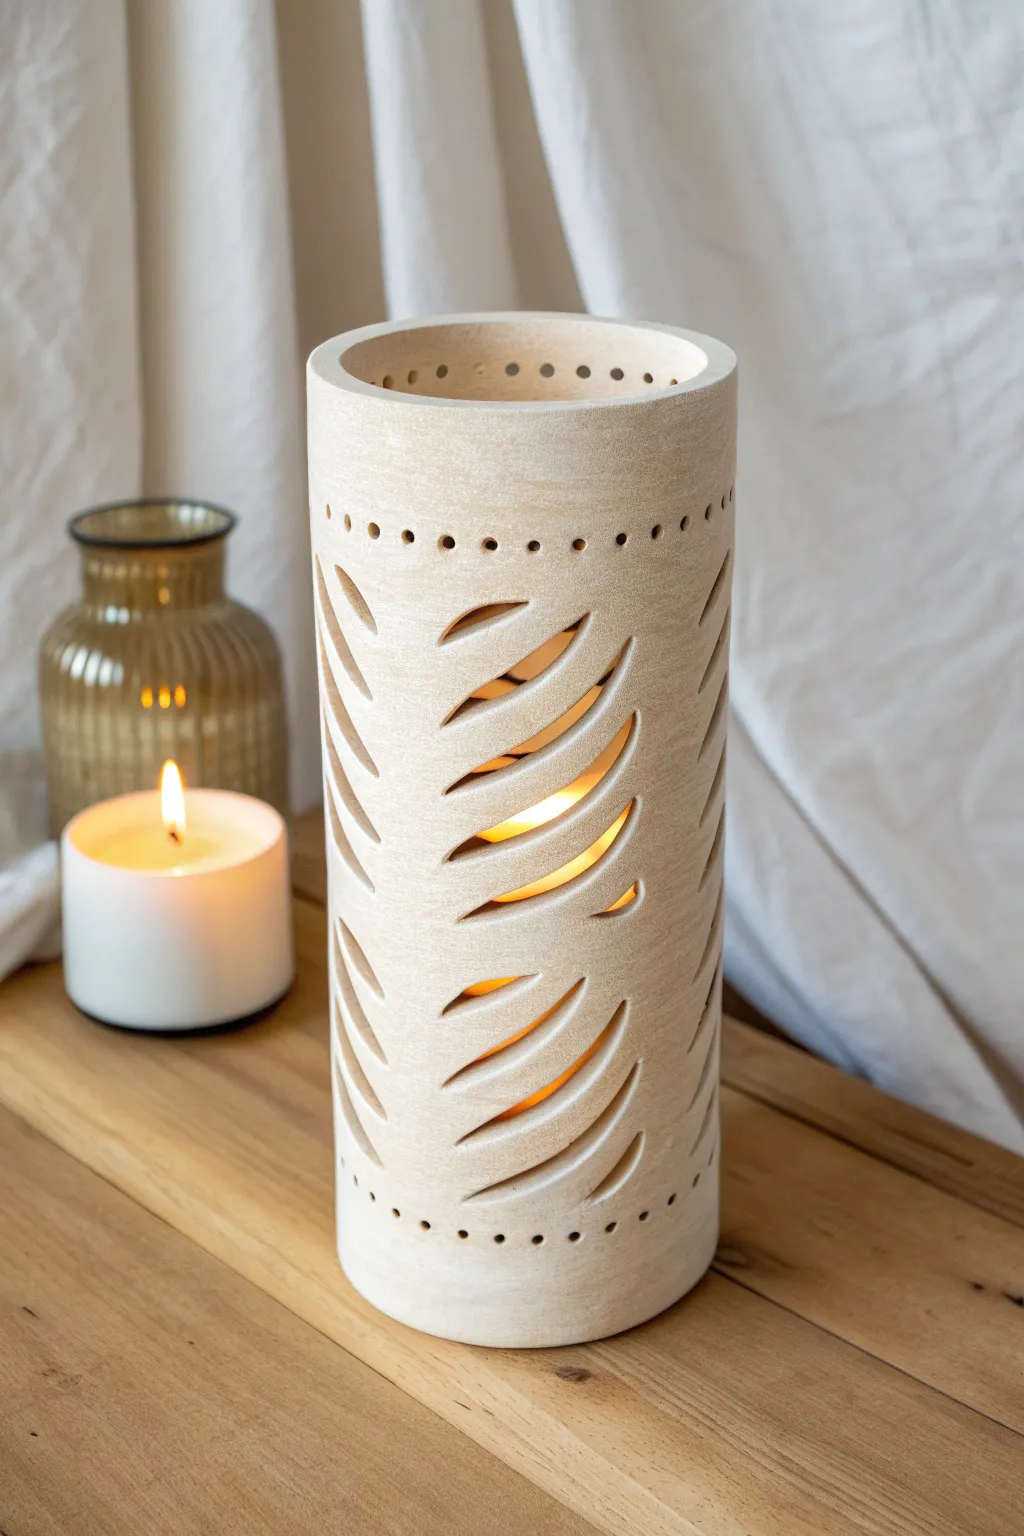
This elegant cylindrical lantern mimics the sweeping patterns of windblown sand or natural leaves with its rhythmic cutouts. The unglazed finish highlights the raw, sandy texture of the clay, creating a warm, earthy glow when lit from within.
Step-by-Step Tutorial
Materials
- Stoneware clay with grog (sandy texture)
- Rolling pin
- Thickness strips or slab roller (approx. 1/4 inch)
- Can or rigid cylinder form (for shaping)
- Fettling knife
- Design template (optional)
- Needle tool
- Loop tool or carving knife
- Drill bit tool or circular hole cutter (small)
- Serrated rib or scoring tool
- Slip
- Sponge
Step 1: Preparing the Slab
-
Roll out the clay:
Begin by wedging your clay to remove air bubbles. Roll it out into a long effortless rectangular slab, aiming for an even thickness of about 1/4 inch. Using thickness strips on either side of your rolling pin is a lifesaver here to keep it perfectly uniform. -
Smooth the surface:
Before cutting, run a soft rib over the surface of the slab. This compresses the clay particles and creates that beautiful, smooth finish you see in the photo, masking any canvas texture from your workspace. -
Measure and cut:
Wrap a measuring tape or piece of string around your chosen cylinder mold to determine the circumference. Add about half an inch for the overlap seam. Cut your slab into a clean rectangle based on these dimensions. -
Stiffen the slab:
Let the slab sit out for a short while until it reaches a ‘soft leather-hard’ state. You want it flexible enough to bend without cracking, but firm enough to hold its shape while you carve.
Step 2: Carving the Design
-
Mark the spiral pattern:
Using a needle tool, lightly sketch two columns of sweeping, leaf-like curves. Notice how the curves in the image stack neatly—start wide at the center and taper significantly toward the edges. -
Cut the primary shapes:
Use a sharp fettling knife or scalpel to carefully cut out these curved shapes. Keep your blade vertical to ensure clean, perpendicular walls on the cutouts. -
Refine the edges:
Once the clay is removed, smooth the inner edges of the cutouts with a damp detail sponge or your fingertip to remove sharp burrs. -
Add texture holes:
Using a small hole cutter or drill tool, punch a horizontal row of small circles near the top rim and another row near the bottom edge. These tiny dots add a lovely finishing detail that frames the larger carvings.
Slumping Issues?
If your cylinder collapses when you remove the mold, the clay was too wet. Re-wrap it around the form and let it dry for another hour or use a heat gun carefully.
Step 3: Assembly
-
Prepare the mold:
Wrap your cylinder form in a layer of newspaper or paper towel. This prevents the clay from sticking to the form and allows the clay to shrink slightly as it dries without cracking. -
Form the cylinder:
Carefully lift your carved slab and wrap it around the mold. I generally like to stand the mold upright and wrap the clay around it, rather than rolling the mold onto the clay. -
Score and slip:
Where the two ends of the slab meet, aggressively score (scratch) both surfaces and apply clay slip. Press the ends together firmly to create a seam. -
Blend the seam:
Use a wooden modeling tool to blend the clay across the seam line, both inside and out, until the join is invisible. Smooth it over with a sponge. -
Refine the shape:
While still on the mold, check that the cylinder is circular and not oval-shaped. Gently pat any uneven areas. -
Remove the mold:
once the clay has stiffened enough to stand on its own without sagging (usually late leather-hard), carefully slide the cylinder mold out.
Level Up: Colored Light
Apply different colored underglazes to the *inside* of the cylinder before firing. When the candle is lit, it will reflect a tinted glow through the cutouts.
Step 4: Finishing
-
Clean up:
Go over the entire piece with a very slightly damp sponge to remove any final fingerprints or rough spots, paying special attention to the rim. -
Dry slowly:
Cover the lantern loosely with plastic to let it dry slowly over several days. This prevents warping. -
Bisque fire:
Fire the piece to cone 04 (or your clay’s bisque temperature). -
Final fire:
For the look in the image, leave the clay unglazed to appreciate the stone texture, or apply a clear matte glaze. Fire to the maturity temperature of your specific stonware clay (likely cone 5/6 or 10).
Place a tea light inside your finished vessel and watch the light dance through your handcrafted spirals
Glaze-Dipped Ombre Cutout Lantern
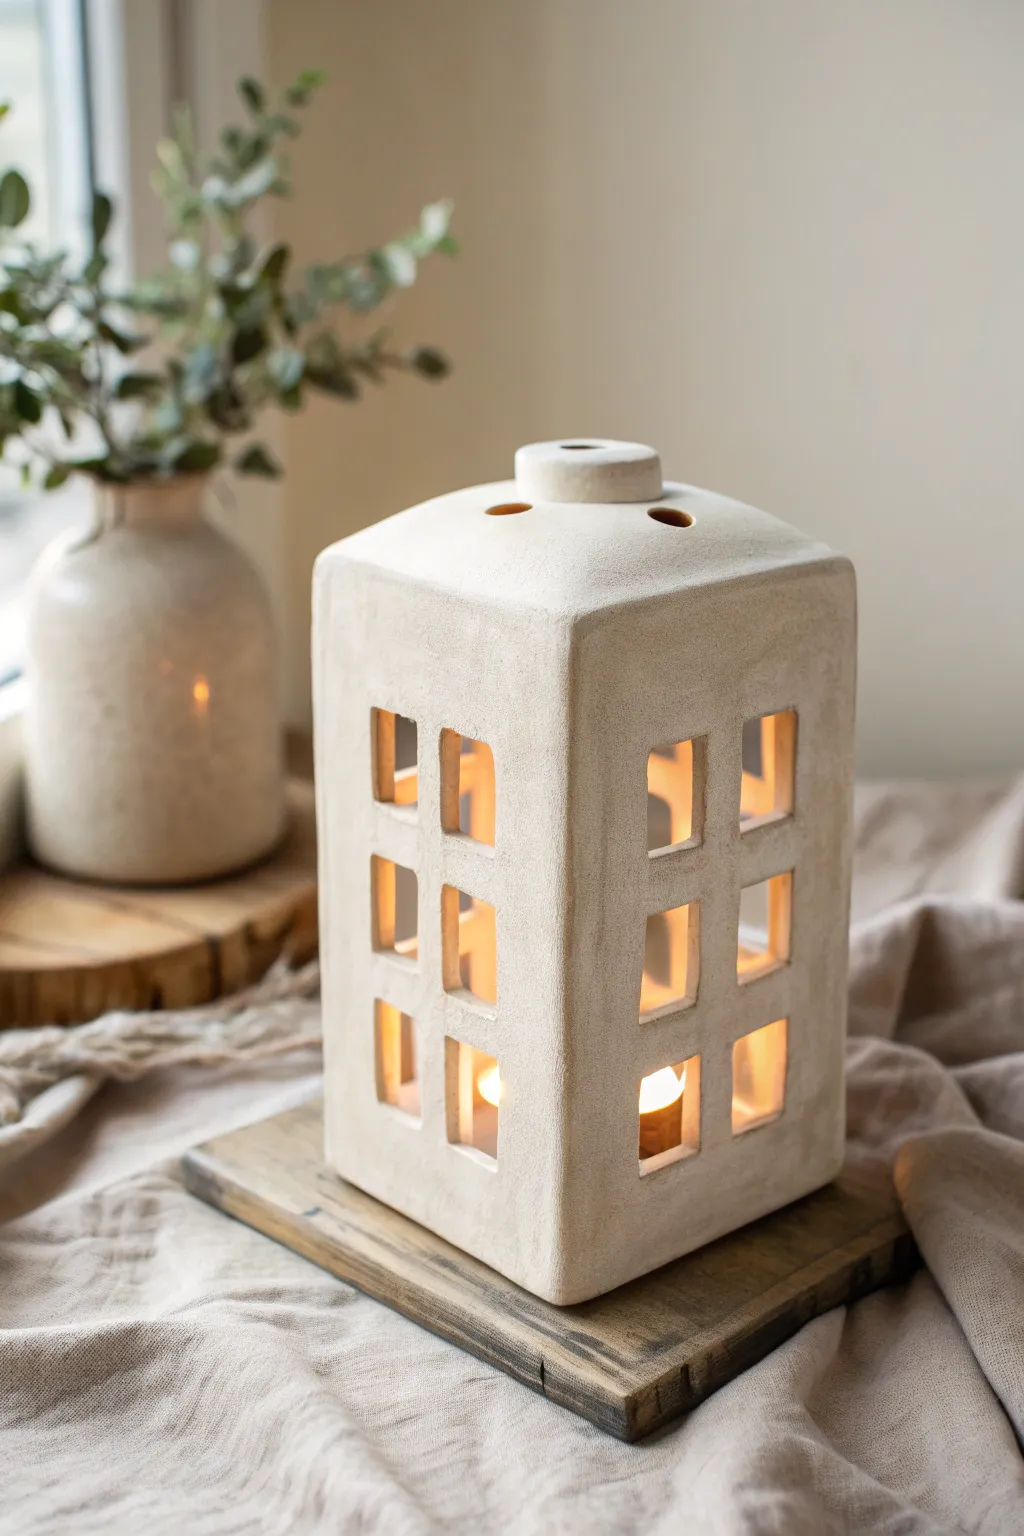
Create a charming architectural element for your mantle or table with this slab-built clay lantern. Its clean lines, grid-style window cutouts, and soft matte texture give it a warm, modern farmhouse feel perfect for housing tealights.
Detailed Instructions
Materials
- Light-colored stoneware clay (with fine grog)
- Rolling pin with texture canvas or wooden guides
- Fettling knife
- Metal or wooden rib
- Ruler/Straight edge
- Square cutter or precise stencil
- Slip and scoring tool
- Sponge
- Matte white or beige glaze
- Kiln access
Step 1: Preparing the Slabs
-
Roll the clay:
Begin by wedging your clay thoroughly to remove air pockets. Roll it out into a large, consistent slab approximately 1/4 inch thick. Using wooden guide sticks on either side of your rolling pin helps ensure an even thickness throughout. -
Smooth the surface:
Before cutting, take a rubber or metal rib and gently compress the clay surface on both sides. This aligns the clay particles, preventing warping later, and creates that smooth canvas we need for the walls. -
Cut the walls:
Measure and cut four identical tall rectangles for the walls. For the lantern shown, aim for about 4 inches wide by 8 inches tall. Create 45-degree bevel cuts on the long vertical edges where the walls will join. -
Form the roof pieces:
Cut a square piece slightly larger than your wall width for the top. Gently drape this over a small hump mold or curve it slightly with your hands to create a subtle dome shape, rather than a flat lid.
Clean Corner Tip
When cutting your windows, cut an ‘X’ from corner to corner inside the square first. This releases tension and makes removing the clay triangles easier without warring the grid bars.
Step 2: Creating the Windows
-
Mark the grid:
While the slabs are leather-hard (stiff but still cold to the touch), lightly sketch a grid for your windows. Leave a solid border of about 1 inch at the bottom and 0.5 inches between each window pane. -
Cut the panes:
Use a sharp fettling knife or a specialized square cutter to remove the clay for the windows. I find it helpful to cut the corners first and then connect them to keep the lines crisp. -
Refine the edges:
Once the windows are cut, use a slightly damp sponge or your fingertip to smooth the sharp interior edges of each cutout. This softens the look and prevents glaze from chipping off sharp corners later. -
Add ventilation:
On the roof piece, punch 2-4 small circular holes using a hole cutter or straw. This is crucial for heat escape when a candle is lit inside.
Level Up: Texture
Before cutting walls, roll the wet slab onto a piece of canvas or rough linen. This imprints a subtle fabric texture that catches matte glaze beautifully.
Step 3: Assembly
-
Score and slip:
Generously score (scratch) the beveled edges of your wall pieces and apply slip (liquid clay). This creates the ‘glue’ for your joinery. -
Construct the tower:
Stand the walls up and press the beveled edges together to form a rectangular tube. Reach inside to smooth the seam with a coil of clay for extra reinforcement. -
Attach the roof:
Score and slip the top edge of the walls and the underside of your roof piece. Gently press the domed roof onto the walls, blending the clay downwards on the outside so the seam disappears completely. -
Add the chimney detail:
Roll a small, thick ring of clay or use a small hollowed knob. Attach this to the center of the roof, over a ventilation hole, to mimic a chimney cap. -
Final smoothing:
Wait until the assembled piece is firmly leather-hard. Take a metal rib or a slightly damp sponge and go over the entire exterior to remove fingerprints and refine the corner sharpness.
Step 4: Firing and Glazing
-
Bisque fire:
Allow the lantern to dry slowly under loose plastic for several days to prevent cracking. Once bone dry, bisque fire it to cone 04 (or your clay’s specific temperature). -
The glaze application:
For the look in the image, select a matte white or stone-colored glaze. Pour the glaze inside first, swivel to coat, and pour out. Then, dip or brush the exterior. -
Glaze wiping:
If you want a more rustic texture, gently wipe back some of the glaze on the edges with a sponge, allowing the clay body to peek through slightly. -
Final fire:
Fire again to the maturity temperature of your glaze and clay body.
Place a tea light inside and enjoy the soft, flickering shadows cast by your new handmade lantern
Word-and-Pattern Projection Lantern
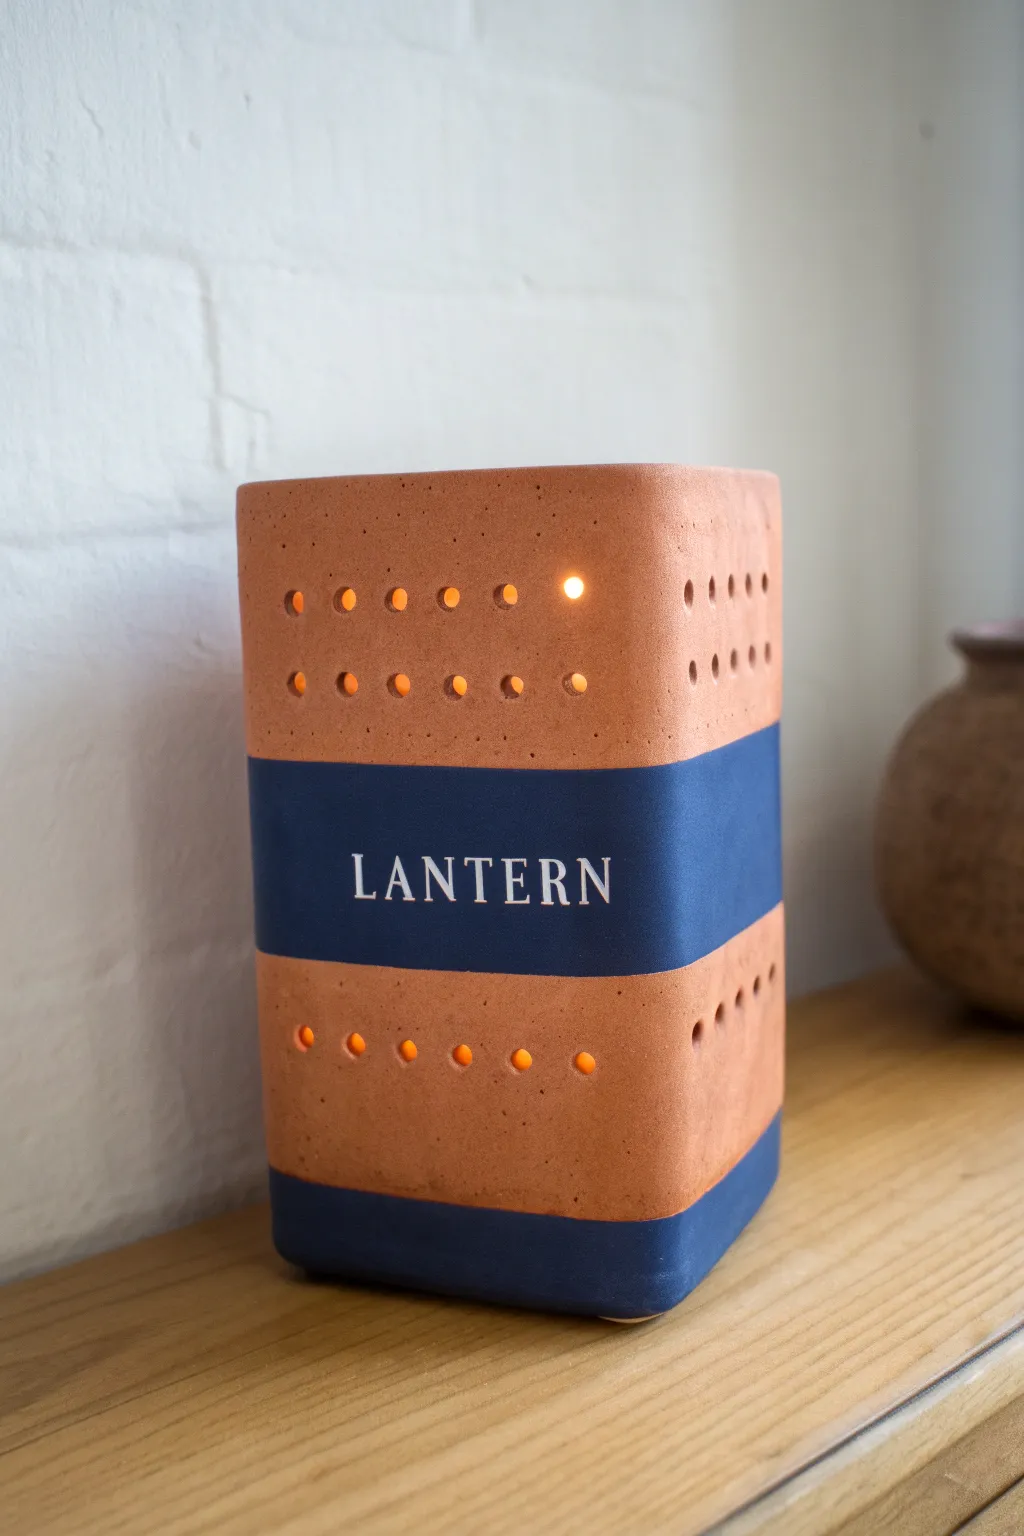
This striking rectangular lantern combines the warmth of raw terracotta with the bold sophistication of navy blue bands. The simple drilled pattern creates a lovely warm glow, while the custom stamped text adds a personalized graphic touch to your decor.
Step-by-Step
Materials
- Terracotta colored stoneware clay (smooth or with fine grog)
- Rolling pin
- Two long wooden guide strips (approx. 5-6mm thickness)
- Rectangular paper template (approx. 10×15 inches)
- Fettling knife or craft knife
- Slip and scoring tool
- Joinery sponge
- Hole punch tool or drill bit (approx. 5-8mm diameter)
- Letter stamp set (serif font)
- Navy blue underglaze
- Flat shader brush
- Masking tape or painter’s tape
- Clear matte glaze (optional)
- Ruler
Step 1: Creating the Slab Body
-
Roll out the slab:
Begin by wedging your terracotta clay to remove air bubbles. Place it between your wooden guide strips and roll it out into a large, even slab. Smooth both sides with a kidney rib to compress the clay particles. -
Cut the form:
Place your rectangular paper template onto the slab. Using a sharp fettling knife and a ruler, cut out the main rectangle that will form the four walls of the lantern. Cut a separate, smaller square for the base. -
Texture and stiffen:
Let the slab sit until it reaches a soft leather-hard stage. This makes it sturdy enough to stand up but flexible enough to bend without cracking. -
Measure the bands:
Lightly mark horizontal lines across your slab where the painted bands will eventually go. This helps you plan where to punch the holes so they don’t interfere with the text area.
Clean Lettering
If underglaze smudges outside the stamped letters, let it dry completely. Then, lightly sand the surface with high-grit sandpaper to reveal the clean clay while leaving color in the depressions.
Step 2: Pattern and Stamping
-
Punch the holes:
Using a hole punch tool, create two rows of holes near the top edge and two rows near the bottom edge. Ensure the spacing is consistent; I find using a ruler as a visual guide helps keep the lines straight. -
Clean the edges:
Smooth out the little burrs of clay left behind by the hole punch using a soft, damp sponge or your finger. -
Stamp the text:
Locate the center of the slab. Press your letter stamps into the clay to spell ‘LANTERN’ (or your chosen word). Apply firm, even pressure to get a crisp impression without pushing all the way through. -
Bevel the edges:
Cut the vertical ends of your main slab at a 45-degree angle. This beveled cut will create a stronger, seamless corner joint when you fold the lantern.
Step 3: Assembly and Decoration
-
Form the cylinder:
Score the beveled edges and apply clay slip. Carefully stand the slab up and curve it into a rounded rectangular tube, pressing the beveled ends together firmly. -
Secure the seam:
Blend the seam on the inside using a modeling tool. On the outside, smooth it gently so the join becomes invisible. -
Attach the base:
Score and slip the bottom edge of your lantern walls and the perimeter of your base square. Press the walls onto the base and blend the clay to seal it. -
Refine the shape:
Gently paddle the sides with a wooden paddle or flat board to encourage a sharper, more rectangular shape rather than a perfect cylinder. -
Bisque fire:
Allow the piece to dry slowly and completely before bisque firing it according to your clay’s specifications. -
Masking the bands:
Once bisque fired, use masking tape or painter’s tape to mark off the central band and the bottom band. Ensure the tape edges are pressed down tightly to prevent bleed. -
Apply underglaze:
Paint three coats of navy blue underglaze into the exposed banded areas and carefully fill in the stamped letters. Peel the tape away while the last coat is still slightly damp for a crisp line. -
Final wipe:
If any underglaze got onto the raw clay areas, sponge it off gently. The letters should remain filled with blue. You can leave the raw clay unglazed or apply a thin clear matte glaze before the final firing.
Make it a Gift
Personalize this for weddings or housewarmings by stamping a family name, a significant date, or a coordinate location instead of the word ‘LANTERN’.
Set a tealight inside and watch how the precision holes cast a beautiful, orderly pattern of light across your room