
When you’re making clay faces, you don’t need perfection—you need personality. Here are my favorite clay face ideas that’ll help you play with expressions, features, and styles in a way that feels fun and totally doable.
Classic Smiley Face Charm
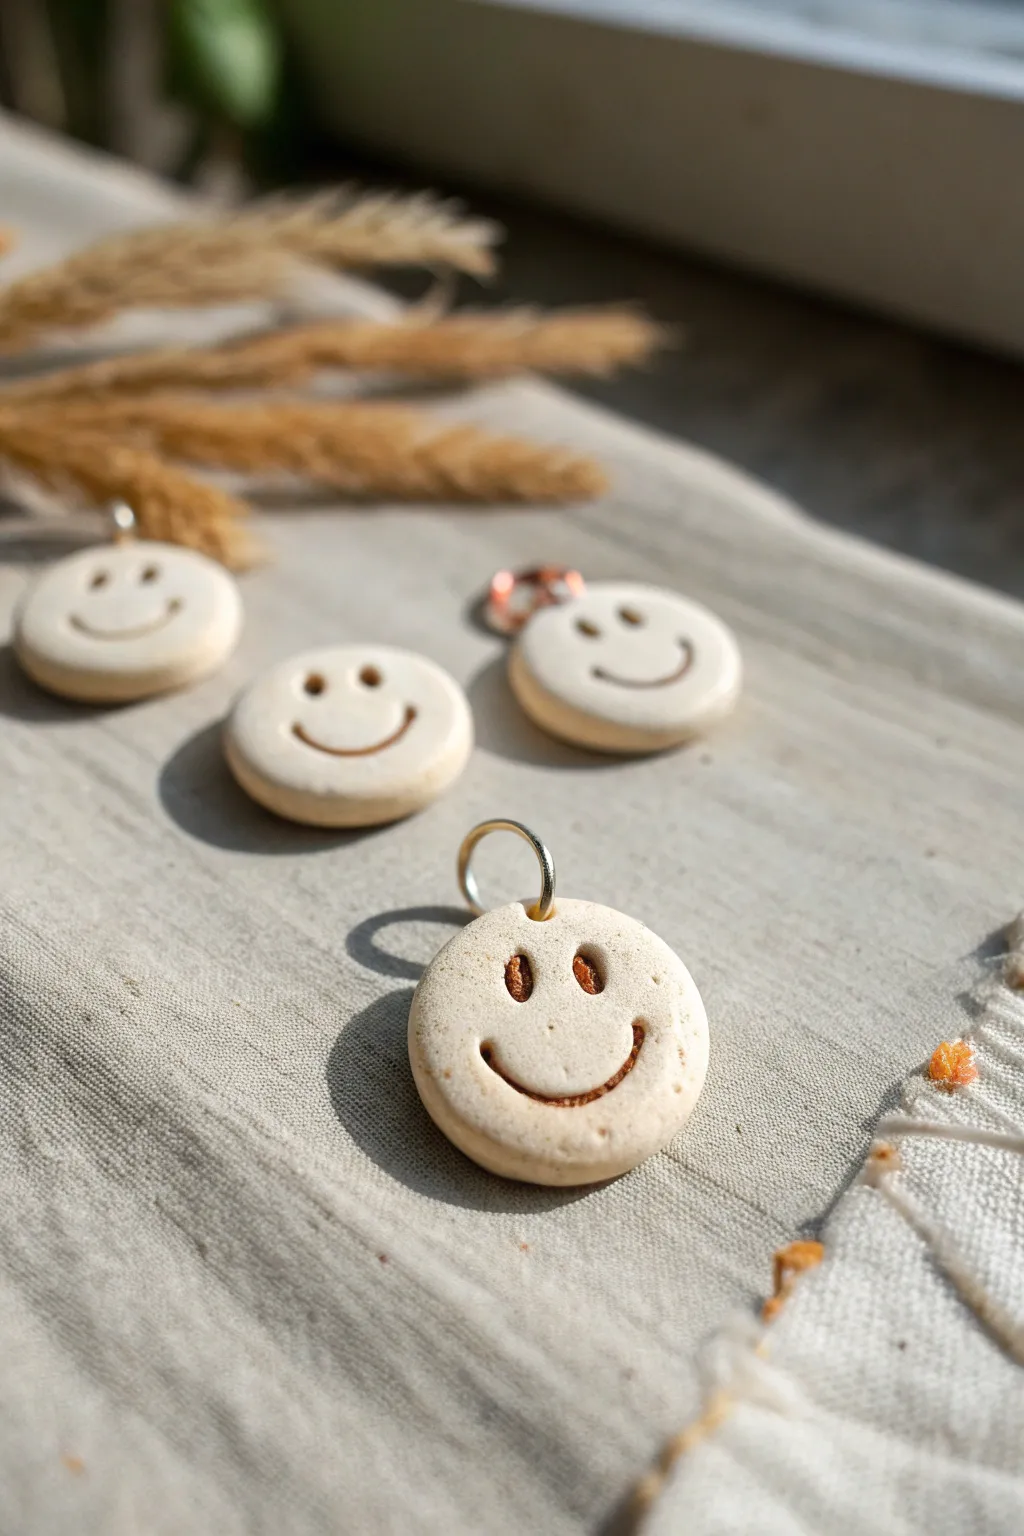
Bring a little joy to your jewelry collection with these simple, rustic smiley face charms. Their natural speckled finish and warm brown inlay give them a charming, handmade aesthetic perfect for necklaces or keychains.
Step-by-Step
Materials
- Beige or oatmeal-colored polymer clay (with speckles if available)
- Brown acrylic paint (burnt sienna or dark umber)
- Small round circle cutter (approx. 1 inch)
- Small jump rings (silver or copper)
- Needle tool or toothpick
- Small ball stylus tool
- Rolling pin or pasta machine
- Glossy glaze or polyurethane varnish (optional)
- Wet wipes or damp paper towel
- Baking sheet and oven (if using polymer clay)
Step 1: Prepping and Shaping
-
Condition the clay:
Start by warming up your beige polymer clay in your hands. Knead it thoroughly until it’s soft and pliable, ensuring there are no air bubbles trapped inside. -
Add texture (optional):
If your clay isn’t pre-speckled, I like to mix in a tiny pinch of ground black pepper or dried used coffee grounds at this stage to achieve that organic, oatmeal look. -
Roll out the slab:
Using your rolling pin or pasta machine, flatten the clay into a slab that is roughly 1/4 inch thick. You want it sturdy enough to hold the impression without warping. -
Cut the circles:
Press your circle cutter firmly into the clay to create your charm bases. Twist slightly before lifting to ensure a clean cut. -
Smooth the edges:
Gently embrace the edges of each circle with your fingertip to round them off slightly, removing any sharp angles left by the cutter.
Smudged Paint?
If the paint dries on the surface before you can wipe it off, dip a Q-tip in a tiny bit of rubbing alcohol or acetone to gently clean the raised areas.
Step 2: Creating the Face
-
Indent the eyes:
Take your small ball stylus tool and press straight down into the upper half of the circle to create two evenly spaced oval or round indentations for the eyes. -
Carve the smile:
Use the same tool or a slightly needle tool to draw a wide, U-shaped smile. Press deeply enough to create a distinct groove, but be careful not to puncture through to the back. -
Add the hardware hole:
Use a needle tool or toothpick to pierce a hole near the very top of the charm. Wiggle the tool slightly to ensure the hole is large enough for your jump ring. -
Double-check the hole:
Make sure the hole goes clean through to the other side and isn’t too close to the edge, or the clay might break later. -
Refine the surface:
Before baking, give the surface one final check over to smooth out any accidental fingerprints. -
Bake the charms:
Place your pieces on a baking sheet and bake according to your specific clay manufacturer’s instructions (usually around 275°F for 15-30 minutes for polymer clay).
Step 3: Finishing Touches
-
Cool down:
Allow the charms to cool completely after baking before attempting to paint them, as the clay hardens as it cools. -
Apply the paint:
Brush the brown acrylic paint generously over the face indentations, ensuring the paint gets deep into the crevices of the eyes and mouth. -
Wipe away excess:
While the paint is still wet, take a damp baby wipe or paper towel and gently wipe across the surface of the charm. This removes the paint from the raised areas but leaves it trapped in the grooved face design. -
Seal the piece (optional):
If you want extra durability or a shine, apply a thin layer of clay varnish or glaze over the entire charm once the paint is fully dry. -
Attach hardware:
Open a jump ring by twisting it sideways with pliers. Thread it through the hole at the top of your charm. -
Close the ring:
Twist the jump ring back into a closed position, ensuring the ends meet perfectly flush so the charm doesn’t slip off.
Make It 3D
Instead of carving the face, roll tiny balls and snakes of dark brown clay and press them onto the surface before baking for a raised relief effect.
Now you have a set of friendly little charms ready to be worn or gifted


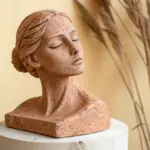
Pinch-Pot Face Head
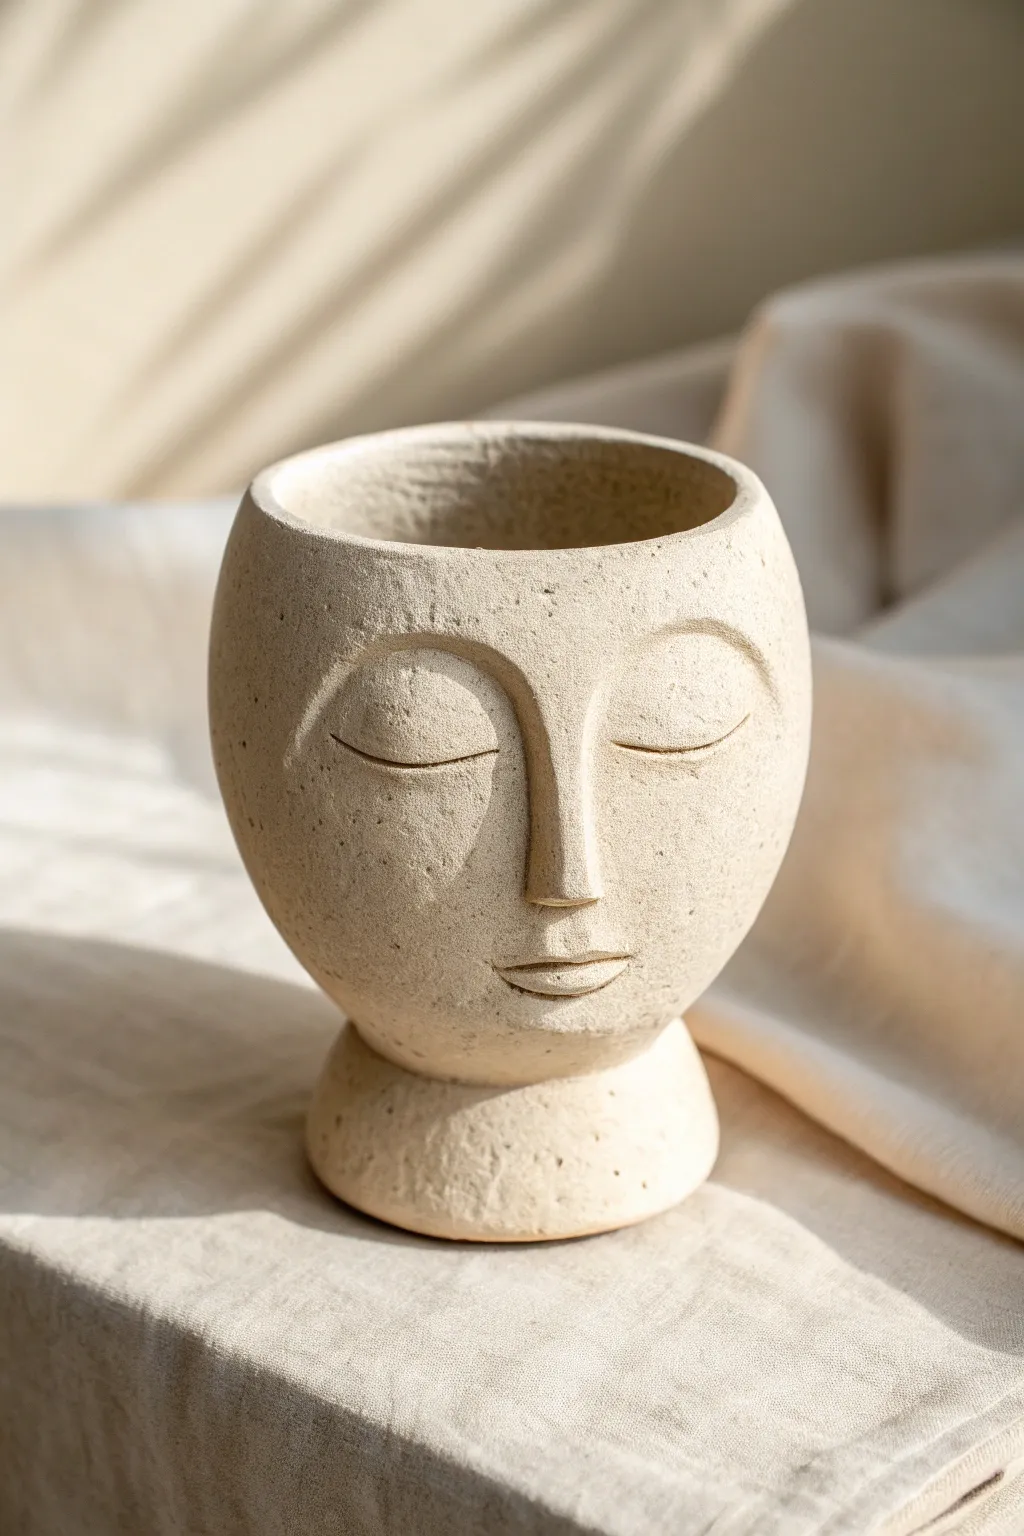
Sculpt a moment of calm with this elegant pinch-pot face planter, featuring a sandy, speckled texture and tranquil closed-eye expression. This project combines basic hand-building techniques with subtle facial modeling to create a timeless sculptural vessel holding your favorite small plant.
Step-by-Step Tutorial
Materials
- Speckled buff stoneware clay (or polymer clay with granite finish)
- Small bowl of water
- Pony sponge or smooth finishing sponge
- Needle tool
- Wooden modeling tool (spatula shape)
- Rib tool (kidney scraper)
- Scoring tool or serrated kidney
- Rolling pin
- Canvas mat or work board
Step 1: Forming the Base Structure
-
Prepare the primary clay ball:
Start with a ball of clay roughly the size of a large grapefruit. Wedge it thoroughly to remove air bubbles, then pat it into a smooth sphere. -
Open the pinch pot:
Hold the sphere in one hand and press your thumb into the center, stopping about a half-inch from the bottom. Gently pinch and turn the clay to open up the bowl shape. -
Shape the vessel wall:
Continue pinching upwards to thin the walls evenly. Aim for a slightly taller, deeper bowl shape rather than a wide, shallow one, as this will become the head. Maintain a wall thickness of about 1/4 inch. -
Create the pedestal foot:
Take a separate, smaller amount of clay and form a short, thick cylinder/disk slightly wider at the bottom than the top. This will be the neck-like base. -
Join the pieces:
Score the bottom of your pinch pot and the top of the pedestal cylinder well. Apply slip (clay water glue), press them firmly together, and smooth the seam completely with a wooden tool so it looks like one continuous piece.
Nose Troubleshooting
If the nose looks like a separate blob, you haven’t blended enough. Smear the clay deeply into the pot’s surface, then rebuild the height if it gets flattened.
Step 2: Sculpting the Facial Features
-
Map out the face:
Using your needle tool lightly, sketch a vertical center line to help with symmetry. Mark where the nose bridge starts and where the chin will end. -
Add volume for the nose:
Roll a small coil of clay for the nose bridge. Score and slip it onto the center line, extending from the forehead area down to the nose tip. -
Blend the nose bridge:
Using your thumb, firmly smear the edges of the nose coil into the main pot. The top of the nose should curve smoothly into the brow bone area just like the reference. -
Define the eye sockets:
Press your thumbs gently on either side of the nose bridge to create subtle depressions. This creates the ‘shadow’ area where the eyes sit. -
Sculpt the closed eyelids:
Roll two small, flattened semi-circle shapes. Attach them into the eye sockets. Use a modeling tool to smooth the top edge into the brow bone, but leave the bottom curved line distinct to represent the closed lash line. -
Refining the brow connection:
I like to use a rib tool here to ensure the transition from the forehead to the nose bridge is seamless and slightly angular, giving that classic statue look. -
Form the lips:
Add a very small, flattened oval of clay below the nose. Cut a horizontal line through the middle for the mouth opening. -
Shape the mouth expression:
Use a small modeling tool to refine the lips. Enhance the ‘cupid’s bow’ slightly on the top lip and round out the bottom lip. Keep the expression neutral and relaxed.
Level Up: Green Hair
Since this is a planter, choose a trailing plant like ‘String of Pearls’ or ‘Burro’s Tail’ to act as cascading hair for your sculpture.
Step 3: Refining and Finishing
-
Smooth the surface:
Dampen your sponge slightly—squeeze it out well—and gently wipe over the entire face to remove harsh tool marks and soften the features. -
Enhance the texture:
If your clay isn’t naturally gritty, you can gently stipple the surface with a coarse sponge or a stiff brush to mimic the stone-like texture seen in the photo. -
Level the rim:
Check the top rim of the pot. If it’s uneven, trim it carefully with a needle tool or flatten it gently with a wooden paddle for a clean, professional finish. -
Final drying check:
Let the piece dry slowly under loose plastic for a day to ensure the nose and added features don’t crack away from the base as they shrink. -
Firing or sealing:
If using ceramic clay, bisque fire and then glaze with a matte, speckled cream glaze. If using polymer or air-dry clay, seal with a matte varnish once fully cured.
Once fired or cured, this peaceful visage is ready to bring a touch of mindfulness to your decor.


Slab Relief Face Plaque
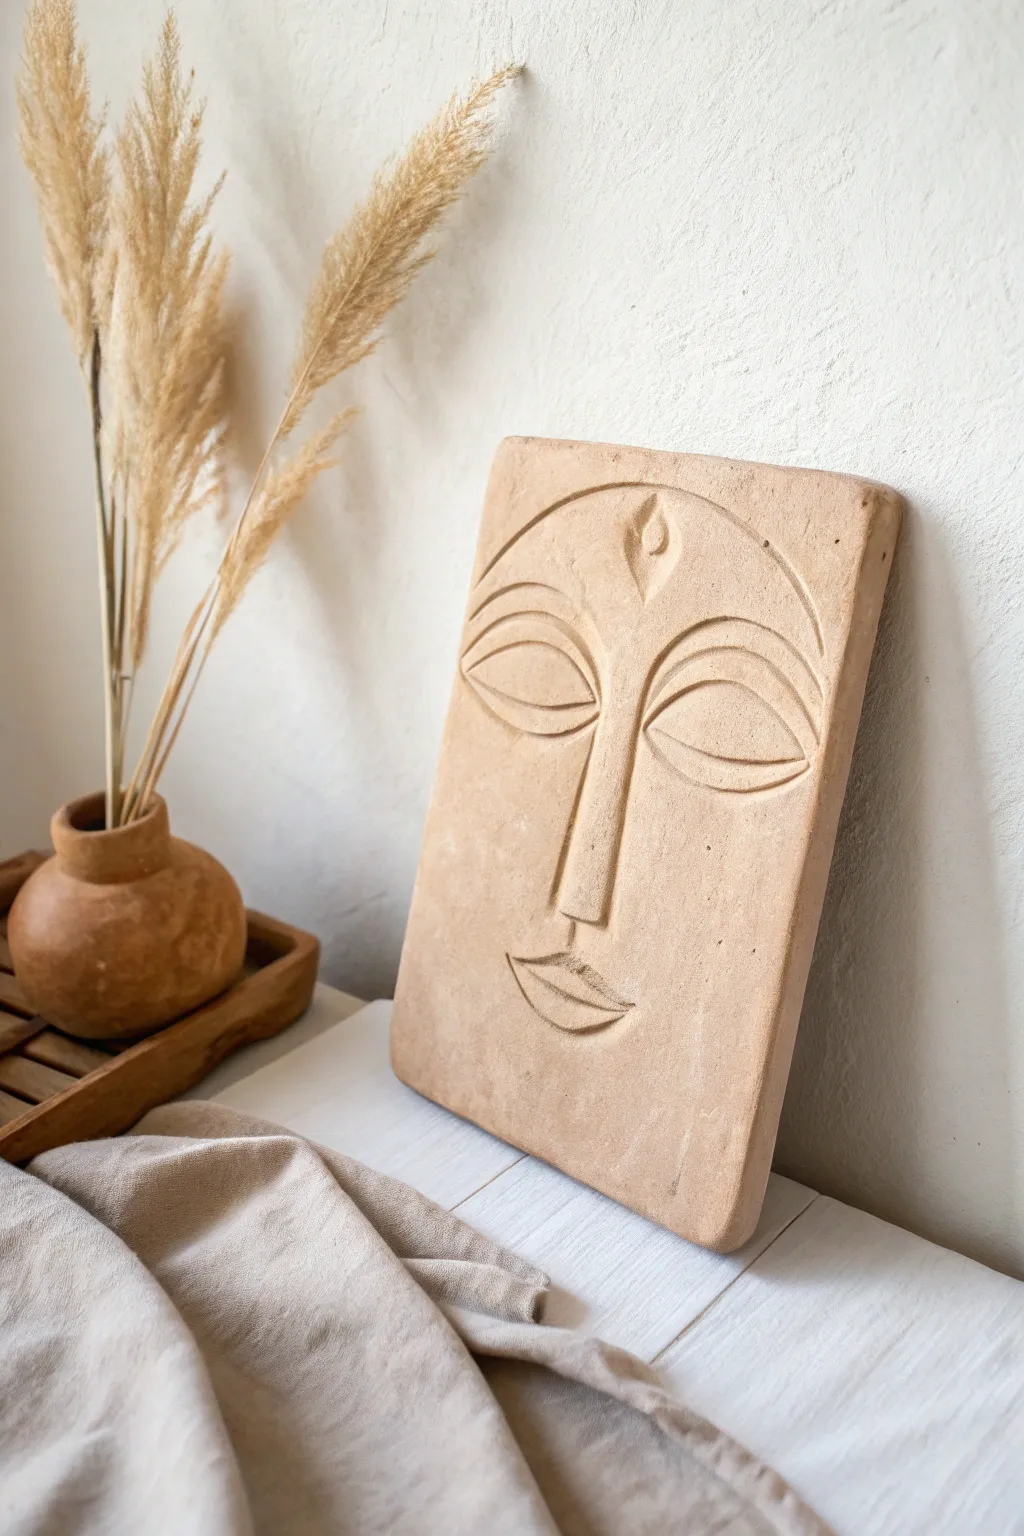
This project transforms a simple clay slab into a striking piece of serene wall art with a raw, earthy aesthetic. The stylized features and terra cotta tone evoke ancient pottery, making it a perfect addition to a natural or bohemian interior.
How-To Guide
Materials
- Terra cotta colored air-dry clay or kiln-fire earthenware
- Rolling pin
- Two wood guide slats (approx. 1/2 inch thick)
- Rectangular template (thick paper or cardboard)
- Fettling knife or sharp craft knife
- Needle tool
- Rubber kidney tool or soft sponge
- Loop carving tool (small U-shape)
- Water in a small dish
- Canvas or heavy fabric mat for working surface
Step 1: Preparing the Slab
-
Wedge the clay:
Begin by thoroughly wedging your clay to remove any air bubbles and insure a consistent texture. This is crucial for preventing cracks later on. -
Set up guides:
Place your wooden guide slats on either side of your fabric workspace. The slats ensure your plaque has an even thickness throughout. -
Roll the slab:
Roll your clay ball between the slats until the rolling pin rides along the wood guides. Aim for a thickness of about half an inch to give the piece substantial weight. -
Cut the rectangle:
Lay your paper template onto the smooth clay surface. Using your fettling knife held vertically, distinctively cut around the template to create a clean rectangle. -
Smooth the edges:
Dip your finger or a sponge lightly in water and run it along the cut edges. You want to soften the sharpness just enough so it looks finished but still handmade.
Warping Worries?
If corners curl up while drying, flip the slab over daily and place a small weighted board on the corners to gently press them back down flat.
Step 2: Drafting the Visage
-
Sketch the outline:
Take your needle tool and very lightly sketch the design directly onto the clay. Start with a central vertical line for the nose, then add two large almond shapes for eyes. -
Add arches:
Draw the curving brow line above the eyes, connecting them to the top of the nose bridge. Add a small teardrop shape on the forehead for the third eye detail. -
Define the mouth:
Sketch a simple, geometric mouth near the bottom of the plaque. I like to keep the lines slightly separated to emphasize the minimalist style shown in the photo.
Step 3: Carving the Relief
-
Carve the nose bridge:
Using the loop tool, carve away the negative space right next to the nose line. Instead of adding clay, you are creating relief by lowering the surface around the features. -
Deepen the eyes:
Carve a border around the almond eye shapes. Slope the carving gently so the eyelids appear raised compared to the surrounding cheek area. -
Define the brow:
Use the loop tool to create a clear separation between the brow arch and the forehead. The cut should be clean and decisive. -
Sculpt the lips:
Carefully remove a thin layer of clay around the lip outline. This makes the mouth pop forward without adding any extra material. -
Add separation lines:
Use the needle tool or a sharp knife to incise the deep line separating the upper and lower eyelids, as well as the center line of the mouth.
Ancient Gaze
Mix a tiny amount of black acrylic wash or dark wax and run it into the carved grooves after drying, then wipe back. This mimics age and adds depth.
Step 4: Refining and Finishing
-
Smooth tool marks:
Take a damp sponge or your finger and gently smooth out the rough ridges left by the carving tool. You want soft transitions, not jagged cuts. -
Texture the surface:
If your clay has become too slick, lightly dab it with a dry sponge or canvas scrap to bring back that matte, stone-like texture visible in the example. -
Create a hanging hole:
If you plan to hang this, gently carve a small keyhole notch or simple hole in the back of the slab while it is still leather-hard. -
Dry slowly:
Place the slab on a wire rack or drywall board. Cover it loosely with plastic for the first day to prevent the corners from curling upward as they dry. -
Final finish:
Once fully dry (or fired, if using kiln clay), leave the surface raw to maintain the natural sandy look.
Display your finished relief on a shelf alongside dried grasses for a complete organic look


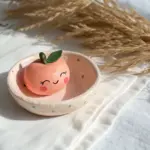
Cute Chubby Cheeks Face
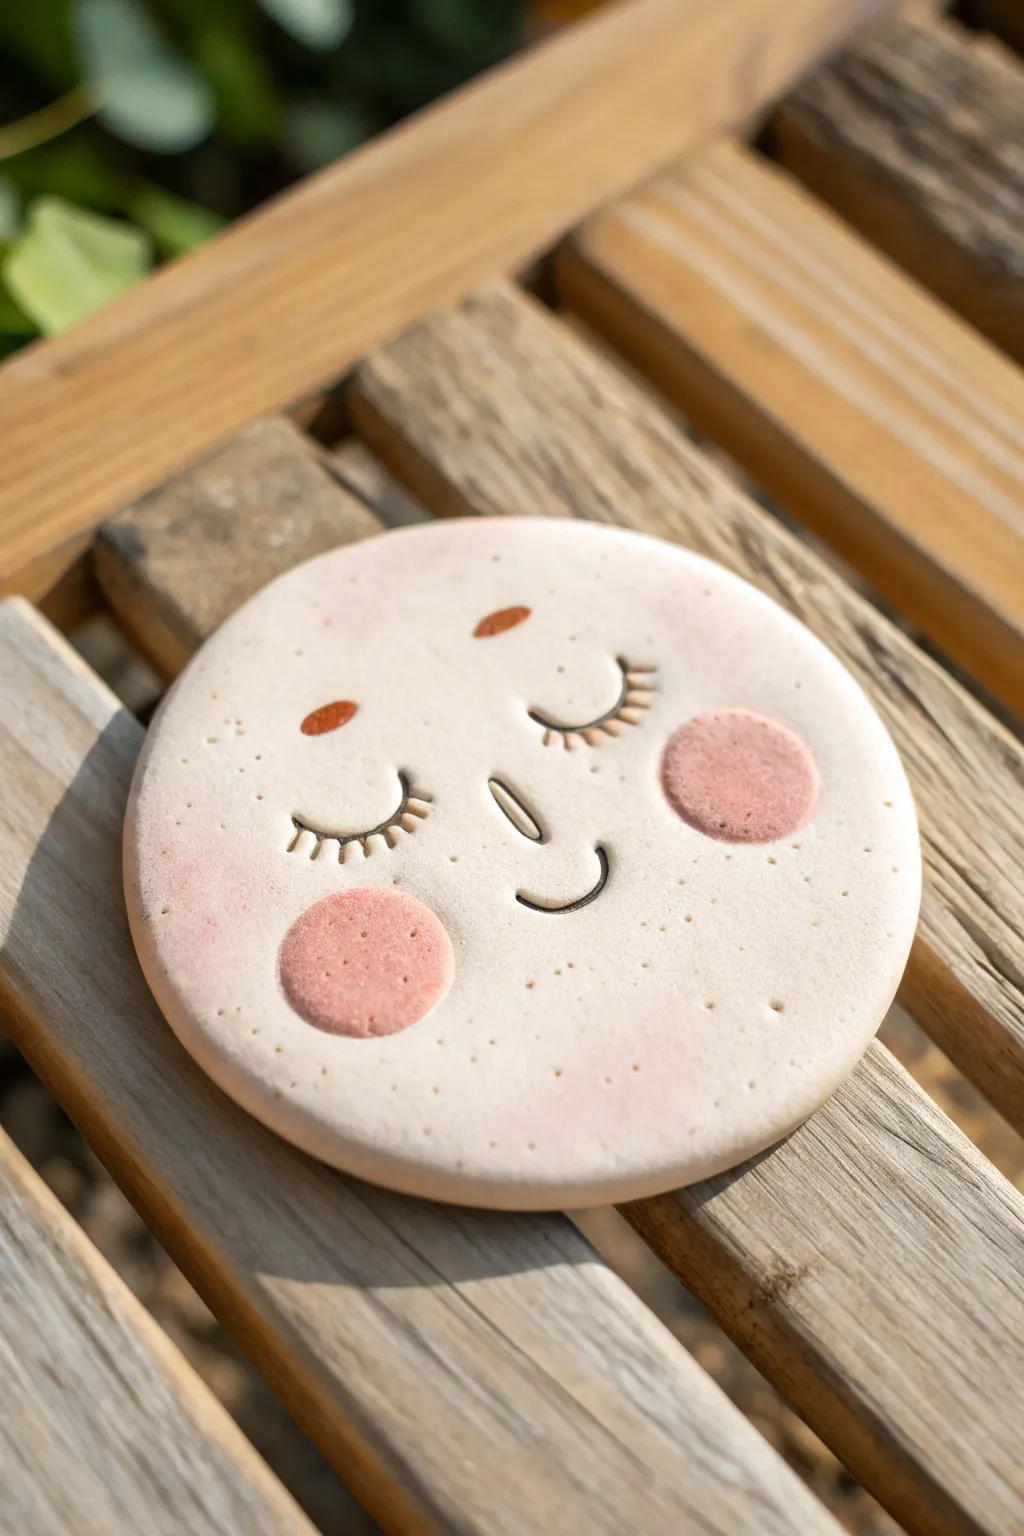
This adorable clay project captures the sweetness of a peaceful slumber with softly sculpted features and prominent rosy cheeks. The design features a smooth, round base with minimal, charming details that make it perfect for use as a coaster or a whimsical wall hanging.
Step-by-Step
Materials
- White polymer clay or air-dry clay
- Pink polymer clay (soft pastel shade)
- Terracotta or rust-colored clay (very small amount)
- Acrylic rolling pin
- Round cookie cutter (approx. 3-4 inches diameter)
- Needle tool or toothpick
- Ball stylus tool
- Black acrylic paint or fine-tip permanent marker
- Fine detail paintbrush
- Sandpaper (fine grit)
- Matte sealant or varnish
Step 1: Shaping the Base
-
Condition the clay:
Start by kneading your white clay until it is soft, pliable, and easy to work with. If you want that subtle speckled look seen in the photo, you can mix in a tiny pinch of black pepper or dried coffee grounds. -
Roll out the slab:
Using your acrylic rolling pin, roll the clay out to an even thickness of about 1/4 inch. Ensure the surface is smooth and free of air bubbles. -
Cut the circle:
Press your round cookie cutter firmly into the clay to create a clean circle. Remove the excess clay from around the edges before lifting the cutter. -
Smooth the edges:
Dip your finger in a little bit of water (for air-dry clay) or baby oil (for polymer) and gently run it around the circumference to soften any sharp cutting lines.
Clean Lines Hack
Before painting the carved lines, wipe the surface with a baby wipe. This removes dust from the grooves, ensuring the paint flows smoothly into the indented details.
Step 2: Creating the Features
-
Form the cheeks:
Take two equal-sized balls of the soft pink clay and flatten them into thin discs. These should be roughly the size of a large coin. -
Attach the cheeks:
Place the pink discs onto the lower half of the face, spacing them apart to leave room for the mouth. Press them down gently so they adhere but remain slightly raised for dimension. -
Add the eyebrows:
Using the rust-colored clay, roll two extremely tiny, short snakes. Position these high on the forehead area at a slight angle to create expressive eyebrows. -
Embed the eyebrows:
Press the eyebrow clay flat into the base so it becomes flush with the surface, rather than sitting on top. -
Carve the nose:
With your needle tool, gently impress a small vertical line in the center of the face, just above where the mouth will go. Keep it subtle. -
Carve the smile:
Use the needle tool or a small curved tool to impress a simple ‘U’ shape for the smiling mouth between the pink cheeks. -
Carve the eyes:
Draw two U-shaped curves for the closed eyes. Add three small lashes to the outer corner of each eye. I find using a lighter touch first helps map out the symmetry before committing to deeper lines.
Step 3: Finishing Touches
-
Texture the surface:
To mimic the stone-like texture, you can gently tap the surface (avoiding the painted features) with a crumpled piece of aluminum foil or a stiff-bristled toothbrush. -
Bake or dry:
If using polymer clay, bake according to the package instructions (usually 275°F for 15-30 minutes). If using air-dry clay, let it sit in a cool, dry place for 24-48 hours. -
Sand imperfections:
Once fully cured or dry, use fine-grit sandpaper to smooth out any rough edges on the rim of the circle. -
Darken the lines:
Dip a fine detail brush into black acrylic paint (or use a marker) and carefully trace inside the carved lines of the eyes, lashes, nose, and mouth to make them pop. -
Seal the piece:
Finish by applying a coat of matte varnish or sealant to protect the clay and give it a professional, finished look.
Make it Functional
Turn this into a wall hanging by poking a small hole near the top edge before baking. Thread a piece of leather cord or twine through it once finished.
Place your finished chubby-cheeked friend on your desk or shelf to add a touch of calm serenity to your space

The Complete Guide to Pottery Troubleshooting
Uncover the most common ceramic mistakes—from cracking clay to failed glazes—and learn how to fix them fast.
Winky Face With Bold Eyebrows

Capture the serene beauty of a daydreaming sun with this textured clay ornament. Blending celestial imagery with minimalist line art, this project creates a warm, earthy piece perfect for hanging near a window to catch the light.
Detailed Instructions
Materials
- Air-dry clay (terracotta or brown shade)
- Circular cookie cutter (approx. 3-4 inches diameter)
- Rolling pin
- Parchment paper or canvas mat
- Modeling tool (needle tool or toothpick)
- Small carving loop tool (optional, for deeper lines)
- Clean sponge and water
- Jute twine or hemp cord
- Straw or pen cap (for creating the hanging hole)
- Small round cutter or bottle cap (approx. 0.5 inch diameter)
Step 1: Preparation and Base Shape
-
Prepare your workspace:
Lay down parchment paper or a canvas mat to prevent sticking. Break off a handful of air-dry clay and knead it briefly until it is pliable and smooth. -
Roll the slab:
Use your rolling pin to flatten the clay into an even slab. Aim for a thickness of about 1/4 inch (6mm)—thick enough to be sturdy but thin enough to dry evenly. -
Cut the circle:
Press your large circular cookie cutter firmly into the slab. Remove the excess clay from around the edges before lifting the cutter to ensure a clean release. -
Smooth the edges:
Dip your finger in a tiny bit of water and run it gently around the circumference of the circle to soften any sharp ridges left by the cutter. -
Create the hanging hole:
Using a straw or a small pen cap, punch a hole near the top, centered about half an inch down from the edge. Twist the tool slightly as you pull it out to get a clean hole.
Cracking Up?
If you see cracks forming while drying, mix a tiny bit of wet clay into a paste (slip) and smooth it into the fissures immediately.
Step 2: Sculpting the Features
-
Position the sun eye:
Imagine the face’s layout. On the right side (the face’s left eye), press a small round cutter or bottle cap gently into the surface to create a raised circle representing the sun. Do not cut all the way through. -
Define the sun center:
Use a small tool or your finger to slightly dome or smooth the center of that small circle, making it distinct from the surrounding clay. -
Carve the sun rays:
Using a needle tool or small knife, carve radiating lines extending outward from the sun circle. Vary the lengths slightly for a natural, bursting effect. -
Outline the winking eye:
On the left side, carve a large, downward-curving arc for the closed eyelid. This should be roughly symmetrical to where the sun eye sits. -
Add eye details:
Carve a second, smaller arc inside the first to define the eyelid crease. Below the main lash line, press small vertical dashes into the clay to represent eyelashes. -
Sculpt the nose:
Draw a simple, L-shaped line starting near the inner corner of the winking eye and extending down the center. Use a modeling tool to deepen the nostril curve slightly. -
Carve the lips:
below the nose, carve the outline of the lips. Start with the center line, then add the upper and lower lip contours. Keep the shape simple and stylized. -
Detail the brows:
For the ‘bold eyebrow’ look, carve deep, confident strokes above the winking eye. You can texture this area with small hatched lines to simulate hair.
Step 3: Finishing Touches
-
Add freckles:
Take your needle point and gently poke random, shallow dots across the cheeks and nose area to create a speckled, freckled texture. I like to vary the pressure for different sized dots. -
Clean up burrs:
Once you are happy with the design, check for any little crumbs of clay (burrs) created by carving. Brush them away with a soft dry brush or smooth them carefully with a finger. -
Drying process:
Place the ornament on a flat surface away from direct heat. Let it air dry for 24-48 hours, flipping it over halfway through to prevent curling. -
Sanding (Optional):
If the edges feel rough after drying, you can lightly sand them with fine-grit sandpaper for a polished feel. -
Stringing:
Cut a piece of jute twine, thread it through the top hole, and tie a secure knot to create a rustic hanging loop.
Pro Tip: Clean Lines
For super crisp lines, wait about 15-20 minutes after rolling the slab before carving. slightly firmer clay holds detail better without dragging.
Hang your celestial friend in a sunny spot and enjoy the peaceful vibe it brings to your space
Simple Line-Art Face Carving
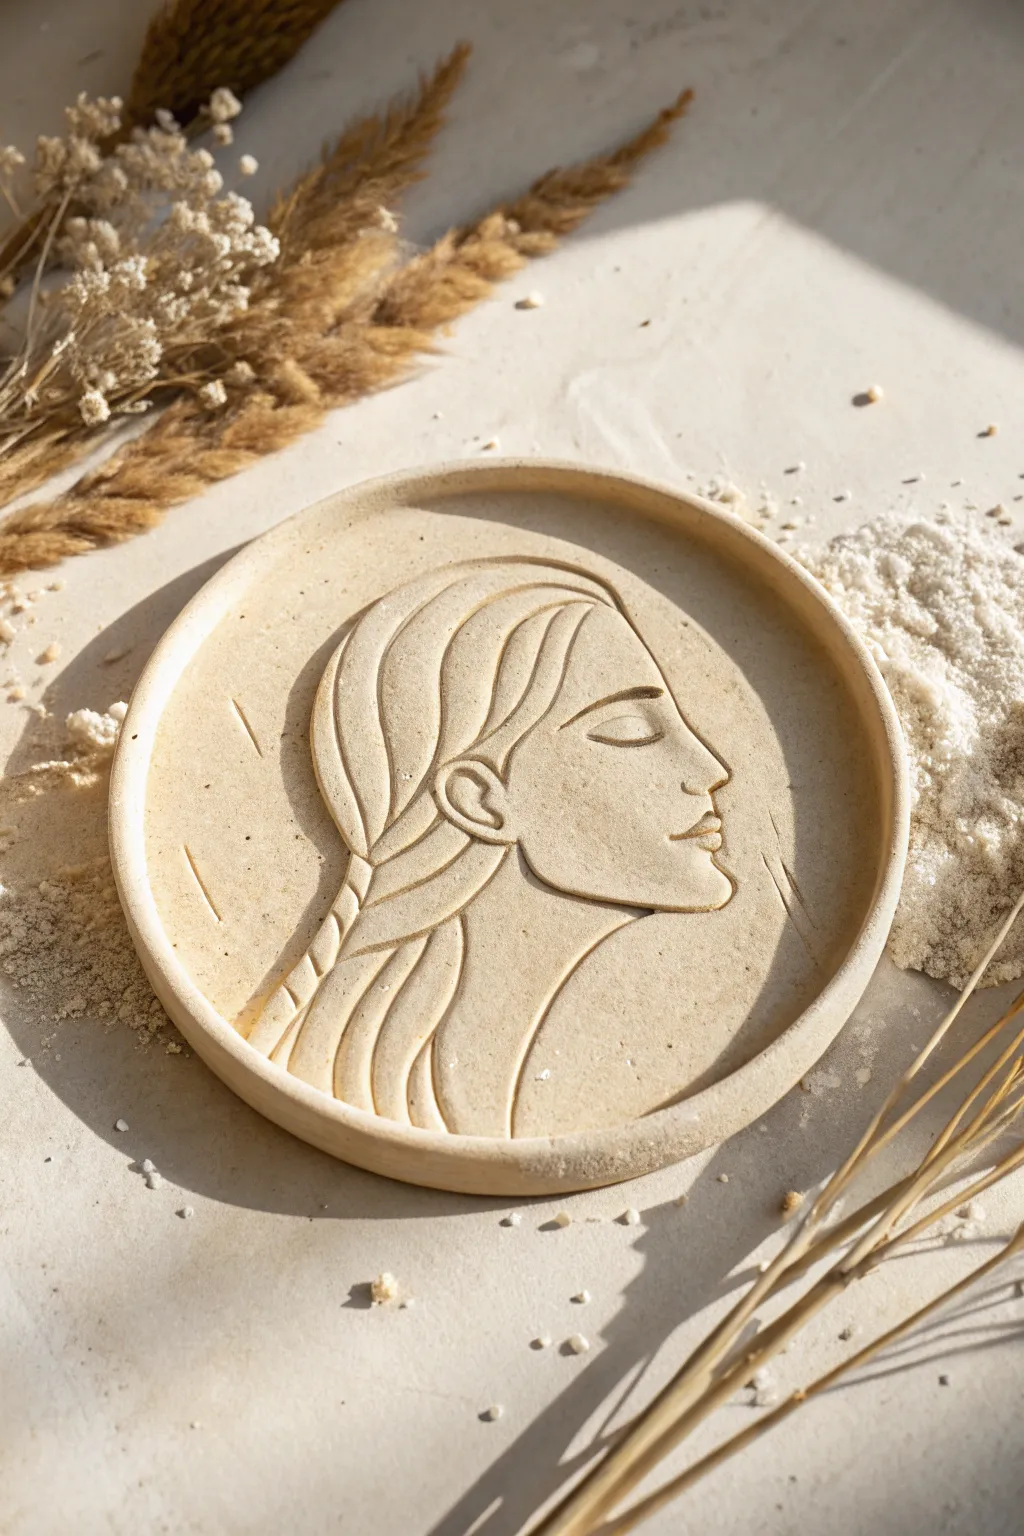
This elegant tray features a serene female profile carved in low relief, capturing a timeless line-art aesthetic. The speckled, sandy clay body adds a natural, organic texture that complements the smooth curves of the design perfectly.
How-To Guide
Materials
- Speckled buff stoneware clay (or polymer clay in a ‘granite’ or ‘sand’ finish)
- Round cookie cutter or template (approx. 4-6 inches)
- Rolling pin
- Two guide sticks / slats (approx. 1/4 inch thick)
- Needle tool
- Small loop tool or carving tool
- Rubber rib or smooth kidney tool
- Sponge
- Water slip (if using ceramic clay)
- Soft paintbrush
Step 1: Preparation & Base
-
Wedge the Clay:
Begin by thoroughly wedging your speckled clay to remove any air bubbles. If you are using polymer clay, condition it until it is soft and pliable. -
Roll the Slab:
Place your clay between two guide sticks to ensure an even thickness. Roll out a slab that is roughly 1/4 to 1/3 inch thick. I find that going slightly thicker allows for deeper carving without making the base too fragile. -
Cut the Circle:
Use your round cutter or a paper template with a needle tool to cut a perfect circle from the slab. -
Smooth the Surface:
Using a rubber rib or a slightly damp sponge, gently compress and smooth the surface of the circle to remove any canvas textures or rolling marks. -
Form the Rim:
Gently pinch up the edges of the circle to create a slight rim. You can also roll a very thin coil, score and slip the edge, and attach it to build a defined border, smoothing it seamlessly into the base.
Step 2: Sketching & Carving
-
Draft the Design:
Lightly sketch the outline of the face onto the clay surface using a needle tool. Keep your touch feather-light so you can smooth out mistakes if needed. Focus on the sweeping curve of the hair and the profile silhouette. -
Outline the Hair:
Start by deepening the lines that define the hair. Use the needle tool to incise the flowing strands, creating long, confident curves. -
Define the Profile:
Trace the forehead, nose, lips, and chin. These lines should be clean and continuous. Pay attention to the spacing between the nose and the upper lip. -
Carve the Relief:
Switch to a small loop tool. Gently excavate the clay adjacent to your main lines—specifically on the ‘negative space’ side—to make the face appear raised. You aren’t removing much material, just creating a slight bevel. -
Refine Features:
Use the loop tool to carefully carve out the eye shape and the detail of the lips. The eye is a simple closed curve with an arched brow above it. -
Add Texture Details:
Go back with your needle tool to add deeper accent lines inside the hair mass to suggest movement and volume. -
Create Background Accents:
Add a few simple, straight dashed lines in the background space behind and in front of the head to balance the composition, as seen in the reference image.
Clean Lines Pro Tip
When smoothing carved lines with a brush, use a distinct flicking motion to lift crumbs out of the grooves rather than just pushing them back into the clay.
Step 3: Finishing Touches
-
Soften Edges:
Take a soft paintbrush dipped in a tiny amount of water (or baby oil for polymer clay) and run it over your carved lines. This melts away the harsh clay crumbs and sharp burrs left by the tools. -
Final Smooth:
Check the rim of the tray one last time. Run a damp sponge or your finger along the edge to ensure it is perfectly round and smooth. -
Dry Slowly:
If using ceramic clay, loosely cover the piece with plastic to let it dry slowly over a few days to prevent warping. For polymer clay, prepare it for baking according to package instructions. -
Fire or Bake:
Fire the stoneware in a kiln (bisque then glaze, or leave as raw clay if high-firing). If using polymer clay, bake in your home oven. -
Optional Sanding:
Once fired or baked, you can lightly sand the bottom or edges with fine-grit sandpaper to ensure a professional, scratch-free finish.
Warping Woes
If your tray edge curls up while drying, flip it upside down on a flat board and place a light weight (like a small bag of sand) on it until bone dry.
Enjoy using your beautiful new tray for jewelry or simply as a piece of standalone art


What Really Happens Inside the Kiln
Learn how time and temperature work together inside the kiln to transform clay into durable ceramic.
Sleepy Sun Face Wall Hanging
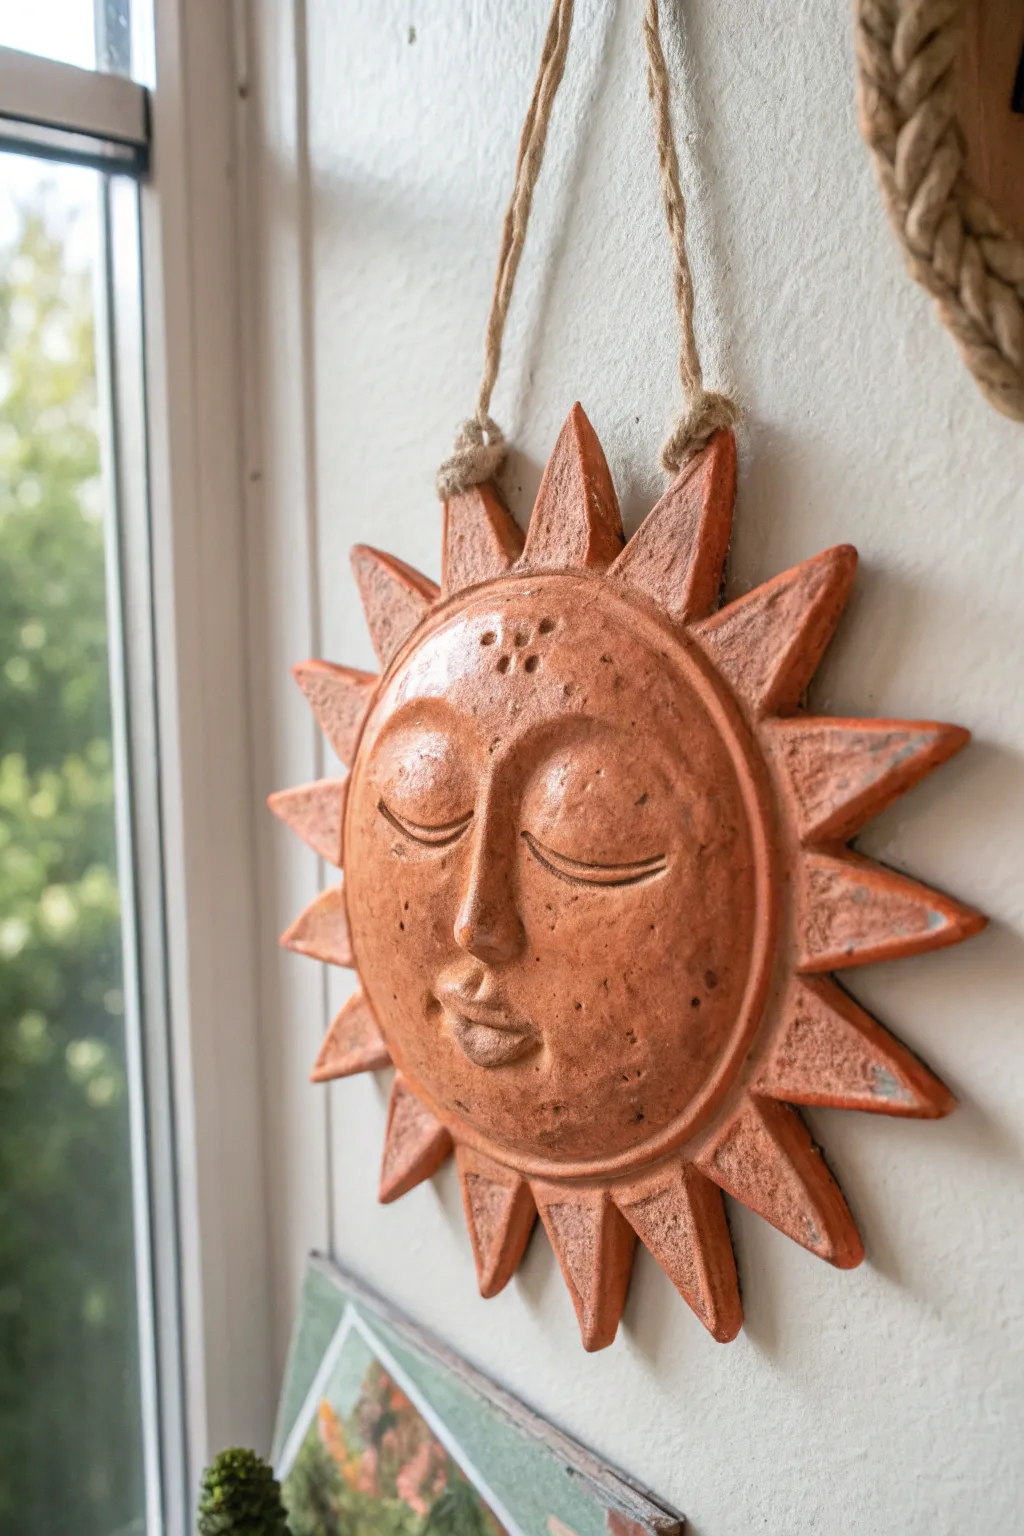
Bring a sense of celestial calm to your walls with this rustic, terracotta-style sun face. Featuring a serene sleeping expression and classic triangular rays, this project uses simple clay techniques to achieve a timeless, artisanal look.
Step-by-Step Guide
Materials
- Air-dry clay (terracotta color preferred) or polymer clay
- Rolling pin
- Clay sculpting tools (needle tool, loop tool, smoothing rib)
- Round cookie cutter or bowl (approx. 4-5 inches diameter)
- Sponge and water
- Acrylic paints (burnt sienna, orange oxide, cream)
- Matte varnish or sealant
- Jute twine or rough rope
- Strong craft glue or epoxy
- Parchment paper or craft mat
Step 1: Forming the Base
-
Prepare your clay slab:
Begin by conditioning your clay until it is pliable. Roll it out on parchment paper to an even thickness of about 1/4 inch. Ensure you roll in various directions to keep the shape relatively circular. -
Cut the central circle:
Use your round cutter or a bowl as a template to cut out the perfect circle that will become the sun’s face. Remove the excess clay but keep it nearby for the rays. -
Add volume to the face:
Roll a smaller ball of clay and flatten it slightly into a dome. Score and slip (scratch the surfaces and add a little water/clay slurry) the back of this dome and attach it to the center of your flat circle to build up the facial area. -
Smooth the transition:
Using a smoothing rib or your wet fingers, blend the edges of the dome into the flat circle so it looks like one cohesive piece, leaving a flat rim around the edge.
Rustic Texture Trick
Before drying, gently pres crumpled aluminum foil against the clay skin. This creates realistic pores and an aged, stone-like surface instantly.
Step 2: Sculpting the Features
-
Map out the face:
Lightly trace a vertical center line to help with symmetry. Mark the positions for the nose, mouth, and the shut eyes. -
Build the nose:
Form a small triangular wedge of clay. Score and slip the center of the face, attach the wedge, and smooth it down into a long, straight nose bridge. -
Create the eye sockets:
Use your thumbs to gently press indentations on either side of the nose bridge to create the eye sockets, softening the transition into the cheeks. -
Sculpt the eyelids:
Roll two small semi-circles or crescents of clay. Attach these into the eye sockets. Use a needle tool to carve a gentle, curved line across the bottom of each to represent closed lashes. -
Shape the mouth:
Add a very small oval of clay below the nose. Use a modeling tool to press a horizontal line into it, slightly curving up the corners for a peaceful expression. Define the upper lip’s cupid’s bow. -
Add texture and details:
I like to take a needle tool and press three small dots or a triangle pattern on the forehead for a decorative touch. Use a sponge to gently dab the cheeks and nose to create a mild skin texture.
Step 3: Adding Rays and Finishing
-
Cut the sun rays:
Roll out your remaining clay. Cut approximately 12-16 triangular shapes. They don’t need to be perfectly identical; slight variation adds to the rustic charm. -
Attach the rays:
Score and slip the flat rim of the main circle and the base of each triangle. Press the rays firmly onto the back of the circle’s rim, arranging them evenly around the circumference. -
Create hanging holes:
Before the clay dries, use a straw or large needle tool to plunge two holes through the clay—one near the top of the left side rays and one on the right. Ensure they are wide enough for your rope. -
Dry thoroughly:
Allow the piece to dry completely. For air-dry clay, this usually takes 24-48 hours. Flip it carefully halfway through to ensure the back dries evenly. -
Apply the finish:
If you didn’t use terracotta clay, paint the piece with a mix of burnt sienna and orange oxide. Once dry, dry-brush a little cream paint over the raised areas (nose, brows, rays) to highlight the texture. -
Seal the project:
Coat the entire piece with a matte varnish to protect it and give it a finished, ceramic-like sheen. -
Attach the rope:
Cut a length of jute rope. Thread the ends through your pre-made holes from the front to the back and tie sturdy knots on the backside to secure the hanger.
Cracking Clay?
If small cracks appear while drying, mix a tiny bit of fresh clay with water to make a paste and fill them in. Smooth with a damp finger.
Hang your sleepy sun near a window to catch the morning light and start your day with a peaceful vibe
Dreamy Moon Face Relief

Capture the serenity of the night sky with this ceramic crescent moon relief. Featuring a gently sculpted sleeping face and a glaze finish that mimics stardust speckles, this piece brings a touch of celestial magic to any wall or shelf.
How-To Guide
Materials
- White or buff stoneware clay (with grog recommended)
- Rolling pin
- Canvas or slab mat
- Needle tool
- Paper template of a crescent moon
- Rib tool (kidney shaped, soft)
- Loop carving tools
- Modeling tool (wooden or rubber tip)
- Sponge
- Speckled vanilla or oatmeal glaze
- Iron oxide wash or terracotta underglaze
- Small paintbrush
- Kiln (or access to firing services)
Step 1: Shaping the Base
-
Prepare the slab:
Begin by rolling out a slab of clay on your canvas to a uniform thickness, approximately 1/4 to 3/8 inch thick. Compress the clay on both sides with a rib tool to align the particles and prevent warping later. -
Cut the crescent:
Place your paper moon template onto the smooth slab. Trace around the edge with a needle tool held vertically, then carefully remove the excess clay. Smooth the sharp cut edges with a damp sponge or your finger. -
Add volume:
To create the raised relief for the face, add a small, flat-ish mound of clay to the center of the inner curve where the profile will emerge. Score and slip both surfaces thoroughly to ensure they bond completely.
Step 2: Sculpting the Features
-
Define the profile:
Using a modeling tool, blend the added clay mound into the crescent shape, pulling clay outward to form a distinct nose bridge and chin that overhang the inner curve of the moon. -
Carve the eye socket:
Press your thumb or a loop tool gently into the clay to create the recess for the eye socket. This establishes the depth needed for the sleeping eyelid. -
Shape the nose:
Refine the nose shape, keeping it slightly triangular and upturned. Use a small tool to gently indent the nostril area, ensuring it looks natural from a side profile view. -
Form the mouth:
Add a tiny coil of clay for the lips if needed, or sculpt them from the existing mass. Define the corners of the mouth with a slight upward curve to give a peaceful, sleeping expression. -
Create the eyelid:
Roll a very small, flattened teardrop shape of clay and attach it to the eye socket area. Smooth the top edge into the brow bone, leaving the bottom edge defined to look like a shut eye. -
Refine the brow:
Use a wooden tool to carve a distinctive arch above the eye. This ridge serves as the eyebrow and adds character to the relief. Smooth the transition back into the forehead.
Prevent Warping
Since crescent shapes love to warp, dry this piece on a slat board or a piece of drywall. The porous surface pulls moisture from the back evenly.
Step 3: Surface Detailing
-
Smooth the skin:
Take a slightly damp sponge and very gently wipe over the facial features. This removes harsh tool marks and gives the face a soft, dreamlike quality. -
Add texture:
If you want a more organic feel, lightly tap the surface of the cheeks and forehead with a stiff bristle brush. This adds micropores that will catch the glaze beautifully. -
Hollow the back:
If the facial area is thicker than 1/2 inch, carefully flip the piece over and hollow out the back of the nose and cheek area with a loop tool to ensure even drying and prevent explosions in the kiln. -
Add hanging method:
While the back is accessible, create a small hole near the top tip or attach a clay loop so the finished moon can be hung on a wall. -
Dry slowly:
Cover the moon loosely with plastic and let it dry very slowly over several days to prevent the tips of the crescent from curling up. Once bone dry, bisque fire the piece.
Celestial Duo
Make a matching sun face relief using the same techniques but on a circular slab. Glaze it in warm honey tones to create a ‘Day and Night’ wall set.
Step 4: Glazing and Finishing
-
Apply oxide accents:
Before the main glaze, mix a small amount of iron oxide wash or terracotta underglaze. Using a fine brush, carefully paint the lips, the eyebrow ridge, and lightly accentuate the eyelid crease. -
Sponge away excess:
Gently sponge back the oxide on the cheeks and brow so it only remains in the textures and recesses, creating a subtle shading effect rather than a solid line. -
Glaze application:
Apply 2-3 coats of a speckled vanilla or creamy oatmeal glaze over the entire front of the piece. Ensure the glaze isn’t too thick in the deep recesses of the eye or nose to preserve the details. -
Speckle enhancement:
If your glaze doesn’t have enough speckles, you can flick a toothbrush dipped in iron oxide wash over the wet glaze to create additional ‘stardust’ spots. -
Final firing:
Wipe the back of the moon completely clean of glaze. Fire the piece to the temperature required by your chosen clay and glaze combination (usually Cone 5 or 6 for stoneware).
Hang your finished moon near a window to catch the evening light and enjoy the peaceful vibe it brings to your room

TRACK YOUR CERAMIC JOURNEY
Capture glaze tests, firing details, and creative progress—all in one simple printable. Make your projects easier to repeat and improve.
Whimsical Flower-Crown Face
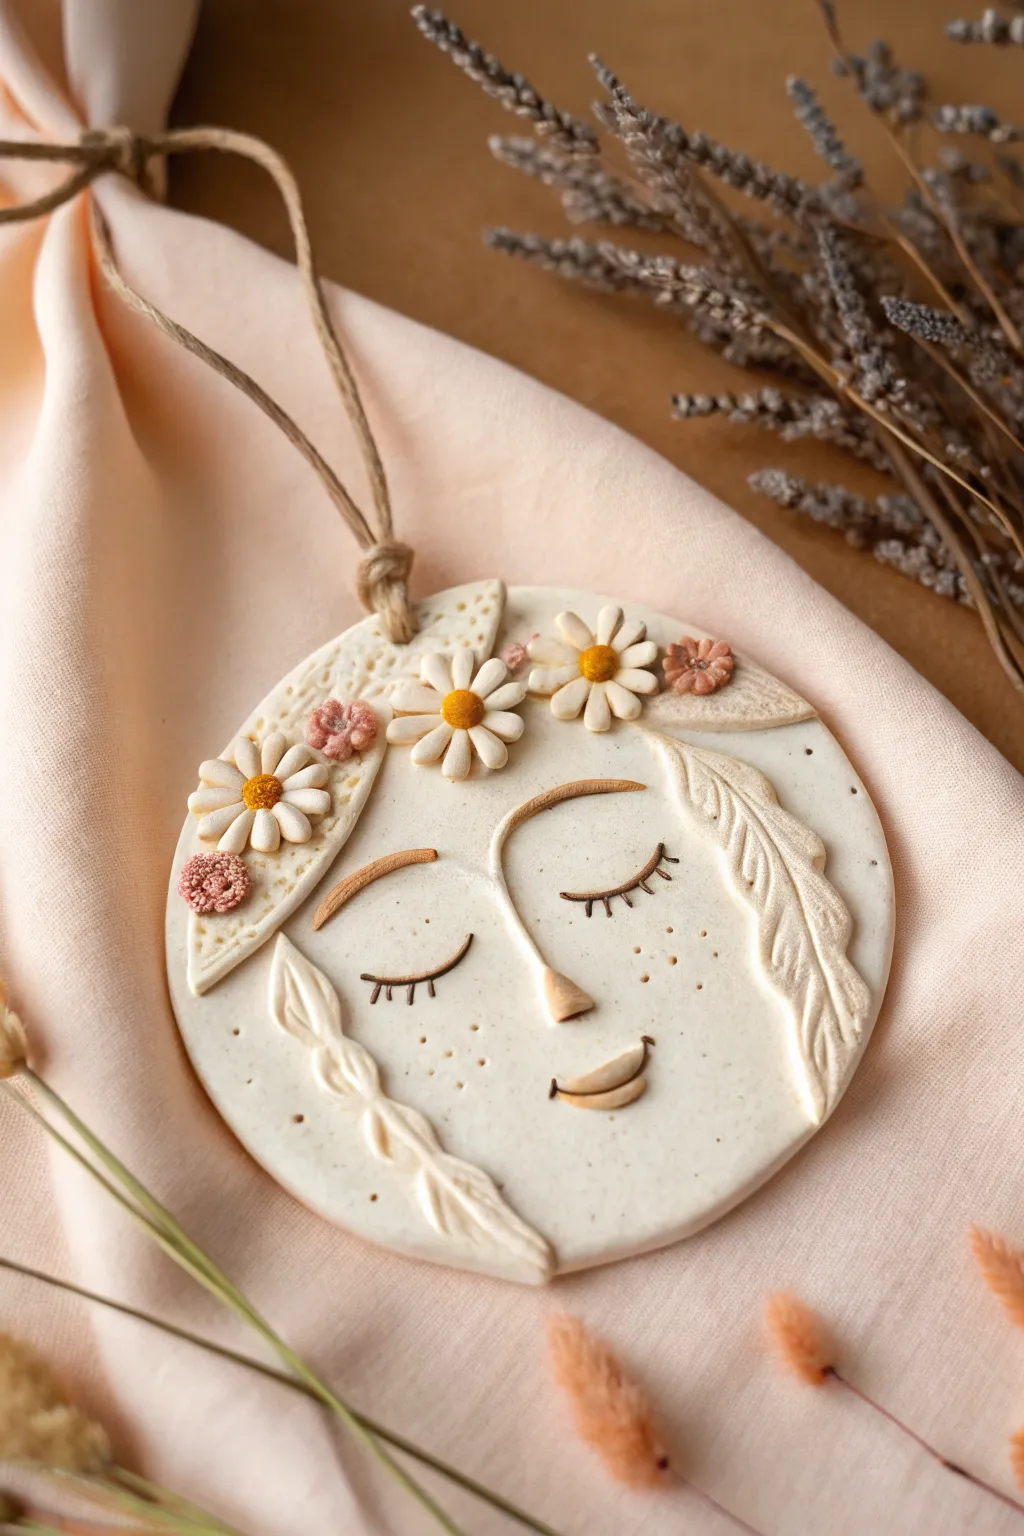
Capture the serenity of nature with this lovely round clay ornament, featuring a gently sculpted face adorned with a daisy crown. This folk-art inspired piece uses simple carving and appliqué techniques to create a peaceful, dreamlike expression.
Step-by-Step Tutorial
Materials
- White air-dry clay or polymer clay
- Rolling pin
- Round cookie cutter (approx. 3-4 inches)
- Clay sculpting tools (needle tool, small ball stylus)
- Brown paint or fine-tip marker
- Yellow and pink acrylic paints (or pre-colored clay)
- Twine or jute cord
- Water (for smoothing)
- Clear sealant (matte finish)
Step 1: Base and Shaping
-
Roll the foundation:
Begin by conditioning your white clay until it is soft and pliable. Roll it out on a smooth surface to an even thickness of about 1/4 inch. -
Cut the circle:
Use your round cookie cutter to stamp out a perfect circle. Smoothing the edges gently with a damp finger removes any sharp burrs left by the cutter. -
Create the hanging hole:
Use a straw or a sculpting tool to punch a hole at the very top center of the circle. Ensure it goes all the way through and is wide enough for your twine.
Smooth Seams
Dip your finger in a tiny bit of water (or baby oil for polymer clay) to blend attached pieces like the nose and braids. This erases join lines for a seamless look.
Step 2: Sculpting the Face
-
Form the nose:
Take a very small piece of clay and shape it into a tiny, elongated triangle. Press this onto the center of the face, blending the edges smoothly into the cheeks while leaving the bridge distinct. -
Sculpt the mouth:
Roll a hairline-thin coil of clay and shape it into a gentle, upwards curve. Attach this below the nose for the mouth, pressing it flat so it looks slightly raised but integrated. -
Add eyebrows:
Create two more thin, short coils for eyebrows. Place them high on the forehead with a soft arch to create a peaceful expression. Use a sculpting tool to add tiny texture lines if desired. -
Carve the eyes:
Instead of adding clay, use a needle tool or the edge of a spoon to gently press two curved lines for the closed eyelids. Add tiny tick marks pointing downwards for the eyelashes.
Step 3: Hair and Crown Details
-
Create the braids:
Roll two long, thin coils of clay. Twist or braid them loosely, then attach them to the sides of the face, framing the cheeks. Gently flatten the ends to blend them into the base. -
Make the daisies:
For the flowers, create several small teardrop shapes for petals. Arrange five or six petals in a circle to form a flower. Make three large daisies for the center of the crown. -
Add flower centers:
Roll tiny balls of clay and press them into the center of each daisy. I like to texture these centers by stippling them with a needle tool to mimic pollen. -
Fill in with small blooms:
Create smaller, simpler five-petal flowers to fill the gaps between the larger daisies. Place them slightly behind the main flowers to add depth to the crown. -
Texture the hair accessories:
Use your needle tool to prick a repeating dot pattern onto the topmost section of clay that represents a headscarf or hair band beneath the flowers.
Vintage Patina
After painting, rub significant areas with a diluted brown wash, then wipe it off immediately with a paper towel. The dark paint will stay in the crevices for an antique look.
Step 4: Finishing Touches
-
Add freckles:
Using the very tip of a needle tool, gently prick random patterns across the nose and cheeks to simulate freckles. -
Dry the piece:
Allow the clay to dry completely according to package instructions. If using air-dry clay, flip it occasionally to prevent warping. -
Paint details:
Once dry, use a fine detail brush to paint the flower centers yellow and the smaller flowers a soft pink. You can lightly wash the eyebrows and mouth with a diluted brown paint for definition. -
Seal and hang:
Apply a coat of matte sealant to protect your work. Once cured, thread a length of natural jute twine through the top hole and tie a secure knot.
Hang your serene creation in a sunny window or giving it as a heartfelt handmade gift
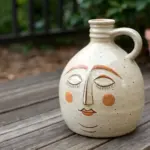
Face Mug With Add-On Features
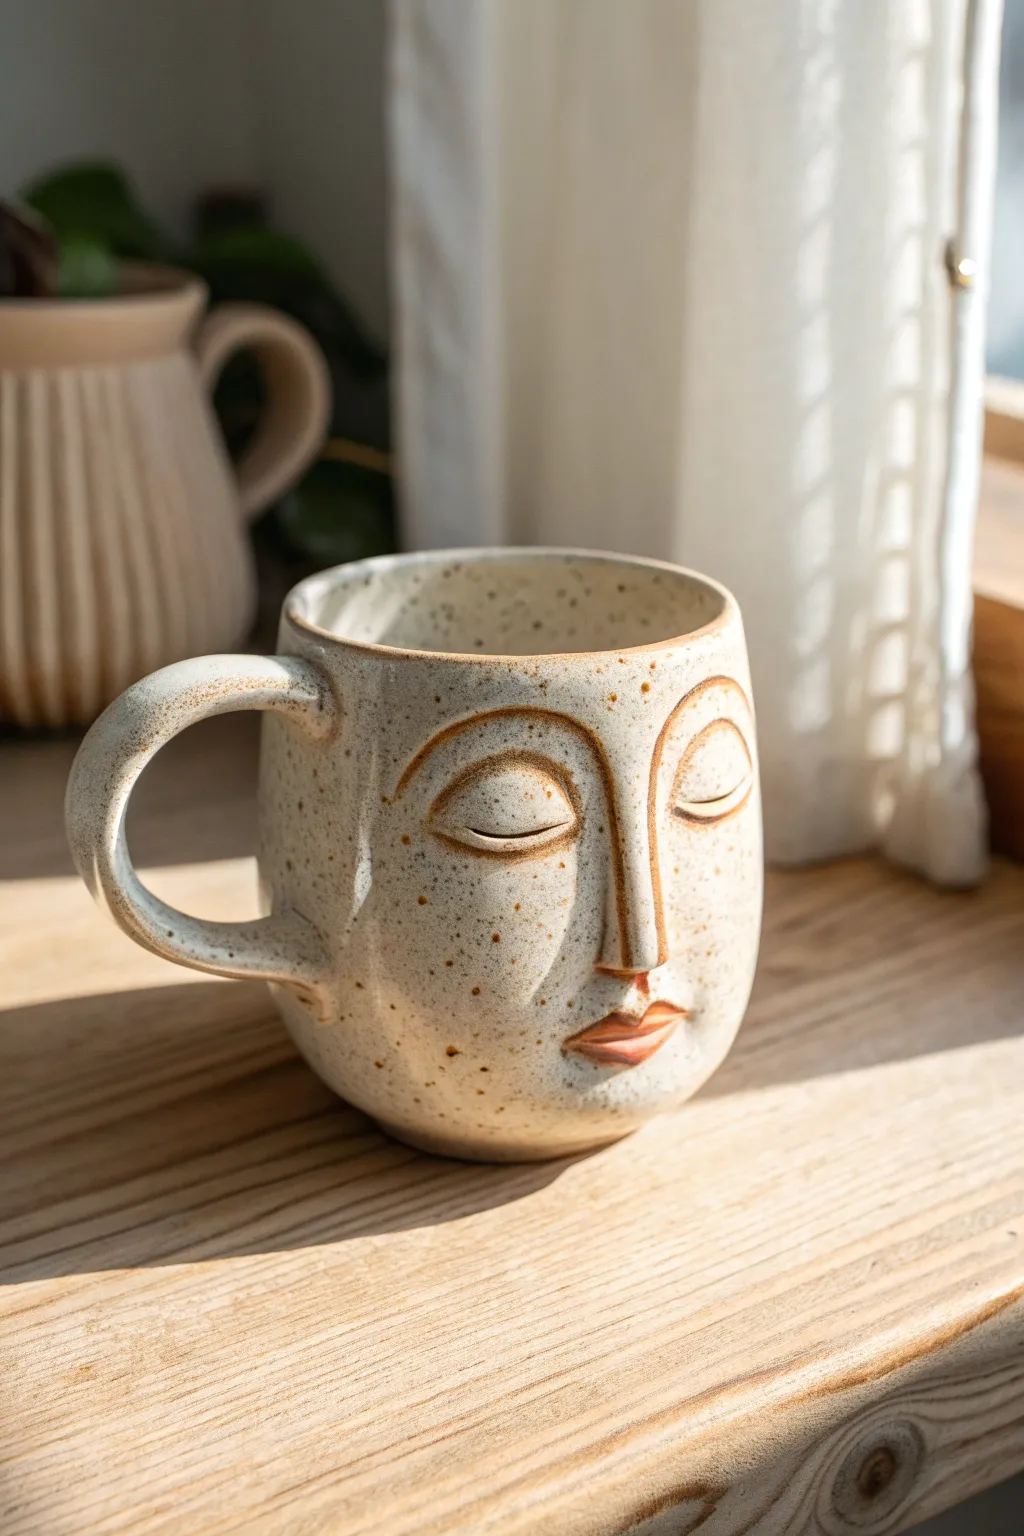
This project transforms a standard hand-built mug into a piece of functional art with a calming, meditative expression. With its speckled clay body and minimal raised features, it balances sculptural depth with everyday utility.
How-To Guide
Materials
- Speckled clay body (stoneware recommended)
- Pottery wheel or slab roller (for the base mug)
- Needle tool
- Scoring tool (serrated rib or wire brush)
- Slip (clay and water slurry)
- Small wooden modeling tool
- Soft rib (rubber or silicone)
- Sponge
- Clear glaze (food safe)
- Underglaze (terracotta or reddish-brown)
- Small detail brush
Step 1: Forming the Base
-
Prepare the Body:
Start by either throwing a medium-sized cylinder on the wheel or hand-building one using the slab method. Aim for a height of about 4-5 inches with slightly rounded walls for a comfortable hold. -
Refine the Shape:
While the clay is leather hard, trim away any excess weight from the bottom. Smooth the exterior surface with a soft rib to ensure a clean canvas for the facial features. -
Pull the Handle:
Pull a strap handle from a carrot-shaped lug of clay. Give it a gentle C-curve that mimics the roundness of the mug body. -
Attach the Handle:
Score the attachment points on both the mug and the handle aggressively. Apply slip, press the handle firmly into place, and smooth the seams until they are invisible.
Cracks at the seams?
If facial features peel away during drying, your clay was too dry when attaching. Try wrapping the mug in plastic for 24 hours after attaching allow moisture to equalize.
Step 2: Sculpting the Face
-
Map the Features:
Lightly sketch the outline of the nose and eyebrows directly onto the leather-hard mug using a needle tool. Center the nose bridge vertically on the side opposite the handle. -
Create the Nose Coil:
Roll a thin coil of clay, roughly 3 inches long. Taper one end slightly; this will become the bridge of the nose merging into the forehead. -
Attach the Nose:
Score and slip along your sketched nose line. Place the coil, pressing down the edges to blend the bridge into the mug wall, but leave the tip and nostrils raised and defined. -
Shape the Eyebrows:
Roll two symmetrical, thin arches of clay for the eyebrows. These should flow directly into the nose bridge line, creating a unified T-shape. Score, slip, and attach them. -
Define the Eyelids:
Roll two small crescent shapes for the closed eyelids. Place them beneath the brow arches. Use a modeling tool to smooth the top edge into the mug, leaving the bottom edge crisp to simulate a lashed line. -
Sculpt the Lips:
Form a small, pill-shaped piece of clay for the mouth. Attach it below the nose. Use a needle tool or wooden knife to press a horizontal line across the center, creating the separation between upper and lower lips. -
Refine Transitions:
Using a small, barely damp sponge or brush, go over all your added features. Smooth any rough texture and ensure the clay additions feel integrated rather than just ‘stuck on’.
Make it yours
Experiment with the position of the eyes. Placing them lower on the mug creates a ‘cuter’ look, while higher eyes can make the face look more regal or stern.
Step 3: Finishing Touches
-
Bisque Fire:
Allow the mug to dry slowly and completely to prevent cracking around the added features. Fire it to a bisque temperature suitable for your clay body. -
Accentuate the Features:
Using a small detail brush, paint a thin line of terracotta-colored underglaze into the crevices of the eyelids, around the nose, and trace the lip line. This adds depth and defines the expression. -
Color the Lips:
Fill in the lips with the same reddish-brown underglaze, wiping away any excess if you want a more stained aesthetic. -
Apply Clear Glaze:
Dip or brush a clear, glossy glaze over the entire interior and exterior of the mug. This highlights the natural speckles of the clay. -
Final Firing:
Fire the piece to its final maturity temperature (typically Cone 5 or 6 for stoneware). Check that the glaze is fully melted and smooth.
Now you have a serene companion for your morning coffee that invites a moment of peace with every sip
Old Soul Wrinkled Face Texture
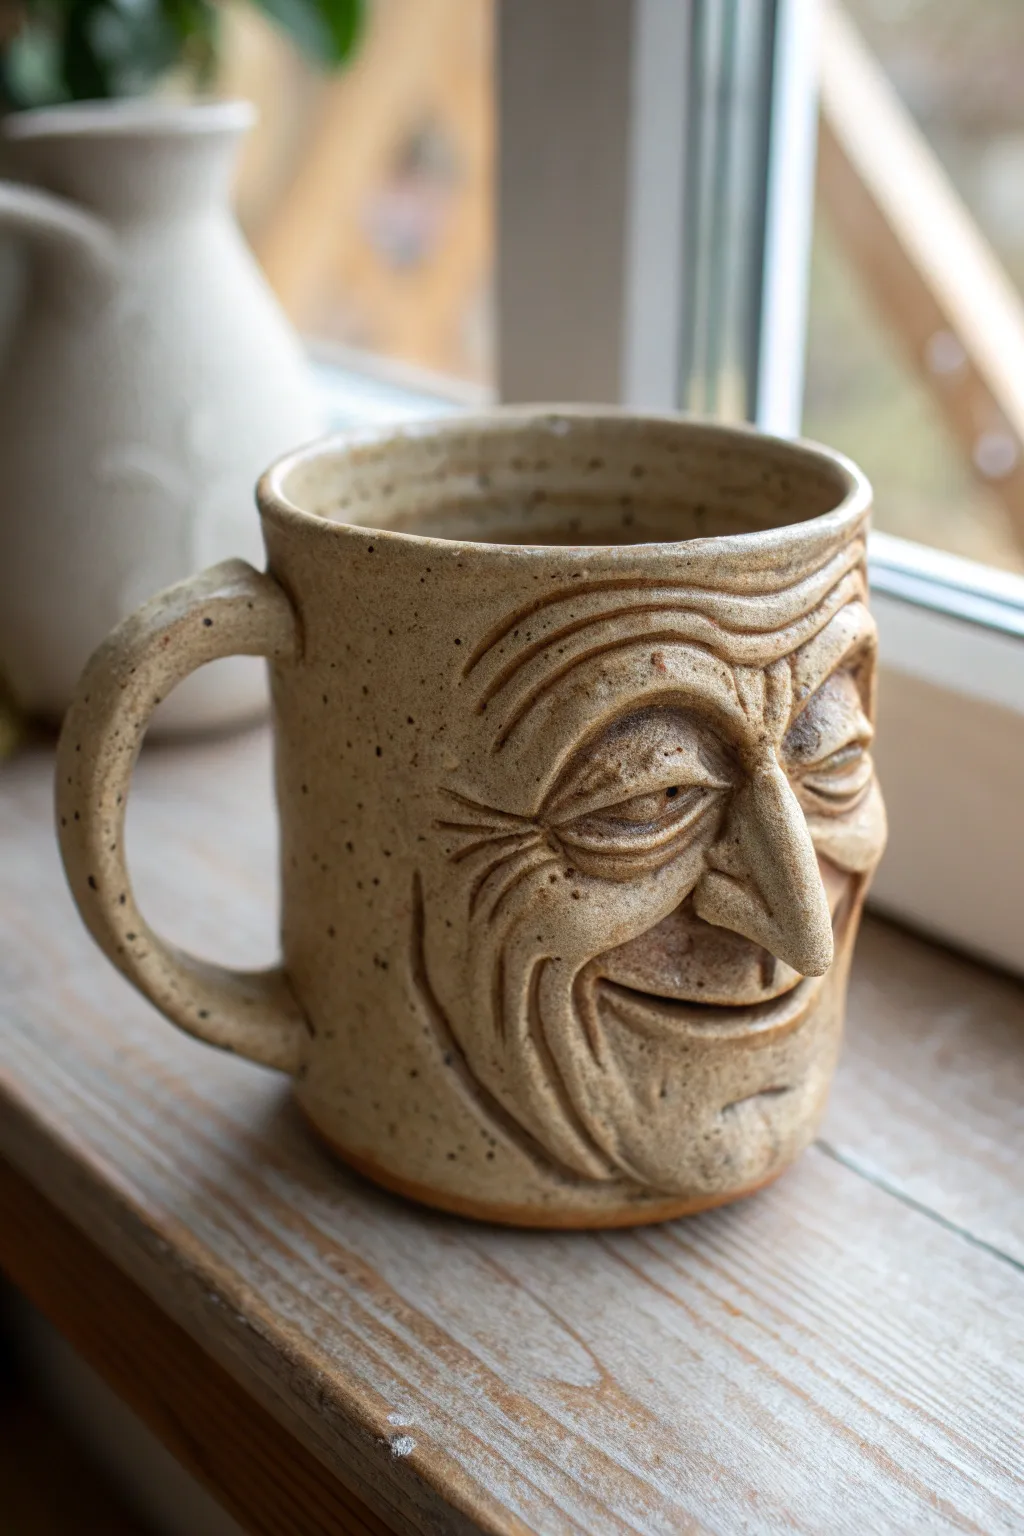
Transform a simple cylinder of clay into a character-filled vessel with deep, expressive wrinkles and a prominent nose. This project focuses on additive and subtractive sculpting techniques to achieve that weathered, ‘old soul’ texture that feels great in your hands.
Step-by-Step Tutorial
Materials
- Stoneware clay (speckled or light brown)
- Pottery wheel (or rolling pin/slab roller for hand-building)
- Wooden sculpting tools
- Loop tools (small)
- Needle tool
- Rib tool (kidney)
- Serrated rib or scoring tool
- Slip (clay mixed with water)
- Sponge
- Clear or light beige glaze (cone 6 or appropriate for your clay)
Step 1: Forming the Base
-
Throw the body:
Start by throwing a thick-walled cylinder on the wheel. You want the walls slightly thicker than a standard mug (about 1/2 inch) to provide enough clay for carving and pushing out later without breaking through. -
Trim and tidy:
Clean up the rim with a chamois or sponge. Use a wooden knife to trim the excess clay at the base, creating a slight undercut for visual lift. -
Shape the handle:
Pull a sturdy handle from a separate piece of clay. Let it stiffen into an arch shape on a board while you work on the face; it needs to be leather hard before attachment.
Cracked Nose?
If the nose cracks during drying, wrap the mug tightly in damp paper towels and plastic for 24 hours to rehydrate slightly, then score, slip, and compress the crack with a tool.
Step 2: Sculpting the Features
-
Push out the features:
While the clay is still malleable but stable, reach inside the mug and gently push outward where you want the cheeks, nose, and chin to protrude. Support the outside with your other hand. -
Add the nose:
Roll a cone of clay for the nose. Score both the mug surface and the back of the nose heavily, add slip, and press firmly into place. -
Blend the nose seams:
Use a wooden modeling tool to drag clay from the edges of the nose onto the cheeks, smoothing the transition until the seam is invisible. I like to leave the bridge of the nose slightly angular. -
Build the brow and cheeks:
Add small coils of clay above the eyes and on the cheekbones to build volume. Blend these completely into the base form. -
Carve the eyes:
Using a small loop tool or wooden spatula, form the eye sockets. Add small almond-shaped pieces of clay for the lids, creating a heavy, hooded look. -
Define the mouth:
Score and slip a curved coil for the lower lip. Press a deep line above it to create the mouth opening, curving the corners up slightly for a subtle smirk.
Enhance the Age
Before glazing, rub a dark iron oxide wash into the wrinkles and wipe away the excess with a sponge. This deepens the shadows significantly.
Step 3: Creating Texture
-
Deepen the wrinkles:
Use a rounded wooden tool to press deep furrow lines into the forehead. Make them wavy and parallel, mimicking folded skin. -
Add crow’s feet:
Etch radiating lines from the outer corners of the eyes. Press deeper at the start of the line and lift pressure as you move outward. -
Refine the skin texture:
Gently stipple the skin surface with a coarse sponge or a stiff brush to remove tool marks and add a natural, porous skin texture. -
Attach the handle:
Score and slip the attachment points opposite the face. Press the handle on firmly, reinforcing the join with small coils of clay blended smooth.
Step 4: Finishing
-
Slow drying:
Cover the mug loosely with plastic to dry very slowly. Fast drying can cause the thick added features (mostly the nose) to crack away from the body. -
Bisque fire:
Once bone dry, fire the piece to bisque temperature (usually Cone 06/04). -
Glazing:
Dip or brush a translucent or ‘breaking’ glaze over the piece. A glaze that thins over high points (like wrinkles) and pools in recesses will highlight your sculpting work best. -
Glaze fire:
Fire again to the maturity temperature of your clay and glaze combination.
Enjoy your morning coffee with a companion that has as much character as you do
Big-Eyed Cartoon Face Pendant
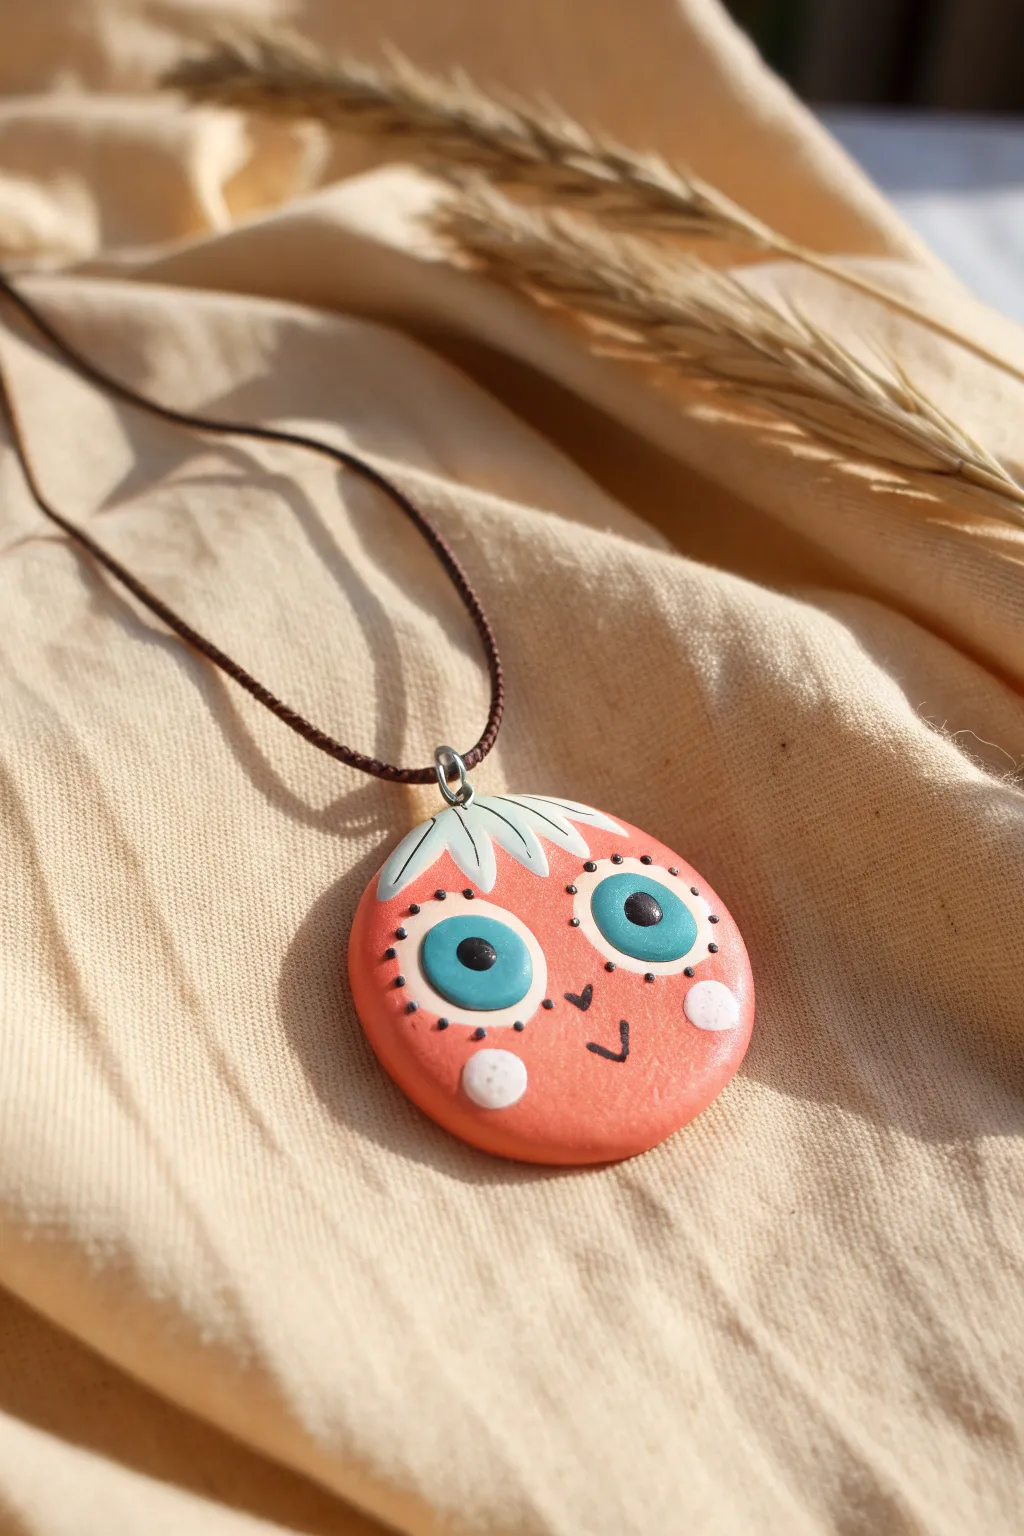
This charming pendant transforms a simple round of clay into an expressive character with oversized eyes and delicate leafy details. The finished piece features a soft matte texture and exaggerated features that give it a playful, cartoon-like personality perfect for wearable art.
Step-by-Step
Materials
- Polymer clay (coral/salmon pink, turquoise, white, mint green, black)
- Circle cutter (approx. 1.5 – 2 inches)
- Small dotting tool or toothpick
- Rolling pin or pasta machine
- Needle tool
- Metal jump ring
- Pliers
- Jewelry cord (brown)
- Oven (for baking)
- Gloss glaze (optional, for eyes)
- Baking tray and parchment paper
Step 1: Base and Shape
-
Condition the base clay:
Start by thoroughly conditioning your coral or salmon-pink polymer clay until it is soft and pliable. Roll it into a smooth ball to ensure there are no air bubbles trapped inside. -
Flatten the base:
Using your palm or a rolling pin, flatten the ball into a thick, rounded disc. Aim for a thickness of about 1/4 inch so the pendant feels substantial but not too heavy. -
Refine the edges:
Gently smooth the edges of the disc with your finger to create a soft, organic round shape rather than a sharp, cookie-cutter edge. This contributes to the friendly feel of the character. -
Create the leafy top:
Take a small amount of mint green clay and form a thin, flattened crescent shape. Place this at the very top of your pendant base to serve as the hair or leaf cap. -
Detail the leaves:
Use a needle tool or a dull knife to press vertical indentations into the mint green clay, creating the appearance of five or six distinct leaf segments. -
Insert the hardware:
Carefully insert a metal eye pin or a small U-shaped wire into the top center of the pendant, right through the mint green section, ensuring it’s secure for hanging later.
Clean Clay Tip
Keep wet wipes handy! Dark colors like the black pupils can stain your fingers and ruin the light pink base. Wipe hands thoroughly between color switches.
Step 2: Face Fundamentals
-
Form the eye sockets:
To make the eyes pop, I like to gently press two small indentations into the face with my thumbs where the eyes will sit. This helps the added clay layer sit naturally. -
Make the eye whites:
Roll two balls of white clay and flatten them into large circles. Place them onto the face, spacing them slightly apart but centered horizontally. -
Add the irises:
Roll smaller balls of turquoise clay, flatten them, and place them centered on top of the white circles. These should cover most of the white, leaving just a thin rim visible. -
Add pupils:
Create tiny balls of black clay and press them into the center of the turquoise circles. Flatten them slightly to complete the eye stack.
Level Up: Texture
Before baking, gently dab the pink face area with a clean toothbrush or stiff brush. This creates a realistic skin texture that contrasts beautifully with the shiny eyes.
Step 3: Expressive Details
-
Add rosy cheeks:
Roll two small balls of white clay (or very pale pink) and flatten them into discs. Press these onto the lower outer corners of the face, below the eyes. -
Create the mouth:
Roll a very thin snake of black clay. Cut two tiny V-shapes and arrange them in the center to form a small, smiling kitty-style mouth. -
Stipple the eye details:
Using a very fine needle tool or the tip of a toothpick, carefully pick up tiny specks of black clay (or use black acrylic paint later) to add small dots around the outer rim of the white part of the eyes for a stitched effect. -
Smooth fingerprints:
Before baking, lightly brush the surface with a little baby oil or cornstarch to smooth out any accidental fingerprints left during the sculpting process.
Step 4: Finishing Up
-
Bake the piece:
Place your pendant on a parchment-lined baking sheet. Bake according to your polymer clay manufacturer’s instructions (usually 275°F/135°C for 15-30 minutes). -
Cool down:
Allow the clay to cool completely in the oven with the door slightly ajar. This gradual cooling helps prevent cracks. -
Seal the eyes:
For an extra pro touch, apply a drop of UV resin or glossy glaze specifically to the eyes. This makes them look wet and alive compared to the matte skin. -
Assemble the necklace:
Open a jump ring with your pliers, thread it through the loop at the top of the pendant, and attach your brown cord.
Now you have a quirky little companion ready to add a pop of personality to any outfit
Asymmetrical Abstract Face
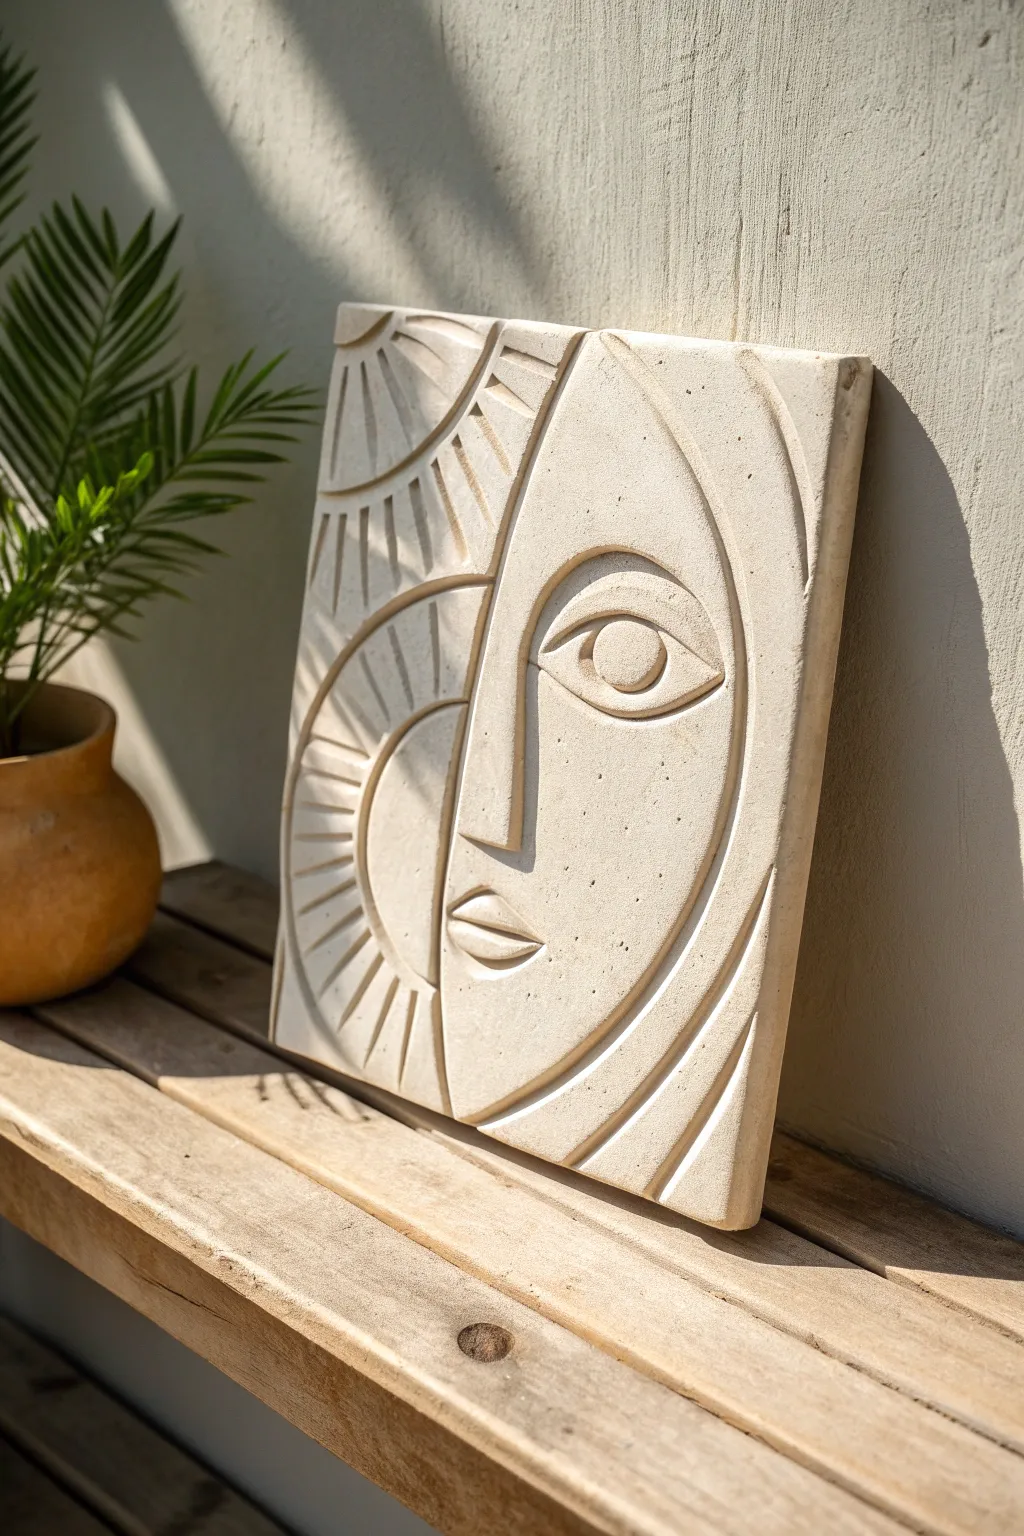
This stunning relief sculpture brings a modern, Picasso-inspired aesthetic to your wall decor, featuring a striking split composition of sun rays and a peaceful visage. carved from light-toned clay, the piece relies on clean lines and varied depths to create dramatic shadows and textures.
Detailed Instructions
Materials
- Air-dry clay or white stoneware clay (approx. 2-3 lbs)
- Rolling pin with guide rings (1/2 inch spacing)
- Canvas mat or slab mat (to prevent sticking)
- Fettling knife or X-Acto knife
- Assorted loop tools (various sizes for carving)
- Needle tool
- Rib tool (metal or rubber)
- Ruler or straight edge
- Bowl of water and slip
- Soft sponge
- Square template (card cut to 8×8 or 10×10 inches)
Step 1: Preparing the Slab
-
Wedge the clay:
Begin by thoroughly wedging your clay to remove air bubbles and ensure a consistent texture, creating a smooth ball to work with. -
Roll out the slab:
Place the clay between guide strips or use rolling pin guides set to roughly 1/2 inch to 3/4 inch thickness. Roll the clay out evenly on your canvas mat. -
Smooth surfaces:
Using a rib tool, compress and smooth the surface of the clay slab on both sides. This compression helps prevent warping later during the drying phase. -
Cut the square shape:
Place your paper template over the slab. Use a needle tool to trace the square lightly, then commit to the cut using your fettling knife held vertically for a crisp edge.
Warping Woes?
If corners curl up while drying, flip the tile over carefully and weigh down the corners with small sandbags or heavy books for a day.
Step 2: Drafting the Design
-
Establish the dividing line:
Using your ruler and a needle tool, lightly scribe a vertical line roughly two-thirds of the way across the tile. It doesn’t need to be perfectly centered; slightly off-center adds interest. -
Curve the profile:
From that vertical line, sketch a gentle ‘S’ curve that will define the nose profile and the separation between the sun motif and the face. -
Draft facial features:
On the right side, lightly sketch a large almond eye, a simple arched eyebrow, and half of a lip shape. Add sweeping curved lines to the right edge to suggest movement or hair. -
Sketch the sun section:
On the left side, draw two partial concentric circles originating from the nose curve. Fill the spaces between these arcs with radiating lines for the sun rays.
Texturing Tip
To get that sandstone look, mix a little fine sand or grog into your clay body before rolling, or sponge the surface with vinegar water before drying.
Step 3: Carving the Relief
-
Carve the dividing channel:
Use a medium U-shaped loop tool to carve a deep, confident channel along your main vertical dividing line and the nose profile. -
Define the eye:
Switch to a smaller loop tool. Carve around the almond eye shape, lowering the surrounding clay so the eye itself remains raised. Carefully scoop out the center of the eye to create the pupil/iris depression. -
Sculpt the lips:
Carve around the lip shape, removing clay to make the mouth protrude. Use a needle tool to define the separation between the lips. -
Create the sun rays:
For the left side, use a V-shaped carving tool or a small knife to excise triangular wedges between your sun ray lines. These should be deep, sharp cuts to catch the light. -
Carve flowing lines:
On the far right edge, use a wide loop tool to create long, sweeping grooves that follow the curve of the face, mirroring the energy of the sun rays.
Step 4: Refining and Finishing
-
Smooth the edges:
Dip your finger or a small sponge in water and gently run it along all your cut edges to soften any sharp burrs or clay crumbs. -
Refine the planes:
I like to take a flat modeling tool here to smooth out the flat, raised areas of the cheeks and forehead, ensuring they look intentional and stone-like. -
Clean the borders:
Check the outer square edges of your tile. If handling has distorted them, use two flat boards to gently paddle the sides back into a perfect square. -
Slow drying process:
Place the tile on a wire rack or a piece of drywall to dry. Cover it loosely with plastic sheeting for the first 24 hours to prevent the corners from curling up, then uncover to finish drying. -
Final texture check:
Once bone dry (or bisque fired if using a kiln), you can lightly sand any remaining rough spots for a pristine, matte finish.
Hang your finished relief in a spot where sunlight can rake across the surface to highlight your beautiful carving work
Grotesque Monster Face Mask

This project captures the whimsical charm of carnival masks with a grotesque twist, featuring deep wrinkles, an exaggerated nose, and a wide, toothy grin. Using basic hand-building skills, you’ll sculpt a distinctively textured piece that feels ancient and full of personality.
Step-by-Step Guide
Materials
- Terracotta or stoneware clay (with grog for texture)
- Clay carving tools (loop tool, needle tool)
- Wooden modeling tools
- Rolling pin
- Canvas or cloth mat
- Sponge and water
- Newspaper or aluminum foil (for armature)
- Slip (clay slurry)
- Scoring tool or old fork
- Iron oxide wash (optional)
Step 1: Forming the Base
-
Prepare the Armature:
Since this is a mask shape, you need a curved support. Bunch up a pile of newspaper or aluminum foil into a mound shape roughly the size of a human face. Cover this mound with a layer of damp paper towel or plastic wrap so the clay doesn’t stick. -
Roll the Slab:
Roll out a slab of clay to about 1/2 inch thickness. It needs to be thick enough to support the heavy features we will add later, but not so thick that it takes forever to dry. -
Drape and Shape:
Drape your slab over the mound armature. Gently press it down to conform to the curve, smoothing out the edges into an oval face shape. -
Establish Landmarks:
Using your thumb, press lightly into the clay to mark where the eye sockets and mouth will be. This helps you visualize proportions before adding mass.
Hollow it Out
If the nose or brow ridges are thicker than 1 inch, hollow them out from the back side using a loop tool. This ensures even drying and prevents kiln explosions.
Step 2: Building the exaggerated Features
-
Add the Brow Ridge:
Roll two thick coils of clay. Score the forehead area and apply slip, then attach the coils to create a heavy, bulging brow ridge. Smooth the clay downward into the nose bridge area. -
Sculpt the Nose:
This character is defined by his nose. Form a large, carrot-shaped cone of clay. Create a hollow cavity at the back of it to prevent explosions in the kiln. Score and slip heavily, then attach it to the center of the face, curving the tip downwards like a beak. -
Build the Cheeks:
Add rounded mounds of clay to the cheeks, blending them smoothly into the sides of the nose and the outer face. These should puff out to emphasize the smile. -
Form the Chin:
Attach a triangular wedge of clay to the bottom for the chin. Shape it so it juts forward slightly, balancing out the large nose.
Make it Wearable
Before the clay hardens to leather-hard, poke small holes on the sides near the ears. After firing, you can thread a leather strap or ribbon through to hang it up.
Step 3: Detailing the Face
-
Carve the Smile:
Use a knife or needle tool to slice a wide, U-shaped smile. Don’t cut all the way through the mask yet; just establish the deep recess of the mouth. -
Create the Teeth:
Roll a small strip of clay and press it into the upper part of the mouth recess. Use a wooden tool to press vertical lines, defining the large, blocky teeth. -
Open the Eyes:
For the eyes, define the almond shapes under the brow. Use a hole cutter or knife to cut out the pupils completely if you want a true mask look, or simply deepen the shadows there. -
Add the Ears:
Form two ‘C’ shapes or small cups of clay. Attach these to the sides of the mask, roughly at eye level. Blending the seams well is crucial here so they don’t pop off during drying.
Step 4: Texturing and Refining
-
Deepen Wrinkles:
Using a modeling tool, carve deep, sweeping lines across the forehead, around the eyes (crow’s feet), and framing the mouth (nasolabial folds). These lines give the face its ‘aged’ character. -
Stipple the Skin:
Take a stiff brush or a needle tool and lightly poke the cheeks and nose to create skin texture or pockmarks. I find this creates a nice contrast against the smooth teeth. -
Refine Edges:
Go around the outer rim of the mask and smooth any sharp edges with a damp sponge. -
The Final Detail:
Add a small decorative swirl or button shape to the chin cleft for a bit of stylistic flair. -
Drying and Finishing:
Let the mask dry slowly under plastic for a few days to prevent warping. Once bone dry, you can brush on a red iron oxide wash and wipe it back with a sponge to highlight the textures before firing.
Once fired, the earthy tones and deep shadows will bring your grotesque character to life on any wall
Tree Spirit Face With Natural Bits
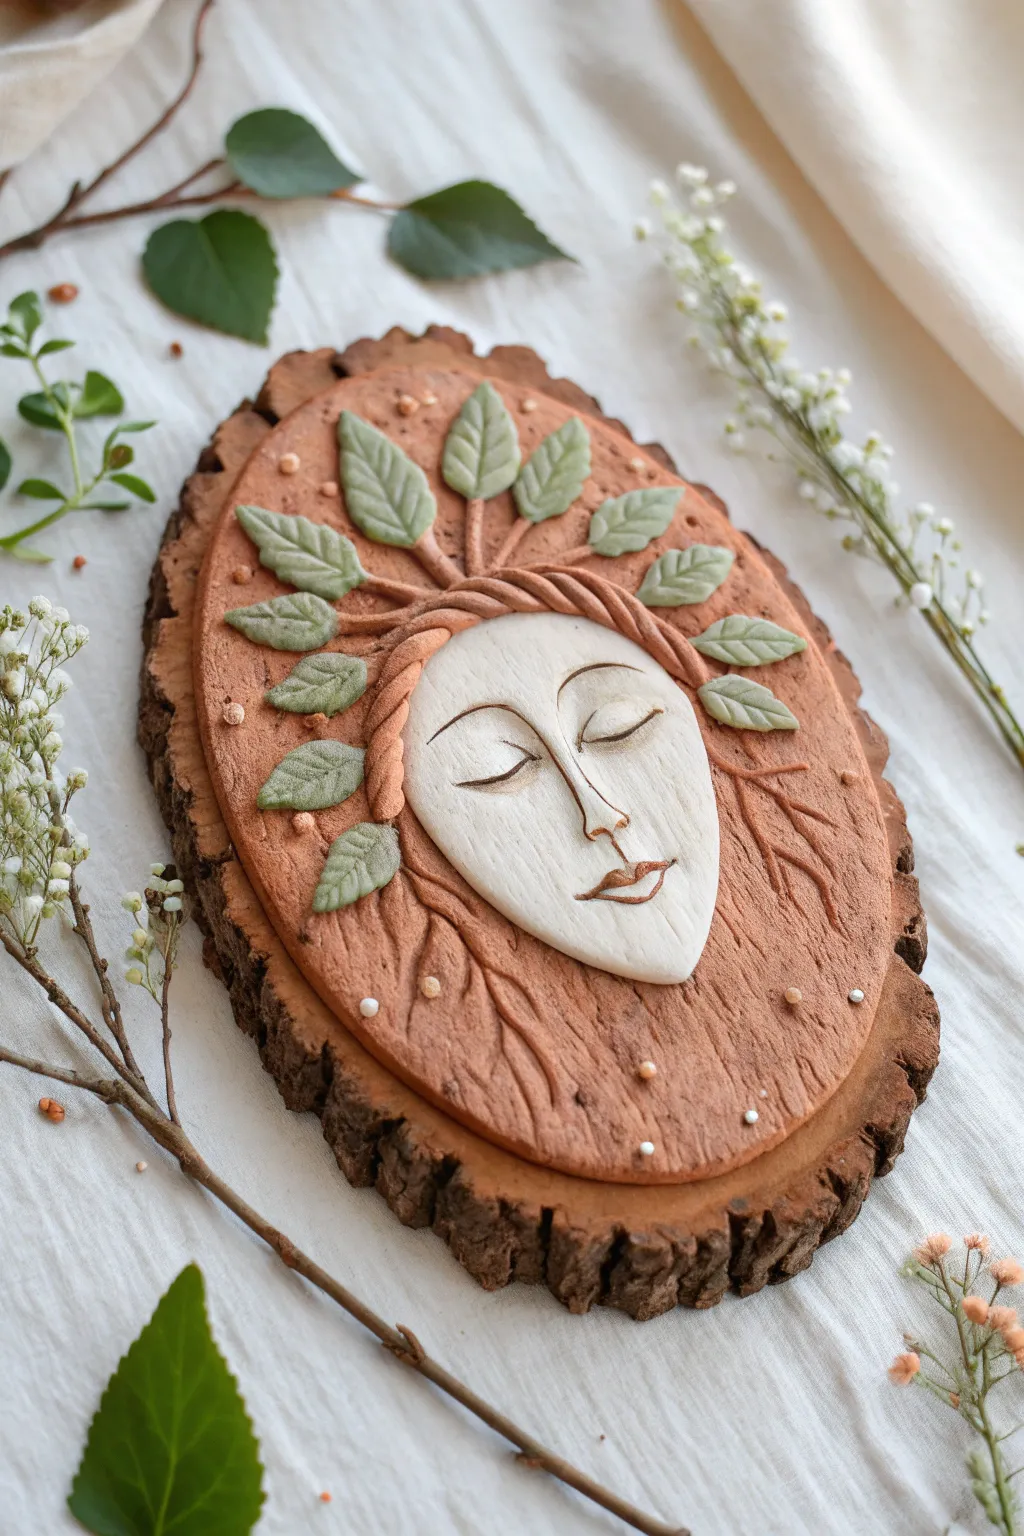
This enchanting relief sculpture captures the quiet magic of the forest with a serene face emerging from organic textures. Using simple clay layering techniques and a rustic wood slice base, you’ll create an earthy, whimsical piece of wall art.
Detailed Instructions
Materials
- Texture-rich background clay (terracotta or gingerbread color)
- White or cream polymer clay for the face
- Muted green polymer clay for the leaves
- Wood slice base (oval or round natural cut)
- Sculpting tools (needle tool, small ball stylus)
- Small craft knife
- Texturing tools (stiff brush, sandpaper, or crumpled foil)
- Liquid clay adhesive or strong craft glue
- Rolling pin
- Fine-grit sandpaper
Step 1: Base Preparation
-
Roll the background:
Begin by conditioning your terracotta-colored clay until pliable. Roll it out into an oval slab about 1/4 inch thick, roughly matching the shape but slightly smaller than your wood slice base. -
Texture the surface:
Before sculpting, give the background an earthy feel. Gently press a stiff brush, crumpled foil, or sandpaper into the clay surface to create a natural, stone-like texture. Avoid smoothing it out; the imperfections add character. -
Create the mounting space:
Place this textured oval onto your work surface. Since the wood slice is the final mount, you can work directly on a baking tile for now to ensure the clay stays flat during curing.
Step 2: Sculpting the Spirit
-
Shape the face:
Roll a ball of white or cream clay and flatten it into a smooth, elongated teardrop or egg shape. This will be the face. Place it centrally on the terracotta background, biased slightly toward the bottom. -
Refine facial features:
Using a modeling tool or your fingers, gently press the edges of the white clay to blend it slightly into the background, but keep the center raised. Use a small knife or needle tool to carve a simple, long nose line and a small, serene mouth. -
Add the eyes:
For the closed eyes, use a needle tool or a very fine blade to incise two curved arches. Add a second, lighter line above each arch to suggest the eyelid crease. This simple technique creates a peaceful, sleeping expression. -
Create the hair braid:
Roll two thin snakes of the terracotta clay. Twist them together to form a tight rope. draping this rope across the top of the white forehead like a crown, tucking the ends down the sides of the face. -
Add flowing hair strands:
Roll very thin, singular snakes of terracotta clay. Press these into the background around the lower face, curving them to look like flowing hair or roots growing into the earth.
Natural Texture
Press a real leaf or piece of rough bark into the background clay before baking. It imitates nature far better than tools can and adds an authentic forest feel.
Step 3: Botanical Details
-
Form the leaves:
Using the muted green clay, create small teardrop shapes. Flatten them between your fingers to form leaves. You’ll need about 10-12 leaves of varying sizes. -
Texture the leaves:
With a needle tool, gently score a central vein down each leaf. Then, create tiny diagonal veins branching off the center. Keep the touch light so you don’t cut all the way through. -
Arrange the crown:
Place the leaves around the braided ‘crown’ and the upper part of the background. I like to overlap a few leaves slightly to create depth, making it look like the foliage is sprouting naturally from behind the braid. -
Add detail dots:
Roll tiny spheres of white or light beige clay. Scatter them randomly around the background and near the hair strands to mimic small seeds, spores, or magical dust.
Antique Wash
After baking, wipe a diluted brown acrylic wash over the entire piece and immediately wipe it off with a damp cloth. It settles in cracks for an aged look.
Step 4: Finishing Touches
-
Final inspection:
Check for any unwanted fingerprints. You can smooth them away with a tiny bit of baby oil on your finger or a soft brush. -
Bake the piece:
Bake the clay piece according to the manufacturer’s instructions for the specific brand of polymer clay you used. Ensure it cools completely before handling. -
Mounting:
Once cool, apply a strong adhesive (like E6000 or heavy-duty wood glue) to the back of the clay piece and center it onto your wood slice. -
Highlighting (Optional):
If desired, dry brush a tiny amount of brown acrylic paint into the crevices of the braid and hair to deepen the shadows and make the details pop.
Hang your new forest guardian on a wall or prop it on a shelf to bring a touch of woodland tranquility to your space
Two-Face Split Expression Sculpture
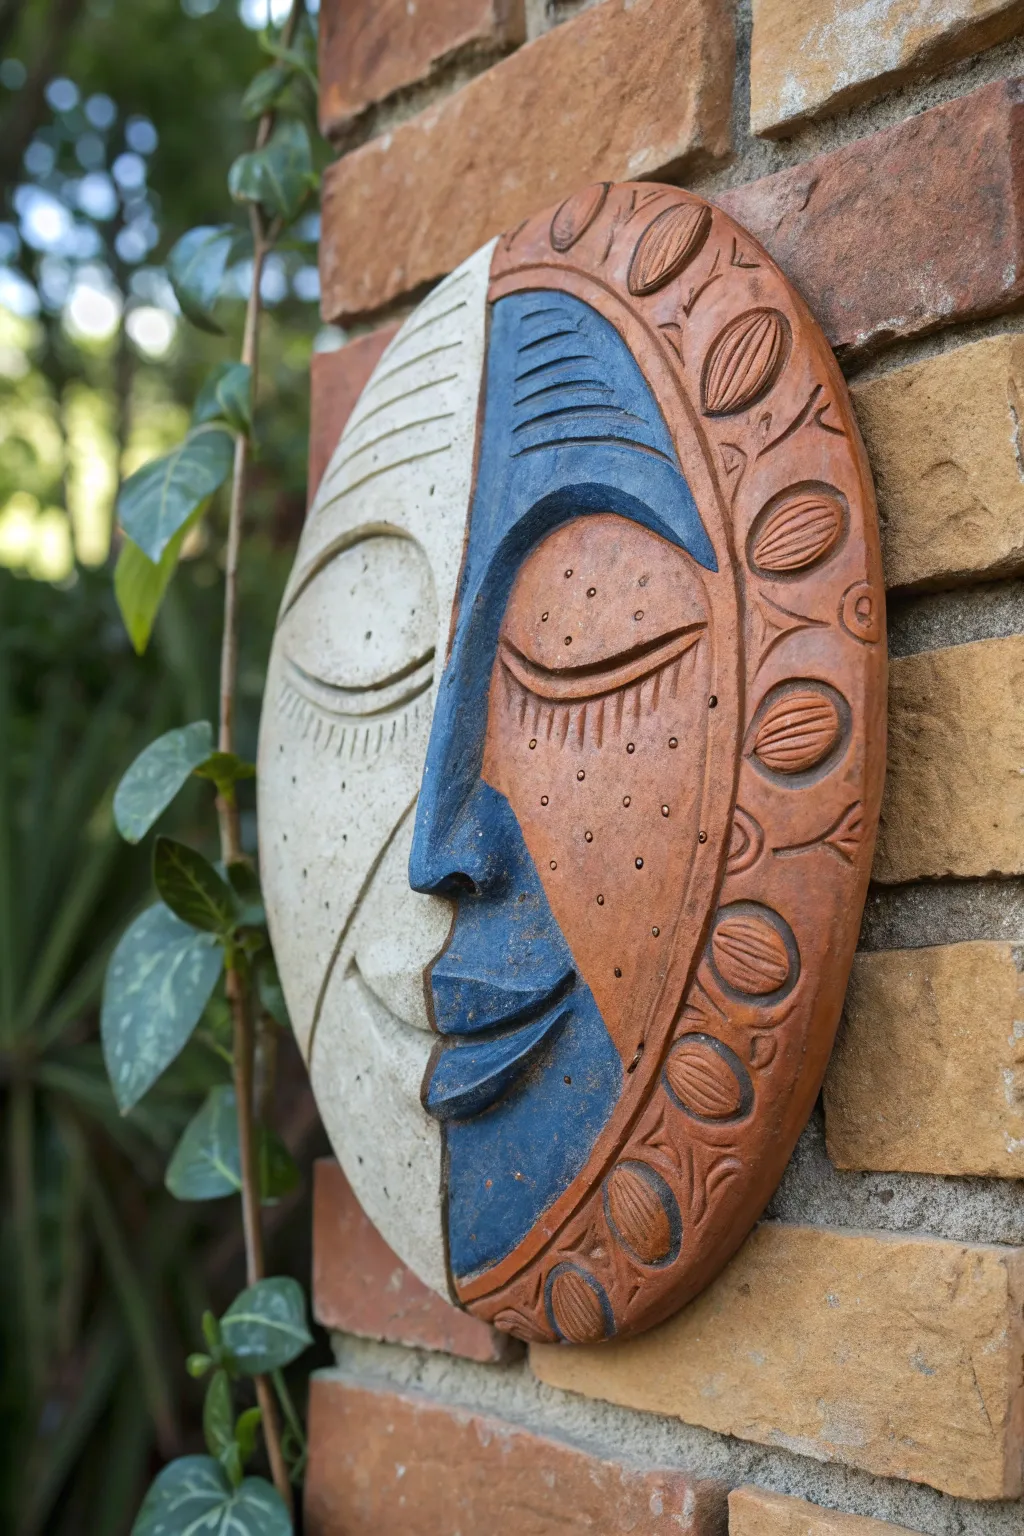
This striking wall sculpture combines elements of sun and moon motifs into a cohesive, abstract face design. With its textured finish, incised details, and bold use of color blocking, this project serves as a sophisticated addition to any garden wall or patio space.
Step-by-Step Tutorial
Materials
- White or buff stoneware clay (approx. 3-4 lbs)
- Circle cutter or circular template (approx. 10-12 inches)
- Needle tool
- Loop carving tool
- Rib tool (wood or rubber)
- Underglazes: Cobalt Blue, Terracotta/Rust Brown, Matte White
- Small round punch or straw (for dots)
- Sponge
- Clear matte glaze (optional)
- Rolling pin and guide strips (3/8 inch thickness)
- Scoring tool or old fork
Step 1: Shaping the Foundation
-
Roll the Slab:
Begin by rolling out your clay slab on a piece of canvas or heavy fabric. Aim for an even thickness of about 3/8 inch to ensure durability. Using guide strips on either side of your rolling pin helps keep the slab perfectly level. -
Cut the Circle:
Place your circular template over the slab. Using a needle tool held vertically, cut out the main circle shape. Smooth the outer edges with a damp sponge to remove any sharp burs created by the cut. -
Dome the Form:
To give the face its gentle convex curve, place the clay circle over a hump mold or a shallow bowl turned upside down with newsprint in between. Gently press the clay to conform to the curve; this adds dimension and prevents the piece from looking flat.
Cracking Up?
If you see hairline cracks forming on the nose or added ridges while drying, score the area deeply again and pack with ‘vinegar slip’ (clay mixed with white vinegar) to seal it.
Step 2: Sculpting the Features
-
Draft the Design Lines:
Lightly trace the main dividing lines with your needle tool. Draw a curved line dividing the left third, and another defining the profile nose/forehead area in the center. Don’t cut through; just mark the surface. -
Build the Nose and Brow:
Roll a coil of clay and attach it along the central profile line to build up the nose and eyebrow ridge. Score the surface and use slip to attach securely, then blend the edges down smoothly so it looks like one piece. -
Define the Lips:
Add small, flattened pieces of clay for the upper and lower lips. Shape them to follow the unique split perspective—the left side of the mouth is subtle, while the center profile lips are more pronounced. -
Carve the Closed Eyes:
Use a needle tool to incise deeply curved lines for the closed eyelids on both the left and right sides. Since the sculpture is stylized, symmetry isn’t necessary; the right eye can sit slightly lower. -
Add Decorative Details:
On the left cheek, scratch tiny vertical dashes under the eye. On the right cheek, use a small punch or straw to create a pattern of recessed dots. This textural contrast is key to the final look. -
Create the Border:
Define a 1.5-inch border on the far right edge. Using a small ribbon loop tool or a carving gouge, carve out repeating oval shapes or ‘seed’ motifs along this rim. Add small curved lines between them for extra detail.
Go Metallic
For a magical touch, apply a small amount of gold luster to the seed pods on the border or the dots on the cheeks after the final glaze firing to catch the sunlight.
Step 3: Glazing and Finishing
-
Initial Drying (Bisque):
Allow the piece to dry slowly under plastic for at least a week to prevent warping. Once bone dry, bisque fire the piece in a kiln according to your clay body’s instructions. -
Apply White Underglaze:
Paint the entire left section (the ‘moon’ side) with three coats of matte white underglaze. Be careful to paint right up to the carved division line without crossing over. -
Apply Blue Underglaze:
I usually switch to a smaller brush here for precision. Apply rich cobalt blue underglaze to the central profile section, covering the nose, half the lips, and the forehead strip. -
Apply Terracotta Wash:
Paint the right cheek and the patterned border with a terracotta or rust-brown underglaze. Let the underglaze settle into the carved dots and ovals to accentuate the texture. -
Wipe Back Texture:
Once the brown underglaze is dry, take a slightly damp sponge and gently wipe the surface of the border. This removes some surface color while leaving dark pigment in the recessed carvings, highlighting the design. -
Final Fire:
You can leave the finish matte for a rustic look or apply a thin clear matte glaze to seal it. Fire again to the recommended temperature for your glazes.
Hang your finished sculpture on a brick wall or garden fence to enjoy its serene expression