Candles and clay are basically best friends—give me a little air-dry clay (or polymer clay) and I’m immediately dreaming up new ways to make that glow feel extra special. Here are my favorite clay candle ideas that look high-end but still feel totally doable at your kitchen table.
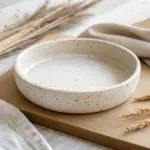
Minimalist Tea Light Cup
Embrace the beauty of minimalism with this sleek, cylindrical tea light cup crafted from smooth white clay. The thick walls and unglazed, matte finish give it a modern, grounded feel ideal for any windowsill.
Step-by-Step
Materials
- White air-dry clay or polymer clay (approx. 500g)
- Non-stick rolling pin
- Circle cutter (approx. 3-4 inches diameter)
- Ruler or straight edge
- Craft knife or clay blade
- Small cup or jar (to use as a mold/form)
- Water and sponge (for smoothing)
- Fine-grit sandpaper (220 and 400 grit)
- Tea light or votive candle
Step 1: Creating the Base
-
Condition the Clay:
Begin by kneading your white clay thoroughly until it is warm, soft, and pliable. Getting rid of air bubbles now is crucial for that smooth, professional finish later. -
Roll the Base Slab:
Roll out a portion of the clay on a flat surface to a thickness of about 1/4 inch. Try to keep the thickness consistent. -
Cut the Circle:
Using your circle cutter or a jar lid as a guide, cut out a perfect circle for the base of your cup. Set this aside gently to avoid warping.
Seamless Finish Tip
To make seams truly disappear, drag clay from one side of the join over to the other using a tool, then smooth it back with a wet sponge.
Step 2: Building the Walls
-
Measure the Circumference:
Measure the circumference of your base circle using a flexible measuring tape or a piece of string. This tells you how long your wall slab needs to be. -
Roll the Wall Slab:
Roll out a larger slab of clay, aiming for slightly thicker walls than the base—perhaps closer to 1/3 inch—to achieve that chunky, minimalist look. -
Trim the Rectangle:
Using a ruler and craft knife, cut a long rectangle from the slab. The length should match your circumference measurement plus a tiny bit for overlap, and the height should be around 3-4 inches. -
Score the Edges:
Take a needle tool or knife and cross-hatch (score) the outer edge of your circular base and the bottom edge of your rectangular wall. Apply a little water or slip to these rough areas. -
Attach the Wall:
Carefully wrap the rectangular slab around the circular base. Press the scored edges together firmly to join them. -
Join the Side Seam:
Where the two ends of the wall meet, score and slip the edges, then press them together. I like to cut this seam at a slight angle (bevel) for a stronger bond and cleaner look.
Cracks While Drying?
If tiny hairline cracks appear as it dries, mix a small amount of clay with water to make a paste and fill them in, then sand smooth once dry.
Step 3: Refining and Smoothing
-
Blend the Seams:
Use a modeling tool or your finger to smooth the clay across the join lines, both inside and outside. You want the clay to become one solid unit with no visible cracks. -
Check the Shape:
If the cylinder has warped, gently place your chosen mold (jar or cup) inside to push the walls back into a perfect circle. Don’t leave it in or the clay might crack as it shrinks. -
Level the Rim:
Inspect the top rim. If it’s uneven, carefully slice off the excess with your blade to make it level. -
Round the Edges:
Dip your finger in water and run it along the top rim to slightly round hard edges. This gives it the soft, pottery-like aesthetic seen in the photo. -
Final Surface Smooth:
Use a damp sponge to wipe down the entire exterior, removing fingerprints and minor imperfections.
Step 4: Finishing Touches
-
Let it Dry:
Allow the piece to dry completely. For air-dry clay, this usually takes 24-48 hours. Rotate it occasionally so it dries evenly. -
Initial Sanding:
Once bone dry, use the 220-grit sandpaper to remove any larger bumps or uneven areas on the rim and sides. -
Polishing:
Switch to the 400-grit sandpaper for a final polish. This step is what creates that velvety, matte texture. -
Dusting Off:
Wipe away all sanding dust with a slightly damp cloth or soft brush. -
Add the Candle:
Place your tea light or votive candle inside your new minimalist vessel.
Enjoy the calming atmosphere your handmade clay vessel brings to your space


Classic Pinch-Pot Votive
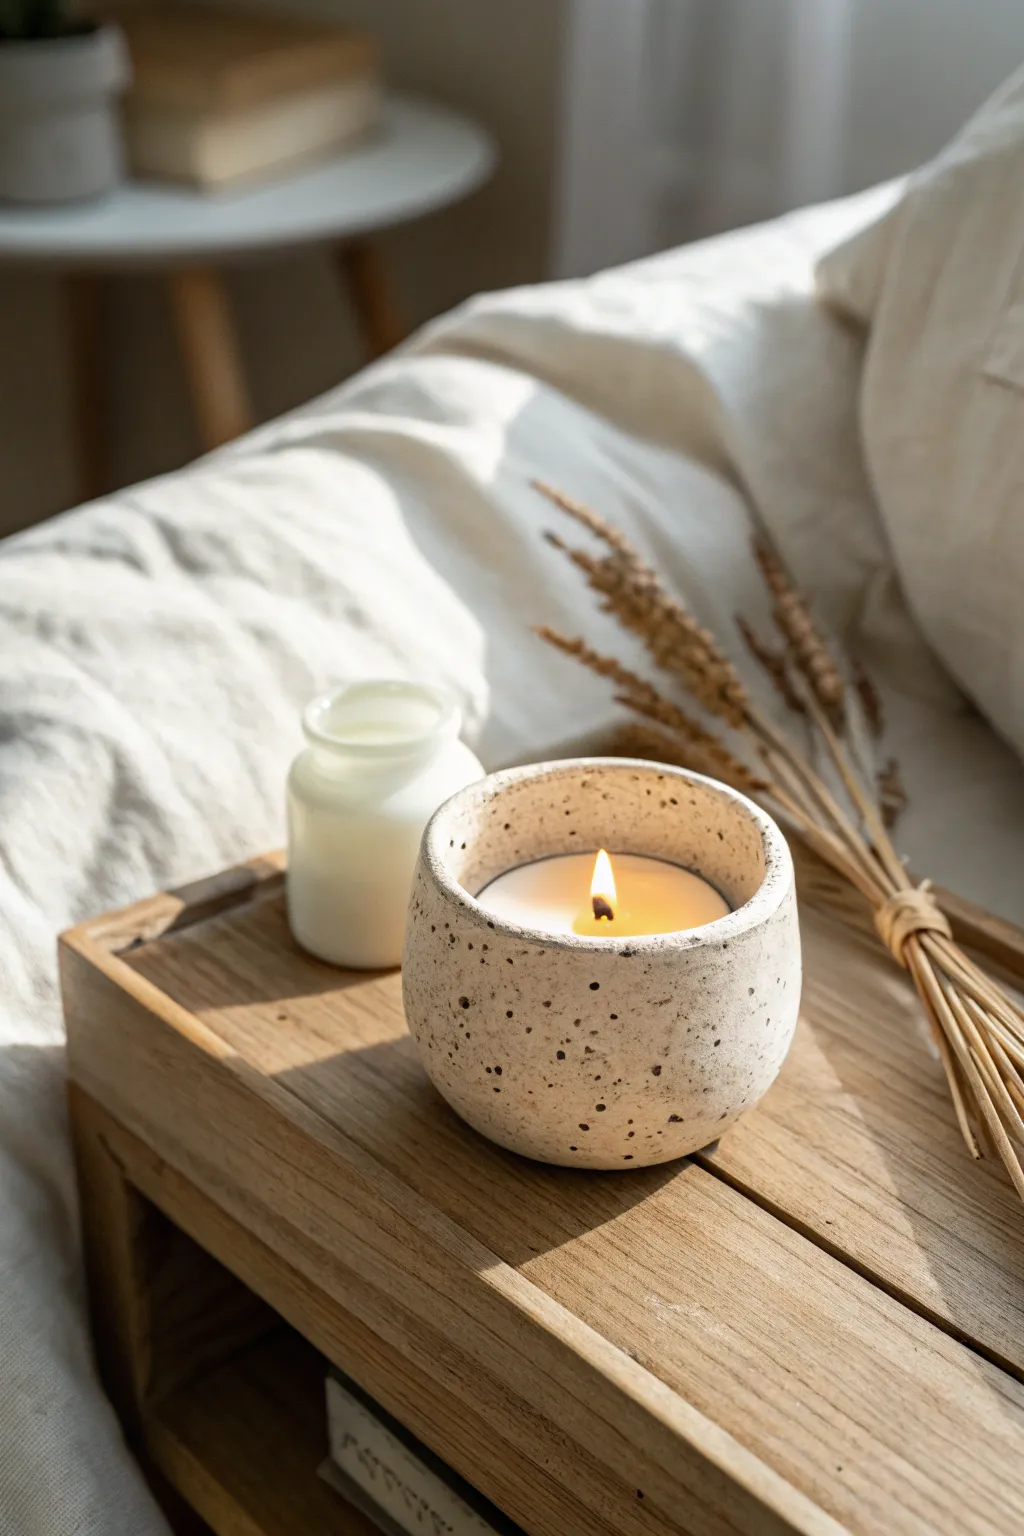
Embrace the rustic charm of hand-built pottery with this organic pinch-pot vessel. Its textured, speckled surface and thick, rounded walls create a cozy, grounded aesthetic perfect for warming up any bedside table.
How-To Guide
Materials
- Speckled stoneware clay (white or buff with grog)
- Small bowl of water
- Sponge
- Needle tool or wooden skewer
- Potter’s rib (rubber or wood)
- Soy wax flakes
- Candle wick with metal tab
- Wick centering device (or pencils)
- Double boiler setup
- Essential oils (optional)
Step 1: Shaping the Vessel
-
Prepare the Clay:
Begin with a ball of speckled stoneware clay roughly the size of a tennis ball. Wedge it thoroughly to remove air bubbles and ensure an even consistency. -
Open the Form:
Hold the clay ball in your non-dominant hand. Press your thumb directly into the center, stopping about a half-inch from the bottom to create a sturdy base. -
Pinch the Walls:
Starting at the bottom and working upwards, gently pinch the clay between your thumb and fingers. Rotate the ball slightly after each pinch to ensure even wall thickness. -
Refine the Thickness:
Aim for slightly thicker walls than a standard cup—about a quarter to a third of an inch—to match the sturdy look in the photo. Keep the rim rounded and soft. -
Shape the Curve:
As you pinch upward, gently curve the walls slightly inward near the top to create a cozy, enclosed shape rather than a wide-open bowl. -
Smooth the Surface:
Use a damp sponge to smooth out any large fingerprints or cracks. I like to leave some subtle imperfections to maintain that organic, handmade character. -
Flatten the Base:
Gently tap the pot against your work surface to create a flat, stable bottom so the candle won’t wobble. -
Dry and Fire:
Allow the pot to dry slowly under loose plastic until bone dry. Bisque fire it in a kiln, then apply a clear matte glaze if desired, or leave the raw clay exterior unglazed for texture before the final firing.
Step 2: Pouring the Candle
-
Secure the Wick:
Once your ceramic vessel is fired and cool, use a dab of hot glue or a wick sticker to adhere the metal wick tab to the inside center of the pot. -
Melt the Wax:
Measure your soy wax flakes (about twice the volume of the pot when solid) and melt them slowly in a double boiler over medium-low heat. -
Add Fragrance:
If you are scenting your candle, let the wax cool slightly (usually to around 185°F) before stirring in your chosen essential oils for about two minutes. -
Center the Wick:
Place a wick centering tool or balance two pencils across the rim of the pot to keep the wick straight and upright. -
Pour the Wax:
Carefully pour the liquid wax into your ceramic vessel, stopping about a half-inch from the rim to allow space for the flame. -
Let it Set:
Allow the candle to cool completely at room temperature for at least 24 hours. Don’t rush this, as uneven cooling can cause sinkholes. -
Trim the Wick:
Using scissors or a wick trimmer, snip the wick to about 1/4 inch above the wax surface before the first burn.
Cracked Clay?
If the rim cracks while pinching, your clay is too dry. Dip your fingers in water (sparingly!) and smooth the cracks immediately with a damp sponge.
Add Texture
Before firing, gently press a coarse fabric or a dried corncob against the exterior clay to enhance the tactile, earthy feel of the finished pot.
Enjoy the warm glow of your handmade creation anywhere in your home

Simple Taper Candle Socket
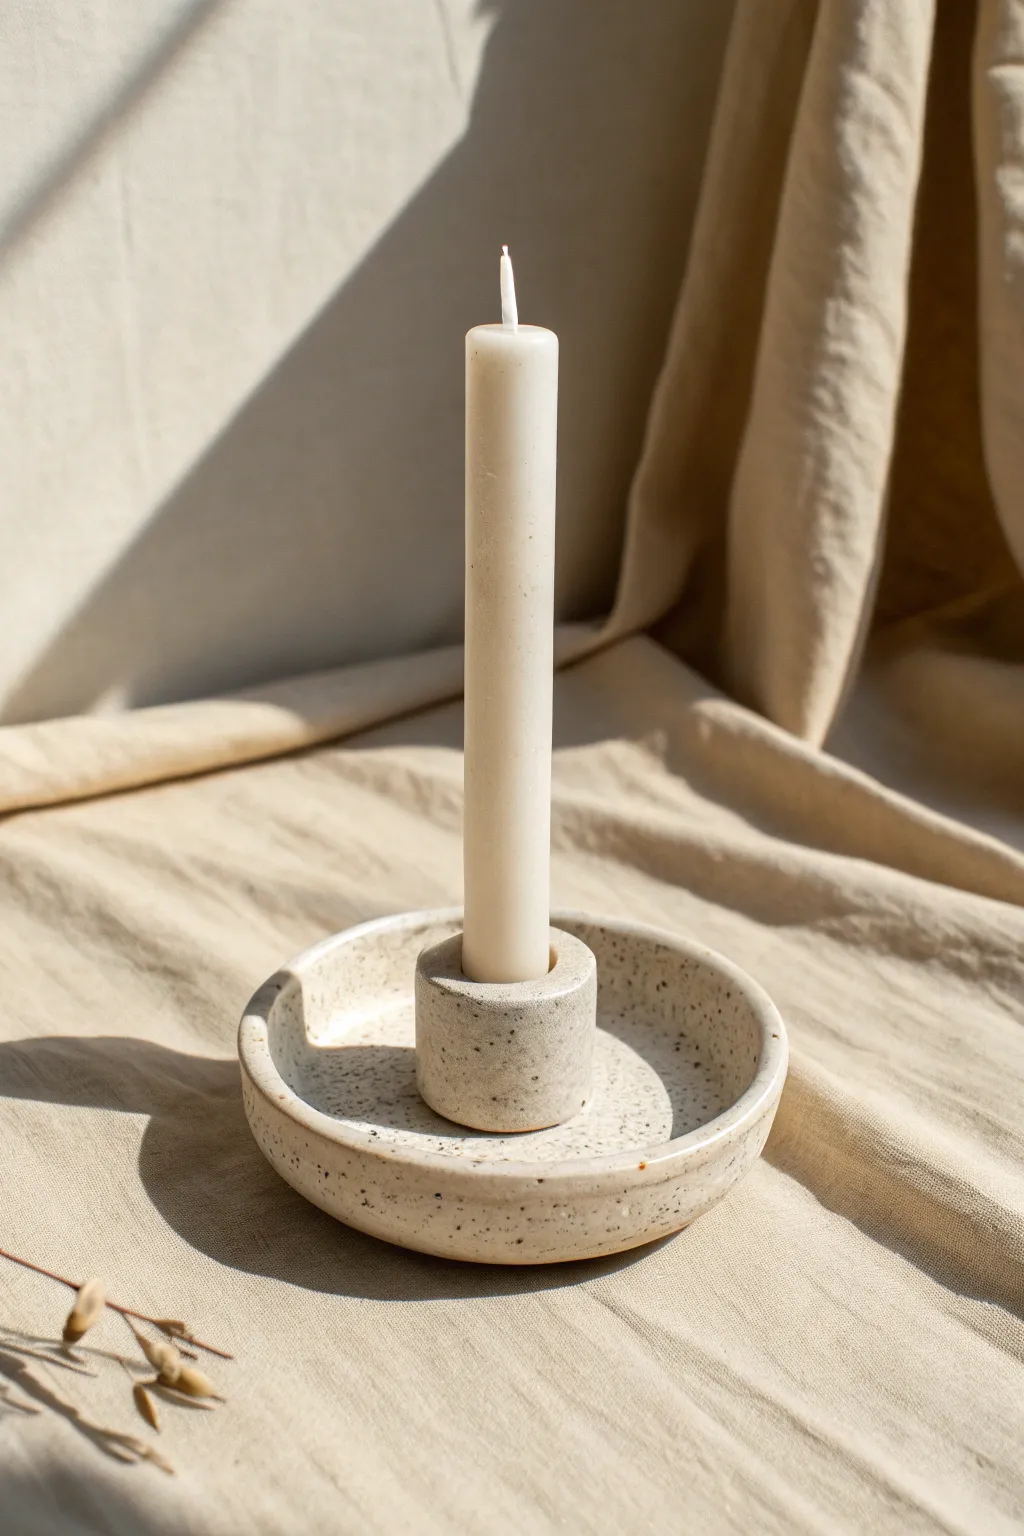
Embrace the beauty of simplicity with this wheel-thrown or hand-built candle socket featuring a wide catch tray and speckled clay body. This design marries functionality with a modern, earthy aesthetic perfect for classic taper candles.
Detailed Instructions
Materials
- Speckled stoneware clay (approx. 1 lb)
- Pottery wheel (optional, can be hand-built)
- Needle tool
- Wire cutter
- Sponge
- Rib tool (metal or wood)
- Trimming tools
- Standard taper candle (for sizing)
- Clear matte or satin glaze
- Kiln
Step 1: Forming the Base
-
Preparation:
Begin by wedging your speckled clay thoroughly to remove air bubbles. Center a small mound, about the size of a large orange, onto your wheel head or bat. -
Opening the clay:
Open the centered clay low and wide. You want to leave a significant thickness in the floor—at least 1 inch—because we will be carving the socket out of this mass later, rather than attaching a separate piece. -
Establishing the rim:
Pull the walls out to form a shallow dish shape. The rim should be slightly raised, about half an inch high, to catch any potential wax drips. -
Refining the tray floor:
Use a flat rib to compress the floor of the tray area surrounding the central hump. Smooth it out so there is a distinct transition from the catch tray to the central mass. -
Shaping the central hub:
You should now have a wide dish with a thick hump of clay in the center. Use your fingers and a rib to refine this center hump into a clean cylinder, roughly 1.5 inches tall and 1.5 inches wide. -
Checking the aesthetic:
Step back and look at the profile. The outer rim should be rounded and soft, while the inner cylinder should stand proud and vertical like a small tower.
Wobbly Candle?
If the fired hole is too large, drop a small bead of melted wax into the bottom before inserting the candle. This acts as a stickum to hold the taper upright.
Step 2: Creating the Socket
-
Centering the hole:
With the wheel spinning slowly, or working carefully on a banding wheel, use your needle tool to mark the exact center of the inner cylinder. -
Drilling the opening:
Using a specifically sized hole cutter or simply your thumbs, press into that center mark to create the actual socket. Go down about an inch. -
Sizing the fit:
I always keep a standard taper candle nearby for this step. Gently test the fit; the hole should be slightly larger than the candle to account for clay shrinkage during drying and firing—usually about 10-12% larger. -
Smoothing the opening:
Use a small piece of damp sponge or a chamois cloth to smooth the rim of the socket hole so it isn’t sharp or jagged. -
Wire off:
Run your wire cutter under the base to separate it from the bat. Slide it onto a ware board to firm up until it reaches leather-hard consistency.
Dual-Tone Texture
Glaze only the interior tray and the socket, leaving the outer rim and exterior raw. This creates a beautiful contrast between the smooth glass and rough stone.
Step 3: Trimming and Finishing
-
Trimming the footer:
Once leather hard, flip the piece over and center it on the wheel. Trim away excess weight from the bottom, carving a neat foot ring that mirrors the vertical rise of the rim. -
Burnishing:
If you want the raw clay texture to shine, take a moment to burnish the unglazed areas with a smooth stone or the back of a spoon. -
Bisque firing:
Place the bone-dry piece in the kiln for a bisque fire (usually Cone 04). This prepares the clay for glazing. -
Glazing:
Dip the entire piece into a transparent matte or satin glaze. This specific look relies on the natural speckles of the clay showing through, so avoid opaque colors. -
Cleaning the foot:
Wipe the bottom of the foot ring completely clean of glaze with a damp sponge to prevent it from fusing to the kiln shelf. -
Final firing:
Fire the piece to the maturity temperature of your clay body (likely Cone 5 or 6 for stoneware). Let the kiln cool completely before unloading.
Place your finished socket on a soft linen cloth and enjoy the warm glow of your handmade creation
Wavy Coil Taper Holder
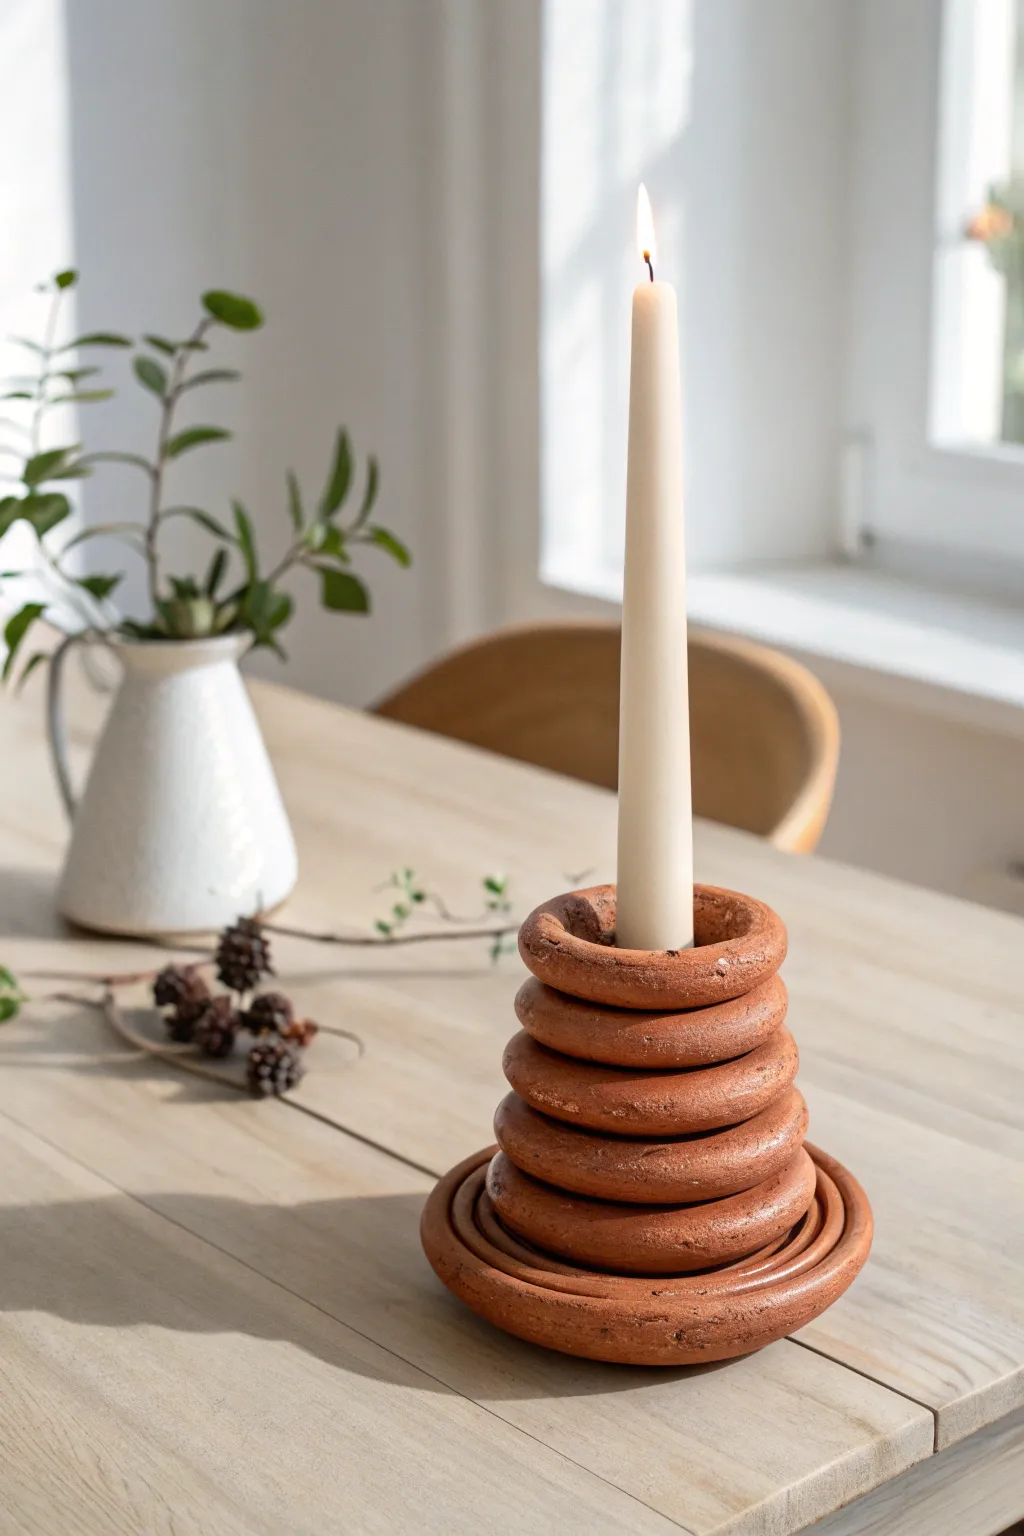
This earthy, sculptural candle holder mimics the look of stacked donuts or stones, bringing a grounding element to any table setting. By layering simple clay coils of varying diameters, you can achieve this textured, organic form that looks beautifully handcrafted.
How-To Guide
Materials
- Terracotta air-dry clay or polymer clay
- Rolling pin
- Clay knife or craft blade
- Slip (clay and water mixture) or liquid clay
- Smoothing tool or sponge
- Old candle or dowel (for sizing)
- Sandpaper (fine grit)
- Matte sealant (optional)
Step 1: Prepping the Coils
-
Condition the Clay:
Begin by thoroughly kneading your terracotta clay until it’s warm, pliable, and free of air bubbles. If using air-dry clay, keep a small bowl of water nearby to keep your hands moist. -
Roll Snakes:
Take sizable chunks of clay and roll them into long, even snakes on a flat surface. You want these to be quite thick—about the width of your thumb or roughly 3/4 inch thick—to give the holder its chunky aesthetic. -
Measure the Core:
Using your taper candle or a dowel of the same size, gently wrap one coil around the base to determine the inner diameter. You want a snug fit, but remember the clay will shrink slightly as it dries. -
Cut the Segments:
Cut your clay snakes into five or six separate lengths. You will need graduated sizes: a few smaller ones for the top stack and slightly longer ones as you move down, plus a much longer piece for the very bottom base.
Step 2: Building the Stack
-
Form the Top Rings:
Take your shortest cut segments and join the ends to create circle rings. Smooth the seam carefully with your finger or a tool so it disappears completely. Make about 4-5 of these rings, keeping them relatively similar in size but allowing for slight organic variation. -
Create the Lower Base:
For the bottommost foundational tiers, create one or two rings that are slightly wider in diameter than the upper stack. This visual weight at the bottom provides stability. -
Make the Saucer:
Roll out a flat slab of clay about 1/4 inch thick. Cut a large circle that is significantly wider than your rings—this will be the saucer base. You can curve the edges up slightly to create a lip. -
Score and Slip:
Before stacking, take a needle tool or knife and scratch cross-hatching marks (scoring) onto the bottom of your first ring and the center of your saucer. dab a little water or liquid clay (slip) on the scratches. This acts as glue. -
Begin Assembly:
Press the widest ring firmly onto the saucer base. Repeat the scoring and slipping process for the top of that ring and the bottom of the next one. -
Stack Upwards:
Continue stacking your rings one by one, moving from the widest at the bottom to the narrowest at the top. Ensure the holes align perfectly in the center so the candle will stand straight. -
Verify the Fit:
Before the clay sets, insert your candle or dowel gently into the center hole to ensure it passes through all the rings unobstructed. Give it a gentle wiggle to ensure the fit isn’t too tight.
Help! My stack is leaning
If the tower lists to one side while wet, insert a rigid dowel or pencil wrapped in parchment paper through the center. Leave it there as a support structure until the clay is firm enough to hold its own weight.
Step 3: Finishing Touches
-
Blend the Interior:
This is a crucial step for stability: use a modeling tool to smear the clay together on the *inside* of the tube where the rings touch. This creates a solid inner wall while leaving the outside looking like separate stacked pieces. -
Texture the Surface:
Use a damp sponge or your finger to smooth out any harsh fingerprints, but don’t over-polish. I like to leave a bit of natural texture to enhance that rustic, earthen look. -
Dry Slowly:
Let the piece dry away from direct sunlight or heat sources. Terracotta clay can crack if it dries too fast. loosely drape a plastic bag over it for the first 24 hours. -
Refine Edges:
Once fully dry (this may take 2-3 days for air-dry clay), use fine-grit sandpaper to gently smooth any sharp edges on the saucer or the top ring. -
Seal:
Apply a matte varnish or sealant to protect the clay from moisture and wax drips, preserving that dry, dusty terracotta color.
Level Up: Dual Tone
Mix a small amount of white clay into your terracotta for the top two rings to create a subtle ombré gradient, or splatter the finished piece with diluted brown paint for a speckled, ceramic-studio effect.
Place a cream-colored taper inside your new holder to enjoy the warm, rustic contrast on your table

The Complete Guide to Pottery Troubleshooting
Uncover the most common ceramic mistakes—from cracking clay to failed glazes—and learn how to fix them fast.
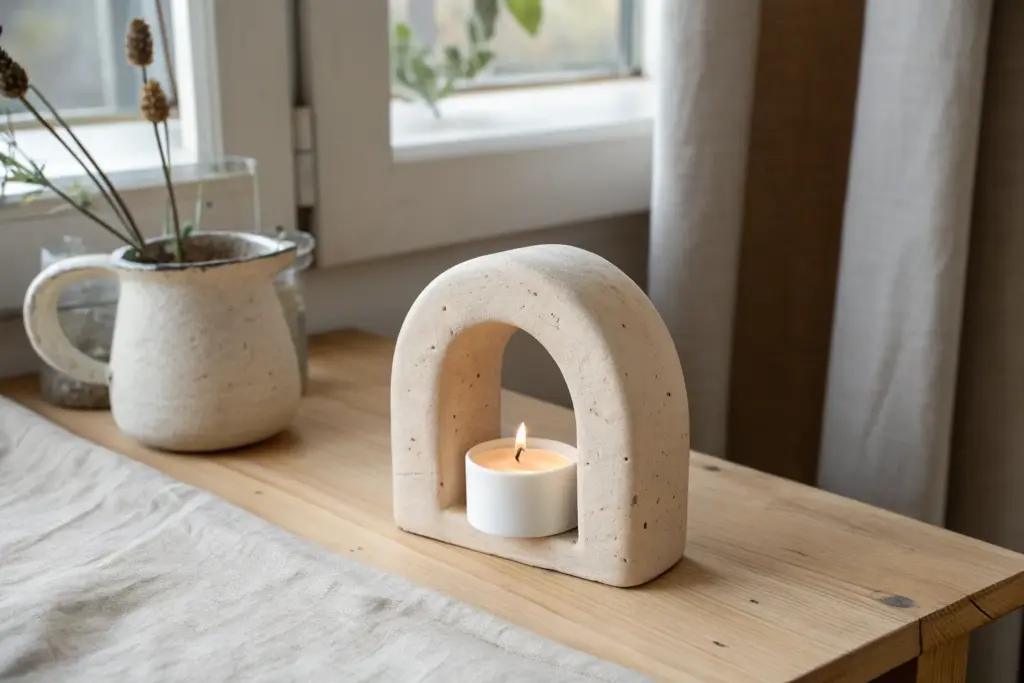
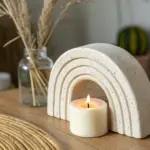
Arch Double Taper Holder
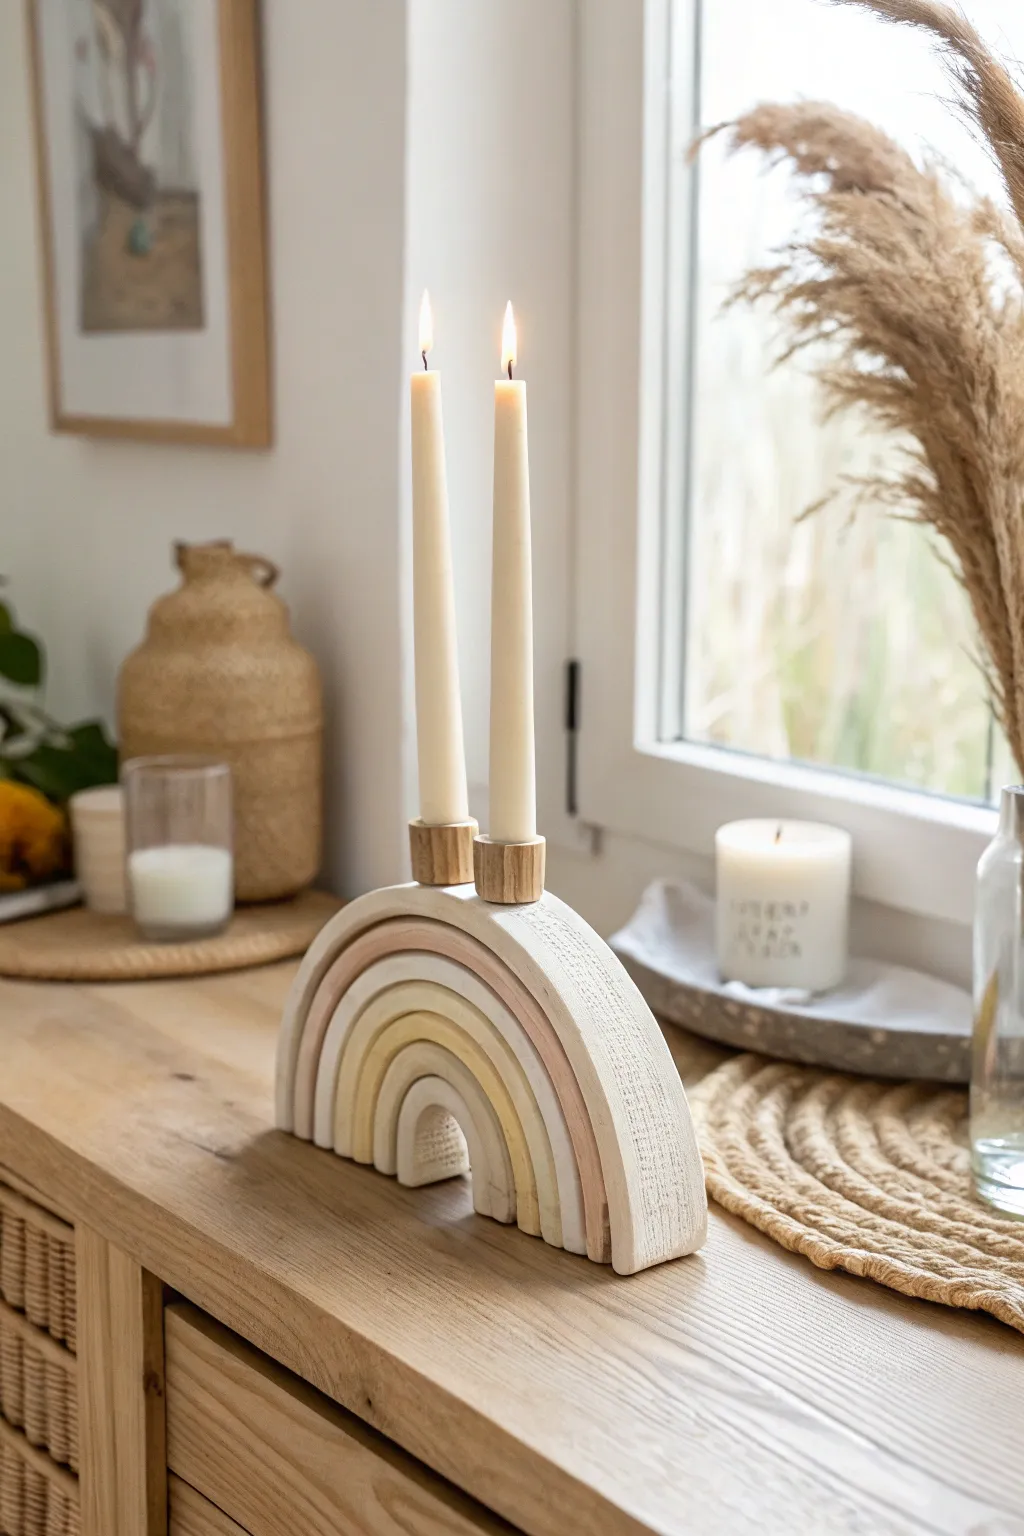
Bring a touch of organic warmth to your mantle with this double-taper candle holder featuring a sculpted rainbow arch design. The soft, neutral tones and textured finish give it a charming, handcrafted pottery look without needing a kiln.
Step-by-Step
Materials
- Air-dry clay (white or light grey)
- Two plain wooden taper candle cup inserts (approx 1-inch diameter)
- Rolling pin
- Clay knife or craft knife
- Ruler
- Cardboard or cardstock (for templates)
- Small bowl of water
- Acrylic paints (Cream, beige, terracotta, white)
- Sponge or textured cloth
- Fine-grit sandpaper
- Strong craft glue (e.g., E6000)
- Matte finish sealant spray
Step 1: Creating the Base Form
-
Prepare your template:
Begin by drawing a semi-circle arch on cardboard that is roughly 8 inches wide at the base and 4-5 inches tall. Cut this out to use as your master guide. -
Condition the clay:
Take a large chunk of air-dry clay and knead it well in your hands until it becomes pliable and warm, removing any air bubbles. -
Roll out the slab:
Roll the clay onto a clean, smooth surface until it is a uniform slab, approximately 1 inch thick. You want it substantial enough to stand on its own. -
Cut the main arch:
Place your cardboard template on the clay slab and use your craft knife to cut out the large semi-circle shape. -
Smooth the edges:
Dip your finger in a little water and run it along the cut edges of the fresh clay arch to soften any sharp corners or drag marks from the knife.
Step 2: Adding the Rainbow Detail
-
Create the layers:
Roll out a separate, thinner slab of clay (about 1/4 inch thick) for the decorative rainbow layers. -
Cut concentric arches:
Using the same template as a guide for the outer curve, cut three or four progressively smaller U-shaped arches from the thin slab. -
Attach the first layer:
Score the surface of the main thick arch and the back of your largest thin arch with a needle tool or fork. Apply a little water slip (watery clay) to bond them. -
Align and press:
Press the thin arch onto the face of the main block, ensuring the bottom edges sit flush with the flat bottom of the base so it stands straight. -
Continue layering:
Repeat the scoring and slipping process for the inner, smaller arches, nesting them inside each other to create the rainbow effect. -
Create the holder placement:
While the clay is still wet, take your wooden candle cups and press them firmly into the top of the arch to create slight indentations where they will sit later. -
Add texture:
I like to gently dab the surface with a coarse sponge or a crumpled textured cloth while the clay is damp to give it that stone-like appearance seen in the photo. -
Dry completely:
Let the piece dry upright in a cool, dry place for at least 24-48 hours. Flip it occasionally if possible to ensure even drying.
Straight & Steady
While drying, prop the arch between two heavy books (lined with parchment paper) to ensure the flat base doesn’t warp, keeping your candles perfectly vertical.
Step 3: Finishing Touches
-
Sand imperfections:
Once fully dry, use fine-grit sandpaper to smooth out any unintentional bumps, particularly on the bottom to ensure the holder doesn’t wobble. -
Mix your palette:
Prepare a palette of muted earth tones. You’ll need a pale cream, a soft yellow-beige, and a muted terracotta pink. -
Paint the arches:
Paint each nested arch layer a different color, keeping the tones soft and matte. Leave the main thick base block a neutral white or cream. -
Distress the paint:
For a rustic look, you can lightly sand over the painted areas once dry to reveal some of the texture underneath. -
Seal the piece:
Spray the entire clay piece with a clear matte sealant to protect the paint and the clay from moisture. -
Attach the cups:
Apply a strong craft glue to the bottom of the wooden candle cups and place them into the indentations you made earlier on top of the arch. -
Final cure:
Let the glue cure according to the manufacturer’s instructions before inserting your taper candles.
Textured Terrazzo
Before the clay dries, press small chips of dried colored clay or coarse sand into the surface for a trendy, embedded terrazzo stone effect.
Now you have a stunning, minimalist centerpiece ready to light up your dining table or windowsill with a cozy glow
Geometric Faceted Tea Light
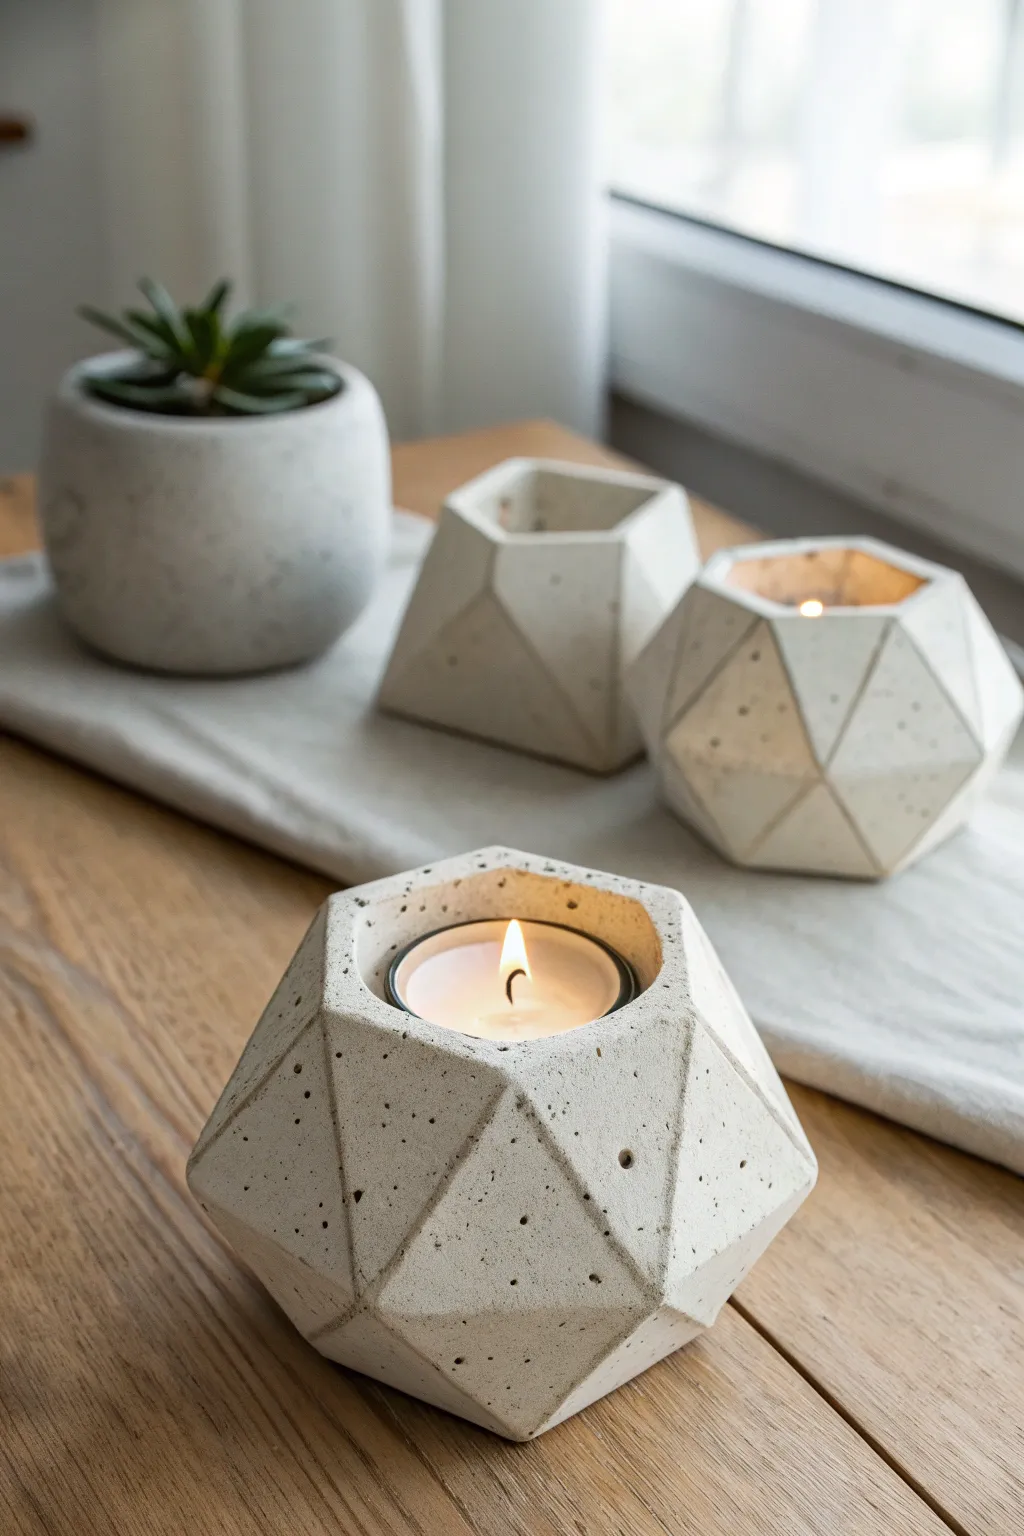
Bring a touch of minimalist elegance to your home with these faceted tea light holders that mimic the look of industrial concrete. Using air-dry clay, you can sculpt these stunning geometric shapes to create a cozy, modern atmosphere without the mess of mixing cement.
Step-by-Step Guide
Materials
- White or light grey air-dry clay (stone effect optional)
- Rolling pin
- Sharp craft knife or scalpel
- Tea light candle (for sizing)
- Ruler or straight edge
- Fine-grit sandpaper (220-400 grit)
- Acrylic sealer or matte varnish
- Cutting mat
- Small sponge
- Water
Step 1: Shaping the Base
-
Prepare the Clay:
Begin by grabbing a substantial handful of air-dry clay. Knead it in your hands until it becomes warm, pliable, and free of any air bubbles. -
Form a Ball:
Roll your kneaded clay into a smooth, tight sphere. Aim for a ball slightly larger than a tennis ball to ensure you have enough material for the faceted cuts. -
Flatten the Bottom:
Gently press the sphere onto your working surface to create a flat, stable base. This ensures your candle holder won’t wobble once finished. -
Create the Opening:
Take a standard tea light candle (metal casing and all) and press it firmly into the center of the top of your clay ball. -
Define the Well:
Push the candle down until it sits flush with the top surface. Wiggle it very slightly to create a tiny bit of clearance, which accounts for clay shrinkage as it dries. -
Remove the Candle:
Carefully pry the tea light out of the clay. If the edges of the hole deformed slightly, gently smooth them back into a perfect circle with a wet fingertip.
Cracks Appearing?
If hairline cracks appear while drying, mix a small amount of fresh clay with water to make a paste (slip). Fill the cracks, smooth over, and let dry again.
Step 2: Carving the Facets
-
First Cuts:
Using your sharp craft knife, slice a flat plane off the side of the sphere. Make the cut swift and decisive to keep the clay surface smooth. -
Create a Pattern:
Continue slicing off sections around the sphere. Try to vary the angles and sizes of your cuts to create an irregular, organic geometric shape rather than a perfect octagon. -
Refining Edges:
As you cut, ensure the new planes intersect cleanly. Sharp, crisp ridges between the distinct faces are what give this project its modern, architectural look. -
Check the Rim:
Slice the top rim at an angle if desired, or keep it flat. Make sure the walls around the candle well remain at least 1/4 inch thick for structural integrity. -
Smoothing Imperfections:
Dip your finger or a small sponge in water and very lightly smooth out any drag marks from the knife, being careful not to round over your crisp edges.
Crisper Lines
For ultra-sharp facets, pop the clay into the freezer for 10-15 minutes before carving. The firmer texture creates much cleaner slices.
Step 3: Finishing Touches
-
Slow Drying:
Set the holder aside in a cool, dry place. Let it dry slowly for 24-48 hours. I find that rushing this process with heat can cause cracks, so patience is key here. -
Faux Stone Texture:
Once fully dry, you can create the speckled stone look seen in the photo. Dip an old toothbrush into diluted black or dark grey acrylic paint. -
Speckling:
Run your thumb over the bristles to flick tiny droplets of paint onto the faceted surfaces. Practice on a paper towel first to control the spray size. -
Sanding:
If there are any rough burrs or sharp points that feel uncomfortable, lightly sand them with fine-grit sandpaper. -
Sealing:
Apply a coat of matte varnish or acrylic sealer to protect the clay from moisture and give it a finished, professional sheen.
Place a tea light inside and enjoy the warm glow reflecting off your handcrafted geometric angles


What Really Happens Inside the Kiln
Learn how time and temperature work together inside the kiln to transform clay into durable ceramic.
Marbled Clay Candle Holder
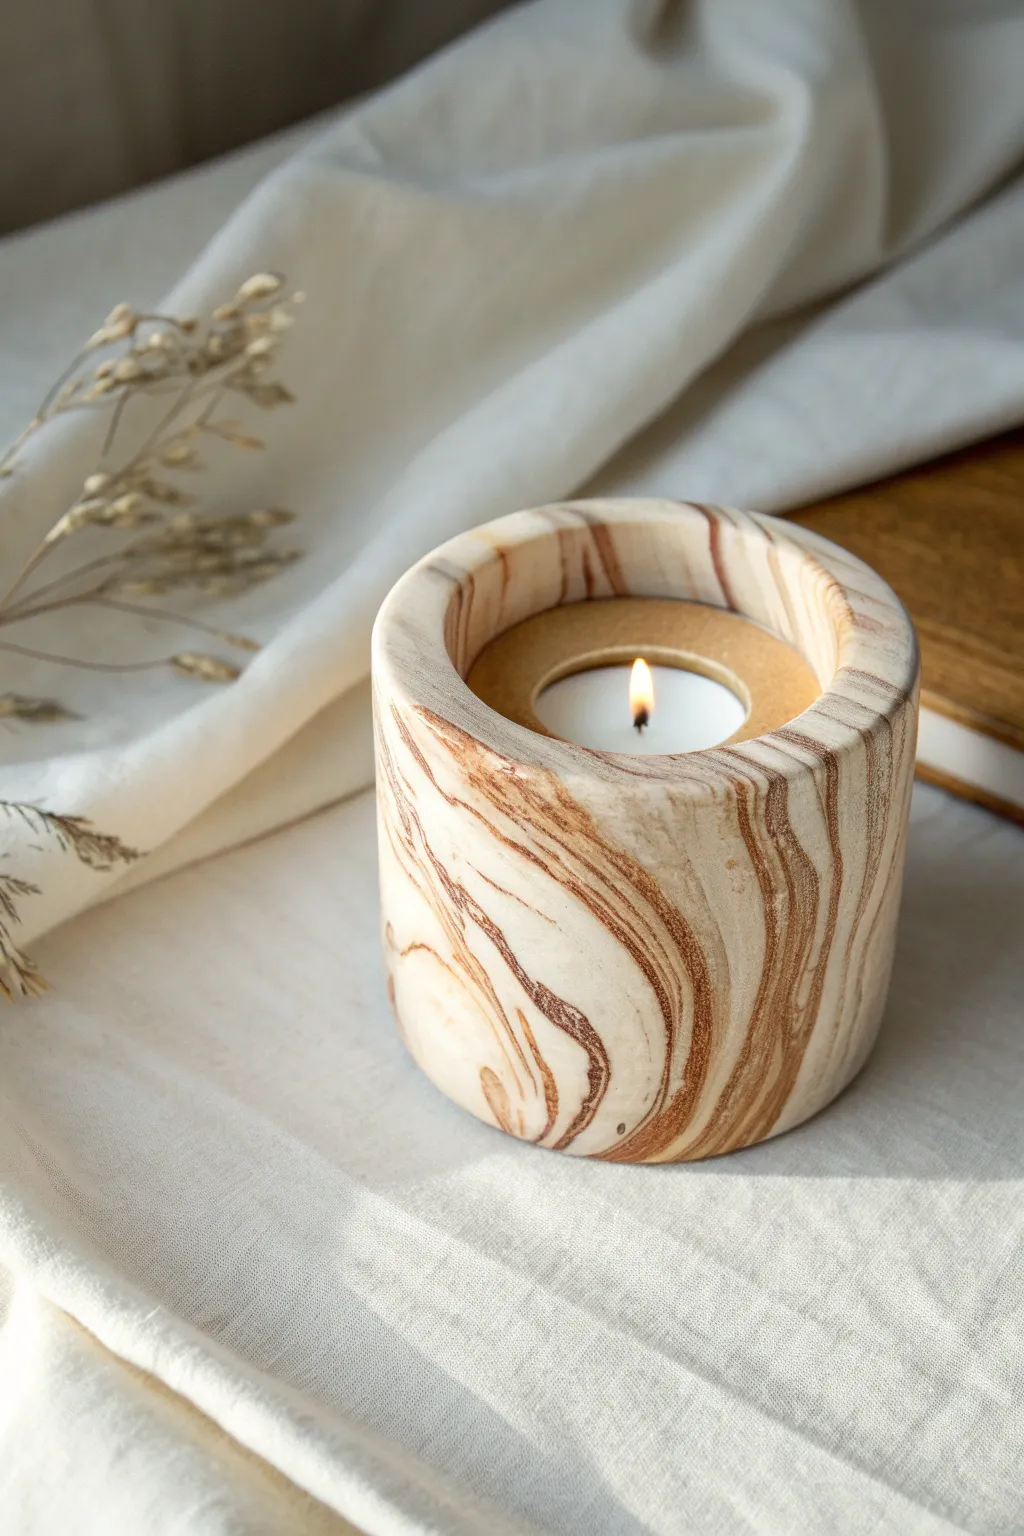
Bring the warmth of natural textures into your home with this stunning marbled clay candle holder. By twisting together strands of cream, beige, and terracotta polymer clay, you’ll create a sophisticated faux wood grain effect that looks incredibly high-end.
Step-by-Step
Materials
- Polymer clay in three colors: White/Cream, Beige/Tan, and Terracotta/Red-Brown
- Rolling pin or acrylic roller
- Circle cutters (one 3-inch, one 1.5-inch for the tealight slot)
- Small tealight candle for sizing
- Sharp craft blade or tissue blade
- Sandpaper (wet/dry distinct grits: 400, 600, 1000)
- Matte or satin polymer clay varnish (optional)
- Baking sheet and parchment paper
- Ruler
Step 1: Preparing the Marbling
-
Condition the Clay:
Begin by thoroughly conditioning each block of clay until it is soft and pliable. You will need about roughly 50% cream, 30% beige, and 20% terracotta to achieve the lighter look shown in the image. -
Create Snakes:
Roll each color family into long, thin snakes about the thickness of a pencil. Quantity depends on the size of your holder, but aim for at least 4-5 snakes of each color to start. -
Bundle and Twist:
Gather a mix of the colored snakes into one large bundle. Grip holding both ends and twist the entire bundle tightly until it looks like a striped candy cane. -
Fold and Roll:
Fold the twisted log in half and roll it out again into a single long cylinder. Repeat this twisting, folding, and rolling process 2-3 times. Don’t overmix, or the distinct lines will turn muddy.
Air Pocket Prevention
Traping air in a thick cylinder can cause cracking in the oven. When compacting your clay log, slam it forcefully onto your table a few times to force out hidden bubbles.
Step 2: Shaping the Cylinder
-
Consolidate the Block:
Squish your marbled log into a solid block shape. Ensure there are no air bubbles trapped inside by pressing firmly from all sides. -
Form the Cylinder:
Roll the block on your work surface to create a thick, smooth cylinder. It should be approximately 3.5 inches in diameter and about 3 inches tall. -
Trim the Ends:
Use your sharp craft blade to slice off the top and bottom of the cylinder to create perfectly flat, level surfaces. I usually check with a ruler to ensure the height is even all around. -
Check the Grain:
Examine the sides of your cylinder. If the marbling lines are running horizontally, you may want to gently compress the cylinder from the sides to elongate the pattern vertically for that wood-grain look.
Gold Accents
For a luxe touch, mix small flakes of gold leaf into the clay during the ‘Bundle and Twist’ phase. The gold will peek through the strata like mineral veins.
Step 3: Creating the Candle Slot
-
Mark the Center:
Find the center of the top flat surface of your cylinder. Place your 1.5-inch circle cutter (or one that matches your tealight width) gently on top to mark the spot. -
Cut the Initial Hole:
Press the cutter down about 0.5 to 0.75 inches deep. Twist gently and pull up to remove the core of clay. -
Refine the Depth:
Test the fit with your actual tealight candle. The top of the candle should sit just below the rim of the holder. If necessary, carefully scoop out a bit more clay from the bottom of the hole. -
Smooth the Edges:
Use your finger or a smoothing tool to round over the sharp top edge of the rim slightly, giving it a soft, stone-like ease.
Step 4: Baking and Finishing
-
Bake the Piece:
Place the holder on parchment paper. Bake according to the manufacturer’s instructions for the thickest part of the clay—this usually requires a longer baking time at a lower temperature to prevent burning. -
Cool Completely:
Allow the piece to cool fully in the oven with the door cracked open. This gradual cooling helps prevent cracking in thick clay pieces. -
Wet Sanding:
Once cool, submerge the piece in water and sand the outer surface, starting with 400 grit and moving to 1000 grit. This reveals the true depth of the marbling and removes fingerprints. -
Buffing:
Dry the piece thoroughly. Rub vigorously with denim or a soft cloth to create a natural sheen. -
Optional Sealant:
If you prefer a glossier look or want extra protection, apply a thin coat of matte or satin varnish to the exterior.
Place a fresh tealight inside and enjoy the warm glow against your beautiful faux-stone creation
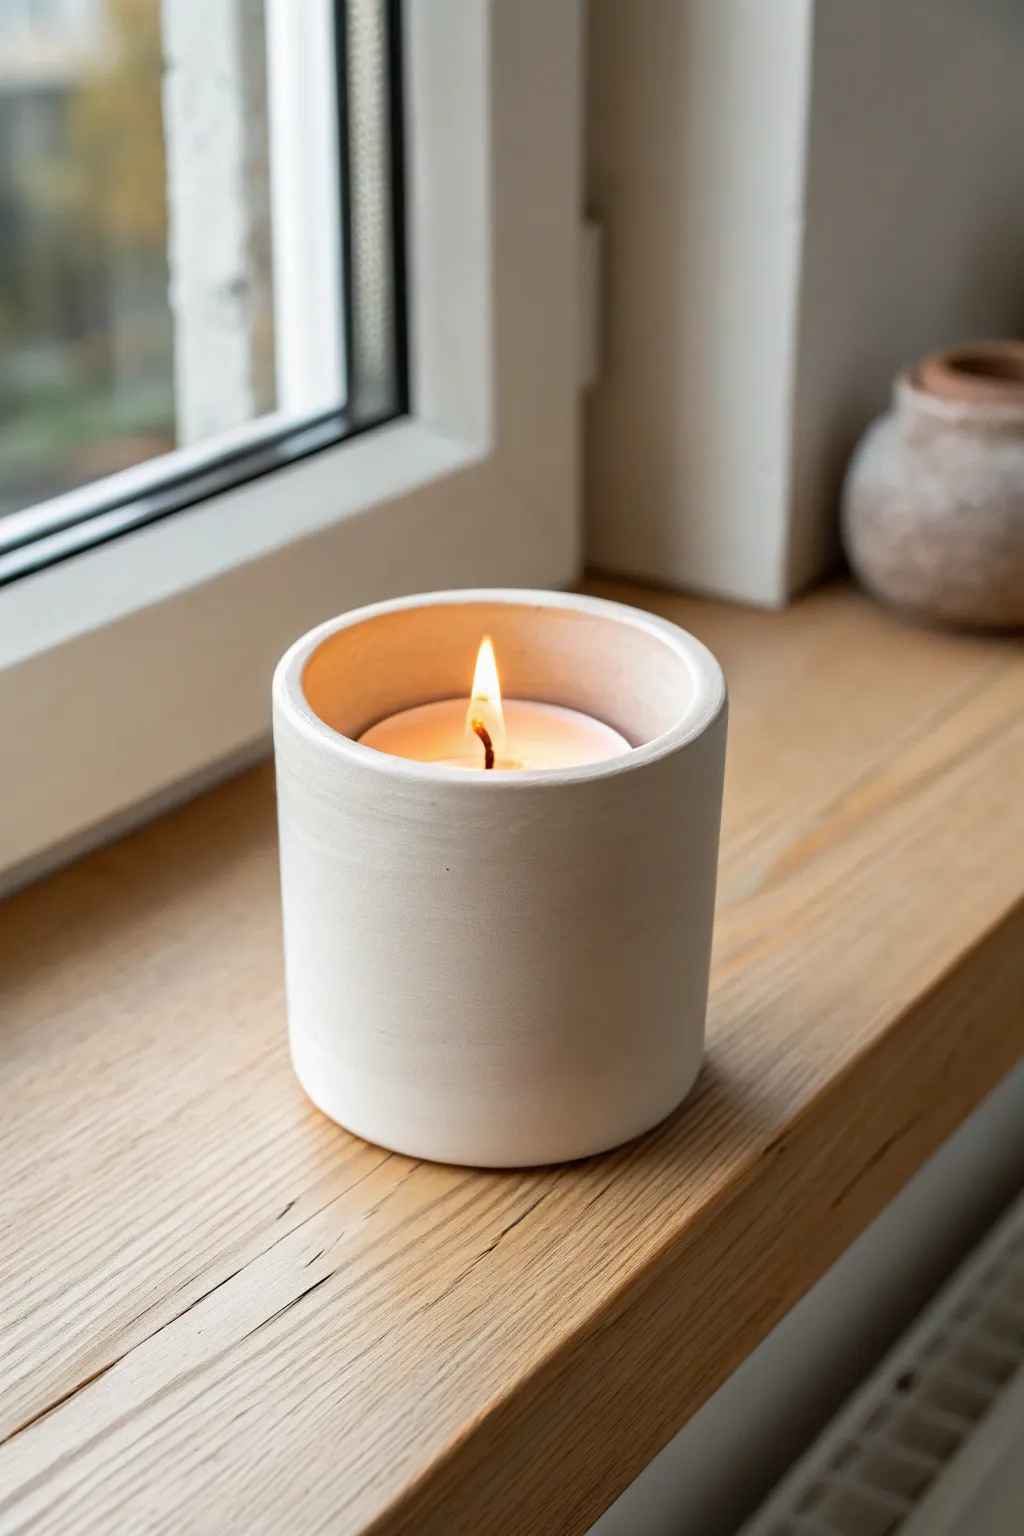
Speckled “Ceramic Look” Votive
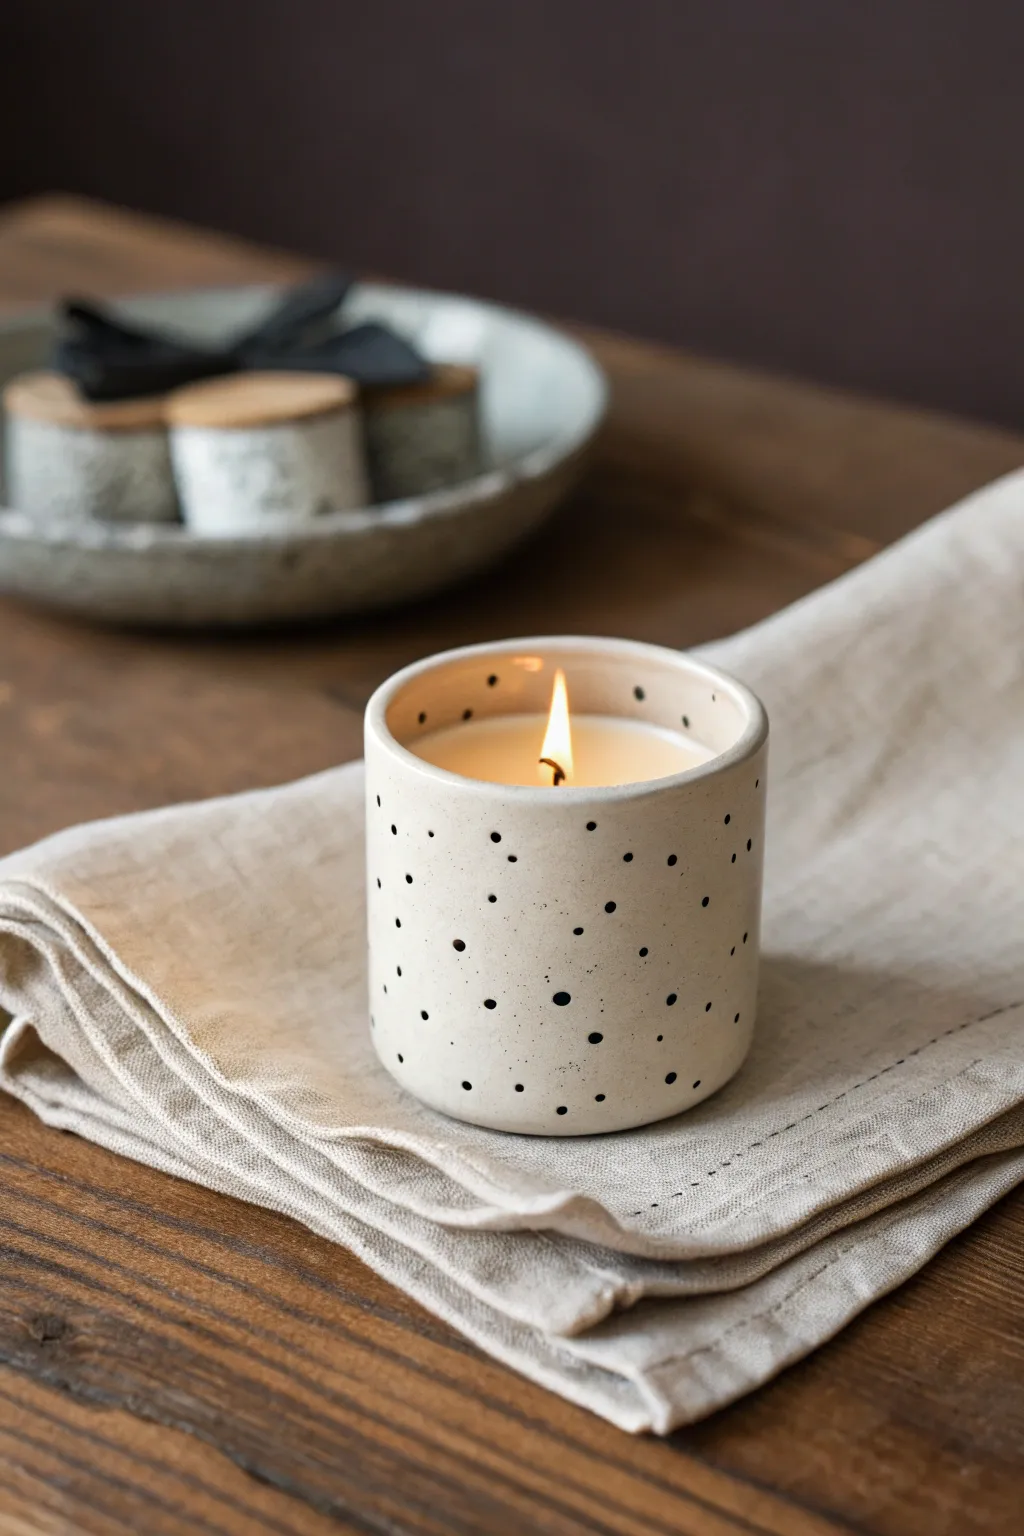
Achieve the high-end look of wheel-thrown pottery without a kiln using polymer clay and a clever painting technique. This project results in a minimalist, speckled cream votive filled with natural soy wax for a cozy, artisanal finish.
How-To Guide
Materials
- White polymer clay (approx. 2oz)
- Black acrylic paint
- Cream or beige acrylic paint (matte finish)
- Clear satin varnish or glaze for polymer clay
- Rolling pin or pasta machine
- Round cookie cutter (3-inch diameter)
- Craft knife or clay blade
- Old toothbrush
- Small paintbrush
- Soy wax flakes
- Candle wick with metal tab
- Wick centering tool or pencils
- Double boiler or microwave-safe jug
- Essential oils (optional)
- Super glue or hot glue
- Sandpaper (fine grit)
Step 1: Sculpting the Vessel
-
Condition the Clay:
Start by warming the white polymer clay in your hands, kneading it thoroughly until it is soft, pliable, and free of any air bubbles. -
Roll the Base:
Roll out a portion of the clay to an even thickness of about 1/4 inch. Use your round cookie cutter to punch out a perfect circle, which will serve as the base of your votive. -
Create the Sidewalls:
Roll the remaining clay into a long, rectangular strip. Aim for the same 1/4 inch thickness as your base to ensure uniform burning later. -
Measure and Cut:
Measure the circumference of your base circle. cut the clay strip to this length, adding just a tiny bit of overlap allowance, and slice the top and bottom edges straight with your craft knife. -
Assemble the Cylinder:
Wrap the clay strip around the circular base. Carefully press the edges together where the wall meets the floor, blending the clay with your fingertip or a clay sculpting tool to create a seamless seal inside and out. -
Seal the Seam:
Join the vertical side seam by pressing and smoothing the clay together. I find smoothing vertical strokes helpful here to make the join invisible. -
Smooth the Rim:
Gently run your finger along the top rim to round it off slightly. It shouldn’t be knife-sharply square; a softer edge mimics hand-thrown pottery best. -
Bake the Vessel:
Place your clay pot on a baking sheet or ceramic tile. Bake according to the manufacturer’s instructions on your clay package (usually 275°F for 15-30 minutes per 1/4 inch of thickness). -
Cool and Sand:
Allow the vessel to cool completely. Once hard, use fine-grit sandpaper to smooth out any fingerprints or rough spots on the exterior.
Practice Your Flick
Test your toothbrush splatter technique on a piece of scrap paper first. The amount of water in the paint changes the dot size significantly.
Step 2: Creating the Speckled Finish
-
Apply the Base Color:
Paint the entire exterior and the inner rim of the vessel with your matte cream or beige acrylic paint. Depending on coverage, apply two coats, letting the first dry completely before adding the second. -
Prepare the Splatter:
Dilute a small dollop of black acrylic paint with a few drops of water until it reaches an inky consistency. -
Splatter Technique:
Dip an old toothbrush into the thinned black paint. Hold the brush a few inches from the vessel and run your thumb across the bristles to flick tiny specks onto the surface. -
Vary the Density:
Rotate the pot as you splatter to ensure even coverage. Don’t worry if some dots are larger than others; that organic variation looks more authentic. -
Seal the Surface:
Once the paint is totally dry, apply a coat of clear satin varnish. This protects the paint and gives it that slight sheen of glazed ceramic.
Watertight Worries?
If you suspect your clay seams aren’t perfect, coat the *inside* with a thin layer of UV resin or waterproof sealer before pouring wax to prevent leaks.
Step 3: Pouring the Candle
-
Secure the Wick:
Apply a dot of super glue or hot glue to the bottom of the metal wick tab and center it firmly inside the bottom of your clay vessel. -
Melt the Wax:
Melt your soy wax flakes in a double boiler or microwave-safe jug until fully liquid and clear. -
Scent the Wax (Optional):
If you are adding fragrance, remove the wax from the heat and stir in your essential oils gently for about two minutes. -
Pour carefully:
Slowly pour the wax into the vessel, stopping about half an inch from the rim. -
Center the Wick:
Use a wick centering tool or balance two pencils across the top of the votive to hold the wick straight while the wax cools. -
Trim and Enjoy:
Once the wax has hardened completely (ideally overnight), trim the wick to 1/4 inch length before lighting.
Light your new candle and enjoy the warm glow contrasting against your modern, speckled creation

TRACK YOUR CERAMIC JOURNEY
Capture glaze tests, firing details, and creative progress—all in one simple printable. Make your projects easier to repeat and improve.
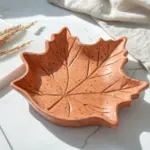
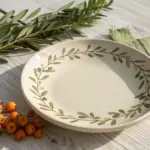
Leaf-Imprint Tea Light Dish
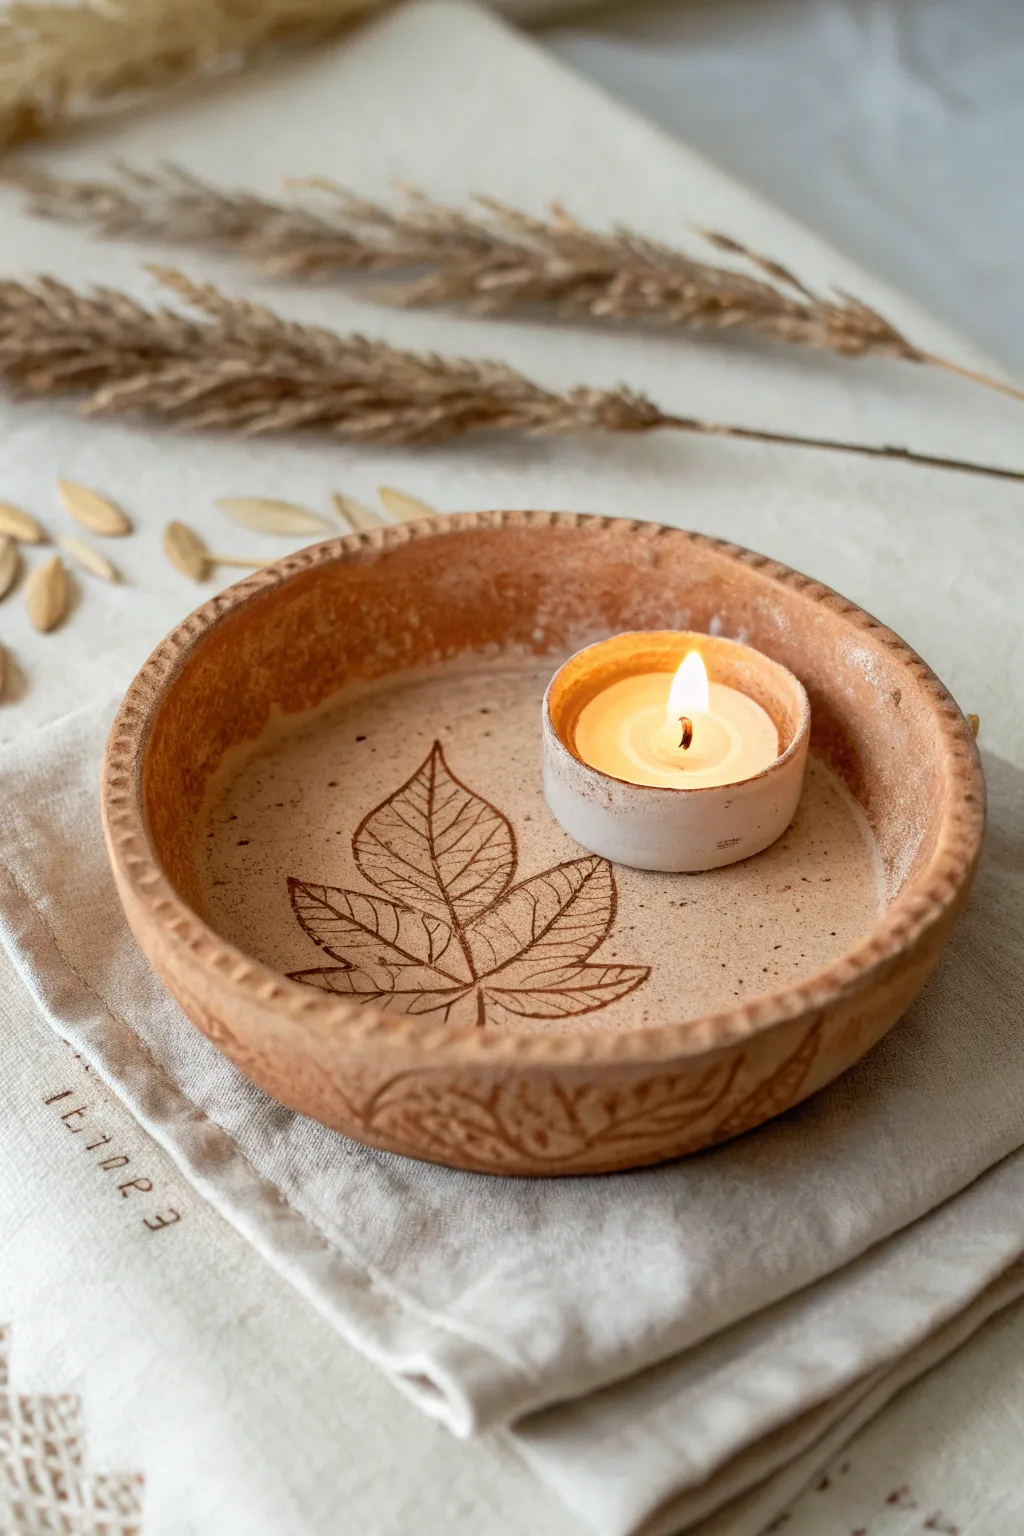
Embrace the changing seasons with this rustic clay dish, featuring a delicate leaf illustration and a warm, two-tone finish. Its shallow, open design makes it the perfect vessel for holding a cozy tea light or displaying collected trinkets.
Step-by-Step Guide
Materials
- Air-dry clay or earthenware clay (terracotta color)
- White or cream acrylic paint or ceramic underglaze
- Small rolling pin
- Round cookie cutter or bowl (approx. 4-5 inches diameter)
- Needle tool or sharp toothpick
- Small carving loop tool (optional)
- Sponge
- Fine grit sandpaper
- Matte or satin varnish
- Small paintbrush
- Real leaf for reference or tracing
Step 1: Shaping the Dish
-
Prepare the clay:
Begin by wedging a fist-sized ball of terracotta-colored clay to remove air bubbles. Roll it out into an even slab, approximately 1/4 inch thick. -
Cut the circle:
Place your round cutter or bowl onto the slab and cut out a perfect circle. Remove the excess clay and smooth the cut edges with a damp finger to remove any sharpness. -
Form the rim:
Gently lift the edges of the circle upwards to create a shallow wall. Pinch evenly around the circumference to form a vertical rim about 3/4 inch high. -
Refine the shape:
Use a damp sponge to smooth the interior floor and the walls. Ensure the transition from the floor to the wall is curved rather than a sharp angle for easier cleaning later. -
Add rim texture:
Take a small, blunt tool or the handle of a paintbrush and press small indentations vertically along the very top edge of the rim. Space them closely together to create a decorative, ticked border.
Clean Lines Pro-Tip
For sharper sgraffito lines, wait until the paint is dry to the touch but the clay is still damp before carving. This prevents the paint from chipping.
Step 2: Detailing and Surface Design
-
Dry the surface:
Allow the clay to dry until it is leather-hard—firm to the touch but still cold and able to be carved without deforming. -
Apply the interior base:
Paint a circle of cream or white underglaze (or acrylic if using air-dry clay) on the interior floor of the dish. I like to leave the walls and rim the natural rusty clay color for contrast. -
Speckle effect:
To mimic the speckled look of stoneware, flick a toothbrush loaded with slightly watered-down brown paint over the cream interior. Keep the speckles fine and subtle. -
Outline the leaf:
Using a needle tool, gently scratch the outline of a maple leaf into the center of the painted area. You can trace a real leaf or freehand it. -
Carve the veins:
Deepen your scratched lines, carving the central vein and branching veins of the leaf. Press firmly enough to reveal the darker clay body beneath the cream paint. -
Add exterior relief:
On the lower outside wall of the dish, use a loop tool or needle to carve simple leaf shapes horizontally around the base. This adds tactile interest to the outside.
Mix It Up
Make a set of four dishes, each featuring a different leaf shape (oak, birch, elm) to represent the full variety of the autumn forest floor.
Step 3: Finishing Touches
-
Final drying:
Let the piece dry completely. If using air-dry clay, this may take 24-48 hours. If firing in a kiln, proceed with your bisque schedule now. -
Sand edges:
Once bone dry, take fine-grit sandpaper and lightly smooth the top rim and any rough patches on the exterior. Be careful not to sand off your painted interior decoration. -
Highlight the carving:
If the leaf lines aren’t dark enough, run a very thin wash of dark brown paint into the carved grooves, then wipe the surface clean with a damp cloth, leaving the pigment only in the recesses. -
Seal the piece:
Apply a coat of matte or satin varnish to the entire piece. This protects the clay and gives the cream paint a finished ceramic look. -
Add the light:
Place a standard tea light or a small votive candle into the center of the dish, directly over your leaf design.
Light your candle and enjoy the warm glow illuminating your handcrafted design
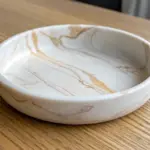
Wildflower-Pressed Candle Tray
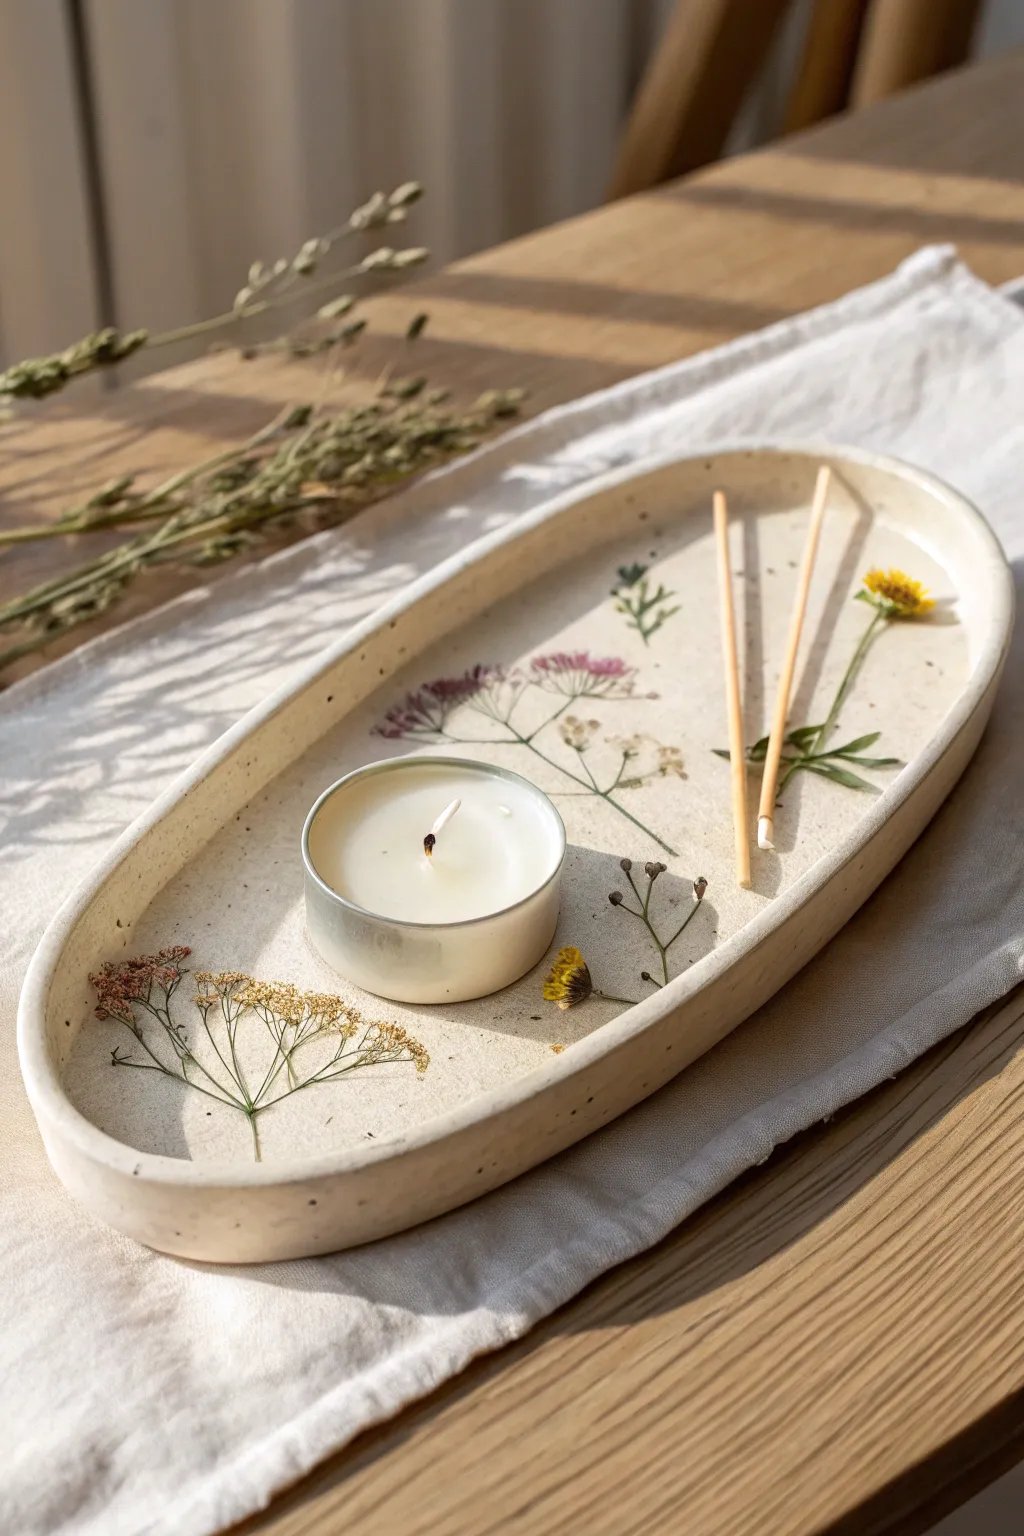
This elegant tray combines the rustic charm of speckled clay with the delicate beauty of pressed wildflowers. It’s a purposeful piece designed to hold your favorite tealights or incense, bringing a touch of nature indoors.
Step-by-Step
Materials
- White or cream air-dry clay (or polymer clay with a granite effect)
- Dried pressed wildflowers and leaves
- Rolling pin
- Sharp craft knife or clay tool
- Small bowl of water
- Fine-grit sandpaper
- Matte clear sealant or varnish (water-based)
- Parchment paper or a smooth work mat
- Small paintbrush
- Tealight candle (for sizing reference)
- Wooden skewer or chopstick
Step 1: Shaping the Clay Foundation
-
Prepare the workspace:
Lay down parchment paper or a smooth work mat to prevent the clay from sticking. Tape the corners down so it doesn’t shift while you roll. -
Roll out the slab:
Take a generous ball of your chosen clay. Knead it slightly to warm it up, then roll it out to an even thickness of about 1/4 inch (6mm). Ensure the surface is perfectly smooth. -
Cut the oval shape:
Freehand an elongated oval shape using a craft knife, or lightly sketch the outline with a toothpick first to get the symmetry right. Aim for a length of about 8-10 inches. -
Smooth the edges:
Dip your finger in a little water and run it along the cut edge of the oval to smooth out any sharpness or crumbs from the cutting process.
Step 2: Creating the Rim
-
Create a coil:
Roll a separate snake of clay that is long enough to go around the entire circumference of your oval base. Make it about the thickness of a pencil. -
Attach the rim:
Score the outer edge of the base and the underside of the coil with a scratching tool. Dab a little water (or slip) on the scored areas and press the coil firmly onto the base edge. -
Blend the seams:
Using your thumb or a modeling tool, blend the clay coil downward into the base on both the inside and outside seams until the join is invisible. -
Refine the walls:
Pinch the walls gently to shape them upwards, creating a shallow lip. Smooth the top edge with water again for a rounded, organic finish.
Fixing Faded Flowers
If your pressed flowers lose vibrancy once sealed, you can lightly touch them up with diluted watercolor paint before the final varnish layer dries.
Step 3: Botanical Impressions
-
Arranging the florals:
Place your dried wildflowers onto the wet clay surface. Arrange them thoughtfully, leaving a specific empty spot where your tealight will eventually sit. -
Pressing the flowers:
Gently place a piece of parchment paper over the flowers. Use the rolling pin to apply light, even pressure to push the flowers flush into the clay surface. -
Check the depth:
Peel back the paper carefully. If any stem or petal edges are sticking up, use your finger to gently depress them into the clay so the surface remains relatively flat. -
Size check:
Place your actual tealight gently onto the wet clay just to ensure it sits flat and fits the intended space. Remove it immediately so it doesn’t get stuck.
Pro Seam Blending
Use the back of a spoon dipped in water to smooth the interior seams. The curve of the spoon matches the inner curve of the tray perfectly.
Step 4: Seal and Finish
-
Allow to dry:
Let the tray dry completely. For air-dry clay, this usually takes 24-48 hours. Rotate it occasionally so the bottom dries evenly and doesn’t warp. -
Sand imperfections:
Once fully cured, use fine-grit sandpaper to buff away any rough spots on the rim or the underside of the tray. -
Apply first seal coat:
Apply a thin layer of matte sealant over the entire tray, including directly over the pressed flowers. This preserves their color and prevents them from rotting or crumbling. -
Final coat:
I usually wait for the first coat to be touch-dry before adding a second coat for durability. Let it cure fully before placing a lit candle inside.
Now you have a serene, nature-inspired resting place for your daily candlelight rituals
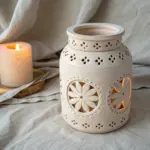
Cutout Lantern Votive
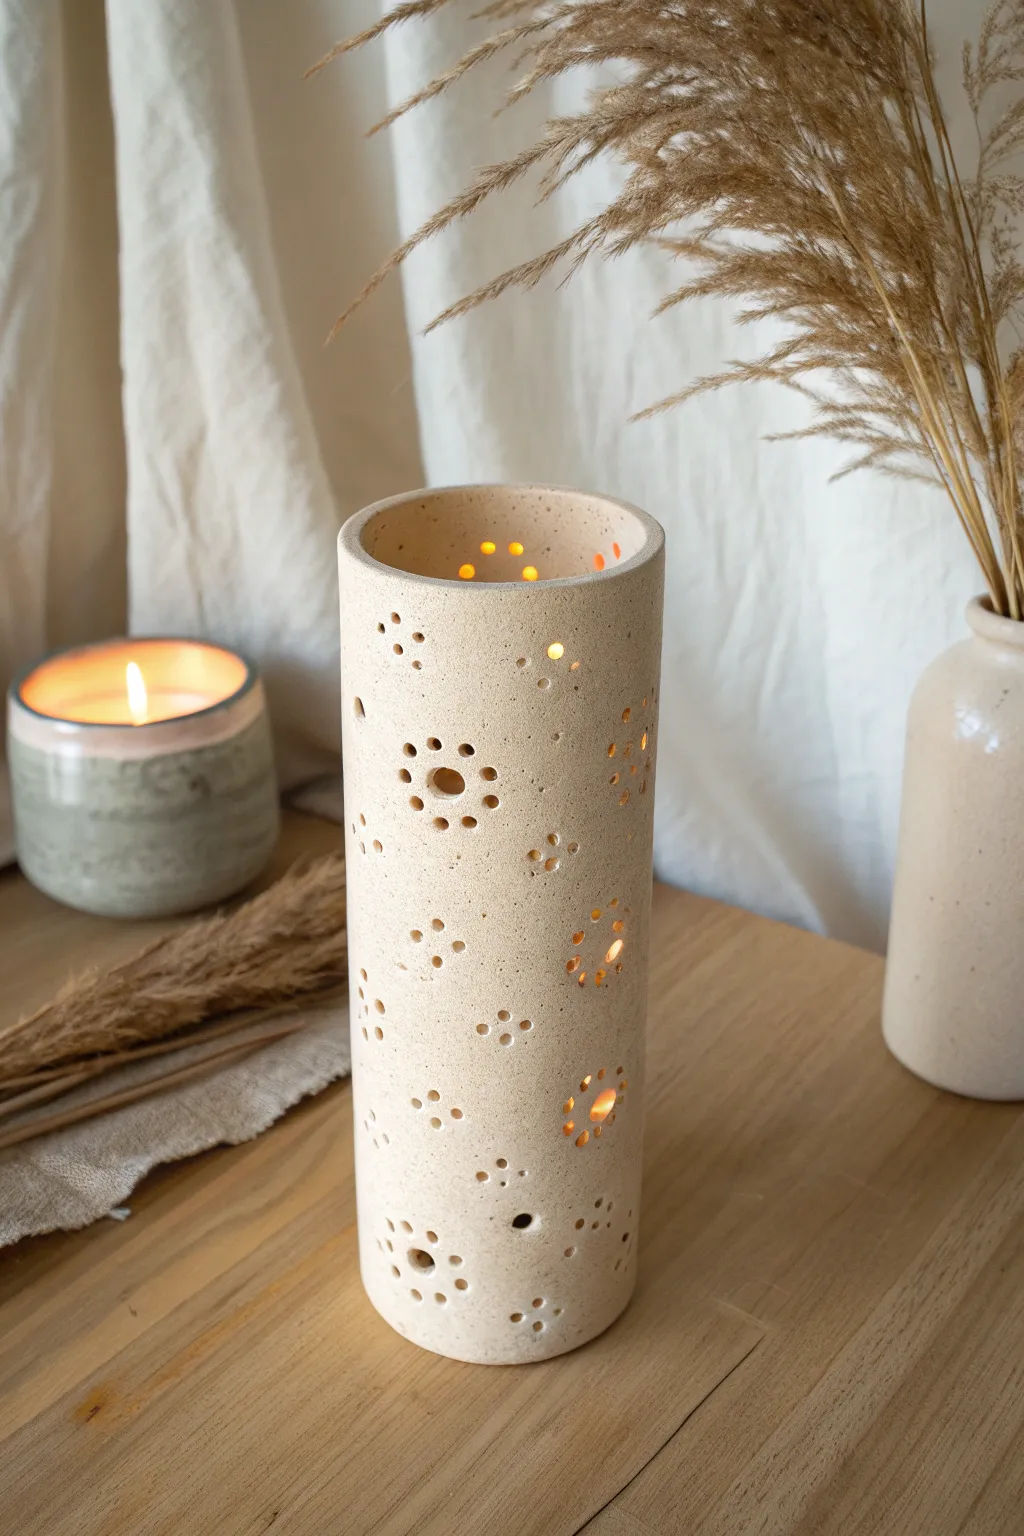
Illuminate your space with the soft glow of this handcrafted clay lantern, featuring delicate patterns pierced through the walls. The natural, stone-like texture combined with geometric flower motifs creates a piece that is both rustic and refined, perfect for cozy evenings.
How-To Guide
Materials
- Speckled stoneware clay (mid-fire or air-dry depending on kiln access)
- Can pipe or rolling pin
- Newsprint or craft paper
- Ruler
- Pottery knife or needle tool
- Various hole punch tools or drill bits (small and medium sizes)
- Slip (clay and water mixture)
- Scoring tool or fork
- Smooth sponge
- Sandpaper (fine grit)
Step 1: Prepping the Slab
-
Roll the Slab:
Begin by rolling out your clay into a large, consistent slab. You want a thickness of about 1/4 inch—too thin and it will collapse, too thick and the light won’t shine through the holes delicately. -
Smooth Texture:
Run a rubber rib or a slightly damp sponge over the surface of the clay to compress the particles and remove any canvas texture from your work surface. -
Cut to Size:
Using a ruler and needle tool, cut a clean rectangle. For the proportions shown, aim for approximately 10 inches wide by 6 inches tall, though you can adjust this based on the diameter of the cylinder you want.
Collapsing Walls?
If the clay slumps when you remove the can, it’s too wet. Put the form back in and wait another hour. Leather-hard clay should feel like cold cheddar cheese.
Step 2: Forming the Cylinder
-
Prepare the Form:
Wrap a piece of newsprint around a sturdy can or PVC pipe that matches your desired diameter. This prevents the clay from sticking to the support form. -
Shape the Clay:
Gently lift your clay slab and wrap it around the paper-covered form. Bring the two short ends together until they just barely touch. -
Score and Slip:
At the seam where the ends meet, score (scratch) both edges thoroughly and apply a generous amount of slip. This acts as the glue for your clay. -
Seal the Seam:
Press the scored edges together firmly. Use your thumb or a wooden tool to blend the clay across the seam line on both the outside and inside until the join is invisible. -
Stiffen Up:
Leave the clay on the form for about 30–60 minutes until it reaches a ‘leather-hard’ state. It needs to be firm enough to stand on its own but soft enough to cut.
Step 3: Creating the Design
-
Remove Support:
Once leather-hard, carefully slide the interior form out. I usually leave the paper inside for a moment longer to help facilitate the sliding motion. -
Plan Pattern:
Lightly sketch your flower motif placement on the surface with a needle tool. The design shown uses flower-like clusters of circular holes. -
Punch Main Holes:
Using a medium-sized circular cutter or hole punch tool, create the center of your flowers. Support the wall from the inside with your hand as you press through. -
Add Petals:
Switch to a smaller hole punch or drill bit. Create the surrounding ‘petals’ by punching a circle of smaller holes around the larger central ones. -
Scatter Details:
Fill the empty negative space between the flower motifs with clusters of three or four small dots to mimic pollen or scattered seeds. -
Clean Edges:
As the clay dries further, go back with a small sponge or dry brush to clean up any ‘burrs’ or rough crumbs of clay left inside the holes.
Use a Straw
Don’t have fancy pottery hole cutters? A simple plastic drinking straw is perfect for punching clean, small holes. Just blow through it to clear the clay plug.
Step 4: Finishing
-
Dry Slowly:
Cover the cylinder loosely with plastic and let it dry very slowly over several days to prevent warping or cracking. -
Sanding:
Once bone dry, gently sand the top rim to ensure it is perfectly flat and smooth to the touch. -
Fire or Seal:
If using kiln-fire clay, bisque fire and then glaze (clear glaze works great for speckled clay). If using air-dry clay, seal it with a heat-safe matte varnish.
Place a tea light inside and enjoy the beautiful patterns of light dancing on your walls
Mini Clay House Tea Light Lantern
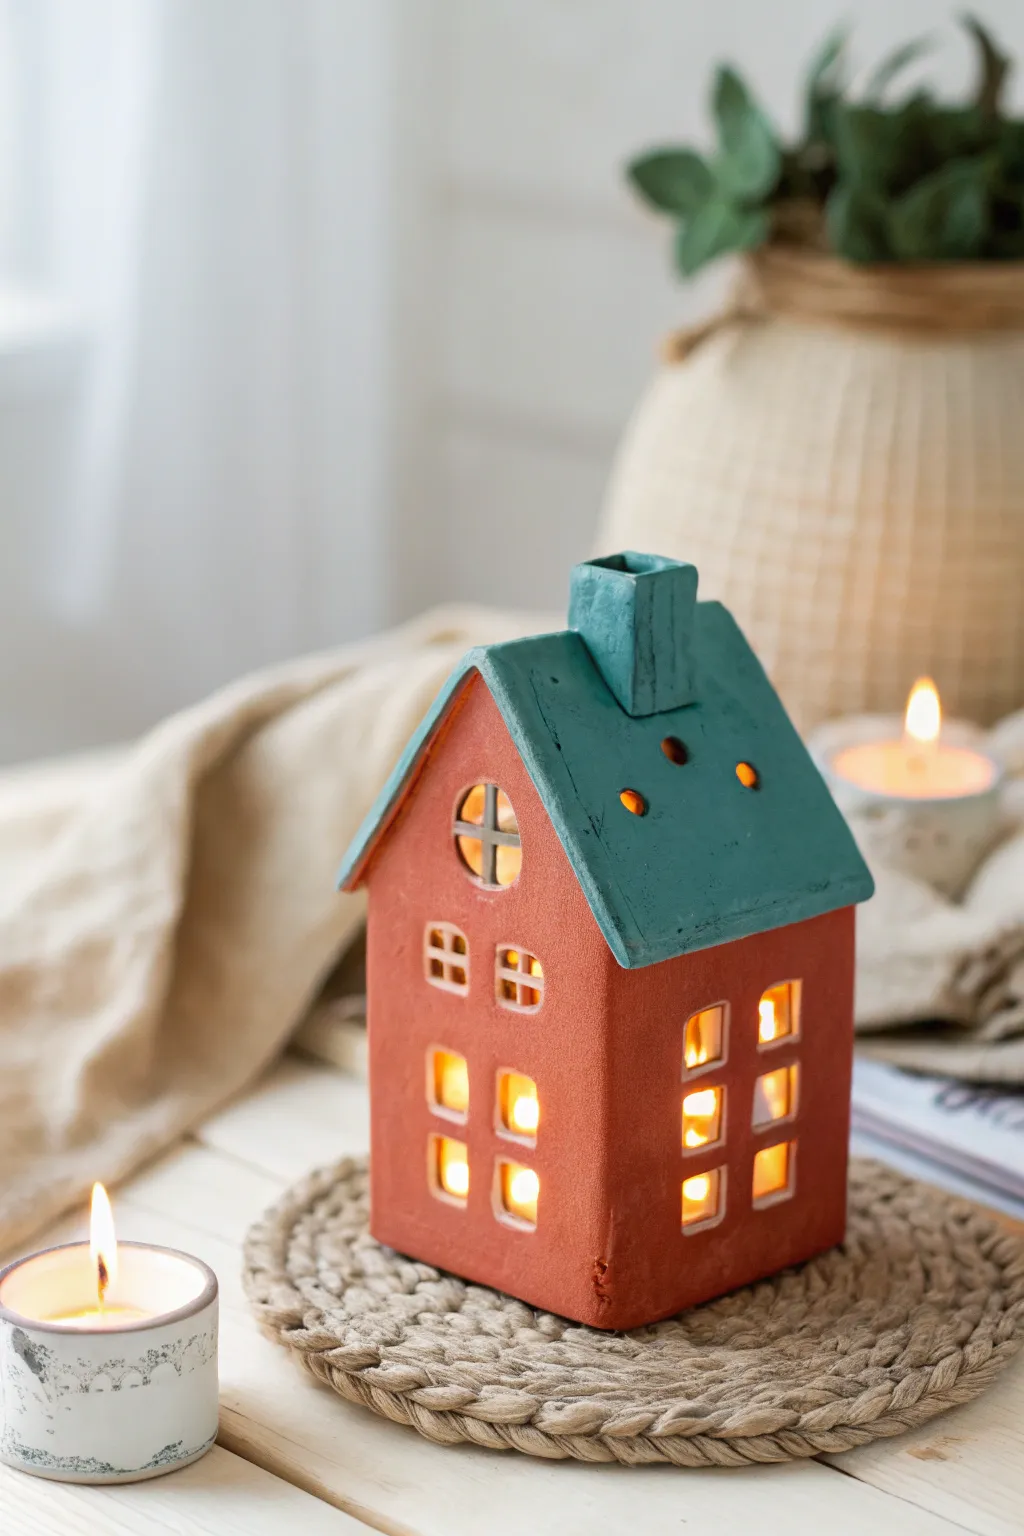
Bring a warm, architectural glow to your mantle with this handcrafted ceramic-style lantern shaped like a quaint cottage. The combination of earthy terracotta tones and a verdigris-inspired roof creates a timeless, artisanal look perfect for housing tea lights.
Step-by-Step Guide
Materials
- Air-dry clay (terracotta color preferred) or polymer clay
- Rolling pin
- Craft knife or scalpel (X-Acto)
- Ruler
- Wooden guide strips (optional, for even thickness)
- Small square cookie cutters (tiny) or a steady hand
- Small round cutter or straw
- Clay slip (water mixed with clay bits) or scoring tool
- Acrylic paints: Burnt sienna/terracotta, teal/turquoise, black (for aging)
- Matte varnish
- Sandpaper (fine grit)
- LED tea lights
Step 1: Constructing the Walls
-
Prepare the slab:
Roll out your terracotta-colored clay to an even thickness of about 1/4 inch. Using wooden guide strips on either side of your roller helps ensure the walls are uniform, which is key for stability. -
Cut the facade:
Measure and cut a rectangle for the front of the house, approximately 3 inches wide by 5 inches tall. At the top 2 inches, cut upward diagonally from both sides to form a steep triangle point for the gable roof. -
Duplicate the back:
Use your cut front piece as a template to cut an identical shape for the back wall. This ensures your roof will sit perfectly straight later on. -
Cut side walls:
Cut two rectangular side panels. The height should match the height of your front wall’s rectangular section (before the roof triangle starts), and the width should match the depth you want for the house. -
Carve the windows:
On the front panel, carefully cut out grid-style windows. Cut four larger squares/rectangles on the lower level and two slightly smaller ones above. Leave thin strips of clay to create the window panes. -
Create the attic accent:
Near the peak of the gable, cut a small round window. I like to slice two thin strips of clay and cross them inside the circle to create a cute muntin bar detail. -
Add side windows:
Repeat the window cutting process on the side panels. This project features two levels of windows on the sides to maximize the light that shines through.
Step 2: Assembly and Roofing
-
Score and slip:
Score (scratch) the edges of your walls where they will join. Apply a little water or ‘slip’ (liquid clay goo) to act as glue. -
Stand the structure:
Assemble the four walls into a box shape. Gently press the seams together from the inside and outside to bond them. Use a modeling tool or your finger to smooth the exterior seams until they are invisible. -
Measure the roof:
Roll out two rectangular slabs for the roof. They need to be long enough to overhang the front and back slightly, and wide enough to overhang the sides. -
Attach the roof:
Score the top triangle edges of your house. Place the roof panels on, ensuring they meet at the peak. Smooth the peak join together so it’s seamless. -
Add the chimney:
Form a small rectangular tube or block from clay scraps. Attach this to one side of the roof using the score-and-slip method. Angle the bottom cut of the chimney so it sits flush against the sloped roof. -
Ventilation holes:
Using a small straw or round tool, punch three or four small holes in the upper part of the roof panels. This adds decoration and lets heat escape if you use real candles (though LEDs are safer).
Sagging Roof?
If the roof panels sag while the clay is wet, crumple a ball of paper towel or newspaper and place it inside the house structure to support the roof until it stiffens.
Step 3: Finishing Touches
-
Texture and dry:
Before the clay hardens, you can gently sponge the surface to give it a slightly rough, stucco-like texture. Let the house dry completely—usually 24-48 hours depending on humidity. -
Sanding:
Once bone dry, lightly sand any sharp burrs around the window edges or corners for a cleaner finish. -
Painting the base:
If you used white clay, paint the walls a deep terracotta orange. Sponge ‘texture’ onto the paint helps mimic the look of unglazed ceramic. -
Painting the roof:
Paint the roof and chimney a solid teal or turquoise color. Don’t worry about perfect coverage; a little patchiness adds to the rustic charm. -
Weathering wash:
Mix a very watery black or dark brown paint. Brush it over the entire piece and immediately wipe it off with a paper towel. This ‘antiquing’ technique leaves dark paint in the crevices and corners. -
Seal:
Apply a coat of matte varnish to protect your paint job and give the piece a finished, fired-clay appearance.
Flickering Realism
Use amber-tinted LED tea lights designed with a ‘flicker’ mode. The warm, moving light mimics real fire perfectly against the terracotta walls without the heat risk.
Place your little house on a woven mat or coaster and enjoy the warm, welcoming ambiance it creates
Stacked Pebble Pillar Base
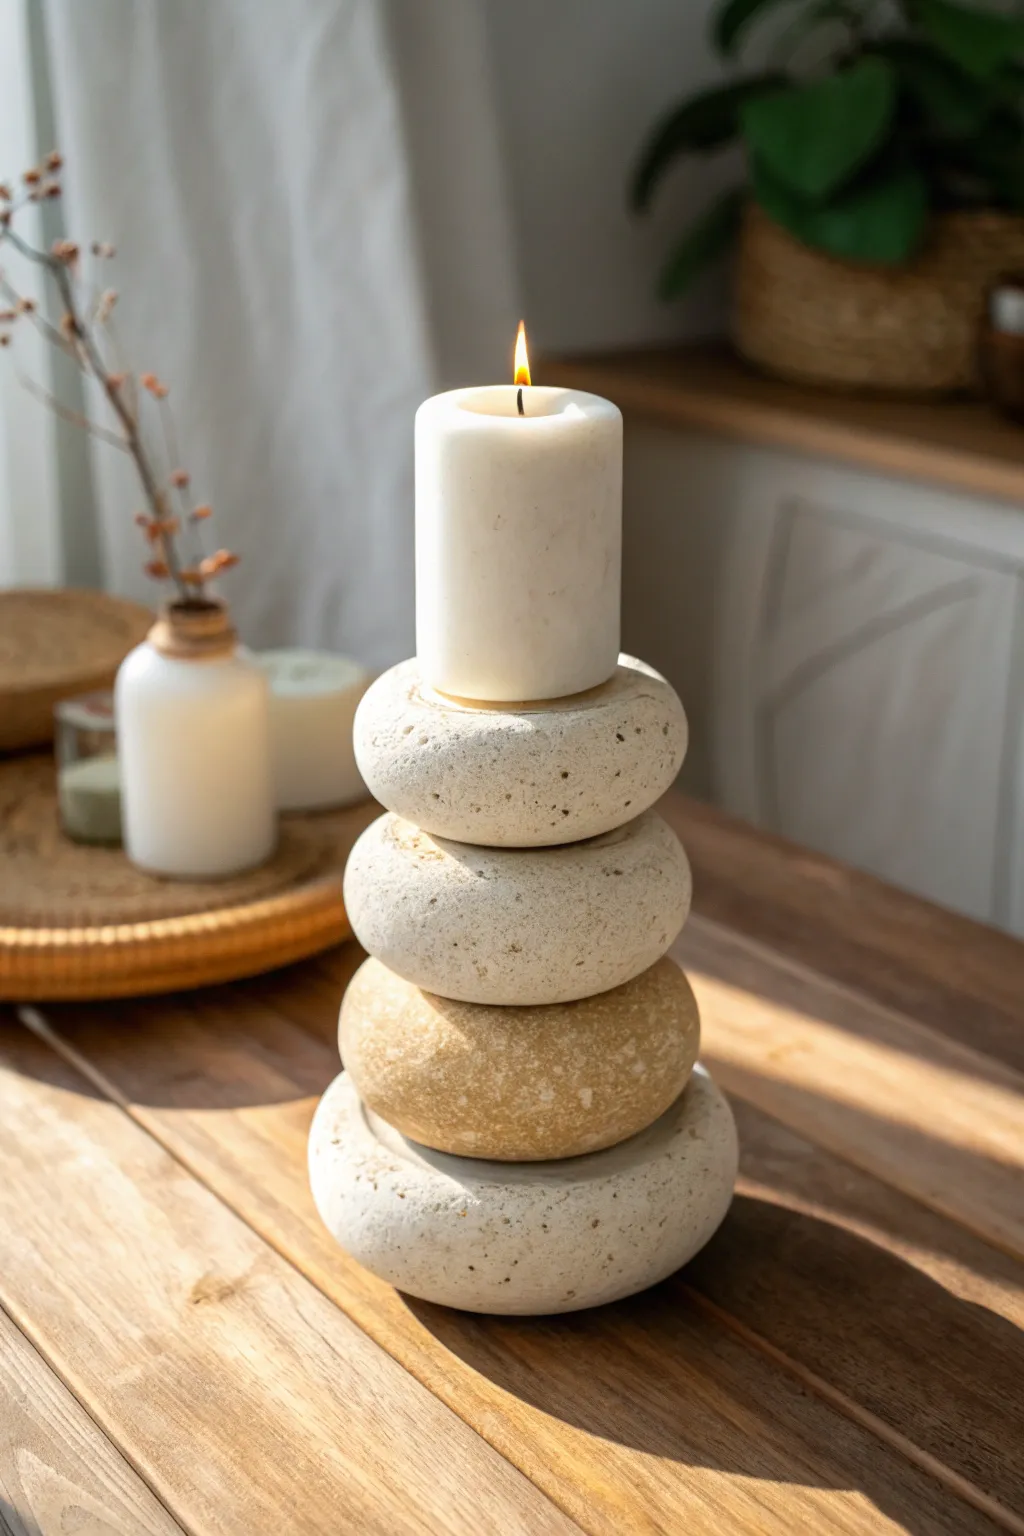
Bring the calming influence of a riverbed into your home with this faux-stone candle holder made entirely from air-dry clay. By forming organic, imperfect pebble shapes and texturing them with natural speckles, you create a sturdy, serene pedestal that looks like genuine stacked rock.
Step-by-Step Tutorial
Materials
- White air-dry clay (approx. 1kg block)
- Acrylic paints (Titanium White, Unbleached Titanium, Raw Sienna, Burnt Umber)
- Used coffee grounds or fine sand (for texture)
- Old toothbrush or stiff bristle brush
- Rolling pin
- Small circular cookie cutter (slightly larger than tea light or pillar candle)
- Sponge
- Water cup
- Strong craft glue or hot glue gun (optional)
- Clear matte varnish spray
Step 1: Shaping the Pebbles
-
Portion the Clay:
Begin by dividing your clay block into four portions. You will need a large amount for the base stone, slightly less for the second, and progressively smaller amounts for the top two stones to create a tapered look. -
Condition the Clay:
Knead each portion of clay warmly in your hands until it becomes pliable and smooth, removing any potential air bubbles. -
Form Rough Spheres:
Roll each portion into a smooth ball. Don’t worry about them being perfectly round; natural variation is key to the aesthetic. -
Flatten into Discs:
Using the palm of your hand, gentling press each sphere down onto your work surface to create thick, rounded discs. Aim for a thickness of about 1.5 to 2 inches for a chunky look. -
Refine the Edges:
Smooth the sides of the discs with a damp sponge or finger to round off any sharp edges or cracks formed during flattening. The goal is a weather-worn river rock shape. -
Create the Stacking Surface:
To ensure stability, gently press the bottom flat against the table. If you plan to glue them, you can also press a slight indentation into the top of the bottom three stones to seat the one above it. -
Prepare the Top Stone:
For the very top pebble, flatten the upper surface carefully so your pillar candle will sit perfectly level.
Step 2: Texturing and Coloring
-
Add Texture:
While the clay is still damp, take an old toothbrush and firmly tap the bristles all over the surface of the stones. This creates a porous, stone-like texture. -
Embed Specks:
Sprinkle a pinch of dry used coffee grounds or fine sand onto the clay surfaces and press them in gently. This mimics mineral deposits found in real rocks. -
Dry Completely:
Let the stones dry for 24-48 hours. I like to flip them over halfway through the drying process to ensure the bottoms harden evenly. -
Mixing the Base Coat:
Mix Titanium White with a tiny drop of Unbleached Titanium acrylic paint. Paint all four dried stones with this creamy off-white mixture. -
Create the Tan Stone:
For the third stone from the bottom (the darker one in the stack), mix Raw Sienna into your base white until you achieve a warm sandy beige. Paint this stone entirely. -
Spattering for Realism:
Dilute a small amount of Burnt Umber paint with water until it is distinctively runny. -
Apply Spatter:
Dip a stiff brush or toothbrush into the brown wash and flick the bristles with your thumb to spray tiny speckles over all the stones. Focus on varied density for a natural look.
Weight It Down
To give the base a heavy, realistic stone feel, knead a clean, smooth rock into the center of the bottom clay ball before shaping it. This adds crucial stability.
Step 3: Assembly & Finishing
-
Seal the Texture:
Once the paint is fully dry, spray each stone individually with a clear matte varnish. This protects the finish and prevents the coffee grounds from molding or flaking off. -
Stack and Align:
Arrange your stones from largest at the bottom to smallest at the top. Rotate them until you find the most stable and visually pleasing balance. -
Glue the Layers:
Apply a strong craft glue or hot glue between each layer to permanently fix the stack. Hold firmly for a minute after placing each stone. -
Final Check:
Place your pillar candle on top to ensure everything is level. If needed, you can adhere a small felt pad under the bottom stone to correct minor wobbles.
Driftwood accents
Before drying, press distinct grooves or wider holes into the sides of the rocks. Later, wedge small pieces of dried driftwood or moss into these gaps for a terrarium vibe.
Now you have a serene, custom-sculpted centerpiece ready to add warmth to your favorite corner
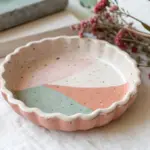
Scalloped Lotus Tea Light Bowl
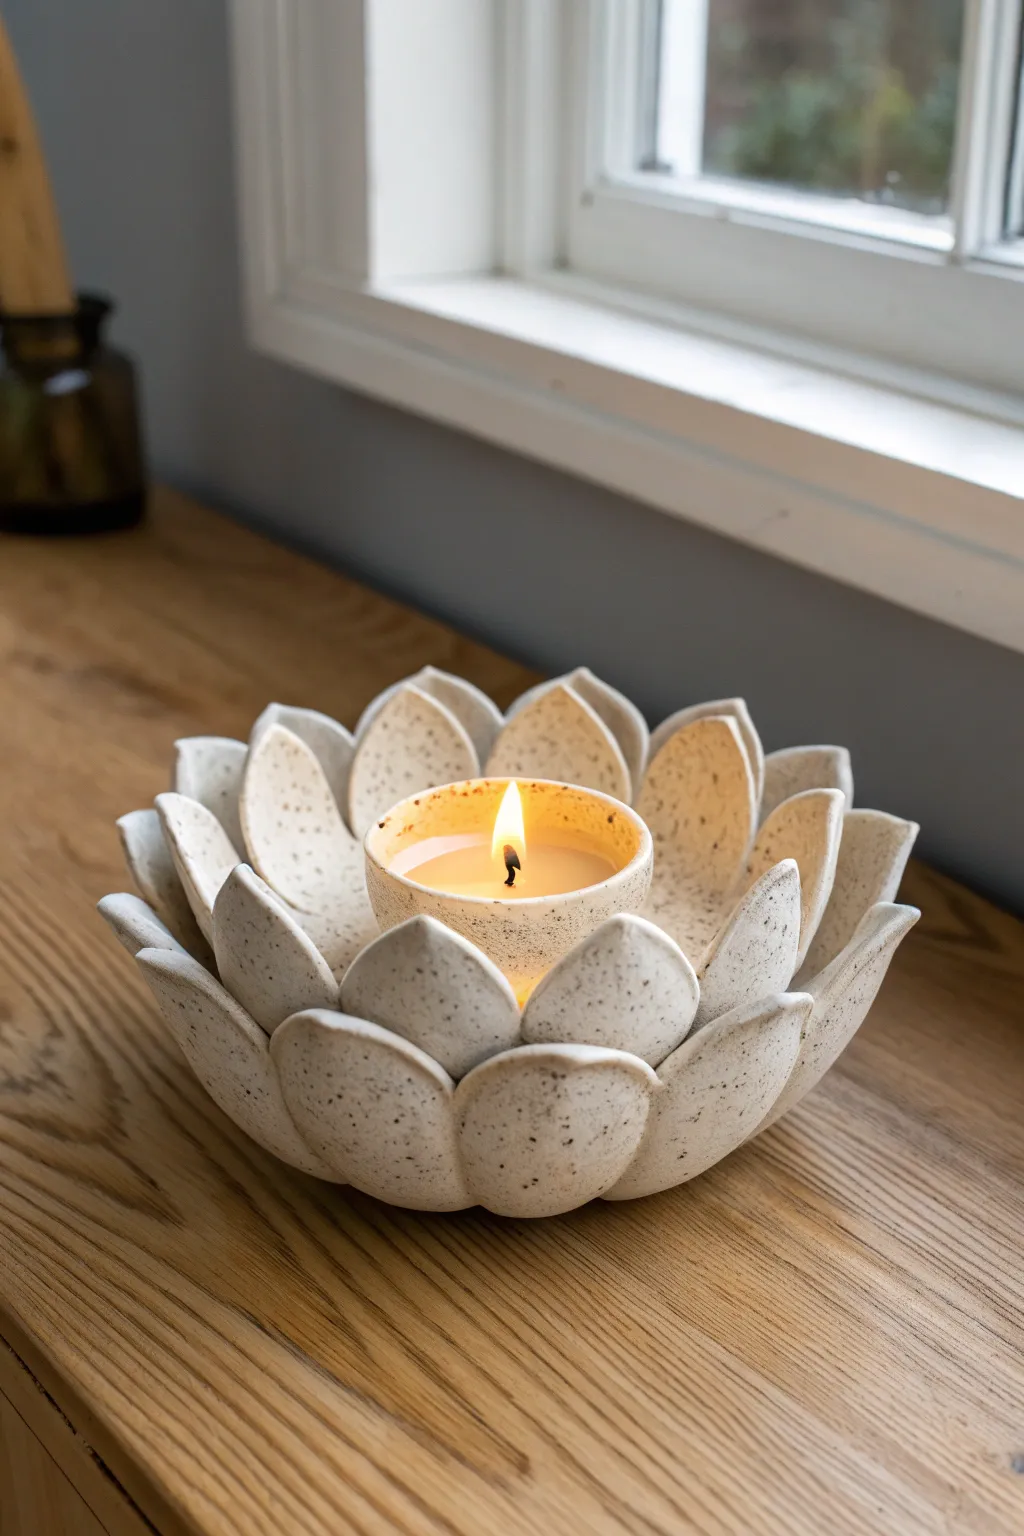
This serene, layered lotus bowl brings a natural, spa-like atmosphere to any corner of your home. The gentle speckled finish mimics the look of high-end stoneware, while the tiered petals create a beautiful organic enclosure for a flickering flame.
How-To Guide
Materials
- Air-dry clay (white or light cream)
- Speckled clay additive (e.g., ground pepper, tea leaves, or faux speckle paint)
- Rolling pin
- Lotus petal template (cardstock)
- Small bowl (for shaping base)
- Craft knife
- Water and slip (clay slurry)
- Fine-grit sandpaper
- Matte sealant or varnish
- Small tea light candle
Step 1: Preparing the Clay Base
-
Mix and roll:
Begin by incorporating your speckles into the white clay. Knead in dry tea leaves or ground pepper until evenly distributed to achieve that stoneware look. Roll the clay out on a smooth surface to an even thickness of about 1/4 inch. -
Create the central cup:
For the candle holder itself, cut a circular base roughly the width of your tea light plus half an inch. Roll a separate strip of clay about an inch tall. -
Assemble the core:
Wrap the strip around the circular base to form a small cup. Score both meeting surfaces with a craft knife and apply a dab of water to join them securely, smoothing the seam with your finger until it disappears.
Clay Consistency Tip
Keep a damp sponge nearby while working. If petal edges perform cracks while bending, the clay is too dry; a little moisture creates smoother curves.
Step 2: Forming the Petals
-
Cut the shapes:
Using your cardstock templates, cut out three sizes of petals from your rolled clay: small, medium, and large. You will need roughly 6-8 of each size to create a full bloom. -
Shape the curves:
Gently cup each petal in your palm. I like to use a thumb to press a slight indentation into the center, giving them a natural, organic curve rather than leaving them perfectly flat. -
Dry the curve:
Let the petals rest on a curved surface (like the outside of a bowl or crumpled foil) for about 30 minutes so they hold their shape during assembly.
Level Up: Ombre Effect
Before sealing, dry brush a tiny amount of pale pink or soft green onto the very tips of the petals for a subtle, realistic floral gradient.
Step 3: Layering the Lotus
-
Attach inner layer:
Score the bottom of the small petals and the outside base of your central cup. Attach the small petals first, overlapping them slightly and pressing firmly at the base. -
Add medium tier:
Move outward with the medium petals. Position them in the gaps between the inner petals, ensuring they lean slightly more open than the first layer. -
Finish outer rim:
Attach the largest petals for the final exterior row. These should cup the structure, creating a bowl-like shape. Ensure the bottom is flat so the holder sits stable. -
Refine edges:
Dip your finger in water and run it along the top rim of every petal to smooth out any sharp cutting marks or roughness.
Step 4: Finishing Touches
-
Slow drying:
Allow the entire piece to dry slowly over 24-48 hours away from direct sunlight to prevent cracking. The tips of the petals are delicate, so handle with care. -
Sand for smoothness:
Once fully cured, use fine-grit sandpaper to buff away any imperfections on the surface, paying special attention to the petal edges. -
Apply speckle paint (optional):
If you didn’t mix speckles into the clay earlier, now is the time to lightly flick brown acrylic paint from a toothbrush onto the piece for that faux-ceramic texture. -
Seal the piece:
Apply a coat of matte varnish or sealant to protect the clay from humidity and give it a finished, professional sheen. -
Light it up:
Place your tea light into the center cup and enjoy the warm glow reflecting off the petal layers.
Enjoy the peaceful ambiance your handcrafted lotus brings to your space
Fluted Sunburst Taper Holder
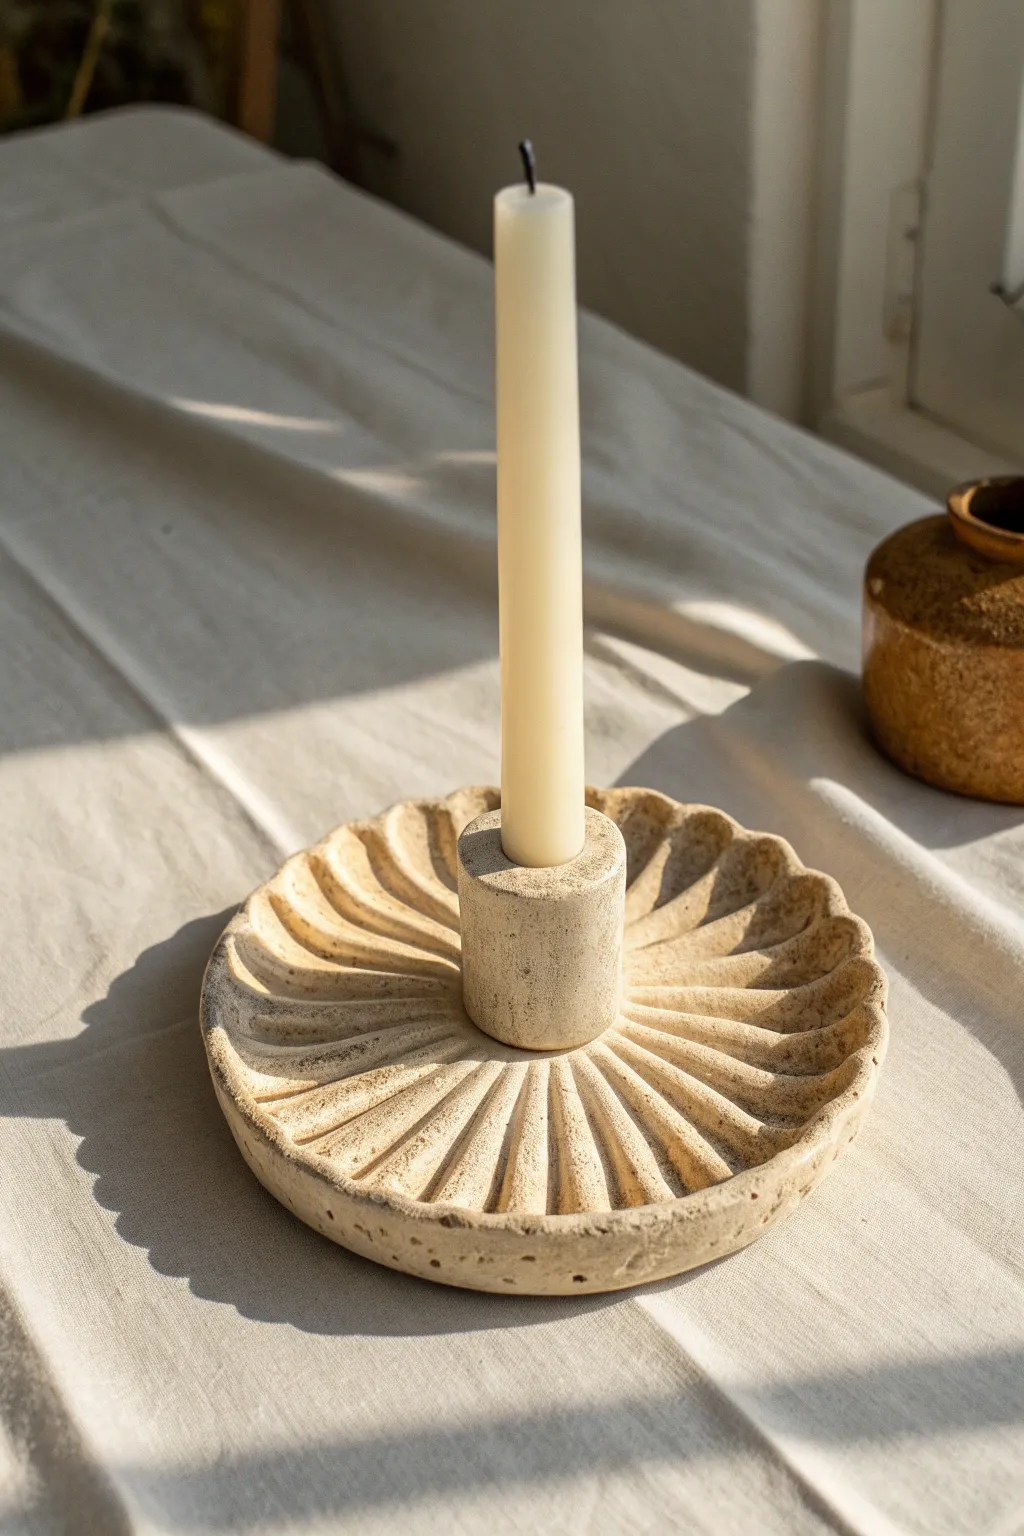
Embrace organic textures and earthy tones with this stunning center-piece candle holder. The radiating fluted ridges catch the light beautifully, giving the impression of carved travertine or sandstone while being deceptively simple to sculpt.
Step-by-Step Guide
Materials
- Air-dry clay (stone or white color)
- Rolling pin
- Circle cutter (approx. 5-6 inches)
- Small circle cutter (approx. 1 inch)
- Modeling tool or dull butter knife
- Small cup (for water)
- Fine-grit sandpaper
- Acrylic paint (beige/cream/taupe)
- Baking soda (for texture)
- Standard taper candle (for sizing)
- Paintbrush
- Sponge
Step 1: Forming the Base
-
Prepare the Clay:
Begin by wedging a large ball of air-dry clay to remove any air bubbles. You want a smooth, pliable consistency that won’t crack easily when shaped. -
Roll the Slab:
Roll out the clay onto a flat surface or canvas mat until it is about 1/2 inch thick. Keep the thickness consistent, as this forms the substantial base of your holder. -
Cut the Base:
Use your large circle cutter or a bowl with a sharp knife to cut out the main disc. This will be the saucer that catches any wax drips. -
Smooth the Edges:
Dip your finger in a little water and run it along the cut edge of the circle to smooth out any roughness or sharp debris from the cutting process.
Stone-Look Hack
For realistic ‘travertine’ holes, poke the wet clay randomly with a stiff toothbrush or crumpled foil just before drying.
Step 2: Sculpting the Central Pillar
-
Create the Cylinder:
Roll a thick coil of clay and flatten the ends to form a cylinder roughly 1.5 inches tall and wide enough to hold your specific taper candle. -
Size the Hole:
Press the base of your actual taper candle into the center of the cylinder to create the perfect indention. Don’t go all the way through; just deep enough to secure the candle. -
Attach to Base:
Score the bottom of the cylinder and the center of your base disc with a needle tool. Apply a little water or slip to the scratched areas and press the cylinder firmly onto the center of the base. -
Blend the Seams:
Use a modeling tool to smooth the clay where the cylinder meets the base, ensuring there is no visible seam and the connection is strong.
Cracking Issues?
If small cracks appear during drying, make a paste of clay dust and water (slip) to fill them, then sand smooth once dry.
Step 3: Carving the Flutes
-
Mark the Guide Lines:
Lightly sketch lines radiating from the central pillar to the outer edge, like the rays of a sun. Space them evenly around the entire circumference. -
Carve the Valleys:
Using a extensive rounded modeling tool or the handle of a paintbrush, press down firmly along your guide lines to create deep grooves. -
Refine the Ridges:
Gently pinch the clay between the grooves to sharpen the ridges. The goal is a soft, undulating pattern rather than sharp geometric spikes. -
Detail the Rim:
Extend the grooves slightly over the outer lip of the base. This creates that lovely scalloped edge profile seen in the finished piece. -
Final Smoothing:
Take a damp sponge and very lightly wipe over the entire surface to soften the harsh tool marks without erasing the grooves. -
Dry Completely:
Set the piece aside in a cool, dry place for 24-48 hours. I usually flip it halfway through drying to ensure the bottom cures evenly.
Step 4: Finishing and Texturing
-
Sand Imperfections:
Once bone dry, use fine-grit sandpaper to remove any unwanted bumps or sharp edges, wiping away the dust with a dry cloth afterwards. -
Mix Texture Paint:
Mix a dollop of beige acrylic paint with a teaspoon of baking soda. This mixture mimics the gritty, porous look of natural stone. -
Apply Base Coat:
Paint the entire holder with your textured mixture. Use a pouncing motion (dabbing up and down) rather than long strokes to enhance the stony effect. -
Add Depth:
While the paint is slightly tacky, dab a slightly darker taupe shade into the deep grooves of the fluting to accentuate the shadows. -
Seal (Optional):
If you plan to use this frequently, apply a matte spray varnish to protect the finish from soot or wax.
Place your favorite taper candle inside and enjoy the warm, artisanal vibe this piece adds to your table
Two-Tone Dip-Painted Candle Set

These textured, multi-tonal candlestick holders bring an earthy yet polished vibe to any table setting. By combining stacked clay forms with cord wrapping and hand-painted details, you’ll create a cohesive set that looks beautifully collected.
Detailed Instructions
Materials
- Air-dry clay (terracotta color)
- Air-dry clay (white)
- Small rolling pin
- Clay sculpting tools (knife tool, smoothing tool)
- Water and sponge for smoothing
- Strong craft glue or heavy-duty ceramic glue
- Teal or dark turquoise cotton cord or jute twine
- Acrylic paint (white, burnt sienna/terracotta)
- Fine detail paintbrush
- Matte clear sealant spray
- Taper candles for sizing
Step 1: Forming the Base Components
-
Shape the base saucers:
Start by rolling out the terracotta air-dry clay to about 1/4 inch thickness. Cut three circles, roughly 3.5 inches in diameter. Gently curve the edges upward to create shallow dish shapes. -
Create the main body:
Roll three balls of terracotta clay into flattened spheres. These should be substantial enough to support the candle but slightly smaller than your base saucers. -
Form the decorative bottom tier:
Roll out a strip of white air-dry clay. Wrap this around the lower half of your terracotta spheres, blending the seam thoroughly so it looks like a single dipped piece. Smooth the transition between the red and white clays with a little water. -
Carve the swirl patterns:
While the white clay section is still soft, take a needle tool or a small stylus. Carve a repeating spiral or ‘snail shell’ pattern all the way around the white band. Vary the direction of the bright swirls for visual interest.
Loose Cord?
If the cord ends keep popping up, use a tiny drop of superglue specifically at the start and end of your wrap, holding it down with a toothpick for 30s.
Step 2: Building the Neck
-
Model the cylinder necks:
Create three cylinders using the terracotta clay. These should be about 1.5 to 2 inches tall. Make sure the top is flat and the center is hollowed out enough to fit your taper candles snugly. -
Size the socket:
I always test fit a real candle at this stage. Insert a taper candle into the soft clay neck to ensure the opening is perfect, then gently remove it and reshape if the walls bulged out. -
Add the top rim:
Roll a small snake of terracotta clay and attach it to the very top rim of your cylinder neck. Flatten it slightly to create a distinct lip. -
Dry the components:
Let all your separate pieces—the saucers, the spherical bodies, and the necks—dry completely. This usually takes 24-48 hours depending on humidity. Rotate them occasionally for even drying.
Step 3: Assembly and Decoration
-
Sand and smooth:
Once bone dry, use fine-grit sandpaper to smooth out any rough fingerprints or jagged edges on the rims and bases. -
Paint the neck section:
Paint the cylindrical neck section (but not the top rim) with a base coat of teal or dark turquoise acrylic paint. This ensures that no red clay shows through if your cord wrapping has tiny gaps. -
Wrap the cord:
Apply a strong craft glue to the painted neck area. Tightly wrap your teal cotton cord around the cylinder, stacking the coils neatly from bottom to top. Tuck the ends securely under the loops. -
Enhance the patterns:
If your carved swirls in the white section aren’t popping enough, use a very fine brush with diluted brown paint to trace the grooves, then wipe the surface clean to leave the dark color only in the recesses.
Mix Your Materials
Swap the cotton cord for leather strips or braided jute for a more rustic, farmhouse look, or use metallic gold wire for a glam twist.
Step 4: Final Construction
-
Stack and glue:
Using heavy-duty ceramic glue, attach the spherical body to the center of the base saucer. Press firmly and hold until it grabs. -
Attach the neck:
Glue the cord-wrapped neck centered on top of the spherical body. Ensure it stands perfectly straight up and down; check from multiple angles. -
Top rim touch-up:
Paint the top clay rim (above the cord) with a terracotta-colored acrylic paint if the natural clay color looks dull compared to the rest. -
Seal the piece:
Spray the entire assembly with a matte clear sealant. This protects the textural difference between the raw clay, the cord, and the paint.
Now you have a stunning custom centerpiece ready to light up your next dinner party
Match-Strike Candle Holder Combo
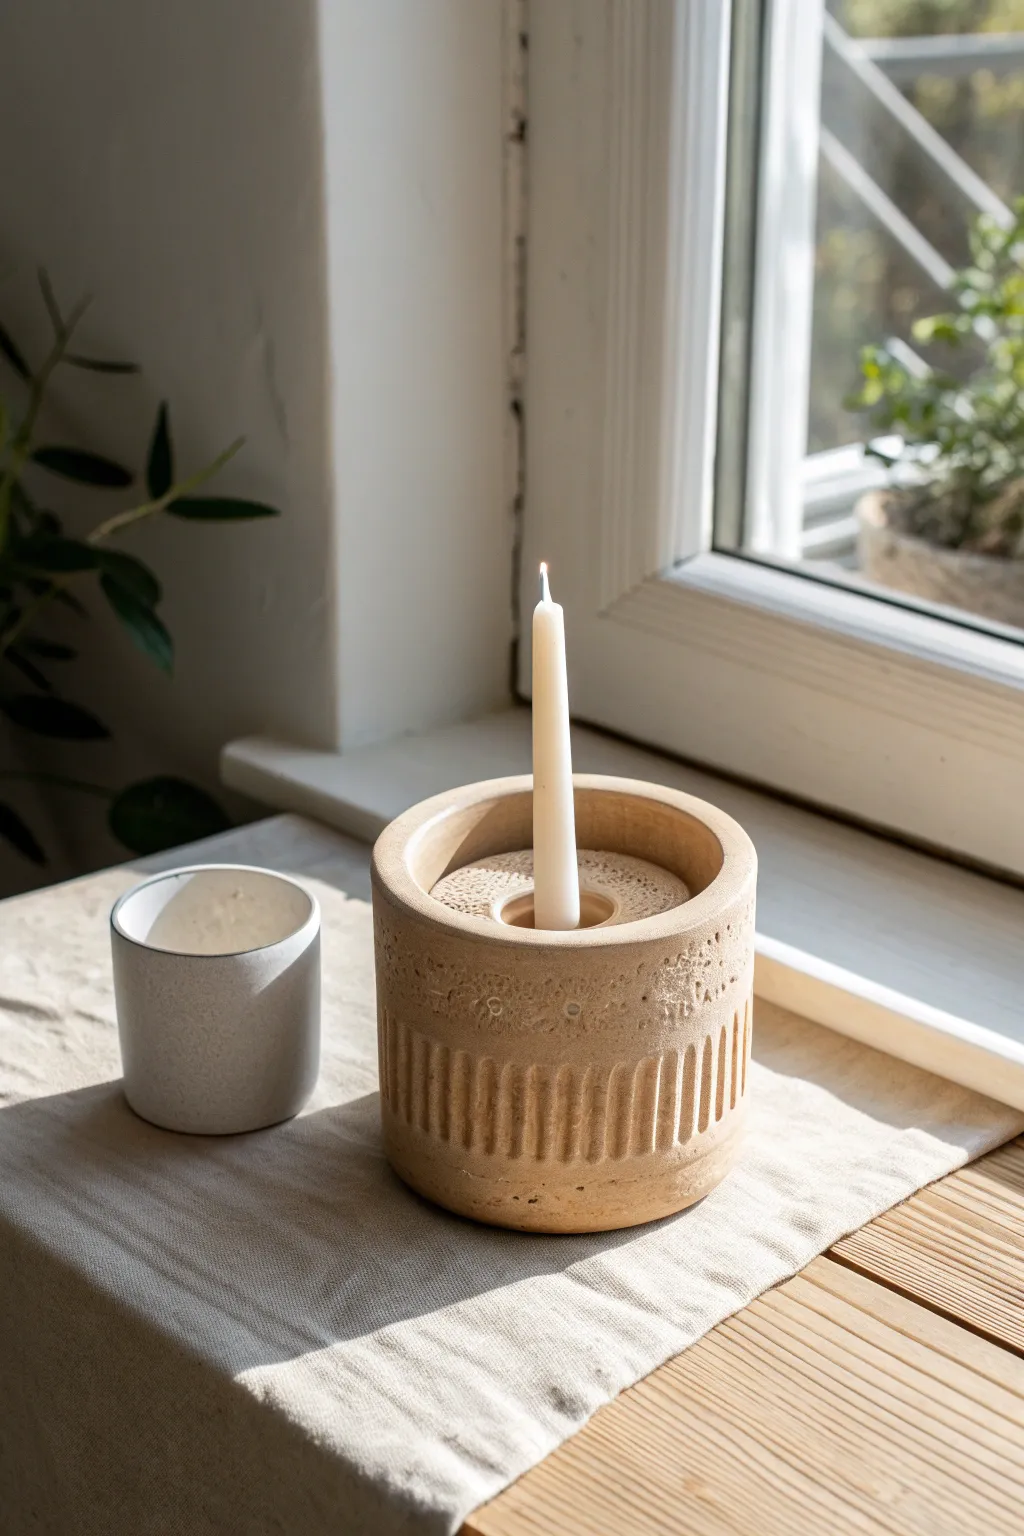
This multifunctional ceramic project combines the rustic charm of unglazed clay with practical utility, serving as both a taper candle holder and a strike surface for matches. The finished piece features handsome vertical fluting and a raw, textured rim that evokes the feeling of carved sandstone.
Step-by-Step Tutorial
Materials
- Stoneware clay with grog (buff or sand color)
- Wooden dowel (approx. 3/8 inch for fluting)
- Rolling pin
- Fettling knife
- Needle tool
- Metal rib scraper
- Sponge
- Slip and scoring tool
- Ruler
- Rough sandpaper or a textured stamp
Step 1: Forming the Base Structure
-
Roll the slab:
Begin by rolling out a substantial slab of clay, approximately 3/8 inch thick. Uniform thickness is important here to prevent warping, so take your time smoothing it out. -
Cut the walls:
Measure and cut a long rectangular strip for the outer wall of the vessel. Aim for about 3 to 4 inches in height. The length will determine the diameter of your holder. -
Form the cylinder:
Curve the rectangular strip into a cylinder. Score the ends thoroughly and apply slip, then press them firmly together to create a seamless join. Smooth the seam inside and out with a rib. -
Add the base:
Place your cylinder onto the remaining slab and trace around the bottom. Cut out this circle, score and slip the contact points, and attach the base to the cylinder wall. -
Create the inner well:
You need a second, smaller cylinder to sit inside—this creates the gap for storing matches. Repeat the rolling and joining process to create a smaller cylinder that fits comfortably inside the main body with about an inch of clearance all around.
Match Strike Issues
Won’t light? Use ‘strike anywhere’ matches. Standard safety matches need a specific chemical strip, but strike-anywhere matches ignite on any rough, unglazed ceramic surface.
Step 2: Detailing and Assembly
-
Insert the inner cup:
Center the smaller cylinder inside the main vessel. It should be slightly shorter than the outer wall. Secure it to the base using a long tool or your fingers to smooth the clay connections at the bottom. -
Bridge the top:
Cut a donut-shaped ring from your slab that covers the gap between the inner and outer walls. This creates the flat top surface. Score, slip, and attach it to seal the chamber, leaving the center open for the candle cup. -
Form the candle socket:
In the very center hole, attach a small cup or ring of clay sized perfectly for a standard taper candle. Ensure this fits snugly so the candle stands straight. -
Define the rim:
Smooth the upper rim where you attached the donut piece. I often use a damp chamois here to get a nice rounded edge that feels finished but handcrafted.
Add an Accent
Before firing, brush a light wash of iron oxide or diluted underglaze into the textured top band. Wipe away the excess to highlight the rough details.
Step 3: Adding Texture and Finishing
-
Mark the guide:
Using a needle tool, lightly scribe a horizontal line around the exterior circumference, dividing the vessel into a top third and bottom two-thirds. -
Create vertical fluting:
Take your wooden dowel and press it vertically into the clay below your guide line. Press firmly to create deep, consistent concave grooves all around the lower section. -
Texturizing the band:
For the upper band above the guide line, use a piece of coarse sandpaper, a rock, or a specialized texture tool to stamp irregular divots and scratches. This rough surface is crucial for the match-strike function. -
Refine the flutes:
Go back over the vertical grooves with a damp sponge to soften any sharp ridges created by the dowel, ensuring the piece feels pleasant to hold. -
Dry slowly:
Cover the piece loosely with plastic to let it dry very slowly. This thick-walled construction needs time to equalize moisture content. -
Bisque fire:
Once bone dry, bisque fire the piece to the appropriate cone (usually 04 or 06). This hardens the clay. -
Final firing:
For a true match-strike surface, you generally leave the textured area unglazed. You can glaze the interior if you wish, or high-fire the raw clay body to maturity (Cone 5-10) to create a vitrified stone-like finish.
Once fired, place this substantial piece near a window to catch the afternoon light across the textures
Mini Candelabra for Three Tapers
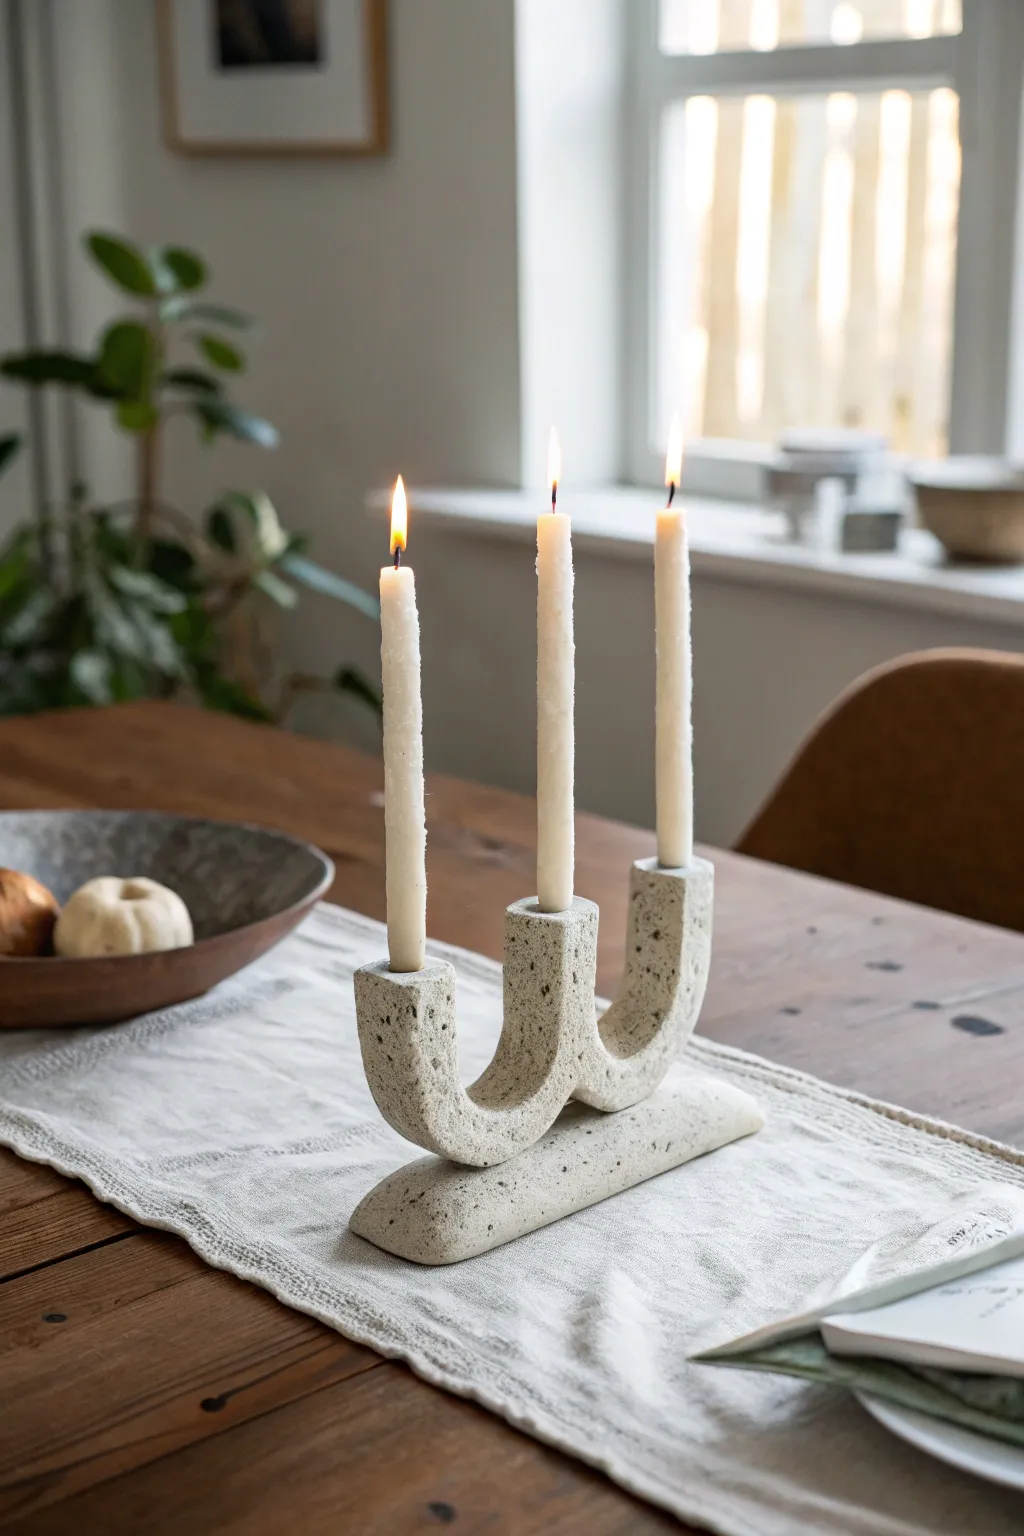
Bring a touch of modern brutalist design to your table with this striking three-taper candle holder. Its organic, wave-like shape and speckled stone finish create a high-end sculptural look using affordable air-dry clay.
Detailed Instructions
Materials
- White air-dry clay (approx. 1kg)
- Rolling pin
- Three taper candles (for sizing)
- Clay sculpting tools (knife, smoothing rib)
- Water and sponge
- Sandpaper (medium and fine grit)
- Acrylic paint (light beige/cream)
- Black and dark grey acrylic paint (for speckles)
- Old toothbrush
- Matte sealant or varnish
- Heavy-duty craft glue or clay slip
Step 1: Sculpting the Base and Form
-
Prepare the base:
Begin by taking a substantial chunk of clay and rolling it into a thick log. Flatten it slightly to create an elongated oval shape, approximately 8-9 inches long and 2 inches wide. This will be the sturdy foot of your candelabra. -
Smooth the foundation:
Use a little water on your fingers or a sponge to smooth out any cracks in the base. Ensure the bottom is perfectly flat so it doesn’t wobble on the table. -
Create the main coil:
Roll a second, much longer log of clay for the upper ‘W’ section. This needs to be thick enough to hold a candle, roughly 1.5 inches in diameter. -
Shape the curves:
Bend the long log into a wave shape with three vertical peaks. The two outer peaks act as candle holders, and the central dip rises up to become the third, middle holder. Check that the spacing looks balanced. -
Form the candle sockets:
Take your actual taper candles and gently press them into the top of each vertical peak to create the holding socket. Twist them slightly while removing to ensure the hole is wide enough, keeping in mind clay shrinks as it dries. -
Refine the sockets:
Deepen the holes carefully with a sculpting tool if needed. I like to smooth the rim of each opening with a damp finger to prevent sharp edges later.
Fit Check Tip
Wrap the base of your candles in plastic wrap before pressing them into the wet clay. Leave them in for the first hour of drying to ensure the holes don’t shrink too small.
Step 2: Assembly and Refining
-
Score and slip:
To attach the wave shape to the base, score the contact points (where the bottom curves meet the flat base) with a knife. Do the same on the base itself. Apply a generous amount of water or clay slip to these rough areas. -
Join the pieces:
Press the wave section firmly onto the base. Use a modeling tool to drag clay from the base up into the wave section, blending the seam until it is completely invisible and the two parts become one solid unit. -
Check alignment:
Stand back and look at the candelabra from the front and side. Ensure the three candle holders are pointing straight up, not leaning. Adjust gently while the clay is still pliable. -
Slow drying:
Let the piece dry for at least 48-72 hours. Drape a plastic bag loosely over it for the first day to prevent it from drying too fast and cracking.
Textured Sand Effect
Mix actual fine sand or baking soda into your beige base paint. This adds a physical grit that makes the faux-stone finish look and feel much more realistic.
Step 3: Finishing the Stone Look
-
Sand for smoothness:
Once fully dry and hard, use medium-grit sandpaper to remove any bumps or uneven areas. Finish with fine-grit sandpaper for a professional, smooth surface. -
Apply base color:
Paint the entire piece with a light beige or cream acrylic paint. You may need two coats to get a solid, opaque finish that hides the raw clay tone. -
Create the texture mix:
Dilute a small amount of black and dark grey paint with water until it’s quite runny. -
Splatter effect:
Dip an old toothbrush into this watery dark mix. use your thumb to flick the bristles, spraying tiny speckles over the candelabra. Practice on a piece of paper first to control the spray density. -
Varnish and protect:
Allow the paint to dry completely. Finish by applying a coat of matte sealant. This protects the finish and gives it that authentic, unpolished stone feel.
Place your tapers in their new home and enjoy the warm, modern glow of your handmade centerpiece
Pumpkin Tea Light Lantern
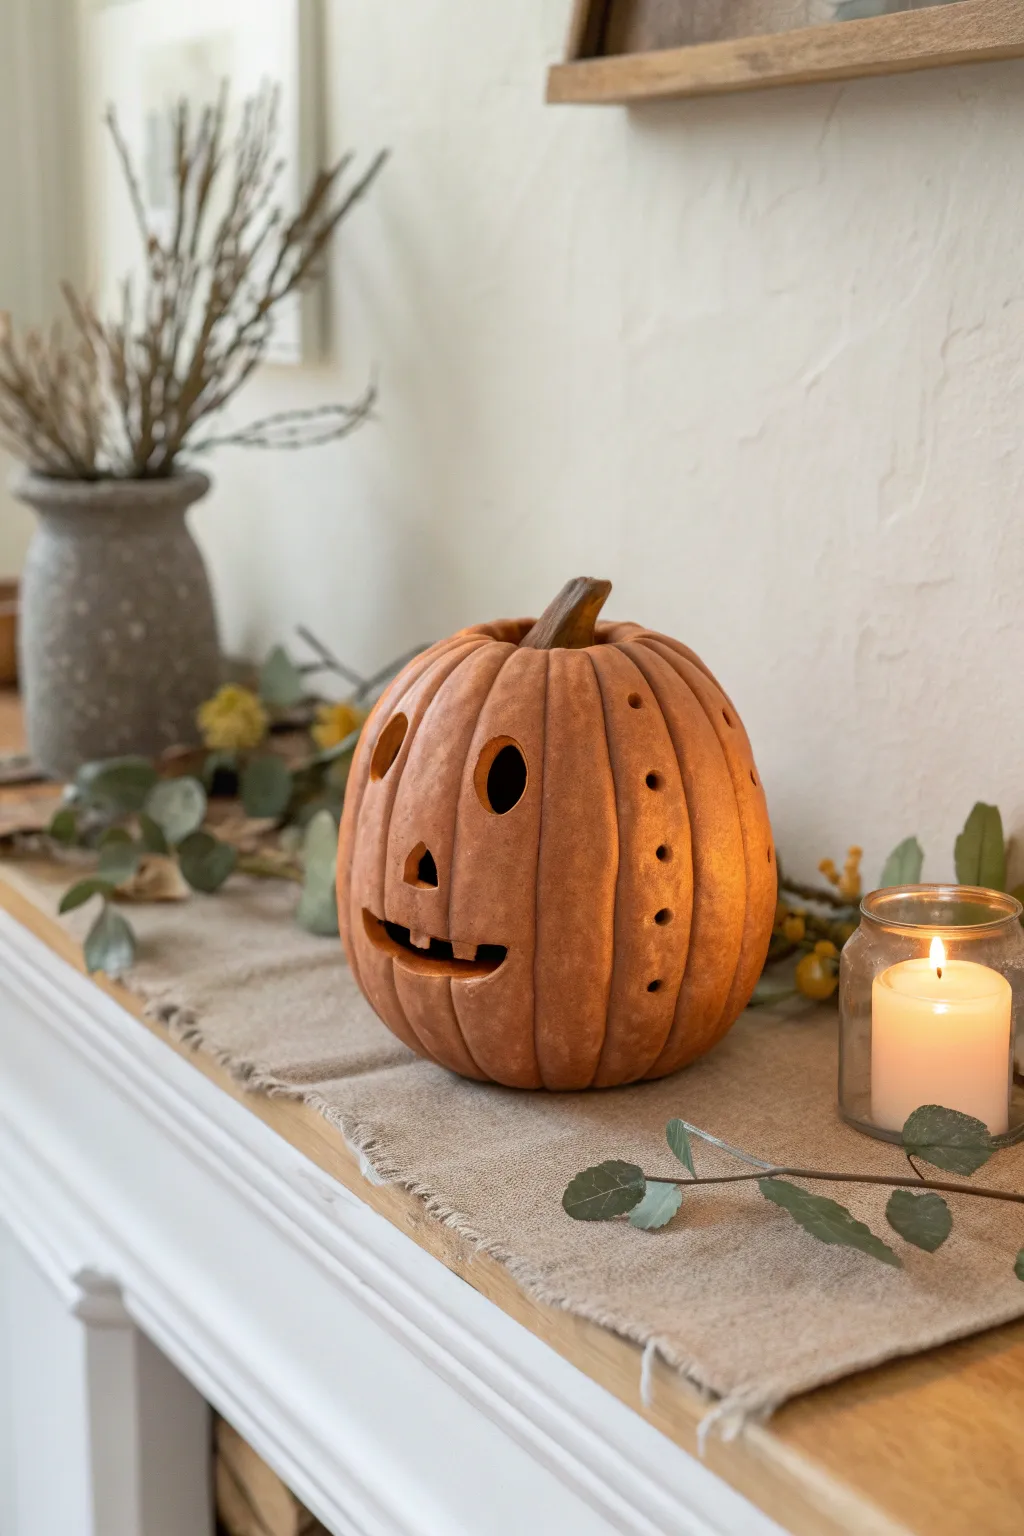
Bring the warmth of autumn indoors with this charming terracotta-hued clay pumpkin. Featuring a classic, slightly goofy carved face and whimsical ventilation holes, this flameless tea light holder adds a rustic, cozy glow to any mantelpiece.
Step-by-Step
Materials
- Air-dry clay (terracotta color) or polymer clay
- Aluminum foil
- Rolling pin
- Clay carving tools (needle tool, loop tool)
- Small round cutter or straw (for holes)
- Sponge and water
- Acrylic paint (burnt sienna, burnt umber, raw sienna)
- Matte sealant spray
- Battery-operated tea light
Step 1: Forming the Base
-
Create the armature:
Crumple a large ball of aluminum foil into a pumpkin shape. This saves clay and keeps the structure light; aim for a ball slightly smaller than your desired finished pumpkin. -
Roll out the clay:
Roll your terracotta-colored clay into a slab approximately 1/4 inch thick. Make sure it’s large enough to fully cover your foil armature. -
Cover the form:
Drape the clay slab over the foil ball. Gently press and smooth the clay down the sides, gathering the excess at the bottom. -
Seal the bottom:
Trim away the bulk of excess clay at the base, leaving just enough to smooth over and create a flat, stable bottom so the pumpkin won’t wobble. -
Smooth the surface:
Using a slightly damp sponge, smooth the entire surface of the sphere to remove fingerprints and joining lines.
Cracks Appearing?
If small cracks form while drying, mix a tiny bit of fresh clay with water to make a paste and fill them in immediately. Smooth with a damp finger.
Step 2: Sculpting the Details
-
Mark the segments:
Using a needle tool or the back of a butter knife, gently score vertical lines from the top center to the bottom to establish the pumpkin’s ribs. -
Define the ribs:
Use a modeling tool or your fingers to press into the scored lines, creating deep grooves. I find it helps to smooth the clay slightly outward from the groove to make the segments look plump. -
Shape the stem:
Form a small, tapered cylinder of clay for the stem. Attach it securely to the top center using the score-and-slip method (scratching both surfaces and adding a bit of water/clay slurry). -
Texture the stem:
Twist the stem slightly and add vertical scratches with your needle tool to mimic a woody texture.
Realistic Texture
Before drying, gently pat the surface with a crumpled piece of sandpaper or a rough sponge. This gives the clay an organic, skin-like texture.
Step 3: Carving and Finishing
-
Map the face:
Lightly sketch the triangular eyes, nose, and smiling mouth onto the clay surface with a needle tool before committing to the cut. -
Carve the features:
Carefully cut out the facial features using a sharp craft knife or clay blade. Remove the cut pieces and smooth the raw edges with a damp finger or brush. -
Add ventilation holes:
Using a small round cutter or a drinking straw, punch a vertical row of holes down the sides of the pumpkin segments. This adds a decorative touch and allows light to escape. -
Create the bottom opening:
Carefully cut a circular hole in the bottom large enough to fit your tea light. At this point, you can carefully remove the foil armature from the inside. -
Dry the piece:
Allow the pumpkin to dry completely according to your clay package instructions. This usually takes 24-48 hours depending on humidity. -
Paint for depth:
Once dry, use a dry-brushing technique with burnt umber paint in the grooves and around the stem to create shadows and age. Highlight the raised areas with a touch of raw sienna. -
Seal the lantern:
Finish with a coat of matte sealant spray to protect the surface and give it a finished, ceramic look.
Place your battery-operated candle underneath and enjoy the warm, spooky glow on your shelf
Snake-Wrapped Candle Holder
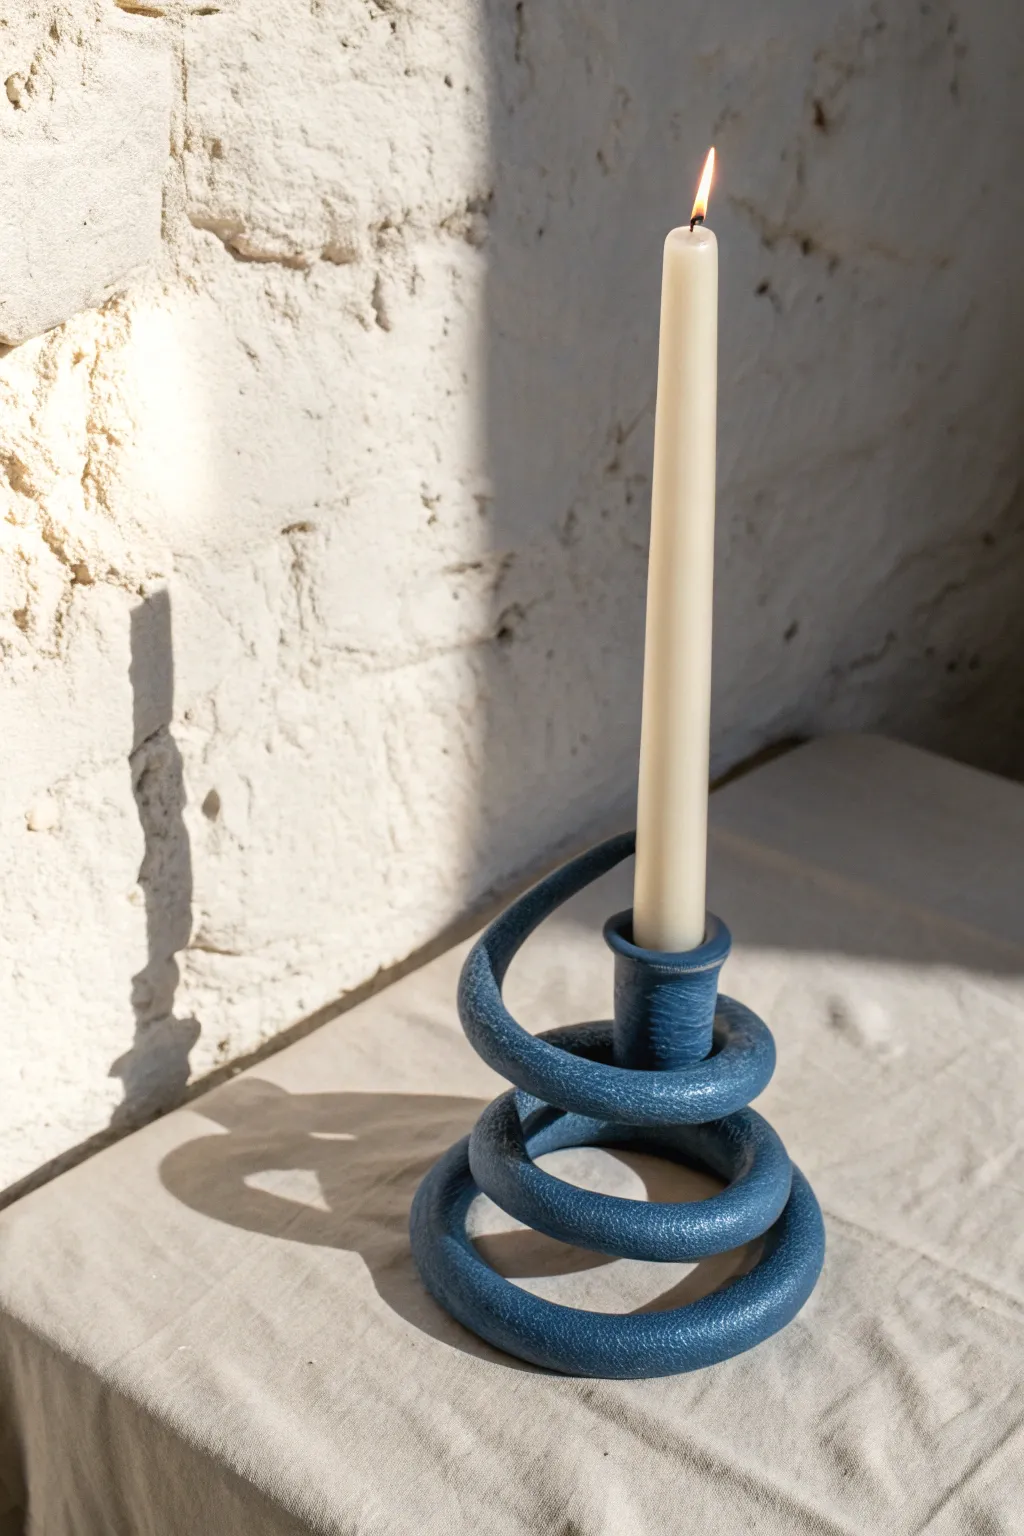
Embrace organic forms with this striking candle holder that mimics a coiled snake rising from the table. Its textured, deep blue finish and spiraling silhouette add a touch of sculptural elegance to any tablescape.
How-To Guide
Materials
- Air-dry clay or polymer clay (approx. 500g)
- Standard taper candle (for sizing)
- Rolling pin
- Texturing tool (sponge, sandpaper, or textured roller)
- Modeling tools or a dull knife
- Water (for smoothing)
- Acrylic paint (Deep Navy or Indigo)
- Matte sealant or varnish
- Paintbrushes
Step 1: Forming the Base Coil
-
Condition the clay:
Begin by kneading your clay thoroughly until it’s warm, pliable, and free of air bubbles. This ensures the coil won’t crack during shaping. -
Roll out a long snake:
On a clean, flat surface, roll the clay into a long, consistent rope. Aim for a thickness of about 3/4 inch (2cm) and a length of at least 20-25 inches. -
Taper the ends:
Gently roll one end of the rope so it tapers slightly; this will be the ‘tail’ at the bottom. Leave the other end blunt for now. -
Start the spiral:
Take the tapered tail end and begin coiling it flat on your workspace to create the base. Create two or three tightly wound, flat circles to ensure stability.
Slumping Spiral?
If your clay is too soft and the spiral sags, snake a piece of supportive wire inside the clay rope before rolling, or prop up the curves with crumpled paper until dry.
Step 2: Building the Rise
-
Elevate the coil:
Once you have a stable base, start angling the clay rope upwards. Instead of laying it flat on the previous ring, place it slightly inward and upward to create a rising spiral effect. -
Check the stability:
As you build vertically, gently press the layers together so they bond, but be careful not to flatten the rope shape too much. The coil should support its own weight. -
Create the candle cup:
When you reach the top of your spiral, shape the very end of the rope into a small vertical cup. I prefer to mold this directly around my taper candle to get the perfect diameter. -
Secure the top:
Use a little water or slip (liquid clay) to securely blend the bottom of this ‘cup’ section into the coil below it, ensuring it stands straight. -
Test the fit:
Insert your candle gently to ensure it stands upright. If it leans, adjust the angle of the top cup while the clay is still soft.
Step 3: Finishing Touches
-
Add texture:
To mimic the stone-like look in the image, lightly press a coarse sponge or a piece of crumpled aluminum foil over the entire surface of the damp clay. -
Smooth imperfections:
Check for any unwanted cracks. Dip your finger in water and smooth them out, blending gently without removing your intentional texture. -
Allow to dry:
Let the piece dry completely. For air-dry clay, this usually takes 24-48 hours. Rotate it occasionally so the bottom dries evenly.
Stone Effect
Mix baking soda into your acrylic paint before applying. This creates a gritty, stone-like texture that looks incredibly realistic and matte when dry.
Step 4: Painting & Sealing
-
Apply base coat:
Once fully dry, apply a coat of deep navy or indigo acrylic paint. Work the paint into all the textured nooks and crannies. -
Create depth:
Mix a tiny amount of black into your blue paint and dab it into the deepest recesses of the coil to enhance the shadowed look. -
Dry brush highlights:
Lightly dip a dry brush into a slightly lighter blue or grey. Dust it over the raised textures to make the ‘stone’ finish pop. -
Seal the piece:
Finish with a matte sealant spray or varnish to protect the paint and give it a finished, professional ceramic look.
Place your new sculptural candle holder on a linen cloth and enjoy the warm glow of your handmade creation