When you’re craving a quick win at the clay table, nothing beats tiny projects with sweet shapes and simple little faces. These cute ideas to make with clay are all about that joyful, palm-sized charm—easy to start, hard to stop making.
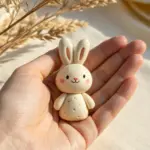
Kawaii Bunny Charms
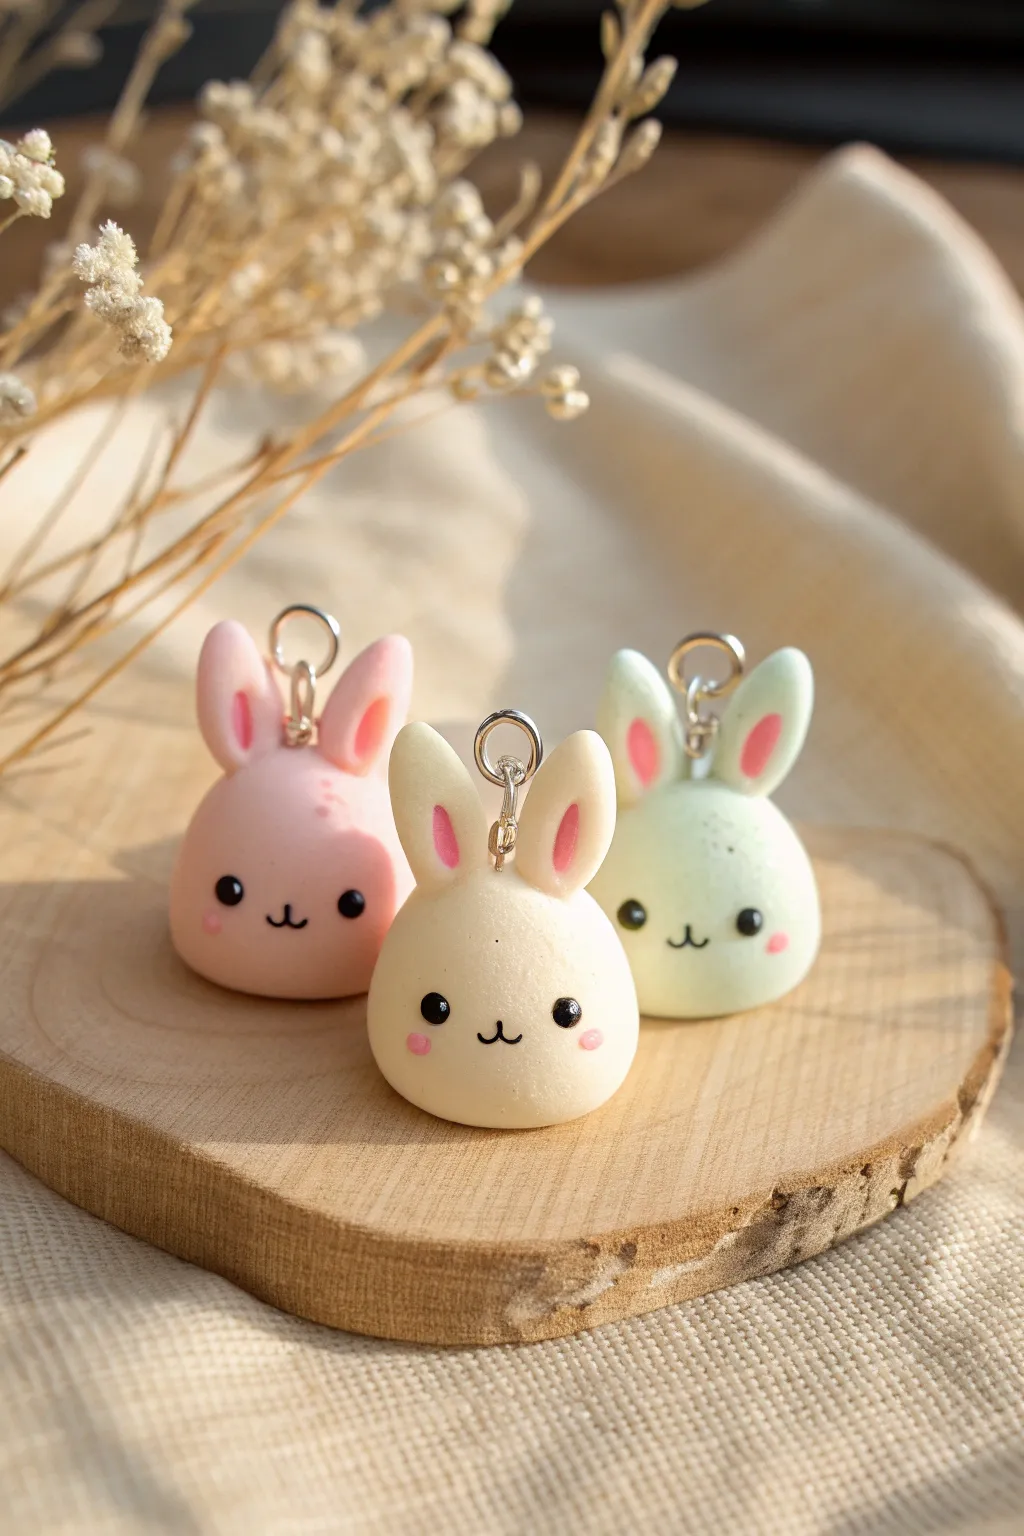
These delightfully chubby bunny charms are the definition of cuteness, featuring soft pastel tones and sweet, minimal faces. Their round, mochi-like bodies and perky ears make them perfect for keychains, zipper pulls, or friendship gifts.
Step-by-Step Guide
Materials
- Polymer clay (white, pastel pink, pastel green, black)
- Blade or craft knife
- Ball stylus tool (small)
- Needle tool or toothpick
- Eye pins (silver or gold tone)
- Jump rings (optional)
- Gloss glaze or UV resin (optional for shine)
- Oven for baking
Step 1: Shaping the Bodies
-
Condition the clay:
Start by thoroughly conditioning your pastel pink, cream (or white), and mint green clay until they are soft and pliable. If the clay is too stiff, warm it in your hands for a few minutes. -
Form the base shapes:
Roll three equal-sized balls of clay, one in each color. Aim for a diameter between 0.75 and 1 inch. I find using a small acrylic block to gently roll them helps eliminate fingerprints. -
Create the gumdrop shape:
Place a clay ball on your work surface and gently press down on the top just slightly to create a flat base, forming a soft, rounded dome shape resembling a chubby gumdrop. -
Smooth the surface:
Inspect the domes for any lint or dust. You can use a tiny bit of baby oil on your finger to smooth out any imperfections before moving on to the details.
Pro Tip: Clean Fingers
Keep baby wipes nearby! When switching between colors, especially from black to pastel, wipe your hands and tools thoroughly to avoid muddying the light clay.
Step 2: Adding Ears and Hardware
-
Form the ears:
For each bunny, roll two small logs of matching clay. Taper one end of each log slightly so it looks like a long teardrop. -
Indent the ears:
Flatten the ear shapes slightly against your work surface. Use a small ball tool or the handle of a paintbrush to press a long groove down the center of each ear. -
Add the inner ear color:
Roll tiny snakes of bright pink clay. Place these inside the grooves you just made and press them flat so the pink is flush with the outer ear color. -
Attach the ears:
Press the wider bottom part of the ears onto the top of the body dome. Blend the seam at the back of the ears into the head using a silicone tool or your finger to ensure a secure bond. -
Insert the eye pin:
Trim an eye pin to about half an inch. Insert it straight down into the center of the head, between the ears. Twisting it slightly as you push helps it grip the clay better.
Step 3: The Kawaii Face
-
Mark eye placement:
Use a needle tool to make two very faint guide dots where you want the eyes to be. Keep them wide-set and low on the face for maximum cuteness. -
Create eye sockets:
Gently press a small ball tool into your guide marks to create shallow indentations. This helps the black clay sit securely without protruding too much. -
Add the eyes:
Roll two minuscule balls of black clay. Pick them up with the tip of a needle tool or dotting tool and place them into the sockets, pressing gently to secure them. -
Paint or sculpt the mouth:
Roll an incredibly thin thread of black clay and shape it into a tiny ‘w’. Alternatively, wait until after baking to paint this on with black acrylic paint and a fine liner brush. -
Apply blush cheeks:
Use a dotting tool to dab a tiny amount of pink chalk pastel dust or soft pink paint onto the cheeks, just below and outside the eyes.
Troubleshooting: Lint Issues
If you see dust specs on your unbaked clay, dip a Q-tip in a tiny amount of rubbing alcohol or baby oil and gently swirl it over the lint to lift it off.
Step 4: Baking and Finishing
-
Prepare for baking:
Place your bunnies on a ceramic tile or a baking sheet lined with parchment paper. Check one last time for any lint. -
Bake:
Bake the charms according to your clay package instructions (usually around 275°F or 135°C for 15-30 minutes depending on thickness). -
Cool down:
Let the bunnies cool completely in the oven with the door slightly ajar to prevent cracking from thermal shock. -
Secure the pin:
Once cool, gently tug the eye pin. If it’s loose, pull it out, add a dab of superglue, and reinsert it immediately. -
Glaze (Optional):
For a protective finish, brush on a thin layer of satin or gloss glaze. This will make the eyes pop and protect the blush.
Attach your jump ring and enjoy your adorable new bunny charm collection


Chibi Bear Desk Minis
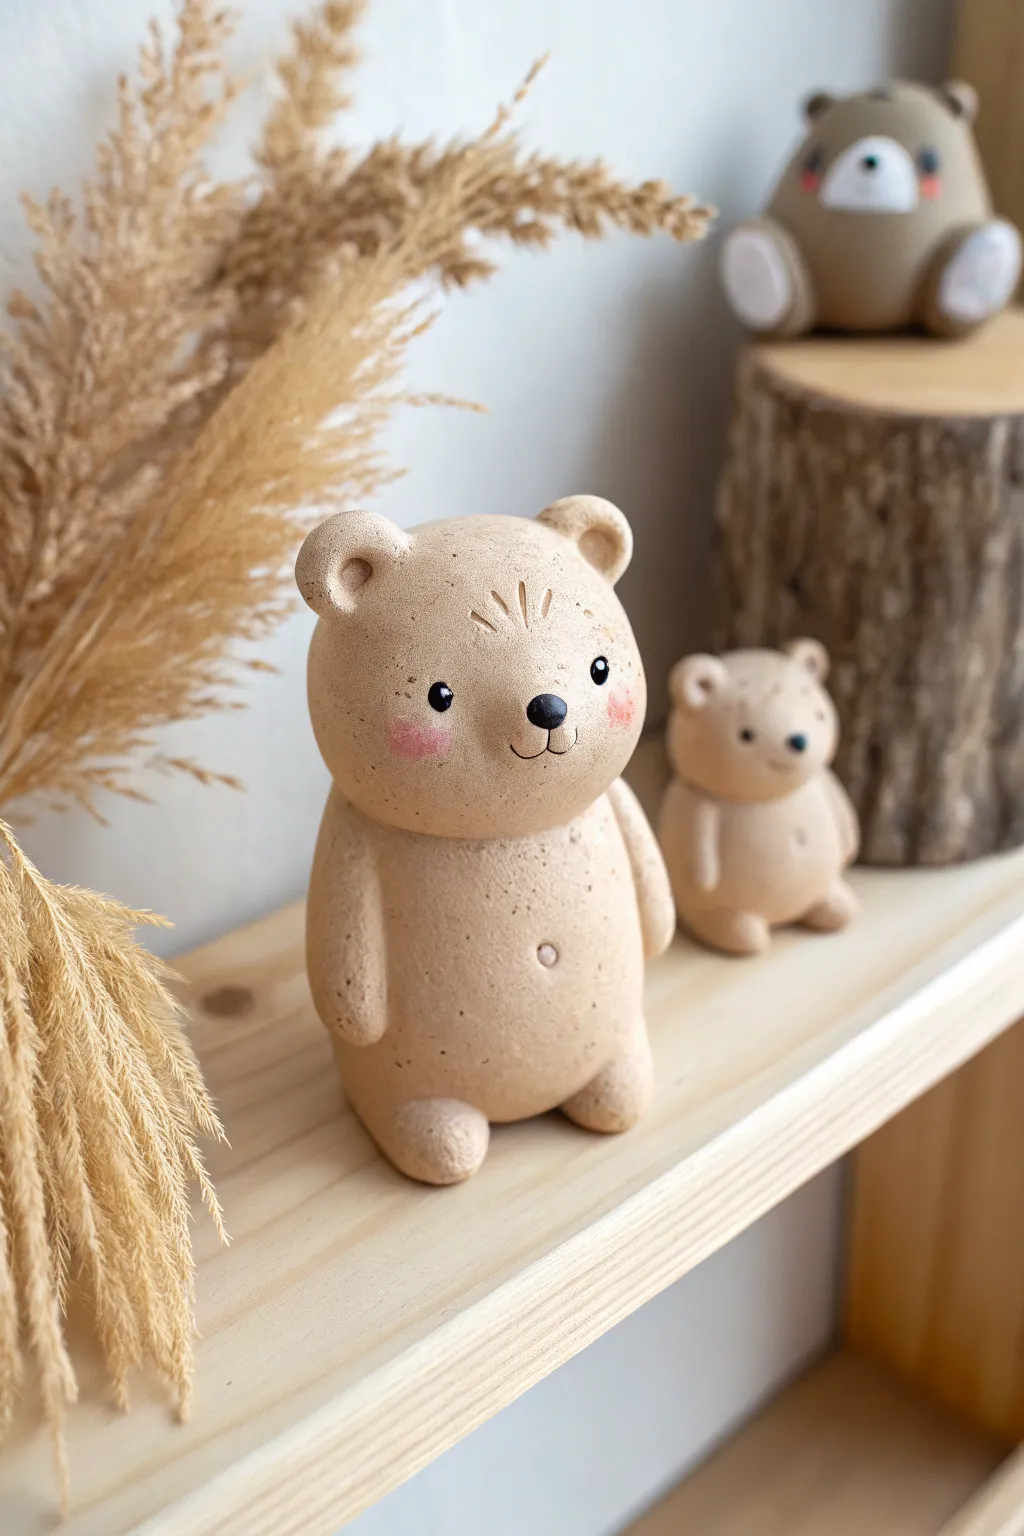
Bring a touch of woodland whimsy to your workspace with this adorable standing bear figurine. Crafted to mimic the look of natural speckled pottery, this piece features soft, rounded forms and sweet painted details that create an inviting, huggable aesthetic.
Step-by-Step
Materials
- Beige polymer clay (approx. 200g)
- Speckled clay additive or coarse black pepper/ground coffee (for faux stoneware effect)
- Black acrylic paint
- Pink soft pastel chalk or blush powder
- Small ball stylus or needle tool
- Fine detail paintbrush
- Sculpting tools (plastic or metal)
- Aluminum foil (for armature)
- Matte varnish
Step 1: Prepping and Base Shape
-
Mix the Clay Body:
Begin by conditioning your beige polymer clay until it is soft and pliable. If you aren’t using pre-speckled clay, knead in a small pinch of ‘speckled’ effect powder or even ground black pepper to achieve that natural, earthy pottery look. -
Form the Core:
Ball up a piece of aluminum foil into a tight egg shape about the size of a large hen’s egg. This saves clay and prevents the figure from being too heavy. -
Cover the Core:
Flatten a sheet of your prepared clay and wrap it completely around the foil egg. Roll it gently between your palms to smooth out any seams until you have a perfect, solid clay egg shape. This will be the combined head and body. -
Refine the Silhouette:
Gentle press the upper third of the egg shape to slightly define the head area, keeping the transition to the body very subtle and thick—we want a ‘chibi’ no-neck look.
Head Heavy?
If the bear keeps tipping forward, your foil core might be unbalanced. Before baking, press the feet onto a tile to flatten the soles perfectly parallel.
Step 2: Adding Extremities
-
Shape the Legs:
Roll two small balls of clay, approximately 1.5 cm in diameter. Press them onto the bottom of the body base, spacing them slightly apart so the bear stands stably. Blend the seams upward into the body using a modeling tool. -
Create the Arms:
Roll two elongated sausage shapes for the arms. Attach them to the sides of the body, letting them hang straight down in a relaxed pose. Blend the shoulder connection smoothly so it looks like one continuous piece. -
Add Ears:
Roll two tiny balls for ears. Flatten them slightly and press them onto the top of the head. Use a ball tool to create a small indentation in the center of each ear. -
Smooth the Surface:
Before adding facial details, give the entire sculpture a final smoothing with your finger or a little baby oil to remove fingerprints. The finish should look matte and porous like earthenware.
Texture Trick
To get that gritty stone texture, gently tap the unbaked clay surface all over with an old toothbrush before smoothing lightly with your finger.
Step 3: Facial Features
-
Sculpt the Snout:
Instead of adding a separate ball of clay, purely suggest the muzzle by slightly flattening the front of the face area. -
Add the Nose:
Take a tiny speck of clay, paint it black (or use black clay), and roll it into a small oval. Press this securely into the center of the face area for the nose. -
Carve the Mouth:
Using a needle tool or very sharp blade, gently press a vertical line down from the nose, splitting into an inverted ‘V’ shape to create the smiling mouth. -
Create Eye Sockets:
Use a small ball stylus to press two indentations where the eyes will go. This helps the painted eyes sit naturally later. -
Detail the Forehead:
Using a needle tool, scratch three or four tiny radiating lines on the forehead to represent tufts of fur. Keep these shallow and delicate. -
Belly Button:
Add a tiny circle indentation in the lower center of the tummy for a cute navel detail.
Step 4: Finishing Touches
-
Baking:
Bake the figure according to your polymer clay package instructions (usually around 275°F/135°C for 15-30 minutes). Support the back with a little polyester fiberfill so it doesn’t develop flat spots. -
Cooling:
Let the bear cool completely before painting. I prefer to let it sit for at least an hour to ensure the surface is hard. -
Paint the Eyes:
Dip a fine detail brush or a toothpick into black acrylic paint. Carefully fill the eye indentations you made earlier, adding a tiny white dot for a catchlight once dry. -
Apply Blush:
Scrape some pink pastel chalk into a fine powder. Use a soft, dry brush to gently dub this powder onto the cheeks for a rosy, flushed look. -
Seal:
Coat the entire piece with a matte varnish to protect the paint and give it that non-shiny, ceramic texture.
Place your new ceramic-style friend on your desk for a calming companion while you work


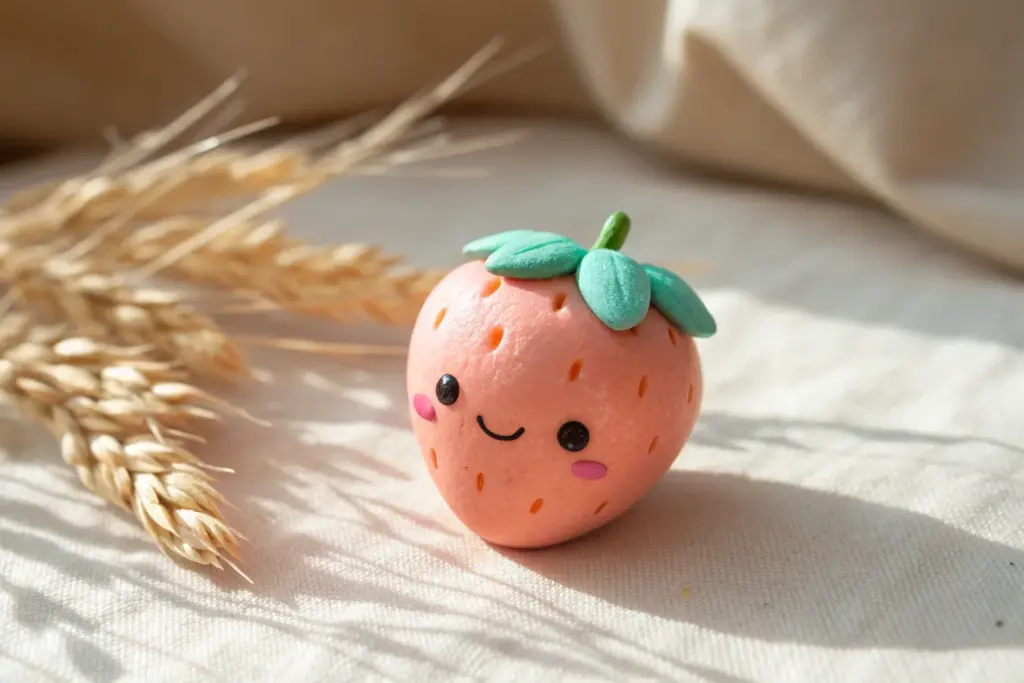
Smiley Fruit Charms
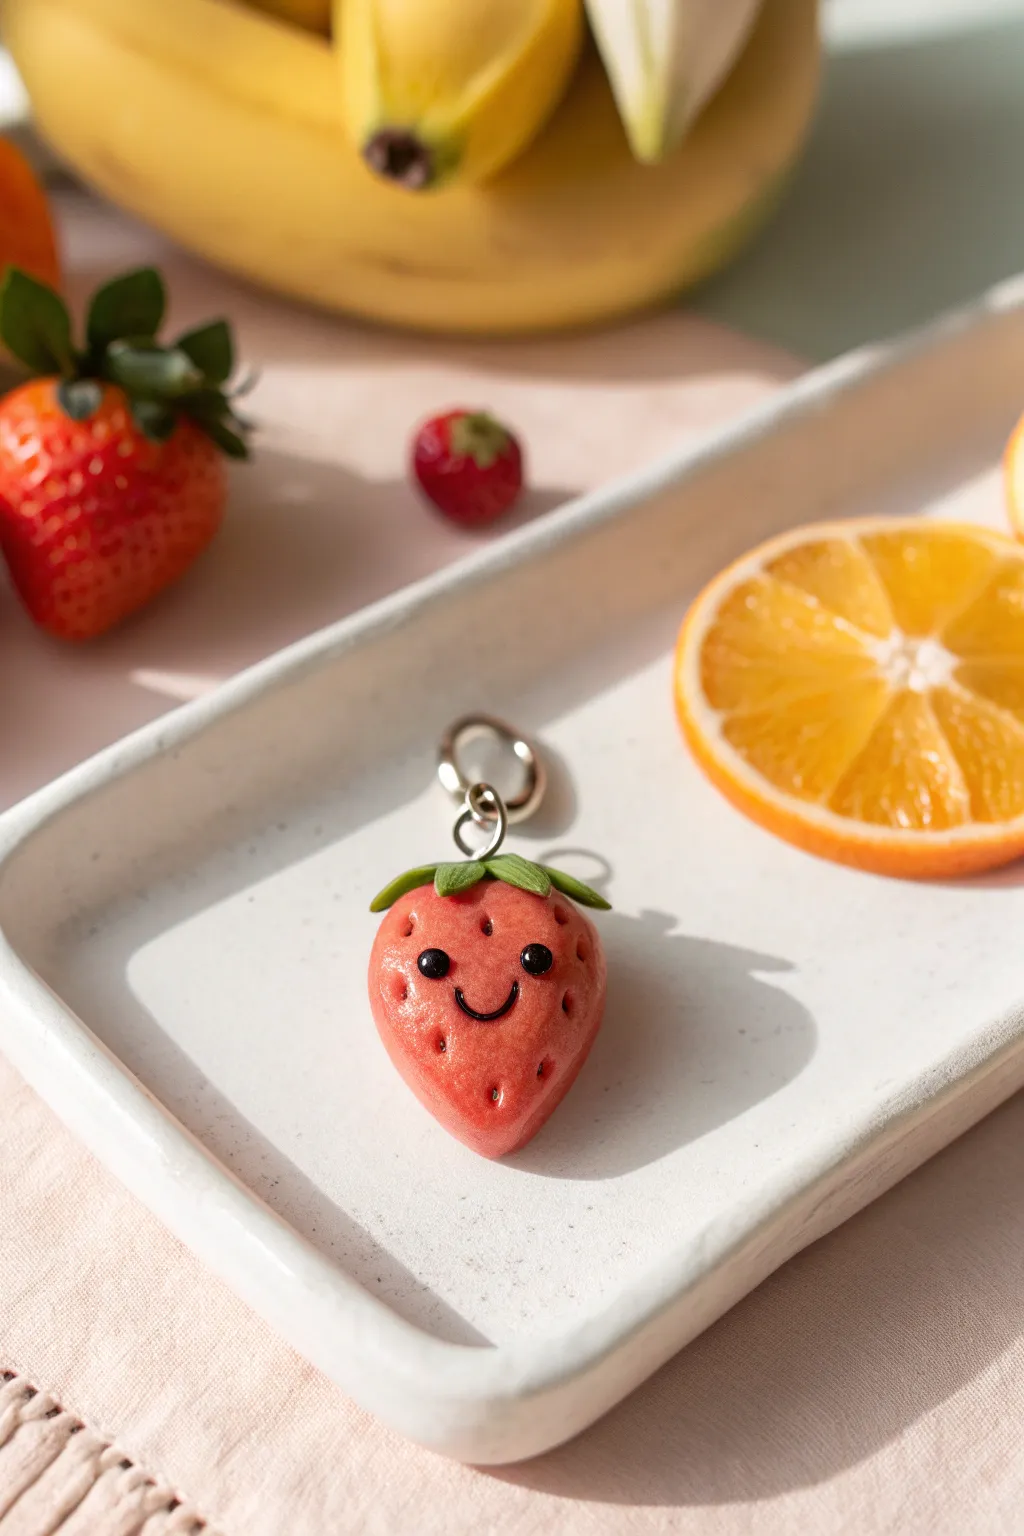
Add a sprinkle of sweetness to your day with this adorable strawberry charm, perfectly sized for a keychain or necklace. Its cheerful expression and realistic texture make it an irresistible little project that captures the essence of summer fun.
Step-by-Step Tutorial
Materials
- Red polymer clay
- Green polymer clay
- Black polymer clay
- Small metal eye pin
- Needle tool or toothpick
- Dotting tool or ball stylus
- Translucent liquid clay (optional)
- Gloss glaze (optional)
- Oven for baking
Step 1: Shaping the Berry
-
Condition the clay:
Start by taking a chunk of red polymer clay roughly the size of a large marble. Knead it in your hands until it becomes soft, warm, and pliable to prevent cracks later on. -
Roll a smooth ball:
Roll the conditioned clay between your palms to create a perfect sphere with no visible seams or lines. -
Form the strawberry shape:
Gently pinch and roll one side of the ball to taper it into a rounded cone shape creating the classic strawberry silhouette. Flatten the top slightly where the leaves will go. -
Add texture:
Using a needle tool or toothpick, gently press small indentations all over the surface of the strawberry to mimic seeds, leaving a clear, smooth space in the center for the face.
Sticky Fingers?
Keep baby wipes or hand sanitizer nearby. Swapping from red to white or green clay can transfer pigment, so clean hands ensure your colors stay bright and crisp.
Step 2: Adding the Face
-
Prepare the eyes:
Roll two profoundly tiny specks of black clay into balls. I find it helpful to pick these up with the tip of a needle tool rather than fingers. -
Position the eyes:
Press the black balls into the smooth area you reserved earlier, spacing them apart slightly to create a cute, wide-set look. Use a ball tool to gently socket them in so they don’t look like they are bulging out. -
Create the smile:
Roll an extremely thin, thread-like snake of black clay. Cut a tiny U-shaped segment and press it gently between the eyes to form the smile. -
Secure the expression:
Tap the smile lightly with your finger or a flat tool to ensure it bonds completely with the red clay base.
Make it a Pair
Make a second strawberry and attach earring hooks to the eye pins instead of a keychain ring for a summery set of statement earrings.
Step 3: Topping it Off
-
Make the calyx base:
Flatten a small pea-sized amount of green clay into a thin pancake. -
Cut the leaves:
Use a craft knife or needle tool to cut a messy star shape or individual teardrop shapes from the green pancake to act as the leaves. -
Attach the greenery:
Place the green star on top of the strawberry. Gently press the points of the star down onto the red shoulders of the fruit, curving them slightly for a natural flow. -
Texture the leaves:
Use your needle tool to score a single line down the center of each leaf for a realistic vein detail. -
Insert the hardware:
Trim a metal eye pin to about half an inch long. Dip the end in a tiny bit of liquid clay (or white glue) for extra grip, and push it straight down through the center of the green leaves.
Step 4: Finishing Touches
-
Bake the charm:
Place your strawberry upright on a baking sheet or tile. Bake according to your specific polymer clay manufacturer’s instructions (usually around 275°F or 130°C for 15-30 minutes). -
Cool down:
Let the charm cool completely inside the oven or on a wire rack before handling it, as hot clay is fragile. -
Seal (Optional):
For a juicy look like the reference photo, brush a thin layer of gloss glaze over the red part of the strawberry, avoiding the leaves if you prefer a matte contrast.
Attach a jump ring to the eye pin and hang your cheerful new friend on a bag or zipper pull


Mini Donut and Pastry Charms
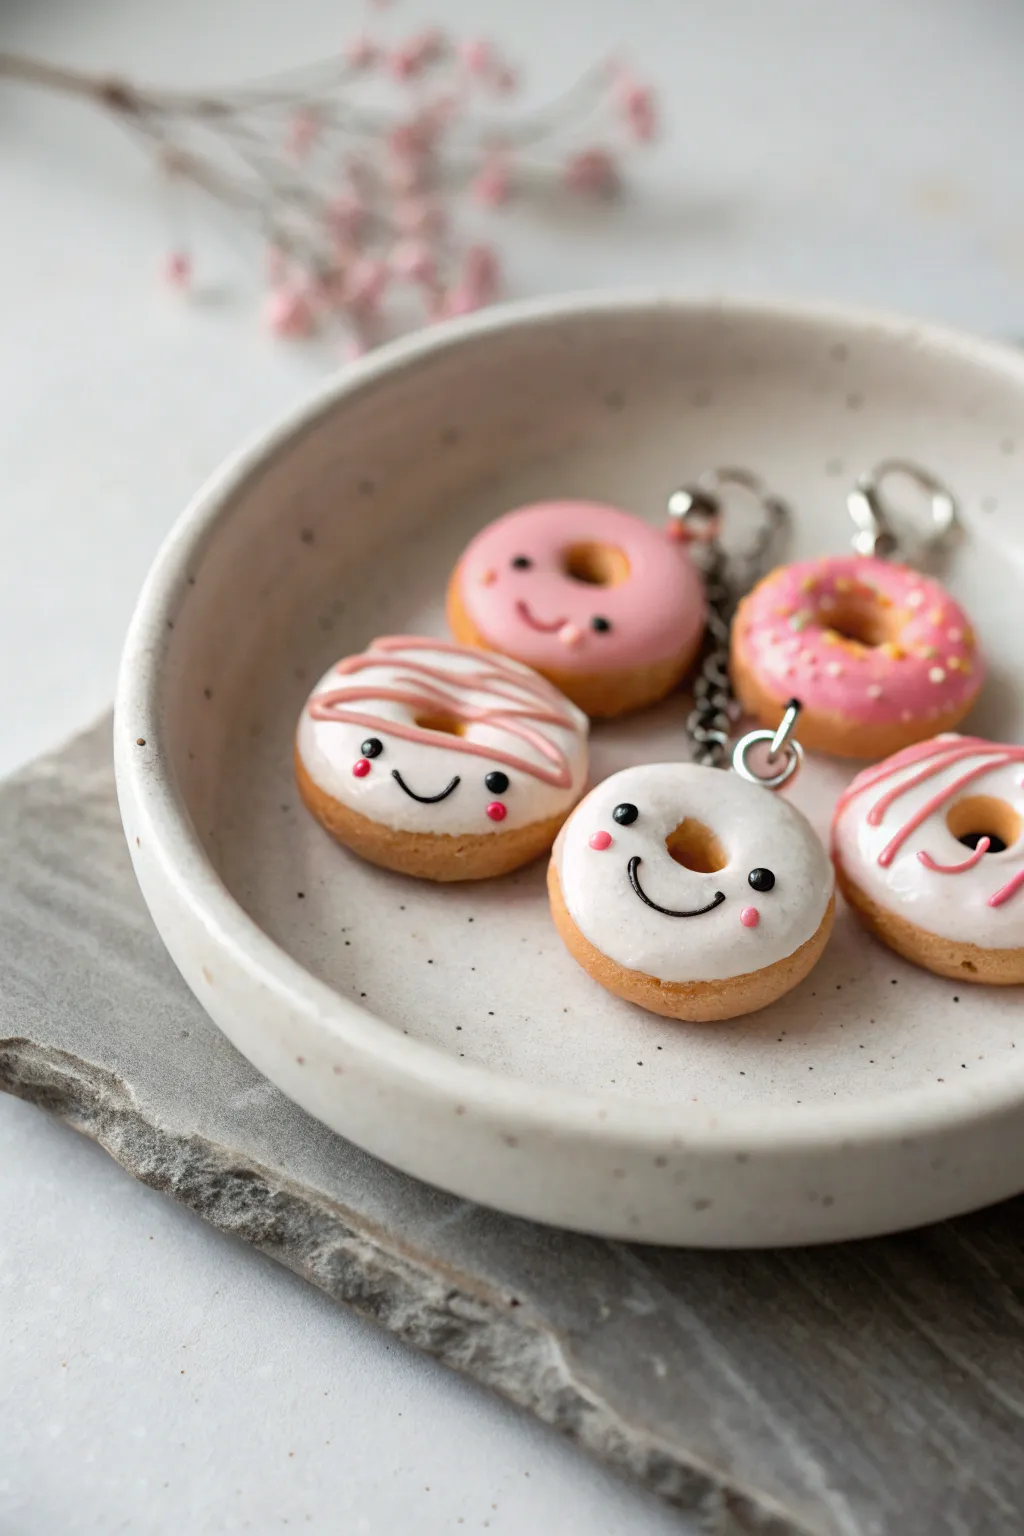
Create a batch of irresistibly sweet donut charms that look good enough to eat but are perfect for accessorizing. These tiny polymer clay treats feature realistic golden-brown dough, glossy icing, and adorable hand-painted faces that bring them to life.
Step-by-Step Guide
Materials
- Polymer clay (tan/ochre for dough, white for icing, pink for icing)
- Liquid polymer clay (Translucent Liquid Sculpey or Fimo Liquid)
- Chalk pastels (orange, brown, yellow ochre)
- Small paintbrush (soft bristle)
- Dotting tool or ball stylus (small)
- Acrylic paint (black, pink)
- Fine detail brush or toothpick
- Eye pins (silver)
- Gloss glaze (polyurethane or resin)
- Needle tool
- Small round cutter (approx. 1 inch)
- Smaller round cutter or straw (for donut hole)
- Baking tile or parchment paper
Step 1: Shaping the Dough Base
-
Mix the dough color:
Start by mixing a dough color if you don’t have a pre-mixed shade. Combine beige clay with a tiny speck of white and translucent clay to get a realistic, slightly airy baked good look. -
Divide the clay:
Roll your mixed clay into a smooth log and cut it into equal segments to ensure all your donuts are the same size. -
Form the rounds:
Take one segment and roll it into a ball between your palms, flattening it gently into a thick disc shape about 2cm in diameter. -
Create the donut hole:
Use a small straw or a tiny round cutter to punch a hole directly in the center of the disc. Soften the sharp edges of the cut with your fingertip so the dough looks risen, not sliced. -
Texture the surface:
Gently tap a clean toothbrush or crumpled foil over the surface of the clay to mimic the porous texture of a fried donut skin. -
Apply the baked effect:
Shave some orange and brown chalk pastel into a powder. Use a soft, dry brush to dust the powder onto the edges and bottom of the donut, building up a golden-brown gradient.
Step 2: Icing and Decorating
-
Prepare the icing:
Mix liquid polymer clay with a small amount of solid white clay (for white icing) or pink clay (for strawberry icing) until you have a gooey consistency similar to heavy cream. -
Apply the base glaze:
Carefully drizzle the liquid clay mixture over the top of your donut using a toothpick or small tool. Guide it towards the edges just enough so it looks like it’s naturally dripping down slightly. -
Add stripe details:
For the striped donuts, take a tiny string of contrasting liquid clay (pink on white) or a very thin snake of solid clay and lay it in a zigzag pattern across the surface. -
Position the hardware:
Before baking, insert a silver eye pin into the top of each donut. I like to bend the bottom of the pin slightly before inserting it to act as an anchor so it doesn’t pull out later. -
Add sprinkles (optional):
If making the sprinkled version, create tiny ‘snakes’ of yellow and pink clay, bake them briefly, chop them into bits, and press them into the wet liquid clay icing. -
Bake the charms:
Place your donuts on a ceramic tile or baking sheet. Bake according to your brand of clay’s instructions (usually 275°F/130°C for 15-30 minutes) and let them cool completely.
Texturing Secret
Use a real toothbrush to texture the ‘dough’ part before shading. The bristles create perfect little pores that catch the chalk pastel shading beautifully.
Step 3: Bringing Them to Life
-
Paint the eyes:
Once cool, use a dotting tool dipped in black acrylic paint to place two small, wide-set eyes on the lower half of the donut. -
Draw the smile:
Use your finest detail brush or the very tip of a needle tool dipped in black paint to draw a tiny ‘U’ shape between the eyes for a happy smile. -
Add rosy cheeks:
Dip a toothpick into pink acrylic paint and gently dab two small dots just below apart from the eyes to give the face a blushing, kawaii look. -
Seal with gloss:
Apply a coat of gloss glaze (or UV resin for extra durability) specifically over the icing area. This makes the frosting look wet and shiny while keeping the dough matte. -
Attach the hardware:
Open a jump ring with pliers, loop it through the eye pin, and attach your keychain or lobster clasp mechanism.
Scented Charms
Mix a tiny drop of vanilla or strawberry essential oil into the clay before baking. The scent will linger, making your charms smell as sweet as they look.
Clip your new donut squad onto a bag or assemble them into a sweet charm bracelet to show off your baking skills.

The Complete Guide to Pottery Troubleshooting
Uncover the most common ceramic mistakes—from cracking clay to failed glazes—and learn how to fix them fast.
Sweet Heart and Star Earrings
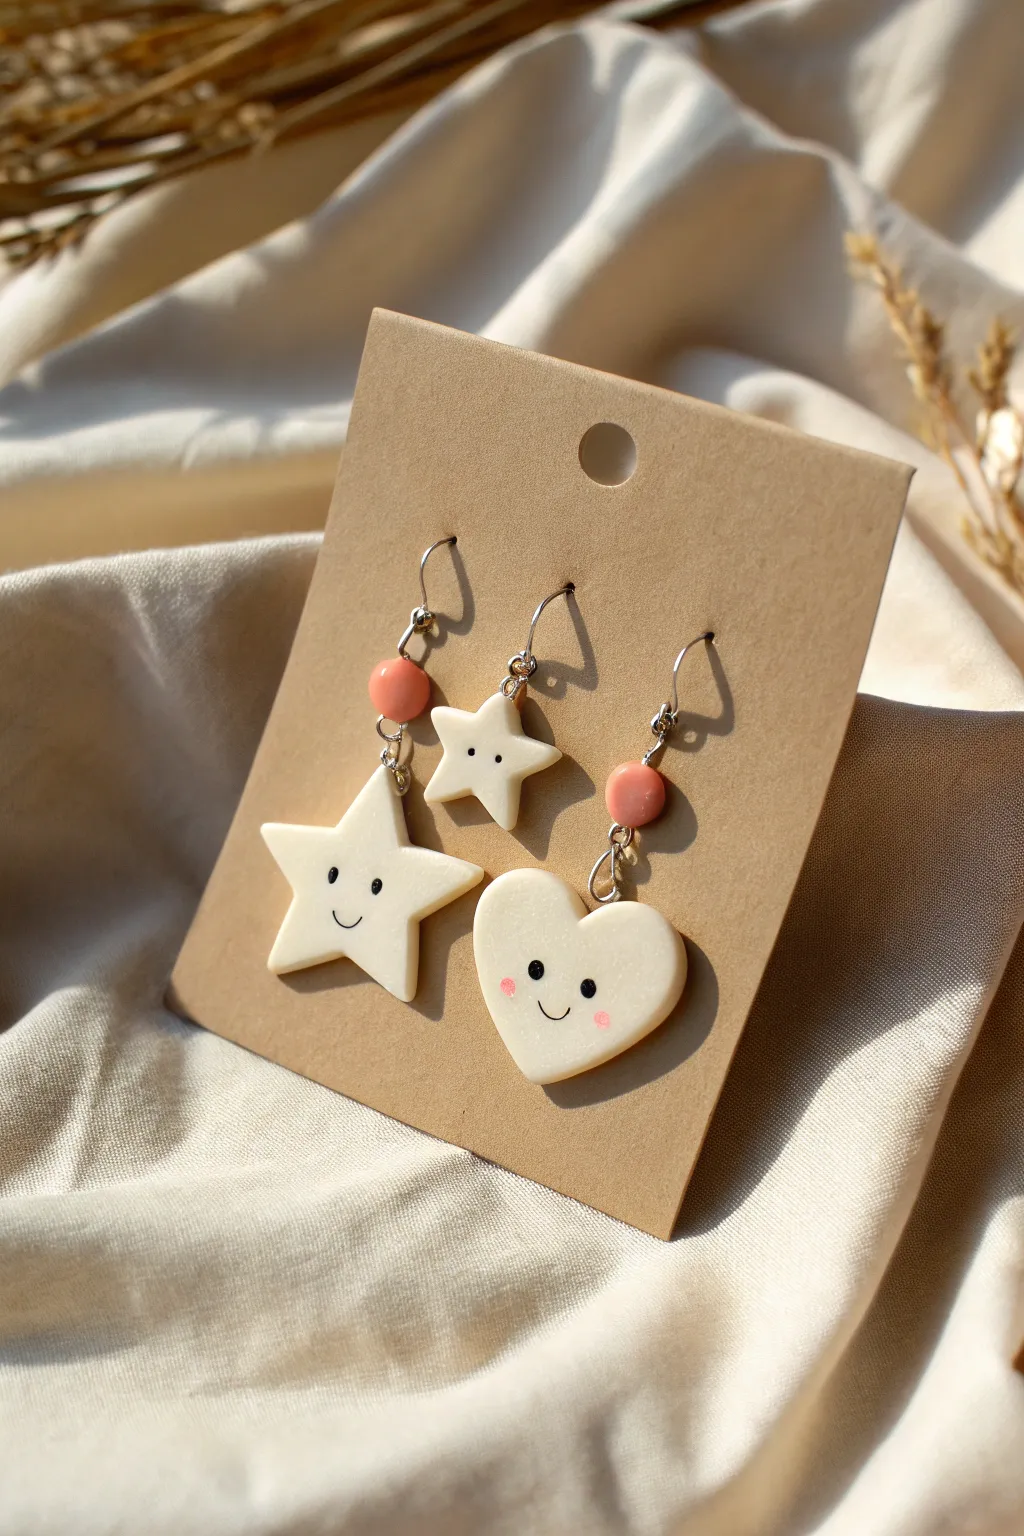
These adorable polymer clay earrings feature a mix of cheerful shapes—a large smiling star, a tiny baby star, and a blushing heart. With their creamy white finish, delicate facial details, and soft pink accents, they make for a charming mismatched set.
Step-by-Step Tutorial
Materials
- White or cream polymer clay
- Translucent pink polymer clay (for cheeks and beads)
- Black acrylic paint or fine-point black liner pen
- Pink acrylic paint (if not using pink clay for cheeks)
- Gloss glaze or UV resin
- Earring hooks (silver finish)
- Eye pins
- Jump rings
- Needle tool or toothpick
- Rolling pin
- Small star cookie cutters (two sizes)
- Small heart cookie cutter
- Round nose pliers and wire cutters
Step 1: Shaping the Clay Charms
-
Condition the white clay:
Begin by kneading your white or cream polymer clay until it is soft, pliable, and free of any air bubbles. -
Roll out the slab:
Use your rolling pin or a pasta machine to roll the clay into an even slab, approximately 3-4mm thick. You want it substantial enough to be sturdy but light enough for ears. -
Cut the shapes:
Using your cutters, punch out one large star, one small star, and one heart shape. Gently smooth any rough edges with your finger. -
Soften the edges:
To give them that puffy, marshmallow-like look, gently pat the edges of each shape inward to round them off slightly rather than leaving them sharp and angular. -
Prepare the pink beads:
Take a small amount of pink clay and roll two small spheres, about the size of a pea, to serve as the connector beads.
Sticky Situation?
If your clay gets stuck in the small cutters, dip the cutter in cornstarch or water before pressing it into the clay to ensure a clean release.
Step 2: Adding Hardware & Baking
-
Insert eye pins:
Carefully trim eye pins to a short length (about 1cm) and insert one into the top center of each shape (large star, small star, heart) and straight through the center of both pink beads. -
Secure the pins:
If I feel the clay is too soft, I like to add a tiny dab of liquid clay or Bake & Bond to the pin shaft before inserting it to ensure it won’t pull out after baking. -
Bake the pieces:
Arrange all your pieces on a ceramic tile or baking sheet lined with parchment paper. Bake according to your specific brand of clay’s instructions (usually 275°F/135°C for 15-30 minutes). -
Cool down:
Allow the pieces to cool completely before touching them; the clay hardens fully as it cools.
Step 3: Painting the Faces
-
Paint the eyes:
Using a very fine dotting tool or a toothpick dipped in black acrylic paint, create two small, widely spaced eyes on the large star and the heart. The small star gets tiny dot eyes too. -
Draw the mouths:
With an ultra-fine detailing brush or a fine-point black liner pen, draw a simple ‘U’ shape for the smile between the eyes. Keep the line thin for a delicate look. -
Add rosy cheeks:
Dip a toothpick into pink paint and dab two tiny dots under the eyes on the heart charm. The large star doesn’t have cheeks in this design, but feel free to add them if you like. -
Seal the charms:
Once the paint is totally dry, coat the front and back of each charm and bead with a layer of gloss glaze or UV resin to protect the paint and give it a ceramic-like shine.
Make it Sparkle
Mix a tiny amount of iridescent glitter or mica powder into your white clay before rolling it out to give the charms a subtle, magical shimmer.
Step 4: Final Assembly
-
Connect the beads:
Using your pliers, create a loop at the other end of the eye pin running through the pink beads. -
Assemble the star earring:
Open the loop of a jump ring and connect the large star charm to the bottom loop of one pink bead component. -
Attach the top hook:
Open the loop on an earring hook and attach it to the top loop of that same pink bead. -
Assemble the heart earring:
Repeat the process for the heart earring: connect the heart charm to the second pink bead, and then attach the earring hook. -
Create the asymmetrical accent:
For the small star, attach it directly to a separate earring hook or add it to the same ring as the large star for a clustered look, depending on your preference. In the photo, it’s a separate small earring.
Now you have a wonderfully sweet set of handmade earrings ready to wear or gift.
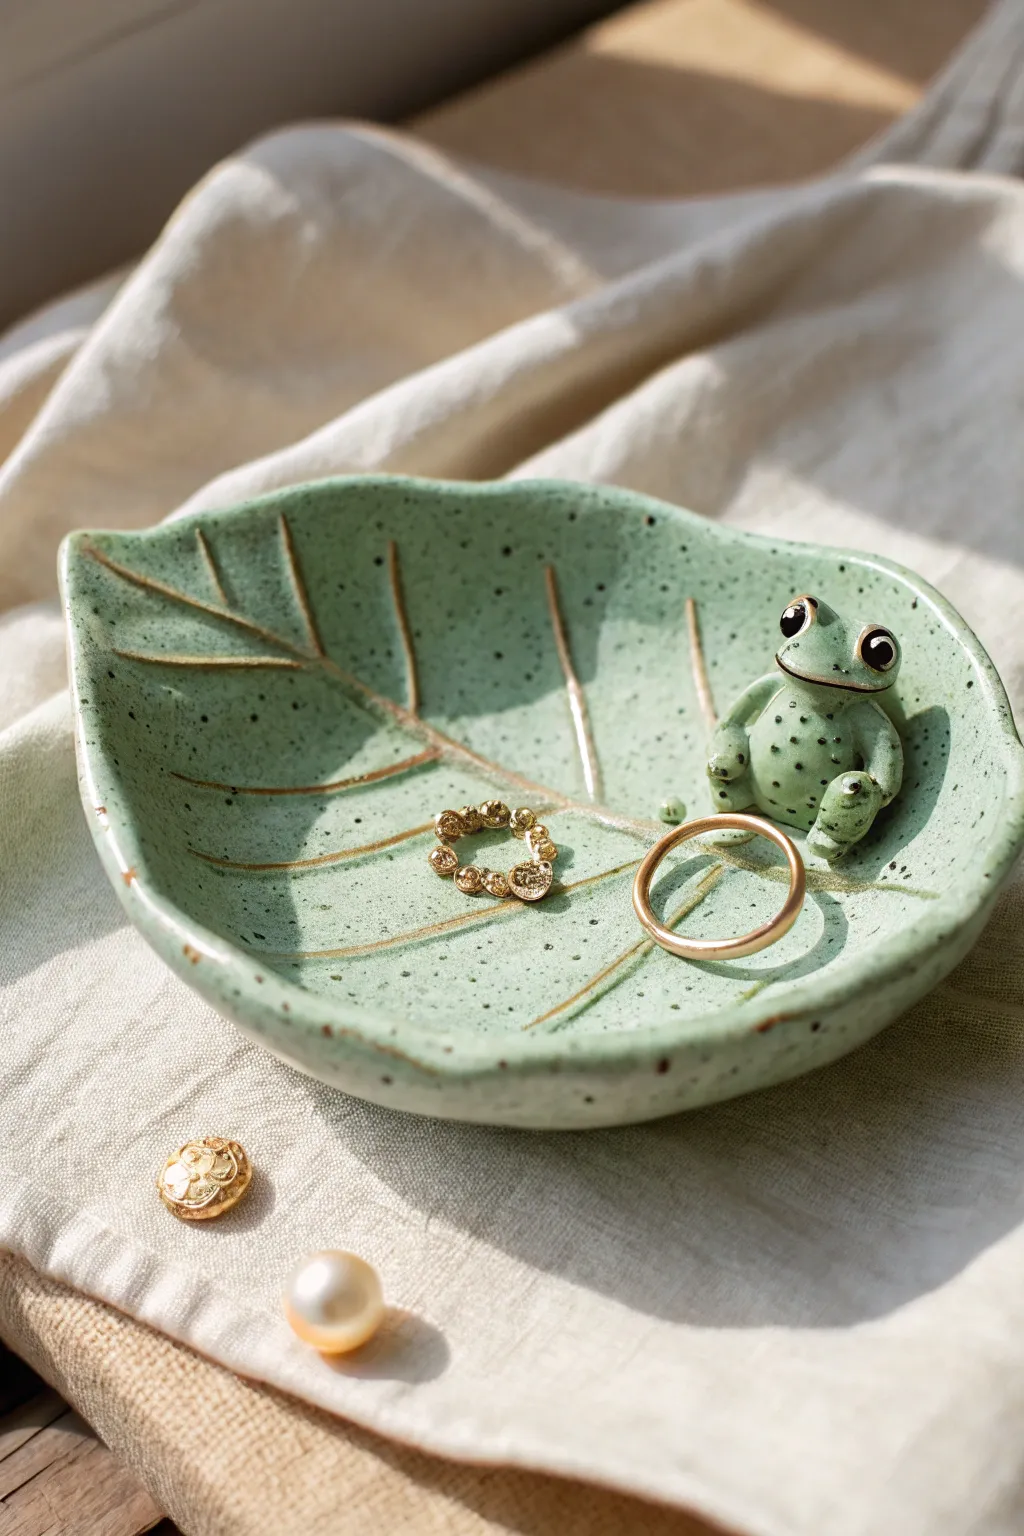
Cat Paw Ring Dish

This adorable ring dish combines a whimsical cloud-like shape with sweet paw print details for the ultimate cat lover’s accessory. With its glossy white finish and touches of blush pink, it’s a functional piece of art that keeps your jewelry safe in style.
Step-by-Step
Materials
- White classic air-dry clay or polymer clay
- Rolling pin
- Modeling tools (or a butter knife and toothpick)
- Small bowl or sponge
- Sandpaper (fine grit)
- White acrylic paint (glossy finish) or white glaze if firing
- Soft pink acrylic paint
- Small round paintbrush
- Detail brush
- Gloss varnish or sealant
Step 1: Shaping the Clay
-
Condition the clay:
Begin by taking a ball of white clay about the size of a tangerine. Knead it in your hands until it is warm, pliable, and free of any large air bubbles. -
Roll out the slab:
Place the clay on a smooth surface and use your rolling pin to flatten it into an even slab, aiming for a consistent thickness of about 1/4 inch. -
Cut the outline:
Using a modeling tool or a knife, verify you have enough space for the shape. Freehand cut a rounded, cloud-like shape with roughly five distinctive scalloped bumps to mimic the overall silhouette of a large paw or cloud. -
Smooth the edges:
Dip your finger in a tiny bit of water and run it along the cut edges of your slab to smooth out any jagged bits or sharpness. -
Lift the edges:
Gently pinch and lift the outer rim of the clay upwards to create the walls of the dish. I like to continuously rotate the piece while doing this to ensure the wall height is even all the way around. -
Refine the shape:
Use your thumbs to smooth the interior curve where the wall meets the base, ensuring a seamless transition and a nice concave dish shape. -
Dry or bake:
Follow the instructions for your specific clay type. If using air-dry clay, let it sit for 24-48 hours until fully hardened; for polymer, bake according to package directions.
Smooth Seams Pro-Tip
If using air-dry clay, keep a small bowl of water nearby. Wet your fingers constantly while molding to buff out cracks instantly before they dry
Step 2: Sanding and Priming
-
Sand for smoothness:
Once fully cured, take your fine-grit sandpaper and gently buff the entire surface. Pay special attention to the rim to make sure it feels soft to the touch. -
Wipe clean:
Use a slightly damp cloth to remove all sanding dust from the dish so your paint will adhere properly. -
Base coat:
Apply two coats of white glossy acrylic paint to the entire dish. Allow the first coat to dry sufficiently before applying the second to achieve a rich, opaque ceramic look.
Step 3: Adding the Details
-
Plan the prints:
Visualize where your paw prints will go. The design features a larger main print slightly off-center and a smaller one near the bottom edge. -
Paint the main pads:
Dip your small round brush into the soft pink paint. Create the large, central ‘palm’ pad for the first paw print. It should look somewhat like a rounded, inverted triangle or heart. -
Add the toes:
Using the same brush, dab four smaller ovals above the main pad to create the toe beans. -
Create the second print:
Repeat the process for the second, smaller paw print near the bottom, slightly overlapping the side wall for a playful effect. -
Rim accents:
Dilute a tiny drop of pink paint with water. create a watercolor effect, or gently dry-brush some pink blotches along the outer bottom rim of the dish to mimic the mottled pattern seen in the reference. -
Side dots:
Take your detail brush (or a toothpick) and dip it into black or dark grey paint. Add three tiny dots in a row on the exterior side wall for a cute finishing detail. -
Seal the piece:
Once all paint is completely dry, apply a generous coat of high-gloss varnish. This mimics the shine of a fired ceramic glaze and protects your jewelry dish.
Level Up: Texture
Before baking or drying, gently press your own thumb into the clay where the pink pads will go to create recessed ‘toe bean’ indentations
Now you have a charming spot to keep your favorite rings safe and sound


What Really Happens Inside the Kiln
Learn how time and temperature work together inside the kiln to transform clay into durable ceramic.
Frog Trinket Tray
This whimsical trinket dish combines the organic shape of a leaf with an adorable amphibian friend to guard your rings. The speckled green finish gives it a charming, handmade ceramic look without needing a kiln.
Step-by-Step Tutorial
Materials
- Air-dry clay or polymer clay (white)
- Rolling pin
- Real leaf (large, with prominent veins) or a leaf-shaped template
- Craft knife or clay tools
- Small bowl (for shaping)
- Acrylic paints: Sage green, Forest Green, Black, White
- Gold metallic paint
- Fine-point detail brushes
- Glossy varnish or glaze
- Toothbrush (for speckling)
- Water cup and sponge
Step 1: Shaping the Leaf Base
-
Roll the slab:
Start by conditioning your clay until it’s soft and pliable, then roll it out into a smooth slab about 1/4 inch thick. Ensure the thickness is even to prevent cracking during drying. -
Cut the shape:
Place your large leaf or paper template onto the clay. Trace around the edge with a craft knife or needle tool to cut out the basic leaf silhouette. -
Smooth the edges:
Dip your finger in a little water (for air-dry clay) or baby oil (for polymer) and gently run it along the cut edges to smooth out any roughness or sharp corners. -
Carve the veins:
Using a sculpting tool or a dull knife, gently carve a central vertical line for the main vein, and diagonal lines branching off for the secondary veins. Don’t press too deep; you just want clean channels. -
Create the curve:
Lift the clay leaf carefully and drape it inside a shallow bowl. Gently press it into the curve so the sides lift up—this will ensure your jewelry stays put once it’s finished.
Step 2: Sculpting the Frog Companion
-
Form the body:
Roll a small ball of clay about the size of a large marble. Shape it into a slightly squat teardrop for the frog’s main body and head. -
Add the legs:
Roll two small sausages of clay for the back legs. Bend them into a ‘V’ shape and attach them to the sides of the body, blending the seams with a modeling tool. -
Sculpt the front arms:
Make two tiny cylinders for the front arms. Attach these to the front of the body so they look like they are resting on the stomach or the leaf surface. -
Attach the eyes:
Roll two tiny spheres for eyes and place them high on the head. Use a small dotting tool to create an indentation in the center of each for the pupil later. -
carve the smile:
Use a needle tool or curved blade to press a wide, friendly smile into the face just below the eyes. -
Mount the frog:
Score the bottom of the frog and the spot on the leaf where he will sit (right side looks great). Add a dab of water or liquid clay and press him firmly onto the rim. -
Dry or bake:
If using air-dry clay, let the piece dry for 24-48 hours. If using polymer clay, bake according to the package instructions. Once hardened, you can lightly sand any rough imperfections.
Don’t Rush the Curve
When drying clay in a bowl, rotate it occasionally so it dries evenly. If the bowl is non-porous (glass/plastic), line it with plastic wrap so the clay doesn’t stick.
Step 3: Painting and Finishing
-
Base coat:
Paint the entire dish and the frog with a coat of sage green acrylic paint. You may need two coats for full opacity. Let this dry completely. -
Create the speckles:
Dilute a tiny bit of darker forest green or black paint with water. Dip an old toothbrush into it and run your thumb across the bristles to flick tiny speckles over the dish. -
Detail the eyes:
Paint the eye bumps solid black. Once dry, add a tiny white dot to each eye for a reflective highlight, which really brings the character to life. -
Add body spots:
Using a small detail brush, paint small, darker green dots on the frog’s back and legs to give him some texture. -
Highlight the veins:
Take your metallic gold paint and a steady hand. Carefully paint inside the carved vein lines of the leaf. I find a liner brush works best for these thin strokes. -
Enhance the rim:
Run a very light amount of gold paint along the very edge/rim of the leaf to define the shape. -
Seal the piece:
Finish by coating the entire project with a glossy varnish. This mimics the look of fired ceramic glaze and protects your paint job from scratches.
Fixing Tiny Cracks
If you see hairline cracks after drying air-dry clay, mix a tiny amount of fresh clay with water to make a paste and smooth it into the crack before painting.
Now you have a delightful spot to keep your favorite rings safe and sound
Cloud and Star Magnets
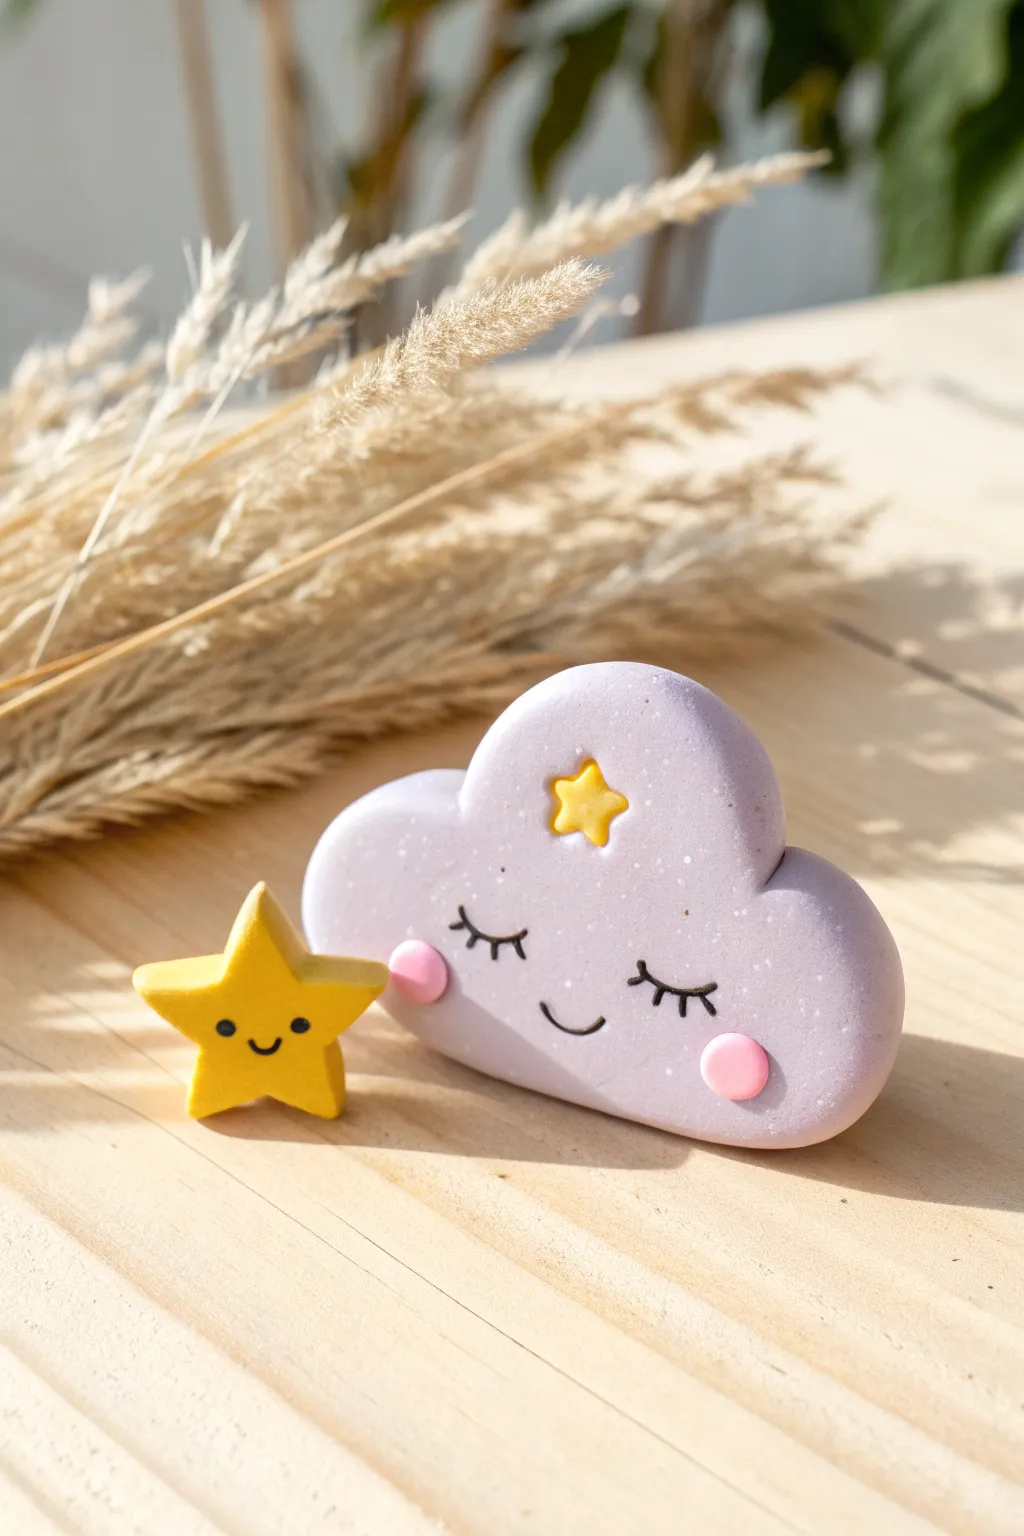
Bring a touch of celestial sweetness to your fridge or workspace with these charming clay magnets. This adorable cloud and star duo features a soft lilac hue and gentle sleeping expressions, making for a truly relaxing creative project.
How-To Guide
Materials
- Polymer clay (lilac/light purple, yellow, pink)
- Acrylic paint (black)
- Small fine-point paintbrush or toothpick
- Rolling pin
- Cloud and star cookie cutters (optional)
- Modeling tools (or a craft knife)
- Circular magnets
- Strong craft glue (e.g., E6000)
- Glaze or varnish (optional for finish)
- Parchment paper or baking tile
Step 1: Shaping the Cloud
-
Prepare the Clay:
Start by conditioning your lilac clay until it is soft and pliable. Roll it into a smooth ball to remove any air bubbles. -
Flatten the Base:
Press the ball down onto your work surface or parchment paper. Use a rolling pin to flatten it to a thickness of about 1/4 inch (6-7mm). I find that keeping it slightly thick gives it a nicer, puffier look. -
Create the Cloud Shape:
You can shape the clay freely by hand into a fluffy cloud outline, or use a cloud-shaped cookie cutter for precision. If shaping by hand, gently press indentations around the perimeter to create the rounded ‘puffs’. -
Smooth the Edges:
Use your finger or a smoothing tool to gently round off the sharp edges of your cloud shape, making it look soft and pillowy. -
Add Cheeks:
Roll two tiny balls of pink clay. Press them gently onto the lower sides of the cloud to create rosy cheeks. Flatten them slightly so they adhere well.
Step 2: Creating the Stars
-
Form the Large Star:
Condition a piece of yellow clay and roll it flat, similar to the cloud’s thickness. Cut out a classic five-point star shape using a cutter or a craft knife. -
Smooth the Points:
Gently tap the points of your yellow star against your finger to round them slightly, avoiding any sharp or fragile tips. -
Make the Mini Star:
Take a tiny pinch of yellow clay and shape a very small star. This will be an embellishment on the cloud’s forehead. -
Attach the Mini Star:
Place the tiny yellow star centered near the top of your purple cloud, pressing gently to bond the clays together.
Clean Clay Tip
Work with lighter colors like the yellow star first, then move to darker colors. Keep baby wipes nearby to clean fingers and tools between colors to avoid smudging.
Step 3: Details & Baking
-
Bake the Pieces:
Place your finished clay shapes on a baking tile or sheet lined with parchment paper. Bake according to your specific brand of polymer clay’s package instructions (usually around 275°F/135°C for 15-30 minutes). -
Cool Down:
Once baked, turn off the oven and let the pieces cool completely before handling them. They harden fully as they cool. -
Paint the Faces:
Using a very fine brush or a toothpick dipped in black acrylic paint, carefully draw the sleeping eyes. Create simple ‘U’ shapes with tiny lashes for the cloud, and a small smile. -
Detail the Star:
On the large yellow star, paint two small dots for eyes and a tiny ‘u’ shape for a smile. -
Add Glaze (Optional):
If you want a glossy finish or extra protection for the paint, apply a thin coat of polymer clay glaze. For the matte look shown in the image, you can skip this step. -
Attach Magnets:
Flip the cooled pieces over. Apply a dab of strong craft glue to the back of the cloud and the star, then press your round magnets firmly into the glue. -
Final Dry:
Allow the glue to cure fully—usually 24 hours—before sticking your new creations to the fridge.
Uneven Surfaces?
If you see fingerprints on your raw clay, lightly brush the surface with a tiny amount of baby oil or cornstarch before baking to smooth them out completely.
Now you have a serene set of sky friends ready to hold up your most important notes and photos

TRACK YOUR CERAMIC JOURNEY
Capture glaze tests, firing details, and creative progress—all in one simple printable. Make your projects easier to repeat and improve.
Tiny Planters With Faces
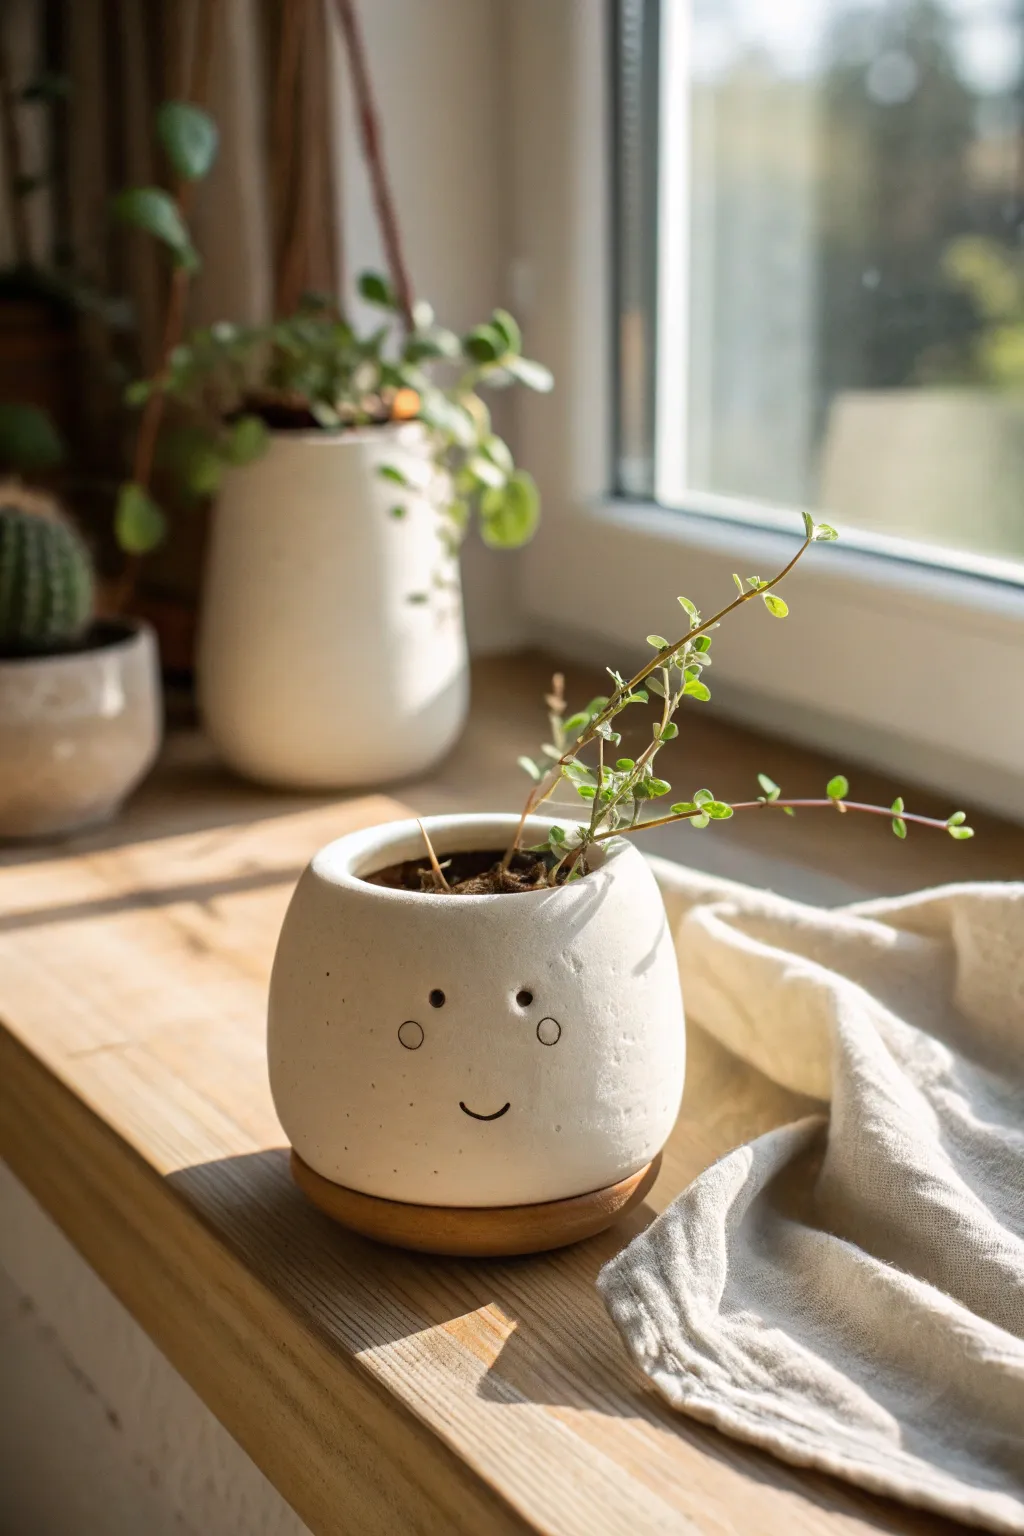
Brighten up your windowsill with this adorable, minimalist planter featuring a sweet little smile. The smooth white finish and subtle engraved details give it a modern, clean look that perfectly highlights any tiny cascading plant.
Step-by-Step
Materials
- White air-dry clay or polymer clay
- Rolling pin
- Small bowl or round cutter (approx. 3-4 inches)
- Small needle tool or toothpick
- Fine grit sandpaper
- Water based varnish or sealant (matte finish recommended)
- Black fine-tip acrylic paint marker or permanent marker
- Small wooden coaster or saucer (store-bought or handmade)
- Water for smoothing
- Plastic wrap
Step 1: Forming the Base
-
Prepare the Clay:
Start with a ball of white clay about the size of a tennis ball. Knead it thoroughly until it is warm and pliable, ensuring there are no air bubbles trapped inside. -
Roll the Slab:
Roll out a portion of the clay to a uniform thickness of about 1/4 inch. This will be the base of your pot. -
Cut the Base:
Use a round cookie cutter or trace around a small glass to cut out a perfect circle for the bottom of the planter. Set this aside on a piece of parchment paper. -
Create the Walls:
Roll out a long, rectangular strip of clay, keeping the same 1/4 inch thickness. The length needs to be slightly longer than the circumference of your base circle. -
Assemble the Cylinder:
Wrap the long strip around the base circle to form a cylinder. Where the two ends of the strip meet, slice through both layers at a diagonal angle to create a seamless join.
Smooth Operator
Keep a small dish of water nearby. If the clay starts to crack while shaping the bulbous belly, just dampen your fingertip and smooth over the cracks immediately.
Step 2: Shaping and Refining
-
Secure the Seams:
Score the edges of both the base and the wall where they meet (scratch cross-hatch marks). Apply a little water or slip (liquid clay) and press them firmly together. -
Blend the Clay:
Use your thumb or a modeling tool to smooth the clay upwards from the base into the wall on the outside, and downwards on the inside, until the seam completely disappears. -
Create the Bulbous Shape:
Gently cup the pot in your hands and push the walls slightly outward from the inside to create that rounded, bulbous belly. Curve the upper rim slightly inward to mimic the silhouette in the photo. -
Smooth the Rim:
Dip your finger in water and run it along the top rim to round off any sharp edges. The top should look soft and organic, not mechanically cut. -
Refine the Surface:
Take a moment to smooth the entire exterior with a slightly damp sponge or finger. Remove any fingerprints or uneven textures now, as they are harder to fix once dry.
Step 3: Adding the Face & Finishing
-
Mark the Features:
With the clay still soft, use a needle tool or toothpick to very lightly sketch the placement of the eyes and cheeks. I find keeping the face lower on the pot makes it look cuter. -
Impress the Eyes:
For the eyes, you can use the non-sharp end of a small drill bit or the back of a paintbrush to press two small, deep indentations into the clay. -
Draw the Cheeks and Mouth:
Using your needle tool, carefully etch tiny circles for the cheeks and a simple ‘U’ shape for the smile. Don’t go all the way through; just create clean, recessed lines. -
Allow to Dry:
Let the pot air dry completely. This usually takes 24-48 hours depending on humidity. Rotate the pot occasionally so the bottom dries evenly. -
Sand for Perfection:
Once bone dry, use fine-grit sandpaper to gently buff away any remaining roughness on the surface or rim, creating a stone-like texture. -
Inking the Details:
Take your black fine-tip marker and carefully trace inside the etched lines for the cheeks, smile, and eyes. The indentation acts as a guide, making it easy to keep lines steady. -
Seal the Pot:
Coat the entire piece, inside and out, with a matte varnish. This protects the clay from moisture when you water your plant. -
Final Assembly:
Place your finished pot onto a small wooden saucer to complete the look and catch any drainage.
Make it Functional
Before drying, use a straw to punch a drainage hole in the bottom center. Essential if you plan to plant directly into the pot rather than using a nursery liner.
Pop in your favorite trailing succulent and enjoy the friendly new face on your shelf
Pastel Dino Toothbrush Cup
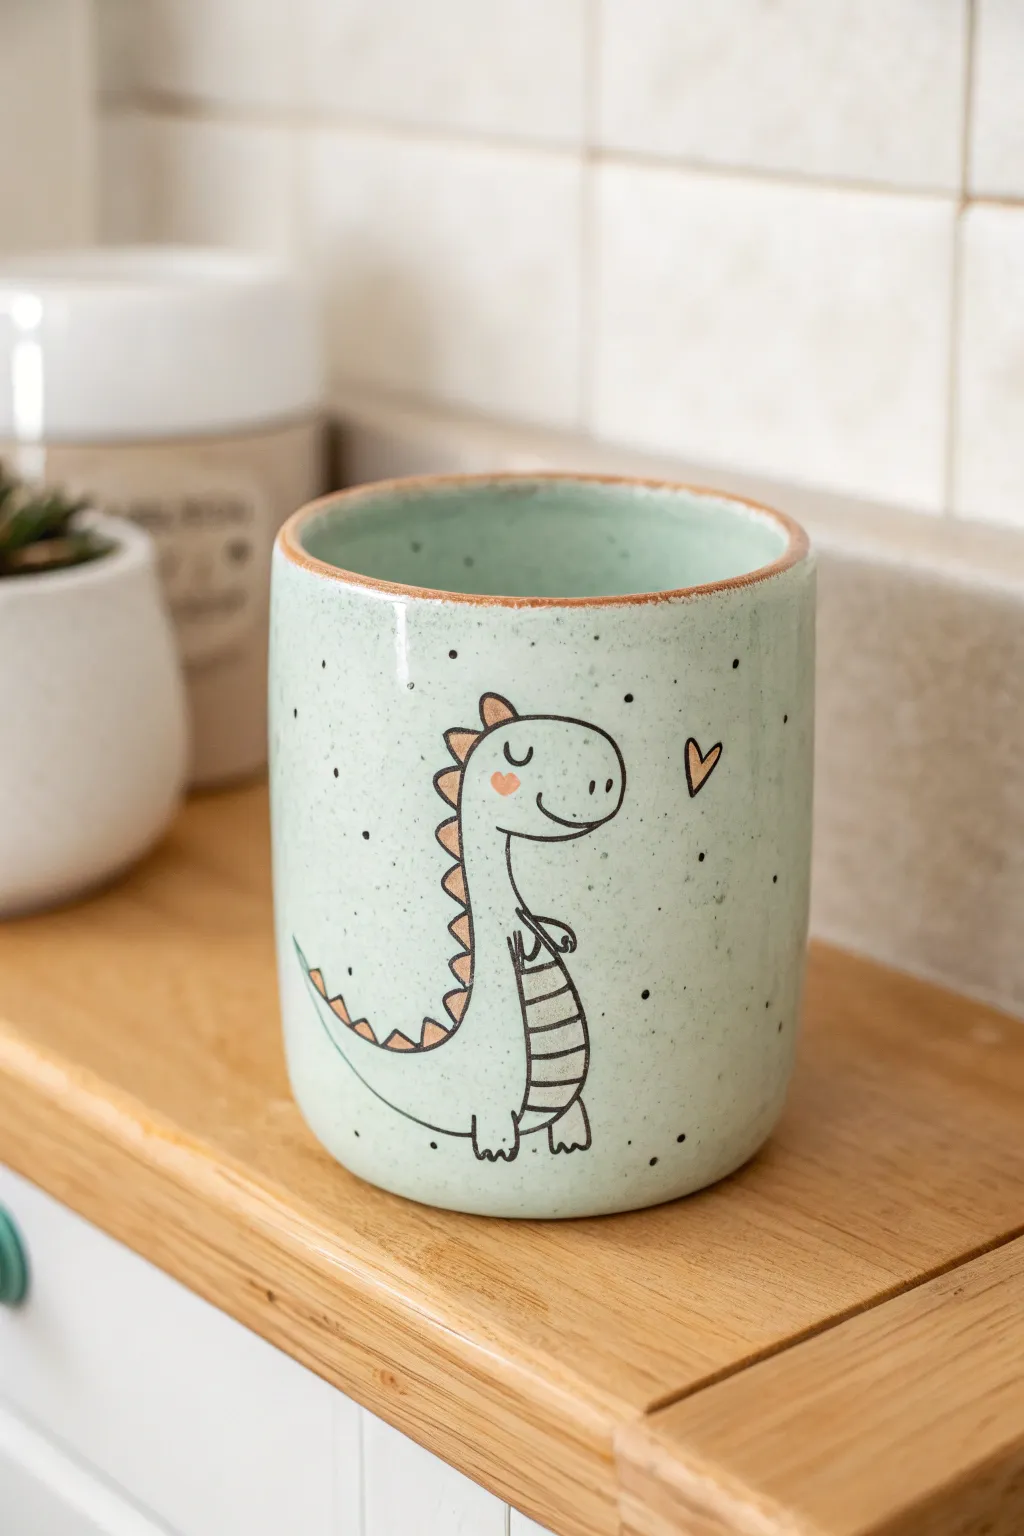
Bring a smile to your morning routine with this adorable handmade toothbrush cup featuring a charming dinosaur illustration. The gentle mint-green glaze and speckled clay body give it a modern yet playful look, perfect for bathroom countertops.
Step-by-Step Tutorial
Materials
- Speckled Stoneware Clay (cone 5/6)
- Rolling pin
- Fettling knife
- Textured canvas or slab roller
- Rib tool (metal and rubber)
- Slip and scoring tool (or fork)
- Template (paper rectangle 9×4 inches)
- Underglaze pencil (black)
- Underglazes (white, orange/peach, mint green)
- Clear glaze (zinc-free recommended)
- Fine detail brush
- Sponge
Step 1: Building the Cylinder
-
Roll the Slab:
Begin by rolling out your speckled clay on a canvas surface to a consistent thickness of about 1/4 inch. Ensure the slab is large enough to fit your rectangular template. -
Cut to Size:
Place your paper template over the clay and carefully cut out the rectangle using your fettling knife. You will also need to cut a circle for the base that matches the cylinder’s diameter. -
Bevel the Edges:
Cut a 45-degree angle on the short ends of your rectangular slab. This helps create a seamless join when you roll the clay into a cylinder. -
Form the Cylinder:
Score the beveled edges and apply a generous amount of slip. Gently curve the slab until the ends meet, pressing them firmly together to create a tube. -
Smooth the Join:
Support the inside wall with one hand while using a rib tool on the outside to smooth the seam until it disappears completely. -
Attach the Base:
Score and slip the bottom edge of your cylinder and the outer edge of your clay circle. Press the cylinder onto the base, sealing the seam well with a modeling tool or your finger. -
Refine the Rim:
Run a damp chamois or sponge over the top rim to round it off smoothly, ensuring there are no sharp edges that could scratch later.
Smudged Lines?
If your black underglaze pencil smudges, use a stiff, dry brush to whisk away loose dust before applying clear glaze. Avoid rubbing with a wet sponge as it smears.
Step 2: Decorating the Dinosaur
-
Bisque Fire:
Once the cup is bone dry, fire it to bisque temperature (usually cone 04) to prepare it for glazing and decoration. -
Sketch the Outline:
Using a regular pencil, lightly sketch your dinosaur design directly onto the bisque. Don’t worry about mistakes; the graphite will burn off in the kiln. I find starting with the head loop helps get the proportions right. -
Apply the Base Color:
Paint the inside of the dino’s body with a mint green underglaze. It might look similar to the raw clay now, but it will pop after firing. Avoid painting over the spikes or belly area just yet. -
Add Accents:
Use a soft peach or orange underglaze to fill in the triangular spikes running down the back and the small heart floating near the head. -
Detail the Belly:
Apply a white or very pale grey underglaze to the belly stripes area to distinguish it from the green body. -
Line Work:
Using a black underglaze pencil or a very fine liner brush with black underglaze, carefully trace over your pencil lines. Add the facial features, the belly stripes, and small dots around the background for texture. -
Wax Resist:
Apply wax resist over your painted dinosaur design and the heart. This prevents the dipping glaze from covering your hard work.
Step 3: Glazing and Finishing
-
Interior Glaze:
Pour a glossy mint or celadon glaze into the cup, swirl it to coat the entire interior, and pour out the excess. Wipe the rim clean. -
Exterior Dipping:
Dip the exterior of the cup into a clear glaze. Because you waxed the dinosaur, the clear glaze will bead off that area, leaving the underglaze visible but protected. -
Rim Detail:
Wipe the very top rim with a damp sponge to expose the raw clay slightly, which often creates a lovely toasted brown line during firing. -
Final Fire:
Load the cup into the kiln and fire to your clay’s maturity temperature (likely cone 5 or 6). Allow the kiln to cool completely before opening.
Personalize It
Swap the heart for a small initial of the person who will use the cup, or change the dino’s expression to sleepy eyes for a perfect bedtime theme.
Now you have a delightful, custom-made vessel ready to organize your bathroom essentials
Tiny Whale Soap Dish
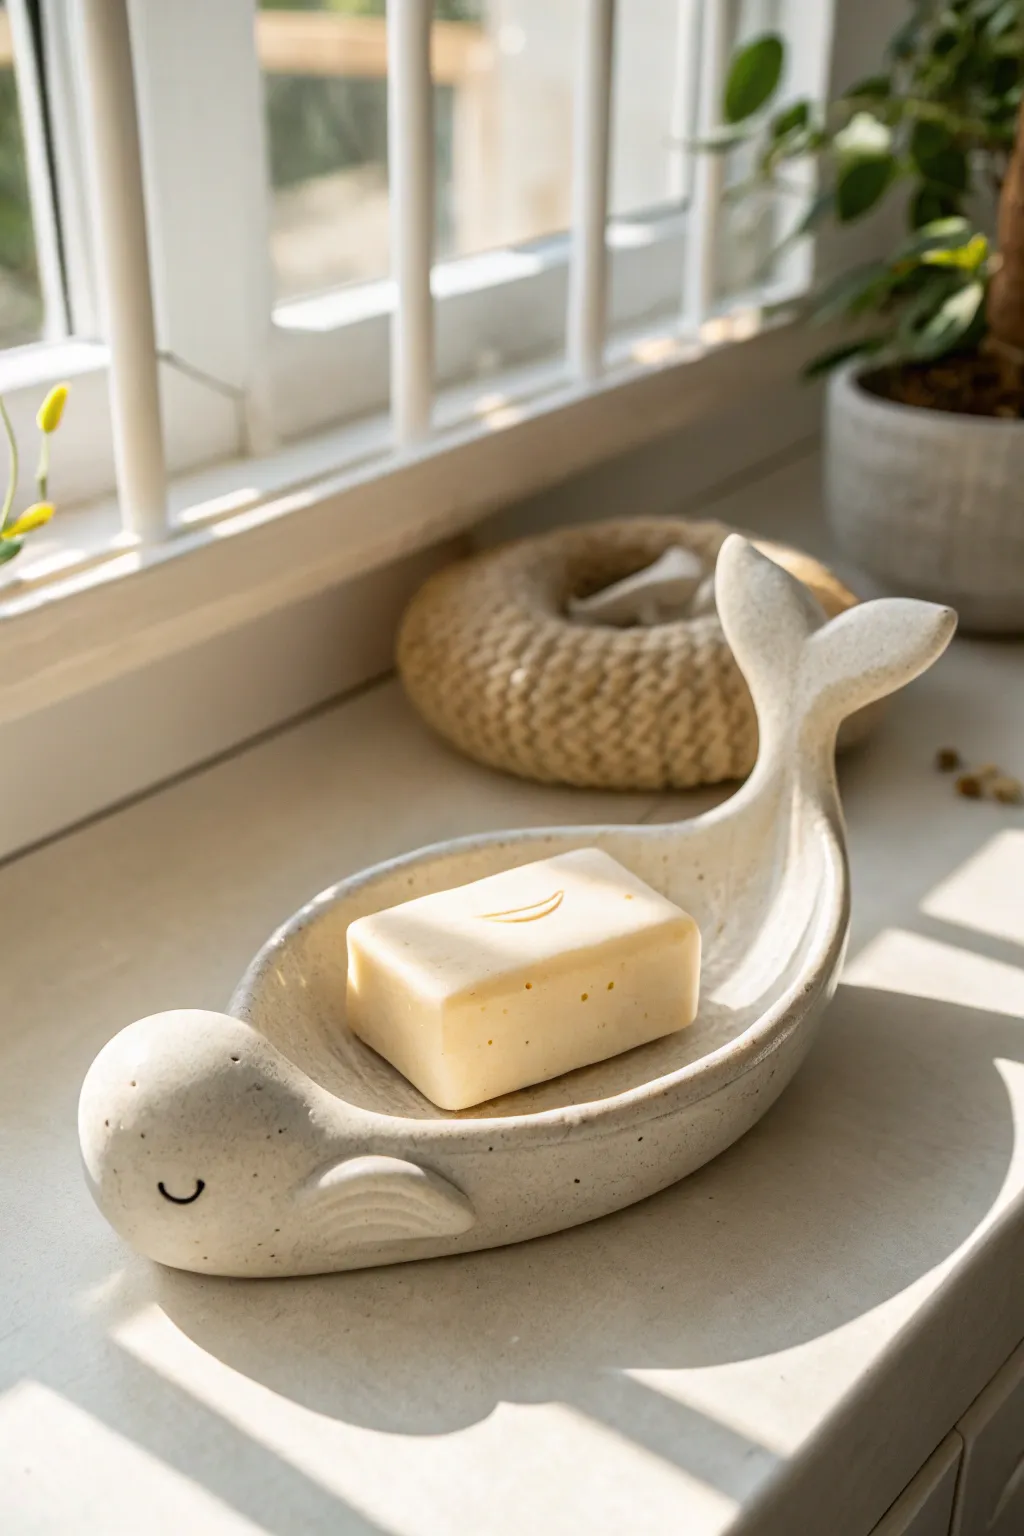
Bring a touch of ocean whimsy to your bathroom sink with this adorable sleeping whale soap dish. Its gently curved body cradles your favorite bar of soap, while the speckled finish mimics the look of high-end ceramic stoneware.
Step-by-Step
Materials
- White air-dry clay (or polymer clay)
- Rolling pin
- Small cup of water (for smoothing)
- Clay sculpting tools (needle tool, sponge)
- Fine-grit sandpaper
- Acrylic paints (creamy white, black)
- Old toothbrush (for speckling)
- Glossy varnish or waterproof sealant
Step 1: Shaping the Base
-
Prepare the clay:
Start with a ball of clay roughly the size of a large orange. Knead it well to remove any air bubbles and to ensure it’s pliable and smooth. -
Form the main body:
Roll the ball into a thick, elongated oval shape. This will become the main body of the whale where the soap rests. -
Create the hollow:
Using your thumbs, gently press into the center of the oval to create a depression. Work your way outward, pinching the sides up to form a rim. Keep the walls about 1/4 inch thick for durability. -
Smooth the interior:
Dip your finger or a small sponge in water and run it along the inside of the dish to erase fingerprints and ensure a concave surface for the soap.
Weight Techinque
To prevent tipping, make sure the head section isn’t too heavy or solid. Hollowing out the head from underneath slightly can fix balance issues.
Step 2: Adding the Whale Features
-
Form the head:
Roll a smaller ball of clay and attach it to one end of your oval dish. Blend the clay seams thoroughly with water and a sculpting tool so the head flows seamlessly into the body. -
Add the tail:
At the opposite end, pull and pinch the clay upwards to form a tapering column. Fashion a ‘V’ shape at the top and flatten the ends to create the flukes of the tail. -
Attach the fins:
Shape two small triangles of clay for the side fins. Score the clay surface on the body and the fin, add a dab of water/slip, and press them firmly onto the sides near the head. Use a tool to add subtle grooved lines for texture. -
Detail the face:
Use a needle tool or the end of a paintbrush to carefully carve a small, curved line for a sleeping eye. Add a tiny dot near the front for a nostril/blowhole indication if desired. -
Final smoothing:
Go over the entire piece with a damp sponge or finger. Soften the edges of the tail and fins so they aren’t sharp. I like to let this dry briefly for ten minutes and do one last check for cracks.
Step 3: Finishing Touches
-
Dry completely:
Let your whale dry for 24-48 hours. Turn it over gently halfway through so the bottom dries evenly. -
Sand for smoothness:
Once bone dry, use fine-grit sandpaper to gently buff away any rough textures, especially around the rim and the seam where the head meets the body. -
Base coat painting:
Paint the entire whale with a creamy, off-white acrylic paint. You may need two coats for full coverage. -
Paint the details:
Use a very fine brush and black paint to carefully fill in the carved eye line. -
Create the speckled effect:
Dip an old toothbrush into slightly watered-down brown or grey paint. Run your thumb across the bristles to flick tiny speckles onto the whale, mimicking ceramic clay. -
Seal for protection:
This is crucial for a soap dish: apply 2-3 coats of a high-quality waterproof varnish or resin to ensure the clay won’t disintegrate when wet.
Cracking Up?
If you see cracks forming while drying, make a small paste of clay and water (slip) and fill them in immediately, then smooth over.
Place your favorite scented soap in its new home and enjoy your seaside creation
Mushroom Buddy Night-Light Decor
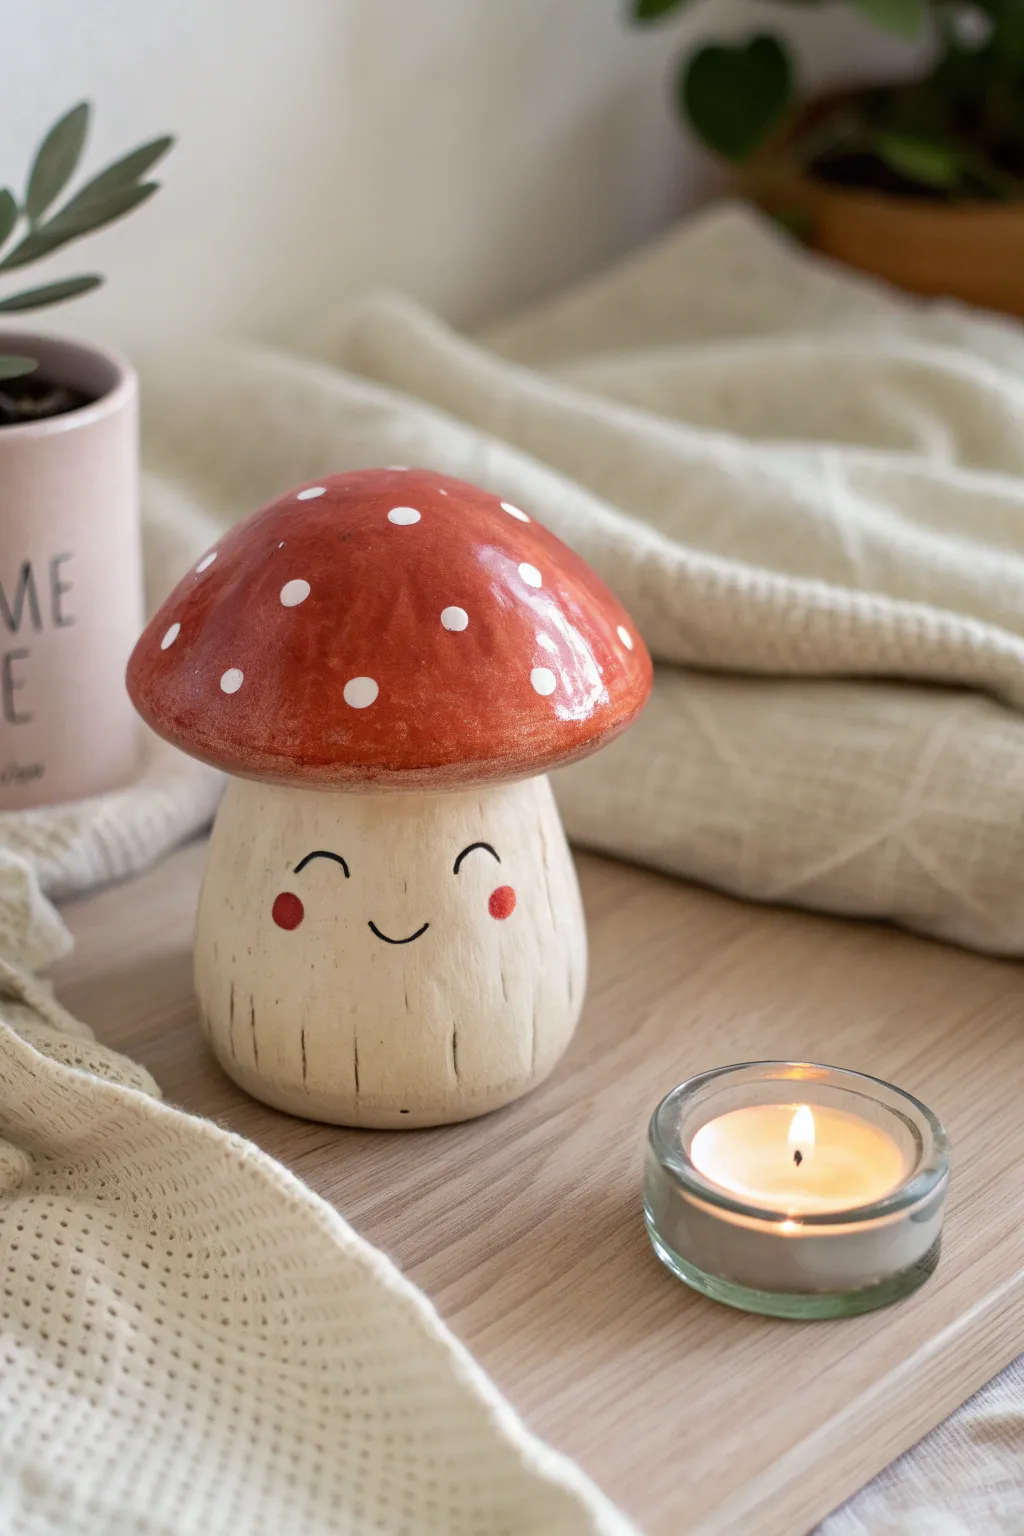
Brighten up your cozy corner with this adorable handcrafted mushroom friend that doubles as a charming piece of decor. With its glossy red cap, blushing cheeks, and natural texture, this little buddy brings a touch of woodland magic to any shelf or bedside table.
Detailed Instructions
Materials
- Air-dry clay or polymer clay (white/beige)
- Acrylic paints (Red, White, Black, Pink/Coral)
- High-gloss varnish or glaze (for the cap)
- Matte sealant (for the stem)
- Sculpting tools (needle tool/toothpick)
- Small round paintbrush
- Fine liner brush
- Rolling pin
- Aluminum foil (for armature)
- Sandpaper (fine grit)
Step 1: Sculpting the Form
-
Create the core:
Begin by crumpling a piece of aluminum foil into a cylinder shape for the stem and a domed shape for the cap. This saves clay and keeps the sculpture lightweight. -
Roll out the clay:
Condition your clay until it is soft and pliable, then roll it out into a sheet about 1/4 inch thick. I find this thickness prevents cracking while still being easy to drape. -
Cover the stem:
Wrap the sheet of clay around your foil cylinder, smoothing the seam with a little water or slip (if using air-dry clay) until the join is invisible. -
Shape the base:
Gently tap the bottom of the stem against your work surface to flatten it, ensuring the mushroom will stand up straight on its own. -
Form the cap:
Cover the domed foil piece with a separate sheet of clay. Smooth it down the sides to create that classic toadstool curve. -
Join the pieces:
Score the top of the stem and the underside of the cap with a needle tool. Apply a dab of water or liquid clay to the scored areas and press them firmly together. -
Blend the connection:
Use a sculpting tool or your finger to smooth the clay where the cap meets the stem, reinforcing the bond so the head doesn’t pop off later. -
Add texture:
Using a needle tool or toothpick, gently scratch vertical lines into the bottom half of the stem to mimic the natural fibrous texture of a real mushroom stalk.
Cracked Clay?
If you see cracks forming as your air-dry clay cures, mix a tiny amount of fresh clay with water to make a paste and fill the cracks, then sand smooth once dry.
Step 2: Painting & Details
-
Dry and sand:
Allow the sculpture to dry completely according to your clay’s instructions. Once hard, use fine-grit sandpaper to smooth out any unintentional fingerprints or rough spots on the cap. -
Base coat the stem:
Paint the stem with a creamy beige or off-white acrylic paint. You might want to water it down slightly for a wash effect that lets some texture show through. -
Paint the cap:
Apply a coat of bright red acrylic paint to the cap. Let it dry, then add a second coat to ensure the color is rich and opaque. -
Add the face:
Using a fine liner brush and black paint, carefully paint two small arches for eyes and a tiny ‘u’ shape for a smile directly onto the upper part of the stem. -
Rosy cheeks:
Dip the back end of a paintbrush handle into pink or coral paint and stamp two small circles just below the eyes for blushing cheeks. -
The iconic spots:
Using a smaller dotting tool or brush handle, dip into white paint and create varied polka dots all over the red cap. -
Gloss the top:
Once the paint is fully bone dry, apply a thick layer of high-gloss varnish only to the red cap to give it that wet, ceramic look. -
Matte the stem:
Finish by applying a matte sealant to the stem area to protect the paint without adding unwanted shine, keeping the natural look of the stalk.
Weighted Base
For extra stability, especially if you have cats, press a heavy washer or coin into the bottom of the stem before the clay hardens to lower the center of gravity.
Enjoy the cozy warmth your new little clay friend adds to your space
Tiny House Pocket Ornaments
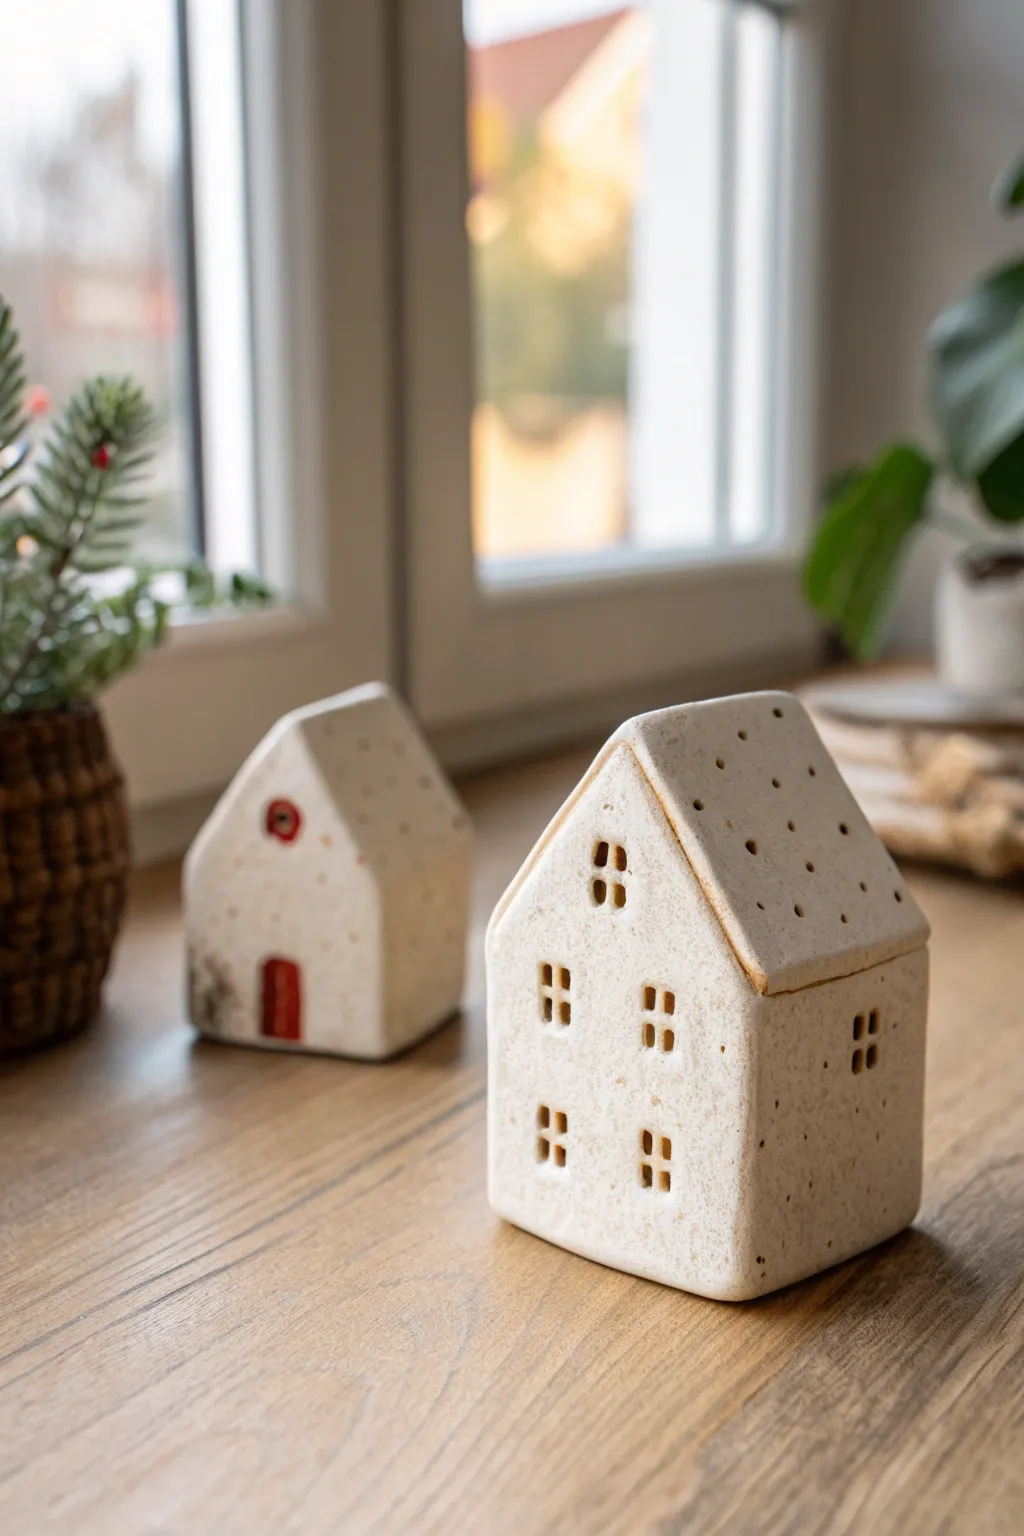
Bring the cozy charm of a European village to your shelf with these adorable miniature clay houses. Featuring a speckled finish and cutout windows, these rustic little dwellings are perfect for creating a warm, festive atmosphere.
Step-by-Step Tutorial
Materials
- Air-dry clay (white or light grey)
- Speckled clay (or fine brown craft sand to mix in)
- Rolling pin
- Craft knife or X-Acto blade
- Ruler
- Small square clay cutter (optional)
- Needle tool or toothpick
- Acrylic paint (red, brown)
- Small paintbrush
- Fine-grit sandpaper
- Matte varnish
Step 1: Preparation & Shaping
-
Texture the clay:
If you aren’t using pre-speckled clay, knead a small pinch of fine brown craft sand or dried coffee grounds into your white air-dry clay. This mimics the beautiful stoneware pottery look seen in the finished houses. -
Roll out the slab:
Roll your clay out on a smooth surface until it is approximately 1/4 inch thick. You want it sturdy enough to stand but thin enough to look delicate. -
Cut the base shape:
Using your ruler and craft knife, cut out a rectangular strip. For the larger house shown, I suggest a strip about 8 inches long and 2.5 inches high. -
Create the walls:
Score slightly on the inside of the strip to mark four sections (front, side, back, side) and fold the clay into a hollow rectangular box shape. Smooth the seam where the ends meet using a little water and your finger. -
Form the roof:
Roll a second piece of clay for the roof. Cut a rectangle that is slightly wider and longer than the footprint of your house walls. Fold it gently in the middle to create an A-frame peak. -
Attach the roof:
Score the top edges of your walls and the underside of the roof piece. Apply a dab of water or slip and press the roof firmly onto the walls. Don’t worry about perfect seams; the rustic look is part of the charm.
Sagging Roof?
If the roof sags while wet, ball up piece of paper towel or newspaper and stuff it inside the house to support the clay structure until it stiffens up.
Step 2: Detailing & Drying
-
Plan the windows:
For the front of the main house, use a needle tool to lightly sketch out a grid of small windows. The example features a symmetrical layout with sets of double-paned windows. -
Cut the windows:
Carefully slice out the window squares. If you have a tiny square clay cutter, this is easy; otherwise, use the very tip of your craft knife to remove the clay. Leave the center mullions intact. -
Add side windows:
Don’t forget the sides of the house. Add groupings of four small square windows to let the ‘light’ through. -
Poke roof details:
Use your needle tool or a toothpick to poke random, decorative holes across the roof surface. This adds texture and visual interest without compromising the structure. -
Smooth the edges:
Dip your finger in water and gently run it over all cut edges to soften any sharpness or burrs from the knife. -
Dry thoroughly:
Let the house dry completely for 24-48 hours. Turn it occasionally so the bottom dries evenly.
Step 3: Finishing Touches
-
Sand imperfections:
Once bone dry, use fine-grit sandpaper to smooth out any rough fingerprints or uneven joins. -
Paint details (optional):
For the background house style, paint a small arched door in deep red. You can also lightly dry-brush the edges of the roof with brown paint to create an aged, toasted ceramic effect. -
Seal the piece:
Apply a coat of matte varnish to protect the clay and give it a finished, professional sheen.
Make it Glow
Cut a large hole in the bottom or back of the house before it dries. Once finished, place an LED tea light inside to illuminate the tiny windows.
Place your little village on a windowsill and enjoy the simple, handmade warmth they bring to the room
Seashell Snail Friends
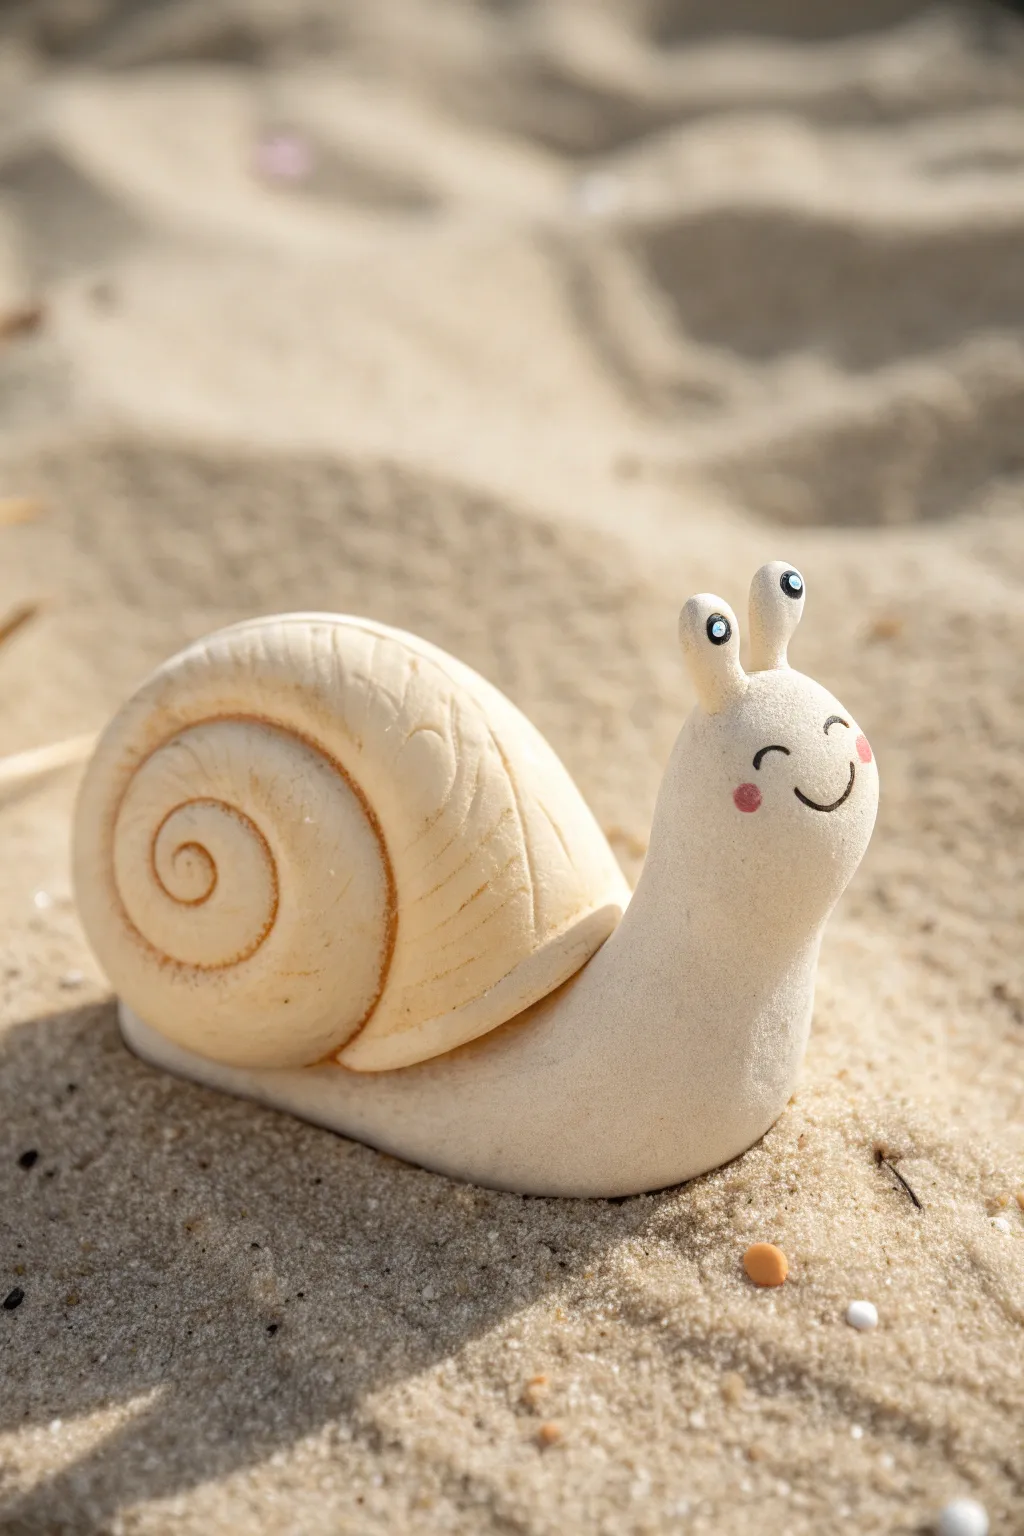
Capture the essence of a beach day with this adorable smiling snail figurine made from sandy-textured clay. Its joyful expression and spiraled shell make it the perfect little friend to perch on a desk or windowsill.
Step-by-Step Guide
Materials
- Beige or sand-colored polymer clay (e.g., Fimo stone effect)
- White acrylic paint
- Black acrylic paint
- Pink acrylic paint or soft pastel
- Clay sculpting tools (needle tool, ball tool)
- Aluminium foil (for the shell core)
- Small detail paintbrush
- Gloss varnish (optional)
Step 1: Sculpting the Body
-
Base shape:
Start by conditioning your beige clay until pliable. Roll a smooth log shape roughly 3-4 inches long, slightly thicker at one end for the head and tapering to a point at the tail. -
Forming the head:
Gently bend the thicker end of the log upwards at a 90-degree angle to create the neck and head. Smooth out the crease where the clay bends so it looks like one continuous piece. -
Flattening the base:
Press the bottom of the snail’s body gently onto your work surface to create a flat side. This ensures your snail will sit stably without tipping over. -
Adding eye stalks:
Roll two tiny sausages of clay for the eye stalks. Attach them to the top of the head, blending the seams downward with a sculpting tool so they look seamless.
Smooth Seams
Use a tiny bit of baby oil or clay softener on your fingertip to blend the eye stalks to the head perfectly. This removes fingerprints too.
Step 2: Creating the Shell
-
Foil core:
To keep the snail light, crunch a small piece of aluminium foil into a tight ball, then flatten it slightly into a disc shape. -
Covering the core:
Roll out a sheet of beige clay and wrap it completely around your foil core. Roll it in your hands to smooth it into a flattened bun shape. -
Carving the spiral:
Using a needle tool, carefully score a spiral groove into both sides of the shell. Start deeply in the center and reduce pressure as you work outward to the edge. -
Adding texture:
Between the spiral lines, use a small tool to make subtle, angled indentations or lines. This mimics the natural growth ridges found on real seashells. -
Attaching the shell:
Score the back of the snail’s body and the bottom edge of the shell to rough them up. Press the shell firmly onto the back of the body, just behind the neck.
Beach Texture
Before baking, gently press an old toothbrush against the clay body to give it a realistic, sandy texture that mimics stone or sand.
Step 3: Face and Finishing
-
Painting the eyes:
Once baked and cooled according to package directions, use a fine brush to paint two white circles near the top of the eye stalks. -
Adding pupils:
Dip a toothpick or very fine tool into black paint and add a tiny dot to the center of each white eye circle for a focused look. -
Drawing the smile:
With an ultra-fine detail brush or black acrylic marker, draw a simple, curved ‘U’ shape for the smile. Add small ticks at the ends of the smile for cheeks. -
Shutting one eye:
For a winking expression like the photo, paint an arched line for a closed eye on the side of the head, rather than a second open eye on a stalk. -
Rosy cheeks:
Mix a tiny amount of pink paint or shave some pink pastel chalk. Dab this softly onto the cheeks with a dry brush or fingertip for a blushing effect. -
Final touches:
I always like to add a tiny dot of white highlight to the black pupil to make the eyes sparkle with life.
Place your finished snail on a shelf to bring a permanent bit of summer sunshine into your home
Octopus Pen Holder Pal
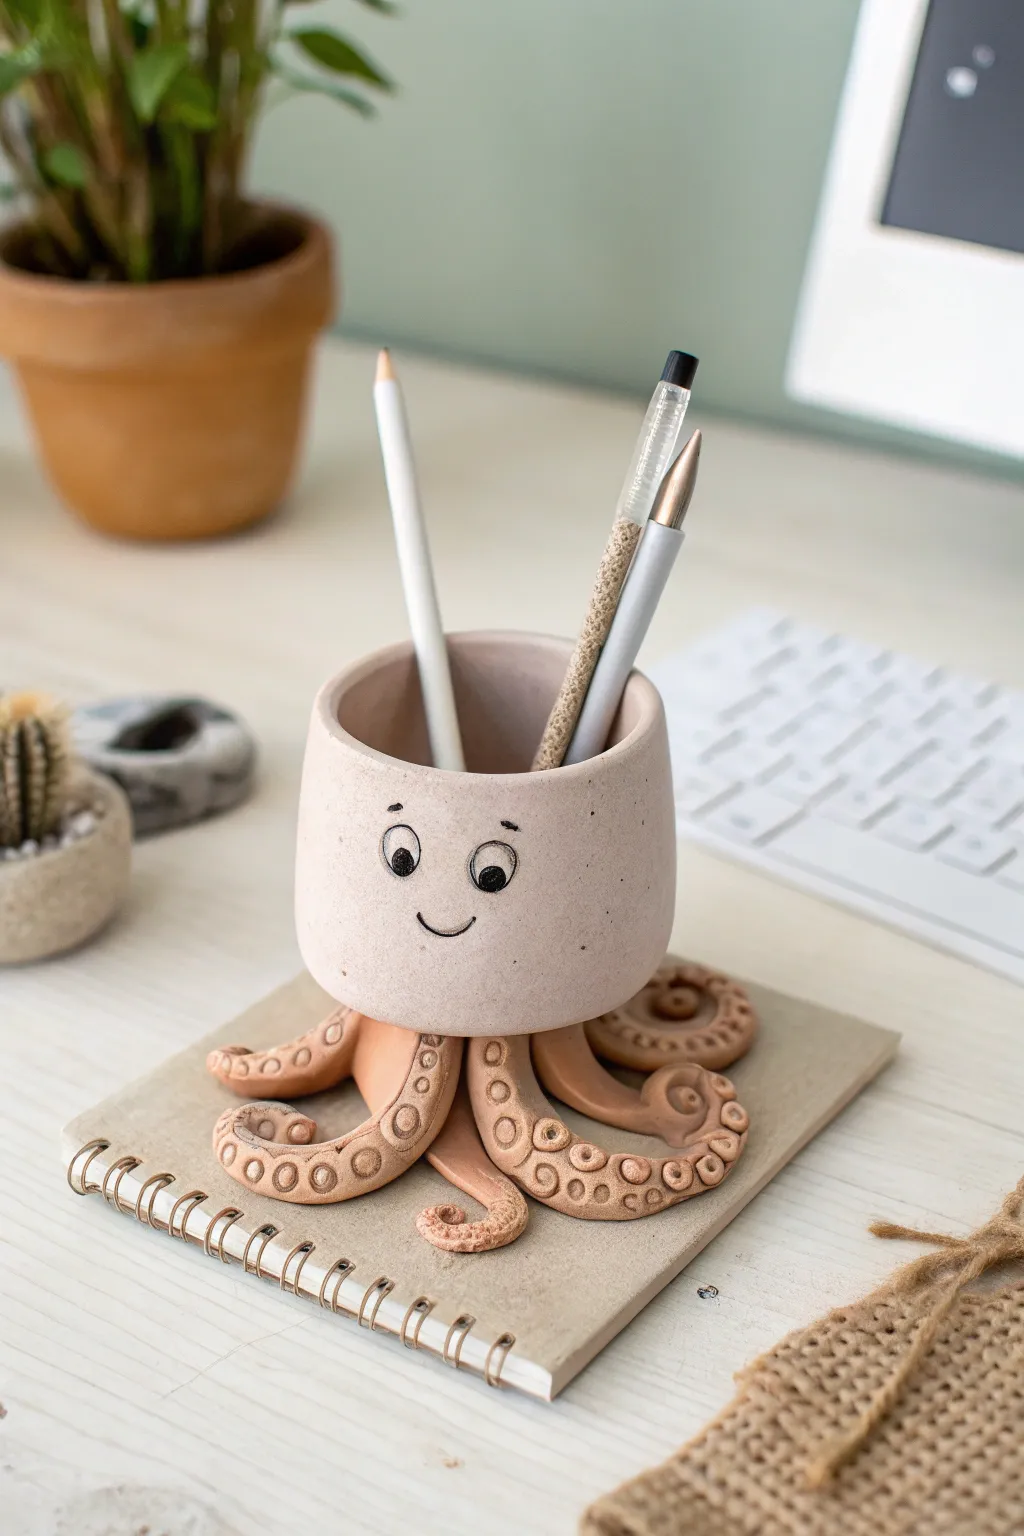
Add a touch of whimsy to your desk with this adorable cephalopod companion. This project combines a simple coil-built cup with sculpted tentacles to create a functional and charming organizer for your favorite pens.
Step-by-Step Tutorial
Materials
- Air-dry clay or polymer clay (beige or light terracotta color)
- Clay rolling pin
- Modeling tools (specifically a small ball tool and a needle tool)
- Small cup or cylinder (for use as a mold/armature)
- Black acrylic paint
- Fine detail paintbrush
- Water (for smoothing air-dry clay) or liquid clay (for polymer)
- Sandpaper (optional)
- Clear matte varnish
Step 1: Shaping the Head
-
Prepare the base:
Start by conditioning your clay until it’s soft and pliable. Roll out a slab of clay to about 1/4 inch thickness. Cut a long rectangular strip and a circular base that matches the diameter of the cup you want to create. -
Form the cylinder:
Wrap the rectangular strip around a cylindrical form or simply curl it to touch the ends together. If using a mold, wrap the clay loosely around it to ensure it doesn’t stick. -
Join the seams:
Blend the vertical seam where the strip ends meet. Use your fingers or a smoothing tool to make the line disappear. Then, attach the cylinder to the circular base, blending the clay downwards to create a seamless cup shape. -
Refine the edges:
Dip your finger in a little water (or clay softener) and run it along the top rim to round off any sharp edges. The cup should look like a smooth, slightly rounded marshmallow.
Step 2: Sculpting the Tentacles
-
Divide the clay:
Roll eight equal-sized logs of clay. These will become the tentacles. I like to taper each log at one end so it resembles a long, stretched teardrop. -
Curl the tips:
Take the tapered end of each tentacle and curl it tightly into a spiral. Vary the direction of the curls—some clockwise, some counter-clockwise—to give the octopus natural movement. -
Attach to the base:
Flip your cup (the head) upside down. Arrange the thicker ends of the eight tentacles in a circle on the bottom of the cup. Blend the clay from the tentacles onto the base of the cup firmly so they don’t fall off. -
Arrange the posture:
Flip the piece back onto its feet. Gently adjust the tentacles so they spread out and support the cup evenly. The curled tips should rest flat on the surface.
Weighted Base
Add a small, flat stone or a heavy washer inside the bottom of the clay cup before attaching tentacles. This keeps it from tipping over when filled with heavy pens.
Step 3: Adding Texture and Details
-
Create suction cups:
Roll many tiny balls of clay. Press these onto the visible undersides and curled tips of the tentacles. -
Indent the centers:
Using a small ball tool or the rounded end of a paintbrush, press into the center of each tiny ball to create the suction cup ring effect. -
Smooth the surfaces:
Check the main body of the cup for any fingerprints. Smooth them away gently before the clay begins to set. -
Dry or bake:
If using air-dry clay, let the piece dry for 24-48 hours. If using polymer clay, bake according to the manufacturer’s instructions.
Color Splash
Instead of plain beige, marble two colors of clay together before sculpting to give your octopus a funky, aquatic pattern or realistic sea-creature texture.
Step 4: Bringing It to Life
-
Sand imperfections:
Once fully dry or cured, use fine-grit sandpaper to buff away any rough spots on the rim or body. -
Draft the face:
Lightly sketch the location of the eyes and mouth with a pencil to ensure symmetry. -
Paint the eyes:
Using a fine detail brush and black acrylic paint, create two oval eyes. Leave a tiny speck unpainted or add a white dot later for the ‘sparkle’ highlight. -
Add the smile:
Paint a simple, thin U-shaped smile centered between and slightly below the eyes. Also add thin eyebrows above the eyes for expression. -
Seal the project:
Finish by applying a coat of clear matte varnish to protect the paint and give the clay a finished ceramic look.
Now your desk has a friendly guardian ready to hold your creative tools
Cute Thumb Page Holder
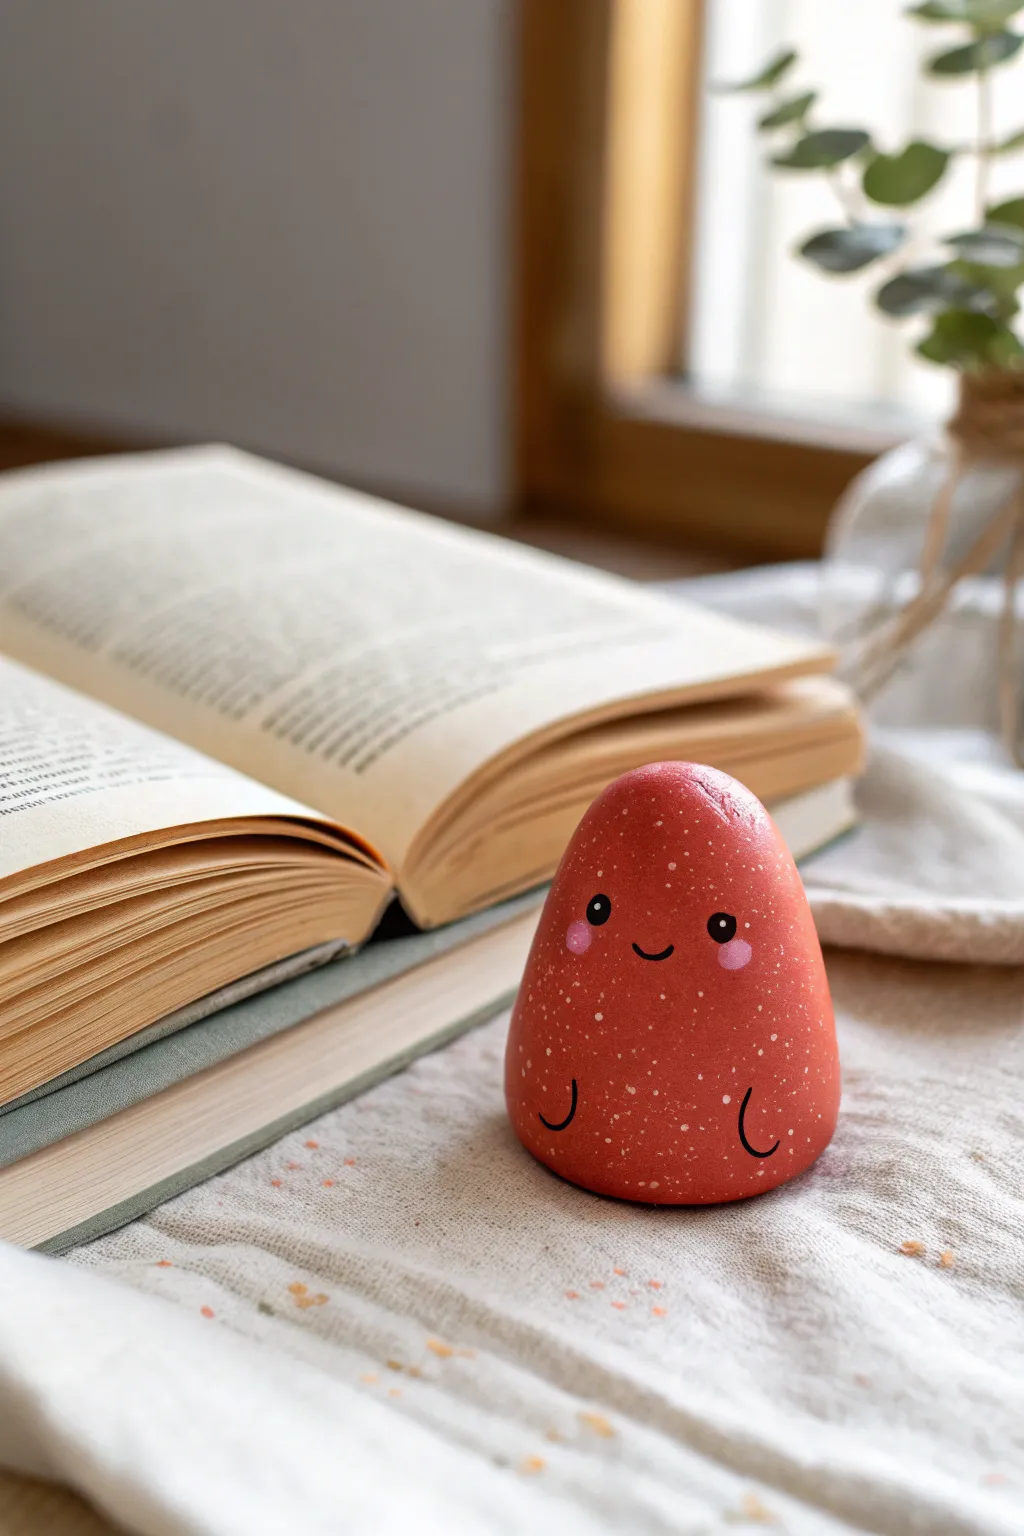
This adorable little red companion isn’t just a cute desk buddy; it’s a simple sculpting project perfect for beginners. With its cheerful speckled finish and tiny painted face, this character brings a touch of whimsy to any reading nook.
Step-by-Step
Materials
- Polymer clay (red and white)
- Acrylic paint (black, pink, and white)
- Fine detail paintbrush
- Dotting tool or toothpick
- Gloss glaze or varnish
- Old toothbrush (optional for speckling)
- Baking sheet
- Parchment paper
Step 1: Sculpting the Body
-
Condition the Clay:
Start by taking a chunk of red polymer clay roughly the size of a walnut. Knead it in your hands until it becomes soft, warm, and pliable to prevent cracking during baking. -
Form a Ball:
Roll the conditioned clay between your palms to create a smooth, seamless sphere. Check carefully for any air bubbles or cracks and smooth them out with your thumb. -
Shape the Cone:
Gently roll one side of the ball against your work surface to taper it slightly, forming a rounded cone or gumdrop shape. The bottom should be wider than the top. -
Flatten the Base:
Press the wide end of your cone firmly onto your work surface. You want a completely flat bottom so your little friend stands up securely without tipping over. -
Refine the Silhouette:
Smooth out the sides with your fingers to ensure a gentle, organic curve from the base to the rounded top. It should look like a soft, slightly squat teardrop. -
Bake the Clay:
Place your sculpture on a baking sheet lined with parchment paper. Bake according to your specific clay brand’s instructions (usually around 275°F/130°C for 15-30 minutes) and let it cool completely.
Clean Brush Tip
To get super fine lines for the mouth and arms, try thinning your black paint with a tiny drop of water. This helps the paint flow smoothly off the brush.
Step 2: Painting the Details
-
Prepare the Speckles:
Once cool, mix a small amount of white acrylic paint with a tiny drop of water to thin it. You want a consistency that flicks easily but isn’t runny. -
Apply the Texture:
Dip an old toothbrush or a stiff bristled brush into the thinned white paint. Use your thumb to flick the bristles, spraying a fine mist of white speckles all over the red body. I find it helps to practice on a scrap paper first to control the spray. -
Dry the Base Coat:
Let the white speckles dry completely before moving on to the face. This usually takes about 10-15 minutes. -
Paint the Eyes:
Using a dotting tool or the end of a paintbrush handle dipped in black paint, place two small, wide-set dots about halfway down the body for the eyes. -
Add Eye Sparkles:
Once the black dots are dry, use a toothpick to add a tiny white dot in the upper corner of each eye. This ‘catchlight’ brings the character to life. -
Create Rosy Cheeks:
Mix a soft pink color or use straight pink paint. Dip a larger dotting tool or the soft end of a brush into the paint and gently stamp a circle just below and outside each eye. -
Draw the Smile:
With your finest detail brush and black paint, carefully paint a tiny, curved ‘u’ shape directly between the eyes to create a sweet little smile. -
Add Little Arms:
Using the same fine brush, paint two small ‘u’ shapes near the bottom of the body, spaced widely apart, to suggest tiny arms resting at its sides. -
Seal the Project:
After all the paint is fully dry (give it at least an hour), apply a coat of gloss glaze or varnish. This protects the paint and gives your friend a polished, ceramic-like finish.
Weighted Base
Before baking, you can embed a small metal washer or a clean stone into the base of the clay. This adds weight, making it a functional paperweight for loose notes.
Place your cheerful new creation on your desk to keep you company during study sessions or quiet reading time
Mini Bento Box Diorama Scene
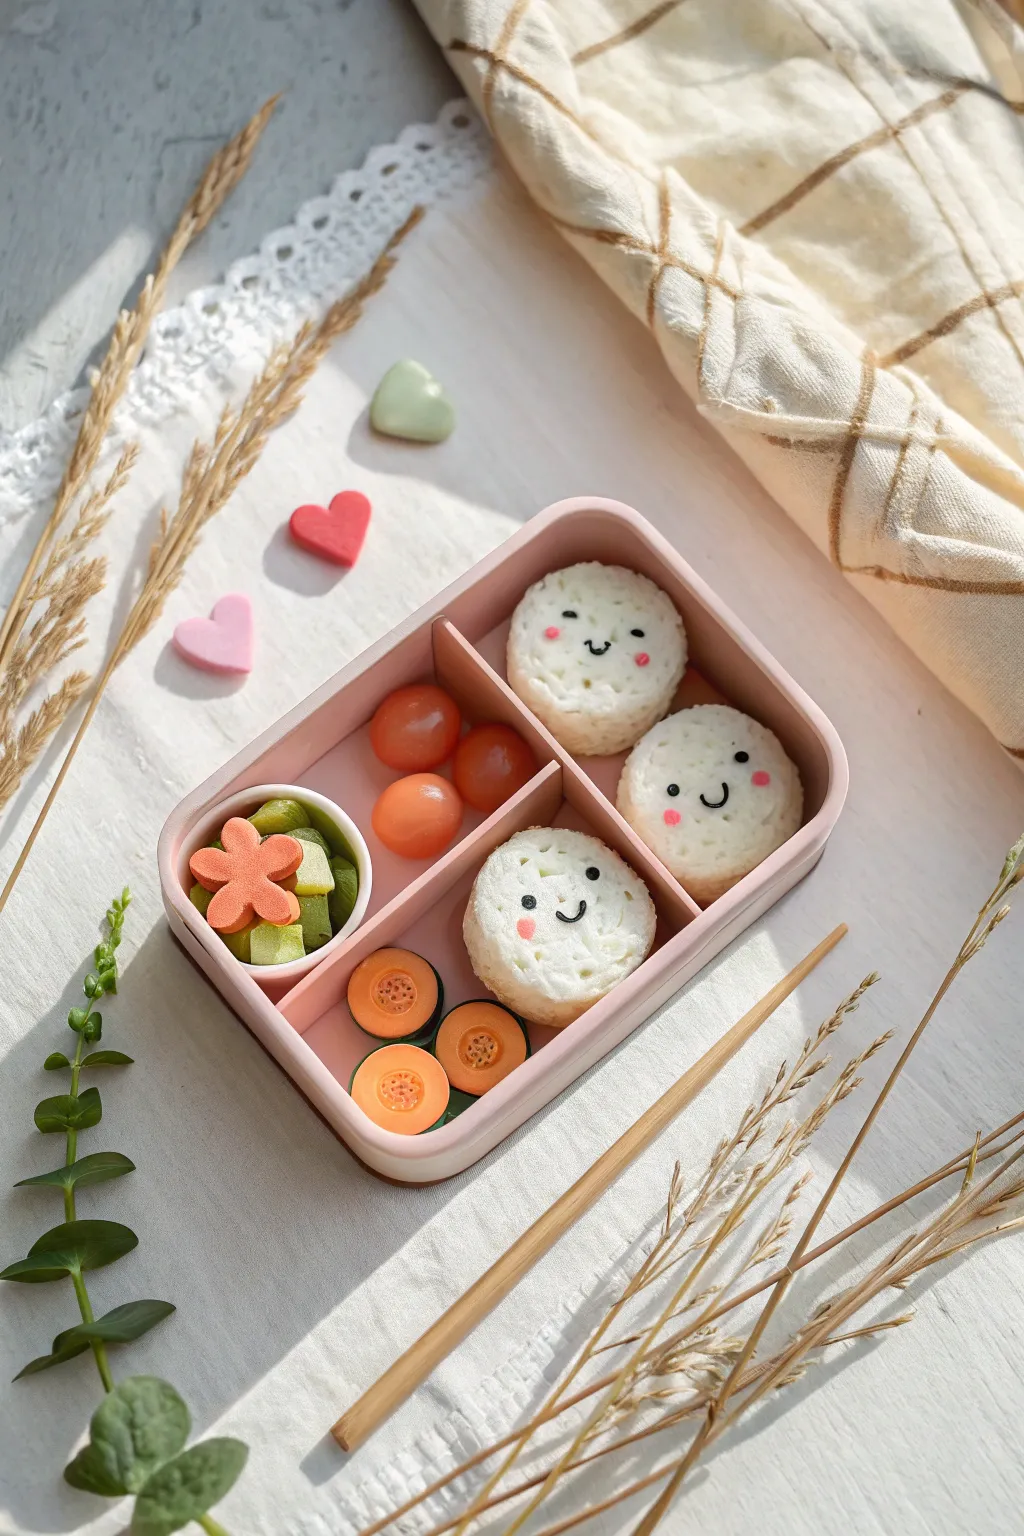
Capture the charm of Japanese lunch culture with this adorable miniature bento box scene sculpted from polymer clay. This project features tiny, expressive rice balls and colorful side dishes nestled in a soft pink container, perfect for dollhouse displays or desk decor.
How-To Guide
Materials
- Polymer clay (white, baby pink, coral, orange, green, black)
- Small square cutter or blade
- Circle cutters (various micro sizes)
- Needle tool or toothpick
- Ball stylus tool
- Texture tool (toothbrush or stiff bristle brush)
- Translucent liquid clay (optional)
- Gloss varnish
- Soft pastel chalks (pink, brown)
- Small paintbrush
- Baking sheet and parchment paper
Step 1: Constructing the Bento Box
-
Mix the base color:
Start by mixing white clay with a tiny amount of baby pink to achieve a very pale, soft pastel pink. Condition the clay until it is pliable and smooth. -
Cut the base shape:
Roll out a slab of your pink clay to about 3mm thick. Use a small rectangular cutter or a blade to cut a rounded rectangle for the base of the lunchbox. -
Form the walls:
Roll a long snake of the same pink clay and flatten it into a strip. Wrap this strip around the edge of your base to form the walls, trimming the excess and smoothing the seam with a modeling tool or your finger. -
Add dividers:
Create the internal compartments by cutting smaller strips of the pink clay strip. Place one vertical divider and one horizontal divider to create three distinct sections inside the box, blending the clay at the join points securely.
Step 2: Creating the Smiley Rice Balls
-
Shape the rice balls:
Roll three balls of white clay. Gently press them into thick discs that fit comfortably into the largest section of your bento box. -
Texture the rice:
To mimic the texture of cooked rice grains, tap the entire surface of the white discs with a clean toothbrush or a stiff bristle brush. I find going over it twice gives the best fluffy look. -
Add faces:
Roll incredibly thin snakes of black clay for the mouths and eyes. Carefully place them on the rice balls with a needle tool. You can make simple smiles or happy squinting eyes. -
Apply blush:
Using a small brush, dust a tiny amount of pink pastel chalk powder onto the cheeks of each rice ball for a rosy effect. Place the finished rice balls into the main compartment.
Make It Glossy
Mix a drop of liquid clay with shavings of orange pastel chalk. Dab this ‘sauce’ gently onto the tomatoes before baking for an extra juicy, glazed appearance.
Step 3: Making the Side Dishes
-
Form the tomatoes:
Mix a translucent orange or coral clay to get a juicy tomato look. Roll three or four small spheres and place them into one of the smaller compartments. -
Sculpt the squash slices:
Roll a log of orange clay and wrap it in a thin sheet of dark green clay. Slice thin rounds from this cane to create squash or melon slices. Use a needle tool to add seed textures in the center. -
Arrange the squash:
Stack three of these slices in the bottom section of the bento box, slightly overlapping them. -
Create the salad cup:
Make a tiny cylindrical cup using white clay. Fill it with tiny irregular chunks of green clay to represent lettuce or cucumbers. -
Add the flower garnish:
Cut a small flower shape from a flattened piece of coral clay using a micro cutter or by hand-sculpting five teardrop shapes. Place this flower on top of the green salad chunks.
Texture Match
Use a piece of real sandpaper to gently press texture onto the orange squash centers. It mimics the fibrous inside of vegetables better than a needle tool.
Step 4: Finishing Touches
-
Scatter loose hearts:
If you have leftover pink or green clay, cut tiny heart shapes to use as scattered props around your scene. -
Bake the project:
Place your bento box on a ceramic tile or baking sheet lined with parchment. Bake according to your specific brand of clay’s instructions (usually 275°F/135°C for 15-30 minutes). -
Cool and seal:
Let the piece cool completely. For a realistic food finish, apply a coat of gloss varnish to the tomatoes and the fruit slices to make them look moist and fresh. -
Matte finish:
Keep the rice balls and the bento box itself matte to maintain a realistic texture contrast.
Now you have a charming miniature meal that will stay fresh forever