Whenever I’m working with air dry clay, my favorite projects are the ones you can actually use every single day. Here are my go-to functional air dry clay ideas that look cute on your shelves but also earn their keep around the house.
Trinket Dish Catchalls
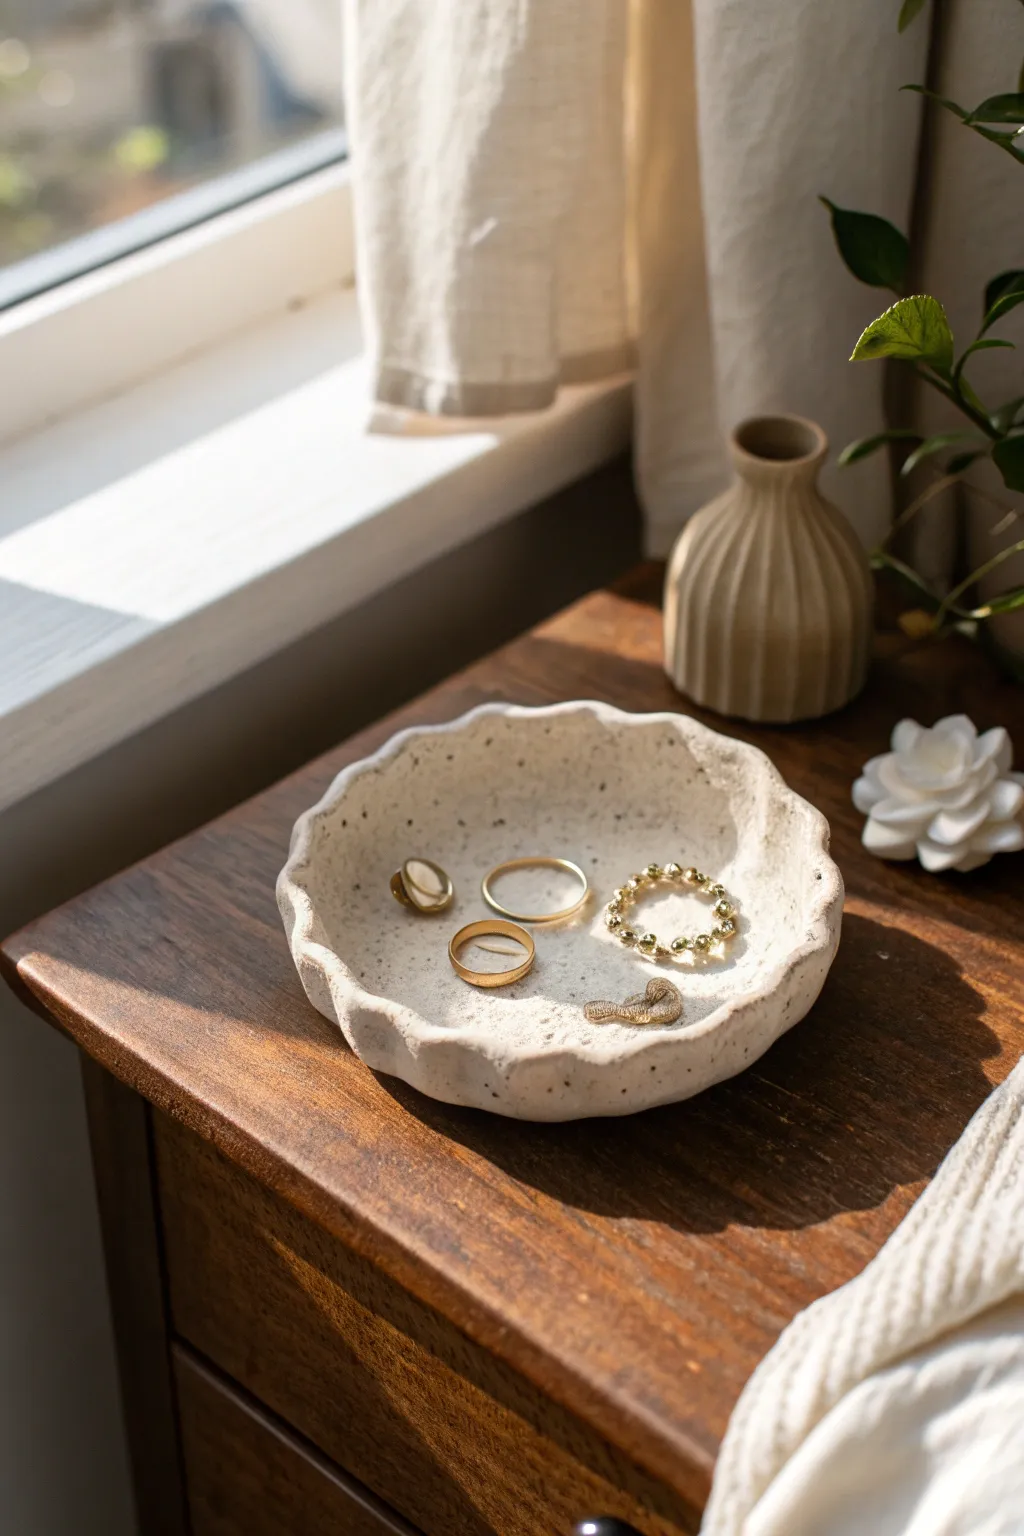
Create a stunningly organic catchall for your favorite rings and trinkets with this simple DIY. Its wavy rim and gentle speckling mimic the look of high-end stoneware pottery without the need for a kiln.
How-To Guide
Materials
- Air dry clay (white or cream)
- Used coffee grounds or black pepper (for speckles)
- Rolling pin
- Canvas mat or parchment paper
- Circular cookie cutter or bowl (approx. 4-5 inches)
- Small bowl (for shaping)
- Sponge
- Bowl of water
- Fine grit sandpaper (220 grit)
- Matte acrylic varnish or sealant
Step 1: Preparing the Clay
-
Condition the clay:
Cut off a chunk of air dry clay about the size of a tennis ball. Knead it in your hands for a few minutes to warm it up and make it pliable. -
Add texture:
To achieve that beautiful speckled stoneware look, sprinkle a pinch of used dried coffee grounds or coarse black pepper onto your clay. Fold the clay over itself and knead until the speckles are evenly distributed throughout the ball. -
Roll it out:
Place the clay on your canvas mat or parchment paper. Using your rolling pin, roll the clay out to an even thickness of about 1/4 inch. Try to keep the pressure consistent so one side isn’t thinner than the other.
Crack Control
If tiny cracks appear during drying, make a ‘slip’ paste of water and clay. Apply it to the crack, smooth it out, and let it dry again.
Step 2: Shaping the Form
-
Cut the circle:
Press your circular cutter or an upside-down bowl firmly into the rolled slab to cut out a perfect circle. Peel away the excess clay from the edges. -
Create the waves:
Gently lift the clay circle. Using your thumb and forefinger, pinch the very edge of the clay at regular intervals to create a subtle ruffle. I like to work opposites (top, bottom, left, right) first to keep the waves symmetrical. -
Deepen the shape:
Place your ruffled circle inside a small bowl lined with plastic wrap or parchment paper. Gravity will help the center sink slightly, creating the dish shape while supporting the outer walls. -
Refine the rim:
While it sits in the mold, go around the rim one last time. Use a damp finger to smooth out any sharp edges or tiny cracks that might have formed during the ruffling process. -
Initial drying:
Let the dish dry inside the bowl for about 24 hours. This ensures it holds that cupped shape while the clay does its main shrinking.
Step 3: Refining and Finishing
-
Remove and flip:
Once the top feels dry and firm to the touch, carefully remove the dish from the bowl. Turn it upside down on a flat surface to allow the bottom to dry completely. This usually takes another 24 hours. -
Check dryness:
The clay should look lighter in color and feel room temperature (not cold) when it is fully cured. -
Sand the edges:
Take your fine grit sandpaper and gently buff the rim of the dish. Focus on smoothing out any uneven bumps from the pinching process, but keep the organic, wavy silhouette intact. -
Smooth the surface:
Lightly sand the interior and exterior of the dish to remove any fingerprints. Be gentle so you don’t sand away the texture of the speckles. -
Wipe down:
Use a slightly damp sponge or cloth to wipe away all the clay dust from sanding. The surface needs to be totally clean before sealing. -
Apply sealant:
Brush on a thin layer of matte acrylic varnish. This protects the clay from moisture and gives it a finished, professional look. Make sure to get into the crevices of the wavy rim. -
Final cure:
Let the varnish dry according to the bottle’s instructions, then apply a second coat if you want extra durability.
Gold Rim Upgrade
For a luxe touch, paint just the very edge of the wavy rim with liquid gold leaf or metallic acrylic paint after the sealer has dried.
Now you have a charming spot to keep your daily jewelry safe and displayed beautifully


Ring Cone Stacker
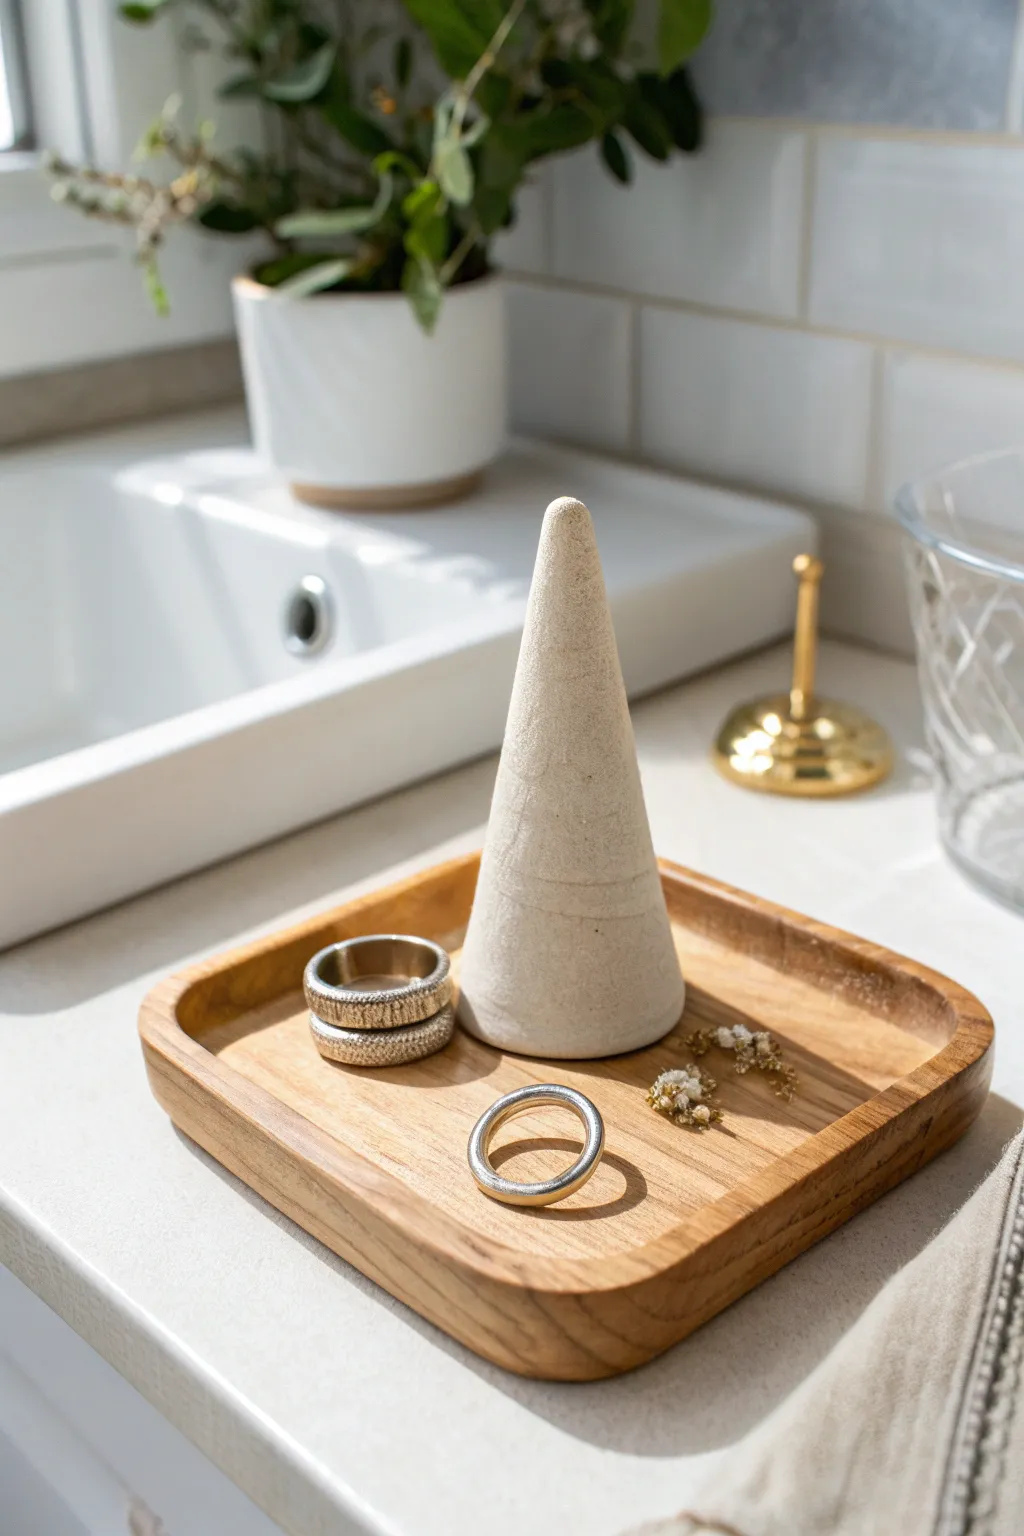
This elegant ring cone mimics the look of raw sandstone with its textured finish and neutral beige tone. It serves as both a sculptural object and a practical organizer, perfect for keeping your everyday jewelry safe by the sink or bedside.
Step-by-Step
Materials
- White air dry clay
- Sand or fine grit texture medium
- Acrylic paint (beige/taupe)
- Small rolling pin
- Craft knife or clay cutter
- Ruler
- Smooth work surface or clay mat
- Water in a small cup
- Fine-grit sandpaper (220 grit)
- Matte spray sealant
Step 1: Shaping the Cone
-
Condition the clay:
Begin by taking a generous handful of air dry clay and kneading it in your hands. You want it to be pliable and free of any air bubbles before you start shaping. -
Roll a cylinder:
Roll the clay on your work surface into a thick cylinder shape, about the width of the base you desire for your cone. -
Form the peak:
Using the palms of your hands, begin rolling just the top portion of the cylinder back and forth, applying slightly more pressure at the top than the bottom to start tapering it. -
Refine the cone shape:
Stand the clay up on your work surface. Use your fingers to smooth upwards towards the point, refining the conical shape. I find it helpful to look at it from all angles to ensure it isn’t leaning. -
Flatten the base:
Pick up the cone and tap the bottom firmly against the table several times. This creates a perfectly flat base so the cone stands up straight without wobbling. -
Smooth the surface:
Dip your finger in a tiny bit of water and run it over the entire surface of the cone to remove any fingerprints or cracks. The goal here is a clean, modern silhouette. -
Add subtle markings (optional):
If you look closely at the inspiration, there are faint horizontal indentation lines near the bottom. You can gently press the dull side of a knife or a ruler edge against the clay while rotating the cone to create these subtle bands. -
Initial drying:
Set the cone aside in a cool, dry place. Let it air dry for at least 24-48 hours. Turn it on its side occasionally so the bottom dries evenly.
Step 2: Creating the Stone Texture
-
Sand for smoothness:
Once fully dry, take your fine-grit sandpaper and gently buff out any unintentional bumps or sharp edges. Wipe away the dust with a barely damp cloth. -
Prepare the textured paint:
Mix your beige or taupe acrylic paint with a small amount of fine sand or a texture medium. Aim for a ratio that looks gritty but is still spreadable. -
Apply the first coat:
Paint the entire cone with your textured mixture. Use a dabbing motion with your brush rather than long strokes; the stippling action enhances the stone-like appearance. -
Let it dry:
Allow the first coat of textured paint to dry completely to the touch. -
Apply a second coat:
Add a second layer of the textured paint to build up opacity and depth. This ensures the white clay underneath is fully concealed. -
Add speckling:
To mimic real stone, dilute a tiny drop of darker brown or grey paint with water on an old toothbrush. Run your thumb over the bristles to flick tiny specks onto the cone. Practice on paper first to control the spray. -
Seal the piece:
Because this might sit near a sink, protection is key. Spray the cone with two light coats of matte sealant. This locks in the texture and protects the clay from minor splashes.
Natural Texture Hack
Don’t have texture medium? Mix baking soda into your acrylic paint. It creates a beautiful, fluffy, matte texture that looks remarkably like ceramic or stone when dry.
Wobbly Base?
If your dried cone doesn’t sit flat, tape a sheet of sandpaper to your table. Rub the bottom of the cone in a figure-8 motion over the paper until completely level.
Place your finished cone on a small wooden tray for a sophisticated, boutique-hotel vibe in your own bathroom


Earring Organizer Tile
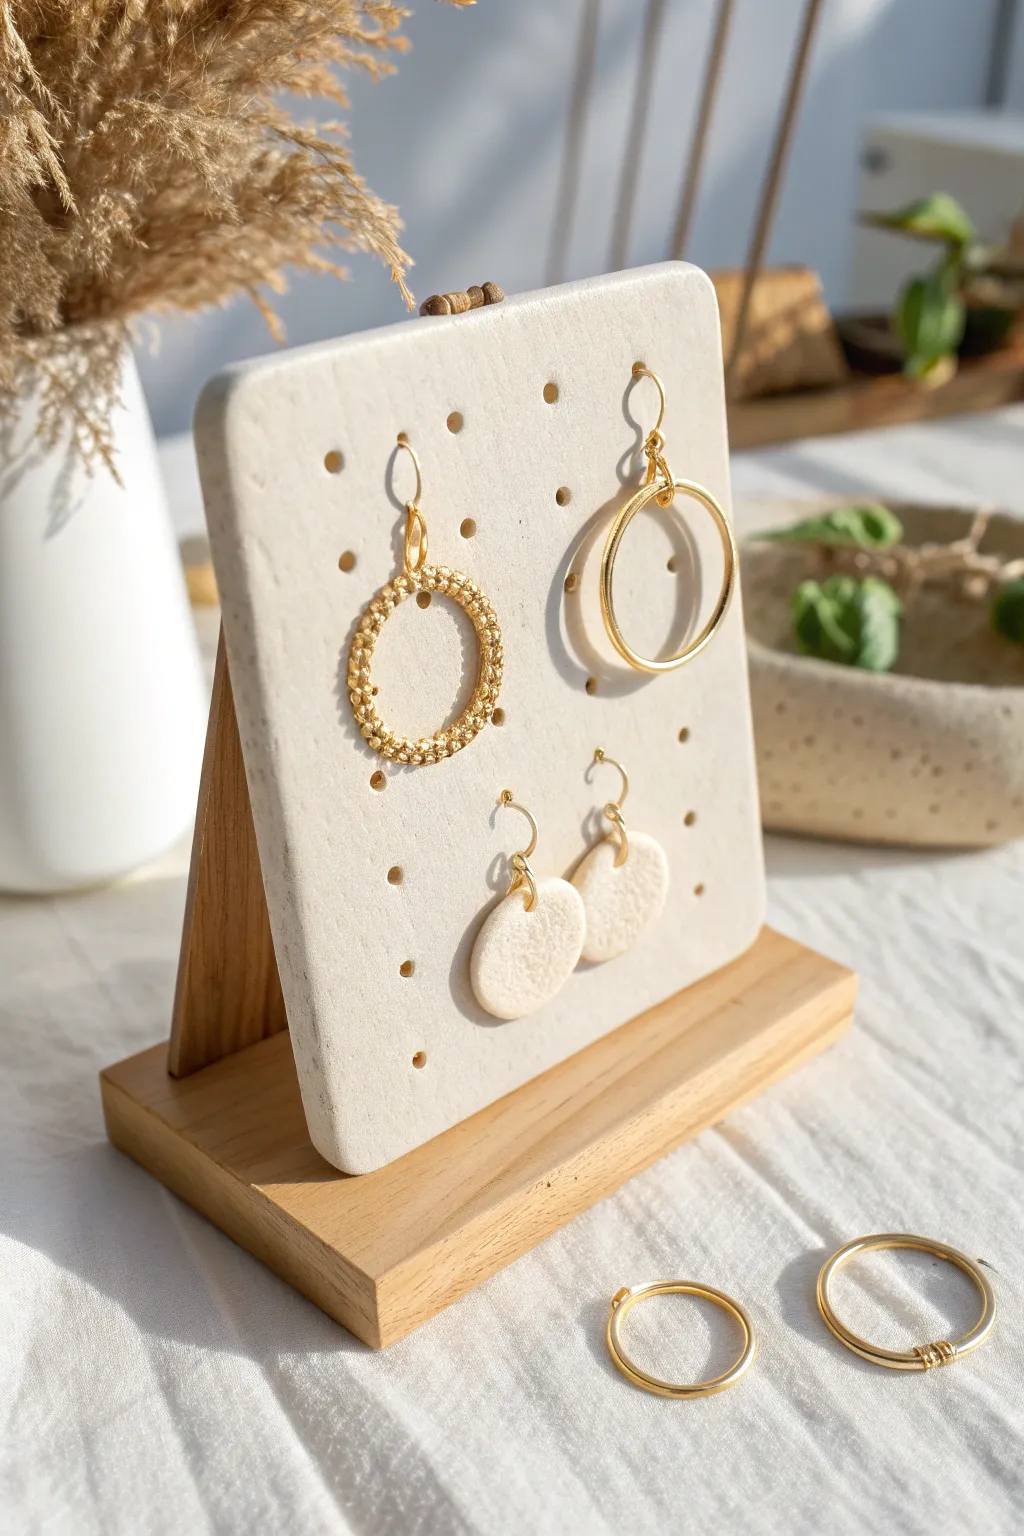
Showcase your favorite jewelry pieces with this elegant, minimalist earring organizer that blends natural textures with sleek design. This project transforms simple air dry clay into a functional display tile that looks stunning on any dresser or vanity.
Step-by-Step Guide
Materials
- White or cream air dry clay
- Rolling pin
- Two wooden dowels or guide sticks (approx. 1/4 inch thick)
- Square cookie cutter or sharp craft knife/ruler
- Small straw or cocktail stick (for hole punching)
- Sandpaper (fine grit)
- Small wooden easel or photo frame stand (store-bought or handmade)
- Optional: matte varnish or sealant
Step 1: Shaping the Clay Base
-
Condition the clay:
Begin by taking a generous amount of air dry clay and kneading it in your hands to warm it up. This conditioning process makes the clay more pliable and reduces the chance of cracks forming later. -
Set up guides:
Place your wooden dowels or guide sticks on either side of your workspace. These will help ensure your slab is rolled out to a perfectly even thickness. -
Roll out the slab:
Place the ball of clay between the guides and use your rolling pin to flatten it. Roll firmly until the pin rests on the guides, creating a smooth, uniform surface. -
Cut the shape:
Using a square cookie cutter or a ruler and craft knife, cut out a clean square shape. For this specific look, aim for a square with slightly rounded corners—you can gently tap the corners with your finger to soften them. -
Smooth the edges:
Dip your finger in a tiny bit of water and run it along the cut edges of the square to smooth out any roughness or loose clay bits.
Step 2: Creating the Grid Pattern
-
Mark the versatile grid:
Lightly mark a grid pattern on the surface using a ruler to ensure even spacing. You want the holes to be far enough apart that earrings won’t tangle, usually about 1 inch between marks. -
Punch the holes:
Use a small straw or a cocktail stick to pierce through the clay at your marked points. A straw removes a clean plug of clay, which creates a neater hole for earring hooks. -
Refine the openings:
I like to gently twist the tool as I pull it out to keep the hole circular. Make sure the holes are large enough to accommodate the thickness of standard earring wires. -
Clean up the back:
Flip the tile over carefully. punching the holes often pushes clay out the back, creating little raised jagged edges. Smooth these flat with your finger.
Uneven Drying?
If the corners curl up while drying, place a light book on top of the tile once it’s semi-dry (leather hard) to force it flat during the final cure.
Step 3: Finishing and Display
-
Drying process:
Place your clay tile on a drying rack or a sheet of parchment paper. To prevent warping, flip the tile over every few hours during the first day of drying. -
Wait patiently:
Allow the clay to dry completely. This usually takes 24-48 hours depending on humidity. Ideally, wait until the clay feels room temperature to the touch (cold clay is still wet inside). -
Sand for perfection:
Once fully dry, take a piece of fine-grit sandpaper and gently buff the surface and edges. This removes any fingerprints or uneven texture, giving it that professional stone-like finish. -
Dust off:
Wipe away any sanding dust with a slightly damp cloth or a soft brush. -
Seal (Optional):
For extra durability, apply a thin coat of matte varnish. This protects the bright white color from handling marks over time. -
Assemble the stand:
Rest your finished tile on a simple wooden easel stand as shown in the image. You can buy a small photo stand or build a simple L-shaped support from scrap wood.
Add Some Texture
Before cutting your holes, press a piece of lace or a textured rolling pin gently into the surface to create a subtle embossed pattern.
Now you have a serene, gallery-style display ready to organize your daily accessories


Jewelry Dish With Center Post
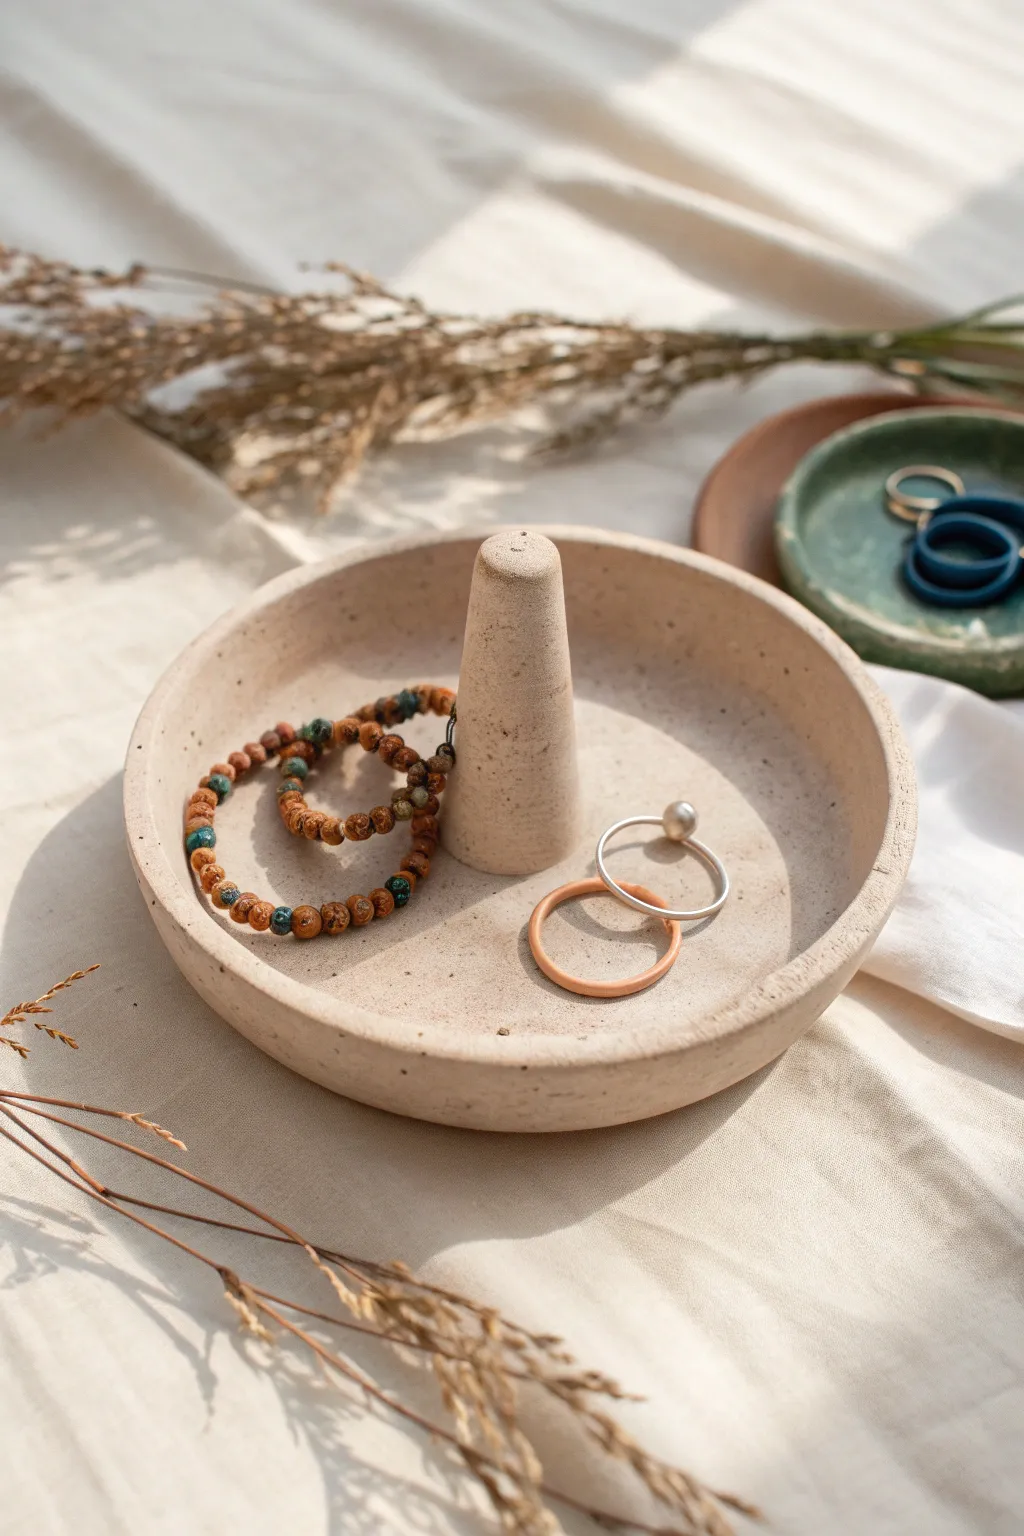
Keep your accessories organized with this minimalist ring holder that mimics the look of natural sandstone. The central post is perfect for stacking rings, while the wide basin catches bracelets and earrings with ease.
Step-by-Step
Materials
- Air dry clay (white or light beige)
- Acrylic rolling pin
- Circle cutter or small bowl (approx. 5-6 inches diameter)
- Craft knife or scalpel
- Small cup of water
- Sponge or paintbrush
- Sandpaper (fine and medium grit)
- Acrylic paint (brown or black) for speckling
- Stiff bristle brush or toothbrush
- Matte spray varnish
Step 1: Forming the Base
-
Condition the clay:
Begin by working a fist-sized ball of air dry clay in your hands. Knead it thoroughly until it is warm, pliable, and free of cracks. -
Roll the slab:
Place the clay on a smooth surface or canvas mat. Roll it out to an even thickness of about 1/4 inch, turning it occasionally to ensure it doesn’t stick. -
Cut the circle:
Place your circle cutter or inverted bowl onto the rolled clay. Press down firmly or trace around the bowl with a craft knife to create a clean circle. -
Shape the rim:
Gently lift the edges of the circle upwards to create a shallow lip. I like to pinch the clay slightly between my thumb and forefinger while rotating the dish to get an even wall height. -
Smooth the edges:
Dip your finger or a sponge into a little water and run it along the rim and the inside walls to smooth out any fingerprints or rough textures.
Seamless Merging
When attaching the post, roll a tiny ‘snake’ of clay and wrap it around the base seam. Smooth this extra clay upward and outward for an invisible bond.
Step 2: Creating the Center Post
-
Shape the cone:
Take a separate piece of clay about the size of a walnut. Roll it into a sausage shape, then apply more pressure to one end to taper it into a cone. -
Flatten the base:
Tap the wider end of the cone onto your work surface to create a completely flat bottom. This ensures it will stand straight in the dish. -
Score the surfaces:
Using your craft knife or a needle tool, scratch cross-hatch marks onto the bottom of the cone and the center of the dish where the post will sit. -
Apply slip:
Mix a tiny bit of clay with water to make a paste (slip). Dab this onto the scored areas to act as glue. -
Attach the post:
Press the cone firmly into the center of the dish. Wiggle it slightly to mesh the scored clay together. -
Blend the seam:
Use a modeling tool or your finger to smooth the clay from the base of the cone down into the dish floor. The seam should disappear completely for a seamless look. -
Refine the top:
Gently tap the very top of the cone with your finger or a flat tool to blunt the point slightly, making it look finished rather than sharp.
Step 3: Finishing Details
-
Allow to dry:
Let the piece dry completely in a cool, dry place for 24-48 hours. Turn the piece over halfway through if possible to help the bottom dry evenly. -
Sand until smooth:
Once fully dry, use medium grit sandpaper to remove major bumps, then switch to fine grit for a silky finish. Pay close attention to the rim. -
Create the speckles:
Dilute a small amount of brown or black acrylic paint with water. Dip a toothbrush into the mixture. -
Apply the texture:
Run your thumb across the toothbrush bristles to flick fine droplets of paint onto the dish. Practice on paper first to control the spray. -
Seal the piece:
After the paint speckles are dry, apply two light coats of matte spray varnish to protect the clay from moisture and dirt.
Warping While Drying?
If the edges start to curl up unevenly while drying, gently weigh down the center of the dish with a small bag of rice or sand to keep the base flat.
Now your jewelry has a beautiful, organic home that looks like expensive stoneware

What Really Happens Inside the Kiln
Learn how time and temperature work together inside the kiln to transform clay into durable ceramic.
Stamped Coasters Set
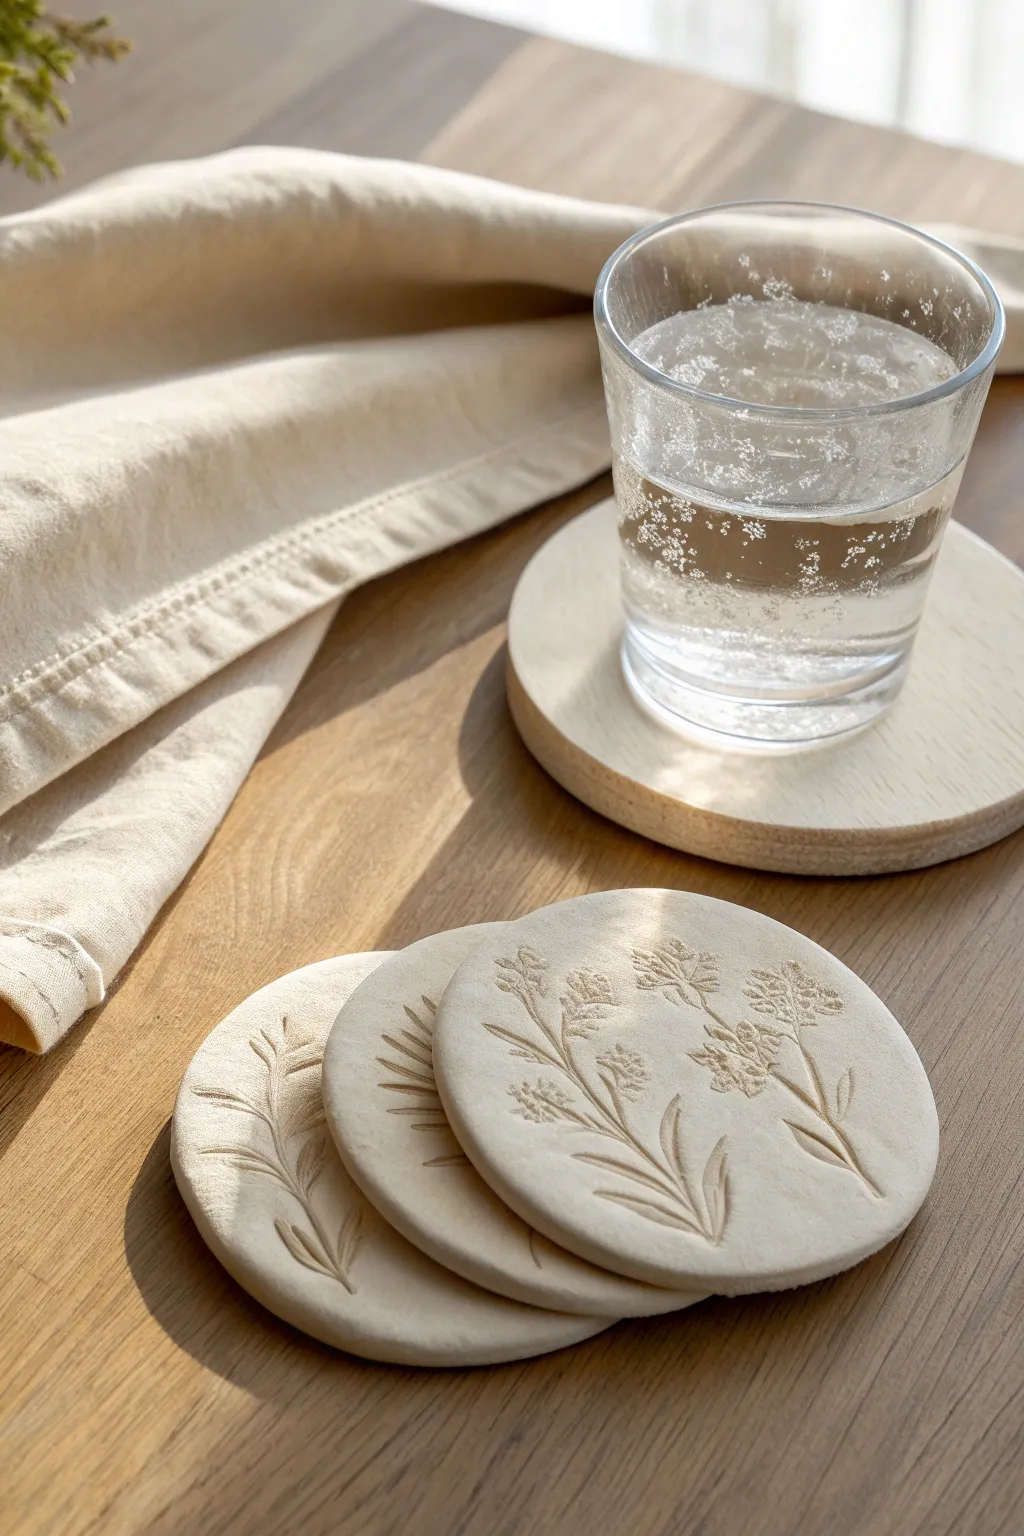
Bring a touch of nature to your coffee table with these elegant, minimalist coasters featuring delicate floral fossils. Using air dry clay creates a soft, matte finish that perfectly highlights the subtle botanical impressions.
Step-by-Step Tutorial
Materials
- White or cream air dry clay
- Rolling pin
- Circle cookie cutter or glass (approx. 3.5-4 inches)
- Fresh or dried plant stems (lavender, grass, or wildflowers work best)
- Fine-grit sandpaper (220-400 grit)
- Parchment paper or canvas mat
- Small bowl of water
- Matte acrylic sealant or varnish (waterproof)
Step 1: Shaping the Base
-
Prepare your workspace:
Lay down a sheet of parchment paper or a canvas mat to prevent the clay from sticking to your table. Take a handful of air dry clay and knead it in your hands for a minute until it feels pliable and warm. -
Roll the slab:
Place the clay ball in the center of your work surface. Use your rolling pin to flatten it into an even slab. You want a consistent thickness of about 1/4 inch (6mm)—too thin and they become brittle; too thick and they take forever to dry. -
Smooth the surface:
Dip your finger slightly in water and gently run it over the surface of the clay slab to remove any small cracks or rolling pin textures. You want a pristine canvas for your stamping.
Warped Clay?
If your coasters curl while drying, slightly dampen the concave side and place a heavy book on top (with parchment paper in between) to flatten them back out.
Step 2: Creating the Design
-
Arrange your botanicals:
Select your plant stems. Stiff, dried plants tend to leave sharper impressions than soft, fresh ones, but use whatever you have. Lay them gently on top of the smooth clay slab in a composition you like. -
Press the impression:
Take your rolling pin and roll firmly over the plants once. Don’t roll back and forth, as this creates a double image. Just one confident pass with enough pressure to push the stems flush with the clay surface is ideal. -
Remove the plants:
Carefully find the edge of the stem or leaf and peel it upwards off the clay. You should see a clean, detailed fossil-like impression left behind. -
Cut the shape:
Position your circle cutter over the imprinted design. Press straight down firmly to cut the coaster shape. If the clay sticks inside the cutter, gently push it out from the edges. -
Refine the edges:
Dip your finger in water again and smooth the outside rim of the cut circle. This softens the sharp cut line and prevents jagged edges later. -
Repeat the process:
Gather your clay scraps, re-roll them, and repeat the stamping and cutting process until you have a full matching set.
Add Subtle Color
Before sealing, dry brush a tiny amount of diluted watercolor paint into the grooves of the floral impression to make the design pop.
Step 3: Drying and Finishing
-
Initial Drying:
Place your coasters on a clean sheet of parchment paper in a cool, dry area. Let them sit undisturbed for at least 24 hours. -
Prevent warping:
Halfway through the drying process, I usually flip the coasters over gently. This helps air reach both sides evenly and stops them from curling up at the edges. -
Check for dryness:
The clay is fully dry when it feels room temperature to the touch (damp clay feels cold) and appears chalky white throughout. -
Sand for smoothness:
Once bone dry, take your fine-grit sandpaper and gently sand the edges and the flat surfaces. Be very careful around the floral impression so you don’t sand away the detail. -
Seal the coaster:
Since air dry clay dissolves in water, sealing is mandatory for coasters. Apply a thin coat of matte acrylic varnish to the top and sides. Let it dry completely. -
Apply second coat:
Apply a second coat of varnish to ensure it is watertight. Don’t forget to seal the bottom as well to protect your table from any moisture the coaster might absorb.
Stack your new set on the table and enjoy their natural, handmade charm with your next cold drink
Spoon Rest for the Stove
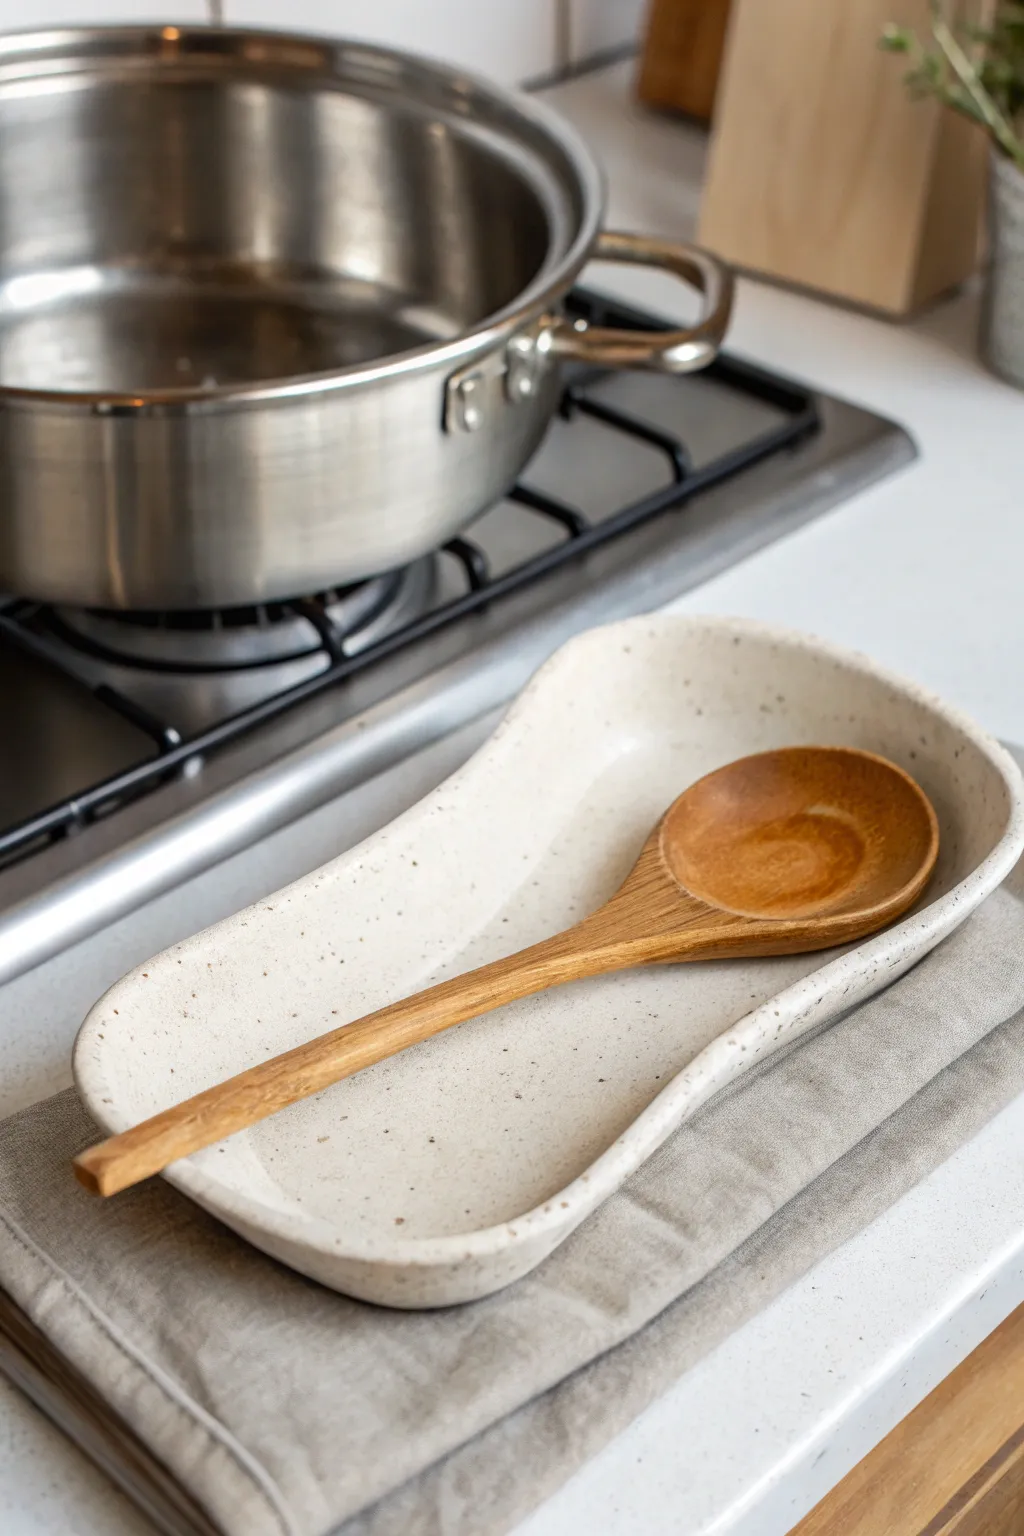
This minimalist spoon rest brings a touch of organic elegance to your stovetop with its gentle curves and speckled oatmeal finish. Its elongated shape is perfectly sized for wooden spoons and spatulas, keeping your counters clean while adding a beautiful handmade accent to the kitchen.
Step-by-Step Guide
Materials
- White air-dry clay (approximately 300-400g)
- Rolling pin
- Rolling guides or wooden slats (approx. 5mm thick)
- Small bowl of water
- Sponge
- Potter’s needle or craft knife
- Fine-grit sandpaper (220 and 400 grit)
- Acrylic paint (cream/off-white and brown)
- Stiff bristle brush (e.g., old toothbrush)
- Sealant (glossy varnish or dishwasher-safe decoupage medium)
- Cardstock for template (optional)
Step 1: Shaping the Form
-
Prepare the Clay:
Begin by kneading your air-dry clay thoroughly to warm it up and remove any potential air pockets. You want a smooth, pliable consistency that won’t crack when bent. -
Roll the Slab:
Place your clay between two wooden rolling guides to ensure an even thickness. Roll the clay out into a long oblong shape until it is roughly 5mm thick throughout. -
Cut the Shape:
Using a needle tool or craft knife, freehand a long oval shape that is slightly wider at the top (spoon head area) and narrower at the bottom (handle area). Alternatively, sketch this shape on cardstock first and trace around it. -
Smooth the Edges:
Dip your finger in a little water and run it along the cut edges to round them off. Ensure there are no sharp angles or burrs left from the cutting tool. -
Create the Rim:
Gently pinch the outer edges of the clay upwards to create a raised lip. This barrier is crucial for keeping oils and sauces contained within the rest. -
Add Organic Movement:
Instead of making the rim perfectly straight, use your thumbs to gently undulate the height slightly. I like to push certain sections down and pull others up just a millimeter or two for that natural, hand-thrown look. -
Refine the Surface:
Uses a slightly damp sponge to wipe the entire interior surface, removing any fingerprints or imperfections. The surface should be buttery smooth.
Clean Edges Tip
To get that perfectly smooth rim, dip a soft paintbrush in water and ‘paint’ the edges while the clay is wet, rather than just using your finger.
Step 2: Drying and Refining
-
Let it Dry:
Place the piece on a wire rack or a piece of cardboard to dry. Air dry clay needs 24-48 hours to cure completely. Flip it over halfway through the process to ensure the bottom dries evenly. -
Initial Sanding:
Once bone dry, use 220-grit sandpaper to smooth out any remaining bumps on the rim and the flat base. Be gentle to avoid changing the shape. -
Final Polishing:
Switch to 400-grit sandpaper for a final pass. This will make the clay feel incredibly smooth and professional before you apply any finish. -
Dust Clean:
Wipe the entire piece with a dry cloth or a slightly damp paper towel to remove all sanding dust. The surface must be clean for the paint to adhere effectively.
Step 3: Painting and Sealing
-
Base Coat:
Paint the entire spoon rest with a creamy off-white or oatmeal acrylic paint. You may need two thin coats for full opacity, letting previous layers dry in between. -
Prepare the Speckle:
Dilute a small amount of dark brown paint with water until it reaches an ink-like consistency. It needs to be fluid enough to fly off a brush. -
Apply the Speckles:
Dip a stiff bristle brush or old toothbrush into the brown mixture. Run your thumb across the bristles to flick tiny droplets onto the clay. Practice on a scrap piece of paper first to control the density. -
Seal the Top:
Once the paint is fully dry, apply a coat of high-gloss varnish or a water-resistant sealant. This mimics the look of ceramic glaze shown in the image. -
Apply Multiple Coats:
For a functional spoon rest, durability is key. I recommend applying at least 3 coats of sealant, allowing adequate drying time between each layer. -
Cure Time:
Let the final sealant cure for several days before using the spoon rest with hot utensils or exposing it to moisture.
Level Up: Texture
Before drying, gently press a real linen napkin into the wet clay surface. This leaves a subtle fabric texture that catches the glaze beautifully.
Now you have a stylish, custom piece ready to serve as a handy helper for your culinary adventures


The Complete Guide to Pottery Troubleshooting
Uncover the most common ceramic mistakes—from cracking clay to failed glazes—and learn how to fix them fast.
Napkin Rings for Everyday Tables
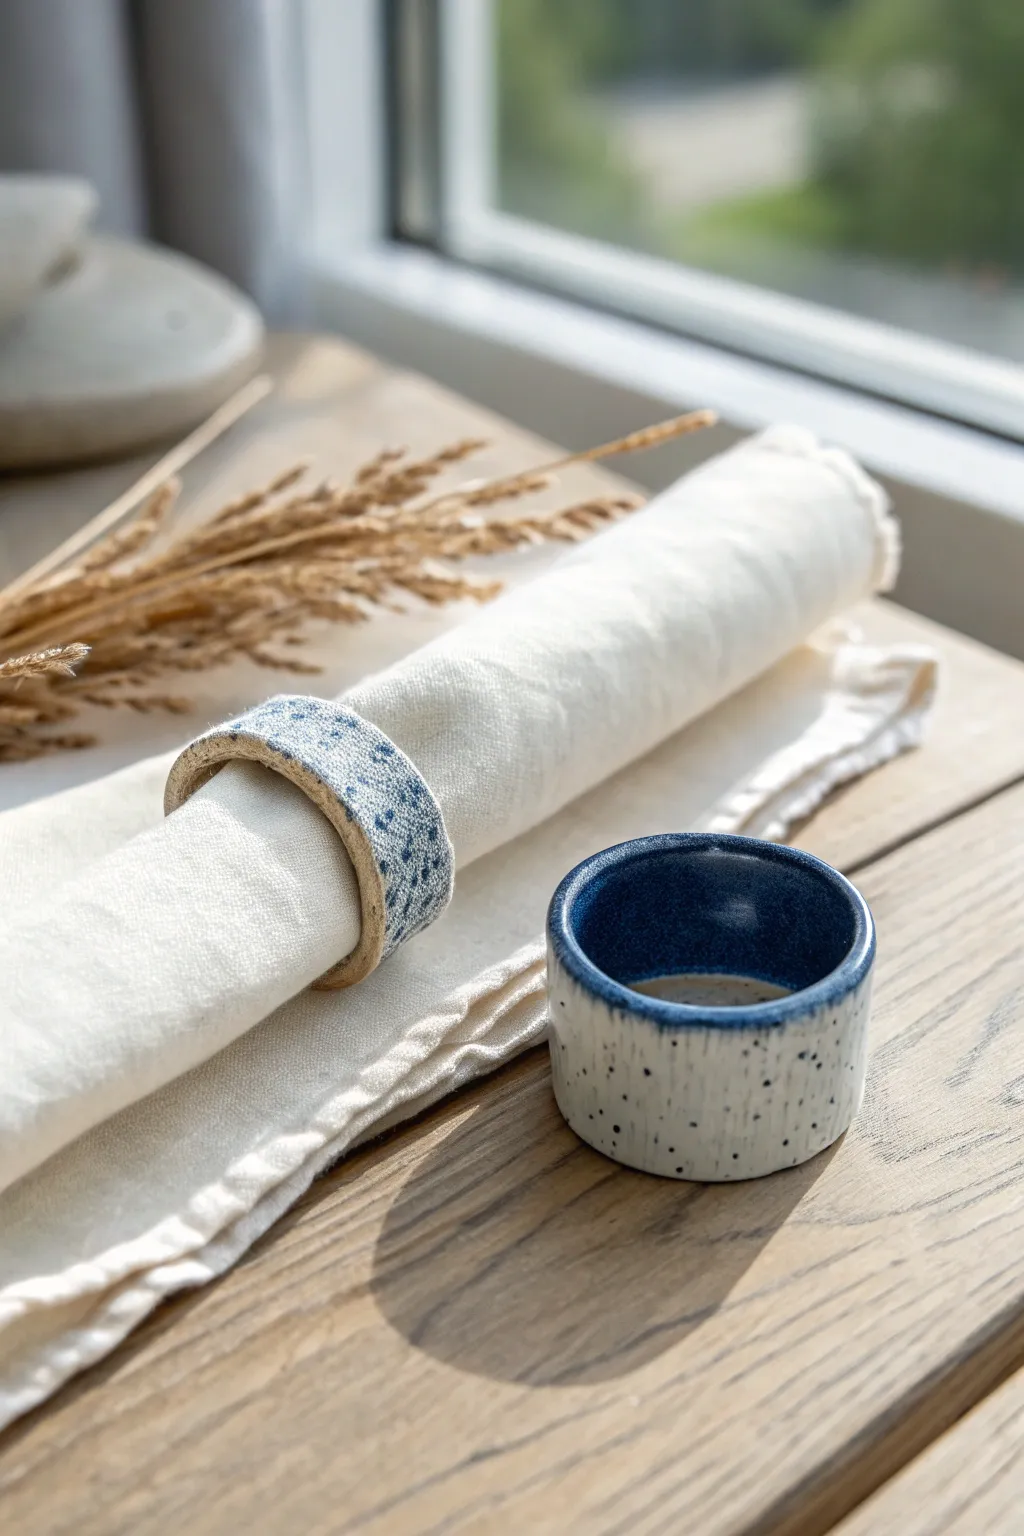
Elevate your table setting with these faux-ceramic napkin rings that mimic the look of expensive speckled stoneware. Using air dry clay and a clever painting technique, you can achieve this rustic, high-end finish without needing a kiln.
Step-by-Step Tutorial
Materials
- White functional air dry clay (durable type recommended)
- Wide rolling pin
- Cardboard tube (paper towel or toilet roll core)
- Parchment paper
- Craft knife or clay slicer
- Small bowl of water
- Fine-grit sandpaper (220 grit)
- Acrylic paints: Navy blue, White, Black (tiny amount)
- Old toothbrush
- Small, soft paintbrush
- Glossy varnish or sealant (water-resistant)
Step 1: Shaping the Rings
-
Prepare the Clay:
Begin by conditioning a handful of air dry clay, kneading it until it is pliable and smooth. I find that working it for just a minute prevents cracking later on. -
Roll Flat:
Roll the clay out onto a piece of parchment paper until you have an even slab, approximately 1/4 inch thick. Aim for a consistent thickness so the ring dries evenly. -
Cut Strips:
Using a craft knife and a straight edge (like a ruler), cut clean rectangular strips. For the wide band style shown on the napkin, aim for about 1.5 inches wide and 6 inches long. -
Form the Ring:
Take your cardboard tube and wrap it in a small piece of parchment paper (this prevents sticking). Gently wrap the clay strip around the tube to form a circle. -
Join the Seam:
Where the two ends of the clay meet, use a little water on your finger to create a slip. Overlap or butt the ends together, smoothing the seam down until it’s invisible. -
Create the Cylindrical Version:
For the standing ring style (the one sitting on the table), you’ll want a slightly thicker slab. Form a smaller, tighter circle that can stand on its own edge once dry. -
Initial Drying:
Let the rings sit on the cardboard tube support for at least 2-3 hours until they hold their shape, then gently slide them off.
Natural Texture
Before the clay dries, gently press a piece of coarse linen fabric onto the surface to imprint a subtle weave texture that catches the paint beautifully.
Step 2: Refining and Drying
-
Full Cure:
Place the rings on a wire rack or fresh parchment paper and allow them to dry completely. This usually takes 24-48 hours depending on humidity. -
Sand Smooth:
Once fully dry and hard, take your 220-grit sandpaper and gently smooth out any rough edges or uneven spots on the rim and surface. -
Dust Off:
Wipe the rings down with a slightly damp cloth or a dry brush to remove all sanding dust before painting.
Step 3: Painting the Faux Glaze
-
Base Coat (Optional):
If your clay isn’t naturally off-white, paint a base coat of warm white or cream acrylic over the entire piece. -
Apply the Rim Color:
Mix a deep navy blue paint. Using a small brush, carefully paint the top and bottom rims of the ring, letting the color bleed naturally slightly down the sides for an organic look. -
Paint the Interior:
For the standing cylindrical ring, paint the entire interior in that same deep navy blue to create a strong contrast. -
Create the Speckle Mix:
Dilute a small amount of navy paint (or black mixed with blue) with water until it is engagingly runny, like ink. -
Splatter Technique:
Dip an old toothbrush into the diluted paint. Hold it facing the napkin ring and run your thumb across the bristles to flick tiny speckles onto the white surface. -
Add Texture:
For the standing ring, use a very dry brush with a tiny bit of greyish paint to add vertical streaks, mimicking wheel-thrown pottery lines.
Cracking Seams?
If the join starts to crack while drying, dip a brush in water and smooth a tiny bit of fresh wet clay into the gap to patch it immediately.
Step 4: Sealing
-
Apply Sealant:
Because these are for specific table use, apply two coats of a high-quality glossy varnish. This mimics the shine of ceramic glaze. -
Final Dry:
Let the varnish cure completely according to the bottle instructions before using them with your linens.
Set your table with your new handmade rings and enjoy the artisan touch they bring to your meals
Salt Pinch Bowl With Tiny Spoon
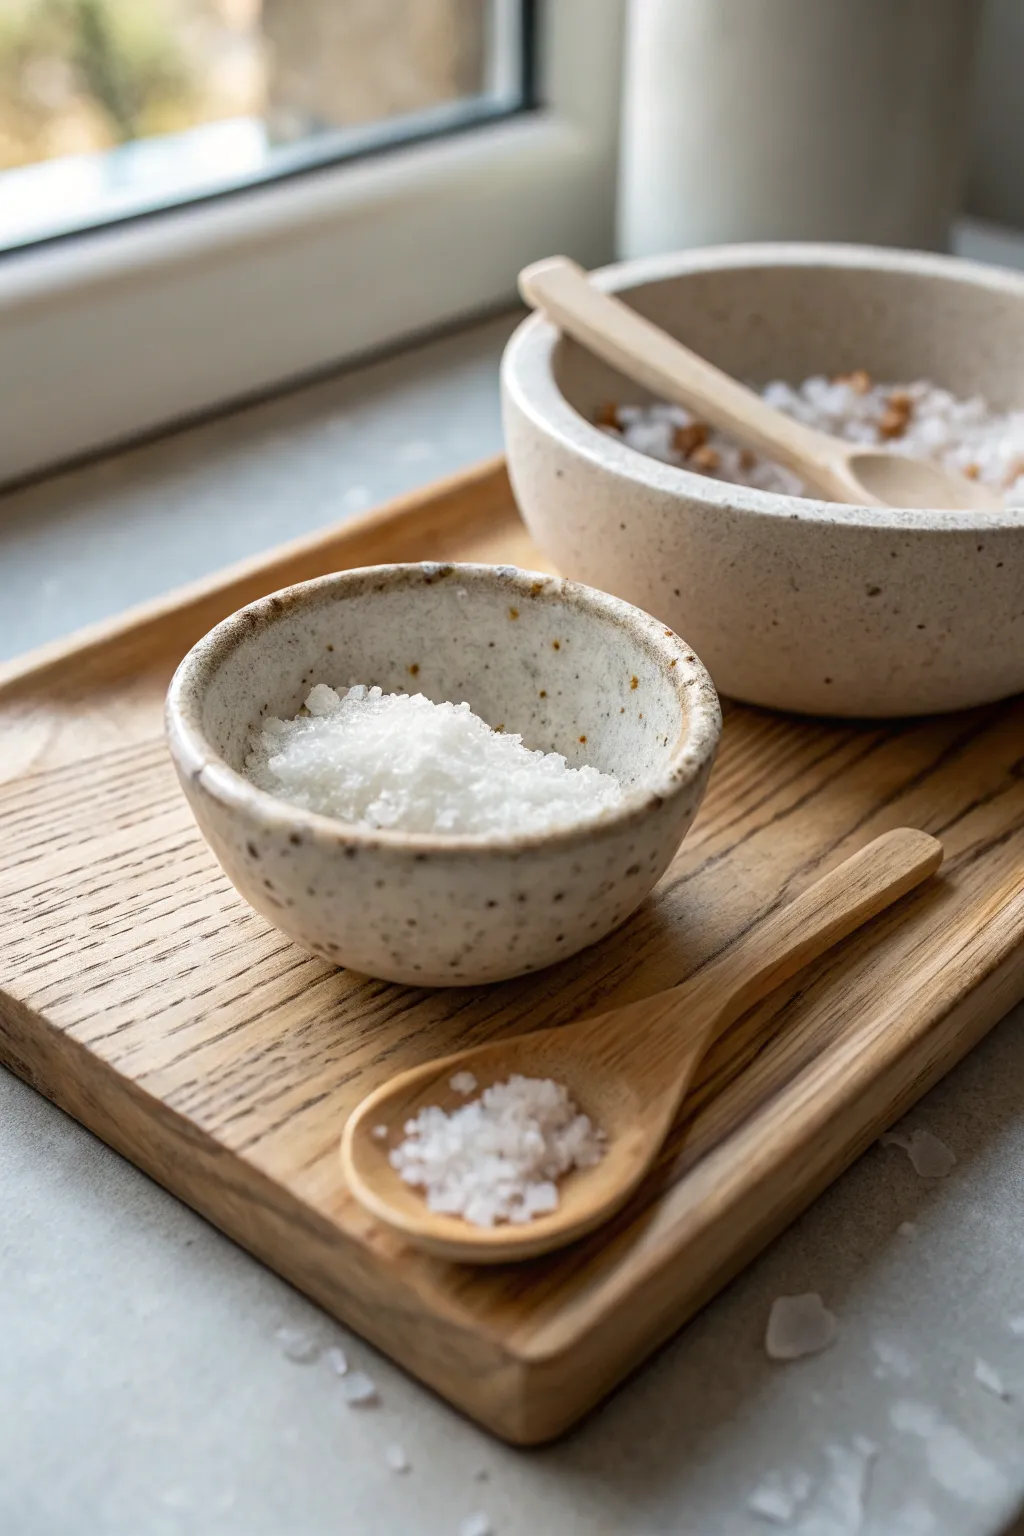
Create a charming addition to your kitchen counter with this petite, organic-style pinch bowl that mimics the look of high-fire speckled stoneware. Its imperfect, natural shape and gritty texture make it perfect for holding finishing salts or spices.
Step-by-Step
Materials
- White functional air dry clay (pottery clay alternative)
- Faux stone spray or speckled acrylic paint (brown/black specks)
- Gloss varnish or resin (food-safe if intended for dry food contact)
- Small rolling pin
- Wax paper or canvas mat
- Sponge
- Water cup
- Fine grit sandpaper
- Craft knife
- Small wooden spoon (store-bought or carved from balsa wood)
- Sand (optional, for texture)
Step 1: Shaping the Bowl
-
Prepare your clay:
Cut off a chunk of white air dry clay about the size of a plum. Knead it in your hands until it becomes warm and pliable, working out any air bubbles. -
Form the base connection:
Roll the clay into a smooth ball between your palms. Place it onto your wax paper or canvas mat. -
Begin the pinch pot:
Press your thumb gently into the center of the ball, stopping about a quarter-inch from the bottom. This establishes your base thickness. -
Pinch the walls:
Using your thumb on the inside and fingers on the outside, gently rotate the ball while pinching the clay walls upwards. Aim for a consistent thickness, but don’t worry about perfection; the rustic look relies on slight irregularities. -
Shape the rim:
Continue pinching until the walls are about 2 inches high. I like to gently tap the rim with a flat wooden tool or my finger to create that slightly organic, undulating edge seen in the photo. -
Smooth the surface:
Dip your finger or a small sponge into water—just a little bit—and glide it over the clay to erase fingerprints and smooth out any harsh cracks. -
Create the foot:
Gently tap the bottom of the bowl on your work surface to flatten it slightly so it sits stable and won’t wobble.
Cracks Appearing?
If hairline cracks appear while drying, mix a tiny bit of fresh clay with water to make a paste (slip) and fill the cracks. Smooth it over and let dry again.
Step 2: Refining and Finishing
-
Initial drying:
Let the bowl sit for about 24 to 48 hours in a cool, dry place. Avoid direct sunlight which can cause cracking. -
Sanding:
Once fully bone dry, use fine-grit sandpaper to smooth any rough patches on the rim and exterior. Wipe away the dust with a barely damp cloth. -
Creating the speckled effect:
To achieve the stoneware look without a kiln, you can lightly mist the piece with a granite-effect spray paint. Alternatively, dilute brown/black acrylic paint and flick the bristles of a toothbrush over the bowl to splatter tiny dots. -
Adding the rim detail:
Mix a tiny amount of diluted brown acrylic paint. Use a sponge or your finger to lightly rub this color along just the very top edge of the rim, giving it that toasted, earthy definition. -
Sealing the interior:
Apply a coat of high-gloss varnish to the inside of the bowl. If you plan to put real salt in it, use a food-safe epoxy resin or a certified non-toxic sealant. -
Sealing the exterior:
Coat the outside with a satin or matte varnish to protect the clay while maintaining a natural, stone-like appearance. -
Customize the spoon:
Take a small wooden craft spoon. If the wood is too pale, lightly sand it and rub it with a bit of olive oil or wood stain to match the warm tones of your display tray. -
Final cure:
Allow all sealants and varnishes to cure completely according to the manufacturer’s instructions before filling with coarse sea salt.
Pro Tip: Weight
Air dry clay is naturally light. To make it feel like heavy ceramic, knead a teaspoon of fine, heavy sand into the wet clay before shaping.
Your speckled pinch bowl is now ready to bring a touch of artisan elegance to your table setting

TRACK YOUR CERAMIC JOURNEY
Capture glaze tests, firing details, and creative progress—all in one simple printable. Make your projects easier to repeat and improve.
Soap Dish With Drain Ridges

Bring a spa-like serenity to your bathroom with this fluted oval soap dish that mimics the look of carved limestone. The textured ridges aren’t just decorative; they serve a practical purpose by helping your soap drain and dry between uses.
How-To Guide
Materials
- White air-dry clay (approximately 300g)
- Small rolling pin
- Oval template (paper or cardstock)
- Modeling tool with a rounded edge (or a chopstick)
- Clay knife or craft knife
- Small bowl of water
- Sponge
- Fine-grit sandpaper
- Acrylic paints (Cream, Beige, Taupe)
- Speckling brush or old toothbrush
- Waterproof varnish or sealant (specifically designed for clay)
Step 1: Shaping the Base
-
Prepare the Clay:
Start by kneading your block of air-dry clay to warm it up and remove air bubbles. This conditioning step is crucial to prevent cracks later on. -
Create a Slab:
Roll the clay out on a smooth surface until it is an even slab, approximately 1/4 inch thick. Aim for consistent thickness throughout. -
Cut the Oval:
Place your paper oval template onto the clay slab. Using your clay knife, carefully trace around the template to cut out the base shape. -
Form the Walls:
Roll a long, thick coil of clay—like a snake—that is long enough to wrap around the entire circumference of your oval base. It should be about 3/4 inch thick. -
Attach the Coil:
Score the outer edge of the base and the bottom of the coil with cross-hatching marks. Apply a little water to create slip, then press the coil firmly onto the base edge. -
Blend the Seams:
Use your fingers or a modeling tool to smooth the clay where the coil meets the base, both on the inside and the outside, until the seam is invisible.
Cracks happen
If small hairline cracks appear while drying, mix a tiny amount of fresh clay with water to make a paste and fill the gaps. Smooth it over and let it dry again.
Step 2: Adding Texture and Detail
-
Refine the Height:
Gently pinch and pull the walls up to create a uniform height. The dish should feel sturdy but not overly chunky. -
Create Outer Ribs:
Using the rounded edge of a modeling tool, press vertical indentations into the outside wall of the dish. Space them evenly apart to create that distinct fluted look. -
Extend to Interior:
Continue these vertical indentations over the lip and down into the interior walls. This connects the design from the outside to the inside. -
Add Base Ridges:
Here I prefer to use a slightly thinner tool to press horizontal lines across the inside bottom of the dish. These will act as drainage channels for the soap. -
Smooth the Rim:
Dip your finger in water and gently run it along the top rim to soften any sharp edges created during the texturing process. -
Initial Drying:
Let the piece dry slowly away from direct heat or sunlight for 24-48 hours. Turn it over occasionally to ensure the bottom dries thoroughly.
Step 3: Finishing and Sealing
-
Sand Imperfections:
Once fully bone dry, lightly sand any rough patches on the rim or bottom. Be gentle to preserve the fluted texture. -
Base Coat:
Paint the entire dish with a creamy off-white acrylic paint. You may need two thin coats for full coverage. -
Add Stony Depth:
Mix a very watery wash of beige or taupe paint. Brush it over the textured areas and quickly wipe the surface with a damp cloth, leaving the darker color settled in the grooves. -
Speckle Effect:
Dip an old toothbrush or stiff brush into diluted grey or taupe paint. Flick the bristles to spray tiny speckles across the dish, mimicking natural stone. -
Waterproofing:
This is the most critical step for functional items. Apply 2-3 coats of a high-quality waterproof varnish or resin sealant to protect the clay from moisture.
Make it drain
Use a straw to poke three small holes through the bottom of the dish in between the interior ridges. This allows water to drip out completely into a sink.
Place your new stone-look dish by the sink and enjoy the custom touch it adds to your daily routine
Toothbrush Holder Cup
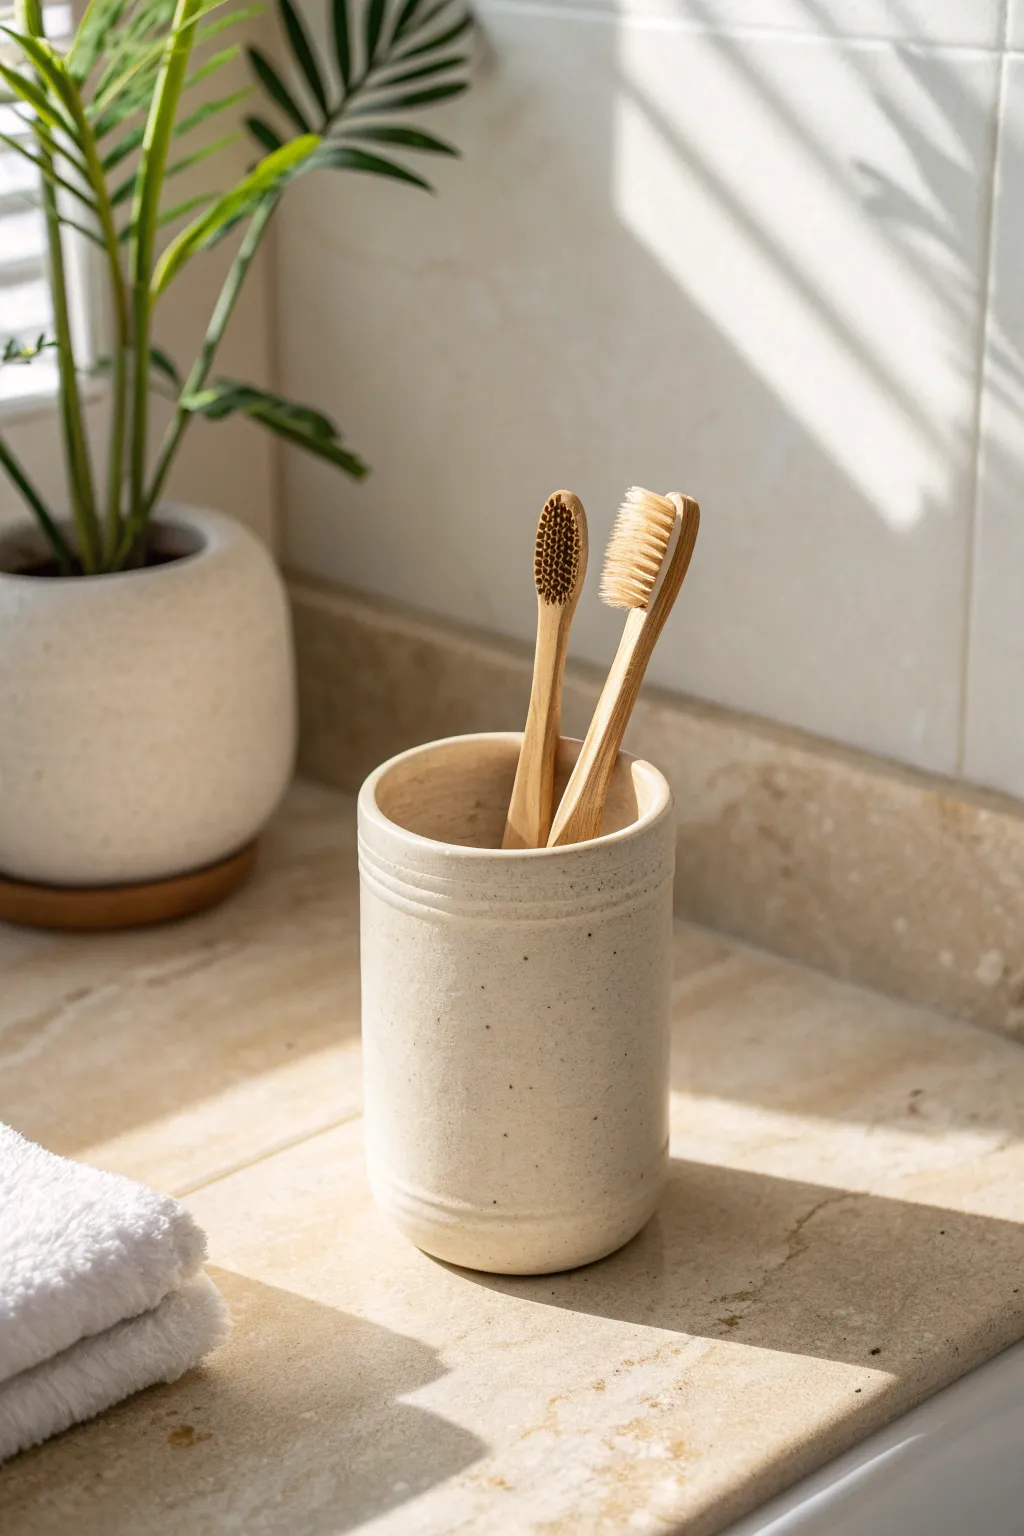
Bring the calming vibes of a spa into your bathroom with this simple, functional toothbrush holder. Modeled to look like speckled stoneware, this air-dry clay project combines a sleek cylindrical form with subtle grooved details for a polished finish.
Step-by-Step Tutorial
Materials
- Air-dry clay (white or cream)
- Rolling pin
- Empty can or jar (for use as a mold)
- Parchment paper
- Clay knife or craft knife
- Small cup of water
- Sponge
- Mod Podge or waterproof varnish
- Acrylic paint (black and brown)
- Old toothbrush (for speckling)
- Sandpaper (fine grit)
Step 1: Forming the Base
-
Prepare your mold:
Select a clean empty can or cylindrical jar that is roughly the width you want your finished cup to be. Wrap it securely in parchment paper, tucking the excess paper inside the top opening. -
Roll out the clay:
Take a large handful of clay and roll it out into a flat slab about 1/4 inch thick. Try to keep the thickness consistent across the entire piece for even drying. -
Cut the clay to size:
Measure the height of your can and cut a rectangular strip of clay. Ensure the length is sufficient to wrap fully around the can with a little overlap. -
Create the cylinder:
Carfully wrap the clay strip around your parchment-covered mold. Where the ends meet, slice through both layers of clay simultaneously with your knife to create a perfect butt joint. -
Seal the seam:
Score the raw edges of your seam with a tool, dab a little water on them, and press them together firmly. Smooth the join with your finger until it disappears. -
Add the bottom:
Roll a small ball of clay flat and place your wrapped cylinder on top of it. Use your knife to trace and cut out a circle that matches the cylinder’s diameter exactly. -
Attach the base:
Score and wet the bottom rim of the cylinder and the edge of the base circle. Press them together, then blend the clay upward from the base onto the wall using a modeling tool or your finger to ensure a watertight seal.
Make it Waterproof
Standard varnish isn’t enough for standing water. Use ‘Dishwasher Safe’ Mod Podge or a heavy-duty resin coating to ensure humidity doesn’t melt your cup.
Step 2: Detailing and Refining
-
Smooth the surface:
Dip your sponge lightly in water and run it over the entire surface of the cup. This helps remove fingerprints and creates that smooth, ceramic-like texture I love. -
Add the rim details:
Using a blunt sculpting tool or the back of a butter knife, gently press a horizontal groove about a half-inch below the top rim. Rotate the cup slowly to keep the line straight. -
Repeat the groove:
Create a second groove parallel to the first one, just a few millimeters below it. Repeat this same double-line process near the bottom of the cup for a balanced look. -
Let it dry:
Allow the clay to dry while still on the mold for at least 24 hours. Once the outside feels firm, carefully slide the can out and peel away the parchment paper so the inside can dry completely—usually another 24 hours. -
Sand for perfection:
Once bone dry, take your fine-grit sandpaper and gently smooth the top rim and any rough patches on the body. Wipe away the dust with a barely damp cloth.
Step 3: The Speckled Finish
-
Mix the speckle paint:
Water down a very small amount of black and brown acrylic paint. You want it to be quite fluid, almost like ink. -
Apply the speckles:
Dip an old toothbrush into the watered-down paint. Hold it near the cup and run your thumb across the bristles to flick tiny droplets onto the surface. Practice on paper first to control the spray. -
Seal the piece:
Since this will live in a bathroom, waterproofing is crucial. Apply at least three coats of waterproof varnish or dishwasher-safe Mod Podge, allowing plenty of drying time between layers. -
Seal the inside:
Don’t forget the interior! Pour a little varnish inside, swirl it around to coat the bottom and walls thoroughly, and pour out the excess. This prevents water from weakening the base over time.
Cracks While Drying?
If small cracks appear as the clay shrinks around the mold, fill them immediately with a ‘slip’ paste made of wet clay and water, then smooth over.
Now you have a chic, spa-worthy accessory that keeps your counter organized and stylish
Incense Cone Burner Bowl
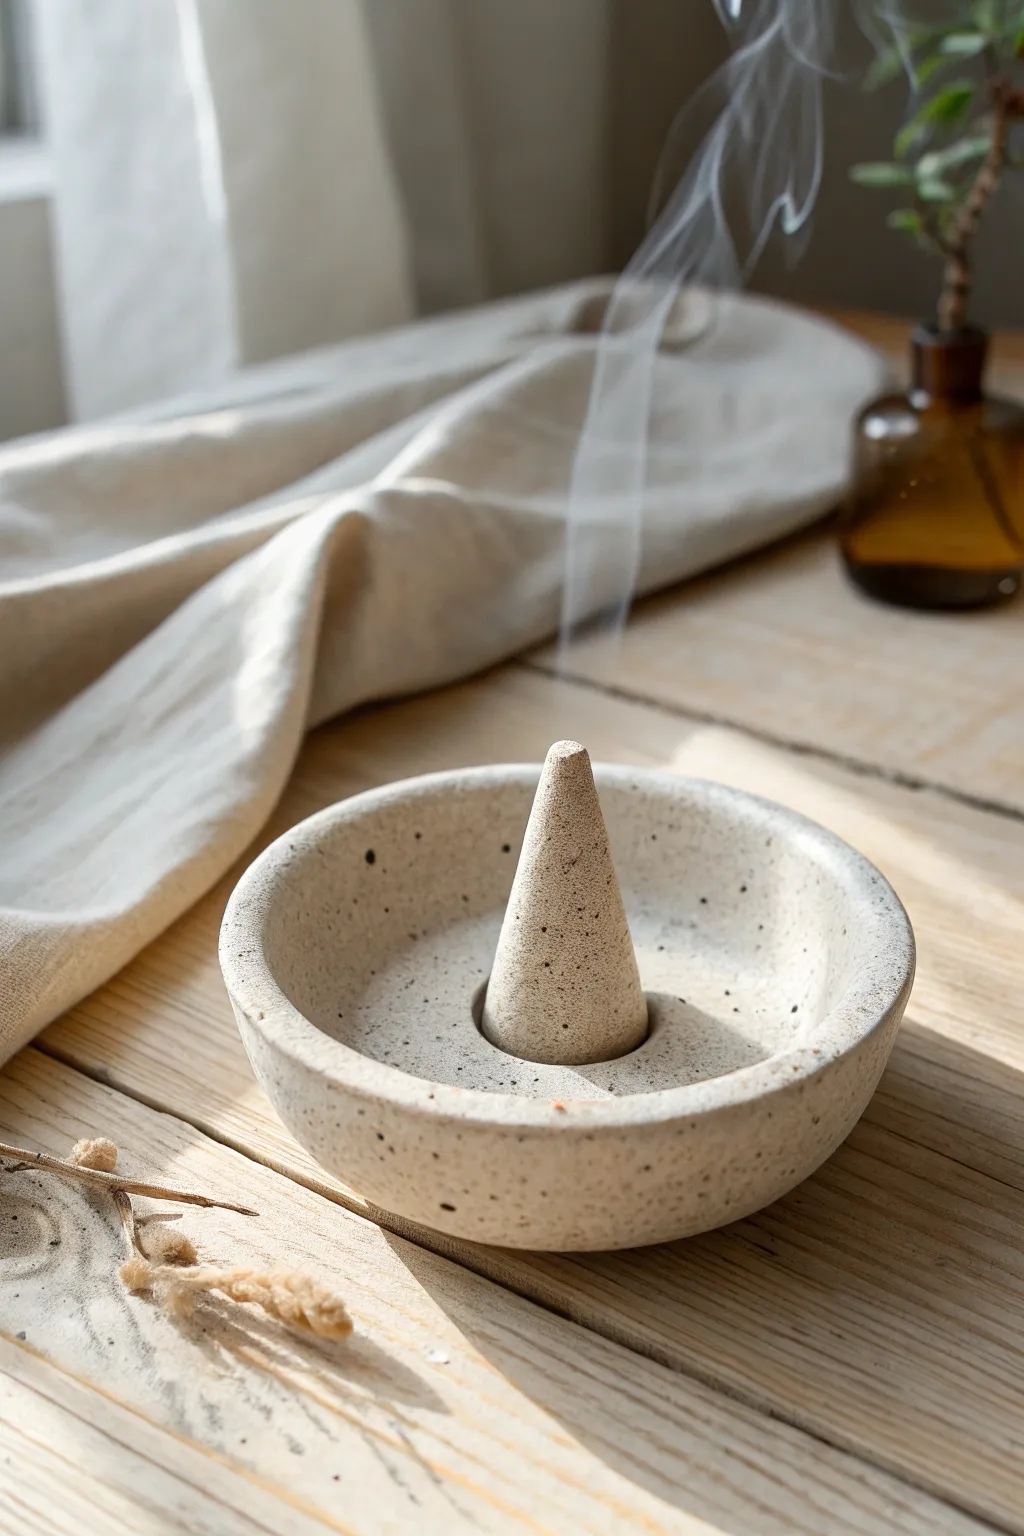
Create a serene atmosphere with this modern incense burner featuring a built-in central cone holder. The natural speckled finish mimics high-end stoneware, making it a functional piece of art for your coffee table.
Step-by-Step Guide
Materials
- White or cream air-dry clay
- Rolling pin
- Circle cutter or small bowl (approx. 4-5 inches)
- Small craft knife
- Sponge
- Fine grit sandpaper
- Acrylic paint (black and brown)
- Old toothbrush
- Matte sealant or varnish
- Water in a small dish
Step 1: Shaping the Base
-
Condition the clay:
Begin by kneading a handful of air-dry clay until it is warm and pliable. This prevents cracks later on. -
Roll out a slab:
Roll the clay out on a smooth surface to an even thickness of about 1/4 inch or slightly thicker for a sturdy feel. -
Cut the circle:
Use a circle cutter or place a small bowl upside down on the clay slab and trace around it with your craft knife to create a perfect circle. -
Form the shallow bowl:
Gently lift the edges of the circle with your fingers, curving them upward to create a shallow rim. Smooth out any fingerprints with a slightly damp sponge as you work around the circumference. -
Refine the shape:
Sit the bowl on a flat surface and ensure the bottom is level. Tap gently from the inside to flatten the base slightly.
Step 2: Creating the Cone Holder
-
Roll a small coil:
Take a separate small piece of clay and roll it into a short, thick cone shape. It should be tall enough to support an incense cone but stable at the base. -
Score and slip:
Use your craft knife to scratch a crosshatch pattern (scoring) on the bottom of the clay cone and in the exact center of your bowl. Dab a little water (slip) on both scored areas. -
Attach the cone:
Press the cone firmly into the center of the bowl. The cone in the image serves as the holder; for stick incense, you would poke a hole now, but for cone incense, simply flatten the very tip slightly so a burning cone can balance, or leave it pointed if you plan to hollow it slightly. -
Blend the seams:
Using a modeling tool or your finger, drag clay from the base of the cone down into the bowl to merge them seamlessly. Smooth this connection with a damp sponge so it looks like one solid piece. -
Create the platform:
I like to ensure the cone stand is flat enough on top so an actual incense cone won’t tip over. Gently press the top flat or create a tiny indentation to cradle the incense.
Fixing Cracks
If tiny cracks appear while drying, don’t panic. Mix a small amount of fresh clay with water to make a paste and fill the cracks, then sand smooth once dry.
Step 3: Finishing and Decoration
-
Slow drying:
Set the piece aside in a cool, dry place away from direct sunlight. To prevent warping, rotate it occasionally. Let it dry completely for 24-48 hours. -
Sand until smooth:
Once bone dry, use fine-grit sandpaper to smooth out any rough edges on the rim or bumps in the bowl. Wipe away dust with a dry cloth. -
Prepare the speckle mix:
Dilute a small amount of black and brown acrylic paint with water until it is very runny. -
Apply the speckles:
Dip an old toothbrush into the paint mixture. Hold it over the bowl and run your thumb across the bristles to flick tiny droplets onto the surface. Practice on paper first to control the density. -
Let paint dry:
Allow the speckled paint effect to dry completely before moving to the final step. -
Seal the piece:
Apply a coat of matte varnish or sealant to protect the clay from ash and heat. This also enhances the stone-like appearance.
Add Texture
Before drying, mix dried coffee grounds or sand directly into your white clay. This adds real texture and integral speckling without needing paint later.
Now you have a tranquil, handmade spot to burn your favorite scents and relax
Palo Santo Dish Tray

This minimalist, oblong tray is the perfect resting place for your Palo Santo bundles or sage wands. Its gentle oval shape and speckled cream finish add a touch of organic warmth to any meditation corner or coffee table.
Step-by-Step
Materials
- Air dry clay (white)
- Acrylic paint (cream or off-white)
- Acrylic paint (black or dark brown)
- Rolling pin
- Clay knife or craft knife
- Fine grit sandpaper
- Cup of water
- Sponge
- Paintbrush (flat)
- Old toothbrush
- Varnish or sealant (matte finish)
Step 1: Shaping the Form
-
Prepare the Clay:
Start by grabbing a handful of air dry clay, roughly the size of a large orange. Knead it in your hands for a minute or two to warm it up and make it pliable. -
Roll it Out:
Place the clay on a clean, flat surface or a canvas mat. Use your rolling pin to flatten the clay into a slab that is roughly 1/4 inch thick. Try to keep the thickness even across the entire surface. -
Cut the Oval:
You can either sketch an oval shape lightly onto the clay with a needle tool or create a paper template first. Once you are happy with the size (aim for about 8 inches long), use your clay knife to cut out the oval shape. -
Smooth the Edges:
Dip your finger in a little water and run it along the cut edge of the slab. This finishes the raw cut and prevents future cracking. -
Create the Rim:
Unlike a coil pot, for this shallow dish, gently lift the edges of your oval slab upward. Use your thumbs to press the center down while your fingers guide the outer rim up, creating a shallow wall about half an inch high. -
Refine the Shape:
Go around the perimeter and pinch the rim gently to make it uniform. I like to smooth the connection point between the floor and the wall with a damp sponge so it looks seamless.
Step 2: Refining and Drying
-
Smoothing the Surface:
Use a slightly damp sponge to wipe down the entire piece, erasing any fingerprints or tool marks. Pay special attention to the rim to ensure it feels soft to the touch. -
Slow Drying:
Place your tray in a cool, dry spot away from direct sunlight. Let it dry completely for 24-48 hours. Rotate the piece occasionally to help the bottom dry evenly. -
Sanding:
Once bone dry, take your piece outside or wear a mask. Use fine-grit sandpaper to buff away any remaining bumps or sharp edges on the rim. Wipe away the dust with a dry cloth or tack cloth.
Clean Edges Pro Tip
For a perfectly smooth rim, use a damp makeup sponge instead of your fingers. The fine texture smooths clay without leaving distinct fingerprints or ridges.
Step 3: Decorating and Sealing
-
Base Coat:
Apply an even coat of cream or off-white acrylic paint to the entire dish, including the bottom. Let this dry completely before adding a second coat if needed for opacity. -
Prepare the Splatter:
Mix a small amount of black or dark brown acrylic paint with a few drops of water. You want a runny, ink-like consistency. -
Applying Speckles:
Dip an old toothbrush into the thinned paint. Hold the brush over the dish and run your thumb across the bristles to flick tiny specks of paint onto the surface. Practice on paper first to control the spray. -
Drying the Detail:
Allow the paint speckles to dry completely. This usually takes only about 15-20 minutes since the droplets are so small. -
Sealing:
Apply a coat of matte varnish or sealant over the entire piece. This protects the paint and gives it a finished ceramic look. -
Final Cure:
Let the sealant cure according to the bottle instructions (usually 24 hours) before placing your Palo Santo or sage bundle inside.
Warping Repair
If the bottom curls up while drying, slightly dampen the underside and weigh it down with a heavy book (with parchment paper in between) overnight to flatten it.
Now you have a serene, custom-made vessel ready to hold your cleansing rituals
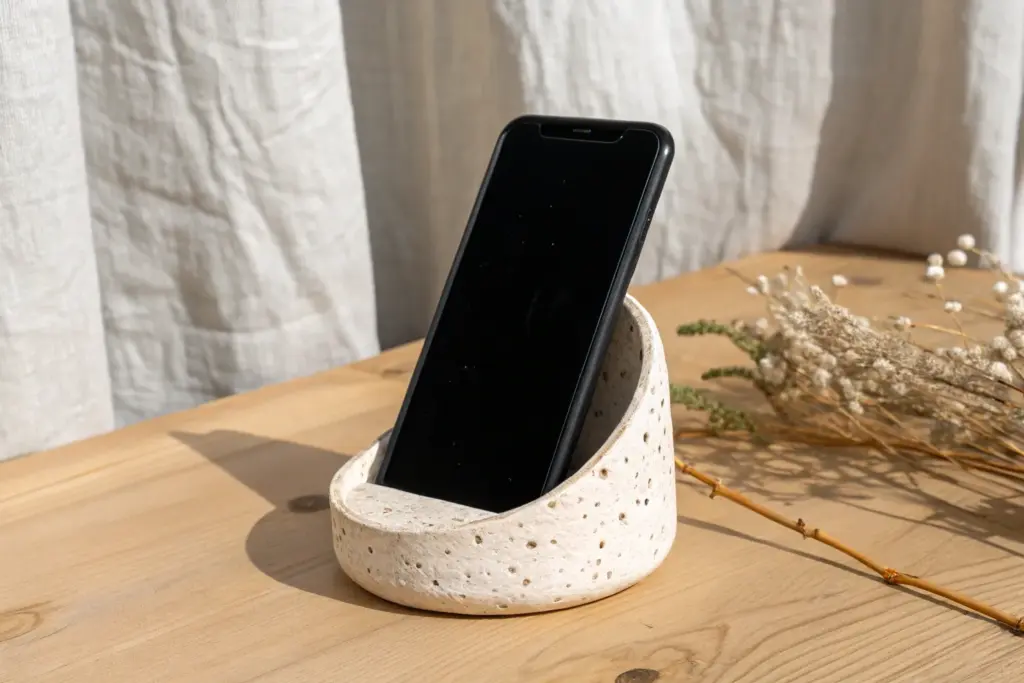
Phone Stand for Your Desk
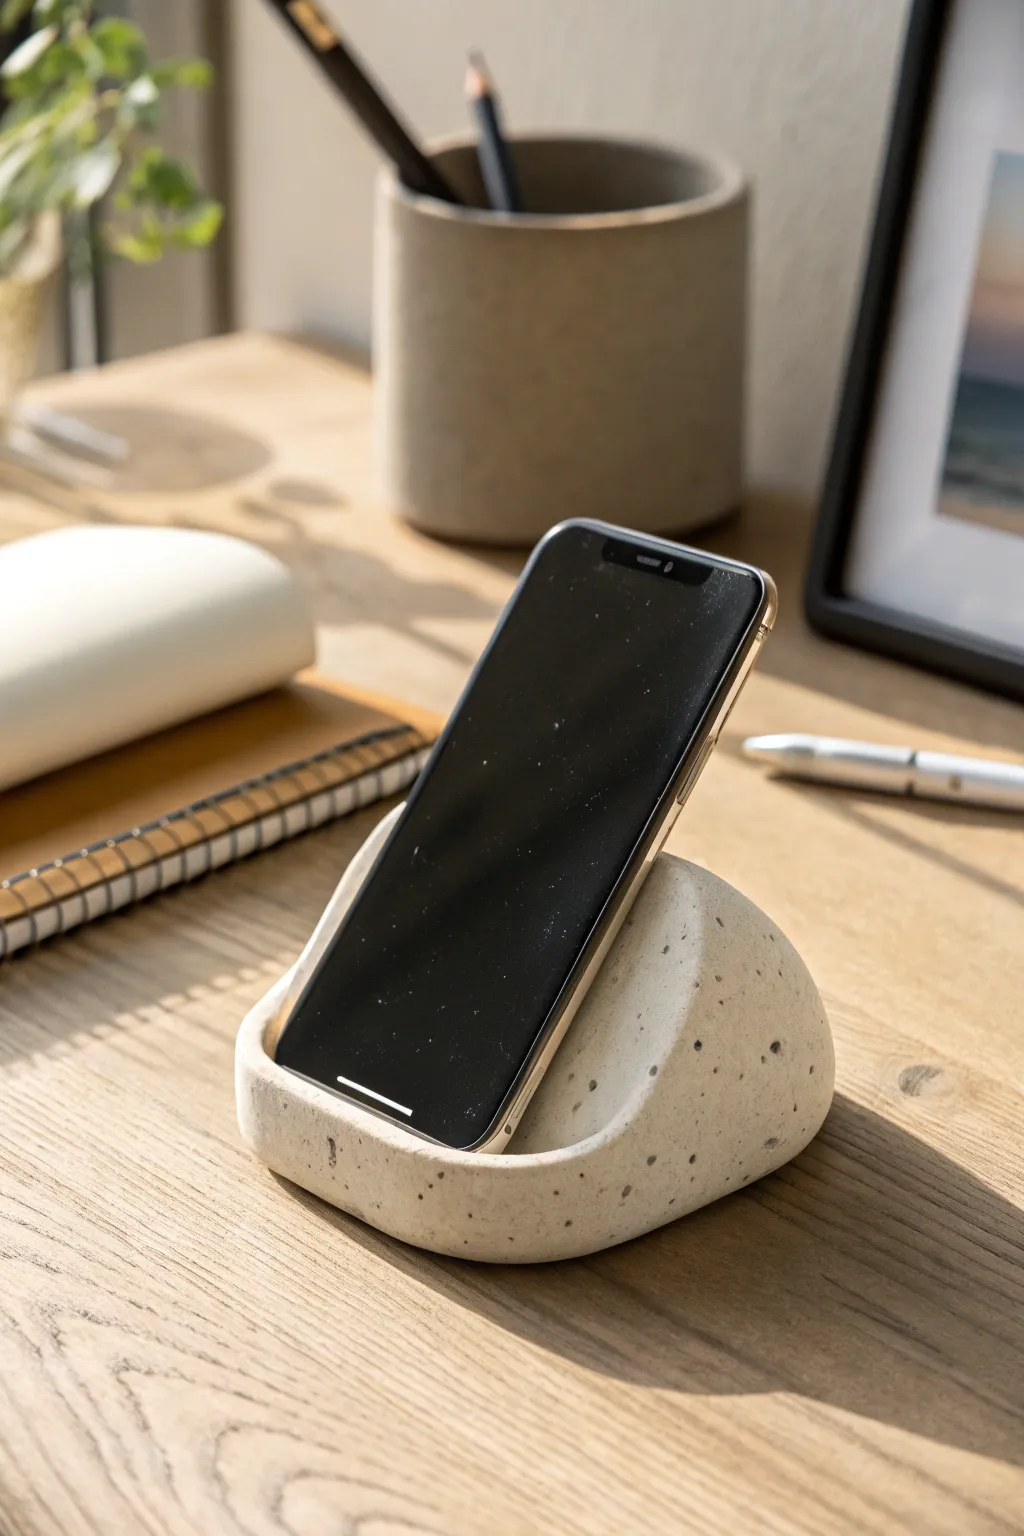
Bring an earthy, modern touch to your workspace with this stone-effect phone stand. Its organic, pebbled shape and subtle speckled texture make it look like a high-end concrete casting rather than a simple clay project.
How-To Guide
Materials
- White or light grey air dry clay (approx. 300g)
- Black acrylic paint (or liquid watercolor)
- Fine sand or used coffee grounds (dried)
- Bowl of water
- Rolling pin
- Smartphone (for sizing)
- Plastic wrap
- Sanding block or fine-grit sandpaper
- Matte varnish or sealant
Step 1: Preparing the Clay Body
-
Condition the clay:
Start by kneading your block of air dry clay in your hands to warm it up. It should be pliable and free of cracks before you add any inclusions. -
Create the terrazzo effect:
Flatten the clay slightly and sprinkle in a pinch of fine sand or dried coffee grounds to create that speckled ‘stone’ look seen in the photo. Fold the clay over and knead it thoroughly to distribute the speckles evenly. -
Form the base ball:
Roll the clay into a smooth, tight sphere. Take your time to smooth out any surface lines or seams with a wet finger. -
Shape the wedge:
Press the sphere down firmly onto your work surface to create a flat bottom. Gently press on one side of the dome to start forming a slight slope, transforming the ball into a rounded wedge shape.
Weight Control
If your phone is large, embed a clean, smooth rock or a few heavy metal washers inside the center of the clay wedge while forming it. This adds hidden weight for stability.
Step 2: Sculpting the Function
-
Prepare your template:
Wrap the bottom half of your phone (or a similar-sized object) tightly in plastic wrap. This ensures the stand fits your device perfectly without sticking to it. -
Create the resting groove:
Press the wrapped phone into the lower front part of your clay wedge at a backward angle. You want to create a deep enough indentation to hold the bottom of the phone securely. -
Build the front lip:
While the phone is pressed in, gently push the clay at the very front upwards to form a small ‘lip’ or bumper. This raised edge prevents the phone from sliding forward. -
Refine the back support:
Smooth the clay behind the phone so it curves up to meet the back of the device. The back section needs to be heavy enough to act as a counterweight so the stand doesn’t tip over. -
Check the angle:
Remove the phone carefully and check the angle of the slot. If it’s too upright, the phone might fall forward; too reclined, and it might slide out. Adjust while the clay is still wet. -
Smooth the exterior:
Use a small amount of water on your fingertips to smooth out the entire outer surface. Round off any sharp edges created by the phone impression to keep that soft, organic pebble look. -
Initial drying phase:
Let the piece sit for about hour, then do a quick test fit with your phone again (wrapped in plastic). The clay might have shifted or puffed up slightly, so press the phone back in to re-establish the perfect fit.
Step 3: Finishing Touches
-
Full dry time:
Allow the stand to dry completely for at least 24 to 48 hours. Turn it over occasionally so the bottom dries evenly. -
Correction sanding:
Once bone dry, take a sanding block and gently buff the entire surface. Focus on the main curves to remove any fingerprints and ensure the shape is uniform. -
Enhance the speckles:
If your sanding hid some of the texture, use a stiff brush to flick tiny droplets of diluted black acrylic paint onto the surface for added visual depth. -
Surface protection:
Apply a coat of matte varnish. This seals the clay and deepens the color of the speckles, making the coffee grounds or sand look more like stone aggregate. -
Add grip:
For extra stability, glue a small piece of felt or thin cork to the flat bottom of the stand once the varnish is dry. This prevents it from scratching your desk.
Color Match
Knead a drop of tan or beige acrylic paint directly into the wet white clay before starting. This tints the base material for a warm, sandy limestone color.
Enjoy your organized desk space with this sleek, handcrafted accessory
Pen Cup Pencil Holder
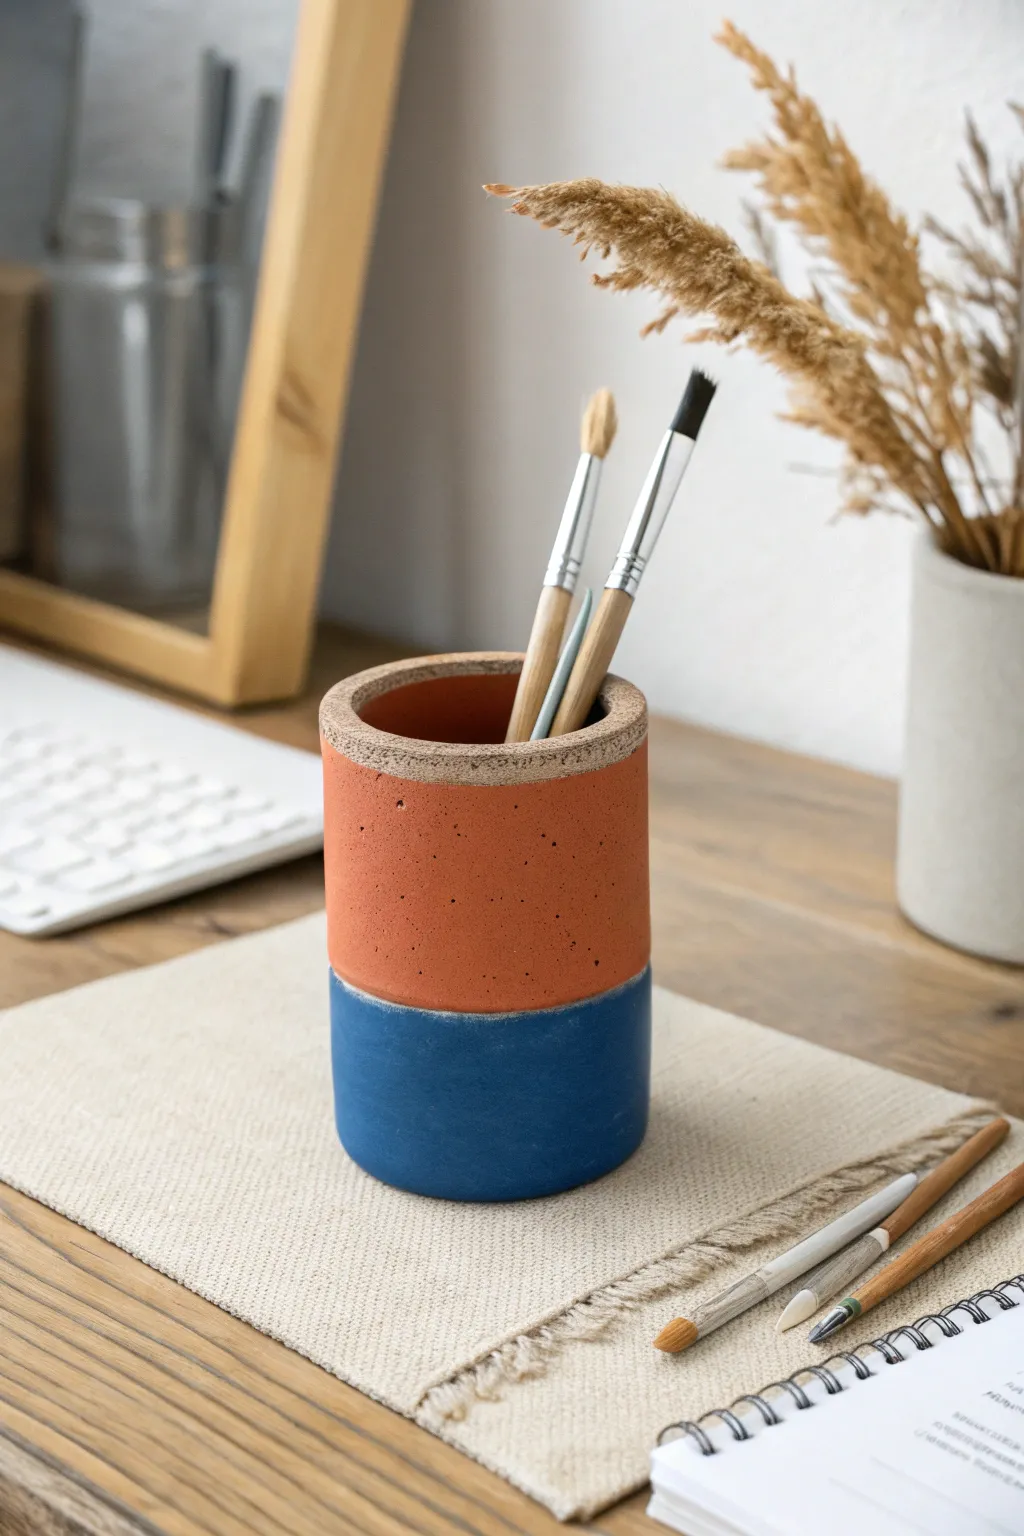
This sleek, cylindrical pencil holder brings a contemporary pop of color to your desk with its striking terracotta and deep blue palette. The smooth, matte finish and thick structural walls give it a professional, ceramic-like weight without needing a kiln.
Detailed Instructions
Materials
- Air dry clay (white or terra cotta color)
- Acrylic rolling pin
- Sharp clay knife or X-Acto blade
- Ruler
- Empty soda can or PVC pipe (approx. 2.5-3 inch diameter) to use as a form
- Parchment paper
- Slip (clay mixed with water)
- Fine-grit sandpaper (220-400 grit)
- Acrylic paints (Terracotta Orange, Deep Navy Blue)
- Medium flat paintbrush
- Matte spray varnish or sealant
- Painter’s tape or masking tape
Step 1: Forming the Cylinder
-
Prep your workspace:
Lay down parchment paper tape so it doesn’t slide. This prevents the clay from sticking to your table and makes moving the wet piece easier. -
Roll out the slab:
Take a large handful of air dry clay and condition it by kneading until pliable. Roll it out into a long rectangle about 1/4 inch thick. Aim for an even thickness to ensure the walls stand up straight. -
Cut the rectangle:
Measure the height of your mold (the slightly taller soda can or pipe) and cut a clean strip of clay that is slightly shorter than your mold, about 4.5 inches high. Ensure the length is enough to wrap fully around your form with a little overlap. -
Wrap the form:
Wrap your mold (soda can) in a loose layer of parchment paper first to prevent sticking. Then, carefully wrap your clay slab around the parchment-covered form. -
Join the seam:
Where the clay ends meet, cut through both layers at an angle (a bevel cut) to create a perfect matching seam. Score both edges with your knife, add a little slip, and press them firmly together. -
Smooth the exterior:
Use your finger or a smoothing tool to blend the seam on the outside until it is invisible. I find a slightly damp sponge helps erase the join lines completely.
Fixing Cracks
If hairline cracks appear during drying, mix a small amount of fresh clay with water to make a thick paste (spackle consistency) and fill the cracks. Sand smooth once dry.
Step 2: Base and Drying
-
Create the base:
Roll out a smaller piece of clay to the same 1/4 inch thickness. Place your wrapped cylinder (still on the form) onto this slab. -
Cut and attach:
Trace around the bottom of the cylinder with your knife to cut the base circle. Score and slip the contact points where the wall meets the base, then blend the clay on the outside to seal the bottom seamlessly. -
Create the rim detail:
Your image shows a nice thick rim. Gently pat the top edge of the cylinder flat with a small block of wood or your fingers to create that substantial, flat lip. -
Remove the form:
Let the clay sit for about an hour to stiffen slightly, then carefully slide the soda can/mold out. Leave the parchment paper inside for another few hours to support the walls as they dry. -
Full dry:
Allow the piece to dry completely for 24-48 hours. Turn it upside down halfway through so the bottom dries evenly.
Level Up: Faux Stone
Mix dried coffee grounds or coarse black pepper into your terracotta paint before applying. This adds physical grit and texture, making the ‘clay’ look undeniably like real kiln-fired stoneware.
Step 3: Sanding and Painting
-
Smooth the surface:
Once bone dry, use fine-grit sandpaper to smooth out any bumps, fingerprints, or seam lines. Pay special attention to the flat top rim to get that crisp look. -
Mark the horizon line:
Measure about one-third of the way up from the bottom. Lightly mark this height all the way around with a pencil. -
Apply tape barrier:
Apply a strip of painter’s tape just *above* your pencil line. Press the edge of the tape down firmly with your fingernail to prevent paint bleed. -
Paint the bottom:
Paint the bottom section with deep navy blue acrylic paint. Use horizontal brush strokes for a smooth finish. You may need two coats for full opacity. -
Paint the top:
Once the blue is dry, remove the tape. Re-apply tape over the dry blue edge to protect it, then paint the top section with terracotta orange acrylic. Leave the very top flat rim unpainted if you want that raw clay accent, or paint it to match. -
Add texture (optional):
To mimic the speckled stoneware look in the photo, you can flick a toothbrush with slightly watered-down brown or black paint lightly over the orange section. -
Seal the piece:
Finish with a matte spray sealant to protect the paint and give the holder a unified sheen.
Place your favorite brushes or pens inside and enjoy the modern touch this piece adds to your creative space
Succulent Cachepot Cover
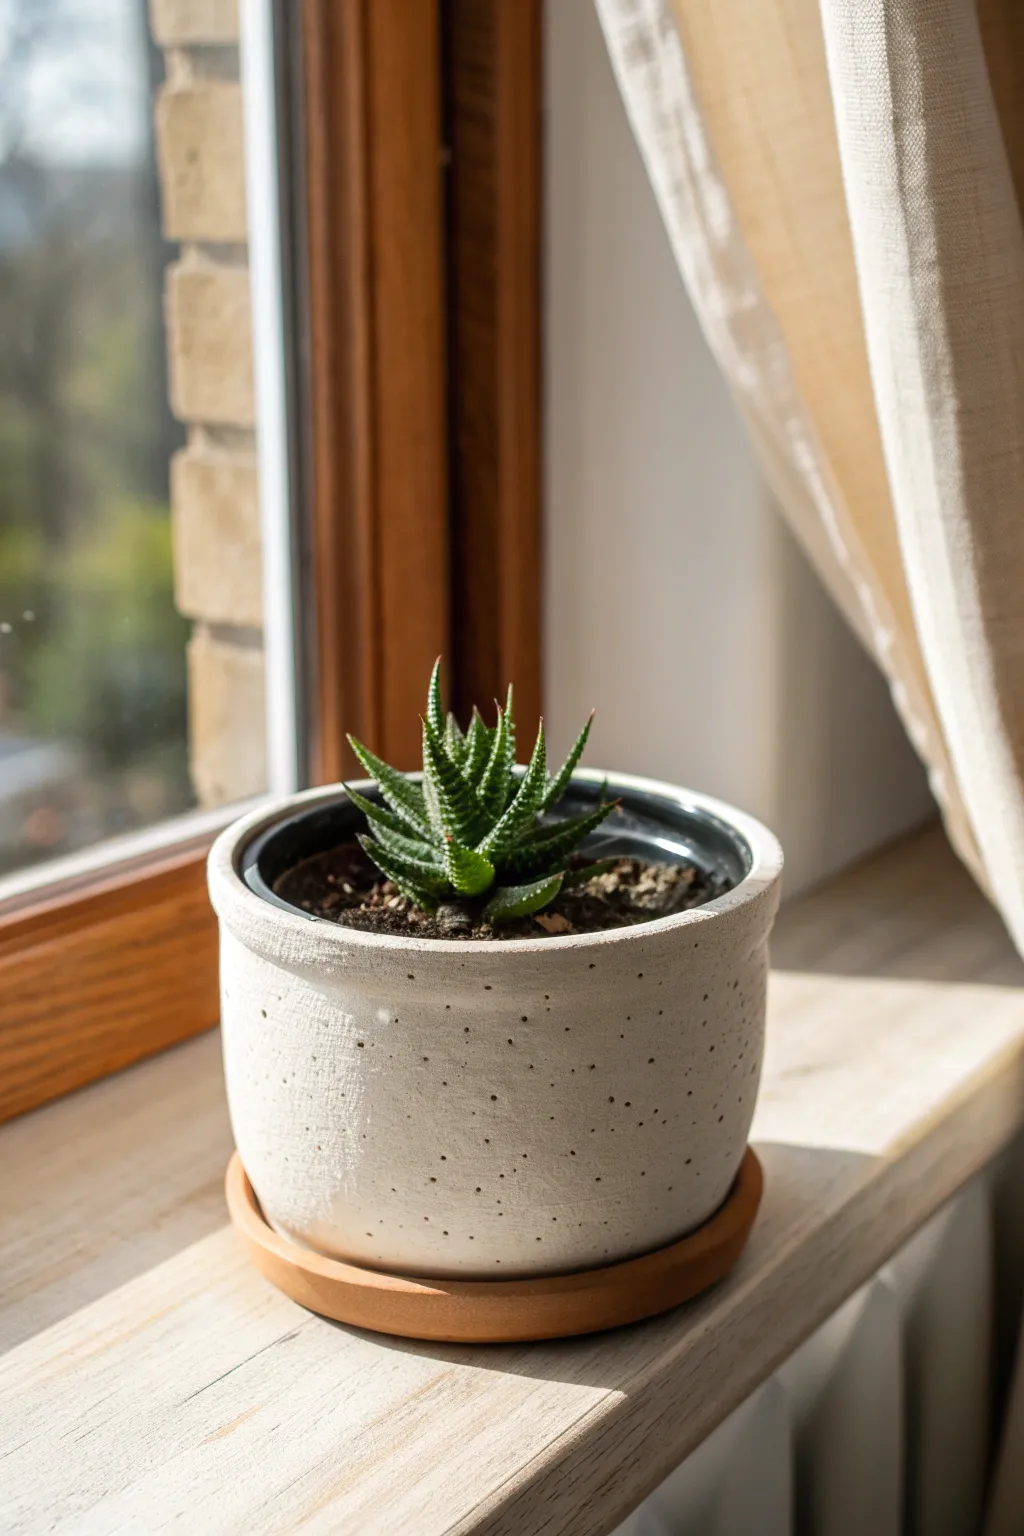
Transform simple air-dry clay into a sophisticated, minimalist home for your favorite succulents. This cachepot features a charming speckled texture and a faux-ceramic finish that looks stunning on any windowsill.
Step-by-Step Tutorial
Materials
- White creative air-dry clay
- Rolling pin
- Small plastic nursery pot (to use as a mold)
- Black acrylic paint
- Old toothbrush
- Terracotta saucer (sized to fit your pot)
- Craft knife or clay cutter
- Sandpaper (fine grit)
- Matte or satin waterproof varnish
- Small bowl of water
- Plastic wrap
Step 1: Shaping the Pot
-
Prepare your clay:
Start by kneading a generous chunk of white air-dry clay until it is soft, pliable, and free of any air bubbles. -
Roll out the slab:
Roll the clay out on a smooth surface to an even thickness of about 1/4 inch. Ensure the strip is long enough to wrap completely around your plastic nursery pot. -
Prepare the mold:
Wrap your plastic nursery pot loosely in plastic wrap. This step is crucial so the clay doesn’t stick to the plastic as it dries. -
Create the base:
Place the wrapped pot on top of the remaining clay slab and cut a circle around the bottom to create the base of your cachepot. -
Form the walls:
Cut a long rectangular strip from your rolled clay. The height should match your nursery pot plus a little extra for the rim. -
Wrap the cylinder:
Carefully wrap the clay strip around the plastic pot mold. Where the ends meet, score the edges with a craft knife and add a dab of water before pressing them together to join. -
Attach the base:
Score the bottom edge of the cylinder and the outer edge of the circular base. Press them together firmly, smoothing the seam with your finger or a modeling tool until it disappears. -
Refine the rim:
I like to slightly thicken the top rim by folding a tiny bit of clay over or simply smoothing it with a wet finger to create a soft, rounded lip reminiscent of thrown pottery.
Natural Stone Look
Mix dried coffee grounds or black pepper directly into the wet clay before rolling. This creates an embedded texture that looks like authentic speckled stoneware without painting.
Step 2: Texturing and Finishing
-
Create the speckles:
Before the clay dries, take a stiff-bristled tool or a needle tool and gently poke tiny, random holes all over the surface. These physical indentations add depth that mimics stone. -
Let it dry:
Allow the pot to dry completely. This usually takes 24-48 hours depending on humidity. Once the outside is firm, gently wiggle the plastic mold out to let the inside dry too. -
Sand for smoothness:
Once bone dry, use fine-grit sandpaper to smooth out any rough fingerprints or sharp edges on the rim and join lines. -
Paint the splatter:
Dilute a small drop of black acrylic paint with water. Dip an old toothbrush into the mixture and flick the bristles with your thumb to spray fine black speckles across the white surface. -
Seal the pot:
This is the most important step for functionality. Apply 2-3 coats of waterproof varnish to both the inside and outside to protect the clay from moisture. -
Prepare the saucer:
Take a pre-made terracotta saucer (or make a matching one from clay) to catch drainage water. -
Final assembly:
Place your succulent into the cachepot (keeping it in its plastic nursery liner makes watering easier) and set the whole assembly onto the saucer.
Cracking Seams?
If seams split while drying, make a ‘slip’ paste of clay and water. Fill the crack, smooth it over, and let it dry slowly away from direct heat or sunlight.
Now you have a stylish, minimalist planter ready to brighten up your desk or window ledge
Page Opener Thumb Saver
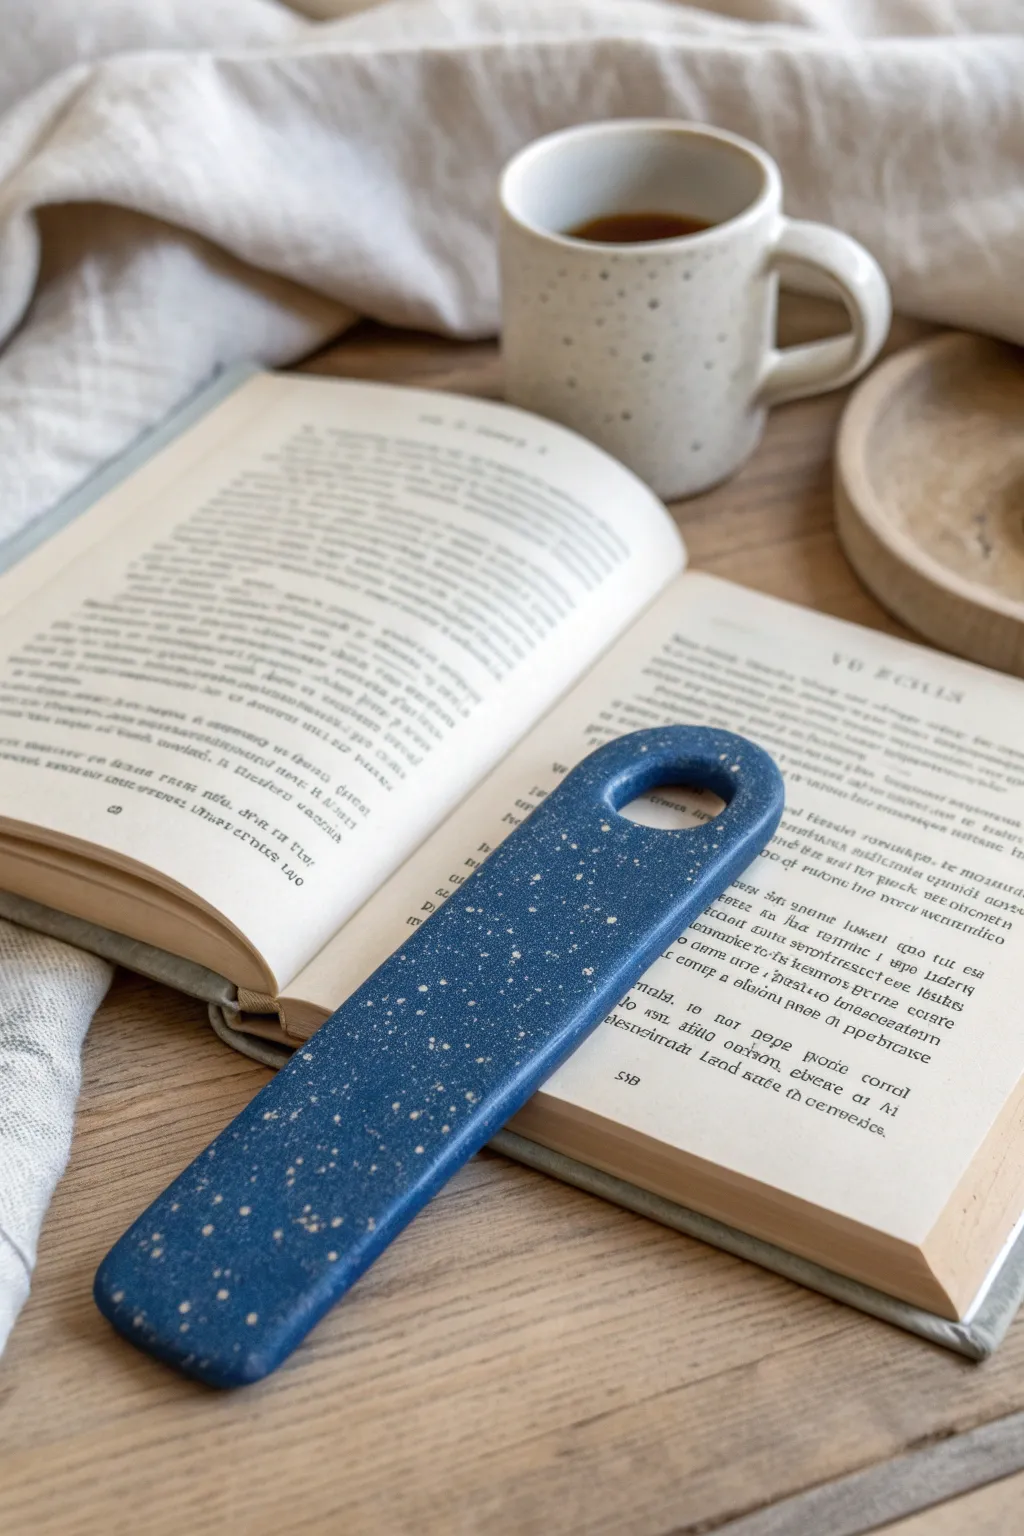
Keep your book pages open effortlessly with this sleek, functional bookmark tool. Featuring a deep indigo hue with golden speckles, this handmade page holder combines reading comfort with artistic flair.
Step-by-Step Guide
Materials
- Air dry clay (white or grey)
- Blue acrylic paint (dark indigo or navy)
- Gold acrylic paint or metallic ink
- Rolling pin
- Cutting tool or craft knife
- Round cookie cutter (small) or bottle cap
- Sandpaper (fine grit)
- Gloss varnish or clear sealant
- Old toothbrush
- Ruler
Step 1: Shaping the Clay
-
Condition the clay:
Begin by taking a chunk of air dry clay and kneading it thoroughly in your hands until it becomes soft, pliable, and free of cracks. -
Roll it out:
Place the clay on a smooth surface or parchment paper. Using your rolling pin, roll the clay out into a long, flat slab about 1/4 inch thick. Aim for an even thickness throughout. -
Cut the basic shape:
Using a ruler and a craft knife, cut out a long, rectangular strip. You want it to be approximately 1.5 inches wide and 6 to 7 inches long. -
Round the corners:
Use your craft knife or simply smooth the corners with your finger to round them off gently. The end that will hold the thumb hole should be slightly wider and rounded like a spoon handle. -
Add the thumb hole:
At the wider, rounded top end, press your small round cutter or bottle cap through the clay to create the thumb hole. Twist it slightly to get a clean cut and remove the center circle. -
Smooth the edges:
Dip your finger in a tiny bit of water and run it along all cut edges, including the inside of the thumb hole. This eliminates sharp ridges and ensures a comfortable grip later.
Warping Woes?
If the clay curls while drying, place a lightweight book on top of it (sandwiching it between parchment paper) once it’s half-dry to flatten it out.
Step 2: Drying and Refining
-
Initial drying:
Place your shaped clay on a flat board or drying rack. Let it sit undisturbed for at least 24 hours. I usually flip it over halfway through to ensure both sides dry evenly. -
Sand for smoothness:
Once the clay is bone dry and hard, take your fine-grit sandpaper and gently sand the entire surface. Pay special attention to the edges and the inside of the hole. -
Wipe clean:
Use a barely damp cloth or dry brush to remove all the clay dust created by sanding. The surface must be totally clean before painting.
Pro Tip: Marble It!
Mix blue pigment directly into the wet clay instead of painting later. Stop kneading just before the color is uniform to create a cool marbled stone effect.
Step 3: Painting and Finishing
-
Apply the base coat:
Paint the entire tool with your dark blue indigo acrylic paint. Apply a thin, even layer. -
Layer the color:
Let the first coat dry completely, then add a second coat to ensure opaque, rich coverage. Don’t forget to paint inside the thumb hole. -
Create the splatter effect:
Dip an old toothbrush into your gold metallic paint or ink. Hold the brush over the dry blue surface and run your thumb across the bristles to flick tiny speckles of gold onto the piece. -
Control the density:
Continue splattering until you reach your desired density. You can create a galaxy effect by concentrating more dots in certain areas. -
Seal the project:
Once the paint is fully cured, apply a coat of gloss varnish. This protects the finish from wear, enhances the blue color, and gives it that professional ceramic look. -
Final cure:
Let the varnish dry according to the manufacturer’s instructions before using it on your favorite book.
Slide your thumb through the loop and enjoy one-handed reading with your new custom tool