
If your bathroom counter is starting to look like a toothbrush parking lot, I’ve got you. These DIY toothbrush holder ideas are the kind of simple, good-looking projects you can knock out at home—especially if you love working with clay and cute functional decor.
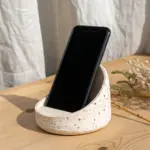
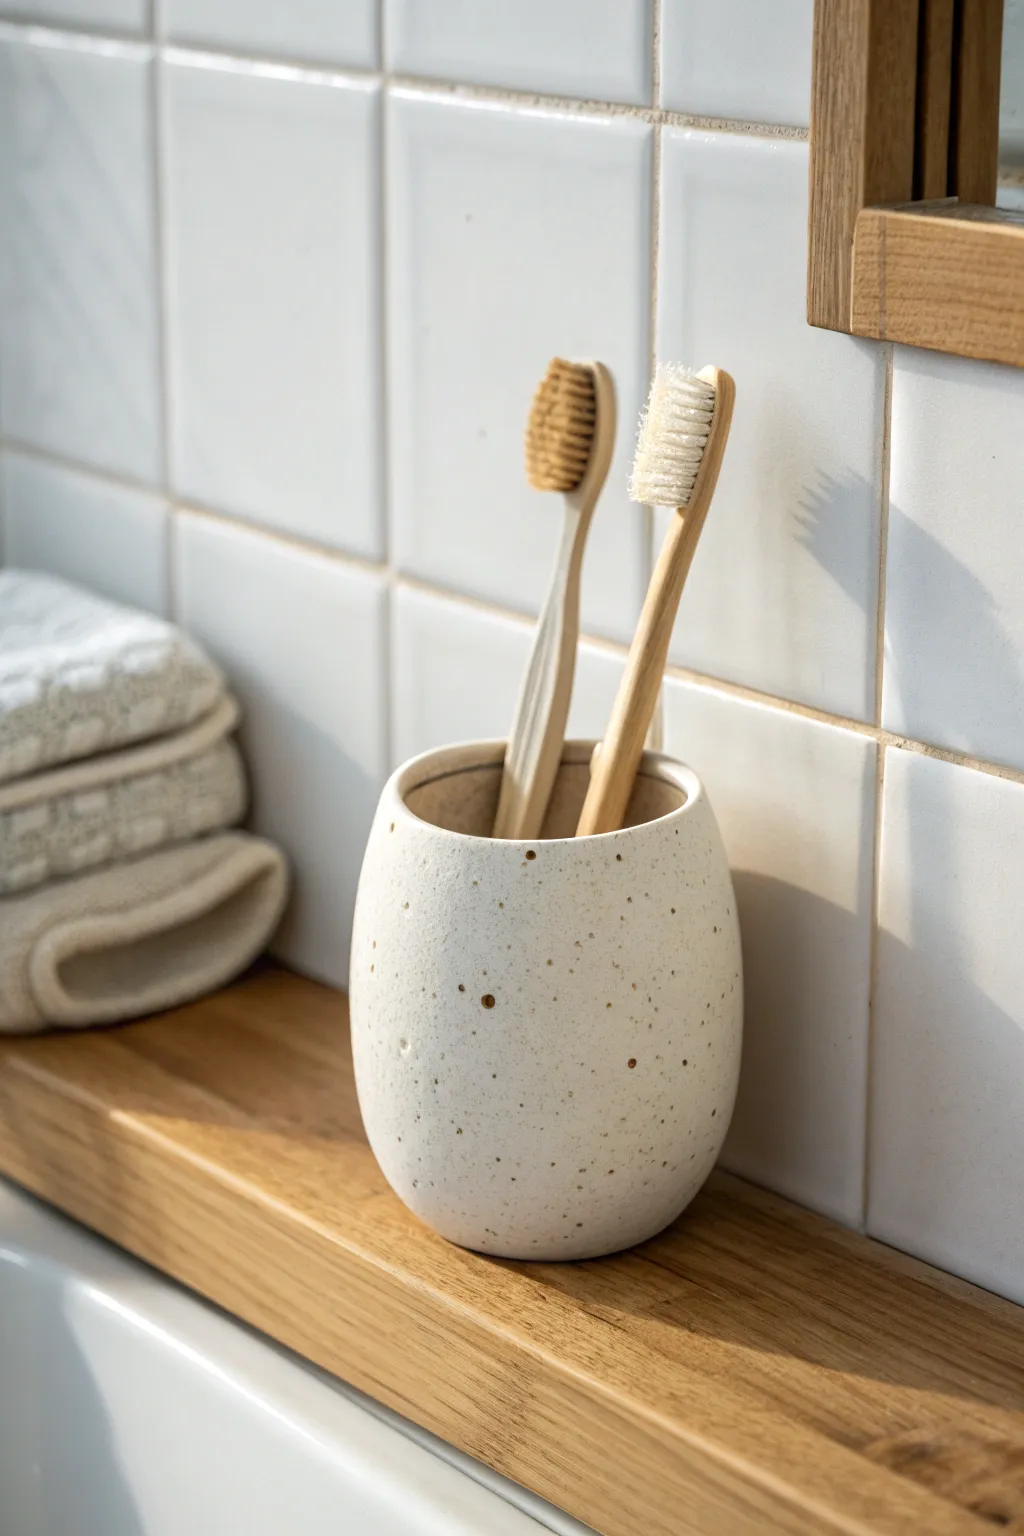
Simple Cup-Style Ceramic Holder
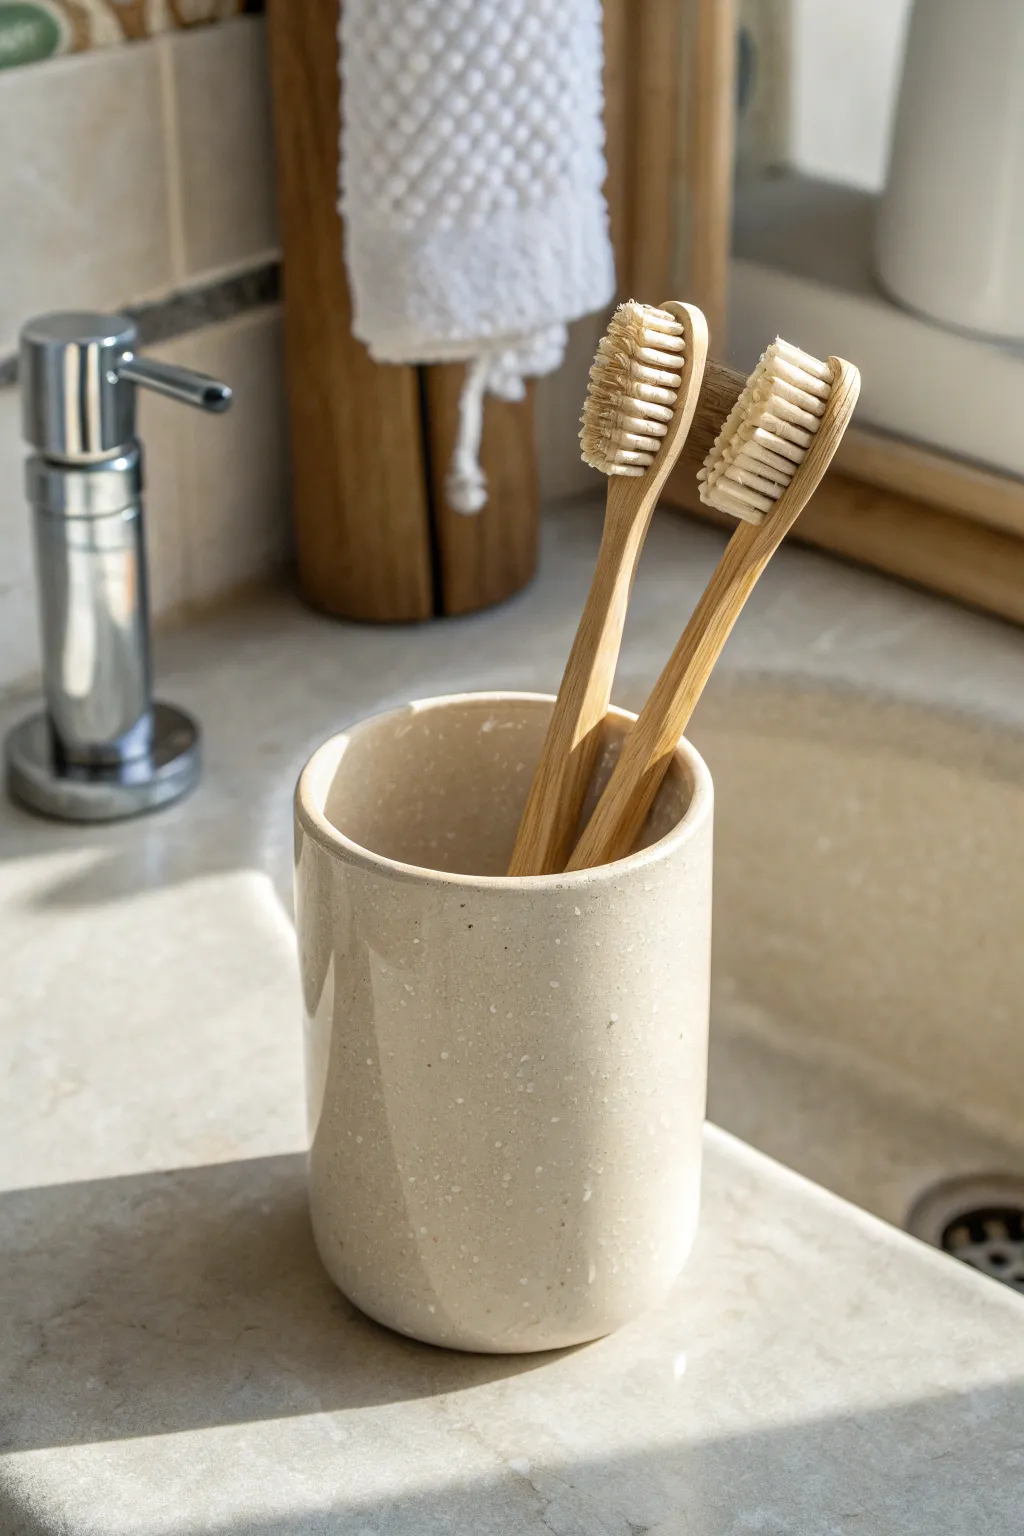
Achieve the high-end look of wheel-thrown pottery without a kiln using air-dry clay and clever finishing techniques. This cylindrical holder features a soft cream glaze effect with subtle speckling that fits perfectly into any natural or modern bathroom aesthetic.
Step-by-Step
Materials
- White air-dry clay
- Rolling pin
- Empty soda can or glass straight-sided jar (for a mold)
- Clay cutting tool or X-Acto knife
- Bowl of water
- Fine-grit sandpaper (220-400 grit)
- Cream or off-white acrylic paint
- Old toothbrush (for spattering)
- Brown or grey acrylic paint (diluted)
- High-gloss waterproof varnish or Mod Podge dishwasher safe formula
- Sponge brush
Step 1: Shaping the Clay Vessel
-
Roll the slab:
Begin by kneading your air-dry clay to warm it up, then roll it out into a smooth, even slab about 1/4 inch thick. Aim for a rectangular shape that is long enough to wrap around your chosen mold form. -
Cut the base:
Place your soda can or jar onto a separate section of the clay slab and trace around the bottom with your cutting tool. Remove the mold and lift away the excess clay to reveal a perfect circle for your base. -
Measure the walls:
Wrap a piece of string or paper around your mold to find the circumference, adding a tiny bit of overlap. Cut a long rectangular strip from your clay slab using this measurement for the length and your desired toothbrush holder height for the width. -
Assemble the cylinder:
Wrap the rectangular clay strip around your mold form (you can wrap the mold in plastic wrap first for easier removal). Gently press the two ends of the clay together where they meet. -
Score and slip:
To ensure a strong bond, scratch cross-hatch marks on the edges you are joining—both the side seam and where the wall meets the circular base. Dab a little water on these scratched areas to act as glue. -
Seal the seams:
Press the clay wall onto the circular base. Use your finger or a smoothing tool to blend the clay across the seams until the join lines disappear completely on both the inside and outside. -
Remove the mold:
Carefully slide your mold out of the clay cylinder while the clay is still pliable. If the shape warps slightly, gently nudge it back into a perfect circle. -
Smooth the rim:
Dip your finger in water and run it along the top rim of the holder. Round off any sharp edges to give it that soft, ceramic look seen in the photo. -
Refine the surface:
Look for any lumps or fingerprints on the exterior. Use a damp sponge or wet finger to smooth the entire surface until it looks uniform, then set it aside to dry completely for 24-48 hours.
Fixing Cracks
Did small cracks appear while drying? Mix a tiny bit of fresh clay with water to make a paste (slip) and fill the cracks. Let dry and sand smooth before painting.
Step 2: Faux Ceramic Finish
-
Sanding:
Once bone dry, take your fine-grit sandpaper and gently sand the entire piece. Focus on the rim and any uneven spots on the body. Wipe away the dust with a barely damp cloth. -
Base coat:
Apply a coat of cream or off-white acrylic paint to the inside and outside. I find a sponge brush works best here to avoid visible brushstrokes. Let it dry and apply a second coat for full opacity. -
Prepare the speckle:
Dilute a small amount of brown or dark grey acrylic paint with water until it has an ink-like consistency. -
Apply the speckle:
Dip an old toothbrush into the diluted paint. Hold the toothbrush a few inches away from the holder and run your thumb across the bristles to flick tiny droplets onto the surface. Practice on paper first to control the spray. -
Control the density:
Rotate the cup as you spatter to ensure even coverage. Keep the speckles fine and subtle; you want a natural stone look, not polka dots. -
Waterproofing:
Since this will live in a bathroom, waterproofing is crucial. Apply at least three coats of a high-gloss waterproof varnish or a specialized dishwasher-safe sealer, allowing ample drying time between each layer. -
Final cure:
Let the final coat cure according to the manufacturer’s instructions (often several days) before introducing it to any water or toothbrushes.
Level Up: Texture
Before the clay dries, gently press a piece of canvas or linen into the surface to create a subtle fabric texture that will catch the glaze beautifully.
Now you have a chic, custom piece of decor that keeps your vanity organized style.
Air Dry Clay Tumbler With Drain Holes
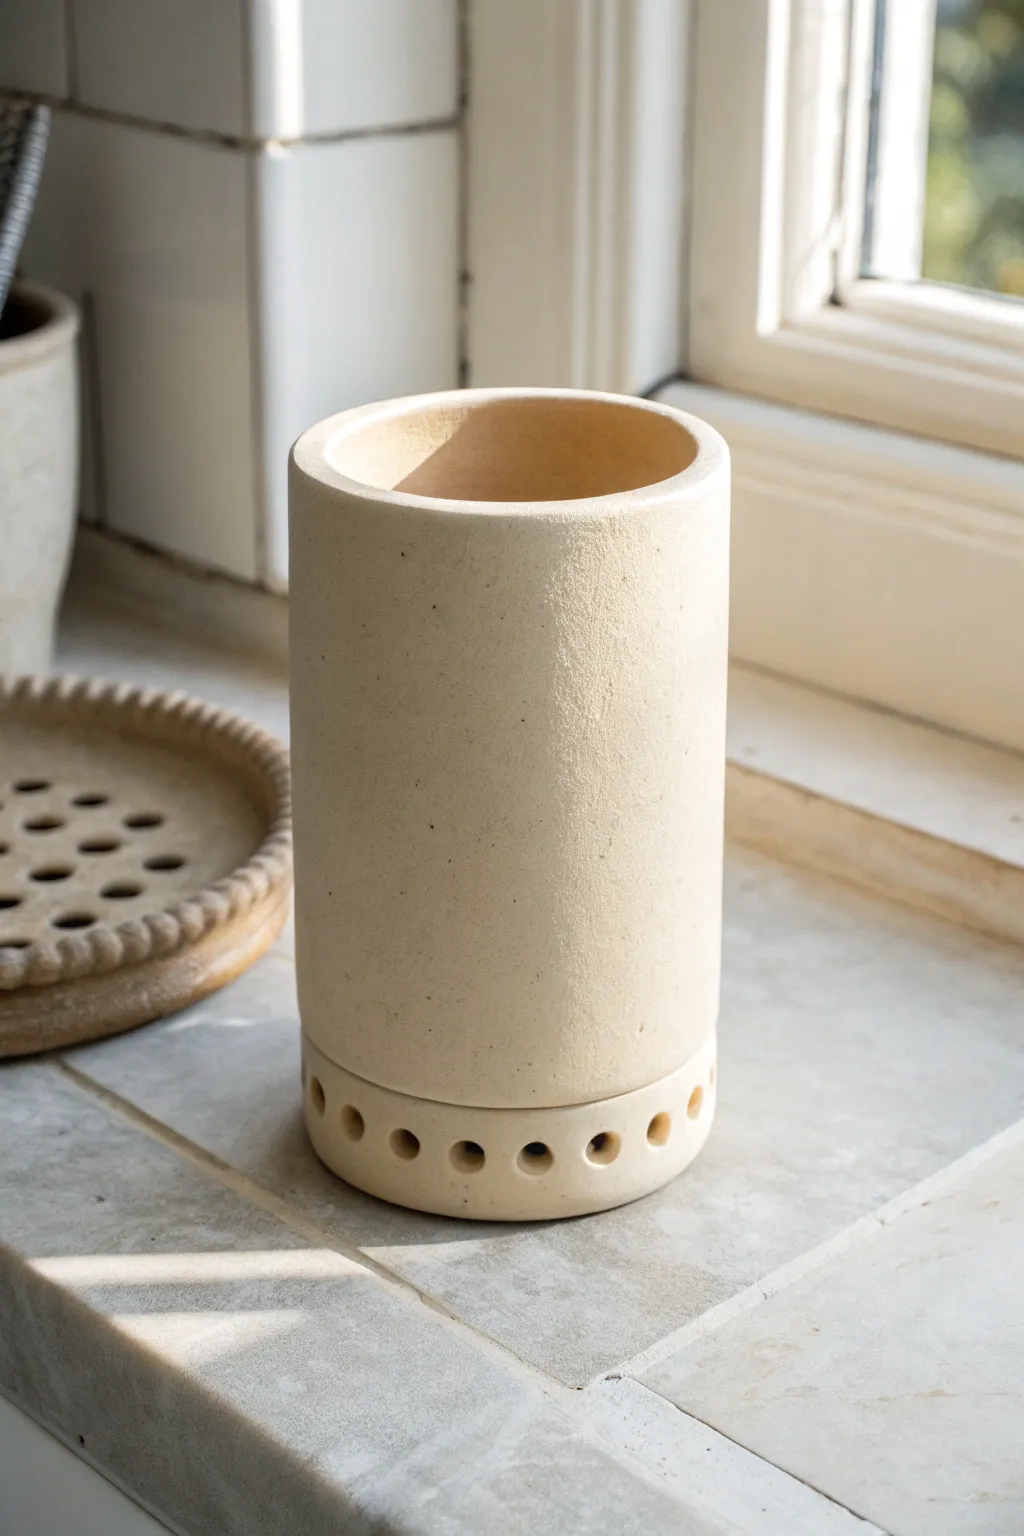
Bring a touch of serene minimalism to your bathroom counter with this handcrafted air dry clay tumbler. Its simple cylindrical form features a clever perforated base for drainage, ensuring your toothbrushes stay dry and hygienic while looking effortlessly chic.
Step-by-Step Guide
Materials
- Air dry clay (white or cream)
- Rolling pin
- Rolling guides (or two thin wood strips, approx. 5mm thick)
- Cylindrical mold (like a smooth glass jar or PVC pipe, approx. 3-inch diameter)
- Clay knife or craft scalpel
- Ruler
- Small circle cutter or sturdy straw
- Slip (clay mixed with a little water)
- Smoothing sponge
- Waterproof varnish or sealer (matte finish)
- Sandpaper (fine grit)
Step 1: Preparing the Clay Base
-
Condition the clay:
Begin by kneading a substantial chunk of air dry clay until it feels pliable and warm in your hands. This removes air pockets and makes the next steps much smoother. -
Roll out the slab:
Place your clay between two rolling guides to ensure an even thickness. Roll the clay out into a long, flat slab, aiming for about 5mm (1/4 inch) thickness. -
Measure and cut:
Using your cylindrical mold as a reference, measure the circumference needed. Use a ruler and sharp knife to cut a precise rectangle that will wrap around the mold with just a tiny bit of overlap, plus a separate circle for the base.
Clean Cuts Only
If using a straw to punch holes, dip the tip in a little cornstarch or baby oil before each punch. This acts as a lubricant and ensures the clay plug slides out easily without distorting the hole.
Step 2: Forming the Cylinder
-
Prepare the mold:
Wrap your glass jar or PVC pipe in a thin layer of parchment paper. This simple trick prevents the sticky clay from adhering to the mold, making removal effortless later. -
Wrap the clay:
Carefully lift your rectangular slab and wrap it snugly around the covered mold. Bring the two short ends together. -
Join the seam:
Score the meeting edges with your knife (make hatch marks) and apply a dab of slip. Press the edges firmly together. -
Smooth the exterior:
Use a damp finger or a rib tool to blend the seam until it disappears completely. I like to spend extra time here to ensure the cylinder looks seamless.
Cracking Issues?
If you notice small cracks forming as the clay dries, patch them immediately with a small amount of slip (clay paste). Smooth it over continuously with a damp sponge until the crack is filled and invisible.
Step 3: Creating the Perforated Base
-
Attach the bottom:
Take your cut clay circle and attach it to the bottom of the cylinder using the score-and-slip method. Blend the clay upwards from the base to the wall to create a solid seal. -
Define the drainage zone:
Decide on the height of your drainage holes. Measure about 1/2 inch from the bottom edge and lightly mark a guideline all the way around the circumference. -
Punch the holes:
Using a small circle cutter or a sturdy straw, punch clean holes evenly spaced along your guideline. Twist the tool gently as you push through to get a clean cut. -
Refine the holes:
Once the holes are punched, use a damp brush or fingertip to smooth the raw edges of each circle so they look polished rather than torn.
Step 4: Finishing Touches
-
Initial drying:
Let the piece sit on the mold for an hour or two until it holds its own shape, then carefully slide the mold out. Let it dry completely for 24-48 hours away from direct heat. -
Sand for perfection:
Once bone dry, take your fine-grit sandpaper and gently buff the entire surface. Pay special attention to the top rim and the drainage holes to remove any sharp burrs. -
Seal for protection:
Since this will live in a bathroom, sealing is crucial. Apply 2-3 coats of waterproof matte varnish, allowing proper drying time between each layer. -
Check the interior:
Don’t forget to varnish the inside as well. A thorough interior seal prevents moisture from seeping into the clay and weakening the structure over time.
Place your finished tumbler on the sink edge and enjoy the organized simplicity it brings to your morning routine
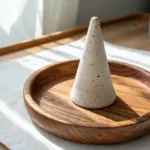

Two-Piece Holder With Removable Insert
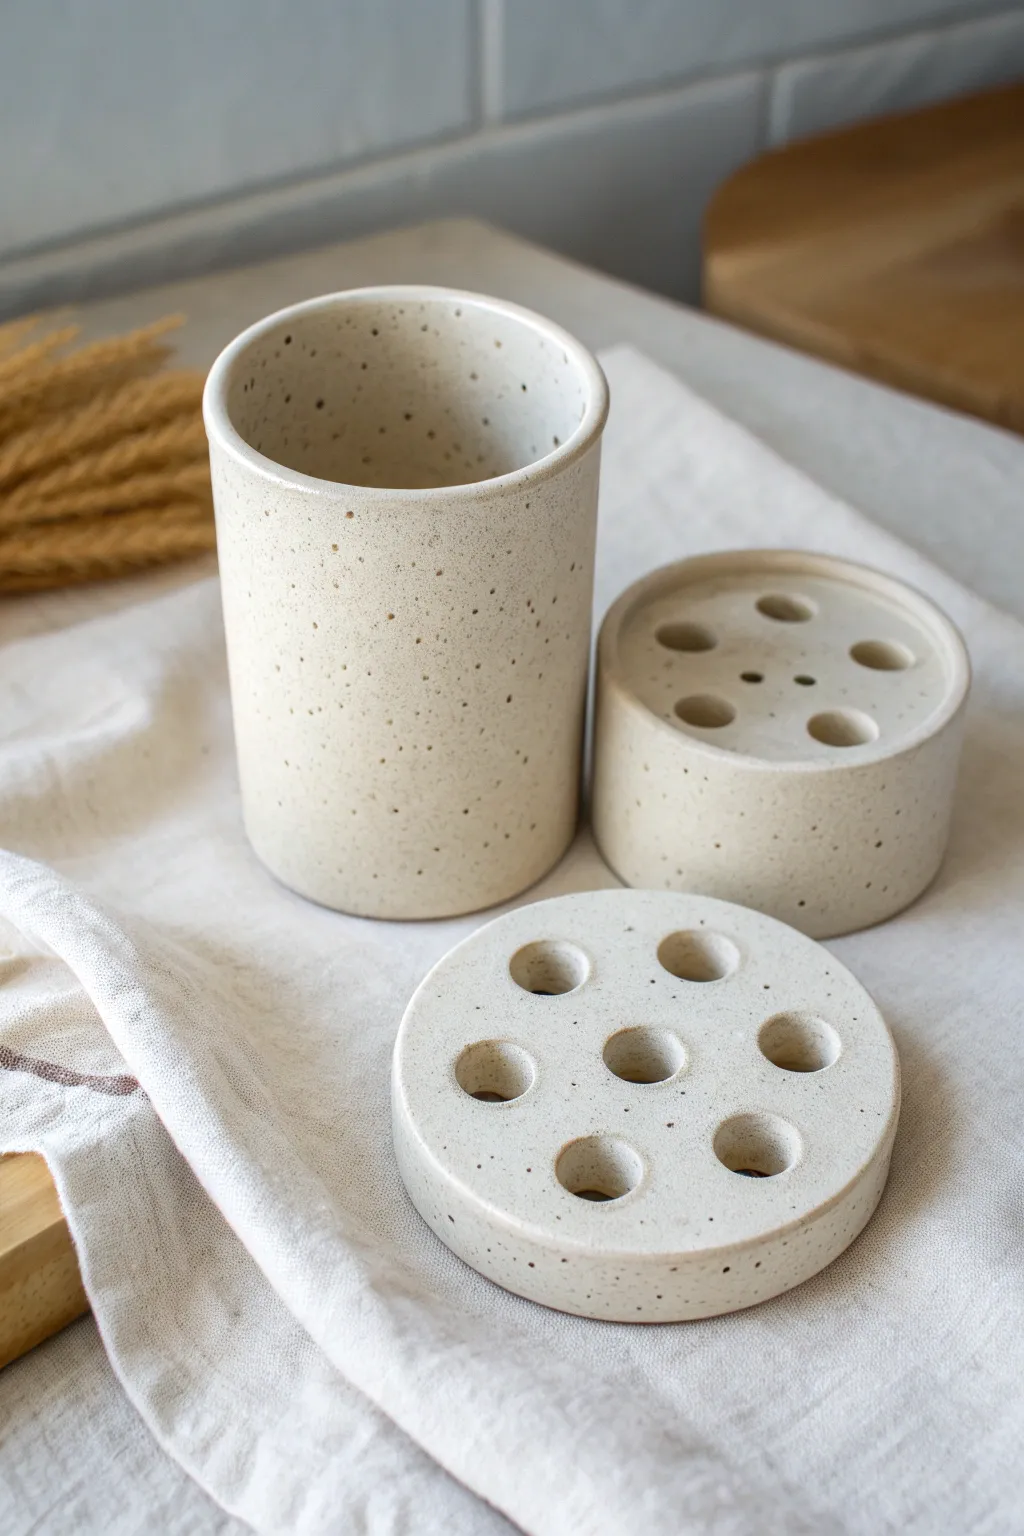
Create a sophisticated, minimalist toothbrush organizer that mimics the look of high-end speckled stoneware. This project features a clever two-piece design with a removable perforated insert, making it incredibly easy to keep clean and hygienic.
How-To Guide
Materials
- White air-dry clay or polymer clay (approx. 1 lb)
- Speckled clay additive (or coarse black pepper/sand)
- Rolling pin with guide rings
- Circle cutters (various sizes)
- Small straw or tubing (approx. 1/2 inch diameter)
- Sanding sponge (fine grit)
- Craft knife or scalpel
- Water and small sponge for smoothing
- Glossy or matte clay varnish/sealer
- Food-safe sealant (optional but recommended for water resistance)
Step 1: Preparing the Speckled Clay
-
Conditioning:
Start by kneading your white clay until it is warm and pliable. If you are using pre-speckled clay, you are ready to roll. If using plain white clay, flatten it out slightly. -
Adding Texture:
Sprinkle a small amount of coarse black pepper, sterile sand, or specific clay speckle additive onto the flattened clay. Fold the clay over and knead thoroughly until the specks are evenly distributed throughout the batch to mimic stoneware.
Step 2: Forming the Main Container
-
Rolling the Slabs:
Roll out a large slab of clay to a consistent thickness of about 1/4 inch. Use guide rings on your rolling pin if you have them to ensure even walls. -
Cutting the Base:
Use a large circle cutter (about 3-4 inches in diameter) to cut the base for the main cup. -
Measuring the Walls:
Measure the circumference of your base circle. Cut a rectangular strip from your clay slab that matches this length plus a tiny bit for overlap, with a height of about 5 inches. -
Assembling the Cylinder:
Wrap the rectangular strip around the circular base. Carefully score and slip the edges where they meet (if using air-dry clay) or blend the seams together with a modeling tool (if using polymer). -
Smoothing Seams:
Use a damp sponge or your finger to smooth the vertical seam and the bottom connection until they are invisible. I find it helpful to work from the inside out to ensure a watertight seal.
Uneven Cylinder?
If your cup looks wobbly, wrap the clay slab around a rigid object like a glass jar or PVC pipe tailored with parchment paper. Keep the form inside while shaping to ensure a perfect circle.
Step 3: Creating the Divider Insert
-
Cutting the Insert Lid:
Roll out a new slab, slightly thicker than the walls (about 1/3 inch). Cut a circle that is just slightly smaller than the outer diameter of your main cup so it rests on top or fits snugly just inside. -
Adding Drainage Holes:
Using a small tube or varying sizes of straws, punch a symmetrical pattern of holes into this disc. Create a central hole and surround it with 5-6 outer holes for the toothbrushes. -
Refining the Holes:
Gently smooth the edges of each hole with a damp brush so they aren’t sharp. -
Forming the Insert Base:
Create a second, shorter cylinder (about 2 inches tall) using the same technique as the main cup. The diameter should match the perforated lid exactly. This acts as the separate stand shown in the reference. -
Attaching the Lid:
Place the perforated disc on top of this shorter cylinder and blend the seams downward until it looks like a solid block of clay.
Go Waterproof
For a truly waterproof finish that lasts years, skip the varnish and use a two-part epoxy resin or a UV resin to coat the inside and outside of the container.
Step 4: Finishing Touches
-
Initial Drying/Baking:
Allow the pieces to dry completely (24-48 hours for air-dry) or bake according to your polymer clay package instructions. -
Sanding:
Once hardened, take a fine-grit sanding sponge and gently sand the rims and the outer surfaces to remove any fingerprints or uneven texture. -
Cleaning:
Wipe away all sanding dust with a slightly damp cloth or tack cloth. -
Sealing:
Apply 2-3 coats of a high-quality water-resistant varnish. Since this item lives in a bathroom, paying extra attention to the bottom inside seams is crucial. -
Curing:
Let the Varnish cure fully before testing the fit of your toothbrushes or exposing the holder to water.
Now you have a chic, speckled organizer that elevates your bathroom counter aesthetic


Wood Block Stand With Clay Catch Tray
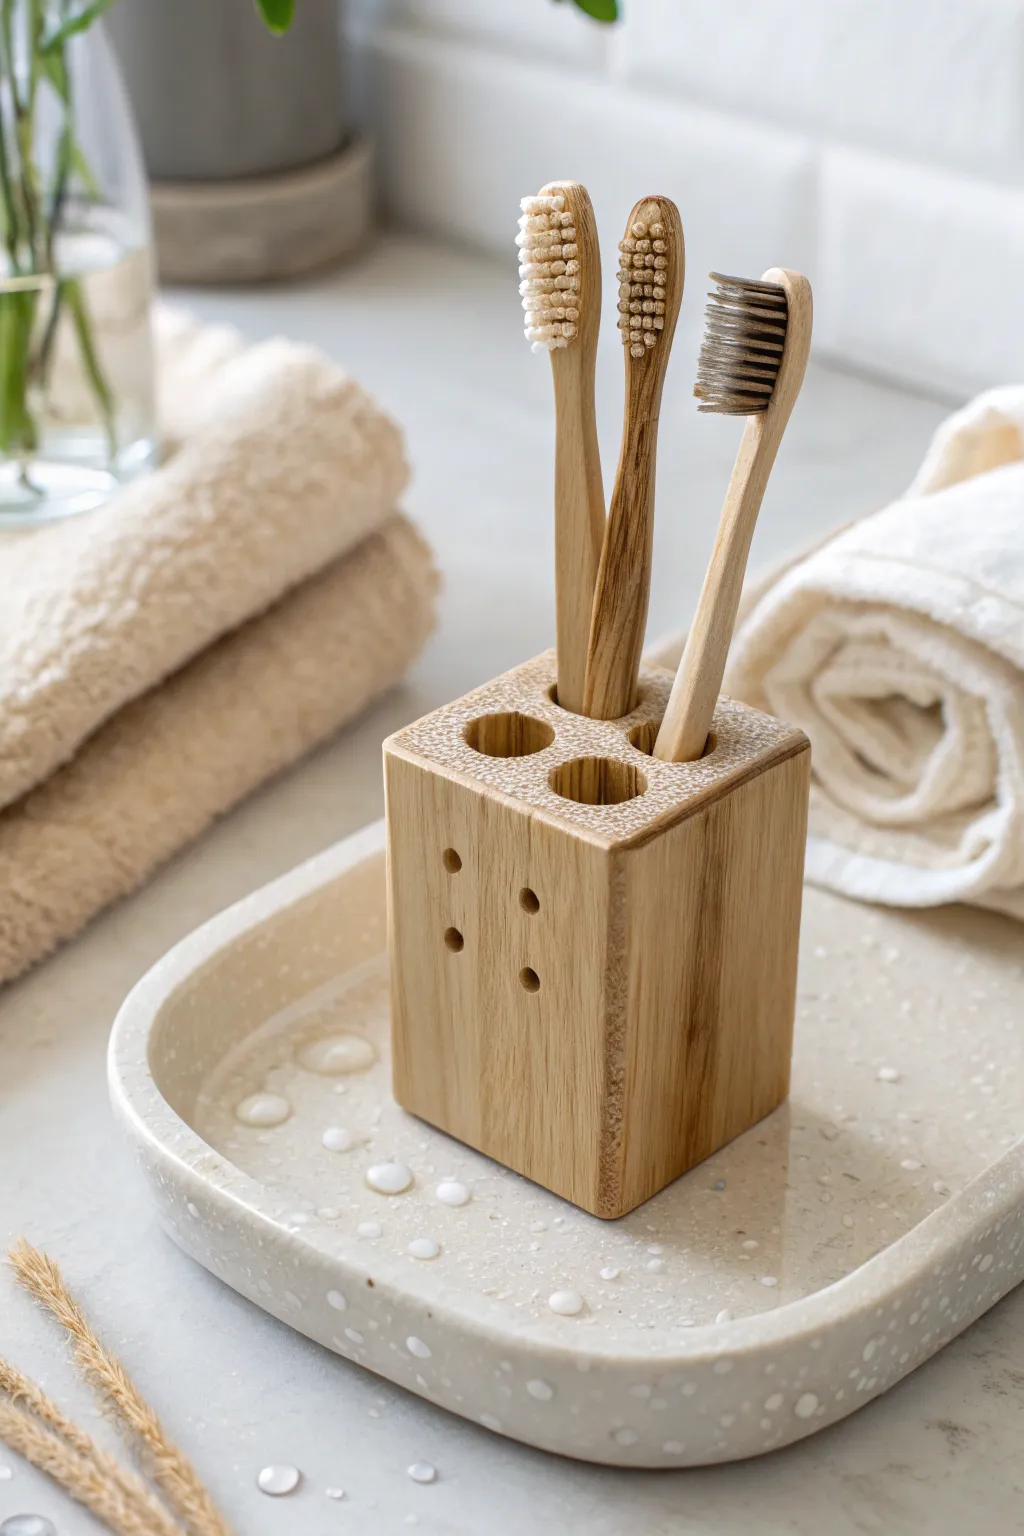
Bring a touch of organic warmth to your bathroom with this elegant pairing of a solid wood toothbrush stand and a handmade clay catch tray. The design combines clean lines with natural textures, keeping your essentials organized and your countertop dry.
Step-by-Step Guide
Materials
- Solid hardwood block (oak or maple), approx 2.5″ x 2.5″ x 3.5″
- Polymer clay or air-dry clay (white/stone color)
- Speckled clay inclusions (sand, glitter, or pre-mixed speckled clay)
- Course and fine sandpaper (80 to 220 grit)
- Drill with 1/2″ spade bit or Forstner bit
- Drill with 1/8″ standard twist bit
- Wood varnish or polyurethane sealer
- Waterproof clay varnish or resin
- Rolling pin
- Ruler and pencil
Step 1: Wooden Stand Construction
-
Select and size your timber:
Start with a solid piece of hardwood. If necessary, cut your block to size using a miter saw to ensure perfectly square ends. A block roughly 2.5 inches square and 3.5 inches tall provides good stability. -
Mark the top layout:
Use a pencil and ruler to mark the positions for your toothbrush holes on the top grain. For a standard three-brush holder, create a triangle pattern or an evenly spaced line, leaving at least 1/4 inch of wood between the hole edges. -
Drill the toothbrush slots:
Using a 1/2″ spade bit or Forstner bit, drill straight down into your marked points. Drill to a depth of about 2 inches—deep enough to hold the brushes steady but not all the way through the block. -
Mark side ventilation holes:
On one vertical face of the block, mark a pattern of small ventilation dots. In the example, there is a simple 2×2 grid. Center these marks on the face of the block. -
Drill the ventilation details:
Switch to a small 1/8″ twist bit. Drill into your side marks about 1/4 inch deep. These are decorative but mimic ventilation holes; if you want true airflow, you can drill these until they intersect with the main vertical chambers. -
Initial rough sanding:
Wrap 80-grit sandpaper around a block and aggressively sand all flat surfaces to remove saw marks. chamfer (slightly angle) the sharp corners to soften the look. -
Refine the wood surface:
Progress to 120-grit and finally 220-grit sandpaper. The wood should feel silky smooth to the touch. -
Seal the wood:
Apply a coat of waterproof wood varnish or polyurethane. Since this will live in a wet environment, dab extra finish inside the drilled holes using a cotton swab. -
Buff and finish:
Once the first coat is dry, lightly sand with high-grit paper and apply a second coat for maximum durability.
Step 2: Clay Catch Tray Creation
-
Prepare the clay:
Take a large ball of polymer or air-dry clay. If you are using plain white clay, knead in some course sand or dried coffee grounds to achieve that speckled, stoneware aesthetic seen in the photo. -
Roll out the slab:
Roll the clay out to a consistent 1/4-inch thickness. You want a slab large enough to cut a rectangle slightly larger than your toothbrush or soap needs. -
Cut the base shape:
Cut a rounded rectangle shape. I usually repurpose a small food storage container lid as a template—just trace around it with a clay knife. -
Form the rim:
Gently curve up the edges of the slab to create a shallow lip. Pinch the corners specifically to create a defined, slightly taller rim that will hold water droplets. -
Smoothing the edges:
Dip your finger in a little water (for air-dry clay) or baby oil (for polymer) and run it along the rim to smooth out any cracks or harsh cuts. -
Curing or drying:
Follow the instructions for your specific clay. Bake polymer clay in the oven as directed, or let air-dry clay sit undisturbed for 24-48 hours until completely hard. -
Waterproofing the tray:
This is the most critical step for bathroom lifespan. Apply 2-3 coats of a high-quality waterproof varnish or a thin layer of UV resin to the entire tray. -
Final assembly:
Once everything is fully cured and dry, place your wooden block onto the tray. The tray will now catch dips while the wood holds your brushes upright and airy.
Uneven Clay bottoms?
If your tray wobbles after drying, tape a sheet of coarse sandpaper to a flat table and rub the bottom of the tray in a circular motion until it sits perfectly flush.
Drainage Pro Tip
Drill the main toothbrush holes all the way through the bottom of the wood block. This allows water to drip directly onto the tray rather than pooling inside the wood.
Enjoy the spa-like atmosphere this simple, functional set brings to your morning routine

The Complete Guide to Pottery Troubleshooting
Uncover the most common ceramic mistakes—from cracking clay to failed glazes—and learn how to fix them fast.
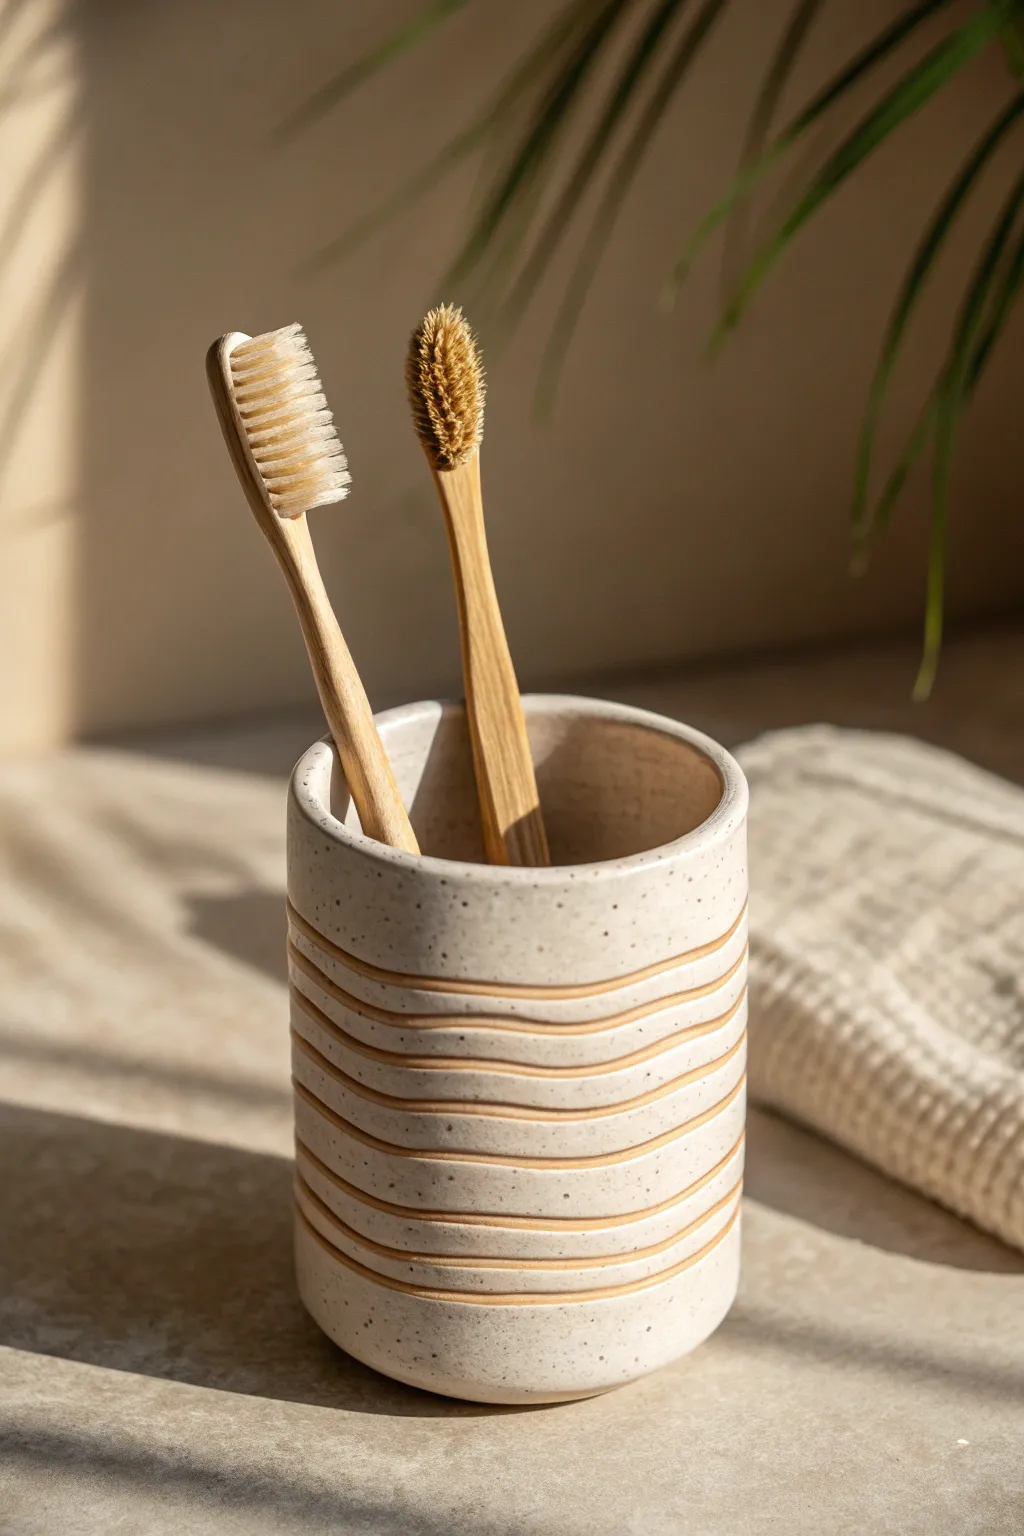
Wall-Mounted Ceramic Pocket Holder
Bring a touch of organic warmth to your bathroom with this minimalist speckled clay toothbrush holder. Its soft, rounded form and natural texture make it the perfect vessel for sustainable bamboo brushes.
Step-by-Step
Materials
- Speckled stoneware clay (white or light cream base)
- Pottery wheel (or coil/pinch tools for hand-building)
- Wooden rib tool
- Pin tool
- Sponge
- Wire cutter
- Clear matte glaze
- Small kiln (or access to a firing service)
Step 1: Forming the Body
-
Prepare the Clay:
Start by wedging a ball of speckled stoneware clay about the size of a large orange. Thorough wedging is crucial to remove air bubbles and ensure the speckles are evenly distributed. -
Center on the Wheel:
Throw the ball of clay firmly onto the center of your wheel head. Using wet hands, cone the clay up and down until it is perfectly centered and spinning without wobbling. -
Open the Vessel:
Press your thumbs into the center to open the form, leaving about a half-inch of clay at the bottom for weight and stability. Pull the floor out to determine the interior width. -
Pull the Walls:
Begin pulling the walls upward. I like to keep the pressure gentle to maintain a uniform thickness. Aim for a cylinder that is slightly taller than your intended finished height. -
Shape the Curve:
Using a wooden rib on the outside and your fingers on the inside, gently push the belly of the pot outward to create a convex curve. The goal is a soft, egg-like silhouette rather than straight sides. -
Refine the Rim:
Slightly taper the rim inward to capture the rounded aesthetic. Use a chamois or a wet sponge to compress and smooth the lip, making it pleasant to the touch. -
Trim the Base:
Use a wooden modeling tool to undercut the base slightly while the wheel is spinning, creating a clean line where the pot meets the shelf. Use your wire tool to cut the pot free, but leave it on the bat to firm up.
Enhance the Speckle
If you want more texture, choose a ‘reduction’ firing cycle if available, or look for a clay body specifically labeled as ‘heavy speckle’ or containing granular manganese.
Step 2: Finishing and Firing
-
Leather Hard Drying:
Allow the piece to dry slowly until it reaches a leather-hard state. It should be firm enough to handle without deforming but still cool to the touch. -
Trimming the Foot:
Place the pot upside down on the wheel. Trim away excess clay from the bottom to create a smooth, rounded bottom edge that mirrors the upper curve. Ensure the foot is flat so it sits stable. -
Bisque Fire:
Once bone dry (completely moisture-free), load the holder into the kiln for a bisque firing. This initial firing hardens the clay and prepares it for glazing. -
Glaze Application:
Wipe the bisque-ware down with a damp sponge to remove dust. Pour a clear matte glaze inside the cup, swirl to coat, and pour out the excess. Dip the exterior quickly to avoid soaking the clay too much. -
Clean the Foot:
Use a damp sponge to meticulously wipe any glaze off the bottom foot ring. Any glaze left here will fuse to the kiln shelf during firing. -
Glaze Fire:
Fire the piece again to the maturation temperature of your specific clay body (likely Cone 5 or 6 for stoneware). This brings out the natural iron speckles through the translucent glaze. -
Final Polish:
Once cool, use a fine-grit sanding pad to smooth the unglazed bottom foot, ensuring it won’t scratch your bathroom surfaces.
Wobbly Rim?
If the opening becomes uneven while shaping the belly, slow the wheel down. Use a needle tool to trim the very top edge off, re-establishing a level horizon before finishing.
Now you have a serene, minimalist holder ready to organize your bathroom essentials
Cabinet-Door Cup Organizer
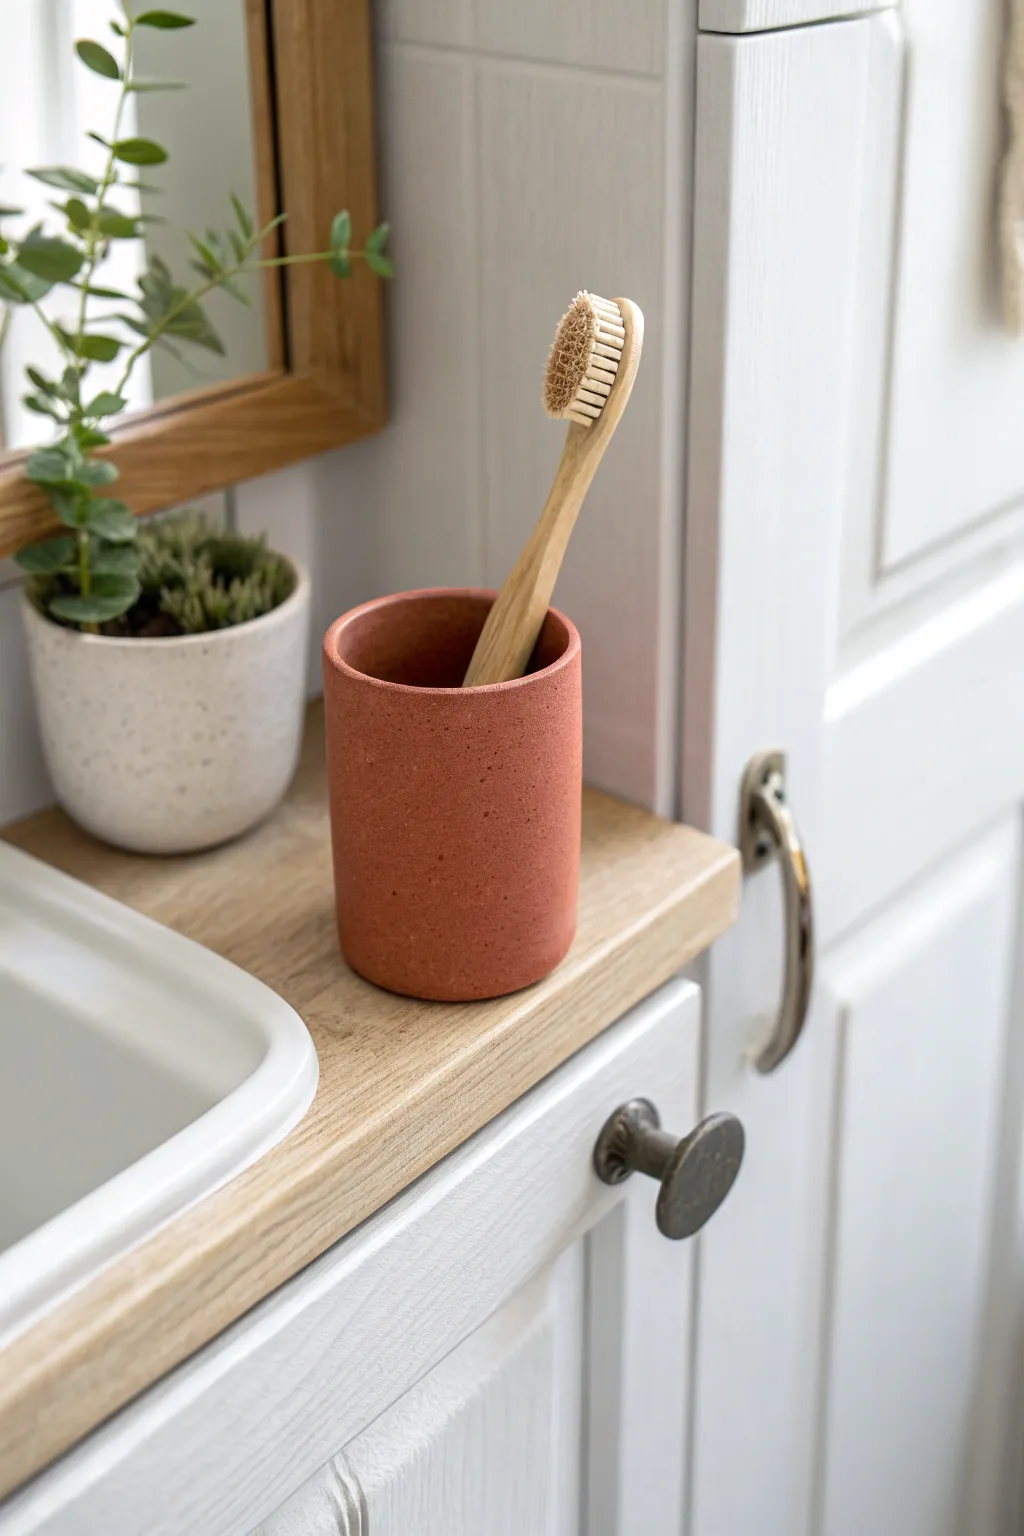
Bring earthy warmth to your bathroom vanity with this simple yet sophisticated cup, specifically designed to look like raw terracotta pottery. Its textured finish and warm reddish-brown hue offer the perfect organic contrast to sleek white tiles and polished fixtures.
Detailed Instructions
Materials
- Clean glass or plastic jar/tumbler (removed label)
- Terracotta colored acrylic paint
- Baking powder
- Matte finish sealant spray or Mod Podge
- Medium flat paintbrush
- Paper plate or mixing palette
- Fine grit sandpaper (optional)
- Small craft sponge (optional)
Step 1: Preparation & Mixing
-
Prepare the vessel:
Begin with a glass jar or plain tumbler that fits your space well. Ensure it is completely clean and dry, removing any sticky residue from labels with warm soapy water or rubbing alcohol. -
Create the texture mix:
Pour a generous amount of your terracotta-colored acrylic paint onto your mixing palette or paper plate. -
Add the secret ingredient:
Sprinkle baking powder into the paint. A good ratio to start with is roughly one teaspoon of baking powder for every two tablespoons of paint. -
Achieve the right consistency:
Mix the powder and paint thoroughly until you have a fluffy, mousse-like consistency. It should be thick enough to hold its shape slightly but still spreadable.
Texture Pro Tip
For a ‘speckled’ ceramic look, flick a tiny amount of watered-down brown or black paint onto the dried terracotta surface using an old toothbrush before sealing.
Step 2: Painting & Texturing
-
Apply the first coat:
Using your medium flat brush, apply a thick layer of the textured paint mixture to the outside of the cup. -
Create vertical strokes:
Direct your brush strokes vertically from the bottom to the top rim to mimic the look of wheel-thrown pottery. -
Cover the rim:
Carefully paint just over the top edge and slightly inside the rim (about half an inch) so the glass doesn’t show when the cup is empty. -
Let it dry completely:
Allow this first layer to dry fully. The baking powder mixture dries faster than regular paint, but give it at least an hour to be safe. -
Assess the coverage:
Check for any see-through spots. If the glass is still visible, you’ll need a second coat. -
Apply the second coat:
Mix a fresh batch of textured paint if needed and apply a second layer, dabbing with a sponge this time if you want a rougher, more stone-like surface.
Step 3: Finishing Touches
-
Smooth rough patches:
Once fully dry, inspect the texture. If any peaks of baking powder are too sharp, lightly brush them with your finger or very fine sandpaper to knock them down. -
Seal the surface:
Since this will live in a bathroom, protection is key. Apply a coat of matte sealant spray or a thin layer of matte Mod Podge over the entire painted surface. -
Protect the bottom:
Flip the cup over and ensure the bottom is sealed heavily to prevent water on the counter from softening the paint. -
Final cure time:
Let the sealer cure for at least 24 hours before introducing it to the humid bathroom environment. -
Arrange your display:
Place your new holder on the vanity and add your bamboo toothbrush for that complete spa-inspired aesthetic.
Level Up: Faux Stone
Mix multiple shades of terracotta and beige paint together but don’t blend them fully. When applied, the swirls create a stunning natural stone or marble effect.
Enjoy the calm, organic vibe your new creation adds to your morning routine


What Really Happens Inside the Kiln
Learn how time and temperature work together inside the kiln to transform clay into durable ceramic.
Tooth-Shaped Air Dry Clay Stand
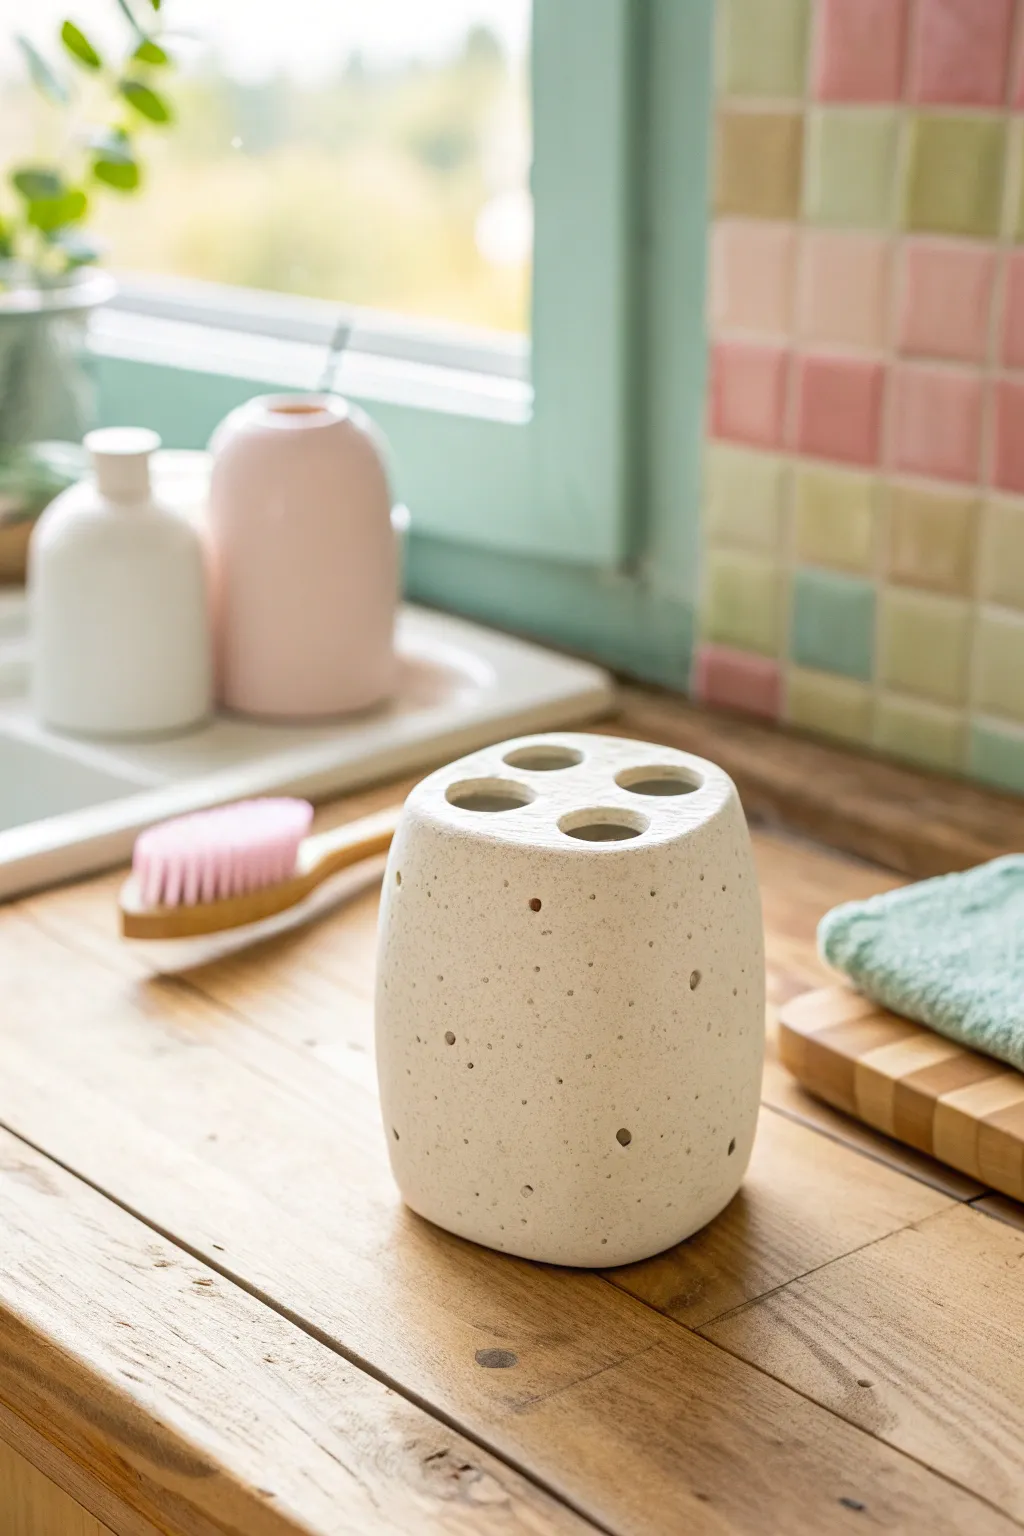
Create a minimalistic bathroom essential that mimics the look of natural speckled stone using air-dry clay. This four-hole toothbrush holder features a soft, organic shape and a textured finish that brings a spa-like calmness to your vanity.
Step-by-Step
Materials
- White air-dry clay (approx. 500g)
- Black pepper or dried coffee grounds (for speckled effect)
- Rolling pin
- Sharp knife or clay cutter
- Four thick markers or dowels (approx. 1/2 inch diameter)
- Small bowl of water
- Sponge or sanding block
- Clear waterproof sealant (matte or satin finish)
- Ruler
Step 1: Preparing the Clay
-
Condition the clay:
Start by taking a large chunk of white air-dry clay. Knead it thoroughly in your hands to warm it up and make it pliable. -
Add the texture:
To create that stone-like speckled appearance, flatten your clay slightly and sprinkle a generous pinch of coarse black pepper or dry coffee grounds onto the surface. -
Integrate the speckles:
Fold the clay over the speckles and continue kneading until the particles are evenly distributed throughout the entire lump of clay.
Step 2: Shaping the Form
-
Form the base block:
Shape the clay into a solid, thick block. I find it easiest to roll it into a thick log first, then gently tap the sides on your work surface to square them off. -
Refine the shape:
Mold the block into a rounded rectangle, aiming for dimensions roughly 3 inches wide, 4 inches tall, and 2 inches deep. Keep the corners soft and rounded rather than sharp. -
Smooth the sides:
Dip your fingers in a little water and run them over the exterior walls to smooth out any distinct creases or fingerprints. -
Check stability:
Tap the bottom firmly against the table to ensure it sits perfectly flat and won’t wobble.
Cracking Issues?
If small surface cracks appear during drying, make a slip (wet clay paste) and fill them in with a small brush, then smooth over.
Step 3: Creating the Holes
-
Mark the positions:
Using a ruler, lightly mark four evenly spaced dots on the top surface of your clay block. -
Drill the holes:
Take your marker caps or dowels and press them vertically down into the clay at your marked spots. Twist them gently as you push to prevent warping the overall shape. -
Determine depth:
Push the dowels down about three-quarters of the way through the block. Do not punch all the way through the bottom. -
Widen gently:
Wiggle the dowels slightly to widen the openings just enough so a toothbrush handle will slide in easily, then carefully remove the dowels. -
Clean the rims:
Use a wet finger or a damp sponge to smooth the rims of the holes, removing any jagged bits of clay that pushed up.
Pro Tip: Weighted Base
Embed a few small, clean rocks or glass marbles into the bottom layer of the clay block while forming it to make the holder heavier.
Step 4: Finishing Touches
-
Adding surface texture:
For added realism, use an old toothbrush or a stiff brush to gently stipple the outside surface, creating tiny pores that mimic real stone. -
Let it dry:
Place the holder in a cool, dry place away from direct sunlight. Allow it to air dry for at least 48 to 72 hours. Turn it over occasionally to ensure the bottom dries evenly. -
Sand imperfections:
Once fully bone dry, use fine-grit sandpaper to buff away any unintentional bumps, being careful not to sand away your intentional texture. -
Seal the piece:
Apply a coat of waterproof sealant to the entire piece, paying special attention to the inside of the holes where water might collect. -
Second coat:
Wait for the first coat to dry, then apply a second layer of sealant to ensure completely water-tight durability for bathroom use.
Place your new brush holder on the sink and enjoy the serene, natural vibe it adds to your morning routine
Flower Holder With Petal Slots
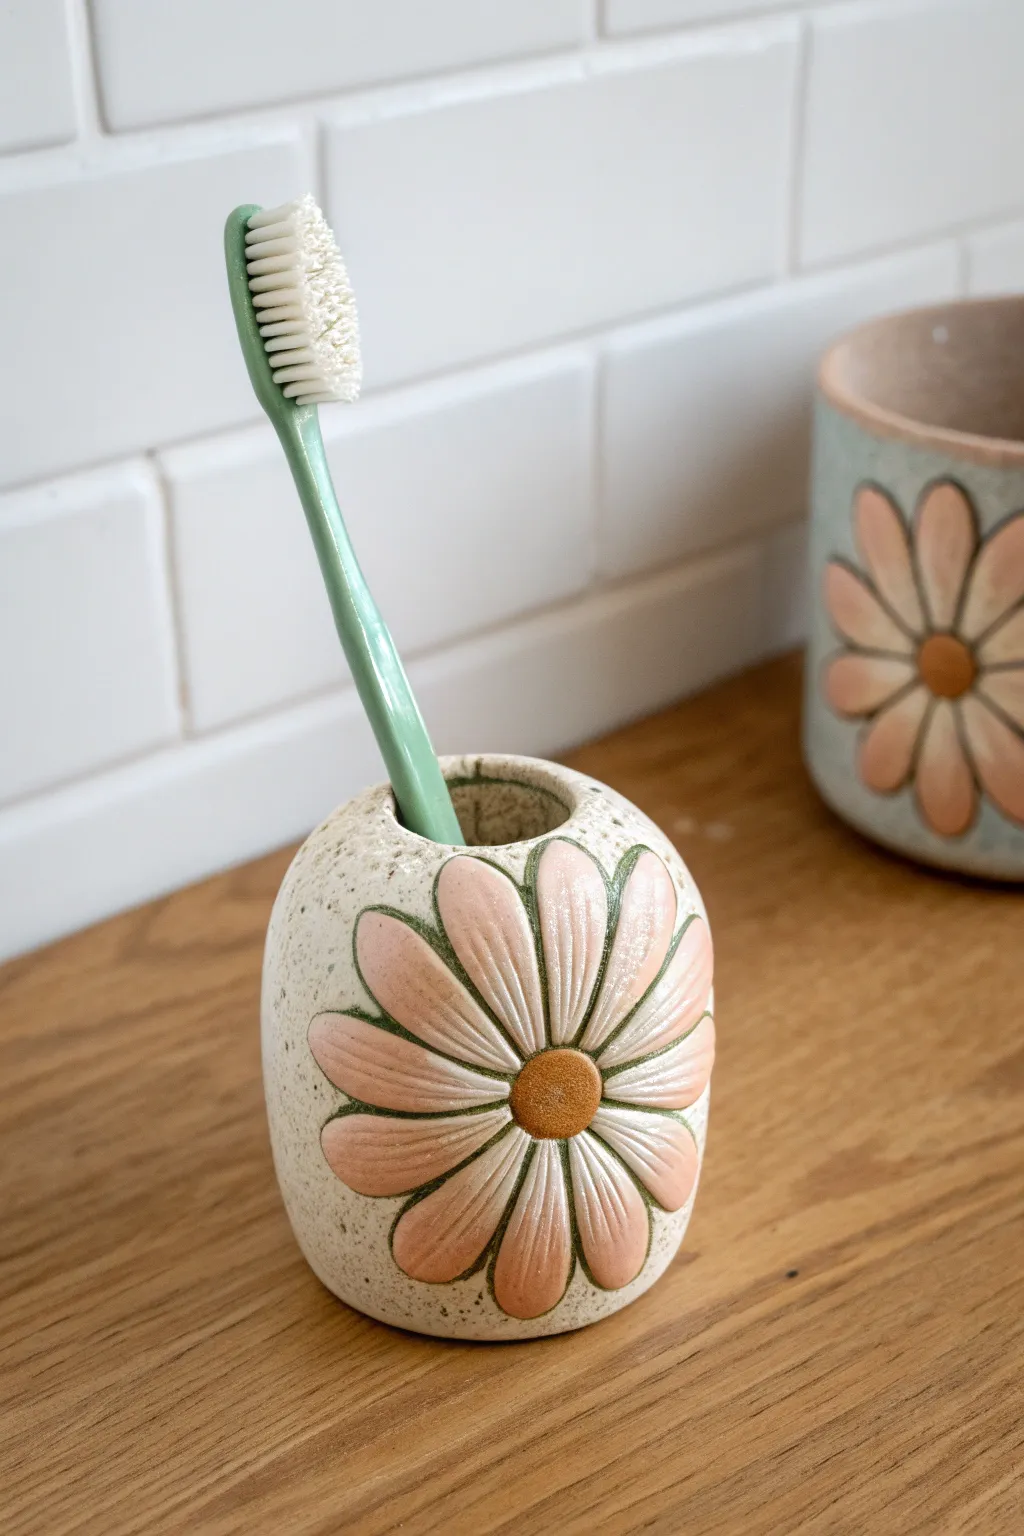
Bring a touch of groovy charm to your bathroom counter with this speckled ceramic flower holder. This project uses stoneware clay and wax resist techniques to create a functional piece with a nostalgic, earthy floral design.
How-To Guide
Materials
- Speckled stoneware clay (mid-fire)
- Pottery wheel (or slab roller/rolling pin for hand-building)
- Needle tool
- Loop tool (small)
- Sponge
- Pottery rib (metal or rubber)
- Stylus tool or small ball tool
- Glaze: Glossy white or clear (for the body)
- Glaze: Pink/Peach (for petals)
- Glaze: Mustard/Ocher (for center)
- Wax resist emulsion
- Small liner brushes
- Kiln
Step 1: Forming the Body
-
Throw the base shape:
Begin with about 1 lb of clay on the wheel. Center it and throw a thick-walled cylinder, roughly 3.5 inches tall. I like to keep the walls slightly thicker than a drinking cup to allow depth for carving later. -
Collar the neck:
Gently collar the top rim inward to create an enclosed, rounded shoulder shape. The opening should be wide enough for a toothbrush but narrower than the body. -
Smooth the exterior:
Use a flexible rib to refine the curve, swelling the belly of the pot out slightly to give it a bubbly, organic look. Smooth away any throwing rings. -
Trim the foot:
Once the piece is leather-hard, trim the bottom to create a clean foot ring. This lifts the form and gives it a professional finish.
Step 2: Carving the Flora
-
Sketch the flower:
Lightly trace a large daisy shape onto the side of the pot using a needle tool. Draw a central circle and long, oval petals radiating outward. -
Carve the relief:
Using a small loop tool, carefully carve away a very shallow layer of clay around the petals to make them stand out slightly, or simply carve the outlines deep to define the shapes. -
Detail the petals:
Use a stylus tool or a dull pencil to impress lines inside each petal, creating a separation between the petal’s edge and its center. -
Texture the center:
Stipple the center circle of the flower with the needle tool to create a pollen-like texture. -
Clean up burrs:
Wait until the clay is bone dry, then gently rub the carved areas with a soft scrub pad or your finger to remove any sharp clay crumbs. -
Bisque fire:
Fire the piece to cone 04 (or your clay body’s bisque temperature) to prepare it for glazing.
Clean Lines
If you don’t have wax resist, you can paint the glazes carefully and then scrape away any overlap with a sharp needle tool before firing to get that clean outline.
Step 3: Glazing Technique
-
apply wax resist:
Carefully paint wax resist over the the thin outlines of raw clay that separate the petals. This will keep the glaze colors distinct and reveal the beautiful speckled clay body. -
Glaze the center:
Using a small brush, dab a mustard or ocher colored glaze into the textured center of the flower. -
Paint the petals:
Fill in the petal shapes with a soft pink or peach glaze. Apply 2-3 coats as needed for opacity, being careful not to drip over your wax lines. -
Glaze the interior:
Pour a white liner glaze inside the pot, swirl it to coat the entire interior, and pour out the excess. This ensures the inside is waterproof and hygienic. -
Dip or brush the exterior body:
For the main body, you can either carefully brush a clear/white glaze around the flower, or dip the whole pot if you’ve waxed the entire flower design perfectly. Brushing allows more control here. -
Wipe the foot:
Use a damp sponge to wipe any glaze off the bottom foot ring so it doesn’t fuse to the kiln shelf. -
Glaze firing:
Fire the kiln to the maturity temperature of your clay and glaze (typically Cone 5 or 6 for stoneware). Let the kiln cool completely before unloading.
Matching Set
Use the same technique to make a larger, open cylinder for a matching drinking cup or makeup brush holder, varying the flower size.
Place your new ceramic holder on the counter and enjoy a pop of floral cheer every morning

TRACK YOUR CERAMIC JOURNEY
Capture glaze tests, firing details, and creative progress—all in one simple printable. Make your projects easier to repeat and improve.
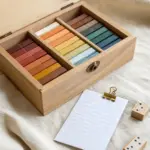
Minimal Terrazzo-Style Polymer Clay Stand
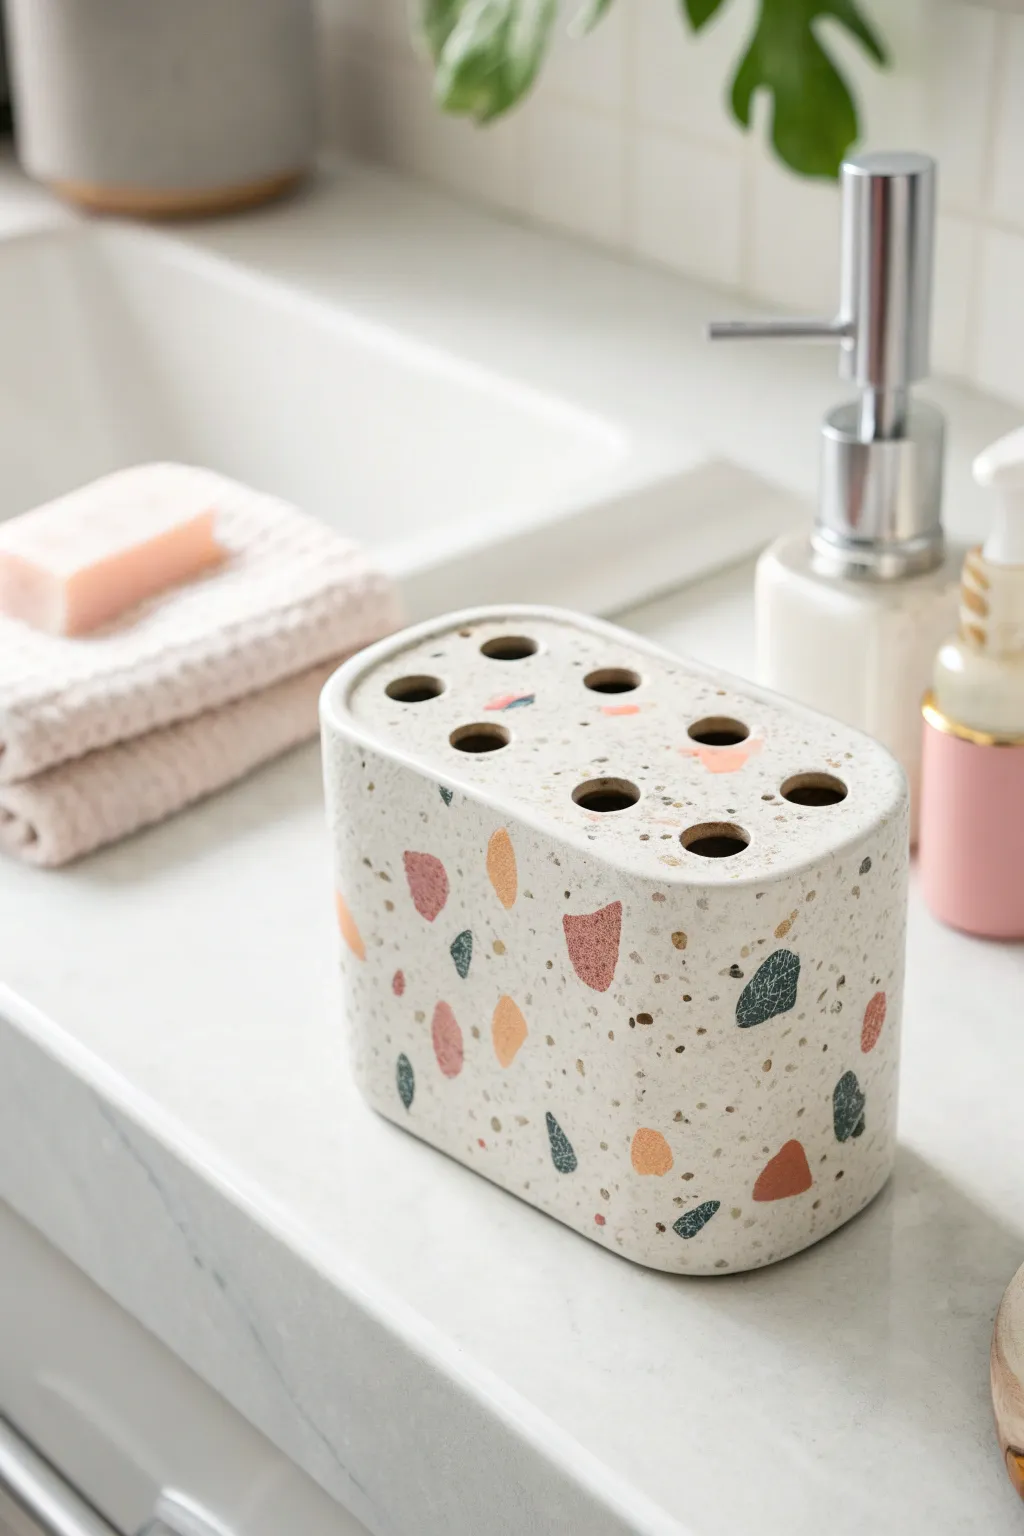
Bring a splash of modern whimsy to your bathroom counter with this simple polymer clay toothbrush holder. The speckled terrazzo effect looks high-end but is surprisingly easy to achieve by embedding small chips of colorful clay into a neutral base.
Step-by-Step
Materials
- White or cream polymer clay (large block, approx. 1 lb)
- Polymer clay in accent colors: dusty rose, terracotta orange, teal, black, beige
- Rolling pin or pasta machine used for clay
- Clay knife or craft blade
- Rectangle cookie cutter or ruler and blade
- Small circular cutter or straw (sized for toothbrush handles)
- Rubbing alcohol
- Sandpaper structure (wet/dry varying grits from 400 to 1000)
- Matte or satin sealant (optional)
- Oven
Step 1: Preparing the Terrazzo Chips
-
Roll accent colors:
Condition your accent colored clays (dusty rose, terracotta, teal, black, beige) and roll them out into very thin separate sheets. -
Bake the sheets:
Place these thin colored sheets on a baking tray and bake them for about 10-15 minutes according to the package instructions. You want them just hard enough to chop, not fully cured to maximum strength. -
Chop into fragments:
Once cooled, use your craft blade to chop the baked sheets into irregular, jagged fragments. Vary the sizes from tiny specks to larger triangles for a natural stone look. -
Condition the base:
Take your large block of white or cream clay and condition it thoroughly until it is soft and pliable. This will form the main body.
Smudged chips?
If the colored chips smear while sanding, your clay wasn’t baked long enough. Sand under cold running water to keep friction heat down and prevent smearing.
Step 2: Building the Form
-
Initial mix:
Mix a handful of your chopped colored fragments into the white clay block. Knead them in gently so they are distributed throughout the interior, not just on the surface. -
Roll the slab:
Roll the mixed white clay into a thick, sturdy block. Aim for a rectangular prism shape, roughly 4-5 inches wide, 2-3 inches deep, and 3-4 inches tall. You can stack layers if needed, smoothing the seams invisibly. -
Surface embedding:
Press more of your leftover colored chips onto the exterior surfaces of the block. Press them firmly so they sit flush with the white clay. -
Smoothing the surface:
Gently roll over the exterior again with your rolling pin to ensure the new surface chips are fully embedded and the walls are flat. -
Refine the shape:
Use your blade to trim the sides straight and create rounded corners. A little bit of water or baby oil on your finger can help smooth out any fingerprints.
Step 3: Creating the Holes
-
Mark positions:
Lightly mark where you want your toothbrush holes to go on the top surface. A grid pattern works best, ensuring equal spacing. -
Cut the holes:
Use a small circular cutter or a sturdy straw to punch vertical holes deep into the block. You don’t need to go all the way through to the bottom; about two-thirds down is sufficient to hold the brushes upright. -
Clean the edges:
Carefully remove the clay plugs and smooth the rim of each hole so there are no jagged bits that would catch water.
Heavy Duty Base
Add weight to your holder by embedding a clean stone or a ball of aluminum foil in the center bottom. This helps prevent it from tipping over.
Step 4: Finishing Touches
-
Final Bake:
Preheat your oven according to the clay manufacturer’s specific instructions. Bake the block for roughly 45-60 minutes. Since it is a thick piece, a longer, slower bake is safer to prevent cracking. -
Cooling down:
Turn the oven off and let the piece cool completely inside the oven. This gradual temperature change helps prevent thermal shock. -
Sanding:
Once cool, wet sand the piece under running water. Start with 400 grit to reveal the colorful chips clearly, then move to 800 and 1000 grit for a silky smooth finish. -
Buffing:
Rub the surface vigorously with a denim cloth or soft towel to bring out a natural sheen. -
Sealing:
Apply a thin layer of matte or satin varnish to protect the clay from bathroom humidity, paying special attention to the inside of the holes.
Enjoy styling your vanity with this chic and functional piece of art
Coil-Built Holder With Wavy Divider
Embrace the beauty of raw texture with this ceramic tumbler that features mesmerizing carved waves. The contrast between the creamy speckled glaze and the warm, exposed clay body creates a stunning visual rhythm perfect for any modern bathroom.
How-To Guide
Materials
- Stoneware clay (buff or speckled)
- Pottery wheel (or materials for hand-building)
- Cylindrical rib tool
- Pin tool or needle tool
- Wire cutter
- Sponge
- Loop trimming tool (small/rounded)
- Creamy white cutting glaze (speckled)
- Clear glaze (optional for interior)
- Kiln
Step 1: Throwing the Form
-
Center the clay:
Start by throwing a manageable ball of clay, roughly 1-1.5 lbs, onto the center of your wheel head. Use your palms to cone it up and push it down until perfectly centered. -
Open the form:
Press your thumbs into the center to open the floor, leaving about a half-inch thickness at the bottom for stability. -
Pull the walls:
Gently pull the clay upward to create a cylinder. Aim for straight vertical walls, keeping the thickness consistent—around a quarter-inch is ideal for this kind of carving. -
Refine the shape:
Use a straight rib tool to smooth the exterior and ensure the sides are perfectly vertical without bowing out. Compress the rim with a chamois or your finger. -
Cut off and dry:
Wire the pot off the wheel bat and set it aside. Let it dry to a ‘leather-hard’ state—firm enough to handle, but soft enough to carve.
Groove Smoothness Pro-Tip
After carving, run a damp brush (not dripping wet) through the grooves. This smooths raw edges without erasing the texture, saving sanding time later.
Step 2: Carving the Texture
-
Plan the spacing:
You can lightly sketch the wavy lines with a pencil if you want precision, but freehand carving often yields the most organic look. -
Begin the first groove:
Using a small loop tool, start carving near the top rim. Instead of making a perfect circle, gently undulate your hand up and down as you rotate the pot. -
Follow the rhythm:
Continue carving parallel grooves down the entire body of the cylinder. I find it helpful to mirror the wave of the previous line to create a cohesive pattern. -
Deepen the contrast:
Go back over your lines if needed to ensure they are deep enough to reveal the raw clay once glazed. Be careful not to puncture through the wall. -
Clean the burrs:
Once the carving is done and the clay is bone dry, gently rub the surface with a soft sponge or a dry scouring pad to remove any sharp clay crumbs or burrs.
Step 3: Glazing and Firing
-
Bisque fire:
Load the bone-dry piece into the kiln for the first firing (bisque fire), typically to cone 04, to prepare it for glazing. -
Apply wax resist:
If you want the carved lines to remain barely glazed or fully raw, carefully paint liquid wax into the grooves. This is optional but sharpens the definition. -
Glaze the interior:
Pour your glaze into the inside of the cup, swirl to coat, and pour out the excess. Wipe the rim clean. -
Dip the exterior:
Dip the entire outside of the cup into your creamy white speckle glaze. Remove it quickly to avoid a coat that is too thick. -
Reveal the waves:
If you didn’t use wax resist, take a damp sponge and firmly wipe the glaze off the high points of the carved ridges, leaving glaze mostly in the valleys or vice-versa depending on your preference. For the look in the photo, wipe the glaze out of the grooves to reveal the raw clay stripe. -
Final cleaning:
Ensure the very bottom of the foot is wiped completely clean of glaze so it doesn’t stick to the kiln shelf. -
Glaze fire:
Fire the piece again to the maturation temperature of your specific clay and glaze (usually cone 5 or 6 for stoneware).
Glaze Trapped in Grooves?
If you want raw clay lines but glaze got stuck deep inside, use a clay carving tool to gently scrape the dried glaze out before firing.
Place your new holder in the bathroom and enjoy the handmade warmth it brings to your daily routine
Rustic Upcycled Can Wrapped in Clay
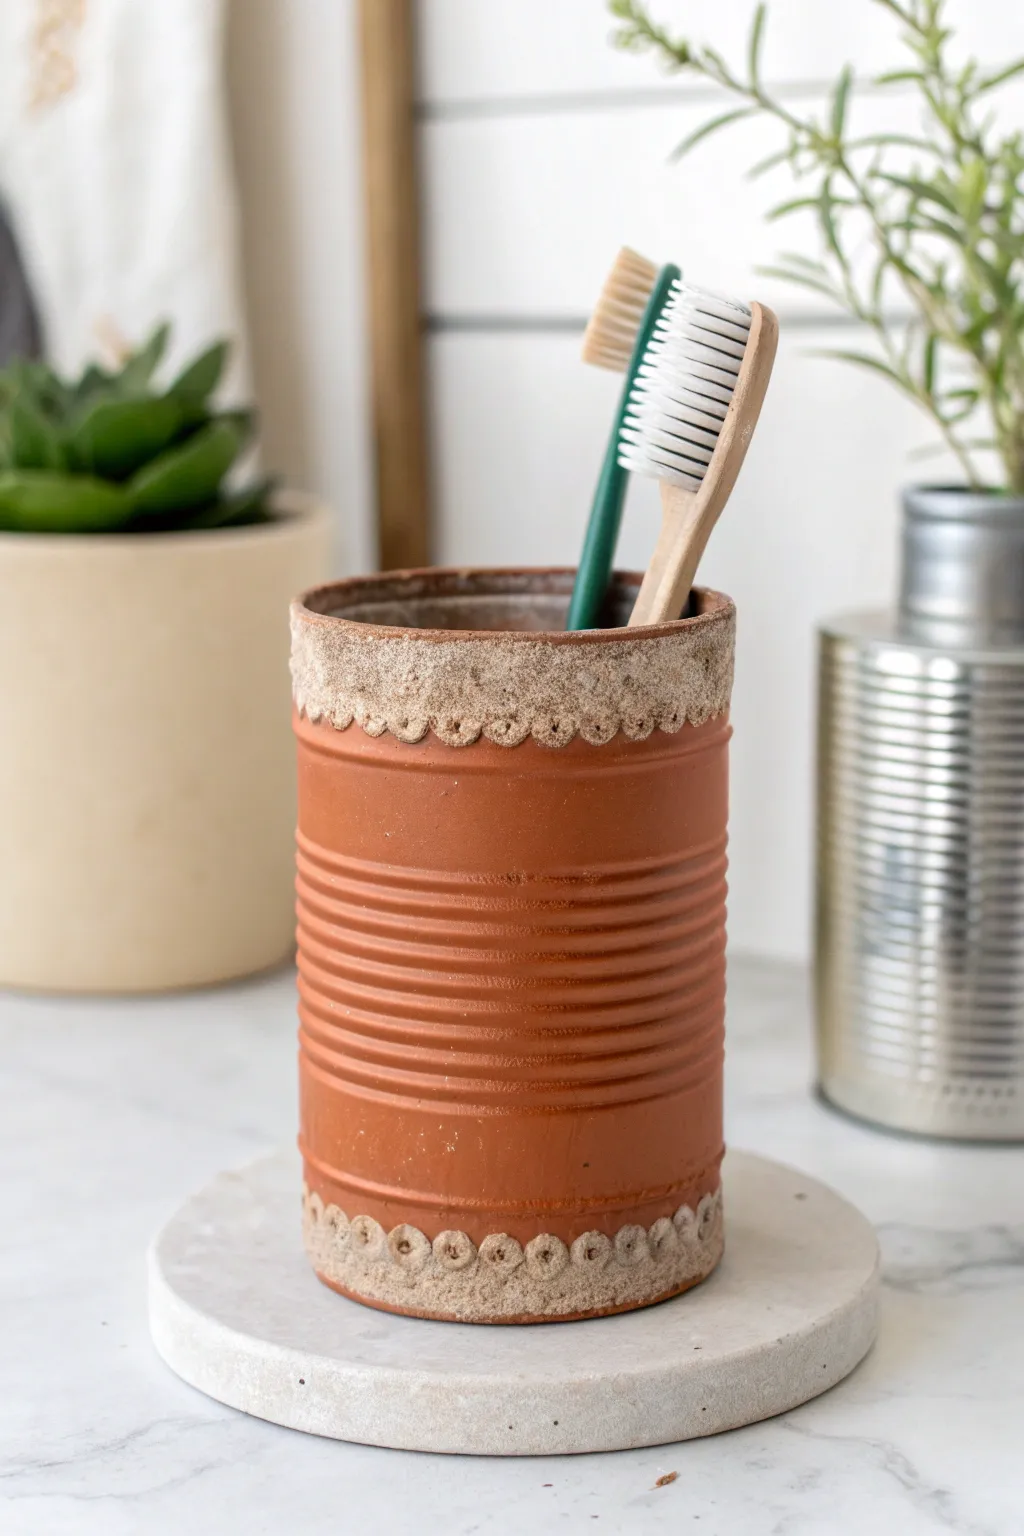
Transform a humble soup can into a rustic bathroom accessory that mimics the warmth of aged terracotta pottery. This upcycling project uses air-dry clay and clever painting techniques to create a textured, high-end look for next to nothing.
How-To Guide
Materials
- Clean, empty tin can (soup or vegetable size)
- Air-dry clay
- Terracotta colored acrylic paint (or orange and brown mix)
- Baking soda
- Small paintbrush
- Rolling pin or smooth glass jar
- Modeling tool or straw (for stamping)
- Craft glue or tacky glue
- Clear matte sealer spray
Step 1: Prepping the Base
-
Clean the Can:
Start by thoroughly washing your tin can and peeling off the label. Remove any sticky residue with warm soapy water or a label remover. -
Safety check:
Run your finger carefully along the inside rim. If there are sharp edges from the can opener, use pliers to pinch them down or file them smooth with sandpaper. -
Prime the surface:
Lightly sand the outside of the can with sandpaper to help the paint and glue adhere better.
Crack Control
If the clay develops small cracks while drying, mix a tiny bit of fresh clay with water to make a paste and smooth it into the cracks before painting.
Step 2: Sculpting the Details
-
Roll the clay:
Take a chunk of air-dry clay and knead it until soft. Roll it out into a long snake shape, roughly half an inch thick. -
Flatten the strip:
Flatten the snake with a rolling pin until it’s about an inch wide, forming a long ribbon of clay. -
Apply glue:
Smear a generous layer of craft glue around the very top rim of the tin can. -
Wrap the rim:
Press your clay ribbon onto the glued area, wrapping it all the way around the top. Cut off the excess and smooth the seam with a wet fingertip. -
Repeat for the base:
Create a second clay ribbon and repeat the gluing and wrapping process around the bottom edge of the can. -
Create the scallop:
Using your thumb or a rounded modeling tool, gently press into the bottom edge of the top clay band to create a wavy, scalloped effect. -
Add texture:
Take a small round tool, the end of a paintbrush, or even a straw, and stamp a small circle impression into the center of each scallop. This mimics traditional pottery details. -
Dry completely:
Set the can aside in a dry place. Let the clay harden completely, which usually takes about 24 hours depending on humidity.
Step 3: Painting the Faux Finish
-
Mix the texture paint:
Pour your terracotta acrylic paint into a dish. Here I like to mix in a teaspoon of baking soda—this creates a gritty, stone-like texture that makes the metal look like ceramic. -
Apply the first coat:
Paint the entire can, including the dried clay details, with your texture mixture. Don’t worry if it looks streaky; texture is good. -
Dry and repeat:
Let the first coat dry for about 20 minutes, then apply a second coat for full opacity. -
Optional distressing:
If you want an aged look, lightly brush some plain white or darker brown paint over the high points of the clay scallops while the terracotta paint is still slightly tacky. -
Seal the work:
Since this will live in a bathroom, apply two coats of clear matte sealer spray to protect the clay from moisture splashes.
Level Up: Stone Effects
Instead of terracotta, paint the can grey and white. While the paint is wet, dust actual dirt or flour over it to create an ancient stone artifact look.
Now you have a charming piece of faux pottery ready to organize your bathroom sink
Soap-and-Brush Combo Bathroom Caddy
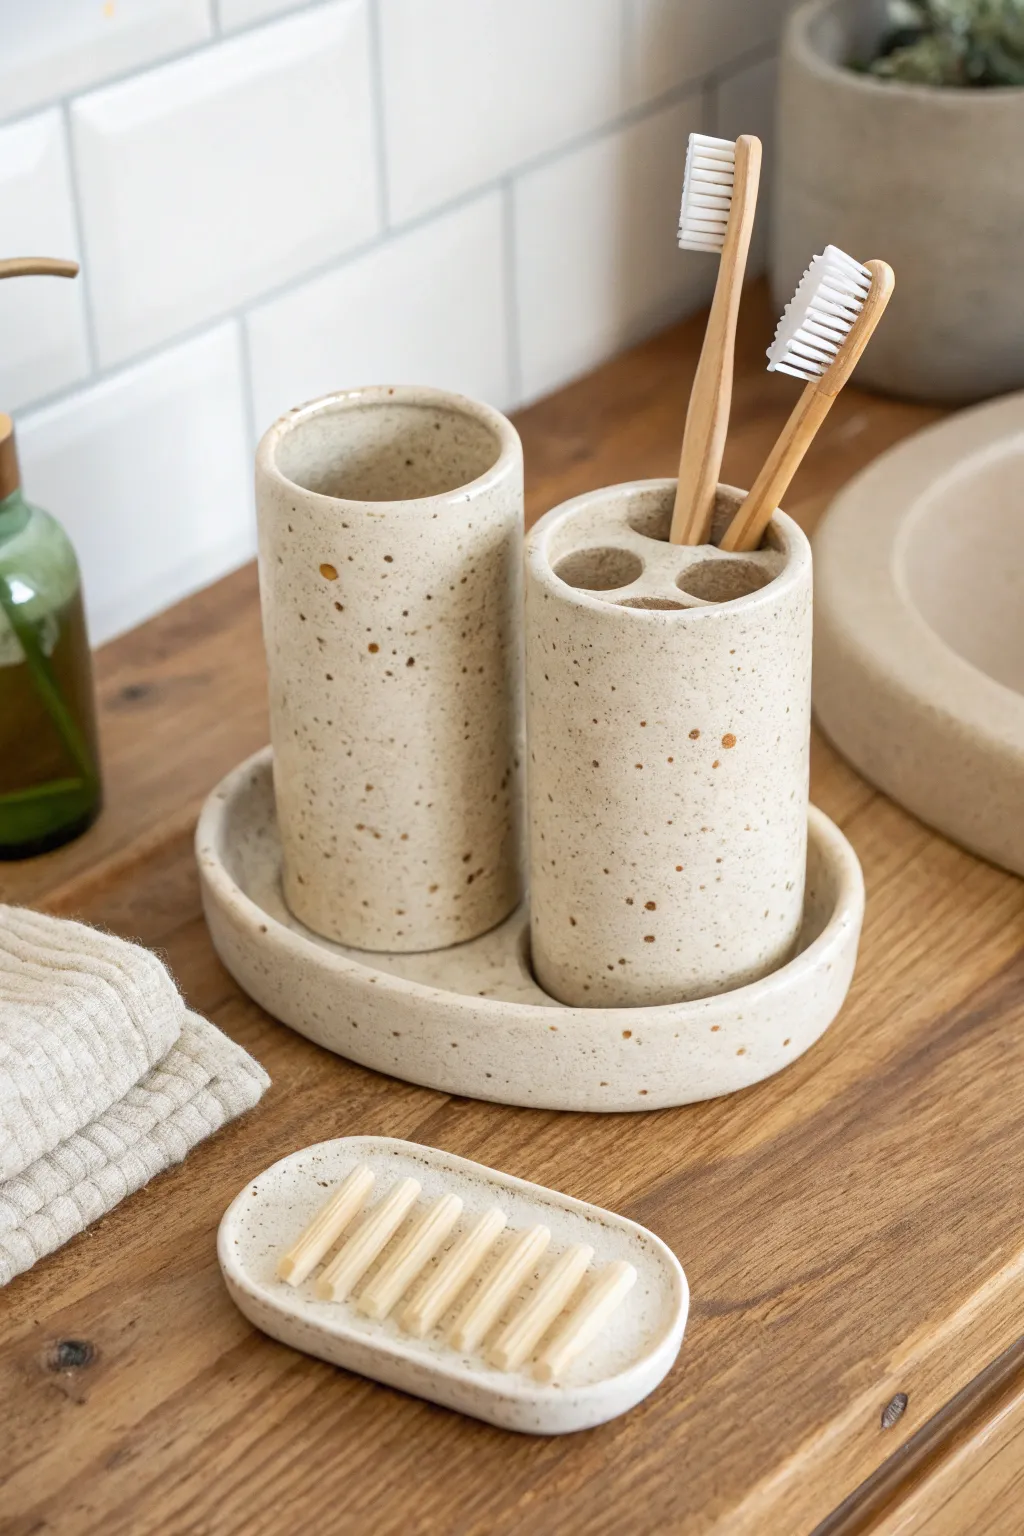
Elevate your bathroom counter with this chic, minimalist vanity set that mimics the look of high-end speckled stoneware. Using polymer clay and a clever texturing technique, you’ll sculpt a custom toothbrush holder, tumbler, tray, and matching soap dish without needing a pottery wheel.
Step-by-Step
Materials
- White or cream polymer clay (approx. 4-5 blocks)
- Ground black pepper or dried coffee grounds (for speckling)
- Rolling pin or acrylic roller
- Circle cutters (various sizes based on desired dimensions)
- Craft knife or clay blade
- Smooth glass jar or can (to use as a mood for the cups)
- Straw or small circle punch (for toothbrush holes)
- Sandpaper (fine grit)
- Matte varnish or sealant (water-resistant)
- Sculpting tool or old credit card
- Oven
Step 1: Preparing the Speckled Clay
-
Condition the clay:
Start by warming the white polymer clay in your hands, kneading it until it is soft, pliable, and free of any cracks. -
Add the texture:
Flatten your conditioned clay and sprinkle a generous pinch of ground black pepper or dried coffee grounds over the surface. Fold the clay over to trap the particles. -
Mix thoroughly:
Knead the clay repeatedly to distribute the pepper or grounds evenly; I find this usually takes few minutes of folding and rolling to get that random, natural stoneware look. -
Roll out slabs:
Roll the speckled clay out into a large, even sheet approximately 1/4 inch thick. Aim for a consistent thickness to ensure the pieces bake evenly.
Step 2: Forming the Cylinders
-
Cut the bases:
Using a large circle cutter or a template, cut two circles from your clay sheet which will serve as the bottoms for the tumbler and the toothbrush holder. -
Measure the walls:
Wrap a piece of paper around your glass jar mold to measure the circumference needed, adding a tiny bit of overlap, then cut two rectangular strips of clay to this length. -
Form the tumbler:
Wrap one clay strip around the glass jar mold, carefully joining the seam by smoothing the clay together with a sculpting tool until the line disappears. -
Attach the base:
Place the wrapped cylinder onto one of the circular bases. Gently blend the clay from the wall down onto the base to create a water-tight seal. -
Create the toothbrush lid:
For the second cylinder (the holder), cut a third circle slightly larger than the cylinder’s diameter. Use a designated cutter to punch three large holes for toothbrushes. -
Assemble the holder:
Repeat the wall-building process for the second cylinder, then carefully press the punched lid onto the top, smoothing the edges downward to seal it.
Seamless Seams
To make seams invisible, cross-hatch/score both edges with a needle tool before pressing them together, then smooth with a tool.
Step 3: Sculpting the Trays
-
Shape the main tray:
Roll a thick oval of clay for the base. Roll a long snake of clay and adhere it around the perimeter of the oval to build a raised rim. -
Smooth the tray:
Blend the snake coil into the base using your thumb or a tool so it looks like one solid piece of ceramic, ensuring the bottom is flat so it sits level. -
Form the soap dish:
Create a smaller, shallow oval dish using the same coil technique used for the main tray. -
Add drainage ridges:
Roll several thin, short ropes of clay and press them gently into the center of the soap dish to create raised ridges that will hold the soap bar up.
Warping While Baking?
If flat pieces warp, bake them between two ceramic tiles or with a slight weight on top (on parchment) to ensure they stay perfectly flat.
Step 4: Finishing Touches
-
Smooth imperfections:
Before baking, run a finger dipped in a little baby oil or water over the clay to smooth out fingerprints and sharp edges. -
Bake carefully:
Place all pieces on a parchment-lined baking sheet and bake according to your clay package instructions (usually 275°F for 15-30 minutes). -
Cool and sand:
Allow the pieces to cool completely in the oven. Once cool, use fine-grit sandpaper to buff away any burrs or uneven spots. -
Seal for protection:
Apply two to three thin coats of a water-resistant matte varnish to protect the set from bathroom moisture and give it a finished, ceramic feel.
Arrange your new set by the sink and enjoy the custom, spa-like atmosphere you have created