If you’re new to clay, the fastest way to build confidence is to make pieces that start from super simple shapes and still look adorable when they’re done. These beginner-friendly ideas focus on easy forms, clean details, and that satisfying “I made this” feeling—without needing fancy skills.
Pinch Pot Trinket Dish
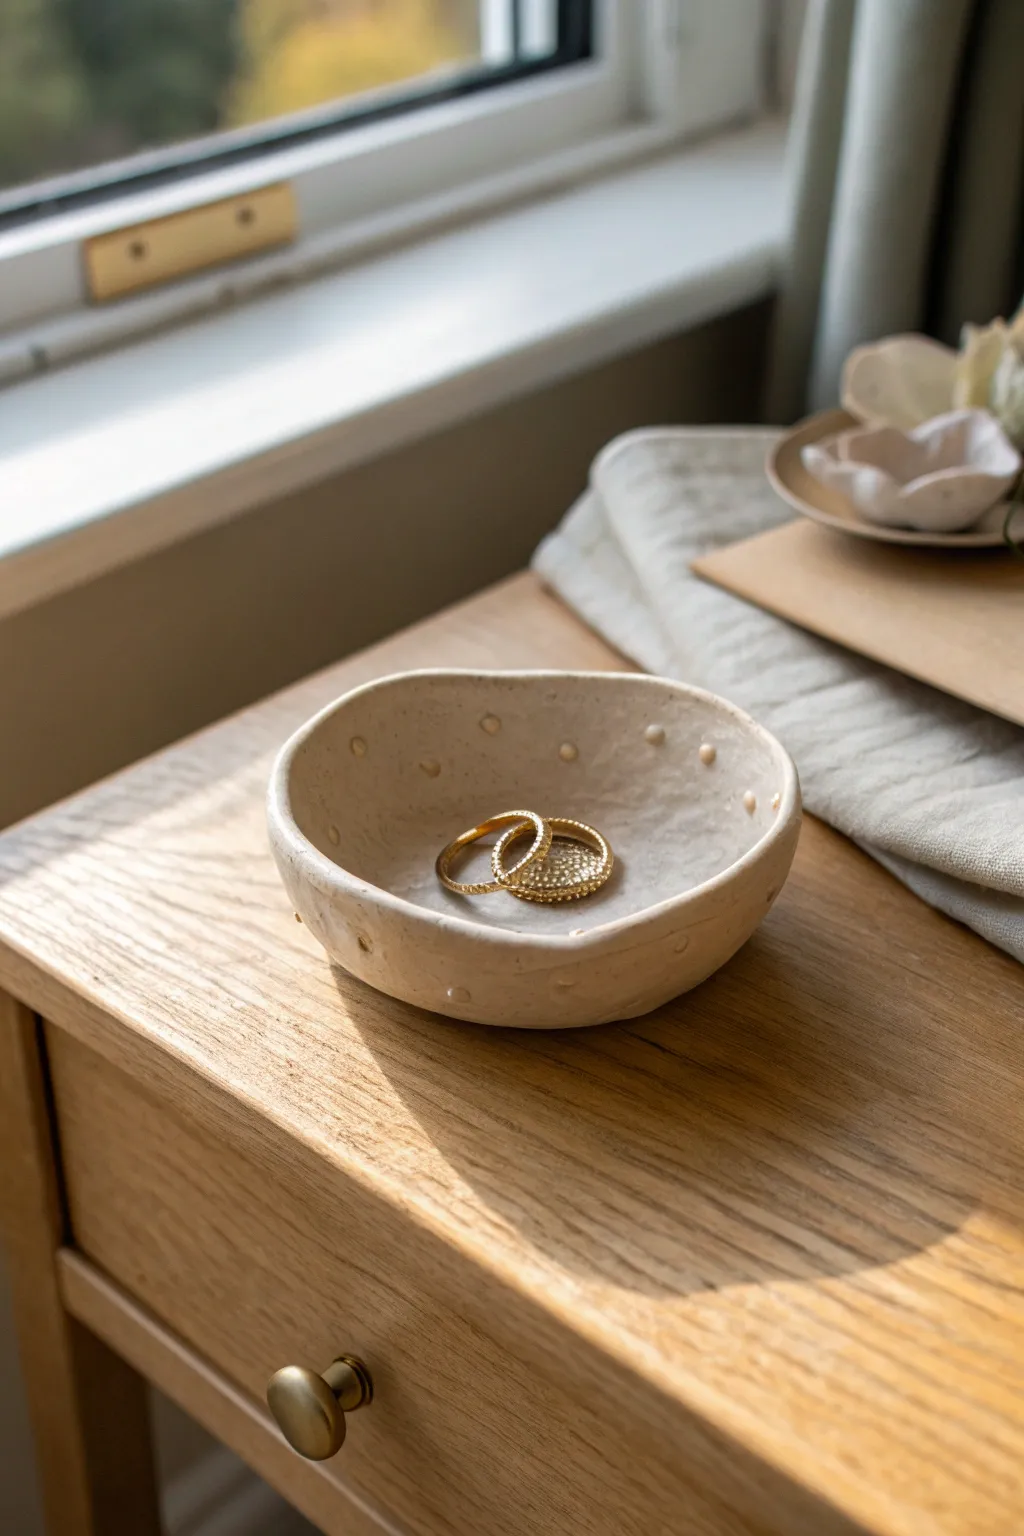
Embrace the beauty of imperfection with this charmingly rustic trinket dish. Featuring a naturally warped rim and delicate raised dots, this simple pinch pot creates a warm, minimalist home for your rings and small treasures.
Step-by-Step Tutorial
Materials
- White or cream air-dry clay (or kiln-fire stoneware)
- Small bowl or cup of water
- Ceramic sponge
- Wooden modeling tool or toothpick
- Rolling pin (optional)
- Small paintbrush
- Clear matte sealant or glaze
Step 1: Forming the Base
-
Prepare the Clay:
Start by taking a lump of clay about the size of a tennis ball. Knead it in your hands briefly to warm it up and ensure there are no air bubbles trapped inside. -
Roll a Sphere:
Roll the clay between your palms or on your work surface until you have a smooth, round ball. -
Open the Pot:
Hold the clay ball in your non-dominant hand. Press your thumb gently into the center of the ball, pushing down until you are about a half-inch from the bottom. -
Pinch the Walls:
Using your thumb on the inside and fingers on the outside, begin to gently pinch the clay while rotating the ball. Work your way from the bottom up to the rim. -
Widen the Shape:
Unlike a cup, we want a shallow dish. Gently pull the walls outward as you pinch to create a wider, bowl-like opening rather than a tall cylinder. -
Refine the Thickness:
Continue pinching until the walls are an even thickness, roughly 1/4 inch thick. Don’t worry about keeping the rim level; the organic wave adds character. -
Flatten the Bottom:
Gently tap the base of the pot on your table to create a flat bottom so the dish sits stable and doesn’t rock.
Cracking Up?
If tiny cracks appear while pinching, your clay is too dry. Dip your fingers in water and smooth the crack immediately. Don’t over-wet the clay or it will slump.
Step 2: Adding Details
-
Smooth the Surface:
Dip your finger or a slightly damp sponge into water and run it over the clay to smooth out any large fingerprints or cracks. You want a matte, natural finish, not perfectly slick. -
Roll Tiny Spheres:
Take a very small amount of fresh clay and roll tiny little spheres, about the size of peppercorns. You will need roughly 15-20 of these for the rim decoration. -
Score the Dots:
Using a needle tool or toothpick, make a tiny scratch on one side of each little sphere. This helps the clay adhere better. -
Score the Placement:
Lightly scratch the inside of the bowl where you want each dot to sit. Aim for the upper half of the inner wall, spacing them somewhat irregularly for a handmade look. -
Attach With Slip:
Dab a tiny drop of water (or clay slip) on the scored spot inside the bowl. Press a clay sphere firmly onto the spot. -
Blend the Edges:
I like to use the back of a small paintbrush or a modeling tool to gently press around the base of each dot, ensuring it is fully connected to the wall without flattening the dot itself. -
Final Smoothing:
Run a damp finger over the attached dots to remove any sharp edges from the attachment process. Ensure the rim feels smooth to the touch.
Make it Shine
After the clay is dry, paint the raised dots with gold leaf or metallic paint for a luxurious contrast against the matte clay body.
Step 3: Finishing
-
Slow Drying:
Place your dish in a spot away from direct sunlight or drafts. Let it dry slowly for 24-48 hours. If it dries too fast, cracks might appear. -
Inspect and Sand:
Once bone dry, check for any rough spots. You can lightly sand the rim or bottom with fine-grit sandpaper if needed. -
Seal or Fire:
If using air-dry clay, apply a matte sealant to protect it from moisture. If using ceramic clay, fire and glaze according to your clay type instructions.
Now you have a serene little vessel ready to hold your favorite jewelry pieces


Easy Slab Coasters With Texture

Create a set of modern, earthy coasters that blend smooth surfaces with satisfying botanical textures. Using a speckled clay body and simple slab-building techniques, these functional squares bring a warm, artisanal touch to your coffee table.
How-To Guide
Materials
- Speckled stoneware clay (white or light beige)
- Terracotta colored clay or underglaze
- Rolling pin
- Two wooden guide strips (approx. 1/4 inch thick)
- Square cookie cutter or template (4×4 inch)
- Fettling knife or needle tool
- Leaf stamps, textured rollers, or actual leaves
- Clean sponge and water
- Clear matte glaze
Step 1: Preparing the Slab
-
Wedge the clay:
Start by thoroughly wedging your speckled clay to remove air bubbles. This ensures your coasters won’t crack or explode in the kiln. -
Set up guides:
Place your wooden guide strips on a canvas-covered work surface. These strips will help you roll a perfectly even slab. -
Roll the main slab:
Place the clay between the guides and roll it out until the rolling pin rests flat on the wood strips. I like to flip the slab once during rolling to keep the canvas texture minimal. -
Smooth the surface:
Take a rubber kidney tool or a slightly damp sponge and compress the surface of the clay. This aligns the clay particles and creates a professional, smooth finish.
Step 2: Creating Designs
-
Apply texture (textured version):
For the botanical coaster, gently press your leaf stamp or carving tool into the fresh clay. Don’t press too deep; you just want a clear impression of the veins and stems. -
Two-tone effect (color block version):
To mimic the terracotta dipped look, you have two options: either inlay a thin sheet of terracotta clay onto a corner of your slab and roll flat, or save this step for glazing later. -
Cut the shapes:
Position your square cutter over the most interesting parts of your texture. Press straight down firmly, then lift. -
Refine the edges:
Use your finger to gently soften the sharp 90-degree edges cut by the tool. A slight bevel makes the finished coaster feel better in the hand.
Warping Woes?
If coasters curl while drying, flip them over daily. Dry them between two sheets of drywall boards to ensure they stay perfectly flat.
Step 3: Drying and Finishing
-
Slow drying:
Place your cut squares on a ware board. To prevent warping, place a lightweight board on top of them for the first day of drying. -
Bisque fire:
Once bone dry (lighter in color and dry to the touch), fire the pieces in the kiln to bisque temperature (usually cone 04). -
Clean the bisque:
Wipe the fired coasters with a wet sponge to remove any kiln dust before glazing. -
Applying color:
If you didn’t use colored clay earlier, paint a terracotta-colored underglaze onto the specific sections or patterns you want to highlight, like the sunray design shown. -
Glazing:
Dip or brush a clear matte glaze over the entire piece. This protects the clay and makes the coaster water-resistant for sweaty mugs. -
Final wipe:
Ensure the very bottom of the coaster is free of glaze so it doesn’t stick to the kiln shelf. -
Glaze fire:
Fire the coasters again to your clay body’s maturity temperature (typically cone 5 or 6 for stoneware).
Level Up: Cork Backing
Glue a square of thin cork sheet to the bottom of your finished fired coaster. It protects furniture and adds a professional finish.
Stack your finished coasters on the coffee table and enjoy that handmade charm with your next cup of tea


Mini Candle Holder Dish
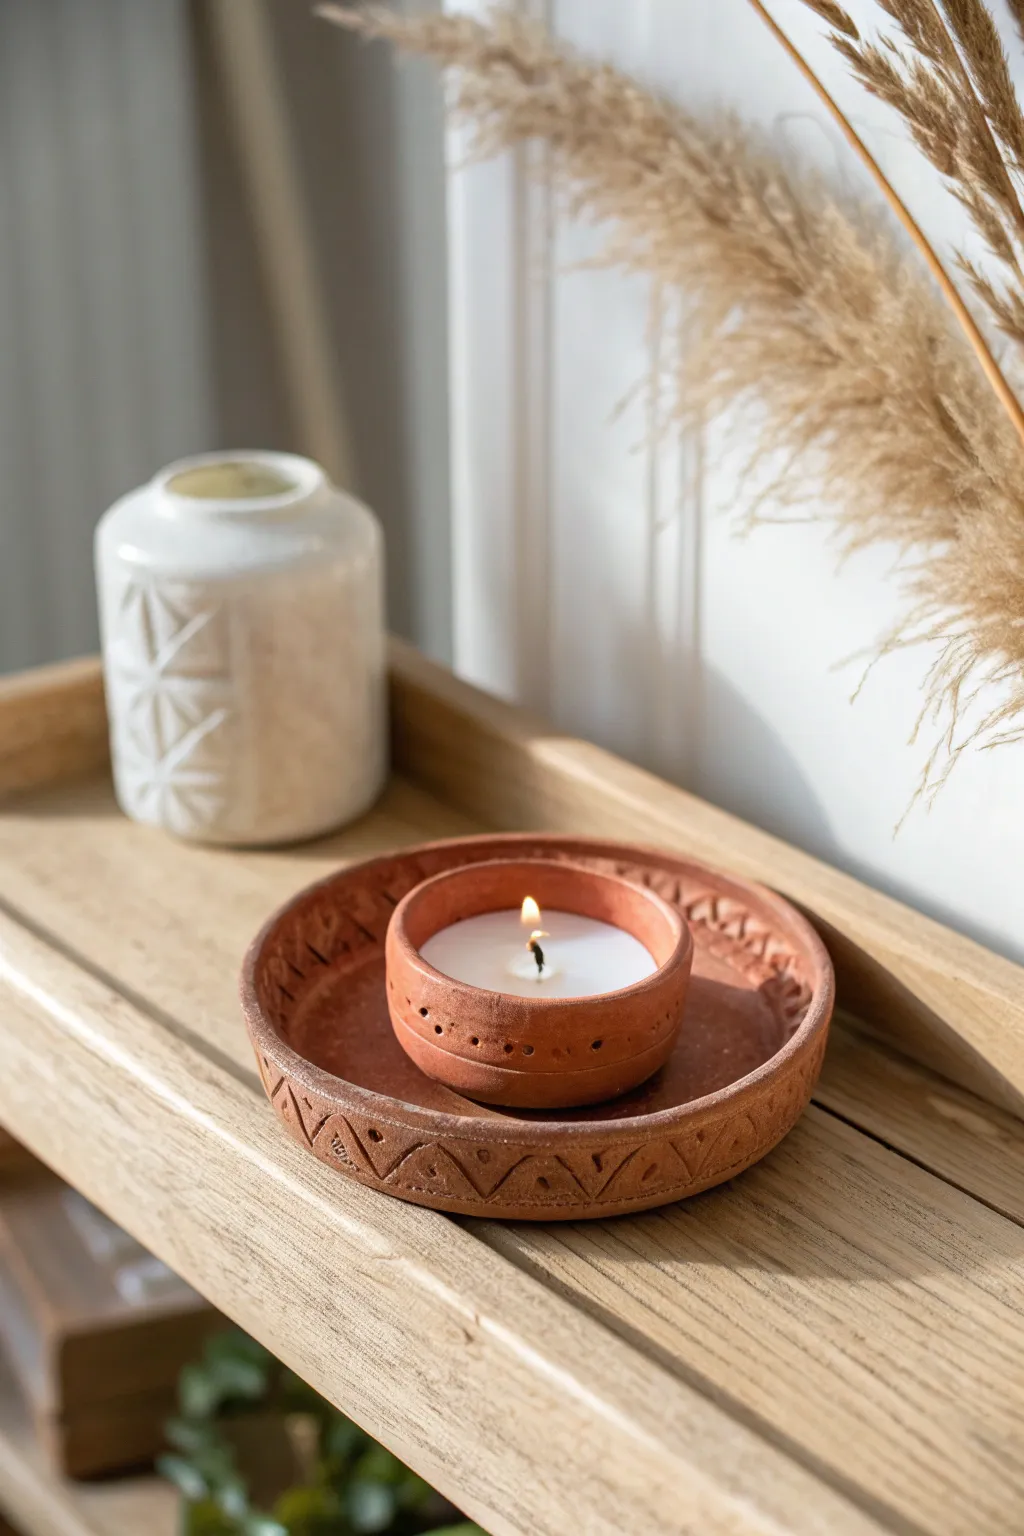
This rustic, two-piece candle holder brings an earthy warmth to any room with its classic terracotta tone and simple stamped details. The design features a shallow catch-dish adorned with a geometric rim, perfectly cradling a matching inner cup for your tea light.
Detailed Instructions
Materials
- Terracotta-colored air-dry clay (or polymer clay)
- Rolling pin
- Circle cutters (approx. 4-inch and 2.5-inch diameter)
- Small cup of water
- Sponge or smoothing tool
- Wooden sculpting tool or toothpick
- Small triangular stamp (or a folded piece of sturdy cardstock)
- Candle wick and wax (for filling)
- Sandpaper (fine grit)
Step 1: Creating the Base Dish
-
Condition the Clay:
Start by kneading a medium-sized ball of terracotta clay until it is warm, pliable, and free of air bubbles. This conditioning step prevents cracking later on. -
Roll the Slab:
Using your rolling pin, roll the clay out into an even slab about 1/4 inch thick. Aim for consistent thickness so step drying happens evenly. -
Cut the Base:
Press your larger circle cutter (around 4 inches) into the slab to create the main base of the dish. Remove the excess clay around the edges. -
Lift the Edges:
Gently lift the edges of the circle with your fingers, curving them upward to create a shallow rim. You want a distinct lip, about half an inch high, to catch any potential drips. -
Smooth the Form:
Dip your finger or a small sponge into water and run it along the rim and the interior surface to erase fingerprints and smooth out any small cracks. -
Stamp the Rim Design:
Taking your triangular stamp or sculpting tool, press a repeating ‘V’ or triangle pattern along the outer vertical edge of the rim. Space them evenly to create a geometric border. -
Add Detail Accents:
Between each triangle or ‘V’ shape, use a toothpick or small dotting tool to gently press a vertical line or dash for added texture, matching the look of the photo.
Rim Cracking?
If the clay creates tiny fissures as you fold the rim up, dip your finger in a little clay slurry (water + clay mud) and massage it into the crack to seal it seamlessly.
Step 2: Forming the Candle Cup
-
Shape the Inner Cup:
Roll a new ball of clay, slightly smaller than the first. You can either use the pinch pot method—pushing your thumb into the center and pinching walls up—or roll a slab and cut a long strip to form a cylinder. -
Refine the Size:
Ensure the cup is wide enough to hold a standard tea light amount of wax (about 2 inches wide) and fits comfortably inside your base dish. -
Thicken the Rim:
Gently tap the rim of the cup against your work surface or flatten it with your thumb to create a nice, thick edge similar to the base dish. -
Add Dot Texture:
Using a toothpick or a small stylus, press a series of small, evenly spaced holes around the exterior wall of the cup. Don’t puncture all the way through; just create indentations. -
Final Smoothing:
Give the inner cup one last pass with a damp sponge to smooth the top edge, ensuring it isn’t sharp or jagged.
Step 3: Finishing Up
-
Drying Time:
Set both pieces aside in a cool, dry place. I usually let air-dry clay sit for at least 24-48 hours. Turn the pieces over halfway through so the bottoms dry completely. -
Sanding:
Once fully cured and hard, use fine-grit sandpaper to gently buff away any rough spots on the rims or bases. -
Preparing the Candle:
Secure a wick to the bottom center of the small dried cup using a dab of melted wax or a wick sticker. -
Pouring the Wax:
Carefully pour melted candle wax into the inner cup, stopping about a quarter-inch from the rim. Keep the wick centered while it cools. -
Assembly:
Once the wax is solid, place the small cup into the center of the larger dish to complete the set.
Stamp Tip
Don’t have a triangle stamp? Use the corner of a square rectangular object, or fold a stiff piece of cardboard into a ‘V’ shape to press into the soft clay.
Light your new bespoke candle and enjoy the warm, handmade glow it adds to your space


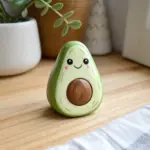

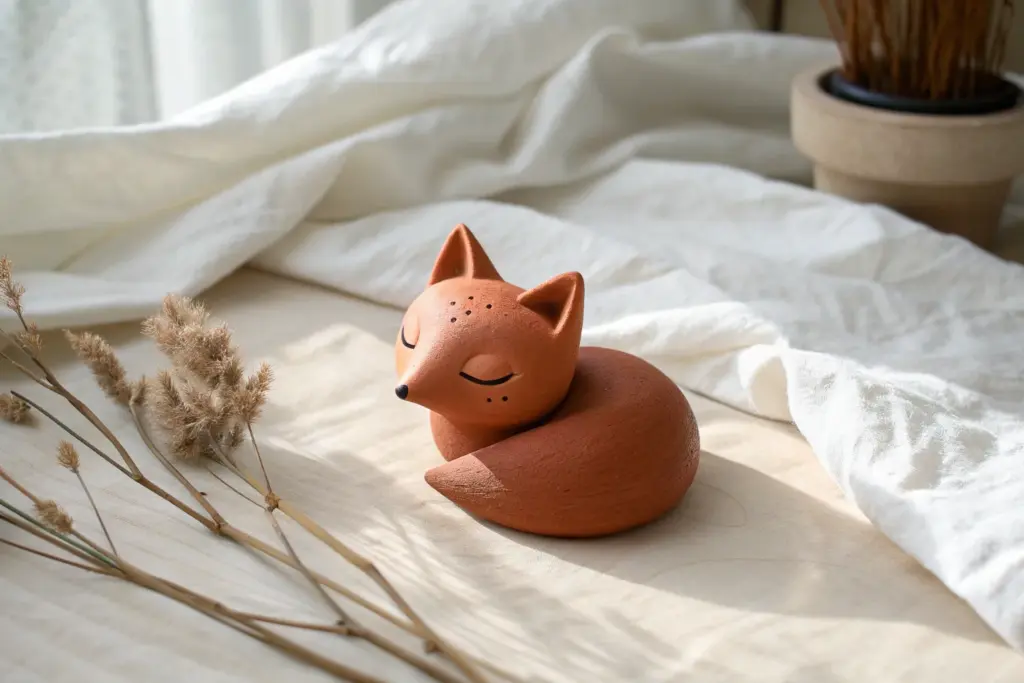
Cute Blob Animal Figurine
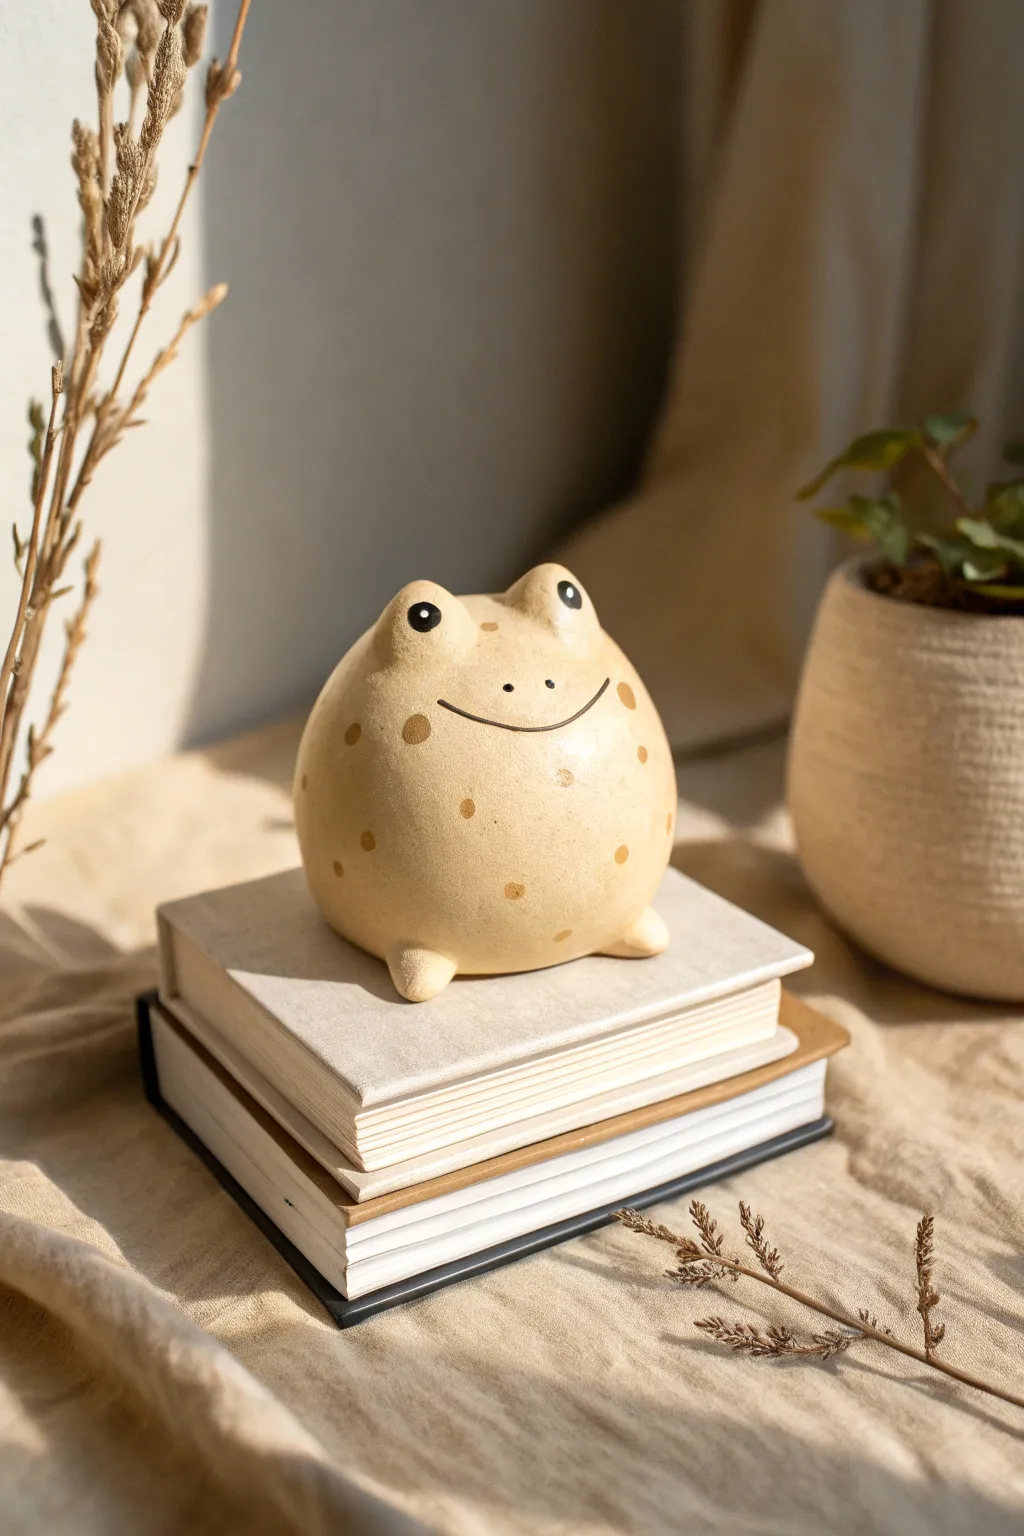
Sculpt a delightfully chunky amphibian that brings a smile to any shelf. This project features a simple spherical body, minimal limbs, and charming painted details for an irresistibly cute finish.
Step-by-Step Tutorial
Materials
- Air-dry clay or polymer clay (beige or white)
- Acrylic paints (black, warm brown, cream)
- Small paintbrush
- Water cup
- Smoothing tool or sponge
- Ball stylus or toothpick
- Clear matte varnish (optional)
Step 1: Shaping the Base
-
Condition the Clay:
Start by kneading a fist-sized ball of clay until it is warm, soft, and pliable. This prevents cracks from forming later in the drying process. -
Form the Body Sphere:
Roll the clay between your palms to create a smooth, perfect sphere. Tap it gently on your work surface to create a flat base so the frog won’t roll away. -
Refine the Shape:
Gently gently press the sides to make it slightly wider at the bottom, giving it a heavy, settled look instead of a perfect ball.
Step 2: Adding Features
-
Create Eye Mounds:
Take two small, equal-sized pieces of clay and roll them into balls. Press these onto the top of the head, spaced slightly apart. -
Blend the Eyes:
Using a smoothing tool or your finger dipped in a little water, blend the bottom edges of the eye mounds into the main body so they look like seamless bumps rather than attached marbles. -
Form the Feet:
Roll two small cones of clay for the front feet. Press them under the front curve of the belly, pointing outward slightly. -
Shape the Hind Legs:
For the back legs, make two slightly flattened oval shapes. Attach them to the lower sides of the body near the back, blending the upper edge into the sphere. -
Smooth Everything:
Go over the entire sculpture with a slightly damp sponge or finger to remove fingerprints and ensure all seams are invisible.
Smooth Surface Secret
Use a tiny bit of water on your finger to ‘polish’ the raw clay before drying. This reduces sanding time later.
Step 3: Drying and Painting
-
Dry Completely:
Let the sculpture dry for 24-48 hours. I usually rotate it occasionally so the bottom gets air exposure too. -
Base Color:
If your clay isn’t already the desired beige, mix a warm cream acrylic paint and apply two thin coats for an even finish. -
Paint the Spots:
Using the handle end of a paintbrush or a large dotting tool, dip into warm brown paint and stamp random dots all over the frog’s body. -
Draw the Smile:
With a fine liner brush and black paint, carefully paint a wide, shallow U-shape for the mouth. Add two tiny dots above it for the nostrils. -
Detail the Eyes:
Paint large black circles on the front of the eye mounds. Once dry, add a tiny white dot to each for a reflection. -
Seal:
Finish with a coat of matte varnish to protect the paint and give it a professional ceramic look.
Creative Twist
Turn your frog into a planter! Hollow out the top of the sphere before adding eyes to hold a small succulent.
Place your little frog friend on a stack of books or near a plant to enjoy its calming presence

The Complete Guide to Pottery Troubleshooting
Uncover the most common ceramic mistakes—from cracking clay to failed glazes—and learn how to fix them fast.
Snail With Swirl Shell
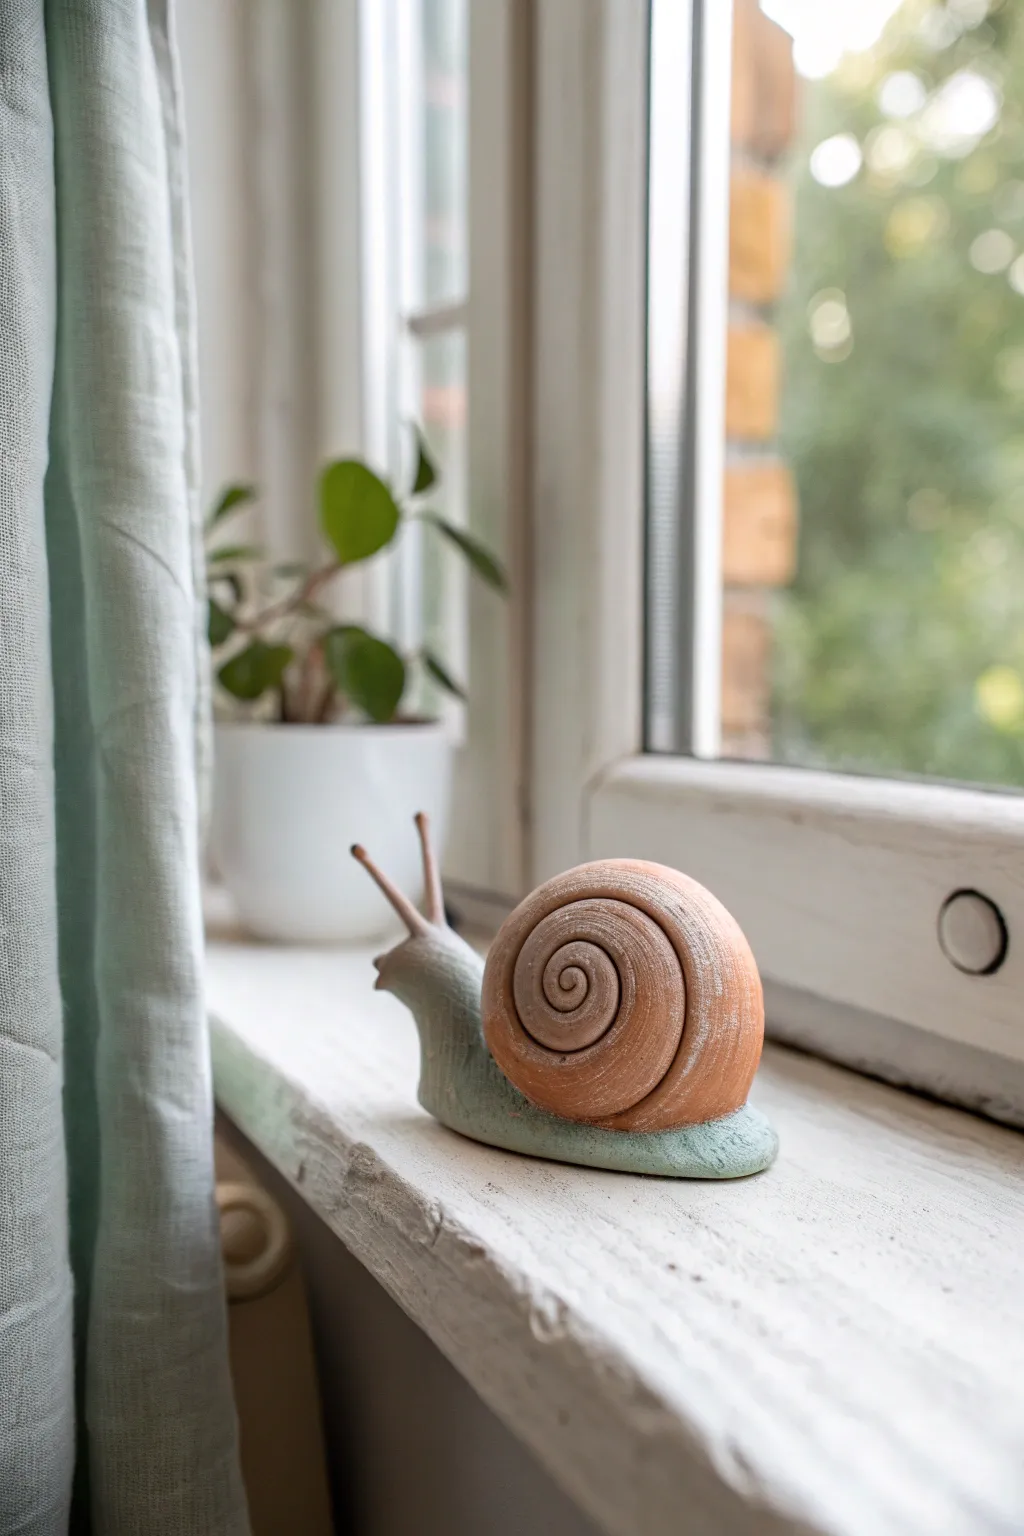
Bring a touch of slow-living charm to your home with this adorable garden snail sculpture. Featuring a textured terracotta-style shell and a smooth, sage-green body, this project is perfect for mastering basic coil and blending techniques.
Step-by-Step
Materials
- Air-dry clay (white or light grey)
- Acrylic paints (terracotta/burnt sienna, sage green, white, dark brown)
- Sculpting tools (needle tool, smoothing tool)
- Water and sponge
- Aluminum foil (for armature)
- Paintbrushes (flat brush and dry brush)
- Matte sealant or varnish
Step 1: Sculpting the Body
-
Form the Core:
Start by crumpling a small piece of aluminum foil into a tapered worm shape. This will act as the core for the snail’s body, saving clay and reducing drying time. -
Wrap the Clay:
Roll out a thick log of clay and flatten it slightly. Wrap this around your foil core, ensuring the clay is evenly distributed. Smooth the seams together with a little water until the foil is completely hidden. -
Shape the Tail:
Gently taper one end of the log to create a pointed tail. Press the bottom against your work surface to flatten the ‘foot’ of the snail so it sits significantly stable. -
Create the Head:
On the opposite end, bend the clay upward slightly to form the head and neck. Smooth the transition so it looks like a natural curve. -
Add Eye Stalks:
Roll two thin, small coils of clay. carefully attach them to the top of the head. I find using a needle tool to drag a bit of clay from the stalk down to the head creates a stronger bond.
Cracks Appearing?
If you see cracks forming while drying, mix a tiny bit of clay with water to make a paste (slip). Fill the cracks with this paste and smooth over immediately.
Step 2: Creating the Shell
-
Roll a Long Coil:
Take a large lump of clay and roll it into a long, consistent snake. It needs to be quite thick at one end and taper down gradually to a thinner point. -
Start the Spiral:
Beginning with the thinnest end, start curling the coil in on itself tightly. Keep winding until you have a flat disc shape. -
Build the Dome:
As you continue winding the thicker part of the coil, start overlapping the previous layer slightly rather than laying it flat. This will create the dimensional, domed shape of the shell. -
Smooth the Inside:
On the underside (concave side) of the shell, use a sculpting tool or your finger to smear the coils together. This structural reinforcement ensures the shell won’t unravel later. -
Refine the Texture:
Leave the outside coils visible for texture. You can gently press a damp sponge over them to soften any sharp ridges while keeping the spiral definition.
Make it Shine
Want a ‘slimy’ looking snail trail? Add a layer of high-gloss varnish just along the very bottom edge of the foot for a realistic wet effect.
Step 3: Assembly and Painting
-
Attach Shell to Body:
Score the back of the snail body and the underside of the shell (scratch cross-hatch marks). Apply a dab of water or slip, then press the shell firmly onto the body. -
Blend the Seam:
Use a small amount of fresh clay to create a seamless transition where the shell meets the body, making it look like one cohesive creature. -
Dry Thoroughly:
Allow the sculpture to dry completely. This can take 24-48 hours depending on thickness. It should feel room temperature, not cool to the touch. -
Base Coat the Body:
Mix sage green with a touch of white and paint the entire body and eye stalks. Apply two thin coats for opaque coverage. -
Base Coat the Shell:
Paint the shell with a solid coat of terracotta or burnt orange acrylic paint. Ensure you get the brush into the deep crevices of the spiral. -
Dry Dry Brushing:
Dip a dry, stiff brush into white paint and wipe most of it off on a paper towel. Lightly dust the brush over the raised ridges of the shell to highlight the spiral texture. -
Finishing Touches:
Paint the tips of the eye stalks a darker brown. Once all paint is dry, apply a matte varnish to protect your new friend from dust.
Place your finished sculpture near a sunny window or planter to keep your plants company
Face Vase Buddy

Bring a sense of calm to your space with this serene, meditative face vase. Its textured blue finish and simple, stylized features make it a perfect beginner sculpting project that looks deceivingly high-end.
Detailed Instructions
Materials
- Air-dry clay (white or terracotta)
- Small rolling pin
- Pottery sponge
- Clay carving tools (needle tool, loop tool)
- Small bowl or cup (optional, for armature)
- Slip (clay mixed with water)
- Matte acrylic paint (royal blue or cornflower blue)
- Gold paint pen or small brush with gold paint
- Baking soda (optional, for texture)
- Clear matte varnish
Step 1: Forming the Vessel
-
Shape the base:
Begin with a ball of clay about the size of a large grapefruit. You can use the pinch pot method—pushing your thumb into the center and pinching the walls up evenly—or coil build the main rounded body. -
Refine the curve:
Smooth out the exterior using a rib tool or your fingers. Aim for an organic, egg-like shape that is wider at the bottom and slightly tapers toward the top. -
Build the neck:
Roll a thick snake of clay to form the neck. Score and slip the top of your vessel body, then attach the coil, smoothing the clay downward to merge it seamlessly with the body. -
Create the rim:
Roll a slightly thinner coil for the very top rim. Attach it to the neck, flaring it out just slightly to give it a finished, pottery-wheel look. Smooth the connection points carefully.
Smooth Seams
When attaching facial features, blend the clay edges until they disappear entirely. The face should look like it was pushed out from inside, not glued on.
Step 2: Sculpting the Features
-
Map the face:
Lightly sketch the position of the nose, eyes, and mouth directly onto the wet clay using a needle tool. Keep the design symmetrical and centered on the belly of the vase. -
Review the geometry:
The nose in this design is a long, continuous line that connects directly to the eyebrows. Ensure this central vertical line is straight. -
Add the nose coil:
Roll a very thin ‘snake’ of clay. Score and slip along your sketched nose line. Press the coil onto the pot, smoothing the edges down so it looks raised rather than stuck on. -
Form the eyebrows:
Extend the nose coil at the top to branch out into two arches for the eyebrows. Alternatively, attach two separate curved coils that meet seamlessly at the bridge of the nose. -
Create the eyelids:
Roll two small crescent shapes for the closed eyelids. Attach them under the brow arches. Use a modeling tool to carve a clear separation line between the eyelid and the cheek for definition. -
Sculpt the mouth:
Add a small, gentle upward curve for the smile. I like to taper the ends of this coil so they vanish into the cheeks naturally. -
Add forehead details:
Using the back of a small paintbrush or a dotting tool, press a row of small indentations around the top of the forehead, just below the neck of the vase, creating a decorative crown effect.
Step 3: Finishing Touches
-
Texturizing:
Before the clay dries, take a slightly damp sponge or a stiff bristle brush and stipple the surface gently. This removes fingerprints and gives it that stone-like texture. -
Drying time:
Let the vase dry completely for 24-48 hours. Keep it away from direct heat to prevent cracking. -
Mixing the paint:
To achieve the gritty, matte texture seen in the photo, mix your blue acrylic paint with a teaspoon of baking soda. This transforms the paint into a faux-ceramic glaze. -
Painting the base:
Apply two coats of your baking soda paint mixture. Let the first coat dry fully before adding the second to ensure deep, opaque coverage. -
The golden eye:
Once the blue paint is dry, use a gold paint pen or a fine brush to paint a single small dot in the center of the forehead (the ‘third eye’). This pop of gold adds immediate elegance. -
Seal and protect:
Finish with a spray of clear matte varnish to protect the paint without making it shiny.
Stone Effect
For an even rockier texture, lightly press a piece of coarse sandpaper or a crumpled ball of aluminum foil against the clay while it’s still soft.
Fill your new masterpiece with dried grasses or reeds to complete the organic, earthy vibe


What Really Happens Inside the Kiln
Learn how time and temperature work together inside the kiln to transform clay into durable ceramic.
Little Toothbrush Holder Creature
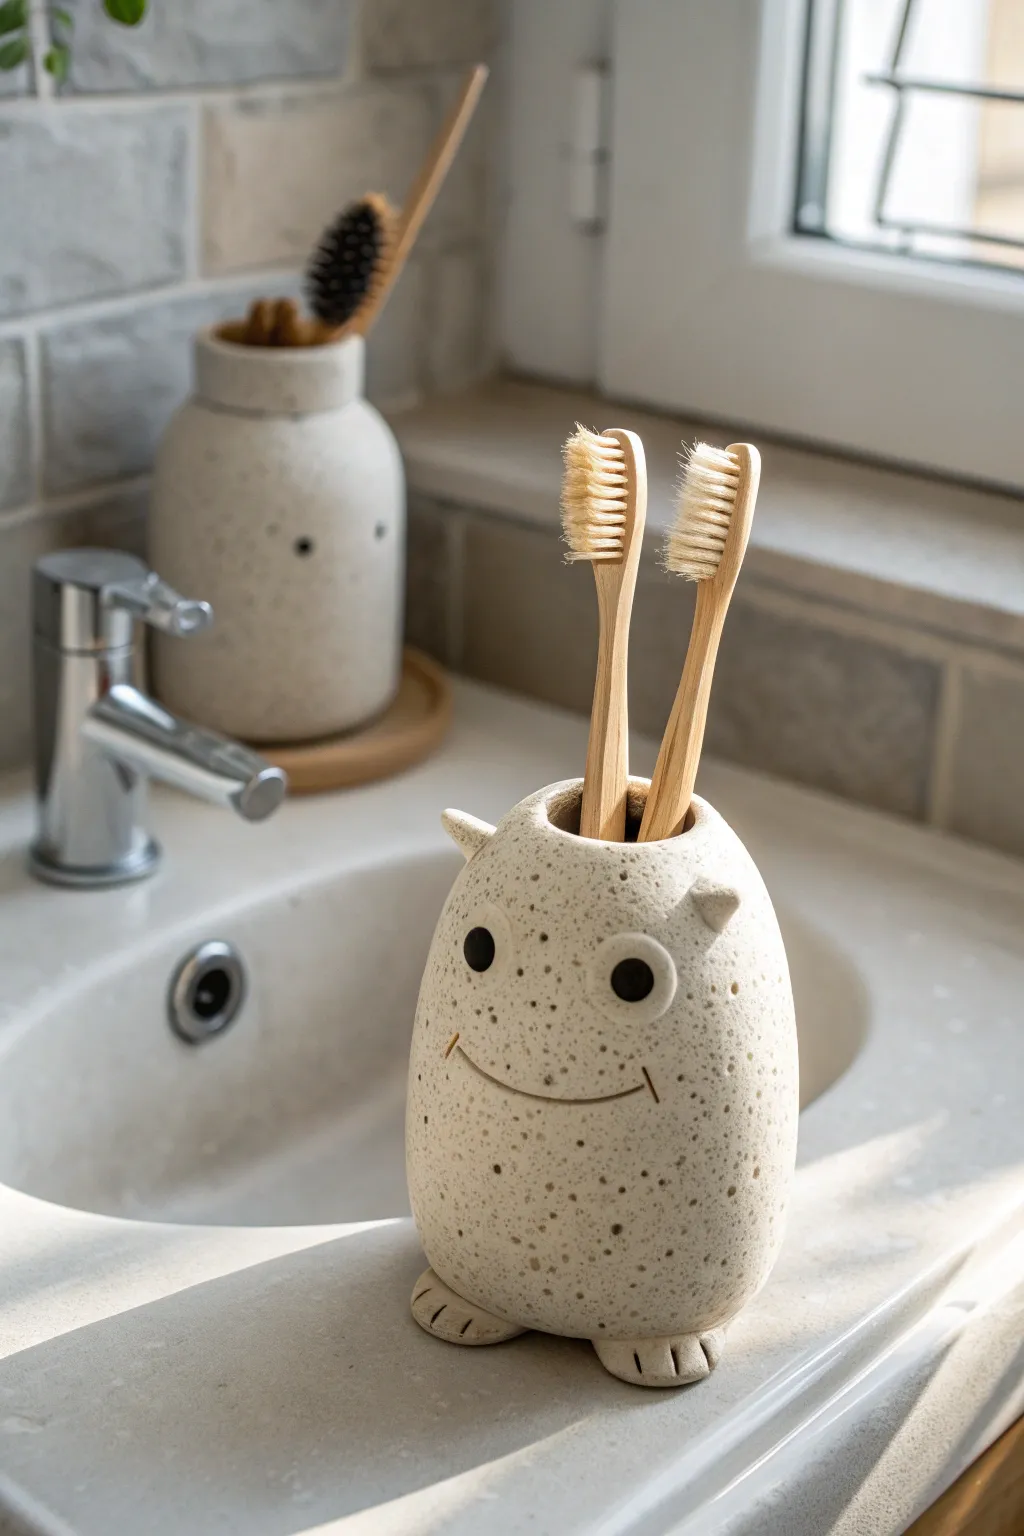
Brighten up your morning routine with this adorable clay creature that happily holds your toothbrushes. This speckled, speckled ceramic buddy features a simple, modern design with tiny feet and a friendly smile.
Step-by-Step Tutorial
Materials
- White stoneware or polymer clay (speckled variety preferred)
- Black underglaze (or acrylic paint if using air-dry clay)
- Needle tool
- Cleanup sponge
- Wooden modeling tool
- Fork or scoring tool
- Clear glaze (if firing)
- Water slip (if using ceramic clay)
- Rolling pin (optional)
Step 1: Farming the Body
-
Prepare the Clay:
Start with a ball of clay roughly the size of a large orange. Wedge it well to remove any air bubbles, which helps prevent cracking later on. -
Shape the Base:
Gently roll the clay between your palms to form a smooth sphere. Gradually elongate it slightly into an egg shape, making sure the bottom is wider than the top. -
Create the Flat Bottom:
Tap the wider end of your egg shape firmly against your work surface to create a flat, stable base so your creature won’t wobble. -
Make the Toothbrush Holes:
Use the handle of a thick paintbrush or a specific hole-cutting tool to press two deep vertical holes into the top of the creature. Make sure they are deep enough to hold a brush securely but don’t poke through the bottom. -
Check the Fit:
Test the holes with an actual toothbrush to ensure they are wide enough. Remember that clay shrinks during drying and firing, so I like to make them slightly larger than necessary.
Step 2: Adding Details
-
Form the Ears:
Pinch off two very small pieces of clay and roll them into tiny cones. These will be the little horns or ears. -
Attach the Ears:
Score the attachment points on the ‘head’ and the base of the ears. Apply a little slip (or water/clay paste) and press them firmly onto the sides of the head near the top. -
Smooth the Seams:
Use a wooden modeling tool or your fingertip to blend the clay from the ears into the main body until the seam disappears completely. -
Create the Feet:
Shape two flat ovals of clay for the feet. Place them under the front edge of the creature so they poke out just slightly. -
Detail the Toes:
Use a needle tool or a dull knife to press three little lines into each foot to create toes. Attach the feet securely to the base using the score-and-slip method.
Shrinkage Surprise
If your toothbrush doesn’t fit after firing, the clay shrank too much. Use a sanding tool or Dremel to carefully widen the holes post-firing.
Step 3: Adding Personality
-
Engrave the Smile:
Use your needle tool to gently carve a wide, shallow U-shape for the mouth. Add tiny vertical ticks at the corners for a quirky grin. -
Position the Eyes:
Mark the spots for the eyes midway between the ears and the mouth. You can press a small round tool in slightly to create a socket. -
Paint the Eyes:
Using a small brush, paint two solid black circles for the eyes using underglaze. If you are using polymer or air-dry clay, do this with acrylic paint after the piece is dry. -
Smoothing:
Take a slightly damp sponge and wipe over the entire piece to smooth out fingerprints and soften any sharp edges. -
Drying:
Let the piece dry slowly under loose plastic for a day or two to prevent cracking, especially around the thick base. -
Firing or Sealing:
If using ceramic clay, bisque fire, then apply a clear glaze (unless your clay is already water-tight) and fire again. For air-dry clay, seal with a waterproof varnish.
Texture Twist
Before drying, gently roll the body over a textured fabric or use a coarse sponge to give the creature a rough, stone-like skin.
Place your finished creature by the sink and enjoy a cheerful start to your brushing routine
Pen And Brush Rest Worm
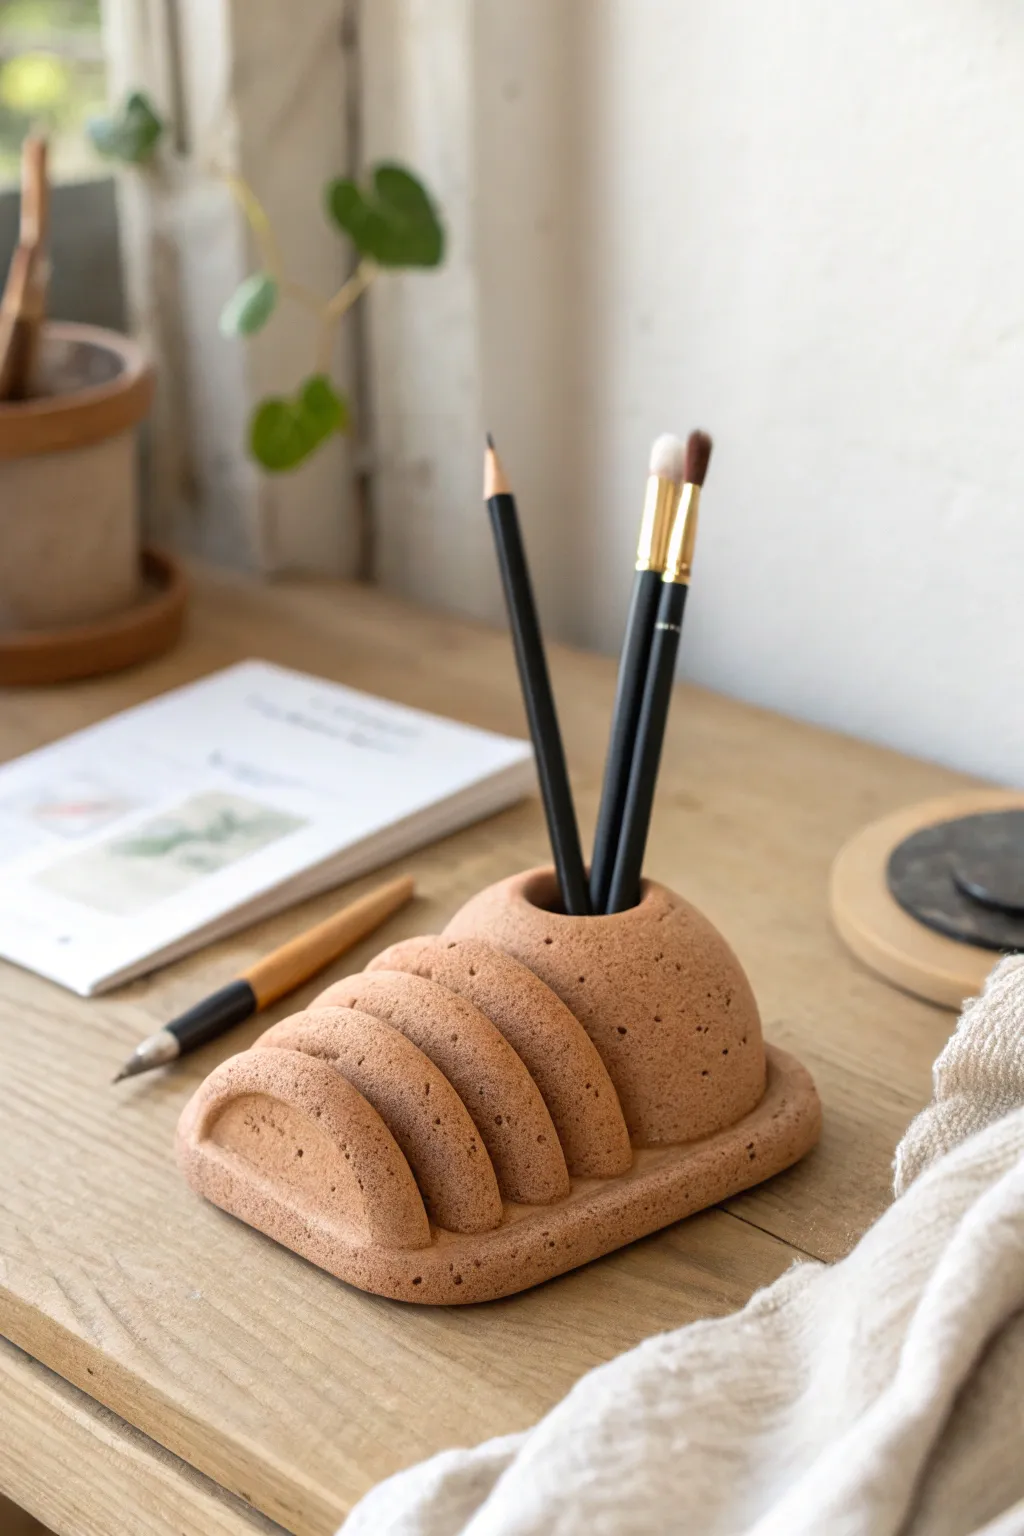
This whimsical yet functional desk organizer combines organic, segmented shapes with a practical pen holder, resembling a stylized caterpillar or worm. Its textured, speckled finish mimics natural stone or terracotta, bringing a warm, earthy element to your creative workspace.
Step-by-Step
Materials
- Air-dry clay (terracotta color) or polymer clay
- Dried coffee grounds or coarse sand (for texture)
- Rolling pin
- Clay knife or wire cutter
- Modeling tool or smooth butter knife
- Sponge and water
- Large marker or dowel (to create the pen hole)
- Sandpaper (fine grit)
- Matte sealant spray
Step 1: Preparing the Base and Body
-
Mix the Texture:
Begin by conditioning your clay. To achieve that stony, speckled look seen in the photo, knead a tablespoon of dried coffee grounds or coarse sand into the clay until it is evenly distributed. -
Form the Base:
Roll out a slab of clay to about 1/4 inch thickness. Cut a rounded rectangle shape, approximately 6 inches long by 3 inches wide. This will serve as the foundation for your sculpture. -
Smooth the Edges:
Dip your finger in a little water and run it along the cut edges of your base to soften any sharp corners, giving it a uniform, rounded lip. -
Create the Pen Mound:
Take a large ball of clay and shape it into a smooth, rounded dome. This will go on the right side of the base. Ensure the bottom is flat so it sits flush. -
Attach the Mound:
Score the bottom of the dome and the corresponding spot on the base with cross-hatching marks. Apply a little water or slip (liquid clay), press the dome firmly onto the right side of the base, and use a modeling tool to blend the seams invisibly.
Cracks Appearing?
If you see hairline cracks while air-drying, mix a tiny amount of fresh clay with water to make a paste. Fill the cracks, smooth it over, and let it dry again slowly away from direct heat.
Step 2: Sculpting the Segments
-
Prepare the Segments:
Roll out a thick coil of clay and cut four semi-circle shapes. These should be graduated in size, designed to lean against each other like sliced loaf bread. -
Shape the First Rib:
Take the largest semi-circle and place it immediately to the left of the pen mound. It should lean slightly against the mound. -
Attach the First Rib:
Score and slip the bottom of this rib and the side touching the mound. getting a strong bond here is crucial for structural integrity. -
Add Remaining Ribs:
Repeat the process with the remaining three semi-circles, placing them one after another to the left. I find it helps to press them gently together as a unit to ensure they look cohesive and snug. -
Create the End:
For the final piece on the far left (the tail), create a shorter, more rounded semi-circle to taper the shape off smoothly. -
Blend the Roots:
Use a small tool to blend the bottom of each rib into the base slab so they look like they are growing out of it, rather than just sitting on top.
Step 3: Refining and Finishing
-
Drill the Holder:
Take your large marker or dowel and press it vertically into the center of the right-side dome. Push down deep enough to hold a pen securely, but be careful not to puncture through the bottom base. -
Widen the Opening:
Gently wiggle the dowel in a circular motion to widen the opening slightly, ensuring it can accommodate multiple brush handles if needed. -
Texture the Surface:
Use a stiff-bristled brush or a crumpled ball of aluminum foil to gently tap the surface of the clay. This enhances the stone-like texture and hides fingerprints. -
Add Pockmarks:
Take a needle tool or toothpick and randomly poke small, shallow holes over the dome and the ribs to mimic natural porous stone. -
Final Smoothing:
Do a final check for any rough seams. Use a barely damp sponge to wipe away crumbly bits, but be gentle so you don’t erase your texture. -
Drying:
Let the piece dry completely. If using air-dry clay, this may take 24-48 hours. Turn it over halfway through to let the bottom breathe. -
Sanding and Sealing:
Once bone dry, lightly sand any sharp burrs. Finish with a matte spray sealant to protect the clay while keeping that natural, earthy appearance.
Make It Heavy
Embed a small, flat stone or a heavy washer into the base slab before attaching the top pieces. This adds weight and prevents the holder from tipping over when holding heavy brushes.
Now you have a charming, textured organizer ready to keep your artistic tools tidy

TRACK YOUR CERAMIC JOURNEY
Capture glaze tests, firing details, and creative progress—all in one simple printable. Make your projects easier to repeat and improve.
Stamp-Pattern Mini Dish Set
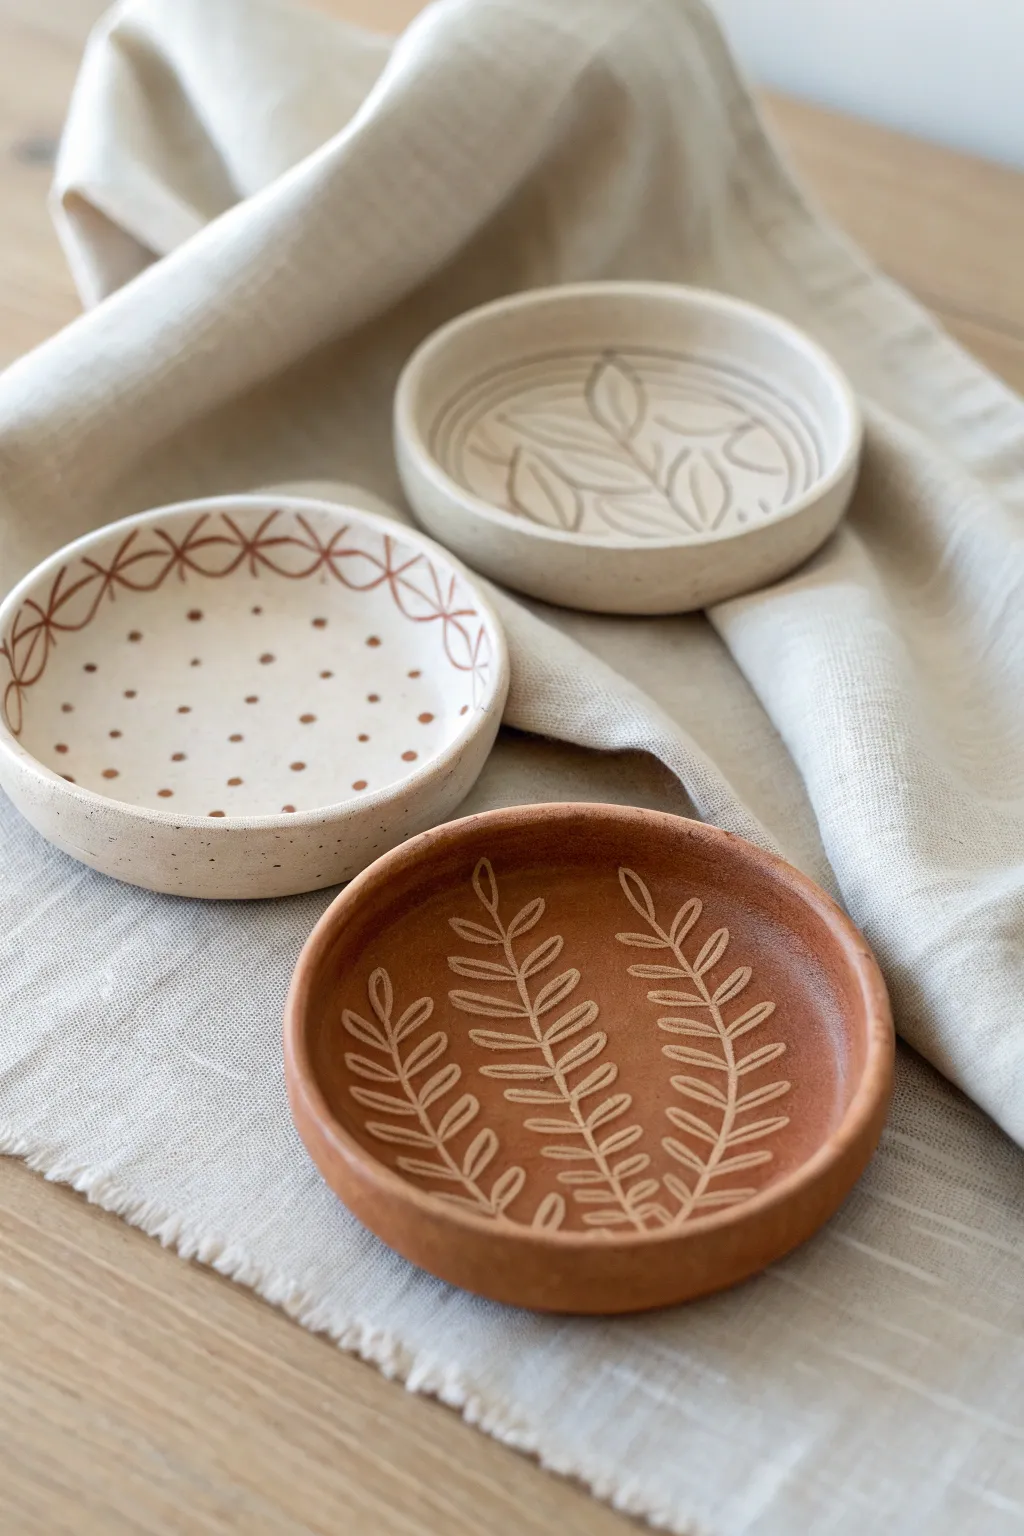
Create a charming set of trinket dishes that highlight simple, geometric beauty and organic leaf motifs. This project introduces beginners to the art of using found objects and carving tools to create texture on contrasting clay bodies.
Detailed Instructions
Materials
- Air-dry clay (white/cream)
- Air-dry clay (terracotta/reddish-brown)
- Rolling pin
- Round cookie cutter or bowl (approx. 4-5 inches)
- Sponge
- Small bowl of water
- Needle tool or toothpick
- Carving tools (small loops or gouges)
- Fine-grit sandpaper
- Clear matte acrylic sealer or varnish
- Small round paintbrush
- Brown acrylic paint (optional, for the dotted dish)
Step 1: Forming the Base
-
Condition the clay:
Start by kneading your white and terracotta clays separately until they are soft, pliable, and free of air bubbles. You need enough of each to make at least one dish. -
Roll out the slab:
Roll your clay out to an even thickness of about 1/4 inch. If you are worried about sticking, work on a canvas mat or a piece of parchment paper. -
Cut the circles:
Use a round cookie cutter or place a small bowl upside down on the clay to trace and cut out three perfect circles. Use the terracotta clay for one circle and the white clay for the other two. -
Shape the rim:
Create the dish shape by gently curling the edges of the circle upward. Use your thumb to smooth the inside curve and your fingers to support the outside, creating a small, raised wall about half an inch high. -
Smooth the surface:
Dip a sponge lightly in water—squeeze it out well so it’s damp, not dripping—and run it over the rim and interior to erase any fingerprints or cracks.
Stamp Shortcut
Don’t trust your freehand drawing? Use actual leaves or rubber stamps to press the designs into the wet clay, then trace over the depression with your carving tool.
Step 2: Designing the Patterns
-
Fern Leaf Dish (Terracotta):
On the reddish-brown dish, lightly sketch three vertical stem lines with a needle tool. Then, using a carving tool or needle, etch pairs of leaf ovals extending outward from the stems to create a fern look. -
Detailing the ferns:
Go back over your etched lines to deepen them slightly so the pattern remains visible after drying. The light carving reveals the lighter texture of the clay beneath the surface skin. -
Geometric Dot Dish (White):
For the first white dish, use a needle tool to scratch a geometric star or flower pattern along the inner rim. It looks like a series of intersecting semicircles. -
Adding texture:
Poke small indentations into the center of this dish to create distinct polka dots. Press deep enough to make a mark, but not through the bottom. -
Leaf Circle Dish (White):
On the final white dish, use a carving tool to gently gouge out a leafy branch design in the center. Surround this central motif with concentric circular lines etched near the rim.
Level Up: Gold Accents
After the matte sealer dries, paint just the very top edge of the rim with liquid gold leaf or metallic gold paint for a chic, high-end finish.
Step 3: Finishing Touches
-
Initial Drying:
Place the dishes on a wire rack to dry. I like to let this dry briefly for about an hour until it’s leather-hard before doing any final clean-up carving. -
Full Cure:
Allow the dishes to dry completely for 24-48 hours. They should feel room temperature to the touch, not cool. -
Sanding:
Once bone dry, take fine-grit sandpaper and gently smooth the rims and any rough ridges created by your carving tools. -
Enhancing the dots:
For the geometric dot dish, dilute a tiny drop of brown acrylic paint with water. Paint this wash into the etched lines and dots, then immediately wipe the surface with a damp cloth, leaving the darker color only in the crevices. -
Sealing:
Apply two thin coats of clear matte varnish to protect the clay from moisture and give it a finished professional look. Let the first coat dry fully before applying the second.
Now you have a stylish, cohesive set ready to hold your rings or keys
Magnetized Clay Letters
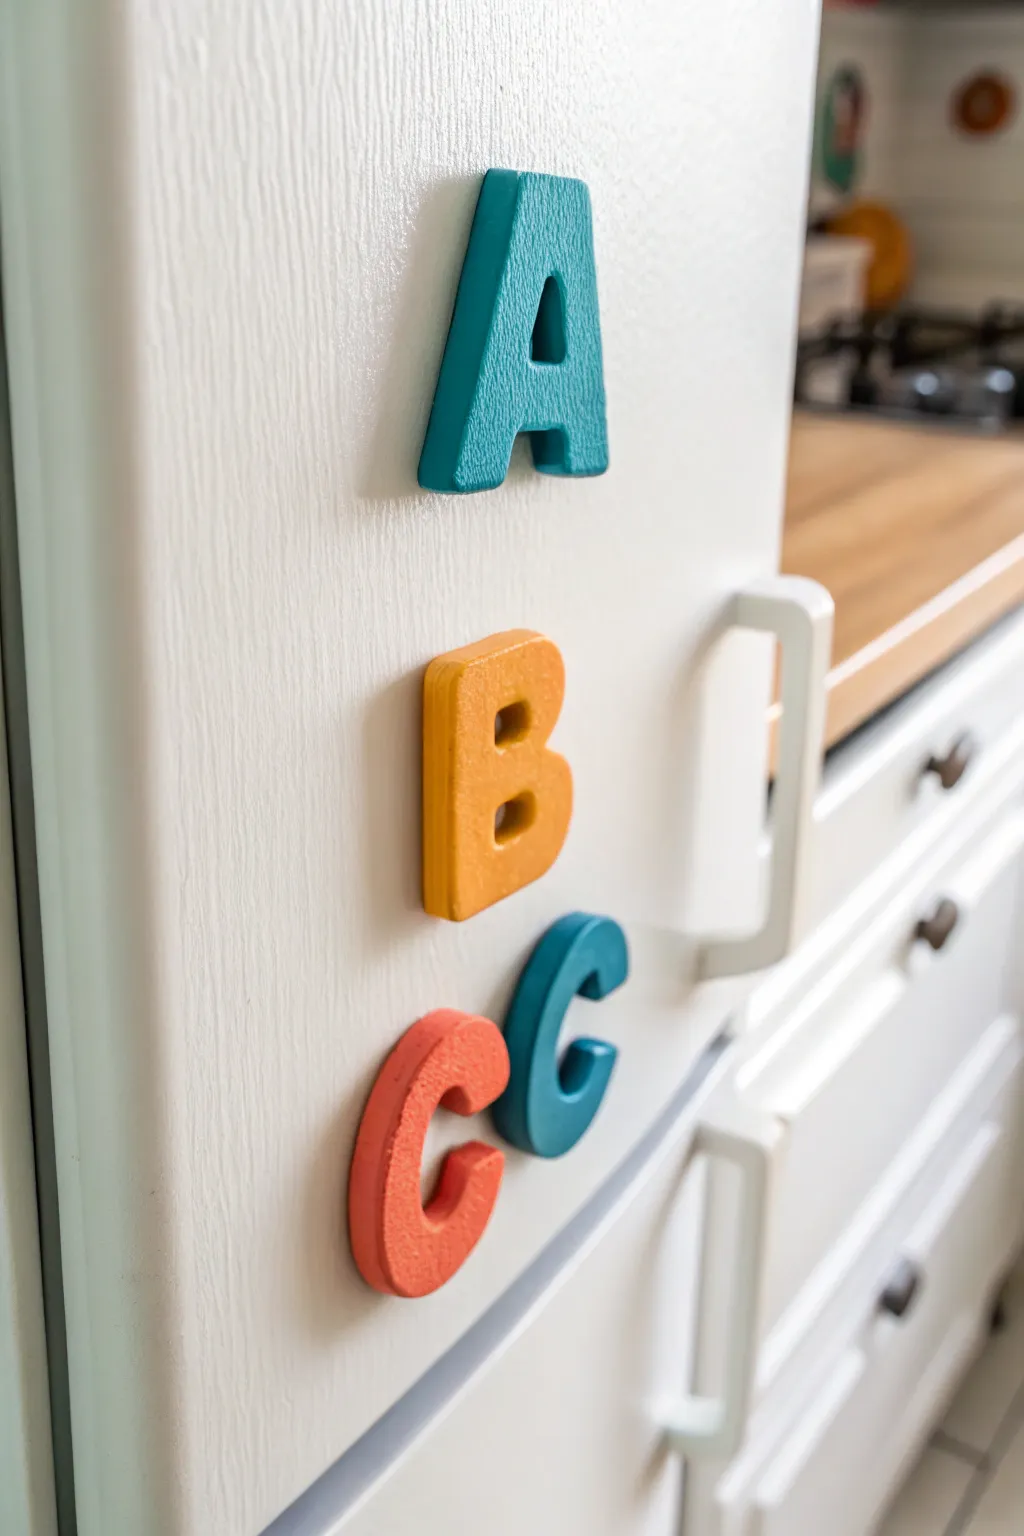
Brighten up your kitchen with these charming, chunky letter magnets that mimic the nostalgic look of classic wooden toys. This project creates durable, colorful alphabet pieces perfect for displaying photos or simply adding a splash of fun to your refrigerator door.
Step-by-Step Guide
Materials
- Polymer clay (teal, sunny yellow/orange, coral red)
- Small disk magnets (neodymium)
- Clay rolling pin or pasta machine
- Alphabet cookie cutters (approx. 1.5 – 2 inches tall)
- Super glue (cyanoacrylate) or Bake & Bond
- Fine-grit sandpaper (optional)
- Parchment paper
- Ceramic tile or baking sheet
- Texture sponge (optional)
Step 1: Preparing the Clay
-
Condition the clay:
Begin by taking your teal polymer clay and kneading it thoroughly in your hands until it becomes soft, warm, and pliable. This conditioning step is crucial to prevent cracks later. -
Roll out the slab:
Place the conditioned clay on a piece of parchment paper. Use a clay roller to flatten it into an even sheet. Aim for a thickness of about 1/4 inch (6mm) to achieve that chunky, toy-like appearance seen in the photo. -
Check thickness consistency:
If you have a pasta machine dedicated to clay, run it through the thickest setting. Otherwise, use playing cards stacked on either side of your roller as guides to ensure the slab is perfectly level. -
Add texture (optional):
For the subtle, matte finish visible in the example, gently press a texture sponge or a piece of heavy sandpaper onto the surface of the raw clay slab before cutting.
Step 2: Shaping the Letters
-
Cut the teal letters:
take your ‘A’ and ‘C’ cookie cutters. Press them firmly into the teal clay slab. Wiggle them slightly to separate the shape from the surrounding clay, then lift the cutter. -
Release the clay:
If the clay sticks inside the cutter, gently push it out from the back using a blunt tool or the eraser end of a pencil, being careful not to dent the front face. -
Smooth the edges:
Once the letter is out, use your fingertip specifically to lightly tap down the sharp edges created by the cutter. You want a slightly rounded, soft edge rather than a sharp, machined look. -
Create the other colors:
Repeat the conditioning and rolling process with your sunny yellow/orange clay for the letter ‘B’, and the coral red clay for the second ‘C’. Ensure they match the thickness of your teal letters. -
Cut remaining letters:
Cut out your ‘B’ and coral ‘C’ shapes. I always double-check the ‘B’ specifically to make sure the inner holes are clean and free of clay debris.
Uneven Surfaces?
If fingerprints are visible on your raw clay, brush a tiny amount of baby oil or cornstarch over the surface and smooth lightly with your finger before baking to erase them.
Step 3: Embedding the Magnets
-
Flip and position:
Turn all your cut clay letters face down onto your baking tile or parchment-lined sheet. -
Mark magnet spots:
Place your magnets on the back of each letter to test placement. For letters like ‘A’, place one magnet near the top and one near the bottom for stability. Smaller letters like ‘C’ may only need one central magnet. -
Embed option A: Press-in:
If you are baking the magnets into the clay (check your magnet manufacturer’s heat tolerance first), press the magnet firmly into the back of the clay until it is flush with the surface. -
Embed option B: Post-bake:
If gluing later, press the magnet into the clay to create an indentation, then carefully remove the magnet. This creates a perfect pocket for gluing after baking. -
Final smoothing:
Do a final check of the front of the letters. Handling them to add magnets might have distorted the shape slightly, so gently nudge them back into perfect alignment.
Go Faux-Wood
To mimic wood grain, mix a tiny bit of darker brown clay into your base colors but don’t blend fully. Leave it slightly streaky for a timber effect.
Step 4: Baking and Finishing
-
Bake the batch:
Preheat your oven according to the polymer clay package instructions (usually around 275°F or 130°C). Bake the letters on a tile or baking sheet for 15-30 minutes depending on brand and thickness. -
Cool down:
Allow the letters to cool completely inside the oven with the door slightly ajar. This gradual cooling helps prevent thermal shock and brittleness. -
Glue the magnets:
If you used the indentation method, apply a small drop of super glue or strong adhesive into the pocket you created and press the magnet in. Hold for 10-15 seconds to set. -
Matte finish:
If the clay looks too shiny after baking, lightly buff the surface with very fine-grit sandpaper or steel wool to achieve the matte, wooden texture shown in the reference image.
Once the glue is fully cured, your colorful alphabet is ready to spell out messages on the fridge
Easy Bead Charms For Jewelry
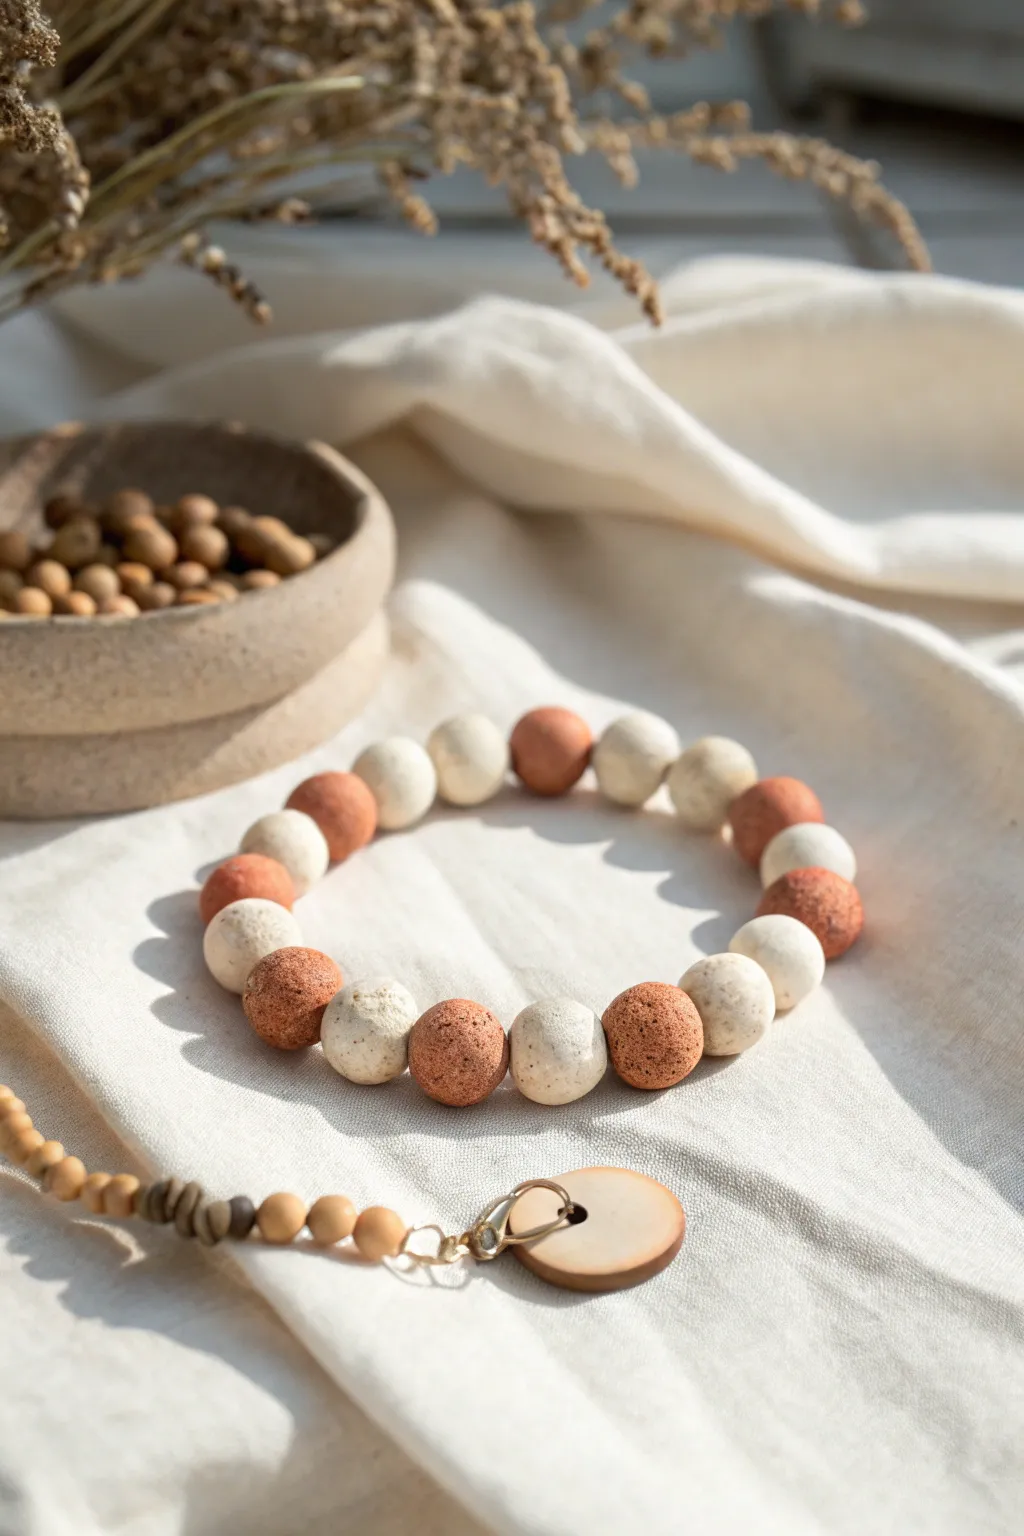
These charmingly rustic beads feature a unique porous texture that mimics volcanic rock or coral, perfect for diffusing essential oils. The alternating pattern of terracotta and cream tones creates a warm, earthy aesthetic that looks effortlessly natural.
Step-by-Step
Materials
- Polymer or air-dry clay (terracotta/orange and cream/white)
- Coarse sea salt or sugar (for texturing)
- Beading needle or toothpick
- Elastic stretch cord (0.8mm or 1mm)
- Scissors or jewelry cutters
- Super glue or jewelry cement
- Optional: Sandpaper
- Bowl of water
Step 1: Preparing the Clay
-
Condition the clay:
Start by warming up your clay in your hands. Knead both the terracotta and cream colors separately until they are soft, pliable, and free of any cracks. -
Portion evenly:
Pinch off small pieces of clay to create your beads. Aim for roughly equal marble-sized portions. You will need about 9-10 pieces of each color for a standard adult wrist. -
Check for consistency:
Roll each piece into a quick ball to check the sizes. If some are visibly larger, pinch a bit off and add it to a smaller one.
Salt vs. Sugar
Use coarse salt for larger, rocky craters or granulated sugar for a finer, sponge-like texture. Both dissolve easily!
Step 2: Texturing the Beads
-
Roll spheres:
Roll each portion of clay between your palms to create smooth, round spheres. -
Prepare texture medium:
Pour a small mound of coarse sea salt (or sugar) onto your work surface or a small plate. -
Apply texture:
Gently roll a clay sphere into the salt, pressing lightly so the crystals embed into the surface. Don’t press so hard that the ball deforms; just enough for the granules to stick. -
Roll again:
Once coat with salt, roll the bead between your palms again. This pushes the crystals deeper into the clay while smoothing the outer spherical shape. -
Repeat process:
Repeat this texturing process for every single bead in both colors.
Diffuser Upgrade
Add 1-2 drops of essential oil to the porous beads once finished. The texture holds the scent for days.
Step 3: Piercing and Curing
-
Pierce the holes:
Using a toothpick or a thick needle, carefully pierce a hole through the center of each bead. Twist the tool gently as you push through to prevent squashing the bead. -
Refine the exit:
Flip the bead over and poke through from the other side to ensure the hole is clean and uniform on both ends. -
Bake or dry:
Follow your specific clay’s instructions. For polymer clay, bake in the oven (usually around 275°F/135°C). For air-dry clay, allow them to sit undisturbed for 24-48 hours. -
Water bath:
Once fully cured or dried, submerge the beads in a bowl of warm water. Let them soak for about 10-15 minutes to dissolve the salt or sugar. -
Scrub and dry:
Use your fingers or a soft brush to gently rub the beads under the water, ensuring all granules dissolve, leaving behind the characteristic pitted texture. Pat them completely dry.
Step 4: Assembly
-
Measure the cord:
Cut a length of elastic cord about 10-12 inches long. This gives you plenty of extra room for tying knots without struggling. -
Pre-stretch:
Give the elastic cord a few firm tugs. I like to do this to ‘pre-stretch’ the material, which prevents the bracelet from drooping immediately after you wear it. -
String the pattern:
Thread the beads onto the cord, alternating one terracotta bead with one cream bead. -
Check the fit:
Wrap the strand around your wrist to check the size. Add or remove beads as necessary for a comfortable fit. -
Secure the knot:
Tie a surgeon’s knot (right over left, left over right, and loop through an extra time). Pull the elastic tight. -
Final glue:
Place a tiny drop of super glue or jewelry cement on the knot. Let it dry, then snip the excess cord close to the knot. Ideally, tuck the knot inside one of the bead holes.
Enjoy wearing your new earthy accessory or wrap it up as a thoughtful handmade gift
Tiny Mushroom Sculptures
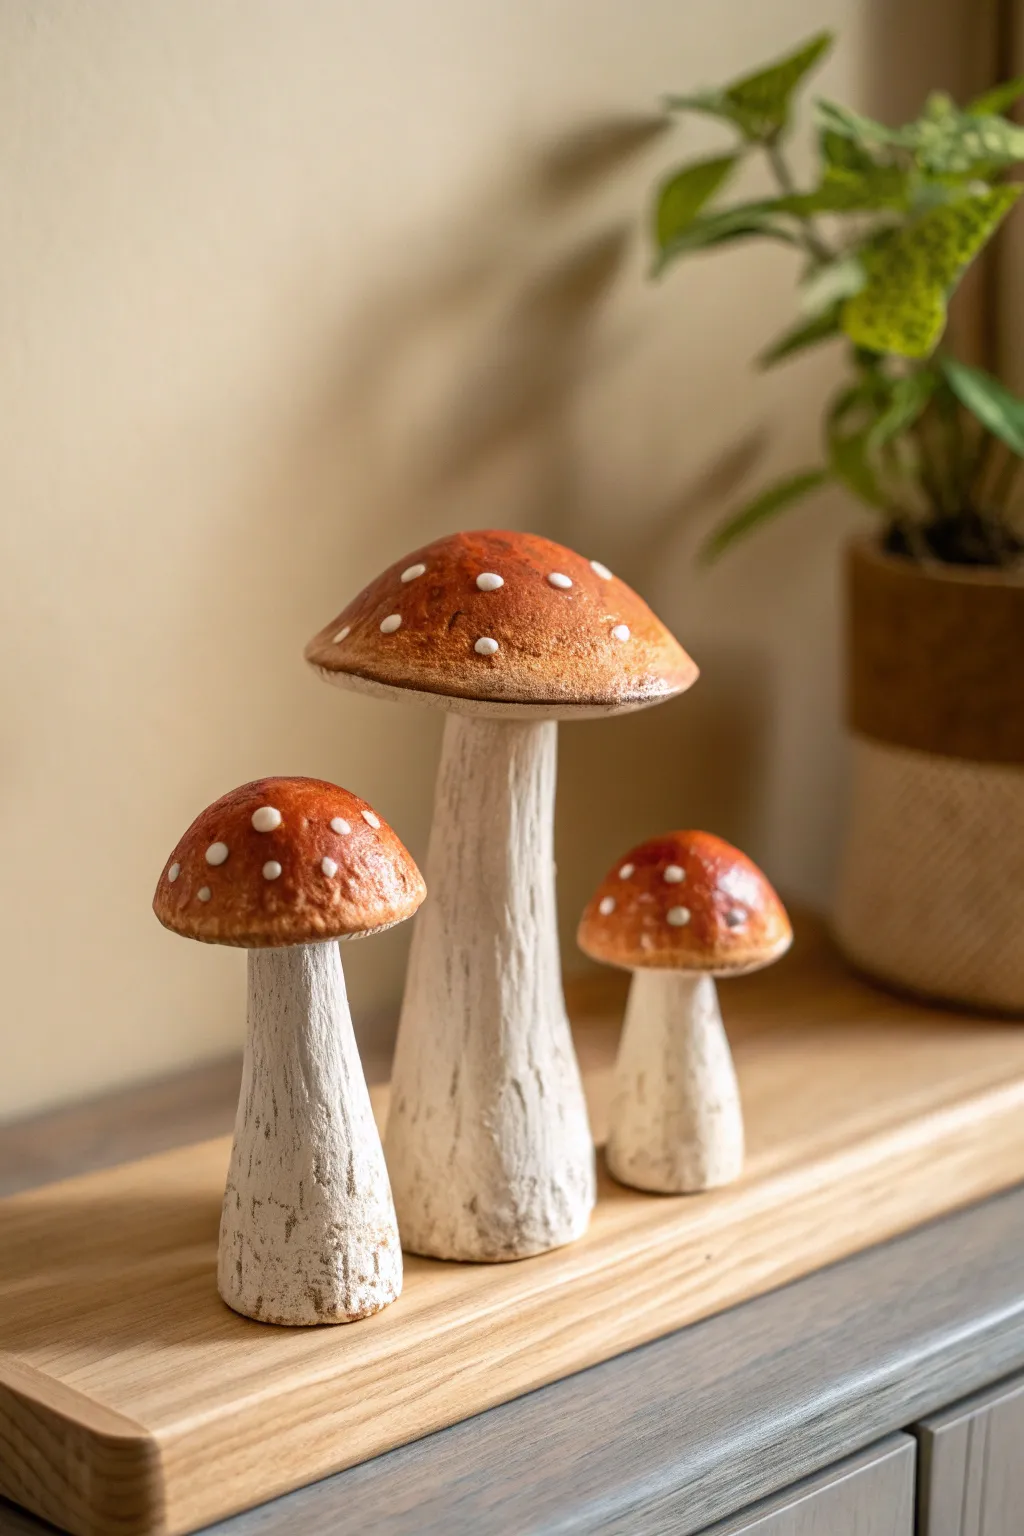
Bring a touch of forest charm to your home with this trio of rustic clay mushrooms. These sculptures feature textured, whitewashed stems and warm, reddish-brown caps dotted with delightful white speckles.
How-To Guide
Materials
- Air-dry clay or polymer clay (white)
- Aluminum foil
- Acrylic paints (burnt orange, rust brown, antique white, pure white, dark umber)
- Sculpting tools (needle tool, blending tool)
- Texture sponge or stiff bristle brush
- Painters tape (optional)
- Matte varnish or sealant
Step 1: Building the Armatures
-
Form the Cores:
Since clay can be heavy and take forever to dry if thick, start by crumbling aluminum foil into three distinct shapes. You want a cone-like column for the stem and a shallow dome for the cap. Make three sets of varying heights to match the photo. -
Refine the Shapes:
Compress the foil tightly. The stems should be wider at the base and taper slightly upward. The caps should be rounded on top and flat underneath. -
Join the Parts:
Insert a piece of wire or a toothpick into the top of your foil stem and push the foil cap onto it to connect them. Secure the joint with a bit of painter’s tape if the foil feels loose.
Cracking Issues?
If air-dry clay cracks while drying, mix a small amount of fresh clay with water to create a ‘slip’ paste and fill in the cracks, then sand smooth once dry.
Step 2: Sculpting the Clay
-
Sheeting the Clay:
Roll out your clay to about a 1/4 inch thickness. Lay a sheet over the foil stem first, pressing it firmly against the foil to remove air pockets. -
Covering the Caps:
drap a separate sheet of clay over the top of the foil cap, smoothing it down the sides. Wrap the excess under the rim and blend it into the top of the stem where they meet. -
Smoothing Seams:
Dip your finger in a little water (for air-dry clay) or baby oil (for polymer) and smooth out any connection points so the mushroom looks like one continuous organic piece. -
Adding Stem Texture:
Using a needle tool or a stiff brush, drag vertical vertical lines up and down the stem. I like to make these quite deep and irregular to mimic the fibrous look of a real mushroom stalk. -
Texturing the Cap:
Gently tap the surface of the cap with a texture sponge to give it a slightly porous, natural feel rather than a perfectly smooth, plastic look. -
Refining the Rim:
Run a tool under the rim of the cap to create a slight separation from the stem, ensuring the cap looks like it overhangs the stalk properly. -
Drying or Baking:
Follow your clay manufacturer’s instructions to cure the pieces. If using air-dry clay, let them sit for at least 24-48 hours until fully hard.
Step 3: Painting and Finishing
-
Base Color for Stems:
Mix a wash of dark umber and water (or thinner). Brush this into all the deep crevices of the stem texture you created. -
Wiping Back:
Before the dark wash dries completely, wipe the surface with a paper towel. The dark paint will stay in the cracks, highlighting the texture. -
Dry Brushing Stems:
Load a flat brush with antique white paint and wipe most of it off on a paper towel. Lightly drag the brush over the raised parts of the stem to make the texture pop. -
Painting the Caps:
Sponge on a gradient of color for the caps. start with burnt orange in the center and blend into a lighter rust brown towards the edges for dimension. -
Adding the Spots:
Once the red paint is dry, use a small detail brush or the back end of a paintbrush to dot on the white spots. Make them slightly raised for a tactile 3D effect. -
Dirtying the Base:
Dab a tiny bit of brown paint around the very bottom of the stem to make it look like it was just pulled from the earth. -
Sealing the Work:
Protect your paint job with a coat of matte varnish. Avoid glossy finishes, as these should look natural and earthy.
Make it Mossy
Glue small bits of dried crafting moss or faux grass to the very base of the stems to create a tiny ecosystem display for your shelf.
Arrange your trio on a wooden shelf or near a potted plant to complete the enchanting look
Mushroom House Mini Decor
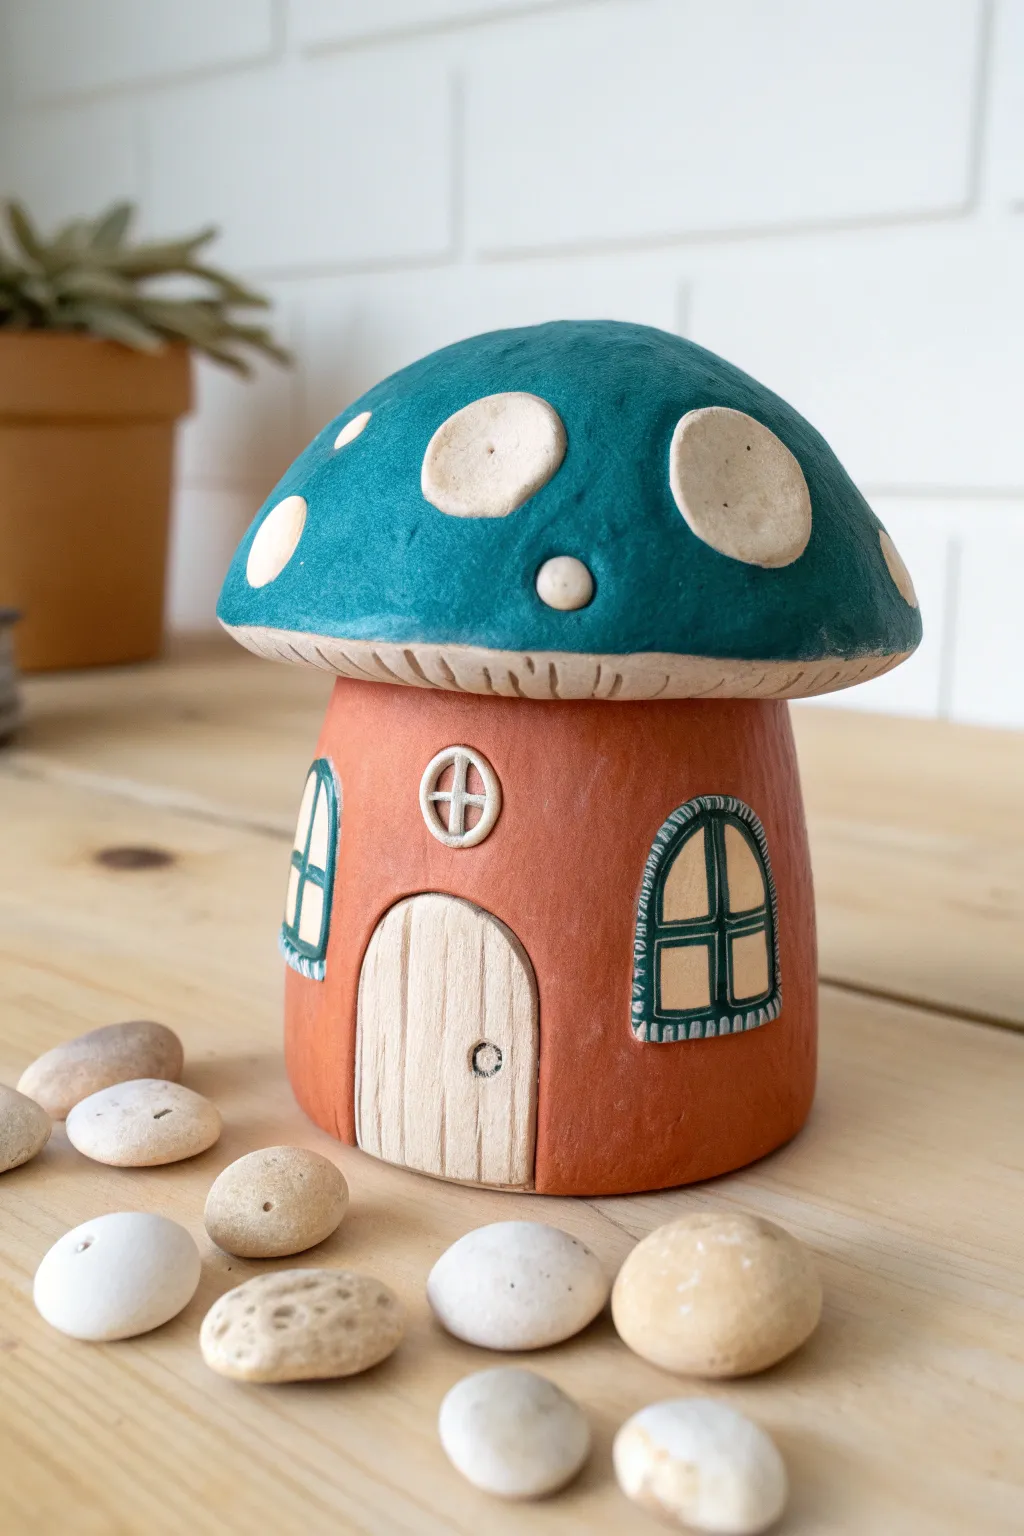
This charming clay project transforms a simple mushroom shape into a cozy woodland dwelling complete with arched windows and a detailed door. The contrast between the terracotta-colored base and the deep teal cap with cream spots creates a delightful, earthy aesthetic perfect for a shelf display.
Step-by-Step Tutorial
Materials
- Air-dry clay (white or terracotta)
- Acrylic paints (terracotta orange, deep teal, cream/off-white, forest green)
- Small paintbrush set (detail and flat shaders)
- Clay sculpting tools (needle tool, small loop tool)
- Rolling pin
- Water and sponge for smoothing
- Aluminum foil (for armature)
- Fine grit sandpaper
Step 1: Sculpting the Base
-
Form the armature:
Begin by crumbling a piece of aluminum foil into a cylinder shape with a slightly wider bottom. This saves clay and keeps the sculpture lightweight while preventing cracking during drying. -
Cover with clay:
Roll out a slab of clay about 1/4 inch thick. Wrap this slab around your foil cylinder, blending the seam thoroughly with a bit of water on your finger so it becomes invisible. -
Shape the stalk:
Smooth the clay surface, gently tapering the top slightly inward. Use a flat surface to tap the bottom flat so it stands securely on its own.
Keep it Smooth
Use a tiny bit of water on your fingertip to smooth out fingerprints before the clay dries. This saves you tons of sanding time later.
Step 2: Creating the Cap
-
Mold the cap shape:
Create a separate ball of foil, flattening it into a dome shape. Cover this with a rolled-out slab of clay, smoothing it over the curve. Ensure the underside is flat or slightly concave to sit on the stalk. -
Attach the spots:
Roll small, varying sizes of clay balls and flatten them into irregular discs. Press these randomly onto the dome of the cap. I like to press them firm enough so they merge slightly but remain raised. -
Add underside texture:
Using a needle tool or knife, gently score shallow lines radiating from the center of the underside of the cap to the outer edge to mimic mushroom gills. -
Connect the pieces:
Score the top of the stalk and the center underside of the cap. Apply a little water or slip (clay mixed with water) and press the cap firmly onto the stalk. Smooth the joint if necessary, or leave the gill texture visible.
Step 3: Adding Details
-
Define the door:
Roll a small oval of clay and flatten it. Attach it to the base for the door. Use a needle tool to carve vertical wood grain lines and a small circle for the doorknob. -
Create the windows:
Form two small arch shapes for windows. Attach them on either side of the door. Roll tiny ‘snakes’ of clay to outline the arches and crisscross them to form window panes. -
Add the circular vent:
Place a tiny clay circle above the door. Press a cross pattern into it for a decorative ventilation window. -
Dry completely:
Allow the sculpture to air dry for 24-48 hours. It should feel room temperature and hard to the touch, not cool or damp.
Cracks Appearing?
If small cracks form while drying, mix a tiny bit of fresh clay with water to make a paste and fill them in like spackle before painting.
Step 4: Painting
-
Base coat the stalk:
Paint the entire stalk (but not the door or windows) with the terracotta orange acrylic paint. Two thin coats are better than one thick one for even coverage. -
Paint the cap:
Carefully paint the dome of the mushroom with deep teal, painting around the raised spots. If you accidentally get paint on the spots, wipe it quickly with a damp brush. -
Detail the spots and gills:
Paint the raised spots and the gill texture underneath the cap with a creamy off-white color. Use a small detail brush for clean edges. -
Highlight architectural features:
Paint the door cream, wiping away excess so paint stays in the grooves for a wood-stain look. Outline the windows with forest green as shown in the reference, using a very steady hand or a fine-tip paint pen. -
Final touches:
Add a tiny black dot for the doorknob and ensure the window panes are filled with cream or a light yellow to look like light is shining from within.
Once sealed with a matte varnish, your magical little mushroom home is ready to add a touch of fantasy to your desk or bookshelf
Textured Feather Fan Peacock
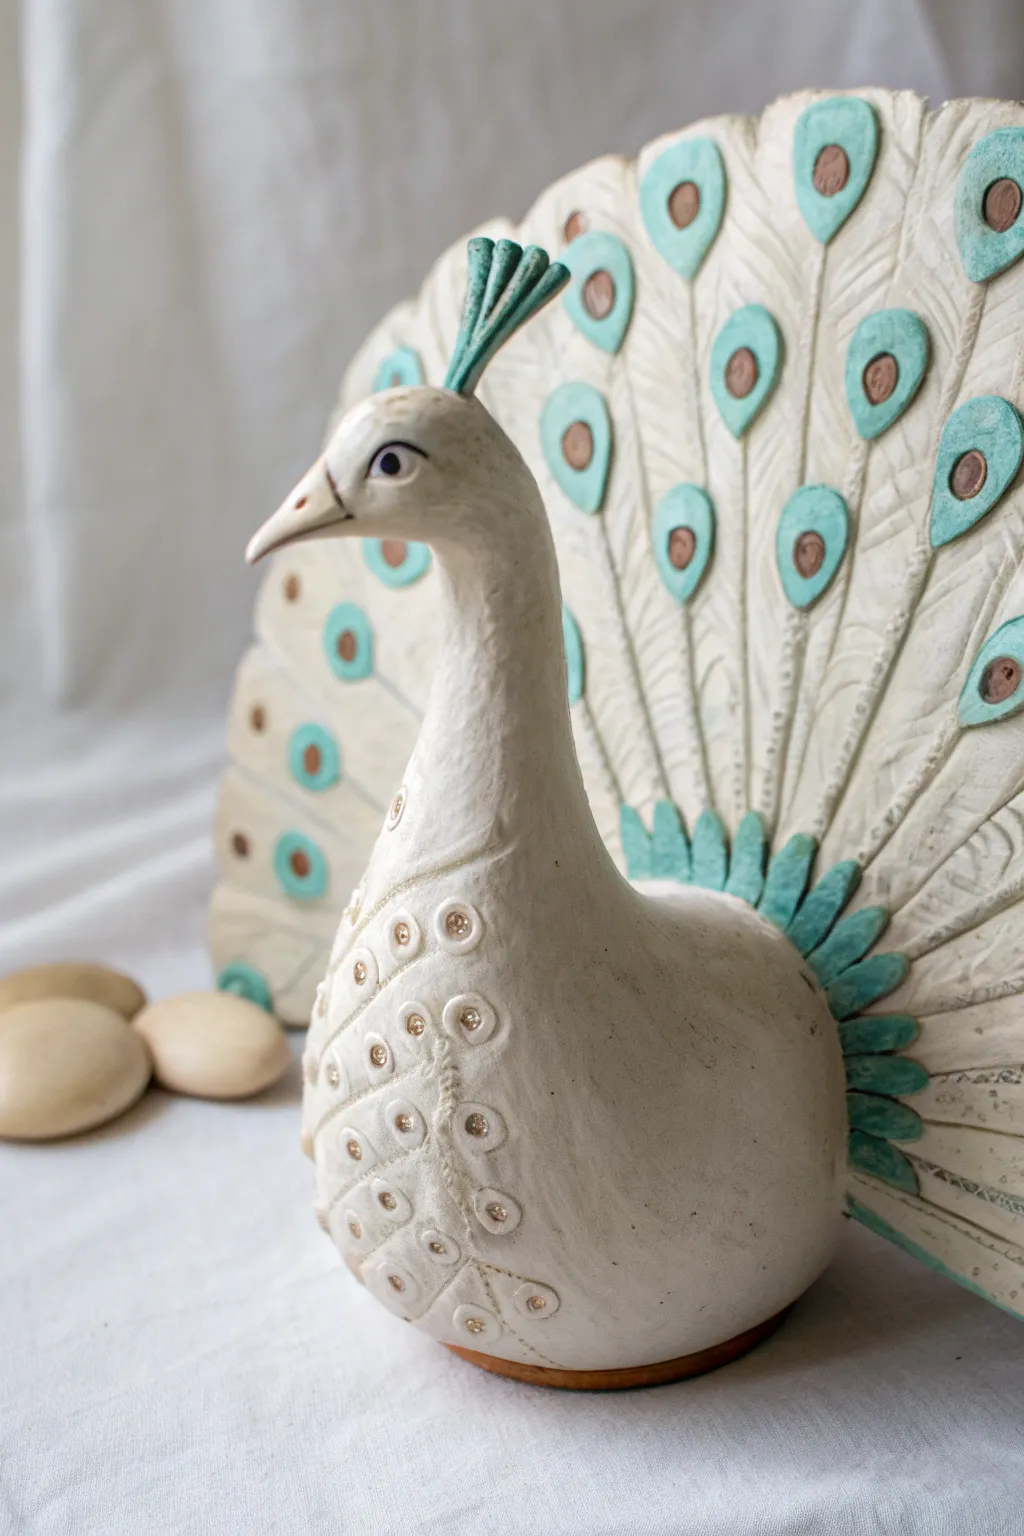
This elegant peacock sculpture captures the beauty of fanned plumage using simple, repetitive texturing techniques perfect for beginners. The project combines a smooth, rounded body with a striking, separately constructed tail fan adorned with teal and bronze accents.
Step-by-Step Tutorial
Materials
- White sculpting clay (air-dry or polymer)
- Small rolling pin
- Modeling tools (or kitchen knife and toothpick)
- Small circle cutter or straw
- Teal and bronze acrylic paints
- Fine grit sandpaper
- Slip (clay mixed with water) or clay glue
- Detail paintbrush
- Cardboard or foil for support
Step 1: Sculpting the Body
-
Form the Core:
Start with a large ball of clay about the size of an orange. Gently roll it into a pear shape, creating a bulbous bottom for the body. -
Extend the Neck:
From the narrower top of your pear shape, pinch and pull the clay upward to elongate the neck. Curve it slightly forward to give the peacock a graceful posture. -
Shape the Head:
Refine the top of the neck into a small, oval head. Pinch out a small, pointed beak at the front. -
Smooth the Surface:
Dip your fingers in a little water (or clay softener) and smooth out any bumps or fingerprints on the entire body form. Set this aside, propped up if necessary, to firm up slightly.
Drooping Tail?
If the heavy tail fan leans backward, prop it against a heavy book or mug while drying. You can also thicken the base of the fan for better support.
Step 2: Creating the Tail Fan
-
Roll the Fan Base:
Roll out a large slab of clay to about 1/4 inch thickness. Cut out a large semi-circle shape that is wider than your prepared body. -
Carve Feather Quills:
Using a modeling tool or dull knife, draw lines radiating from the bottom center of the semi-circle all the way to the outer edge to represent the feather quills. -
Add Texture Details:
Between each radiating line, use a toothpick or tool to scratch in angled hash marks. This mimics the fine barbs of the feathers. -
Make the Eye Feathers:
Roll out a thin sheet of clay and cut out small teardrop shapes. Attach these to the ends of your radiating lines on the fan using a dab of slip. -
Impress the Details:
Press a small circle cutter (or the end of a straw) gently into the center of each teardrop to create the ‘eye’ of the feather.
Try Gold Leaf
Instead of bronze paint, apply tiny bits of gold leaf to the center of the tail ‘eyes’ and chest details for a stunning, shimmering effect.
Step 3: Assembly and Refining
-
Texture the Chest:
For the chest feathers, press small circle indentations into the front of the peacock’s body in a V-pattern. I like to add tiny pinpricks inside these circles for extra detail. -
Create the Crest:
Fashion three or four tiny clay distinct strands. Attach them to the top of the head so they fan backward. -
Attach the Tail:
Identify where the fan meets the body’s back. Score (scratch) both surfaces, apply slip, and press firmly together. You may need to prop the tail up with a crumpled ball of foil or cardboard while it dries. -
Add Base Feathers:
Create a row of small, leaf-shaped clay pieces. Attach these across the seam where the tail meets the body to hide the join and add volume.
Step 4: Painting and Finishing
-
Drying:
Allow the sculpture to dry purely. If using air-dry clay, wait 24-48 hours until it is fully white and hard. -
Sanding:
Lightly sand any rough edges, particularly around the beak or the rim of the tail fan, to ensure a professional finish. -
Adding Color:
Use teal paint to carefully fill in the teardrop shapes on the tail and the crest feathers on the head. -
Bronze Details:
Paint the small circular impressions inside the teal feathers with a bronze or brown tone. Use this same color for the eye details on the bird’s face (the pupil) and the beak line. -
Optional Wash:
For an antique look, you can dillute a tiny amount of brown paint with water and brush it into the texturing, wiping away the excess immediately with a cloth.
Now you have a regal bird ready to display on your shelf
Tiny Book Nook Scene Sculpture
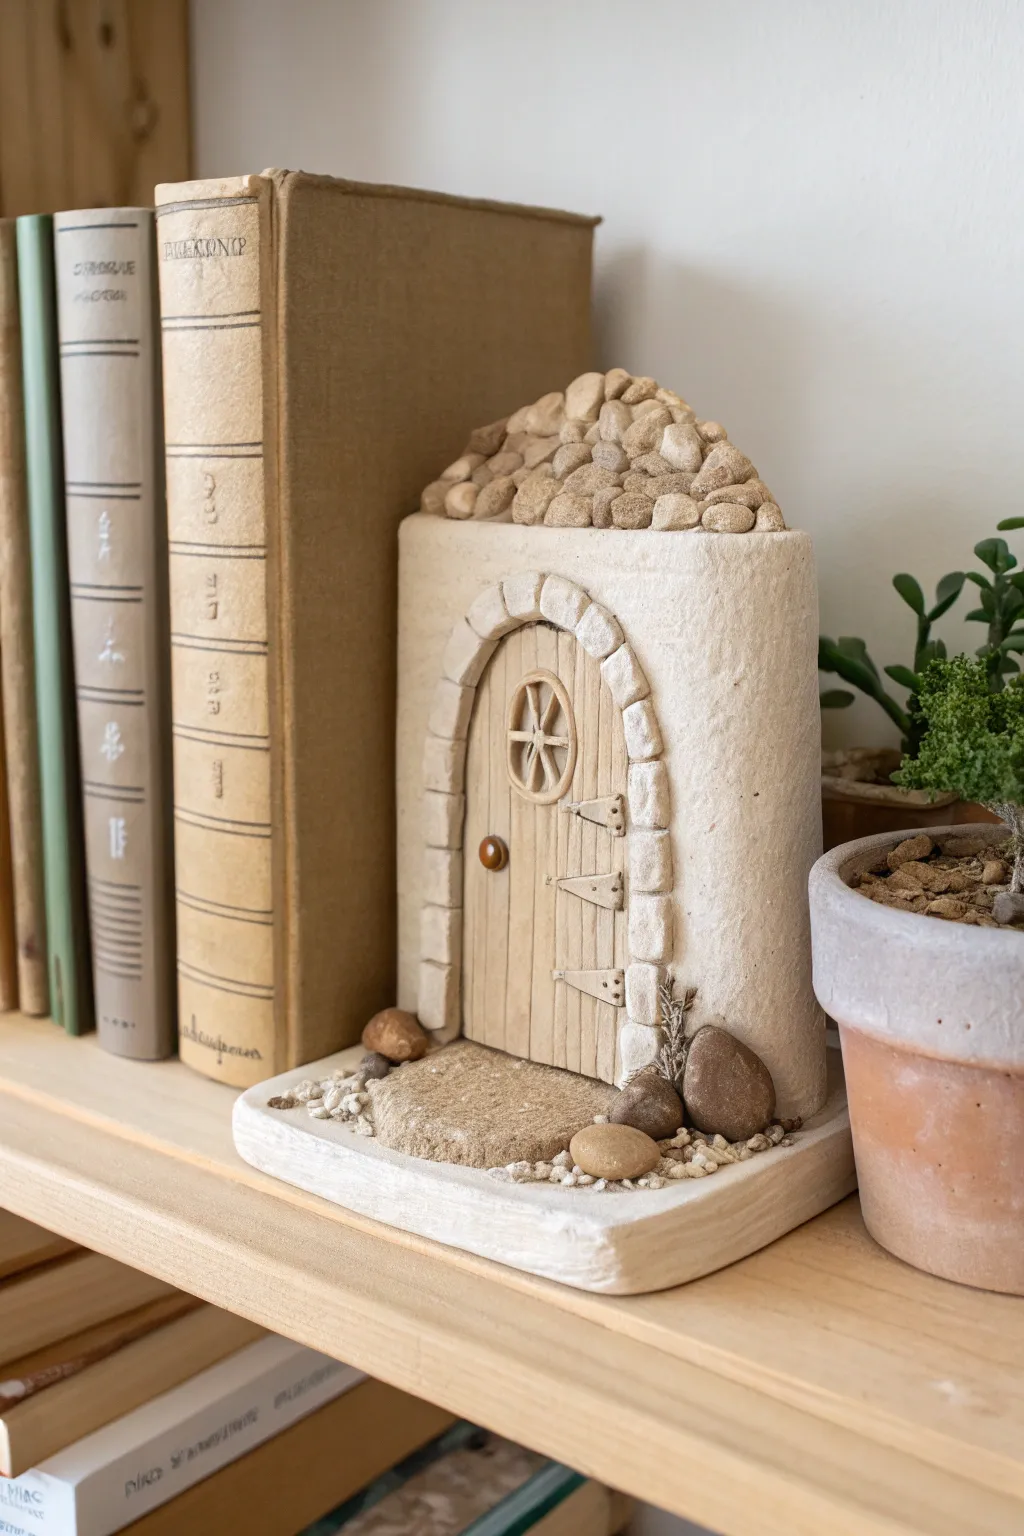
Transform a simple block of space on your bookshelf into a charming secret entrance with this miniature stone cottage façade. This beginner-friendly project uses basic sculpting techniques to create realistic stone textures and a cozy wooden door effect that looks like it belongs in a fairytale.
Step-by-Step
Materials
- Air-dry clay (stone gray or white)
- Aluminum foil (for the core structure)
- Cardboard or sturdy cardstock (for the base)
- Texturing tools (old toothbrush, crumpled foil, toothpick)
- Rolling pin
- Sculpting tools (needle tool, small knife)
- Acrylic paints (beige, warm grey, dark brown, burnt sienna)
- Small pebbles or coarse sand (for landscaping)
- Wood glue or strong craft glue
- Matte varnish (optional)
Step 1: Building the Core Structure
-
Form the base core:
Crumple aluminum foil into a rectangular block shape with a rounded top, mimicking the main shape of the house structure. This saves clay and keeps the sculpture lightweight. -
Create the base platform:
Cut a piece of sturdy cardboard into a small rectangle slightly larger than your foil structure. This will serve as the ground for your cottage entrance. -
Sheath the structure:
Roll out a slab of clay to about 1/4 inch thickness. Wrap this slab entirely around your foil core, smoothing the seams with a little water to create a uniform block. -
Add initial texture:
Before the clay hardens, gently press an old toothbrush or a ball of crumpled foil against the entire surface to give it a rough, weathered stucco appearance.
Make it Look Ancient
When painting the walls, try ‘dry brushing’ a lighter shade of cream over the textured surface. This catches on the raised bumps and makes the stucco texture pop.
Step 2: Sculpting the Doorway
-
Cut the entrance:
Use a needle tool to trace an arch shape on the front face where the door will go. Gently scoop out a little clay inside this arch to recess the door slightly. -
Create the door slab:
Roll a smaller, flat piece of clay and trim it to fit snugly inside your recessed arch. Press it into place. -
Detail the wood planks:
Using a knife tool or a toothpick, score vertical lines down the door to simulate wooden planks. Vary the pressure slightly so the planks look organic and handmade. -
Add the stone arch:
Roll small individual balls of clay and flatten them into irregular rectangles. Press these around the door frame to create the stone archway. Score lines on them for extra realism. -
Sculpt door hardware:
Fashion tiny triangles for hinges and a small sphere for the doorknob. Create a small circle with crossed strips for the window detail and attach them all using a slip (water and clay mix).
Step 3: Roof and Landscaping
-
Prepare the roof stones:
Roll dozens of tiny, irregular pebble shapes from your clay. These don’t need to be perfect; variation adds character. -
Apply the roof:
Starting at the bottom edge of the rounded roof area, glue or press these clay pebbles onto the top of the structure, stacking them until the entire top surface is covered in a pile of ‘stones’. -
Form the doorstep:
Add a large, flat, irregular pad of clay at the foot of the door to act as a flagstone step. Texture it heavily with your foil ball. -
Landscape the base:
Coat the remaining cardboard base area with a thin layer of glue or wet clay. Press real tiny pebbles or sand into the edges to create a gravel path look.
Cracking Clay?
If you see cracks forming as the clay dries, dampen your finger with water and smooth a little fresh soft clay into the fissure. Smooth it out and let it dry again.
Step 4: Painting and Finishing
-
Base coat:
Once fully dry (usually 24 hours), paint the main wall a creamy beige or off-white. Use a watery wash so the texture shows through. -
Paint the door:
Paint the wooden door a light natural wood color. I prefer mixing burnt sienna with a lot of white for a sun-bleached look. -
Detail the stones:
Paint the roof stones and archway stones in varying shades of warm grey and light brown. Keep the colors muted to match the peaceful aesthetic. -
Add a wash:
Mix a very diluted dark brown paint (mostly water). Brush this over the door cracks and between the stones, then quickly wipe away the excess with a paper towel to highlight the crevices. -
Highlight the hardware:
Paint the hinges and doorknob with a darker brown or bronze color to make them stand out against the light wood. -
Final assembly:
Glue the house structure firmly onto the decorated base. You can add a tiny dried twig or sprig of faux moss near the door for a final touch of greenery.
Place your finished cottage on a shelf between two beloved books and enjoy your tiny new neighborhood