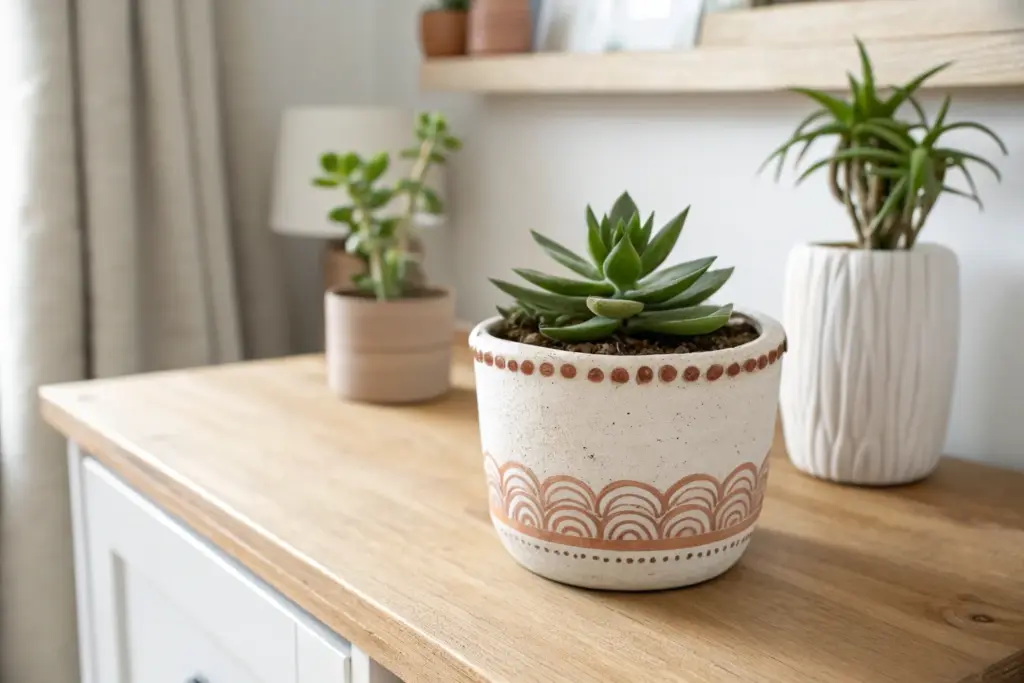
Air-dry clay pots are my favorite kind of project because they feel like real pottery, but you can make them right at the kitchen table. If you’re craving cute, beginner-friendly planters with lots of personality, these air dry clay pot ideas will keep your hands happily messy.
Classic Mini Pinch Pots for Succulents
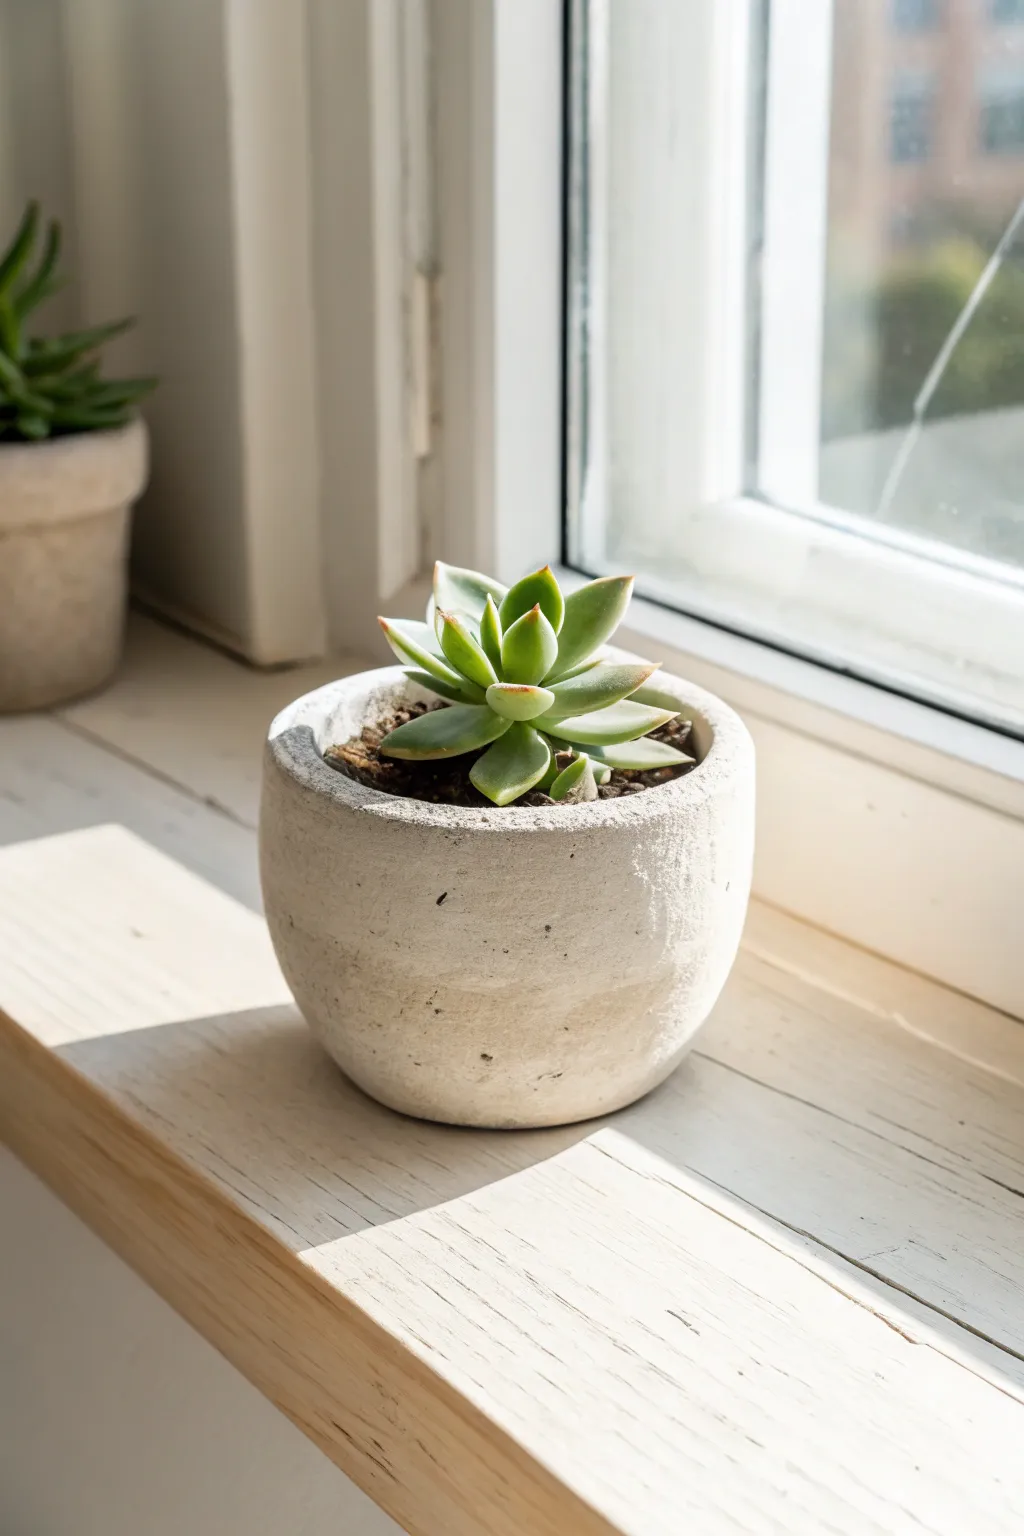
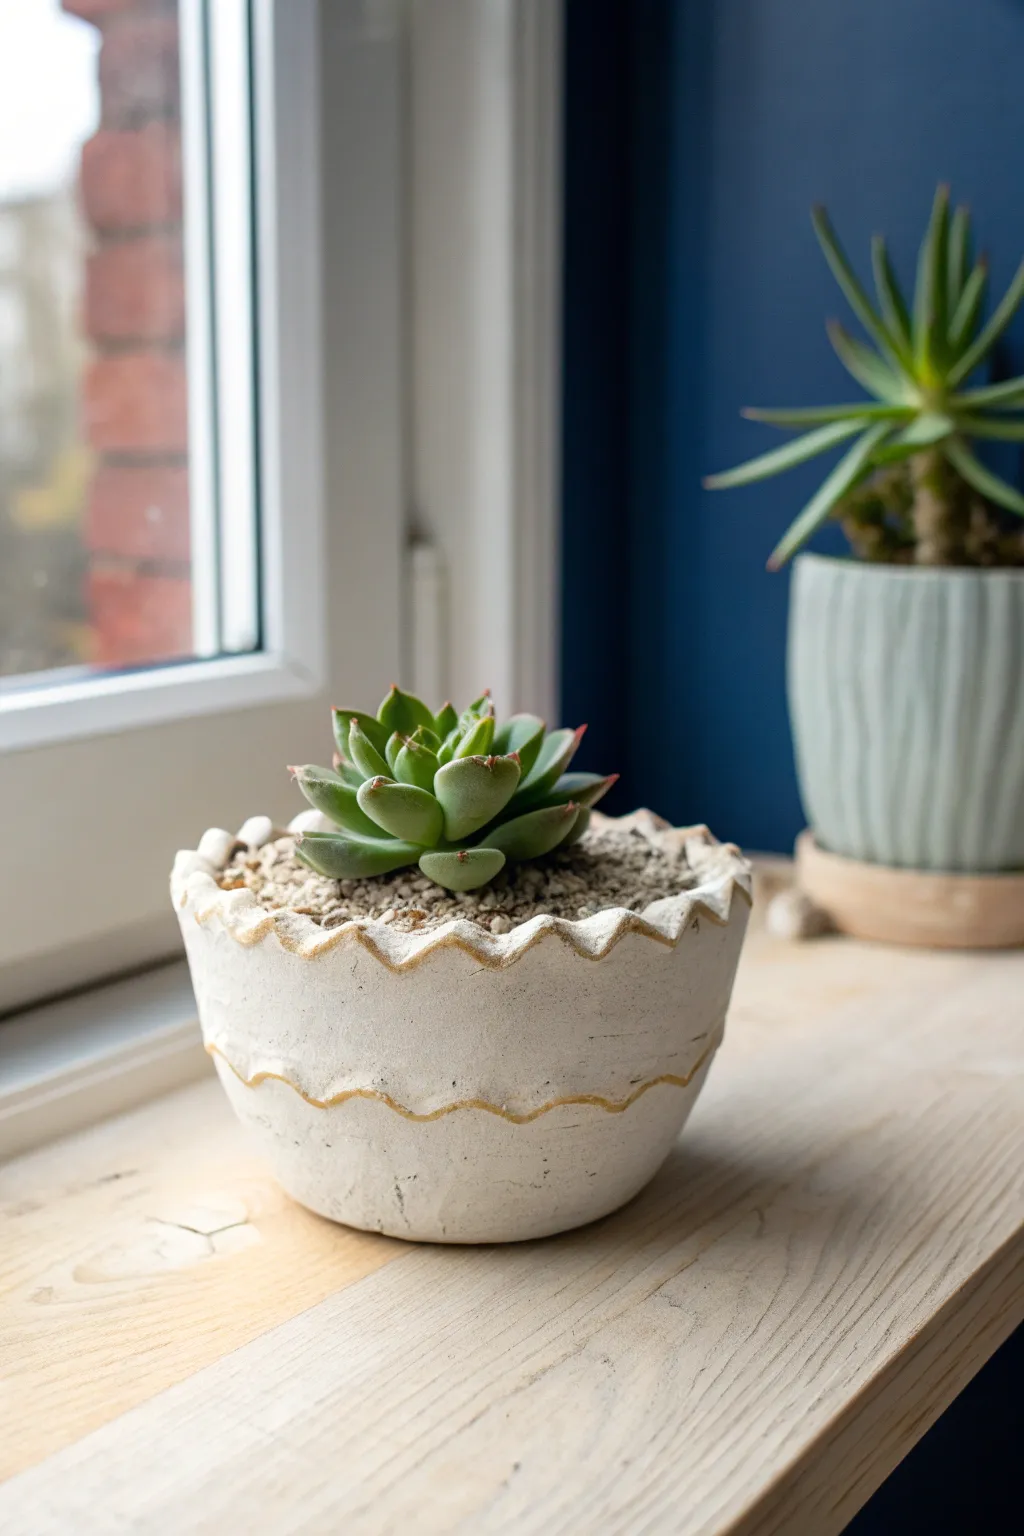
Embrace the beauty of simplicity with this wonderfully flawed, organic pinch pot that perfectly houses small succulents. Its matte, stone-like texture and soft white finish make it a timeless addition to any sunny windowsill.
How-To Guide
Materials
- White or grey air-dry clay (about 1 lb)
- Small bowl of water
- Rolling pin (optional)
- Sponge
- Fine-grit sandpaper
- White acrylic paint (matte finish)
- Grey acrylic paint (optional, for texture)
- Water-based sealant (matte)
- Paintbrush
Step 1: Shaping the Clay
-
Condition the clay:
Start by kneading your chunk of air-dry clay in your hands for a few minutes until it is warm, pliable, and free of any air pockets. -
Form the base sphere:
Roll the clay between your palms or against a clean work surface to create a smooth, solid ball roughly the size of a tennis ball. -
Begin the pinch:
Hold the sphere in your non-dominant hand and gently press your dominant thumb into the center, stopping about a half-inch from the bottom to ensure a sturdy base. -
Open the walls:
Using your thumb on the inside and fingers on the outside, gently pinch and rotate the ball. Work your way from the bottom up, thinning the walls evenly as you go. -
Create the cylinder shape:
Instead of flaring the rim out like a bowl, gently press the walls upwards to create straight, vertical sides. This gives it that modern, cylindrical look. -
Flatten the bottom:
Tap the base of the pot firmly against your table to create a flat bottom so it doesn’t wobble. This also helps compact the clay at the base. -
Smooth the imperfections:
Dip your finger in a little water and run it over any large cracks. Don’t worry about getting it perfectly smooth; the texture adds character. -
Refine the rim:
Use your thumb to lightly press down on the rim to flatten it slightly, creating a nice, thick edge rather than a sharp one.
Step 2: Finishing and Painting
-
Dry thoroughly:
Let the pot air dry completely for 24-48 hours. Keep it away from direct heat sources to prevent uneven cracking. -
Sand the surface:
Once bone dry, take fine-grit sandpaper and gently buff the exterior. You want to remove sharp burrs but keep some of the natural dimples. -
Wipe down:
Use a slightly damp sponge or cloth to remove all sanding dust before you start painting. -
Apply base coat:
Paint the entire exterior and the inner rim with matte white acrylic paint. You may need two coats for full opacity. -
Add subtle texture (optional):
To mimic the stone look in the photo, mix a tiny drop of grey into your white paint. Dab this very lightly with a sponge in random areas. -
Seal the pot:
Apply two coats of a matte water-based sealant to the inside and outside. I find this crucial for longevity since air-dry clay isn’t waterproof. -
Final drying:
Allow the sealant to cure fully according to the bottle instructions before adding any soil.
Crack Control
If cracks appear while drying, fill them with a ‘slip’ paste made of clay and water. Smooth over the patch and let dry again.
Faux Concrete Look
Mix baking soda into your white acrylic paint before applying. It creates a gritty, stone-like texture instantly.
Pop in your favorite succulent and enjoy the calm vibe your handmade pot brings to the room


Simple Cylinder Pots Wrapped Around a Mold
This rustic planter achieves a clean, modern look with a textured twist, featuring a creamy white finish and a decorative carved band. Using a simple cylinder mold technique, you can create a perfectly round vessel that still retains the delightful imperfections of handmade pottery.
Step-by-Step Guide
Materials
- White air-dry clay (approx. 500g)
- Small amount of terracotta or beige tinted air-dry clay
- Rolling pin
- Cylindrical mold (a sturdy glass jar or tin can)
- Parchment paper or cling film
- Clay knife or craft knife
- Slip (clay mixed with water)
- Modeling tool with a twist/braid texture or a rope section
- Sponge
- Acrylic sealer (matte)
- Black or brown acrylic paint (for speckling)
- Old toothbrush
Step 1: Forming the Cylinder Base
-
Prepare the Mold:
Begin by wrapping your cylindrical mold (a jar or can) completely in parchment paper or cling film. This ensures the clay won’t stick to the object and makes removal much easier later on. -
Roll the Slab:
Roll out the white air-dry clay on a clean surface to an even thickness of about 1/4 inch. Creating a long rectangular strip is your goal here—it needs to be long enough to wrap fully around your mold with a little overlap. -
Cut to Size:
Using a blade and a straight edge, trim the clay into a neat rectangle. Measure the height of your mold to determine how tall you want the pot to be, leaving space for the rim. -
Create the Base:
Roll out a separate piece of clay for the bottom. Place your wrapped mold onto this piece and trace around it with a needle tool or knife, cutting out a perfect circle. -
Construct the Walls:
Carefully lift your rectangular strip and wrap it around the mold. Where the ends meet, cut through both layers at an angle (a bevel cut) to create a seamless joint. -
Join the Seams:
Score the edges of the vertical seam and the circular base with a needle tool. Apply a dab of slip (clay water glue) to the scored areas. -
Attach and Smooth:
Press the walls firmly together at the seam and attach the cylinder to the base. Use your fingers or a smoothing tool to blend the clay so the separation lines disappear completely.
Step 2: Adding the Decorative Band
-
Create the Accent Strip:
Take your terracotta or beige-tinted clay and roll it into a long, thin ribbon, approximately 1 inch wide and the same thickness as your pot walls. -
Attach the Band:
Score and slip the middle section of your white pot where the band will sit. Wrap the beige strip around the cylinder, pressing it gently to adhere. -
Texture the Band:
This is the fun part—press a twisted modeling tool, a piece of thick rope, or a stamp into the beige band to create the diagonal braided pattern seen in the image. -
Refine the Rim:
I like to add a slightly thicker rim to the top edge for stability. You can fold a tiny bit of the top clay over or simply smooth and round the edge with a damp sponge.
Crack Control
If hairline cracks appear while drying, don’t panic. Mix a small amount of fresh clay with water to make a thick paste and fill the gaps, then smooth over.
Step 3: Finishing Touches
-
Slow Drying:
Let the pot sit with the mold still inside for about an hour to stiffen. Then, carefully slide the mold out and peel away the parchment paper. -
Full Cure:
Allow the pot to dry completely in a draft-free area for 24-48 hours. Turn it occasionally to ensure crucial airflow reaches the bottom. -
Sanding:
Once fully dry, gently sand any rough seams or sharp edges with fine-grit sandpaper for a professional finish. -
Add Speckles:
Dilute a tiny drop of dark brown or black paint with water. Dip an old toothbrush into it and flick the bristles with your thumb to mist the pot with subtle speckles. -
Seal:
Apply two coats of matte acrylic sealer inside and out to protect the clay from moisture, especially if you plan to put a real plant inside.
Use A Liner
Air-dry clay is never 100% waterproof. To keep your plant happy, slip a plastic nursery pot inside your finished vessel rather than planting directly.
Enjoy styling your new handmade pot near a sunny window


Coil-Built Pots With an Organic Wavy Rim
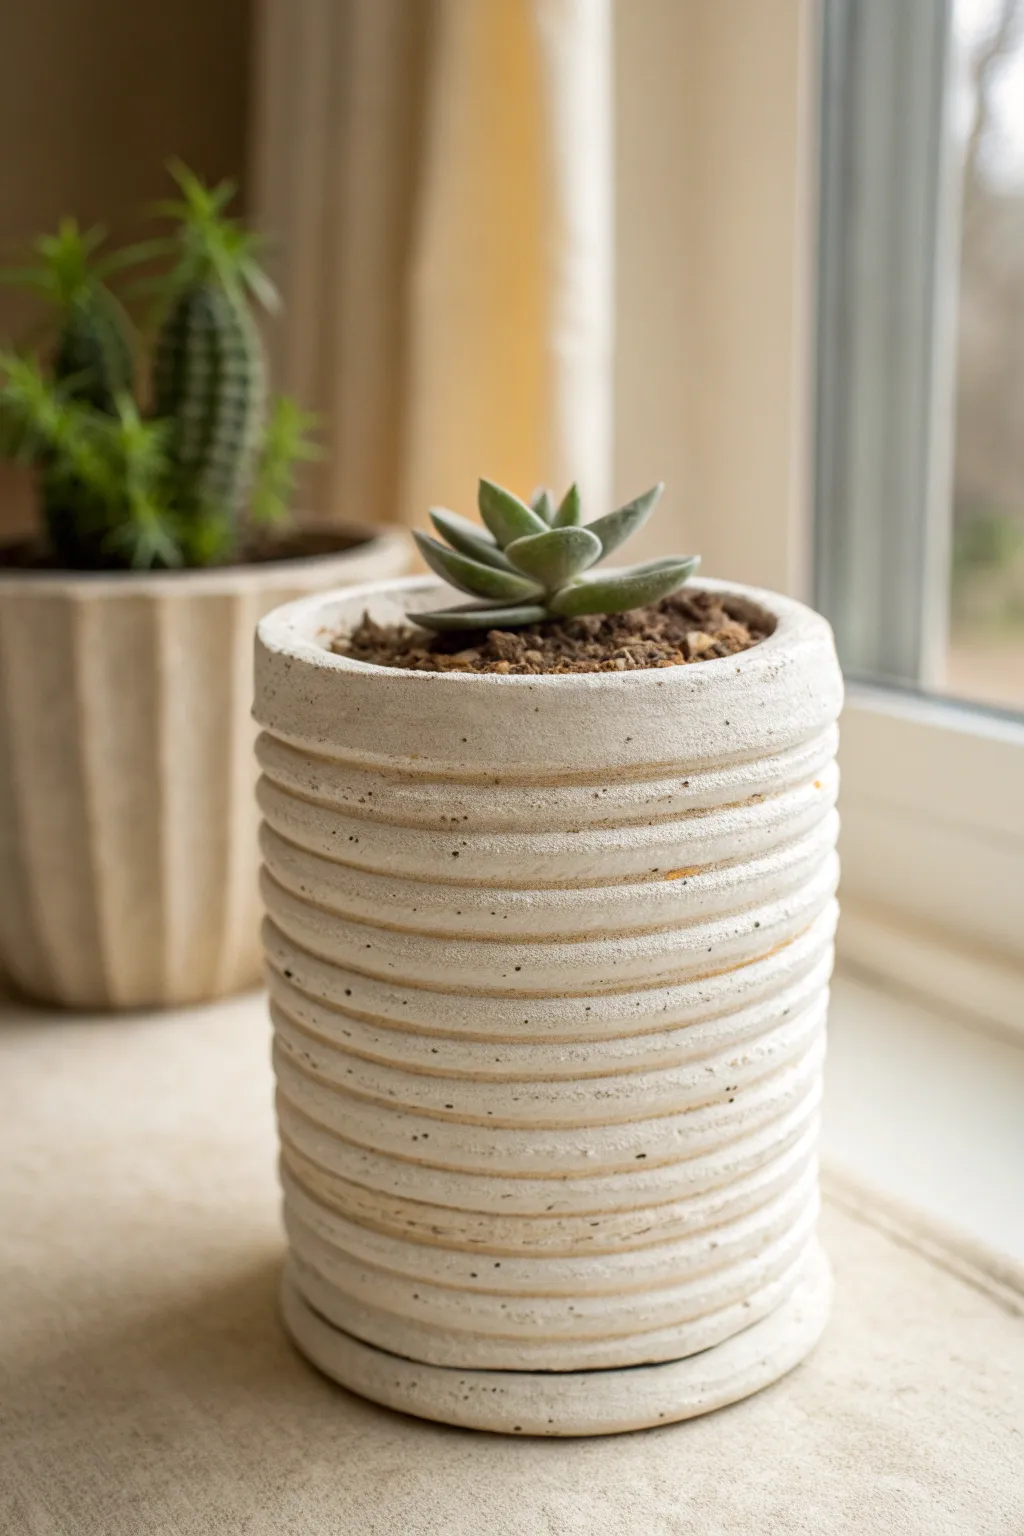
Create a sophisticated home for your succulents with this deceptively simple coil-built vessel. The design features tight, uniform ridges that mimic the look of wheel-thrown pottery while maintaining a wonderfully tactile, hand-built charm.
Step-by-Step
Materials
- Air-dry clay (white or light grey)
- Clay roller or rolling pin
- Clay knife or fettling knife
- Slip (clay mixed with water)
- Scoring tool or old fork
- Wooden modeling tool or spoon back
- Sponge
- Sandpaper (fine grit)
- Matte acrylic varnish or sealant
- Beige or cream acrylic paint (optional)
- Brown acrylic paint for speckling
Step 1: Creating the Base
-
Roll out the Slab:
Begin by taking a handful of clay and rolling it out into a flat slab about 1/4 inch thick. This will form the bottom of both your pot and the saucer. -
Cut the Circles:
Use a round cookie cutter or trace around a jar lid to cut two identical circles from your slab. One will be the pot base, the other the saucer base. -
Prepare the Saucer:
For the saucer, roll a very thin coil of clay. Score and slip the edge of one circle, then attach the coil to create a small raised lip. Smooth the inside seam deeply to ensure it bonds, then set it aside to dry flat.
Keep it Vertical
To ensure your cylinder doesn’t flare out, place a can from your pantry inside the pot while you coil. Use it as a guide, but remove it before the clay shrinks!
Step 2: Building the Walls
-
Make Uniform Coils:
Roll out several long coils of clay. Try to keep them consistent in thickness, roughly the width of your pinky finger. Consistency here is key to the ribbed look. -
Attach the First Ring:
Score the outer edge of your pot base and apply a little slip. Place your first coil on top of the scored area, pressing gently to adhere. -
Stacking Up:
Continue stacking coils one directly on top of the other. Unlike typical coil pots where you blend the outside smooth, we want to keep the definition of each ring visible on the exterior. -
Blind the Interior:
As you add every two or three layers, stop to smooth the *inside* of the pot completely. Drag the clay from the upper coil down into the lower coil using your thumb or a modeling tool. This provides the structural strength since we are leaving the outside textured. -
Check Verticality:
Pause occasionally to look at the pot from the side. You want a straight cylinder, so ensure your coils aren’t flaring outward or caving inward. Gently pat the sides with a flat board if needed. -
Finish the Rim:
Once you reach the desired height, add one final coil. I tend to flatten this top coil slightly more than the others to create a finished-looking rim.
Make it Waterproof
Air-dry clay dissolves in water. For a real plant, line the inside with a plastic cup cut to size, or use a heavy-duty resin sealant for better water resistance.
Step 3: Refining and Detail
-
Define the Ridges:
Take a wooden tool or the back of a spoon and gently run it along the grooves between the outer coils. You aren’t blending them, just deepening and cleaning up the horizontal lines to make them crisp. -
Dry Slowly:
eLet the pot dry slowly away from direct heat or sunlight. To prevent cracking, you might loosely drape a plastic bag over it for the first 24 hours. -
Sanding:
Once bone dry, use fine-grit sandpaper to gently smooth the top rim and any sharp bits. Be careful not to sand away your beautiful coil texture.
Step 4: Faux Ceramic Finish
-
Base Coat:
Paint the entire pot and saucer with a matte off-white or cream acrylic paint. If your clay is already white, you might skip this or do a wash to even out the tone. -
Create the Speckles:
Mix a small amount of brown paint with water until it’s distinctively runny. Dip an old toothbrush into this mixture. -
Technical Splatter:
Hold the toothbrush near the pot and run your thumb across the bristles to flick tiny droplets of paint onto the surface. Rotate the pot to get even coverage. This mimics the iron spots found in fired stoneware. -
Seal Protection:
Since air-dry clay isn’t waterproof, apply two coats of a matte varnish or sealant inside and out to protect your hard work from moisture.
Place your favorite succulent inside and enjoy the organic, modern vibe this piece adds to your windowsill


Two-Tone Color-Dipped Clay Pots
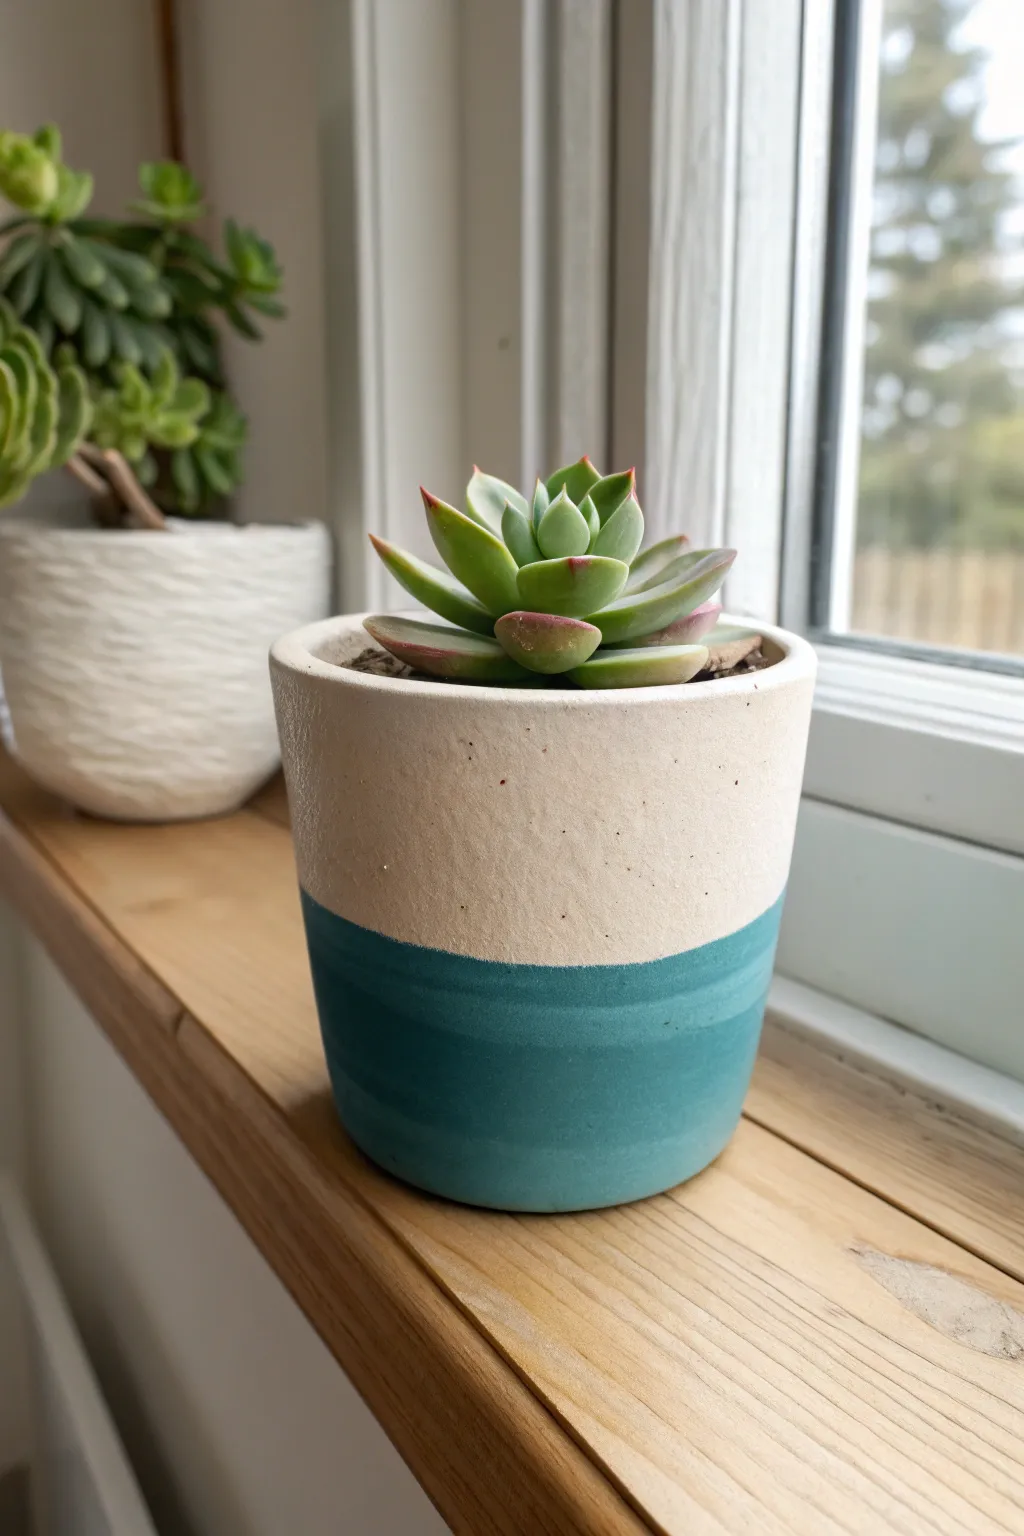
Achieve a modern, high-end ceramic look for a fraction of the price with this simple yet striking air-dry clay project. The clean division between natural cream clay and a bold teal ‘dip’ creates a fresh, breezy aesthetic perfect for brightening up any windowsill.
Step-by-Step Guide
Materials
- White or natural air-dry clay (approx. 500g)
- Rolling pin
- Circle cutter or circular template (approx. 4-inch diameter)
- Craft knife or clay cutter
- Small cup of water
- Sandpaper (fine grit)
- Blue painter’s tape or masking tape
- Teal acrylic paint
- Flat paintbrush
- Matte or satin sealant spray (waterproof)
Step 1: Shaping the Base Vessel
-
Roll your slab:
Begin by working a generous handful of air-dry clay in your hands to warm it up. Roll it out on a flat surface to an even thickness of about 1/4 inch. If you want a uniform look, use guide sticks on either side of your roller. -
Cut the base:
Using your circle cutter or a bowl as a template, cut out a perfect circle for the bottom of your pot. Set this disc aside on a piece of parchment paper to prevent sticking. -
Measure and cut sides:
Measure the circumference of your base circle. Roll out a long rectangular strip of clay that matches this length plus a tiny bit of overlap, keeping the height around 3 to 4 inches. -
Form the cylinder:
Carefully lift the rectangular strip and wrap it around the edge of your circular base. I like to score the edges—making little scratch marks with a tool—where the clay pieces will meet to help them bond securely. -
Seal the seams:
Dip your finger in water and smooth the clay where the wall meets the base, blending the two pieces until the seam disappears. Do the same for the vertical seam where the wall edges overlap. -
Smooth the surface:
Wet your fingers slightly and run them over the entire exterior and interior to remove cracks or fingerprints. Pay special attention to the rim, smoothing it so it’s pleasant to the touch. -
Let it dry completely:
Place your pot in a spot with good airflow but away from direct heat. Let it dry for at least 24-48 hours until it turns a chalky white and feels hard.
Step 2: Sanding and Painting
-
Sand for perfection:
Once fully dry, take your fine-grit sandpaper and gently buff the outside of the pot. Focus on removing any bumps or rough patches to mimic the smooth texture of fired ceramic. -
Clean off dust:
Wipe the entire pot down with a slightly damp cloth or a dry brush to remove all the clay dust from sanding. This is crucial for a crisp paint line. -
Tape the dividing line:
Apply a strip of painter’s tape horizontally around the pot, slightly below the halfway mark. Press the bottom edge of the tape down firmly with your fingernail to prevent paint bleed. -
Apply the first coat:
Using your flat brush, paint the entire bottom section below the tape with teal acrylic paint. Load your brush moderately to avoid drips running under the tape. -
Layer for opacity:
Allow the first coat to dry to the touch (about 20 minutes) before applying a second coat. This ensures the teal color is rich and completely opaque against the light clay. -
Remove tape carefully:
While the second coat is still slightly tacky—not soaking wet, but not rock hard—gently peel off the tape. Pull it away at a 45-degree angle for the sharpest possible line. -
Seal and finish:
Once the paint is fully cured, take the pot outside and spray it with several light coats of matte sealant. This protects the clay from moisture, essential if you plan to put a plant inside.
Clean Lines Secret
Paint a thin layer of clear matte medium or white paint over the tape edge before the teal. This seals the gap so any bleed is invisible!
Paint Bleeding?
If paint seeped under the tape, wait for it to dry fully, then gently scratch the excess away with a craft knife or use a white paint pen to touch up.
Pop in a small succulent and enjoy the fresh pop of color in your space

What Really Happens Inside the Kiln
Learn how time and temperature work together inside the kiln to transform clay into durable ceramic.
Speckled “Faux Ceramic” Air-Dry Clay Pots
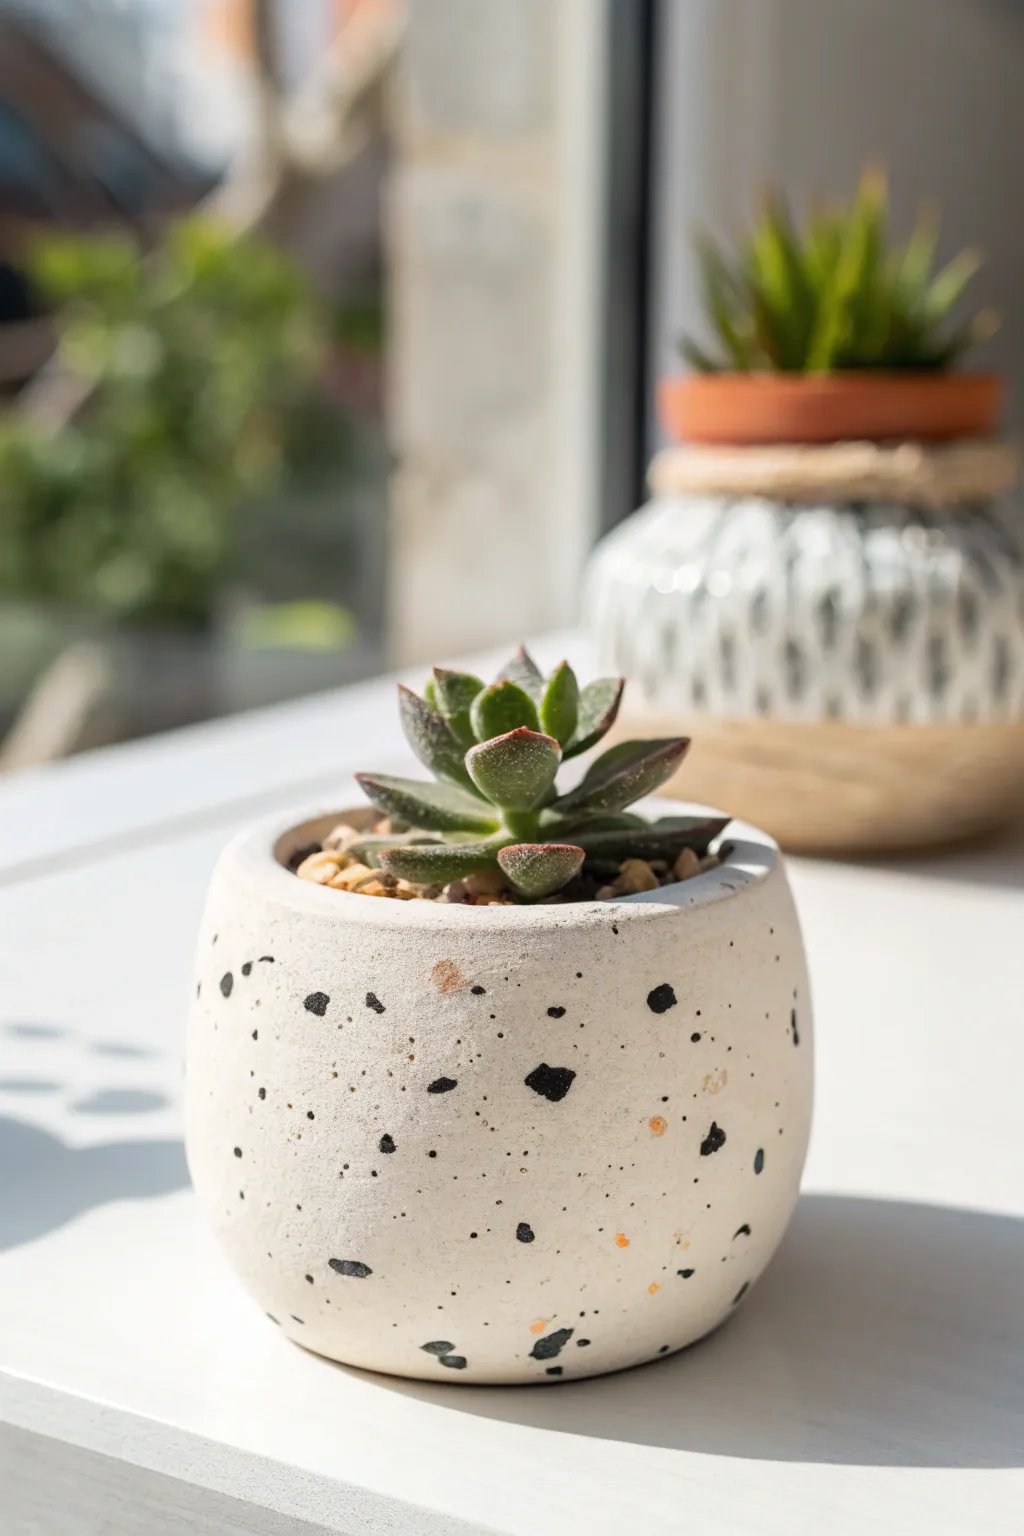
Bring a trendy, modern aesthetic to your windowsill with this minimalist air-dry clay pot that mimics the look of high-end speckled ceramic. The faux-terrazzo finish is surprisingly easy to achieve using simple paint flicking techniques, creating a chic home for your favorite small succulents.
Step-by-Step
Materials
- White air-dry clay (approx. 200g)
- Small rolling pin
- Craft knife or scalpel
- Small bowl or cup (for use as a mold)
- Sandpaper (medium and fine grit)
- White acrylic paint (matte)
- Black acrylic paint
- Old toothbrush or stiff bristle brush
- Small paintbrush
- Matte spray varnish or sealant
- Water
- Plastic wrap (cling film)
Step 1: Shaping the Clay Base
-
Condition the clay:
Begin by kneading your white air-dry clay until it is soft, pliable, and free of cracks. If it feels too dry, dip your fingers in a tiny bit of water and work it in. -
Roll out a slab:
Roll the clay out into a smooth, even slab that is approximately 1/4 inch thick. Aim for consistent thickness to prevent cracking during the drying process. -
Prepare your mold:
Take a small bowl or cup that has the rounded shape you desire. Wrap the outside of this object tightly with plastic wrap to ensure the clay doesn’t stick to it later. -
Cut the base and sides:
Place the bottom of your mold onto the clay slab and trace around it with a craft knife to create a circular base. Set this circle aside. -
Measure the circumference:
Cut a long rectangular strip from the remaining clay slab. The length should be equal to the circumference of your base, and the height should determine how tall your pot will be. -
Construct the cylinder:
Wrap the rectangular strip around the plastic-covered mold. Where the two ends meet, score the edges with your knife (make little hash marks) and add a dab of water to create ‘slip’. -
Seal the seam:
Press the scored ends together firmly. Use a modeling tool or your finger to smooth the seam on both the inside and outside so perfectly that the join becomes invisible. -
Attach the base:
Score the bottom edge of your clay cylinder and the outer edge of your circular base. Press them together, smoothing the clay downwards to blend the walls into the floor of the pot.
Clean Edges Pro-Tip
For a super crisp rim, wait until the clay is ‘leather hard’ (partially dry but firm) before giving the top edge a final trim with a sharp blade.
Step 2: Refining and Drying
-
Smooth the surface:
Dip your finger in water and run it over the entire surface of the pot to smooth out fingerprints or uneven textures. Gently curve the top rim inward slightly if you want that rounded, enclosed look. -
Create a drainage hole:
If you plan to plant directly (rather than using a nursery pot insert), use a straw or tool to punch a distinct drainage hole in the center of the bottom. -
Let it dry:
Allow the clay to dry on the mold for about 24 hours so it holds its shape. Then, carefully slide it off the mold and peel away the plastic wrap. -
Complete drying:
Let the pot dry completely without the mold for another 24 to 48 hours. It should feel room temperature (not cool) to the touch when fully dry. -
Sanding:
Once fully cured, use medium-grit sandpaper to level any bumps or uneven rims. Finish with fine-grit sandpaper to make the surface feel like smooth bisque ceramic.
Step 3: Painting the Faux Finish
-
Apply base coat:
Paint the entire exterior and the inner rim with two coats of matte white acrylic paint. This provides a clean, bright canvas for the speckles. -
Prepare the speckle paint:
Squeeze a small amount of black acrylic paint onto a palette and dilute it slightly with water. It should be fluid enough to flick easily, like ink. -
Test your splatter:
Dip an old toothbrush or stiff bristle brush into the diluted black paint. Practice running your thumb across the bristles over a piece of scrap paper to gauge the spray pattern. -
Speckle the pot:
Hold the brush near the pot and flick the bristles to spray tiny black dots across the surface. I like to rotate the pot constantly to ensure random, organic coverage. -
Add larger accents:
To create the varied terrazzo look, dip the very tip of a fine paintbrush into undiluted black paint. Manually dab a few larger, irregular spots randomly among the fine mist. -
Seal the project:
Once the paint is bone dry, spray the entire pot with a matte varnish. Apply 2-3 coats to protect the clay from moisture, especially if you plan to water the plant occasionally.
Level Up: Color Pop
Mix a tiny drop of gold or copper metallic paint into your splatter step. The subtle shimmer adds an elegant, modern dimension to the monochrome palette.
Place your favorite succulent inside and enjoy the sophisticated, handmade touch this pot adds to your decor
Stamped Pattern Pots With Repeating Texture
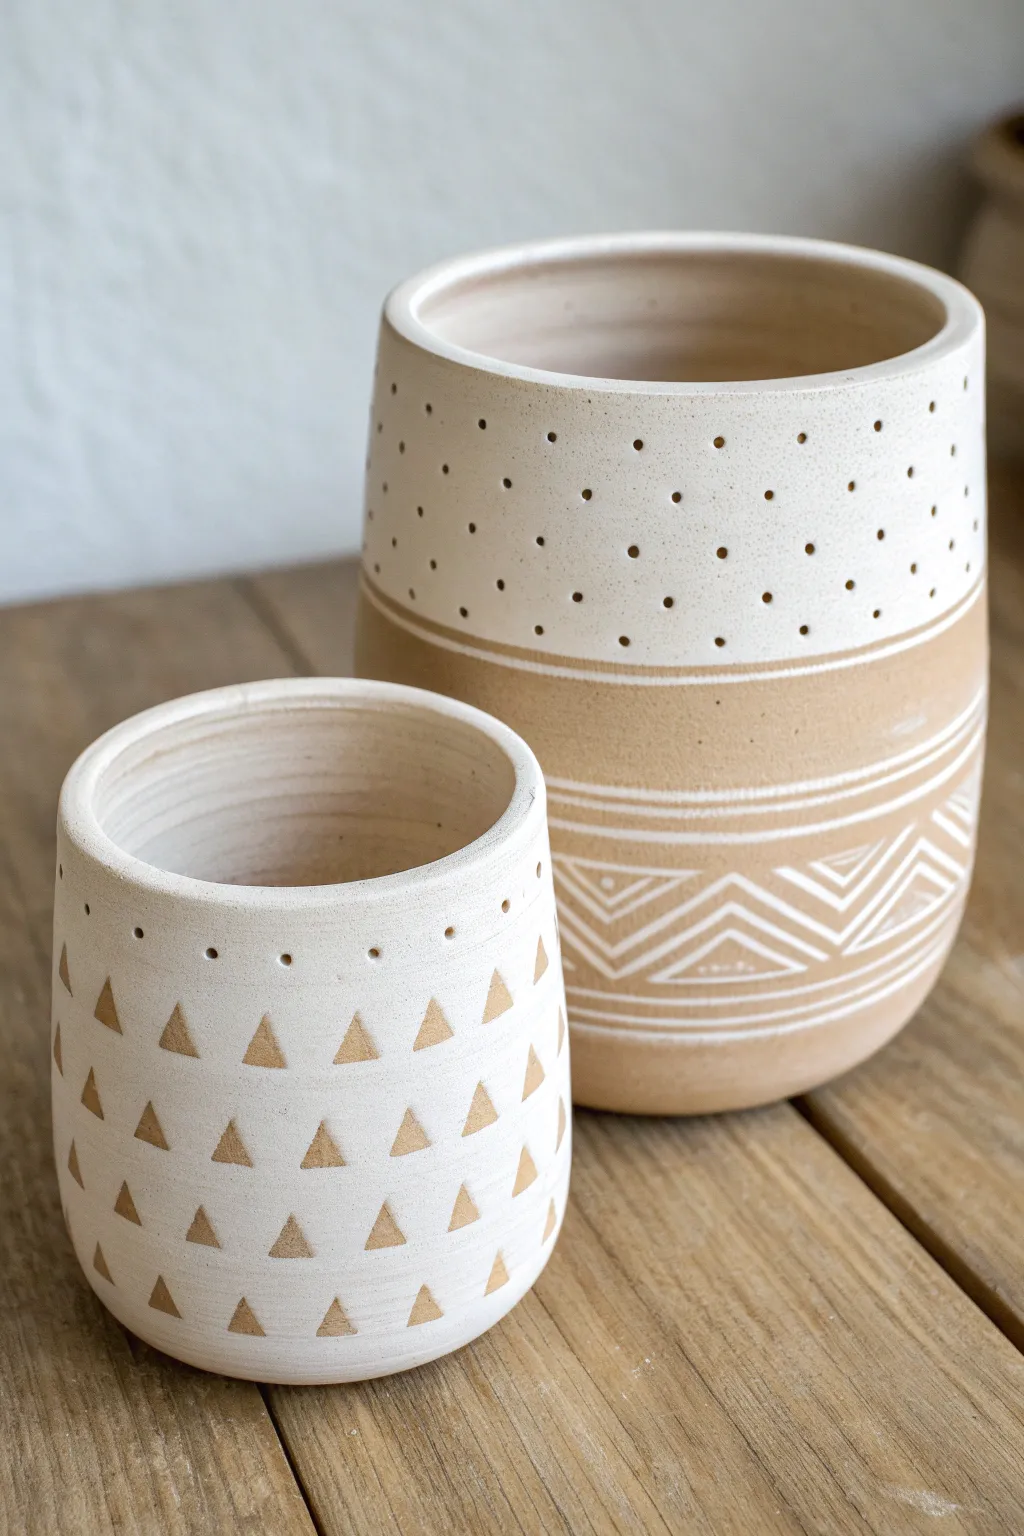
Bring a touch of modern bohemian style to your home with these textured air dry clay pots. By using simple tools to stamp repeating patterns, you can achieve a sophisticated, two-tone ceramic look without needing a kiln.
Step-by-Step Tutorial
Materials
- White air dry clay (2-3 lbs)
- Rolling pin
- Canvas mat or parchment paper
- Round cookie cutters or templates (large and medium)
- Clay knife or craft knife
- Small bowl of water
- Sponge
- Carving tool (or end of a paintbrush)
- Triangle stamp (or a cut piece of eraser)
- Acrylic paint (Tan/Terracotta color)
- White acrylic paint
- Detail paintbrush
- Matte spray varnish or sealant
- Fine-grit sandpaper
Step 1: Forming the Pots
-
Roll the base:
Begin by wedging your clay to remove air bubbles, then roll out a slab to about 1/4 inch thickness on your canvas mat. Cut out two circles for your bases using your cookie cutters. -
Create the walls:
Roll out two long rectangular strips of clay, maintaining that same 1/4 inch thickness. Ensure the length of the strip is slightly longer than the circumference of your base circles. -
Score and slip:
Use your clay knife to scratch hatch marks (scoring) along the edge of the base circle and the bottom edge of your rectangular strip. Dab a little water (slip) onto these roughed-up areas. -
Attach the walls:
Carefully wrap the clay strip around the base, pressing the scored edges together firmly. Where the two ends of the wall meet, score and slip the vertical seam, blending the clay together with your thumb or a modeling tool until the seam disappears. -
Smooth the surface:
Dip your sponge lightly in water and run it over the entire surface of the pot to smooth out fingerprints and imperfections. I find it helpful to support the inside wall with one hand while smoothing the outside to keep the shape round.
Stamp Master Tip
Dust your stamp lightly with cornstarch before pressing into the clay. This acts as a release agent so the clay doesn’t stick to your tool.
Step 2: Adding Texture & Pattern
-
Mark the dot pattern:
For the taller pot, wait until the clay is leather-hard (firm but cool). Use a round tool, like the back end of a paintbrush or a skewer, to gently press a grid of small indentations into the upper half of the pot. -
Carve the geometric lines:
Below the dot section, use a carving tool to etch horizontal parallel lines around the circumference. Between two of these bands, carve a repeating zigzag or diamond pattern to mimic tribal textiles. -
Stamp the triangle pot:
For the smaller pot, use a pre-made triangle stamp or carve a small triangle shape out of a rubber eraser. Keep the stamp clean and press it into the clay in repeating rows, alternating the spacing like bricks. -
Detail the rim:
Add a finishing touch to the smaller pot by poking a single row of small holes or dots right below the rim using a needle tool. -
Dry completely:
Let your pots dry slowly for 24-48 hours. Keep them away from direct heat sources to prevent cracking. Once fully bone dry, lightly sand any rough edges with fine-grit sandpaper.
Step 3: Painting & Finishing
-
Base coat:
For the smaller pot, paint the entire exterior white (or leave natural if using white clay). For the larger pot, paint the bottom half in a terracotta or tan shade and the top half white. -
Highlight the carvings:
On the larger pot, use a fine detail brush and white paint to fill in the carved geometric lines on the tan section. This ‘inlay’ effect makes the pattern pop. -
Paint the stamped triangles:
Using your tan paint and a steady hand, fill in the stamped triangle impressions on the smaller pot. -
Enhance the dots:
Dip a toothpick or fine geometric tool into brown or black paint and carefully dab a tiny dot into the center of each indentation on the top half of the large pot. -
Seal the work:
Since air dry clay isn’t waterproof, apply two coats of matte spray varnish to protect your paint job. Remember to use a plastic liner if you plan to put fresh flowers inside.
Fixing Cracks
If small cracks appear while drying, mix a tiny bit of fresh clay with water to make a paste and fill the crack. Smooth it over and let dry again.
Now step back and admire your custom, handcrafted pottery display that looks professionally made


The Complete Guide to Pottery Troubleshooting
Uncover the most common ceramic mistakes—from cracking clay to failed glazes—and learn how to fix them fast.
Leaf-Imprint Pots With Botanical Texture
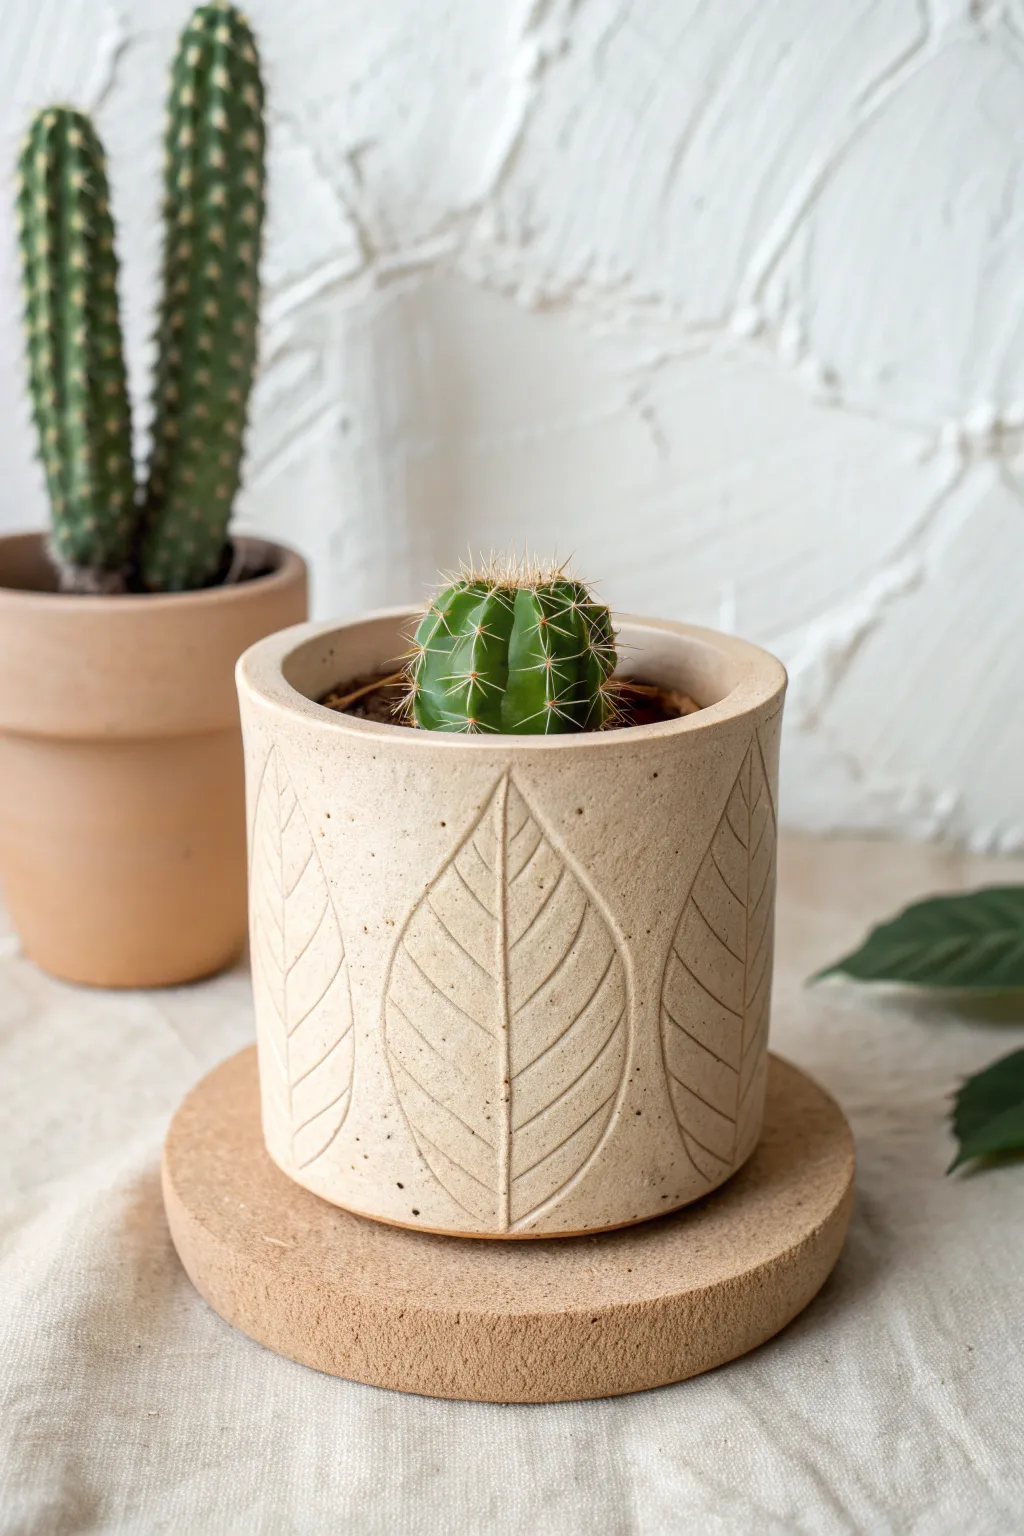
Bring a touch of minimalist nature indoors with this handcrafted clay pot featuring elegant, carved leaf motifs. The natural beige tone and subtle texture give it a sophisticated, organic look that perfectly complements succulent greenery.
How-To Guide
Materials
- Air dry clay (white or cream)
- Non-stick rolling pin
- Empty can or cylindrical mold (approx. 4-inch diameter)
- Craft knife or clay needle tool
- Small bowl of water
- Sponge
- Sandpaper (fine grit)
- Waterproof sealer or varnish
- Carving tool or linocut gouge
Step 1: Forming the Cylinder
-
Condition the Clay:
Start by taking a substantial chunk of air dry clay and kneading it in your hands to warm it up. You want it pliable and smooth, free from any cracks before you begin rolling. -
Roll the Slab:
Roll the clay out onto a flat surface to an even thickness of about 1/4 inch. If you want a uniform look, place guide strips of wood on either side of your roller. -
Cut the Base:
Using your cylindrical mold (like a soup can) as a guide, trace a circle onto the clay slab with your needle tool for the base of the pot. Set this circle aside on a piece of parchment paper. -
Measure the Wall:
Measure the circumference of your mold or base circle. Cut a long rectangular strip from your rolled clay that matches this length plus a tiny overlap, with a height of about 3 to 4 inches. -
Assemble the Pot:
Score the edges of the base circle and the bottom edge of your rectangular strip. Apply a little water or slip (clay and water mix) to the scored areas. Wrap the strip around the base circle to form the cylinder. -
Seal the Seam:
Where the two ends of the rectangle meet, score and slip the join. Press them firmly together. Use your fingers or a smoothing tool to blend the clay so the seam disappears completely on both the inside and outside.
Step 2: Carving the Design
-
Refine the Shape:
With the cylinder formed, dip your sponge in water and gently smooth the rim and walls. Ensure the walls are straight and vertical. -
Let it Leather-Hard:
Let the pot sit for about an hour or two until it becomes ‘leather hard.’ This is crucial—if it’s too soft, the carving will drag; if it’s too dry, it will chip. -
Outline the Leaves:
Using a needle tool, very lightly sketch the outline of large, simple leaf shapes around the exterior. I like to space them evenly so the tips of the leaves point upward toward the rim. -
Carve the Veins:
Take your sharper carving tool or needle and press deeper into the clay to define the central vein of each leaf, running vertically from the bottom to the tip. -
Add Detail Lines:
Carve the diagonal veins radiating from the center line. Keep your pressure consistent to create clean, indented grooves rather than scratched lines. -
Deepen the Outline:
Go back over the outer perimeter of each leaf shape with your carving tool to make the design pop against the smooth background. -
Add Texture Spots:
For that speckled, organic look seen in the photo, gently poke the clay randomly with a needle tool or a stiff toothbrush bristles in the negative space between leaves. -
Dry Completely:
Allow the pot to dry fully for 24 to 48 hours. Keep it away from direct heat sources to prevent cracking.
Don’t Rush the Dry
To prevent warping, loosely cover the pot with plastic wrap for the first 12 hours of drying. This slows moisture loss and keeps your circle perfectly round.
Step 3: Finishing Touches
-
Sand Smooth:
Once bone dry, use fine-grit sandpaper to gently smooth the rim and any rough spots on the exterior, being careful not to sand away your carved details. -
Dust Off:
Wipe the pot down with a barely damp cloth or a dry brush to remove all the clay dust from the sanding process. -
Seal the Pot:
Apply 2-3 coats of a waterproof varnish or sealant. This is essential if you plan to put a real plant inside, as air dry clay will disintegrate if it gets wet.
Faux Stone Finish
Mix some used coffee grounds or cracked pepper into your clay before rolling it out. When sanded, this creates a beautiful speckled, granite-like texture.
Place your favorite cactus inside and enjoy the serene, handcrafted vibe this planter adds to your space
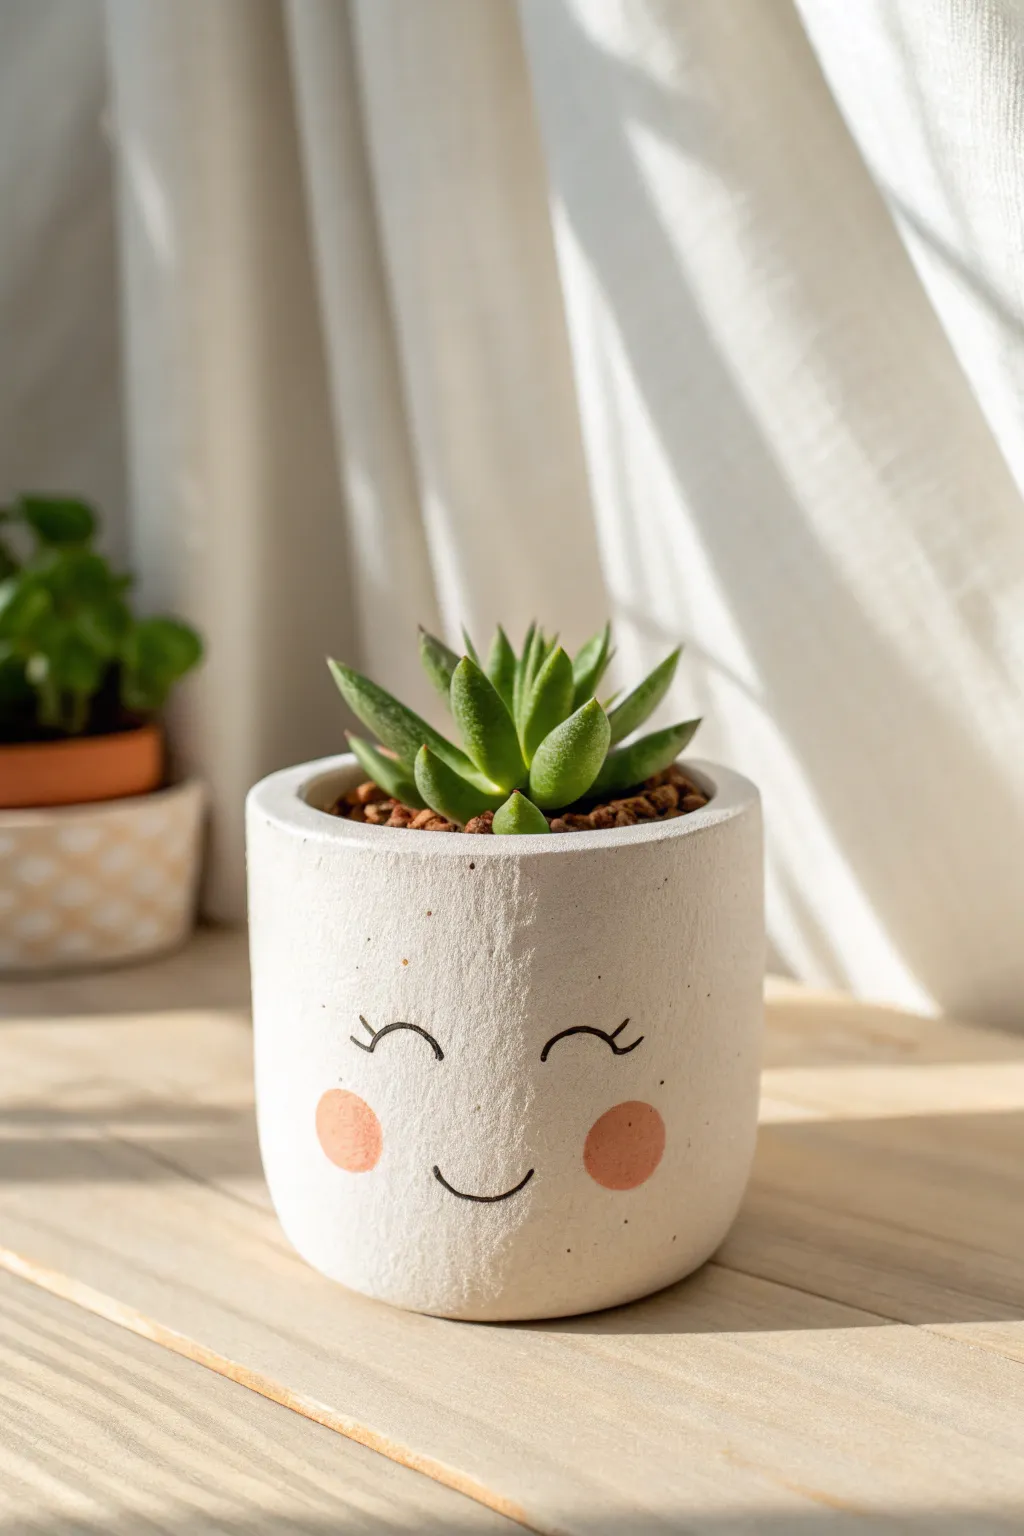
Minimal Face Pots With Simple Raised Features

Bring a sense of calm to your plant shelf with this charming face planter, featuring a smooth, speckled finish and gentle raised features. The simple, sleeping expression adds personality without overwhelming the minimalist aesthetic, making it a perfect home for small succulents.
Detailed Instructions
Materials
- White or light grey air-dry clay
- Rolling pin
- Small bowl or straight-sided jar (to use as a mold)
- Clay sculpting tools (needle tool, small loop tool)
- Sponge
- Water
- Sandpaper (fine grit)
- Black acrylic paint or fine-tip permanent marker
- Matte sealant or varnish
- Acrylic paint in ‘speckle’ colors (brown/grey, optional)
- Old toothbrush (optional for speckling)
Step 1: Forming the Base
-
Prepare the Clay Slab:
Begin by conditioning a handful of air-dry clay until it is soft and pliable. Roll it out into a long rectangle slab, aiming for a consistent thickness of about 1/4 inch. -
Cut the Base Circle:
Use your chosen bowl or jar to trace a circle onto the excess clay for the bottom of the pot. Cut this out cleanly with your needle tool. -
Wrap the Mold:
Wrap your rectangular slab around the sides of your jar or bowl mold. If you aren’t using a removable mold method, you can build the cylinder freehand, but using a form helps keep the sides straight. -
Join the Seams:
Where the ends of the clay meet, score the edges creates a rough texture, add a little water (slip), and press them firmly together to create a seamless cylinder. -
Attach the Bottom:
Place the cylinder onto the circular base. Score and slip the contact points, then use a tool or your finger to smooth the clay from the outside wall down onto the base to seal it completely.
Cracks Appearing?
Make a ‘slurry’ paste by mixing a small chunk of clay with water until it’s like heavy cream. Fill cracks with this paste, let dry, then sand smooth.
Step 2: Sculpting the Features
-
Define the Nose Bridge:
Roll a small, small snake of clay for the nose. Attach it vertically to the center of the pot face, blending the top seamlessly into the forehead area so it creates a subtle raised bridge. -
Shape the Nostrils:
Use your fingers to gently flare out the bottom of the nose snake. Use a small ball tool or the rounded end of a paintbrush to create two subtle indentations for nostrils. -
Create the Eyelids:
For the sleeping eyes, roll two small, thin semi-circles of clay. Attach them symmetrically on either side of the nose bridge, slightly pressing the edges down to make them look like closed eyelids. -
Add the Mouth:
Roll a very tiny, thin worm of clay for the mouth. Shape it into a gentle upward curve and attach it below the nose. Use a tool to refine the smile, blending the edges so it looks like part of the face rather than stuck on. -
Refine the Surface:
Dip a sponge in a little water and gently wipe over the entire pot. This smooths out fingerprints and softens the edges of your added features, giving it that organic, stone-like look. -
Let it Dry:
Place the pot in a dry area away from direct sunlight. I like to let this dry slowly over 24 to 48 hours to minimize cracking, rotating it occasionally.
Waterproofing Tip
Air dry clay dissolves in water! Always use a plastic liner pot for live plants, or coat the inside with multiple layers of waterproof resin.
Step 3: Finishing Touches
-
Sand for Smoothness:
Once fully dry, lightly sand the surface with fine-grit sandpaper. Focus on the rim and any rough spots where the clay was joined. -
Add the Faux Stone Speckles:
To achieve the speckled stone effect seen in the photo, dip an old toothbrush into watered-down brown or grey acrylic paint. Run your thumb over the bristles to flick tiny splatters across the pot. -
Draw the Details:
Using a fine-tip brush with black paint or a marker, carefully trace along the bottom edge of the clay eyelids to create the eyelash line. Add three small lashes to the outer corners. -
Highlight the Smile:
Add a very thin line of black in the crease of the mouth to give the smile more definition. -
Seal the Pot:
Apply a coat of matte varnish or sealant to protect the clay from moisture, especially if you plan to put a real plant inside.
Pop in your favorite succulent and enjoy the serene vibes your new creation brings to the room

TRACK YOUR CERAMIC JOURNEY
Capture glaze tests, firing details, and creative progress—all in one simple printable. Make your projects easier to repeat and improve.
Smiley Pots With Painted Expressions
Bring a little joy to your windowsill with this refreshingly simple cylinder planter featuring a sweet, minimalist face. Its clean white finish and rosy cheeks give it a soft, modern look that perfectly complements small succulents.
Step-by-Step
Materials
- White operational air dry clay (approx. 500g)
- Rolling pin
- Circle cutter or bowl (approx. 4-inch diameter)
- Ruler
- Craft knife or clay tool
- Small cup or jar (to use as a mold – optional)
- Water in a small dish
- Slip (clay mixed with water)
- Sandpaper (fine grit)
- Acrylic paint (Black and Soft Pink)
- Fine detail paintbrush
- Small round sponge dobber or cotton swab
- Matte varnish or sealant
Step 1: Shaping the Cylinder
-
Prepare the clay:
Begin by kneading your air dry clay until it is soft, pliable, and free of air bubbles. If it feels too dry, wet your hands slightly while working it. -
Roll the base slab:
Roll out a portion of the clay to an even thickness of about 1/4 inch. Using your circle cutter or a bowl as a template, cut out a perfect circle for the base of your pot. -
Measure the circumference:
Measure the circumference of your base circle. You can do this by wrapping a piece of string around the edge and then measuring the string against a ruler. -
Create the walls:
Roll out a larger slab of clay into a long rectangular strip. The length should match your circumference measurement plus a tiny bit for overlap, and the height should be how tall you want your pot (around 3-4 inches works well). -
Score and slip:
Score (scratch hatch marks) along the outer edge of your circular base and along the bottom edge of your rectangular strip. Apply a generous amount of slip to these scored areas. -
Attach the wall:
Carefully wrap the rectangular strip around the base circle. I find it easiest to stand the strip on its edge and curl it around the base rather than trying to place the base on top. -
Seal the seam:
Where the two ends of the wall meet, score and slip the vertical edges. Press them firmly together. Use a modeling tool or your finger to smooth the clay over the seam both inside and outside until it disappears. -
Reinforce the bottom:
Smooth the clay where the wall meets the base. You want a seamless transition so water doesn’t leak out later. Ensure the bottom edge is completely sealed.
Use a Can Scaffold
Wrap a soda can in parchment paper and build your clay wall around it. This keeps the cylinder perfectly round while you smooth the seams.
Step 2: Refining and Drying
-
Smooth the surface:
Dip your finger in a little water and run it over the entire surface of the pot to smooth out any fingerprints or bumps. The goal is a clean, modern cylinder. -
Level the rim:
Check the top rim of the pot. If it’s uneven, trim any excess clay with your craft knife to make it level, then smooth the cut edge with a damp sponge. -
Slow drying:
Place the pot in a cool, dry area away from direct sunlight. Let it dry slowly for 24-48 hours. Rotate it occasionally to ensure even drying and prevent warping. -
Sanding:
Once fully bone dry, use fine-grit sandpaper to gently buff the exterior. Focus on any lingering uneven spots or the vertical seam to get that matte, stone-like finish.
Cracks While Drying?
Mix a tiny amount of fresh clay with water to make a thick paste. Fill the crack, smooth it over, and let it dry again before sanding.
Step 3: Painting the Face
-
Draft the face:
Lightly sketch the facial features with a pencil. Place the eyes about halfway down the pot and space them widely for a cute look. Draw a small U-shape for the smile centered below them. -
Paint the eyes:
Using a very fine detail brush and black acrylic paint, trace your pencil lines for the eyes. Add two small flicks on the outer corners for eyelashes. -
Paint the smile:
Carefully paint the thin, curved line for the smile. Keep your hand steady and use just the tip of the brush for a delicate line. -
Add the cheeks:
Dip a small round sponge dobber (or the end of a cotton swab) into soft pink paint. Dab off excess paint on paper first, then press gently onto the pot cheeks to create soft, round circles. -
Seal the pot:
Once the paint is completely dry, apply a coat of matte varnish or sealant inside and out. This step is crucial to protect the clay from moisture when you water your plant.
Now you have a charming little planter ready to house your favorite succulent
Raised Flower Appliqué Pots for Sweet Detail
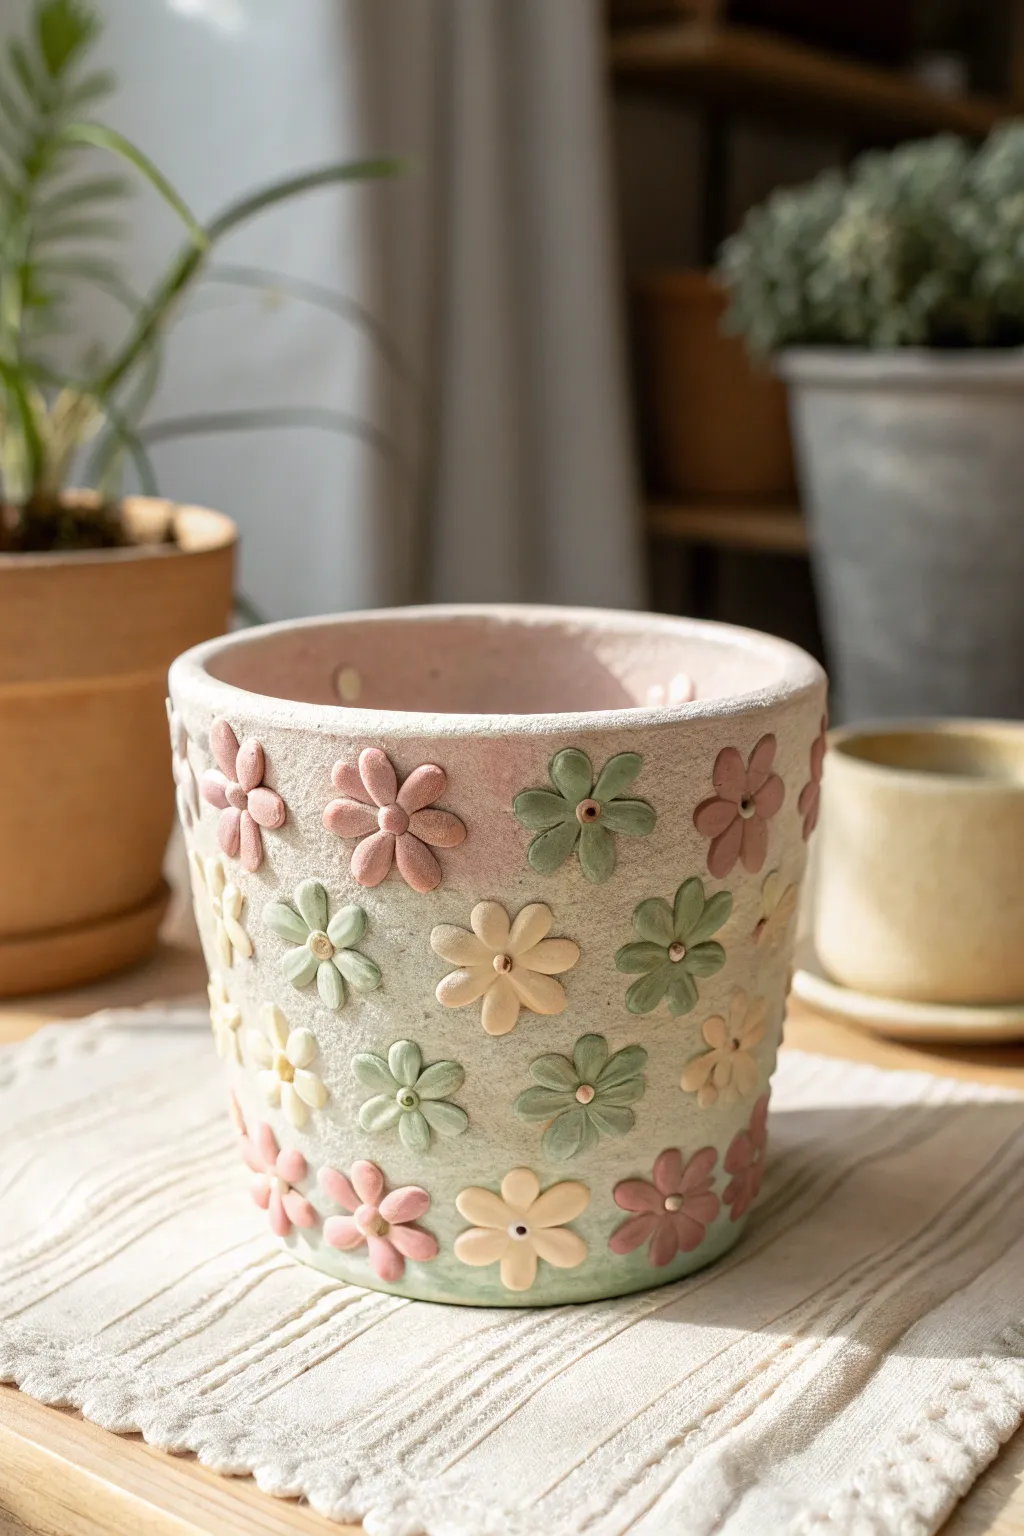
Add a touch of cottagecore charm to your indoor garden with this textured air-dry clay planter. Featuring soft pastel daisies raised against a stone-like background, this project transforms a simple base into a blooming work of art that feels both vintage and fresh.
Step-by-Step Guide
Materials
- White air-dry clay (approx. 500g)
- Small plastic plant pot (to use as a mold) or a pre-made terracotta pot
- Rolling pin
- Small flower fondant cutters (daisy shape)
- Clay sculpting tools (specifically a small ball tool)
- Water and a small sponge
- Acrylic paints: Sage Green, Dusty Pink, Cream/Butter Yellow, White, Beige
- Matte textured spray paint (stone effect) or beige textural paste
- Matte varnish sealant
- Fine grit sandpaper
- Craft glue or slip (clay mixed with water)
Step 1: Preparing the Base
-
Choose your method:
Decide whether you want to build the pot from scratch or upcycle an existing one. For the sturdy look in the photo, covering a clean terracotta pot with a thin layer of clay is the easiest route to ensure structural integrity. -
Roll out the base layer:
Roll out a large slab of air-dry clay to about 1/4 inch thickness. It needs to be long enough to wrap around the circumference of your chosen pot. -
Cover the pot:
Apply a little water to the outside of your terracotta pot to help adhesion. Wrap the clay slab around it, trimming any excess at the rim and base. -
Smooth the seams:
Use a little water on your fingertips to blend the vertical seam where the clay overlap meets. Try to make this invisible. -
Refine the surface:
While the clay is still damp, gently sponge the surface to create a slightly rustic, uneven texture rather than perfectly smooth porcelain. This mimics the stone look seen in the photo.
Cracking Clay?
If small cracks appear as the clay dries, mix a small amount of fresh clay with water to make a paste and fill the cracks like spackle before painting.
Step 2: Creating the Appliqué Flowers
-
Prepare flower clay:
Roll out a fresh, thinner sheet of clay (about 1/8 inch thick). This will be for the floral appliqués. -
Cut the shapes:
Using your daisy-shaped fondant cutters, punch out roughly 20-30 flowers. If you don’t have cutters, you can hand-sculpt five small teardrop shapes for petals and join them in a circle. -
Detail the petals:
Take a sculpting tool and gently press a line down the center of each petal to give them definition and a slightly puffy look. -
Create the centers:
Roll tiny balls of clay for the flower centers. Press one firmly into the middle of each flower using a small ball tool to indent it slightly. -
Score the attachment points:
Plan where your flowers will sit on the pot. Lightly score (scratch) the surface of the pot and the back of a flower using a needle tool. -
Attach the blooms:
Apply a dab of slip (watery clay) to the scored area and press the flower onto the pot. I usually like to start placing them randomly to ensure an organic spread rather than distinct rows. -
Ensure a good bond:
Gently press around the center of the flower to ensure it bonds fully with the base layer—you don’t want petals popping off later. -
Vary the spacing:
Continue attaching flowers all around the pot, leaving roughly an inch of space between them to let the background texture show through. -
Allow to dry:
Let the entire project dry completely. This can take 24-48 hours depending on humidity. The clay creates a cold sensation while wet; wait until it is room temperature to the touch.
Make it Functional
Since air-dry clay isn’t waterproof, place a plastic liner or smaller nursery pot inside your finished creation to protect it from moisture damage.
Step 3: Painting and Finishing
-
Sand imperfections:
Once bone dry, use fine-grit sandpaper to smooth any sharp jagged edges on the rim or petals. -
Prime the base:
Mix a beige acrylic with a tiny bit of baking soda or use a textured stone-effect spray paint to coat the entire pot, including over the flowers. This unifies the texture. -
Paint the flowers:
Paint the petals using soft pastels: Dusty Pink, Sage Green, and Cream. Use a small detail brush to keep the edges neat. -
Add dimension:
For the specific look in the photo, white-wash the colored petals slightly. Brush on a very watery white paint and immediately wipe most of it off with a paper towel. This leaves pigment in the crevices and gives a chalky finish. -
Detail the centers:
Paint the tiny center dots of the green and pink flowers with a contrasting metallic gold or simple beige to make them pop. -
Seal the work:
Finish with two coats of matte varnish. This is crucial for air-dry clay to protect it from stray water droplets when watering your plant.
Pop in your favorite succulent or fern and enjoy the sweet, handmade warmth this planter brings to your space
Geometric Strip-Built Pots With Clean Lines
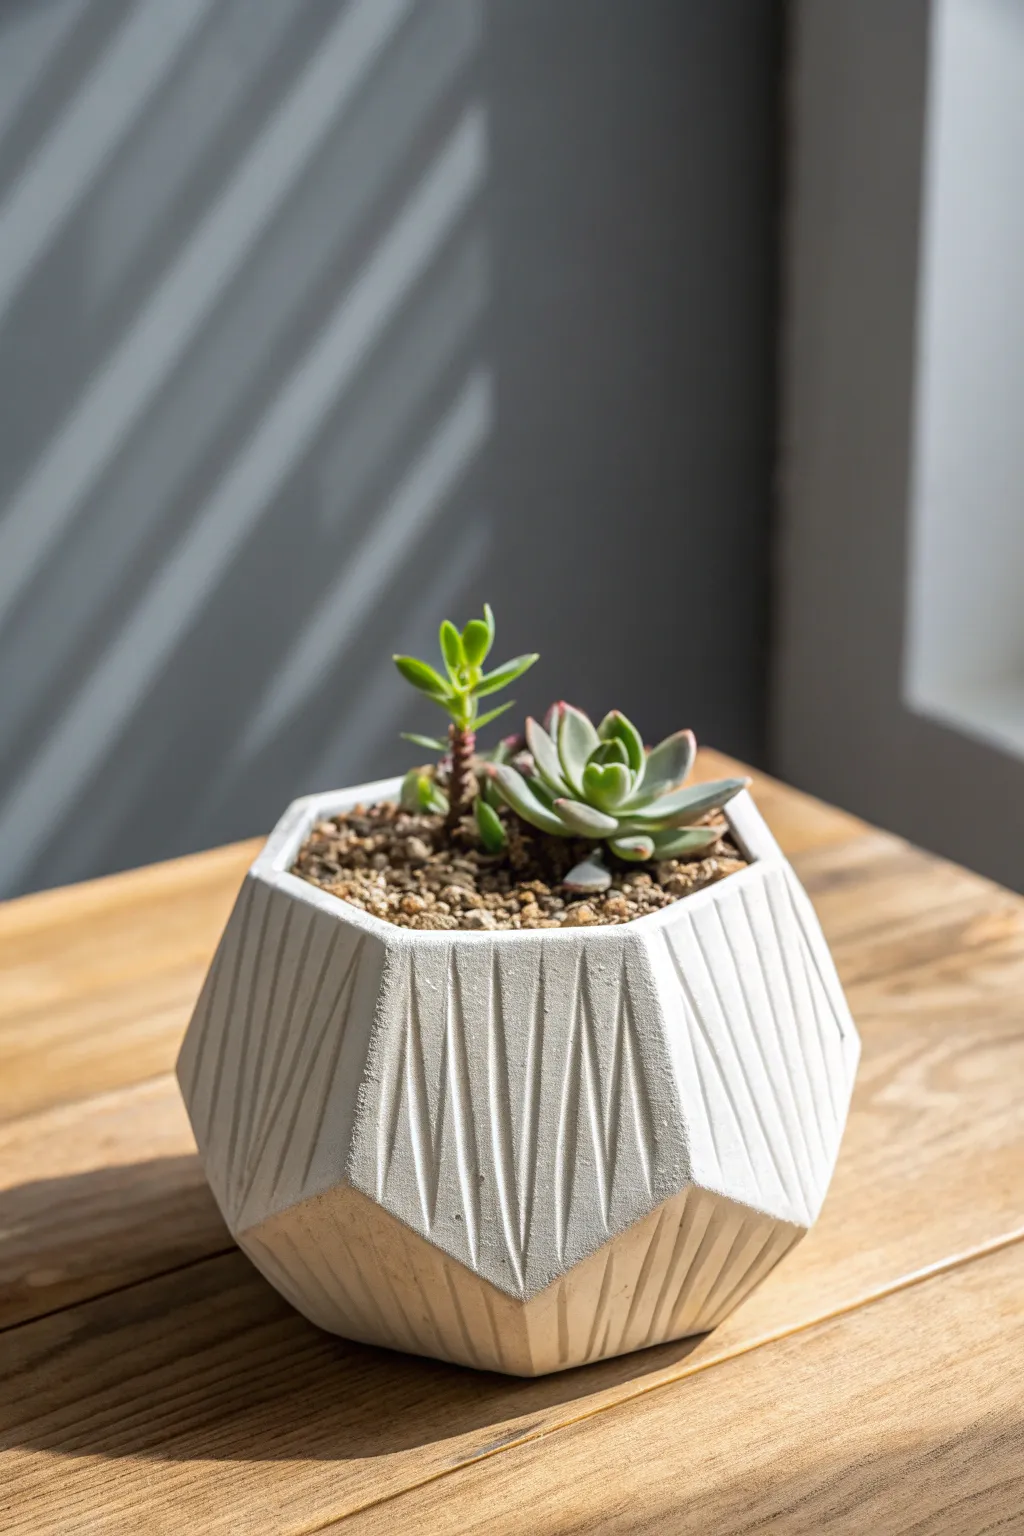
Bring modern elegance to your plant collection with this crisp, white geometric pot featuring carved vertical textures. The multi-faceted shape combined with regimented lines creates a sophisticated vessel that looks far more expensive than the simple clay it’s built from.
How-To Guide
Materials
- White modeling clay (air dry)
- Rolling pin
- Sharp craft knife or clay blade
- Ruler
- Small bowl or sphere for molding (optional)
- Clay sculpting tool (needle or small spatula)
- Water and sponge for smoothing
- Fine-grit sandpaper
- White acrylic paint (optional)
- Matte spray sealant
Step 1: Forming the Base Structure
-
Prepare the clay:
Begin by kneading a large ball of white air-dry clay until it is soft, pliable, and free of air bubbles. -
Create the base slab:
Roll out a portion of the clay to a consistent thickness of about 1/4 inch. Cut a hexagon or octagon shape for the very bottom of the pot; this will dictate how wide the base sits. -
Form the walls:
You can build this using the slab method. Roll out a long strip of clay, roughly 3 inches tall. Be sure the thickness is uniform. -
Assemble the cylinder:
Wrap the clay strip around the perimeter of your geometric base. Score and slip the edges where they meet the base and where the vertical seam joins to create a rough cylinder. -
Basic shaping:
Gently push the walls outward from the inside to create a rounded belly, tapering slightly inward at the top rim. I find using a small bowl inside as a temporary support helps maintain the shape.
Step 2: Faceting and Texturing
-
Mark the facets:
Using a ruler and a light touch with a needle tool, lightly sketch geometric panels around the exterior. You want roughly diamond or trapezoidal shapes that mimic a cut gemstone. -
Sharpen the angles:
Take your sharp blade and carefully shave down the clay along your sketched lines to create flat planes. The goal is to replace the smooth curve with distinct, angular faces. -
Refine the edges:
Use a damp finger to smooth just the very transitions between planes, keeping the faces flat but ensuring the clay is engaged and seamless. -
Carve the vertical lines:
On the central band of facets, use a needle tool or small clay gouge to carve deep, vertical lines. I like to keep them parallel but slightly varied in length for organic interest. -
Texture the lower facets:
Continue the carving pattern on the lower, angled-in facets, angling the lines to follow the slope of the pot toward the base. -
Clean the rim:
Slice the top rim horizontally to create a flat, clean lip. You can carve a few vertical notches into the rim to match the body texture.
Clean Lines Hack
To get perfectly straight carved lines, gently press the edge of a credit card or stiff ruler into the soft clay instead of dragging a sharp tool.
Step 3: Finishing Touches
-
Initial drying:
Let the pot sit in a cool, dry place for 24 to 48 hours. Turn it occasionally to ensure the bottom dries evenly. -
Sanding:
Once fully cured, use fine-grit sandpaper to smooth out any rough burs from the carving process, making the geometric edges crisp. -
Painting (Optional):
If your clay dried off-white or grayish, apply a coat of matte white acrylic paint to achieve that pristine look shown in the photo. -
Sealing:
Apply a matte waterproof sealant inside and out. This is crucial for durability if you plan to put soil directly in the pot.
Stone Effect
Mix a small amount of coarse black pepper or sand into your white clay before rolling it out to create a speckled, faux-stone granite texture.
Place your favorite succulent inside and enjoy the modern architectural vibe this planter adds to your space
Scalloped Rim Pots for a Cute Cottage Feel
Embrace the cottagecore aesthetic with this charming handmade planter featuring double scalloped detailing. The textured white clay and gold accents create a perfectly imperfect home for your favorite small succulent.
Step-by-Step Tutorial
Materials
- White organic air dry clay (stone effect preferred)
- Small rolling pin
- Clay knife or craft knife
- Small circular cookie cutter (or a bottle cap)
- Bowl for water
- Sponge
- Gold metallic paint or paint pen
- Fine detail paintbrush
- Sandpaper (medium grit)
- Clear acrylic sealant (matte finish)
Step 1: Creating the Base
-
Roll the base:
Start by taking a medium-sized ball of clay and rolling it flat to about 1/4 inch thickness. Use a round cutter or trace a circle about 4 inches in diameter to create the bottom of your pot. -
Prepare the walls:
Roll out a long rectangular slab of clay for the walls. Aim for the same 1/4 inch thickness as the base. The length needs to be slightly longer than the circumference of your base circle. -
Create the scalloped edge:
Along one long edge of your rectangular strip, use your small circular cutter or bottle cap. Instead of punching fully through, align the cutter halfway off the edge of the clay to cut out semi-circles, creating a wave pattern along the entire length. -
Form the cylinder:
Carefully lift your rectangular strip and wrap it around the circular base. Join the two ends of the rectangle together by scoring the clay (making scratch marks) and adding a dab of water (slip) to glue them. -
Smooth the seam:
Use your finger or a clay tool to smooth the vertical seam where the wall connects. Blend the clay until the line disappears on both the inside and outside.
Make it Waterproof
Air dry clay melts if it gets wet! For real plants, seal the inside thoroughly with dishwasher-safe Mod Podge or resin, or simply use the clay pot as a decorative cover for a plastic nursery pot.
Step 2: Adding Details
-
Attach base to walls:
Flip the pot gently or work from the inside to thoroughly seal the wall to the base circle. Use a small clay tool or your finger to drag clay from the wall down onto the base to ensure a watertight seal. -
Create the second scallop strip:
Roll a very thin snake of clay and flatten it significantly, or cut a thin strip from a rolled slab. Use a much smaller cutter or freehand cut a second wavy, scalloped pattern along this thin strip. -
Attach the decorative strip:
Score a horizontal line around the middle of your pot’s exterior. Apply a little water and press your thin scalloped strip onto the pot, smoothing it down gently so it adheres but keeps its raised texture. -
Refine the rim:
Go back to the top rim. Use a damp sponge to smooth out any sharp edges on the scallops. You want them to look soft and rounded rather than freshly cut. -
Add texture:
Dab the entire exterior surface with a slightly rough sponge or a crumpled ball of aluminum foil. This gives the pot that aged, stone-like texture seen in the photo. -
Initial drying:
Set the pot aside in a cool, dry place. Let it air dry for at least 24-48 hours. Turn it occasionally to ensure even drying and prevent warping.
Step 3: Finishing Touches
-
Sand imperfections:
Once fully dry and hard, lightly sand any unintended sharp ridges or the bottom edge to make sure the pot sits flat. Wipe away all dust with a slightly damp cloth. -
Painting the details:
Using a fine detail brush and gold metallic paint, carefully trace the very edge of the top rim. I find that resting my pinky finger on the pot for stability helps keep the line steady. -
Highlighting the middle:
Paint a similar thin gold line along the edge of the decorative scalloped strip in the middle of the pot. -
Seal the interior:
Since air dry clay isn’t waterproof, apply 2-3 coats of a heavy-duty waterproof sealer or epoxy resin to the inside of the pot if you plan to put soil directly in it. -
Seal the exterior:
Apply a coat of matte acrylic varnish to the outside to protect the paint and texture without making it look too shiny.
Vintage Patina
Before adding the gold, dilute some brown acrylic paint with water (a wash) and brush it over the dried clay. Wipe it off immediately with a rag to leave dark color in the textures for an antique look.
Place your favorite succulent inside and enjoy the handmade warmth this little pot brings to your windowsill
Hanging Air-Dry Clay Pots With Simple Holes
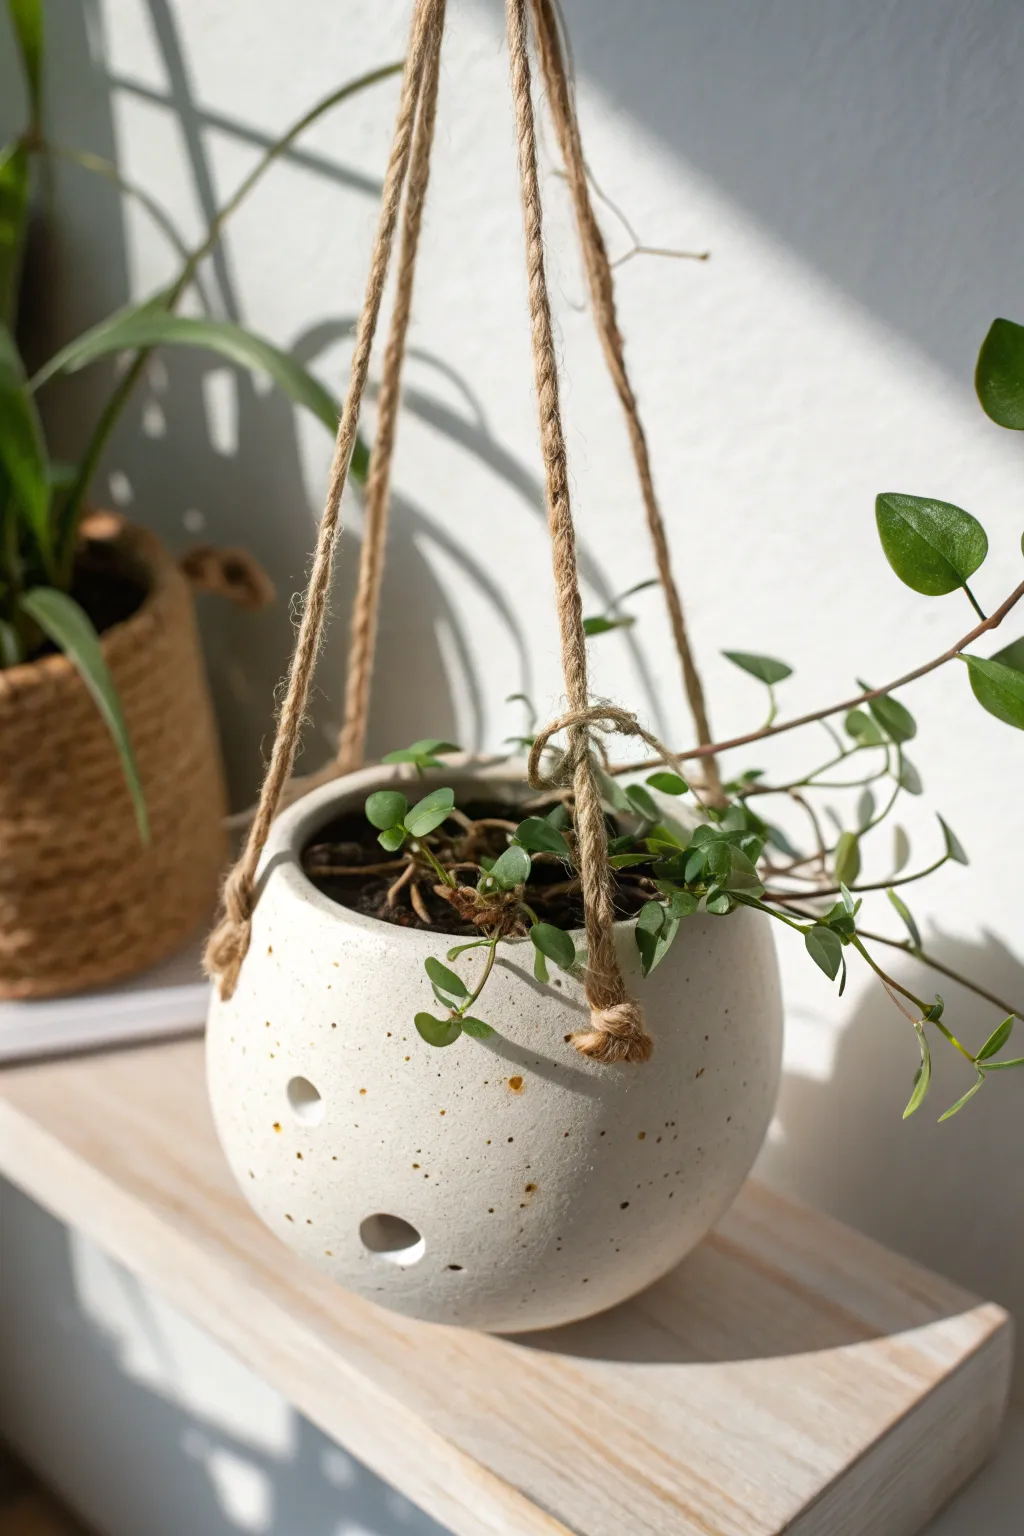
Bring a touch of modern bohemian style to your window ledge with this spherical hanging planter. The faux-stone speckling and strategic cutouts give it an airy, organic feel that perfectly complements trailing vines.
Detailed Instructions
Materials
- White air-dry clay (approx. 500g)
- Small round bowl (for mold)
- Plastic wrap
- Rolling pin
- Circle cutters (various sizes) or bottle caps
- Jute twine
- Sandpaper (medium and fine grit)
- Acrylic paint (brown or burnt sienna)
- Old toothbrush
- Clear acrylic sealant (matte finish)
- Water and sponge
Step 1: Shaping the Bowl
-
Prepare your mold:
Select a smooth, round bowl from your kitchen to use as a slump mold. Cover the outside of the bowl entirely with plastic wrap to prevent the clay from sticking later. -
Roll the slab:
Take a large chunk of air-dry clay and knead it briefly to warm it up. Roll it out on a flat surface until it is an even slab, approximately 1/4 inch thick. -
Drape the clay:
Carefully lift your clay slab and drape it over the upside-down bowl. Gently press the clay against the bowl’s curve, smoothing out any major folds or creases with your thumbs. -
Trim the edge:
Using a knife or a clay tool, trim the excess clay around the rim of the bowl to create a clean, even edge. I find that rotating the bowl on a lazy susan makes this step much smoother. -
Smooth the surface:
Dip a sponge in a little bit of water and gently wipe the entire outer surface of the clay to remove fingerprints and tiny cracks.
Cracking Up?
If hairline cracks appear while drying, mix a small amount of fresh clay with water to make a ‘slip’ paste. Fill the cracks, smooth over, and let dry again.
Step 2: Adding Details
-
Create drainage and design holes:
While the clay is still easy to manipulate but slightly firm, use a small circle cutter to punch a drainage hole in the very center bottom. -
Punch side details:
Use a medium-sized circle cutter (or a bottle cap) to punch 3-5 decorative holes randomly around the lower half of the sphere. These allow air flow and add visual interest. -
Make hanging holes:
Near the rim of the pot, use a straw or small tool to poke three evenly spaced holes for the twine. Ensure they are at least half an inch from the edge to prevent tearing. -
Initial drying:
Let the clay sit on the mold for about 24 hours until it is firm enough to hold its shape without support. -
Remove mold:
Carefully flip the project over and remove the bowl and plastic wrap. Let the inside of the pot dry completely for another 24-48 hours.
Level Up: Ombre Twist
Before splattering, sponge a soft gradient of terracotta or sage green paint onto the bottom third of the pot for a subtle, dipped-dye ombre effect.
Step 3: Finishing Touches
-
Sand until smooth:
Once fully dry and bone white, use medium-grit sandpaper to even out the rim and the edges of your cutouts. Switch to fine grit for a silky smooth exterior finish. -
Create the splatter effect:
To achieve the speckled stone look, dilute a small amount of brown acrylic paint with water. Dip an old toothbrush into the mix. -
Apply the speckles:
Run your thumb across the bristles to flick tiny droplets of paint onto the pot. Rotate the pot to get even coverage, varying the density for a natural stone appearance. -
Seal the pot:
Since air-dry clay dissolves in water, apply two to three coats of a matte acrylic sealant or varnish to both the inside and outside to make it water-resistant. -
Attach the hanger:
Cut three equal lengths of jute twine. Thread one end through each hole near the rim and tie a sturdy double knot on the outside. -
Secure the top:
Gather the three loose ends of the twine at your desired hanging height and tie them together in a large overhand knot to create the hanging loop.
Now you have a stunning, minimalistic home for your favorite trailing plant and plenty of shelf envy
Textured “Retro” Pots Using Simple Tool Marks
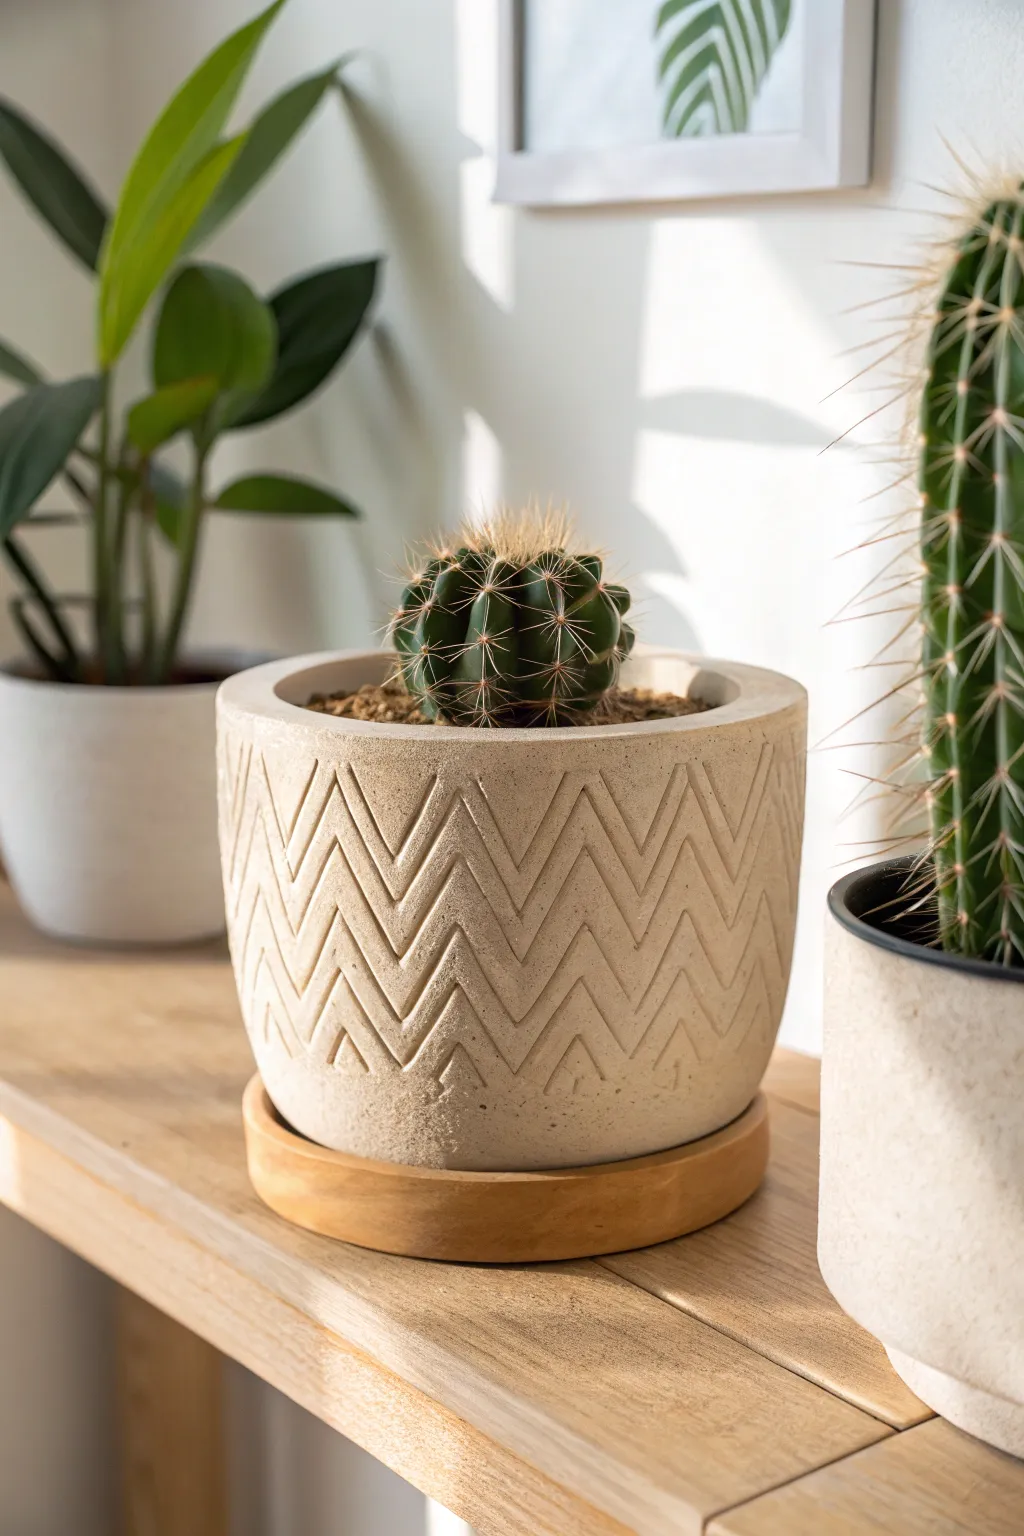
Bring some mid-century modern flair to your plant shelf with this textured planter featuring a classic chevron pattern. By using simple carving tools on air-dry clay, you can achieve a deeply etched design that looks professionally crafted.
How-To Guide
Materials
- White air-dry clay (approx. 1kg)
- Rolling pin
- Canvas mat or parchment paper
- Craft knife or scalpel
- Slip (clay mixed with water)
- Modeling tool with a distinct V-tip or a sturdy toothpick
- Straight edge or ruler
- Fine grit sandpaper (200-400 grit)
- Clear matte acrylic sealer or varnish
- Wooden coaster or small wooden round (for the base)
- Water
Step 1: Forming the Pot Base
-
Roll the Slab:
Begin by rolling out a substantial portion of your clay on a canvas mat or parchment paper. Aim for an even thickness of about 1/4 to 1/3 inch (6-8mm) to ensure the pot walls are sturdy enough to support the cactus. -
Cut the Base Circle:
Using a circle cutter, a bowl, or a template, cut out a circle for the bottom of your pot. Smooth the edges with a finger dipped in a little water. -
Measure and Cut the Wall:
Measure the circumference of your base circle. Cut a long rectangular strip of clay that matches this length (plus a tiny bit extra for overlap) and is as tall as you want your pot to be—about 4-5 inches is standard for this size. -
Score and Slip:
Using your craft knife or a needle tool, score rough hatch marks along the outer edge of the base circle and the bottom edge of the rectangular strip. Apply a generous amount of slip to these scored areas. -
Assemble the Cylinder:
Carefully lift the rectangular strip and wrap it around the base circle. Press the scored edges together firmly. Where the two ends of the wall meet, score and slip the vertical seam, then blend the clay until the join is invisible. -
Reinforce the Interior:
Roll a thin coil of clay and press it into the bottom interior seam where the wall meets the floor. Smooth this coil out completely to create a strong, watertight bond.
Step 2: Carving the Texture
-
Let it Firm Up:
This is crucial: Let the pot dry until it is ‘leather hard.’ It should be firm to the touch and not squishy, but still cool and carveable. If you carve too soon, the pot will warp. -
Plan the Guide Lines:
Lightly scratch horizontal guide rings around the pot using your ruler to ensure your zigzags stay level. Space them evenly to define the height of your peaks and valleys. -
Carve the First Zigzags:
Using a V-tip tool or a sharp modeling tool, carve the first continuous zigzag line around the circumference. Apply consistent pressure to create a deep, defined groove rather than a surface scratch. -
Echo the Pattern:
Carve parallel lines below your first zigzag, following the exact same angles. I find it easiest to work one section at a time rather than trying to do one whole ring at once. -
Create the Nested Chevrons:
Continue adding nested V-shapes inside the larger zigzags. Don’t worry if the lines aren’t machine-perfect; the hand-carved look adds character. -
Refine the Rim:
Smooth out the top rim of the pot with a damp sponge or your finger. You want a nice, flat top edge that contrasts with the textured sides.
Clean Lines Hack
Work gently! When carving the zigzags, pull the tool towards you rather than pushing away. This usually gives you more control and cleaner lines.
Step 3: Finishing Touches
-
Dry Completely:
Allow the pot to air dry completely. This will take 24-48 hours depending on humidity. Rotate it occasionally so it dries evenly. -
Sand for Smoothness:
Once bone dry, take your fine-grit sandpaper and gently sand the surface. Focus on removing any burrs or sharp crumbs of clay created during the carving process. -
Seal the Clay:
Apply 2-3 coats of clear matte acrylic sealer or varnish to the entire pot (inside and out) to protect it from moisture. -
Add the Wooden Base:
Place your finished pot onto a simple wooden saucer or coaster. This protects your furniture and completes the mixed-material aesthetic shown in the photo.
Level Up: Stone Effect
Before sealing, flick a toothbrush with diluted grey or brown paint straight onto the pot. These tiny speckles will mimic the look of natural stoneware.
Now you have a stylish, custom planter ready to showcase your favorite succulent
Animal Planter Pots With Tiny Ears and Paws
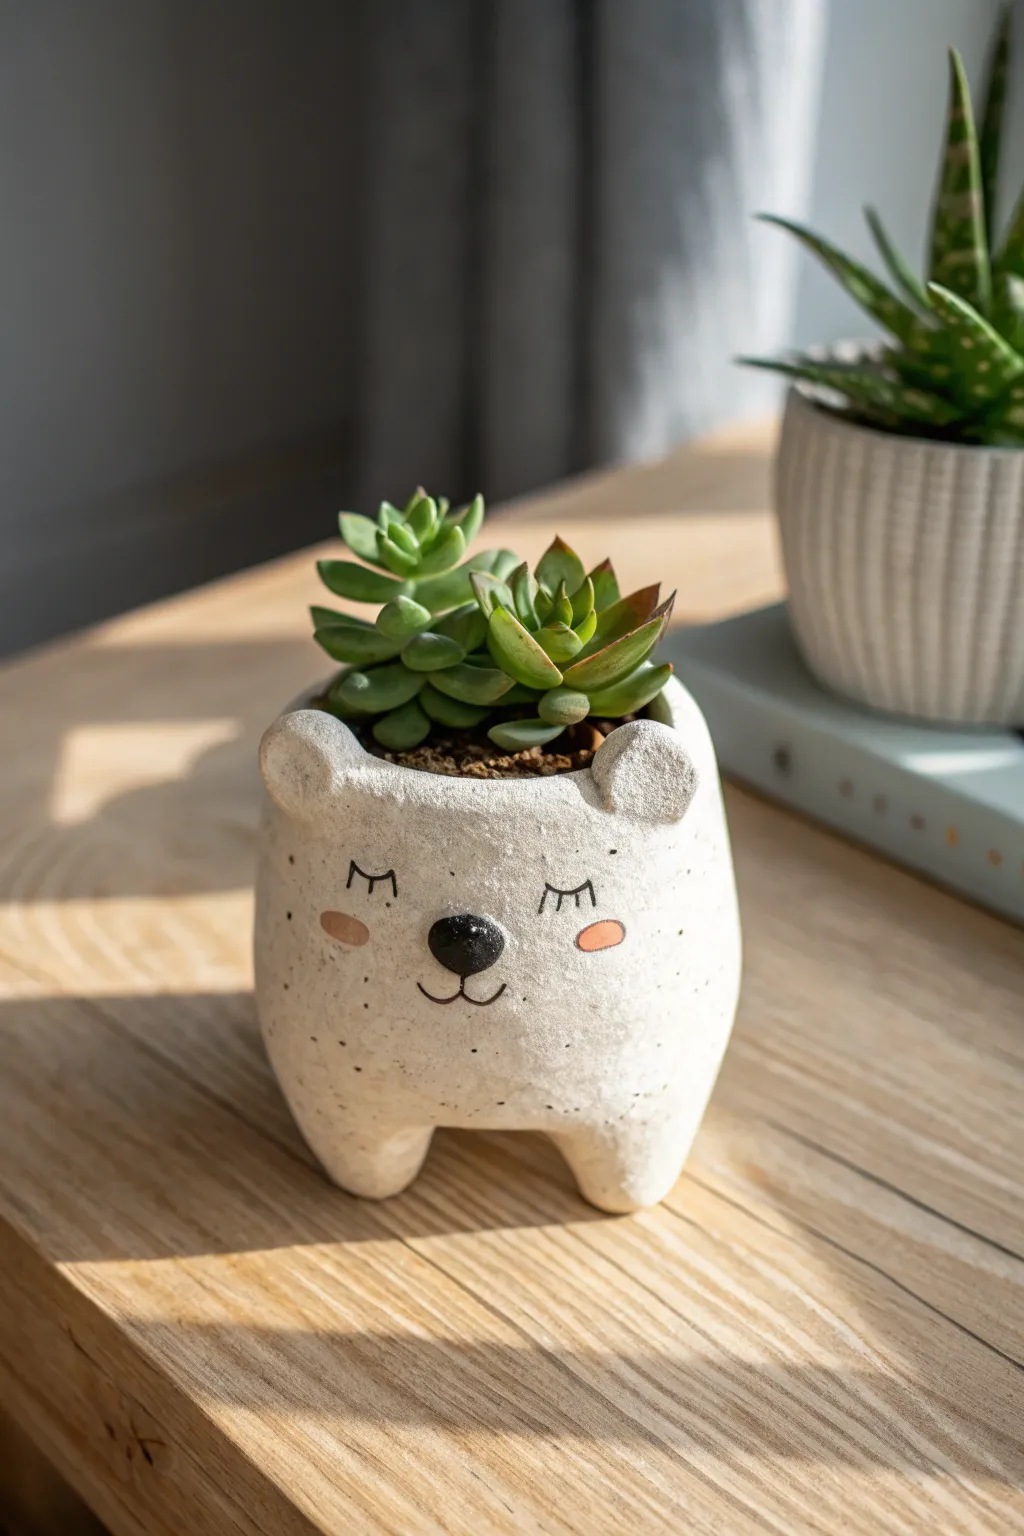
This adorable bear-shaped planter brings a touch of whimsy to any windowsill with its sleepy expression and tiny paws. The textured, speckled finish gives it a charming, organic look perfect for housing small succulents.
Step-by-Step Tutorial
Materials
- White or speckled white air dry clay
- Rolling pin
- Small cup or jar (about 3 inches wide) to use as a mold/armature
- Clay sculpting tools (needle tool, smoothing tool)
- Small bowl of water
- Sponge
- Acrylic paints (Black, Soft Pink)
- Fine detail paintbrush
- Matte varnish or sealant
- Sandpaper (fine grit)
Step 1: Shaping the Base
-
Prepare the clay:
Start by conditioning a generous handful of air dry clay. Knead it until it’s soft, pliable, and free of cracks. If you are using plain white clay and want the speckled look shown, I like to mix in a tiny pinch of dried coffee grounds or black pepper into the clay body at this stage. -
Roll the slab:
Roll the clay out into a rectangular slab about 1/4 inch thick. It needs to be long enough to wrap around your chosen cup or jar armature. -
Form the cylinder:
Cut a clean rectangle from your slab. Wrap it loosely around your jar armature to form a cylinder. Join the seam by scoring both edges, adding a little water, and blending the clay together until the line disappears. -
Create the bottom:
Place the cylinder on top of a flattened piece of clay and trace around the base. Cut out this circle, score the edges, and attach it to the bottom of your cylinder to close it up. Smooth the join on the outside perfectly. -
Refine the shape:
Gently slide the jar out if you haven’t already. Now, use your hands to gently push the walls outward from the inside to create a slightly rounded, chubby belly shape rather than a straight cylinder. Keep the rim somewhat narrower.
Pro Tip: Drainage Trick
Don’t plant directly! Air dry clay dissolves in water. Instead, size your bear to fit a standard plastic nursery pot inside so you can remove the plant to water it.
Step 2: Adding Features
-
Make the ears:
Roll two small balls of clay, about the size of marbles. Flatten them slightly and pinch one side to create a teardrop shape. Score the top rim of the pot and attach these securely as ears, blending the clay downwards into the main body. -
Form the feet:
Roll four smaller balls of clay for the paws. Flip the pot over gently. Attach two feet near the front bottom edge and two at the back. Blend the clay well so the feet look like they are pulled out from the body, not just stuck on. -
Check stability:
Stand the pot upright on its new feet. Press down very gently to flatten the bottoms of the paws so the pot sits stable and level. -
Add the nose:
Roll a tiny, slightly flattened ball of clay for the snout area. Place this in the center of the ‘face’ area. Then, create a smaller, slightly raised triangle within that for the actual nose. -
Create texture:
To mimic the stone-like texture in the photo, take an old toothbrush or a stiff bristle brush and gently tap it all over the surface of the clay. This removes fingerprints and adds a rustic finish. -
Let it dry:
Allow your planter to dry completely. This usually takes 24-48 hours depending on humidity. Turn it occasionally so the bottom dries evenly.
Step 3: Painting and Finishing
-
Sand imperfections:
Once fully dry, use fine-grit sandpaper to gently smooth any rough seams or sharp edges on the rim. Be careful not to sand away your texture. -
Paint the nose:
Using a small brush and black acrylic paint, carefully paint the raised nose bump. A matte black works best for a natural look. -
Paint the cheeks:
Mix a soft, muted pink color. Paint two small oval blushes on either side of the nose area. -
Draw the face details:
With an ultra-fine brush or a black paint pen, draw the sleeping eyes. Make two small ‘U’ shapes upside down with tiny lashes. Draw a simple mouth line connecting to the nose. -
Seal the pot:
Apply a coat of matte varnish inside and out to protect the clay from moisture. Since air dry clay isn’t waterproof, always use a plastic liner pot inside when planting.
Level Up: Tail Time
Add a tiny round ball of clay to the back of the pot before drying to create a cute little bear tail, or elongate the ears to turn it into a sleepy bunny.
Now you have a charming little companion ready to hold your favorite succulent
Whimsical Character Pots With Sculpted Add-Ons
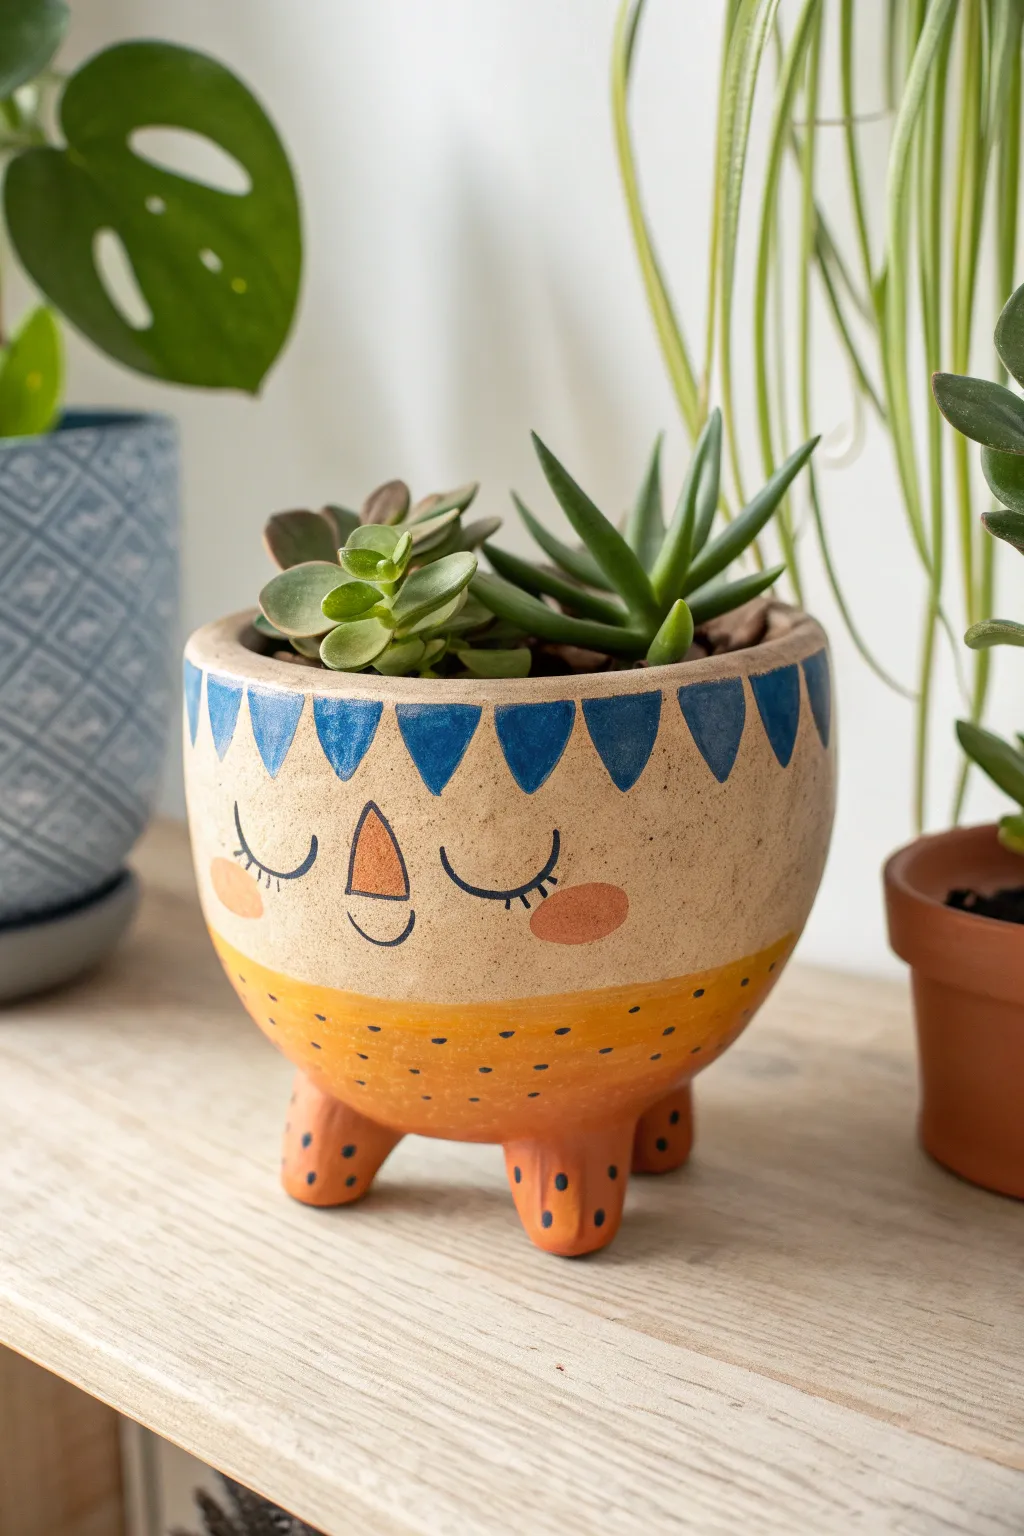
Brighten up your shelf with this adorable, sleepy-legged character pot made entirely from air-dry clay. Its cheerful orange dip-dye effect and hand-painted details give it a sweet personality that pairs perfectly with succulents.
Step-by-Step Guide
Materials
- Air dry clay (white or terra cotta color)
- Clay rolling pin
- Small bowl (for a mold support)
- Plastic wrap
- Sponge and water
- Clay sculpting tools (knife tool, smoothing tool)
- Fine grit sandpaper
- Acrylic paints (Cream, Orange, Cobalt Blue, Black, Burnt Orange)
- Paintbrushes (small detail brush, medium flat brush)
- Acrylic sealer or varnish (matte or satin)
- Slip (clay mixed with water)
Step 1: Sculpting the Base
-
Prepare the clay slab:
Begin by rolling out a medium-sized ball of air dry clay until it is roughly ¼ inch thick. Ensure the thickness is even to prevent cracking during the drying phase. -
Form the main bowl:
Line a small bowl with plastic wrap to use as a mold. Gently press your clay slab into the lined bowl, trimming the excess clay at the rim with a knife tool to create a clean, level edge. -
Smooth the interior:
Dip a sponge or your finger in a little water and smooth out the inside of the pot. I find taking extra time here really pays off for a professional finish later. -
Create the feet:
Roll three small, equal-sized balls of clay. Gently shape them into stubby cones or rounded cylinders to serve as the legs. -
Attach the legs:
Score the bottom of your pot and the top of each leg with a needle tool or toothpick. Apply a dab of slip (clay and water paste) to the scored areas. -
Secure and blend:
Press the legs firmly onto the base of the pot. Use a sculpting tool or your thumb to blend the clay from the legs onto the pot body so there are no visible seams. -
Level check:
Flip the pot right-side up (carefully, while still supported by the mold if needed) and gently tap it on the table to ensure it stands flat and practically level.
Step 2: Drying and Refining
-
Initial dry:
Let the pot sit in a cool, dry place away from direct sunlight. Allow it to firm up for about 24 hours before removing it from the mold. -
Full cure:
Once removed from the mold, let the pot dry completely for another 24-48 hours until it is hard and turns a lighter color. -
Sand for smoothness:
Using fine-grit sandpaper, gently sand the entire surface of the pot. Focus on the rim and the leg joints to make them buttery smooth.
Smooth Seams Secret
Use a slightly damp paintbrush to blend the seams where the legs attach. It acts like an eraser for join lines without adding too much water.
Step 3: Painting the Character
-
Base coat:
Paint the top two-thirds of the pot with a creamy beige or off-white acrylic paint. You may need two coats for opaque coverage. -
Color blocking:
Paint the bottom third of the pot and the legs with a bright orange acrylic paint. Create a soft, slightly wavy line where the orange meets the cream color to mimic a dipped look. -
Geometric rim:
Using a small flat brush and cobalt blue paint, add a row of inverted triangles around the very top rim to create a decorative band or ‘hairline’ for your character. -
Face details:
With your finest detail brush and black paint, draw two wide U-shapes for closed, sleepy eyes. Add tiny lashes and a small U-smile. -
Nose and cheeks:
Paint a small, soft triangle in burnt orange for the nose. Add rosy oval cheeks on either side using the same orange mixed with a little cream. -
Polka dot texture:
Dip the non-brush end of a paintbrush into dark blue or black paint. Dot small speckles over the orange section of the pot and legs for added texture. -
Seal the deal:
Once all paint is visibly dry, apply a coat of matte or satin varnish to protect your paint job and give the pot a finished sheen.
Go 3D!
Before the clay dries, sculpt a tiny 3D nose or protruding ears onto the pot instead of just painting them for extra character depth.
Now you have a charming little friend ready to hold your favorite succulent