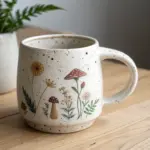
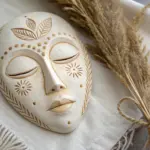
I love how clay luminaries look sweet and sculptural in daylight, then completely steal the show once you pop a light inside. Here are my favorite cutout pattern and form ideas that are super doable, with that cozy warm glow payoff every time.
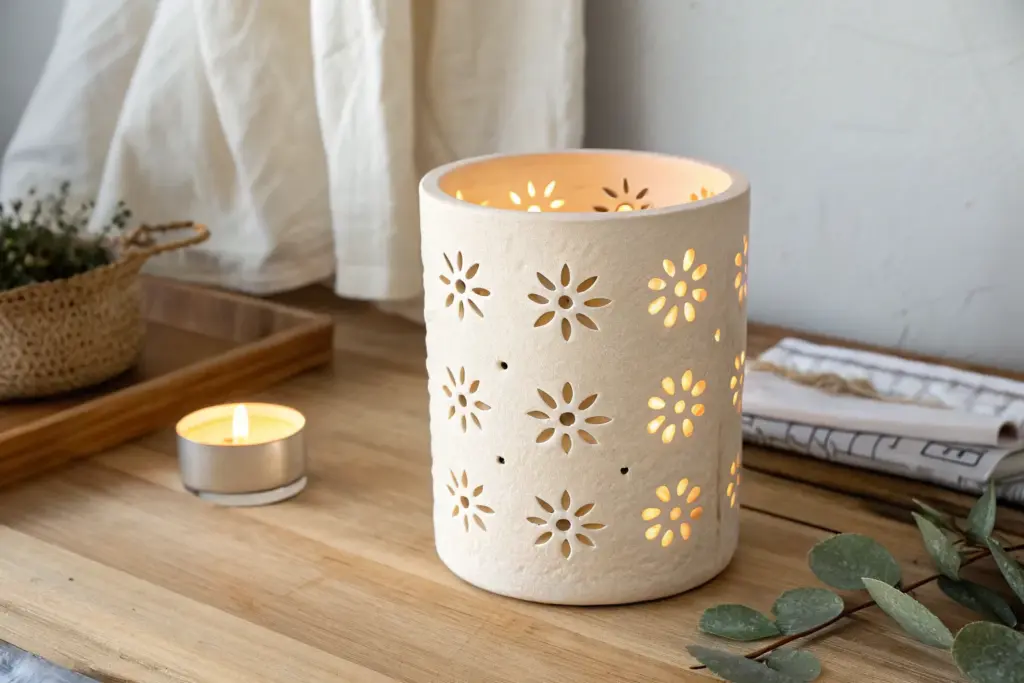
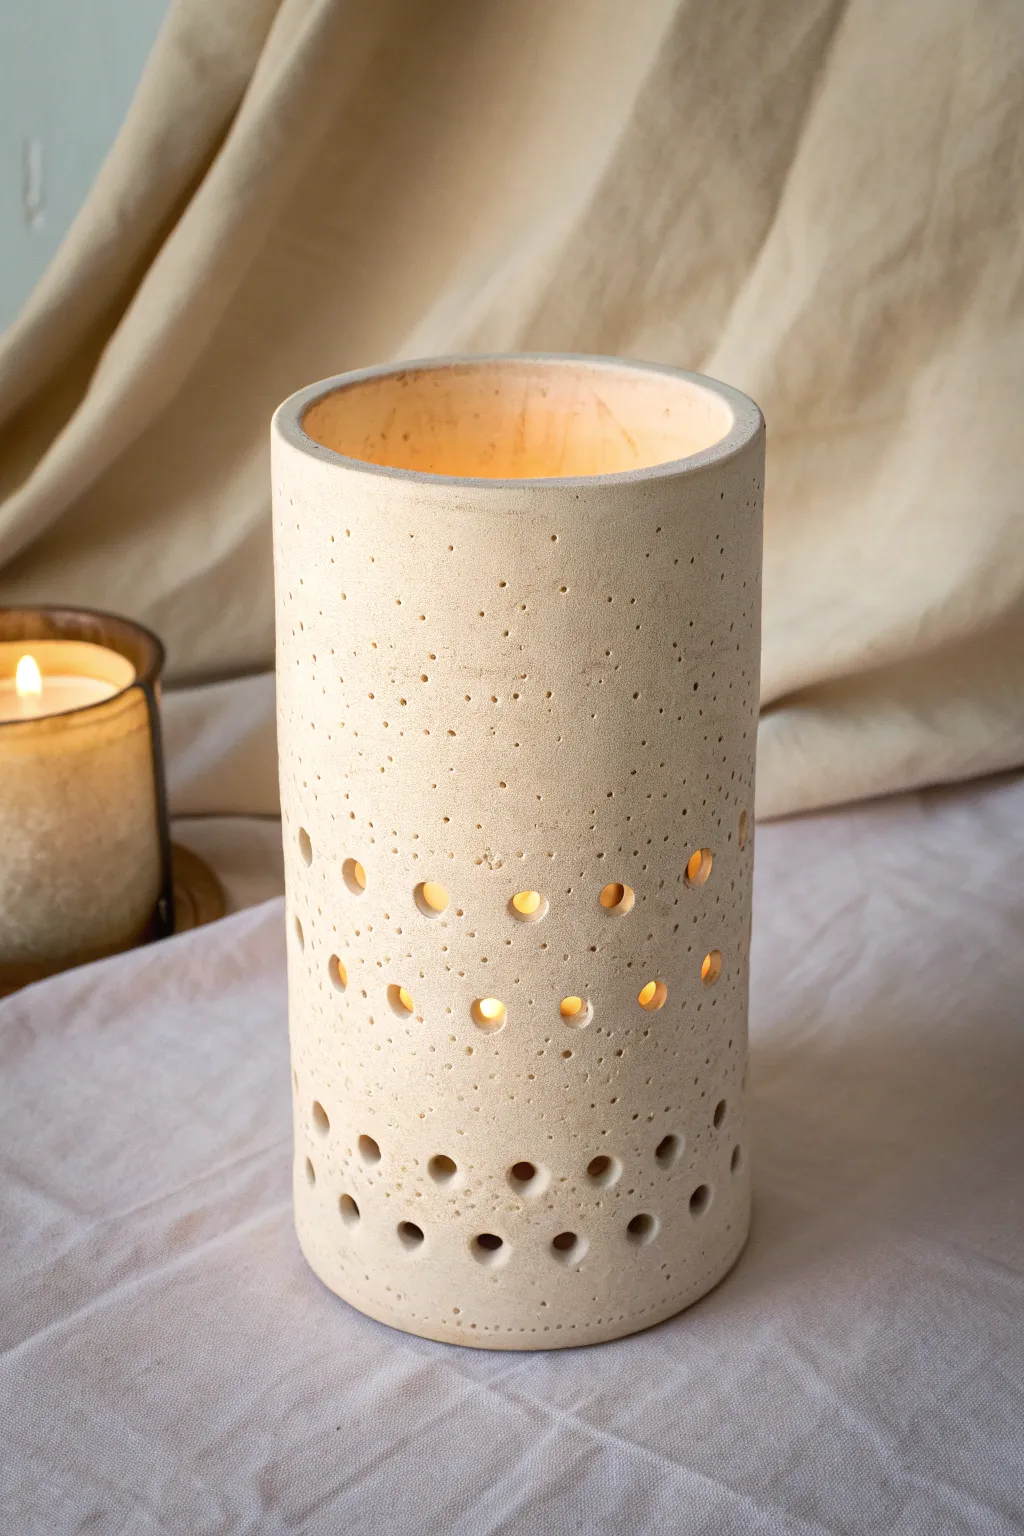
Classic Cylinder With Mixed Round Cutouts
This elegant cylindrical luminary uses simple negative space to create a warm, dappled glow perfect for cozy evenings. The raw, speckled clay texture combined with varied circular cutouts offers a modern yet rustic aesthetic that is surprisingly easy to achieve.
Step-by-Step Guide
Materials
- Speckled buff stoneware clay (or polymer clay with granite finish)
- Circular clay cutters (3 different sizes: small, medium, large)
- Rolling pin
- Canvas mat or slab roller
- Cylindrical form (PVC pipe or large can)
- Newspaper or paper towel
- Needle tool
- Scoring tool or old toothbrush
- Slip (liquid clay)
- Fettling knife
- Sponge
- Smoothing rib (rubber or wood)
Step 1: Forming the Cylinder
-
Prepare the slab:
Begin by rolling out your speckled clay on a canvas mat. Aim for a consistent thickness of about 1/4 inch (6-7mm). If the clay is too thin, the walls won’t support the cutouts; too thick, and the light won’t shine through as delicately. -
Measure and cut:
Determine the circumference of your cylindrical form. I like to wrap a piece of string around my PVC pipe to get the exact measurement, then add an extra half-inch for the overlap. Cut a precise rectangle from your slab based on these dimensions. -
Wrap the form:
Wrap your form (PVC pipe or can) with a layer of newspaper. This prevents the clay from sticking to the mold and makes removal much easier later. -
Shape the clay:
Gently lift your clay slab and wrap it around the prepared form. Bring the two short ends together until they meet. -
Score and slip:
Where the ends meet, score (scratch) both surfaces thoroughly with a needle tool or serrated rib. Apply a generous amount of slip to the scored areas. -
Create the seam:
Press the scored ends firmly together to create a bond. Use your thumb or a wooden tool to smudge the clay across the seam line, blending it until the join is invisible on the outside. -
Smooth the surface:
Run a rubber rib over the entire exterior surface while it’s still on the form. This compresses the clay particles and creates that lovely smooth finish shown in the photo.
Clean Cuts Every Time
If your circle cutters are sticking, dip them in a little cornstarch or water before pressing into the clay. This helps the tool release cleanly without dragging.
Step 2: Designing With Light
-
Mark the pattern:
Before cutting, lightly press your circle cutters into the surface just enough to leave an impression. Arrange them in a loose, semi-random grid pattern, alternating between larger and smaller circles to mimic the photo’s organic feel. -
Punch the holes:
Once satisfied with the placement, press the cutters all the way through the clay wall. Twist gently as you pull them out to remove the varying clay plugs cleanly. -
Specific placement tip:
Notice how the holes in the photo aren’t perfectly aligned in rows? Stagger your vertical columns slightly so the light will scatter more naturally. -
Clean the edges:
After cutting, you might have sharp bits or burrs around the holes. Wait until the clay is leather-hard, then gently smooth each cutout with a slightly damp sponge or your finger. -
Remove the form:
Carefully slide the cylinder off the form. If you used newspaper, you can peel it out from the inside now. -
Add a base (optional):
Cut a circle of clay slightly larger than the cylinder’s diameter. Score and slip the bottom edge of your cylinder and attach it to this base circular slab for a contained candle holder. -
Refine the rim:
Use a damp sponge to round off the top rim of the cylinder. A sharp rim is prone to chipping, while a rounded one looks softer and more professional.
Glow Up
Try varying the hole depth slightly—punch some all the way through for bright light, and shave others halfway for a translucent glowing dot effect.
Step 3: Finishing Touches
-
Dry slowly:
Loosely cover your luminary with plastic to let it dry slowly over several days. This prevents warping, which is crucial for maintaining that perfect cylindrical shape. -
Bisque fire:
Fire the piece to bisque temperature (usually Cone 04) in a kiln. If you are using polymer clay, bake according to the package instructions instead. -
Leaving it raw:
To achieve the exact look in the image, do not glaze the exterior. The raw, speckled stoneware adds beautiful texture. You may choose to use a clear glaze on the inside only for easier candle wax cleanup. -
Final wipe down:
After the final firing (or baking), sand the bottom lightly if it feels rough to ensure it sits flat on your table.
Enjoy the cozy atmosphere your handcrafted luminary brings to your space

Even Grid of Geometric Windows
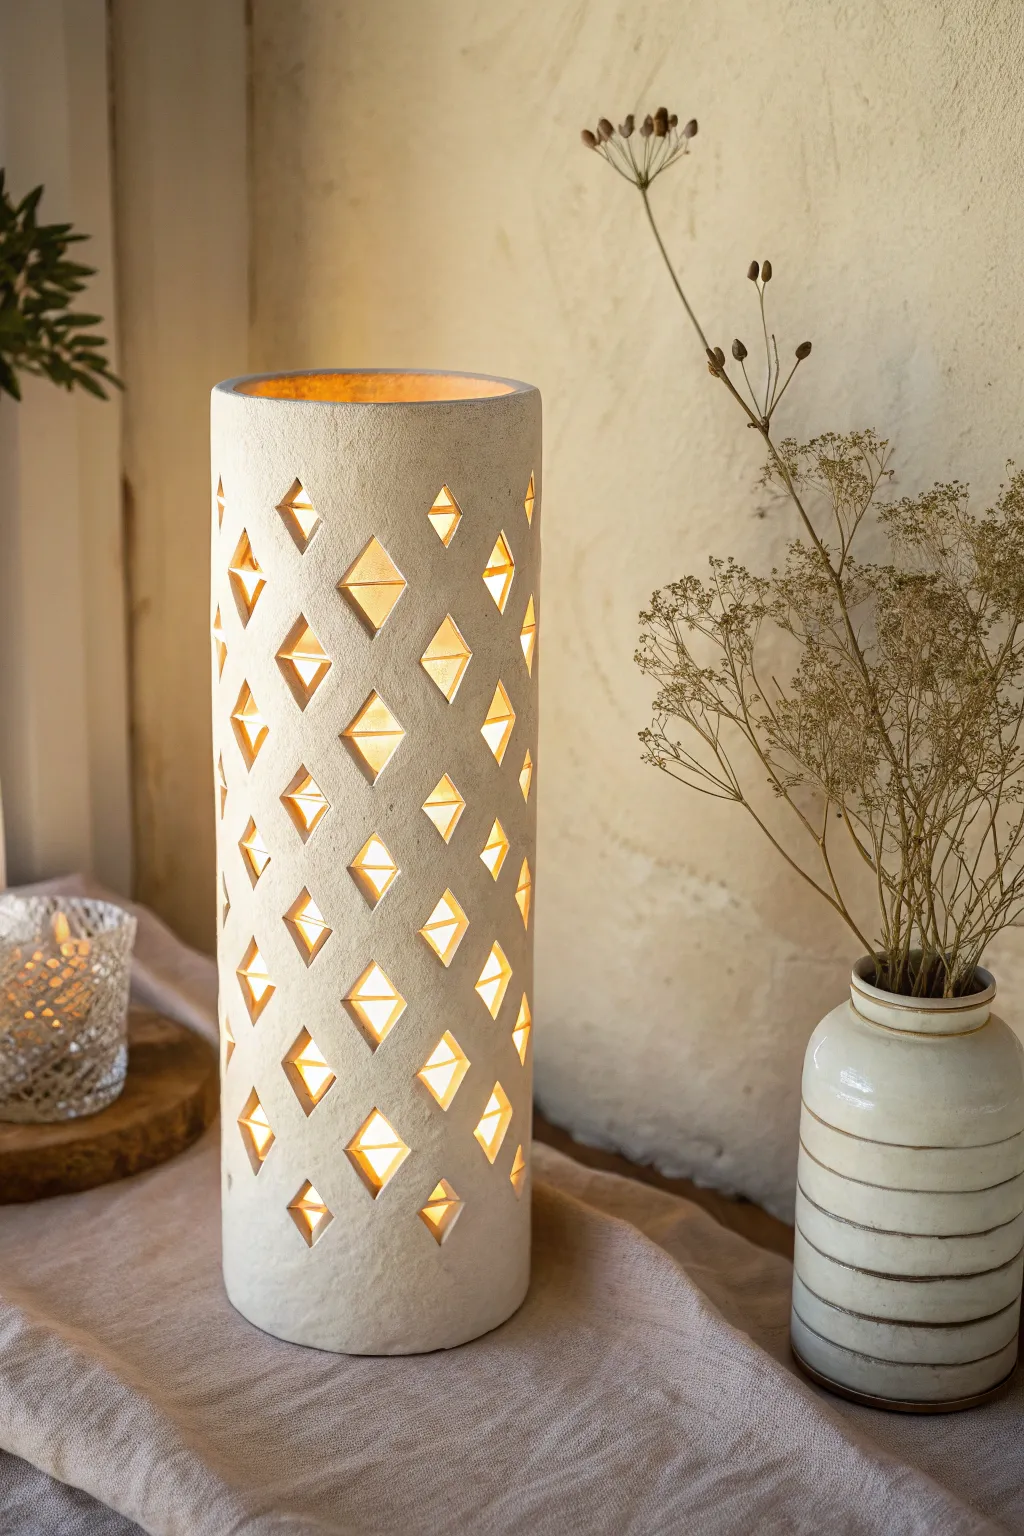
Cast a warm, geometric glow in your home with this tall, cylindrical luminary made from white clay. The repeating grid of diamond-shaped windows creates a stunning play of light and shadow that feels both modern and timeless.
Step-by-Step Tutorial
Materials
- White stoneware clay or air-dry clay (approx. 2-3 lbs)
- Rigid cardboard mailing tube or PVC pipe (approx. 4-inch diameter)
- Newsprint or kraft paper
- Rolling pin
- Canvas mat or cloth for rolling
- Ruler
- Needle tool
- Fettling knife or craft knife (X-Acto)
- Diamond-shaped cutter (small/medium) or cardstock template
- Slip and scoring tool (if using kiln clay) or clay slip
- Sponge
- Rib tool
Step 1: Preparing the Cylinder
-
Prepare the workspace:
Begin by setting up your canvas mat to prevent sticking. Wrap your form (the cardboard tube or PVC pipe) in a layer of newsprint or kraft paper; this ensures the clay won’t bond to the mold and slides off easily later. -
Roll the slab:
Take your wedge of clay and roll it out into a large, rectangular slab. Aim for an even thickness of about 1/4 inch (6mm). Consistency is key here so the walls stand straight. -
Measure and cut:
Based on likely circumference of your tube, measure the slab’s length. You want enough to wrap around the form with a slight overlap. Trim the top and bottom edges straight using a ruler and fettling knife. -
Form the cylinder:
Carefully lift the slab and wrap it around your paper-covered tube. Bring the two short ends together to meet. -
Join the seam:
If using stoneware, score and slip the meeting edges aggressively. If using air-dry clay, moisten and mesh the clay together. Press the seam firmly to bond it. -
Smooth the connection:
Use a rib tool or your fingers to smooth over the seam line on the outside until it is invisible. I like to do the inside as well if my hand fits, or use a sponge on a stick.
Step 2: Creating the Grid
-
Map the grid:
While the clay is still supported by the tube, lightly trace a grid pattern onto the surface using a ruler and needle tool. Create intersecting diagonal lines to mark where the centers of your diamonds will sit. -
Mark cut locations:
Decide on your spacing. The example shows diamonds spaced so their points almost touch, creating a lattice effect. Mark the exact placement of each diamond gently. -
Begin cutting:
If you have a diamond clay cutter, press it gently into the clay at your marked spots. If not, place your cardstock template and trace around it with a needle tool. -
Remove the shapes:
Using a sharp craft knife, carefully cut out the diamond shapes. Keep the blade perpendicular to the cylinder to ensure clean, straight window edges. Lift the cut pieces out gently with the tip of the knife. -
Refine the edges:
Once all diamonds are removed, dip a small sponge or your finger in water and very gently smooth the raw edges of each cutout to remove burrs or sharpness.
Slumping Cylinder?
If the clay sags when you cut the windows, it’s too wet. Let the cylinder firm up on the mold for 30-60 minutes before cutting, allowing the clay to support its own structure.
Step 3: Finishing Touches
-
Dry slightly:
Let the clay sit on the tube until it reaches a soft leather-hard stage. It should be firm enough to hold its shape but not fully dry. -
Remove the form:
Carefully slide the cardboard tube or PVC pipe out from the center, leaving the paper liner inside if it’s stuck (you can peel it out later). This step requires patience to avoid warping the cylinder. -
Refine the rim:
Check the top rim of the cylinder. If it became distorted, smooth it back into a perfect circle with a damp sponge. -
Add a bottom (optional):
If you want a closed bottom, cut a clay circle slightly larger than the cylinder’s diameter. Score and slip the bottom edge of your cylinder and attach it to the disc. -
Trim the base:
Trim any excess clay from the bottom disc so it is flush with the cylinder walls, then smooth the connection point. -
Final drying:
Allow the piece to dry slowly under a loose plastic sheet if using stoneware to prevent cracking. Air-dry clay can dry in the open air away from direct heat. -
Fire or seal:
For stoneware, bisque fire and then glaze (or leave raw as shown) and fire again. For air-dry clay, seal with a matte varnish once fully dry to protect the finish.
Golden Glow
Paint the interior with a metallic gold acrylic or glaze. When lit, the light will reflect off the inner back wall, creating a much warmer, richer glow through the front windows.
Now step back and admire how simple geometry transforms into a cozy atmosphere


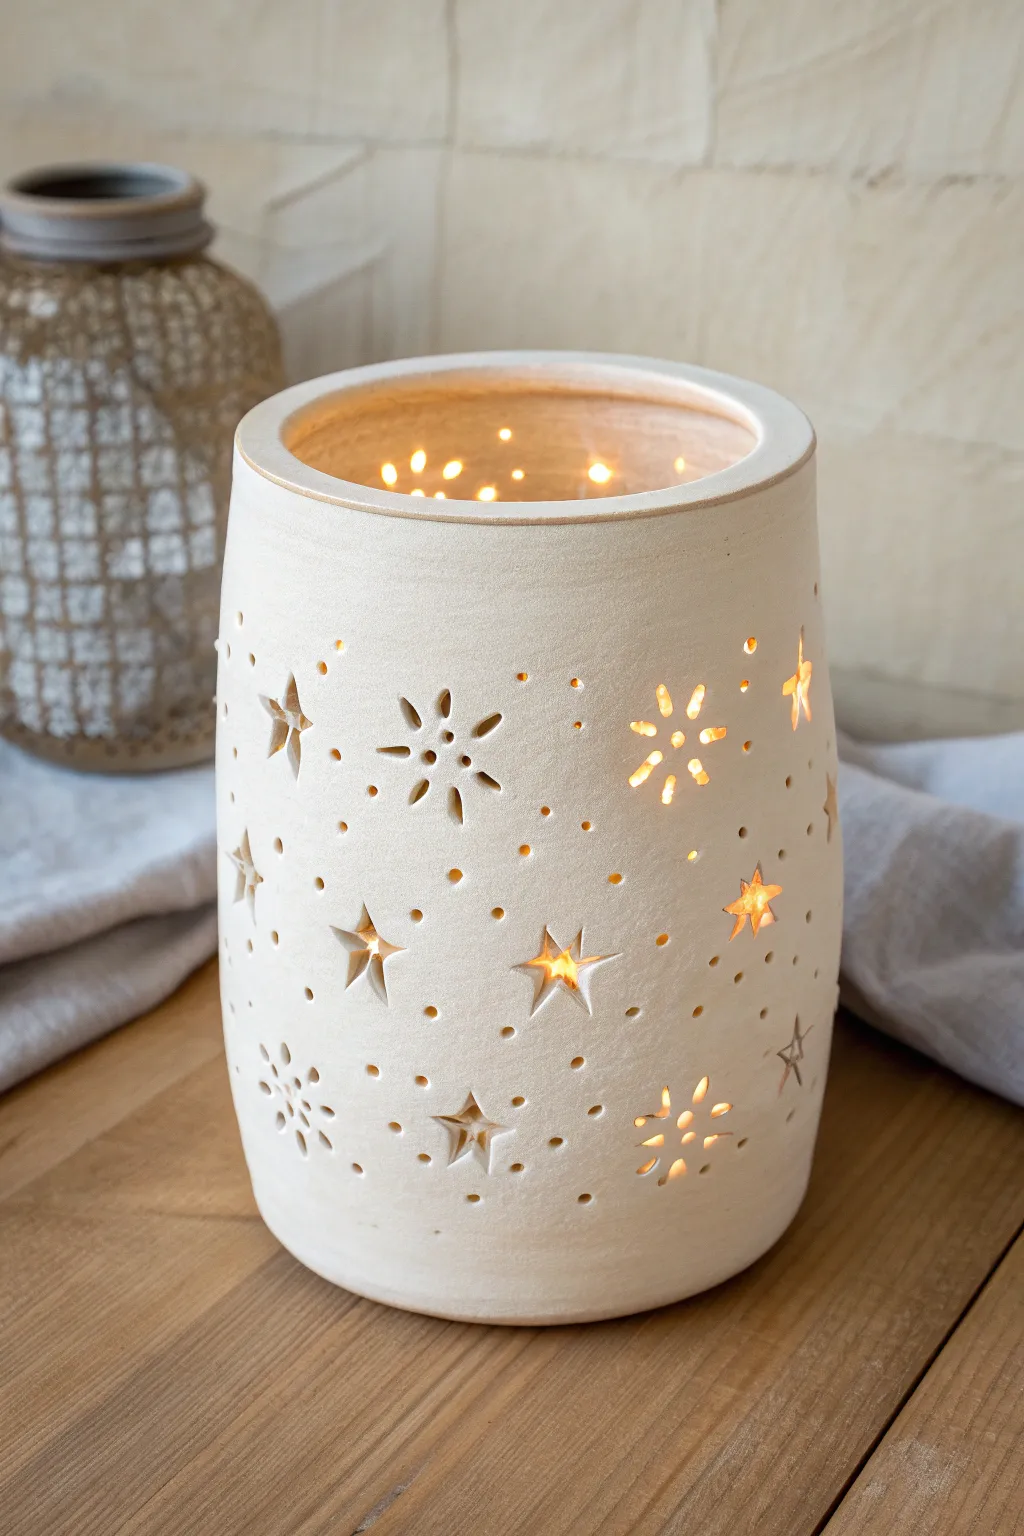
Moon and Stars Night-Sky Luminary
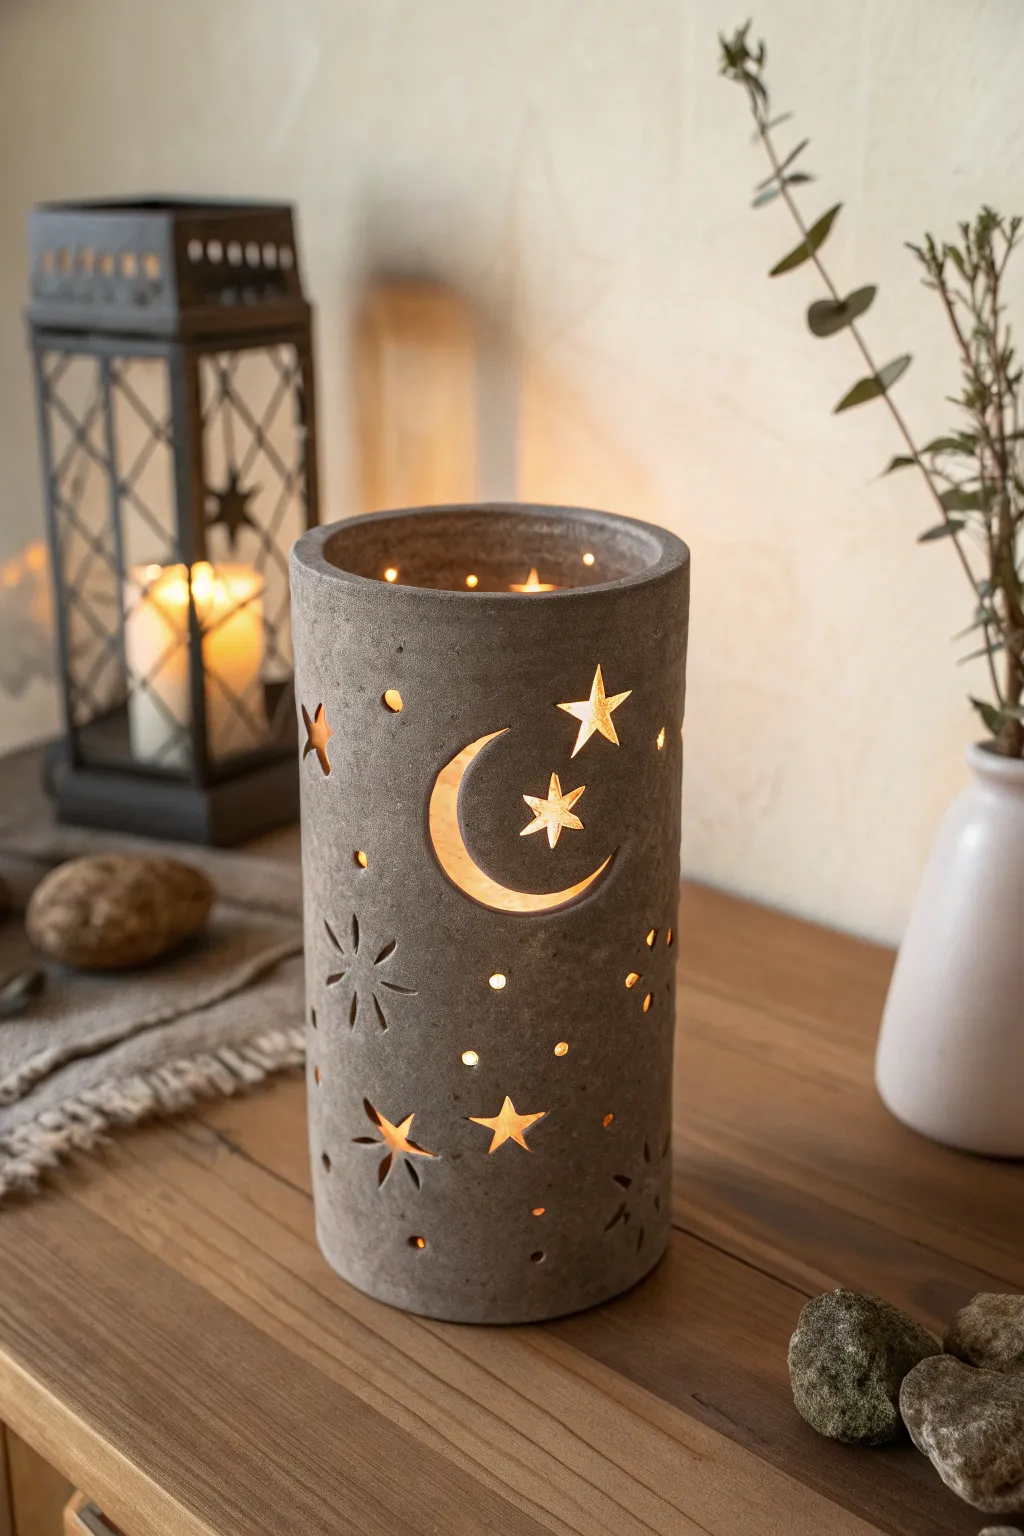
Capture the magic of a midnight sky with this industrial-chic luminary featuring whimsical moon and star cutouts. Its textured, stone-like finish provides a beautiful contrast to the warm glow of the candlelight within.
How-To Guide
Materials
- Air-dry clay (grey or concrete effect)
- Rolling pin
- Cardboard tube or PVC pipe (approx. 4-5 inch diameter)
- Craft knife or scalpel
- Small star-shaped cookie cutters (optional)
- Circular cookie cutter or small cap (for moon curve)
- Sanding sponge (medium grit)
- Water and small sponge
- Parchment paper
- Ruler
Step 1: Forming the Cylinder
-
Prepare the Clay:
Knead your air-dry clay thoroughly to remove air bubbles and make it pliable. I like to work on a sheet of parchment paper so I can move the slab easily without distorting it. -
Roll the Slab:
Roll the clay out into a long rectangle. Aim for a consistent thickness of about 1/4 inch to ensure structural integrity without being too bulky. -
Measure and Trim:
Measure the circumference of your tube mold. Trim your clay rectangle to be slightly longer than this measurement to allow for overlapping, and cut the top and bottom edges straight with a ruler and knife. -
Wrap the Mold:
Wrap your parchment paper around the tube mold first (to prevent sticking), then carefully lift the clay slab and wrap it around the form. -
Seal the Seam:
Score the overlapping edges with a needle tool or fork, add a little water, and press them firmly together. Smooth the seam with your finger or a wet sponge until it blends invisibly into the rest of the cylinder.
Crack Control
If small cracks appear while drying, mix a tiny bit of fresh clay with water to make a paste (slip). Fill the crack, smooth it over, and let it dry slowly under plastic.
Step 2: Carving the Night Sky
-
Sketch the Design:
While the clay is still supported by the tube, lightly trace your moon and star layout onto the surface face using a toothpick. Vary the placement for a natural, scattered sky look. -
Cut the Crescent Moon:
For the large crescent, use a craft knife to carefully cut along your traced lines. If you have nested circle cutters, you can press one circle and then an offset second circle to create a perfect crescent shape. -
Create the Stars:
Use small star cutters for the larger stars to get sharp points. For the smaller, hand-drawn stars or dots, carefully carve them out with the tip of your scalpel. -
Add Starburst Details:
Using the knife tip, gently carve shallow radiating lines around some of the smaller circular holes to mimic twinkling stars or starbursts, just like in the photo. -
Clean the Edges:
Once all shapes are cut, use a damp brush or your finger to smooth any rough burrs around the cutouts. This is easier to do now while the clay is soft rather than sanding later. -
Structural Dry:
Let the clay dry on the mold for a few hours until it is leather-hard and can support its own weight. Do not let it dry completely on the mold, or it may crack as it shrinks. -
Remove from Mold:
Gently slide the cylinder off the tube mold. Peel away the parchment paper from the interior.
Golden Glow
Paint the interior of the cylinder with metallic gold acrylic paint. When lit, the light will reflect off the gold, casting a much warmer, richer glow through the stars.
Step 3: Refining the Finish
-
Full Cure:
Allow the luminary to dry completely for 24-48 hours. Keep it away from direct heat sources to prevent uneven drying. -
Sand for Texture:
Once bone dry, use a medium-grit sanding sponge over the exterior. Sand in circular motions to enhance the ‘stone’ look and smooth out any fingerprints. -
Dust and Clean:
Wipe away all sanding dust with a slightly damp cloth or a dry soft brush. -
Optional Sealing:
If you plan to use this outdoors, apply a matte sealant spray. For indoor use, the natural raw clay finish looks beautifully rustic on its own.
Place a battery-operated pillar candle inside and watch your personal galaxy come to life


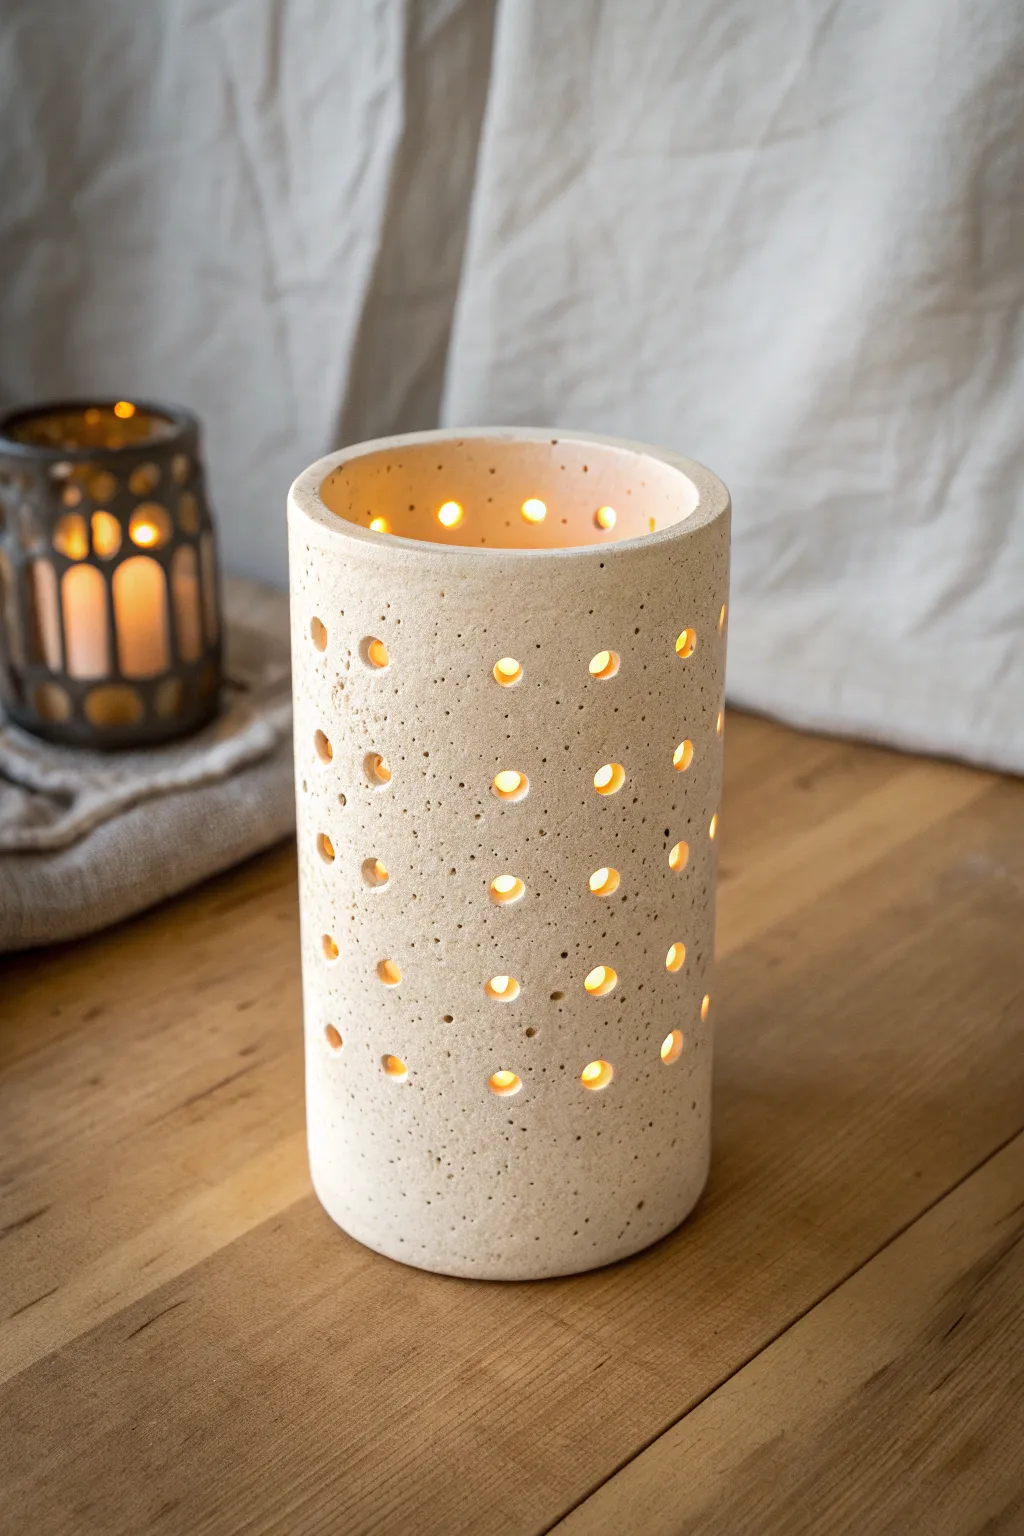
Gradient Holes From Tiny to Bold
This elegant cylindrical luminary mimics the night sky, starting with bold, large perforations at the base that gradually fade into a delicate mist of starlight. The speckled clay body adds a warm, rustic texture that glows beautifully when lit from within.
Detailed Instructions
Materials
- Speckled stoneware clay (mid-fire)
- Rolling pin
- Canvas or slab mat
- Rectangular template (approx. 12″ x 6″)
- Fettling knife
- Needle tool
- Slip and scoring tool
- Cylindrical form (PVC pipe or rolling pin)
- Hole punch tools (large, medium, small)
- Sponge
- Rubber kidney rib
Step 1: Forming the Cylinder
-
Roll the slab:
Begin by wedging your clay to remove air bubbles, then roll it out into a consistent slab about 1/4-inch thick. Using guide sticks can help keep the thickness even across the entire surface. -
Cut the rectangle:
Place your rectangular paper template onto the slab. Using a fettling knife, cut cleanly around the edges. This rectangle will determine the height and circumference of your luminary. -
Smooth the surface:
Before rolling it up, use a damp sponge or a rubber kidney rib to smooth out any canvas textures or imperfections on the slab surface. -
Bevel the edges:
Cut a 45-degree bevel on the two short ends of your rectangle. Cut one bevel facing up and the other facing down so they overlap seamlessly when joined. -
Score and slip:
Score the beveled edges thoroughly and apply a generous amount of slip. This ensures a strong bond during firing. -
Form the tube:
Wrap the slab around your cylindrical form (like a PVC pipe wrapped in newspaper). Press the beveled edges together firmly to create the cylinder. -
Compress the seam:
Use a wooden tool or your fingers to smooth the seam inside and out. I like to run a rib over the exterior seam to make it completely invisible.
Cracking Between Holes?
If clay splits between holes while drying, compress the area with a rounded tool immediately after punching. Dry very slowly under plastic to equalise moisture.
Step 2: Creating the Gradient Pattern
-
Mark the rows:
Lightly trace horizontal guidelines with a needle tool where your rows of holes will sit. The bottom rows should be closer together, spacing out slightly as you move up. -
Punch the base row:
Using your largest hole punch (approx. 1/2 inch), create the bottom-most row of holes. Space them evenly around the circumference, leaving at least a half-inch of clay between them for structural integrity. -
Punch the second row:
Use the same large punch for the second row, but offset the holes so they sit between the holes of the row below, creating a staggered brick pattern. -
Transition to medium:
Switch to a medium-sized punch (approx. 1/4 inch). Create two more staggered rows above the large ones. This begins the visual transition upward. -
Clean the holes:
As you punch, remove the clay plugs immediately. Smooth the edges of each hole with a damp sponge or fingertip before the clay gets too dry. -
Add the scatter:
Switch to your smallest punch or a large needle tool. Above the medium rows, create a row that feels slightly more random, breaking the strict grid pattern. -
Create the mist:
For the top half of the luminary, use a needle tool to poke tiny, random pinpricks. Concentrate them just above the medium holes and let them dissipate as you reach the rim, creating a fading effect. -
Refine the rim:
Smooth the top rim of the cylinder with a chamois or damp sponge to ensure it is soft to the touch and perfectly round.
Step 3: Finishing and Firing
-
Slow drying:
Loosely cover the cylinder with plastic to let it dry slowly. This prevents the thin clay bridges between holes from cracking as they shrink. -
Bisque fire:
Once bone dry, fire the piece to bisque temperature (usually cone 04 or 06). -
Glazing:
For this natural look, leave the exterior unglazed to show off the speckled clay body. Apply a clear matte glaze to the interior to reflect the candlelight. -
Final fire:
Fire the piece to the maturity temperature of your clay body (likely cone 5 or 6). Once cool, sand the bottom lightly to ensure it sits flat on your table.
Glow Up
Paint the interior with a metallic gold luster or underglaze before the final firing. This amplifies the candlelight, making the ‘stars’ shine much brighter.
Place a tea light inside and watch your gradient constellation come to life on the walls

The Complete Guide to Pottery Troubleshooting
Uncover the most common ceramic mistakes—from cracking clay to failed glazes—and learn how to fix them fast.
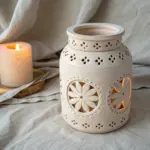
Clustered Pinholes for a Starry Glow
Capture the magic of a starry night in ceramic form with this elegant cylindrical luminary. By combining delicate star cutouts with clusters of tiny pinholes, you’ll create a vessel that casts a dreamy, twinkling glow across any room.
Step-by-Step Tutorial
Materials
- White earthenware or stoneware clay (approx. 2-3 lbs)
- Rolling pin
- Canvas mat or slab roller
- Release agent (cornstarch)
- Cylindrical form for draping (PVC pipe or large can)
- Newsprint or paper
- Needle tool
- Fettling knife
- Star-shaped clay cutters (smalls)
- Drill bit or small hole punch tool
- Scoring tool (serrated rib)
- Slip (clay mixed with water)
- Sponge
- Clear or white transparent glaze
Step 1: Preparing the Cylinder
-
Roll the Slab:
Begin by wedging your clay to remove air bubbles. Roll it out into a rectangular slab that is approximately 1/4 inch thick. Aim for a consistent thickness throughout so the light shines through evenly later. -
Measure and Cut:
Determine the circumference of your cylindrical form and add an inch for overlap. Using a fettling knife and a straight edge, cut a clean rectangle from the slab. Smooth the edges with a damp finger to remove any sharp burrs. -
Prepare the Form:
Wrap your PVC pipe or canister in a sheet of newsprint. This crucial step prevents the clay from sticking to the mold and allows the cylinder to slide off easily once it stiffens. -
Form the Cylinder:
Lift the slab and wrap it gently around the paper-covered form. Bring the two short ends together. Score both meeting edges deeply with a serrated tool and apply a generous amount of slip. -
Join the Seam:
Press the scored edges together firmly. Use your thumb or a wooden rib to smooth the seam on the outside until it disappears. I prefer to reach inside and reinforce the inner seam with a coil of clay if the wall feels thin. -
Refine the Rim:
While the clay is still on the form, use a damp sponge to smooth the top rim. You can gently compress it to create that slightly rounded, finished lip seen in the photo.
Step 2: Creating the Starry Pattern
-
Initial Drying:
Let the cylinder sit on the form until it is leather-hard—firm enough to hold its shape but soft enough to cut. Carefully slide it off the form. -
Punching Stars:
Using small star-shaped cutters, press gently into the clay wall to remove star shapes. Scatter them randomly around the cylinder, leaving plenty of negative space between them. -
Carving Bursts:
For the larger starburst detail, use a needle tool or small knife to carve radiants. Create a central circle and slice small teardrop shapes radiating outward, mimicking a shining star. -
Adding Pinholes:
Take a needle tool or a small drill bit and pierce tiny holes in clusters. Group these around the star cutouts to look like distant galaxies or stardust. Varied spacing creates a more organic, natural look. -
Cleaning Edges:
Wait for the clay to dry slightly more. Use a soft, dry brush or a barely damp sponge to gently wipe away the little crumbs of clay left inside the cutouts and holes. Sharp edges can be sharp after firing, so softening them now is key.
Clogged Holes?
If glaze fills your tiny pinholes, use a small drill bit or pipe cleaner to gently clear them while the glaze is powdery and dry, just before the final firing.
Step 3: Base and Finishing
-
Attaching the Bottom:
Roll a small slab for the base. Place your cylinder on top and trace around it. Score and slip the bottom edge of the cylinder and the corresponding area on the base slab, then press them together securely to seal. -
Trimming:
Trim away any excess clay from the base slab so it is flush with the cylinder walls. Smooth the join line with a rib tool. -
Bisque Fire:
Allow the piece to dry completely (bone dry) before firing it in a kiln to bisque temperature (usually Cone 04). This prepares it for glazing. -
Glazing:
Apply a transparent or semi-opaque white glaze. If dipping, make sure to blow through the pinholes immediately after to clear them of glaze, or use a pin tool to unclog them. -
Final Fire:
Fire the piece again to the maturity temperature of your clay body and glaze. Once cool, place a tealight or LED candle inside to reveal the design.
Make it Shine
Use a metallic gold luster on the rim or inside the star cutouts for a third firing. This adds a luxurious reflective quality when the candle is unlit.
Light a candle inside your new creation and watch the constellations dance on your walls
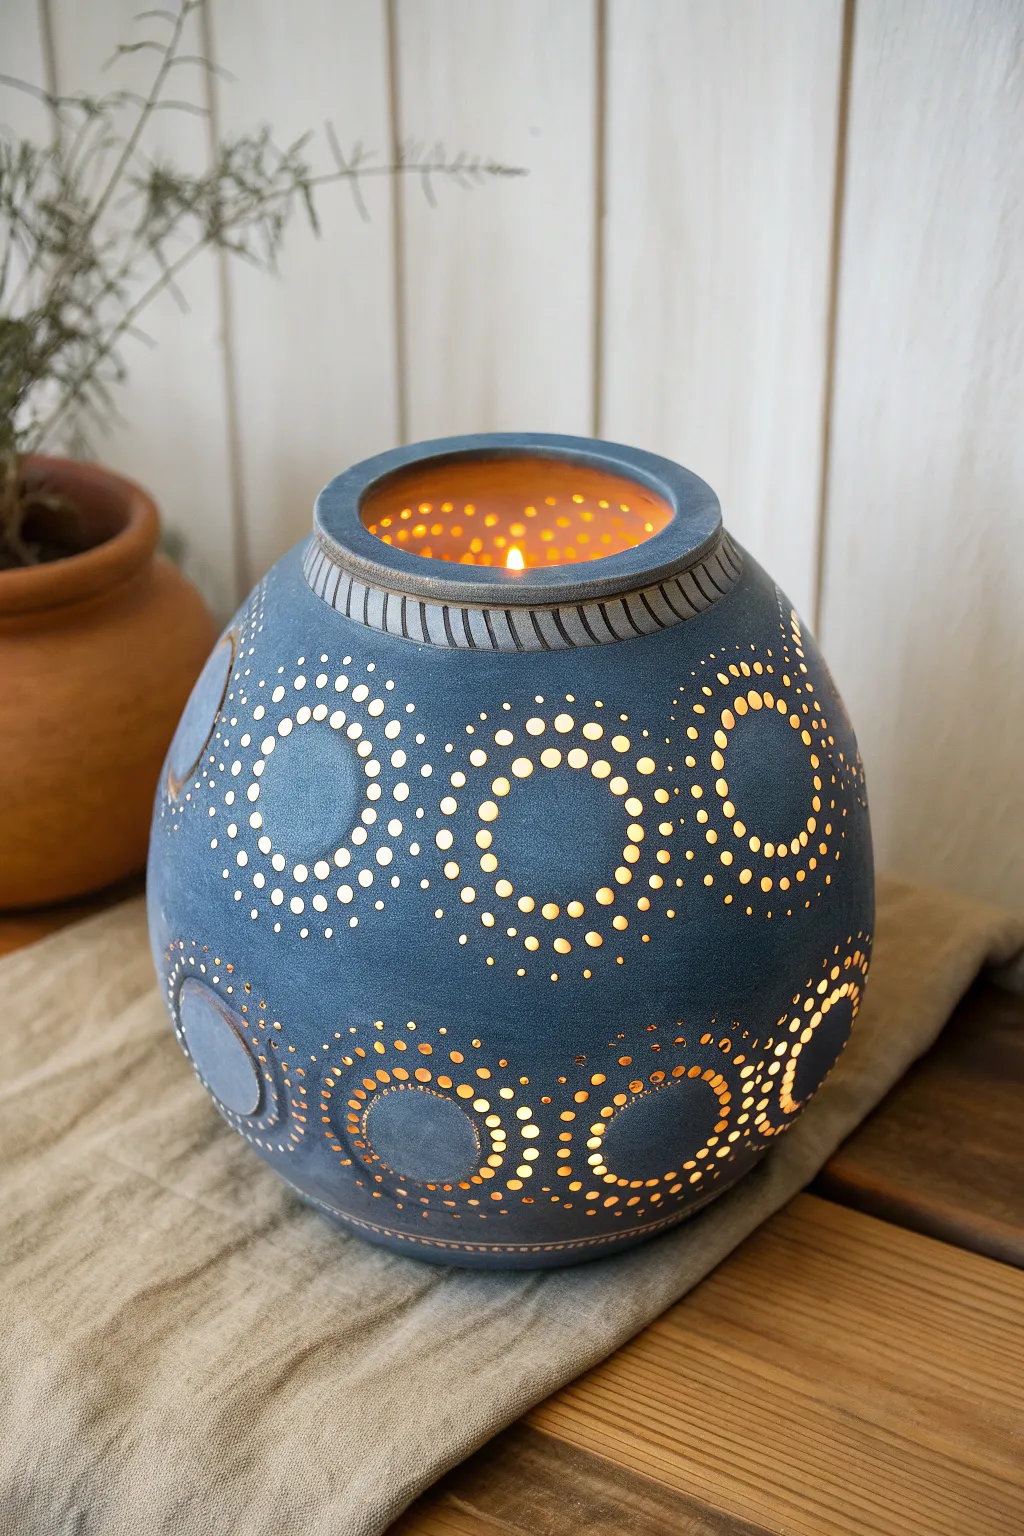
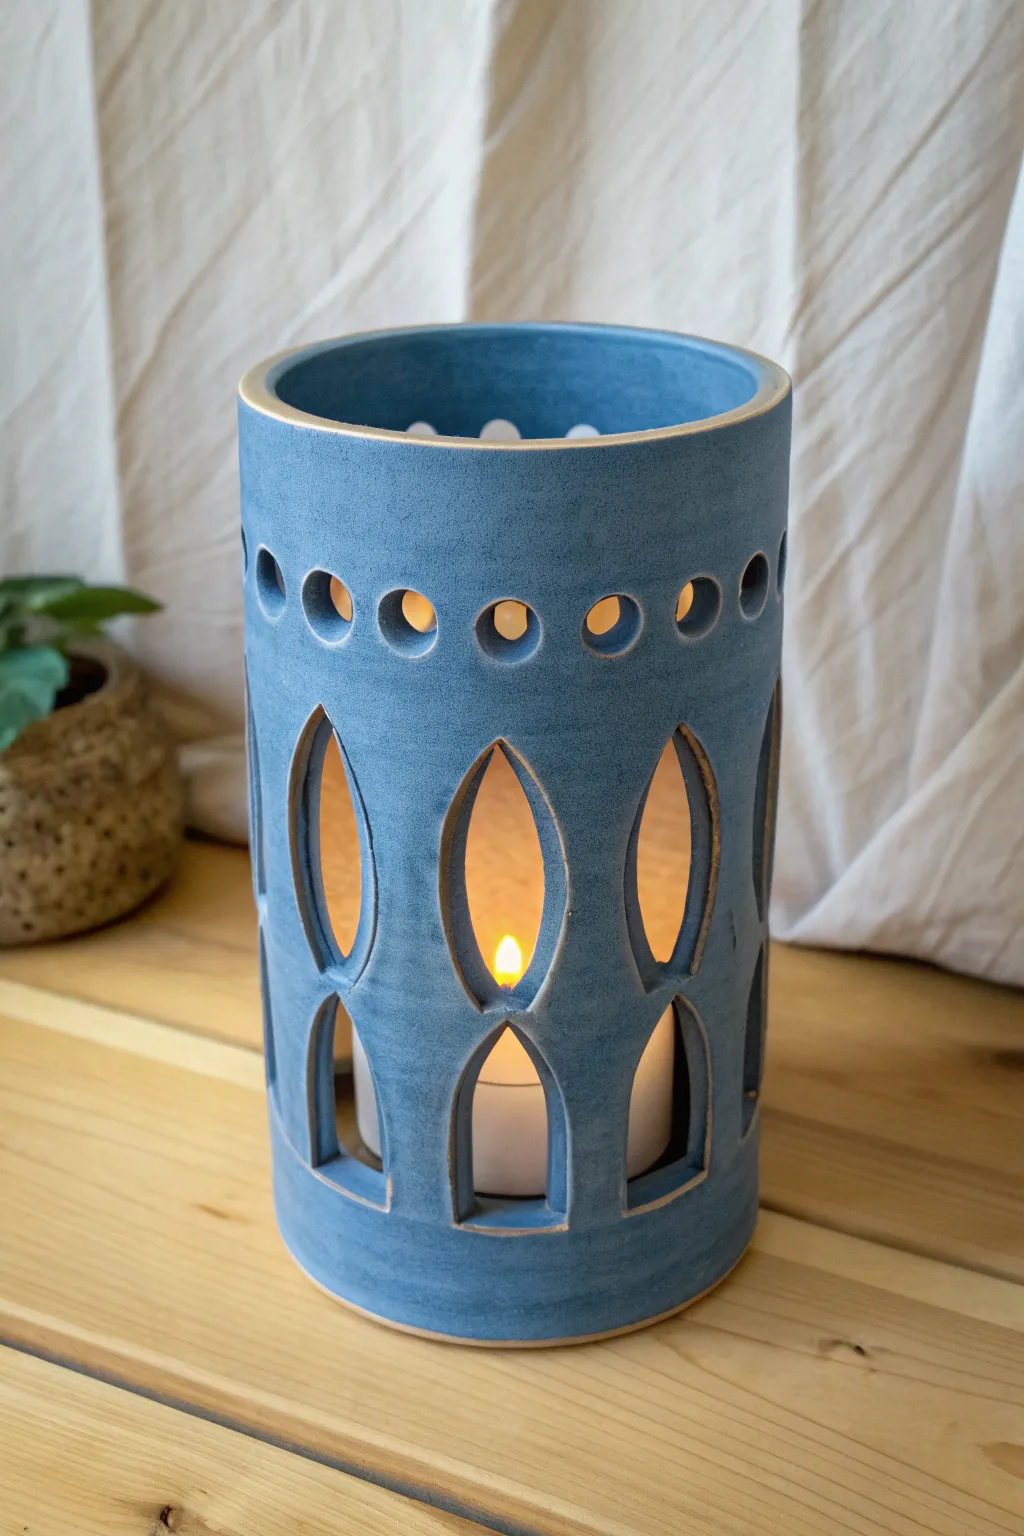
Arch Windows for a Little Lantern Vibe
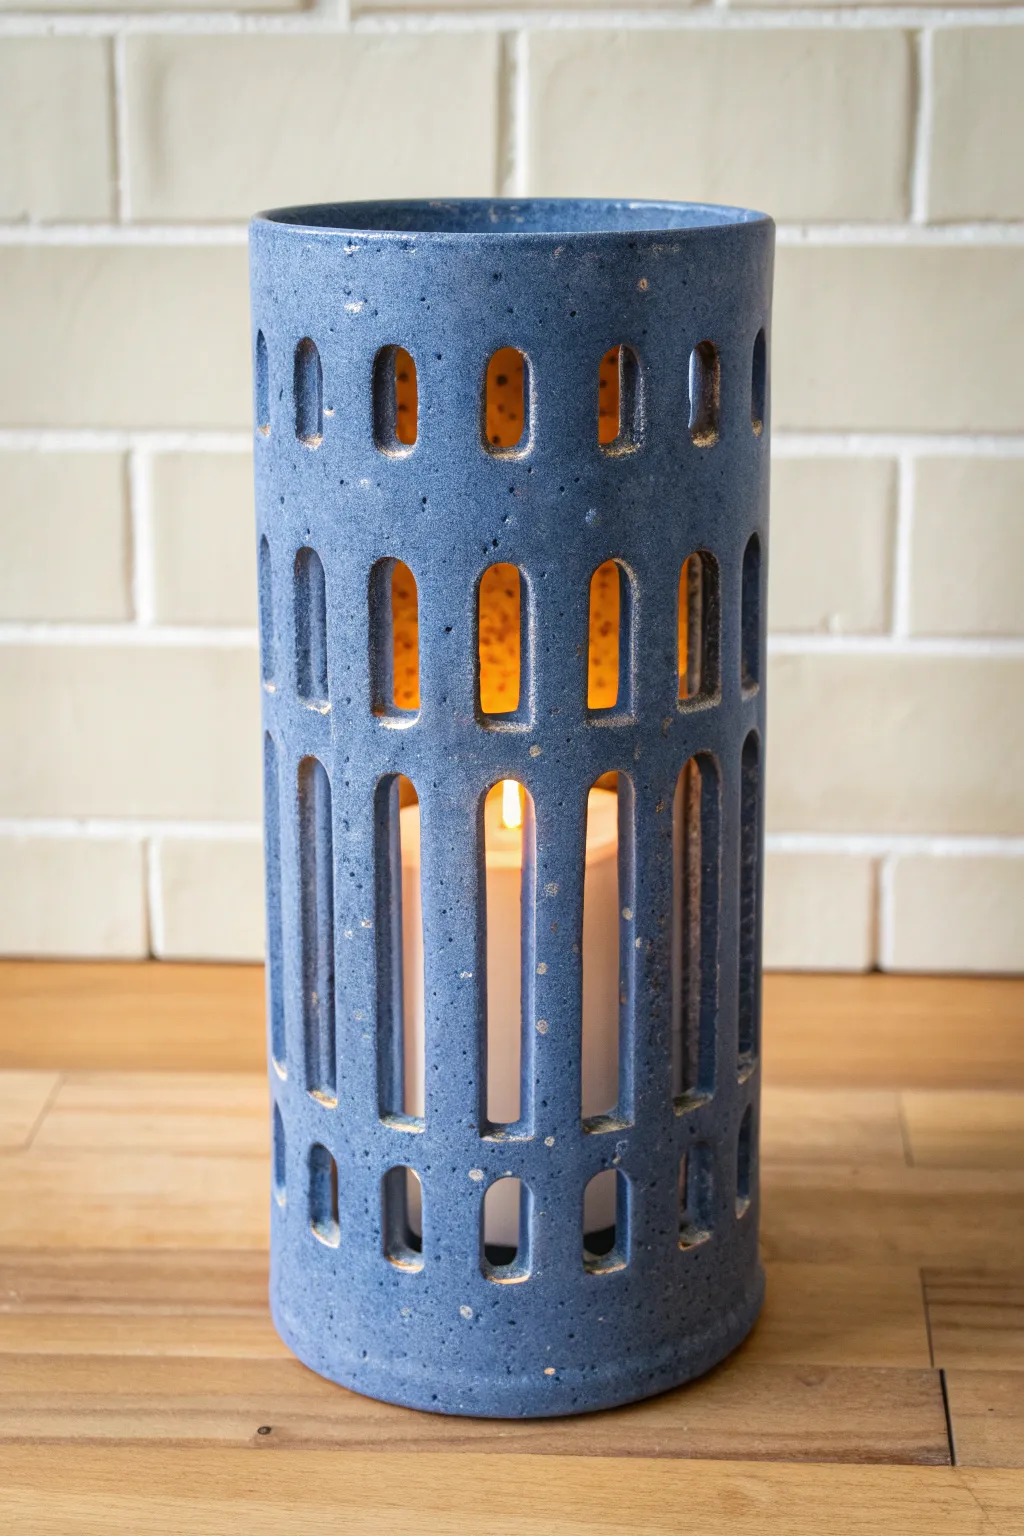
This striking cylindrical luminary channels the charm of Roman architecture with its rhythmic rows of arched windows. The deep blue glaze, speckled with natural clay tones, creates a stunning contrast against the warm glow of candlelight within.
Step-by-Step
Materials
- Stoneware clay body (preferably with grog for stability)
- Rolling pin
- Canvas work surface or slab mat
- Rectangle template (approx. 12″ x 7″ depending on desired circumference)
- Ruler
- Needle tool
- Felting knife or clay knife
- Various sizes of oval or arch-shaped clay cutters (or a steady hand with a knife)
- Slip and scoring tool
- Sponge
- Rib tool (wooden and rubber)
- Speckled blue stoneware glaze
- Kiln
Step 1: Creating the Cylinder Form
-
Roll the Slab:
Begin by rolling out a consistent slab of clay, aiming for about 1/4 inch thickness. Ensure the slab is large enough to accommodate your rectangular template. -
Cut the Rectangle:
Place your paper or craft foam template onto the clay. Using a needle tool or fettling knife, cut a clean rectangle. This will form the body of your cylinder. -
Texture and Smooth:
Before standing it up, compress the clay on both sides with a rib tool to align the clay particles and prevent warping. If you want a specific texture, add it now while the slab is flat, though this specific project relies on the glaze for texture. -
Form the Cylinder:
Carefully lift the slab and curve it into a cylinder. Bevell the short edges at a 45-degree angle to create a seamless join. -
Join the Seam:
Score the beveled edges aggressively and apply slip. Press the edges together firmly. Use a wooden rib or your thumb to blend the clay across the seam on both the inside and outside until the join is invisible. -
Add a Base:
Roll a smaller slab for the floor of the luminary. Place the cylinder on top of it, trace around the base, and cut out the circle. Score and slip both contact surfaces, then attach the base to the cylinder, sealing the interior seam with a small coil of clay for reinforcement.
Clean Cuts Tip
When cutting the windows, let the leather-hard clay sit for 20 mins after cutting but BEFORE removing the cutout piece. It pulls away cleaner!
Step 2: Carving the Arches
-
Let it Stiffen:
The cylinder needs to be leather-hard before cutting. If it’s too soft, the walls will collapse when you cut the windows. Cover it loosely with plastic and let it set up overnight. -
Map Out the Grid:
Using a ruler and a light touch with a needle tool, lightly scratch horizontal guidelines around the cylinder. You’ll need four distinct zones: a top row of small arches, a second row of medium arches, a tall main section, and a bottom row of small arches. -
Mark Vertical Spacing:
Mark vertical lines to ensure your arches remain straight and evenly spaced around the circumference. Creating a symmetrical look requires patience during this measuring phase. -
Cut the Top Row:
Start with the top-most row. Using a small arch cutter or a sharp knife, remove the clay to create small window openings. Support the wall from the inside with your other hand as you cut. -
Cut the Middle Row:
Move to the second row down. These arches should be slightly taller than the top row. Ensure they align vertically with the windows above them. -
Create the Long Windows:
For the main body section, cut long, slender vertical arches. This is the most delicate part; leave enough clay between cuts (the ‘mullions’) to support the weight of the piece. -
Finish with the Base Row:
Cut the final row of small arches near the bottom. I find it helpful to leave about an inch of solid clay at the very base for structural integrity. -
Clean the Edges:
Once all cuts are made, use a damp sponge or a soft brush to smooth the sharp edges of every window. Do this gently to avoid distorting the freshly cut shapes.
Gold Accents
After the final firing, apply gold luster to the inner edges (the thickness) of the windows and re-fire at a low cone (018) for a luxe finish.
Step 3: Firing and Glazing
-
Bisque Fire:
Allow the piece to dry slowly and completely under loose plastic to prevent uneven shrinkage. Once bone dry, bisque fire the luminary to cone 04 (or your clay’s specific bisque temperature). -
Glaze Application:
clean the bisque ware with a damp sponge to remove dust. Pour a speckled blue stoneware glaze inside the cylinder, roll it around to coat, and pour out the excess. Then, dip or brush the exterior. -
Clean the Foot:
Wipe the bottom of the pot and about 1/4 inch up the side perfectly clean with a sponge to prevent the glaze from adhering the pot to the kiln shelf. -
Glaze Fire:
Fire the piece to the maturity temperature of your clay and glaze (typically Cone 5 or 6 for stoneware). The glaze should break brownish-gold over the sharp edges of either the rim or the cutouts.
Place a pillar candle inside and enjoy the architectural shadows cast on your walls


What Really Happens Inside the Kiln
Learn how time and temperature work together inside the kiln to transform clay into durable ceramic.
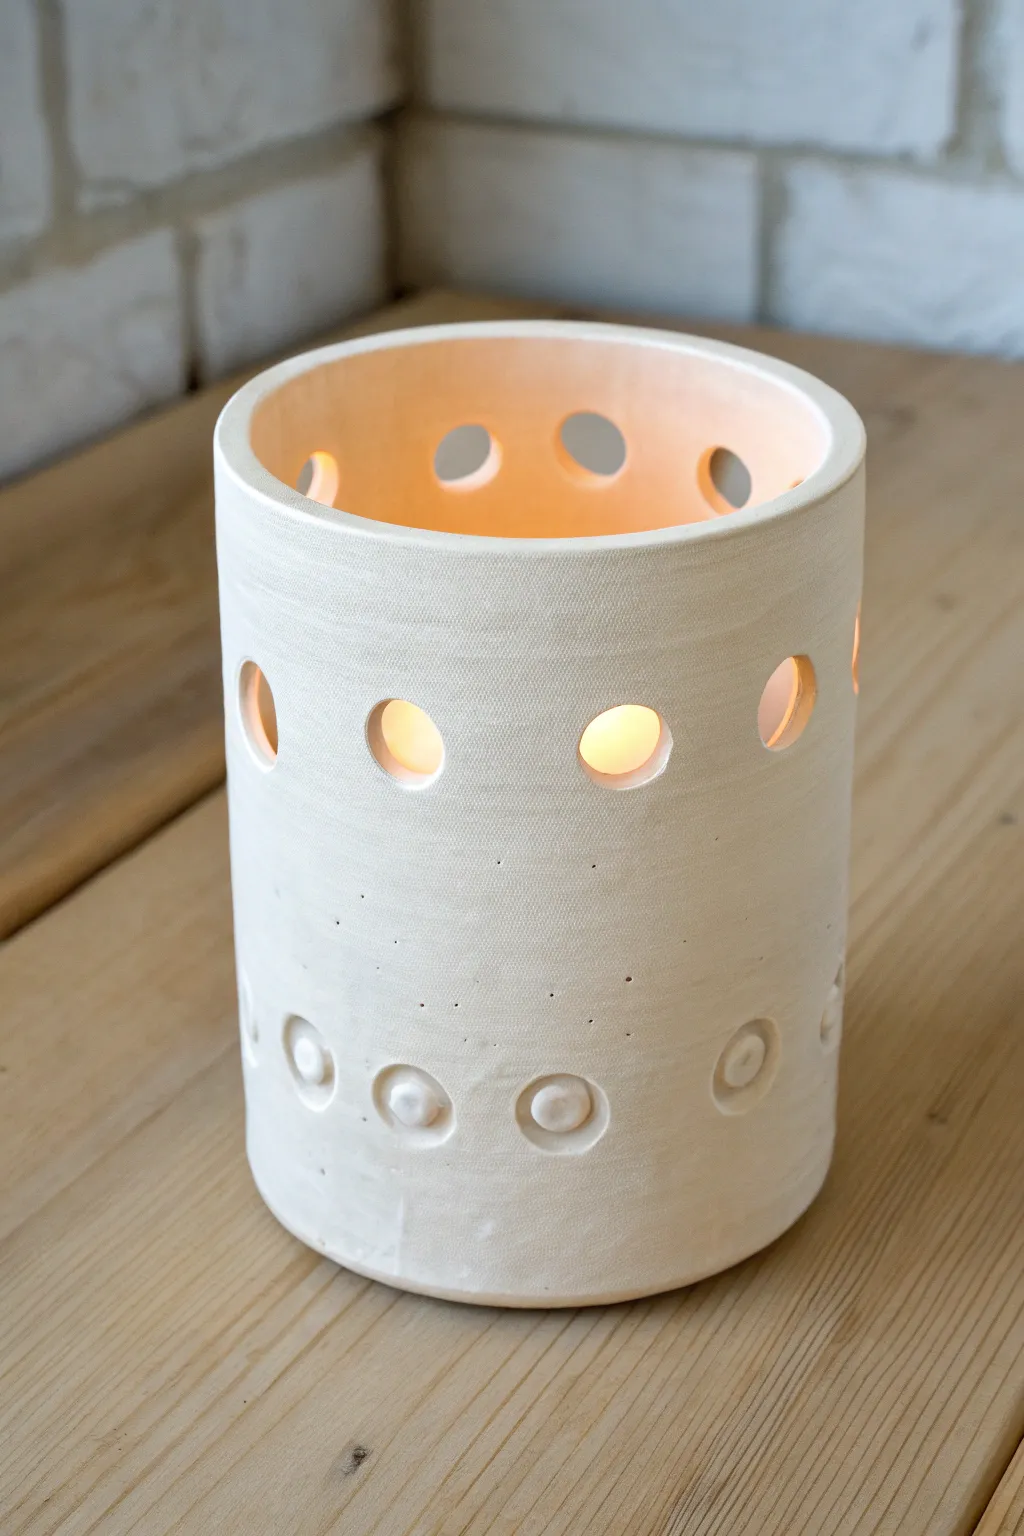
Ribbed Texture With Simple Slit Cutouts
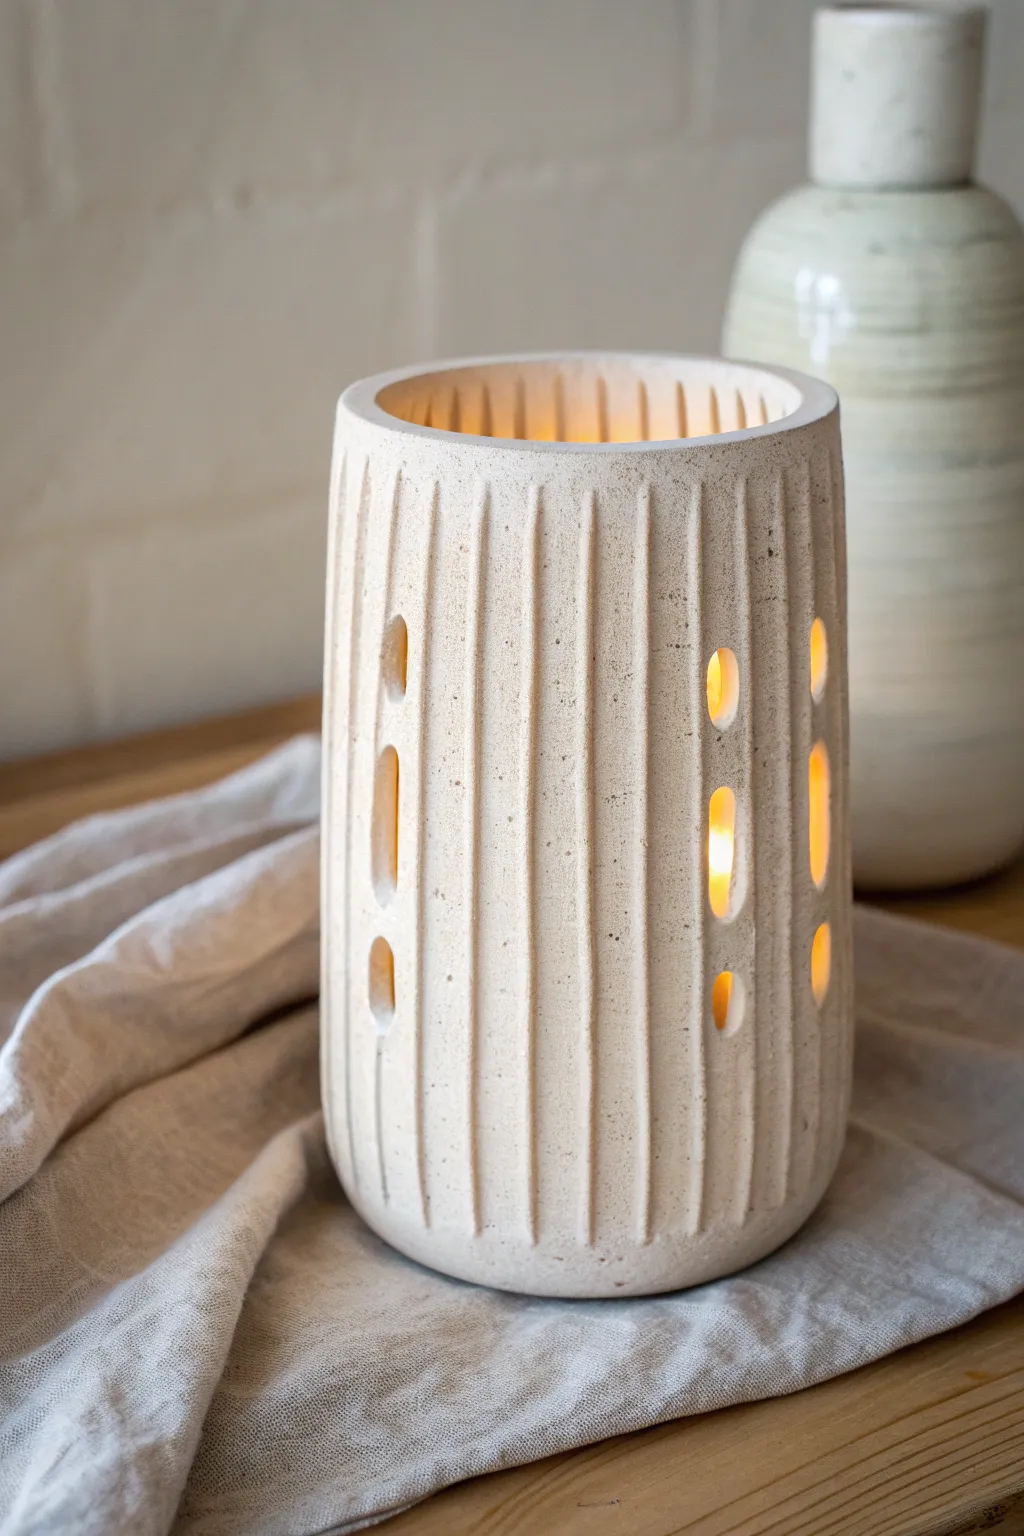
Bring warmth to any corner with this textured clay luminary that mimics the look of carved sandstone. The vertical ribs and soft oval cutouts create a cozy, rhythmic play of light when illuminated from within.
How-To Guide
Materials
- White or speckled stoneware clay (about 3-4 lbs)
- Circular bat or banding wheel
- Rolling pin with guide sticks (1/4 inch)
- Fettling knife
- Ribbon tool (flat, squared loop)
- Small oval cutter or sharp detail knife
- Slip and scoring tool
- Large sponge
- Straight edge or ruler
- Canvas work surface
Step 1: Forming the Cylinder
-
Prepare the Clay:
Begin by wedging your clay thoroughly to remove air bubbles. This step is crucial for ensuring the walls stand up straight without slumping later. -
Roll the Slab:
Roll out a large slab of clay on your canvas. Use 1/4 inch guide sticks to ensure an even thickness throughout the entire piece. -
Cut the Rectangle:
Measure and cut a long rectangle. The height should be about 8-10 inches, and the length should be the circumference of your desired cylinder plus a little extra for the seam. -
Create the Base:
Cut a circle from the remaining clay that matches the diameter of your eventual cylinder. Place this onto a bat or board. -
Construct the Cylinder:
Stand the rectangular slab up and curve it into a cylinder shape. Score and slip the vertical edges, then press them firmly together to create a seam. Smooth the seam inside and out so it disappears. -
Attach the Base:
Score and slip the bottom edge of the cylinder and the outer edge of your circular base. Join them securely, using a tool to meld the clay together at the seam.
Slumping Cylinder?
If the walls buckle while carving, the clay is too wet. Cover it loosely and let it firm up to a ‘leather hard’ state before attempting more texture work.
Step 2: Adding Texture and Cuts
-
Refine the Shape:
Place the cylinder on a banding wheel. Use a damp sponge to smooth the surface and barely round off the top rim. -
Mark Vertical Guidelines:
Using a ruler, very lightly softly mark vertical lines all around the cylinder at equal intervals. These will guide your carving tool. -
Carve the Ribs:
Take a flat, squared ribbon tool. Drag it downwards from the top rim to the bottom to create vertical channels. Leave a strip of uncarved clay between each channel to create the raised ‘ribs’. -
Clean the Edges:
I usually go back over the ribs with a slightly damp finger to smooth any sharp clay crumbs left by the ribbon tool. -
Select Cutout Zones:
Choose 3 or 4 vertical channels where you want the light to shine through. The cutouts shouldn’t be on every rib, just a few selected columns. -
Cut the Slits:
Use a small oval cutter or a detail knife to remove elongated oval shapes within the recessed channels. Space them vertically, leaving about an inch of clay between each hole for structural integrity. -
Smooth the Cutouts:
Once the clay is leather hard, use a slightly damp sponge to tidy up the interior edges of the cutouts so they look polished, not jagged.
Step 3: Finishing
-
Slow Drying:
Cover the piece loosely with plastic. Let it dry very slowly over several days to prevent warping, especially around the cutouts. -
Bisque Fire:
Fire the piece to bisque temperature (usually Cone 04) once it is bone dry. -
Glazing (Optional):
For the look in the photo, leave the exterior unglazed to highlight the raw clay texture. You can apply a clear matte glaze to the interior for easier cleaning. -
Final Fire:
Fire the piece to maturity (Cone 5 or 6 depending on your clay body). Sand the bottom lightly after firing if it feels rough.
Make it Shine
Before firing, brush a thin layer of white slip or underglaze into the carved recesses only. Wipe the raised ribs clean to create high-contrast definition.
Place a tea light inside and enjoy the striking vertical shadows this piece casts on your walls
Nested Set of Three Coordinated Luminaries
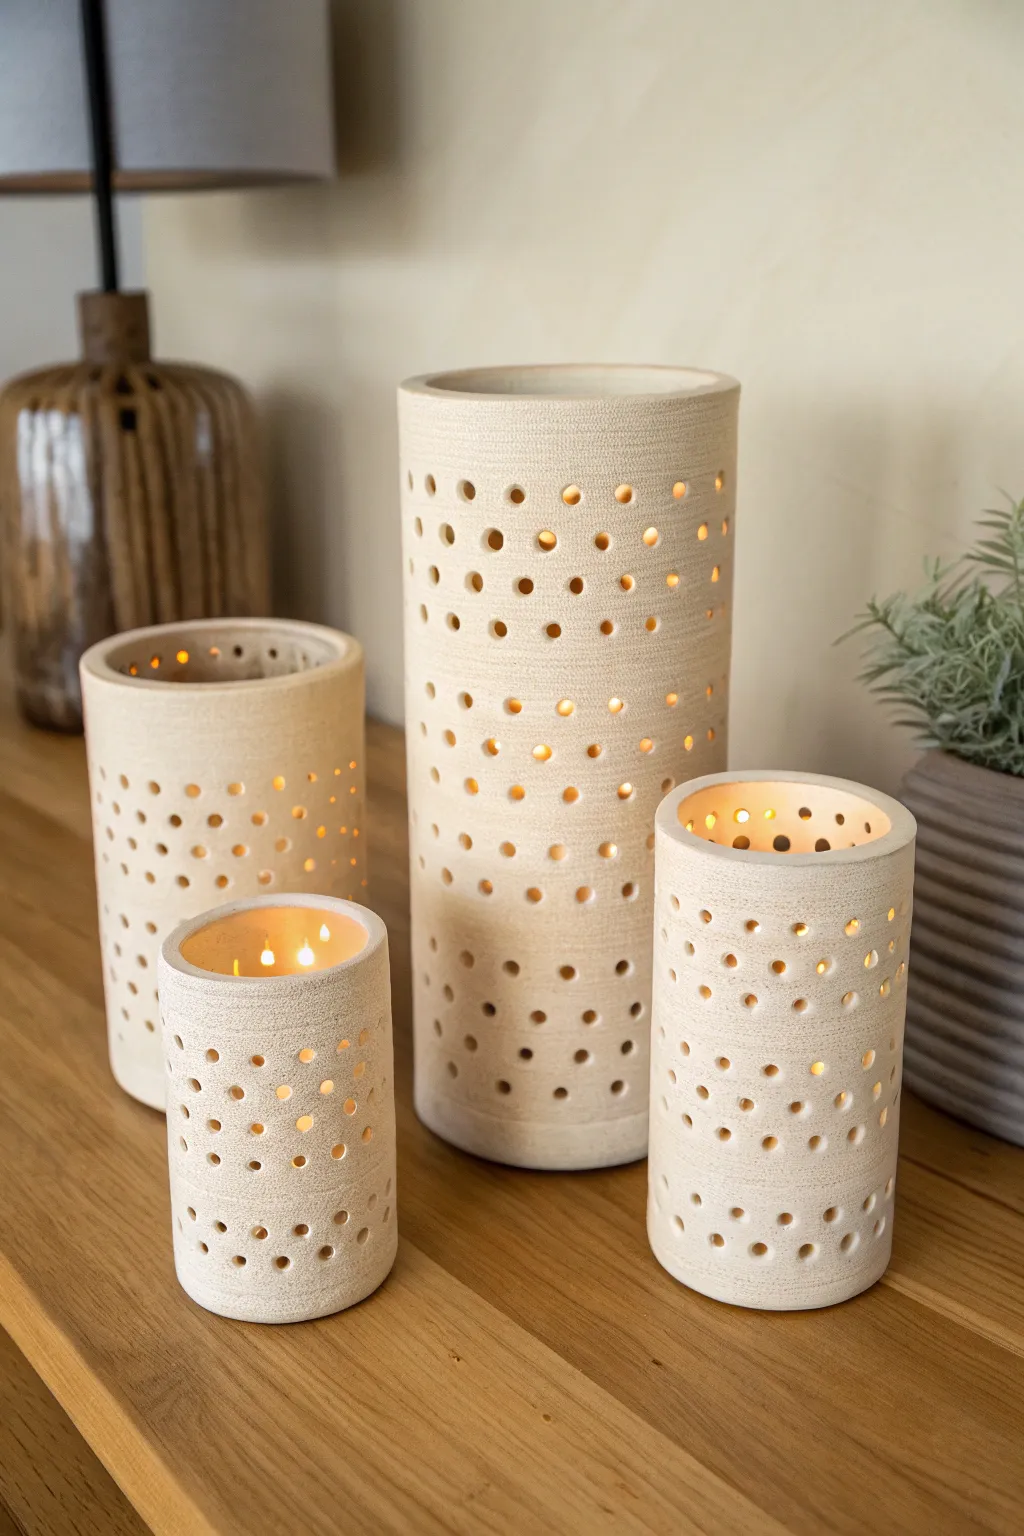
These sleek, modern luminaries bring a warm glow to any corner with their pierced designs and natural stone-like texture. Created in graduated sizes, they look stunning grouped together on a mantel or used individually as cozy accent lighting.
Detailed Instructions
Materials
- Light-colored stoneware clay with fine grog (approx. 5-7 lbs)
- Rolling pin
- Canvas work surface or slab mat
- 3-4 sturdy cardboard mailing tubes or PVC pipes (various diameters: 3″, 4″, 5″)
- Newspaper or paper towels
- Needle tool
- Serrated rib tool
- Smooth rubber rib
- Hole cutters (various sizes: 3mm, 5mm, 8mm)
- Slip (clay slurry)
- Fettling knife
- Sponge
Step 1: Preparing the Slabs
-
Roll the clay:
Begin by wedging your clay thoroughly to remove air bubbles. Roll out a large, even slab of clay to approximately 1/4-inch thickness using your rolling pin and canvas mat. You want a consistent thickness so the light shines through evenly later. -
Add texture:
If your clay is smooth, drag a serrated rib gently across the surface in multiple directions to create that subtle, fabric-like linear texture shown in the image. If using a gritty clay, smooth it slightly with a damp sponge to expose the grog. -
Measure the tubes:
Wrap a piece of paper around each of your cardboard tubes or PVC pipes to determine the circumference needed. Add an extra half-inch to this measurement for the overlap or bevel joint. -
Cut the rectangles:
Using your paper templates as a guide, cut rectangular slabs for each luminary size using a fettling knife. The height is up to you, but varying them creates the best visual interest.
Step 2: Forming the Cylinders
-
Prepare the forms:
Wrap your cardboard tubes or PVC pipes in a single layer of newspaper or paper towel. This prevents the clay from sticking to the form and allows you to slide it off easily later. -
Wrap the slab:
Carefully lift a clay rectangle and wrap it around the prepared tube. Bring the two ends together. For a seamless look, I prefer to cut both ends at a 45-degree angle (beveling) so they overlap cleanly without a bump. -
Join the seam:
Score the edges of the seam with your needle tool and apply a generous amount of slip. Press the edges firmly together. -
Smooth the connection:
Support the wall from the inside with one hand (or let the tube support it) whilst using a smooth rib on the outside to blend the seam until it’s invisible. Re-apply the texture with the serrated rib if you smoothed it away too much. -
Allow to firm up:
Let the clay dry to a ‘leather hard’ state while still on the tube. This is crucial; if the clay is too soft, the walls will collapse when you start punching holes.
Warped Cylinders?
If your cylinders are turning into ovals, your clay was likely too soft when you removed the tube. Try drying them vertically on the form for an extra hour before removal.
Step 3: Design and Detailing
-
Remove the form:
Once the clay is firm enough to hold its shape but still workable, gently slide the cylinder off the tube and peel away the newspaper. -
Plan the punches:
Lightly sketch a grid or random pattern on the surface using a needle tool if you want precision. Alternatively, you can work freestyle for a more organic feel. -
Punch the holes:
Using hole cutters of various sizes, press through the clay wall. Twist the cutter slightly as you pull it out to remove the plug of clay cleanly. Support the wall from the inside with your hand to prevent warping. -
Vary the heights:
Create visual movement by placing larger holes near the middle and smaller ones near the top and bottom, or create horizontal bands of density as seen in the inspiration image. -
Clean the edges:
Once all holes are punched, wait for the clay to dry slightly more. Then, use a damp sponge or a soft brush to gently smooth any sharp burrs around the hole edges. -
Level the rims:
Check the top and bottom rims. If they look uneven, gently rasp them flat or use a damp sponge to round them off for a finished look.
Make it Shine
Brush a coat of white slip or metallic gold glaze on the interior only. This acts as a reflector, amplifying the candlelight and making the piece glow brighter.
Step 4: Firing and Finishing
-
Bisque fire:
Let the luminaries dry completely (bone dry) before bisque firing them in a kiln according to your clay body’s specifications. -
Glazing choice:
For the matte, stone-like look in the photo, stick to an unglazed exterior or use a very matte, dry glaze. You can apply a clear glaze to the inside to reflect more candlelight. -
Final fire:
Fire the pieces a second time to the maturation temperature of your clay. Once cool, add tea lights or LED candles to test the glow.
Arrange your finished luminaries in a cluster and enjoy the mesmerizing play of light they cast on your walls

TRACK YOUR CERAMIC JOURNEY
Capture glaze tests, firing details, and creative progress—all in one simple printable. Make your projects easier to repeat and improve.
Wheel-Thrown Closed Form With Pierced Pattern
This striking luminary combines the elegance of a closed form with the magic of candlelight, casting intricate shadows through concentric patterns. The deep blue glaze contrasts beautifully with the warm glow from within, making it a perfect centerpiece for cozy evenings.
How-To Guide
Materials
- Stoneware clay (smooth body preferred)
- Pottery wheel
- Throwing tools (sponge, rib, needle tool, wire)
- Small hole cutters or drill bits (various sizes)
- Loop tool for trimming
- Carving tool for rim detail
- Compass or circle template (optional)
- Satin matte blue glaze
- Kiln
Step 1: Throwing the Form
-
Center and open:
Start with a centered ball of clay, roughly 3-4 lbs. Open the clay wide enough to accommodate a large candle later, leaving the floor about half an inch thick. -
Pull the walls:
Pull the walls up into a cylinder first. Aim for even thickness from bottom to top, as thin spots will make the later piercing stage risky. -
Collar and shape:
Begin shaping the sphere by bellowing out the belly while collaring in the rim. I like to use a flexible rib on the outside to smooth the curve while pushing from the inside. -
Refine the opening:
Close the form significantly at the top, leaving a clean, circular opening about 3-4 inches wide. Compress the rim thoroughly to prevent future cracks. -
Add rim detail:
while the wheel is spinning slowly, use a carving tool to incise a dedicated band just below the lip. Add angled hash marks within this band for that textured collar effect seen in the photo.
Step 2: Trimming and Patterning
-
Dry to leather hard:
Let the piece dry slowly until it reaches a sturdy leather-hard stage. It shouldn’t be tacky, but not bone dry either. -
Trim the foot:
Invert the pot onto a chuck or foam bat. Trim away excess weight from the bottom and carve a clean foot ring to lift the piece slightly. -
Mark the layout:
Turn the pot right side up. Lightly scratch circles onto the surface using a compass or by tracing around a round object. Create a staggered pattern of large circles across the belly. -
Start the outer rings:
Using your smallest hole cutter, punch a ring of holes along the outer perimeter of your drawn circles. Support the clay from the inside with one hand to prevent warping. -
Fill the pattern:
Work inward, punching concentric rings of holes. Vary the hole sizes if you wish, or keep them uniform for the look in the image. Leave the very center of each circle solid. -
Clean the burrs:
Once the clay is bone dry, gently sand or sponge away the little clay burrs created by the hole cutters. Inspect the inside to ensure no hanging chads remain.
Hole Distortion?
If holes warp into ovals while cutting, your clay is too wet. Let it dry longer. If the clay cracks around the cutter, mist it lightly—it’s too dry.
Step 3: Finishing
-
Bisque fire:
Load the kiln carefully and fire to bisque temperature (usually Cone 04). This hardens the clay for glazing. -
Wax the foot:
Apply wax resist to the bottom foot ring to prevent glaze from sticking to the kiln shelf. -
Glaze application:
Dip or spray the piece with a satin matte blue glaze. Specifically, ensure the glaze isn’t too thick, or it might fill in your carefully punched holes. -
Clean the holes:
Check every single hole. If glaze has bridged across any opening, gently clear it with a needle tool or a puff of air before firing. -
Glaze fire:
Fire to the maturation temperature of your clay and glaze (likely Cone 5 or 6). Allow the kiln to cool completely before opening.
Stained Glass Effect
Before the final firing, place a tiny chunk of transparent glass frit or a marble into some larger holes to melt and create colorful windows.
Place a tea light or pillar candle inside and watch your craftsmanship illuminate the room with dancing patterns of light
Dome Luminary on a Base Plate
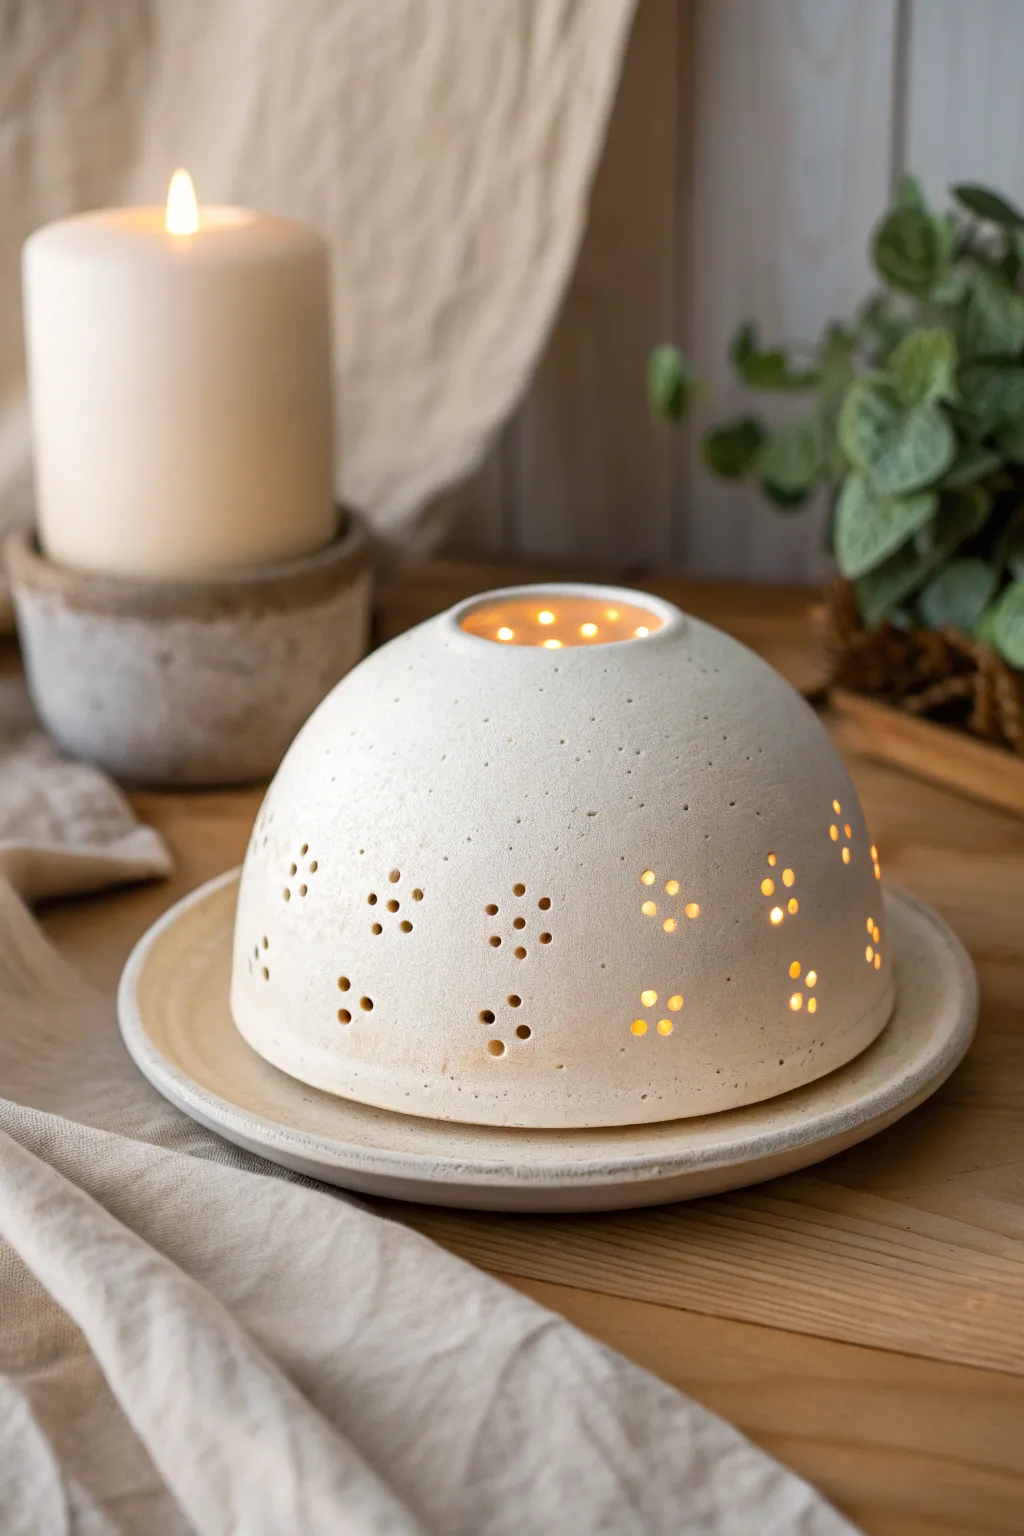
This elegant two-piece pottery project features a self-contained dome that nestles perfectly onto a matching base plate, creating a safe and stunning home for a tealight or votive candle. The creamy, textured white clay body is punctured with delicate starburst patterns that cast a warm, inviting glow across your table.
Step-by-Step Guide
Materials
- White earthenware or stoneware clay (with fine grog for texture)
- Pottery wheel (or circular slump molds for hand-building)
- Sponge and bucket of water
- Pin tool
- Wire clay cutter
- Wooden modeling rib
- Small hole punch tool or drill bit (approx. 3-4mm)
- Banding wheel (for trimming)
- Loop tool for trimming
- Compass or calipers
- Matte white glaze
Step 1: Shaping the Base Plate
-
Throw the plate:
Begin with a small ball of clay, roughly 1 pound. Center it on the wheel and flatten it into a thick disc. Open it up gently, leaving a floor thickness of about a quarter-inch. -
Form the rim:
Pull the clay outwards rather than upwards to create a shallow saucer shape. Compress the rim with a chamois or your sponge to ensure it is smooth and resistant to chipping. -
Measure the gallery:
Using your wooden rib, define a clear, flat interior area where the dome will eventually sit. This doesn’t need a raised wall, but the floor needs to be perfectly flat. -
Cut and dry:
Wire the plate off the bat and set it aside to stiffen to a leather-hard state. It needs to be firm enough to support weight without warping.
Clogged Holes?
If glaze dries inside your tiny holes, use a small drill bit (hand-held, not power) to gently twist and clear the blockage before the final firing.
Step 2: Creating the Dome
-
Throw a closed form:
Center a slightly larger ball of clay (1.5 lbs). Cylinder it up, then begin collaring the neck inwards fairly early to create a dome shape. I find it easier to close the top almost completely, leaving just a tiny hole, or perform a complete close and cut the opening later. -
Refine the curve:
Use a flexible metal or wooden rib on the outside while pushing gently from the inside to create a continuous, smooth semi-circle profile. -
Check the diameter:
Before removing it from the wheel, use calipers to ensure the bottom diameter of your dome matches the interior space of your base plate. -
Open the chimney:
If you threw a closed form, use your pin tool to cut a clean, circular opening at the very top (about 1.5 inches wide) to allow heat to escape. -
Smooth the surface:
Run a damp sponge over the surface to bring out the grog texture slightly and remove any throwing rings for a more modern, clean look.
Step 3: piercing and Finishing
-
Trim the pieces:
Once leather hard, trim the foot of the plate and the bottom edge of the dome so they fit together snugly without wobbling. -
Plan the pattern:
Lightly sketch your design with a pencil directly on the leather-hard clay. Looking at the example, plan for clusters of 5-6 holes arranged in rough circles or flower shapes. -
Punch the holes:
Using a small circular punch or a drill bit twisted by hand, create the holes. Support the wall from the inside with your hand to prevent the clay from caving in. -
Clean the burrs:
Let the clay dry a bit more, then use a dry paintbrush or a small sponge to knock off the little crumbs and ‘burrs’ created by the hole punching. -
Bisque fire:
Load both pieces into the kiln for a bisque firing to cone 04 (or your clay’s specification). -
Glaze application:
Dip or spray a matte white glaze. Be very careful not to clog the holes; if glaze fills them, blow it out gently while it is still wet. -
Final wipe:
Wipe the foot of the plate and the bottom rim of the dome perfectly clean so they don’t fuse to the kiln shelf or each other. -
Glaze fire:
Fire to the final temperature required by your clay and glaze combination.
Clean Cuts Pro Tip
Punch your holes when the clay is on the firmer side of leather-hard. If it’s too soft, the holes will drag and warp; too dry, and the clay may crack.
Place a tea light on the base, lower the dome, and enjoy the cozy atmosphere created by your handiwork
Porcelain-Style Thin Walls for Soft Glow
Capture the delicate beauty of translucent porcelain without the finicky wheel work using this simple slab-building technique. This cylindrical luminary features charming peek-a-boo cutouts and surface stamping that glows warmly when lit from within.
Step-by-Step Tutorial
Materials
- White stoneware or porcelain clay body
- Rolling pin
- Canvas mat or textured fabric
- Cylindrical object for forming (like a heavy jar or PVC pipe, roughly 4-5 inches diameter)
- Newspaper or paper towel
- Needle tool
- Small circular clay cutter (approx. 0.5 – 0.75 inch)
- Scoring tool (or serrated rib)
- Slip (clay and water slurry)
- Sponge
- Small round object for stamping (like a marker cap or dowel)
Step 1: Preparing the Slab
-
Roll the clay:
Begin by rolling out a generous chunk of your white clay on a canvas mat. Aim for an even thickness of about 1/4 inch; keeping it consistent ensures the light shines through evenly later. -
Add texture:
If your canvas mat doesn’t have a strong enough weave, you can gently press a piece of coarse fabric onto the surface of the clay slab with the rolling pin to imprint that lovely textile texture seen in the reference. -
Measure and cut:
Using a ruler and needle tool, cut a clean rectangle from your slab. The length should be the circumference of your forming cylinder plus about a half-inch for overlap, and the height should be roughly 6-7 inches.
Clean Cuts Pro-Tip
When punching holes, wrap your circular cutter in a layer of thin plastic wrap. The plastic softens the edges of the cut and releases the clay plug effortlessly, reducing cleanup time.
Step 2: Forming the Cylinder
-
Prepare the form:
Wrap your cylindrical form (PVC pipe or jar) in a sheet of newspaper. This acts as a barrier so the clay doesn’t stick to the rigid form. -
Score the edges:
Take your rectangular slab and score (scratch) the two short ends that will meet to form the cylinder. Apply a generous amount of slip to these roughed-up areas. -
Connect the wall:
Wrap the slab around the paper-covered form, bringing the scored ends together. Press them firmly to create a seam. I typically use a wooden rib to smooth the seam on the outside until it’s nearly invisible. -
Initial refinement:
While the clay is still supported by the form, ensure the top rim is level. Use your needle tool to trim any unevenness if necessary.
Step 3: Adding the Base
-
Cut the base:
Roll a smaller piece of clay to the same thickness. Place your cylinder (still on the form if possible, or carefully removed) onto this new slab and trace around it. -
Score and attach:
Score and slip the bottom edge of your cylinder and the perimeter of the base circle. Press them together firmly. -
Blend the seam:
Use a modeling tool or your finger to blend the clay from the cylinder wall down onto the base to create a watertight seal. Smooth the exterior connection so it looks seamless.
Level Up: Translucency
To maximize the glow, carefully crave or sand the wall thinner specifically around the embossed bottom circles before firing. This creates brighter hotspots of light.
Step 4: Creating the Design
-
Mark hole placement:
Lightly mark a horizontal line around the upper third of the cylinder where you want your main light holes to be. Spacing them evenly by eye adds a nice handmade charm. -
Cut the circles:
Using your small circular cutter, punch out holes along your marked line. Support the wall from the inside with your hand to prevent the clay from deforming as you press the cutter through. -
Add the embossed pattern:
Near the bottom of the cylinder, use a small round object (like a the back of a pen or a specialized clay stamp) to press ring indentations into the clay. Press deeply enough to create a shadow but not so hard that you punch through. -
Create the raised centers:
Roll tiny balls of clay, flatten them slightly, and use a dot of slip to attach one into the center of each stamped ring at the bottom. This creates the ‘bullseye’ relief effect.
Step 5: Finishing Touches
-
Clean up:
Once the clay is leather hard (stiff but cool to the touch), use a slightly damp sponge to smooth any sharp edges around the rim and the cutout holes. -
Drying:
Allow the piece to dry slowly under plastic for a day or two to prevent warping, then uncover it to dry completely bone dry. -
Bisque firing:
Fire the piece to cone 04. For the look in the photo, you can leave the exterior unglazed to highlight the raw clay texture. -
Glaze (optional) and Final Fire:
Apply a clear glaze to the interior for functionality and shine, then fire to the maturation temperature of your specific clay body (e.g., Cone 6 for stoneware).
Place a tea light or LED pillar inside and enjoy the warm atmosphere your handcrafted luminary brings to the room
Two-Layer Sleeve for Extra Depth
This striking luminary creates a beautiful sense of depth by layering a intricately cut outer sleeve over a solid inner core. The calm, matte blue glaze contrasts wonderfully with the warm glow of the candlelight peeking through the arched and circular windows.
Step-by-Step Guide
Materials
- Stoneware clay body
- Rolling pin with thickness guides (approx. 1/4 inch)
- Cylindrical form or PVC pipe (for shaping)
- Fettling knife or needle tool
- Circle cutters (small diameter)
- Kemper Klay Kutter tools (oval/teardrop shapes) or a sharp X-Acto knife
- Scoring tool and slip
- Smoothing rib (rubber or metal)
- Matte blue ceramic glaze
- Kiln for firing
Step 1: Forming the Inner & Outer Cylinders
-
Roll the slabs:
Begin by wedging your clay to remove air bubbles. Roll out two uniform slabs of clay to approximately 1/4 inch thickness. One slab will be for the inner candle holder, and the other—slightly larger—for the decorative outer sleeve. -
Measure and cut:
Measure the circumference of your cylindrical form. Cut the first slab to this length plus a slight overlap for the seam. For the outer sleeve, cut the second slab about 1/2 inch to 1 inch wider and taller to ensure it fits loosely over the inner piece. -
Assemble the inner cylinder:
Wrap the smaller slab around your form. Score and slip the edges where they meet, pressing firmly to create a secure seam. Smooth the seam inside and out so it disappears. -
Add the base:
Cut a circle of clay for the base of the inner cylinder. Score and slip the bottom edge of your cylinder and attach it to the base. This inner piece will hold the candle. -
Form the outer sleeve:
Wrap the larger slab around a slightly larger form (or pad your original form with newspaper). Create a cylinder just like the first one, but leave this one open at the bottom—it acts as a shade that sits over the inner piece.
Clean Cuts Tip
Wait until the clay is truly leather-hard before cutting. If it’s too soft, the knife will drag and warp the intricate oval shapes.
Step 2: Designing the Cutouts
-
Plan the spacing:
With the outer sleeve leather-hard (firm but still workable), lightly mark horizontal guidelines for your three tiers of cutouts. This ensures your pattern stays level around the cylinder. -
Cut the top circles:
Using a small circular hole punch or cutter, punch a row of evenly spaced circles near the top rim. Support the clay from the inside with your hand to prevent warping as you push the tool through. -
Carve the middle ovals:
For the central row, sketch large, pointed oval shapes (like a marque shape). Carefully cut these out using a sharp fettling knife or an X-Acto blade. Keep your knife perpendicular to the clay wall for a clean edge. -
Create the bottom arches:
Directly below the points of the middle ovals, cut a row of tall, narrow arches. These anchor the design visually and allow light to spill out comfortably near the base. -
Clean the edges:
Once the clay stiffens a bit more, go back with a damp sponge or soft brush to smooth the sharp edges of your cutouts. I find this step crucial for a professional, finished look.
Warping Woes?
If your cylinder ovalizes while drying, gently nudge it back into a circle every few hours during the drying phase until it holds its shape.
Step 3: Finishing and Firing
-
Bisque fire:
Allow both the inner cup and the outer sleeve to dry slowly and completely. Bisque fire them in the kiln according to your clay body’s specifications. -
Glaze application:
Apply a matte blue glaze to the outer sleeve. You likely want to dip or spray it for even coverage. Leave the rim unglazed or wipe it back slightly if you want the raw clay body to show as a crisp line. -
Glazing the inner vessel:
For the inner cylinder, you can use a clear glaze or a white glaze to maximize light reflection. Ensure the bottom is wiped clean of glaze. -
Final firing:
Load the kiln carefully, ensuring neither piece touches the other. Fire to the maturity temperature of your glaze and clay. -
Assembly:
Once cool, place a votive or LED candle in the inner cup, then slide the blue sleeve over the top to complete the luminary.
Enjoy the cozy, layered light show your new handmade ceramic luminary provides
Marbled Clay Body With Simple Windows
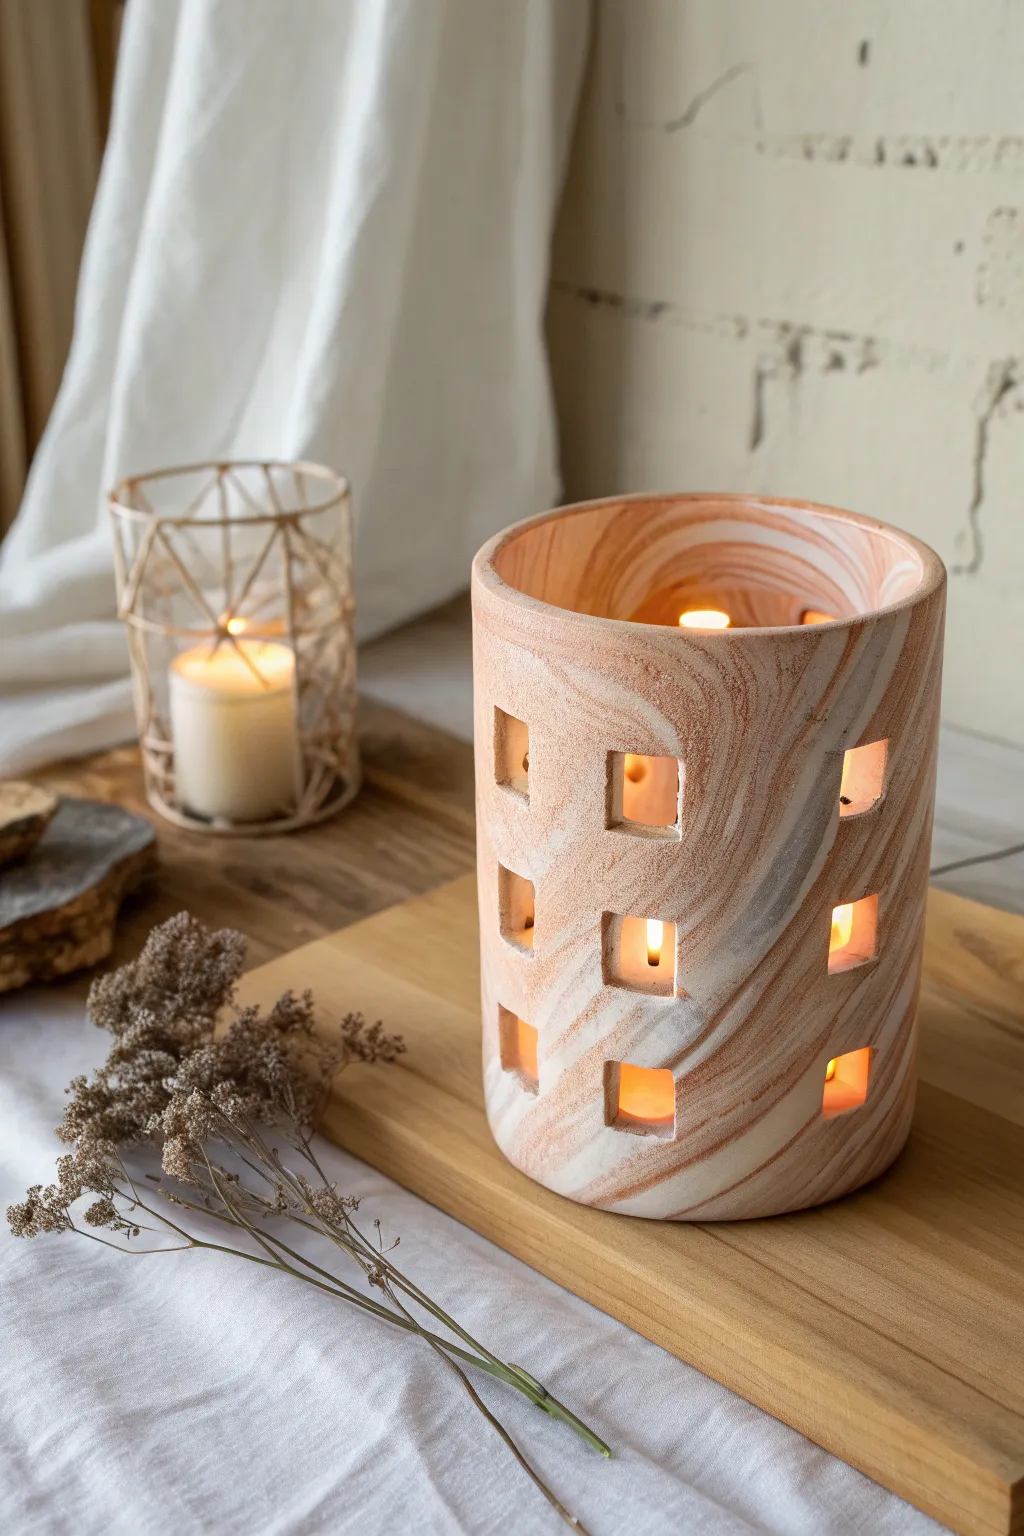
This project combines the organic beauty of marbled clay with geometric precision to create a stunning source of ambient light. The swirling effect of white and terracotta clay creates a natural, stone-like appearance, while the crisp square windows let the candlelight dance through.
Detailed Instructions
Materials
- White polymer clay or air-dry ceramic clay (approx. 500g)
- Terracotta or rust-colored polymer clay (approx. 250g)
- Acrylic rolling pin or slab roller
- Large cylindrical object for a mold (like a large glass jar or metal can)
- Parchment paper or plastic wrap
- Square clay cutter (approx. 1 inch) or craft knife
- Ruler
- Clay cutting blade or wire tool
- Sponge and water (if using ceramic clay)
- Sandpaper (fine grit)
Step 1: Preparing the Marbled Slab
-
Condition the Clay:
Begin by thoroughly conditioning both your white and terracotta clays separately until they are soft, pliable, and free of cracks. Warm clay is much easier to blend seamlessly. -
Create Logs:
Roll the white clay into two thick logs and the terracotta clay into one slightly thinner log. The ratio should be roughly 2:1 in favor of the white clay to keep the look light and airy. -
Twist Together:
Twist the three logs together into one large rope. Fold this rope in half, twist it again, and repeat this process 3-4 times. Don’t overmix, or the colors will become muddy instead of distinct swirls. -
Combine into a Ball:
Squish the twisted rope into a single, comprehensive ball. You should already see beautiful striations of color running through the mass. -
Roll the Slab:
Using your rolling pin, flatten the ball into a long rectangular slab. Aim for a thickness of about 1/4 inch (6mm). If you possess a pasta machine dedicated to clay, this ensures an even thickness. -
Check Dimensions:
Measure the circumference and height of your cylindrical mold. Ensure your clay slab is slightly larger than these dimensions so you have room to trim.
Step 2: Cutting and Shaping
-
Trim the Edges:
Using a ruler and a sharp blade, trim the clay slab into a perfect rectangle. The width should match the circumference of your mold plus a tiny bit for overlap, and the height is up to your preference. -
Plan the Windows:
Place the slab flat on your work surface. Lightly mark a grid pattern where you want your windows to go. I find using a ruler helps keep the vertical and horizontal alignment perfect. -
Cut the Squares:
Press a square cutter firmly into the clay at your measured points to remove the clay squares. If you don’t have a cutter, carefully cut along your marked lines with a craft knife. -
Smooth the Windows:
Dip your finger in a little styling water (or just water for ceramic clay) and gently smooth the inner edges of each square cutout to remove any sharp burrs.
Clean Cuts Hack
Place a sheet of cling film over the clay slab before pressing your square cutter down. This creates slightly rounded, ‘pillowed’ edges on your windows and prevents the clay from getting stuck in the cutter.
Step 3: Forming the Cylinder
-
Wrap the Mold:
Cover your cylindrical mold with parchment paper to prevent sticking. Carefully lift your clay slab and wrap it around the mold. -
Join the Seam:
Bring the two short ends of the rectangle together. Slice through both layers at an angle to create a bevel, then press the raw edges together. -
Blend the Joint:
Use a modeling tool or your smooth thumb to blend the seam until it disappears. The marbled pattern helps disguise this join beautifully. -
Checking Shape:
Inspect the cylinder to ensure it hasn’t slumped. The square cutouts might have distorted slightly during lifting; gently reshape them now while the clay is supported by the mold. -
Drying or Baking:
If using polymer clay, bake according to the package instructions while still on the heat-safe mold (glass). If using air-dry clay, allow it to stiffen slightly before carefully sliding it off the mold to dry completely.
Is the clay sagging?
If your slab is too soft and won’t hold its shape around the mold, place the rolled slab in the refrigerator for 15 minutes before cutting the windows. The cooler clay will be firmer and easier to handle.
Step 4: Finishing Touches
-
Sanding:
Once fully cured and cooled (or dried), use fine-grit sandpaper to smooth the top rim and bottom edge. Sand away any fingerprints or rough spots on the body. -
Sealing (Optional):
For a glossy finish that highlights the marbling, apply a thin coat of polyurethane varnish. For a natural matte stone look, leave the clay as is.
Place a simple tealight or LED candle inside and enjoy the warm, flickering shadows cast by your new creation
Sgraffito Lines Around Cutouts for Contrast
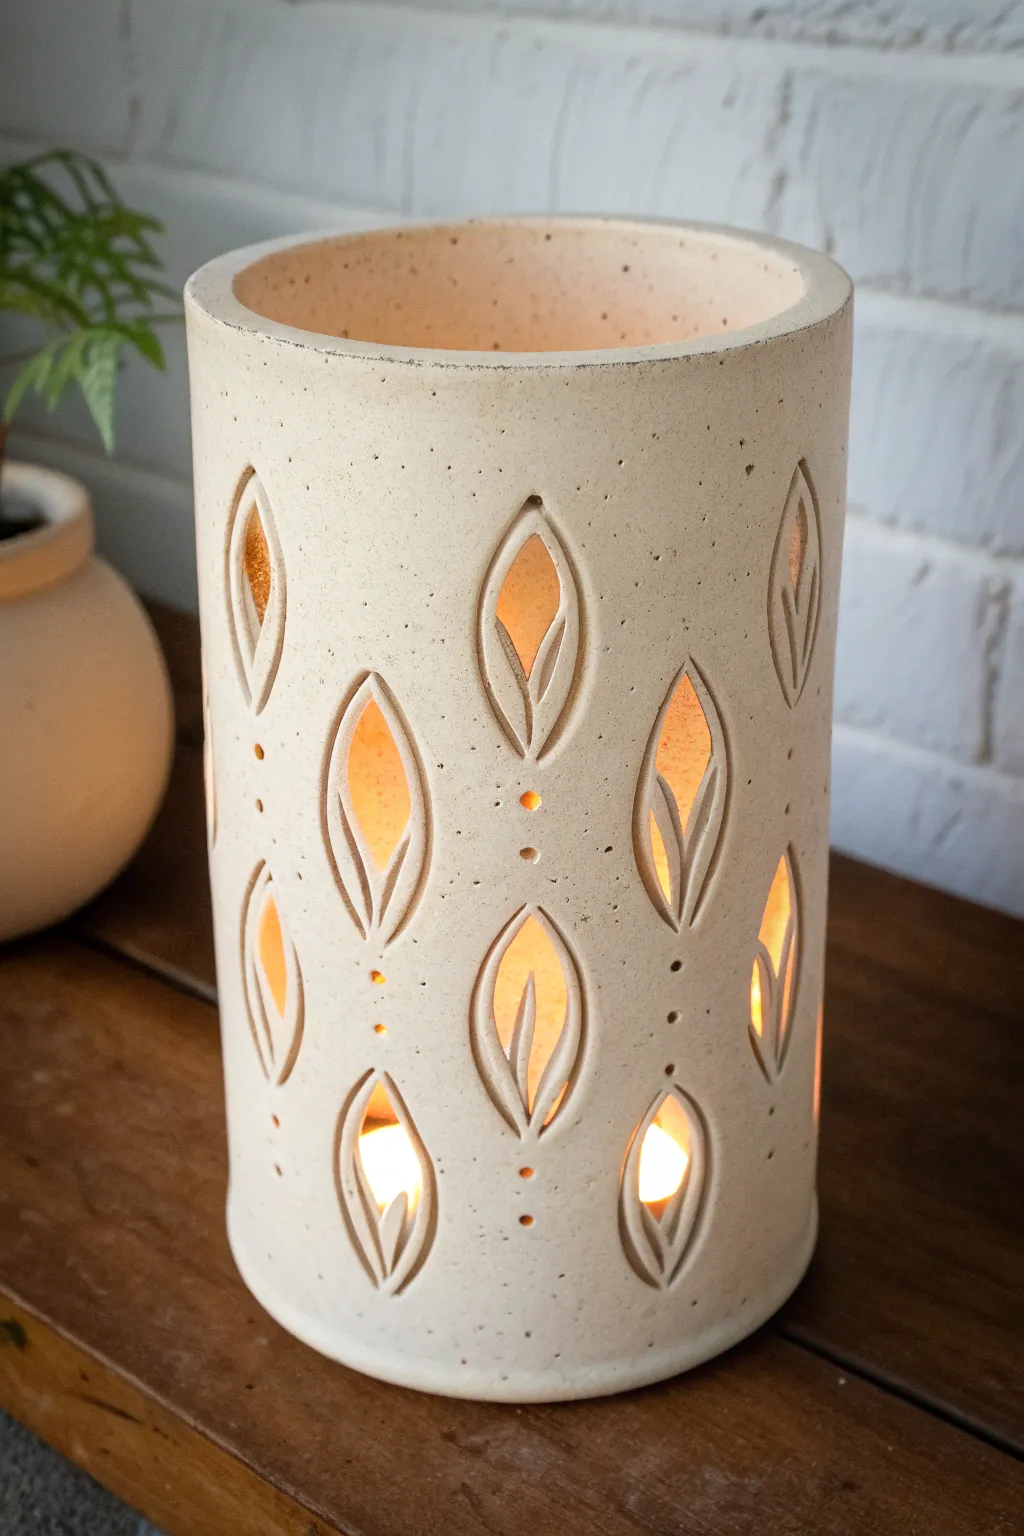
This elegant cylindrical luminary showcases the natural beauty of speckled buff clay, illuminated by warm candlelight. The design features a rhythm of teardrop-shaped leaf cutouts enhanced by delicate sgraffito-style carving lines that add depth and definition.
Step-by-Step Tutorial
Materials
- Speckled buff stoneware clay (rolled into a slab)
- Small circular cookie cutter or needle tool
- Leaf-shaped cutout tool (or a sharp Fettling knife)
- Pottery sponge
- Scoring tool (serrated rib or needle tool)
- Slip (clay mixed with water)
- Small loop tool or carving tool
- Rolling pin and guide sticks (for even slab thickness)
- Cylindrical form (PVC pipe or large can) for shaping
- Paper or newspaper (to wrap the form)
Step 1: Creating the Cylinder
-
Establish the slab:
Begin by rolling out your speckled buff clay into a slab approximately 1/4 inch thick. Use guide sticks on either side of your rolling pin to ensure the thickness is perfect and uniform, which is key for a sturdy luminary. -
Measure and cut:
Determine the desired height and circumference of your luminary. Cut a clean rectangle from your slab, ensuring the length wraps fully around your forming cylinder with a slight overlap for the seam. -
Prepare the form:
Wrap your chosen cylindrical mold (like a PVC pipe) with a sheet of newspaper. This simple barrier prevents the wet clay from sticking to the mold and allows you to slide it off later. -
Form the wall:
Gently lift the clay slab and wrap it around the paper-covered form. Bring the two short ends together. -
Join the seam:
Score both overlapping edges aggressively with your serrated tool and apply a generous amount of slip. Press the edges together firmly to create a bond. -
Smooth the connection:
Use a rib tool or your fingers to smooth the vertical seam inside and out until it disappears completely. Let the cylinder stiffen up slightly on the form for about 30 minutes before carefully sliding it off.
Slumping Walls?
If your cylinder collapses while cutting, your clay is too wet. Cover it loosely with plastic and let it stiffen to a ‘leather hard’ state before attempting to cut any shapes.
Step 2: Designing the Cutouts
-
Mark the pattern:
With the cylinder standing upright and leather-hard (firm but carve-able), use a needle tool to lightly scratch a grid or guide marks. This ensures your leaf columns stay vertical and evenly spaced around the circumference. -
Center the leaves:
Plan the placement of the leaf shapes. I like to stagger them slightly, placing the point of one leaf between the wide bottoms of the two above it creates a nice flow. -
Cut the openings:
Using a sharp fettling knife or a specialized teardrop cutter, press through the clay wall to remove the negative space. Clean up any ragged edges immediately with a slightly damp sponge or brush. -
Add ventilation:
Between the vertical columns of leaves, gently poke small holes with a needle tool or small drill bit. These tiny dots add visual interest and help air flow to the candle flame.
Make it Shine
For extra dimension, apply a dark underglaze into the carved lines and wipe back the surface with a sponge. The dark lines will remain, making the design pop.
Step 3: Refining with Carving
-
Outline the shapes:
This is where the contrast technique comes in. Using a small U-shaped loop tool or a sharp stylus, carve a deep groove around the immediate perimeter of every leaf cutout. This creates a shadow line that makes the opening pop. -
Carve the stems:
From the bottom point of the outline you just carved, extend a line upward into the center of the cutout space (if you left clay there) or extend the lines downward on the solid clay to mimic a stem base. -
Detail the leaves:
This specific design relies on the illusion of a leaf inside the cutout. If you cut a standard teardrop, you can carve two curved lines starting from the bottom point, sweeping up the sides of the cutout to frame the opening. -
Clean the burrs:
Wait until the clay is bone dry to perform the final cleanup. Gently rub away any little clay crumbs (burrs) created by the carving tool with a dry sponge or soft sanding pad. -
Fire the piece:
Bisque fire the luminary to cone 04. Since this look relies on the raw clay body, you can choose to leave the exterior unglazed or apply a thin, matte clear glaze to seal it without hiding the speckles. -
Final firing:
Glaze fire to the maturation temperature of your specific clay body (likely Cone 5 or 6 for stoneware). Place a tea light or LED candle inside to test the warm glow.
Once fired, the candlelight will cast dancing shadows through your intricate hand-carved leaves
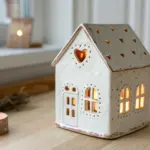
Sculptural Birdhouse Luminary With Entry Hole
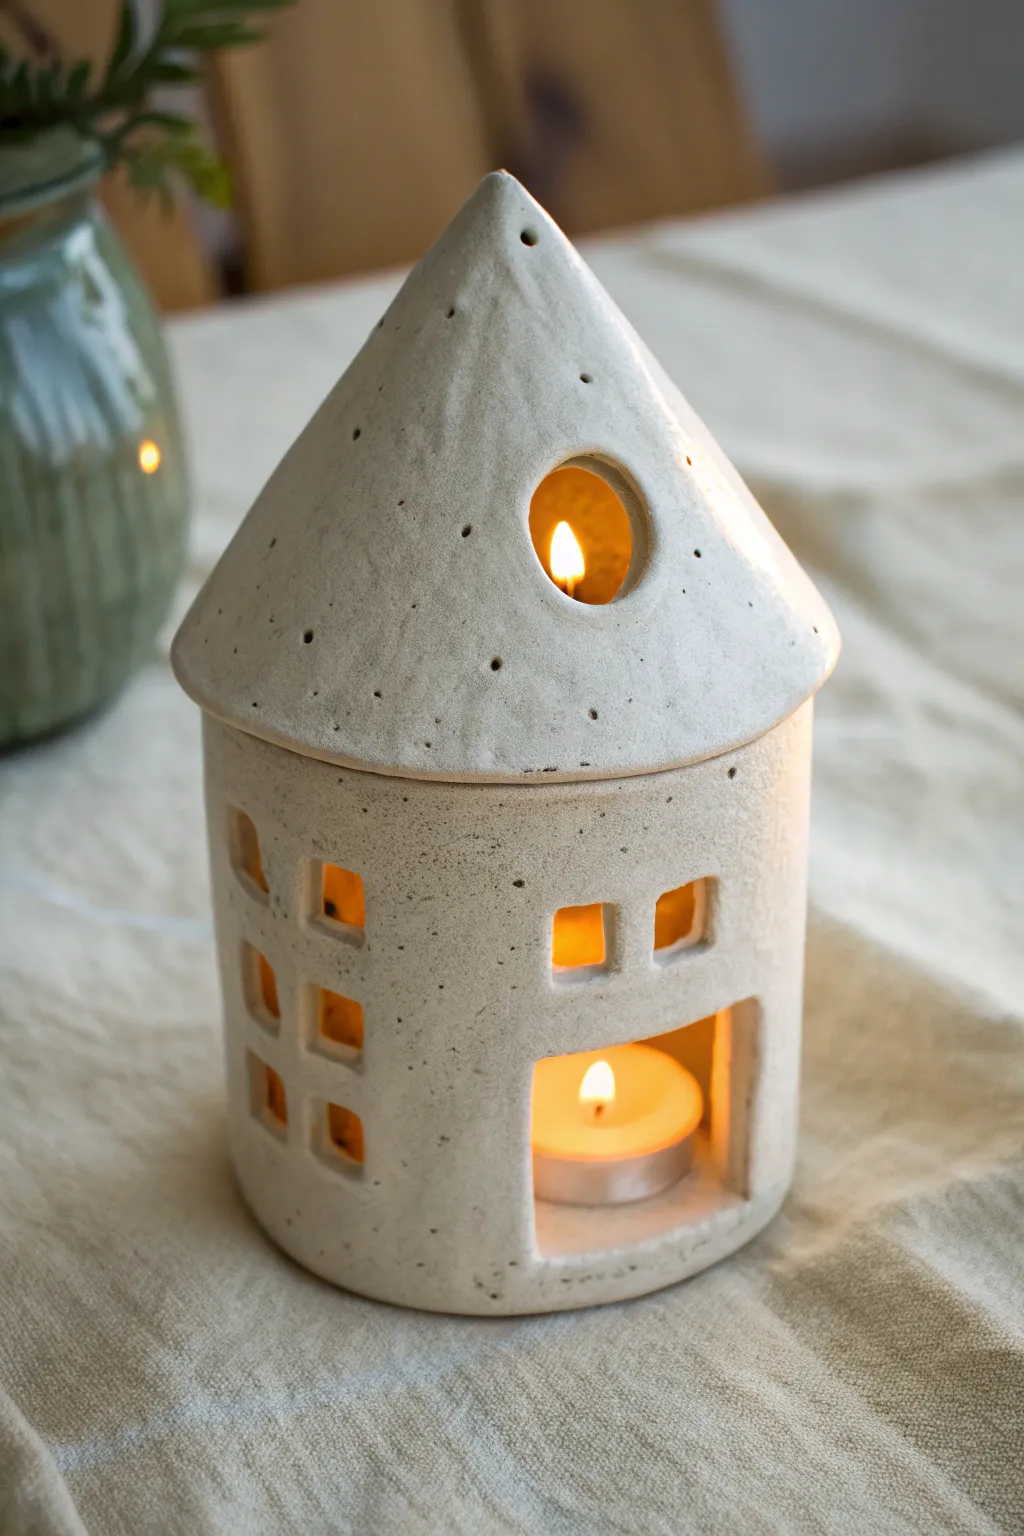
Create a charming, fairy-tale atmosphere with this two-piece speckled clay birdhouse luminary. The detachable conical roof allows for easy candle placement, while the glowing windows cast a warm, cozy light perfect for any table setting.
Step-by-Step
Materials
- Speckled stoneware clay (mid-fire)
- Rolling pin
- Canvas working surface
- Fettling knife
- Circle cutter (approx. 4-inch diameter)
- Round cookie cutters (small)
- Square cookie cutters (very small)
- Scoring tool or fork
- Slip (clay mixed with water)
- A cylindrical mold (like a large can or PVC pipe)
- Sponge
- Paintbrush for smoothing
Step 1: Forming the Base
-
Roll the slab:
Begin by wedging your speckled clay to remove air bubbles. Roll it out into a long rectangular slab about 1/4 inch thick on your canvas surface, ensuring an even thickness throughout. -
Cut the walls:
Measure the circumference of your cylindrical mold. Cut a rectangle from your slab that is slightly longer than this circumference and as tall as you want your house walls to be (around 4-5 inches). -
Create the cylinder:
Wrap the slab rectangle around your mold. Where the ends meet, cut through both layers simultaneously at a 45-degree angle to create a seamless bevel joint. -
Join the seam:
Score the beveled edges thoroughly and apply slip. Press the ends together firmly. I like to use a wooden rib to smooth the seam on the outside so the join becomes invisible. -
Add the floor:
Cut a circle from your remaining slab that matches the diameter of your cylinder. Score and slip the bottom edge of the cylinder and the edge of the circle, then join them to create the floor. -
Clean connections:
Smooth the connection between the wall and the floor. You can reinforce the inside seam with a thin coil of soft clay blended in with your thumb.
Collapsing Roof?
If your roof cone sags while working, wad up some newspaper and stuff it inside the cone to support the shape until the clay stiffens to leather-hard.
Step 2: Carving and Detailing
-
Cut the entryway:
While the clay is leather-hard (firm but not dry), use a sharp knife to cut a large rectangular opening near the bottom. This allows you to slide a tealight in and out easily. -
Add windows:
Use your small square and rectangular cutters to punch out windows around the sides. Vary the spacing to give it an organic, cottage feel. -
Refine the edges:
Use a damp sponge to smooth any sharp edges around the windows and the door frame. Rough edges can become very sharp once fired.
Level Up: Chimney Charm
Add a tiny clay cylinder to the side of the roof cone for a chimney. Don’t forget to push a hole through the roof inside the chimney so smoke can actually escape.
Step 3: Sculpting the Roof
-
Cut the roof shape:
Roll out another slab of clay. Cut a large circle (approx. 6-7 inches), then cut a wedge out of it—picture Pac-Man shape. Removing a larger wedge creates a steeper cone. -
Form the cone:
Bring the straight cut edges of the ‘Pac-Man’ shape together to form a cone. Check the fit against your base cylinder; the roof should overhang slightly. -
Secure the roof seam:
Score and slip the edges where they meet, pressing firmly. Smooth the exterior seam completely so the roof looks like one continuous piece. -
Add the attic window:
Use a round cutter to create a circular porthole window halfway up the roof cone. This is a signature detail that lets candlelight shine from the top. -
Poke ventilation holes:
Using a needle tool or small drill bit, poke tiny random holes all over the roof surface. This adds texture and allows heat to escape. -
Create a flange:
Flip the roof upside down. Attach a small ring of clay coil inside, slightly smaller than the diameter of the house base. This ‘flange’ prevents the roof from sliding off the base.
Step 4: Finishing
-
Final smooth:
Give the entire piece a final check. Smooth any fingerprints or rough spots with a slightly damp sponge, being careful not to erase the natural speckled texture. -
Dry slowly:
Place the roof gently on the base (with a piece of paper between them to prevent sticking) and cover loosely with plastic. Let it dry very slowly over several days to prevent warping. -
Fire the piece:
Bisque fire the piece. Since the clay is speckled and beautiful on its own, you can choose to leave it unglazed or apply a clear matte glaze to protect it before the final firing.
Light a tea light inside and enjoy the soft, cozy glow of your handmade home